
3-Axis Stabilized Handheld Gimbal Smartphone
Instructions Manual
Model: SPG2
Guilin Feiyu Technology Incorporated Company
1. SPG 2 Overview

Accessories

Introduction of Interface and screws
1. Micro USB Port
- Used for charging the gimbal (input 5V / 2A ), the gimbal can be used while being charged, but it is not available for external power supply.
- Used for firmware upgrade (computer), please refer to the firmware upgrade operation steps for details.
Please stuff up this port by the dustproof plug when it is not in use.
2. Audio Jack
Used to connect the phone to the audio input or output of the phone.
3. 1/4-20 Thread Mount
Used for expanding other accessories, such as the tripod which built-in 1/4 inch screw, extension rod and so on.
Introduction of Display and Buttons
1. Display

2. Joystick

3. Function Button
- Long press: Power on / Power off
- Single tap: Panning Mode / Lock Mode
- Double tap: Follow Mode
- Triple tap: All Follow Mode
- Quadruple tap: Auto-rotation Mode
- Five tap: Initialization
4. Shutter Button
After the gimbal is connected to the mobile phone through Feiyu ON App, single tap the shutter button to control the phone to take photos, and double tap it to switch between the front and the rear lens of the camera, press and hold to control the video recording.
Please refer to the chapter «App — Download and Connecting» in page 10
5. Setting Button
- Long press: Switch the volume interface/Click to exit
- Single tap: Click on the main interface to switch to the phone shooting mode
6. Horizontal Adjustment Button
You can control the horizon angle via the horizontal adjustment button.
7. Trigger Button
- Press and hold: Fast follow mode
- Double tap: Reset
8. Multifunction Knob
- Achieve the control to the focal length of Smartphone, such as follow focus, zoom.
- Control the axial angle of the gimbal
Introduction of Axis and Knob
- Tilt Axis
Take the Smartphone lens as the base point, and control the smartphone lens to move upward or downward by tilt axis. - Knob Ring
Used for fixing the cross arm. - Roll axis
Take the smartphone lens as the base point, and control the smartphone lens to tilt to the left or tilt to the right by roll axis. - Pan Aaxxiiss
Take the smartphone lens as the base point, and control the smartphone lens to turn left or turn right by pan axis.
Introduction of Other Components
- Cross arm
Used for adjusting the up and down centre-of-gravity position of smartphone. - Smartphone holder
Used for fixing the Smartphone. - Vertical arm
Used for connecting the rolling axis and the panning axis. - Hand grip
Used for holding the gimbal by one hand.
2. Quick Start Guide
1. Install Battery
Remove the bottom cap, insert a 26650 battery and then tighten the cap.

- Type: 26650
- Battery Capacity: 5000mAh
2. Put the Smartphone on
It’s recommended to remove your smartphone protective case.

Place smartphone in holder so that the phone is snug against the back of the holder.
3. Balance the Gimbal

4. Set the horizontal shooting/ vertical shooting of mobile phone
Support clockwise / counterclockwise rotation
Pull the mobile phone fixture to switch between horizontal and vertical shooting, as shown in below picture:


5. Power on / off
NOTE
- Please mount the smartphone before powering on the gimbal.
- When the battery is low, please charge the gimbal.
- When not in use, turn off the gimbal and then remove the battery.
Power on / off: Long press the function button, the display will show and release it when you hear the beep tone.
3. Charging
Charging the Gimbal
Charging with Micro USB cable as shown below.

Charging the Smartphone
Use the mobile phone transfer charging cable (self-provided) to charge the mobile phone, and select the corresponding charging adapter cable according to the charging port of the mobile phone.

4. Operation
Modes
Panning Mode (Default mode)
The roll and tilt direction are fixed, and the smartphone moves according to the left-right movements of the user’s hand.
Follow Mode
The roll direction is fixed, and the smartphone moves according to the left-right movements, up-down movements of the user’s hand.
All Follow Mode
The smartphone moves according to the user’s hand.
Reset
Return to panning mode, three axises return to default position.
Lock Mode
The orientation of the camera is fixed.

Introduction of Display


- Bluetooth 1 is used for connecting the mobile phone with the gimbal via audio; please refer to the “Mobile Phone Audio Connection” .
- Bluetooth 2 is used for connecting the mobile phone with the gimbal via APP; please refer to the “App Downloading and Connection”.
Joystick — operation

Function Button — operation
Note:Functions in practice may differ from what is described in the manual in hand due to firmware upgrade. Please refer to the latest version of manual which could be found on official website.

Shutter Button-operation
When SPG 2 is connected to the mobile phone via Feiyu ON App, single tap the shutter button to control the phone to take photos, double tap it to switch between the front and the rear lens of the camera, press and hold it to control the video recording.


Please refer to the chapter «App — Download and Connecting» in page 10
Setting Button — operation
When SPG 2 is connected to the mobile phone via Feiyu ON App, the setting button can switch the phone shooting mode, and the phone volume can be adjusted after connecting to the phone audio Bluetooth.
Please refer to the chapter «App — Download and Connecting» in page 10
Switch Camera Modes
Single tap the setting button to switch the phone shooting mode

Adjust volume
Press and hold the setting button to switch between the main interface and the volume interface.
You can adjust the volume by moving the four-directional joystick up/down (this operation requires connecting to the mobile phone audio Bluetooth)

Horizontal Adjustment Button — operation
You can control the horizon angle via the horizontal adjustment button.

Trigger Button — operation

Multifunction Knob — Zooming control / Follow focus / Control 3 Axis


App — Download and Connecting
- Download and Install Feiyu ON App
Please download Feiyu ON at your smartphone app store or can the QR code below.
* Requires iOS 9.0 or later, Android 6.0 or later.

Or search and download the «Feiyu ON» App on the following application platform:

2. Connecting Feiyu ON App
- Turn on the gimbal.
- On smartphone, enable bluetooth and open Feiyu ON App. Login or register, follow instruction and connect to the Gimbal
5. Advanced Operation
Manual Lock
Camera can be manually positioned while in panning mode , follow mode or lock mode. Both the pan axis and tilt axis can be manually set up.
Manually move camera to desired position, and hold for half a second. New tilt and/or pan positions are automatically saved.
Take the tilt axis setting for example:

Auto-rotation Mode
The SPG2 gimbal can easily create constant speed movements in the auto-rotation mode.
This mode can be used for recording both regular video and motion timelapse photography.
For better performance, attach gimbal to the FeiyuTech tripod, or other tripod, to keep it completely still.
Set rotation speed in Feiyu ON App
Both the pan and tilt directions can be rotated.
Connect to the Feiyu ON App and select desired speed from the auto-rotation mode rate option in the settings menu.


Exit ⇒ Double tap Trigger button ⇒ Exit the auto-rotation mode and reset
Firmware Upgrade

Mobile phone audio connection
Turn on the phone Bluetooth and connect to FY_SPG2AUDID_XX, after the connection is successful, the phone audio can be input or output through the audio jack of SPG 2.
Gimbal Initialization
You can initialize your gimbal when:
- When smartphone is not level
- If not used for a long period of time
- In case of extreme temperature variations
Adjusting Steps

- Tap the function button for 5 consecutive times and hear the «beep» sound, and the motor will stop working and «Initing» shows up.

2. Place the gimbal on the table unmoved, and the gimbal automatically detect whether or not it is placed on a static flat surface, and then its initializing will start automatically showing «Initing» on the display, and «Init Complete» will be displayed after the initializing has been successfully completed.

3. After the initialization is done, single tap the function button to wake up and return to the main interface.
NOTE: If the initialization is not successful for a long time, long press the function button to turn off the gimbal, restart it and then initialize.
Vertical Shooting
Press and hold the trigger button in the horizontal shooting mode and then single click the function button to switch to the vertical shooting mode.
Double click the trigger button to exit the vertical shooting and restore to the horizontal shooting mode.

Audio recording with Bluetooth connection
Note: The audio jack at the SPG2 handle is suitable for American standard earphones. To use the Chinese standard earphones, you need to use the conversion cable (self-prepared).
- Turn the gimbal on and plug the earphone connector into the audio jack on the right side of the SPG2 handle.

2. Turn on the mobile phone Bluetooth and connect to FY_SPG2AUDID_XX. After the connection is successful, press the shutter button on the handle. If the volume appears on the phone interface (as shown in below picture), the connection is successful.

3. Open the Feiyu ON App, after the connection is successful, click the volume icon at the top right corner of the interface, select “Bluetooth Earphone”, blow or talk to the sound hole 1 of the earphone, and the icon has sound waves, which indicates the reception is OK.
4. Press and hold the shutter button for about 1 second to start video recording. After the video recording is completed, you can play back the video in the album and listen to the audio effects from the earphones. Or disconnect the Bluetooth with the gimbal from the Bluetooth list on your mobile phone to listen to the audio effects from your mobile phone.
Precautions:
- When using the earphone for recording, please note that the audio jack at the SPG2 handle is suitable for
American standard earphones, to use the Chinese standard earphones, you need to use the conversion cable.
Most of the American standard and Chinese standard earphones can be distinguished by the color of the insulation ring. American standard: White; Chinese standard: Black.

2. When using a microphone equipped with a camera, the corresponding mobile phone patch cable is required,
the interface of the patch cable is suitable for mobile phones and is the American standard.
3. SPG2’s Bluetooth radio is not available for the phone’s camera, it needs to be used with the Feiyu ON APP, or
some live or video app, such as the iOS client end of Tik Tok.
6. Specifications

- Product Name: SPG2 3-Axis Stabilized Handheld Gimbal for Smartphone
- Max. Tilting Range: 320°
- Max. Rolling Range: 320°
- Max. Panning Range: 360°
- Tilting Speed: 2°/s ~ 75°/s
- Panning Speed: 3°/s ~ 150°/s
- Operation Time: 14Hours
- Weight: 440g ( exclude the battery and smart phone)
- Adaption smart phone: IPhone series and Android series (width 54mm~95mm)
Guilin Feiyu Technology Incorporated Company
Documents / Resources
References
-

FeiyuTech — Official Website
tags: 3-Axis Stabilized Handheld Gimbal Smartphone, FeiyuTech, SPG-2,

Correct Method For Using USB Data Cable
Battery Charging:
Connect The Computer:
Put the Mini-USB terminal of the USB
cable into the Mini-USB interface of the charger and the
USB terminal to the power adapter, optional connect to
the EU Connector.
Please remove the batteries first,
then insert the Mini-USB terminal into the function interface on the
Gimbal and the USB terminal to the USB connector. Afterwards
connect the device with the computer to do firmware updates or
parameter configuration. (Please connect the USB cable to the
computer with the USB connector, otherwise the interface of
the computer will be damaged ).
Further information can be found in the chapter of the
Function Interface Instructions.
Name
Remote
Control
Battery
Extender
Extension
Bar
Realize the heading & pitch angle adjustment,
mode switching, level calibration and heading
follow speed configuration from a distance.
Extend the capacity space for battery to
make the runtime longer.
Spiral design of the extension bar can be
perfect combination with G4 power switch;
Extended length is optional, it will help to
enjoy a different visual easily.
Function Description
Please refer to the method of proper usage
mentioned below. Otherwise the device
itself or other equipments can be damaged
Optional Accessories
!
Function
Button
Power
Switch
Pitch Axis
Roll Axis
Indicator
Heading Axis
The indicator flashes in red light
when in working, it will prompt the
Gimbal at fault.
Please install the suitable camera first before power on the Gimbal.
Attention !
How To Adjust The Pitching Angle:
Double press the function button to enter into“Heading And Pitch Follow Mode”.
Hold the Gimbal at the desired angle, then press the button once to reengage “Heading Follow Mode” in order to lock the
angle of desired pitch.
Smooth And Steady Filming:
Handheld the Gimbal, keep stable for movement, keep light and steady for walking.
Selfie:
Turn the Gimbal 180°so the function interface is facing you. Then, simply adjust the angle of pitch to the desired
angle by utilizing the “Heading And Pitch Follow Mode”which described above and then switch back to “Heading
Follow Mode”. Once complete you can film yourself with ease.
1
Beginner Guide
2
Product Appearance Instructions
Indicator Explanation
LED Status
Explain
Blue light flashes
three times
Full Power
Blue light flashes
twice
Enough Power
Blue light flashes
once
Low Power
Blue light keeps
flashing
No Power
If any comments or suggestions please do not hesitate
to e-mail us directly : service@feiyu-tech.com
Remove the power
switch cap, insert two
18350 batteries into
the handle.
Install the sports camera by the
special Thumb Screw. And make
sure it is fixed well.
Power On
Confirm the camera
is installed well, then
press the power
button to turn on
the Gimbal.
Mode Switching
When the Gimbal is working,
you can press the function
button to switch among the
three working modes and a
special working condition.
( Details of working modes please
refer to the instructions of
working modes )
Insert The Batteries Install The CameraFEIYU-EN-1
EN
4
Standard And Optional Accessories
Operation Instructions
3
Special Working Condition (Inversion Mode)
When in any working mode, press the function button for three times in succession, the
Gimbal will enter into the inversion mode and switch to the Heading following mode automatically. Invert the Gimbal to capture more excited
scenes easily by switching mode combination. When in inversion working condition press the function button for three times in succession to reset
the Gimbal back to the original state.
Manual Pulling Locking
The pitching can be adjusted 8 seconds after the Gimbal has been started. Within the Heading Follow and Heading
Lock Mode the pitching can be adjusted to the desired angle manually, wait in this position up to 0.5 second until the current angle is adjusted.
Standby Mode
Press the function button for 3 seconds, then the motor will stop working and the LED of the function button will light constantly.
This indicates that the Gimbal is in the standby mode. Single press the function button the Gimbal will be awakened immediately.
Function Button Working Mode Instructions
Operation
Double Press
Single Press
Long Press
For 1 Second
LED Status
Single Flashes
Double Flashes
On Constantly
Function Explanation
Operation Again
Function Of Operation Again
Heading Follow Mode
Heading And Pitch Follow Mode
Three Press Three Press again
Other operation is arbitrary
Other operation is arbitrary
Other operation is arbitrary
Single Flashes Inversion Mode Exit inversion mode to original state
Lock Mode
Function Button Instructions
Heading, Pitch and Roll are all locked to point at
Use for switch
the working
mode and
realize other
function
The working mode and function
can be identified by the LED status
Heading Follow Mode
Camera Pitch and Roll Angles remain
Heading And Pitch Follow Mode Camera Roll Angle remains
Lock Mode
Roll
Pitch
Heading
constant, heading follows the handheld position.
constant. Heading and Pitch follow the handheld position.
one position.
Sports Video Camera
Gimbal For Sony
Suitable for SONY FDR-X1000V and AS series sports cameras
Function
Interface
For SONY Sports Video Camera
Charger
Input: DC 5V
Output: DC 4.2V
USB CableUSB ConnectorStandard Accessories
Type: 18350
Rechargeable Battery
USB
Mini-USB
Цена:36.99$
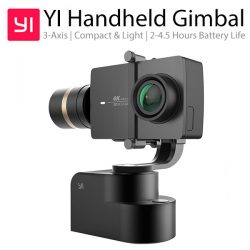 Так получилось, что этот стабилизатор для экшн-камеры YI 4K я купил даже раньше, чем купил саму камеру… Я надеялся, что буду использовать его с теми камерами, которые у меня были, но по причине, о которой я напишу ниже, мне пришлось отложить YI Handheld Gimbal на полку и ждать, когда по хорошей цене появится YI 4K.
В итоге камеру я купил через 2,5 месяца, но нормально заняться и камерой, и стабилизатором у меня получилось только сейчас. Стабилизатор достаточно простой, он имеет всего лишь три режима работы и управлять стабилизатором нельзя. С другой стороны, YI Handheld Gimbal создан специально для работы в паре с YI 4K.
Стабилизатор был куплен в июне 2019 года на «Летней распродаже». В фирменном магазине YI можно было два раза сыграть в игру «Угадай карту» и выиграть купон от магазина с номиналом -50/100$. Мне повезло и этот купон я выиграл! На момент распродажи один стабилизатор стоил 66.99$, чтобы применить купоны, я взял сразу два стабилизатора, в итоге от суммы в 133.98$ я скинул 50$ купоном магазина, а так же применил купон -10/69$ от Али (поменял его на 1000 монет). За два стабилизатора я заплатил 73.98$, т.е. один обошелся мне 36.99$. Даже на данный момент цена просто отличная!
Стабилизатор поставляется в большой коробке, внутри вспененный полиэтилен, в котором в отдельных ячейка уложен стабилизатор и аксессуары к нему. Кроме самого стабилизатора YI Handheld Gimbal в комплект входят: два аккумулятора Li-ion 18350 по 850 mAh каждая, зарядное устройство для аккумуляторов, кабель USB Type A — Micro USB и инструкция на английском языке. Аккумуляторы пришли уже распечатанными и почему-то установленными в зарядное устройство, хотя для них есть отдельная ячейка.
Отдельно хочу остановиться на крышке аккумуляторного отсека. Очень хочется оторвать руки тому инженеру, который ее спроектировал. Дело в том, что винт, которым фиксируется крышка, очень маленький и ничем не закреплен. Потерять его очень просто, так что обратите на это внимание.
Характеристики:
| Производитель: | YI Technology |
| Модель: | YI Handheld Gimbal |
| Диапазон перемещений по оси панорамирования: | -160° ~ +160° (320°) |
| Диапазон перемещений по горизонтальной оси: | -42° ~ +42° (84°) |
| Диапазон перемещений по оси наклона: | -160° ~ +160° (320°) |
| Управление скоростью перемещения по оси наклона: | 2°/s ~ 100°/s |
| Управление скоростью перемещения по оси панорамирования: | 2°/s ~ 150°/s |
| Рабочее напряжение: | Стандартное: 8.4V
Диапазон значений: 6.0V ~ 12.0V |
| Рабочая температура: | -20 °C ~ 50 °C |
| Крепление: | ¼» универсальное крепление |
| Аккумуляторы: | 2 x Li-ion 18350 по 850 mAh каждый |
| Автономность: | 2,5 — 4 часа (в зависимости от эксплуатации) |
| Материал: | Алюминий, пластик |
| Размеры и вес: | 95x77x75 мм., 210 гр. (без камеры) |
| Комплект: | Стабилизатор, 2 аккумулятора 18350, зарядное устройство для аккумуляторов, кабель USB Type A — Micro USB, инструкция на английском языке |
Инструкцию на английском языке можно скачать здесь.
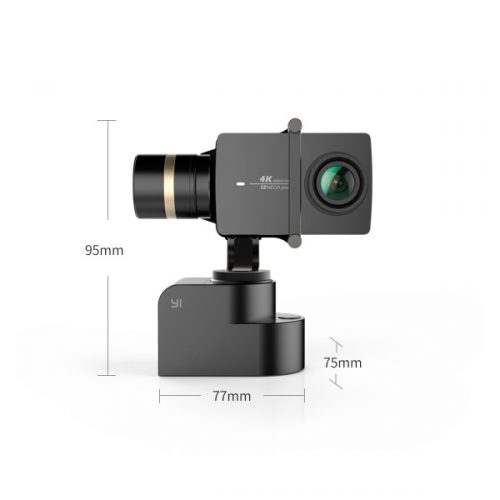
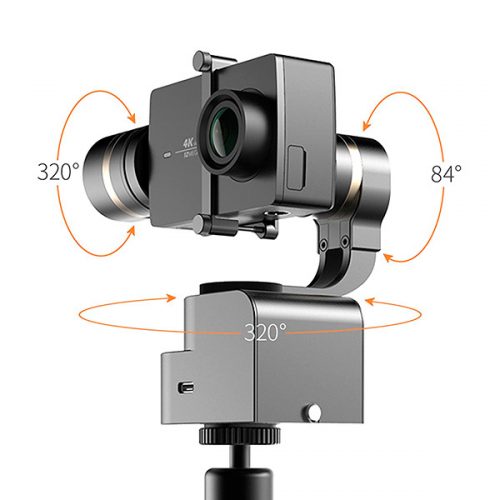
Фото:
Упаковка и комплект:
С установленной камерой:
На фирменном моноподе и на маленьком штативе:
Установка камеры и режимы работы:
Все просто: сначала заряжаем аккумуляторы и устанавливаем их в стабилизатор. Винтик, которым прикручена крышка, маленький и короткий, не потеряйте. Затем откручиваем два длинных и тонких болтика на креплении, устанавливаем камеру и затягиваем эти же болтики. Вот и все. С другими камерами могут возникнуть проблемы с установкой — в крепление нормально влезут только камеры с толщиной корпуса не более, чем 21-22 мм. Поэтому я так и не смог установить те камеры, которые на момент покупки стабилизатора были у меня в наличии. Уже гораздо позже, когда я уже купил YI 4K, я прочитал, что камеру можно было закрепить с помощью канцелярских резинок. Почему производитель сделал такое ограничение — для меня загадка, ведь это значительно сузило круг потенциальных покупателей.
Теперь про режимы работы, их всего три:
| Режим панорамирования: | Ось панорамирования повторяет движение стабилизатора, при этом камера остается неподвижной по продольной оси и оси наклона, удерживаясь в вертикальном положении |
| Режим блокировки: | Продольная ось заблокирована, оси наклона и панорамирования перемещаются для отслеживания движения стабилизатора |
| Режим панорамирования и наклона: | Все оси заблокированы, стабилизатор направлен только в одном направлении |
Переключаются режимы с помощью единственной кнопки на стабилизаторе:
| Действие: | Индикация: | Режим: |
| Зажать кнопку на 3 секунды | Нет | Включить/выключить стабилизатор |
| Одно нажатие | Одиночные вспышки | Режим панорамирования |
| Два нажатия | Двойные вспышки | Режим панорамирования и наклона |
| Одно нажатие | Тройные вспышки | Режим блокировки |
| Быстро мигает | Аккумулятор почти разряжен |
Т.е. работает все так: долгим нажатием включаем камеру, по умолчанию при каждом включении активирован режим панорамирования (Pan Mode), индикация — одиночные вспышки. Однократным нажатием переключаемся на режим блокировки (Lock Mode), индикация — тройные вспышки. Два раза быстро нажимаем на кнопку и переходим в режим панорамирования и наклона (Pan and Tilt Mode), индикация — двойные вспышки. В общем, разобраться не сложно.
Если с вращение по горизонтали и вертикали проблем нет, то при наклоне камера может зацепиться за стабилизатор — заявлены углы наклона 84°. Поэтому постоянно нужно следить во время съемки за камерой. Если бы кронштейн, на котором расположен мотор наклона, был бы длиннее, то этого бы не происходило, жаль, что такая регулировка не предусмотрена… Лично мне еще очень не хватает ручного управления, как на YI Smartphone Gimbal.
Сделал короткое видео с поочередным переключением режимов. Извините, делал на скорую руку, как получилось, так получилось… Снимал видео на Xioami Redmi Note 9S.
Калибровка и обновление прошивки:
Вместо того, чтобы лично все описывать, я выкладываю три видео с официального сайта: офлайн калибровка, онлайн калибровка и обновление прошивки.
Осталась только одна прошивка (версия V1.004), которая датирована 07.11.2016. Здесь я не буду давать на нее ссылку, но по просьбе могу выложить в облако. Новых прошивок точно не будет.
Для калибровки и прошивки стабилизатора используется разъем Micro USB на стабилизаторе. К сожалению, заряжать аккумуляторы с помощью этого порта не получится. Я считаю, что это очень большой минус, удобней было бы подключать блок питания от сети или павербанк для зарядки, чем каждый раз доставать аккумуляторы и отдельно их заряжать.
Примеры работы:
Примеров будет всего два: режим панорамирования (Pan Mode) на первом видео и режим блокировки (Lock Mode) на втором. Третий режим не использовал, т.к. не возникло необходимости.
Пример №1:
Пример №2:
Мое личное мнение:
Стабилизатор YI Handheld Gimbal выпущен 4 года назад, но все еще вполне актуален. Выбор режимов небогат, есть проблемы с наклоном камеры во время съемки, нет ручного управления, нельзя заряжать аккумуляторы в самом стабилизаторе. Но при всех минусах YI Handheld Gimbal прекрасно справляется со своей работой, особенно в паре с YI 4K. Большим плюсом является компактность стабилизатора, при наличии необходимых креплений его можно установить куда угодно. Универсальное крепление 1/4″ позволяет использовать огромное количество креплений, аксессуаров и штативов. Я уже купил крепление камеры на грудь, уже попробовал — очень удобно, стабилизатор с камерой жестко закреплен, руки свободны, установить и снять — дело десяти секунд. В общем и целом покупкой я доволен. Жаль только, что новинок от YI теперь не стоит ждать и в конечном итоге придется переходить на другой бренд с совершенно другими ценниками.
Плюсы и минусы:
Плюсы:
- Очень низкая цена
- Изначально создавался, как стабилизатор для YI 4K
- Компактные размеры
- Большой срок работы от аккумуляторов
- Возможно быстро заменить аккумуляторы
- Стандартное крепление 1/4″
Плюс/минус:
- Нет ручного управления стабилизатором
- Только три режима работы
- Небольшие углы наклона
Минусы:
- Можно установить камеру с толщиной корпуса не более, чем 21-22 мм.
- Камера при наклоне задевает корпус и нарушается стабилизация (камера не возвращается в предыдущее положение)
- Совершенно идиотское крепление крышки аккумуляторного отсека
- Нельзя заряжать аккумуляторы через порт Micro USB на корпусе стабилизатора
- Нет никакой пыле/влагозащиты
- Выпуск экшн-камер и аксессуаров к ним компанией YI прекращен, так же прекращена поддержка уже существующих продуктов, т.е. новых прошивок не будет
Выводы:
Выводы практически такие же, как и в случае с YI 4K. Отлично работающий стабилизатор, идеален в паре с YI 4K. Но выпуск прекращен, поддержки от производителя нет и уже не будет.
С другой стороны, за такую цену на данный момент сложно найти альтернативу. Сейчас, судя по всему, фирменный магазин YI на Али распродает остатки YI Handheld Gimbal. В отзывах пишут, что стабилизаторы присылают не в коробке, как у меня, а в фирменном кейсе! И цена на распродаже составляет около 50$. Если еще применить купоны от Али, то можно скинуть цену до 45$ и даже ниже. В общем, если вас не смущает, что стабилизатор снят с производства и поддержки от производителя (прошивки и софт) не будет, то YI Handheld Gimbal — это просто отличный выбор за такие деньги. Владельцам YI 4K однозначно рекомендую, всем остальным — зависит от габаритов вашей камеры.
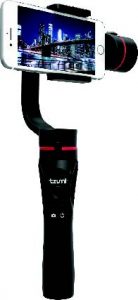
Как альтернативу YI Handheld Gimbal на Али можно нейти: Hohem XG1 (~120-150$), или FeiyuTech FY Feiyu WG2X (~170-190$). Цены видите сами… А проблему с креплением, кстати, можно решить с помощью канцелярских резинок, просто плотно зафиксировать ими камеру, читал, что многие так делают, если камера не фиксируется стандартным креплением.
1,271 просмотров всего, 2 просмотров сегодня
Автор публикации

1 576
Комментарии: 1118Публикации: 519Регистрация: 04-09-2016

User Manual
Tzumi SteadyGO Electric Stabilizer Smartphone 3-Axis Handheld Gimbal
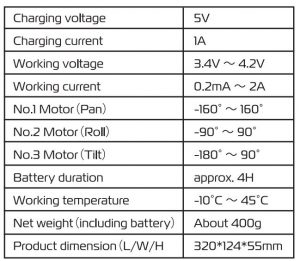
SPECIFICATIONS
tzumi® Inc. SteadyGo Stabilizer. Distributed by tzumi” Inc. NY, NY 10016. ©Copyright 2017 tzumi® Inc. All Rights Reserved. Made in China. iPhone is a trademark of Apple Inc., registered in the U.S. and other countries. Apple and the Apple logo are trademarks of Apple Inc., registered in the U.S. and other countries. App Store is a service mark of Apple Inc., registered in the U.S. and other countries. Samsung and Galaxy S are both registered trademarks of Samsung Electronics Co., ltd. Google, the Google Logo, Android, Google Play, Google Play logo. Google Cardboard and YouTube are registered trademarks of Google Inc. All other trademarks or service marks are property of their respective owners. Subject to change without prior notice.


DISCLAIMER
Please read all instructions and warnings prior to using the Stabilizer. By using this product, you agree to the terms and conditions listed here. You agree that you are solely responsible for your own conduct while using this product, and for any consequences that may occur. You agree to use this product only for purposes that are in accordance with the guidelines and warnings/cautions listed in this manual.
Tzumi® accepts no liability for damage, injury or any legal responsibility incurred directly or indirectly from the use of this product. Users must follow directions listed in this manual in order to properly operate this device.
IMPORTANT SAFEGUARDS
- Do not use the Stabilizer for anything other than its intended use.
- Keep the Stabilizer away from heat source, direct sunlight, humidity, water, or any other liquid.
- Do not expose the Stabilizer to extremely high or low temperatures.
- Do not operate the Stabilizer if it has been wet or moist.
It is not waterproof or water-resistant. - Do not use the Stabilizer if it has been damaged in any way.
- Repairs to electrical equipment should only be performed by a qualified electrician.
Improper repairs may place the user at serious risk. - Keep the Stabilizer out of reach of children.
- Keep the Stabilizer away from any situations where the Stabilizer or smartphone can be dropped or damaged. Use carefully.
WARNING ! LITHIUM-ION BATTERY
Lithium-ion cells and battery packs may get hot explode or ignite and cause serious injury
if exposed to abuse conditions. Be sure to follow the safety warnings listed below:
- Do not pierce, strike or step on the battery with sharp or heavy objects or otherwise
subject it to strong impacts or shocks. - If the battery was dropped or damaged in any way, do not use it.
- Do not operate the battery if it was exposed to any liquid that made the battery wet or moist.
- Do not charge unattended. Please keep the battery away from small children or ensure strict supervision by an adult at all times.
- Remember to shut the battery off when not in use.
- Do not expose the battery to extremely high or low temperatures or pressure; near fire, on stoves, in direct sunlight or other high temperature locations such as inside cars in hot weather, will cause the battery to generate heat, explode or ignite.
- Exposure to extreme temperatures such as near a fire, on a stovetop, in direct sunlight, or being left inside a car on a hot day may cause the battery to generate heat, explode or ignite.
- Using the battery in this manner may also result in a loss of performance and a shortened life expectancy.
- Do not disassemble or modify the battery in any way. The battery contains safety and protection devices, which, if damaged, may cause the battery to generate heat, explode or ignite.
- Immediately discontinue use of the battery if, while using, charging, or storing the battery, the unit emits an unusual smell or smol<e. feels hot, changes color or shape, or appears abnormal in any other way.
- If this occurs, place the battery in a safe place and contact us at tzumi,com/support
Getting Started
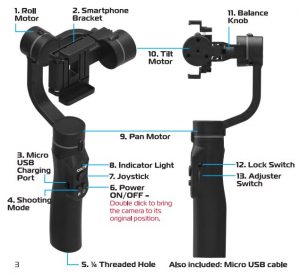
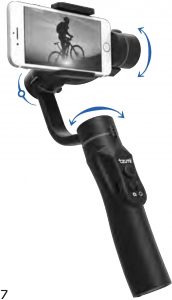
- Roll Motor – 180° rotation.
- Smartphone Bracket – Holds smartphone steady.
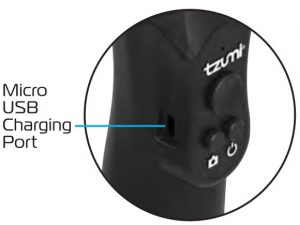
- Micro USB Charging Port – Insert Micro-USS cable to charge the Stabilizer.
- S hooting Mode – Press once to take a picture.
Press 2 times to switch between Front and Rear cameras.
Press 3 times to switch between Photo and Video mode. - ¼ Threaded Hole – For tri-pod use.
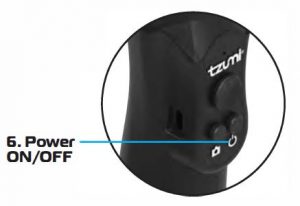
- Power – Turns the Stabilizer ON and OFF. Press and hold until indicator light turns on and flashes blue. Double click to bring the camera to its original position.
- Joystick – Controls movement UP /DOWN (Tilt Motor) and LEFT /RIGHT (Pan Motor).
- Indicator Light – Displays current state of the Stabilizer:
Blue Light – Stabilizer in operation.
Green Light – unit is stable and ready.
Red Light Flashing – low on charge – shut down – recharge.
Red & Blue Lights – Stabilizer overload – shut down – restart.
Yellow Light – error – shut down – restart. - Pan Motor – 320° rotation
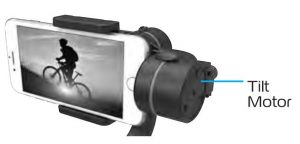
- Tilt Motor – 270° rotation
- Balance Knob – move left or right to help level your phone.
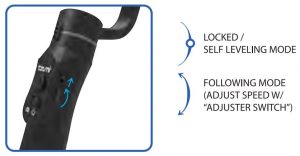
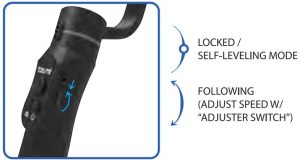
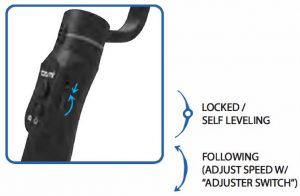
- Lock Switch – UP position: entering Following Mode (Tilt is unlocl<ed).
DOWN position: Following Mode off (Tilt is locked). - Adjuster Switch – DOWN position: Locl<ing Mode (Tilt, Pan and Roll
motors are locl<ed, holding the camera still).
UP position: Locl<ing Mode off.
CHARGING(STABILIZER/ Steadygo APP
CHARGING STABILIZER
- Prior to use, make sure the Stabilizer is fully charged.
- Insert the provided Micro-USS cable into the Micro-USB port of the Stabilizer.
- It takes approximately 3 hours to fully charge the Stabilizer.
- On full charge, the Stabilizer operates up to 4 hours.
SteadyGo APP
Scan QR Code access to our exclusive SteadyGo App.

- Faster connection between your mobile and Stabilizer.
- Enhance the stability control for best video footage.
- Real-time synchronization of device information, working status, battery and modes, etc.
- A variety of camera filter styles for different scenes and effects.
- Device software version detection and updates.
- Face detection and following capabilities.
CONNECTION INSTRUCTIONS
- Download the Steady-GO App
- Follow on-screen instruction to set up your smart phone and connect to the unit.
- Your Stabilizer is now ready for use.
SMARTPHONE PLACEMENT
SMARTPHONE PLACEMENT
IMPORTANT!
DO NOT turn the Stabilizer on before attempting to position your smartphone in the bracket.

- Place the smartphone into the bracket, as shown on the right. The bracket expands and can fit most smartphones up to 5.5 inches.
- Slide the smartphone all the way to the right until it touches Tilt Motor.
- Depending on the size and weight of your smartphone, you may need to balance it prior to use.
- If the smartphone does not stay leveled, loosen the Balance Knob by turning it counterclockwise. Adjust the Tilt Motor until the smartphone balances itself. Tighten the Balance Knob by rotating it clockwise.
‘When removing the smartphone from the bracket, open the bracket and pull the smartphone forward for a quick release.
USAGE – TURN ON/OFF
TURNING THE STABILIZER ON AND OFF
Press and hold the Power button until the indicator light turns ON and flashes blue. Double click the power button to bring the camera to its original position.
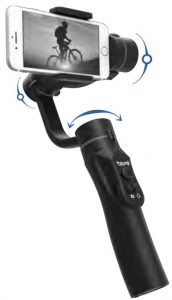
FOLLOWING MODE
- Roll Motor is locked.
- The smartphone pans left/right and tilts up/down.
- You may control Roll Motor by using the joystick (press left/right).
USAGE – MODES
PAN FOLLOWING MODE
TILT and ROLL motors are locked.
The smartphone pans left and right.
You may control TILT motor by using the Joystick (press up/down).
LOCKING MODE
All 3 axes are locked (TILT, ROLL and PAN). The camera stays still and stable.
You may control TILT and PAN motors by using the joystick (press up/down and left/right).
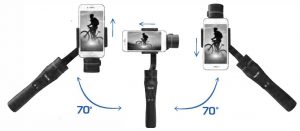
SWITCHING SHOOTING DIRECTION
SWITCHING FROM HORIZONTAL TO VERTICAL SHOOTING:
At horizontal shooting status: Keep phone facing yourself and rotate the Stabilizer handle over 70 degrees in a counterclockwise direction; Stabilizer will enter vertical shooting mode (phone camera downward).
At horizontal shooting status: Keep phone facing yourself and rotate the Stabilizer handle over 70 degrees in a clockwise direction, stabilizer enter vertical shooting (phone camera upward).
SWITCHING FROM VERTICAL TO HORIZONTAL SHOOTING:
At vertical shooting status: keep the phone facing yourself and the Stabilizer handle upright to exit vertical shooting mode.
MANUAL ADJUSTMENT
Adjusting Pan and Tilt manually when the indicator light displays either green or red.
CLEANING
DO NOT USE ANY HARSH OR ABRASIVE CLEANERS TO CLEAN THE STABILIZER. The product is not waterproof or water-resistant. Use a soft dry cloth to gently wipe the surface of the unit.

FEIYU-EN-1
Suitable for iPhone6 / 5C / 5S / 5 / 4S / 4 and similar ones.
Indicator
The indicator flashes in red light
when in working, it will prompt the
Gimbal at fault.
Upgrade……..
Adjust The Pitching Angle:
Remote Control To Adjust:
Customer can adjust the gimbal like mode switch or pitch angle by connecting remote control.
Auto Adjust:
Double press the function button to enter into“Heading And Pitch Follow Mode”. Hold the Gimbal at the
desired angle, then press the button once to reengage “Heading Follow Mode” in order to lock the angle of desired pitch.
Manual Adjust:
Switch to heading follow mode or inversion mode,control the pitch angle to the the position you want, and
keep for 0.5 second,the gimbal will lock current angle.
Smooth And Steady Filming:
Handheld the Gimbal, keep stable for movement, keep light and steady for walking.
Please install the suitable smartphone first before power on the Gimbal.
Attention !
Flexible Use Of Inversion Mode:
Press the function button for three times in succession, the Gimbal switch to the
inversion mode and help to captured low angle view more easily. If filming with moving forward at a high speed, keep the
handle roughly parallel with the ground will be helpful.
4
1
2
5
3
Special Working Condition (Inversion Mode)
When in any working mode, press the function button for three times in succession,
the Gimbal enter into the inversion mode and switch to the Heading following mode automatically. Invert the Gimbal to capture more
excited scenes easily by switching mode combination. When in inversion working condition press the function button for three times in
succession to reset the Gimbal back to the original state.
Hand Pulling Locking
The pitching can be adjust by hand pulling after start the gimbal 8 seconds. During the Heading Follow Mode
pulling the pitching to the desired angle and stay 0.5 second it will lock in the current angle.
Standby Mode
Press function button for 3 seconds, the motor stop working and the LED of the function button will single flashes this
will indicate that gimbal enter the standby mode. Single press the function button the gimbal will be awaken immediately.
Please visit the official website of Feiyu Tech: www.feiyu-tech.com to download the USB driver, firmware upgrade software and the latest
firmware then unzip the RAR file.Remove the batteries and refer to the connection diagram to connect the gimbal with the computer.
Please refer to the manual of update operation to upgrading,otherwise the Gimbal will be abnormal.
The heading following speed can be configurate through parameter setting software.User can adjust to the desired following speed mode
according to the requirements of filming scene. Three modes for optional: “SLOW” mode, “NORMAL” mode , “FAST” mode.
Default setting is “FAST” mode.
The Gimbal attitude can be calibrate through parameter setting software. User can adjust the pitch and roll in a small angle to achieve more
accuracy filming scene. Please insert the batteries then refer to the connection diagram to connect the gimbal with the computer for caliration.
Firmware Upgrade Instruction
Parameters Configuration
Gimbal Calibration
Indicator Explanation
LED Status
Explain
Blue light flashes
three times
Full Power
Blue light flashes
twice
Enough Power
Blue light flashes
once
Low Power
Blue light keeps
flashing
No Power
Please Remove
The Batteries
Before Upgrading
!
Attention : Please be sure to connect the computer with the USB connector.
Attention : Please be sure to connect the computer with the USB connector.
Attention : Please be sure to connect the computer with the USB connector.
If any comments or suggestions please do not hesitate
to e-mail us directly : service@feiyu-tech.com
Attention: Be sure to connect the computer with the USB connector
Remove the power
switch cap, insert two
batteries into the handle.
Install the Smart phone
by the quick-release
adapter. And make
sure it is fixed well.
Confirm the phone is
installed well, then press
the power button to turn
on the Gimbal.
When the Gimbal is working, you can
press the function button to switch
among the working modes and a special
working condition freely.
Item
Double Press
Single Press
Long Press For 1 Second
Long Press For 3 Second
LED Status
Single Flashes
Double Flashes
Function Explanation
Item
LED Status
Explanation
Heading Follow Mode
Heading And Pitch Follow Mode
Three Press
Single Flashes
Inversion Mode
Pitch Recover Level
Single Flashes
Single Flashes
Standby Mode
Use for switching working modes.
Identify the working mode via
switch to different status of the
indicator light.
Heading Follow Mode:Camera Pitch and Roll Angles
remain constant, heading follows the handheld position.
Heading And Pitch Follow Mode:Camera Roll Angle remains
constant. Heading and Pitch follow the handheld position.
G4 Handheld Gimbal For Smartphone
Pitch Axis
Heading Axis
Function Interface
Power Switch
Roll Axis
Function Button
The USB Mini terminal of the cable plug into the function interface , the USB terminal plug
into the USB connector. Please ensure to connect with the USB connector.
Connection Mode
In order to get the best working status ,
please try to keep the smart phone and
pitch axis balance before power on the
gimbal. Please refer to thefollowing:
R
Standard Installation Method
5 mm
iPhone5
iPhone6
0 mm