
![]()
EzRecorder 310
ER310
HDMI
English
USERMANUAL
|
Table of Contents |
||
|
Chapter 1 |
In the Box …………………………………………………………………………. |
2 |
|
Chapter 2 |
Parts and Ports …………………………………………………………………. |
4 |
|
2.1 |
Control Panel ……………………………………………………………………. |
4 |
|
2.2 |
Infrared Sensor …………………………………………………………………. |
4 |
|
2.3 |
LED Indicator ……………………………………………………………………. |
5 |
|
2.4 |
Connection Ports……………………………………………………………….. |
6 |
|
2.4.1 |
Front View……………………………………………………………………………… |
6 |
|
2.4.2 |
Rear View ……………………………………………………………………………… |
7 |
|
Chapter 3 |
Installation and First-Time Setup………………………………………….. |
8 |
|
3.1 |
Hardware Installation …………………………………………………………. |
8 |
|
3.2 |
Storage Device Installation………………………………………………… |
12 |
|
3.2.1 |
Internal HDD Installation ………………………………………………………… |
12 |
|
3.2.2 |
USB Storage Device Insertion ………………………………………………… |
15 |
|
3.3 |
Setup Wizard ………………………………………………………………….. |
16 |
|
3.4 |
IR Learning Setup ……………………………………………………………. |
18 |
|
3.5 |
Supported Resolutions……………………………………………………… |
20 |
|
Chapter 4 |
The Remote Control…………………………………………………………. |
22 |
|
Chapter 5 |
Basic Operation ………………………………………………………………. |
24 |
|
Chapter 6 |
The OSD Menu Display ……………………………………………………. |
27 |
|
6.1 |
Media Studio …………………………………………………………………… |
28 |
|
6.1.1 |
Post-Edit Recorded Videos ……………………………………………….. |
31 |
|
6.2 |
File Management …………………………………………………………….. |
34 |
|
6.3 |
Schedule List ………………………………………………………………….. |
37 |
|
6.4 |
Settings ………………………………………………………………………….. |
42 |
|
Appendix A |
Troubleshooting ………………………………………………………………. |
51 |
1

Thank you for purchasing EzRecorder 310. Please read this user manual carefully to ensure proper use of this product. We recommend you to keep it for future reference.
Chapter 1 In the Box
Please confirm that the package contains the following items. If any of the package contents are missing or damaged, please contact the distributor immediately.
EzRecorder 310
Power adapter
Power adapter outlet module
HDMI cable
IR blaster cable
Quick guide
2

Remote control (batteries included)
The accessories that come with the package may slightly vary depending on different sales regions.
EzRecorder 310 is made for recording and capturing media materials that are legally owned or licensed by the user only. Any violation of copyrights or other intellectual property rights is not allowed.
AVerMedia regularly releases the latest version of firmware for EzRecorder 310. Having the latest
firmware enhances the functionality of EzRecorder 310. To download the latest firmware file, please go to www.avermedia.com and then enter the model name in Product Search field. For firmware info, refer to Product Information (p.48).
3

Chapter 2 Parts and Ports
2.1 Control Panel
The button panel found on the front of the unit provides quick access to commonly used functions.
Record
1
Press to start / stop recording.
Hold down the button for four seconds to force shut down EzRecorder 310.
|
2 |
Power |
|
|
Press to turn the unit on. |
||
2.2 Infrared Sensor
When using the remote control, aim it at the infrared (IR) sensor located at the front panel of the unit. The remote control must be held at an angle within 30 degrees perpendicular to the IR sensor to function correctly. The distance between the remote control and the sensor should not exceed 6 meters (20 feet).
4

2.3 LED Indicator
The LED indicators on the front of the unit show the device’s status.
1HDMI source LED indicator
3Record status LED indicator
Status
Powered on
Ready to record/snapshot
Recording
Take a snapshot
Unable to record/snapshot
No source
Source is available
Powering off
Pass-through ON when powering off
Recording paused
Finishing recording
Source
Solid green
Solid green
Flashes red once
Solid green
Solid green
Solid green
Solid orange
Solid red
Solid green
2YPbPr source LED indicator
4Power status LED indicator
Record
Breathing
Flashes red once
Solid red
Flashes red continuously
Power
Solid green
Solid green
Solid green
Flashes red once
Flashes green continuously
Flashes green continuously
Flashes green continuously
Solid red
Solid green
5

|
Condition |
Source |
Record |
Power |
|||||||||||||
|
Storage space is low |
Solid green |
Glows at a |
Solid green |
|||||||||||||
|
slow pace |
||||||||||||||||
|
Device is not ready |
Flashes green |
|||||||||||||||
|
continuously |
||||||||||||||||
|
no storage/ no signal/ |
Flashes green |
|||||||||||||||
|
protected content |
continuously |
|||||||||||||||
|
Accepting a remote |
Flashes green |
|||||||||||||||
|
control command |
once |
|||||||||||||||
2.4Connection Ports
2.4.1Front View
1USB slot
USB slot is for external hard drive storage device connection as well as for firmware upgrade via storage device.
USB hub is not supported.
There will be no function or reply when connecting EzRecorder 310 to the computer via USB.
6
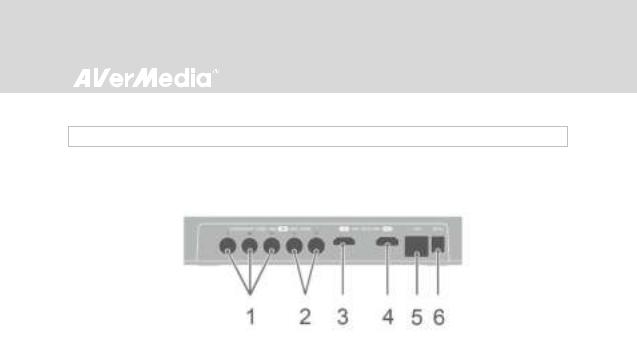
2.4.2 Rear View
|
1 |
Component video input |
4 |
HDMI output |
|
|
2 |
Audio L/R input |
5 |
LAN port |
|
|
3 |
HDMI input |
6 |
DC-IN |
|
7
Chapter 3 Installation and First-Time Setup
3.1 Hardware Installation
Please follow the steps below to properly connect EzRecorder 310 to your set-top box (STB) and TV.
Before making the connections, make sure to set STB’s video output to “Component” and adjust its output resolution to 1080i or below. Then power your STB off.
If you would like to install internal hard drive, in stall it before making the connections.
Make sure that the cables are firmly connected and that neither of the cables are loose. If any of the cables are loose or disconnected, there may be a loss of signal or screen color problems.
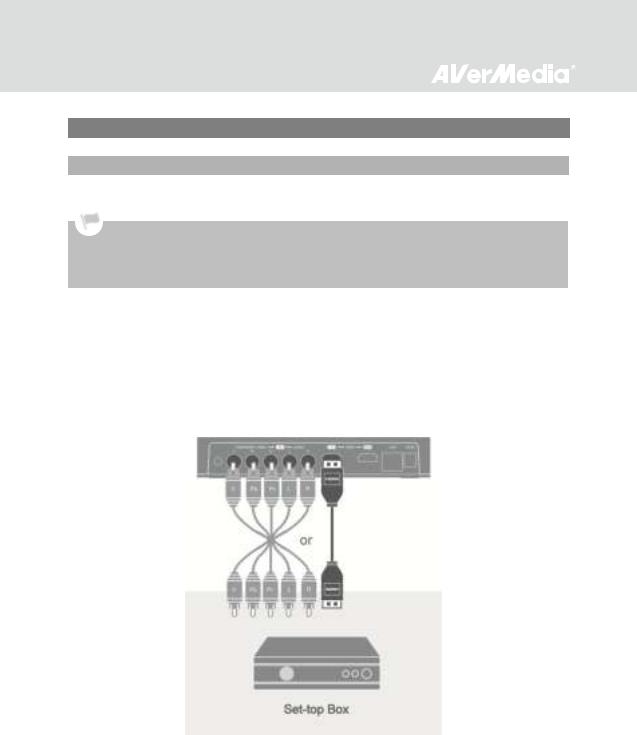
Step 1
Connecting EzRecorder 310 to Your Set-top Box
Connect one end of the an HDMI cable or a component video cable to the rear of EzRecorder 310 and the other end to the HDMI or COMPONENT VIDEO OUT (red, green, and blue) port on your STB.
If you are using a component cable for video, you’ll need a composite cable for audio. Connect one end of the composite audio cable to the AUDIO IN port on the rear of EzRecorder 310 and the other end to the AUDIO OUT (red and white) port on the STB.
8

Step 2
Connecting EzRecorder 310 to Your TV
Take another HDMI cable and connect one end to the HDMI OUT port on the rear of EzRecorder 310 and the other end to the HDMI IN port on your TV.
Step 3
Connecting IR Blaster Cable
Step 3-1:
Use a soft cloth to gently clean and remove any dust on the infrared (IR) sensor of your STB.
Step 3-2:
Connect the IR blaster cable to the IR BLASTER port on the rear of the device. Make sure you snap the cable securely in place.
Step 3-3:
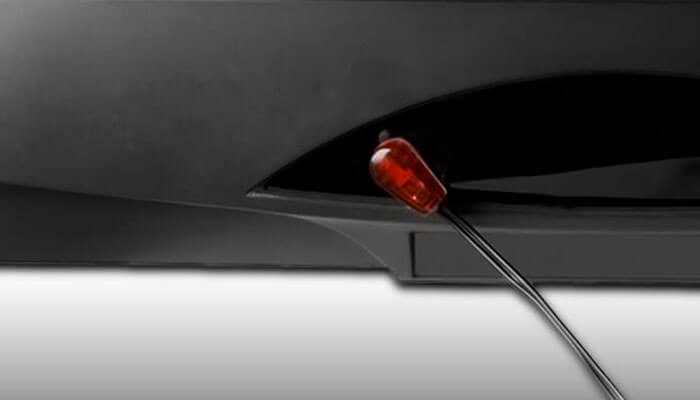
Peel off the sticker on the back of IR emitter and stick the IR emitter right to the STB IR sensor window. To make sure it is properly attached, use your thumb to secure the emitter with a little pressure for at least 3 seconds.
9
![]()
The location of IR sensor window on STB varies. To find the exact location of the IR sensor, refer to the guide that comes with your STB.
Step 4
Powering on Your STB
Power on your STB.
Step 5
Installing the Power Adapter
Slide the power adapter outlet module into the groove on the power adapter.
Step 6
Connecting the Power Adapter
Connect the power adapter connector to the DC-IN port on the rear of the device. Then plug the power
adapter to a wall outlet.
10
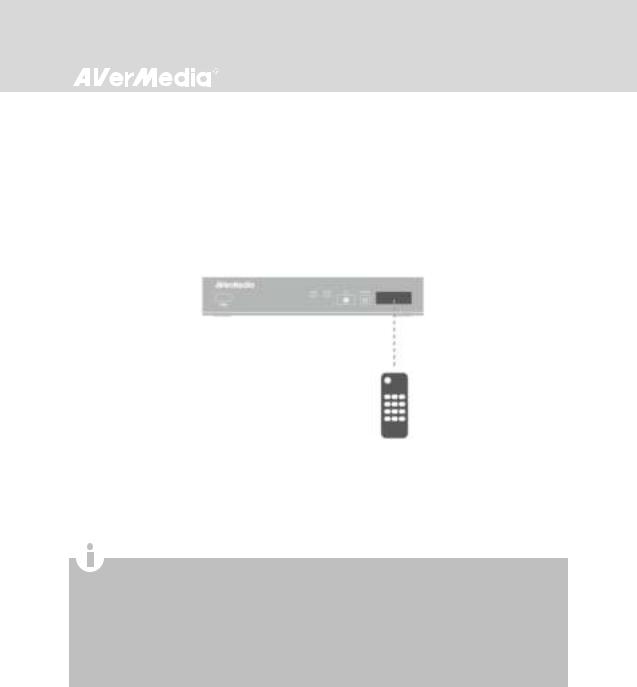
Step 7
Powering on EzRecorder 310
Press the power button on the front panel of the device.
OR
Aim the remote control at the infrared sensor located on the front panel of the device. Then press
POWER on the remote.
The LED indicator then lights up green, indicating that the device is on.
Step 8
Check Video on TV Screen
Turn on your TV and make sure the screen is properly displayed.
If your TV is not displaying video properly, please check the followings:
Make sure that your TV is set on the correct input source (COMPONENT IN). Switch video input by pressing the input selection button («Input»/»Source»/»TV/AV») on the TV remote control.
Supported resolutions vary depending on the TV model in use. For details, please refer to the guide that comes with your TV.
Check video output settings of your STB.
Power off EzRecorder 310 and then make sure that the device is connected properly and with the proper cables.
If there is still no video signal on TV, refer to FAQ at www.avermedia.com for further troubleshooting.
11
3.2 Storage Device Installation
EzRecorder 310 supports 2.5 inch internal hard drive (HDD) and external USB hard drive. You can choose to save the videos and snapshots either to an internal hard drive or an external USB drive.
3.2.1 Internal HDD Installation
It is highly recommended to use a new unformatte d hard drive or a hard drive formatted as NTFS file system. The supported maximum storage capacity of the hard drive is 2 TB.
Before installing or removing the internal HDD, please disconnect the power supply from EzRecorder 310 to avoid data loss.
Removing internal HDD immediately after powering-off may cause personal injury due to heat. Please wait until the HDD cools down completely (it takes approximately 10 minutes) before any attempt to remove it.
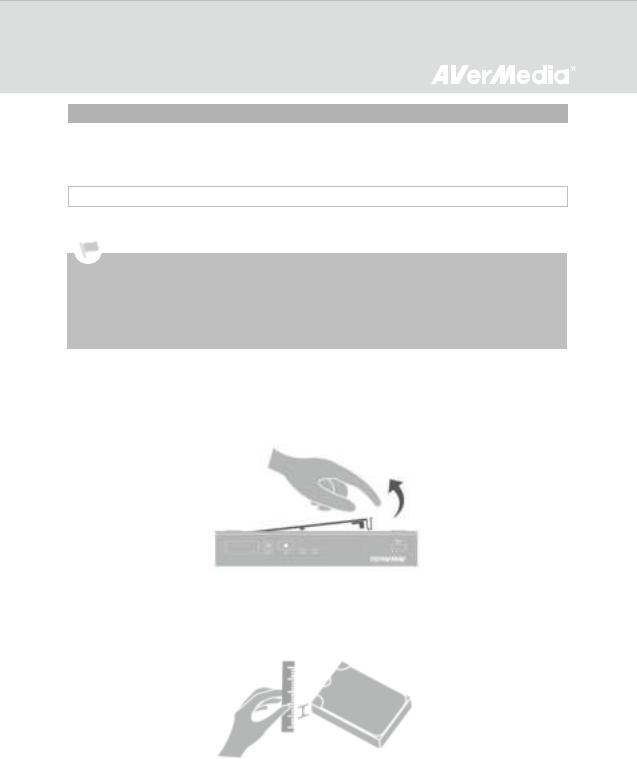
Step 1
Removing the HDD Lid
Use your fingertip to flip open the HDD lid, located on the bottom of EzRecorder 310. Lift off the lid and set it aside.
Step 2
Measuring HDD Height
Use a ruler to measure the height of your HDD (7 mm, 9.5 mm, or 12.7 mm).
12
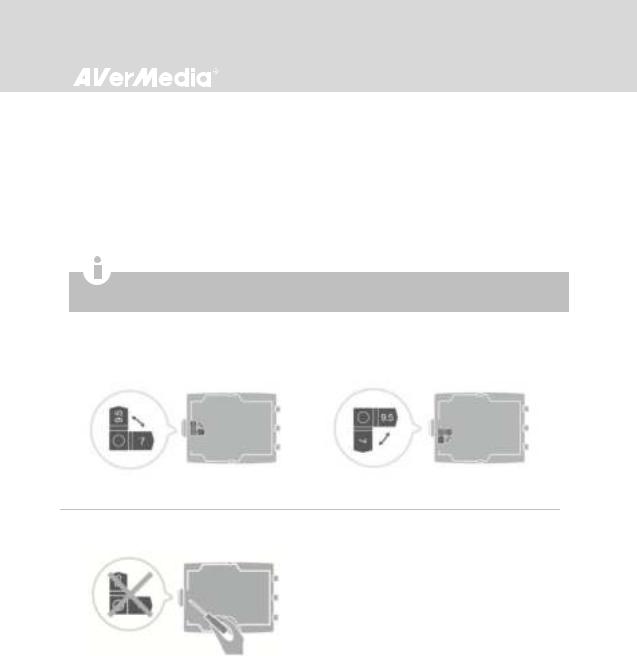
Step 3
Adjusting the Rotary Knob
Adjust the rotary knob attached to the inner side of the lid to fit the height of your HDD.
The default position of the rotary knob fits HDD with 9.5 mm height. If you use a 7 mm HDD, rotate the rotary knob to the other direction. For a 12.7 mm HDD, you need to remove the rotary knob using a screwdriver.
The device with measurement marked on the inner HDD lid may vary by region. Please read the instructions according to the device purchased.
|
Using a 7 mm HDD: |
Using a 9.5 mm HDD: |
Using a 12.7 mm HDD:
13
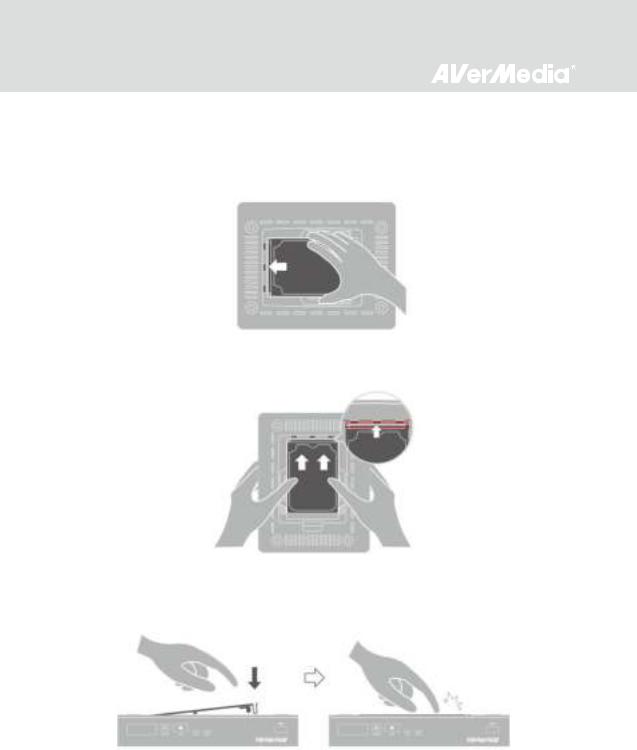
Step 4
Inserting the HDD
Place the HDD on the slot with the sticker-side facing up and the HDD connector end facing the SATA connector.
Align and insert the HDD connectors all the way into the SATA connectors attached to the slot. Push in firmly to secure them.
Step 5
Replacing the HDD Lid
Place the HDD lid back and snap it into place.
14

If your hard drive is not detected, keep the hard drive connected and restart EzRecorder 310 or format current drive to NTFS file system (please download the free application of “HP USB Storage Format Tool” from the FAQ of AVerMedia
website). If problem remains unsolved, refer to FAQ at www.avermedia.com for further troubleshooting.
It is common to have a hard drive with a slightly decreased capacity after formatting.
3.2.2USB Storage Device Insertion
Connect your portable USB hard drive to the USB port on the front of EzRecorder 310.
It is highly recommended to use an NTFS-formatted internal hard drive.
If you would like to use an external hard drive, do not remove your portable USB hard drive before an incoming schedule starts; otherwise, the scheduled task may fail to start.
If you connect another hard drive to EzRecorder 310, please go to Menu > Settings > Disk Management > Storage Destination to re-select desired storage destination for both recorded files and snapshots.
To avoid data loss, please safely remove your external storage device before unplugging it from EzRecorder 310 (See p.31 for details).
15
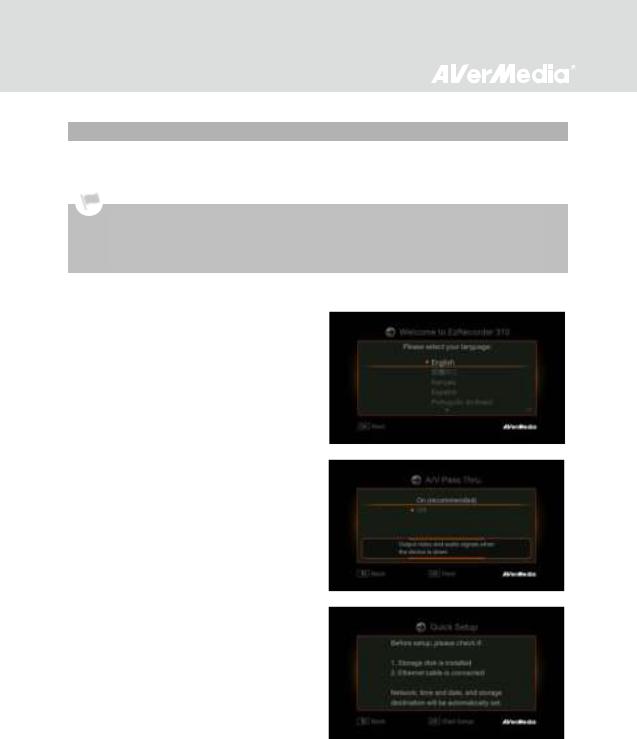
3.3 Setup Wizard
When the first time you power on EzRecorder 310 unit, the setup wizard appears. The following steps guide you through the initial configuration process.
Make sure to install internal hard drive or external USB storage device beforehand.
For the first-time initialization, a short duration of black screen (approximately 20 seconds) is followed by an AVerMedia logo. The blinking green status light indicates that EzRecorder 310 is starting up. Please wait until the welcome screen appears.
Step 1
Selecting Language
When the welcome page appears, use ▲/▼ to select your preferred language. Press OK to confirm.
Step 2
A/V Pass-Through
It is advised to turn ON A/V pass-through.
Step 3
Reminder
Make sure an NTFS-formatted hard drive is connected or installed to the device.
Check the connection of network.
Press OK to start setup.
A router which supports DHCP IP network is recommended. Also, refer to Ch. 6.2 for manual connection setup.
16
 Loading…
EzRecorder 310 ER310
12 989
Снято с производства
Карта видеозахвата
EzRecorder 310 ER310
- Описание
- Особенности
- Спецификации
- Видео
Автономный захват видео
![]()
УниверсальностьЗахват видео происходит в популярных форматах
![]()
Вырезаем ненужноеВ комплекте с EZRecorder 310 присутствует видео-редактор для которого не нужен ПК
![]()
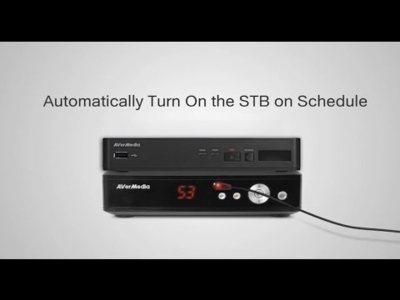
Автозапуск записиЗа счет встроенного ИК-передачика, EZRecorder 310 включит вашу телеприставку
![]()
Удобное время просмотраПросматривайте записанные передачи и видео в удобное для вас время

Запись в 1080 (Full HD)Сохранять видео, трансляции и передачи из любого цифрового источника
 Официальная гарантия
![]()
Универсальность
Захват видео происходит в популярных форматах
Впечатления, которые всегда с Вами
EZRecorder 310 записывает файлы в популярных форматах, таких как MP4 и JPG без шифрования. Таким образом, вы можете наслаждаться видео и снимками на любом компьютере или мобильном устройстве, где бы вы ни находились.
![]()
Вырезаем ненужное
В комплекте с EZRecorder 310 присутствует видео-редактор для которого не нужен ПК
Никакой рекламы
Разве Вас не утомляет все рекламные ролики на телевидении? Не беспокойся. EZRecorder 310 поставляется со встроенным видео-редактором, позволяющим редактировать видео прямо на вашем ТВ — ПК не требуется. Теперь вы можете по-настоящему наслаждаться видео без нежелательных рекламных объявлений.
![]()
Автозапуск записи
За счет встроенного ИК-передачика, EZRecorder 310 включит вашу телеприставку
Автоматическое включение телеприставки для записи
Присоединив комплектный ИК-передатчик к ИК-датчику вашей телеприставки, EZRecorder 310 может включать вашу телеприставку в заранее установленное время и переключать его на нужный канал для записи. Независимо от того, если вы на встрече с клиентами или дремлете в вашей постеле, все эпизоды сериала, футбольные игры или детские мультфильмы могут быть записаны без особых усилий.
![]()
Удобное время просмотра
Просматривайте записанные передачи и видео в удобное для вас время
Смотрите когда Вам удобно
Сколько раз Вы пропускали Ваше любимое шоу только потому, что небыли дома или приходилось работать?! К счастью с планировщиком записи EzRecorder 310 Вы сами составляете график, когда Вам смотреть телевизор, а не наоборот.
Запись в 1080 (Full HD)
Сохранять видео, трансляции и передачи из любого цифрового источника
Запись в высоком качестве и разрешении
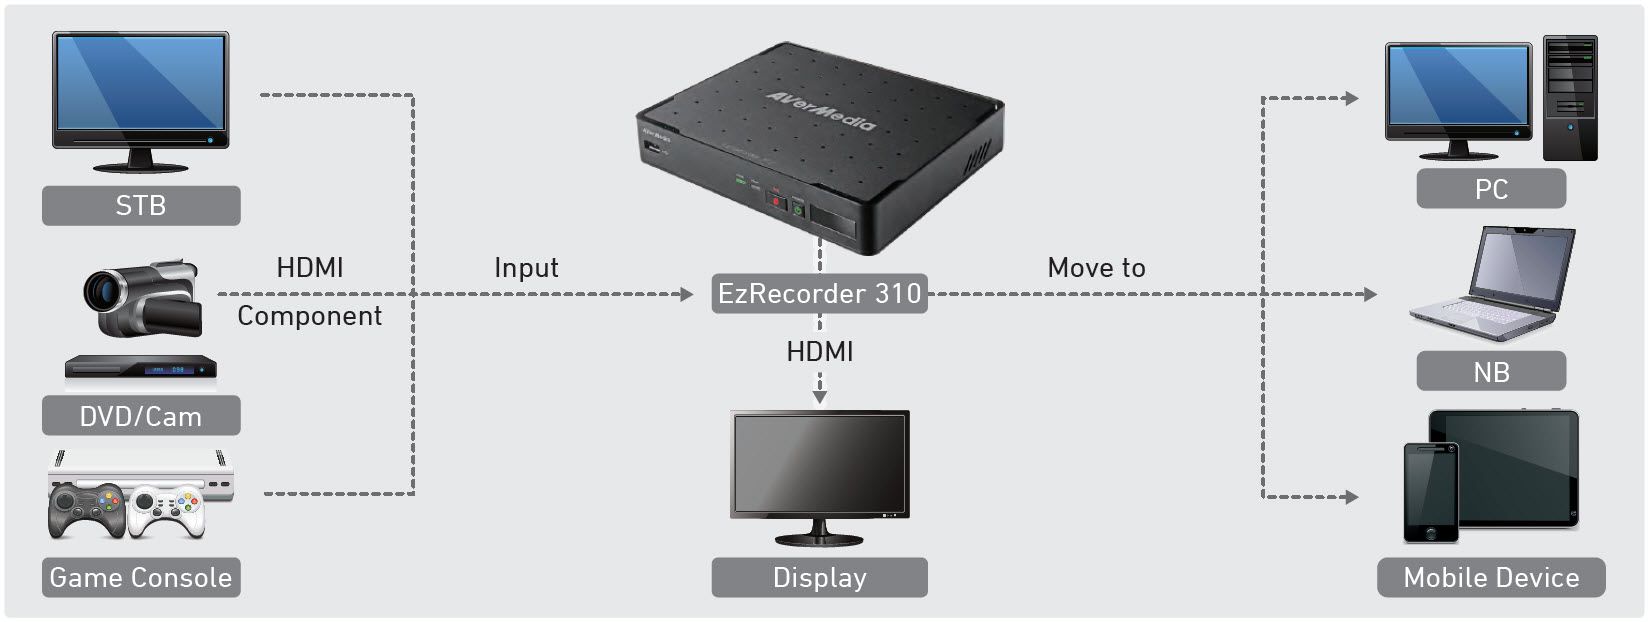
Просто подключите EZRecorder 310 к любому HDMI или компонентному источнику видеосигнала, например, кабель, спутник, видео по запросу, игровая приставка, Blu-Ray плеер, или даже к услуге потокового видео и начите запись видео в Full HD качестве.
Спецификации
- Технические спецификации
- Соединения
- Системные требования
- Комплектация
Технические спецификации
-
Разрешение захвата:
576p
-
Питание:
Внешний адаптер питания от 220В
-
Устройство хранения:
USB порт, Отсек для SATA диска 2.5″
-
Сетевое подключение:
Ethernet LAN (RJ45)
-
Режим работы:
Работает без ПК
-
Формат записи:
MPEG 4 (H.264+AAC), MJPEG, Поддерживает аппаратное кодирование
-
Разрешение захвата:
1080p30
-
Сквозное разрешение:
1080p60
-
Вход / Выход:
HDMI 2.0
-
Способ установки:
Внешний
-
Объём:
19 x 3 x 15
-
Вес:
0.4
Соединения
Комплектация
- Карта захвата AVerMedia EzRecorder 310 (ER310)
- Кабель HDMI 2.0
- Удлинитель IR сигнала
- Адаптер питания 220В (12В / 1,5 А)
- Пульт дистанционного управления (батарейки включены)
- Руководство пользователя
ДОПОЛНИТЕ ЭТОТ ПРОДУКТ
TV-Тюнер AVerTV Hybrid Volar T2
H831
Цифровое DVB-T2 и аналоговое ТВ на вашем ПК
DVD EZMaker 7
C039
Внешнее устройство конвертации S-Video или Композитного (RCA) сигнала в USB 2.0, для оцифровки видеокассет через ПК или ноутбук
Видео
EzRecorder 310 video 3

EzRecorder 310 video 2
EzRecorder 310 video 1
- Главная
- TV-тюнеры
- AVerMedia Technologies
- Типустройство видеозахвата
- Исполнениевнешнее
- Тип подключенияавтономный
- Запись видеоMPEG4
- Поддержка HD720p, 1080i, 1080p
- Входыаудио, компонентный, HDMI
- ВыходыHDMI
- Размеры (ШxВxД)190×34х153 мм
- Вес385 г
- Показать все
Здесь вы можете изучить характеристики, видео обзоры, отзывы покупателей о AVerMedia Technologies EzRecorder 310
Цена от 9626 ₽
(на июнь 2022)
Характеристики AVerMedia Technologies EzRecorder 310
*
| Тип | устройство видеозахвата |
| Исполнение | внешнее |
| Тип подключения | автономный |
Характеристики видео*
| Запись видео | MPEG4 |
| Поддержка HD | 720p, 1080i, 1080p |
Входы и выходы*
| Входы | аудио, компонентный, HDMI |
| FireWire | нет |
| Выходы | HDMI |
Дополнительно*
| Особенности | SATA II слот: внутренний 2.5” SATA HDD; встроенный видеоредактор |
| Размеры (ШxВxД) | 190×34х153 мм |
| Пульт ДУ | есть |
| Вес | 385 г |
| Комплектация | EzRecorder 310; HDMI кабель; ИК-передатчик; Адаптер питания (12V/1.5A); Пульт дистанционного управления (элементы питания в комплекте); Краткое пособие |
* Точные параметры уточняйте на сайте продавца.
Отзывы пользователей о AVerMedia Technologies EzRecorder 310
Похожие товары

AVerMedia Technologies Avermedia Live Streamer 311
-
AVerMedia Technologies CE314-HN
-
AVerMedia Technologies CE314-SN
-
AVerMedia Technologies CL311-M2
-
AVerMedia Technologies CL332-HN


Запись в 1080 (Full HD)
Просто подключите EZRecorder 310 к любому HDMI или компонентному источнику видеосигнала — например, кабель, спутнику, видео по запросу, игровой приставке, Blu-Ray плееру или даже к услуге потокового видео и начните запись в Full HD качестве.

Универсальность
EZRecorder 310 записывает файлы в популярных форматах, таких как MP4 и JPG, без шифрования. Таким образом, вы можете наслаждаться видео и снимками на любом компьютере или мобильном устройстве, где бы вы ни находились.
Никакой рекламы
Разве вас не утомляют все рекламные ролики на телевидении? Не беспокойтесь. EZRecorder 310 поставляется со встроенным видео-редактором, позволяющим редактировать видео прямо на вашем ТВ — ПК не требуется. Теперь вы можете по-настоящему наслаждаться видео без нежелательных рекламных объявлений.
Автоматическое включение телеприставки для записи
Присоединив комплектный ИК-передатчик к ИК-датчику вашей телеприставки, EZRecorder 310 может включать вашу телеприставку в заранее установленное время и переключать ее на нужный канал для записи. Независимо от того, вы на встрече с клиентами или дремлете в вашей постели, все эпизоды сериала, футбольные игры или детские мультфильмы могут быть записаны без особых усилий.

Смотрите когда Вам удобно
Сколько раз вы пропускали ваше любимое шоу только потому, что не были дома или работали?! К счастью, с планировщиком записи EzRecorder 310 вы сами составляете график, когда вам смотреть телевизор.
Интерфейсы

Технические характеристики
| Разрешение захвата | 576p |
| Питание | Внешний адаптер питания от 220В |
| Устройство хранения | USB порт, Отсек для SATA диска 2.5″ |
| Сетевое подключение | Ethernet LAN (RJ45) |
| Режим работы | Работает без ПК |
| Формат записи | MPEG 4 (H.264+AAC), MJPEG, Поддерживает аппаратное кодирование |
| Разрешение захвата | 1080p30 |
| Сквозное разрешение | 1080p60 |
| Вход / Выход | HDMI 2.0 |
| Способ установки | Внешний |
| Объём | 19 x 3 x 15 |
| Вес | 0.4 |
| Комплектация |
|
Характеристики
| Максимальное разрешение | Full HD (1920×1080) |
| Интерфейсы | HDMI LAN USB 2.0 Компонентный |
| Разъемы | HDMI A RCA RJ45 USB-A |
| Исполнение | Внешнее |