
Getting Started ……………………………………………………………………………. 3
Radio……………………………………………………………………………………………. 8
USB/iPod/AUX …………………………………………………………………………. 10
App Mode …………………………………………………………………………………. 13
Spotify …………………………………………………………………………………….. 14
Using Pioneer ARC APP …………………………………………………………….. 15
Settings …………………………………………………………………………………….. 17 FUNCTION settings ……………………………………………………………………. 17 AUDIO settings ………………………………………………………………………….. 19 SYSTEM settings ………………………………………………………………………… 20 ILLUMINATION settings……………………………………………………………… 21 MIXTRAX settings………………………………………………………………………. 21
Additional Information …………………………………………………………….. 23
About this manual: In the following instructions, a USB memory or USB audio player are referred to as
USB device. In this manual, iPod and iPhone are referred to as iPod.
Table of Contents
MVH-S125UI
Remote Control
Getting Started
Basic operation
SRC (source)/OFF
Detach button Display window
M.C. (multi-control) dial
BAND/
DISP (display)/DISP OFF
USB port
AUX input jack (3.5 mm stereo jack)
BASS
/
SRC (source)
VOLUME +/ MUTE
DISP (display) FUNCTION AUDIO
Frequently used operations
* When this units blue/white lead is connected to the vehicles auto-antenna relay control terminal, the vehicles antenna extends when this units source is turned on. To retract the antenna, turn the source off.
Display indication
Purpose Operation
Head Unit Remote Control
Turn on the power* Press SRC/OFF to turn on the power. Press and hold SRC/OFF to turn off the power.
Press SRC to turn on the power. Press and hold SRC to turn off the power.
Adjust the volume Turn the M.C. dial. Press VOLUME + or . Press MUTE to mute the unit. Press MUTE again or press VOLUME + or to unmute.
Select a source Press SRC/OFF repeatedly. Press SRC repeatedly.
Change the display information
Press DISP/DISP OFF repeatedly. Press and hold DISP/DISP OFF to turn off the display information.
Press DISP repeatedly.
Return to the previous display/list
Press BAND/ . Press / to select the next/previous folder.
Return to the normal display from the menu
Press and hold BAND/ .
Boost the bass level Press BASS. You can select the bass
level in [BASS BOOST] (page 19).
Indication Description
Appears when a lower tier of the menu or folder exists.
Appears when the BASS button is pressed and held.
Appears when the local seek tuning function is set (page 17).
Appears when a traffic program is received.
Appears when the TA (traffic announcements) function is set (page 17).
Detach the front panel to prevent theft. Remove any cables and devices attached to the front panel and turn off the unit before detaching it.
Important Avoid subjecting the front panel to excessive shock. Keep the front panel out of direct sunlight and high temperatures. Always store the detached front panel in a protective case or bag.
Remove the insulation sheet before use.
Appears when the sound retriever function is set (page 18).
Appears when random/shuffle play is set.
Appears when repeat play is set.
Appears when the iPod control function is set (page 12).
Detaching the front panel
Preparing the remote control
Indication Description
Detach Attach
How to replace the battery
Insert the CR2025 (3 V) battery with the plus (+) and minus () poles orientated properly.
WARNING Do not ingest the battery, Chemical Burn Hazard.
(The remote control supplied with) This product contains a coin/button cell battery. If the coin/ button cell battery is swallowed, it can cause severe internal burns in just 2 hours and can lead to death. Keep new and used batteries away from children. If the battery compartment does not close securely, stop using the product and keep it away from children. If you think batteries might have been swallowed or placed inside any part of the body, seek immediate medical attention.
Batteries (battery pack or batteries installed) must not be exposed to excessive heat such as sunshine, fire or the like.
CAUTION There is a danger of explosion if the battery is incorrectly replaced. Replace only with the same or
equivalent type. Do not handle or store the battery with metallic tools or objects. If the battery leaks, remove the battery and wipe the remote control completely clean. Then install a
new battery. When disposing of used batteries, please comply with governmental regulations or environmental
public institutions rules that apply in your country/area.
Important Do not store the remote control in high temperatures or direct sunlight. Do not let the remote control fall onto the floor, where it may become jammed under the brake or
accelerator pedal.
When you turn the ignition switch to ON after installation, [SET UP :YES] appears in the display.
1 Press the M.C. dial. The setup menu disappears after 30 seconds of no operation. If you prefer not to set at this time, turn the M.C. dial to select [NO], then press to confirm.
2 Turn the M.C. dial to select the options, then press to confirm. To proceed to the next menu option, you need to confirm your selection.
Setup menu
Menu Item Description
CLOCK SET Set the clock.
FM STEP Select the FM tuning step from 100 kHz or 50 kHz.
[100], [50]
AM STEP Select the AM tuning step from 10 kHz or 9 kHz.
[10], [9]
3 [QUIT :YES] appears when all the settings have been made. To return to the first item of the setup menu, turn the M.C. dial to select [QUIT :NO], then press to confirm.
4 Press the M.C. dial to confirm the settings.
NOTES You can cancel the menu setting by pressing SRC/OFF. These settings can be made at any time from the SYSTEM settings (page 20) and INITIAL settings
(page 7).
1 Press the M.C. dial to display the main menu.
2 Turn the M.C. dial to select [SYSTEM], then press to confirm.
3 Turn the M.C. dial to select [DEMO OFF], then press to confirm.
4 Turn the M.C. dial to select [YES], then press to confirm.
1 Press and hold SRC/OFF until the unit turns off.
2 Press the M.C. dial to display the main menu.
3 Turn the M.C. dial to select [INITIAL], then press to confirm.
4 Turn the M.C. dial to select an option, then press to confirm.
Canceling the demonstration display (DEMO OFF)
INITIAL settings
Menu Item Description
FM STEP Select the FM tuning step from 100 kHz or 50 kHz.
[100], [50]
AM STEP Select the AM tuning step from 10 kHz or 9 kHz.
[10], [9]
1 Press SRC/OFF to select [RADIO].
2 Press BAND/ to select the band from [FM1], [FM2], [FM3] or [AM].
3 Press a number button (1/ to 6/ ).
TIP The / buttons can be also used to select a preset station when [SEEK] is set to [PCH] in the FUNCTION settings (page 18).
The six strongest stations are stored on the number buttons (1/ to 6/ ).
SP-P/O MODE Select when there is a full-range speaker connected to the rear speaker output leads and there is a subwoofer connected to the RCA output.
[REAR/SUB.W]
[SUB.W/SUB.W] Select when there is a passive subwoofer connected directly to the rear speaker output leads and there is a subwoofer connected to the RCA output.
[REAR/REAR] Select when there are full-range speakers connected to the rear speaker output leads and RCA output. If there is a full-range speaker connected to the rear speaker output leads, and the RCA output is not used, you may select either [REAR/SUB.W] or [REAR/REAR].
S/W UPDATE Select to confirm the latest system information on the unit.
[SYSTEM INFO]
[SYSTEM UPDATE] Select to update the unit to the latest software and initialize the unit settings. For details on the latest software and updating, visit our website.
SYSTEM RESET Select [YES] to initialize the unit settings. The unit will be restarted automatically. (Some of the settings may be retained even after resetting the unit.)
[YES], [NO]
Radio
Receiving preset stations
Best stations memory (BSM)
Menu Item Description
1 After selecting the band, press the M.C. dial to display the main menu.
2 Turn the M.C. dial to select [FUNCTION], then press to confirm.
3 Turn the M.C. dial to select [BSM], then press to confirm.
To seek a station manually 1 After selecting the band, press / to select a station.
Press and hold / then release to seek an available station. Scanning stops when the unit receives a station. To cancel seek tuning, press / .
NOTE [SEEK] needs to be set to [MAN] in the FUNCTION settings (page 18).
To store stations manually 1 While receiving the station you want to store, press and hold one of the number
buttons (1/ to 6/ ) until it stops flashing.
The unit searches for a station by PTY (program type) information.
1 Press and hold BASS during FM reception.
2 Turn the M.C. dial to select a program type from [NEWS/INFO], [POPULAR], [CLASSICS] or [OTHERS].
3 Press the M.C. dial. The unit begins to search for a station. When it is found, its program service name is displayed.
NOTES To cancel the search, press the M.C. dial. The program of some stations may differ from that indicated by the transmitted PTY. If no station is broadcasting the type of program you searched for, [NOT FOUND] is displayed for
about two seconds and then the tuner returns to the original station.
Using PTY functions
Disconnect headphones from the device before connecting it to the unit.
USB devices (including Android)/iPod 1 Open the USB port cover. 2 Plug in the USB device/iPod using an appropriate cable.
NOTE To automatically switch to [USB] source when a USB device/iPod is connected to the unit, set [USB AUTO] to [ON] in the SYSTEM settings (page 21).
CAUTION Use a USB cable (sold separately) to connect the USB device as any device connected directly to the unit will protrude out from the unit, which could be dangerous.
Before removing the device, stop playback.
AOA connections For details on AOA connection, see page 15.
MTP connection A device installed with Android OS 4.0 or most of later versions can be connected to the unit via MTP, using the cable supplied with the device. However, depending on the connected device, OS version or the numbers of the files in the device, audio files/songs may not be able to be played back via MTP. Note that MTP connection is not compatible with WAV file formats, and cannot be used with the MIXTRAX function.
NOTE If you use an MTP connection, [ANDROID WIRED] needs to be set to [MEMORY] in the SYSTEM settings (page 20).
AUX 1 Insert the stereo mini plug into the AUX input jack. 2 Press SRC/OFF to select [AUX] as the source.
NOTE If [AUX] is set to [OFF] in the SYSTEM settings, [AUX] cannot be selected as a source (page 20).
USB/iPod/AUX
Playing back
You can make various adjustments in the FUNCTION settings (page 17). Note that the following operations do not work for an AUX device. To operate an AUX device, use the device itself.
*1 Compressed audio files only
Operations
Purpose Operation
Select a folder/album*1 Press 1/ or 2/ .
Select a track/song (chapter) Press or .
Fast forward or reverse*2 Press and hold or .
Search for a file from a list 1 Press and hold BASS to display the list. 2 Turn the M.C. dial to select the desired
file (folder) name or category, then press to confirm.
3 Turn the M.C. dial to select the desired file, then press to confirm. Playback starts.
View a list of the files in the selected folder/ category*1
Press the M.C. dial when a folder/category is selected.
Play a song in the selected folder/ category*1
Press and hold the M.C. dial when a folder/ category is selected.
Alphabetical search (iPod only) 1 Press and hold BASS to display the list. 2 Turn the M.C. dial to select the desired
category list, then press and hold BASS to enter the alphabetical search mode. (Turning the M.C. dial twice also enters the alphabetical search mode.)
3 Turn the M.C. dial to select a letter, then press to display the alphabetical list.
To cancel alphabetical search, press BAND/ .
Repeat play Press 6/ .
Random/shuffle play Press 5/ .
Shuffle all play (iPod only) Press and hold 5/ .
Pause/resume playback Press 4/PAUSE.
Return to root folder (USB only)*1 Press and hold 1/ .
Change drives in USB device (Devices that support the USB mass storage device class protocol only)
Press BAND/ .
*2 When you use the fast forward or reverse function while playing a VBR file, the playback time may be not correct.
Link play mode You can access songs based on the artist, album, or genre currently playing. 1 While listening to a song, press and hold 4/PAUSE to enter the link play mode. 2 Turn the M.C. dial to select the mode ([ARTIST], [ALBUM], [GENRE]), then press to
confirm. The selected song/album will be played after the currently playing song.
NOTE The selected song/album may be canceled if you use functions other than those from the link play mode (e.g. fast forward and reverse).
iPod control You can control the unit via a connected iPod. The following iPod models are not compatible with this function.
iPod nano 1st generation, iPod with video 1 Press BAND/ during playback, then select the control mode.
[CONTROL iPod]: The units iPod function can be operated from the connected iPod. [CONTROL AUDIO]: The units iPod function can only be operated by the buttons on the unit or supplied remote control. In this mode, the connected iPod cannot be turned on or off.
NOTES Switching the control mode to [CONTROL iPod] pauses song playback. Use the connected iPod to
resume playback. The following operations are still accessible from the unit, even if the control mode is set to
[CONTROL iPod]. Pause, fast forward/reverse, song/chapter selection
The volume can only be adjusted from the unit.
The MIXTRAX function creates a non-stop mix of your music library. For details on MIXTRAX settings, see page 21.
NOTES When USB is selected as a source and the MIXTRAX function is in use, the sound retriever function is
disabled. Depending on the file/song, sound effects may not be available.
Useful functions for iPod
About MIXTRAX (USB/iPod only)
1 Press 3/MIX to turn MIXTRAX on/off.
You can enjoy listening to an application on an iPhone via the unit. In some cases, you can control an application by using the unit. For details on compatible devices, visit our website.
Important Use of third party apps may involve or require the provision of personally identifiable information, whether through the creation of a user account or otherwise, and for certain applications, the provision of geolocation data. ALL THIRD PARTY APPS ARE THE SOLE RESPONSIBILITY OF THE PROVIDERS, INCLUDING WITHOUT LIMITATION COLLECTION AND SECURITY OF USER DATA AND PRIVACY PRACTICES. BY ACCESSING THIRD PARTY APPS, YOU AGREE TO REVIEW THE TERMS OF SERVICE AND PRIVACY POLICIES OF THE PROVIDERS. IF YOU DO NOT AGREE WITH THE TERMS OR POLICIES OF ANY PROVIDER OR DO NOT CONSENT TO THE USE OF GEOLOCATION DATA WHERE APPLICABLE, DO NOT USE THAT THIRD PARTY APP.
For iPhone users This function is compatible with iPhone and iPod touch installed with iOS 5.0 or later.
NOTE PIONEER IS NOT LIABLE FOR ANY THIRD PARTY APPS OR CONTENT, INCLUDING WITHOUT LIMITATION THEIR ACCURACY OR COMPLETENESS. THE CONTENT AND FUNCTIONALITY OF SUCH APPS ARE THE SOLE RESPONSIBILITY OF THE APP PROVIDER.
1 Connect this unit with the mobile device. iPhone via USB (page 10)
2 Press SRC/OFF to select [APP].
3 Operate the mobile device to start up the application.
Basic operations You can make various adjustments in the FUNCTION settings (page 17).
App Mode
Playback of an application via the unit
Purpose Operation
Select a track Press or .
Fast forward or reverse Press and hold or .
Pause/resume playback Press BAND/ .
(MVH-S125UI is only compatible with Spotify installed on iPhone.) Spotify is a music streaming distribution service not affiliated with Pioneer. More information is available at http://www.spotify.com. The Spotify application is available for compatible smartphones, please visit https:// support.spotify.com/ for the latest compatibility information. To enjoy Spotify as you drive, first download the Spotify app to your iPhone. You can download it on the iTunes App Store. Choose a free account or a paid Premium account, either in the app or at spotify.com. A Premium account gives you more features, like offline listening.
Important This product incorporates Spotify software which is subject to 3rd party licenses found here:
www.spotify.com/connect/third-party-licenses. For information on the countries and regions where Spotify can be used, take a look at https://
spotify.com/us/select-your-country/.
Update the firmware of the Spotify application to the latest version before use.
1 Connect this unit with the mobile device. iPhone via USB (page 10)
2 Press SRC/OFF to select [SPOTIFY].
3 Launch the Spotify application on the mobile device and start playback.
Basic operations You can make various adjustments in the FUNCTION settings (page 17).
NOTE The available operations may vary according to the type of contents (track/album/artist/playlist/radio) you want to play.
Spotify
Listening to Spotify
Purpose Operation
Skip a track Press or .
Search for a track from a list 1 Press and hold BASS to display the list. 2 Turn the M.C. dial to select the desired
category, then press to confirm. 3 Turn the M.C. dial to select the desired
file, then press to confirm. Playback starts.
NOTE Some functions of Spotify may not be operated from the unit.
You can operate the unit from Pioneer ARC APP installed on an iPhone/Android device. In some cases, you can control aspects of the application, such as source selection, pause, etc., by using the unit. For details on what operations are available on the application, see the applications help section.
WARNING Do not attempt to operate the application while driving. Make sure to pull off the road and park your vehicle in a safe location before attempting to use the controls on the application.
For iPhone users This function is compatible with iPhones (iPhone 5 or later) and iPod touches installed with iOS 8.0 or later. You can download Pioneer ARC APP on iTunes App Store.
For Android device users This function is compatible with a phone that runs Android 4.1 up to 7.1.2 and also supports AOA (Android Open Accessory) 2.0, but the compatibility depends on the smartphone. You can download Pioneer ARC APP on Google Play.
Pause/resume playback Press 4/PAUSE.
Thumbs Up (Only for radio) Press 1/ .
Thumbs Down (Only for radio) Press 2/ .
Random play (Only for track/album/artist/ playlist)
Press 5/ .
Repeat play (Only for track/album/artist/ playlist)
Press 6/ .
Start a radio channel based on the song currently being played.
1 Press and hold 5/ to start a radio. 2 Press the M.C. dial. This function may not be available
depending on the selected song.
Store the information about the song currently being played. Remove the song information stored.
1 Press and hold 3/MIX. [SAVE]/[UNSAVE] appears.
2 Press the M.C. dial.
Using Pioneer ARC APP
Purpose Operation
NOTE Some Android devices connected via AOA 2.0 may not work properly or emit sounds due to their own software design, regardless of the OS version.
When making a connection with an Android device 1 Press the M.C. dial to display the main menu. 2 Turn the M.C. dial to select [SYSTEM], then press to confirm. 3 Turn the M.C. dial to select [ANDROID WIRED], then press to confirm. 4 Turn the M.C. dial to select [APP CONTROL], then press to confirm. 5 Turn the M.C. dial to select [P.APP AUTO ON], then press to confirm. 6 Turn the M.C. dial to select [ON], then press to confirm. 7 Connect this unit with the Android device via USB.
Pioneer ARC APP on the Android device starts automatically.
NOTE If Pioneer ARC APP has not been installed on your Android device yet, a message that prompts you to install the application will appear on your Android device. Select [OFF] in [P.APP AUTO ON] to clear the message (page 21).
When making a connection with an iPhone 1 Connect this unit with the iPhone via USB. 2 Press SRC/OFF to select any source. 3 Press and hold the M.C. dial.
Pioneer ARC APP on the iPhone starts.
NOTE If the connection fails, launch Pioneer ARC APP on the iPhone.
1 Press SRC/OFF to select [ANDROID].
Basic operations
Making a connection with Pioneer ARC APP
Listening to music on Android
Purpose Operation
Select a track Press or .
Fast forward or reverse Press and hold or .
You can adjust various settings in the main menu.
1 Press the M.C. dial to display the main menu.
2 Turn the M.C. dial to select one of the categories below, then press to confirm. FUNCTION settings (page 17) AUDIO settings (page 19) SYSTEM settings (page 20) ILLUMINATION settings (page 21) MIXTRAX settings (page 21)
3 Turn the M.C. dial to select the options, then press to confirm.
The menu items vary according to the source.
Pause/resume playback Press 4/PAUSE.
Settings
FUNCTION settings
Menu Item Description
BSM
Store the six strongest stations on the number buttons (1/ to 6/ ) automatically.
REGIONAL
[ON], [OFF] Limit the reception to the specific regional programs when AF (alternative frequencies search) is selected. (Available only when FM band is selected.)
LOCAL
FM: [OFF], [LV1], [LV2], [LV3], [LV4] AM: [OFF], [LV1], [LV2]
Restrict the tuning station according to the signal strength.
TA
[ON], [OFF] Receive current traffic information if available. (Available only when FM band is selected.)
Purpose Operation
AF
[ON], [OFF] Allow the unit to retune to a different frequency providing the same station. (Available only when FM band is selected.)
NEWS
[ON], [OFF] Interrupt the currently selected source with news programs. (Available only when FM band is selected.)
ALARM
[ON], [OFF] Interrupt the currently selected source with emergency announcements. Select [OFF] to disable this function.
SEEK
[MAN], [PCH] Assign or buttons to seek the stations one by one (manual tuning) or select a station from the preset channels.
SAVE
Store the information about the song currently being played to your music list on Spotify.
UNSAVE
Remove the song information stored in [SAVE].
S.RTRV
[1] (effective for low compression rates), [2] (effective for high compression rates), [OFF]
Enhance compressed audio and restore rich sound. (Not available when USB is selected as a source and the MIXTRAX function is set to on.)
AUDIO BOOK
[FASTER], [NORMAL], [SLOWER] Change the playback speed. (Not available when [CONTROL iPod] is selected in the control mode.)
PAUSE
Pause or resume playback.
Menu Item Description
USB iPod
iPod
AUDIO settings Menu Item Description
FADER*1
Adjust the front and rear speaker balance.
BALANCE
Adjust the left and right speaker balance.
EQ SETTING
[SUPER BASS], [POWERFUL], [DYNAMIC], [NATURAL], [VOCAL], [VIVID], [CUSTOM1], [CUSTOM2], [FLAT]
Select an equalizer band and level for further customizing. Equalizer band: [80HZ], [250HZ], [800HZ], [2.5KHZ], [8KHZ] Equalizer level: [+6] to [6]
Select or customize the equalizer curve. [CUSTOM1] can be set separately for each source. However, each of the below combinations are set to the same setting automatically. USB, iPod, ANDROID, SPOTIFY, and APP
(iPhone) [CUSTOM2] is a shared setting used for all sources.
LOUDNESS
[OFF], [LOW], [MID], [HI] Compensate for clear sound at low volume.
SUB.W*2
[NOR], [REV], [OFF] Select the subwoofer phase.
SUB.W CTRL*2*3
Cut-off frequency: [50HZ], [63HZ], [80HZ], [100HZ], [125HZ], [160HZ], [200HZ] Output level: [24] to [+6] Slope level: [12], [24]
Only frequencies lower than those in the selected range are output from the subwoofer.
BASS BOOST
[0] to [+6] Select the bass boost level.
HPF SETTING
Cut-off frequency: [OFF], [50HZ], [63HZ], [80HZ], [100HZ], [125HZ], [160HZ], [200HZ] Slope level: [12], [24]
Only frequencies higher than the high-pass filter (HPF) cutoff are output from the speakers.
*1 Not available when [SUB.W/SUB.W] is selected in [SP-P/O MODE] in the INITIAL settings (page 8). *2 Not available when [REAR/REAR] is selected in [SP-P/O MODE] in the INITIAL settings (page 8). *3 Not available when [OFF] is selected in [SUB.W].
You can also access to these menus when the unit is turned off.
SLA
[+4] to [4] Adjust the volume level for each source except FM. Each of the below combinations are set to the same setting automatically. USB, iPod, ANDROID, SPOTIFY, and APP
(iPhone)
SYSTEM settings
Menu Item Description
CLOCK SET
Set the clock (page 6).
12H/24H
[12H], [24H] Select the time notation.
SCROLL SET
[ONCE], [LOOP], [OFF] Select the way to scroll the text in the display window.
AUTO PI
[ON], [OFF] Search for a different station with the same programming, even if using a preset station.
AUX
[ON], [OFF] Set to [ON] when using an auxiliary device connected to the unit.
SPOTIFY
[ON], [OFF] Set to [ON] when using the Spotify function.
ANDROID WIRED
[MEMORY], [APP CONTROL] Select the appropriate connection method for an Android device.
Menu Item Description
*1 Depending on your car, this function may not work properly. In this case, contact your dealer or an authorized PIONEER Service Station.
*2 Please use a commercially available wiring harness for each car model when [PRESET] mode is engaged, and use a commercially available adapter when in [PIONEER].
P.APP AUTO ON
[ON], [OFF] Select [ON] to automatically launch Pioneer ARC APP when an Android device is connected to the unit via AOA. (Not available when [MEMORY] is selected in [ANDROID WIRED].)
S.REMOTE*1*2
[OFF], [PIONEER], [PRESET] Select [PIONEER] or [PRESET] according to your wired remote control.
USB AUTO
[ON], [OFF] Select [ON] to automatically switch to [USB] source when a USB device/iPod is connected to the unit. Select [OFF] when a USB device/iPod is being connected to the unit just for charging.
ILLUMINATION settings Menu Item Description
DIM SETTING
[SYNC CLOCK], [MANUAL] Select the way to change the display brightness.
BRIGHTNESS
[1] to [10] Change the display brightness. The available setting ranges differ depending on [DIM SETTING].
MIXTRAX settings Menu Item Description
SHORT PLAYBCK
[1.0 MIN], [1.5 MIN], [2.0 MIN], [2.5 MIN], [3.0 MIN], [OFF]
Select the length of the playback time.
Menu Item Description
MIX PATTERN
[SOUND LEVEL] Change the MIXTRAX special effects according to the audio level. The mix pattern changes according to the sound level.
[LOW PASS] The mix pattern changes according to the bass level.
[RANDOM] The mix pattern changes randomly according to the sound level mode and low pass mode.
DISPLAY FX
[ON], [OFF] Set the MIXTRAX special effects on/off.
CUT IN FX
[ON], [OFF] Turn the MIXTRAX sound effects on/off while manually changing the tracks.
Menu Item Description
The display automatically returns to the normal display. No operations have been made for
about 30 seconds. Perform an operation.
The repeat play range changes unexpectedly. Depending on the repeat play range,
the selected range may change when another folder or track is being selected or during fast forwarding/reversing. Select the repeat play range again.
A subfolder is not played back. Subfolders cannot be played when
[FLD] (folder repeat) is selected. Select another repeat play range.
The sound is intermittent. You are using a device, such as a cellular
phone, that may cause audible interference. Move electrical devices that may be
causing the interference away from the unit.
Common AMP ERROR This unit fails to operate or the speaker
connection is incorrect. The protective circuit is activated.
Check the speaker connection. Turn the ignition switch OFF and back
to ON again. If the message remains, contact your dealer or an authorized Pioneer Service Station for assistance.
NO XXXX (NO TITLE, for example) There is no embedded text information.
Switch the display or play another track/file.
USB device/iPod FORMAT READ Sometimes there is a delay between the
start of playback and when you start to hear any sound. Wait until the message disappears and
you hear sound.
NO AUDIO There are no songs.
Transfer the audio files to the USB device and connect.
The connected USB device has security enabled. Follow the USB device instructions to
disable the security.
SKIPPED The connected USB device contains
DRM protected files. The protected files are skipped.
PROTECT All the files on the connected USB
device are embedded with DRM. Replace the USB device.
N/A USB The connected USB device is not
supported by this unit. Disconnect your device and replace it
with a compatible USB device.
HUB ERROR The USB device connected via a USB
hub is not supported by this unit. Connect the USB device directly to this
unit using a USB cable.
Additional Information Troubleshooting
Error messages
CHECK USB The USB connector or USB cable has
short-circuited. Check that the USB connector or USB
cable is not caught in something or damaged.
The connected USB device consumes more than maximum allowable current. Disconnect the USB device and do not
use it. Turn the ignition switch OFF and back to ACC or ON. Connect only compliant USB devices.
ERROR-19 Communication failed.
Perform one of the following operations, then return to the USB source. Disconnect the USB device. Change to a different source.
iPod failure. Disconnect the cable from the iPod.
Once the iPods main menu is displayed, reconnect the iPod and reset it.
ERROR-23 USB device was not formatted properly.
Format the USB device with FAT12, FAT16 or FAT32.
ERROR-16 The iPod firmware version is old.
Update the iPod version. iPod failure.
Disconnect the cable from the iPod. Once the iPods main menu is displayed, reconnect the iPod and reset it.
STOP There are no songs in the current list.
Select a list that contains songs.
NOT FOUND No related songs.
Transfer songs to the iPod.
APP START UP APP The application has not started running
yet. Operate the mobile device to start up
the application.
Spotify CHECK APP Connection to the Spotify application
failed. Follow the instructions that appear on
the screen.
Only the first 32 characters can be displayed as a file name (including the file extension) or a folder name.
The unit may not work properly depending on the application used to encode WMA files.
There may be a slight delay at the start of the playback of audio files embedded with image data, or audio files stored on a USB device with numerous folder hierarchies.
CAUTION Pioneer cannot guarantee compatibility
with all USB mass storage devices, and assumes no responsibility for any loss of data on media players, smartphones, or other devices while using this product.
Do not leave discs or a USB storage device in any place that is subject to high temperatures.
WMA files
Compressed audio compatibility
File extension .wma
MP3 files
WAV files WAV file formats cannot be connected via
MTP.
USB device There may be a slight delay when starting
playback of audio files on a USB storage device with numerous folder hierarchies.
This unit supports only the following iPod models. Older versions may not be supported. Made for iPod touch (1st through 6th generation) iPod classic iPod nano (3rd through 7th generation) iPhone 6s iPhone 6s Plus iPhone 6 iPhone 6 Plus iPhone 5s iPhone 5c iPhone 5 iPhone 4s iPhone 4 iPhone 3GS iPhone 3G iPhone
Operations may vary depending on the generation and/or software version of the iPod.
Users of iPod with the Lightning Connector should use the Lightning to USB Cable (supplied with iPod).
Users of iPod with the Dock Connector should use the CD-IU51. For details, consult your dealer.
Refer to the iPod manuals for information about the file/format compatibility.
Audiobook, Podcast: Compatible
CAUTION Pioneer accepts no responsibility for data lost on the iPod, even if that data is lost while this unit is used.
Bit rate 48 kbps to 320 kbps (CBR), 48 kbps to 384 kbps (VBR)
Sampling frequency 32 kHz, 44.1 kHz, 48 kHz
Windows Media Audio Professional, Lossless, Voice/DRM Stream/Stream with video
Not compatible
File extension .mp3 Bit rate 8 kbps to 320 kbps
(CBR), VBR Sampling frequency 8 kHz to 48 kHz (32
kHz, 44.1 kHz, 48 kHz for emphasis)
Compatible ID3 tag version
1.0, 1.1, 2.2, 2.3, 2.4 (ID3 tag Version 2.x is given priority over Version 1.x.)
M3u playlist Not compatible MP3i (MP3 interactive), mp3 PRO
Not compatible
File extension .wav Quantization bits 8 and 16 (LPCM) Sampling frequency 16 kHz to 48 kHz
(LPCM)
Playable folder hierarchy
Up to eight tiers (A practical hierarchy is less than two tiers.)
Playable folders Up to 500 Playable files Up to 15 000
Playback of copyright- protected files
Not compatible
Partitioned USB device
Only the first partition can be played.
iPod compatibility
The user cannot assign folder numbers and specify playback sequences with this unit. Sequence of audio file depends on the connected device. Note that the hidden files in a USB device cannot be played back.
Example of a hierarchy
iTunes Apple and iTunes are trademarks of Apple Inc., registered in the U.S. and other countries.
WMA Windows Media is either a registered trademark or trademark of Microsoft Corporation in the United States and/or other countries. This product includes technology owned by Microsoft Corporation and cannot be used or distributed without a license from Microsoft Licensing, Inc.
iPhone, iPod and Lightning Use of the Made for Apple badge means that an accessory has been designed to connect specifically to the Apple
product(s) identified in the badge, and has been certified by the developer to meet Apple performance standards. Apple is not responsible for the operation of this device or its compliance with safety and regulatory standards. Please note that the use of this accessory with an Apple product may affect wireless performance. iPhone, iPod, iPod classic, iPod nano, iPod touch and Lightning are trademarks of Apple Inc., registered in the U.S. and other countries.
Google, Google Play, Android Google, Google Play and Android are trademarks of Google LLC.
MIXTRAX MIXTRAX is a trademark of the PIONEER CORPORATION.
Spotify SPOTIFY and the Spotify logo are among the registered trademarks of Spotify AB. Compatible mobile digital devices and premium subscription required, where available, see https://www.spotify.com.
Sequence of audio files
Copyright and trademark
Folder Compressed audio file
to : Playback sequence 01 to 05: Folder number
………………………………………. 3
………………………………………… 8
USB/iPod/AUX ………………………………….. 9
………………………………….. 12
Spotify ……………………………………… 12
Pioneer ARC APP …………………………… 14
…………………………………………. 15
FUNCTION ………………………………….. 16
AUDIO …………………………………….. 17
SYSTEM ……………………………………. 18
ILLUMINATION ………………………………. 19
MIXTRAX …………………………………… 20
……………………………………… 21
: USB USB USB iPod iPhone iPod
MVH-S125UI
* SRC/OFF SRC/OFF
SRC SRC
SRC/OFF
M.C.
BAND/
DISP/DISP OFF
USB
AUX 3.5 mm
BASS
/
SRC
VOLUME +/
MUTE
DISP
FUNCTION AUDIO
*
M.C. VOLUME + MUTE MUTE VOLUME +
SRC/OFF SRC
DISP/DISP OFF DISP/DISP OFF
DISP
BAND/ /
BAND/
BASS [BASS BOOST] 18
BASS
16
TA 16
17
/
iPod 11
ON [SET UP :YES]
1 M.C.
30 M.C.
[NO]
2 M.C.
3 [QUIT :YES]
M.C. [QUIT :NO]
4 M.C.
SRC/OFF SYSTEM 18 INITIAL 7
1 M.C.
2 M.C. [SYSTEM]
CLOCK SET
FM STEP FM 100 kHz 50 kHz
[100][50]
AM STEP AM 10 kHz 9 kHz
[10][9]
DEMO OFF
3 M.C. [DEMO OFF]
4 M.C. [YES]
1 SRC/OFF
2 M.C.
3 M.C. [INITIAL]
4 M.C.
INITIAL
FM STEP FM 100 kHz 50 kHz
[100][50]
AM STEP AM 10 kHz 9 kHz
[10][9]
SP-P/O MODE RCA [REAR/SUB.W]
[SUB.W/SUB.W] RCA
[REAR/REAR] RCA RCA [REAR/SUB.W] [REAR/ REAR]
S/W UPDATE
[SYSTEM INFO]
[SYSTEM UPDATE]
SYSTEM RESET [YES] [YES][NO]
1 SRC/OFF [RADIO]
2 BAND/ [FM1][FM2][FM3] [AM]
3 1/ 6/
FUNCTION 16 [SEEK] [PCH] /
1/ 6/
1 M.C.
2 M.C. [FUNCTION]
3 M.C. [BSM]
1 /
/
/
FUNCTION 16 [SEEK] [MAN]
1 1/ 6/
PTY
1 FM BASS
BSM
PTY
2 M.C. [NEWS/INFO][POPULAR][CLASSICS]
[OTHERS]
3 M.C.
M.C. PTY [NOT FOUND]
USB Android/iPod 1 USB
2 USB iPod
USB iPod [USB] SYSTEM [USB AUTO] [ON] 19
USB USB
AOA AOA 14
MTP Android OS 4.0 MTP OS MTP MTP WAV MIXTRAX
MTP SYSTEM [ANDROID WIRED] [MEMORY] 19
USB/iPod/AUX
AUX 1 AUX
2 SRC/OFF [AUX]
SYSTEM [AUX] [OFF] [AUX] 19
FUNCTION 16 AUX AUX
*1 1/ 2/
*2
1 BASS 2 M.C.
3 M.C.
*1 M.C.
*1 M.C.
iPod 1 BASS 2 M.C.
BASS M.C.
3 M.C.
BAND/
6/
5/
iPod 5/
4/PAUSE
USB*1 1/
USB USB
BAND/
*1 *2 VBR
1 4/PAUSE
2 M.C. [ARTIST][ALBUM][GENRE]
iPod iPod iPod
iPod nano 1 iPod
1 BAND/
[CONTROL iPod] iPod iPod
[CONTROL AUDIO] iPod
iPod
[CONTROL iPod] iPod [CONTROL iPod]
MIXTRAX MIXTRAX 20
USB MIXTRAX
1 3/MIX MIXTRAX
iPod
MIXTRAX USB/iPod
iPhone
iPhone iOS 5.0 iPhone iPod touch
PIONEER
1
USB iPhone 9
2 SRC/OFF [APP]
3
FUNCTION 16
MVH-S125UI iPhone Spotify
BAND/
Spotify
Spotify Pioneer http:// www.spotify.com Spotify https:// support.spotify.com/ Spotify Spotify iPhone iTunes App Store spotify.com Premium Premium
Spotify www.spotify.com/connect/third-party- licenses
Spotify https://spotify.com/us/select-your- country/
Spotify
1
USB iPhone 9
2 SRC/OFF [SPOTIFY]
3 Spotify
FUNCTION 16
/ / / /
Spotify
1 BASS 2 M.C.
3 M.C.
4/PAUSE
1/
2/
/ / /
5/
Spotify
iPhone/Android Pioneer ARC APP
iPhone iOS 8.0 iPhoneiPhone 5 iPod touch iTunes App Store Pioneer ARC APP
Android Android 4.1 7.1.2 AOAAndroid 2.0 Google Play Pioneer ARC APP
AOA2.0 Android
Android 1 M.C.
/ / /
6/
1 5/ 2 M.C.
1 3/MIX [SAVE]/[UNSAVE]
2 M.C.
Pioneer ARC APP
Pioneer ARC APP
2 M.C. [SYSTEM]
3 M.C. [ANDROID WIRED]
4 M.C. [APP CONTROL]
5 M.C. [P.APP AUTO ON]
6 M.C. [ON]
7 USB Android
Android Pioneer ARC APP
Android Pioneer ARC APPAndroid [P.APP AUTO ON] [OFF] 19
iPhone 1 USB iPhone
2 SRC/OFF
3 M.C.
iPhone Pioneer ARC APP
iPhone Pioneer ARC APP
1 SRC/OFF [ANDROID]
1 M.C.
2 M.C.
Android
4/PAUSE
FUNCTION 16 AUDIO 17 SYSTEM 18 ILLUMINATION 19 MIXTRAX 20
3 M.C.
FUNCTION
BSM
1/ 6/
REGIONAL
[ON][OFF] AF FM
LOCAL
FM:[OFF][LV1][LV2] [LV3][LV4] AM:[OFF][LV1][LV2]
TA
[ON][OFF] FM
AF
[ON][OFF] FM
NEWS
[ON][OFF] FM
ALARM
[ON][OFF] [OFF]
SEEK
[MAN][PCH]
SAVE
Spotify
UNSAVE
[SAVE]
S.RTRV
[1] [2] [OFF]
USB MIXTRAX
AUDIO BOOK
[FASTER][NORMAL][SLOWER] [CONTROL iPod]
PAUSE
AUDIO
FADER*1
BALANCE
EQ SETTING
[SUPER BASS][POWERFUL] [DYNAMIC][NATURAL] [VOCAL][VIVID][CUSTOM1] [CUSTOM2][FLAT]
[80HZ][250HZ] [800HZ][2.5KHZ][8KHZ] [+6] [6]
[CUSTOM1] USBiPodANDROIDSPOTIFY APP iPhone [CUSTOM2]
LOUDNESS
[OFF][LOW][MID][HI]
USB iPod
iPod
*1 INITIAL 7 [SP-P/O MODE] [SUB.W/SUB.W] *2 INITIAL 7 [SP-P/O MODE] [REAR/REAR] *3 [SUB.W] [OFF]
SUB.W*2
[NOR][REV][OFF]
SUB.W CTRL*2*3
:[50HZ][63HZ] [80HZ][100HZ][125HZ] [160HZ][200HZ] :[24] [+6] :[12][24]
BASS BOOST
[0] [+6]
HPF SETTING
:[OFF][50HZ] [63HZ][80HZ][100HZ] [125HZ][160HZ][200HZ] :[12][24]
HPF
SLA
[+4] [4] FM USBiPodANDROIDSPOTIFY APP iPhone
SYSTEM
CLOCK SET
6
12H/24H
[12H][24H]
SCROLL SET
[ONCE][LOOP][OFF]
*1 PIONEER
*2 [PRESET][PIONEER]
AUTO PI
[ON][OFF]
AUX
[ON][OFF] [ON]
SPOTIFY
[ON][OFF] Spotify [ON]
ANDROID WIRED
[MEMORY][APP CONTROL] Android
P.APP AUTO ON
[ON][OFF] Android AOA[ON] Pioneer ARC APP[ANDROID WIRED] [MEMORY]
S.REMOTE*1*2
[OFF][PIONEER][PRESET] [PIONEER] [PRESET]
USB AUTO
[ON][OFF] [ON] USB iPod [USB] USB iPod [OFF]
ILLUMINATION
DIM SETTING
[SYNC CLOCK][MANUAL]
BRIGHTNESS
[1] [10] [DIM SETTING]
MIXTRAX
SHORT PLAYBCK
[1.0 MIN][1.5 MIN] [2.0 MIN][2.5 MIN] [3.0 MIN][OFF]
MIX PATTERN
[SOUND LEVEL] MIXTRAX
[LOW PASS]
[RANDOM]
DISPLAY FX
[ON][OFF] MIXTRAX
CUT IN FX
[ON][OFF] MIXTRAX
30
[FLD]
AMP ERROR
OFF ON
NO XXXX ( NO TITLE)
USB iPod
FORMAT READ
NO AUDIO
USB USB
USB
SKIPPED USB DRM
PROTECT USB
DRM USB
N/A USB USB
USB
HUB ERROR USB
USB USB USB
CHECK USB USB USB
USB USB
USB USB OFF ACC ON USB
ERROR-19
USB USB
iPod iPod iPod iPod
ERROR-23 USB
FAT12FAT16FAT32USB
ERROR-16 iPod
iPod iPod
iPod iPod iPod
STOP
NOT FOUND
iPod
APP
START UP APP
Spotify
CHECK APP Spotify
32
WMA
USB
USB
USB
WMA
MP3
.wma
48 kbps 320 kbps CBR48 kbps 384 kbpsVBR
32 kHz44.1 kHz 48 kHz
Windows Media Audio Professional Lossless DRM
.mp3
8 kbps 320 kbps CBRVBR
8 kHz 48 kHz32 kHz44.1 kHz48 kHz
ID3 1.01.12.22.3 2.4ID3 2.x 1.x
M3u
MP3i MP3 mp3 PRO
WAV WAV MTP
USB USB
iPod
iPod touch 1 6 iPod classic iPod nano 3 7 iPhone 6s iPhone 6s Plus iPhone 6 iPhone 6 Plus iPhone 5s iPhone 5c iPhone 5 iPhone 4s iPhone 4 iPhone 3GS iPhone 3G iPhone
iPod
LightningiPod Lightning USB iPod
Dock iPod CD- IU51
iPod
:
iPod
USB
iTunes Apple iTunes Apple Inc.
.wav
8 16LPCM
16 kHz 48 kHz LPCM
500
15 000
USB
iPod
:
01 05:
WMA Windows Media Microsoft Corporation Microsoft Corporation Microsoft Licensing, Inc.
iPhoneiPod Lightning Made for Apple Apple Apple Apple Apple iPhoneiPodiPod classic iPod nanoiPod touch Lightning Apple Inc.
Google, Google Play, Android GoogleGoogle PlayAndroid Google LLC.
MIXTRAX MIXTRAX
Spotify SPOTIFY Spotify Spotify AB Premium https:// www.spotify.com
— 26 —
Pioneer iPod
.
. .
.USB
1 2 3 4
:05 01 :
iTunes iTunes Apple
Apple Inc. .
WMA Windows Media
Microsoft Corporation . /
Microsoft Corporation
Microsoft .Licensing, Inc.
Lightning iPod iPhone Made for Apple
Apple )(
Apple .Apple
.
. Apple iPod nano iPod classic iPod iPhone Lightning iPod touch
. U.S. Apple Inc.
Android Google Play Google Android Google Play Google
.Google LLC
MIXTRAX PIONEER MIXTRAX
.CORPORATION
Spotify Spotify SPOTIFY
.Spotify AB
.https://www.spotify.com
— 25 —
Windows Media Audio Professional
DRM/Voice Lossless Stream/Stream
MP3 .mp3
8 320
VBR )CBR(
48 8 44.1 32(
48 )
ID3 2.4 2.3 2.2 1.1 1.0 ( 2.x ID3
).1.x
M3u
) MP3( MP3i mp3 PRO
WAV .MTP WAV
.wav
)LPCM( 16 8
48 16 )LPCM(
USB
USB .
(
).
500
15 000
USB .
iPod . iPod
.
) ( iPod touch iPod classic ) ( iPod nano iPhone 6s iPhone 6s Plus iPhone 6 iPhone 6 Plus iPhone 5s iPhone 5c iPhone 5 iPhone 4s iPhone 4 iPhone 3GS iPhone 3G iPhone
/ .iPod
Lightning iPod ( USB Lightning
.)iPod iPod
.CD-IU51 .
iPod ./
:
— 24 —
CHECK USB .USB USB
USB USB .
USB .
. USB .ON ACC OFF
. USB
ERROR-19 .
.USB
.USB .
.iPod .iPod
iPod . iPod
ERROR-23 . USB
FAT12 USB .FAT32 FAT16
ERROR-16 . iPod
.iPod .iPod
.iPod iPod
. iPod
STOP .
.
NOT FOUND .
.iPod
APP
START UP APP .
.
Spotify
CHECK APP .Spotify
.
( 32
. )
.WMA
USB
.
Pioneer
USB
. USB
.
WMA .wma
48 320 48 )CBR(
384 )VBR(
44.1 32 48
— 23 —
. . 30
.
.
. /
.
.
.) ( [FLD] .
.
.
.
AMP ERROR
. .
. ON OFF
. . Pioneer
) NO TITLE( NO XXXX .
. /
iPod/USB
FORMAT READ
. .
NO AUDIO .
USB .
. USB . USB
SKIPPED .DRM USB
.
PROTECT USB
.DRM .USB
N/A USB USB
. . USB
HUB ERROR USB USB
. USB
.USB
— 22 —
MIX PATTERN
[SOUND LEVEL]. MIXTRAX .
[LOW PASS].
[RANDOM] .
DISPLAY FX
[OFF] [ON] / MIXTRAX .
CUT IN FX
[OFF] [ON] MIXTRAX / .
— 21 —
P.APP AUTO ON
[OFF] [ON] Pioneer ARC APP [ON] ( .AOA Android
).[ANDROID WIRED] [MEMORY]
2*1*S.REMOTE
[PRESET] [PIONEER] [OFF] [PRESET] [PIONEER] .
USB AUTO
[OFF] [ON] [USB] [ON] . iPod/USB
iPod/USB [OFF] .
. PIONEER . 1* [PRESET] 2*
.[PIONEER]
ILLUMINATION
DIM SETTING
[MANUAL] [SYNC CLOCK].
BRIGHTNESS
[10] [1]. .[DIM SETTING]
MIXTRAX
SHORT PLAYBCK
[2.0 MIN] [1.5 MIN] [1.0 MIN] [OFF] [3.0 MIN] [2.5 MIN]
.
— 20 —
SLA
[4] [+4].FM .
)iPhone( APP SPOTIFY ANDROID iPod USB
.)8 ( INITIAL [SP-P/O MODE] [SUB.W/SUB.W] 1* .)8 ( INITIAL [SP-P/O MODE] [REAR/REAR] 2*
.[SUB.W] [OFF] 3*
SYSTEM .
CLOCK SET
.)6 (
12H/24H
[24H] [12H].
SCROLL SET
[OFF] [LOOP] [ONCE].
AUTO PI
[OFF] [ON] .
AUX
[OFF] [ON]. [ON]
SPOTIFY
[OFF] [ON].Spotify [ON]
ANDROID WIRED
[APP CONTROL] [MEMORY].Android
— 19 —
AUDIO
1*FADER
.
BALANCE
.
EQ SETTING
[POWERFUL] [SUPER BASS] [NATURAL] [DYNAMIC]
[CUSTOM1] [VIVID] [VOCAL] [FLAT] [CUSTOM2]
.
[250HZ] [80HZ] : [8KHZ] [2.5KHZ] [800HZ]
[6] [+6] :
. . [CUSTOM1]
. )iPhone( APP SPOTIFY ANDROID iPod USB
. [CUSTOM2]
LOUDNESS
[HI] [MID] [LOW] [OFF].
2*SUB.W
[OFF] [REV] [NOR] .
3*2*SUB.W CTRL
[63HZ] [50HZ] : [125HZ] [100HZ] [80HZ]
[200HZ] [160HZ] [+6] [24] : [24] [12] :
.
BASS BOOST
[+6] [0].
HPF SETTING
[63HZ] [50HZ] [OFF] : [125HZ] [100HZ] [80HZ]
[200HZ] [160HZ] [24] [12] :
. )HPF(
— 18 —
AF
[OFF] [ON] . ).FM (
NEWS
[OFF] [ON] ( . ).FM
ALARM
[OFF] [ON] [OFF] . .
SEEK
[PCH] [MAN] / ) (
.
SAVE
.Spotify
UNSAVE .[SAVE]
iPod USB S.RTRV
) ( [1] [OFF] ) ( [2]
( . ).MIXTRAX USB
iPod AUDIO BOOK
[SLOWER] [NORMAL] [FASTER] ( . ). [CONTROL iPod]
PAUSE
.
— 17 —
/ .PAUSE/4
.
1 . M.C.
2 . M.C. )17 ( FUNCTION )19 ( AUDIO )20 ( SYSTEM )21 ( ILLUMINATION )21 ( MIXTRAX
3 . M.C.
FUNCTION .
BSM
/1( . ) /6
REGIONAL
[OFF] [ON] ( AF ).FM ( .)
LOCAL
[LV3] [LV2] [LV1] [OFF] :FM [LV4]
[LV2] [LV1] [OFF] :AM
.
TA
[OFF] [ON] . ).FM (
— 16 —
AOA 2.0 Android
.
Pioneer ARC APP
Android 1 . M.C. 2 . [SYSTEM] M.C. 3 . [ANDROID WIRED] M.C. 4 . [APP CONTROL] M.C. 5 . [P.APP AUTO ON] M.C. 6 . [ON] M.C. 7 .USB Android
. Android Pioneer ARC APP
Android Pioneer ARC APP
.)21 ( [P.APP AUTO ON] [OFF] .Android
iPhone 1 .USB iPhone 2 . OFF/SRC 3 .M.C.
.iPhone Pioneer ARC APP
.iPhone Pioneer ARC APP
Android
1 .[ANDROID] OFF/SRC
.
.
— 15 —
/ .PAUSE/4
) ( . /1
) ( . /2
) /// ( . /5
) /// ( . /6
.
1 . /5 2 .M.C. .
.
.
1 .MIX/3 .[UNSAVE]/[SAVE]
2 .M.C.
. Spotify
Pioneer ARC APP .Android/iPhone Pioneer ARC APP
.
.
.
.
iPhone iOS 8.0 iPod touch ) iPhone 5( iPhone
. .iTunes App Store Pioneer ARC APP
Android Android ( AOA 7.1.2 Android 4.1
. 2.0 ) .Google Play Pioneer ARC APP
— 14 —
Spotify ).iPhone Spotify MVH-S125UI(
.Pioneer Spotify .http://www.spotify.com
https://support.spotify.com/ Spotify .
iTunes .iPhone Spotify Spotify .spotify.com Premium .App Store
. Premium
: Spotify
.www.spotify.com/connect/third-party-licenses Spotify
.https://spotify.com/us/select-your-country/
Spotify . Spotify
1 . )10 ( USB iPhone
2 .[SPOTIFY] OFF/SRC
3 . Spotify
.)17 ( FUNCTION
. )/ ///(
.
1 . BASS 2 M.C.
. 3 M.C.
. .
— 13 —
1 .MIXTRAX / MIX/3
. iPhone
. .
.
. .
.
iPhone . iOS 5.0 iPod touch iPhone
. PIONEER
.
1 . )10 ( USB iPhone
2 .[APP] OFF/SRC
3 .
.)17 ( FUNCTION
.
.
/ . /BAND
— 12 —
iPod
Link .
1 .Link PAUSE/4 2 . )[GENRE] [ALBUM] [ARTIST]( M.C.
. /
( Link /
.)
iPod . iPod
. iPod iPod iPod nano
1 . /BAND . iPod iPod :[CONTROL iPod]
iPod :[CONTROL AUDIO] . iPod .
. iPod . [CONTROL iPod] .[CONTROL iPod]
/ / .
) iPod/USB( MIXTRAX . MIXTRAX
.21 MIXTRAX
. MIXTRAX USB . /
— 11 —
.)17 ( FUNCTION
. AUX .AUX
1*/ . /2 /1
)( / .
2* .
1 . BASS 2 )( M.C.
. 3 M.C.
. .
1* / ./ M.C.
1* / ./ M.C.
) iPod( 1 . BASS 2 M.C.
BASS .
M.C. ( ).
3 M.C. .
. /BAND
. /6
/ . /5
) iPod( . /5
/ .PAUSE/4
1*) USB( . /1
USB USB (
)
. /BAND
1* . VBR 2*
— 10 —
AUX/iPod/USB
.
iPod/)Android ( USB 1 .USB 2 . iPod/USB
[ON] [USB AUTO] iPod/USB [USB]
.)21 ( SYSTEM
USB ) ( USB
.
.
AOA .15 AOA
MTP MTP Android OS 4.0 / .
.MIXTRAX WAV MTP .MTP
.)20 ( SYSTEM [MEMORY] [ANDROID WIRED] MTP
AUX 1 .AUX 2 . [AUX] OFF/SRC
.)20 ( [AUX] SYSTEM [OFF] [AUX]
— 9 —
1 . M.C.
2 . [FUNCTION] M.C.
3 . [BSM] M.C.
1 . /
. / . / .
.)18 ( FUNCTION [MAN] [SEEK]
1 ) /6 /1(
.
PTY .) ( PTY
1 .FM BASS
2 [CLASSICS] [POPULAR] [NEWS/INFO] M.C. .[OTHERS]
3 .M.C. . .
.M.C. . PTY [NOT FOUND]
.
— 8 —
SP-P/O MODE .RCA [REAR/SUB.W]
[SUB.W/SUB.W] .RCA
[REAR/REAR] .RCA
RCA .[REAR/REAR] [REAR/SUB.W]
S/W UPDATE.
[SYSTEM INFO]
[SYSTEM UPDATE]
. .
SYSTEM RESET . . [YES] ). ( [NO] [YES]
1 .[RADIO] OFF/SRC
2 .[AM] [FM3] [FM2] [FM1] /BAND
3 .) /6 /1(
[PCH] [SEEK] /
.)18 ( FUNCTION
)BSM( + .) /6 /1(
— 7 —
3 . [QUIT :YES] . [QUIT :NO] M.C.
4 . M.C.
.OFF/SRC .)7 ( INITIAL )20 ( SYSTEM
)DEMO OFF(
1 . M.C.
2 . [SYSTEM] M.C.
3 . [DEMO OFF] M.C.
4 . [YES] M.C.
INITIAL
1 . OFF/SRC
2 . M.C.
3 . [INITIAL] M.C.
4 . M.C.
FM STEP. 50 100 FM
[50] [100]
AM STEP. 9 10 AM
[9] [10]
— 6 —
.
./ ) ( . /
. .
. ) (
.
. . . . ./
. .
. [SET UP :YES] ON
1 .M.C. . 30
. [NO] M.C.
2 . M.C. .
CLOCK SET.
FM STEP. 50 100 FM
[50] [100]
AM STEP. 9 10 AM
[9] [10]
— 5 —
.)17 ( ) ( TA
.)18 (
. /
.
.)12 ( iPod
.
.
. . .
.
) 3( CR2025 . )( )+(
— 4 —
* . OFF/SRC OFF/SRC
.
. SRC SRC
.
.M.C. . + VOLUME . MUTE
MUTE + VOLUME
.
. OFF/SRC . SRC
DISP OFF/DISP .
DISP OFF/DISP .
. DISP
/ . /BAND / / .
. /BAND
.BASS
.)19 ( [BASS BOOST]
* / . .
.
.BASS
.)17 (
.
— 3 —
MVH-S125UI
) ( M.C.
/BAND
DISP OFF/)( DISP
OFF/)( SRC
) 3.5 ( AUX
USB BASS
)( SRC
/
)( DISP
MUTE
/+ VOLUME
AUDIOFUNCTION
— 2 —
: .USB USB USB .iPod iPhone iPod
3 ………………………………………………………………………………………………………
8 ……………………………………………………………………………………………………..
10 ………………………………………………………………………………..AUX/iPod/USB
13 ………………………………………………………………………………………….
14 …………………………………………………………………………………………… Spotify
15 …………………………………………………………………. Pioneer ARC APP
17 ……………………………………………………………………………………………… 17 ………………………………………………………………………….FUNCTION 19 ……………………………………………………………………………….. AUDIO 20 …………………………………………………………………………….. SYSTEM 21 …………………………………………………………………..ILLUMINATION 21 …………………………………………………………………………… MIXTRAX
23 ……………………………………………………………………………………..
— 26 —
/ . iPod
:
Pioneer
iPod
.
. .
USB .
1 2 3 4
:05 01 :
iTunes Apple Inc. iTunes Apple
.
WMA Windows Media Microsoft
. /
Microsoft Corporation
Microsoft Licensing, Inc. .
Lightning iPod iPhone Made for Apple
Apple Apple
. Apple
.
Apple .
iPod nano iPod classic iPod iPhone Lightning iPod touch Apple Inc.
.
Android Google Play Google Android Google Play Google
. Google LLC
MIXTRAX PIONEER MIXTRAX
. CORPORATION
Spotify Spotify SPOTIFY
. Spotify AB
. https://www.spotify.com
— 25 —
48 320
48 )CBR( 384
)VBR(
44.1 32 48
Windows Media Audio Professional,
Lossless, Voice/DRM Stream/Stream
MP3 .mp3
320 8 )CBR(
VBR
48 8 44.1 32(
48 )
ID3 2.4 2.3 2.2 1.1 1.0 ID3 2.x (
). 1.x
M3u
) MP3( MP3i mp3 PRO
WAV MTP WAV
.
.wav
)LPCM( 16 8
48 16 )LPCM(
USB
USB .
(
).
500
15 000
USB
.
iPod iPod
. .
) 6 1 ( iPod touch iPod classic ) 7 3 ( iPod nano iPhone 6s iPhone 6s Plus iPhone 6 iPhone 6 Plus iPhone 5s iPhone 5c iPhone 5 iPhone 4s iPhone 4 iPhone 3GS iPhone 3G iPhone
. iPod
Lightning iPod ( USB Lightning
. )iPod Dock iPod
. CD-IU51 .
— 24 —
CHECK USB . USB USB
USB USB .
USB .
. USB OFF
. ON ACC . USB
ERROR-19 .
. USB
. USB .
. iPod . iPod
iPod iPod .
ERROR-23 . USB
FAT32 FAT16 FAT12 USB .
ERROR-16 . iPod
. iPod . iPod
. iPod iPod iPod
.
STOP .
.
NOT FOUND .
. iPod
APP
START UP APP .
.
Spotify
CHECK APP . Spotify
.
32
. ) (
. WMA
USB
.
Pioneer
USB
.
USB .
WMA .wma
— 23 —
.
. 30 .
.
/
. .
. ) ( [FLD]
. .
.
.
.
AMP ERROR
. .
. OFF
. ON
. Pioneer
) NO TITLE( NO XXXX .
/ .
iPod/USB
FORMAT READ
. .
NO AUDIO .
USB .
. USB USB
.
SKIPPED USB
. DRM .
PROTECT USB
. DRM . USB
N/A USB USB
.
. USB
HUB ERROR USB USB
. USB
. USB
— 22 —
MIX PATTERN
[SOUND LEVEL] MIXTRAX .
.
[LOW PASS].
[RANDOM] .
DISPLAY FX
[OFF] [ON] / MIXTRAX .
CUT IN FX
[OFF] [ON] . / MIXTRAX
— 21 —
P.APP AUTO ON
[OFF] [ON] Android [ON] Pioneer ARC APP AOA
( . ). [ANDROID WIRED] [MEMORY]
2*1* S.REMOTE
[PRESET] [PIONEER] [OFF] [PRESET] [PIONEER] .
USB AUTO
[OFF] [ON] [USB] [ON] . iPod/USB
iPod/USB [OFF] .
. 1* . PIONEER
[PRESET] 2* . [PIONEER]
ILLUMINATION
DIM SETTING
[MANUAL] [SYNC CLOCK].
BRIGHTNESS
[10] [1]. [DIM SETTING]
.
MIXTRAX
SHORT PLAYBCK
[2.0 MIN] [1.5 MIN] [1.0 MIN] [OFF] [3.0 MIN] [2.5 MIN]
.
— 20 —
SLA
[4] [+4]. FM
. )iPhone( APP SPOTIFY ANDROID iPod USB
. )8 ( INITIAL [SP-P/O MODE] [SUB.W/SUB.W] 1* . )8 ( INITIAL [SP-P/O MODE] [REAR/REAR] 2*
. [SUB.W] [OFF] 3*
SYSTEM .
CLOCK SET .)6 (
12H/24H
[24H] [12H].
SCROLL SET
[OFF] [LOOP] [ONCE].
AUTO PI
[OFF] [ON] .
AUX
[OFF] [ON] . [ON]
SPOTIFY
[OFF] [ON]. [ON] Spotify
ANDROID WIRED
[APP CONTROL] [MEMORY] Android .
— 19 —
AUDIO
1* FADER .
BALANCE .
EQ SETTING
[POWERFUL] [SUPER BASS] [NATURAL] [DYNAMIC]
[CUSTOM1] [VIVID] [VOCAL] [FLAT] [CUSTOM2]
.
[250HZ] [80HZ] : [8KHZ] [2.5KHZ] [800HZ]
[6] [+6] :
. [CUSTOM1]
. .
)iPhone( APP SPOTIFY ANDROID iPod USB . [CUSTOM2]
LOUDNESS
[HI] [MID] [LOW] [OFF].
2* SUB.W
[OFF] [REV] [NOR].
3*2* SUB.W CTRL
[63HZ] [50HZ] : [125HZ] [100HZ] [80HZ]
[200HZ] [160HZ] [+6] [24] : [24] [12] :
.
BASS BOOST
[+6] [0].
HPF SETTING
[63HZ] [50HZ] [OFF] : [125HZ] [100HZ] [80HZ]
[200HZ] [160HZ] [24] [12] :
)HPF( .
— 18 —
AF
[OFF] [ON] FM ( .
).
NEWS
[OFF] [ON] . FM (
).
ALARM
[OFF] [ON] [OFF] . .
SEEK
[PCH] [MAN] ) (
.
SAVE
Spotify .
UNSAVE
. [SAVE]
iPod USB S.RTRV
( [1] )
( [2] ) [OFF]
USB ( .
MIXTRAX ).
iPod AUDIO BOOK
[SLOWER] [NORMAL] [FASTER] [CONTROL iPod] ( . ).
PAUSE .
— 17 —
/. PAUSE/4
.
1 . M.C.
2 . M.C. )17 ( FUNCTION )19 ( AUDIO )20 ( SYSTEM )21 ( ILLUMINATION )21 ( MIXTRAX
3 . M.C.
FUNCTION .
BSM
. ) /6 /1(
REGIONAL
[OFF] [ON] AF . ) (
). FM (
LOCAL
[LV3] [LV2] [LV1] [OFF] :FM [LV4]
[LV2] [LV1] [OFF] :AM
.
TA
[OFF] [ON] . ). FM (
— 16 —
AOA 2.0 Android
. OS
+Pioneer ARC APP
Android 1 . M.C. 2 . [SYSTEM] M.C. 3 . [ANDROID WIRED] M.C. 4 . [APP CONTROL] M.C. 5 . [P.APP AUTO ON] M.C. 6 . [ON] M.C. 7 . Android USB
. Android Pioneer ARC APP
Android Android Pioneer ARC APP
[P.APP AUTO ON] [OFF] . .)21 (
iPhone 1 . iPhone USB 2 . SRC/OFF 3 . M.C.
. iPhone Pioneer ARC APP
. iPhone Pioneer ARC APP
Android
1 . [ANDROID] OFF/SRC
.
.
— 15 —
/. PAUSE/4
) ( . /1
) ( . /2
/// ( )
. /5
/// ( )
. /6
.
1 . /5 2 . M.C.
.
.
.
1 . MIX/3 . [UNSAVE]/[SAVE]
2 . M.C.
. Spotify
Pioneer ARC APP Android/iPhone Pioneer ARC APP .
.
.
.
.
iPhone iOS 8.0 iPod touch ) iPhone 5( iPhone
. . iTunes App Store Pioneer ARC APP
Android Android Open( AOA 7.1.2 Android 4.1
. 2.0 )Accessory . Google Play Pioneer ARC APP
— 14 —
Spotify ). iPhone Spotify MVH-S125UI(
. Pioneer Spotify . http://www.spotify.com
Spotify . https://support.spotify.com/
. iPhone Spotify Spotify Premium . iTunes App Store
Premium . spotify.com .
: Spotify
.www.spotify.com/connect/third-party-licenses Spotify
. https://spotify.com/us/select-your-country/
Spotify . Spotify
1 . )10 ( USB iPhone
2 . [SPOTIFY] OFF/SRC
3 . Spotify
. )17 ( FUNCTION
)/ ///(
.
.
1 . BASS 2 M.C.
. 3 M.C.
. .
— 13 —
. /
1 . MIXTRAX / MIX/3
. iPhone
. .
.
.
.
.
iPhone . iOS 5.0 iPod touch iPhone
. PIONEER
.
1 . )10 ( USB iPhone
2 . [APP] OFF/SRC
3 .
. )17 ( FUNCTION
.
.
/. /BAND
— 12 —
1* VBR 2*
.
iPod
.
1 . PAUSE/4 2 )[GENRE] [ALBUM] [ARTIST]( M.C.
. . /
/ ) (
.
iPod . iPod
. iPod iPod iPod nano
1 . /BAND . iPod iPod :[CONTROL iPod]
iPod :[CONTROL AUDIO] . iPod .
iPod . [CONTROL iPod]
. . [CONTROL iPod]
/ / .
)iPod/USB ( MIXTRAX . MIXTRAX
. 21 MIXTRAX
MIXTRAX USB
.
— 11 —
. )17 ( FUNCTION
AUX . AUX .
1*/ . /2 /1 )( / .
2* .
1 . BASS 2 /)( M.C.
. 3 M.C.
. .
/ 1*
M.C. / .
1* / M.C. / .
)iPod ( 1 . BASS 2 M.C.
BASS .
M.C. ( ).
3 M.C. .
. /BAND
. /6 / . /5
)iPod ( . /5 /. PAUSE/4
1* )USB ( . /1
USB (
) USB
. /BAND
— 10 —
AUX/iPod/USB
.
iPod/)Android ( USB 1 . USB 2 . iPod/USB
[USB SYSTEM iPod/USB [USB]
.)21 ( [ON] AUTO]
) ( USB USB
.
.
AOA . 15 AOA
MTP MTP Android 4.0
. MTP . MTP /
. MIXTRAX WAV
[MEMORY] [ANDROID WIRED] SYSTEM MTP
.)20 (
AUX 1 . AUX 2 . [AUX] OFF/SRC
[AUX] [OFF] [AUX] SYSTEM
.)20 (
— 9 —
1 . M.C.
2 . [FUNCTION] M.C.
3 . [BSM] M.C.
1 . /
. . / / .
.
. [MAN] [SEEK] )18 ( FUNCTION
1 ) /6 /1(
.
PTY . ) ( PTY
1 . FM BASS
2 [CLASSICS] [POPULAR] [NEWS/INFO] M.C. . [OTHERS]
3 . M.C. .
.
. M.C. . PTY 2 [NOT FOUND]
.
— 8 —
SP-P/O MODE . RCA [REAR/SUB.W]
[SUB.W/SUB.W] . RCA
[REAR/REAR] . RCA
RCA . [REAR/REAR] [REAR/SUB.W]
S/W UPDATE.
[SYSTEM INFO]
[SYSTEM UPDATE]
.
.
SYSTEM RESET . [YES] .
). ( [NO] [YES]
1 . [RADIO] OFF/SRC
2 .[AM] [FM3] [FM2] [FM1] /BAND
3 . ) /6 /1(
/
. [PCH] [SEEK] )18 ( FUNCTION
)BSM( . ) /6 /1(
— 7 —
3 . [QUIT :YES] [QUIT :NO] M.C.
.
4 . M.C.
. OFF/SRC . )7 ( INITIAL )20 ( SYSTEM
)DEMO OFF(
1 . M.C.
2 . [SYSTEM] M.C.
3 . [DEMO OFF] M.C.
4 . [YES] M.C.
INITIAL
1 . OFF/SRC
2 . M.C.
3 . [INITIAL] M.C.
4 . M.C.
FM STEP. 50 100 FM
[50] [100]
AM STEP. 9 10 AM
[9] [10]
— 6 —
.
/ . / ) ( . 2
. .
. ) (
.
. . . . .
.
. .
[SET UP :YES] ON
.
1 . M.C. . 30
. [NO] M.C.
2 . M.C. .
CLOCK SET.
FM STEP. 50 100 FM
[50] [100]
AM STEP. 9 10 AM
[9] [10]
— 5 —
.)17 ( ) ( TA
. )18 (
. /
.
. )12 ( iPod
.
.
. . v .
.
)3 V( CR2025 . )( )+(
— 4 —
* OFF/SRC .
OFF/SRC .
SRC .
SRC .
. M.C. . + VOLUME MUTE
MUTE . + VOLUME
.
. OFF/SRC. SRC
DISP OFF/DISP .
DISP OFF/DISP
.
. DISP
/ . /BAND / . /
/BAND .
. BASS
[BASS BOOST] .)19 (
* / . .
.
. BASS
. )17 (
.
— 3 —
MVH-S125UI
/BAND
BASS
OFF/)( SRC
DISP OFF/)( DISP
) ( M.C. USB
) 3.5 ( AUX
)( SRC FUNCTION AUDIO
/
)( DISP
MUTE /+ VOLUME
— 2 —
: USB USB USB
. . iPod iPhone iPod
3 …………………………………………………………………………………………….
8 ……………………………………………………………………………………………………..
10 ………………………………………………………………………………..AUX/iPod/USB
13 …………………………………………………………………………………………..
14 …………………………………………………………………………………………… Spotify
15 ………………………………………………………………..Pioneer ARC APP
17 ………………………………………………………………………………………………. 17 ………………………………………………………………………….FUNCTION 19 ………………………………………………………………………………..AUDIO 20 ………………………………………………………………………………SYSTEM 21 …………………………………………………………………. ILLUMINATION 21 ……………………………………………………………………………MIXTRAX
23 ……………………………………………………………………………………
Магнитола Pioneer MVH-S125UI: как сбросить настройки
Как опытный автомеханик и специалист по автомобильным системам, мне часто задают вопросы о настройках автомобильных магнитол. В этой статье я расскажу вам, как сбросить настройки магнитолы Pioneer MVH-S125UI и вернуть ее к заводским настройкам.
Почему может потребоваться сброс настроек?
Периодически необходимость сброса настроек магнитолы может возникать по различным причинам:
- Вы хотите продать свою магнитолу и хотите, чтобы новый владелец получил ее с настройками по умолчанию.
- Магнитола начала вести себя некорректно и вы хотите попробовать сбросить ее настройки, чтобы исправить проблему.
- Вы изменили настройки магнитолы, но хотите вернуться к исходным параметрам работы.
Как выполнить сброс настроек магнитолы Pioneer MVH-S125UI?
Следуйте этим простым инструкциям, чтобы сбросить настройки магнитолы Pioneer MVH-S125UI:
- Убедитесь, что магнитола полностью выключена. Если она подключена к аккумулятору автомобиля, убедитесь, что зажигание выключено.
- Нажмите и удерживайте кнопку «SRC/OFF» на передней панели магнитолы в течение нескольких секунд.
- Во время удержания кнопки «SRC/OFF» нажмите и удерживайте кнопку «MENU» до появления на дисплее сообщения «Initialize».
- Отпустите обе кнопки и подождите, пока магнитола завершит процедуру сброса. Это может занять несколько секунд.
- Когда магнитола загрузится, вы увидите, что все предыдущие настройки были сброшены и она вернулась к заводским настройкам.
После сброса настроек ваша магнитола Pioneer MVH-S125UI будет работать как новая, и вы сможете настроить ее снова в соответствии с вашими предпочтениями. Не забудьте проверить настройки звука, радио и другие параметры, чтобы удостовериться, что все работает должным образом.
Видео ответы
Как сбросить магнитолу pioneer до заводских настоек
Как сбросить настройки магнитолы ( или чё в первую очередь нужно сделать для проверки магнитолы)
Скрытые настройки магнитолы пионер, которые нужны всем, как настроить магнитолу
Вы можете взять этот сайт в аренду, по данному вопросу пишите в телеграм @DanilaLidopad
Выбираете товар
Добавьте интересующие вас товары в корзину
Оформляете заказ
Заполните все поля формы, чтобы получить предложение
Получаете предложения
В ближайшее время с вами свяжется менеджер для уточнения деталей
PioneerPioneer mvh-s125ui <p>Pioneer MVH-S125UI — 1DIN-вый цифровой медиа-ресивер, является аналогом модели Pioneer MVH-S120UI, но в отличии от аналога имеет в комплекте пульт ДУ.</p>
6990RUB
4.4282815

Функция усиления баса (bassboost)
+
Количество фиксированных настроек
9
USB-накопитель (фронтальный) / подключение iPod/iPhone / подключение Android
Фильтр верхних частот (фвч)
+
Фильтр нижних частот (фнч)
+
Смотрите также
На чтение 17 мин Просмотров 21.1к. Опубликовано
Содержание
- Для чего настраивать магнитолу Pioneer
- Настройки базовых функций на «Пионере»
- Отключите «Демо»
- Настройка времени
- Язык и календарь
- Как настроить магнитолу Pioneer?
- Таблица: описание элементов устройства
- Включение и выключение
- Как перезагрузить
- Активация Bluetooth
- Как выключить подсветку
- Настройка
- Настройка звука
- Настройка звука для динамиков
- Настройка эквалайзера и сабвуфера
- Настройка тонкомпенсации
- Радио
- Как выключить
- Что можно улучшить
- Аудио
- Передние динамики
- Задние динамики
- Тонкомпенсация
- Настройки эквалайзера
- Подключение по Bluetooth
- Неисправности и их устранение
Для чего настраивать магнитолу Pioneer
Аудиосистема в вашем автомобиле состоит из множества компонентов. Первые варианты были оснащены самым необходимым минимумом — парой динамиков на задней полке и радиоприемником на передней переборке. Но прогресс продолжается — приемник заменили магнитофоном, а количество колонок увеличилось в несколько раз. Если магнитола предварительно установлена в автомобиле — обычно ничего настраивать не нужно. Но оборудование нескольких компаний (среди которых Pioneer — лидер в области аудиотехники), как правило, покупается владельцем отдельно. В то же время динамики в автомобиле разные. Чтобы оптимально настроить качество звука, чтобы существующие колонки «подружились» с новой магнитолой, необходимо внести некоторые изменения в последнюю.
Настройки базовых функций на «Пионере»
Отключите «Демо»
Отключите режим «Демо», прежде чем вносить какие-либо изменения в настройки радиостанции. Pioneer и многие другие современные автомобильные аудиосистемы имеют демонстрационный режим. Пока устройство не выключено, все настройки сохраняются в точности до момента выключения. Если вы не хотите перенастраивать свои предпочтения при каждом включении, этот режим следует отключить.
Основная ручка управления на магнитолах Pioneer с фирменными основными ручками управления
Это делается следующим образом:
- Выключите радио (нажмите и удерживайте кнопку SRC, пока дисплей не погаснет).
- Нажимайте ту же кнопку снова, пока не появится меню запуска.
- С помощью регулятора громкости выберите в меню пункт «System», а затем «Demo». Справа от него будет положение On.
- Любая из стрелок по бокам регулятора громкости переключит положение на Off.
- Нажатие кнопки Band сохраняет настройку. Режим Выкл. сохраняется в памяти, и радио выключается. Можно переходить к другим настройкам.
Регулятор громкости также выполняет функции джойстика на автомобильном радиоприемнике марки; помимо вращения, его можно сдвигать с места, толкать вверх и вниз или перемещать влево и вправо для выполнения определенных настроек.
Настройка времени
- Повторите шаги 1-2 из инструкции выше.
- Затем поверните диск, чтобы выбрать в меню пункт «Система».
- Нажмите на диск и выберите настройку часов в новом меню.
- Используйте стрелку вправо для ввода настроек.
- Поверните «Volume» против часовой стрелки, чтобы установить значение.
- Нажмите один раз для подтверждения.
- Используйте стрелку влево, чтобы выйти из настройки.
Часы, минуты и секунды могут быть установлены индивидуально. Выбранная настройка начинает мигать.
Язык и календарь
Как и часы, эти настройки находятся в меню Система. Принцип настройки идентичен принципу настройки часов. Как и часы, календарь можно настроить отдельно для дня, месяца и года.
Как настроить магнитолу Pioneer?
Специфические функции для настройки магнитолы:
- Перед настройкой работы устройства после подключения динамиков необходимо вставить рабочие батарейки в панель управления.
- Настройка осуществляется с помощью панели управления, в центре которой находится круглый джойстик. Регулировка осуществляется путем поворота и вдавливания круглой ручки джойстика в корпус магнитолы.
- Частоты Bass и Tween должны быть выбраны и отрегулированы поочередно в Меню.
Таблица: описание элементов устройства

На следующей схеме показаны органы управления DVH-780AV
| 1 | Лоскут на передней панели |
| 2 (отключение звука) |
Кнопка выполняет следующие функции:
|
| 3 (СРК) |
Функции, выполняемые этим органом управления:
|
| 4 (BSM) |
Функции, которые можно выполнить с помощью этой кнопки:
|
| 5 (BAND). | Кнопка для воспроизведения или остановки треков в режимах CD, MP3 и DVD и для переключения диапазона в режиме радио. |
| 6 (ВЛЕВО, «-«). |
Клавиша выполняет следующие опции:
|
| 7 (МУЛЬТИКОНТРОЛЬ) |
Этот элемент управления имеет следующие опции:
|
| 8 (Down, «I»). |
Кнопка используется для управления следующими опциями:
|
| 9 (справа, «-«) |
Используйте этот элемент управления для настройки следующих параметров:
|
| 10 (ESC) |
Кнопка для следующих функций:
|
| 11 | Дистанционное управление |
| 12 | Вход AUX 3,5 мм для подключения аксессуаров |
| 13 (Вверх, «I») | Используется для перемещения вверх в навигационном меню, когда радиоприемник находится в режиме CD, MP3 и DVD. Регулятор также можно использовать для переключения на следующую сохраненную станцию. Для этого радиостанция должна находиться в режиме радио. |
| 14 (SAL) | Кратковременно нажмите кнопку , чтобы войти в меню настройки аудио/видео. При нажатии этого регулятора автомобильная радиостанция входит в меню настроек. |
| 15 | 3″ TFT экран |
| 16 | Подключение запоминающего устройства USB |
Включение и выключение
На примере DVH-780AV основной блок активируется кратковременным нажатием кнопки SRC. Когда вы хотите выключить систему, этот элемент управления нажимается в течение нескольких секунд до выключения автомобильного радио.
Как перезагрузить
Сброс настроек аудиосистемы можно выполнить с помощью кнопки Reset, расположенной в верхней левой части радиоприемника. Чтобы получить доступ к этому элементу управления, откиньте переднюю панель головного устройства. Нажмите на переключатель Reset кончиком карандаша или аналогичным заостренным предметом.
Активация Bluetooth
Чтобы беспроводное соединение Bluetooth работало правильно, устройства должны быть сопряжены. Для выполнения задания требуется ввести пароль на радио, который затем повторяется на смартфоне или плеере. Если мобильное устройство уже подключено к аудиосистеме, пин-код необходимо ввести только на основном устройстве.
Пароль вводится следующим образом:
- Аудиосистема выключена.
- Нажмите и удерживайте кнопку активации магнитолы, и вы получите доступ к главному меню.
- С помощью регулятора громкости выберите «Ввод пин-кода».
- Поверните джойстик вверх и вниз, чтобы ввести код сопряжения. Если вы хотите перемещаться между цифрами, вращайте регулятор громкости влево и вправо.
- Кратковременно нажмите ручку громкости для подтверждения выбранных настроек. После этого можно выйти из меню настроек.
- Затем на мобильном устройстве активируется беспроводной режим и выполняется поиск автомобильного радиоприемника. Если пользователь изначально присвоил головному устройству уникальное имя, выберите «Редактировать имя устройства» вместо «Ввод пин-кода». Все остальные операции выполняются аналогичным образом.
Как выключить подсветку
Если основной блок не выключается автоматически при извлечении ключа из замка зажигания, выполните следующие действия:
- Выберите вкладку «Система» в главном меню.
- В появившемся списке выберите подраздел с надписью «PW Save». Попав в меню, нажмите кнопку «Выключение».
- После этого аудиосистема выключается. Дисплей устройства должен оставаться светящимся, а индикация часов — включенной.
- Нажмите кнопку с надписью «Дисплей», чтобы выключить экран.
Настройка
При настройке радиостанции Pioneer для настройки используется джойстик MULTI-CONTROL. В руководстве содержатся подробные инструкции по настройке каждого параметра.
Нажмите MULTI-CONTROL, чтобы открыть главное меню. Поверните джойстик, чтобы выбрать AUDIO, нажмите для выбора. Нажмите для перехода к предыдущему меню, нажмите и удерживайте DISP/BACK/SCRL для перехода к главному меню. Кнопка BAND/ESC вернет вас к исходному экрану.
Выберите аналогичным образом: FADER/BALANCE (настройка баланса), PRESET EQUALIZER (вызов графического эквалайзера), EQ SETTING 1 (настройка графического эквалайзера), EQ SETTING 2 (точная настройка эквалайзера), LOUDNESS (компенсация тембра), SW SETTING 1 (включение/выключение сабвуфера), SW SETTING 2 (регулировка сабвуфера), HIGH PASS FILTER, BASS BOOST (фильтр низких частот), SRC LV ADJUST (регулировка входного уровня). Используйте меню HIGH PASS FILTER и BASS BOOST для устранения искажений в звуке.
Эквалайзер используется для настройки эквализации звука. Кроме того, устройство уже имеет 5 предустановок: мощный, естественный, ровный, супербас. Существует также настройка CUSTOM, которая представляет собой регулируемую кривую, которую вы создаете самостоятельно. Если вы внесете изменения в кривую эквалайзера, они будут сохранены в CUSTOM.
Тональная компенсация компенсирует недостаточное звуковое давление в нижнем и верхнем диапазоне звуковых частот при низкой громкости. С помощью MULTI-CONTROL выберите LOUDNESS.
Настройка звука
Индикатор загорается в главном меню настроек звука:
- Отображение времени.
- Категория настроек.
- Категория параметров выбранной функции.
- Подраздел.

Главное меню настройки звука Pioneer
Настройка звука для динамиков
Настройки звука для передних динамиков можно правильно отрегулировать следующим образом:
- Вход в меню настроек осуществляется нажатием и удержанием в течение нескольких секунд кнопки SRC или System.
- Подраздел «Аудио» активен.
- Нажатие на регулятор громкости приведет нас к новому списку опций, где мы найдем и выберем вкладку «Reader».
- В заводских настройках это значение соответствует 0, выберите 15 единиц.
- После настройки параметров вернитесь в главное подменю ‘Audio’, повернув ручку громкости один раз влево.
- Далее отрегулируйте высокие частоты, выбрав подраздел «HPF» или «Фильтр высоких частот». В большинстве моделей Pioneer это значение равно 0, рекомендуется установить его на 50 единиц.
- После изменения настроек регулятор громкости прокручивается влево и выходит из главного меню.
Чтобы изменить настройки громкости задних динамиков, выполните следующие действия:
- Основное устройство выключается, а затем снова включается кратковременным нажатием кнопки активации.
- Попав в меню настроек, выберите опцию «SW Control».
- Используйте регулятор громкости для входа в меню для этого параметра. Выберите значение «SW». Нажмите ручку, чтобы подтвердить выбор.
- Нажмите кнопку выключения, чтобы сохранить настройки и выйти из меню.
- Затем вы вернетесь в раздел «Аудио». Нажмите регулятор громкости и выберите нужную настройку, поворачивая его. Нажмите кнопку еще раз.
- В открывшемся разделе выберите «Настройки SW1». Нажмите на рычаг, чтобы войти в меню настроек.
- Появится меню с тремя параметрами, из которых нужно выбрать ‘Normal’ или ‘Rev’. На практике второй вариант часто дает лучшее качество звука.
Настройка эквалайзера и сабвуфера
Для того чтобы магнитола и сабвуфер хорошо и качественно воспроизводили любые звуковые дорожки, необходимо выбрать мощность и настроить параметры эквалайзера следующим образом:
- Выберите «EQ Setting 1» в главном меню. Здесь можно выбрать три уровня настройки частоты — средний, низкий и высокий.
- Настройки регулируются в соответствии с вашими предпочтениями и возможностями вашей аудиосистемы. Рекомендуется, чтобы уровень низких частот (басов) находился в диапазоне от 0 до 1.
- Для получения хорошего и насыщенного звука в автомобиле отрегулируйте настройки с помощью элементов управления.
Особенности настройки сабвуфера, установленного в автомобиле:
- Войдите в главное меню и выберите подраздел «SW SETTINGS2». Поворачивайте регулятор громкости, пока на экране не появится SW 80 HZ 0.
- С помощью джойстика выберите уровень частоты, соответствующий 50 Гц, или другое значение в соответствии с вашими предпочтениями.
- После выбора прокрутите ручку, пока на дисплее не появится «0».
- Затем вы можете настроить уровень мощности режима, который может варьироваться от -6 до +6. При изменении настроек следите за тем, чтобы аудиоустройство не искажало качество звука.
- Чтобы выйти из подраздела настроек, нажмите кнопку «Band».
Настройка тонкомпенсации
Чтобы настроить этот параметр, перейдите в подраздел Аудио и нажмите кнопку Band:
- Войдите в главное меню настроек, выберите «Громкость».
- Нажмите регулятор громкости для выбора подраздела.
- Попав в меню настроек, вы можете выбрать один из трех вариантов: высокий, средний или низкий. Параметр тонкомпенсации используется для настройки частоты, когда радиостанция работает на низкой громкости. Настройки нельзя посоветовать, их нужно испытать на себе.
- Выход из меню после выбора настроек.
Радио
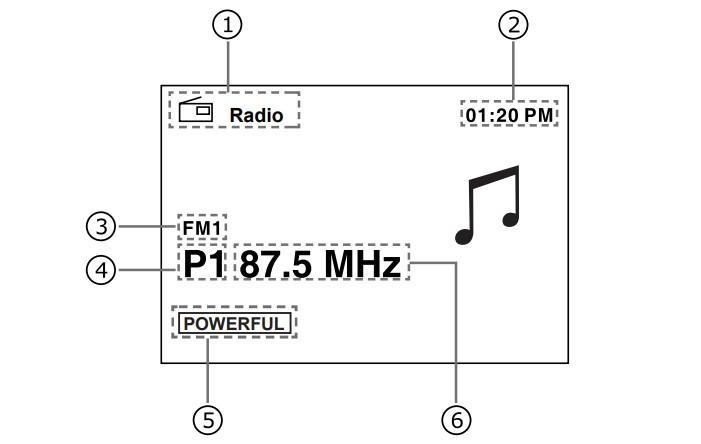
Экран настройки радиоприемника Pioneer
Идентификация позиции на дисплее при настройке радио:
- Значок источника импульсов.
- Табло с текущим временем.
- Диапазон частот для настройки.
- Номер предварительно настроенной радиостанции.
- Значок звукового эффекта.
- Уровень частоты.
Как выключить
Чтобы выключить радиоприемник Pioneer, нажмите и удерживайте кнопку OFF, пока устройство не выключится.
Что можно улучшить
Говоря о настройках, стоит пояснить, что Pioneer не рассматривает бумбокс как просто устройство для прослушивания радио или прослушивания записей. На этом устройстве можно видеть дату, время и многое другое, если они установлены. Информация может отображаться на нескольких языках — либо на японском (поскольку бренд имеет японское происхождение), либо, чаще всего, на английском.

Будет ли меню на русском языке, зависит от ряда факторов, но даже английское меню легче понять, чем японское. Некоторые дополнительные функции — например, порты USB — также необходимо активировать через меню. Не говоря уже об упомянутой проблеме подключения конкретных колонок.
Аудио
Передние динамики
Когда радио настроено и источники звука подключены, можно приступать к качеству звука.
Рекомендуемая громкость для правильной настройки — не более 30.
- После регулировки громкости нажмите ручку, чтобы войти в меню настроек.
- Здесь найдите пункт «Аудио».
- Нажмите ручку, чтобы войти в это меню.
- Просмотрев его, вы найдете индикацию фейдера.
Оно часто связано с меню Balance, поэтому меню, которое вы ищете, звучит как Fader/Balance.
- Нажмите ручку, чтобы войти в это подменю.
В заводской настройке значения равны нулю.
- Как обычно, выберите меню Fader (оно должно мигать).
- Поверните ручку, чтобы установить значение 15 единиц.
- Одно нажатие ручки влево возвращает вас в меню Audio.
- Теперь вам нужно найти фильтр высоких частот (HPF).
- Войдите в меню.
- На экране HPF, вероятно, также будет равен нулю.
- Повернув ручку, установите значение 50.
Опыт показывает, что здесь можно установить 100 — 125.
- Повернув его влево, выйдите из меню.
Задние динамики
Передние колонки работают безупречно, теперь пришло время перевести задние колонки в режим сабвуфера, слава богу, Pioneer умеет это делать.
- Выключение стереосистемы.
- Нажмите и удерживайте кнопку питания (как будто они собираются настроиться на «демо» режим).
- Попав в меню, найдите слово SW Kontrol.
- Пользователь входит в это меню, поворачивая ручку.
- Установите параметр SW, повернув его.
- Подтвердите, снова нажав на ручку.
- Нажмите кнопку выключения — сохранение параметров, выход из меню.
- Затем вернитесь в меню «Аудио» (нажмите на ручку громкости и выберите вращением).
- Нажмите поворотную ручку, чтобы войти в меню.
- Здесь найдите SW SETTING1. Нажмите ручку, чтобы войти.
- В меню необходимо выбрать один из двух вариантов — Normal или Rev.
В большинстве автомобилей именно второй режим обеспечивает наилучшее звучание.
- Сделав выбор, поверните ручку влево — обратно в положение «Аудио».
- Повернитесь вправо, чтобы отобразить меню SW SETTING2.
- Войдите, нажав на ручку. Заводская настройка показывает 80 HZ 0. Поверните ручку, чтобы уменьшить первое значение.
Наилучшей настройкой является 50 HZ.
- Выбрав нужную настройку, поверните ручку по часовой стрелке, чтобы изменить второй параметр. Это уровень мощности. Здесь диапазон составляет от минус шести до плюс шести. Невозможно назвать оптимальные параметры — все зависит от качества используемых колонок.
- Нажмите кнопку Band, чтобы выйти из меню.
Прежде чем переходить к следующим настройкам, проверьте на разных уровнях громкости, как работают выбранные настройки. Если что-то им не подходит, повторите описанные выше действия и попробуйте другие значения.
Тонкомпенсация
Этот параметр скрыт в том же меню «Аудио».
- Войдите в меню и найдите параметр Громкость.
- Его выбор осуществляется нажатием на ручку.
- Он предлагает три значения — High, Middle, Low (высокое, среднее, низкое соответственно).
- Этот параметр отвечает за регулировку частоты при низких уровнях громкости.
Здесь также невозможно дать оптимальные настройки — они определяются опытом. - Наклоните ручку влево для выхода в Аудио или из настроек, нажав Band.
Настройки эквалайзера
Для продвинутых аудиофилов здесь приведены еще несколько настроек эквалайзера. Они скрыты в том же меню Audio.
- Оказавшись в меню, поверните ручку для выбора параметра EQ SETTING.
- Войдите в это меню (в зависимости от модели, здесь может быть еще одно меню для входа).
Три параметра, предлагаемые в этом меню, отвечают за регулировку низких, средних и высоких частот по отдельности. - Установите их в соответствии с вашими предпочтениями. В некоторых моделях здесь можно выбрать несколько предустановок. В зависимости от динамиков и собственных предпочтений вы настраиваете эти параметры.
Настройки здесь ничем не отличаются от других — выбирайте нажатием, изменяйте поворотом, повышайте уровень, качая ручку влево.
Подключение по Bluetooth
Обратите внимание, что, как и в случае с большинством других устройств с поддержкой Bluetooth, для правильной работы соединения устройство должно быть сопряжено с устройством с поддержкой Bluetooth. Пин-код вводится на магнитоле и повторяется на устройстве (иногда, особенно если устройство уже сопряжено через Bluetooth, его нужно вводить только на магнитоле).
Чтобы ввести пин-код на радиоприемнике, выполните следующие действия:
- Выключите его.
- Удерживая нажатой клавишу питания, перейдите в меню «Пуск».
- Поверните джойстик, чтобы найти функцию PIN CODE INPUT (появляется, если BT включен).
- Поверните джойстик вверх и вниз, чтобы ввести код. Если вы хотите переходить от одного символа к другому, поворачивайте ручку влево и вправо.
- Подтвердите, нажав на циферблат один раз.
- Выход из меню.
Теперь вы можете включить режим на своем устройстве и попытаться определить местонахождение радио. Те, кто любит присваивать устройствам однозначные имена, могут воспользоваться описанным выше способом, но вместо PIN CODE INPUT выбрать EDIT DEVICE NAME. Остальные шаги идентичны.
Важно!!! Нажмите один раз для подтверждения. Нажатие на то же меню во второй раз приведет к сбросу кода, и вам придется ввести его снова.
Разъем 3,5 AUX находится справа от органов управления радиоприемником, а USB — за крышкой с логотипом USB.

Радиоприемник Pioneer без CD, но с поддержкой USB и AUX
Неисправности и их устранение

Установка автомобильной магнитолы Pioneer
В автомобильном радиоприемнике могут возникнуть следующие неисправности:
- Дисплей возвращается в исходный режим, даже если владелец автомобиля не сделал ничего, чтобы предотвратить это. Причиной этого может быть то, что в течение полуминуты не было выполнено ни одной операции. Поэтому весь процесс придется повторять с самого начала.
- Диапазон воспроизводимых файлов изменяется самим устройством. Диапазон воспроизводимых файлов может измениться при выборе другой папки или пути. Для устранения ошибки необходимо заново выбрать диапазон, чтобы его можно было воспроизвести.
- Папка на подключенном устройстве не воспроизводится. Вы должны попробовать сыграть еще раз.
Примечание: Папка может не воспроизводиться из-за выбранного диапазона папок. Вы также можете решить проблему, изменив этот диапазон.
- При изменении функции дисплея отображается NO XXXX. Это означает, что текстовая информация отсутствует. Вы должны попытаться переключить дисплей. Если это не удается, необходимо переключиться на другую дорожку.
- Дисплей горит даже при выключенном устройстве. Это может быть связано с тем, что активен демонстрационный режим. Его следует просто отключить.
- Во время работы могут возникать некоторые ошибки. Также могут возникать помехи.
Примечание: Помехи, скорее всего, вызваны влиянием дополнительного устройства на автомобильное радио. Ее следует удалить как можно дальше, чтобы она не влияла на него.
Источники
- https://avtozvuk-info.ru/akusticheskie-sistemy-i-ekvalajzery/avtomagnitoly/nastroyka-magnitolyi-pioneer
- https://AutoTuning.expert/magnitola/pioner-mosfet-50wx4-instruktsiya.html
- https://ReForever.ru/ustrojstvo-motora/nastrojka-avtomagnitoly-pioneer.html
- https://kodobd.top/shema-podklyucheniya-magnitoly-pioner/
- http://myfixbase.ru/user_guides/pioneer/head_units.html