
-
Axis M1031-W — page 1
ENGLISH DEUTSCH ITALIANO ESPAÑOL INSTALLATION GUIDE FRAN Ç AIS AXIS M1011 Network Camera AXIS M1011-W Network Camera AXIS M1031-W Network Camera …
-
Axis M1031-W — page 2
About this Document This document includes ins tru ctions for installing the AXIS M1011/M1031 on your network. Previous experience of networking will be beneficial when installing the product . Legal Consideratio ns Video and audio surveillance ca n be prohibited by laws that vary from country to co untry. Check the laws in your local region before …
-
Axis M1031-W — page 3
AXIS M1011/M1011-W/M1031-W Installation Guide Page 3 ENGLISH AXIS M1011/-W & AXIS M1031-W Installation Guide This installation guide provides instructions for installing the AXIS M1011/-W / AXIS M1031-W Network Camera on your network. For all other as pects of using the product, please see the User’s Manual, available on the CD included in th …
-
Axis M1031-W — page 4
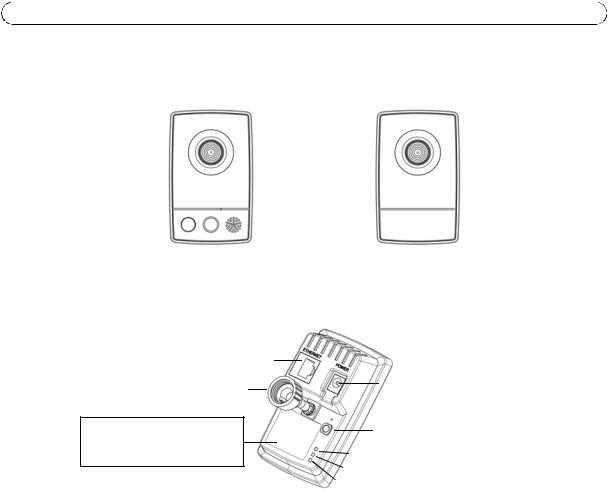
Page 4 AXIS M1011/M1011-W/M1 031-W Installation Guide Hardware overview Please refer to page 15 for details on the connectors and LED indicators. Product number (P/N) & The seri al numbe r may be required during the installation. Power connector Control button Network connector Power Indicator LED Network Indicator LED Lock ring Microphone Ligh …
-
Axis M1031-W — page 5
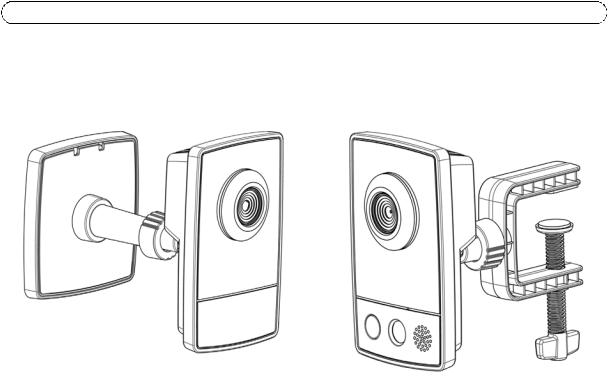
AXIS M1011/M1011-W/M1031-W Installation Guide Page 5 ENGLISH Install the hardware Mount the camera AXIS M1011/M1011-W/M1031-W is shipped with the stand and extension section mounted. Disassemble the stand and, depending on the inte nded installat ion, follow these instructions for wall mounting or shelf mounting. Wall mounting 1. Unscrew the extens …
-
Axis M1031-W — page 6
Page 6 AXIS M1011/M1011-W/M1 031-W Installation Guide Assign an IP address Most networks today have a DHCP server that automatically assi gns IP addresses to connected devices. If your network does not have a DHCP server the AXIS M1011/M1011-W/M1031-W will use 192.168.0.90 as the default IP address. If you would like to assign a static IP addres s, …
-
Axis M1031-W — page 7
AXIS M1011/M1011-W/M1031-W Installation Guide Page 7 ENGLISH AXIS IP Utility — single camera/small installation AXIS IP Utility automatically discovers and displays Axis devices on your network. The application can also be used to manually assign a static IP address Note that the computer running AXIS IP Utility must be on the same network segment …
-
Axis M1031-W — page 8
Page 8 AXIS M1011/M1011-W/M1 031-W Installation Guide AXIS Camera Management — mult iple cameras/large installations AXIS Camera Management can au tomatically discover multiple Axis devices, show connection status, manage firmware upgr ades and set IP addresses. Automatic discovery 1. Check that the camera is conn ected to th e network and that pow …
-
Axis M1031-W — page 9
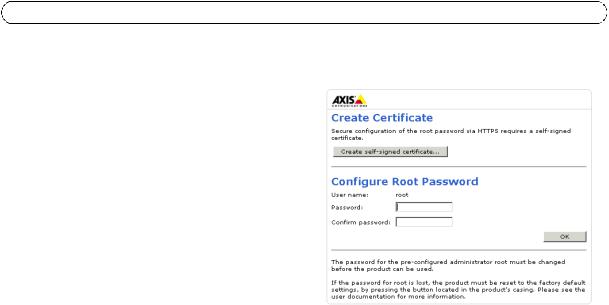
AXIS M1011/M1011-W/M1031-W Installation Guide Page 9 ENGLISH Set the password To gain access to the product, the pass word for the default administra tor user root must be set. This is done in the ‘ Configure Root Password ’ dialog, which is displayed when the AXIS M1011/M1011- W/M1031-W is accessed for the first time. To prevent network eavesd …
-
Axis M1031-W — page 10
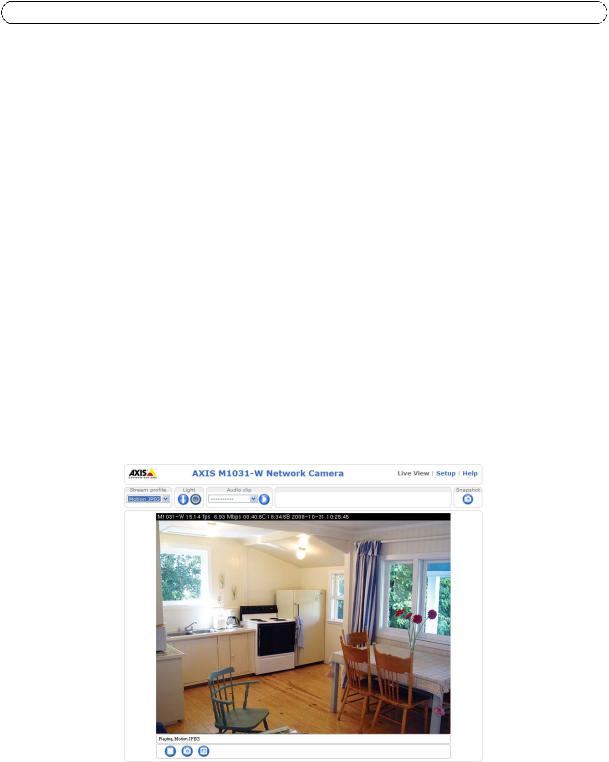
Page 10 AXIS M1011/M1 011-W/ M1031-W Installation Guide Access the video stream The Live View page of the networ k camera is displayed, with links to the Setup tools which allow you to customize the camera. If required, click Yes to install AMC (AXIS Media Control), which allows viewing of the video st ream in Internet Explorer. You will need admin …
-
Axis M1031-W — page 11
AXIS M1011/M1011-W/M1 031-W Installation Guide Page 11 ENGLISH Configure the wireless connection AXIS M1011-W/M1031-W is temporarily connected to the wired network to allow configuration of the camera’s wireless settings be fore connecting to the wireless network. Configuring the camera using an unsecured wireless conne ction is not recommended, …
-
Axis M1031-W — page 12
Page 12 AXIS M1011/M1 011-W/ M1031-W Installation Guide Wireless Settings 1. Select an access point or ad-hoc device under Statu s of Wireless Networks , some of the required information will automatically be entered under Wireless Sett ings . 2. SSID is the name of the selected wireless netw ork. Leave this field blank if AXIS M1011-W/ M1031-W is …
-
Axis M1031-W — page 13
AXIS M1011/M1011-W/M1 031-W Installation Guide Page 13 ENGLISH WEP Authentication — Select Open or Shared Key , depending on the method used by your access point. Not all access points have this option, in which case they probably use Open System, which is sometimes known as SSID Authentication. Key length — This sets the length of the key used fo …
-
Axis M1031-W — page 14
Page 14 AXIS M1011/M1 011-W/ M1031-W Installation Guide Other methods of setting the IP address The table below shows the other methods available for setting or discovering the IP address. All methods are enabled by defaul t, and all can be disabled. Set the IP address with ARP/Ping 1. Acquire an IP address on the same networ k segment your compute …
-
Axis M1031-W — page 15
AXIS M1011/M1011-W/M1 031-W Installation Guide Page 15 ENGLISH Unit connectors Network connector — RJ-45 Ethernet connector. Shielded cables recommended. Power connector — Mini DC connect or 5.0-5.1V DC, Max 1.5A. Center pin +. LED indicators AXIS M1031-W only AXIS M1031-W is equipped with the following: PIR sensor — a passive infrared sensor that …
-
Axis M1031-W — page 16
Page 16 AXIS M1011/M1 011-W/ M1031-W Installation Guide Resetting to the Factory Default Settings This will reset all parameters, including the IP address, to the Fa ctory Default settings: 1. Disconnect power from the camera. 2. Press and hold the Control button and reconnect power. 3. Keep the Control button pressed until the Power indicator flas …
-
Axis M1031-W — page 17
AXIS M1011/M1011-W/M1 031-W Guide d’installa tion Page 17 FRAN Ç AIS AXIS M1011/-W & AXIS M1031-W Guide d’installation Ce guide d’installation explique comment inst aller la caméra AXIS M1011/-W / AXIS M1031-W Caméra réseau sur votre réseau. Pour toute autre qu estion relative à l’utili sation de ce produit, reportez-vous au manue …
-
Axis M1031-W — page 18
Page 18 AXIS M1011/M1011 -W/M 1031-W Guide d’installation Vue d’ensemble du matériel Reportez-vous à la page 31 pour tous renseignemen ts sur les connecteurs et les témoins DEL. Référence produit (P/N) et Le numéro de série peut être demandé pendant l’installation. Connecteur d’alimentation Bouton de commande Connecteur réseau Té …
-
Axis M1031-W — page 19
AXIS M1011/M1011-W/M1 031-W Guide d’installa tion Page 19 FRAN Ç AIS Installation du matériel Montage de la caméra L’AXIS M1011/M1011-W/M1031-W est fournie avec support et rallon ge montés. Démontez le support suivez les consignes ci-après pour monter la caméra sur un mur ou sur une étagère, selon le type d’installation prévue. Mont …
-
Axis M1031-W — page 20
Page 20 AXIS M1011/M1011 -W/M 1031-W Guide d’installation Attribution d’une adresse IP Aujourd’hui, la plupart des réseaux sont équipés d’un serveur DHCP, qui attribue automatiquement des adresses IP aux périphérique s connectés. Si votre réseau en est dépourvu, la caméra AXIS M1011/M1011-W/M1031-W utilisera 192.168.0. 90 comme adr …
-
Axis M1031-W — page 21
AXIS M1011/M1011-W/M1 031-W Guide d’installa tion Page 21 FRAN Ç AIS AXIS IP Utility – Une seule caméra/petites installations AXIS IP Utility détecte automatiquement les périphériq ues Axis de votre réseau et les affiche. Cette application permet également de défini r manuellement une adresse IP statique. Notez que l’ordinateur exécu …
-
Axis M1031-W — page 22
Page 22 AXIS M1011/M1011 -W/M 1031-W Guide d’installation AXIS Camera Management – Plusie urs caméras/grandes installations AXIS Camera Management est ca pable de détecter automatiquem ent plusieurs dispositifs Axis, d’afficher l’état de connexion, de gérer les mises à niveau du micrologiciel et de configurer les adresses IP. Détectio …
-
Axis M1031-W — page 23
AXIS M1011/M1011-W/M1 031-W Guide d’installa tion Page 23 FRAN Ç AIS Configuration du mot de passe Pour accéder au produit, le mot de pa sse de l’administrateur par défaut, root , doit être configuré. Vous pouvez effectuer cette opéra tion via la boîte de dialogue Configure Root Password (Configurer le mot de passe root) qui s’affiche …
-
Axis M1031-W — page 24
Page 24 AXIS M1011/M1011 -W/M 1031-W Guide d’installation Accès au flux de données vidéo La page Live View (Vidéo en di rect) de la camé ra réseau s’affiche. E lle propose des liens vers différents outils de configuration vous pe rmettant d’adapter la caméra à vos besoins. Si nécessaire, cliquez sur Yes (Oui) pour installer AMC (Axi …
-
Axis M1031-W — page 25
AXIS M1011/M1011-W/M1 031-W Guide d’installa tion Page 25 FRAN Ç AIS Configuration de la connexion sans fil L’AXIS M1011-W/M1031-W est temporairement conne ctée au réseau sans fil afin de vous permettre de configurer les paramètres sans fil de la caméra avant la connexion au réseau sans fil. Il est déconseillé de configurer la caméra a …
-
Axis M1031-W — page 26
Page 26 AXIS M1011/M1011 -W/M 1031-W Guide d’installation Paramètres sans fil 1. Sélectionnez un point d’accès ou un dispositif ad hoc sous Statu s of Wireless Networks (État des réseaux sans fil) . Certaines des informatio ns requises sont automa tiquement reprises sous Wireless Settings (Paramètres sans fil) . 2. SSID est le nom du rés …
-
Axis M1031-W — page 27
AXIS M1011/M1011-W/M1 031-W Guide d’installa tion Page 27 FRAN Ç AIS EAP-TLS • Identity (Identité) : saisissez l’identité de l’utilisateur à présenter au réseau. • Private key pass word (Mot de passe pour la clé privée) : saisissez le mot de passe de votre identité d’utilisateur. • EAPOL version (Version EAPOL) : sélectionne …
-
Axis M1031-W — page 28
Page 28 AXIS M1011/M1011 -W/M 1031-W Guide d’installation Fin de l’installation sans fil 1. Vérifiez que les paramètres sans fil de la caméra correspondent à ceux du point d’accès. 2. Débranchez le câble réseau de la caméra. 3. Actualisez la page Web au bout de 20 à 30 second es afin de valider la connexion sans fil. Si vous ne pouv …
-
Axis M1031-W — page 29
AXIS M1011/M1011-W/M1 031-W Guide d’installa tion Page 29 FRAN Ç AIS Autres méthodes de configuration de l’adresse IP Le tableau ci-dessous indique les autres méthodes permettant de configurer ou de déterminer l’adresse IP. Toutes les méthodes sont activé es par défaut et peuvent être désact ivées. Configuration de l’adresse IP à …
-
Axis M1031-W — page 30
Page 30 AXIS M1011/M1011 -W/M 1031-W Guide d’installation Remarques : • Pour ouvrir une invite de commande sous Window s : dans le menu Démarre r, sélectionnez Exécuter… et tapez cmd. Cliquez sur OK. • Pour utiliser la commande ARP sous Mac OS X, utilisez l’utilitaire Termina l dans Application > Utilitaires. …
-
Axis M1031-W — page 31
AXIS M1011/M1011-W/M1 031-W Guide d’installa tion Page 31 FRAN Ç AIS Connecteurs de l’appareil Connecteur réseau — Connecteur Ethernet RJ-45. Il est co nseillé d’utiliser de s câbles blindés. Connecteur d’alimentation — Miniconnecteur CC 5,0-5,1 V CC, ma x. 1,5 A. Broche centrale +. Témoins DEL Témoin DEL Couleur Indication Réseau V …
-
Axis M1031-W — page 32
Page 32 AXIS M1011/M1011 -W/M 1031-W Guide d’installation AXIS M1031-W uniquement L’AXIS M1031-W est équipée des dispositifs suivant s : Capteur infrarouge passif – Le capteur infrarouge passif mesu re la lumière infrarouge des objets traversant son champ de vision. Si la caméra est configurée en ce sens, elle peut automatiquement allume …
-
Axis M1031-W — page 33
AXIS M1011/M1011-W/M1 031-W Guide d’installa tion Page 33 FRAN Ç AIS Rétablissement des paramètres d’usine par défaut Procédez comme suit pour rétablir tous les pa ramètres d’usine définis par défaut, y compris l’adresse IP : 1. Débranchez l’aliment ation de la caméra. 2. Maintenez le bouton de commande enfoncé et rebranchez l …
-
Axis M1031-W — page 34
…
-
Axis M1031-W — page 35
AXIS M1011/M1011-W/M1031 -W Installationsanleitung Seite 35 DEUTSCH AXIS M1011/-W & AXIS M1031-W Installationsanleitung In dieser Anleitung wird die Installation der AXIS M1011/-W / AXIS M1031-W Netzwerk-Kamera in einem Netzwerk beschrieben. Alle weiteren Hinw eise zur Verwendung des Produkts finden Sie im Benutzerhandbuch, das auf der mitgelie …
-
Axis M1031-W — page 36
Seite 36 AXIS M1011/M1011-W/M1031- W Installationsanleitung Hardwareübersicht Ausführliche Informationen zu den Anschlüsse n und LED-Anzeigen finden Sie auf Seite 50. Produktnummer (Artikelnr.) und Die Seriennummer wird für die Installation benötigt. Netzans chlus s Steuertaste Netzwerkanschluss Betriebsanzeige (LED) Netzwerkanzeige (LED ) Ver …
-
Axis M1031-W — page 37
AXIS M1011/M1011-W/M1031 -W Installationsanleitung Seite 37 DEUTSCH Hardware installieren Kamera befestigen AXIS M1011/M1011-W/M1031-W Die Kamera wird mit montiertem Standfuß und mit Verlängerung ausgeliefert. Wenn Sie die Kamera an der Wand oder an einem Regal befestigen möchten, demontieren Sie den Standfuß und befolgenden Sie die folgenden A …
-
Axis M1031-W — page 38
Seite 38 AXIS M1011/M1011-W/M1031- W Installationsanleitung 3. Überprüfen Sie, ob die LED-Anzeigen die Betr iebszustände korrekt angeben. Weitere Informationen finden Sie in der Tabelle auf Seite 5 0. Beachten Sie , dass LEDs deaktiviert sein können und deshalb nicht leuchten. 4. Fahren Sie mit IP-Adresse zuweisen, auf Seite 39 fort. …
-
Axis M1031-W — page 39
AXIS M1011/M1011-W/M1031 -W Installationsanleitung Seite 39 DEUTSCH IP-Adresse zuweisen In den meisten Netzwerken ist heutzutage ei n DHCP-Server eingebunden, der angeschlossenen Geräten automatisch IP-Adressen zuweist. Wenn Ihr Netzwerk über keinen DHCP-Server verfügt, wird für die AXIS M1011/M1011-W/M1031-W die St andard-IP-Adresse 192.168.0. …
-
Axis M1031-W — page 40
Seite 40 AXIS M1011/M1011-W/M1031- W Installationsanleitung AXIS IP Utility — Einzelne Kamera/kleine In stallation AXIS IP Utility erkennt automatisch im Netzwerk vorhandene Axis-Geräte und zeigt diese an. Die Anwendung kann außerdem zur manuellen Zuweisung einer statischen IP -Adresse verwendet werden Beachten Sie, dass sich die AXIS M1011/M1011 …
-
Axis M1031-W — page 41
AXIS M1011/M1011-W/M1031 -W Installationsanleitung Seite 41 DEUTSCH AXIS Camera Management — Mehr ere Kameras/große Installation Mit AXIS Camera Management können auto matisch mehrere Axis-Geräte erkannt, de r Verbindungsstatus angezeigt, die Firmware-Aktualisierungen verw al tet und IP-Adressen festgelegt werden. Automatische Erkennung 1. Stell …
-
Axis M1031-W — page 42
Seite 42 AXIS M1011/M1011-W/M1031- W Installationsanleitung Kennwort festlegen Für den Zugriff auf das Produkt muss das Kenn wort für den standardmäßigen Administrator- Benutzer root festgelegt werden. Beim erstmaligen Zugriff auf AXIS M1011/M1011-W/M103 1-W wird das Dialogfeld „ Configure Root Password “ (Root-Kennwort konfiguriere n) geö …
-
Axis M1031-W — page 43
AXIS M1011/M1011-W/M1031 -W Installationsanleitung Seite 43 DEUTSCH Auf Videostrom zugreifen Die Seite „Live-View“ (Live-Ansi cht) Netzwerk-Kam era enthält Links zu Setup-Tools, mit denen Sie die Kamera Ihren Bedürfnissen entsprechend anpassen können. Klicken Sie bei Bedarf auf Yes (Ja), um AMC (AXIS Media Control) zu installieren. Nach Absc …
-
Axis M1031-W — page 44
Seite 44 AXIS M1011/M1011-W/M1031- W Installationsanleitung WLAN-Verbindung konfigurieren Bevor Sie eine Verbindung zum WLAN-Netzwerk herstellen, müssen Sie AXIS M1011-W/M1031-W vorübergehend über Kabel mit dem Netzwerk verbinden, um die Einst ellungen für die drahtlose Verbindung zu konfigurieren. Es ist nicht empf ehlenswert, die Kamera über …
-
Axis M1031-W — page 45
AXIS M1011/M1011-W/M1031 -W Installationsanleitung Seite 45 DEUTSCH Einstellungen für die WLAN-Verbindung 1. Wählen Sie einen Access Point bzw. ein Ad-hoc-Gerät unter Status of Wireless Networks (Status von WLAN-Netzwerken) aus. Einige Felder unter Wireless Se ttings (Einstellungen für die WLAN-Verbindung) werden automatisch ausgefüllt. 2. SSI …
-
Axis M1031-W — page 46
Seite 46 AXIS M1011/M1011-W/M1031- W Installationsanleitung EAP-TLS • Identity (Identität) — Geben Sie die Benutzeridentität für das Netzwerk ein. • Private key pass word (Privater Schlüssel) — Geben Sie das Kennwort für die Benutzeridentität ein. • EAPOL version (EAPOL-Version ) — Wählen Sie die vom Access Point verwendete Version (1 …
-
Axis M1031-W — page 47
AXIS M1011/M1011-W/M1031 -W Installationsanleitung Seite 47 DEUTSCH Schließen Sie die Installatio n des Drahtlosnetzwerks ab 1. Stellen Sie sicher, dass die Einstellungen fü r die WLAN-Verbindung in der Kamera mit den Einstellungen im Access Point übereinstimmen. 2. Ziehen Sie das Netzwerkkabel von der Kamera ab. 3. Aktualisieren Sie die Webseit …
-
Axis M1031-W — page 48
Seite 48 AXIS M1011/M1011-W/M1031- W Installationsanleitung Andere Methoden zum Festlegen der IP-Adresse Diese Tabelle bietet einen Überblick über weiter e Methoden, die IP-Adresse festzulegen bzw. zu ermitteln. Alle Methoden sind standardmäßig aktiviert und können deaktiviert werden. IP-Adresse per ARP/Ping zuweisen 1. Wählen Sie eine IP-Adr …
-
Axis M1031-W — page 49
AXIS M1011/M1011-W/M1031 -W Installationsanleitung Seite 49 DEUTSCH 6. Starten Sie einen Browser, geben Sie im Adressfe ld „http://<IP-Adresse>“ ein, und drücken Sie die Eingabetaste auf der Tastat ur. Hinweise: • So öffnen Sie die Eingabeaufforderung unter Wi ndows: Wählen Sie im Startmenü die Option „Ausführen…“ und geben S …
-
Axis M1031-W — page 50
Seite 50 AXIS M1011/M1011-W/M1031- W Installationsanleitung Geräteanschlüsse Netzwerkanschluss — RJ-45-Ethernetanschluss. Die Verwendung von abgesc hirmten Kabeln wird empfohlen. Netzanschluss — Mini-Gleichstromanschluss 5.0-5.1 V Gleichst rom, max. 1,5 A. Mittlerer Anschluss +. LED-Anzeigen LED Farbe Bedeutung Netzwerk Grün Leuchtet da uerhaf t …
-
Axis M1031-W — page 51
AXIS M1011/M1011-W/M1031 -W Installationsanleitung Seite 51 DEUTSCH AXIS M1031-W-Komponenten AXIS M1031-W ist mit den folgenden Komponenten ausgestat tet: PIR-Sensor — Ein passiver Infrarotsensor, der das In frarotlicht beweglicher Objekte im Sichtfeld messen kann. Sie können die Kamera so konfiguriere n, dass über den PIR-S ensor automatisch Lic …
-
Axis M1031-W — page 52
Seite 52 AXIS M1011/M1011-W/M1031- W Installationsanleitung Parameter auf Werkseinstellungen zurücksetzen Gehen Sie wie folgt vor, um sämtliche Parameter ei nschließlich der IP-Adresse auf die werkseitigen Standardeinstellungen zurückzusetzen: 1. Trennen Sie die Kamera von der Stromversorgung. 2. Halten Sie die Steuertaste gedrückt und schlie? …
-
Axis M1031-W — page 53
Guida all’installazione AXIS M101 1/M1011-W/M1031-W Pagina 53 ITALIAN O AXIS M1011/-W & AXIS M1031-W Guida all’installazione Questo documento forn isce le istr uzioni necessarie per installare la videocamera AXIS M1011/-W / AXIS M1031-W Videocamera di rete nella rete in uso. Per ulteriori informazioni sull’utilizzo del prodotto, con …
-
Axis M1031-W — page 54
Pagina 54 Guida all’installazion e AXIS M1011/M1011 -W/M1031-W Panoramica dell’hardware Per informazioni dettagliate sui connettori e gli indicatori LED, vedere la Pagina 68. Codice prodotto (N/P) e Il numero di serie è talvolta richiesto durante l’installazione. Connettore di alimentazione Pulsante di comando Connettore di rete Indica …
-
Axis M1031-W — page 55
Guida all’installazione AXIS M101 1/M1011-W/M1031-W Pagina 55 ITALIAN O Installazione dell’hardware Montaggio della videocamera La videocamera AXIS M1011/M1011-W/M1031-W viene fornita con la base e la sezione allungabile pre-montate. Smontare la base e, a seconda dell a configurazione di inst allazione, seguire le istruzioni riportate di …
-
Axis M1031-W — page 56
Pagina 56 Guida all’installazion e AXIS M1011/M1011 -W/M1031-W 3. Verificare che i LED indichino le condizioni di funzionamento corrette. Per ulteriori dettagli, vedere la tabella a Pagina 68. Si noti che al cuni LED possono essere disabilitati o spenti. 4. Passare a Assegnazione di un indirizzo IP, alla pagina 57. …
-
Axis M1031-W — page 57
Guida all’installazione AXIS M101 1/M1011-W/M1031-W Pagina 57 ITALIAN O Assegnazione di un indirizzo IP La maggior parte delle reti dispone di un server DHCP che automaticamente assegna gli indirizzi IP alle perif eriche conn esse. Se la rete non dispone di un server DHCP, per la videocamera AXIS M1011/M1011-W/M1031-W viene utilizzato l’i …
-
Axis M1031-W — page 58
Pagina 58 Guida all’installazion e AXIS M1011/M1011 -W/M1031-W AXIS IP Utility: videocamera singola/piccole installazioni AXIS IP Utility rileva e visualizza automaticame nte le periferiche Axis collegate alla rete. L’applicazione può inoltre esse re utilizzata per assegnare manualmente un indirizzo IP statico. Si tenga presente che la v …
-
Axis M1031-W — page 59
Guida all’installazione AXIS M101 1/M1011-W/M1031-W Pagina 59 ITALIAN O AXIS Camera Management: più vi deocamere/grandi installazioni È possibile utilizzare AXIS Camera Management per individuare auto maticamente la presenza di più periferiche Axis, mostrare lo stato di conness ione, gestire gli aggiornamenti del firmware e impostare gli in …
-
Axis M1031-W — page 60
Pagina 60 Guida all’installazion e AXIS M1011/M1011 -W/M1031-W Impostazione della password Per ottenere l’accesso al prodotto , è necessario impostare la pass word dell’utente amministratore predefinito root . Questa operazione può essere effe ttuata nella finestra di dialogo ‘ Configure Root Password ’ (Configura password root …
-
Axis M1031-W — page 61
Guida all’installazione AXIS M101 1/M1011-W/M1031-W Pagina 61 ITALIAN O Accesso al flusso video Viene visualizzata la pagina Live View (Immagi ni dal vivo) con i collegamenti agli strumenti di configurazione che consentono di personalizzare la videocamera. Se necessario, fare clic su Yes (Sì) per installare AMC (Axis Media Control) che consen …
-
Axis M1031-W — page 62
Pagina 62 Guida all’installazion e AXIS M1011/M1011 -W/M1031-W Configurazione della connessione wireless Collegare temporaneamente la videocamera AXIS M1011-W/M 1031-W alla rete cablata per configurare le impostazioni wireless prima di eseg uire il collegamento alla rete wireless. Non è consigliabile usare una connessione wireless non sicura …
-
Axis M1031-W — page 63
Guida all’installazione AXIS M101 1/M1011-W/M1031-W Pagina 63 ITALIAN O Impostazioni wireless 1. Selezionare il numero di punto di ac cesso o di una periferica ad hoc in Status of Wireless Networks (Stato delle reti wireless ). Alcune delle informazioni richieste vengono inserite automaticamente nella sezione Wireless Sett ings (Impostazioni w …
-
Axis M1031-W — page 64
Pagina 64 Guida all’installazion e AXIS M1011/M1011 -W/M1031-W EAP-TLS • Identity (Identità) – Inserire l’ID utente da presentare alla rete. • Private key pass word (Password basata su chiave privata) – Inserire la password da usare per l’ID utente. • EAPOL version (Versione EAPOL) – Selezionare la versione usata (1 o 2) …
-
Axis M1031-W — page 65
Guida all’installazione AXIS M101 1/M1011-W/M1031-W Pagina 65 ITALIAN O Completamento dell’i nstallazione wireless 1. Verificare che le impostazioni wireless della videocamera corrispondano alle impostazioni del punto di accesso. 2. Scollegare il cavo di rete dalla videocamera. 3. Aggiornare la pagina Web dopo circa 20-30 seco ndi per con …
-
Axis M1031-W — page 66
Pagina 66 Guida all’installazion e AXIS M1011/M1011 -W/M1031-W Altri metodi di impostazione dell’indirizzo IP La seguente tabella descrive gli altri metodi dispon ibili per impostare o individuare l’indirizzo IP. Per impostazione predefinita, tutti i metodi so no disponibili e possono essere disabilitati. Impostazione dell’indirizz …
-
Axis M1031-W — page 67
Guida all’installazione AXIS M101 1/M1011-W/M1031-W Pagina 67 ITALIAN O Note • Per aprire una finestra MS-DOS in Windows: dal menu Start, scegliere Esegui… e digitare cmd. Fare clic su OK. • Per utilizzare il comando ARP in un sistema operativo M ac OS X, usare l’utility Terminal, in Applicazioni > Utilità. …
-
Axis M1031-W — page 68
Pagina 68 Guida all’installazion e AXIS M1011/M1011 -W/M1031-W Connettori Connettore di rete — Connettore Ethernet RJ-45. È cons igliato l’uso di cavi schermati. Connettore di alimentazio ne — Connettore mini DC da 5,0-5,1V c.c., max 1,5 A. Center pin +. Indicatori LED Solo per il modello AXIS M1031-W La videocamera AXIS M1031-W è munit …
-
Axis M1031-W — page 69
Guida all’installazione AXIS M101 1/M1011-W/M1031-W Pagina 69 ITALIAN O Per ulteriori informazioni, vedere la Guida per l’utente della videocamera AX IS M1011/M1011-W/ M1031-W disponibile sul sito Web di Axis all’indi rizzo www.axis.com oppure sul CD fornito con il prodotto. Ripristino delle impostazioni predefinite Questa procedura …
-
Axis M1031-W — page 70
…
-
Axis M1031-W — page 71
AXIS M1011/M1011 -W/ M1031-W Guía de instalación Página 71 ESPAÑOL AXIS M1011/-W & AXIS M1031-W Guía de instalación Esta guía de instalación incluye las instrucciones necesarias para instal ar la AXIS M1011/-W / AXIS M1031-W Cámara de red en su red. Para obtener información sobre cualquier cuestión relacionada con el uso del producto …
-
Axis M1031-W — page 72
Página 72 AXIS M1011/M10 11-W/M1031-W Guía de instalación Presentación del hardware Consulte la página 84 si necesita más inform ación sobre los conectores e indicadores LED. Referencia (N/P) y El número de serie puede ser necesario durante la instalación. Conector de alimentación Botón de control Conector de red LED indicador de aliment …
-
Axis M1031-W — page 73
AXIS M1011/M1011 -W/ M1031-W Guía de instalación Página 73 ESPAÑOL Instale el hardware Montaje de la cámara AXIS M1011/M1011-W/M1031-W se suministra con el soporte y la pieza extensora montados. En función de la instalación que necesite, desmonte el soporte y siga las instrucciones que indicamos a continuación para montar en pared o en esta …
-
Axis M1031-W — page 74
Página 74 AXIS M1011/M10 11-W/M1031-W Guía de instalación Asignación de la di rección IP Actualmente, la mayoría de redes disponen de un servidor DHCP que asigna direcciones IP a los dispositivos conectados de forma automática. Si su red no dispone de un servidor DHCP, AXIS M1011/M1011-W/M1031-W utilizará 192.168.0.90 como dirección IP pre …
-
Axis M1031-W — page 75
AXIS M1011/M1011 -W/ M1031-W Guía de instalación Página 75 ESPAÑOL AXIS IP Utility: para cámaras in dividuales o instalaciones pequeñas AXIS IP Utility detecta y muestra automáticamente los dispositivos Axis qu e existen en la red. Además, puede utilizarse para asignar manualmente una dirección IP estática. Recuerde que el equipo que ejec …
-
Axis M1031-W — page 76
Página 76 AXIS M1011/M10 11-W/M1031-W Guía de instalación AXIS Camera Management: para varias cámaras e instalaciones grandes AXIS Camera Management puede de tectar automáticamente varios dispositivos Axis, mostrar el estado de la conexión, administrar las actualizac iones del firmware y configurar direcciones IP. Detección automática 1. Co …
-
Axis M1031-W — page 77
AXIS M1011/M1011 -W/ M1031-W Guía de instalación Página 77 ESPAÑOL Configuración de la contraseña Para poder acceder al producto, hay que configurar la contraseña del usuario predeterminado para el administrador root . Al acceder por primera vez a la cámara AXIS M1011/M1011-W/M1031-W, aparecerá el cuadro de diálogo “ Configure Root Pass …
-
Axis M1031-W — page 78
Página 78 AXIS M1011/M10 11-W/M1031-W Guía de instalación Acceda al vídeo continuo La página Live View de la cámara de red apar ece con enlace s a las herra mientas de configuración que le permiten personalizar la cámara. En caso necesario, haga clic en Yes (Sí) para instalar el AMC (AXIS Media Cont rol) y así permitir la visualización d …
-
Axis M1031-W — page 79
AXIS M1011/M1011 -W/ M1031-W Guía de instalación Página 79 ESPAÑOL Configuración de la conexión inalámbrica La AXIS M1011-W/M1031-W está conectada tem poralmente a la red co n cables para poder configurar los parámetros inalámbricos de la cámara antes de efectuar la co nexión a la red. No se recomienda configurar la cámara mediante una …
-
Axis M1031-W — page 80
Página 80 AXIS M1011/M10 11-W/M1031-W Guía de instalación Valores inalámbricos 1. Seleccione un punto de acceso o dispositivo ad hoc en Estado de las redes inalámbricas . Parte de la información necesaria se introducirá automáticamente en Valores inalámbricos . 2. SSID es el nombre de la red inal ámbrica seleccionada. Deje este campo en b …
-
Axis M1031-W — page 81
AXIS M1011/M1011 -W/ M1031-W Guía de instalación Página 81 ESPAÑOL EAP-TLS • Identity (Identidad): escriba la identidad del usuario para presentarla a la red • Private key password (contraseña de clave privada): escriba la contraseña correspondiente a la identidad de su usuario • EAPOL version (versión de EAPOL): seleccione la versión …
-
Axis M1031-W — page 82
Página 82 AXIS M1011/M10 11-W/M1031-W Guía de instalación • Las claves, contraseñas y certific ados utilizad os para fines de seguridad deben introducirse manualmente. Contacte con el administrador de red del punto de acceso o dispositivo ad hoc seleccionado. • Los valores inalámbricos deben configurarse o cambiarse siempre (durante la ins …
-
Axis M1031-W — page 83
AXIS M1011/M1011 -W/ M1031-W Guía de instalación Página 83 ESPAÑOL Otros métodos para configurar la dirección IP Esta tabla presenta otros métodos disponibles para configurar o detectar la dirección IP. Todos los métodos están habilitados de forma pred eterminada y es posible deshabilitarlos. Configuración de la dirección IP con ARP/Pin …
-
Axis M1031-W — page 84
Página 84 AXIS M1011/M10 11-W/M1031-W Guía de instalación Notas: • Para abrir una línea de comando en Windows: desd e el menú Inicio, seleccione Ejecutar… y escriba cmd. Haga clic en OK (Aceptar). • Para utilizar el comando ARP en un sistema opera tiv o Mac OS X, utilice la herramienta Terminal, que se encuentra en Apli caciones > Uti …
-
Axis M1031-W — page 85
AXIS M1011/M1011 -W/ M1031-W Guía de instalación Página 85 ESPAÑOL AXIS M1031-W sólo AXIS M1031-W está equipada co n los siguientes elementos: Sensor de PIR : un sensor infrarrojo pasivo permite medir la luz infrarroja de los objetos que pasan por su campo de visualización. Si se conf igura para ello, la cámara puede encender automáticamen …
-
Axis M1031-W — page 86
Página 86 AXIS M1011/M10 11-W/M1031-W Guía de instalación Más información El manual del usuario está disponible en el si tio Web de Axis, www.axis.com, o en el CD de productos de vídeo en red de Ax is suministrado con este producto. Un consejo: Visite www.axis.com/techsup para comproba r si existe algún firmware actualizado disponible para …
-
Axis M1031-W — page 87
AXIS M1011/-W/M1031- W In stallation Guide Page 87 Radio Transmission Regula tory Information & EMC This equipment generates and radiates radio frequenc y energy, and must be in stalled and operated while maintaining a minimum body-to-camera distance of 3 feet (1 meter). If this equipment causes ha rmful interference to radio or television rece …
-
Axis M1031-W — page 88
Installation Guide Ver.1.10 AXIS M1011/-W/M1031-W Printed: February 2009 © Axis Communications AB, 2008-2009 Part No. 34807 …
![]()
USER’S MANUAL
AXIS M1011 Network Camera
AXIS 1011W Network Camera
AXIS M1031W Network Camera

Notices
This manual is intended for administrators and users of the AXIS M1011/M1011W/M1031W Network Camera, and is applicable for firmware release 5.00 and later. It includes instructions for using and managing the camera on your network. Previous experience of networking will be of use when using this product. Some knowledge of UNIX or Linux-based systems may also be beneficial, for developing shell scripts and applications. Later versions of this document will be posted to the Axis Website, as required. See also the product’s online help, available via the Web-based interface.
Liability
Every care has been taken in the preparation of this manual. Please inform your local Axis office of any inaccuracies or omissions. Axis Communications AB cannot be held responsible for any technical or typographical errors and reserves the right to make changes to the product and manuals without prior notice. Axis Communications AB makes no warranty of any kind with regard to the material contained within this document, including, but not limited to, the implied warranties of merchantability and fitness for a particular purpose. Axis Communications AB shall not be liable nor responsible for incidental or consequential damages in connection with the furnishing, performance or use of this material.
Intellectual Property Rights
Axis AB has intellectual property rights relating to technology embodied in the product described in this document. In particular, and without limitation, these intellectual property rights may include one or more of the patents listed at http://www.axis.com/patent.htm and one or more additional patents or pending patent applications in the US and other countries.
This product contains licensed third-party software. See the menu item “About” in the product’s user interface for more information.
This product contains source code copyright Apple Computer, Inc., under the terms of Apple Public Source License 2.0 (see http://www.opensource.apple.com/apsl/).
The source code is available from: http://developer.apple.com/darwin/projects/bonjour/
Equipment Modifications
This equipment must be installed and used in strict accordance with the instructions given in the user documentation. This equipment contains no user-serviceable components. Unauthorized equipment changes or modifications will invalidate all applicable regulatory certifications and approvals.
Trademark Acknowledgments
Apple, Boa, Bonjour, Ethernet, Internet Explorer, Linux, Microsoft, Mozilla, Netscape Navigator, OS/2, Real, QuickTime, UNIX, Windows, WWW are registered trademarks of the respective holders. Java and all Java-based trademarks and logos are trademarks or registered trademarks of Sun Microsystems, Inc. in the United States and other countries. Axis Communications AB is independent of Sun Microsystems Inc.
UPnPTM is a certification mark of the UPnPTM Implementers Corporation.
Support
Should you require any technical assistance, please contact your Axis reseller. If your questions cannot be answered immediately, your reseller will forward your queries through the appropriate channels to ensure a rapid response. If you are connected to the Internet, you can:
•download user documentation and firmware updates
•find answers to resolved problems in the FAQ database. Search by product, category, or phrases
•report problems to Axis support by logging in to your private support area
•visit Axis Support at www.axis.com/techsup
AXIS M1011/M1011W/M1031W — Notices
AXIS M1011/M1011W/M1031W Network Camera User’s Manual
Rev. 1.0
Copyright© Axis Communications AB, 2008
December 2008 Part no. 34147

AXIS M1011/M1011-W/M1031-W — Table of contents
|
Notices . . . . . . . . . . . . . . . . . . . . . . . . . . . . . . . . . . . . . . . . . . . . . . . . . . . . . . . . . . . . . . . . . . . . . . . . . . . . . . . . . . . . . . . . . |
. 2 |
|
Product Description . . . . . . . . . . . . . . . . . . . . . . . . . . . . . . . . . . . . . . . . . . . . . . . . . . . . . . . . . . . . . . . . . . . . . . . . . . . . . . . |
. 4 |
|
Key features |
4 |
|
Overview |
5 |
|
Accessing the Camera . . . . . . . . . . . . . . . . . . . . . . . . . . . . . . . . . . . . . . . . . . . . . . . . . . . . . . . . . . . . . . . . . . . . . . . . . . . . . |
. 7 |
|
Access from a browser |
7 |
|
Setting the root password |
8 |
|
Access from the Internet |
8 |
|
The Live View page |
10 |
|
Video Streams . . . . . . . . . . . . . . . . . . . . . . . . . . . . . . . . . . . . . . . . . . . . . . . . . . . . . . . . . . . . . . . . . . . . . . . . . . . . . . . . . . . |
12 |
|
How to stream MPEG-4/H.264 |
12 |
|
Motion JPEG |
13 |
|
Alternative methods of accessing the video stream |
13 |
|
Video & Audio Settings . . . . . . . . . . . . . . . . . . . . . . . . . . . . . . . . . . . . . . . . . . . . . . . . . . . . . . . . . . . . . . . . . . . . . . . . . . . . |
14 |
|
Video Stream |
14 |
|
Stream Profiles |
15 |
|
Camera Settings |
16 |
|
Overlay Image |
16 |
|
Privacy mask |
17 |
|
Audio Settings (AXIS M1031-W) |
17 |
|
Audio Clips (AXIS M1031-W) |
18 |
|
Live View Configuration . . . . . . . . . . . . . . . . . . . . . . . . . . . . . . . . . . . . . . . . . . . . . . . . . . . . . . . . . . . . . . . . . . . . . . . . . . . |
19 |
|
Layout |
19 |
|
Event Configuration . . . . . . . . . . . . . . . . . . . . . . . . . . . . . . . . . . . . . . . . . . . . . . . . . . . . . . . . . . . . . . . . . . . . . . . . . . . . . . . |
21 |
|
Event Servers |
21 |
|
Event Types |
21 |
|
Camera Tampering |
23 |
|
Motion Detection |
24 |
|
Port Status |
25 |
|
System Options . . . . . . . . . . . . . . . . . . . . . . . . . . . . . . . . . . . . . . . . . . . . . . . . . . . . . . . . . . . . . . . . . . . . . . . . . . . . . . . . . . |
26 |
|
Security |
26 |
|
Date & Time |
27 |
|
Network |
27 |
|
Ports & Devices |
33 |
|
LED Settings |
33 |
|
Maintenance |
33 |
|
Support |
33 |
|
About . . . . . . . . . . . . . . . . . . . . . . . . . . . . . . . . . . . . . . . . . . . . . . . . . . . . . . . . . . . . . . . . . . . . . . . . . . . . . . . . . . . . . . . . . . |
35 |
|
Resetting to the Factory Default Settings . . . . . . . . . . . . . . . . . . . . . . . . . . . . . . . . . . . . . . . . . . . . . . . . . . . . . . . . . . . . . |
35 |
|
Troubleshooting . . . . . . . . . . . . . . . . . . . . . . . . . . . . . . . . . . . . . . . . . . . . . . . . . . . . . . . . . . . . . . . . . . . . . . . . . . . . . . . . . . |
36 |
|
Upgrading the Firmware |
36 |
|
Technical Specifications . . . . . . . . . . . . . . . . . . . . . . . . . . . . . . . . . . . . . . . . . . . . . . . . . . . . . . . . . . . . . . . . . . . . . . . . . . . |
41 |
|
General performance considerations |
43 |
|
Glossary of Terms . . . . . . . . . . . . . . . . . . . . . . . . . . . . . . . . . . . . . . . . . . . . . . . . . . . . . . . . . . . . . . . . . . . . . . . . . . . . . . . . . |
44 |
|
Index . . . . . . . . . . . . . . . . . . . . . . . . . . . . . . . . . . . . . . . . . . . . . . . . . . . . . . . . . . . . . . . . . . . . . . . . . . . . . . . . . . . . . . . . . . . |
50 |
3
AXIS M1011/M1011-W/M1031-W — Product Description
Product Description
This manual applies to the AXIS M1011/M1011-W/M1031-W Network Camera. The information provided here applies to all models, except where otherwise indicated.
Key features
•Attractive, small-sized design
These small, smart-looking and yet discreet cameras are perfectly suited for securing small businesses, boutiques, restaurants, hotels or residences.
•Progressive scan
The cameras use progressive scan technology, providing VGA images of moving objects with no distortion.
•Multiple H.264 streams
Multiple H.264 and Motion JPEG streams can be provided simultaneously, individually optimized for different quality needs and bandwidth constraints. These cameras support MPEG-4 Part 2 for backward compatibility.
•Easy and flexible installation
AXIS M1011/M1011-W/M1031-W Network Cameras are easy to install, with the -W variants optionally offering wireless connectivity for added flexibility.
•Advanced security and network management
Axis network cameras offer advanced security and network management features such as HTTPS encryption with preserved performance, IPv6 and Quality of Service.
•PIR Sensor (AXIS M1031-W)
Complementing the video motion detection capability of the cameras, the full-featured AXIS M1031-W additionally integrates a PIR Sensor for detecting movements — even in the dark.
•Illumination (AXIS M1031-W)
AXIS M1031-W offers a white LED for illuminating the scene automatically at an event or when requested by the user.
•Microphone and speaker (AXIS M1031-W)
AXIS M1031-W provides two-way audio support with integrated microphone and speaker, allowing remote listening in on an area as well as communication with persons entering the scene. An event can trigger the sound of an audio clip, stored in the camera, to be emitted through the speaker.
4
AXIS M1011/M1011-W/M1031-W — Product Description
Overview
|
AXIS M1031-W |
AXIS M1011/-W |
||||||||
|
Lens with |
Lens with |
||||||||
|
Status Indicator |
Status Indicator |
||||||||
|
LED |
LED |
||||||||
|
Microphone |
|||||||||
|
Light |
|||||||||
|
Speaker |
|||||||||
|
Rear view |
|||||||||
|
PIR Sensor |
|||||||||
|
(both models) |
Network connector
Lock ring
Product ID & Serial number (S/N). The serial number may be
required during the installation.
Power connector
Control button
Power Indicator LED
 Network Indicator LED
Wireless Indicator LED
(only activated on wireless models)
PIR Sensor — AXIS M1031-W is equipped with a PIR Sensor that has a maximum range of 6 meters for detecting movement in the dark.
Light — White LED to illuminate the scene.
Microphone/Speaker — Two-way audio support allows for remote users to listen in on an area and communicate with visitors or intruders.
Power Connector — For connection of the PS-H or PS-V power adapter (included).
Network Connector — The camera connects to the network via a standard network connector. Supporting NWay, the camera detects the speed of the local network segment (10BaseT/100BaseTX Ethernet).
Serial Number Label — The serial number may be required during installation.
Control Button — Press this button to install the camera using the AXIS Internet Dynamic DNS Service, or to restore the factory default settings, as described in Resetting to the Factory Default Settings, on page 35.
Note:
AXIS Internet Dynamic DNS Service is a free service from Axis that allows you to quickly and simply install your camera. This requires an Internet connection with no HTTP proxy. See www.axiscam.net for more information.
5

AXIS M1011/M1011-W/M1031-W — Product Description
LED indicators
|
LED |
Color |
Description |
|
Network |
Green |
Steady for connection to 100 Mbit/s network. Flashes for network activity. |
|
Amber |
Steady for connection to 10 Mbit/s network. Flashes for network activity. |
|
|
Unlit |
No connection. |
|
|
Power |
Green |
Normal operation. |
|
Amber |
Flashes green/amber during firmware upgrade. |
|
|
Wireless |
Green |
Steady for connection to a wireless network. Flashes for network activity. |
|
(Wireless |
Red |
Steady for no wireless network connection. Flashes when scanning for wireless net- |
|
models only) |
works. |
|
|
Unlit |
Wired mode. |
|
|
Status |
Green |
Shows steady green for normal operation. |
|
Note: The Status LED can be configured to be unlit during normal operation, or to flash |
||
|
only when the camera is accessed. See the online help files for more information. Go to |
||
|
Setup > System Options > LED settings |
||
|
Amber |
Steady during startup, reset to factory default or when restoring settings. |
|
|
Red |
Slow flash for failed upgrade. |
|
6
AXIS M1011/M1011-W/M1031-W — Accessing the Camera
Accessing the Camera
To install the AXIS M1011/M1011-W/M1031-W network cameras, refer to the installation guide supplied with your product.
The network camera can be used with most standard operating systems and browsers. The recommended browser is Microsoft Internet Explorer with Windows, Safari with Macintosh and Mozilla Firefox with other operating systems. See Technical Specifications, on page 41.
Notes:
•To view streaming video in Microsoft Internet Explorer, set your browser to allow ActiveX controls and install AXIS Media Control (AMC) on your workstation.
•QuickTimeTM is also supported for viewing H.264 and MPEG-4 streams and for audio.
•If your computer restricts the use of additional software components, the camera can be configured to use a Java applet for viewing Motion JPEG.
•The network camera includes one (1) H.264 decoder license and one (1) MPEG-4 decoder license for viewing video streams, and (1) AAC audio license (AXIS M1031-W). They are automatically installed with AMC. The administrator can disable the installation of the decoders to prevent installation of unlicensed copies.
Access from a browser
1.Start a browser (Internet Explorer, Firefox).
2.Enter the IP address or host name of the camera in the Location/Address field of your browser.
To access the camera from a Macintosh computer (Mac OSX), click on the Bonjour tab and select the AXIS M1011/M1011-W/M1031-W from the drop-down list.
3.If this is the first time you are accessing the camera, see Access from the Internet, on page 8. Otherwise enter your user name and password, set by the administrator.
4.The camera’s Live View page appears in your browser.
Note:
The layout of the Live View page may have been customized to specific requirements. Consequently, some of the examples and functions featured here may differ from those displayed on your own Live View page.
7
AXIS M1011/M1011-W/M1031-W — Accessing the Camera
Setting the root password
1.When accessing the camera for the first time, the ‘Configure Root Password’ dialog appears.
2.Enter a password and re-enter to confirm. Click OK. The
Enter Network Password dialog appears.
3.Enter the User name: root
4.Enter the password set in step 2, and click OK. If the password is lost, the camera must be reset to the factory default settings. See page 35.
Notes:
•The default administrator user name ‘root’ is permanent and cannot be deleted.
•While setting the root password, click Yes to install the AXIS Media Control (AMC), if you are prompted to. You will need administrator rights on the computer to do this.
Access from the Internet
Once connected, the camera is accessible on your local network (LAN). To access the camera from the Internet you must configure your broadband router to allow incoming data traffic to the camera. To do this, enable the NAT-traversal feature, which will attempt to automatically configure the router to allow access to the camera. This is enabled from Setup > System Options > Network > TCP/IP Advanced.
For more information, please see. See also the AXIS Internet Dynamic DNS Service at www.axiscam.net For Technical notes on this and other topics, visit the Axis Support web at www.axis.com/techsup
8
AXIS M1011/M1011-W/M1031-W — Accessing the Camera
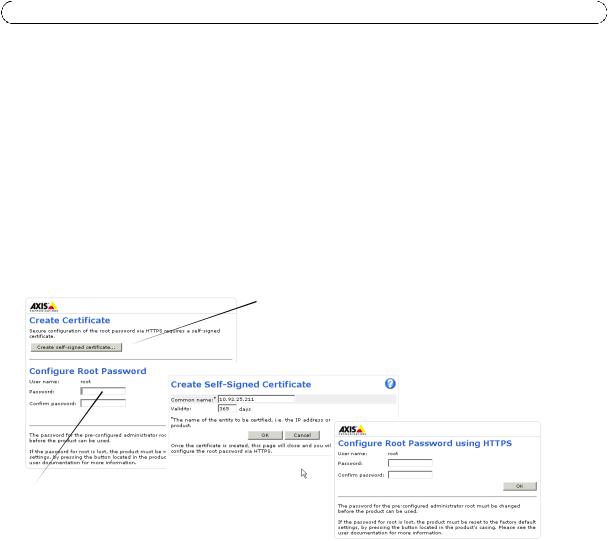
Setting the root password over a secure connection
To gain access to the product, you must set the password for the default administrator user — ‘root’. This is done in the ‘Configure Root Password’ dialog, which appears when the network camera is accessed for the first time.
To prevent network eavesdropping, the root password can be set via an encrypted HTTPS connection, which requires an HTTPS certificate (see notes below).
To set the password via a standard HTTP connection, enter it directly in the first dialog shown below.
To set the password via an encrypted HTTPS connection, follow these steps:
1.Click the Create self-signed certificate button.
2.Provide the requested information and click OK. The certificate is created and the password can now be set securely. All traffic to and from the network camera is encrypted from this point on.
3.Enter a password and then re-enter it to confirm the spelling. Click OK. The password has now been configured.
To create an HTTPS connection, click this button.
To configure the password directly via an unencrypted connection, enter the password here.
Notes:
•HTTPS (Hypertext Transfer Protocol over SSL) is a protocol used to encrypt the traffic between web browsers and servers. The HTTPS certificate controls the encrypted exchange of information.
•The default administrator user root cannot be deleted.
•If the password for root is lost or forgotten, the network camera must be reset to the factory default settings. See page 35.
•A warning may pop up in the browser due to the fact that the certificate is self-signed and not signed by a Trusted Certificate Authority (CA).
9

AXIS M1011/M1011-W/M1031-W — Accessing the Camera
The Live View page
How you customize the Live View page determines which buttons are visible. Not all the buttons described below will show up unless configured to do so.
General controls
The Stream Profile drop-down list allows you to select a customized or pre-programmed stream profile on the Live View page. Stream profiles are configured under Video & Audio > Stream Profiles, see Stream Profiles, on page 15 for more information.
Light (Active/Inactive) — The built-in light can be controlled directly from the Live View page. The three options are Pulse, Active/Inactive and a Slider. Select Active/Inactive to display a button for each action: Activate and Inactivate. The light button is configured under Live View Config > Layout. For more information see Layout, on page 19.
Light (Pulse) — Select Pulse to display one button that activates the port with the defined Activate and Inactivate actions for the defined period.
Light (Slider) — Use this slider to adjust the brightness of the camera’s white LED.
Audio clip — Audio clips can be played when an event occurs or manually from the Live View page.
The Snapshot button saves a snapshot of the video image on display. Right-click on the video image to save it in JPEG format on your computer. This button is primarily intended for use when the AMC viewer toolbar is not available.
AXIS Media Control (AMC) toolbar
AMC general controls
The AMC viewer toolbar (AXIS Media Control) is available in Microsoft Internet Explorer only. See AXIS Media Control (AMC), on page 13 for more information. AMC displays the following buttons:
The Play button connects to the Axis product and starts playing a media stream.
The Stop button stops the video stream being played.
The Snapshot button takes a snapshot of the current image. The location where the image is saved can be specified using the AXIS Media Control (AMC).
Click the View Full Screen button and the video image will fill the entire screen. Press Esc (Escape) on the computer keyboard to cancel full screen view.
The Record button is used to record the current video stream. The location where the recording is saved can be specified using the AXIS Media Control (AMC) toolbar.
10
![]()
AXIS M1011/M1011-W/M1031-W — Accessing the Camera
AMC audio controls (AXIS M1031-W)
AMC audio controls monitor the client computer’s speaker output. These controls are only available when audio is enabled.
Click the Speaker Button to switch the sound off and on to your computer’s speaker.
If you have set your network camera to half-duplex mode and the half-duplex Listen button appears first in the live view page of your Axis network camera, you are only able to receive audio from an external camera microphone. To be able to send audio, click this button. See note below.
If you have set your network camera to half-duplex mode and the half-duplex Talk button appears in the live view page of your Axis network camera if you push to talk, and you are only able to send audio to your Axis network camera. To be able to receive audio, click this button.
Click the Microphone button to switch the sound off and on to your computer’s microphone.
In Simplex — Network Camera speaker only mode, you can click this button to stop sending audio to the network camera. See note below.
Use this slider to control the volume of the speakers and the microphone.
Note:
In Simplex – speaker only or microphone only mode, you can use either the Microphone button or the half-duplex Talk button to stop sending audio to the network camera. To send audio, both buttons must be enabled.
11

AXIS M1011/M1011-W/M1031-W — Video Streams
Video Streams
The network camera provides several image and video stream formats. Your requirements and the properties of your network will determine the type you use.
The Live View page in the network camera provides access to H.264, Motion JPEG, and MPEG-4 video streams, and to the list of available stream profiles. Other applications and clients can also access these video streams/images directly, without going via the Live View page.
How to stream MPEG-4/H.264
This video compression standard makes good use of bandwidth, and can provide high quality video streams at less than 1 Mbit/s.
Deciding which combination of protocols and methods to use depends on your viewing requirements, and on the properties of your network. The available options in AMC are:
|
Unicast RTP |
This unicast method (RTP over UDP) should |
||
|
be your first consideration for live unicast |
|||
|
video, especially when it is important to |
|||
|
always have an up-to-date video stream, |
Unicasting is used for video-on-demand broadcasting, |
||
|
even if some images are dropped. |
|||
|
so that there is no video traffic on the network until a |
|||
|
RTP over RTSP |
This unicast method (RTP tunneled over |
client connects and requests the stream. |
|
|
RTSP) is useful as it is relatively simple to |
|||
|
configure firewalls to allow RTSP traffic. |
Note that there is a maximum of 20 simultaneous uni- |
||
|
cast connections. |
|||
|
RTP over RTSP over |
This unicast method can be used to traverse |
||
|
HTTP |
firewalls. Firewalls are commonly configured |
||
|
to allow the HTTP protocol, thus allowing |
|||
|
RTP to be tunneled. |
|||
|
Multicast RTP |
This method (RTP over UDP) should be used for live multicast video. The video stream is always |
||
|
up-to-date, even if some images are dropped. |
|||
|
Multicasting provides the most efficient usage of bandwidth when there are large numbers of cli- |
|||
|
ents viewing simultaneously. A multicast broadcast cannot however, pass a network router unless |
|||
|
the router is configured to allow this. It is not possible to multicast over the Internet, for example. |
|||
|
Note also that all multicast viewers count as one unicast viewer in the maximum total of 10 |
|||
|
simultaneous connections. |
|||
AMC negotiates with the camera to determine the transport protocol to use in the order listed above. This order can be changed and the options disabled, to suit specific requirements.
Important!
H.264, MPEG-4, and AAC (AXIS M1031-W), are licensed technologies. The network camera includes one H.264 viewing client license and one MPEG-4 viewing client license, and one audio client license. Installing additional unlicensed copies of the clients is prohibited. To purchase additional licenses, contact your Axis reseller.
12
AXIS M1011/M1011-W/M1031-W — Video Streams
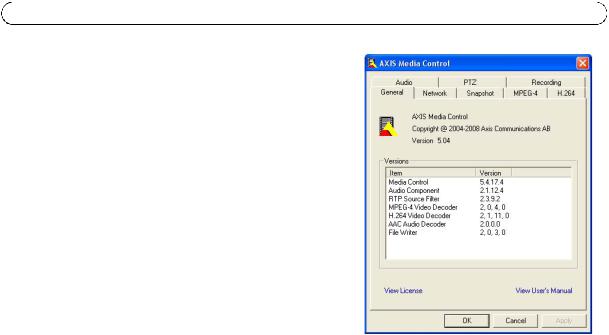
AXIS Media Control (AMC)
AXIS Media Control (AMC) in Microsoft Internet Explorer in Windows is the recommended method of accessing live video from the network camera.
The AMC control panel can be used to configure various video and audio settings. Please see the readme file included in the tool for more information.
The AMC control panel is automatically installed on first use, after which it can be configured. Open the AMC Control Panel from:
•Windows Control Panel (from the Start menu)
•Alternatively, right-click the video image in Internet Explorer and click Settings to access the AMC window.
Motion JPEG
This format uses standard JPEG still images for the video stream. These images are then displayed and updated at a rate sufficient to create a stream that shows constantly updated motion.
The Motion JPEG stream uses considerable amounts of bandwidth, but provides excellent image quality and access to every image contained in the stream. The recommended method of accessing Motion JPEG live video from the network camera is to use the AXIS Media Control (AMC) in Microsoft Internet Explorer in Windows.
Alternative methods of accessing the video stream
You can also access video/images from the network camera in the following ways:
•Motion JPEG server push (if supported by the client, Firefox, for example). This option maintains an open HTTP connection to the browser and sends data as and when required, for as long as required.
•Still JPEG images in a browser. Enter the path — http://<ip>/axis-cgi/jpg/image.cgi
•Windows Media Player. This requires AMC and the MPEG-4/H.264 viewing client to be installed. The paths that can be used are listed below in the order of preference:
•Unicast via RTP: axrtpu://<ip>/axis-media/media.amp
•Unicast via RTSP: axrtsp://<ip>/axis-media/media.amp
•Unicast via RTSP, tunneled via HTTP: axrtsphttp://<ip>/axis-media/media.amp
•Multicast: axrtpm://<ip>/axis-media/media.amp
•To access the video stream from QuickTime™ the following paths can be used:
•rtsp://<ip>/axis-media/media.amp
•rtsp://<ip>/axis-media/media.3gp
Notes:
•The network camera supports QuickTime 6.5.1 and later.
•QuickTime adds latency to the video and audio stream (up to 3 seconds).
•It may be possible to use other players to view the MPEG-4/H.264 stream using the paths above, although Axis does not guarantee this.
•<ip> = IP address
13

AXIS M1011/M1011-W/M1031-W — Video & Audio Settings
Video & Audio Settings
This section describes how to configure the camera, and is intended for product Administrators, who have unrestricted access to all settings; and Operators, who have access to the settings for Basic Setup, Video & Audio and Events.
You can configure the camera by clicking Setup in the top right-hand corner of the Live View page. Click  on this page to access the online help that explains the setup tools.
Video Stream
The video stream settings appear under four different tabs:
•Image
•Audio (AXIS M1031-W)
•H.264 & MPEG-4
•MJPEG
Image
Image Appearance
Use these settings to modify the image resolution and compression. Setting the compression level affects the image quality and the amount of bandwidth required; the lower the compression, the higher the image quality with higher bandwidth requirements.
See the online help files  for more information.
Video Stream
To avoid bandwidth problems on the network, the frame rate allowed to each viewer can be limited. Select the Unlimited radio button option to allow the highest available frame rate; or select the Limited to radio button option and enter a value (1-30) fps in the field.
Text Overlay Settings
Use these settings to include text, date, and time as overlay. Click  for information on available options.
Preview
For a preview of the image before saving the adjusted settings, select the Video Format and click Open…. When satisfied with the settings, click Save.
Audio (AXIS M1031-W)
Check the Enable Audio option to enable audio.
Text, date & time
overlay
14

AXIS M1011/M1011-W/M1031-W — Video & Audio Settings
Configuration settings from Video & Audio > Audio Settings are displayed under Current Audio Settings. See Audio Settings (AXIS M1031-W), on page 17 for more information on the audio settings.
H.264 & MPEG-4
GOV Settings
The GOV structure describes the composition of the video stream. Setting the GOV-length to a higher value saves considerably on bandwidth but may have an adverse effect on image quality.
Bit Rate Control
The bit rate can be set as Variable Bit Rate (VBR) or Constant Bit Rate (CBR).
VBR adjusts the bit rate according to the image complexity, using more bandwidth for increased activity in the image, and less for lower activity.
CBR allows you to set a fixed Target bit rate that consumes a predictable amount of bandwidth. As the bit rate would usually need to increase for increased image activity, but in this case cannot, the frame rate and image quality are affected negatively. To partly compensate for this, it is possible to prioritize either the frame rate or the image quality whenever the bit rate needs to be increased. Not setting a priority means the frame rate and image quality are equally affected.
Note:
•To determine a reasonable bit rate, go to Setup > Video & Audio > Video Stream > Image, check the Include checkbox and enter the code #b in the Include text: field. The current bit rate will display as a text overlay on the Live View page.
•To view the image stream while configuring the GOV settings and Bit rate control, select Open… under Preview.
MJPEG
Sometimes the image size is large due to low light or complex scenery. Adjusting the maximum frame size helps to control the bandwidth and storage used by the Motion JPEG video stream in these situations. Defining the frame size as Unlimited provides consistently good image quality at the expense of increased bandwidth and storage usage during low light. Limiting the frame size optimizes bandwidth and storage usage, but may give poor image quality. To prevent increased bandwidth and storage usage, the maximum frame size can be limited.
Stream Profiles
There are four pre-programmed stream profiles available for quick set-up. These settings can be adjusted and new customized profiles can be created. Each profile has a descriptive name, describing its usage and/or purpose. The profiles can be accessed from the Live View page.
•To add a new stream profile, click Add to bring up the Stream Profile Settings dialog.
•Choose a descriptive name and enter a description for your profile.
•Choose the form of Video encoding you wish to use from the drop-down list:
H.264 — Also known as MPEG-4 Part 10. This is the new generation compression standard for digital video. This function offers higher video resolution than Motion JPEG or MPEG-4 at the same bit rate and bandwidth, or the same quality video at a lower bit rate.
MPEG-4 part 2 — A video compression standard for digital video.
Motion JPEG — Delivers a high quality video stream, from which individual images can be extracted and saved.
•Copy an existing stream profile to your system and rename the copy.
•Modify an existing stream profile based on the light situation and motion to be captured by your camera. See Stream Profile Settings for more information.
•Highlight the stream profile you wish to remove, then click Remove to remove it from the list.
15

AXIS M1011/M1011-W/M1031-W — Video & Audio Settings
Camera Settings
This page provides access to the advanced image settings for the AXIS M1011/M1011-W/M1031-W.
Image Appearance
Color level — Select an appropriate level by entering a value in the range 0-100. Lower values mean less color saturation, whilst the value 100 gives maximum color saturation.
Brightness — The image brightness can be adjusted in the range 0-100, where a higher value produces a brighter image.
Sharpness — Controls the amount of sharpening applied to the image. A sharper image might increase image noise especially in low light conditions. A lower setting reduces image noise, but the image would be less sharp.
Contrast — Adjust the image’s contrast by raising or lowering the value in this field.
Rotate image — The image can be rotated to the correct orientation. Select the appropriate value from the drop-down list.
White balance
This is used to compensate for the different colors present in different light sources, to make the colors in the image appear the same. The AXIS M1011/M1011-W/M1031-W can be set to automatically identify the light source and compensate for its color. Alternatively, the type of light source can be manually selected from the drop-down list. Please see the online help files  for a description of each available setting.
Exposure Settings
Configure the exposure settings to suit the image quality requirements in relation to lighting, frame rate and bandwidth considerations.
Exposure value — Increasing the exposure will improve image quality at the expense of the total frame rate. There may also be an increase in motion blur.
Exposure control — This setting is used to remove 50/60 Hz flicker.
Enable Backlight compensation — Backlight compensation makes the subject appear clearer when the image background is too bright, or the subject too dark.
Exposure zones — This setting determines which part of the image is used to calculate the exposure.
Exposure priority — This defines the balance between image quality and the frame rate. When Motion is prioritized, motion blur is minimized, but the image quality may be reduced with a higher frame rate. A prioritized Low noise will provide better image quality with a lower frame rate.
View Image Settings
Click View to view the video stream with the current configuration. Once satisfied, click Save.
Overlay Image
An overlay image is a static image superimposed over the video image. An overlay can be used to provide extra information, or to mask a part of the video image.
To use an overlay image in the AXIS M1011/M1011-W/M1031-W Network Camera, it must be selected from the drop-down list of available images. The overlay (a logo, for example) is then displayed in the video image.
To use your own image, first upload it to the AXIS M1011/M1011-W/M1031-W Network Camera. To upload enter the name of the file in the field provided, or click the Browse button, locate and click the Upload button.
16
 Loading…
-
Страница 1
ENGLISH DEUTSCH ITALIANO ESPAÑOL INSTALLATION GUIDE FRAN Ç AIS AXIS M1011 Network Camera AXIS M1011-W Network Camera AXIS M1031-W Network Camera[…]
-
Страница 2
About this Document This document includes ins tru ctions for installing the AXIS M1011/M1031 on your network. Previous experience of networking will be beneficial when installing the product . Legal Consideratio ns Video and audio surveillance ca n be prohibited by laws that vary from country to co untry. Check the laws in your local region before[…]
-
Страница 3
AXIS M1011/M1011-W/M1031-W Installation Guide Page 3 ENGLISH AXIS M1011/-W & AXIS M1031-W Installation Guide This installation guide provides instructions for installing the AXIS M1011/-W / AXIS M1031-W Network Camera on your network. For all other as pects of using the product, please see the User’s Manual, available on the CD included in th[…]
-
Страница 4
Page 4 AXIS M1011/M1011-W/M1 031-W Installation Guide Hardware overview Please refer to page 15 for details on the connectors and LED indicators. Product number (P/N) & The seri al numbe r may be required during the installation. Power connector Control button Network connector Power Indicator LED Network Indicator LED Lock ring Microphone Ligh[…]
-
Страница 5
AXIS M1011/M1011-W/M1031-W Installation Guide Page 5 ENGLISH Install the hardware Mount the camera AXIS M1011/M1011-W/M1031-W is shipped with the stand and extension section mounted. Disassemble the stand and, depending on the inte nded installat ion, follow these instructions for wall mounting or shelf mounting. Wall mounting 1. Unscrew the extens[…]
-
Страница 6
Page 6 AXIS M1011/M1011-W/M1 031-W Installation Guide Assign an IP address Most networks today have a DHCP server that automatically assi gns IP addresses to connected devices. If your network does not have a DHCP server the AXIS M1011/M1011-W/M1031-W will use 192.168.0.90 as the default IP address. If you would like to assign a static IP addres s,[…]
-
Страница 7
AXIS M1011/M1011-W/M1031-W Installation Guide Page 7 ENGLISH AXIS IP Utility — single camera/small installation AXIS IP Utility automatically discovers and displays Axis devices on your network. The application can also be used to manually assign a static IP address Note that the computer running AXIS IP Utility must be on the same network segment […]
-
Страница 8
Page 8 AXIS M1011/M1011-W/M1 031-W Installation Guide AXIS Camera Management — mult iple cameras/large installations AXIS Camera Management can au tomatically discover multiple Axis devices, show connection status, manage firmware upgr ades and set IP addresses. Automatic discovery 1. Check that the camera is conn ected to th e network and that pow[…]
-
Страница 9
AXIS M1011/M1011-W/M1031-W Installation Guide Page 9 ENGLISH Set the password To gain access to the product, the pass word for the default administra tor user root must be set. This is done in the ‘ Configure Root Password ’ dialog, which is displayed when the AXIS M1011/M1011- W/M1031-W is accessed for the first time. To prevent network eavesd[…]
-
Страница 10
Page 10 AXIS M1011/M1 011-W/ M1031-W Installation Guide Access the video stream The Live View page of the networ k camera is displayed, with links to the Setup tools which allow you to customize the camera. If required, click Yes to install AMC (AXIS Media Control), which allows viewing of the video st ream in Internet Explorer. You will need admin[…]
-
Страница 11
AXIS M1011/M1011-W/M1 031-W Installation Guide Page 11 ENGLISH Configure the wireless connection AXIS M1011-W/M1031-W is temporarily connected to the wired network to allow configuration of the camera’s wireless settings be fore connecting to the wireless network. Configuring the camera using an unsecured wireless conne ction is not recommended, […]
-
Страница 12
Page 12 AXIS M1011/M1 011-W/ M1031-W Installation Guide Wireless Settings 1. Select an access point or ad-hoc device under Statu s of Wireless Networks , some of the required information will automatically be entered under Wireless Sett ings . 2. SSID is the name of the selected wireless netw ork. Leave this field blank if AXIS M1011-W/ M1031-W is […]
-
Страница 13
AXIS M1011/M1011-W/M1 031-W Installation Guide Page 13 ENGLISH WEP Authentication — Select Open or Shared Key , depending on the method used by your access point. Not all access points have this option, in which case they probably use Open System, which is sometimes known as SSID Authentication. Key length — This sets the length of the key used fo […]
-
Страница 14
Page 14 AXIS M1011/M1 011-W/ M1031-W Installation Guide Other methods of setting the IP address The table below shows the other methods available for setting or discovering the IP address. All methods are enabled by defaul t, and all can be disabled. Set the IP address with ARP/Ping 1. Acquire an IP address on the same networ k segment your compute[…]
-
Страница 15
AXIS M1011/M1011-W/M1 031-W Installation Guide Page 15 ENGLISH Unit connectors Network connector — RJ-45 Ethernet connector. Shielded cables recommended. Power connector — Mini DC connect or 5.0-5.1V DC, Max 1.5A. Center pin +. LED indicators AXIS M1031-W only AXIS M1031-W is equipped with the following: PIR sensor — a passive infrared sensor that […]
-
Страница 16
Page 16 AXIS M1011/M1 011-W/ M1031-W Installation Guide Resetting to the Factory Default Settings This will reset all parameters, including the IP address, to the Fa ctory Default settings: 1. Disconnect power from the camera. 2. Press and hold the Control button and reconnect power. 3. Keep the Control button pressed until the Power indicator flas[…]
-
Страница 17
AXIS M1011/M1011-W/M1 031-W Guide d’installa tion Page 17 FRAN Ç AIS AXIS M1011/-W & AXIS M1031-W Guide d’installation Ce guide d’installation explique comment inst aller la caméra AXIS M1011/-W / AXIS M1031-W Caméra réseau sur votre réseau. Pour toute autre qu estion relative à l’utili sation de ce produit, reportez-vous au manue[…]
-
Страница 18
Page 18 AXIS M1011/M1011 -W/M 1031-W Guide d’installation Vue d’ensemble du matériel Reportez-vous à la page 31 pour tous renseignemen ts sur les connecteurs et les témoins DEL. Référence produit (P/N) et Le numéro de série peut être demandé pendant l’installation. Connecteur d’alimentation Bouton de commande Connecteur réseau Té[…]
-
Страница 19
AXIS M1011/M1011-W/M1 031-W Guide d’installa tion Page 19 FRAN Ç AIS Installation du matériel Montage de la caméra L’AXIS M1011/M1011-W/M1031-W est fournie avec support et rallon ge montés. Démontez le support suivez les consignes ci-après pour monter la caméra sur un mur ou sur une étagère, selon le type d’installation prévue. Mont[…]
-
Страница 20
Page 20 AXIS M1011/M1011 -W/M 1031-W Guide d’installation Attribution d’une adresse IP Aujourd’hui, la plupart des réseaux sont équipés d’un serveur DHCP, qui attribue automatiquement des adresses IP aux périphérique s connectés. Si votre réseau en est dépourvu, la caméra AXIS M1011/M1011-W/M1031-W utilisera 192.168.0. 90 comme adr[…]
-
Страница 21
AXIS M1011/M1011-W/M1 031-W Guide d’installa tion Page 21 FRAN Ç AIS AXIS IP Utility – Une seule caméra/petites installations AXIS IP Utility détecte automatiquement les périphériq ues Axis de votre réseau et les affiche. Cette application permet également de défini r manuellement une adresse IP statique. Notez que l’ordinateur exécu[…]
-
Страница 22
Page 22 AXIS M1011/M1011 -W/M 1031-W Guide d’installation AXIS Camera Management – Plusie urs caméras/grandes installations AXIS Camera Management est ca pable de détecter automatiquem ent plusieurs dispositifs Axis, d’afficher l’état de connexion, de gérer les mises à niveau du micrologiciel et de configurer les adresses IP. Détectio[…]
-
Страница 23
AXIS M1011/M1011-W/M1 031-W Guide d’installa tion Page 23 FRAN Ç AIS Configuration du mot de passe Pour accéder au produit, le mot de pa sse de l’administrateur par défaut, root , doit être configuré. Vous pouvez effectuer cette opéra tion via la boîte de dialogue Configure Root Password (Configurer le mot de passe root) qui s’affiche […]
-
Страница 24
Page 24 AXIS M1011/M1011 -W/M 1031-W Guide d’installation Accès au flux de données vidéo La page Live View (Vidéo en di rect) de la camé ra réseau s’affiche. E lle propose des liens vers différents outils de configuration vous pe rmettant d’adapter la caméra à vos besoins. Si nécessaire, cliquez sur Yes (Oui) pour installer AMC (Axi[…]
-
Страница 25
AXIS M1011/M1011-W/M1 031-W Guide d’installa tion Page 25 FRAN Ç AIS Configuration de la connexion sans fil L’AXIS M1011-W/M1031-W est temporairement conne ctée au réseau sans fil afin de vous permettre de configurer les paramètres sans fil de la caméra avant la connexion au réseau sans fil. Il est déconseillé de configurer la caméra a[…]
-
Страница 26
Page 26 AXIS M1011/M1011 -W/M 1031-W Guide d’installation Paramètres sans fil 1. Sélectionnez un point d’accès ou un dispositif ad hoc sous Statu s of Wireless Networks (État des réseaux sans fil) . Certaines des informatio ns requises sont automa tiquement reprises sous Wireless Settings (Paramètres sans fil) . 2. SSID est le nom du rés[…]
-
Страница 27
AXIS M1011/M1011-W/M1 031-W Guide d’installa tion Page 27 FRAN Ç AIS EAP-TLS • Identity (Identité) : saisissez l’identité de l’utilisateur à présenter au réseau. • Private key pass word (Mot de passe pour la clé privée) : saisissez le mot de passe de votre identité d’utilisateur. • EAPOL version (Version EAPOL) : sélectionne[…]
-
Страница 28
Page 28 AXIS M1011/M1011 -W/M 1031-W Guide d’installation Fin de l’installation sans fil 1. Vérifiez que les paramètres sans fil de la caméra correspondent à ceux du point d’accès. 2. Débranchez le câble réseau de la caméra. 3. Actualisez la page Web au bout de 20 à 30 second es afin de valider la connexion sans fil. Si vous ne pouv[…]
-
Страница 29
AXIS M1011/M1011-W/M1 031-W Guide d’installa tion Page 29 FRAN Ç AIS Autres méthodes de configuration de l’adresse IP Le tableau ci-dessous indique les autres méthodes permettant de configurer ou de déterminer l’adresse IP. Toutes les méthodes sont activé es par défaut et peuvent être désact ivées. Configuration de l’adresse IP à[…]
-
Страница 30
Page 30 AXIS M1011/M1011 -W/M 1031-W Guide d’installation Remarques : • Pour ouvrir une invite de commande sous Window s : dans le menu Démarre r, sélectionnez Exécuter… et tapez cmd. Cliquez sur OK. • Pour utiliser la commande ARP sous Mac OS X, utilisez l’utilitaire Termina l dans Application > Utilitaires.[…]
-
Страница 31
AXIS M1011/M1011-W/M1 031-W Guide d’installa tion Page 31 FRAN Ç AIS Connecteurs de l’appareil Connecteur réseau — Connecteur Ethernet RJ-45. Il est co nseillé d’utiliser de s câbles blindés. Connecteur d’alimentation — Miniconnecteur CC 5,0-5,1 V CC, ma x. 1,5 A. Broche centrale +. Témoins DEL Témoin DEL Couleur Indication Réseau V[…]
-
Страница 32
Page 32 AXIS M1011/M1011 -W/M 1031-W Guide d’installation AXIS M1031-W uniquement L’AXIS M1031-W est équipée des dispositifs suivant s : Capteur infrarouge passif – Le capteur infrarouge passif mesu re la lumière infrarouge des objets traversant son champ de vision. Si la caméra est configurée en ce sens, elle peut automatiquement allume[…]
-
Страница 33
AXIS M1011/M1011-W/M1 031-W Guide d’installa tion Page 33 FRAN Ç AIS Rétablissement des paramètres d’usine par défaut Procédez comme suit pour rétablir tous les pa ramètres d’usine définis par défaut, y compris l’adresse IP : 1. Débranchez l’aliment ation de la caméra. 2. Maintenez le bouton de commande enfoncé et rebranchez l[…]
-
Страница 34
[…]
-
Страница 35
AXIS M1011/M1011-W/M1031 -W Installationsanleitung Seite 35 DEUTSCH AXIS M1011/-W & AXIS M1031-W Installationsanleitung In dieser Anleitung wird die Installation der AXIS M1011/-W / AXIS M1031-W Netzwerk-Kamera in einem Netzwerk beschrieben. Alle weiteren Hinw eise zur Verwendung des Produkts finden Sie im Benutzerhandbuch, das auf der mitgelie[…]
-
Страница 36
Seite 36 AXIS M1011/M1011-W/M1031- W Installationsanleitung Hardwareübersicht Ausführliche Informationen zu den Anschlüsse n und LED-Anzeigen finden Sie auf Seite 50. Produktnummer (Artikelnr.) und Die Seriennummer wird für die Installation benötigt. Netzans chlus s Steuertaste Netzwerkanschluss Betriebsanzeige (LED) Netzwerkanzeige (LED ) Ver[…]
-
Страница 37
AXIS M1011/M1011-W/M1031 -W Installationsanleitung Seite 37 DEUTSCH Hardware installieren Kamera befestigen AXIS M1011/M1011-W/M1031-W Die Kamera wird mit montiertem Standfuß und mit Verlängerung ausgeliefert. Wenn Sie die Kamera an der Wand oder an einem Regal befestigen möchten, demontieren Sie den Standfuß und befolgenden Sie die folgenden A[…]
-
Страница 38
Seite 38 AXIS M1011/M1011-W/M1031- W Installationsanleitung 3. Überprüfen Sie, ob die LED-Anzeigen die Betr iebszustände korrekt angeben. Weitere Informationen finden Sie in der Tabelle auf Seite 5 0. Beachten Sie , dass LEDs deaktiviert sein können und deshalb nicht leuchten. 4. Fahren Sie mit IP-Adresse zuweisen, auf Seite 39 fort.[…]
-
Страница 39
AXIS M1011/M1011-W/M1031 -W Installationsanleitung Seite 39 DEUTSCH IP-Adresse zuweisen In den meisten Netzwerken ist heutzutage ei n DHCP-Server eingebunden, der angeschlossenen Geräten automatisch IP-Adressen zuweist. Wenn Ihr Netzwerk über keinen DHCP-Server verfügt, wird für die AXIS M1011/M1011-W/M1031-W die St andard-IP-Adresse 192.168.0.[…]
-
Страница 40
Seite 40 AXIS M1011/M1011-W/M1031- W Installationsanleitung AXIS IP Utility — Einzelne Kamera/kleine In stallation AXIS IP Utility erkennt automatisch im Netzwerk vorhandene Axis-Geräte und zeigt diese an. Die Anwendung kann außerdem zur manuellen Zuweisung einer statischen IP -Adresse verwendet werden Beachten Sie, dass sich die AXIS M1011/M1011[…]
-
Страница 41
AXIS M1011/M1011-W/M1031 -W Installationsanleitung Seite 41 DEUTSCH AXIS Camera Management — Mehr ere Kameras/große Installation Mit AXIS Camera Management können auto matisch mehrere Axis-Geräte erkannt, de r Verbindungsstatus angezeigt, die Firmware-Aktualisierungen verw al tet und IP-Adressen festgelegt werden. Automatische Erkennung 1. Stell[…]
-
Страница 42
Seite 42 AXIS M1011/M1011-W/M1031- W Installationsanleitung Kennwort festlegen Für den Zugriff auf das Produkt muss das Kenn wort für den standardmäßigen Administrator- Benutzer root festgelegt werden. Beim erstmaligen Zugriff auf AXIS M1011/M1011-W/M103 1-W wird das Dialogfeld „ Configure Root Password “ (Root-Kennwort konfiguriere n) geö[…]
-
Страница 43
AXIS M1011/M1011-W/M1031 -W Installationsanleitung Seite 43 DEUTSCH Auf Videostrom zugreifen Die Seite „Live-View“ (Live-Ansi cht) Netzwerk-Kam era enthält Links zu Setup-Tools, mit denen Sie die Kamera Ihren Bedürfnissen entsprechend anpassen können. Klicken Sie bei Bedarf auf Yes (Ja), um AMC (AXIS Media Control) zu installieren. Nach Absc[…]
-
Страница 44
Seite 44 AXIS M1011/M1011-W/M1031- W Installationsanleitung WLAN-Verbindung konfigurieren Bevor Sie eine Verbindung zum WLAN-Netzwerk herstellen, müssen Sie AXIS M1011-W/M1031-W vorübergehend über Kabel mit dem Netzwerk verbinden, um die Einst ellungen für die drahtlose Verbindung zu konfigurieren. Es ist nicht empf ehlenswert, die Kamera über[…]
-
Страница 45
AXIS M1011/M1011-W/M1031 -W Installationsanleitung Seite 45 DEUTSCH Einstellungen für die WLAN-Verbindung 1. Wählen Sie einen Access Point bzw. ein Ad-hoc-Gerät unter Status of Wireless Networks (Status von WLAN-Netzwerken) aus. Einige Felder unter Wireless Se ttings (Einstellungen für die WLAN-Verbindung) werden automatisch ausgefüllt. 2. SSI[…]
-
Страница 46
Seite 46 AXIS M1011/M1011-W/M1031- W Installationsanleitung EAP-TLS • Identity (Identität) — Geben Sie die Benutzeridentität für das Netzwerk ein. • Private key pass word (Privater Schlüssel) — Geben Sie das Kennwort für die Benutzeridentität ein. • EAPOL version (EAPOL-Version ) — Wählen Sie die vom Access Point verwendete Version (1 […]
-
Страница 47
AXIS M1011/M1011-W/M1031 -W Installationsanleitung Seite 47 DEUTSCH Schließen Sie die Installatio n des Drahtlosnetzwerks ab 1. Stellen Sie sicher, dass die Einstellungen fü r die WLAN-Verbindung in der Kamera mit den Einstellungen im Access Point übereinstimmen. 2. Ziehen Sie das Netzwerkkabel von der Kamera ab. 3. Aktualisieren Sie die Webseit[…]
-
Страница 48
Seite 48 AXIS M1011/M1011-W/M1031- W Installationsanleitung Andere Methoden zum Festlegen der IP-Adresse Diese Tabelle bietet einen Überblick über weiter e Methoden, die IP-Adresse festzulegen bzw. zu ermitteln. Alle Methoden sind standardmäßig aktiviert und können deaktiviert werden. IP-Adresse per ARP/Ping zuweisen 1. Wählen Sie eine IP-Adr[…]
-
Страница 49
AXIS M1011/M1011-W/M1031 -W Installationsanleitung Seite 49 DEUTSCH 6. Starten Sie einen Browser, geben Sie im Adressfe ld „http://<IP-Adresse>“ ein, und drücken Sie die Eingabetaste auf der Tastat ur. Hinweise: • So öffnen Sie die Eingabeaufforderung unter Wi ndows: Wählen Sie im Startmenü die Option „Ausführen…“ und geben S[…]
-
Страница 50
Seite 50 AXIS M1011/M1011-W/M1031- W Installationsanleitung Geräteanschlüsse Netzwerkanschluss — RJ-45-Ethernetanschluss. Die Verwendung von abgesc hirmten Kabeln wird empfohlen. Netzanschluss — Mini-Gleichstromanschluss 5.0-5.1 V Gleichst rom, max. 1,5 A. Mittlerer Anschluss +. LED-Anzeigen LED Farbe Bedeutung Netzwerk Grün Leuchtet da uerhaf t[…]
-
Страница 51
AXIS M1011/M1011-W/M1031 -W Installationsanleitung Seite 51 DEUTSCH AXIS M1031-W-Komponenten AXIS M1031-W ist mit den folgenden Komponenten ausgestat tet: PIR-Sensor — Ein passiver Infrarotsensor, der das In frarotlicht beweglicher Objekte im Sichtfeld messen kann. Sie können die Kamera so konfiguriere n, dass über den PIR-S ensor automatisch Lic[…]
-
Страница 52
Seite 52 AXIS M1011/M1011-W/M1031- W Installationsanleitung Parameter auf Werkseinstellungen zurücksetzen Gehen Sie wie folgt vor, um sämtliche Parameter ei nschließlich der IP-Adresse auf die werkseitigen Standardeinstellungen zurückzusetzen: 1. Trennen Sie die Kamera von der Stromversorgung. 2. Halten Sie die Steuertaste gedrückt und schlie?[…]
-
Страница 53
Guida all’installazione AXIS M101 1/M1011-W/M1031-W Pagina 53 ITALIAN O AXIS M1011/-W & AXIS M1031-W Guida all’installazione Questo documento forn isce le istr uzioni necessarie per installare la videocamera AXIS M1011/-W / AXIS M1031-W Videocamera di rete nella rete in uso. Per ulteriori informazioni sull’utilizzo del prodotto, con[…]
-
Страница 54
Pagina 54 Guida all’installazion e AXIS M1011/M1011 -W/M1031-W Panoramica dell’hardware Per informazioni dettagliate sui connettori e gli indicatori LED, vedere la Pagina 68. Codice prodotto (N/P) e Il numero di serie è talvolta richiesto durante l’installazione. Connettore di alimentazione Pulsante di comando Connettore di rete Indica[…]
-
Страница 55
Guida all’installazione AXIS M101 1/M1011-W/M1031-W Pagina 55 ITALIAN O Installazione dell’hardware Montaggio della videocamera La videocamera AXIS M1011/M1011-W/M1031-W viene fornita con la base e la sezione allungabile pre-montate. Smontare la base e, a seconda dell a configurazione di inst allazione, seguire le istruzioni riportate di […]
-
Страница 56
Pagina 56 Guida all’installazion e AXIS M1011/M1011 -W/M1031-W 3. Verificare che i LED indichino le condizioni di funzionamento corrette. Per ulteriori dettagli, vedere la tabella a Pagina 68. Si noti che al cuni LED possono essere disabilitati o spenti. 4. Passare a Assegnazione di un indirizzo IP, alla pagina 57.[…]
-
Страница 57
Guida all’installazione AXIS M101 1/M1011-W/M1031-W Pagina 57 ITALIAN O Assegnazione di un indirizzo IP La maggior parte delle reti dispone di un server DHCP che automaticamente assegna gli indirizzi IP alle perif eriche conn esse. Se la rete non dispone di un server DHCP, per la videocamera AXIS M1011/M1011-W/M1031-W viene utilizzato l’i[…]
-
Страница 58
Pagina 58 Guida all’installazion e AXIS M1011/M1011 -W/M1031-W AXIS IP Utility: videocamera singola/piccole installazioni AXIS IP Utility rileva e visualizza automaticame nte le periferiche Axis collegate alla rete. L’applicazione può inoltre esse re utilizzata per assegnare manualmente un indirizzo IP statico. Si tenga presente che la v[…]
-
Страница 59
Guida all’installazione AXIS M101 1/M1011-W/M1031-W Pagina 59 ITALIAN O AXIS Camera Management: più vi deocamere/grandi installazioni È possibile utilizzare AXIS Camera Management per individuare auto maticamente la presenza di più periferiche Axis, mostrare lo stato di conness ione, gestire gli aggiornamenti del firmware e impostare gli in[…]
-
Страница 60
Pagina 60 Guida all’installazion e AXIS M1011/M1011 -W/M1031-W Impostazione della password Per ottenere l’accesso al prodotto , è necessario impostare la pass word dell’utente amministratore predefinito root . Questa operazione può essere effe ttuata nella finestra di dialogo ‘ Configure Root Password ’ (Configura password root[…]
-
Страница 61
Guida all’installazione AXIS M101 1/M1011-W/M1031-W Pagina 61 ITALIAN O Accesso al flusso video Viene visualizzata la pagina Live View (Immagi ni dal vivo) con i collegamenti agli strumenti di configurazione che consentono di personalizzare la videocamera. Se necessario, fare clic su Yes (Sì) per installare AMC (Axis Media Control) che consen[…]
-
Страница 62
Pagina 62 Guida all’installazion e AXIS M1011/M1011 -W/M1031-W Configurazione della connessione wireless Collegare temporaneamente la videocamera AXIS M1011-W/M 1031-W alla rete cablata per configurare le impostazioni wireless prima di eseg uire il collegamento alla rete wireless. Non è consigliabile usare una connessione wireless non sicura […]
-
Страница 63
Guida all’installazione AXIS M101 1/M1011-W/M1031-W Pagina 63 ITALIAN O Impostazioni wireless 1. Selezionare il numero di punto di ac cesso o di una periferica ad hoc in Status of Wireless Networks (Stato delle reti wireless ). Alcune delle informazioni richieste vengono inserite automaticamente nella sezione Wireless Sett ings (Impostazioni w[…]
-
Страница 64
Pagina 64 Guida all’installazion e AXIS M1011/M1011 -W/M1031-W EAP-TLS • Identity (Identità) – Inserire l’ID utente da presentare alla rete. • Private key pass word (Password basata su chiave privata) – Inserire la password da usare per l’ID utente. • EAPOL version (Versione EAPOL) – Selezionare la versione usata (1 o 2)[…]
-
Страница 65
Guida all’installazione AXIS M101 1/M1011-W/M1031-W Pagina 65 ITALIAN O Completamento dell’i nstallazione wireless 1. Verificare che le impostazioni wireless della videocamera corrispondano alle impostazioni del punto di accesso. 2. Scollegare il cavo di rete dalla videocamera. 3. Aggiornare la pagina Web dopo circa 20-30 seco ndi per con[…]
-
Страница 66
Pagina 66 Guida all’installazion e AXIS M1011/M1011 -W/M1031-W Altri metodi di impostazione dell’indirizzo IP La seguente tabella descrive gli altri metodi dispon ibili per impostare o individuare l’indirizzo IP. Per impostazione predefinita, tutti i metodi so no disponibili e possono essere disabilitati. Impostazione dell’indirizz[…]
-
Страница 67
Guida all’installazione AXIS M101 1/M1011-W/M1031-W Pagina 67 ITALIAN O Note • Per aprire una finestra MS-DOS in Windows: dal menu Start, scegliere Esegui… e digitare cmd. Fare clic su OK. • Per utilizzare il comando ARP in un sistema operativo M ac OS X, usare l’utility Terminal, in Applicazioni > Utilità.[…]
-
Страница 68
Pagina 68 Guida all’installazion e AXIS M1011/M1011 -W/M1031-W Connettori Connettore di rete — Connettore Ethernet RJ-45. È cons igliato l’uso di cavi schermati. Connettore di alimentazio ne — Connettore mini DC da 5,0-5,1V c.c., max 1,5 A. Center pin +. Indicatori LED Solo per il modello AXIS M1031-W La videocamera AXIS M1031-W è munit[…]
-
Страница 69
Guida all’installazione AXIS M101 1/M1011-W/M1031-W Pagina 69 ITALIAN O Per ulteriori informazioni, vedere la Guida per l’utente della videocamera AX IS M1011/M1011-W/ M1031-W disponibile sul sito Web di Axis all’indi rizzo www.axis.com oppure sul CD fornito con il prodotto. Ripristino delle impostazioni predefinite Questa procedura […]
-
Страница 70
[…]
-
Страница 71
AXIS M1011/M1011 -W/ M1031-W Guía de instalación Página 71 ESPAÑOL AXIS M1011/-W & AXIS M1031-W Guía de instalación Esta guía de instalación incluye las instrucciones necesarias para instal ar la AXIS M1011/-W / AXIS M1031-W Cámara de red en su red. Para obtener información sobre cualquier cuestión relacionada con el uso del producto[…]
-
Страница 72
Página 72 AXIS M1011/M10 11-W/M1031-W Guía de instalación Presentación del hardware Consulte la página 84 si necesita más inform ación sobre los conectores e indicadores LED. Referencia (N/P) y El número de serie puede ser necesario durante la instalación. Conector de alimentación Botón de control Conector de red LED indicador de aliment[…]
-
Страница 73
AXIS M1011/M1011 -W/ M1031-W Guía de instalación Página 73 ESPAÑOL Instale el hardware Montaje de la cámara AXIS M1011/M1011-W/M1031-W se suministra con el soporte y la pieza extensora montados. En función de la instalación que necesite, desmonte el soporte y siga las instrucciones que indicamos a continuación para montar en pared o en esta[…]
-
Страница 74
Página 74 AXIS M1011/M10 11-W/M1031-W Guía de instalación Asignación de la di rección IP Actualmente, la mayoría de redes disponen de un servidor DHCP que asigna direcciones IP a los dispositivos conectados de forma automática. Si su red no dispone de un servidor DHCP, AXIS M1011/M1011-W/M1031-W utilizará 192.168.0.90 como dirección IP pre[…]
-
Страница 75
AXIS M1011/M1011 -W/ M1031-W Guía de instalación Página 75 ESPAÑOL AXIS IP Utility: para cámaras in dividuales o instalaciones pequeñas AXIS IP Utility detecta y muestra automáticamente los dispositivos Axis qu e existen en la red. Además, puede utilizarse para asignar manualmente una dirección IP estática. Recuerde que el equipo que ejec[…]
-
Страница 76
Página 76 AXIS M1011/M10 11-W/M1031-W Guía de instalación AXIS Camera Management: para varias cámaras e instalaciones grandes AXIS Camera Management puede de tectar automáticamente varios dispositivos Axis, mostrar el estado de la conexión, administrar las actualizac iones del firmware y configurar direcciones IP. Detección automática 1. Co[…]
-
Страница 77
AXIS M1011/M1011 -W/ M1031-W Guía de instalación Página 77 ESPAÑOL Configuración de la contraseña Para poder acceder al producto, hay que configurar la contraseña del usuario predeterminado para el administrador root . Al acceder por primera vez a la cámara AXIS M1011/M1011-W/M1031-W, aparecerá el cuadro de diálogo “ Configure Root Pass[…]
-
Страница 78
Página 78 AXIS M1011/M10 11-W/M1031-W Guía de instalación Acceda al vídeo continuo La página Live View de la cámara de red apar ece con enlace s a las herra mientas de configuración que le permiten personalizar la cámara. En caso necesario, haga clic en Yes (Sí) para instalar el AMC (AXIS Media Cont rol) y así permitir la visualización d[…]
-
Страница 79
AXIS M1011/M1011 -W/ M1031-W Guía de instalación Página 79 ESPAÑOL Configuración de la conexión inalámbrica La AXIS M1011-W/M1031-W está conectada tem poralmente a la red co n cables para poder configurar los parámetros inalámbricos de la cámara antes de efectuar la co nexión a la red. No se recomienda configurar la cámara mediante una[…]
-
Страница 80
Página 80 AXIS M1011/M10 11-W/M1031-W Guía de instalación Valores inalámbricos 1. Seleccione un punto de acceso o dispositivo ad hoc en Estado de las redes inalámbricas . Parte de la información necesaria se introducirá automáticamente en Valores inalámbricos . 2. SSID es el nombre de la red inal ámbrica seleccionada. Deje este campo en b[…]
-
Страница 81
AXIS M1011/M1011 -W/ M1031-W Guía de instalación Página 81 ESPAÑOL EAP-TLS • Identity (Identidad): escriba la identidad del usuario para presentarla a la red • Private key password (contraseña de clave privada): escriba la contraseña correspondiente a la identidad de su usuario • EAPOL version (versión de EAPOL): seleccione la versión[…]
-
Страница 82
Página 82 AXIS M1011/M10 11-W/M1031-W Guía de instalación • Las claves, contraseñas y certific ados utilizad os para fines de seguridad deben introducirse manualmente. Contacte con el administrador de red del punto de acceso o dispositivo ad hoc seleccionado. • Los valores inalámbricos deben configurarse o cambiarse siempre (durante la ins[…]
-
Страница 83
AXIS M1011/M1011 -W/ M1031-W Guía de instalación Página 83 ESPAÑOL Otros métodos para configurar la dirección IP Esta tabla presenta otros métodos disponibles para configurar o detectar la dirección IP. Todos los métodos están habilitados de forma pred eterminada y es posible deshabilitarlos. Configuración de la dirección IP con ARP/Pin[…]
-
Страница 84
Página 84 AXIS M1011/M10 11-W/M1031-W Guía de instalación Notas: • Para abrir una línea de comando en Windows: desd e el menú Inicio, seleccione Ejecutar… y escriba cmd. Haga clic en OK (Aceptar). • Para utilizar el comando ARP en un sistema opera tiv o Mac OS X, utilice la herramienta Terminal, que se encuentra en Apli caciones > Uti[…]
-
Страница 85
AXIS M1011/M1011 -W/ M1031-W Guía de instalación Página 85 ESPAÑOL AXIS M1031-W sólo AXIS M1031-W está equipada co n los siguientes elementos: Sensor de PIR : un sensor infrarrojo pasivo permite medir la luz infrarroja de los objetos que pasan por su campo de visualización. Si se conf igura para ello, la cámara puede encender automáticamen[…]
-
Страница 86
Página 86 AXIS M1011/M10 11-W/M1031-W Guía de instalación Más información El manual del usuario está disponible en el si tio Web de Axis, www.axis.com, o en el CD de productos de vídeo en red de Ax is suministrado con este producto. Un consejo: Visite www.axis.com/techsup para comproba r si existe algún firmware actualizado disponible para […]
-
Страница 87
AXIS M1011/-W/M1031- W In stallation Guide Page 87 Radio Transmission Regula tory Information & EMC This equipment generates and radiates radio frequenc y energy, and must be in stalled and operated while maintaining a minimum body-to-camera distance of 3 feet (1 meter). If this equipment causes ha rmful interference to radio or television rece[…]
-
Страница 88
Installation Guide Ver.1.10 AXIS M1011/-W/M1031-W Printed: February 2009 © Axis Communications AB, 2008-2009 Part No. 34807[…]
About this Document
This document includes instructions for installing the
AXIS M1011/M1031 on your network. Previous
experience of networking will be beneficial when
installing the product.
Legal Considerations
Video and audio surveillance can be prohibited by laws
that vary from country to country. Check the laws in
your local region before using this product for
surveillance purposes.
This product includes one (1) H.264 decoder license and
(1) MPEG-4 decoder license. To purchase further
licenses, contact your reseller.
Electromagnetic Compatibility (EMC)
This equipment generates, uses and can radiate radio
frequency energy and, if not installed and used in
accordance with the instructions, may cause harmful
interference to radio communications. However, there is
no guarantee that interference will not occur in a
particular installation.
If this equipment does cause harmful interference to
radio or television reception, which can be determined
by turning the equipment off and on, the user is
encouraged to try to correct the interference by one or
more of the following measures: Re-orient or relocate
the receiving antenna. Increase the separation between
the equipment and receiver. Connect the equipment to
an outlet on a different circuit to the receiver. Consult
your dealer or an experienced radio/TV technician for
help. Shielded (STP) network cables must be used with
this unit to ensure compliance with EMC standards. See
on page 87 for more information on this product’s
compliance with radio frequency and safety
standards.
Equipment Modifications
This equipment must be installed and used in strict
accordance with the instructions given in the user
documentation. This equipment contains no
user-serviceable components. Unauthorized equipment
changes or modifications will invalidate all applicable
regulatory certifications and approvals.
Liability
Every care has been taken in the preparation of this
document. Please inform your local Axis office of any
inaccuracies or omissions. Axis Communications AB
cannot be held responsible for any technical or
typographical errors and reserves the right to make
changes to the product and documentation without
prior notice. Axis Communications AB makes no
warranty of any kind with regard to the material
contained within this document, including, but not
limited to, the implied warranties of merchantability
and fitness for a particular purpose. Axis
Communications AB shall not be liable nor responsible
for incidental or consequential damages in connection
with the furnishing, performance or use of this material.
RoHS
This product complies with both the European
RoHS directive, 2002/95/EC, and the Chinese
RoHS regulations, ACPEIP.
WEEE Directive
The European Union has enacted a Directive
2002/96/EC on Waste Electrical and Electronic
Equipment (WEEE Directive). This directive is
applicable in the European Union member
states.
The WEEE marking on this product (see right) or its
documentation indicates that the product must not be
disposed of together with household waste. To prevent
possible harm to human health and/or the environment,
the product must be disposed of in an approved and
environmentally safe recycling process. For further
information on how to dispose of this product correctly,
contact the product supplier, or the local authority
responsible for waste disposal in your area.
Business users should contact the product supplier for
information on how to dispose of this product correctly.
This product should not be mixed with other commercial
waste. For more information, visit
www.axis.com/techsup/.
Support
Should you require any technical assistance, please
contact your Axis reseller. If your questions cannot be
answered immediately, your reseller will forward your
queries through the appropriate channels to ensure a
rapid response. If you are connected to the Internet, you
can:
• download user documentation and firmware updates
• find answers to resolved problems in the FAQ database.
Search by product, category, or phrases
• report problems to Axis support by logging in to your
private support area.
-
Page 1: Axis Communications M1031W
USER’S MANUAL AXIS M1011 Network Camera AXIS 1011W Network Camera AXIS M1031W Network Camera[…]
-
Page 2: Axis Communications M1031W
AXIS M1011/M1011W/M1031W — Notices Notices This manual is intended for administrators and users of the AXIS M1011/M1011W/M1031W Network Cam era, and is applicable for firmware release 5.00 and later. It includes instructions for using and managing the camera on your ne twork. Previous experience of networking will be of use when using this product.[…]
-
Page 3: Axis Communications M1031W
3 AXIS M1011/M1011-W/M1031-W — Table of contents Notices . . . . . . . . . . . . . . . . . . . . . . . . . . . . . . . . . . . . . . . . . . . . . . . . . . . . . . . . . . . . . . . . . . . . . . . . . . . . . . . . . . . . . . . . . . 2 Product Description . . . . . . . . . . . . . . . . . . . . . . . . . . . . . . . . . . . . . . . . . . . . . .[…]
-
Page 4: Axis Communications M1031W
4 AXIS M1011/M1011-W/M1031-W — Product Description Product Description This manual applies to the AXIS M101 1/M1011-W/M1031-W Netw ork Camera. The information provided here applies to all models, except where otherwise indicated. Key features • Attractive, small-sized design These small, smart-looking and yet discreet camer as are perfe ctly suit[…]
-
Page 5: Axis Communications M1031W
5 AXIS M1011/M1011-W/M1031-W — Product Description Overview PIR Sensor — AXIS M1031-W is equipped with a PIR Sensor that has a maximum range of 6 meters for detecting movement in the dark. Light — White LED to illuminate the scene. Microphone/Speaker — Two-way audio support allows for remote users to listen in on an area and communicate with visito[…]
-
Page 6: Axis Communications M1031W
6 AXIS M1011/M1011-W/M1031-W — Product Description LED indicators LED Color Description Network Green Steady for connection to 100 Mbit/s network. Flash es for network activity. Amber Steady for connection to 10 Mbit/s n etwork. Flashes for network a ctivity. Unlit No connection. Power Green Normal operation. Amber Flashes green/amber during firmwa[…]
-
Page 7: Axis Communications M1031W
7 AXIS M1011/M1011-W/M1031-W — A ccessing the Camera Accessing the Camera To install the AXIS M1011/M1011-W/M1031-W network cameras, re fer to the installation guide supplied with your product. The network camera can be used with mo st standard operating systems and browse rs. The recommended browser is Microsoft Internet Explorer with Windows, Saf[…]
-
Page 8: Axis Communications M1031W
8 AXIS M1011/M1011-W/M1031-W — A ccessing the Camera Setting the root password 1. When accessing the camera for the first time, the ‘ Configure Root Password ’ dialog appears. 2. Enter a password and re-ente r to confirm. Click OK . The Enter Network Password dialog appears. 3. Enter the User name: root 4. Enter the password set in step 2, and […]
-
Page 9: Axis Communications M1031W
9 AXIS M1011/M1011-W/M1031-W — A ccessing the Camera Setting the root password over a secure connection To gain access to the product, you must set the password for the default administrator user — ‘root’. This is done in the ‘Configure Root Password’ dialog, which appears when the net work camera is acce ssed for the first time. To prevent[…]
-
Page 10: Axis Communications M1031W
10 AXIS M1011/M1011-W/M1031-W — A ccessing the Camera The Live View page How you customize the Live View page dete rmines which buttons are visible. Not all the buttons described below will show up unless configured to do so. General contro ls AXIS Media Control (AMC) toolbar AMC general controls The AMC viewer toolbar (AXIS Media Control) is av ai[…]
-
Page 11: Axis Communications M1031W
11 AXIS M1011/M1011-W/M1031-W — A ccessing the Camera AMC audio controls (AXIS M1031-W) AMC audio controls monitor the client computer’s speaker outp ut. These controls are only available when audio is enabled. Note: In Simplex – sp eaker only or microphone only mode, you can use either the Microphone button or the half-du plex Talk button to s[…]
-
Page 12: Axis Communications M1031W
12 AXIS M1011/M1011-W/M1031-W — Video Streams Video Streams The network camera provides se veral image and video stream formats. Your re quirements and the properties of your network will determine the type you use. The Live View page in the network camera provides access to H.264 , Motion JPEG, and MPEG -4 video streams, and to the list of availab[…]
-
Page 13: Axis Communications M1031W
13 AXIS M1011/M1011-W/M1031-W — Video Streams AXIS Media Control (AMC) AXIS Media Control (AMC) in Microsof t Internet Explorer in Windows is the recommended method of accessing live video from the network camera. The AMC control panel can be used to configure various video and audio settings. Please see the readme file included in the tool for mor[…]
-
Page 14: Axis Communications M1031W
14 AXIS M1011/M1011-W/M1031-W — Video & Audio Settings Video & Audio Settings This section describes how to configure the camera, and is intended for product Administrators, who have unrestricted access to all settings; and Operators , who have access to the settings for Basic Setup, Video & Audio and Events. You can configure the camer[…]
-
Page 15: Axis Communications M1031W
15 AXIS M1011/M1011-W/M1031-W — Video & Audio Settings Configuration settings from Video & Audio > Audio Settings are displayed under Current Audio Settings . See Audio Settings (AXIS M1031-W), on page 17 for more information on the audio settings. H.264 & MPEG-4 GOV Settings The GOV structure describes the composition of the video s[…]
-
Page 16: Axis Communications M1031W
16 AXIS M1011/M1011-W/M1031-W — Video & Audio Settings Camera Settings This page provides access to the advanced image settings fo r the AXI S M1011/M1011-W/M1031-W. Image Appearance Color level — Select an appropriate level by entering a value in the range 0-100. Lower values mean less color saturat ion, whilst the value 100 gives maximum colo[…]
-
Page 17: Axis Communications M1031W
17 AXIS M1011/M1011-W/M1031-W — Video & Audio Settings Image Overlay Placement — To place the overlay image at specif ic coordinates i n the live vi ew image, check Include overlay image at the coordinates and enter the X and Y coordinates. Click View to view the overlay image in the vi deo stream. Once satisfied, click Save. Privacy mask Priva[…]
-
Page 18: Axis Communications M1031W
18 AXIS M1011/M1011-W/M1031-W — Video & Audio Settings Audio Input If the sound input is too low or too high, adjust the input gain for the network camera’s built-in microphone. Select the desired audio En codin g format, AAC, G711, G726. If AAC is selected, select the required Sample rat e (number of times per second the sound is sampled). T[…]
-
Page 19: Axis Communications M1031W
19 AXIS M1011/M1011-W/M1031-W — Live View Configuration Live View Configuration Layout Stream Profile From the Stream Profile drop-down list, select the stream profile to be u sed for the Live View page. Listed are the standa rd stream profiles as well as the ones created under Video & Audio > Stream Profiles . See the online help files on t[…]
-
Page 20: Axis Communications M1031W
20 AXIS M1011/M1011-W/M1031-W — Live View Configuration Viewer Settings Check the Show viewer toolbar box to display the AXIS Media Control (AMC) or the QuickTime viewer toolbar under the video image in your browser. The administrator can disable the installation of the H.264, MPEG-4 , and AAC (AXIS M1031-W) decoders included with AMC. This is used[…]
-
Page 21: Axis Communications M1031W
21 AXIS M1011/M1011-W/M1031-W — Event Configuration Event Configuration An event or Event Typ e in the camera triggers certain actions when activated. An event type is a set of parameters that defines these actions. A common event type is an alarm that causes the camera to upload images. Many event types use an Event Server to receive uploaded imag[…]
-
Page 22: Axis Communications M1031W
22 AXIS M1011/M1011-W/M1031-W — Event Configuration Example: If somebody passes in front of a came ra and an event has been configured to detect and respond to motion, the camera can record and save images to an FTP server, and can send a notification e-mail to an e-mail address. Images can be sent as e-mail attachments. Triggered Event A triggered[…]
-
Page 23: Axis Communications M1031W
23 AXIS M1011/M1011-W/M1031-W — Event Configuration Continue image upload (unbuffered) — enables the upload of video images for a fi xed length of time. Specify the length of time for the uploaded recording, in seconds, minutes or hours, or for as long as the trigger is active. F inally, set the desire d image frequency to the maximum (the maximum […]
-
Page 24: Axis Communications M1031W
24 AXIS M1011/M1011-W/M1031-W — Event Configuration Motion Detection The AXIS M1011/M1011-W/M1031-W can detect moving objects in its field of vision using video motion detection. The AXIS M1031-W can also detect infrared object motion using the PIR Sensor (see page 2 5 ). Video Motion Detection Video motion detection is used to generate an alarm wh[…]
-
Page 25: Axis Communications M1031W
25 AXIS M1011/M1011-W/M1031-W — Event Configuration Please see the online help for descriptions of each available option. Examples: • Avoid triggering on small objects in the video image by setting the object size level too high. • Use several small Motion Detection wi ndows rather than one large window, if triggers on small movements or object[…]
-
Page 26: Axis Communications M1031W
26 AXIS M1011/M1011-W/M1031-W — System Options System Options Security Users User access control is enabled by default. An administrator can set up other users, by giving these user names and passwords. It is also possible to allow anonymous viewer login, which means that anybody may access the Live View page, as described below: The user list disp[…]
-
Page 27: Axis Communications M1031W
27 AXIS M1011/M1011-W/M1031-W — System Options Audio Support Enable audio support — Allow clients to retrieve audio streams from the AXIS M1031-W. See also Audio Settings (AXIS M1031-W), on page 17 for information on how to configure the audio settings. Note: This parameter will enable/disable audio globally in the ca mera, even for configured even[…]
-
Page 28: Axis Communications M1031W
28 AXIS M1011/M1011-W/M1031-W — System Options Notes: • DHCP is a protocol for automatic IP a ddress assignment on a netw ork. IP address assignment via DHCP may lead to the situation where the I P address changes and you lose contact with the camera. Configure the options for notification of IP address ch ange (under Services) to receive notific[…]
-
Page 29: Axis Communications M1031W
29 AXIS M1011/M1011-W/M1031-W — System Options Advanced TCP/IP Settings DNS Configurat ion — DNS (Domain Name Service) provides the translation of host n ames to IP addresses on your network. Obtain DNS server address via DH CP — aut omatically use the DNS server setting s provided by the DHCP server. Click the View button to see the current settin[…]
-
Page 30: Axis Communications M1031W
30 AXIS M1011/M1011-W/M1031-W — System Options Enable/Disable — when enabled, the n etwork camera attempts to conf igure port mapping in a NAT router on your network, using UPnP™. Note that UPnP™ must be enabled in the camera (see System Options > Network > UPnP ). Use manually selected NAT router — select this option to manually select a[…]
-
Page 31: Axis Communications M1031W
31 AXIS M1011/M1011-W/M1031-W — System Options Leaving this field blank means the camera will attempt to access the nearest open network. Note: SSID is sometimes written as ESSID. Network type — Setting this to Master means the camera will attempt to access the specified a ccess point or the nearest open access point if the SSID is left blank. The […]
-
Page 32: Axis Communications M1031W
32 AXIS M1011/M1011-W/M1031-W — System Options QoS (Quality of Service) Quality of Service (QoS) guarantees a certai n level of a specified resource to select ed traffic on a network. Quality can be defined as a maintained level of bandwidth, low latency, and no packet losses. The main benefits of a QoS-aware network can be summarized as: • The a[…]
-
Page 33: Axis Communications M1031W
33 AXIS M1011/M1011-W/M1031-W — System Options Bonjour The network cameras include support for Bonjour. When enabled, the camera is au tomatically detected by operating systems and clients that support this. Ports & Devices I/O Ports This page shows the normal and current state of the PIR Sensor. PIR Sensor PIR Sensor State — This setting shows[…]
-
Page 34: Axis Communications M1031W
34 AXIS M1011/M1011-W/M1031-W — System Options System Overview System Overview provides an overview of the camera’s status and settings. Informat ion that can be found here includes the camera’s firmware version, IP a ddress, security, event and image settings and rece nt log items. Many of the captions are also links to the proper Setup page t[…]
-
Page 35: Axis Communications M1031W
35 AXIS M1011/M1011-W/M1031-W — About About Here you can find basic information a bout your network camera. You can also view third party software licenses. Resetting to the Factory Default Settings To reset the camera to the original factory default settings, go to the System Options > Maintenance web page (as described in Maintenance, on page […]
-
Page 36: Axis Communications M1031W
36 AXIS M1011/M1011-W/M1031-W — Troubleshoot ing Troubleshooting Checking the Firmware Firmware is software that determines the functionality of the n etwork came ras. One of your first actions when troubleshooting a problem should be to check the current firmwa re version. The late st version may contain a correction that fixes your particular pro[…]
-
Page 37: Axis Communications M1031W
37 AXIS M1011/M1011-W/M1031-W — Troubleshoot ing 4. After the upgrade is complete (1-10 minutes), the unit automatically resta rts and shows a steady green on the Power and Status LEDs and flashing green or amber on the Network LED. 5. Reinstall the camera, refer rin g to the installation guide. If the emergency recovery procedure doe s not get the[…]
-
Page 38: Axis Communications M1031W
38 AXIS M1011/M1011-W/M1031-W — Troubleshoot ing Symptoms, Possible Causes, and Remedial Action Problems setting the IP address When using ARP/Ping Try the installation again. The I P address mu st be se t within two minut es after p ower has been applied to the camera. Ensure the Ping length is set to 408. See the Installation Guide. The camera is[…]
-
Page 39: Axis Communications M1031W
39 AXIS M1011/M1011-W/M1031-W — Troubleshoot ing Color saturati on is differe nt in H.2 64 and Motion JPEG Modify the settings for your graphics adapter. Please see the adapter’s documentation for more information. Lower frame rate than expected Reduce number of applications running on the client computer. Limit the number of simultaneous view[…]
-
Page 40: Axis Communications M1031W
40 AXIS M1011/M1011-W/M1031-W — Troubleshoot ing For further assistance, please contact your reseller or see the support pages on the Axis website at www.axis.com/techsup No audio Incorrect setup Che ck the sound card in the PC. En sure that th e mute but ton is not pressed and the volume settings are correct. No audio or very poor audio quality Ch[…]
-
Page 41: Axis Communications M1031W
41 AXIS M1011/M1011-W/M1031-W — Technical Specifications Technical Specifications Function/group Item Spec ification Camera Models • AXIS M1011 • AXIS M1011-W: Wireless • AXIS M1031-W: Wireless, PIR Sensor, Audio, Illumination LED Image sensor ¼” Progressive scan RGB VGA CMOS Lens • 4.4 mm, F2.0, fixed iris, fixed focus • Angle of view[…]
-
Page 42: Axis Communications M1031W
42 AXIS M1011/M1011-W/M1031-W — Technical Specifications System Integration Application Programming Interface • Open API for software integrat ion, including VAPIX® from Axis Communications*, AXIS Media Control SDK*, event trigger data in video stream • Quality of Service (QoS) la yer 3, DiffServ Model • Embedded Linux operating system *Avai[…]
-
Page 43: Axis Communications M1031W
43 AXIS M1011/M1011-W/M1031-W — Technical Specifications General performance considerations When setting up your system, it is important to consider how various settings and situations will affect performance. Some factors affect the amount of bandwidth (the bit rate) required, others can affect the frame rate, and some affect both. If the load on […]
-
Page 44: Axis Communications M1031W
44 AXIS M1011/M1011-W/M1031-W — Glossary of Terms Glossary of Terms ActiveX — A standard that enables software components to interact with one anothe r in a networke d environment, regardless of the langua ge(s) used to create them . web browsers may come into contact with ActiveX controls, ActiveX documents, and ActiveX scripts. ActiveX controls a[…]
-
Page 45: Axis Communications M1031W
45 AXIS M1011/M1011-W/M1031-W — Glossary of Terms centrally manage the assignment of Internet Protocol (IP) addresses to network devices in a network. DHCP uses the concept of a ‘lease’ or amount of time that a give n IP address will be valid for a computer. The lease time can vary, depen ding on how long a user is likely to require the network[…]
-
Page 46: Axis Communications M1031W
46 AXIS M1011/M1011-W/M1031-W — Glossary of Terms Hub — A (network) hub is used to co nnect multiple devices to the network. The hub tra nsmits all data to all dev ices connected to it, whereas a switch will only transmit the data to the device it is spe cifically intended for. IEEE 802.11 — A family of standards for wireless LANs. The 802. 11 stan[…]
-
Page 47: Axis Communications M1031W
47 AXIS M1011/M1011-W/M1031-W — Glossary of Terms and video coding standards, and is typically used to encode audio and video for broadcast signals, including digital satellite and Ca ble TV. MPEG-2, with some modifications, is also the coding format used by standard commercial DVD movies. MPEG-4 — A video compression standard that makes good use o[…]
-
Page 48: Axis Communications M1031W
48 AXIS M1011/M1011-W/M1031-W — Glossary of Terms video bridges as well as multicast-to-unicast translators. RTCP offers quality-of-service feedback from receivers to t he mult icast gr oup as we ll as supp ort for the synchronization of different media streams. RTP (Real-Time Transpo rt Protocol) — RTP is an Internet protoc ol for the transport of[…]
-
Page 49: Axis Communications M1031W
49 AXIS M1011/M1011-W/M1031-W — Glossary of Terms advantage of UDP is that it is not required to deliver all data and may drop network packets when there is e.g. network congestion. This is suitable for live video, as there is no point in re-transmitting old information that will not be displayed anyway. Unicast — Com munication between a single se[…]
-
Page 50: Axis Communications M1031W
AXIS M1011/M1011-W/M1031-W — Index 50 Index A AAC 20 Action Buttons 20 Action Event 21 Ad-hoc 31 Administrator 14 Alarm 24 ARP/Ping 28 Audio Clips 18 Audio Feedback 17 Audio Input 18 Audio output 18 Audio Settings 17 AXIS Media Control (AMC) 7, 13, 17 AXIS Media Control toolbar 10 B Bit Rate 15 Bonjour 7 C Camera Settings 16 Camera tampering 23 Cer[…]
-
Page 51: Axis Communications M1031W
51 AXIS M1011/M1011-W/M1031-W — Index U Upgrade Server 33 Upgrading the Firmware 36 UPnP 29, 32 Users 26 V Video & Audio settings 14 Video Streams 12, 14 W WEP 31 Wireless (Access point) 30 Wireless Network (SSID, M ode, Security, Channel, Signal strength & Bit rate) 30 WPA-/WPA2-Enterprise 31 WPA-/WPA2-PSK 31[…]