
![]()
SIMPLY CLEVER
ŠkodaAuto
CAR RADIO BOLERO


Contents 1
|
Contents |
|
|
General information . . . . . . . . . . . . . . . . . |
2 |
|
Equipment overview . . . . . . . . . . . . . . . . . . . . . . . . . . |
2 |
|
Important information . . . . . . . . . . . . . . . . . . . . . . . . |
2 |
|
Anti-theft protection . . . . . . . . . . . . . . . . . . . . . . . . . . |
3 |
|
General operation . . . . . . . . . . . . . . . . . . . . . . . . . . . . |
4 |
|
Switching the system on and off . . . . . . . . . . . . . . |
5 |
|
Basic setting . . . . . . . . . . . . . . . . . . . . . . . . . . . . . |
6 |
|
Sound settings . . . . . . . . . . . . . . . . . . . . . . . . . . . . . . . . |
6 |
|
RADIO selector key . . . . . . . . . . . . . . . . . . . . . . . . . . . |
6 |
|
Selector key MEDIA . . . . . . . . . . . . . . . . . . . . . . . . . . . |
9 |
|
Selector key SETUP . . . . . . . . . . . . . . . . . . . . . . . . . . . . |
13 |
|
Selector key PHONE . . . . . . . . . . . . . . . . . . . . . . . . . . |
16 |
|
Index . . . . . . . . . . . . . . . . . . . . . . . . . . . . . . . . . . . . . . . . |
21 |

2 General information
General information
Equipment overview
A1 Switching on/off: Rotary/push knob for switching the navigation system on/off (press) and volume control (turn)
A2 Selector key for selecting the corresponding menu:
− RADIO – changes over into radio mode and changes the frequency range when in the radio mode.
− – changes over to the last played media source or selects a new media source.
− – Phone function – Muting of the current audio source.
− – TIM function (Traffic Information Memory) recorded traffic announcements can be replayed. After entering up to two different TIM recording times in SETUP menu, a recording of the traffic announcements is also possible if the unit is switched off.
− TP – Switch the traffic information function (Traffic Program) on or off or interrupt the currently received traffic announcement.
− – enables setting-up the individual fields.
A3 and : The backwards/forwards keys operate the “active” audio source.
|
− RADIO-Mode – for the selection of the stations from the memory |
||
|
list. |
||
|
− MEDIA-Mode – for the selection of the previous or following |
||
|
track. |
||
|
A4 CD-case |
||
|
A5 |
Touchscreen (Touch-screen): Fields circled in colour on the display |
|
|
are presently “active” and are operated by touching the display. |
||
|
A6 |
Eject key |
– press briefly to move an inserted CD into the posi- |
|
tion ready for removal. |
||
|
A7 |
– opens the sound and volume settings menu. |
|
|
A8 |
Setting up button |
−RADIO mode – turn for manual station adjustment; press briefly to start or stop the automatic play (Scan).
−MEDIA mode – turn to change track; press briefly to start or stop the automatic play (Scan).
A9 Memory card case: SD memory cards (“Secure Digital Memory Cards”), SDHC (“Secure Digital High Capacity Card”) and MMC (“Multimedia Cards”) measuring 32 mm x 24 mm x 2.1 mm and with a capacity of up to 32 GB are available. The case for the memory card is located under the display.
Explanation of symbols
* items of equipment which are marked in such a way are only installed as standard on certain models or are supplied as special equipment.
End of a section.
The section is continued on the next page.
 Note
Note
This Owner’s Manual describes the range of functions at the time of going to press. The illustrations can differ in minor details from the version of your unit. 
Important information
Warranty
The equipment warranty terms and conditions also apply for new vehicles.
After the expiration of the warranty, a piece of equipment in need of repair will be replaced with a reconditioned, original item with spare part warranty. It is, however, a precondition that the housing has not been damaged and no unauthorised attempts have been made to carry out repairs.

General information 3
 Note
Note
Damage within the meaning of the warranty must not be the result of improper handling of the system or from unprofessional repair attempts. It is also essential that there is no external damage. 
Operation
The radio should only be used, if the traffic situation permits it.
The volume settings must be selected in such a way that audible signals from the outside, e.g. a Martins horn from utility vehicles (police cars, ambulances and fire brigade), can be heard at all times.

 WARNING
Please concentrate fully at all times on your driving! As the driver you are fully responsible for road safety. Only use the functions of the radio in such a way that you are always in full control of your vehicle in all traffic situations!
Caution
•Inserting a second CD while a CD is being ejected can destroy the CD drive in the unit. Please note that the CD ejection lasts a few seconds after pressing the
Eject key  . During this time the lock in front of the CD case is open. It is essential that you wait until the CD has been fully ejected before you try to insert a new CD.
•Press the buttons and the keys of the unit gently in order to avoid damaging them. Gentle pressure on the appropriate key is sufficient to operate the unit. Please note that the rotary/push knobs have predetermined breaking points, in order to reduce the risk of injury.
•Do not use any pointed or sharp-edged objects to operate the touch-screen. Slight finger pressure sufficient to operate the equipment. A text in the display, which cannot be called up by pressing the button, is therefore not available at that time. 
Care of the display
Carefully handle the display because dents and scratches can occur through pressure of the finger or contact with sharp objects.
The display can be cleaned with a soft cloth and finger marks can be wiped away with pure alcohol.
 Note
Note
Do not use solvent such as turpentine or petrol as they will corrode the display surface. 
Anti-theft protection
Anti-theft coding
Your radio is equipped with a convenience coding. If the radio is being operated for the first time, the safety code is not only stored in the radio but also in the vehicle.
After disconnecting and reconnecting the battery, first of all switch on the ignition and then the radio.
If you wish to install the radio in another vehicle, the safety code must be entered. In this case, please do not hesitate to contact a Škoda Service Partner or a Škoda importer.
As the unit only functions after entering the safety code, this practically excludes its use after a theft — a contribution to increased anti-theft safety.
 Note
Note
The code is stored in the instrument cluster. This ensures that it is automatically decoded (convenience coding). Manual input of the code is normally not necessary. 

4 General information
Enter code
–If a keypad appears after switching on with the command to enter the code, the unit can be unlocked by entering the correct four-digit code number. The number of the possible attempts is shown in the second display line.
–Press directly a digit from  0 to
0 to  9 on the digit block displayed on the display. The digit is accepted in the entry line.
–After a four-digit order has been entered, the group of digits will turn grey (inactive) and no further digits can be accepted in the entry line.
–Press  on the display to erase the digits in the entry line from right to left and thereby correct your input, if necessary.
–If the correct code number is displayed in the entry line, press  OK .
OK .
Code number
The code number can only be called up “online” via the Škoda system, as this guarantees even more effective anti-theft protection. Please contact your Škoda dealer if necessary.
Incorrect code number
If an incorrect code is confirmed after input, the procedure can be repeated one more time. The number of attempts is shown in the second display line.
If the code number is entered incorrectly for the second time, the unit will be blocked for approx. one hour. The safety code can only be entered again after one hour has expired, with the unit switched on and the ignition key in the ignition lock.
If two invalid attempts are then made again, the navigation system will be blocked again for an hour.
The cycle — two attempts, blocked for an hour — will continue to apply.
 Note
Note
The code is normally stored in the instrument cluster. This ensures that it is automatically decoded (convenience coding). Manual input of the code is normally not necessary. 
General operation
“Scrollbar”
The vertical bar on the right side of the display with a sliding regulator between the arrow keys and is called a “scroll bar”. It indicates that further menu entries become visible if the sliding regulator is moved completely to the bottom.
Display set-ups
In a set-up menu a set-up or value is infinitely adjustable. Move the sliding regulator or press  + or
+ or  — to change a setting. Press the function key
  , to take over a changed setting and to switch back to the initial menu.
“Pop-up window”
A function key with an arrow behind another function key shows the presently selected set-up, e.g. with an 
 .
.
If you press on the function key  on the display, a so-called “pop-up window” will open where all the set-up options are displayed.
Briefly press the desired set-up option. The pop-up window is closed and the setting you have selected is displayed. To close the pop-up window without changing the set-up, press the function button in the pop-up window  .
.
“Check-box”
There is a so-called “check box” in front of a function which can only be switched on or off. A tick in the check-box indicates that the function is switched on, an empty check-box , indicates that it is switched off.
Briefly press the corresponding function key for switching on and off. 

General information 5
Switching the system on and off
–The system is switched on or off by turning / pressing the rotary / push knob A1 .
The last active audio source before switching off will be repeated.
If the key is pulled out of the ignition lock with the unit switched on, the unit wil switch off automatically.
You can then switch the unit on again. If the engine is switched off, the system (vehicle battery protection against discharging) switches off automatically after approx. one hour. This process can be repeated as often as necessary. 

6 Basic setting
Basic setting
Sound settings
By pressing the button  you can select the following parameters:
• Tone setups — Setting of height, middle and depth;
• Balance Fader — Volume ratio (left and right = balance), (front and rear = fader);
• — Startup volume , Traffic announcements and
  * — Switch on
volume, traffic announcements and volume of park distance control signal;
• — Speed dependent volume adaptation
•
Volume decrease for park distance control (PDC) *
If your vehicle is equipped with “parking aid”, the volume is automatically decreased to a pre-defined value, when the “parking aid” is active.
GALA function
Your radio increases automatically its volume with the increasing vehicle speed. A higher setting value results in a stronger volume increase. 
RADIO selector key
Selecting a radio station
Call up main menu RADIO and choose frequency range
–Press the  RADIO selector key to call up the main RADIO menu. The currently heard radio station is indicated at the top of the display.
–To change the frequency range, press the function key Band and on
FM or AM in the opening pop-up window. The current frequency range is indicated at the top left of the display.
Changing a radio station
–When briefly pressing the arrow keys on the unit A3 or the arrow keys on the display of the main menu RADIO, you change to the previous or following station.
Selecting a radio station from the station list
–Press the function key Station list to display all radio stations that can currently be received. The list “skips” directly to the display of the currently heard radio station.
–Choose the desired station by pressing the respective selection. After about 20 seconds without operation the image of the station list will close automatically.
Function keys in the radio main menu
 to
to  – Station keys for storing or calling up a stored radio station. The station keys to be displayed are determined in the menu Setup Radio.
 – Button for selecting the desired frequency range.
 – opens the list of the presently receivable radio station. Memory – opens the list of the stored radio station.
 – Button for calling up the automatic play Scan or for inserting radio text.
 – opens the frequency band of the selected frequency range.
Searching and storing radio stations
Manual search
– Turn the Set button A8 in the main menu RADIO or press the function key Man. . The scale of the selected frequency range is inserted in the frequency band in the lower part of the display.
 Loading…
You can only view or download manuals with
Sign Up and get 5 for free
Upload your files to the site. You get 1 for each file you add
Get 1 for every time someone downloads your manual
Buy as many as you need

Цена вопроса: 800 ₽
Пробег: 6 660 км
Комментарии
84
Войдите или зарегистрируйтесь, чтобы писать комментарии, задавать вопросы и участвовать в обсуждении.

А можно ссылку на стекло, не получается перейти с той что в тексте, там что то не то

12 фотографий о героической наклейке пленки на экран. Неужели больше нечего писать?

Посмотри о чём другие пишут!🤦
Ну яндекс тоже может в «бордовую» пробку завести. Waze хорош! Попробуйте.
У яндекс реклама на пол экрана ещё🥳

Нашли куда смартфон лепить? 
Для объезда пробок гуглокарты, waze, да и 2gis — пока не конкуретны я-навигатору, который (как минимум, без без рута) через АА не вывести.
Это капля на крышке багажника.
Когда машина чистая видно совсем немного багажника.

Добрый день. Времени нет искать ответ, скажите пожалуйста: через Apple CarPlay какие навигационные программы работают? Яндекс.Навигатор поддерживает?
Waze
Google
2gis
Точно работают. Waze больше всего нравится. Камеры, пробки, и новые построенные дома(здания) показывает.
Благодарю за оперативный ответ. Яндекс — не работает, верно?
Яндекс через взлом телефона.
Не, это не наш метод ))))

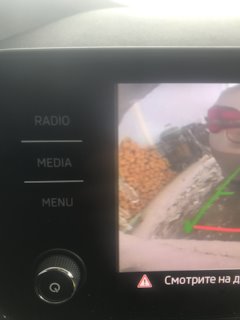
День добрый. Увидел у вас фото, с камерой заднего вида, так должно быть? В левом верхнем углу какая то хрень. У всех так?

А в новом рапиде нет разъёма для SD-карты ? Только USB type-c ?

Ок.
СПАСИБО!
Завтра попробую.
Set нажмите. Новые данные шин сохраняться.
Всем доброго вечера.
Подскажите пож. у меня появилось сообщение, » Низкое давление в шинах». Проверил и подкачал, на всех колёсах 2,3 — 2,4
неисправность осталась.
Что делать?

Я езжу на Skoda Rapid (2G)
после проверки и подкачки надо снова провести калибровку.
Да, так и сделал.
СПАСИБО.
Сейчас всё норм.
Защита не главное. Глянец меньше отпечатков оставляет чем матовое. И выглядит эстетичней)) Мне нравится результат😎
Все комментарии
-
Страница 1
www.skoda-auto.com Bolero Infotainment anglicky 11.2012 S00.5614.03.20 5E0 012 095 H SIMPLY CLEVER Infotainment Radio Bolero Owner’s Manual[…]
-
Страница 2
Structure of this Owner’s Manual (explanations) This Owner’s Manual has been systematically designed to make it easy for you to search for and obtain the information you require. At the beginning of this manual you will find a table of contents where all the top- ics described are arranged sequentially. At the end of this manual you will […]
-
Страница 3
Preface You have chosen a ŠKODA vehicle, which is fitted with an Infotainment Radio Bolero (hereafter called the unit) – we thank you for your confidence in us. The new operating concept allows you to make all the vehicle settings and to operate electronic systems centrally from the device. Please read this Owner’s Manual carefully, because[…]
-
Страница 4
Table of Contents Introductory information Vehicle equipment 3 Safety information 3 Warranty 3 Component protection 3 Touch screen 3 Unit overview and operation 4 Unit setup Main menu 7 Sound setup 7 Screen settings 8 Time and date settings 8 Keypad settings 8 Settings for units 8 Settings for voice control 9 Restore factory settings 9 Bluetooth se[…]
-
Страница 5
Introductory information Vehicle equipment These operating instructions describe all possible equipment variants without identifying them as special equipment, model variants or market-dependent equipment. Consequently, this vehicle does not need to contain all of the equipment compo- nents described in these operating instructions. The level of eq[…]
-
Страница 6
Unit overview and operation Unit overview Fig. 1 Unit overview Unit overview — Unit on/off, adjust volume Operation and confirmation RADIO — Radio menu » page 10 MEDIA — Media menu » page 14 Depending on equipment fitted: › MUTE — Mute › PHONE — Phone menu » page 19 Depending on equipment fitted: › TP — Traffic information » page 11 ?[…]
-
Страница 7
Note ■ The volume change is displayed on the screen of the unit. ■ When the sound is muted, the symbol appears in the display. Ð Screen display and control of the unit Fig. 2 Screen display Screen areas which confirm a function or a menu are called “ function keys ”. Greyed out function keys are not active. White or green function keys[…]
-
Страница 8
■ Sound — Sound setup ■ Volume — Volume setting ■ Bass — Mid — Treble — Sets the bass, mid and treble ■ Balance — Fader — Sets the balance between left and right, front and rear Example menu ■ xyz — the first menu level ■ xyz — the second menu level ■ xyz — the third menu level ■ xyz — the first menu level Ð Input screen with keypa[…]
-
Страница 9
Unit setup Main menu Fig. 4 Unit settings: Main menu First and foremost, pay attention to the safety instructions » page 3 . Select and confirm all functions as described at the beginning of this man- ual » page 4 . Call up the main menu › Press the button SETUP . Menus in the main menu for unit setup ■ Sound — Sound setup » page 7 ■ Scree[…]
-
Страница 10
■ Audio lowering: — Setting the reduction of the volume when the park distance control is active ■ Off — switches off ■ Weak — weak reduction ■ Medium — medium input sensitivity ■ Strong — strong reduction ■ Bass — Mid — Treble — Sets the bass, mid and treble ■ Balance — Fader — Sets the balance between left and right, front and rear […]
-
Страница 11
■ Consumption — Consumption units ■ l/100 km — Litres per 100 kilometres ■ km/l — Kilometres per litre ■ mpg (US) — Miles per gallon (US) ■ mpg (UK) — Miles per gallon (UK) ■ Gas consumption — Gas consumption units ■ kg/100 km — Kilograms per 100 km ■ km/kg — Kilometres per kilogram ■ m3/100 km — Cubic metres per 100 kilometres ?[…]
-
Страница 12
Radio Main menu Fig. 6 Radio: Main menu First and foremost, pay attention to the safety instructions » page 3 . Select and confirm all functions as described at the beginning of this man- ual » page 4 . Call up the main menu › Press the button RADIO . Explanation of graphic A Selected radio station B Function keys used to select a station store[…]
-
Страница 13
■ Sound — Sound setup » page 7 , Sound setup ■ Scan — Auto-play all stations in the current frequency band, each station for around five seconds Press again to stop the auto-play function at the current radio station ■ Arrow buttons — Sets the function of the station selection in radio mode ■ Preset list — Switches to only stored stations […]
-
Страница 14
Digital radio DAB Main menu Fig. 7 DAB: Main menu First and foremost, pay attention to the safety instructions » page 3 . Select and confirm all functions as described at the beginning of this man- ual » page 4 . Call up the main menu › Press the button RADIO → DAB . Explanation of graphic Selected DAB radio station Function keys used to sele[…]
-
Страница 15
Display main menu Fig. 8 Slideshow › Press the button RADIO → DAB → . ■ Preset list — Display only stored DAB stations ■ Station info. — Displays DAB station information (e.g., station name, group, or pro- gramme type) in the form of radio text and images ■ Radio text — Display radio text ■ Slide show — Display slideshow Ð Set-up[…]
-
Страница 16
Media Main menus Fig. 9 Media: Main menu First and foremost, pay attention to the safety instructions » page 3 . Select and confirm all functions as described at the beginning of this man- ual » page 4 . The unit supports audio files in the following formats: mp3, wma, wav, aac, m4a, m4b and mp4. Only standard size audio CDs (CD-DA) and data CDs […]
-
Страница 17
Function key Action Operation Press briefly (5 seconds after the start of play- back of the track) Plays the current track from the start Press button for a long period of time Fast-reverse of the track Press briefly Plays the next track from the start Press button for a long period of time Fast-forward of the track Press Switch[…]
-
Страница 18
WARNING The CD player is a class 1 laser device. Opening the CD player produces a risk of injury through invisible laser radiation. CAUTION ■ Never insert DVDs into the internal drive — risk of damage to the unit. ■ Never insert CDs with the designation “ Do not insert in drives without a drawer ” or “ Eco Disc ” into the internal drive[…]
-
Страница 19
External audio sources Introductory information Adjusting the play volume of the external audio source The playback volume of the external audio source can be changed with the but- ton . Depending on the connected audio source, the output volume on the external au- dio source can be changed. Conditions for successful connection › Only USB dev[…]
-
Страница 20
Sort tracks from a connected Apple device › Video (only available if a red adapter is used) — Video playlists, films, music vid- eos, TV shows, video podcasts, rented films › Music — Playlists, artists, albums, tracks, podcasts, genres, composers, audio books iPod (iPad, iPhone) settings › Press the button MEDIA → → Video (iPod) . ■[…]
-
Страница 21
Telephone Introductory information The phone menu is only available when the ignition is on and the Bluetooth ® function is activated. To connect a mobile phone with the hands-free system, the two devices must be paired » page 19 . After switching on the unit, the system attempts to connect to the last connected mobile phone 1) . Further informat[…]
-
Страница 22
Prerequisites for successful pairing › Ignition is switched on › Both the Bluetooth ® function and the visibility of the hands-free sys- tem » page 9 and mobile phone must be switched on » See the owner’s manual of the mobile phone . Automatic connection After switching on the unit, the system attempts to connect to the last connected m[…]
-
Страница 23
During the search, the system displays a list of function keys: ■ — Cancel the search ■ Help — Display help ■ Results — Display the search results as they become available. Here, you can se- lect a found Bluetooth ® device before the search has completed. Ð Pairing from the mobile phone When pairing from the mobile phone, follow the ins[…]
-
Страница 24
The input screen also functions as an alphanumeric keypad that you can use to search for contacts in the phonebook. While you are entering the numbers, the unit displays a list of contacts that changes according to the letter or sequence of letters entered. For example, if you enter 32, the unit will display contacts with the letter se- quence DA, […]
-
Страница 25
Settings in telephone mode › Press the button PHONE → . Menu with settings in telephone mode ■ Select telephone — Search for available telephones/list of paired telephones/select telephone ■ Find telephone — Search for a mobile phone ■ Bluetooth — Bluetooth ® settings » page 9 ■ User profile — User profile settings ■ Manage favo[…]
-
Страница 26
During a conference Depending on the context, you can select the following functions: ■ — Hold the conference — leave the conference temporarily (the conference continues in your absence) ■ — Return to the held conference ■ — Switch off the microphone ■ — Switch on the microphone ■ — End the conference ■ Conference s[…]
-
Страница 27
Button 5 Action Operation Press briefly Leave telephone menu Ð Telephone calls in the information display The following functions in the information display can be executed depending on the context. Incoming call ■ Answer — Answer a call ■ Reject — Reject a call ■ Ignore — Ignore a call Outgoing call ■ Hang up — End a call […]
-
Страница 28
Voice control Introductory information You can only use voice control in phone mode. Voice control settings » page 9 . The period of time during which the system is ready to receive voice commands and to carry them out is called a dialogue. The system gives audible feedback and guides you if necessary through the relevant functions. The microphone[…]
-
Страница 29
The symbol displayed on the device screen or in the information display changes from to . Press the following briefly: › Function key ; › VOICE button on the unit; › button on the multifunction steering wheel. Voice command input is reactivated. Voice command not recognised If a voice command is not recognised, the system answ[…]
-
Страница 30
Setting vehicle systems Main menu First and foremost, pay attention to the safety instructions » page 3 . Select and confirm all functions as described at the beginning of this man- ual » page 4 . The vehicle systems setup functions can only be used when the ignition is switched on. Call up the main menu › Press the button CAR . — Displays […]
-
Страница 31
■ Convenience consumers — Displays up to three consumers which have the largest share of fuel consumption and displays the fuel consumption to run all conven- ience consumers » Vehicle Owner’s Manual ■ Vehicle status — Displays vehicle status » Fig. 17 or tyre pressure monitoring infor- mation ■ Vehicle status — Displays vehicle status[…]
-
Страница 32
■ Units — Settings for units of measurement » page 8 ■ Service — Service interval display, VIN » page 32 ■ Factory settings — Resets to factory settings » page 32 Ð ESC system › Press the button → ESC system . ■ Activated — Switches on all components of the ESC system ■ ASR off — Switches off the ASR system Ð Tyres › Press […]
-
Страница 33
An obstacle appearing in the collision zone is shown as a red-coloured seg- ment Do not proceed! An area without detected obstacles is shown as a transparent segment. An obstacle in the sensor range which lies outside of the collision area is shown by the white segment. ■ ParkPilot — Settings for the parking assistant ■ Activate automatically -[…]
-
Страница 34
Seats › Press the button → Seats . ■ Store seat position — Store driver’s seat position on key ■ Vehicle key activated — Storing driver’s seat position on key on/off Ð Multifunction display › Press the button → Multifunction display . ■ Current consumption — Display of current fuel consumption on/off ■ Average con[…]
-
Страница 35
Other functions Introductory information First and foremost, pay attention to the safety instructions » page 3 . Select and confirm all functions as described at the beginning of this man- ual » page 4 . The following functions can only be used when the ignition is switched on. Ð Selecting driving mode Fig. 20 Centre console: Button for se- lect[…]
-
Страница 36
Climatronic settings Fig. 21 Climatronic: Main menu If Climatronic is switched on, the system displays the desired temperature for the driver’s side and front passenger side » Fig. 21 . Depending on the desired temper- ature, the airflow from the air outlet vents is shown in blue (temperature under 21.5 °C) or red (temperature above 22 °C).[…]
-
Страница 37
Unit menus Main menu Fig. 22 Unit menus: Main menu First and foremost, pay attention to the safety instructions » page 3 . Select and confirm all functions as described at the beginning of this man- ual » page 4 . Call up the main menu › Press the button MENU . — Radio » page 10 — Media » page 14 — Sound settings » page 7 — U[…]
-
Страница 38
Index A AM 10 Anti-theft protection 3 Automatic station finding 10 AUX 17 Auxiliary heater and ventilation 29 B Bluetooth Connecting an external audio source 17 Connecting your phone with hands-free system 19 Profiles 20 Settings 9 Switch on/off 9 Visibility 9 C CD 15 Climatronic 34 Component protection 3 Control of the unit 5 D DAB 12 Data Conveni[…]
-
Страница 39
Keypad 8 Language 7 Manage favourites 21 Restore factory settings 9 Screen 8 Telephone 23 Time and date 8 Units 8 User profile 21 Voice control 9 Volume 4 Setting vehicle systems Auxiliary heater and ventilation 29 Climatronic 34 Driver assistance 30 ESC system 30 Lights 31 Main menu 28 Mirrors and wipers 31 Multifunction display 32 Opening/closing[…]
-
Страница 40
ŠKODA AUTO a.s. pursues a policy of constant development of Infotainment ra- dios and navigation systems. We trust that you will understand that changes to models in terms of shape and engineering may be introduced at any time. The de- tails of appearance, dimensions and functions of the Infotainment radios and nav- igation systems were correct at[…]
-
Страница 41
www.skoda-auto.com Bolero Infotainment anglicky 11.2012 S00.5614.03.20 5E0 012 095 H SIMPLY CLEVER Infotainment Radio Bolero Owner’s Manual[…]
Система «посвежела» и управляется через новый экран.
Накануне Skoda Rapid обновился до 2020 года и получил современную систему мультимедиа Bolero. Об её особенностях поведал дилер на YouTube-канале Skoda club Piter.
Экран теперь «парит»
Главным внешним отличием нового комплекса стал «парящий» сенсорный экран. Диагональ составляет 6,5 и 8,0 дюймов в зависимости от комплектации. Монитор напоминает планшет с «крутилками», которые регулируют громкость и переключают настройки.
Для музыки и смартфонов
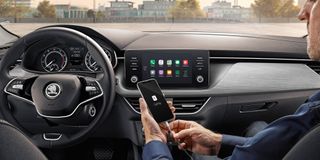
Музыка в Skoda Rapid 2020 воспроизводится 6 передними и боковыми динамиками. Приятным моментом стала поддержка Android Auto и Apple CarPlay, которых раньше не было. Подключить смартфоны можно также через порт Type C — для этого нужен переходник со стандартного USB-разъема.
С заботой о безопасности
Появилась система контроля дистанции. Сонар расположен на радиаторной решетке, а данные передаются на панель приборов. Рабочий стол сделали более понятным, конструкторы убрали лишние иконки.
Поменялось расположение органов управления — оно стало более удобным и понятным. С обновлением системы до версии 3.0 сенсор стал еще более отзывчивым.
Не без ложки дёгтя
Единственной проблемой модели осталась программа-коннектор Mirrorlink, с помощью которой отображается экран устройства. При прослушивании музыки и включении навигатора «Яндекс.Авто», плейлист «вылетает».
В итоге, на обновленном Skoda Rapid 2020 почти всё работает грамотно и в духе чешского производителя. Стоит напомнить, что в России за версию с мультимедиа Bolero понадобится отдать как минимум 1 150 000 рублей.
Многофункциональное рулевое колесо
Носители
11
Радио
11
Телефон
12
Многофункциональный дисплей
53
Мультимедиа
AUX
33
USB
33
Н
Наклон зеркальных элементов — опускание ли-
нии обзора при движении задним ходом
52
Настройка систем автомобиля
Вспомогательные системы для водителя
50
Многофункциональный дисплей
53
Парковка и маневрирование
51
Шины
50
Настройки
17
Восстановление заводских настроек
20
Время и дата
19
Голосовое управление
20
Громкость
7
Дополнительные раскладки клавиатуры
19
Единицы измерения
19
Звучание
18
Клавиатура
19
Носители
30
Профиль пользователя
43
Радио
25
Режим движения
47
Телефон
38
Управление избранным
43
Устройство
17
Экран устройства
18
Язык
17
Bluetooth
20
DAB
26
FM
26
Настройки автомобиля
Зеркала и стеклоочистители
52
Настройки звучания
18
Настройки систем автомобиля
47
Автономный отопитель и вентилятор
49
Восстановление заводских настроек
53
Освещение
51
Открывание и закрывание
52
Сиденья
52
Система ESC
50
Техническое обслуживание
53
Climatronic
54
Настройки устройства
17
Носители
28
Воспроизведение
29
Выбор источника сигнала
28
Главное меню
28
Голосовое управление
13
Источник сигнала
30
Многофункциональное рулевое колесо
11
Настройки
30
Поддерживаемые носители
30
Сканирование
29
Список папок
29
Управление
28
Условия и ограничения
31
Форматы файлов
30
AUX
33
Bluetooth-Audio
31
CD
32
MEDIA IN
34
SD-карта памяти
33
USB
33
О
Ограничение скорости для зимних шин
50
Описание устройства
5
Отключение звука
7
Отпирание дверей
52
Отсек для телефона
38
П
Парковочный ассистент
51
Подрулевой переключатель
10
Подсветка приборов
51
Поиск радиостанции
23
Полуавтоматический поиск радиостанции
23
Превентивная система безопасности
50
Р
Радио
22
Автоматический поиск
23
Главное меню
22
Голосовое управление
13
Дорожное вещание (TP)
24
Логотип станции
24
Многофункциональное рулевое колесо
11
Настройки
25
Настройки DAB
26
Настройки FM
26
Поиск
23
Предисловие
22
Сохранение радиостанции
23
Список доступных радиостанций
23
Управление
22
Радиостанции
Автоматический поиск
23
Поиск
23
См. Главное меню
22
Сохранение
23
Радиостанция
Логотип
24
Распознавание усталости
50
Режим движения
47
Реж. Путешествие
51
С
Связь
36
Отсек для телефона
38
Сиденья
Настройки
52
56
Алфавитный указатель
-
Skoda Radio Bolero — page 1
www.skoda-auto.com Bolero Infotainment anglicky 11.2012 S00.5614.03.20 5E0 012 095 H SIMPLY CLEVER Infotainment Radio Bolero Owner’s Manual …
-
Skoda Radio Bolero — page 2
Structure of this Owner’s Manual (explanations) This Owner’s Manual has been systematically designed to make it easy for you to search for and obtain the information you require. At the beginning of this manual you will find a table of contents where all the top- ics described are arranged sequentially. At the end of this manual you will …
-
Skoda Radio Bolero — page 3
Preface You have chosen a ŠKODA vehicle, which is fitted with an Infotainment Radio Bolero (hereafter called the unit) – we thank you for your confidence in us. The new operating concept allows you to make all the vehicle settings and to operate electronic systems centrally from the device. Please read this Owner’s Manual carefully, because …
-
Skoda Radio Bolero — page 4
Table of Contents Introductory information Vehicle equipment 3 Safety information 3 Warranty 3 Component protection 3 Touch screen 3 Unit overview and operation 4 Unit setup Main menu 7 Sound setup 7 Screen settings 8 Time and date settings 8 Keypad settings 8 Settings for units 8 Settings for voice control 9 Restore factory settings 9 Bluetooth se …
-
Skoda Radio Bolero — page 5
Introductory information Vehicle equipment These operating instructions describe all possible equipment variants without identifying them as special equipment, model variants or market-dependent equipment. Consequently, this vehicle does not need to contain all of the equipment compo- nents described in these operating instructions. The level of eq …
-
Skoda Radio Bolero — page 6
Unit overview and operation Unit overview Fig. 1 Unit overview Unit overview — Unit on/off, adjust volume Operation and confirmation RADIO — Radio menu » page 10 MEDIA — Media menu » page 14 Depending on equipment fitted: › MUTE — Mute › PHONE — Phone menu » page 19 Depending on equipment fitted: › TP — Traffic information » page 11 ? …
-
Skoda Radio Bolero — page 7
Note ■ The volume change is displayed on the screen of the unit. ■ When the sound is muted, the symbol appears in the display. Ð Screen display and control of the unit Fig. 2 Screen display Screen areas which confirm a function or a menu are called “ function keys ”. Greyed out function keys are not active. White or green function keys …
-
Skoda Radio Bolero — page 8
■ Sound — Sound setup ■ Volume — Volume setting ■ Bass — Mid — Treble — Sets the bass, mid and treble ■ Balance — Fader — Sets the balance between left and right, front and rear Example menu ■ xyz — the first menu level ■ xyz — the second menu level ■ xyz — the third menu level ■ xyz — the first menu level Ð Input screen with keypa …
-
Skoda Radio Bolero — page 9
Unit setup Main menu Fig. 4 Unit settings: Main menu First and foremost, pay attention to the safety instructions » page 3 . Select and confirm all functions as described at the beginning of this man- ual » page 4 . Call up the main menu › Press the button SETUP . Menus in the main menu for unit setup ■ Sound — Sound setup » page 7 ■ Scree …
-
Skoda Radio Bolero — page 10
■ Audio lowering: — Setting the reduction of the volume when the park distance control is active ■ Off — switches off ■ Weak — weak reduction ■ Medium — medium input sensitivity ■ Strong — strong reduction ■ Bass — Mid — Treble — Sets the bass, mid and treble ■ Balance — Fader — Sets the balance between left and right, front and rear …
-
Skoda Radio Bolero — page 11
■ Consumption — Consumption units ■ l/100 km — Litres per 100 kilometres ■ km/l — Kilometres per litre ■ mpg (US) — Miles per gallon (US) ■ mpg (UK) — Miles per gallon (UK) ■ Gas consumption — Gas consumption units ■ kg/100 km — Kilograms per 100 km ■ km/kg — Kilometres per kilogram ■ m3/100 km — Cubic metres per 100 kilometres ? …
-
Skoda Radio Bolero — page 12
Radio Main menu Fig. 6 Radio: Main menu First and foremost, pay attention to the safety instructions » page 3 . Select and confirm all functions as described at the beginning of this man- ual » page 4 . Call up the main menu › Press the button RADIO . Explanation of graphic A Selected radio station B Function keys used to select a station store …
-
Skoda Radio Bolero — page 13
■ Sound — Sound setup » page 7 , Sound setup ■ Scan — Auto-play all stations in the current frequency band, each station for around five seconds Press again to stop the auto-play function at the current radio station ■ Arrow buttons — Sets the function of the station selection in radio mode ■ Preset list — Switches to only stored stations …
-
Skoda Radio Bolero — page 14
Digital radio DAB Main menu Fig. 7 DAB: Main menu First and foremost, pay attention to the safety instructions » page 3 . Select and confirm all functions as described at the beginning of this man- ual » page 4 . Call up the main menu › Press the button RADIO → DAB . Explanation of graphic Selected DAB radio station Function keys used to sele …
-
Skoda Radio Bolero — page 15
Display main menu Fig. 8 Slideshow › Press the button RADIO → DAB → . ■ Preset list — Display only stored DAB stations ■ Station info. — Displays DAB station information (e.g., station name, group, or pro- gramme type) in the form of radio text and images ■ Radio text — Display radio text ■ Slide show — Display slideshow Ð Set-up …
-
Skoda Radio Bolero — page 16
Media Main menus Fig. 9 Media: Main menu First and foremost, pay attention to the safety instructions » page 3 . Select and confirm all functions as described at the beginning of this man- ual » page 4 . The unit supports audio files in the following formats: mp3, wma, wav, aac, m4a, m4b and mp4. Only standard size audio CDs (CD-DA) and data CDs …
-
Skoda Radio Bolero — page 17
Function key Action Operation Press briefly (5 seconds after the start of play- back of the track) Plays the current track from the start Press button for a long period of time Fast-reverse of the track Press briefly Plays the next track from the start Press button for a long period of time Fast-forward of the track Press Switch …
-
Skoda Radio Bolero — page 18
WARNING The CD player is a class 1 laser device. Opening the CD player produces a risk of injury through invisible laser radiation. CAUTION ■ Never insert DVDs into the internal drive — risk of damage to the unit. ■ Never insert CDs with the designation “ Do not insert in drives without a drawer ” or “ Eco Disc ” into the internal drive …
-
Skoda Radio Bolero — page 19
External audio sources Introductory information Adjusting the play volume of the external audio source The playback volume of the external audio source can be changed with the but- ton . Depending on the connected audio source, the output volume on the external au- dio source can be changed. Conditions for successful connection › Only USB dev …
-
Skoda Radio Bolero — page 20
Sort tracks from a connected Apple device › Video (only available if a red adapter is used) — Video playlists, films, music vid- eos, TV shows, video podcasts, rented films › Music — Playlists, artists, albums, tracks, podcasts, genres, composers, audio books iPod (iPad, iPhone) settings › Press the button MEDIA → → Video (iPod) . ■ …
-
Skoda Radio Bolero — page 21
Telephone Introductory information The phone menu is only available when the ignition is on and the Bluetooth ® function is activated. To connect a mobile phone with the hands-free system, the two devices must be paired » page 19 . After switching on the unit, the system attempts to connect to the last connected mobile phone 1) . Further informat …
-
Skoda Radio Bolero — page 22
Prerequisites for successful pairing › Ignition is switched on › Both the Bluetooth ® function and the visibility of the hands-free sys- tem » page 9 and mobile phone must be switched on » See the owner’s manual of the mobile phone . Automatic connection After switching on the unit, the system attempts to connect to the last connected m …
-
Skoda Radio Bolero — page 23
During the search, the system displays a list of function keys: ■ — Cancel the search ■ Help — Display help ■ Results — Display the search results as they become available. Here, you can se- lect a found Bluetooth ® device before the search has completed. Ð Pairing from the mobile phone When pairing from the mobile phone, follow the ins …
-
Skoda Radio Bolero — page 24
The input screen also functions as an alphanumeric keypad that you can use to search for contacts in the phonebook. While you are entering the numbers, the unit displays a list of contacts that changes according to the letter or sequence of letters entered. For example, if you enter 32, the unit will display contacts with the letter se- quence DA, …
-
Skoda Radio Bolero — page 25
Settings in telephone mode › Press the button PHONE → . Menu with settings in telephone mode ■ Select telephone — Search for available telephones/list of paired telephones/select telephone ■ Find telephone — Search for a mobile phone ■ Bluetooth — Bluetooth ® settings » page 9 ■ User profile — User profile settings ■ Manage favo …
-
Skoda Radio Bolero — page 26
During a conference Depending on the context, you can select the following functions: ■ — Hold the conference — leave the conference temporarily (the conference continues in your absence) ■ — Return to the held conference ■ — Switch off the microphone ■ — Switch on the microphone ■ — End the conference ■ Conference s …
-
Skoda Radio Bolero — page 27
Button 5 Action Operation Press briefly Leave telephone menu Ð Telephone calls in the information display The following functions in the information display can be executed depending on the context. Incoming call ■ Answer — Answer a call ■ Reject — Reject a call ■ Ignore — Ignore a call Outgoing call ■ Hang up — End a call …
-
Skoda Radio Bolero — page 28
Voice control Introductory information You can only use voice control in phone mode. Voice control settings » page 9 . The period of time during which the system is ready to receive voice commands and to carry them out is called a dialogue. The system gives audible feedback and guides you if necessary through the relevant functions. The microphone …
-
Skoda Radio Bolero — page 29
The symbol displayed on the device screen or in the information display changes from to . Press the following briefly: › Function key ; › VOICE button on the unit; › button on the multifunction steering wheel. Voice command input is reactivated. Voice command not recognised If a voice command is not recognised, the system answ …
-
Skoda Radio Bolero — page 30
Setting vehicle systems Main menu First and foremost, pay attention to the safety instructions » page 3 . Select and confirm all functions as described at the beginning of this man- ual » page 4 . The vehicle systems setup functions can only be used when the ignition is switched on. Call up the main menu › Press the button CAR . — Displays …
-
Skoda Radio Bolero — page 31
■ Convenience consumers — Displays up to three consumers which have the largest share of fuel consumption and displays the fuel consumption to run all conven- ience consumers » Vehicle Owner’s Manual ■ Vehicle status — Displays vehicle status » Fig. 17 or tyre pressure monitoring infor- mation ■ Vehicle status — Displays vehicle status …
-
Skoda Radio Bolero — page 32
■ Units — Settings for units of measurement » page 8 ■ Service — Service interval display, VIN » page 32 ■ Factory settings — Resets to factory settings » page 32 Ð ESC system › Press the button → ESC system . ■ Activated — Switches on all components of the ESC system ■ ASR off — Switches off the ASR system Ð Tyres › Press …
-
Skoda Radio Bolero — page 33
An obstacle appearing in the collision zone is shown as a red-coloured seg- ment Do not proceed! An area without detected obstacles is shown as a transparent segment. An obstacle in the sensor range which lies outside of the collision area is shown by the white segment. ■ ParkPilot — Settings for the parking assistant ■ Activate automatically — …
-
Skoda Radio Bolero — page 34
Seats › Press the button → Seats . ■ Store seat position — Store driver’s seat position on key ■ Vehicle key activated — Storing driver’s seat position on key on/off Ð Multifunction display › Press the button → Multifunction display . ■ Current consumption — Display of current fuel consumption on/off ■ Average con …
-
Skoda Radio Bolero — page 35
Other functions Introductory information First and foremost, pay attention to the safety instructions » page 3 . Select and confirm all functions as described at the beginning of this man- ual » page 4 . The following functions can only be used when the ignition is switched on. Ð Selecting driving mode Fig. 20 Centre console: Button for se- lect …
-
Skoda Radio Bolero — page 36
Climatronic settings Fig. 21 Climatronic: Main menu If Climatronic is switched on, the system displays the desired temperature for the driver’s side and front passenger side » Fig. 21 . Depending on the desired temper- ature, the airflow from the air outlet vents is shown in blue (temperature under 21.5 °C) or red (temperature above 22 °C). …
-
Skoda Radio Bolero — page 37
Unit menus Main menu Fig. 22 Unit menus: Main menu First and foremost, pay attention to the safety instructions » page 3 . Select and confirm all functions as described at the beginning of this man- ual » page 4 . Call up the main menu › Press the button MENU . — Radio » page 10 — Media » page 14 — Sound settings » page 7 — U …
-
Skoda Radio Bolero — page 38
Index A AM 10 Anti-theft protection 3 Automatic station finding 10 AUX 17 Auxiliary heater and ventilation 29 B Bluetooth Connecting an external audio source 17 Connecting your phone with hands-free system 19 Profiles 20 Settings 9 Switch on/off 9 Visibility 9 C CD 15 Climatronic 34 Component protection 3 Control of the unit 5 D DAB 12 Data Conveni …
-
Skoda Radio Bolero — page 39
Keypad 8 Language 7 Manage favourites 21 Restore factory settings 9 Screen 8 Telephone 23 Time and date 8 Units 8 User profile 21 Voice control 9 Volume 4 Setting vehicle systems Auxiliary heater and ventilation 29 Climatronic 34 Driver assistance 30 ESC system 30 Lights 31 Main menu 28 Mirrors and wipers 31 Multifunction display 32 Opening/closing …
-
Skoda Radio Bolero — page 40
ŠKODA AUTO a.s. pursues a policy of constant development of Infotainment ra- dios and navigation systems. We trust that you will understand that changes to models in terms of shape and engineering may be introduced at any time. The de- tails of appearance, dimensions and functions of the Infotainment radios and nav- igation systems were correct at …
-
Skoda Radio Bolero — page 41
www.skoda-auto.com Bolero Infotainment anglicky 11.2012 S00.5614.03.20 5E0 012 095 H SIMPLY CLEVER Infotainment Radio Bolero Owner’s Manual …