
Operation Guide 5176
MO1011-EA
E-1
ENGLISH
Congratulations upon your selection of this CASIO watch.
Applications
The built-in sensors of this watch measure barometric pressure, temperature and
altitude. Measured values are then shown on the display. Such features make this
watch useful when hiking, mountain climbing, or when engaging in other such outdoor
activities.
E-2
Warning !
•
The measurement functions built into this watch are not intended for taking
measurements that require professional or industrial precision. Values produced
by this watch should be considered as reasonable representations only.
•
Note that CASIO COMPUTER CO., LTD. assumes no responsibility for any
damage or loss suffered by you or any third party arising through the use of
this product or its malfunction.
E-3
About This Manual
•
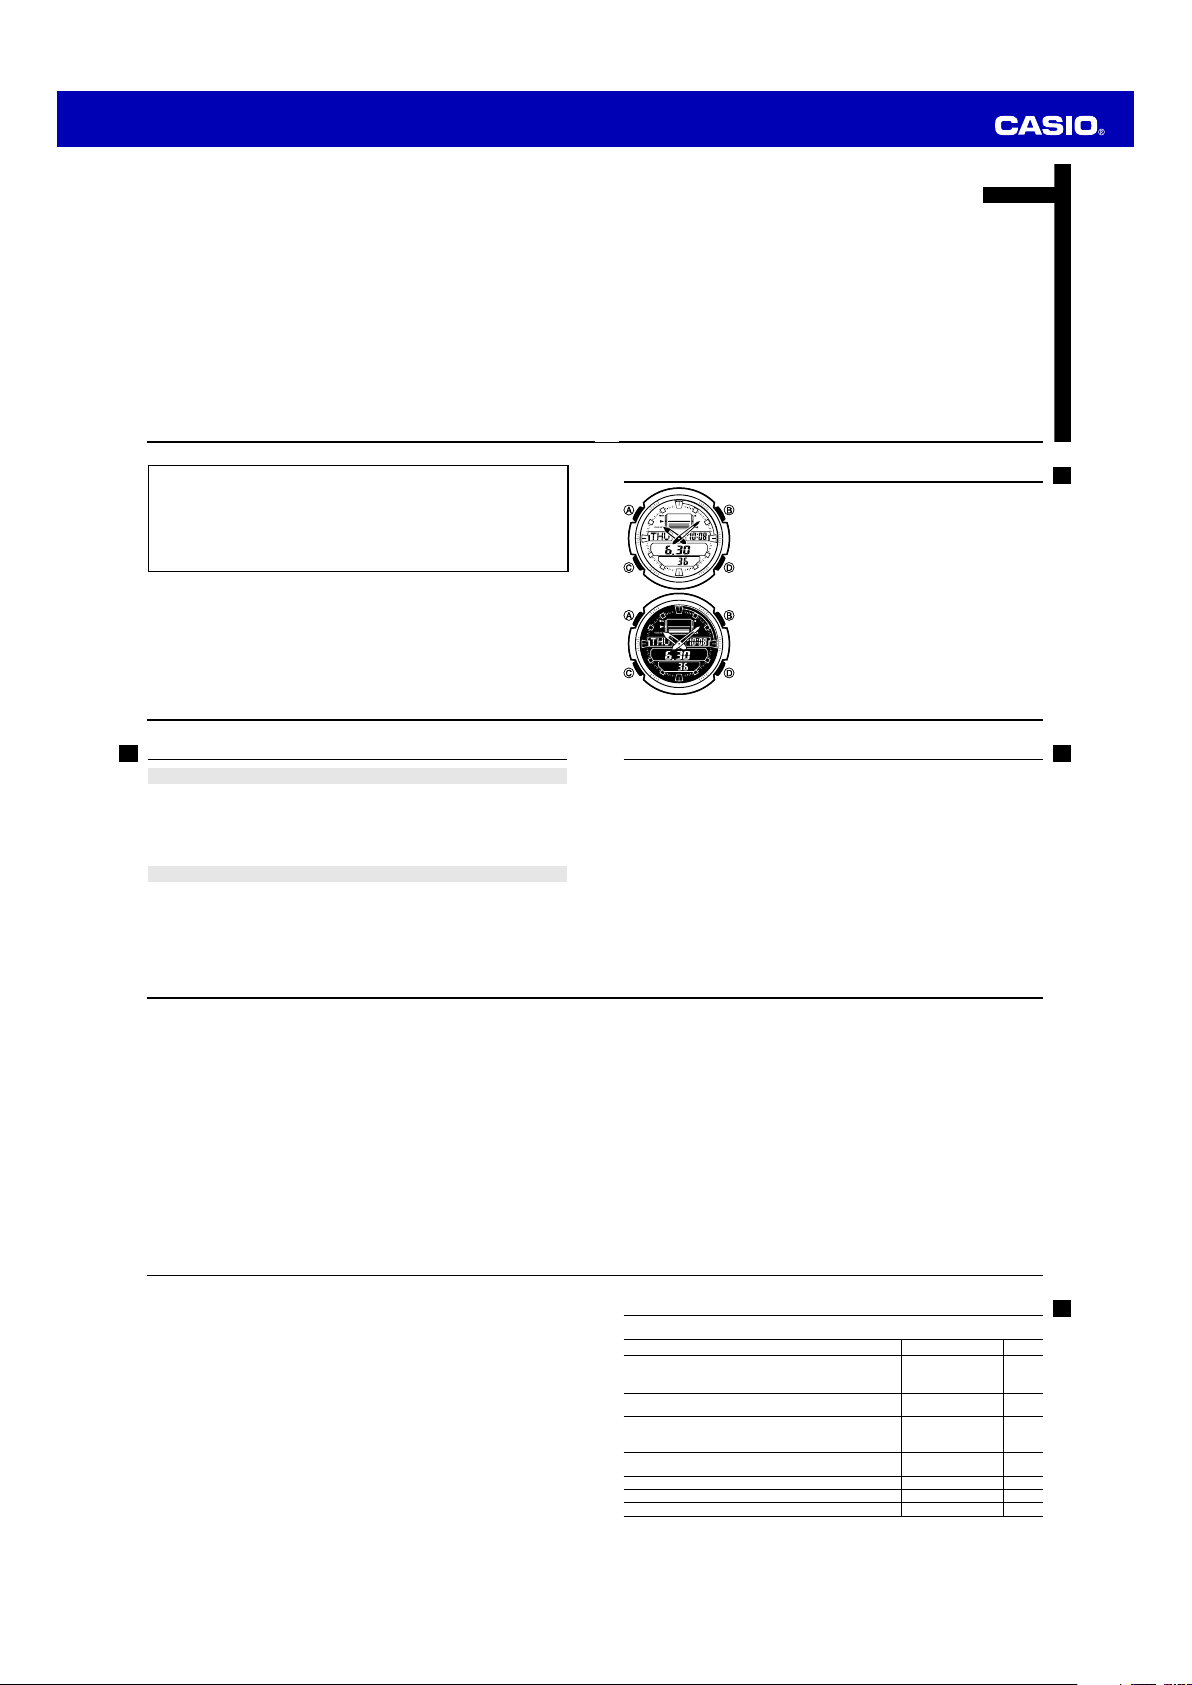
Depending on the model of your watch, display text
appears either as dark fi gures on a light background, or
light fi gures on a dark background. All sample displays
in this manual are shown using dark fi gures on a light
background.
•
Button operations are indicated using the letters shown
in the illustration.
•
Note that the product illustrations in this manual are
intended for reference only, and so the actual product
may appear somewhat different than depicted by an
illustration.
E-4
Things to check before using the watch
1. Check the Home City and the daylight saving time (DST) setting.
Use the procedure under “To confi gure Home City settings” (page E-14) to confi gure
your Home City and daylight saving time settings.
Important!
Proper World Time Mode data depend on correct Home City, time, and date settings
in the Timekeeping Mode. Make sure you confi gure these settings correctly.
2. Set the current time.
See “Confi guring Current Time and Date Settings” (page E-17).
The watch is now ready for use.
E-5
Contents
E-3 About
This
Manual
E-4
Things to check before using the watch
E-9 Mode
Reference
Guide
E-13 Timekeeping
E-14 Confi guring Home City Settings
E-14
To confi gure Home City settings
E-16
To change the Daylight Saving Time (summer time) setting
E-17 Confi guring Current Time and Date Settings
E-18
To change the current time and date settings
E-22 Hand
Home
Position
Correction
E-22
To adjust home positions
E-6
E-23 Barometer/Thermometer
E-23
To enter and exit the Barometer/Thermometer Mode
E-28
To calibrate the pressure sensor and the temperature sensor
E-30 Altimeter
E-31
To take an altimeter reading
E-34
To specify a reference altitude value
E-39 Specifying Temperature, Barometric Pressure, and Altitude Units
E-39
To specify temperature, barometric pressure, and altitude units
E-41
Precautions Concerning Simultaneous Measurement of Altitude and
Temperature
E-42 Checking the Current Time in a Different Time Zone
E-42
To enter the World Time Mode
E-42
To view the time in another time zone
E-43
To specify standard time or daylight saving time (DST) for a city
E-7
E-44 Using
the
Stopwatch
E-44
To enter the Stopwatch Mode
E-44
To perform an elapsed time operation
E-44
To pause at a split time
E-45
To measure two fi nishes
E-46 Using the Countdown Timer
E-46
To enter the Countdown Timer Mode
E-46
To specify the countdown start time
E-48
To perform a countdown timer operation
E-48
To stop the alarm
E-49 Using
the
Alarm
E-49
To enter the Alarm Mode
E-50
To set an alarm time
E-51
To test the alarm
E-52
To turn an alarm and the Hourly Time Signal on and off
E-52
To stop the alarm
E-8
E-53 Illumination
E-53
To turn on illumination
E-53
To change the illumination duration
E-55 Button
Operation
Tone
E-55
To turn the button operation tone on and off
E-57 Troubleshooting
E-61 Specifi cations
E-9
Mode Reference Guide
Your watch has 7 “modes”. The mode you should select depends on what you want to do.
To do this:
Enter this mode:
See:
•
View the current time and date in the Home City
•
Confi gure Home City and daylight saving time (DST) settings
•
Confi gure time and date settings
Timekeeping Mode
E-13
View the barometric pressure and temperature at your
current location
Barometer/
Thermometer Mode
E-23
•
View the altitude at your current location
•
Determine the altitude differential between two locations
(reference point and current location)
Altimeter Mode
E-30
View the current time in one of 48 cities (31 time zones)
around the globe
World Time Mode
E-42
Use the stopwatch to measure elapsed time
Stopwatch Mode
E-44
Use the countdown timer
Countdown Timer Mode
E-46
Set an alarm time
Alarm Mode
E-49
MO1011-EA
Operation Guide 5176
Congratulations upon your selection of this CASIO watch.
Applications
The built-in sensors of this watch measure barometric pressure, temperature and
altitude. Measured values are then shown on the display. Such features make this
watch useful when hiking, mountain climbing, or when engaging in other such outdoor
activities.
ENGLISH
E-1
•
The measurement functions built into this watch are not intended for taking
measurements that require professional or industrial precision. Values produced
by this watch should be considered as reasonable representations only.
• Note that CASIO COMPUTER CO., LTD. assumes no responsibility for any
damage or loss suffered by you or any third party arising through the use of
this product or its malfunction.
E-2
Warning !
Things to check before using the watch
1. Check the Home City and the daylight saving time (DST) setting.
Use the procedure under “To confi gure Home City settings” (page E-14) to confi gure
your Home City and daylight saving time settings.
Important!
Proper World Time Mode data depend on correct Home City, time, and date settings
in the Timekeeping Mode. Make sure you confi gure these settings correctly.
2. Set the current time.
See “Confi guring Current Time and Date Settings” (page E-17).
The watch is now ready for use.
E-4
E-23 Barometer/Thermometer
E-23 To enter and exit the Barometer/Thermometer Mode
E-28 To calibrate the pressure sensor and the temperature sensor
E-30 Altimeter
E-31 To take an altimeter reading
E-34 To specify a reference altitude value
E-39 Specifying Temperature, Barometric Pressure, and Altitude Units
E-39 To specify temperature, barometric pressure, and altitude units
E-41
Precautions Concerning Simultaneous Measurement of Altitude and
Temperature
E-42 Checking the Current Time in a Different Time Zone
E-42 To enter the World Time Mode
E-42 To view the time in another time zone
E-43 To specify standard time or daylight saving time (DST) for a city
E-6
About This Manual
• Depending on the model of your watch, display text
appears either as dark fi gures on a light background, or
light fi gures on a dark background. All sample displays
in this manual are shown using dark fi gures on a light
background.
• Button operations are indicated using the letters shown
in the illustration.
• Note that the product illustrations in this manual are
intended for reference only, and so the actual product
may appear somewhat different than depicted by an
illustration.
Contents
E-3 About This Manual
E-4 Things to check before using the watch
E-9 Mode Reference Guide
E-13 Timekeeping
E-14 Confi guring Home City Settings
E-14 To confi gure Home City settings
E-16 To change the Daylight Saving Time (summer time) setting
E-17 Confi guring Current Time and Date Settings
E-18 To change the current time and date settings
E-22 Hand Home Position Correction
E-22 To adjust home positions
E-44 Using the Stopwatch
E-44 To enter the Stopwatch Mode
E-44 To perform an elapsed time operation
E-44 To pause at a split time
E-45 To measure two fi nishes
E-46 Using the Countdown Timer
E-46 To enter the Countdown Timer Mode
E-46 To specify the countdown start time
E-48 To perform a countdown timer operation
E-48 To stop the alarm
E-49 Using the Alarm
E-49 To enter the Alarm Mode
E-50 To set an alarm time
E-51 To test the alarm
E-52 To turn an alarm and the Hourly Time Signal on and off
E-52 To stop the alarm
E-3
E-5
E-7
E-53 Illumination
E-53 To turn on illumination
E-53 To change the illumination duration
E-55 Button Operation Tone
E-55 To turn the button operation tone on and off
E-57 Troubleshooting
E-61 Specifi cations
E-8
Mode Reference Guide
Your watch has 7 “modes”. The mode you should select depends on what you want to do.
To do this: Enter this mode: See:
• View the current time and date in the Home City
•
Confi gure Home City and daylight saving time (DST) settings
• Confi gure time and date settings
View the barometric pressure and temperature at your
current location
• View the altitude at your current location
• Determine the altitude differential between two locations
(reference point and current location)
View the current time in one of 48 cities (31 time zones)
around the globe
Use the stopwatch to measure elapsed time Stopwatch Mode E-44
Use the countdown timer
Set an alarm time Alarm Mode E-49
Timekeeping Mode E-13
Barometer/
Thermometer Mode
Altimeter Mode E-30
World Time Mode E-42
Countdown Timer Mode
E-23
E-46
E-9
Operation Guide 5176
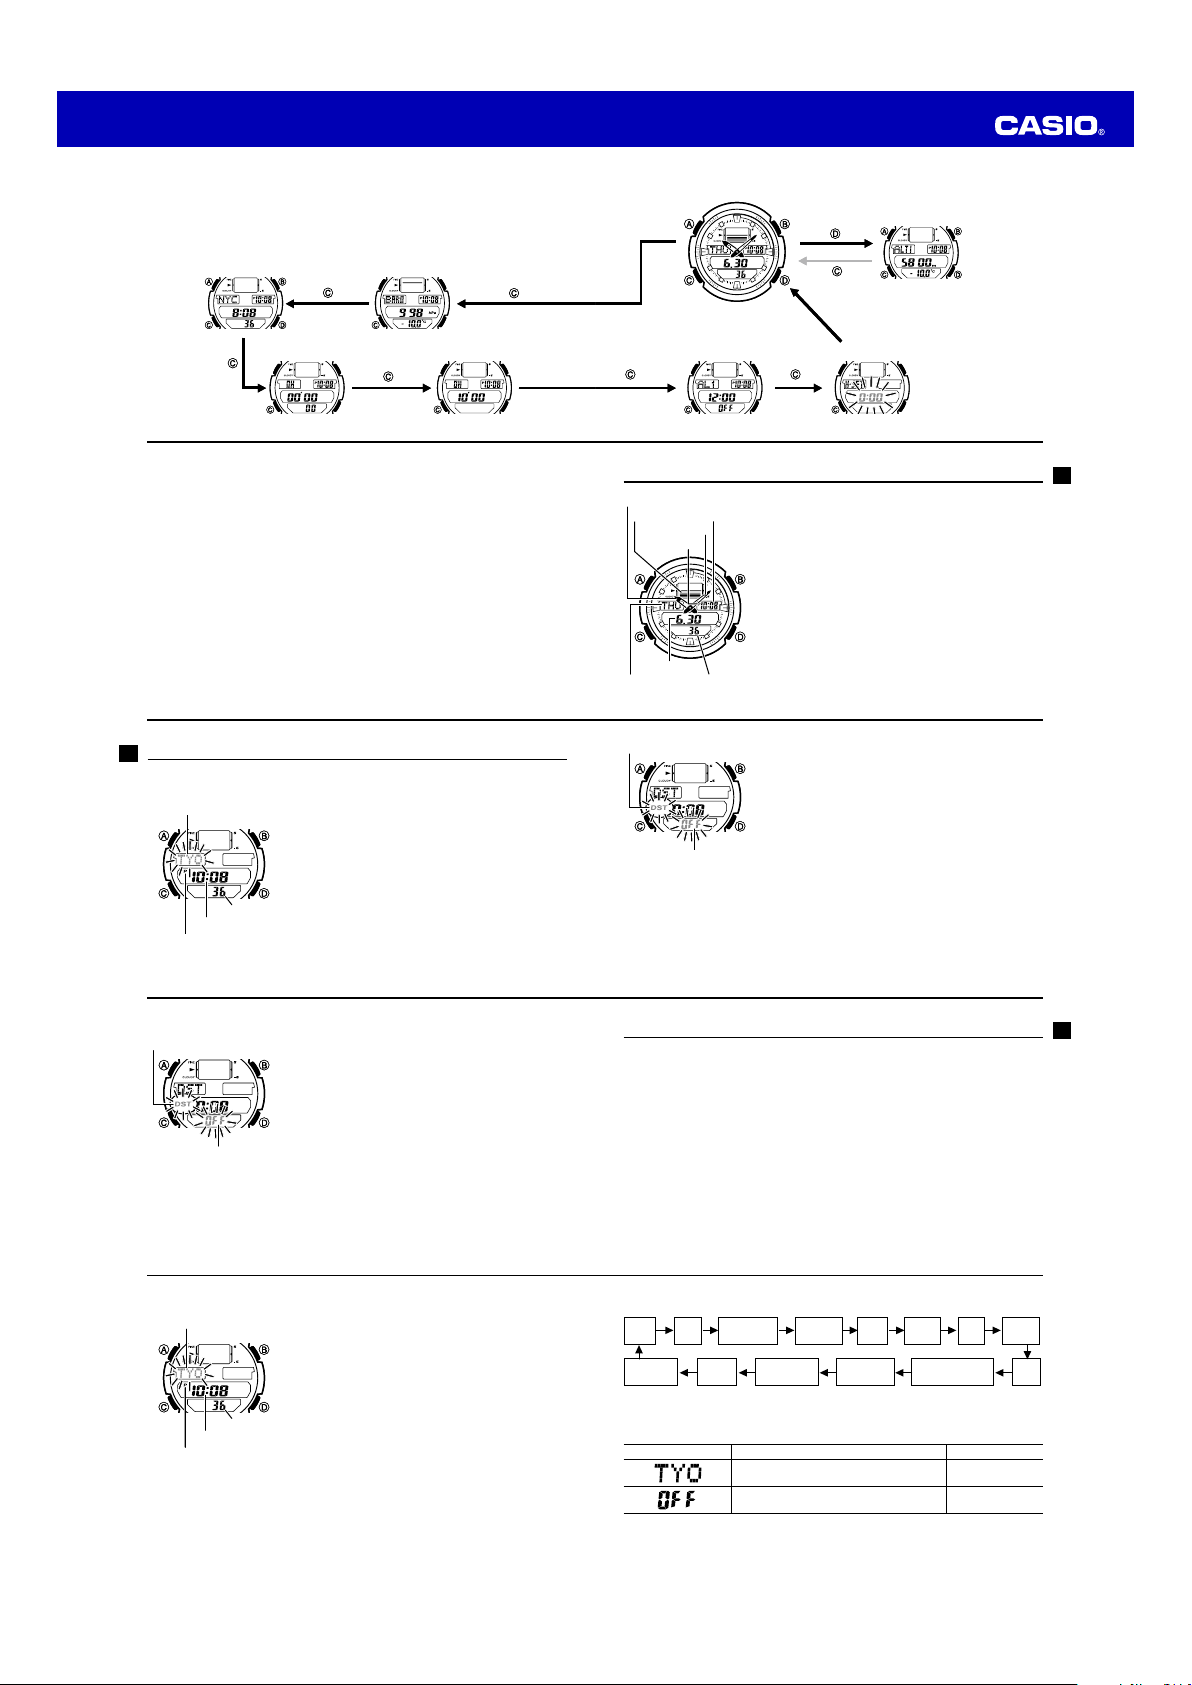
Selecting a Mode
• The illustration below shows which buttons you need to press to navigate between
modes.
• In any mode (except when a setting screen, with fl ashing digits is on the display),
pressB to illuminate the display.
World Time
World Time
Mode
Mode
Stopwatch Mode
Stopwatch Mode
E-10
General Functions (All Modes)
The functions and operations described in this section can be used in all of the modes.
Auto Return Features
• The watch returns to the Timekeeping Mode automatically if you do not perform any
button operation for two or three minutes in the Alarm Mode.
• The watch will return to the Timekeeping Mode automatically if you do not perform
any operation for about one hour after entering the Barometer/Thermometer Mode.
•
If you leave a setting screen with fl ashing digits on the display for two or three minutes
without performing any operation, the watch exits the setting screen automatically.
Initial Screens
When you enter the World Time Mode or Alarm Mode, the data you were viewing
when you last exited the mode appears fi rst.
Scrolling
TheB and D buttons are used on the setting screen to scroll through data on the
display. In most cases, holding down these buttons during a scroll operation scrolls
through the data at high speed.
E-12
Barometer/
Barometer/
Thermometer Mode
Thermometer Mode
Countdown
Countdown
Timer Mode
Timer Mode
Confi guring Home City Settings
There are two Home City settings: actually selecting the Home City and selecting
either standard time or daylight saving time (DST).
To confi gure Home City settings
1. In the Timekeeping Mode, hold down A until the
currently selected city code (Home City) starts to fl ash.
This is the city code setting screen.
• Before the cit y code starts to fl ash, the m essage
SET Hold will appear on the dis play. Keep
depressed until SET Hold disappears and the cit y
code star ts to fl ash.
Seconds
Seconds
• The watch will exi t the settin g mode autom atically if
you do not per form any ope ration for ab out two or
three minutes.
• For deta ils about cit y codes, see the “Cit y Code Table”
at the back of thi s manual.
A
E-14
City code
City code
PM indicator
PM indicator
Hour : Minutes
Hour : Minutes
Timekeeping Mode
Timekeeping Mode
Altimeter Mode
Altimeter Mode
Alarm Mode
Alarm Mode
Hand Setting Mode
Hand Setting Mode
Timekeeping
Hour hand
Hour hand
Graphic
Graphic
Hour : Minutes
Hour : Minutes
Minute hand
Minute hand
PM indicator
PM indicator
Month Day
Month Day
Day of week
Day of week
DST indicator
DST indicator
Setting
Setting
5.
After all the settings are the way you want, press A to return to the Timekeeping Mode.
• The DST indicator a ppears to indi cate that Daylig ht Saving Tim e is turned on.
Note
• After you sp ecify a cit y code, the watch w ill use UTC* of fsets in the World Time
Mode to calcu late the current t ime for othe r time zones bas ed on the curre nt
time in your H ome City.
* Coordinated Universal Time, the world-wide scientifi c standard of timekeeping.
The reference point for UTC is Greenwich, England.
Use the Timekeeping Mode to set and view the current
time and date.
• In the Timekeeping Mode, the graphic in the center of
the display indicates the passage of seconds.
Seconds
Seconds
2. Press D (East) and B (West) to select the city code
you want to use as your Home City.
• Keep pressing D or B until the cit y code you want to
select as you r Home Cit y appears on t he display.
3. Press C to display the DST setting screen.
PressDto toggle between Daylight Saving Time (On)
4.
and Standard Time (
• Note that you c annot switch b etween st andard time
and daylight sav ing time (DS T) while U TC is
selected as your Home City.
OFF
).
E-11
E-13
E-15
To change the Daylight Saving Time (summer time) setting
DST indicator
DST indicator
1. In the Timekeeping Mode, hold down A until the
currently selected city code (Home City) starts to fl ash.
This is the city code setting screen.
• Before the cit y code starts to fl ash, the m essage
SET Hold will appear on the dis play. Keep
depressed until SET Hold disappears and the cit y
code star ts to fl ash.
2. Press C to display the DST setting screen.
Setting
Setting
E-16
To change the current time and date settings
City code
City code
Hour : Minutes
Hour : Minutes
PM indicator
PM indicator
E-18
3. Press D to toggle between Daylight Saving Time (On)
and Standard Time (
4. After all the settings are the way you want, press A to
return to the Timekeeping Mode.
• The DST indicator ap pears to indica te that Daylight
Saving Tim e is turned on.
1. In the Timekeeping Mode, hold down A until the
currently selected city code (Home City) starts to fl ash.
This is the city code setting screen.
• Before the cit y code starts to fl ash, the m essage
SET Hold will appear on the dis play. Keep
depressed until SET Hold disappears and the cit y
code star ts to fl ash.
2. Use D and B to select the city code you want.
Seconds
Seconds
• Select you r Home Cit y code before c hanging any
other setting.
• For full info rmation on c ity codes , see the “Cit y Code
Table” at the back of thi s manual.
OFF
).
Confi guring Current Time and Date Settings
You can use the procedure below to adjust the current time and date settings if they
are off.
A
A
Changing the digital Home City data should cause the analog time setting to change
accordingly. If the analog time does not indicate the digital time, check the home
positions of the hands and make adjustments if necessary (page E-22).
3.
PressC to move the fl ashing in the sequence shown below to select the other settings.
City
Code
Barometer
unit
DST
Altitude
unit
12/24-Hour
Format
Seconds Hour Minute Year Month
Temperature
unit
Illumination
Duration
Button Operation
Tone On/Off
Day
• The follow ing steps expla in how to confi gu re timekeepi ng setting s only.
4. When the timekeeping setting you want to change is fl ashing, use B and/or D to
change it as described below.
Screen To do this: Do this:
Change the city code
Toggle between Daylight Saving Time (On)
and Standard Time (
OFF
).
UseD (East) and
B
(West).
PressD.
E-17
E-19

Operation Guide 5176
Screen To do this: Do this:
Toggle between 12-hour (
24H
(
) timekeeping.
Reset the seconds to
Change the hour or minute
Change the year, month, or day
00
12H
) and 24-hour
PressD.
PressD.
UseD (+) and
(–).
B
5. Press A to exit the setting screen.
E-20
Hand Home Position Correction
The hour and minute hands of the watch can be thrown off by exposure to strong
magnetism or impact. The watch is designed to correct the hour and minute hand
positions manually.
• All of the operations in this section are performed in the Hand Setting Mode, which
you enter by pressing C (page E-11).
To adjust home positions
Hour and minute hands
Hour and minute hands
Correct hour and
Correct hour and
minute hand positions
minute hand positions
E-22
2. Press C fi ve times to return to the Timekeeping Mode.
•
The watch will ret urn to the Time keeping Mod e automatica lly if you do not pe rform
any operatio n for about on e hour after e ntering the Baro meter/T hermom eter Mode.
Barometric Pressure
• Barometric pressure is displayed in units of 1 hPa (or 0.05 inHg).
•
The displayed barometric pressure value changes to
pressure falls outside the range of 260 hPa to 1,100 hPa (7.65 inHg to 32.45 inHg).
The barometric pressure value will reappear as soon as the measured barometric
pressure is within the allowable range.
Temperature
• Temperature is displayed in units of 0.1°C (or 0.2°F).
• The displayed temperature value changes to
temperature falls outside the range of –10.0°C to 60.0°C (14.0°F to 140.0°F). The
temperature value will reappear as soon as the measured temperature is within the
allowable range.
1. In the Hand Setting Mode, hold down A for about two
seconds until 0:00 appears on the display.
• This is the home position adjustment mode.
2. Check the positions of the hour and minute hands.
• The hand s are in the corre ct home posi tions if they are
pointed at 12 o’clock. I f they aren’t, u se D (clockwise)
and B (counterclock wise) to adjust their positi ons.
3. Press A to exit the setting screen.
• This will cause the hour and minute hands to move to
the current T imekeepin g Mode time.
— — —
if a measured barometric
—.-
°C (or °F) if a measured
Note
• For information about selecting a Home City and confi guring the DST setting, see
“Confi guring Home City Settings” (page E-14).
• While 12-hour format is selected for timekeeping, a P (PM) indicator will appear for
times from noon to 11:59 p.m. No indicator appears for times from midnight to
11:59 a.m. With 24-hour format, time is displayed from 0:00 to 23:59, without any
(PM) indicator.
• The watch’s built-in full automatic calendar makes allowances for different month
lengths and leap years. Once you set the date, there should be no reason to
change it except after you have the watch’s battery replaced.
E-21
Barometer/Thermometer
This watch uses a pressure sensor to measure air pressure (barometric pressure) and
a temperature sensor to measure temperature.
To enter and exit the Barometer/Thermometer Mode
1. While in the Timekeeping Mode, press C to enter the
Barometer/Thermometer Mode.
• BARO will appea r on the display, indic ating
that baromet ric pressure an d temperature
measurem ents are in progre ss. The mea surement
results will a ppear on the di splay after abo ut fi ve
seconds.
• After you press C, the watch will take readings every
fi ve seconds fo r the fi rst three mi nutes, and th en
every two mi nutes after t hat.
This pointer indicates the relative difference between
Barometric
Barometric
the most recent barometric pressure reading and the
pressure
pressure
differential
differential
current barometric pressure value displayed in the
pointer
pointer
Barometer/Thermometer Mode (page E-23).
E-23
Barometric
Barometric
pressure
pressure
Current time
Current time
Temperature
Temperature
Pressure
Pressure
differential
differential
pointer
pointer
Display Units
You can select either hectopascals (hPa) or inchesHg (inHg) as the display unit for the
measured barometric pressure, and Celsius (°C) or Fahrenheit (°F) as the display unit
for the measured temperature value. See “To specify temperature, barometric
pressure, and altitude units” (page E-39).
Barometric Pressure Differential Pointer
P
E-24
Reading Barometric Pressure Differential Pointer
Pressure differential is indicated in the range of ±5 hPa, in 1-hPa units.
If the pointer is located here: It means this:
CLOUDY (–)
FINE (+)
• The nearby screen shot, for example, shows what the pointer would indicate when
the calculated pressure differential is approximately – 3 hPa (approximately – 0.09
inHg).
E-26
To calibrate the pressure sensor and the temperature sensor
E-28
Pressure is falling and weather will tend to deteriorate.
Pressure is rising and weather will tend to improve.
0.15
−0.15
inHg valueshPa values
1.Take a reading with another measurement device to
determine the exact current barometric pressure or
temperature.
2. With the watch in the Timekeeping Mode, press C to
enter the Barometer/Thermometer Mode.
3. Hold down A until the current temperature value starts
to fl ash on the display. This is the setting screen.
• Before the tem perature value s tarts to fl ash, t he
message SET Hold will appear on the display.
Keep A depressed u ntil SET Hold disappears.
4. Press C to move the fl ashing between the temperature
value and barometric pressure value, to select the one
you want to calibrate.
Current pressure greater than
most recent measured pressure
Current pressure less than most
recent measured pressure
E-25
• Barometric pressure is calculated and displayed using hPa as the standard. The
barometric pressure differential also can be read in inHg units as shown in the
illustration (1 hPa
Pressure Sensor and Temperature Sensor Calibration
The pressure sensor and temperature sensor built into the watch are calibrated at the
factory and normally require no further adjustment. If you notice serious errors in the
pressure readings and temperature readings produced by the watch, you can calibrate
a sensor to the reading of another device to correct the errors.
Important!
• Incorrectly calibrating the temperature sensor can result in incorrect readings.
Carefully read the following before doing anything.
Compare the readings produced by the watch with those of another reliable and
–
accurate thermometer.
– If adjustment is required, remove the watch from your wrist and wait for 20 or 30
minutes to give the temperature of the watch time to stabilize.
5.
UseD (+) and B (–) to adjust the calibration value in the units shown below.
Temperature 0.1°C (0.2°F)
Barometric Pressure 1 hPa (0.05 inHg)
• To return the currentl y fl ashing value to it s initial facto ry default se tting, press
and D at the same ti me. OFF will appear at t he fl ashing lo cation for ab out one
second, fo llowed by the init ial default valu e.
=
0.03 inHg).
E-27
B
6. Press A to return to the Barometer/Thermometer Mode screen.
Barometer and Thermometer Precautions
• The pressure sensor built into this watch measures changes in air pressure, which
you can then apply to your own weather predictions. It is not intended for use as a
precision instrument in offi cial weather prediction or reporting applications.
• Sudden temperature changes can affect pressure sensor readings.
• Temperature measurements are affected by your body temperature (while you are
wearing the watch), direct sunlight, and moisture. To achieve a more accurate
temperature measurement, remove the watch from your wrist, place it in a well
ventilated location out of direct sunlight, and wipe all moisture from the case. It
takes approximately 20 to 30 minutes for the case of the watch to reach the actual
surrounding temperature.
E-29
 Loading…

Operation Guide 5176
MO1011-EA
E-1
ENGLISH
Congratulations upon your selection of this CASIO watch.
Applications
The built-in sensors of this watch measure barometric pressure, temperature and
altitude. Measured values are then shown on the display. Such features make this
watch useful when hiking, mountain climbing, or when engaging in other such outdoor
activities.
E-2
Warning !
•
The measurement functions built into this watch are not intended for taking
measurements that require professional or industrial precision. Values produced
by this watch should be considered as reasonable representations only.
• Note that CASIO COMPUTER CO., LTD. assumes no responsibility for any
damage or loss suffered by you or any third party arising through the use of
this product or its malfunction.
E-3
About This Manual
• Depending on the model of your watch, display text
appears either as dark fi gures on a light background, or
light fi gures on a dark background. All sample displays
in this manual are shown using dark fi gures on a light
background.
• Button operations are indicated using the letters shown
in the illustration.
• Note that the product illustrations in this manual are
intended for reference only, and so the actual product
may appear somewhat different than depicted by an
illustration.
E-4
Things to check before using the watch
1. Check the Home City and the daylight saving time (DST) setting.
Use the procedure under “To confi gure Home City settings” (page E-14) to confi gure
your Home City and daylight saving time settings.
Important!
Proper World Time Mode data depend on correct Home City, time, and date settings
in the Timekeeping Mode. Make sure you confi gure these settings correctly.
2. Set the current time.
See “Confi guring Current Time and Date Settings” (page E-17).
The watch is now ready for use.
E-5
Contents
E-3 About This Manual
E-4 Things to check before using the watch
E-9 Mode Reference Guide
E-13 Timekeeping
E-14 Confi guring Home City Settings
E-14 To confi gure Home City settings
E-16 To change the Daylight Saving Time (summer time) setting
E-17 Confi guring Current Time and Date Settings
E-18 To change the current time and date settings
E-22 Hand Home Position Correction
E-22 To adjust home positions
E-6
E-23 Barometer/Thermometer
E-23 To enter and exit the Barometer/Thermometer Mode
E-28 To calibrate the pressure sensor and the temperature sensor
E-30 Altimeter
E-31 To take an altimeter reading
E-34 To specify a reference altitude value
E-39 Specifying Temperature, Barometric Pressure, and Altitude Units
E-39 To specify temperature, barometric pressure, and altitude units
E-41
Precautions Concerning Simultaneous Measurement of Altitude and
Temperature
E-42 Checking the Current Time in a Different Time Zone
E-42 To enter the World Time Mode
E-42 To view the time in another time zone
E-43 To specify standard time or daylight saving time (DST) for a city
E-7
E-44 Using the Stopwatch
E-44 To enter the Stopwatch Mode
E-44 To perform an elapsed time operation
E-44 To pause at a split time
E-45 To measure two fi nishes
E-46 Using the Countdown Timer
E-46 To enter the Countdown Timer Mode
E-46 To specify the countdown start time
E-48 To perform a countdown timer operation
E-48 To stop the alarm
E-49 Using the Alarm
E-49 To enter the Alarm Mode
E-50 To set an alarm time
E-51 To test the alarm
E-52 To turn an alarm and the Hourly Time Signal on and off
E-52 To stop the alarm
E-8
E-53 Illumination
E-53 To turn on illumination
E-53 To change the illumination duration
E-55 Button Operation Tone
E-55 To turn the button operation tone on and off
E-57 Troubleshooting
E-61 Specifi cations
E-9
Mode Reference Guide
Your watch has 7 “modes”. The mode you should select depends on what you want to do.
To do this: Enter this mode: See:
• View the current time and date in the Home City
•
Confi gure Home City and daylight saving time (DST) settings
• Confi gure time and date settings
Timekeeping Mode E-13
View the barometric pressure and temperature at your
current location
Barometer/
Thermometer Mode
E-23
• View the altitude at your current location
• Determine the altitude differential between two locations
(reference point and current location)
Altimeter Mode E-30
View the current time in one of 48 cities (31 time zones)
around the globe
World Time Mode E-42
Use the stopwatch to measure elapsed time Stopwatch Mode E-44
Use the countdown timer
Countdown Timer Mode
E-46
Set an alarm time Alarm Mode E-49