
![]()
Operating Instructions
DVD Recorder
Model No. DMR-EH57
DMR-EH67
The illustrations in these Operating Instructions show images of the silver model of DMR-EH57 for Australia and N.Z.
[For]Australia]and]N.Z.]
Instructions/notes regarding SD Cards and SD Drive are applicable to the DMR-EH67 model only.
Region number supported by this unit
Region numbers are allocated to DVD Recorders and DVD-Video according to where they are sold.
For Asia
≥The region number of this unit is “3”. ≥The unit will play DVD-Video marked with
labels containing “3” or “ALL”.
Example:
3 ALL 234
For Australia and N.Z.
≥The region number of this unit is “4”. ≥The unit will play DVD-Video marked with
labels containing “4” or “ALL”.
Example:
4 ALL 234
For Middle East
≥The region number of this unit is “2”. ≥The unit will play DVD-Video marked with
labels containing “2” or “ALL”.
Example:
2 ALL 235
Dear customer
Thank you for purchasing this product. For optimum performance and safety, please read these instructions carefully.
Before connecting, operating or adjusting this product, please read the instructions completely. Please keep this manual for future reference.
|
Getting |
started |
|
Recording |
|
|
Playing |
back |
|
Editing |
|
|
Copying |
|
|
Convenient |
functions |
|
Reference |
|

CAUTION!
THIS PRODUCT UTILIZES A LASER.
USE OF CONTROLS OR ADJUSTMENTS OR PERFORMANCE OF PROCEDURES OTHER THAN THOSE SPECIFIED HEREIN MAY RESULT IN HAZARDOUS RADIATION EXPOSURE.
DO NOT OPEN COVERS AND DO NOT REPAIR YOURSELF. REFER SERVICING TO QUALIFIED PERSONNEL.
WARNING:
TO REDUCE THE RISK OF FIRE, ELECTRIC SHOCK OR PRODUCT DAMAGE,
≥DO NOT EXPOSE THIS APPARATUS TO RAIN, MOISTURE,
DRIPPING OR SPLASHING AND THAT NO OBJECTS FILLED WITH LIQUIDS, SUCH AS VASES, SHALL BE PLACED ON THE APPARATUS.
≥USE ONLY THE RECOMMENDED ACCESSORIES.
≥DO NOT REMOVE THE COVER (OR BACK); THERE ARE NO
USER SERVICEABLE PARTS INSIDE. REFER SERVICING TO QUALIFIED SERVICE PERSONNEL.
CAUTION!
≥DO NOT INSTALL OR PLACE THIS UNIT IN A BOOKCASE,
BUILT-IN CABINET OR IN ANOTHER CONFINED SPACE. ENSURE THE UNIT IS WELL VENTILATED. TO PREVENT RISK OF ELECTRIC SHOCK OR FIRE HAZARD DUE TO OVERHEATING, ENSURE THAT CURTAINS AND ANY OTHER MATERIALS DO NOT OBSTRUCT THE VENTILATION VENTS.
≥DO NOT OBSTRUCT THE UNIT’S VENTILATION OPENINGS
WITH NEWSPAPERS, TABLECLOTHS, CURTAINS, AND SIMILAR ITEMS.
≥DO NOT PLACE SOURCES OF NAKED FLAMES, SUCH AS
LIGHTED CANDLES, ON THE UNIT.
≥DISPOSE OF BATTERIES IN AN ENVIRONMENTALLY
FRIENDLY MANNER.
CAUTION
Danger of explosion if battery is incorrectly replaced. Replace only with the same or equivalent type recommended by the manufacturer. Dispose of used batteries according to the manufacturer’s instructions.
[For]Australia]and]N.Z.]
THIS UNIT IS INTENDED FOR USE IN MODERATE CLIMATES.
[For]Asia]and]Middle]East]
THIS UNIT IS INTENDED FOR USE IN TROPICAL CLIMATES.
This product may receive radio interference caused by mobile telephones during use. If such interference is apparent, please increase separation between the product and the mobile telephone.
The socket outlet shall be installed near the equipment and easily accessible.
The mains plug of the power supply cord shall remain readily operable.
To completely disconnect this apparatus from the AC Mains, disconnect the power supply cord plug from AC receptacle.
CLASS 1
LASER PRODUCT
|
RQT8906 |
(Inside of product) |
||||||||||||
|
2 |
|||||||||||||
Caution for AC Mains Lead
(For Saudi Arabia)
For your safety, please read the following text carefully.
This appliance is supplied with a moulded three pin mains plug for your safety and convenience.
A 5-ampere fuse is fitted in this plug.
Should the fuse need to be replaced please ensure that the replacement fuse has a rating of 5-ampere and that it is approved by ASTA or BSI to BS1362.
Check for the ASTA mark Ï or the BSI mark Ì on the body of the fuse.
If the plug contains a removable fuse cover you must ensure that it is refitted when the fuse is replaced.
If you lose the fuse cover the plug must not be used until a replacement cover is obtained.
A replacement fuse cover can be purchased from your local dealer.
CAUTION!
IF THE FITTED MOULDED PLUG IS UNSUITABLE FOR THE SOCKET OUTLET IN YOUR HOME THEN THE FUSE SHOULD BE REMOVED AND THE PLUG CUT OFF AND DISPOSED OF SAFELY.
THERE IS A DANGER OF SEVERE ELECTRICAL SHOCK IF THE CUT OFF PLUG IS INSERTED INTO ANY 13-AMPERE SOCKET.
If a new plug is to be fitted please observe the wiring code as stated below.
If in any doubt please consult a qualified electrician.
IMPORTANT
The wires in this mains lead are coloured in accordance with the following code:
Blue: Neutral, Brown: Live.
As these colours may not correspond with the coloured markings identifying the terminals in your plug, proceed as follows:
The wire which is coloured Blue must be connected to the terminal which is marked with the letter N or coloured Black or Blue.
The wire which is coloured Brown must be connected to the terminal which is marked with the letter L or coloured Brown or Red.
WARNING: DO NOT CONNECT EITHER WIRE TO THE EARTH TERMINAL WHICH IS MARKED WITH THE LETTER E, BY THE EARTH SYMBOL Ó OR
COLOURED GREEN OR GREEN/YELLOW.
THIS PLUG IS NOT WATERPROOF—KEEP DRY.
Before use
Remove the connector cover.
How to replace the fuse
The location of the fuse differ according to the type of AC mains plug (figures A and B). Confirm the AC mains plug fitted and follow the instructions below.
Illustrations may differ from actual AC mains plug.
1. Open the fuse cover with a screwdriver.
Fuse cover
2. Replace the fuse and close or attach the fuse cover.
Fuse Fuse (5 ampere) (5 ampere)
-If you see this symbol-
Information on Disposal in other Countries outside the European Union
This symbol is only valid in the European Union. If you wish to discard this product, please contact
your local authorities or dealer and ask for the correct method of disposal.

Table of contents
Getting started
HDD, disc and card information . . . . . . . . . . . . . . . . . . . 4 Important notes for recording . . . . . . . . . . . . . . . . . . . . . 8 HDD (Hard disk drive) handling care . . . . . . . . . . . . . . . 9 Disc and card handling . . . . . . . . . . . . . . . . . . . . . . . . . 10 Unit care . . . . . . . . . . . . . . . . . . . . . . . . . . . . . . . . . . . . . 10 Included accessories . . . . . . . . . . . . . . . . . . . . . . . . . . . 11 The remote control information . . . . . . . . . . . . . . . . . . 11 Control reference guide . . . . . . . . . . . . . . . . . . . . . . . . . 12
Remote control . . . . . . . . . . . . . . . . . . . . . . . . . . . . . . . . . . . . . . 12 Main unit. . . . . . . . . . . . . . . . . . . . . . . . . . . . . . . . . . . . . . . . . . . 13 The unit’s display . . . . . . . . . . . . . . . . . . . . . . . . . . . . . . . . . . . . 13
STEP 1 Connection . . . . . . . . . . . . . . . . . . . . . . . . . . . . .14
Connecting with an HDMI (High Definition Multimedia
Interface) terminal . . . . . . . . . . . . . . . . . . . . . . . . . . . . . . . . . . 17 VIERA Link “HDAVI Control TM” . . . . . . . . . . . . . . . . . . . . . . . . . 17 Easy control only with VIERA remote control. . . . . . . . . . . . . . . 18
STEP 2 Channel reception settings and TV aspect settings . . . . . . . . . . . . . . . . . . . . . . . . . . . . . . . . . . . . . .19
STEP 3 Set up to match your television
and remote control . . . . . . . . . . . . . . . . . . . . . . . . . . . .20
To enjoy progressive video . . . . . . . . . . . . . . . . . . . . . . . . . . . . 20
Recording
Recording television programmes . . . . . . . . . . . . . . . . 22
Disc Insertion/Ejection . . . . . . . . . . . . . . . . . . . . . . . . . . . . . . . . 23 To specify a time to stop recording—One Touch Recording . . . 24 Recording settings for High Speed Copy . . . . . . . . . . . . . . . . . . 24 Flexible Recording . . . . . . . . . . . . . . . . . . . . . . . . . . . . . . . . . . . 25 Playing while you are recording . . . . . . . . . . . . . . . . . . . . . . . . . 25
Timer recording . . . . . . . . . . . . . . . . . . . . . . . . . . . . . . . 26
Using G-CODE system to make timer recordings . . . . . . . . . . . . 26 Manually programming timer recordings . . . . . . . . . . . . . . . . . . 27 To cancel recording when recording has already begun . . . . . . 28 To release the unit from recording standby . . . . . . . . . . . . . . . . 28 Notes on timer recording . . . . . . . . . . . . . . . . . . . . . . . . . . . . . . 28 Check, change or delete a programme . . . . . . . . . . . . . . . . . . . 29 Relief Recording. . . . . . . . . . . . . . . . . . . . . . . . . . . . . . . . . . . . . 29 Auto Renewal Recording . . . . . . . . . . . . . . . . . . . . . . . . . . . . . . 29
Playing back
Playing recorded video contents/
Playing play-only discs . . . . . . . . . . . . . . . . . . . . . . . . 30
Operations during play . . . . . . . . . . . . . . . . . . . . . . . . . . . . . . . . 31 Changing audio during play . . . . . . . . . . . . . . . . . . . . . . . . . . . . 32
Playing DivX discs, MP3 discs and
still pictures (JPEG) . . . . . . . . . . . . . . . . . . . . . . . . . . . 33
Regarding DivX discs, MP3 discs and still pictures (JPEG). . . . 33 Selecting file type to play . . . . . . . . . . . . . . . . . . . . . . . . . . . . . . 34 Playing DivX discs . . . . . . . . . . . . . . . . . . . . . . . . . . . . . . . . . . . 34 Playing MP3 discs . . . . . . . . . . . . . . . . . . . . . . . . . . . . . . . . . . . 35 Playing still pictures . . . . . . . . . . . . . . . . . . . . . . . . . . . . . . . . . . 36 Useful functions during still picture play . . . . . . . . . . . . . . . . . . . 37
Using on-screen menus/Status message. . . . . . . . . . . 38
Using on-screen menus . . . . . . . . . . . . . . . . . . . . . . . . . . . . . . . 38 Status messages . . . . . . . . . . . . . . . . . . . . . . . . . . . . . . . . . . . . 39
Editing
Editing titles/chapters . . . . . . . . . . . . . . . . . . . . . . . . . . 40
Editing titles/chapters and playing chapters . . . . . . . . . . . . . . . . 40 Title operations . . . . . . . . . . . . . . . . . . . . . . . . . . . . . . . . . . . . . . 41 Chapter operations . . . . . . . . . . . . . . . . . . . . . . . . . . . . . . . . . . . 41
Creating, editing and playing playlists . . . . . . . . . . . . . 42
Creating playlists. . . . . . . . . . . . . . . . . . . . . . . . . . . . . . . . . . . . . 42 Editing and playing playlists/chapters . . . . . . . . . . . . . . . . . . . . . 43 Playlist operations . . . . . . . . . . . . . . . . . . . . . . . . . . . . . . . . . . . . 43 Chapter operations . . . . . . . . . . . . . . . . . . . . . . . . . . . . . . . . . . . 43
Editing still pictures [EH67] . . . . . . . . . . . . . . . . . . . . . . . 44
Album and picture operation . . . . . . . . . . . . . . . . . . . . . . . . . . . . 45
Delete Navigator . . . . . . . . . . . . . . . . . . . . . . . . . . . . . . . 46
Using the DELETE Navigator to delete. . . . . . . . . . . . . . . . . . . . 46 Deleting titles or pictures during play . . . . . . . . . . . . . . . . . . . . . 46
Copying
Copying titles or playlists . . . . . . . . . . . . . . . . . . . . . . . 47
Copy . . . . . . . . . . . . . . . . . . . . . . . . . . . . . . . . . . . . . . . . . . . . . . 48 Copying using the copying list–Advanced Copy . . . . . . . . . . . . . 49 Copying a finalised DVD-R, DVD-R DL,
DVD-RW (DVD-Video format), +R and +R DL . . . . . . . . . . . . . 51 Copying SD Video from an SD Card [EH67]. . . . . . . . . . . . . . . . . 51
Copying still pictures [EH67] . . . . . . . . . . . . . . . . . . . . . . 52
Copying using the copying list. . . . . . . . . . . . . . . . . . . . . . . . . . . 52 Copying all the still pictures on a card—Copy All Pictures . . . . . 53
Copying from a video cassette recorder . . . . . . . . . . . 54
Manual recording . . . . . . . . . . . . . . . . . . . . . . . . . . . . . . . . . . . . 54 DV automatic recording (DV Auto Rec) . . . . . . . . . . . . . . . . . . . 54
Convenient functions
HDD, disc and card management . . . . . . . . . . . . . . . . . 55
Common procedures. . . . . . . . . . . . . . . . . . . . . . . . . . . . . . . . . . 55 Setting the protection . . . . . . . . . . . . . . . . . . . . . . . . . . . . . . . . . 55 Providing a name for a disc. . . . . . . . . . . . . . . . . . . . . . . . . . . . . 55 Deleting all titles and playlists—Delete all titles . . . . . . . . . . . . . 56 Deleting all the contents of a disc or card—Format . . . . . . . . . . 56 Selecting the background style—Top Menu . . . . . . . . . . . . . . . . 57 Selecting whether to show the Top Menu first
—Auto-Play Select . . . . . . . . . . . . . . . . . . . . . . . . . . . . . . . . . . 57 Enabling discs to be played on other equipment—Finalise . . . . 57 Creating Top Menu—Create Top Menu . . . . . . . . . . . . . . . . . . . 57
Entering text . . . . . . . . . . . . . . . . . . . . . . . . . . . . . . . . . . 58 FUNCTION MENU window . . . . . . . . . . . . . . . . . . . . . . . 59 Child Lock . . . . . . . . . . . . . . . . . . . . . . . . . . . . . . . . . . . . 59 Changing the unit’s settings . . . . . . . . . . . . . . . . . . . . . 60
Common procedures. . . . . . . . . . . . . . . . . . . . . . . . . . . . . . . . . . 60 Summary of settings . . . . . . . . . . . . . . . . . . . . . . . . . . . . . . . . . . 61 Tuning . . . . . . . . . . . . . . . . . . . . . . . . . . . . . . . . . . . . . . . . . . . . . 65 TV System. . . . . . . . . . . . . . . . . . . . . . . . . . . . . . . . . . . . . . . . . . 66 Clock Settings . . . . . . . . . . . . . . . . . . . . . . . . . . . . . . . . . . . . . . . 67
Reference
Messages. . . . . . . . . . . . . . . . . . . . . . . . . . . . . . . . . . . . . 68 Frequently asked questions . . . . . . . . . . . . . . . . . . . . . 70 Troubleshooting guide . . . . . . . . . . . . . . . . . . . . . . . . . . 71 Glossary. . . . . . . . . . . . . . . . . . . . . . . . . . . . . . . . . . . . . . 77 Specifications . . . . . . . . . . . . . . . . . . . . . . . . . . . . . . . . . 78 Safety precautions . . . . . . . . . . . . . . . . . . . . . . . . . . . . . 79 Index. . . . . . . . . . . . . . . . . . . . . . . . . . . . . . . . . Back cover
About descriptions in these operating instructions
≥These operating instructions are applicable to models DMR-EH57 and DMR-EH67. Unless otherwise indicated, illustrations in these operating instructions are of DMR-EH57 for Australia and N.Z.
[EH57] : indicates features applicable to DMR-EH57 only. [EH67] : indicates features applicable to DMR-EH67 only.
≥Instructions/notes regarding SD Cards and SD Drive are applicable to the DMR-EH67 model only.
≥Pages to be referred to are indicated as “ {{”.
RQT8906
3

HDD, disc and card information
HDD and discs you can use for recording and play
|
Hard disk drive (HDD) |
DVD-RAM |
|||
|
Disc type |
≥[EH57] 160 |
GB |
≥4.7 GB/9.4 GB, 12 cm |
|
|
[EH67] 250 |
GB |
≥2.8 GB, 8 cm |
||
|
Logo |
– |
|||
|
Indicated in these |
[HDD] |
[RAM] |
||
|
instructions by |
||||
DVD Video Recording format
|
Recording format |
This is a recording format which allows you to record and edit television broadcasts and so on. |
||
|
≥You can delete unwanted parts of a title, create playlists, etc. |
|||
|
≥The broadcasts that allow “One time only recording” can be recorded to a CPRM compatible disc. |
|||
|
Data that can be recorded |
Video |
Video |
|
|
and played |
Still pictures ([EH67]) |
Still pictures ([EH67]) |
|
|
Re-writable |
|||
|
≤ |
≤ |
||
|
Play on other players§2 |
– |
Only on DVD-RAM compatible players. |
|
|
Compatible with high |
– |
Up to 5X recording speed discs. |
|
|
speed recording§3 |
|||
What you can do on this unit (≤: Can do, –: Cannot do)
|
Recording broadcasts that |
≤ |
≤ [CPRM ( 77) compatible discs only.] |
|
|
allow one copy |
|||
|
Recording both M 1 and |
|||
|
M 2 for bilingual |
≤ |
≤ |
|
|
broadcasts§4 |
|||
|
Recording 16:9 aspect |
≤ |
≤ |
|
|
picture§4 |
|||
|
Creating and editing |
≤ |
≤ |
|
|
playlists |
|||
Disc type
Logo
Indicated in these instructions by
Recording format
Data that can be recorded and played
Re-writable
Play on other players§2
Compatible with high speed recording§3
|
DVD-R§1 |
DVD-R DL§1 |
DVD-RW |
|
|
(dual layer on single side) |
|||
|
≥4.7 GB, 12 cm |
≥4.7 GB, 12 cm |
||
|
≥You cannot directly record to a |
|||
|
≥1.4 GB, 8 cm |
≥1.4 GB, 8 cm |
||
|
DVD-R DL disc on this unit ( |
|||

|
[-R] before finalisation |
[-R]DL] before finalisation |
[-RW‹V›] before finalisation |
|
[DVD-V] after finalisation |
[DVD-V] after finalisation |
[DVD-V] after finalisation |
DVD-Video format
This recording format is the same as commercially available DVD-Video. ≥The broadcasts that allow “One time only recording” cannot be recorded.
|
Video |
Video |
Video |
|
|
– |
– |
≤ |
|
|
Only on DVD-R DL compatible |
Only after finalising the disc |
||
|
Only after finalising the disc ( 57, 77). |
players after finalising the disc |
||
|
( 57, 77). |
|||
|
( 57, 77). |
|||
|
Up to 16X recording speed discs. |
Up to 8X recording speed discs. |
Up to 6X recording speed discs. |
|
What you can do on this unit (≤: Can do, –: Cannot do)
|
Recording broadcasts that |
– |
– |
– |
||
|
allow one copy |
|||||
|
Recording both M 1 and |
– [Only one is recorded.( 62, Bilingual |
– [Only one is recorded.( 62, |
– [Only one is recorded.( 62, |
||
|
M 2 for bilingual |
|||||
|
Audio Selection)] |
Bilingual Audio Selection)] |
Bilingual Audio Selection)] |
|||
|
broadcasts§4 |
|||||
|
Recording 16:9 aspect |
≤ |
≤ |
≤ |
||
|
picture§4 |
|||||
|
Creating and editing |
– |
– |
– |
||
|
playlists |
|||||
|
RQT8906 |
(continued on the next page) |
4

§3
§4
§5
§6
HDD and discs you can use for recording and play
(continued)
|
+R§1 §5 |
+R DL§1 |
||||
|
Disc type |
(double layer on single side) |
+RW |
|||
|
≥4.7 GB, 12 cm |
≥You cannot directly record to a |
||||
|
+R DL disc on this unit ( |
|||||
|
Logo |
– |
– |
– |
||
|
Indicated in these |
[+R] before finalisation |
[+R]DL] before finalisation |
[+RW] |
||
|
instructions by |
[DVD-V] after finalisation |
[DVD-V] after finalisation |
|||
+VR (+R/+RW Video Recording) format
This is a format for recording moving pictures to +R/+RW discs.
Recording format You can playback such discs recorded in this format in a similar way as contents recorded in the DVD-Video format.
≥The broadcasts that allow “One time only recording” cannot be recorded.
≥After finalising the disc or creating the top menu, you can play the disc on DVD players and other equipment.
|
Data that can be recorded |
Video |
Video |
Video |
||
|
and played |
|||||
|
Re-writable |
– |
– |
≤ |
||
|
Play on other players§2 |
Only after finalising the disc ( 57, 77). |
Only on +R DL compatible players |
Only on +RW compatible players. |
||
|
after finalising the disc ( 57, 77). |
|||||
|
Compatible with high |
Up to 16X recording speed discs. |
Up to 8X recording speed discs. |
Up to 4X recording speed discs.§6 |
||
|
speed recording§3 |
|||||
|
What you can do on this unit (≤: Can do, –: Cannot do) |
|||||
|
Recording broadcasts that |
– |
– |
– |
||
|
allow one copy |
|||||
|
Recording both M 1 and |
– [Only one is recorded.( 62, |
– [Only one is recorded.( 62, |
– [Only one is recorded.( 62, |
||
|
M 2 for bilingual |
|||||
|
Bilingual Audio Selection)] |
Bilingual Audio Selection)] |
Bilingual Audio Selection)] |
|||
|
broadcasts§4 |
|||||
|
Recording 16:9 aspect |
– (The picture is recorded in 4:3 |
– (The picture is recorded in 4:3 |
– (The picture is recorded in 4:3 |
||
|
picture§4 |
aspect.) |
aspect.) |
aspect.) |
||
|
Creating and editing playlists |
– |
– |
– |
||
§1 The amount of the recordable disc space doesn’t increase even if the programme is deleted when you use discs that can only be used for recording once.
§2 [RAM] Can be played on Panasonic DVD Recorders and DVD-RAM compatible DVD players. If you play a DVD-R DL, +R DL or +RW, use compatible equipment.
The high speed recording discs listed here are compatible with this unit. However, this is not the copy speed. For further information ( 8, Important notes for recording)
[Note]
When “Rec for High Speed Copy” is set to “On”, the restrictions on secondary audio recording are also applied to DVD-RAM. Turn this setting “Off” if high speed copy to DVD-R, etc. is not necessary when recording a programme (The default setting is “On”. 61).
+R discs recorded with this unit and +R discs recorded with another Panasonic DVD Recorder may be incompatible. However, discs that are finalised are compatible and can be played.
You can play 8X recording speed discs recorded on another equipment.
≥We recommend using Panasonic discs and cards. We also recommend using DVD-RAM discs with cartridges to protect them from scratches and dirt.
≥You may not be able to record depending on the condition of the discs and you may not be able to play due to the condition of the recording. ≥You cannot record programmes that allow “One time only recording” to CPRM compatible DVD-R and DVD-RW on this unit.
≥This unit cannot record NTSC signals to discs that already have PAL signal recordings. (However, both types of programmes can be recorded onto the HDD.)
Finalise
A process that makes play of a recorded disc possible on equipment that can play such media. After finalising, the disc becomes play-only and you can no longer record or edit. ( 57)
Formatting
Formatting is the process of making media such as DVD-RAM recordable on recording equipment. ( 56)
Formatting permanently deletes all contents.
You cannot directly record to a DVD-R DL and +R DL disc on this unit.
Record to the HDD and then copy to the disc.
When playing DVD-R DL (Dual Layer, single-sided) and +R DL (Double Layer, single-sided)
DVD-R DL (Dual Layer, single-sided) and +R DL (Double Layer, single-sided) discs have two writable layers on one side. If there is not enough space on the first layer to record a programme, the remainder is recorded on the second layer. When playing a title recorded on both layers, the unit automatically switches between layers and plays the title in the same way as a normal programme. However, video and audio may momentarily cut out when the unit is switching layers.
|
When switching layers: |
|||
|
Video and audio may momentarily cut |
|||
|
Second recordable layer |
|||
|
(Inner |
The available |
||
|
space |
|||
|
section of the |
|||
|
disc) |
First recordable layer |
||
|
DVD-R DL |
Title 1 |
Title 2 |
|
|
+R DL |
|||
|
Playback direction |
(Outer section of the disc)
HDD, disc and card information
RQT8906
|
∫ Recording modes and approximate recording times ( 23) |
5 |

HDD, disc and card information
Play-only discs (12 cm/8 cm)
Disc type
Logo
Indicated in these instructions by
Instructions
|
DVD-Video |
DVD-RW (DVD Video Recording format) |
|
[DVD-V] |
[-RW‹VR›] |
||
|
High quality movie and music discs |
DVD-RW recorded on another DVD Recorder |
||
|
≥You can play programmes that allow “One time only recording” if they have been |
|||
|
recorded to a CPRM compatible disc. |
|||
|
≥By formatting ( 56) the disc, you can record to it in DVD-Video format and play it |
|||
|
on this unit. |
|||
|
≥It may be necessary to finalise the disc on the equipment used for recording. |
.
Disc type
Logo
Indicated in these instructions by
Instructions
|
DVD-R |
DVD-R DL |
CD |
Video CD |
–
|
DivX |
DivX |
[CD] |
DivX, MP3, JPEG |
[VCD] |
|
≥DVD-R§ with video |
≥DVD-R DL§ with |
Recorded audio and |
≥CD-R and CD-RW§ with |
Recorded music and |
|
recorded in DivX |
video recorded in |
music (including CD- |
video recorded in DivX |
video (including CD-R/ |
|
DivX |
§ |
≥CD-R and CD-RW§ with |
§ |
|
|
R/RW ) |
music recorded in MP3 |
RW ) |
||
|
≥CD-R and CD-RW§ with still |
||||
|
pictures recorded in JPEG |
§ Close the session after recording. Play may be impossible on some discs due to the condition of the recording.
≥The producer of the disc can control how discs are played. So you may not always be able to control play as described in these operating instructions. Read the disc’s instructions carefully.
≥Operation and sound quality of CDs that do not conform to CD-DA specifications (copy control CDs, etc.) cannot be guaranteed.
Discs that cannot be played
≥2.6 and 5.2 GB DVD-RAM, 12 cm ≥3.95 and 4.7 GB DVD-R for Authoring
≥DVD-R, DVD-R DL, DVD-RW, +R, +R DL recorded on another unit and not finalised ( 77).
≥Discs recorded with AVCHD format.
≥[For]Asia] DVD-Video with a region number other than “3” or “ALL” ≥[For]Australia]and]N.Z.] DVD-Video with a region number other than
“4” or “ALL”
≥[For]Middle]East] DVD-Video with a region number other than “2” or “ALL”
≥DVD-Audio ≥Blu-ray, HD DVD
≥DVD-ROM, +R (8 cm), CD-ROM, CDV, CD-G, Photo CD, CVD, SVCD, SACD, MV-Disc, PD, etc.
Types of disc or title recorded on HDD for the type of connected TV
When you use the discs recorded either PAL or NTSC, or playback a title recorded on HDD using PAL or NTSC, refer to this table.
(≤: Possible to view, –: Impossible to view)
|
TV type |
Disc/Titles |
Yes/No |
|
|
recorded on HDD |
|||
|
Multi-system TV |
PAL |
≤ |
|
|
NTSC |
≤ |
||
|
PAL TV |
PAL |
≤ |
|
|
NTSC |
≤§1 (PAL60) |
||
|
NTSC TV |
PAL |
– |
|
|
NTSC |
≤§2 |
||
§1 If your television is not equipped to handle PAL 525/60 signals the picture will not be shown correctly.
§2 Select “NTSC” in “TV System” ( 66).
≥When playing back a title recorded on the HDD, ensure that you match the “TV System” setting to the title (PAL or NTSC) ( 66).
RQT8906
6

Cards you can use on this unit [EH67]
Type
Indicated in these instructions by
Data that can be recorded and played
Instructions
SD Memory Card (from 8 MB to 2 GB) SDHC Memory Card (4 GB)
miniSD Card§
MultiMediaCard
The card types mentioned above will be referred to as “SD Card” in these operating instructions.
[SD]
Still pictures
Video (SD Video)
You can insert directly into the SD Card slot.
§ A miniSD card adaptor included with the miniSD card is necessary.
≥You can play and copy still pictures taken on a digital camera etc. ( 36, 52).
≥SD Video shot with a Panasonic SD Video camera, etc. can be copied to the HDD or DVD-RAM. ( 51)
≥SD Video cannot be played directly from the SD Card.
Suitable SD Cards
≥When using 4 GB SD Memory Cards, only SD Memory Cards that display the SDHC logo can be used. ≥Useable memory is slightly less than the card capacity.
≥Please confirm the latest information on the following website. http://panasonic.co.jp/pavc/global/cs
(This site is in English only.)
≥If the SD Card is formatted on other equipment, the time necessary for recording may be longer. Also, if the SD Card is formatted on a PC, you may not be able to use it on this unit. In these cases, format the card on this unit ( 56, 77).
≥This unit is compatible with SD Memory Cards that meet SD Card Specifications FAT 12 and FAT 16 formats, as well as SDHC Memory Cards in FAT 32 format.
≥SDHC Memory Cards used for recording with this unit can only be used with other SDHC Memory Card-compatible equipment. SDHC Memory Cards cannot be used with equipment that is only compatible with SD Memory Cards.
≥This unit cannot play AVCHD format motion pictures on an SD Card. ≥We recommend using a Panasonic SD Card.
≥Keep the Memory Card out of reach of children to prevent swallowing.
HDD, disc and card information
Structure of folders displayed by this unit [EH67]
The following  can be displayed on this unit.
|
¢¢¢: Numbers |
XXX: Letters |
DVD-RAM
JPEG
DCIM¢¢¢ (Higher folder)

 ¢¢¢XXXXX (Picture folder)
 XXXX¢¢¢¢.JPG
¢¢¢XXXXX
XXXX¢¢¢¢.JPG
Card
DCIM (Higher folder)
¢¢¢XXXXX (Picture folder)
 XXXX¢¢¢¢.JPG
|
IM¢¢CDPF or IMEXPORT |
§ |
|
XXXX¢¢¢¢.JPG |
SD_VIDEO
PRG¢¢¢ (MPEG2 folder)
MOV¢¢¢.MOD
MOV¢¢¢.MOI
PRG¢¢¢.PGI
MGR_INFO (MPEG2 information folder)
§ Folders can be created on other equipment. However, these folders cannot be selected as a copying destination. ≥The folder cannot be displayed if the numbers are all “0” (e.g., DCIM000, etc.).
≥If a folder name or file name has been input using other equipment, the name may not be displayed properly or you may not be able to play or edit the data.
RQT8906
7
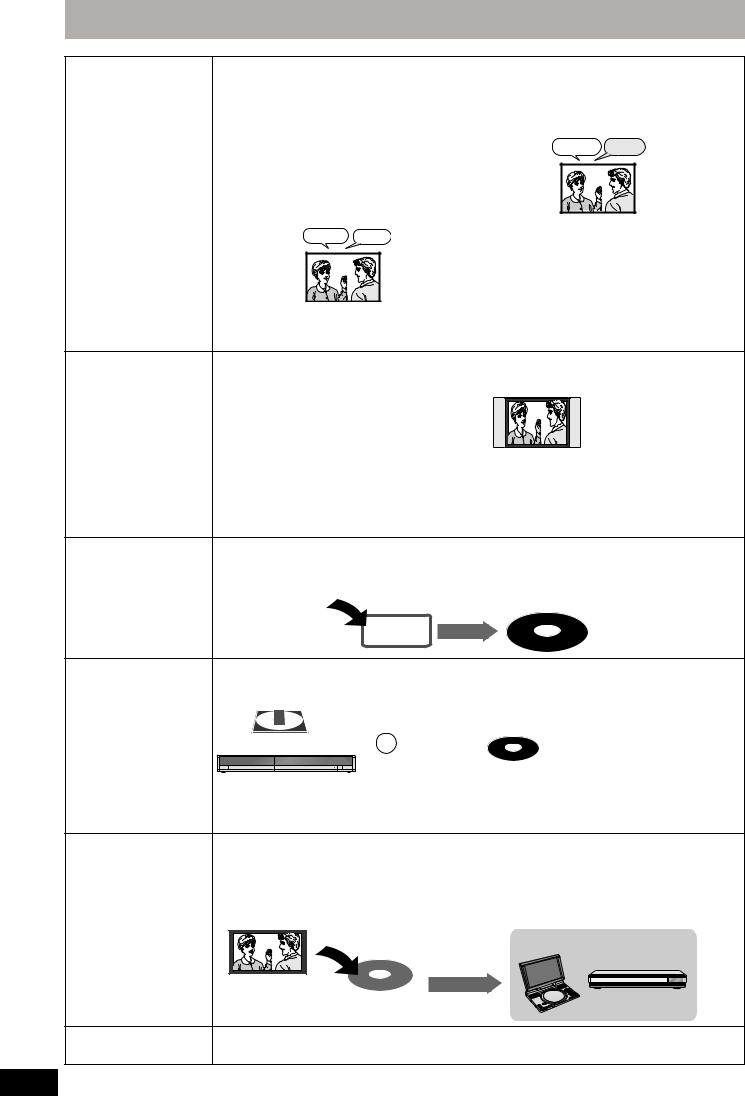
Important notes for recording
|
When recording a |
[HDD] [RAM] |
[-R] [-RW‹V›] [+R] [+RW] |
|
|
bilingual programme |
Both main and secondary audio can be recorded. |
Select the main or secondary audio before |
|
|
You can change the audio during playback. |
recording |
||
|
( 32, Changing audio during play) |
( 62, Bilingual Audio Selection) |
||
|
However in the following cases, select whether to |
M 1 |
||
|
record the main or secondary audio: |
Hello |
||
|
–Recording sound in LPCM ( 62, Audio Mode for |
|||
|
XP Recording) |
The selected |
||
|
–“Rec for High Speed Copy” is set to “On” (The |
|||
|
audio only is |
|||
|
default setting is “On”. 61) |
|||
|
recorded. |
|||
|
M 1 |
M 2 |
If you record from external equipment |
|
|
Hello |
Hallo |
||
|
–Select “M 1” or “M 2” on the external equipment. |
|||
|
If you record from external equipment |
||
|
–Select both “M 1” and “M 2” on the external |
||
|
equipment. |
||
|
About the aspect when |
[HDD] [RAM] [-R] [-RW‹V›] |
[+R] [+RW] |
|
recording a programme |
≥If “Aspect for Recording” in the Setup menu is set to |
Recorded in 4:3 aspect |
|
“Automatic” (The default setting is “Automatic” 61), |
||
|
the programme will be recorded in the original aspect |
||
|
used when recording started (including when |
||
|
recording started at a commercial, etc.). If recorded |
||
|
with a different aspect, select the correct aspect |
||
|
(“16:9” or “4:3”). |
However, in the following case, programme will be recorded in 4:3.
[-R] [-RW‹V›]
Programme recorded using “EP” or “FR (recordings 5 hours or longer)” recording modes will be recorded in 4:3 aspect.
|
When you want to copy |
Set “Rec for High Speed Copy” to “On” before recording to the HDD (The default setting is “On”. 61). |
|||
|
titles in high speed |
You can copy titles in high speed mode (max. speed is 75X§); however, the audio and aspect settings |
|||
|
mode from the HDD to |
( above) are necessary before recording to the HDD. |
|||
|
§ Depending on the disc, max. speed may vary. |
||||
|
DVD-R, etc. |
||||
|
Record to the HDD |
High speed copy to DVD-R, etc. |
|||
|
HDD |
||||
|
When recording the |
It is not possible to record the broadcasts that allow “One time only recording” onto DVD-R, DVD-RW, +R, +RW |
|||
|
“One time only |
or 8 cm DVD-RAM discs. Use the HDD or CPRM ( 77) compatible DVD-RAM. |
|||
|
recording” broadcasts |
[RAM] CPRM compatible discs only. |
|||
|
[-R] [-RW‹V›] [+R] [+RW] |
||||
|
[HDD] |
` |
|||
|
(≤: Can do, –: Cannot do) |
||||
|
≥“One time only recording” titles can only be transferred from the HDD to CPRM compatible DVD-RAM (They |
||||
|
are deleted from the HDD). They cannot be copied. |
||||
|
≥Even when copying to videotape the title may not be copied correctly because of the copy guard. |
||||
|
≥You cannot copy a playlist created from “One time only recording” titles. |
||||
|
Playing the disc on |
[-R] [-R]DL] [-RW‹V›] [+R] [+R]DL] |
|||
|
other DVD players |
The disc must be finalised after recording or copying ( 57). |
|||
|
It is necessary to finalise DVD-R, etc. on this unit after recording or copying titles to them. You can then play |
||||
|
them as a commercially sold DVD-Video. However, the discs become play-only and you can no longer record |
||||
|
or copy.§ |
||||
|
§You can record and copy again if you format DVD-RW. |
||||
|
Record to DVD-R, etc. |
Play on other DVD equipment |
|||
|
Finalise |
||||
|
Recording to DVD-R DL |
You cannot directly record to a DVD-R DL and +R DL disc on this unit. |
|||
|
and +R DL |
Record to the HDD and then copy to the disc. |
RQT8906 ≥It is not possible to record to both HDD (Hard Disk Drive) and DVD drive simultaneously.
8

DO NOT
This unit
VCR
HDD (Hard disk drive) handling care
The HDD is a high precision recording instrument and because of its long recording capability and high speed operation it is a very special device that is easily susceptible to damage.
As a basic rule, save important content to a disc as backup.
∫ The HDD is a device that is not built to withstand vibration/shock or dust
Depending on the setup environment and handling of the HDD some content may become damaged and play and recording may no longer be possible. Especially during operation, do not subject the unit to any vibration, shock, or remove the AC mains lead from the household mains socket. In the event of a power failure during recording or play, the content may be damaged.
∫ The HDD is a temporary storage device
The HDD is not an everlasting storage device for recorded content. Use the HDD as a temporary storage place for one-off viewing, editing, or saving recorded content to a disc.
∫ Immediately save (backup) all content as soon as you feel there may be a problem with the HDD
If there is an irregularity within the HDD, repetitive strange sounds or problems with picture (block noise, etc.) may result. Using the HDD in this condition may worsen the problem and in the worst case the HDD may no longer be usable. As soon as you notice this type of problem, copy all content to disc and request service. Recorded content (data) on a HDD that has become unusable is unrecoverable.
≥When the HDD has been automatically entered power save mode ( below), or the unit is turned on or off, there may be an unexpected sound. This does not indicate a problem with this unit.
∫ Setup precautions
≥Do not place in an enclosed area where the rear cooling fan and the cooling vents on the side are covered up.
≥Place the unit on a surface that is flat and not subject to vibration or impact.
≥Do not place on anything that generates heat like a video cassette recorder, etc.
≥Do not place in an area often subject to temperature changes.
≥Place in an area where condensation does not occur. Condensation is a phenomenon where moisture forms on a cold surface when there is an extreme change in
temperature. Condensation may cause internal damage to the unit.
≥Conditions where condensation may occur
–When there is an extreme change in temperature (moving from a very hot location to a very cold location, or vice versa, or when subjected to an air conditioner or when cooled air directly impacts the unit). When the HDD (warms during operation) is subjected to cold air, condensation may form on the inside of the HDD and may cause damage to the HDD heads, etc.
–When there is high humidity or a lot of steam in the room. –During the rainy season.
In the above situation, without turning the unit on, let the unit adjust to the room temperature and wait 2–3 hours until condensation is gone.
∫ Cigarette smoke etc. causes malfunction or breakdown
The unit may breakdown if cigarette smoke or bug spray/vapor, etc. gets inside the unit.
∫ While operating
≥Do not move the unit or subject to vibration or impact. (The HDD may become damaged.)
≥Do not remove the AC mains lead from the household mains socket, or flip the power breaker switch.
While the unit is on, the HDD is rotating at high speed. Sound or movement due to rotation is normal.
∫ When moving the unit
1Turn the unit off. (Wait until “BYE” disappears from the display.)
2 Remove the AC mains lead from the household mains socket.
3Move only after the unit has come to a complete stop (approx. 2 minutes) in order to avoid subjecting to vibration and shock. (Even after turning the unit off, the HDD continues operating for a short time.)
∫ HDD recording time remaining
This unit records using a VBR (Variable bit rate) data compression system to vary recorded data segments to match video data segments which may cause differences in the displayed amount of time and space remaining for recording.
If the remaining amount of time is insufficient, delete any unwanted titles to create enough space before you start recording. (Deleting a playlist will not increase the amount of time.)
∫ The HDD automatically enters power save mode
The HDD has been automatically entered power save mode. (The HDD continues to rotate at high speed while the unit is on. In order to extend the life of the HDD, the HDD will be entered power save mode if no operation has been performed for 30 minutes while there is no disc on the disc tray.)
≥While in power save mode play or recording may not start right away because the HDD takes time to be re-activated. ≥When not using the unit, we recommend removing the disc in the tray in order to set the HDD to the power save mode.
Important notes for recording/HDD (Hard disk drive) handling care
∫ Indemnity concerning recorded content
Panasonic does not accept any responsibility for damages directly or indirectly due to any type of problems that result in loss of recording or edited content (data), and does not guarantee any content if recording or editing does not work properly. Likewise, the above also applies in a case where any type of repair is made to the unit (including any other non-HDD related component).
RQT8906
9
DO NOT
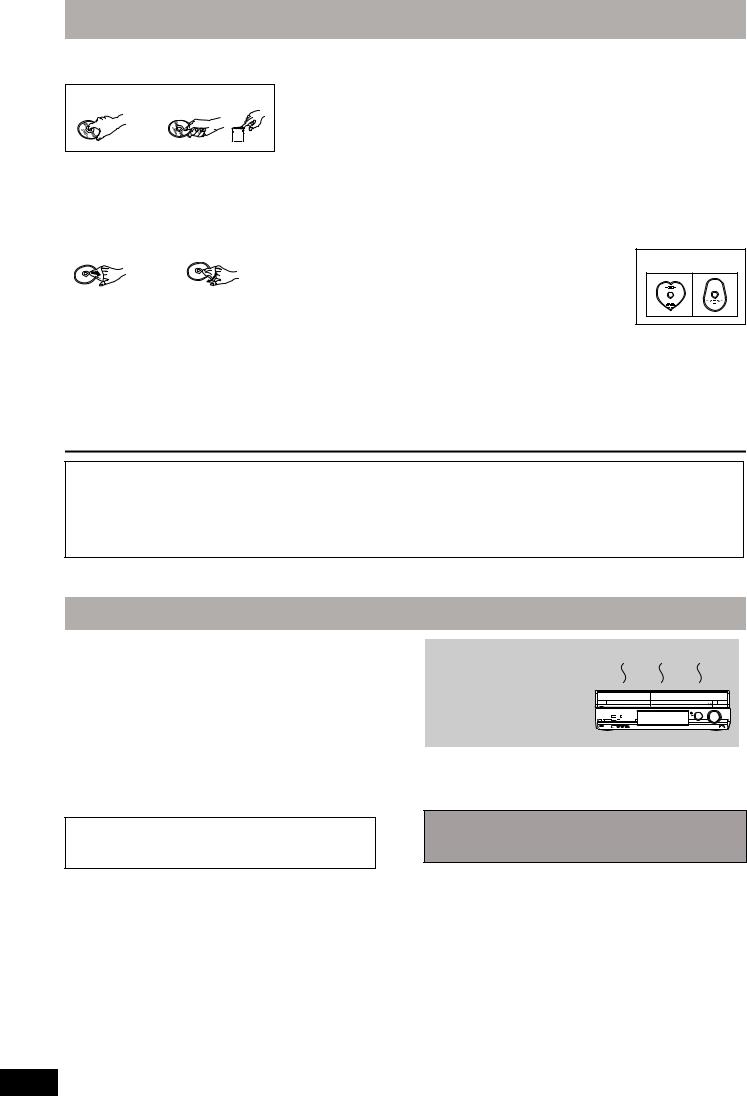
Disc and card handling
∫ How to hold a disc or card
Do not touch the recorded surface or the terminal surface.
∫ Concerning non-cartridge discs
Be careful about scratches and dirt.
∫ If there is dirt or condensation on the disc
Wipe with a damp cloth and then wipe dry.
∫ Handling precautions
≥Do not attach labels or stickers to discs. (This may cause disc warping and un-balanced rotation, rendering it unusable.)
≥Write on the label side of the disc only with a soft, oil-based felt pen. Do not use ballpoint pens or other hard writing implements.
≥Do not use record cleaning sprays, benzine, thinner, static electricity prevention liquids or any other solvent.
≥Do not use scratch-proof protectors or covers.
≥Do not expose the terminals of the card to water, garbage or other strange things.
≥Do not drop stack, or impact discs. Do not place objects on them. ≥Do not use the following discs:
–Discs with exposed adhesive from removed stickers or labels (rental discs, etc.).
–Discs that are badly warped or cracked. –Irregularly shaped discs, such as heart
shapes.
≥Do not place in the following areas: –In direct sunlight.
–In very dusty or humid areas. –Near a heater.
–Locations susceptible to significant difference in temperature (condensation can occur).
–Where static electricity or electromagnetic waves occur.
≥To protect discs from scratches and dirt, return them to their cases or cartridges when you are not using them.
The manufacturer accepts no responsibility and offers no compensation for loss of recorded or edited material due to a problem with the unit or recordable media, and accepts no responsibility and offers no compensation for any subsequent damage caused by such loss.
Examples of causes of such losses are
≥A disc recorded and edited with this unit is played in a DVD Recorder or computer disc drive manufactured by another company. ≥A disc used as described above and then played again in this unit.
≥A disc recorded and edited with a DVD Recorder or computer disc drive manufactured by another company is played in this unit.
Unit care
The precision parts in this unit are readily affected by the environment, especially temperature, humidity, and dust. Cigarette smoke also can cause malfunction or breakdown.
To clean this unit, wipe with a soft, dry cloth.
≥Never use alcohol, paint thinner or benzine to clean this unit. ≥Before using chemically treated cloth, carefully read the
instructions that came with the cloth.
Observe the following points to ensure continued listening and viewing pleasure.
Dust and dirt may adhere to the unit’s lens over time, making it impossible to record or play discs.
Use the DVD lens cleaner about once every year, depending on frequency of use and the operating environment. Carefully read the lens cleaner’s instructions before use.
DVD lens cleaner: RP-CL720E
≥This lens cleaner may not be for sale depending on the region.
DO NOT
Do not place the unit on amplifiers or equipment that may become hot.
The heat can damage the unit.
[Note]
Do not obstruct the rear panel’s internal cooling fan.
Before moving the unit, ensure the disc tray is empty.
Failure to do so will risk severely damaging the disc and the unit.
RQT8906
10
![]()
|
Included accessories |
|||||
|
Please check and identify the supplied accessories. |
|||||
|
(Product numbers correct as of April 2007. These may be subject to change.) |
|||||
|
∏ |
∏ |
∏ |
∏ |
∏ |
|
|
[For]Asia]and]Middle]East] |
[For]Asia] |
||||
|
1 |
Remote control |
1 |
AC mains lead |
|
(N2QAYB000134) |
||||
|
[For]Australia]and]N.Z.] |
[For]Australia]and]N.Z.] |
2 RF coaxial cables |
2 Batteries |
1 Audio/video |
|
1 Remote control |
1 AC mains lead |
for remote control |
cable |
(N2QAYB000133)
[For]Middle]East]
2 AC mains lead
For Saudi Arabia
≥For use with this unit only. Do not use it with other equipment. Also, do not use cords for other
equipment with this unit.
The remote control information
|
∫ Batteries |
∫ Use |
|
|
≥Insert so the poles (i and j) match those in the remote control. |
Remote control signal sensor |
|
|
≥When closing the lid, insert it from the j (minus) side. |
||
Disc and card handling/Unit care/Included accessories/The remote control information
R6/LR6, AA
≥Do not use rechargeable type batteries. ≥Do not mix old and new batteries.
≥Do not use different types at the same time. ≥Do not heat or expose to flame.
≥Do not take apart or short circuit.
≥Do not attempt to recharge alkaline or manganese batteries. ≥Do not use batteries if the covering has been peeled off.
Mishandling of batteries can cause electrolyte leakage which can damage items the fluid contacts and may cause a fire.
Remove if the remote control is not going to be used for a long period of time. Store in a cool, dark place.
Remote control operations ( 12)
20
30 20
30
7 m directly in front of the unit
RQT8906
11

Control reference guide
Remote control
Instructions for operations are generally described using the remote control.
e.g., [Australia]and]N.Z.]
|
> |
|||||||||||
|
DVD |
TVÍ |
||||||||||
|
1 |
Í |
? |
|||||||||
|
DRIVE |
CH |
VOL |
|||||||||
|
2 |
SELECT |
AV |
|||||||||
|
1 |
2 |
3 |
CH |
@ |
|||||||
|
3 |
4 |
5 |
6 |
||||||||
|
7 |
8 |
9 INPUTSELECT |
A |
||||||||
|
4 |
DELETE |
0 |
-/— G-Code |
B |
|||||||
|
SKIP |
SLOW/SEARCH |
||||||||||
|
5 |
|||||||||||
|
STOP |
PAUSE |
PLAY/x1.3 |
|||||||||
|
6 |
TIME SLIP |
EXIT |
C |
||||||||
|
/C |
|||||||||||
|
OG HE |
|||||||||||
|
7 |
R |
C |
D |
||||||||
|
P |
K |
||||||||||
|
R |
F |
||||||||||
|
T |
O |
U |
|||||||||
|
N |
|||||||||||
|
C |
|||||||||||
|
A |
T |
||||||||||
|
8 |
IG |
I |
|||||||||
|
V |
O |
E |
|||||||||
|
A |
N |
||||||||||
|
N |
|||||||||||
|
T |
OK |
M |
|||||||||
|
C |
|||||||||||
|
E |
E |
||||||||||
|
R |
N |
||||||||||
|
I |
|||||||||||
|
D |
U |
||||||||||
|
9 |
OPTION |
RETURN |
F |
|
: |
CREATE |
G |
|
; |
AUDIO DISPLAY CHAPTER MANUAL SKIP |
H |
|
< |
REC REC MODE F Rec STATUS |
I |
|
= |
||
1 Turn the unit on ( 19)
2Select drive [HDD, DVD or SD ([EH67])] ( 22, 30, 36) Drive changes each time you press [DRIVE SELECT].
3 Select channels and title numbers, etc./Enter numbers
4To delete unnecessary recorded titles or still pictures ([EH67]) ( 46)
5 Basic operations for recording and play
6 Skip the specified time ( 32)
7 Selection/OK, Frame-by-frame ( 32)
8 Show Top Menu/DIRECT NAVIGATOR ( 30, 31, 40)
9Show OPTION menu ( 40)
This menu is used when playing or editing titles and still pictures,
etc.
: Select audio ( 32)
; Colour buttons for switching between Video/Picture ([EH67]) and Video/Playlists, manual tuning settings ( 30, 49, 65)
< Show on-screen menu ( 38)
=Recording functions
[¥ REC] Start recording ( 22)
[REC MODE] Change recording mode ( 22)
[F Rec] Start Flexible Recording ( 25) > Transmit the remote control signal
? Television operations ( 20) @ Channel select ( 22)
A Input select (AV1, AV2, AV3, AV4 or DV) ( 54)
B [For]Australia]and]N.Z.] Show G-CODE screen ( 26)
C Exit the menu screen
D Show Timer Recording screen ( 27)
EShow FUNCTION MENU window ( 59)
By using the FUNCTION MENU window you may access the
main functions (Playback, Recording, etc.) quickly and easily. F Return to previous screen
G Create chapter ( 32)
H Skip approx. 30 seconds forward ( 32) I Show status messages ( 39)
RQT8906
12

Main unit
|
1 |
2 |
3 |
4 |
5 |
|
[EH67] |
< |
6 |
7 8 |
9 |
: |
; |
|
Opening the front panel |
||||||
|
Place your finger on the protruding section below the 4 and |
REC |
|||||
|
press down to flip open the front panel. |
1Standby/on switch (Í/I) ( 19)
Press to switch the unit from on to standby mode or vice versa. In
standby mode, the unit is still consuming a small amount of power. 2 Disc tray ( 22, 30)
3 Connection for digital video (DV) camcorder ( 54) 4 Connection for VCR, camcorder etc. ( 54)
5 Display ( below)
6 Channel select ( 22)
7 Stop ( 22, 31)
8 Start play ( 30)
9 Start recording ( 22)/Specify a time to stop recording ( 24) : Open/close disc tray ( 22, 30)
; Remote control signal sensor
< [EH67] SD Card slot ( below)
Rear panel terminals ( 14–17)
Control reference guide
Inserting, Removing the SD Card [EH67]
When the card indicator (“SD”) on the unit’s display is flashing, the card is being read from or written to. Do not turn off the unit or remove the card. Such action may result in malfunction or loss of the card’s contents.
≥Inserting foreign objects can cause a malfunction.
≥You can use SD Cards with capacities from 8 MB to 4 GB ( 7).
|
Inserting the card |
Removing the card |
Press on the centre of the card until it clicks into place.
Insert the card label up with the cut-off corner on the right.
|
If you are using a |
|
|
miniSD card, insert it |
|
|
into the miniSD card |
|
|
adaptor that comes |
|
|
with the card. |
ADAPTER |
|
Insert and remove this |
|
|
adaptor from the unit. |
1 Press on the centre of the card.
2Pull it straight out.
Automatic drive select function
≥If you insert an SD Card while the unit is stopped, the “SD Card” screen is displayed. Select an item and press [OK] to switch to the SD drive ( 36, 52).
If you remove an SD Card, the HDD drive is automatically selected.
The unit’s display
1 2 3
|
REC |
|||
|
PLAY |
4[EH67] |
||
|
5 |
|||
|
6 |
7 |
8 |
1Copying indicator Lights during copy.
|
2 |
Recording |
Playback |
Recording/ |
|
indicator |
indicator |
Playback indicator |
|
REC |
REC |
|
|
PLAY |
PLAY |
|
|
3 Timer recording indicator |
6 Drive [HDD, DVD or SD ([EH67])] indicator |
|
|
4 [EH67] SD Card slot indicator |
Lights when the HDD, DVD or SD drive is selected. |
|
|
5 Disc indicator |
7 Main display section indicator |
|
|
Lights when a disc that is supported by this unit is inserted in the |
8 Recording mode indicator |
|
|
tray. |
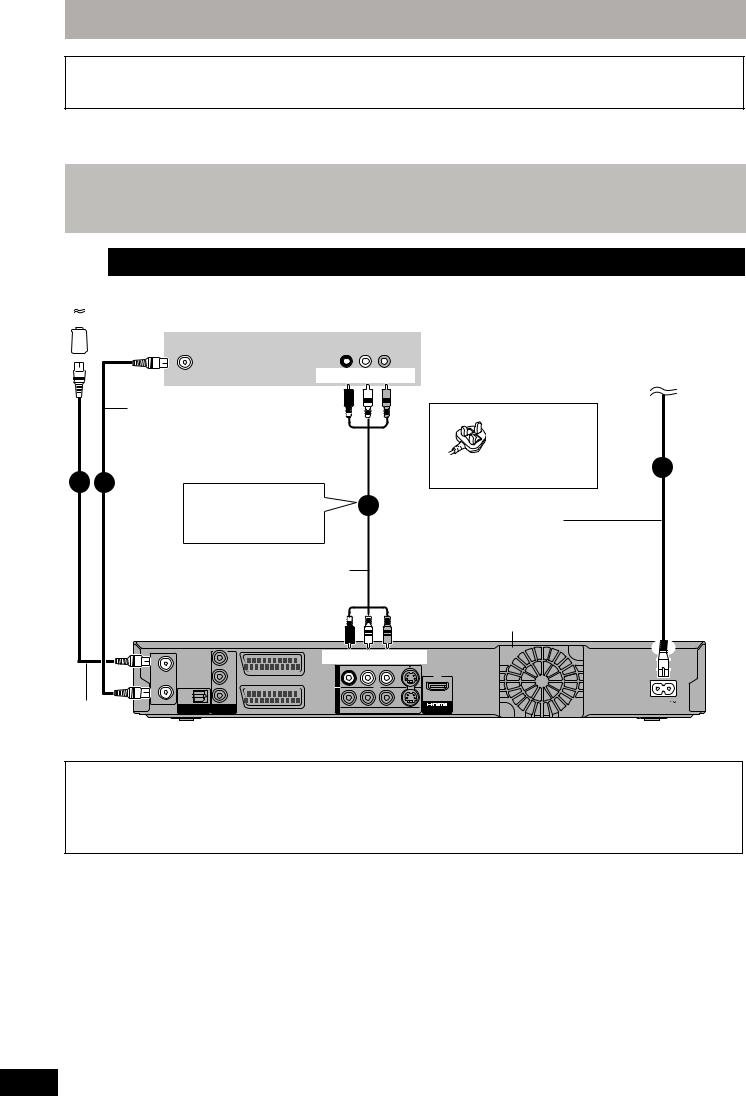
STEP 1 Connection
Make sure to use the pair of supplied RF coaxial cables
Use the pair of supplied RF coaxial cables only when you make connections to the unit through its RF IN and RF OUT terminals. Striping may appear and disrupt images on the TV if you use different cables for connection.
≥Before connection, turn off all equipment and read the appropriate operating instructions.
≥Select the connection pattern that matches your environment from pattern A–B. Confirm connections not listed below with your dealer.
When the unit is not to be used for a long time
To save power, unplug it from the household mains socket. This unit consumes a small amount of power, even when it is turned off
[approx. 2 W (Power Save mode)]
When “Power Save” is set to “On”, the “Quick Start” function does not work.
|
A |
Connecting a television |
||||
|
To the aerial |
|||||
|
Aerial |
Television’s rear panel |
To household mains socket |
|||
|
cable |
AUDIO IN VIDEO IN |
[For]Australia]and]N.Z.] |
|||
|
VHF/UHF |
(AC 220 to 240 V, 50 Hz) |
||||
|
RF IN |
R L |
||||
|
[For]Asia]and]Middle]East] |
|||||||||
|
Red White Yellow |
(AC 220 to 240 V, 50/60 Hz) |
||||||||
|
RF coaxial cable |
[For\Saudi\Arabia[ BE SURE TO |
||||||||
|
(included) |
READ THE |
||||||||
|
CAUTION FOR |
|||||||||
|
THE AC MAINS |
|||||||||
|
LEAD ON PAGE |
4 |
||||||||
|
1 |
2 BEFORE |
||||||||
|
2 |
CONNECTION. |
||||||||
|
Other connections |
|||||||||
|
3 |
|||||||||
|
( 16, 17) |
AC mains lead |
||||||||
|
(included) |
|||||||||
|
Connect only after all other |
|||||||||
|
connections are complete. |
|||||||||
|
Audio/Video cable |
[For]Middle]East] |
||||||||
|
(included) |
≥Use the AC mains lead that matches |
||||||||
|
the socket for the area you live in. |
|||||||||
|
Cooling fan |
|||||||||
|
IN |
Y |
Red White Yellow |
|||||||
|
RF |
|||||||||
|
PB |
OUT |
||||||||
|
AV1 |
|||||||||
|
(TV) |
|||||||||
|
RF |
OPTICAL |
PR |
IN |
AC IN |
|||||
|
OUT |
4 |
||||||||
|
RF coaxial |
AV |
||||||||
|
(PCM/BITSTREAM) |
VIDEO OUT |
AV2(EXT) |
R-AUDIO-L |
VIDEO |
S VIDEO |
AV OUT |
|||
|
DIGITAL AUDIO OUT COMPONENT |
|||||||||
|
cable |
This unit’s rear panel |
||||||||
|
(included) |
Connecting to a television with 21-pin Scart terminal
You can also connect with the AV1 terminal on this unit using the 21-pin Scart cable.
If your television is equipped with RGB input capability, by connecting with a fully wired 21-pin Scart cable you can see video using RGB output on this unit.
[Required]setting]
“AV1 Output” in the Setup menu ( 63)
RQT8906
14

B Connecting a television and VCR
|
Television’s rear panel |
||
|
To the aerial |
VHF/UHF |
AUDIO IN VIDEO IN |
|
RF IN |
R L |
|
Red White Yellow |
|||||
|
Other connections |
5 |
||||
|
( 16, 17) |
|||||
|
4 |
|||||
|
2 |
Audio/Video cable |
||||
|
RF coaxial cable |
(included) |
||||
|
(included) |
|||||
|
RF |
Y |
Red White Yellow |
|||
|
IN |
|||||
|
PB |
OUT |
||||
|
AV1 |
|||||
|
(TV) |
|||||
|
RF |
OPTICAL |
PR |
IN |
||
|
OUT |
4 |
||||
|
DIGITAL AUDIO OUT |
COMPONENT |
AV |
|||
|
-AUDIO-L VIDEO |
S VIDEO |
||||
|
(PCM/BITSTREAM) |
VIDEO OUT |
AV2(EXT) |
|||
|
Red White Yellow |
|||||
|
RF coaxial cable |
|||||
|
(included) |
|||||
|
2 |
3 |
||||
|
1 |
|||||
|
Audio/Video cable |
Aerial cable
|
Red White Yellow |
||
|
VHF/UHF |
RF OUT |
R L |
|
RF IN |
AUDIO OUT VIDEO OUT |
VCR’s rear panel
Connecting to a television with 21-pin Scart terminal
|
To household mains socket |
|
|
[For]Australia]and]N.Z.] |
|
|
(AC 220 to 240 V, 50 Hz) |
|
|
[For]Asia]and]Middle]East] |
|
|
(AC 220 to 240 V, 50/60 Hz) |
|
|
[For\Saudi\Arabia[ BE SURE TO |
|
|
READ THE |
6 |
|
CAUTION FOR |
|
|
THE AC MAINS |
|
|
LEAD ON PAGE |
|
|
2 BEFORE |
|
|
CONNECTION. |
AC mains lead
(included)
Connect only after all other
connections are complete.
[For]Middle]East]
≥Use the AC mains lead that matches the socket for the area you live in.
|
AC IN |
||
|
AV OUT |
||
|
Cooling fan |
This unit’s rear panel |
|
|
Connect the unit directly to the television |
DO NOT |
If you connect the unit through an AV
selector or video cassette recorder to the
Television
television, video signal will be affected by copyright protection systems and the picture
may not be shown correctly.
VCR
This unit
≥When connecting to a television with a built-in VCR
Connect to the input terminals on the television side if there are both television and VCR input terminals.
You can also connect with the AV1 terminal on this unit using the 21-pin Scart cable.
If your television is equipped with RGB input capability, by connecting with a fully wired 21-pin Scart cable you can see video using RGB output on this unit.
[Required]setting]
“AV1 Output” in the Setup menu ( 63)
Connecting to a VCR with 21-pin Scart terminal
You can also connect with the AV2 terminal on this unit using the 21-pin Scart cable.
[Required]setting]
“AV2 Input” in the Setup menu ( 63)
STEP 1 Connection
RQT8906
15

STEP 1 Connection
Other connections
§ Leave “Yellow” unconnected.
Connecting a television with S VIDEO terminals
The S VIDEO OUT terminal achieves a more vivid picture than the VIDEO OUT terminal. (Actual results depend on the television.)
Television’s rear panel
|
AUDIO IN |
VIDEO |
S VIDEO |
|
|
R |
L |
IN |
IN |
Red White
|
§ |
|
|
S Video |
|
|
Audio/Video cable |
cable |
(included)
§
Red White
|
OUT |
|||
|
AV4 IN |
|||
|
R-AUDIO-L |
VIDEO |
S VIDEO |
AV OUT |
This unit’s rear panel
Connecting an amplifier or system component
∫ Connecting an amplifier with a digital input terminal
≥To enjoy multi-channel surround sound DVD-Video, connect an amplifier with Dolby Digital, DTS and MPEG decoders.
[Required]setting]
“Digital Audio Output” in the Setup menu ( 62)
≥When this unit is connected to an amplifier with an Optical digital audio cable and connected to a television with an HDMI cable, you can enjoy the highest quality of audio from the disc by setting “Digital Audio Output” to “Optical Only” in the Setup menu ( 63). In this case audio is only output from the amplifier not the television.
≥Before purchasing an optical digital audio cable (not included), check the terminal shape of the connected equipment.
≥You cannot use DTS Digital Surround decoders not suited to DVD.
Amplifier’s OPTICAL
rear panel
|
Optical digital |
Insert fully, with this |
|
|
audio cable |
||
|
side facing up. |
||
|
Do not bend |
||
|
sharply when |
||
|
connecting. |
|
PB |
OUT |
||
|
AV1 |
|||
|
(TV) |
|||
|
OPTICAL |
PR |
IN |
|
|
DIGITAL AUDIO OUT |
COMPONENT |
AV4 |
|
|
(PCM/BITSTREAM) |
VIDEO OUT |
AV2(EXT) |
This unit’s rear panel
RQT8906
Connecting a television with COMPONENT VIDEO terminals
Television’s rear panel

 Y COMPONENT
VIDEO IN
PB
PR
Component
Video cable
|
RF |
OPTICAL |
PR |
|
|
OUT |
|||
|
DIGITAL AUDIO OUT |
COMPONENT |
||
|
(PCM/BITSTREAM) |
VIDEO OUT |
AV2(EXT) |
AUDIO IN
R L
Red White
§
Audio/Video cable
 § (included)
Red White
|
OUT |
||
|
AV4 IN |
||
|
R-AUDIO-L |
VIDEO |
S VIDEO |
This unit’s rear panel
COMPONENT VIDEO terminals can be used for either interlace or progressive output ( 77) and provide a purer picture than the
S VIDEO OUT terminal.
≥Connect to terminals of the same colour.
If you have a regular television (CRT: cathode ray tube)
Use component output with progressive “Off” (The default setting63), even if it is progressive compatible, because progressive output can cause some flickering. This is the same for multi system televisions using PAL mode.
CRT 

DO NOT
COMPONENT VIDEO OUT
|
Progressive output |
||
|
This unit |
COMPONENT |
|
|
VIDEO IN |
||
For progressive output ( 20)
∫ Connecting a stereo amplifier
Amplifier’s rear panel
AUDIO IN
R L
Red White
Audio cable
Red White
|
OUT |
||
|
AV4 IN |
||
|
R-AUDIO-L |
VIDEO |
S VIDEO |
This unit’s rear panel
16

Connecting with an HDMI (High Definition Multimedia Interface) terminal
When connected to an HDMI compatible unit, an uncompressed digital audio and video signal is transmitted. You can enjoy high quality, digital video and audio with just one cord. When connecting to an HDMI-compatible HDTV (High Definition Television), this unit’s output can be switched to 1080p, 1080i or 720p HD video.
≥Please use the HDMI cables 5.0 meters or less.
Preparation
From the Setup menu ( 63), set “Digital Audio Output” to “HDMI and Optical”.
Connecting to a TV
|
Television’s |
HDMI IN |
|
|
rear panel |
||
|
This unit’s |
||
|
rear panel |
HDMI AV OUT |
|
|
OUT |
||
|
AV4 IN |
R-AUDIO-L VIDEO S VIDEO AV OUT |
|
≥If you are connecting to a TV that is only compatible with 2 channel audio output, audio with 3 channels or more will be down mixed ( 77) and output as 2 channels, even if connecting with an HDMI cable. (Some discs cannot be down mixed.)
≥You cannot connect this unit to DVI devices that are incompatible with HDCP.
For units compatible with HDCP (High-Bandwidth Digital Content Protection) copyright protection that are equipped with a digital DVI input terminal (PC monitors, etc.):
Depending on the unit, images may not display properly or at all when connecting with a DVI/HDMI switching cable. (Audio cannot be output.)
Connecting to a receiver
HDMI IN
Television’s rear panel
|
Receiver’s rear |
|
|
HDMI IN |
HDMI OUT panel |
This unit’s
rear panel
HDMI AV OUT
STEP 1 Connection
VIERA Link “HDAVI Control TM”
What is VIERA Link “HDAVI Control”?
VIERA Link “HDAVI Control” is a convenient function that offers linked operations of this unit, and a Panasonic TV (VIERA) or receiver under “HDAVI Control”. You can use this function by connecting the equipment with the HDMI cable. See the operating instructions for connected equipment for operational details.
≥VIERA Link “HDAVI Control”, based on the control functions provided by HDMI which is an industry standard known as HDMI CEC (Consumer Electronics Control), is a unique function that we have developed and added. As such, its operation with other manufacturers’ equipment that supports HDMI CEC cannot be guaranteed.
≥This unit supports “HDAVI Control 2” function.
“HDAVI Control 2” is the newest standard (current as of February, 2007) for Panasonic’s HDAVI Control compatible equipment. This standard is compatible with Panasonic’s conventional HDAVI equipment.
≥It is recommended that you use Panasonic’s HDMI cable.
Recommended part number: RP-CDHG15 (1.5 m), RP-CDHG30 (3.0 m), RP-CDHG50 (5.0 m), etc. ≥Non-HDMI-compliant cables cannot be utilised.
Preparation
1.Connect this unit to your TV or receiver with an HDMI cable ( above).
2.Set “VIERA Link” to “On” ( 63). (The default setting is “On”.)
3.Set the “HDAVI Control” operations on the connected equipment (e.g., TV).
4.Turn on all “HDAVI Control” compatible equipment, turn the TV off/on, and then select this unit’s input channel on the connected TV so that the “HDAVI Control” function works properly.
Also when the connection or settings are changed, repeat this procedure.
What you can do with “HDAVI Control”
|
(When the TV is on) |
When the TV is on and the following operations are performed, the TV’s input will automatically switch to HDMI input |
|
|
Easy playback |
mode and the TV displays the corresponding action. |
|
|
(Picture or sound may not be available for the first few seconds.) |
||
|
Press [FUNCTION MENU]§1, [1] (PLAY)§2, [DIRECT NAVIGATOR], [PROG/CHECK], [G-Code]§3 etc. |
||
|
(When the TV is off) |
When the TV is off and the following operations are performed, the TV will automatically turn on and displays the |
|
|
Power on link |
corresponding action. |
|
|
(Picture or sound may not be available for the first few seconds.) |
||
|
Press [FUNCTION MENU]§1, [1] (PLAY)§2, [DIRECT NAVIGATOR], [PROG/CHECK], [G-Code]§3 etc. |
||
|
≥[DVD-V] [CD] [VCD] and MP3 |
||
|
The TV is automatically turned on when you insert the discs. |
||
|
Power off link |
When you set the TV to standby mode, the unit is also automatically set to standby mode. The unit is automatically |
|
|
set to standby mode even if the FUNCTION MENU screen etc. is displayed during playback or when the unit set to a |
||
|
timer recording. |
||
|
Even if the TV is set to standby mode, the unit will not be set to standby mode at the same time when recording, |
||
|
copying, finalising etc. |
||
|
≥When this unit is connected to an “HDAVI Control” compatible Panasonic receiver with an HDMI cable, the receiver |
||
|
will also turn off. |
||
§1 This button is available only when this unit is on.
§2 When this button is pressed, the playback image is not immediately displayed on the screen and it may not be possible to watch the contents from where playback started.
In this case, press [:] or [6] to go back to where playback started.
§3 Only for Australia and N.Z.
[Note]
≥These functions may not work normally depending on the equipment condition.
≥About “HDAVI Control” function, read the manual of the connected equipment (e.g., TV) too.
(continued on the next page)
RQT8906
17

STEP 1 Connection
(continued)
Easy control only with VIERA remote control
If you connect this unit to the TV that has “HDAVI Control 2” function with an HDMI cable, you can enjoy using more convenient functions. You can operate this unit using the following buttons on the TV remote control.
[3, 4, 2, 1], [OK], [RETURN], [EXIT], [OPTION] and the coloured buttons.
Use the remote control for this unit to operate any other buttons (numbered buttons, etc.) that are not listed above.
Using the FUNCTION
MENU window to operate this unit
Refer to the TV operating instructions for operating the TV.
1 Display this unit’s “FUNCTION MENU” window using the TV remote control.
≥If this unit is set to standby mode, it will automatically turn on.
2Select the item you want to operate with the TV remote control, and press [OK].
|
FUNCTION MENU |
||
|
HDD |
Remain |
30:00 SP |
|
Playback |
||
|
Recording |
||
|
Delete |
||
|
Copy |
||
|
To Others |
||
|
OK |
||
|
RETURN |
|
About the FUNCTION MENU |
|||||||
|
window ( 59). |
|||||||
|
Using the OPTION |
By using the TV remote control, you can play discs using the “Control Panel” ( below) and display the Top |
||||||
|
menu window to |
Menu for DVD-Video. |
||||||
|
operate this unit |
1 Press [OPTION]. |
Control Panel |
Control Panel is |
||||
|
e,g., |
displayed ( below). |
||||||
|
FUNCTION MENU |
FUNCTION MENU |
||||||
|
Control Panel |
|||||||
|
window is displayed |
|||||||
|
FUNCTION MENU |
|||||||
|
( above). |
|||||||
|
Top Menu |
|||||||
|
Menu |
|||||||
|
Top Menu [DVD-V] |
Top menu is displayed |
||||||
|
Drive Select |
|||||||
|
( 31). |
|||||||
|
OK |
|||||||
|
RETURN |
|||||||
|
Menu [DVD-V] |
Menu is displayed |
||||||
|
( 31). |
|||||||
|
[Note] |
|||||||
|
Drive Select |
Select the HDD, DVD or |
||||||
|
You cannot use the OPTION menu while the Top Menu |
|||||||
|
SD ([EH67]) drive |
|||||||
|
for DVD-Video is displayed and while DVD-Video is |
|||||||
|
copying. |
Rotate RIGHT |
Rotate the still picture |
|||||
|
2 Select an item then press [OK]. |
(JPEG) |
( 37). |
|||||
|
Rotate LEFT |
|||||||
|
(JPEG) |
|||||||
|
Zoom in (JPEG) |
Enlarge or shrink the still |
||||||
|
picture ( 37). |
|||||||
|
Zoom out (JPEG) |
|||||||
Using the “Control Panel”, you can operate search backward, search forward, stop, etc, with the TV remote control.
Perform steps 1 and 2 of “Using the OPTION menu window to operate this unit” ( above).
|
The Control Panel is displayed ( right). |
Control Panel |
|||
|
≥When playing a title or DVD-Video, etc. |
||||
|
–[3]: Pause, [4]: Stop, [2]: Search backward, [1]: Search forward, [OK]: |
Pause |
Exit |
||
|
Play, [EXIT]: Exit the screen. |
||||
|
Search |
||||
|
≥While playing still pictures |
Search |
|||
|
–[4]: Stop, [2]: View previous picture, [1]: View next picture, [EXIT]: Exit |
Play |
|||
|
the screen. |
Stop |
|||
∫ When you want to leave the TV on and set only this unit to standby mode
Press [Í DVD] on this unit’s remote control and set to standby mode.
∫ When not using “HDAVI Control”
Set “VIERA Link” in the Setup menu to “Off” ( 63).
RQT8906
18

|
STEP 2 Channel reception settings and TV aspect settings |
||||||||||||
|
Í/ l |
3 Press [2, 1] to select the item you |
|||||||||||
|
want to change. |
||||||||||||
|
This is a 24-hour clock. |
||||||||||||
|
REC |
OPEN/CLOSE |
The items change as follows: |
||||||||||
|
e.g., [Australia]and]N.Z.] |
Hour!#Minute!#Second!#Day!#Month!#Year |
|||||||||||
|
^——————————————————————————————J |
||||||||||||
|
settings |
||||||||||||
|
Reset the clock regularly to maintain accuracy ( 67). |
||||||||||||
|
DVD |
TVÍ |
(Monthly accuracy +/– 15 seconds.) |
||||||||||
|
Í DVD |
Í |
4 Press [3, 4] to change the setting. |
||||||||||
|
DRIVE |
CH |
VOL |
||||||||||
|
SELECT |
AV |
aspect |
||||||||||
|
1 |
2 |
3 |
You can also use the numbered buttons for setting. |
|||||||||
|
Numbered |
CH |
5 Press [OK] when you have finished |
||||||||||
|
4 |
5 |
6 |
||||||||||
|
buttons |
||||||||||||
|
INPUTSELECT |
TV |
|||||||||||
|
7 |
8 |
9 |
the settings. |
|||||||||
|
and |
||||||||||||
|
DELETE |
0 |
-/— |
G-Code |
TV aspect setting screen appears. |
||||||||
|
SKIP |
SLOW/SEARCH |
|||||||||||
|
settings |
||||||||||||
|
TV Aspect |
||||||||||||
|
STOP |
PAUSE |
PLAY/x1.3 |
16:9 WIDE TV |
|||||||||
|
TIME SLIP |
EXIT |
16:9 |
||||||||||
|
4:3 TV |
||||||||||||
|
/C |
||||||||||||
|
reception |
||||||||||||
|
G H |
E |
|||||||||||
|
RO |
Pan & Scan |
|||||||||||
|
P |
CK |
|||||||||||
|
O R |
F |
Letterbox |
||||||||||
|
T |
U |
|||||||||||
|
N |
||||||||||||
|
C |
||||||||||||
|
A |
T |
|||||||||||
|
IG |
I |
|||||||||||
|
V |
O |
|||||||||||
|
A |
||||||||||||
|
N |
N |
SELECT |
||||||||||
|
T |
OK |
M |
||||||||||
|
C |
||||||||||||
|
E |
||||||||||||
|
R |
E |
|||||||||||
|
I |
N |
|||||||||||
|
D |
||||||||||||
|
3,4,2,1 |
U |
OK |
||||||||||
|
RETURN |
||||||||||||
|
OK |
OPTION |
RETURN |
||||||||||
|
RETURN |
Channel |
|||||||||||
|
CREATE |
6 Press [3, 4] to select the TV aspect |
|||||||||||
|
AUDIO |
||||||||||||
|
DISPLAY CHAPTER MANUAL SKIP |
||||||||||||
|
REC |
REC MODE |
F Rec |
STATUS |
|||||||||
|
and press [OK]. |
Turn on the television and select the appropriate AV input to suit the connections to this unit.
Press [Í DVD] to turn the unit on.
[For]Australia]and]N.Z.]
The country setting screen appears on the television.
Country
Australia
New Zealand
Others
If your favourite channel is not received
SELECT
after selecting this, please start Auto-Setup Restart from Setup.
OK 

RETURN
RETURN: leave OK: access
Press [3, 4] to select the country and press [OK].
Pre-set channels are set when you select “Australia” in the country setting menu.
Auto-Setup does not start. The clock setting menu appears ( step 3). If your favourite channel is not received after selecting “Australia”, perform “Auto-Setup Restart” ( 66).
Auto-Setup starts. This takes about 5 minutes.
Auto-Setup
1
Auto-Setup in progress. Please wait.
RETURN: to cancel
RETURN
Auto-Setup is complete when you see the clock setting menu.
Clock
|
Time |
Date |
|||||||||||
|
0 |
: |
00 |
: |
00 |
1 |
. |
1 |
. |
2007 |
|||
|
Number |
||||||||||||
|
0 |
9 |
|||||||||||
|
Please set clock manually. |
||||||||||||
|
CHANGE |
OK: store |
RETURN: leave |
||||||||||
|
SELECT |
OK 
RETURN
|
≥16:9: |
When connected to a 16:9 widescreen |
2 |
|
|
television. |
Connection/STEP1STEP |
||
|
≥Pan & Scan: When connected to a 4:3 aspect television, |
|||
|
side picture is trimmed for 16:9 picture ( 77). |
|||
|
≥Letterbox: |
When connected to a 4:3 aspect television. |
||
|
16:9 picture is shown in the letterbox style |
|||
|
( 77). |
To stop partway
Press [RETURN].
∫To confirm that stations have been tuned correctly ( 65)
∫To restart set up ( 66)
RQT8906
19

STEP 3 Set up to match your television and remote control
e.g., [Australia]and]N.Z.]
Numbered buttons
3,4,2,1
OK
|
DVD |
TVÍ |
|||
|
Í |
TV operation |
|||
|
DRIVE |
CH |
VOL |
||
|
buttons |
||||
|
SELECT |
AV |
|||
|
1 |
2 |
3 |
CH |
|
|
4 |
5 |
6 |
||
|
7 |
8 |
9 INPUTSELECT |
||
|
DELETE |
0 |
-/— |
G-Code |
 SKIP
SKIP  SLOW/SEARCH
STOP PAUSE PLAY/x1.3
|
TIME SLIP |
EXIT |
|||||||
|
G |
/C |
|||||||
|
H |
EC |
|||||||
|
RO |
||||||||
|
R |
P |
K |
||||||
|
U |
||||||||
|
T |
O |
F |
||||||
|
N |
||||||||
|
C |
||||||||
|
A |
T |
|||||||
|
IG |
I |
|||||||
|
V |
O |
|||||||
|
A |
||||||||
|
N |
N |
|||||||
|
T |
OK |
M |
||||||
|
E |
||||||||
|
C |
E |
|||||||
|
R |
||||||||
|
D |
N |
|||||||
|
I |
U |
|||||||
|
OPTION |
RETURN |
|||||||
|
AUDIO |
CREATE |
|||||||
|
DISPLAY CHAPTER MANUAL SKIP |
EXIT
FUNCTION MENU
RETURN
REC REC MODE F Rec STATUS
To enjoy progressive video
You can enjoy progressive video by connecting this unit’s COMPONENT VIDEO OUT terminals to an LCD/plasma television or LCD projector compatible with progressive scan ( 77).
1 While stopped
Press [FUNCTION MENU].
|
FUNCTION MENU |
||
|
HDD |
Remain |
70:00 SP |
|
Playback |
||
|
Recording |
||
|
Delete |
||
|
Copy |
||
|
To Others |
||
|
OK |
||
|
RETURN |
2 Press [3, 4] to select “To Others” and press [OK].
4 Press [3, 4] to select “Connection” and press [1].
|
Setup |
TV Aspect |
16:9 |
|
|
Progressive |
Off |
||
|
Tuning |
TV System |
PAL |
|
|
HDMI Settings |
|||
|
Disc |
|||
|
AV1 Output |
Video |
||
|
Picture |
|||
|
AV2 Input |
Video |
||
|
Sound |
|||
|
Display |
SELECT |
TAB |
|
|
Connection |
|||
|
OK |
RETURN |
||
|
Others |
5 Press [3, 4] to select “Progressive” and press [OK].
|
Setup |
Progressive |
|
|
On |
||
|
Tuning |
Off |
|
|
Disc |
||
|
Picture |
||
|
Sound |
||
|
Display |
SELECT |
|
|
Connection |
OK |
|
|
Others |
||
|
RETURN |
||
6 Press [3, 4] to select “On” and press
[OK].
Output becomes progressive.
[Note]
≥When connected to a regular television (CRT: Cathode ray tube) or a multi system television using PAL mode, even if it is progressive compatible, progressive output can cause some flickering. Turn off “Progressive” if this occurs ( 39).
≥Picture will not be displayed correctly if connected to an incompatible television.
≥There is no output from the COMPONENT VIDEO OUT terminals if “AV1 Output” in the Setup menu is set to “RGB 1 (without component)” or “RGB 2 (without component)” ( 63).
To return to the previous screen
Press [RETURN].
To exit the screen
Press [EXIT].
Television operation
You can configure the remote control TV operation buttons to turn the television on/off, change the television input mode, select the television channel and change the television volume.
|
3 Press [3, 4] to select “Setup” and |
||||||||
|
press [OK]. |
DVD |
TVÍ |
||||||
|
Setup |
Turn TV on/off |
Í |
VOL |
Volume |
||||
|
CH |
||||||||
|
Manual Tuning |
DRIVE |
|||||||
|
SELECT |
AV |
Channel |
||||||
|
Auto-Setup Restart |
||||||||
|
Input select |
||||||||
|
Tuning |
1 |
2 |
3 |
Select |
||||
|
Disc |
CH |
|||||||
|
Picture |
4 |
5 |
6 |
|||||
|
Sound |
||||||||
|
Display |
SELECT |
|||||||
|
TAB |
1 Point the remote control at the television |
|||||||
|
Connection |
RETURN |
|||||||
|
Others |
||||||||
|
While pressing [Í TV], enter the code |
||||||||
|
with the numbered buttons. |
||||||||
|
e.g., |
01: |
[0] [1] |
10: |
[1] [0] |
||||
|
(continued on the next page) |
RQT8906
20
![]()
(continued)
Refer to the control reference on page 20.
Manufacturer and Code No.
|
Brand |
Code |
Brand |
Code |
|
Panasonic |
01/02/03/04 |
METZ |
05/28 |
|
AIWA |
35 |
MITSUBISHI |
05/19/20/47 |
|
AKAI |
27/30 |
MIVAR |
24 |
|
BEJING |
33 |
NEC |
36 |
|
BEKO |
05/71/72/73/ |
NOBLEX |
33 |
|
74 |
|||
|
BENQ |
58/59 |
NOKIA |
25/26/27/ |
|
60/61 |
|||
|
BP |
09 |
NORDMENDE |
10 |
|
BRANDT |
10/15 |
OLEVIA |
45 |
|
BUSH |
05 |
ONWA |
30/39/70 |
|
CENTREX |
66 |
ORION |
05 |
|
CHANGHONG |
69 |
PEONY |
46/69 |
|
CURTIS |
05 |
PHILCO |
41/48/64 |
|
DAEWOO |
64/65 |
PHILIPS |
05/06/46 |
|
DESMET |
05 |
PHONOLA |
05 |
|
DUAL |
05 |
PIONEER |
37/38 |
|
ELEMIS |
05 |
PROVIEW |
52 |
|
FERGUSON |
10/34 |
PYE |
05 |
|
FINLUX |
61 |
RADIOLA |
05 |
|
FISHER |
21 |
SABA |
10 |
|
FUJITSU |
53 |
SALORA |
26 |
|
FUNAI |
63/67 |
SAMSUNG |
32/42/43/ |
|
65/68 |
|||
|
GOLDSTAR |
05/50/51 |
SANSUI |
05 |
|
GOODMANS |
05 |
SANYO |
21/54/55/56 |
|
GRADIENTE |
36 |
SCHNEIDER |
05/29/30 |
|
GRUNDIG |
09 |
SEG |
05/69/75/ |
|
76/77/78 |
|||
|
HIKONA |
52 |
SELECO |
05/25 |
|
HITACHI |
05/22/23/40/ |
SHARP |
18 |
|
41 |
|||
|
INNO HIT |
05 |
SIEMENS |
09 |
|
IRRADIO |
30 |
SINUDYNE |
05 |
|
ITT |
25 |
SONY |
08 |
|
JINGXING |
49 |
TCL |
31/33/66/ |
|
67/69 |
|||
|
JVC |
17/30/39/70 |
TELEFUNKEN |
10/11/12/ |
|
13/14 |
|||
|
KDS |
52 |
TEVION |
52 |
|
KOLIN |
45 |
TEX ONDA |
52 |
|
KONKA |
62 |
THOMSON |
10/15/44 |
|
LG |
05/50/51 |
TOSHIBA |
16/57 |
|
LOEWE |
07/46 |
WHITE |
05 |
|
WESTINGHOUSE |
|||
|
MAG |
52 |
YAMAHA |
18/41 |
2 Test by turning on the television and changing channels.
≥Repeat the procedure until you find the code that allows correct operation.
≥If your television brand is not listed or if the code listed for your television does not allow control of your television, this remote control is not compatible with your television.
[Note]
≥If your television brand has more than one code listed, select the one that allows correct operation.
When other Panasonic products respond to this remote control
Change the remote control code on the main unit and the remote control (the two must match) if you place other Panasonic products close together.
|
Use “DVD 1”, the factory set code, under normal circumstances. |
control |
|||||
|
1 |
While stopped |
|||||
|
remote |
||||||
|
2 |
Press [3, 4] to select “To Others” |
|||||
|
Press [FUNCTION MENU]. |
||||||
|
and press [OK]. |
and |
|||||
|
4 |
television |
|||||
|
Press [3, 4] to select “Others” and |
||||||
|
3 |
Press [3, 4] to select “Setup” and |
|||||
|
press [OK]. |
||||||
|
5 |
press [1]. |
your |
||||
|
Press [3, 4] to select “Remote |
matchto |
|||||
|
6 |
Press [3, 4] to select the code (“DVD |
|||||
|
Control” and press [OK]. |
||||||
|
1”, “DVD 2” or “DVD 3”) and press |
up |
|||||
|
[OK]. |
Set3 |
|||||
|
Setup |
Remote Control |
STEP |
||||
|
control. |
||||||
|
Press “ ” and “OK” together |
||||||
|
Tuning |
for more than 5 seconds on the remote |
|||||
|
Disc |
||||||
|
Picture |
||||||
To change the code on the remote control
7 While pressing [OK], press and hold the numbered button ([1], [2] or [3]) for more than 5 seconds.
8 Press [OK].
∫When the following indicator appears on the unit’s display
The unit’s remote control code
Change the code on the remote control to match the main unit’s ( step 7).
[Note]
Executing “Shipping Condition” in the Setup menu returns the main unit code to “DVD 1”. Change the remote control code to 1
( step 7).
To return to the previous screen
Press [RETURN].
To exit the screen
Press [EXIT].
RQT8906
21

Recording television programmes
|
2 |
||||||||||||
|
REC |
OPEN/CLOSE |
|||||||||||
|
e.g., [Australia]and]N.Z.] |
DVD |
TVÍ |
3 |
∫ |
5 |
|||||||
|
Í |
||||||||||||
|
1 |
DRIVE |
CH |
VOL |
|||||||||
|
SELECT |
AV |
|||||||||||
|
1 |
2 |
3 |
3 |
|||||||||
|
Numbered |
CH |
|||||||||||
|
4 |
5 |
6 |
||||||||||
|
buttons |
||||||||||||
|
7 |
8 |
9 INPUTSELECT |
||||||||||
|
DELETE |
0 |
-/— G-Code |
||||||||||
|
SKIP |
SLOW/SEARCH |
|||||||||||
|
; |
||||||||||||
|
∫ |
STOP |
PAUSE |
PLAY/x1.3 |
|||||||||
|
TIME SLIP |
EXIT |
|||||||||||
|
G |
/C |
|||||||||||
|
H |
EC |
|||||||||||
|
RO |
||||||||||||
|
P |
K |
|||||||||||
|
R |
F |
|||||||||||
|
T |
O |
U |
||||||||||
|
N |
||||||||||||
|
C |
||||||||||||
|
A |
T |
|||||||||||
|
IG |
I |
|||||||||||
|
V |
O |
|||||||||||
|
A |
N |
|||||||||||
|
N |
||||||||||||
|
T |
OK |
M |
||||||||||
|
C |
||||||||||||
|
E |
||||||||||||
|
R |
E |
|||||||||||
|
I |
N |
|||||||||||
|
D |
||||||||||||
|
3,4,2,1 |
U |
|||||||||||
|
OK |
OPTION |
RETURN |
||||||||||
|
AUDIO |
CREATE |
|||||||||||
|
AUDIO |
DISPLAY CHAPTER MANUAL SKIP |
|||||||||||
|
5 |
REC |
REC MODE |
F Rec |
STATUS |
4 |
|||||||
See also “Important notes for recording” ( 8).
Depending on the type of disc used for recording or the type of broadcast, there may be restrictions on the title you are trying to record.
≥[RAM] It is not possible to record continuously from one side of a double sided disc to the other. You will need to eject the disc and
turn it over.
≥[+RW] You can create Top Menu using “Create Top Menu” ( 57). Recording or editing on the disc may delete the menu. In that case, create the menu again.
[SD] ([EH67])
≥It is not possible to record onto a card.
[RAM] [-RW‹V›] [+R] [+R]DL] [+RW]
≥To use a new disc, formatting is necessary.
Preparation
≥Turn on the television and select the appropriate video input to suit the connections to this unit.
≥Turn on this unit.
1 Press [DRIVE SELECT] to select the HDD or DVD drive.
The HDD or DVD indicator lights up on the unit’s display.
2 If you selected the DVD drive
Press [< OPEN/CLOSE] on the main unit to open the tray and insert a disc.
≥Press the button again to close the tray.
≥When using 8 cm DVD-RAM, or 8 cm DVD-R, remove the disc from the cartridge.
|
∫ Cartridge disc |
|
|
Insert label-up. |
Insert label-up with the |
|
arrow facing in. |
Insert fully.
Automatic drive select function
[RAM] [Only for discs with the write-protect tab on the cartridge
set to “PROTECT” ( 55, Cartridge-protection)]
[DVD-V] [VCD] [CD]
≥If the unit is recording to the HDD or stopped, it automatically switches to the DVD drive when a disc is inserted.
≥If you eject a disc and close the disc tray, the HDD drive is automatically selected.
RQT8906
3 Press [W X CH] to select the channel.


 REC
REC
To select with the numbered buttons: e.g., 5: [5]
15:[-/—] [1] [5]
4 Press [REC MODE] to select the recording mode (XP, SP, LP or EP).
|
REC |
Remaining time |
|
on the disc |
≥To record sound using LPCM (XP mode only):
Set the “Audio Mode for XP Recording” to “LPCM” in the Setup menu ( 62).
5 Press [¥ REC] to start recording.


 REC
REC
Recording will take place on open space on the HDD or on disc. Data will not be overwritten.
≥You cannot change the channel or recording mode during recording.
≥You can record while the unit is in standby for timer recording. However, once the time for the timer recording to begin is reached, any recording taking place will stop and the timer recording will begin.
≥[HDD] [RAM] When “Rec for High Speed Copy” is set to “Off” ( 61), you can change the audio being received by pressing [AUDIO] during recording. (Does not affect the recording of audio.)
∫ To pause recording
Press [;].
Press again to restart recording.
You can also press [¥ REC] to restart. (Title is not split into separate titles.)
∫ To stop recording
Press [∫].
≥From the start to the end of the recording is called one title. ≥[-R] [-RW‹V›] [+R] [+RW] It takes about 30 seconds for the unit to complete recording management information after recording
finishes.
In order to play DVD-R, DVD-RW (DVD-Video format) and +R (recorded with this unit) on other DVD players, it is necessary to finalise them ( 57).
Quick Start ( 64)
1 Sec. Quick Start for Recording on DVD-RAM and HDD
(When connecting to TV using 21-pin Scart, COMPONENT VIDEO, VIDEO or S VIDEO terminals)
From the power on, recording on DVD-RAM and HDD starts in about 1 second after the REC button is pressed. (Quick Start Mode)
“Quick Start” is set to “On” at the time of purchase.
[Note]
Startup takes up to a minute when:
–You play a disc or start recording to discs other than DVDRAM.
–You want to make other operations. –The clock has not been set.
22
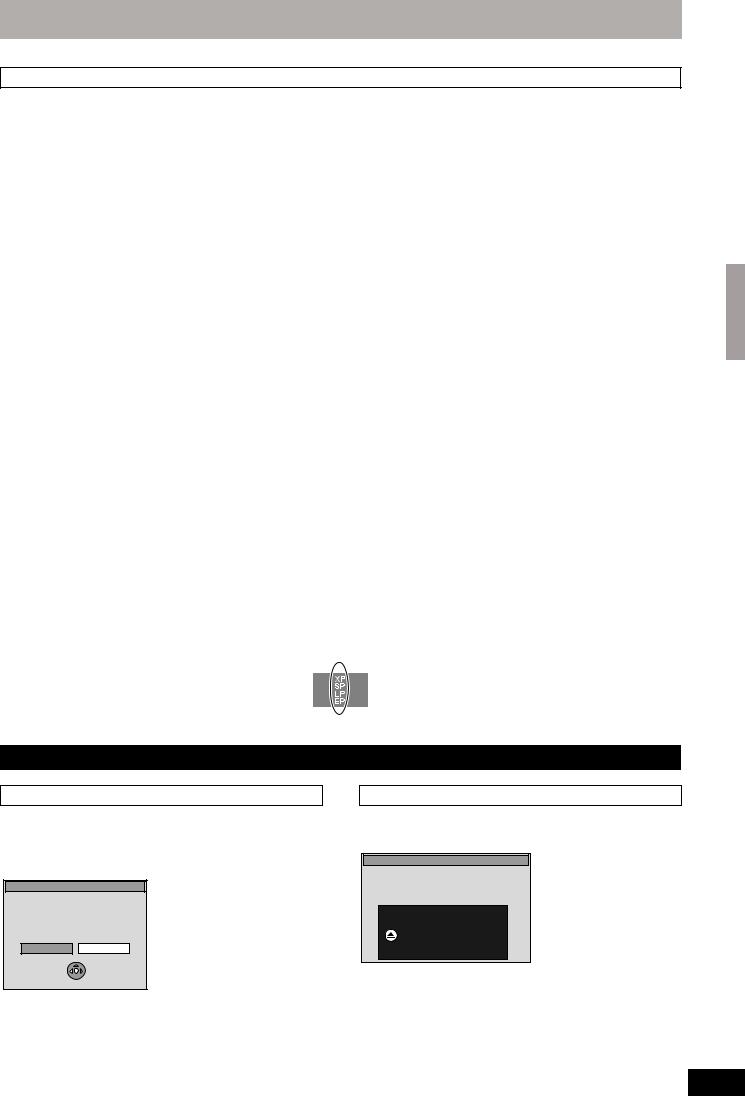
Recording modes and approximate recording times
Depending on the content being recorded, the recording times may become shorter than indicated. (The times provided on this chart are an estimate.)
|
HDD |
DVD-RAM |
DVD-R |
||||||
|
DVD-RW |
DVD-R DL§3 |
+R DL§3 |
||||||
|
Recording Mode |
Single- |
Double- |
+R |
|||||
|
[EH57] |
[EH67] |
(8.5 GB) |
(8.5 GB) |
|||||
|
sided |
sided§1 |
+RW |
||||||
|
(160 GB) |
(250 GB) |
|||||||
|
(4.7 GB) |
(9.4 GB) |
(4.7 GB) |
||||||
|
XP (High picture |
||||||||
|
quality recording |
36 hours |
55 hours |
1 hour |
2 hours |
1 hour |
1 hour 45 min. |
1 hour 45 min. |
|
|
mode) |
||||||||
|
SP (Standard |
70 hours |
111 hours |
2 hours |
4 hours |
2 hours |
3 hours 35 min. |
3 hours 35 min. |
|
|
recording mode) |
||||||||
|
LP (Long |
138 hours |
222 hours |
4 hours |
8 hours |
4 hours |
7 hours 10 min. |
7 hours 10 min. |
|
|
recording mode) |
||||||||
|
EP (Extra long |
284 hours |
443 hours |
8 hours |
16 hours |
8 hours |
14 hours 20 min. |
||
|
recording mode)§4 |
(212 hours§2) |
(333 hours§2) |
(6 hours§2) |
(12 hours§2) |
(6 hours§2) |
(10 hours 45 min.§2) |
||
|
FR (Flexible |
8 hours |
Approximately |
||||||
|
284 hours |
443 hours |
8 hours |
8 hours |
9 hours with video |
||||
|
Recording |
maximum |
14 hours 20 min. |
||||||
|
maximum |
maximum |
maximum |
maximum |
quality equivalent |
||||
|
Mode)§4 |
for one side |
|||||||
|
to LP mode. |
||||||||
§1 It is not possible to record or play continuously from one side of a double sided disc to the other. §2 When “Recording time in EP mode” is set to “EP (6 Hours)” in the Setup menu ( 61).
The sound quality is better when using “EP (6 Hours)” than when using “EP (8 Hours)”.
§3 You cannot record directly to DVD-R DL and +R DL discs with this unit. The table shows the recording time when copying. [+R]DL] You cannot copy in “EP” or “FR (recordings 5 hours or longer)” mode.
§4 When recording to the HDD in “EP” or “FR (recordings 5 hours or longer)” mode , you cannot perform high-speed copy to +R or +RW discs.
≥[RAM] When recording to DVD-RAM using “EP (8 Hours)” mode, play may not be possible on DVD players that are compatible with DVD-RAM. Use “EP (6 Hours)” mode if playback may be on other equipment.
≥[HDD] You can record up to 500 titles on HDD. (When continuously recording for long durations, titles are automatically divided every 8 hours.) ≥[RAM] [-R] [-RW‹V›] You can record up to 99 titles on one disc.
≥[+R] [+RW] You can record up to 49 titles on one disc.
FR (Flexible Recording Mode)
You can set FR (Flexible Recording) mode when copying or programming timer recordings.
The unit automatically selects a recording rate between XP and EP (8 Hours) that will enable the recordings to fit in the remaining disc space with the best possible recording quality.
For example with a 90 minute recording to an unused DVD-RAM, the picture quality is adjusted to between “XP” and “SP”. ≥When recording to the HDD, picture quality is automatically adjusted to precisely fit a copied title on a 4.7 GB disc.
≥All the recording modes from XP to EP appear in the display.
Recording television programmes
Disc Insertion/Ejection
When the format confirmation screen is displayed
[RAM] [-RW‹V›] [+R] [+R]DL] [+RW]
When you insert a new disc or a disc recorded on a computer or other equipment, a format confirmation screen is displayed. Format the disc to use it. However, all the recorded contents are deleted.
Format
This disc is not formatted properly.
Do you want to format the disc now ?
Yes No
SELECT
OK
 RETURN
Press [2, 1] to select “Yes” and press [OK].
To format a disc
“Deleting all the contents of a disc or card—Format” ( 56)
When removing a recorded disc
[-R] [-R]DL] [-RW‹V›] [+R] [+R]DL]
The following screen appears when you have not processed the disc for play on other equipment.
Finalise
Finalise the disc so that is can be played on other DVD players.
Note: Recording or Editing is not possible after finalising. This may take up to min.
min.
 Press the REC button to start finalise.
Press the OPEN/CLOSE button to exit.
The disc cannot be played on other
DVD players without finalising.
∫ To finalise the disc
Press [¥ REC] on the main unit.
≥You cannot stop this process once you have started it.
≥If you want to set the background, play menu select or provide a disc name, select “Top Menu” ( 57), “Auto-Play Select” ( 57) or “Disc Name” ( 55) in “DVD Management” before finalising.
RQT8906
∫ To open the tray without disc finalisation
|
Press [< OPEN/CLOSE] on the main unit. |
23 |
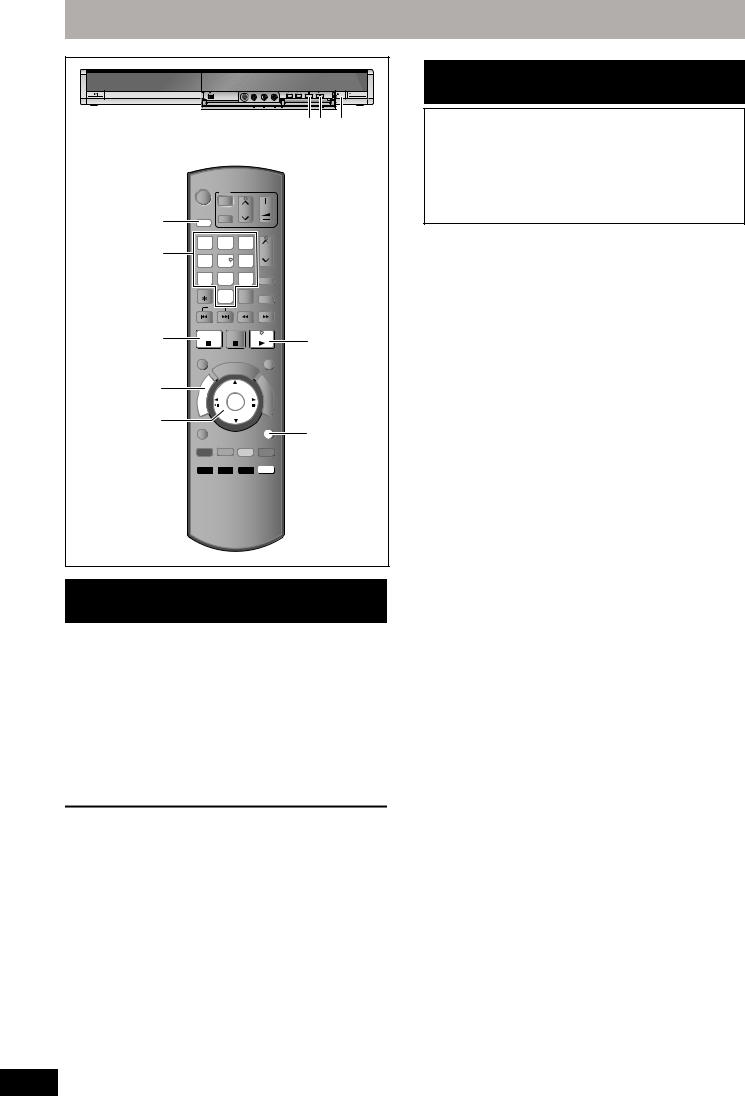
Recording television programmes
∫ 1 ¥ REC
e.g., [Australia]and]N.Z.]
DVD
ÍTVÍ
|
DRIVE |
CH |
VOL |
||||||||
|
DRIVE |
SELECT |
AV |
||||||||
|
SELECT |
1 |
2 |
3 |
|||||||
|
Numbered |
CH |
|||||||||
|
4 |
5 |
6 |
||||||||
|
buttons |
||||||||||
|
7 |
8 |
9 INPUT SELECT |
||||||||
|
DELETE |
0 |
-/— G-Code |
||||||||
|
SKIP |
SLOW/SEARCH |
|||||||||
|
∫ |
STOP |
PAUSE |
PLAY/x1.3 |
1 |
||||||
|
TIME SLIP |
EXIT |
|||||||||
|
/C |
||||||||||
|
G H |
EC |
|||||||||
|
RO |
||||||||||
|
DIRECT |
P |
K |
||||||||
|
R |
F |
|||||||||
|
NAVIGATOR |
T |
O |
U |
|||||||
|
IG |
N |
|||||||||
|
C |
||||||||||
|
I |
||||||||||
|
A |
T |
|||||||||
|
V |
O |
|||||||||
|
A |
||||||||||
|
N |
N |
|||||||||
|
T |
OK |
M |
||||||||
|
E |
||||||||||
|
C |
E |
|||||||||
|
R |
||||||||||
|
D |
N |
|||||||||
|
3,4,2,1 |
I |
U |
||||||||
|
OK |
OPTION |
RETURN |
RETURN |
|||||||
|
CREATE |
||||||||||
|
AUDIO |
||||||||||
|
DISPLAY CHAPTER MANUAL SKIP |
REC REC MODE F Rec STATUS
F Rec 
 STATUS
Recording settings for High Speed Copy
When copying in high speed mode to DVD-R, DVD-R DL, DVD-RW (DVD-Video format), +R, +R DL and +RW, set “Rec for High Speed Copy” to “On” before recording to the HDD. (The default setting is “On”. 61)
However, some restrictions apply:
Refer to the “When recording a bilingual programme” and “About the aspect when recording a programme” for more information ( 8).
[Note]
If you do not intend to copy titles in high speed mode to DVD-R, DVD-R DL, DVD-RW (DVD-Video format), +R, +R DL and +RW, set “Rec for High Speed Copy” to “Off”.
To specify a time to stop recording— One Touch Recording
[HDD] [RAM] [-R] [-RW‹V›] [+R] [+RW]
During recording
Press [¥ REC] on the main unit to select the recording time.
≥You can specify up to 4 hours later.
≥The unit display changes as shown below.
OFF 0:30 «»# OFF 1:00 «»# OFF 1:30 «»# OFF 2:00 ^» Counter (cancel) ,»» OFF 4:00 ,»» OFF 3:00 ,}
≥This does not work during timer recordings ( 26) or while using Flexible Recording ( 25).
≥The unit turns off automatically after the time to stop recording is reached.
To cancel
Press [¥ REC] on the main unit several times until the counter appears.
≥The time to stop recording is cancelled; however, recording continues.
To stop recording
Press [∫].
RQT8906
24
 Loading…

Operating Instructions
DVD Recorder
Model No.
DMR-EH57
DMR-EH67
The illustrations in these Operating Instructions show images of the silver model of
DMR-EH57 for Australia and N.Z.
[For]Australia]and]N.Z.]
Dear customer
Thank you for purchasing this product. For optimum
performance and safety, please read these
instructions carefully.
Before connecting, operating or adjusting this
product, please read the instructions completely.
Please keep this manual for future reference.
Instructions/notes regarding SD Cards and
SD Drive are applicable to the DMR-EH67
model only.
Region number supported by
this unit
Region numbers are allocated to DVD
Recorders and DVD-Video according to
where they are sold.
For Asia
≥The region number of this unit is “3”.
≥The unit will play DVD-Video marked with
labels containing “3” or “ALL”.
Example:
For Australia and N.Z.
≥The region number of this unit is “4”.
≥The unit will play DVD-Video marked with
labels containing “4” or “ALL”.
Example:
For Middle East
≥The region number of this unit is “2”.
≥The unit will play DVD-Video marked with
labels containing “2” or “ALL”.
Example:
3
ALL
3
4
2
4
ALL
3
4
2
4
ALL
3
4
2
2
ALL
3
5
2
GC GCS GN
RQT8906-L
G
e
tt
ing
sta
rted
R
eco
rd
in
g
Pla
y
in
g
b
ack
Editin
g
Cop
y
ing
Co
n
v
e
n
ie
n
t
func
tions
Re
fe
re
nc
e
EH57_67GN.book Page 1 Thursday, March 15, 2007 5:36 PM
More products and manuals for DVD players Panasonic
| Models | Document Type |
|---|---|
|
DMREH55 |
User Manual
76 pages |
|
DVD-S48 |
Datasheet
2 pages |
|
DMR-EX769 |
Operations Instructions
72 pages |
|
DMREX773 |
Operations Instructions
80 pages |
|
NVVP32Series |
Operations Instructions
48 pages |
|
DMRES15 |
Operations Instructions
52 pages |
|
NVVHD1EC |
Operations Instructions
24 pages |
|
DMR-E50EG9-S |
Operations Instructions
64 pages |
|
DMRES15EBL |
Operations Instructions
52 pages |
|
SCDV290EB |
Operations Instructions
52 pages |
|
DVDLS5 |
Operations Instructions
22 pages |
|
DMREH65 |
Operations Instructions
76 pages |
|
NVVP60SERIES |
Operations Instructions
44 pages |
|
DVDLS87 |
Operations Instructions
28 pages |
|
DVDS295 |
Operations Instructions
24 pages |
|
DVD- 2OO3 |
Operations Instructions
20 pages |
|
DMREX93CEG |
User Manual
92 pages |
|
SCPT150 |
User Manual
40 pages |
|
CQVW100N |
User Manual
52 pages |
|
DMRBCT735 |
User Manual
128 pages |


EH5767-Ru.book Page 1 Friday, April 27, 2007 10:01 AM Инструкция по эксплуатации DVD Рекордер Региональный код, поддерживаемый данным аппаратом В зависимости от географии продажи DVDрекордеров и дисков DVD-Video им присваиваются определенные региональные коды. ≥Региональный код данной системы “5”.
EH5767-Ru.book Page 2 Friday, April 27, 2007 10:01 AM GPELOCTEPE·EHNE! B ÍTOM YCTPOÆCTBE NCGOJV„YETCR JA„EP. GPNMEHEHNE PEFYJNPOBOK N HACTPOEK, OTJN¨HSX OT HN·EOGNCAHHSX, MO·ET GPNBECTN K OGACHOMY JA„EPHOMY OøJY¨EHND. HE OTKPSBAÆTE KPSWKY N HE GPON„BOLNTE PEMOHT CAMN—JY¨WE GOPY¨NTV ÍTO
EH5767-Ru.book Page 3 Friday, April 27, 2007 10:01 AM Содержание Перед началом эксплуатации Информация о НЖМД, дисках и картах . . . . . . . . . . .4 Важная информация о записи . . . . . . . . . . . . . . . . . . .8 Меры предосторожности при обращении с накопителем на жестких магнитных дисках
EH5767-Ru.book Page 4 Friday, April 27, 2007 10:01 AM Информация о НЖМД, дисках и картах НЖМД и диски, которые можно использовать для записи и воспроизведения Тип диска Жесткий диск (НЖМД) ≥[EH57] 160 ГБ [EH67] 250 ГБ Логотип DVD-RAM ≥4,7 ГБ/9,4 ГБ, 12 см ≥2,8 ГБ, 8 см – Обозначение в настоящей
EH5767-Ru.book Page 5 Friday, April 27, 2007 10:01 AM НЖМД и диски, которые можно использовать для записи и воспроизведения (продолжение) Логотип Обозначение в настоящей инструкции +R ≥4,7 ГБ, 12 см – [+R] до финализации диска [DVD-V] после финализации диска +R DL§1 (двойной слой на одной стороне)
EH5767-Ru.book Page 6 Friday, April 27, 2007 10:01 AM Информация о НЖМД, дисках и картах Диски только для воспроизведения (12 см/8 см) Тип диска DVD-Video DVD-RW (формат DVD Video Recording) [DVD-V] [-RW‹VR›] Логотип Обозначение в настоящей инструкции Инструкции Диски с высококачественными записями
EH5767-Ru.book Page 7 Friday, April 27, 2007 10:01 AM Карты памяти, совместимые с данным аппаратом [EH67] SD-карта памяти (от 8 МБ до 2 ГБ) Карта памяти SDHC (4 ГБ) Карта miniSD § MultiMediaCard В настоящей инструкции по эксплуатации карты памяти вышеуказанных типов называют “SDкартами”.
EH5767-Ru.book Page 8 Friday, April 27, 2007 10:01 AM Важная информация о записи При записи двуязычных программ [HDD] [RAM] Можно записывать основной и дополнительный звуковые каналы одновременно. Можно переключать звуковые каналы во время воспроизведения. (➡ 32, Переключение звуковых каналов во
EH5767-Ru.book Page 9 Friday, April 27, 2007 10:01 AM Меры предосторожности при обращении с накопителем на жестких магнитных дисках (НЖМД) Поскольку НЖМД является высокоточным записывающим устройством, которое позволяет осуществлять записи большой продолжительности и работает на высоких скоростях,
EH5767-Ru.book Page 10 Friday, April 27, 2007 10:01 AM Обращение с диском и картой ∫ Как держать диск или карту Не прикасайтесь к поверхности с записью или поверхности выводов. ПРАВИЛЬНО НЕПРАВИЛЬНО ∫ Диски без кассеты Будьте осторожны, чтобы не поцарапать и не испачкать диск. ∫ При наличии грязи
EH5767-Ru.book Page 11 Friday, April 27, 2007 10:01 AM Комплект принадлежностей ∏ ∏ ∏ ∏ ∏ 1 Сетевой шнур ≥Только для использования с данным аппаратом. Не используйте его с другой аппаратурой. Также шнур нельзя использовать для другой аппаратуры, работающей вместе с данным аппаратом. 2
EH5767-Ru.book Page 12 Friday, April 27, 2007 10:01 AM Справочное руководство по органам управления Пульт дистанционного управления (ДУ) Инструкции по управлению описаны, главным образом, для пульта ДУ. > DVD 1 2 3 4 TV Í Í CH DRIVE SELECT VOL ? CH @ ShowView A STATUS B C AV 1 2 3 4 5 6 7 8 9
EH5767-Ru.book Page 13 Friday, April 27, 2007 10:01 AM Аппарат 3 2 5 4 REC 6 < [EH67] 7 8 9 OPEN/CLOSE : ; Открытие фронтальной панели Надавите пальцем вниз на выступающий участок под 4 и откиньте фронтальную панель. 1 Включатель питания standby/on (Í/I) (➡ 20) Нажмите включатель, чтобы переключить
EH5767-Ru.book Page 14 Friday, April 27, 2007 10:01 AM ОПЕРАЦИЯ 1 Подключение Убедитесь, что вы используете пару радиочастотных (RF) коаксиальных кабелей, входящих в комплект поставки. Используйте пару радиочастотных (RF) кабелей, входящих в комплект поставки, только при подключении данного
EH5767-Ru.book Page 15 C Friday, April 27, 2007 10:01 AM Подключение телевизора и цифрового/спутникового ресивера или декодера Задняя панель телевизора Подключение к другим гнездам, кроме 21-штекерного разъема СКАРТ (➡ 16, 17) Радиочастотный коаксиальный кабель (RF) (прилагается) 1 2 RF IN 3
EH5767-Ru.book Page 16 Friday, April 27, 2007 10:01 AM ОПЕРАЦИЯ 1 Подключение Другие подключения Оставьте “Желтый” не подсоединенным. Подключение телевизора через гнезда AUDIO/ VIDEO или S VIDEO При использовании гнезда S VIDEO OUT изображение будет более естественным, чем при использовании гнезда
EH5767-Ru.book Page 17 Friday, April 27, 2007 10:01 AM Подключение с помощью гнезда HDMI (High Definition Multimedia Interface) (Мультимедийный интерфейс высокой четкости) Относительно функции VIERA Link “HDAVI ControlTM” При подключении к телевизору Panasonic (VIERA) или ресиверу с функцией “HDAVI
EH5767-Ru.book Page 18 Friday, April 27, 2007 10:01 AM Операции с подключенным телевизором (VIERA Link “HDAVI ControlTM”/Q Link) Для проведения взаимосвязанных операций с телевизором и ресивером используйте “HDAVI Control” или Q Link. Что такое VIERA Link “HDAVI Control”? Что такое Q Link? VIERA
EH5767-Ru.book Page 19 Friday, April 27, 2007 10:01 AM Простота управления при помощи пульта ДУ VIERA Использование окна FUNCTION MENU для управления данным аппаратом Сведения об управлении телевизором приведены в инструкции по эксплуатации телевизора. 1 Откройте окно “FUNCTION MENU” данного
EH5767-Ru.book Page 20 Friday, April 27, 2007 10:01 AM ОПЕРАЦИЯ 2 Настройки принимаемых каналов и настройки телевизора изображения формата 16:9 обрезаются (➡ 77). DVD Í DVD TV Í Í VOL CH DRIVE SELECT AV 1 2 3 4 5 6 7 8 9 DELETE INPUT 0 SELECT Цифровые кнопки SKIP PAUSE STOP STATUS EXIT DIRECT
EH5767-Ru.book Page 21 Friday, April 27, 2007 10:01 AM ОПЕРАЦИЯ 3 Настройка соответствия телевизора и пульта ДУ Управление телевизором Включение/ выключение телевизора DRIVE SELECT TV Í CH Громкость VOL AV Выбор канала Выбор входа 1 1 1 2 3 Направьте пульт ДУ на телевизор Нажав [Í TV], введите код
EH5767-Ru.book Page 22 Friday, April 27, 2007 10:01 AM Запись телевизионных программ 3 2 Выберите канал нажатием [W X CH]. REC REC TV Í 1 Цифровые кнопки Í 4 AV 1 2 3 4 5 6 7 8 9 DELETE INPUT 0 SELECT SKIP Выбор при помощи цифровых кнопок: Пример, 5: [0] ➡ [5] 15: [1] ➡ [5] 5 VOL CH DRIVE SELECT ∫
EH5767-Ru.book Page 23 Friday, April 27, 2007 10:01 AM Режимы записи и приблизительная продолжительность записи НЖМД Режим записи [EH57] (160 ГБ) [EH67] (250 ГБ) DVD-RAM Односторонний Двусторонний§1 (4,7 ГБ) (9,4 ГБ) DVD-R DVD-RW +R +RW (4,7 ГБ) DVD-R DL§3 (8,5 ГБ) +R DL§3 (8,5 ГБ) ХР (Режим записи
EH5767-Ru.book Page 24 Friday, April 27, 2007 10:01 AM Запись телевизионных программ Параметры записи для высокоскоростного копирования REC OPEN/CLOSE ∫ 1 ¥ REC DVD TV Í DRIVE SELECT Цифровые кнопки Í AV 1 2 3 4 5 6 7 8 9 DELETE INPUT 0 SELECT SKIP ∫ VOL CH DRIVE SELECT STOP CH Примечания ShowView
Page 25 Friday, April 27, 2007 10:01 AM Запись в гибком режиме 5 (Чтобы запись точно поместилась на оставшемся свободном месте) [RAM] [-R] [-RW‹V›] [+R] [+RW] ≥Когда объем свободного места на диске осложняет выбор подходящего режима записи. ≥Если вы хотите записать длинную программу с возможно
EH5767-Ru.book Page 26 Friday, April 27, 2007 10:01 AM Запись по таймеру 4 REC ∫ Нажмите [OK]. Программа таймера заносится в память и отображается значок таймера. OPEN/CLOSE ¥ REC Пиктограмма таймера DVD Í DVD TV Í Í DRIVE SELECT VOL CH DRIVE SELECT AV 1 2 3 4 5 6 7 8 9 DELETE INPUT 0 SELECT
Page 27 Friday, April 27, 2007 10:01 AM (продолжение) ≥Можно также выбрать записывающее устройство нажатием [DRIVE SELECT]. Если при записи на “DVD” не хватает свободного места, запись автоматически переключается на “HDD” (НЖМД) (➡ 28, Переключение записи). ≥Для смены режима записи можно также
EH5767-Ru.book Page 28 Friday, April 27, 2007 10:01 AM Запись по таймеру См. информацию об управлении на стр. 26. Примечания, касающиеся записи по таймеру ≥Когда установлен таймер записи, не могут воспроизводиться DVD, записанные в другой телевизионной системе, если только телевизионная система не
EH5767-Ru.book Page 29 Friday, April 27, 2007 10:01 AM Запись телепередач с внешней аппаратуры [HDD] [RAM] [-R] [-RW‹V›] [+R] [+RW] Также см. “Важная информация о записи” (➡ 8). Запись по таймеру с телевизора (Пример: цифровые телепередачи) Для записи по таймеру подсоедините к аппарату телевизор с
EH5767-Ru.book Page 30 Friday, April 27, 2007 10:01 AM Воспроизведение видеозаписей/дисков только для воспроизведения Выбор записанных программ (фрагментов) для воспроизведения – Direct Navigator 2 [HDD] [RAM] [-R] [-R]DL] [-RW‹V›] [+R] [+R]DL] [+RW] [-RW‹VR›] (Данная функция недоступна для
EH5767-Ru.book Page 31 Friday, April 27, 2007 10:01 AM [DVD-V] Нажатием [3, 4, 2, 1] выберите элемент, затем нажмите [OK]. Для выбора некоторых элементов можно также воспользоваться цифровыми кнопками. Если на экране появится приглашение “ENTER”, нажмите [OK]. [VCD] Выберите элемент при помощи
EH5767-Ru.book Page 32 Friday, April 27, 2007 10:01 AM Воспроизведение видеозаписей/дисков только для воспроизведения См. информацию об управлении на стр. 30. Операции во время воспроизведения (продолжение) Замедленное воспроизведение [HDD] [RAM] [-R] [-R]DL] [-RW‹V›] [+R] [+R]DL] [+RW] [DVD-V]
EH5767-Ru.book Page 33 Friday, April 27, 2007 10:01 AM Воспроизведение DivX дисков, дисков в формате MP3 и показ снимков (JPEG) DivX Воспроизводимые [-R] [-R]DL] [CD] диски Формат файла DivX ≥Файлы должны иметь расширение “.DIVX”, “.divx”, “.AVI” или “.avi”. Количество Максимальное число
EH5767-Ru.book Page 34 Friday, April 27, 2007 10:01 AM Воспроизведение DivX дисков, дисков в формате MP3 и показ снимков (JPEG) Воспроизведение дисков DivX [-R] [-R]DL] [CD] Можно воспроизводить диски DVD-R, DVD-R DL и CD-R/CD-RW, содержащие видеозаписи в формате DivX, записанные на компьютере. DVD
Page 35 Friday, April 27, 2007 10:01 AM О передаче DivX VOD Передача видео на заказ DivX (VOD) зашифрована для защиты авторских прав. Для воспроизведения передачи DivX VOD необходимо предварительно зарегистрировать аппарат. Выполняйте интерактивные инструкции для покупки содержимого DivX VOD, чтобы
EH5767-Ru.book Page 36 Friday, April 27, 2007 10:01 AM Воспроизведение DivX дисков, дисков в формате MP3 и показ снимков (JPEG) См. информацию об управлении на стр. 34. Инструкции/примечания касательно SD-карт и SDустройства относятся только к модели DMR-EH67. 3 Нажатием [3, 4, 2, 1] выберите
EH5767-Ru.book Page 37 Friday, April 27, 2007 10:01 AM Полезные функции при воспроизведении снимков Haч. пoкaз cлaйдoв Возможно отображение снимков по порядку с постоянным временным интервалом. Уcт. пoкaзa cлaйдoв 1 Интервал слайда Нажатием [3, 4, 2, 1] выберите альбом. 2 Нажмите [1] (PLAY). [HDD]
EH5767-Ru.book Page 38 Friday, April 27, 2007 10:01 AM Использование экранных меню/Сообщение о состоянии Меню Диск – Настройка содержания диска DVD Звук. дорож.§ [HDD] [RAM] [-R] [-R]DL] [-RW‹V›] [+R] [+R]DL] [+RW] [-RW‹VR›] Отображаются свойства звукозаписи на диске. [DVD-V] Выберите звуковую
Page 39 Friday, April 27, 2007 10:01 AM Меню Play – изменение последовательности воспроизведения Эта функция действует только при отображении истекшего времени воспроизведения. Выберите элемент для повторного воспроизведения. На разных дисках элементы, которые можно выбрать, отличаются. Повтор
EH5767-Ru.book Page 40 Friday, April 27, 2007 10:01 AM Редактирование фрагментов/разделов DRIVE SELECT Í Í DRIVE SELECT AV VOL CH 1 2 3 4 5 6 7 8 9 DELETE INPUT 0 SELECT SKIP CH [EH67] STATUS PLAY/x1.3 TIME SLIP 2 3 ; 1 DIRECT NAVIGATO R CTION MENU OPTION OPTION “Красная” 007 FU N 3,4,2,1 OK OK
EH5767-Ru.book Page 41 Friday, April 27, 2007 10:01 AM Операции с фрагментами После выполнения операций 1–5 (➡ 40) [HDD] [RAM] [-R] [-R]DL] [-RW‹V›] [+R] [+R]DL] [+RW] Характеристики [HDD] [RAM] [-R] [-R]DL] [-RW‹V›] [+R] [+R]DL] [+RW] [-RW‹VR›] Ввести название [HDD] [RAM] [-R] [-R]DL] [-RW‹V›]
EH5767-Ru.book Page 42 Friday, April 27, 2007 10:01 AM Создание, редактирование и воспроизведение списков воспроизведения Í DRIVE SELECT VOL CH DRIVE SELECT AV 1 2 3 4 5 6 7 8 9 DELETE INPUT 0 SELECT SKIP 3 Нажатием [3, 4] выберите “Cпиcки вocпpoизвeд.”, затем нажмите [OK]. 4 Нажатием [3, 4, 2, 1]
Page 43 Friday, April 27, 2007 10:01 AM Редактирование и воспроизведение списков воспроизведения/разделов [HDD] [RAM] [-RW‹VR›] (Только воспроизведение) 1 2 3 4 В режиме остановки Нажмите [FUNCTION MENU]. Нажатием [3, 4] выберите “Другие функции”, затем нажмите [OK]. Нажатием [3, 4] выберите
EH5767-Ru.book Page 44 Friday, April 27, 2007 10:01 AM Редактирование снимков [EH67] 1 2 Нажмите [DIRECT NAVIGATOR]. [HDD] [RAM] Нажатием кнопки “Зеленая” выберите “СНИМОК”. 3 DVD Í DRIVE SELECT Í VOL CH DRIVE SELECT ≥Для создания альбома с помощью “Coздaть aльбoм”, нажмите [OPTION] без выбора
EH5767-Ru.book Page 45 Friday, April 27, 2007 10:01 AM Операции с альбомами и изображениями После выполнения операций 1–4, стр. 44 Нажатием [2, 1] выберите “Удалить”, затем нажмите [OK]. [HDD] [RAM] [SD] ≥При удалении запись утрачивается окончательно и не может быть восстановлена. Подумайте перед
EH5767-Ru.book Page 46 Friday, April 27, 2007 10:01 AM Haвигaтop“УДAЛ” Инструкции/примечания касательно SD-карт и SDустройства относятся только к модели DMR-EH67. 1 DVD TV Í DRIVE SELECT DELETE ¢ Использование Haвигaтop“УДAЛ” для удаления Í 2 VOL CH DRIVE SELECT AV 1 2 3 4 5 6 7 8 9 DELETE INPUT 0
EH5767-Ru.book Page 47 Friday, April 27, 2007 10:01 AM Копировать Koпиp. c pacш. вoзм Составьте список копируемых элементов, затем копируйте. Копирование с НЖМД на DVD Особенности осуществляется легко и не требует сложных Можно установить желаемые настройки копирования настроек. фрагментов или
EH5767-Ru.book Page 48 Friday, April 27, 2007 10:01 AM Копирование фрагментов или списков воспроизведения AV Цифровые кнопки 1 2 3 4 5 6 7 8 9 DELETE INPUT 0 SELECT SKIP :, 9 1 CH 2 ShowView STATUS STATUS В режиме остановки Нажмите [FUNCTION MENU]. Нажатием [3, 4] выберите “Копировать”, затем
Page 49 Friday, April 27, 2007 10:01 AM Копирование с использованием списка копирования—Koпиp. c pacш. вoзм 6 ≥Если зарегистрированный список копирования не нуждается в изменениях (➡ операция 7). 1 Нажатием [3, 4] выберите “Созд. переч.”, затем нажмите [1]. [HDD] ,-. [RAM] [+RW] [-RW‹VR›] > [HDD]
EH5767-Ru.book Page 50 Friday, April 27, 2007 10:01 AM Копирование фрагментов или списков воспроизведения (Продолжение) См. информацию об управлении на стр. 48. ∫ Для остановки копирования Нажмите и удерживайте [RETURN] 3 секунды. (Остановка во время финализации невозможна) При копировании в
Page 51 Friday, April 27, 2007 10:01 AM Копирование финализированных дисков DVD-R, DVD-R DL, DVD-RW (формат DVD-Video), +R и +R DL [DVD-V] > [HDD] Содержимое финализированных дисков DVD-R, DVD-R DL, DVD-RW (формат DVD-Video), +R, и +R DL можно перезаписывать на НЖМД и повторно редактировать. При
EH5767-Ru.book Page 52 Friday, April 27, 2007 10:01 AM Копирование снимков [EH67] DRIVE SELECT DRIVE SELECT Цифровые кнопки VOL CH 6 AV 1 2 3 4 5 6 7 8 9 DELETE INPUT 0 SELECT SKIP Выбор снимков для копирования. ≥Если зарегистрированный список копирования не нуждается в изменениях (➡ операция 7).
Page 53 Friday, April 27, 2007 10:01 AM Для отображения других страниц Нажатием [3, 4, 2, 1] выберите “Предыдущ.” или “След.”, затем нажмите [OK]. ≥Для отображения других страниц можно также нажать [:, 9]. Редактирование нескольких элементов Выберите с помощью [3, 4, 2, 1] и нажмите [;]. (Повтор.)
EH5767-Ru.book Page 54 Friday, April 27, 2007 10:01 AM Копирование с видеомагнитофона CH DRIVE SELECT 1 2 3 4 5 6 7 8 9 DELETE INPUT 0 SELECT SKIP STOP ∫ VOL 2 CH 3 AV DRIVE SELECT ShowView STATUS PAUSE PLAY/x1.3 Пропуск ненужных мест Нажмите [;] для приостановки записи. (Повторное нажатие
EH5767-Ru.book Page 55 Friday, April 27, 2007 10:01 AM Ввод текста DELETE ¢ SKIP ShowView PAUSE PLAY/x1.3 TIME SLIP ≥Удаление символа Нажатием [3, 4, 2, 1] выберите символ в поле названия, затем нажмите [;]. (Выбранные символы удаляются). ; EXIT G/CHECK PRO ≥Использование цифровых кнопок для ввода
EH5767-Ru.book Page 56 Friday, April 27, 2007 10:01 AM Управление НЖМД, дисками и картами памяти Инструкции/примечания касательно SD-карт и SDустройства относятся только к модели DMR-EH67. Установка защиты [RAM] Подготовка ≥Нажатием [DRIVE SELECT] выберите устройство воспроизведения DVD. DVD TV Í Í
Page 57 Friday, April 27, 2007 10:01 AM Удаление всех фрагментов и списков воспроизведения—Удaлить вce зaпиcи [HDD] [RAM] Подготовка ≥Нажатием [DRIVE SELECT] выберите в качестве устройства HDD (НЖМД) или DVD. ≥Снимите защиту (➡ 56). После выполнения операций 1–3 (➡ 56) 4 5 6 Нажатием [3, 4]
EH5767-Ru.book Page 58 Friday, April 27, 2007 10:01 AM Управление НЖМД, дисками и картами памяти См. информацию об управлении на cтp. 56. Выбор формата фонового изображения—Top Menu [-R] [-R]DL] [-RW‹V›] [+R] [+R]DL] [+RW] Можно выбрать фоновое изображение, которое будет отображаться в качестве
EH5767-Ru.book Page 59 Friday, April 27, 2007 10:01 AM Oкно FUNCTION MENU Окно FUNCTION MENU облегчает и ускоряет переход к основным функциям. 1 DVD TV Í AV 1 2 3 4 5 6 7 8 9 DELETE INPUT 0 SELECT SKIP В режиме остановки Нажмите [FUNCTION MENU]. VOL CH DRIVE SELECT Отображаемые функции зависят от
EH5767-Ru.book Page 60 Friday, April 27, 2007 10:01 AM Изменение настроек аппарата Общие процедуры X CH W 1 REC OPEN/CLOSE ∫ 2 < OPEN/CLOSE 3 4 DVD TV Í Í Нажмите [FUNCTION MENU]. Нажатием [3, 4] выберите “Другие функции” затем нажмите [OK]. Нажатием [3, 4] выберите “Нач. наст.” затем нажмите [OK].
EH5767-Ru.book Page 61 Friday, April 27, 2007 10:01 AM Обзор настроек Настройки сохраняются, даже после переключения аппарата в режим ожидания. Разделы Меню Опции (подчеркнуты заводские установки) Автонастройки возобновить (➡ 66) Загрузить (➡ 66) Диск Уcтaнoвки пpoигpывaния ≥Нажмите [OK] для
EH5767-Ru.book Page 62 Friday, April 27, 2007 10:01 AM Изменение настроек аппарата (продолжение) См. информацию об управлении на cтp. 60. Разделы Меню Изображение Опции (подчеркнуты заводские установки) Comb Filter ≥Вкл.:Изображение становится более четким и Для выбора резкости изображения при
Page 63 Friday, April 27, 2007 Разделы 10:01 AM Меню Дисплей Язык Выбор языка для меню и экранных сообщений. Опции (подчеркнуты заводские установки) ≥English ≥Русский ≥Deutsch ≥Česky ≥Español ≥Magyar ≥Polski Сообщения на экpaнe Для выбора автоматического отображения сообщений о состоянии.
EH5767-Ru.book Page 64 Friday, April 27, 2007 10:01 AM Изменение настроек аппарата (продолжение) См. информацию об управлении на cтp. 60. Разделы Меню Опции (подчеркнуты заводские установки) Соединение Настройки AV2 (Настройте в соответствии с подключенной аппаратурой.) (Продолжение) ≥Нажмите [OK]
Page 65 Friday, April 27, 2007 10:01 AM Приём ТВ 1 2 3 4 ∫ Изменение параметров настройки отдельной программной позиции В режиме остановки Нажмите [FUNCTION MENU]. Нажатием [3, 4] выберите “Другие функции” затем нажмите [OK]. Нажатием [3, 4] выберите “Нач. наст.” затем нажмите [OK]. Нажатием [3, 4]
EH5767-Ru.book Page 66 Friday, April 27, 2007 10:01 AM Изменение настроек аппарата См. информацию об управлении на cтp. 60. Система TB Автонастройки возобновить Если процедура настройки (➡ 20) была прервана по какимлибо причинам, можно возобновить автоматическую настройку каналов. Измените
EH5767-Ru.book Page 67 Friday, April 27, 2007 10:01 AM Установка часов вручную Изменение настроек аппарата Обычно функция настройки аппарата (➡ 20) автоматически устанавливает правильное время. Однако если в меню установки страны выбрана “Россия” (Russia), функция автоматической установки часов не
EH5767-Ru.book Page 68 Friday, April 27, 2007 10:01 AM Сообщения На экране телевизора Стр. Oшибкa aвтopизaции. ≥Попытка воспроизведения содержимого диска DivX VOD, приобретенного с другим регистрационным кодом. Воспроизведение содержимого на данном аппарате невозможно. (DivX) Нельзя завершить
EH5767-Ru.book Page 69 Friday, April 27, 2007 10:01 AM На дисплее аппарата При обнаружении неполадок во время пуска или эксплуатации аппарата на его дисплее отображаются следующие сообщения или сервисные номера. Стр. ≥Пульт ДУ и аппарат используют разные коды. Смените код пульта ДУ. Одновременно
EH5767-Ru.book Page 70 Friday, April 27, 2007 10:01 AM Часто задаваемые вопросы В случае сомнений касательно функционирования аппарата обращайтесь к информации, приведенной ниже. Установка Какая аппаратура необходима для воспроизведения многоканального окружающего звука? ≥Без дополнительного
EH5767-Ru.book Page 71 Friday, April 27, 2007 10:01 AM Руководство по устранению неполадок Не является признаком неполадок следующее: ≥Обычный шум вращения диска. ≥Плохой прием из-за атмосферных условий. ≥Искажение изображения во время поиска. ≥Прерывистый прием из-за периодических перебоев
EH5767-Ru.book Page 72 Friday, April 27, 2007 10:01 AM Руководство по устранению неполадок Телевизионное и видео изображение (Продолжение) Стр. Записанный фрагмент растянут ≥Программы формата 16:9 записываются в формате 4:3 в следующих случаях. по вертикали. –[-R] [-R]DL] [-RW‹V›] Если запись или
EH5767-Ru.book Page 73 Friday, April 27, 2007 Управление Телевизор не реагирует на управление. Не работает пульт ДУ. 10:01 AM ≥Смените код производителя. Управление некоторыми телевизорами невозможно даже после смены кода. ≥Пульт ДУ и аппарат используют разные коды. Смените код пульта ДУ. Стр. 21
EH5767-Ru.book Page 74 Friday, April 27, 2007 10:01 AM Руководство по устранению неполадок Запись, запись по таймеру и копирование Запись не получается. ≥Диск не вставлен или запись на вставленный диск невозможна. Вставьте диск, Копирование не записываемый аппаратом. выполняется. ≥Диск не
Page 75 Friday, April 27, 2007 Воспроизведение Воспроизведение не включается при нажатии [1] (PLAY). Воспроизведения включается, но сразу же выключается. Мгновенные паузы в звуке и видео. Не воспроизводится диск DVD-Video. Не включаются другие звуковые дорожки и субтитры. Субтитры отсутствуют. Не
EH5767-Ru.book Page 76 Friday, April 27, 2007 10:01 AM Руководство по устранению неполадок Снимки Не отображается окно Direct Navigator. Не редактируется или не форматируется карта. ([EH67]) Содержимое карты не считывается. ([EH67]) Копирование, удаление или включение защиты занимает много времени.
Page 77 Friday, April 27, 2007 10:01 AM НЖМД (Накопитель на жестких магнитных дисках) Это устройство для хранения большого объема данных, которое используется в компьютерах и т.д. Диски, на поверхность которых нанесено магнитное покрытие, вращаются, а магнитная головка, “плавающая” непосредственно
EH5767-Ru.book Page 78 Friday, April 27, 2007 10:01 AM Технические характеристики Система записи DVD-RAM : Формат DVD Video Recording DVD-R : формат DVD-Video§1 DVD-R DL (двуслойный) : формат DVD-Video§1 DVD-RW : формат DVD-Video§1 +R +R DL (двойной слой) +RW Записываемые диски DVD-RAM: 2X
EH5767-Ru.book Page 79 Friday, April 27, 2007 10:01 AM Меры предосторожности Напряжение Не используйте источники питания высокого напряжения. Это может привести к перегрузке аппарата и возгоранию. Нельзя использовать источники питания постоянного тока. Тщательно проверьте источник питания, прежде
EH5767-Ru.book Page 80 Friday, April 27, 2007 10:01 AM Указатель Автоматическая запись DV . . . . . . . . 54 Автоматическое обновление записи . . . . . . . . . . . . . . . . . . . . . . . . . 28 Альбом Воспроизведение . . . . . . . . . . . . . . . 36 Редактирование . . . . . . . . . . . . . . . .
EH5767-Ru.book  Page 2  Friday, April 27, 2007  10:01 AM
GPELOCTEPE·EHNE!
B ITOM YCTPO?CTBE NCGOJV„YETCR JA„EP.                            CLASS 1
GPNMEHEHNE PEFYJNPOBOK N HACTPOEK, OTJN?HSX                      LASER PRODUCT
OT HN·EOGNCAHHSX, MO·ET GPNBECTN K
OGACHOMY JA„EPHOMY OoJY?EHND.
HE OTKPSBA?TE KPSWKY N HE GPON„BOLNTE
PEMOHT CAMN—JY?WE GOPY?NTV ITO
KBAJNINUNPOBAHHOMY CGEUNAJNCTY.
ПРЕДУПРЕЖДЕНИЕ:
ЧТОБЫ УМЕНЬШИТЬ ОПАСНОСТЬ ВОЗНИКНОВЕНИЯ
ПОЖАРА, ПОРАЖЕНИЯ ЭЛЕКТРИЧЕСКИМ ТОКОМ ИЛИ
ПОВРЕЖДЕНИЯ ИЗДЕЛИЯ,
?НЕ ПОДВЕРГАЙТЕ ЭТОТ АППАРАТ ВОЗДЕЙСТВИЮ
ДОЖДЯ, ВЛАГИ, КАПЕЛЬ ИЛИ БРЫЗГ, И НЕ
ПОМЕЩАЙТЕ НА АППАРАТ НИКАКИЕ ПРЕДМЕТЫ,
НАПОЛНЕННЫЕ ВОДОЙ, НАПРИМЕР, ВАЗЫ.
(Внутри аппарата)
?ИСПОЛЬЗУЙТЕ ТОЛЬКО РЕКОМЕНДУЕМЫЕ
ПРИНАДЛЕЖНОСТИ.
?НЕ СНИМАЙТЕ КРЫШКУ (ИЛИ ЗАДНЮЮ КРЫШКУ);                         Информaция для покупaтeля
ВНУТРИ НЕТ ЧАСТЕЙ ДЛЯ ОБСЛУЖИВАНИЯ                  Нaзвaниe пpодyкции:     DVD Рекордер
ПОЛЬЗОВАТЕЛЕМ. ЗА ОБСЛУЖИВАНИЕМ                     Нaзвaниe cтpaны         Словакия
ОБРАЩАЙТЕСЬ К КВАЛИФИЦИРОВАННОМУ                    пpоизводитeля:
ОБСЛУЖИВАЮЩЕМУ ПЕРСОНАЛУ.
Нaзвaниe пpоизводитeля:  Maцyшитa Элeктpик
GPELOCTEPE·EHNE!                                                             Индacтpиaл Ko., Лтд.
?HE CJELYET YCTAHABJNBATV NJN PA„MEQATV              Юpидичecкий aдpec:      1006 Kaдoмa, Ocaкa, Япония
LAHHS? AGGAPAT B KHN·HOM WKAIY,                     Дaтa пpоизводcтвa: Вы можeтe yточнить год и мecяц по
BCTPOEHHOM WKAIY NJN LPYFOM OFPAHN?EHHOM            cepийномy номepy нa тaбличкe. Пpимep мapкиpовки —
GPOCTPAHCTBE LJR TOFO, ?TOoS COXPAHNTV              Сepийный номep № XX6AXXXXXXX (X-любaя цифpa или бyквa)
YCJOBNR XOPOWE? BEHTNJRUNN.                         Год: Тpeтья цифpa в cepийном номepe (6—2006, 7—2007, ...)
YLOCTOBEPVTECV, ?TO WTOPS N LPYFNE                  Mecяц: Чeтвepтaя бyквa в cepийном номepe (A—Янвapь, B—
GOLOoHSE GPELMETS HE GPEGRTCTBYDT                   Фeвpaль, ...L—Дeкaбpь)
HOPMAJVHO? BEHTNJRUNN LJR GPELOTBPAQEHNR            Дополнитeльнaя инфоpмaция: Пожaлyйcтa внимaтeльно
PNCKA GOPA·EHNR IJEKTPN?ECKNM TOKOM NJN                                     пpочитaйтe инcтpyкцию по
BO„HNKHOBEHNR GO·APA N„-„A GEPEFPEBA.                                       экcплyaтaции.
?НЕ ЗАКРЫВАЙТЕ ВЕНТИЛЯЦИОННЫЕ ОТВЕРСТИЯ
АППАРАТА ГАЗЕТАМИ, СКАТЕРТЯМИ, ШТОРАМИ И            Уcтaнoвлeнный  пpоизводитeлeм в поpядкe п. 2 cт. 5
ПОДОБНЫМИ ПРЕДМЕТАМИ.                               фeдepaльнoгo зaкoнa PФ “O зaщитe пpaв пoтpeбитeлeй” cpoк
?НЕ РАЗМЕЩАЙТЕ НА АППАРАТ ИСТОЧНИКИ                  cлyжбы дaннoгo издeлия paвeн 7 гoдaм c дaты пpоизводcтвa
ОТКРЫТОГО ПЛАМЕНИ, ТАКИЕ, КАК ГОРЯЩИЕ СВЕЧИ.        пpи ycлoвии, чтo издeлиe иcпoльзyeтcя в cтpoгoм cooтвeтcтвии
?ВЫБРАСЫВАЙТЕ БАТАРЕИ В МУСОР, УЧИТЫВАЯ              c нacтoящeй инcтpyкциeй пo экcплyaтaции и пpимeнимыми
ОХРАНУ ОКРУЖАЮЩЕЙ СРЕДЫ.                            тexничecкими cтaндapтaми.
Cделaнo в Cлoвaкии
ПРЕДУПРЕЖДЕНИЕ
-Если Вы увидите такой символ-
При неправильной замене аккумулятора возникает        Информация по обращению с отходами для стран, не
опасность взрыва. Производить замену, используя только
входящих в Европейский Союз
тот же тип аккумулятора, или равноценный ему,
рекомендуемый производителем. Размещение в отходы            Действие этого символа распространяется только
использованных аккумуляторов производить согласно            на Европейский Союз.
Если Вы собираетесь выбросить данный продукт,
инструкциям производителя.
узнайте в местных органах власти или у дилера,
как следует поступать с отходами такого типа.
ЭТОТ АППАРАТ ПРЕДНАЗНАЧЕН ДЛЯ
ИСПОЛЬЗОВАНИЯ В КЛИМАТЕ СРЕДНЕЙ ПОЛОСЫ.
Это изделие может принимать радио помехи,
обусловленные переносными телефонами. Если такие
помехи являются очевидными, увеличьте, пожалуйста,
расстояние между изделием и переносным телефоном.
Сетевая розетка должна быть расположена вблизи
оборудования, и быть легко доступной.
Вилка сетевого шнура питания должна оставаться быстро
доступной.
Чтобы полностью отсоединить этот аппарат от сети
переменного тока, отсоедините вилку сетевого шнура
питания от розетки переменного тока.
RQT8909
2
EH5767-Ru.book  Page 3  Friday, April 27, 2007  10:01 AM
Содержание
Создание, редактирование и воспроизведение
Перед началом эксплуатации
списков воспроизведения . . . . . . . . . . . . . . . . . . . .  42
Информация о НЖМД, дисках и картах   . . . . . . . . . . .4  Создание списков воспроизведения  . . . . . . . . . . . . . . . . . . . 42
Важная информация о записи   . . . . . . . . . . . . . . . . . . .8  Редактирование и воспроизведение списков
Меры предосторожности при обращении с                   воспроизведения/разделов  . . . . . . . . . . . . . . . . . . . . . . . . . 43
накопителем на жестких магнитных                      Операции со списками воспроизведения  . . . . . . . . . . . . . . . 43
дисках (НЖМД) . . . . . . . . . . . . . . . . . . . . . . . . . . . . . . . .9  Операции с разделами   . . . . . . . . . . . . . . . . . . . . . . . . . . . . . . 43
Обращение с диском и картой  . . . . . . . . . . . . . . . . . .10  Редактирование снимков [EH67]  . . . . . . . . . . . . . . . . .  44
Осторожность при обращении с аппаратом   . . . . . .10  Операции с альбомами и изображениями . . . . . . . . . . . . . . . 45
Комплект принадлежностей . . . . . . . . . . . . . . . . . . . .11  Haвигaтop“УДAЛ”   . . . . . . . . . . . . . . . . . . . . . . . . . . . .  46
Информация о пульте ДУ . . . . . . . . . . . . . . . . . . . . . . .11  Использование Haвигaтop“УДAЛ” для удаления  . . . . . . . . . 46
Справочное руководство по органам управления  . . .12  Удаление фрагментов или изображений во время
Пульт дистанционного управления (ДУ)  . . . . . . . . . . . . . . . .  12  воспроизведения . . . . . . . . . . . . . . . . . . . . . . . . . . . . . . . . . . 46
Аппарат   . . . . . . . . . . . . . . . . . . . . . . . . . . . . . . . . . . . . . . . . . .  13
Дисплей аппарата  . . . . . . . . . . . . . . . . . . . . . . . . . . . . . . . . . .  13  Копирование
ОПЕРАЦИЯ 1 Подключение . . . . . . . . . . . . . . . . . . . . .14
Операции с подключенным телевизором                   Копирование фрагментов или списков
TM
(VIERA Link “HDAVI Control ”/Q Link)  . . . . . . . . . . .18  воспроизведения . . . . . . . . . . . . . . . . . . . . . . . . . . . .  47
ОПЕРАЦИЯ 2 Настройки принимаемых каналов и             Копировать  . . . . . . . . . . . . . . . . . . . . . . . . . . . . . . . . . . . . . . . . 48
настройки телевизора  . . . . . . . . . . . . . . . . . . . . . . . .20  Копирование с использованием списка копирования
Воспроизведение прогрессивного видеосигнала   . . . . . . . .  20  —Koпиp. c pacш. вoзм  . . . . . . . . . . . . . . . . . . . . . . . . . . . . . . 49
ОПЕРАЦИЯ 3 Настройка соответствия телевизора           Копирование финализированных дисков DVD-R, DVD-R DL,
DVD-RW (формат DVD-Video), +R и +R DL  . . . . . . . . . . . . . 51
и пульта ДУ . . . . . . . . . . . . . . . . . . . . . . . . . . . . . . . . . .21
Копирование SD Video с SD-карты [EH67]   . . . . . . . . . . . . . . . 51
Копирование снимков [EH67]  . . . . . . . . . . . . . . . . . . . .  52
Запись                                               Копирование с помощью списка копирования  . . . . . . . . . . . 52
Копирование всех снимков на карте—Koп. вcex cнимкoв  . . . . 53
Запись телевизионных программ   . . . . . . . . . . . . . . .22
Установка/Извлечение диска  . . . . . . . . . . . . . . . . . . . . . . . .  23  Копирование с видеомагнитофона  . . . . . . . . . . . . .  54
Запись в ручном режиме . . . . . . . . . . . . . . . . . . . . . . . . . . . . . 54
Указание времени остановки записи                     Автоматическая запись DV (DV aвтoзaпиcь)   . . . . . . . . . . . . 54
– запись одним нажатием кнопки . . . . . . . . . . . . . . . . . . . .  24
Параметры записи для высокоскоростного копирования . . . .  24
Запись в гибком режиме . . . . . . . . . . . . . . . . . . . . . . . . . . . . .  25  Удобные функции
Воспроизведение во время записи  . . . . . . . . . . . . . . . . . . . .  25  Ввод текста . . . . . . . . . . . . . . . . . . . . . . . . . . . . . . . . . .  55
Запись по таймеру . . . . . . . . . . . . . . . . . . . . . . . . . . . . .26  Управление НЖМД, дисками и картами памяти  . .  56
Использование номера для записи по таймеру SHOWVIEW . . . .  26  Общие процедуры  . . . . . . . . . . . . . . . . . . . . . . . . . . . . . . . . . . 56
Программирование записи по таймеру вручную  . . . . . . . . .  26  Установка защиты  . . . . . . . . . . . . . . . . . . . . . . . . . . . . . . . . . . 56
Отмена записи после ее начала  . . . . . . . . . . . . . . . . . . . . . .  27  Присвоение названия диску  . . . . . . . . . . . . . . . . . . . . . . . . . . 56
Вывод аппарата из режима ожидания записи . . . . . . . . . . .  27  Удаление всех фрагментов и списков воспроизведения—
Проверка, изменение или удаление программы  . . . . . . . . .  27  Удaлить вce зaпиcи . . . . . . . . . . . . . . . . . . . . . . . . . . . . . . . . 57
Примечания, касающиеся записи по таймеру  . . . . . . . . . . .  28  Удаление всего содержимого диска или карты—Формат . . 57
Переключение записи   . . . . . . . . . . . . . . . . . . . . . . . . . . . . . .  28  Выбор формата фонового изображения—Top Menu  . . . . . . 58
Автоматическое обновление записи . . . . . . . . . . . . . . . . . . .  28  Выберите, следует ли отображать вначале Top Menu
Функция VPS/PDC . . . . . . . . . . . . . . . . . . . . . . . . . . . . . . . . . .  28  —Выбор автомат. воспроизв.   . . . . . . . . . . . . . . . . . . . . . . . 58
Запись телепередач с внешней аппаратуры  . . . . . .29  Обеспечение возможности воспроизведения дисков на
Запись по таймеру с телевизора  . . . . . . . . . . . . . . . . . . . . . .  29  другой аппаратуре—Финализация   . . . . . . . . . . . . . . . . . . . 58
Запись с цифрового/спутникового                       Создание Top Menu—Coздaть Top Menu   . . . . . . . . . . . . . . . 58
ресивера или декодера  . . . . . . . . . . . . . . . . . . . . . . . . . . . .  29  Oкно FUNCTION MENU   . . . . . . . . . . . . . . . . . . . . . . . .  59
Запись по таймеру с внешней подключенной аппаратуры   Блокировка от детей   . . . . . . . . . . . . . . . . . . . . . . . . .  59
(цифрового/спутникового ресивера) – EXT LINK . . . . . . . .  29
Изменение настроек аппарата   . . . . . . . . . . . . . . . . .  60
Общие процедуры  . . . . . . . . . . . . . . . . . . . . . . . . . . . . . . . . . . 60
Воспроизведение                                      Обзор настроек  . . . . . . . . . . . . . . . . . . . . . . . . . . . . . . . . . . . . 61
Приём ТВ . . . . . . . . . . . . . . . . . . . . . . . . . . . . . . . . . . . . . . . . . . 65
Воспроизведение видеозаписей/дисков только             Система TB . . . . . . . . . . . . . . . . . . . . . . . . . . . . . . . . . . . . . . . . 66
для воспроизведения   . . . . . . . . . . . . . . . . . . . . . . . .30  Установка часов вручную  . . . . . . . . . . . . . . . . . . . . . . . . . . . . 67
Операции во время воспроизведения   . . . . . . . . . . . . . . . . .  31
Переключение звуковых каналов
во время воспроизведения  . . . . . . . . . . . . . . . . . . . . . . . . .  32  Справочный материал
Воспроизведение DivX дисков, дисков в формате         Сообщения   . . . . . . . . . . . . . . . . . . . . . . . . . . . . . . . . . .  68
MP3 и показ снимков (JPEG) . . . . . . . . . . . . . . . . . . .33  Часто задаваемые вопросы . . . . . . . . . . . . . . . . . . . .  70
О дисках DivX, MP3 и снимках (JPEG)   . . . . . . . . . . . . . . . . .  33  Руководство по устранению неполадок . . . . . . . . .  71
Выбор типа файла для воспроизведения   . . . . . . . . . . . . . .  34  Глоссарий  . . . . . . . . . . . . . . . . . . . . . . . . . . . . . . . . . . .  76
Воспроизведение дисков DivX . . . . . . . . . . . . . . . . . . . . . . . .  34  Технические характеристики  . . . . . . . . . . . . . . . . . .  78
Воспроизведение дисков МР3 . . . . . . . . . . . . . . . . . . . . . . . .  35  Меры предосторожности  . . . . . . . . . . . . . . . . . . . . . .  79
Воспроизведение снимков . . . . . . . . . . . . . . . . . . . . . . . . . . .  36  Указатель   . . . . . . . . . . . . . .  Задняя сторона обложки
Полезные функции при воспроизведении снимков . . . . . . .  37
Использование экранных меню/Сообщение о                Касательно описаний в настоящей инструкции по
состоянии  . . . . . . . . . . . . . . . . . . . . . . . . . . . . . . . . . . .38  эксплуатации
Использование экранных меню . . . . . . . . . . . . . . . . . . . . . . .  38  ?Данная инструкция по эксплуатации относится к моделям
Сообщения о состоянии  . . . . . . . . . . . . . . . . . . . . . . . . . . . . .  39  DMR-EH57 и DMR-EH67. Если не указано иное, на
иллюстрациях в настоящей инструкции по эксплуатации
показана модель DMR-EH57.
Редактирование                                        [EH57] : обозначает функции, поддерживаемые только
моделью DMR-EH57.
Редактирование фрагментов/разделов  . . . . . . . . . .40  [EH67] : обозначает функции, поддерживаемые только
Редактирование фрагментов/разделов и воспроизведение   моделью DMR-EH67.
разделов  . . . . . . . . . . . . . . . . . . . . . . . . . . . . . . . . . . . . . . . .  40  ?Инструкции/примечания касательно SD-карт и SD-
устройства относятся только к модели DMR-EH67.
Операции с фрагментами . . . . . . . . . . . . . . . . . . . . . . . . . . . .  41  ?Ссылки на страницы обозначаются так: “? {{”.  RQT8909
Операции с разделами  . . . . . . . . . . . . . . . . . . . . . . . . . . . . . .  41
3
EH5767-Ru.book Page 1 Friday, April 27, 2007 10:01 AM Инструкция по эксплуатации На иллюстрациях в настоящей инструкции по эксплуатации показана модель DMR-EH57. Региональный код, поддерживаемый данным аппаратом В зависимости от географии продажи DVDрекордеров и дисков DVD-Video им присваиваются
EH5767-Ru.book Page 2 Friday, April 27, 2007 10:01 AM GPELOCTEPE·EHNE! B ÍTOM YCTPOÆCTBE NCGOJV„YETCR JA„EP. GPNMEHEHNE PEFYJNPOBOK N HACTPOEK, OTJN¨HSX OT HN·EOGNCAHHSX, MO·ET GPNBECTN K OGACHOMY JA„EPHOMY OøJY¨EHND. HE OTKPSBAÆTE KPSWKY N HE GPON„BOLNTE PEMOHT CAMN—JY¨WE GOPY¨NTV ÍTO
EH5767-Ru.book Page 3 Friday, April 27, 2007 10:01 AM Содержание Создание, редактирование и воспроизведение списков воспроизведения . . . . . . . . . . . . . . . . . . . . 42 Перед началом эксплуатации Информация о НЖМД, дисках и картах . . . . . . . . . . .4 Важная информация о записи . . . . . .
EH5767-Ru.book Page 4 Friday, April 27, 2007 10:01 AM Информация о НЖМД, дисках и картах НЖМД и диски, которые можно использовать для записи и воспроизведения Тип диска Жесткий диск (НЖМД) ≥[EH57] 160 ГБ [EH67] 250 ГБ Логотип DVD-RAM ≥4,7 ГБ/9,4 ГБ, 12 см ≥2,8 ГБ, 8 см – Обозначение в настоящей
EH5767-Ru.book Page 5 Friday, April 27, 2007 10:01 AM НЖМД и диски, которые можно использовать для записи и воспроизведения (продолжение) Логотип Обозначение в настоящей инструкции +R ≥4,7 ГБ, 12 см – [+R] до финализации диска [DVD-V] после финализации диска +R DL§1 (двойной слой на одной стороне)
EH5767-Ru.book Page 6 Friday, April 27, 2007 10:01 AM Информация о НЖМД, дисках и картах Диски только для воспроизведения (12 см/8 см) Тип диска DVD-Video DVD-RW (формат DVD Video Recording) [DVD-V] [-RW‹VR›] Логотип Обозначение в настоящей инструкции Инструкции Диски с высококачественными записями
EH5767-Ru.book Page 7 Friday, April 27, 2007 10:01 AM Карты памяти, совместимые с данным аппаратом [EH67] SD-карта памяти (от 8 МБ до 2 ГБ) Карта памяти SDHC (4 ГБ) Карта miniSD § MultiMediaCard В настоящей инструкции по эксплуатации карты памяти вышеуказанных типов называют “SDкартами”.
EH5767-Ru.book Page 8 Friday, April 27, 2007 10:01 AM Важная информация о записи При записи двуязычных программ [HDD] [RAM] Можно записывать основной и дополнительный звуковые каналы одновременно. Можно переключать звуковые каналы во время воспроизведения. (➡ 32, Переключение звуковых каналов во
EH5767-Ru.book Page 9 Friday, April 27, 2007 10:01 AM Меры предосторожности при обращении с накопителем на жестких магнитных дисках (НЖМД) Поскольку НЖМД является высокоточным записывающим устройством, которое позволяет осуществлять записи большой продолжительности и работает на высоких скоростях,
EH5767-Ru.book Page 10 Friday, April 27, 2007 10:01 AM Обращение с диском и картой ∫ Как держать диск или карту ∫ Меры предосторожности при обращении Не прикасайтесь к поверхности с записью или поверхности выводов. ≥Не приклеивайте на диски этикетки или наклейки. (Это может привести к деформации и
EH5767-Ru.book Page 11 Friday, April 27, 2007 10:01 AM Комплект принадлежностей ∏ ∏ ∏ ∏ ∏ 1 Сетевой шнур ≥Только для использования с данным аппаратом. Не используйте его с другой аппаратурой. Также шнур нельзя использовать для другой аппаратуры, работающей вместе с данным аппаратом. 2
EH5767-Ru.book Page 12 Friday, April 27, 2007 10:01 AM Справочное руководство по органам управления Пульт дистанционного управления (ДУ) Инструкции по управлению описаны, главным образом, для пульта ДУ. > DVD 1 2 3 4 TV Í Í CH DRIVE SELECT VOL ? CH @ AV 1 2 3 4 5 6 7 8 9 DELETE INPUT 0 SELECT SKIP
EH5767-Ru.book Page 13 Friday, April 27, 2007 10:01 AM Аппарат 3 2 5 4 REC 6 < [EH67] 7 8 9 OPEN/CLOSE : ; Открытие фронтальной панели Надавите пальцем вниз на выступающий участок под 4 и откиньте фронтальную панель. 1 Включатель питания standby/on (Í/I) (➡ 20) Нажмите включатель, чтобы переключить
EH5767-Ru.book Page 14 Friday, April 27, 2007 10:01 AM ОПЕРАЦИЯ 1 Подключение Убедитесь, что вы используете пару радиочастотных (RF) коаксиальных кабелей, входящих в комплект поставки. Используйте пару радиочастотных (RF) кабелей, входящих в комплект поставки, только при подключении данного
EH5767-Ru.book Page 15 C Friday, April 27, 2007 10:01 AM Подключение телевизора и цифрового/спутникового ресивера или декодера Задняя панель телевизора Подключение к другим гнездам, кроме 21-штекерного разъема СКАРТ (➡ 16, 17) Радиочастотный коаксиальный кабель (RF) (прилагается) 1 2 RF IN 3
EH5767-Ru.book Page 16 Friday, April 27, 2007 10:01 AM ОПЕРАЦИЯ 1 Подключение Другие подключения Оставьте “Желтый” не подсоединенным. Подключение телевизора через гнезда AUDIO/ VIDEO или S VIDEO При использовании гнезда S VIDEO OUT изображение будет более естественным, чем при использовании гнезда
EH5767-Ru.book Page 17 Friday, April 27, 2007 10:01 AM Подключение с помощью гнезда HDMI (High Definition Multimedia Interface) (Мультимедийный интерфейс высокой четкости) Относительно функции VIERA Link “HDAVI ControlTM” При подключении к телевизору Panasonic (VIERA) или ресиверу с функцией “HDAVI
EH5767-Ru.book Page 18 Friday, April 27, 2007 10:01 AM Операции с подключенным телевизором (VIERA Link “HDAVI ControlTM”/Q Link) Для проведения взаимосвязанных операций с телевизором и ресивером используйте “HDAVI Control” или Q Link. Что такое VIERA Link “HDAVI Control”? Что такое Q Link? VIERA
EH5767-Ru.book Page 19 Friday, April 27, 2007 10:01 AM Простота управления при помощи пульта ДУ VIERA Использование окна FUNCTION MENU для управления данным аппаратом Сведения об управлении телевизором приведены в инструкции по эксплуатации телевизора. 1 Откройте окно “FUNCTION MENU” данного
EH5767-Ru.book Page 20 Friday, April 27, 2007 10:01 AM ОПЕРАЦИЯ 2 Настройки принимаемых каналов и настройки телевизора изображения формата 16:9 обрезаются (➡ 77). DVD Í DVD TV Í Í VOL CH DRIVE SELECT AV 1 2 3 4 5 6 7 8 9 DELETE INPUT 0 SELECT Цифровые кнопки SKIP PAUSE STOP STATUS EXIT DIRECT
EH5767-Ru.book Page 21 Friday, April 27, 2007 10:01 AM ОПЕРАЦИЯ 3 Настройка соответствия телевизора и пульта ДУ Управление телевизором DVD Включение/ выключение телевизора Í DRIVE SELECT Í CH Громкость VOL AV Выбор канала 1 2 3 ShowView Нажав [Í TV], введите код при помощи цифровых кнопок. [0] ➡
EH5767-Ru.book Page 22 Friday, April 27, 2007 10:01 AM Запись телевизионных программ 3 2 Выберите канал нажатием [W X CH]. REC REC TV Í 1 Цифровые кнопки Í SKIP ∫ 4 AV 1 2 3 4 5 6 7 8 9 DELETE INPUT 0 SELECT PAUSE 5 EXIT DIRECT NAVIGATO R CTION MENU REC RETURN DISPLAY CREATE CHAPTER MANUAL SKIP
EH5767-Ru.book Page 23 Friday, April 27, 2007 10:01 AM Режимы записи и приблизительная продолжительность записи НЖМД Режим записи [EH57] (160 ГБ) [EH67] (250 ГБ) DVD-RAM Односторонний Двусторонний§1 (4,7 ГБ) (9,4 ГБ) DVD-R DVD-RW +R +RW (4,7 ГБ) DVD-R DL§3 (8,5 ГБ) +R DL§3 (8,5 ГБ) ХР (Режим записи
EH5767-Ru.book Page 24 Friday, April 27, 2007 10:01 AM Запись телевизионных программ Параметры записи для высокоскоростного копирования REC OPEN/CLOSE ∫ 1 ¥ REC DVD TV Í DRIVE SELECT Цифровые кнопки Í AV 1 2 3 4 5 6 7 8 9 DELETE INPUT 0 SELECT SKIP ∫ VOL CH DRIVE SELECT STOP CH Примечания ShowView
Page 25 Friday, April 27, 2007 10:01 AM Запись в гибком режиме 5 ≥Начинается запись. ≥На дисплее отображаются все режимы записи от XP до EP. [HDD] [RAM] [-R] [-RW‹V›] [+R] [+RW] Аппарат выбирает наилучшее качество изображения, при котором записываемый материал помещается на свободное место на
EH5767-Ru.book Page 26 Friday, April 27, 2007 10:01 AM Запись по таймеру 4 REC ∫ Нажмите [OK]. Программа таймера заносится в память и отображается значок таймера. OPEN/CLOSE ¥ REC Пиктограмма таймера DVD Í DVD TV Í Í DRIVE SELECT VOL CH DRIVE SELECT AV 1 2 3 4 5 6 7 8 9 DELETE INPUT 0 SELECT
Page 27 Friday, April 27, 2007 10:01 AM 4 Нажмите [OK]. Программа таймера заносится в память и отображается значок таймера. Пиктограмма таймера № Назв. F 01 ARD На дисплее аппарата появляется индикатор “F”, сигнализирующий о том, что включен режим ожидания записи по таймеру. 12:56:00 15. 7. BT VPS
EH5767-Ru.book Page 28 Friday, April 27, 2007 10:01 AM Запись по таймеру См. информацию об управлении на стр. 26. Примечания, касающиеся записи по таймеру ≥Когда установлен таймер записи, не могут воспроизводиться DVD, записанные в другой телевизионной системе, если только телевизионная система не
EH5767-Ru.book Page 29 Friday, April 27, 2007 10:01 AM Запись телепередач с внешней аппаратуры [HDD] [RAM] [-R] [-RW‹V›] [+R] [+RW] Также см. “Важная информация о записи” (➡ 8). Запись по таймеру с телевизора (Пример: цифровые телепередачи) Для записи по таймеру подсоедините к аппарату телевизор с
EH5767-Ru.book Page 30 Friday, April 27, 2007 10:01 AM Воспроизведение видеозаписей/дисков только для воспроизведения Выбор записанных программ (фрагментов) для воспроизведения – Direct Navigator 2 [HDD] [RAM] [-R] [-R]DL] [-RW‹V›] [+R] [+R]DL] [+RW] [-RW‹VR›] (Данная функция недоступна для
EH5767-Ru.book Page 31 Friday, April 27, 2007 10:01 AM [DVD-V] Нажатием [3, 4, 2, 1] выберите элемент, затем нажмите [OK]. Для выбора некоторых элементов можно также воспользоваться цифровыми кнопками. Если на экране появится приглашение “ENTER”, нажмите [OK]. [VCD] Выберите элемент при помощи
EH5767-Ru.book Page 32 Friday, April 27, 2007 10:01 AM Воспроизведение видеозаписей/дисков только для воспроизведения См. информацию об управлении на стр. 30. Операции во время воспроизведения (продолжение) Замедленное воспроизведение [HDD] [RAM] [-R] [-R]DL] [-RW‹V›] [+R] [+R]DL] [+RW] [DVD-V]
EH5767-Ru.book Page 33 Friday, April 27, 2007 10:01 AM Воспроизведение DivX дисков, дисков в формате MP3 и показ снимков (JPEG) DivX Воспроизводимые [-R] [-R]DL] [CD] диски Формат файла DivX ≥Файлы должны иметь расширение “.DIVX”, “.divx”, “.AVI” или “.avi”. Количество Максимальное число
EH5767-Ru.book Page 34 Friday, April 27, 2007 10:01 AM Воспроизведение DivX дисков, дисков в формате MP3 и показ снимков (JPEG) Воспроизведение дисков DivX [-R] [-R]DL] [CD] Можно воспроизводить диски DVD-R, DVD-R DL и CD-R/CD-RW, содержащие видеозаписи в формате DivX, записанные на компьютере. DVD
Page 35 Friday, April 27, 2007 10:01 AM О передаче DivX VOD Передача видео на заказ DivX (VOD) зашифрована для защиты авторских прав. Для воспроизведения передачи DivX VOD необходимо предварительно зарегистрировать аппарат. Выполняйте интерактивные инструкции для покупки содержимого DivX VOD, чтобы
EH5767-Ru.book Page 36 Friday, April 27, 2007 10:01 AM Воспроизведение DivX дисков, дисков в формате MP3 и показ снимков (JPEG) См. информацию об управлении на стр. 34. Инструкции/примечания касательно SD-карт и SDустройства относятся только к модели DMR-EH67. 3 Нажатием [3, 4, 2, 1] выберите
EH5767-Ru.book Page 37 Friday, April 27, 2007 10:01 AM Полезные функции при воспроизведении снимков Haч. пoкaз cлaйдoв Возможно отображение снимков по порядку с постоянным временным интервалом. Уcт. пoкaзa cлaйдoв [HDD] [RAM] [SD] 1 Пока отображается окно Aльбoмный вид Интервал слайда Нажатием [3,
EH5767-Ru.book Page 38 Friday, April 27, 2007 10:01 AM Использование экранных меню/Сообщение о состоянии Меню Диск – Настройка содержания диска DVD Звук. дорож.§ [HDD] [RAM] [-R] [-R]DL] [-RW‹V›] [+R] [+R]DL] [+RW] [-RW‹VR›] Отображаются свойства звукозаписи на диске. [DVD-V] Выберите звуковую
Page 39 Friday, April 27, 2007 10:01 AM Меню Play – изменение последовательности воспроизведения Эта функция действует только при отображении истекшего времени воспроизведения. Выберите элемент для повторного воспроизведения. На разных дисках элементы, которые можно выбрать, отличаются. Повтор
EH5767-Ru.book Page 40 Friday, April 27, 2007 10:01 AM Редактирование фрагментов/разделов DRIVE SELECT Í Í DRIVE SELECT AV SKIP 2 CH STATUS 3 SLOW/SEARCH PAUSE PLAY/x1.3 TIME SLIP ; 1 DIRECT NAVIGATO R CTION MENU OPTION OPTION “Красная” 007 FU N 3,4,2,1 OK CREATE AUDIO DISPLAY CHAPTER MANUAL SKIP
EH5767-Ru.book Page 41 Friday, April 27, 2007 10:01 AM Операции с фрагментами После выполнения операций 1–5 (➡ 40) [HDD] [RAM] [-R] [-R]DL] [-RW‹V›] [+R] [+R]DL] [+RW] Характеристики [HDD] [RAM] [-R] [-R]DL] [-RW‹V›] [+R] [+R]DL] [+RW] [-RW‹VR›] Ввести название [HDD] [RAM] [-R] [-R]DL] [-RW‹V›]
EH5767-Ru.book Page 42 Friday, April 27, 2007 10:01 AM Создание, редактирование и воспроизведение списков воспроизведения Í VOL CH DRIVE SELECT AV DRIVE SELECT 1 2 3 4 5 6 7 8 9 DELETE INPUT 0 SELECT SKIP 3 Нажатием [3, 4] выберите “Cпиcки вocпpoизвeд.”, затем нажмите [OK]. 4 Нажатием [3, 4, 2, 1]
Page 43 Friday, April 27, 2007 10:01 AM Редактирование и воспроизведение списков воспроизведения/разделов [HDD] [RAM] [-RW‹VR›] (Только воспроизведение) 1 2 3 4 В режиме остановки Нажмите [FUNCTION MENU]. Нажатием [3, 4] выберите “Другие функции”, затем нажмите [OK]. Нажатием [3, 4] выберите
EH5767-Ru.book Page 44 Friday, April 27, 2007 10:01 AM Редактирование снимков [EH67] 1 2 Нажмите [DIRECT NAVIGATOR]. [HDD] [RAM] Нажатием кнопки “Зеленая” выберите “СНИМОК”. 3 DVD Í Í VOL CH DRIVE SELECT ≥Для создания альбома с помощью “Coздaть aльбoм”, нажмите [OPTION] без выбора альбома. AV DRIVE
EH5767-Ru.book Page 45 Friday, April 27, 2007 10:01 AM Операции с альбомами и изображениями После выполнения операций 1–4, стр. 44 Нажатием [2, 1] выберите “Удалить”, затем нажмите [OK]. [HDD] [RAM] [SD] ≥При удалении запись утрачивается окончательно и не может быть восстановлена. Подумайте перед
EH5767-Ru.book Page 46 Friday, April 27, 2007 10:01 AM Haвигaтop“УДAЛ” Инструкции/примечания касательно SD-карт и SDустройства относятся только к модели DMR-EH67. DVD DELETE ¢ 1 В режиме остановки 2 Нажмите [FUNCTION MENU]. Нажатием [3, 4] выберите “Удалить”, затем нажмите [OK]. TV Í DRIVE SELECT
EH5767-Ru.book Page 47 Friday, April 27, 2007 10:01 AM Копировать Koпиp. c pacш. вoзм Составьте список копируемых элементов, затем копируйте. Копирование с НЖМД на DVD Особенности осуществляется легко и не требует сложных Можно установить желаемые настройки копирования настроек. фрагментов или
EH5767-Ru.book Page 48 Friday, April 27, 2007 10:01 AM Копирование фрагментов или списков воспроизведения AV Цифровые кнопки 1 2 3 4 5 6 7 8 9 DELETE INPUT 0 SELECT SKIP :, 9 1 В режиме остановки 2 Нажмите [FUNCTION MENU]. Нажатием [3, 4] выберите “Копировать”, затем нажмите [OK]. CH ShowView
Page 49 Friday, April 27, 2007 10:01 AM Копирование с использованием списка копирования—Koпиp. c pacш. вoзм 6 Регистрация фрагментов и списков воспроизведения для копирования. ≥Если зарегистрированный список копирования не нуждается в изменениях (➡ операция 7). 1 Нажатием [3, 4] выберите “Созд.
EH5767-Ru.book Page 50 Friday, April 27, 2007 10:01 AM Копирование фрагментов или списков воспроизведения (Продолжение) См. информацию об управлении на стр. 48. ∫ Для остановки копирования Нажмите и удерживайте [RETURN] 3 секунды. (Остановка во время финализации невозможна) При копировании в
Page 51 Friday, April 27, 2007 10:01 AM Копирование финализированных дисков DVD-R, DVD-R DL, DVD-RW (формат DVD-Video), +R и +R DL [DVD-V] > [HDD] Содержимое финализированных дисков DVD-R, DVD-R DL, DVD-RW (формат DVD-Video), +R, и +R DL можно перезаписывать на НЖМД и повторно редактировать. При
EH5767-Ru.book Page 52 Friday, April 27, 2007 10:01 AM Копирование снимков [EH67] DRIVE SELECT DRIVE SELECT Цифровые кнопки VOL CH 6 AV 1 2 3 4 5 6 7 8 9 DELETE INPUT 0 SELECT SKIP Выбор снимков для копирования. ≥Если зарегистрированный список копирования не нуждается в изменениях (➡ операция 7).
Page 53 Friday, April 27, 2007 10:01 AM Для отображения других страниц Нажатием [3, 4, 2, 1] выберите “Предыдущ.” или “След.”, затем нажмите [OK]. ≥Для отображения других страниц можно также нажать [:, 9]. Редактирование нескольких элементов Выберите с помощью [3, 4, 2, 1] и нажмите [;]. (Повтор.)
EH5767-Ru.book Page 54 Friday, April 27, 2007 10:01 AM Копирование с видеомагнитофона VOL CH DRIVE SELECT 1 2 3 4 5 6 7 8 9 DELETE INPUT 0 SELECT SKIP STOP ∫ 2 AV DRIVE SELECT 3 CH ShowView Нажмите [¥ REC]. STATUS PAUSE PLAY/x1.3 Пропуск ненужных мест Нажмите [;] для приостановки записи. (Повторное
EH5767-Ru.book Page 55 Friday, April 27, 2007 10:01 AM Ввод текста DELETE ¢ SKIP ∫ 2 CH ShowView Повторите эту операцию для других символов. STATUS SLOW/SEARCH PAUSE STOP PLAY/x1.3 TIME SLIP ≥Удаление символа Нажатием [3, 4, 2, 1] выберите символ в поле названия, затем нажмите [;]. (Выбранные
EH5767-Ru.book Page 56 Friday, April 27, 2007 10:01 AM Управление НЖМД, дисками и картами памяти Инструкции/примечания касательно SD-карт и SDустройства относятся только к модели DMR-EH67. Установка защиты [RAM] Подготовка ≥Нажатием [DRIVE SELECT] выберите устройство воспроизведения DVD. DVD TV Í Í
Page 57 Friday, April 27, 2007 10:01 AM Удаление всех фрагментов и списков воспроизведения—Удaлить вce зaпиcи [HDD] [RAM] Подготовка ≥Нажатием [DRIVE SELECT] выберите в качестве устройства HDD (НЖМД) или DVD. ≥Снимите защиту (➡ 56). После выполнения операций 1–3 (➡ 56) 4 5 6 Нажатием [3, 4]
EH5767-Ru.book Page 58 Friday, April 27, 2007 10:01 AM Управление НЖМД, дисками и картами памяти См. информацию об управлении на cтp. 56. Выбор формата фонового изображения—Top Menu [-R] [-R]DL] [-RW‹V›] [+R] [+R]DL] [+RW] Можно выбрать фоновое изображение, которое будет отображаться в качестве
EH5767-Ru.book Page 59 Friday, April 27, 2007 10:01 AM Oкно FUNCTION MENU Окно FUNCTION MENU облегчает и ускоряет переход к основным функциям. DVD 1 TV Í VOL CH DRIVE SELECT Нажмите [FUNCTION MENU]. AV 1 2 3 4 5 6 7 8 9 DELETE INPUT 0 SELECT SKIP В режиме остановки Отображаемые функции зависят от
EH5767-Ru.book Page 60 Friday, April 27, 2007 10:01 AM Изменение настроек аппарата Общие процедуры X CH W 1 REC OPEN/CLOSE ∫ 2 < OPEN/CLOSE 3 4 DVD TV Í Í VOL CH DRIVE SELECT В режиме остановки Нажмите [FUNCTION MENU]. Нажатием [3, 4] выберите “Другие функции” затем нажмите [OK]. Нажатием [3, 4]
EH5767-Ru.book Page 61 Friday, April 27, 2007 10:01 AM Обзор настроек Настройки сохраняются, даже после переключения аппарата в режим ожидания. Разделы Меню Опции (подчеркнуты заводские установки) Автонастройки возобновить (➡ 66) Загрузить (➡ 66) Диск Уcтaнoвки пpoигpывaния ≥Нажмите [OK] для
EH5767-Ru.book Page 62 Friday, April 27, 2007 10:01 AM Изменение настроек аппарата (продолжение) См. информацию об управлении на cтp. 60. Разделы Меню Изображение Опции (подчеркнуты заводские установки) Comb Filter ≥Вкл.:Изображение становится более четким и Для выбора резкости изображения при
Page 63 Friday, April 27, 2007 Разделы 10:01 AM Меню Дисплей Язык Выбор языка для меню и экранных сообщений. Опции (подчеркнуты заводские установки) ≥English ≥Русский ≥Deutsch ≥Česky ≥Español ≥Magyar ≥Polski Сообщения на экpaнe Для выбора автоматического отображения сообщений о состоянии.
EH5767-Ru.book Page 64 Friday, April 27, 2007 10:01 AM Изменение настроек аппарата (продолжение) См. информацию об управлении на cтp. 60. Разделы Меню Опции (подчеркнуты заводские установки) Соединение Настройки AV2 (Настройте в соответствии с подключенной аппаратурой.) (Продолжение) ≥Нажмите [OK]
Page 65 Friday, April 27, 2007 10:01 AM Приём ТВ ∫ Изменение параметров настройки отдельной программной позиции 1 В режиме остановки 2 Нажмите [FUNCTION MENU]. Нажатием [3, 4] выберите “Другие функции” затем нажмите [OK]. 3 4 Нажатием [3, 4] выберите “Нач. наст.” затем нажмите [OK]. Нажатием [3, 4]
EH5767-Ru.book Page 66 Friday, April 27, 2007 10:01 AM Изменение настроек аппарата См. информацию об управлении на cтp. 60. Система TB Автонастройки возобновить Если процедура настройки (➡ 20) была прервана по какимлибо причинам, можно возобновить автоматическую настройку каналов. Измените
EH5767-Ru.book Page 67 Friday, April 27, 2007 10:01 AM Установка часов вручную Изменение настроек аппарата Обычно функция настройки аппарата (➡ 20) автоматически устанавливает правильное время. Однако если в меню установки страны выбрана “Россия” (Russia), функция автоматической установки часов не
EH5767-Ru.book Page 68 Friday, April 27, 2007 10:01 AM Сообщения На экране телевизора Стр. Oшибкa aвтopизaции. ≥Попытка воспроизведения содержимого диска DivX VOD, приобретенного с другим регистрационным кодом. Воспроизведение содержимого на данном аппарате невозможно. (DivX) Нельзя завершить
EH5767-Ru.book Page 69 Friday, April 27, 2007 10:01 AM На дисплее аппарата При обнаружении неполадок во время пуска или эксплуатации аппарата на его дисплее отображаются следующие сообщения или сервисные номера. Стр. ≥Пульт ДУ и аппарат используют разные коды. Смените код пульта ДУ. 21 Одновременно
EH5767-Ru.book Page 70 Friday, April 27, 2007 10:01 AM Часто задаваемые вопросы В случае сомнений касательно функционирования аппарата обращайтесь к информации, приведенной ниже. Установка Какая аппаратура необходима для воспроизведения многоканального окружающего звука? ≥Без дополнительного
EH5767-Ru.book Page 71 Friday, April 27, 2007 10:01 AM Руководство по устранению неполадок Не является признаком неполадок следующее: ≥Обычный шум вращения диска. ≥Плохой прием из-за атмосферных условий. ≥Искажение изображения во время поиска. ≥Прерывистый прием из-за периодических перебоев
EH5767-Ru.book Page 72 Friday, April 27, 2007 10:01 AM Руководство по устранению неполадок Телевизионное и видео изображение (Продолжение) Стр. Записанный фрагмент растянут ≥Программы формата 16:9 записываются в формате 4:3 в следующих случаях. по вертикали. — –[-R] [-R]DL] [-RW‹V›] Если запись или
EH5767-Ru.book Page 73 Friday, April 27, 2007 Управление Телевизор не реагирует на управление. Не работает пульт ДУ. 10:01 AM ≥Смените код производителя. Управление некоторыми телевизорами невозможно даже после смены кода. ≥Пульт ДУ и аппарат используют разные коды. Смените код пульта ДУ. Стр. 21
EH5767-Ru.book Page 74 Friday, April 27, 2007 10:01 AM Руководство по устранению неполадок Запись, запись по таймеру и копирование Запись не получается. ≥Диск не вставлен или запись на вставленный диск невозможна. Вставьте диск, Копирование не записываемый аппаратом. выполняется. ≥Диск не
Page 75 Friday, April 27, 2007 Воспроизведение Воспроизведение не включается при нажатии [1] (PLAY). Воспроизведения включается, но сразу же выключается. Мгновенные паузы в звуке и видео. Не воспроизводится диск DVD-Video. Не включаются другие звуковые дорожки и субтитры. Субтитры отсутствуют. Не
EH5767-Ru.book Page 76 Friday, April 27, 2007 10:01 AM Руководство по устранению неполадок Снимки Не отображается окно Direct Navigator. Не редактируется или не форматируется карта. ([EH67]) Содержимое карты не считывается. ([EH67]) Копирование, удаление или включение защиты занимает много времени.
Page 77 Friday, April 27, 2007 10:01 AM НЖМД (Накопитель на жестких магнитных дисках) Это устройство для хранения большого объема данных, которое используется в компьютерах и т.д. Диски, на поверхность которых нанесено магнитное покрытие, вращаются, а магнитная головка, “плавающая” непосредственно
EH5767-Ru.book Page 78 Friday, April 27, 2007 10:01 AM Технические характеристики Система записи DVD-RAM : Формат DVD Video Recording DVD-R : формат DVD-Video§1 DVD-R DL (двуслойный) : формат DVD-Video§1 DVD-RW : формат DVD-Video§1 +R +R DL (двойной слой) +RW Записываемые диски DVD-RAM: 2X
EH5767-Ru.book Page 79 Friday, April 27, 2007 10:01 AM Меры предосторожности Напряжение Не используйте источники питания высокого напряжения. Это может привести к перегрузке аппарата и возгоранию. Нельзя использовать источники питания постоянного тока. Тщательно проверьте источник питания, прежде
EH5767-Ru.book Page 80 Friday, April 27, 2007 10:01 AM Указатель Автоматическая запись DV . . . . . . . . 54 Автоматическое обновление записи . . . . . . . . . . . . . . . . . . . . . . . . . 28 Альбом Воспроизведение . . . . . . . . . . . . . . . 36 Редактирование . . . . . . . . . . . . . . . .