

IMPORTANT SAFETY INSTRUCTIONS
When using an electrical appliance, basic safety precautions should always be followed, including the followings:
Read all instructions before using this appliance.
DANGER— To reduce the risk of electric shock:
1.An appliance should never be left unattended when plugged in. Always unplug this sewing machine from the electric outlet immediately after using and before cleaning.
2.Always unplug before replacing a sewing machine bulb. Replace bulb with same type rated 12 Volts, 5 Watts.
WARNING— To reduce the risk of burns, fire, electric shock, or injury to persons:
1.Do not allow to be used as a toy. Close attention is necessary when this sewing machine is used by or near children.
2.Use this appliance only for its intended use as described in this owner’s manual.
Use only attachments recommended by the manufacturer as contained in this owner’s manual.
3.Never operate this sewing machine if it has a damaged cord or plug, if it is not working properly, if it has been dropped or damaged, or dropped into water.
Return this sewing machine to the nearest authorized dealers or service center for examination, repair, electrical or mechanical adjustment.
4.Never operate the appliance with any air opening blocked. Keep ventilation openings of this sewing machine and foot controller free from accumulation of lint, dust and loose cloth.
5.Never drop or insert any object into any opening.
6.Do not use outdoors.
7.Do not operate where aerosol (spray) products are being used or where oxygen is being administered.
8.To disconnect, turn all controls to the off (“O”) position, then remove plug from outlet.
9.Do not unplug by pulling on cord. To unplug, grasp the plug, not the cord.
10.Keep fingers away from all moving parts. Special care is required around the sewing machine needle.
11.Always use the proper needle plate. The wrong plate can cause the needle to break.
12.Do not use bent needles.
13.Do not pull or push fabric while stitching. It may deflect the needle causing it to break.
14.Switch this sewing machine off (“O”) when making any adjustment in the needle area, such as threading the needle, changing the needle, threading the bobbin or changing the presser foot, and the like.
15.Always unplug this sewing machine from the electrical outlet when removing covers, lubricating, or when making any other adjustments mentioned in this owner’s manual.
SAVE THESE INSTRUCTIONS
The design and specifications are subject to change without a prior notice.
TABLE OF CONTENTS
|
NAME OF PARTS …………………………………….. |
3 |
|
STANDARD ACCESSORIES …………………….. |
4 |
|
GETTING READY TO SEW ……………………….. |
5 |
|
Connecting the Power Supply …………………………… |
5 |
|
To use start/stop button …………………………………. |
5 |
|
To use foot control ………………………………………… |
5 |
|
Controlling Sewing Speed ………………………………… |
6 |
|
Speed control slider ……………………………………… |
6 |
|
Foot control …………………………………………………. |
6 |
|
Function Buttons ……………………………………… |
7 — 10 |
|
Raising and Lowering the Presser Foot ……………. |
11 |
|
Attaching the Knee Lifter ………………………………… |
11 |
|
Changing the Presser Foot …………………………….. |
12 |
|
Detaching and Attaching the Foot Holder …………. |
12 |
|
Setting for Dual Feed Sewing ………………………….. |
13 |
|
To disengage the Dual Feed Device ………………… |
14 |
|
Detaching the Dual Feed Foot ………………………… |
14 |
|
Variety of Presser Feet and Their Uses ……………. |
15 |
|
Winding the Bobbin ………………………………… |
16 — 18 |
|
Removing the bobbin ………………………………….. |
16 |
|
Setting the spool of thread …………………………… |
16 |
|
Winding the bobbin……………………………………… |
17 |
|
Inserting the bobbin ……………………………………. |
18 |
|
Threading the Machine …………………………… |
19 — 22 |
|
Threading the machine…………………………. |
19 — 22 |
|
Automatic needle threader …………………………… |
21 |
|
Drawing up the bobbin thread ………………………. |
22 |
|
Changing Needles…………………………………………. |
23 |
|
Thread and Needle Chart ………………………………. |
23 |
|
Balancing Thread Tension ………………………………. |
24 |
|
Adjusting the tension …………………………………… |
24 |
|
Adjusting the Foot Pressure ……………………………. |
25 |
|
Dropping the Feed Dog ………………………………….. |
25 |
|
Selecting the Sewing Mode …………………………….. |
26 |
|
The Help Button ……………………………………………. |
27 |
|
Selecting the Pattern ……………………………………… |
27 |
|
Customizing Machine Settings …………………. |
28 — 29 |
|
Resumption setting …………………………………….. |
28 |
|
Sound setting …………………………………………….. |
28 |
|
Language selection …………………………………….. |
29 |
|
Window duration time setting ……………………….. |
29 |
|
BASIC STITCHES (Mode 1) ………………………. |
30 — 44 |
|
Straight Stitch(A:Zigzag foot) …………………….. |
30 — 36 |
|
Using the cloth guide……………………………………. |
31 |
|
Using the seam guide lines …………………………… |
31 |
|
Adjusting the needle drop position,stitch length .. 32 |
|
|
Changing the stitch width, length(Auto) …………… |
33 |
|
Restoring the original setting …………………………. |
33 |
|
Variety of the straight stitches …………………. |
34 — 35 |
|
Straight Stitch(AD:Dual feed) …………………………… |
36 |
|
Dual feed adjusting dial …………………………………. |
36 |
|
Basting …………………………………………………………. |
37 |
|
Zigzag Stitch …………………………………………………. |
38 |
|
Overcasting Stitch ………………………………………….. |
39 |
|
Variety of Overcasting Stitches …………………………. |
40 |
|
Zipper Sewing …………………………………………. |
41 — 43 |
|
Rolled Hem ……………………………………………………. |
44 |
|
PATCHWORK AND QUILTING (Mode 2) …. |
45 — 48 |
|
Using the Needle Plate …………………………………… |
45 |
|
Seaming Patchwork Pieces …………………………….. |
45 |
|
Patchwork Stitches …………………………………………. |
45 |
|
Quilting …………………………………………………………. |
46 |
|
Free Motion Quilting ………………………………………… |
46 |
|
Clasp Stitch ……………………………………………………. |
47 |
|
Applique ……………………………………………………….. |
47 |
|
Programming French Knots …………………………….. |
48 |
1
|
UTILITY STITCHES AND |
||
|
DECORATIVE STITCHES (Mode 3) ………… |
49 -73 |
|
|
Buttonholes ………………………………………………….. |
49 |
|
|
Sensor buttonholes ………………………………… |
50 — 54 |
|
|
Square buttonhole ……………………………….. |
50 — 52 |
|
|
Corded buttonhole ………………………………………. |
53 |
|
|
Changing buttonhole width …………………………… |
54 |
|
|
Changing buttonhole stitch density ……………….. |
54 |
|
|
Automatic buttonhole………………………………. |
55 — 56 |
|
|
Round buttonhole ………………………………………….. |
57 |
|
|
Keyhole buttonhole ………………………………………… |
57 |
|
|
Knit buttonhole ……………………………………………… |
58 |
|
|
Button Sewing ………………………………………………. |
59 |
|
|
Darning ………………………………………………… |
60 — 61 |
|
|
Tacking ………………………………………………………… |
62 |
|
|
Eyelet ………………………………………………………….. |
63 |
|
|
Blind Hem……………………………………………… |
64 — 65 |
|
|
Extender Stitches ………………………………………….. |
66 |
|
|
One cycle sewing with the auto-lock stitch ………… |
67 |
|
|
Pattern combination with auto thread cutting …….. |
68 |
|
|
Elongation Sewing ………………………………………… |
69 |
|
|
Programming pattern combination with |
||
|
a mirror Image ……………………………………………… |
70 |
|
|
Sewing the pattern combination from the |
||
|
beginning……………………………………………………… |
71 |
|
|
Sewing the current pattern from the beginning ….. |
71 |
|
|
Shell Tuc ………………………………………………………. |
72 |
|
|
Scallop Stitch ……………………………………………….. |
72 |
|
|
Cording………………………………………………………… |
73 |
|
|
MONOGRAMMING………………………………… |
74 — 76 |
|
|
Selecting a Letter Style ………………………………….. |
74 |
|
|
Programming a Monogram………………………. |
75 — 76 |
|
EDITING (1) ……………………………………………… |
7778 |
|
Viewing a Long Text ………………………………………. |
77 |
|
Editing a Monogram ……………………………….. |
77 — 78 |
|
Deleting a letter (character)………………………….. |
77 |
|
Inserting a letter (character) …………………………. |
78 |
|
Duplicating a pattern …………………………………… |
78 |
|
EDITING (2) ……………………………………………… |
7981 |
Uniform stitch adjustment (Mode 2 and 3 only)
|
……………………………………………………………. |
79 — 80 |
|
Custom stitch adjustment (Mode 2 and 3 only) ….. 81 |
|
|
TO STORE AND CALL STITCH PATTERN |
|
|
COMBINATIONS (Mode2,Mode3,Monogram) |
|
|
………………………………………………………. |
82 — 83 |
|
TWIN NEEDLE SEWING ……………………. |
84 -85 |
|
CORRECTING DISTORED STITCH |
|
|
PATTERNS ……………………………………………. |
86 |
|
CARE AND MAINTENANCE……………… |
87 — 88 |
|
Cleaning the Hook Race, Feed Dog and |
|
|
Thread Cutter ……………………………………………….. |
87 |
|
Attaching Bobbin Holder and Needle Plate ……….. |
87 |
|
Replacing the Light Bulb ………………………………… |
88 |
|
PROBLEMS AND WARNING SIGNALS 89 — 90 |
|
|
TROUBLESHOOTING …………………………….. |
91 |
2

|
1 |
3 |
||
|
2 |
4 |
||
|
5 |
|||
|
26 |
|||
|
25 |
|||
|
24 |
|||
|
23 |
|||
|
22 |
|||
|
31 |
33 |
||
|
30 |
32 |
||
|
29 |
27 |
||
|
28 |
|||
|
44 |
|||
|
43 |
|||
|
42 |
|||
|
41 |
|||
|
40 |
|||
|
39 |
38 |
||
7
8
9
13
14
21 15
17
16
18
19
20
34
35
1.Foot Pressure Dial
2.Thread Take-up Lever
3.Thread Guide
4.Quick Reference Board
5.Speed Control slider
6.Retractable Thread Guide
7.Bobbin Winder Spindle
8.Bobbin Winder Stopper
9.LCD Screen
10.Function Buttons
11.LCD Contrast Adjusting Dial
12.Drop Feed Lever
13.Knee Lifter Socket
14.Stitch Balance Adjusting Screw
1115. Tension Regulating Dial
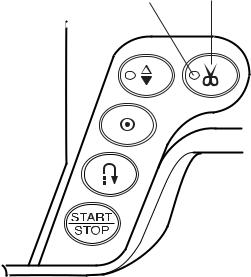
16.Thread Cutter Button
17.Up/Down Needle Button
18.Auto-Lock Button
19.Reverse Button
20.Start/Stop Button
21.Hook Cover Plate Release Button
22.Hook Cover Plate
23.Needle Plate
24.Needle Threader
25.Thread Cutter
26.Face Plate
27.Zigzag Foot A
28.Foot Holder
29.Thumb Screw
30.Buttonhole Lever
31.Upper Feed Mechanism
32.Needle
33.Needle Clamp Screw
34.Carrying Handle
35.Bobbin Winding Tension Disk
36.Presser Foot Lifter
37.Spool Pins
38.Dual Feed Adjusting Dial
39.Machine Sockets
40.Foot Control Plug
41.Power Switch
42.Handwheel
43.Thread Cutter
44.Thread Guide 1
Attaching the quick reference board
The quick reference board and setscrews are included in
37the standard accessories.
Fix the quick reference board on the backside of the machine with the two setscrews.
Tighten the screws firmly with a screwdriver.
q Setscrews
w Quick Reference Board
3

STANDARD ACCESSORIES
1. Zigzag Foot A (comes attached to the machine)
2.Overedge Foot C
3.Rolled Hem Foot D
4. Zipper Foot E
5. Satin Stitch Foot F
6.Blind Hem Foot G
7.Cording Foot H
8. Overcasting Foot M
9. Automatic Buttonhole Foot R
10. Screwdriver
11. Screwdriver
12.Set of Needles
13.Lint Brush
14. Seam Ripper
15. Spool Holder (Large)
16.Spool Holder (Small)
17.Bobbins
18.Quilting Bar
19. Basting/Darning Foot P-2
20.1/4” Seam Foot O
21.Open Toe Satin Stitch Foot F-2
22.Cloth Guide with Screw
23. Quick Reference Chart
24. Instruction Book
25. Power Supply Cord
26. Foot Control
27.Accessory Box
28.Knee Lifter
29. Dual Feed Foot AD
27
28
29
4

GETTING READY TO SEW
Connecting the Power Supply
 CAUTION
Always turn the power switch off and unplug the sewing machine from the electrical outlet when the machine is not in use.
zTo use start/stop button
Turn off the power switch, then insert the machine plug into the machine and the power supply plug into the wall outlet. Turn on the power switch.
1Power Switch
2Machine Plug
3Machine Socket
4Power Supply Cord
5Power Supply Plug
6Wall Outlet
NOTE:
Make sure to use the power supply cord that comes with the machine.
5
x To use foot control
Turn off the power switch, insert the foot control plug x and machine plug into the machine, then the power
supply plug into the wall outlet in this order. Turn on the power switch.
1
 3
3
2
7
4 6
1Power Switch
2Machine Plug
3Machine Socket
4Foot Control Plug
5Power Supply Plug
6Wall Outlet
7Foot Control socket
5
5

Controlling Sewing Speed
Speed control slider
Sewing speed can be varied according to your sewing needs with the speed control slider.
q To increase sewing speed, slide it to the right. w To decrease sewing speed, slide it to the left.
Foot control
Sewing speed is varied by the foot control.
The harder you press down on the foot control, the faster the machine runs.
The machine runs at the maximum speed set by the speed control slider when the foot control is fully depressed.
Operating Instructions:
The symbol “O” on a switch indicates the «off» position of a switch.
For appliances with a polarized plug (one blade wider than the other): To reduce the risk of electric shock, this plug is intended to fit in a polarized outlet only one way. If it does not fit fully in the outlet, reverse the plug. If it still does not fit, contact a qualified electrician to install the proper outlet. Do not modify the plug in any way.
Foot controller Model 21371 is for use with sewing machine Model MC6600P.
6

|
Function Buttons |
|
|
1 Start/stop button |
|
|
5 |
Press this button to start or stop the machine. The machine starts running slowly |
|
for the first few stitches, it then runs at the speed set by the speed control slider. |
The button turned on to red while the machine running.
The button turned on to green while the machine stopping.
NOTES:
•Start/stop button cannot be used when the foot control is connected to the machine.
•If you start the machine with the presser foot up (normal up position or extra lifted position), the LCD screen will advise you to lower tht the machine. (See page 11. for the presser lifter position)
2 Reverse stitch button
When stitches D1, D2, 8, 9 Mode 1, D01, D02, 08, 09 Mode 2 and 01, 02 Mode 3 are selected, the machine will sew in reverse while the reverse stitch button is pressed.
If you press the reverse stitch button when sewing any other stitches, the machine will immediately sew locking stitches and automatically stop.
3 Auto-lock button
When stitches D1, D2, 8, 9 Mode 1, D01, D02, 08, 09 Mode 2 and 01, 02 Mode 3 are selected, the machine will immediately sew locking stitches when the Autolock button is pressed, then automatically stop. When sewing any other stitches, the machine will sew locking stitches at the end of the current pattern and automatically stop.
4 Up/down needle position button
Press this button to bring the needle up or down. The machine will stop with the needle up or down depending on the needle position determined by this button. The needle position LED will turn on when the down position is selected.
5 Needle up/down stop position LED
NOTE:
The needle will always stop in the up position after sewing buttonholes, bartacks, eyelets and darning.
If you press the up/down needle position button when the presser foot is at the extra lifted position, the LCD screen will advise you to lower the foot.
7
|
6 Thread cutter button |
||
|
7 |
6 |
Press this button after finishing sewing and the machine will trim the |
|
threads. |
||
|
The LED signal blinks while cutting the threads. |
||
|
7 Thread Cutter Signal |
||
|
NOTES: |
||
|
The auto thread cutter will work well with normal sewing threads #30 or |
||
|
finer. |
||
|
Use the thread cutter on the face plate to cut the specialized or thick |
||
|
threads if the auto thread cutter does not work well. |
||
|
When starting the next seam, pull the needle thread to pick the bobbin |
||
|
thread up and draw them to the back and under the foot. |
||
|
Clean the auto thread cutter mechanism regularly to avoid malfunction |
||
|
due to built up lint. |
||
|
Avoid using a paper cored spool when it begins to empty since it will not |
||
|
unwind smoothly. It may cause the thread to bunch or slip when using |
||
|
the auto thread cutter. |
||
8
![]()
8
9
10
11
12
13
14
15
16
17
18
|
8 |
9 |
10 |
11 |
12 |
13 |
17
18
Mode button (See page 26)
Press this button to select the desired mode.
Letter style button (See page 74)
Press this button to change the letter style of monogram.
Memory/recall button (See pages 33, 82)
Press this button to register or recall programmed pattern combinations.
The previous pattern combination will be replaced by the new combination when pressing this button after programming. The registered pattern combination will be recalled when pressing this button on the initial screen of the selected mode.
Twin needle button (See page 84)
Press this button when sewing with a twin needle.
Elongation button (See page 69)
Press this button to elongate satin stitch patterns.
Bobbin winding button (See page 17)
Press this button to wind the bobbin.
Stitch width adjusting button (See pages 38, 75)
Press this button to alter the stitch width.
In the monogram mode, pressing the “ – ” button will reduce the letter to 2/3 of the original size.
Stitch length adjusting button (See pages 33, 38)
Press this button to alter the stitch length.
Editing button (See page 77)
Press this button to edit the programmed patterns.
In the editing mode this button is used to shift the cursor to the left.
Help button (See pages 27, 77)
Press this button to view alternative applications of certain stitches. In the editing mode this button is used to shift the cursor to the right.
LCD contrast adjusting dial
Turn this dial to adjust contrast of the LCD Screen.
9
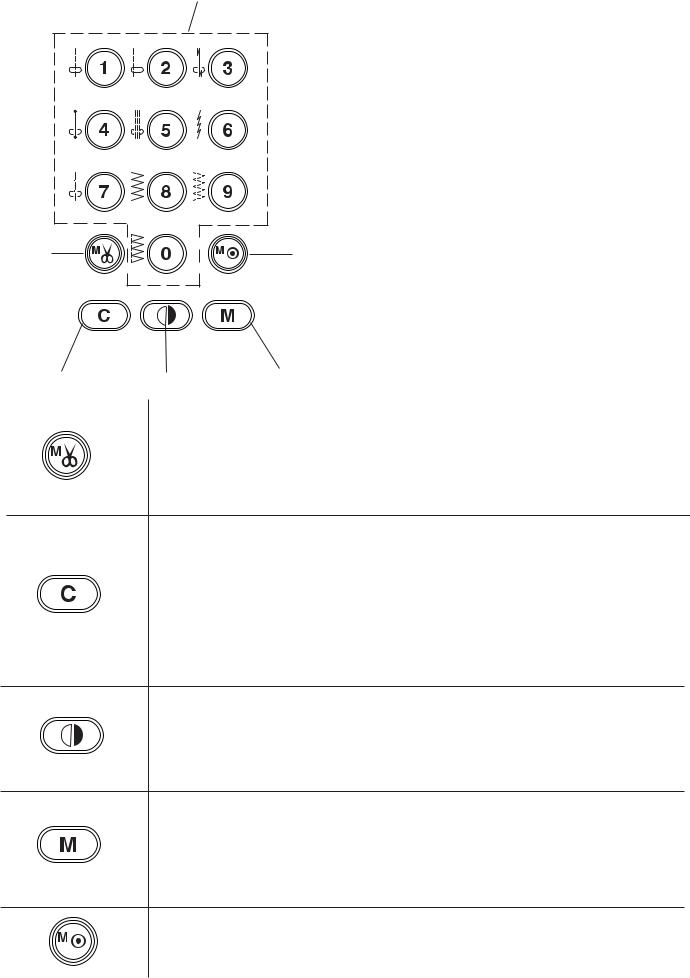
19 Pattern selection buttons (See page 27)
19
|
Press these buttons to select the desired pattern. In |
|||
|
the direct selection mode (Mode 1), patterns number |
|||
|
01 to 10 can be directly selected by pressing the |
|||
|
corresponding button. |
|||
|
In other modes, enter the two-digit pattern number |
|||
|
with the numeral buttons. |
|||
|
20 |
24 |
||
|
21 |
22 |
23 |
|
|
Auto thread cutter button (See pages 52, 76) |
|||
|
20 |
Press this button after the last memorized pattern and the machine will automatically |
||
|
trim the threads when sewing is finished. |
|||
|
Clear button (See page 77) |
|||
|
Press this button to delete a pattern from programmed pattern combination. Pressing |
|||
|
21 |
this button after sewing or pressing and holding for a few seconds will delete entire |
||
|
pattern combination and the LCD screen will return to the initial display of the selected |
|||
|
mode. |
|||
|
Initial display: D1 Mode 1, D01 Mode 2 , 01 Mode 3. |
|||
|
Turnover memory button (See pages 70, 71) |
|||
|
22 |
Press this button to memorize a pattern in mirror image. |
||
|
Memory button (See pages 66-68, 71, 75, 78) |
|||
|
23 |
Press this button to memorize the desired patterns. Up to 50 patterns can be |
||
|
memorized. |
|||
|
Locking stitch button (See page 67) |
|||
|
24 |
Press this button after memorizing the last pattern and the machine will sew the |
||
|
pattern combination and lock the stitch off then stop automatically when sewing is |
|||
|
finished. |
1 0

1
2
(A)
4
3
5 
3
2
1
Raising and Lowering the Presser Foot
The presser foot lifter raises and lowers the presser foot. You can raise the presser foot higher than the normal up position. This allows for setting the dual feed device and helps you to place thick fabrics under it.
1Presser Foot Lifter
2Presser Foot
3Up Position
4Extra Lift
5Down Position
NOTE:
If you press the up/down needle position button with the presser foot at the extra lifted position, the LCD screen advise you to lower the foot (A).
Attaching the Knee Lifter
The Knee Lifter is extremely helpful when sewing applique, patchwork and quilting since it allows you to handle the fabric while your knee controls the presser foot.
Match the ribs on the knee lifter with the notches in the knee lifter socket and insert the knee lifter.
1Knee Lifter
2Ribs
3Notches
Push the knee lifter with your knee to raise and lower.
NOTE:
Do not touch the knee lifter while sewing, otherwise the fabric will not be fed smoothly.
1 1

|
Changing the Presser Foot |
||||
|
CAUTION: |
||||
|
Turn OFF the power switch before changing the foot. |
||||
|
Always use the proper foot for the selected pattern. Wrong |
||||
|
2 |
3 |
foot can cause the needle to break. |
||
|
To snap off: |
||||
|
Raise the needle and presser foot. |
||||
|
1 |
Press the red button on the back of the foot holder and the |
|||
|
foot will drop. |
||||
|
1 |
Red Button |
|||
|
2 |
Foot Holder |
|||
|
3 |
Presser Foot |
|||
|
To snap on: |
||||
|
Place the presser foot so the pin on the foot lies just under |
||||
|
the groove of the foot holder. |
||||
|
Lower the foot holder to lock the foot in place. |
||||
|
Each foot is marked with a letter for identification. |
||||
|
4 |
Groove |
|||
|
5 |
6 |
5 |
Pin |
|
|
4 |
6 |
Identification Letter |
||
Detaching and Attaching the Foot Holder
|
WARNING: |
||||
|
Turn OFF the power switch before detaching or attaching |
||||
|
2 |
the foot holder. |
|||
|
To detach: |
||||
|
Raise the presser bar and turn the thumbscrew |
||||
|
1 |
counterclockwise to remove the foot holder. |
|||
|
1 |
Thumbscrew |
|||
|
2 |
Foot holder |
|||
|
2 |
To attach: |
|||
|
Loosen the thumbscrew and attach the presser foot to the |
||||
|
3 |
||||
|
presser bar. |
||||
|
Tighten the thumbscrew by turning it clockwise. |
||||
|
3 |
Presser Bar |
1
1 2

|
Setting for Dual Feed Sewing |
||
|
When you use the Dual feed, attach the Dual feed as |
||
|
follows. |
||
|
(See page 27) |
||
|
1 |
||
|
To attach the Dual feed foot: |
||
|
Raise the needle and presser foot. |
||
|
1 |
Presser foot lifter |
|
|
Loosen the thumb screw and remove the foot holder. |
||
|
2 |
Thumb screw |
|
|
3 |
Foot holder |
|
|
2 |
Attach the Dual feed foot to the pressure bar, and tighten |
|
|
thumbscrew lightly. Lower the presser foot lifter and |
||
|
tighten the thumbscrew securely. |
||
|
4 |
Dual feed foot |
|
|
5 |
Pressure bar |
3
5
4
To engage the dual feed device
|
1 |
Raise the presser foot lifter to its extra lift position. |
|
|
1 |
Extra lift position |
|
|
Lower the Dual feed device slowly and swing forward |
||
|
to the under side of the Dual feed foot untill they |
||
|
engage. |
||
|
2 |
Dual feed device |
2
1 3

To disengage the Dual Feed Device
zRaise the needle and the presser foot lifter to its extra lift position.
1 Presser foot lifter
xPull down the Dual feed device and swing it to the rear to disengage. Release the Dual feed device slowly.
2 Dual feed device
Detaching the Dual Feed Foot
zSet the presser foot lifter to normal position.
xLoosen the thumb screw and remove the Dual feed foot.
3 Thumb screw
4 Dual feed foot
cAttach the foot holder to the pressure bar and tighten thumb screw firmly.
5 Foot holder
6 Pressure bar
1 4

1
2
3
4
5
6
7
8
9
10
11
12
13
Variety of Presser Feet and Their Uses
1 Zigzag foot A:
This is the most versatile foot. It can be used for various stitches including straight stitches and zigzag stitches. It is designed to achieve firm and neat seam results.
2 Overedge foot C:
This foot is exclusively for overedging. The brush on the foot effectively prevents skipped stitches on the raw edge of fabrics.
3 Rolled hem foot D:
This special foot is for sewing a rolled hem. The curl of the foot helps to form a hem at a constant width.
4 Zipper foot E:
This foot is for sewing zippers. The zipper teeth are guided through the grooves on the bottom of the foot.
5 Satin stitch foot F:
This clear plastic foot is ideal for satin stitches and decorative stitches. The center groove on the bottom of the foot ensures smooth feeding of dense stitches.
6 Craft foot F-2:
This is an open toe satin stitch foot for patchwork and appliqué.
7 Blind hem foot G:
This foot is specially designed for blind hemming. The guide on the foot helps feed the fabric and sew a straight and nearly invisible blind-hem.
8 Cording foot H:
This foot is specially designed to hold one or three strands of cording to create braiding.
9 Overcasting Foot M:
This foot is specially designed to simulate professional style overlocking. The wires on the foot effectively prevent the fabric edge from puckering or rolling.
10 1/4” Seam foot O:
This foot is useful for patchwork piecing. The guide on the foot maintains an exact 1/4” (0.7 cm) seam allowance.
11 Basting/Darning foot P-2:
This is a special foot for basting. It holds the fabric while taking a stitch, synchronizing with the needle bar movement. This foot can also be used for free motion embroidery or quilting.
12 Automatic buttonhole foot R:
This foot is for buttonholes and for darning. Place a button in the button holder on the rear of the foot. This automatically sets the buttonhole size.
13 Dual feed foot AD:
This is a special foot for hard-to- feed materials. This foot effectively prevents fabrics from shifting and puckering. It is great for quilting and matching plaids.
1 5

Winding the Bobbin
z Slide the hook cover plate release button to the right, and remove the hook cover plate.
2
xLift out the bobbin from the bobbin holder.
1Hook Cover Plate Release Button
2Hook Cover Plate
3Bobbin
NOTES:
Avoid using a bobbin when it begins to become empty, as it may cause thread bunching.
Always use the correct bobbin. Using a wrong bobbin may cause malfunctions.
Setting the spool of thread
cPlace the spool of thread on the spool pin with the thread coming off the spool as shown.
Attach the spool holder, and press it firmly against the spool of thread.
1 Spool of Thread
2 Spool Pin
3 Spool Holder
|
Use the large spool holder for ordinary spools, while |
||||
|
the small spool holder for small spools. |
||||
|
3 |
5 |
5 |
4 |
Small Spool |
|
5 |
Small Spool Holder |
|||
|
1 |
4 |
4 |
||
|
NOTES: |
||||
|
Avoid using a paper cored spool when it begins to |
||||
|
empty since it will not unwind smoothly. It may cause |
||||
|
the thread to bunch or slip when using the auto thread |
||||
|
cutter. |
1 6
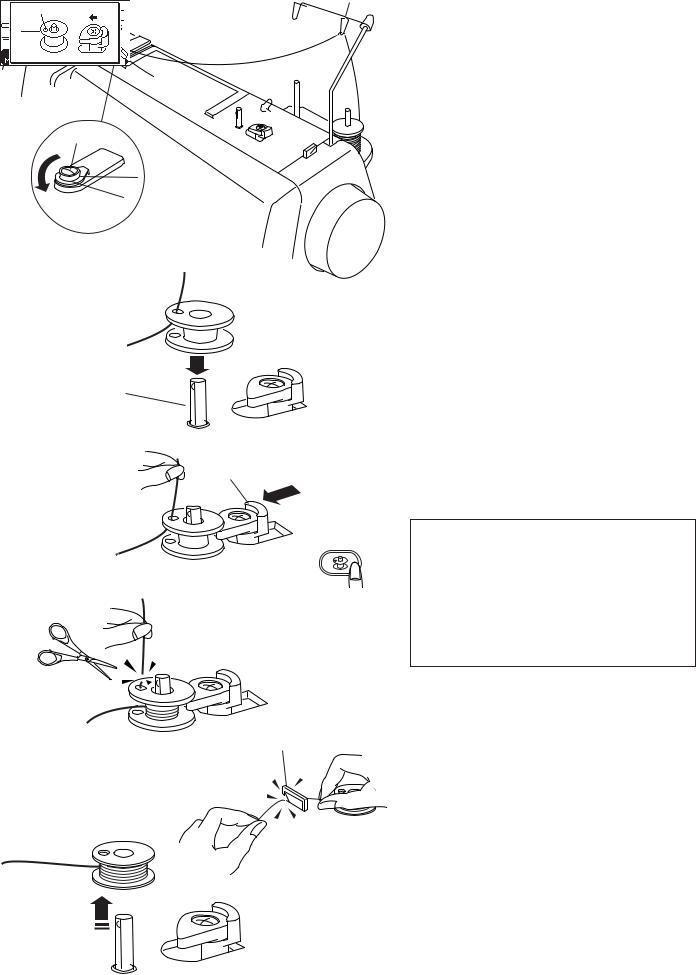
Winding the bobbin
zPass the thread through the guide on the thread guide bar from behind.
1 Thread Guide Bar
xPass the thread under the bobbin winding tension disk.
2 Bobbin Winding Tension Disk
cThread through the hole in the bobbin from the inside to the outside.
3 Bobbin Winder Spindle
vPut the bobbin on the bobbin winder spindle. Push the bobbin winder stopper to the left.
4 Bobbin Winder Stopper
NOTE:
When the bobbin winding button is pushed without pushing the bobbin winder stopper to the left, the following screen is displayed.
bHold the free end of the thread in your hand and press the bobbin winding button.
Press the bobbin winding button again to stop the bobbin when it has wound several layers, and cut the thread close to the hole in the bobbin.
5 Bobbin Winding Button
nPress the bobbin winding button again. When the bobbin is fully wound, the machine will stop automatically.
Automatically return the bobbin winder stopper to its original position, and cut the thread.
6 Thread cutter
1 7

z
1
2
x
(A)
c
(B)
v
(B)
b
3
Inserting the bobbin
zPlace the bobbin in the bobbin holder with the thread running off counterclockwise.
1 Thread
2 Bobbin Holder
xGuide the thread into notch (A) on the front of the bobbin holder.
cDraw the thread to the left, sliding it between the tension spring blades.
vContinue to draw the thread lightly until the thread slips into side notch (B). The bobbin should turn counterclockwise when pulling the bobbin thread. If not, reverse the bobbin and re-thread.
bPull out about 10 cm (4″) of thread to the rear. Refer to the threading chart shown on the hook cover plate.
Reattach the hook cover plate. 3 Threading Chart
1 8
![]()
|
Threading the Machine |
||
|
z |
Draw the thread in order from z to .. |
|
|
v |
||
|
Raise the presser foot lifter. Press the up/down needle |
||
|
c |
2 |
|
|
button twice to raise the needle to its highest position. |
||
|
1 |
Turn the power switch off. |
|
|
3 |
x |
|
|
z Pass the thread through the guide on the thread |
||
|
guide bar from behind. |
||
|
1 Spool Holder |
||
|
x Pass the thread through the right thread guide. |
||
|
2 Right Thread Guide |
4
c Hold the upper thread with both hands as shown
and slip it under the thread guide plate. 3 Thread Guide Plate
vDraw the thread toward you and pass it into the left thread guide. Draw the thread along the right channel.
4 Left Thread Guide
5 Thread Guide 2
NOTE:
Be sure to use the spool holder to secure the thread spool in place.
1 9
Threading the machine (continued)
bDraw the thread down and around the tension dial from the right to the left. Pull the thread up to insert it between the tension disks and under the loop of the check spring.
Be sure that the thread is coming out from notch of the disk.
6 Check Spring
7 Notch
nFirmly draw the thread up to the take-up lever and down into its eye from the right to the left, while holding the thread at the spool.
8 Eye of the Thread Take-up Lever
mDraw the thread down through the lower thread guide from the right.
9 Lower Thread Guide
,Slip the thread behind the needle bar thread guide on the left.
10 Needle Bar Thread Guide
.Thread the needle from front to back by hand or use the automatic needle threader.
2 0
Automatic needle threader
zRaise the needle to its highest position by pressing the up/down needle button twice. Turn the power switch off.
Lower the presser foot.
1 Up/Down Needle Button
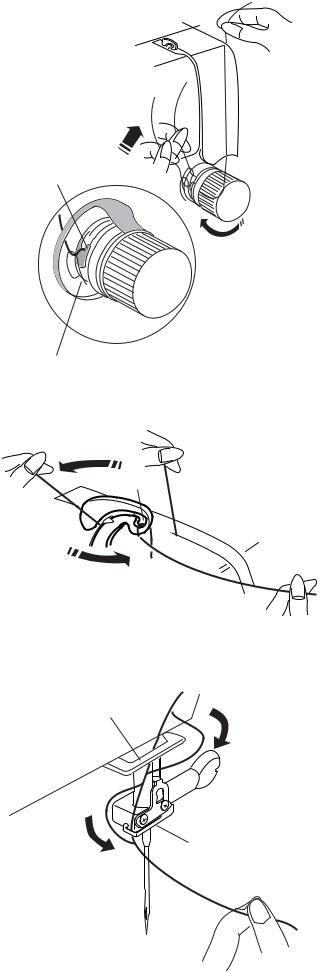
xDepress the needle threader knob as far as it will go. The hook comes out through the needle eye from behind.
2 Needle Threader Knob
3 Hook
cDraw the thread down around the threader guide and under the hook.
4 Threader Guide
vRelease the threader knob slowly while holding the thread end with your hand. A loop of the thread is pulled up through the needle eye.
5 Loop of Thread
bRemove the loop from the threader and pull out the thread end from the needle eye.
NOTES:
The automatic threader works well with the threads #50-90 and needles #11-16, including the Blue Tip needle.
The automatic needle threader cannot be used for threading the twin needle.
If the hook fails to pull a loop of the thread, check the needle and its setting.
2 1

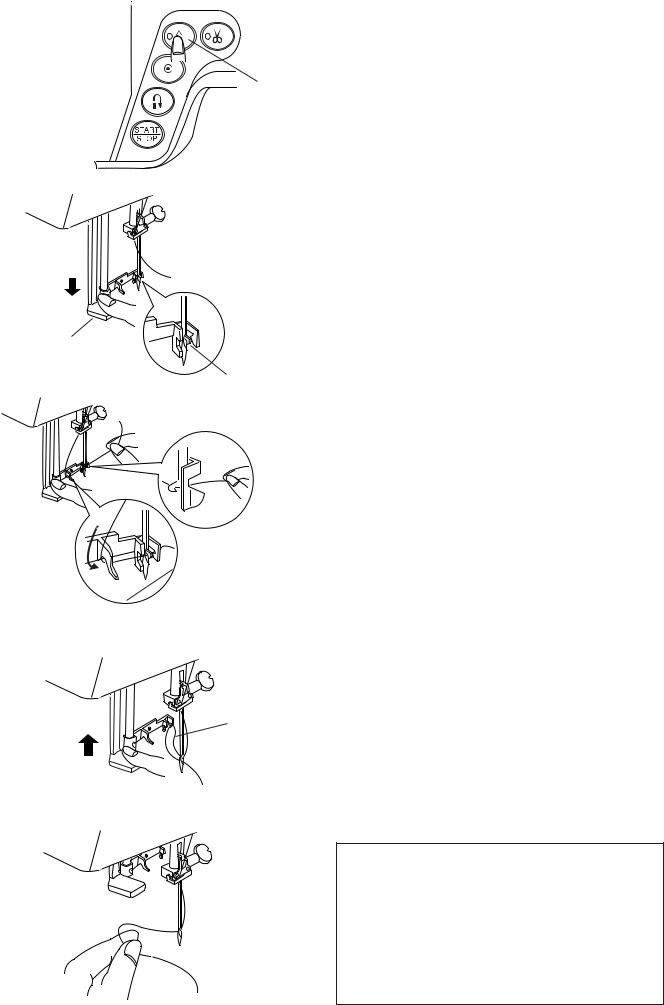
Drawing up the bobbin thread
z
z Raise the Presser Foot Lifter.
x
|
1 |
x Hold the needle thread with your finger and press |
|
|
the up/down needle button twice to pick up the |
||
|
bobbin thread. |
||
|
1 |
Needle Thread |
|
|
2 |
Needle Up/Down Button |
cDraw up the needle thread to bring up a loop of the bobbin thread.
3 Bobbin Thread
|
v |
v Slide 10 cm (4″) of both threads to the back under |
|
1 |
the presser foot. |
3
2 2

|
Changing Needles |
||
|
Raise the needle by pressing the up/down needle |
||
|
1 |
button and lower the presser foot. |
|
|
Turn off the power switch. |
||
|
Loosen the needle clamp screw by turning it |
||
|
counterclockwise. |
||
|
Remove the needle from the clamp. |
||
|
1 |
Needle Clamp Screw |
|
|
Insert a new needle into the needle clamp with the |
||
|
2 |
flat side of the needle to the rear. |
|
|
When inserting the needle into the needle clamp, |
||
|
push it up against the stopper pin and tighten the |
||
|
needle clamp screw firmly. |
||
|
2 |
Stopper Pin |
|
|
3 |
3 |
Flat Side |
|
To check needle straightness, place the flat side of the |
||
|
needle onto something flat (a needle plate, glass etc.) |
||
|
The gap between the needle and the flat surface |
||
|
should be consistent. |
||
|
4 |
Never use a blunt needle. |
|
|
4 Gap |
||
 CAUTION:
Always make sure to turn the power switch off and disconnect the machine from power supply before
changing the needle.
Fabric and Needle Chart
|
WEIGHT |
FABRIC |
TYPE of NEEDLE |
NEEDLE SIZE |
||
|
Very Light |
Chiffon, Georgette, Fine Lace, Organdy |
Universal |
9 (65) |
||
|
Net, Tulle |
Ball Point |
9 (65) |
|||
|
Light |
Batiste, Voile, Lawn, Pure Silk, Crepe de Chine, |
Blue Tip Needle |
11 |
(75) |
|
|
Sheer Crepe, Chambray, Handkerchief Linen, |
Universal |
11 |
(75) |
||
|
Gingham, Challis, Percale, Wool Crepe, Peau de Soie, |
12 |
(80) |
|||
|
Taffeta, Satin, Silk Surah, Satin-backed |
|||||
|
Crepe, Qiana |
|||||
|
Single Knits, Jersey, Swim wear, and Tricot |
Blue Tip Needle |
11 |
(75) |
||
|
Ball Point |
11 |
(75) |
|||
|
Leather Suede |
Wedge Point |
11 |
(75) |
||
|
Leather Needle |
|||||
|
Medium |
Flannel, Velour, Velvet, Muslin, Velveteen, |
Universal |
14 |
(90) |
|
|
Poplin, Corduroy, Broadcloth, Linen, Chintz, |
|||||
|
Gabardine, Felt, Terry, Burlap, Quilted Fabrics |
|||||
|
Double Knits, (synthetic and natural) Stretch |
Ball Point |
14 |
(90) |
||
|
Velour, Stretch Terry, Sweater Knits |
|||||
|
Leather, Vinyl, Suede |
Wedge Point |
14 |
(90) |
||
|
Leather Needle |
|||||
|
Heavy |
Denim, Sailcloth, Ticking |
Denim Needle |
16 |
(100) |
|
|
Double Faced Wool, Heavy Coating, Fake Fur, |
Universal |
16 |
(100) |
||
|
Drapery Fabrics |
|||||
|
Leather, Suede |
Wedge Point |
16 |
(100) |
||
|
Leather Needle |
18 |
(110) |
|||
|
Very Heavy |
Canvas, Duck, Upholstery Fabrics |
Universal |
16 |
(100) |
|
|
Topstitching for Special Finish |
Topstitching Needle |
14 |
(90) |
2 3

|
5 |
|||
|
5 |
4 |
3 |
|
|
6 |
2 |
||
|
7 |
1 |
||
|
8 |
9 |
0 |
|
|
6 |
|||
1 3
2
4
7
2 3
1
4
2 3
1
4
Balancing Thread Tension
Correct tension:
The ideal straight stitch has threads locked between two layers of fabric.
For an ideal zigzag stitch, the bobbin thread does not show on the right side of the fabric, and the needle thread shows slightly on the wrong side of the fabric.
1Needle Thread
2Right Side of the Fabric
3Wrong Side of the Fabric
4Bobbin Thread
Adjusting the tension
Tension adjustment may be needed depending on the sewing materials, layers of fabric and other sewing conditions.
Turn the tension control dial to set the desired number at the setting mark.
Consult information on the LCD screen for the recommended tension setting.
5Setting Mark
6Tension Control Dial
7Recommended Tension Setting
Needle thread tension is too tight:
The bobbin thread will appear on the right side of the fabric.
Loosen the needle thread tension by moving the dial to a lower number.
Needle thread tension is too loose:
The needle thread will appear on the wrong side of the fabric.
Tighten the needle thread tension by moving the dial to a higher number.
2 4

|
Adjusting the Foot Pressure |
|||
|
1 |
The foot pressure dial should be set at “3” for regular |
||
|
sewing. |
|||
|
Reduce the pressure for appliqué, sewing on fine |
|||
|
synthetics and elastic fabrics. |
|||
|
Set the dial at “1” when sewing extra fine fabrics. |
|||
|
0 |
2 |
1 |
Foot Pressure Dial |
|
1 |
2 |
Setting mark |
|
|
2 |
|||
|
3 |
Recommended Tension Setting |
||
|
3 |
|||
|
NOTE: |
|||
|
Do not reduce the foot pressure lower than “0”. |
3
Dropping the Feed Dog
1
The feed dog can be lowered by the drop feed lever for sewing on buttons, free motion embroidery, etc.
Shift the drop feed lever to the right to lower the feed dog.
Shift the lever to the left to raise the feed dog, it will return to the up position when starting the machine.
1 Drop Feed Lever
2 Down position
3 Up position
NOTE:
The feed dog should be in up position for normal sewing. A message will appear on the LCD screen when starting the machine with the feed dog lowered. The machine will run with the feed dog lowered when pattern D1, D2, 7, 8, 9 (Mode 1) and 11, 12, 13, 14, 15,16, 26, 29,61,62, 63 (Mode 2) has been selected. The machine will not sew with the feed dog lowered when other patterns have been selected.
4 Message on the LCD screen
2 5

Selecting the Sewing Mode
|
On the LCD screen, the mode number and the following |
|||||||
|
information are displayed: |
|||||||
|
1 |
Stitch Pattern |
||||||
|
2 |
Stitch Width |
||||||
|
3 |
Stitch Length |
||||||
|
1 |
2 3 |
4 |
Recommended Thread Tension |
||||
|
5 |
Recommended Foot |
||||||
|
Mode 1 |
4 |
6 |
Recommended Foot Pressure |
||||
|
The following 3 sewing modes are available: |
|||||
|
6 |
5 |
Mode 1 (Direct): |
|||
|
The 10 most commonly used stitches can be selected |
directly.
Mode 2 (Quilting):
The patterns for patchwork quilting are available.
Mode 3 (Utility):
The buttonholes, utility and decorative stitches are available.
26
 Loading…
Page 2 — ÑÎÕÐÀÍßÉÒÅ ÝÒÈ ÈÍÑÒÐÓÊÖÈÈ
8Êíîïêè âûáîðà ñòðî÷åêÍàæìèòå íà êíîïêó äëÿ âûáîðà ñòðî÷êè. ðåæèìå 1 (ïðÿìîãî âûáîðà) ìîæíî âûáðàòüñòðî÷êè ïîä íîìåðàìè îò 01 äî 10, íàæàâñîîòâåòñòâó
Page 3 — ÑÎÄÅÐÆÀÍÈÅ
91212334Ïîäúåì è îïóñêàíèåïðèæèìíîé ëàïêèÐû÷àã ïîäúåìà ëàïêè ïîäíèìàåò è îïóñêàåòïðèæèìíóþ ëàïêó. Âû ìîæåòå ïîäíÿòüïðèæèìíóþ ëàïêó íà 6 ìì âûøå åå îáû
Page 4
10Çàìåíà ïðèæèìíîé ëàïêèÂÍÈÌÀÍÈÅ:Ïåðåä çàìåíîé ëàïêè îòêëþ÷èòå ïèòàíèå. Äëÿâûáðàííîãî ñòåæêà èñïîëüçóéòå òîëüêîðåêîìåíäóåìóþ ëàïêó. Ïðè èñïîëüçîâàíèèä
Page 5 — ÇÍÀÊÎÌÑÒÂÎ Ñ ÌÀØÈÍÎÉ
111234568791011Íàçíà÷åíèå ïðèæèìíûõ ëàïîê1. Ëàïêà äëÿ çèãçàãà À:Ýòî ñàìàÿ ôóíêöèîíàëüíàÿ ëàïêà. Åå èñïîëüçóþò äëÿðàçëè÷íûõ ñòåæêîâ, âêëþ÷àÿ ïðÿìîé è ç
Page 6 — Ñòàíäàðòíûå àêñåññóàðû
12Íàìîòêà øïóëüêèÑíÿòèå øïóëüêèÎòîäâèíüòå êíîïêó ÷åëíî÷íîé ïëàñòèíû âïðàâî èñíèìèòå åå.Âûòàùèòå øïóëüêó.1 Êíîïêà ÷åëíî÷íîé ïëàñòèíû2 ×åëíî÷íàÿ ïëàñòèí
Page 7 — ÏÎÄÃÎÒÎÂÊÀ Ê ØÈÒÜÞ
13435112754326Íàìîòêà øïóëüêè1 Ïðîïóñòèòå íèòü â íàïðàâèòåëü àíòåííûñçàäè íàïåðåä.1 Íàïðàâèòåëü àíòåííû2 Íàïðàâüòå íèòü ïîä äèñêîì íàòÿæåíèÿìîòàëêè.2
Page 8 — Ôóíêöèîíàëüíûå êíîïêè
14Óñòàíîâêà øïóëüêè1 Ïîìåñòèòå øïóëüêó â äåðæàòåëü, îòìàòûâàÿíèòü ïðîòèâ ÷àñîâîé ñòðåëêè.1 Íèòü2 Äåðæàòåëü øïóëüêè2 Ïðîïóñòèòå íèòü â ïàç (À) â ïåðåäí
Page 9
1234521Ðàáîòà ñ âåðõíèìòðàíñïîðòåðîì òêàíèÄëÿ ðàáîòû ñ âåðõíèì òðàíñïîðòåðîì òêàíèóñòàíîâèòå ëàïêó-âåðõíèé òðàíñïîðòåð âñîîòâåòñòâèè ñ ïðèâåäåííûìè íè
Page 10 — Êíîïêè âûáîðà ñòðî÷åê
12134534zxzxcÊàê îòêëþ÷èòü óñòðîéñòâîäâîéíîé ïîäà÷è òêàíè1 Ïîäíèìèòå èãëó è ðû÷àã ïîäúåìàïðèæèìíîé ëàïêè â íàèâûñøååïîëîæåíèå.1 Ðû÷àã ïîäúåìà ïðèæèìíî
Page 11 — Óñòàíîâêà êîëåííîãî ðû÷àãà
154134313422Çàïðàâêà íèòè â ìàøèíóÏîäíèìèòå ðû÷àã ïðèæèìíîé ëàïêè. Äâàæäûíàæìèòå íà êëàâèøó ïîäúåìà/îïóñêàíèÿ èãëû èïîäíèìèòå èãëó ââåðõ.1 Ïðîïóñòèòå
Page 12 — Óñòàíîâêà äåðæàòåëÿ ëàïêè
ÂÀÆÍÛÅ ÈÍÑÒÐÓÊÖÈÈ ÏÎ ÁÅÇÎÏÀÑÍÎÑÒÈÏåðåä íà÷àëîì ðàáîòû íà ìàøèíå âíèìàòåëüíî ïðî÷èòàéòå âñå èíñòðóêöèè ïî ïîëüçîâàíèþ.ÎÏÀÑÍÎ — Âî èçáåæàíèå ðèñêà óäàð
Page 13 — Íàçíà÷åíèå ïðèæèìíûõ ëàïîê
16Çàïðàâêà íèòè â ìàøèíó(ïðîäîëæåíèå)5 Ïðîïóñòèòå íèòü âíèç è âîêðóã äèñêàíàòÿæåíèÿ ñïðàâà íàëåâî. Ïîäòÿíèòå íèòüââåðõ è âñòàâüòå ìåæäó äèñêàìè íàòÿæå
Page 14 — Íàìîòêà øïóëüêè
17Àâòîìàòè÷åñêèé íèòåâäåâàòåëü1 Ïîäíèìèòå èãëó â âåðõíåå ïîëîæåíèå, íàæàâíà êíîïêó ïîäúåìà/îïóñêàíèÿ èãëû.2 Îòêëþ÷èòå ïèòàíèå.3 Îïóñòèòå ïðèæèìíóþ ëàï
Page 15
18121331132Âûòÿãèâàíèå íèæíåé íèòè1 Ïîäíèìèòå ðû÷àã ïðèæèìíîé ëàïêè.Óäåðæèâàÿ èãîëüíóþ íèòêó, äâàæäû íàæìèòåíà êíîïêó ïîäúåìà/îïóñêàíèÿ èãëû è äëÿâûòÿ
Page 16 — Óñòàíîâêà øïóëüêè
19Ñîîòíîøåíèå èãë è íèòîêÒÈÏ ÒÊÀÍÈ ÒÊÀÍÜ ÒÈÏ ÈÃËÛ ÐÀÇÌÅÐ ÈÃËÛÎ÷åíü ëåãêèå Øèôîí, æîðæåò, òîíêîå êðóæåâî, îðãàíçà, âóàëü, òþëü. Óíèâåðñàëüíûå. 9 (65)Äë
Page 17 — Ðàáîòà ñ âåðõíèì
20Áàëàíñ íàòÿæåíèÿ íèòèÏðàâèëüíîå íàòÿæåíèå:Ó èäåàëüíîãî ïðÿìîãî ñòåæêà âåðõíÿÿ è íèæíÿÿíèòè ïåðåñåêàþòñÿ ïî ñåðåäèíå äâóõ ñëîåâòêàíè. Ïðè ïðàâèëüíîì
Page 18 — Êàê ñíÿòü ëàïêó-âåðõíèé
21Ðåãóëèðîâêà äàâëåíèÿ ëàïêèÏðè îáû÷íîì øèòüå ðó÷êà ðåãóëèðîâêè äàâëåíèÿëàïêè íà òêàíü äîëæíà áûòü óñòàíîâëåíà íà «3».Ïðè ðàáîòå ñ àïïëèêàöè
Page 19 — 4 Ëåâûé íèòåíàïðàâèòåëü
22Âûáîð ðåæèìà øèòüÿÂìåñòå ñ íîìåðîì ðåæèìà ðàáîòû íà ÆÊäèñïëåå ïîÿâëÿåòñÿ ñëåäóþùàÿ èíôîðìàöèÿ:1 Îáðàçåö ñòåæêà2 Ðåêîìåíäóåìîå íàòÿæåíèå íèòè3 Ðåêîìå
Page 20 — 8 Íèæíèé íèòåâîäèòåëü
23Êíîïêà ïîìîùèÏðè íàæàòèè íà ýòó êíîïêó íà äèñïëåå ïîÿâÿòñÿàëüòåðíàòèâíûå âàðèàíòû ïðèìåíåíèÿâûáðàííîãî ñòåæêà, åñëè ýòî ñòåæêè 01, 08, 09 10(Ðåæèì 1
Page 21 — 4 Íèòåíàïðàâèòåëü
2412123331122Çíàêîìñòâî ñ óñòàíîâêàìèìàøèíûÏî Âàøåìó âûáîðó ìîæíî ââåñòè óñòàíîâêè âïàìÿòü ìàøèíû.Íàæìèòå íà âûêëþ÷àòåëü ïèòàíèÿ, âêëþ÷èòåìàøèíó, îäíî
Page 22 — 3 Íèæíÿÿ íèòü
25ÎÑÍÎÂÍÛÅ ØÂÅÉÍÛÅÒÅÕÍÈÊÈ (Ðåæèì 1)Ïðÿìîé ñòåæîêÓñòàíîâêè ìàøèíû:Ñòðî÷êà: 01Íàòÿæåíèå íèòè: 2-6Ïðèæèìíàÿ ëàïêà: Ëàïêà äëÿ çèãçàãà ÀÄàâëåíèå ëàïêè: 3Íà
Page 24 — Ðåãóëèðîâêà íàòÿæåíèÿ
26132132Ñìåíà íàïðàâëåíèÿ øèòüÿÎñòàíîâèòå ìàøèíó çà íåñêîëüêî ñòåæêîâ äîêðàÿ òêàíè. Íåñêîëüêî ðàç íàæìèòå íà êíîïêóïîäúåìà/îïóñêàíèÿ èãëû, ïîêà èãëà í
Page 26 — Âûáîð ðåæèìà øèòüÿ
28Âàðèàíòû ïðÿìîãî ñòåæêà02 Ïðÿìîé ñòåæîê ñ ëåâûìïîçèöèîíèðîâàíèåì èãëûÏðèìåíÿéòå ýòîò ñòåæîê äëÿ ôîðìèðîâàíèÿ øâàïî êðàþ òêàíè.03 Ñòåæîê Lock-a-Matic
Page 27 — Âûáîð ñòðî÷åê
29ÍàìåòêàÓñòàíîâêè ìàøèíû:Ñòðî÷êà: 07Íàòÿæåíèå íèòè: 1-3Ïðèæèìíàÿ ëàïêà: äëÿ øòîïêè Ð-2Äàâëåíèå ëàïêè: 1Òðàíñïîðòåð òêàíè: Îòêëþ÷åíÍàìåòêà èñïîëüçóåòñ
Page 28 — Çíàêîìñòâî ñ óñòàíîâêàìè
30ÇèãçàãÓñòàíîâêè ìàøèíû:Ñòðî÷êà: 08Íàòÿæåíèå íèòè: 3-7Ïðèæèìíàÿ ëàïêà: Ëàïêà äëÿ çèãçàãà ÀÄàâëåíèå ëàïêè: 3Ñòåæîê çèãçàã èñïîëüçóåòñÿ äëÿ ðàçëè÷íûõöå
Page 29 — ÒÅÕÍÈÊÈ (Ðåæèì 1)
31Îâåðëî÷íûå ñòåæêè (Ðåæèìû 1 è 3)Îâåðëî÷íûé ñòåæîê ñ çèãçàãîìÓñòàíîâêè ìàøèíû:Ñòðî÷êà: 08Íàòÿæåíèå íèòè: 3-7Ïðèæèìíàÿ ëàïêà: Ëàïêà äëÿ îáðàáîòêè êðàÿ
Page 30 — Ñìåíà íàïðàâëåíèÿ øèòüÿ
32Îâåðëî÷íûõ ñòåæêè (ïðîäîëæåíèå)Òðèêîòàæíûé ñòåæîêÓñòàíîâêè ìàøèíû:Ñòðî÷êà: 01(Ðåæèì 3)Íàòÿæåíèå íèòè: 3-7Ïðèæèìíàÿ ëàïêà: Ëàïêà äëÿ çèãçàãà ÀÄàâëåíè
Page 31 — Ðåãóëèðîâêà äëèíû ñòåæêà
33Ïðèøèâàíèå ìîëíèèÓñòàíîâêè ìàøèíû:Ñòðî÷êà: 01 (Ðåæèì 1)Íàòÿæåíèå íèòè: 2-6Ïðèæèìíàÿ ëàïêà: Ëàïêà äëÿ ïðèøèâàíèèìîëíèè ÅÄàâëåíèå ëàïêè: 3Êàê ïðèñòåãí
Page 32 — Âàðèàíòû ïðÿìîãî ñòåæêà
34Ïðèøèâàíèå3 Çàëîæèòå íàçàä îñòàâøèåñÿ ïðèïóñêè íàøâû. Ïîâåðíèòå íàä ïðàâûì ïðèïóñêîì èñôîðìèðóéòå ñêëàäêó â 0.2-0.3 ñì.Ðàñïîëîæèòå çóáöû ìîëíèè ðÿäî
Page 33
356 Çàêðîéòå ìîëíèþ è ðàñïðàâüòå òêàíü ëèöåâîéñòîðîíîé ââåðõ. Ïðèìåòàéòå ðàñêðûòóþ òêàíüê ëåíòå ìîëíèè.11 Íàìåòêà12 Ëåíòà ìîëíèè7 Ïåðåñòàâüòå ëàïêó äë
Page 35 — Îâåðëî÷íûé ñòåæîê
36Ðîëèêîâûé øîâÓñòàíîâêè ìàøèíû:Ñòðî÷êà: 01 (Ðåæèì 1)Íàòÿæåíèå íèòè: 2-6Ïðèæèìíàÿ ëàïêà: Ëàïêà äëÿ ðîëèêîâîãîøâà DÄàâëåíèå ëàïêè: 3Êàê øèòü:Ñäåëàéòå ä
Page 36 — Äâîéíîé îâåðëî÷íûé ñòåæîê
37ÏÝ×ÂÎÐÊ È ÊÂÈËÒÈÍÃ(Ðåæèì 2)Ïý÷âîðêÓãëîâàÿ øêàëà íà èãîëüíîé ïëàñòèíåÂû ìîæåòå ëåãêî ðàáîòàòü ñ ïý÷âîðêîì èñîáèðàòü êóñî÷êè òêàíè ïîä ëþáûì æåëàåìûì
Page 37 — Ïðèøèâàíèå ìîëíèè
38Ñøèâàíèå ïðè ïîìîùèëàïêè-òðàíñïîðòåðàËàïêà-òðàíñïîðòåð íåçàìåíèìà è î÷åíüýôôåêòèâíà ïðè ðàáîòå ñ ïý÷âîðêîì è ñøèâàíèèêóñî÷êîâ â ëîæáèíêàõ.Êàê óñòàíî
Page 38 — Ïðèøèâàíèå
39Íàïðàâèòåëü äëÿ êâèëòèíãà íà ëàïêóäëÿ çèãçàãàÓñòàíîâêè ìàøèíû:Ñòðî÷êà: 01 (Ðåæèì 01)Íàòÿæåíèå íèòè: 2-6Ïðèæèìíàÿ ëàïêà: Ëàïêà äëÿ çèãçàãà ÀÄàâëåíèå
Page 39
40Ñòåæîê-áðîøêàÓñòàíîâêè ìàøèíû:Ñòðî÷êà: 70 (Ðåæèì 2)Íàòÿæåíèå íèòè: 3-6Ïðèæèìíàÿ ëàïêà: Ëàïêà äëÿ àòëàñíûõñòðî÷åê FÄàâëåíèå ëàïêè: 2-3Âû ìîæåòå ñêðåï
Page 40 — Ðîëèêîâûé øîâ
41Ïðîãðàììèðîâàíèåôðàíöóçñêèõ óçëîâÏðèìåð: êîìáèíàöèÿ ñòðî÷åê 19 è 121 Âûáåðèòå ðåæèì 2.2 Âûáåðèòå ñòðî÷êó 19.3 Íàæìèòå êíîïêó ïàìÿòè.4 Âûáåðèòå ñòðî÷
Page 41 — (Ðåæèì 2)
42ÄÎÏÎËÍÈÒÅËÜÍÛÅ ØÂÅÉÍÛÅ ÒÅÕÍÈÊÈÈ ÄÅÊÎÐÀÒÈÂÍÛÅ ÑÒÅÆÊÈ (Ðåæèì 3)Àâòîìàòè÷åñêèå ïåòëèÐàçíîâèäíîñòè ïåòåëü11 Ñåíñîðíàÿ (Êâàäðàòíàÿ) ïåòëÿÝòà êâàäðàòíàÿ ï
Page 42 — Êâèëòèíã
43Ñåíñîðíûå ïåòëèÓñòàíîâêè ìàøèíû:Ñòðî÷êà: 11 (Ðåæèì 3)Íàòÿæåíèå íèòè: 1-5Ïðèæèìíàÿ ëàïêà: Ëàïêàäëÿ àâòîìàòè÷åñêîéïåòëè RÄàâëåíèå ëàïêè: 3ÏÐÈÌÅ×ÀÍÈß:Ñ
Page 43 — 4 Ðàññòîÿíèå ìåæäó øâàìè
443 Ïîòÿíèòå âíèç çà ðû÷àã ïåòëè äî êîíöà.1 Ðû÷àã ïåòëèÏÐÈÌÅ×ÀÍÈÅ:Åñëè Âû íå îòòÿíóëè ðû÷àã ïåòëè âíèç äî êîíöà,ïðè íà÷àëå øèòüÿ íà ÆÊ äèñïëåå ïîÿâèòñ
Page 44 — Àïïëèêàöèÿ
455 Íà÷èíàéòå øèòü. Ïåòëÿ áóäåò ñîçäàíààâòîìàòè÷åñêè.Øàã 1: Ìàøèíà ñíà÷àëà ïðîøüåò ïåðåäíþþçàêðåïêó è ëåâóþ ñòîðîíó.Çàòåì ìàøèíà âåðíåòñÿ â òî÷êó íà÷à
Page 45 — Ïðîãðàììèðîâàíèå
3123456121314151617181920212228252689101124273031323334353629237373839Íàèìåíîâàíèå ÷àñòåé1. Ðåãóëÿòîð äàâëåíèÿ ëàïêè íà òêàíü2. Ðû÷àã íèòåâîäèòåëÿ3. Í
Page 46 — Àâòîìàòè÷åñêèå ïåòëè
46Äâóõñëîéíàÿ ïåòëÿ×òîáû ïåòëÿ áûëà êðåïêàÿ è ïðî÷íàÿ, ïðîøåéòååùå îäèí ñëîé ïåòëè ïîâåðõ ïðåäûäóùèõñòåæêîâ.Ïîñëå òîãî, êàê ïåòëÿ áóäåò çàâåðøåíà, ñíî
Page 47 — Íà÷àëî øèòüÿ
47Èçìåíåíèå øèðèíû ïåòëèÍàæìèòå íà êíîïêó èçìåíåíèÿ øèðèíû ñòåæêà, íàäèñïëåå îòêðîåòñÿ îêíî èçìåíåíèé.Íàæìèòå íà «+» äëÿ óâåëè÷åíèÿ øèðèíû ï
Page 48 —
48Àâòîìàòè÷åñêîå âûïîëíåíèå ïåòëèÓñòàíîâêè ìàøèíû:Ñòðî÷êà: 12 (Ðåæèì 3)Íàòÿæåíèå íèòè: 1-5Ïðèæèìíàÿ ëàïêà: Ëàïêà äëÿàâòîìàòè÷åñêîéïåòëè RÄàâëåíèå ëàïê
Page 49 — 10 Ïðîáîéíèê
49Êàê øèòüÍàæìèòå íà ïåäàëü è ïðîøåéòå ëåâûé ðÿä ïåòëèíà æåëàåìóþ äëèíó.Îñòàíîâèòå ìàøèíó è íàæìèòå íà êíîïêóðåâåðñà.4 Æåëàåìàÿ äëèíà5 Êíîïêà ðåâåðñàÑ
Page 50 — Çàæãóòîâàííàÿ ïåòëÿ
50Ïðèøèâàíèå ïóãîâèöÓñòàíîâêè ìàøèíû:Ñòðî÷êà: 01 (Ðåæèì 1)Íàòÿæåíèå íèòè: 3-7Ïðèæèìíàÿ ëàïêà: Ëàïêà äëÿ àòëàñíûõñòåæêîâ FÄàâëåíèå ëàïêè: 3Òðàíñïîðòåð
Page 51 — Èçìåíåíèå øèðèíû ïåòëè
51ØòîïêàÓñòàíîâêè ìàøèíû:Ñòðî÷êà: 18 (Ðåæèì 3)Íàòÿæåíèå íèòè: 3-6Ïðèæèìíàÿ ëàïêà: Ëàïêà äëÿ àâòîìàòè÷åñêîéïåòëè RÄàâëåíèå ëàïêè: 3Îòîäâèíüòå äî êîíöà
Page 52 — 3 Øïóëüíàÿ íèòü
52Êîðîòêàÿ øòîïêà×òîáû ñäåëàòü øòîïêó ìåíåå 2 ñì, ñíà÷àëàïðîøåéòå íóæíóþ äëèíó, çàòåì îñòàíîâèòåìàøèíó è íàæìèòå íà êíîïêó ðåâåðñà.Òåïåðü íóæíàÿ äëèíà
Page 53
53ÇàêðåïêàÓñòàíîâêè ìàøèíû:Ñòðî÷êà: 19 (Ðåæèì 3)Íàòÿæåíèå íèòè: 3-6Ïðèæèìíàÿ ëàïêà: Ëàïêà äëÿ àòëàñíûõñòåæêîâ FÄàâëåíèå ëàïêè: 3Çàêðåïêà èñïîëüçóåòñÿ
Page 54 — Ïðèøèâàíèå ïóãîâèö
54Âûïîëíåíèå ãëàçêîâÓñòàíîâêè ìàøèíû:Ñòðî÷êà: 20 (Ðåæèì 3)Íàòÿæåíèå íèòè: 3-6Ïðèæèìíàÿ ëàïêà: Ëàïêà äëÿ àòëàñíûõñòåæêîâ FÄàâëåíèå ëàïêè: 3Ãëàçêè èñïîë
Page 56 — Âûðàâíèâàíèå øòîïêè
42830291234567891211101314151617182019212223242625272Ñòàíäàðòíûå àêñåññóàðû1. Ëàïêà äëÿ çèãçàãà À (ïðèñòåãíóòà íà ìàøèíå)2. Ëàïêà äëÿ îáðàáîòêè êðàÿ Ñ
Page 57 — Çàêðåïêà
56Ñìåíà ïîëîæåíèÿ èãëûÍàæìèòå íà êíîïêó èçìåíåíèÿ øèðèíû ñòåæêà.ÆÊ äèñïëåé ïîêàæåò ëåâîå ïîëîæåíèå èãëû îòíàïðàâèòåëÿ â ìì.Íàæìèòå íà «-«, ÷
Page 58 — Âûïîëíåíèå ãëàçêîâ
57Øîâ-ðàêóøêàÓñòàíîâêè ìàøèíû:Ñòðî÷êà: 06 (Ðåæèì 3)Íàòÿæåíèå íèòè: 6-8Ïðèæèìíàÿ ëàïêà: Ëàïêà äëÿ àòëàñíûõñòåæêîâ FÄàâëåíèå ëàïêè: 3Óâåëè÷üòå íàòÿæåíèå
Page 59 — Ïîòàéíàÿ ñòðî÷êà
58Øèòüå äâîéíîé èãëîéÏÐÈÌÅ×ÀÍÈß:Åñëè Âû øüåòå ñòðî÷êè äâîéíîé èãëîé, íàæìèòåêíîïêó äâîéíîé èãëû è ïåðåä íà÷àëîìîñíîâíîãî øèòüÿ ñäåëàéòå ïðîáíû
Page 60 — Äëèííûé ïðÿìîé ñòåæîê
59Êàê øèòüÂûáåðèòå ñòðî÷êó.Íàæìèòå êíîïêó äâîéíîé èãëûÍà ÆÊ äèñïëåå ïîÿâèòñÿ îáîçíà÷åíèå äâîéíîéèãëû è ìàñêèìàëüíî âîçìîæíàÿ øèðèíà ñòåæêà â3,0 ìì.1 Î
Page 61 — Ïðèøèâàíèå øíóðà
60Ïðîãðàììèðîâàíèå êîìáèíàöèéñòåæêîâÎäèí öèêë ñ àâòîçàêðåïêîéÂûáåðèòå æåëàåìóþ ñòðî÷êó.Íàæìèòå êíîïêó ïàìÿòè.Íàæìèòå êíîïêó çàêðåïêè.ÏÐÈÌÅ×ÀÍÈÅ:Ïîñëå
Page 62 — Øèòüå äâîéíîé èãëîé
61Êîìáèíèðîâàíèå ñòðî÷åêÏðèìåð: Ïðîãðàììèðîâàíèå ñòðî÷åê 23 è 25.Âûáåðèòå ñòðî÷êó 23 â Ðåæèìå 3.Íàæìèòå êíîïêó ïàìÿòè.Âûáåðèòå ñòðî÷êó 25.Íàæìèòå êíîï
Page 63 —
62Âûòÿãèâàíèå ñòðî÷åêÑòðî÷êè íîìåð 21-28 â Ðåæèìå 3 ìîæíîâûòÿíóòü.Ïðèìåð: Ñòðî÷êà 23Âûáåðèòå ñòðî÷êó 23.Íàæìèòå íà êíîïêó âûòÿãèâàíèÿ.Ìàñøòàá âûòÿãèâà
Page 64 — Ïðîãðàììèðîâàíèå êîìáèíàöèé
63Âûïîëíåíèå êîìáèíàöèè ñòðî÷åêñ íà÷àëàÅñëè Âû õîòèòå îñòàíîâèòü âûïîëíåíèåêîìáèíàöèè ñòðî÷åê è ïðîøèòü âñå ñíîâà,íàæìèòå íà êíîïêó ïàìÿòè è íà÷íèòå â
Page 65 — Ïðîãðàììèðîâàíèå ñòåæêîâ
64Ïðîãðàììà ðåäàêòèðîâàíèÿÎäíîâðåìåííîå èçìåíåíèå ñòåæêà(òîëüêî ðåæèìû 2 è 3)Øèðèíó è äëèíó ñòåæêîâ çàïðîãðàììèðîâàííûõ ñòðî÷åêìîæíî îäíîâðåìåííî èçìå
Page 66 — Âûòÿãèâàíèå ñòðî÷åê
65Èçìåíåíèå ëþáèìûõ ñòåæêîâ(òîëüêî ðåæèì 2 è 3) çàïðîãðàììèðîâàííîé êîìáèíàöèè äëÿ êàæäîé ñòðî÷êèèíäèâèäóàëüíî ìîæíî èçìåíèòü øèðèíó è äëèíó ñòåæêà.Ï
Page 67
51432365ÏÎÄÃÎÒÎÂÊÀ Ê ØÈÒÜÞÏîäêëþ÷åíèå ìàøèíû ê ñåòèÎòêëþ÷èòå ïèòàíèå.Âñòàâüòå øòåêåð ïåäàëè â ðàçúåì ìàøèíû.Âñòàâüòå øòåêåð ñåòåâîãî êàáåëÿ â ðàçúåì ï
Page 68 — Ïðîãðàììà ðåäàêòèðîâàíèÿ
66ÌÎÍÎÃÐÀÌÌÛ (Ðåæèì 4)Âûáîð ñòèëÿÂû ìîæåòå âûáðàòü ïå÷àòíûå è ïðîïèñíûåáóêâû.Íàæìèòå êíîïêó ñòèëÿ äëÿ âûáîðà áóêâ èçñëåäóþùåãî:(1) Ïå÷àòíûå(2) Ïå÷àòíû
Page 69 — (òîëüêî ðåæèì 2 è 3)
67Ïðîãðàììèðîâàíèå ìîíîãðàììÏðèìåð: Çàïðîãðàììèðîâàòü «R&B»Âûáåðèòå Ðåæèì 4.Âûáåðèòå áóêâó «R» (ñòðî÷êà 28).Íàæìèòå êíîïêó ïàì
Page 70 — ÌÎÍÎÃÐÀÌÌÛ (Ðåæèì 4)
68Ïðîñìîòð äëèííîãî òåêñòàÎäíîâðåìåííî íà ÆÊ äèñïëåå ïîêàçûâàåòñÿòîëüêî 8 ñèìâîëîâ ìîíîãðàììû.Åñëè òåêñò íå ïîêàçûâàåòñÿ ïîëíîñòüþ, íàæìèòåêíîïêó ðåäà
Page 71 — Ïðîãðàììèðîâàíèå ìîíîãðàìì
69ÓÕÎÄ ÇÀ ÌÀØÈÍÎÉÐåãóëèðîâêà íàðóøåííûõñòðî÷åêÐåçóëüòàòû øèòüÿ ñòðî÷åê ìîãóò çàâèñåòü îòìíîãèõ óñëîâèé, òàêèõ êàê ñêîðîñòü øèòüÿ, òèïòêàíè, êîëè÷åñòâ
Page 72 — Ðåäàêòèðîâàíèå ìîíîãðàìì
70×èñòêà øïóëüíîãî îòñåêàè òêàíåíàïðàâèòåëåéÂÍÈÌÀÍÈÅ:Ïåðåä ÷èñòêîé ìàøèíû îòêëþ÷èòå ïèòàíèå èâûòàùèòå âèëêó èç ðîçåòêè.ÏÐÈÌÅ×ÀÍÈÅ:Íå ðàçáèðàéòå ìàøèíó
Page 73 — ÓÕÎÄ ÇÀ ÌÀØÈÍÎÉ
71Çàìåíà ëàìïî÷êèÂÍÈÌÀÍÈÅ:Ïåðåä çàìåíîé ëàìïî÷êè îòêëþ÷èòå ïèòàíèåìàøèíû.Ëàìïî÷êà ìîæåò áûòü ãîðÿ÷åé, ïîäîæäèòå, ïîêàîíà îñòûíåò.×òîáû ñíÿòü ëàìïî÷êó:
Page 74 — ×èñòêà øïóëüíîãî îòñåêà
72Ïðîáëåìû è ïðåäóïðåæäàþùèå çíàêèÅñëè ïîÿâèòñÿ çâóêîâîé ñèãíàë, à íà ÆÊ äèñïëåå ïðåäóïðåæäàþùèé çíàê èëè íàäïèñü, ñëåäóéòåèíñòðóêöèÿì íèæå:Ïðåäóïðåæä
Page 75 — Çàìåíà ëàìïî÷êè
73Ïðåäóïðåæäàþùèé çíàê Ïðè÷èíà Ïîïðîáóéòå ñäåëàòüÍàæàòà êíîïêà âûòÿãèâàíèÿ îáðàçöà,êîãäà âûáðàííûé îáðàçåö íåïîäõîäèò äëÿ ýòîãî.Ñíîâà âêëþ÷åíî ïèòàíèå
Page 76
74ÍåèñïðàâíîñòüÐâåòñÿ âåðõíÿÿíèòüÐâåòñÿ íèæíÿÿíèòüËîìàåòñÿ èãëàÏðîïóñêàþòñÿñòåæêèÏðîïóñêè íàòêàíèÒêàíü ïîäàåòñÿíåðàâíîìåðíîÍà øâåîáðàçóþòñÿïåòëèÌàøèíà
Page 77
846-800-004(E) Îòïå÷àòàíî íà Òàéâàíå
Page 78 — Óñòðàíåíèå íåèñïðàâíîñòåé
6Ôóíêöèîíàëüíûå êíîïêè1 Îáðåçêà íèòèÏî îêîí÷àíèè øèòüÿ íàæìèòå íà ýòó êíîïêó,ìàøèíà îáðåæåò íèòè.Êîãäà íèòè îáðåçàþòñÿ, êíîïêà ìèãàåò.5 Ñèãíàë ðàáîòû
Page 79
712345678910111234567891011Mode button:Press this button to select the desired mode.Letter style button:Press this button to change the letter style o
There is document — Sewing machines Janome Memory Craft 6600 User Manual available here for reading and downloading. Use the download button below or simple online reader.
The file extension — PDF and ranks to the manuals
Инструкция по эксплуатации Janome Memory Craft 6600
89
views
on
Category: Sewing machines
Languages: RU,
Pages: 79
Download: 89
Report
Sharing files
Related
Tags
Sewing machines, Janome, Memory Craft 6600
Comments
Log in to leave a message!
Вы здесь
Каталог инструкций » J » Janome » Швейные машинки Janome » Janome Memory Craft 6600 » Страница инструкции 1
-

1
-
2
-
3
-
4
-
5
-
6
-
7
-
8
-
9
-
10
-
11
-
12
-
13
-
14
-
15
-
16
-
17
-
18
-
19
-
20
-
21
-
22
-
23
-
24
-
25
-
26
-
27
-
28
-
29
-
30
-
31
-
32
-
33
-
34
-
35
-
36
-
37
-
38
-
39
-
40
-
41
-
42
-
43
-
44
-
45
-
46
-
47
-
48
-
49
-
50


- 1
- 2
- ››
Распечатать
Страница 1 из
- << Предыдущая
- Следующая >>

Швейные машинки Janome в инструкции по эксплуатации Janome Memory Craft 6600
- << Предыдущая
- Следующая >>
JANOME MC6600P
ВАЖНЫЕ ИНСТРУКЦИИ ПО БЕЗОПАСНОСТИ
Перед началом работы на машине внимательно прочитайте все инструкции по пользованию.
ОПАСНО
Во избежание риска удара электрическим током:
1.
Н
икогда не оставляйте включенную в сеть машину без присмотра. Всегда отключайте прибор от сети
сразу же после работы и перед началом чистки.
2. Всегда отключайте от сети при замене лампочки. Вставляйте лампочку такого же типа на 12 В, 5Ватт.
ВНИМАНИЕ
Во избежание ожогов, пожара, удара электрическим током или нанесения
повреждений пользователю:
1. Не позволяйте играть с машиной. Будьте внимательны при работе, если в помещении находятся
дети.
2. Используйте прибор только по его прямому назначению, описанному в этой инструкции.
Используйте приспособления, только рекомендуемые производителем и описанные в инструкции.
3. Не используйте машину, если у нее поврежденный шнур или вилка, в случае, если она падала, была
повреждена, попала в воду или работает неправильно. Отнесите машину к ближайшему
авторизованному дилеру для ремонта или наладки.
4. Машина должна работать только с открытыми вентиляционными отверстиями. Периодически
чистите вентиляционные области машины и ножную педаль от пыли, грязи и остатков материи.
5. Ничего не кидайте и не вставляйте в вентиляционные отверстия.
6. Работайте на машине только в помещении.
7. Не работайте в помещении, где распылялись аэрозоли или использовался кислород.
8. Чтобы отключить питание, поставьте все выключатели в положение ВЫКЛ.(«0»). Затем вытащите
вилку из розетки.
9. Не тяните вилку из розетки за шнур, берите вилку за корпус.
10. Будьте осторожны при работе с движущимися частями машины. Особое внимание уделяйте рабочей
области вокруг иглы.
11. Используйте только оригинальную игольную пластину. Изза неправильной пластины может
сломаться игла.
12. Не используйте гнутые иглы.
13. Не тяните и не толкайте ткань при шитье, может сломаться игла.
14. Всегда ставьте выключатель на «0» при регулировке или замене деталей в области работы иглы:
заправке нити в иглу, смене иглы, заправке нижней нити, смене прижимной лапки и т.д.
15. Всегда отключайте машину от электрической розетки при проведении профилактических работ,
снятии панелей и других процедур, описанных в этой инструкции.
СОХРАНЯЙТЕ ЭТИ ИНСТРУКЦИИ
Внешний вид и характеристики машины могут изменяться без предварительного уведомления.
Страницы и текст этой инструкции
 Инструкция — Memory Craft 6600
 Информация отображена на картинке
 Информация отображена на картинке
 Информация отображена на картинке
 Информация отображена на картинке
Как использовать наш сайт инструкций OnlineManuals.ru
Наша цель состоит в том, чтобы предоставить вам быстрый доступ к содержанию инструкции для — Memory Craft 6600.
С помощью онлайн просмотра, Вы можете быстро просмотреть содержимое инструкции и найти решение проблемы с — Memory Craft 6600.
Для Вашего удобства
Если листать руководство пользователя — Memory Craft 6600 прямо на сайте, не очень удобно для Вас, есть два возможных решения:
• Просмотр в полноэкранном режиме — легко просмотреть руководство пользователя (без загрузки его на свой компьютер), Вы можете использовать режим полноэкранного просмотра.
Для просмотра инструкции пользователя — Memory Craft 6600 на полном экране, используйте кнопку «Открыть в Pdf-viewer».
• Загрузка на компьютер — Вы можете также скачать Инструкция — Memory Craft 6600 на свой компьютер и сохранить его в файлах.
Многие люди предпочитают читать документы не на экране, а в печатной версии.
Возможность печати руководства пользователя также была предусмотрена на нашем сайте,
и вы можете использовать ее, нажав на иконку «печать» в Pdf-viewer.
Нет необходимости печатать все руководство — Memory Craft 6600, можно выбрать только нужные страницы инструкции.