
Страницы и текст этой инструкции
 Epson Stylus CX3500. Страница №1") Инструкция МФУ (многофункционального устройства) Epson Stylus CX3500
Инструкция МФУ (многофункционального устройства) Epson Stylus CX3500
 Epson Stylus CX3500. Страница №2") Информация отображена на картинке
Информация отображена на картинке
 Epson Stylus CX3500. Страница №3") Информация отображена на картинке
Информация отображена на картинке
 Epson Stylus CX3500. Страница №4") Информация отображена на картинке
Информация отображена на картинке
 Epson Stylus CX3500. Страница №5") Информация отображена на картинке
Информация отображена на картинке
Как использовать наш сайт инструкций OnlineManuals.ru
Наша цель состоит в том, чтобы предоставить вам быстрый доступ к содержанию инструкции для МФУ (многофункционального устройства) Epson Stylus CX3500.
С помощью онлайн просмотра, Вы можете быстро просмотреть содержимое инструкции и найти решение проблемы с МФУ (многофункционального устройства) Epson Stylus CX3500.
Для Вашего удобства
Если листать руководство пользователя МФУ (многофункционального устройства) Epson Stylus CX3500 прямо на сайте, не очень удобно для Вас, есть два возможных решения:
• Просмотр в полноэкранном режиме — легко просмотреть руководство пользователя (без загрузки его на свой компьютер), Вы можете использовать режим полноэкранного просмотра.
Для просмотра инструкции пользователя МФУ (многофункционального устройства) Epson Stylus CX3500 на полном экране, используйте кнопку «Открыть в Pdf-viewer».
• Загрузка на компьютер — Вы можете также скачать Инструкция МФУ (многофункционального устройства) Epson Stylus CX3500 на свой компьютер и сохранить его в файлах.
Многие люди предпочитают читать документы не на экране, а в печатной версии.
Возможность печати руководства пользователя также была предусмотрена на нашем сайте,
и вы можете использовать ее, нажав на иконку «печать» в Pdf-viewer.
Нет необходимости печатать все руководство МФУ (многофункционального устройства) Epson Stylus CX3500, можно выбрать только нужные страницы инструкции.
All in One Product
Basic Operation Guide
Safety Instructions . . . . . . . . . . . . . . . . . . . . . . . . . . . . . . . . . . . . . . 1
Warnings, Cautions, and Notes. . . . . . . . . . . . . . . . . . . . . . . . . . . . . . . . . 1
Safety Instructions . . . . . . . . . . . . . . . . . . . . . . . . . . . . . . . . . . . . . . . . . . . . 1
Using the Control Panel. . . . . . . . . . . . . . . . . . . . . . . . . . . . . . . . . . 2
Control Panel Functions . . . . . . . . . . . . . . . . . . . . . . . . . . . . . . . . . . . . . . . 2
Copying . . . . . . . . . . . . . . . . . . . . . . . . . . . . . . . . . . . . . . . . . . . . . . 4
Loading Paper . . . . . . . . . . . . . . . . . . . . . . . . . . . . . . . . . . . . . . . . . . . . . . . 4
Placing a Photo or Document on the Document Table . . . . . . . . . . . . . 5
Copying Overview . . . . . . . . . . . . . . . . . . . . . . . . . . . . . . . . . . . . . . . . . . . 5
Standard Copying . . . . . . . . . . . . . . . . . . . . . . . . . . . . . . . . . . . . . . . . . . . . 5
Borderless Copying . . . . . . . . . . . . . . . . . . . . . . . . . . . . . . . . . . . . . . . . . . . 6
Small Margin Copying . . . . . . . . . . . . . . . . . . . . . . . . . . . . . . . . . . . . . . . . 6
Fit to Page Copying . . . . . . . . . . . . . . . . . . . . . . . . . . . . . . . . . . . . . . . . . . . 6
Canceling Copying . . . . . . . . . . . . . . . . . . . . . . . . . . . . . . . . . . . . . . . . . . . 6
Printing or Scanning. . . . . . . . . . . . . . . . . . . . . . . . . . . . . . . . . . . . . 7
Printing from Your Computer . . . . . . . . . . . . . . . . . . . . . . . . . . . . . . . . . . 7
Scanning to Your Computer . . . . . . . . . . . . . . . . . . . . . . . . . . . . . . . . . . . 7
Canceling Printing . . . . . . . . . . . . . . . . . . . . . . . . . . . . . . . . . . . . . . . . . . . . 7
Replacing Ink Cartridges . . . . . . . . . . . . . . . . . . . . . . . . . . . . . . . . 8
Choosing Ink Cartridges. . . . . . . . . . . . . . . . . . . . . . . . . . . . . . . . . . . . . . . 8
Precautions on Ink Cartridge Replacement . . . . . . . . . . . . . . . . . . . . . . . 8
Replacing an Ink Cartridge . . . . . . . . . . . . . . . . . . . . . . . . . . . . . . . . . . . . 9
Maintenance . . . . . . . . . . . . . . . . . . . . . . . . . . . . . . . . . . . . . . . . . 11
Checking the Print Head Nozzles and Remaining Ink Levels . . . . . . 11
Cleaning the Print Head . . . . . . . . . . . . . . . . . . . . . . . . . . . . . . . . . . . . . . 11
Aligning the Print Head . . . . . . . . . . . . . . . . . . . . . . . . . . . . . . . . . . . . . . 12
Troubleshooting . . . . . . . . . . . . . . . . . . . . . . . . . . . . . . . . . . . . . . . 13
Using the Error Light and Other Lights to Diagnose Errors . . . . . . . . 13
Clearing Jammed Paper . . . . . . . . . . . . . . . . . . . . . . . . . . . . . . . . . . . . . . 13
Contacting Customer Support . . . . . . . . . . . . . . . . . . . . . . . . . . . 14
Regional Customer Services. . . . . . . . . . . . . . . . . . . . . . . . . . . . . . . . . . . 14
Product Information. . . . . . . . . . . . . . . . . . . . . . . . . . . . . . . . . . . . 15
Product Specifications. . . . . . . . . . . . . . . . . . . . . . . . . . . . . . . . . . . . . . . . 15
4049442-00
xxx
Epson Stylus CX3500

- Downloads
- Manuals and Warranty
- Registration
- Contact Us
Downloads
Manuals and Warranty
Quick Reference Guide
PDF
This document contains quick reference information for your product and the warranty.
Start Here
PDF
This document will assist you with product unpacking, installation, and setup.
User’s Guide
PDF
This document contains an overview of the product, specifications, basic and in-depth usage instructions, and information on using options.
Registration
Register Your Product
To register your new product, click the button below.
Register Now
Contact Us
Service Center Locator
To find a service center near you, click the button below.
Find a Location
Contact Us
Mail
:
Epson America, Inc.
3131 Katela Ave
Los Alamitos CA 90720
![]()
All in One Product
English
Basic Operation Guide
Safety Instructions
Warnings, Cautions, and Notes. . . . . . . . . . . . . . . . . . . . . . . . . . . . . . . . . 3
Safety Instructions . . . . . . . . . . . . . . . . . . . . . . . . . . . . . . . . . . . . . . . . . . . . 3
Using the Control Panel
Control Panel Functions . . . . . . . . . . . . . . . . . . . . . . . . . . . . . . . . . . . . . . . 4
Copying
Loading Paper . . . . . . . . . . . . . . . . . . . . . . . . . . . . . . . . . . . . . . . . . . . . . . . 6
Placing a Photo or Document on the Document Table . . . . . . . . . . . . . 7
Copying Overview . . . . . . . . . . . . . . . . . . . . . . . . . . . . . . . . . . . . . . . . . . . 7
Standard Copying . . . . . . . . . . . . . . . . . . . . . . . . . . . . . . . . . . . . . . . . . . . . 7
Borderless Copying . . . . . . . . . . . . . . . . . . . . . . . . . . . . . . . . . . . . . . . . . . . 8
Small Margin Copying . . . . . . . . . . . . . . . . . . . . . . . . . . . . . . . . . . . . . . . . 8
Fit to Page Copying . . . . . . . . . . . . . . . . . . . . . . . . . . . . . . . . . . . . . . . . . . . 8
Canceling Copying . . . . . . . . . . . . . . . . . . . . . . . . . . . . . . . . . . . . . . . . . . . 8
Printing or Scanning
Printing from Your Computer . . . . . . . . . . . . . . . . . . . . . . . . . . . . . . . . . . 9
Scanning to Your Computer . . . . . . . . . . . . . . . . . . . . . . . . . . . . . . . . . . . 9
Canceling Printing . . . . . . . . . . . . . . . . . . . . . . . . . . . . . . . . . . . . . . . . . . . . 9
Replacing Ink Cartridges
Choosing Ink Cartridges. . . . . . . . . . . . . . . . . . . . . . . . . . . . . . . . . . . . . . 10
Precautions on Ink Cartridge Replacement . . . . . . . . . . . . . . . . . . . . . . 10
Replacing an Ink Cartridge . . . . . . . . . . . . . . . . . . . . . . . . . . . . . . . . . . . 11
Maintenance
Checking the Print Head Nozzles and Remaining Ink Levels . . . . . . 13
Cleaning the Print Head . . . . . . . . . . . . . . . . . . . . . . . . . . . . . . . . . . . . . . 13
Aligning the Print Head . . . . . . . . . . . . . . . . . . . . . . . . . . . . . . . . . . . . . . 14
Troubleshooting
Using the Error Light and Other Lights to Diagnose Errors. . . . . . . . 15
Clearing Jammed Paper . . . . . . . . . . . . . . . . . . . . . . . . . . . . . . . . . . . . . . 15
Contacting Customer Support
Regional Customer Services. . . . . . . . . . . . . . . . . . . . . . . . . . . . . . . . . . . 16
Product Information
Product Specifications. . . . . . . . . . . . . . . . . . . . . . . . . . . . . . . . . . . . . . . . 17
1

All in One Product
Basic Operation Guide
All rights reserved. No part of this publication may be reproduced, stored in a retrieval system, or transmitted in any form or by any means, electronic, mechanical, photocopying, recording, or otherwise, without the prior written permission of Seiko Epson Corporation. The information contained herein is designed only for use with this product. Epson is not responsible for any use of this information as applied to other products.
Neither Seiko Epson Corporation nor its affiliates shall be liable to the purchaser of this product or third parties for damages, losses, costs, or expenses incurred by the purchaser or third parties as a result of accident, misuse, or abuse of this product or unauthorized modifications, repairs, or alterations to this product, or (excluding the U.S.) failure to strictly comply with Seiko Epson Corporation’s operating and maintenance instructions.
Seiko Epson Corporation shall not be liable for any damages or problems arising from the use of any options or any consumable products other than those designated as Original Epson Products or Epson Approved Products by Seiko Epson Corporation.
Seiko Epson Corporation shall not be held liable for any damage resulting from electromagnetic interference that occurs from the use of any interface cables other than those designated as Epson Approved Products by Seiko Epson Corporation.
EPSON® is a registered trademark and EPSON Stylus™ is a trademark of Seiko Epson Corporation.
General Notice: Other product names used herein are for identification purposes only and may be trademarks of their respective owners. Epson disclaims any and all rights in those marks.
Copyright © 2004 by Seiko Epson Corporation, Nagano, Japan.
Parts
|
edge guide sheet feeder |
paper support extension |
|
paper support |
|
|
feeder guard |
|
|
document |
|
|
cover |
|
|
control panel |
|
|
output |
|
|
tray |
|
|
scanner unit |
output tray extension |
document table
 cartridge cover
adjust lever 

USB cable connector
AC inlet
2

Safety Instructions
Warnings, Cautions, and Notes
wWarnings
must be followed carefully to avoid bodily injury.
cCautions
must be observed to avoid damage to your equipment.
Notes
contain important information and useful tips on the operation of your product.
Safety Instructions
Read all of the instructions in this section when setting up and using this product.
When placing this product
Avoid places subject to rapid changes in temperature and humidity. Also, keep this product away from direct sunlight, strong light, and heat sources.
Avoid places subject to dust, shocks, and vibrations.
Leave enough room around this product for sufficient ventilation.
Place this product near a wall outlet where you can easily plug in and unplug this product.
Place this product on a flat, stable surface that extends beyond this product base in all directions. If you place this product by the wall, leave more than 10 cm between the back of this product and the wall. This product will not operate properly if it is tilted at an angle.
When storing or transporting this product, do not tilt it, stand it on its side, or turn it upside down; otherwise, ink may leak from the cartridge.
When choosing a power source
Use only the type of power source indicated on the label on the back of this product.
Use only the power cord that comes with this product. Use of another cord may cause fire or electric shock.
This product’s power cord is for use with this product only. Use with other equipment may cause fire or electric shock.
Be sure your AC power cord meets the relevant local safety standards.
Do not use a damaged or frayed power cord.
If you use an extension cord with this product, make sure that the total ampere rating of the devices plugged into the extension cord does not exceed the cord’s ampere rating. Also, make sure that the total ampere rating of all devices plugged into the wall outlet does not exceed the wall outlet’s ampere rating.
If you plan to use this product in Germany, the building installation must be protected by a 10 or 16 amp circuit breaker to provide adequate short-circuit protection and over-current protection for this product.
When handling ink cartridges
Do not shake the ink cartridge after removing from the package; this can cause leakage.
Keep the ink cartridge out of the reach of children. Do not allow children to handle it, or drink ink.
Be careful when you handle used ink cartridges, as there may be some ink remaining around the ink supply port. If ink gets on your skin, wash the area thoroughly with soap and water. If ink gets into your eyes, flush them immediately with water. If discomfort or vision problems remain after a thorough flushing, see a doctor immediately.
When using this product
Do not put your hand inside this product or touch the ink cartridges during printing.
Do not block or cover the openings on this product.
Do not attempt to service this product by yourself.
Unplug this product and refer servicing to qualified service personnel under the following conditions:
The power cord or plug is damaged; liquid has entered into this product; this product has been dropped or the cover damaged; this product does not operate normally or exhibits a distinct change in performance.
When connecting this product to a computer or other device with a cable, ensure the correct orientation of the connectors. Each connector has only one correct orientation. Inserting a connector in the wrong orientation may damage both devices connected by the cable.
Do not insert objects into the slots on this product.
Never spill liquid on this product.
Do not leave this product with the ink cartridges uninstalled. If it has been left with ink cartridges uninstalled for a long time, the ink remaining in the print head nozzle drys out; this product may becomes unable to print.
English
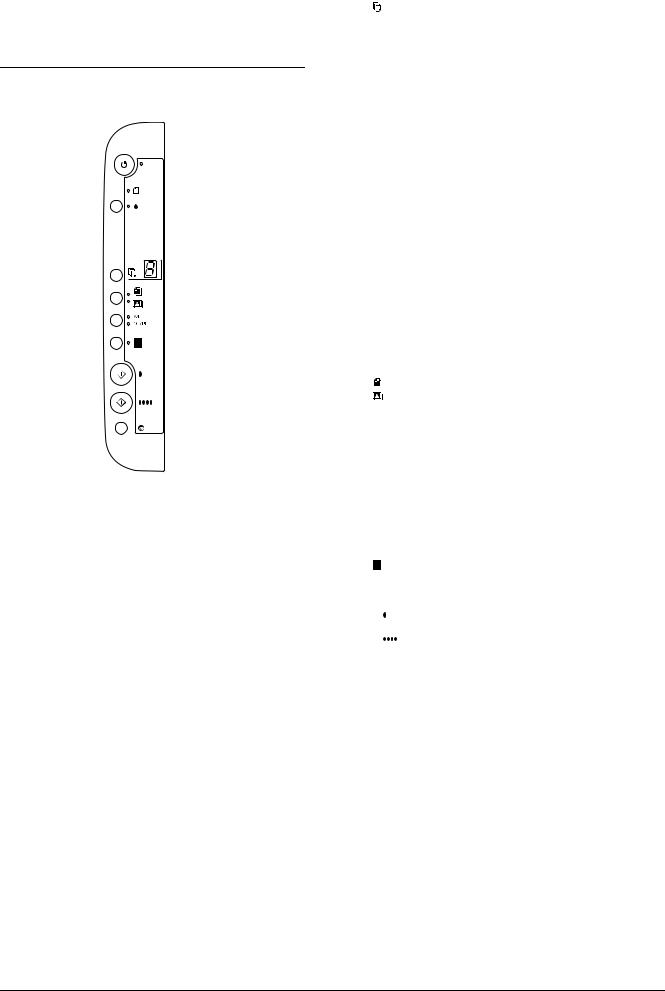
Using the Control Panel
Control Panel Functions
Buttons
|
Buttons |
Function |
|
P On |
Turns this product on and off. |
|
H |
Moves the print head to the ink |
|
check position when an ink |
|
|
cartridge that is empty or nearly |
|
|
empty is detected. |
|
|
Moves the print head to the ink |
|
|
cartridge replacement position. |
|
|
Returns the print head to its home |
|
|
position after ink cartridge |
|
|
replacement. |
|
|
Performs print head cleaning if held |
|
|
down for three seconds when the ink |
|
|
light is off. |
|
|
Copy |
Enters Copy Mode and allows you to |
|
|
set the number of copies. |
||
|
The number of copies increases by |
||
|
one when this button is pressed |
||
|
once. |
||
|
The number of copies is displayed in |
||
|
the LED window. |
||
|
If you press this button when 9 is |
||
|
displayed as the number of copies, |
||
|
“-” appears in the LED window. |
||
|
This indicates that 100 copies will be |
||
|
made. To make between 10 and 100 |
||
|
copies, make sure that “-” is |
||
|
displayed, then insert the same |
||
|
amount of sheets in the feeder as |
||
|
the number of copies you want |
||
|
made. |
||
|
If you make up to 99 copies, a paper |
||
|
out error will occur when this product |
||
|
finishes making copies and runs out |
||
|
of paper. To clear the error, press the |
||
|
y Stop button. |
||
|
1 appears in the LED window if this |
||
|
button is pressed when “-” is |
||
|
displayed. |
||
|
Plain Paper |
Selects Plain Paper or Photo Paper |
|
|
Photo Paper |
as the paper type. Select Plain |
|
|
Paper when using plain paper or |
||
|
recycled paper. Select Photo Paper |
||
|
when using DURABright Photo |
||
|
Paper. |
||
|
A4 |
Selects A4 or 10× 15 as the size of the |
|
|
10× 15 |
paper set in the sheet feeder. 10× 15 |
|
|
indicates 10 × 15 cm size paper. You |
||
|
can only copy onto A4 or 10 × 15 cm |
||
|
size paper when using the control |
||
|
panel. |
||
|
Fit to Page |
Reduces or enlarges the size of the |
|
|
copied image to fit the selected size |
||
|
of paper. |
||
|
x |
Start B&W |
Copies in grayscale. |
|
x |
Start Color |
Copies in color. |
|
y Stop |
Stops copying. The sheet being |
|
|
copied is ejected. |
||
4 Using the Control Panel

Lights
Note:
All lights will turn off if no buttons have been pressed for 15 minutes. When a button is pressed, the lights will return to their former state.
|
Light |
Pattern |
Status |
|
On |
On |
Indicates this product is |
|
on. |
||
|
Flashing |
Indicates this product is |
|
|
(slow) |
copying, printing, |
|
|
receiving data, |
||
|
scanning, having an ink |
||
|
cartridge replaced, |
||
|
charging ink, or |
||
|
cleaning the print head. |
||
|
Flashing |
Indicates this product is |
|
|
(fast) |
being turned off. |
|
|
m Error |
On or |
Indicates that an error |
|
Flashing |
has occurred. (For |
|
|
details, see |
||
|
“Troubleshooting” on |
||
|
page 15.) |
||
|
H |
Flashing |
Indicates that the ink |
|
level in a cartridge is low. |
||
|
Continue to use it until it |
||
|
is empty. |
||
|
On |
Indicates that an ink |
|
|
cartridge is empty or |
||
|
missing. |
||
|
Copy |
1 to 9 |
Indicates the number of |
|
(LED window) |
copies. |
|
|
— |
Indicates that 100 |
|
|
copies will be made. |
||
|
E |
Indicates that an error |
|
|
has occurred. |
||
|
H |
Indicates that the adjust |
|
|
lever has been set to the |
||
|
^ position. |
||
|
L |
Indicates that the adjust |
|
|
lever has been set to the |
||
|
standard m position. |
||
|
. (dot) |
Indicates that the |
|
|
control panel is |
||
|
operating at reduced |
||
|
power. (The product |
||
|
switches to this mode |
||
|
after 15 minutes of |
||
|
inactivity. The panel |
||
|
reverts to normal power |
||
|
when any key other |
||
|
than the P On button is |
||
|
pressed.) |
||
|
Plain Paper |
On |
Indicates the selected |
|
Photo Paper |
paper type. |
|
|
A4 |
On |
Indicates the selected |
|
10× 15 |
paper size. |
|
|
10× 15 indicates |
||
|
10 × 15 cm size paper. |
||
|
Fit to Page |
On |
Indicates that the |
|
product has been set to |
||
|
copy the original so that |
||
|
it fits to the selected |
||
|
paper size. |
||
English
|
Using the Control Panel |
5 |

Copying
This section describes how to make copies using the control panel.
Loading Paper
1.Open the paper support, then slide out the extension, and then open the feeder guard.
2.Lower the output tray and slide out the extension.
3.Slide out the left edge guide so that the distance between the two edge guides is slightly wider than the paper you are going to load.
4.Load the paper with the printable side up so it is against the right edge guide, and slide it into the sheet feeder.
5.Slide the left edge guide so that it meets the left edge of the paper.
Note:
Always load paper short edge first into the sheet feeder.
Make sure that the paper stack is flush with or lower than the triangular load-limit mark on the edge guide.
Make sure that the paper is loaded under the tabs inside the edge guides.
Ensure that you set the adjust lever to the m position. If you print on paper other than
envelopes when the lever is set to the ^ position, print quality and speed will be compromised.
6.Set the feeder guard back.
Note:
The print result is affected by the kind of paper you use. For the best quality, use the appropriate paper.
6 Copying
 Loading…
Перейти к контенту
МФУ (многофункциональные устройства) Epson

- Размер инструкции: 561.08 kB
- Формат файла: pdf
Если вы потеряли инструкцию от МФУ (многофункционального устройства) Epson Stylus CX3500, можете скачать файл для просмотра на компьютере или печати.
Инструкция для МФУ (многофункционального устройства) Epson Stylus CX3500 на русском языке. В руководстве описаны возможности и полезные функции, а также правила эксплуатации. Перед использованием внимательно ознакомьтесь с инструкцией.
Чтобы не читать всю инструкцию вы можете выполнить поиск по содержимому внутри инструкции и быстро найти необходимую информацию. Рекомендации по использованию помогут увеличить срок службы МФУ (многофункционального устройства) Epson Stylus CX3500. Если у вас появилась проблема, то найдите раздел с описанием неисправностей и способами их решения. В нем указаны типичные поломки и способы их решения.