
![]()
Downloaded from
www . vandenborre . be
User’s Guide
NPD5449-00 EN
|
User’s Guide |
Downloaded |
|||
Copyright |
||||
|
Copyright |
from |
|||
|
www |
||||
|
. |
||||
|
No part of this publication may be reproduced, stored in a retrieval system, or transmitted in any form or by any |
||||
|
means, electronic, mechanical, photocopying, recording, or otherwise, without the prior written permission of |
||||
|
Seiko Epson Corporation. No patent liability is assumed with respect to the use of the information contained |
||||
|
herein. Neither is any liability assumed for damages resulting from the use of the information herein. The |
vandenborre |
|||
|
. |
||||
|
information contained herein is designed only for use with this Epson product. Epson is not responsible for any |
be |
|||
use of this information as applied to other products.
Neither Seiko Epson Corporation nor its affiliates shall be liable to the purchaser of this product or third parties for damages, losses, costs, or expenses incurred by the purchaser or third parties as a result of accident, misuse, or abuse of this product or unauthorized modifications, repairs, or alterations to this product, or (excluding the U.S.) failure to strictly comply with Seiko Epson Corporation’s operating and maintenance instructions.
Seiko Epson Corporation and its affiliates shall not be liable for any damages or problems arising from the use of any options or any consumable products other than those designated as Original Epson Products or Epson Approved Products by Seiko Epson Corporation.
Seiko Epson Corporation shall not be held liable for any damage resulting from electromagnetic interference that occurs from the use of any interface cables other than those designated as Epson Approved Products by Seiko Epson Corporation.
© 2016 Seiko Epson Corporation. All rights reserved.
The contents of this manual and the specifications of this product are subject to change without notice.
2

|
User’s Guide |
Downloaded |
|
Trademarks |
||
|
Trademarks |
from |
|
|
www |
||
|
. |
||
|
PRINT Image Matching™ and the PRINT Image Matching logo are trademarks of Seiko Epson Corporation.vandenborre |
||
|
EPSON®is a registered trademark, and EPSON EXCEED YOUR VISION or EXCEED YOUR VISION is a |
||
|
trademark of Seiko Epson Corporation. |
||
|
Copyright © 2001 Seiko Epson Corporation. All rights reserved. |
. |
|
|
be |
Epson Scan 2 software is based in part on the work of the Independent JPEG Group.
libtiff
Copyright © 1988-1997 Sam Leffler
Copyright © 1991-1997 Silicon Graphics, Inc.
Permission to use, copy, modify, distribute, and sell this software and its documentation for any purpose is hereby granted without fee, provided that (i) the above copyright notices and this permission notice appear in all copies of the software and related documentation, and (ii) the names of Sam Leffler and Silicon Graphics may not be used in any advertising or publicity relating to the software without the specific, prior written permission of Sam Leffler and Silicon Graphics.
THE SOFTWARE IS PROVIDED «AS-IS» AND WITHOUT WARRANTY OF ANY KIND, EXPRESS, IMPLIED OR OTHERWISE, INCLUDING WITHOUT LIMITATION, ANY WARRANTY OF MERCHANTABILITY OR FITNESS FOR A PARTICULAR PURPOSE.
IN NO EVENT SHALL SAM LEFFLER OR SILICON GRAPHICS BE LIABLE FOR ANY SPECIAL, INCIDENTAL, INDIRECT OR CONSEQUENTIAL DAMAGES OF ANY KIND, OR ANY DAMAGES WHATSOEVER RESULTING FROM LOSS OF USE, DATA OR PROFITS, WHETHER OR NOT ADVISED OF THE POSSIBILITY OF DAMAGE, AND ON ANY THEORY OF LIABILITY, ARISING OUT OF OR IN CONNECTION WITH THE USE OR PERFORMANCE OF THIS SOFTWARE.
SDXC Logo is a trademark of SD-3C, LLC.
Microsoft®, Windows®, and Windows Vista®are registered trademarks of Microsoft Corporation.
Apple, Macintosh, Mac OS, OS X, Bonjour, Safari, iPad, iPhone, iPod touch, and iTunes are trademarks of Apple Inc., registered in the U.S. and other countries. AirPrint and the AirPrint logo are trademarks of Apple Inc.
Google Cloud Print™, Chrome™, Chrome OS™, and Android™ are trademarks of Google Inc.
Adobe and Adobe Reader are either registered trademarks or trademarks of Adobe Systems Incorporated in the United States and/or other countries.
Intel® is a registered trademark of Intel Corporation.
General Notice: Other product names used herein are for identification purposes only and may be trademarks of their respective owners. Epson disclaims any and all rights in those marks.
3
|
User’s Guide |
Downloaded |
|||||
Contents |
||||||
|
from |
||||||
|
Contents |
www |
|||||
|
. |
||||||
|
Copyright |
Checking the Network Status Using Network |
vandenborre |
||||
|
Icon. . . . . . . . . . . . . . . . . . . . . . . . . . . . . . |
. . . |
25 |
||||
|
Trademarks |
Printing a Network Connection Report. . . . . |
. . . |
26 |
|||
|
Printing a Network Status Sheet |
29 |
. |
||||
|
. . . |
||||||
|
Replacing or Adding New Access Points |
30 |
|||||
|
About This Manual |
. . . |
be |
||||
|
Changing the Connection Method to a Computer. . |
30 |
|||||
|
Introduction of Manuals. . . . . . . . . . . . . . . . . . . . . |
8 |
Disabling Wi-Fi from the Control Panel. . . . . . . |
. . . |
32 |
||
|
Marks and Symbols. . . . . . . . . . . . . . . . . . . . . . . . . |
8 |
Disconnecting Wi-Fi Direct (Simple AP) |
32 |
|||
|
Descriptions Used in this Manual |
9 |
connection from the Control Panel. . . . . . . . . . |
. . . |
|||
|
Restoring the Network Settings from the |
||||||
|
Operating System References |
9 |
|||||
|
Control Panel |
32 |
|||||
|
. . |
||||||
|
Important Instructions |
Loading Paper |
|||||
|
Safety Instructions |
10 |
|||||
|
Paper Handling Precautions |
33 |
|||||
|
Printer Advisories and Warnings |
11 |
. . |
||||
|
Available Paper and Capacities |
34 |
|||||
|
Advisories and Warnings for Setting Up/ |
. . |
|||||
|
List of Paper Types |
35 |
|||||
|
Using the Printer |
11 |
. . |
||||
|
Loading Paper in the Rear Paper Feed |
35 |
|||||
|
Advisories and Warnings for Using the |
. . |
|||||
|
Printer with a Wireless Connection. . . . . . . . . . . |
12 |
|||||
|
Advisories and Warnings for Using Memory |
12 |
Placing Originals |
||||
|
Cards. . . . . . . . . . . . . . . . . . . . . . . . . . . . . . . . |
Placing Originals on the Scanner Glass |
39 |
||||
|
Advisories and Warnings for Using the LCD |
. . |
|||||
|
Screen. . . . . . . . . . . . . . . . . . . . . . . . . . . . . . . . |
12 |
. . . . . . . . . . . . . .How to Place Various Originals |
. . |
40 |
||
|
Protecting Your Personal Information. . . . . . . . . . . |
12 |
Placing Originals for 2-Up Layout. . . . . . . . . . |
. . |
40 |
||
|
Placing a Double-Page Spread for 2-Up Layout. . |
40 |
|||||
|
Printer Basics |
Placing Multiple Photos for Scanning. . . . . . . . |
. |
41 |
|||
|
Part Names and Functions. . . . . . . . . . . . . . . . . . . |
13 |
Inserting a Memory Card |
||||
|
Control Panel |
15 |
|||||
|
Supported Memory Cards |
42 |
|||||
|
Buttons |
15 |
. |
||||
|
Inserting and Removing a Memory Card |
42 |
|||||
|
Guide to the LCD Screen |
15 |
. . |
||||
|
Network Settings |
Printing |
|||||
|
Printing from the Control Panel |
44 |
|||||
|
Network Connection Types |
19 |
. |
||||
|
Printing Photos by Selecting from a Memory |
||||||
|
Wi-Fi Connection |
19 |
|||||
|
Card |
44 |
|||||
|
Wi-Fi Direct (Simple AP) Connection |
19 |
. |
||||
|
Printing Lined Paper, Calendars, and |
||||||
|
Connecting to a Computer |
20 |
|||||
|
Original Writing Paper |
45 |
|||||
|
Connecting to a Smart Device |
22 |
. . |
||||
|
DPOF Printing. . . . . . . . . . . . . . . . . . . . . . . . |
. |
46 |
||||
|
Making Wi-Fi Settings from the Control Panel. . . . . |
22 |
Menu Options for Print Photos Mode. . . . . . . |
. . |
46 |
||
|
Making Wi-Fi Settings Manually. . . . . . . . . . . . . |
22 |
Printing from a Computer. . . . . . . . . . . . . . . . . . |
. |
46 |
||
|
Making Wi-Fi Settings by Push Button Setup. . . . |
23 |
Printing Basics — Windows. . . . . . . . . . . . . . . . |
. |
46 |
||
|
Making Wi-Fi Settings by PIN Code Setup |
24 |
Printing Basics — Mac OS X. . . . . . . . . . . . . . . |
. . |
48 |
||
|
(WPS). . . . . . . . . . . . . . . . . . . . . . . . . . . . . . . . |
Printing on 2-Sides (for Windows only) |
50 |
||||
|
Making Wi-Fi Direct (Simple AP) |
. . |
|||||
|
Printing Several Pages on One Sheet |
51 |
|||||
|
Connection Settings |
25 |
. . |
||||
|
Printing to Fit the Paper Size |
52 |
|||||
|
Checking the Network Connection Status |
25 |
. . |
||||
4
|
User’s Guide |
Downloaded |
||||||
|
Contents |
|||||||
|
Printing Multiple Files Together (for |
from |
||||||
|
Checking and Cleaning the Print Head — |
|||||||
|
Windows Only) |
54 |
Windows |
www |
94 |
|||
|
. . . . . |
. . |
||||||
|
Printing One Image on Multiple Sheets to |
64 |
Checking and Cleaning the Print Head — |
. |
||||
|
Printing from Smart Devices. . . . . . . . . . . . . . . . . |
Mac OS X |
vandenborre |
|||||
|
Create a Poster (for Windows Only). . . . . . . . . . |
55 |
. . . . . |
. . |
. 94 |
|||
|
Printing Using Advanced Features. . . . . . . . . . . |
61 |
Aligning the Print Head. . . . . . . . . . . . . |
. . . . . |
. . |
. 94 |
||
|
Printing Photos Using Epson Easy Photo Print. . |
63 |
Aligning the Print Head — Control Panel |
95 |
||||
|
. . . |
|||||||
|
Aligning the Print Head — Windows. . . |
. . . . . |
. . |
.95 |
. |
|||
|
Using Epson iPrint |
64 |
Aligning the Print Head — Mac OS X |
96 |
be |
|||
|
. . . . |
. . . |
||||||
|
Using AirPrint. . . . . . . . . . . . . . . . . . . . . . . . . . |
66 |
Cleaning the Paper Path. . . . . . . . . . . . . . |
. . . . |
. . . |
96 |
||
|
Canceling Printing. . . . . . . . . . . . . . . . . . . . . . . . . |
66 |
Cleaning the Scanner Glass. . . . . . . . . . . . |
. . . . |
. . . |
97 |
||
|
Canceling Printing — Printer Button. . . . . . . . . . . |
66 |
Saving Power. . . . . . . . . . . . . . . . . . . . . . |
. . . . |
. . . |
97 |
||
|
Canceling Printing — Windows. . . . . . . . . . . . . . |
67 |
Saving Power — Control Panel |
97 |
||||
|
Canceling Printing — Mac OS X |
67 |
. . . . |
. . . |
||||
|
Saving Power — Windows |
98 |
||||||
|
. . . |
. . . |
||||||
|
Copying |
Saving Power — Mac OS X. . . . . . . . . . . |
. . . . |
. . . |
98 |
|||
|
Menu Options for Copy Mode. . . . . . . . . . . . . . . . |
68 |
Menu Options for Setup Mode |
|||||
|
Scanning |
Menu Options for Ink Levels. . . . . . . . . . . |
. . . . |
. . |
99 |
|||
|
Menu Options for Maintenance. . . . . . . . . |
. . . |
. . . |
99 |
||||
|
Scanning Using the Control Panel. . . . . . . . . . . . . . |
71 |
Menu Options for Printer Setup. . . . . . . . . |
. . . |
. . |
100 |
||
|
Scanning to a Computer. . . . . . . . . . . . . . . . . . . |
71 |
Menu Options for Network Settings. . . . . . |
. . . |
. . |
100 |
||
|
Scanning to a Computer (WSD). . . . . . . . . . . . . |
72 |
Menu Options for Epson Connect Services. . . . |
. . |
101 |
|||
|
Scanning from a Computer. . . . . . . . . . . . . . . . . . . |
74 |
Menu Options for Google Cloud Print Services. |
. . |
102 |
|||
|
Scanning Using Epson Scan 2. . . . . . . . . . . . . . . |
74 |
Menu Options for File Sharing. . . . . . . . . . |
. . . |
. . |
102 |
||
|
Scanning from Smart Devices. . . . . . . . . . . . . . . . . |
80 |
Menu Options for Firmware Update. . . . . |
. . . . |
. . |
103 |
||
|
Installing Epson iPrint. . . . . . . . . . . . . . . . . . . . |
80 |
Menu Options for Restore Default Settings. . . . |
. . |
103 |
|||
|
Scanning Using Epson iPrint. . . . . . . . . . . . . . . |
80 |
||||||
|
Replacing Ink Cartridges |
Network Service and Software |
||||||
|
Information |
|||||||
|
Checking the Ink Levels. . . . . . . . . . . . . . . . . . . . . |
82 |
Epson Connect Service. . . . . . . . . . . . . . . |
. . . . |
. . |
104 |
||
|
Checking the Ink Levels — Control Panel. . . . . . . |
82 |
Web Conf ig |
104 |
||||
|
Checking the Ink Levels — Windows |
82 |
. . . |
. . . |
||||
|
Running Web Config on a Web Browser |
105 |
||||||
|
Checking the Ink Levels — Mac OS X |
82 |
. . |
|||||
|
Running Web Conf ig on Windows |
105 |
||||||
|
Ink Cartridge Codes |
82 |
. . . . |
. . |
||||
|
Running Web Conf ig on Mac OS X |
105 |
||||||
|
Ink Cartridge Handling Precautions |
83 |
. . . |
. . . |
||||
|
Windows Printer Driver. . . . . . . . . . . . . . |
. . . . |
. . |
106 |
||||
|
Replacing Ink Cartridges. . . . . . . . . . . . . . . . . . . . |
85 |
Guide to Windows Printer Driver. . . . . |
. . . . |
. . |
107 |
||
|
Temporarily Printing with Black Ink. . . . . . . . . . . . |
88 |
Making Operation Settings for the Windows |
|||||
|
Temporarily Printing with Black Ink — Windows. |
90 |
Printer Driver. . . . . . . . . . . . . . . . . . . . |
. . . |
. . |
109 |
||
|
Temporarily Printing with Black Ink — |
Mac OS X Printer Driver. . . . . . . . . . . . . . |
. . . |
. . |
109 |
|||
|
Mac OS X. . . . . . . . . . . . . . . . . . . . . . . . . . . . . |
91 |
Guide to Mac OS X Printer Driver. . . . . |
. . . . |
. . |
110 |
||
|
Conserving Black Ink when the Black Ink Is |
Making Operation Settings for the Mac OS X |
||||||
|
Low (for Windows Only). . . . . . . . . . . . . . . . . . . . |
92 |
Printer Driver. . . . . . . . . . . . . . . . . . . . |
. . . |
. . |
111 |
||
|
Maintaining the Printer |
Epson Scan 2 (Scanner Driver). . . . . . . . . |
. . . . |
. . |
112 |
|||
|
Epson Event Manager. . . . . . . . . . . . . . . . |
. . . . |
. . |
112 |
||||
|
Checking and Cleaning the Print Head. . . . . . . . . . |
93 |
Epson Easy Photo Print. . . . . . . . . . . . . . . |
. . . |
. . |
113 |
||
|
Checking and Cleaning the Print Head — |
E-Web Print (for Windows Only). . . . . . . . |
. . . |
. . |
113 |
|||
|
Control Panel. . . . . . . . . . . . . . . . . . . . . . . . . . |
93 |
Easy Photo Scan. . . . . . . . . . . . . . . . . . . . |
. . . . |
. . |
114 |
||
5
|
User’s Guide |
Downloaded |
|||||
|
Contents |
||||||
|
EPSON Sof tware Updater |
114 |
from |
||||
|
Blurry Prints, Vertical Banding, or |
www |
|||||
|
. . . . . . . . . . . . . . . . . . .Uninstalling Applications |
115 |
. . . . . . . . . . . . . . . . . .Misalignment |
. . . . . . |
. |
.131 |
|
|
Uninstalling Applications — Windows |
115 |
Print Quality is Poor. . . . . . . . . . . . . . |
. . . . .. |
.131 |
||
|
Colors |
vandenborre133 |
|||||
|
Updating Applications and Firmware. . . . . . . . . . |
117 |
. . . . . |
||||
|
Uninstalling Applications — Mac OS X. . . . . . . . |
116 |
Paper Is Smeared or Scuf fed. . . . . . . . |
. . . . . |
. |
. 132 |
|
|
Installing Applications. . . . . . . . . . . . . . . . . . . . . |
116 |
. . . . . . . . . . .Printed Photos are Sticky |
. . . . |
. . |
132 |
|
|
Images or Photos are Printed in Unexpected |
||||||
|
Updating the Printer’s Firmware using the |
Colors Differ from What You See on the |
. |
||||
|
117 |
be |
|||||
|
Control Panel. . . . . . . . . . . . . . . . . . . . . . . . . . |
Display. . . . . . . . . . . . . . . . . . . . . . . . |
. . . . |
. . |
133 |
||
|
Cannot Print Without Margins. . . . . . |
. . . . . |
. . |
133 |
|||
|
Solving Problems |
Edges of the Image are Cropped During |
133 |
||||
|
Checking the Printer Status |
119 |
Borderless Printing. . . . . . . . . . . . . . . |
. . . . . |
. |
||
|
The Position, Size, or Margins of the Printout |
||||||
|
Checking Error Codes on the LCD Screen |
119 |
|||||
|
Are Incorrect. . . . . . . . . . . . . . . . . . . |
. . . . . |
. . |
134 |
|||
|
Checking the Printer Status — Windows. . . . . . . |
120 |
Printed Characters Are Incorrect or Garbled. |
. . |
134 |
||
|
Checking Printer Status — Mac OS X. . . . . . . . . |
120 |
T he Printed Image Is Inverted. . . . . . . |
. . . . |
. . |
. 134 |
|
|
Removing Jammed Paper. . . . . . . . . . . . . . . . . . . |
121 |
Mosaic-Like Patterns in the Prints. . . . |
. . . . . |
. . |
134 |
|
|
Removing Jammed Paper from the Rear |
Uneven Colors, Smears, Dots, or Straight |
|||||
|
Paper Feed. . . . . . . . . . . . . . . . . . . . . . . . . . . . |
121 |
Lines Appear in the Copied Image. . . . |
. . . . . |
. . |
135 |
|
|
Removing Jammed Paper from the Output Tray 121 |
Moiré (Cross-Hatch) Patterns Appear in the |
135 |
||||
|
Removing Jammed Paper from Inside the |
Copied Image. . . . . . . . . . . . . . . . . . . |
. . . . . |
. |
|||
|
An Image of the Reverse Side of the Original |
||||||
|
Printer. . . . . . . . . . . . . . . . . . . . . . . . . . . . . . . |
122 |
135 |
||||
|
Paper Does Not Feed Correctly |
123 |
Appears in the Copied Image. . . . . . . . |
. . . . |
. . |
||
|
The Printout Problem Could Not be Cleared |
135 |
|||||
|
Paper Jams |
123 |
. . |
||||
|
Other Printing Problems |
136 |
|||||
|
Paper Feeds at a Slant |
123 |
. . . . . |
. |
|||
|
Printing Is Too Slow |
136 |
|||||
|
Several Sheets of Paper are Fed at a Time |
124 |
. . . . . |
. . |
|||
|
Printing Slows Down Dramatically During |
||||||
|
No Paper Feeds |
124 |
|||||
|
Continuous Printing |
136 |
|||||
|
Paper Out Error Occurs |
124 |
. . . . . |
. . |
|||
|
Cannot Cancel Printing from a Computer |
||||||
|
Power and Control Panel Problems |
124 |
|||||
|
Running Mac OS X v10.6.8 |
136 |
|||||
|
Power Does Not Turn On |
124 |
. . . . . |
. . |
|||
|
Cannot Start Scanning |
137 |
|||||
|
Power Does Not Turn Of f |
124 |
. . . . . |
. . |
|||
|
Cannot Start Scanning when Using the |
||||||
|
LCD Screen Gets Dark |
124 |
|||||
|
Control Panel |
137 |
|||||
|
Cannot Print from a Computer |
124 |
. . . . . |
. . |
|||
|
Scanned Image Problems |
138 |
|||||
|
When You Cannot Make Network Settings |
125 |
. . . . |
. . |
|||
|
Uneven Colors, Dirt, Spots, and so on Appear |
||||||
|
Cannot Connect from Devices Even Though |
||||||
|
125 |
when Scanning from the Scanner Glass. . . . . |
. . |
138 |
|||
|
Network Settings are No Problem. . . . . . . . . . . |
T he Image Quality Is Rough |
138 |
||||
|
Checking the SSID Connected to the Printer |
127 |
. . . . . |
. . |
|||
|
Offset Appears in the Background of Images |
138 |
|||||
|
Checking the SSID for the Computer |
127 |
. . |
||||
|
Text is Blurred |
138 |
|||||
|
Suddenly the Printer Cannot Print over a |
. . . . . |
. . |
||||
|
Moiré Patterns (Web-Like Shadows) Appear. |
. . |
139 |
||||
|
Network Connection. . . . . . . . . . . . . . . . . . . . . . |
128 |
Cannot Scan the Correct Area on the |
||||
|
Suddenly the Printer Cannot Print Using a USB |
Scanner Glass. . . . . . . . . . . . . . . . . . . |
. . . . . |
. . |
139 |
||
|
Connection. . . . . . . . . . . . . . . . . . . . . . . . . . . . . |
129 |
Cannot Preview in T humbnail. . . . . . |
. . . . . |
. . |
139 |
|
|
Cannot Print from an iPhone or iPad. . . . . . . . . . |
129 |
Text is Not Recognized Correctly when |
||||
|
Printing is Paused. . . . . . . . . . . . . . . . . . . . . . . . |
129 |
Saving as a Searchable PDF. . . . . . . . . |
. . . . . |
. . |
140 |
|
|
Printout Problems |
129 |
Cannot Solve Problems in the Scanned Image. . |
140 |
|||
|
Other Scanning Problems |
141 |
|||||
|
Printout is Scuf fed or Color is Missing |
129 |
. . . . . |
. . |
|||
|
Scanning Is Too Slow |
141 |
|||||
|
Banding or Unexpected Colors Appear. . . . . . . |
130 |
. . . . . |
. . |
|||
|
Colored Banding Appears at Intervals of |
Scanning Stops when Scanning to PDF/ |
|||||
|
Approximately 2.5 cm. . . . . . . . . . . . . . . . . . . . |
130 |
. . . . . . . . . . . . . . . . . . . . .Multi-TIFF |
. . . . |
. . |
141 |
|
|
Other Problems. . . . . . . . . . . . . . . . . . . |
. . . . . |
. . |
141 |
|||
6

User’s Guide
Contents
Slight Electric Shock when Touching the
Printer. . . . . . . . . . . . . . . . . . . . . . . . . . . . . . .141 Operation Sounds Are Loud. . . . . . . . . . . . . . . 141 Cannot Save the Data to a Memory Card. . . . . .142 Application Is Blocked by a Firewall (for
Windows Only). . . . . . . . . . . . . . . . . . . . . . . . 142 «?» Is Displayed on the Photo Selection Screen. . 142
Appendix
Technical Specif ications. . . . . . . . . . . . . . . . . . . . 143
Printer Specif ications. . . . . . . . . . . . . . . . . . . . 143 Scanner Specif ications. . . . . . . . . . . . . . . . . . . 144 Interface Specif ications. . . . . . . . . . . . . . . . . . . 144 Network Function List. . . . . . . . . . . . . . . . . . . 144 Wi-Fi Specif ications. . . . . . . . . . . . . . . . . . . . . 146 Security Protocol. . . . . . . . . . . . . . . . . . . . . . . 146 Supported T hird Party Services. . . . . . . . . . . . . 146 External Storage Device Specif ications. . . . . . . .147 Dimensions. . . . . . . . . . . . . . . . . . . . . . . . . . . 148 Electrical Specif ications. . . . . . . . . . . . . . . . . . 148 Environmental Specif ications. . . . . . . . . . . . . . 148 System Requirements. . . . . . . . . . . . . . . . . . . . 149
Regulatory Information. . . . . . . . . . . . . . . . . . . . 149
Standards and Approvals. . . . . . . . . . . . . . . . . 149 Restrictions on Copying. . . . . . . . . . . . . . . . . . 149
Transporting the Printer. . . . . . . . . . . . . . . . . . . . 150
Accessing a Memory Card From a Computer. . . . .152
Where to Get Help. . . . . . . . . . . . . . . . . . . . . . . . 153
Technical Support Web Site. . . . . . . . . . . . . . . .153
Contacting Epson Support. . . . . . . . . . . . . . . . 153
Downloaded from
www . vandenborre . be
7

|
User’s Guide |
Downloaded |
|
About This Manual |
||
|
About This Manual |
from |
|
|
www |
||
|
. |
||
Introduction of Manuals |
vandenborre |
|
|
The following manuals are supplied with your Epson printer. As well as the manuals, see the help included in the |
. |
|
|
be |
various Epson software applications.
Start Here (paper manual)
Provides you with information on setting up the printer, installing the software, using the printer, solving problems, and so on.
User’s Guide (digital manual)
This manual. Provides overall information and instructions on using the printer, on network settings when using the printer on a network, and on solving problems.
You can obtain the latest versions of the above manuals with the following methods.
Paper manual
Visit the Epson Europe support website at http://www.epson.eu/Support, or the Epson worldwide support website at http://support.epson.net/.
Digital manual
Start EPSON Software Updater on your computer. EPSON Software Updater checks for available updates of Epson software applications and the digital manuals, and allows you to download the latest ones.
Related Information
& “EPSON Software Updater” on page 114
Marks and Symbols
!Caution:
Instructions that must be followed carefully to avoid bodily injury.
cImportant:
Instructions that must be observed to avoid damage to your equipment.
Note:
Provides complementary and reference information.
& Related Information
Links to related sections.
8

|
User’s Guide |
Downloaded |
||
|
About This Manual |
|||
|
from |
|||
Descriptions Used in this Manual |
www |
||
|
. |
|||
|
Screenshots of the printer driver and the Epson Scan 2 (scanner driver) screens are from Windows 10 or Mac |
|||
|
OS X v10.11.x. The content displayed on the screens varies depending on the model and situation. |
|||
|
Illustrations of the printer used in this manual are examples only. Although there may be slight differences |
|||
|
depending on the model, the method of operation is the same. |
vandenborre |
||
|
. |
|||
|
Some of the menu items on the LCD screen vary depending on the model and settings. |
be |
||
Operating System References
Windows
In this manual, terms such as «Windows 10», «Windows 8.1», «Windows 8», «Windows 7», «Windows Vista», and «Windows XP» refer to the following operating systems. Additionally, «Windows» is used to refer to all versions.
Microsoft® Windows® 10 operating system
Microsoft® Windows® 8.1 operating system
Microsoft® Windows® 8 operating system
Microsoft® Windows® 7 operating system
Microsoft® Windows Vista® operating system
Microsoft® Windows® XP operating system
Microsoft® Windows® XP Professional x64 Edition operating system
Mac OS X
In this manual, «Mac OS X v10.11.x» refers to OS X El Capitan, «Mac OS X v10.10.x» refers to OS X Yosemite, «Mac OS X v10.9.x» refers to OS X Mavericks, and «Mac OS X v10.8.x» refers to OS X Mountain Lion. Additionally, «Mac OS X» is used to refer to «Mac OS X v10.11.x», «Mac OS X v10.10.x», «Mac OS X v10.9.x», «Mac OS X v10.8.x», «Mac OS X v10.7.x», and «Mac OS X v10.6.8».
9

|
User’s Guide |
Downloaded |
|
Important Instructions |
||
|
Important Instructions |
from |
|
|
www |
||
|
. |
||
Safety Instructions |
vandenborre |
|
|
Read and follow these instructions to ensure safe use of this printer. Make sure you keep this manual for future |
. |
|
|
be |
reference. Also, be sure to follow all warnings and instructions marked on the printer.
Some of the symbols used on your printer are to ensure safety and proper use of the printer. Visit the following Web site to learn the meaning of the symbols.
http://support.epson.net/symbols
Use only the power cord supplied with the printer and do not use the cord with any other equipment. Use of other cords with this printer or the use of the supplied power cord with other equipment may result in fire or electric shock.
Be sure your AC power cord meets the relevant local safety standard.
Never disassemble, modify, or attempt to repair the power cord, plug, printer unit, scanner unit, or options by yourself, except as specifically explained in the printer’s manuals.
Unplug the printer and refer servicing to qualified service personnel under the following conditions:
The power cord or plug is damaged; liquid has entered the printer; the printer has been dropped or the casing damaged; the printer does not operate normally or exhibits a distinct change in performance. Do not adjust controls that are not covered by the operating instructions.
Place the printer near a wall outlet where the plug can be easily unplugged.
Do not place or store the printer outdoors, near excessive dirt or dust, water, heat sources, or in locations subject to shocks, vibrations, high temperature or humidity.
Take care not to spill liquid on the printer and not to handle the printer with wet hands.
Keep the printer at least 22 cm away from cardiac pacemakers. Radio waves from this printer may adversely affect the operation of cardiac pacemakers.
If the LCD screen is damaged, contact your dealer. If the liquid crystal solution gets on your hands, wash them thoroughly with soap and water. If the liquid crystal solution gets into your eyes, flush them immediately with water. If discomfort or vision problems remain after a thorough flushing, see a doctor immediately.
Be careful when you handle used ink cartridges, as there may be some ink around the ink supply port.
If ink gets on your skin, wash the area thoroughly with soap and water.
If ink gets into your eyes, flush them immediately with water. If discomfort or vision problems continue after a thorough flushing, see a doctor immediately.
If ink gets into your mouth, see a doctor right away.
Do not disassemble the ink cartridge; otherwise ink may get into your eyes or on your skin.
Do not shake ink cartridges too vigorously and do not drop them. Also, be careful not to squeeze them or tear their labels. Doing so may cause ink leakage.
Keep ink cartridges out of the reach of children.
10
|
User’s Guide |
Downloaded |
||
|
Important Instructions |
|||
|
from |
|||
Printer Advisories and Warnings |
www |
||
|
. |
|||
|
Read and follow these instructions to avoid damaging the printer or your property. Make sure you keep this |
vandenborre |
||
|
manual for future reference. |
|||
Advisories and Warnings for Setting Up/Using the Printer |
. |
||
|
be |
Do not block or cover the vents and openings in the printer.
Use only the type of power source indicated on the printer’s label.
Avoid using outlets on the same circuit as photocopiers or air control systems that regularly switch on and off.
Avoid electrical outlets controlled by wall switches or automatic timers.
Keep the entire computer system away from potential sources of electromagnetic interference, such as loudspeakers or the base units of cordless telephones.
The power-supply cords should be placed to avoid abrasions, cuts, fraying, crimping, and kinking. Do not place objects on top of the power-supply cords and do not allow the power-supply cords to be stepped on or run over. Be particularly careful to keep all the power-supply cords straight at the ends and the points where they enter and leave the transformer.
If you use an extension cord with the printer, make sure that the total ampere rating of the devices plugged into the extension cord does not exceed the cord’s ampere rating. Also, make sure that the total ampere rating of all devices plugged into the wall outlet does not exceed the wall outlet’s ampere rating.
If you plan to use the printer in Germany, the building installation must be protected by a 10 or 16 amp circuit breaker to provide adequate short-circuit protection and over-current protection for the printer.
When connecting the printer to a computer or other device with a cable, ensure the correct orientation of the connectors. Each connector has only one correct orientation. Inserting a connector in the wrong orientation may damage both devices connected by the cable.
Place the printer on a flat, stable surface that extends beyond the base of the printer in all directions. The printer will not operate properly if it is tilted at an angle.
When storing or transporting the printer, avoid tilting it, placing it vertically, or turning it upside down; otherwise ink may leak.
Allow space above the printer so that you can fully raise the document cover.
Leave enough space in front of the printer for the paper to be fully ejected.
Avoid places subject to rapid changes in temperature and humidity. Also, keep the printer away from direct sunlight, strong light, or heat sources.
Do not insert objects through the slots in the printer.
Do not put your hand inside the printer during printing.
Do not touch the white flat cable inside the printer.
Do not use aerosol products that contain flammable gases inside or around the printer. Doing so may cause fire.
Do not move the print head by hand; otherwise, you may damage the printer.
Be careful not to trap your fingers when closing the scanner unit.
Do not press too hard on the scanner glass when placing the originals.
Always turn the printer off using the P button. Do not unplug the printer or turn off the power at the outlet until the P light stops flashing.
11

|
User’s Guide |
Downloaded |
||
|
Important Instructions |
|||
|
from |
|||
|
Before transporting the printer, make sure that the print head is in the home (far right) position and the ink |
|||
|
cartridges are in place. |
www |
||
|
. |
|||
|
If you are not going to use the printer for a long period, be sure to unplug the power cord from the electrical |
|||
|
Advisories and Warnings for Using the Printer with a Wireless |
vandenborre |
||
|
outlet. |
|||
|
. |
|||
|
Connection |
be |
||
Radio waves from this printer may negatively affect the operation of medical electronic equipment, causing them to malfunction. When using this printer inside medical facilities or near medical equipment, follow directions from the authorized personnel representing the medical facilities, and follow all posted warnings and directions on the medical equipment.
Radio waves from this printer may negatively affect the operation of automatically controlled devices such as automatic doors or fire alarms, and could lead to accidents due to malfunction. When using this printer near automatically controlled devices, follow all posted warnings and directions on these devices.
Advisories and Warnings for Using Memory Cards
Do not remove a memory card or turn off the printer while the memory card light is flashing.
The methods for using memory cards vary according to card type. Be sure to refer to the manual packaged with your memory card for details.
Use only memory cards compatible with the printer.
Related Information
& “Supported Memory Card Specifications” on page 147
Advisories and Warnings for Using the LCD Screen
The LCD screen may contain a few small bright or dark spots, and because of its features it may have an uneven brightness. These are normal and do not indicate that it is damaged in any way.
Only use a dry, soft cloth for cleaning. Do not use liquid or chemical cleaners.
The exterior cover of the LCD screen could break if it receives a heavy impact. Contact your dealer if the screen’s surface chips or cracks, and do not touch or attempt to remove the broken pieces.
Protecting Your Personal Information
When you give the printer to someone else or dispose of it, erase all the personal information stored in the printer’s memory by selecting Setup > Restore Default Settings > All Settings on the control panel.
12
User’s Guide
Printer Basics
Printer Basics
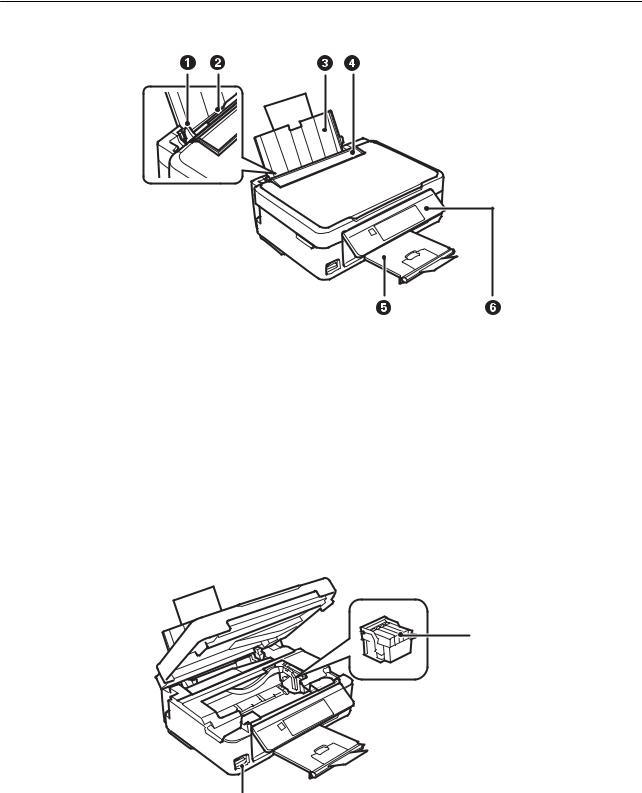
Part Names and Functions
Downloaded from
www . vandenborre . be
|
A |
Edge guide |
Feeds the paper straight into the printer. Slide to the edges of the paper. |
|
B |
Rear paper feed |
Loads paper. |
|
C |
Paper support |
Supports loaded paper. |
|
D |
Feeder guard |
Prevents foreign substance from entering the printer. Usually keep this guard |
|
closed. |
||
|
E |
Output tray |
Holds the ejected paper. Before printing, raise the stopper to prevent the |
|
ejected paper from falling off the tray. |
||
|
F |
Control panel |
Operates the printer. |
B
A
13
|
User’s Guide |
Downloaded |
|||||||
|
Printer Basics |
||||||||
|
from |
||||||||
|
A |
Memory card slot |
Insert a memory card. |
www |
|||||
|
B |
Ink cartridge holder |
Install the ink cartridges. Ink is ejected from the print head nozzles underneath.. |
||||||
|
vandenborre |
||||||||
|
. |
||||||||
|
be |
||||||||
|
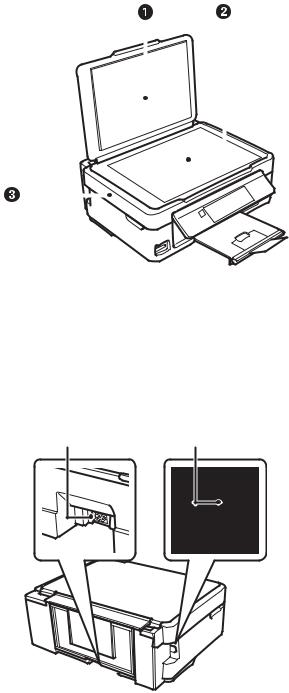
A |
Document cover |
Blocks external light while scanning. |
|
B |
Scanner glass |
Place the originals. |
|
C |
Scanner unit |
Scans placed originals. Open when replacing ink cartridges or removing |
|
jammed paper inside the printer. |
||
|
A |
AC inlet |
Connects the power cord. |
|
B |
USB port |
Connects a USB cable. |
14
|
User’s Guide |
Downloaded |
|||
|
Printer Basics |
||||
|
from |
||||
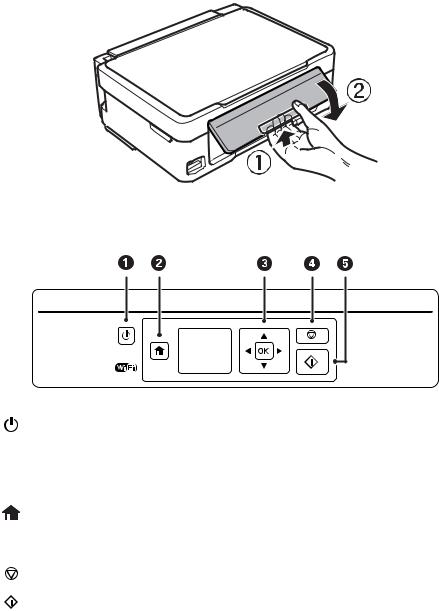
Control Panel |
www |
|||
|
. |
||||
|
You can change the angle of the control panel. |
vandenborre |
|||
|
To lower the control panel, squeeze the lever on the back of the panel as shown below. |
||||
|
. |
||||
|
be |
Buttons
|
A |
Turns the printer on or off. |
|
|
Do not turn off while the power light is flashing (while the printer is operating or processing |
||
|
data). |
||
|
Unplug the power cord when the power light is off. |
||
|
B |
Displays the home screen. |
|
|
C |
u d l r OK |
Use the u d l r buttons to select a menu, and press the OK button to run the selected menu. |
|
D |
Stops the current operation or returns to the previous screen. |
|
|
E |
Starts an operation such as printing or copying. |
|
Guide to the LCD Screen
Menus and messages are displayed on the LCD screen. Select a menu or setting by pressing the u d l r buttons.
15

User’s Guide
Printer Basics
Guide to the Home Screen
The following icons and menus are displayed on the home screen.
Downloaded from
www . vandenborre . be
|
A |
Icons that show the network status are displayed. |
|
|
Indicates a problem with the printer’s wireless (Wi-Fi) network connection, or that the printer is |
||
|
searching for a wireless (Wi-Fi) network connection. |
||
|
Indicates that the printer is connected to a wireless (Wi-Fi) network. |
||
|
The number of bars indicates the signal strength of the connection. The more bars there are, |
||
|
the stronger the connection. |
||
|
Indicates that a wireless (Wi-Fi) network is disabled, or that the printer is processing a wireless |
||
|
network connection. |
||
|
Indicates that Wi-Fi Direct is enabled. |
||
|
Indicates that Wi-Fi Direct is disabled. |
||
|
B |
When l and r are displayed, you can scroll right or left by pressing the l or r button. |
|
|
C |
Function icons and names are displayed as mode icons. |
|
|
Copy |
Enters Copy mode that allows you to copy a document. |
|
|
Print Photos |
Enters Print Photos mode that allows you to print photos on your memory card. |
|
|
Scan |
Enters Scan mode that allows you to scan a document or a photo. |
|
|
Personal |
Enters Personal Stationery mode that allows you to print original items, such as ruled paper |
|
|
Stationery |
and calendars, using the photos on your memory card. |
|
|
Quiet Mode |
Displays Quiet Mode setting that allows you to reduce the noise the printer makes. However, |
|
|
enabling this may reduce print speed. Depending on the paper type and print quality settings |
||
|
you selected, there may be no difference in the printer’s noise level. |
||
|
This is a shortcut to the following menu. |
||
|
Setup > Printer Setup > Quiet Mode |
||
|
Setup |
Enters Setup mode that allows you to make maintenance, printer setup, and network settings. |
|
|
Wi-Fi Setup |
Displays menus that allow you to set up the printer for use on a wireless network. This is a |
|
|
shortcut to the following menu. |
||
|
Setup > Network Settings > Wi-Fi Setup |
||
|
D |
Available buttons are displayed. In this example, you can proceed to the selected menu by pressing the OK button. |
|
16

|
User’s Guide |
Downloaded |
||
|
Printer Basics |
|||
|
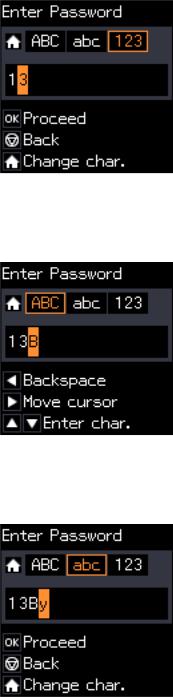
Entering Characters |
from |
||
|
www |
|||
|
. |
|||
|
To enter characters and symbols for network settings from the control panel, use the u, d, l, and r buttons |
|||
|
Press the u or d button to select the character you want to enter, and then press the r button to move the cursor |
|||
|
to the next input position. When you have finished entering characters, press the OK button. |
|||
|
The displayed screen varies depending on the setting items. The following is the screen for entering the passwordvandenborre |
|||
|
for your Wi-Fi network. |
. |
||
|
be |
|
Icons |
Descriptions |
|
Switches the character type. |
|
|
ABC: Uppercase characters |
|
|
abc: Lowercase characters |
|
|
123: Numbers and symbols |
|
|
u d |
Selects the character to be entered. |
rMoves the cursor to the right.
lDeletes a character to the left (backspace).
|
OK |
Enters the selected characters. |
|
Returns to the previous screen. |
Entering the Practice String «13By»
1.Press the  button twice to switch the character type to 123.
17
|
User’s Guide |
Downloaded |
|||
|
Printer Basics |
||||
|
2. Press the u button twice to select «1». |
from |
|||
|
www |
||||
|
3. Press the r button once to move the cursor, and then press the u button four times to select «3». |
. |
|||
|
vandenborre |
||||
|
. |
||||
|
be |
4.Press the r button once to move the cursor, and then press the  button to switch the character type to
ABC. Press the u button twice to select «B».
5.Press the r button once to move the cursor, and then press the  button to switch the character type to abc. Press the d button twice to select «y».
6.Press the OK button.
18
User’s Guide
Network Settings
Network Settings
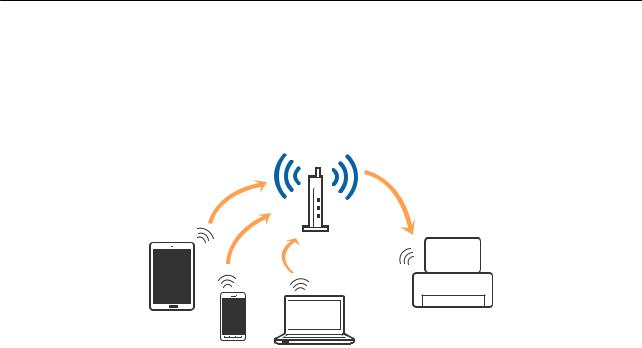
Network Connection Types
Wi-Fi Connection
Downloaded from
www . vandenborre . be
Connect the printer and the computer or smart device to the access point. This is the typical connection method for home or office networks where computers are connected by Wi-Fi through the access point.
Related Information
&“Connecting to a Computer” on page 20
&“Connecting to a Smart Device” on page 22
&“Making Wi-Fi Settings from the Control Panel” on page 22
Wi-Fi Direct (Simple AP) Connection
Use this connection method when you are not using Wi-Fi at home or at the office, or when you want to connect the printer and the computer or smart device directly. In this mode, the printer acts as an access point and you can connect up to four devices to the printer without having to use a standard access point. However, devices directly connected to the printer cannot communicate with each other through the printer.
19

|
User’s Guide |
Downloaded |
|||||
|
Network Settings |
||||||
|
Note: |
from |
|||||
|
www |
||||||
|
Wi-Fi Direct (Simple AP) connection is a connection method designed to replace Ad Hoc mode. |
||||||
|
. |
||||||
|
vandenborre |
||||||
|
. |
||||||
|
be |
The printer can be connected by Wi-Fi and Wi-Fi Direct (Simple AP) connection simultaneously. However, if you start a network connection in Wi-Fi Direct (Simple AP) connection when the printer is connected by Wi-Fi, the Wi-Fi is temporarily disconnected.
Related Information
& “Making Wi-Fi Direct (Simple AP) Connection Settings” on page 25
Connecting to a Computer
We recommend using the installer to connect the printer to a computer. You can run the installer using one of the following methods.
Setting up from the website
Access the following website, and then enter the product name. http://epson.sn
Go to Setup, and then click Download in the download and connect part. Click or double-click the downloaded file to run the installer. Follow the on-screen instructions.
Setting up using the software disc (only for the models that come with a software disc and users with computers with disc drives.)
Insert the software disc into the computer, and then follow the on-screen instructions.
Selecting the Connection Methods
Follow the on-screen instructions until the following screen is displayed, and then select the connection method of the printer to the computer.
20
![]()
User’s Guide
Network Settings
Windows
Select the connection type and then click Next.
Downloaded from
www . vandenborre . be
Mac OS X
Select the connection type.
21
|
User’s Guide |
Downloaded |
|
|
Network Settings |
||
|
Follow the on-screen instructions. The necessary software is installed. |
from |
|
|
www |
||
|
. |
||
Connecting to a Smart Device |
vandenborre |
|
|
You can use the printer from a smart device when you connect the printer to the same Wi-Fi network (SSID) as the |
||
|
smart device. To use the printer from a smart device, set up from the following website. Access to the website from |
. |
|
|
the smart device that you want to connect to the printer. |
be |
|
http://epson.sn > Setup
Note:
If you want to connect a computer and a smart device to the printer at the same time, we recommend connecting the computer first.
Making Wi-Fi Settings from the Control Panel
You can make network settings from the printer’s control panel. After connecting the printer to the network, connect to the printer from the device that you want to use (computer, smart phone, tablet, and so on.)
Related Information
&“Making Wi-Fi Settings Manually” on page 22
&“Making Wi-Fi Settings by Push Button Setup” on page 23
&“Making Wi-Fi Settings by PIN Code Setup (WPS)” on page 24
&“Making Wi-Fi Direct (Simple AP) Connection Settings” on page 25
Making Wi-Fi Settings Manually
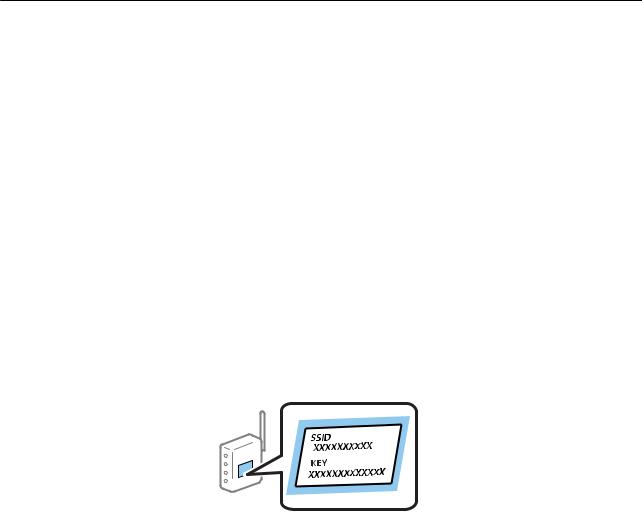
You can manually set up the information necessary to connect to an access point from the printer’s control panel. To set up manually, you need the SSID and password for an access point.
Note:
If you are using an access point with its default settings, the SSID and password are on the label. If you do not know the SSID and password, contact the person who set up the access point, or see the documentation provided with the access point.
1.Select Wi-Fi Setup on the home screen, and then press the OK button.
2.Select Wi-Fi (Recommended), and then press the OK button.
3.Press the OK button.
4.Select Wi-Fi Setup Wizard, and then press the OK button.
22
|
User’s Guide |
Downloaded |
||
|
Network Settings |
|||
|
from |
|||
|
5. Select the SSID for the access point from printer’s control panel, and then press the OK button. |
www |
||
|
Note: |
|||
|
. |
|||
|
If the SSID you want to connect to is not displayed on the printer’s control panel, select Search Again to update the |
|||
|
list. If it is still not displayed, select Other SSIDs, and then enter the SSID directly. |
|||
|
If you do not know the SSID, check if it is written on the label of the access point. If you are using the access point |
|||
|
with its default settings, use the SSID written on the label. |
vandenborre |
||
|
. |
|||
|
6. Enter the password, and then press the OK button. |
be |
||
Select whether or not you print a network connection report after finishing the settings.
Note:
The password is case-sensitive.
If you do not know the password, check if it is written on the label of the access point. If you are using the access point with its default settings, use the password written on the label. The password may also be called a «Key», a «Passphrase», and so on.
If you do not know the password for the access point, see the documentation provided with the access point, or contact the person who set it up.
If you fail to connect, load paper, and then press the  button to print a network connection report.
Related Information
&“Entering Characters” on page 17
&“Checking the Network Connection Status” on page 25
&“When You Cannot Make Network Settings” on page 125
Making Wi-Fi Settings by Push Button Setup
You can automatically set up a Wi-Fi network by pressing a button on the access point. If the following conditions are met, you can set up by using this method.
The access point is compatible with WPS (Wi-Fi Protected Setup).
The current Wi-Fi connection was established by pressing a button on the access point.
Note:
If you cannot find the button or you are setting up using the software, see the documentation provided with the access point.
1.Select Wi-Fi Setup on the home screen, and then press the OK button.
2.Select Wi-Fi (Recommended), and then press the OK button.
3.Press the OK button.
4.Select Push Button Setup (WPS), and then press the OK button.
23
|
User’s Guide |
Downloaded |
|||
|
Network Settings |
||||
|
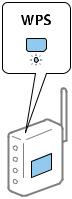
5. Hold down the [WPS] button on the access point until the security light flashes. |
from |
|||
|
www |
||||
|
. |
||||
|
vandenborre |
||||
|
. |
||||
|
be |
If you do not know where the [WPS] button is, or there are no buttons on the access point, see the documentation provided with your access point for details.
6.Press the OK button on the printer’s control panel. Follow the on-screen instruction hereafter.
Note:
If connection fails, restart the access point, move it closer to the printer, and try again. If it still does not work, print a network connection report and check the solution.
Related Information
&“Checking the Network Connection Status” on page 25
&“When You Cannot Make Network Settings” on page 125
Making Wi-Fi Settings by PIN Code Setup (WPS)
You can connect to an access point by using a PIN code. You can use this method to set up if an access point is capable of WPS (Wi-Fi Protected Setup). Use a computer to enter a PIN code into the access point.
1.Select Setup on the home screen, and then press the OK button.
2.Select Network Settings and then press the OK button.
3.Select Wi-Fi Setup on the home screen and then press the OK button.
4.Select PIN Code (WPS) and then press the OK button.
5.Use your computer to enter the PIN code (an eight digit number) displayed on the printer’s control panel into the access point within two minutes.
Note:
See the documentation provided with your access point for details on entering a PIN code.
6.Press the OK button.
Setup is complete when the setup completion message is displayed.
Note:
If connection fails, restart the access point, move it closer to the printer, and try again. If it still does not work, print a connection report and check the solution.
24

|
User’s Guide |
Downloaded |
||
|
Network Settings |
|||
|
Related Information |
from |
||
|
www |
|||
|
& “Checking the Network Connection Status” on page 25 |
|||
|
. |
|||
|
& “When You Cannot Make Network Settings” on page 125 |
vandenborre |
||
Making Wi-Fi Direct (Simple AP) Connection Settings |
. |
||
|
This method allows you to connect the printer directly to computer or smart devices without an access point. The |
be |
||
printer acts as an access point.
cImportant:
When you connect from a computer or smart device to the printer using the Wi-Fi Direct (Simple AP) connection, the printer is connected to the same Wi-Fi network (SSID) as the computer or smart device and the communication is established between them. Since the computer or smart device is automatically connected to the other connectable Wi-Fi network if the printer is turned off, it is not connected to the previous Wi-Fi network again if the printer is turned on. Connect to the printer’s SSID for Wi-Fi Direct (Simple AP) connection from the computer or smart device again. If you do not want to connect every time you turn the printer on or off, we recommend using Wi-Fi network by connecting the printer to an access point.
1.Select Wi-Fi Setup on the home screen, and then press the OK button.
2.Select Wi-Fi Direct, and then press the OK button.
3.Press the OK button.
4.Press the OK button to start the setup.
5.Press the OK button.
6.Check the SSID and password displayed on the printer’s control panel. On the network connection screen of the computer or smart device, select the SSID shown on the printer’s control panel to connect.
7.Enter the password displayed on the printer’s control panel on the computer or smart device.
8.After the connection is established, press the OK button on the printer’s control panel.
9.Press the OK button.
Related Information
&“Checking the Network Connection Status” on page 25
&“When You Cannot Make Network Settings” on page 125
Checking the Network Connection Status
Checking the Network Status Using Network Icon
You can check the network connection status using the network icon on the printer’s home screen. The icon changes depending on the connection type and strength of the radio wave.
25
|
User’s Guide |
Downloaded |
||
|
Network Settings |
|||
|
Related Information |
from |
||
|
www |
|||
|
& “Guide to the Home Screen” on page 16 |
|||
|
. |
|||
Printing a Network Connection Report |
vandenborre |
||
|
You can print a network connection report to check the status between the printer and the access point. |
. |
||
|
be |
1.Load papers.
2.Select Setup on the home screen, and then press the OK button.
3.Select Network Settings > Connection Check. The connection check starts.
4.Press the x button to print the network connection report.
If an error has occurred, check the network connection report, and then follow the printed solutions.
Related Information
& “Messages and Solutions on the Network Connection Report” on page 26
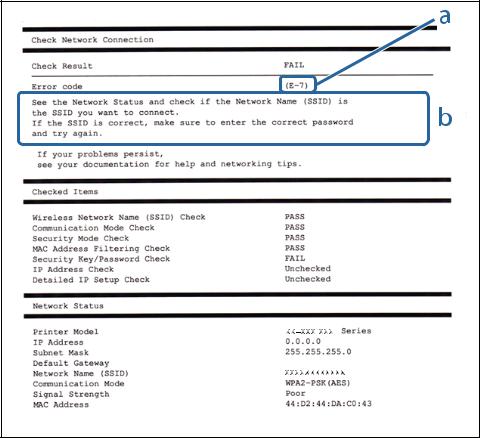
Messages and Solutions on the Network Connection Report
Check the messages and error codes on the network connection report, and then follow the solutions.

|
User’s Guide |
Downloaded |
|||||
|
Network Settings |
||||||
|
a. Error code |
from |
|||||
|
www |
||||||
|
b. Messages on the Network Environment |
||||||
|
. |
||||||
|
a. Error code |
vandenborre |
|||||
|
Code |
Solution |
. |
||||
|
E-1 |
Make sure that the Ethernet cable is connected to the printer, a hub, or other network devices. |
be |
||||
|
Make sure that the hub or other network devices are turned on. |
||||||
|
E-2 |
Make sure that the access point is turned on. |
|||||
|
E-3 |
Check that the computer or other devices are connected correctly to the access point. |
|||||
|
E-7 |
Place the printer close to the access point. Remove any obstacles between them. |
If you have entered the SSID manually, check if it is correct. Check the SSID from the Network Status part on the network connection report.
To establish a network using push button setup, check that the access point supports WPS. If it does not support WPS, you cannot establish a network using push button setup.
Check that only ASCII characters (alphanumeric characters and symbols) are used for the SSID. The printer cannot display an SSID which contains any characters other than ASCII characters.
Check the SSID and password before connecting to the access point. If you are using an access point with its default settings, the SSID and password are on the label. If you do not know the SSID and password, contact the person who set up the access point, or see the documentation provided with the access point.
When you want to connect to an SSID generated using the tethering function on a smart device, check the SSID and password in the documentation provided with the smart device.
If the Wi-Fi connection is suddenly disconnected, check the following. If any of these are applicable, reset the network settings using the installer. You can run it from the following website.
http://epson.sn > Setup
Another smart device was added to the network using push button setup.
The Wi-Fi network was set up using any method other than push button setup.
|
E-5 |
Make sure the access point’s security type is set to one of the following. If it is not, change the security type on |
|
|
the access point, and then reset the printer’s network settings. |
||
|
WEP-64 bit (40 bit) |
||
|
WEP-128 bit (104 bit) |
||
|
WPA PSK (TKIP/AES)* |
||
|
WPA2 PSK (TKIP/AES)* |
||
|
WPA (TKIP/AES) |
||
|
WPA2 (TKIP/AES) |
||
|
* |
: WPA PSK is also known as WPA Personal. WPA2 PSK is also known as WPA2 Personal. |
|
|
E-6 |
Check if the MAC address filtering is disabled. If it is enabled, register the printer’s MAC address so that it is |
|
|
not filtered. See the documentation provided with the access point for details. You can check the printer’s |
||
|
MAC address from the Network Status part on the network connection report. |
||
|
If the access point’s shared authentication is enabled on the WEP security method, make sure the |
||
|
authentication key and index are correct. |
||
|
E-8 |
Enable DHCP on the access point when the printer’s Obtain IP Address is set to Auto. |
|
|
If the printer’s Obtain IP Address is set to Manual, the IP address you manually set is out of range (for |
||
|
example: 0.0.0.0) and it is disabled. Set a valid IP address from printer’s control panel or Web Config. |
27

|
User’s Guide |
Downloaded |
|||||
|
Network Settings |
||||||
|
from |
||||||
|
Code |
Solution |
www |
||||
|
E-9 |
Check the following. |
. |
||||
|
Devices are turned on. |
vandenborre |
|||||
|
You can access the Internet and other computers or network devices on the same network from the devices |
||||||
|
you want to connect to the printer. |
||||||
|
If it still does not work after checking the above, reset the network settings using the installer. You can run it |
. |
|||||
|
be |
||||||
|
from the following website. |
||||||
|
http://epson.sn > Setup |
||||||
|
E-10 |
Check the following. |
|||||
|
Other devices on the network are turned on. |
||||||
|
Network addresses (IP address, subnet mask, and default gateway) are correct if you have set the printer’s |
||||||
|
Obtain IP Address to Manual. |
||||||
|
Reset the network address if these are incorrect. You can check the IP address, subnet mask, and default |
||||||
|
gateway from the Network Status part on the network connection report. |
||||||
|
When DHCP is enabled, change the printer’s Obtain IP Address to Auto. If you want to set the IP address |
||||||
|
manually, check the printer’s IP address from the Network Status part on the network connection report, and |
||||||
|
then select Manual on the network settings screen. Set the subnet mask to [255.255.255.0]. |
||||||
|
E-11 |
Check the following. |
|||||
|
The default gateway address is correct when you set the printer’s TCP/IP Setup to Manual. |
||||||
|
The device that is set as the default gateway is turned on. |
||||||
|
Set the correct default gateway address. You can check the default gateway address from the Network Status |
||||||
|
part on the network connection report. |
||||||
|
E-12 |
Check the following. |
|||||
|
Other devices on the network are turned on. |
||||||
|
The network addresses (IP address, subnet mask, and default gateway) are correct if you are entering them |
||||||
|
manually. |
||||||
|
The network addresses for other devices (subnet mask and default gateway) are the same. |
||||||
|
The IP address does not conflict with other devices. |
||||||
|
If it still does not work after checking the above, try the following. |
||||||
|
Make network settings on the computer that is on the same network as the printer using the installer. You |
||||||
|
can run it from the following website. |
||||||
|
http://epson.sn > Setup |
||||||
|
You can register several passwords on an access point that uses the WEP security type. If several passwords |
||||||
|
are registered, check if the first registered password is set on the printer. |
||||||
28

|
User’s Guide |
Downloaded |
||||
|
Network Settings |
|||||
|
from |
|||||
|
Code |
Solution |
www |
|||
|
E-13 |
Check the following. |
||||
|
. |
|||||
|
Network devices such as an access point, hub, and router are turned on. |
|||||
|
The TCP/IP Setup for network devices has not been set up manually. (If the printer’s TCP/IP Setup is set |
|||||
|
automatically while the TCP/IP Setup for other network devices is performed manually, the printer’s network |
|||||
|
may differ from the network for other devices.) |
vandenborre |
||||
|
. |
|||||
|
If it still does not work after checking the above, try the following. |
be |
||||
Make network settings on the computer that is on the same network as the printer using the installer. You can run it from the following website.
http://epson.sn > Setup
You can register several passwords on an access point that uses the WEP security type. If several passwords are registered, check if the first registered password is set on the printer.
b.Messages on the Network Environment
|
Message |
Solution |
|
*Multiple network names (SSID) that |
The same SSID may be set on several access points. Check the settings on the |
|
match your entered network name (SSID) |
access points, and change the SSID. |
|
have been detected. Confirm network |
|
|
name (SSID). |
|
|
The Wi-Fi environment needs to be |
After moving the printer closer to the access point and removing any |
|
improved. Turn the wireless router off and |
obstacles between them, turn the access point on. If it still does not connect, |
|
then turn it on. If the connection does not |
see the documentation supplied with the access point. |
|
improve, see the documentation for the |
|
|
wireless router. |
|
|
*No more devices can be connected. |
You can simultaneously connect up to four computers and smart devices in |
|
Disconnect one of the connected devices if |
Wi-Fi Direct (Simple AP) connection. To add another computer or smart |
|
you want to add another one. |
device, disconnect one of the connected devices first. |
Related Information
&“Connecting to a Computer” on page 20
&“Web Config” on page 104
&“When You Cannot Make Network Settings” on page 125
Printing a Network Status Sheet
You can check the detailed network information by printing it.
1.Load papers.
2.Select Setup on the home screen.
3.Select Network Settings > Print Status Sheet.
4.Press the x button.
The network status sheet is printed.
29

Changing the Connection Method to a Computer
Using the installer and re-set up in a different connection method.
& “Changing the Connection Method to a Computer” on page 30
Related Information
Replacing or Adding New Access Points
Network Settings
User’s Guide
Downloaded from
www . If the SSID changes due to the replacement of an access point, or an access point is added and a new networkvandenborre environment is established, re-set the Wi-Fi settings.
. be
Setting up from the website
Access the following website, and then enter the product name. http://epson.sn
Go to Setup, and then click Download in the download and connect part. Click or double-click the downloaded file to run the installer. Follow the on-screen instructions.
Setting up using the software disc (only for the models that come with a software disc and users with computers with disc drives.)
Insert the software disc into the computer, and then follow the on-screen instructions.
Selecting Change the Connection Methods
Follow the on-screen instructions until the following screen is displayed.
30

|
User’s Guide |
Downloaded |
|
|
Network Settings |
||
|
Windows |
from |
|
|
www |
||
|
Select Change or re-set the connection method on the Select Software Installation screen, and then click Next. |
||
|
. |
||
|
vandenborre |
||
|
. |
||
|
be |
Mac OS X
Select how you want to connect the printer to your computer.
31

User’s Guide
Network Settings
Disabling Wi-Fi from the Control Panel
When Wi-Fi is disabled, the Wi-Fi connection is disconnected.
1.Select Setup on the home screen.
2.Select Network Settings.
Downloaded from
www . vandenborre . be
3.Select Wi-Fi Setup.
4.Select Disable Wi-Fi.
5.Check the message, and then select Yes.
Disconnecting Wi-Fi Direct (Simple AP) connection from the Control Panel
Note:
When Wi-Fi Direct (Simple AP) connection disabled, all computers and smart devices connected to the printer in Wi-Fi Direct (Simple AP) connection are disconnected. If you want to disconnect a specific device, disconnect from the device instead of the printer.
1.Select Setup on the home screen.
2.Select Network Settings.
3.Select Wi-Fi Setup.
4.Select Wi-Fi Direct Setup.
5.Select Disable Wi-Fi Direct.
6.Check the message, and then select Yes.
Restoring the Network Settings from the Control Panel
You can restore all network settings to their defaults.
1.Select Setup on the home screen.
2.Select Restore Default Settings > Network Settings.
3.Check the message, and then select Yes.
32

|
User’s Guide |
Downloaded |
||
Loading Paper |
|||
|
Loading Paper |
from |
||
|
www |
|||
|
. |
|||
Paper Handling Precautions |
vandenborre |
||
|
Read the instruction sheets supplied with the paper. |
. |
||
|
be |
Fan and align the edges of the paper before loading. Do not fan or curl photo paper. Doing so may damage the printable side.
If the paper is curled, flatten it or curl it slightly in the opposite direction before loading. Printing on curled paper may cause paper jams and smears on the printout.
Do not use paper that is wavy, torn, cut, folded, damp, too thick, too thin, or paper that has stickers stuck to it. Using these types of paper causes paper jams and smears on the printout.
Fan and align the edges of the envelopes before loading. When the stacked envelopes are puffed up with air, press them down to flatten them before loading.
Do not use envelopes that are curled or folded. Using these envelopes causes paper jams and smears on the printout.
Do not use envelopes with adhesive surfaces on the flaps or window envelopes.
Avoid using envelopes that are too thin, as they may curl during printing.
Related Information
& “Printer Specifications” on page 143
33

|
User’s Guide |
Downloaded |
|||||
|
Loading Paper |
||||||
|
from |
||||||
Available Paper and Capacities |
www |
|||||
|
. |
||||||
|
Epson recommends using genuine Epson paper to ensure high-quality printouts. |
vandenborre |
|||||
|
Genuine Epson Paper |
||||||
|
. |
||||||
|
Media Name |
Size |
Loading |
Manual 2- |
Borderless |
||
|
be |
||||||
|
Capacity |
Sided Printing |
Printing |
||||
|
(Sheets) |
||||||
|
Epson Bright White Ink Jet |
A4 |
80* |
– |
|||
|
Paper |
||||||
|
Epson Ultra Glossy Photo |
A4, 13×18 cm (5×7 in.), |
20 |
– |
|||
|
Paper |
10×15 cm (4×6 in.) |
|||||
|
Epson Premium Glossy |
A4, 13×18 cm (5×7 in.), 16:9 |
20 |
– |
|||
|
Photo Paper |
wide size (102×181 mm), |
|||||
|
10×15 cm (4×6 in.) |
||||||
|
Epson Premium Semigloss |
A4, 10×15 cm (4×6 in.) |
20 |
– |
|||
|
Photo Paper |
||||||
|
Epson Photo Paper Glossy |
A4, 13×18 cm (5×7 in.), |
20 |
– |
|||
|
10×15 cm (4×6 in.) |
||||||
|
Epson Matte Paper- |
A4 |
20 |
– |
|||
|
Heavyweight |
||||||
|
Epson Photo Quality Ink Jet |
A4 |
80 |
– |
– |
||
|
Paper |
||||||
*For manual 2-sided printing, you can load up to 30 sheets for paper with one side already printed.
Note:
The availability of paper varies by location. For the latest information on paper available in your area, contact Epson support.
Commercially Available Paper
|
Media Name |
Size |
Loading Capacity |
Manual 2-Sided |
Borderless |
|
(Sheets) |
Printing |
Printing |
||
|
Plain paper*1 |
Letter*2, A4, B5*2, A5*2, A6*2 |
Up to the line |
– |
|
|
indicated by the |
||||
|
triangle symbol on |
||||
|
the edge guide.*3 |
||||
|
Legal*2 |
1 |
|||
|
User Defined*2 |
||||
|
Envelope*2 |
Envelope #10, Envelope DL, |
10 |
– |
– |
|
Envelope C6 |
||||
*1 The loading capacity for pre-punched paper is one sheet. *2 Only printing from computer is available.
34

|
User’s Guide |
Downloaded |
|||
|
Loading Paper |
||||
|
*3 For manual 2-sided printing, you can load up to 30 sheets for paper with one side already printed. |
from |
|||
|
www |
||||
|
Related Information |
||||
|
. |
||||
|
& “Technical Support Web Site” on page 153 |
vandenborre |
|||
List of Paper Types |
. |
|||
|
be |
To obtain optimum printing results, select the paper type that suits the paper.
|
Media Name |
Media Type |
|
|
Control Panel |
Printer Driver, Smart device*2 |
|
|
Epson Bright White Ink Jet Paper*1 |
plain papers |
plain papers |
|
Epson Ultra Glossy Photo Paper*1 |
Ultra Glossy |
Epson Ultra Glossy |
|
Epson Premium Glossy Photo Paper*1 |
Prem. Glossy |
Epson Premium Glossy |
|
Epson Premium Semigloss Photo Pa- |
Prem. Semigloss |
Epson Premium Semigloss |
|
per*1 |
||
|
Epson Photo Paper Glossy*1 |
Glossy |
Photo Paper Glossy |
|
Epson Matte Paper-Heavyweight*1 |
Matte |
Epson Matte |
|
Epson Photo Quality Ink Jet Paper*1 |
Matte |
Epson Matte |
|
Plain paper*1 |
plain papers |
plain papers |
|
Envelope |
Envelope |
Envelope |
*1 These paper types are compatible with Exif Print and PRINT Image Matching when printed by the printer driver. For more information, see the documentation that came with the Exif Print or PRINT Image Matching compatible digital camera.
*2 For smart devices, these media types can be selected when printing using Epson iPrint.
Loading Paper in the Rear Paper Feed
1.Open the feeder guard, extend the paper support, and then tilt it backwards.
35

User’s Guide
Loading Paper
2.Slide the edge guide to the left.
Downloaded from
www . vandenborre . be
3.Load paper vertically along the right side of the rear paper feed with the printable side facing up.
cImportant:
Do not load more than the maximum number of sheets specified for the paper. For plain paper, do not load above the line indicated by the triangle symbol on the edge guide.
Envelopes
36

User’s Guide
Loading Paper
Pre-punched paper
Downloaded from
www . vandenborre . be
Note:
Load a single sheet of paper without binding holes at the top or the bottom.
Adjust the print position of your file to avoid printing over the holes.
4.Slide the edge guide to the edge of the paper, and then close the feeder guard.
5.Check the paper size and paper type settings displayed on the control panel. To use the settings, select
Confirm using the u or d button, press the OK button, and then go to step 7. To change the settings, select
Change using the u or d button, press the OK button, and then go to the next step.
cImportant:
The paper setting screen is not displayed if the paper is not loaded along the right side of the rear paper feed. An error occurs when you start printing.
37

|
User’s Guide |
Downloaded |
|||
|
Loading Paper |
||||
|
Note: |
from |
|||
|
www |
||||
|
A message is displayed if the registered paper size and paper type settings differ from the print settings. |
||||
|
. |
||||
|
vandenborre |
||||
|
. |
||||
|
be |
The paper setting screen is not displayed if you have disabled Paper Configuration in the following menus. In this situation, you cannot print using AirPrint.
Setup > Printer Setup > Paper Source Settings > Paper Configuration
6.On the paper size setting screen, select the paper size using the l or r button, and then press the OK button. On the paper type setting screen, select the paper type in the same way, and then press the OK button. Confirm the settings, and then press the OK button.
Note:
You can also display the paper size and paper type settings screen by selecting the following menus.
Setup > Printer Setup > Paper Source Settings > Paper Setup
7.Slide out the output tray and then raise the stopper.
Note:
Return the remaining paper to its package. If you leave it in the printer, the paper may curl or the print quality may decline.
Related Information
&“Paper Handling Precautions” on page 33
&“Available Paper and Capacities” on page 34
38

|
User’s Guide |
Downloaded |
||
Placing Originals |
|||
|
Placing Originals |
from |
||
|
www |
|||
|
. |
|||
Placing Originals on the Scanner Glass |
vandenborre |
||
|
. |
|||
|
be |
cImportant:
When placing bulky originals such as books, prevent exterior light from shining directly onto the scanner glass.
1.Open the document cover.
2.Remove any dust or stains on the scanner glass.
3.Place the original face-down and slide it to the corner mark.
Note:
A range of 1.5 mm from the edges of the scanner glass is not scanned.
4.Close the cover gently.
5.Remove the originals after scanning.
Note:
If you leave the originals on the scanner glass for a long time, they may stick to the surface of the glass.
39

User’s Guide
Placing Originals
How to Place Various Originals
Placing Originals for 2-Up Layout
Downloaded from
www . vandenborre . be
Placing a Double-Page Spread for 2-Up Layout
40
![]()
|
User’s Guide |
Downloaded |
|||||||||||||
|
Placing Originals |
||||||||||||||
Placing Multiple Photos for Scanning |
from |
|||||||||||||
|
www |
||||||||||||||
|
. |
||||||||||||||
|
You can scan multiple photos at once in Photo Mode in Epson Scan 2 when you select Thumbnail from the list at |
||||||||||||||
|
the top of the preview window. |
vandenborre |
|||||||||||||
|
. |
||||||||||||||
|
be |
||||||||||||||
41

User’s Guide
Inserting a Memory Card
Inserting a Memory Card
Supported Memory Cards
miniSD*
miniSDHC*
microSD*
microSDHC*
microSDXC*
SD
SDHC
SDXC
*Attach an adapter to fit the memory card slot. Otherwise, the card may get stuck.
Downloaded from
www . vandenborre . be
Related Information
& “Supported Memory Card Specifications” on page 147
Inserting and Removing a Memory Card
1.Insert a memory card into the printer.
The printer starts reading the data and the light flashes. When reading is complete, the light stops flashing and remains on.
cImportant:
Insert a memory card straight into the printer.
The card should not be fully inserted. Do not try to force it all the way into the slot.
42

|
User’s Guide |
Downloaded |
|
|
Inserting a Memory Card |
||
|
from |
||
|
2. When you have finished using the memory card, make sure the light is not flashing, and then re ove the card. |
||
|
www |
||
|
. |
||
|
vandenborre |
||
|
. |
||
|
be |
cImportant:
If you remove the memory card while the light is flashing, the data in the memory card may be lost.
Note:
If you access the memory card from a computer, you need to operate the computer to safely remove the removable device.
Related Information
& “Accessing a Memory Card From a Computer” on page 152
43

|
User’s Guide |
Downloaded |
||
Printing |
|||
|
Printing |
from |
||
|
www |
|||
|
. |
|||
Printing from the Control Panel |
vandenborre |
||
|
. |
|||
|
be |
Printing Photos by Selecting from a Memory Card
1.Load paper in the printer.
cImportant:
Make the paper settings on the control panel.
2.Insert a memory card into the printer.
cImportant:
Do not remove the memory card until you have finished printing.
3.Enter Print Photos from the home screen using the l or r button, and then press the OK button.
4.Use the l or r button to select a photo, and use the u or d button to set the number of copies. When printing more than one photo, repeat this procedure.
5.Press the OK button to display the print settings confirmation screen.
6.To change the print settings, press the d button to display the setting screen. Use the u or d button to select setting items such as the paper size and the paper type, and change the settings using the l or r button. When you have finished, press the OK button.
7.Press the x button.
Related Information
&“Loading Paper in the Rear Paper Feed” on page 35
&“List of Paper Types” on page 35
&“Inserting a Memory Card” on page 42
&“Menu Options for Print Photos Mode” on page 46
44

|
User’s Guide |
Downloaded |
|||
|
Printing |
||||
|
from |
||||
Printing Lined Paper, Calendars, and Original Writing Paper |
||||
|
www |
||||
|
You can easily print lined paper, calendars, and original writing paper using the Personal Stationery menu. |
. |
|||
|
vandenborre |
||||
|
. |
||||
|
be |
1.Load paper in the printer.
cImportant:
Make the paper settings on the control panel.
2.To print writing paper using a photo on your memory card, insert the memory card into the printer.
3.Enter Personal Stationery from the home screen using the l or r button, and then press the OK button.
4.Select a menu item using the l or r button, and then press the OK button.
5.Follow the on-screen instructions to print.
Related Information
&“Loading Paper in the Rear Paper Feed” on page 35
&“List of Paper Types” on page 35
&“Inserting a Memory Card” on page 42
&“Menu Options for Printing Lined Paper, Calendars, and Original Writing Paper” on page 45
&“Menu Options for Print Photos Mode” on page 46
Menu Options for Printing Lined Paper, Calendars, and Original Writing Paper
Lined Papers
Prints some types of lined paper, graph paper, or music paper on A4 size paper.
Writing Papers
Prints some types of writing paper on A4 size paper with a photo from the memory card set as the background. The photo is printed lightly so that it can be easily written on.
Calendar
45

|
User’s Guide |
Downloaded |
||
|
Printing |
|||
|
from |
|||
|
Prints a weekly or monthly calender. Select the year and the month for the monthly calendar. |
|||
|
www |
|||
DPOF Printing |
. |
||
|
This printer is compatible with DPOF (Digital Print Order Format) Ver. 1.10. DPOF is a format that stores |
|||
|
additional information for photos such as the date, time, user name, and printing information. DPOF-compatible |
|||
|
vandenborre |
|||
|
cameras allow you to set which image on a memory card to print and the number of copies. When the memory |
. |
||
|
card is inserted into the printer, the photos selected by the camera are printed. |
be |
||
Note:
For information on making print settings on your camera, see the documentation provided with your camera.
When you insert a memory card into the printer, a confirmation screen is displayed. Press the OK button to display the print start screen. Press the x button to start printing. If you want to change the print settings, press the d button. Setting items are the same as in Print Photos mode.
Related Information
&“Printing Photos by Selecting from a Memory Card” on page 44
&“Menu Options for Print Photos Mode” on page 46
Menu Options for Print Photos Mode
Paper Size
Select the paper size you loaded.
Paper Type
Select the paper type you loaded.
Borderless
To print without margins around the edges, select Borderless. The image is enlarged a little to remove margins from the edges of the paper. To print with margins around the edges, select With Border.
Quality
Select the print quality. Selecting Best provides higher quality printing, but the printing speed may be slower.
Printing from a Computer
Printing Basics — Windows
Note:
See the online help for explanations of the setting items. Right-click an item, and then click Help.
Operations differ depending on the application. See the application’s help for details.
46
 Loading…
![]()
Русский
- Bedienungsanleitung Epson EXPRESSION HOME XP-342
- Epson EXPRESSION HOME XP-342 User Manual
- Manual Usuario Epson EXPRESSION HOME XP-342
- Mode d’emploi Epson EXPRESSION HOME XP-342
- Istruzioni Epson EXPRESSION HOME XP-342
- инструкция Epson EXPRESSION HOME XP-342
- Epson EXPRESSION HOME XP-342の取扱説明書
- Handleiding Epson EXPRESSION HOME XP-342
- Manual de uso Epson EXPRESSION HOME XP-342
Вам нужна инструкция? Мы поможем Вам ее найти и сэкономить Ваше время.
- 158 stron
- 0.72 mb
Изделие Epson EXPRESSION HOME XP-342, а также другие, которыми Вы пользуетесь ежедневно, наверняка вы получили в комплекте с инструкцией обслуживания. Из опыта наших пользователей мы знаем, что большинство из Вас не уделили этому особого внимания. Большая часть инструкций, сразу же после покупки попадает в корзину для мусора вместе с коробкой — это ошибка. Ознакомьтесь с информацией, касающейся инструкции Epson EXPRESSION HOME XP-342, которая поможет Вам в будущем сэкономить нервы и избежать головной боли.
Важная подсказка — не забывайте хотя бы раз прочитать инструкцию Epson EXPRESSION HOME XP-342
Если вы не хотите каждый раз читать информационные брошюры, касающиеся, тех или Epson EXPRESSION HOME XP-342 иных изделий, достаточно, прочитать их раз — сразу же после покупки устройства. Вы получите основное знания, касающиеся поддержания изделия Epson EXPRESSION HOME XP-342 в хорошем эксплуатационном состоянии, так, чтобы без проблем достигнуть его планируемого цикла работы. Затем инструкцию можно отложить на полку и вернуться к ней только в случае, если вы не уверены, правильно ли проводится техобслуживание изделия. Правильный уход является необходимым элементом Вашего удовольствия Epson EXPRESSION HOME XP-342.
Раз в году пересмотрите шкафчик, в котором держите инструкции для всех устройств, — выбросите те, которыми вы уже не пользуетесься. Это поможет Вам сохранять порядок в своей домашней базе инструкций обслуживания.
Summary of Contents for Epson EXPRESSION HOME XP-342
Что находится в инструкции Epson EXPRESSION HOME XP-342? Почему стоит ее прочитать?
- Гарантия и подробности, касающиеся техобслуживания изделия
Хорошей идеей будет прикрепить чек к странице инструкции. Если что-то плохое случится во время использования Epson EXPRESSION HOME XP-342, у вас будет комплект документов, необходимый для гарантийного ремонта. В этой части инструкции вы найдете информацию об авторизованных сервисных центрахEpson EXPRESSION HOME XP-342 а также, как самостоятельно правильно ухаживать за оборудованием — так, чтобы не потерять гарантийных прав. - Указания по монтажу и Setup
Не терять нервов и времени на самостоятельную попытку установки и первого запуска изделия. Воспользуйтесь рекомендациями производителя Epson EXPRESSION HOME XP-342 чтобы правильно запустить изделие, без лишнего риска повреждения оборудования. - Информация, касающаяся дополнительных запчастей (входящих в комплект а также являющихся опцией)
Пересматривая эту часть документа вы сможете проверить, доставлен ли ваш Epson EXPRESSION HOME XP-342 с полним комплектом аксессуаров. Вы также сможете узнать, какие дополнительные запчасти или аксессуары для Epson EXPRESSION HOME XP-342 Вы сможете найти и докупить к своему устройству. - Troubleshooting
Самые частые проблемы, касающиеся Epson EXPRESSION HOME XP-342 и методы их решения. Это очень полезная часть руководства по обслуживанию — она позволит Вам сэкономить много времени на поиск решений. 90% проблем с Epson EXPRESSION HOME XP-342 повторяется у многих пользователей. - Требования, касающиеся питания и энергетический класс
Информация, касающаяся количества потребляемой энергии, а также рекомендации, касающиеся установки и питания Epson EXPRESSION HOME XP-342. Прочитайте, чтобы оптимально пользоваться Epson EXPRESSION HOME XP-342 и не использовать большего количества ресурсов, нежели это необходимо для правильной работы изделия. - Специальные функции Epson EXPRESSION HOME XP-342
Здесь вы можешь узнать, как персонализировать изделие Epson EXPRESSION HOME XP-342. Вы узнаете, какие дополнительные функции могут помочь Вам удобно использовать продукт Epson EXPRESSION HOME XP-342 а также, какие функции Вашего устройства оптимальны для выполнения конкретной деятельности.
Как видите в инструкции вы найдете информацию, которая реально поможет Вам в использовании Вашего изделия. Стоит с ней ознакомиться, чтобы избежать разочарований, возникающих из более короткого, нежели предусматривалось, периода исправности изделия Epson EXPRESSION HOME XP-342. Если все же вы не хотите копить инструкции в своем доме, наш сайт поможет Вам в этом — вы должны найти у нас руководство по обслуживанию большинства из своих устройств, а также Epson EXPRESSION HOME XP-342.
Комментарии (0)

Proof Sign-o:A. Yoshizawa CRM NakanoM. Ishigamieditor
R41AF7290/7300
Start Here Rev.C_Final2
R41AF7290_7300_SH.indd A3 size16/03/314132300-00 BlackFront
© 2016 Seiko Epson Corporation.
All rights reserved.
Printed in XXXXXX
Windows
http://epson.sn
http://epson.sn
EN
Start Here
FR
Démarrez ici
DE
Hier starten
2
Do not connect a USB cable unless
instructed to do so.
Ne branchez pas de câble USB à moins
que vous ne soyez invité à le faire.
Ein USB-Kabel erst anschließen, wenn
Sie dazu aufgefordert werden.
Sluit alleen een USB-kabel aan wanneer
dit in de instructies wordt aangegeven.
Non collegare un cavo USB se non
specicatamente richiesto.
No conecte el cable USB hasta que se
le indique.
NL
Hier beginnen
IT
Inizia qui
ES
Para empezar
1
Contents may vary by location.
Le contenu peut varier d’un pays à l’autre.
Inhalt kann je nach Auslieferungsort variieren.
Inhoud kan per land verschillen.
Il contenuto può variare a seconda dell’area.
El contenido puede variar según la región.
Q
If the Firewall alert appears, allow access
for Epson applications.
Si un avertissement relatif au pare-feu
s’ache, autorisez l’accès pour les
applications Epson.
Wenn die Firewall-Warnung angezeigt
wird, den Zugri für Epson-Anwendungen
erlauben.
Verleen Epson-toepassingen toegang
als een rewallwaarschuwing wordt
weergegeven.
Se appare l’avviso rewall, consentire
l’accesso alle applicazioni Epson.
Si aparece la alerta de Firewall, permita
el acceso a las aplicaciones de Epson.
Visit the website to start the setup process, install software, and congure
network settings.
Consultez le site web pour procéder à la conguration, à l’installation des
logiciels et à la dénition des paramètres réseau.
Rufen Sie die Website auf, um den Setup zu starten, Software zu installieren und
Netzwerkeinstellungen zu kongurieren.
Ga naar de website om het installatieproces te starten, software te installeren en
netwerkinstellingen te congureren.
Visitare il sito web per avviare il processo di installazione, per installare il
software e per congurare le impostazioni di rete.
En la página web se explica cómo congurar, instalar software y denir los
ajustes de red.
Epson Connect
Using your mobile device, you can print from any location worldwide to your
Epson Connect compatible printer. Visit the website for more information.
Avec votre appareil mobile, vous pouvez imprimer depuis n’importe où
dans le monde sur votre imprimante compatible Epson Connect. Pour plus
d’informations, consultez le site web.
Mit Ihren mobilen Endgeräten können Sie von überall auf der Welt Druckaufträge
an Ihren Epson Connect-kompatiblen Drucker senden. Suchen Sie die Webseite
auf, um weitere Informationen zu erhalten.
Met behulp van uw mobiele apparaat kunt u vanaf elke locatie ter wereld naar
uw met Epson Connect compatibele printer afdrukken. Ga naar de website voor
meer informatie.
Utilizzando il proprio dispositivo mobile, è possibile stampare in tutto il mondo
sulla propria stampante compatibile Epson Connect. Visitare il sito web per
maggiori informazioni.
Puede utilizar su dispositivo móvil para imprimir desde cualquier lugar del
mundo con su impresora compatible con Epson Connect. Consulte la página
web para obtener más información.
https://www.epsonconnect.com/
Questions?
You can open the User’s Guide (PDF) from the shortcut icon, or download the
latest versions from the following website.
Vous pouvez ouvrir le Guide d’utilisation (PDF) à partir de l’icône de raccourci,
outélécharger les versions les plus récentes depuis le site web suivant.
Sie können das Benutzerhandbuch(PDF) über die Verknüpfung önen oder die
aktuellen Versionen von der angegebenen Website herunterladen.
U kunt de Gebruikershandleiding (PDF) openen via het pictogram of de laatste
versies downloaden van de volgende website.
È possibile aprire la Guida utente (PDF) dall’icona scorciatoia e scaricare le ultime
versioni dal sito web al seguente indirizzo.
Puede abrir el Manual de usuario (en PDF) desde el icono de acceso directo
odescargar la última versión desde el siguiente sitio web.
http://www.epson.eu/Support
BK C M Y
Black
Noir
Schwarz
Zwart
Nero
Negro
Cyan
Cyan
Cyan
Cyaan
Ciano
Cian
Magenta
Magenta
Magenta
Magenta
Magenta
Magenta
Yellow
Jaune
Gelb
Geel
Giallo
Amarillo
29 29 29 2929XL 29XL 29XL 29XL
Strawberry / Fraise / Erdbeere /
Aardbei / Fragola / Fresa
For information on Epson’s ink cartridge yields, please visit the website.
Pour obtenir des informations concernant le rendement des cartouches d’encre
Epson, consultez le site web.
Informationen zur Ergiebigkeit von Epson-Tintenpatronen nden Sie auf der
Website.
Informatie over de capaciteit van Epson-cartridges kunt u vinden op de website.
Per informazioni sulla resa delle cartucce di inchiostro Epson, visitare il sito web.
Para más información acerca del rendimiento de los cartuchos de tinta Epson,
consulte la página web.
http://www.epson.eu/pageyieldInk Cartridge Code in Europe / Code des cartouches d’encre en Europe/ Tintenpatronencode in Europa / Inktcartridgecode in Europa / Codice cartuccia inchiostro in Europa / Código de los cartuchos de tinta enEuropa
Do not open the ink cartridge package until you are ready to install it in the
printer. The cartridge is vacuum packed to maintain its reliability.
N’ouvrez pas l’emballage contenant la cartouche tant que vous n’êtes pas
prêt à l’installer dans l’imprimante. La cartouche est conditionnée sous vide
an de préserver sa abilité.
Önen Sie die Verpackung der Tintenpatrone erst, wenn Sie bereit sind, sie
im Drucker zu installieren. Die Tintenpatrone ist vakuumverpackt, um ihre
Funktionsfähigkeit aufrecht zu erhalten.
Open de verpakking van de inktcartridge niet voordat u gereed bent om
deze in de printer te installeren. De cartridge is vacuümverpakt om de
betrouwbaarheid te waarborgen.
Non aprire la cartuccia di inchiostro no a quando non si è pronti ad
installarla nella stampante. La cartuccia è sotto vuoto per garantirne
l’adabilità.
No abra el envoltorio del cartucho de tinta hasta el momento de instalarlo
en la impresora. El cartucho está envasado al vacío para conservar todas
sus propiedades.
WindowsWindows (No CD / DVD drive)Mac OS XiOS / Android
Visit the website to install Epson iPrint application, start the setup process, and
congure network settings.
Consultez le site web pour installer l’application Epson iPrint, faire la
conguration et dénir les paramètres réseau.
Rufen Sie die Website auf, um die Anwendung Epson iPrint zu installieren, den
Setup zu starten und Netzwerkeinstellungen zu kongurieren.
Ga naar de website om Epson iPrint te installeren, het installatieproces te starten
en netwerkinstellingen te congureren.
Visitare il sito web per installare l’applicazione Epson iPrint, per avviare il
processo di installazione e per congurare le impostazioni di rete.
Visite la web para instalar la aplicación Epson iPrint, comenzar el proceso de
conguración y congurar los ajustes de red.
!
Caution; must be followed carefully to avoid bodily injury.
Attention: mise en garde à suivre à la lettre pour éviter des
blessures corporelles.
Achtung – Warnhinweise müssen unbedingt beachtet werden, um
Verletzungen zu vermeiden.
Let op: moet zorgvuldig worden opgevolgd om lichamelijk letsel te
voorkomen.
Attenzione: osservare attentamente per evitare danni alla persona.
Precaución; debe seguirse estrictamente para evitar lesiones.
Not all cartridges are available in all regions.
Toutes les cartouches ne sont pas disponibles dans toutes les régions.
Nicht alle Tintenpatronen sind in allen Ländern verfügbar.
Niet alle cartridges zijn verkrijgbaar in alle landen.
Non tutte le cartucce sono disponibili in tutti i paesi.
Los cartuchos disponibles varían según la región.
Посмотреть инструкция для Epson Expression Home XP-342 бесплатно. Руководство относится к категории принтеры, 5 человек(а) дали ему среднюю оценку 8.7. Руководство доступно на следующих языках: английский. У вас есть вопрос о Epson Expression Home XP-342 или вам нужна помощь? Задайте свой вопрос здесь
Принтер Epson Expression Home XP-342 представляет собой устройство, предназначенное для печати документов высокого качества. Благодаря своей компактности и легкости, он может установлен на рабочем столе в офисе или дома. Он обладает функцией печати, сканирования и копирования, которая делает его универсальным и многофункциональным устройством.
Epson Expression Home XP-342 характеризуется высокой производительностью и печатает до 10 страниц в минуту, что позволяет сэкономить время при работе с большими объемами документов. Благодаря технологии Micro Piezo HP, задача печати становится более точной и качественной.
Принтер совместим со многими операционными системами, такими как Windows и Mac OS. Он поддерживает работу со всеми типами бумаги и форматами – от А4 до 10х15, что делает его универсальным в использовании.
Интерфейс принтера оснащен режимом Wi-Fi, благодаря которому пользователи могут легко и быстро подключить устройство к сети. Благодаря дисплею с панелью управления и поддержке карт памяти, принтер становится более удобным в использовании и позволяет выполнить работу быстро и эффективно.
Epson Expression Home XP-342 — это удобный и производительный принтер, который сделает работу с документами приятной и легкой. Он подойдет для использования дома и в офисе благодаря своей универсальности и функциональности.
Главная
| Epson | |
| Expression Home XP-342 | |
| принтер | |
| английский | |
| Руководство пользователя (PDF) |
Не можете найти ответ на свой вопрос в руководстве? Вы можете найти ответ на свой вопрос ниже, в разделе часто задаваемых вопросов о Epson Expression Home XP-342.
Как удалить замятую бумагу из принтера?
Лучше всего аккуратно вытянуть бумагу из принтера. Выключите принтер и убедитесь, что печатающий узел не нависает над бумагой и что в принтере не осталось бумаги.
Почему после установки оригинального картриджа принтер не работает?
Принтер может не распознать неоригинальный картридж. В этом случае вы получите сообщение о том, что картридж пуст. В инструкции к приобретенному картриджу обычно указаны способы устранения проблемы. Если это сделать не удалось, рекомендуется обратиться к продавцу.
Чем обусловлено плохое качество печати?
Причины плохого качества печати могут быть разными. Убедитесь, что картридж заполнен, а тонер имеется в достаточном количестве. Если такой проблемы нет, причина может заключаться в том, что струйному принтеру требуется чистка, высох картридж или сломан печатающий узел. Для лазерного принтера рекомендуется выполнить калибровку.
В чем разница между лазерным и струйным принтером?
Лазерный принтер печатает тонером, а струйный — чернилами.
Почему при печати на струйном принтере появляются черные полосы?
В большинстве случаев это обусловлено поломкой картриджа струйного принтера. Необходимо заменить картридж.
Что означает аббревиатура DPI?
DPI обозначает Dots Per Inch и представляет собой количество капель чернил (на дюйм), которые подаются на бумагу при печати.
Инструкция Epson Expression Home XP-342 доступно в русский?
К сожалению, у нас нет руководства для Epson Expression Home XP-342, доступного в русский. Это руководство доступно в английский.
Не нашли свой вопрос? Задайте свой вопрос здесь
Смотреть руководство для Epson Expression Home XP-342 ниже. Все руководства на ManualsCat.com могут просматриваться абсолютно бесплатно. Нажав кнопку «Выбор языка» вы можете изменить язык руководства, которое хотите просмотреть.

MANUALSCAT | RU
Вопросы и ответы
У вас есть вопрос о Epson Expression Home XP-342, но вы не можете найти ответ в пользовательском руководстве? Возможно, пользователи ManualsCat.com смогут помочь вам и ответят на ваш вопрос. Заполните форму ниже — и ваш вопрос будет отображаться под руководством для Epson Expression Home XP-342. Пожалуйста, убедитесь, что вы опишите свои трудности с Epson Expression Home XP-342 как можно более детально. Чем более детальным является ваш вопрос, тем более высоки шансы, что другой пользователь быстро ответит на него. Вам будет автоматически отправлено электронное письмо, чтобы проинформировать вас, когда кто-то из пользователей ответит на ваш вопрос.
Здравствуйте, хотела распечатать документ, а принтер выдал ошибку с надписью — «Ошибка принтера. Дополнительные сведения см. в документации. 000033.»
Акимова Полина2018-06-10
здравствуйте! помогите пожалуйста поменять язык на панели принтера epson XP-342 .установила немецкий ,а нужен русский язык.
olga2017-10-24
Здравствуйте! Замятие бумаги.Выдает ошибку №000041
Игорь2018-09-01
Прошу пользовательское руководство на русском языке
Вера2019-03-01
Принтер XP-342 При печати фото с ноутбука часто просто выходит чистая бумага. Выключал принтер из сети сек на 30 напечатает 1 фото и опять то же самое. При обычной печати А4 все нормально.
Сергей2018-11-10
Подключил катридж, все как в инструкции, выдает ошибку 000031, прокачки чернил по шлейфу нет
Феликс2019-09-30
Здравствуйте. Что-то жужжит (прокручивается) 1-2 секунды сразу после включения. И пишет ошибку принтера Е -01. Дополнительные сведения в документации 000033. Что посмотреть?
Наталья2021-07-10
как настроить фото без полей? печает только с полями
иван владимирович2019-02-15
Задать вопрос о Epson Expression Home XP-342
- Бренд:
- Epson
- Продукт:
- принтеры
- Модель/название:
- Expression Home XP-342
- Тип файла:
- Доступные языки:
- английский