
![]()

Table of Contents
Introduction
. .About. . . . .FabFilter. . . . . .Pro. . —.Q. .3. . . . . . . . . . . . . . . . . . . . . . . . . . . . . . . . . . . . . . . . . . . . . . . . . . . . . . . . . . . . .3
. .Quick. . . . start. . . . . . . . . . . . . . . . . . . . . . . . . . . . . . . . . . . . . . . . . . . . . . . . . . . . . . . . . . . . . . . . . . . . . . . . .5
Using FabFilter Pro-Q 3
. .Overview. . . . . . . . . . . . . . . . . . . . . . . . . . . . . . . . . . . . . . . . . . . . . . . . . . . . . . . . . . . . . . . . . . . . . . . . . . . . .6
. .Knobs. . . . . . . . . . . . . . . . . . . . . . . . . . . . . . . . . . . . . . . . . . . . . . . . . . . . . . . . . . . . . . . . . . . . . . . . . . . . .8
. .Display. . . . . .and. . .workflow. . . . . . . . . . . . . . . . . . . . . . . . . . . . . . . . . . . . . . . . . . . . . . . . . . . . . . . . . . . . . . . . . . . .9
. .Band. . . .controls. . . . . . . . . . . . . . . . . . . . . . . . . . . . . . . . . . . . . . . . . . . . . . . . . . . . . . . . . . . . . . . . . . . . . . . .11.
. .Dynamic. . . . . . EQ. . . . . . . . . . . . . . . . . . . . . . . . . . . . . . . . . . . . . . . . . . . . . . . . . . . . . . . . . . . . . . . . . . . . . .13.
. .Solo. . . . . . . . . . . . . . . . . . . . . . . . . . . . . . . . . . . . . . . . . . . . . . . . . . . . . . . . . . . . . . . . . . . . . . . . . . . .15.
. .Full. . .Screen. . . . .mode. . . . .and. . .resizing. . . . . . . . . . . . . . . . . . . . . . . . . . . . . . . . . . . . . . . . . . . . . . . . . . . . . . . . . . . .16.
. .Piano. . . .display. . . . . . . . . . . . . . . . . . . . . . . . . . . . . . . . . . . . . . . . . . . . . . . . . . . . . . . . . . . . . . . . . . . . . . . .18.
. .Stereo. . . . .options. . . . . . . . . . . . . . . . . . . . . . . . . . . . . . . . . . . . . . . . . . . . . . . . . . . . . . . . . . . . . . . . . . . . . . .19.
. .Surround. . . . . . . . . . . . . . . . . . . . . . . . . . . . . . . . . . . . . . . . . . . . . . . . . . . . . . . . . . . . . . . . . . . . . . . . . . . .21.
. .Processing. . . . . . . .mode. . . . . . . . . . . . . . . . . . . . . . . . . . . . . . . . . . . . . . . . . . . . . . . . . . . . . . . . . . . . . . . . . . . .22.
. .Spectrum. . . . . . .analyzer. . . . . . . . . . . . . . . . . . . . . . . . . . . . . . . . . . . . . . . . . . . . . . . . . . . . . . . . . . . . . . . . . . . . .25.
. .EQ. . Match. . . . . . . . . . . . . . . . . . . . . . . . . . . . . . . . . . . . . . . . . . . . . . . . . . . . . . . . . . . . . . . . . . . . . . . . . .27.
. .Spectrum. . . . . . .Grab. . . . . . . . . . . . . . . . . . . . . . . . . . . . . . . . . . . . . . . . . . . . . . . . . . . . . . . . . . . . . . . . . . . . .30.
. .Output. . . . . options. . . . . . . . . . . . . . . . . . . . . . . . . . . . . . . . . . . . . . . . . . . . . . . . . . . . . . . . . . . . . . . . . . . . . . .31.
. .MIDI. . . .learn. . . . . . . . . . . . . . . . . . . . . . . . . . . . . . . . . . . . . . . . . . . . . . . . . . . . . . . . . . . . . . . . . . . . . . . .32.
. .Undo,. . . . .redo,. . . .A/B. . .switch. . . . . . . . . . . . . . . . . . . . . . . . . . . . . . . . . . . . . . . . . . . . . . . . . . . . . . . . . . . . . . . .34.
Presets
. .Loading. . . . . .presets. . . . . . . . . . . . . . . . . . . . . . . . . . . . . . . . . . . . . . . . . . . . . . . . . . . . . . . . . . . . . . . . . . . . . .35.
. .Saving. . . . .presets. . . . . . . . . . . . . . . . . . . . . . . . . . . . . . . . . . . . . . . . . . . . . . . . . . . . . . . . . . . . . . . . . . . . . . .36.
. .How. . . presets. . . . . .are. . .stored. . . . . . . . . . . . . . . . . . . . . . . . . . . . . . . . . . . . . . . . . . . . . . . . . . . . . . . . . . . . . . . .37.
Purchasing FabFilter Pro-Q 3
. .Purchasing. . . . . . . .FabFilter. . . . . . .Pro. .—.Q.3. . . . . . . . . . . . . . . . . . . . . . . . . . . . . . . . . . . . . . . . . . . . . . . . . . . . . . . . .38.
. .Entering. . . . . . your. . . .license. . . . .key. . . . . . . . . . . . . . . . . . . . . . . . . . . . . . . . . . . . . . . . . . . . . . . . . . . . . . . . . . . . .39.
Support
. .Support. . . . . . . . . . . . . . . . . . . . . . . . . . . . . . . . . . . . . . . . . . . . . . . . . . . . . . . . . . . . . . . . . . . . . . . . . . . .40.
. .Upgrading. . . . . . . .to. Pro. . .-Q. .3. . . . . . . . . . . . . . . . . . . . . . . . . . . . . . . . . . . . . . . . . . . . . . . . . . . . . . . . . . . . . .41.
. .Manual. . . . . installation. . . . . . . . . . . . . . . . . . . . . . . . . . . . . . . . . . . . . . . . . . . . . . . . . . . . . . . . . . . . . . . . . . . . . . .42.
. .VST. . .plug. . .—.in. .versions. . . . . . . . . . . . . . . . . . . . . . . . . . . . . . . . . . . . . . . . . . . . . . . . . . . . . . . . . . . . . . . . . . .43.
. .External. . . . . .side. . . chaining. . . . . . . . . . . . . . . . . . . . . . . . . . . . . . . . . . . . . . . . . . . . . . . . . . . . . . . . . . . . . . . . . . .44.
. .License. . . . . .agreement. . . . . . . . . . . . . . . . . . . . . . . . . . . . . . . . . . . . . . . . . . . . . . . . . . . . . . . . . . . . . . . . . . . . . .46.
. .Acknowledgements. . . . . . . . . . . . . . . . . . . . . . . . . . . . . . . . . . . . . . . . . . . . . . . . . . . . . . . . . . . . . . . . . . . . . . . . . . . .48.
. .About. . . . .FabFilter. . . . . . . . . . . . . . . . . . . . . . . . . . . . . . . . . . . . . . . . . . . . . . . . . . . . . . . . . . . . . . . . . . . . . . .49.
2

Since its original release in 2009, FabFilter Pro-Q has become the trusted workhorse EQ plug-in for many engineers and producers around the world, widely praised for its superb workflow, excellent sound quality and extensive feature set. With version 3, we’re bringing Pro-Q to a new level, introducing features like dynamic EQ, surround support up to Dolby Atmos 7.1.2, per-band mid/side processing, and much more.
FabFilter Pro-Q 3 gives you the highest possible sound quality, a complete feature set, and a gorgeous, intelligent interface that is designed to help you get\’that’ sound quickly and easily.
New in version 3
At first glance, FabFilter Pro-Q 3 looks quite similar to its predecessor. But looks are\deceiving! Of course, the clean design and intelligence of Pro-Q 2 is still present, but a lot of exciting new functionality has been added to improve your sound and\workflow:
Dynamic EQ for any of the 24 bands (Shelf or Bell at any slope), with Dynamic Range and Threshold controls and an intelligent Auto Threshold mode.
Dynamic EQ bands still feature perfect analog EQ shape matching and also support Linear Phase mode.
Easily create dynamic bands in the EQ display by holding the Alt key while dragging the result curve or double-clicking in the display.
Surround support (up to 7.1.2 Dolby Atmos), with intelligent per-band speaker selection.
Per-band mid/side or left/right processing options.
New Brickwall LP/HP filter slope.
New Flat Tilt filter shape: a flat tilting correction curve over the whole audible frequency spectrum.
Improved spectrum analyzer with frequency collision indication and the option to show the spectrum of any other Pro-Q 3 instance: simply hover over the analyzer button in the bottom bar and choose another Pro-Q 3 plug-in instance here. Instances are named automatically and can be renamed if needed.
Improved EQ parameter value display with bypass, shape and delete buttons and easy access to the band menu.
Improved Spectrum Grab with labels indicating the most important peaks.
Improved EQ band menu (also accessible via the value display), with Make Dynamic, Invert Gain options and more.
Improved EQ Match, adding the possibility to match with a post spectrum from another Pro-Q 3 instance in your session.
Improved Auto Gain with channel weighting and an estimated correction of dynamic gain for a better overall gain adjustment.
Improved MIDI Learn with the ability of controlling the active band using a single set of controls on your
3

MIDI controller.
Overall new and fresh design.
Other key features
And of course, all the goodness of the Pro-Q 2 is still here: highest possible sound\quality, Natural and Linear Phase processing, univeral slope support for all EQ shapes, EQ match, a gorgeous, resizeable interface with full screen more for easy and\precise editing, up to 24 EQ bands, intelligent band solo mode, stereo or mid/side processing,\intelligent multi-band selection and editing for maximum ease and efficiency, spectrum grab, GPUpowered\graphics acceleration, double-click text entry of parameter values, different display ranges: 3\dB and 6 dB ranges for mastering, 12 dB and 30 dB for mixing, Pro Tools hardware control surfaces\support, MIDI Learn, undo/redo and A/B comparison, and an extensive help file with interactive help\hints.
Upgrading to Pro-Q 3
Upgrading from Pro-Q version 2 to the new Pro-Q 3 is safe and easy: installing Pro-Q 3 will\not replace or delete the previous Pro-Q 2 and Pro-Q version 1 plug-ins. All versions will co-exist\and can be used at the same time. This ensures that you can open old songs that use Pro-Q 2 or Pro-Q 1\without problems! Of course, FabFilter Pro-Q 3 opens all presets from Pro-Q 2 and Pro-Q 1 without problems.\See Upgrading to Pro-Q 3 for more information.
FabFilter Pro-Q 3 is available in VST, VST3, AU (Audio Units), AAX Native and AudioSuite formats (all both 64bit and 32-bit).
|
Windows requirements |
macOS requirements |
|
|
32-bit: Windows 10, 8, 7, Vista or XP |
OS X 10.8 or higher |
|
|
64-bit: Windows 10, 8, 7 or Vista (x64) |
AU or VST 2/3 host or Pro Tools |
|
|
VST 2/3 host or Pro Tools |
Intel processor |
|
|
Next: Quick start |
||
|
See Also |
||
|
Using FabFilter Pro-Q 3 |
||
|
Acknowledgements |
4

Quick start
The installer will copy the FabFilter Pro-Q 3 plug-in into the common VST, VST 3, AU (macOS only)\and Pro Tools plug-in folders on your computer. On macOS, the global plug-in folders in\/Library/Audio/Plug-Ins are used.
In most cases, your host will then recognize the plugin automatically. However, if the\instructions below do not work, see Manual\installation instead.
Cubase
Choose an empty insert slot, for example in the Mixer, and select FabFilter Pro-Q 3 from the menu that appears. To use the MIDI features in Pro-Q 3, create a new MIDI track and set its output to the Pro-Q 3 instance you have just created. (The VST 3 version of Pro-Q 3 can be found in the EQ section.)
Logic Pro
Choose an empty insert slot on one of your audio tracks, instrument tracks or buses and select\FabFilter Pro-Q 3 from the pop-up menu. You will find FabFilter Pro-Q 3 in the Audio Units > FabFilter section (named FF Pro-Q 3).
Ableton Live
In Session view, select the track you would like to place FabFilter Pro-Q 3 on, for example by\clicking the track name. At the left top of Ableton Live’s interface, click on the Plug-in\Device Browser icon (third icon from the top). From the plug-ins list, double-click\FabFilter/FabFilter Pro-Q 3, or drag it onto the track.
Pro Tools
Choose an empty insert slot on one of your audio tracks, instrument tracks or buses and select\FabFilter Pro-Q 3 from the pop-up menu in the EQ section.
To begin, just open the plug-in and drag the yellow line in the display or double-click\anywhere to create new EQ bands. Enjoy!
Next: FabFilter Pro-Q 3 overview
See Also
Overview
5

Overview
The interface of FabFilter Pro-Q 3 is simple and straightforward. The interactive EQ display\fills the whole plug-in window, and lets you create and adjust EQ bands using the mouse. When you\create or select bands, the band controls will appear, floating above the display, positioned\under the selected bands. Using the band controls, you can change the settings of the currently\selected EQ bands. The bottom bar offers features like processing mode (zero latency, Natural\Phase or linear phase), spectrum analyzer settings, global\bypass, phase-invert, auto-gain, gain scale and output level/panning.
 Interactive EQ display
The interactive EQ display shows you in a glance what’s going on and lets you easily create and\edit EQ bands. See Display and workflow.
 Band selection controls
The controls below the EQ display adjust the parameters of the currently selected EQ bands in\the display. See Band controls.
 Processing mode
FabFilter Pro-Q 3 can work in zero-latency mode, Natural Phase mode or in linear-phase mode\with variable processing resolution. See Processing\mode.
 Spectrum analyzer and EQ Match
Via the Analyzer button, you can enable or disable the real-time spectrum analyzers for the\pre-EQ, post-EQ and external signals, and you can customize the analyzer settings. See\Spectrum Analyzer. Via the same settings panel, you can also access\EQ Match mode, which lets you match the spectrum of a reference signal. See EQ Match.
 Output options
On the far right of the bottom bar, you can bypass the entire plug-in, invert the output phase,\enabled or disable autogain, show/hide the output metering, apply an overall gain scale and\adjust the output level and panning. See Output options.
 Resize and Full Screen mode
Using the Resize button at the right of\the bottom bar, you can choose a desired interface size. In addition, using the Full Screen\button at the right top corner, you can enter Full Screen mode, in which Pro-Q 3 fills the\whole screen. See Full Screen mode and resizing.
 Piano display
Using the Piano Display button, you can toggle between the normal frequency scale and a piano\keyboard display, via which you can easily quantize band frequencies. See Piano display.
 MIDI learn
MIDI Learn lets you easily associate any MIDI controller with any plug-in parameter. See\MIDI Learn.
 Presets, undo, A/B, help
With the preset buttons, you can easily browse through the factory presets or save your own\settings so you can re-use them in other songs. The Undo, Redo, A/B and Copy buttons at the top\of the plug-in interface enable you to undo your changes and switch between different states of\the plug-in. Finally, the Help menu provides access to help and version information. See\Loading presets and Undo,\redo, A/B switch.
Next: Knobs
See Also
6

Knobs
It is easy to control FabFilter Pro-Q 3’s parameters with the large round knobs. They will light up when you move the mouse cursor around to indicate that you can adjust them. The moment you move the mouse cursor over a knob, a parameter value display will pop up, which shows the name and the current value of the parameter.
All knobs support four ways of control:
1.Vertical mode
Click on the center area of a knob and drag up or down to rotate it. The knob reacts to the\speed with which you are dragging, so if you move the mouse slowly, you make precise\adjustments.
2.Rotate mode
Grab the arrow of the knob and drag it around. By moving the mouse cursor further away from the knob while dragging it, you can make precise adjustments.
3.Mouse wheel mode
Perhaps the easiest way to make adjustments is by using the mouse wheel when you hover over a knob. This mode works for all the knobs and possible panning rings. (On Windows, you might need\to click in the plug-in interface first to make sure it is the active window.)
4.Text entry mode
Double-click a knob to enter an exact value using the keyboard.
Tips
To reset a knob to its default position, hold down the Ctrl key (Windows) or\Command key (macOS) and click the knob once. Note: In Pro Tools, Pro-Q 3 uses the\default Pro Tools keyboard shortcut for reset: Alt+click.
To fine-tune a value when using vertical drag mode or the mouse wheel, hold down the\Shift key while dragging or moving the mouse wheel. Note: In Pro Tools, Pro-Q 3 uses the default Pro Tools keyboard shortcut for fine tune: Ctrl+drag on Windows or\Command+drag on macOS.
There are several handy shortcuts in text entry mode. With frequency values, you can\type e.g. ‘1k’ to set the value to 1000 Hz, and also ‘A4′ for 440 Hz, or even strings like\’C#3+13’. With dB values, you can type e.g. ‘2x’ to get +6 dB (the value that corresponds to\two times louder). With all values, you can also type a percentage (e.g. ‘50%’ will put a knob\exactly in the middle position).
Sometimes, knobs in our plug-in interfaces are linked: these be adjusted\simultaneously by holding down the Alt key (Shift key in Pro Tools) while\dragging on one of them. For example, an output level and input level setting of a plug-in\could be adjusted simultaneously (in the opposite direction) this way.
Next: Display and workflow
See Also
Overview
8

Display and workflow
The large display shows all EQ bands and lets you easily create new bands and edit them. The\thick yellow curve shows the overall frequency response and dynamic behavior of the equalizer. The EQ display looks\simple and straightforward, but holds a lot of intelligence and smart features. We strongly\recommend to take some time to read this topic and learn about all its options and shortcuts…\it will highly improve your workflow!
Creating bands
To add a new EQ band, simply click on the yellow overall curve and drag it up or down.
Alternatively, double-click or Ctrl-click (Command-click on macOS) on the display\background.
Hold down the Alt key while creating a band using the method above, to create a dynamic band instead of a normal band.
The shape of newly created curves is determined automatically depending on where you click,\and once you get used to this, it’s a real time-saver! Do you need a Notch curve? Just\double-click in the far low area of the display. Want a Low Cut or High Cut filter? Double-click\in the far left or far right areas. Shelving filter? Drag the yellow curve at the left or right\end of the display.
Selecting bands
Click the EQ band’s dot or the colored area around it to select it.
Click and drag on the display background to select adjacent bands by\dragging a rectangle around them.
Hold down Ctrl (Command on macOS) and click another dot to\select multiple bands. Hold down Shift and click a dot to\select a consecutive range of bands.
Deselect all bands by clicking anywhere on the display background.
Adjusting and editing bands
Once you have selected one or more EQ bands, the display highlights the shapes of the selected\bands. You can now of course edit the EQ settings via the floating band controls, but the easiest way to adjust them is simply by dragging\them around:
Click and drag a selected dot to adjust the frequency and\gain of all selected bands. If you have multiple bands selected, the gain of\all selected bands will be scaled relative to each other.
For dynamic bands, drag the dynamic range indicator up or down to adjust the dynamic range.
Move the mouse wheel to adjust the Q setting, making\the selected bands narrower or wider. This works while dragging or when the mouse pointer is above a curve.\Alternatively, adjust the Q of all selected bands by holding down Ctrl (Command on macOS) while dragging vertically.
Move the mouse wheel while holding down Alt to adjust the dynamic range setting or Ctrl (Command on macOS) to adjust the gain. Hold both Alt and Ctrl (Alt+Command on macOS) to perform a linked change, trading gain for dynamic range.
9

Hold down Shift while dragging (or while using the mouse wheel) to fine-tune the settings of the\selected bands.
Hold down Alt while dragging to constrain to horizontal\adjustments (frequency) or vertical adjustments (gain or Q, depending on the\Ctrl/Command key).
Hold down Alt and click the dot on an EQ band once to toggle its\bypass state (enabling or disabling the band).
Hold down Ctrl+Alt (Command+Alt on macOS) and click the dot on an EQ\band once to change its shape. Hold down Alt+Shift and click the dot on an EQ band once to change its\slope.
Double-click a dot to enter values in the EQ parameter display (using\the Tab key to step through Frequency, Gain and Q) or double-click the values in the\parameter value display directly. Note that you can enter frequencies in various ways, like\»100″, «2k», «A4» or «C#2+13».
If you right-click on the dot for an EQ band, a pop-up menu appears with\various band settings. This is a quick way to modify the EQ band while you’re working in the\display.
EQ parameter display
Next to each EQ band’s dot in the display, the EQ parameter display shows the exact parameter values for the EQ band, along with quick controls to bypass or delete a band, enter solo mode, and change its shape. You can double-click a value in the display directly to edit it. Click the triangular menu button to access the band menu with more options. In case you find the EQ parameter display to be distracting, you can turn it off via the Show EQ Parameter Display option on the Help menu.
Display range
Note that two display scales are drawn: the yellow scale corresponds to the EQ band curves and\yellow overall curve. The gray scale at the far right is used by the spectrum analyzer and output level meter. In the\top-right corner of the display at the top of the yellow scale, there is a drop-down button to\choose the display range: +/- 3 dB, 6 dB, 12 dB or 30 dB. When you are dragging\a curve outside the current range of the display, the range will expand automatically as\needed.
Horizontal zooming
Sometimes it might be useful to zoom in to a specific frequency for extra precise editing. You\can easily do this by clicking and dragging the frequency scale at the bottom of the EQ display,\just above the bottom bar. You can do the following:
Click and drag up and down to zoom in and out at the frequency you have\clicked on.
While zoomed in, you can also drag left and right to move the frequency\scale. Just double-click the scale to return to its default full range.
Tips
In Full Screen mode, available via the button at the right top of the\interface, the EQ display will fill the whole screen so you can make very precise adjustements.\See Full Screen mode and resizing.
To quantize a frequency without using the piano display, just double-click\a curve dot in the display or the Frequency knob in the EQ controls, and enter a value like\»A4″ or «C#2».
It is possible to turn off the automatic adjustment of the display range via the Auto-Adjust Display Range option on the Help menu.
Even though frequencies above 20 kHz are generally inaudible, the display extends to 30 kHz\so you can put filters above this limit. The left part of the filter, extending into the\audible frequency spectrum, still affects the sound. This gives you even more possibilities to\shape the frequency response of the equalizer just the way you need it.
Next: Band controls
See Also
Overview
Dynamic EQ
Spectrum Grab
10
![]()
Band controls
When you select EQ bands in the interactive EQ display, the\floating band controls will automatically appear, right under the selected bands at the bottom of\the display. The band controls show the current settings of the selected EQ bands and enable you\to adjust them precisely.
From left to right, the following settings are available:
The bypass button at the left top lets you easily bypass the selected EQ\bands. Note that you can also bypass an EQ band by Alt-clicking its dot in the\display. While an EQ band is bypassed, it is dimmed in the display and a red light glows in the\bypass button.
The shape button selects the filter shape of the selected bands:
1.Bell, the traditional parametric EQ shape and probably the most versatile of them\all
2.Low Shelf, to boost or attenuate low frequencies
3.Low Cut, to cut all sound below the filter frequency
4.High Shelf, to boost or attenuate high frequencies
5.High Cut, to cut all sound above the filter frequency
6.Notch, to cut a small section of the spectrum
7.Band Pass, to isolate a section of the spectrum
8.Tilt Shelf, to tilt the spectrum around a certain frequency
9.Flat Tilt, to tilt the spectrum using a flat curve, around a certain frequency
Note: you also change the shape of an EQ band by Ctrl+Alt-clicking its dot\(Command+Alt on macOS) in the display.
The slope button below the shape parameter sets the steepness of the\filter from 6 dB/octave to 96 dB/octave (and even up to Brickwall for Low Cut and High Cut filters). In Pro-Q, the slope not only applies to the usual\Low Cut and High Cut filters, but to all filter shapes! This allows you to make highly surgical\adjustments if needed. So for example, you can make ultra-narrow Bell or Notch filters or very steep Shelving filters.
The frequency knob sets the frequency of the selected band between 5 Hz\and 30 kHz. If multiple bands are selected, they are adjusted in parallel.
The gain knob sets the gain in dB of the selected bands between -30 and\+30 dB. This setting is only used for Bell and Shelving filter types.
The dynamic range ring sets the range of dynamic EQing in dB, ranging from -30 to 30 dB (possibly limited by the gain setting limits). Choosing a positive or negative dynamic range will make the band dynamic and expose additional dynamic controls. This setting is only available for Bell and Shelving filter types. See Dynamic EQ.
The Q knob sets the bandwidth of the selected bands, widening or\narrowing them. The Q cannot be adjusted when a 6 dB/octave slope is used.
Note: Because there are different interpretations of Q values in various EQ plug-ins and\scientific papers, we have chosen the value 1 to correspond to the default bandwidth. For the\shelf filters, the internal Q values are chosen such that they result in a good range of\shelf shapes. Keep this in mind when trying to reproduce the filter shapes of another EQ\plug-in in Pro-Q: the interpretation of the Q values might not be the same.
Using the Gain-Q interaction button, between the gain and Q knobs, you\can enable a subtle, analog- EQ-like gain-Q interaction. When enabled, Q and gain influence\each other in a pleasant way often found in analog mixing consoles. Essentially, this means\that the Q automatically gets a bit narrower when gain is increased, and the other way\around, a little gain is added when the Q gets very narrow.
11

Note: Gain-Q interaction only affects the Bell filter shape. Pro-Q remembers the last\Gain-Q interaction setting that you’ve chosen and will use this for new instances of the\plug-in.
The previousand next band buttons let you step through the current\available bands in the display, in the order in which they currently appear in the display.\In between, the band number of the current band is shown to help you to identify this band in\the host when automating EQ parameters.
Note: When creating new bands, they will be numbered 1, 2, 3 and so on. But when you\delete a band, the others won’t renumber, in order to ensure that currently written\automation in your host still controls the correct band.
The delete button at the right top removes the selected EQ bands. If you\have accidentally deleted some bands, you can easily restore them using the Undo button at the top of the plug-in interface.
The stereo placement button controls which channels are affected by the selected\bands. The split button (scissors icon) splits the selected bands into L and R (or M and S) bands. See Stereo options. When using Pro-Q on a surround channel, the stereo placement button will open a panel with more extensive stereo placement and speaker selection setting. See Surround.
Tips
Double-click any knob to enter the value directly using the keyboard. See Knobs for more information. For the Frequency knob, you can enter values in\various ways, like «100» or «2k», but also «A4» or «C#2+13».
To hide the band controls, simply deselect all bands by clicking on the display\background.
Hold down the Alt key while changing the gain or dynamic range knobs in a reverse-linked way (i.e. to trade gain for dynamic range).
Next: Dynamic EQ
See Also
Overview
Display and workflow
12

Dynamic EQ
One of the most important new features in Pro-Q 3 is dynamic EQ: any of Pro-Q’s bands (with Bell or Shelf shapes) can be made dynamic, at any slope, with perfect analog matching and in Linear Phase mode.
Simply put, dynamic EQ changes the gain of an EQ band dynamically, depending on the level of the input signal. This makes it possible to perform subtle and surgical edits similar to a multi-band compressor, but in a way that’s often more intuitive and easier to work with.
Since Pro-Q is used by many engineers and producers worldwide as their standard workhorse EQ, we have ensured that Pro-Q 3 remains very lightweight and ultra-fast to work with, keeping the existing natural workflow and shortcuts. Dynamic EQ in Pro-Q 3 is an intuitive and elegant extension of the regular workflow: the dynamic options and controls are only exposed when you actually start using them, and won’t get in the way of your normal EQ work.
The dynamic behavior of Pro-Q 3 has been carefully tuned and is highly program dependent: attack, release and knee all depend on the processed audio, the frequency range of the EQ band and the current dynamic range. This results in very natural and smooth sounding compression and expansion, useful for a wide range of dynamic EQing applications.
Creating dynamic bands
Any of Pro-Q’s bands can be made dynamic. This can be achieved in different ways:
Select EQ bands in the EQ display, and then adjust the dynamic range ring around the Gain knob in the band controls, choosing a positive of negative value.
Hover above an EQ band in the display, and use the mouse wheel while holding down the Alt key to adjust the dynamic range for this band or the selected EQ bands.
Select EQ bands in the display, and then choose Make Dynamic on the band menu (which you can access by right-clicking the band dot, or via the menu button in the EQ parameter display).
You can also create dynamic bands right away (initialized with a dynamic range instead of normal gain), by holding down the Alt key while creating bands in any of the normal ways: Alt+drag the result curve, Alt+double-click in the EQ display or Alt+Ctrl+click (Alt+Command+click on macOS) in the EQ display.
Internally, the dynamic EQ process will trigger on a band-limited version of the plugin’s input, according to the frequency range the band works on.
Dynamic band controls
The following dynamic controls are displayed for dynamic EQ bands:
The dynamic range ring sets the amount of dynamic EQing for a band, ranging from -30 to 30 dB (possibly limited by the maximum gain setting limits). Choose a positive (expansion) or negative
13

(compression) value here enables dynamic EQing and exposes the additional dynamic controls. Note that this setting is only available for Bell and Shelving filter types. The current dynamic gain change is shown as a yellow bar inside the ring, on top of the dynamic range that is indicated in red.
Note that you can also drag the dynamic range indicator for a band in the EQ display up or down to adjust the dynamic range.
The auto-threshold button toggles the dynamic behavior between the default autoor custom threshold mode. When in auto mode, the threshold is constantly adjusting to the level of the current, band-limited trigger signal. Click it to enable the custom threshold mode, revealing the threshold slider.
The threshold slider, visible when not using auto-threshold mode, sets the threshold for triggering the dynamic EQ. The level of the trigger signal is shown in the slider, making it easy to find the correct threshold. Note that a soft knee is used internally by the dynamic EQ algorithm, so it can start triggering a little bit below the selected threshold value.
The bypass dynamics button at the left top of the dynamic range ring makes it easy to bypass the dynamic behavior of the currently selected bands. While the dynamic behavior is bypassed, this is reflected in the EQ display, the dynamic range ring is shown as inactive, and a red light glows in the button.
The clear dynamics button will reset the dynamic range to 0 dB for all selected bands, essentially turning them back into normal, non-dynamic bands.
How and when to use dynamic EQ
Generally when mixing or mastering, making static EQ adjustments works very well. But sometimes, using EQ dynamically can be the key to solving specific frequency issues or bringing out certain elements in a mix. For example, you can use dynamic EQ to brighten a kick drum or tame a hi-hat in your drum track, highlighting or suppressing only the transients. Or you could use a narrow dynamic bell filter to suppress sibilance in a vocal recording. Especially in combination with the per-band mid/side/stereo options, the possibilities are endless.
Pro-Q 3’s workflow is perfectly designed for this: you can use it as your go-to EQ on every channel, doing the usual static EQing, but when you need to you can make any band dynamic right away.
Linear Phase processing
Dynamic EQing also works in Linear Phase mode, but only for Processing Resolution settings up to High. The attack and release response will be slightly different from the normal behavior in Zero Latency and Natural Phase modes.
When using dynamic EQ in Linear Phase mode in combination with the Very High or Maximum resolution settings, you will see a warning sign next to the Processing Mode button to indicate that this is not possible. In this case, simply lower the resolution to High or lower to be able to use dynamic EQing.
Tips
When using the mouse wheel above an EQ band while holding down both Alt and Ctrl (Command on macOS), you change both the dynamic range and gain or the band in a reverse linked way, i.e. you can trade gain for dynamic range.
Next: Solo
See Also
Overview
Band controls
Spectrum Grab
14

Solo
When you move the mouse cursor near an EQ band in the display, the EQ parameter display pops\up showing the current parameter values for the band.
Click and hold the solo button (with the headphones icon) to\enter solo mode for the current EQ band. The other EQ bands will dim, just like\the yellow overall curve. Simply drag the solo button horizontally to change the frequency of\the band, or vertically to adjust the solo listening level.
In solo mode, you don’t hear the effect of the EQ band itself, but instead you\will hear the part of the frequency spectrum that is being affected by that band. Of course, the\frequency range depends on the frequency and Q settings, and is visualized in the display as\well.
When using solo mode with Low Cut or High Cut\bands, you will hear the frequencies that are being cut away instead of the frequencies that\pass, which helps you to determine whether you are cutting the right frequencies.
Generally, solo mode aims to expose the parts of the incoming audio that matter\to the current EQ band, but that you can’t hear just by listening to the regular EQ sound.
Tips
When using solo with Bell or Shelving bands, hold down\Ctrl (Cmd on macOS) while dragging to change the Q, which will of course affect the frequency\range that you hear. For filter types that do not have a Gain setting (Lowand High Cut,\Notch, Band Pass), dragging in solo mode has the same effect as dragging the normal, changing\both Frequency and Q.
You can adjust the solo listening level by moving the mouse up or down while holding the solo button.
If the piano display is enabled, the parameter value\display will also show the note number that corresponds to the band frequency.
You can turn the parameter value display on and off by clicking Show EQ Parameter\Display in the Help menu.
Next: Full Screen mode and resizing
See Also
Overview
Display and workflow
15
 Loading…
Making musical edits with Dynamic EQ
After our previous article on「M/S mode enhancements」, we will take a look at more new functions in fabfilter Pro-Q 3.
Let’s take a look at the「dynamic EQ」which is a big pull for this new version.
Dynamic EQ will adjust the amount of applied EQ depending on the frequency; a monumental new function.
It can be used for individual tracks, as well as applied onto the master track for EQ edits.
fabfilter Pro-Q 3 Dynami EQ Video Access

Applying dynamic EQ
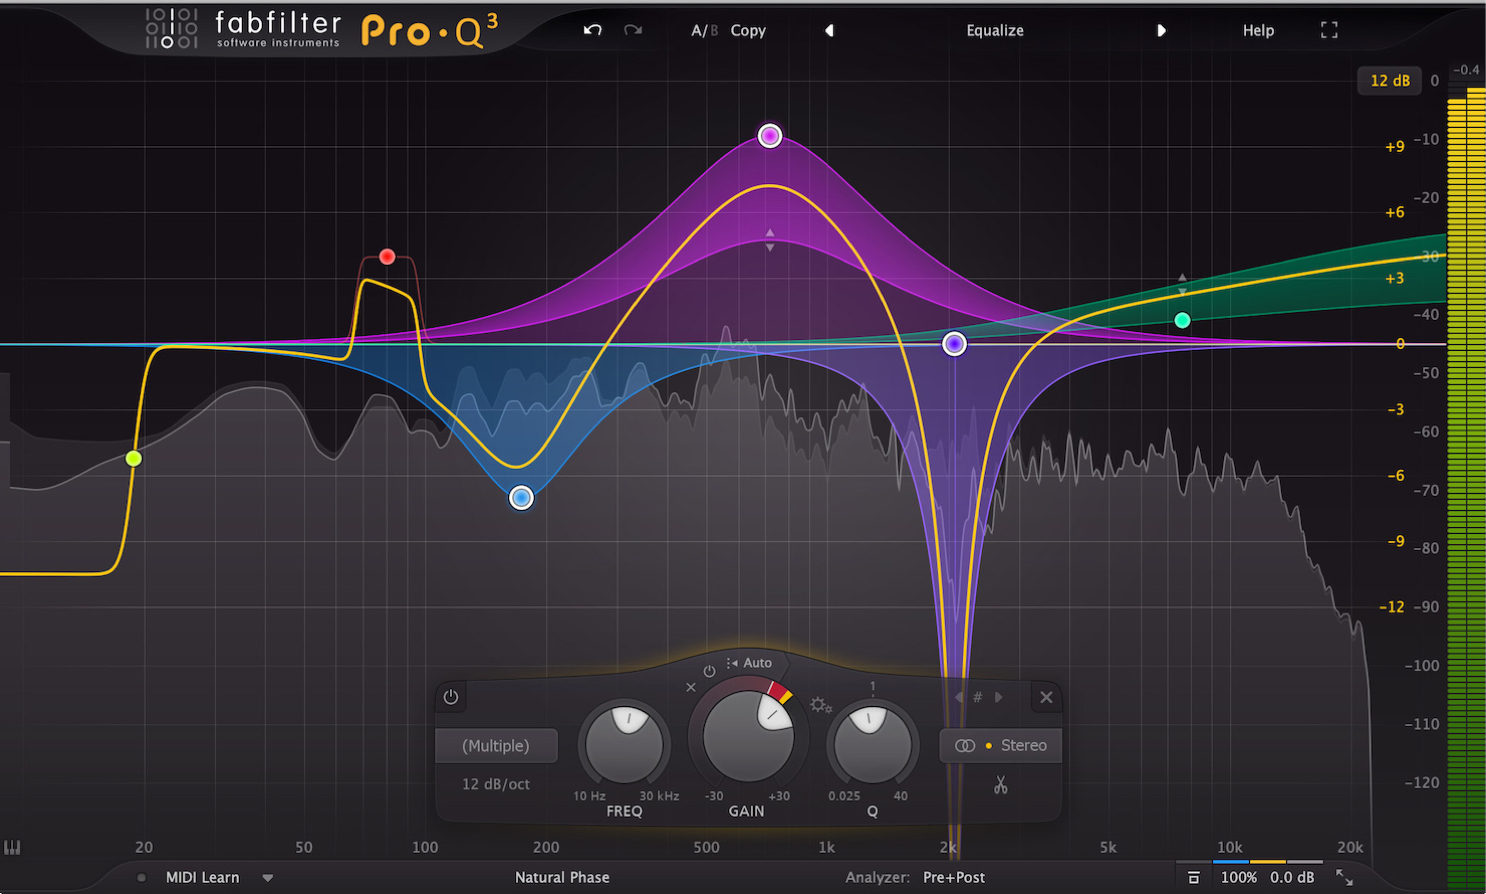
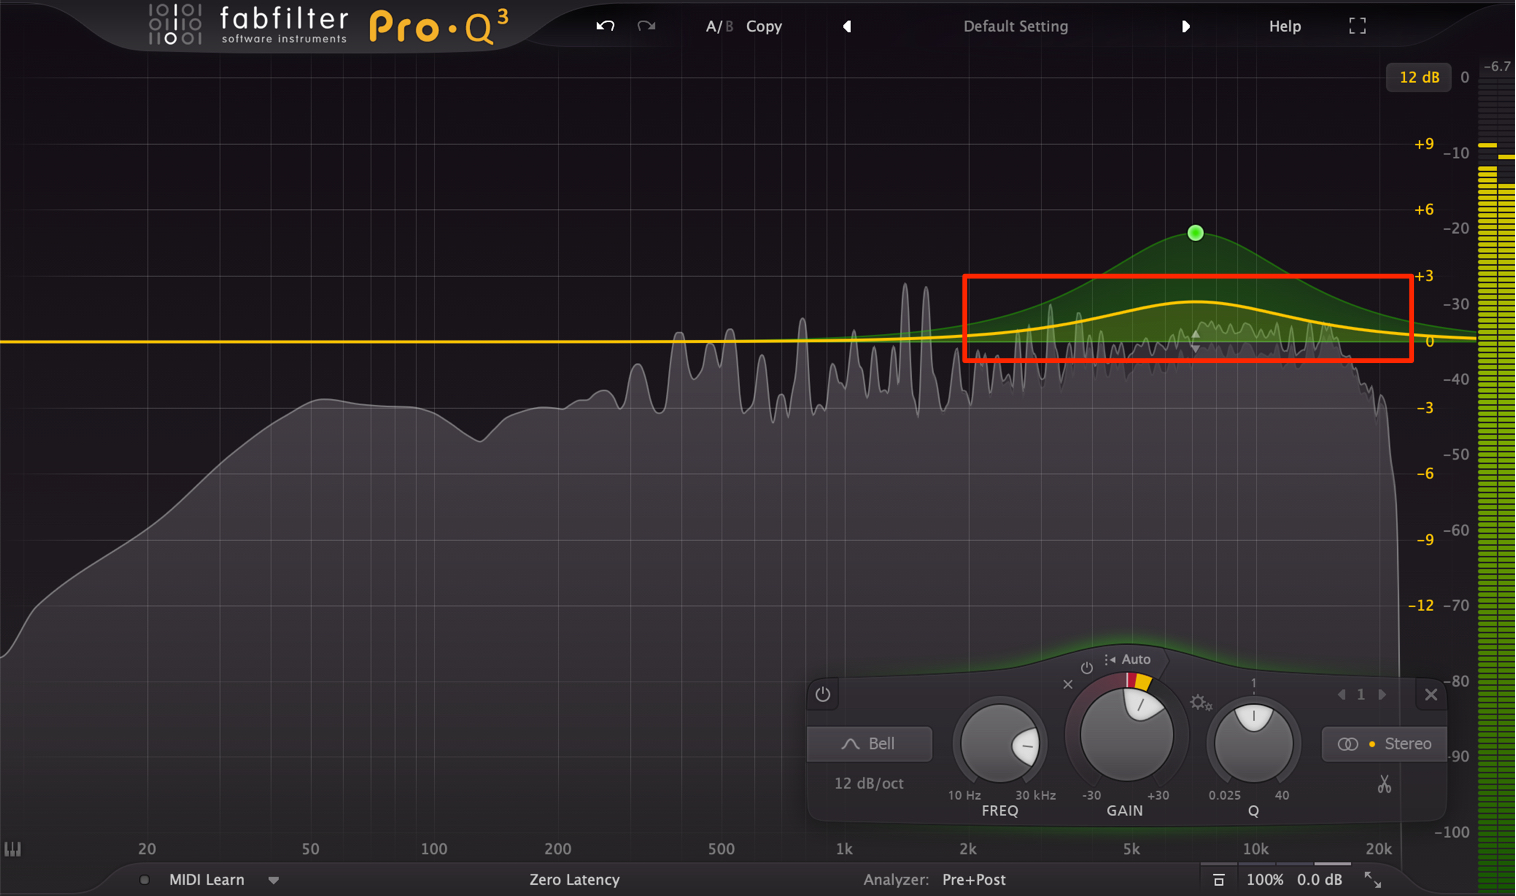
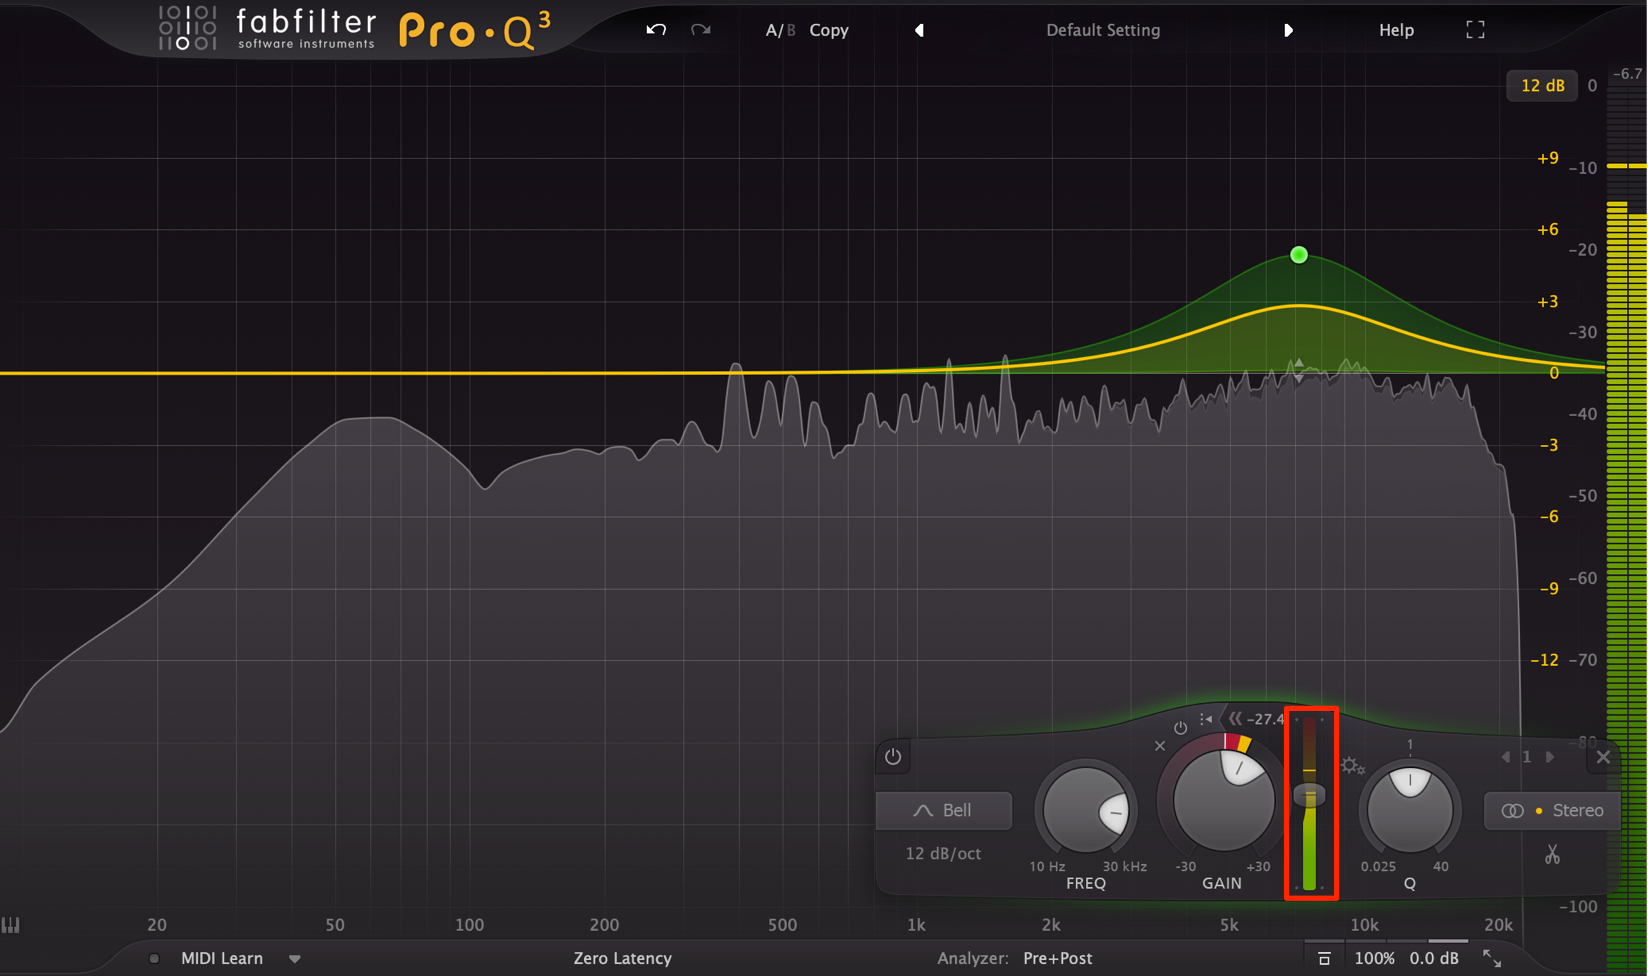
Here we have applied Pro-Q 3 to the master track.
We want to add more clarity to the mix, so we’ve tried boosting the 7kHz range by 5db.
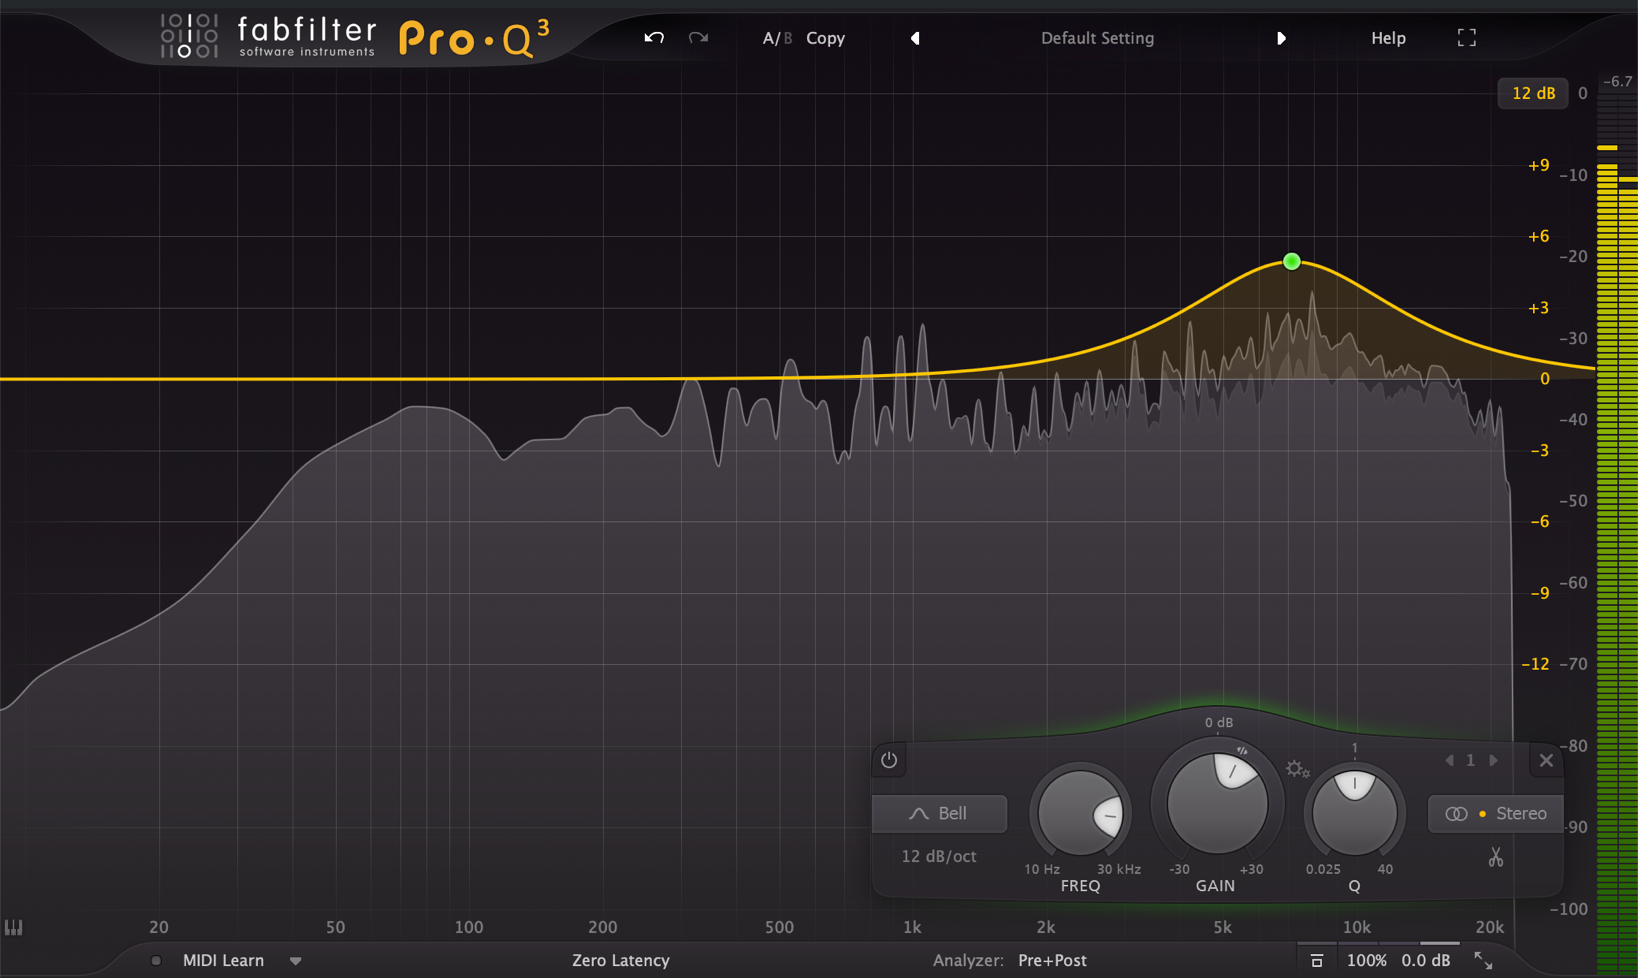
There’s definitely more clarity, but is slightly sharp/painful in some areas.
Dynamic EQ comes in handy in this situation.
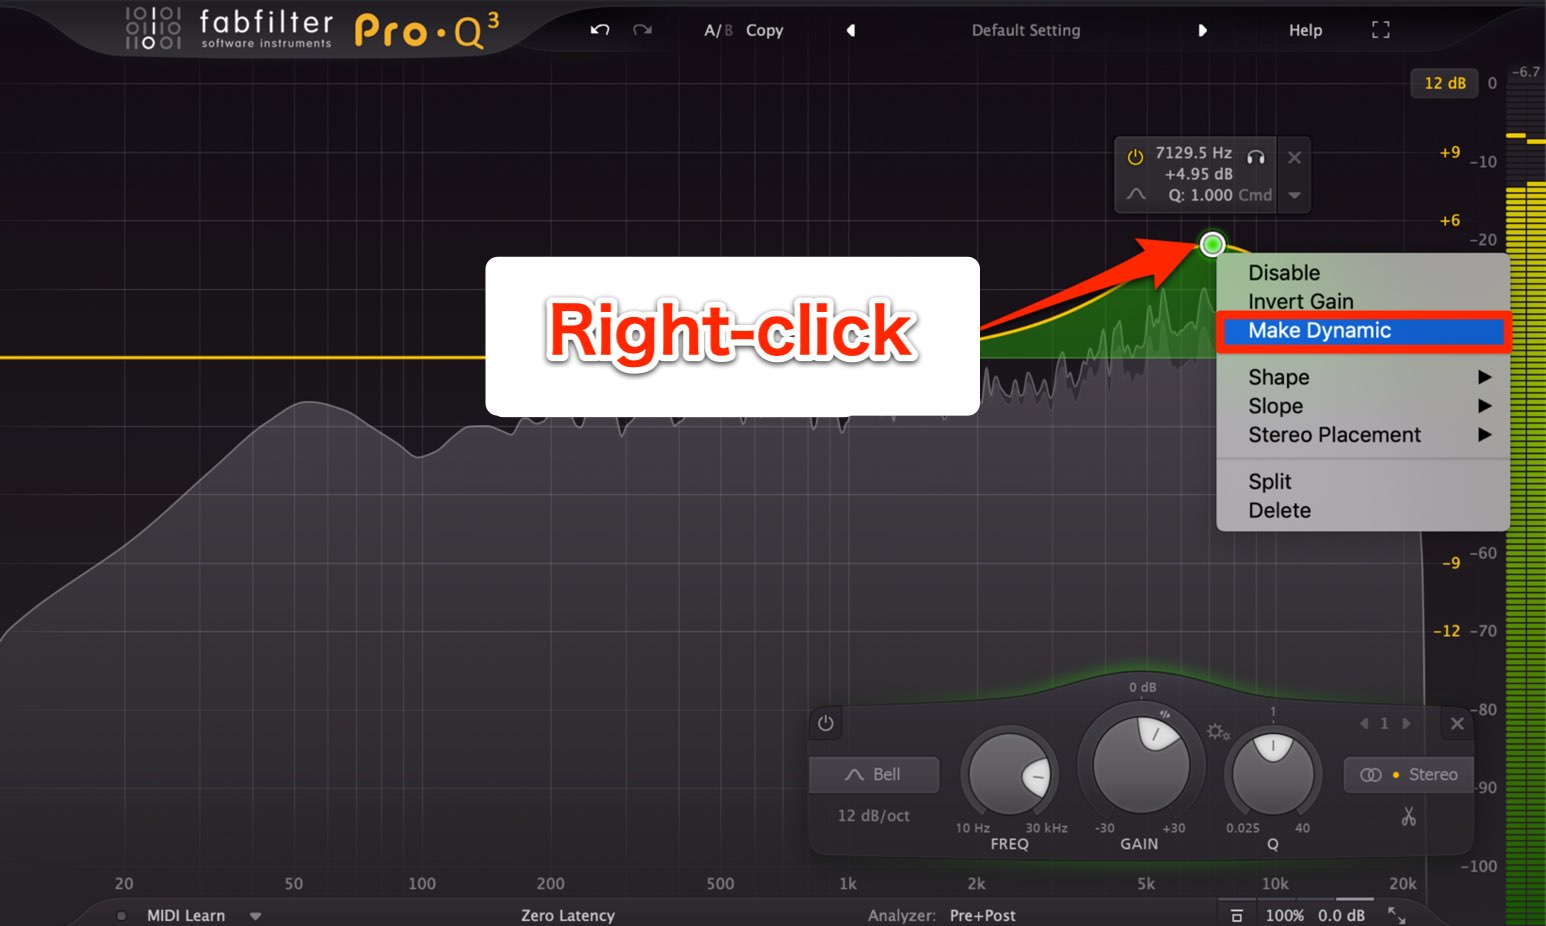
Right click on a point and select「Make Dynamic」.
By doing this, the point is in dynamic EQ mode.
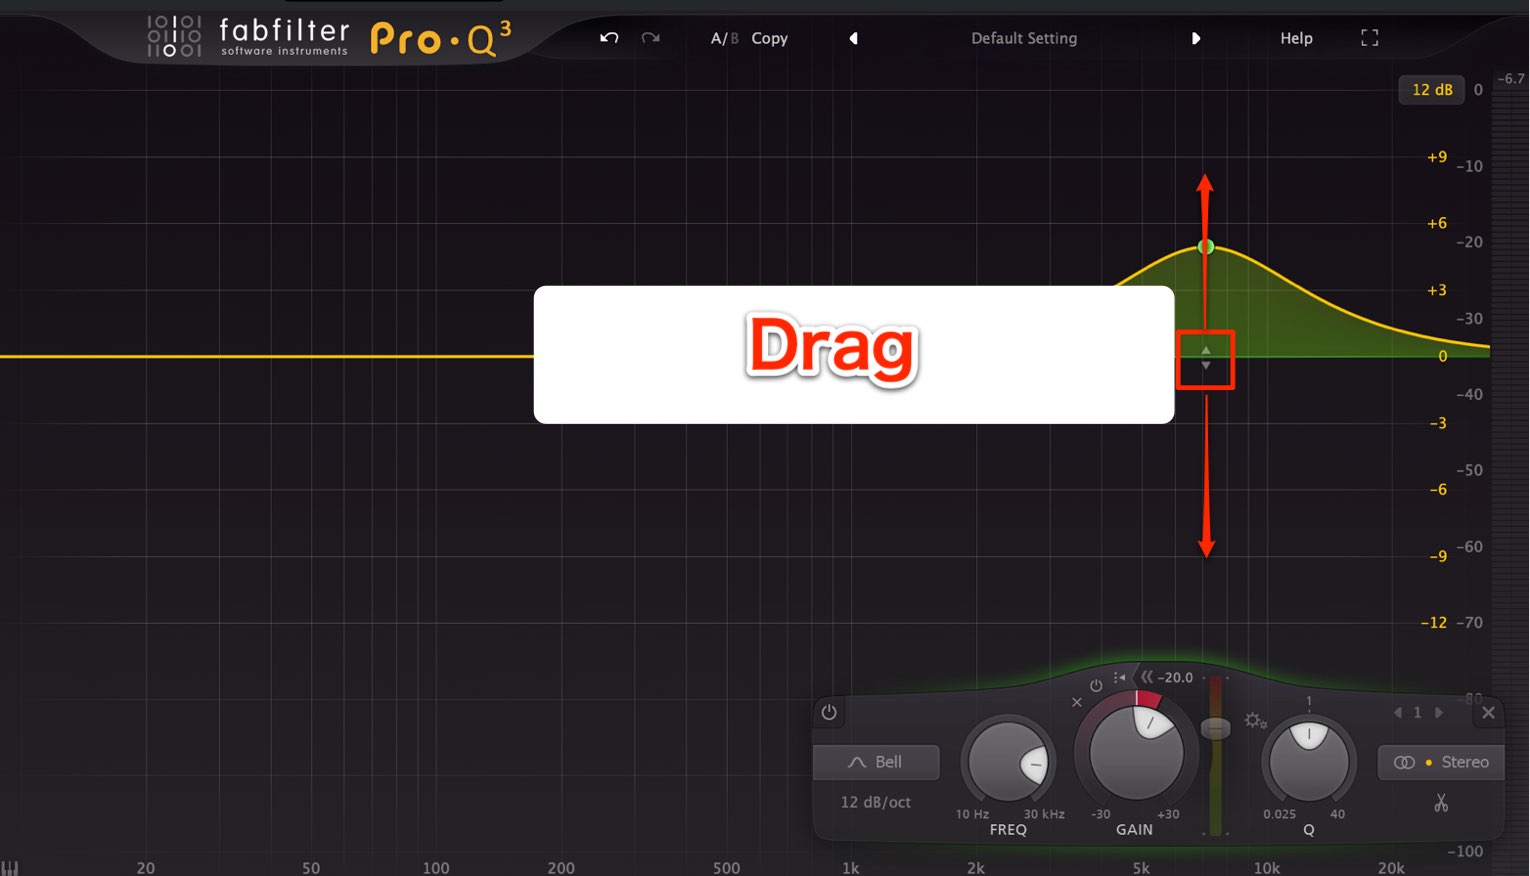
Another parameter point is shown apart from the EQ point.
This point can be moved by dragging it up/down. Here we’re set it to “0”.
When you press play, a a yellow line moving between the points appears.
This is the actual amount of applied EQ.
In general, an equalizer will apply the amount of EQ specified by the gain amount.
However, dynamic EQ changes how much gain is applied to a frequency depending on it’s volume, allowing for a more natural and musical effect.
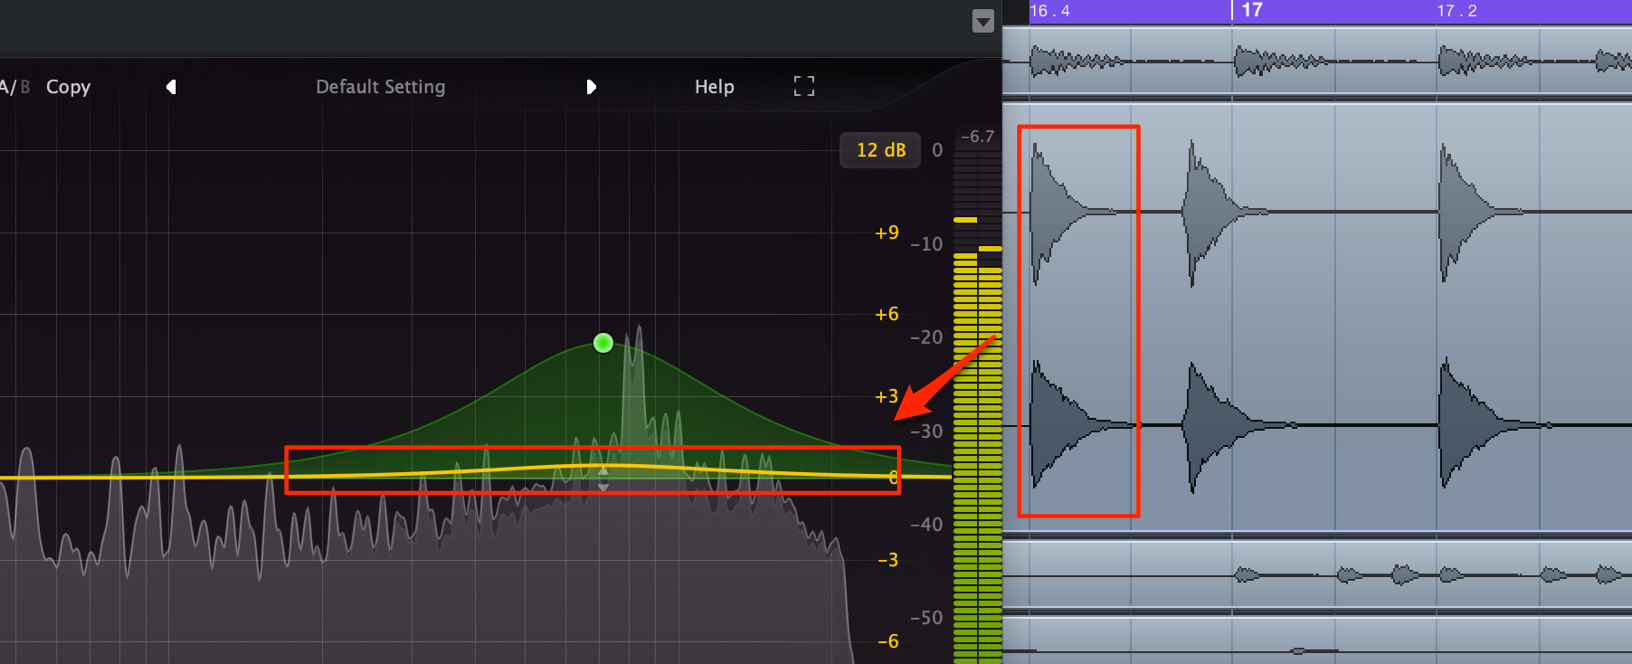
When looking at the line, you can see it duck down when the snare is hit.
This is because the snare attack contains many elements in the 7kHz range, and means that 7kHz temporarily is louder when the snare is hit.
When the snare plays, the EQ boost is automatically lessened, making the sound less harsh, while keeping highs present when the snare isn’t playing.
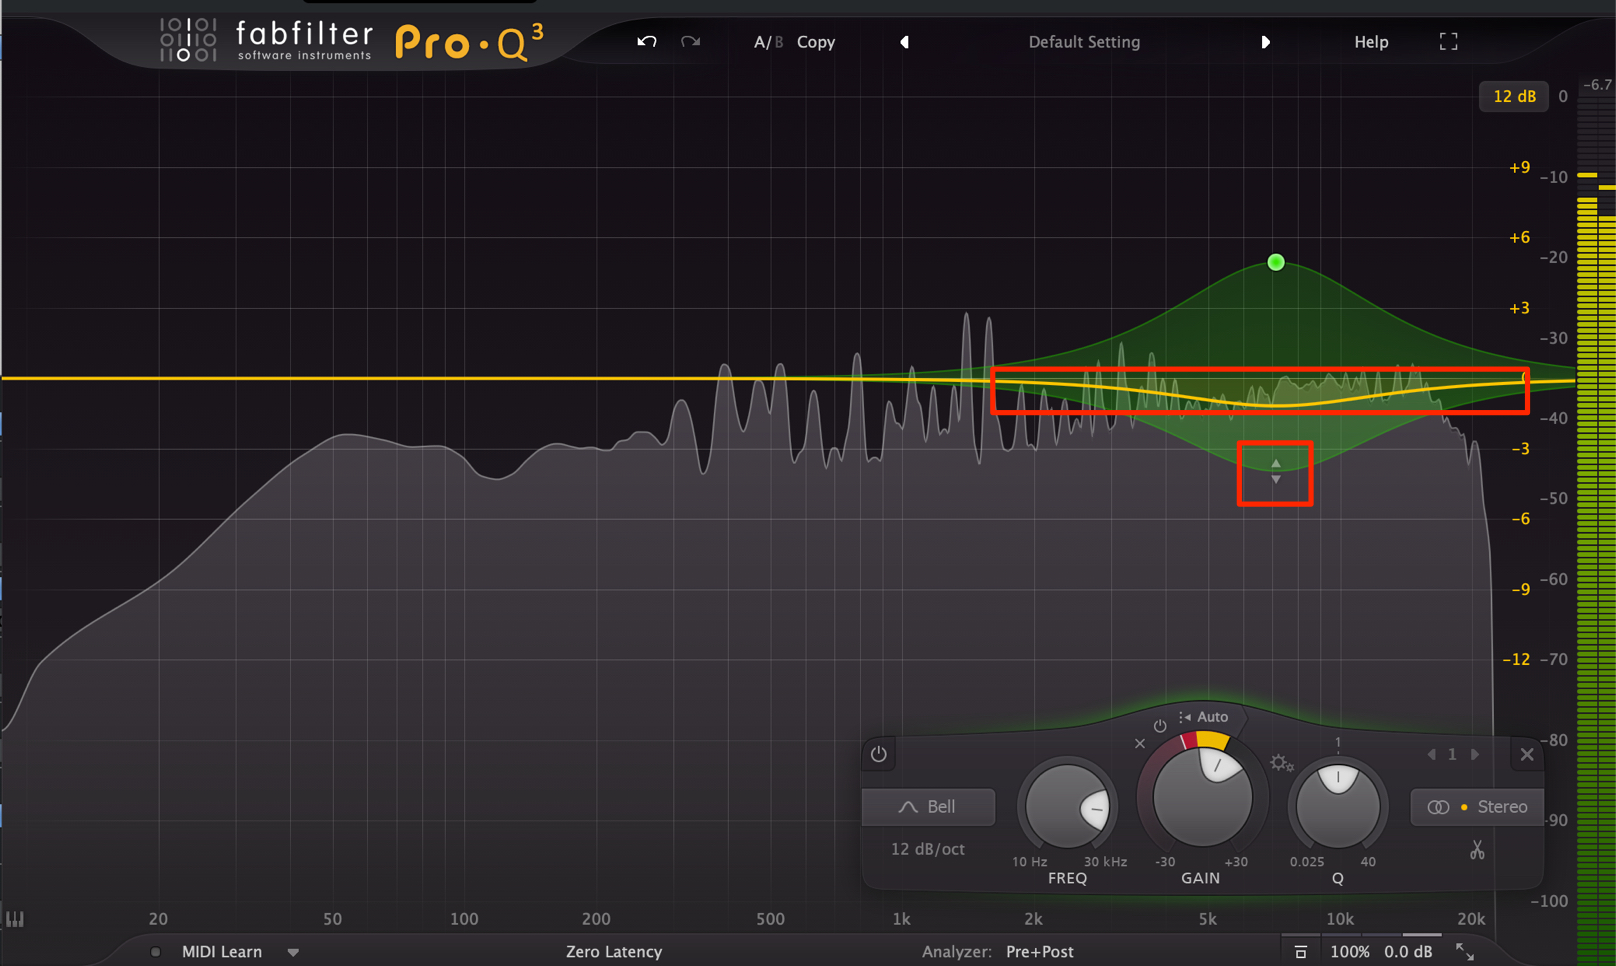
The volume fluctuates between the eq point and the amount set with the dynamic point.
By setting a lower point, you can create an effect where the dynamic eq lowers a frequency when it goes over a certain volume as well.
Changing from Auto to Manual
The volume at which the dynamic EQ kicks in is auto determined within the plugin, but this can be set up manually as well.
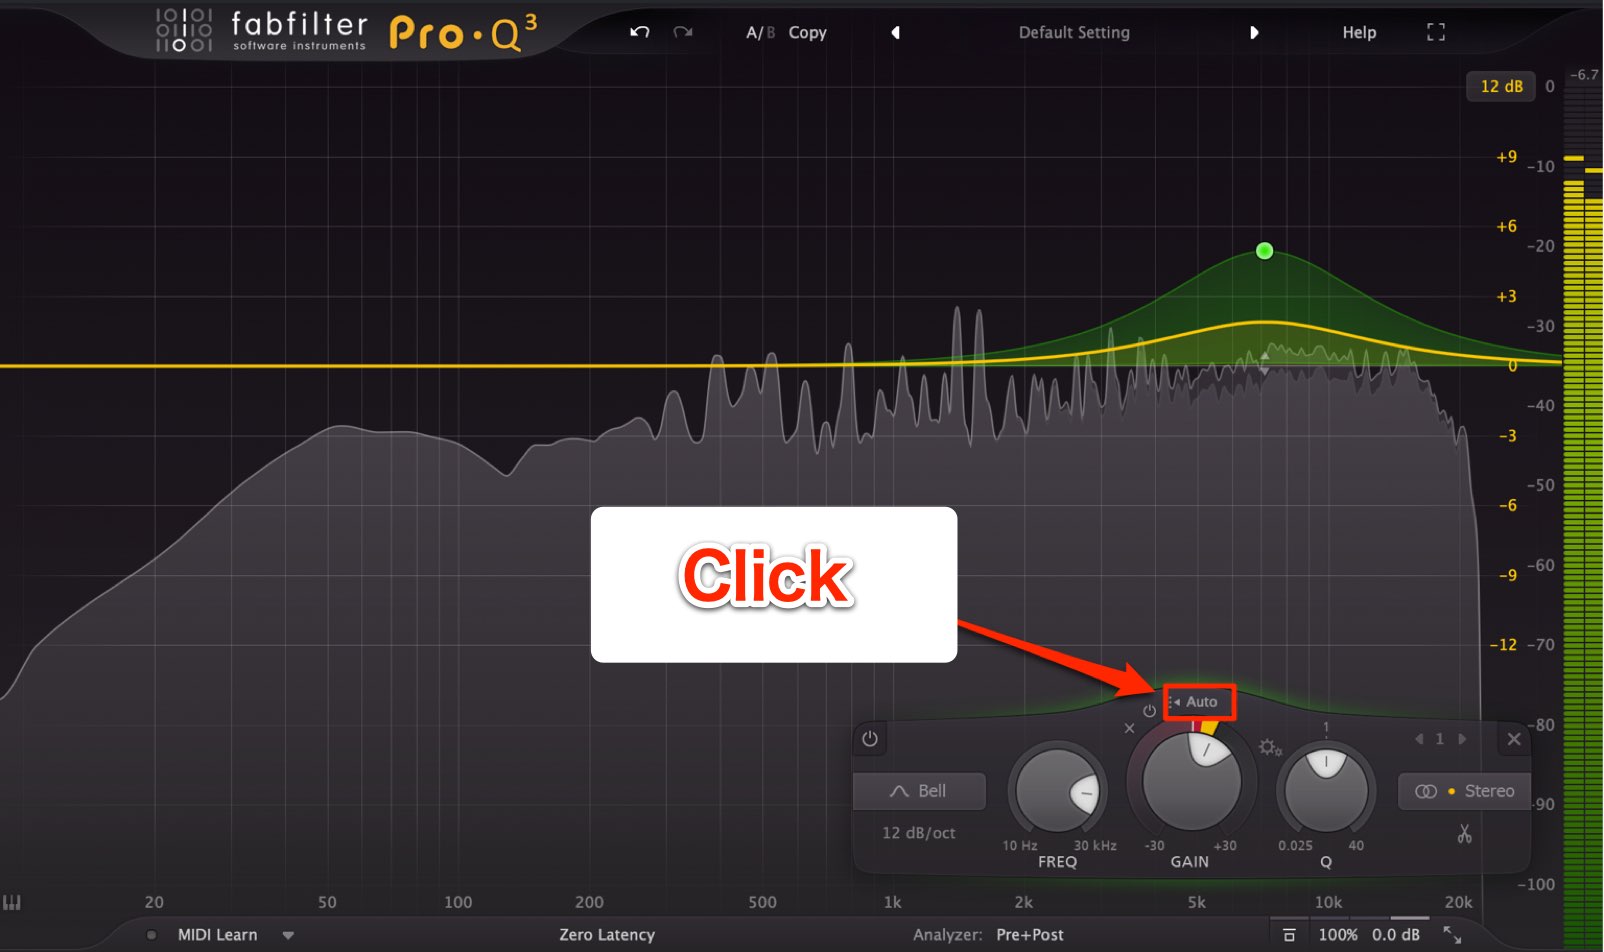
Select a point and click「Auto」.
Drag the threshold slider, to make small adjustments to the dynamic eq “attack” (the timing at which it kicks in).
First try using Auto, and set it up if you aren’t getting your desired results.
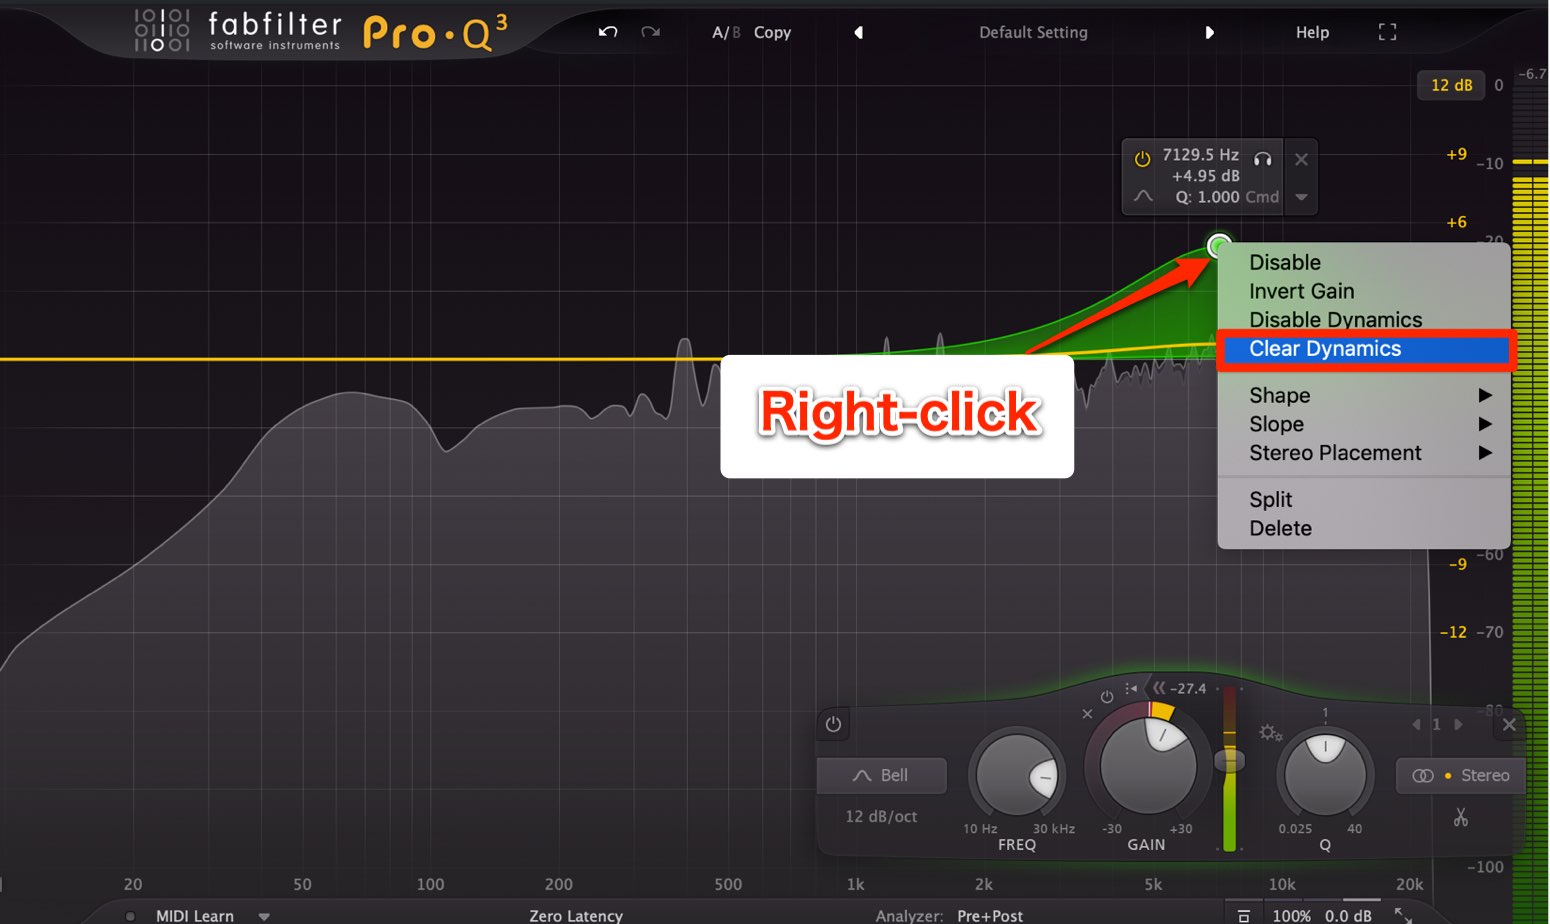
To remove dynamic EQ, right click the point, and select「Clear Dynamics」.
We hope you enjoyed this article.
This dynamic EQ is a monumental function in the world of EQ, and provides great sound.
Please try it out on your next track!
We will take a look at the remaining new functions of「Brickwall Slope/Flat Tilt/Masking Detection」.


#Fabfilter #Pro #Q3 – #полный #обзор. В этой версии есть много полезных улучшений, таких как контрастность и новая опция мини-интерфейса. #FabfilterProQ3
- Динамические фильтры
- Новые параметры фильтра
- Середина / боковая обработка для каждого фильтра
- Спектральные ссылки и обнаружение столкновений
Fabfilter Pro Q3 – появились новые типы фильтров, позволяющие мгновенно создавать линейные наклоны от одного частотного экстремума к другому (например, затухание басов соответствует подъему высоких частот), в то время как Brickwall производит более экстремальную фильтрацию, чем когда-либо, позволяя проводить “полный” вариант снижения громкости для фильтров высоких и низких частот. Fabfilter Pro Q 3 впервые вводит обработку объемного звука, поддерживая многоканальные миксы.
Произошли ещё два больших события – это включение режима “визуализации внешнего спектра” и “динамического эквалайзера”. Если вы знакомы с iZotope’s Neutron, то вам будете проще понять о чём идёт речь. Эта функция позволяет наложить частотный “футпринт” любого экземпляра Fabfilter Pro Q 3 на другой, так что вы можете видеть, где частоты конфликтуют в достаточной мере, чтобы вызвать проблемы. Наиболее распространенным местом использованием этого является обработка частот ударных и басов, однако эта функция может использоваться и в других областях.
Режим динамического эквалайзера позволяет создавать частотные узлы, которые динамически реагируют на входной уровень сигнала, так что при увеличении громкости входного сигнала применяется большее затухание. Это очень удобно, поскольку это очень гибкий инструмент.
Еще одна примечательная новая функция – это обработка по полосе mid/side или left/right. Внезапно вы обнаружите, что можете применить изменение тона к среднему, боковому, левому и правому сигналам для каждой полосы независимо.
Undo/Redo – отмена и возвращение предыдущих действий.
A/B – переключение между двумя состояниями для сравнения сделанных конфигураций.
Copy – копирует активное состояние в неактивное.
Presets – готовые частотные настройки для некоторых инструментов.
Help – информация о плагине.
Full Screen mode and Resize – переключение режима отображения плагина в полноэкранный режим и один из вариантов оконного. Для удобного подстраивания под ваш экран. В этом режиме и не только в правой части экрана можно отображать масштаб от 3 dB для мастеринга (не значительные изменения), 6 dB и 12 dB для сведения (более сильные изменения вносимые в звук) и 30 dB для максимального влияния на звук.
Interactive EQ display – интерактивное окно эквализации частотного диапазона.
Band selection controls – органы управления частотными характеристиками выбранной точки. Здесь вы можете выбрать тип узла фильтра. Такие как bell, low shelf, high shelf, low cut, high cut и т.д. Выбрать крутизну среза от 6 до 96 dB на октаву.
- Регулятор Frequency – выбор частоты.
- Gain – усиление или ослабление.
- Q – регулятор добротности .
- Gain-Q interactions – очень интересная функция которая позволяет звучать нашему эквалайзеру еще более аналогово.
- Каждый узел мы можем назначить на левый и правый канал либо нажав на копку ножницы разделить. При включении режима mid/side мы можем отрегулировать стерео и моно составляющие каждой точки АЧХ.
Processing mode – изменение режима обработки. На выбор linear phase, natural phase, zero latency.
- Zero latency – не создает задержку при обработке звука.
- Linear phase – линейный режим имеет пять настроек качества и вносит задержку.
- Natural phase – это режим эквализации близкий к аналоговому и особенно это заметно при эквализации высоких частот. Также вносит небольшую задержку около 5 ms на частоте 44 kHz. Channel mode – глобальный регулятор. Либо обычный режим панорамирования left/right или mid/side (моно/стерео составляющие).
Spectrum analyzer and EQ Match – настройки анализатора звука.
- Pre – до обработки, post – после обработки и sc функция сайдчейн.
- Range – масштаб отображения от 60 до 120 dB.
- Resolution – разрешение от низкого, когда мы практически ничего не можем понять и максимальное разрешение где мы практически можем понять каждую ноту.
- Speed – скорость срабатывания от очень медленной very slow для того чтобы рассмотреть все детали до очень быстрой.
- Кривая Tilt – от 0 dB до 6 dB на октаву стандартное значение 4,5 dB. Из нового функция spectrum grab – наводим на АЧХ, и она как бы замораживается.
- Также функция analyzer freeze – которая полностью замораживает звуковой сигнал для того чтобы более детально рассмотреть АЧХ звука.
- Функция EQ match используется совместно с функцией сайдчейна (sc). Нажав на отображение АЧХ sc и post после на EQ match, мы видим, как наш входной сигнал подстраивается под сигнал который попадает в плагин по линии сайдчейн и здесь мы можем максимально его подстроить с помощью регулятора более грубой настройки от 1 и более точной до 24.
Output options – уровень выходного канала. В режиме mid/side баланс между mid составляющей и side. В режиме left/right обыкновенная панорама.
- Bypass – отключение плагина.
- Output invert phase – переворот фазы.
- Ex auto gain – очень удобная функция благодаря которой сигнал который попадает на вход эквализируется и остается на той же громкости что и был. Однако стоит заметить, что это функция auto gain и на компрессорах, и в эквалайзерах работает не корректно. Это связано с тем что мы можем производить изменения на разных частотах, а ухо наиболее чувствительно от 2 до 8 KHz. Поэтому субъективно мы можем воспринимать настройки на низких частотах с включенной функцией auto gain, как более тихий сигнал на выходе.
Piano display – фортепианные клавиши. Позволяет просмотреть какие ноты в АЧХ необходимо отрегулировать.
MIDI learn – из первой версии перекочевали настройки миди. Здесь вы можете настроить ваш миди инструмент.
FabFilter недавно выпустили Pro-Q 3 — обновление своего флагманского эквалайзера. Его предшественник, Pro-Q 2, остается невероятным инструментом, который мы использовали в каждой сессии, а последняя интеграция добавила несколько чрезвычайных функций, включая:
- Режим динамического эквалайзера, который позволяет обрабатывать определенные области частотного спектра, когда они пересекают установленный порог. По сути, эта функция сочетает в себе реактивность компрессора и возможности эквалайзера для формирования тона.
- Чрезвычайно крутая установка наклона фильтров нижних и верхних частот.
- Полная поддержка объемного звучания Dolby Atmos 7.1.2 — для тех, кто работает в пост-продакшине.
- Среднечастотная обработка для каждой полосы, которая обеспечивает детальные возможности формирования звука в стереофоническом поле.
- Визуализация внешнего спектра из других экземпляров Pro-Q 3, которая позволяет увидеть, как различные элементы вашего сеанса взаимодействуют и, возможно, конфликтуют.
Объедините эти полезные новые функции с тем, что уже было в мощном Pro-Q 2, и вы получите, пожалуй, самый универсальный плагин эквалайзера на рынке. Вот некоторые из многих путей, для которых можно использовать FabFilter Pro-Q 3.
См. также: Acustica Audio — Ceil Channel Strip (бесплатно)
1. Редактирование диалогов
Возможно, самым большим обновлением Pro-Q 3 является режим динамического эквалайзера — и эта функция окажется весьма полезной для редакторов диалогов. Динамический эквалайзер позволяет установить пороговое значение на уровне каждой полосы. Если плагин не обнаруживает, что порог превышен, обработка не применяется. Это удобно, поскольку частоты не срезаются и не пережимаются на всей области дорожки. В целях уменьшения нежелательных низких резонансов, резкости или сибилянтов Pro-Q 3 не имеет себе равных благодаря функции динамического эквалайзера.
2. Мастеринг
Мастеринг — это искусство и наука оптимизации материала для распространения, и одна из ключевых ролей мастеринг-инженера — подготовка музыки для прослушивания в самых разных конфигурациях воспроизведения. Часто, когда мы выполняем мастеринг, нас интересует уменьшение звуковых дефектов и выделение сильных сторон. Получив материал в работу, мы прослушиваем и ослабляем нежелательные или слишком заметные области. Этот процесс помогает сохранить запас громкости, если требуется выжать из трека максимум, путем сильного сжатия динамики.
Очень полезна обновленная функция захвата спектра. Вставив экземпляр Pro-Q 3 в дорожку, нажмите кнопку воспроизведения и наведите курсор на анализатор частоты. Он станет фиолетовым и покажет любые пики, которые могут присутствовать — которые вы можете захватить и ослабить. Возможность выбора обрабатываемого канала — еще одно обновление, которое делает Pro-Q 3 преимуществом для мастеринга музыки.
См. также: Мысли по творческому использованию Auto-Tune на вокале
3. Редактирование звуковых эффектов, звуковой дизайн и перезапись микширования в Surround
Тот факт, что Pro-Q 3 обеспечивает поддержку объемного звука вплоть до Dolby Atmos 7.1.2, является важным событием для всех, кто занимается постпроизводством звука для визуальных носителей, включая кино, телевидение, рекламу и игры. Для устранения низкочастотного грохота, чрезмерной яркости и выполнения общих задач по «очистке звука» каждая итерация FabFilter EQ была первоклассной, и теперь она может быть использована во всех средах, включающих звуковые сигналы.
4. Микширование музыки (и это очевидно), включая микширование партитуры
Преимущества Pro-Q 3 очевидны для миксинг-инженеров. Это просто один из лучших эквалайзеров, доступных в настоящее время для музыкальных DAW программ, и теперь он работает в объемном звучании. В настоящее время можно использовать параметр внешней боковой цепи для визуализации сигнала от другого источника через анализатор или для целей EQ Match. Единственное чтобы мы добавили в Pro Q-3, это возможность использовать функцию боковой цепи для применения динамического эквалайзера к одному сигналу на основе входных данных другого.
Сообщение от
05.03.2020
0 Комментарий(и)
Создание музыки,
Подробный курс по FabFilter Pro-Q3. Помимо стандартных возможностей, рассмотрена динамическая эквализация, функция Spectrum Grab, динамическая эквализация, анализ частотных конфликтов, сайд-чейн эквализация, авто-эквализация под референс и функции анализатора.
Купить плагин или скачать демо ТУТ
Данная статья является частью цикла статей FabFilter
Одной из наиболее важных новых функций Pro-Q 3 является динамический эквалайзер: любую полосу Pro-Q (с формой колокола или полки) можно сделать динамической, с любым наклоном, с идеальным аналоговым согласованием и в режиме линейной фазы.
Проще говоря, динамический эквалайзер динамически изменяет усиление полосы эквалайзера в зависимости от уровня входного сигнала. Это позволяет выполнять тонкие и хирургические изменения, аналогичные многополосному компрессору, но зачастую более интуитивно понятным и легким в работе способом.
Поскольку Pro-Q используется многими инженерами и производителями по всему миру в качестве стандартного рабочего плагина, мы позаботились о том, чтобы Pro-Q 3 оставался очень легким и сверхбыстрым в работе, сохраняя существующий естественный рабочий процесс и регулировки. Динамический эквалайзер в Pro-Q 3 — это интуитивно понятное и элегантное расширение обычного рабочего процесса: динамические параметры и элементы управления отображаются только тогда, когда вы действительно начинаете их использовать, и они не мешают вашей обычной работе эквалайзера.
Динамическое поведение Pro-Q 3 было тщательно настроено и в значительной степени зависит от задач: атака, отпускание и сгибание — все зависит от обрабатываемого звука, частотного диапазона полосы эквалайзера и текущего динамического диапазона. Это приводит к очень естественному и плавному звуку сжатия и расширения, что полезно для широкого применения динамической эквализации.
Содержание
- 1 Создание динамических полос
- 2 Управление динамическими полосами
- 3 Как и когда использовать динамический эквалайзер
- 4 Линейная фазовая обработка
- 5 Подсказки
Создание динамических полос[править]
Любую из полос Pro-Q можно сделать динамической. Этого можно добиться разными способами:
- Выберите полосы эквалайзера на экране эквалайзера, а затем отрегулируйте кольцо динамического диапазона вокруг регулятора усиления в элементах управления полосами, выбрав положительное или отрицательное значение.
- Наведите указатель мыши на полосу эквалайзера на дисплее и используйте колесо мыши, удерживая нажатой клавишу Alt, чтобы настроить динамический диапазон для этой полосы или выбранных полос эквалайзера.
- Выберите диапазоны эквалайзера на дисплее, а затем выберите «Make Dynamic» («Сделать динамическим») в меню диапазонов (доступ к которому можно получить, щелкнув правой кнопкой мыши точку диапазона или нажав кнопку меню на дисплее параметров эквалайзера).
- Вы также можете сразу создавать динамические полосы (вместо обычного усиления будет сразу регулироваться динамический диапазон), удерживая нажатой клавишу Alt при создании полос любым из обычных способов:
Alt + перетащите результирующую кривую, Alt + двойной щелчок на дисплее или Alt + Ctrl + щелчок (Alt + Command + щелчок на macOS) на дисплее.
Внутренне процесс динамического эквалайзера запускается на ограниченном по полосе варианте входа плагина в соответствии с диапазоном частот, в котором работает полоса.
Управление динамическими полосами[править]
Для полос динамического эквалайзера отображаются следующие динамические элементы управления:
- Кольцо динамического диапазона устанавливает уровень динамической эквализации для полосы в диапазоне от -30 до 30 дБ (соответственно ограничению пределами настройки максимального усиления). Выберите здесь положительное (расширение) или отрицательное (сжатие) значение, чтобы включить динамический эквалайзер и открыть дополнительные динамические элементы управления. Обратите внимание, что этот параметр доступен только для типов фильтров Bell и Shelving. Текущее изменение динамического усиления отображается в виде желтой полосы внутри кольца над динамическим диапазоном, обозначенным красным.
Обратите внимание, что вы также можете перетащить индикатор динамического диапазона для полосы на дисплее эквалайзера вверх или вниз, чтобы настроить динамический диапазон.
- Кнопка автоматического порогового значения переключает динамическое поведение между автоматическим или настраиваемым пороговым режимом по умолчанию. В автоматическом режиме порог постоянно подстраивается под уровень текущего исходного сигнала с ограниченной полосой пропускания. Щелкните ее, чтобы включить режим настраиваемого порога, открыв ползунок порога.
- Кнопка внешней боковой цепи, видимая при использовании настраиваемого порога, позволяет переключаться между запуском по входному сигналу плагина или входу внешней боковой цепи. Обратите внимание, что входной сигнал плагина ограничен полосой и, возможно, закодирован мид/сайд в зависимости от настроек полосы, но вход внешней боковой цепи не обрабатывается таким образом, чтобы обеспечить максимальную гибкость при использовании этой функции.
- Ползунок порога, видимый, когда не используется режим авто-порога, устанавливает порог срабатывания динамического эквалайзера. Уровень сигнала запуска отображается на ползунке, что упрощает поиск правильного порога. Обратите внимание, что алгоритм динамического эквалайзера используется внутри алгоритма динамического эквалайзера, поэтому он может запускаться немного ниже выбранного порогового значения.
- Кнопка обхода динамики в левой верхней части кольца динамического диапазона позволяет легко обходить динамическое поведение выбранных в данный момент полос. В то время как динамическое поведение отключено, это отражается на дисплее эквалайзера, кольцо динамического диапазона отображается как неактивное, а на кнопке горит красный индикатор.
- Кнопка очистки динамики сбрасывает динамический диапазон до 0 дБ для всех выбранных диапазонов, по сути превращая их обратно в обычные диапазоны усиления.
Как и когда использовать динамический эквалайзер[править]
Как правило, при сведении или мастеринге, статическая регулировка эквалайзера работает очень хорошо. Но иногда использование динамического эквалайзера может быть ключом к решению конкретных частотных проблем или выявлению определенных элементов в миксе. Например, вы можете использовать динамический эквалайзер для увеличения яркости бас-барабана или чёткости хай-хэта в треке ударных, выделяя или подавляя только переходные процессы. Или вы можете использовать узкий динамический колоколообразный фильтр для подавления сибилянтов при записи вокала. Возможности безграничны, особенно в сочетании с опциями mid/side/stereo для каждой полосы.
Рабочий процесс Pro-Q 3 идеально подходит для этого: вы можете использовать его в качестве основного эквалайзера на каждом канале, выполняя обычный статический эквалайзер, но когда вам нужно, вы можете сразу же сделать любую полосу динамической.
Линейная фазовая обработка[править]
Динамический эквалайзер также работает в режиме линейной фазы, но только для настроек разрешения обработки до высокого (High). Реакция на атаку и спад будет немного отличаться от нормального поведения в режимах с нулевой задержкой и естественной фазой.
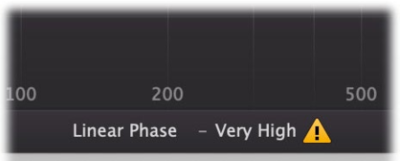
При использовании динамического эквалайзера в режиме линейной фазы в сочетании с настройками очень высокого или максимального разрешения вы увидите предупреждающий знак рядом с кнопкой режима обработки, указывающий, что это невозможно. В этом случае просто уменьшите разрешение до высокого или более низкого, чтобы иметь возможность использовать динамическую эквализацию.
Подсказки[править]
- При использовании колесика мыши над полосой эквалайзера, удерживая одновременно Alt и Ctrl (Command в macOS), вы изменяете динамический диапазон и усиление или полосу обратным связыванием, то есть вы можете обменивать усиление на динамический диапазон.