
MUSTANG I / II ™ РАСШИРЕННОЕ РУКОВОДСТВО ПОЛЬЗОВАТЕЛЯ BY FENDER ®
MU S T A NG ™ I / II Программируемые рукоятки Введение Представляем пошаговое руководство по всем новым функциям гитарного комбо усилителя Mustang™ I / II Информацию по использованию Fender® FUSE™, Ableton® Live или Amplitube®, смотрите в отдельных руководствах, доступных на сайте
MU S T A NG Эти индикаторы связаны с вращаемой рукояткой. Индикаторы пронумерованы 1, 2, 3 и соответствуют трем позициям в пределах диапазонов выбора А, В, С, D на каждой ручке. Используйте эти индикаторы для определения точной позиции рукоятки, например, А 1 как показано ниже: В таблице ниже
MU S T A NG ™ I / II Это означает, что было сделано изменение пресета. Для восстановления модификации достаточно просто выбрать другой пресет и затем вернуться назад. Кнопка тюнера Комбо усилитель Mustang имеет встроенный режим тюнера, который переключает светодиодные индикаторы панели управления в
MU S T A NG Ножной переключатель ™ I / II Восстановление заводски настрок и обновление программы Восстановление заводских настроек Для дистанционного переключения между двумя выбранными пресетами, подключите (опционально) однокнопочный ножной переключатель (№0994049000) к джеку FTSW. Светодиодный
Названия компонентов Опасные вещества Свинец Ртуть x x x o o o 6-валентКадмий ный хром o o o Полибромистый бифенил Полибромистый дифенилэфир o o o o o o o o o O: SJ/T 11363-2006 X: SJ/T 11363-2006 Данный продукт защищен патентом US Pat. 6,222,110 Производитель: FENDER MUSICAL INSTRUMENTS
Перед вами файл pdf, где представлена инструкция (руководство) на русском для FENDER MUSTANG I (V.2). Вы можете скачать ее либо изучить в онлайн режиме.
Подробные сведения об инструкции:
Устройство из раздела: гитарный комбо
Бренд-производитель: FENDER
Наименование модели: FENDER MUSTANG I (V.2)
Язык: Руководство на русском языке
Файл: pdf
Размер файла: 6,42 MB
Скачать инструкцию к HARPER HDT2-1110
ЗАГРУЗИТЬ
Просмотр инструкции онлайн
Fender Mustang Amplifier I/II/III/IV/V v.2 Manual
Advanced Manual
Introduction
This manual is your step-by-step guide to the advanced features found on your Mustang™ I / II (V.2) amplifier. For information on using Fender® FUSE™, Ableton® Live or Amplitube®, please see the separate manuals for each product available at https://fuse.fender.com/mustangv2/support.
Navigation
There are just a few basics of Mustang navigation that you should know before you explore any further…
Selecting Presets
The most powerful feature of your Mustang amplifier is its ability to store every amplifier setting and effect selection as a preset that you can instantly recall using the PRESET knob, or remotely from your computer or footswitch.
Use the PRESET knob to select one of 24 presets. Presets are stored in three banks, colored AMBER, GREEN and RED.
Turn the PRESET knob to scroll through each bank of presets in the following order:
Each preset is based on one of the eight amplifier types labeled next to each of the preset LEDs. That gives you a total of three presets for each amplifier type.
 The RED and GREEN banks are for creating your own presets. The AMBER bank of presets can only be modified using Fender FUSE software available free at https://fuse.fender.com.
Each preset includes the settings of all the programmable knobs on the Mustang, which includes every knob exceptthe MASTER volume and PRESET knobs.
Programmable Knobs
Because the setting of every knob on the Mustang amplifier (except MASTER) is part of each preset, all programmable knobs are normally inactive and knob positions will NOT show their actual settings when a preset is first selected.
How do I activate a programmable knob? The moment you turn any programmable knob it instantly becomes active and it will remain active until you select a different preset, at which time it becomes inactive again.
You may hear a big change in volume or tone when you first turn a programmable knob if there happens to be a large difference between the knob’s position and the stored preset setting for the knob. For example, if the VOLUME knob is pointing to «8» but the stored VOLUME preset setting is «2,» the volume level will jump from «2» to «8» the moment you turn the VOLUME knob, making the knob active.
The only way to know what the preset setting of a knob is before you turn it, is by using Fender FUSE software and connecting the Mustang to your computer.
Effects
There are two effect selection knobs on the Mustang:
- MOD — selects Modulation type effects
- DLY / REV — selects Delay and Reverb type effects
You can also select effects from a STOMPBOX category using Fender FUSE software.
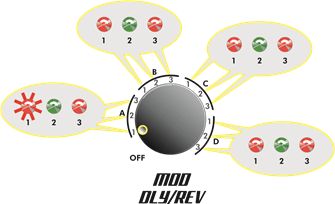
The MOD and DLY / REV knobs share the same three selection indicator LEDs. Whichever knob was turned most recently is the knob currently associated with these 3 indicator LEDs:
These LEDs are numbered 1, 2, 3 and correspond to the three positions within each of the selection ranges A, B, C, D on both effects knobs. Use the LEDs to determine exactly which position the knob is pointing to, for example, A 1 is shown below:
Effect Selections
The tables below list the effect selections for each knob.
| MODULATION EFFECTS | |
| A1 | Chorus |
| A2 | Chorus Deep |
| A3 | Flanger |
| B1 | Touch Wah |
| B2 | Bias/Sine Tremolo |
| B3 | Optical/Vintage Tremolo Fast |
| C1 | Vibratone Slow |
| C2 | Vibratone Fast |
| C3 | Pitch Shifter – Up a 5th |
| D1 | Pitch Shifter – Down an Octave |
| D2 | Phaser Medium |
| D3 | Step Filter |
| DELAY EFFECTS | REVERB EFFECTS | |
| A1 | Tape Delay 150ms / 1 Repeat | |
| A2 | Stereo Tape Delay 300ms / 3 Repeats | |
| A3 | Mono Delay 700ms / 4 Repeats | |
| B1 | Small Room Reverb | |
| B2 | Plate Reverb | |
| B3 | Large Hall Reverb | |
| C1 | Fender ’65 Spring Reverb | |
| C2 | Fender ’63 Spring Reverb | |
| C3 | Tape Delay | Room |
| D1 | Tape Delay | Large Hall |
| D2 | Ducking Delay | Small Hall |
| D3 | Echo Filter |
You can completely change the effects list on your Mustang™ amplifier using Fender® FUSE™ software available at https://fuse.fender.com.
Effects Level
You can adjust the effects level by holding down the EXIT button while rotating either the MOD or DLY/REV knob, depending on which effect type you want to adjust.
Tap Button
The TAP button can be used to «tap in» delay time and modulation rate settings:
When you select a delay effect, the TAP button will blink green in time with the delay time setting. When you select a modulation effect, the TAP button will blink red in time with the modulation rate setting.
When both delay and modulation effects are selected simultaneously, the TAP button will blink green and only control the delay time setting.
You can use TAP to set both delay time and modulation rate by tapping in the modulation rate first, with NO delay effect selected, then adding a delay effect and tapping in the delay time last.
To set the TAP interval of effects:
- Select an effect that causes the TAP button to blink, using the DLY/REV or MOD knob.
- Press the TAP button rhythmically (twice minimum) in time with the desired interval.
Tuner Button
Your Mustang™ amplifier has a built-in Tuner mode that turns the control panel LEDs into a chromatic guitar tuner.
To use the tuner:
- Press and hold the TAP button for 2 seconds. The TAP and EXIT buttons will illuminate.
- Strike any single string on your guitar and watch the panel LEDs. The Preset LEDs are used to indicate the note of the string being tuned (the top LED «#» indicates if the note is sharp).

- Turn the tuning peg on your guitar until the fine tuning LEDs above the MOD knob indicate the string is in tune, as shown above.
- Standard guitar tuning is as follows:
- Press EXIT or TAP to exit from the Tuner.


Save Button
 Your Mustang amplifier gives you the powerful ability to save every setting on the amplifier as part of a preset. When you select a preset, the level of each knob, including effect selections, is instantly recalled to your pre-programmed settings!
The SAVE button will light up red when you turn any programmable knob on the amplifier. This indicates that you have temporarily modified the preset. You can reset your modifications simply by selecting a different preset and then back again.
The EXIT button will not cancel changes to the current preset. Only by selecting a different preset using the PRESET knob will your temporary changes be erased.
To save a preset:
- To save a preset you must first modify an existing preset by turning any of the programmable knobs, such as GAIN or MOD. (once the SAVE button is illuminated, you can proceed to step 2).
- Press the SAVE button. The SAVE and EXIT buttons should be flashing rapidly. You can press EXIT at this point to cancel the save process.
- Turn the PRESET knob to select a preset to overwrite. You can only overwrite the red and green banks of the amplifier type that you started from (if you started by modifying the amber bank, you must select either the red or green bank to overwrite).You can modify the AMBER bank of presets by using your computer and Fender® FUSE™ software available at https://fuse.fender.com.
- Press the SAVE button again to confirm the save.
Aux / Phones Jacks
Auxiliary Input
You can use the Auxiliary jack to input audio into your Mustang amplifier for accompaniment. Connect the headphone output on your CD player or MP3 player to the AUX jack using a mini-stereo cable. Use the volume control on your player, together with the MASTER volume knob, to adjust the auxiliary volume level.
Phones Jack
Plug in your headphones, ear buds, or powered speakers to enjoy the Mustang’s stereo features. This jack may also be used as a stereo recording output. The amp’s internal speaker is muted when the PHONES jack is used.
Footswitch

Connect a (optional) 1-button footswitch (P/N 0994049000) into the FTSW jack to enable remote selection of your two favorite presets. The LED (next to the FTSW jack) will turn red or green to indicate which footswitch preset is active.
To program the footswitch:
- Select a preset that you want to assign to the footswitch. The preset must not be modified (the SAVE button must NOT be illuminated to proceed to step 2).
- Press the SAVE button. The SAVE and EXIT buttons should be flashing rapidly. You can press EXIT at this point to cancel the footswitch assignment process.
- Press the footswitch button to select either the red or green LED next to the FTSW jack to associate with the chosen preset.
- Press the SAVE button to confirm the footswitch assignment. Now when you press the footswitch, the chosen preset will be activated with the assigned red or green footswitch indicator.
USB Port
Use the USB port to connect the Mustang™ amplifier to your computer and take your music to the next level:
Factory Restore & Firmware Update
Factory Restore
You can restore your Mustang amplifier to the original factory settings if desired. All user presets will be erased!
To restore the Mustang amplifier to factory settings:
- Turn the amplifier OFF.
- Press and hold the EXIT button while turning the amplifier ON. Continue holding the EXIT button until it is no longer illuminated.
The FACTORY RESTORE function will erase all user modified presets. It will also restore the AMBER bank of presets and any effect selections that have been modified using Fender FUSE software.
Firmware Update
From time to time, Fender may make available firmware updates for your Mustang amplifier to improve operation or to add new features. To update the firmware on your amplifier you will need to connect it through the USB port to a computer with Fender FUSE software and an internet connection.
Please see the Fender FUSE manual at https://fuse.fender.com/support for details.
FAQ
There are several great places you can go to learn more about the Mustang and music in general:
- www.fender.com/support
- Join a Fender Community forum where you can ask questions and read threads. There’s even a forum just for the Mustang: www.fender.com/community/forums
- Find music theory learning materials and sheet music at Hal Leonard Publications: www.halleonard.com
MUSTANG III/IV/V (V.2)
Advanced Manual
Introduction
This manual is your step-by-step guide to all the advanced features found on your Mustang™ I II/ IV/V (V.2) amplifier. For information on using Fender® FUSE™, Ableton® Live or Amplitube®, please see the separate manuals for each product available at https://fuse.fender.com/mustangv2/support.
Navigation
There are just a few basics of Mustang navigation that you should know before you explore any further…
Selecting Presets
Turn the DATA WHEEL to select one of 100 presets.
You will find some presets you like and others that you want to change…
Each preset stores the settings for:
- Amplifier type — 17 selections
- Effects — 4 categories, 44 selections total
- Knob levels — GAIN through REVERB (not MASTER)
You can also select and edit presets from your computer using Fender® FUSE™ software, available free of charge at https://fuse.fender.com
Master Volume
The MASTER volume knob is always «active.» That means the position of the MASTER knob always shows the true master volume setting, unlike the programmable knobs.
(Always turn the MASTER volume knob first to adjust the overall volume output of your Mustang amplifier.)
Programmable Knobs
Because the setting of every knob (except MASTER) is stored within each preset, the «programmable» knob postitions are not active and the knob positions will NOT show their actual settings when a preset is first selected.
How do I activate a programmable knob? The moment you turn any programmable knob it instantly becomes active and it will remain active until you select a different preset, at which time all the programmable knobs become inactive again.
Press the DATA WHEEL to see what the stored preset settings are for all the programmable knobs before you turn them. Press EXIT to return to Play mode.
Press the DATA WHEEL a second time to see where your effects are located in the Guitar Signal Processing Path. Press EXIT to return to Play mode.
You can change the order of effects in the Signal Path using Fender® FUSE™ software.
Select amplifier models and adjust amplifier settings using the Amp menus.
Amplifier Models
To select Amplifier Models:
- Press the AMP button.
- Turn the DATA WHEEL to select one of 17 amplifier models:
AMP MODELS Studio Preamp ’57 Champ ’57 Deluxe ’57 Twin ’59 Bassman ’65 Princeton ’65 Deluxe Reverb ’65 Twin Reverb ’60s Thrift British Watts British ’60s British ’70s British ’80s British Colour Super-Sonic (Burn) American ’90s Metal 2000 - Press EXIT to return to Play mode.
Amplifier Settings
To adjust Amplifier Settings:
- Press the AMP button.
- Press the DATA WHEEL one or more times until the setting that you want to adjust is highlighted, then turn the DATA WHEEL to adjust the setting.
- Press the AMP button a second time to access «Page 2» with more amplifier settings. The settings that appear on «Page 2» will depend on the amp model that is currently selected.You can de-select the highlighted amp setting and return to Amp Model selection mode, as a shortcut, by pressing and holding the AMP button.
- Press EXIT to return to Play mode.

Bypassing Effects
You can turn on– off effects that have been selected for the current preset by pressing the corresponding effect button.
Effects can also be bypassed (turned on-off) from the footswitch included with your Mustang amplifier.
Effects that are shown on screen as «– EMPTY–» can not be activated until an effect has been selected in that slot.
Selecting Effects
To select Effects:
- Press and hold one of the four effects buttons.
- Turn the DATA WHEEL to select one of the following effects:
STOMPBOX MODULATION Ranger Boost Sine Chorus Green Box Triangle Chorus Overdrive Sine Flanger Fuzz Triangle Flanger Orange Box Vibratone Black Box Vintage Tremolo Big Fuzz Sine Tremolo Wah Ring Modulator Touch Wah Step Filter Simple Compressor Phaser Compressor Wah Touch Wah Diatonic Pitch Pitch Shifter DELAY REVERB Mono Delay Small Hall Mono Echo Filter Large Hall Stereo Echo Filter Small Room Multitap Delay Large Room Ping Pong Delay Small Plate Ducking Delay Large Plate Reverse Delay Ambient Tape Delay Arena Stereo Tape Delay Fender ’63 Spring Fender ’65 Spring - Press EXIT to return to Play mode.
You can switch to a different effect category at any time, even while you are in the effect selection menus, by pressing and holding a different Effects button.
Effect Settings
Use the Effects Settings menus to adjust a dazzling array of effect settings.
To adjust Effect Settings:
- Press and hold any Effect button (STOMP, MOD, DELAY, REVERB).
- Turn the DATA WHEEL to select the effect you want to work with.
- Press the DATA WHEEL one or more times until the setting that you want to adjust is highlighted, then turn the DATA WHEEL to adjust the setting.
- Press EXIT to return to Play mode.

You can bypass an effect at any time, even while you are in the effect settings menus, by pressing the Effect button or corresponding footswitch button.
Tap Button
The TAP button can be used to «tap in» delay time and modulation rate settings, by rhythmically pressing the TAP button.
When you select a delay effect, the TAP button will blink in time with the delay time setting. When you select a modulation effect, the TAP button will blink in time with the modulation rate setting (note that modulation rates can have up to 12 second intervals and the TAP button will flash infrequently).
When both delay and modulation effects are selected simultaneously, the TAP button will blink in time with the delay effect and will only control the delay time setting.
You can use the Effects menus or Fender FUSE to set delay time and modulation rates more precisely.
To set the TAP interval of effects:
- Select a Delay or Modulation effect that causes the TAP button to blink, using the Effects menus (see Selecting Effects).
- Press the TAP button rhythmically (twice minimum) in time with the desired interval. If you press the TAP button only once, the interval will be set to the maximum value.
If you open the Effect settings menu (see Effect Settings, above), you can watch the actual TAP values you are setting while you are tapping them in!
Saving Presets
Your Mustang™ amplifier gives you the powerful ability to save every setting on the amplifier as part of a preset. When you select a preset, the level of each knob, every effect setting, and the amp model selection, are instantly recalled to your pre-programmed settings. The SAVE button will light up red when you turn any programmable knob or edit any other setting on the amp. This indicates that you have temporarily modified the preset. You can undo your modifications by turning the DATA WHEEL to a different preset and then back again.
The EXIT button will not cancel changes to the current preset. Only by selecting a different preset using the DATA WHEEL, Footswitch, or Fender FUSE, will your temporary changes be erased.
To save a preset:
Memory Lock must be OFF to save presets (see Utility Menus)
- To save a preset you should first modify an existing preset, for example, by turning any of the programmable knobs, such as GAIN.
- Press the SAVE button. The SAVE and EXIT buttons should be illuminated. You can press EXIT at this point to cancel the save process.
- Turn the DATA WHEEL select a preset destination to overwrite.
- Press the DATA WHEEL if you want to edit the name of your new preset. Use the buttons to perform the functions listed along the bottom of the screen; turn the DATA WHEEL to select characters.
- Press the SAVE button a second time to confirm the save.

Guitar Tuner
Your Mustang™ amplifier has a built-in Tuner mode that turns the screen into a guitar tuner.
To use the Tuner:
- Press and hold the TAP button. The TAP and EXIT buttons will illuminate.
- Strike any single string on your guitar and watch the screen. The note of the string being tuned is displayed along with a fine tuning needle.
- Turn the tuning peg on your guitar until the fine tuning needle indicates the string is in tune, as shown above.
- Standard guitar tuning is as follows:
- Press EXIT or TAP to exit from the Tuner.


Footswitches
Four-Button Footswitch (0080996000)
Connect a 4-button footswitch to your Mustang amplifier (included with the Mustang IV & V, optional equipment for the Mustang III) to enable remote multi-function foot control. The footswitch display and LEDs show some of the same information as the amplifier screen, so you can, for example, tune your guitar and select presets by watching the footswitch without ever looking at the screen onboard the Mustang!
- Select Quick Access presets (QA1/QA2/QA3)
- Select presets (up/down/bank)
- Bypass effects
- Activate the Tuner
")
The footswitch has three modes that are identified by the three LEDs labeled MODE 1, MODE 2 and MODE 3. The footswitch also has a Tuner mode which is indicated when all of the mode LEDs are off.
To switch between modes, press the MODE button. To activate Tuner mode, press and hold the MODE button.
You can lock the 4-button footswitch in Mode 1, 2 or 3 using the Utility menus, to prevent accidental Mode changes (see Utility Menus).
- Mode 1—In Mode 1 the footswitch is used to select one of three Quick Access presets, using the buttons labeled: QA1 / QA2 / QA3 (in line with the MODE 1 LED). When you select a Quick Access preset, the number of the preset will appear in the display of the footswitch.
You can any assign any preset to be a Quick Access preset in the Utility menus. (see Utility Menus).
- Mode 2—In Mode 2 the footswitch is used to select presets down/up, or in banks of 10, using the buttons labeled: DOWN / UP / BANK (in line with the MODE 2 LED). When you select a preset, the number of the preset will appear in the display of the footswitch.
- Mode 3—In Mode 3 the footswitch is used to bypass the Stompbox, Modulation or Delay effects, using the buttons labeled: STOMP / MOD / DELAY (in line with the MODE 3 LED). The footswitch button LEDs indicate the effects that are active, just like the buttons on the amplifier.
You can also have a footswitch button assigned to bypass the Reverb effect by adding on the 2-button Mustang footswitch (see Six-Button Footswitching options, below).
- Tuner Mode—Press and hold the MODE button to activate the Tuner. The ampifier screen and the footswitch both will display the same tuner information so that you can look in either place to tune your guitar. The footswitch will display the nearest note; the button LEDs will indicate sharp and flat and «in tune» is indicated when the green LED below the footswitch display lights up. Press any footswitch button to exit Tuner mode.
Two-Button Footswitch (0080997000)
Connect a 2-button footswitch to your Mustang amplifier (included with the Mustang III, optional equipment for the Mustang IV & V) to enable remote multi-function foot control. Use the Utility menus to assign one of the following functions to the 2-button footswitch:
- Select presets (up/down)
- Select Quick Access presets (QA1/QA2)
- Bypass effects (various combinations)
- Set TAP interval
")
Six-Button Footswitching options
Plug both a 4-button and a 2-button footswitch into your Mustang amplifier to expand your remote control options. By assigning different functions to each footswitch you can create more than a dozen different foot control combinations.
For example, you could assign Quick Access presets to the 4-button footswitch and Up/Down presets to the 2-button footswitch. Or you could bypass effects with the 4-button footswitch and select presets with the 2-button footswitch. The choice is up to you.
EXP-1 Expression Pedal

The EXP-1 expression pedal (P/N 2301050000) is a dual-mode pedal that can be programmed to control a wide variety of parameters on your Mustang amplifier. Plug the EXP-1 pedal into the «4 BUTTON FOOTSWITCH» jack.
The EXP-1 operates in two modes, Volume behavior mode and Expression behavior mode. Switch between modes by pressing down hard on the toe end of the pedal. Red and green LEDs on the EXP-1 indicate the current pedal mode:
- Volume behavior mode (green) is used to control master volume (or the EXP-1 can be set to OFF in Volume mode).
- Expression behavior mode (red) can be used to control most effect and amp parameters on your Mustang amplifier. Some common uses are to control the frequency parameter of a wah effect or the rate/time parameter of a modulation or delay effect.
Fender® FUSE™ software can also be used to program all settings on your EXP-1 pedal.
EXP-1 Pedal Calibration
The first time you connect the EXP-1 to your Mustang amplifier, you should calibrate it so that the desired range of pedal movement registers with the amplifier. Calibration takes less than a minute:
To calibrate the EXP-1:
- Plug the EXP-1 pedal into the 4 BUTTON FOOTSWITCH jack on the back of your Mustang amplifier using the included cable.
- Turn the amplifier OFF.
- Press and hold the UTIL button on the amplifier, then turn the amplifier ON. Continue holding the UTIL button down until it is no longer illuminated.
- Move the EXP-1 pedal between the desired heel and toe endpoints to set the range of pedal movement that is registered (recognized) by the amplifier. For example, if you only want the middle third of the pedal range to register with the amplifier, only move the EXP-1 pedal back and forth through the middle third of its range of motion. You must start the calibration process with the EXP-1 pedal positioned somewhere within the desired range.
- Turn the DATA WHEEL to select a new preset.
- The EXP-1 expression pedal has been calibrated!Repeat the calibration procedure each time you change EXP-1 pedals, plug the EXP-1 into a different amplifier, or perform a Factory Restore proceedure on the amplifier.
EXP-1 Pedal Settings
The EXP-1 pedals settings can be saved with the current preset so that each time you select a particular preset, the EXP-1 functions are customized for that preset. Before you change the EXP-1 settings, select the preset that you want to save the EXP-1 settings with.
To configure EXP-1 settings:
- Plug the EXP-1 pedal into the 4 BUTTON FOOTSWITCH jack on the back of your Mustang amplifier using the included cable.
- Select the preset with which you want to use the EXP-1.
- Press and hold the DATA WHEEL until the Expression Mode Enable menu appears.
- Rotate the DATA WHEEL to change the settings in the current menu. Press the DATA WHEEL to select the next menu from the list below.SHORTCUT: You can speed select menus in either direction by rotating the DATA WHEEL while holding it down.
- Save the current preset if you want to keep the modified EXP-1 settings, otherwise, press EXIT, then select a different preset using the DATA WHEEL to erase your changes.
EXP-1 Menus:
- Expression Mode Enable — (Off, Amp, Stomp, Mod, Delay, Reverb, Volume) Select the category that you want to control with the EXP-1 in Expression mode, or select «Off» if you want the pedal to be OFF in Expression mode. You must have an effect selected for the current preset on the amplifier (or in Fender FUSE) to make that category of effect become available for selection in this menu.
- Expression Mode Parameter — (Variable) Select the parameter that you want to control with the EXP-1 in Expression mode. Your options will vary depending on the category you selected in the Expression Mode Enable menu above, and the effect module that is selected in the current preset.
- Expression Mode Heel/Toe — (Variable) Use these two menus to set the level of the active parameter (selected in the menu above) with the heel of the pedal in the fully down position (Heel Setting) and with the toe of the pedal in the fully down position (Toe Setting). Range options will vary depending on your selection in the Expression Mode Parameter menu above.
- Expression Mode Type — (Capture, Live) If «Live» is selected, the current pedal position will override the stored preset setting for the assigned expression pedal parameter when a preset is first selected. If «Capture» is selected, the pedal is disabled until you move the pedal after a preset is first selected.
- Expression Effect Bypass — (On/Off) Select «On» to bypass (turn off) the effect currently selected in the Expression Mode Enable menu when switching the EXP-1 to Volume mode. Select «Off» to leave the effect active (keep on).
- Expression Parameter Restore — (On/Off) Select «On» to return the Expression Mode Parameter to the stored preset value when switching the EXP-1 to Volume mode. Select «Off» if you want the parameter to be left set to the position of the pedal (toe position) when switching to Volume mode.
- Volume Mode Behavior — (Volume/Off) Select «Volume» if you want the pedal to control the master volume in Volume mode. Select «Off» if you want the pedal to be OFF when switched to Volume mode.
- Volume Mode Heel/Toe — (0– 100%) Use these two menus to set the master volume level with the heel of the pedal in the fully down position (Heel Volume) and with the toe of the pedal in the fully down position (Toe Volume).
- Pedal Initial Source — (From Preset/From Pedal) Select «From Preset» if you want the EXP-1 mode to switch to the Preset Default mode (see note below) each time you select a preset. Select «From Pedal» if you want the EXP-1 to remain in whichever mode the EXP-1 is currently in as you change presets. The Pedal Initial Source setting is a global setting. It is not associated with any preset and does not need to be saved; it stays set to the current selection. Preset Default mode is the mode (volume or expression) that the EXP-1 is in when you save the preset. You can change the Preset Default mode by re-saving the preset with the EXP-1 in a different mode, or using Fender FUSE software.
 Press the UTIL button to activate the Utility menus. Press the UTIL button repeatedly to step through each of the nine menus, listed below.
- Quick Access #1 / #2 / #3 — Use the first three Utility menus to choose Quick Access presets. You can then access those presets quickly from the footswitches (see Footswitches).
- Two-Button Footswitch Mode — Use this menu to assign functions to the two-button footswitch.
- Four-Button Footswitch Mode — Use this menu to lock the four-button footswitch in Mode 1, Mode 2 or Mode 3. Select «Normal» for normal, multi-mode operation. Tuner mode is always available, even when a mode is locked.
- Memory Lock — Use the Memory Lock menu to prevent accidental preset modifications. You will still be able to make temporary changes to presets with Memory Lock ON, but you won’t be able to save those changes until Memory Lock is switched OFF.
- Line Out Boost — Use the Line Out Boost menu to adjust the output level of the Line Out jacks to accommodate the input sensitivity of connected sound equipment.
- LCD Contrast — Use this menu to adjust the contrast of the Mustang display.
- About This Amp — This menu displays the Firmware version currently running on the amplifier. Use this information to determine if an update is available for your amplifier.
Speaker Outputs
Mustang V, only

The Mustang V head amplifier provides stereo speaker outputs that must both be connected to a stereo speaker cabinet such as the Mustang V 412, with four 12″ Celestion® G12P Rocket 50 speakers (recommended), or two 8Ω speaker cabinets capable of handling 75W each.
Line Outputs

These stereo XLR output jacks provide balanced, line-level signals for connection to mixing consoles or recording equipment. Press the GROUND LIFT switch «in» to disconnect the ground connections (pins-1) from the XLR jacks which may reduce line noise in some situations. Normally leave this switch in the «out» (grounded) position.
Aux / Phones Jacks
Auxiliary Input
 You can use the Auxiliary jack to input audio into your Mustang amplifier for accompaniment. Connect the headphone output on your CD player or MP3 player to the AUX jack using a mini-stereo cable. Use the volume control on your player, together with the MASTER volume knob, to adjust the auxiliary volume level.
Phones Jack
 Plug in your headphones, ear buds, or powered speakers to enjoy the Mustang’s stereo features. This jack may also be used as a stereo recording output. The amp’s speaker is muted when the PHONES jack is used.
Effects Loop
Connect external effects devices to your Mustang amplifier using the effects loop jacks.
The Mustang IV & V amplifiers can accept stereo or mono effects devices. Note that a mono-in, mono-out effect unit will use one send and one return, and only effect one side of the stereo image. The Mustang III amplifier only accepts mono effects devices.
Connect the FX SEND jack(s) to the input(s) on your external effects device and connect the FX RETURN jack(s) to the output(s) on your effects device.
USB Port
 Use the USB port to connect the Mustang™ amplifier to your computer and take your music to the next level:
Factory Restore & Firmware Update
Factory Restore
You can restore your Mustang amplifier to the original factory settings if desired. All user presets will be erased!
To restore the Mustang amplifier to factory settings:
- Turn the amplifier OFF.
- Press and hold the EXIT button while turning the amplifier ON. Continue holding the EXIT button until it is no longer illuminated.
The FACTORY RESTORE function will erase all user modified presets. It will also restore any effect selections that have been modified using Fender FUSE software.
Firmware Update
From time to time, Fender may make available firmware updates for your Mustang amplifier to improve operation or to add new features. To update the firmware on your amplifier you will need to connect it through the USB port to a computer with Fender FUSE software and an internet connection.
Please see the Fender FUSE manual at https://fuse.fender.com/support for details.
FAQ
There are several great places you can go to learn more about your Mustang and music in general:
- www.fender.com/support
- Join a Fender Community forum where you can ask questions and read threads. There’s even a forum just for the Mustang: www.fender.com/community/forums
- Find music theory learning materials and sheet music at Hal Leonard Publications: www.halleonard.com

Documents / Resources
References
Download manual
Here you can download full pdf version of manual, it may contain additional safety instructions, warranty information, FCC rules, etc.
Download Fender Mustang Amplifier I/II/III/IV/V v.2 Manual

Американская компания Fender представляет новый комбоусилитель для электрогитары FENDER MUSTANG I (V2). В своей спецификации гитарный усилитель представлен в серии транзисторных комбо, основной функции которого является работа с звучанием электрогитары. Комбоусилитель ФЕНДЕР МУСТАНГ 1(В2) является представителем самой известной и самой
продаваемой в мире серией гитарных усилителей в серии Mustang. Сегодня эта модель возвращается к нам в виде обновленного комбоусилителя MUSTANG I (V2), имеющего обновленные и уникальные характеристики и совершенно новым внешним обликом.
Производителем комбо является известная компания Fender, представляющая самый крупный американский бренд в сфере производства музыкальных инструментов. Именно серия усилителей и электрогитар Mustang смогла внести достаточно неоценимый вклад в развитие музыки по всему миру.
Комбо для электрогитары MUSTANG I (V2) смог сочетать в себе самые важные и нужные особенности, которые так нужны активно практикующим гитаристам. Комбо впитал в себя все самое лучшее от своего производителя, включая обновленный внешний облик в сочетании с классическими оттенками первых усилителей Fender и обновленную версию гитарного процессора включающую в себя практически всю линейку звучания усилителей Fender.
Гитарный усилитель Mustang V.2 призван к тому, чтобы функционально повышать все стандарты звучания современных гитар. В комбоусилитель МУСТАНГ В2 включены пять новых моделей гитарных усилителей и пять новых эффектов обработки звучания электрогитар, а так же функция интеллектуального переключения тона.
Функциональные особенности гитарного комбоусилителя FENDER MUSTANG I (V2).
Гитарный комбо Mustang V.2 действительно позиционируется Fender, как совершенно новое и по своей сути гораздо более функциональное устройство, чем многие аналоги в данной ценовой категории. Прежде всего, комбо впитал в себя нотки классического дизайна Fender, в дополнение к этому сочетая и гибкость настроек и звучания самых передовых и классических гитарных усилителей этого производителя. Действительно, комбо предлагает все возможности для получения звучания классических усилителей, используя встроенный блок модуляции их звучания. Так в модель комбо Mustang V.2 были добавлены пять совершенно новых моделей гитарных усилителей и пять новых эффектов для обработки звукового сигнала электрогитары. Кроме всего, гитарный усилитель оснащен функцией, позволяющей использовать новую технологию интеллектуального переключения тона.
Комбоусилитель имеет номинальную мощность в 20 Ватт, что дает возможность качественного озвучивания практически всех комнат в квартире или же небольших репетиционных помещений, а так же небольших репетиционных баз. При правильном снятии звучания с восьмидюймового динамика, гитарный комбоусилитель Mustang V.2 совершенно качественно озвучит и гораздо большие помещения и пространства, четко передавая все особенности звучания гитарных усилителей компании Fender. Если Вы нуждаетесь в достаточно удобном и функциональном комбоусилителе, оснащенном блоком эффектов, возможностью прямого подключения и записи музыки на персональный компьютер, тогда комбо для электрогитары FENDER MUSTANG I (V2) станет Вашим лучшим выбором в данной ценовой категории.
Новые пресеты секции классических гитарных усилителей
Программный блок модуляции комбо Fender Mustang 1 оснащен несколькими, самыми яркими популярными моделями гитарных усилителей, которые специализированы для передачи аутентичного звучания оригинальных усилителей Fender. Звучание этих усилителей выбирается при помощи удобной ручки Preset, быстро и плавно переключающей модели гитарных усилителей. Так же, типы гитарных усилителей можно выбирать при помощи отдельно приобретаемого напольного, ножного контроллера. В общей сумму гитарный усилитель предлагает Вам 17 высококачественных моделей гитарных усилителей, среди которых есть такиt популярные модели, как Fender 57 Twin, Fender 60 Thrift, 59 Bassman, British 60, British 80, Fender Deluxe, Fender American 90s и многие другие. Используя различные типы модуляций звучания гитарных усилителей, Вы сможете добиться именно того звучания электрогитары, которое необходимо для различных музыкальных стилей. Данный блок позволяет играть музыку в любых музыкальных стилях, начиная от джаза, заканчивая тяжелым роком или современной электронной музыкой.
Встроенный блок секции эффектов гитарного комбо MUSTANG I (V2).
Как правило, гитаристы используют отдельные гитарные педали, включающие в себя дорогостоящие эффекты обработки звукового сигнала электрогитары. Для того, что бы дать гитаристам возможность лично попробовать высококачественные эффекты без приобретения гитарных педалей, гитарный комбоусилитель оснащен секцией встроенного процессора эффектов.
В дополнение к основным типам эффектов, процессор включает в себя такие новые эффекты, как
Аналоговый и цифровой эффект реверберации (reverb), эффекты delay и echo, классический tremolo эффект и разнообразные эффекты модуляции. Теперь для того, что бы использовать и просто попробовать в работе разные вариации эффектов, Вам потребуется всего лишь включить один из них при помощи ручкикнопки управления, кроме этого, все эффекты можно переключать при помощи напольного футсвича, который приобретается отдельно. Для секции эффектов есть отдельная кнопка TAP, позволяющая предельно точно настроить рем повтора эффекта в соответствии с темпом музыкальной композиции.
Хроматический тюнер и взаимодействие с персональным компьютером
Для более практичной эксплуатации, гитарный усилитель оборудован встроенным, хроматическим тюнером. Для того, что бы настроить электрогитару, потребуется всего лишь активировать режим тюнера и пользуясь светодиодной индикацией настроить электрогитару.
Гитарный комбо оборудован USB разъемом для прямого подключения к персональному компьютеру. Это дает возможность для качественной записи Вашей электрогитары напрямую в музыкальное программное обеспечение без каких либо сложностей и «танцев с бубном»! кроме этого, посредством специализированного программного обеспечения Fender FUSE Вы всегда сами сможете редактировать программные пресеты, изменяя и сохраняя их. На сайте производителя можно бесплатно скачать большое количество пресетов, созданное профессиональными музыкантами. Среди таких, достаточно популярных среди гитаристов пресетов, особенно следует выделить эмуляции педали эффектов Big Fuzz и Green Screamer.
Коммутационные особенности комбоусилителя MUSTANG I (V2)
Гитарный комбо имеет совершенно новую платформу, с невероятно низким уровнем шумов, благодаря чему, этот комбо станет идеальным помощником и практической работе в студии звукозаписи. Коммутация гитарного комбоусилителя имеет инструментальный входной разъем Input со стандартным инструментальным джеком (14 Jack) и разъем для подключения источника дополнительного звукового сигнала (3,5 мм.), благодаря которому Вы всегда сможете попрактиковаться дома или выступать перед аудиторией с минусовым музыкальным треком. Для тихих занятий или записи используйте дополнительный выход на наушники (3,5 мм., стерео) или же USB разъем. Для подключения внешних педалей-контроллеров, прямо на верхней панели есть отдельное гнездо — FTSW (14 Jack).
Технические характеристики комбоусилителя FENDER MUSTANG I (V2)
Тип устройства : комбоусилитель.
Спецификация комбо : электрогитара.
Колличесвто каналов : один канал звучания.
Номинальная мощность : 20 Ватт (RMS).
Колличесвто динамиков усилителя : один динамик (х 1).
Размер динамика : 8″ (дюймов).
Материал кабинета комбо : МДФ.
Отделка корпуса : виниловое покрытие с серебряной решеткой из ткани, черный цвет.
Встроенный хроматический тюнер : есть, светодиодная индикация.
Габаритные размеры комбо : 193 мм. х 400 мм. х 368 миллиметров.
Вес комбо : 7,7 кг.
Характеристики коммутации комбо :
— Инструментальный вход : Input (х 1) 14 Jack;
— Дополнительный вход : Aux (х 1) 1/8″;
— Выход на наушники : 1/8″ (стерео);
— Вход для педали футсвича : FTSW (х 1) 14 Jack;
— Разъем USB : подключение к персональному компьютеру.
Регуляторы и органы управления :
— Ручка Gain : уровень перегруза;
— Ручка Volume : настройка уровня выходного уровня;
— Секция эквалайзера :
— Ручка Treble : настройка высоких частот;
— Ручка Bass : настойка низких частот;
— Ручка Master : настройка уровня сигнала;
— Ручка Preset Select : ручка выбора пресетов звучания;
— Ручка Modulation Select : выбор эффектов обработки;
— Ручка Delay/Reverb : выбор типов эффектов;
— Кнопка Save : сохранение отредактированного пресета;
— Кнопка Tap : настройка темпа эффекта;
— Кнопка Exit : выход из режима редактированиянастройка уровня эффекта.
Программное обеспечение :
— Программное обеспечение Fender FUSE : ПО для редактирования и работы с пресетами;
— Версия ПО Ableton Live Lite 8 (Fender Edition) : ПО совместимое с ПО Mustang USB выходом;
— Версия ПО AmpliTube (Fender LE) : с возможностью скачивания программного обеспечения для Mac и PC платформ.
Обзор №1
Достоинства:
Хороший звук, компактный размер, гибкие настройки звучания, редактирование с ноутбука
Недостатки:
Более урезанный вариант настройки по сравнению с моделями классом выше, слабо передаёт динамику игры, в комплкте не идёт футсвитч
Вот уже несколько лет замечаю в гитарных усилителях начальной и средней ценовой категории следующую тенденцию: транзисторных усилителей становится заметно меньше, а им на смену пришли усилители моделирующего типа. Они представляют собой усилители формата комбика или головы и предлагают эмуляцию звучания других известных усилителей и дополнительные эффекты обработки звучания гитары. По сути, это обыкновенный цифровой гитарный процессор с усилителем в формате комбоусилителя. Они различаются по мощности, функциям и настройкам и уже практически каждая известная фирма запустила линейку такой продукции. Действительно удобное решение для домашних занятий, ведь функционал и звучание этих усилителей значительно лучше, чем у прежних транзисторных моделей.
Недавно подарил отцу на день рождения электрогитару Fender Squier Affinity Stratocater и выбирая к ней комбоусилитель мой выбор остановился на небольшом 20-ти ваттном комбике Fender Mustang 1. Малогабаритный, мощность отлично подходит для игры дома, динамик 8 дюймов, 24 пресета, модуляционные эффекты и возможность подключения через USB к ноутбуку, для более точного редактирования пресетов, а также обновления и узнаваемый дизайн усилителей Fender. Я давно профессионально занимаюсь занимаюсь музыкой и, имея большой опыт работы с гитарной аппаратурой, чётко себе представляю, что должно быть в усилителе, а за что не стоит переплачивать деньги попусту.
Фирма Fender хорошо знакома всем музыкантам своей продукцией и качеством звука и я решил изучить линейку усилителей Fender Mustang. Так как усилитель выбирался для игры дома, я выбрал самую компактную и негромкую модель Fender Mustang 1. Модель Fender Mustang 2 имеет более высокую мощность и динамик размеров 12 дюймом, что даёт более правильный и объёмный гитарный звук, но для дома он оказался слишком громким, а покупать усилитель чтобы включать его максимум на 1 я не видел смысла. Но, как оказалось, Fender Mustang звучит более чем достойно, а небольшой размер динамика можно компенсировать настройками эквалайзера ( немного прибрать верха для более плотного звучания) и для домашней игры звучание очень комфортное.
На органы управления усилителем Fender Mustang 1 расположены сверху и редактировать звучание можно как вручную, так и подключив усилитель к ноутбуку по USB. Сразу отмечу, что редактировать с ноутбука лучше и удобнее т. к. в прилагаемом софте представлены более расширенные функции настроек. На эквалайзере усилителя при экономии места не добавили ручку средних частот и её редактирование доступно только с ноутбука. Также с компьютера есть возможность полной настройки пресета: звучание усилителя, включение шумодава, выбор микрофона и положения динамика, полной и точной настройки всех эффектов. Практически перед нами хороший гитарный процессор со всеми его возможностями моделирования звука. Также на официальном сайте Fender пользователи периодически выкладывают свои пресеты и возможно многие из них Вам подойдут или станут отправной точкой при создании своих.
На панеле управления усилителя Fender Mustang 1 расположены 2 гнезда входа. Первое это входное гнездо для подключения гитары, второе гнездо для подключения футсвитча. Футсвитч в комплекте не идёт и его необходимо приобретать отдельно, что немного огорчает, но стоит он недорого. С его помощью Вы можете переключать звучания между двумя выбранными пресетами. Я настроил в зелёном положении чистый звук, в красном звук на перегрузе для соло. Возможностей не много, но всё равно удобно.
На другом конце панели управления расположен включатель, USB порт, вход для подключения внешнего источника ( например Mp3 плеера, кнопка tap tempo, и ручка Preset для выбора пресета звучания. Вы можете играть как на заводских звуках, так и назначить все свои и выбирать их них нужное звучание. Также удерживая кнопку tap tempo Вы активизируете тюнер — очень удобно и всё в формате одного усилителя)
Комбик Fender Mustang 1 очень легкий и компактный и Вы всегда найдёте ему место в квартире. Дизайн усилителя совмещает в себе классические элементы Fender — узнаваемый логотип, ткань silverface защищающая динамик, но сам корпус обтянут материалом напоминающий рисунков карбон. Очень жаль, что нет вариантов усилителей в классической твидовой ткани т. к. внешний вид был бы ещё более фирменный) Но в целом усилитель выглядит очень стильно и хорошо впишется в интерьер любой квартиры. Увы, только на чёрном цвете очень хорошо видна пыль.
Теперь самое главное, звук! Звучит усилитель довольно хорошо, даже не смотря на небольшой динамик и цифровую эмуляцию усилителей других фирм. Особенно могу отметить звучание чистого звука. За него отвечают пресеты эмуляции усилителей Fender. Это вполне логично т. к. звук Fender у всех ассоциируется с чистым звуком и усилителями Fender Twin Reverb. Тут Fender Mustang получает 5 балов!
Звучание на перегрузе эмулирует усилители таких фирм как VOX, Marshall, Mesa Boogie. На мой взгляд перегруз звучит менее удачно и требует более долгой отстройки пресета. Некоторые модели усилителей, такие как Marshall звучат вполне убедительно и отлично раскачиваются дополнительным овердрайвом. Звучание VOX тоже могу назвать очень похожим на звучание британского вторжения 60-х годов). Звучание мне Mesa совершенно не понравилась, но, возможно, поклонники тяжёлого звука его оценят. Мой отец играет больше на чистом или чуть подгруженном звуке и вариант Fender Mustang нас полностью устроил, но если Вы играете тяжёлую музыку, тогда советую обратить внимание на усилители других фирм. Отстроив однажды пресеты мы их больше не редактируем и усилитель уже 2 года радует своим звучанием.
Для концертных выступлений, как мне кажется, Mustang не очень подходит т. к. нет быстрой возможности подстройки звука, но, если если Вы постоянно выступаете, допустим, в баре и используете 2 настройки звука, то Mustang вполне может с этим справиться. Но ещё более удачным вариантом для живух выступлений будут усилители Fender Mustang более продвинутых серий т. к. их функционал и возможности настройки ещё лучше и более гибкие.
Долгое время продолжается скрытая война между ламповыми и транзисторными гитарными усилителями. Постепенно в эту гонку включились и цифровые устройства и, как мне кажется, в сегменте домашних усилителей цифра постепенно побеждает и её удобство неоспоримо.
Время использования: 2 года
Стоимость: 6690 руб.
Общее впечатление: Отличный комбик для занятий дома
Обзор №2
Достоинства:
Шикароне звучание плюс логотип известного во всем мире бренда
Недостатки:
не нашел
Давно хотел приобрести себе гитарный комбоусилитель достойного качества, со встроенными эффектами, и встроенным гитарным тюнером — но прослушав звучание десятков или даже сотен некудышних моделей я постоянно был разочарован или их прсто ужасным качеством, или через чур огромной ценой, или совсем уж убогим дизайном (что для меня — только не смейтесь — тоже играет немаловажную роль — несмотря что на качество звука это никак не влияет).
И вот однажды я наткнулся на комбик Fender Mustang — попробовав его в действии я был сильно удивлен, причем в приятную сторону — так как комбик сразу выдал прекрасный звук, а покрутив ручки я понял, что этот звук можно сделать еще прекраснее — ведь в него встроен шикарный кабинет всевозможных эфектов — начиная от ревера и эха и до сводящих с ума фейзеров, флежеров и вах-вахов. При этом он имеет достаточно удобную ручку — чтобы его переносить куда угодно, но я вам скажу по секрету — что он отлично подойдет для игры не только на концертах и в студии, но и в обычной жилой в квартире — мои соседи снизу, сбоку и сверху не дадут мне соврать.
Год выпуска/покупки: 2015
Общее впечатление: Привет Бендер — Привет Фендер
Обзор №3
Достоинства:
Возможность управления с ПК
Недостатки:
Пластмассовый звук
Fender Mustang 1 не стоит брать новичку как первый. Конечно, яркая коробка, красивый внешний вид, небольшое количество крутилок, вход для наушников и AUX, и самое бросающиеся в глаза- вход USB. Если верить инструкции, на официальном сайте можно скачать к нему программу, с помощью которой можно нарулить любой звук, даже ваше любимой группы!
На практике же всё немного иначе. Стандартные пресеты звучат очень грязно. Неопытному человеку очень сложно сделать нормальный дисторшн, крутя ручки наугад. Специальная программа всё же спасает. В ней можно поставить виртуальные педали, более детально управлять крутилками, или скачать готовые пресеты. Но даже это не спасает сам пластмассовый звук комбоусилителя. За эту цену можно найти более достойный вариант.
Обзор №4
Для своей цены комбик очень даже неплох. Звук, на мой взгляд, несколько синтетический выдает, но это дело вкуса.
Плюсы:
1) низкая стоимость;
2) комбик простой и понятный, ничего лишнего, много места не занимает, для бедрум-гитариста — идеально;
3) ПО, идущее в комплекте, сильно расширяет возможности: можно накрутить много интересных пресетов, начиная с полностью чистого звука (преамп с шумоподавлением), который можно пустить в дальнейшую обработку на комп, и заканчивая икающим дисторшеном.
Минусы:
1) для чего-то большего, чем потренькать дома — вряд ли подойдет;
2) плохо работает в качестве аудио-ин для программ типа кубейс, аблетон и прочих — через некоторое время начинает хрипеть и шоркать, помогает только «включить-выключить»; читал в инете об этой проблеме — у всех так.
В целом, хороший вариант для начала.
Обзор №5
Fender Mustang 1 Хороший усилитель! Я конечно понимаю, что звук идёт только из пальцев, но…не подключайте совсем дешёвые гитары, шнуры — комбик очень чувствительный. Первые пресеты усилителей совсем не предназначены для игры квинтами, но на соло имеем хороший блюзовый хруст) Не играли ребята в 50-60х тяжёлые риффы, да и есть ли хоть у кого-нибудь кроме заядлых коллекционеров хоть один экземпляр Bassman’a или Twin Reverb’a, чтобы сравнить, и узнать какой звук был после выверта ручки гейна на максимум? Думаю, нет. Перегрузы современных усилителей качественные, нет намёка на пластмассу, и крутите крутите эквалайзер! Экспериментируйте! У комбика хорошая регулировка середины, запросто накрутил «Сепультура».
Реагирует на динамику игры, шорохи-шелесты, всё присутствует, можно тренировать звукоизвлечение. Те, кто не знает его реальной стоимости, задают вопрос, «Где ты взял такой раритет?» — очень стильно и ладно сделан! Ну и ещё одно преимущество лично для меня — вес! Часто беру поиграть на дачу, там есть возможность выкрутить погромче! И не нужно тащить педали, шнуры, блок питания, тройник-удлиннитель для розетки, только гитара, один шнур и комбик!
При желании подключить педаль выбираем какой-нибудь «бассман», убираем в ноль гейн просто чуть повернув ручку, и довернув до «0», эквалайзер регулируем по вкусу. Лучше звучат на нём педали овердрайва с бархатистой серединой. Ну а «дэлей» — что встроенный цифровой, что в педальном формате — цифровой. Аналоговых на прилавке я не встречал. Это сейчас нормально.
, MUSTANG II (V.2) User Manual")
MUSTANG™ I/ II BY FENDER®

MUSTANG ™ I / II
Mustang™ I / II
Fender® FUSE™, Ableton® Live Amplitube®,
, www.fender.com/support
Навигация
Mustang,
• • Mustang – •
• •
• • ,
• • PRESET,
, • • —
.
24 PRESET.
|
AMBER |
Bank |
GREEN Bank |
RED Bank |
||||||||||||||||||||||||||
|
(Factory presets) |
(User presets) |
(User presets) |
|||||||||||||||||||||||||||
• •
, •
. • •
• • .
|
♫ |
||
|
. |
||
|
Fender FUSE, |
|||
|
www.fender.com/support. |
|||
|
Mustang. |
, |
||
|
MASTER PRESET |
|
Mustang ( MASTER) |
— |
||||||||||||||||||||
|
, |
, , |
||||||||||||||||||||
|
, |
• |
||||||||||||||||||||
• .
? •
|
, — |
|||
|
. • • |
|||
|
. |
|
. |
||||||||||||||||||||||||||||||||||||
|
• |
• |
— |
||||||||||||||||||||||||||||||||||
|
. • |
|
• |
— |
||||||
|
. •- |
|||||||
|
, VOLUME |
«8», |
||||||
|
VOLUME «2», |
|||||||
|
• |
VOLUME — |
||||||
|
«2» «8», |
|||||||
|
VOLUME «8». |
|||||||
|
♫ |
• – • |
||||||
|
Fender FUSE Mustang . |
|||||||
|
Эффекты |
|||||||
|
• Mustang |
• : |
•MOD— Выбор эффектов типа модуляции
•DLY /REV— выбор эффектовтипа задержки и ревербера-.
|
♫ |
||||
|
— •€€ STOMPBOX |
||||
|
• Fender FUSE |
Рукоятки MOD иDLY / REV используют одни и те же светодиод-
. •-
 Loading…
You can only view or download manuals with
Sign Up and get 5 for free
Upload your files to the site. You get 1 for each file you add
Get 1 for every time someone downloads your manual
Buy as many as you need