
-
Инструкции по эксплуатации
75
Языки:

Nikon COOLPIX L830 инструкция по эксплуатации
(204 страницы)
- Языки:Русский
-
Тип:
PDF -
Размер:
10.05 MB -
Описание:
Фотоаппарат
Просмотр

Nikon COOLPIX L830 инструкция по эксплуатации
(204 страницы)
- Языки:Русский
-
Тип:
PDF -
Размер:
10.15 MB
Просмотр

Nikon COOLPIX L830 инструкция по эксплуатации
(128 страниц)
- Языки:Русский
-
Тип:
PDF -
Размер:
6.44 MB
Просмотр

Nikon COOLPIX L830 инструкция по эксплуатации
(128 страниц)
- Языки:Английский
-
Тип:
PDF -
Размер:
7 MB -
Описание:
for customers in Asia, Oceania, the Middle East, and Africa
Просмотр

Nikon COOLPIX L830 инструкция по эксплуатации
(204 страницы)
- Языки:Английский
-
Тип:
PDF -
Размер:
9.19 MB
Просмотр

Nikon COOLPIX L830 инструкция по эксплуатации
(44 страницы)
- Языки:Английский
-
Тип:
PDF -
Размер:
3.96 MB -
Описание:
for customers in Europe
Просмотр

Nikon COOLPIX L830 инструкция по эксплуатации
(44 страницы)
- Языки:Английский
-
Тип:
PDF -
Размер:
4 MB -
Описание:
for customers in the Americas
Просмотр

Nikon COOLPIX L830 инструкция по эксплуатации
(128 страниц)
- Языки:Вьетнамский
-
Тип:
PDF -
Размер:
6.27 MB
Просмотр

Nikon COOLPIX L830 инструкция по эксплуатации
(204 страницы)
- Языки:Вьетнамский
-
Тип:
PDF -
Размер:
9.97 MB
Просмотр

Nikon COOLPIX L830 инструкция по эксплуатации
(204 страницы)
- Языки:Украинский
-
Тип:
PDF -
Размер:
10.09 MB
Просмотр

Nikon COOLPIX L830 инструкция по эксплуатации
(128 страниц)
- Языки:Украинский
-
Тип:
PDF -
Размер:
6.42 MB
Просмотр

Nikon COOLPIX L830 инструкция по эксплуатации
(128 страниц)
- Языки:Турецкий
-
Тип:
PDF -
Размер:
9.04 MB
Просмотр

Nikon COOLPIX L830 инструкция по эксплуатации
(204 страницы)
- Языки:Турецкий
-
Тип:
PDF -
Размер:
14.13 MB
Просмотр

Nikon COOLPIX L830 инструкция по эксплуатации
(128 страниц)
- Языки:Тайский
-
Тип:
PDF -
Размер:
6.52 MB
Просмотр

Nikon COOLPIX L830 инструкция по эксплуатации
(204 страницы)
- Языки:Тайский
-
Тип:
PDF -
Размер:
10.07 MB
Просмотр

Nikon COOLPIX L830 инструкция по эксплуатации
(204 страницы)
- Языки:Телугу
-
Тип:
PDF -
Размер:
12.21 MB
Просмотр

Nikon COOLPIX L830 инструкция по эксплуатации
(204 страницы)
- Языки:Тамильский
-
Тип:
PDF -
Размер:
11.67 MB
Просмотр

Nikon COOLPIX L830 инструкция по эксплуатации
(204 страницы)
- Языки:Шведский
-
Тип:
PDF -
Размер:
9.96 MB
Просмотр

Nikon COOLPIX L830 инструкция по эксплуатации
(44 страницы)
- Языки:Шведский
-
Тип:
PDF -
Размер:
3.98 MB
Просмотр

Nikon COOLPIX L830 инструкция по эксплуатации
(44 страницы)
- Языки:Сербский
-
Тип:
PDF -
Размер:
3.99 MB
Просмотр

Nikon COOLPIX L830 инструкция по эксплуатации
(204 страницы)
- Языки:Словенский
-
Тип:
PDF -
Размер:
9.71 MB
Просмотр

Nikon COOLPIX L830 инструкция по эксплуатации
(128 страниц)
- Языки:Словенский
-
Тип:
PDF -
Размер:
6.3 MB
Просмотр

Nikon COOLPIX L830 инструкция по эксплуатации
(204 страницы)
- Языки:Словацкий
-
Тип:
PDF -
Размер:
9.74 MB
Просмотр

Nikon COOLPIX L830 инструкция по эксплуатации
(44 страницы)
- Языки:Словацкий
-
Тип:
PDF -
Размер:
4.01 MB
Просмотр

Nikon COOLPIX L830 инструкция по эксплуатации
(128 страниц)
- Языки:Румынский
-
Тип:
PDF -
Размер:
6.37 MB
Просмотр

Nikon COOLPIX L830 инструкция по эксплуатации
(204 страницы)
- Языки:Румынский
-
Тип:
PDF -
Размер:
9.93 MB
Просмотр

Nikon COOLPIX L830 инструкция по эксплуатации
(204 страницы)
- Языки:Португальский
-
Тип:
PDF -
Размер:
10.02 MB -
Описание:
Brasil
Просмотр

Nikon COOLPIX L830 инструкция по эксплуатации
(128 страниц)
- Языки:Польский
-
Тип:
PDF -
Размер:
6.38 MB
Просмотр

Nikon COOLPIX L830 инструкция по эксплуатации
(204 страницы)
- Языки:Польский
-
Тип:
PDF -
Размер:
9.92 MB
Просмотр

Nikon COOLPIX L830 инструкция по эксплуатации
(204 страницы)
- Языки:Нидерландский
-
Тип:
PDF -
Размер:
10 MB
Просмотр

Nikon COOLPIX L830 инструкция по эксплуатации
(44 страницы)
- Языки:Нидерландский
-
Тип:
PDF -
Размер:
3.99 MB
Просмотр

Nikon COOLPIX L830 инструкция по эксплуатации
(204 страницы)
- Языки:Маратхи
-
Тип:
PDF -
Размер:
10.4 MB
Просмотр

Nikon COOLPIX L830 инструкция по эксплуатации
(204 страницы)
- Языки:Латышский
-
Тип:
PDF -
Размер:
9.73 MB
Просмотр

Nikon COOLPIX L830 инструкция по эксплуатации
(44 страницы)
- Языки:Литовский
-
Тип:
PDF -
Размер:
3.99 MB
Просмотр

Nikon COOLPIX L830 инструкция по эксплуатации
(204 страницы)
- Языки:Литовский
-
Тип:
PDF -
Размер:
9.73 MB
Просмотр

Nikon COOLPIX L830 инструкция по эксплуатации
(128 страниц)
- Языки:Казахский
-
Тип:
PDF -
Размер:
6.49 MB
Просмотр

Nikon COOLPIX L830 инструкция по эксплуатации
(204 страницы)
- Языки:Казахский
-
Тип:
PDF -
Размер:
9.94 MB
Просмотр

Nikon COOLPIX L830 инструкция по эксплуатации
(128 страниц)
- Языки:Индонезийский
-
Тип:
PDF -
Размер:
6.21 MB
Просмотр

Nikon COOLPIX L830 инструкция по эксплуатации
(204 страницы)
- Языки:Индонезийский
-
Тип:
PDF -
Размер:
9.74 MB
Просмотр

Nikon COOLPIX L830 инструкция по эксплуатации
(128 страниц)
- Языки:Венгерский
-
Тип:
PDF -
Размер:
6.38 MB
Просмотр

Nikon COOLPIX L830 инструкция по эксплуатации
(204 страницы)
- Языки:Венгерский
-
Тип:
PDF -
Размер:
9.96 MB
Просмотр

Nikon COOLPIX L830 инструкция по эксплуатации
(204 страницы)
- Языки:Хинди
-
Тип:
PDF -
Размер:
11.46 MB
Просмотр

Nikon COOLPIX L830 инструкция по эксплуатации
(44 страницы)
- Языки:Французский
-
Тип:
PDF -
Размер:
4.09 MB -
Описание:
pour nos clients en Amérique
Просмотр

Nikon COOLPIX L830 инструкция по эксплуатации
(128 страниц)
- Языки:Французский
-
Тип:
PDF -
Размер:
6.44 MB -
Описание:
pour nos clients en Asie et en Afrique
Просмотр

Nikon COOLPIX L830 инструкция по эксплуатации
(204 страницы)
- Языки:Французский
-
Тип:
PDF -
Размер:
10.22 MB
Просмотр

Nikon COOLPIX L830 инструкция по эксплуатации
(44 страницы)
- Языки:Французский
-
Тип:
PDF -
Размер:
4.05 MB -
Описание:
pour nos clients en Europe
Просмотр

Nikon COOLPIX L830 инструкция по эксплуатации
(204 страницы)
- Языки:Финский
-
Тип:
PDF -
Размер:
9.8 MB
Просмотр

Nikon COOLPIX L830 инструкция по эксплуатации
(204 страницы)
- Языки:Эстонский
-
Тип:
PDF -
Размер:
9.69 MB
Просмотр

Nikon COOLPIX L830 инструкция по эксплуатации
(44 страницы)
- Языки:Эстонский
-
Тип:
PDF -
Размер:
3.99 MB
Просмотр

Nikon COOLPIX L830 инструкция по эксплуатации
(204 страницы)
- Языки:Греческий
-
Тип:
PDF -
Размер:
10.11 MB
Просмотр

Nikon COOLPIX L830 инструкция по эксплуатации
(128 страниц)
- Языки:Греческий
-
Тип:
PDF -
Размер:
6.44 MB
Просмотр

Nikon COOLPIX L830 инструкция по эксплуатации
(204 страницы)
- Языки:Датский
-
Тип:
PDF -
Размер:
9.82 MB
Просмотр

Nikon COOLPIX L830 инструкция по эксплуатации
(128 страниц)
- Языки:Китайский
-
Тип:
PDF -
Размер:
6.71 MB
Просмотр

Nikon COOLPIX L830 инструкция по эксплуатации
(204 страницы)
- Языки:Китайский
-
Тип:
PDF -
Размер:
10.2 MB
Просмотр

Nikon COOLPIX L830 инструкция по эксплуатации
(156 страниц)
- Языки:Китайский
-
Тип:
PDF -
Размер:
7.98 MB
Просмотр

Nikon COOLPIX L830 инструкция по эксплуатации
(156 страниц)
- Языки:Китайский
-
Тип:
PDF -
Размер:
8.44 MB
Просмотр

Nikon COOLPIX L830 инструкция по эксплуатации
(244 страницы)
- Языки:Китайский
-
Тип:
PDF -
Размер:
11.19 MB
Просмотр

Nikon COOLPIX L830 инструкция по эксплуатации
(244 страницы)
- Языки:Китайский
-
Тип:
PDF -
Размер:
11.19 MB
Просмотр

Nikon COOLPIX L830 инструкция по эксплуатации
(204 страницы)
- Языки:Португальский
-
Тип:
PDF -
Размер:
9.91 MB
Просмотр

Nikon COOLPIX L830 инструкция по эксплуатации
(128 страниц)
- Языки:Итальянский
-
Тип:
PDF -
Размер:
6.34 MB
Просмотр

Nikon COOLPIX L830 инструкция по эксплуатации
(204 страницы)
- Языки:Итальянский
-
Тип:
PDF -
Размер:
9.86 MB
Просмотр

Nikon COOLPIX L830 инструкция по эксплуатации
(44 страницы)
- Языки:Итальянский
-
Тип:
PDF -
Размер:
4 MB
Просмотр

Nikon COOLPIX L830 инструкция по эксплуатации
(204 страницы)
- Языки:Немецкий
-
Тип:
PDF -
Размер:
9.92 MB
Просмотр

Nikon COOLPIX L830 инструкция по эксплуатации
(44 страницы)
- Языки:Немецкий
-
Тип:
PDF -
Размер:
3.9 MB
Просмотр

Nikon COOLPIX L830 инструкция по эксплуатации
(44 страницы)
- Языки:Испанский
-
Тип:
PDF -
Размер:
4.03 MB -
Описание:
para los clientes en Europa
Просмотр

Nikon COOLPIX L830 инструкция по эксплуатации
(44 страницы)
- Языки:Испанский
-
Тип:
PDF -
Размер:
4.07 MB -
Описание:
para los clientes en América
Просмотр

Nikon COOLPIX L830 инструкция по эксплуатации
(204 страницы)
- Языки:Испанский
-
Тип:
PDF -
Размер:
10.1 MB
Просмотр

Nikon COOLPIX L830 инструкция по эксплуатации
(204 страницы)
- Языки:Чешский
-
Тип:
PDF -
Размер:
9.98 MB
Просмотр

Nikon COOLPIX L830 инструкция по эксплуатации
(44 страницы)
- Языки:Чешский
-
Тип:
PDF -
Размер:
4 MB
Просмотр

Nikon COOLPIX L830 инструкция по эксплуатации
(204 страницы)
- Языки:Бенгальский
-
Тип:
PDF -
Размер:
11.39 MB
Просмотр

Nikon COOLPIX L830 инструкция по эксплуатации
(44 страницы)
- Языки:Болгарский
-
Тип:
PDF -
Размер:
4.02 MB
Просмотр

Nikon COOLPIX L830 инструкция по эксплуатации
(128 страниц)
- Языки:Арабский
-
Тип:
PDF -
Размер:
6.97 MB
Просмотр

Nikon COOLPIX L830 инструкция по эксплуатации
(204 страницы)
- Языки:Арабский
-
Тип:
PDF -
Размер:
10.23 MB
Просмотр

Nikon COOLPIX L830 инструкция по эксплуатации
(204 страницы)
-
Тип:
PDF -
Размер:
9.78 MB
Просмотр

Nikon COOLPIX L830 инструкция по эксплуатации
(44 страницы)
-
Тип:
PDF -
Размер:
3.99 MB
Просмотр
На NoDevice можно скачать инструкцию по эксплуатации для Nikon COOLPIX L830. Руководство пользователя необходимо для ознакомления с правилами установки и эксплуатации Nikon COOLPIX L830. Инструкции по использованию помогут правильно настроить Nikon COOLPIX L830, исправить ошибки и выявить неполадки.
Просмотр
Доступно к просмотру 201 страница. Рекомендуем вам скачать файл инструкции, поскольку онлайн просмотр документа может сильно отличаться от оригинала.
-
Данное руководство не может быть воспроизведено в любой форме
целиком или частично (за исключением краткого цитирования в
статьях или обзорах) без письменного разрешения компании NIKON.
ЦИФРОВАЯ ФОТОКАМЕРА
Подробное руководство пользователя
Отпечатано в России
CT3L01(1D)
6MN3411D-01
-
Введение
Основные элементы фотокамеры
Основы съемки и просмотра
Функции съемки
Функции просмотра
Запись и просмотр видеороликов
Общие настройки фотокамеры
Подключение фотокамеры к телевизору, компьютеру или принтеру
Раздел справочной информации
Технические примечания и алфавитный указатель
i
-
Введение
Прочтите это в первую очередь
Благодарим вас за приобретение цифровой фотокамеры Nikon COOLPIX L830. Прежде чем
начать пользоваться фотокамерой, ознакомьтесь с содержанием раздела «Меры
предосторожности» (A viii-xi) и с информацией, содержащейся в этом руководстве. После
прочтения этого руководства держите его под рукой и обращайтесь к нему для ознакомления
Введение
с преимуществами новой камеры.
ii
- 1
- 2
- 3
- 4
- 201
 Модель: Компактная фотокамера Nikon Coolpix L830
Год выпуска: 2014
Количество страниц: 204
Язык: русский
Формат: pdf
Размер: 5,3 Mb
Описание:
УльтраZoom фотоаппарат Nikon Coolpix L830 представляет собой простую камеру с потрясающими возможностями автоматической съемки. Она оборудована качественной 16-мегапиксельной CMOS-матрицей, имеет множество интеллектуальных режимов и отличается мощнейшим оптическим Zoom`ом.
Содержание
- Введение.
- Прочтите это в первую очередь.
- Об этом руководстве.
- Информация и меры предосторожности.
- Меры предосторожности.
- ПРЕДУПРЕЖДЕНИЯ.
- Примечания.
- Прочтите это в первую очередь.
- Основные элементы фотокамеры.
- Корпус фотокамеры.
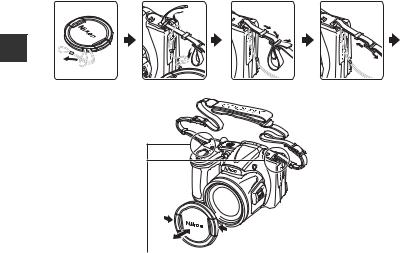
- Изменение угла наклона монитора.
- Прикрепление ремня фотокамеры и крышки объектива.
- Подъем и опускание вспышки.
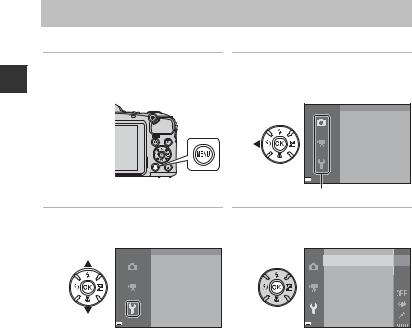
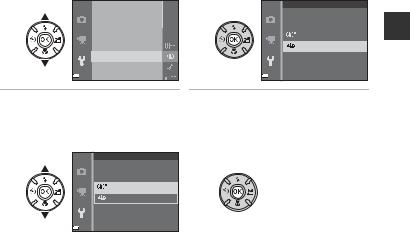
- Использование меню (кнопка MENU).
- Монитор.
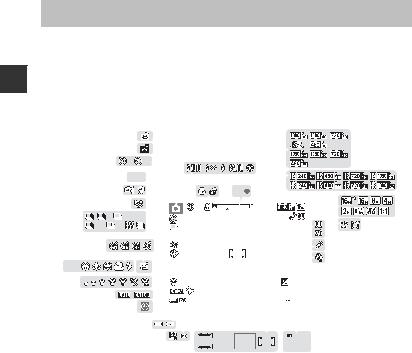
- Режим съемки.
- Режим просмотра.
- Корпус фотокамеры.
- Основы съемки и просмотра.
- Подготовка 1. Установка батарей.
- Применимые батареи.
- Подготовка 2. Установка карты памяти.
- Внутренняя память и карты памяти.
- Подготовка 3. Установка языка дисплея, даты и времени.
- Шаг 1. Включение фотокамеры.
- Шаг 2. Выбор режима съемки.
- Доступные режимы съемки.
- Шаг 3. Компоновка кадра.
- Использование зума.
- Шаг 4. Фокусировка и съемка.
- Спусковая кнопка затвора.
- Шаг 5. Просмотр изображений.
- Шаг 6. Удаление изображений.
- Подготовка 1. Установка батарей.
- Функции съемки.
- (простой авто режим).
- Сюжетный режим (съемка в соответствии с сюжетами).
- Подсказки и примечания.
- Режим специальных эффектов (применение эффектов при съемке).
- Режим интеллектуального портрета (съемка улыбающихся лиц).
- Режим (авто).
- Функции, устанавливаемые с помощью мультиселектора.
- Использование вспышки.
- Использование автоспуска.
- Использование режима макросъемки.
- Регулировка яркости (Поправка экспозиции).
- Настройки по умолчанию.
- Функции, которые можно установить с помощью кнопки d (Меню съемки).
- Параметры, доступные в меню съемки.
- Функции, одновременное использование которых невозможно.
- Фокусировка.
- Использование системы распознавания лиц.
- Использование функции смягчения тона кожи.
- Использование АФ с обнаружением объекта.
- Объекты, не подходящие для автофокусировки.
- Блокировка фокусировки.
- Функции просмотра.
- Увеличение при просмотре.
- Просмотр уменьшенных изображений, отображение календаря.
- Функции, которые можно установить с помощью кнопки (Меню просмотра).
- Запись и просмотр видеороликов.
- Запись видеороликов.
- Функции, которые можно установить с помощью кнопки (меню Видео).
- Просмотр видеороликов.
- Запись видеороликов.
- Общие настройки фотокамеры.
- Функции, которые можно установить с помощью кнопки (меню настройки).
- Подключение фотокамеры к телевизору, компьютеру или принтеру.
- Способы подключения.
- Использование ViewNX 2.
- Установка ViewNX 2.
- Передача изображений на компьютер.
- Просмотр снимков.
- Раздел справочной информации.
- Использование функции «Простая панорама» (съемка и просмотр).
- Съемка с использованием функции «Простая панорама».
- Просмотр изображений, снятых с помощью функции простой панорамы.
- Просмотр и удаление изображений, снятых в режиме непрерывной съемки (последовательность).
- Просмотр последовательности снимков.
- Удаление снимков в последовательности.
- Редактирование фотографий.
- Перед редактированием изображений.
- Быстрая обработка: улучшение контраста и насыщенности.
- D-Lighting: повышение яркости и контраста.
- Подавление красных глаз: подавление эффекта «красных глаз», вызываемого вспышкой.
- Смягчение тона кожи: смягчение тона кожи.
- Эфф. фильтров: применение эффектов цифровых фильтров.
- Уменьшить снимок: уменьшение размера изображения.
- Кадрирование: создание кадрированной копии.
- Подключение фотокамеры к телевизору (просмотр изображений на экране телевизора).
- Подключение фотокамеры к принтеру (прямая печать).
- Подключение фотокамеры к принтеру.
- Печать отдельных изображений.
- Печать нескольких изображений.
- Редактирование видеороликов.
- Извлечение только нужных фрагментов видеоролика.
- Сохранение кадра видеоролика как фотографии.
- Меню съемки (для режима A (авто)).
- Настройки режима изображения (размер и качество изображения).
- Баланс белого (регулировка оттенка).
- Непрерывная съемка.
- Чувствительность.
- Параметры цвета.
- Режим зоны АФ.
- Меню интеллектуального портрета.
- Смягчение тона кожи.
- Таймер улыбки.
- Отслеж. моргания.
- Меню просмотра.
- Задание печати (создание задания печати DPOF).
- Показ слайдов.
- Защита.
- Повернуть снимок.
- Копирование (копирование с карты памяти во внутреннюю память фотокамеры и наоборот).
- Свойства отобр. послед.
- Выбрать основн. снимок.
- Меню видео.
- Параметры видео.
- Режим зоны АФ.
- Режим автофокуса.
- Видео VR.
- Подавл. шумов от ветра.
- Меню настройки.
- Экран приветствия.
- Часовой пояс и дата.
- Настройка монитора.
- Печать даты (впечатывание даты и времени).
- Фотография VR.
- Обнаруж. движения.
- АФ-помощь.
- Настройка звука.
- Авто выкл.
- Форматир. памяти/Форматир. карточки.
- Язык/Language.
- Настройки ТВ.
- Предуп. о закр. глаз.
- Загрузка Eye-Fi.
- Сброс всех знач.
- Тип батарей.
- Версия прошивки.
- Сообщения об ошибках.
- Имена файлов.
- Дополнительные принадлежности.
- Использование функции «Простая панорама» (съемка и просмотр).
- Технические примечания и алфавитный указатель.
- Уход за изделием.
- Фотокамера.
- Батареи.
- Карты памяти.
- Чистка и хранение.
- Чистка.
- Хранение.
- Поиск и устранение неисправностей.
- Технические характеристики.
- Рекомендованные карты памяти.
- Алфавитный указатель.
- Уход за изделием.
Скачать: disk.yandex.ru | mega.co.nz
![]()
DIGITAL CAMERA
User’s Manual
For advanced use of the camera, read the Reference Manual (in pdf format) which is available in many languages including Hindi, Bengali, Tamil, Marathi and Telugu.
See the reverse side for information to download the file.

Introduction
Parts of the Camera
The Basics of Shooting and Playback
Shooting Features
Playback Features
Recording and Playing Back Movies General Camera Setup Connecting the Camera to a TV, Computer, or Printer
Technical Notes and Index
i
Introduction
Introduction
Read This First
Thank you for purchasing the Nikon COOLPIX L830 digital camera. Before using the camera, please read the information in “For Your Safety” (Aviii-xi) and familiarize yourself with the information provided in this manual. After reading, please keep this manual handy and refer to it to enhance your enjoyment of your new camera.
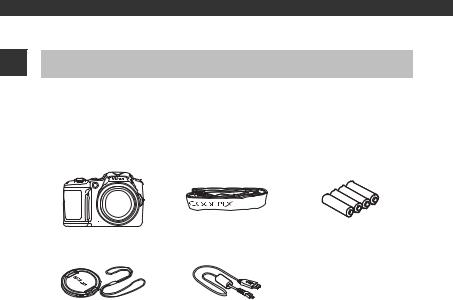
Confirming the Package Contents
In the event that any items are missing, please contact the store where you purchased the camera.
|
COOLPIX L830 |
Camera Strap |
LR6/L40 (AA-size) |
|
Digital Camera |
alkaline batteries (×4)1 |
|
Lens Cap LC-CP28 |
USB Cable UC-E16 |
||
|
(with cord) |
|||
|
Audio Video Cable |
Battery Charger MH-73 |
Four EN-MH2 rechargeable |
|
|
EG-CP162 |
(with power cable)2 |
Ni-MH batteries2 |
|
|
• |
User’s Manual (this manual) |
• Warranty |
|
|
1 |
The included batteries are for trial use only. |
2This item is supplied only if the camera was purchased in India, and is described in this manual as being “optional,” “available separately,” etc.
iiNOTE: A memory card is not included with the camera.

About This Manual
If you want to start using the camera right away, see “The Basics of Shooting and Playback” (A12).
To learn about the parts of the camera and information that is displayed in the monitor, see “Parts of the Camera” (A1).
Downloading the “Reference Manual”
Refer to the Reference Manual (PDF format) for more detailed information. The Reference Manual can be downloaded from the Nikon website. http://nikonimglib.com/manual/
The Reference Manual can be viewed using Adobe Reader, available for free download from the Adobe website.
Introduction
iii

Other Information
•Symbols and Conventions
To make it easier to find the information you need, the following symbols and conventions are used in this manual:
|
Icon |
Description |
||
|
Introduction |
B |
This icon indicates cautions and information that should be read before using |
|
|
the camera. |
|||
|
C |
This icon indicates notes and information that should be read before using the |
||
|
camera. |
|||
|
A/E/F |
These icons indicate other pages containing relevant information; |
||
|
E*: “Reference Section”, F: “Technical Notes and Index.” |
* Refer to the Reference Manual for pages indicated with E.
•SD, SDHC, and SDXC memory cards are referred to as “memory cards” in this manual.
•The setting at the time of purchase is referred to as the “default setting.”
•The names of menu items displayed in the camera monitor, and the names of buttons or messages displayed on a computer monitor appear in bold.
•In this manual, images are sometimes omitted from monitor display samples so that monitor indicators can be more clearly shown.
•Illustrations and monitor content shown in this manual may differ from the actual product.
iv

Information and Precautions
Life-Long Learning
As part of Nikon’s “Life-Long Learning” commitment to ongoing product support and education, continually updated information is available online at the following sites:
•For users in the U.S.A.: http://www.nikonusa.com/
•For users in Europe and Africa: http://www.europe-nikon.com/support/
•For users in Asia, Oceania, and the Middle East: http://www.nikon-asia.com/
Visit these sites to keep up-to-date with the latest product information, tips, answers to frequently asked questions (FAQs), and general advice on digital imaging and photography. Additional information may be available from the Nikon representative in your area. Visit the site below for contact information:
http://imaging.nikon.com/
Use Only Nikon Brand Electronic Accessories
Nikon COOLPIX cameras are designed to the highest standards and include complex electronic circuitry. Only Nikon brand electronic accessories (including battery chargers, batteries, and AC adapters) certified by Nikon specifically for use with this Nikon digital camera are engineered and proven to operate within the operational and safety requirements of this electronic circuitry.
THE USE OF NON-NIKON ELECTRONIC ACCESSORIES COULD DAMAGE THE CAMERA AND MAY VOID YOUR NIKON WARRANTY.
For more information about Nikon brand accessories, contact a local authorized Nikon dealer.
Before Taking Important Pictures
Before taking pictures on important occasions (such as at weddings or before taking the camera on a trip), take a test shot to ensure that the camera is functioning normally. Nikon will not be held liable for damages or lost profits that may result from product malfunction.
Introduction
v
About the Manuals
|
• |
No part of the manuals included with this product may be reproduced, transmitted, transcribed, |
||
|
stored in a retrieval system, or translated into any language in any form, by any means, without |
|||
|
Nikon’s prior written permission. |
|||
|
• |
Nikon reserves the right to change the specifications of the hardware and software described in |
||
|
Introduction |
these manuals at any time and without prior notice. |
||
|
• |
Nikon will not be held liable for any damages resulting from the use of this product. |
||
|
• |
While every effort was made to ensure that the information in these manuals is accurate and |
||
|
complete, we would appreciate it were you to bring any errors or omissions to the attention of the |
|||
|
Nikon representative in your area (address provided separately). |
Notice Concerning Prohibition of Copying or Reproduction
Note that simply being in possession of material that was digitally copied or reproduced by means of a scanner, digital camera or other device may be punishable by law.
• Items prohibited by law from being copied or reproduced
Do not copy or reproduce paper money, coins, securities, government bonds or local government bonds, even if such copies or reproductions are stamped “Sample.” The copying or reproduction of paper money, coins, or securities which are circulated in a foreign country is prohibited. Unless the prior permission of the government was obtained, the copying or reproduction of unused postage stamps or post cards issued by the government is prohibited.
The copying or reproduction of stamps issued by the government and of certified documents stipulated by law is prohibited.
• Cautions on certain copies and reproductions
The government has issued cautions on copies or reproductions of securities issued by private companies (shares, bills, checks, gift certificates, etc.), commuter passes, or coupon tickets, except when a minimum of necessary copies are to be provided for business use by a company. Also, do not copy or reproduce passports issued by the government, licenses issued by public agencies and private groups, ID cards and tickets, such as passes and meal coupons.
• Comply with copyright notices
The copying or reproduction of copyrighted creative works such as books, music, paintings, woodcut prints, maps, drawings, movies, and photographs is governed by national and international copyright laws. Do not use this product for the purpose of making illegal copies or to infringe copyright laws.
vi

Disposing of Data Storage Devices
Please note that deleting images or formatting data storage devices such as memory cards or built-in camera memory does not completely erase the original image data. Deleted files can sometimes be recovered from discarded storage devices using commercially available software, potentially resulting in the malicious use of personal image data. Ensuring the privacy of such data is the user’s responsibility.
Before discarding a data storage device or transferring ownership to another person, erase all data using commercial deletion software, or format the device and then completely refill it with images
containing no private information (for example, pictures of empty sky). Be sure to also replace any pictures selected for the Select an image option in the Welcome screen setting (A72). Care
should be taken to avoid injury or damage to property when physically destroying data storage devices.
Introduction
vii
Introduction
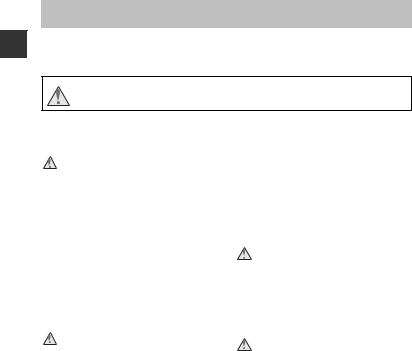
For Your Safety
To prevent damage to your Nikon product or injury to yourself or to others, read the following safety precautions in their entirety before using this equipment. Keep these safety instructions where all those who use the product will read them.
This icon marks warnings, information that should be read before using this Nikon product, to prevent possible injury.
WARNINGS
Turn off in the event of malfunction
Should you notice smoke or an unusual smell coming from the camera or AC adapter, unplug the AC adapter and remove the batteries immediately, taking care to avoid burns. Continued operation could result in injury. After removing or disconnecting the power source, take the equipment to a Nikon-authorized service representative for inspection.
Do not disassemble
Touching the internal parts of the camera or AC adapter could result in injury. Repairs should be performed only by qualified technicians. Should
the camera or AC adapter break open as the result of a fall or other accident, take the product to a Nikon-authorized service representative for inspection, after unplugging the product and/or removing the batteries.
Do not use the camera or AC adapter in the presence of flammable gas
Do not use electronic equipment in the presence of flammable gas, as this could result in explosion or fire.
Handle the camera strap with care
Never place the strap around the neck of an infant or child.
viii
![]()
Keep out of reach of children
Particular care should be taken to prevent infants from putting the batteries or other small parts into their mouths.
Do not remain in contact with the camera, battery charger, or AC adapter for extended periods while the devices are on or in use
Parts of the devices become hot. Leaving the devices in direct contact with the skin for extended periods may result in low-temperature burns.
Do not leave the product where it will be exposed to extremely high temperatures, such as in an enclosed automobile or in direct sunlight
Failure to observe this precaution could cause damage or fire.
Observe caution when handling batteries
Batteries may leak or explode if improperly handled. Observe the following precautions when handling batteries for use in this product:
•Before replacing the batteries, turn the product off. If you are using an AC adapter, be sure it is unplugged.
•Use only the batteries approved for use in this product (A13). Do not combine old and new batteries or batteries of different makes or types.
•When charging Nikon EN-MH2 rechargeable Ni-MH batteries, use only the specified charger and charge the batteries four at a time. When replacing the batteries with EN-MH2-B2 batteries (available separately), purchase two sets (total of four batteries).
•The EN-MH2 rechargeable batteries are for use with Nikon digital cameras only, and are compatible with COOLPIX L830.
•Insert batteries in the correct orientation.
•Do not short or disassemble batteries or attempt to remove or break battery insulation or casing.
•Do not expose batteries to flame or to excessive heat.
•Do not immerse in or expose to water.
•Do not transport or store with metal objects such as necklaces or hairpins.
Introduction
ix

Introduction
•Batteries are prone to leakage when fully discharged. To avoid damage to the product, be sure to remove the batteries when no charge remains.
•Discontinue use immediately should you notice any change in the batteries, such as discoloration or deformation.
•If liquid from damaged batteries comes in contact with clothing or skin, rinse immediately with plenty of water.
Observe the following precautions when handling the Battery Chargers (available separately)
•Keep dry. Failure to observe this precaution could result in fire or electric shock.
•Dust on or near the metal parts of the plug should be removed with a dry cloth. Continued use could result in fire.
•Do not handle the power cable or go near the battery charger during lightning storms. Failure to observe this precaution could result in electric shock.
•Do not damage, modify, forcibly tug or bend the power cable, place it under heavy objects, or expose it to heat or flame. Should the insulation be damaged and the wires become exposed, take it to a Nikonauthorized service representative for inspection. Failure to observe these precautions could result in fire or electric shock.
•Do not handle the plug or battery charger with wet hands. Failure to observe this precaution could result in electric shock.
•Do not use with travel converters or adapters designed to convert from one voltage to another or with DC- to-AC inverters. Failure to observe this precaution could damage the product or result in overheating or fire.
Use appropriate cables
When connecting cables to the input and output jacks, use only the cables provided or sold by Nikon for the purpose, to maintain compliance with product regulations.
x

Handle moving parts with care
Be careful that your fingers or other objects are not pinched by the lens cover or other moving parts.
Observe caution when using the flash
Using the flash close to your subject’s eyes could cause temporary visual impairment. The flash should be no less than 1 m (3 ft 4 in.) from the subject. Particular care should be observed when photographing infants.
Do not operate the flash with the flash window touching a person or object
Failure to observe this precaution could result in burns or fire.
Avoid contact with liquid crystal
Should the monitor break, care should be taken to avoid injury caused by broken glass and to prevent liquid crystal from the monitor touching the skin or entering the eyes or mouth.
Turn the power off when using inside an airplane or the hospital
Turn the power off while inside the airplane during take off or landing. Do not use wireless network functions while in the air.
Follow the instructions of the hospital when using while in a hospital.
The electromagnetic waves emitted by this camera may disrupt the electronic systems of the airplane or the instruments of the hospital. If you are using an Eye-Fi card, remove it from the camera before boarding an aircraft or entering a hospital.
Introduction
xi

Introduction
Notices
Notice for Customers in the U.S.A.
Federal Communications
Commission (FCC) Radio Frequency Interference Statement
This equipment has been tested and found to comply with the limits for a Class B digital device, pursuant to Part 15 of the FCC rules. These limits are designed to provide reasonable protection against harmful interference in a residential installation. This equipment generates, uses, and can radiate radio frequency energy and, if not installed and used in accordance with the instructions, may cause harmful interference to radio communications. However, there is no guarantee that interference will not occur in a particular installation. If this equipment does cause harmful interference to radio or television reception, which can be determined by turning the equipment off and on, the user is encouraged to try to correct the interference by one or more of the following measures:
•Reorient or relocate the receiving antenna.
•Increase the separation between the equipment and receiver.
•Connect the equipment into an outlet on a circuit different from that to which the receiver is connected.
•Consult the dealer or an experienced radio/television technician for help.
CAUTIONS
Modifications
The FCC requires the user to be notified that any changes or modifications made to this device that are not expressly approved by Nikon Corporation may void the user’s authority to operate the equipment.
xii

Interface Cables
Use the interface cables sold or provided by Nikon for your equipment. Using other interface cables may exceed the limits of Class B Part 15 of the FCC rules.
Notice for customers in the State of California
WARNING
Handling the cord on this product will expose you to lead, a chemical known to the State of California to cause birth defects or other reproductive harm.
Wash hands after handling.
Nikon Inc.,
1300 Walt Whitman Road Melville, New York 11747-3064 USA
Tel: 631-547-4200
Notice for customers in Canada
CAN ICES-3 B / NMB-3 B
Notice for Customers in Europe
This symbol indicates that electrical and electronic equipment is to be collected separately.
The following apply only to users in European countries:
•This product is designated for separate collection at an appropriate collection point. Do not dispose of as household waste.
•Separate collection and recycling helps conserve natural resources and prevent negative consequences for human health and the environment that might result from incorrect disposal.
•For more information, contact the retailer or the local authorities in charge of waste management.
Introduction
xiii

Introduction
This symbol on the batteries indicates that the batteries
are to be collected separately.
The following apply only to users in European countries:
•All batteries, whether marked with this symbol or not, are designated for separate collection at an appropriate collection point. Do not dispose of as household waste.
•For more information, contact the retailer or the local authorities in charge of waste management.
xiv

|
Table of Contents |
|
|
Introduction …………………………………………… |
ii |
|
Read This First ………………………………………………. |
ii |
|
Confirming the Package Contents…………….. |
ii |
|
About This Manual………………………………………….. |
iii |
|
Information and Precautions……………………….. |
v |
|
For Your Safety …………………………………………. |
viii |
|
WARNINGS ………………………………………………………. |
viii |
|
Notices…………………………………………………………. |
xii |
|
Parts of the Camera ………………………………. |
1 |
|
The Camera Body…………………………………………. |
1 |
|
Changing the Angle of the Monitor………….. |
3 |
|
Attaching the Camera Strap and Lens Cap … |
4 |
|
Raising and Lowering the Flash………………….. |
5 |
|
Using Menus (the dButton)………………….. |
6 |
|
The Monitor ………………………………………………….. |
8 |
|
Shooting Mode …………………………………………………. |
8 |
|
Playback Mode ……………………………………………….. |
10 |
The Basics of Shooting and Playback… 12
|
Preparation 1 Insert the Batteries …………… |
12 |
|
Applicable Batteries………………………………………. |
13 |
|
Preparation 2 Insert a Memory Card………. |
14 |
|
Internal Memory and Memory Cards……… |
15 |
|
Preparation 3 Setting the Display Language, |
|
|
Date, and Time…………………………………………… |
16 |
|
Step 1 Turn the Camera On……………………… |
20 |
|
Step 2 Select a Shooting Mode……………….. |
22 |
|
Available Shooting Modes………………………….. |
23 |
|
Step 3 Frame a Picture ……………………………… |
24 |
|
Using the Zoom ……………………………………………… |
25 |
|
Step 4 Focus and Shoot……………………………. |
26 |
|
The Shutter-release Button ………………………… |
27 |
|
Step 5 Play Back Images …………………………… |
28 |
|
Step 6 Delete Images………………………………… |
29 |
Introduction
Refer to the Reference Manual for pages indicated with E.
xv

Introduction
|
Shooting Features……………………………….. |
31 |
|
G(Easy Auto) Mode ……………………………….. |
31 |
|
Scene Mode (Shooting Suited to Scenes) … |
32 |
|
Tips and Notes ………………………………………………… |
33 |
|
Special Effects Mode |
|
|
(Applying Effects When Shooting) …………. |
38 |
|
Smart Portrait Mode |
|
|
(Capturing Images of Smiling Faces)……… |
40 |
|
A(Auto) Mode ………………………………………… |
42 |
|
Functions That Can Be Set Using the Multi |
|
|
Selector……………………………………………………….. |
43 |
|
Using the Flash ……………………………………………….. |
44 |
|
Using the Self-timer………………………………………. |
47 |
|
Using Macro Mode………………………………………… |
49 |
|
Adjusting Brightness |
|
|
(Exposure Compensation)………………………….. |
50 |
|
Default Settings………………………………………………. |
51 |
|
Functions That Can Be Set with the |
|
|
dButton (Shooting Menu) …………………. |
53 |
|
Options Available in the Shooting Menu … |
54 |
|
Functions That Cannot Be Used |
|
|
Simultaneously………………………………………….. |
55 |
|
Focusing……………………………………………………… |
57 |
|
Using Face Detection …………………………………… |
57 |
|
Using Skin Softening…………………………………….. |
58 |
|
Using Target Finding AF ……………………………… |
59 |
|
Subjects Not Suitable for Autofocus………. |
60 |
|
Focus Lock………………………………………………………… |
61 |
|
Playback Features ……………………………….. |
62 |
|
Playback Zoom ………………………………………….. |
62 |
|
Thumbnail Playback, Calendar Display….. |
63 |
|
Functions That Can Be Set with the |
|
|
dButton (Playback Menu) ………………….. |
64 |
|
Recording and Playing Back Movies … |
65 |
|
Recording Movies ……………………………………… |
65 |
|
Functions That Can Be Set with the |
|
|
dButton (Movie Menu)…………………………. |
69 |
|
Playing Back Movies………………………………….. |
70 |
|
General Camera Setup ……………………….. |
72 |
|
Functions That Can Be Set with the |
|
|
dButton (Setup Menu) ……………………….. |
72 |
|
Connecting the Camera to a TV, |
|
|
Computer, or Printer…………………………… |
74 |
|
Connection Methods………………………………… |
74 |
|
Using ViewNX 2 …………………………………………. |
76 |
|
Installing ViewNX 2………………………………………… |
76 |
|
Transferring Images to the Computer……. |
77 |
|
Viewing Images ………………………………………………. |
79 |
|
xvi |
Refer to the Reference Manual for pages indicated with E. |

|
Reference Section …………………………… |
E1 |
|
Using Easy Panorama |
|
|
(Shooting and Playback) ……………………… |
E2 |
|
Shooting with Easy Panorama…………….. |
E2 |
|
Viewing Images Captured with Easy |
|
|
Panorama…………………………………………………….. |
E5 |
|
Viewing and Deleting Images Captured |
|
|
Continuously (Sequence)…………………….. |
E6 |
|
Viewing Images in a Sequence …………… |
E6 |
|
Deleting Images in a Sequence ………….. |
E7 |
|
Editing Still Images……………………………….. |
E8 |
|
Before Editing Images …………………………….. |
E8 |
|
Quick Retouch: |
|
|
Enhancing Contrast and Saturation ….. |
E9 |
|
D-Lighting: |
|
|
Enhancing Brightness and Contrast….. |
E9 |
|
Red-eye Correction: Correcting Red Eyes |
|
|
Caused by Using the Flash…………………. |
E10 |
|
Skin Softening: Softening Skin Tones… |
E11 |
|
Filter Effects: |
|
|
Applying Digital Filter Effects ……………. |
E12 |
|
Small Picture: |
|
|
Reducing the Size of an Image…………. |
E14 |
|
Crop: Creating a Cropped Copy ………. |
E15 |
|
Connecting the Camera to a TV |
|
|
(Viewing Images on a TV)…………………… |
E16 |
|
Connecting the Camera to a Printer |
|
|
(Direct Print)…………………………………………. |
E18 |
|
Connecting the Camera to a Printer… |
E19 |
|
Printing Individual Images………………….. |
E20 |
|
Printing Multiple Images …………………….. |
E22 |
|
Editing Movies …………………………………….. |
E25 |
|
Extracting Only the Desired Portions of a |
|
|
Movie ………………………………………………………….. |
E25 |
|
Saving a Frame from a Movie as a Still |
|
|
Image………………………………………………………….. |
E26 |
|
The Shooting Menu |
|
|
(for A(Auto) Mode)………………………….. |
E27 |
|
Image Mode Settings |
|
|
(Image Size and Quality) ……………………… |
E27 |
|
White Balance (Adjusting Hue)…………. |
E29 |
|
Continuous Shooting …………………………… |
E32 |
|
ISO Sensitivity…………………………………………… |
E34 |
|
Color Options…………………………………………… |
E35 |
|
AF Area Mode………………………………………….. |
E36 |
|
The Smart Portrait Menu……………………. |
E40 |
|
Skin Softening………………………………………….. |
E40 |
|
Smile Timer……………………………………………….. |
E40 |
|
Blink Proof …………………………………………………. |
E41 |
|
The Playback Menu …………………………….. |
E42 |
|
Print Order |
|
|
(Creating a DPOF Print Order) …………… |
E42 |
|
Slide Show ………………………………………………… |
E45 |
|
Protect………………………………………………………… |
E46 |
|
Rotate Image……………………………………………. |
E48 |
|
Copy (Copy Between Internal Memory |
|
|
and Memory Card)…………………………………. |
E49 |
|
Sequence Display Options …………………. |
E51 |
|
Choose Key Picture ……………………………….. |
E51 |
Introduction
Refer to the Reference Manual for pages indicated with E.
xvii

Introduction
|
The Movie Menu …………………………………. |
E52 |
|
Movie Options…………………………………………. |
E52 |
|
AF Area Mode………………………………………….. |
E55 |
|
Autofocus Mode…………………………………….. |
E55 |
|
Movie VR……………………………………………………. |
E56 |
|
Wind Noise Reduction …………………………. |
E56 |
|
The Setup Menu ………………………………….. |
E57 |
|
Welcome Screen…………………………………….. |
E57 |
|
Time Zone and Date …………………………….. |
E58 |
|
Monitor Settings…………………………………….. |
E60 |
|
Print Date |
|
|
(Imprinting Date and Time)……………….. |
E62 |
|
Photo VR ……………………………………………………. |
E63 |
|
Motion Detection…………………………………… |
E64 |
|
AF Assist …………………………………………………….. |
E65 |
|
Sound Settings ……………………………………….. |
E65 |
|
Auto Off……………………………………………………… |
E66 |
|
Format Memory/Format Card…………… |
E67 |
|
Language ………………………………………………….. |
E68 |
|
TV Settings………………………………………………… |
E68 |
|
Blink Warning…………………………………………… |
E69 |
|
Eye-Fi Upload…………………………………………… |
E70 |
|
Reset All……………………………………………………… |
E71 |
|
Battery Type……………………………………………… |
E72 |
|
Firmware Version……………………………………. |
E72 |
|
Error Messages…………………………………….. |
E73 |
|
File Names ……………………………………………. |
E77 |
|
Optional Accessories ………………………….. |
E78 |
|
Technical Notes and Index ……………… |
F1 |
|
Caring for the Product……………………………. |
F2 |
|
The Camera…………………………………………………… |
F2 |
|
Batteries………………………………………………………….. |
F3 |
|
Memory Cards ……………………………………………… |
F5 |
|
Cleaning and Storage…………………………….. |
F6 |
|
Cleaning …………………………………………………………. |
F6 |
|
Storage……………………………………………………………. |
F6 |
|
Troubleshooting …………………………………….. |
F7 |
|
Specifications ……………………………………….. |
F14 |
|
Approved Memory Cards……………………… |
F18 |
|
Index………………………………………………………. |
F21 |
|
xviii |
Refer to the Reference Manual for pages indicated with E. |

Parts of the Camera
The Camera Body
|
1 |
2 3 4 |
5 6 |
7 |
3 |
8 |
|
Camera the of Parts
9
10
|
………………………………………………..Zoom control |
25 |
||
|
f : wide-angle……………………………………….. |
25 |
||
|
1 |
g : telephoto………………………………………….. |
25 |
|
|
h : thumbnail playback……………………… |
63 |
||
|
i : playback zoom……………………………….. |
62 |
||
|
j : help …………………………………………………….. |
32 |
||
|
2 |
Shutter-release button……………………………… |
26 |
|
|
3 |
Eyelet for camera strap ……………………………….. |
4 |
|
|
4 |
Power switch/power-on lamp………………. |
20 |
|
|
5 |
Self-timer lamp…………………………………………….. |
47 |
|
|
AF-assist illuminator |
72 |
||
|
6 |
Speaker……………………………………………………………. |
70 |
|
7 |
Microphone (stereo) ………………………………….. |
65 |
|
8 |
Flash …………………………………………………………….. |
5, 44 |
|
9 |
USB/audio/video output connector……. |
74 |
|
10 |
HDMI micro connector (Type D) …………… |
74 |
|
11 |
Connector cover………………………………………….. |
74 |
|
12 |
m(flash pop-up) button………………………. |
5, 44 |
|
13 |
Side zoom control………………………………………. |
25 |
|
14 |
Lens |
1
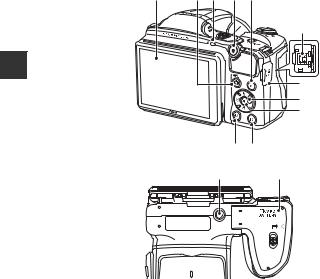
Camera the of Parts
|
1 |
2 |
3 |
4 |
5 |
6
7
8
9
11 10
13 12
2
|
1 |
Monitor ……………………………………………………………… |
8 |
|
|
2 |
A(shooting mode) button |
||
|
…………………………………………………31, 32, 38, 40, 42 |
|||
|
3 |
Flash lamp……………………………………………………… |
46 |
|
|
4 |
b(emovie-record) button………………… |
65 |
|
|
5 |
c(playback) button………………………………… |
28 |
|
|
6 |
DC input connector (for AC adapter available |
||
|
separately from Nikon) |
E78 |
||
7DC input connector cover
|
8 |
Multi selector…………………………………………………… |
6 |
|
|
9 |
k(apply selection) button |
………………………..6 |
|
|
10 |
l(delete) button……………………………………….. |
29 |
|
|
11 |
d(menu) button …………. |
6, 53, 64, 69, 72 |
|
|
12 |
Battery-chamber/ |
||
|
memory card slot cover…………………….. |
12, 14 |
||
|
13 |
Tripod socket………………………………………….. |
F17 |
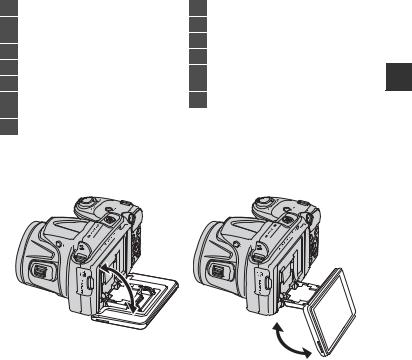
Changing the Angle of the Monitor
The angle of the monitor can be lowered down to approx. 85° or raised upward to approx. 90°. This is convenient when taking images with the camera held at high or low positions.
B Notes About Monitor
Camera the of Parts
|
• |
Do not apply excessive force when changing the angle of the monitor. |
|
|
• |
The monitor cannot be moved to the left or right. |
|
|
• |
Put the monitor back in the original position when using in normal situations. |
3 |
Attaching the Camera Strap and Lens Cap
Attach the lens cap to the camera strap, and then attach the strap to the camera.
Camera the of Parts
Attach them at two places.
B Lens Cap
When the camera is not in use, protect the lens by attaching the lens cap.
4

Raising and Lowering the Flash
Press the m(flash pop-up) button to raise the flash.
•See “Using the Flash” (A44) for more information about flash settings.
•Push the flash down gently to lower the flash until it clicks into place when not in use.
Camera the of Parts
5
Camera the of Parts
Using Menus (the dButton)
Use the multi selector and kbutton to navigate the menus.
|
1 Press the dbutton. |
2 Press the multi selector J. |
|
• The menu is displayed. |
• The current menu icon is displayed in |
|
yellow. |
|
|
Shooting menu |
|
|
Image mode |
|
|
White balance |
|
|
Continuous |
|
|
ISO sensitivity |
|
|
Color options |
|
|
AF area mode |
|
|
Menu icons |
|
|
3 Select the desired menu icon. |
4 Press the kbutton. |
|
• The menu is changed. |
• The menu options become selectable. |
Set up
Welcome screen Time zone and date Monitor settings Print date
Photo VR
Motion detection
AF assist
|
Welcome screen |
|
Time zone and date |
|
Monitor settings |
|
Print date |
|
Photo VR |
|
Motion detection |
|
AF assist |
6
|
5 Select a menu option. |
6 Press the kbutton. |
• The settings for the option you selected are displayed.
|
Photo VR |
|
|
Welcome screen |
|
|
Time zone and date |
|
|
Monitor settings |
On (hybrid) |
|
Print date |
On |
|
Photo VR |
Off |
|
Motion detection |
|
|
AF assist |
|
|
7 Select a setting. |
8 Press the kbutton. |
• The setting you selected is applied.
• When you are finished using the menu, press the dbutton.
|
Photo VR |
|
On (hybrid) |
|
On |
|
Off |
C Notes About Setting Menu Options
•Certain menu options cannot be set depending on the current shooting mode or the state of the camera. Unavailable options are displayed in gray and cannot be selected.
•When a menu is displayed, you can switch to shooting mode by pressing the shutter-release button, A(shooting mode) button, or b(emovie-record) button.
Camera the of Parts
7
Camera the of Parts
The Monitor
The information that is displayed in the monitor during shooting and playback changes depending on the camera’s settings and state of use.
By default, information is displayed when the camera is first turned on and when you operate the camera, and turns off after a few seconds (when Photo info is set to Auto info in
Monitor settings (A72)).
Shooting Mode
|
38 |
6 |
|||||||||||||||||||||||||||||||||
|
36 |
37 |
2 |
||||||||||||||||||||||||||||||||
|
2 |
10 |
|||||||||||||||||||||||||||||||||
|
7 |
||||||||||||||||||||||||||||||||||
|
35 |
HDR |
1 |
3 |
4 |
5 |
|||||||||||||||||||||||||||||
|
34 |
||||||||||||||||||||||||||||||||||
|
AF |
8 |
|||||||||||||||||||||||||||||||||
|
32 |
33 |
|||||||||||||||||||||||||||||||||
|
H |
L |
10 |
9 |
|||||||||||||||||||||||||||||||
|
120 |
60 |
|||||||||||||||||||||||||||||||||
|
10 |
||||||||||||||||||||||||||||||||||
|
31 |
11 |
|||||||||||||||||||||||||||||||||
|
30 PRE |
29 |
12 |
||||||||||||||||||||||||||||||||
|
28 |
+1.0 |
13 |
||||||||||||||||||||||||||||||||
|
27 |
29 m 0s |
14 |
||||||||||||||||||||||||||||||||
|
26 |
25 |
1/250 |
F3.0 |
9 9 9 |
||||||||||||||||||||||||||||||
|
24 |
23 |
22 |
21 |
16 |
15 |
|||||||||||||||||||||||||||||
|
999 |
||||||||||||||||||||||||||||||||||
|
20 |
9999 |
|||||||||||||||||||||||||||||||||
|
19 |
18 |
17 |
8

|
1 |
……………………………………..Shooting mode |
22, 23 |
20 |
……Focus area (subject tracking) |
54, E39 |
|||
|
2 |
Flash mode……………………………………………………. |
44 |
21 |
Aperture value ……………………………………………… |
27 |
|||
|
3 |
Macro mode …………………………………………………. |
49 |
22 |
Shutter speed……………………………………………….. |
27 |
|||
|
4 |
Zoom indicator…………………………………….. |
25, 49 |
23 |
Travel destination icon ……………………………… |
72 |
|||
|
5 |
Focus indicator |
26 |
24 |
ISO sensitivity |
54 |
|||
|
6 |
Movie options (normal speed movies)… 69 |
25 |
Battery level indicator ……………………………….. |
20 |
||||
|
7 |
……………………..Movie options (HS movies) |
69 |
26 |
………………………“Date not set” indicator |
16, 72 |
Parts |
||
|
8 |
Image mode …………………………………… |
54, E27 |
27 |
Print date………………………………………………………… |
72 |
|||
|
9 |
Easy panorama |
36 |
28 |
Eye-Fi communication indicator |
73 |
of |
||
|
the |
||||||||
|
10 |
Vibration reduction icon |
69, 72 |
29 |
Skin softening |
54 |
|||
|
Camera |
||||||||
|
12 |
Wind noise reduction ……………………………….. |
69 |
31 |
Color options………………………………………………… |
54 |
|||
|
11 |
Motion detection icon ……………………………… |
72 |
30 |
White balance mode …………………………………. |
54 |
|||
|
13 |
Exposure compensation value ……………… |
50 |
32 |
Continuous shooting mode ……………. |
37, 54 |
|||
|
14 |
Movie recording time remaining …………. |
65 |
33 |
Blink proof icon ……………………………………………. |
54 |
|||
|
15 |
Number of exposures remaining |
20 |
34 |
Hand-held/tripod…………………………………. |
33, 34 |
|||
|
(still images)………………………………………………….. |
35 |
Backlighting (HDR) |
35 |
|||||
|
16 |
Internal memory indicator |
20 |
||||||
|
36 |
Self-timer indicator |
47 |
||||||
|
17 |
Focus area (for manual or center) |
54, 61 |
||||||
|
37 |
Smile timer |
54 |
||||||
|
18 |
Focus area (target finding AF) |
54, 59 |
||||||
|
38 |
Pet portrait auto release |
37 |
||||||
|
Focus area (face detection, |
||||||||
|
19 |
||||||||
|
pet detection)…………………… |
26, 37, 40, 54, 57 |
9

Camera the of Parts
Playback Mode
|
1 2 3 |
4 56 7 8 |
9 |
10 |
||||||||||||||||||||||||
|
a |
|||||||||||||||||||||||||||
|
9 9 9 / 9 9 9 |
999/999 |
||||||||||||||||||||||||||
|
9999/9999 |
b |
||||||||||||||||||||||||||
|
29m 0s |
|||||||||||||||||||||||||||
|
29m 0s |
|||||||||||||||||||||||||||
|
22 |
11 |
||||||||||||||||||||||||||
|
21 |
9999 . JPG |
||||||||||||||||||||||||||
|
12 |
|||||||||||||||||||||||||||
|
15/05/201 4 12:00 |
|||||||||||||||||||||||||||
|
20 |
13 |
||||||||||||||||||||||||||
|
19 |
18 |
17 |
16 |
15 |
14 |
||||||||||||||||||||||
10
![]()
|
1 |
Protect icon…………………………………….. |
64, E46 |
|
|
2 |
Sequence display (when Individual |
||
|
pictures is selected) |
64, E51 |
||
|
3 |
Print order icon ……………………………… |
64, E42 |
|
|
4 |
Skin softening icon………………………. |
64, E11 |
|
|
5 |
Filter effects icon…………………………… |
64, E12 |
|
|
6 |
D-Lighting icon………………………………… |
64, E9 |
|
|
7 |
Quick retouch icon…………………………. |
64, E9 |
|
|
8 |
Red-eye correction icon…………….. |
64, E10 |
|
|
9 |
Internal memory indicator………………………. |
15 |
(a)Current image number/ 10 total number of images
(b)Movie length
|
11 Volume indicator ………………………………………… |
70 |
|
12 |
Image mode…………………………………… |
54, E27 |
|
13 |
Movie options ……………………………….. |
69, E52 |
|
14 |
Easy panorama ………………………………… |
36, E2 |
|
15 |
Crop icon…………………………………………. |
62, E15 |
|
16 |
Small picture icon………………………… |
64, E14 |
|
Easy panorama playback guide … |
36, E5 |
|
|
17 |
Sequence playback guide…………… |
64, E6 |
|
Movie playback guide……………………………….. |
70 |
|
|
18 |
Time of recording ……………………………………….. |
16 |
|
19 |
Date of recording………………………………………… |
16 |
|
20 |
Battery level indicator ……………………………….. |
20 |
|
21 |
File number and type………………………… |
E77 |
|
22 |
Eye-Fi communication indicator |
|
|
…………………………………………………………….. |
73, E70 |
Camera the of Parts
11

Playback and Shooting of Basics The
The Basics of Shooting and Playback
Preparation 1 Insert the Batteries
1Open the battery-chamber/memory card slot cover.
•Hold the camera upside down to prevent the batteries from falling out.
2Insert the batteries.
•Confirm that the positive (+) and negative (–) terminals are oriented correctly and insert the batteries.
3Close the battery-chamber/memory card slot cover.
•Slide the cover while securely holding down the area marked 2.
 1
1
2 3
3
12

Applicable Batteries
•Four LR6/L40 (AA-size) alkaline batteries (included batteries)
•Four FR6/L91 (AA-size) lithium batteries
•Four EN-MH2 rechargeable Ni-MH (nickel metal hydride) batteries (included batteries) * EN-MH1 rechargeable Ni-MH batteries cannot be used.
B Removing the Batteries
•Turn the camera off and make sure that the power-on lamp and the monitor have turned off, and then open the battery-chamber/memory card slot cover.
•The camera, batteries, and memory card may be hot immediately after using the camera.
B Notes About the Batteries
•Do not combine old and new batteries or batteries of different makes or types.
•Batteries with the following defects cannot be used:
|
Batteries with peeling |
Batteries with insulation that |
Batteries with a flat |
||||||||||||||||||||||||||||
|
does not cover the area around |
negative terminal |
|||||||||||||||||||||||||||||
|
the negative terminal |
B Battery Type
By setting Battery type in the setup menu (A72) to match the type of batteries inserted in the camera, the batteries can perform more efficiently.
The default setting is the type of batteries included with purchase.
B Notes About EN-MH2 Rechargeable Batteries
When using EN-MH2 batteries with the camera, charge four batteries at a time using Battery Charger MH-73 (E78, F4).
C Alkaline Batteries
Playback and Shooting of Basics The
Performance of alkaline batteries may vary greatly depending on the manufacturer. Choose a
reliable brand.
13

Playback and Shooting of Basics The
Preparation 2 Insert a Memory Card
|
1 Turn off the camera and open the battery- |
3 |
|
|
chamber/memory card slot cover. |
||
• Hold the camera upside down to prevent the batteries from falling out.
 2
2

 1
1
2 Insert the memory card.
• Slide the memory card in until it clicks into place.
Memory card slot
B Be Careful to Insert the Memory Card in Correct Direction
Inserting the memory card upside down or backwards could damage the camera and the memory card.
3Close the battery-chamber/memory card slot cover.
•Slide the cover while securely holding down the area marked 2.
14
 1
1
2 3
3

B Formatting Memory Cards
The first time you insert a memory card that has been used in another device into this camera, make
sure to format it with this camera. Insert the card into the camera, press the dbutton, and select Format card in the setup menu.
Removing Memory Cards
|
Turn the camera off and make sure that the power-on lamp and the |
|
|
monitor have turned off, and then open the battery-chamber/ |
|
|
memory card slot cover. |
1 2 |
|
Gently push the memory card into the camera (1) to partially eject |
|
|
the card (2). |
B High Temperature Caution
The camera, batteries, and memory card may be hot immediately after using the camera.
Internal Memory and Memory Cards
Camera data, including images and movies, can be saved either in the camera’s internal memory or on a memory card. To use the camera’s internal memory, first remove the memory card.
Playback and Shooting of Basics The
15

Playback and Shooting of Basics The
Preparation 3 Setting the Display Language, Date, and Time
When the camera is turned on for the first time, the language-selection screen and the date and time setting screen for the camera clock are displayed.
•If you exit without setting the date and time, Owill flash when the shooting screen is displayed.
1 Press the power switch to turn on the camera.
|
2 |
Use the multi selector HIto select |
Language |
|
the desired language and press the |
||
|
kbutton. |
||
|
Cancel |
||
|
3 |
Select Yes and press the kbutton. |
Choose time zone and set date and time?
Yes
No
 Cancel
16

4Select your home time zone and press the kbutton.
•To enable daylight saving time, press H. When the daylight saving time function is enabled, Wis displayed above the map.
To turn off the daylight saving time function, press I.
London, Casablanca
 Back
Back
5Select the date format and press the kbutton.
Date format

 Year/Month/Day


 Month/Day/Year

 Day/Month/Year
6Set the date and time, and press the kbutton.
•Select a field: Press JK(changes between D, M, Y, h, and m).
•Edit the date and time: Press HI.
•Confirm the setting: Select m and press the kbutton.
Date and time
|
D |
M |
Y |
h |
m |
||||
|
01 |
01 |
2014 |
00 |
00 |
 Edit
Edit
7 Select Yes and press the kbutton.
15/05/2014 15:30
OK?
Yes
No
Playback and Shooting of Basics The
17

Playback and Shooting of Basics The
8 Make sure that the lens cap has been removed and press the Abutton.
|
• |
The shooting-mode selection screen is displayed. |
Press this button in |
|
|
shooting mode for |
|||
|
shooting-mode |
|||
|
selection menu. |
|||
|
9 When Easy auto mode is displayed, press the |
|||
|
Easy auto mode |
|||
|
kbutton. |
|||
• The camera enters the shooting mode and you can take images in Easy auto mode (A22).
• To switch to another shooting mode, press HIbefore pressing the kbutton.
18

C Changing the Language Setting and the Date and Time Setting
•You can change these settings using the Language and Time zone and date settings in the zsetup menu (A72).
•You can enable or disable daylight saving time in the zsetup menu by selecting Time zone and date followed by Time zone. Press the multi selector Kand then Hto enable daylight saving time and move the clock forward one hour, or Ito disable daylight saving time and move the clock back one hour.
C The Clock Battery
•The camera’s clock is powered by a built-in backup battery. The backup battery charges when the main batteries are inserted into the camera or when the camera is connected to an optional AC adapter, and it can run the clock for several days after about ten hours of charging.
•If the camera’s backup battery becomes exhausted, the date and time setting screen is displayed when the camera is turned on. Set the date and time again. See step 3 (A16) of “Preparation 3 Setting the Display Language, Date, and Time” for more information.
C Imprinting the Shooting Date on Printed Images
•You can permanently imprint the shooting date on images as they are captured by setting Print date in the setup menu (A72).
•If you want the shooting date to be printed without using the Print date setting, print using the ViewNX 2 software (A76).
Playback and Shooting of Basics The
19
 Loading…

Данное руководство не может быть воспроизведено в любой форме
целиком или частично (за исключением краткого цитирования в
статьях или обзорах) без письменного разрешения компании NIKON.
Отпечатано в России
CT3L01(1D)
6MN3411D-01
ЦИФРОВАЯ ФОТОКАМЕРА
Подробное руководство пользователя