
Устранение неисправностей и ремонт
Ваш продукт не работает должным образом? Найдите решение здесь.
Выберите продукт
Дополнительная информация
-
Руководство пользователя PDF
файл,
1.8 MB
18 апреля 2022 г. -
Руководство пользователя PDF
файл,
1.8 MB
18 апреля 2022 г. -
Руководство пользователя PDF
файл,
1.8 MB
18 апреля 2022 г. -
Руководство пользователя PDF
файл,
1.8 MB
18 апреля 2022 г. -
Руководство пользователя PDF
файл,
1.8 MB
18 апреля 2022 г. -
Руководство пользователя PDF
файл,
1.8 MB
18 апреля 2022 г. -
Руководство пользователя PDF
файл,
1.8 MB
18 апреля 2022 г. -
Руководство пользователя PDF
файл,
1.8 MB
18 апреля 2022 г. -
Руководство пользователя PDF
файл,
1.8 MB
18 апреля 2022 г. -
Руководство пользователя PDF
файл,
1.8 MB
18 апреля 2022 г. -
Руководство пользователя PDF
файл,
1.8 MB
18 апреля 2022 г. -
Руководство пользователя PDF
файл,
1.8 MB
18 апреля 2022 г. -
Руководство пользователя PDF
файл,
1.8 MB
18 апреля 2022 г. -
Руководство пользователя PDF
файл,
1.8 MB
18 апреля 2022 г. -
Руководство пользователя PDF
файл,
1.8 MB
18 апреля 2022 г. -
Руководство пользователя PDF
файл,
6.6 MB
18 апреля 2022 г. -
Руководство пользователя PDF
файл,
6.6 MB
18 апреля 2022 г. -
Руководство пользователя PDF
файл,
6.6 MB
18 апреля 2022 г. -
Руководство пользователя PDF
файл,
6.6 MB
18 апреля 2022 г. -
Руководство пользователя PDF
файл,
6.6 MB
18 апреля 2022 г. -
Руководство пользователя PDF
файл,
6.6 MB
18 апреля 2022 г. -
Руководство пользователя PDF
файл,
6.6 MB
18 апреля 2022 г. -
Руководство пользователя PDF
файл,
6.6 MB
18 апреля 2022 г. -
Руководство пользователя PDF
файл,
6.6 MB
18 апреля 2022 г. -
Руководство пользователя PDF
файл,
6.6 MB
18 апреля 2022 г. -
Руководство пользователя PDF
файл,
7.2 MB
18 апреля 2022 г. -
Руководство пользователя PDF
файл,
7.2 MB
18 апреля 2022 г. -
Руководство пользователя PDF
файл,
7.2 MB
18 апреля 2022 г. -
Руководство пользователя PDF
файл,
7.2 MB
18 апреля 2022 г. -
Руководство пользователя PDF
файл,
7.2 MB
18 апреля 2022 г. -
Локализованная торговая брошюра PDF
файл,
351.9 kB
29 июля 2023 г.
Зарегистрируйте продукт и получите
- Электронную гарантию
- Информацию о скидках и акциях
- Простой доступ к поддержке продуктов
Обращение в компанию Philips
Мы всегда рады помочь вам
Предлагаемые продукты
Comfort
HD6115, HD6112, HD6111

2
3

4

ENGLISH 6
POLSKI 14
ROMÂNĂ 23
РУССКИЙ 31
ČESKY 41
MAGYAR 49
SLOVENSKY 57
УКРАЇНСЬКА 65
HRVATSKI 73
EESTI 81
LATVISKI 89
LIETUVIŠKAI 97
SLOVENŠČINA 105
БЪЛГАРСКИ 113
SRPSKI 123
HD6115, HD6112, HD6111

ENGLISH6
Introduction
Dear customer, congratulations on acquiring your new Philips Comfort Plus fryer.Your new fryer
allows you to fry all kinds of food safely and easily.
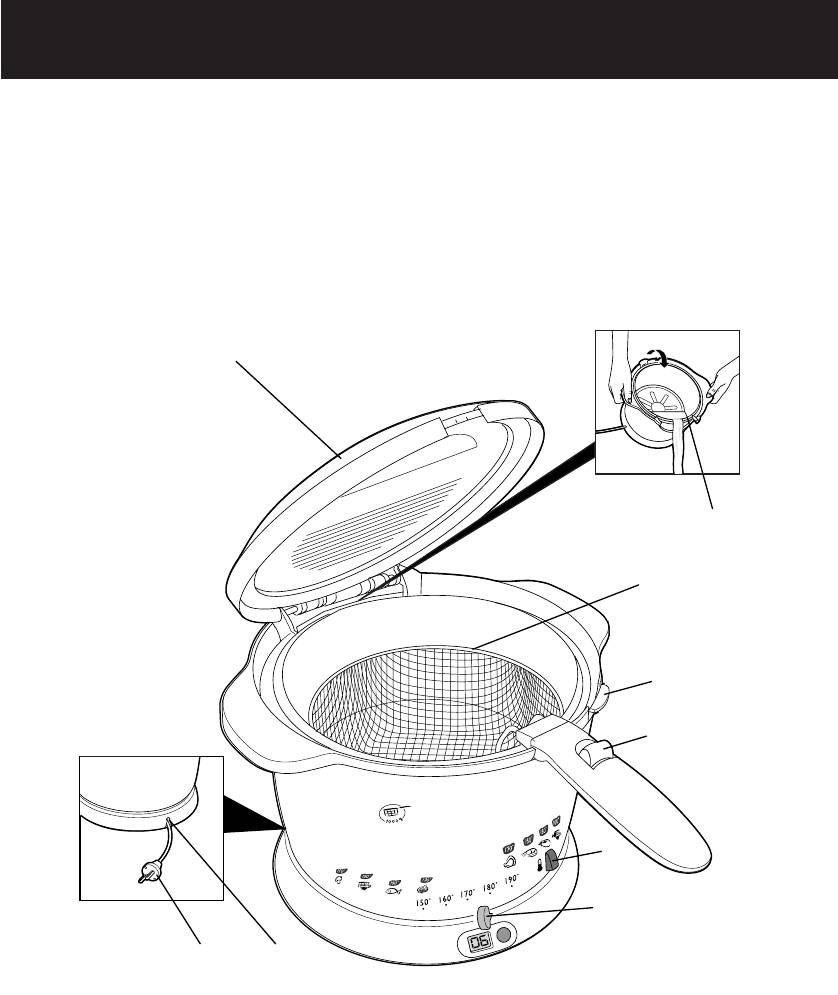
General description
A Lid
B Frying basket
C Temperature control
D Temperature light
E Lid release lever
F Handle release slide
G Cord
H Cord storage compartment
I Timer (HD6115 only)
J Pour-out system
Important
Read these instructions for use carefully before using the appliance and save them for future
reference.
◗ Check if the voltage indicated on the appliance corresponds to the local mains voltage before
you connect the appliance.
◗ Only connect the appliance to an earthed wall socket.
◗ If the mains cord is damaged, it must be replaced by Philips, a service centre authorised by
Philips or similarly qualified persons in order to avoid a hazard.
◗ Always return the appliance to a service centre authorised by Philips for examination or
repair. Do not attempt to repair the appliance yourself, otherwise your guarantee will
become invalid.
◗ Clean the separate parts of the fryer thoroughly before using the appliance for the first time
(see chapter ‘Cleaning’). Make sure all parts are completely dry before you fill the fryer with
oil or liquid fat.
◗ Never immerse the housing, which contains electrical components and the heating element,
in water nor rinse it under the tap.
◗ Always unplug the appliance after use. Do not move the fryer until it has cooled down
sufficiently.
◗ Do not switch the appliance on before you have filled it with oil or fat. Make sure the fryer is
always filled to a level between the two indication marks on the inside of the inner bowl.
◗ During frying, hot steam is released through the filter. Keep your hands and face at a safe
distance from the steam.You should also be careful of the hot steam when you open the lid.
◗ Keep the appliance out of the reach of children. Do not let the mains cord hang over the
edge of the table or worktop on which the appliance is standing.
◗ This appliance is intended for household use only. If the appliance is used improperly or for
(semi-)professional purposes or if it is used in a way that is not in accordance with the
instructions for use, the guarantee will become invalid and Philips will not accept liability for
any damage caused.
◗ Fry food golden-yellow instead of dark or brown and remove burnt remnants! Do not fry
starchy foods, especially potato and cereal products, at a temperature above 175cC (to
minimise the production of acrylamide).

ENGLISH 7
Safety cut-out
This appliance is equipped with a safety cut-out that switches the appliance off if it overheats.This
may happen if there is not enough oil or fat in the fryer or if blocks of solid fat are being melted in
the fryer, which will prevent the heating element from being able to give off its heat.
◗ If the fryer doesn’t work anymore, let the oil or fat cool down and turn to your Philips
dealer or a service centre authorised by Philips.
Preparing for use
1 Place the appliance on a horizontal, even and stable surface out of the reach of children.
If you wish to place the fryer on top of the cooker, make sure the rings of the cooker have been
turned off and are cold.
2 Fill the dry fryer with oil, liquid fat or melted solid fat up to the MAX indication on the inside
of the inner bowl (see section ‘Oil and fat’ for instructions on how to use solid fat) (fig. 1).
Oil/liquid fat
Solid fat
Min.
1.8 l
1500 g
Max.
2 l
1700 g
Oil and fat
Never mix different types of oil or fat!
We advise you to use frying oil or liquid frying fat, preferably vegetable oil or fat that is rich in
unsaturated fats (e.g. linoleic acid).
It is possible to use solid frying fat, but in that case extra precautions are necessary to prevent the
fat from spattering and the heating element from overheating or becoming damaged.
1 If you want to use new blocks of fat, melt them slowly over a low heat in a normal pan.
2 Pour the melted fat carefully into the fryer.
3 Store the fryer with the resolidified fat still in it at room temperature.
4 If the fat gets very cold, it may start spattering when melted. Punch some holes into the
resolidified fat with a fork to prevent this (fig. 2).
Be careful not to damage the inner bowl with the fork.
Using the appliance
Frying
Be careful: hot steam will escape from the filter in the lid during frying.
1 Take the entire cord from the cord storage compartment and put the plug in the wall socket
(fig. 3).
Make sure the mains cord does not come into contact with hot parts of the appliance.
2 Set the temperature control to the required temperature (160-190cC) (fig. 4).
The temperature light goes on.
— For information about which temperature to select, check the package of the food to be fried
or the table at the end of these instructions for use.
— The oil or fat will be heated to the selected temperature in 10 to 15 minutes.

ENGLISH8
— When the temperature light stays out for some time, the oil or fat has reached the preset
temperature.
B
You can leave the basket in the fryer while the oil or fat is heating up.
3 Fold out the handle of the basket (fig. 5).
4 Open the lid by pulling the release lever.The lid will open automatically (fig. 6).
5 Remove the basket from the fryer and put the food to be fried in the basket (fig. 7).
◗ For the best frying results, we advise you not to exceed the maximum quantities mentioned
below.
Home-made French fries
Frozen French fries
Max. quantity
1000 g
800 g
Recommended quantity for best
600 g
450 g
result
6 Put the basket in the fryer (fig. 8).
7 Close the lid.
8 HD6115 only — Set the required frying time (see section ‘Timer’ in this chapter).
You can also use the fryer without setting the timer.
9 Move the release slide of the basket handle towards you and carefully fold the handle against
the fryer (fig. 9).
B
For a good end result, stick to the preparation time indicated on the package of the food to be fried
or the preparation time mentioned in the table at the end of these instructions for use.
B
For a uniform golden frying result, lift the basket out of the oil or fat a few times during frying and
gently shake the contents.
Timer (HD6115 only)
The timer indicates the end of the frying time, but does NOT switch the fryer off.
Setting the timer
1 Press the timer button to set the frying time in minutes.
The set time will become visible on the display.
2 Keep the button pressed to put the minutes forward quickly. Release the button once the
required frying time has been reached.
— The maximum time that can be set is 99 minutes.
— A few seconds after you have set the frying time, the timer will start counting down.
— While the timer is counting down, the remaining frying time blinks on the display.The last minute
is displayed in seconds.
3 If the preset time is not correct, you can erase it by pressing the timer button for 2 seconds
at the moment the timer starts counting down (i.e. when the time starts to blink). Keep the
button pressed until ’00’ appears on the display.You can now set the correct frying time.
4 When the preset time has elapsed you will hear an audible signal.After 10 seconds the
audible signal will be repeated.You can stop the audible signal by pressing the timer button.
ENGLISH 9
After frying
1 Fold out the handle of the basket (fig. 5).
2 Open the lid by pulling the lid release lever (fig. 6).
Beware of the hot steam and possible spattering of the oil.
3 Carefully remove the basket from the fryer.
◗ If necessary, shake the basket over the fryer to remove excess oil or fat. Put the fried food in
a bowl or colander containing grease-absorbing paper, e.g. kitchen paper.
4 Unplug the appliance after use.
Do not move the fryer until the oil or fat has cooled down sufficiently, which takes
approximately 30 minutes.
B
If you do not use the fryer regularly, we advise you to remove the oil or liquid fat and to store it in
well-closed containers, preferably in the refrigerator or in a cool place. Fill the containers by pouring
the oil or fat through a fine sieve to remove food particles. Remove the frying basket before emptying
the inner bowl.
B
If the fryer contains solid fat, let the fat solidify in the fryer and store the fryer with the fat still in it
(see chapter ‘Preparing for use’, section ‘Oil and fat’).
Cleaning
Wait until the oil or fat has cooled down sufficiently.
Do not use any abrasive (liquid) cleaning agents or materials (e.g scouring pads) to clean the
appliance.
1 Pull the lid release lever to open the lid.
2 Then lift the lid off the appliance.
The pour-out system will become visible.
3 Remove the frying basket from the fryer and pour out the oil or fat (fig. 10).
4 Clean the housing with a moist cloth (with some washing-up liquid) and/or kitchen paper.
5 Clean the inner bowl with hot water and some washing-up liquid.
Do not immerse the complete fryer housing in water.
6 Clean the lid and the frying basket in hot water with some washing-up liquid or in the
dishwasher.
7 Rinse the parts with fresh water and dry them thoroughly.
Cleaning the permanent anti-grease filter
The lid with the permanent anti-grease filter can be cleaned thoroughly in the dishwasher or in hot
water with some washing-up liquid.
Dishwasher-proof parts
— Lid with permanent anti-grease filter
— Basket

ENGLISH10
Changing oil or fat
Because oil and fat lose their favourable properties rather quickly, you should change the oil or fat
regularly.To do so, follow the instructions below.
If you mainly use the fryer to prepare French fries and if you sieve the oil or fat after each use, you
can re-use the oil or fat 10 to 12 times before it needs to be changed. If you use the fryer to
prepare food that is rich in proteins (such as meat or fish), you should change the oil or fat more
often.
◗ Never use the same oil longer than 6 months and always follow the instructions on the
package.
◗ Never add fresh oil or fat to used oil or fat.
◗ Never mix different types of oil or fat.
◗ Always change the oil or fat if it starts foaming when it is heated, if it has a strong smell or
taste or if it turns dark and/or syrupy.
Disposing of used oil or fat
Pour used oil or liquid fat back into its original (resealable) plastic bottle.You can dispose of used fat
by letting it solidify in the fryer (without the basket in it) and subsequently scooping it out of the
fryer by means of a spatula and wrapping it in a newspaper. If applicable, you can put the bottle or
newspaper in the bin for non-compostable waste (not in the compostable waste bin) or dispose of
it in accordance with the regulations in your country.
Storage
1 Put all parts back into/onto the fryer and close the lid.
2 Roll up the cord, put it into the cord storage compartment and insert the plug in the plug
fixing facility.
3 Lift the fryer by its handles.
Frying tips
For an overview of preparation times and frying temperatures, see the table at the end of these
instructions for use.
Home-made French fries
You will make the tastiest and crispiest French fries in the following way:
1 Use firm potatoes and cut them into sticks. Rinse the sticks with cold water.
This will prevent them from sticking to each other during frying.
B
Dry the sticks thoroughly.
2 Fry the French fries twice: the first time for 4-6 minutes at a temperature of 160cC, the
second time for 5-8 minutes at a temperature of 175cC.
3 Put the home-made French fries in a bowl and shake them. Let the fries cool down before
frying them for the second time.

ENGLISH 11
Frozen food
Frozen fries have already been precooked, so you will only have to fry them once in accordance
with the instructions on the package.Food from the freezer (-16 to -18cC) will cause the oil or fat
to cool down considerably when the food is immersed in it. Because the food does not sear right
away, it may also absorb too much oil or fat.
Take the following measures to prevent this:
— Preferably allow frozen food to defrost at room temperature before frying.
— Carefully shake off as much ice and water as possible and dab the food to be fried until it is
properly dry.
— Do not fry very large quantities at one time (consult the table with preparation times and frying
temperatures).
— Select the frying temperature indicated in the table in these instructions for use or on the
package of the food to be fried. If there are no instructions, select a temperature of 175cC.
— Lower the food into the oil or fat very gently, since frozen food may cause the hot oil or fat to
start bubbling violently.
Getting rid of unwanted flavours
Certain types of food, particularly fish, can give the oil or fat an unpleasant flavour.To neutralise the
taste of the oil or fat:
1 Heat the oil or fat to a temperature of 160cC.
2 Put two thin slices of bread or a few sprigs of parsley in the oil.
3 Wait until no more bubbles appear and then scoop the bread or the parsley out of the fryer
with a spatula.
The oil or fat will now have a neutral taste again.
Environment
◗ Do not throw the appliance away with the normal household waste at the end of its life, but
hand it in at an official collection point for recycling. By doing this you will help to preserve
the environment (fig. 11).
Remove the battery of the timer (HD6115 only) before you discard the appliance.
1 Use a small flat-blade screwdriver to remove the timer panel.
2 Remove the battery. Do not throw the battery away with the normal household waste, but
hand it in at an official collection point.
Guarantee & service
If you need information or if you have a problem, please visit the Philips website at www.philips.com
or contact the Philips Customer Care Centre in your country (you will find its phone number in the
worldwide guarantee leaflet). If there is no Customer Care Centre in your country, turn to your
local Philips dealer or contact the Service Department of Philips Domestic Appliances and Personal
Care BV.

ENGLISH12
Troubleshooting
Problem
Possible cause
Solution
The fried food does
The selected temperature is too
Check on the package of the food or in the table in
not have a golden
low and/or the food has not
these instructions for use whether the temperature
brown colour and/or
been fried long enough.
and/or preparation time you have selected is/are
is not crispy.
correct. Set the temperature control to the correct
temperature.
There is too much food in the
Never fry more food at one time than the quantity
basket.
mentioned in the table.
The oil or fat does not become
The fuse of the temperature control may have blown,
hot enough.
causing the safety cut-out to switch the appliance off.
Turn to your Philips dealer or a service centre
authorised by Philips to have the fuse replaced.
The fryer gives off a
The permanent anti-grease filter
Remove the lid and clean the lid and filter in hot water
strong unpleasant
is saturated.
with some washing-up liquid or in the dishwasher.
smell.
The oil or fat is no longer fresh.
Change the oil or fat. Regularly sieve the oil or fat to
keep it fresh longer.
The type of oil or fat used is not
Use frying oil or liquid frying fat of good quality. Never
suitable for deep-frying food.
mix different types of oil or fat.
Steam escapes from
The lid has not been closed
Check whether the lid has been closed properly.
other places than
properly.
the filter.
The permanent anti-grease filter
Remove the lid and clean the lid and filter in hot water
is saturated.
with some washing-up liquid or in the dishwasher.
Oil or fat spills over
There is too much oil or fat in
Make sure the oil or fat in the fryer does not exceed
the edge of the fryer
the fryer.
the maximum level.
during frying.
The food contains too much
Dry the food thoroughly before you start frying it and
moisture.
fry the food in accordance with these instructions for
use.
There is too much food in the
Do not fry more food at one time than the quantity
frying basket.
mentioned in the table.
The oil or fat foams
The food contains too much
Dry the food thoroughly before frying it.
strongly during
moisture.
frying.
The type of oil or fat used is
Use frying oil or liquid frying fat of good quality. Never
unsuitable for deep-frying food.
mix different types of oil or fat.
The inner bowl has not been
Clean the inner bowl as described in these instructions
cleaned properly.
for use.
Страницы и текст этой инструкции
 Инструкция фритюрницы Philips HD 6103_70
 Информация отображена на картинке
 Информация отображена на картинке
 Информация отображена на картинке
 Информация отображена на картинке
Как использовать наш сайт инструкций OnlineManuals.ru
Наша цель состоит в том, чтобы предоставить вам быстрый доступ к содержанию инструкции для фритюрницы Philips HD 6103_70.
С помощью онлайн просмотра, Вы можете быстро просмотреть содержимое инструкции и найти решение проблемы с фритюрницы Philips HD 6103_70.
Для Вашего удобства
Если листать руководство пользователя фритюрницы Philips HD 6103_70 прямо на сайте, не очень удобно для Вас, есть два возможных решения:
• Просмотр в полноэкранном режиме — легко просмотреть руководство пользователя (без загрузки его на свой компьютер), Вы можете использовать режим полноэкранного просмотра.
Для просмотра инструкции пользователя фритюрницы Philips HD 6103_70 на полном экране, используйте кнопку «Открыть в Pdf-viewer».
• Загрузка на компьютер — Вы можете также скачать Инструкция фритюрницы Philips HD 6103_70 на свой компьютер и сохранить его в файлах.
Многие люди предпочитают читать документы не на экране, а в печатной версии.
Возможность печати руководства пользователя также была предусмотрена на нашем сайте,
и вы можете использовать ее, нажав на иконку «печать» в Pdf-viewer.
Нет необходимости печатать все руководство фритюрницы Philips HD 6103_70, можно выбрать только нужные страницы инструкции.
На этой странице Вы найдете инструкции к:
- Philips HD 6103/70
- Philips HD6161/00
- Philips HD 9220/40
Скачайте бесплатно и без регистрации инструкции по эксплуатации для категории товаров «Фритюрницы Philips». На нашем сайте собраны мануалы хорошего качества из проверенных источников. Ознакомившись с инструкцией, Вы сможете безошибочно использовать все функции заложенные в «Фритюрница»
Philips HD 6103/70 инструкция

Описание инструкции:
- Тип устройства: Фритюрница
- Модель: Philips HD 6103/70
- Инструкция на русском языке
- Формат файла: pdf
- Количество скачиваний: 48896
Philips HD6161/00 инструкция

Описание инструкции:
- Тип устройства: Фритюрница
- Модель: Philips HD6161/00
- Инструкция на русском языке
- Формат файла: pdf
- Количество скачиваний: 17401
Philips HD 9220/40 инструкция

Описание инструкции:
- Тип устройства: Фритюрница
- Модель: Philips HD 9220/40
- Инструкция на русском языке
- Формат файла: pdf
- Количество скачиваний: 12132

![]() Инструкция пользователя фритюрница Philips HD 4268 и Philips HD 4269
Инструкция пользователя фритюрница Philips HD 4268 и Philips HD 4269
Мануал на русском языке по эксплуатации фритюрница Philips HD 4268 и Philips HD 4269.
В представленной в инструкции на русском языке таблице перечислены блюда, которые можно приготовить с помощью фритюрницы, и указано, какие при этом нужны температура и длительность приготовления. В таблице также указаны максимальные количества продуктов на одну закладку. Вы можете несколько отступать от этих рекомендаций в зависимости от количества приготавливаемой вами пищи и вашего вкуса.
Для Philips HD 4269 установите на кастрюлю фритюрницы крышку. Для выбора правильной температуры и правильного времени обжаривания продуктов пользуйтесь таблицей. После окончания обжаривания продуктов снимите крышку и снова закрепите на обжарочной корзине ручной захват. Извлеките корзину из масла/жира и зацепите ее за край фритюрницы, чтобы дать стечь маслу/жиру с зажаренных продуктов. Теперь масло/жир во фритюрнице имеет возможность достигнуть заданной температуры (приблизительно 3-5 минут). Переложите зажаренные продукты в дуршлаг или сетчатый ковш, выложенный впитывающей жир бумагой (например, кухонная бумага). Профильтруйте масло/жир (если это нужно) после охлаждения. См. параграф “Рекомендации”. Фритюрница должна храниться с надетой на нее крышкой. Это предотвратит попадание пыли и других посторонних предметов в кастрюлю фритюрницы.
Описание PHILIPS HD 4268/69. Перед началом эксплуатации прибора изучите данное руководство, пользуясь при этом иллюстрациями. Перед включением прибора, убедитесь, что напряжение, указанное на его основании, соответствует напряжению электросети у вас дома. Никогда не погружайте фритюрницу в воду.
Перед использованием фритюрницы протрите ее детали влажной тряпкой. Перед заполнением фритюрницы маслом или жиром проверьте, что она является совершенно сухой. Не включайте фритюрницу до того, как вы заполните ее маслом или жиром.
При расплавлении жира сначала установите температуру 160 градусов и не устанавливайте более высокую температуру до тех пор, пока жир полностью не расплавится. Расплавьте кусочки жира на дне фритюрницы, а не в жарочной корзине.
Используйте только те сорта масла и жира, которые рекомендованы для использования во фритюрнице. Эта информация указана на упаковке таких масел и жиров. Фритюрница должна заполняться маслом или жиром до уровня между метками MIN (МИНИМУМ) и MAX (МАКСИМУМ). Перед началом обжаривания обязательно проверьте, что во фритюрнице имеется достаточное количество масла/жира.
Закладка продуктов во фритюрницу не должна превышать указанное в таблице значение. Никогда не заполняйте корзину более чем на 3/4 ее высоты. Если корзина переполнена, то горячий жир/масло может перелиться через край фритюрницы. Типы HD 4269: Во время процесса обжаривания струя горячего пара выходит через фильтр в крышке фритюрницы. Будьте осторожны, чтобы не ошпарить ваши руки и лицо. Фритюрница должна располагаться в недоступном для детей месте, особенно, когда она включена.
Шнур питания не должен свешиваться с края стола или раковины. Если фритюрница используется за пределами дома, она должна обязательно подключаться к заземленной розетке сети питания. После окончания работы выньте вилку шнура питания из розетки электросети и дайте маслу или жиру остынуть. Не передвигайте фритюрницу до тех пор, пока она полностью не остынет. Сохраните это руководство в качестве справочного материала.
Перед первым применением промойте жарочную корзину в горячей мыльной воде. Налейте немного горячей мыльной воды в фритюрницу и тщательно промойте внутреннюю часть фритюрницы. Обильно ополосните внутреннюю часть фритюрницы чистой водой (можно, например, использовать для этого чашку). Полностью высушите фритюрницу.
Обжаривание во фритюрнице. Внимание — только для типа HD 4268. При обжаривании продуктов должен быть обеспечен выход пара из фритюрницы. Поэтому при выполнении обжаривания продуктов не устанавливайте на фритюрницу крышку без задерживающего запахи фильтра. Эта крышка должна использоваться только в перечисленных ниже ситуациях. При погружении заполненной жарочной корзины в горячее масло/жир для защиты от брызг. После использования в качестве пылезащитной крышки. Заполните сухую фритюрницу маслом или жиром до метки МАХ (МАКСИМУМ) (2 литра масла или 1800 г жира). Никогда не смешивайте два разных сорта масла и/или жира.
Тип Philips HD 4269. Установите на фритюрницу крышку (с задерживающим запах фильтром). Установите ручку регулятора температуры в нужное положение. Вставьте вилку шнура питания в розетку электросети. При этом загорается сигнальный индикатор. Нагрейте фритюрницу с маслом/жиром в течение 15-20 минут. Во время нагревания сигнальный индикатор будет гореть. Когда масло/жир нагреется до заданной температуры, контрольная лампа погаснет. Во время обжаривания сигнальный индикатор будет время от времени загораться, это означает, что масло/жир снова подогревается до заданной температуры. Закрепите ручной захват на жарочной корзине и заполните корзину продуктами вне кастрюли фритюрницы. Для получения наилучших результатов загружайте только рекомендованное количество продуктов. Осторожно опустите заполненную корзину в масло/жир. Для предотвращения разбрызгивания масла/жира используйте крышку. Отсоедините ручной захват от жарочной корзины.
***
The table provided in the instructions in Russian lists the dishes that can be prepared using a deep fryer, and indicates what temperature and cooking time are needed. The table also shows the maximum number of products per tab. You can deviate from these recommendations somewhat depending on the amount of food you prepare and your taste.
For Philips HD 4269, place the lid on the fryer pan. Use the table to select the correct temperature and the correct time for frying products. After the end of frying the products, remove the lid and reattach the manual grip on the roasting basket. Remove the basket from the oil/fat and hook it on the edge of the fryer to allow the oil/fat to drain from the fried foods. Now the oil / fat in the fryer has the ability to reach the set temperature (approximately 3-5 minutes). Transfer the fried foods to a colander or mesh ladle lined with fat-absorbing paper (for example, kitchen paper). Filter the oil/fat (if necessary) after cooling. See the section «Recommendations». The fryer should be stored with a lid on it. This will prevent dust and other foreign objects from entering the fryer pan.
Description of PHILIPS HD 4268/69. Before using the device, read this manual, using the illustrations. Before turning on the device, make sure that the voltage indicated on its basis corresponds to the voltage of the power grid at your home. Never immerse the fryer in water.
Before using the fryer, wipe its parts with a damp cloth. Before filling the fryer with oil or fat, check that it is completely dry. Do not turn on the fryer before you fill it with oil or fat.
When melting fat, first set the temperature to 160 degrees and do not set a higher temperature until the fat has completely melted. Melt the pieces of fat at the bottom of the fryer, not in the frying basket.
Use only those types of oil and fat that are recommended for use in the fryer. This information is indicated on the packaging of such oils and fats. The fryer must be filled with oil or fat to the level between the MIN (MINIMUM) and MAX (MAXIMUM) marks. Before starting frying, be sure to check that there is a sufficient amount of oil / fat in the fryer.
The tab of products in the fryer should not exceed the value specified in the table. Never fill the basket more than 3/4 of its height. If the basket is full, then hot fat/oil may spill over the edge of the fryer. HD 4269 Types: During the frying process, a jet of hot steam escapes through a filter in the fryer lid. Be careful not to scald your hands and face. The fryer should be located out of the reach of children, especially when it is turned on.
The power cord should not hang over the edge of the table or sink. If the fryer is used outside the house, it must be connected to a grounded power outlet. After finishing work, unplug the power cord from the power outlet and let the oil or grease cool down. Do not move the fryer until it has completely cooled down. Keep this manual as a reference.
Before the first use, rinse the frying basket in hot soapy water. Pour some hot soapy water into the fryer and thoroughly rinse the inside of the fryer. Rinse the inside of the fryer abundantly with clean water (you can, for example, use a cup for this). Dry the fryer completely.
Deep-frying. Attention — only for HD 4268 type. When frying products, the steam output from the fryer must be ensured. Therefore, when frying products, do not install a lid on the fryer without a filter that detains odors. This cover should only be used in the situations listed below. When the filled frying basket is immersed in hot oil/grease to protect against splashes. After being used as a dust cover. Fill the dry fryer with oil or fat to the MAX mark (MAXIMUM) (2 liters of oil or 1800 g of fat). Never mix two different types of oil and/or fat.
Philips HD 4269 type. Install the lid on the fryer (with an odor-retarding filter). Set the temperature control knob to the desired position. Plug the power cord into an electrical outlet. At the same time, the signal indicator lights up. Heat the fryer with oil/fat for 15-20 minutes. During heating, the signal indicator will light up. When the oil/fat is heated to the set temperature, the indicator lamp will go out. During frying, the signal indicator will light up from time to time, which means that the oil /fat is heated again to the set temperature. Fasten the hand grip on the frying basket and fill the basket with products outside the fryer pan. For best results, download only the recommended number of products. Carefully lower the filled basket into the oil/grease. To prevent oil/grease splashing, use a lid. Disconnect the hand grip from the frying basket.
Philips HD 4268 и Philips HD 4269 File-Size: 30 кб
Просмотр
Доступно к просмотру 118 страниц. Рекомендуем вам скачать файл инструкции, поскольку онлайн просмотр документа может сильно отличаться от оригинала.
-
EnglisH  6
Български  13
Cestina  21
eesti  28
Hrvatski  35
Magyar  42
?аза?ша  49
Lietuviskai  57
Latviesu  64
PoLski  71
roMana  78
русский  85
sLovensky  93
sLovensCina  100
srPski  107
українська  114
HD6163
-
6   EnglisH
introduction
Congratulations on your purchase and welcome to Philips! To fully benefit from the support that
Philips offers, register your product at www.philips.com/welcome.
general description (Fig. 1)
a  Lid with handgrip
B  Viewing window
C  Frying basket
D  Heating element
E  MIN and MAX indications
F  Removable inner bowl
g  Housing
H  Permanent filter
i  Detachable control panel
1  Power-on light
2  Temperature light
3  On/off switch
4  Temperature control
J  Safety switch
k  Reset button
l  Cord storage compartment
M  Carrying handles
important
Read this user manual carefully before you use the appliance and save it for future reference.
Danger
-  Never immerse the control panel with the heating element attached to it in water nor rinse it
under the tap.
Warning
-  Check if the voltage indicated on the appliance corresponds to the local mains voltage before
you connect the appliance.
-  Do not use the appliance if the plug, the mains cord or the appliance itself is damaged.
-  If the mains cord is damaged, you must have it replaced by Philips, a service centre authorised by
Philips or similarly qualified persons in order to avoid a hazard.
-  This appliance is not intended for use by persons (including children) with reduced physical,
sensory or mental capabilities, or lack of experience and knowledge, unless they have been given
supervision or instruction concerning use of the appliance by a person responsible for their safety.
-  Children should be supervised to ensure that they do not play with the appliance.
-  Keep the mains cord out of the reach of children. Do not let the mains cord hang over the edge
of the table or worktop on which the appliance stands.
-  Only connect the appliance to an earthed wall socket.
-  During frying, hot steam is released through the filter. Keep your hands and face at a safe
distance from the steam. Also be careful of hot steam when you remove the lid.
Caution
-  Always return the appliance to a service centre authorised by Philips for examination or repair.
Do not attempt to repair the appliance yourself, otherwise the guarantee becomes invalid.
-  Place the appliance on a horizontal, even and stable surface.
-  Do not touch the viewing window, as it becomes hot during frying.
-
EnglisH     7
-  This appliance is intended for household use only. If the appliance is used improperly or for
professional or semi-professional purposes or if it is not used according to the instructions in the
user manual, the guarantee becomes invalid and Philips refuses any liability for damage caused.
-  Fry food golden-yellow instead of dark or brown and remove burnt remnants. Do not fry
starchy foods, especially potato and cereal products, at a temperature above 175°C (to minimise
the production of acrylamide).
-  Prevent water and/or ice from coming into contact with oil or fat, as this causes heavy spattering
or violent bubbling of the oil or fat. To achieve this, remove all excess ice from frozen ingredients
before you fry them and dry ingredients thoroughly before you fry them. Do not overfill the
basket. After cleaning, dry all parts thoroughly before you put oil or fat in the fryer.
-  Do not fry Asian rice cakes (or similar types of food) in this appliance. This might cause heavy
spattering or violent bubbling of the oil or fat.
-  Make sure the fryer is always filled with oil or fat to a level between the ‘MIN’ and ‘MAX’
indications on the inside of the inner bowl to prevent either overflowing or overheating.
-  Do not switch on the appliance before you have filled it with oil or fat, as this can damage
the appliance.
-  The appliance is not intended to be operated by means of an external timer or a separate
remote control system.
Electromagnetic fields (EMF)
This Philips appliance complies with all standards regarding electromagnetic fields (EMF). If handled
properly and according to the instructions in this user manual, the appliance is safe to use based on
scientific evidence available today.
Before first use
1  Disassemble all removable parts.
2  Clean all parts as described in chapter ‘Cleaning’
3  Reassemble all parts. Make sure the control panel is correctly placed (‘click’) (Fig. 2).
Preparing for use
1  Take the lid off the fryer (Fig. 3).
2  Consult the oil/fat table to determine how much oil or fat you have to put in the
fryer (Fig. 4).
3  Fill the fryer with oil, liquid frying fat or melted solid fat to a level between the MIN and
MAX indications (Fig. 5).
Do not switch on the appliance before you have filled it with oil or fat.
4  Fold out the handle of the frying basket (‘click’) (Fig. 6)
5  Carefully place the basket in the inner bowl (Fig. 7).
6  Put the lid back onto the fryer.
Oil and fat
Never mix different types of oil or fat and never add fresh oil or fat to used oil or fat.
We advise you to use frying oil or liquid frying fat. Preferably use vegetable oil or fat that is rich in
unsaturated fats (e.g. linoleic acid), such as soy oil, peanut oil, maize oil or sunflower oil.
Because oil and fat lose their favourable properties rather quickly, you have to change the oil or fat
regularly (after 10-12 times).
Always change the oil or fat if it starts foaming when it is heated, if it has a strong smell or taste or if
it turns dark and/or syrupy.
- 1
- 2
- 3
- 4
- 118