
-
Страница 1
ZX1200 i /ZX1300 i/ ZX1600 i BARCODE PRINTER USER MANUAL User Manual Version Issue Date P/N : ZX1200i series : Rev. 1.0 : 2013.12.12 : 920-015111-00[…]
-
Страница 2
Contents Contents ZX1200 i /ZX1300 i/ ZX1600 i USER MANUAL CONTENTS 1 Barcode Printer 001 1.1 1.2 Box Content Getting to Know Your Printer 001 002 2 Printer Setup 004 2.1 2.2 2.3 2.4 Loading the label roll Loading & Removing the Ribbon Connecting the Printer to the Host Computer Installing Printer Driver and GoLabel with Super W izard CD 004 00[…]
-
Страница 3
Declaration ZX1200 i /ZX1300 i/ ZX1600 i USER MANUAL FCC COMPLIANCE STATEMENT FOR AMERICAN USERS This equipment has been tested and found to comply with the limits for a CLASS A digital device, pursuant to Part 15 of the FCC Rules. These limits are designed to provide reasonable protection against harmful interference when the equipment is operated[…]
-
Страница 4
Safety instructions SAFETY INSTRUCTIONS Please read the following instructions carefully. 1. Keep the equipment away from humidity. 2. Before you connect the equipment to the power outlet, please check the voltage of the power source. 3. Make sure the printer is off before plugging the power connector into the power jack. 4. It is recommended that […]
-
Страница 5
1 Barcode Printer 1.1 Box Content Please check that all of the following items are included with your printer. ZX1200i / ZX1300i / ZX1600i Barcode Printer CD Including GoLabel software and user’s manual. ZX1200i / ZX1300i / ZX1600i Series Quick Guide ZX1200i / ZX1300i / ZX1600i Series USB Cable Label Stock Ribbon Power Ada[…]
-
Страница 6
2 Front View 1 Barcode Printer 1.2 Getting to Know Your Printer Device Overview Rear View Stylus Pen TOUCH PANEL POWER BUTTON FEED BUTTON LOWER COVER PLATE USB HOST PRINTER COVER VIEWING WINDOW Feed slot for continuous labels Calibration button Ethernet port Serial port (DB-9) Applicator Interface(OPTION) USB port USB Host Parallel port(OPT[…]
-
Страница 7
3 1 Barcode Printer The Internal View of Printer Ribbon rewind hub Ribbon supply hub Print mechanism Platen roller Release lever for print head Paper guide Label tension guide Label supply hub Label roll guide Adjustable Sensor RFID module RFID module Paper guide[…]
-
Страница 8
4 This printer supports the following printing methods: Thermal transfer printing (TTP) : Requires a ribbon for transferring a printed image to a medium. Direct thermal printing (DTP) : Does not require a ribbon, only thermal paper. Please check which printing method you are using and alter the settings accordingly in the printer driver, printe[…]
-
Страница 9
5 Now slide the label roll guide forward and fold it down Place the label roll on the label supply hub , pushing it right up to the printer housing. (Do not apply too much pressure to avoid damaging the label stock.) * When moving the label roll guide, hold it only by the end that is attached to the brack et, not by its top. Note 2 Printer Setup[…]
-
Страница 10
6 Load the label roll into the printer as shown in the illustration. Pass it through the printer as indicated by the red arrows. Pass the label stock through the Adjustable Sensor and up to the tear-off plate. * Remember to set the movable sensor to gap, black mark, or tag hole by changing the position of the sensor with the adjustment wheel. Note […]
-
Страница 11
7 1. The labels pass between the wall of the printer housing and the adjustable paper guide. 1 2. Return the print head release lever to its original position. Then close the printer cover. 2 Printer Setup 1 2[…]
-
Страница 12
8 Place the printer on a flat surface and open the printer cover Place a new ribbon on the ribbon supply hub. The two illustrations as below show you how to install the ribbon depending on the ribbon type (ink side in or out). Ink side out Ink side in 2 Printer Setup 2.2 Loading & Removing the Ribbon Loading Ribbon[…]
-
Страница 13
9 * Do not pass the ribbon under the sensor. Note 2 Printer Setup Pass the ribbon under the print head and back up on the other side. Attach it to the empty ribbon core.[…]
-
Страница 14
10 2 Printer Setup 2.3 Connecting the Printer to the Host Computer 1. Please make sure that the printer is switched off. 2. Connect the power cord to the AC adapter and connect the adapter to the printer. 3. Connect the USB cable to the printer and host computer. 4. Switch on the printer. The operator panel should now light up. ZX1200i / ZX1300i / […]
-
Страница 15
11 * If the Super Wizard program did not run automatically, you can either turn on the “Auto-run” setting for your CD/DVD driver or double-click the icon of CD/DVD driver to run the program. Note 2 Printer Setup 2.4 Installing Printer Driver and GoLabel with Super Wizard CD 1. Insert the Super Wizard CD in the CD/DVD drive of the host computer […]
-
Страница 16
12 2 Printer Setup 4. As the printer driver and GoLabel are installing, a screen will display a progress bar. 5. Once the installation is complete, you can start to make and print labels with GoLabel or through the printer driver. * If you need more resources, tools or reference documents, you can also find them on Super Wizard CD. Just click “Ot[…]
-
Страница 17
13 2 Printer Setup 1. Insert the product CD in the CD/DVD drive of the host computer and open the «Seagull Drivers» folder on the CD. Select the icon for the driver file and click it to start the installation. 2. Follow the instructions on the screen. The Driver Wizard guides you through the installation procedure. Select «Install pr[…]
-
Страница 18
14 2 Printer Setup 4. Specify the port used to connect the printer to the host computer. 6. Once the installation is complete, a summary of the printer settings is displayed. Check whether the printer settings are correct and click «Finish» to start copying the driver files. Wait until copying is complete, then finish the installation. 5.[…]
-
Страница 19
15 2 Printer Setup 7. Once the driver installation is complete, the new printer should appear in the «Printers and Faxes» folder. Godex ZX1200i Godex ZX1200i[…]
-
Страница 20
16 3 Printer Setting and Control 3.1 Operation Panel OPERATION TOUCH PANEL FEED BUTTON POWER BUTTON TOUCH PANEL POWER Button Press the POWER button to turn on the printer, and the START UP SCREEN appears. The printer is on “ready to print” status, the LCD screen should display the message “READY“ on the screen. When printer is turned on, ho[…]
-
Страница 21
17 3 Printer Setting and Control 3.2 LCD Interface Introduction Getting Started Press the POWER button to turn on the printer, and the START UP SCREEN appears. Power on If the printer is on “ready to print” status, the LCD screen should display the message “Ready“ on the screen. Use touch gestures to get around the Home screen and other scr[…]
-
Страница 22
18 Wizard 0 Continuous 6 10 Darkness Speed Media Type 0 X-Offset Y-Offset Wizard Test Main ZX1200 V2.0000 Wizard Test Main ZX1200 V2.0000 Test Self-Test page Out of Dump Mode Wizard Test Main ZX1200 V2.0000 Main LCD Language Printer Setting Label Setting Device Printer Control Codepage Dump Mode Recall Label 3 Printer Setting and Control On the Rea[…]
-
Страница 23
19 3 Printer Setting and Control finish setting tap back to main page if do not save, tap system would not save any changes. Printer Settings Continuous Auto Select 6 10 Darkness Speed Sensor Select Media Type Main LCD Language Printer Setting Label Setting Device Printer Control Codepage Dump Mode Recall Label Printer Settings Continuous Auto Sele[…]
-
Страница 24
20 3 Printer Setting and Control Keyboard Mode When plug-in an USB keyboard to the printer, LCD touch panel will display “Enter Standalone”, press the “Y” key on keyboard to entering to the dialog for “Keyboard Mode” operation. ZX1200 V2.0000 Enter Standalone (Y/N) Keyboard Mode Country Code Label Edit Database Setting Codepage Recall L[…]
-
Страница 25
21 3 Printer Setting and Control 0 0° 0 Preview Label Recall Label 5 5 15 001/002 FORM NAME LABEL-1 LABEL-2 0 0° 0 Preview Label Recall Label 5 5 15 ZX1230i FW:V2.000 Recall Label Prompt 001 Recall Label Print Quantity 1 From the Recall Label Page the touch panel shown on all labels, Tap up to choose labels. Tap down to choose labels. Tap Preview[…]
-
Страница 26
22 3 Printer Setting and Control 3.3 LCD Interface Function Main Page Main LCD Language Printer Setting Label Setting Device Printer Control Codepage Dump Mode Recall Label Set t ing i t ems fo r print er, e x. P rint ing s pee d, darkness .A lso inc ludes a P rint ing Wi zard fo r y o ur eas e o f print ing . More t han 10 langu ages for pr int er[…]
-
Страница 27
23 Device Buzzer Option Setting Smart Backfeed Serial Port Setting LAN Setting LCD Setting Clock Setting Device 3 Printer Setting and Control Device Page Set t ing o ff o r o n fo r buzz er Set t ing i t ems for opt ions, e x . Cut t e r, Label Dispe n se r, A pplicat or Choo se ON. P rint ing labe ls would be back t o st a rt p o sit ion. Set t in[…]
-
Страница 28
24 3 Printer Setting and Control Setting Items in Setting Mode Printer Setting Darkness 0-19 Speed 2-5 Sensor Select Media Detection A u to Select See-Through Reflective Media Type Label with Gaps Label with Marks Continuous Printing Mode Direct Thermal Thermat Transfer Tear-off Posi tion 0-40 Top of Form Apply Cancel LCD Language English Deutsch ?[…]
-
Страница 29
25 3 Printer Setting and Control Device Buzzer OFF ON Optional Setting None Cutter Label Dispenser Applicator Smart Backfeed Off On Serial Port Setting Baud Rate 4800 bps 9600 bps 19200 bps 38400 bps 57600 bps 115200 bps Parity Non Odd Even Data bits 7 bits 8 bits Stop bits 1 bits 2 bits LAN Setting DHCP On IP A ddress 0.0.0.0 Subnet Mask 255.255.2[…]
-
Страница 30
26 3 Printer Setting and Control Icon Definition Status of LCD Interface When printer is on standby status (ready to print), the LCD interface will display “Ready” on screen. You can only print when you see the “Ready“ status. Wizard Test Main ZX1200 V2.0000 If there is any printers error, the LCD screen will display the error screen to sho[…]
-
Страница 31
27 3 Printer Setting and Control Label Calibration The printer can automatically detect and store label height. That means the host computer does not need to transmit the label height to the printer. 3.4 Label Calibration and Self Test Self Test Self-test function lets you check whether the printer is functioning normally. Here is how you run the l[…]
-
Страница 32
28 3 Printer Setting and Control Label Calibration Button A hardware button to make a Label Calibration while printer encountering ‘’Media Error’’ during the cases when first-time printer start up or change label or ribbon to another type, such as change using gap label to continuous or black mark labels. Press C-button for 2 seconds, it wi[…]
-
Страница 33
29 3 Printer Setting and Control 3.5 Error Alerts In the event of a problem that prevents normal functioning of the printer, you will see an error message on LCD screen and hear some beep signals. Please refer to below table for the error alerts. Check ribbon Operation Panel Status T yp e B eeps De sc ript ion S olut io n P ri n t H ea d Err or 2 x[…]
-
Страница 34
30 3 Printer Setting and Control Operation Panel Status S a t u s B eeps D escr ip tion S ol u t io n No p a p er is d etected . M a k e sure th a t th e lab el senso r i s p os it io n ed co r r ectly. I f t he se n so r s t ill d oes n ot d etect t h e pa p er , r u n t h e au t o- d etection f u n ction a gain. P a p er is f inis h ed . R epla c[…]
-
Страница 35
31 3 Printer Setting and Control 3.6 USB Host Definition : USB Host port supports either device : USB memory stick, keyboard or scanner. Purpose USB memory stick : It extends the user memory space up to 32GB for Graphic, Font, Label Format, DBF and Command files downloading. The printer’s Firmware also can be updating if copy new version of[…]
-
Страница 36
32 3 Printer Setting and Control * * The USB Host port on GoDEX printer is without ‘’HUB’’ function. * * The USB Memory Stick supports with ‘’FAT32’’Disk Format and up to 32GB only. The certified venders are Transcend, Apacer, Patriot, Consair and Kingston. * The download function for Graphic, Font, Label Format, DBF and Command fil[…]
-
Страница 37
33 4 NetSetting for Ethernet 4.1 Installing the NetSetting software The NetSetting software is used to manage the network configurations when connecting the printer via Ethernet port. It is available on product CD or can be downloaded from official website. To install the NetSetting, please follow below steps. 5. Click ”Next” to start the insta[…]
-
Страница 38
34 4 NetSetting for Ethernet 4.2 The Interface of NetSetting Click the NetSetting icon to start the program; you will see the start page as below. The start page will display the basic information of connected printer and your PC. There are six tabs on the top of interface which can configure different types of network settings. But for the data se[…]
-
Страница 39
35 4 NetSetting for Ethernet * *** To fully benefit from the NetSetting software, you should be familiar with basic networking principles. Please contact your network administrator for related network setting information. You can press “Set” button to apply the settings and “ReGet” button to refresh the setting values. IP Setting The IP Set[…]
-
Страница 40
36 4 NetSetting for Ethernet You can press “Set” button to apply the settings and “ReGet” button to refresh the setting values. Alert Path Setting NetSetting will send the alert messages to designated mail account when the error happened on printer. The alert messages are sent by SMTP (Simple Mail Transfer Protocol) or SNMP (Simple Network […]
-
Страница 41
37 4 NetSetting for Ethernet You can press “Set” button to apply the settings and “ReGet” button to refresh the setting values. Alert Message Setting For the alert message notification function, you can decide which error cases need to be sent out to the operator. Moreover, the alert messages can be set to be sent by SMTP, SNMP or both.[…]
-
Страница 42
38 4 NetSetting for Ethernet You can press “Set” button to apply the settings and “ReGet” button to refresh the setting values. Printer Configuration Set or change the configurations of connected printer. Most of key settings for the printer operation can be done by this setting page. ZX1200i[…]
-
Страница 43
39 4 NetSetting for Ethernet You can press “Send Command” button to send printer commands via Ethernet port and control the printer remotely. User Command The “User Command” tab provides a communication interface for operator to control the printer. Input printer commands in «Input Command» window and press “Send Command” butt[…]
-
Страница 44
40 4 NetSetting for Ethernet In addition to the firmware update, you can press “Recover To Factory Settings” button to restore the printer configurations back to factory default. Firmware Download On “Firmware Download” tab, the current version of printer firmware will be showed on the screen. If you need to update the printer firmware, jus[…]
-
Страница 45
41 5 Accessories 5 Accessories 5.1 Preparation Steps Before installing the optional modules, please make some preparations as follows. 1. Turn off the printer : Remember to switch off the printer before installing any module. 2. Open the printer cover * *** Remember to switch off the printer before installing the cutter. ** ** Do not use to cut adh[…]
-
Страница 46
42 5 Accessories 1.Cutter module 2. Screw 5.2 Installing the Cutter The Overview of the Cutter Remove lower cover plate to the a little bit right then can get out. Unscrew the screw marked in the illustration on the front of the printer, which secures the lower cover plate. 2 1[…]
-
Страница 47
43 5 Accessories Connect the cutter cable connector to the cutter jack on the printer. Be sure the cutter module insert to printer properly. (see red arrow)[…]
-
Страница 48
44 5 Accessories Now load the label roll into the printer and close the printer cover. * *** Check whether the cutter function is enabled in the printer. ** ** Labels or paper should be at least 30 mm high. *** * After installation of the cutter module, set the stop position (^E) to 30. Finish the cutter module installed. Secure the cutter module o[…]
-
Страница 49
45 5 Accessories 5.2 Option Rewind Ribbon Hub Removing Ribbon Use tool to cut off the ribbon.[…]
-
Страница 50
46 Pull open the knob, ribbon could be easy to remove. 5 Accessories[…]
-
Страница 51
47 6 Maintenance and Adjustment 6.1 Installing / removing the print head module Open the printer cover. Turn the print head counterclockwise to a top right position $ using a screwdriver or a coin, loosen the screw to take out the TPH module. Hold the print head module , pull out the TPH cable smoothly. To install TPH module, follow the reverse ord[…]
-
Страница 52
48 6 Maintenance and Adjustment 6.2 Adjusting the print line Open the printer cover. If no improvement is visible, turn the screws(A) clockwise or counterclockwise as far as possible and be sure to align with the indicator board and indicator line. Repeat the adjustment process until printing quality has improved. $ Turn the print head counterclock[…]
-
Страница 53
49 6 Maintenance and Adjustment 6.3 Adjusting ribbon tension You can adjust the ribbon tension by turning the ribbon shaft knob (see illustration) clockwise or counterclockwise. There are 4 possible settings, which is marked on the ribbon supply hub. # 1 : Tension is the highest # 4 : Tension is the lowest If the tension is so low that the ribbon d[…]
-
Страница 54
50 6 Maintenance and Adjustment 6.4 Cleaning the thermal print head Dirt on the print head or ribbon may result in inadequate print quality (there are only partial images on the label). The printer cover should therefore be kept closed when possible. Keeping dirt and dust away from the paper or labels ensures a good print quality and a longer lifes[…]
-
Страница 55
51 6 Maintenance and Adjustment 6.5 Adjusting the balance and print head tension Open the printer cover. $ using a screwdriver or a coin to loosen the screw When using a variety of label stock and ribbons, the ink may not be evenly distributed. If there is no printed image on one side of the paper , or the ribbon wrinkles, the print head pressure m[…]
-
Страница 56
52 6 Maintenance and Adjustment 6.6 Ribbon shield settings The use of different ribbon materials may cause wrinkling of the ribbon, which in turn affects the print result as illustrated by the examples in (a) and (b). To change the print quality, you can adjust the ribbon shield screws. If your print result looks like the example in (a), you need t[…]
-
Страница 57
53 6 Maintenance and Adjustment 6.7 Cutter settings * Remember to switch off the printer before removing the CUTTER. **The label medium should be at least 30 mm long to ensure correct functioning of the cutter. Note Switch off the printer before removing the CUTTER. (remove or install cutter refer to ‘’accessories’’ in Section 5) Unscrew th[…]
-
Страница 58
54 6 Maintenance and Adjustment 6.8 Troubleshooting * *** If any problems occur that are not described above, please contact your dealer. Problem Solution The printer is s wi tched on b ut the LED does not light up. ♦ Check the po w er supply. Please se e the Section 2.4 The LED lights up red and pr in t ing is interrupted. ♦ Check the soft w a[…]
-
Страница 59
Appendix ZX1200 i /ZX1300 i/ ZX1600 i USER MANUAL APPENDIX PRODUCT SPECIFICATIONS Notice Specifications are subject to ch ange without notice. A ll company and/or product names are trademarks and/or registered trademarks of their respectiv e ow ne rs. ** Minimum print h eight and maximum print sp ee d specification compliance ca n b e dep en d en t[…]
-
Страница 60
Appendix Appendix INTERFACE Serial Port Default settings : Baud rate 9600, no parity, 8 data bits, 1 stop bit, XON/XOFF protocol and RTS/CTS RS232 Housing(9-p i n to 9- pin) DB9 Socket DB9 Plug — RXD TXD DTR GND DSR RTS CTS RI Computer 1 1 2 2 3 3 4 4 5 5 6 6 7 7 8 8 9 9 +5V, max 500mA TXD RXD N/C GND RTS CTS RTS N/C Printer * *** The total curre[…]
-
Страница 61
Appendix Pin NO. 1 2 3 4 Function VBUS D- D+ GND USB Port Computer Connector : Ty pe A : Pin NO. 1 2 3 4 Function VBUS D- D+ GND Connector Typ e : Type B Ethernet (RJ-45) PIN NO. FUNCTION 1 T+ 2 T- 3 R+ 4 N/C 5 N/C 6 R- 7 N/C 8 N/C Applicator PIN NO. FUNCTION 1 GND 2 +5V,max 500mA 3 START_PNT 4 SLEW_LABEL 5 PAUSE 6 REPRINT 7 +24V,max 1.[…]
-
Page 1: Godex ZX1300i
ZX1200 i /ZX1300 i/ ZX1600 i BARCODE PRINTER USER MANUAL User Manual Version Issue Date P/N : ZX1200i series : Rev. 1.0 : 2013.12.12 : 920-015111-00[…]
-
Page 2: Godex ZX1300i
Contents Contents ZX1200 i /ZX1300 i/ ZX1600 i USER MANUAL CONTENTS 1 Barcode Printer 001 1.1 1.2 Box Content Getting to Know Your Printer 001 002 2 Printer Setup 004 2.1 2.2 2.3 2.4 Loading the label roll Loading & Removing the Ribbon Connecting the Printer to the Host Computer Installing Printer Driver and GoLabel with Super W izard CD 004 00[…]
-
Page 3: Godex ZX1300i
Declaration ZX1200 i /ZX1300 i/ ZX1600 i USER MANUAL FCC COMPLIANCE STATEMENT FOR AMERICAN USERS This equipment has been tested and found to comply with the limits for a CLASS A digital device, pursuant to Part 15 of the FCC Rules. These limits are designed to provide reasonable protection against harmful interference when the equipment is operated[…]
-
Page 4: Godex ZX1300i
Safety instructions SAFETY INSTRUCTIONS Please read the following instructions carefully. 1. Keep the equipment away from humidity. 2. Before you connect the equipment to the power outlet, please check the voltage of the power source. 3. Make sure the printer is off before plugging the power connector into the power jack. 4. It is recommended that […]
-
Page 5: Godex ZX1300i
1 Barcode Printer 1.1 Box Content Please check that all of the following items are included with your printer. ZX1200i / ZX1300i / ZX1600i Barcode Printer CD Including GoLabel software and user’s manual. ZX1200i / ZX1300i / ZX1600i Series Quick Guide ZX1200i / ZX1300i / ZX1600i Series USB Cable Label Stock Ribbon Power Ada[…]
-
Page 6: Godex ZX1300i
2 Front View 1 Barcode Printer 1.2 Getting to Know Your Printer Device Overview Rear View Stylus Pen TOUCH PANEL POWER BUTTON FEED BUTTON LOWER COVER PLATE USB HOST PRINTER COVER VIEWING WINDOW Feed slot for continuous labels Calibration button Ethernet port Serial port (DB-9) Applicator Interface(OPTION) USB port USB Host Parallel port(OPT[…]
-
Page 7: Godex ZX1300i
3 1 Barcode Printer The Internal View of Printer Ribbon rewind hub Ribbon supply hub Print mechanism Platen roller Release lever for print head Paper guide Label tension guide Label supply hub Label roll guide Adjustable Sensor RFID module RFID module Paper guide[…]
-
Page 8: Godex ZX1300i
4 This printer supports the following printing methods: Thermal transfer printing (TTP) : Requires a ribbon for transferring a printed image to a medium. Direct thermal printing (DTP) : Does not require a ribbon, only thermal paper. Please check which printing method you are using and alter the settings accordingly in the printer driver, printe[…]
-
Page 9: Godex ZX1300i
5 Now slide the label roll guide forward and fold it down Place the label roll on the label supply hub , pushing it right up to the printer housing. (Do not apply too much pressure to avoid damaging the label stock.) * When moving the label roll guide, hold it only by the end that is attached to the brack et, not by its top. Note 2 Printer Setup[…]
-
Page 10: Godex ZX1300i
6 Load the label roll into the printer as shown in the illustration. Pass it through the printer as indicated by the red arrows. Pass the label stock through the Adjustable Sensor and up to the tear-off plate. * Remember to set the movable sensor to gap, black mark, or tag hole by changing the position of the sensor with the adjustment wheel. Note […]
-
Page 11: Godex ZX1300i
7 1. The labels pass between the wall of the printer housing and the adjustable paper guide. 1 2. Return the print head release lever to its original position. Then close the printer cover. 2 Printer Setup 1 2[…]
-
Page 12: Godex ZX1300i
8 Place the printer on a flat surface and open the printer cover Place a new ribbon on the ribbon supply hub. The two illustrations as below show you how to install the ribbon depending on the ribbon type (ink side in or out). Ink side out Ink side in 2 Printer Setup 2.2 Loading & Removing the Ribbon Loading Ribbon[…]
-
Page 13: Godex ZX1300i
9 * Do not pass the ribbon under the sensor. Note 2 Printer Setup Pass the ribbon under the print head and back up on the other side. Attach it to the empty ribbon core.[…]
-
Page 14: Godex ZX1300i
10 2 Printer Setup 2.3 Connecting the Printer to the Host Computer 1. Please make sure that the printer is switched off. 2. Connect the power cord to the AC adapter and connect the adapter to the printer. 3. Connect the USB cable to the printer and host computer. 4. Switch on the printer. The operator panel should now light up. ZX1200i / ZX1300i / […]
-
Page 15: Godex ZX1300i
11 * If the Super Wizard program did not run automatically, you can either turn on the “Auto-run” setting for your CD/DVD driver or double-click the icon of CD/DVD driver to run the program. Note 2 Printer Setup 2.4 Installing Printer Driver and GoLabel with Super Wizard CD 1. Insert the Super Wizard CD in the CD/DVD drive of the host computer […]
-
Page 16: Godex ZX1300i
12 2 Printer Setup 4. As the printer driver and GoLabel are installing, a screen will display a progress bar. 5. Once the installation is complete, you can start to make and print labels with GoLabel or through the printer driver. * If you need more resources, tools or reference documents, you can also find them on Super Wizard CD. Just click “Ot[…]
-
Page 17: Godex ZX1300i
13 2 Printer Setup 1. Insert the product CD in the CD/DVD drive of the host computer and open the «Seagull Drivers» folder on the CD. Select the icon for the driver file and click it to start the installation. 2. Follow the instructions on the screen. The Driver Wizard guides you through the installation procedure. Select «Install pr[…]
-
Page 18: Godex ZX1300i
14 2 Printer Setup 4. Specify the port used to connect the printer to the host computer. 6. Once the installation is complete, a summary of the printer settings is displayed. Check whether the printer settings are correct and click «Finish» to start copying the driver files. Wait until copying is complete, then finish the installation. 5.[…]
-
Page 19: Godex ZX1300i
15 2 Printer Setup 7. Once the driver installation is complete, the new printer should appear in the «Printers and Faxes» folder. Godex ZX1200i Godex ZX1200i[…]
-
Page 20: Godex ZX1300i
16 3 Printer Setting and Control 3.1 Operation Panel OPERATION TOUCH PANEL FEED BUTTON POWER BUTTON TOUCH PANEL POWER Button Press the POWER button to turn on the printer, and the START UP SCREEN appears. The printer is on “ready to print” status, the LCD screen should display the message “READY“ on the screen. When printer is turned on, ho[…]
-
Page 21: Godex ZX1300i
17 3 Printer Setting and Control 3.2 LCD Interface Introduction Getting Started Press the POWER button to turn on the printer, and the START UP SCREEN appears. Power on If the printer is on “ready to print” status, the LCD screen should display the message “Ready“ on the screen. Use touch gestures to get around the Home screen and other scr[…]
-
Page 22: Godex ZX1300i
18 Wizard 0 Continuous 6 10 Darkness Speed Media Type 0 X-Offset Y-Offset Wizard Test Main ZX1200 V2.0000 Wizard Test Main ZX1200 V2.0000 Test Self-Test page Out of Dump Mode Wizard Test Main ZX1200 V2.0000 Main LCD Language Printer Setting Label Setting Device Printer Control Codepage Dump Mode Recall Label 3 Printer Setting and Control On the Rea[…]
-
Page 23: Godex ZX1300i
19 3 Printer Setting and Control finish setting tap back to main page if do not save, tap system would not save any changes. Printer Settings Continuous Auto Select 6 10 Darkness Speed Sensor Select Media Type Main LCD Language Printer Setting Label Setting Device Printer Control Codepage Dump Mode Recall Label Printer Settings Continuous Auto Sele[…]
-
Page 24: Godex ZX1300i
20 3 Printer Setting and Control Keyboard Mode When plug-in an USB keyboard to the printer, LCD touch panel will display “Enter Standalone”, press the “Y” key on keyboard to entering to the dialog for “Keyboard Mode” operation. ZX1200 V2.0000 Enter Standalone (Y/N) Keyboard Mode Country Code Label Edit Database Setting Codepage Recall L[…]
-
Page 25: Godex ZX1300i
21 3 Printer Setting and Control 0 0° 0 Preview Label Recall Label 5 5 15 001/002 FORM NAME LABEL-1 LABEL-2 0 0° 0 Preview Label Recall Label 5 5 15 ZX1230i FW:V2.000 Recall Label Prompt 001 Recall Label Print Quantity 1 From the Recall Label Page the touch panel shown on all labels, Tap up to choose labels. Tap down to choose labels. Tap Preview[…]
-
Page 26: Godex ZX1300i
22 3 Printer Setting and Control 3.3 LCD Interface Function Main Page Main LCD Language Printer Setting Label Setting Device Printer Control Codepage Dump Mode Recall Label Set t ing i t ems fo r print er, e x. P rint ing s pee d, darkness .A lso inc ludes a P rint ing Wi zard fo r y o ur eas e o f print ing . More t han 10 langu ages for pr int er[…]
-
Page 27: Godex ZX1300i
23 Device Buzzer Option Setting Smart Backfeed Serial Port Setting LAN Setting LCD Setting Clock Setting Device 3 Printer Setting and Control Device Page Set t ing o ff o r o n fo r buzz er Set t ing i t ems for opt ions, e x . Cut t e r, Label Dispe n se r, A pplicat or Choo se ON. P rint ing labe ls would be back t o st a rt p o sit ion. Set t in[…]
-
Page 28: Godex ZX1300i
24 3 Printer Setting and Control Setting Items in Setting Mode Printer Setting Darkness 0-19 Speed 2-5 Sensor Select Media Detection A u to Select See-Through Reflective Media Type Label with Gaps Label with Marks Continuous Printing Mode Direct Thermal Thermat Transfer Tear-off Posi tion 0-40 Top of Form Apply Cancel LCD Language English Deutsch ?[…]
-
Page 29: Godex ZX1300i
25 3 Printer Setting and Control Device Buzzer OFF ON Optional Setting None Cutter Label Dispenser Applicator Smart Backfeed Off On Serial Port Setting Baud Rate 4800 bps 9600 bps 19200 bps 38400 bps 57600 bps 115200 bps Parity Non Odd Even Data bits 7 bits 8 bits Stop bits 1 bits 2 bits LAN Setting DHCP On IP A ddress 0.0.0.0 Subnet Mask 255.255.2[…]
-
Page 30: Godex ZX1300i
26 3 Printer Setting and Control Icon Definition Status of LCD Interface When printer is on standby status (ready to print), the LCD interface will display “Ready” on screen. You can only print when you see the “Ready“ status. Wizard Test Main ZX1200 V2.0000 If there is any printers error, the LCD screen will display the error screen to sho[…]
-
Page 31: Godex ZX1300i
27 3 Printer Setting and Control Label Calibration The printer can automatically detect and store label height. That means the host computer does not need to transmit the label height to the printer. 3.4 Label Calibration and Self Test Self Test Self-test function lets you check whether the printer is functioning normally. Here is how you run the l[…]
-
Page 32: Godex ZX1300i
28 3 Printer Setting and Control Label Calibration Button A hardware button to make a Label Calibration while printer encountering ‘’Media Error’’ during the cases when first-time printer start up or change label or ribbon to another type, such as change using gap label to continuous or black mark labels. Press C-button for 2 seconds, it wi[…]
-
Page 33: Godex ZX1300i
29 3 Printer Setting and Control 3.5 Error Alerts In the event of a problem that prevents normal functioning of the printer, you will see an error message on LCD screen and hear some beep signals. Please refer to below table for the error alerts. Check ribbon Operation Panel Status T yp e B eeps De sc ript ion S olut io n P ri n t H ea d Err or 2 x[…]
-
Page 34: Godex ZX1300i
30 3 Printer Setting and Control Operation Panel Status S a t u s B eeps D escr ip tion S ol u t io n No p a p er is d etected . M a k e sure th a t th e lab el senso r i s p os it io n ed co r r ectly. I f t he se n so r s t ill d oes n ot d etect t h e pa p er , r u n t h e au t o- d etection f u n ction a gain. P a p er is f inis h ed . R epla c[…]
-
Page 35: Godex ZX1300i
31 3 Printer Setting and Control 3.6 USB Host Definition : USB Host port supports either device : USB memory stick, keyboard or scanner. Purpose USB memory stick : It extends the user memory space up to 32GB for Graphic, Font, Label Format, DBF and Command files downloading. The printer’s Firmware also can be updating if copy new version of[…]
-
Page 36: Godex ZX1300i
32 3 Printer Setting and Control * * The USB Host port on GoDEX printer is without ‘’HUB’’ function. * * The USB Memory Stick supports with ‘’FAT32’’Disk Format and up to 32GB only. The certified venders are Transcend, Apacer, Patriot, Consair and Kingston. * The download function for Graphic, Font, Label Format, DBF and Command fil[…]
-
Page 37: Godex ZX1300i
33 4 NetSetting for Ethernet 4.1 Installing the NetSetting software The NetSetting software is used to manage the network configurations when connecting the printer via Ethernet port. It is available on product CD or can be downloaded from official website. To install the NetSetting, please follow below steps. 5. Click ”Next” to start the insta[…]
-
Page 38: Godex ZX1300i
34 4 NetSetting for Ethernet 4.2 The Interface of NetSetting Click the NetSetting icon to start the program; you will see the start page as below. The start page will display the basic information of connected printer and your PC. There are six tabs on the top of interface which can configure different types of network settings. But for the data se[…]
-
Page 39: Godex ZX1300i
35 4 NetSetting for Ethernet * *** To fully benefit from the NetSetting software, you should be familiar with basic networking principles. Please contact your network administrator for related network setting information. You can press “Set” button to apply the settings and “ReGet” button to refresh the setting values. IP Setting The IP Set[…]
-
Page 40: Godex ZX1300i
36 4 NetSetting for Ethernet You can press “Set” button to apply the settings and “ReGet” button to refresh the setting values. Alert Path Setting NetSetting will send the alert messages to designated mail account when the error happened on printer. The alert messages are sent by SMTP (Simple Mail Transfer Protocol) or SNMP (Simple Network […]
-
Page 41: Godex ZX1300i
37 4 NetSetting for Ethernet You can press “Set” button to apply the settings and “ReGet” button to refresh the setting values. Alert Message Setting For the alert message notification function, you can decide which error cases need to be sent out to the operator. Moreover, the alert messages can be set to be sent by SMTP, SNMP or both.[…]
-
Page 42: Godex ZX1300i
38 4 NetSetting for Ethernet You can press “Set” button to apply the settings and “ReGet” button to refresh the setting values. Printer Configuration Set or change the configurations of connected printer. Most of key settings for the printer operation can be done by this setting page. ZX1200i[…]
-
Page 43: Godex ZX1300i
39 4 NetSetting for Ethernet You can press “Send Command” button to send printer commands via Ethernet port and control the printer remotely. User Command The “User Command” tab provides a communication interface for operator to control the printer. Input printer commands in «Input Command» window and press “Send Command” butt[…]
-
Page 44: Godex ZX1300i
40 4 NetSetting for Ethernet In addition to the firmware update, you can press “Recover To Factory Settings” button to restore the printer configurations back to factory default. Firmware Download On “Firmware Download” tab, the current version of printer firmware will be showed on the screen. If you need to update the printer firmware, jus[…]
-
Page 45: Godex ZX1300i
41 5 Accessories 5 Accessories 5.1 Preparation Steps Before installing the optional modules, please make some preparations as follows. 1. Turn off the printer : Remember to switch off the printer before installing any module. 2. Open the printer cover * *** Remember to switch off the printer before installing the cutter. ** ** Do not use to cut adh[…]
-
Page 46: Godex ZX1300i
42 5 Accessories 1.Cutter module 2. Screw 5.2 Installing the Cutter The Overview of the Cutter Remove lower cover plate to the a little bit right then can get out. Unscrew the screw marked in the illustration on the front of the printer, which secures the lower cover plate. 2 1[…]
-
Page 47: Godex ZX1300i
43 5 Accessories Connect the cutter cable connector to the cutter jack on the printer. Be sure the cutter module insert to printer properly. (see red arrow)[…]
-
Page 48: Godex ZX1300i
44 5 Accessories Now load the label roll into the printer and close the printer cover. * *** Check whether the cutter function is enabled in the printer. ** ** Labels or paper should be at least 30 mm high. *** * After installation of the cutter module, set the stop position (^E) to 30. Finish the cutter module installed. Secure the cutter module o[…]
-
Page 49: Godex ZX1300i
45 5 Accessories 5.2 Option Rewind Ribbon Hub Removing Ribbon Use tool to cut off the ribbon.[…]
-
Page 50: Godex ZX1300i
46 Pull open the knob, ribbon could be easy to remove. 5 Accessories[…]
-
Page 51: Godex ZX1300i
47 6 Maintenance and Adjustment 6.1 Installing / removing the print head module Open the printer cover. Turn the print head counterclockwise to a top right position $ using a screwdriver or a coin, loosen the screw to take out the TPH module. Hold the print head module , pull out the TPH cable smoothly. To install TPH module, follow the reverse ord[…]
-
Page 52: Godex ZX1300i
48 6 Maintenance and Adjustment 6.2 Adjusting the print line Open the printer cover. If no improvement is visible, turn the screws(A) clockwise or counterclockwise as far as possible and be sure to align with the indicator board and indicator line. Repeat the adjustment process until printing quality has improved. $ Turn the print head counterclock[…]
-
Page 53: Godex ZX1300i
49 6 Maintenance and Adjustment 6.3 Adjusting ribbon tension You can adjust the ribbon tension by turning the ribbon shaft knob (see illustration) clockwise or counterclockwise. There are 4 possible settings, which is marked on the ribbon supply hub. # 1 : Tension is the highest # 4 : Tension is the lowest If the tension is so low that the ribbon d[…]
-
Page 54: Godex ZX1300i
50 6 Maintenance and Adjustment 6.4 Cleaning the thermal print head Dirt on the print head or ribbon may result in inadequate print quality (there are only partial images on the label). The printer cover should therefore be kept closed when possible. Keeping dirt and dust away from the paper or labels ensures a good print quality and a longer lifes[…]
-
Page 55: Godex ZX1300i
51 6 Maintenance and Adjustment 6.5 Adjusting the balance and print head tension Open the printer cover. $ using a screwdriver or a coin to loosen the screw When using a variety of label stock and ribbons, the ink may not be evenly distributed. If there is no printed image on one side of the paper , or the ribbon wrinkles, the print head pressure m[…]
-
Page 56: Godex ZX1300i
52 6 Maintenance and Adjustment 6.6 Ribbon shield settings The use of different ribbon materials may cause wrinkling of the ribbon, which in turn affects the print result as illustrated by the examples in (a) and (b). To change the print quality, you can adjust the ribbon shield screws. If your print result looks like the example in (a), you need t[…]
-
Page 57: Godex ZX1300i
53 6 Maintenance and Adjustment 6.7 Cutter settings * Remember to switch off the printer before removing the CUTTER. **The label medium should be at least 30 mm long to ensure correct functioning of the cutter. Note Switch off the printer before removing the CUTTER. (remove or install cutter refer to ‘’accessories’’ in Section 5) Unscrew th[…]
-
Page 58: Godex ZX1300i
54 6 Maintenance and Adjustment 6.8 Troubleshooting * *** If any problems occur that are not described above, please contact your dealer. Problem Solution The printer is s wi tched on b ut the LED does not light up. ♦ Check the po w er supply. Please se e the Section 2.4 The LED lights up red and pr in t ing is interrupted. ♦ Check the soft w a[…]
-
Page 59: Godex ZX1300i
Appendix ZX1200 i /ZX1300 i/ ZX1600 i USER MANUAL APPENDIX PRODUCT SPECIFICATIONS Notice Specifications are subject to ch ange without notice. A ll company and/or product names are trademarks and/or registered trademarks of their respectiv e ow ne rs. ** Minimum print h eight and maximum print sp ee d specification compliance ca n b e dep en d en t[…]
-
Page 60: Godex ZX1300i
Appendix Appendix INTERFACE Serial Port Default settings : Baud rate 9600, no parity, 8 data bits, 1 stop bit, XON/XOFF protocol and RTS/CTS RS232 Housing(9-p i n to 9- pin) DB9 Socket DB9 Plug — RXD TXD DTR GND DSR RTS CTS RI Computer 1 1 2 2 3 3 4 4 5 5 6 6 7 7 8 8 9 9 +5V, max 500mA TXD RXD N/C GND RTS CTS RTS N/C Printer * *** The total curre[…]
-
Page 61: Godex ZX1300i
Appendix Pin NO. 1 2 3 4 Function VBUS D- D+ GND USB Port Computer Connector : Ty pe A : Pin NO. 1 2 3 4 Function VBUS D- D+ GND Connector Typ e : Type B Ethernet (RJ-45) PIN NO. FUNCTION 1 T+ 2 T- 3 R+ 4 N/C 5 N/C 6 R- 7 N/C 8 N/C Applicator PIN NO. FUNCTION 1 GND 2 +5V,max 500mA 3 START_PNT 4 SLEW_LABEL 5 PAUSE 6 REPRINT 7 +24V,max 1.[…]

Сканеры штрих кода

Принтеры этикеток, штрих-кода, Расходники

Терминалы сбора данных

POS системы

ПО Сканкод

Электронные ценники (ESL)

Автоматизация склада (WMS)

Кассовое оборудование

Конвертеры интерфейса

Контроль доступа, учет рабочего времени

Считыватели, магнитные карты, RFID

Электронные весы

Аксессуары

Акции, распродажа
Главная страница
Скачать
Godex принтеры этикеток (всех модели, аксессуары)
Руководство пользователя принтерами ZX 1200/1300i/1600i (англ.)
")
Нет в наличии
-
Godex ZX1300i — page 1
ZX1200 i /ZX1300 i/ ZX1600 i BARCODE PRINTER USER MANUAL User Manual Version Issue Date P/N : ZX1200i series : Rev. 1.0 : 2013.12.12 : 920-015111-00 …
-
Godex ZX1300i — page 2
Contents Contents ZX1200 i /ZX1300 i/ ZX1600 i USER MANUAL CONTENTS 1 Barcode Printer 001 1.1 1.2 Box Content Getting to Know Your Printer 001 002 2 Printer Setup 004 2.1 2.2 2.3 2.4 Loading the label roll Loading & Removing the Ribbon Connecting the Printer to the Host Computer Installing Printer Driver and GoLabel with Super W izard CD 004 00 …
-
Godex ZX1300i — page 3
Declaration ZX1200 i /ZX1300 i/ ZX1600 i USER MANUAL FCC COMPLIANCE STATEMENT FOR AMERICAN USERS This equipment has been tested and found to comply with the limits for a CLASS A digital device, pursuant to Part 15 of the FCC Rules. These limits are designed to provide reasonable protection against harmful interference when the equipment is operated …
-
Godex ZX1300i — page 4
Safety instructions SAFETY INSTRUCTIONS Please read the following instructions carefully. 1. Keep the equipment away from humidity. 2. Before you connect the equipment to the power outlet, please check the voltage of the power source. 3. Make sure the printer is off before plugging the power connector into the power jack. 4. It is recommended that …
-
Godex ZX1300i — page 5
1 Barcode Printer 1.1 Box Content Please check that all of the following items are included with your printer. ZX1200i / ZX1300i / ZX1600i Barcode Printer CD Including GoLabel software and user’s manual. ZX1200i / ZX1300i / ZX1600i Series Quick Guide ZX1200i / ZX1300i / ZX1600i Series USB Cable Label Stock Ribbon Power Ada …
-
Godex ZX1300i — page 6
2 Front View 1 Barcode Printer 1.2 Getting to Know Your Printer Device Overview Rear View Stylus Pen TOUCH PANEL POWER BUTTON FEED BUTTON LOWER COVER PLATE USB HOST PRINTER COVER VIEWING WINDOW Feed slot for continuous labels Calibration button Ethernet port Serial port (DB-9) Applicator Interface(OPTION) USB port USB Host Parallel port(OPT …
-
Godex ZX1300i — page 7
3 1 Barcode Printer The Internal View of Printer Ribbon rewind hub Ribbon supply hub Print mechanism Platen roller Release lever for print head Paper guide Label tension guide Label supply hub Label roll guide Adjustable Sensor RFID module RFID module Paper guide …
-
Godex ZX1300i — page 8
4 This printer supports the following printing methods: Thermal transfer printing (TTP) : Requires a ribbon for transferring a printed image to a medium. Direct thermal printing (DTP) : Does not require a ribbon, only thermal paper. Please check which printing method you are using and alter the settings accordingly in the printer driver, printe …
-
Godex ZX1300i — page 9
5 Now slide the label roll guide forward and fold it down Place the label roll on the label supply hub , pushing it right up to the printer housing. (Do not apply too much pressure to avoid damaging the label stock.) * When moving the label roll guide, hold it only by the end that is attached to the brack et, not by its top. Note 2 Printer Setup …
-
Godex ZX1300i — page 10
6 Load the label roll into the printer as shown in the illustration. Pass it through the printer as indicated by the red arrows. Pass the label stock through the Adjustable Sensor and up to the tear-off plate. * Remember to set the movable sensor to gap, black mark, or tag hole by changing the position of the sensor with the adjustment wheel. Note …
-
Godex ZX1300i — page 11
7 1. The labels pass between the wall of the printer housing and the adjustable paper guide. 1 2. Return the print head release lever to its original position. Then close the printer cover. 2 Printer Setup 1 2 …
-
Godex ZX1300i — page 12
8 Place the printer on a flat surface and open the printer cover Place a new ribbon on the ribbon supply hub. The two illustrations as below show you how to install the ribbon depending on the ribbon type (ink side in or out). Ink side out Ink side in 2 Printer Setup 2.2 Loading & Removing the Ribbon Loading Ribbon …
-
Godex ZX1300i — page 13
9 * Do not pass the ribbon under the sensor. Note 2 Printer Setup Pass the ribbon under the print head and back up on the other side. Attach it to the empty ribbon core. …
-
Godex ZX1300i — page 14
10 2 Printer Setup 2.3 Connecting the Printer to the Host Computer 1. Please make sure that the printer is switched off. 2. Connect the power cord to the AC adapter and connect the adapter to the printer. 3. Connect the USB cable to the printer and host computer. 4. Switch on the printer. The operator panel should now light up. ZX1200i / ZX1300i / …
-
Godex ZX1300i — page 15
11 * If the Super Wizard program did not run automatically, you can either turn on the “Auto-run” setting for your CD/DVD driver or double-click the icon of CD/DVD driver to run the program. Note 2 Printer Setup 2.4 Installing Printer Driver and GoLabel with Super Wizard CD 1. Insert the Super Wizard CD in the CD/DVD drive of the host computer …
-
Godex ZX1300i — page 16
12 2 Printer Setup 4. As the printer driver and GoLabel are installing, a screen will display a progress bar. 5. Once the installation is complete, you can start to make and print labels with GoLabel or through the printer driver. * If you need more resources, tools or reference documents, you can also find them on Super Wizard CD. Just click “Ot …
-
Godex ZX1300i — page 17
13 2 Printer Setup 1. Insert the product CD in the CD/DVD drive of the host computer and open the «Seagull Drivers» folder on the CD. Select the icon for the driver file and click it to start the installation. 2. Follow the instructions on the screen. The Driver Wizard guides you through the installation procedure. Select «Install pr …
-
Godex ZX1300i — page 18
14 2 Printer Setup 4. Specify the port used to connect the printer to the host computer. 6. Once the installation is complete, a summary of the printer settings is displayed. Check whether the printer settings are correct and click «Finish» to start copying the driver files. Wait until copying is complete, then finish the installation. 5. …
-
Godex ZX1300i — page 19
15 2 Printer Setup 7. Once the driver installation is complete, the new printer should appear in the «Printers and Faxes» folder. Godex ZX1200i Godex ZX1200i …
-
Godex ZX1300i — page 20
16 3 Printer Setting and Control 3.1 Operation Panel OPERATION TOUCH PANEL FEED BUTTON POWER BUTTON TOUCH PANEL POWER Button Press the POWER button to turn on the printer, and the START UP SCREEN appears. The printer is on “ready to print” status, the LCD screen should display the message “READY“ on the screen. When printer is turned on, ho …
-
Godex ZX1300i — page 21
17 3 Printer Setting and Control 3.2 LCD Interface Introduction Getting Started Press the POWER button to turn on the printer, and the START UP SCREEN appears. Power on If the printer is on “ready to print” status, the LCD screen should display the message “Ready“ on the screen. Use touch gestures to get around the Home screen and other scr …
-
Godex ZX1300i — page 22
18 Wizard 0 Continuous 6 10 Darkness Speed Media Type 0 X-Offset Y-Offset Wizard Test Main ZX1200 V2.0000 Wizard Test Main ZX1200 V2.0000 Test Self-Test page Out of Dump Mode Wizard Test Main ZX1200 V2.0000 Main LCD Language Printer Setting Label Setting Device Printer Control Codepage Dump Mode Recall Label 3 Printer Setting and Control On the Rea …
-
Godex ZX1300i — page 23
19 3 Printer Setting and Control finish setting tap back to main page if do not save, tap system would not save any changes. Printer Settings Continuous Auto Select 6 10 Darkness Speed Sensor Select Media Type Main LCD Language Printer Setting Label Setting Device Printer Control Codepage Dump Mode Recall Label Printer Settings Continuous Auto Sele …
-
Godex ZX1300i — page 24
20 3 Printer Setting and Control Keyboard Mode When plug-in an USB keyboard to the printer, LCD touch panel will display “Enter Standalone”, press the “Y” key on keyboard to entering to the dialog for “Keyboard Mode” operation. ZX1200 V2.0000 Enter Standalone (Y/N) Keyboard Mode Country Code Label Edit Database Setting Codepage Recall L …
-
Godex ZX1300i — page 25
21 3 Printer Setting and Control 0 0° 0 Preview Label Recall Label 5 5 15 001/002 FORM NAME LABEL-1 LABEL-2 0 0° 0 Preview Label Recall Label 5 5 15 ZX1230i FW:V2.000 Recall Label Prompt 001 Recall Label Print Quantity 1 From the Recall Label Page the touch panel shown on all labels, Tap up to choose labels. Tap down to choose labels. Tap Preview …
-
Godex ZX1300i — page 26
22 3 Printer Setting and Control 3.3 LCD Interface Function Main Page Main LCD Language Printer Setting Label Setting Device Printer Control Codepage Dump Mode Recall Label Set t ing i t ems fo r print er, e x. P rint ing s pee d, darkness .A lso inc ludes a P rint ing Wi zard fo r y o ur eas e o f print ing . More t han 10 langu ages for pr int er …
-
Godex ZX1300i — page 27
23 Device Buzzer Option Setting Smart Backfeed Serial Port Setting LAN Setting LCD Setting Clock Setting Device 3 Printer Setting and Control Device Page Set t ing o ff o r o n fo r buzz er Set t ing i t ems for opt ions, e x . Cut t e r, Label Dispe n se r, A pplicat or Choo se ON. P rint ing labe ls would be back t o st a rt p o sit ion. Set t in …
-
Godex ZX1300i — page 28
24 3 Printer Setting and Control Setting Items in Setting Mode Printer Setting Darkness 0-19 Speed 2-5 Sensor Select Media Detection A u to Select See-Through Reflective Media Type Label with Gaps Label with Marks Continuous Printing Mode Direct Thermal Thermat Transfer Tear-off Posi tion 0-40 Top of Form Apply Cancel LCD Language English Deutsch ? …
-
Godex ZX1300i — page 29
25 3 Printer Setting and Control Device Buzzer OFF ON Optional Setting None Cutter Label Dispenser Applicator Smart Backfeed Off On Serial Port Setting Baud Rate 4800 bps 9600 bps 19200 bps 38400 bps 57600 bps 115200 bps Parity Non Odd Even Data bits 7 bits 8 bits Stop bits 1 bits 2 bits LAN Setting DHCP On IP A ddress 0.0.0.0 Subnet Mask 255.255.2 …
-
Godex ZX1300i — page 30
26 3 Printer Setting and Control Icon Definition Status of LCD Interface When printer is on standby status (ready to print), the LCD interface will display “Ready” on screen. You can only print when you see the “Ready“ status. Wizard Test Main ZX1200 V2.0000 If there is any printers error, the LCD screen will display the error screen to sho …
-
Godex ZX1300i — page 31
27 3 Printer Setting and Control Label Calibration The printer can automatically detect and store label height. That means the host computer does not need to transmit the label height to the printer. 3.4 Label Calibration and Self Test Self Test Self-test function lets you check whether the printer is functioning normally. Here is how you run the l …
-
Godex ZX1300i — page 32
28 3 Printer Setting and Control Label Calibration Button A hardware button to make a Label Calibration while printer encountering ‘’Media Error’’ during the cases when first-time printer start up or change label or ribbon to another type, such as change using gap label to continuous or black mark labels. Press C-button for 2 seconds, it wi …
-
Godex ZX1300i — page 33
29 3 Printer Setting and Control 3.5 Error Alerts In the event of a problem that prevents normal functioning of the printer, you will see an error message on LCD screen and hear some beep signals. Please refer to below table for the error alerts. Check ribbon Operation Panel Status T yp e B eeps De sc ript ion S olut io n P ri n t H ea d Err or 2 x …
-
Godex ZX1300i — page 34
30 3 Printer Setting and Control Operation Panel Status S a t u s B eeps D escr ip tion S ol u t io n No p a p er is d etected . M a k e sure th a t th e lab el senso r i s p os it io n ed co r r ectly. I f t he se n so r s t ill d oes n ot d etect t h e pa p er , r u n t h e au t o- d etection f u n ction a gain. P a p er is f inis h ed . R epla c …
-
Godex ZX1300i — page 35
31 3 Printer Setting and Control 3.6 USB Host Definition : USB Host port supports either device : USB memory stick, keyboard or scanner. Purpose USB memory stick : It extends the user memory space up to 32GB for Graphic, Font, Label Format, DBF and Command files downloading. The printer’s Firmware also can be updating if copy new version of …
-
Godex ZX1300i — page 36
32 3 Printer Setting and Control * * The USB Host port on GoDEX printer is without ‘’HUB’’ function. * * The USB Memory Stick supports with ‘’FAT32’’Disk Format and up to 32GB only. The certified venders are Transcend, Apacer, Patriot, Consair and Kingston. * The download function for Graphic, Font, Label Format, DBF and Command fil …
-
Godex ZX1300i — page 37
33 4 NetSetting for Ethernet 4.1 Installing the NetSetting software The NetSetting software is used to manage the network configurations when connecting the printer via Ethernet port. It is available on product CD or can be downloaded from official website. To install the NetSetting, please follow below steps. 5. Click ”Next” to start the insta …
-
Godex ZX1300i — page 38
34 4 NetSetting for Ethernet 4.2 The Interface of NetSetting Click the NetSetting icon to start the program; you will see the start page as below. The start page will display the basic information of connected printer and your PC. There are six tabs on the top of interface which can configure different types of network settings. But for the data se …
-
Godex ZX1300i — page 39
35 4 NetSetting for Ethernet * *** To fully benefit from the NetSetting software, you should be familiar with basic networking principles. Please contact your network administrator for related network setting information. You can press “Set” button to apply the settings and “ReGet” button to refresh the setting values. IP Setting The IP Set …
-
Godex ZX1300i — page 40
36 4 NetSetting for Ethernet You can press “Set” button to apply the settings and “ReGet” button to refresh the setting values. Alert Path Setting NetSetting will send the alert messages to designated mail account when the error happened on printer. The alert messages are sent by SMTP (Simple Mail Transfer Protocol) or SNMP (Simple Network …
-
Godex ZX1300i — page 41
37 4 NetSetting for Ethernet You can press “Set” button to apply the settings and “ReGet” button to refresh the setting values. Alert Message Setting For the alert message notification function, you can decide which error cases need to be sent out to the operator. Moreover, the alert messages can be set to be sent by SMTP, SNMP or both. …
-
Godex ZX1300i — page 42
38 4 NetSetting for Ethernet You can press “Set” button to apply the settings and “ReGet” button to refresh the setting values. Printer Configuration Set or change the configurations of connected printer. Most of key settings for the printer operation can be done by this setting page. ZX1200i …
-
Godex ZX1300i — page 43
39 4 NetSetting for Ethernet You can press “Send Command” button to send printer commands via Ethernet port and control the printer remotely. User Command The “User Command” tab provides a communication interface for operator to control the printer. Input printer commands in «Input Command» window and press “Send Command” butt …
-
Godex ZX1300i — page 44
40 4 NetSetting for Ethernet In addition to the firmware update, you can press “Recover To Factory Settings” button to restore the printer configurations back to factory default. Firmware Download On “Firmware Download” tab, the current version of printer firmware will be showed on the screen. If you need to update the printer firmware, jus …
-
Godex ZX1300i — page 45
41 5 Accessories 5 Accessories 5.1 Preparation Steps Before installing the optional modules, please make some preparations as follows. 1. Turn off the printer : Remember to switch off the printer before installing any module. 2. Open the printer cover * *** Remember to switch off the printer before installing the cutter. ** ** Do not use to cut adh …
-
Godex ZX1300i — page 46
42 5 Accessories 1.Cutter module 2. Screw 5.2 Installing the Cutter The Overview of the Cutter Remove lower cover plate to the a little bit right then can get out. Unscrew the screw marked in the illustration on the front of the printer, which secures the lower cover plate. 2 1 …
-
Godex ZX1300i — page 47
43 5 Accessories Connect the cutter cable connector to the cutter jack on the printer. Be sure the cutter module insert to printer properly. (see red arrow) …
-
Godex ZX1300i — page 48
44 5 Accessories Now load the label roll into the printer and close the printer cover. * *** Check whether the cutter function is enabled in the printer. ** ** Labels or paper should be at least 30 mm high. *** * After installation of the cutter module, set the stop position (^E) to 30. Finish the cutter module installed. Secure the cutter module o …
-
Godex ZX1300i — page 49
45 5 Accessories 5.2 Option Rewind Ribbon Hub Removing Ribbon Use tool to cut off the ribbon. …
-
Godex ZX1300i — page 50
46 Pull open the knob, ribbon could be easy to remove. 5 Accessories …
-
Godex ZX1300i — page 51
47 6 Maintenance and Adjustment 6.1 Installing / removing the print head module Open the printer cover. Turn the print head counterclockwise to a top right position $ using a screwdriver or a coin, loosen the screw to take out the TPH module. Hold the print head module , pull out the TPH cable smoothly. To install TPH module, follow the reverse ord …
-
Godex ZX1300i — page 52
48 6 Maintenance and Adjustment 6.2 Adjusting the print line Open the printer cover. If no improvement is visible, turn the screws(A) clockwise or counterclockwise as far as possible and be sure to align with the indicator board and indicator line. Repeat the adjustment process until printing quality has improved. $ Turn the print head counterclock …
-
Godex ZX1300i — page 53
49 6 Maintenance and Adjustment 6.3 Adjusting ribbon tension You can adjust the ribbon tension by turning the ribbon shaft knob (see illustration) clockwise or counterclockwise. There are 4 possible settings, which is marked on the ribbon supply hub. # 1 : Tension is the highest # 4 : Tension is the lowest If the tension is so low that the ribbon d …
-
Godex ZX1300i — page 54
50 6 Maintenance and Adjustment 6.4 Cleaning the thermal print head Dirt on the print head or ribbon may result in inadequate print quality (there are only partial images on the label). The printer cover should therefore be kept closed when possible. Keeping dirt and dust away from the paper or labels ensures a good print quality and a longer lifes …
-
Godex ZX1300i — page 55
51 6 Maintenance and Adjustment 6.5 Adjusting the balance and print head tension Open the printer cover. $ using a screwdriver or a coin to loosen the screw When using a variety of label stock and ribbons, the ink may not be evenly distributed. If there is no printed image on one side of the paper , or the ribbon wrinkles, the print head pressure m …
-
Godex ZX1300i — page 56
52 6 Maintenance and Adjustment 6.6 Ribbon shield settings The use of different ribbon materials may cause wrinkling of the ribbon, which in turn affects the print result as illustrated by the examples in (a) and (b). To change the print quality, you can adjust the ribbon shield screws. If your print result looks like the example in (a), you need t …
-
Godex ZX1300i — page 57
53 6 Maintenance and Adjustment 6.7 Cutter settings * Remember to switch off the printer before removing the CUTTER. **The label medium should be at least 30 mm long to ensure correct functioning of the cutter. Note Switch off the printer before removing the CUTTER. (remove or install cutter refer to ‘’accessories’’ in Section 5) Unscrew th …
-
Godex ZX1300i — page 58
54 6 Maintenance and Adjustment 6.8 Troubleshooting * *** If any problems occur that are not described above, please contact your dealer. Problem Solution The printer is s wi tched on b ut the LED does not light up. ♦ Check the po w er supply. Please se e the Section 2.4 The LED lights up red and pr in t ing is interrupted. ♦ Check the soft w a …
-
Godex ZX1300i — page 59
Appendix ZX1200 i /ZX1300 i/ ZX1600 i USER MANUAL APPENDIX PRODUCT SPECIFICATIONS Notice Specifications are subject to ch ange without notice. A ll company and/or product names are trademarks and/or registered trademarks of their respectiv e ow ne rs. ** Minimum print h eight and maximum print sp ee d specification compliance ca n b e dep en d en t …
-
Godex ZX1300i — page 60
Appendix Appendix INTERFACE Serial Port Default settings : Baud rate 9600, no parity, 8 data bits, 1 stop bit, XON/XOFF protocol and RTS/CTS RS232 Housing(9-p i n to 9- pin) DB9 Socket DB9 Plug — RXD TXD DTR GND DSR RTS CTS RI Computer 1 1 2 2 3 3 4 4 5 5 6 6 7 7 8 8 9 9 +5V, max 500mA TXD RXD N/C GND RTS CTS RTS N/C Printer * *** The total curre …
-
Godex ZX1300i — page 61
Appendix Pin NO. 1 2 3 4 Function VBUS D- D+ GND USB Port Computer Connector : Ty pe A : Pin NO. 1 2 3 4 Function VBUS D- D+ GND Connector Typ e : Type B Ethernet (RJ-45) PIN NO. FUNCTION 1 T+ 2 T- 3 R+ 4 N/C 5 N/C 6 R- 7 N/C 8 N/C Applicator PIN NO. FUNCTION 1 GND 2 +5V,max 500mA 3 START_PNT 4 SLEW_LABEL 5 PAUSE 6 REPRINT 7 +24V,max 1. …

- Главная
Godex ZX1200i/ZX1300i/ZX1600i — промышленный принтер штрих-кодов с набором интерфейсов для подключения к нескольким устройствам одновременно.
-
Способ печати:
Термотрансферный
-
По классу:
Промышленный класс
-
Ширина печати:
0-104
мм
-
Максимальная скорость печати:
178*,
254*,
76*
мм/с
-
Качество печати:
203*,
300*,
600*
dpi
-
Интерфейсы подключения:
USB
,
USB-host
,
RS-232
,
Ethernet (LAN)
-
Диаметр рулона этикеток:
203
мм
-
Ширина красящей ленты:
30-110
мм
-
Диаметр втулки красящей ленты:
1
дюйм
-
Аксессуары:
Полноразмерный внутренний смотчик
-
Доступные опции:
Bluetooth,
LPT,
WiFi,
Автоматический аппликатор,
Нож полной отрезки,
Отделитель,
Полноразмерный внутренний смотчик
-
Длина печати:
4-2159*,
4-4572*,
4-660*
мм
Подробнее
От
118 017.00
Наличие узнавайте у менеджера
Описание
Ключевые особенности:
- Большой интуитивно понятный сенсорный ЖК-экран позволяет контролировать процесс печати;
- Сразу три USB-хост порта для интеграции сразу с несколькими устройствами;
- Высокопроизводительный принтер, предназначенный для больших объемов печати;
- Скорость печати до 14 дюймов в секунду;
- Идеально подходит как для печати больших объемов, так и для высокоточной печати.
Характеристики
-
ZX-1200i, 200 dpi, 10 дюймов в секунду, RS232, USB, USB-host, LAN, RTC, дюймовая втулка риббона, риббон до 450 м, цветной сенсорный ЖК дисплей
- 011-Z2i072-00B, 011-Z2i012-000
-
118 017.00 -

-
Термотрансферный
-
Промышленный класс
-
0-104
-
25.4-118
-
254
-
203
-
USB
,
USB-host
,
RS-232
,
Ethernet (LAN)
-
Перемещаемый полностью
-
Фиксированный по центру
-
203
-
38.1,
76.2
-
30-110
-
450
-
1
-
Штрихкоды
(Codabar,
Code 11,
Code 128,
Code 32,
Code 39,
Code 49,
Code 93,
EAN-128 (UCC-128, GS1-128),
EAN-13,
EAN13+2,
EAN13+5,
EAN-8,
EAN8+2,
EAN8+5,
GS1 Databar,
Industrial 2/5,
Interleaved 2/5,
ISBT-128,
ITF14,
K-Mart,
Logmars,
Matrix 2/5,
MSI,
Random Weight,
RPS128,
Standart 2/5,
UPC-A,
UPC-E),
Составные коды
(Codablock,
GS1 Composite,
MicroPDF417,
PDF417),
2D коды (двумерные)
(Aztec,
Datamatrix,
Maxicode,
Micro QR,
QR,
TLC 39),
Другие
(China Post,
FIM,
German Post Code,
HIBC,
Planetcode,
Plessey,
Postnet,
Telepen)
-
Полноразмерный внутренний смотчик
-
Bluetooth,
LPT,
WiFi,
Автоматический аппликатор,
Нож полной отрезки,
Отделитель,
Полноразмерный внутренний смотчик
-
EZPL
(Нативно),
GEPL
(Нативно),
GZPL
(Нативно)
-
8 буквенно-цифровых растровых шрифтов
-
BMP,
PCX
-
32-разрядный процессор RISC
-
Перфорированный,
Перфорированный с черной меткой,
С межэтикеточным расстоянием,
Сплошной,
Сплошной с выкусами,
Сплошной с черной меткой
-
4-4572
-
0.076-0.25
-
128
-
32
-
5-40
-
-20-60
-
20-85
-
10-90
-
31.2
-
26.9
-
46.5
-
13.6
-
ZX-1600i, 600 dpi, 3 дюйма в секунду, RS232, USB, USB-host, LAN, дюймовая втулка риббона, риббон до 450 м, цветной сенсорный ЖК дисплей
- 011-Z6i017-000,011-Z6i012-000
-
195 207.00 -
-
Термотрансферный
-
Промышленный класс
-
0-104
-
25.4-118
-
76
-
600
-
USB
,
USB-host
,
RS-232
,
Ethernet (LAN)
-
Перемещаемый полностью
-
Фиксированный по центру
-
203
-
38.1,
76.2
-
30-110
-
450
-
1
-
Штрихкоды
(Codabar,
Code 11,
Code 128,
Code 32,
Code 39,
Code 49,
Code 93,
EAN-128 (UCC-128, GS1-128),
EAN-13,
EAN13+2,
EAN13+5,
EAN-8,
EAN8+2,
EAN8+5,
GS1 Databar,
Industrial 2/5,
Interleaved 2/5,
ISBT-128,
ITF14,
K-Mart,
Logmars,
Matrix 2/5,
MSI,
Random Weight,
RPS128,
Standart 2/5,
UPC-A,
UPC-E),
Составные коды
(Codablock,
GS1 Composite,
MicroPDF417,
PDF417),
2D коды (двумерные)
(Aztec,
Datamatrix,
Maxicode,
Micro QR,
QR,
TLC 39),
Другие
(China Post,
FIM,
German Post Code,
HIBC,
Planetcode,
Plessey,
Postnet,
Telepen)
-
Полноразмерный внутренний смотчик
-
—
-
Bluetooth,
LPT,
WiFi,
Автоматический аппликатор,
Нож полной отрезки,
Отделитель,
Полноразмерный внутренний смотчик
-
EZPL
(Нативно),
GEPL
(Нативно),
GZPL
(Нативно)
-
8 буквенно-цифровых растровых шрифтов
-
BMP,
PCX
-
32-разрядный процессор RISC
-
Перфорированный,
Перфорированный с черной меткой,
С межэтикеточным расстоянием,
Сплошной,
Сплошной с выкусами,
Сплошной с черной меткой
-
4-660
-
0.076-0.25
-
128
-
32
-
5-40
-
-20-60
-
20-85
-
10-90
-
31.2
-
26.9
-
46.5
-
13.6
-
ZX-1300i, 300 dpi, 7 дюймов в секунду, RS232, USB, USB-host, LAN, дюймовая втулка риббона, риббон до 450 м, цветной сенсорный ЖК дисплей
- 011-Z3i012-000
-
137 547.00 -
-
Термотрансферный
-
Промышленный класс
-
0-104
-
25.4-118
-
178
-
300
-
USB
,
USB-host
,
RS-232
,
Ethernet (LAN)
-
Перемещаемый полностью
-
Фиксированный по центру
-
203
-
38.1,
76.2
-
30-110
-
450
-
1
-
Штрихкоды
(Codabar,
Code 11,
Code 128,
Code 32,
Code 39,
Code 49,
Code 93,
EAN-128 (UCC-128, GS1-128),
EAN-13,
EAN13+2,
EAN13+5,
EAN-8,
EAN8+2,
EAN8+5,
GS1 Databar,
Industrial 2/5,
Interleaved 2/5,
ISBT-128,
ITF14,
K-Mart,
Logmars,
Matrix 2/5,
MSI,
Random Weight,
RPS128,
Standart 2/5,
UPC-A,
UPC-E),
Составные коды
(Codablock,
GS1 Composite,
MicroPDF417,
PDF417),
2D коды (двумерные)
(Aztec,
Datamatrix,
Maxicode,
Micro QR,
QR,
TLC 39),
Другие
(China Post,
FIM,
German Post Code,
HIBC,
Planetcode,
Plessey,
Postnet,
Telepen)
-
Полноразмерный внутренний смотчик
-
—
-
Bluetooth,
LPT,
WiFi,
Автоматический аппликатор,
Нож полной отрезки,
Отделитель,
Полноразмерный внутренний смотчик
-
EZPL
(Нативно),
GEPL
(Нативно),
GZPL
(Нативно)
-
8 буквенно-цифровых растровых шрифтов
-
BMP,
PCX
-
32-разрядный процессор RISC
-
Перфорированный,
Перфорированный с черной меткой,
С межэтикеточным расстоянием,
Сплошной,
Сплошной с выкусами,
Сплошной с черной меткой
-
4-2159
-
0.076-0.25
-
128
-
32
-
5-40
-
-20-60
-
20-85
-
10-90
-
31.2
-
26.9
-
46.5
-
13.6


Промышленный термотрансферный принтер этикеток Godex, 300 DPI, (дюймовая втулка риббона), ширина печати 104мм., скорость печати 178 мм/сек., интерфейс подключения USB 2.0, RS232, Ethernet, USB Host, цветной сенсорный ЖК дисплей
Расходные материалы
Аксессуары и сопутствующие товары
Принтер штрихкода Godex ZX1x00i предназначен для эксплуатации на складах и производствах для печати больших объемов этикеток, шириной до 4″ (дюймов). Корпус и печатающий механизм принтера изготовлены из металла.
Принтер может быть укомплектован печатающей головкой с разрешением 203, 300 или 600 dpi (точек на дюйм). В последствии, если потребуется, головку можно установить другого разрешения, они взаимозаменяемые.
У принтеров серии ZX-1х00i используется двойная буферизация: пока одна этикетка печатается, следующая уже загружается в память принтера. Это дает значительное превосходство в скорости печати этикеток через драйвер с использованием очереди заданий.
В принтере возможно использовать красящую ленту длиной до 450 метров, при этом направление намотки ленты не имеет значения: в принтер возможно загрузить ленту как ink out (красящий слой наружу), так и ленту ink in (красящий слой внутрь).
Конструкция печатающего механизма снабжена простыми регулировками линии печати, а также распределения давления на печатающую головку, что позволяет избежать перекосов красящей ленты при печати как узких, так и широких этикеток.
Печатающая головка прижимается к этикеткам с помощью двух регулируемых подпружиненных упоров. Величину и распределение прижимающего давления легко отрегулировать для достижения максимального качества печати этикеток любой ширины.
Специальная «щетка» предназначена для снятия статического электричества с красящей ленты — защита от прилипания риббона к этикеткам в процессе печати.
Принтер оборудован 2-мя типами сенсора края этикетки — «на отражение» и «на просвет». Комбинация этих сенсоров позволяет использовать этикетки с любой плотностью подложки, а также этикетки с «черной меткой». Положение сенсора можно отрегулировать при использовании этикеток неправильной геометрии или ленты в несколько ручьёв. Перед использованием принтера необходимо запустить процесс калибровки для определения размера заправленных в него этикеток. Для этого надо нажать соответствующую кнопку на задней стороне принтера.
Godex ZX-1200i/1300i/1600i — рассчитаны на совместную работу с 1С любых версий.
Распечатка этикеток из программы 1С производится с помощью стандартного Windows драйвера.
При подключении к 1С8.0 и выше, рекомендуется пользоваться драйверами для ОС 32/64 Битных Windows всех версий.
При подключении к 1С 7.7 — рекомендуем использовать компоненту, выложенную для бесплатного скачивания на нашем сайте, которая увеличивает скорость печати. Для пользователей Linux операционных систем предлагаются драйвера, которые также возможно скачать с нашего сайта. С помощью бесплатной программы GoLabel (Qlabel-IV), которая поставляется в комплекте, возможно создание, редактирование, сохранение макетов этикеток, позволяет подключать базу данных (данной функции нет ни в одном альтернативном софте, распространяемом бесплатно).
Принтер полностью русифицирован и имеет встроенные русские шрифты.
Имеется возможность загрузки в память принтера любых пользовательских шрифтов и макетов этикеток для последующей печати.
Параметры этикет ленты:
- Максимальный внешний диаметр рулона: 203.2 мм (8″) c втулкой 3″ (76.2мм), 152.4мм (6″) с втулкой 1.5″ (38.1мм);
- Ширина ленты: 25.4мм ~ 110 мм;
- Максимальная ширина резака: 117мм (4.61″);
- Максимальная ширина отделителя/намотчика: 110мм (4.64″);
- Толщина этикет ленты (носителя): 0.06 ~ 0.25 мм;
- Размеры применяемых втулок: 1.5″ (38.1мм) и 3″ (76.2мм);
- Допускается применение носителей: бумажные, тканевые, полимерные, картон, текстиль и другие в рулонах.
Параметры красящей ленты:
- Тип красящей ленты: WAX, RESIN, WAX/RESIN;
- Максимальная длина: 450 м (большие рулоны для повышенных объёмов печати);
- Максимальный внешний диаметр: 76 мм (2.99″);
- Ширина: 30.0 мм (1.18″) ~ 110 мм (4.33″);
- Размер втулки: 1″ (25.4мм);
- Допускается применение 2-х типов лент: красящим слоем внутрь или наружу (Ink in, Ink out);
В стандартной комплектации принтер уже имеет:
- RTC- микросхему календаря/часов;
- интерфейсы — USB2.0, RS232, RJ45, 3 USB Host;
- встроенный LAN;
- Кнопку калибровки;
- Цветной тач TFT LCD дисплей;
- Кнопку «Power» (включения) и «Enter» (ввод) на передней панели;
- Автоматическое распознавание языков — EZPL, GEPL и GZPL.
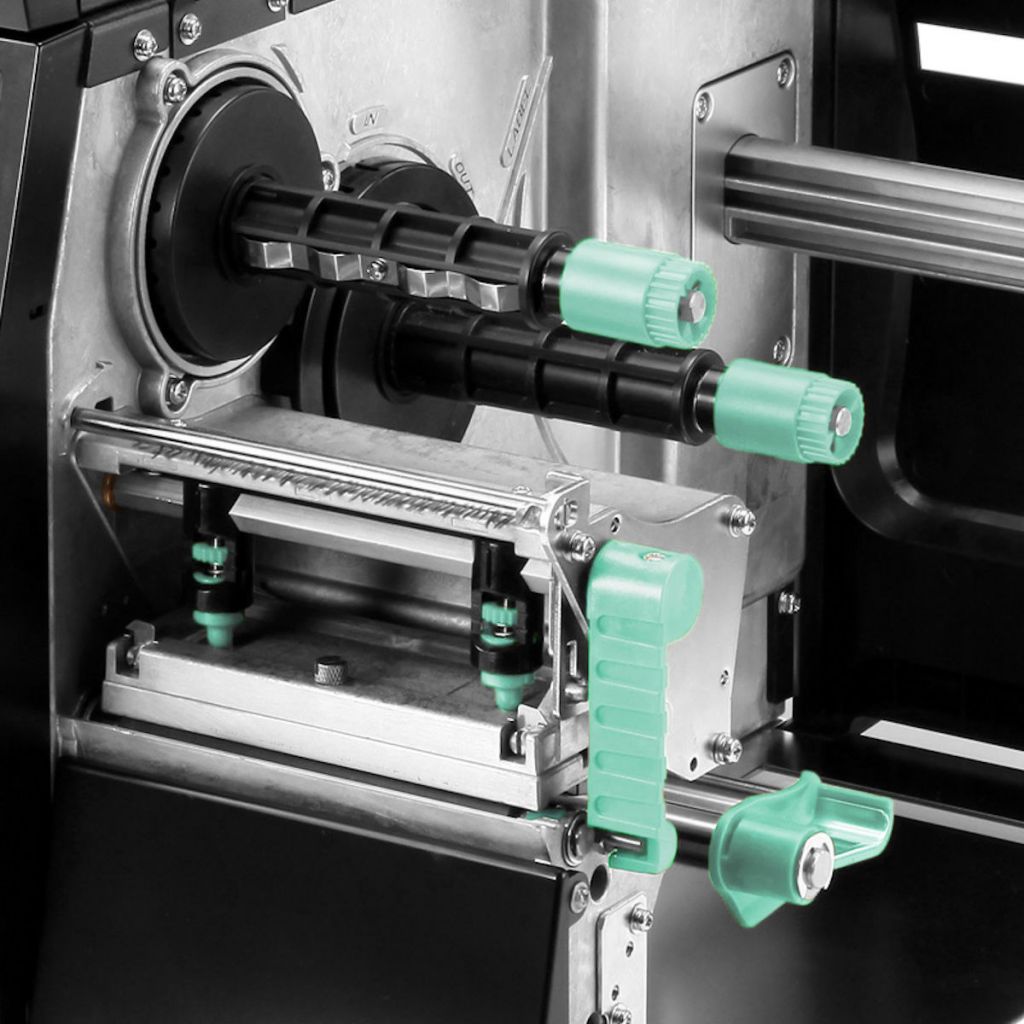

|
Сортировать по: Цене Отображать характеристики: Все |
|---|
|
Объём оперативной памяти (Мб) |
|
Память для данных (Мб) |
|
Разрешение печати |
|
Ширина печати (мм) |
|
Скорость печати (мм/сек) |
|
Длина печати (мм) |
|
Арт. 1020555 Godex ZX-1300i 011-Z3i012-000
124 098 ₽ Купить |
|---|
|
128 |
|
32 |
|
300 dpi |
|
106 |
|
177 |
|
2159 |

Технические характеристики
Класс принтера
промышленный
Модуль отделителя этикеток
отсутствует
Модуль отрезчика этикеток
отсутствует
Внутренний смотчик
отсутствует
RTC (часы реального времени)
да
Язык программирования
EZPL, GEPL, GZPL
Дисплей
Встроенный дисплей
цветной LCD 3.2″
Хранение информации
Объём оперативной памяти
128 Мб
Интерфейсы
Интерфейс подключения
USB, RS-232, Ethernet, USB Host
Характеристики печати
Метод печати
термотрансферная
Разрешение печати
300 dpi
Скорость печати
177 мм/сек
Свойства материалов для печати
Тип намотки красящей ленты (риббон)
IN/OUT
Диаметр втулки красящей ленты (риббон)
1″
Максимальная намотка красящей ленты (риббон)
450 м
Максимальный диаметр рулона риббона
76 мм
Минимальная ширина риббона
30 мм
Максимальная ширина риббона
110 мм
Минимальная ширина ленты этикеток
25.4 мм
Максимальная ширина ленты этикеток
118 мм
Толщина бумаги
0.076-0.254 мм
Диаметр втулки ленты этикеток
1.5″ (40 мм), 3″ (76,2 мм)
Минимальный диаметр втулки ленты этикеток
38.1 мм
Максимальный диаметр втулки ленты этикеток
76.2 мм
Максимальный диаметр рулона этикеток
203 мм
Шрифты / графика / символы
Встроенные шрифты
11 встроенных шрифтов (включая OCRA & B), с 8-микратно изменяемыми по горизонтали и вертикали размерами. Шрифты можно поворачивать (8 углов ориентации). Масштабируемый шрифт (кодовые страницы 850 и 852) (4 угла ориентации)
Загружаемые шрифты
Возможна загрузка русских Windows Bit-map шрифтов (8 углов ориентации) и русских True Type шрифтов ver. 2.XX (4 угла ориентации). Шрифты можно поворачивать
Обработка изображений
Загрузка в принтер: BMP, PCX. Поддерживается программно: ICO, WMF, JPG, EMF
Штрих-код
Типы штрих-кодов
1D: Code 39, Code 93, EAN 8/13 (add on 2 & 5), UPC A/E (add on 2 & 5), I 2 of 5 & I 2 of 5 with Shipping Bearer Bars, Codabar, Code 128 (subset A, B, C), EAN 128, RPS 128, UCC 128, UCC/EAN-128 K-Mart, Random Weight, Post NET, ITF 14, China Postal Code, HIBC, MSI, Plessey, Telepen, FIM, GS1 DataBar, German Post Code, Planet 11 & 13 digit, Japanese Postnet, I2 of 5 with human readable check digit, Standard 2 of 5, Industrial 2 of 5 , Logmars, Code 11, Code 49, Cadablock
2D: PDF417, DataMatrix code, MaxiCode, QR code, Micro PDF417, Micro QR code, Aztec code
Электронные параметры
Питание
от сети 100-240 вольт (авто переключение), 50-60 Hz
ОС и программные утилиты
Программное обеспечение
Редактор Golabel, Qlabel-IV (русифицированы, только для EZPL прошивки), для создания и печати этикеток под Windows, DLL и драйверы для различных версий Windows (NT4.0/2000/XP/Vista/Win7), Linux драйвера для Ubuntu v9.04/9.10, Компонента и DLL для 1С 7.7 и 8.0 для печати этикеток на принтерах EZPL. Все ПО входит в комплект поставки.
Драйверы
MAC , Linux , Windows 2000 / XP / VISTA / Windows 7 / Windows 8.1
Физические характеристики
Габариты товара (ДxШxВ)
465x271x308 мм
Габариты товара (ДxШxВ) в упаковке
46.5/27.1/30.8 см
Условия эксплуатации и стандарты
Температура эксплуатации
+5°C ~ +40°C
Температура хранения
-20°C ~ +60°C
Влажность при эксплуатации
20-85%, без конденсации
Влажность при хранении
10-90%, без конденсации
Стандарт качества
CE(EMC), FCC Class A, CB, cUL, CCC
Авторизуйтесь, чтобы оставить отзыв
Оставляйте отзывы, делитесь опытом или просто задавайте интересующие Вас вопросы! Мы оперативно ответим Вам!
Мы поддерживаем контакты с основными официальными сервисными центрами по ремонту техники, предлагаемой в нашем интернет-магазине.
При наступлении случая, требующего ремонта в авторизованном центре, Вы можете обратиться к менеджерам нашей фирмы и мы сами возьмем на себя хлопоты по доставке техники в сервис. Все работы по обслуживанию выполняют квалифицированные мастера в самые краткие сроки . По дополнительным условиям и гарантии обращайтесь к менеджерам за подробной консультацией.