
Только только купили свою первую экшн-камеру GoPro 5 Black или собираетесь это сделать? — Отлично, а мы решили помочь вам разобраться со своей покупкой, чтобы вы не искали информацию в интернете.

Мы сняли подробную инструкцию для GoPro Hero 5 Black на русском языке, в которой рассказали о всех особенностях, связанных с данной моделью:
В нашем видео, вы найдете ответы на такие вопросы как:
- Распаковка GoPro Hero 5 Black
- Первое включение GoPro Hero 5 Black
- Обзор меню GoPro Hero 5 Black
- Обзор режимов съемки GoPro Hero 5 Black
- Настройка видео режима GoPro Hero 5 Black
- Обзор общих настроек и голосового управления GoPro Hero 5 Black
- Обзор режима просмотра, а также редактирование отснятых файлов на GoPro Hero 5 Black
- Общие советы по использованию GoPro Hero 5 Black в различных ситуациях
Мы постарались сделать видео максимально подробным, чтобы вы раскрыли возможности своей GoPro 5 Black на все 100%.

Кроме того, мы собрали все полезные материалы для вашей GoPro 5 Black:
- PDF инструкция на русском языке для GoPro Hero 5 Black (нажмите)
- Настройка и подключение GoPro 5 Black к смартфону через приложение «GoPro Capture» (нажмите)
- Установка прошивки и русского языка с помощью обновления GoPro Hero 5 Black до последней версии ПО (нажмите)
Мы очень надеемся, что наш FAQ по GoPro 5 Black поможет вам быстро изучить свою экшн-камеру и приступить к съемке.

А все полезные видео и статьи, посвященные GoPro 5 Black, вы найдете здесь (нажмите).

С уважением, команда магазина gopro-shop.by. Вы всегда можете написать или позвонить нам тут.
- Инструкции и руководства
- Бренды
- GoPro
- HERO5 Black
- Инструкции Пользователя
![]()
Руководство по настройке и устранению неисправностей HERO11 Black
HERO11 Black. Руководство пользователя
HERO10 Black. Руководство пользователя
HERO9 Black. Руководство пользователя
GoPro HERO8 Black. Руководство пользователя
GoPro MAX. Руководство пользователя.
GoPro Fusion. Руководство пользователя
HERO7 Black. Руководство пользователя
HERO7 Black. Краткая инструкция
HERO7 Silver. Руководство пользователя
HERO7 Silver & White. Краткая инструкция
HERO7 White. Руководство пользователя
GoPro HERO 2018. Руководство пользователя
Квадрокоптер GoPro Karma. Руководство пользователя
GoPro HERO6 Black. Руководство пользователя
Стабилизатор Karma Grip. Краткая инструкция
GoPro HERO5 Black. Руководство пользователя
HERO5 Black. Краткая инструкция
HERO5 Session. Руководство пользователя
HERO5 Session. Краткая инструкция
HERO Session. Руководство пользователя
HERO Session. Краткая инструкция
HERO4 Black. Руководство пользователя
HERO4 Silver. Руководство пользователя
HERO4 Silver Music. Руководство пользователя
HERO4 Silver Music. Краткая инструкция
HERO4 Black Music. Руководство пользователя
HERO4 Black Music. Краткая инструкция
HERO. Руководство пользователя
HERO+. Руководство пользователя
HERO+LCD. Руководство пользователя
HERO+LCD. Краткая инструкция
HERO3+ Black. Руководство пользователя
HERO3+ Black. Краткая инструкция
HERO3+ Silver. Руководство пользователя
HERO3+ Silver. Краткая инструкция
HERO3_Black. Руководство пользователя
HERO3_Silver. Руководство пользователя
HERO3_White. Руководство пользователя
HERO3_ White. Краткая инструкция
HD2. Руководство пользователя
HD_960. Руководство пользователя
HD_HERO. Руководство пользователя
WD My Passport Wireless. Инструкция
WD My Passport . Инструкция
Крепление на ружье SportsmanMount. Инструкция
The Frame_HERO3/3+/4. Инструкция
HERO3+_DualBatteryCharger. Инструкция
HERO4_DualBatteryCharger. Инструкция
Battery BacPac_HD_HERO. Инструкция
Battery BacPac. Инструкция
Соединение HERO3 с пультом Wi-Fi Remote
Присоска_JOBY_Гориллапод. Инструкция
Присоска_JOBY_LockingArm. Инструкция
3D_HERO_System. Инструкция
Набор для замены линз в водонепроницаемом боксе_HERO4. Инструкция
![]()
USER MANUAL
1

JOIN THE GOPRO MOVEMENT
|
facebook.com/GoPro |
youtube.com/GoPro |
|
twitter.com/GoPro |
instagram.com/GoPro |

TABLE OF CONTENTS
|
Your HERO5 Black |
6 |
|
Getting Started |
8 |
|
Navigating Your GoPro |
16 |
|
Map of Modes and Settings |
20 |
|
QuikCapture |
22 |
|
Capturing Video and Photos |
24 |
|
Controlling Your GoPro with Your Voice |
27 |
|
Playing Back Your Content |
30 |
|
Using Your Camera with an HDTV |
33 |
|
Connecting to the Capture App |
35 |
|
Offloading Your Content |
36 |
|
Video Mode: Capture Modes |
39 |
|
Video Mode: Settings |
41 |
|
Video Mode: Advanced Settings |
48 |
|
Photo Mode: Capture Modes |
50 |
|
Photo Mode: Settings |
52 |
|
Photo Mode: Advanced Settings |
54 |
|
Time Lapse Mode: Capture Modes |
56 |
|
Time Lapse Mode: Settings |
58 |
TABLE OF CONTENTS
|
Time Lapse Mode: Advanced Settings |
62 |
|
Advanced Controls |
63 |
|
Connecting to an Audio Accessory |
73 |
|
Customizing Your GoPro |
74 |
|
Important Messages |
78 |
|
Resetting Your Camera |
79 |
|
Mounting |
80 |
|
Removing the Side Door |
85 |
|
Maintenance |
87 |
|
Battery Information |
88 |
|
Troubleshooting |
91 |
|
Customer Support |
93 |
|
Trademarks |
93 |
|
Regulatory Information |
93 |

YOUR HERO5 BLACK
1
12
2
14
1.Shutter Button [  ]
]
2.Camera Status Screen
3.Mode Button [  ]
]
4.Side Door
5.USB-C Port
14
4
9
5
6
6.Micro HDMI Port (cable not included)
7.Speaker
8.Battery Door
9.Latch Release Button
YOUR HERO5 BLACK
|
14 |
||
|
3 |
||
|
12 |
||
|
13 |
10 |
|
|
11 |
||
|
7 |
9 |
|
|
12 |
8 |
10.Battery
11.microSD Card Slot
12.Camera Status Light
13.Touch Display
14.Microphone
GETTING STARTED
Welcome to your new HERO5 Black. To capture video and photos, you need a microSD card (sold separately).
MICROSD CARDS
Use brand name memory cards that meet these requirements:
•microSD, microSDHC, or microSDXC
•Class 10 or UHS-I rating
•Capacity up to 128GB
For a list of the recommended microSD cards, visit gopro.com/workswithgopro.
If the memory card becomes full during recording, your camera stops recording and displays FULL on the touch display.
NOTICE: Use care when handling memory cards. Avoid liquids, dust and debris. As a precaution, power off the camera before inserting or removing the card. Check manufacturer guidelines regarding use in acceptable temperature ranges.
REFORMATTING YOUR MICROSD CARD
To keep your microSD card in good condition, reformat it on a regular basis. Reformatting erases all of your content, so be sure to offload your photos and videos first.
To reformat your card, swipe down, then tap Preferences > Format SD Card > Delete.
GETTING STARTED
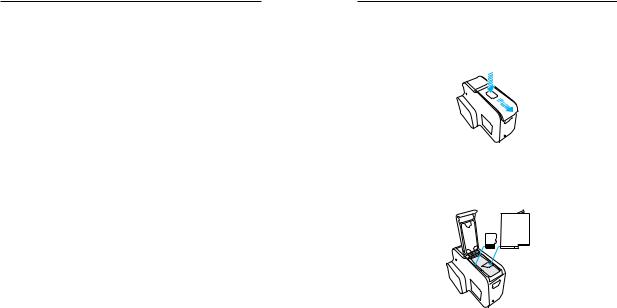
CHARGING THE BATTERY
For the best experience with your new camera, we recommend fully charging the battery before first use.
1.Hold down the Latch Release button on the battery door, then slide the door open.
2.Insert a microSD card with the label facing the battery (microSD card is not required for charging).
Note: To remove the card, press it into the slot with your fingernail and it will pop out.
3.Insert the battery, then close the door.
GETTING STARTED
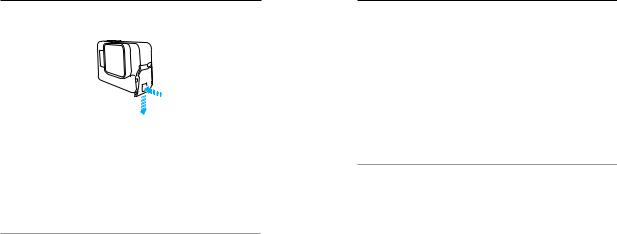
4.Hold down the Latch Release button on the side door, then slide the door open.
5.Connect the camera to a computer or other USB charging adapter using the included USB-C cable.
6.Power off the camera. The camera status light turns on during charging and turns off when charging is complete.
When charging with a computer, be sure that the computer is connected to a power source. If the camera status light does not turn on, use a different USB port.
The battery charges to 100% in about 3 hours. For more information, see
Battery Information (page 88).
PRO TIP: For fastest charging, use GoPro’s Supercharger (sold separately). You can charge your camera with a USB-compatible wall charger or auto charger.
GETTING STARTED
UPDATING YOUR CAMERA SOFTWARE
To get the latest features and best performance from your GoPro, make sure your camera is always using the most current software. When you connect to the Capture app or Quik for desktop, you are automatically notified if an update is available.
1.Download these apps:
•Capture app from the Apple© App Store© or Google Play™
•Quik for desktop from gopro.com/apps
2.Connect your camera to your smartphone/tablet or computer. If an update is available, the app provides instructions for installing it.
You can also update your camera manually using the microSD card and a card reader/adapter (sold separately). For details and information about the latest software version, visit gopro.com/update.
PRO TIP: To see your current software version, swipe down from the main screen, then tap Preferences > About This GoPro.
GETTING STARTED
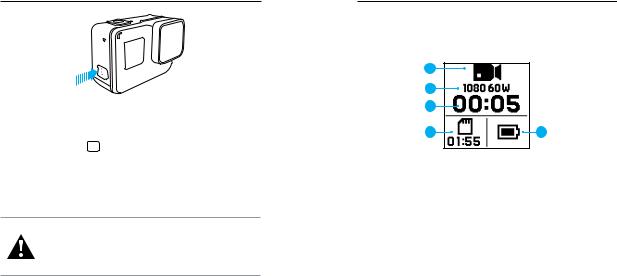
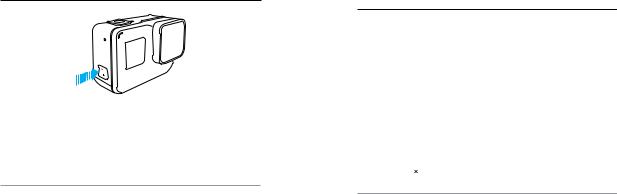
POWERING ON + OFF
To Power On:
Press the Mode button [ 
 ]. The camera beeps several times while the camera status lights flash. When information appears on the touch display or the camera status screen, your camera is on.
To Power Off:
Press and hold the Mode button for two seconds. The camera beeps several times while the camera status lights flash.
WARNING: Use caution when using your GoPro as part of your active lifestyle. Always be aware of your surroundings to avoid injury to yourself and others.
Abide by all local laws when using your GoPro and related mounts and accessories, including all privacy laws, which may restrict recording in certain areas.
GETTING STARTED
CAMERA STATUS SCREEN
The camera status screen on the front of the camera contains the following information about modes and settings so you can see the basics for your current setting at a glance:
1
2
3
1.Camera Mode
2.Settings
3.Number of Files Captured
4.Remaining microSD Card Storage
5.Battery Status
Note: The icons and settings that appear on the camera status screen vary by mode. Those shown above are for Video mode.
GETTING STARTED
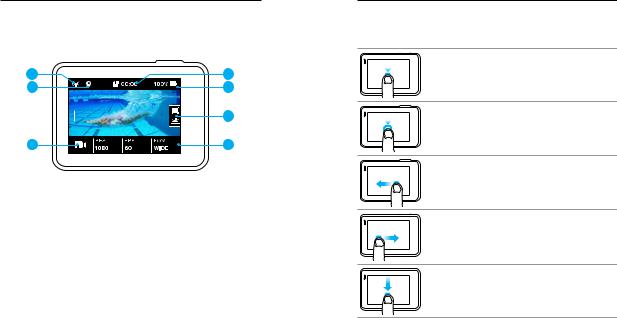
TOUCH DISPLAY
The touch display on the back of the camera contains the following information about modes and settings on the main screen. The settings that appear vary by mode.
1.Wireless Status
2.GPS Status
3.Time Remaining/Photos Taken
4.Battery Status
5.Camera Mode
6.Settings
7.Advanced Settings (icons)
Note: The touch display does not work under water.
GETTING STARTED
TOUCH DISPLAY GESTURES
Use these gestures to navigate the touch display. When swiping, swipe from the edge of the screen.
Tap
Selects an item, turns a setting on/off.
Press and Hold
Accesses Exposure Control setting.
Swipe Left
Accesses advanced settings (if available) for the current mode.
Swipe Right
Displays your media.
Swipe Down
From the main screen, opens the Connect and Preferences menus. Otherwise, returns to the main screen.
PRO TIP: To lock the touch display to prevent accidental input, swipe down from the main screen, then tap [  ]. Tap this icon again to unlock it.
NAVIGATING YOUR GOPRO
MODES
Your HERO5 Black contains three camera modes: Video, Photo, and Time Lapse.
Video
Video mode contains three capture modes: Video, Video + Photo, and Looping. For descriptions of each capture mode, see Video Mode: Capture Modes (page 39).
Photo
Photo mode contains three capture modes: Photo, Burst, and Night. For descriptions of each capture mode, see Photo Mode: Capture Modes (page 50).
Time Lapse
Time Lapse mode contains three capture modes: Time Lapse Video, Time Lapse Photo, Night Lapse Photo. For descriptions of each capture mode, see Time Lapse Mode: Capture Modes (page 56).
For a visual map of your GoPro’s modes and settings, see Map of Modes and Settings (page 20).
NAVIGATING YOUR GOPRO
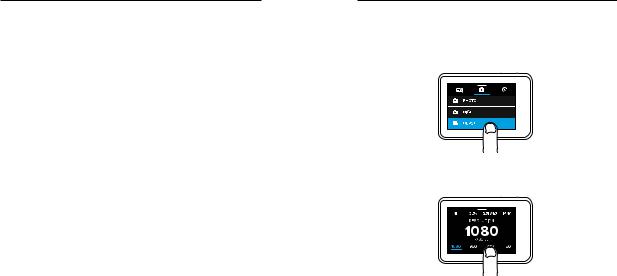
NAVIGATING WITH THE TOUCH DISPLAY
1.From the main screen, tap the icon in the lower left corner.
2.Tap one of the mode icons at the top of the screen (Video, Photo, or Time Lapse).
3.Tap a capture mode in the list below it.
4.On the main screen, tap the setting that you want to change.
5.Tap a new option (available options are white). The camera returns you to the main screen.
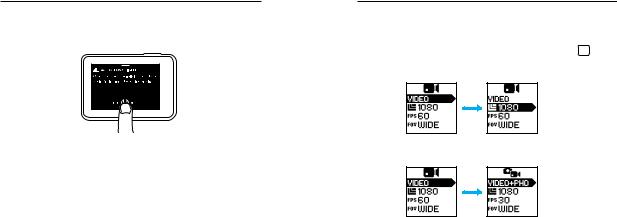
If you select a video resolution (RES) that does not support the frames per second (FPS) setting that is selected, a message appears that instructs you to tap the touch display to automatically move to the FPS setting and select a different value. A similar message appears if you select an FPS that is not supported by the selected resolution.
NAVIGATING YOUR GOPRO
6.To change an advanced setting, swipe left.
Note: Not all capture modes have advanced settings.
7.To turn on an advanced setting, tap [ ].
].
8. To return to the main screen, swipe down.
CHANGING MODES WITH THE MODE BUTTON
The Mode button lets you quickly cycle through the capture modes that you set. For example, if you previously selected Video in Video mode, Night Photo in Photo mode, and Time Lapse Video in Time Lapse mode, pressing the Mode button cycles through those capture modes.
Note that Burst photo always appears in this cycle. You can capture fastmoving action like kids jumping into a pool or a mountain bike jump without having to change your Photo capture mode ahead of time.
NAVIGATING YOUR GOPRO
NAVIGATING WITH THE BUTTONS
If you use the camera under water, use the buttons and the camera status screen to change modes and settings.
1.With the camera powered on, hold down the Mode button [ 
 ] and press the Shutter button [
  ].
].
2.Use the Mode button to cycle through the settings.
3.Press the Shutter button to cycle through the options within a setting. To select an option, leave the option highlighted.
4.To exit, press and hold the Shutter button, or cycle to Done in the menu.
![]()
|
MAP OF MODES AND SETTINGS |
MAP OF MODES AND SETTINGS |
||||||||||||||||||||||||||||||||||||||||||||||||||||||||||||||||||
|
Auto Low Light |
Manual Audio Control |
RAW |
Video Mode / Video |
||||||||
|
Burst |
Night Photo |
Resolution (RES) |
Video + Photo |
||||||||
|
FOV |
Night Lapse Photo |
Shutter |
Video Stabilization |
||||||||
|
FPS |
Photo Mode / Photo |
Time Lapse Mode |
WDR |
||||||||
|
Interval |
Protune |
Time Lapse Photo |
|||||||||
|
Looping |
Rate |
Time Lapse Video |
QUIKCAPTURE
QuikCapture is the fastest way to capture video or time lapse photos with HERO5 Black. Because the camera is powered on only when it is capturing, you also conserve battery power.
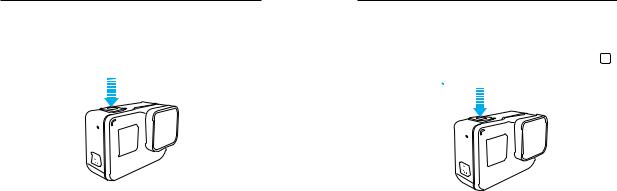
CAPTURING VIDEO WITH QUIKCAPTURE
1. With the camera powered off, press the Shutter button [  ].
].
Your camera powers on, beeps several times, and automatically
begins capturing video. The camera status lights blink while the camera is recording.
2.To stop recording, press the Shutter button again.
The camera stops recording, beeps several times, and automatically powers off.
To capture other types of video, see Capturing Video and Photos (page 24).
QUIKCAPTURE
CAPTURING TIME LAPSE PHOTOS WITH QUIKCAPTURE
In addition to showing how a scene changes over time, time lapse photos are also useful for capturing a series of photos to be sure you get the shot you want.
1.With the camera powered off, press and hold the Shutter button [  ] until capture begins.
 3 sec
3 sec
Your camera powers on, beeps several times, and automatically
begins capturing time lapse photos. The camera status lights blink once for each photo captured.
2.To stop capturing, press the Shutter button again.
The camera stops recording, beeps several times, and automatically powers off to maximize battery life.
To capture other types of photos or time lapse content, see Capturing Video and Photos (page 24).
TURNING QUIKCAPTURE OFF
QuikCapture is on by default, but you can turn it off, if needed.
1.From the main screen, swipe down.
2.Tap Preferences > QuikCapture.
3.Tap Off.
CAPTURING VIDEO AND PHOTOS
CAPTURING VIDEO AND PHOTOS
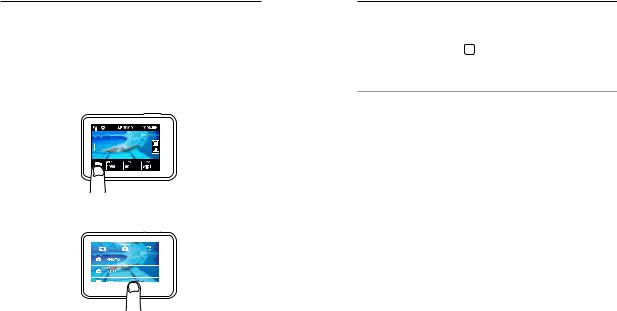
You can also use a more traditional method to capture video and photos— including time lapse video and photos—in which you leave the camera powered on and capture, as needed. With this method, you can use the touch display to preview your shots and change modes and settings before capturing. However, unlike QuikCapture, the camera remains on when you are not capturing, so you must manually power it off to save battery life.
1.If needed, select a different mode:
a. Tap the icon in the lower left corner of the touch display.
b.Tap one of the mode icons at the top of the screen.
c.Tap a capture mode in the list below it.
CAPTURING VIDEO AND PHOTOS
2.If needed, select different settings. For details about settings, see Video Mode: Capture Modes (page 39), Photo Mode: Capture Modes
(page 50), or Time Lapse Mode: Capture Modes (page 56).
3.Press the Shutter button [  ]. The camera beeps and the camera status lights flash while the camera is capturing.
4.To stop capturing video or time lapse, press the Shutter button. The camera beeps and the camera status lights flash quickly.
PRO TIP: You can also capture video and photos using voice commands. For details, see Controlling Your GoPro with Your Voice (page 27).
CAPTURING VIDEO AND PHOTOS
ADDING HILIGHT TAGS
You can mark specific moments in your video during recording or playback with HiLight Tags. HiLight Tags make it easy to find the best highlights
to share.
While recording or playing back video, press the Mode button [  ].
].
PRO TIP: You can also add HiLight Tags during recording with the Capture app, Voice Control, or the Smart Remote.
CONTROLLING YOUR GOPRO WITH YOUR VOICE
You can control your HERO5 Black with your voice using a set of specific commands (see list below).
Note: Voice Control performance may be impacted by distance, wind, and noisy conditions. Keep the product clean and clear of debris.
USING VOICE CONTROL
Voice Control works best when you and your GoPro are in close proximity.
1.From the main screen, swipe down, then tap [ 
 ].
].
Note: You can also turn Voice Control on or off from the Preferences menu. Tap Preferences > On Camera Voice Control, then select an option.
2.If this is the first time you turned on voice control, confirm or change the voice control language.
3.Say a command from List of Voice Commands (page 28).
4.To turn off Voice Control manually, swipe down on the main screen,
then tap [  ]. Voice Control also turns off when your camera powers off. For details, see Auto Off (page 75).
PRO TIP: To extend the voice control of your camera in windy and noisy environments, use Remo (Waterproof Voice Activated Remote). For details, visit gopro.com.

CONTROLLING YOUR GOPRO WITH YOUR VOICE
LIST OF VOICE COMMANDS
Two types of commands are available with Voice Control:
•Action commands let you immediately capture video or photos. For example, if you just stopped recording video, you can say the command to take a photo or begin capturing time lapse—without having to first change the mode.
•Mode commands are useful if you want to quickly select a mode and then use the Shutter button to capture.
Your camera does not need to be in a specific mode to capture video or photos. You can use the action commands from any mode. Your camera captures video or photos based on the settings you previously selected.
|
Action Command |
Description |
|
GoPro start recording |
Starts capturing video |
|
GoPro HiLight |
Adds a HiLight Tag to video |
|
during recording |
|
|
That was sick |
Adds a HiLight Tag to video |
|
during recording |
|
|
GoPro stop recording |
Stops capturing video |
|
GoPro take a photo |
Captures a single photo |
|
GoPro shoot burst |
Captures burst photos |
|
GoPro start time lapse |
Starts capturing time lapse |
|
GoPro stop time lapse |
Stops capturing time lapse |
|
GoPro turn off |
Powers off the camera |
CONTROLLING YOUR GOPRO WITH YOUR VOICE
|
Mode Command |
Description |
|
GoPro Video mode |
Changes the camera mode to Video |
|
(does not capture video) |
|
|
GoPro Photo mode |
Changes the camera mode to Photo |
|
mode (does not capture photos) |
|
|
GoPro Burst mode |
Changes the camera mode to Burst |
|
mode (does not capture burst photos) |
|
|
GoPro Time Lapse mode |
Changes the camera mode to |
|
Time Lapse (does not capture time |
|
|
lapse photos) |
|
For the most updated list of commands, visit gopro.com/yourhero5.
PRO TIP: If you are recording video or time lapse, you must stop recording before issuing a new command.
CHANGING YOUR VOICE CONTROL LANGUAGE
1.From the main screen, swipe down.
2.Tap Preferences > Language (in the Voice Control section).
3.Tap a language.
 Loading…
Page 1 — РУКОВОДСТВО ПОЛЬЗОВАТЕЛЯ
1РУКОВОДСТВО ПОЛЬЗОВАТЕЛЯ
Page 2
18 19другое значение. Аналогичное сообщение отображается в том случае, если выбрать значение FPS (кадры/с), которое не поддерживается выбранным разреш
Page 3 — СОДЕРЖАНИЕ
20 21СХЕМА РЕЖИМОВ И НАСТРОЕК СХЕМА РЕЖИМОВ И НАСТРОЕКАвтоматический режим съемки при слабом освещенииСерийная съемкаFOV (УГОЛ ОБЗОРА)FPS (КАДРОВ/С)Ин
Page 4 — КАМЕРА HERO5 BLACK
22 23QuikCapture (Быстрая съемка) — это самый быстрый способ съемки видео и фото в режиме замедленной съемки с камерой HERO5 Black. Вы сможете экономи
Page 5 — НАЧАЛО РАБОТЫ
24 25ВИДЕО- И ФОТОСЪЕМКА Можно также использовать более традиционный метод видео- и фотосъемки, включая режим замедленной видео- и фотосъемки, в кото
Page 6 — НАЧАЛО РАБОТЫ НАЧАЛО РАБОТЫ
26 27ФОТО- И ВИДЕОСЪЕМКА2. При необходимости выберите другие параметры настроек. Сведения о настройках см. в разделе Режим видео: режимы съемки (page
Page 7
28 29Вы можете управлять HERO5 Black голосом, используя набор специальных команд (см. список ниже). Примечание. Качество голосового управления зависит
Page 8
30 31Команда режимов ОписаниеGoPro Video modeПереключает камеру в режим видео Video (Видео) (видеосъемка не начинается).GoPro Time Lapse modeПереключа
Page 9
32 33СОЗДАНИЕ КРАТКИХ КЛИПОВ НА ОСНОВЕ ВИДЕО Нарезка видео позволяет создавать из отснятых видеофайлов короткие клипы ваших любимых моментов. Клипы со
Page 10
34 35ПРОСМОТР ВИДЕО И ФОТО НА ТЕЛЕВИЗОРЕ ВЫСОКОЙ ЧЕТКОСТИ Воспроизведение видео и фото на телевизоре высокой четкости позволяет просматривать материал
Page 11
36 37ПЕРВОЕ ПОДКЛЮЧЕНИЕ К ПРИЛОЖЕНИЮ Приложение Capture позволяет дистанционно управлять камерой с помощью смартфона или планшета. Функциональные воз
Page 13 — ФОТО- И ВИДЕОСЪЕМКА
38 39ВЫГРУЗКА МАТЕРИАЛОВЗАГРУЗКА СОДЕРЖИМОГО В ОБЛАКО Подписка GoPro Plus позволяет загружать отснятые материалы в облако для последующего просмотра,
Page 14
40 41Режим видео поддерживает три режима съемки: Video (Видео), Video + Photo (Видео + фото) и Looping (Циклическая съемка). Каждый режим камеры имеет
Page 15
42 43РАЗРЕШЕНИЕ ВИДЕОРазрешение видеофайла определяется количеством горизонтальных линий видео. Например, разрешение 720p означает, что видео содержит
Page 16
44 45Разрешение видео Оптимальное использование1080pИдеально подходит для всех видов съемки, а также публикации отснятых материалов в социальных сетях
Page 17
46 47FOV (УГОЛ ОБЗОРА) Оптимальное использованиеSuperViewРежим SuperView позволяет снимать с широким углом обзора, что создает потрясающий эффект погр
Page 18 — ВЫСОКОЙ ЧЕТКОСТИ
48 49Разрешение видео (RES)Кадры/с (NTSC/PAL)1FOV (УГОЛ ОБЗОРА)Разрешение экранаСоотношение сторон1080p 120/120Wide (Широкий), Narrow (Узкий)1920 x 1
Page 19 — ВЫГРУЗКА МАТЕРИАЛОВ
50 51ИНТЕРВАЛ (ВИДЕО)Настройки интервала задают время, которое проходит между съемкой отдельных кадров.Интервалы видео + фото Доступные интервалы для
Page 20
52 53АВТОМАТИЧЕСКИЙ РЕЖИМ СЪЕМКИ ПРИ СЛАБОМ ОСВЕЩЕНИИРежим Auto Low Light (Автоматический режим съемки при слабом освещении) позволяет снимать при сла
Page 21 — РЕЖИМ ВИДЕО: РЕЖИМЫ СЪЕМКИ
54 55Данный режим поддерживает три режима съемки: Photo (Фото), Night (Ночная съемка) и Burst (Серийная съемка). Все фотографии имеют разрешение 12Мп
Page 22 — РЕЖИМ ВИДЕО: НАСТРОЙКИ
56 57УГОЛ ОБЗОРА (FOV), РЕЖИМ PHOTO (ФОТО)Ваша камера поддерживает несколько вариантов угла обзора (FOV) для съемки фотографий. Все фотографии имеют р
Page 23
Камера HERO5 Black6Начало работы8Навигация по меню камеры GoPro16Схема режимов и настроек20QuikCapture (Быстрая съемка)22Фото- и видеосъемка25Голосово
Page 24
58 59ШИРОКИЙ ДИНАМИЧЕСКИЙ ДИАПАЗОН (WDR)Широкий динамически диапазон (WDR) позволяет увеличить уровень детализации участков фотографии с недостаточным
Page 25
60 61Режим замедленной съемки поддерживает три режима съемки: Time Lapse Video (Замедленная видеосъемка), Time Lapse Photo (Замедленная фотосъемка) и
Page 26 — НАСТРОЙКИ
62 63РАЗРЕШЕНИЕ И УГОЛ ОБЗОРА ПРИ ЗАМЕДЛЕННОЙ ВИДЕОСЪЕМКЕВ режиме замедленной съемки параметры разрешения и угла обзора применимы только к Time Lapse
Page 27
64 65Интервал Примеры10–60секундПродолжительные события, например, строительные проекты или создание произведений искусстваИнтервал режима Night Laps
Page 28
66 67PROTUNEПри активном режиме Time Lapse (Режим замедленной съемки) параметры Protune доступны только для фотографии в режиме замедленной съемки и н
Page 29 — РЕЖИМ ФОТОСЪЕМКИ: НАСТРОЙКИ
68 69ДОПОЛНИТЕЛЬНЫЕ ЭЛЕМЕНТЫ УПРАВЛЕНИЯИспользование установки экспозиции с блокировкой экспозиции С помощью этого параметра камера может заблокироват
Page 30
70 71Отмена установки экспозиции Управление экспозицией автоматически отключается при выборе другого режима или перезапуска камеры. Вы также можете от
Page 31 — СЪЕМКИ): РЕЖИМЫ СЪЕМКИ
72 73ЦветЦвет позволяет регулировать цветовой профиль видеоматериалов или фотографий. При изменении данного параметра сенсорный дисплей немедленно про
Page 32 — СЪЕМКИ): НАСТРОЙКИ
74 75ДОПОЛНИТЕЛЬНЫЕ ЭЛЕМЕНТЫ УПРАВЛЕНИЯISO Minimum (Мин. ISO ) (только для фото)ISO Maximum (Макс. ISO) (только для фото)Минимальное и максимальное зн
Page 33
76 77ДОПОЛНИТЕЛЬНЫЕ ЭЛЕМЕНТЫ УПРАВЛЕНИЯСпуск затвораНастройки Shutter (Спуск затвора) применяются только при ночной и ночной замедленной съемке; они о
Page 34 — УПРАВЛЕНИЯ
6 71. Кнопка Спуск затвора [ ]2. Экран состояния камеры3. Кнопка Режим [ ]4. Боковая крышка5. Порт USB-C 6. Порт Micro HDMI (кабель не входит
Page 35
78 79РезкостьРезкость влияет на качество детализации видеоматериалов и фотографий. Параметрами данной настройки являются: высокая (по умолчанию), сред
Page 36
80 81ПОЛЬЗОВАТЕЛЬСКАЯ НАСТРОЙКА GOPROУдобная настройка работы камеры: от уровня звукового сигнала до отключения индикаторов состояния камеры. ИЗМЕНЕНИ
Page 37
82 83ПОЛЬЗОВАТЕЛЬСКАЯ НАСТРОЙКА GOPRODEFAULT MODE (РЕЖИМ ПО УМОЛЧАНИЮ)Устанавливает режим съемки по умолчанию, который активен при включении камеры Go
Page 38
84 85VIDEO FORMAT (ВИДЕОФОРМАТ)Задает частоту кадров камеры, принятую в вашем регионе, для записи и воспроизведения видео на телевизоре/HDTV. За счет
Page 39
86 87СБРОС НАСТРОЕК КАМЕРЫ СБРОС НАСТРОЕК КАМЕРЫRESETTING THE CONNECTIONS (СБРОС ПОДКЛЮЧЕНИЙ) Этот параметр удаляет содержимое списка подключений и сб
Page 40
88 89ФИКСАЦИЯ КАМЕРЫ В КРЕПЛЕНИЯХЧтобы установить камеру в крепление, необходимы крепежная рамка (для установки HERO5 Black), а также крепежная пряжка
Page 41 — ПОДКЛЮЧЕНИЕ ДОПОЛНИТЕЛЬНОГО
90 91ПОДСОЕДИНЕНИЕ СКОБ ДЛЯ УСТАНОВКИ К КРОНШТЕЙНАМ 1. Откройте Фиксатор крепежной пряжки.2. Вставьте пряжку в кронштейн до щелчка.3. Нажмите на за
Page 42
92 93СБОРКА И КРЕПЛЕНИЕ• Приклеивайте крепления при комнатной температуре. Крепления не приклеиваются надлежащим образом к холодным и сырым поверхност
Page 43 — ВАЖНАЯ ИНФОРМАЦИЯ
94 95Следующие рекомендации помогут обеспечить оптимальную производительность вашей камеры.• Камера водонепроницаема до глубины 10м (33фута) без ис
Page 44
96 97СВЕДЕНИЯ ОБ АККУМУЛЯТОРЕУВЕЛИЧЕНИЕ СРОКА СЛУЖБЫ АККУМУЛЯТОРАЕсли уровень заряда аккумулятора опускается ниже 10%, на сенсорном дисплее появляетс
Page 45 — СБОРКА И КРЕПЛЕНИЕ
8 9Перед вами ваша новая камера HERO5 Black. Чтобы снимать видео и фото, вам понадобится карта microSD (приобретается отдельно). КАРТЫ MICROSD Использ
Page 46
98 99СВЕДЕНИЯ ОБ АККУМУЛЯТОРЕПРЕДУПРЕЖДЕНИЕ. Камеру и аккумулятор не следует ронять, разбирать, вскрывать, ломать, сгибать, деформировать, протыкать,
Page 47 — СНЯТИЕ БОКОВОЙ КРЫШКИ
100 101УСТРАНЕНИЕ НЕПОЛАДОКЯ ЗАБЫЛ ИМЯ ПОЛЬЗОВАТЕЛЯ И ПАРОЛЬ ДЛЯ МОЕЙ КАМЕРЫ Проведите пальцем вниз, затем нажмите Connect (Подключить) > Name &
Page 48
10 114. Удерживайте нажатой кнопку фиксатора на боковой крышке, чтобы открыть эту крышку.5. Подсоедините камеру к компьютеру или к USB-адаптеру для п
Page 49 — СВЕДЕНИЯ ОБ АККУМУЛЯТОРЕ
12 13НАЧАЛО РАБОТЫВКЛЮЧЕНИЕ + ВЫКЛЮЧЕНИЕВключение: нажмите кнопку Режим [ ]. Камера издаст несколько звуковых сигналов в такт мигания индикаторов сос
Page 50 — УСТРАНЕНИЕ НЕПОЛАДОК
14 15НАЧАЛО РАБОТЫСЕНСОРНЫЙ ДИСПЛЕЙ Сенсорный дисплей на обратной стороне устройства служит для отображения следующих сведений о режимах и настройках.
Page 51 — НОРМАТИВНАЯ ИНФОРМАЦИЯ
16 17РЕЖИМЫ Ваша HERO5 Black поддерживает три режима камеры: Video (Видео), Photo (Фото) и Time Lapse (Режим замедленной съемки). Видео Режим видеосъ