
Перейти к контенту
Принтеры струйные HP

- Размер инструкции: 3.57 Мб
- Формат файла: pdf
Если вы потеряли инструкцию от струйного принтера HP Officejet 4500, можете скачать файл для просмотра на компьютере или печати.
Инструкция для струйного принтера HP Officejet 4500 на русском языке. В руководстве описаны возможности и полезные функции, а также правила эксплуатации. Перед использованием внимательно ознакомьтесь с инструкцией.
Чтобы не читать всю инструкцию вы можете выполнить поиск по содержимому внутри инструкции и быстро найти необходимую информацию. Рекомендации по использованию помогут увеличить срок службы струйного принтера HP Officejet 4500. Если у вас появилась проблема, то найдите раздел с описанием неисправностей и способами их решения. В нем указаны типичные поломки и способы их решения.
![]()
OFFICEJET 4500
OFFICEJET ADVANTAGE 4500
User Guide
K710

HP Officejet 4500 (G510)/ HP Officejet 4575 (K710)/HP Officejet Advantage 4500 (K710) All-in-One series
User Guide

Copyright information
© 2011 Copyright Hewlett-Packard Development Company, L.P.
Hewlett-Packard Company notices
The information contained in this document is subject to change without notice.
All rights reserved. Reproduction, adaptation, or translation of this material is prohibited without prior written permission of Hewlett-Packard, except as allowed under copyright laws.
The only warranties for HP products and services are set forth in the express warranty statements accompanying such products and services. Nothing herein should be construed as constituting an additional warranty. HP shall not be liable for technical or editorial errors or omissions contained herein.
Acknowledgements
Windows, Windows XP, and Windows Vista are U.S. registered trademarks of Microsoft Corporation.
ENERGY STAR and the ENERGY STAR mark are registered U.S. marks.
Safety information
Always follow basic safety precautions when using this product to reduce risk of injury from fire or electric shock.
1.Read and understand all instructions in the documentation that comes with the device.
2.Observe all warnings and instructions marked on the product.
3.Unplug this product from wall outlets before cleaning.
4.Do not install or use this product near water, or when you are wet.
5.Install the product securely on a stable surface.
6.Install the product in a protected location where no one can step on or trip over the line cord, and the line cord cannot be damaged.
7.If the product does not operate normally, see Solve a problem.
8.There are no user-serviceable parts inside. Refer servicing to qualified service personnel.
Accessibility
The device provides a number of features that make it accessible for people with disabilities.
Visual
The device software is accessible for users with visual impairments or low
vision through the use of your operating system’s accessibility options and features. It also supports most assistive technology such as screen readers, Braille readers, and voice-to-text applications. For users who are color blind, colored buttons and tabs used in the software and on the device control panel have simple text or icon labels that convey the appropriate action.
Mobility
For users with mobility impairments, the device software functions can be executed through keyboard commands. The software also supports Windows accessibility options such as StickyKeys, ToggleKeys, FilterKeys, and MouseKeys. The device doors, buttons, paper trays, and paper guides can be operated by users with limited strength and reach.
Support
For more details about the accessibility of this product and HP’s commitment to product accessibility, visit HP’s Web site at www.hp.com/accessibility.
For accessibility information for the Mac OS X, visit the Apple Web site at www.apple.com/accessibility.

Contents
|
1 |
Get started |
|
|
Accessibility……………………………………………………………………………………………………………….. |
9 |
|
|
Eco-Tips…………………………………………………………………………………………………………………… |
10 |
|
|
Understand the device parts……………………………………………………………………………………….. |
10 |
|
|
Front view…………………………………………………………………………………………………………… |
10 |
|
|
Printing supplies area…………………………………………………………………………………………… |
11 |
|
|
Back view……………………………………………………………………………………………………………. |
11 |
|
|
Use the product control panel……………………………………………………………………………………… |
12 |
|
|
Overview of buttons and lights………………………………………………………………………………. |
12 |
|
|
Change product settings……………………………………………………………………………………….. |
13 |
|
|
Select the mode……………………………………………………………………………………………… |
13 |
|
|
Change product settings………………………………………………………………………………….. |
14 |
|
|
Types of messages………………………………………………………………………………………………. |
14 |
|
|
Status messages……………………………………………………………………………………………. |
14 |
|
|
Warning messages…………………………………………………………………………………………. |
14 |
|
|
Error messages……………………………………………………………………………………………… |
14 |
|
|
Critical error messages……………………………………………………………………………………. |
15 |
|
|
Finding the device model number……………………………………………………………………………….. |
15 |
|
|
Select print media……………………………………………………………………………………………………… |
15 |
|
|
Recommended papers for printing and copying……………………………………………………….. |
15 |
|
|
Recommended papers for photo printing………………………………………………………………… |
17 |
|
|
Tips for selecting and using media…………………………………………………………………………. |
17 |
|
|
Load an original on the scanner glass………………………………………………………………………….. |
18 |
|
|
Load an original in the automatic document feeder (ADF)………………………………………………. |
19 |
|
|
Load media………………………………………………………………………………………………………………. |
19 |
|
|
Maintain the device……………………………………………………………………………………………………. |
21 |
|
|
Clean the scanner glass……………………………………………………………………………………….. |
21 |
|
|
Clean the exterior ……………………………………………………………………………………………….. |
22 |
|
|
Clean the automatic document feeder (ADF) (Some models only)……………………………… |
22 |
|
|
Turn off the device…………………………………………………………………………………………………….. |
24 |
|
|
2 |
|
|
|
Print documents………………………………………………………………………………………………………… |
25 |
|
|
Print documents (Windows)…………………………………………………………………………………… |
25 |
|
|
Print documents (Mac OS X)…………………………………………………………………………………. |
26 |
|
|
Print brochures…………………………………………………………………………………………………………. |
26 |
|
|
Print brochures (Windows)……………………………………………………………………………………. |
26 |
|
|
Print brochures (Mac OS X)…………………………………………………………………………………… |
26 |
|
|
Print on envelopes…………………………………………………………………………………………………….. |
27 |
|
|
Print on envelopes (Windows)……………………………………………………………………………….. |
27 |
|
|
Print on envelopes (Mac OS X)……………………………………………………………………………… |
27 |
|
|
Print a Web page………………………………………………………………………………………………………. |
28 |
|
|
Print a Web page (Windows)…………………………………………………………………………………. |
28 |
|
|
Print a Web page (Mac OS X)……………………………………………………………………………….. |
28 |
1
|
Print photos……………………………………………………………………………………………………………… |
29 |
|
|
Print photos on photo paper (Windows)………………………………………………………………….. |
29 |
|
|
Print photos on photo paper (Mac OS X)………………………………………………………………… |
29 |
|
|
Print on special and custom-sized paper………………………………………………………………………. |
30 |
|
|
Print on special or custom-sized paper (Windows)…………………………………………………… |
30 |
|
|
Print on special or custom-sized paper (Mac OS X)………………………………………………….. |
31 |
|
|
Print borderless documents………………………………………………………………………………………… |
31 |
|
|
Print borderless documents (Windows)…………………………………………………………………… |
32 |
|
|
Print borderless documents (Mac OS X)…………………………………………………………………. |
32 |
|
|
3 |
Scan |
|
|
Scan an original………………………………………………………………………………………………………… |
34 |
|
|
Scan an original from the product control panel……………………………………………………….. |
34 |
|
|
Edit a scanned document using optical character recognition (OCR) software………………….. |
35 |
|
|
4 |
Copy |
|
|
Copy documents……………………………………………………………………………………………………….. |
36 |
|
|
Change copy settings………………………………………………………………………………………………… |
36 |
|
|
5 |
Fax |
|
|
Send a fax……………………………………………………………………………………………………………….. |
38 |
|
|
Send a basic fax………………………………………………………………………………………………….. |
38 |
|
|
Send a fax manually from a phone…………………………………………………………………………. |
39 |
|
|
Send a fax using monitor dialing……………………………………………………………………………. |
40 |
|
|
Send a fax from memory………………………………………………………………………………………. |
41 |
|
|
Schedule a fax to send later………………………………………………………………………………….. |
41 |
|
|
Send a fax to multiple recipients…………………………………………………………………………….. |
42 |
|
|
Send a fax in Error Correction Mode………………………………………………………………………. |
42 |
|
|
Receive a fax……………………………………………………………………………………………………………. |
43 |
|
|
Receive a fax manually………………………………………………………………………………………… |
43 |
|
|
Set up backup fax………………………………………………………………………………………………… |
44 |
|
|
Reprint received faxes from memory………………………………………………………………………. |
45 |
|
|
Poll to receive a fax……………………………………………………………………………………………… |
45 |
|
|
Forward faxes to another number………………………………………………………………………….. |
46 |
|
|
Set the paper size for received faxes……………………………………………………………………… |
46 |
|
|
Set automatic reduction for incoming faxes……………………………………………………………… |
47 |
|
|
Block junk fax numbers………………………………………………………………………………………… |
47 |
|
|
Add numbers to the junk fax list……………………………………………………………………….. |
48 |
|
|
Remove numbers from the junk fax list……………………………………………………………… |
48 |
|
|
Print a Junk Fax Report…………………………………………………………………………………… |
48 |
|
|
Receive faxes to your computer (Fax to PC and Fax to Mac)…………………………………….. |
49 |
|
|
Fax to PC and Fax to Mac requirements……………………………………………………………. |
49 |
|
|
Activate Fax to PC and Fax to Mac…………………………………………………………………… |
49 |
|
|
Modify Fax to PC or Fax to Mac settings……………………………………………………………. |
50 |
|
|
Turn off Fax to PC or Fax to Mac……………………………………………………………………… |
50 |
2
|
Contents |
|
|
Change fax settings…………………………………………………………………………………………………… |
50 |
|
Configure the fax header………………………………………………………………………………………. |
51 |
|
Set the answer mode (Auto answer)………………………………………………………………………. |
51 |
|
Set the number of rings before answering……………………………………………………………….. |
51 |
|
Change the answer ring pattern for distinctive ring…………………………………………………… |
52 |
|
Set the fax error correction mode…………………………………………………………………………… |
52 |
|
Set the dial type…………………………………………………………………………………………………… |
53 |
|
Set the redial options……………………………………………………………………………………………. |
53 |
|
Set the fax speed…………………………………………………………………………………………………. |
53 |
|
Set the fax sound volume……………………………………………………………………………………… |
54 |
|
Fax over Internet Protocol (FoIP)………………………………………………………………………………… |
54 |
|
Use reports………………………………………………………………………………………………………………. |
55 |
|
Print fax confirmation reports…………………………………………………………………………………. |
55 |
|
Print fax error reports……………………………………………………………………………………………. |
56 |
|
Print and view the fax log……………………………………………………………………………………… |
56 |
|
Clear the fax log………………………………………………………………………………………………….. |
57 |
|
Print the details of the last fax transaction……………………………………………………………….. |
57 |
|
Print a Caller ID History Report……………………………………………………………………………… |
58 |
|
6 Work with ink cartridges |
|
|
Information about ink cartridges………………………………………………………………………………….. |
59 |
|
Check the estimated ink levels……………………………………………………………………………………. |
60 |
|
Handle the ink cartridges……………………………………………………………………………………………. |
61 |
|
Replace the ink cartridges………………………………………………………………………………………….. |
61 |
|
Store printing supplies……………………………………………………………………………………………….. |
65 |
|
Advanced ink cartridge maintainance…………………………………………………………………………… |
65 |
|
Align the ink cartridges…………………………………………………………………………………………. |
65 |
|
Clean the ink cartridges………………………………………………………………………………………… |
67 |
|
7 Solve a problem |
|
|
HP support……………………………………………………………………………………………………………….. |
69 |
|
Obtain electronic support………………………………………………………………………………………. |
70 |
|
HP support by phone……………………………………………………………………………………………. |
70 |
|
Before you call……………………………………………………………………………………………….. |
70 |
|
Phone support period……………………………………………………………………………………… |
71 |
|
Telephone support numbers…………………………………………………………………………….. |
71 |
|
After the phone support period…………………………………………………………………………. |
73 |
|
General troubleshooting tips and resources………………………………………………………………….. |
73 |
|
Solve printing problems……………………………………………………………………………………………… |
74 |
|
The device shuts down unexpectedly……………………………………………………………………… |
74 |
|
Error message appears on control-panel display……………………………………………………… |
74 |
|
Alignment fails…………………………………………………………………………………………………….. |
74 |
|
The device is not responding (nothing prints)…………………………………………………………… |
74 |
|
Device takes a long time to print……………………………………………………………………………. |
75 |
|
Blank or partial page printed………………………………………………………………………………….. |
75 |
|
Something on the page is missing or incorrect…………………………………………………………. |
76 |
|
Placement of the text or graphics is wrong………………………………………………………………. |
76 |
|
The device prints half a page, then ejects the paper…………………………………………………. |
77 |
3
|
Poor print quality and unexpected printouts………………………………………………………………….. |
77 |
|
Solution 1: Use genuine HP cartridges……………………………………………………………………. |
77 |
|
Solution 2: Check the paper………………………………………………………………………………….. |
77 |
|
Solution 3: Wait a short period of time (if possible)…………………………………………………… |
78 |
|
Solution 4: Check the print settings………………………………………………………………………… |
78 |
|
Step 1: Check the print quality settings……………………………………………………………… |
79 |
|
Step 2: Check the Print in Grayscale setting………………………………………………………. |
79 |
|
Solution 5: Check estimated ink levels and replace low or empty ink cartridges…………… |
80 |
|
Solution 6: Print and evaluate a diagnostic report and troubleshoot defects…………………. |
80 |
|
Print Quality Diagnostic Report………………………………………………………………………… |
81 |
|
Self-Test Report……………………………………………………………………………………………… |
85 |
|
Solution 7: Clean the ink cartridges………………………………………………………………………… |
87 |
|
Solution 8: Align the ink cartridges…………………………………………………………………………. |
88 |
|
Solution 9: Replace the problem ink cartridge………………………………………………………….. |
88 |
|
Solution 10: Service the product…………………………………………………………………………….. |
88 |
|
Clean the area around the ink nozzles…………………………………………………………………………. |
89 |
|
Solve paper-feed problems………………………………………………………………………………………… |
91 |
|
Solve copy problems…………………………………………………………………………………………………. |
92 |
|
No copy came out………………………………………………………………………………………………… |
93 |
|
Copies are blank………………………………………………………………………………………………….. |
93 |
|
Documents are missing or faded……………………………………………………………………………. |
93 |
|
Size is reduced……………………………………………………………………………………………………. |
94 |
|
Copy quality is poor …………………………………………………………………………………………….. |
94 |
|
Copy defects are apparent……………………………………………………………………………………. |
94 |
|
The device prints half a page, then ejects the paper…………………………………………………. |
95 |
|
Paper mismatch…………………………………………………………………………………………………… |
95 |
|
Solve scan problems…………………………………………………………………………………………………. |
95 |
|
Scanner did nothing……………………………………………………………………………………………… |
95 |
|
Scan takes too long……………………………………………………………………………………………… |
96 |
|
Part of the document did not scan or text is missing…………………………………………………. |
96 |
|
Text cannot be edited…………………………………………………………………………………………… |
97 |
|
Error messages appear………………………………………………………………………………………… |
97 |
|
Scanned image quality is poor ……………………………………………………………………………… |
97 |
|
Scan defects are apparent……………………………………………………………………………………. |
98 |
|
Solve fax problems……………………………………………………………………………………………………. |
99 |
|
The fax test failed………………………………………………………………………………………………… |
99 |
|
Solve wired (Ethernet) network problems (some models only)………………………………………. |
111 |
|
General network troubleshooting………………………………………………………………………….. |
111 |
|
Network port created does not match device IP address (Windows)…………………………. |
112 |
4
|
Contents |
|
|
Solve wireless problems (some models only)……………………………………………………………… |
112 |
|
Basic wireless troubleshooting…………………………………………………………………………….. |
112 |
|
Advanced wireless troubleshooting………………………………………………………………………. |
113 |
|
Step 1: Make sure your computer is connected to your network………………………….. |
113 |
|
Step 2: Make sure that the HP device is connected to your network……………………. |
114 |
|
Step 3: Check to see if the firewall software is blocking communication……………….. |
115 |
|
Step 4: Make sure the HP device is online and ready………………………………………… |
116 |
|
Step 5: Make sure the wireless version of the HP device is set as the default printer |
|
|
driver (Windows only)……………………………………………………………………………………. |
116 |
|
Step 6: Make sure the HP Network Devices Support service is running (Windows |
|
|
only)……………………………………………………………………………………………………………. |
117 |
|
Add hardware addresses to a wireless access point (WAP)……………………………….. |
117 |
|
Configure your firewall to work with HP devices…………………………………………………………… |
118 |
|
Solve device management problems…………………………………………………………………………. |
119 |
|
Embedded Web server cannot be opened…………………………………………………………….. |
120 |
|
The EWS is only available in English……………………………………………………………………. |
120 |
|
Troubleshoot installation issues………………………………………………………………………………… |
121 |
|
Hardware installation suggestions………………………………………………………………………… |
121 |
|
Software installation suggestions…………………………………………………………………………. |
122 |
|
Understand the Printer Status Report and Self-Test Report………………………………………….. |
122 |
|
Understand the network configuration page (some models only)…………………………………… |
124 |
|
Clear jams………………………………………………………………………………………………………………. |
125 |
|
Clear paper jams……………………………………………………………………………………………….. |
126 |
|
Avoid paper jams……………………………………………………………………………………………….. |
127 |
|
A Technical information |
|
|
Warranty information……………………………………………………………………………………………….. |
128 |
|
Hewlett-Packard limited warranty statement………………………………………………………….. |
129 |
|
Ink cartridge warranty information………………………………………………………………………… |
130 |
|
Device specifications……………………………………………………………………………………………….. |
131 |
|
Physical specifications………………………………………………………………………………………… |
131 |
|
Product features and capacities…………………………………………………………………………… |
131 |
|
Processor and memory specifications…………………………………………………………………… |
131 |
|
System requirements………………………………………………………………………………………….. |
132 |
|
Network protocol specifications (Some models only)………………………………………………. |
132 |
|
Embedded Web server specifications (some models only)………………………………………. |
133 |
|
Media specifications…………………………………………………………………………………………… |
133 |
|
Understand supported sizes…………………………………………………………………………… |
133 |
|
Understand supported media types and weights………………………………………………. |
135 |
|
Set minimum margins……………………………………………………………………………………. |
136 |
|
Guidelines for two-sided (duplex) printing…………………………………………………… |
137 |
|
Print resolution…………………………………………………………………………………………………… |
137 |
|
Print specifications……………………………………………………………………………………………… |
137 |
|
Copy specifications…………………………………………………………………………………………….. |
137 |
|
Fax specifications………………………………………………………………………………………………. |
138 |
|
Scan specifications…………………………………………………………………………………………….. |
139 |
|
Operating environment……………………………………………………………………………………….. |
139 |
|
Electrical requirements……………………………………………………………………………………….. |
139 |
|
Acoustic emission specification……………………………………………………………………………. |
139 |
5
|
Regulatory information…………………………………………………………………………………………….. |
140 |
|
FCC statement…………………………………………………………………………………………………… |
141 |
|
Notice to users in Korea……………………………………………………………………………………… |
141 |
|
VCCI (Class B) compliance statement for users in Japan………………………………………… |
141 |
|
Notice to users in Japan about the power cord………………………………………………………. |
142 |
|
Noise emission statement for Germany………………………………………………………………… |
142 |
|
LED indicator statement……………………………………………………………………………………… |
142 |
|
Notice to users of the U.S. telephone network: FCC requirements……………………………. |
143 |
|
Notice to users of the Canadian telephone network………………………………………………… |
143 |
|
Notice to users in the European Economic Area…………………………………………………….. |
145 |
|
Notice to users of the German telephone network………………………………………………….. |
145 |
|
Australia wired fax statement………………………………………………………………………………. |
145 |
|
Regulatory information for wireless products…………………………………………………………. |
145 |
|
Exposure to radio frequency radiation……………………………………………………………… |
146 |
|
Notice to users in Brazil…………………………………………………………………………………. |
146 |
|
Notice to users in Canada……………………………………………………………………………… |
146 |
|
Notice to users in Taiwan………………………………………………………………………………. |
146 |
|
European Union regulatory notice…………………………………………………………………… |
147 |
|
Regulatory model number…………………………………………………………………………………… |
147 |
|
Declaration of conformity…………………………………………………………………………………….. |
148 |
|
Environmental product stewardship program………………………………………………………………. |
151 |
|
Paper use…………………………………………………………………………………………………………. |
151 |
|
Plastics…………………………………………………………………………………………………………….. |
151 |
|
Material safety data sheets………………………………………………………………………………….. |
151 |
|
Recycling program……………………………………………………………………………………………… |
151 |
|
HP inkjet supplies recycling program……………………………………………………………………. |
151 |
|
Disposal of waste equipment by users in private households in the European |
|
|
Union……………………………………………………………………………………………………………….. |
152 |
|
Power consumption……………………………………………………………………………………………. |
152 |
|
Chemical Substances…………………………………………………………………………………………. |
153 |
|
RoHS notices (China only)………………………………………………………………………………….. |
153 |
|
Third-party licenses…………………………………………………………………………………………………. |
154 |
|
HP Officejet 4500 Desktop………………………………………………………………………………….. |
155 |
|
HP Officejet 4500 / HP Officejet 4575 / HP Officejet Advantage 4500……………………….. |
158 |
|
HP Officejet 4500 Wireless………………………………………………………………………………….. |
165 |
|
B HP supplies and accessories |
|
|
Order printing supplies online……………………………………………………………………………………. |
172 |
|
Supplies…………………………………………………………………………………………………………………. |
172 |
|
Supported ink cartridges……………………………………………………………………………………… |
172 |
|
HP media………………………………………………………………………………………………………….. |
173 |
6
|
Contents |
||
|
C |
Additional fax setup |
|
|
Set up faxing (parallel phone systems)………………………………………………………………………. |
174 |
|
|
Choose the correct fax setup for your home or office………………………………………………. |
175 |
|
|
Case A: Separate fax line (no voice calls received)………………………………………………… |
177 |
|
|
Case B: Set up the device with DSL……………………………………………………………………… |
178 |
|
|
Case C: Set up the device with a PBX phone system or an ISDN line………………………. |
179 |
|
|
Case D: Fax with a distinctive ring service on the same line…………………………………….. |
179 |
|
|
Case E: Shared voice/fax line……………………………………………………………………………… |
180 |
|
|
Case F: Shared voice/fax line with voice mail………………………………………………………… |
181 |
|
|
Case G: Fax line shared with computer modem (no voice calls received)………………….. |
182 |
|
|
Set up the device with a computer dial-up modem…………………………………………….. |
183 |
|
|
Set up the device with a computer DSL/ADSL modem………………………………………. |
184 |
|
|
Case H: Shared voice/fax line with computer modem……………………………………………… |
185 |
|
|
Shared voice/fax with computer dial-up modem………………………………………………… |
185 |
|
|
Shared voice/fax with computer DSL/ADSL modem………………………………………….. |
187 |
|
|
Case I: Shared voice/fax line with answering machine……………………………………………. |
188 |
|
|
Case J: Shared voice/fax line with computer modem and answering machine……………. |
189 |
|
|
Shared voice/fax line with computer dial-up modem and answering machine……….. |
190 |
|
|
Shared voice/fax line with computer DSL/ADSL modem and answering |
||
|
machine………………………………………………………………………………………………………. |
192 |
|
|
Case K: Shared voice/fax line with computer dial-up modem and voice mail……………… |
193 |
|
|
Serial-type fax setup………………………………………………………………………………………………… |
195 |
|
|
Test fax setup…………………………………………………………………………………………………………. |
196 |
|
|
D Network setup (some models only) |
||
|
Change basic network settings………………………………………………………………………………….. |
197 |
|
|
View and print network settings……………………………………………………………………………. |
197 |
|
|
Turn the wireless radio on and off (some models only)……………………………………………. |
197 |
|
|
Change advanced network settings…………………………………………………………………………… |
197 |
|
|
Set link speed……………………………………………………………………………………………………. |
198 |
|
|
To View IP settings…………………………………………………………………………………………….. |
198 |
|
|
To Change IP settings………………………………………………………………………………………… |
198 |
|
|
Set up the device for wireless communication (some models only)………………………………… |
199 |
|
|
Understand 802.11 wireless network settings………………………………………………………… |
199 |
|
|
To set up wireless communication using the device control panel with wireless setup |
||
|
wizard………………………………………………………………………………………………………………. |
200 |
|
|
To set up wireless communication using the installer (Windows)……………………………… |
201 |
|
|
To set up wireless communication using the installer (Mac OS X)…………………………….. |
201 |
|
|
Connect the device using an ad hoc wireless network connection……………………………. |
201 |
|
|
To turn off wireless communication………………………………………………………………………. |
202 |
|
|
To print a wireless test page………………………………………………………………………………… |
202 |
|
|
Reset wireless settings……………………………………………………………………………………….. |
202 |
|
|
Change the connection method……………………………………………………………………………. |
202 |
|
|
Guidelines for ensuring wireless network security…………………………………………………… |
203 |
|
|
To add hardware addresses to a WAP…………………………………………………………….. |
203 |
|
|
Other guidelines…………………………………………………………………………………………… |
203 |
|
|
Guidelines for reducing interference on a wireless network……………………………………… |
203 |
|
|
Uninstall and reinstall the software…………………………………………………………………………….. |
203 |
|
|
E |
Device management tools |
|
|
Toolbox (Windows)………………………………………………………………………………………………….. |
206 |
7
|
Use the HP Solution Center (Windows)……………………………………………………………………… |
206 |
|
HP Utility (Mac OS X)………………………………………………………………………………………………. |
206 |
|
Embedded Web server (some models only)……………………………………………………………….. |
207 |
|
F Errors (Windows) |
|
|
Fax Memory Full……………………………………………………………………………………………………… |
209 |
|
Device Disconnected……………………………………………………………………………………………….. |
209 |
|
Ink Alert………………………………………………………………………………………………………………….. |
209 |
|
Cartridge Problem…………………………………………………………………………………………………… |
210 |
|
Solution 1: Install the ink cartridges correctly…………………………………………………………. |
210 |
|
Solution 2: Turn the product off and on…………………………………………………………………. |
212 |
|
Solution 3: Clean the electrical contacts………………………………………………………………… |
212 |
|
Solution 4: Replace the ink cartridge…………………………………………………………………….. |
212 |
|
Paper Mismatch………………………………………………………………………………………………………. |
212 |
|
The cartridge cradle cannot move……………………………………………………………………………… |
212 |
|
Paper Jam……………………………………………………………………………………………………………… |
212 |
|
Paper Jam……………………………………………………………………………………………………………… |
212 |
|
The printer is out of paper………………………………………………………………………………………… |
213 |
|
Printer Offline………………………………………………………………………………………………………….. |
213 |
|
Printer Paused………………………………………………………………………………………………………… |
213 |
|
Document failed to print……………………………………………………………………………………………. |
213 |
|
General printer error………………………………………………………………………………………………… |
213 |
|
Align cartridge…………………………………………………………………………………………………………. |
214 |
|
Index………………………………………………………………………………………………………………………….. |
215 |
8

1 Get started
This guide provides details about how to use the device and to resolve problems.
•Accessibility
•Eco-Tips
•Understand the device parts
•Use the product control panel
•Finding the device model number
•Select print media
•Load an original on the scanner glass
•Load an original in the automatic document feeder (ADF)
•Load media
•Maintain the device
•Turn off the device
 NOTE: If you are using the device with a computer running Windows XP Starter Edition, Windows Vista Starter Edition, or Windows 7 Starter Edition, some features might not be available. For more information, see Operating system compatibility.
Accessibility
The device provides a number of features that make it accessible for people with disabilities.
Visual
The device software is accessible for users with visual impairments or low vision through the use of your operating system’s accessibility options and features. It also supports most assistive technology such as screen readers, Braille readers, and voice-to-text applications. For users who are color blind, colored buttons and tabs used in the software and on the device control panel have simple text or icon labels that convey the appropriate action.
Mobility
For users with mobility impairments, the device software functions can be executed through keyboard commands. The software also supports Windows accessibility options such as StickyKeys, ToggleKeys, FilterKeys, and MouseKeys. The device doors, buttons, paper trays, and paper guides can be operated by users with limited strength and reach.
Support
For more details about the accessibility of this product and HP’s commitment to product accessibility, visit HP’s Web site at www.hp.com/accessibility.
For accessibility information for Mac OS X, visit the Apple Web site at www.apple.com/ accessibility.
Chapter 1
Eco-Tips
HP is committed to helping customers reduce their environmental footprint. HP has provided the Eco-Tips below to help you focus on ways to assess and reduce the impact of your printing choices. In addition to specific features in this product, please visit the HP Eco Solutions Web site for more information on HP’s environmental initiatives.
www.hp.com/hpinfo/globalcitizenship/environment/
•Duplex printing: Use Paper-saving Printing to print two-sided documents with multiple pages on same sheet to reduce paper usage. For more information, see Two-sided printing (duplexing).
•Smart Web printing (Windows): The HP Smart Web Printing interface includes a Clip Book and Edit Clips window where you can store, organize, or print clips you have gathered from the Web. For more information, see Print a Web page.
•Energy Savings Information: To determine the ENERGY STAR® qualification status for this product, see Power consumption.
•Recycled Materials: For more information regarding recycling of HP products, please visit:
www.hp.com/hpinfo/globalcitizenship/environment/recycle/
Understand the device parts
This section contains the following topics:
•Front view
•Printing supplies area
•Back view
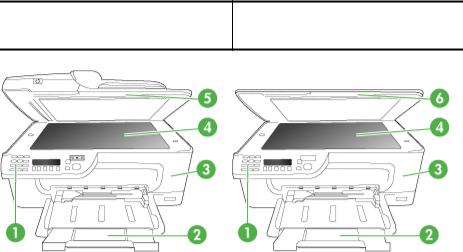
Front view
HP Officejet 4500 / HP Officejet 4575 /
HP Officejet 4500 Wireless / HP Officejet HP Officejet 4500 Desktop Advantage 4500
10 Get started

1Control panel
2Main tray
3Cartridge access door
4Scanner glass
5Automatic document feeder
6Scanner lid
Printing supplies area
HP Officejet 4500 / HP Officejet 4575 /
HP Officejet 4500 Wireless / HP Officejet HP Officejet 4500 Desktop Advantage 4500
1Cartridge access door
2Ink cartridges
Back view
HP Officejet 4500 / HP Officejet 4575 /
HP Officejet 4500 Wireless / HP Officejet HP Officejet 4500 Desktop Advantage 4500
|
Understand the device parts |
11 |
Chapter 1
|
1 |
Universal serial bus (USB) port |
|
2 |
Ethernet port (HP Officejet 4500 / HP Officejet 4575 / HP Officejet Advantage 4500 only) |
|
3 |
Power input |
|
4 |
1-LINE (fax) |
|
5 |
2-EXT (phone) |
Use the product control panel
This section contains the following topics:
•Overview of buttons and lights
•Change product settings
•Types of messages
Overview of buttons and lights
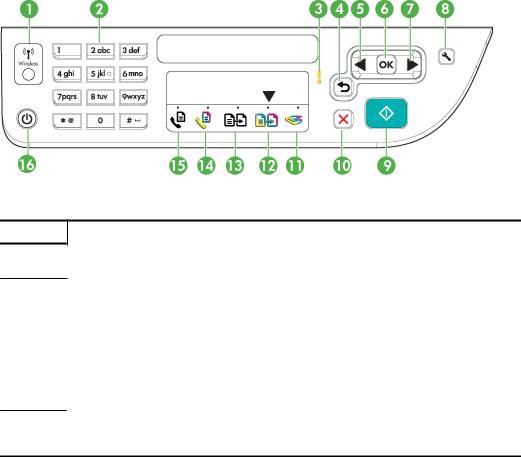
The following diagram and related table provide a quick reference to the device control panel features.
|
Label |
Name and Description |
1Wireless button (HP Officejet 4500 Wireless): Turns the 802.11 wireless feature on or off. The button is lit when the wireless feature is on.
|
2 |
Keypad: Enters values. |
|
3 |
Attention light: Indicates an error condition. |
|
4 |
Back button: Reverts back to its previous setting or upper level menu. |
|
5 |
Left arrow button: Navigates forward through settings in the menus. |
|
6 |
OK button: Selects the current menu or setting. |
|
7 |
Right arrow button: Navigates in reverse through settings in the menus. |
8Setup: Presents the Setup menu for generating reports and other maintenance settings, and for accessing the Help menu. The topic that you select from the Help menu opens a help window on your computer screen.
12 Get started
(continued)
|
Label |
Name and Description |
|
9 |
Start: Initiates a copy, fax, or scan job. Pressing Start processes the job according to the function |
|
selected. |
|
|
10 |
Cancel: Stops a job, exits a menu, or exits settings. |
|
11 |
Scan function indicator |
|
12 |
Copy Color function indicator |
|
13 |
Copy B&W function indicator |
|
14 |
Fax Color function indicator |
|
15 |
Fax B&W function indicator |
16Power: Turns the device on or off. The Power button is lit when the device is on. The light blinks while performing a job.
When the device is turned off, a minimal amount of power is still supplied. To completely disconnect the power supply, turn the device off, and then unplug the power cord.
Change product settings
You use the control panel to change the product’s mode and settings, print reports, or get help for the product.
TIP: If the product is connected to a computer, you can also change the product settings using software tools available on your computer, such as the Toolbox (Windows), the HP Utility (Mac OS X), or the embedded Web server (EWS). For more information about these tools, see Device management tools.
This section contains the following topics:
•Select the mode
•Change product settings
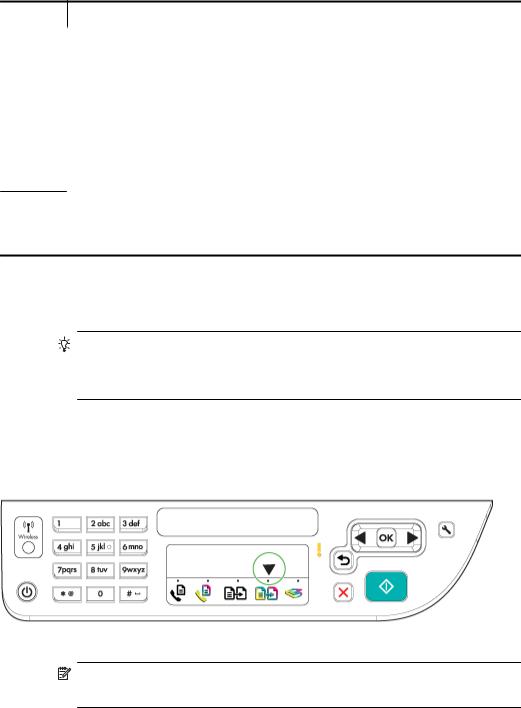
Select the mode
The mode indicator arrow on the control panel shows the mode currently selected for the product.
NOTE: After selecting a mode and changing settings, press  (Start button) to start the job.
|
Use the product control panel |
13 |

Chapter 1
To select a different mode
Press left arrow  or right arrow
  to select the desired mode, and then press OK.
To change settings for a mode
1.After selecting a mode, press the arrow buttons to scroll through the available settings available, and then press OK to select the setting you want to change.
2.Press the arrow buttons to change the settings, and then press OK.
 NOTE: Use the left arrow
  button or
  button when you want to delete an incorrect entry on the display.
Change product settings
To change the product settings or print reports, use the options available in the Setup menu:
1.Press the  (Setup) button
2.Press the arrow buttons to scroll through the menus.
3.Press OK to select menus or options.
 NOTE: Use the left arrow
  button or
  button when you want to delete an incorrect entry on the display.
Types of messages
While using the product, messages will appear on the control panel display. These messages provide information about the product’s activity. While some types of messages just provide information about the product’s status, other types of messages might require that you take the appropriate action (often specified in the message itself) before the product can continue functioning.
Status messages
Status messages reflect the current state of the device. They inform you of normal operation and require no action to clear them. They change as the state of the device changes. Whenever the device is ready, not busy, and has no pending warning messages, the status message READY appears if the device is turned on.
Warning messages
Warning messages inform you of events that require your attention, but they do not prevent the device from operating. An example of a warning message is a low ink warning. These messages appear until you resolve the condition.
Error messages
Error messages communicate that some action must be performed, such as adding media or clearing a media jam. These messages are usually accompanied by a blinking red Attention light. Take the appropriate action to continue printing.
14 Get started

If the error message shows an error code, press the Power button to turn off the device, and then turn it on again. In most situations, this action solves the problem. If the message persists, your device might need service. For more information, see Solve a problem.
Critical error messages
Critical error messages inform you of a device failure. Some of these messages can be cleared by pressing the Power button to turn off the device, and then turning it on again. If a critical error persists, service is required. For more information, see Solve a problem.
Finding the device model number
In addition to the model name that appears on the front of the device, this device has a specific model number. You can use this number to help determine which supplies or accessories are available for your product, as well as when obtaining support.
The model number is printed on a label located inside the device, near the ink cartridges area.
Select print media
The device is designed to work well with most types of office media. It is best to test a variety of print media types before buying large quantities. Use HP media for optimum print quality. Visit the HP Web site at www.hp.com for more information about HP media.
HP recommends plain papers with the ColorLok logo for printing and copying of everyday documents. All papers with the ColorLok logo are independently tested to meet high standards of reliability and print quality, and produce documents with crisp, vivid color, bolder blacks & dry faster than ordinary plain papers. Look for papers with the ColorLok logo in a variety of weights and sizes from major paper manufacturers.
This section contains the following topics:
•Recommended papers for printing and copying
•Recommended papers for photo printing
•Tips for selecting and using media
Recommended papers for printing and copying
If you want the best print quality, HP recommends using HP papers that are specifically designed for the type of project you are printing.

Chapter 1
Depending on your country/region, some of these papers might not be available.
|
HP Brochure Paper |
These papers are glossy-coated or matte-coated on both sides for two- |
|
|
HP Superior Inkjet |
sided use. They are the perfect choice for near-photographic |
|
|
reproductions and business graphics for report covers, special |
||
|
Paper |
||
|
presentations, brochures, mailers, and calendars. |
||
|
HP Bright White Inkjet |
HP Bright White Inkjet Paper delivers high-contrast colors and sharp |
|
|
Paper |
text. It is opaque enough for two-sided color usage with no show- |
|
|
through, which makes it ideal for newsletters, reports, and flyers. It |
||
|
features ColorLok Technology for less smearing, bolder blacks and |
||
|
vivid colors. |
||
|
HP Printing Paper |
HP Printing Paper is a high-quality multifunction paper. It produces |
|
|
documents that look and feel more substantial than documents printed |
||
|
on standard multipurpose or copy paper. It features ColorLok |
||
|
Technology for less smearing, bolder blacks and vivid colors. It is acid- |
||
|
free for longer lasting documents. |
||
|
HP Office Paper |
HP Office Paper is a high-quality multifunction paper. It is suitable for |
|
|
copies, drafts, memos and other everyday documents. It features |
||
|
ColorLok Technology for less smearing, bolder blacks and vivid colors. |
||
|
It is acid-free for longer lasting documents |
||
|
HP Office Recycled |
HP Office Recycled Paper is a high-quality multifunction paper made |
|
|
Paper |
with 30% recycled fiber. It features ColorLok Technology for less |
|
|
smearing, bolder blacks and vivid colors. It is acid-free for longer lasting |
||
|
documents. |
||
|
HP Premium |
These papers are heavy two-sided matte papers perfect for |
|
|
Presentation Paper |
presentation, proposals, reports and newsletters. They are |
|
|
HP Professional Paper |
heavyweight for an impressive look and feel. |
|
|
HP Premium Inkjet |
HP Premium Inkjet Transparency Film makes your color presentations |
|
|
Transparency Film |
vivid and even more impressive. This film is easy to use and handle and |
|
|
dries quickly without smudging. |
||
|
HP Advanced Photo |
This thick photo paper features an instant-dry finish for easy handling |
|
|
Paper |
without smudging. It resists water, smears, fingerprints, and humidity. |
|
|
Your prints have a look and feel comparable to a store processed photo. |
||
|
It is available in several sizes, including A4, 8.5 x 11 inch, 10 x 15 cm |
||
|
(4 x 6 inch), 13×18 cm (5 x7 inch) and two finishes – glossy or soft gloss |
||
|
(satin matte). It is acid-free for longer lasting documents. |
||
|
HP Everyday Photo |
Print colorful, everyday snapshots at a low cost, using paper designed |
|
|
Paper |
for casual photo printing. This affordable, photo paper dries quickly for |
|
|
easy handling. Get sharp, crisp images when you use this paper with |
||
|
any inkjet printer. Available in semi-gloss finish in 8.5 x11 inch, A4, 4 x |
||
|
6 inch and 10 x 15 cm. It is acid-free for longer lasting documents. |
||
|
HP Iron-On Transfers |
HP Iron-on Transfers (for color fabrics or for light or white fabrics) are |
|
|
the ideal solution for creating custom T-shirts from your digital photos. |
||
To order HP papers and other supplies, go to www.hp.com/buy/supplies. If prompted, choose your country/region, follow the prompts to select your product, and then click one of the shopping links on the page.
 NOTE: At this time, some portions of the HP Web site are available in English only.
HP Photo Value Packs:
16 Get started
![]()
HP Photo Value Packs conveniently package Original HP ink cartridges and HP Advanced Photo Paper to save you time and take the guesswork out of printing affordable professional photos with your HP printer. Original HP inks and HP Advanced Photo Paper have been designed to work together so your photos are long lasting and vivid, print after print. Great for printing out an entire vacation’s worth of photos or multiple prints to share.
Recommended papers for photo printing
If you want the best print quality, HP recommends using HP papers that are specifically designed for the type of project you are printing.
Depending on your country/region, some of these papers might not be available.
HP Advanced Photo Paper
This thick photo paper features an instant-dry finish for easy handling without smudging. It resists water, smears, fingerprints, and humidity. Your prints have a look and feel comparable to a store processed photo. It is available in several sizes, including A4, 8.5 x 11 inch, 10 x 15 cm (4 x 6 inch), 13 x 18 cm (5 x 7 inch) and two finishes – glossy or soft gloss (satin matte). It is acid-free for longer lasting documents.
HP Everyday Photo Paper
Print colorful, everyday snapshots at a low cost, using paper designed for casual photo printing. This affordable, photo paper dries quickly for easy handling. Get sharp, crisp images when you use this paper with any inkjet printer. Available in semi-gloss finish in 8.5 x 11 inch, A4, 4 x 6 inch and 10 x 15 cm. It is acid-free for longer lasting documents.
HP Photo Value Packs:
HP Photo Value Packs conveniently package Original HP ink cartridges and HP Advanced Photo Paper to save you time and take the guesswork out of printing affordable professional photos with your HP printer. Original HP inks and HP Advanced Photo Paper have been designed to work together so your photos are long lasting and vivid, print after print. Great for printing out an entire vacation’s worth of photos or multiple prints to share.
To order HP papers and other supplies, go to www.hp.com/buy/supplies. If prompted, choose your country/region, follow the prompts to select your product, and then click one of the shopping links on the page.
 NOTE: At this time, some portions of the HP Web site are available in English only.
Tips for selecting and using media
For the best results, observe the following guidelines.
•Always use media that conforms to the device specifications. For more information, see Media specifications.
•Load only one type of media at a time into a tray or automatic document feeder (ADF) (some models only).
•When loading the trays and ADF (some models only), make sure the media is properly loaded. For more information, see Load media or Load an original in the automatic document feeder (ADF).
Chapter 1
•Do not overload the tray or ADF (some models only). For more information, see Media specifications.
•To prevent jams, poor print quality, and other printing problems, avoid loading the following media in the trays or ADF (some models only):
◦Multipart forms
◦Media that is damaged, curled, or wrinkled
◦Media with cutouts or perforations
◦Media that is heavily textured, embossed, or does not accept ink well
◦Media that is too lightweight or stretches easily
◦Media that contains staples or clips
 NOTE: To scan, copy, or fax documents that contain pages that do not conform to these guidelines, use the scanner glass. For more information, see Load an original on the scanner glass.
Load an original on the scanner glass
You can copy, scan, or fax up to letteror A4-size originals by loading them on the glass.
 NOTE: Many of the special features will not work correctly if the glass and lid backing are not clean. For more information, see Maintain the device.
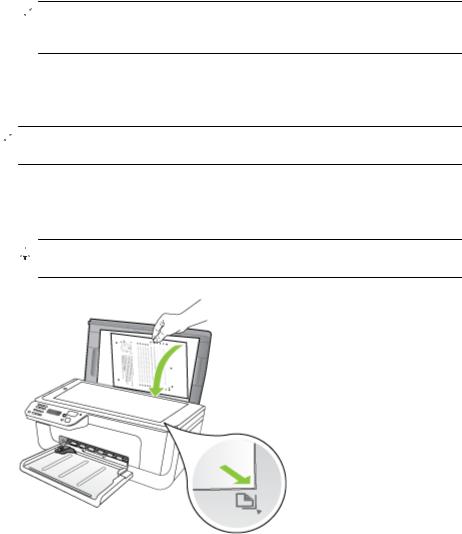
To load an original on the scanner glass
1.Lift the scanner lid.
2.Load your original print side down.

 TIP: For more help on loading an original, refer to the engraved guides along the edge of the glass.
18 Get started
3. Close the lid.
Load an original in the automatic document feeder (ADF)
 NOTE: The ADF is available for some models only.
You can copy, scan, or fax a one-sided, singleor multiple-page, A4or letter-size document by placing it in the document feeder tray.
 CAUTION: Do not load photos in the ADF; this might cause damage to your photos.
 NOTE: Two-sided legal-size documents cannot be scanned, copied, or faxed using the ADF.
NOTE: Some features, such as the Fit to Page copy feature, do not work when you load your originals in the ADF. You must load your originals on the glass.
The document feeder tray holds a maximum of 50 sheets of plain paper.
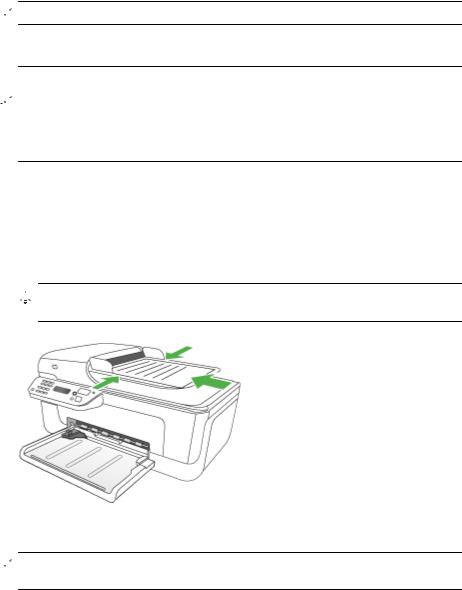
To load an original in the document feeder tray
1.Load your original, with the print side up, into the document feeder tray. Place the pages so that the top edge of the document goes in first. Slide the media into the automatic document feeder until you hear a beep or see a message on the display indicating that the loaded pages were detected.

 TIP: For more help on loading originals in the automatic document feeder, refer to the diagram engraved in the document feeder tray.
2. Slide the width guides inward until they stop at the left and right edges of the media.
 NOTE: Remove all originals from the document feeder tray before lifting the lid on the device.
Load media
This section provides instructions for loading media into the device.
Chapter 1
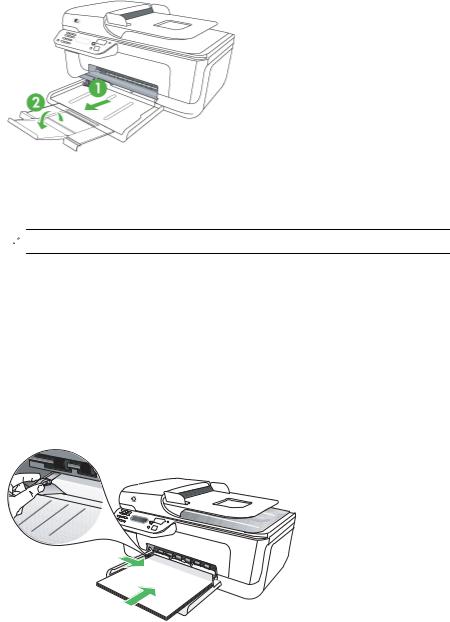
To load media
1. Pull out the tray extender.
2.Insert the media print-side down along the right of the main tray. Make sure the stack of media aligns with the right and back edges of the tray, and does not exceed the line marking in the tray.
 NOTE: Do not load paper while the device is printing.
•Envelopes: Load envelopes with the flaps facing up to the right or the back of the tray. Depending on the type of envelope you are loading, the flap hinge should be on the left or towards the back of the tray.
•Photo paper: If the photo paper has a tab along one edge, make sure the tab is pointing towards the back of the product.
•Transparencies: Insert transparencies with the rough side down and the adhesive strip pointing towards the back of the product.
•Custom-sized media: Use only custom-sized media that is supported by the device. For more information, see Media specifications.
3.Slide the media guides in the tray to adjust them for the media size that you have loaded.
20 Get started
Maintain the device
This section provides instructions for keeping the device in top working condition. Perform these maintenance procedures as necessary.
•Clean the scanner glass
•Clean the exterior
•Clean the automatic document feeder (ADF) (Some models only)
Clean the scanner glass
 NOTE: Dust or dirt on the scanner glass, scanner lid backing, or scanner frame can slow down performance, degrade the quality of scans, and affect the accuracy of special features such as fitting copies to a certain page size.
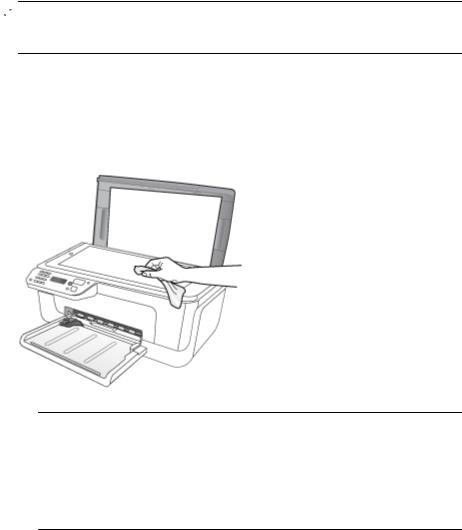
To clean the scanner glass
1.Turn off the device.
2.Lift the scanner lid.
3.Clean the glass by using a soft, lint-free cloth that has been sprayed with a mild glass cleaner. Dry the glass with a dry, soft, lint-free cloth.
 CAUTION: Use only glass cleaner to clean the scanner glass. Avoid cleaners that contain abrasives, acetone, benzene, and carbon tetrachloride, all of which can damage the scanner glass. Avoid isopropyl alcohol because it can leave streaks on the glass.
CAUTION: Do not spray the glass cleaner directly on the glass. If too much glass cleaner is applied, the cleaner could leak under the glass and damage the scanner.
4. Close the scanner lid, and turn on the device.
Chapter 1
Clean the exterior
 WARNING! Before cleaning the device, turn off the power and unplug the power cord from the electrical socket.
Use a soft, damp, lint-free cloth to wipe dust, smudges, and stains off of the case. The exterior of the device does not require cleaning. Keep fluids away from the interior of the device, as well as from the device control panel.
Clean the automatic document feeder (ADF) (Some models only)
 NOTE: The ADF is available for some models only.
If the automatic document feeder picks up multiple pages or if it does not pick up plain paper, you can clean the rollers and separator pad. Lift the automatic document feeder cover to access the pick assembly inside the automatic document feeder, clean the rollers or separator pad, and then close the cover.
If you have lines or dust appearing on scanned documents or faxes, clean the plastic strip in the ADF.
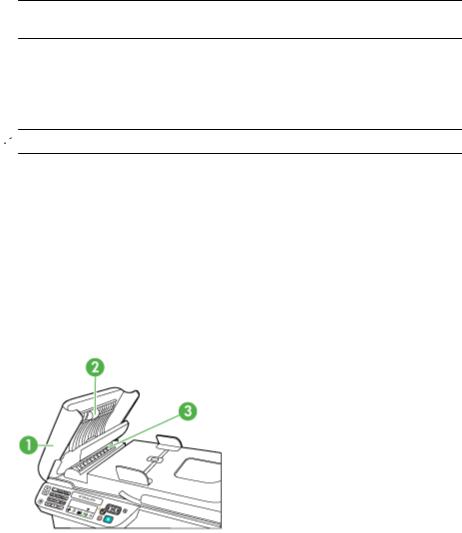
To clean the rollers or separator pad
1.Remove all originals from the document feeder tray.
2.Lift the automatic document feeder cover (1).
This provides easy access to the rollers (2) and separator pad (3), as shown below.
|
1 |
Automatic document feeder cover |
|
2 |
Rollers |
|
3 |
Separator pad |
3.Lightly dampen a clean lint-free cloth with distilled water, then squeeze any excess liquid from the cloth.
22 Get started
4.Use the damp cloth to wipe any residue off the rollers or separator pad.
 NOTE: If the residue does not come off using distilled water, try using isopropyl (rubbing) alcohol.
5.Close the cover of the automatic document feeder.
To clean the plastic strip inside the automatic document feeder
1.Turn off the device and unplug the power cord.
 NOTE: Depending how long the device is unplugged, the date and time might be erased. You might need to reset the date and time later, when you plug the power cord back in.
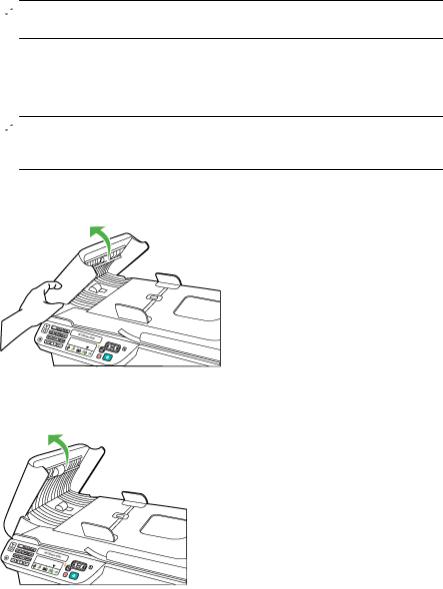
2.Lift the cover of the automatic document feeder until it stops, and then gently pry the cover to release the catch.
3. Continue lifting the automatic document feeder cover to the vertical position.
Chapter 1
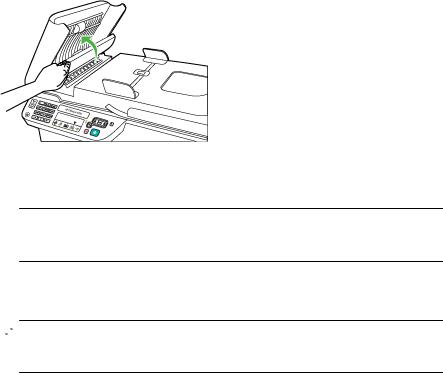
4. Lift the automatic document feeder mechanism.
5.Clean the plastic strip with a soft cloth or sponge slightly moistened with a nonabrasive glass cleaner.
 CAUTION: Do not use abrasives, acetone, benzene, or carbon tetrachloride on the plastic strip, since they can damage it. Do not place or spray liquid directly on the plastic strip. The liquid might seep under the glass and damage the device.
6.Gently lower the automatic document feeder mechanism to avoid dislodging the plastic strip, and then close the cover of the automatic document feeder.
7.Plug in the power cord, and then turn on the device.
 NOTE: If you still see dust or lines on scans after cleaning the plastic strip, you may need to order a new plastic strip. For more information, see Solve a problem.
Turn off the device
Turn off the product by pressing the  (power) button located on the product. Wait until the power light turns off before unplugging the power cord or turning off a power strip. If you improperly turn off the product, the print carriage might not return to the correct position causing problems with the ink cartridges and print quality issues.
24 Get started

2 Print
Most print settings are automatically handled by the software application. You need to change the settings manually only when you want to change print quality, print on specific types of paper, or use special features. For more information about selecting the best print media for your documents, see Select print media.
This section contains the following topics:
•Print documents
•Print brochures
•Print on envelopes
•Print a Web page
•Print photos
•Print on special and custom-sized paper
•Print borderless documents
Print documents
 NOTE: With certain types of paper, you can print on both sides of a sheet of paper (called “two-sided printing” or “duplex printing”). For more information, see Two-sided printing (duplexing).
Follow the instructions for your operating system.
•Print documents (Windows)
•Print documents (Mac OS X)
Print documents (Windows)
1.Load paper in the tray. For more information, see Load media.
2.On the File menu in your software application, click Print.
3.Select the product you want to print to.
4.If you need to change settings, click the button that opens the Properties dialog box. Depending on your software application, this button might be called Properties,
Options, Printer Setup, Printer, or Preferences.
5.Click a type of print task in the Printing Shortcuts list. The preset default settings for the shortcuts are displayed.
6.If you change any settings on the Printing Shortcuts tab, you can save your custom settings as a new printing shortcut:
a. Select the shortcut, and then click Save As.
b. To delete a shortcut, select the shortcut, and then click Delete.

 TIP: You can change more options for the print job by using the features available on the other tabs in the dialog box.
7.Click OK.
8.Click Print or OK to begin printing.
Print 25

Chapter 2
Print documents (Mac OS X)
1.Load paper in the tray. For more information, see Load media.
2.From the File menu in your software application, choose Print.
3.Make sure the product you want to use is selected.
4.Change the print settings for the option provided in the pop-up menus, as appropriate for your project.
 NOTE: Click the blue disclosure triangle next to the Printer selection to access these options.
5.Click Print to begin printing.
Print brochures
Follow the instructions for your operating system.
 NOTE: To set print settings for all print jobs, make the changes in the printer driver.
For more information about the features of the Windows printer driver, see the online help for the driver. For more information about printing from a specific application, see the documentation that came with the application.
•Print brochures (Windows)
•Print brochures (Mac OS X)
Print brochures (Windows)
1.Load paper in the tray. For more information, see Load media.
2.On the File menu in your software application, click Print.
3.Select the product you want to print to.
4.If you need to change settings, click the button that opens the Properties dialog box. Depending on your software application, this button might be called Properties,
Options, Printer Setup, Printer, or Preferences.
5.Select Brochure Printing – Borderless in the Printing Shortcuts list. The default settings are displayed.
6.Change any other print settings.

 TIP: You can change more options for the print job by using the features available on the other tabs in the dialog box.
7.Click Print to begin printing.
Print brochures (Mac OS X)
1.Load paper in the tray. For more information, see Load media.
2.From the File menu in your software application, choose Print.
3.Make sure the product you want to use is selected.
26 Print
![]()
4.Choose Paper Type/Quality from the pop-up menu, and then choose the following settings:
•Paper Type: the appropriate brochure paper type
•Quality: Normal or Best
 NOTE: Click the blue disclosure triangle next to the Printer selection to access these options.
5. Select any other print settings that you want, and then click Print to begin printing.
Print on envelopes
When choosing envelopes, avoid envelopes that have a very slick finish, self-stick adhesives, clasps, or windows. Also, avoid envelopes with thick, irregular, or curled edges, or areas that are wrinkled, torn, or otherwise damaged.
Make sure the envelopes you load in the product are tightly constructed and that the folds are sharply creased.
 NOTE: For more information about printing on envelopes, see the documentation available with the software program you are using.
Follow the instructions for your operating system.
•Print on envelopes (Windows)
•Print on envelopes (Mac OS X)
Print on envelopes (Windows)
1.Load paper in the tray. For more information, see Load media.
2.On the File menu in your software application, click Print.
3.Select the product you want to print to.
4.If you need to change settings, click the button that opens the Properties dialog box. Depending on your software application, this button might be called Properties,
Options, Printer Setup, Printer, or Preferences.
5.On the Features tab, change the orientation to Landscape.
6.In the Basic Options area, from the Size drop-down list, select More. Then, select the appropriate envelope type.

 TIP: You can change more options for the print job by using the features available on the other tabs in the dialog box.
7.Click OK, and then click Print or OK to begin printing.
Print on envelopes (Mac OS X)
1.Load paper in the tray. For more information, see Load media.
2.From the File menu in your software application, choose Print.
3.Make sure the product you want to use is selected.
4.Choose the appropriate envelope size in the Paper Size pop-up menu.

Chapter 2
5.Select the landscape or horizontal Orientation option.
 NOTE: Click the blue disclosure triangle next to the Printer selection to access these options.
6.Select any other print settings that you want, and then click Print to begin printing.
Print a Web page
TIP: To print Web pages correctly, you might need to set your print orientation to Landscape.
If you are using a computer running Windows and Internet Explorer 6.0 or higher for Web browsing, you can use HP Smart Web Printing to ensure simple, predictable web printing with control over what you want and how you want it printed. You can access HP Smart Web Printing from the toolbar in Internet Explorer. For more information about HP Smart Web Printing, see the help file provided with it.
 NOTE: With certain types of paper, you can print on both sides of a sheet of paper (called “two-sided printing” or “duplex printing”). For more information, see Two-sided printing (duplexing).
Follow the instructions for your operating system.
•Print a Web page (Windows)
•Print a Web page (Mac OS X)
Print a Web page (Windows)
1.Load paper in the tray. For more information, see Load media.
2.On the File menu in your software application, click Print.
3.Select the product you want to print to.
4.If your Web browser supports it, select the items on the Web page that you want to include in the printout.
For example, in Internet Explorer, click the Options tab to select options such as As laid out on screen, Only the selected frame, and Print all linked documents.
5.Click Print or OK to begin printing.
Print a Web page (Mac OS X)
1.Load paper in the tray. For more information, see Load media.
2.From the File menu in your software application, choose Print.
3.Make sure the product you want to use is selected.
4.Some Web browsers include special options for printing Web pages. If available, choose the option for your Web browser from the pop-up menu in the Print dialog. For more information, see the documentation provided with your Web browser.
 NOTE: Click the blue disclosure triangle next to the Printer selection to access these options.
5.Select any other print settings that you want, and then click Print to begin printing.
28 Print

Print photos
Do not leave unused photo paper in the input tray. The paper might start to curl, which could reduce the quality of your printout. Photo paper should be flat before printing.
Follow the instructions for your operating system.
•Print photos on photo paper (Windows)
•Print photos on photo paper (Mac OS X)
Print photos on photo paper (Windows)
1.Load paper in the tray. For more information, see Load media.
2.On the File menu in your software application, click Print.
3.Select the product you want to print to.
4.If you need to change settings, click the button that opens the Properties dialog box. Depending on your software application, this button might be called Properties,
Options, Printer Setup, Printer, or Preferences.
5.Click Photo Printing – Borderless or Photo Printing with white borders in the
Printing Shortcuts list. The default settings are displayed.
 NOTE: To achieve the highest dpi resolution, you can use the Maximum dpi setting with supported types of photo paper. If Maximum dpi is not listed in the Print quality drop-down list, you can enable it from the Advanced tab.
6.If you change any settings on the Printing Shortcuts tab, you can save your custom settings as a new printing shortcut:
•Select the shortcut, and then click Save As.
•To delete a shortcut, select the shortcut, and then click Delete.
TIP: You can change more options for the print job by using the features available on the other tabs in the dialog box.
7.If you want to print the photo in black and white, click the Advanced tab and, in the
Color Options area, select the Print in grayscale check box.
8.Click OK, and then click Print or OK to begin printing.
Print photos on photo paper (Mac OS X)
1.Load paper in the tray. For more information, see Load media.
2.From the File menu in your software application, choose Print.
3.Make sure the product you want to use is selected.
4.Choose Paper Type/Quality from the pop-up menu, and then choose the following settings:
•Paper Type: The appropriate photo paper type
•Quality: Best or Maximum dpi
 NOTE: Click the blue disclosure triangle next to the Printer selection to access these options.

Chapter 2
5.If necessary, click the disclosure triangle next to Color Options.
Select any other print settings that you want, and then click Print to begin printing.
6.Select the appropriate Photo Fix options:
•Off: applies no HP Real Life Technologies to the image.
•Basic: automatically focuses the image; moderately adjusts image sharpness.
7.If you want to print the photo in black and white, choose the Grayscale from the Color pop-up menu, and then choose one of the following options:
•High Quality: uses all the available colors to print your photo in grayscale. This creates smooth and natural shades of gray.
•Black Print Cartridge Only: uses black ink to print your photo in grayscale. The gray shading is created by varying patterns of black dots, which might result in a grainy image.
Print on special and custom-sized paper
If your application supports custom-sized paper, set the size in the application before printing the document. If not, set the size in the print driver. You might need to reformat existing documents to print them correctly on custom-sized paper.
Use only custom-sized paper that is supported by the device. For more information, see Media specifications.
 NOTE: With certain types of paper, you can print on both sides of a sheet of paper (called “two-sided printing” or “duplex printing”). For more information, see Two-sided printing (duplexing).
Follow the instructions for your operating system.
•Print on special or custom-sized paper (Windows)
•Print on special or custom-sized paper (Mac OS X)
Print on special or custom-sized paper (Windows)
1.Load paper in the tray. For more information, see Load media.
2.On the File menu in your software application, click Print.
3.Select the product you want to print to.
4.If you need to change settings, click the button that opens the Properties dialog box. Depending on your software application, this button might be called Properties,
Options, Printer Setup, Printer, or Preferences.
5.If necessary, set up the custom size in the printer driver:
a. On the Features tab, click Custom in the Size drop-down list. b. Type a name for the new custom size.
c. In the Width and Height boxes, type the dimensions, and then click Save. d. Click OK.
 NOTE: To achieve the highest dpi resolution, you can use the Maximum dpi setting with supported types of photo paper. If Maximum dpi is not listed in the Print quality drop-down list, you can enable it from the Advanced tab.
6.Make sure the custom size is selected in the Size drop-down list.
30 Print

7.Select the paper type:
a. Click More in the Paper type drop-down list. b. Click the desired paper type, and then click OK.
8.Click OK, and then click Print or OK to begin printing.
Print on special or custom-sized paper (Mac OS X)
 NOTE: Before you can print on custom-sized paper, you must set up the custom size in the printing software. For instructions, see Set up custom sizes (Mac OS X).
1.Load the appropriate paper in the tray. For more information, see Load media.
2.From the File menu in your software application, choose Print.
3.Make sure the product you want to use is selected.
4.Choose Paper Handling from the pop-up menu.
 NOTE: Click the blue disclosure triangle next to the Printer selection to access these options.
5.Under Destination Paper Size, click Scale to fit paper size, and then select the custom size.
Select any other print settings that you want, and then click Print to begin printing.
6.Change any other settings, and then click Print to begin printing.
Set up custom sizes (Mac OS X)
1.From the File menu in your software application, choose Print.
2.Choose the desired printer in the Format for pop-up menu.
3.Choose Manage Custom Sizes in the Paper Size pop-up menu.
4.Click the + on the left side of the screen, double-click Untitled, and type a name for the new, custom size.
5.In the Width and Height boxes, type the dimensions, and then set the margins, if desired.
6.Choose Paper Handling from the pop-up menu.
7.Click OK.
Print borderless documents
Borderless printing lets you print to the edges of certain photo media types and a range of standard media sizes.
 NOTE: You cannot print a borderless document if the paper type is set to Plain paper.
NOTE: Before printing a borderless document, open the file in a software application and assign the image size. Make sure the size corresponds to the media size on which you are printing the image.
NOTE: Not all applications support borderless printing.
|
Print borderless documents |
31 |

Chapter 2
Follow the instructions for your operating system.
•Print borderless documents (Windows)
•Print borderless documents (Mac OS X)
Print borderless documents (Windows)
1.Load paper in the tray. For more information, see Load media.
2.On the File menu in your software application, click Print.
3.Select the product you want to print to.
4.If you need to change settings, click the button that opens the Properties dialog box. Depending on your software application, this button might be called Properties,
Options, Printer Setup, Printer, or Preferences.
5.Click the Features tab.
6.In the Size list, click More, and then select the borderless size loaded in the tray. If a borderless image can be printed on the specified size, the Borderless check box is selected.
7.In the Paper type drop-down list, click More, and then select the appropriate paper type.
8.Select the Borderless check box if it is not already checked.
If the borderless paper size and paper type are not compatible, the product software displays an alert and allows you to select a different type or size.
9.Click OK, and then click Print or OK to begin printing.
Print borderless documents (Mac OS X)
1.Load paper in the tray. For more information, see Load media.
2.From the File menu in your software application, choose Print.
3.Make sure the product you want to use is selected.
4.Choose Paper Type/Quality from the pop-up menu, and then choose the following settings:
•Paper Type: The appropriate paper type
•Quality: Best or Maximum dpi
 NOTE: Click the blue disclosure triangle next to the Printer selection to access these options.
5.If necessary, select the appropriate Photo Fix options:
•Off: applies no HP Real Life Technologies to the image.
•Basic: automatically focuses the image; moderately adjusts image sharpness.
6.Select any other print settings that you want, and then click Print to begin printing.
Two-sided printing (duplexing)
With certain types of paper, you can print on both sides of a sheet of paper (called “twosided printing” or “duplex printing”).
•Perform two-sided printing (Windows)
•Perform two-sided printing (Mac OS X)
32 Print

Perform two-sided printing (Windows)
1.Load paper in the tray. For more information, see Load media and Guidelines for twosided (duplex) printing.
2.On the File menu in your software application, click Print.
3.Select the Two-sided (Duplex) Printing option in the Printing Shortcuts list.
4.Click OK, and then click Print or OK to begin printing.
5.Follow any onscreen instructions.
Perform two-sided printing (Mac OS X)
1.Load paper in the tray. For more information, see Load media and Guidelines for twosided (duplex) printing.
2.From the File menu in your software application, choose Print.
3.Make sure the product you want to use is selected.
4.Choose Paper Handling from the pop-up menu, and then choose Odd numbered pages or Odd only.
5.Change any other settings, and then click Print.
6.After the odd-numbered pages have printed, rotate the printed pages 180 degrees and reload them in the tray.
 NOTE: Make sure the freshly printed text is face up.
7.From the File menu, choose Print.
8.Choose Paper Handling from the pop-up menu, and then choose Even numbered pages or Even only.
9.Click Print to begin printing.
|
Two-sided printing (duplexing) |
33 |

3 Scan
Using the product’s control panel, you can scan originals and send them to a variety of destinations, such as a folder or a program on a computer. You can also scan originals using the HP software provided with the product and TWAIN-compliant or WIA-compliant programs on a computer.
You can use the HP software to convert the text in scanned documents into a format that you can search, copy, paste, and edit.
 NOTE: Scan functions are only available after you install the software.
This section contains the following topics:
•Scan an original
•Edit a scanned document using optical character recognition (OCR) software
Scan an original
You can start a scan from a computer or from the device control panel.
To use the scan features, your device and computer must be connected and turned on. The HP software must also be installed and running on your computer prior to scanning. To verify that the HP software is running on a computer running Windows, look for the device icon in the system tray at the lower-right side of the screen, near the clock.
 NOTE: Closing the HP Digital Imaging Monitor icon in your Windows system tray can cause your device to lose some of its scan functionality and result in the No Connection error message. If this happens, you can restore full functionality by restarting your computer or by starting the HP Digital Imaging Monitor.
NOTE: If you are using a computer running Windows, you can also use the
HP Solution Center to scan an image. Using this software, you can edit a scanned image and create special projects using a scanned image. For more information, see the onscreen help that came with your software.
This section contains the following topics:
•Scan an original from the product control panel
Scan an original from the product control panel
You can send a scan to a computer connected directly to the device. You can also send a scan to a program installed on a computer.
 NOTE: If you are scanning a borderless original, load the original on the scanner glass, not the ADF.
To scan from the product control panel
1.Load the original. For more information, see Load an original on the scanner glass.
2.Press left arrow  or right arrow to select the Scan function, and then press OK.
 or right arrow
  to select the
 34 Scan
3.Press right arrow  to select what to do with the scan, and then press OK.
4.Press Start.
Edit a scanned document using optical character recognition (OCR) software
You can use OCR software to import scanned text into your preferred word-processing program for editing. This allows you to edit letters, newspaper clippings, and many other documents.
You can specify the word-processing program that you want to use for editing. If the wordprocessing icon is not present or active, either you do not have word-processing software installed on your computer, or the scanner software did not recognize the program during the installation. See the onscreen Help for the HP Solution Center for information about how to create a link to the word-processing program.
The OCR software does not support scanning colored text. Colored text is always converted to black-and-white text before being sent to OCR. Thus, all text in the final document is in black and white, regardless of the original color.
Because of the complexity of some word-processing programs and their interaction with the device, it is sometimes preferable to scan to a text editor, such as Wordpad (Windows) or TextEdit (Mac OS X), and then cut and paste the text into the preferred wordprocessing program.
|
Edit a scanned document using optical character recognition (OCR) software |
35 |

4 Copy
You can produce high-quality color and grayscale copies on a variety of paper types and sizes.
 NOTE: If you are copying a document when a fax arrives, the fax is stored in the device memory until the copying finishes. This can reduce the number of fax pages stored in memory.
This section contains the following topics:
•Copy documents
•Change copy settings
Copy documents
You can make quality copies from the device control panel.
 NOTE: If you are copying a borderless original, load the original on the scanner glass, not the ADF.
To copy documents
1.Make sure you have paper loaded in the main tray.
2.Place your original face down on the scanner glass. If you are copying a borderless original, load the original on the scanner glass, not the ADF. For more information, see Load an original on the scanner glass.
3.Use the left arrow  or right arrow
  to select one of the following functions:
•Copy B&W: To select a black-and-white copy job.
•Copy Color : To select a color copy job.
 NOTE: If you have a color original, selecting the Copy B&W function produces a black-and-white copy of the color original, while selecting the Copy Color function produces a full-color copy of the color original.
4.Press OK.
5.Change any additional settings. For more information, see Change copy settings
6.Press Start.
Change copy settings
You can customize copy jobs using the various settings available from the product’s control panel, including the following:
•Number of copies
•Copy paper size
•Copy paper type
•Copy speed or quality
36 Copy
•Lighter/Darker settings
•Resizing originals to fit on different paper sizes
You can use these settings for single copy jobs, or you can save settings to be used as defaults for future jobs.
To change copy settings for a single job
1.Press left arrow  or right arrow
  to navigate between different copy options.
2.Make any changes to the copy function settings, and then press OK to accept the changes.
To save the current settings as defaults for future jobs
1.Press left arrow  or right arrow
  to navigate between different copy options.
2.Make any changes to the copy function settings, and then press OK to accept the changes.
3.Press right arrow  until Set As Default appears, and then press OK.
4.Press right arrow  to select Yes, and then press OK.

5 Fax
You can use the device to send and receive faxes, including color faxes. You can schedule faxes to be sent at a later time and set up speed-dials to send faxes quickly and easily to frequently used numbers. From the device control panel, you can also set a number of fax options, such as resolution and the contrast between lightness and darkness on the faxes you send.
 NOTE: Before you begin faxing, make sure you have set up the device properly for faxing. You might have already done this as part of the initial setup, by using either the control panel or the software that came with the device. You can verify the fax is set up correctly by running the fax setup test from the control panel. To run the fax test, press
  (Setup), select Tools, select Run fax test, and then press OK.
This section contains the following topics:
•Send a fax
•Receive a fax
•Change fax settings
•Fax over Internet Protocol (FoIP)
•Use reports
Send a fax
You can send a fax in a variety of ways. Using the device control panel, you can send a black-and-white or color fax. You can also send a fax manually from an attached phone. This allows you to speak with the recipient before sending the fax.
This section contains the following topics:
•Send a basic fax
•Send a fax manually from a phone
•Send a fax using monitor dialing
•Send a fax from memory
•Schedule a fax to send later
•Send a fax to multiple recipients
•Send a fax in Error Correction Mode
Send a basic fax
You can easily send a singleor multiple-page black-and-white or color fax by using the device control panel.
 NOTE: If you need printed confirmation that your faxes were successfully sent, enable fax confirmation before sending any faxes.
38 Fax

TIP: You can also send a fax manually from a phone or by using monitor dialing. These features allow you to control the pace of your dialing. They are also useful when you want to use a calling card to charge the call and you have to respond to tone prompts while dialing.
To send a basic fax from the device control panel
1.Load your originals. If you are faxing a borderless original, load the original on the scanner glass, not the ADF. For additional information, see Load an original on the scanner glass.
2.Press the left arrow  or right arrow
  to select Fax B&W or Fax Color , and then press OK.
3.Enter the fax number by using the keypad.

 TIP: To add a pause in the fax number you are entering, press the * button repeatedly, until a dash (—) appears on the display.
4.Press Start.
If the device detects an original loaded in the automatic document feeder, it sends the document to the number you entered.

 TIP: If the recipient reports issues with the quality of the fax you sent, you can try changing the resolution or contrast of your fax.
Send a fax manually from a phone
Sending a fax manually allows you to make a phone call and talk with the recipient before you send the fax. This is useful if you want to inform the recipient that you are going to send them a fax before sending it. When you send a fax manually, you can hear the dial tones, telephone prompts, or other sounds through the handset on your telephone. This makes it easy for you to use a calling card to send your fax.
Depending on how the recipient has their fax machine set up, the recipient might answer the phone, or the fax machine might take the call. If a person answers the phone, you can speak with the recipient before sending the fax. If a fax machine answers the call, you can send the fax directly to the fax machine when you hear the fax tones from the receiving fax machine.
To send a fax manually from an extension phone
1.Load your originals. If you are copying a borderless original, load the original on the scanner glass, not the ADF. For additional information, see Load an original on the scanner glass.
2.Press the left arrow  or right arrow
  to select Fax B&W or Fax Color , and then press OK.
3.Dial the number by using the keypad on the phone that is connected to the device.
 NOTE: Do not use the keypad on the control panel of the device when manually sending a fax. You must use the keypad on your phone to dial the recipient’s number.

 TIP: To switch between Fax B&W or Fax Color , press the Back button.

Chapter 5
4.If the recipient answers the telephone, you can engage in a conversation before sending your fax.
 NOTE: If a fax machine answers the call, you will hear fax tones from the receiving fax machine. Proceed to the next step to transmit the fax.
5.When you are ready to send the fax, press Start.
 NOTE: If prompted, select Send Fax.
If you were speaking with the recipient before sending the fax, inform the recipient that they should press Start on their fax machine after they hear fax tones.
The telephone line is silent while the fax is transmitting. At this point, you can hang up the telephone. If you want to continue speaking with the recipient, remain on the line until the fax transmission is complete.
Send a fax using monitor dialing
Monitor dialing allows you to dial a number from the device control panel as you would dial a regular telephone. When you send a fax using monitor dialing, you can hear the dial tones, telephone prompts, or other sounds through the speakers on the device. This enables you to respond to prompts while dialing, as well as control the pace of your dialing.
TIP: If you do not enter your calling card PIN fast enough, the device might start sending fax tones too soon and cause your PIN not to be recognized by the calling card service. If this is the case, you can create a speed dial entry to store the PIN for your calling card.
 NOTE: Make sure the volume is turned on, or you will not hear a dial tone.
To send a fax using monitor dialing from the device control panel
1.Load your originals. For additional information, see Load an original on the scanner glass or Load an original in the automatic document feeder (ADF).
 NOTE: The ADF is available for some models only.
2.Press the left arrow  or right arrow
  to select Fax B&W or Fax Color , and then press Start.
If the device detects an original loaded in the automatic document feeder, you will hear a dial tone.
3.When you hear the dial tone, enter the number by using the keypad on the device control panel.
4.Follow any prompts that might occur.

 TIP: If you are using a calling card to send a fax and you have your calling card PIN stored as a speed dial, when prompted to enter your PIN, press Speed Dial to select the speed dial entry where you have your PIN stored.
Your fax is sent when the receiving fax machine answers.
40 Fax

Send a fax from memory
You can scan a black-and-white fax into memory and then send the fax from memory. This feature is useful if the fax number you are trying to reach is busy or temporarily unavailable. The device scans the originals into memory and sends them once it is able to connect to the receiving fax machine. After the device scans the pages into memory, you can immediately remove the originals from the document feeder tray.
 NOTE: You can only send a black-and-white fax from memory.
To send a fax from memory
1.Load your originals. For additional information, see Load an original on the scanner glass or Load an original in the automatic document feeder (ADF).
 NOTE: The ADF is available for some models only.
2.Press the left arrow  or right arrow
  to select Fax B&W or Fax Color , and then press OK.
3.Enter the fax number by using the keypad, press Speed Dial to select a speed dial, or press Redial/Pause to redial the last number dialed.
4.Press right arrow  until Fax Method appears, and then press OK.
5.Press right arrow  until Scan & Fax appears, and then press OK.
6.Press Start.
The device scans the originals into memory and sends the fax when the receiving fax machine is available.
Schedule a fax to send later
You can schedule a black-and-white fax to be sent within the next 24 hours. This enables you to send a black-and-white fax late in the evening, when phone lines are not as busy or phone rates are lower, for example. The device automatically sends your fax at the specified time.
You can only schedule one fax to be sent at a time. You can continue to send faxes normally, however, while a fax is scheduled.
 NOTE: You can only send faxes in black and white due to memory limitations.
To schedule a fax from the device control panel
1.Load your originals. For additional information, see Load an original on the scanner glass or Load an original in the automatic document feeder (ADF).
 NOTE: The ADF is available for some models only.
2.Press the left arrow  or right arrow
  to select Fax B&W or Fax Color , and then press OK.
3.Press right arrow  until Fax Method appears, and then press OK.
4.Press right arrow  until Send Fax Later appears, and then press OK.
5.Enter the send time by using the numeric keypad, and then press OK. If prompted, press 1 for AM, or 2 for PM.

Chapter 5
6.Enter the fax number by using the keypad, press Speed Dial to select a speed dial, or press Redial/Pause to redial the last number dialed.
7.Press Start.
The device scans all pages and the scheduled time appears on the display. The fax is sent at the scheduled time.
To cancel a scheduled fax
1.Press the left arrow  or right arrow
  to select Fax B&W or Fax Color , and then press OK.
2.Press right arrow  until Fax Method appears, and then press OK.
3.Press right arrow  until Send Fax Later appears, and then press OK.
If there is a fax already scheduled, the Cancel prompt appears on the display.
4.Press 1 to select Yes.
 NOTE: You can also cancel the scheduled fax by pressing Cancel on the device control panel when the scheduled time is visible on the display.
Send a fax to multiple recipients
You can send a fax to multiple recipients at once by grouping individual speed dial entries into group speed dial entries.
To send a fax to multiple recipients using group speed dial
1.Load your originals. For additional information, see Load an original on the scanner glass or Load an original in the automatic document feeder (ADF).
 NOTE: The ADF is available for some models only.
2.Press the left arrow  or right arrow
  to select Fax B&W, and then press OK.
3.Press the left arrow  or right arrow
  until the appropriate group speed dial entry appears.

 TIP: You can also select a speed dial entry by entering its speed dial code using the keypad on the device control panel.
4.Press Start.
If the device detects an original loaded in the automatic document feeder, it sends the document to each number in the group speed dial entry.
 NOTE: You can only use group speed dial entries to send faxes in black and white, because of memory limitations. The device scans the fax into memory then dials the first number. When a connection is made, it sends the fax and dials the next number. If a number is busy or not answering, the device follows the settings for Busy Redial and No Answer Redial. If a connection cannot be made, the next number is dialed and an error report is generated.
Send a fax in Error Correction Mode
Error Correction Mode (ECM) prevents loss of data due to poor phone lines by detecting errors that occur during transmission and automatically requesting retransmission of the erroneous portion. Phone charges are unaffected, or might even be reduced, on good
42 Fax

phone lines. On poor phone lines, ECM increases sending time and phone charges, but sends the data much more reliably. The default setting is On. Turn ECM off only if it increases phone charges substantially, and you can accept poorer quality in exchange for reduced charges.
Before turning the ECM setting off, consider the following. If you turn ECM off
•The quality and transmission speed of faxes you send and receive are affected.
•The Fax Speed is automatically set to Medium.
•You will no longer be able to send or receive faxes in color.
To change the ECM setting from the control panel
1.Press Setup.
2.Press right arrow  until Fax Settings appears, and then press OK.
3.Press right arrow  until Error Correction Mode appears, and then press OK.
4.Press right arrow  to select On or Off, and then press OK.
Receive a fax
You can receive faxes automatically or manually. If you turn off the Auto Answer option, you must receive faxes manually. If you turn on the Auto Answer option (the default setting), the device automatically answers incoming calls and receives faxes after the number of rings that are specified by the Rings to Answer setting. (The default Rings to Answer setting is five rings.)
If you receive a legal-size fax and the device is not currently set to use legal-size paper, the device reduces the fax so that it fits on the paper that is loaded. If you have disabled the Automatic Reduction feature, the device prints the fax on two pages.
 NOTE: If you are copying a document when a fax arrives, the fax is stored in the device memory until the copying finishes. This can reduce the number of fax pages stored in memory.
•Receive a fax manually
•Set up backup fax
•Reprint received faxes from memory
•Poll to receive a fax
•Forward faxes to another number
•Set the paper size for received faxes
•Set automatic reduction for incoming faxes
•Block junk fax numbers
•Receive faxes to your computer (Fax to PC and Fax to Mac)
Receive a fax manually
When you are on the phone, the person you are speaking with can send you a fax while you are still connected. This is referred to as manual faxing. Use the instructions in this section to receive a manual fax.
 NOTE: You can pick up the handset to talk or listen for fax tones.
Chapter 5
You can receive faxes manually from a phone that is:
•Directly connected to the device (on the 2-EXT port)
•On the same phone line, but not directly connected to the device
To receive a fax manually
1.Make sure the device is turned on and you have paper loaded in the main tray.
2.Remove any originals from the document feeder tray.
3.Set the Rings to Answer setting to a high number to allow you to answer the incoming call before the device answers. Or, turn off the Auto Answer setting so that the device does not automatically answer incoming calls.
4.If you are currently on the phone with the sender, instruct the sender to press Start on their fax machine.
5.When you hear fax tones from a sending fax machine, do the following:
a. Press left arrow  or right arrow
  to select Black-and-white fax or Color fax. b. Press Start.
c. After the device begins to receive the fax, you can hang up the phone or remain on the line. The phone line is silent during fax transmission.
Set up backup fax
Depending on your preference and security requirements, you can set up the device to store all the faxes it receives, only the faxes it receives while the device is in an error condition, or none of the faxes it receives.
The following Backup fax modes are available:
|
On |
The default setting. When Backup fax is On, the device stores all received |
|
faxes in memory. This enables you to reprint up to eight of the most recently |
|
|
printed faxes if they are still saved in memory. |
|
|
NOTE: When device memory is low, it overwrites the oldest, printed faxes |
|
|
as it receives new faxes. If the memory becomes full of unprinted faxes, the |
|
|
device stops answering incoming fax calls. |
|
|
NOTE: If you receive a fax that is too large, such as a very detailed color |
|
|
photo, it might not be stored in memory due to memory limitations. |
|
|
On Error Only |
Causes the device to store faxes in memory only if an error condition exists |
|
that prevents the device from printing the faxes (for example, if the device |
|
|
runs out of paper). The device continues to store incoming faxes as long |
|
|
as there is memory available. (If the memory becomes full, the device stops |
|
|
answering incoming fax calls.) When the error condition is resolved, the |
|
|
faxes stored in memory print automatically, and then they are deleted from |
|
|
memory. |
|
|
Off |
Faxes are never stored in memory. For example, you might want to turn off |
|
Backup fax for security purposes. If an error condition occurs that prevents |
|
|
the device from printing (for example, the device runs out of paper), the |
|
|
device stops answering incoming fax calls. |
|
44 Fax

 NOTE: If Backup fax is enabled and you turn off the device, all faxes stored in memory are deleted, including any unprinted faxes that you might have received while the device was in an error condition. You must contact the senders to ask them to resend any unprinted faxes. For a list of the faxes you have received, print the Fax Log. The Fax Log is not deleted when the device is turned off.
To set backup fax from the device control panel
1.Press Setup.
2.Press right arrow  until Tools appears, and then press OK.
3.Press right arrow  until Backup fax appears, and then press OK.
4.Press right arrow  to select On, On Error Only, or Off.
5.Press OK.
Reprint received faxes from memory
If you set the Backup fax mode to On, the received faxes are stored in memory, whether the device has an error condition or not.
 NOTE: After the memory becomes full, the oldest, printed faxes are overwritten as new faxes are received. If all the stored faxes are unprinted, the device does not receive any fax calls until you print or delete the faxes from memory. You might also want to delete the faxes in memory for security or privacy purposes.
Depending on the sizes of the faxes in memory, you can reprint up to eight of the most recently printed faxes, if they are still in memory. For example, you might need to reprint your faxes if you lost the copy of your last printout.
To reprint faxes in memory from the device control panel
1.Make sure you have paper loaded in the main tray.
2.Press Setup.
3.Press right arrow  until Print Report appears, and then press OK.
4.Press right arrow  until Reprint Faxes appears, and then press OK.
The faxes are printed in the reverse order from which they were received with the most recently received fax printed first, and so on.
5.Press Start.
6.If you want to stop reprinting the faxes in memory, press Cancel.
To delete all the faxes in memory from the device control panel
▲Turn off the device by pressing the Power button.
All faxes stored in memory are deleted from memory when you turn off the power.
Poll to receive a fax
Polling allows the HP All-in-One to ask another fax machine to send a fax that it has in its queue. When you use the Poll to Receive feature, the HP All-in-One calls the designated fax machine and requests the fax from it. The designated fax machine must be set for polling and have a fax ready to send.

Chapter 5
 NOTE: The HP All-in-One does not support polling pass codes. Polling pass codes are a security feature that require the receiving fax machine to provide a pass code to the device it is polling in order to receive the fax. Make sure the device you are polling does not have a pass code set up (or has not changed the default pass code) or the HP All-in-One will not be able to receive the fax.
To set up poll to receive a fax from the device control panel
1.Press left arrow  or right arrow
  to select Black-and-white fax or Color fax, and then press OK.
2.Press right arrow  until Fax Method appears, and then press OK.
3.Press right arrow  until Poll to Receive appears, and then press OK.
4.Enter the fax number of the other fax machine.
5.Press Start.
 NOTE: If you selected Color Fax but the sender sent the fax in black and white, the device prints the fax in black and white.
Forward faxes to another number
You can set up the device to forward your faxes to another fax number. A received color fax is forwarded in black and white.
HP recommends that you verify the number you are forwarding to is a working fax line. Send a test fax to make sure the fax machine is able to receive your forwarded faxes.
To forward faxes from the device control panel
1.Press Setup.
2.Press right arrow  until Fax Settings appears, and then press OK.
3.Press right arrow  until Fax Forwarding appears, and then press OK.
4.Press right arrow  until On appears, and then press OK.
 NOTE: If the device is not able to forward the fax to the designated fax machine (for example, if it is not turned on), the device prints the fax. If you set up the device to print error reports for received faxes, it will also print an error report.
5.At the prompt, enter the number of the fax machine that will receive the forwarded faxes, and then press OK.
Fax Forwarding appears on the device control panel display.
If the device loses power when Fax Forwarding is set up, it saves the Fax Forwarding setting and phone number. When the power is restored to the device, the Fax Forwarding setting is still On.
 NOTE: You can cancel fax forwarding by pressing Cancel on the device control panel when the Fax Forwarding message is visible on the display, or you can select Off from the Fax Fwd, Black menu.
Set the paper size for received faxes
You can select the paper size for received faxes. The paper size you select should match what is loaded in your main tray. Faxes can be printed on letter, A4, or legal paper only.
46 Fax
 Loading…
Руководства HP Officejet 4500 Размер файлов: 5201 KB, Язык: English, Формат: pdf, Платформа: Windows/Linux, Дата: 2017-03-02
На данной странице вы можете скачать руководства HP Officejet 4500. Мы предлагаем вам ознакомиться с руководством пользователя, инструкцией по сервисному обслуживанию и ремонту.
Также здесь вы найдете список заказных номеров на комплектующие HP Officejet 4500.
Все файлы предоставляются исключительно в ознакомительных целях. И не являютя руководством по ремонту, а направлены лишь на то чтобы помочь вам более детально ознакомиться с принципом построения устройства.
Содержимое представленных здесь руководств требуют от вас знания технического английского языка.
Если вы собираетесь скачать руководство по сервисному обслуживанию HP Officejet 4500, иными словами сервис мануал, вы дожны обладать хотя бы минимальными познаниями в области электроники и пониманием базовых принципов работы электромеханических устройств.
Для просмотра руководств вам понадобится Adobe Acrobat Reader версии 9 и выше либо другая программа для просмотра pdf файлов.
В связи с популярностью информации представленной на сайте и ее бесплатного предоставления конечному пользователю, убедительная просьба использовать специальные программные продукты для многопотокового скачивания файлов.
Руководства для HP Officejet 4500
- Руководство пользователя (User manual)
- Руководство по сервисному обслуживанию (Service manual)
- Руководство по ремонту (Repair manual)
- Перечень комплектующих (PartList)
The HP Officejet 4500 All-in-One printer is designated for home or small offices, or it can serve as a personal multifunctional printer in a large office, that is, it is for those who need an inexpensive device capable of scanning, copying, and faxing with a built-in interface for the network. Having an affordable price ($99.99), the 4500 is rather economical in prospect, as it offers a low cost for a page wherein providing a professional color printing. In many aspects the HP Officejet 4500 resembles the Canon Pixma MX340, but it lacks the MX340 option to print from memory cards or cameras.
Being capable to fulfill its functions over a network, the All-in-One 4500 can also operate as an autonomous fax or copy machine. It is possible to scan directly to e-mail with attaching a scanned document to your message. Scanning performance is excellent and results are clear-cut and tidy. It should be noted that scanning is one of the appealing feature for the 4500.
The automatic document feeder (ADF) for 20 sheets is one more attractive feature of the device. It can easily handle your multipage papers even of legal size, not matching the printer’s flatbed. The ADF is driven by a carriage motor as it does not have its own driving motor. This unusual but sufficiently elegant solution is unlikely to affect the overall reliability of the device, although this increases the load on the carriage motor that theoretically reduces its resource.
There is the paper input tray in the 4500 with the capacity of 100 pages. It is quite enough if your daily norm of printed pages does not exceed 20 sheets, so that you can reload paper only once a week.
The Officejet 4500 does not have four cartridges, as it is now accepted, but only two ones: black and tri-color. The only advantage of such a decision is the price reduction of the printing system. The main drawback is a significant increase in the running cost of the device. The combined cartridge means that, if one or more colors dominate in the color range, their consumption increases, and you have to dispose non-empty cartridges as one of the colors is sure to end earlier.
The quality of the printed documents meets the required level to solve business tasks and can be defined as acceptable. In draft mode you can notice slight irregularity of some characters. When printing in laser-quality mode, such problem does not occur. The printing speed is significantly below the promised one. In draft mode it is 12 and 10 pages per minute for document monochrome and color printing respectively, in laser-quality mode the speed is 4 and 2 pages per minute. The quality of photo printing is a pleasant surprise. The inexpensive office multifunction HP Officejet 4500, as it appeared can produce photos qualified at a decent level.
In general, if you are not too picky about the main features of the HP Officejet 4500 (the quality and speed of printing), but you wish to get an All-in-One for all occasions, the HP Office-jet 4500 is a good opportunity to implement this desire into reality at low cost.