
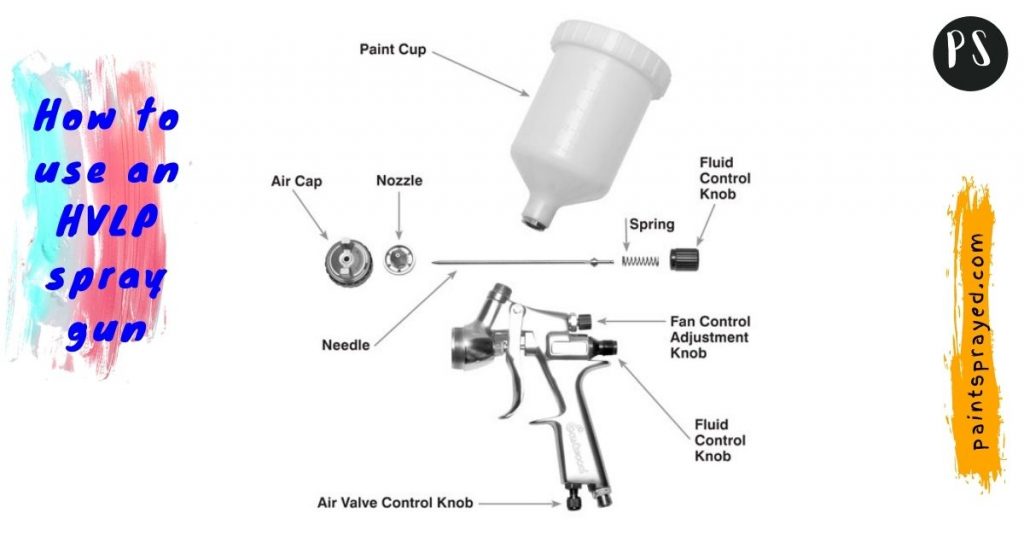
Knowing how to use HVLP spray gun models and clean them when you are done using them is important.
These tools need the proper care to operate as they were designed to, and you need to be aware of the best practices for using them.
Knowing what an HVLP spray gun is and how it works can significantly improve the results of the work that you do with them. Find out more below!
How To Best Paint With A HVLP Spray Gun
HVLP spray gun setup is a straightforward kind of spraying gun to set up, use, and maintain. You will have a few challenges when you pick this spray gun model, no matter who makes it.
You will love that you can use and care for this gun so readily since you are not making money while you are doing clean-up processes or dealing with issues with your machine.

Setting Up
You will need to add your product of choice to the hopper, and then you will want to attach your spraying gun of choice to the hopper. You will need to make sure that your product has been prepared correctly before you add it to the hopper for the best results.
Since these guns are gravity fed, preparing this way will help the gun thin down and spray the product evenly.
Make sure that you connect the air hoses correctly per your instruction manual. You will then want to check that the spray pattern is right for your needs.
You might need to switch to a bigger tip if there are issues with the spray not being thin enough. This can be common with viscous paints or primer products.
Make sure that you use the adjustment wheel to angle the spray width correctly and provide the right coverage for your needs.
You will also want to be sure that you have not used too much product in the hopper to allow you to keep your hand steady. This can impact your overall painting results, so be realistic here with a weight you are comfortable holding.
Adjusting The HVLP Spray Gun
These guns are meant to be adjusted through two means. You can change the angle and pattern of the spray that you are applying to surfaces by turning the wheel adjustment that is usually at the back of the gun.
You can also change out the tip to make spraying more reliable with thicker paints and varnishes or sealants. Be sure that you have various size tips available for this reason.
You will experience clogs and other issues if you try to force your spraying gun to work with the wrong size tip in place.
Spraying
When you need to spray on varnishes and thick paints with this spray gun, you will need to be sure that you are using the right tip and that you have the correct spray pattern in place.
This might take some trial and error if you have not used a product before, but it is usually really simple to sort out what is needed to get the right spray pattern.
Always start out with the spray needle wide open so that you do not clog the gun right away. You will then want to do some test sprays and see if your airflow, your nozzle size, and the flow pattern are correct.
It is easy to make adjustments after your test sprays so that you will get the right flow of product.
Once you have the product flowing correctly, you will need to spray with even pressure and even strokes to prevent streaking and other issues.
Move quickly enough that you are not spraying too long in any one spot. This is easy to do when you are using either the hopper-fed or siphon-fed models of this gun since the handsets are quite light.
Cleaning Up
To thoroughly clean your HVLP spray gun, you will need to remove the hopper and rinse it out with water or a solvent. You can then add water to the hopper and attach the sprayer again. Rinse all this water through the spraying gun by operating it just as you did when you had paint in it.
Once the water is running clear, you will need to put some solvent into a small bucket and disassemble all the parts of your handset.
Set the filter to the side because it is already clean. You will need to use a toothbrush or a rag to clean off the small parts that go inside the handset and remove paint from them.
After this process is done, you can reassemble the sprayer and reattach it to the cleaned hopper. Your spraying gun will be ready for the next time that you need it.
How To Determine The Correct Tip Size For HVLP Spray Gun
You need to be sure that you use the correct size tip for your paint spraying needs.[1]
It can ruin or clog your gun to use the wrong tip, and you might experience runs in your paint as well as overspray and other issues if you are using the wrong size tip for the job at hand.
This is a critical part of getting good results from this style gun, no matter if you are using a hopper-fed model or a siphon-fed style gun.
|
Tip Sizes |
Common Uses |
|---|---|
|
0.8 |
Very fine mist- PVA use |
|
1.2 |
Most paint types |
|
1.4 |
All-around use for single-stage paints |
|
1.6 |
General-purpose paints for light or heavy viscosity |
|
1.8 |
Priming products |
|
2.2-2.5 |
Gel coats or thick resins |

Different Uses For HVLP Spray Guns
This is a type of spraying gun that offers reliable results with ease, and you will get the maximum paint coverage you want with each sweep of the handset.
HVLP are better quality compared to most LVLP guns, and you will be able to use it for many jobs and tasks.
Automotive
This is a really ideal spraying gun for automotive painting because you can control the spray width, and you will get a no-drip finish from your efforts.
In addition, these spray guns will let you apply primer, clear coats, and paint, and you will be able to reach all the tough to paint areas with ease with this style of spraying gun.
Marine
Varnishes are no trouble for HVLP spray gun which makes them an excellent fit for your needs if you want to be able to spray varnish onto your boat or other marine items.
You will be able to prevent overspray that can cause running in varnish applications, and you will not have to deal with clogs or problems with your application being slowed down in any way.
Architectural Coating
Architectural painting of all kinds is easy with this kind of spraying gun. You will be able to prevent overspray, which is great when you are working outdoors where wind and other conditions can cause this problem.
You will also be able to spray all kinds of different coatings with ease and find good results when you use an HVLP spray gun.
Furniture Finishing
When you are applying varnishes and protective coatings to furniture, you need to be sure that your application will work perfectly and that you will get great coverage for your efforts.
There are often small spaces that need to be covered in these kinds of uses, and you will be able to take care of this demand with ease with an HVLP spray gun on your side.

Frequent HVLP Spray Gun FAQs
Do you need to thin the paint for an HVLP spray gun?
Yes, quality latex paints require thinning down for an HVLP spray gun.
What pressure should I set my HVLP spray gun at?
You should set spray gun pressure at 25-30 PSI.[2] You will want to consider lower pressure for some products, but overall, you will want to have enough air pressure to create a good even spray that is fine and light.
Can you paint a house with an HVLP spray gun?
Yes, you can paint a house with an HVLP spray gun. But it is not usually powerful enough for large commercial jobs.
Why is my HVLP spray gun spitting?
HVLP spray gun splits due to the paint gun nozzle not being screwed into place. You might also not have the right size nozzle attached to the product that you are trying to spray on.
Conclusion
An HVLP spray gun is an excellent tool for all kinds of painting processes. These are reliable spray guns that are easy to use, and that can handle jobs both big and small.
Knowing how to care for this kind of spray gun will make your overall use of it much more effective and straightforward.
References:
1. https://garage.eastwood.com/diy-how-to/how-to-select-the-right-tip-for-your-paint-gun/
2. https://www.parex.com/docs/librariesprovider5/additional-product-literature/technical-bulletins/tb042—understanding-conventional-hvlp-spray-guns.pdf?sfvrsn=5efa925d_5
![]()
3 Year Guarantee
*Register online within 30 days. Terms & Conditions apply
Garantie de 3 ans
*Enregistrez votre produit en ligne dans les 30 jours. Sous réserve des termes et conditions appliquées
3 Jahre Garantie
*Innerhalb von 30 Tagen online registrieren. Es gelten die Allgemeinen Geschäftsbedingungen
3 años de garantía
*Registre su producto online durante los primeros 30 días. Se aplican términos y condiciones
3 anni di garanzia
*Registrarsi on-line entro 30 giorni. Termini e Condizioni si applicano
3 jaar garantie
*Registreer uw product binnen 30 dagen online. Algemene voorwaarden zijn van toepassing
www.silverlinetools.com

580420
|
ER |
L |
||||
|
V |
I |
||||
|
L |
|||||
|
I |
N |
||||
|
S |
E |
||||
A I R
|
Gravity |
Feed |
HVLP |
Spray |
 Gravity Feed HVLP Spray Gun
 Pistolet pulvérisateur HVLP à alimentation par gravité
 HVLP-Spritzpistole mit Fließbecher
 Pistola para pintar por gravedad
 Pistola a spruzzo con alimentazione
  HVLP verfspuitpistool
www.silverlinetools.com

2

|
E |
R |
|||||
|
V |
L |
|||||
|
L |
||||||
|
I |
I |
|||||
|
S |
N |
|||||
|
A I R |
E |
|||||
|
R |
||||||
|
A |
E |
|||||
|
NG |
®
|
HVLP |
|||
|
Feed |
|||
|
Gravity |
|||
|
English………………. |
4 |
||
|
Français…………….. |
10 |
||
|
Deutsch……………… |
16 |
||
|
Español……………… |
22 |
||
|
Italiano………………. |
28 |
||
|
Nederlands………… |
34 |
100ml
www.silverlinetools.com 3

GB
Description of Symbols
The rating plate on your tool may show symbols. These represent important information about the product or instructions on its use
Wear hearing protection
Wear eye protection
Wear breathing protection
Wear head protection
Wear hand protection
Read instruction manual
Caution!
Toxic fumes or gases!
Risk of fire!
Risk of explosion!
NO open flames!
DO NOT use with compressed gas cylinders!
Conforms to relevant legislation and safety standards
Environmental Protection
Air tools should not be disposed of with household waste. Please recycle where facilities exist. Check with your local authority or retailer for recycling advice.
Specification
|
Maximum operating pressure:………….. |
2.1bar (30psi) |
|
Air Inlet:………………………………………… |
¼» BSP, supplied |
|
with two male airline quick connectors (EN-6 ‘UK’ and |
|
|
EQ-4 ‘European’ types) |
|
|
Spray gun body material:…………………. |
Polished die cast |
|
aluminium |
|
|
Paint container material:………………….. |
Polypropylene (PP) |
|
Paint container volume:…………………… |
100cm3 |
|
Type of feed:………………………………….. |
Gravity |
|
Nozzle diameter:…………………………….. |
1.0mm |
|
Fluid output:…………………………………… |
70-110ml/min |
Min. hose diameters:
8mm (5⁄16«) for supply hose length up to 15m 9.5mm (3⁄8«) for longer supply hoses
|
Air consumption:…………………………….. |
28-113L/min |
|
(1-4cfm) |
|
|
Weight:…………………………………………. |
0.75kg |
As part of our ongoing product development, specifications of Silverline products may alter without notice.
4
General Safety Warnings
•For multiple hazards, read and understand the safety instructions before installing, operating, repairing, maintaining, changing accessories on, or working near this tool. Failure to do so can result in serious bodily injury
•Only qualified and trained operators should install, adjust, or use this tool
•Do not modify this tool. Modifications can reduce the effectiveness of safety measures and increase the risks to the operator
•Do not discard the safety instructions; give them to the operator
•Do not use this tool if it has been damaged
•Tools shall be inspected periodically to verify that the ratings and markings required by this part of ISO 11148 are legibly marked on the tool. The employer/user should contact the manufacturer to obtain replacement marking labels when necessary
WARNING: This appliance is not intended for use by persons (including children) with reduced, physical or mental capabilities or lack of experience or knowledge unless they have been given supervision or instruction concerning use of the appliance by a person responsible for their safety. Children must be supervised to ensure that they do not play with the appliance.
Projectile Hazards
•Be aware that failure of the workpiece or accessories, or even of the tool itself, can generate high-velocity projectiles
•Always wear impact-resistant eye protection during operation of this tool. The grade of protection required should be assessed for each use
•For overhead work, wear a safety helmet
•The risks to others should also be assessed at this time
•Ensure that the workpiece is securely fixed
Entanglement Hazards
•Choking, scalping and/or lacerations can occur if loose clothing, personal jewellery, neck wear, hair or gloves are not kept away from the tool and its accessories
Operating Hazards
•Use of the tool can expose the operator’s hands to hazards, including cuts, abrasions and heat
•Wear suitable gloves to protect hands
•Operators and maintenance personnel should be physically able to handle the bulk, weight and power of the tool
•Hold the tool correctly; be ready to counteract normal or sudden movements and have both hands available
•Maintain a balanced body position and secure footing
•Release the start-and-stop device in the case of an interruption of the energy supply
•Use only lubricants recommended by the manufacturer
•Personal protective safety glasses should be used; suitable gloves and protective clothing are recommended
•Avoid direct contact with moving parts in order to prevent pinching or cutting of hands or other body parts. Wear suitable gloves to protect hands
•Never run the tool unless it is directed towards the workpiece
•There is a risk of electrostatic discharge if used on plastic and other non-conductive materials
•Potentially explosive atmospheres can be caused by aerosols and fumes resulting from spraying
•Always use dust extraction or suppression systems which are suitable for the material being processed
Repetitive Motions Hazards
•When using this tool to perform work-related activities, the operator can experience discomfort in the hands, arms, shoulders, neck or other parts of the body
•While using this tool, the operator should adopt a comfortable posture whilst maintaining secure footing and avoiding awkward or off-balance postures. The operator should change posture during extended tasks; this can help avoid discomfort and fatigue
•If the operator experiences symptoms such as persistent or recurring discomfort, pain, throbbing, aching, tingling, numbness, burning sensations or stiffness, these warning signs should not be ignored. The operator should inform the employer and consult a qualified health professional
Accessory Hazards
•Disconnect the tool from the energy supply before filling or changing accessories
•Use only sizes and types of accessories and consumables that are recommended by the manufacturer of this tool; do not use other types or sizes of accessories or consumables
Workplace Hazards
•Slips, trips and falls are major causes of workplace injury. Be aware of slippery surfaces caused by use of the tool and also of trip hazards caused by the air line or hydraulic hose
•This tool is not intended for use in potentially explosive atmospheres and is not insulated against contact with electric power

|
580420 |
Gravity Feed HVLP Spray Gun |
Dust and Fume Hazards
•Dust and fumes generated when using this tool can cause ill health (for example cancer, birth defects, asthma and/or dermatitis); risk assessment and implementation of appropriate controls for these hazards are essential
•Risk assessment should include dust created by the use of the tool and the potential for disturbing existing dust
•Operate and maintain this tool as recommended in these instructions, to minimise dust or fume emissions
•Direct the exhaust so as to minimise disturbance of dust in a dust-filled environment
•Where dust or fumes are created, the priority should be to control them at the point of emission
•All integral features or accessories for the collection, extraction or suppression of airborne dust or fumes should be correctly used and maintained in accordance with the manufacturer’s instructions
•Select, maintain and replace the consumable/inserted tool as recommended in the instruction handbook, to prevent an unnecessary increase in dust or fumes
•Use respiratory protection in accordance with employer’s instructions and as required by occupational health and safety regulations
Safety Instructions for Pneumatic Tools
Air under pressure can cause severe injury:
•Always shut off air supply, drain hose of air pressure and disconnect tool from air supply when not in use, before changing accessories or when making repairs
•Never direct air at yourself or anyone else
•Whipping hoses can cause severe injury. Always check for damaged or loose hoses and fittings
•Whenever universal twist couplings (claw couplings) are used, lock pins should be installed and whipcheck safety cables should be used to safeguard against possible hose-to-tool or hose-to-hose connection failure
•Do not exceed the maximum air pressure stated on the tool
•Never carry an air tool by the hose
Spray Gun Safety
Dangerous environment
•Ensure there is adequate clear space around the work area. Only use spraying tools in a well-ventilated area or a specialist spray booth. Be aware that air hoses can present a trip hazard; always lay hoses in a way that minimises hazards.
Protect your eyes
• Always wear safety goggles or safety glasses.
Protect your hearing
• Always wear ear protection.
Protection from vibration
•Hand-held air tools may produce vibration and should not be used for long periods without a break. Vibration can cause disease. Gloves may help to maintain good blood circulation in the fingers.
Protective equipment
•Always wear appropriate protective equipment including but not limited to overalls, gloves, facemask etc.
•It is the user’s responsibility to ensure that other persons in the vicinity of the work area are also equipped with the appropriate protective equipment.
Use the correct air hose
•Use lightweight hose to connect the tool to the air compressor.
•Air should be supplied by a suitable length of 8mm (5⁄16«) diameter air hose fitted with a female 1⁄4» NPS connection at gun end. For hose lengths over 15m (50′), use 9.5mm (3⁄8«) diameter hose.
•When spraying, ensure that the gun is connected to a clean, filtered air supply.
Always disconnect
•Ensure that your air tool has completely stopped functioning before putting it down.
•Disconnect an air tool from the air supply before performing any servicing or refilling
•Ensure the air tool is switched OFF before connecting to air supply. Be aware that air tools may hold residual pressure after use. Always bleed air pressure from the tool after shutting off air supply.
Do not abuse the tool
•Do not increase air pressure above the recommended level; excessive pressure leads to wear of moving parts, possible failure and may cause the tool casing to split.
•Do not attempt to modify air tools. Any attempt to modify this air tool could result in serious injury to you or others, and will invalidate its warranty.
Use of spray guns
•Do not aim a spray gun at people or animals!
•When spraying keep away from heat and naked flames!
WARNING: Solvents and paints are flammable, harmful and can even be toxic. Some solvents and paints are extremely flammable. Handle with care, according to the manufacturer’s recommendations. Store solvents and paint in suitable sealed, leak proof containers. Always wear suitable protective equipment and dispose of solvents and paints, as well as contaminated items, as special waste, according to laws and regulations.
WARNING: Solvents that are chemically based on halogenated hydrocarbon, like trichloroethane and methylene chloride 1,1,1, for example, may cause chemical reactions in combination with aluminium and galvanized or hot galvanized components and will therefore represent a potential risk of explosion.
WARNING: When spraying coating materials, dangerous vapours or aerosols, which are detrimental to your health, are produced. Please read all labels and safety instructions carefully, and observe all indicated instructions and recommendations. In case of doubt, please ask the material supplier. Use respiratory protection when spraying. The respiratory equipment used must be suitable for the material in use and adapted to the degree of the vapour concentration. When spraying paint, use respiratory equipment independent of the ambient atmosphere, or equipment with filter combination A1/A2-P2. Ensure a sufficient protection of your skin during all spraying and cleaning procedures. Wear appropriate protective clothes and use suitable protective skin ointments.
WARNING: Do not atomize acids, caustic solutions, removers and similar substances.
www.silverlinetools.com 5

GB
Product Familiarisation
1Paint Container Lid
2Paint Container
3Hanging Hook
4Knurled Needle Adjustment Screw
5Pattern Adjustment Dial
6Handle
7Quick Connector
8Knurled Air Adjustment Screw
9Trigger
10Material Nozzle
11Air Nozzle
12Air Nozzle Locking Ring
Intended Use
•Atomising gravity feed spray gun, powered by filtered compressed air from a compressor, for spraying of medium viscosity paint and coatings at low pressures
•Compared to conventional spray guns, HVLP (High Volume Low Pressure) spray guns use a higher volume of air to atomise the paint at much lower air pressures. As a result, a higher proportion of paint reaches the workpiece surface, and overspray, material consumption as well as air pollution, are greatly reduced.
Unpacking Your Tool
•Carefully unpack and inspect your tool. Fully familiarise yourself with all its features and functions
•Ensure that all parts of the tool are present and in good condition. If any parts are missing or damaged, have such parts replaced before attempting to use this tool
Before Use
Fitting the quick connector
Note: This tool is supplied with two different male airline quick connectors:
EQ-4 – commonly used in Europe
EN-6 – mainly used in the UK
•Please choose the connector that is compatible with the airline system you are using, and install as outlined below:
1.Apply PTFE tape (not included) to the screw threads of the Quick Connector (7). This will help to maintain an air tight seal
Note: Apply PTFE tape tightly and in a clockwise direction, so it does not come off when the thread is screwed into the tool.
2.Remove the protective plug from the air inlet
3.Using a spanner (not included) screw the quick connector into the air inlet located at the base of the handle
4.Connect to airline, pressurise carefully and carry out a leak check (e.g. by spraying small amounts of soapy water on to the outside of the connectors)
•Air lines fitted with matching female quick connectors will now be a push fit to the tool
Fitting the paint container
•Before fitting the gravity feed Paint Container (2), pull out the plastic filter element that sits inside the paint container connection of the spray gun, clean if necessary (see ‘Maintenance’) and inspect for damage
•Fit the paint container by screwing it in to the opening on top of the spray gun. Tighten by hand
Note: Always inspect the O-ring on the paint container thread, and ensure it is in good condition. Change if required.
6
Air supply connection
Pressure Separator 


 regulator filter unit
Spray gun
Air line
• This tool should be connected to a clean, dry air supply with water separator and filter
WARNING: Under no circumstances can the spray gun be used in a compressed air system with integrated oiler.
Note: Achieving a fine spray finish without the use of a high quality separator filter is virtually impossible.
•Do not allow supply pressure to exceed the maximum stated (see ‘Specifications’)
•Ensure that water is drained from air system daily
•Ensure that all parts of the system (hoses, couplers, etc.) are correctly rated for the air pressure to be used
•Do not use non-conductive tubing to help prevent build-up of electrostatic charge
Setting the air pressure
•Spray pressure must be set properly to allow for the drop in air pressure between the regulator and the spray gun
•Use recommended hose diameter to minimise pressure drop and adjust supply air pressure according to ‘Specifications’
IMPORTANT: To reduce overspray and in order to obtain maximum efficiency, always spray with the lowest possible air pressure.
Paint preparation
WARNING: Ensure the type of paint, solvent used and the viscosity is suitable for the material and type of this spray gun.
•Mix, condition and filter the material to be sprayed according to the manufacturer’s recommendations
•Refer to the manufacturer’s guidelines for storing and disposal of prepared material
Filling the paint container
1.Ensure the spray gun is disconnected from the air supply
2.Unscrew the Paint Container Lid (1)
3.Fill the paint container to the required level
Note: The outside of the paint container features a scale in ml. Never overfill (see ‘Specifications’ for max. paint container capacity).
4. Re-fit the lid of the paint container. Close tightly by hand
Note: The lid features a small hole for pressure equalisation and is therefore not completely sealed. Take care not to spill material through this hole. Always ensure the hole remains clean and unblocked.
Adjusting the spray gun
•Bring the spray gun into the default position:
1.Carefully screw the Knurled Needle Adjustment Screw (4) clockwise until it stops
Note: The needle adjustment screw features a separate knurled locking ring that needs to be loosened before adjustment is possible. Tighten this ring to lock the needle adjustment.
WARNING: The paint needle can easily be damaged. Be careful not to use too much force.
2.Carefully screw the Knurled Air Adjustment Screw (8) clockwise until it stops WARNING: DO NOT use too much force, as this may damage the valve seat.
3.Turn the Pattern Adjustment Dial (5) clockwise until it stops
4.Loosen the Air Nozzle Locking Ring (12) about a quarter turn, to allow the Air Nozzle (11) to be adjusted
Adjust the material output:
1.Connect the spray gun to the air supply
2.Direct the gun towards a large piece of cardboard or similar material
3.Hold the spray gun steady and depress the Trigger (9)
Note: In default position, there should be no material or air output.
4.Turn the Knurled Air Adjustment Screw (8) anticlockwise to set the required air flow
5.Slowly turn the Knurled Needle Adjustment Screw (4) anticlockwise to open the material flow
6.Adjust until the desired material output is reached

580420
FIG. A
Adjust the spray pattern:
Note: Always readjust the material output when modifying the width or shape of the spray beam.
1.Slowly turn the Pattern Adjustment Dial (5) anticlockwise to adjust the spray pattern. Turn until the desired spray pattern is reached
Note: Turning the pattern adjustment screw anticlockwise increases the spread, turning it clockwise leads to a narrower, more circular spray pattern.
2.Turn the Air Nozzle (11) to adjust the orientation of the spray pattern (see Fig. A)
3.Once you reached the desired spray pattern, release the Trigger (9) and tighten the Air Nozzle Locking Ring (12) by hand, to lock the air nozzle in place
Note: In most operations the wings on the air nozzle should be horizontal to provide a vertical spray pattern which gives maximum coverage as the gun is moved backwards and forwards parallel to the surface being painted.
Operation
|
FIG. B |
Coating will be |
Coating will be |
||
|
light at this point |
heavy at this point |
|||
|
Wrong |
||||
|
250mm- |
and wet when spraying |
|||
|
Coating should be even |
||||
|
200 |
||||
|
Start |
Pull |
Release |
End of |
|
|
stroke |
trigger |
trigger |
Stroke |
Correct
Trigger operation
•The trigger has a 2-stage mechanism:
•Press to the first stage, the air will flow through the gun
•Press further and the paint is released
Note: Adjusting the Knurled Needle Adjustment Screw (4) will determine how far the trigger can be depressed
Spray technique
• To achieve a smooth even coat the material must be prepared and thinned in accordance to the manufacturer’s guidelines
• The gun must be clean and correctly loaded, the spray pattern adjusted and the compressor set at the correct pressure
• Always carry out a test spray and follow the procedures described in ‘Adjusting the spray gun’, to establish the best settings
• Hold the spray gun approximately 200-250mm away from the workpiece
• Spray workpiece edges first. Overlap approximately 50% of each applied spray beam
• Spray in continuous, even motion. Keep your hand as steady as possible and move the spray in a straight pass across the workpiece (see Fig. B)
• Do not operate in an arc motion. Arcing will lead to an uneven finish (see Fig. B)
• Avoid intensive waving, as it will cause the air jacket to become unstable, allowing clouds of atomised spray material to escape
• Before spraying it is good practice to visualise the entire spraying process. Start with the least visible areas and work towards the parts that will be seen. This will create an even finish, allow you to identify problematic areas of the workpiece, and let you work around spots that may already have been covered
Gravity Feed HVLP Spray Gun
• After use, immediately disconnect the spray gun from the air supply
WARNING: Be aware that air tools may hold residual pressure after use. Always bleed air pressure from the tool after shutting off air supply.
Maintenance
WARNING: Always disconnect from the air supply and depressurise before disassembling or carrying out any maintenance.
WARNING: Always wear suitable protective equipment including eye and respiratory protection, as well as gloves, when carrying out cleaning or maintenance procedures.
WARNING: The majority of solvents used for painting applications are toxic and highly flammable. Comply with local laws and regulations with regards to handling, storage and disposal of solvents and other harmful and potentially dangerous substances.
Note: Your spray gun is a fine precision instrument and must be treated and maintained accordingly, in order to achieve consistent, professional-looking, uniform results.
•The most common problems with spray guns are caused by paint being allowed to dry inside the tip, nozzle or internal air/fluid passages
•Clean the entire spray gun thoroughly after each project, and when changing the type of material being sprayed
•Always use the same solvent for cleaning that was used to thin the paint
General cleaning after every use
1.Unscrew Paint Container Lid (1), empty remaining material into a suitable sealed container, unscrew the Paint Container (2) from the spray gun and clean thoroughly with the appropriate solvent and clean cloths
2.Pull the plastic filter element out of the spray gun body (it sits inside the paint container connection) and clean thoroughly with solvent
3.Clean the nozzle assembly of the gun, lid and gasket of the paint container
4.Refit the filter element and paint container, fill with a small amount of solvent and close the lid
5.Connect the gun to the air supply
6.Direct the gun towards an empty container and spray the solvent through the gun into the container, until the spray is clear of any paint
7.Turn off the air supply and disconnect the gun
8.Open the paint container, empty remaining solvent into the disposal container, and allow all components to dry thoroughly
WARNING: In order to prevent solvents and other harmful substances from entering the atmosphere, open solvent cleaning is not permitted in some territories, and special
cleaning procedures apply (e.g. cleaning inside special closed bags and containers, etc.). Make yourself familiar with local regulations, and apply the recommended procedures.
Special cleaning procedures for air and fluid nozzles and needles
WARNING: All nozzles and needles are precision made. They must be handled with the utmost care. Damage and alterations will cause decreased performance or faulty spray.
WARNING: Needles have sharp points. Handle with care to avoid puncture wounds and other injuries.
1.Referring to the ‘Assembly Diagram’, carefully disassemble the spray gun, remove the nozzle assembly and fluid needle
2.To clean, soak nozzles and needle in a suitable solvent that dissolves any dried material and clean with a suitable soft brush
Note: Never soak the entire spray gun in solvent, as this will damage the packings and remove lubrication.
3. Carefully blow all components clean with filtered, compressed air
WARNING: Do not probe any of the holes in the nozzles with metal instruments. If mechanical cleaning becomes necessary, use only implements from materials softer than brass, such as specialised nozzle cleaning aids.
Lubrication
•Even though the air and material passages of the spray gun must remain free of oil and other contaminants, some components require frequent lubrication
•Slightly lubricate all packings, bearings and dynamic O-rings with a specialised spray gun lube, and apply a small amount of petroleum jelly to springs
www.silverlinetools.com 7

GB
|
Storage |
Disposal |
|||
|
• Store this tool carefully in a secure,dry place,out of the reach of children |
• Air tools should not be disposed of with household waste |
|||
|
• Spray guns may contain traces of solvents and paint residue, and must be recycled |
||||
|
accordingly |
||||
|
• Surplus paints, solvents and cleaning solutions must be disposed of according to the |
||||
|
manufacturer’s instructions |
||||
|
• Contact your local waste disposal authority for information on the correct way to dispose |
||||
|
of air tools |
||||
|
Troubleshooting |
||||
|
Problem |
Possible Cause |
Solution |
||
|
No air pressure |
Check air supply |
|||
|
Material viscosity far too high |
Regulate material viscosity |
|||
|
Spray gun will not spray |
||||
|
Filter clogged |
Remove filter element inside paint container connection and clean with solvent |
|||
|
Spray gun wrongly adjusted |
Follow adjustment procedure to readjust spray gun |
|||
|
Fluid level too low |
Refill paint container |
|||
|
Dry or worn needle packing seat; air seeping into fluid |
Tighten packing; lubricate |
|||
|
passage |
||||
|
Intermittent/sputtering spray |
Leaking paint container connection |
Check O-ring of paint container connection; tighten paint container |
||
|
Obstruction in fluid passage |
Remove filter element inside paint container connection and clean with solvent ; flush |
|||
|
spray gun with solvent to dissolve blockage |
||||
|
Packing fluid needle too loose causing leaking |
Tighten or replace packing |
|||
|
Horn holes clogged |
||||
|
Arc-shaped spray pattern |
Remove obstructions from horn holes; soak in suitable solvent and wipe clean |
|||
|
Uneven volume of fluid from horn holes cause fluid |
||||
|
deviation |
||||
|
Material builds up on the outside of the fluid tip or centre |
Remove obstruction |
|||
|
Spray pattern is |
hole or partially clogs the nozzle orifice |
|||
|
not evenly spread |
||||
|
Loose fluid nozzle |
Tighten fluid nozzle |
|||
|
Centre of spray |
Atomising air pressure too high |
Reduce air pressure |
||
|
pattern too narrow |
Material too thin |
Regulate material viscosity |
||
|
Atomising air pressure too low |
Increase air pressure |
|||
|
Pattern width too small |
||||
|
Material too thick |
Regulate material viscosity |
|||
|
Fluid passage clogged |
||||
|
Remove obstructions |
||||
|
No or very little paint output |
Air holes in the nozzle blocked |
|||
|
Fluid needle stroke too small (Material flow too low) |
Increase material flow |
|||
|
Atomising air pressure too high |
Reduce air pressure |
|||
|
Excessive overspray |
Spray gun too far from work surface |
Use proper distance to workpiece |
||
|
Wrong spray gun movement (arcing, too fast) |
Move at moderate pace, parallel to the workpiece |
|||
|
Atomising air pressure too high |
Reduce air pressure |
|||
|
Material not properly prepared |
Adjust viscosity and re-filter material |
|||
|
Dry spray |
Spray gun too far from work surface |
Use proper distance to workpiece |
||
|
Spray gun motion too fast |
Move at moderate pace |
|||
|
Spray gun wrongly adjusted |
Follow adjustment procedure to readjust spray gun |
|||
|
Material flow too high |
Reduce material flow |
|||
|
Runs and sags |
Material too thin |
Regulate material viscosity |
||
|
Gun tilted on an angle |
Hold gun at right angle to the workpiece; improve spraying technique |
|||
If the above troubleshooting solutions fail, contact your dealer or an authorised Silverline service centre.
8

|
580420 |
Gravity Feed HVLP Spray Gun |
Silverline Tools Guarantee
This Silverline product comes with a 3 year guarantee
Register this product at www.silverlinetools.com within 30 days of purchase in order to qualify for the 3 year guarantee. Guarantee period begins according to the date of purchase on your sales receipt.
Registering your purchase
Registration is made at silverlinetools.com by selecting the Guarantee Registration button. You will need to enter:-
•Your personal details
•Details of the product and purchase information
Once this information is entered your guarantee certificate will be created in PDF format for you to print out and keep with your purchase.
Terms & Conditions
Guarantee period becomes effective from the date of retail purchase as detailed on your sales receipt.
PLEASE KEEP YOUR SALES RECEIPT
If this product develops a fault within 30 days of purchase, return it to the stockist where it was purchased, with your receipt, stating details of the fault. You will receive a replacement or refund.
If this product develops a fault after the 30 day period, return it to:
Silverline Tools Service Centre PO Box 2988
Yeovil
BA21 1WU, UK
The guarantee claim must be submitted during the guarantee period.
You must provide the original sales receipt indicating the purchase date, your name, address and place of purchase before any work can be carried out.
You must provide precise details of the fault requiring correction.
Claims made within the guarantee period will be verified by Silverline Tools to establish if the deficiencies are related to material or manufacturing of the product.
Carriage will not be refunded. Items for return must be in a suitably clean and safe state for repair, and should be packaged carefully to prevent damage or injury during transportation. We may reject unsuitable or unsafe deliveries.
All work will be carried out by Silverline Tools or its authorized repair agents.
The repair or replacement of the product will not extend the period of guarantee
Defects recognised by us as being covered by the guarantee shall be corrected by means of repair of the tool, free of charge (excluding carriage charges) or by replacement with a tool in perfect working order.
Retained tools, or parts, for which a replacement has been issued, will become the property of Silverline Tools.
The repair or replacement of your product under guarantee provides benefits which are additional to and do not affect your statutory rights as a consumer.
What is covered:
The repair of the product, if it can be verified to the satisfaction of Silverline Tools that the deficiencies were due to faulty materials or workmanship within the guarantee period.
If any part is no longer available or out of manufacture, Silverline Tools will replace it with a functional replacement part.
Use of this product in the EU.
What is not covered:
Silverline Tools does not guarantee repairs required as a result of:
Normal wear and tear caused by use in accordance with the operating instructions eg blades, brushes, belts, bulbs, batteries etc.
The replacement of any provided accessories drill bits, blades, sanding sheets, cutting discs and other related items.
Accidental damage, faults caused by negligent use or care, misuse, neglect, careless operation or handling of the product.
Use of the product for anything other than normal domestic purposes. Change or modification of the product in any way.
Use of parts and accessories which are not genuine Silverline Tools components.
Faulty installation (except installed by Silverline Tools).
Repairs or alterations carried out by parties other than Silverline Tools or its authorized repair agents.
Claims other than the right to correction of faults on the tool named in these guarantee conditions are not covered by the guarantee.
CE Declaration of Conformity
The undersigned: Mr Darrell Morris
as authorised by: Silverline Tools
Declares that
Identification code: 580420
Description: Gravity Feed HVLP Spray Gun
Conforms to the following directives and standards:
•Machinery Directive 2006/42/EC
•EN1953:1998+A1:2009
Notified body: SLG Pruf – und Zertifizierungs Gmbh, Dongguan, China
The technical documentation is kept by: Silverline Tools
Date: 11/06/13
Signed:
Director
Name and address of the manufacturer:
Powerbox International Ltd, Boundary Way, Lufton Trading Estate, Yeovil,
Somerset, BA22 8HZ United Kingdom
www.silverlinetools.com 9
![]()
F
Description des symboles
La plaque signalétique figurant sur votre outil peut présenter des symboles.
Ces symboles constituent des informations importantes relatives au produit ou des instructions concernant son utilisation.
Port de protection auditive
Port de lunettes de sécurité
Port du masque respiratoire
Port du casque
Port de gants
Read instruction manual
Attention
Emanation d’échappement ou de gaz !
Risque d’incendie
Risque d’explosion
Pas de flammes nues
Ne pas utiliser l’air comprimé des bouteilles à haute pression
Conforme à la règlementation et aux normes européennes de sécurité pertinentes
Protection de l’environnement
Les outils à air comprimé ne doivent pas être jetés avec les ordures ménagères. Veuillez les recycler dans les centres prévus à cet effet. Pour de plus amples informations, veuillez contacter votre municipalité ou point de vente
Caractéristiques techniques
Pression maximale de fonctionnement :. 2,1 bar
|
Arrivée d’air :…………………………………… |
Raccord 1/4’’ BSP |
|
fourni avec deux raccords rapides (type anglais EN-6 et |
|
|
européen EQ-4) |
|
|
Pistolet:…………………………………………… |
en fonte d’aluminium |
|
moulé sous pression |
|
|
Réservoir de la peinture :…………………… |
en polypropylène (PP) |
|
Capacité du réservoir :………………………. |
1000 cm³ |
|
Type d’alimentation :…………………………. |
par gravité |
|
Diamètre de la buse :………………………… |
1,0 mm |
|
Débit :…………………………………………….. |
70-110 ml/min |
Diamètre minimal du tuyau :
8 mm pour des tuyaux jusqu’à 15 m de longueur 9,5 mm pour des tuyaux plus long
|
Consommation d’air :………………………… |
28 -113 L/min |
|
Poids :…………………………………………….. |
0,75 kg |
Du fait de l’évolution constante de nos produits, les caractéristiques des produits Silverline peuvent changer sans notification préalable.
10
Consignes générales de sécurité
•En ce qui concerne les risques, lire et comprendre les instructions de sécurité avant d’installer, utiliser, réparer, entretenir, changer d’accessoires, ou travailler proche de cet outil. Ne pas respecter les consignes peut engendrer de sérieuses blessures corporelles.
•Seule une personne qualifiée et formée peut assembler, régler et utiliser la cet outil.
•N’apporter aucune modification sur cet outil. Des modifications peuvent diminuer l’efficacité des mesures de sécurité et augmenter les risques pour l’utilisateur.
•Garder toujours les instructions de sécurité, et les donner à l’utilisateur.
•Ne pas utiliser cet outil si elle est endommagée.
•Les outils doivent être inspectés régulièrement pour vérifier la validité des données de l’appareil en fonction de la norme ISO 11148-8:2011. Ces données doivent être
lisibles sur l’appareil. Il est de la responsabilité de ‘employeur/ utilisateur de contacter le fabricant pour obtenir le remplacement de la plaque signalétique si nécessaire.
Attention : Cet appareil n’est pas conçu pour être utilisé par des personnes (enfants compris) ayant des capacités physiques ou mentales réduites, ou n’ayant pas la connaissance ou l’expérience requise, à moins d’être sous la supervision d’une personne responsable de leur sécurité ou d’avoir reçu les instructions nécessaires. Les enfants ne doivent pas s’approcher et jouer avec cet appareil.
Risques de projection
•Il est à savoir qu’un défaut sur la pièce de travail, sur un accessoire ou sur l’appareil même peut engendrer l’envoi de projectiles avec une vitesse très importante.
•Toujours porter des protections oculaires résistantes aux impacts pendant toute la durée d’utilisation de cet outil. Le grade de protection doit être évalué avant chaque utilisation.
•Pour les travaux à effectuer au-dessus de la tête, porter un casque de sécurité.
•Les risques pour les autres personnes doivent être également évalués.
•Vérifier que la pièce de travail soit convenablement stabilisé pour travailler en toute sécurité.
Risques d’enchevêtrement
•Etouffements, lacérations et ou déchirures peuvent être provoques avec le port de vêtements amples, de bijoux, colliers, et si les cheveux ou des gants ne sont pas maintenus hors de portee de l’appareil et de ses accessoires.
Risques liés à l’utilisation
•L’utilisation de l’appareil peut exposer les mains à des risques de coupures, égratignures ou des inflammations.
•Porter des gants de protection adéquats
•Les utilisateurs et le personnel d’entretien doivent être physiquement capables de manipuler cet appareil de par son volume, poids et puissance.
•Maintenez l’appareil convenablement de façon à répondre aux mouvements normaux et d’anticiper les mouvements soudains de l’outil.
•Travailler avec une posture stable.
•Relâcher le dispositif de marche/arrêt en cas de coupure d’alimentation.
•Utiliser les lubrifiants recommandés par le fabricant.
•Des protections oculaires personnelles doivent être portées. Des gants et vêtements de protection sont également recommandés.
•Eviter le contact avec les éléments en mouvement pour éviter des pincements et coupures sur les mains ou autres parties du corps.
•Porter des lunettes de sécurité, des gants adéquats et des vêtements de protection appropriés.
•Ne jamais faire fonctionner le pistolet autre que vers la pièce de travail.
•Des décharges électrostatiques peuvent se produire en cas d’utilisation sur du plastiques ou d’autres matériaux non conducteurs.
•La pulvérisation peut engendrer des émanations d’échappement et d’aérosol, et ainsi créer des zones à atmosphère potentiellement explosives.
•oujours utiliser un système d’extraction de la poussière adéquat à cet appareil.
Risques liés aux mouvements répétitifs
•L’utilisation à bon escient de cet outil peut engendrer des sensations de gêne sur les mains, bras, épaules, cou et autres parties du corps.
•Lors de son utilisation, il est important de garder une posture stable et d’éviter toute posture pouvant engendrer un déséquilibre. Pour éviter une sensation de gêne ou de fatigue lors de longues utilisations, changer de posture.
•Si un utilisateur ressent des symptômes de façon récurrente ou persistante, comme la gêne, élancement, douleur, picotement, engourdissement, sensation de brûlure, raideur, ces avertissements doivent être pris sérieusement. L’utilisateur doit avertir son employeur et consulter professionnel de la santé qualifié.
Risques liés aux accessoires
•Débrancher toujours l’appareil de sa source d’alimentation avant de remplir le réservoir ou de changer d’accessoire.
•Utiliser uniquement les tailles et types d’accessoires recommandés par le fabricant.
Risques liés au lieu de travail
•Les causes d’accidents sur le lieu de travail sont souvent dues à des trébuchements, glissades et chutes. Faites attention sur les surfaces rendues glissantes par l’utilisation de l’appareil, ainsi que les risques de trébuchements qui pourraient être occasionnés par le tuyau d’air et tuyau hydraulique.

|
580420 |
Pistolet pulvérisateur HVLP à alimentation par gravité |
•Cet outil n’est pas conçu pour être utilisée en milieu à atmosphère potentiellement explosif, et n’est pas isolante contre le contact avec une source électrique.
Risques liés à la poussière et aux émanations.
•La poussière et les émanations produites lors de l’utilisation de cet appareil peuvent provoquer des maladies (comme le cancer, asthme, dermatite et d’anomalies congénitales).
•L’évaluation des risques doit inclure la poussière produite lors de l’utilisation de l’outil, ainsi que le déplacement de la poussière déjà existant crée par de l’utilisation de l’outil.
•Faire fonctionner et entretenir cet outil sont recommandés dans ces instructions pour la poussière et les émanations.
•Dirigé la sortie de la poussière de façon à limiter le déplacement de la poussière dans un milieu poussiéreux.
•Lorsque de la poussière et des émanations sont créés, la priorité doit être de les contrôler à la source de l’émission.
•Tous les systèmes d’extraction de la poussière ou des systèmes de pulvérisation d’eau anti-poussière/émanations doivent être correctement utilise en fonction des instructions du fabricant.
•Choisir, entretenir et remplacer les accessoires recommandés dans le manuel d’utilisation pour éviter une augmentation de la production de poussière et d’émanations.
•Utiliser les protections respiratoires en accordance avec les instructions de l’employeur ainsi qu’avec la réglementation en matière de santé et de sécurité.
Consignes supplémentaires relatives aux outils pneumatiques
L’air comprimé peut engendre des blessures graves :
•Toujours couper l’alimentation en air, purger le tuyau d’air et débrancher l’appareil de l’alimentation en air lorsqu’il n’est pas utilisé ou lors d’un changement d’accessoires ou avant toutes réparations.
•Ne jamais diriger l’air vers vous ou d’autres personnes
•Les tuyaux peuvent être une source de dangers en donnant des coups de fouets. Toujours vérifier le bon état du tuyau et des raccords.
•Pour toute utilisation de coupleurs universels, utiliser des goupilles et vérifier les tuyaux pour éviter un mauvais raccord entre le tuyau et l’appareil.
•Ne jamais dépasser la pression maximale d’air indiquée sur l’appareil.
•Ne jamais porter l’appareil par le tuyau.
Consignes de sûreté relatives aux outils pneumatiques
Environnements dangereux
•Assurez-vous de disposer d’un espace suffisamment dégagé autour de la zone de travail. Sachez que les tuyaux flexibles d’alimentation en air comprimé peuvent représenter un danger de trébuchage. Veillez à les disposer de manière à réduire autant que possible ce danger.
Protégez vos yeux
• Portez toujours des lunettes de sécurité.
Protégez votre ouïe
• Portez toujours des protections auditives
Protégez-vous des vibrations
•Les outils électriques portatifs produisent des vibrations et ne doivent pas être utilisés pendant de longues périodes sans marquer de pause. Les vibrations peuvent en effet provoquer des maladies. En conservant la chaleur, des gants portés par l’utilisateur peuvent lui permettre de maintenir une bonne circulation sanguine dans les doigts.
•Portez un équipement de protection
•Portez toujours un équipement de protection adapté, comprenant entre autres une combinaison de travail, des gants, un masque, etc.
•Il est de la responsabilité de l’utilisateur de s’assurer que toute personne se trouvant à proximité de la zone de travail soit également pourvue d’un équipement de sécurité approprié.
•Utilisez un tuyau flexible d’air comprimé adapté
•Utilisez des tuyaux flexibles légers pour raccorder l’outil au compresseur d’air.
•L’air comprimé doit être fourni par un tuyau de 8 mm de diamètre avec un raccord femelle ¼’’ NSP branché sur le pistolet. Pour des tuyaux d’une longueur supérieure à 15 m, le diamètre du tuyau doit être de 9,5 mm.
•Avant toute pulvérisation, assurez-vous que le pistolet soit raccordé à une alimentation en air propre et filtré.
•Débranchez l’outil avant tout changement
•Assurez-vous toujours que votre outil pneumatique se soit complètement arrêté de fonctionner avant de le déposer.
•Débranchez toujours l’outil de l’alimentation en air comprimé avant tout travail d’entretien ou opération de remplissage.
•Assurez-vous toujours que votre outil pneumatique soit en position éteinte avant de le brancher à l’alimentation en air comprimé. Sachez que les outils pneumatiques peuvent conserver une pression résiduelle après utilisation. Purgez toujours la pression d’air de l’outil après avoir fermé l’alimentation en air comprimé.
Ménagez l’appareil
•N’employez pas une pression d’air comprimé supérieure au niveau recommandé. Une pression excessive peut entraîner une usure précoce des pièces en rotation et favoriser les dysfonctionnements. Elle peut également conduire à une fissure du carter
•Ne tentez pas de modifier un outil pneumatique. Toute tentative de modification de votre outil pourrait entraîner des blessures graves sur vous-même ou les personnes se trouvant autour de vous et annulera sa garantie.
Utilisation des pistolets à peinture
•Ne dirigez pas le pistolet à peinture vers une personne ou un animal
•Lors de la pulvérisation de peinture, tenez-vous à l’écart des sources de chaleur et des flammes nues
ATTENTION : Les solvants et les peintures sont nocifs et peuvent être toxique. Certains de ces produits peuvent être également extrêmement inflammables. Manipulez-les avec précautions, selon les recommandations du fabricant. Entreposez les solvants et peintures dans des récipients hermétiques conçus pour résister aux propriétés chimiques de ces
produits. Portez toujours des équipements de protection et disposez des solvants, peintures et récipients en accordance avec les lois et régulations.
ATTENTION : Les solvants à base d’hydrocarbures halogénés, comme le trichloroéthane et chlorure de méthylène 1,1,1 peuvent engendrer des réactions chimiques avec des corps en aluminium et galvanisés ou galvanisé à chaud, et éventuellement provoquer des risques d’explosion.
ATTENTION : Lors de la pulvérisation de matériaux de revêtements, des vapeurs et aérosols sont produits qui sont nocifs pour votre santé. Veuillez lire attentivement les étiquettes et instructions de sécurité et respectez toutes les recommandations et
instructions indiqués. En cas de doute, contactez votre revendeur. Utilisez des protections respiratoires lors de la pulvérisation. Les équipements de protections respiratoires doivent être adéquats au matériau utilisé et au niveau de concentration de vapeur dégagée. Pour la pulvérisation de la peinture, utilisez des équipements respiratoires indépendant de l’air ambiant ou avec des filtres A1/A2-P2. Assurez-vous également de protéger votre peau pendant la pulvérisation ou les opérations de nettoyages. Portez les vêtements de sécurité adéquats et des crèmes de protections de la peau.
ATTENTION : Ne pulvérisez pas d’acides, solutions caustiques, détachant ou autres produits similaires.
www.silverlinetools.com 11

F
Présentation du produit
1Couvercle du réservoir
2Réservoir de peinture
3Crochet d’accrochage
4Molette de réglage de l’aiguille
5Bouton de réglage du jet
6Poignée
7Raccord rapide
8Molette de réglage de la pression d’air
9Gâchette
10Buse de sortie de la peinture
11Buse d’air
12Bague de verrouillage de la buse d’air
Utilisation appropriée
•Pistolet à pulvérisation par gravité, alimenté par un compresseur à air comprimé filtré, pour pulvériser des peintures et revêtements à viscosité moyenne avec des basses pressions d’air
•Comparés aux pistolets conventionnels, les pistolets HVLP utilise un plus grand volume d’air pour pulvériser la peinture avec une basse pression. Par conséquent, une plus grande quantité de peinture est pulvérisée sur la surface de travail. De plus, la surpulvérisation, la quantité de produit et la pollution de l’air sont réduites.
Déballage
Déballez le produit avec soin. Veillez à retirer tout le matériau d’emballage et familiarisezvous avec toutes les caractéristiques du produit.
Si des pièces sont endommagées ou manquantes, faites-les réparer ou remplacer avant d’utiliser l’appareil.
Avant utilisation
Montage du connecteur rapide
Remarque : Cet outil est fourni avec deux raccords rapides mâles pour la conduite d’air : EQ-4 , généralement utilisé en Europe
EN-6 , utilisé principalement au Royaume-Uni
Choisissez un raccord rapide compatible avec la conduite d’air utilisée, et montezle de la façon suivante :
1.Appliquez une bande de PTFE (non fournie) sur le filetage du raccord pour conserver une meilleure étanchéité. Les conduites d’air pourvues d’un raccord ¼” coordonné s’emmancheront par simple pression sur le raccord de l’appareil.
Remarque : appliquez la bande PFTE en la serrant bien et dans le sens horaire pour que la bande reste bien en place lorsque le raccord sera vissez sur l’appareil.
2.Retirez le bouchon protecteur de l’arrivée d’air
3.En utilisant une clé (non fournie), vissez le raccord rapide sur l’arrivée d’air située sur la base de la poignée.
4.Alimentez le circuit d’air en pressurisant avec précaution, et vérifiez qu’il n’y pas de fuite (par exemple en vaporisant un peu d’eau savonneuse sur les raccords).
•Les conduites d’air avec des raccords rapides femelles peuvent s’insérer maintenant sur l’appareil.
Assemblage du réservoir de peinture
•Assemblez le réservoir (1) en le vissant sur le raccord (4) du pistolet. Serrez avec douceur en vous aidant d’une clé (non fournie).
12
Connexion de l’air comprimé
Régulateur Filtre 


 de la pression séparateur
Pistolet
Tuyau d’air
•Cet outil doit être branché à une alimentation en air comprimé propre et sec, pourvue d’un d’un séparateur d’eau et d’un filtre.
ATTENTION : N’utilisez en aucun cas le pistolet avec un système d’air comprimé avec un graisseur intégré.
•Ne laissez pas la pression d’alimentation dépasser la pression maximale spécifiée. (Voir caractéristiques techniques).
•Vérifiez que l’eau soit drainée quotidiennement
•Vérifiez que toutes les parties du système (tuyaux, coupleurs, etc) soient adaptés à l’air comprimé utilisé.
Réglage de la pression d’air
•La pression de pulvérisation doit être réglée de façon correcte pour qu’il y ait une baisse de pression entre le compresseur/régulateur et le pistolet.
•Utilisez un diamètre de tuyau recommandé pour diminuer la baisse de pression et régler l’alimentation en air comprimé conformément aux caractéristiques techniques.
IMPORTANT : pour réduire la surpulvérisation et obtenir le maximum d’efficacité, pulvérisez toujours avec la pression de pulvérisation la plus faible possible.
Préparation de la peinture
ATTENTION : Assurez-vous que le type de peinture ou solvant utilisé ainsi que la viscosité est compatible avec le matériau et le pistolet.
•Mélangez et filtrez la substance à pulvériser conformément aux recommandations du fabricant.
•Référez-vous aux instructions du fabricant pour entreposer et disposer de la substance préparée.
Remplir le réservoir de peinture
1.Assurez-vous que le pistolet soit débranché de l’alimentation en air comprimé.
2.Dévissez le couvercle du réservoir (1)
3.Remplissez le réservoir jusqu’au niveau requis
Remarque : Une graduation en ml se trouve sur l’extérieur du réservoir. Ne pas remplir au-dessus de la capacité maximale (voir les caractéristiques techniques).
4. Remettez le couvercle et fermez fermement à la main.
Remarque : Le couvercle est muni d’une petite ouverture avec le tube d’égalisation. Le réservoir n’est donc pas complètement hermétique. Faites attention de ne rien verser sur ce tube. Assurez-vous que l’ouverture et le tube soient toujours propres et non bouchés.
Réglage du pistolet
•Mettez le pistolet dans sa position par défaut
1.Tournez doucement et complètement la molette de réglage de l’aiguille (4) dans le sens horaire.
Remarque : La vis de réglage de l’aiguille possède une bague de serrage moletée qui doit être desserrée pour pouvoir effectuer le réglage. Resserrez la bague lorsque le réglage est effectué.
ATTENTION : L’aiguille peut s’endommager facilement. Ne pas forcez pas trop dessus.
2.Tournez doucement et complètement la molette de réglage de pulvérisation (8) dans le sens horaire.
ATTENTION : Ne forcez pas trop, cela pourrait endommager le siège de la valve.
3.Tournez doucement et complètement le bouton de réglage du jet (5) dans le sens horaire.
4.Desserrez la bague de verrouillage de la buse d’air (12) d’environ un quart de tour pour régler la buse d’air (11)
Réglage du débit
1.Branchez le pistolet sur l’alimentation en air
2.Dirigez le pistolet vers un large carton ou similaire
3.Maintenez fermement le pistolet et appuyez sur la gâchette (9)

|
580420 |
Pistolet pulvérisateur HVLP à alimentation par gravité |
Remarque : Dans la position par défaut, il n’y a pas de débit d’air ou de peinture
4.Tournez doucement la molette de réglage de la pression d’air (8) dans le sens antihoraire pour régler le débit d’air requis.
5.Tournez doucement la molette de réglage de l’aiguille dans le sens antihoraire pour avoir un débit de peinture.
6.Réglez jusqu’au débit voulu.
FIG. A
Réglage du jet de pulvérisation
Remarque : réajustez toujours le débit lorsque vous modifiez la forme du jet.
1.Tournez doucement le bouton de réglage du jet (5) dans le sens antihoraire pour régler la forme du jet. Tournez le bouton jusqu’à obtention du jet voulu.
Remarque : Tourner la molette de réglage de pulvérisation dans le sens antihoraire élargit le jet, et le rétrécit (forme circulaire) dans le sens horaire.
2.Tournez la buse d’air (11) pour régler l’orientation du jet de pulvérisation (voir Fig.A)
3.Une fois satisfait de la pulvérisation, relâchez la gâchette (9) et serrez la bague de verrouillage de la buse d’air (12) à la main pour maintenir la buse d’air en position.
Remarque : Pour la plupart des utilisations les papillons de la buse d’air doivent être horizontaux pour un jet vertical, ce qui maximise la surface de recouvrement lorsque le pistolet est déplacé avec un mouvement de va et vient parallèle à la surface à peindre.
Instructions d’utilisation
|
FIG. B |
Coating will be |
Coating will be |
||
|
light at this point |
heavy at this point |
|||
|
Wrong |
||||
|
250mm- |
and wet when spraying |
|||
|
Coating should be even |
||||
|
200 |
||||
|
Start |
Pull |
Release |
End of |
|
|
stroke |
trigger |
trigger |
Stroke |
Correct
Utilisation de la gâchette
•La gâchette s’actionne en deux temps
•La première étape permet de faire arriver l’air dans le pistolet
•En appuyant plus, cela permet le débit de la peinture
Remarque : Régler la molette de réglage de pulvérisation (9) empêche d’appuyer plus qu’il ne faut sur la gâchette.
• Pour obtenir une couche régulière, la peinture ou la substance de revêtement doit être préparée et diluée selon les instructions du fabricant.
• Le pistolet doit être propre et correctement rempli, le jet de pulvérisation réglé et le compresseur réglé à la pression requise
• Effectuez toujours un test pour le jet comme indiqué dans le ‘Réglage du pistolet’ pour obtenir le meilleur réglage
• Gardez le pistolet à environ 20-25 cm de la pièce de travail.
• Pulvérisez d’abord la peinture sur les bords. Repassez sur à peu près de la moitié de la bande peinte pour peindre la prochaine bande.
• Pulvérisez en continue avec un geste régulier. Maintenez le pistolet fermement et restez bien parallèle le long de la pièce de travail
• N’effectuez pas de mouvement en arrondi car la finition ne sera pas régulière (voir Fig.B)
•Evitez de trop secouer, car cela pourrait entrainer une circulation d’air instable et provoquer l’émanation de nuages de pulvérisation de peinture.
•Avant de commencer la pulvérisation, il est recommandé de bien visualiser la pièce à peindre. Commencez par les endroits les moins visibles vers les plus visibles. Cela vous permettra d’obtenir une meilleure finition, en vous permettant d’identifier les endroits les plus problématiques et de travailler autour des endroits déjà peints.
•Après utilisation, débranchez immédiatement le pistolet de la source en air comprimé.
ATTENTION : De l’air comprimé résiduel peut rester dans l’appareil après utilisation. Purgez toujours l’air de l’appareil après avoir éteint l’alimentation en air.
Entretien
ATTENTION : Débranchez toujours l’appareil de sa source d’alimentation et purgez l’air avant de démonter ou effectuer son entretien.
ATTENTION : Portez toujours les équipements de sécurité comme les protections oculaires et respiratoires, ainsi que des gants avant d’effectuer les opérations de nettoyages et d’entretien.
ATTENTION : La plupart des solvants utilisés pour la peinture sont toxiques et hautement inflammables. Référez-vous aux lois et régulations locales en ce qui concerne la manipulation, entrepôt et le rejet des solvants et d’autres substances nocives et potentiellement dangereuses.
Remarque : Le pistolet est un outil de précision et doit donc être traité et maintenu en conséquence, afin d’obtenir des résultats performants et constants.
•Le problème le plus commun des pistolets est causé par de la peinture qui a séché à l’intérieur de la pointe, la buse ou dans la conduite.
•Nettoyez le pistolet entièrement après chaque utilisation, et lorsque le type de substance à pulvériser change.
•Utilisez toujours le même solvant qui a été utilisé pour diluer la peinture.
Nettoyage après chaque utilisation
1.Enlevez le réservoir, videz le reste de peinture ou autre substance dans un récipient hermétique adéquat et nettoyez avec le solvant approprié et un chiffon propre.
2.Nettoyez la buse, le couvercle et le joint d’étanchéité du réservoir
3.Versez une petite quantité de solvant dans le réservoir propre et remontez-le sur le pistolet.
4.Branchez le pistolet sur la source d’air
5.Dirigez le pistolet vers un récipient vide et pulvérisez le solvant dans le récipient jusqu’à le jet ne présente plus de trace de peinture
6.Coupez l’alimentation en air et débranchez le pistolet
7.Retirez le réservoir, et videz le reste de solvant dans un récipient adéquat pour être rejeté, et laissez sécher toutes les parties du pistolet.
8.Remontez le réservoir pour ranger le pistolet.
ATTENTION : Afin de ne pas relâcher des solvants ou autres substances nocives dans l’atmosphère, ouvrir des solvants de nettoyage dans certains endroits n’est pas permis, et des procédures spéciales de nettoyage doivent être suivies (par exemple utilisation de sacs fermés ou récipients, etc.). Familiarisez-vous avec les régulations locales et suivez les instructions recommandées.
Nettoyage spécial pour les buses et les aiguilles
Attention : Toutes les buses et aiguilles sont fabriquées avec précision. Elles doivent être manipulées avec grandes précautions. Tout endommagement ou modification réduira la performance de l’appareil ou provoquera un mauvais jet de pulvérisation.
Attention : Les aiguilles ont une extrémité pointue. Manipulez avec précaution pour éviter les blessures.
1.Référez-vous au schéma éclaté pour démonter le pistolet et enlevez la buse et l’aiguille
2.Pour nettoyer, trempez les buses et l’aiguille dans un solvant capable d’enlever les résidus secs et nettoyez avec une brosse adéquate souple.
Remarque : Ne trempez jamais entièrement le pistolet dans un solvant, car cela abimera le corps du pistolet et enlèvera la lubrification.
3. Soufflez avec précaution toutes les parties nettoyées avec de l’air comprimé filtré.
ATTENTION : N’essayez pas de nettoyer l’intérieur des buses avec des instruments métalliques. Si un nettoyage mécanique est nécessaire, utilisez uniquement des outils en matériau plus doux que le laiton, comme des agents de nettoyage spécifiques aux buses.
Lubrification
•Même si l’air et les conduits du pistolet ne doivent pas contenir de traces d’huile et autres contaminants, certaines parties requièrent une lubrification régulière.
•Lubrifiez légèrement tout le corps, roulement, joints toriques actifs avec une huile de graissage spécifique et appliquez un peu de vaseline sur les ressorts.
Rangement
Ranger cet outil dans un endroit sûr, sec et hors portée des enfants
www.silverlinetools.com 13
 Loading…
Mastering the art of spray paint can be gratifying, especially when it shows off a finished product that has been completed by your own hand.
Whether you’re someone who is a professional artist or perhaps a hobbyist with an eye for detail.
Setting up and creating a work of art that is worthy of showing off is easier than ever thanks to HVLP spray paint gun technology.
In this post of mine, I will teach you guys “how to use an HVLP spray gun” properly so that you people out there.
Who can be an amateur in this profession don’t mess up stuff and getting disappointed?
Don’t worry I will try my best to teach you guys the best use of an HVLP spray gun in my post.
On the other hand, I have to admit that HVLP gun sprayers may seem a bit more difficult to use at first. However, you will discover that they are basically pretty similar to other sprayers out there.
In fact, if you’re familiar with HVLP sprayer parts, you will no doubt find it easier to use one of these particular machines.
What is an HVLP sprayer?
In short, an HVLP spray gun is a spray gun that uses much less paint than a regular paint gun. One of the main benefits of an HVLP spray gun is that it reduces paint waste.
Although the price tag may be much higher than a traditional spray gun some are affordable in the market also.
And the lower amount of paint consumed per project can actually save you money in the long run, which is great news for many DIY enthusiasts.
These spray guns are also much less messy than traditional paint guns.
Since they are more precise, they are able to completely cover all areas without running or dripping.
HVLP spray guns also provide you with excellent control over your spray pattern, which means you are better able to spray a fine pattern, unlike with a traditional paint gun.
This helps you get a more detailed finish. These spray guns are also excellent at laying paint down extremely smoothly, and they produce a superior finish that is long-lasting.
Types of HVLP sprayers out there:
In fact, there are types of HVLP spray guns out there. However, they can be divided into two categories: air-powered and electric.
Air-powered HVLP spray guns use air pressure to deliver paint to the surface.
The air comes from a compressor, which also supplies air for the paint cups. Air needs to be filtered, so it does not blow any debris or other foreign particles into the paint.
The other type of HVLP spray gun uses electricity to produce pressure. The electricity goes to the high-pressure pump, which in turn creates pressure that pushes the paint out of the tip.
Some electric HVLP guns are corded, while others are cordless. However, they both have the same advantages.
Electric HVLP guns are quieter and produce less vibration, which is why many people like them.
They are smaller, easier to handle and a lot easier to use. However, some people dislike them because.
They can be a bit too complicated but they are not if they read the manual which the company sends with the product.
Things you will need to get the job done (My suggestions)
Make sure before starting with the project you have these things with you to make your work easy and with satisfactory results
- Paint sprayer which suits you
- The compressor can be needed sometimes
- Nozzle
- Coating
- Cardboard piece to check the sprayer
- Protection is a must like goggles, face masks, gloves, etc.
The process to set up the HVLP spray gun
When learning how to set up an HVLP spray gun, it very much depends on whether you’re using a pneumatic or turbine-powered unit.
But as the fundamentals are the same, I will keep it to four simple sections — preparation and how to properly adjust your HVLP spray gun.
Preparation of sprayer
First of all, the preparation of the sprayer is a must before doing anything.
When DIYing, preparation is key. The first step is to read your owner’s manual for any specific details.
From this, you can determine the exact air requirements for your device and have the correct-sized compressor at hand (in the case of a pneumatic spray gun).
The way I started painting my house was very simple. I wanted to remove the weathered finish, so I decided to prime the surface.
Doing so would provide an even base layer in preparation for repainting it with a fresh coat.
Selecting the appropriate type of paint spray tip is all part of the how-to choose a spray gun process — it’s not a case of one size fits all.
For example, if you’re planning on using a dense coating on an expansive surface area, you’ll need a larger-sized tip to the size.
Which your spray tip can atomize and project your fan pattern is going to determine the coverage you ultimately get for your body material.
This is where a sprayer such as the Wagner FLEXiO 5000 could be a great bit of kit — there are two different tips included with this high-quality HVLP gun.
The first is an x-large .50 mm wide pattern that offers great coverage over large surface areas while being a super fine finish;
And second, there’s also a .60 mm wide ultra & extra fine pattern option with this model, which should suit those looking to do more intricate detailing work!
Adjustment and testing of the HVLP sprayer
Before you start to work on a project, it is important to test out your equipment.
You want to make sure that everything is calibrated correctly so that when you actually begin working it will roll out right away.
To do this simply place some pieces of scrap cardboard or paper onto the top of the motor drive tray, and create a two-inch border of space around all sides.
Next set both the volume and angle controls accordingly – make sure that they are not too far apart, but also not setting controls too close together as this will give off an inconsistent coating.
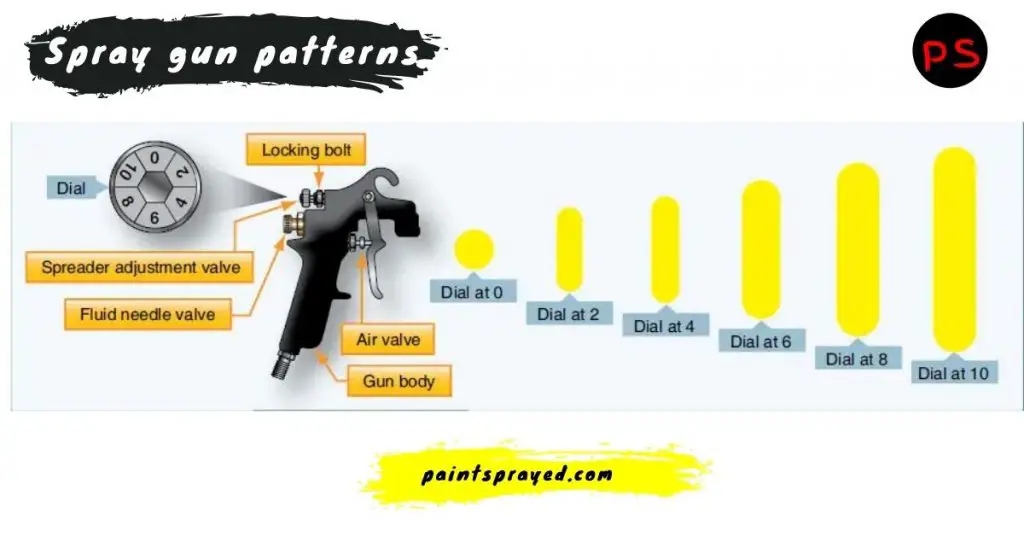
To get the best out of your sprayer, keep the sprayer six inches away from the surface and gently pull on the trigger for a split second, then release it to deliver a quick burst of coating.
Once you see that even pattern with each such burst, that’s when you’ve got your pattern length set just right.
And unless you want a new design every time you open up your paint can don’t touch any more dials!
Now, hold your spray gun at a distance of around nine inches from the surface and spray another short burst of coating.
This time, there should be one pattern that is between nine and ten inches long. The pattern should provide total coverage in the center with an even fade away toward the edges.
You might find that the spray gun you’re using isn’t performing well at low RPMs. If you’re using a pneumatic gun with an air regulator, slightly reduce the pressure output on the regulator.
You can then begin the test again to fine-tune your settings and retry it until you achieve good results from all angles.
Once you finish this test and feel that you don’t need to make any further adjustments while working, then you’re ready to paint!
Some sprayer techniques I use
These are some of the techniques which I often use with HVLP spray guns for my projects.
I am gonna share these so that you guys get help with these while doing your projects with the HVLP sprayer.
I hope these techniques or some of these might help you out in some way or the other.
Let me know in the comments section if any one of these techniques helped you out while painting the surface or object
Uplift your project
If you’re working with a smaller-medium-sized object (think hobby-project sized rather than full-scale project)
It can help to raise your work so that you can use the HVLP system at a comfortable height to keep your posture safe and sound.
If you work in an area with a workbench, cover it with something to avoid damage and wear – like an old drop cloth shall we say? – and place your object on top.
If you don’t have a permanent workspace of your own just yet then don’t worry. You could use an old cardboard box or similar to hold up the object (carefully!) while you spray away.
Keeping the arm straight
You don’t need to walk a line between a tight, uncomfortable grip and a loose/limp hand.
Just keep your arm in a straight line with the HVLP spray gun nozzle while spraying on basecoats and stains — this will ensure even coverage of your favorite coatings.
Apply thinner coats
When you’re painting you should be aware that the thinner your coats, the easier it will be to get a smooth finished surface.
It’s easy to see when the paint is applied in an uneven manner and you’ll end up with drips, which not only looks unprofessional but is also a time-waster for sanding it down after as well.
Going with the Grain
When staining or painting a wood-based project, go with the grain. Much like music, this directly follows the lead of a headliner act as well-known and widely regarded as Wood Grain.
By following what naturally comes to you once exposed to it through an HVLP paint sprayer.
You’ll achieve a finish that won’t soon be forgotten by anyone that might happen to lay eyes on your masterpiece of DIY!
Check the weather before starting
At one of my friend’s places there’s always raining so he also checks that if the weather is clear a little bit then he is good to go or he covers the stuff if he had to paint while in little rain.
Not all work days are made equal. It’s a good idea to choose a non-breezy day when working outdoors.
Because you don’t want your project to end up looking like a Jackson Pollock painting in the end.
Trade-offs can be made of course, if the time crunch is real but we recommend coming prepared so that the choice is not yours to make.
Protect yourself
I’d like to point out that it’s vital to wear a face mask, eye goggles, and coveralls while spraying.
Not only will this protect your clothes and avoid getting the coating on yourself, but you can also prevent any irritation to your skin.
How do you use an HVLP sprayer?
- Prepare the surface to be sprayed by cleaning and sanding it.
- Mix the paint or stain according to the manufacturer’s instructions.
- Fill the sprayer’s cup with the paint or stain.
- Turn on the air compressor and adjust the pressure according to the manufacturer’s recommendations.
- Hold the sprayer about 8-12 inches away from the surface and pull the trigger to begin spraying.
- Move the sprayer in a steady, back-and-forth motion to apply an even coat.
- Release the trigger when you’re done spraying a section.
- Allow the paint or stain to dry according to the manufacturer’s instructions.
- Clean the sprayer according to the manufacturer’s recommendations before storing it.
How do you mix paint for a HVLP sprayer?
- Start by reading the manufacturer’s instructions for the paint you’re using.
- Measure out the appropriate amount of paint and pour it into a separate container.
- Slowly add the recommended amount of thinner or reducer to the paint. Stir the mixture well to ensure it is fully combined.
- Use a paint strainer to remove any lumps or debris from the mixture.
- Pour the paint into the sprayer’s cup and use the sprayer according to the manufacturer’s instructions.
- Be sure to use the correct thinner/reducer for the paint you are using, some paints may require a special thinner/reducer to work correctly with HVLP sprayers.
- It’s also a good idea to test the paint mixture on a small, inconspicuous area before starting the main job to ensure that you have the right consistency and that the paint will spray correctly.
How do you get a smooth finish with a HVLP sprayer?
- Use the correct nozzle: HVLP (High Volume Low Pressure) sprayers come with different nozzle sizes, use the right one for the job. A smaller nozzle size can produce a finer spray and a smoother finish.
- Adjust the pressure: Adjust the pressure on the air compressor to the recommended setting for the paint or stain you’re using. This will ensure that the paint is atomized properly and will result in a smoother finish.
- Thin the paint: Thin the paint or stain according to the manufacturer’s instructions. This will make it easier for the paint to flow through the sprayer and will help to prevent drips and splatters.
- Use light even passes: Hold the sprayer 8-12 inches from the surface and use light, even passes to apply the paint. Overlapping each pass will help to ensure an even coat and a smooth finish.
- Use consistent movement: Use a consistent, back-and-forth movement to apply the paint. Avoid pausing or stopping in one spot, as this can cause drips and an uneven finish.
- Sand between coats: Sand lightly between coats, Use fine grit sandpaper, this will remove any imperfections and make the surface smooth before the next coat.
- Clean the equipment: Clean the sprayer and the nozzle thoroughly after each use. Paint buildup on the nozzle or in the sprayer can cause an uneven finish and can affect the quality of the paint spray in future uses.
Can you spray latex paint with hvlp gun?
Yes, you can spray latex paint with an HVLP (High Volume Low Pressure) spray gun.
However, latex paint is thicker than some other types of paint, which can make it more challenging to spray with an HVLP gun.
Here are some tips to help you get good results when spraying latex paint with an HVLP gun:
- Thin the paint: Latex paint can be thinned with water to make it easier to spray. You can add up to 10% water to latex paint to thin it for spraying. Be sure to stir the paint thoroughly after adding water to ensure a consistent consistency.
- Use a larger tip: When spraying latex paint, it’s recommended to use a tip size of at least 1.5mm. A larger tip will help the paint atomize properly and reduce the likelihood of clogging or spitting.
- Adjust the air pressure: The appropriate air pressure for spraying latex paint with an HVLP gun can vary depending on the specific gun and paint being used. As a general guideline, start with an air pressure of around 20-25 PSI and adjust from there as needed.
- Spray technique: When spraying latex paint, it’s important to use a slow and steady spray technique. Move the gun in a side-to-side motion, overlapping each pass by 50%. Hold the gun perpendicular to the surface being painted to achieve an even coat.
In summary, you can spray latex paint with an HVLP gun by thinning the paint, using a larger tip, adjusting the air pressure, and using a slow and steady spray technique.
With these tips in mind, you can achieve good results when spraying latex paint with an HVLP gun.
How to spray clear coat with hvlp gun?
Spraying a clear coat with an HVLP (High Volume Low Pressure) gun can produce a smooth and professional finish. Here are the steps to follow to spray clear coat with an HVLP gun:
- Prepare the surface: Before spraying the clear coat, make sure that the surface is clean and free from any dirt, debris, or grease. Sand the surface if necessary to ensure a smooth and even finish.
- Mix the clear coat: Follow the manufacturer’s instructions to mix the clear coat with any required solvents or thinners. Stir the mixture thoroughly to ensure an even consistency.
- Set up the HVLP gun: Attach the appropriate nozzle and needle to the HVLP gun according to the manufacturer’s instructions. Set the air pressure according to the manufacturer’s recommendations. Typically, the air pressure should be set between 20-30 PSI.
- Test spray: Before spraying the clear coat onto the surface, test spray on a scrap piece of material to check the spray pattern and adjust the air pressure and fluid flow accordingly.
- Begin spraying: Hold the HVLP gun approximately 6-8 inches away from the surface and use a sweeping motion to apply the clear coat in thin, even coats. Start at the top of the surface and work downwards. Overlap each pass by approximately 50%.
- Allow to dry: After applying the clear coat, allow it to dry for the recommended time according to the manufacturer’s instructions. Apply additional coats if necessary.
- Clean the HVLP gun: Clean the HVLP gun thoroughly with an appropriate solvent according to the manufacturer’s instructions.
By following these steps, you can achieve a smooth and professional finish when spraying clear coat with an HVLP gun.
It’s important to follow the manufacturer’s instructions for the specific clear coat you are using, as well as the HVLP gun and any other equipment.
How to spray gelcoat with HVLP gun?
Spraying gelcoat with an HVLP (High Volume Low Pressure) gun can be a bit more challenging than spraying other types of coatings.
But with the right technique and equipment, it can be done. Here are the steps to follow to spray gelcoat with an HVLP gun:
- Prepare the surface: Before spraying the gelcoat, make sure that the surface is clean and free from any dirt, debris, or grease. Sand the surface if necessary to ensure a smooth and even finish.
- Mix the gelcoat: Follow the manufacturer’s instructions to mix the gelcoat with any required solvents or thinners. Stir the mixture thoroughly to ensure an even consistency.
- Set up the HVLP gun: Attach the appropriate nozzle and needle to the HVLP gun according to the manufacturer’s instructions. Set the air pressure according to the manufacturer’s recommendations. Typically, the air pressure should be set between 40-60 PSI.
- Test spray: Before spraying the gelcoat onto the surface, test spray on a scrap piece of material to check the spray pattern and adjust the air pressure and fluid flow accordingly.
- Begin spraying: Hold the HVLP gun approximately 6-8 inches away from the surface and use a sweeping motion to apply the gelcoat in thin, even coats. Start at the top of the surface and work downwards. Overlap each pass by approximately 50%.
- Apply a second coat: Allow the first coat to dry for the recommended time according to the manufacturer’s instructions. Apply a second coat if necessary.
- Apply wax: After the gelcoat has dried, apply a wax or other protective coating to the surface to prevent oxidation and fading.
- Clean the HVLP gun: Clean the HVLP gun thoroughly with an appropriate solvent according to the manufacturer’s instructions.
By following these steps, you can achieve a smooth and professional finish when spraying gelcoat with an HVLP gun.
It’s important to follow the manufacturer’s instructions for the specific gelcoat you are using, as well as the HVLP gun and any other equipment.
Keep in mind that spraying gelcoat can be more difficult than other coatings, so it may take some practice to achieve the desired results.
How to thin acrylic paint for HVLP spray gun?
Thinning acrylic paint is necessary when using an HVLP (High Volume Low Pressure) spray gun to ensure that the paint flows smoothly through the gun and produces an even, consistent finish.
Here are the steps to follow to thin acrylic paint for an HVLP spray gun:
- Determine the viscosity of the paint: The viscosity of the paint will determine how much thinner you need to add. Acrylic paint should have a viscosity similar to that of heavy cream.
- Choose the right thinner: There are several types of thinners that can be used to thin acrylic paint, including water, acrylic medium, and rubbing alcohol. Water is the most common thinner for acrylic paint.
- Mix the paint: Pour the acrylic paint into a clean container and add a small amount of thinner. Mix thoroughly and add more thinner as needed until the desired consistency is achieved. A good rule of thumb is to add 10-20% thinner to the paint.
- Test the paint: Test the thinned paint on a scrap piece of material to check the spray pattern and adjust the thinning ratio if necessary.
- Strain the paint: Strain the thinned paint through a fine mesh strainer to remove any lumps or impurities that could clog the HVLP gun.
- Fill the HVLP gun: Pour the thinned paint into the HVLP gun’s paint cup, taking care not to overfill it.
- Spray the paint: Hold the HVLP gun approximately 6-8 inches away from the surface and use a sweeping motion to apply the thinned paint in thin, even coats. Overlap each pass by approximately 50%.
By following these steps, you can achieve a smooth and professional finish when spraying thinned acrylic paint with an HVLP gun.
It’s important to follow the manufacturer’s instructions for the specific acrylic paint and HVLP gun you are using, as well as the thinner you choose.
Keep in mind that thinning the paint too much can cause it to run or drip, while not thinning it enough can cause it to clog the gun and produce an uneven finish.
How to spray latex paint with a hvlp gun?
Spraying latex paint with an HVLP (High Volume Low Pressure) gun can produce a smooth and even finish, but it requires some preparation and technique.
Here are the general steps you can follow:
- Choose the right paint: Latex paint is thicker than other types of paint, so you’ll need to choose a paint that’s specifically formulated for spraying. Look for a paint that’s labeled as “HVLP ready” or “airless sprayer ready.”
- Thin the paint: Even with an HVLP gun, you may need to thin the paint to achieve the right consistency for spraying. Follow the manufacturer’s instructions on how to thin the paint, and test the consistency by spraying a small amount onto a scrap piece of wood or cardboard.
- Prepare your workspace: Cover any surfaces you don’t want to get paint on, and wear appropriate safety gear, including a respirator mask, goggles, and gloves.
- Adjust the gun settings: Before you begin spraying, adjust the HVLP gun settings to the appropriate settings for latex paint. This will typically involve adjusting the fluid flow and air pressure settings to achieve a fine mist of paint.
- Practice spraying: To get the hang of spraying, practice on a scrap piece of wood or cardboard. Hold the gun about 6-8 inches away from the surface you’re spraying, and move the gun in a steady back-and-forth motion, overlapping each pass slightly.
- Spray the paint: Once you’re comfortable with the technique, begin spraying the paint onto your project. Work in small sections, and use light, even coats to build up the desired coverage. Allow each coat to dry completely before applying additional coats.
- Clean the gun: After you’re finished spraying, clean the HVLP gun thoroughly with warm soapy water or a paint thinner recommended by the manufacturer.
Remember that the specifics of using an HVLP gun to spray latex paint may vary depending on the brand and model of the gun, so always consult the manufacturer’s instructions for best results.
How to thin oil based paint for hvlp spray gun?
To thin oil-based paint for an HVLP (High Volume Low Pressure) spray gun, you will need to follow a few steps:
- Check the manufacturer’s instructions: Before you begin thinning your oil-based paint, check the manufacturer’s instructions for the recommended thinning method and the appropriate thinning ratio. Different brands and types of paint may require different ratios of thinning.
- Use the right type of thinner: Choose the appropriate type of paint thinner for your oil-based paint. Some common types of paint thinner for oil-based paints include mineral spirits, turpentine, and naphtha. Make sure to use the recommended type of thinner for your paint.
- Mix the paint and thinner: Measure the amount of paint you need for your project and pour it into a mixing container. Slowly add the recommended amount of thinner to the paint, stirring constantly with a stir stick or mixing paddle. Start with a small amount of thinner and gradually add more until you reach the desired consistency for spraying.
- Test the paint: Once you’ve mixed the paint and thinner, test it by spraying a small amount onto a test surface. If the paint is too thick, add more thinner. If it’s too thin, add more paint.
- Adjust the spray gun settings: Adjust the spray gun settings to the appropriate settings for oil-based paint. This will typically involve adjusting the fluid flow and air pressure settings to achieve a fine mist of paint.
- Practice spraying: To get the hang of spraying, practice on a scrap piece of wood or cardboard. Hold the gun about 6-8 inches away from the surface you’re spraying, and move the gun in a steady back-and-forth motion, overlapping each pass slightly.
- Spray the paint: Once you’re comfortable with the technique, begin spraying the thinned oil-based paint onto your project. Work in small sections, and use light, even coats to build up the desired coverage. Allow each coat to dry completely before applying additional coats.
Remember to always follow the manufacturer’s instructions for your specific paint and spray gun to achieve the best results.
How to use harbor freight hvlp spray gun?
Harbor Freight is a popular brand that offers a range of HVLP (High Volume Low Pressure) spray guns for different types of projects.
Here’s a general guide on how to use a Harbor Freight HVLP spray gun:
- Choose the right spray gun: Harbor Freight offers different HVLP spray guns for different types of projects, so choose the spray gun that’s best suited for your project.
- Prepare your workspace: Cover any surfaces you don’t want to get paint on, and wear appropriate safety gear, including a respirator mask, goggles, and gloves.
- Choose the right paint: Check the manufacturer’s instructions for the recommended type of paint and the appropriate thinning ratio. Different brands and types of paint may require different thinning ratios.
- Mix the paint and thinner: Measure the amount of paint you need for your project and pour it into a mixing container. Slowly add the recommended amount of thinner to the paint, stirring constantly with a stir stick or mixing paddle. Start with a small amount of thinner and gradually add more until you reach the desired consistency for spraying.
- Adjust the spray gun settings: Harbor Freight spray guns come with a range of adjustable settings, including the fluid flow, air pressure, and spray pattern. Adjust the settings to the appropriate settings for your paint and project.
- Practice spraying: To get the hang of spraying, practice on a scrap piece of wood or cardboard. Hold the gun about 6-8 inches away from the surface you’re spraying, and move the gun in a steady back-and-forth motion, overlapping each pass slightly.
- Spray the paint: Once you’re comfortable with the technique, begin spraying the paint onto your project. Work in small sections, and use light, even coats to build up the desired coverage. Allow each coat to dry completely before applying additional coats.
- Clean the spray gun: After you’re finished spraying, clean the Harbor Freight spray gun thoroughly with warm soapy water or a paint thinner recommended by the manufacturer.
Remember that the specifics of using a Harbor Freight HVLP spray gun may vary depending on the model and type of gun, so always consult the manufacturer’s instructions for best results.
How to use a wagner HVLP spray gun?
Here are some general steps to follow when using a Wagner HVLP (High Volume Low Pressure) spray gun:
- Choose the right spray gun: Wagner offers different models of HVLP spray guns, so choose a model that’s appropriate for your project.
- Prepare your workspace: Cover any surfaces you don’t want to get paint on, and wear appropriate safety gear, including a respirator mask, goggles, and gloves.
- Prepare the paint: Mix the paint according to the manufacturer’s instructions. Depending on the product, you may need to thin the paint with a recommended thinner.
- Set up the spray gun: Attach the spray gun to the air hose, and adjust the fluid flow, air pressure, and spray pattern settings on your Wagner HVLP spray gun to the appropriate settings for your paint.
- Test the spray gun: Before spraying your project, test the Wagner HVLP spray gun on a scrap piece of wood or cardboard to ensure that the settings are correct and the paint is the right consistency.
- Spray the paint: Once you’re satisfied with the settings and consistency, begin spraying the paint onto your project. Hold the spray gun about 6-8 inches away from the surface and move the gun in a back-and-forth motion to apply an even coat of paint.
- Apply additional coats (if necessary): Depending on the type of paint and the finish you want to achieve, you may need to apply additional coats of paint. Allow each coat to dry completely before applying additional coats.
- Clean the spray gun: After you’re finished spraying, clean the Wagner HVLP spray gun thoroughly with warm soapy water or a paint thinner recommended by the manufacturer.
Remember to always follow the manufacturer’s instructions for your specific Wagner HVLP spray gun and paint to achieve the best results.
FAQ’s of How to use an HVLP spray gun
Conclusion on How to use an HVLP spray gun
Here it is, I have explained each and every point which I practice in my projects while using an HVLP sprayer.
Hope this post of mine helped you in some way. If you have any suggestions or tips do comment below so that others can also get help and I also can increase my knowledge.
I hope you’ve enjoyed reading this blog. If you already own an HVLP spray gun, what are you waiting for? Get out there and start using it!
If, however, you want to learn more about these devices before buying one, keep an eye out for my upcoming HVLP spray gun reviews.
Where I’ll cover all the kits you need to know about. Happy Painting lads!

Matthew Edward is a professional painter who loves to paint and wants to share useful tips and tricks which he had learned in many years of experience in painting. He also used many products that can be used for painting he has tried and tested each and every product to give an unbias opinion about it in his review. This blog is very useful for those newbies who want to learn painting without making mistakes.
How to use Hvlp Spray Gun before starting a painting is a common question. The modern Hvlp spray gun is a helpful tool for getting perfect painting results. But If you buy an Hvlp spray gun, you may become confused about its use when you open the packaging.
Surely for a quality painting, you need to learn techniques on how to use an Hvlp spray gun to get perfect results from Hvlp spray painting. Do not worry!! Today I will let you know how to use an Hvlp spray gun for a fine painting job.
Until you do not know How To Use Hvlp Spray Gun and how to set up a Hvlp spray gun, it is hard to get correct results from the gun. An Hvlp spray gun has three steps to get the correct setting up a hvlp spray gun. It includes choosing the correct air supply, choosing the right tips, and then setting it up. Then it will be easy for you to use. So, How To Use Hvlp Spray Gun or how set up an hvlp spray gun is a major part you have to know?
Our below discussion on how to use hvlp spray gun will be the best guide for you and you will learn the all details on it. So, why late start to read:
Table of Contents
The Basic Of The How To Use Hvlp Spray Gun
Setting Up Air Volume
To get accurate results from the Hvlp spray gun, you need to know how to set up an hvlp spray gun to set air volume at a high level. You can read the directions on the spray gun to know how many CFM your spray gun has. It will be good if you set the air volume higher than the required level.
Choosing Right Tip
Tips for your Hvlp spray gun are also important to choose; when you purchase a gun, you will get different sizes of tips. But which one is the correct tip size for your job depends on your job needs.
You can use any of the available tips. Suppose you are working with some small-level DIY projects, then the 1.0 tip is good to use. But for the larger projects, the recommended tip sizes are 1.3 or 1.4.
For the primers build, recommended tip sizes are 1.8 to 2.3 depending on the desired thickness level.
Correct Adjustment Of Tip
Setting up the tip is not a tough job, but you need a proper setup for a constant material flow. So follow the guidelines on instruction guides on how to adjust a hvlp spray gun or how to adjust an hvlp spray gun?.
Most spray guns come with easy adjustment features such as hooking up the tip with the spray gun and turning it clockwise; when you hear a click sound, it’s done.
How Should I Use An Hvlp Spray Gun To Get Perfect Paint?

How to use a hvlp spray gun to solve this problem If you have an Hvlp spray gun with you, it is a plus for you because you can easily finish many difficult projects with ease. You can easily get a fine and professional painting job with less effort. But you should know how to use an Hvlp spray gun to get the right painting experience.
I have collected the information to teach you the right way How To Use Hvlp Spray Gun to finish your paint job an Hvlp spray gun. Follow my simple step-by-step guidelines to learn techniques for painting.
Step One (Prepare The Area For Work):
To know How To Use Hvlp Spray Gun, First of all, you should prepare the area for work and always make sure you choose an airy place. An airy place is necessary because paint materials contain different chemicals that may cause suffocation.
So choose an airy and neat, and clean place for placing your painting items. If you are painting the wall, make sure there is a proper system for airflow, and there are no obstacles to disturb when you are painting.
Step Two (Arrange The Required Materials):
The second step is How To Use Hvlp Spray Gun to arrange the required materials. It depends on the surface that you are painting. So make sure that you are working with wood, metal, or concrete. Choose the paint material according to surface requirements and your budget.
Only a Hvlp spray gun is not enough; you also need to arrange for accessories, compressors, and safety gadgets. Never forget to wear safety gadgets. When choosing the Hvlp spray gun, make sure you have selected the right gun.
Choice of the gun also depends on the surface’s thickness, size, and the material that you will use. So make sure you have chosen an Hvlp spray gun that is fast and right for your project to complete smoothly.
Step Three (SetUp hvlp Spray Gun):
Now, set up hvlp spray gun to ensure proper functioning. Follow the instructions to get the right setup for your Hvlp spray gun that I have provided in the above content. So, it is important for you to know how to use Hvlp Spray Gun.
Step Four (Choose The Right Paint):
Forth steps How To Use Hvlp Spray Gun the performance of your Hvlp spray gun also depends on the paint. Make it possible that you have selected the correct paint. Only choosing the right paint is also not enough.
You also need to prepare the paint for the spray gun. Make sure your paint is not too thick or too thin. A moderate paint is good to get the right performance from an Hvlp spray gun.
Step Five (Load The Paint In Your Spray Gun):
Once you have prepared the paint for use in your Hvlp spray gun, you need a setup hvlp spray gun to load paint in your spray gun. It may not seem like a difficult job, but you need to be careful at this stage.
Please use pantyhose or paint strainer to fill the spray gun cup with paint. It will assist you in pouring the right amount of paint and protecting your paint from waste.
Step Six (Connect Turbine System With The Right Hose):
You may know that you need a proper turbine system for Hvlp spray gun to work. So you will need to connect it with the right hose to get the perfect job.
The length and width of a hose affect the performance of a spray gun. So choose the right size, so make sure you have chosen a hose size that should be at least 6 ft. Larger than 6 ft is good because it will reduce the risk of heating and create proper heat as required for painting.
Step Seven (Connect Your Hvlp Spray Gun With A Compressor):
Connect your Hvlp spray gun with a compressor. You should have a compressor that can produce high volume and low pressure. You can choose it according to the required instructions on Hvlp, but a more powerful compressor will be easy to finish.
Step Eight (Follow The Proper Technique While Painting):
You should follow the proper technique to apply paint on the required surface. Before applying on the required surface, test it on some paper or cardboard.
When applying paint, hold the gun in your hand and manage the distance between the surface and the spray gun tip between 6 and 7 inches.
If your chosen surface is vertical, then apply paint from top then to bottom. For verticals, you can follow the reverse of that. If you did not follow it, you might get thick layers and dots.
Always start your painting from convenient edges and then apply to other edges. Try to maintain a constant speed for consistent work.
Step Nine (Check The Surface And Give The Next Coat If Needed):
The next step is to check the surface if there is a need to apply more paint, then give the next coat. But before applying the next coat, make sure the first coat is completely dry. Do not apply paint over a wet coat; otherwise, you will get a messy look.
Step Ten (Clean The Hvlp Spray Gun With Paint Cleaner):
Once you have done your job, clean the Hvlp spray gun with paint cleaner, leave it for some hours to completely dry and then store the Hvlp spray gun in a safe place for next use.
Frequently Ask And Questions (FAQ): How To Use a Hvlp Spray Gun
Question 1: What Is An HVLP Spray Gun?
Answer: HVLP Spray gun is a modern spray gun type that works on high volume but at low pressure. The recommended volume for a Hvlp spray gun is 10-25 CFM, while the pressure should be 10 PSI or less to get the perfect finish.
It is an efficient type of air spray gun and is suitable for all types of jobs. It also saves your time, and you need less paint to finish a painting job.
These spray guns are also sometimes called turbo-sprayers and are suitable to use for in professional projects. Some of the major uses of Hvlp spray guns are trim, staining, furniture, cabinet painting, finishing work, auto vehicle painting, and much more.
Question 2: How Much Bigger An Air Compressor Do You Need To Operate An Hvlp Spray Gun?
Answer: It varies depending on the requirement of spray gun models because each model requires different compressor sizes. But the most recommended size for a Hvlp spray gun show is at least 3-hp and with a tank size of 20 gallons. It will be a plus if you choose a larger compressor than required.
Question 3: What Pressure Does My Hvlp Spray Need For Proper Functioning?
Answer: It depends on the specifications of your spray gun models, but for a fine painting job, experts recommend a pressure between 25-30 PSI for the hvlp spray gun. If you are looking for auto vehicle painting, then you can increase it up to 20 PSI.
Question 4: What Is The Right CFM Level For An Hvlp Spray Gun?
Answer: While using a Hvlp spray gun, you need to arrange a lot of air to get a perfect job. But typically, you always need a minimum of 8 CFM for DIY projects.
For quality projects, the recommended CFM is a minimum of 30 to protect the Hvlp spray gun from generating bad results. You can change the CFM level by making changes in fan adjustments.
Question 5: How Do I Get The Right Dilute Paint When Painting With A Hvlp Spray Gun?
Answer: First test painting with an Hvlp spray gun with dilute paint, but if atomization is not up, mark the dilute it in 5 percent increments by stirring with a rod. For perfect dilution, you can also check the material manufacturer’s technical data sheet details.
Conclusion:
Hvlp spray gun is a modern tool that makes painting jobs much easier than before. You can paint any surface with a Hvlp spray gun in less time but get the perfect finish.
But for getting the right results, you need to learn about how to use an Hvlp spray gun. We have taught you all the essential details that may help you to make your finish perfect.