
New in HW VSP3
 Single-port and multi-port version:
- Single-port version of HW VSP3 is available freely
- Multi-port version is available only for HW group products
- Runs as a stand-alone application, or as a NT service suitable for servers
- Complete support for Windows 8 and Windows 10
- Supports all 32-bit or 64-bit Windows systems, including Server versions
- Configuration is stored in an INI file for easy backup or transfer to another PC
- Automatically connects to a previously opened serial port
- Receive buffer cleared when a port is opened
- In the service mode, both versions run as a client/server application allowing you to create, reconfigure and remove virtual ports remotely using a client-side part of VSP – useful for multi-port applications
- Supports UAC (User Account Control)
- VSP in TCP server mode uses 0.0.0.0 as a pre-entered IP address
- Baudrate emulation — when no flow control is available
 Single-port and multi-port version:
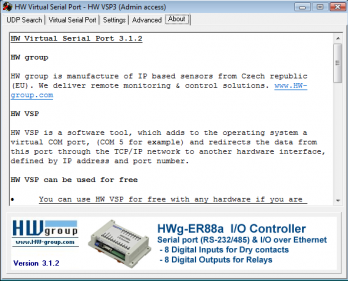
Description of HW VSP3
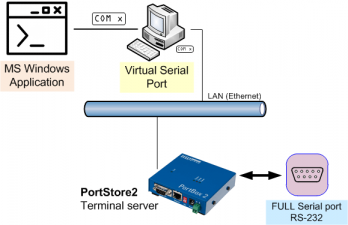 HW Virtual Serial Driver is intended primarily for devices produced by HW group, although it can be used for free as a universal driver that creates a virtual remote serial port, which redirects data to a predefined TCP/IP address and port.
In special applications (e.g. involving GPRS devices), the PC with the HW VSP driver can be set to operate in TCP Server mode, enabling the remote device to initialize the connection by sending any data to the remote port. Upon receiving RS-232 data, the converter establishes a connection with the PC and passes the data to the virtual COM port. Therefore, the scenario very closely resembles behavior of a real serial port.
When using HW VSP together with recommended devices produced by HW group, it is possible to change connection speed, parity, and other communication parameters (as well as to control any digital outputs and inputs) remotely on the fly via the RFC-2217 protocol, thus achieving a true remote serial port behavior.
Running as a NT service / in client-server mode
Ability to run as a service has been the main reason for developing the new version. Running HW VSP as a standalone application requires starting it under a logged-in user and therefore prevents autonomous operation on Windows servers. (At this time, HW VSP fully supports Windows 2000 Server and Windows 2003 Server. Support for Windows 2008 Server is being tested.) In this mode, HW VSP consists of a client-side part (setup GUI) and a server-side part (the service itself). Parameters of a VSP running on a remote server can be easily changed from a local PC. However, in order to improve stability, only one user may access the service and change virtual port parameters at a time. Furthermore, since service administration requires administrator privileges, securing a VSP against misuse is as simple as not installing the client-side part.
Note: From the user point of view, using HW VSP in service mode has many advantages. However, on Windows XP SP2/Vista/2003 Server, it is necessary to manually configure the firewall to enable the appropriate communication ports or the entire application (by default Program Files\HW group\HW VSP3s\HW_VSP3s_srv.exe for the single-port version and Program Files\HW group\HW VSP3\HW_VSP3_srv.exe for the multi-port one). Firewall dialog control is currently under development.
Baudrate emulation
In the previous version, HW VSP was fully transparent to the client software and did not restrict the communication flow in any way. Hence, the client SW had to send the data to the serial port using a defined communication speed, or use flow control (handshake). Otherwise, data were sent to the Ethernet / Internet with the maximum speed possible, often in the 10 Mbps range. When the buffers in VSP filled up, data started to be thrown away. Now, it is possible to enable the Strict Baudrate Emulation option in the Settings tab to ensure that VSP communicates with the client SW using the speed that is currently selected for the port.
Note: The Strict Baudrate Emulation option is only available when connected to HW group devices and with NVT support enabled.
Purging transmit and receive buffers
The option allows to clear Ethernet receive and transmit buffers when the port is opened. This ensures that the client application does not receive any previously received data (e.g. sent in a previous session) that could cause problems.
Automatic connection to previously opened port
This function allows connecting VSP to the port previously created and opened by the client application. This function is useful for servers, where it eliminates the need to close the corresponding virtual port before restarting server or the VSP service.
Configuration stored in an INI file
With the introduction of the multi-port version, VSP configuration is now stored in an INI file instead of the system registry. Therefore, configuration can be easily backed up or restored to another PC or server simply by copying the file and restarting the service. The INI file contains a complete VSP configuration, enabling the user to create a custom graphical interface to generate the INI file. Upon restarting the service, the INI file is loaded and the port parameters are changed — no need to study the complexities of controlling services. WC VSP for WirelesCOM is an example of such a customized application.
Works with Windows 8
HW VSP 3 now fully supports the Windows 8. UAC (user switching) support is also fully functional now, including functionality in a domain. When HW VSP is run as a service, all users can control it.
Installing HW VSP3
HW VSP 3 is freeware; you can download it free of charge HERE. The software is available in a single-port and multi-port version (development is in the final stage now). Installation is straightforward, except for Windows Vista, where it is necessary to allow the installer to elevate its privileges.
 Installation procedure:
- Run the “HW VSP Setup 3.0.23 single.exe” installation program.
- Step 1: The welcome screen is displayed. Click “Next” to proceed to the next step of the installation, or click “Back” to return to the previous step.
- Step 2: The basic product information is displayed.
- Step 3: Select the location where to install the driver.
- Select installation type – Client-Server / Standalone or Custom.
- Step 4: Choose a name for the folder to create in the Start menu.
- Step 5: Select whether you want to create a shortcut on the Desktop.
- Step 6: The entered data are displayed for verification.
- Step 7: Confirm the installation.
- Step 8: HW VSP will prompt you to agree with adding HW VSP to the list of exceptions for Windows Firewall. Permission is necessary for correct operation. If you deny the permission, you will have to add the application and the service to the list of exceptions manually.
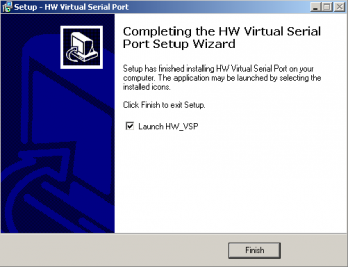
 If the installation is successful, the following window appears. If you check the “Launch HW_VSP” box, the program is started after completing the installation. It is not necessary to restart the computer after the installation. You can start HW VSP by clicking the “VSP” icon (icon with a red arrow).
Note: When installing HW VSP in Client/Server mode or using it in the Server mode on Windows XP SP2/Vista/2003 Server, it is necessary to manually configure the firewall to enable the appropriate communication ports or the entire service (by default Program Files\HW group\HW VSP3s\HW_VSP3s_srv.exe for the single-port version and Program Files\HW group\HW VSP3\HW_VSP3_srv.exe for the multi-port version). Firewall dialog control is currently under development.
Configuring the connected device
Before connecting to the VSP, it is necessary to configure the remote device according to its manual. If you use one of our devices, make sure to check the following parameters.
Most important parameters:
- IP address of the remote device
- IP port
- Gateway
- Mask
- TCP/IP mode — TCP Server / Passive mode
- Network Virtual Terminal (NVT) — On (only for recommended HWg devices)
- Serial port parameters
Security
UDP Search
Click Use this IP to set the IP address and the incoming port number of the selected device as the current device address for HW VSP to work with.
 All configuration settings in HW VSP3 are password-protected. To enter the password, press the Login button. The default password is «admin«. You can change your password with the HW_VSP3s_passwd.exe application that is available at Program Files\HW group\HW VSP3s\.
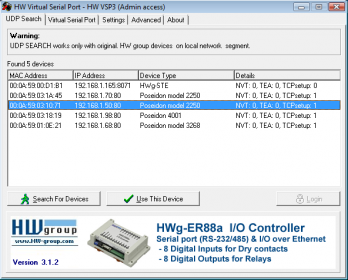 Run HW VSP and switch to “UDP Search” tab. After clicking Search modules, the Modules MAC List displays a list of devices found in the local network segment.
Virtual Serial Port
Click “Show Log” to display the program log that can simplify troubleshooting.
- VSP pane
List of serial port settings.- LAN pane
Displays Ethernet connection status.- Counters pane
Volume of the data transferred and requests queued.
- IP Address
IP address of the remote serial port. The value can be taken automatically from the UDP tab.
- Port
Incoming port of the remote serial port device. Your PC opens the TCP/IP connection and sends data to this port.
Number of the Virtual Serial Port being created – select a port number from COM2 to COM20.- External NVT Commands Port
HW VSP opens the specified TCP port on your PC, where it receives NVT control commands for controlling I/O pins and passes them over the connection to the remote device.
For example, a proprietary utility processes barcode data and your program (e.g. the HWg SDK example) controls I/O pins through VSP and the specified port – see the Block diagram.If you need to create more virtual serial ports on a single PC, you can use the multi-port version of HW VSP.
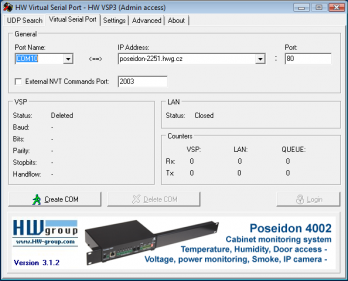 The main tab displays basic information about establishing the connection and its progress. Here you can create or delete a virtual serial port using the “Create COM” and “Delete COM” buttons respectively.
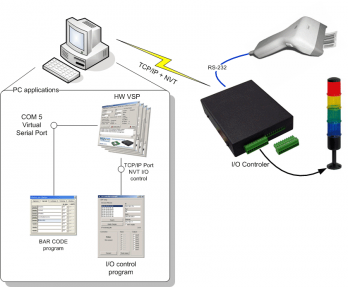 Port Name
Settings
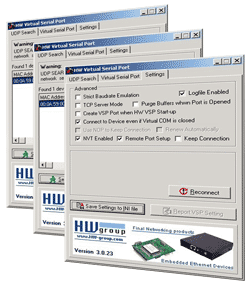
Caution: These settings apply to the HW VSP utility only. They do NOT influence the remote device. Remote device properties are set according to its manual (e.g. via the Hercules utility in case of HW group products).
- Log files enabled
Logs all communication to a .log file.- Create VSP Port at HW VSP startup
If this box is checked, all virtual ports are recreated when HW VSP is started.- TCP Server Mode
Activates VSP as a TCP/IP server. The driver then behaves as a TCP Client/Server device — this means that the first party to receive any data switches over to Client mode and establishes the connection. In the TCP server mode, IP address is automatically preset to 0.0.0.0 and TCP port is set to current COM port number + 3000 (e.g. COM3 = TCP port 3003). The port can be changed. Pay attention to the firewall settings!- Purge Buffers when Port is Opened
Clears transmit and receive buffers upon opening the port. This ensures that no leftover data from a previous session are sent or received. However, this also deletes any data received before the port is opened (e.g. during PC startup).- Connect to device even if VSP Port is closed
If this box is checked, the connection is established immediately after the virtual port is created, even if no application is using the port. As a result, data sent when the port was open but unused will be lost. The device sends data even if you don’t “listen” for them.- Use NOP to Keep Connection
+ Renew automatically
Expects a testing NOP to check for module presence. If a module was unreachable and is rediscovered (starts to respond again), the connection is reestablished either immediately (“Renew automatically” checked), or as soon as VSP sends new data to the TCP socket (“Renew automatically” unchecked).- NVT
Click “NVT Enable” to enable RFC2217 support and detection of our remote ports. Remember to activate NVT support on the corresponding device as well. After activating NVT commands, it is possible to activate the following parameters in the same way:
- Remote port setup – sends control information to the remote port according to VSP settings on your PC. If your terminal software (e.g. Hyperterminal) changes the baudrate to 19200Bd and this feature is active, the VSP driver sends a NVT command (according to the RFC2217 standard) to the remote TCP/IP serial port and changes its baudrate, too.
- Keep Connection – your TCP device closes an open TCP/IP connection after 50 seconds of inactivity. This function lets you keep the connection open (transfers 2 bytes every 5 seconds).
- Strict Baudrate Emulation
Limits the application-to-VSP and TCP-to-VSP transfer rate according to the baudrate of the open serial port.- Save Settings to INI file
Saves current configuration in the INI file.
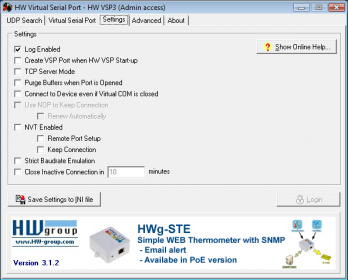 The “Settings” tab allows you to set up all functions supported by the virtual serial port.
Advanced
Allows you to specify whether the GUI connects to the service running on the same PC, or change IP ports for the communication.
- Local Machine – it is possible to change the port number for the GUI to service communication, e.g. in case of conflicts.
- Remote Machine – Allows the client software to connect to a remote service, e.g. in situations where Remote Desktop is not available or suitable.
- Reconnect
Reestablishes the connection of the client interface to the running service, e.g. when the connection is lost, or establishes the connection of the local client portion to a remote service that runs for instance on a server.- Report VSP Setting
Displays current configuration of the remote device (if TCP Setup is enabled on the device using the standard port 99).- Show Log
Displays a logfile of VSP3 activity.
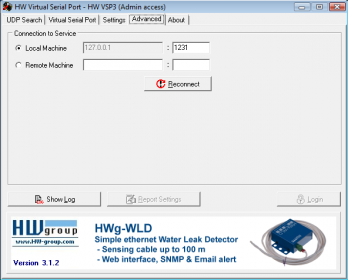 Connection to Service
License – Distribution and Usage Conditions
 Even though a license fee is not paid for the use of the Freeware Version software, it does not mean that there are no conditions for using such software:
-
The Licensee will not have any proprietary rights to the Software. The Licensee acknowledges and agrees that the Licensor retains all copyrights and other proprietary rights in and to the Software.
-
The Licensee must reproduce all copyright notices and any other proprietary legends on any copy of the Software.
-
The Licensee may not disassemble, reverse-engineer, modify or alter in any way the installer program without the Licensor’s specific approval. The Licensee is not authorized to use any plug-in or enhancement that permits to save modifications to a file with the Software licensed and distributed by the Licensor.
- The Software under this License may contain the components developed by third-parties. The structure, organization and code of such components are the valuable trade secrets and confidential information of the third-party and are protected by copyright and third-party license agreement. The Licensee may not:
- 4.1 incorporate such third-party components into software and hardware, developed by the Licensee, without the third-party’s special permission;
- 4.2 provide such third-party components to accompany software and hardware, sold by the Licensee, without the third-party’s special permission.
- Private & Commercial license of HW VSP
- 5.1 Private use license
There are no restrictions to use and distribution of this software by private individuals; however, we kindly ask that you add a link to your website (or blog) that points to our website, www.HW-group.com, preferably in the form shown below. - 5.2 Commercial license
Organizations and other legal entities may use and distribute this software only if they display a link to the http://www.HW-group.com named as “Using HW VSP powered by HW group” on the website on the company or if they receive authorisation from HW group in written form.
- 5.1 Private use license
If you distribute the software without publishing the link as described, you violate our copyright and we may take legal action against you.
|
Suggested link appearance |
Source code for your WWW pages |
| HW VSP Free Virtual Serial Port to connect any TCP/IP Terminal server to your Windows as a virtual serial port (e.g. COM 7). Produced by www.HW-group.com. |
<b><a href=»http://www.hw-group.com/products/hw_vsp/index_en.html»>HW VSP</a></b><br> Free Virtual Serial Port to connect any TCP/IP Terminal server to your Windows as a virtual serial port (e.g. COM 7). Produced by <a href=»http://www.HW-group.com» target=»_blank»>www.HW-group.com</a>. |
 HW VSP HW VSPFree Virtual Serial Port to connect any TCP/IP Terminal server to your Windows as a virtual serial port (e.g. COM 7). Produced by www.HW-group.com. |
<a href=»http://www.HW-group.com»><img src=»http://www.HW-group.com/download/hwg_ikona88x31.png» width=»88″ height=»31″ hspace=»3″ vspace=»0″ border=»0″ align=»right»></a> <b><a href=»http://www.hw-group.com/products/hw_vsp/index_en.html»>HW VSP</a></b><br> Free Virtual Serial Port to connect any TCP/IP Terminal server to your Windows as a virtual serial port (e.g. COM 7). Produced by <a href=»http://www.HW-group.com» target=»_blank»>www.HW-group.com</a>. |
|
|
<a href=»http://www.HW-group.com»><img src=»http://www.HW-group.com/download/hwg_ikona88x31.png» width=»88″ height=»31″ hspace=»3″ vspace=»0″ border=»0″></a> |
| HW VSP — Produced by www.HW-group.com. | <b><a href=»http://www.hw-group.com/products/hw_vsp/index_en.html»>HW VSP</a></b> — Produced by <a href=»http://www.HW-group.com» target=»_blank»>www.HW-group.com</a>. |
| Note: You may save the icon image locally where your web is hosted; however, we prefer linking to the image at the HW group website, as the example code shows |
Содержание
- 1 COM порт по сети?
- 1.1 COM-порты, работающие через TCP/IP
- 1.2 Редиректор TCP_SerPort
Читатель нашего сайта Иван, спрашивает:
Здравствуйте! Подскажите пожалуйста, есть ли какая-нибудь программа, с помощью которой можно использовать выход/вход ethernet как виртуальный COM port?
Да, такой софт существует. Самое известное решение — программа HW Virtual Serial Port от компании HW Group.
Мы нашли хороший материал об этой программе:
COM-порты, работающие через TCP/IP
Хорошая идея – создать виртуальные COM-порты, работающие через TCP/IP-протокол. Их наличие в операционной системе персонального компьютера позволило бы «достучаться» удаленно к любому ресурсу, использующему ethernet-подключение по локальной сети. Виртуализация последовательных портов, клонированных таким образом, сняла бы ограничение на длину RS232-соединений и решила бы коммуникационную задачу. Исполнительное устройство, транслирующее LAN-подключение хотя бы в Rx/Tx-сигналы и доступное с персоналки, виделось бы в системе как периферия, управляемая через UART. Несть числа приложениям, требующих виртуализацию COM-портов: управление кондиционерами, коммутации силовых линий, съем и обработка телеметрической информации (температура, давление, влажность), мониторинг цифровой техники с возможностью ее ресета и/или перезагрузки. Много-много полезных дел требуют удаленного доступа к RS232-совместимым оконечным устройствам.
Одним из решений поставленной задачи является программный продукт от компании HW Group под названием HW Virtual Serial Port. Это свободно распространяемое программное обеспечение, предназначенное для формирования в среде Windows-совместимых операционных систем драйвера последовательного порта, использующего TCP/IP стек. Драйвер способен нумеровать то количество COM-портов, которое предоставляет в его распоряжение операционка, при этом каких-либо ограничений на его использование с сетевыми протоколами нет.
Управление программным пакетом выполняется посредством менеджера виртуальных портов:
Управление подключениями осуществляется за счет того, что устанавливается взаимно однозначное соответствие между IP-адресом удаленной периферии и мнемоническим именем COM-порта. Наряду с закладкой «Virtual Serial Port» менеджер предоставляет доступ по UDP к ресурсам локальной сети, идентифицированных MAC-адресами. Доступ к ним возможен через шлюз по IP-адресу и маске, а кроме того – с указанием конкретного порта периферийного устройства. К сожалению, возможности этой закладки нацелены только на оригинальные устройства HW Group.
Закладка для установок виртуального COM-порта управляет служебными операциями программного обеспечения: отвечает за ведение лога, запускает утилиту по старту операционной системы, предоставляет системный трей для оперативного доступа, устанавливает параметры PING-операций и т.д. Но главная задача установочной закладки – параметры шифрования с помощью TEA-ключей. С ее же помощью задаются параметры работы в терминальной сессии путем установки NVT–параметров.


Источник
Мы также нашли еще одну программу, которая может решать эту же задачу для мобильных устройств:
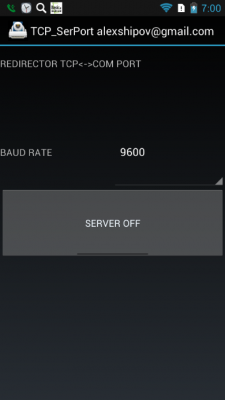
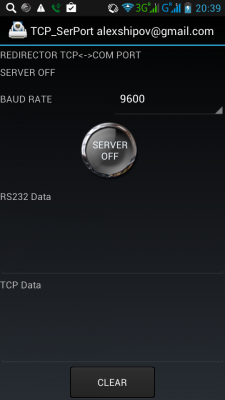
Редиректор TCP_SerPort
версия: 1.1
Последнее обновление программы в шапке: 17.09.2013
Краткое описание:
Перенаправляет данные с сети (TCP) в COM порт на Андроид устройстве и из COM порта в сеть. Поддерживает FT232RL (FTDI), CP2102 (Silicon Lab), PL2303 (PROLIFIC).Описание:
Программа представляет из себя редиректор который принимает данные с сети (ТСP) и перенаправляет их через СОМ порт подключенный к Андроид на различные устройства. Поддерживаются переходники USB<->COM на чипах FT232RL(FTDI), CP2102(Silicon Lab), PL2303(PROLIFIC). Андроид должен иметь USB HOST и версию не ниже 3.1Где это может быть использовано? Допустим у Вас есть устройство (например теплосчетчик или микроконтроллер) который имеет интерфейс RS232 или USB и работает напрямую с компьютером.Теперь Вам надо получать/управлять им через сеть или Интернет.Часто бывает что переписать программу на компьютере на сетевую нет возможности (сложная,программист уволился/спился
Софтовый аналог программы замечательная утилита LINUX ser2net. Есть программы редиректоры под PC но они в основном платные и на обоих сторонах должны быть компьютеры, что часто неудобно. Есть так-же «железные» решения типа Tibbo. Плюс использования Андроид в том что небольшое, сразу имеем WI_FI и можно еще организовать обработку и запись данных.
Редиректор также можно использовать в робототехнике когда андроид устройство стоит на тележке,а рулим удалено с PC или другого андроида.Для этого просто пишем клиента к TCP серверу. Так-же можно подключать различное торговое оборудование (сканеры,принтеры и т.д)
Программа Вета версия. Делал под свои задачи. Буду рад если пригодится еще кому то. Конструктивные замечания/предложения приветствуются. Перед использованием можно проверить работают ли у Вас на устройстве переходники USB<> COM моей программой TermUSB
Так-же рекомендую для тестирования программы по сети утилиту Hercules Setup UTILITY. Ну и конечно в LINUX NETCAT
Разработчик: Шипов Александр
Источник

Admin
IT-cпециалист с высшим техническим образованием и 8-летним опытом системного администрирования. Подробней об авторе и контакты. Даю бесплатные консультации по информационным технологиям, работе компьютеров и других устройств, программ, сервисов и сайтов в интернете. Если вы не нашли нужную информацию, то задайте свой вопрос!

Contents
- 1 Configure Hw Virtual Serial Port App Youtube
- 2 How To Create Virtual Serial Com Port
- 2.1 Conclusion
- 2.1.1 Related image with configure hw virtual serial port app youtube
- 2.1.2 Related image with configure hw virtual serial port app youtube
- 2.1 Conclusion
Join us as we celebrate the nuances, intricacies, and boundless possibilities that Configure Hw Virtual Serial Port App Youtube brings to our lives. Whether you’re seeking a moment of escape, a chance to connect with fellow enthusiasts, or a deep dive into Configure Hw Virtual Serial Port App Youtube theory, you’re in the right place. Main the driver Find ports this windows virtual configure rundown of com serial virtual create port and 10 seri- features virtual video- in 10 in
Hw Virtual Serial Port Download Review
Hw Virtual Serial Port Download Review
Configuration of hw virtual serial port to monitor epever mppt solar charge controller from solar station monitor software remotely over wifi electron. 3.55k subscribers subscribe 5.3k views 9 years ago hw virtual serial port allows creating virual serial port drivers. hw virtual serial port2 is developed by hw group. read the full.

Hw Virtual Serial Port Single Latest Version Get Best Windows Software
Hw Virtual Serial Port Single Latest Version Get Best Windows Software
Here is a small video tutorial on how to configure a fresh install of hardware virtual serial port to be used with the cyberflashing phone flashing application. almost yours: 2 weeks, on us. Hw vsp is a software driver that adds a virtual serial port (e.g. com5) to the operating system and redirects the data from this port via a tcp ip network to another hardware interface, which is specified by its ip address and port number. hw vsp3 support even nt services and 64 bit windows 8 . licence type: freeware sw version: hw vsp3 single. Virtual serial port is required when your computer does not have physical serial port or you want to debug your program. virtual serial driver used in this v. Find the rundown of virtual serial port driver 10 main features in this video. create and configure virtual com ports in windows 10: virtual seri.

Hw Virtual Serial Port Download Review
Hw Virtual Serial Port Download Review
Virtual serial port is required when your computer does not have physical serial port or you want to debug your program. virtual serial driver used in this v. Find the rundown of virtual serial port driver 10 main features in this video. create and configure virtual com ports in windows 10: virtual seri. Introduction this article provides a configuration example to enable communication from a serial device connected to the trb145 to a virtual com port on a windows machine using the software hw vsp3, to enable its usage by applications (such as putty) as a native device of the computer. 3rd party the hw group product portfolio includes three major domains: environmental, system and process monitoring devices; technology for ip based serial interface system control and data logging and access systems. monitoring alarming mobile applications utilities ip serial security & home automation others monitoring add to comparator.

Hw Vsp3 Virtual Serial Port Hw Group
Hw Vsp3 Virtual Serial Port Hw Group
Introduction this article provides a configuration example to enable communication from a serial device connected to the trb145 to a virtual com port on a windows machine using the software hw vsp3, to enable its usage by applications (such as putty) as a native device of the computer. 3rd party the hw group product portfolio includes three major domains: environmental, system and process monitoring devices; technology for ip based serial interface system control and data logging and access systems. monitoring alarming mobile applications utilities ip serial security & home automation others monitoring add to comparator.

Configure Serial Port For A Virtual Machine Youtube
Configure Serial Port For A Virtual Machine Youtube
How To Create Virtual Serial Com Port
How To Create Virtual Serial Com Port
virtual serial port is required when your computer does not have physical serial port or you want to debug your program. virtual find the rundown of virtual serial port driver 10 main features in this video. create and configure virtual com ports in windows we sometimes want to set up virtual com ports to allow synchronization between sdruno and other logging or decoding visit virtuallypeculiar for more vmware configurations and troubleshooting. we need a virtual com port for connecting two applications such as proteus with arduino serial plotter, proteus with matlab, learn how to communicate to your ethernet module using a virtual com port ncd official website ➡ ncd.io buy it here virtual serial port emulator used to create virtual port to forward the serial data through tcp port. home page eltima products vspdxp create virtual com port pairs connected by null modem emulator with the pon a prueba virtual serial port driver pro 10 link del blog del canal: monkeyelectronics007 virtual serial port driver 10.0 build 10.0.858 updated on may, 12th 2021 official website: virtual serial port.org virtual com port driver provides you with the ability to create an unlimited number of com ports. this is a quick tutorial describing how to setup the com port redirector software that comes with many of the products sold by grid
Conclusion
All things considered, it is evident that the post offers valuable information regarding Configure Hw Virtual Serial Port App Youtube. Throughout the article, the writer presents a deep understanding on the topic. Especially, the section on Z stands out as a highlight. Thank you for taking the time to this post. If you have any questions, feel free to reach out via email. I look forward to your feedback. Additionally, below are a few relevant content that you may find interesting:
Introduction
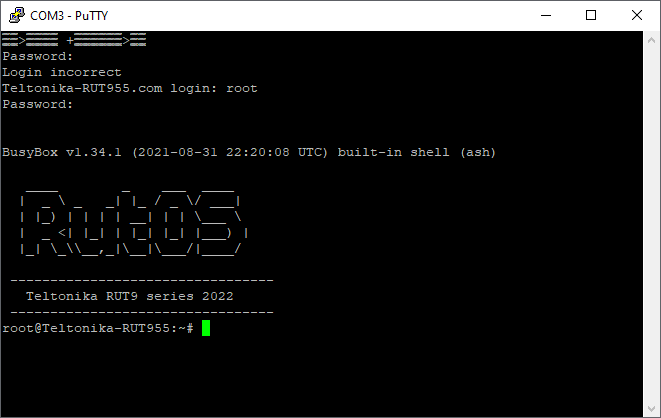
This article provides a configuration example to enable communication from a serial device connected to the TRB145 to a virtual COM port on a Windows machine using the software HW VSP3, to enable its usage by applications (such as Putty) as a native device of the computer.
The information in this page is updated in accordance with firmware version TRB1_R_00.07.02.1.
If you’re having trouble finding this page or some of the parameters described here on your device’s WebUI, you should turn on «Advanced WebUI» mode. You can do that by clicking the «Basic» button under «Mode», which is located at the top-right corner of the WebUI.

Configuration Overview and Prerequisites
The TRB145 has an RS485 interface which can be used to communicate with serial devices. Combining this, plus the Serial-Over-IP functionality of the device, can enable serial devices to be communicated through LAN or WAN as native COM ports in Windows machines.
This configuration focuses on enabling the Serial-Over-IP functionality of the TRB145 and connecting it through LAN to the HW VSP3 software, which is a Freeware provided by HW Group which allows Windows machines to connect to Serial-over-IP devices as if they were directly connected to the computer.
For example purposes, we will enable a RUT955 in Serial Console mode to be our Serial end device.
Prerequisites
- A TRB145 device (this configuration also works with a TRB245 or a RUT955).
- An RS485 serial device, which in this example is a RUT955.
- A computer running Windows with the HW VSP3 Software.
- The software Putty installed in this Windows machine.
Configuration Scheme
Configuration
First, we will set up the RS485 functionality of the RUT955 to have it act as a Serial console.
For this, open the WebUI and run th Setup Wizard to finish the basic configurations of the device, and once you are in the main page of the WebUI, head over to Services > RS485 and enable the service, without changing any of the default settings.
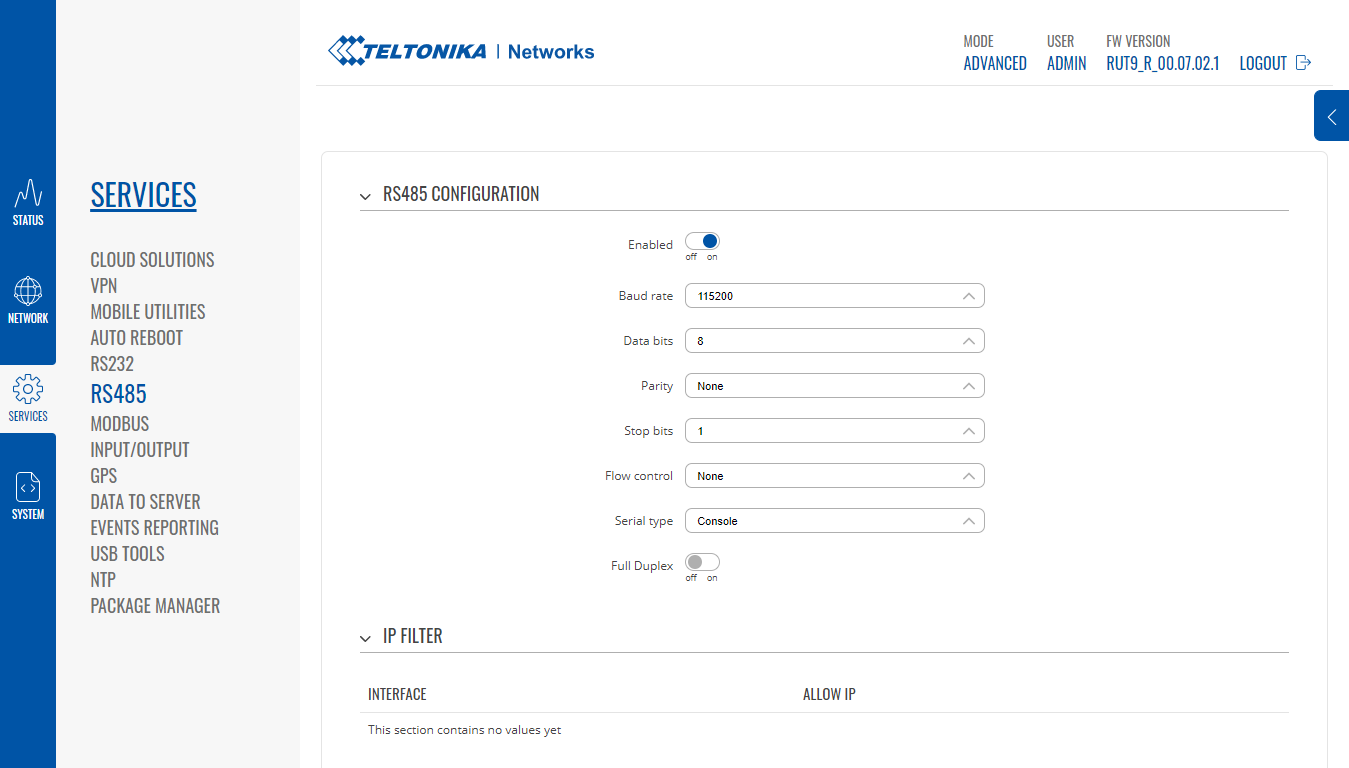
Afterwards, please click on the Save & Apply button to save the changes. This will enable console access through the RS485 port of the RUT955.
Then, we will move onto the TRB145. Please connect the device to the computer through the provided micro USB cable, and enter the WebUI.
Set up the basic configurations of your device by following the Setup Wizard instructions, and then head over to the Services > RS485 menu.
There, set the following configurations:
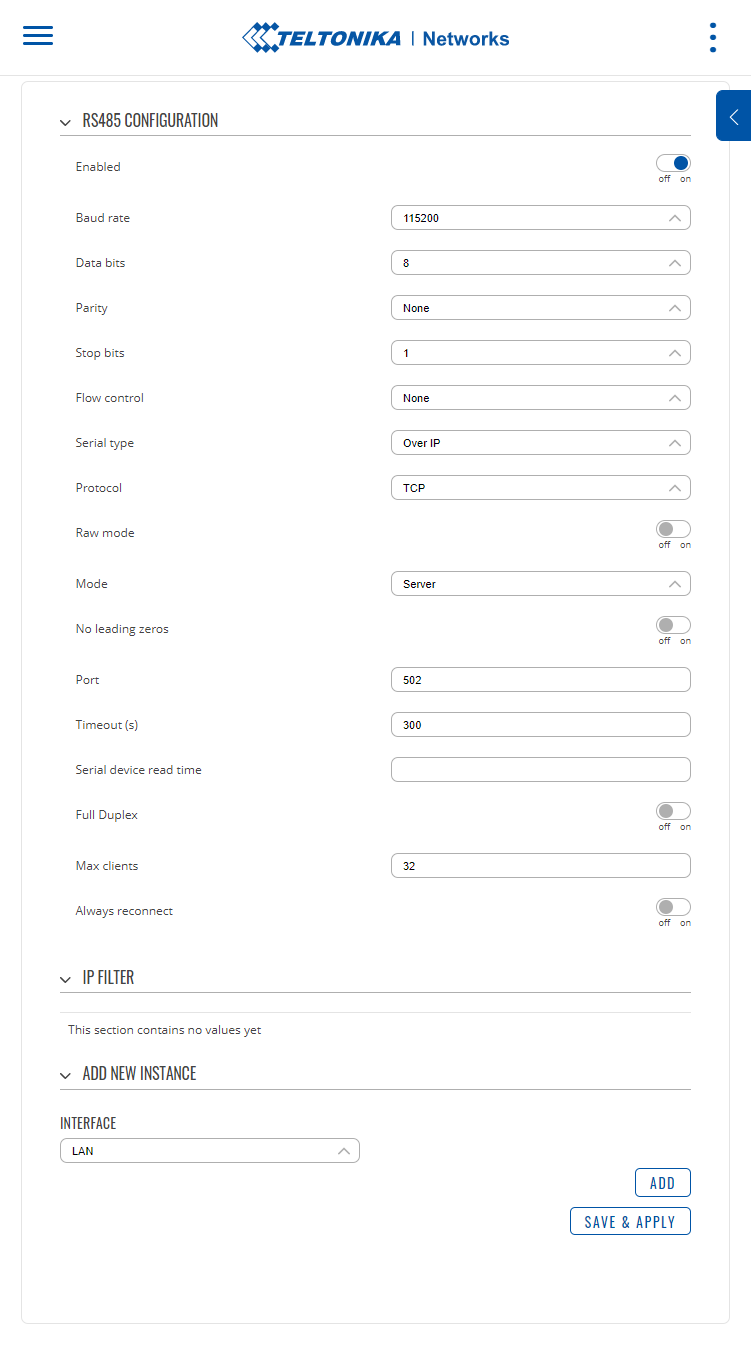
The following changes are to be made to this configuration page:
- Serial type: Over IP
- Port: 502 (you can use any port, however, 502 is used here as an example)
- Enabled: ON
Then, hit Save & Apply to save the changes.
The Router will automatically create a Firewall rule to open this port to the Internet, which can be verified in the Network > Firewall > Traffic Rules menu, on the second page of rules.
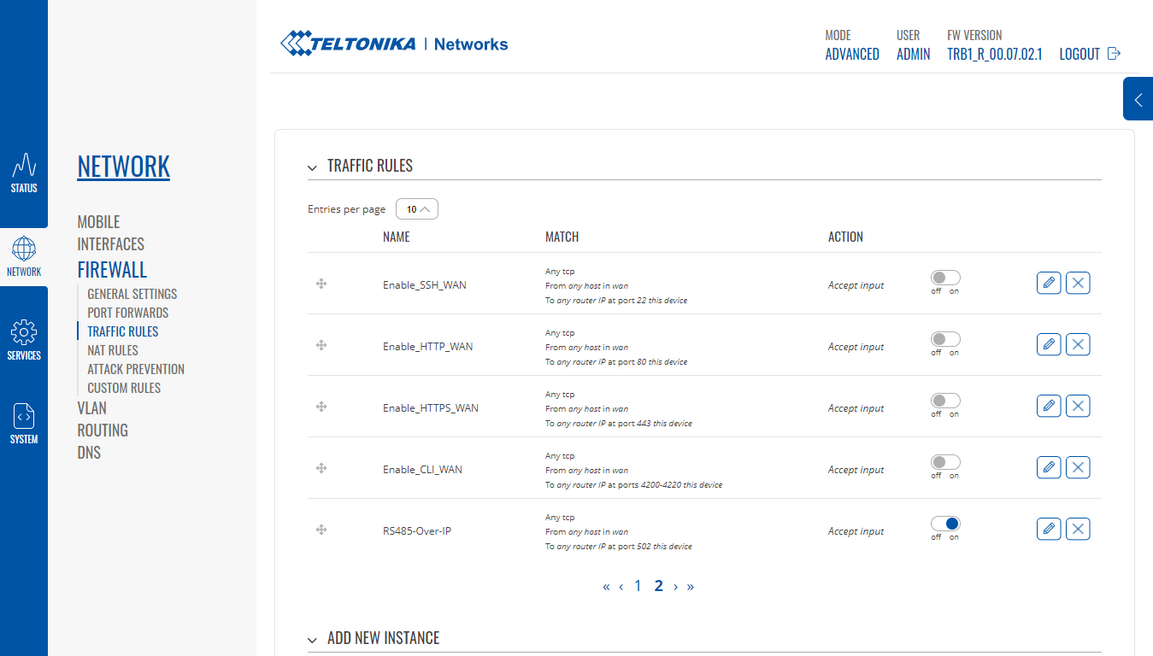
Note: If a VPN is being used for this configuration, please edit the rule by clicking on the pen icon, and setting the Source Zone to the corresponding VPN firewall zone. For more information about the Firewall zones, please refer to this article.
Then, we move onto the computer to use the HW VSP3 software, which can be downloaded from this link. Proceed with a normal installation, and once installed, open the software.
In order to generate a serial connection to the Serial device, once you have opened the software and head over to the Virtual Serial Port tab, and set up a name for the Port Name, which in this example is COM3. Then, also select the TRB145 IP address, and the Port we set up in the TRB145.
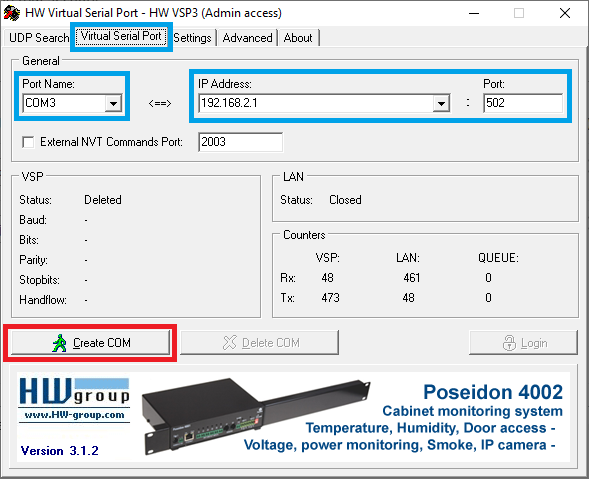
Finally, press on the Create COM port to enable the virtual port on the device, which will interface with the Serial Over IP device.
This virtual port can be tested in a software like Putty. To do this, please first select the Serial option for the Connection Type, and then, select the correct Port Name in the Serial Line field, which is COM3 in this case, and the correct Speed, which in this case is 115200.
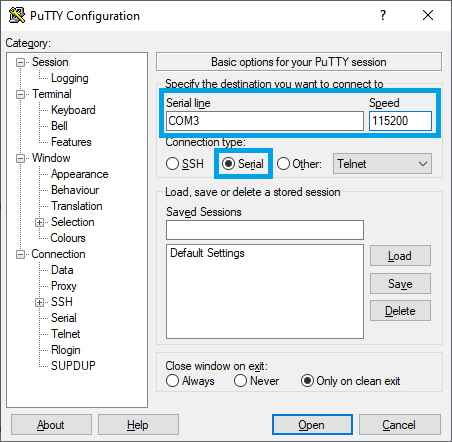
Then, you can proceed to click on the Open button to start a console to the Serial device.
Afterwards, as the RUT955 is connected, it will prompt to log into the device just as if this was an SSH connection, however, all of the traffic will go through Serial-Over-IP.
This configuration can be replicated using a public IP on the SIM card of the TRB145, or using this configuration coupled with a VPN (by also enabling the adequate Firewall rules) to enable the usage of serial devices through the Internet as native COM ports. This setup can also be replicated to work with the RS232 interface by instead making the same configurations over the RS232 configuration page.
Доброго дня дорогие друзья!
Дисклеймер: Данный вид коммуникации ущербен из-за того что скорость по воздуху не позволяет печатать комфортно, принтер тупит. Так что статья чисто для самообразования 
На написание сего поста сподвигло меня полное отсутствие какой либо структурированной инфы по этому вопросу.
Задача была заставить принтер печатать из Simplify3D без шнурка по WiFi на плате Lerdge-X (подойдет и для K).
Из коробки WiFi убогий, по документации стало понятно что толкового ничего не выйдет.
Там ничего про подключение с компа не было, предлагалась поставить приложение на смартфон и управлять с нее, но функционал ее ущербен и мало того, она на китайском
В общем я решил таки залезть поглубже в тему.
Для работы соответственно понадобится модуль WiFi для Lerdge https://goo.gl/vsTjjfБуду описывать как получить результат, а не процедуру моих мучительных поисков
Для начала нужно подружить принтер с вашим WiFi роутером, это описано в документации (Пункт 2):
Подключение принтера к WifiПосле успешной настройки, вбиваем в браузере выданный IP адрес, и вводим lerdge и пароль lerdge
 через виртуальный COM порт")
Далее изменяем параметр Protocol Type на TCP Server и сохраняем.
 через виртуальный COM порт")
Там же кстати можно установить статический IP для принтера если роутер при подключении вдруг выдает разные адреса каждый раз.
В общем принтер готов и настроен, теперь дело за малым, создать виртуальный COM-порт.
Для этого нам понадобиться бесплатная софтина с сайта HW Group
HW VSP3 Single 3.1.2Устанавливаем ее по умолчанию, запускаем HW Virtual Serial Port.
Интерфейс у программы простецкий, для начала нужно войти под админом
 через виртуальный COM порт")
Пароль по умолчанию admin
После этого можно создать COM-порт. Устанавливаем нужный COM-порт который будем использовать в Simplify3D, IP адрес принтера и порт (по умолчанию Lerdge использует 8686).
 через виртуальный COM порт")
Далее идем в настройки (Settings) и устанавливаем галки как на картинке:
 через виртуальный COM порт")
Сохраняем все, возращаемся на вкладку Virtual Serial Port, и жмем кнопку Create COM
 через виртуальный COM порт")
На этом настройка COM порта окончена.
Теперь в Simplify3D можно подключиться к этому порту
 через виртуальный COM порт")
Если все настроено верно, появятся значения в обведенном красном прямоугольнике.
В принципе даже можно использовать эту связку например для Repetier Server
На этом все
Бывают случаи, когда программа опроса конечного оборудования не умеет работать с TCP/IP, а работает только лишь через COM-порт. Для данной цели используются специальные программы, которые позволяют создавать на локальном ПК виртуальный COM-порт из TCP порта, с которым может работать программа опроса. Мы предлагаем Вам несколько вариантов решения проблемы, когда ПО опроса работает только через COM-порт.
-
Использование облачного сервиса M2M24Cloud для создания виртуальных COM-портов
-
Использование программ для создания виртуальных COM-портов, не требующих выход в Интернет
-
Пример использования программы Tibbo VSP Manager
-
Пример использования программы HW VSP3
-
1. Использование облачного сервиса M2M24Cloud для создания виртуальных COM-портов через сеть Интернет.
Вы можете воспользоваться облачным сервисом TCP-соединений M2M24Cloud в связке с TCP-шлюзом M2M24Gateway, который предоставляет возможность создавать виртуальные TCP и COM-порты. При выборе данного способа, необходимо помнить, что в данном случае необходимо обеспечить конвертеру ER108 доступ во внешнюю сеть Интернет.
M2M24Gateway — программа, которая может работать только в связке с облачным сервером M2M24Cloud. Она позволяет создавать на локальном ПК виртуальные COM, а также TCP-порты для подключенных устройств.
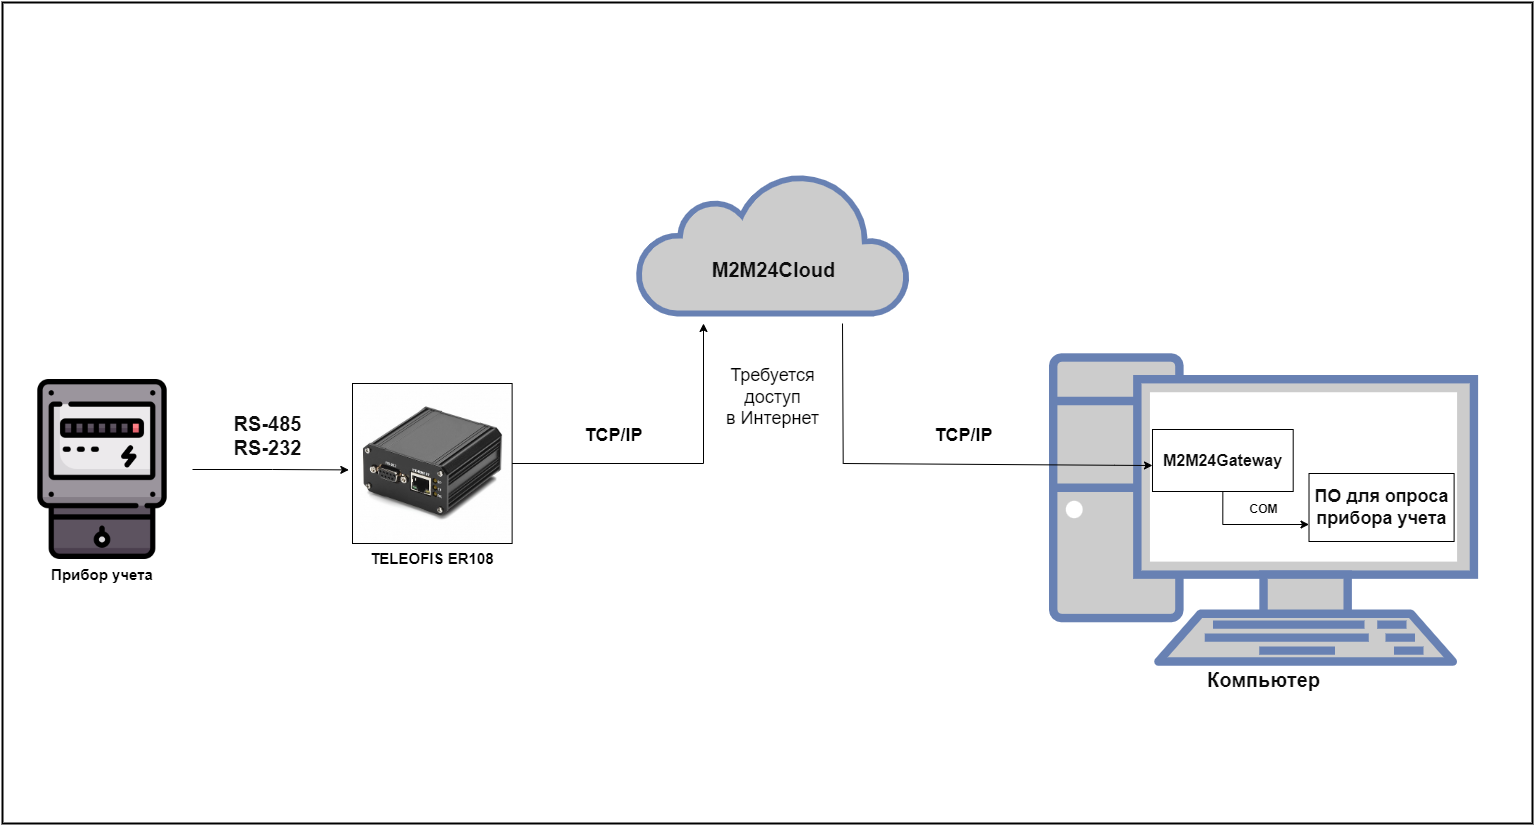
Для создания виртуального COM-порта для преобразователя интерфейсов ER108 необходимо проделать простой алгоритм:
1. Настроить интерфейс конвертера ER108 (RS-232, RS485) на подключение к облачному серверу M2M24Cloud. Подробнее ознакомиться с подключением к M2M24Cloud можно в данной статье — Настройка конвертеров TELEOFIS ER для работы с сервером М2М24Cloud
2. Добавить устройство в личный кабинет M2M24Cloud с указанием необходимых данных (имя устройства, идентификатор интерфейса, код авторизации, внешний порт);
3. Запустить M2M24Gateway, указать идентификатор (1) и пароль группы (2), выбрать пункт «Создавать виртуальные COM-порты» (3) и запустить службу (4);
4. Запустить ПО для опроса прибора и указать созданный ранее COM-порт.

Также, обращаем Ваше внимание, что не каждая программа способна обрабатывать больши́е значения COM-портов (к примеру COM 50001). В данном случае необходимо изменить значение порта на меньшее в личном кабинете M2M24 (внешний порт).
2. Использование программ для создания виртуального COM-порта, не требующих выход в сеть Интернет.
Принцип работы таких программ достаточно простой: между интерфейсом конвертера и программой устанавливается TCP-соединение и на выходе создается виртуальный COM-порт. Некоторые программы умеют работать и TCP-клиентом (тогда интерфейс ER108 необходимо настроить в режим «Сервер»), и TCP-сервером (тогда интерфейс ER108 необходимо настроить в режим «Клиент»). Такие программы могут работать как во внешней сети Интернет, так и в локальной/закрытой сетях.

Вот далеко неполный список таких программ:
|
Название ПО |
Описание |
Ссылка |
| Tibbo VSP Manager |
Бесплатная |
Tibbo VSP Manager |
|
HW Virtual Serial Port |
Бесплатная |
HW Virtual Serial Port |
|
TCP COM Bridge |
Платная, есть бесплатная trial-версия |
TCP Com Bridge |
|
Advanced Virtual COM Port |
Платная, есть бесплатная trial-версия |
Advanced Virtual COM Port |
|
Serial Port Redirector |
Платная, есть бесплатная trial-версия |
Serial Port Redirector |
|
COM2TCP |
Платная, есть бесплатная trial-версия |
COM2TCP |
|
COM2TCP (Null modem emulator) |
Бесплатная |
COM2TCP (Null modem emulator) |
Таблица 1. Программы-преобразователи
В качестве примера рассмотрим создание и настройку виртуального COM-порта в двух бесплатных программах: Tibbo VSP Manager и HW Virtual Serial Port
2.1. Пример работы программы Tibbo VSP Manager
Программа Tibbo VSP Manager может работать как в качестве клиента, так и в качестве сервера, в связи с чем, режим работы конвертера потребуется настроить противоположным образом.
Для того, чтобы создать виртуальный СОМ-порт при помощи программы Tibbo VSP Manager, требуется выполнить следующие действия:
1. Открыть программу и выбрать Add (добавить)

2. Произвести настройку подключения, указав номер виртуального СОМ-порта (1), выбрав режим работы клиент/сервер (2), а так же сетевые параметры подключения, такие как IP-адрес и порт (3) интерфейса конвертера. Также, потребуется задать необходимые параметры виртуального COM-порта («Default Serial Settings»)


Также, присутствует возможность создания нескольких виртуальных портов одновременно. Для этого необходимо проделать те же действия, что в п.1 и п.2

На этом настройка виртуального СОМ-порта с помощью программы Tibbo VSP Manager завершена.
2.2. Пример работы программы HW Virtual Serial Port
Программа HW VSP3 может работать как в качестве клиента, так и в качестве сервера, в связи с чем, режим работы конвертера потребуется настроить противоположным образом.
Для того, чтобы создать виртуальный COM-порт при помощи программы HW Virtual Serial Port, требуется выполнить следующие действия:
1. Открыть программу и перейти во вкладку «Virtual Serial Port»
2. Произвести настройку подключения, указав номер виртуального СОМ-порта (1), а так же сетевые параметры подключения, такие как IP-адрес (2) и порт (3) интерфейса конвертера. Параметры интерфейса (скорость, битность, четность) выбираются автоматически, в зависимости от указанных параметров в ПО для опроса.

3. Нажать кнопку «Create COM» (4)
Для создания COM-порта в качестве сервера, необходимо перейти во вкладку «Settings» и установить флажок напротив пункта «TCP Server Mode», затем в параметрах указать требуемый порт. Адрес сервера в таком случае будет 0.0.0.0

В данной программе возможно создать несколько COM-портов, однако необходимо запускать несколько экземпляров программы одновременно, что может быть не очень удобно для большого количества конечных устройств.
Для создания нескольких портов необходимо запустить требуемое количество окон программы и проделать те же действия, что и в п.2

На этом настройка виртуального СОМ-порта с помощью программы HW VSP3 завершена.
Дополнительная информация:
Преобразователи интерфейсов TELEOFIS
Дополнительные статьи по работе с преобразователем интерфейсов ER108
Ссылки по теме:
Типовые схемы построение прозрачного канала связи через M2M24Cloud
Конвертеры TELEOFIS ER108. Краткое руководство пользователя.