

EN
Instruction manual
NL
Gebruiksaanwijzing
FR
Mode d’emploi
DE Bedienungsanleitung
ES Manual de usuario
PT Manual de utilizador
IT Manuale utente
SV Bruksanvisning
CS Návod na použití
PL Instrukcja obsługi
SK Návod na použitie
Ice Cream Maker Deluxe
01.282604.14.001
Ice Cream Maker De
RU Руководство по эксплуатации
1 4 5 6 7 82 3
PARTS DESCRIPTION / ONDERDELENBESCHRIJVING / DESCRIPTION DES PIÈCES /
TEILEBESCHREIBUNG / DESCRIPCIÓN DE LAS PIEZAS / DESCRIÇÃO DOS
COMPONENTES / DESCRIZIONE DELLE PARTI / BESKRIVNING AV DELAR /
OPIS CZĘŚCI / POPIS SOUČÁSTÍ / POPIS SÚČASTÍ / ОПИСАНИЕ ЗАПЧАСТИ
www.princesshome.eu
© Princess 2019[WEEE Logo]
ENInstruction manual
SAFETY
• By ignoring the safety instructions the
manufacturer cannot be held responsible for
the damage.
• If the supply cord is damaged, it must be
replaced by the manufacturer, its service
agent or similarly qualified persons in order to
avoid a hazard.
• Never move the appliance by pulling the cord
and make sure the cord cannot become
entangled.
• The appliance must be placed on a stable,
level surface.
• The user must not leave the device
unattended while it is connected to the supply.
• This appliance is only to be used for
household purposes and only for the purpose
it is made for.
• This appliance shall not be used by children
aged less than 8 years. This appliance can be
used by children aged from 8 years and above
and persons with reduced physical, sensory or
mental capabilities or lack of experience and
knowledge if they have been given
supervision or instruction concerning use of
the appliance in a safe way and understand
the hazards involved. Children shall not play
with the appliance. Keep the appliance and its
cord out of reach of children aged less than 8
years. Cleaning and user maintenance shall
not be made by children unless older than 8
and supervised.
• To protect yourself against an electric shock,
do not immerse the cord, plug or appliance in
the water or any other liquid.
• Do not allow children to use the device without
supervision.
• Switch off the appliance and disconnect from
supply before changing accessories or
approaching parts that move in use.
• Always disconnect the device from the supply
if it is left unattended and before assembling,
disassembling or cleaning.
• It is absolutely necessary to keep this
appliance clean at all times, because it comes
into direct contact with food.
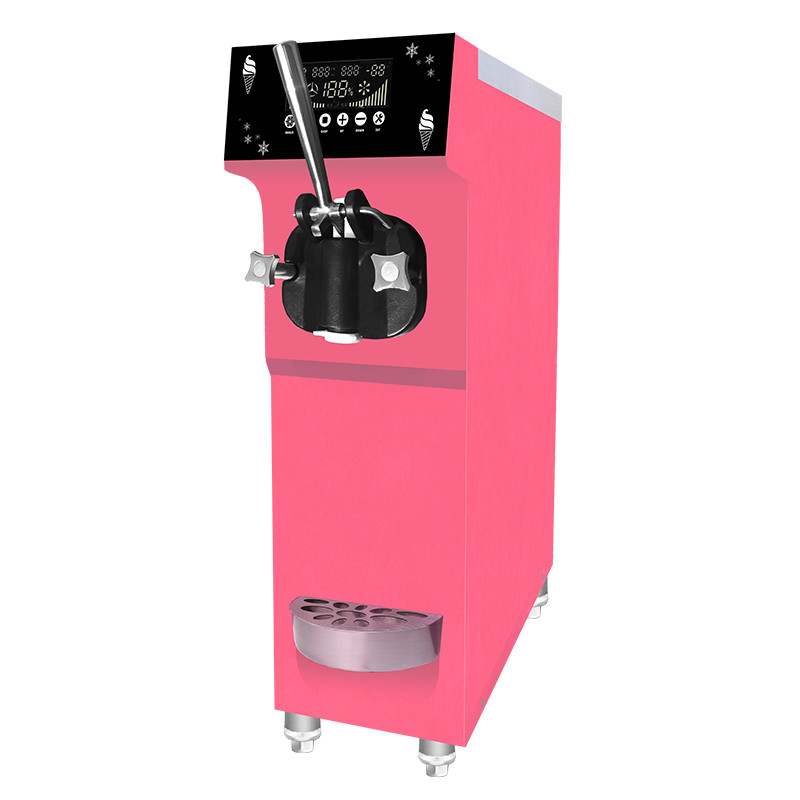
PARTS DESCRIPTION1. Lid2. Removable bowl3. Mixing blade4. Display5. Start/Pause button6. Menu button7. Power button8. Control buttonBEFORE THE FIRST USE• Wash the freezer bowl, lid and mixing paddle in warm soapy water. Besure to rinse and dry all parts thoroughly.• Wipe the motor unit with a moist cloth.• Do not immerse the motor unit in water or any other liquid.• Do not put the motor unit neither one of the parts in the dishwasher.
USE
Function buttons• [Power] press the power button to turn the appliance on or off• [Menu] press the menu button to switch between the different menus:Ice cream —> Cooling only —> Mixing only.• [Control button] after choosing the desired menu you can use thecontrol button to set the desired time.• [Start/pause] after setting the desired menu and time press this buttonto start operate.Making ice cream1. Prepare the ingredients from your own recipe or from the recipe youwill find in this manual. Note: you do not need to freeze the bowl in afreezer in advance, as this machine has a built in compressor thatfreezes the recipe ingredients during operation.2. Pour the prepared ingredients into the removable bowl.3. Put the removable bowl into the machine and slightly turn aroundthe bowl to make it fitted well.4. Place the mixing blade into the removable bowl on the motor axis.Then put the transparent lid onto the machine and lock it by turn itanticlockwise.5. Plug in the appliance, and press the [POWER] button to turn on theappliance.6. Press the [MENU] button to choose the desired working mode.7. Turn the control button to set the desired working time.8. Press the [START/PAUSE] button to start operate.9. During operation you can add ingredients by opening the refillcover.10. When the ice cream is finished the machine will start up the keepcool function automatically for 10 minutes.Motor self-protection functionWhen the ice cream becomes harder, the mixing motor might beblocked to ensure the life of the motor.Controlling the Volume of the IngredientsTo avoid overflow and waste, please make sure that the ingredients donot exceed 60% of capacity of the removable bowl (Ice cream expandswhen being formed)RecipeVanilla ice creamIngredients:• 240ml whole milk• 100 grams granulated sugar• 160ml heavy cream, well chilled• 8 grams pure vanilla extract, to tastePreparationPut the ingredients in a medium bowl, use a hand mixer or a whisk tocombine the milk and granulated sugar until the sugar is dissolved,about 1 – 2 minutes on low speed. Stir in the heavy cream and vanilla totaste. Turn machine on, pour mixture into freezer bowl throughingredient spout and let mix until thickened, about 30 – 40 minutes.CLEANING AND MAINTENANCE• The freezer bowl, paddle and lid can be cleaned with warm water andmild detergent. The motor drive can be cleaned by using a damp cloth.• Do not put any parts in the dishwasher. Never immerse the motor unit inwater.• Make sure all parts are dried thoroughly.• Never store the mixing paddle and/or drive shaft in the freezer.ENVIRONMENTThis appliance should not be put into the domestic garbage at theend of its durability, but must be offered at a central point for the recyclingof electric and electronic domestic appliances. This symbol on theappliance, instruction manual and packaging puts your attention to thisimportant issue. The materials used in this appliance can be recycled. Byrecycling of used domestic appliances you contribute an important push tothe protection of our environment. Ask your local authorities for informationregarding the point of recollection.SupportYou can find all available information and spare parts atwww.princesshome.eu!
NLGebruiksaanwijzing
VEILIGHEID
• Als u de veiligheidsinstructies negeert, kan de
fabrikant niet verantwoordelijk worden
gehouden voor de mogelijke schade.
• Als het netsnoer beschadigd is, moet het
worden vervangen door de fabrikant, de
onderhoudsmonteur van de fabrikant of door
personen met een soortgelijke kwalificatie om
gevaar te voorkomen.
• Verplaats het apparaat nooit door aan het snoer
te trekken en zorg dat het snoer niet in de war
kan raken.
• Het apparaat moet op een stabiele, vlakke
ondergrond worden geplaatst.
• De gebruiker mag het apparaat niet onbeheerd
achterlaten wanneer de stekker zich in het
stopcontact bevindt.
• Dit apparaat is uitsluitend voor huishoudelijk
gebruik en voor het doel waar het voor bestemd
is.
• Dit apparaat mag niet worden gebruikt door
kinderen jonger dan 8 jaar. Dit apparaat kan
worden gebruikt door kinderen vanaf 8 jaar en
door personen met verminderde lichamelijke,
zintuiglijke of geestelijke vermogens of gebrek
aan de benodigde ervaring en kennis indien ze
onder toezicht staan of instructies krijgen over
hoe het apparaat op een veilige manier kan
worden gebruikt alsook de gevaren begrijpen
die met het gebruik samenhangen. Kinderen
mogen niet met het apparaat spelen. Houd het
apparaat en het netsnoer buiten bereik van
kinderen jonger dan 8 jaar. Laat reiniging en
onderhoud niet door kinderen uitvoeren, tenzij
ze ouder zijn dan 8 jaar en onder toezicht staan.
• Dompel het snoer, de stekker of het apparaat
niet onder in water of andere vloeistoffen om
elektrische schokken te voorkomen.
• Buiten het bereik van kinderen houden indien er
geen toezicht is.
• Schakel het apparaat uit en verwijder de stekker
uit het stopcontact, voordat u accessoires
verwisselt of bewegende onderdelen benadert.
• Koppel het apparaat te allen tijde los als er
geen toezicht is en alvorens het apparaat te
monteren, te demonteren of te reinigen.
• Het is noodzakelijk om dit toestel zuiver te
houden, aangezien het in direct contact komt
met eetwaren.
ONDERDELENBESCHRIJVING1. Deksel2. Verwijderbare kom3. Mengspatel4. Display5. Start/pauze-knop6. Menu-knop7. Aan/uit-knop8. BesturingsknopVOORAFGAANDE AAN HET EERSTE GEBRUIK• Was de koelbol, het deksel, de spatel en de as van de spatel af in eenwarm sopje, spoel alle onderdelen vervolgens af en droog deze grondig.• Maak de buitenkant van het motorblok schoon met een vochtige doek.• Dompel de motorunit niet onder in water of andere vloeistoffen.• Doe de motorunit en de onderdelen niet in de vaatwasser.GEBRUIKFunctieknoppen• [Power] Druk op de aan/uitknop om het apparaat in of uit te schakelen• [Menu] Druk op de menuknop om tussen de verschillende menu’s teschakelen: IJs —> Alleen koelen —> Alleen mengen.• [Control button] Nadat u het gewenste menu heeft geselecteerd, kunt umet de besturingsknop de gewenste tijd instellen.• [Start/pause] Druk na het instellen van het gewenste menu en de tijd opdeze knop om het apparaat in werking te stellen.IJs maken1. Bereid de ingrediënten van uw eigen recept of van het recept dat u indeze handleiding aantreft voor. Opmerking: u hoeft de kom niet voorafin een vriezer te bevriezen. Deze machine bevat een ingebouwdecompressor die de ingrediënten van het recept tijdens bedrijf bevriest.2. Giet de voorbereide ingrediënten in de verwijderbare kom.3. Plaats de verwijderbare kom in de machine en draai de kom een kleinstukje om deze correct te plaatsen.4. Plaats de mengspatel in de verwijderbare kom op de motoras. Plaatsvervolgens de transparante deksel op de machine en vergrendel dezedoor hem linksom te draaien.5. Steek de stekker van het apparaat in het stopcontact en druk op deknop [POWER] om het apparaat in te schakelen.6. Druk op de knop [Menu] om de gewenste werkfunctie te kiezen.7. Draai aan de besturingsknop om de gewenste werktijd in te stellen.8. Druk op de knop [START/PAUSE] om het apparaat in werking testellen.9. Tijdens bedrijf kunt u ingrediënten toevoegen door de bijvulkap teopenen.10. Als het ijs gereed is, start de machine de koelhoudfunctie automatischgedurende 10 minuten op.Zelfbeschermingsfunctie van de motorAls het ijs harder wordt, kan de mengmotor worden geblokkeerd om eenlange levensduur van de motor te verzekeren.Het volume van de ingrediënten regelenZorg om overstroming en verspilling te voorkomen dat de ingrediëntenmaximaal 60% van de inhoud van de verwijderbare kom innemen (ijs zetuit tijdens de bereiding).ReceptVanille-ijsIngrediënten:• 240ml volle melk• 100g kristalsuiker• 160ml slagroom, goed gekoeld• 8g puur vanille-extract naar smaakBereidingDoe de ingrediënten in een middelgrote kom en meng de melk en dekristalsuiker met een handmixer of een garde tot de suiker is opgelost,ongeveer 1 – 2 minuten op een lage snelheid. Roer de slagroom en devanille naar smaak hierdoor. Zet de machine aan, giet het mengsel via deingrediëntentuit in de vrieskom en laat dit mengen tot een dik mengselontstaat, ongeveer 30 – 40 minuten.REINIGING EN ONDERHOUD• De koelbol, de spatel en het deksel mogen worden afgewassen metwarm water en een zacht afwasmiddel spoel ze hierna grondig af. Hetmotorblok moet worden schoongemaakt met een vochtige doek.• Plaats geen van de onderdelen in de vaatwasmachine. Dompel hetmotorblok nooit onder in water of een andere vloeistof.• Let erop dat alle onderdelen volledig droog zijn.• Leg de spatel of de as van de spatel nooit in de diepvriezer.MILIEUDit apparaat mag aan het einde van de levensduur niet bij hetnormale huisafval worden gedeponeerd, maar moet bij een speciaalinzamelpunt voor hergebruik van elektrische en elektronische apparatenworden aangeboden. Het symbool op het apparaat, in degebruiksaanwijzing en op de verpakking attendeert u hierop. De in hetapparaat gebruikte materialen kunnen worden gerecycled. Met hetrecyclen van gebruikte huishoudelijke apparaten levert u een belangrijkebijdrage aan de bescherming van ons milieu. Informeer bij uw lokaleoverheid naar het inzamelpunt.SupportU kunt alle beschikbare informatie en reserveonderdelen vinden opwww.princesshome.eu!
FRManuel d’instructions
SÉCURITÉ
• Si vous ignorez les consignes de sécurité, le
fabricant ne peut être tenu pour responsable
des dommages.
• Si le cordon d’alimentation est endommagé, il
doit être remplacé par le fabricant, son
réparateur ou des personnes qualifiées afin
d’éviter tout risque.
• Ne déplacez jamais l’appareil en tirant sur le
cordon et veillez à ce que celui-ci ne s’enroule
pas.
• L’appareil doit être posé sur une surface stable
et nivelée.
• Ne laissez jamais le dispositif sans surveillance
s’il est connecté à l’alimentation.
• Cet appareil est uniquement destiné à des
utilisations domestiques et seulement dans le
but pour lequel il est fabriqué.
• Cet appareil ne doit pas être utilisé par des
enfants de moins de 8 ans. Cet appareil peut
être utilisé par des enfants de 8 ans ou plus et
des personnes présentant un handicap
physique, sensoriel ou mental voire ne
disposant pas des connaissances et de
l’expérience nécessaires en cas de surveillance
ou d’instructions sur l’usage de cet appareil en
toute sécurité et de compréhension des risques
impliqués. Les enfants ne doivent pas jouer
avec l’appareil. Maintenez l’appareil et son
cordon d’alimentation hors de portée des
enfants de moins de 8 ans. Le nettoyage et la
maintenance utilisateur ne doivent pas être
confiés à des enfants sauf s’ils ont 8 ans ou
plus et sont sous surveillance.
• Afin de vous éviter un choc électrique,
n’immergez pas le cordon, la prise ou l’appareil
dans de l’eau ou autre liquide.
• Ne pas laisser les enfants jouer avec l’appareil.
• Éteignez l’appareil et débranchez-le du secteur
avant de changer les accessoires ou
d’approcher de parties amovibles durant le
fonctionnement
• Débranchez toujours l’appareil du secteur si
vous quittez la pièce et avant de le monter, le
démonter ou le nettoyer.
• Il est impératif de conserver cet appareil propre
en permanence car il est en contact direct avec
des aliments.
DESCRIPTION DES PIÈCES1. Couvercle2. Bol amovible3. Lame de mixeur4. Écran5. Bouton Début/Pause6. Bouton Menu7. Bouton Marche8. Bouton CommandeAVANT LA PREMIÈRE UTILISATION• Laver le bol réfrigérant, le couvercle et le batteur avec de l’eau chaudesavonneuse. Bien rincer et sécher tous les éléments.• Nettoyer le bloc moteur à l’aide d’un chiffon humide.• Ne pas immerger le bloc moteur dans l’eau ou dans tout autre liquide.• Le bloc moteur et les autres éléments ne doivent pas être mis au lave-vaisselle.UTILISATIONBoutons de fonction• [Power] appuyez sur le bouton Marche pour mettre l’appareil en marche /arrêt.• [Menu] appuyez sur le bouton Menu pour alterner entre les différentsmenus : Glace —> Refroidissement uniquement —> Mélangeuniquement.• [Control button] après le choix du menu voulu, utilisez le bouton decommande pour régler le temps voulu.• [Start/pause] après le réglage du temps et du menu voulus, appuyez surce bouton pour commencer le travail.Préparation de glace1. Préparez les ingrédients de votre propre recette ou de la recette de cemanuel. Note : inutile de congeler le bol à l’avance au congélateur.Cette machine intègre un compresseur qui congèle les ingrédients dela recette durant le fonctionnement.2. Placez les ingrédients préparés dans le bol amovible.3. Placez le bol amovible dans la machine et tournez légèrement le bolpour bien l’ajuster.4. Placez la lame de mixeur dans le bol amovible sur l’axe du moteur.Placez ensuite le couvercle transparent dans la machine et verrouillezen tournant dans le sens antihoraire.5. Branchez l’appareil et appuyez sur le bouton [POWER] pour mettrel’appareil en marche.6. Appuyez sur le bouton [MENU] pour choisir le mode defonctionnement voulu.7. Tournez le bouton de commande sur le temps de travail voulu.8. Appuyez sur le bouton [START/PAUSE] pour lancer le travail.9. Durant le fonctionnement, vous pouvez ajouter des ingrédients parl’ouverture du couvercle de remplissage.10. Une fois la glace prête, la machine initie automatiquement la fonctionde maintien de température pendant 10 minutes.Fonction d’autoprotection du moteurDès que la glace durcit, le moteur de mixeur peut se bloquer pourpréserver sa durée de vie.Contrôle du volume des ingrédientsPour éviter les débordements et gaspillages, assurez-vous que lesingrédients ne dépassent pas 60% de la capacité du bol amovible (laglace en formation a une tendance à l’expansion)RecetteGlace à la vanilleIngrédients:• 240ml de lait entier• 100g de sucre cristallisé• 160ml de crème épaisse, bien refroidie• 8g d’extrait de vanille pur selon les goûtsPréparationVersez les ingrédients dans un bol moyen et utilisez un mixeur à main ouun fouet pour mélanger le lait et le sucre cristallisé jusqu’à dissolution dusucre, environ 1 — 2 minutes à basse vitesse. Incorporez la crème épaisseet la vanille (selon vos goûts). Mettez la machine en marche, versez lemélange dans le bol réfrigérant à travers le bec à ingrédient et laissez lemélange épaissir 30 – 40 minutes.NETTOYAGE ET ENTRETIEN• Le bol réfrigérant, le batteur et le couvercle peuvent être nettoyés avecde l’eau chaude et un produit détergent doux. Le bloc moteur peut êtrenettoyé à l’aide d’un chiffon humide.• Ne mettez aucune pièce au lave-vaisselle. N’immergez jamais le bloc dumoteur dans l’eau.• Assurez-vous que toutes les parties de l’appareil ont été correctementséchées.• Ne jamais mettre le batteur et/ou son axe au congélateur.ENVIRONNEMENTCet appareil ne doit pas être jeté avec les déchets ménagers à lafin de sa durée de vie, il doit être remis à un centre de recyclage pour lesappareils électriques et électroniques. Ce symbole sur l’appareil, lemanuel d’utilisation et l’emballage attire votre attention sur un pointimportant. Les matériaux utilisés dans cet appareil sont recyclables. Enrecyclant vos appareils, vous contribuez de manière significative à laprotection de notre environnement. Renseignez-vous auprès des autoritéslocales pour connaître les centres de collecte des déchets.SupportVous retrouvez toutes les informations et pièces de rechange surwww.princesshome.eu!
DEBedienungsanleitung
SICHERHEIT
• Beim Ignorieren der Sicherheitshinweise kann
der Hersteller nicht für Schäden haftbar
gemacht werden.
• Ist das Netzkabel beschädigt, muss es vom
Hersteller, dem Kundendienst oder ähnlich
qualifizierten Personen ersetzt werden, um
Gefahren zu vermeiden.
• Bewegen Sie das Gerät niemals durch Ziehen
am Kabel, und stellen Sie sicher, dass sich das
Kabel nicht verwickeln kann.
• Das Gerät muss auf einer ebenen, stabilen
Fläche platziert werden.
• Das Gerät darf nicht unbeaufsichtigt bleiben,
während es am Netz angeschlossen ist.
• Dieses Gerät darf nur für den
Haushaltsgebrauch und nur für den Zweck
benutzt werden, für den es hergestellt wurde.
• Dieses Gerät darf nicht von Kindern unter 8
Jahren verwendet werden. Dieses Gerät darf
von Kindern ab 8 Jahren und von Personen mit
eingeschränkten körperlichen, sensorischen
oder geistigen Fähigkeiten oder einem Mangel
an Erfahrung und Kenntnissen verwendet
werden, sofern diese Personen beaufsichtigt
oder über den sicheren Gebrauch des Geräts
unterrichtet wurden und die damit verbundenen
Gefahren verstanden haben. Kinder dürfen mit
dem Gerät nicht spielen. Halten Sie das Gerät
und sein Anschlusskabel außerhalb der
Reichweite von Kindern unter 8 Jahren.
Reinigungs- und Wartungsarbeiten dürfen nicht
von Kindern vorgenommen werden, es sei
denn, sie sind älter als 8 und werden
beaufsichtigt.
• Tauchen Sie zum Schutz vor einem
Stromschlag das Kabel, den Stecker oder das
Gerät niemals in Wasser oder sonstige
Flüssigkeiten.
• Kinder dürfen das Gerät nicht ohne
Beaufsichtigung benutzen.
• Schalten Sie das Gerät aus und trennen es von
der Stromversorgung, bevor Sie Zubehörteile
wechseln oder sich beweglichen Teilen nähern.
• Trennen Sie das Gerät immer von der
Stromversorgung, wenn es unbeaufsichtigt
zurückgelassen wird sowie vor dem
Zusammenbau, der Zerlegung oder Reinigung.
• Es ist absolut notwendig, das Gerät immer
sauber zu halten, weil es in direkten Kontakt mit
Nahrungsmitteln kommt.
TEILEBESCHREIBUNG1. Deckel2. Entfernbarer Behälter3. Mischmesser4. Anzeige5. Start-/Pause-Taste6. Menütaste7. Ein-/Aus-Taste8. SteuertasteVOR DEM ERSTEN GEBRAUCH• Waschen Sie Gefrierschüssel, Deckel und Rührpaddel in warmemSeifenwasser. Alle Teile gründlich abspülen und abtrocknen.• Wischen Sie die Motoreinheit mit einem feuchten Tuch ab.• Tauchen Sie die Motoreinheit nicht in Wasser oder andere Flüssigkeiten.• Geben Sie weder Motoreinheit noch ein anderes Teil in denGeschirrspüler.GEBRAUCHFunktionstasten• [Power] Drücken Sie auf die Ein-/Aus-Taste, um das Gerät ein- oderauszuschalten.• [Menu] Drücken Sie auf die Menütaste, um zwischen den verschiedenenMenüs umzuschalten: Eiscreme —> Nur kühlen —> Nur mischen.• [Control] Nach Auswahl des gewünschten Menüs können Sie dieSteuertaste verwenden, um die gewünschte Zeit einzustellen.• [Start/pause] Drücken Sie nach der Einstellung des gewünschten Menüsund der gewünschten Zeit auf diese Taste, um den Betrieb zu starten.Zubereitung von Eiscreme1. Bereiten Sie die Zutaten Ihres eigenen oder des in diesem Handbuchbeschriebenen Rezepts zu. Hinweis: Sie müssen die Schüssel nichtvorher im Kühlschrank einfrieren, da diese Maschine eineneingebauten Kompressor hat, der die Rezeptzutaten während desBetriebes einfriert.2. Gießen Sie die zubereiteten Zutaten in die entfernbare Schüssel.3. Setzen Sie die entfernbare Schüssel in die Maschine ein und drehenSie die Schüssel leicht, damit sie richtig sitzt.4. Setzen Sie das Mischmesser in die entfernbare Schüssel auf derMotorachse ein. Setzen Sie dann den durchsichtigen Deckel auf dieMaschine und sichern Sie ihn durch Drehen gegen den Uhrzeigersinn.5. Stecken Sie den Gerätestecker in die Steckdose und drücken Sie aufdie [POWER]-Taste, um das Gerät einzuschalten.6. Drücken Sie auf die [MENU]-Taste, um den gewünschtenBetriebsmodus zu wählen.7. Drehen Sie die Steuertaste, um die gewünschte Betriebszeiteinzustellen.8. Drücken Sie auf die [START/PAUSE]-Taste, um den Betrieb zustarten.9. Während des Betriebes können Sie Zutaten hinzufügen, indem Sieden Nachfülldeckel öffnen.10. Wenn die Eiscreme fertig ist, startet die Maschine automatisch 10Minuten lang die Kühlhaltefunktion.MotorschutzfunktionWenn die Eiscreme härter wird, ist der Mischmotor möglicherweiseblockiert, um die Lebensdauer des Motors sicherzustellen.Steuerung des Volumens der ZutatenUm ein Überlaufen und Abfall zu vermeiden, stellen Sie bitte sicher, dassdie Zutaten 60% des Fassungsvermögens der entfernbaren Schüsselnicht überschreiten (die Eiscreme dehnt sich beim Formen aus).RezeptVanilleeisZutaten:• 240ml Vollmilch• 100g Kristallzucker• 160ml Sahne, gut gekühlt• 8g reines Vanilleextrakt nach GeschmackZubereitungGeben Sie die Zutaten in eine mittelgroße Schüssel und verwenden Sie 1- 2 Minuten lang einen Handmixer mit niedriger Geschwindigkeit odereinen Schneebesen, um die Milch und den Streuzucker zu vermengen, bissich der Zucker aufgelöst hat. Rühren Sie die Sahne und Vanille für denGeschmack durch. Schalten Sie die Maschine ein, gießen Sie dieMischung durch die Zutatentülle in die Gefrierschüssel und lassen Sie dasGanze ca. 30 — 40 Minuten lang durchmischen, bis die Mischung dick ist.REINIGUNG UND PFLEGE• Die Einfrierschale, das Paddel und der Deckel können mit warmemWasser und einem milden Reinigungsmittel gereinigt werden. DerMotorantrieb kann mit einem feuchten Lappen gereinigt werden.• Die Teile dürfen nicht mit der Geschirrspülmaschine gereinigt werden.Tauschen Sie die Motoreinheit niemals in Wasser!• Achten Sie darauf, dass alle Teile gründlich getrocknet werden.• Bewahren Sie das Mischpaddel und/oder die Antriebswelle niemals imGefrierschrank auf.UMWELTDieses Gerät darf am Ende seiner Lebenszeit nicht im Hausmüllentsorgt werden, sondern muss an einer Sammelstelle für das Recycelnvon elektrischen und elektronischen Haushaltsgeräten abgegebenwerden. Das Symbol auf dem Gerät, in der Bedienungsanleitung und aufder Verpackung macht Sie auf dieses wichtige Thema aufmerksam. Die indiesem Gerät verwendeten Materialien können recycelt werden. Durchdas Recyceln gebrauchter Haushaltsgeräte leisten Sie einen wichtigenBeitrag zum Umweltschutz. Fragen Sie Ihre örtliche Behörde nachInformationen über eine Sammelstelle.SupportSämtliche verfügbaren Informationen und Ersatzteile finden Sie unterwww.princesshome.eu!
ESManual de instrucciones
SEGURIDAD
• Si ignora las instrucciones de seguridad,
eximirá al fabricante de toda responsabilidad
por posibles daños.
Каталог >
Научные опыты > Кулинария >
Фабрика мороженого
Артикул: 5392
Для увеличения изображения нажмите на картинку


Фабрика мороженого
Сладкое мороженное, ванильное и шоколадное, с фруктами и орехами, в стаканчиках и на палочке, — что может быть вкуснее и желаннее, когда тебе 8, а на улице долгожданное лето?!
Хотите, чтобы ребенок сам приготовил это изумительное лакомство, знакомое всем с детства? Тогда подарите маленькому кулинару набор «Фабрика мороженного» от Сreative.
Овладеть кондитерским искусством совсем не трудно, когда под рукой есть все необходимое, а инструменты просты в использовании. К набору прилагается инструкция с подробными рецептами, следуя которым малыш сможет приготовить шербет и мороженное разнообразных видов.
В отличие от покупного, в вашем лакомстве не будет консервантов и ароматизаторов, только натуральные компоненты: фрукты, сметана, сливки, сахар и т.д. Поэтому десерты, приготовленные своими руками, получатся в 2 раза вкуснее и в 3 раза полезнее!
Помимо кулинарных навыков, ребенок проявит фантазию и креативность, украшая готовые блюда и стаканчики для них.
Что входит в набор:
Машинка с двумя емкостями для приготовления мороженого;
2 ложки, меняющие цвета;
10 конусных стаканчиков одноразового использования;
135 голографических наклеек для декорирования стаканчиков;
Буклет с 15 рецептами шербета и мороженого.
Также набор не включает ингредиенты, указанные в рецептах.
Как пользоваться набором?
Прежде чем приступить к работе, внимательно изучите инструкцию и рассмотрите элементы, входящие в набор. Машинка для приготовления мороженого имеет 2 круглые емкости и крышку. На внутренней сторону крышки расположены лопасти для смешивания и датчик температуры. На внешней стороне – 2 окошка для выпуска нагретого пара и 2 кнопки: «PRE» — для быстрого перемешивания до замораживания, «PRO» — для медленного перемешивания во время замораживания.
Перед началом приготовления тщательно вымойте машинку с помощью средства для мытья посуды. Просушите полотенцем.
Поместите в отсек на боковой стороне крышки 4 пальчиковые батарейки.
Выберите понравившийся рецепт и подготовьте все ингредиенты.
Наполните емкости на ⅔ от их объема и закройте крышкой. В емкости можно поместить разные смеси, чтобы одновременно приготовить 2 разных десерта.
Первый этап приготовления – быстрое перешивание. Нажмите «PRE», после этого должен загореться красный индикатор. Засеките 5 минут и отключите машинку, нажав на ту же клавишу. Проверьте температуру блюда. Если смесь недостаточно холодная, можно запустить быстрое перешивание, нажав на кнопку «PRE». Важно запомнить, что нельзя ставить в холодильник машинку, если смесь еще теплая.
Второй этап – медленное перешивание. Нажмите на клавишу «PRO» (в зависимости от температуры продукта загорится красный или желтый индикатор).
Включенную машинку поместите в морозильное отделение холодильника. Перемешивание автоматически запускается при температуре смеси +4℃ и продолжается, пока смесь не охладиться до -4℃. Среднее время замораживания – 1.5 часа (может меняться в зависимости от рецептуры и типа морозильной камеры).
Пока смесь стоит в холодильнике, у вас есть время для декорирования стаканчиков. Используя голографические наклейки из набора, украсьте каждый рожок в своем неповторимом стиле.
Теперь можно проверять, готово ли угощение. Цвет индикатора изменился на зеленый — значит, ваше лакомство можно доставать. Выньте машинку из холодильника и нажмите кнопку «PRO», чтобы выключить.
Аккуратно извлеките получившееся мороженное из емкостей и разложите по стаканчикам. Подавайте десерт на стол вместе с ложечками.
Приятного вам аппетита!
Обратите внимание, что мороженное следует извлекать из морозилки не ранее чем за 15 минут до подачи. После приготовления обязательно промойте и высушите машинку, предварительно вынув из нее батарейки.
Перед повторным применением машинку и батарейки необходимо подержать при комнатной температуре не менее 2 часов.
Меры предосторожности
Набор содержит мелкие детали и не рекомендуется для детей младше 3 лет.
Все этапы работы проводят только под присмотром взрослых.
Возраст: 8 — 99 лет
Размер: 25.5х31х17 см
Вес: 1.5 кг
Производитель: Creative
Чтобы купить товар Фабрика мороженого, поместите его в корзину или оформите заказ по телефону: (499) 704-20-04, (812) 458-35-80
Спасибо за Ваши отзывы и оценки. Нам важно Ваше мнение.
Если Вам понравился товар, то Вы можете разместить ссылку на него у себя в блоге или на форуме:
| Код для вставки в блог: | BB-код для вставки в форум: | |||
| Чтобы использовать этот код, щелкните по нему мышкой, нажмите CTRL-C (код скопируется в ваш буфер обмена). Затем перейдите (откройте) нужную вам страницу (форум, livejournal, и т.д.), и вставьте этот код в ваше сообщение, нажав CTRL-V. |
С данным товаром также покупают

Copyright @ 2010-2023 «Развивайка» — интернет магазин игрушек
Телефон: Москва — 8(499)704-20-04, Санкт-Петербург — 8(812)458-35-80
E-mail: info@razvivayka.com
Цвет товара на изображении может несколько отличаться от реального. Описание товара носит информационный характер и публичной офертой не является.
Способы оплаты:
-
Надежные фризеры для мягкого мороженого Miken! В ассортименте нашей компании Вы найдете аппараты на любой вкус: настольные и напольные, на один и на три вида мороженого.
от 97 950 руб.
-
Ролл мороженое (жареное мороженое) — диковинка на Российском рынке из года в год набирающая обороты! Предлагаем Фризер для ролл мороженого на одну охлаждающую поверхность!
105 000 руб.
-
Более 20 вкусов сухих смесей для мороженого, более 10 видов сахарных рожков для мягкого и твердого мороженого. Предусмотрена система скидок для постоянных покупателей!
10 кг — 2 620 руб.
-
Морозильные витрины для мороженого от 149 880 руб. На нашем сайте представлены витрины от 8 до 18 емкостей для хранения твердого мороженого. Оригинальный внешний вид, качественная сборка, гарантия долгой работы!
от 149 880 руб.

manualCuisinart ICE-20

ICE-20 Series
Automatic Frozen Yogurt-Ice Cream & Sorbet Maker
INSTRUCTION AND
RECIPE BOOKLET
For your safety and continued enjoyment of this product, always read the instruction book carefully before using.
View the manual for the Cuisinart ICE-20 here, for free. This manual comes under the category ice-cream makers and has been rated by 5 people with an average of a 8. This manual is available in the following languages: English. Do you have a question about the Cuisinart ICE-20 or do you need help? Ask your question here
The Cuisinart ICE-20 is an ice-cream maker that allows you to create your favorite frozen treats at home. With its sleek design and user-friendly features, it offers a convenient and enjoyable ice-cream making experience.
This ice-cream maker is equipped with a large mixing bowl, which has a capacity of up to 1.5 quarts of ice cream. This allows you to make enough ice cream to share with friends and family. The mixing bowl is also removable, making it easy to clean and store.
The ICE-20 utilizes a unique mixing paddle, which thoroughly combines all the ingredients to create smooth and creamy ice cream. The paddle is easy to attach and detach, allowing for quick and hassle-free setup.
With the ICE-20, you have the flexibility to customize your ice cream to suit your taste preferences. Whether you prefer classic flavors or want to experiment with unique combinations, this ice-cream maker can handle it all. It also offers the option to add mix-ins, such as chocolate chips or fruit, during the mixing process.
Operating the ICE-20 is straightforward, thanks to its simple control panel. It features an on/off switch, as well as a countdown timer to ensure precision in your ice-cream making. This allows you to sit back and relax while the machine does all the work.
Overall, the Cuisinart ICE-20 is a reliable and user-friendly ice-cream maker, perfect for those who enjoy homemade frozen desserts. With its capacity, functionality, and ease of use, it is a great addition to any kitchen.
General
Can’t find the answer to your question in the manual? You may find the answer to your question in the FAQs about the Cuisinart ICE-20 below.
How do I assemble the ice-cream maker correctly?
Start by placing the freezer bowl in the freezer for a minimum of 12 hours. Once frozen, insert the mixing arm firmly into the bowl’s center, ensuring it is fully locked in place.
Which ingredients can I use to make ice cream with this machine?
You can use a variety of ingredients such as heavy cream, whole milk, sugar, vanilla extract, and any desired flavorings or mix-ins. Be creative and experiment with different flavors!
What is the maximum capacity of this ice-cream maker?
The Cuisinart ICE-20 has a maximum capacity of 1.5 quarts (1.4 liters) of ice cream mixture. Ensure not to exceed this limit to avoid overflow during the churning process.
How long should I churn the ice cream for optimal results?
To achieve a creamy texture and consistency, churn the ice cream mixture for approximately 20-25 minutes. However, keep an eye on it, as the actual time may vary based on the recipe and desired consistency.
How do I clean and maintain this ice-cream maker?
After each use, remove the freezer bowl and rinse it with warm soapy water, then dry it thoroughly. Clean the mixing arm and lid in the same manner. Ensure all components are completely dry before storing. Never immerse the base of the machine in water, instead, wipe it clean using a damp cloth.
Is the manual of the Cuisinart ICE-20 available in English?
Yes, the manual of the Cuisinart ICE-20 is available in English .
Is your question not listed? Ask your question here
(Many of the links in this article redirect to a specific reviewed product. Your purchase of these products through affiliate links helps to generate commission for Storables.com, at no extra cost. Learn more)
Table of Contents
- Introduction
- Understanding the Ice Cream Machine
- Preparing the Ice Cream Mixture
- Chilling the Mixture
- Setting Up the Ice Cream Machine
- Adding the Mixture to the Machine
- Operating the Ice Cream Machine
- Monitoring the Freezing Process
- Adding Mix-ins
- Removing the Finished Ice Cream
- Cleaning and Maintaining the Ice Cream Machine
- Troubleshooting Tips
- Conclusion
Introduction
Welcome to the world of homemade ice cream! The joy of creating your own frozen treats is unmatched. And what better way to achieve that than by using an ice cream machine? Whether you’re a seasoned chef or a beginner in the kitchen, an ice cream machine can elevate your dessert game to new heights.
In this article, we’ll guide you through the process of using an ice cream machine, from understanding the machine itself to creating delicious ice cream flavors. Get ready to embark on a delightful journey of ice cream making!
Before we dive into the specifics, let’s take a moment to explore why using an ice cream machine can make all the difference in your homemade ice cream. The primary purpose of an ice cream machine is to freeze the mixture while constantly churning it. This continuous churning prevents the formation of large ice crystals, resulting in a smoother and creamier texture. It also incorporates air into the mixture, giving your ice cream a lighter and fluffier consistency.
While it’s possible to make ice cream without a machine, the process can be more time-consuming and requires regular stirring by hand to prevent ice crystals from forming. Using an ice cream machine automates the freezing and churning process, giving you consistent and professional results every time.
Now that we understand the advantages of using an ice cream machine, let’s move on to the next section, where we’ll delve deeper into the different types of ice cream machines available in the market and which one might be perfect for you.
Key Takeaways:
- Elevate your homemade ice cream game with an ice cream machine, ensuring a smoother, creamier texture and the convenience of automated freezing and churning.
- Prepare a delicious ice cream mixture, chill it thoroughly, and add mix-ins at the right time for a burst of flavor and texture. Enjoy the delightful process of making homemade ice cream!
Understanding the Ice Cream Machine
Before you begin using an ice cream machine, it’s essential to familiarize yourself with its components and understand how it works. Ice cream machines come in various types, including freezer bowl machines, compressor machines, and commercial-grade machines. Each type operates differently, but the basic principle remains the same: freezing and churning the ice cream mixture.
The most common type of ice cream machine for home use is the freezer bowl machine. This machine consists of a bowl that needs to be pre-frozen before use. Inside the bowl, there is a built-in freezing element that freezes the mixture while it churns. Freezer bowl machines are affordable, compact, and easy to use, making them a popular choice amongst home ice cream enthusiasts.
Compressor machines, on the other hand, have a built-in freezer unit, eliminating the need to pre-freeze a separate bowl. These machines are more expensive but offer the convenience of making multiple batches of ice cream without waiting for the bowl to refreeze. Compressor machines are great for those who frequently make ice cream and want more flexibility without the hassle of pre-freezing.
Commercial-grade ice cream machines are designed for professional use, typically found in ice cream parlors and restaurants. These machines have a higher capacity, faster freezing capabilities, and more advanced features. While they may be out of reach for most home users, it’s interesting to know how they operate for a complete understanding of ice cream machines.
Regardless of the type of ice cream machine you choose, understanding the basic components is crucial. Most machines consist of a motor, a dasher or paddle, a freezing unit, and various control settings. The motor drives the paddle, which rotates and churns the mixture. The freezing unit freezes the mixture as it churns, ensuring the formation of small ice crystals for a smooth texture.
Some ice cream machines offer adjustable settings for different textures and freezing times. These settings allow you to customize your ice cream according to your preferences. It’s important to refer to the user manual of your specific machine to understand the controls and recommended settings.
Now that you have a good understanding of the ice cream machine, let’s move on to the next section, where we’ll discuss how to prepare the ice cream mixture.
Preparing the Ice Cream Mixture
Creating the perfect ice cream starts with a well-prepared ice cream mixture. The ingredients and proportions you use will determine the flavor, texture, and overall quality of your homemade ice cream. Here’s a step-by-step guide on how to prepare a delicious ice cream mixture:
- Choose your base ingredients: The base of the ice cream mixture typically consists of heavy cream, whole milk, sweeteners like sugar or honey, and flavorings such as vanilla extract. You can also use alternative dairy-free options like coconut milk or almond milk for a vegan-friendly ice cream.
- Combine the ingredients: In a mixing bowl, whisk together the heavy cream, milk, sweetener, and any desired flavorings. Make sure all the ingredients are well incorporated and the sweetener is dissolved.
- Add mix-ins: This is the stage where you can get creative and add various mix-ins to elevate the flavor and texture of your ice cream. Popular mix-ins include chocolate chips, fruit chunks, nuts, cookie dough, or even swirls of caramel and fudge. Add them to the mixture and gently stir to evenly distribute the mix-ins.
- Taste and adjust: Before freezing the mixture, it’s a good idea to taste it and make any necessary adjustments. You can add more sweetener, flavorings, or mix-ins according to your taste preference. Remember that the flavors will intensify during the freezing process, so it’s better to slightly under-sweeten or under-flavor the mixture.
- Chill the mixture: Transfer the ice cream mixture to a container with a lid and refrigerate it for at least 2-4 hours, or until it’s thoroughly chilled. Chilling the mixture allows the flavors to meld together and helps achieve a smoother texture during the freezing process.
Once your ice cream mixture is prepared and chilled, it’s time to move on to the next steps, where we’ll guide you through setting up and operating the ice cream machine.
Chilling the Mixture
Chilling the ice cream mixture is a crucial step in the ice cream making process. The purpose of chilling is to ensure that the mixture is cold enough before it goes into the ice cream machine, which helps in achieving a smoother and creamier texture. Here’s how to properly chill your ice cream mixture:
- Transfer the prepared ice cream mixture into a container with a tight-fitting lid. It’s essential to choose a container that is large enough to hold the entire mixture but leaves enough space for expansion during freezing.
- Place the lid on the container and refrigerate it for a minimum of 2-4 hours, or preferably overnight. The longer you chill the mixture, the better the flavors will meld together, resulting in a more flavorful ice cream.
- While chilling, it’s essential to cover the container to prevent any flavors or odors from permeating the mixture. This will help maintain the integrity of the ice cream’s taste and aroma.
- If you’re in a hurry and don’t have enough time to refrigerate the mixture overnight, you can speed up the chilling process by placing the container in an ice bath. Fill a larger bowl or basin with ice cubes and water, then place the container with the ice cream mixture inside it. Stir the mixture intermittently to help it chill faster. However, ensure that no water from the ice bath enters the mixture as it can affect the final texture.
Chilling the ice cream mixture before using the ice cream machine is important because it allows the ingredients to thoroughly cool down. Cold mixture freezes faster and prevents the formation of large ice crystals, resulting in a smoother and creamier ice cream.
Once your mixture is properly chilled, you’re ready to move on to the next steps, where we’ll guide you through setting up and operating the ice cream machine.
Setting Up the Ice Cream Machine
Now that your ice cream mixture is chilled and ready to go, it’s time to set up your ice cream machine. Properly setting up the machine ensures that it operates smoothly and efficiently. Here are the steps to set up your ice cream machine:
- Find a stable and level surface: Choose a flat and stable surface in your kitchen where you can place the ice cream machine. It’s crucial to have a level surface to ensure the machine functions properly during the freezing and churning process.
- Remove the freezer bowl from the freezer: If you’re using a freezer bowl machine, carefully remove the bowl from the freezer. Make sure it’s fully frozen, as per the manufacturer’s instructions. It’s recommended to leave the bowl in the freezer for at least 24 hours before usage to ensure optimal freezing.
- Assemble the machine: Follow the user manual provided with your specific ice cream machine to properly assemble all the components. This typically involves attaching the paddle or dasher to the motor and placing the freezing bowl into the machine’s base.
- Ensure the machine is clean: Before proceeding, clean all the components of the ice cream machine to remove any dust or residue. This ensures that your ice cream will be free from any unwanted flavors or particles.
- Ensure optimal freezing conditions: If you’re using a freezer bowl machine, ensure that the bowl is properly inserted into the machine and securely locked in place. Make sure there are no gaps between the bowl and the machine. This ensures maximum contact and efficient freezing of the ice cream mixture.
- Double-check the controls and settings: Before adding the ice cream mixture, review the controls and settings on your ice cream machine. Make sure you understand how to operate the machine, adjust the freezing time, and select the desired consistency for your ice cream.
With your ice cream machine properly set up, you’re now ready to move on to the next step, which is adding the ice cream mixture into the machine. In the following sections, we’ll guide you through the process of adding the mixture, operating the machine, and monitoring the freezing process to ensure perfect homemade ice cream.
Adding the Mixture to the Machine
Now that your ice cream machine is set up and ready to go, it’s time to add the chilled ice cream mixture into the machine. This step is crucial as it kickstarts the freezing and churning process that transforms your mixture into delicious ice cream. Here’s how to add the mixture to the machine:
- Remove the lid from your ice cream mixture container and give it a quick stir to ensure all the ingredients are well mixed.
- If you’re using a freezer bowl machine, carefully remove the freezing bowl from the freezer and place it in the machine’s base. Make sure it’s securely locked.
- Place the paddle or dasher on the machine’s spindle, ensuring it fits properly and sits securely.
- Pour the chilled ice cream mixture slowly into the machine’s freezing bowl. Do not overfill the bowl, as the mixture will expand during the freezing process and may overflow.
- If needed, use a spatula to scrape any remaining mixture from the container to ensure you don’t waste any deliciousness.
- Close the lid of the machine to create a seal. This will help maintain the optimal freezing temperature and prevent any ice crystals from forming on the surface.
It’s important to note that different ice cream machines may have specific instructions regarding the maximum capacity or filling level. Refer to your machine’s user manual for guidelines on the appropriate amount of mixture to add.
With the mixture added to the machine, it’s time to move on to the next step: operating the ice cream machine. In the following section, we’ll guide you through the process of operating the machine and monitoring the freezing process to ensure the perfect consistency of your homemade ice cream.
Operating the Ice Cream Machine
Now that you’ve added the ice cream mixture to the machine, it’s time to start the freezing and churning process. Operating the ice cream machine correctly will ensure that your ice cream freezes evenly and achieves the desired consistency. Here’s how to operate your ice cream machine:
- Plug in the machine: Before turning on the machine, make sure it is securely plugged into an outlet. This will provide the necessary power to the motor and freezing unit.
- Turn on the machine: Locate the power switch or button on your ice cream machine and turn it on. The machine will start running, and the freezing process will begin.
- Set the timer: If your machine has a built-in timer, set it according to the manufacturer’s instructions or your desired freezing time. The recommended freezing time for most ice cream machines is between 20-30 minutes. However, this can vary depending on the machine and the specific recipe you’re using.
- Let the machine do its work: Once the machine is running, avoid opening the lid frequently during the freezing process. Opening the lid can disrupt the freezing process and result in a less creamy consistency. However, if your machine has a transparent lid, you can occasionally check on the progress of the ice cream without opening it fully.
- Enjoy the process: While the machine is churning and freezing the mixture, take a moment to enjoy the delightful aroma of fresh ice cream being made. It’s a joyful experience that builds anticipation for the delicious treat that awaits!
- Monitor the freezing process: As the freezing progresses, you may notice that the mixture thickens and increases in volume. This is a good sign that your ice cream is on its way to perfection. Keep an eye on the consistency and texture, as it will help you determine when the ice cream is ready.
The freezing time can vary depending on factors such as the temperature of the mixture, the room temperature, and the specific machine you’re using. It’s important to follow the recommended freezing time provided by the manufacturer or consult your specific ice cream recipe for guidance.
Once the freezing time is complete, it’s time to move on to the next step: adding mix-ins to your ice cream. In the following section, we’ll guide you on how to incorporate delicious mix-ins for added flavor and texture.
Before using an ice cream machine, make sure the bowl is completely frozen to ensure proper freezing of the ice cream mixture. This will result in a smoother and creamier texture.
Monitoring the Freezing Process
As your ice cream machine works its magic, it’s important to monitor the freezing process to ensure that your ice cream reaches the perfect consistency. Proper monitoring allows you to make adjustments if needed and helps you achieve the desired texture and flavor of your homemade ice cream. Here are some tips for monitoring the freezing process:
- Observe the consistency: As the ice cream mixture churns and freezes, keep an eye on its consistency. The mixture should gradually thicken and increase in volume as it freezes. It’s normal for the mixture to look soft and slushy in the early stages, but it should gradually become thicker and creamier.
- Check for freeze lines: Freeze lines are visible lines that form on the sides of the freezing bowl during the freezing process. These lines indicate the level to which the ice cream has frozen. If you notice freeze lines forming, it’s a sign that the ice cream is progressing and freezing properly.
- Perform the spoon test: To determine if your ice cream is nearing its desired consistency, you can perform the spoon test. Take a spoonful of the partially frozen mixture and observe its texture. If it holds together on the spoon and has a creamy, smooth consistency, it’s a good indication that the ice cream is close to being done.
- Taste-testing: Another way to monitor the freezing process is by tasting the partially frozen ice cream. Take a small spoonful and notice its flavor and texture. Adjust the sweetness or flavorings if needed, keeping in mind that the flavors will slightly mellow once fully frozen. This is the perfect opportunity to tweak the taste to your preference.
- Don’t over-churn: While monitoring the freezing process, it’s important not to over-churn the ice cream. Over-churning can lead to the formation of excessive air and result in a lighter, fluffier texture. However, prolonged churning can also cause the ice cream to become icy and grainy. It’s recommended to follow the suggested freezing time provided by the manufacturer or your ice cream recipe.
Remember, the freezing process can vary depending on factors such as the specific ice cream machine, the temperature of the mixture, and the environment. Trust your observations and the guidelines provided with your machine to determine when your ice cream has reached the desired consistency.
In the next section, we’ll guide you on how to add mix-ins to enhance the flavor and texture of your homemade ice cream.
Adding Mix-ins
Adding mix-ins to your ice cream is a fantastic way to elevate its flavor and texture. Whether you prefer chunks of chocolate, swirls of caramel, or pieces of fruit, mix-ins add a delightful surprise to each bite. Here’s how to incorporate mix-ins into your homemade ice cream:
- Prepare your mix-ins: Depending on the type of mix-ins you’ve chosen, you might need to prepare them beforehand. For example, if you’re using chocolate chips, you can chop up a chocolate bar into small chunks. If you’re using fruits, you can dice them into bite-sized pieces. Prepping your mix-ins ensures that they’re ready to be added to the ice cream.
- Timing is key: It’s important to add mix-ins at the right time during the freezing process. Adding them too early may cause them to sink to the bottom, while adding them too late may result in uneven distribution. The ideal time to add mix-ins is usually during the last few minutes of the freezing process, once the ice cream has reached a semi-frozen consistency.
- Pause the machine: Depending on your ice cream machine, you may have the option to pause or stop the machine temporarily. If you can, pause the machine and quickly add the mix-ins to the partially frozen ice cream. This will allow for even distribution and ensure that the mix-ins are incorporated throughout the ice cream.
- Gently fold in the mix-ins: Once the mix-ins are added, resume the freezing process by starting the machine again. The paddle or dasher will help evenly distribute the mix-ins throughout the ice cream. The key here is to gently fold in the mix-ins to avoid overmixing and retaining their texture and shape.
- Continue freezing: Allow the machine to continue running for the remaining freezing time. This ensures that the mix-ins freeze along with the ice cream and become fully incorporated.
Popular mix-ins include chocolate chips, crushed cookies, nuts, fresh fruits, caramel swirls, and marshmallows. You can get creative and customize your ice cream with your favorite flavors and textures.
Once the freezing process is complete and the mix-ins are incorporated, it’s time to proceed to the next step: removing the finished ice cream from the machine. In the following section, we’ll guide you on how to do that and how to properly store your homemade ice cream.
Removing the Finished Ice Cream
Congratulations! Your homemade ice cream is now finished and ready to be enjoyed. Follow these steps to properly remove the ice cream from the machine and prepare it for serving or storage:
- Turn off the machine: Once the freezing time is complete, turn off the ice cream machine by switching off the power or pressing the designated button.
- Unplug the machine (if applicable): If your machine has a plug, it’s a good practice to unplug it from the outlet for safety purposes before handling the ice cream.
- Remove the lid: Carefully remove the lid of the machine to reveal the frozen ice cream. Use a spatula or a silicone spoon to scrape any ice cream that may be stuck to the paddle or the sides of the freezing bowl.
- Serve immediately: If you prefer serving the ice cream immediately, scoop it out of the freezing bowl using an ice cream scoop or a large spoon. Serve it in bowls, cones, or any desired serving dish. Enjoy your homemade ice cream as is, or add additional toppings like sprinkles or a drizzle of chocolate syrup.
- Transfer to a storage container: If you want to save some ice cream for later, transfer the remaining ice cream to an airtight container. Choose a container that is freezer-safe and has enough space to accommodate the entire batch of ice cream. This will help prevent freezer burn and maintain the freshness and flavor of the ice cream.
- Smooth the surface: Once the ice cream is in the storage container, use a spatula or the back of a spoon to smooth the surface. This minimizes the chances of ice crystals forming and helps maintain the creamy texture.
- Seal the container: Securely close the container with its lid or cover. Make sure it’s tightly sealed to prevent any air or moisture from entering, which can affect the texture and taste of the ice cream.
- Label and date the container: To keep track of the freshness, write the date on the container using a marker or a label. This way, you’ll know how long the ice cream has been stored and can consume it within the recommended timeframe.
- Place in the freezer: Transfer the sealed container to the freezer and place it in a flat position. Allow the ice cream to freeze for a few hours or until it reaches the desired firmness.
- Enjoy at your leisure: Once fully frozen, your homemade ice cream is ready to be enjoyed anytime you crave a sweet treat. Serve it scooped into bowls, cones, or create your own ice cream sundaes with a variety of toppings.
Remember, homemade ice cream is best enjoyed within a few weeks of freezing for optimal taste and texture. Now that you know how to remove the finished ice cream, let’s move on to the next section, where we’ll discuss the importance of cleaning and maintaining your ice cream machine to ensure its longevity.
Cleaning and Maintaining the Ice Cream Machine
Proper cleaning and maintenance of your ice cream machine are essential to ensure its longevity and keep it in pristine working condition. Regular cleaning prevents the build-up of residue and ensures that each batch of ice cream is fresh and flavorful. Here’s how to clean and maintain your ice cream machine:
- Unplug the machine: Before starting the cleaning process, ensure that the machine is fully unplugged from the power source for safety.
- Disassemble the machine: Follow the instructions provided in the user manual to safely disassemble the removable parts of the machine, such as the freezing bowl, paddle, and any other detachable components.
- Wash in warm soapy water: Fill your sink or a basin with warm water and a mild dish soap. Submerge the removable parts of the machine in the soapy water and use a sponge or soft brush to gently scrub away any residue or ice cream remnants. Pay close attention to the paddle, as it may have accumulated the most build-up.
- Rinse thoroughly: After cleaning, rinse each component with warm water to remove any soap residue. Make sure all parts are rinsed completely before drying.
- Dry completely: Use a clean towel or allow the parts to air dry completely before reassembling the machine. This helps prevent the growth of mold or bacteria.
- Wipe down the machine: While the removable parts are drying, use a damp cloth or sponge to wipe down the machine’s exterior. Pay attention to any spills or drips that may have occurred during the freezing process.
- Reassemble the machine: Once all the parts are dry, carefully reassemble the machine as per the manufacturer’s instructions. Make sure each component is securely in place.
- Store properly: If you plan to store the machine for an extended period, ensure it is completely dry and free of any moisture. Store it in a cool, dry place with the parts secured together.
- Maintain regular maintenance schedule: Follow the recommended maintenance schedule provided in the user manual. This may include tasks such as lubricating moving parts or checking the machine’s electrical connections.
By following these cleaning and maintenance guidelines, you can ensure that your ice cream machine remains in excellent condition, providing you with years of delicious ice cream-making adventures.
In case you encounter any issues or difficulties with your machine, let’s move on to the next section, where we’ll provide some troubleshooting tips to help you resolve common ice cream machine problems.
Troubleshooting Tips
While using an ice cream machine is generally a straightforward and enjoyable process, you may encounter some challenges along the way. Here are some troubleshooting tips to help you overcome common issues and ensure a smooth ice cream-making experience:
- Ice cream not freezing: If your ice cream is not freezing properly, make sure that the freezing bowl is fully frozen before adding the mixture. Check that you’ve followed the recommended chilling time and that the machine is plugged in and running. If using a freezer bowl machine, ensure that the bowl is tightly attached to the machine.
- Ice cream too soft: If your ice cream comes out too soft and melts quickly, the freezing time may have been too short. Try extending the freezing time by a few minutes. Also, ensure that the mixture was adequately chilled before adding it to the machine. Additionally, double-check that the machine was set to the correct freezing temperature.
- Ice cream texture is grainy: Grainy ice cream can result from over-churning or not incorporating enough air into the mixture. Follow the recommended freezing time and avoid over-churning the ice cream. Also, make sure to use a smooth ice cream base and any mix-ins are evenly distributed and not overly chunky.
- Mixture overflowing during freezing: If your ice cream mixture overflows from the machine, it may be due to overfilling the freezing bowl. Ensure that you leave enough room for the mixture to expand as it freezes. If necessary, remove some of the mixture and save it for a separate batch.
- Machine making loud noises: Unusual noises coming from the machine may indicate that something is not properly aligned or there is a mechanical issue. In this case, refer to the user manual for troubleshooting guidance or consult the manufacturer for assistance.
- Mix-ins sinking to the bottom: If your mix-ins sink to the bottom of the ice cream, make sure to add them at the right time during the freezing process. Incorporate the mix-ins during the last few minutes of freezing, when the ice cream is semi-frozen and has thickened slightly. Stir them gently to distribute them evenly throughout the ice cream.
If you encounter persistent issues with your ice cream machine that you cannot resolve with these troubleshooting tips, consider reaching out to the manufacturer’s customer support for further assistance.
Now that you are equipped with troubleshooting tips, you can confidently overcome any challenges and continue enjoying the delightful process of making homemade ice cream. In the final section, we’ll conclude our article with a brief summary of what we’ve covered.
Conclusion
Making ice cream at home is a delightful experience, and having an ice cream machine takes it to a whole new level. Throughout this article, we’ve explored the various aspects of using an ice cream machine, from understanding its components to creating the perfect ice cream mixture, freezing process, and troubleshooting common issues.
We’ve learned that an ice cream machine plays a vital role in freezing and churning the ice cream mixture, resulting in a smoother and creamier texture. Whether you have a freezer bowl machine, a compressor machine, or a commercial-grade model, each type offers unique advantages in terms of convenience and capacity.
Preparing the ice cream mixture with quality ingredients and chilling it thoroughly before using the machine is essential for achieving excellent results. By properly setting up and operating the machine, you can monitor the freezing process and add mix-ins at the right time for that extra burst of flavor and texture.
Remember to clean and maintain your ice cream machine regularly to keep it in optimal condition. By following the troubleshooting tips, you can overcome common challenges and continue enjoying the art of homemade ice cream making.
So, what are you waiting for? Strap on your apron, gather your ingredients, and let your creativity flow as you embark on the journey of making homemade ice cream with your ice cream machine. Enjoy the pure satisfaction of indulging in a scoop of your very own creation!
Happy ice cream making!
Frequently Asked Questions about How To Use An Ice Cream Machine
QWhat are the benefits of using an ice cream machine?
A
Using an ice cream machine allows you to create your own delicious and creamy ice cream with complete control over the ingredients. You can customize the flavors, control the sweetness, and even make healthier versions using alternative sweeteners and dairy-free options.
QCan I use an ice cream machine to make other frozen treats besides ice cream?
A
Absolutely! An ice cream machine can be used to make a variety of frozen desserts such as sorbet, gelato, frozen yogurt, and even slushies. The possibilities are endless, and you can get creative with different flavors and mix-ins.
QHow long does it take to make ice cream with an ice cream machine?
A
The time it takes to make ice cream with an ice cream machine can vary depending on the recipe and the specific machine you are using. Generally, it takes about 20-30 minutes for the mixture to churn and freeze into a creamy consistency.
QDo I need to pre-freeze the bowl of the ice cream machine?
A
Yes, most ice cream machines require you to pre-freeze the bowl for several hours before using it. This ensures that the mixture will freeze properly and result in a creamy texture. It’s important to plan ahead and make sure the bowl is fully frozen before you start making your ice cream.
QHow do I clean and maintain an ice cream machine?
A
It’s important to follow the manufacturer’s instructions for cleaning and maintaining your ice cream machine. Typically, the bowl, paddle, and lid can be washed with warm, soapy water, while the machine itself should be wiped down with a damp cloth. It’s also important to properly dry all components before storing the machine to prevent any damage or mold growth.
At Storables.com, we guarantee accurate and reliable information. Our content, validated by Expert Board Contributors, is crafted following stringent Editorial Policies. We’re committed to providing you with well-researched, expert-backed insights for all your informational needs.
We try our best to ship products to you as soon as possible. On average, it takes us about 2 business days to ship products out of our warehouses across India. Eduspark Toys working days are from Monday to Friday i.e we work 5 days a week excluding public holidays. However, if the quantities ordered are more than 5 pieces per product, or if the item ordered is under production, or if it is marked as under pre-order, it may take longer to process your order. Should this happen, we will keep you informed by email or call.
Upon successful shipment of an order, we will send you the details of the consignment to allow you to check the status of your order. The typical delivery date shall be within 10 days of shipping and in some cases 12-15 days (Please see shipping and returns policy for details).
FOR Kids Furniture ( items which are 20 kgs +) we require a minimum of 3 Days for Inspection and Packaging. Once packaged and dispatched we will update the Tracking in 2 working days. The delivery time for heavier goods is within 15 Days.
There is no return or exchange on Kids Furniture.
We are shipping as per the latest government guidelines. We assure you that we are taking all the necessary steps to ensure that your order is delivered at the earliest. In case of order cancellation, cancellation charges up to 100% may be levied
All Legal Matters under shipping & return are subject to Mumbai Jurisdiction only.
Please note — no two discount coupons can be applied together. Products on slashed pricing will not be eligible for further discounts.
For shipping within India
We offer free shipping all over India.