
Displayed below is the user manual for IB 88B60 NE by Indesit which is a product in the Hobs category.
This manual has pages.
Download the complete instruction manual on
http:// docs . indesit . eu
or call the phone number
shown on the warranty booklet.
Before using the appliance, read these safety
instructions. Keep them nearby for future reference.
These instructions and the appliance itself provide
important safety warnings, to be observed at all times.
The manufacturer declines any liability for failure to
observe these safety instructions, for inappropriate
use of the appliance or incorrect setting of controls.
WARNING: The appliance and its accessible parts
become hot during use. Care should be taken to
avoid touching heating elements.
Children less than 8 years of age shall be kept away
unless continuously supervised.
WARNING: If the hob surface is cracked, do not
use the appliance — risk of electric shock.
WARNING: Danger of re: Do not store items on
the cooking surfaces.
CAUTION: The cooking process has to be
supervised. A short cooking process has to be
supervised continuously.
WARNING: Unattended cooking on a hob with fat
or oil can be dangerous — risk of re. NEVER try to
extinguish a re with water: instead, switch o the
appliance and then cover ame e.g. with a lid or a
re blanket.
Do not use the hob as a work surface or support.
Keep clothes or other ammable materials away
from the appliance, until all the components have
cooled down completely — risk of re.
Metallic objects such as knives, forks, spoons and
lids should not be placed on the hob surface since
they can get hot.
Very young children (0-3 years) should be kept
away from the appliance. Young children (3-8years)
should be kept away from the appliance unless
continuously supervised. Children from 8years old
and above and persons with reduced physical,
sensory or mental capabilities or lack of experience
and knowledge can use this appliance only if they
are supervised or have been given instructions on
safe use and understand the hazards involved.
Children must not play with the appliance. Cleaning
and user maintenance must not be carried out by
children without supervision.
After use, switch o the hob element by its
control and do not rely on the pan detector.
PERMITTED USE
CAUTION: the appliance is not intended to be
operated by means of an external switching device,
such as a timer, or separate remote controlled system.
This appliance is intended to be used in household
and similar applications such as: sta kitchen areas
in shops, oces and other working environments;
farm houses; by clients in hotels, motels, bed &
breakfast and other residential environments.
No other use is permitted (e.g. heating rooms).
This appliance is not for professional use. Do not
use the appliance outdoors.
INSTALLATION
The appliance must be handled and installed by
two or more persons — risk of injury. Use protective
gloves to unpack and install — risk of cuts.
Installation, including water supply (if any),
electrical connections and repairs must be carried
out by a qualied technician. Do not repair or replace
any part of the appliance unless specically stated in
the user manual. Keep children away from the
installation site. After unpacking the appliance,
make sure that it has not been damaged during
transport. In the event of problems, contact the
dealer or your nearest After-sales Service. Once
installed, packaging waste (plastic, styrofoam parts
etc.) must be stored out of reach of children — risk of
suocation. The appliance must be disconnected
from the power supply before any installation
operation — risk of electric shock. During installation,
make sure the appliance does not damage the
power cable — risk of re or electric shock. Only
activate the appliance when the installation has
been completed.
Carry out all cabinet cutting operations before
tting the appliance and remove all wood chips and
sawdust.
If the appliance is not installed above an oven, a
separator panel (not included) must be installed in
the compartment under the appliance.
ELECTRICAL WARNINGS
It must be possible to disconnect the appliance
from the power supply by unplugging it if plug is
accessible, or by a multi-pole switch installed
upstream of the socket in accordance with the
wiring rules and the appliance must be earthed in
conformity with national electrical safety standards.
Do not use extension leads, multiple sockets or
adapters. The electrical components must not be
accessible to the user after installation. Do not use
the appliance when you are wet or barefoot. Do not
operate this appliance if it has a damaged power
cable or plug, if it is not working properly, or if it has
been damaged or dropped.
If the supply cord is damaged, it must be replaced
with an identical one by the manufacturer, its service
agent or similarly qualied persons in order to avoid
a hazard — risk of electric shock.
CLEANING AND MAINTENANCE
WARNING: Ensure that the appliance is switched
o and disconnected from the power supply before
performing any maintenance operation; never use
steam cleaning equipment — risk of electric shock.
SAFETY INSTRUCTIONS IMPORTANT TO BE READ AND OBSERVED
EN

Do not use abrasive or corrosive products,
chlorine-based cleaners or pan scourers.
DISPOSAL OF PACKAGING MATERIALS
The packaging material is 100% recyclable and is marked with the recycle
symbol .
The various parts of the packaging must therefore be disposed of responsibly
and in full compliance with local authority regulations governing waste
disposal.
DISPOSAL OF HOUSEHOLD APPLIANCES
This appliance is manufactured with recyclable or reusable materials.
Dispose of it in accordance with local waste disposal regulations. For
further information on the treatment, recovery and recycling of household
electrical appliances, contact your local authority, the collection service
for household waste or the store where you purchased the appliance. This
appliance is marked in compliance with European Directive 2012/19/EU,
Waste Electrical and Electronic Equipment (WEEE).
By ensuring this product is disposed of correctly, you will help prevent
negative consequences for the environment and human health.
The symbol on the product or on the accompanying documentation
indicates that it should not be treated as domestic waste but must be
taken to an appropriate collection center for the recycling of electrical and
electronic equipment.
ENERGY SAVING TIPS
Make the most of your hot plate’s residual heat by switching it o a few
minutes before you nish cooking.
The base of your pot or pan should cover the hot plate completely; a
container that is smaller than the hot plate will cause energy to be wasted.
Cover your pots and pans with tight-tting lids while cooking and use as
little water as possible. Cooking with the lid o will greatly increase energy
consumption.
Use only at-bottomed pots and pans.
DECLARATION OF CONFORMITY
This appliance meets the Ecodesign requirements set out in European
Regulation n.66/2014, in conformity to the European standard EN60350-2.
NOTE
People with a pacemaker or similar medical device should use care when
standing near this induction cooktop while it is on. The electromagnetic
eld may aect the pacemaker or similar device. Consult your doctor, or
the manufacturer of the pacemaker or similar medical device for additional
information about its eects with electromagnetic elds of the induction
cooktop.

INSTALLATION
0
+
2
560 mm
R = Max. 10 mm
Min. 35 mm
560 mm
0
+
2
R = 11.5 mm
593 mm
0
+
2
0
+
2
513 mm
Min. 480 mm
Max. 492 mm
50 mm
6mm
kit 4801 211 00112
A
A
R = Max. 10 mm
R = 11.5 mm
4 mm
551 mm
510 mm
479 mm
590 mm
Min. 480 mm
Max. 492 mm
L
Min. 35 mm
i
45 mm
90 mm
120 mm
28 mm—
No Max.
min. 20 mm
min. 45 mm
min. 550 mm
Min. 400 mm
Min.100 mm
12 mm—
No Max.
min. 45 mm
min. 550 mm
min. 20 mm
60 mm
min. 10 mm
EN
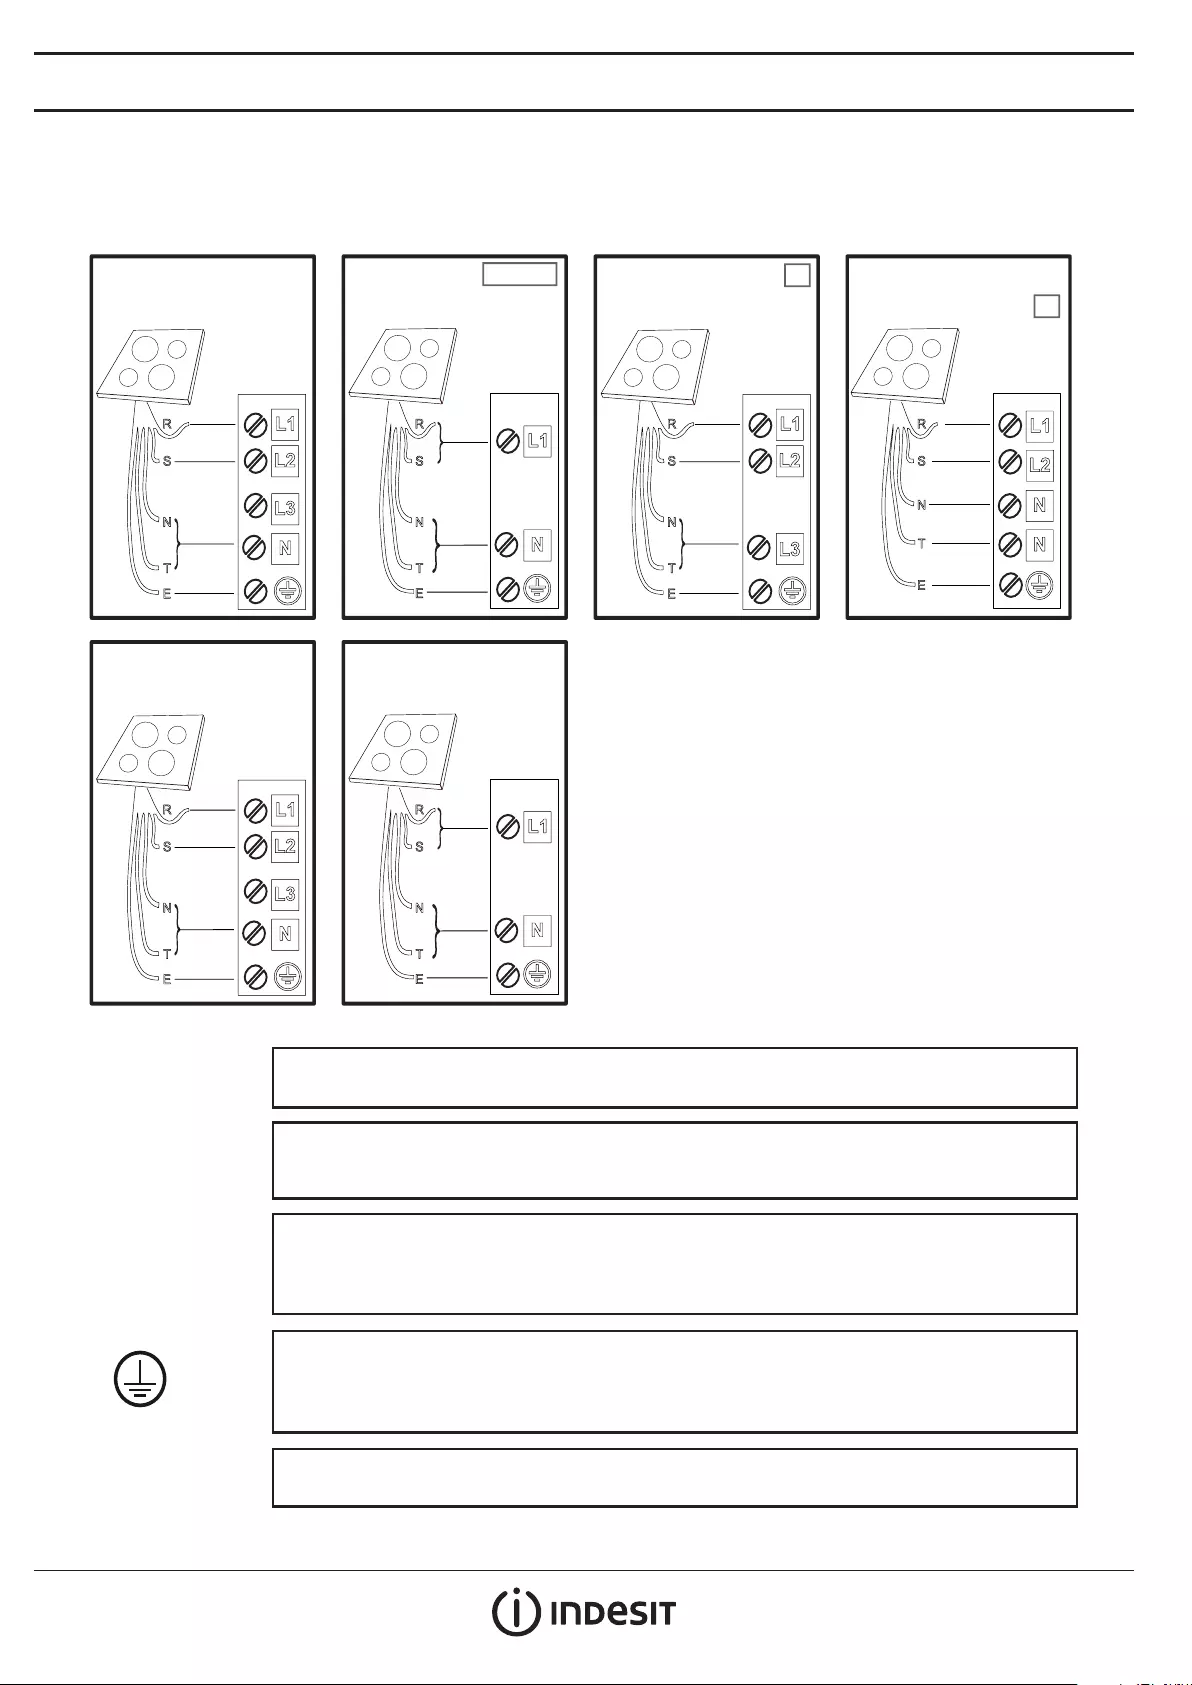
ELECTRICAL CONNECTION
Electrical connection must be made before connecting the appliance to the electricity supply.
Installation must be carried out by qualied personnel who know the current safety and installation regulations. Specically, installation must be carried
out in compliance with the regulations of the local electricity supply company.
Make sure the voltage specied on the data plate located on the bottom of the appliance is the same as that of the home.
Regulations require that the appliance be earthed: use conductors (including the earth conductor) of the appropriate size only.
blue-blu-azul-azul-μπλε-sinine-zila-mėlyna-niebieski-blau-bleu-blauw-albastru-синьо-плава-modro-
plava-синий-синій-көк-modrý-modrý-kék-blå-sininen-blå-blåt-mavi-gorm
blue (gray)-blu (grigio)-azul (gris)-azul (cinza)-μπλε (γκρι)-sinine (hall)-zila (pelēka)-mėlyna (pilkas)-
niebieski (szary)-blau (grau)-bleu (gris)-blauw (grijs)-albastru (gri)-синьо (сиво)-плава (сива)-
modro (sivo)-plava (siva)-синий (серый)-синій (сірий)-көк (сұр)-modrý (šedá)-modrý (sivá)-
kék (szürke)-blå (grå)-sininen (harmaa)-blå (grå)-blåt (gråt)-mavi (gri)-gorm (liath)
T
yellow/green-giallo/verde-amarillo/verde-amarelo/verdeκίτρινο/πράσινο-kollane/roheline-dzeltens/zaļš-
geltona/žalia-żółty/zielony-gelb/grün-jaune/vert-geel/groen-galben/verde-жълто/зелено-жуто/зелена-
rumeno/zeleno-žuto/zelena-желтый/зеленый-жовтий/зелений-жасыл/сары-žlutá/zelená-žltá/zelená-
sárga/zöld-gul/grønn-keltainen/vihreä-gul/grön-gul/grøn-sarı/yeşil-buí/glas
E
=
black-nero-negro-preto-μαύροσ-must-melns-juodas-czarny-schwarz-noir-zwart-negru-черно-црн-
črna-crno-черный-чорний-қара-černá-čierna-fekete-svart-musta-svart-sort-siyah-dubh
brown-marrone-marrón-marrom-καφέ-pruun-brūns-rudas-brązowy-braunen-brun-bruin-maro-кaфяв-
браон-rjava-smeđ-коричневый-коричневий-қоңыр-hnědý-hnedý-barna-brunt-ruskea-brunt-brun-
kahverengi-donn
R
S
220-240 V
~
220-240 V 3
~
230V 2 Phase 2N
~
380-415 V 2 N ~
220-240 V
~
380-415 V 3 N ~
AU-UK-IRL BE
NL

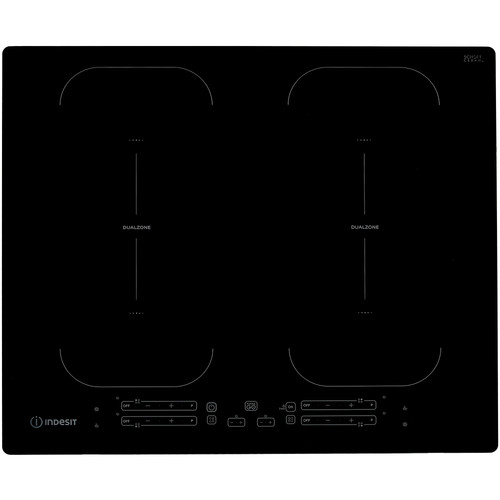
PRODUCT DESCRIPTION
1. Cooktop
2. Control panel
CONTROL PANEL
5
16
11
10
8
4
147 15
8
1. Symbols/activation of special functions
2. Cooking level selected
3. Cooking zone o button
4. Power adjustment buttons
5. Identifying the cooking zone
6. Quick heat button
7. DUALZONE button (left)
8. Indicator light – function active
9. On/O button
10. Timer
11. PUSH&GO button
12. Cooking time indicator
13. OK/Child lock button – 3seconds
14. DUALZONE button (right)
15. Timer active indicator
16. Zone selection indicator
17. Timer indicator symbol
EN

FIRST TIME USE
POWER MANAGEMENT
At the time of purchase, the hob is set to the maximum possible power.
Adjust the setting in relation to the limits of the electrical system in your
home as described in the following paragraph.
N.B: Depending on the power selected for the hob, some of the cooking
zone power levels and functions (e.g. boil or quick reheating) could be
automatically limited, in order to prevent the selected limit from being
exceeded.
To set the power of the hob:
Once you have connected the device to the mains power supply, you can
set the power level within 60seconds.
Press the far right timer “+“ button for at least 5seconds. The display shows
“PL“.
Press the
button to conrm.
Use the “+“
and
“−“
buttons to select the desired power level.
The power levels available are: 2.5 kW – 4.0 kW – 6.0 kW – 7.2 kW.
Conrm by pressing
.
The power level selected will stay in the memory even if the power supply
is interrupted.
To change the power level, disconnect the appliance from the mains for at
least 60seconds, then plug it back in and repeat the steps above.
If an error occurs during the setting sequence, the
“EE“ symbol will appear,
and you will hear a beep. If this happens, repeat the operation.
If the error persists, contact the After-Sales Service.
ACOUSTIC SIGNAL ON/OFF
To switch the acoustic signal on/o:
• Connect the hob to the power supply;
• Wait for the switch-on sequence;
• Press the “P“ button of the rst keypad at the top left for 5seconds.
Any alarms set will remain active.
DEMO MODE reheating deactivated, see section on “Troubleshooting“)
To switch the demo mode on and o:
• Connect the hob to the power supply;
• Wait for the switch-on sequence;
• Within the rst minute, press the quick heating button “P“ of the
bottom left keypad for 5seconds (as shown below).
• “DE“ will show on the display.
ACCESSORIES
POTS AND PANS
Only use pots and pans made from ferromagnetic
material which are suitable for use with induction hobs:
• enamelled steel
• cast iron
• special pots and pans in stainless steel, suitable
for induction cooking
To determine whether a pot is suitable, check for the
symbol (usually
stamped on the bottom). A magnet may be used to check whether pots are
magnetic.
The quality and the structure of the pot base can alter cooking performance.
Some indications for the diameter of the base do not correspond to the
actual diameter of the ferromagnetic surface.
Some pots and pans have only a part of the bottom in ferromagnetic
material, with parts in another material that is not suitable for induction
cooking. These areas may heat up at dierent levels or with lower
temperatures. In certain cases, where the bottom is made mainly of
non-ferromagnetic materials, the hob might not recognise the pan and
therefore not switch on the cooking zone.
To ensure optimum eciency, always use pots and pans with a at bottom
that distributes the heat evenly. If the bottom is uneven, this will aect
power and heat conduction.
Empty pots or pots with a thin base
Do not use empty pots or pans when the hob is on. The hob is equipped with
an internal safety system that constantly monitors the temperature, activating
the “automatic o“ function where high temperatures are detected. When
used with empty pots or pots with thin bases, the temperature may rise very
quickly, and the “automatic o“ function may not be triggered immediately,
damaging the pan or the hob surface. If this occurs, do not touch anything,
and wait for all components to cool down.
If any error messages appear, call the service centre.
Minimum diameter of pot/pan base for the dierent cooking areas
To ensure that the hob functions properly, use pots of a suitable minimum
diameter (refer to the table below).
Always use the cooking zone that best corresponds to the minimum
diameter of the bottom of the pot.
Place the pot making sure it is well centered on the cooking zone in use.
It is recommended not to use pots that exceed the perimeter of the cooking
zone in use.
ADAPTER FOR POTS/PANS UNSUITABLE FOR INDUCTION
Using this accessory makes it possible to use pots and pans that are not
suitable for induction hobs. It is important to bear in mind that using it
aects eciency and consequently the time needed to heat food. Its
use should be limited because the temperatures reached on its surface
depend signicantly on the pot/pan used, its atness and the type of food
being cooked. Using a pot or pan with a smaller diameter than the adapter
disc may cause heat to build up that is not transmitted to the pot or pan
and this could blacken both the hob and the disc. Adapt the diameter of
your pots/pans and the hob to the diameter of the adapter.
DAILY USE
SWITCHING THE HOB ON/OFF
To turn the hob on, press the power button for around 1 second.
To turn the hob o, press the same button again, and all cooking zones will
be deactivated.
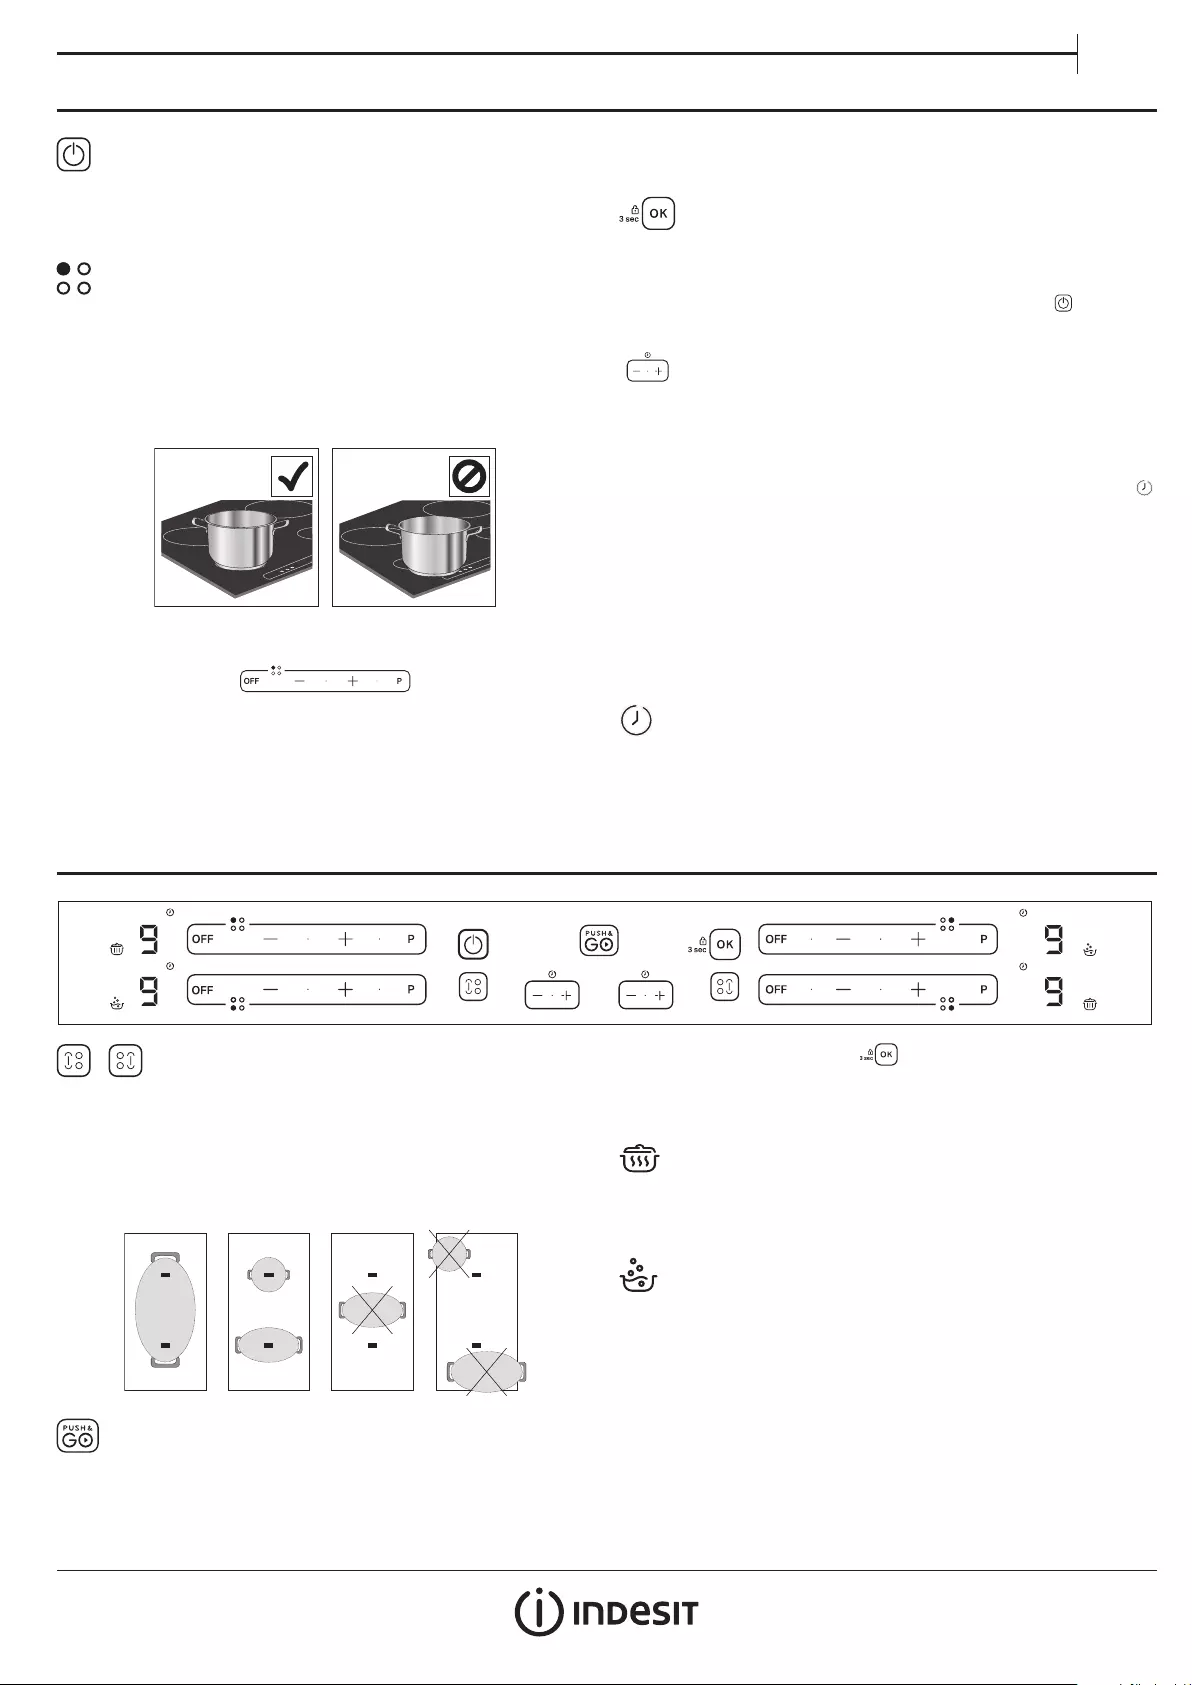
POSITIONING
Locate the desired cooking zone by referring to the position symbols.
Do not cover the control panel symbols with the cooking pot.
Please note: In the cooking zones close to the control panel, it is advisable to
keep pots and pans inside the markings (taking both the bottom of the pan
and the upper edge into consideration, as this tends to be larger).
This prevents excessive overheating of the keypad. When grilling or frying,
please use the rear cooking zones wherever possible.
ACTIVATING/DEACTIVATING COOKING ZONES AND ADJUSTING
POWER LEVELS
To activate the cooking zones:
Press the “+“ or “−“ button of the required cooking zone to activate it and
adjust the power. The level will be shown in line with the area, along with
the indicator light identifying the active cooking zone. The “P“ button can
be used to select the quick heating function.
To deactivate the cooking zones:
Press the “OFF“ button to the left of the power adjustment.
CONTROL PANEL LOCK
To lock the settings and prevent it being switched on accidentally, press
and hold the OK/Child lock button for 3seconds. A beep and a warning
light above the symbol indicate that this function has been activated. The
control panel is locked except for the switching o function ( ). To unlock
the controls, repeat the activation procedure.
TIMER
There are two timers — one controls the left-hand cooking zones, while
the other controls the right-hand cooking zones.
To activate the timer:
Press the “+“ or “−“ button to set the desired time on the cooking zone in
use. An indicator light will be activated in line with the specic symbol .
Once the set time has elapsed, a beep will sound, and the cooking zone will
switch o automatically.
The time can be changed at any point, and several timers can be activated
simultaneously.
In case 2 timers on the same side of the hob are activated simultaneously,
“Zone selection indicator“ ashes and the relative cooking time selected is
displayed on the central display“.
To deactivate the timer:
Press the
“+“
and
“−“
buttons together until the timer is deactivated.
TIMER INDICATOR
This LED (when ON) indicates that the timer has been set for the cooking
zone.
FUNCTIONS
DUALZONE
It allows to combine two cooking zones and use them as a single large area.
Ideal for sh kettles, pots or grilles that cover the entire cooking surface. The
function is de-activated if the bridge area is not entirely covered. Either of the
keypads on the right and on the left can be used.
To activate/deactivate the function, press the “DUALZONE“ button.
IMPORTANT: Place the pots in the center of the cooking zone so that they
cover at least one of the reference points (as shown below).
PUSH&GO
The “PUSH&GO“ button activates the special functions.
Place the pot in position and select the cooking zone.
Press the “PUSH&GO“ button. The display of the selected area will show “A“.
The indicator for the special feature will light up.
The function is activated once the button has been pressed to conrm.
To deactivate the special function and return to manual mode, press “OFF“.
The power level when using special functions is pre-set by the hob and
cannot be modied.
PUSH&WARM
This feature allows you to keep your food at an ideal temperature, usually
after cooking is complete, or when reducing liquids very slowly. Ideal for
serving foods at the perfect temperature.
PUSH&BOIL
This function allows you to bring water to the boil and keep it boiling, with
lower energy consumption.
About 2 litres of water (preferably at room temperature) should be placed
in the pan, and left uncovered. In all cases, users are advised to monitor the
boiling water closely, and check the amount of water remaining regularly.
EN

INDICATORS
RESIDUAL HEAT
If “H“ appears on the display, this means that the cooking zone is hot. The
indicator lights up even if the zone has not been activated but has been
heated due to the use of the adjacent zones, or because a hot pot has been
placed on it.
When the cooking zone has cooled down, the “H“ disappears.
POT INCORRECTLY POSITIONED OR MISSING
This symbol appears if the pot is not suitable for induction cooking, is not
positioned correctly or is not of an appropriate size for the cooking zone
selected. If no pot is detected within 30 seconds of making the selection,
the cooking zone switches o.
COOKING TABLE
MAINTENANCE AND CLEANING
POWER LEVEL TYPE OF COOKING LEVEL USE
(indicating cooking experience and habits)
Maximum
power
PFast heating Ideal for rapidly increasing the temperature of food to fast boiling in the case of
water or rapidly heating cooking liquids.
8
−
9 Frying
−
boiling Ideal for browning, starting to cook, frying deep frozen products, fast boiling.
High power
7
−
8 Browning
−
sautéing
−
boiling
−
grilling Ideal for sautéing, maintaining a lively boil, cooking and grilling (for a short
period of time, 5-10 minutes).
6
−
7 Browning
−
cooking
−
stewing
−
sautéing
−
grilling Ideal for sautéing, maintaining a light boil, cooking and grilling (for a medium
period of time, 10-20 minutes), preheating accessories.
Medium power
4
−
5Cooking
−
stewing
−
sautéing
−
grilling Ideal for stewing, maintaining a gentle boil, cooking (for a long period of time).
Creaming pasta.
3
−
4 Cooking
−
simmering
−
thickening
−
creaming
Ideal for long-cooking recipes (rice, sauces, roasts, sh) with liquids (e.g. water,
wines, broth, milk), creaming pasta.
2
−
3
Ideal for long-cooking recipes (less than a litre in volume: rice, sauces, roasts, sh)
with liquids (e.g. water, wines, broth, milk).
Low power
1
−
2 Melting
−
defrosting
−
keeping
food warm
−
creaming
Ideal for softening butter, gently melting chocolate, thawing small products and
keeping just-cooked food warm (e.g. sauces, soups, minestrone).
1Ideal for keeping just-cooked food warm, for creaming risottos and for keeping
serving dishes warm (with induction-suitable accessory).
Zero power OFF Support surface Hob in stand-by or o mode (possible end-of-cooking residual heat, indicated
by an “H“).
WARNING
• Do not use steam cleaning equipment.
• Before cleaning, make sure the cooking zones are switched o and that the residual heat indicator (“H“) is not displayed.
Important:
• Do not use abrasive sponges or scouring pads as they may damage
the glass.
• After each use, clean the hob (when it is cool) to remove any deposits
and stains from food residue.
• A surface that is not kept suitably clean may reduce the sensitivity of
control panel buttons.
• Use a scraper only if residues are stuck to the hob. Follow the scraper
manufacturer’s instructions to avoid scratching the glass.
• Sugar or foods with a high sugar content can damage the hob and
must be immediately removed.
• Salt, sugar and sand could scratch the glass surface.
• Use a soft cloth, absorbent kitchen paper or a special hob cleaner
(follow the Manufacturer’s instructions).
• Spills of liquid in the cooking zones can cause the pots to move or vibrate.
• After cleaning the hob, dry thoroughly.

Induction hobs may whistle or creak during normal operation.
These noises actually come from the cookware and are linked to the
characteristics of the pan bottoms (for example, when the bottoms are
made from dierent layers of material or are irregular).
These noises may vary according to the type of cookware used and to the
amount of food it contains and are not the symptom of something wrong.
SOUNDS PRODUCED DURING OPERATION
TROUBLESHOOTING
• Check that the electricity supply has not been shut o.
• If you are unable to turn the hob o after using it, disconnect it from the
power supply.
• If alphanumeric codes appear on the display when the hob is switched on,
consult the following table for instructions.
Please note: The presence of water, liquid spilled from pots or any objects
resting on any of the hob buttons can accidentally activate or deactivate
the control panel lock function.
DISPLAY CODE DESCRIPTION POSSIBLE CAUSES SOLUTION
F0E1
Cookware is detected but it is not
compatible with requested operation. The cookware is not well positioned on
the cooking zone, or it is not compatible
with one or more cooking zones.
Press On/O button twice to remove the
F0E1 code and restore the functionality
of the cooking zone. Then, try to use the
cookware with a dierent cooking zone, or
use dierent cookware.
F0E7 Wrong power cord connection. The power supply connection is not
exactly as indicated in “ELECTRICAL
CONNECTION“
paragraph
.
Adjust the power supply connection
according to “ELECTRICAL CONNECTION“
paragraph
.
F0EA
The control panel switches o because
of excessively high temperatures. The internal temperature of electronic
parts is too high. Wait for the hob to cool down before using
it again.
F0E2, F0E4, F0E6,
F0E8, F0EC, F1E1,
F6E1, F7E5, F7E6
Disconnect the hob from the power supply.
Wait a few seconds then reconnect the hob to the power supply.
If the problem persists, call the service centre and specify the error code that appears on the display.
d E
[when the hob is off]
The hob does not switch heat up.
The functions do not come on. DEMO MODE on.
Follow the instructions in the “DEMO
MODE“ paragraph.
e.g.
:
The hob does not allow a special
function to be activated. The power regulator limits the power
levels in accordance with the maximum
value set for the hob.
See paragraph “Power management“.
e.g.
[
Power level lower than
level requested
]
The hob automatically sets a minimum
power level to ensure that the cooking
zone can be used.
The power regulator limits the power
levels in accordance with the maximum
value set for the hob.
See paragraph “Power management“.
AFTERSALES SERVICE
In order to receive a more complete assistance, please register your product
on www . indesit . com / register.
BEFORE CALLING THE AFTER-SALES SERVICE:
1. See if you can solve the problem by yourself with the help of the
suggestions given in the TROUBLESHOOTING.
2. Switch the appliance o and back on again to see if the fault persists.
IF AFTER THE ABOVE CHECKS THE FAULT STILL OCCURS, GET IN
TOUCH WITH THE NEAREST AFTER-SALES SERVICE.
To receive assistance, call the number shown on the warranty booklet or
follow the instructions on the website www . indesit . com .
When contacting our Client After sales service, always specify:
• a brief description of the fault;
• the type and exact model of the appliance;
XXXXXXXXXXXXXXX
XXXXXXXXXXXXXXXXXXXXXX
Made in X
Type: XXXMod.: XXX01 XXXX XXX XXXXXXX XXXX XXXXX
XXXXXXXXXXXXXXXXXXXX
XXXXXXXXXXXXXXXXXXXXXXXXXXXXXXXXXXXXXXXXXXXXXXXXXXXXXXXXXXXXXXXXXXXXXXXXX
• the service number (number after the word Service on the rating plate).
The service number is also indicated on the guarantee booklet;
• your full address;
• your telephone number.
If any repairs are required, please contact an authorized after-sales service
(to guarantee that original spare parts will be used and repairs carried out
correctly).
In the case of ush-mounted installation, call the After Sales Service to
request assembly of screws kit 4801 211 00112.
400011446739
EN
Узнавай о новинках и акциях первым
Вы успешно зарегистрированы на сайте.
Вам доступен личный кабинет пользователя.
Перейти к покупкам
Ваш пароль воcстановлен!
Теперь вы можете полноценно пользоваться
всеми возможностями нашего интернет-магазина.
Здравствуйте, Ваша претензия принята и зарегистрирована.
В течение 3-х рабочих дней Вам, на электронную почту, будет дан письменный ответ. В случае возникновения дополнительных вопросов, менеджер претензионного отдела свяжется с Вами.
Перейти к покупкам

Ваше сообщение об ошибке на сайте успешно отправлено.
Большое спасибо!
Добавить отзыв о магазине
Торг для данного товара сейчас не возможен!
Сколько вы готовы заплатить за этот товар?
Введите ваше ценовое предложение
Мы согласны с вашим предложением
Мы принимаем вашу цену, и вы можете купить товар по цене:
0 руб.
![]()
|
SV |
||||
|
SÄKERHETSANVISNINGAR |
VIKTIGT ATT LÄSA OCH |
|||
|
FÖLJA |
Ladda ner den kompletta instruktionsmanualen på http://docs.indesit.eu eller ring telefonnumret
som finns i garantihäftet.
Innan du använder apparaten ska du läsa dessa säkerhetsanvisningar. Förvara dem till hands för framtida bruk.
I dessa instruktioner och på själva apparaten ges viktiga säkerhetsföreskrifter som måste iakttas hela tiden. Tillverkaren frånsäger sig allt ansvar för underlåtenhet att följa dessa säkerhetsinstruktioner, för olämplig användning av apparaten eller vid felaktig inställning av kontrollerna.
 VARNING: Denna produkt och dess åtkomliga delar blir heta under användning. Var noga med att inte vidröra värmeelementen. Barn under 8 års ålder ska hållas på avstånd förutom om de hålls under ständig tillsyn.
 VARNING: Om spishällens yta är sprucken ska apparaten inte användas — risk för elchock.
 VARNING: Risk för brand: Förvara inte föremål på värmezonerna.
 FÖRSIKTIGHET: Tillagningen ska övervakas. Kortvarig tillagning ska övervakas hela tiden.
 VARNING: Tillagning på spishällen med fett och olja utan uppsyn kan vara farlig — risk för brand. Försök ALDRIG att släcka brand med vatten: Stäng istället av apparaten och täck över lågorna med t.ex. ett lock eller en brandfilt.
 Använd inte spishällen som arbetsyta eller som underlägg.Hållkläderellerandrabrännbaramaterial borta från apparaten tills alla komponenter har svalnat helt — risk för brand.
 Metallföremål såsom knivar, gafflar, skedar och lock får inte läggas på hällens yta eftersom de kan bli heta.
 Mycket små barn (0-3 år) ska hållas på avstånd från apparaten. Små barn (3-8 år) ska hållas på avstånd från apparaten förutom om de hålls under ständig tillsyn. Barn från 8 års ålder och personer med nedsatt fysisk, sensorisk eller mental förmåga, eller bristande erfarenhet och kunskap får lov att använda produkten om de hålls under uppsikt eller om de har fått instruktioner om hur produkten ska användas på ett säkert sätt och förutsatt att de förstår vilka faror det innebär. Barn får inte leka med apparaten. Rengöring och användarunderhåll får inte utföras av barn utan tillsyn.
 Efter användning, stäng av spishällen med hjälp av knappen och lita inte blint på kastrulldetektorn.
TILLÅTEN ANVÄNDNING
 FÖRSIKTIGHET: Apparaten är inte avsedd att drivasmedhjälpavenexternomkopplingsanordning, såsom en timer, eller ett separat fjärrstyrt system.
 Den här apparaten är avsedd för hushållsbruk och liknande typ av användning, som t.ex: I
personalrumibutiker,kontorochandraarbetsplatser På lantgårdsboende Av kunder på hotell, motell och andra inkvarteringsanläggningar.
 Ingen annan användning är tillåten (t.ex. för att värma rummet).
 Denna apparat är inte avsedd för professionellt bruk. Använd inte apparaten utomhus.
INSTALLATION
 För att hantera och installera apparaten krävs minst två personer — risk för skada. Använd skyddshandskar vid uppackning och installation — risk för skärskada.
 Installation, inklusive vattentillförsel (i förekommande fall), elektriska anslutningar och reparationer ska utföras av behörig tekniker. Reparera och byt inte ut delar på produkten om detta inte direkt anges i bruksanvisningen. Håll barn på avstånd från installationsplatsen. När apparaten har packats upp, kontrollera att den inte har skadats under transporten.Kontaktadinåterförsäljareellernärmaste kundservice om du upptäcker något problem. Efter installationen ska förpackningsmaterialet (delar av plast, frigolit osv.) förvaras utom räckhåll för barn — risk för kvävning. Apparaten ska kopplas bort från strömförsörjningen innan någon installationsåtgärd utförs — risk för elchock. Under installation, se till att apparaten inte skadar nätkabeln — risk för brand eller elchock. Aktivera apparaten endast när installationen har slutförts.
 Utför alla skåputskärningar innan apparaten monteras och ta bort alla träflis och sågspån.
 Om apparaten inte monteras över en ugn är det nödvändigt att placera en skiljepanel (medföljer inte) i utrymmet under apparaten.
ELEKTRISKA VARNINGAR
 Det måste alltid kunna gå att koppla bort apparaten från elnätet, antingen genom att ta ut stickproppen från eluttaget, om åtkomligt, eller med hjälp av en flerpolig strömbrytare som installeras föreeluttagetenligtkabeldragningsbestämmelserna. Dessutom ska apparaten jordas i enlighet med nationella elstandarder.
 Använd inte förlängningskablar, grenuttag eller adaptrar.Närinstallationenärklarskainteanvändaren kunna få åtkomst till de elektriska komponenterna. Använd inte apparaten om du är våt eller barfota. Använd inte denna apparat om nätkabeln eller stickkontakten är skadad, om den inte fungerar som den ska eller om den har skadats eller fallit ned på golvet.
 Om nätkabeln är skadad ska den bytas ut mot en identisk av tillverkaren, tillverkarens servicesagent eller liknande kvalificerad tekniker för att undvika fara — risk för elchock.
RENGÖRING OCH UNDERHÅLL
 VARNING: Försäkra dig om att apparaten är avstängd och bortkopplad från strömförsörjningen

innan någon form av underhållsåtgärd påbörjas. Använd aldrig ångtvätt — risk för elchock.
 Använd inte slipande eller frätande produkter, klorbaserade rengöringsmedel eller stålull.
BORTSKAFFANDE AV FÖRPACKNINGSMATERIAL
Förpackningsmaterialet kan återvinnas till 100%, vilket framgår av
återvinningssymbolen  .
.
Förpackningsmaterialets olika delar ska därför bortskaffas på ett ansvarsfullt sätt och i enlighet med den lokala lagstiftningen om avfallshantering.
KASSERING AV GAMLA HUSHÅLLSAPPARATER
Denna apparat är tillverkad av material som kan återanvändas eller återvinnas. Kassera den enligt lokala bestämmelser för avfallshantering. För mer information om hantering, återvinning och återanvändning av elektriska hushållsapparater, var god kontakta de lokala myndigheterna, ortens sophanteringstjänst eller butiken där apparaten inhandlades. Denna apparat är märkt i enlighet med direktiv 2012/19/EU om avfall som utgörs av eller innehåller elektrisk och elektronisk utrustning (Waste Electrical and Electronic Equipment, WEEE).
Genom att säkerställa att denna produkt bortskaffas på ett korrekt sätt hjälper du till att förhindra negativa konsekvenser på miljön och människors hälsa.
Symbolen  på produkten eller i medföljande dokument anger att denna produkt inte får kasseras som hushållsavfall, utan ska lämnas in till en miljöstation för återvinning av elektrisk och elektronisk utrustning.
MILJÖRÅD
Utnyttja värmeplattans restvärme genom att stänga av den några minuter innan tillagningen är klar.
Kastrullens eller stekpannans botten ska täcka plattan helt.Ett kärl som är mindre än värmeplattan kommer att slösa energi.
Täck över dina kastruller och stekpannor med lock under tillagningen och använd så lite vatten som möjligt. Vid tillagning utan lock ökar energiförbrukningen.
Använd endast flatbottnade kastruller och stekpannor.
FÖRSÄKRAN OM ÖVERENSSTÄMMELSE
Denna apparat uppfyller kraven i den europeiska ekodesignförordningen nr 66/2014 i enlighet med europastandard EN 60350-2.
OBS
Personer med pacemaker eller liknande medicinsk utrustning bör vara försiktiga när de står nära denna induktionshäll medan den är på. Det elektromagnetiska fältet kan påverka pacemaker eller liknande apparater. Rådfråga din läkare eller tillverkaren av pacemakern eller liknande medicinsk utrustning för ytterligare information om dess effekter med induktionshällens elektromagnetiska fält.

|
mm |
|||||||
|
R = Max. 10 mm |
590 mm |
||||||
|
4 |
|||||||
|
479 mm |
|||||||
|
R = 11.5 mm |
|||||||
|
513 + 20 mm |
593 + 20 mm |
A |
|||||
|
510 mm |
A |
|||
|
50 mm |
||||
|
551 mm |
||||
|
Min. 480 mm |
||||
|
Max. 492 mm |
||||
|
R = 11.5 mm |
kit 4801 211 00112
|
Min. 480 mm |
R = Max. 10 mm |
|
Max. 492 mm |
|
|
i |
|
|
L |
|
|
Min. 400 mm |
|
|
Min.100 mm |
28 mm- |
|
Min. 35 mm |
No Max. |
|
120 mm |
90 mm |
45 mm |
|
|
12 mm- |
|||
|
min. 10 mm |
min. 45 mm |
No Max. |
|
|
min. 550 mm |
|||
|
60 mm |
|||
|
min. 20 mm |
x4
 Loading…
Индукционная варочная поверхность Indesit IB 88B60 NE
независимая, конфорок — 4 шт, панель — стеклокерамика, 7.2 кВт
подробнее

25
Код товара: 5331840

Summary of Content for Indesit IB 88B60 NE Hob Safety Instructions PDF
Download the complete instruction manual on http:// docs . indesit . eu or call the phone number shown on the warranty booklet.
Before using the appliance, read these safety instructions. Keep them nearby for future reference. These instructions and the appliance itself provide important safety warnings, to be observed at all times. The manufacturer declines any liability for failure to observe these safety instructions, for inappropriate use of the appliance or incorrect setting of controls.
WARNING: The appliance and its accessible parts become hot during use. Care should be taken to avoid touching heating elements. Children less than 8 years of age shall be kept away unless continuously supervised.
WARNING: If the hob surface is cracked, do not use the appliance — risk of electric shock.
WARNING: Danger of fire: Do not store items on the cooking surfaces.
CAUTION: The cooking process has to be supervised. A short cooking process has to be supervised continuously.
WARNING: Unattended cooking on a hob with fat or oil can be dangerous — risk of fire. NEVER try to extinguish a fire with water: instead, switch off the appliance and then cover flame e.g. with a lid or a fire blanket.
Do not use the hob as a work surface or support. Keep clothes or other flammable materials away from the appliance, until all the components have cooled down completely — risk of fire.
Metallic objects such as knives, forks, spoons and lids should not be placed on the hob surface since they can get hot.
Very young children (0-3 years) should be kept away from the appliance. Young children (3-8 years) should be kept away from the appliance unless continuously supervised. Children from 8 years old and above and persons with reduced physical, sensory or mental capabilities or lack of experience and knowledge can use this appliance only if they are supervised or have been given instructions on safe use and understand the hazards involved. Children must not play with the appliance. Cleaning and user maintenance must not be carried out by children without supervision.
After use, switch off the hob element by its control and do not rely on the pan detector. PERMITTED USE
CAUTION: the appliance is not intended to be operated by means of an external switching device, such as a timer, or separate remote controlled system.
This appliance is intended to be used in household and similar applications such as: staff kitchen areas in shops, offices and other working environments;
farm houses; by clients in hotels, motels, bed & breakfast and other residential environments.
No other use is permitted (e.g. heating rooms). This appliance is not for professional use. Do not
use the appliance outdoors. INSTALLATION
The appliance must be handled and installed by two or more persons — risk of injury. Use protective gloves to unpack and install — risk of cuts.
Installation, including water supply (if any), electrical connections and repairs must be carried out by a qualified technician. Do not repair or replace any part of the appliance unless specifically stated in the user manual. Keep children away from the installation site. After unpacking the appliance, make sure that it has not been damaged during transport. In the event of problems, contact the dealer or your nearest After-sales Service. Once installed, packaging waste (plastic, styrofoam parts etc.) must be stored out of reach of children — risk of suffocation. The appliance must be disconnected from the power supply before any installation operation — risk of electric shock. During installation, make sure the appliance does not damage the power cable — risk of fire or electric shock. Only activate the appliance when the installation has been completed.
Carry out all cabinet cutting operations before fitting the appliance and remove all wood chips and sawdust.
If the appliance is not installed above an oven, a separator panel (not included) must be installed in the compartment under the appliance. ELECTRICAL WARNINGS
It must be possible to disconnect the appliance from the power supply by unplugging it if plug is accessible, or by a multi-pole switch installed upstream of the socket in accordance with the wiring rules and the appliance must be earthed in conformity with national electrical safety standards.
Do not use extension leads, multiple sockets or adapters. The electrical components must not be accessible to the user after installation. Do not use the appliance when you are wet or barefoot. Do not operate this appliance if it has a damaged power cable or plug, if it is not working properly, or if it has been damaged or dropped.
If the supply cord is damaged, it must be replaced with an identical one by the manufacturer, its service agent or similarly qualified persons in order to avoid a hazard — risk of electric shock. CLEANING AND MAINTENANCE
WARNING: Ensure that the appliance is switched off and disconnected from the power supply before performing any maintenance operation; never use steam cleaning equipment — risk of electric shock.
SAFETY INSTRUCTIONS IMPORTANT TO BE READ AND OBSERVED EN
Do not use abrasive or corrosive products, chlorine-based cleaners or pan scourers. DISPOSAL OF PACKAGING MATERIALS The packaging material is 100% recyclable and is marked with the recycle symbol . The various parts of the packaging must therefore be disposed of responsibly and in full compliance with local authority regulations governing waste disposal.
DISPOSAL OF HOUSEHOLD APPLIANCES This appliance is manufactured with recyclable or reusable materials. Dispose of it in accordance with local waste disposal regulations. For further information on the treatment, recovery and recycling of household electrical appliances, contact your local authority, the collection service for household waste or the store where you purchased the appliance. This appliance is marked in compliance with European Directive 2012/19/EU, Waste Electrical and Electronic Equipment (WEEE). By ensuring this product is disposed of correctly, you will help prevent negative consequences for the environment and human health.
The symbol on the product or on the accompanying documentation indicates that it should not be treated as domestic waste but must be taken to an appropriate collection center for the recycling of electrical and electronic equipment. ENERGY SAVING TIPS Make the most of your hot plates residual heat by switching it off a few minutes before you finish cooking. The base of your pot or pan should cover the hot plate completely; a container that is smaller than the hot plate will cause energy to be wasted. Cover your pots and pans with tight-fitting lids while cooking and use as little water as possible. Cooking with the lid off will greatly increase energy consumption. Use only flat-bottomed pots and pans.
DECLARATION OF CONFORMITY This appliance meets the Ecodesign requirements set out in European Regulation n. 66/2014, in conformity to the European standard EN 60350-2.
NOTE People with a pacemaker or similar medical device should use care when standing near this induction cooktop while it is on. The electromagnetic field may affect the pacemaker or similar device. Consult your doctor, or the manufacturer of the pacemaker or similar medical device for additional information about its effects with electromagnetic fields of the induction cooktop.
INSTALLATION
0+ 2560 mm
R = Max. 10 mm
Min. 35 mm
560 mm0+ 2
R = 11.5 mm
593 mm0+ 2
0+ 2513 mm
Min. 480 mm Max. 492 mm
50 mm 6mm
kit 4801 211 00112
A
A
R = Max. 10 mm
R = 11.5 mm
4 m
m
551 mm
510 mm
479 mm
590 mm
Min. 480 mm Max. 492 mm
L
Min. 35 mm
i
45 mm 90 mm 120 mm
28 mm- No Max.
min. 20 mm
min. 45 mm min. 550 mm
Min. 400 mm Min.100 mm
12 mm- No Max. min. 45 mm
min. 550 mm
min. 20 mm
60 mm min. 10 mm
x4
21
2mm x4
3 90C
1
2 3
4
21
x4
EN
ELECTRICAL CONNECTION
Electrical connection must be made before connecting the appliance to the electricity supply. Installation must be carried out by qualified personnel who know the current safety and installation regulations. Specifically, installation must be carried out in compliance with the regulations of the local electricity supply company. Make sure the voltage specified on the data plate located on the bottom of the appliance is the same as that of the home. Regulations require that the appliance be earthed: use conductors (including the earth conductor) of the appropriate size only.
blue-blu-azul-azul—sinine-zila-mlyna-niebieski-blau-bleu-blauw-albastru—modro- plava—-modr-modr-kk-bl-sininen-bl-blt-mavi-gormN
blue (gray)-blu (grigio)-azul (gris)-azul (cinza)- ()-sinine (hall)-zila (pelka)-mlyna (pilkas)- niebieski (szary)-blau (grau)-bleu (gris)-blauw (grijs)-albastru (gri)- ()- ()- modro (sivo)-plava (siva)- ()- ()- ()-modr (ed)-modr (siv)- kk (szrke)-bl (gr)-sininen (harmaa)-bl (gr)-blt (grt)-mavi (gri)-gorm (liath)
T yellow/green-giallo/verde-amarillo/verde-amarelo/verde/-kollane/roheline-dzeltens/za- geltona/alia-ty/zielony-gelb/grn-jaune/vert-geel/groen-galben/verde-/-/- rumeno/zeleno-uto/zelena-/-/-/-lut/zelen-lt/zelen- srga/zld-gul/grnn-keltainen/vihre-gul/grn-gul/grn-sar/yeil-bu/glas
E=
black-nero-negro-preto—must-melns-juodas-czarny-schwarz-noir-zwart-negru— rna-crno—-ern-ierna-fekete-svart-musta-svart-sort-siyah-dubh
brown-marrone-marrn-marrom—pruun-brns-rudas-brzowy-braunen-brun-bruin-maro-a- -rjava-sme—-hnd-hned-barna-brunt-ruskea-brunt-brun- kahverengi-donn
R S
220-240 V ~ 220-240 V 3 ~ 230V 2 Phase 2N ~380-415 V 2 N ~
220-240 V ~380-415 V 3 N ~
AU-UK-IRL BE
NL
PRODUCT DESCRIPTION
1
2
1. Cooktop 2. Control panel
CONTROL PANEL
1 2 3
5 16
11
10 8
4 6 98 8
147 15
12 13 17
8
1. Symbols/activation of special functions 2. Cooking level selected 3. Cooking zone off button 4. Power adjustment buttons 5. Identifying the cooking zone 6. Quick heat button
7. DUALZONE button (left) 8. Indicator light function active 9. On/Off button 10. Timer 11. PUSH&GO button 12. Cooking time indicator
13. OK/Child lock button 3 seconds 14. DUALZONE button (right) 15. Timer active indicator 16. Zone selection indicator 17. Timer indicator symbol
EN
FIRST TIME USE
POWER MANAGEMENT At the time of purchase, the hob is set to the maximum possible power. Adjust the setting in relation to the limits of the electrical system in your home as described in the following paragraph. N.B: Depending on the power selected for the hob, some of the cooking zone power levels and functions (e.g. boil or quick reheating) could be automatically limited, in order to prevent the selected limit from being exceeded.
To set the power of the hob: Once you have connected the device to the mains power supply, you can set the power level within 60 seconds. Press the far right timer + button for at least 5 seconds. The display shows PL. Press the button to confirm. Use the + and buttons to select the desired power level. The power levels available are: 2.5 kW 4.0 kW 6.0 kW 7.2 kW. Confirm by pressing .
The power level selected will stay in the memory even if the power supply is interrupted. To change the power level, disconnect the appliance from the mains for at least 60 seconds, then plug it back in and repeat the steps above.
If an error occurs during the setting sequence, the EE symbol will appear, and you will hear a beep. If this happens, repeat the operation. If the error persists, contact the After-Sales Service.
ACOUSTIC SIGNAL ON/OFF To switch the acoustic signal on/off: Connect the hob to the power supply; Wait for the switch-on sequence; Press the P button of the first keypad at the top left for 5 seconds. Any alarms set will remain active.
DEMO MODE (reheating deactivated, see section on Troubleshooting) To switch the demo mode on and off: Connect the hob to the power supply; Wait for the switch-on sequence; Within the first minute, press the quick heating button P of the
bottom left keypad for 5 seconds (as shown below). DE will show on the display.
ACCESSORIES
POTS AND PANS Only use pots and pans made from ferromagnetic material which are suitable for use with induction hobs: enamelled steel cast iron special pots and pans in stainless steel, suitable
for induction cooking To determine whether a pot is suitable, check for the symbol (usually stamped on the bottom). A magnet may be used to check whether pots are magnetic. The quality and the structure of the pot base can alter cooking performance. Some indications for the diameter of the base do not correspond to the actual diameter of the ferromagnetic surface.
Some pots and pans have only a part of the bottom in ferromagnetic material, with parts in another material that is not suitable for induction cooking. These areas may heat up at different levels or with lower temperatures. In certain cases, where the bottom is made mainly of non-ferromagnetic materials, the hob might not recognise the pan and therefore not switch on the cooking zone.
To ensure optimum efficiency, always use pots and pans with a flat bottom that distributes the heat evenly. If the bottom is uneven, this will affect power and heat conduction.
NOOK
Empty pots or pots with a thin base Do not use empty pots or pans when the hob is on. The hob is equipped with an internal safety system that constantly monitors the temperature, activating the automatic off function where high temperatures are detected. When used with empty pots or pots with thin bases, the temperature may rise very quickly, and the automatic off function may not be triggered immediately, damaging the pan or the hob surface. If this occurs, do not touch anything, and wait for all components to cool down. If any error messages appear, call the service centre.
Minimum diameter of pot/pan base for the different cooking areas To ensure that the hob functions properly, use pots of a suitable minimum diameter (refer to the table below). Always use the cooking zone that best corresponds to the minimum diameter of the bottom of the pot. Place the pot making sure it is well centered on the cooking zone in use. It is recommended not to use pots that exceed the perimeter of the cooking zone in use.
120 mm 220 mm min.
ADAPTER FOR POTS/PANS UNSUITABLE FOR INDUCTION Using this accessory makes it possible to use pots and pans that are not suitable for induction hobs. It is important to bear in mind that using it affects efficiency and consequently the time needed to heat food. Its use should be limited because the temperatures reached on its surface depend significantly on the pot/pan used, its flatness and the type of food being cooked. Using a pot or pan with a smaller diameter than the adapter disc may cause heat to build up that is not transmitted to the pot or pan and this could blacken both the hob and the disc. Adapt the diameter of your pots/pans and the hob to the diameter of the adapter.
DAILY USE
SWITCHING THE HOB ON/OFF To turn the hob on, press the power button for around 1 second. To turn the hob off, press the same button again, and all cooking zones will be deactivated.
POSITIONING Locate the desired cooking zone by referring to the position symbols. Do not cover the control panel symbols with the cooking pot.
Please note: In the cooking zones close to the control panel, it is advisable to keep pots and pans inside the markings (taking both the bottom of the pan and the upper edge into consideration, as this tends to be larger). This prevents excessive overheating of the keypad. When grilling or frying, please use the rear cooking zones wherever possible.
ACTIVATING/DEACTIVATING COOKING ZONES AND ADJUSTING POWER LEVELS
To activate the cooking zones: Press the + or button of the required cooking zone to activate it and adjust the power. The level will be shown in line with the area, along with the indicator light identifying the active cooking zone. The P button can be used to select the quick heating function.
To deactivate the cooking zones: Press the OFF button to the left of the power adjustment.
CONTROL PANEL LOCK To lock the settings and prevent it being switched on accidentally, press and hold the OK/Child lock button for 3 seconds. A beep and a warning light above the symbol indicate that this function has been activated. The control panel is locked except for the switching off function ( ). To unlock the controls, repeat the activation procedure.
TIMER There are two timers — one controls the left-hand cooking zones, while the other controls the right-hand cooking zones.
To activate the timer: Press the + or button to set the desired time on the cooking zone in use. An indicator light will be activated in line with the specific symbol . Once the set time has elapsed, a beep will sound, and the cooking zone will switch off automatically. The time can be changed at any point, and several timers can be activated simultaneously. In case 2 timers on the same side of the hob are activated simultaneously, Zone selection indicator flashes and the relative cooking time selected is displayed on the central display.
To deactivate the timer: Press the + and buttons together until the timer is deactivated.
TIMER INDICATOR This LED (when ON) indicates that the timer has been set for the cooking zone.
FUNCTIONS
DUALZONE It allows to combine two cooking zones and use them as a single large area. Ideal for fish kettles, pots or grilles that cover the entire cooking surface. The function is de-activated if the bridge area is not entirely covered. Either of the keypads on the right and on the left can be used. To activate/deactivate the function, press the DUALZONE button. IMPORTANT: Place the pots in the center of the cooking zone so that they cover at least one of the reference points (as shown below).
PUSH&GO The PUSH&GO button activates the special functions. Place the pot in position and select the cooking zone. Press the PUSH&GO button. The display of the selected area will show A. The indicator for the special feature will light up.
The function is activated once the button has been pressed to confirm. To deactivate the special function and return to manual mode, press OFF. The power level when using special functions is pre-set by the hob and cannot be modified.
PUSH&WARM This feature allows you to keep your food at an ideal temperature, usually after cooking is complete, or when reducing liquids very slowly. Ideal for serving foods at the perfect temperature.
PUSH&BOIL This function allows you to bring water to the boil and keep it boiling, with lower energy consumption. About 2 litres of water (preferably at room temperature) should be placed in the pan, and left uncovered. In all cases, users are advised to monitor the boiling water closely, and check the amount of water remaining regularly.
EN
INDICATORS
RESIDUAL HEAT If H appears on the display, this means that the cooking zone is hot. The indicator lights up even if the zone has not been activated but has been heated due to the use of the adjacent zones, or because a hot pot has been placed on it. When the cooking zone has cooled down, the H disappears.
POT INCORRECTLY POSITIONED OR MISSING This symbol appears if the pot is not suitable for induction cooking, is not positioned correctly or is not of an appropriate size for the cooking zone selected. If no pot is detected within 30 seconds of making the selection, the cooking zone switches off.
COOKING TABLE
MAINTENANCE AND CLEANING
POWER LEVEL TYPE OF COOKING LEVEL USE (indicating cooking experience and habits)
Maximum power
P Fast heating Ideal for rapidly increasing the temperature of food to fast boiling in the case of water or rapidly heating cooking liquids.
8 9 Frying boiling Ideal for browning, starting to cook, frying deep frozen products, fast boiling.
High power 7 8 Browning sauting boiling
grilling Ideal for sauting, maintaining a lively boil, cooking and grilling (for a short period of time, 5-10 minutes).
6 7 Browning cooking stewing sauting grilling
Ideal for sauting, maintaining a light boil, cooking and grilling (for a medium period of time, 10-20 minutes), preheating accessories.
Medium power
4 5 Cooking stewing sauting grilling
Ideal for stewing, maintaining a gentle boil, cooking (for a long period of time). Creaming pasta.
3 4 Cooking simmering thickening
creaming
Ideal for long-cooking recipes (rice, sauces, roasts, fish) with liquids (e.g. water, wines, broth, milk), creaming pasta.
2 3 Ideal for long-cooking recipes (less than a litre in volume: rice, sauces, roasts, fish) with liquids (e.g. water, wines, broth, milk).
Low power 1 2
Melting defrosting keeping food warm creaming
Ideal for softening butter, gently melting chocolate, thawing small products and keeping just-cooked food warm (e.g. sauces, soups, minestrone).
1 Ideal for keeping just-cooked food warm, for creaming risottos and for keeping serving dishes warm (with induction-suitable accessory).
Zero power OFF Support surface Hob in stand-by or off mode (possible end-of-cooking residual heat, indicated by an H).
! WARNING Do not use steam cleaning equipment. Before cleaning, make sure the cooking zones are switched off and that the residual heat indicator (H) is not displayed.
Important: Do not use abrasive sponges or scouring pads as they may damage
the glass. After each use, clean the hob (when it is cool) to remove any deposits
and stains from food residue. A surface that is not kept suitably clean may reduce the sensitivity of
control panel buttons. Use a scraper only if residues are stuck to the hob. Follow the scraper
manufacturer’s instructions to avoid scratching the glass.
Sugar or foods with a high sugar content can damage the hob and must be immediately removed.
Salt, sugar and sand could scratch the glass surface. Use a soft cloth, absorbent kitchen paper or a special hob cleaner
(follow the Manufacturers instructions). Spills of liquid in the cooking zones can cause the pots to move or vibrate. After cleaning the hob, dry thoroughly.
Induction hobs may whistle or creak during normal operation. These noises actually come from the cookware and are linked to the characteristics of the pan bottoms (for example, when the bottoms are made from different layers of material or are irregular).
These noises may vary according to the type of cookware used and to the amount of food it contains and are not the symptom of something wrong.
SOUNDS PRODUCED DURING OPERATION
TROUBLESHOOTING
Check that the electricity supply has not been shut off. If you are unable to turn the hob off after using it, disconnect it from the
power supply. If alphanumeric codes appear on the display when the hob is switched on,
consult the following table for instructions.
Please note: The presence of water, liquid spilled from pots or any objects resting on any of the hob buttons can accidentally activate or deactivate the control panel lock function.
DISPLAY CODE DESCRIPTION POSSIBLE CAUSES SOLUTION
F0E1
Cookware is detected but it is not compatible with requested operation.
The cookware is not well positioned on the cooking zone, or it is not compatible with one or more cooking zones.
Press On/Off button twice to remove the F0E1 code and restore the functionality of the cooking zone. Then, try to use the cookware with a different cooking zone, or use different cookware.
F0E7 Wrong power cord connection. The power supply connection is not
exactly as indicated in ELECTRICAL CONNECTION paragraph.
Adjust the power supply connection according to ELECTRICAL CONNECTION paragraph.
F0EA The control panel switches off because of excessively high temperatures.
The internal temperature of electronic parts is too high.
Wait for the hob to cool down before using it again.
F0E2, F0E4, F0E6, F0E8, F0EC, F1E1, F6E1, F7E5, F7E6
Disconnect the hob from the power supply. Wait a few seconds then reconnect the hob to the power supply. If the problem persists, call the service centre and specify the error code that appears on the display.
d E [when the hob is off]
The hob does not switch heat up. The functions do not come on.
DEMO MODE on. Follow the instructions in the DEMO MODE paragraph.
e.g. : The hob does not allow a special function to be activated.
The power regulator limits the power levels in accordance with the maximum value set for the hob.
See paragraph Power management.
e.g. [Power level lower than
level requested]
The hob automatically sets a minimum power level to ensure that the cooking zone can be used.
The power regulator limits the power levels in accordance with the maximum value set for the hob.
See paragraph Power management.
AFTER-SALES SERVICE
In order to receive a more complete assistance, please register your product on www . indesit . com / register.
BEFORE CALLING THE AFTER-SALES SERVICE: 1. See if you can solve the problem by yourself with the help of the
suggestions given in the TROUBLESHOOTING. 2. Switch the appliance off and back on again to see if the fault persists.
IF AFTER THE ABOVE CHECKS THE FAULT STILL OCCURS, GET IN TOUCH WITH THE NEAREST AFTER-SALES SERVICE. To receive assistance, call the number shown on the warranty booklet or follow the instructions on the website www . indesit . com .
When contacting our Client After sales service, always specify: a brief description of the fault; the type and exact model of the appliance;
XXXXXXXXXXXXXXX XXXXXXXXXXXXXXXXXXXXXXMade in X
Type: XXX Mod.: XXX 01 XXXX XXX XXXXX XX XXXX XXXXX XXXXXXXXXXXXXXXXXXXX
XXXXXXXXXXXXXXXXXXXXXXXXXXXXXXXXXXXXXXXXXXXXXXXXXXXXXXXXXXXXXXXXXXXXXXXXX
the service number (number after the word Service on the rating plate). The service number is also indicated on the guarantee booklet;
your full address; your telephone number.
If
Manualsnet FAQs
If you want to find out how the IB 88B60 NE Indesit works, you can view and download the Indesit IB 88B60 NE Hob Safety Instructions on the Manualsnet website.
Yes, we have the Safety Instructions for Indesit IB 88B60 NE as well as other Indesit manuals. All you need to do is to use our search bar and find the user manual that you are looking for.
The Safety Instructions should include all the details that are needed to use a Indesit IB 88B60 NE. Full manuals and user guide PDFs can be downloaded from Manualsnet.com.
The best way to navigate the Indesit IB 88B60 NE Hob Safety Instructions is by checking the Table of Contents at the top of the page where available. This allows you to navigate a manual by jumping to the section you are looking for.
This Indesit IB 88B60 NE Hob Safety Instructions consists of sections like Table of Contents, to name a few. For easier navigation, use the Table of Contents in the upper left corner.
You can download Indesit IB 88B60 NE Hob Safety Instructions free of charge simply by clicking the “download” button in the upper right corner of any manuals page. This feature allows you to download any manual in a couple of seconds and is generally in PDF format. You can also save a manual for later by adding it to your saved documents in the user profile.
To be able to print Indesit IB 88B60 NE Hob Safety Instructions, simply download the document to your computer. Once downloaded, open the PDF file and print the Indesit IB 88B60 NE Hob Safety Instructions as you would any other document. This can usually be achieved by clicking on “File” and then “Print” from the menu bar.