
Standalone Use
1.Shooting Mode Screen
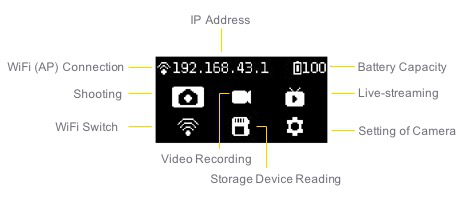
2.Operation Instructions
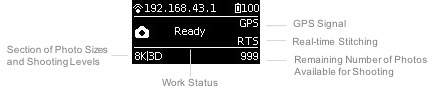
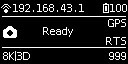
(1) Select the shooting mode from the camera menu, press the POWER key to confirm entering such mode. After the camera completes the preparation, the Ready state will be displayed.
(2) When the shooting mode is in Ready state, press UP and DOWN keys to switch over the sizes for shooting.
(3) When the shooting mode is in Ready state, press POWER key and you can take a photo as per the current size.
If the real-time stitching level is needed after the photo is taken, the camera will enter the processing state. After processing is done, the photo will be saved, and then, the camera will be switched to shooting READY state.
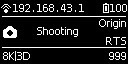
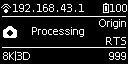
A 5s countdown is needed in each shooting. During the countdown, the work indicating lamp will flash continuously, accompanied by a sound prompt. Be sure to keep away from the camera within the 5s, to avoid affecting the shooting effect. There will be a sound prompt after the shooting is done successfully.
3.Specification and level for shooting
| Shooting Specification | Description |
|---|---|
| 8K|OF | Shoot and store 8K panoramic original photos and real-time optical flow stitching photos. |
| 8K|3D|OF | Shoot and store 8K 3D panoramic original photos and real-time optical flow stitching photos. |
| 8K | Shoot and store panoramic original photos without real-time optical flow stitching. 8K panoramic or 8K 3D panoramic photos can be made in post-production. |
| AEB3 | When shooting AEB3 (Automatic Exposure Bracketing) photos, there will be 3 groups of photos with different exposures. With this function, photos with relatively high latitude can be made in post-production. You can choose to shoot 3, 5, 7, 9 photos in camera settings. |
| Burst | One key shoot and store 10 groups of original photos. 10 8K panoramic / 3D panoramic photos can be synthesized through post-production, and one 12K super-resolution panoramic photo can also be made through post-production. |
| Timelapse | Interval length (minimum 2s) can be set and images at consecutive intervals are taken. The maximum of 8K 3D panoramic video can be synthesized in post-production. |
| Customize | Camera customized options allow users to quickly select parameters saved last time when using the controlling app. Details of usage are shown in 7.2. |
Note:
① Photos shot in all modes can be stored in the format of Raw+jpg.
② Photos shot in normal, AEB or Burst mode are stored in SD card. In Timelapse mode, when the photo is stored in jpg format, the minimum interval length can be set to 2s. When the photo is stored in raw+jpg formats, the minimum interval length is 4s due to the limit of write speed. The jpg files from each lens will be stored in the SD card while dng files will be stored in six MicroSD cards.
③ For 8K 3D photo and 8K photo, the resolution of their original files captured by every single lens is 4000 x 3000. These files can be stitched into 3D or 8K 2D photo in post-production. The real-time stitching function in camera will not affect the original files from each lens.
Use the app for shooting
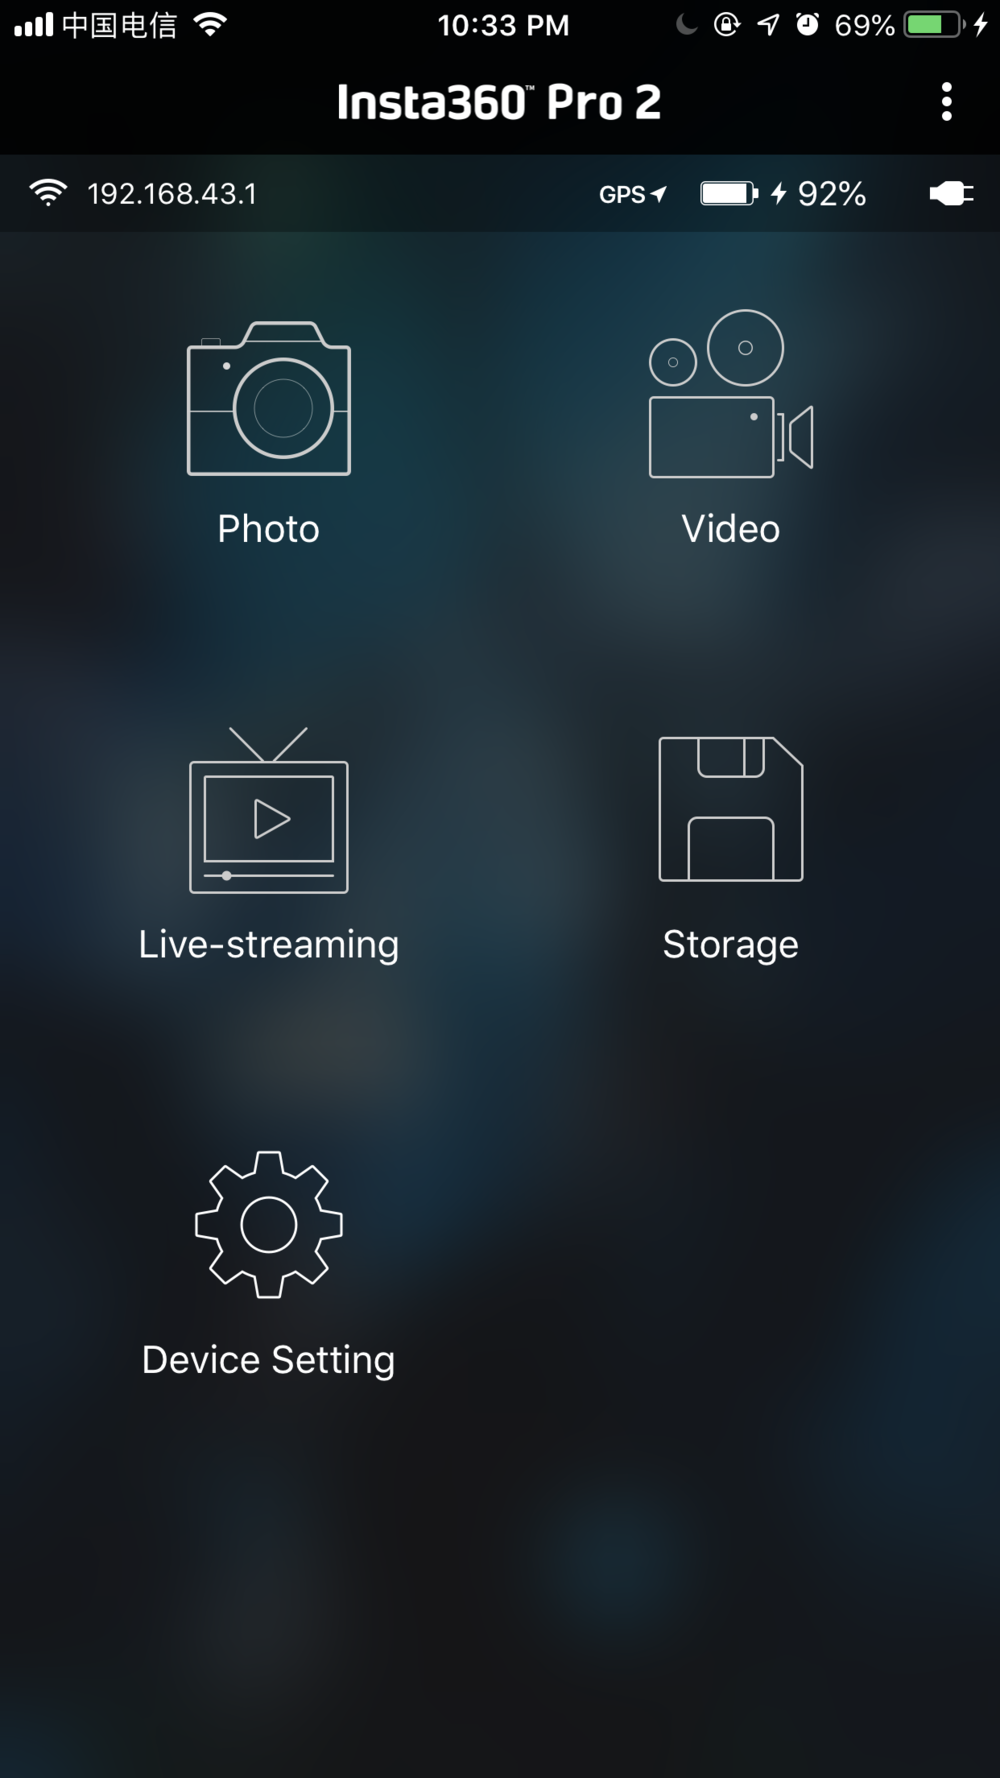
1. Shoot photos with the app (take the interface of iOS app as an example)
The camera provides access to the following functions: photo, video, live-streaming, calibration, storage and device setting
Click to enter shooting mode, the app will automatically load preview stream and get ready to shoot after completion. The interface of the photo shooting mode is shown below. There are several buttons at the bottom of the preview screen. The buttons from left to right are:
① Gyroscope for stabilization: with the function on, photos stored through the camera’s real-time stitching function can be automatically corrected according to gyroscope data. Note that this feature cannot take effect when recording 3D real-time stitching content or 3D live-streaming.
② VR preview button: tap the button to switch to preview under VR glasses mode.
③ Full screen: tap the button to watch the preview stream in full screen.
④ Brightness histogram: with the button on, a brightness histogram of the preview stream will be shown on the top left of the preview screen. When shooting under sunlight, it’s hard to just check the exposure with your eyes on the preview screen. Brightness histogram can help you to get the proper exposure.
⑤ Audio button: tap the button to turn on or off the sound in the preview stream. Note that this function only takes effect in the preview screen and doesn’t affect the sound recording settings in the camera.
⑥ Close preview button: press it to close the preview screen. It can save electricity when the preview screen is closed. You can tap anywhere in the preview screen to turn on the preview function again.
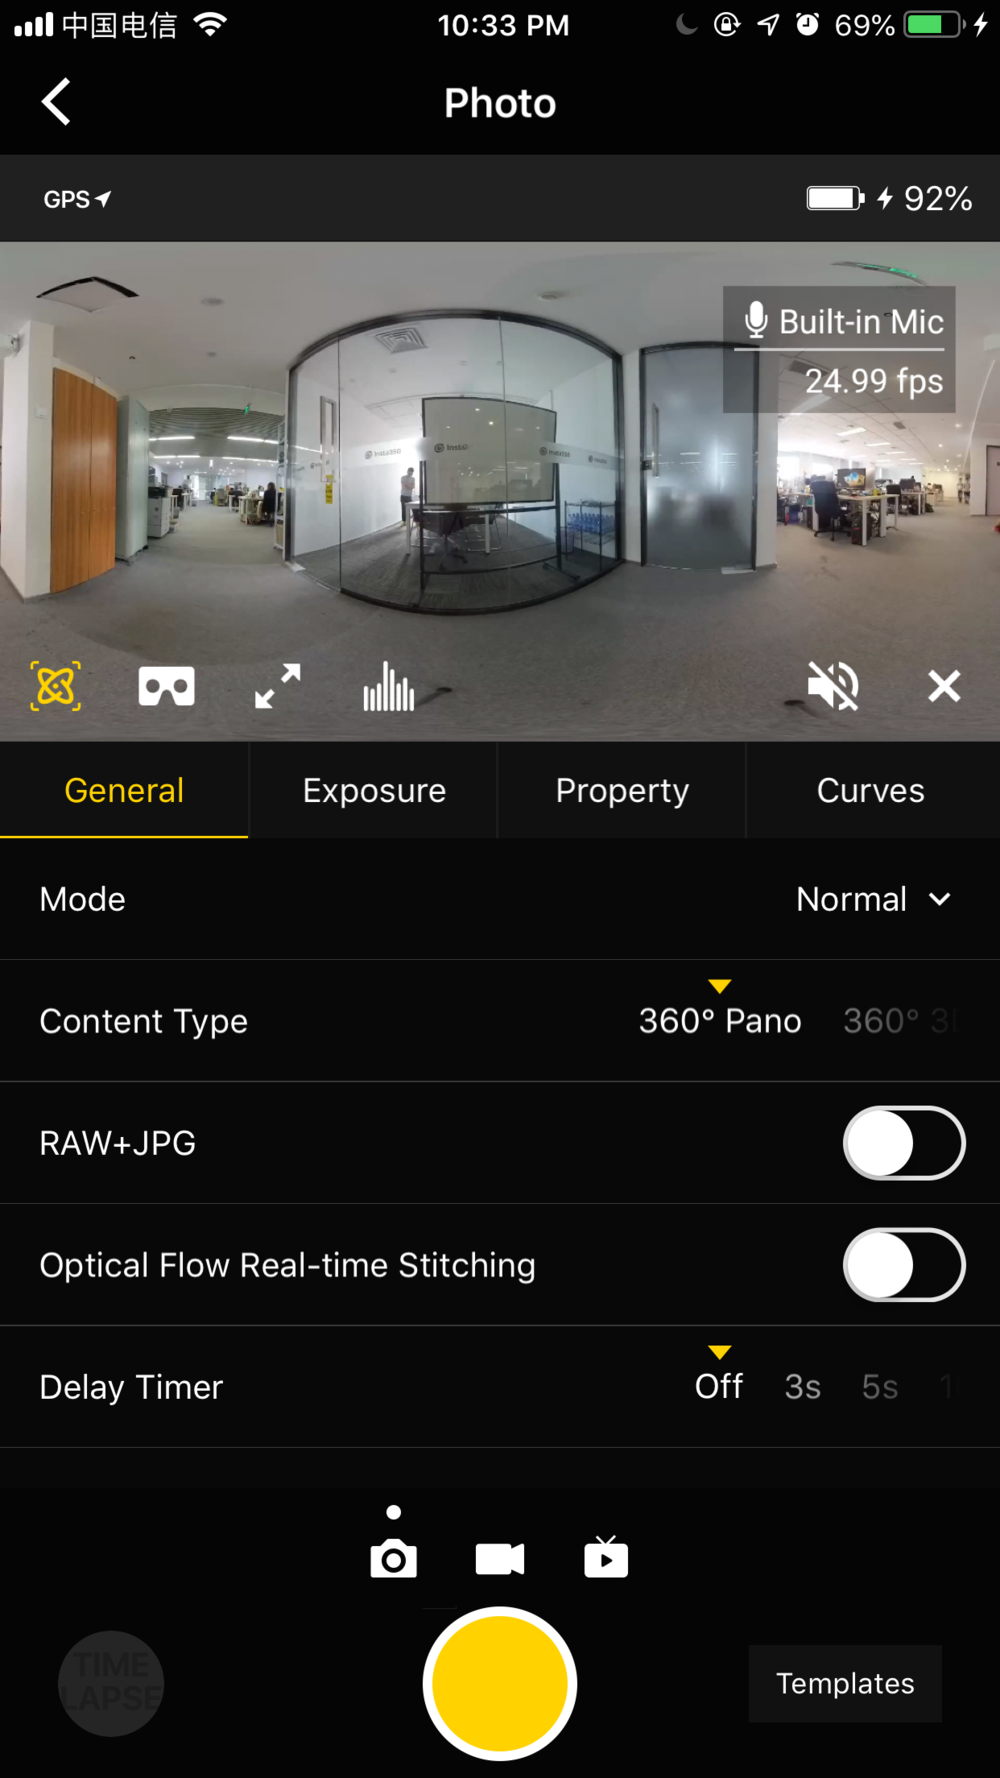
General (Basic settings for photo):
| General | Level | Notice |
|---|---|---|
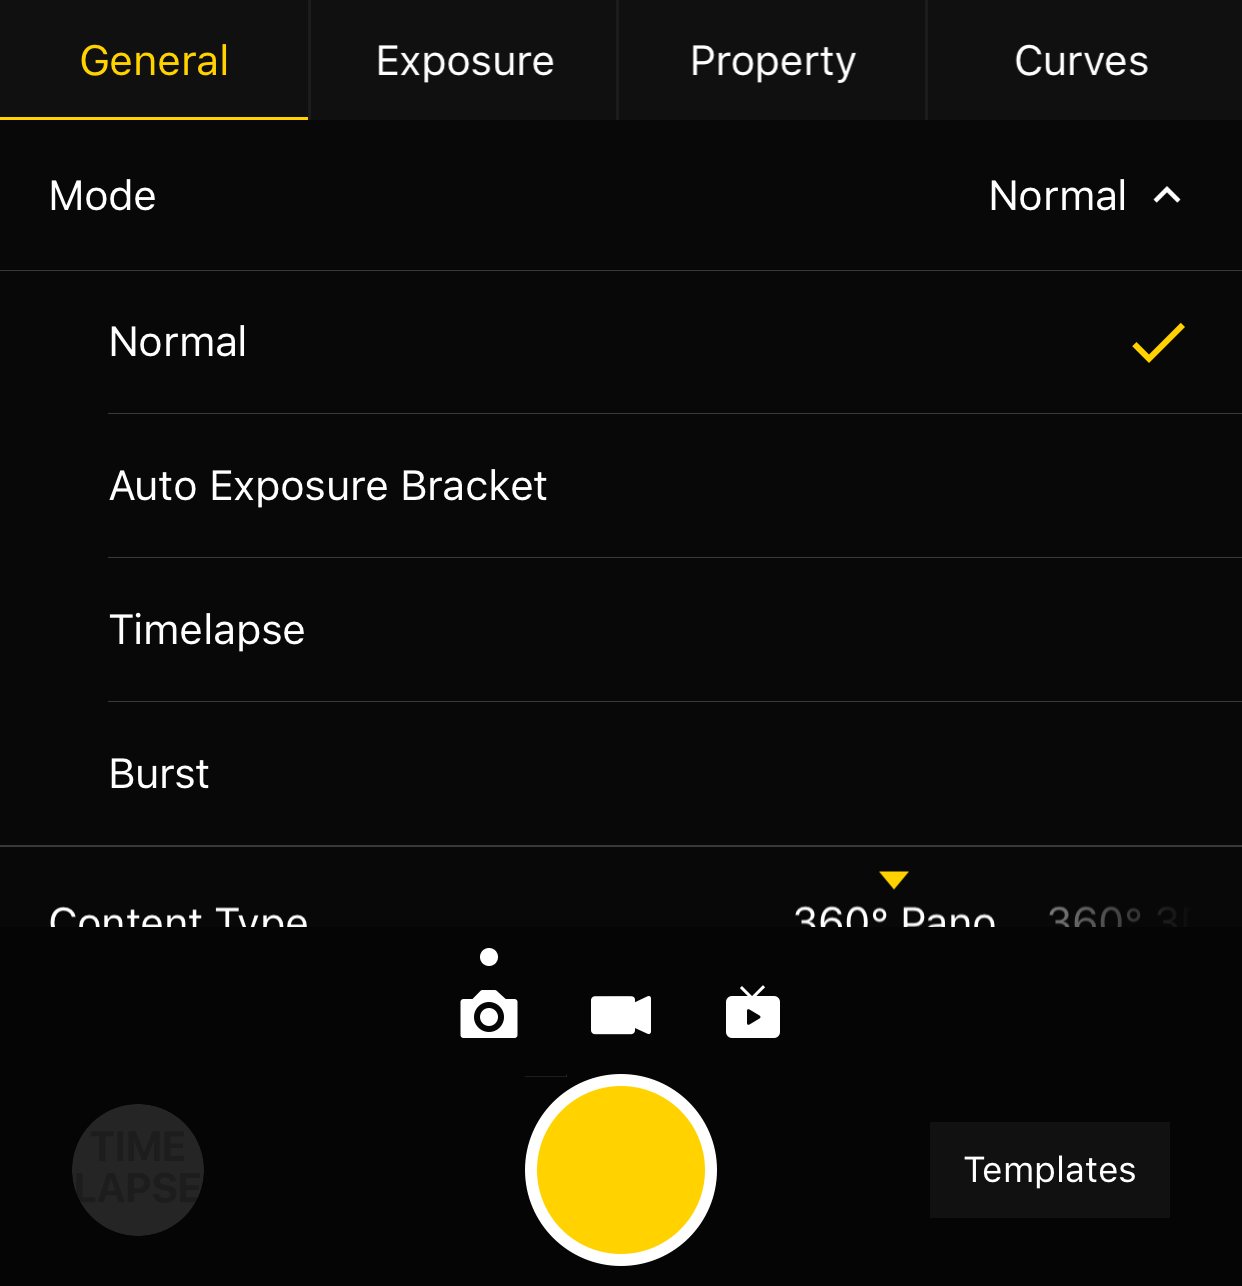
| Mode | Normal Burst Timelapse Auto Exposure Bracket |
1. All photo modes can store images from 6 lenses. Each photo has a resolution of 4000 x 3000. RAW photo format is DNG. Panoramic / 3D images with maximum resolution of 8K can be synthesized in Insta360 Stitcher.
2. The interval length of Timelapse photography must be set above 2s, while interval time should be 2s longer than Shutter time. For example, when the interval is set to 3s, Shutter can be set to 1s at a minimum. 3. 10 photos taken by Burst can use Stitcher to synthesize photos with the resolution of 12K at maximum. 4. Auto Exposure Bracket can select 3, 5, 7, 9 photos with different exposures, eventually synthesizing HDR photos by using software such as Stitcher or Photoshop. |
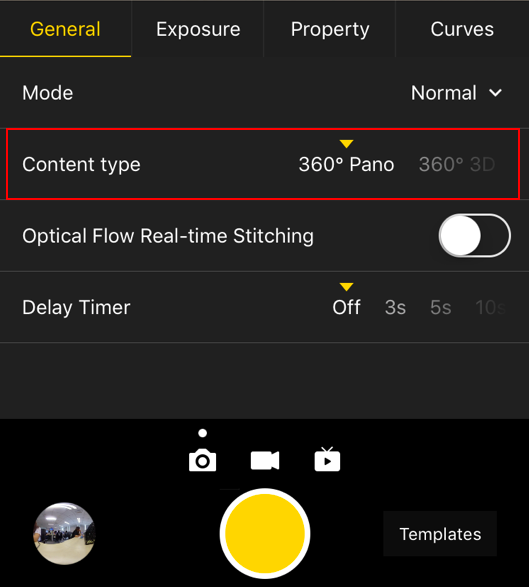
| Content Type | 360° Pano 360° 3D |
This setting only affects photos that are stitched in real time to be 3D or 2D. Insta360 Stitcher can be used to synthesize the original photos from 6 lenses to be panoramic or 3D photos. |
| Raw | On / Off | 1. When this mode is on, photos will be stored in both formats of Raw+JPG simultaneously.
2. DNG files can be toned via Photoshop etc. |
| Optical Flow | On: use Optical Flow Stitching. Off: use Template Stitching |
1. Under Normal mode, real-time optical flow takes time to stitch a 360 ° Pano or 360 ° 3D photo and save the original images from 6 lenses simultaneously. The whole real-time stitching process takes a certain time (camera state is Processing) to complete. After stitching, the camera will be ready for the next shoot.
2. Optical flow real-time stitching only takes effect for JPG. If Raw + JPG photos are taken simultaneously, only JPG photo will be stitched into a panoramic photo in real time. |
| Delay Timer | None, 3S, 5S, 10S, 20S, 30S, 40S, 50S, 60S | Cameras will shoot after the countdown is over. |
| Reset |
Exposure:
| Exposure | Level | Notice |
|---|---|---|
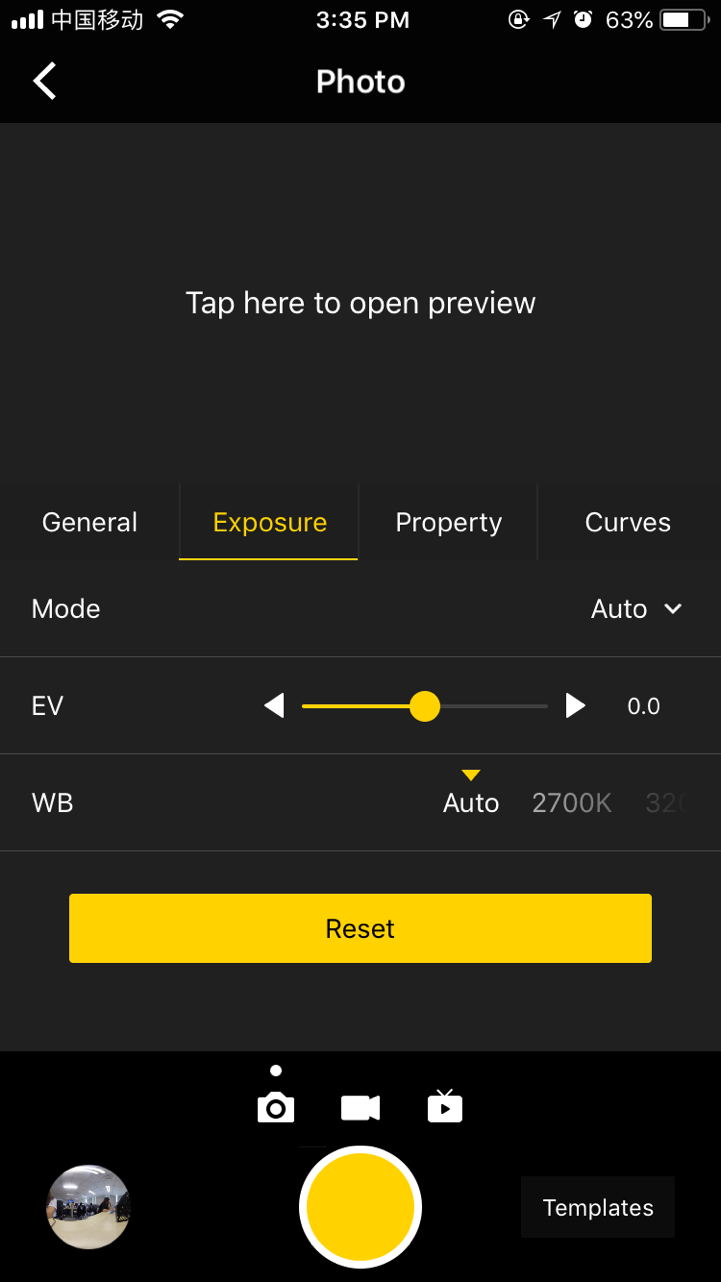
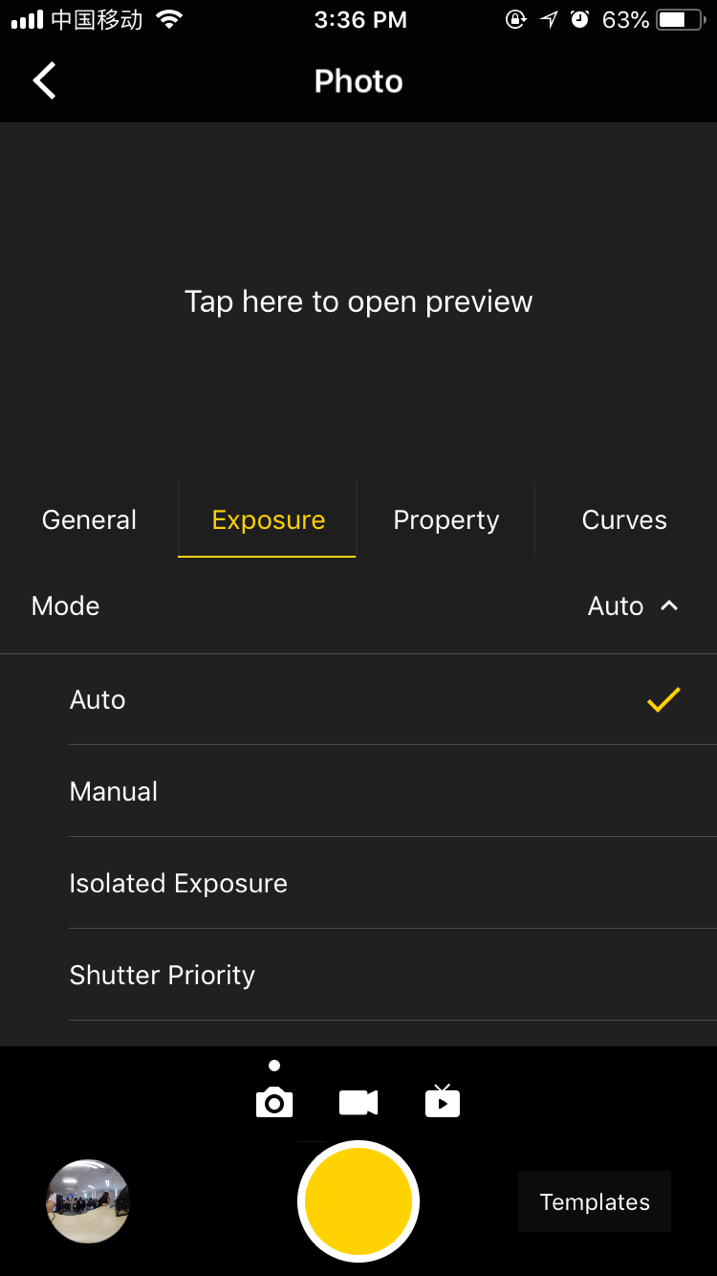
| Auto | It can adjust EV, white balance | In the Normal shooting mode, the range of EV is-5 ~ 5. |
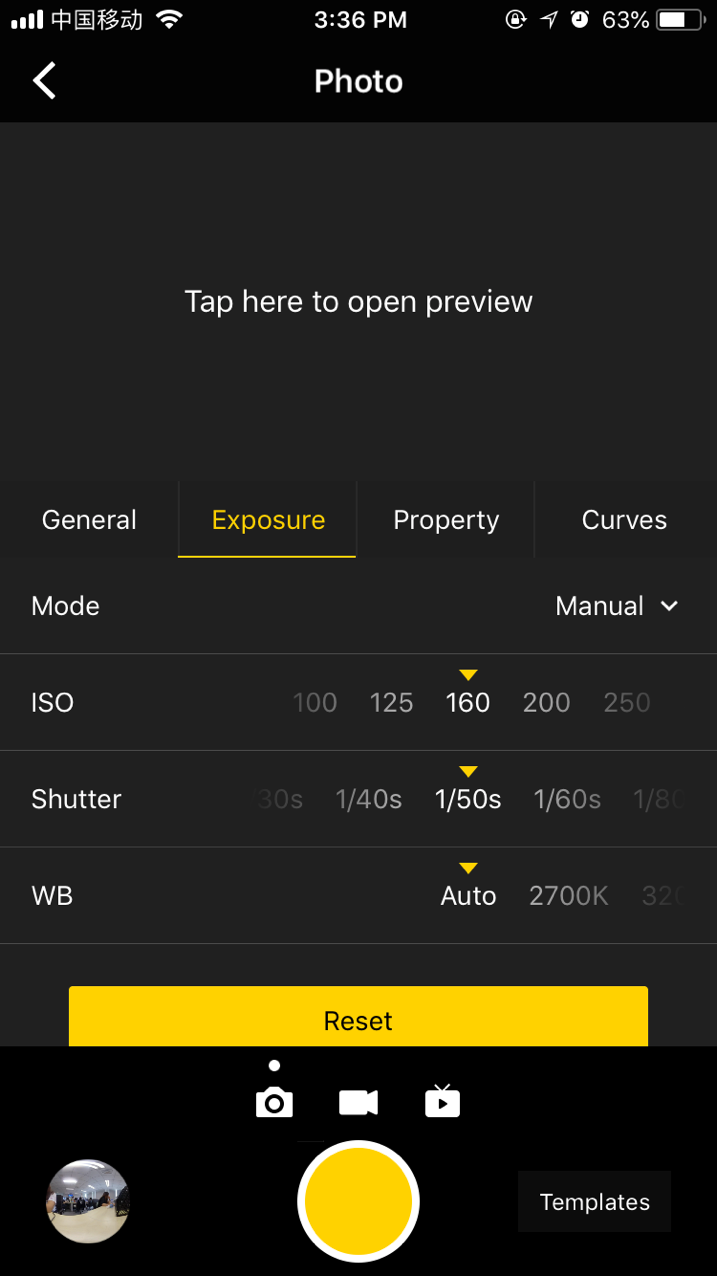
| Manual | ISO range: 100 ~ 6400
Shutter speed range: 1/2s ~ 1/8000s for ordinary Shutter, 1s ~ 55s for Long Shutter WB levels: Auto(auto white balance), 2700K, 3200K, 4000K, 5000K, 6500K, 7500K |
|
| Isolated Exposure | Six lenses will expose independently and automatically. EV and white balance can be adjusted. | Isolated exposure is suitable for shooting scenes with sharp light and shade contrast, such as shooting in a room with bright sunlight streaming through a window. |
| Shutter Priority | Shutter parameters can be set manually; other parameters are automatically matched by camera | |
| ISO Priority | ISO can be set manually; other parameters are automatically matched by camera | |
| Reset |
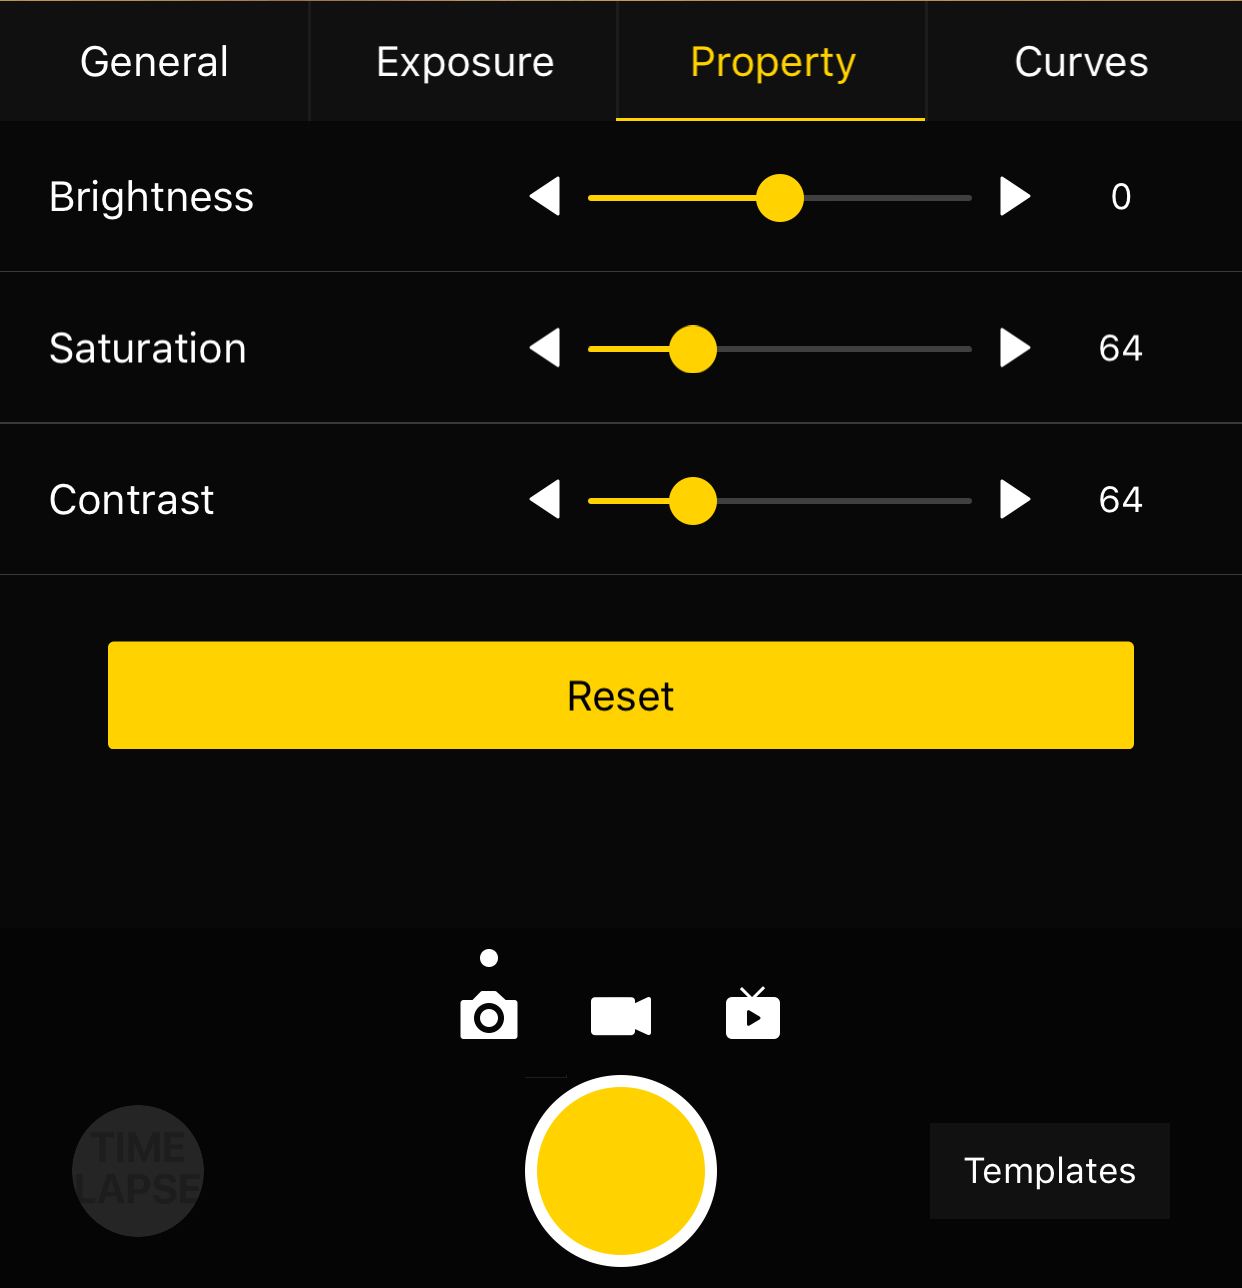
Property
| Property | ||
|---|---|---|
| Brightness | -255 ~ 255 | Note: it’s not suggested to modify the property settings. |
| Saturation | 0 ~ 255 | |
| Contrast | 0 ~ 255 | |
| Reset |
After shooting the desired contents using the mobile app, you can go to the camera storage album through the shortcut entry in the lower left corner, to access the file folders containing the contents shot just now and from history. Except for photos in the Auto Exposure Bracket (HDR), Burst or Timelapse mode, all the materials may be previewed, which is helpful for the user to locate a subject quickly. Users can view individual material file via client terminal and download photos to mobile phones.
However, most of the material files are large in volume, and a camera’s performance of downloading and playing is relatively weak, so it is recommended that users should use a computer to view and manage the shot materials.
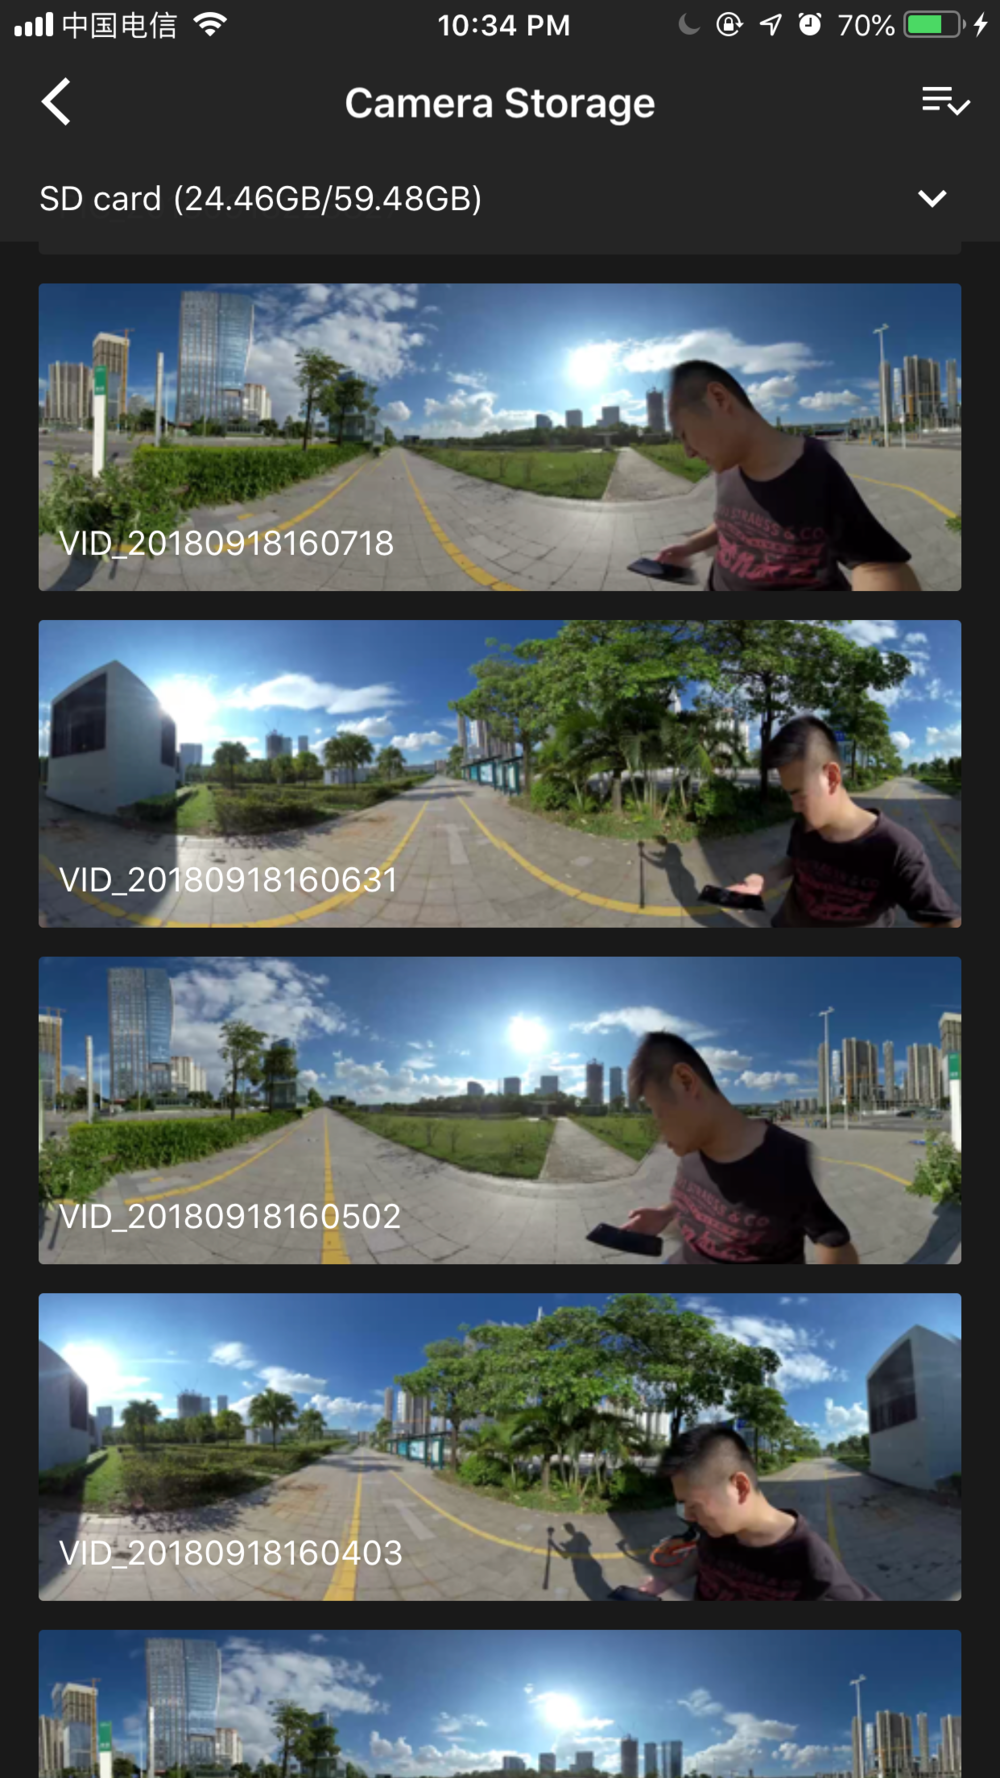
With the storage management function, you can view the capacity of the storage device currently configured to the camera.
2. Precautions for shooting
In mobile AP connection, it may cause unstable connection due to crowd density, and shelter, etc.
Pro 2 is not waterproof so it cannot be photographed underwater nor does it recommend photographing in rainy weather.
Optical flow stitching algorithm is designed to detect each pixel between frames. And if no similar point is found in adjacent images, ripples will be generated at moving objects or lens seams. For example, in front of wallpaper of fine vertical stripes, twigs, reflective glass or stainless steel railings. Therefore, we should try to avoid these situations and place the camera in the scene with details that are rich but non-repetitive.
Safe distance: the safe distance of optical flow stitching is 50cm. The safety distance between template stitching is 1.5m and safe distance should be considered in camera’s position.
Download or browse on-line these Operation & User’s Manual for Insta360 Pro2 Digital Camera.
Summary of Contents:
 |
[Page 1] Insta360 Pro2 Pro2 User Manual English |
 |
[Page 2] Insta360 Pro2 Dierence between Pro 2 and Pro 1 (users updating from Pro 1 to Pro 2 are recommended to read) 0.1 Dierence in appearance and interface 0.2 Special functions of Pro 2 0.3 Comparison of detailed functional parameters Chapter 1 Preparation for Bas… |
 |
[Page 3] Insta360 Pro2 3.1.2 [Beginner] Selection of accessories for shooting 3.1.3 [Advanced] Selection of Advanced accessories for video recording 3.1.4 [Advanced] Recording equipment 3.1.5 [Advanced] Introduction of stabilizer 3.1.6 [Advanced] Special scene shooting pre… |
 |
[Page 4] Insta360 Pro2 4.2.2 [Beginner] Push mode: internal push, server push, HDMI output 4.2.3 [Beginner] Live-streaming while storing 4.2.4 [Beginner] External audio setting 4.2.5 [Intermediate] Indoor live-streaming scheme 4.2.6 [Intermediate] Outdoor Live-streaming sc… |
 |
[Page 5] Insta360 Pro2 1 Dierence in appearance and interface 1. Compared to the Pro 1, the Pro 2 adds a AP (WiFi) antenna and a GPS antenna to the top. The stable communication distance of Pro 2 AP signal is twice as long as that of Pro 1. Dierent from Pro 1, which … |
 |
[Page 6] Insta360 Pro2 2. A new USB2.0 port, a 3.5mm port, and a 1/4 tapped hole are added to the top of the Pro 2 to make it easier for users to use some external USB or 3.5mm microphones and hold them directly above the camera. It is especially suitable for panoramic aco… |
 |
[Page 7] Insta360 Pro2 In the process of using, as the number of storage cards increases, the file directory structure will be more complex than that of Pro 1, but the stitching soware, Stitcher, provides a tool to import Pro 2 content with only one key. User only needs… |
 |
[Page 8] Insta360 Pro2 3 Comparison of detailed functional parameters Pro 2 Pro Weight 1550g 1228g Diameter φ143mm φ143mm Material aluminum alloy aluminum alloy Lens 200°6 x F2.4 fish-eye lens 200°6 x F2.4 fish-eye lens Photo Specification real-time stitching: 7680 x… |
 |
[Page 9] Insta360 Pro2 Pro 2 Pro Exposure Modes Auto Manual Lens-by-Lens Custom Shutter Priority (photo only) ISO Priority (photo only) video mode can set ISO upper limit Auto Manual Lens-by-Lens Custom Shutter Priority (photo only) ISO Priority (photo only) White… |
 |
[Page 10] Insta360 Pro2 Pro 2 Pro Stitching OpticalFlow / Template OpticalFlow / Template Exposure Range 12 stop 12 stop Control Soware Windows / Mac / iOS / Android Windows / Mac / iOS / Android 1.1.1 Know the camera |
 |
[Page 11] Insta360 Pro2 Specification parameter Specification Parameter |
 |
[Page 12] Insta360 Pro2 Specification Parameter Lenses 6 * 200°F2.4 fish-eye lenses Maximum resolution of single-path photograph 4000 * 3000 360°panoramic photo shooting Real-time Stitching/ Post-Processing Stitching, 7680 * 3840 (8K) at the maximum. 360°panoramic video … |
 |
[Page 13] Insta360 Pro2 Note: according to international aviation regulations, if you check in your luggage, please remove lithium batteries and carry them around. |
 |
[Page 14] Insta360 Pro2 1.1.3 Selection and formatting of storage media 6 TF (MicroSD) cards and one SD card must be inserted to use Insta360 Pro 2 to shoot. |
 |
[Page 15] Insta360 Pro2 Selection and notes for storage devices Both TF (MicroSD) cards and SD card required by Insta360 Pro 2 needs to reach the read-write speed level of V30 memory card. It is recommended to purchase SanDisk SD card (JD.com purchase link, Amazon purchase … |
 |
[Page 16] Insta360 Pro2 Pro 2 does not have maximum capacity limits on SD card / TF (MicroSD) card Note for removing storage card As the file directory structure is more complex in Pro 2, please make sure to turn o the camera before pulling out storage cards. If the stor… |
 |
[Page 17] Insta360 Pro2 3. Once formatting is completed, if it prompts «Failed», it represents a format failure. Please check whether this storage device’s write-protection is turned on or it has been corrupted. Please try formatting again aer you remove writ… |
 |
[Page 18] Insta360 Pro2 If the test result shows some card’s write speed isn’t suicient, it means recording process may be aected with this card. Please follow the instructions above to format this SD card using formatting function on camera. Please make sure to b… |
 |
[Page 19] Insta360 Pro2 Power adapter: The camera adopts12V 5A power adapter with DC interface. Battery type and duration: The camera uses 5100 mAh replaceable battery. Without WiFi, the battery life is about 50 min. To fully charge a battery takes about 2.5 hours. Charging… |
 |
[Page 20] Insta360 Pro2 About real-time stitching and stitching calibration Insta360 Pro 2 has an accurate stitching parameter which can be used in most shooting scenarios. The stitching eect shown on the preview screen is based on this default stitching parameter. Howev… |
 |
[Page 21] Insta360 Pro2 (2) Aer starting this function, please place the camera in an open place and ensure that there is no shelter within 2m of the camera radius including the user himself or herself. Then press the power button, and the camera will automatically condu… |
 |
[Page 22] Insta360 Pro2 1.1.5 Connection mode of camera Insta360 Pro 2 provides a variety of camera connection modes, which can be divided into three types, namely, Farsight, wired connection, and Wi-Fi connection. It can be connected to a computer, iPad or mobile phone, fo… |
 |
[Page 23] Insta360 Pro2 3. Turn on the camera and Farsight transmitter. It takes 15 seconds to start aer transmitter is on. 4. Connect the transmitter with Pro 2 camera via network cable. Waiting for the display of IP address of 192.168.100.XXX on top of camera … |
 |
[Page 24] Insta360 Pro2 (Farsight receiver — Micro USB port)  (Farsight receiver — antenna port) 6. Please ensu… |
 |
[Page 25] Insta360 Pro2 7. Compatibility List of Farsight receiver (devices added continuously) Device System Huawei P9 Android 7.0+ Huawei P10 Android 7.0+ Huawei Mate9 Android 8.0+ Huawei Mate10 Android 8.0+ Huawei Honor V10 Android 8.0+ Samsung Galaxy S8 Android 8.0+… |
 |
[Page 26] Insta360 Pro2 1. Enter the settings menu of Pro 2, set Ethernet to DHCP mode. 2. Connect Pro 2 to router through network cable, and the router’s allocation mode needs to be DHCP, and the computer connects to router’s LAN. 3. Ensure camera and computer are i… |
 |
[Page 27] Insta360 Pro2 (IP configuration Interface for Windows) (IP configuration Interface for Mac OS) 3. Aer completing the above configuration, enter 192.168.1.188 on client operation soware, and then connect. WiFi connectivity — connecting client devic… |
 |
[Page 28] Insta360 Pro2 1. click on WiFi logo on homepage of camera screen, and the camera will open its own AP hotspot. 2. open your client device (phone, tablet, laptop) to search nearby WiFi hotspots, and find the hotspots of «Insta360-Pro 2-XXXXXX». Cli… |
 |
[Page 29] Insta360 Pro2 1.1.6 Download oicial soware As a technology company dedicated to developing global panoramic imaging technology and building open ecology and convenient product experience, Insta360 provides abundant soware for users and panoramic enthusi… |
 |
[Page 30] Insta360 Pro2 (app compatibility requirements) Insta360 Pro STITCHER Use Insta360 Stitcher to quickly and easily stitch camera footage taken by Insta360 Pro/Pro 2. What computer configuration can run Stitcher’s stitching function smoothly? According to St… |
 |
[Page 31] Insta360 Pro2 Insta360 Pro 2 FIRMWARE Camera firmware The Insta360 Pro camera firmware ensures that the Insta360 Pro 2 runs eiciently. Please update to the latest version for the optimal experience. How to upgrade firmware? Insta360 Moment CrystalView 8… |
 |
[Page 32] Insta360 Pro2 content with certain vertical angles, we must require tripod to assist especially during night, sunrise, sunset and in weak light environments, or we need to shoot with long exposure, delay etc. , in which cases, one cannot hold cameras. Here are sug… |
 |
[Page 33] Insta360 Pro2 Do not select tripod with handle 7. When shooting panoramic view, we should try to reduce the area of bottom bracket as much as possible for convenient post editing. In this sense, Manfrotto series products, which are relatively safe, portable, … |
 |
[Page 34] Insta360 Pro2 http://shop.nodalninja.com/carbon-fiber-poles/ 1.1.8 Import from multiple storage cards Compared with Pro 1, the largest change in Pro 2 is the addition of six TF (Micro SD) cards. The original files are stored in multiple storage cards. It’s more … |
 |
[Page 35] Insta360 Pro2 2. Open Stitchergo to “Pro 2 File Manager» page. Click the «Import» button below method 1. Choose the root directory from any one of the inserted SD cards. |
 |
[Page 36] Insta360 Pro2 3. It takes a while to load all the contents in SD cards. Please wait for loading process to complete. |
 |
[Page 37] Insta360 Pro2 4. Aer all the files are loaded, click the button «Import contents to local drive» at the bottom. Then all the selected contents will be imported to local drive. Import method 2: Connect your Pro 2 to your computer via cable 1. Go to the… |
 |
[Page 38] Insta360 Pro2 3. If you see six MicroSD cards and one SD card, you have successfully accessed all of your camera’s storage devices. You can choose to merge files in individual folders manually and copy them locally on your computer, or you can import them by … |
 |
[Page 39] Insta360 Pro2 You can also map a network drive for Pro 2 directory under server address: \\192.168.1.188. In this way, you don’t have to type its network address each time. |
 |
[Page 40] Insta360 Pro2 5. It takes a while to load all the contents in SD cards. Please wait for loading process to complete. 6. Aer all the files are loaded, click the button «Import contents to local drive» at the bottom. Then all the selected contents will … |
 |
[Page 41] Insta360 Pro2 Import Pro 2 files to computer in MacOS: Import method 1: Use the USB Hub and the SD card reader 1. Please use our oicial SD card reader and USB Hub. Insert the SD card and six MicroSD cards into the Hub, then connect the Hub to your computer…. |
 |
[Page 42] Insta360 Pro2 3. It takes a while to load all the contents in SD cards. Please wait for loading process to complete. 4. Aer all the files are loaded, click the button «Import contents to local drive» at the bottom. Then all the selected contents will … |
 |
[Page 43] Insta360 Pro2 1. Go to the Pro 2’s home menu, select the fih function and start storage device reading mode. Wait until the camera displays «Reading storage devices…». If the camera shows «Loading failed» aer entering this mode, pl… |
 |
[Page 44] Insta360 Pro2 3. Enter smb://192.168.1.188, in the Server Address bar and click “Connect”. 4. Select “Guest” in the pop-up window and click “Connect”. 5. In the next pop-up window, select «pro2″ and click “OK» to connect. |
 |
[Page 45] Insta360 Pro2 6. If you see six MicroSD cards and one SD card, you have successfully accessed all of your camera’s storage devices. You can choose to merge files in individual folders manually and copy them locally on your computer, or you can import them by … |
 |
[Page 46] Insta360 Pro2 8. It takes a while to load all the contents in SD cards. Please wait for loading process to complete. |
 |
[Page 47] Insta360 Pro2 9. Aer all the files are loaded, click the button «Import contents to local drive» at the bottom. Then all the selected contents will be imported to local drive. Please note that aer you have put your camera in storage device reading … |
 |
[Page 48] Insta360 Pro2 Battery power: Pro 2’s battery can be used for about 50 minutes when fully charged. When moving to take photos, one can prepare several spare batteries. Gyro calibration: before shooting, one can check the preview scene through the camera controlli… |
 |
[Page 49] Insta360 Pro2 http://shop.nodalninja.com/carbon-fiber-poles/ 2.1.3 [Advanced] Selection of advanced accessories for photographing Base support. Pro 2 has a weight of 1550 g. Please select base with large suction force for single-lens camera, which is relatively mo… |
 |
[Page 50] Insta360 Pro2 2.1.4 [Advanced] Preparation of special photographing scene (aerial photography) Aerial panoramic photos: Unmanned aerial vehicles choose unmanned aerial vehicles with large load capacity, such as DJI S 900, M 600, Inspire 2 etc. No stabilizer is nee… |
 |
[Page 51] Insta360 Pro2 2.2.1 [Beginner] Shooting mode screen and settings Standalone Use 1.Shooting Mode Screen 2.Operation Instructions (1) Select the shooting mode from the camera menu, press the POWER key to confirm entering such mode. Aer the camera completes the pr… |
 |
[Page 52] Insta360 Pro2 (2) When the shooting mode is in Ready state, press UP and DOWN keys to switch over the sizes for shooting. (3) When the shooting mode is in Ready state, press POWER key and you can take a photo as per the current size. If the real-time stitching lev… |
 |
[Page 53] Insta360 Pro2 Photos shot in normal, AEB3 or Burst mode are stored in SD card. In Timelapse mode, when photo is stored in jpg format, the minimum interval length can be set to 2s. When photo is stored in raw+jpg formats, the minimum interval length is 4s due to t… |
 |
[Page 54] Insta360 Pro2 from le to right are: Gyroscope for stabilization: with the function on, photos stored through camera’s real-time stitching function can be automatically corrected according to gyroscope data. Note that this feature cannot take eect when rec… |
 |
[Page 55] Insta360 Pro2 General (Basic settings for photo): General Level Notice Mode Normal Burst Timelapse Auto Exposure Bracket 1. All photo modes can store images from 6 lens. Each photo has a resolution of 4000 * 3000. RAW photo format is DNG. Panoramic / 3D images wit… |
 |
[Page 56] Insta360 Pro2 General Level Notice Optical Flow Opening: use optical flow algorithm. Closing: use template stitching 1. Under Normal mode, real-time optical flow takes time to stitch a 360 ° Pano or 360 ° 3D photo and save 6-lens original images simultaneously. … |
 |
[Page 57] Insta360 Pro2 Exposure: Exposure Auto It can adjust EV, white balance In the Normal shooting mode, the range of EV is-5 ~ 5. Manual ISO range: 100 ~ 6400 Shutter speed range: 1/2s ~ 1/8000s for ordinary Shutter, 1s ~ 55s for Long Shutter WB levels: Auto(aut… |
 |
[Page 58] Insta360 Pro2 … |
 |
[Page 59] Insta360 Pro2 … |
 |
[Page 60] Insta360 Pro2 Property Property Brightness -255 ~ 255 Note: Property settings generally do not modify, especially sharpness, which may cause noise increase aer modification. Saturation 0 ~ 255 Contrast 0 ~ 255 Reset |
 |
[Page 61] Insta360 Pro2 Aer shooting the desired contents using the mobile app, you can go to the camera storage album through the shortcut entry in the lower le corner, to access the file folders containing the contents shot just now and from history. Except for phot… |
 |
[Page 62] Insta360 Pro2 With the storage management function, you can view the capacity of the storage device currently configured to the camera. (2) Precautions for shooting In mobile AP connection, it may cause unstable connection due to crowd density, and shelter, etc. P… |
 |
[Page 63] Insta360 Pro2 2.2.2 [Advanced] Shooting in special format (Raw, AEB, Timelapse, Burst, super-resolution) Raw Shooting Aer opening Raw shooting, photos will be stored simultaneously in Raw (dng format) and jpg format while taking photos. The following ill… |
 |
[Page 64] Insta360 Pro2 Please note that in Stitcher, color correction function only takes eect for stitched photo in jpg format. Photo in dng format (Raw) can be stitched only. Please use Photoshop to adjust color for Raw photo. AEB (Automatic Surround Exposu… |
 |
[Page 65] Insta360 Pro2 For example, this is an ordinary jpg photograph taken in the shade of a tree, the part of the sky where the sun has been exposed in order to get the details of the shade. Choose Auto Exposure Bracket mode to take 9 groups of photos with dieren… |
 |
[Page 66] Insta360 Pro2 Burst is to shoot 10 groups of photos. The continuous capture is carried out based on the camera shutter speed, so the shutter speed is 1 / 10s to the minimum. 10 continuous captured photos can be exported. This mode can be used in taking group pho… |
 |
[Page 67] Insta360 Pro2 Photos are stored in jpg or dng format. The jpg photos are all stored in the SD card, and if you choose to shot in RAW+JPG dual format, only the dng (raw) photos in Timelapse mode will be stored on the six MicroSD cards. All the rest of the photo… |
 |
[Page 68] Insta360 Pro2 On the top is the menu bar: File, Settings, Language, Help. You can find functions of file import, google street view upload, log display, preference settings (hard so decoding) , hardware performance test, language settings, log upload, etc. … |
 |
[Page 69] Insta360 Pro2 Import a picture folder Content Type can be Monoscopic, Stereo (Le Eye on Top), Stereo (Right Eye on Top), Stereo (Distinguish two eyes). For Stitching Mode, you can select new optical flow and optical flow to calculate new template acco… |
 |
[Page 70] Insta360 Pro2 As for Sampling Type, if the camera is still static then three sampling types are not very dierent from each other. If the camera is moving, sampling with slower speed can obtain better image quality which is commonly used in video stitching. … |
 |
[Page 71] Insta360 Pro2 Resolution can be customized in output settings except the preset ones. Output directory path and output file name can be set. When setup completes, you can add to batch list for pending processing or stitch immediately. |
 |
[Page 72] Insta360 Pro2 Progress is shown in taskbar. Aer stitching completes, you can open folder to view stitched photos. 4. Stitching of special shots RAW+JPG: *. DNG is an image taken with RAW+JPG, and it saves the most original information, which gives l… |
 |
[Page 73] Insta360 Pro2 Methods for creating HDR images by using Photoshop: |
 |
[Page 74] Insta360 Pro2 … |
 |
[Page 75] Insta360 Pro2 Timelapse image sequence stitching Photos taken by Insta360 Pro 2 are saved in a folder named PIC_* in the form of a photo group sequence. Insta360 Stitcher can be used to splice up a panoramic image sequence of 8K at maximum. For exampl… |
 |
[Page 76] Insta360 Pro2 adjust level, save and apply the current eect. Open Adobe Premiere CC2018, import by sequence. Create a new sequence and set the resolution to 7680*3840 |
 |
[Page 77] Insta360 Pro2 Because it is processing timelapse project with higher-resolution, which has high requirement on computer configuration. Occurring lag during the process is normal. If the screen flashes, other soware can be used to remove flicker in timelapse… |
 |
[Page 78] Insta360 Pro2 Note that this video needs to be set as VR panoramic video, in which way, Metadata panorama information can be written into the video. 2.3.2 [Advanced] How to stich Super Resolution photo with Burst photo Photos shot on Pro 2 in Burst mode of 8K… |
 |
[Page 79] Insta360 Pro2 2. Choose the «Super Resolution» option, and the highest resolution will increase by two grades, 8.2K for the best GearVR eect and the other 12K. The default Super Resolution is 8.2K. 3. If the super resolution function is used … |
 |
[Page 80] Insta360 Pro2 4. Save the intended value in «super resolution setting». Create a task to export (original photos are the 8K bursts), and one 12K resolution photo will be produced. Compared to the 8K original photo on the le, the 12K super res… |
 |
[Page 81] Insta360 Pro2 Tips: To attain the best super resolution image results, please make sure photos be taken in stationary. The more static the camera stays during shooting, the more clear the image will be. It has been proved that photo shot in an environment … |
 |
[Page 82] Insta360 Pro2 2.3.3 [Advanced] Stitching by third party soware, such as PTgui, etc. The original images of 6 lens are saved for every shoot, so we can put them together with third party stitching soware, taking PTgui, Autopano Giga, Mistika VR as examples he… |
 |
[Page 83] Insta360 Pro2 Click Align images for stitching analysis Adjust level in Panorama Editor, adjust pictures accurately, etc. Detailed method refers to PTgui oicial tutorial. |
 |
[Page 84] Insta360 Pro2 «File-Save as templates» is to save it as pts template files for subsequent use; «Create panorama» can export jpg panorama images. 2. Autopano Giga Open Autopano Giga, click icon to import original images of 6 lens. |
 |
[Page 85] Insta360 Pro2 Analyze images, click icons to open «Image settings», modify «Lens type» to be «Fisheye», «Focal» for 10.57mm, click on «OK» to confirm. Select «Detect» icon on upper le corner to analyze… |
 |
[Page 86] Insta360 Pro2 3. Mistika VR stitching panorama Since the resolution of Mistika VR rendering is consistent with settings in engineering Project, you should set the required resolution beforehand in Project. Here we chose to build a project of 8K. Choose original pi… |
 |
[Page 87] Insta360 Pro2 Select «Import Stich» in Stitch drop-down box to find the picture folder, import pro.prj files, refer to Insta360 Pro’s engineering description file to automatically stitch into a panorama picture. Select improve osets and improve angl… |
 |
[Page 88] Insta360 Pro2 We found that there were characters whose heads were not perfectly stitched so we chose to edit edge points to avoid header stitching. In this case we add «Edge Point» to camera 5, camera 1 , camera 3, avoiding header stitching of five char… |
 |
[Page 89] Insta360 Pro2 2.3.4 [Advanced] Color matching and modification of Photoshop panorama The latest version of Photoshop cc 2018 has supported panoramic editing. Here is a brief introduction to the basic workflows. Open Photoshop, select Spherical Panorama from top me… |
 |
[Page 90] Insta360 Pro2 You can drag mouse to view from dierent angles in 3D interface. The angle value can be modified in the camera property of 3D and change field angle size. 8 millimeters is the view angle of panoramic view on Facebook by default. So we can easily mo… |
 |
[Page 91] Insta360 Pro2 Adjust view to bottom, use imitation seal, patch, stain wipe tools, to remove tripod at the bottom. Because filters can only apply to visible parts, if you want to modify the overall color, you can use «adjust» in the camera workspace, to d… |
 |
[Page 92] Insta360 Pro2 Another way is to double click on filename, to open smart layer, convert polar coordinates into spherical shape, and then use Camera RAW to mix color to avoid producing transition seams. |
 |
[Page 93] Insta360 Pro2 Open camera raw filter for color grading |
 |
[Page 94] Insta360 Pro2 Once again, we apply polar coordinate eect to return to the rectangular of 2:1. |
 |
[Page 95] Insta360 Pro2 Back to the workspace of spherical panoramic images, we see that images have shown perfect color correction results. You can also automatically adapt text into 360 sphere automatically by adding text into image, adding new text layer, applying «… |
 |
[Page 96] Insta360 Pro2 When exporting, using «export panorama» from the 3D menu to correctly save into panoramic image, which has been written into panoramic Metadata and can be uploaded directly to those platforms supporting panorama. 2.4.1 [Beginner] Fast acqui… |
 |
[Page 97] Insta360 Pro2 Normal photos and 8K 2D panoramic photos captured by Pro 2 can be shared to the community via Insta360 apps like ONE. However, 3D photos and videos are not supported in the community currently. Please note that the files shared to the community shoul… |
 |
[Page 98] Insta360 Pro2 Next, directly release, and you can see panoramic images on timeline. Weibo doesn’t support uploading panoramic images from PC end, but the app for Insta360 panoramic camera supports uploading panoramic images to Weibo. Take Insta360 Nano app as… |
 |
[Page 99] Insta360 Pro2 2.4.2 [Beginner] Insta360 Player Insta360 Player supports to play the content of Insta360 panoramic camera and supports the play of standard panoramic videos and images with the ratio of 2:1, supporting various platforms. Take Windows v2.3.6 as an ex… |
 |
[Page 100] Insta360 Pro2 Import a panorama, you can drag mouse to view panoramic view. Preview small window is at the upper right corner. |
Highlight all
Match case
Current View
Current View
Enter the password to open this PDF file:
File name:
—
File size:
—
Title:
—
Author:
—
Subject:
—
Keywords:
—
Creation Date:
—
Modification Date:
—
Creator:
—
PDF Producer:
—
PDF Version:
—
Page Count:
—
Preparing document for printing…
0%
Report abuse
Libble takes abuse of its services very seriously. We’re committed to dealing with such abuse according to the laws in your country of residence. When you submit a report, we’ll investigate it and take the appropriate action. We’ll get back to you only if we require additional details or have more information to share.
Product:
Get your user manual by e-mail
Enter your email address to receive the manual of Insta360 Pro2 in the language / languages: English as an attachment in your email.
The manual is 14,48 mb in size.
You will receive the manual in your email within minutes. If you have not received an email, then probably have entered the wrong email address or your mailbox is too full. In addition, it may be that your ISP may have a maximum size for emails to receive.
The manual is sent by email. Check your email
If you have not received an email with the manual within fifteen minutes, it may be that you have a entered a wrong email address or that your ISP has set a maximum size to receive email that is smaller than the size of the manual.
Аппарат, рассматриваемый в данной статье, предназначен для профессиональной работы, а не для домашней съёмки. Дело в том, что возможности видеокамеры Insta360 Pro 2 ощутимо выше, чем желания и потребности рядового потребителя. В связи с этим и использование данного аппарата не такое простое. Действительно, разработчики анонсировали эту камеру, не как домашнюю и любительскую. Попробуем разобраться, почему она скорее относится к профессиональной технике.
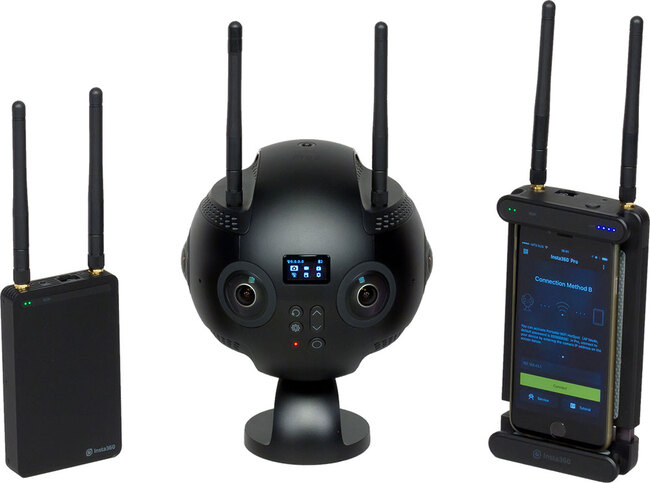
Так выглядит Insta360 Pro 2
Содержание
Комплектация и внешний вид
Технические характеристики и функционал
Приёмник и передатчик
Стоимость и где купить
Заключение
Комплектация и внешний вид
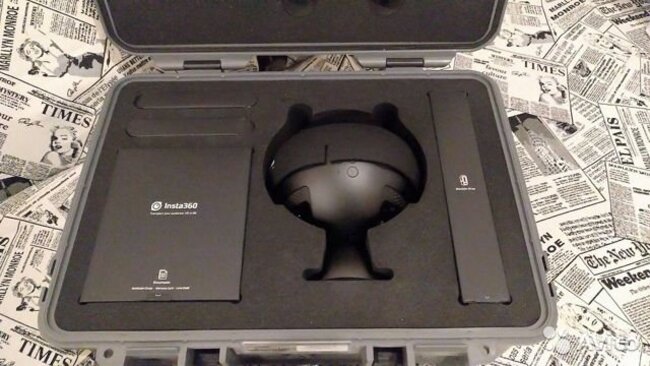
Данная камера 8К продаётся в чёрном чемоданчике, изготовленном из крепкой пластмассы, которая хорошо защищает камеру от ударов и температурных перепадов. Помимо самого видеоаппарата в чемодане находятся следующие аксессуары:
- Защитная крышка для объектива
- Устройство зарядки и питания
- Приёмник и передатчик FarSight
- LAN-шнур
- USB-провод Type-A и Type-C
- Батарея на 5100 мАч
- Ethernet-кабель (может развивать скорость до 100 Мбит/сек)
- Ремешок для чемодана
- Платочки для чистки объектива
- Insta 360 pro 2 manual/туториал (руководство по эксплуатации)
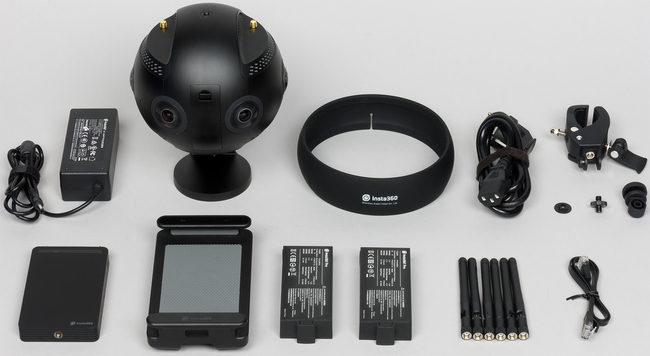
Комплект аппарата
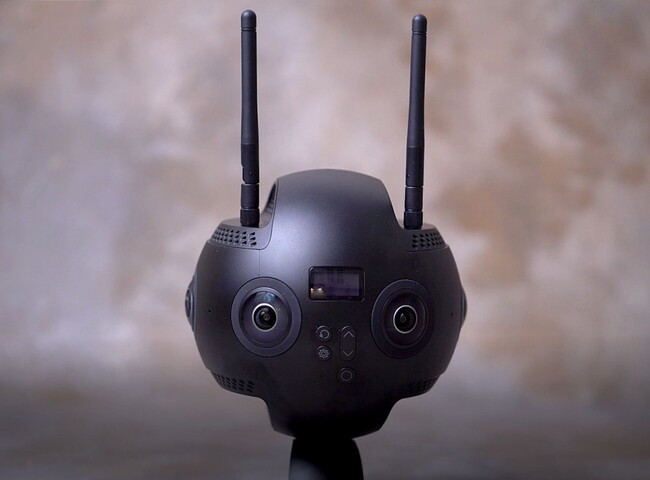
На алюминиевом корпусе Insta360 Pro 2 есть разъёмы для винтов антенн, которые располагаются на верхней части устройства. Один из разъёмов служит крепежом для Wi-Fi-модуля, второй — для устройства GPS. Также в правой части корпуса находится съёмный аккумулятор, а чуть ниже расположен вход для мемори-карты microSD. Данная карта является основным носителем, на который аппарат ведёт запись видео, фотоснимков, а также многих других файлов, в том числе и информацию по GPS.
На панорамной видеокамере 360 можно увидеть многочисленные отверстия под вентиляцию. Также на аппарате вкруговую находятся 6 объективов, при этом каждый из них имеет возможность обзора на 200 градусов. При этом крепёжная стойка, на которой установлено устройство, не попадает в объективы ни одной из камер.
Чемодан с рассматриваемой камерой
На переднем участке корпуса имеется маленький монохромный дисплей, элементарный в эксплуатации. Ниже находятся кнопки, которых достаточно для детальных настроек видеокамеры. Их расположение однако не очень удобное, ведь когда держишь камеру на весу и пытаешься её настроить, легко попасть ладонью в один из объективов. После этого приходится протирать линзы, иначе качество съёмки пострадает. Можно было расположить кнопки более практично.
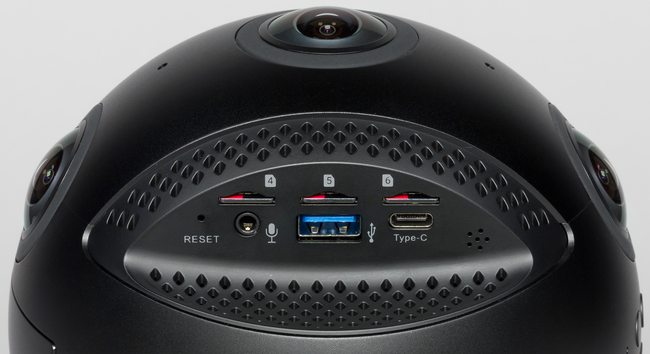
Основные разъёмы камеры
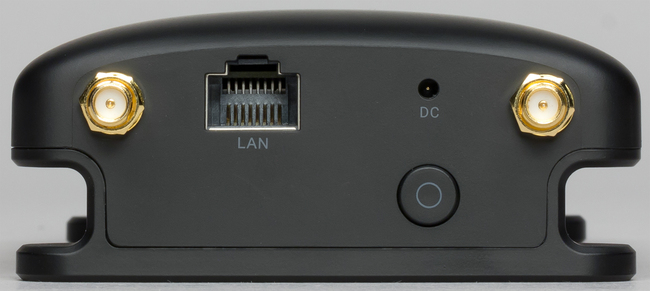
Основная часть интерфейсов и разъёмов Insta360 Pro 2 находится в нижней части корпуса. Здесь расположено целых шесть входов для мемори-карт microSD, разъём USB 3.0, мини-джек для микрофона на 3,5 миллиметра, разъём для подзарядки и питания, микро-HDMI версии 2.0, углубление со спрятанной кнопкой сброса настроек, а также USB-вход Type-C. Как можно заметить, видеокамера наполнена различными разъёмами и это действительно характерно для аппаратов подобного уровня.
Для работы с готовыми записями рекомендуем программу для обработки видео. Она предлагает простой и удобный интерфейс, поддержку более сотни популярных форматов и многочисленные возможности обработки. Редактируйте, улучшайте качество, добавляйте эффекты и переходы вместе с программой ВидеоМОНТАЖ.
Технические характеристики и функционал
Теперь перейдём к самой интересной части обзора — к описанию характеристик и функций. Как уже описывалось выше, панорамная видеокамера Pro имеет шесть объективов с рыбьим глазом и углами обзора в 200 градусов. Устройство оборудовано девятиосевым стабилизатором картинки, выравнивающим съёмку в горизонтальном положении. Рассматриваемая камера может записывать в разрешении 7680×3840 30p в 8К 3D и 3840х3840 24p в 4К 3D. Также в меньших разрешениях аппарат ведёт высокоскоростную съёмку до 120p, что является вполне нормальным показателем в современных реалиях.
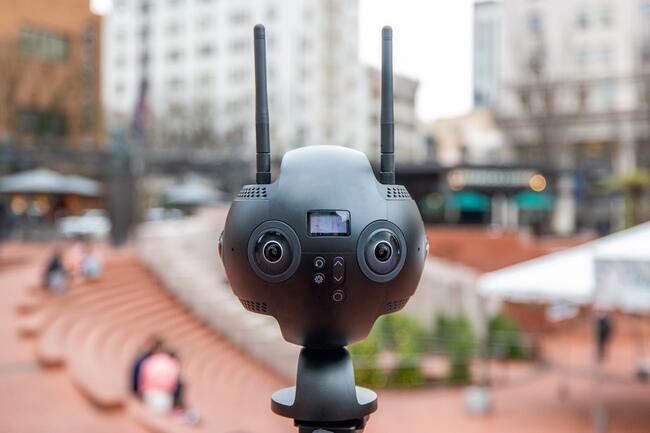
Эта модель отлично снимает в городских условиях
Insta360 Pro 2 поддерживает одну карту формата microSD, при этом записывает видео с битрейтом в 40 Мбит/сек (данная скорость взята с учётом одного объектива из шести). Помимо всего прочего аппарат может работать с кабелями технологии RJ-45 (стандартный сетевой интерфейс). Размеры данной видеокамеры составляют 14,3 сантиметра при весе в 1,5 кг.
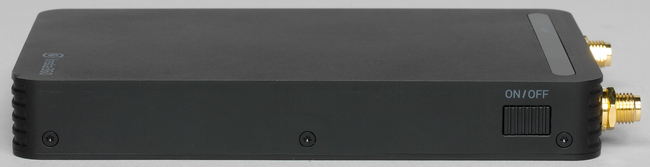
Приёмник и передатчик
В комплекте с Insta360 Pro Camera идут приёмник и передатчик FarSight. Их размеры: 7х11,5х1,5 см у передатчика и 8,7х15,3х3,7 см у приёмника. В верхней части корпуса передатчика установлены зелёные светодиоды, оповещающие пользователя о состоянии батареи. Также есть антенные разъёмы и LAN-вход, через который передатчик соединяется с видеокамерой. Включить или выключить гаджет можно при помощи кнопки, находящейся на боковине корпуса.
Корпус передатчика
Верхняя зона приёмника оснащена синими и зелёными диодами, отображающими сигнальную мощность между аппаратами. Также на его корпусе расположены антенные гнёзда и LAN-вход для соединения с ноутбуком/стационарным компьютером. Здесь есть разъём для подзарядки встроенной батареи, микро-USB и кнопка on/off.
Разъёмы приёмника
Хочется отметить, что система FarSight отлично работает в тандеме с видеокамерой Insta360 Pro и не вызывает никаких нареканий. Со своими функциями приёмник и передатчик справляются на 5 с плюсом.
Стоимость и где купить
Панорамную видеокамеру Insta360 Pro 2 можно приобрести по цене в 449 000 рублей в различных интернет-магазинах видеотехники, а также в розничных точках по всей территории России. Устройство недешёвое, но среди прочих панорамных камер его цена не выглядит неоправданно высокой и соответствует ее качеству.
Заключение
Insta360 Pro 2 — это прекрасный вариант для съёмки в коммерческих целях и проведения высококачественных трансляций в панораме. Если вы желаете создавать впечатляющие панорамные ролики, не стоит жалеть денег на покупку данной модели. Итак перечислим основные и самые значимые плюсы Pro 2:
- Высокая продолжительность работы в автономном режиме
- Возможность 3D-съёмки на высокой скорости
- Качественная стабилизация на девять осей
- Огромное расстояние связи аппарата с пользователем
- Хороший GPS-датчик
- Режим записи в HDR
Панорамная камера и её передатчик с приёмником
Если, прочитав этот обзор, вы захотели приобрести Insta360 Pro 2, то дополнительно к ней советуем программу для монтажа видео. С ней вы сможете значительно повысить качество записей: обрезать ролик в нужных местах, изменить задний фон, добавить заставки и эффекты. Начните пользоваться видеоредактором уже сейчас, и вы удивитесь его функциональности.
Cохраните себе статью, чтобы не потерять: