
У вас уже есть продукция Canon? Зарегистрируйте свои продукты для доступа к программному обеспечению и обновлениям встроенного ПО, а также подпишитесь на рассылку, чтобы получать персонализированные советы и эксклюзивные предложения

Поддержка
Canon PowerShot G9 X
Загружайте ПО, встроенное ПО и руководства, а также получите доступ к материалам поддержки для вашего продукта серии PowerShot.
Драйверы
Для выполнения подключения некоторых устройств к компьютеру может потребоваться драйвер. На этой вкладке вы найдете соответствующие драйверы для своего устройства или, в случае отсутствия драйверов, описание совместимости устройства с каждой операционной системой.
Полезная информация. Доступ к программному обеспечению, руководствам и другим материалам можно получить с помощью вкладок, расположенных выше.
Операционная система Обнаруженная операционная система
Программное обеспечение
Программное обеспечение загружать необязательно, но оно обеспечивает дополнительные функции и позволяет максимально эффективно пользоваться возможностями устройства. На этой вкладке можно просмотреть и загрузить доступное программное обеспечение для вашего устройства.
Операционная система Обнаруженная операционная система
Руководства пользователя
Руководства для вашего устройства или программного обеспечения перечислены ниже.
Приложения и функции
На этой вкладке можно посмотреть доступные приложения и функции, совместимые с вашим устройством.
Встроенное ПО
Встроенное ПО — это постоянное программное обеспечение, установленное на устройстве и обеспечивающее его корректную работу. Canon может периодически выпускать обновления для этого встроенного ПО, и если обновление доступно, его можно загрузить ниже.
FAQs
На этой вкладке вы найдете ответы на часто задаваемые вопросы и другую полезную информацию, которая поможет вам в решении вопросов и проблем.
Важная информация
На этой вкладке вы найдете подборку часто задаваемых вопросов, которые, на наш взгляд, будут вам интересны.
Коды ошибок
Код ошибки или сообщение об ошибке может появиться на устройстве по различным причинам. С помощью поля поиска можно найти полезную информацию о конкретном коде ошибки, где будут указаны причина ошибки и необходимые действия по ее устранению.
Технические характеристики
Ниже приведены все технические характеристики данного продукта.
Полезные ссылки
-
-
Ремонт
Поиск центров по ремонту оборудования, полезная информация по процессу ремонта
-
Переработка
Узнайте больше о программе утилизации картриджей Canon
-
Canon ID
Регистрация продукта и управление аккаунтом Canon ID
1
Camera Basics
Auto Mode /
Hybrid Auto Mode
Other Shooting Modes
P Mode
Tv, Av, M, and C Mode
Playback Mode
Wi-Fi Functions
Setting Menu
Accessories
Appendix
Before Use
Basic Guide
Index
Advanced Guide
© CANON INC. 2015 CT0-D002-000-F101-A
● Make sure you read this guide, including the “Safety Precautions”
(=
14) section, before using the camera.
● Reading this guide will help you learn to use the camera properly.
● Store this guide safely so that you can use it in the future.
● Click the buttons in the lower right to access other pages.
: Next page
: Previous page
: Page before you clicked a link
● To jump to the beginning of a chapter, click the chapter title at right.
Camera User Guide
ENGLISH
2
Camera Basics
Auto Mode /
Hybrid Auto Mode
Other Shooting Modes
P Mode
Tv, Av, M, and C Mode
Playback Mode
Wi-Fi Functions
Setting Menu
Accessories
Appendix
Before Use
Basic Guide
Index
Advanced Guide
Initial Information
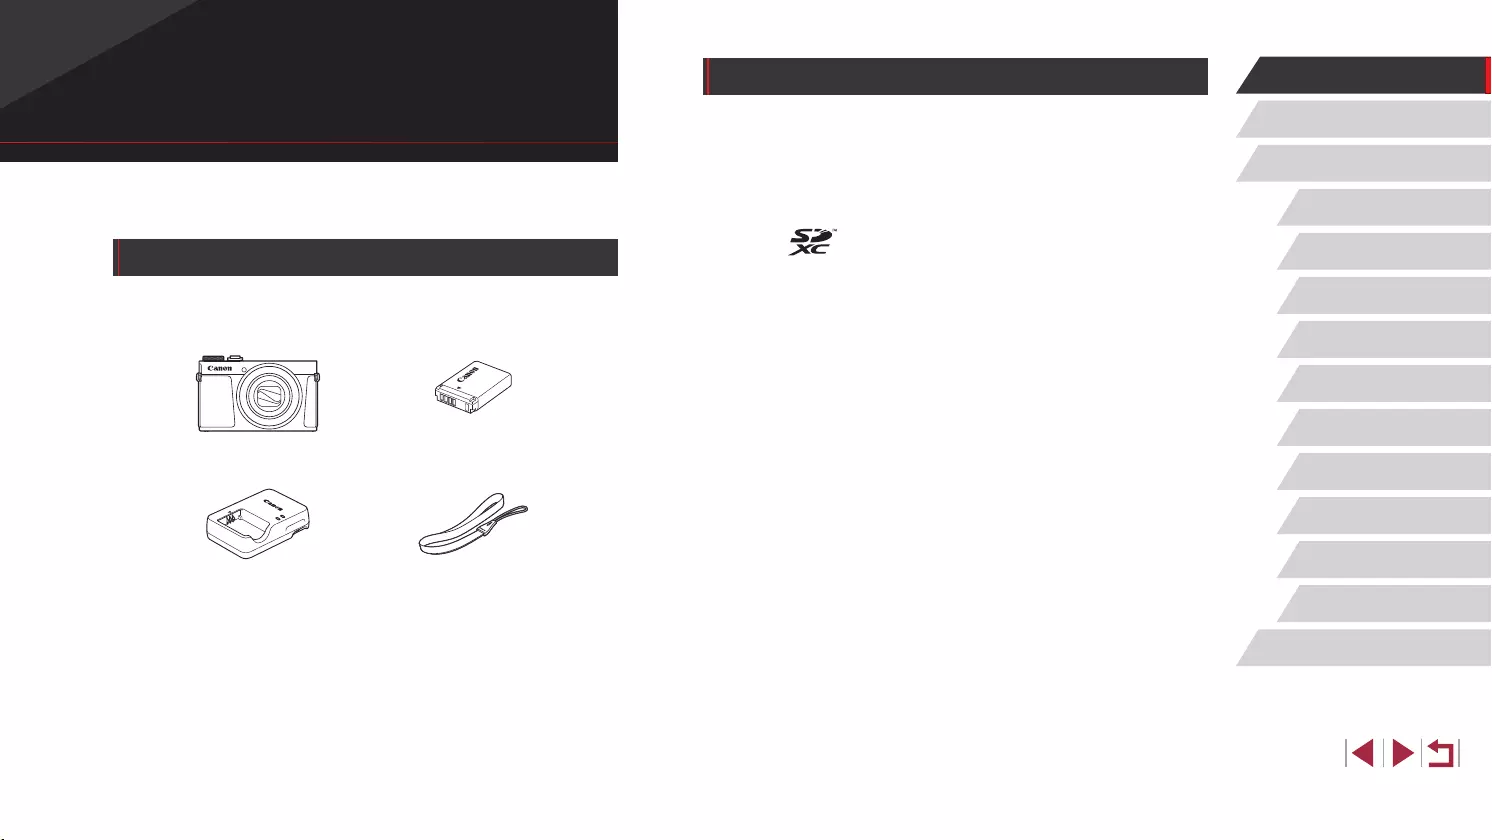
Package Contents
Before use, make sure the following items are included in the package.
If anything is missing, contact your camera retailer.
Camera Battery Pack
NB-13L*
Battery Charger
CB-2LH/CB-2LHE Wrist Strap
* Do not peel off the adhesive covering from a battery pack.
●Printed matter is also included.
●A memory card is not included (=
2).
Compatible Memory Cards
The following memory cards (sold separately) can be used, regardless of
capacity.
●SD memory cards*1
●SDHC memory cards *1*2
●SDXC memory cards*1*2
*1 Cards conforming to SD standards. However, not all memory cards have been
veried to work with the camera.
*2 UHS-I memory cards are also supported.
Before Use

3
Camera Basics
Auto Mode /
Hybrid Auto Mode
Other Shooting Modes
P Mode
Tv, Av, M, and C Mode
Playback Mode
Wi-Fi Functions
Setting Menu
Accessories
Appendix
Before Use
Basic Guide
Index
Advanced Guide
Conventions in This Guide
●In this guide, icons are used to represent the corresponding camera
buttons and dials on which they appear or which they resemble.
●The following camera buttons and controls are represented by icons.
Numbers in parentheses indicate the numbers of corresponding
controls in “Part Names” (=
4).
[] Control ring (10) on front
●Shooting modes and on-screen icons and text are indicated in
brackets.
●: Important information you should know
●: Notes and tips for expert camera use
●: Indicates touch-screen operations
●= xx: Pages with related information (in this example, “xx” represents
a page number)
●Instructions in this guide apply to the camera under default settings.
●For convenience, all supported memory cards are simply referred to as
the “memory card”.
●The symbols “ Still Images” and “ Movies” below titles indicate
how the function is used—whether for still images or movies.
Preliminary Notes and Legal Information
●Take and review some test shots initially to make sure the images
were recorded correctly. Please note that Canon Inc., its subsidiaries
and afliates, and its distributors are not liable for any consequential
damages arising from any malfunction of a camera or accessory,
including memory cards, that result in the failure of an image to be
recorded or to be recorded in a way that is machine readable.
●Images recorded by the camera shall be for personal use. Refrain
from unauthorized recording that infringes on copyright law, and note
that even for personal use, photography may contravene copyright
or other legal rights at some performances or exhibitions, or in some
commercial settings.
●The camera warranty is valid only in the area of purchase. In case of
camera problems while abroad, return to the area of purchase before
contacting a Canon Customer Support Help Desk.
●Although the screen (monitor) is produced under extremely high-
precision manufacturing conditions and more than 99.99% of the
pixels meet design specications, in rare cases some pixels may be
defective or may appear as red or black dots. This does not indicate
camera damage or affect recorded images.
●When the camera is used over an extended period, it may become
warm. This does not indicate damage.
4
Camera Basics
Auto Mode /
Hybrid Auto Mode
Other Shooting Modes
P Mode
Tv, Av, M, and C Mode
Playback Mode
Wi-Fi Functions
Setting Menu
Accessories
Appendix
Before Use
Basic Guide
Index
Advanced Guide
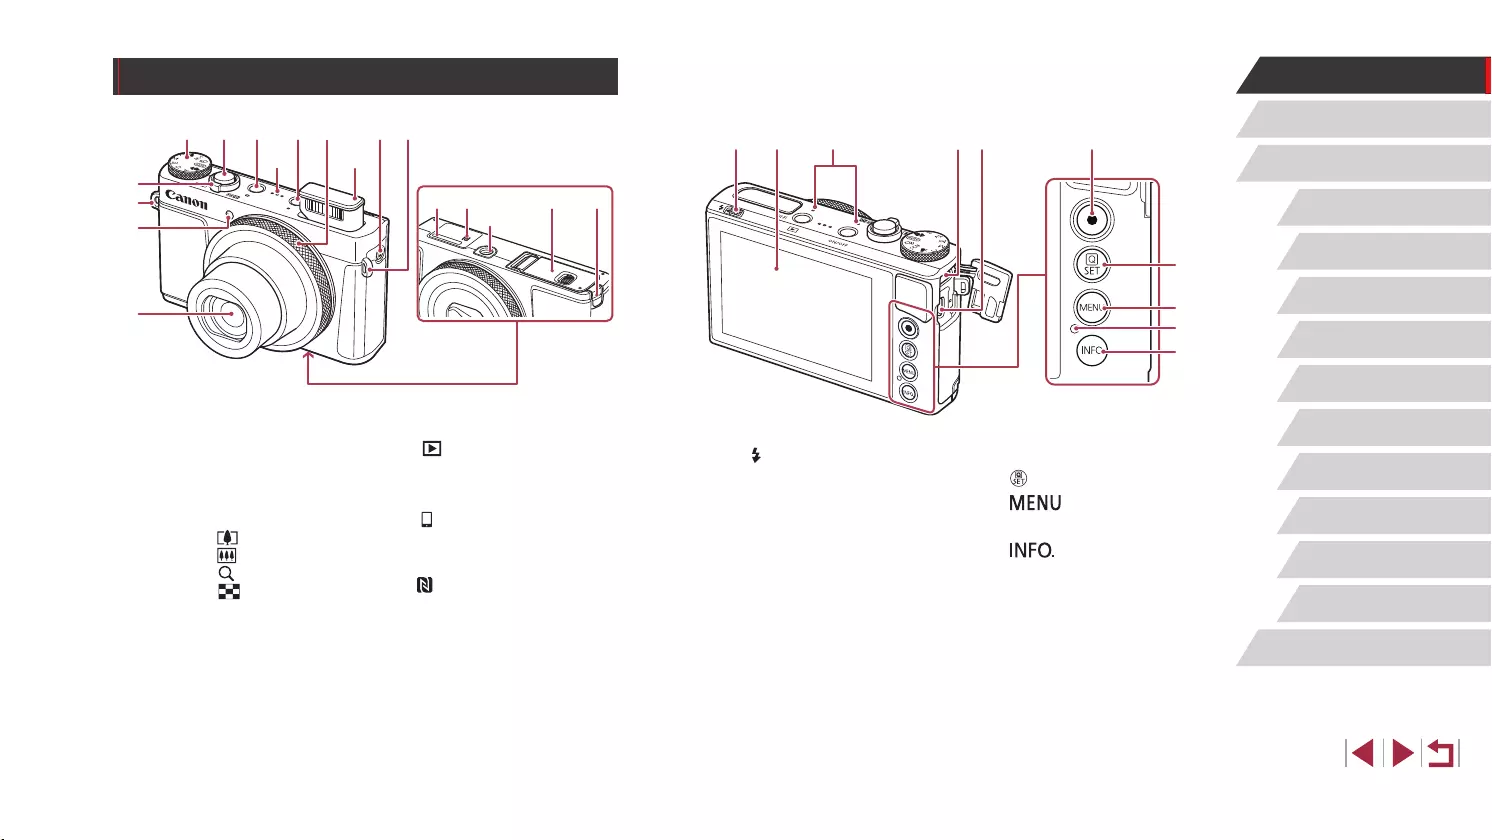
(7)
(10
(6)(2)(1) (3) (4) (5)
(8)
(9)
(1) [ (Flash pop up)] switch
(2) Screen (monitor)*2
(3) Microphone
(4) DIGITAL terminal
(5) HDMI™ terminal
(6) Movie button
(7) [ (Quick Set menu/Set)] button
(8) [ ] button
(9) Indicator / USB charge lamp
(10) [ (Information)] button
*1 Used with NFC features (=
132).
*2 Gestures may not be detected as easily if you apply a screen protector. In this
case, increase the sensitivity of the touch-screen panel (=
164).
Part Names
4)
2)
1)
3)
(11)
(8)
(17)
(14)(13)
(15)
(16)
(1) Lens
(2) Lamp
(3) Strap mount
(4) Zoom lever
Shooting: [ (telephoto)] /
[ (wide angle)]
Playback: [ (magnify)] /
[ (index)]
(5) Mode dial
(6) Shutter button
(7) Power button
(8) Speaker
(9) [ (Playback)] button
(10) Control ring
(11) Flash
(12) [ (Mobile Device Connection)]
button
(13) Serial number (Body number)
(14) (N-Mark)*1
(15) Tripod socket
(16) Memory card/battery cover
(17) DC coupler terminal cover

5
Camera Basics
Auto Mode /
Hybrid Auto Mode
Other Shooting Modes
P Mode
Tv, Av, M, and C Mode
Playback Mode
Wi-Fi Functions
Setting Menu
Accessories
Appendix
Before Use
Basic Guide
Index
Advanced Guide
Table of Contents
Before Use
Initial Information …………………………………………………….. 2
Package Contents ………………………………………………………….. 2
Compatible Memory Cards………………………………………………. 2
Preliminary Notes and Legal Information …………………………… 3
Conventions in This Guide ………………………………………………. 3
Part Names …………………………………………………………………… 4
Common Camera Operations ………………………………………… 12
Safety Precautions ……………………………………………………….. 14
Basic Guide
Basic Operations……………………………………………………. 17
Touch-Screen Operations………………………………………………. 17
Touching …………………………………………………………………………17
Dragging …………………………………………………………………………17
Initial Preparations………………………………………………………… 18
Attaching the Strap ………………………………………………………….. 18
Holding the Camera ………………………………………………………….18
Charging the Battery Pack …………………………………………………18
Inserting the Battery Pack and Your Memory Card ……………….19
Removing the Battery Pack and Memory Card …………………20
Setting the Date and Time ………………………………………………… 20
Changing the Date and Time ………………………………………….21
Display Language ……………………………………………………………. 21
Trying the Camera Out ………………………………………………….. 22
Shooting (Smart Auto) ………………………………………………………22
Viewing …………………………………………………………………………..23
Erasing images …………………………………………………………….24
Advanced Guide
Camera Basics ………………………………………………………. 25
On/Off …………………………………………………………………………. 25
Power-Saving Features (Auto Power Down) ……………………….. 26
Power Saving in Shooting Mode …………………………………….26
Power Saving in Playback Mode ……………………………………. 26
Shutter Button ……………………………………………………………… 26
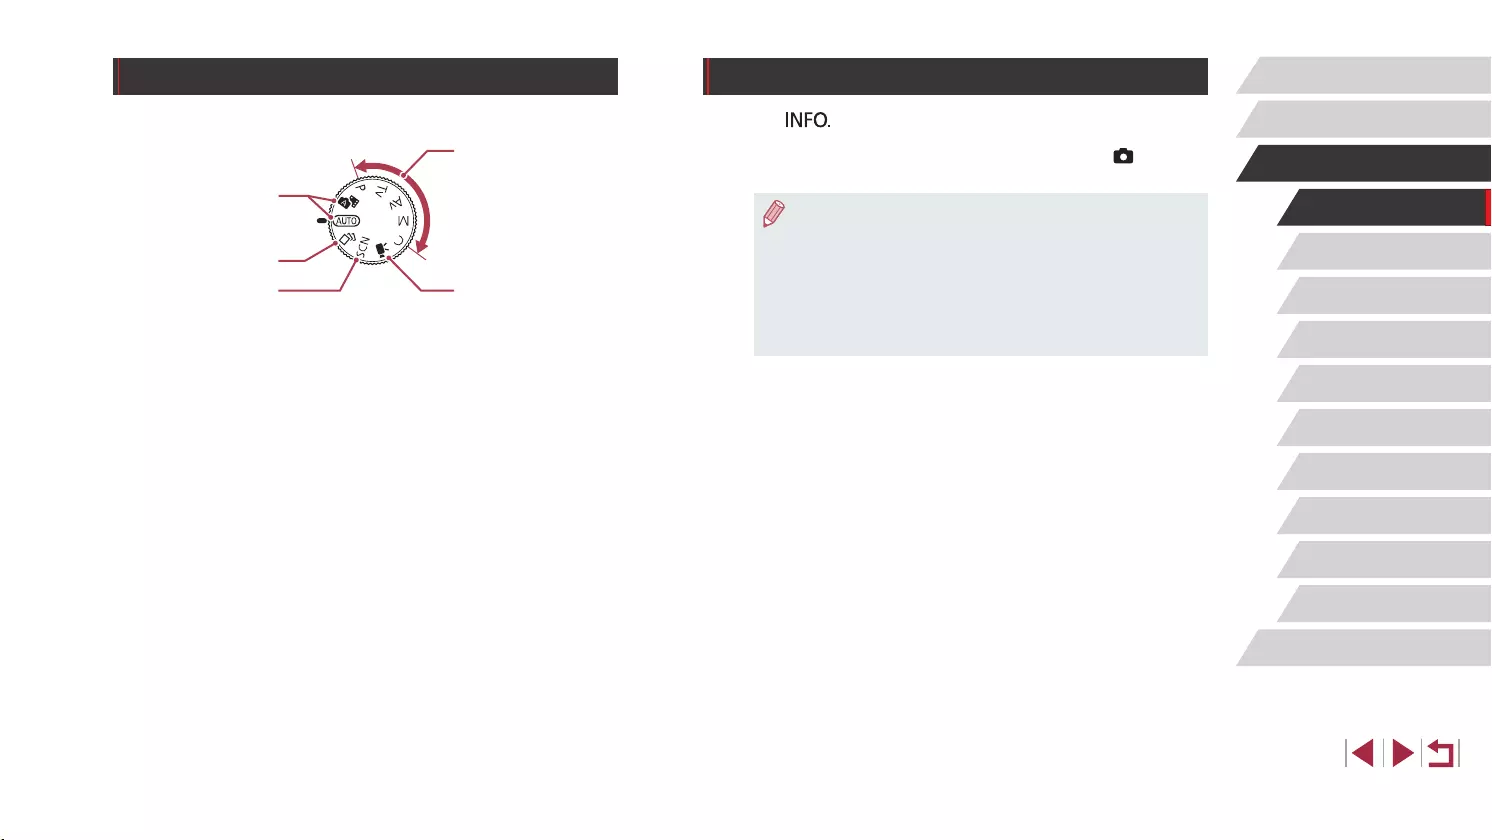
Shooting Modes …………………………………………………………… 27
Shooting Display Options ………………………………………………. 27
Using the Quick Set Menu……………………………………………… 28
Using Touch-Screen Operations to Congure Settings ………….28
Using the Menu Screen …………………………………………………. 29
Touch-Screen Operations ………………………………………………….30
On-Screen Keyboard…………………………………………………….. 30
Indicator Display …………………………………………………………… 31
Clock ………………………………………………………………………….. 32
Auto Mode / Hybrid Auto Mode ……………………………….. 33
Shooting with Camera-Determined Settings …………………….. 33
Shooting (Smart Auto) ………………………………………………………33
Shooting in Hybrid Auto Mode …………………………………………… 35
Digest Movie Playback ………………………………………………….36
Still Images/Movies ………………………………………………………36
Still Images …………………………………………………………………. 36
Movies ………………………………………………………………………..36
Scene Icons ……………………………………………………………………. 37
Continuous Shooting Scenes …………………………………………38
Image Stabilization Icons …………………………………………………..38
On-Screen Frames …………………………………………………………..39
Common, Convenient Features ……………………………………… 39
Zooming In Closer on Subjects (Digital Zoom) …………………….. 39

6
Camera Basics
Auto Mode /
Hybrid Auto Mode
Other Shooting Modes
P Mode
Tv, Av, M, and C Mode
Playback Mode
Wi-Fi Functions
Setting Menu
Accessories
Appendix
Before Use
Basic Guide
Index
Advanced Guide
Preventing the Red-Eye Reduction Lamp from Lighting Up ……53
Changing the Image Display Style after Shots …………………….. 54
Changing the Image Display Period after Shots ……………….54
Changing the Screen Displayed after Shots …………………….54
Other Shooting Modes ……………………………………………. 55
Applying Effects Automatically (Creative Shot) …………………. 55
Enjoying a Variety of Images from Each Shot ………………………55
Choosing Effects ……………………………………………………………..56
Recording Movies with a Variety of Effects…………………………..56
Creative Shot Movie Playback ……………………………………….56
Specic Scenes ……………………………………………………………. 57
Applying Special Effects ………………………………………………… 58
Shooting High-Contrast Scenes (High Dynamic Range) ………..58
Adding Artistic Effects …………………………………………………… 59
Shooting with Faded Colors (Nostalgic) ………………………………59
Shooting with a Fish-Eye Lens Effect (Fish-Eye Effect) ………… 59
Shots Resembling Miniature Models (Miniature Effect) ………….60
Playback Speed and Estimated Playback Time
(for One-Minute Clips) …………………………………………………..60
Shooting with a Toy Camera Effect (Toy Camera Effect) ………..61
Making Subjects Stand Out (Background Defocus) ………………61
Shooting with a Soft Focus Effect ……………………………………….62
Shooting in Monochrome …………………………………………………..62
Special Modes for Other Purposes …………………………………. 63
Shooting Starry Skies (Star) ……………………………………………… 63
Shooting People against Starry Skies (Star Portrait) …………63
Shooting Night Scenes under Starry Skies
(Star Nightscape) …………………………………………………………64
Shooting Star Trails (Star Trails) …………………………………….65
Shooting Movies of Star Movement
(Star Time-Lapse Movie) ……………………………………………….66
Shooting at Preset Focal Lengths (Step Zoom) ……………………40
Using the Self-Timer ………………………………………………………… 40
Using the Self-Timer to Avoid Camera Shake …………………..41
Customizing the Self-Timer ……………………………………………41
Shooting by Touching the Screen (Touch Shutter) ………………..42
Continuous Shooting ………………………………………………………..42
Image Display during Playback ………………………………………43
Using Face ID………………………………………………………………. 43
Personal Information ………………………………………………………..43
Registering Face ID Information ………………………………………… 44
Shooting …………………………………………………………………………45
Checking and Editing Registered Information ………………………45
Overwriting and Adding Face Information ………………………..46
Erasing Registered Information ……………………………………… 47
Image Customization Features ………………………………………. 47
Changing the Aspect Ratio ……………………………………………….. 47
Changing Image Quality …………………………………………………… 48
Correcting Greenish Image Areas from Mercury Lamps ………..48
Changing Movie Image Quality ………………………………………….49
For NTSC Video …………………………………………………………..49
For PAL Video ………………………………………………………………49
Helpful Shooting Features ……………………………………………… 50
Using the Electronic Level ………………………………………………… 50
Magnifying the Area in Focus …………………………………………….50
Checking for Closed Eyes …………………………………………………51
Deactivating Auto Level ……………………………………………………. 51
Changing the IS Mode Settings …………………………………………. 52
Deactivating Image Stabilization …………………………………….52
Recording Movies with Subjects at the Same Size Shown
before Shooting ……………………………………………………………….52
Customizing Camera Operation ……………………………………… 53
Preventing the AF-Assist Beam from Firing ………………………….53

7
Camera Basics
Auto Mode /
Hybrid Auto Mode
Other Shooting Modes
P Mode
Tv, Av, M, and C Mode
Playback Mode
Wi-Fi Functions
Setting Menu
Accessories
Appendix
Before Use
Basic Guide
Index
Advanced Guide
Changing Image Color Tones (My Colors) …………………………..79
Custom Color……………………………………………………………….80
Shooting Range and Focusing ……………………………………….. 80
Shooting Close-Ups (Macro) ……………………………………………..80
Shooting in Manual Focus Mode ……………………………………….. 81
Easily Identifying the Focus Area (MF Peaking) ………………..82
Focus Bracketing (Focus-BKT Mode) ……………………………..82
Digital Tele-Converter ……………………………………………………….83
Choosing the AF Method ………………………………………………….. 83
1-point AF ……………………………………………………………………83
Moving and Resizing AF Frames (1-point AF) …………………..84
+Tracking ………………………………………………………………….84
Shooting with Servo AF …………………………………………………….85
Changing the Focus Setting ………………………………………………85
Choosing a Person to Focus On (Face Select) ……………………. 86
Choosing Subjects to Focus On (Touch AF) ………………………… 86
Shooting with the AF Lock ………………………………………………… 87
Flash…………………………………………………………………………… 87
Changing the Flash Mode …………………………………………………87
Auto ……………………………………………………………………………87
On ………………………………………………………………………………87
Slow Synchro ………………………………………………………………88
Off ……………………………………………………………………………… 88
Adjusting the Flash Exposure Compensation ……………………….88
Shooting with the FE Lock ………………………………………………… 89
Changing the Flash Timing ………………………………………………..89
Other Settings ……………………………………………………………… 90
Changing Image Quality …………………………………………………… 90
Capturing in RAW Format ……………………………………………..90
Using the Menu ……………………………………………………………91
Changing the IS Mode Settings …………………………………………. 91
Adjusting Colors …………………………………………………………..68
Adjusting the Focus ……………………………………………………… 68
Recording Various Movies ……………………………………………… 69
Recording Movies in [ ] Mode ………………………………………….69
Locking or Changing Image Brightness before Recording …. 69
Disabling Auto Slow Shutter ………………………………………….70
Correcting Severe Camera Shake ………………………………………70
Sound Settings ………………………………………………………………..70
Deactivating the Wind Filter …………………………………………..70
Using the Attenuator …………………………………………………….. 71
Recording Short Clips ……………………………………………………….71
Playback Effects …………………………………………………………..71
Recording iFrame Movies ………………………………………………….72
P Mode ………………………………………………………………….. 73
Shooting in Program AE ([P] Mode) ………………………………… 73
Image Brightness (Exposure) …………………………………………. 74
Adjusting Image Brightness (Exposure Compensation) ………… 74
Locking Image Brightness / Exposure (AE Lock) ………………….74
Changing the Metering Method ………………………………………….74
Linking the Spot AE Point Frame to the AF Frame …………….75
Changing the ISO Speed …………………………………………………..75
Adjusting ISO Auto Settings …………………………………………..76
Changing the Noise Reduction Level (High ISO NR) ……………. 76
Auto Exposure Bracketing (AEB Shooting) ………………………….76
Dynamic Range Correction (DR Correction) …………………….77
Shadow Correct ……………………………………………………………77
Adjusting Auto ND Filter Settings ……………………………………….77
Image Colors ……………………………………………………………….. 78
Capturing Natural Colors (White Balance) …………………………..78
Custom White Balance …………………………………………………. 78
Manually Correcting White Balance ………………………………..78

8
Camera Basics
Auto Mode /
Hybrid Auto Mode
Other Shooting Modes
P Mode
Tv, Av, M, and C Mode
Playback Mode
Wi-Fi Functions
Setting Menu
Accessories
Appendix
Before Use
Basic Guide
Index
Advanced Guide
Viewing Short Movies Created When Shooting Still Images
(Digest Movies) ………………………………………………………………106
Viewing by Date ………………………………………………………….106
Checking People Detected in Face ID ……………………………….107
Browsing and Filtering Images ……………………………………… 107
Navigating through Images in an Index …………………………….. 107
Touch-Screen Operations …………………………………………….108
Finding Images Matching Specied Conditions …………………..108
Using the Control Ring to Jump between Images ……………….109
Touch-Screen Operations ……………………………………………. 110
Viewing Individual Images in a Group ………………………………. 110
Editing Face ID Information …………………………………………… 111
Changing Names …………………………………………………………… 111
Erasing Names ……………………………………………………………… 111
Image Viewing Options …………………………………………………112
Magnifying Images ………………………………………………………… 112
Touch-Screen Operations ……………………………………………. 112
Viewing Slideshows ……………………………………………………….. 113
Protecting Images ………………………………………………………..113
Using the Menu …………………………………………………………….. 113
Choosing Images Individually ………………………………………….. 114
Selecting a Range …………………………………………………………. 114
Protecting All Images at Once …………………………………………. 115
Clearing All Protection at Once ……………………………………. 115
Erasing Images ……………………………………………………………115
Erasing Multiple Images at Once ……………………………………… 116
Choosing a Selection Method ……………………………………… 116
Choosing Images Individually ………………………………………. 116
Selecting a Range ……………………………………………………… 117
Specifying All Images at Once ……………………………………… 117
Rotating Images …………………………………………………………..117
Using the Menu …………………………………………………………….. 117
Tv, Av, M, and C Mode …………………………………………….. 92
Specic Shutter Speeds ([Tv] Mode)……………………………….. 92
Specic Aperture Values ([Av] Mode) ………………………..…….. 93
Specic Shutter Speeds and Aperture Values ([M] Mode) ….. 93
Shooting Long Exposures (Bulb)…………………………………….. 94
Adjusting the Flash Output …………………………………………….. 95
Recording Movies at Specic Shutter Speeds and Aperture
Values …………………………………………………………………………. 95
Customizing Controls and Display ………………………………….. 96
Adjusting Settings while Switching Control Ring Functions …….96
Changing Control Ring Settings …………………………………………97
Functions Assignable to the Control Ring ………………………..97
Assigning Functions to the Control Ring ………………………….98
Customizing Display Information ……………………………………….. 98
Customizing the Information Displayed …………………………… 99
Assigning Functions to the Movie Button …………………………….99
Customizing the Quick Set Menu ………………………………….. 100
Choosing Items to Include in the Menu ……………………………..100
Rearranging Menu Items …………………………………………….. 100
Saving Shooting Settings …………………………………………….. 101
Settings That Can Be Saved ………………………………………..101
Saving Commonly Used Shooting Menu Items (My Menu) …..101
Playback Mode …………………………………………………….. 103
Viewing ……………………………………………………………………… 103
Switching Display Modes …………………………………………………105
Overexposure Warning (for Image Highlights) ……………….. 105
Histogram ………………………………………………………………….105
RGB Histogram, GPS Information Display …………………….. 105
Viewing Short Movies Recorded in Creative Shot Mode
(Creative Shot Movies) …………………………………………………… 106

9
Camera Basics
Auto Mode /
Hybrid Auto Mode
Other Shooting Modes
P Mode
Tv, Av, M, and C Mode
Playback Mode
Wi-Fi Functions
Setting Menu
Accessories
Appendix
Before Use
Basic Guide
Index
Advanced Guide
Adding a Smartphone Using the Wi-Fi Menu ……………………..136
Using Another Access Point …………………………………………….137
Previous Access Points …………………………………………………..138
Saving Images to a Computer ………………………………………. 138
Preparing to Register a Computer ……………………………………. 138
Checking Your Computer Environment ………………………….138
Installing the Software …………………………………………………138
Conguring the Computer for a Wi-Fi Connection
(Windows Only) ………………………………………………………….139
Saving Images to a Connected Computer ………………………….140
Conrming Access Point Compatibility ………………………….. 140
Using WPS-Compatible Access Points ………………………….140
Connecting to Listed Access Points ………………………………142
Previous Access Points ……………………………………………….143
Sending Images to a Registered Web Service ………………… 144
Registering Web Services ……………………………………………….144
Registering CANON iMAGE GATEWAY …………………………144
Registering Other Web Services …………………………………..146
Uploading Images to Web Services ………………………………….146
Printing Images Wirelessly from a Connected Printer ………. 147
Sending Images to Another Camera ……………………………… 149
Image Sending Options ……………………………………………….. 150
Sending Multiple Images …………………………………………………150
Choosing Images Individually ……………………………………….150
Selecting a Range ………………………………………………………150
Sending Favorite Images …………………………………………….151
Notes on Sending Images ……………………………………………….151
Choosing the Number of Recording Pixels (Image Size) ……..152
Adding Comments …………………………………………………………. 152
Sending Images Automatically (Image Sync) ………………….. 152
Initial Preparations …………………………………………………………. 152
Preparing the Camera …………………………………………………152
Deactivating Auto Rotation ……………………………………………… 118
Tagging Images as Favorites …………………………………………118
Using the Menu …………………………………………………………….. 118
Convenient Control: Touch Actions …………………………………119
Using Touch Actions Functions ………………………………………… 119
Changing Touch Actions Functions …………………………………..120
Assignable Functions ………………………………………………….120
Editing Still Images ……………………………………………………… 121
Resizing Images …………………………………………………………….121
Using the Menu ……………………………………………………………..121
Cropping ……………………………………………………………………….122
Changing Image Color Tones (My Colors) …………………………123
Correcting Image Brightness (i-Contrast) ………………………….. 123
Correcting Red-Eye ………………………………………………………..124
Editing Movies ……………………………………………………………. 125
Reducing File Sizes ……………………………………………………….. 126
Image Quality of Compressed Movies …………………………..126
Erasing Movie Chapters ………………………………………………….126
Viewing Albums (Story Highlights) ………………………………… 127
Choosing Themes for Albums ………………………………………127
Adding Background Music to Albums ……………………………….. 128
Creating Your Own Albums ………………………………………………129
Combining Short Clips…………………………………………………. 130
Wi-Fi Functions ……………………………………………………. 131
Available Wi-Fi Features ……………………………………………… 131
Sending Images to a Smartphone …………………………………. 132
Sending Images to an NFC-Compatible Smartphone ………….132
Connecting via NFC When Camera Is Off or
in Shooting Mode ……………………………………………………….132
Connecting via NFC When Camera Is in Playback Mode … 134
Sending to a Smartphone Assigned to the Button ……………….134

10
Camera Basics
Auto Mode /
Hybrid Auto Mode
Other Shooting Modes
P Mode
Tv, Av, M, and C Mode
Playback Mode
Wi-Fi Functions
Setting Menu
Accessories
Appendix
Before Use
Basic Guide
Index
Advanced Guide
Customizing Sounds ……………………………………………………….164
Start-Up Screen …………………………………………………………….. 164
Hiding Hints and Tips ………………………………………………………164
Listing Shooting Modes by Icon ………………………………………..164
Increasing Touch-Screen Panel Sensitivity ………………………..164
Automatically Locking the Touch-Screen Panel ………………….165
Metric / Non-Metric Display ……………………………………………..165
Checking Certication Logos …………………………………………… 165
Setting Copyright Information to Record in Images ……………..165
Deleting All Copyright Information …………………………………166
Adjusting Other Settings …………………………………………………. 166
Restoring Default Camera Settings ………………………………….. 166
Accessories …………………………………………………………. 167
System Map ………………………………………………………………. 167
Optional Accessories …………………………………………………… 168
Power Supplies ………………………………………………………………168
Flash Unit ……………………………………………………………………..169
Other Accessories ………………………………………………………….169
Printers …………………………………………………………………………169
Photo and Movie Storage ……………………………………………….. 169
Using Optional Accessories………………………………………….. 170
Playback on a TV …………………………………………………………..170
Powering the Camera with Household Power ……………………. 171
Inserting and Charging the Battery Pack………………………… 172
Using a Computer to Charge the Battery ……………………….173
Using the Software ……………………………………………………… 173
Computer Connections via a Cable ………………………………….. 174
Checking Your Computer Environment ………………………….174
Installing the Software …………………………………………………174
Saving Images to a Computer …………………………………………. 174
Printing Images ………………………………………………………….. 175
Preparing the Computer ………………………………………………153
Sending Images ……………………………………………………………..154
Viewing Images Sent via Image Sync on a Smartphone…..154
Using a Smartphone to View Camera Images and
Control the Camera …………………………………………………….. 155
Geotagging Images on the Camera ………………………………….155
Shooting Remotely …………………………………………………………155
Editing or Erasing Wi-Fi Settings…………………………………… 156
Editing Connection Information ………………………………………..156
Changing a Device Nickname ………………………………………157
Erasing Connection Information ……………………………………157
Changing the Camera Nickname ………………………………….157
Returning the Wi-Fi Settings to Default ……………………………..158
Setting Menu ………………………………………………………… 159
Adjusting Basic Camera Functions ……………………………….. 159
Date-Based Image Storage …………………………………………….. 159
File Numbering ………………………………………………………………159
Formatting Memory Cards ………………………………………………. 160
Low-Level Formatting …………………………………………………. 160
Changing the Video System …………………………………………….160
Electronic Level Calibration …………………………………………….. 161
Resetting the Electronic Level ……………………………………… 161
Switching the Color of Screen Information …………………………161
Using Eco Mode …………………………………………………………….161
Power-Saving Adjustment ……………………………………………….162
Screen Brightness ………………………………………………………….162
World Clock …………………………………………………………………..162
Date and Time ……………………………………………………………….163
Lens Retraction Timing …………………………………………………… 163
Display Language ………………………………………………………….. 163
Silencing Camera Operations …………………………………………..163
Adjusting the Volume ………………………………………………………164

11
Camera Basics
Auto Mode /
Hybrid Auto Mode
Other Shooting Modes
P Mode
Tv, Av, M, and C Mode
Playback Mode
Wi-Fi Functions
Setting Menu
Accessories
Appendix
Before Use
Basic Guide
Index
Advanced Guide
[1] Tab …………………………………………………………………..195
[2] Tab …………………………………………………………………..196
[3] Tab …………………………………………………………………..197
[4] Tab …………………………………………………………………..198
[5] Tab …………………………………………………………………..199
[6] Tab …………………………………………………………………..200
[7] Tab …………………………………………………………………..201
[8] Tab …………………………………………………………………..201
Set Up Tab ……………………………………………………………………. 202
My Menu Tab …………………………………………………………………202
Playback Tab …………………………………………………………………202
Handling Precautions ………………………………………………….. 203
Specications …………………………………………………………….. 204
Camera ………………………………………………………………………… 204
Number of Shots/Recording Time, Playback Time ……………… 205
Shooting Range …………………………………………………………….. 205
Number of Shots per Memory Card …………………………………..205
Recording Time per Memory Card ……………………………………206
Battery Pack NB-13L ………………………………………………………206
Battery Charger CB-2LH/CB-2LHE …………………………………..206
Compact Power Adapter CA-DC30/CA-DC30E ………………….206
Index…………………………………………………………………………. 207
Wi-Fi (Wireless LAN) Precautions …………………………………. 209
Radio Wave Interference Precautions ………………………………. 209
Security Precautions ……………………………………………………….209
Trademarks and Licensing …………………………………………..210
Disclaimer ………………………………………………………………….210
Easy Print ……………………………………………………………………..175
Conguring Print Settings ……………………………………………….. 176
Cropping Images before Printing …………………………………..177
Choosing Paper Size and Layout before Printing ……………177
Available Layout Options …………………………………………….. 178
Printing ID Photos ………………………………………………………178
Printing Movie Scenes ……………………………………………………. 178
Movie Printing Options ………………………………………………..178
Adding Images to the Print List (DPOF) …………………………….179
Conguring Print Settings …………………………………………….179
Setting Up Printing for Individual Images ……………………….179
Setting Up Printing for a Range of Images …………………….. 180
Setting Up Printing for All Images ………………………………….180
Clearing All Images from the Print List …………………………..180
Printing Images Added to the Print List (DPOF) ……………… 180
Adding Images to a Photobook ………………………………………..181
Choosing a Selection Method ………………………………………181
Adding Images Individually …………………………………………..181
Adding All Images to a Photobook ………………………………..181
Removing All Images from a Photobook ………………………..181
Appendix ……………………………………………………………… 182
Troubleshooting ………………………………………………………….. 182
On-Screen Messages………………………………………………….. 186
On-Screen Information ………………………………………………… 188
Shooting (Information Display) …………………………………………188
Battery Level ……………………………………………………………..188
Playback (Detailed Information Display) …………………………….189
Summary of Movie Control Panel ………………………………….189
Functions and Menu Tables …………………………………………. 190
Functions Available in Each Shooting Mode ………………………190
Quick Set Menu ……………………………………………………………..192
Shooting Tab ………………………………………………………………….195
12
Camera Basics
Auto Mode /
Hybrid Auto Mode
Other Shooting Modes
P Mode
Tv, Av, M, and C Mode
Playback Mode
Wi-Fi Functions
Setting Menu
Accessories
Appendix
Before Use
Basic Guide
Index
Advanced Guide
Common Camera Operations
Shoot
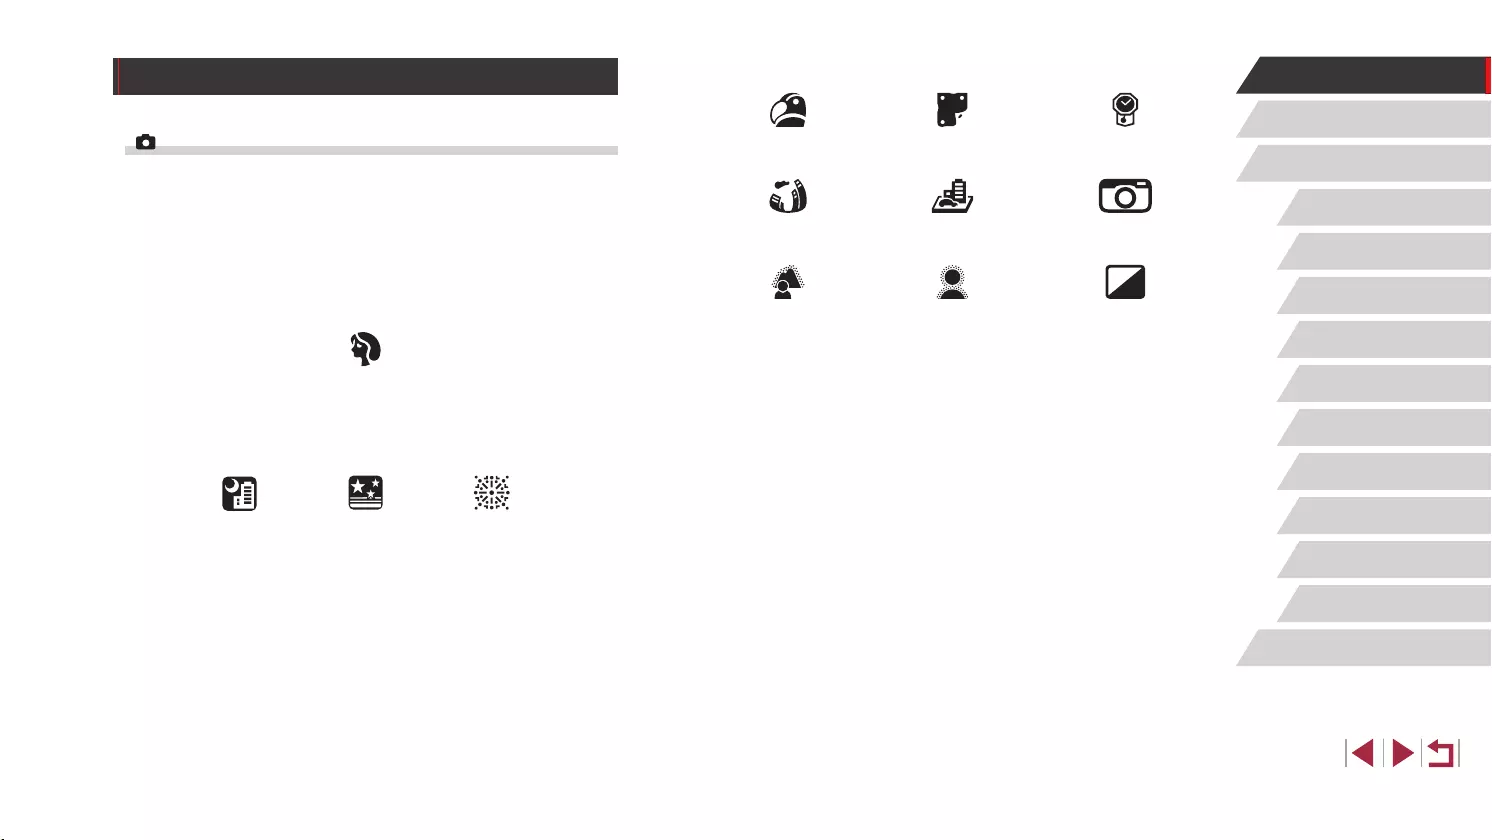
●Use camera-determined settings (Auto Mode, Hybrid Auto Mode)
— =
33, =
35
●See several effects applied to each shot, using camera-determined
settings (Creative Shot Mode)
— =
55
Shooting people well
Portraits
(=
57)
Matching specic scenes
Night Scenes
(=
57)
Starry Skies
(=
63)
Fireworks
(=
57)
Applying special effects
Vivid Colors
(=
58)
Poster Effect
(=
58)
“Aged” Photos
(=
59)
Fish-Eye Effect
(=
59)
Miniature Effect
(=
60)
Toy Camera Effect
(=
61)
Background Defocus
(=
61)
Soft Focus
(=
62)
Monochrome
(=
62)
●Focus on faces
— =
33, =
57, =
84
●Without using the ash (Flash Off)
— =
33
●Include yourself in the shot (Self-Timer)
— =
40
●Movie clips and photos together (Movie Digest)
— =
35

13
Camera Basics
Auto Mode /
Hybrid Auto Mode
Other Shooting Modes
P Mode
Tv, Av, M, and C Mode
Playback Mode
Wi-Fi Functions
Setting Menu
Accessories
Appendix
Before Use
Basic Guide
Index
Advanced Guide
Save
●Save images to a computer
— =
174
Use Wi-Fi Functions
●Send images to a smartphone
— =
132
●Share images online
— =
144
●Send images to a computer
— =
152
View
●View images (Playback Mode)
— =
103
●Automatic playback (Slideshow)
— =
113
●On a TV
— =
170
●On a computer
— =
174
●Browse through images quickly
— =
107
●Erase images
— =
115
●Create an album automatically
— =
127
Record/View Movies
●Record movies
— =
33, =
69, =
95
●View movies (Playback Mode)
— =
103
●Print pictures
— =
175

14
Camera Basics
Auto Mode /
Hybrid Auto Mode
Other Shooting Modes
P Mode
Tv, Av, M, and C Mode
Playback Mode
Wi-Fi Functions
Setting Menu
Accessories
Appendix
Before Use
Basic Guide
Index
Advanced Guide
●If your model has a viewnder or interchangeable lens, do not look
through the viewnder or lens at bright light sources (such as the sun
on a clear day, or a bright articial light source).
This may damage your eyesight.
●If your model has an interchangeable lens, do not leave the lens (or
the camera with the lens attached) in the sun without the lens cap on.
This could result in a re.
●Do not touch the product during thunderstorms if it is plugged in.
This could result in electrical shock or re. Immediately stop using the
product and distance yourself from it.
●Use only the recommended battery pack/batteries.
●Do not place the battery pack/batteries near or in direct ame.
This may cause the battery pack/batteries to explode or leak, resulting in
electrical shock, re, or injuries. If leaking battery electrolyte comes into
contact with eyes, mouth, skin, or clothing, immediately ush with water.
●If the product uses a battery charger, note the following precautions.
— Remove the plug periodically and, using a dry cloth, wipe away any
dust and dirt that has collected on the plug, the exterior of the power
outlet, and the surrounding area.
— Do not insert or remove the plug with wet hands.
— Do not use the equipment in a manner that exceeds the rated
capacity of the electrical outlet or wiring accessories. Do not use if
the plug is damaged or not fully inserted in the outlet.
— Do not allow dust or metal objects (such as pins or keys) to contact
the terminals or plug.
— Do not cut, damage, alter, or place heavy items on the power cord, if
your product uses one.
This could result in electrical shock or re.
●Turn the camera off in places where camera use is prohibited.
The electromagnetic waves emitted by the camera may interfere with the
operation of electronic instruments and other devices. Exercise adequate
caution when using the product in places where use of electronic devices
is restricted, such as inside airplanes and medical facilities.
Safety Precautions
●Before using the product, ensure that you read the safety precautions
described below. Always ensure that the product is used correctly.
●The safety precautions noted here are intended to prevent you and
other persons from being injured or incurring property damage.
●Be sure to also check the guides included with any separately sold
accessories you use.
Warning
Denotes the possibility of serious injury or death.
●Do not trigger the ash in close proximity to people’s eyes.
Exposure to the intense light produced by the ash could damage
eyesight. In particular, remain at least 1 meter (3.3 feet) away from infants
when using the ash.
●Store this equipment out of the reach of children and infants.
A strap wound around a child’s neck may result in asphyxiation.
If your product uses a power cord, mistakenly winding the cord around a
child’s neck may result in asphyxiation.
●Use only recommended power sources.
●Do not disassemble, alter, or apply heat to the product.
●Do not peel off the adhesive covering, if the battery pack has it.
●Avoid dropping or subjecting the product to severe impacts.
●Do not touch the interior of the product if it is broken, such as when
dropped.
●Stop using the product immediately if it emits smoke or a strange
smell, or otherwise behaves abnormally.
●Do not use organic solvents such as alcohol, benzine, or thinner to
clean the product.
●Avoid contact with liquid, and do not allow liquid or foreign objects
inside.
This could result in electrical shock or re.
If the product gets wet, or if liquid or foreign objects get inside, remove the
battery pack/batteries or unplug immediately.

15
Camera Basics
Auto Mode /
Hybrid Auto Mode
Other Shooting Modes
P Mode
Tv, Av, M, and C Mode
Playback Mode
Wi-Fi Functions
Setting Menu
Accessories
Appendix
Before Use
Basic Guide
Index
Advanced Guide
●On products that raise and lower the ash automatically, make sure to
avoid pinching your ngers with the lowering ash.
This could result in injury.
Caution
Denotes the possibility of property damage.
●Do not aim the camera at intense light sources, such as the sun on a
clear day or an intense articial light source.
Doing so may damage the image sensor or other internal components.
●When using the camera on a sandy beach or at a windy location, be
careful not to allow dust or sand to enter the camera.
●On products that raise and lower the ash automatically, do not push
the ash down or pry it open.
This may cause the product to malfunction.
●Wipe off any dust, grime, or other foreign matter on the ash with a
cotton swab or cloth.
The heat emitted from the ash may cause foreign matter to smoke or the
product to malfunction.
●Remove and store the battery pack/batteries when you are not using
the product.
Any battery leakage that occurs may cause product damage.
●Before you discard the battery pack/batteries, cover the terminals with
tape or other insulators.
Contacting other metal materials may lead to re or explosions.
●Unplug any battery charger used with the product when not in use. Do
not cover with a cloth or other objects when in use.
Leaving the unit plugged in for a long period of time may cause it to
overheat and distort, resulting in re.
●Do not leave any dedicated battery packs near pets.
Pets biting the battery pack could cause leakage, overheating, or
explosion, resulting in product damage or re.
●Do not allow the camera to maintain contact with skin for extended
periods.
Even if the camera does not feel hot, this may cause low-temperature
burns, manifested in redness of the skin or blistering. Use a tripod in hot
places, or if you have poor circulation or insensitive skin.
Caution
Denotes the possibility of injury.
●When carrying the product by the strap, be careful not to bang it,
subject it to strong impacts or shocks, or let it get caught on other
objects.
●Be careful not to bump or push strongly on the lens.
This could lead to injury or damage the camera.
●Be careful not to subject the screen to strong impacts.
If the screen cracks, injury may result from the broken fragments.
●When using the ash, be careful not to cover it with your ngers or
clothing.
This could result in burns or damage to the ash.
●Avoid using, placing, or storing the product in the following places:
— Places subject to direct sunlight
— Places subject to temperatures above 40 °C (104 °F)
— Humid or dusty places
These could cause leakage, overheating, or an explosion of the battery
pack/batteries, resulting in electrical shock, re, burns, or other injuries.
Overheating and damage may result in electrical shock, re, burns, or
other injuries.
●The slideshow transition effects may cause discomfort when viewed
for prolonged periods.
●When using optional lenses, lens lters, or lter adapters (if
applicable), be sure to attach these accessories rmly.
If the lens accessory becomes loose and falls off, it may crack, and the
shards of glass may lead to cuts.

16
Camera Basics
Auto Mode /
Hybrid Auto Mode
Other Shooting Modes
P Mode
Tv, Av, M, and C Mode
Playback Mode
Wi-Fi Functions
Setting Menu
Accessories
Appendix
Before Use
Basic Guide
Index
Advanced Guide
●If your product uses multiple batteries, do not use batteries that
have different levels of charge together, and do not use old and
new batteries together. Do not insert the batteries with the + and –
terminals reversed.
This may cause the product to malfunction.
●When putting the camera in your bag, ensure that hard objects do not
come into contact with the screen. Also close the screen (so that it
faces the body), if your product’s screen closes.
●Do not attach any hard objects to the product.
Doing so may cause malfunctions or damage the screen.
17
Camera Basics
Auto Mode /
Hybrid Auto Mode
Other Shooting Modes
P Mode
Tv, Av, M, and C Mode
Playback Mode
Wi-Fi Functions
Setting Menu
Accessories
Appendix
Before Use
Index
Advanced Guide
Basic Guide
Touch-Screen Operations
The camera’s touch-screen panel enables intuitive operation simply by
touching or tapping the screen.
Touching
Touch the screen briey with your nger.
zThis gesture is used to shoot, congure
camera functions, and so on.
Dragging
Touch the screen and move your nger
across it.
zThis gesture is used in Playback mode
to switch to the next image, or to change
the magnied image area, among other
operations.
Basic information and instructions, from initial
preparations to shooting and playback
Basic Guide
Basic Operations
18
Camera Basics
Auto Mode /
Hybrid Auto Mode
Other Shooting Modes
P Mode
Tv, Av, M, and C Mode
Playback Mode
Wi-Fi Functions
Setting Menu
Accessories
Appendix
Before Use
Index
Advanced Guide
Basic Guide
Charging the Battery Pack
Before use, charge the battery pack with the included charger. Be sure to
charge the battery pack initially, because the camera is not sold with the
battery pack charged.
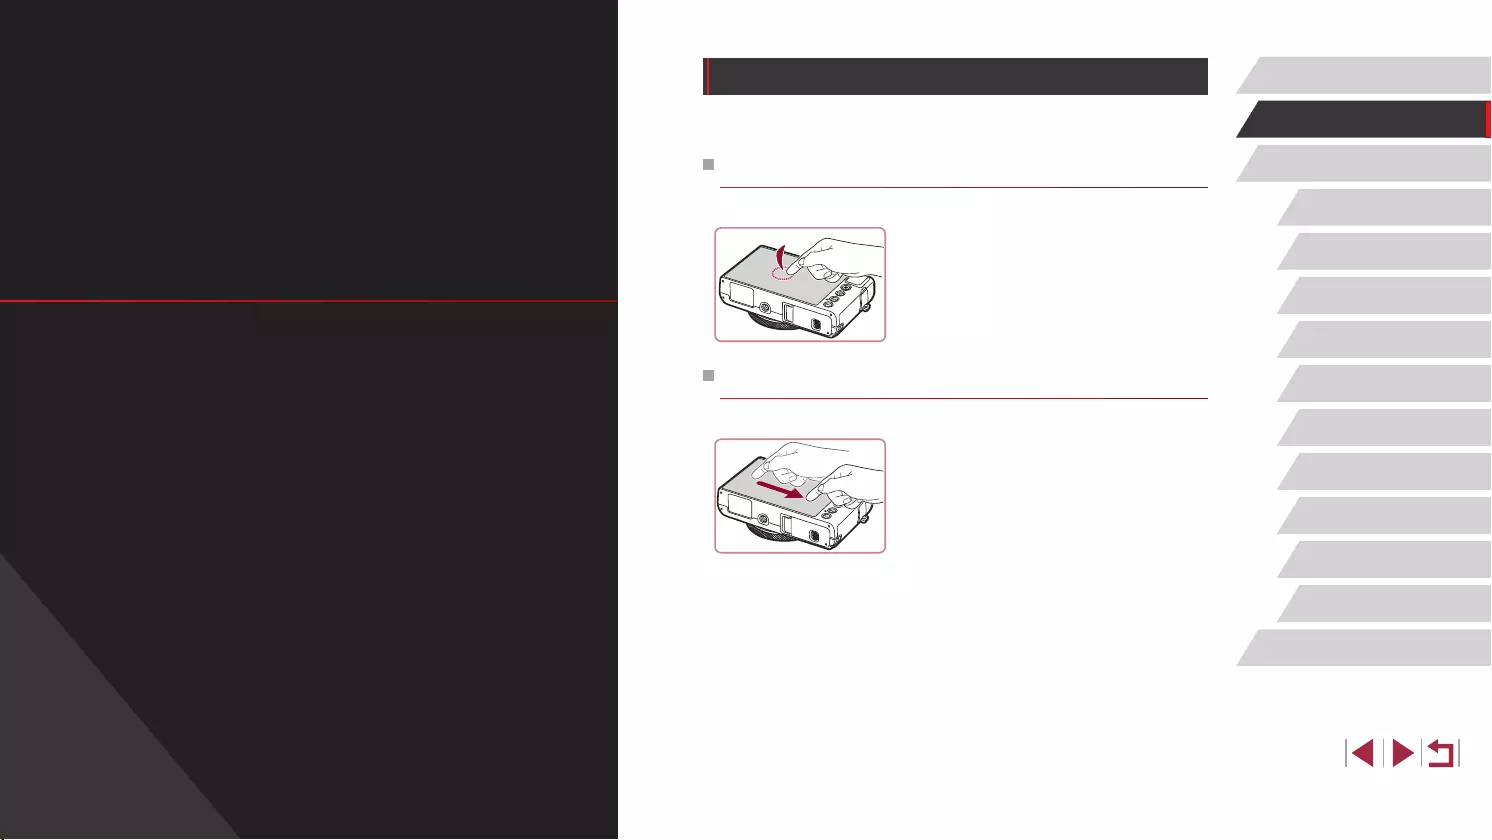
1 Insert the battery pack.
zAfter aligning the marks on the battery
pack and charger, insert the battery pack
by pushing it in (1) and down (2).
2 Charge the battery pack.
zCB-2LH: Flip out the plug (1) and plug
the charger into a power outlet (2).
zCB-2LHE: Plug the power cord into the
charger, then plug the other end into a
power outlet.
zThe charging lamp turns orange, and
charging begins.
zWhen charging is nished, the lamp turns
green.
3 Remove the battery pack.
zAfter unplugging the battery charger,
remove the battery pack by pushing it in
(1) and up (2).
●To protect the battery pack and keep it in optimal condition, do not
charge it continuously for more than 24 hours.
●For battery chargers that use a power cord, do not attach
the charger or cord to other objects. Doing so could result in
malfunction or damage to the product.
(1)
(2)
(1)
(2)
CB-2LH
(2)
(1)
Initial Preparations
Prepare for shooting as follows.
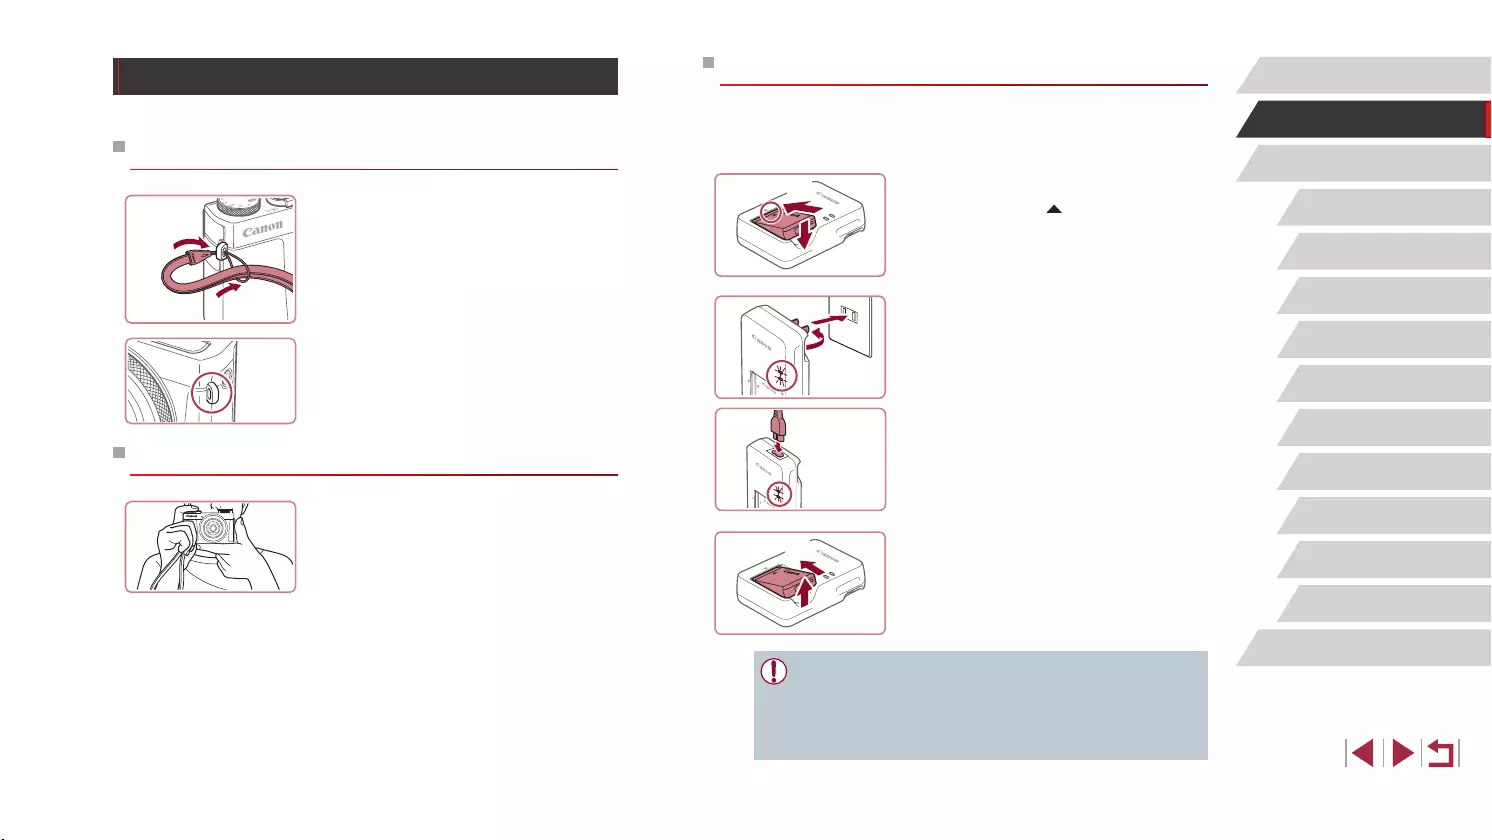
Attaching the Strap
zThread the end of the strap through the
strap mount (1), and then pull the other
end of the strap through the loop on the
threaded end (2).
zThe strap can also be attached to the left
side of the camera.
Holding the Camera
zPlace the strap around your wrist.
zWhen shooting, keep your arms close to
your body and hold the camera securely
to prevent it from moving. If you have
raised the ash, do not rest your ngers
on it.
(2)
(1)

19
Camera Basics
Auto Mode /
Hybrid Auto Mode
Other Shooting Modes
P Mode
Tv, Av, M, and C Mode
Playback Mode
Wi-Fi Functions
Setting Menu
Accessories
Appendix
Before Use
Index
Advanced Guide
Basic Guide
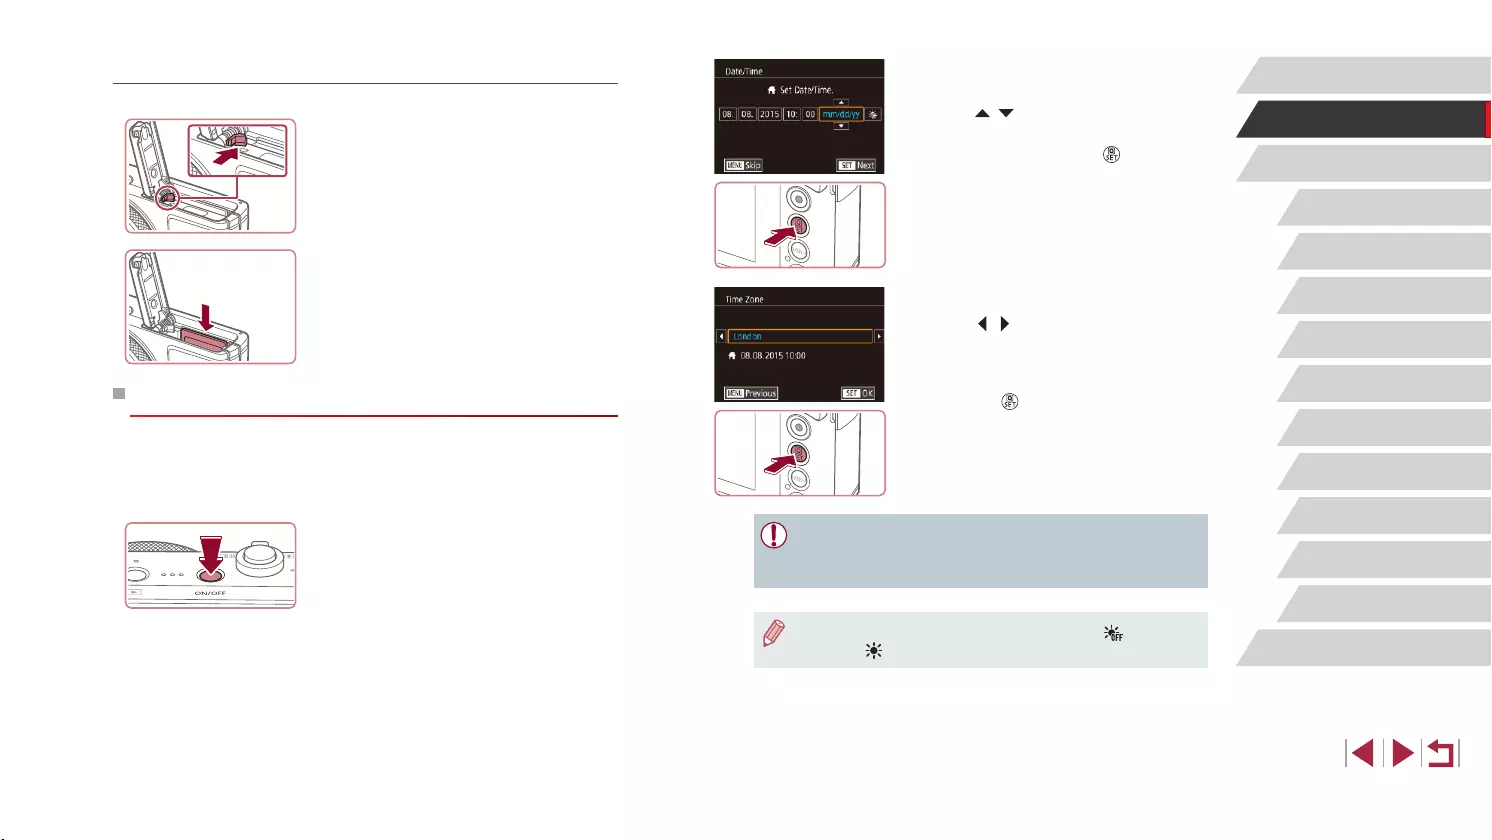
2 Insert the battery pack.
zHolding the battery pack with the terminals
in the position shown (1), hold the battery
lock toward (2) and insert the battery pack
toward (3) until the lock clicks shut.
zIf you insert the battery pack facing the
wrong way, it cannot be locked into the
correct position. Always conrm that the
battery pack is facing the right way and
locks when inserted.
3 Check your card’s write-protect
switch and insert the memory card.
zRecording is not possible on memory
cards with a write-protect switch when the
switch is in the locked position. Move the
switch toward (1).
zInsert the memory card with the label (2)
facing as shown until it clicks into place.
zMake sure the memory card is facing the
right way when you insert it. Inserting
memory cards facing the wrong way may
damage the camera.
4 Close the cover.
zLower the cover (1) and hold it down as
you slide the switch, until it clicks into the
closed position (2).
●For guidelines on how many shots or hours of recording can be
saved on one memory card, see “Number of Shots per Memory
Card” (=
205).
(3)
(1)
(2)
(2)
(1)
(1)
(2)
●For details on charging time and the number of shots and
recording time possible with a fully charged battery pack, see
“Number of Shots/Recording Time, Playback Time” (=
205).
●Charged battery packs gradually lose their charge, even when
they are not used. Charge the battery pack on (or immediately
before) the day of use.
●As a visual reminder of the charge status, attach the battery cover
with visible on a charged battery pack and concealed on an
uncharged one.
●The charger can be used in areas with 100 – 240 V AC power
(50/60 Hz). For power outlets in a different format, use a
commercially available adapter for the plug. Never use an
electrical transformer designed for traveling, which may damage
the battery pack.
Inserting the Battery Pack and Your Memory
Card
Insert the included battery pack and a memory card (sold separately).
Note that before using a memory card that is new or has been formatted
in another device, you should format the memory card with this camera
(=
160).
1 Open the cover.
zSlide the switch (1) and open the cover
(2).
(2)
(1)
20
Camera Basics
Auto Mode /
Hybrid Auto Mode
Other Shooting Modes
P Mode
Tv, Av, M, and C Mode
Playback Mode
Wi-Fi Functions
Setting Menu
Accessories
Appendix
Before Use
Index
Advanced Guide
Basic Guide
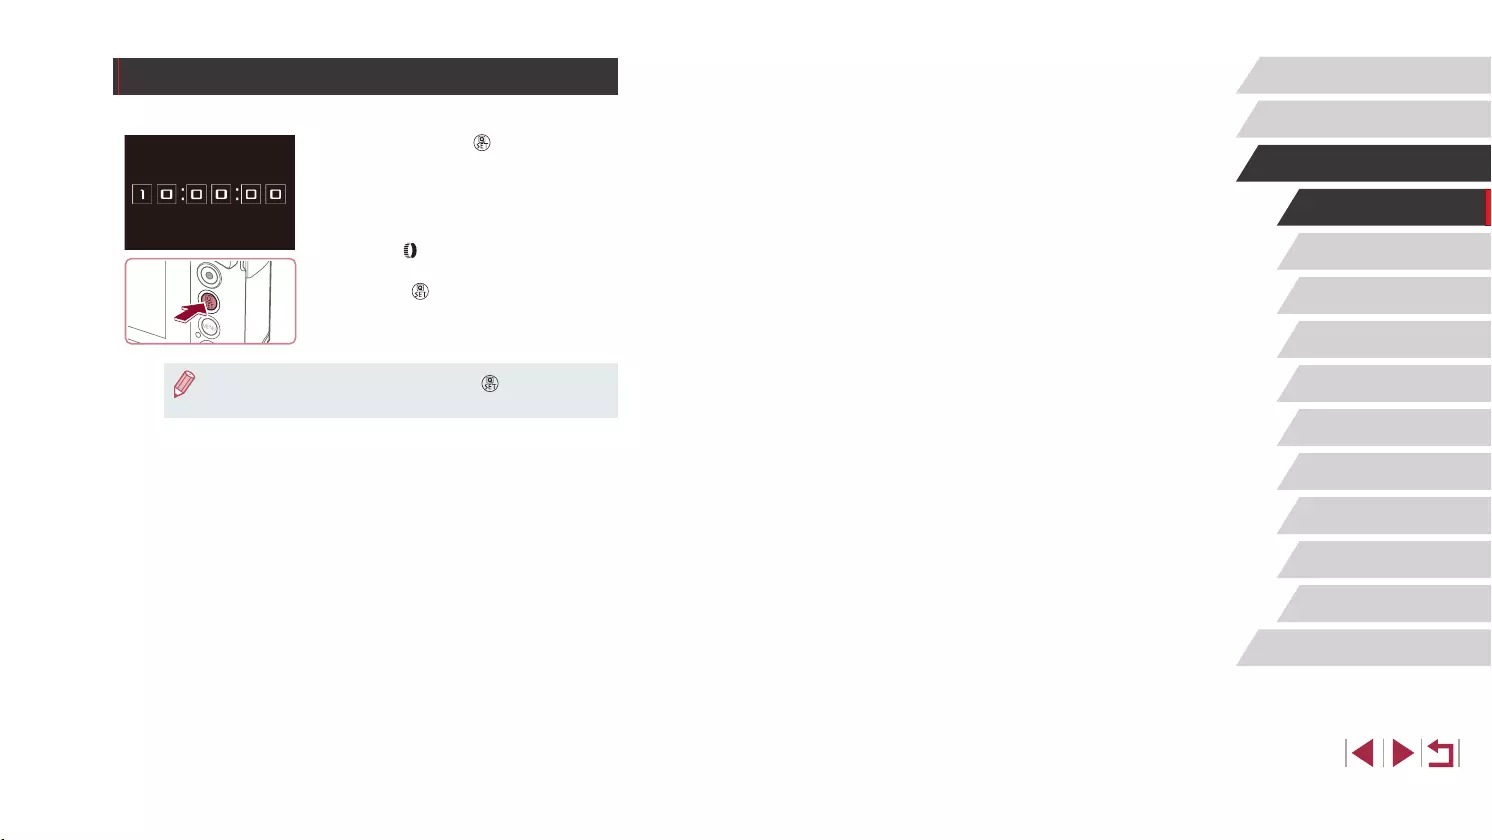
2 Set the date and time.
zTouch the item to congure, and then
touch [ ][ ] to specify the date and
time.
zWhen nished, press the [ ] button.
3 Specify your home time zone.
zTouch [ ][ ] to choose your home time
zone.
4 Finish the setup process.
zPress the [ ] button when nished.
After a conrmation message, the setting
screen is no longer displayed.
zTo turn off the camera, press the power
button.
●Unless you set the date, time, and home time zone, the [Date/
Time] screen will be displayed each time you turn the camera on.
Specify the correct information.
●To set daylight saving time (1 hour ahead), touch [ ] and
choose [ ] in step 2.
Removing the Battery Pack and Memory Card
Remove the battery pack.
zOpen the cover and press the battery
lock in the direction of the arrow.
zThe battery pack will pop up.
Remove the memory card.
zPush the memory card in until it clicks,
and then slowly release it.
zThe memory card will pop up.
Setting the Date and Time
Set the current date and time correctly as follows if the [Date/Time] screen
is displayed when you turn the camera on. Information you specify this
way is recorded in image properties when you shoot, and it is used when
you manage images by shooting date or print images showing the date.
1 Turn the camera on.
zPress the power button.
zThe [Date/Time] screen is displayed.
21
Camera Basics
Auto Mode /
Hybrid Auto Mode
Other Shooting Modes
P Mode
Tv, Av, M, and C Mode
Playback Mode
Wi-Fi Functions
Setting Menu
Accessories
Appendix
Before Use
Index
Advanced Guide
Basic Guide
Display Language
Change the display language as needed.
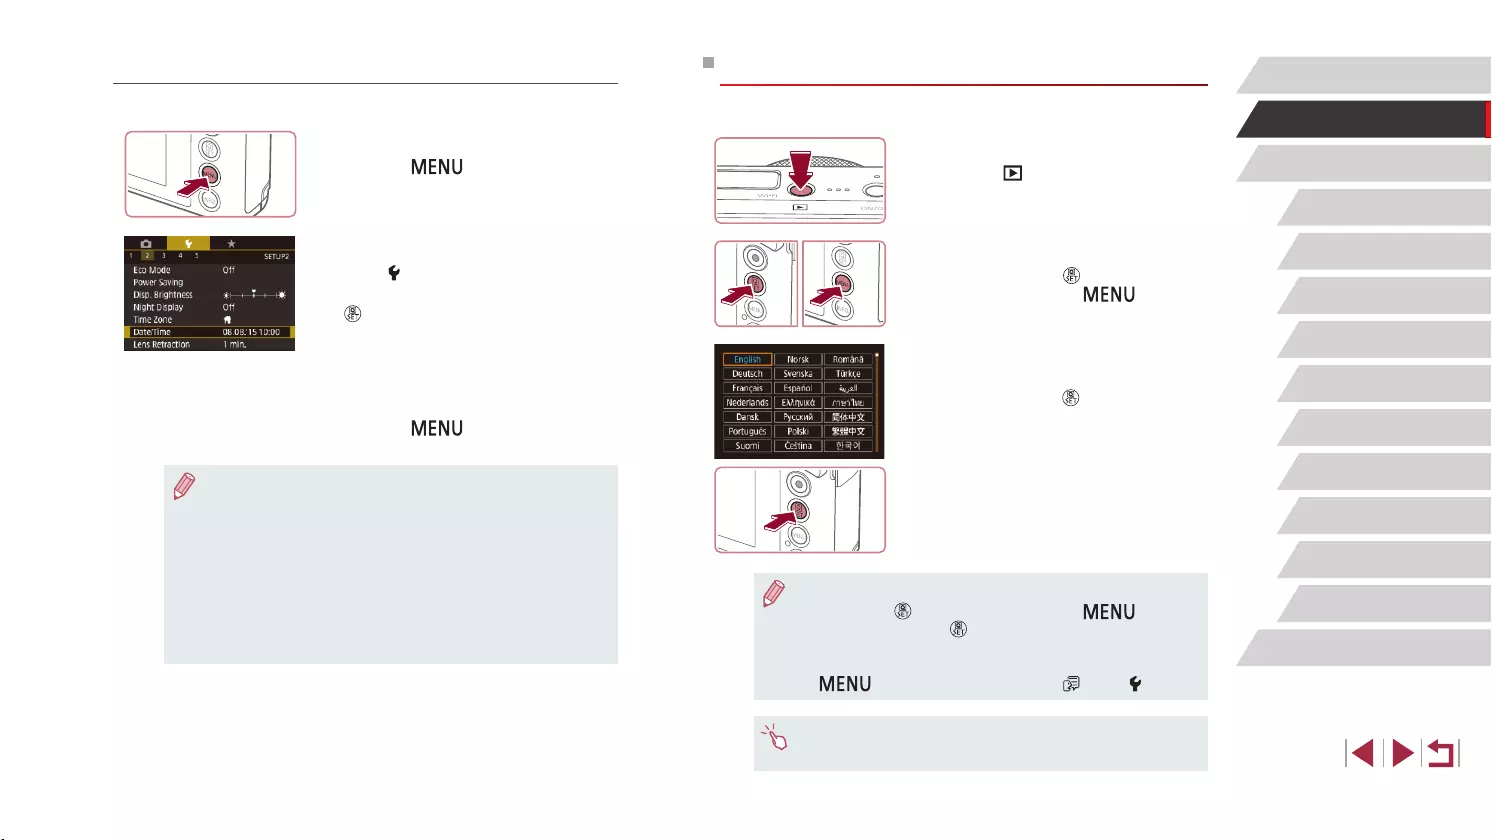
1 Enter Playback mode.
zPress the [ ] button.
2 Access the setting screen.
zPress and hold the [ ] button, and then
immediately press the [ ] button.
3 Set the display language.
zTouch a display language to choose it,
and then press the [ ] button.
zOnce the display language has been set,
the setting screen is no longer displayed.
●The current time is displayed if you wait too long in step 2 after
pressing the [ ] button before you press the [ ] button.
In this case, press the [ ] button to dismiss the time display and
repeat step 2.
●You can also change the display language by pressing the
[] button and choosing [Language ] on the [ 3] tab.
●You can also set the display language by touching a language on
the screen in step 3 and then touching it again.
Changing the Date and Time
Adjust the date and time as follows.
1 Access the menu screen.
zPress the [ ] button.
2 Choose [Date/Time].
zTouch [ ], and then touch [2].
zTouch [Date/Time], and then press the
[] button.
3 Change the date and time.
zFollow step 2 in “Setting the Date and
Time” (=
20) to adjust the settings.
zPress the [ ] button to close the
menu screen.
●Date/time settings can be retained for about 3 weeks by the
camera’s built-in date/time battery (backup battery) after the
battery pack is removed.
●The date/time battery will be charged in about 4 hours once you
insert a charged battery pack or connect the camera to an AC
adapter kit (sold separately, =
168), even if the camera is left
off.
●Once the date/time battery is depleted, the [Date/Time] screen will
be displayed when you turn the camera on. Set the correct date
and time as described in “Setting the Date and Time” (=
20).
22
Camera Basics
Auto Mode /
Hybrid Auto Mode
Other Shooting Modes
P Mode
Tv, Av, M, and C Mode
Playback Mode
Wi-Fi Functions
Setting Menu
Accessories
Appendix
Before Use
Index
Advanced Guide
Basic Guide
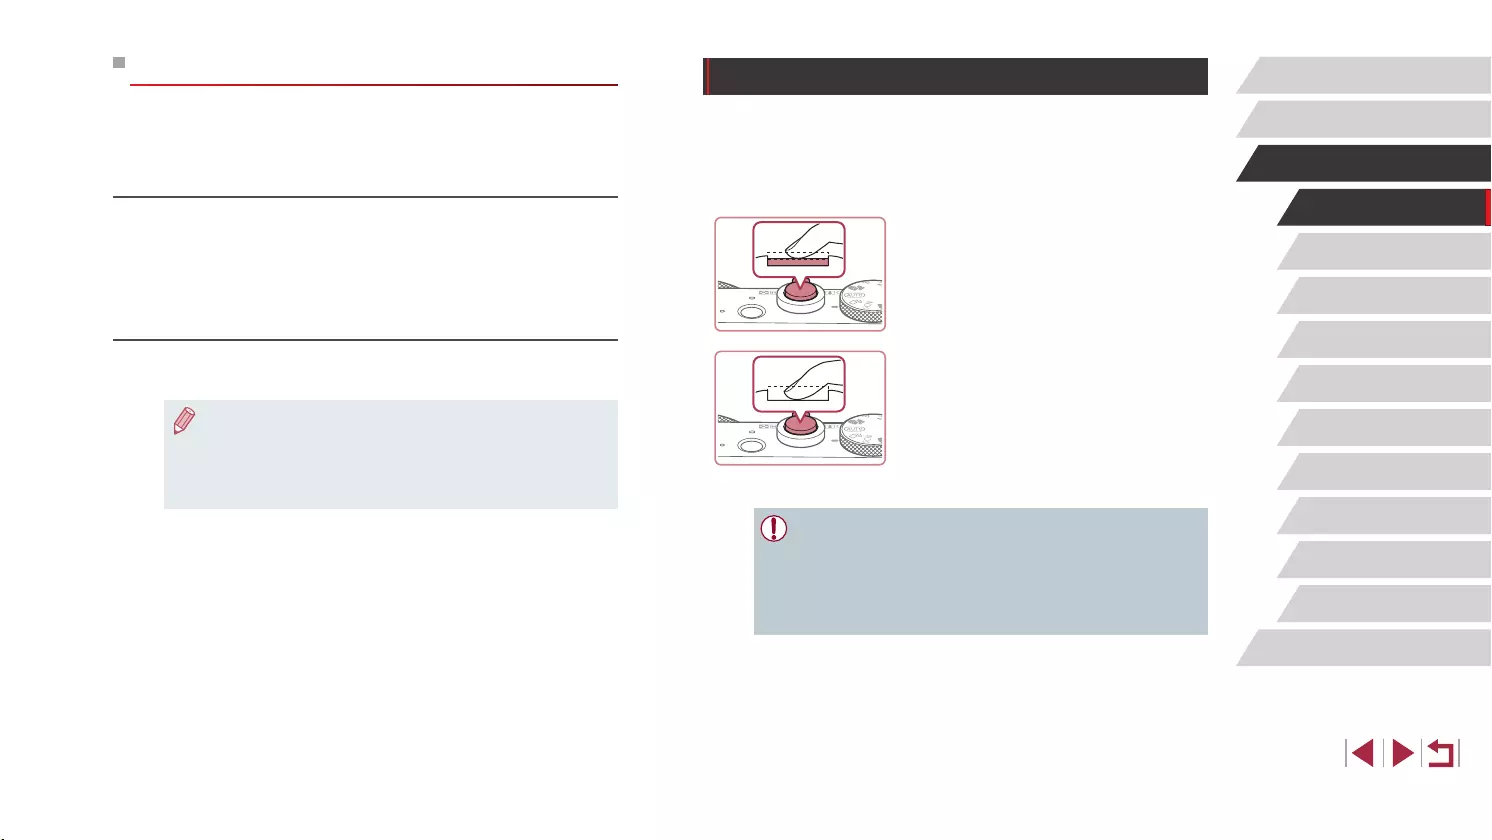
4 Shoot.
Shooting Still Images
1) Focus.
zPress the shutter button lightly, halfway
down. The camera beeps twice after
focusing, and frames are displayed to
indicate image areas in focus.
zIf [Raise the ash] is displayed, move
the [ ] switch to raise the ash. It will re
when shooting. If you prefer not to use
the ash, push it down with your nger,
into the camera.
2) Shoot.
zPress the shutter button all the way
down.
zAs the camera shoots, a shutter sound
is played, and in low-light conditions
when you have raised the ash, it res
automatically.
zKeep the camera still until the shutter
sound ends.
zAfter displaying your shot, the camera will
revert to the shooting screen.
Trying the Camera Out
Still Images Movies
Follow these instructions to turn the camera on, shoot still images or
movies, and then view them.
Shooting (Smart Auto)
For fully automatic selection of the optimal settings for specic scenes,
simply let the camera determine the subject and shooting conditions.
1 Turn the camera on.
zPress the power button.
zThe startup screen is displayed.
2 Enter [ ] mode.
zSet the mode dial to [ ].
zAim the camera at the subject. The
camera will make a slight clicking noise
as it determines the scene.
zIcons representing the scene and image
stabilization mode are displayed in the
upper left of the screen.
zFrames displayed around any detected
subjects indicate that they are in focus.
3 Compose the shot.
zTo zoom in and enlarge the subject, move
the zoom lever toward [ ] (telephoto),
and to zoom away from the subject, move
it toward [ ] (wide angle).
23
Camera Basics
Auto Mode /
Hybrid Auto Mode
Other Shooting Modes
P Mode
Tv, Av, M, and C Mode
Playback Mode
Wi-Fi Functions
Setting Menu
Accessories
Appendix
Before Use
Index
Advanced Guide
Basic Guide
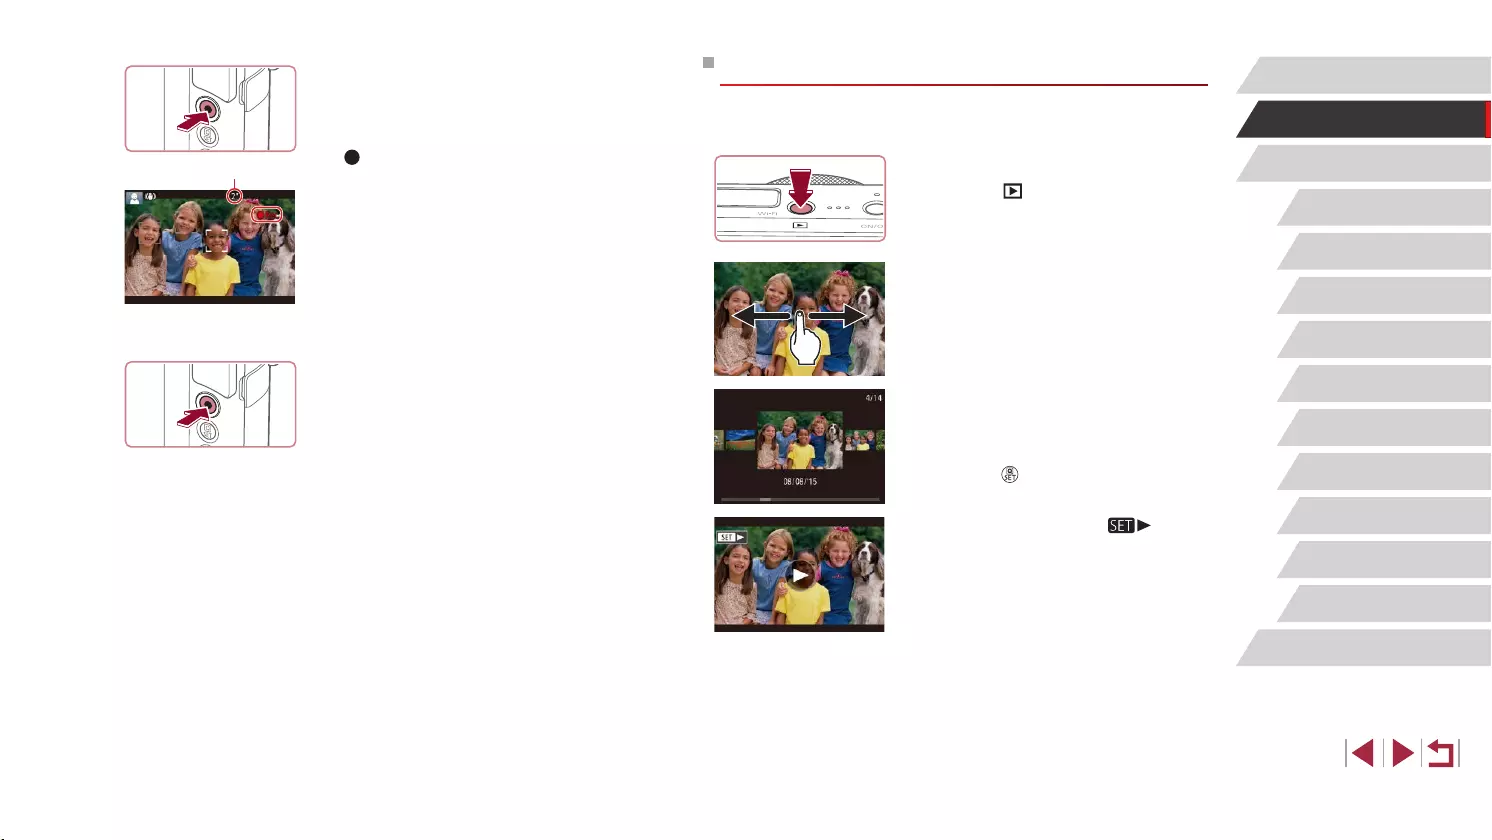
Viewing
After shooting images or movies, you can view them on the screen as
follows.
1 Enter Playback mode.
zPress the [ ] button.
zYour last shot is displayed.
2 Choose images.
zTo view the next image, drag right to
left across the screen, and to view the
previous image, drag left to right.
zTo access this screen (Scroll Display
mode), quickly drag left or right
repeatedly. In this mode, drag across the
screen to browse through images.
zPress the [ ] button to restore single-
image display.
zMovies are identied by a [ ] icon.
To play movies, go to step 3.
Recording Movies
1) Start recording.
zPress the movie button. The camera
beeps once as recording begins, and
[Rec] is displayed with the elapsed
time (1).
zBlack bars are displayed on the top and
bottom edges of the screen, and the
subject is slightly enlarged. The black
bars indicate image areas not recorded.
zFrames displayed around any detected
faces indicate that they are in focus.
zOnce recording begins, take your nger
off the movie button.
2) Finish recording.
zPress the movie button again to stop
recording. The camera beeps twice as
recording stops.

24
Camera Basics
Auto Mode /
Hybrid Auto Mode
Other Shooting Modes
P Mode
Tv, Av, M, and C Mode
Playback Mode
Wi-Fi Functions
Setting Menu
Accessories
Appendix
Before Use
Index
Advanced Guide
Basic Guide
3 Play movies.
zPress the [ ] button, choose [ ], and
then press the [ ] button.
zPlayback now begins, and after the movie
is nished, [ ] is displayed.
zTo adjust the volume, quickly drag up or
down across the screen during playback.
●To switch to Shooting mode from Playback mode, press the
shutter button halfway.
●You can also start movie playback by touching [ ].
Erasing images
You can choose and erase unneeded images one by one. Be careful
when erasing images, because they cannot be recovered.
1 Choose an image to erase.
zDrag left or right across the screen to
choose an image.
2 Erase the image.
zPress the [ ] button, choose [ ], and
then press the [ ] button.
zAfter [Erase?] is displayed, touch [Erase].
zThe current image is now erased.
zTo cancel erasure, touch [Cancel].
●Images can also be erased by using Touch Actions (=
119).
●You can choose multiple images to erase at once (=
116).
25
Auto Mode /
Hybrid Auto Mode
Other Shooting Modes
P Mode
Tv, Av, M, and C Mode
Playback Mode
Wi-Fi Functions
Setting Menu
Accessories
Appendix
Before Use
Index
Basic Guide
Advanced Guide
Camera Basics
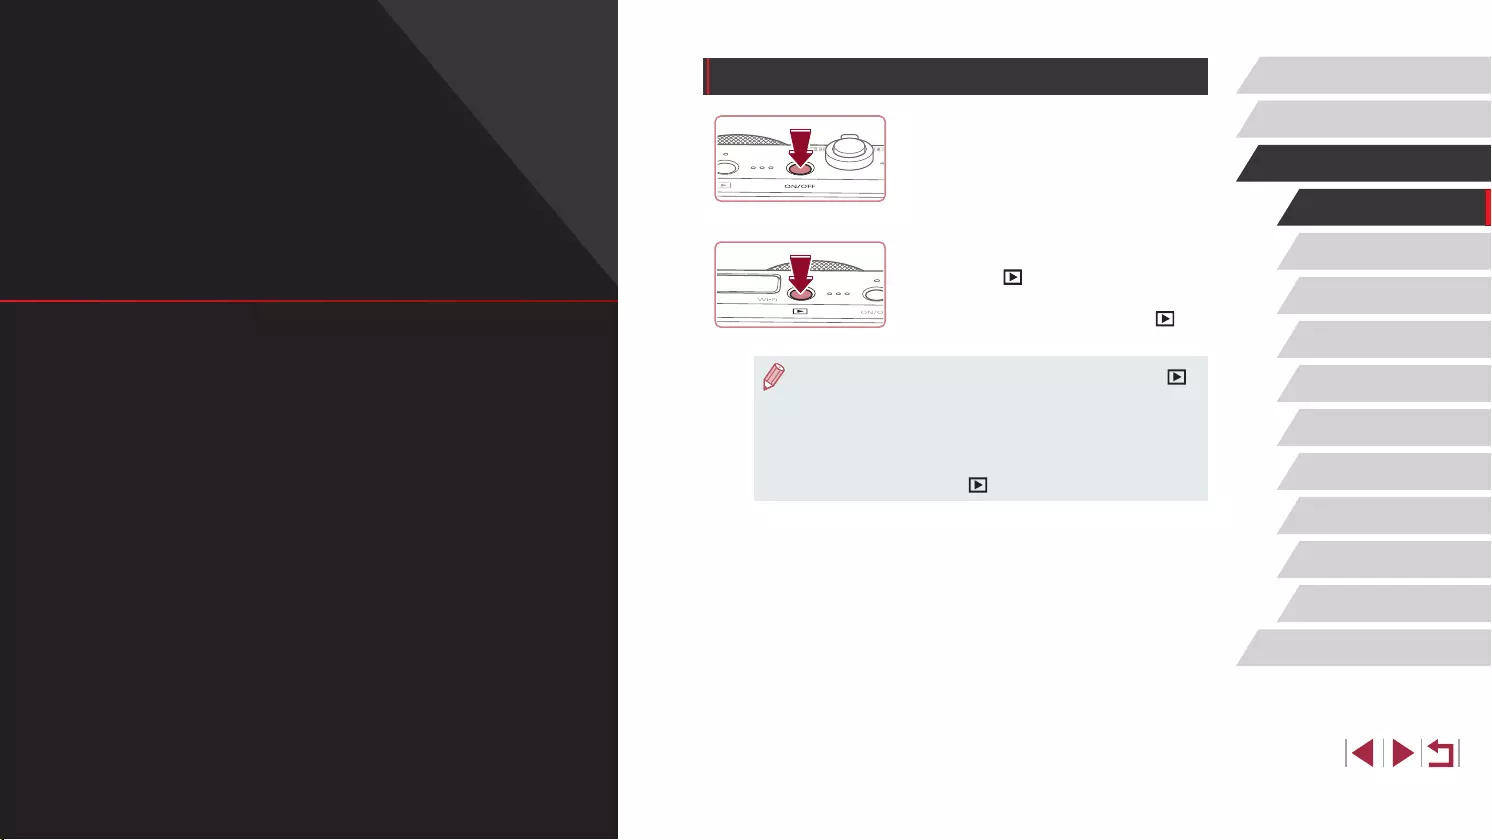
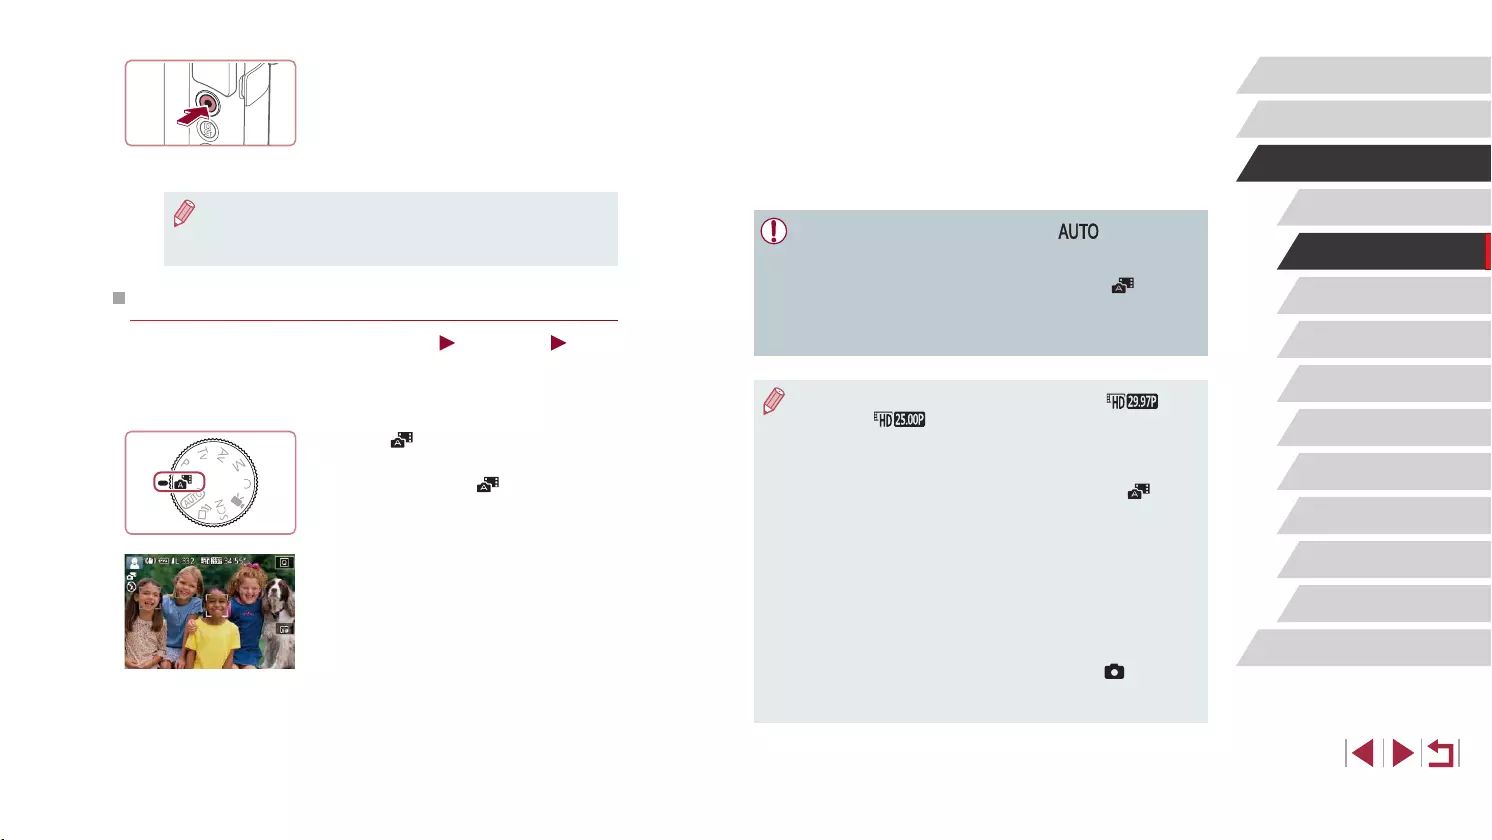
On/Off
Shooting Mode
zPress the power button to turn the
camera on and prepare for shooting.
zTo turn the camera off, press the power
button again.
Playback Mode
zPress the [ ] button to turn the camera
on and view your shots.
zTo turn the camera off, press the [ ]
button again.
●To switch to Playback mode from Shooting mode, press the [ ]
button.
●To switch to Shooting mode from Playback mode, press the
shutter button halfway (=
26).
●The lens will be retracted after about one minute once the camera
is in Playback mode. You can turn the camera off when the lens is
retracted by pressing the [ ] button.
Advanced Guide
Camera Basics
Other basic operations and more ways to enjoy your
camera, including shooting and playback options
26
Auto Mode /
Hybrid Auto Mode
Other Shooting Modes
P Mode
Tv, Av, M, and C Mode
Playback Mode
Wi-Fi Functions
Setting Menu
Accessories
Appendix
Before Use
Index
Basic Guide
Advanced Guide
Camera Basics
Shutter Button
To ensure your shots are in focus, always begin by holding the shutter
button halfway down, and once the subject is in focus, press the button all
the way down to shoot.
In this manual, shutter button operations are described as pressing the
button halfway or all the way down.
1 Press halfway. (Press lightly to
focus.)
zPress the shutter button halfway. The
camera beeps twice, and frames are
displayed around image areas in focus.
2 Press all the way down. (From the
halfway position, press fully to
shoot.)
zThe camera shoots, as a shutter sound
is played.
zKeep the camera still until the shutter
sound ends.
●Images may be out of focus if you shoot without initially pressing
the shutter button halfway.
●Length of shutter sound playback varies depending on the time
required for the shot. It may take longer in some shooting scenes,
and images will be blurry if you move the camera (or the subject
moves) before the shutter sound ends.
Power-Saving Features (Auto Power Down)
As a way to conserve battery power, the camera automatically deactivates
the screen (Display Off) and then turns itself off after a specic period of
inactivity.
Power Saving in Shooting Mode
The screen is automatically deactivated after about one minute of
inactivity. In about two more minutes, the lens is retracted and the camera
turns itself off. To activate the screen and prepare for shooting when
the screen is off but the lens is still out, press the shutter button halfway
(=
26).
Power Saving in Playback Mode
The camera turns itself off automatically after about ve minutes of
inactivity.
●You can deactivate Auto Power Down and adjust the timing of
Display Off, if you prefer (=
162).
●Power saving is not active while the camera is connected to other
devices via Wi-Fi (=
131), or when connected to a computer
(=
174).
27
Auto Mode /
Hybrid Auto Mode
Other Shooting Modes
P Mode
Tv, Av, M, and C Mode
Playback Mode
Wi-Fi Functions
Setting Menu
Accessories
Appendix
Before Use
Index
Basic Guide
Advanced Guide
Camera Basics
Shooting Display Options
Press the [ ] button to show or hide the grid lines and electronic
level.
To congure the on-screen display in greater detail, access [ 1] tab ►
[Shooting information display] (=
98).
●Screen brightness is automatically increased by the night view
function when you are shooting under low light, making it easier
to check how shots are composed. However, on-screen image
brightness may not match the brightness of your shots. Note that
any on-screen image distortion or jerky subject motion will not
affect recorded images.
●For playback display options, see “Switching Display Modes”
(=
105).
Shooting Modes
Use the mode dial to access each shooting mode.
1)
2)
(
)(
(1) Auto Mode / Hybrid Auto Mode
Fully automatic shooting, with
camera-determined settings
(=
22, =
33, =
35).
(2) Creative Shot Mode
See several effects applied to
each shot automatically (=
55).
(3) Special Scene Mode
Shoot with settings designed for
specic scenes, or add a variety of
effects (=
57).
(4) Movie Mode
For shooting movies (=
69,
=
95).
You can also shoot movies when
the mode dial is not set to Movie
mode, simply by pressing the
movie button.
(5) P, Tv, Av, M, and C Modes
Take a variety of shots using
your preferred settings (=
73,
=
92).
28
Auto Mode /
Hybrid Auto Mode
Other Shooting Modes
P Mode
Tv, Av, M, and C Mode
Playback Mode
Wi-Fi Functions
Setting Menu
Accessories
Appendix
Before Use
Index
Basic Guide
Advanced Guide
Camera Basics
●To undo any accidental setting changes, you can restore the
camera’s default settings (=
166).
●You can also exit by touching [ ] in the menu.
Using Touch-Screen Operations to Congure
Settings
zTouch [ ] in the upper right of the screen
to access the Quick Set menu.
zTouch a menu item and then an option to
complete the setting.
zTo return to the previous screen, touch
the [ ] menu item, or touch the selected
option again.
zYou can access the screen for items
labeled with a [ ] icon by touching
[ ].
zYou can access the screen for items
labeled with a [ ] icon by touching
[ ].
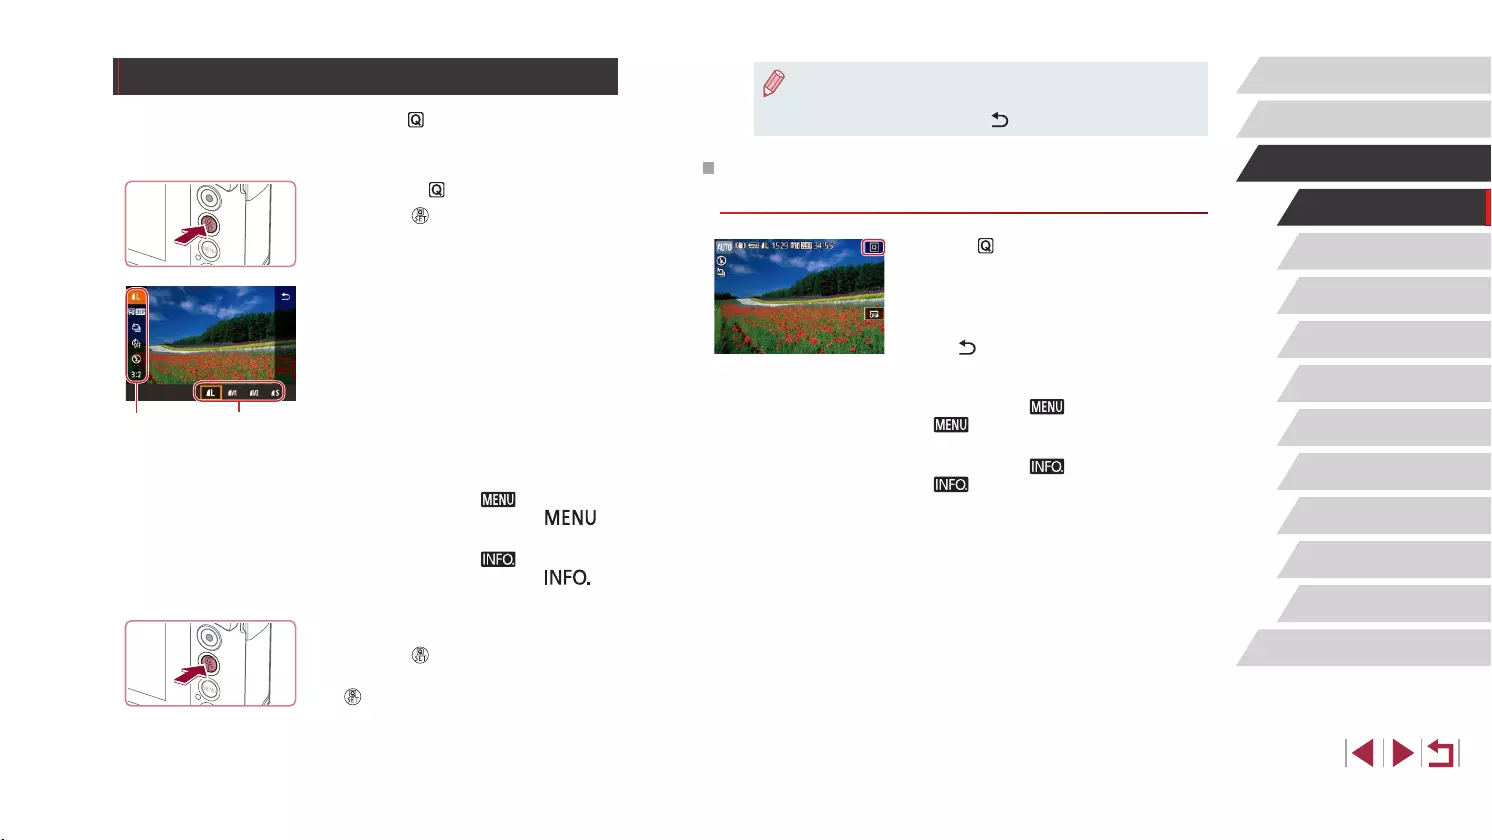
Using the Quick Set Menu
Congure commonly used functions in the (Quick Set) menu.
Note that menu items and options vary depending on the shooting mode
(=
192).
1 Access the menu.
zPress the [ ] button.
2 Choose a menu item.
zTouch a menu item (1) to choose it.
zAvailable options (2) are shown at the
bottom of the screen.
3 Choose an option.
zDrag an option left or right to choose it.
zItems labeled with a [ ] icon can
be congured by pressing the [ ]
button.
zItems labeled with a [ ] icon can
be congured by pressing the [ ]
button.
4 Conrm your choice and exit.
zPress the [ ] button.
zThe screen before you pressed the
[] button in step 1 is displayed again,
showing the option you congured.

29
Auto Mode /
Hybrid Auto Mode
Other Shooting Modes
P Mode
Tv, Av, M, and C Mode
Playback Mode
Wi-Fi Functions
Setting Menu
Accessories
Appendix
Before Use
Index
Basic Guide
Advanced Guide
Camera Basics
4 Choose an option.
zTouch an option to choose it.
5 Conrm your choice and exit.
zPress the [ ] button to conrm your
choice and return to the menu item
selection screen.
zPress the [ ] button to return to the
screen displayed before you pressed the
[] button in step 1.
●To undo any accidental setting changes, you can restore the
camera’s default settings (=
166).
●Available menu items vary depending on the selected shooting or
playback mode (=
195 – =
202).
Using the Menu Screen
Congure a variety of camera functions through the menu screen as
follows.
1 Access the menu screen.
zPress the [ ] button.
2 Choose a tab.
zTouch a tab to choose it.
zTabs represent functions (1), such as
shooting ([ ]), playback ([ ]), or
settings ([ ]), or pages within each
function (2). Tabs are identied in this
manual by combining the function and
page, as in [ 1].
zPage tabs can also be selected by
moving the zoom lever or dragging left or
right across the screen.
3 Choose a menu item.
zTouch an item to choose it, and then
press the [ ] button.
zYou can also choose menu items by
turning the [ ] ring.
zFor menu items with options not shown,
rst press the [ ] button to switch
screens, and then touch an item to
choose it.
zTo return to the previous screen, press
the [ ] button.
30
Auto Mode /
Hybrid Auto Mode
Other Shooting Modes
P Mode
Tv, Av, M, and C Mode
Playback Mode
Wi-Fi Functions
Setting Menu
Accessories
Appendix
Before Use
Index
Basic Guide
Advanced Guide
Camera Basics
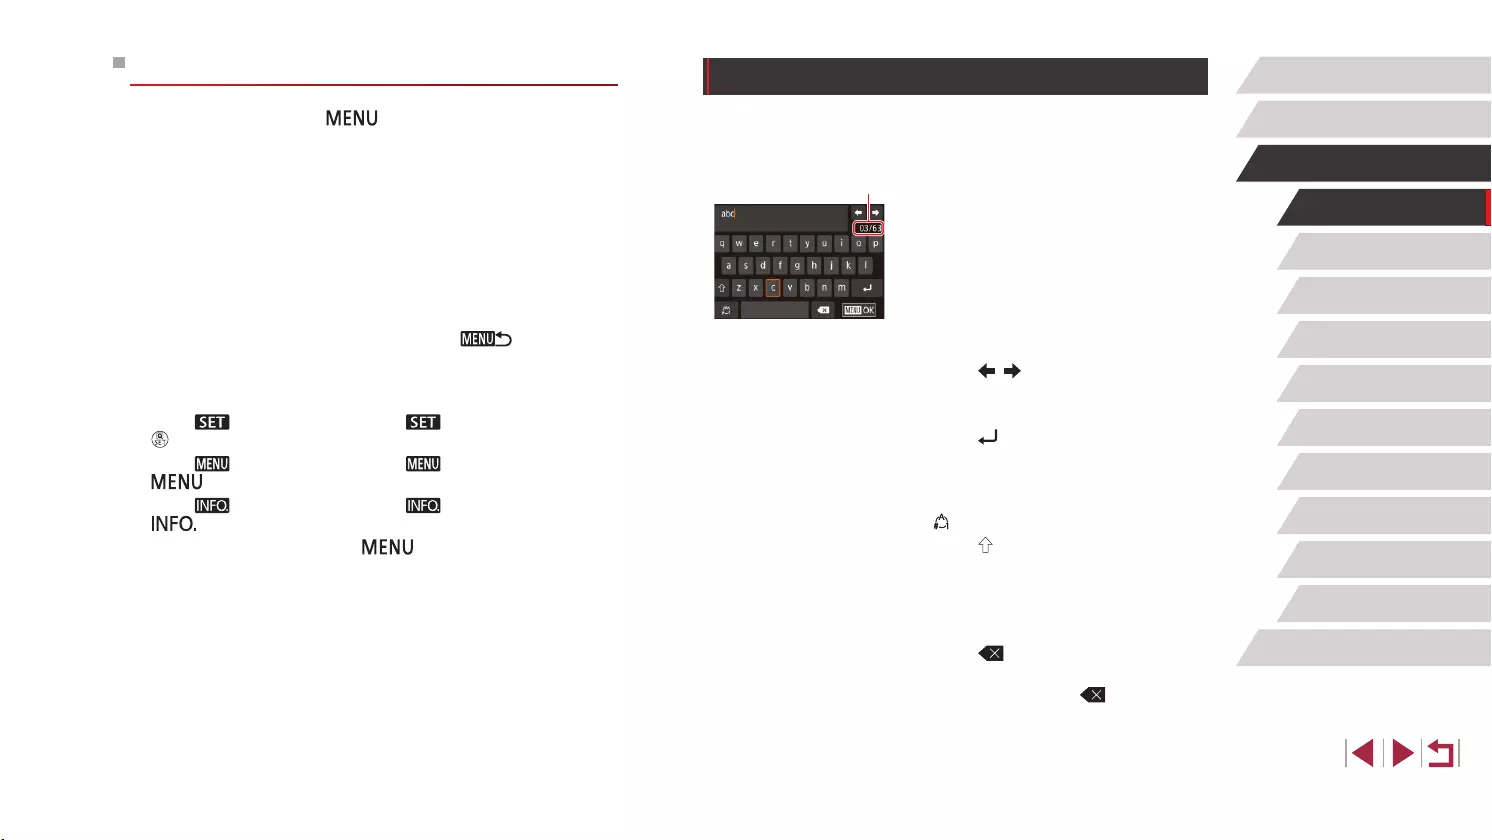
On-Screen Keyboard
Use the on-screen keyboard to enter information for Face ID (=
43),
Wi-Fi connections (=
131), and so on. Note that the length and type of
information you can enter varies depending on the function you are using.
Entering Characters
zTouch the characters to enter them.
zThe amount of information you can enter
(1) varies depending on the function you
are using.
Moving the Cursor
zTouch [ ][ ].
Entering Line Breaks
zTouch [ ].
Switching Input Modes
zTo switch to numbers or symbols, touch
[ ].
zTouch [ ] to enter capital letters.
zAvailable input modes vary depending on
the function you are using.
Deleting Characters
zTouch [ ] to delete the previous
character.
zTouching and holding [ ] will delete ve
characters at a time.
Touch-Screen Operations
●To choose tabs, press the [ ] button to access the menu screen,
and then touch the desired function tab and page tab.
●Drag the menu items up or down to scroll them, or touch a menu item
to choose it.
●Touch an option to complete the setting and return to the menu item
selection screen.
●For menu items displayed with a bar to indicate the level, touch the
desired position on the bar.
●To congure menu items for which options are not shown, rst touch
the menu item to access the setting screen. On the setting screen,
either drag or touch to choose the item, and then touch to choose the
option. To return to the previous screen, touch [ ].
●You can also touch input elements (such as check boxes or text elds)
to select them, and you can enter text by touching the on-screen
keyboard.
●When [ ] is shown, you can touch [ ] instead of pressing the
[] button, if you prefer.
●When [ ] is shown, you can touch [ ] instead of pressing the
[] button, if you prefer.
●When [ ] is shown, you can touch [ ] instead of pressing the
[] button, if you prefer.
●To dismiss the menu, press the [ ] button again.
31
Auto Mode /
Hybrid Auto Mode
Other Shooting Modes
P Mode
Tv, Av, M, and C Mode
Playback Mode
Wi-Fi Functions
Setting Menu
Accessories
Appendix
Before Use
Index
Basic Guide
Advanced Guide
Camera Basics
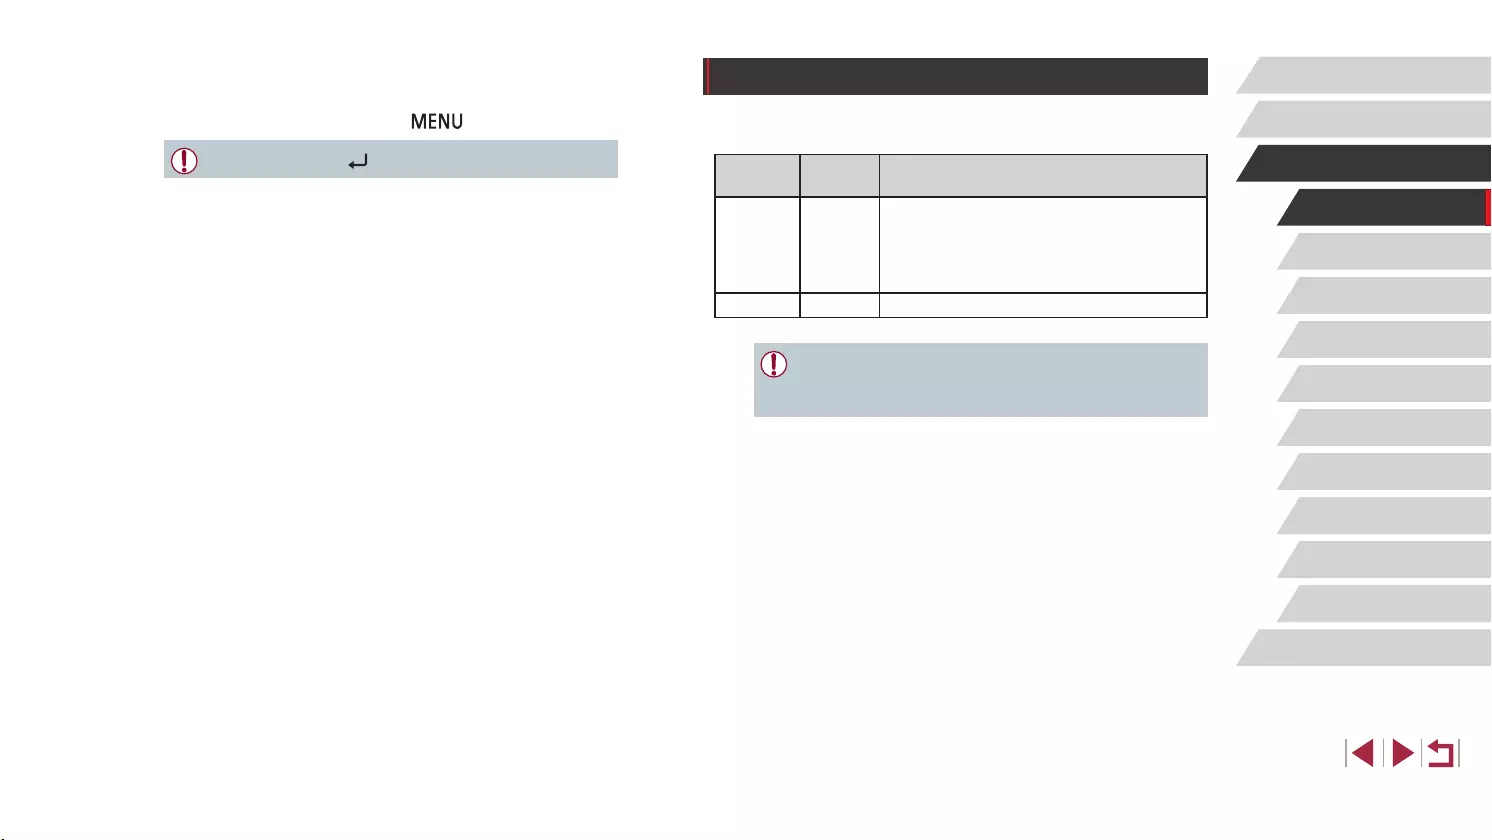
Indicator Display
The indicator on the back of the camera (=
4) lights up or blinks
depending on the camera status.
Color Indicator
Status Camera Status
Green Blinking
Starting up, recording/reading/transmitting
images, shooting long exposures (=
92,
=
93), connected to a computer (=
174),
connecting/transmitting via Wi-Fi, or display
off (=
26, =
161, =
162)
Orange On Charging via USB
●When the indicator blinks green, never turn the camera off, open
the memory card/battery cover, or shake or jolt the camera, which
may corrupt images or damage the camera or memory card.
Conrming Input and Returning to the
Previous Screen
zPress the [ ] button.
●For some functions, [ ] is not displayed and cannot be used.
32
Auto Mode /
Hybrid Auto Mode
Other Shooting Modes
P Mode
Tv, Av, M, and C Mode
Playback Mode
Wi-Fi Functions
Setting Menu
Accessories
Appendix
Before Use
Index
Basic Guide
Advanced Guide
Camera Basics
Clock
You can check the current time.
zPress and hold the [ ] button.
zThe current time appears.
zIf you hold the camera vertically while
using the clock function, it will switch to
vertical display.
zTurn the [ ] ring to change the display
color.
zPress the [ ] button again to cancel the
clock display.
●When the camera is off, press and hold the [ ] button, then
press the power button to display the clock.

33
Other Shooting Modes
P Mode
Tv, Av, M, and C Mode
Playback Mode
Wi-Fi Functions
Setting Menu
Accessories
Appendix
Before Use
Index
Basic Guide
Advanced Guide
Camera Basics
Auto Mode /
Hybrid Auto Mode
Shooting with Camera-Determined Settings
For fully automatic selection of the optimal settings for specic scenes,
simply let the camera determine the subject and shooting conditions.
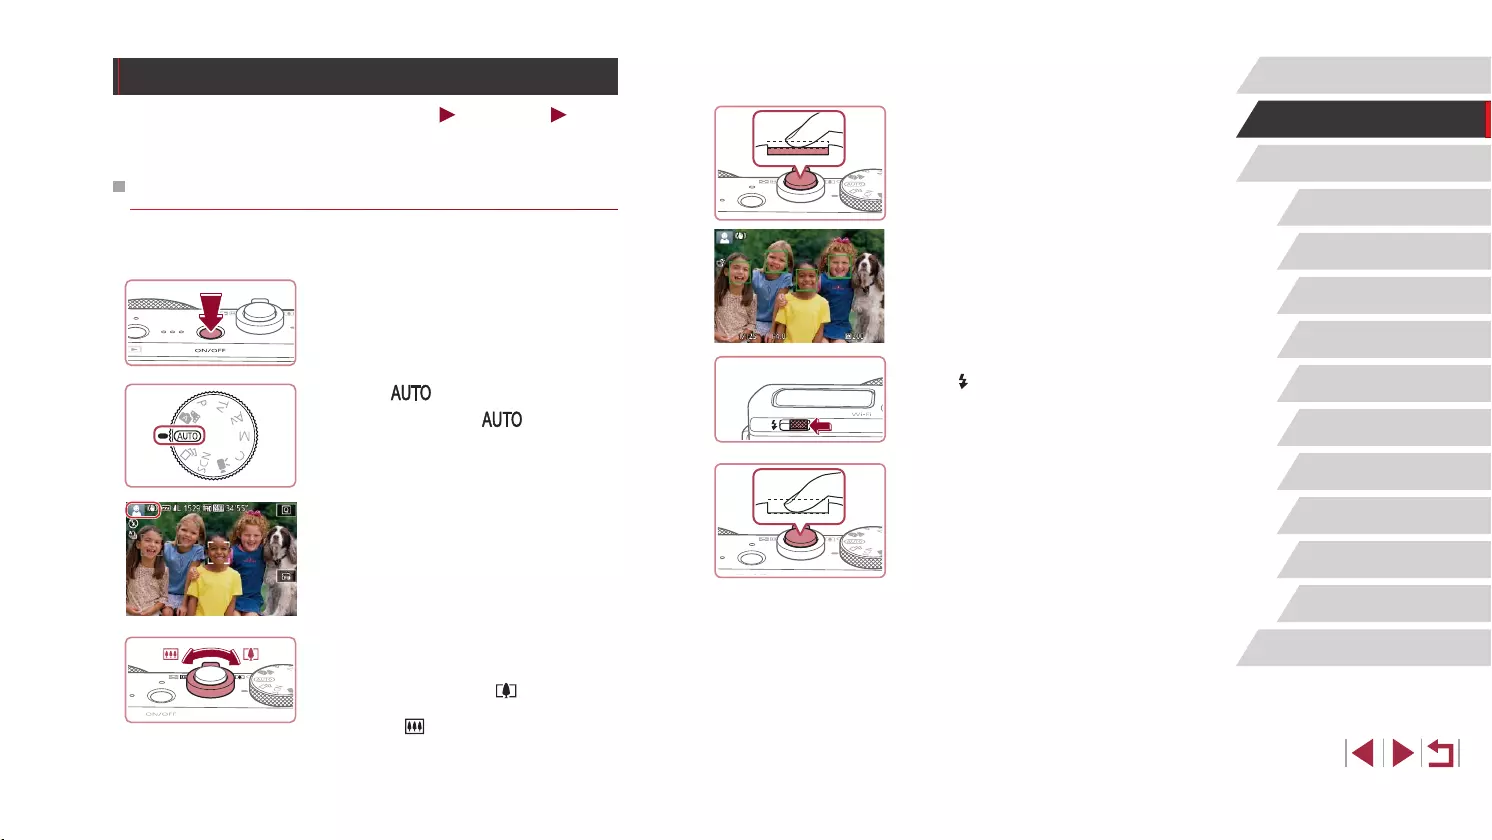
Shooting (Smart Auto)
Still Images Movies
1 Turn the camera on.
zPress the power button.
zThe startup screen is displayed.
2 Enter [ ] mode.
zSet the mode dial to [ ].
zAim the camera at the subject. The
camera will make a slight clicking noise
as it determines the scene.
zIcons representing the scene and image
stabilization mode are displayed in
the upper left of the screen (=
37,
=
38).
zFrames displayed around any detected
subjects indicate that they are in focus.
Auto Mode /
Hybrid Auto Mode
Convenient mode for easy shots with greater control
over shooting
34
Other Shooting Modes
P Mode
Tv, Av, M, and C Mode
Playback Mode
Wi-Fi Functions
Setting Menu
Accessories
Appendix
Before Use
Index
Basic Guide
Advanced Guide
Camera Basics
Auto Mode /
Hybrid Auto Mode
2) Shoot.
zPress the shutter button all the way down.
zAs the camera shoots, a shutter sound
is played, and in low-light conditions
when you have raised the ash, it res
automatically.
zKeep the camera still until the shutter
sound ends.
zAfter displaying your shot, the camera will
revert to the shooting screen.
Recording Movies
1) Start recording.
zPress the movie button. The camera beeps
once as recording begins, and [ Rec] is
displayed with the elapsed time (1).
zBlack bars are displayed on the top and
bottom edges of the screen, and the
subject is slightly enlarged. The black
bars indicate image areas not recorded.
zFrames displayed around any detected
faces indicate that they are in focus.
zOnce recording begins, take your nger
off the movie button.
2) Resize the subject and recompose
the shot as needed.
zTo resize the subject, repeat the
operations in step 3.
However, note that the sound of camera
operations will be recorded. Note that
movies shot at zoom factors shown in
blue will look grainy.
zWhen you recompose shots, the
focus, brightness, and colors will be
automatically adjusted.
3 Compose the shot.
zTo zoom in and enlarge the subject, move
the zoom lever toward [ ] (telephoto),
and to zoom away from the subject, move
it toward [ ] (wide angle). (A zoom
bar (1) showing the zoom position is
displayed, along with the range of focus
(2).)
4 Shoot.
Shooting Still Images
1) Focus.
zPress the shutter button halfway. The
camera beeps twice after focusing, and
frames are displayed to indicate image
areas in focus.
zSeveral frames are displayed when
multiple areas are in focus.
zIf [Raise the ash] is displayed, move
the [ ] switch to raise the ash. It will re
when shooting. If you prefer not to use
the ash, push it down with your nger,
into the camera.
(
)
35
Other Shooting Modes
P Mode
Tv, Av, M, and C Mode
Playback Mode
Wi-Fi Functions
Setting Menu
Accessories
Appendix
Before Use
Index
Basic Guide
Advanced Guide
Camera Basics
Auto Mode /
Hybrid Auto Mode
3 Shoot.
zFollow step 4 in “Shooting (Smart Auto)”
(=
33) to shoot a still image.
zThe camera records both a still image
and movie clip. The clip, which ends with
the still image and a shutter sound, forms
a single chapter in the digest movie.
●Battery life is shorter in this mode than in [ ] mode, because
digest movies are recorded for each shot.
●A digest movie may not be recorded if you shoot a still image
immediately after turning the camera on, choosing [ ] mode, or
operating the camera in other ways.
●Sounds and vibrations from operating the camera will be recorded
in digest movies.
●Digest movie image quality is automatically set to [ ] for
NTSC or [ ] for PAL and cannot be changed (=
160).
●Sounds are not played when you press the shutter button halfway
or trigger the self-timer (=
164).
●Digest movies are saved as separate movie les in the following
cases even if they were recorded on the same day in [ ] mode.
— The digest movie le size reaches approximately 4 GB, or the
total recording time reaches approximately 16 minutes and 40
seconds.
— The digest movie is protected (=
113).
— Daylight saving time (=
20) or time zone (=
162) settings
are changed.
— A new folder is created (=
159).
●Recorded shutter sounds cannot be modied or erased.
●If you prefer to record digest movies without still images, adjust
the setting in advance. Choose MENU (=
29) ► [ 7] tab ►
[Digest Type] ► [No Stills].
●Individual chapters can be edited (=
126).
3) Finish recording.
zPress the movie button again to stop
recording. The camera beeps twice as
recording stops.
zRecording will stop automatically when
the memory card becomes full.
●The ash ring during shots indicates that the camera has
automatically attempted to ensure optimal colors in the main
subject and background (Multi-area White Balance).
Shooting in Hybrid Auto Mode
Still Images Movies
You can make a short movie of the day just by shooting still images. The
camera records 2 – 4-second clips of scenes before each shot, which are
later combined in a digest movie.
1 Enter [ ] mode.
zFollow step 2 in “Shooting (Smart Auto)”
(=
33) and choose [ ].
2 Compose the shot.
zFollow steps 3 – 4 in “Shooting (Smart
Auto)” (=
33) to compose the shot and
focus.
zFor more impressive digest movies,
aim the camera at subjects about four
seconds before shooting still images.
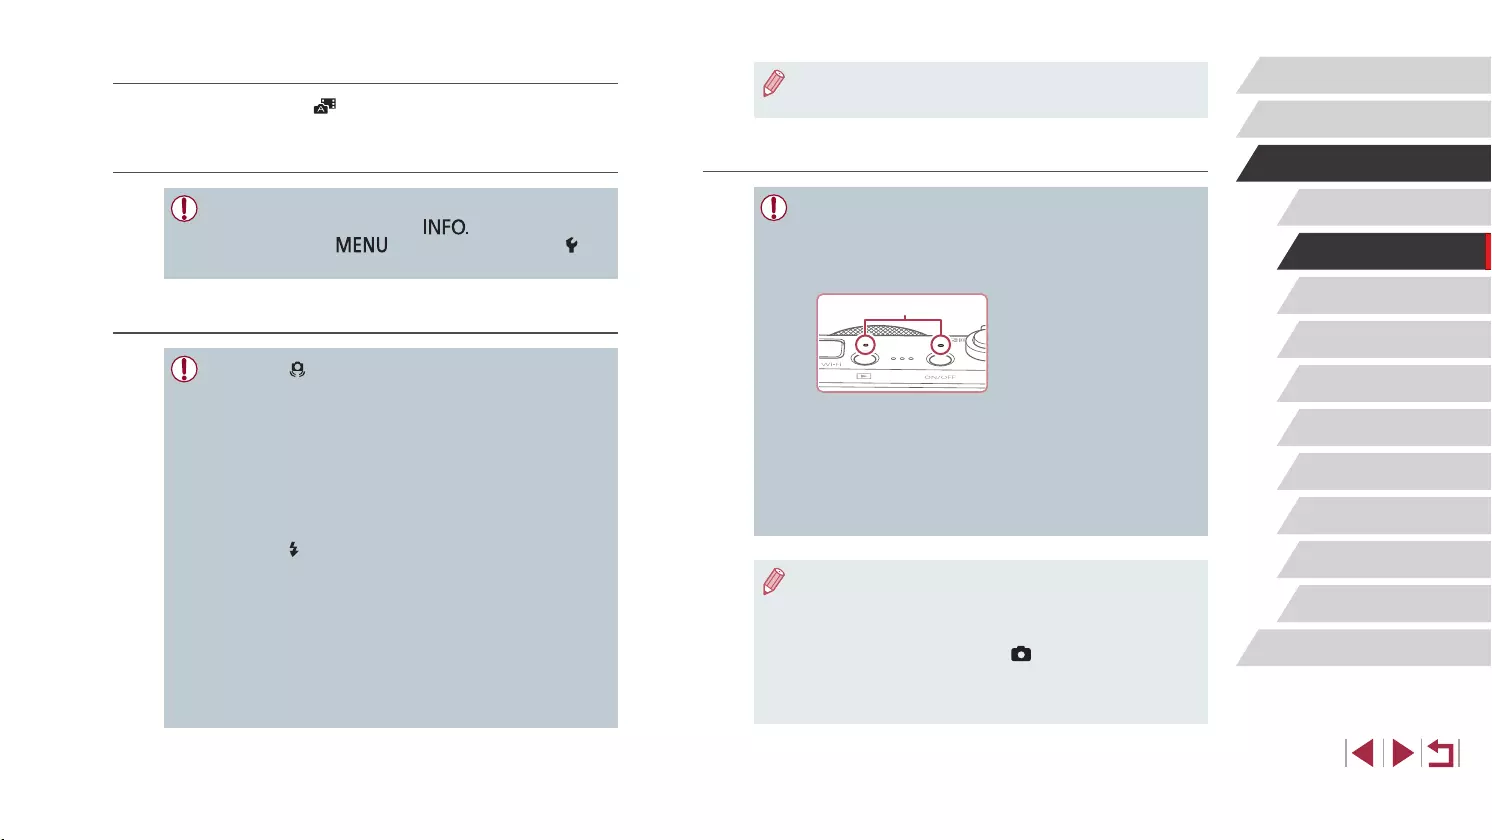
36
Other Shooting Modes
P Mode
Tv, Av, M, and C Mode
Playback Mode
Wi-Fi Functions
Setting Menu
Accessories
Appendix
Before Use
Index
Basic Guide
Advanced Guide
Camera Basics
Auto Mode /
Hybrid Auto Mode
●You can change how long images are displayed after shots
(=
54).
Movies
●Before movie recording, lower the ash with your nger. During
recording, keep your ngers away from the microphone (1).
Leaving the ash raised, or blocking the microphone may prevent
audio from being recorded or may cause the recording to sound
mufed.
●Avoid touching camera controls other than the movie button when
recording movies, because sounds made by the camera will be
recorded.
●Once movie recording begins, the image display area changes
and subjects are enlarged to allow for correction of signicant
camera shake. To shoot subjects at the same size shown before
shooting, set Dynamic IS to [Low] (=
52).
1
●Audio is recorded in stereo.
●Distorted audio caused by recording when the wind is strong can
be reduced. However, the recording may sound unnatural when
this option is used when there is no wind. When the wind is not
strong, choose MENU (=
29) ► [ 7] tab ► [Wind Filter] ►
[Off] (=
70).
●During movie recording, lens operating noises from auto focusing
may also be recorded.
Digest Movie Playback
Display a still image shot in [ ] mode to play the digest movie created
on the same day, or specify the date of the digest movie to play (=
106).
Still Images/Movies
●If the camera makes no operating sounds, it may have been
turned on while holding down the [ ] button. To activate
sounds, press the [ ] button, choose [Mute] on the [ 3]
tab, and then choose [Off].
Still Images
●A blinking [ ] icon warns that images are more likely to be
blurred by camera shake. In this case, mount the camera on a
tripod or take other measures to keep it still.
●If your shots are dark despite the ash ring, move closer to the
subject. For details on the ash range, see “Camera” (=
204).
●The subject may be too close if the camera only beeps once
when you press the shutter button halfway. For details on the
range of focus (shooting range), see “Shooting Range” (=
205).
●To reduce red-eye and to assist in focusing, the lamp may be lit
when shooting in low-light conditions.
●A blinking [ ] icon displayed when you attempt to shoot
indicates that shooting is not possible until the ash has nished
recharging. Shooting can resume as soon as the ash is ready,
so either press the shutter button all the way down and wait, or
release it and press it again.
●No shutter sound is played when “Sleeping” and “Sleeping
Babies” icons (=
37) are displayed.
●Although you can shoot again before the shooting screen
is displayed, your previous shot may determine the focus,
brightness, and colors used.
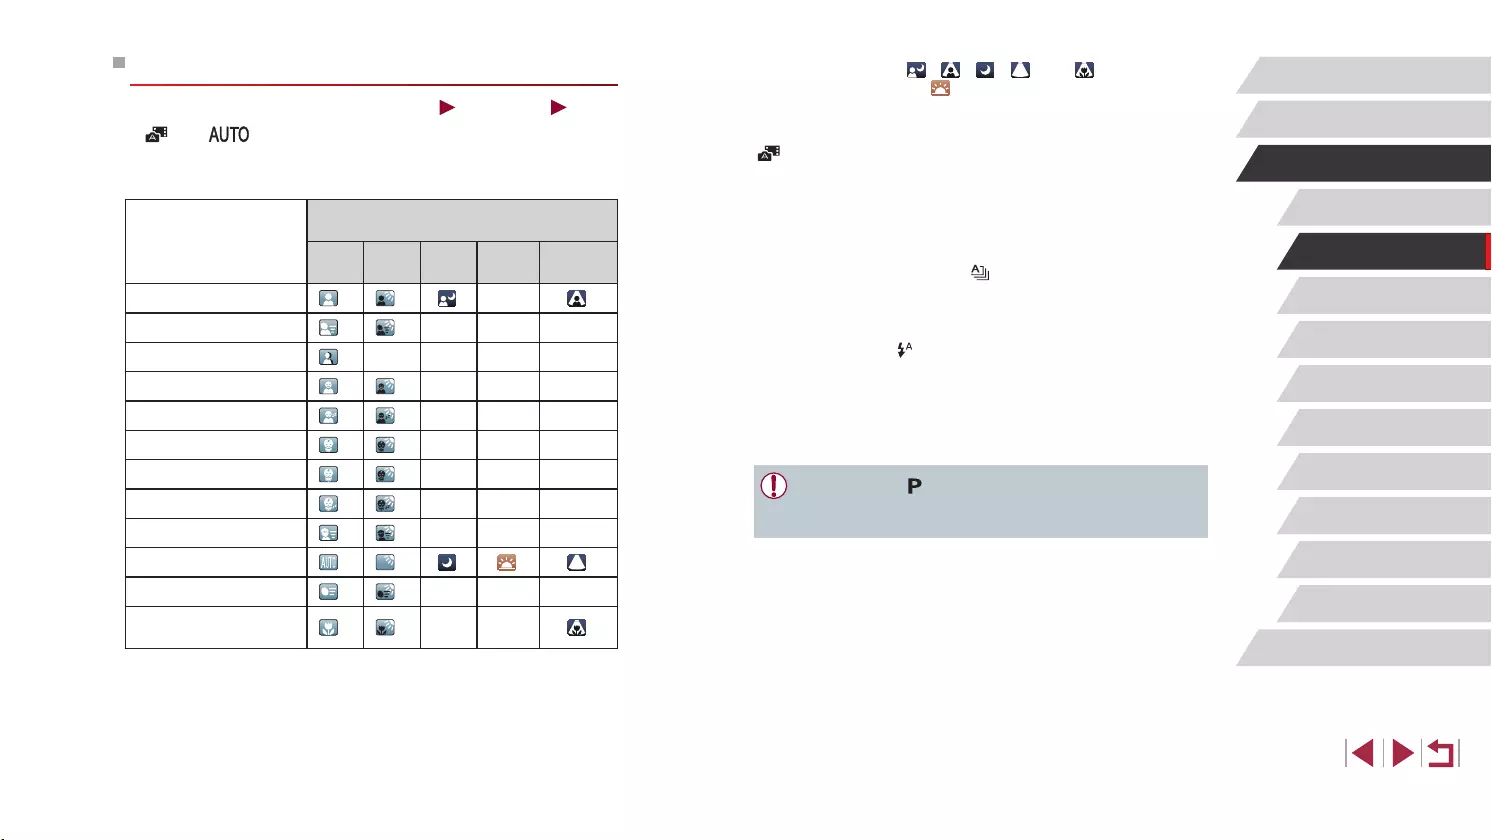
37
Other Shooting Modes
P Mode
Tv, Av, M, and C Mode
Playback Mode
Wi-Fi Functions
Setting Menu
Accessories
Appendix
Before Use
Index
Basic Guide
Advanced Guide
Camera Basics
Auto Mode /
Hybrid Auto Mode
●The background color of [ ], [ ], [ ], [ ], and [ ] is dark blue,
and the background color of [ ] is orange.
●For movies, only People, Other Subjects, and Other Close-Range
Subjects icons are displayed.
●In [ ] mode, icons are only displayed for People, Shadows on Face,
Other Subjects, and Other Close-Range Subjects.
●For self-timer shots, icons are not displayed for the following subjects:
moving, smiling, or sleeping people; smiling or sleeping babies;
moving children; and other moving subjects.
●Icons are not displayed for smiling or sleeping subjects and moving
children in drive modes other than [ ] (=
38, =
42) and when
[Hg Lamp Corr.] is set to [On] and scenes are automatically corrected
(=
48).
●Backlit icons are not displayed for moving children and smiling people
when the ash is set to [ ].
●Icons for babies (including smiling and sleeping babies) and moving
children are displayed when [Face ID] is set to [On] and faces of
registered babies (less than two years old) or children (2 – 12 years
old) are detected (=
44). Conrm beforehand that the date and time
are correct (=
20).
●Try shooting in [ ] mode (=
73) if the scene icon does not
match actual shooting conditions, or if it is not possible to shoot
with your expected effect, color, or brightness.
Scene Icons
Still Images Movies
In [ ] and [ ] modes, shooting scenes determined by the camera
are indicated by the icon displayed, and corresponding settings are
automatically selected for optimal focusing, subject brightness, and color.
Depending on the scene, continuous images may be shot (=
38).
Subject
Background
Normal Backlit Dark*1Sunsets Spotlights
People *2*3–
Moving People *3*3– – –
Shadows on Face *2– – – –
Smiling *3*3– – –
Sleeping *2*3– – –
Babies *3*3– – –
Smiling Babies *3*3– – –
Sleeping Babies *2*3– – –
Moving Children *3*3– – –
Other Subjects *2*3
Other Moving Subjects *3*3– – –
Other Close-Range
Subjects *2*3– –
*1 Tripod used.
*2 The background color of icons is light blue when the background is a blue sky,
dark blue when the background is dark, and gray for all other backgrounds.
*3 The background color of icons is light blue when the background is a blue sky,
and gray for all other backgrounds.
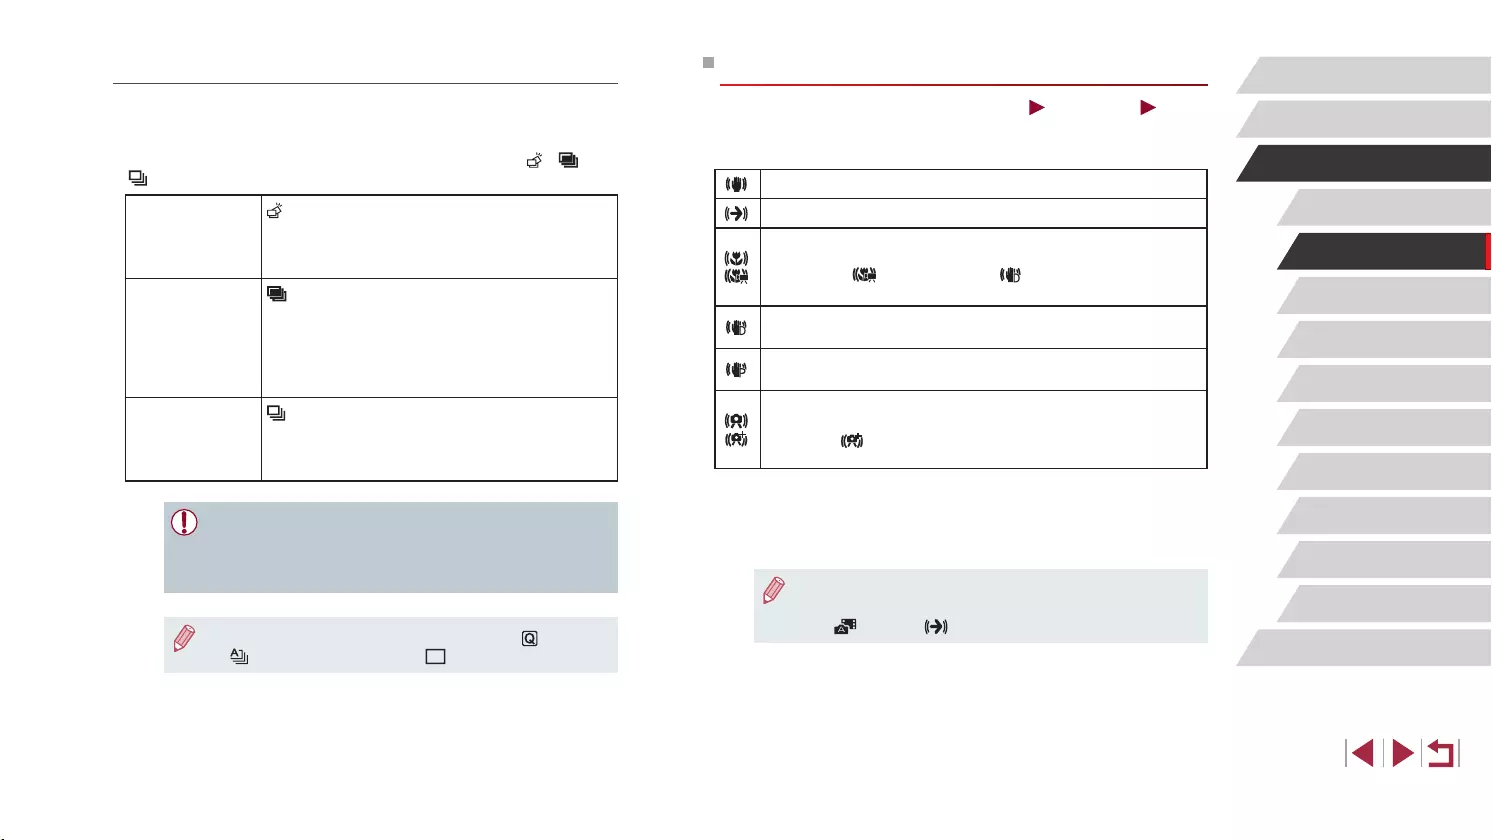
38
Other Shooting Modes
P Mode
Tv, Av, M, and C Mode
Playback Mode
Wi-Fi Functions
Setting Menu
Accessories
Appendix
Before Use
Index
Basic Guide
Advanced Guide
Camera Basics
Auto Mode /
Hybrid Auto Mode
Image Stabilization Icons
Still Images Movies
Optimal image stabilization for the shooting conditions (Intelligent IS) is
automatically applied, and the following icons are displayed.
Image stabilization for still images (Normal)
Image stabilization for still images when panning (Panning)*
Image stabilization for angular camera shake and shift-shake in
macro shots (Hybrid IS).
For movies, [ ] is displayed and [ ] image stabilization is also
applied.
Image stabilization for movies, reducing strong camera shake, as
when recording while walking (Dynamic)
Image stabilization for slow camera shake, such as when
recording movies at telephoto (Powered)
No image stabilization, because the camera is mounted on
a tripod or held still by other means. However, during movie
recording, [ ] is displayed, and image stabilization to counteract
wind or other sources of vibration is used (Tripod IS).
* Displayed when you pan, following moving subjects with the camera. When you
follow subjects moving horizontally, image stabilization only counteracts vertical
camera shake, and horizontal stabilization stops. Similarly, when you follow
subjects moving vertically, image stabilization only counteracts horizontal camera
shake.
●To cancel image stabilization, set [IS Mode] to [Off] (=
52). In
this case, an IS icon is not displayed.
●In [ ] mode, no [ ] icon is displayed.
Continuous Shooting Scenes
If the icon for one of the following scenes (in table’s left column) is
displayed when you shoot a still image, the camera shoots continuously. If
the icon for one of the following scenes (in table’s left column) is displayed
when you press the shutter button halfway, one of the icons [ ], [ ], or
[] is displayed to inform you that the camera shoots continuously.
Smiling
(including Babies)
Consecutive images are captured, and the camera
analyzes details such as facial expressions to save
the image determined to be the best.
Sleeping
(including Babies)
Beautiful shots of sleeping faces, created by
combining consecutive shots to reduce camera
shake and image noise.
The AF-assist beam and the ash will not re, and
the shutter sound will not be played.
Children So you don’t miss a photo opportunity of children
who move around, the camera will capture three
consecutive images for each shot.
●In some scenes, expected images may not be saved, and images
may not look as expected.
●Focus, image brightness, and color are determined by the rst
shot.
●When you want to shoot single images only, touch [ ], choose
[] in the menu, and then select [ ].
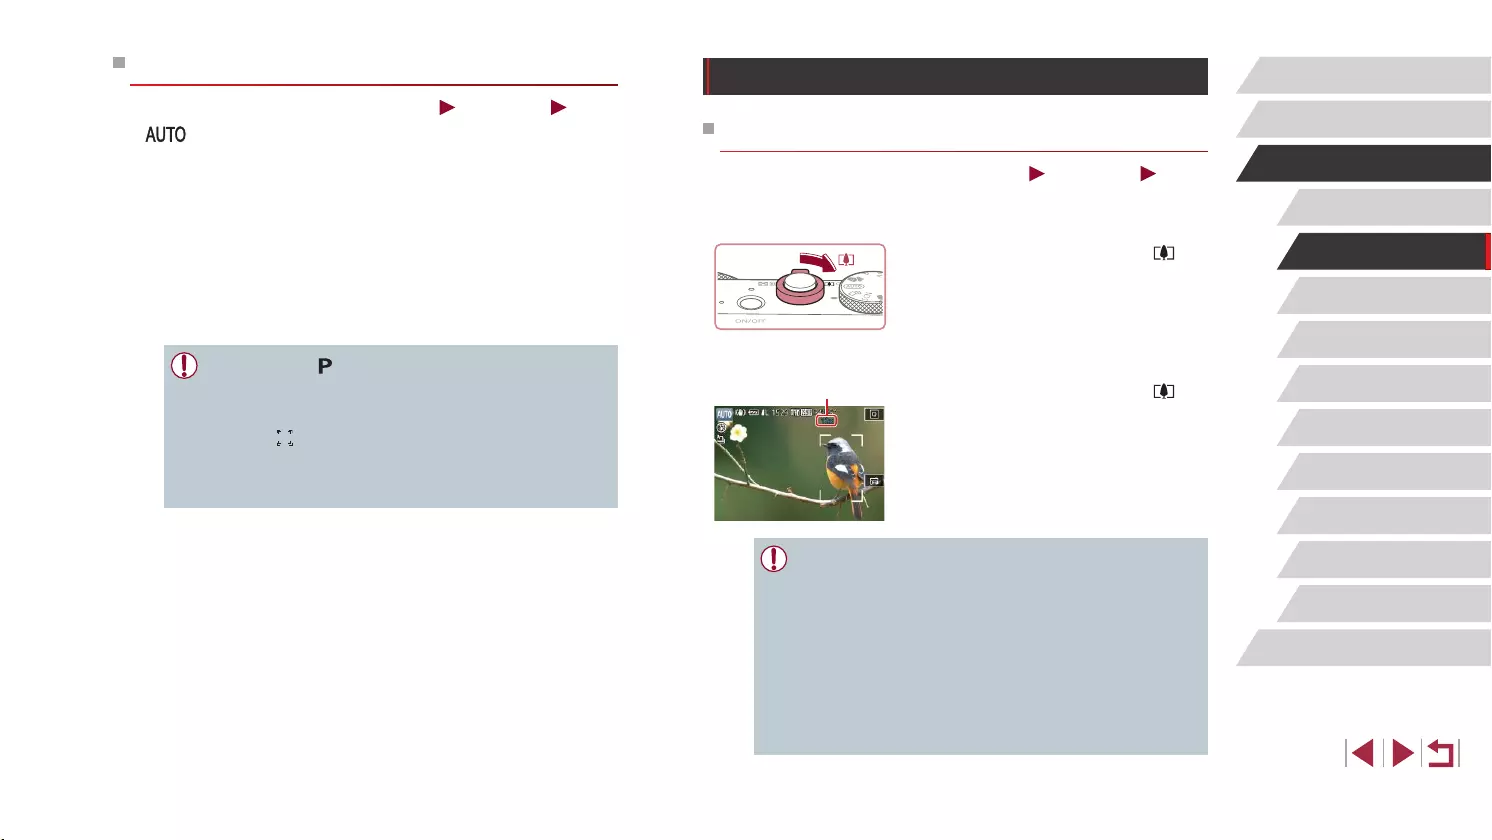
39
Other Shooting Modes
P Mode
Tv, Av, M, and C Mode
Playback Mode
Wi-Fi Functions
Setting Menu
Accessories
Appendix
Before Use
Index
Basic Guide
Advanced Guide
Camera Basics
Auto Mode /
Hybrid Auto Mode
Common, Convenient Features
Zooming In Closer on Subjects (Digital Zoom)
Still Images Movies
When distant subjects are too far away to enlarge using the optical zoom,
use digital zoom for up to about 12x enlargement.
1 Move the zoom lever toward [ ].
zHold the lever until zooming stops.
zZooming stops at the largest zoom factor
before the image becomes noticeably
grainy, which is then indicated on the
screen.
2 Move the zoom lever toward [ ]
again.
zThe camera zooms in even closer on the
subject.
z(1) is the current zoom factor.
●Moving the zoom lever will display the zoom bar (which indicates
the zoom position). The zoom bar is color-coded to indicate the
zoom range.
— White range: optical zoom range where the image will not
appear grainy.
— Yellow range: digital zoom range where the image is not
noticeably grainy (ZoomPlus).
— Blue range: digital zoom range where the image will appear grainy.
●Because the blue range will not be available at some recording
pixel settings (=
90), the maximum zoom factor can be
achieved by following step 1.
On-Screen Frames
Still Images Movies
In [ ] mode, a variety of frames are displayed once the camera
detects subjects you are aiming the camera at.
●A white frame is displayed around the subject (or person’s face)
determined by the camera to be the main subject, and gray frames are
displayed around other detected faces. Frames follow moving subjects
within a certain range to keep them in focus. However, if the camera
detects subject movement, only the white frame will remain on the
screen.
●When you are pressing the shutter button halfway and the camera
detects subject movement, a blue frame is displayed, and the focus
and image brightness are constantly adjusted (Servo AF).
●Try shooting in [ ] mode (=
73) if no frames are displayed, if
frames are not displayed around desired subjects, or if frames are
displayed on the background or similar areas.
●To choose subjects to focus on, touch the desired subject on the
screen. [ ] is displayed, and the camera enters Touch AF mode
(=
86). Pressing the shutter button halfway will display a blue
frame, and the camera will keep the subject in focus and image
brightness adjusted (Servo AF).

40
Other Shooting Modes
P Mode
Tv, Av, M, and C Mode
Playback Mode
Wi-Fi Functions
Setting Menu
Accessories
Appendix
Before Use
Index
Basic Guide
Advanced Guide
Camera Basics
Auto Mode /
Hybrid Auto Mode
Using the Self-Timer
Still Images Movies
With the self-timer, you can include yourself in group photos or other
timed shots. The camera will shoot about 10 seconds after you press the
shutter button.
1 Congure the setting.
zPress the [ ] button, choose [ ] in the
menu, and then choose [ ] (=
28).
zOnce the setting is complete, [ ] is
displayed.
2 Shoot.
zFor Still Images: Press the shutter button
halfway to focus on the subject, and then
press it all the way down.
zFor Movies: Press the movie button.
zOnce you start the self-timer, the lamp
will blink and the camera will play a self-
timer sound.
zTwo seconds before the shot, the blinking
and sound will speed up. (The lamp will
remain lit in case the ash res.)
zTo cancel shooting after you have
triggered the self-timer, press the
[] button.
zTo restore the original setting, choose [ ]
in step 1.
●To deactivate digital zoom, choose MENU (=
29) ► [ 2] tab
► [Digital Zoom] ► [Off].
Shooting at Preset Focal Lengths (Step Zoom)
Still Images Movies
Shoot at common focal lengths in a range of 28 – 84 mm (35mm lm
equivalent).
zTo change the focal length from 28 to
35 mm, turn the [ ] ring counterclockwise
until it clicks. Turn the [ ] ring
counterclockwise to zoom in or clockwise
to zoom out.
●Step zoom is not available when recording movies even if you
turn the [ ] ring.
●When you are using digital zoom (=
39), you cannot adjust the
zoom factor by turning the [ ] ring counterclockwise. However,
you can set the focal length to 84 mm by turning it clockwise.
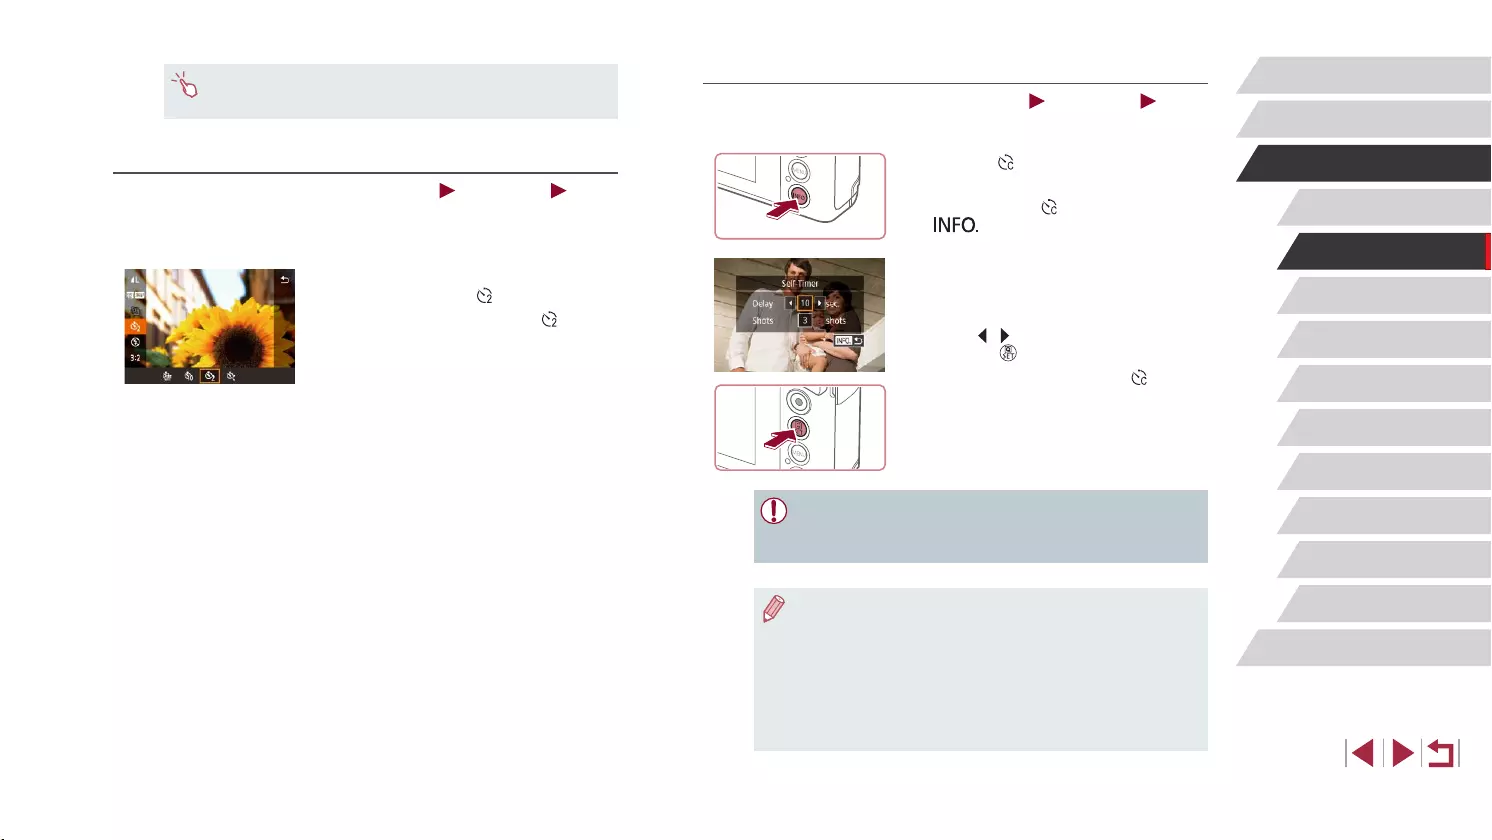
41
Other Shooting Modes
P Mode
Tv, Av, M, and C Mode
Playback Mode
Wi-Fi Functions
Setting Menu
Accessories
Appendix
Before Use
Index
Basic Guide
Advanced Guide
Camera Basics
Auto Mode /
Hybrid Auto Mode
Customizing the Self-Timer
Still Images Movies
You can specify the delay (0 – 30 seconds) and number of shots (1 – 10).
1 Choose [ ].
zFollowing step 1 in “Using the Self-Timer”
(=
40), choose [ ] and press the
[] button.
2 Congure the setting.
zTouch the delay time or number of shots
to choose one of these items.
zTouch [ ][ ] to choose a value, and then
press the [ ] button twice.
zOnce the setting is complete, [ ] is
displayed.
zFollow step 2 in “Using the Self-Timer”
(=
40) to shoot.
●For movies recorded using the self-timer, recording begins after
your specied delay time, but specifying the number of shots has
no effect.
●When you specify multiple shots, image brightness and white
balance are determined by the rst shot. More time is required
between shots when the ash res or when you have specied
to take many shots. Shooting will stop automatically when the
memory card becomes full.
●When a delay longer than two seconds is specied, two seconds
before the shot, the lamp blinking and self-timer sound will speed
up. (The lamp will remain lit in case the ash res.)
●You can also cancel shooting after the timer begins by touching
the screen.
Using the Self-Timer to Avoid Camera Shake
Still Images Movies
This option delays shutter release until about two seconds after you
have pressed the shutter button. If the camera is unsteady while you are
pressing the shutter button, it will not affect your shot.
zFollow step 1 in “Using the Self-Timer”
(=
40) and choose [ ].
zOnce the setting is complete, [ ] is
displayed.
zFollow step 2 in “Using the Self-Timer”
(=
40) to shoot.
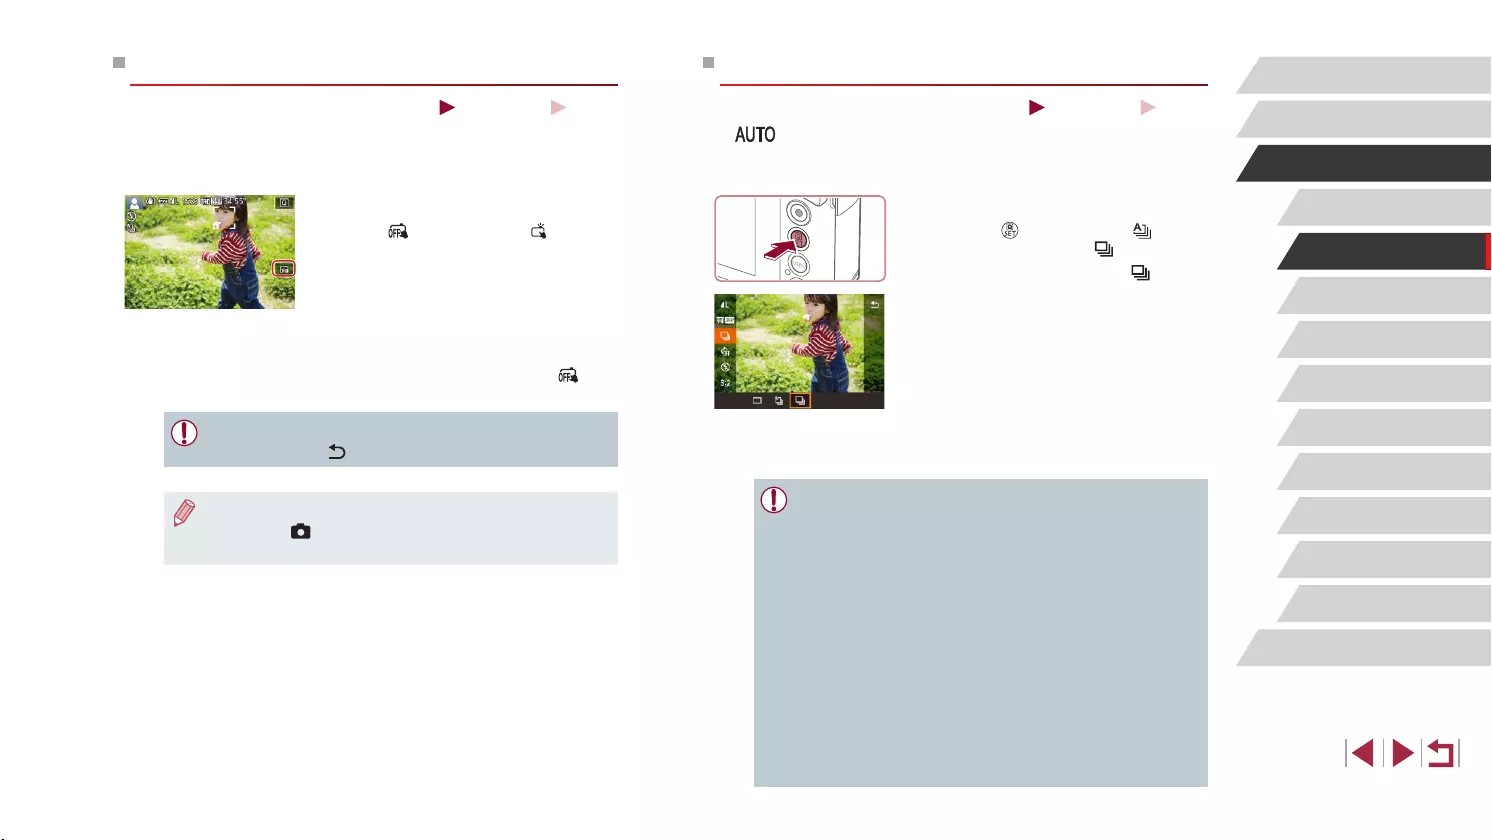
42
Other Shooting Modes
P Mode
Tv, Av, M, and C Mode
Playback Mode
Wi-Fi Functions
Setting Menu
Accessories
Appendix
Before Use
Index
Basic Guide
Advanced Guide
Camera Basics
Auto Mode /
Hybrid Auto Mode
Continuous Shooting
Still Images Movies
In [ ] mode, hold the shutter button all the way down to shoot
continuously.
For details on the continuous shooting speed, see “Camera” (=
204).
1 Congure the setting.
zPress the [ ] button, choose [ ] in the
menu, and then choose [ ] (=
28).
zOnce the setting is complete, [ ] is
displayed.
2 Shoot.
zHold the shutter button all the way down
to shoot continuously.
●During continuous shooting, the focus, exposure, and colors are
locked at the position/level determined when you pressed the
shutter button halfway.
●Cannot be used with the self-timer (=
40).
●Shooting may stop momentarily or continuous shooting may slow
down depending on shooting conditions, camera settings, and the
zoom position.
●As more shots are taken, shooting may slow down.
●Shooting may slow down if the ash res.
●Multi-area White Balance (=
33) is not available. Also note that
these features are not available.
— [Hg Lamp Corr.] (=
48)
— [Blink Detection] (=
51)
●With Touch Shutter (=
42), the camera shoots continuously
while you touch the screen. Focus and exposure during
continuous shooting remain constant, after they are determined
for the rst shot.
Shooting by Touching the Screen (Touch Shutter)
Still Images Movies
With this option, instead of pressing the shutter button, you can simply
touch the screen and release your nger to shoot. The camera will focus
on subjects and adjust image brightness automatically.
1 Enable the touch-shutter function.
zTouch [ ] and change it to [ ].
2 Shoot.
zTouch the subject on the screen to take
the picture.
zThe camera shoots, as a shutter sound
is played.
zTo cancel touch shutter, choose [ ] in
step 1.
●Even while the shot is displayed, you can prepare for the next
shot by touching [ ].
●You can also congure touch-shutter settings by choosing MENU
(=
29) ► [ 2] tab ► [Touch Shutter]. To hide the Touch
Shutter setting icon, set [Touch shutter icon] to [Off].
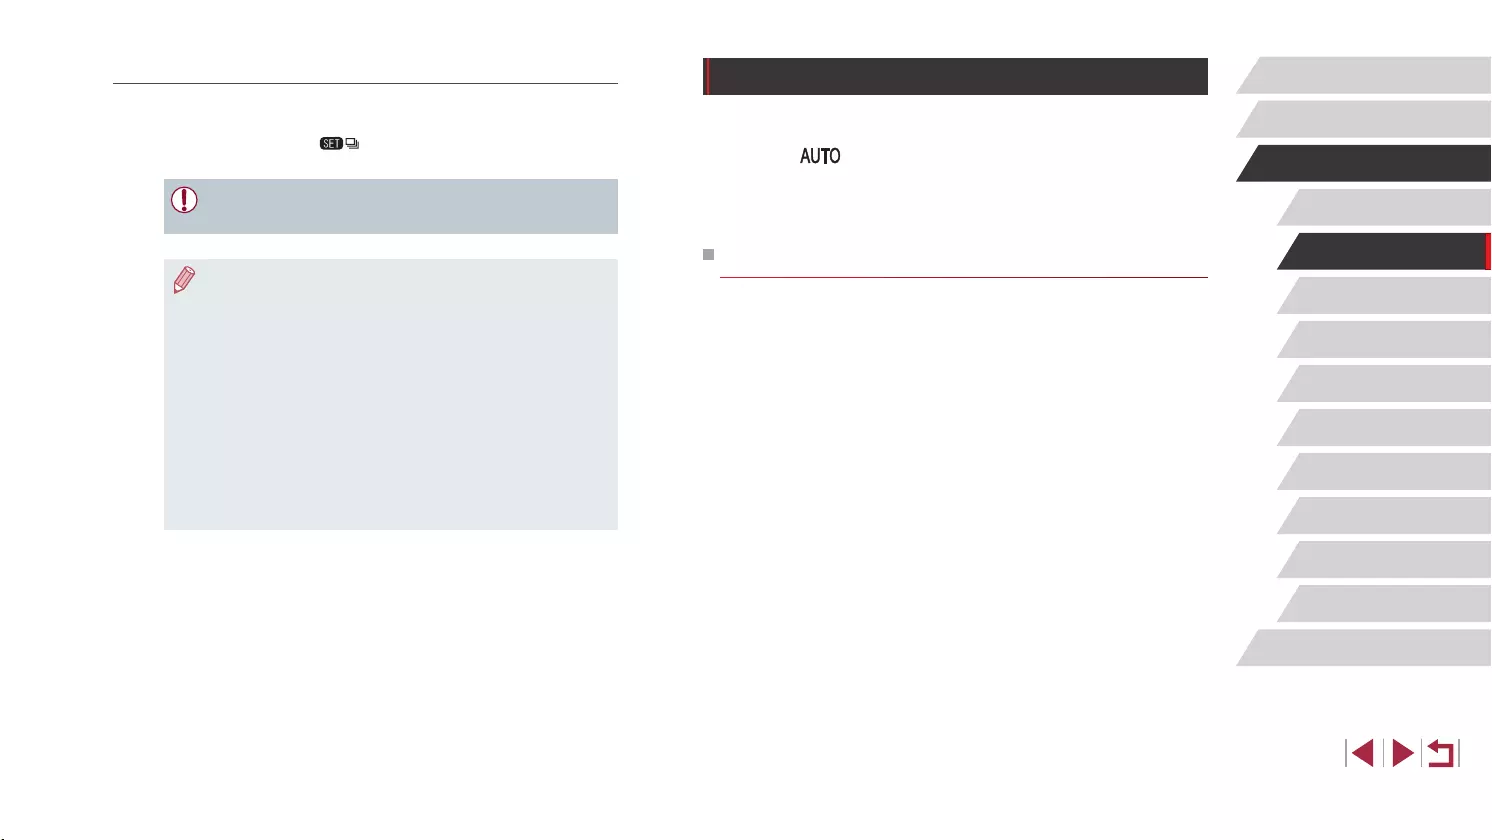
43
Other Shooting Modes
P Mode
Tv, Av, M, and C Mode
Playback Mode
Wi-Fi Functions
Setting Menu
Accessories
Appendix
Before Use
Index
Basic Guide
Advanced Guide
Camera Basics
Auto Mode /
Hybrid Auto Mode
Using Face ID
If you register a person ahead of time, the camera will detect that person’s
face, and prioritize focus, brightness, and color for that person when
shooting. In [ ] mode, the camera can detect babies and children
based on registered birthdays and optimize settings for them when
shooting.
This function also enables you to nd shots you have taken that include
registered people (=
108).
Personal Information
●Information such as images of a face (face info) registered with
Face ID, and personal information (name, birthday) will be saved
on the camera. Additionally, when registered people are detected,
their names will be recorded in still images. When using the Face ID
function, be careful when sharing the camera or images with others,
and when posting images online where many others can view them.
●When disposing of a camera or transferring it to another person after
using Face ID, be sure to erase all information (registered faces,
names, and birthdays) from the camera (=
47).
Image Display during Playback
Each set of images shot continuously is managed as a single group,
and only the rst image in that group will be displayed. To indicate that
the image is part of a group, [ ] is displayed in the upper left of the
screen.
●If you erase a grouped image (=
115), all images in the group
are also erased. Be careful when erasing images.
●Grouped images can be played back individually (=
110) and
ungrouped (=
110).
●Protecting (=
113) a grouped image will protect all images in
the group.
●Grouped images can be viewed individually when played
back using Image Search (=
107). In this case, images are
temporarily ungrouped.
●The following actions are not available for grouped images:
editing Face ID information (=
111), magnifying (=
112),
tagging as favorites (=
118), editing (=
121), printing
(=
175), setting up individual image printing (=
179), or
adding to a photobook (=
181). To do these things, either
view grouped images individually (=
110) or cancel grouping
(=
110) rst.
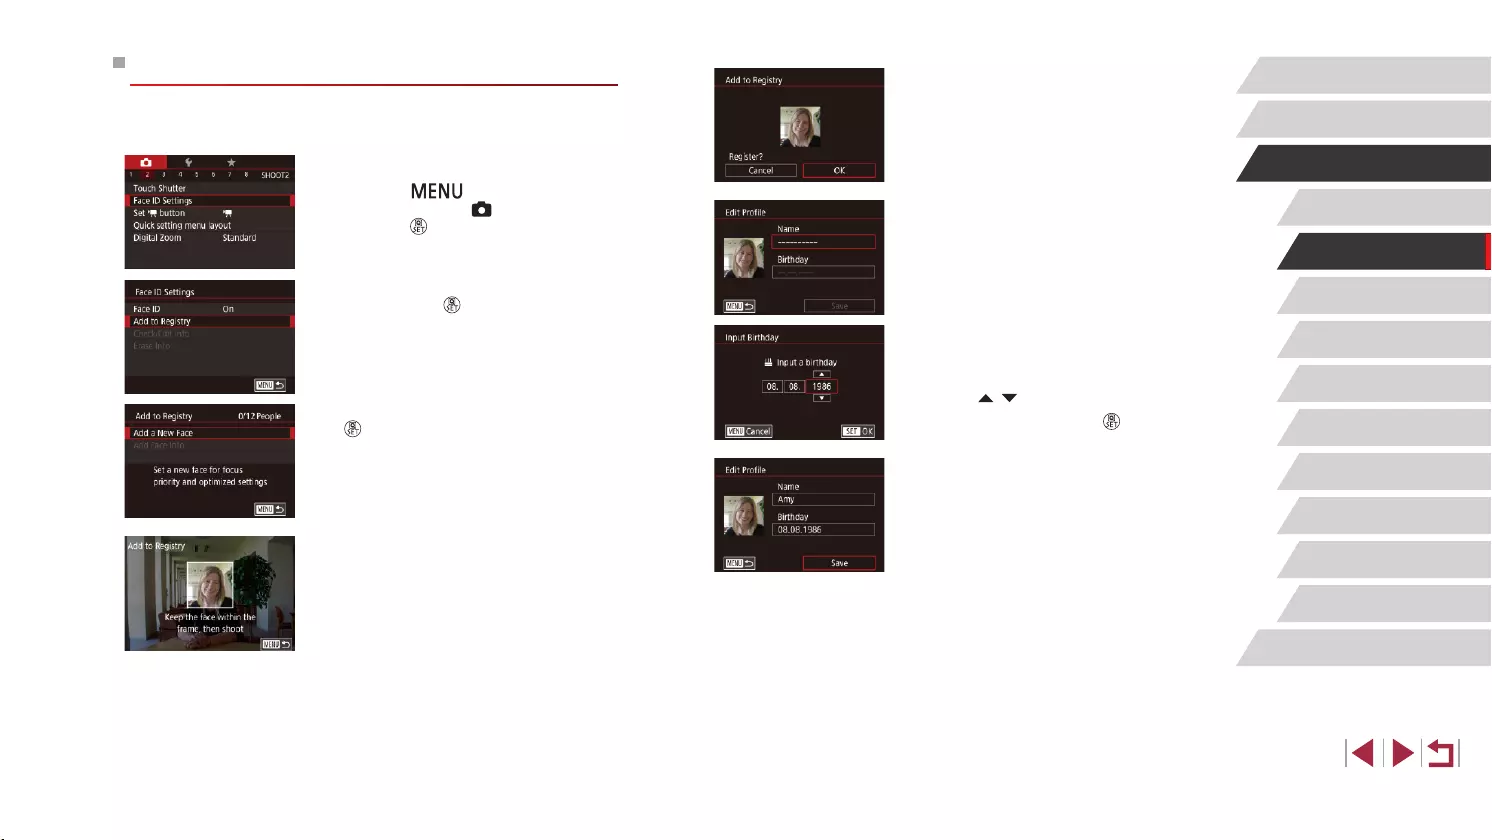
44
Other Shooting Modes
P Mode
Tv, Av, M, and C Mode
Playback Mode
Wi-Fi Functions
Setting Menu
Accessories
Appendix
Before Use
Index
Basic Guide
Advanced Guide
Camera Basics
Auto Mode /
Hybrid Auto Mode
zAfter [Register?] is displayed, touch [OK].
zThe [Edit Prole] screen is displayed.
3 Register the person’s name and
birthday.
zTouch the name text box to access the
keyboard, and then enter the name
(=
30).
zTo register a birthday, on the [Edit Prole]
screen, touch the birthday text box.
zTouch an option to choose it.
zTouch [ ][ ] to specify the date.
zWhen nished, press the [ ] button.
4 Save the settings.
zTouch [Save].
zAfter a message is displayed, touch [Yes].
5 Continue registering face
information.
zTo register up to 4 more points of face
information (expressions or angles),
repeat step 2.
zRegistered faces are more easily
recognized if you add a variety of face
information. In addition to a head-on
angle, add a slight side angle, a shot
when smiling, and shots inside and
outside.
Registering Face ID Information
You can register information (face info, names, and birthdays) for up to 12
people to use with Face ID.
1 Access the setting screen.
zPress the [ ] button, choose [Face
ID Settings] on the [ 2] tab, and then
press the [ ] button (=
29).
zTouch [Add to Registry] to choose it, and
then press the [ ] button.
zChoose [Add a New Face] and press the
[] button.
2 Register face information.
zAim the camera so that the face of the
person you want to register is inside the
gray frame at the center of the screen.
zA white frame on the person’s face
indicates that the face is recognized.
Make sure a white frame is displayed on
the face, and then shoot.
zIf the face is not recognized, you cannot
register face information.
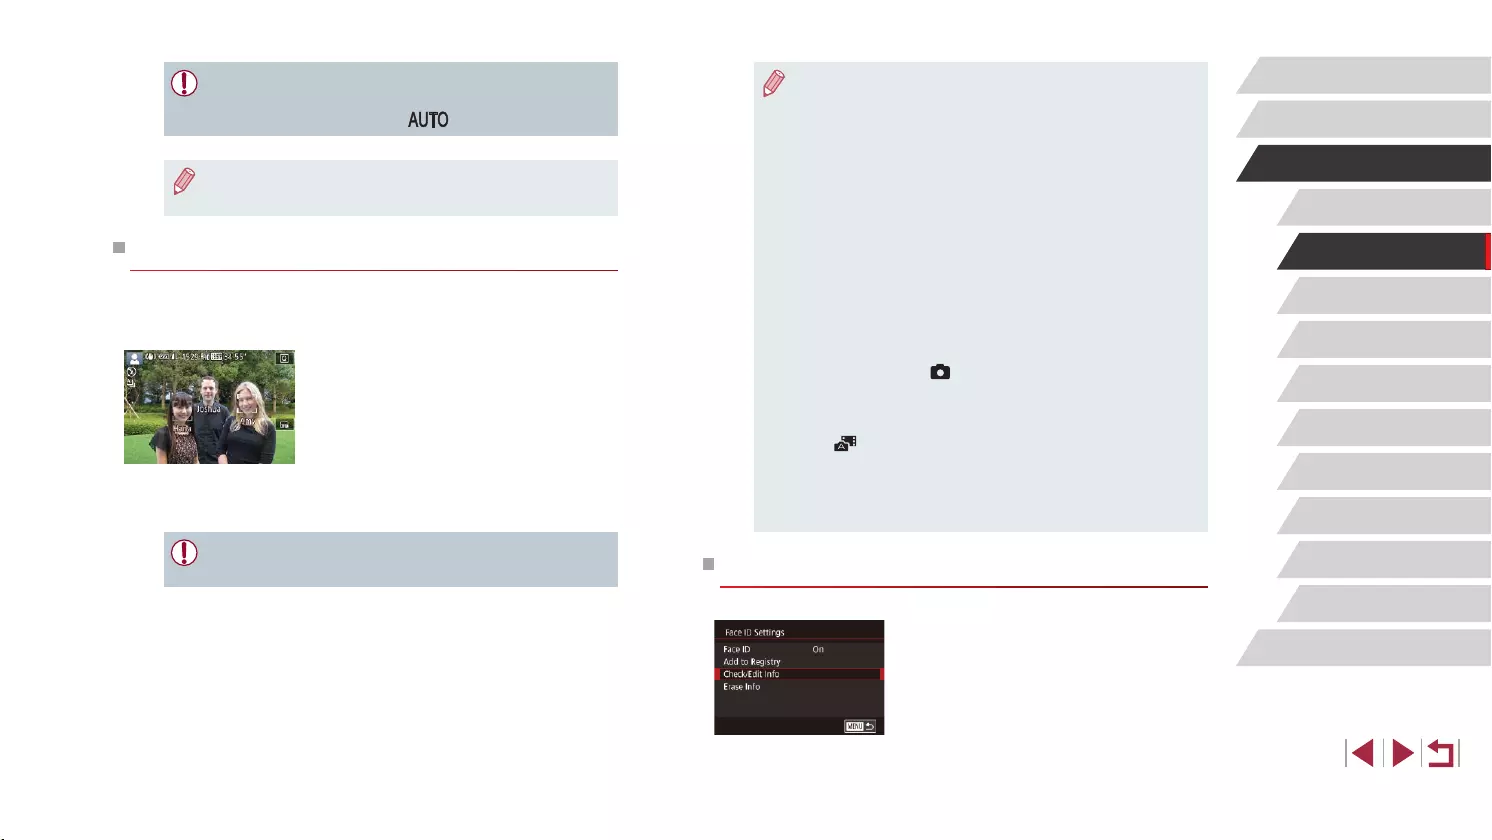
45
Other Shooting Modes
P Mode
Tv, Av, M, and C Mode
Playback Mode
Wi-Fi Functions
Setting Menu
Accessories
Appendix
Before Use
Index
Basic Guide
Advanced Guide
Camera Basics
Auto Mode /
Hybrid Auto Mode
●Registered people may not be correctly detected if the captured
image or scene differs drastically from the registered face
information.
●If a registered face is not detected, or not easily detected,
overwrite registered information with new face info. Registering
face info right before shooting will allow for easier detection of
registered faces.
●If a person is mistakenly detected as another person and you
continue shooting, you can edit or erase the name recorded in the
image during playback (=
111).
●Because faces of babies and children change quickly as they
grow, you should update their face info regularly (=
44).
●Names will still be recorded in images even if you clear the
[Shooting Info] check box in “Customizing the Information
Displayed” (=
99) so that the names are not displayed.
●If you don’t want names to be recorded in images, choose [Face
ID Settings] on the [ 2] tab, choose [Face ID], and then choose
[Off].
●You can check names recorded in images in the playback screen
(simple information display) (=
105).
●In [ ] mode, names are not displayed on the shooting screen,
but they will be recorded in still images.
●Names recorded in continuous shooting (=
42) continue to be
recorded in the same position as the rst shot, even if subjects
move.
Checking and Editing Registered Information
1 Access the [Check/Edit Info] screen.
zFollowing step 1 in “Registering Face ID
Information” (=
44), choose [Check/
Edit Info].
●The ash will not re when following step 2.
●If you do not register a birthday in step 3, Babies or Children icons
(=
37) will not be displayed in [ ] mode.
●You can overwrite registered face info, and add face info later if
you have not lled all 5 face info slots (=
44).
Shooting
If you register a person ahead of time, the camera will prioritize that
person as the main subject, and optimize focus, brightness, and color for
that person when shooting.
zWhen you point the camera toward
people, the names of up to 3 registered
people will be displayed when they are
detected.
zShoot.
zDisplayed names will be recorded in still
images. The names of detected people
(maximum total of 5) will be recorded,
even if the names are not displayed.
●People other than those registered may be mistakenly detected
as the registered person if they share similar facial features.
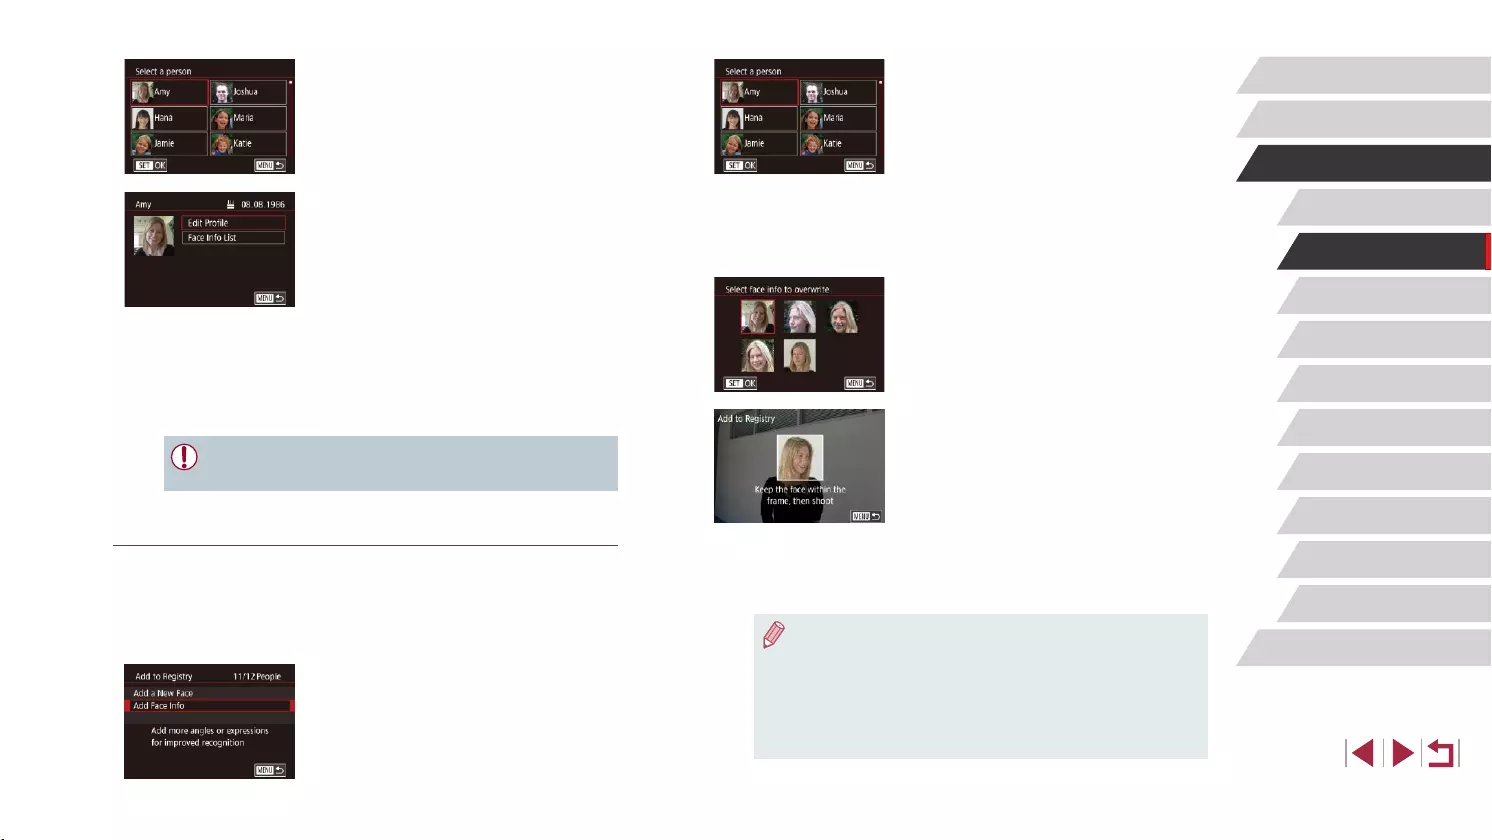
46
Other Shooting Modes
P Mode
Tv, Av, M, and C Mode
Playback Mode
Wi-Fi Functions
Setting Menu
Accessories
Appendix
Before Use
Index
Basic Guide
Advanced Guide
Camera Basics
Auto Mode /
Hybrid Auto Mode
2 Choose a person to overwrite their
face info.
zTouch the name of the person whose
face info you want to overwrite.
zIf ve items of face info have already
been registered, a message will be
displayed. Touch [OK].
zIf less than ve items of face info are
registered, go to step 4 to add face
information.
3 Choose the face info to overwrite.
zTouch the face info you want to overwrite.
4 Register face information.
zFollow step 2 in “Registering Face ID
Information” (=
44) to shoot, and then
register the new face information.
zRegistered faces are more easily
recognized if you add a variety of face
information. In addition to a head-on
angle, add a slight side angle, a shot
when smiling, and shots inside and
outside.
●You cannot add face information if all 5 information slots are lled.
Follow the steps above to overwrite face information.
●You can follow the above steps to register new face info when
there is at least one slot open; however, you cannot overwrite
any face information. Instead of overwriting face info, rst erase
unwanted existing info (=
45), and then register new face
information (=
44) as needed.
2 Choose a person to check or edit
their information.
zTouch the image of the person whose
information you want to check or edit.
3 Check or edit the information as
needed.
zTo check a name or birthday, touch
[Edit Prole]. On the screen displayed,
you can edit the name or birthday as
described in step 3 of “Registering Face
ID Information” (=
44).
zTo check face information, touch [Face
Info List]. To erase face information, touch
[Erase] on the screen displayed, and then
touch the face information to erase. After
[Erase?] is displayed, touch [OK].
●Even if you change names in [Edit Prole], the names recorded in
previously shot images will remain the same.
Overwriting and Adding Face Information
You can overwrite existing face information with new face info. You should
update face information regularly, especially with babies and children, as
their faces change quickly as they grow.
You can also add face information when all 5 face info slots have not been
lled.
1 Access the [Add Face Info] screen.
zFollowing step 1 in “Registering Face ID
Information” (=
44), choose [Add Face
Info].
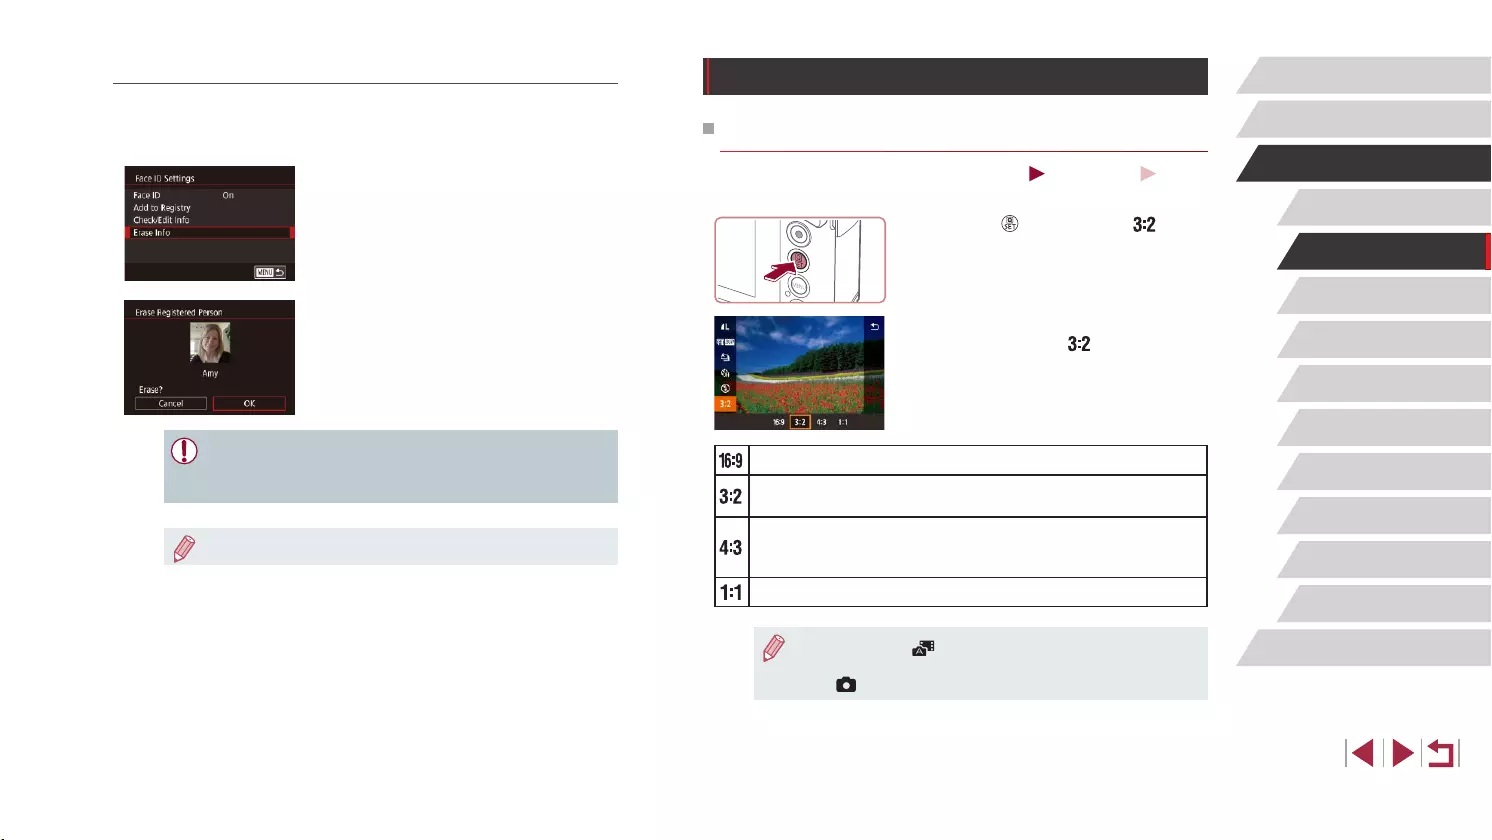
47
Other Shooting Modes
P Mode
Tv, Av, M, and C Mode
Playback Mode
Wi-Fi Functions
Setting Menu
Accessories
Appendix
Before Use
Index
Basic Guide
Advanced Guide
Camera Basics
Auto Mode /
Hybrid Auto Mode
Image Customization Features
Changing the Aspect Ratio
Still Images Movies
Change the image aspect ratio (ratio of width to height) as follows.
zPress the [ ] button, choose [ ] in the
menu, and choose the desired option
(=
28).
zOnce the setting is complete, the screen
aspect ratio will be updated.
zTo restore the original setting, repeat this
process but choose [ ].
Used for display on widescreen HDTVs or similar display devices.
Native aspect ratio of the camera screen. Same aspect ratio as
35mm lm, used for printing images at 5 x 7-inch or postcard sizes.
Used for display on standard-denition televisions or similar display
devices. Also used for printing images at 3.5 x 5-inch or A-series
sizes.
Square aspect ratio.
●Not available in [ ] mode.
●You can also congure this setting by choosing MENU (=
29)
► [ 1] tab ► [Still Image Aspect Ratio].
Erasing Registered Information
You can erase information (face info, names, and birthdays) registered to
Face ID. However, names recorded in previously shot images will not be
erased.
1 Access the [Erase Info] screen.
zFollow step 1 in “Registering Face ID
Information” (=
44) and choose [Erase
Info].
2 Choose a person to erase their
information.
zTouch the name of the person to erase.
zAfter [Erase?] is displayed, touch [OK].
●If you erase a registered person’s info, you will not be able to
display their name (=
107), overwrite their info (=
111), or
search for images that include them (=
108).
●You can also erase names in image information (=
111).
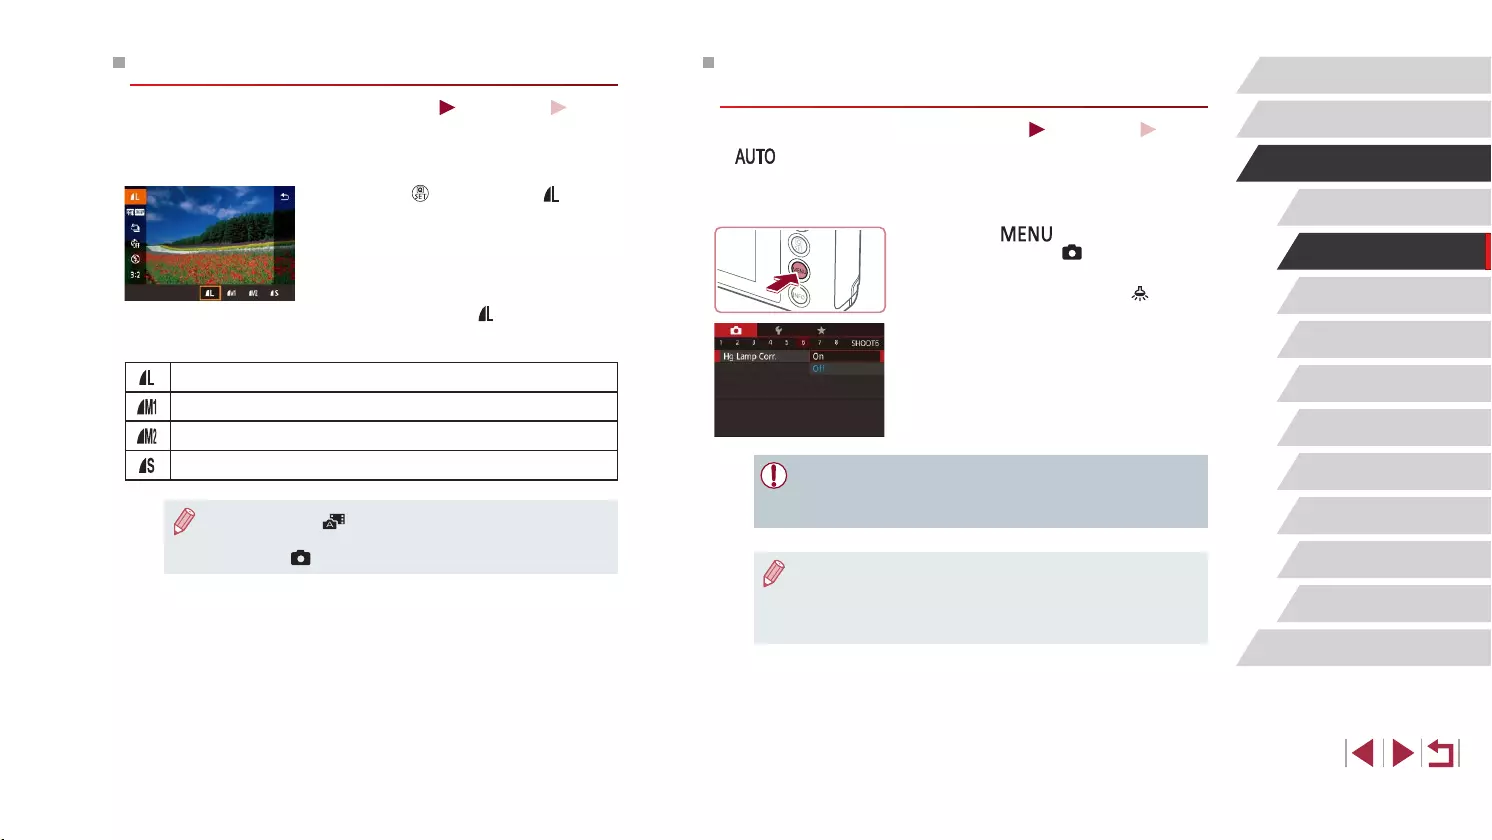
48
Other Shooting Modes
P Mode
Tv, Av, M, and C Mode
Playback Mode
Wi-Fi Functions
Setting Menu
Accessories
Appendix
Before Use
Index
Basic Guide
Advanced Guide
Camera Basics
Auto Mode /
Hybrid Auto Mode
Correcting Greenish Image Areas from
Mercury Lamps
Still Images Movies
In [ ] mode, subjects or background in shots of evening scenes
illuminated by mercury lamps may appear to have a greenish tinge. This
greenish tinge can be corrected automatically when shooting, using Multi-
area White Balance.
zPress the [ ] button, choose [Hg
Lamp Corr.] on the [ 6] tab, and then
choose [On] (=
29).
zOnce the setting is complete, [ ] is
displayed.
zTo restore the original setting, repeat this
process but choose [Off].
●After you are nished shooting under mercury lamps, you should
set [Hg Lamp Corr.] back to [Off]. Otherwise, green hues not
caused by mercury lamps may be corrected by mistake.
●Try taking some test shots rst to make sure you obtain the
desired results.
●In continuous shooting (=
42), this setting is set to [Off] and
cannot be changed.
Changing Image Quality
Still Images Movies
Choose from 4 levels of image quality. For guidelines on how many of
each kind of image can t on a memory card, see “Number of Shots per
Memory Card” (=
205).
zPress the [ ] button, choose [ ] in the
menu, and choose the desired option
(=
28).
zThe option you congured is now
displayed.
zTo restore the original setting, repeat this
process but choose [ ].
Guidelines for choosing image quality based on paper size (for 3:2 images)
A2 (16.5 x 23.4 in.)
A3 – A5 (11.7 x 16.5 – 5.8 x 8.3 in.)
3.5 x 5 in., 5 x 7 in., Postcard
For e-mailing and similar purposes
●Not available in [ ] mode.
●You can also change the image quality by accessing MENU
(=
29) ► [ 1] tab ► [Image quality] (=
90).
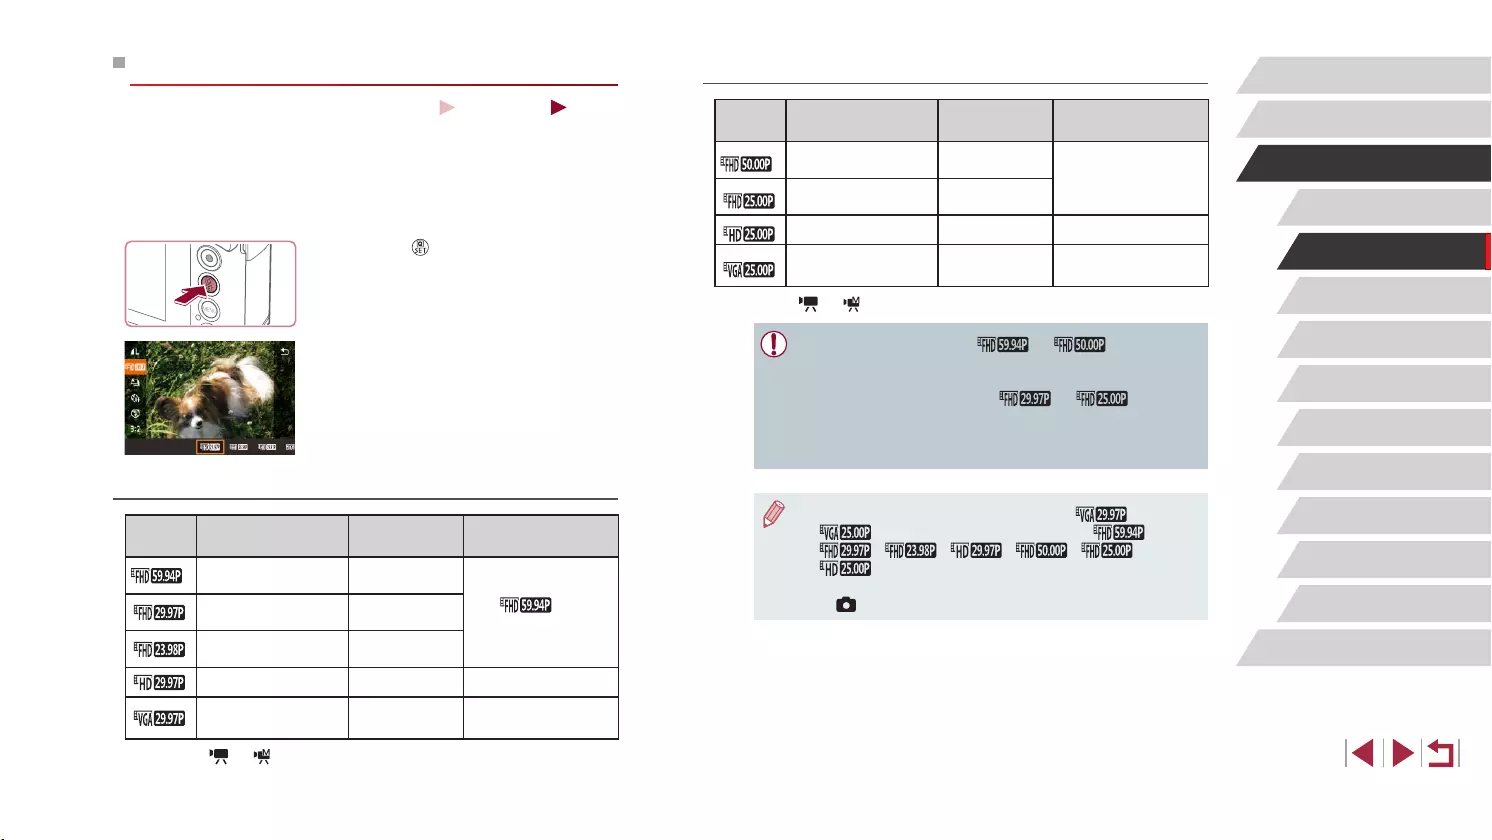
49
Other Shooting Modes
P Mode
Tv, Av, M, and C Mode
Playback Mode
Wi-Fi Functions
Setting Menu
Accessories
Appendix
Before Use
Index
Basic Guide
Advanced Guide
Camera Basics
Auto Mode /
Hybrid Auto Mode
For PAL Video
Image
Quality
Number of Recording
Pixels Frame Rate Details
*1920 x 1080 50.00 fps For shooting in Full
HD.
1920 x 1080 25.00 fps
1280 x 720 25.00 fps For shooting in HD.
640 x 480 25.00 fps For shooting in
standard denition.
* Available in [ ] or [ ] mode.
●After repeated recording in [ ] or [ ] mode, movie
recording at that level of quality may be temporarily unavailable
(even if you press the movie button) until the camera has cooled
down. To continue recording in [ ] or [ ] mode
instead, touch [Yes] after the notication message is displayed.
Otherwise, turn the camera off and wait a while for it to cool down
before you resume recording.
●Black bars (displayed on the left and right in [ ] and
[] modes and on the top and bottom in [ ],
[], [ ], [ ], [ ], [ ], and
[] modes) indicate image areas not recorded.
●You can also congure this setting by choosing MENU (=
29)
► [ 8] tab ► [Movie Quality].
Changing Movie Image Quality
Still Images Movies
Adjust movie image quality (image size and frame rate). The frame rate
indicates how many frames are recorded per second, which is determined
automatically based on the NTSC or PAL setting (=
160). For guidelines
on the total recording time for movies at each level of image quality
that will t on a memory card, see “Recording Time per Memory Card”
(=
206).
zPress the [ ] button, choose the movie
quality menu item, and then choose the
desired option (=
28).
zThe option you congured is now
displayed.
For NTSC Video
Image
Quality
Number of Recording
Pixels Frame Rate Details
*1920 x 1080 59.94 fps For shooting in Full
HD. [ ] enables
movies with smoother
motion.
1920 x 1080 29.97 fps
1920 x 1080 23.98 fps
1280 x 720 29.97 fps For shooting in HD.
640 x 480 29.97 fps For shooting in
standard denition.
* Available in [ ] or [ ] mode.
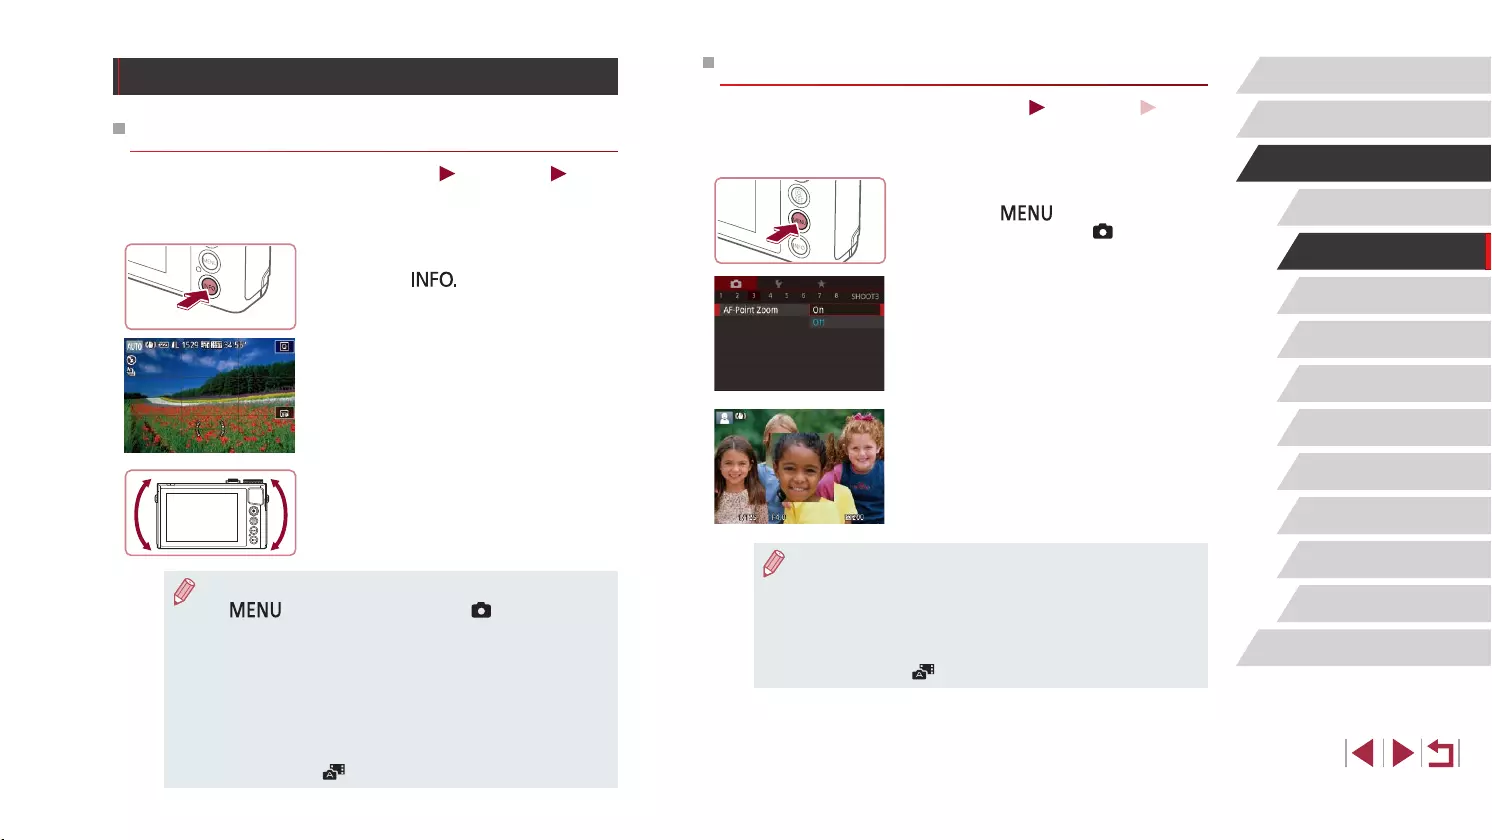
50
Other Shooting Modes
P Mode
Tv, Av, M, and C Mode
Playback Mode
Wi-Fi Functions
Setting Menu
Accessories
Appendix
Before Use
Index
Basic Guide
Advanced Guide
Camera Basics
Auto Mode /
Hybrid Auto Mode
Magnifying the Area in Focus
Still Images Movies
You can check the focus by pressing the shutter button halfway, which will
enlarge the portion of the image in focus in the AF frame.
1 Congure the setting.
zPress the [ ] button, choose
[AF-Point Zoom] on the [ 3] tab, and
then choose [On] (=
29).
2 Check the focus.
zPress the shutter button halfway. The
face detected as the main subject is now
magnied.
zTo restore the original setting, choose
[Off] in step 1.
●The area in focus is not magnied in the following cases when the
shutter button is pressed halfway.
— If a face was not detected, if the person is too close to the
camera and their face is too large for the screen, or if the
camera detects subject movement
— When digital zoom is used (=
39)
●Not available in [ ] mode.
Helpful Shooting Features
Using the Electronic Level
Still Images Movies
An electronic level can be displayed on the screen when shooting as a
guideline to determine if the camera is level.
1 Display the electronic level.
zPress the [ ] button to display the
electronic level.
2 Level the camera as needed.
zLevel the camera so that the center of the
electronic level is green.
●If the electronic level is not displayed in step 1, press the
[] button and check the setting in [ 1] tab ► [Shooting
information display].
●Tilting the camera too far forward or backward will prevent you
from using the electronic level, which will turn gray.
●The electronic level is not displayed during movie recording.
●If you hold the camera vertically, the orientation of the electronic
level will be updated automatically to match the camera orientation.
●Calibrate the electronic level if it seems ineffective in helping you
level the camera (=
161).
●Not available in [ ] mode.
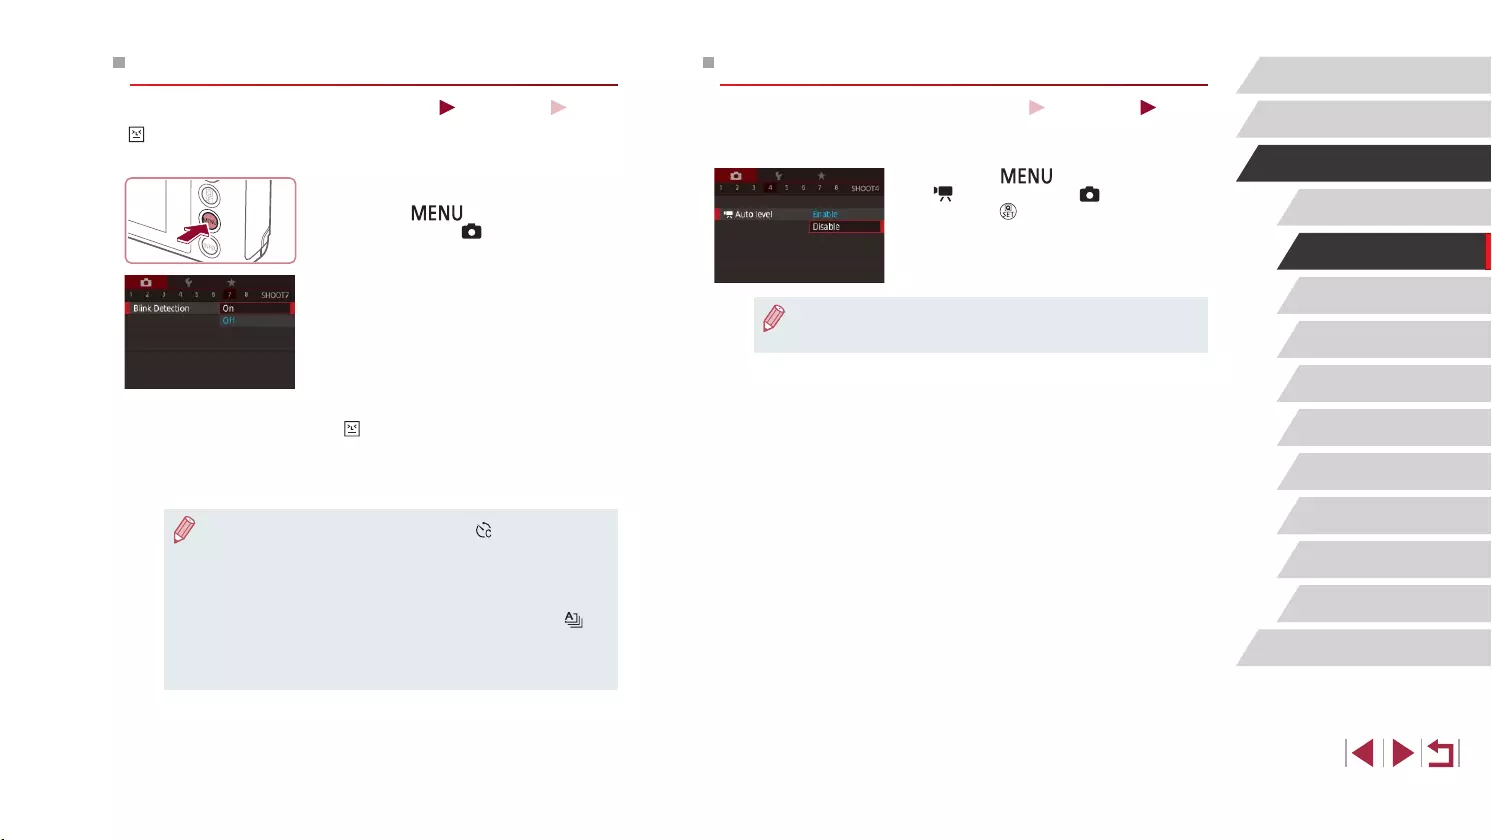
51
Other Shooting Modes
P Mode
Tv, Av, M, and C Mode
Playback Mode
Wi-Fi Functions
Setting Menu
Accessories
Appendix
Before Use
Index
Basic Guide
Advanced Guide
Camera Basics
Auto Mode /
Hybrid Auto Mode
Deactivating Auto Level
Still Images Movies
Normally, auto leveling keeps movies straight. To cancel this feature,
choose [Disable].
zPress the [ ] button, choose
[ Auto level] on the [ 4] tab, and then
press the [ ] button (=
29).
zChoose [Disable] (=
29).
●Once recording begins, the display area narrows, and subjects
are enlarged (=
52).
Checking for Closed Eyes
Still Images Movies
[] is displayed when the camera detects that people may have closed
their eyes.
1 Congure the setting.
zPress the [ ] button, choose [Blink
Detection] on the [ 7] tab, and then
choose [On] (=
29).
2 Shoot.
z[] ashes when the camera detects a
person whose eyes are closed.
zTo restore the original setting, choose
[Off] in step 1.
●When you have specied multiple shots in [ ] mode, this
function is only available for the nal shot.
●A frame is displayed around people whose eyes are closed when
you have selected [2 sec.], [4 sec.], [8 sec.], or [Hold] in [Display
Time] (=
54).
●This feature is not available during continuous shooting in [ ]
mode (=
38).
●This feature is not available in continuous shooting mode
(=
42).
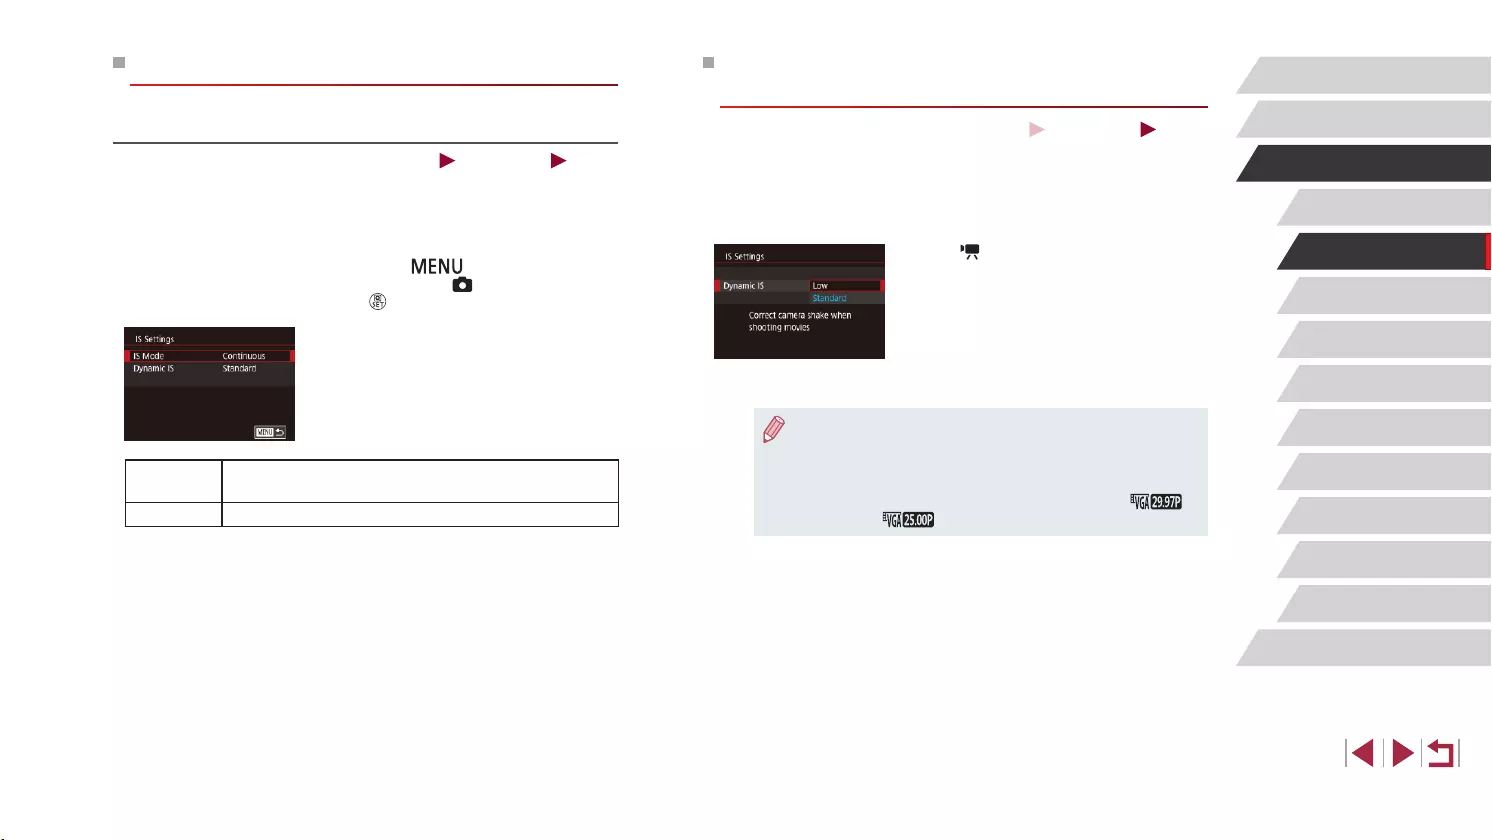
52
Other Shooting Modes
P Mode
Tv, Av, M, and C Mode
Playback Mode
Wi-Fi Functions
Setting Menu
Accessories
Appendix
Before Use
Index
Basic Guide
Advanced Guide
Camera Basics
Auto Mode /
Hybrid Auto Mode
Recording Movies with Subjects at the Same
Size Shown before Shooting
Still Images Movies
Normally, once movie recording begins, the image display area changes
and subjects are enlarged to allow for image straightening and correction
of signicant camera shake.
To record movies with subjects at the same size shown before shooting,
you can reduce image stabilization and cancel Auto Level.
zSet [ Auto level] to [Disable] as
described in “Deactivating Auto Level”
(=
51).
zFollow step 1 in “Deactivating Image
Stabilization” (=
52) to access the [IS
Settings] screen.
zChoose [Dynamic IS], and then choose
[Low] (=
29).
●You can also set [IS Mode] to [Off], so that subjects are recorded
at the same size shown before shooting.
●[Dynamic IS] is not available when [IS Mode] is set to [Off]
(=
52).
●Only [Standard] is available when the movie quality is [ ]
(NTSC) or [ ] (PAL).
Changing the IS Mode Settings
Deactivating Image Stabilization
Still Images Movies
When the camera is held still (as when shooting from a tripod), you should
set image stabilization to [Off] to deactivate it.
1 Access the setting screen.
zPress the [ ] button, choose [IS
Settings] on the [ 4] tab, and then press
the [ ] button (=
29).
2 Congure the setting.
zTouch [IS Mode], and then choose an
option (=
29).
Continuous Optimal image stabilization for the shooting conditions is
automatically applied (Intelligent IS) (=
38).
Off Deactivates image stabilization.
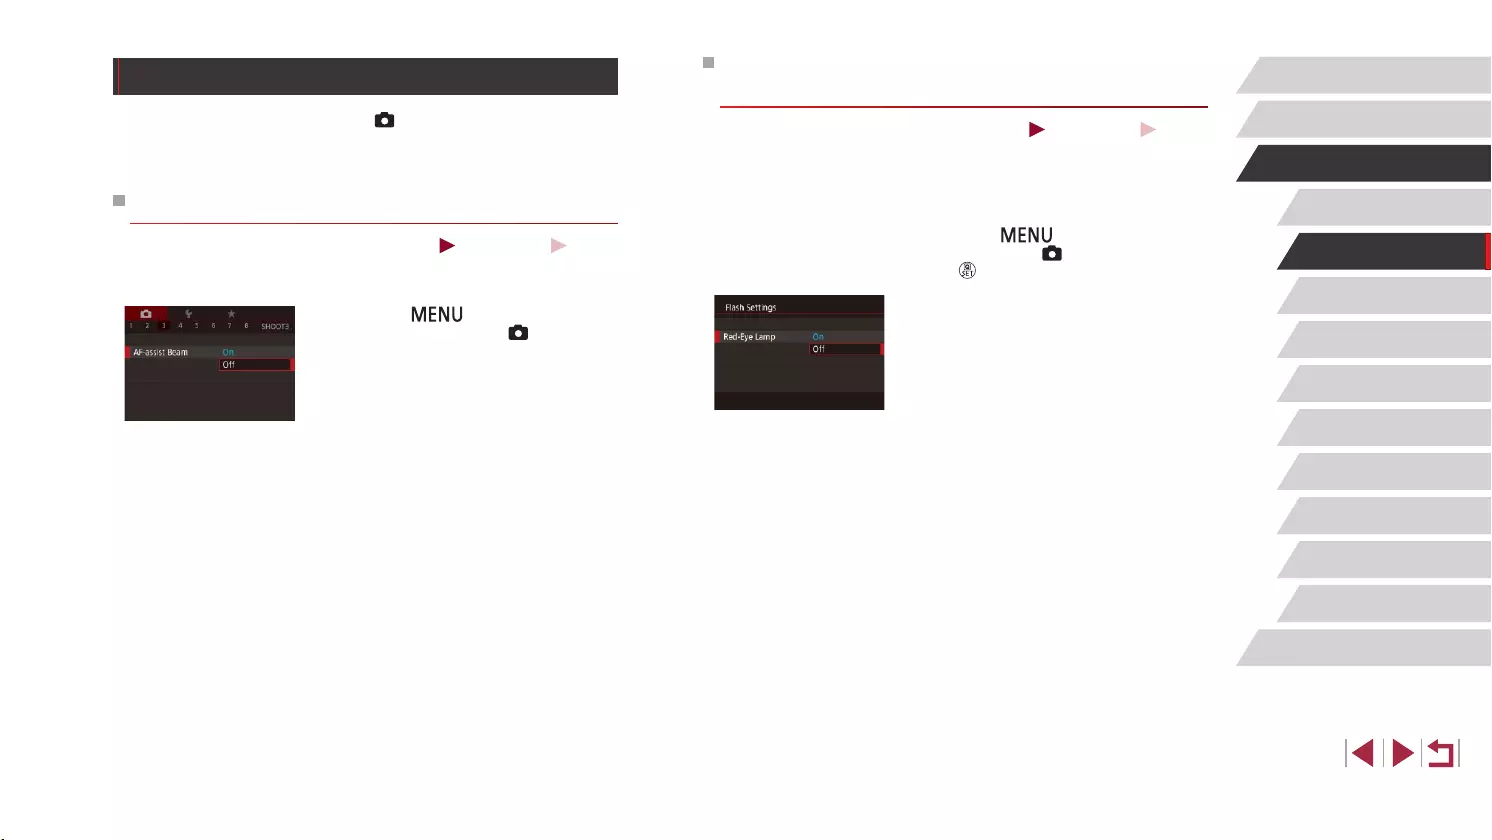
53
Other Shooting Modes
P Mode
Tv, Av, M, and C Mode
Playback Mode
Wi-Fi Functions
Setting Menu
Accessories
Appendix
Before Use
Index
Basic Guide
Advanced Guide
Camera Basics
Auto Mode /
Hybrid Auto Mode
Preventing the Red-Eye Reduction Lamp from
Lighting Up
Still Images Movies
You can deactivate the red-eye reduction lamp that lights up to reduce
red-eye when the ash is used in low-light shots.
1 Access the [Flash Settings] screen.
zPress the [ ] button, choose [Flash
Settings] on the [ 5] tab, and then press
the [ ] button.
2 Congure the setting.
zChoose [Red-Eye Lamp], and then
choose [Off].
zTo restore the original setting, repeat this
process but choose [On].
Customizing Camera Operation
Customize shooting functions on the [ ] tab of the menu screen as
follows.
For instructions on menu functions, see “Using the Menu Screen”
(=
29).
Preventing the AF-Assist Beam from Firing
Still Images Movies
You can deactivate the lamp that normally lights up to help you focus
when you press the shutter button halfway in low-light conditions.
zPress the [ ] button, choose
[AF-assist Beam] on the [ 3] tab, and
then choose [Off].
zTo restore the original setting, repeat this
process but choose [On].
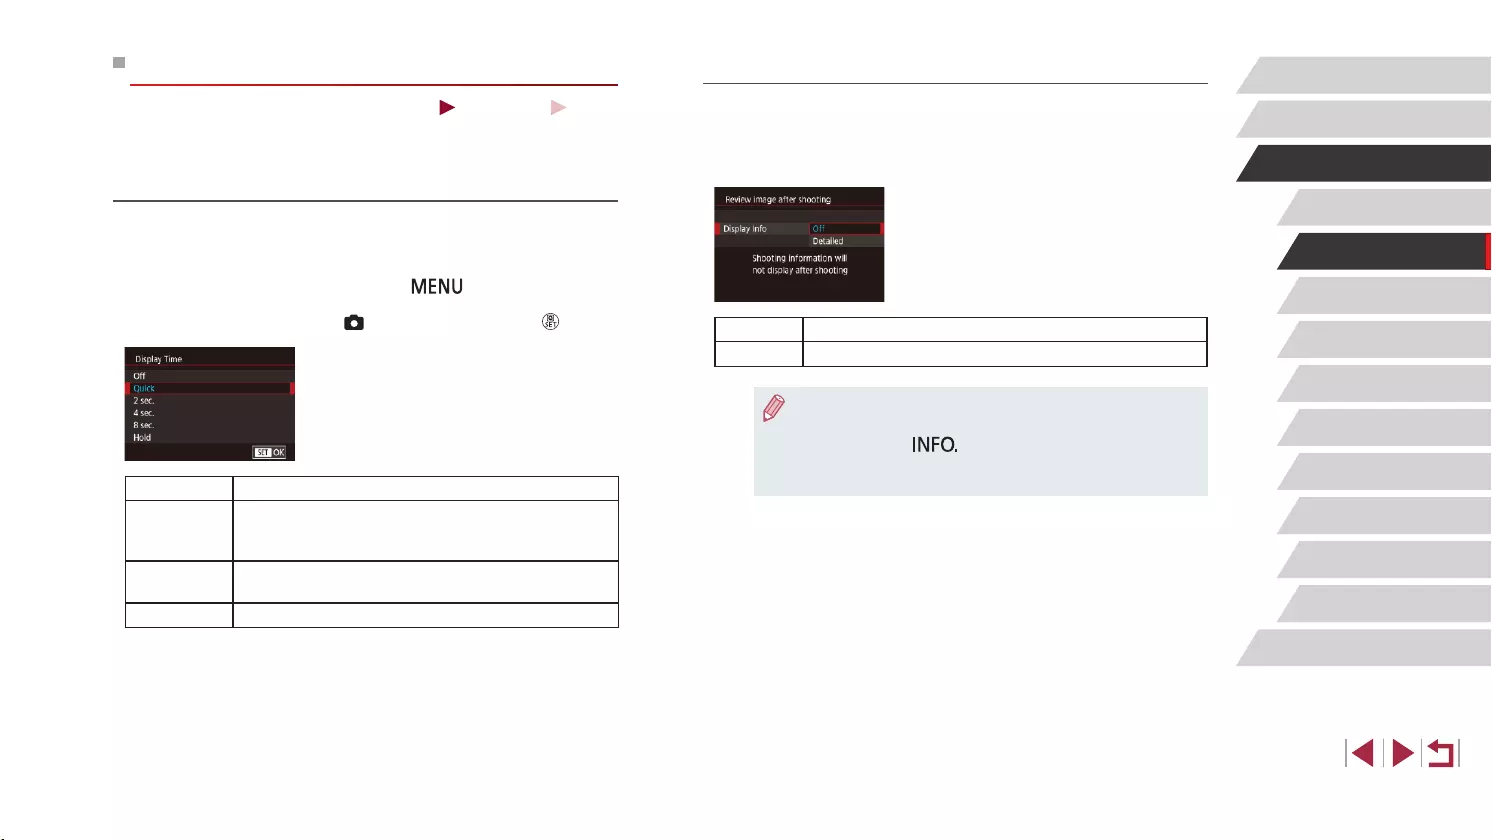
54
Other Shooting Modes
P Mode
Tv, Av, M, and C Mode
Playback Mode
Wi-Fi Functions
Setting Menu
Accessories
Appendix
Before Use
Index
Basic Guide
Advanced Guide
Camera Basics
Auto Mode /
Hybrid Auto Mode
Changing the Screen Displayed after Shots
Change the way images are displayed after shots as follows.
1 Set [Display Time] to [2 sec.],
[4 sec.], [8 sec.], or [Hold] (=
54).
2 Congure the setting.
zChoose [Display Info], and then choose
the desired option.
zTo restore the original setting, repeat this
process but choose [Off].
Off Displays only the image.
Detailed Displays shooting details (=
189).
●When [Display Time] (=
54) is set to [Off] or [Quick], [Display
Info] is set to [Off] and cannot be changed.
●By pressing the [ ] button while an image is displayed after
shooting, you can switch the display information. Note that the
settings of [Display Info] are not changed.
Changing the Image Display Style after Shots
Still Images Movies
You can change how long images are displayed and what information is
displayed immediately after shooting.
Changing the Image Display Period after Shots
1 Access the [Review image after
shooting] screen.
zPress the [ ] button, choose
[Review image after shooting] on the
[1] tab, and then press the [ ] button.
2 Congure the setting.
zChoose [Display Time], and then choose
the desired option.
zTo restore the original setting, repeat this
process but choose [Quick].
Quick Displays images only until you can shoot again.
2 sec., 4 sec.,
8 sec.
Displays images for the specied time. Even while
the shot is displayed, you can take another shot by
pressing the shutter button halfway again.
Hold Displays images until you press the shutter button
halfway.
Off No image display after shots.
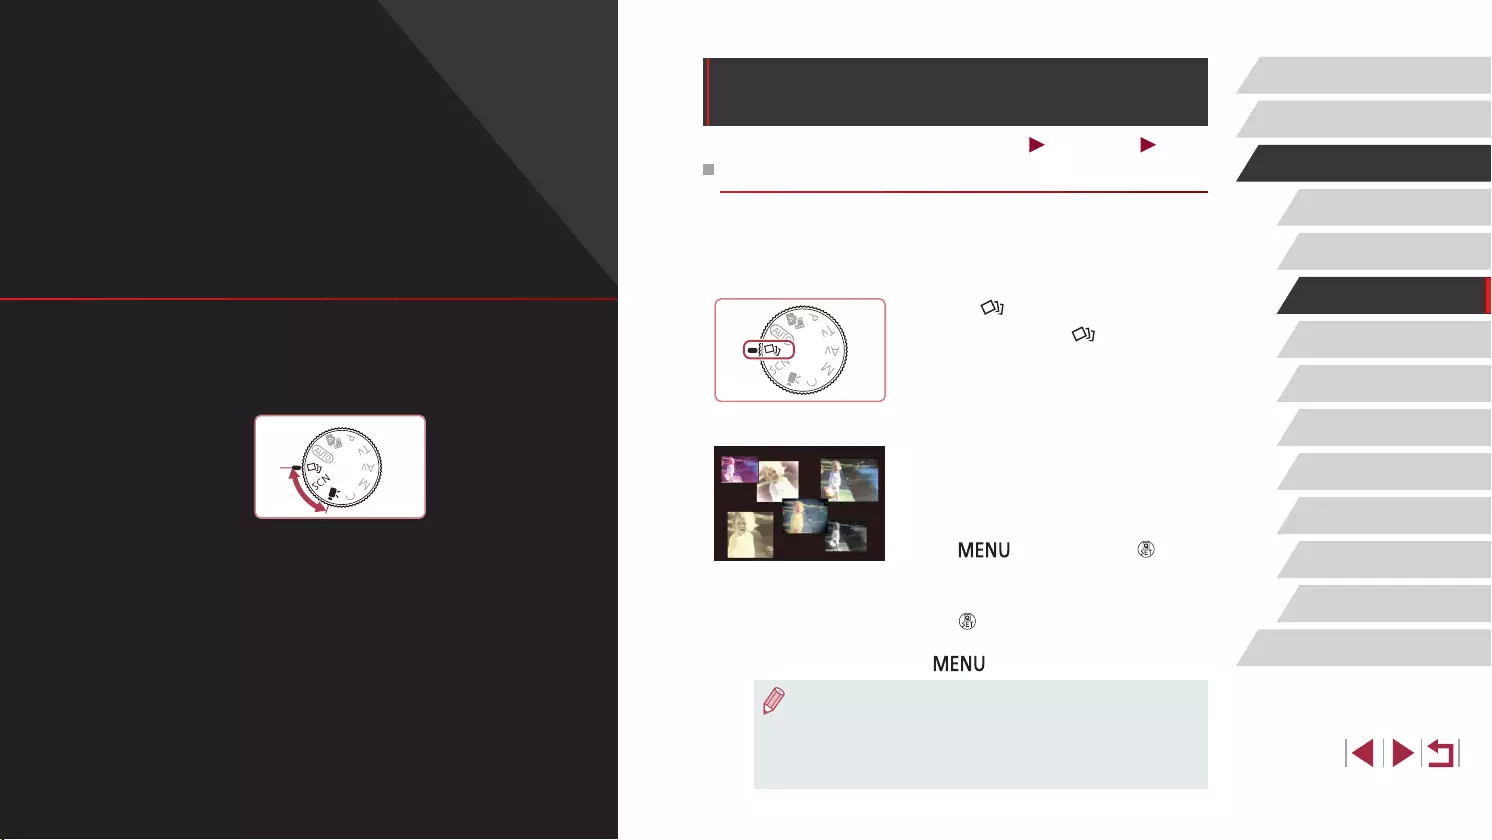
55
P Mode
Tv, Av, M, and C Mode
Playback Mode
Wi-Fi Functions
Setting Menu
Accessories
Appendix
Before Use
Index
Basic Guide
Advanced Guide
Camera Basics
Auto Mode /
Hybrid Auto Mode
Other Shooting Modes
Applying Effects Automatically
(Creative Shot)
Still Images Movies
Enjoying a Variety of Images from Each Shot
The camera determines the subject and shooting conditions, automatically
applying special effects and recomposing the shot to emphasize the
subject. Six still images are recorded for each shot. You can capture
multiple still images with effects using camera-determined settings.
1 Enter [ ] mode.
zSet the mode dial to [ ].
2 Shoot.
zPress the shutter button all the way
down. As you shoot, the shutter sound is
played three times.
zAfter the six images are displayed
in succession, they are displayed
simultaneously for about two seconds.
zTo keep the images displayed until you
press the shutter button halfway or press
the [ ] button, press the [ ] button
while the images are displayed. You can
choose an image for full-screen display
by touching the image and then pressing
the [ ] button.
zTo return to the original display, press the
[] button.
●Shooting will take some time when the ash res, but hold the
camera steady until the shutter sound is played three times.
●The six images are managed together as a group (=
110).
●Simultaneous display of the six images as shown in step 2 is only
available immediately after you shoot.
Other Shooting Modes
Shoot more effectively in various scenes, and
take shots enhanced with unique image effects or
captured using special functions
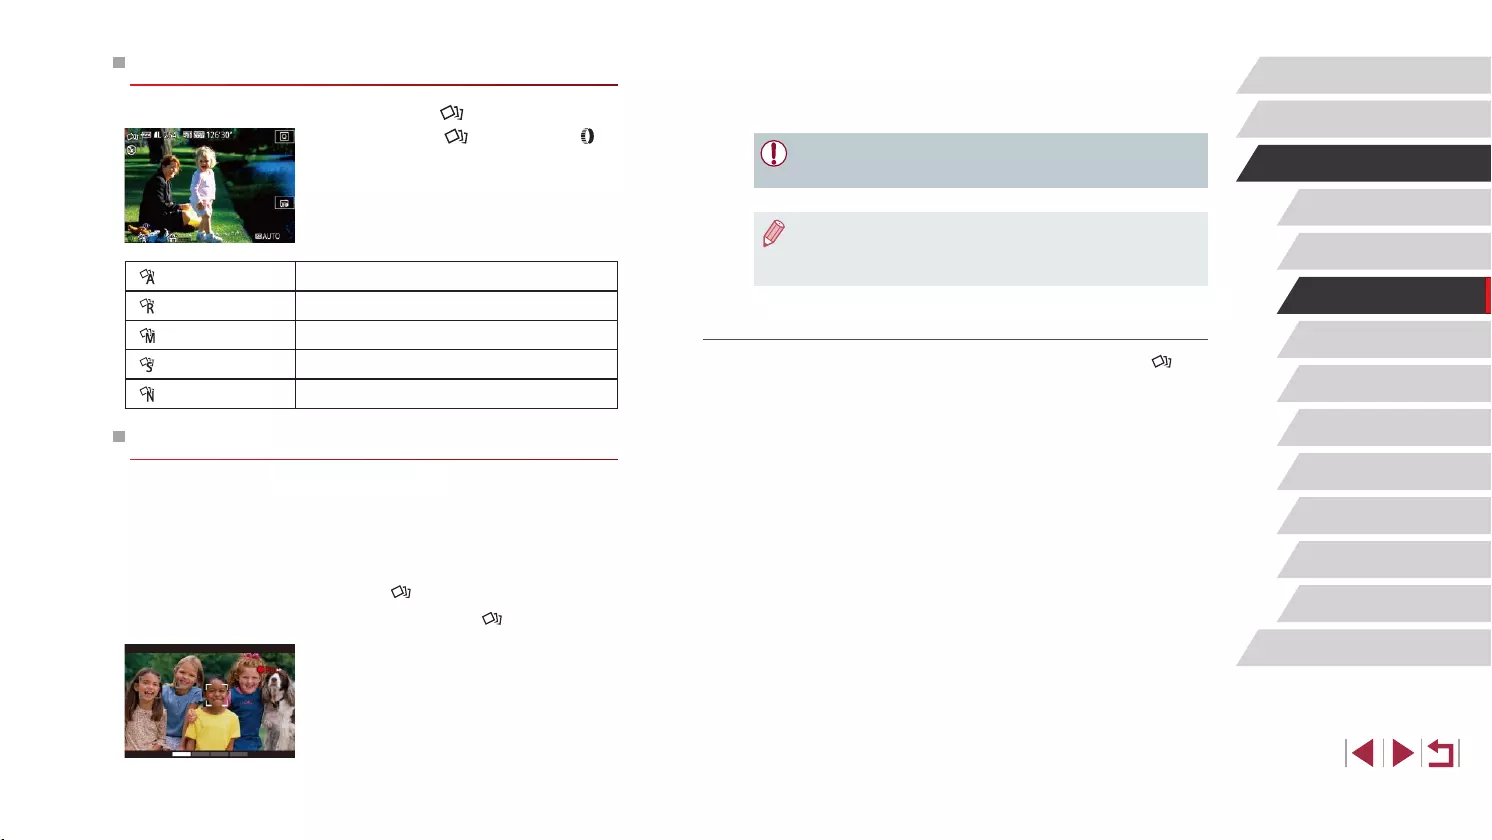
56
P Mode
Tv, Av, M, and C Mode
Playback Mode
Wi-Fi Functions
Setting Menu
Accessories
Appendix
Before Use
Index
Basic Guide
Advanced Guide
Camera Basics
Auto Mode /
Hybrid Auto Mode
Other Shooting Modes
3 Record the second to fourth movies.
zRepeat step 2 three times to record four
movies.
●Even if you do not record four movies that day, a Creative Shot
movie will be saved as a separate le once the date changes.
●Effects are generally applied consistently to movies 1 – 4, but you
can also change the effect in each movie (=
56).
●Individual chapters can be edited (=
126).
Creative Shot Movie Playback
You can choose and play back Creative Shot movies recorded in [ ]
mode (=
106).
Choosing Effects
You can choose effects for images captured in [ ] mode.
zAfter choosing [ ] mode, turn the [ ]
ring to choose the effect.
Auto All effects
Retro Images resemble old photos
Monochrome Images are generated in one color
Special Bold, distinctive-looking images
Natural Subdued, natural-looking images
Recording Movies with a Variety of Effects
Let the camera determine subjects and shooting conditions when you
record movies, and lters and effects such as playback in slow or fast
motion will be added automatically. Once you have recorded a few
movies, up to four are automatically combined to create a Creative Shot
movie of 15 – 25 seconds. Note that sound is not recorded in this mode.
1 Enter [ ] mode.
zSet the mode dial to [ ].
2 Record the rst movie.
zPress the movie button. Recording
begins, and a bar is displayed to indicate
the elapsed time.
zRecording stops automatically in
3 – 6 seconds.
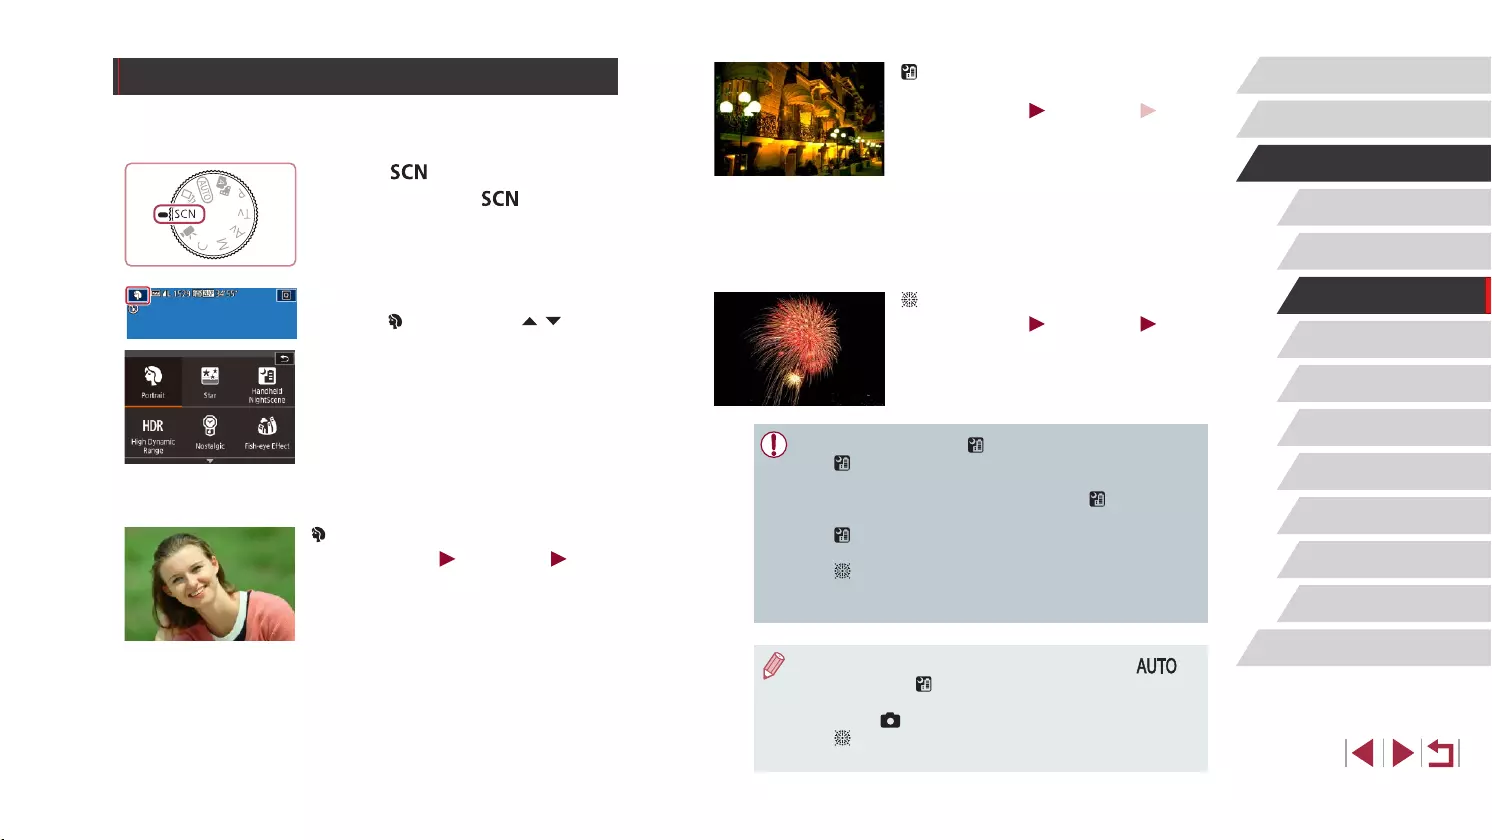
57
P Mode
Tv, Av, M, and C Mode
Playback Mode
Wi-Fi Functions
Setting Menu
Accessories
Appendix
Before Use
Index
Basic Guide
Advanced Guide
Camera Basics
Auto Mode /
Hybrid Auto Mode
Other Shooting Modes
Shooting Evening Scenes without
Using a Tripod (Handheld Night Scene)
Still Images Movies
zBeautiful shots of evening scenes or
portraits with evening scenery in the
background, without the need to hold the
camera very still (as with a tripod).
zA single image is created by combining
consecutive shots, reducing camera
shake and image noise.
Shooting Fireworks (Fireworks)
Still Images Movies
zVivid shots of reworks.
●Subjects appear larger in [ ] mode compared to other modes.
●In [ ] mode, shots may look grainy because the ISO speed
(=
75) is increased to suit the shooting conditions.
●Because the camera will shoot continuously in [ ] mode, hold it
steady while shooting.
●In [ ] mode, excessive motion blur or certain shooting conditions
may prevent you from obtaining the desired results.
●In [ ] mode, mount the camera on a tripod or take other
measures to keep it still and prevent camera shake. In this case,
you should set [IS Mode] to [Off] (=
52).
●When you use a tripod for evening scenes, shooting in [ ]
mode instead of [ ] mode will give better results (=
33).
●You can also choose the shooting mode by accessing MENU
(=
29) ► [ 1] tab ► [Rec. Mode].
●In [ ] mode, although no frames are displayed when you press
the shutter button halfway, optimal focus is still determined.
Specic Scenes
Choose a mode matching the shooting scene, and the camera will
automatically congure the settings for optimal shots.
1 Enter [ ] mode.
zSet the mode dial to [ ].
2 Choose a shooting mode.
zTouch [ ], and then touch [ ][ ] or drag
up or down on the screen to choose a
shooting mode.
zTo conrm your choice, touch [OK].
3 Shoot.
Shooting Portraits (Portrait)
Still Images Movies
zTake shots of people with a softening
effect.
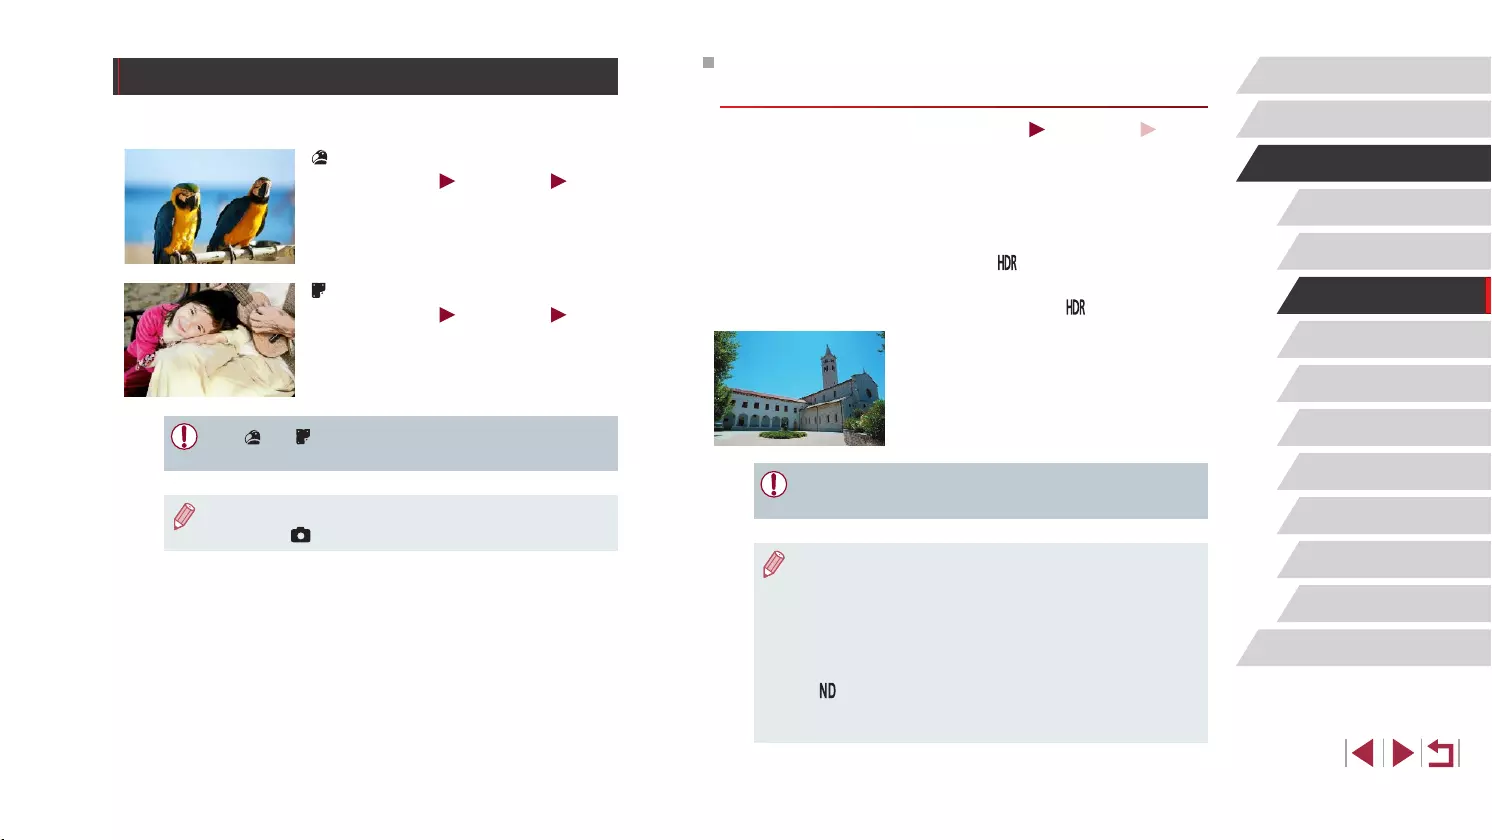
58
P Mode
Tv, Av, M, and C Mode
Playback Mode
Wi-Fi Functions
Setting Menu
Accessories
Appendix
Before Use
Index
Basic Guide
Advanced Guide
Camera Basics
Auto Mode /
Hybrid Auto Mode
Other Shooting Modes
Shooting High-Contrast Scenes
(High Dynamic Range)
Still Images Movies
Three consecutive images are captured at different brightness levels
each time you shoot, and the camera combines image areas with optimal
brightness to create a single image. This mode can reduce the washed-
out highlights and loss of detail in shadows that tend to occur in high-
contrast shots.
1 Choose [ ].
zFollow steps 1 – 2 in “Specic Scenes”
(=
57) and choose [ ].
2 Shoot.
zHold the camera steady as you shoot.
When you press the shutter button all
the way down, the camera will take three
shots and combine them.
●Excessive motion blur or certain shooting conditions may prevent
you from obtaining the desired results.
●If excessive camera shake interferes with shooting, mount
the camera on a tripod or take other measures to keep it still.
Additionally, you should set [IS Mode] to [Off] when using a tripod
or other means to secure the camera (=
52).
●Any subject movement will cause images to look blurry.
●There will be a delay before you can shoot again, as the camera
processes and combines the images.
●[] may be displayed when you press the shutter button halfway
in bright conditions, indicating automatic adjustment for optimal
image brightness.
Applying Special Effects
Add a variety of effects to images when shooting.
Shooting in Vivid Colors (Super Vivid)
Still Images Movies
zShots in rich, vivid colors.
Posterized Shots (Poster Effect)
Still Images Movies
zShots that resemble an old poster or
illustration.
●In [ ] and [ ] modes, try taking some test shots rst, to make
sure you obtain the desired results.
●You can also choose the shooting mode by accessing MENU
(=
29) ► [ 1] tab ► [Rec. Mode].
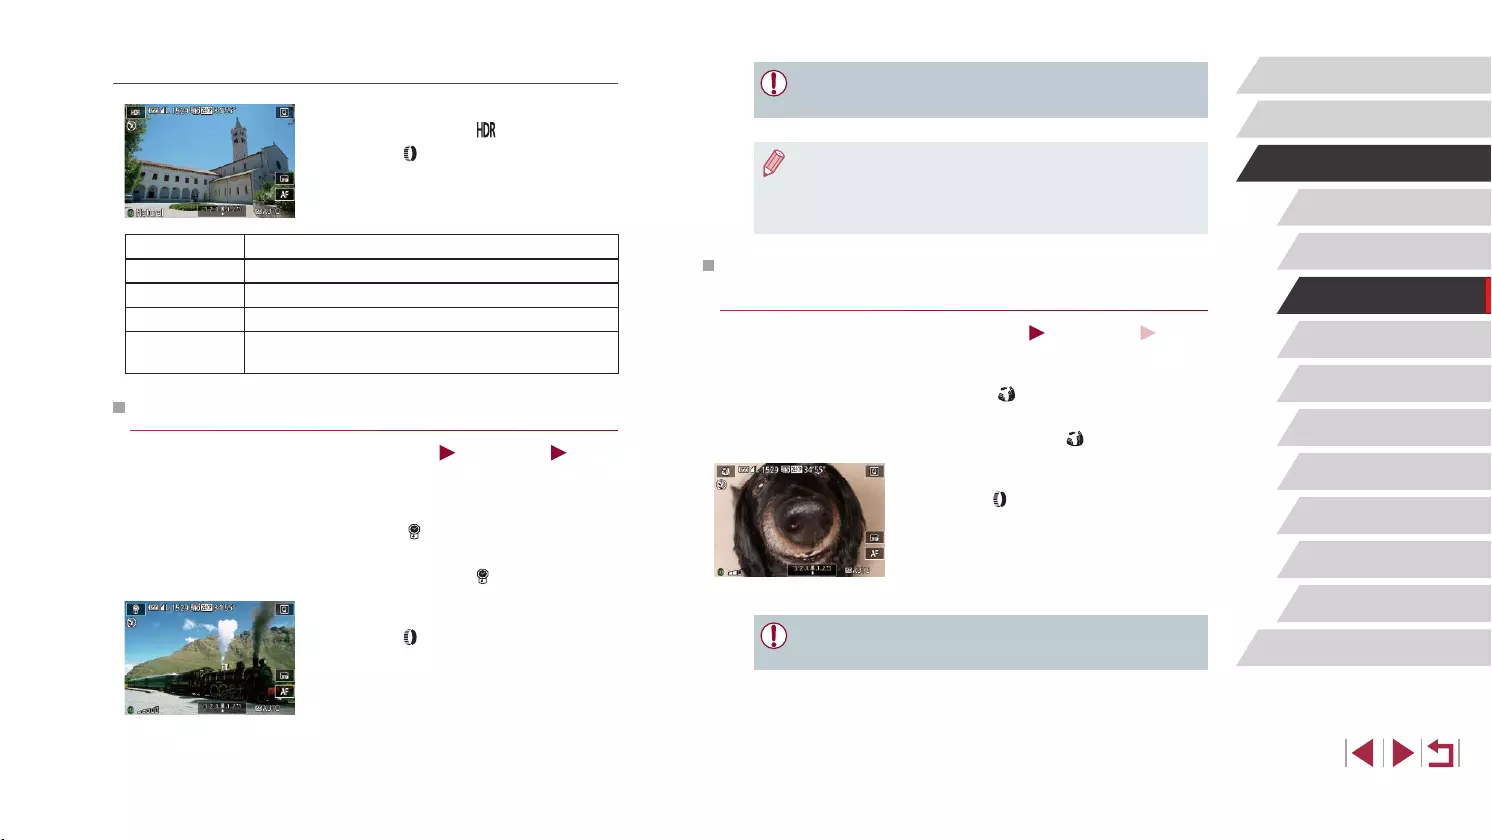
59
P Mode
Tv, Av, M, and C Mode
Playback Mode
Wi-Fi Functions
Setting Menu
Accessories
Appendix
Before Use
Index
Basic Guide
Advanced Guide
Camera Basics
Auto Mode /
Hybrid Auto Mode
Other Shooting Modes
●Try taking some test shots rst, to make sure you obtain the
desired results.
●Colors will look faded on the shooting screen, but the image aging
effect is not shown. Review the image in Playback mode to see
the effect (=
103).
●The image aging effect is not shown in movies.
Shooting with a Fish-Eye Lens Effect
(Fish-Eye Effect)
Still Images Movies
Shoot with the distorting effect of a sh-eye lens.
1 Choose [ ].
zFollow steps 1 – 2 in “Specic Scenes”
(=
57) and choose [ ].
2 Choose an effect level.
zTurn the [ ] ring to choose an effect
level.
zA preview is shown of how your shot will
look with the effect applied.
3 Shoot.
●Try taking some test shots rst, to make sure you obtain the
desired results.
Adding Artistic Effects
zFollow steps 1 – 2 in “Specic Scenes”
(=
57) and choose [ ].
zTurn the [ ] ring to choose an effect.
zA preview is shown of how your shot will
look with the effect applied.
Natural Images are natural and organic.
Art Standard Images resemble paintings, with subdued contrast.
Art Vivid Images resemble vivid illustrations.
Art Bold Images resemble oil paintings, with bold edges.
Art Embossed Images resemble old photos, with bold edges and
dark ambiance.
Shooting with Faded Colors (Nostalgic)
Still Images Movies
This effect makes colors look faded and images look weathered, as in old
photographs. Choose from ve effect levels.
1 Choose [ ].
zFollow steps 1 – 2 in “Specic Scenes”
(=
57) and choose [ ].
2 Choose an effect level.
zTurn the [ ] ring to choose an effect
level.
zA preview is shown of how your shot will
look with the effect applied.
3 Shoot.
60
P Mode
Tv, Av, M, and C Mode
Playback Mode
Wi-Fi Functions
Setting Menu
Accessories
Appendix
Before Use
Index
Basic Guide
Advanced Guide
Camera Basics
Auto Mode /
Hybrid Auto Mode
Other Shooting Modes
Playback Speed and Estimated Playback Time
(for One-Minute Clips)
Speed Playback Time
Approx. 12 sec.
Approx. 6 sec.
Approx. 3 sec.
Movies are played back at 30 fps.
●The zoom is not available when shooting movies. Be sure to set
the zoom before shooting.
●Try taking some test shots rst, to make sure you obtain the
desired results.
●To switch the orientation of the frame to vertical, press the [ ]
button in step 2. Touch the screen to move the frame. To return
the frame to horizontal orientation, press the [ ] button again.
●Holding the camera vertically will change the orientation of the
frame.
●Movie image quality is [ ] at an aspect ratio of [ ] and [ ] at
an aspect ratio of [ ] (=
47). These quality settings cannot
be changed.
Shots Resembling Miniature Models
(Miniature Effect)
Still Images Movies
Creates the effect of a miniature model, by blurring image areas above
and below your selected area.
You can also make movies that look like scenes in miniature models by
choosing the playback speed before the movie is recorded. People and
objects in the scene will move quickly during playback. Note that sound is
not recorded.
1 Choose [ ].
zFollow steps 1 – 2 in “Specic Scenes”
(=
57) and choose [ ].
zA white frame is displayed, indicating the
image area that will not be blurred.
2 Choose the area to keep in focus.
zPress the [ ] button.
zMove the zoom lever to resize the frame,
and touch the screen or drag the white
frame up or down to move it.
3 For movies, choose the movie
playback speed.
zOn the screen in step 2, turn the [ ] ring
to choose the speed.
4 Return to the shooting screen and
shoot.
zPress the [ ] button to return to the
shooting screen, and then shoot.
61
P Mode
Tv, Av, M, and C Mode
Playback Mode
Wi-Fi Functions
Setting Menu
Accessories
Appendix
Before Use
Index
Basic Guide
Advanced Guide
Camera Basics
Auto Mode /
Hybrid Auto Mode
Other Shooting Modes
Making Subjects Stand Out (Background Defocus)
Still Images Movies
You can shoot subjects so that they stand out from the background.
Two consecutive images are captured with settings optimized for
background defocus. The background is defocused through lens effects
and subject- and scene-based image processing.
1 Choose [ ].
zFollow steps 1 – 2 in “Specic Scenes”
(=
57) and choose [ ].
2 Shoot.
zHold the camera steady as you shoot.
Two consecutive images are captured
when you press the shutter button all the
way down.
zA blinking [ ] icon indicates that the
images could not be processed.
●Excessive motion blur or certain shooting conditions may prevent
you from obtaining the desired results.
●For the best results with background defocusing, try shooting
close to the subject, and ensure ample distance between the
subject and background.
●There may be a delay after shooting before you can shoot again.
●To adjust the effect level, turn the [ ] ring.
Shooting with a Toy Camera Effect
(Toy Camera Effect)
Still Images Movies
This effect makes images resemble shots from a toy camera by vignetting
(darker, blurred image corners) and changing the overall color.
1 Choose [ ].
zFollow steps 1 – 2 in “Specic Scenes”
(=
57) and choose [ ].
2 Choose a color tone.
zTurn the [ ] ring to choose a color tone.
zA preview is shown of how your shot will
look with the effect applied.
3 Shoot.
Standard Shots resemble toy camera images.
Warm Images have a warmer tone than with [Standard].
Cool Images have a cooler tone than with [Standard].
●Try taking some test shots rst, to make sure you obtain the
desired results.
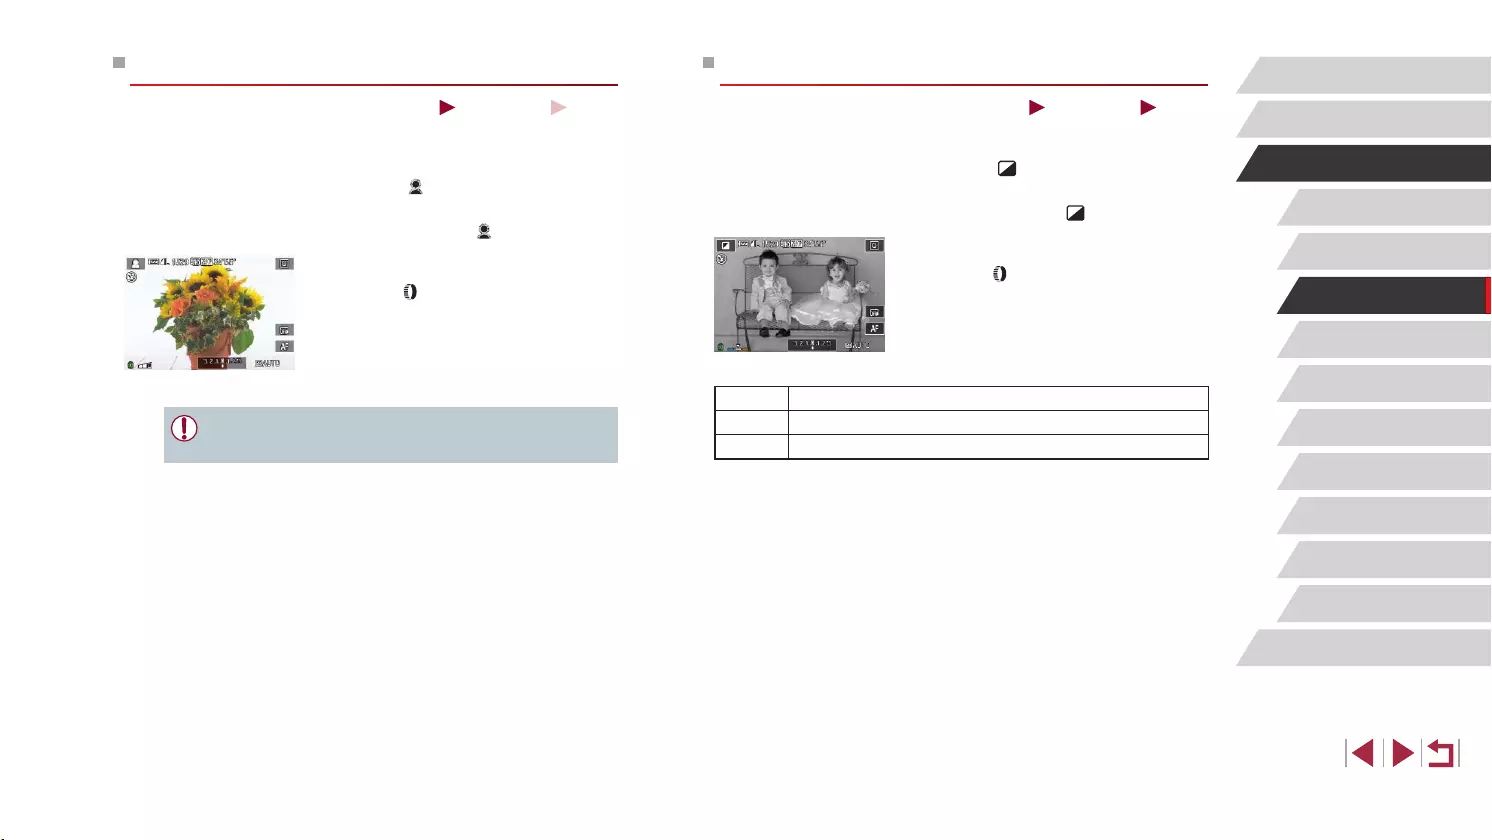
62
P Mode
Tv, Av, M, and C Mode
Playback Mode
Wi-Fi Functions
Setting Menu
Accessories
Appendix
Before Use
Index
Basic Guide
Advanced Guide
Camera Basics
Auto Mode /
Hybrid Auto Mode
Other Shooting Modes
Shooting in Monochrome
Still Images Movies
Shoot images in black and white, sepia, or blue and white.
1 Choose [ ].
zFollow steps 1 – 2 in “Specic Scenes”
(=
57) and choose [ ].
2 Choose a color tone.
zTurn the [ ] ring to choose a color tone.
zA preview is shown of how your shot will
look with the effect applied.
3 Shoot.
B/W Black and white shots.
Sepia Sepia tone shots.
Blue Blue and white shots.
Shooting with a Soft Focus Effect
Still Images Movies
This function allows you to shoot images as if a soft focus lter were
attached to the camera. You can adjust the effect level as desired.
1 Choose [ ].
zFollow steps 1 – 2 in “Specic Scenes”
(=
57) and choose [ ].
2 Choose an effect level.
zTurn the [ ] ring to choose an effect
level.
zA preview is shown of how your shot will
look with the effect applied.
3 Shoot.
●Try taking some test shots rst, to make sure you obtain the
desired results.
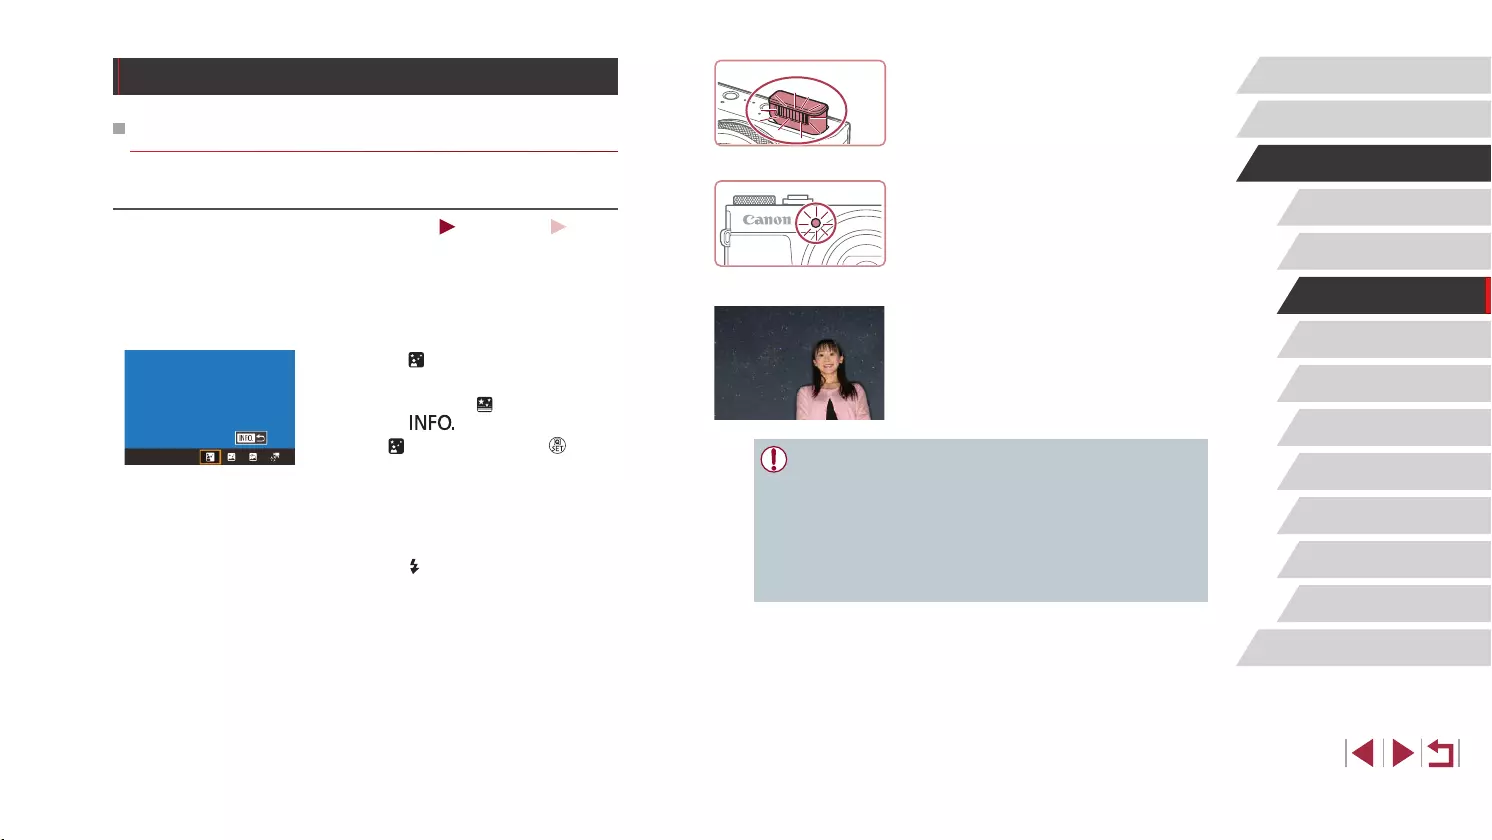
63
P Mode
Tv, Av, M, and C Mode
Playback Mode
Wi-Fi Functions
Setting Menu
Accessories
Appendix
Before Use
Index
Basic Guide
Advanced Guide
Camera Basics
Auto Mode /
Hybrid Auto Mode
Other Shooting Modes
4 Shoot.
zPress the shutter button. The ash res
as the camera takes the rst shot.
zThe second and third shots are now
taken, without ring the ash.
5 Have the person stay still until the
lamp blinks.
zThe person you are shooting should stay
still until the lamp blinks three times after
the third shot, which may take up to about
two seconds.
zAll the shots are combined to create a
single image.
●Under some shooting conditions, images may not look as
expected.
●For better shots, have the person stand away from illumination
such as street lights, and make sure the ash is raised.
●There will be a delay before you can shoot again, as the camera
processes the images.
●To avoid blurry shots, make sure the person you shoot in steps
4 – 5 stays still.
Special Modes for Other Purposes
Shooting Starry Skies (Star)
Shooting People against Starry Skies (Star Portrait)
Still Images Movies
Capture beautiful shots of people against starry skies. After initially ring
the ash to capture the person, the camera shoots twice without ash.
The three images are combined into a single image and processed to
make the stars more prominent.
For details on the ash range, see “Camera” (=
204).
1 Choose [ ].
zFollow steps 1 – 2 in “Specic Scenes”
(=
57) and choose [ ], and then
press the [ ] button.
zTouch [ ], and then press the [ ]
button.
zZoom is set to maximum wide angle and
cannot be adjusted.
2 Raise the ash.
zMove the [ ] switch.
3 Secure the camera.
zMount the camera on a tripod or take
other measures to keep it still.
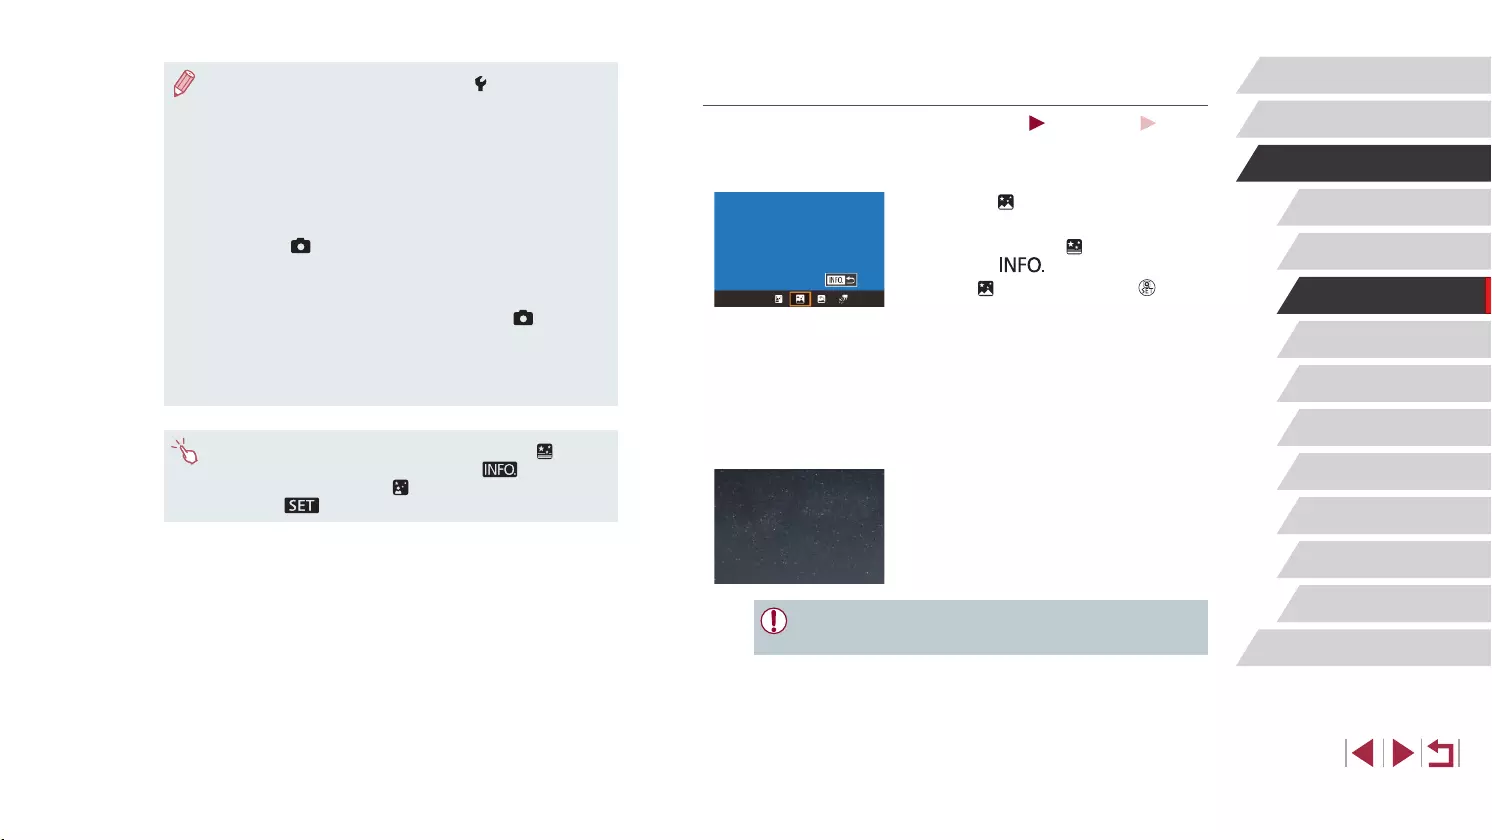
64
P Mode
Tv, Av, M, and C Mode
Playback Mode
Wi-Fi Functions
Setting Menu
Accessories
Appendix
Before Use
Index
Basic Guide
Advanced Guide
Camera Basics
Auto Mode /
Hybrid Auto Mode
Other Shooting Modes
Shooting Night Scenes under Starry Skies
(Star Nightscape)
Still Images Movies
Capture impressive shots of starry skies above night scenes. Starlight in
the image is automatically enhanced, making starry skies look beautiful.
1 Choose [ ].
zFollow steps 1 – 2 in “Specic Scenes”
(=
57) and choose [ ], and then
press the [ ] button.
zTouch [ ], and then press the [ ]
button.
zZoom is set to maximum wide angle and
cannot be adjusted.
2 Secure the camera.
zMount the camera on a tripod or take
other measures to keep it still and
prevent camera shake.
3 Shoot.
●There will be a delay before you can shoot again, as the camera
processes the images.
●For easier viewing, try choosing MENU ► [ 2] tab ► [Night
Display] ► [On] (=
161) before shooting.
●To adjust subject brightness, try changing the ash exposure
compensation (=
88).
●To adjust background brightness, try changing the exposure
compensation (=
74). However, images may not look as
expected under some shooting conditions, and the person should
stay still in steps 4 – 5, which may take up to about 15 seconds.
●To capture more stars and brighter starlight, choose MENU
(=
29) ► [ 6] tab ► [Star Portrait Settings] ► [Star Visibility]
► [Prominent]. However, images may not look as expected under
some shooting conditions, and the person should stay still in
steps 4 – 5, which may take up to about 8 seconds.
●To make stars brighter, choose MENU (=
29) ► [ 6] tab ►
[Star Emphasis] ► [Sharp]. To emphasize the bright stars in a
starry sky, set [Star Emphasis] to [Soft]. This setting can produce
eye-catching shots by enlarging bright stars while de-emphasizing
dimmer stars. To disable starlight processing, select [Off].
●You can also choose the shooting mode by choosing [ ] in steps
1 – 2 of “Specic Scenes” (=
57), touching [ ] to access
the setting screen, touching [ ], and then touching the same
option or [ ].
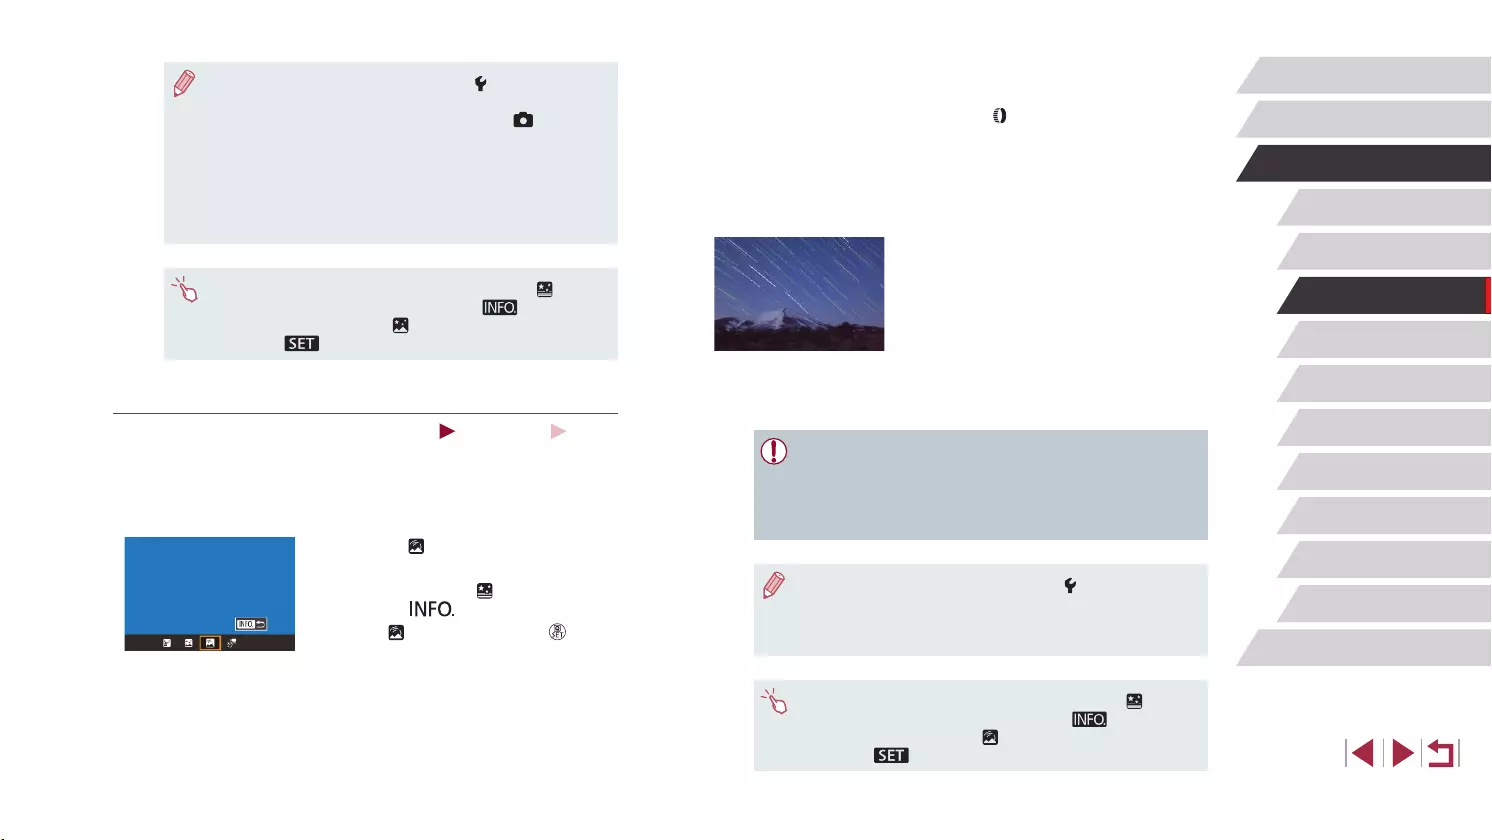
65
P Mode
Tv, Av, M, and C Mode
Playback Mode
Wi-Fi Functions
Setting Menu
Accessories
Appendix
Before Use
Index
Basic Guide
Advanced Guide
Camera Basics
Auto Mode /
Hybrid Auto Mode
Other Shooting Modes
2 Specify the duration of the shooting
session.
zTurn the [ ] ring to choose the shooting
duration.
3 Secure the camera.
zMount the camera on a tripod or take
other measures to keep it still.
4 Shoot.
zPress the shutter button all the way
down. [Busy] is displayed briey, and
then shooting begins.
zDo not disturb the camera while shooting.
zTo cancel shooting, press the shutter
button all the way down again. Note that
cancellation may take up to about 30
seconds.
●If the camera runs out of battery power, shooting stops and a
composite image created from the images up to that point is
saved.
●There will be a delay before you can shoot again, as the camera
processes the images.
●For easier viewing, try choosing MENU ► [ 2] tab ► [Night
Display] ► [On] (=
161) before shooting.
●Try switching to manual focus mode (=
81) to more accurately
specify the focal position before shooting.
●You can also choose the shooting mode by choosing [ ] in steps
1 – 2 of “Specic Scenes” (=
57), touching [ ] to access
the setting screen, touching [ ], and then touching the same
option or [ ].
●For easier viewing, try choosing MENU ► [ 2] tab ► [Night
Display] ► [On] (=
161) before shooting.
●To make stars brighter, choose MENU (=
29) ► [ 5] tab ►
[Star Emphasis] ► [Sharp]. To emphasize the bright stars in a
starry sky, set [Star Emphasis] to [Soft]. This setting can produce
eye-catching shots by enlarging bright stars while de-emphasizing
dimmer stars. To disable starlight processing, select [Off].
●Try switching to manual focus mode (=
81) to more accurately
specify the focal position before shooting.
●You can also choose the shooting mode by choosing [ ] in steps
1 – 2 of “Specic Scenes” (=
57), touching [ ] to access
the setting screen, touching [ ], and then touching the same
option or [ ].
Shooting Star Trails (Star Trails)
Still Images Movies
Streaks created by the movement of stars through the sky are recorded in
a single image. After determining the shutter speed and number of shots,
the camera shoots continuously. A shooting session can last up to about
two hours. Check the battery level in advance.
1 Choose [ ].
zFollow steps 1 – 2 in “Specic Scenes”
(=
57) and choose [ ], and then
press the [ ] button.
zTouch [ ], and then press the [ ]
button.
zZoom is set to maximum wide angle and
cannot be adjusted.
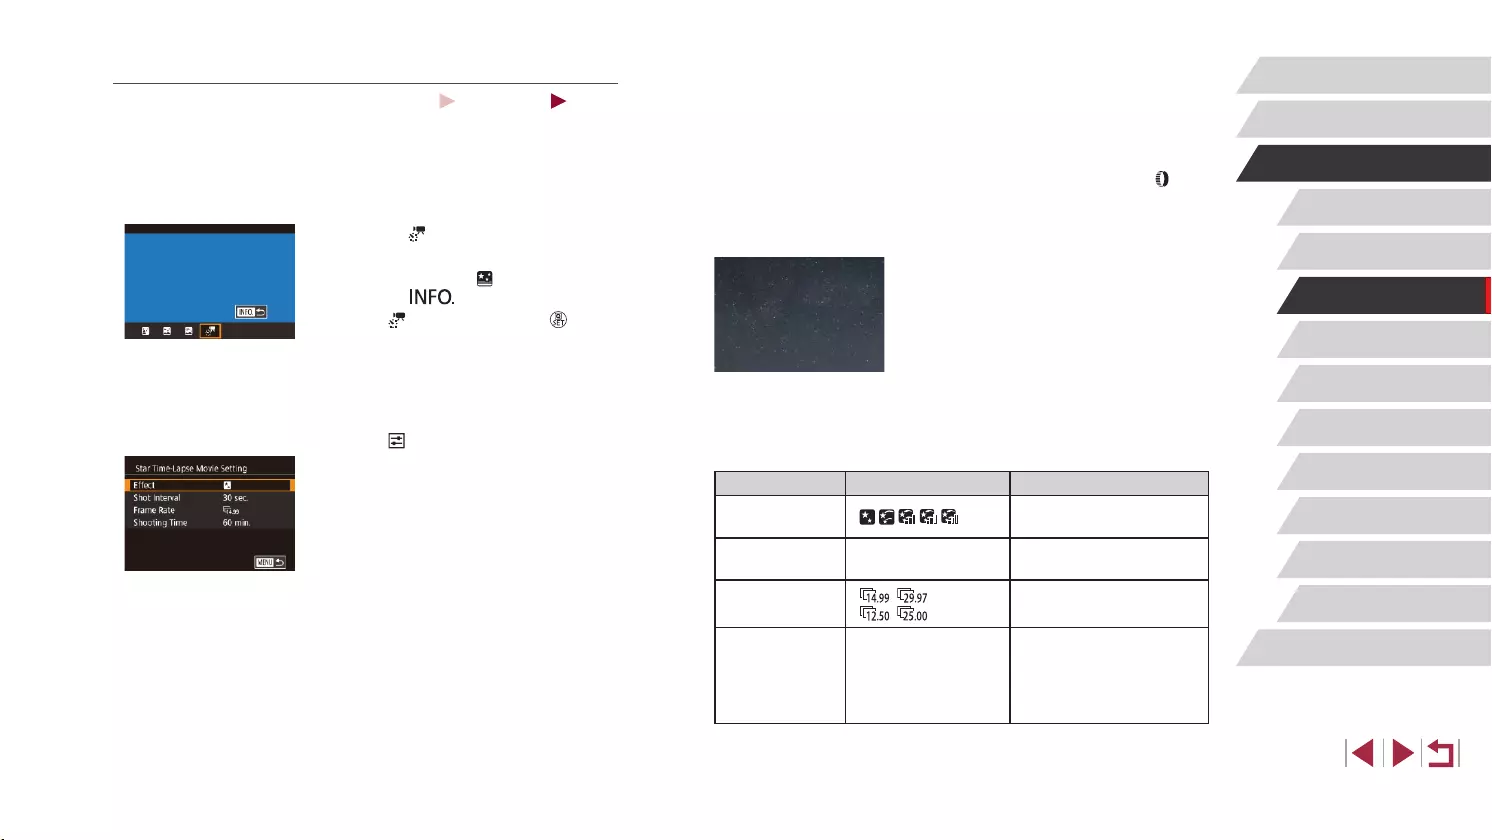
66
P Mode
Tv, Av, M, and C Mode
Playback Mode
Wi-Fi Functions
Setting Menu
Accessories
Appendix
Before Use
Index
Basic Guide
Advanced Guide
Camera Basics
Auto Mode /
Hybrid Auto Mode
Other Shooting Modes
4 Check the brightness.
zPress the shutter button all the way down
to shoot a single still image.
zSwitch to Playback mode (=
103) and
check image brightness.
zTo adjust the brightness, turn the [ ] ring
on the shooting screen and change the
exposure level. Check brightness again
by taking another shot.
5 Shoot.
zPress the movie button. [Busy] is
displayed briey, and then shooting
begins.
zDo not disturb the camera while shooting.
zTo cancel shooting, press the movie
button again. Note that cancellation may
take up to about 30 seconds.
zThe camera operates in Eco mode
(=
161) while shooting.
Item Options Details
Effect Choose movie effects,
such as star trails.
Shot Interval 15 sec., 30 sec.,
1 min.
Choose the interval
between each shot.
Frame Rate , (NTSC)
, (PAL)
Choose the movie frame
rate.
Shooting Time 60 min., 90 min.,
120 min., Unlimited
Choose the length of
the recording session.
To record until the
battery runs out, choose
[Unlimited].
Shooting Movies of Star Movement (Star Time-Lapse Movie)
Still Images Movies
By recording a time-lapse movie that combines images shot at a specied
interval, you can create movies with fast-moving stars. You can adjust the
shooting interval and recording duration as needed.
Note that each session takes a long time, and requires many shots. Check
the battery level and memory card space in advance.
1 Choose [ ].
zFollow steps 1 – 2 in “Specic Scenes”
(=
57) and choose [ ], and then
press the [ ] button.
zTouch [ ], and then press the [ ]
button.
zZoom is set to maximum wide angle and
cannot be adjusted.
2 Congure movie settings.
zTouch [ ].
zTouch an item, and then choose the
desired option.
3 Secure the camera.
zMount the camera on a tripod or take
other measures to keep it still.
67
P Mode
Tv, Av, M, and C Mode
Playback Mode
Wi-Fi Functions
Setting Menu
Accessories
Appendix
Before Use
Index
Basic Guide
Advanced Guide
Camera Basics
Auto Mode /
Hybrid Auto Mode
Other Shooting Modes
●Sound is not recorded.
●For easier viewing, try choosing MENU ► [ 2] tab ► [Night
Display] ► [On] (=
161) before shooting.
●You can also access the screen in step 2 by choosing MENU
(=
29) ► [ 5] tab ► [Star Time-Lapse Movie Setting].
●To save each shot collected before the movie is created, choose
MENU (=
29) ► [ 5] tab ► [Save Stills] ► [On]. Note
that these individual images are managed as a single group, and
during playback, only the rst image is displayed. To indicate that
the image is part of a group, [ ] is displayed in the upper left
of the screen. If you erase a grouped image (=
115), all images
in the group are also erased. Be careful when erasing images.
●Try switching to manual focus mode (=
81) to more accurately
specify the focal position before shooting.
●Even if you specify [Unlimited] in [Shooting Time] in step 2 and
use an AC adapter kit (sold separately, =
168), shooting will
stop after about 8 hours, at most.
●You can also choose the shooting mode by choosing [ ] in steps
1 – 2 of “Specic Scenes” (=
57), touching [ ] to access
the setting screen, touching [ ], and then touching the same
option or [ ].
Estimated playback time based on shooting interval and frame rate (for a
one-hour session)
Interval between Shots Frame Rate Playback Time
NTSC PAL
15 sec. 16 sec.
15 sec. 8 sec.
30 sec. 8 sec.
30 sec. 4 sec.
1 min. 4 sec.
1 min. 2 sec.
●There will be a delay before you can shoot again, as the camera
processes the images.
●If the camera runs out of battery power or memory card space,
shooting stops and a movie created from the images up to that
point is saved.
●A shooting interval of [1 min.] is not available with these effects:
[], [ ], [ ], or [ ].
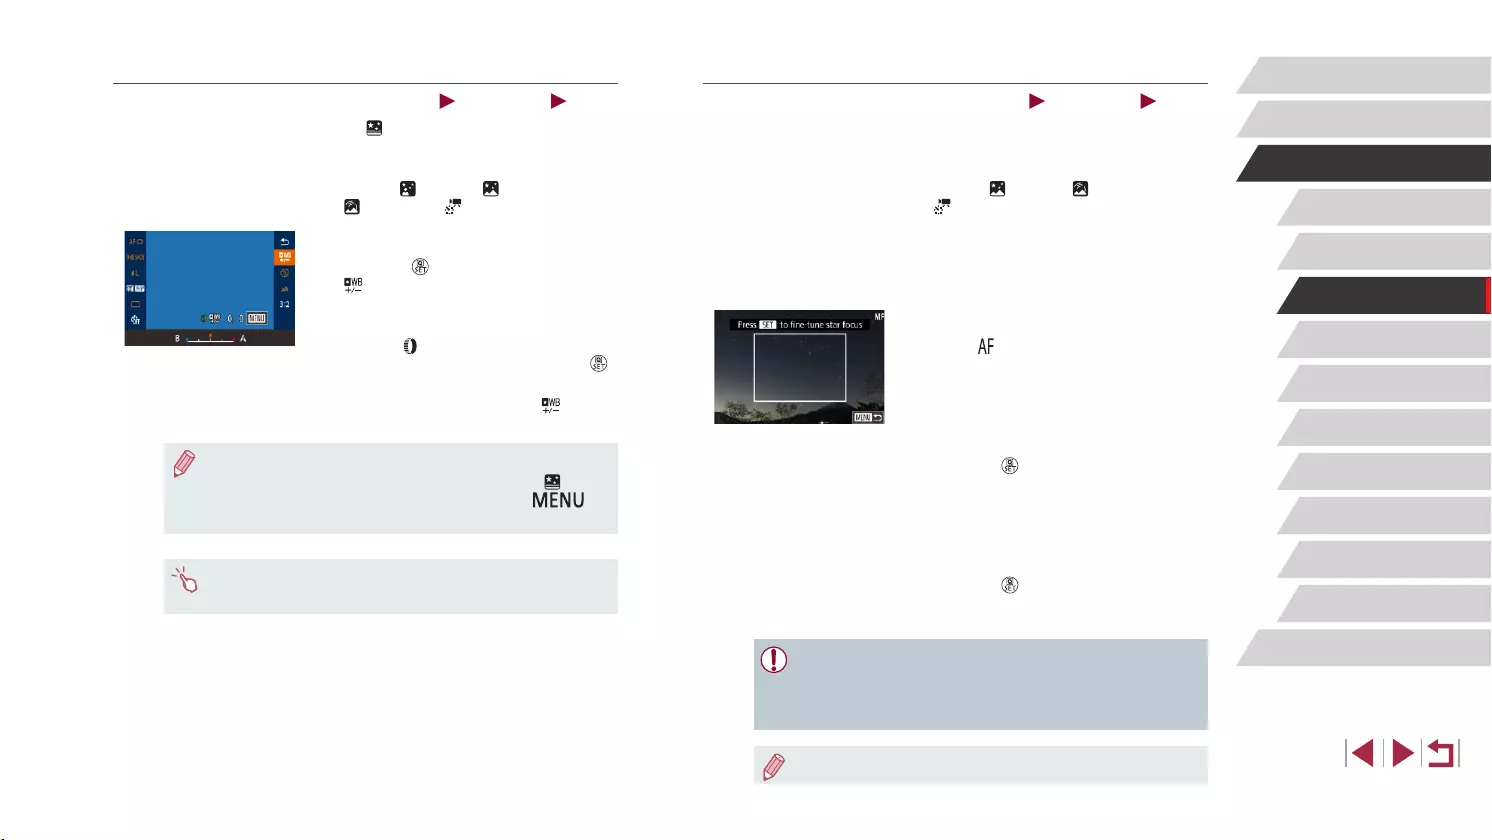
68
P Mode
Tv, Av, M, and C Mode
Playback Mode
Wi-Fi Functions
Setting Menu
Accessories
Appendix
Before Use
Index
Basic Guide
Advanced Guide
Camera Basics
Auto Mode /
Hybrid Auto Mode
Other Shooting Modes
Adjusting the Focus
Still Images Movies
Automatically adjust the focus to suit starry skies.
1 Choose a shooting mode.
zChoose [ ] (=
64), [ ] (=
65), or
[ ] (=
66).
2 Secure the camera.
zMount the camera on a tripod or take
other measures to keep it still.
3 Frame the stars to capture.
zTouch [ ], and then touch [Rene
starfocus].
zTilt the camera so that the stars to
capture are inside the frame displayed.
4 Adjust the focus.
zPress the [ ] button. [Adjusting star
focus] is displayed, and adjustment
begins.
zAdjustment may take up to about 30
seconds. Do not move the camera until
[Adjustment completed] is displayed.
zPress the [ ] button.
5 Shoot (=
64, =
65, =
66).
●The focal position may not be adjusted under the following
conditions. If so, try again from step 3.
— There is a bright light source
— Airplanes or other light sources or clouds crossed the sky
●If adjustment fails, focus returns to the original position.
Adjusting Colors
Still Images Movies
Colors can be manually adjusted in [ ] mode.
1 Choose a shooting mode.
zChoose [ ] (=
63), [ ] (=
64),
[ ] (=
65), or [ ] (=
66).
2 Choose color adjustment.
zPress the [ ] button, and then choose
[] in the menu (=
28).
3 Adjust the setting.
zTurn the [ ] ring to adjust the correction
level for B and A, and then press the [ ]
button.
zOnce the setting is complete, [ ] is
displayed.
●B represents blue and A, amber.
●Skin tones remain the same when you adjust colors in [ ] mode.
●Advanced settings can be accessed by pressing the [ ]
button when the screen in step 2 is displayed (=
78).
●You can also choose the correction level by touching or dragging
the bar in step 2.
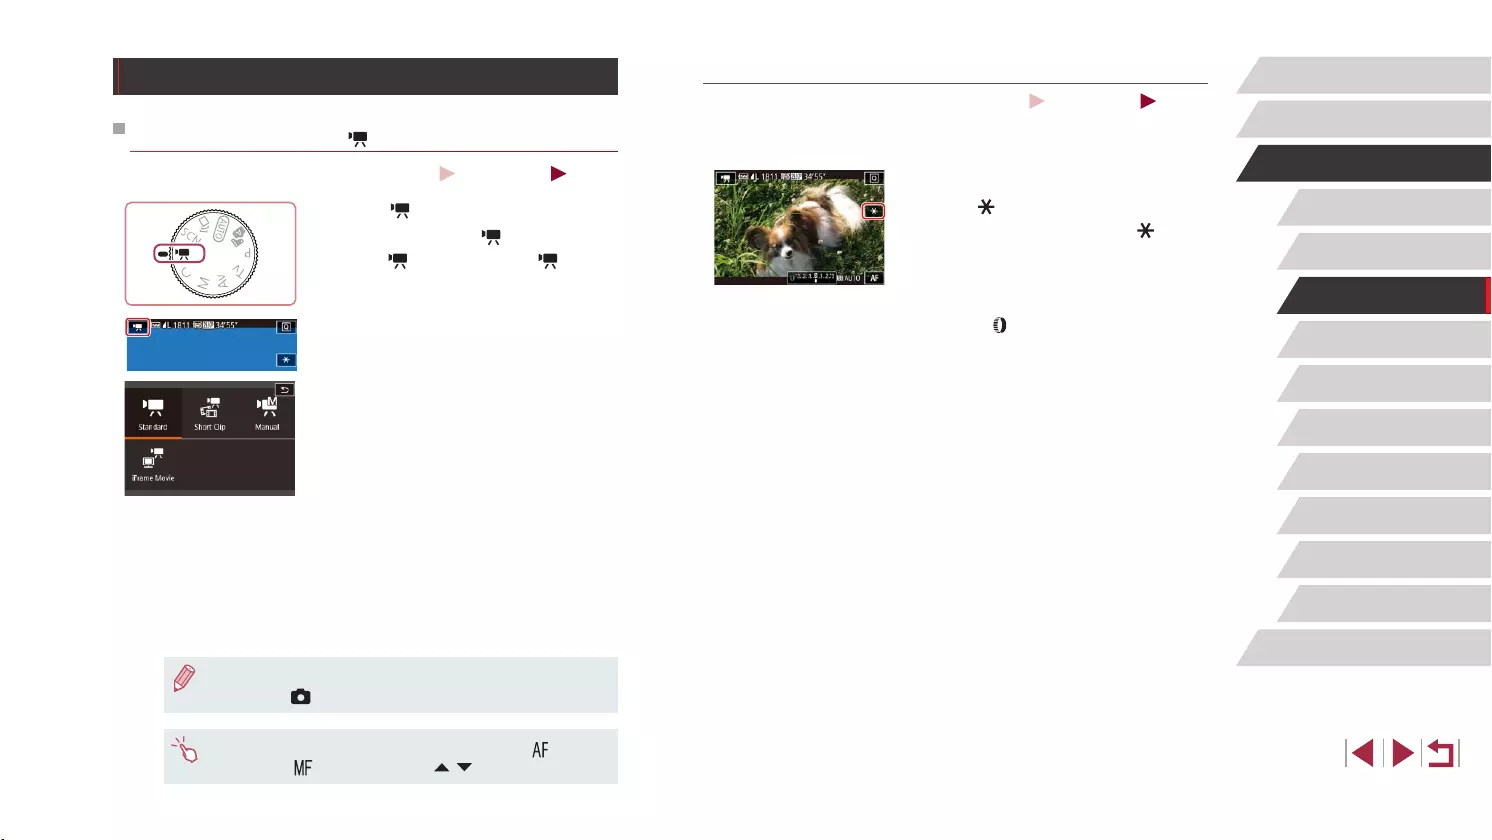
69
P Mode
Tv, Av, M, and C Mode
Playback Mode
Wi-Fi Functions
Setting Menu
Accessories
Appendix
Before Use
Index
Basic Guide
Advanced Guide
Camera Basics
Auto Mode /
Hybrid Auto Mode
Other Shooting Modes
Locking or Changing Image Brightness before Recording
Still Images Movies
You can lock the exposure before or during recording or adjust it in 1/3-
stop increments within a range of −3 to +3 stops.
1 Lock the exposure.
zTouch [ ] to lock the exposure.
zTo unlock the exposure, touch [ ] again.
2 Adjust the exposure.
zTurn the [ ] ring to adjust the exposure,
as you watch the screen.
3 Shoot (=
69).
Recording Various Movies
Recording Movies in [ ] Mode
Still Images Movies
1 Enter [ ] mode.
zSet the mode dial to [ ].
zTouch [ ], and then choose [ ].
zTo conrm your choice, touch [OK].
zBlack bars are displayed on the top and
bottom edges of the screen, and the
subject is slightly enlarged. The black
bars indicate image areas not recorded.
2 Congure the settings to suit the
movie (=
190).
3 Shoot.
zPress the movie button.
zTo stop movie recording, press the movie
button again.
●You can also choose the shooting mode by accessing MENU
(=
29) ► [ 1] tab ► [Rec. Mode].
●Focus can be adjusted during recording by touching [ ] (to
switch it to [ ]) and then touching [ ][ ].
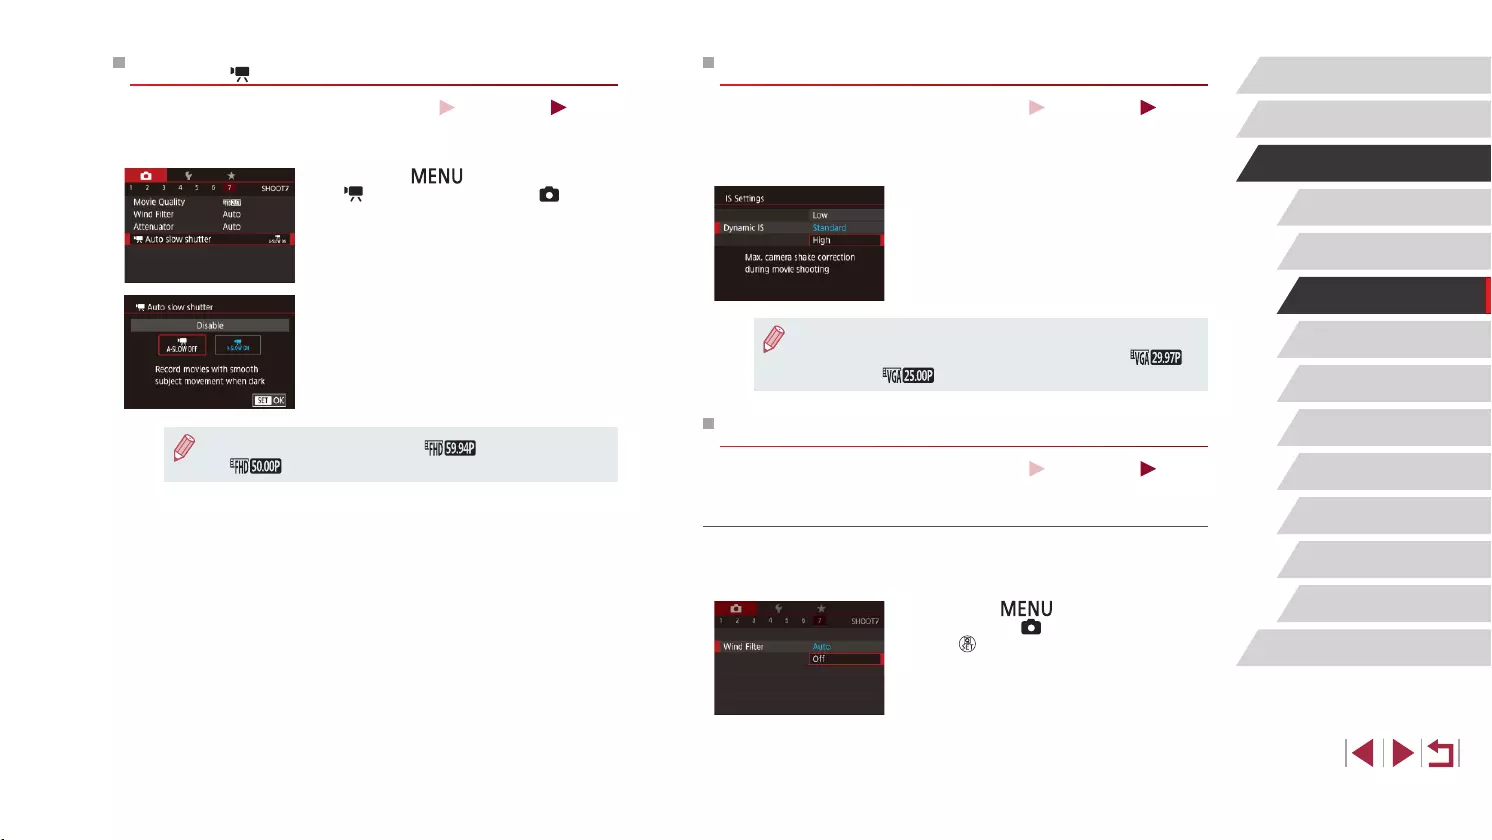
70
P Mode
Tv, Av, M, and C Mode
Playback Mode
Wi-Fi Functions
Setting Menu
Accessories
Appendix
Before Use
Index
Basic Guide
Advanced Guide
Camera Basics
Auto Mode /
Hybrid Auto Mode
Other Shooting Modes
Correcting Severe Camera Shake
Still Images Movies
Counteract severe camera shake, such as when recording while moving.
The portion of images displayed changes more than for [Standard], and
subjects are further enlarged.
zFollow the steps in “Recording Movies
with Subjects at the Same Size Shown
before Shooting” (=
52) to choose
[High].
●[Dynamic IS] is not available when [IS Mode] is set to [Off].
●Only [Standard] is available when the movie quality is [ ]
(NTSC) or [ ] (PAL).
Sound Settings
Still Images Movies
Deactivating the Wind Filter
Noise caused by strong wind can be reduced. However, the recording
may sound unnatural when this option is used when there is no wind. In
this case, you can deactivate the wind lter.
zPress the [ ] button, choose [Wind
Filter] on the [ 7] tab, and then press
the [ ] button (=
29).
zChoose [Off] (=
29).
Disabling Auto Slow Shutter
Still Images Movies
Auto Slow Shutter can be disabled if movement in movies is rough.
However, under low light, movies may look dark.
zPress the [ ] button, choose
[ Auto slow shutter] on the [ 7]
tab, and then choose [A-SLOW OFF]
(=
29).
zTo restore the original setting, repeat this
process but choose [A-SLOW ON].
●Auto Slow Shutter only applies to [ ] (with NTSC) or
[] (with PAL) movies.
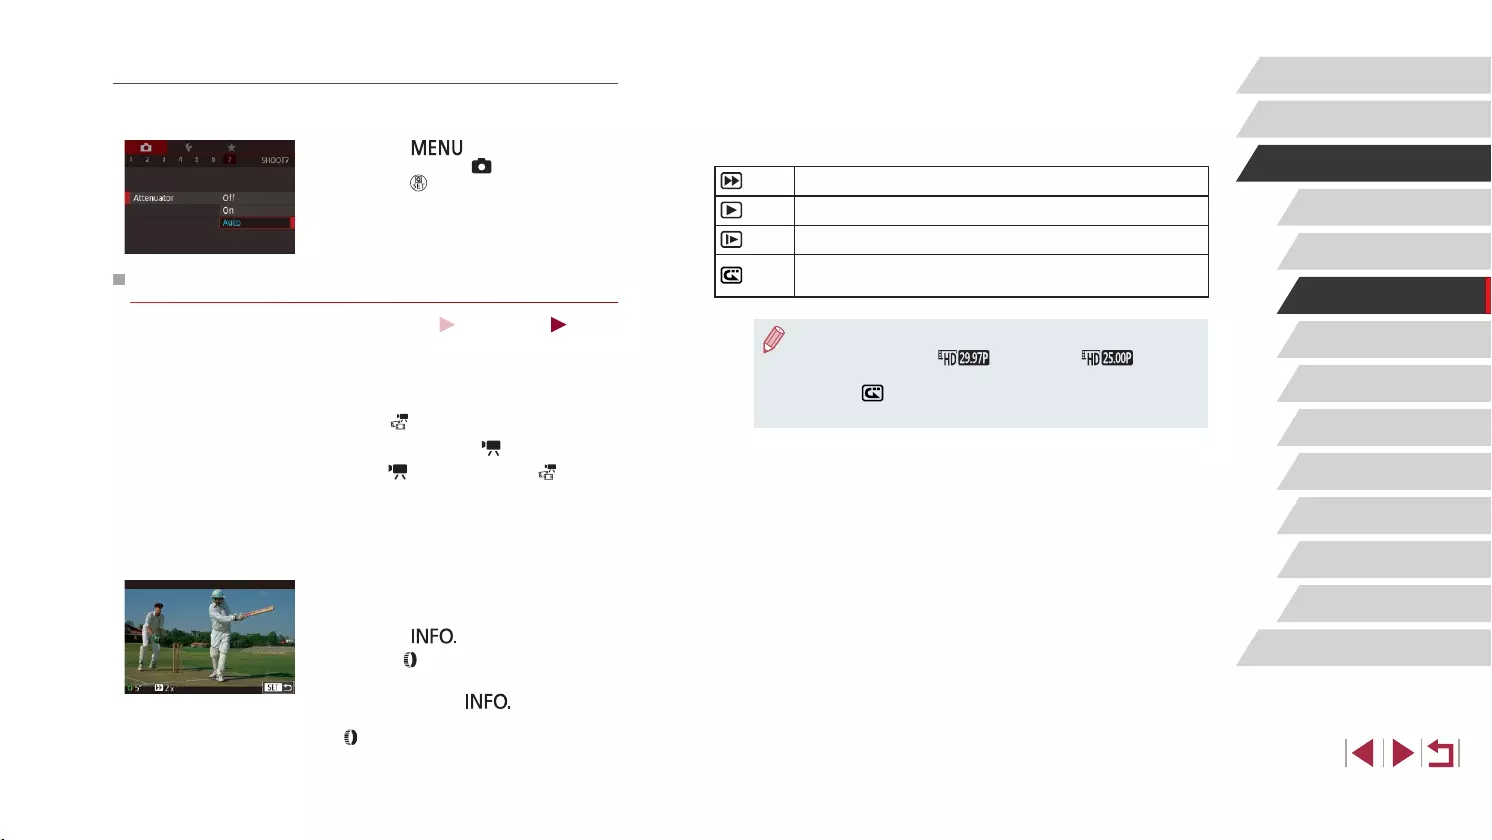
71
P Mode
Tv, Av, M, and C Mode
Playback Mode
Wi-Fi Functions
Setting Menu
Accessories
Appendix
Before Use
Index
Basic Guide
Advanced Guide
Camera Basics
Auto Mode /
Hybrid Auto Mode
Other Shooting Modes
3 Shoot (=
69).
zA bar showing the elapsed time is
displayed.
Playback Effects
2x Playback in fast motion
1x Playback at normal speed
1/2x Playback in slow motion
Normal playback with the last two seconds rewound and
played again in slow motion
●Sound is not recorded in these clips.
●The movie quality is [ ] (for NTSC) or [ ] (for PAL)
(=
49, =
49) and cannot be changed.
●During [ ] recording, a mark indicating the last two seconds is
added to the bar showing the elapsed time.
Using the Attenuator
The attenuator can reduce audio distortion in noisy environments.
However, in quiet environments, it lowers the sound-recording level.
zPress the [ ] button, choose
[Attenuator] on the [ 7] tab, and then
press the [ ] button (=
29).
zChoose an option as desired (=
29).
Recording Short Clips
Still Images Movies
Apply playback effects to brief clips of a few seconds, such as fast motion,
slow motion, or replay. Clips recorded in this mode may be included in
Story Highlights albums (=
127).
1 Enter [ ] mode.
zSet the mode dial to [ ].
zTouch [ ], and then choose [ ].
zTo conrm your choice, touch [OK].
zBlack bars displayed on the top and
bottom edges of the screen indicate
image areas not recorded.
2 Specify the shooting time and
playback effect.
zPress the [ ] button.
zTurn the [ ] ring to set the shooting time
(4 – 6 sec.).
zAfter pressing the [ ] button, set the
playback effect (=
71) by turning the
[] ring.

72
P Mode
Tv, Av, M, and C Mode
Playback Mode
Wi-Fi Functions
Setting Menu
Accessories
Appendix
Before Use
Index
Basic Guide
Advanced Guide
Camera Basics
Auto Mode /
Hybrid Auto Mode
Other Shooting Modes
Recording iFrame Movies
Still Images Movies
Record movies that can be edited with iFrame-compatible software or
devices.
1 Choose [ ].
zSet the mode dial to [ ].
zTouch [ ], and then choose [ ].
zTo conrm your choice, touch [OK].
zBlack bars displayed on the top and
bottom edges of the screen indicate
image areas not recorded.
2 Shoot (=
69).
●iFrame is a video format developed by Apple Inc.
●The movie quality is [ ] (for NTSC) or [ ] (for PAL)
(=
49, =
49) and cannot be changed.
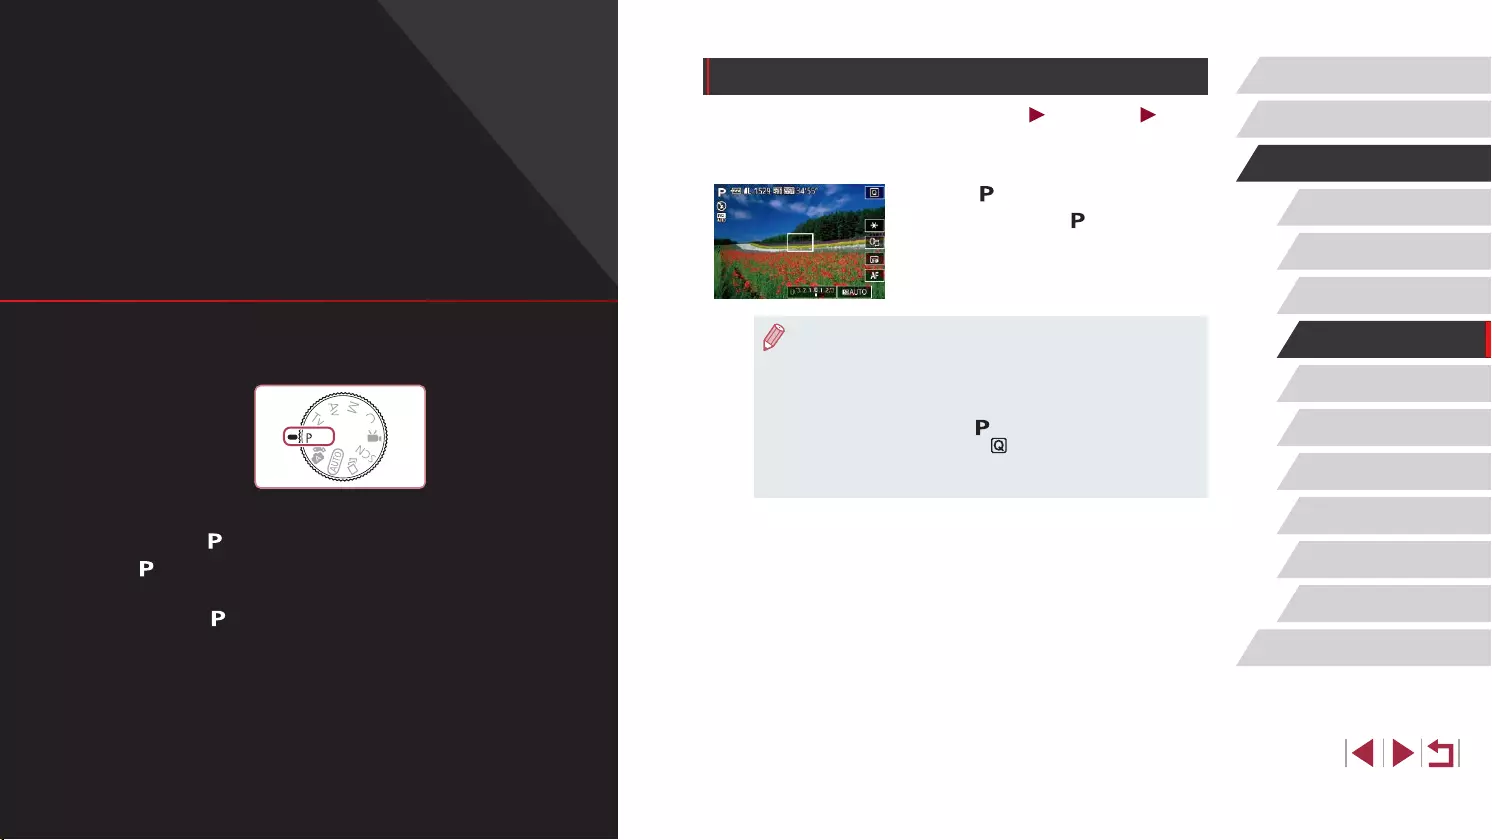
73
Tv, Av, M, and C Mode
Playback Mode
Wi-Fi Functions
Setting Menu
Accessories
Appendix
Before Use
Index
Basic Guide
Advanced Guide
Camera Basics
Auto Mode /
Hybrid Auto Mode
Other Shooting Modes
P Mode
Shooting in Program AE ([P] Mode)
Still Images Movies
You can customize many function settings to suit your preferred shooting
style.
1 Enter [ ] mode.
zSet the mode dial to [ ].
2 Customize the settings as desired
(=
74 – =
91), and then shoot.
●If the optimum exposure cannot be obtained when you press the
shutter button halfway, the shutter speed and aperture value are
displayed in orange. In this case, try adjusting the ISO speed
(=
75) or activating the ash (if subjects are dark, =
87),
which may enable optimum exposure.
●Movies can be recorded in [ ] mode as well, by pressing the
movie button. However, some menu (=
28) and MENU
(=
29) settings may be automatically adjusted for movie
recording.
P Mode
More discerning shots, in your preferred shooting
style
●Instructions in this chapter apply to the camera with the mode
dial set to [ ] mode.
●[]: Program AE; AE: Auto Exposure
●Before using a function introduced in this chapter in modes
other than [ ], make sure the function is available in that mode
(=
190).
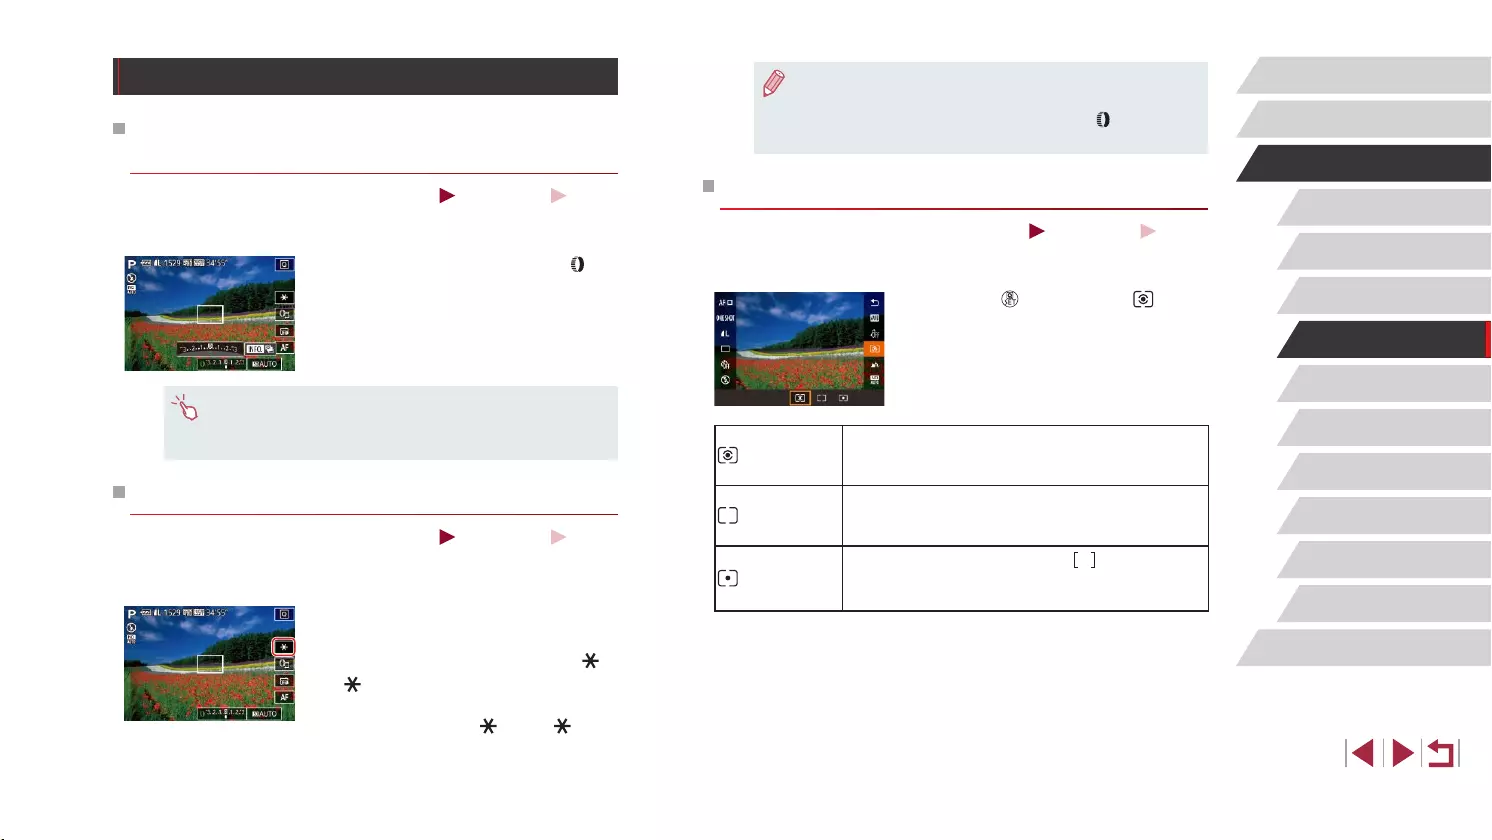
74
Tv, Av, M, and C Mode
Playback Mode
Wi-Fi Functions
Setting Menu
Accessories
Appendix
Before Use
Index
Basic Guide
Advanced Guide
Camera Basics
Auto Mode /
Hybrid Auto Mode
Other Shooting Modes
P Mode
●AE: Auto Exposure
●After the exposure is locked, you can adjust the combination of
shutter speed and aperture value by turning the [ ] ring (Program
Shift).
Changing the Metering Method
Still Images Movies
Adjust the metering method (how brightness is measured) to suit shooting
conditions as follows.
zPress the [ ] button, choose [ ] in the
menu, and choose the desired option
(=
28).
zThe option you congured is now
displayed.
Evaluative
For typical shooting conditions, including backlit
shots. Automatically adjusts exposure to match the
shooting conditions.
Center
Weighted
Avg.
Determines the average brightness of light across
the entire image area, calculated by treating
brightness in the central area as more important.
Spot
Metering restricted to within the [ ] (Spot AE Point
frame). You can also link the Spot AE Point frame to
the AF frame (=
75).
Image Brightness (Exposure)
Adjusting Image Brightness
(Exposure Compensation)
Still Images Movies
The standard exposure set by the camera can be adjusted in 1/3-stop
increments, in a range of -3 to +3.
zAs you watch the screen, turn the [ ] ring
to adjust brightness.
●You can also congure this setting by touching the exposure
compensation icon on the bottom of the shooting screen and then
touching or dragging the bar displayed, or by touching [–][+].
Locking Image Brightness / Exposure (AE Lock)
Still Images Movies
Before shooting, you can lock the exposure, or you can specify focus and
exposure separately.
1 Lock the exposure.
zAim the camera at the subject to shoot with
the exposure locked, and then touch [ ].
z[] is displayed, and the exposure is
locked.
zTo unlock AE, touch [ ] again. [ ] is no
longer displayed.
2 Compose the shot and shoot.
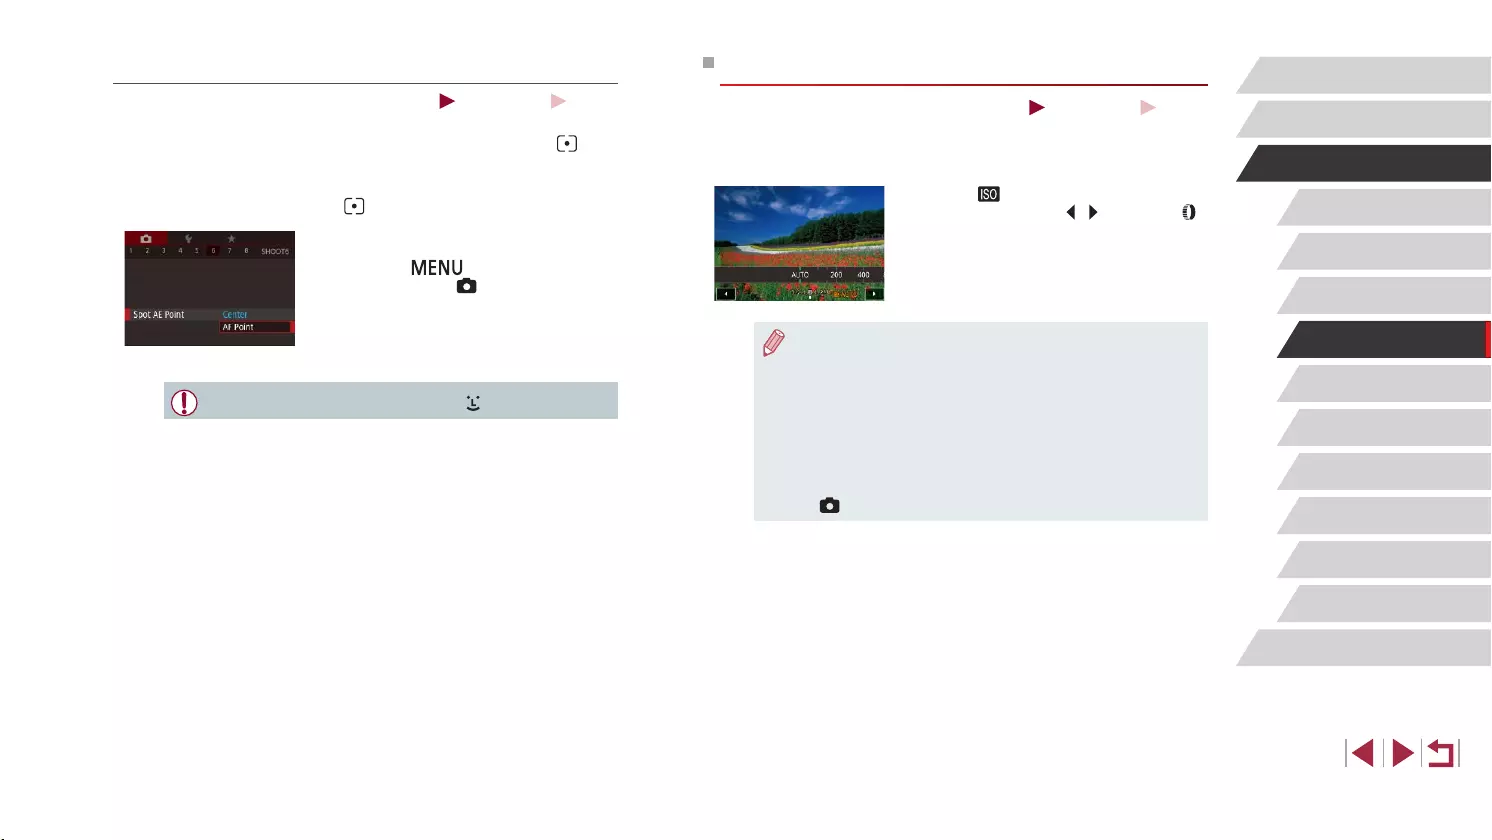
75
Tv, Av, M, and C Mode
Playback Mode
Wi-Fi Functions
Setting Menu
Accessories
Appendix
Before Use
Index
Basic Guide
Advanced Guide
Camera Basics
Auto Mode /
Hybrid Auto Mode
Other Shooting Modes
P Mode
Changing the ISO Speed
Still Images Movies
Set the ISO speed to [AUTO] for automatic adjustment to suit the shooting
mode and conditions. Otherwise, set a higher ISO speed for higher
sensitivity, or a lower value for lower sensitivity.
zTouch [ ], and then choose the ISO
speed (either touch [ ][ ] or turn the [ ]
ring).
zThe option you congured is now
displayed.
●To view the automatically determined ISO speed when you have
set the ISO speed to [AUTO], press the shutter button halfway.
●Although choosing a lower ISO speed may reduce image
graininess, there may be a greater risk of subject and camera
shake in some shooting conditions.
●The faster shutter speed used at higher ISO speeds reduces
subject and camera shake and increases the ash range.
However, shots may look grainy.
●You can also set the ISO speed by accessing MENU (=
29) ►
[5] tab ► [ISO speed] ► [ISO Speed].
Linking the Spot AE Point Frame to the AF Frame
Still Images Movies
1 Set the metering method to [ ].
zFollow the steps in “Changing the
Metering Method” (=
74) to choose
[ ].
2 Congure the setting.
zPress the [ ] button, choose [Spot
AE Point] on the [ 6] tab, and then
choose [AF Point] (=
29).
zThe Spot AE Point frame will now be
linked to the movement of the AF frame
(=
84).
●Not available when [AF method] is set to [ +Tracking] (=
84).
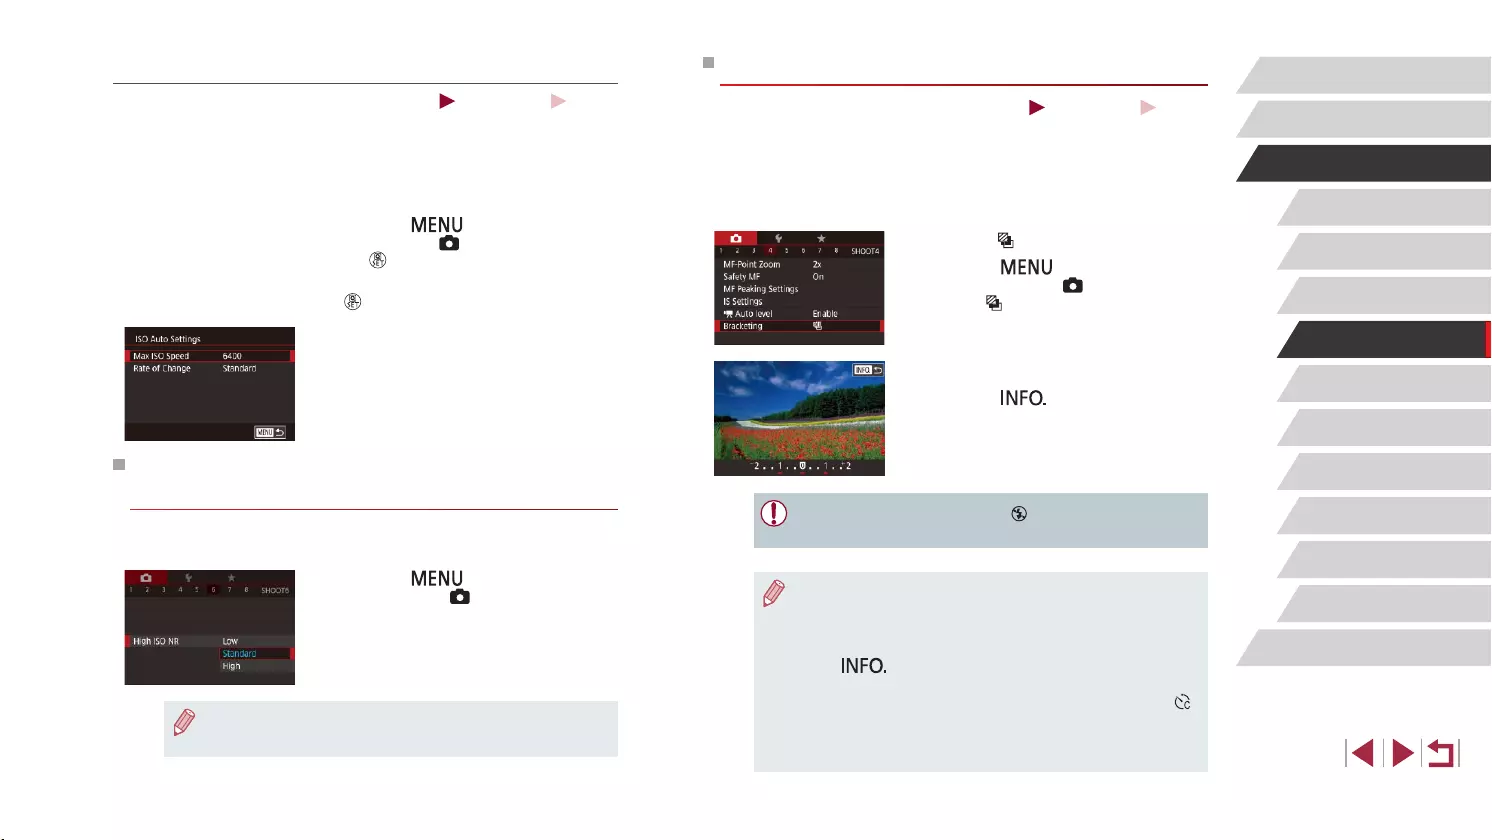
76
Tv, Av, M, and C Mode
Playback Mode
Wi-Fi Functions
Setting Menu
Accessories
Appendix
Before Use
Index
Basic Guide
Advanced Guide
Camera Basics
Auto Mode /
Hybrid Auto Mode
Other Shooting Modes
P Mode
Auto Exposure Bracketing (AEB Shooting)
Still Images Movies
Three consecutive images are captured at different exposure levels
(standard exposure, underexposure, and then overexposure) each
time you shoot. You can adjust the amount of underexposure and
overexposure (relative to standard exposure) from –2 to +2 stops in 1/3-
stop increments.
1 Choose [ ].
zPress the [ ] button, choose
[Bracketing] on the [ 4] tab, and then
choose [ ] (=
29).
2 Congure the setting.
zPress the [ ] button, and then
specify a value by touching or dragging
the bar on the setting screen.
●AEB shooting is only available in [ ] mode (=
87).
●Continuous shooting (=
42) is not available in this mode.
●If exposure compensation is already in use (=
74), the value
specied for that function is treated as the standard exposure
level for this function.
●You can also access the setting screen of step 2 by pressing
the [ ] button when the exposure compensation screen
(=
74) is displayed.
●Three shots are taken, regardless of any quantity specied in [ ]
(=
41).
●In [Blink Detection] mode (=
51), this function is only available
for the nal shot.
Adjusting ISO Auto Settings
Still Images Movies
When the camera is set to [AUTO], maximum ISO speed can be specied
in a range of [400] – [12800], and sensitivity can be specied in a range of
three levels.
1 Access the setting screen.
zPress the [ ] button, choose [ISO
speed] on the [ 5] tab, and then press
the [ ] button (=
29).
zChoose [ISO Auto Settings] and press the
[] button.
2 Congure the setting.
zChoose a menu item to congure, and
then choose the desired option (=
29).
Changing the Noise Reduction Level
(High ISO NR)
You can choose from 3 levels of noise reduction: [Standard], [High], [Low].
This function is especially effective when shooting at high ISO speeds.
zPress the [ ] button, choose [High
ISO NR] on the [ 6] tab, and then
choose the desired option (=
29).
●Not available when images are captured in RAW format
(=
90).
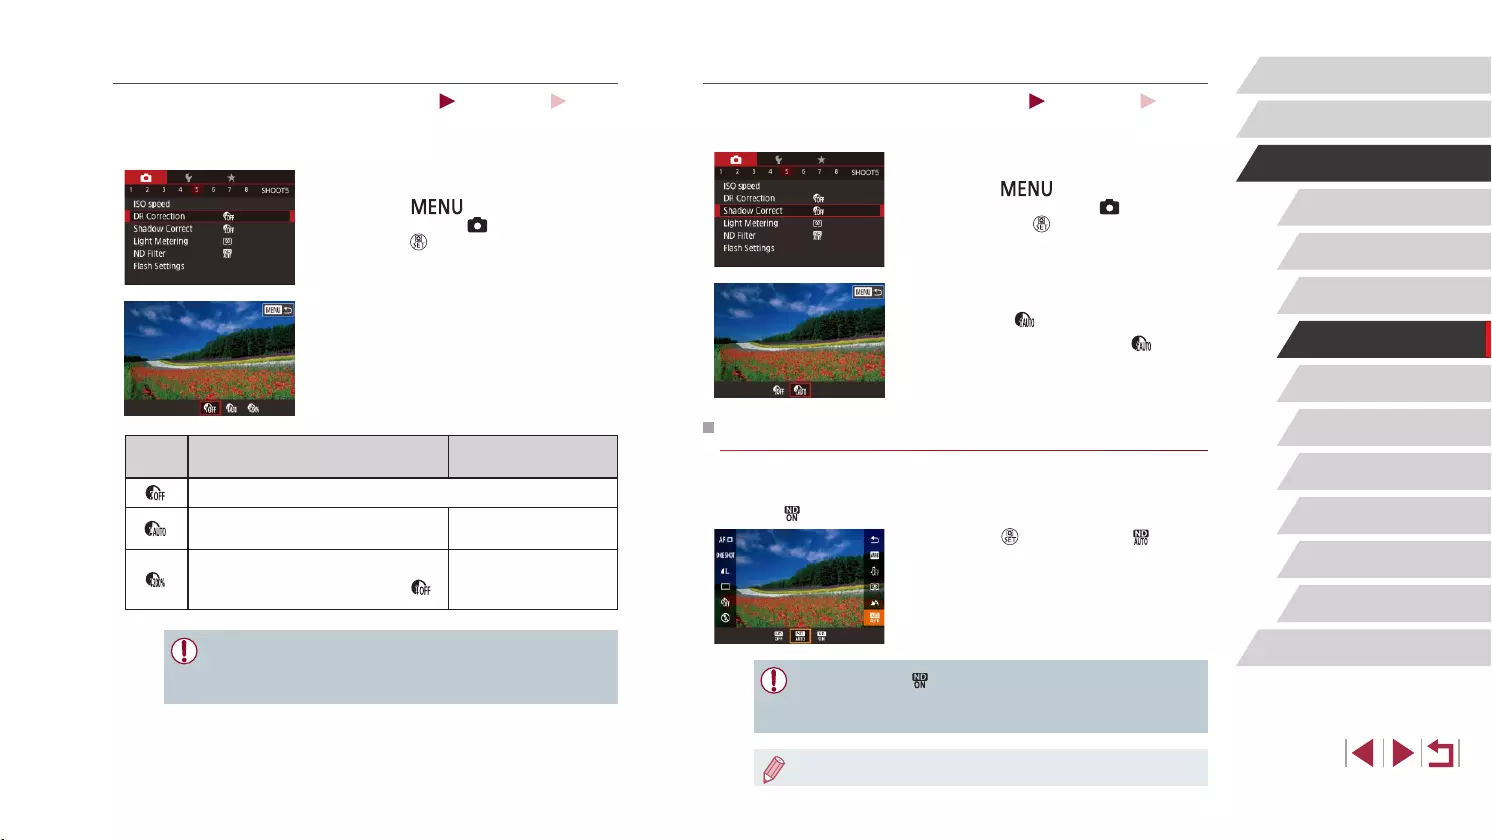
77
Tv, Av, M, and C Mode
Playback Mode
Wi-Fi Functions
Setting Menu
Accessories
Appendix
Before Use
Index
Basic Guide
Advanced Guide
Camera Basics
Auto Mode /
Hybrid Auto Mode
Other Shooting Modes
P Mode
Shadow Correct
Still Images Movies
Automatically preserve image detail in shadows as follows.
1 Access the setting screen.
zPress the [ ] button, choose
[Shadow Correct] on the [ 5] tab, and
then press the [ ] button (=
29).
2 Congure the setting.
zChoose the [ ] option (=
29).
zOnce the setting is complete, [ ] is
displayed.
Adjusting Auto ND Filter Settings
For optimal brightness in the scenes you shoot, Auto ND lter reduces light
intensity to 1/8 the actual level, by an amount equivalent to three stops.
Choosing [ ] enables you to reduce the shutter speed and aperture value.
zPress the [ ] button, choose [ ] in the
menu, and choose the desired option
(=
28).
zThe option you congured is now
displayed.
●When selecting [ ], mount the camera on a tripod or take other
measures to keep it still and prevent camera shake. In this case,
you should set [IS Mode] to [Off] (=
52).
●ND: Neutral Density
Dynamic Range Correction (DR Correction)
Still Images Movies
Tone down bright image areas, which might otherwise look washed out,
as follows.
1 Access the setting screen.
zPress the [ ] button, choose [DR
Correction] on the [ 5] tab, and then
press the [ ] button (=
29).
2 Congure the setting.
zChoose an option as desired (=
29).
zOnce set, the option you chose is
displayed.
Options Details Available ISO Speed
(=
75)
–
Automatic adjustment to prevent
washed-out highlights [AUTO], [125] – [12800]
Tone down highlights by about 200%
relative to the brightness level of [ ]. [AUTO], [250] – [6400]
●ISO speed (=
75) will be adjusted to a speed within the
supported range if you have specied a value outside the
supported range indicated here.
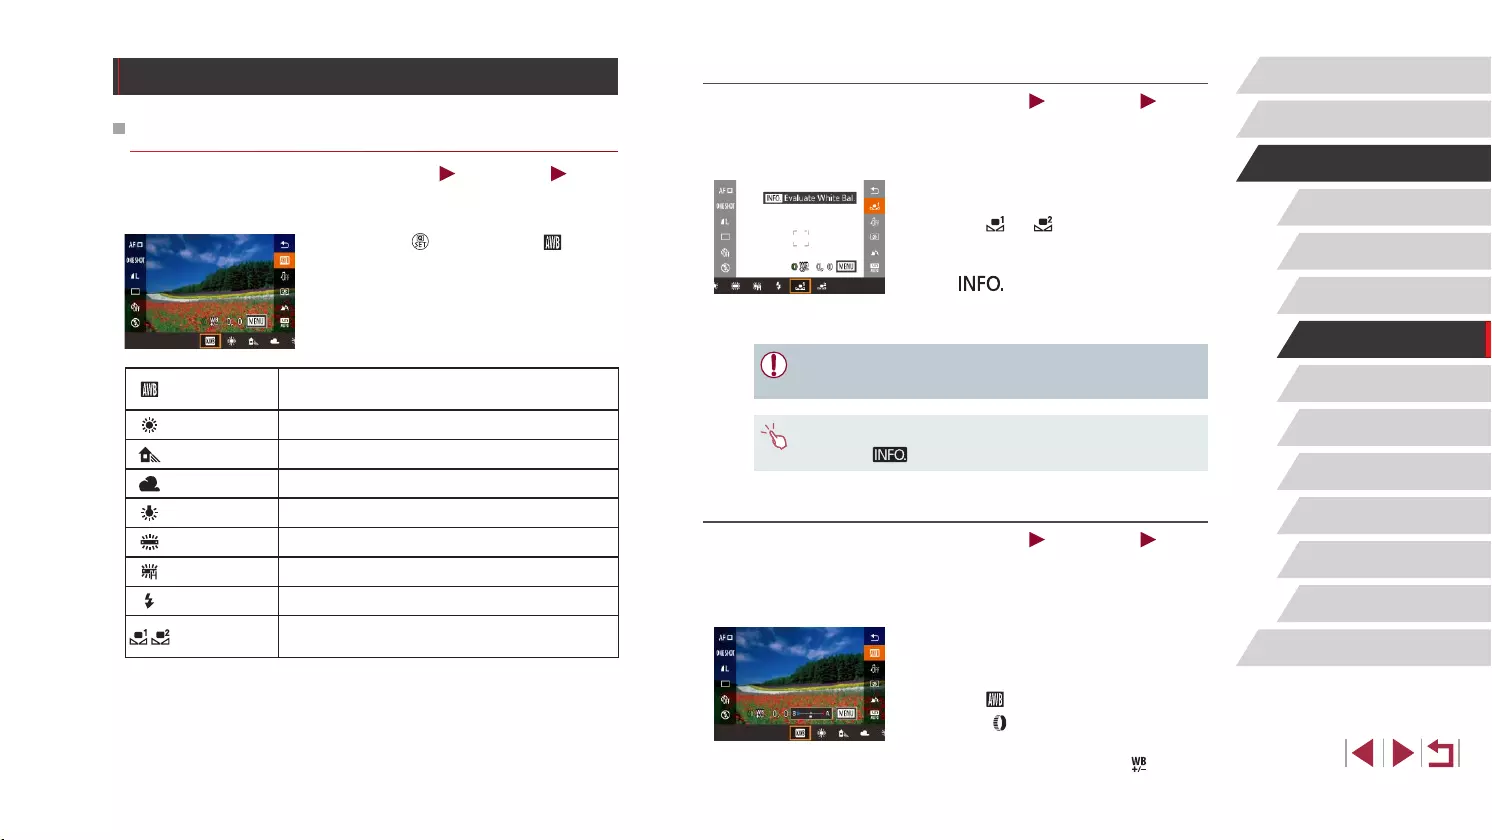
78
Tv, Av, M, and C Mode
Playback Mode
Wi-Fi Functions
Setting Menu
Accessories
Appendix
Before Use
Index
Basic Guide
Advanced Guide
Camera Basics
Auto Mode /
Hybrid Auto Mode
Other Shooting Modes
P Mode
Custom White Balance
Still Images Movies
For image colors that look natural under the light in your shot, adjust white
balance to suit the light source where you are shooting. Set the white
balance under the same light source that will illuminate your shot.
zFollow the steps in “Capturing Natural
Colors (White Balance)” (=
78) to
choose [ ] or [ ].
zAim the camera at a plain white subject,
so that the entire screen is white. Press
the [ ] button.
zThe tint of the screen changes once the
white balance data has been recorded.
●Colors may look unnatural if you change camera settings after
recording white balance data.
●You can also record white balance data on the screen above by
touching [ ].
Manually Correcting White Balance
Still Images Movies
You can correct white balance. This adjustment can match the effect of
using a commercially available color temperature conversion lter or color-
compensating lter.
1 Congure the setting.
zFollow the steps in “Capturing Natural
Colors (White Balance)” (=
78) to
choose [ ].
zTurn the [ ] ring to adjust the correction
level for B and A.
zOnce the setting is complete, [ ] is
displayed.
Image Colors
Capturing Natural Colors (White Balance)
Still Images Movies
By adjusting white balance (WB), you can make image colors look more
natural for the scene you are shooting.
zPress the [ ] button, choose [ ] in the
menu, and choose the desired option
(=
28).
zThe option you congured is now
displayed.
Auto Automatically sets the optimal white balance for
the shooting conditions.
Day Light For shooting outdoors in fair weather.
Shade For shooting in the shade.
Cloudy For shooting in cloudy weather or at twilight.
Tungsten For shooting under ordinary incandescent lighting.
Fluorescent For shooting under white uorescent lighting.
Fluorescent H For shooting under daylight uorescent lighting.
Flash For shooting with the ash.
Custom For manually setting a custom white balance
(=
78).
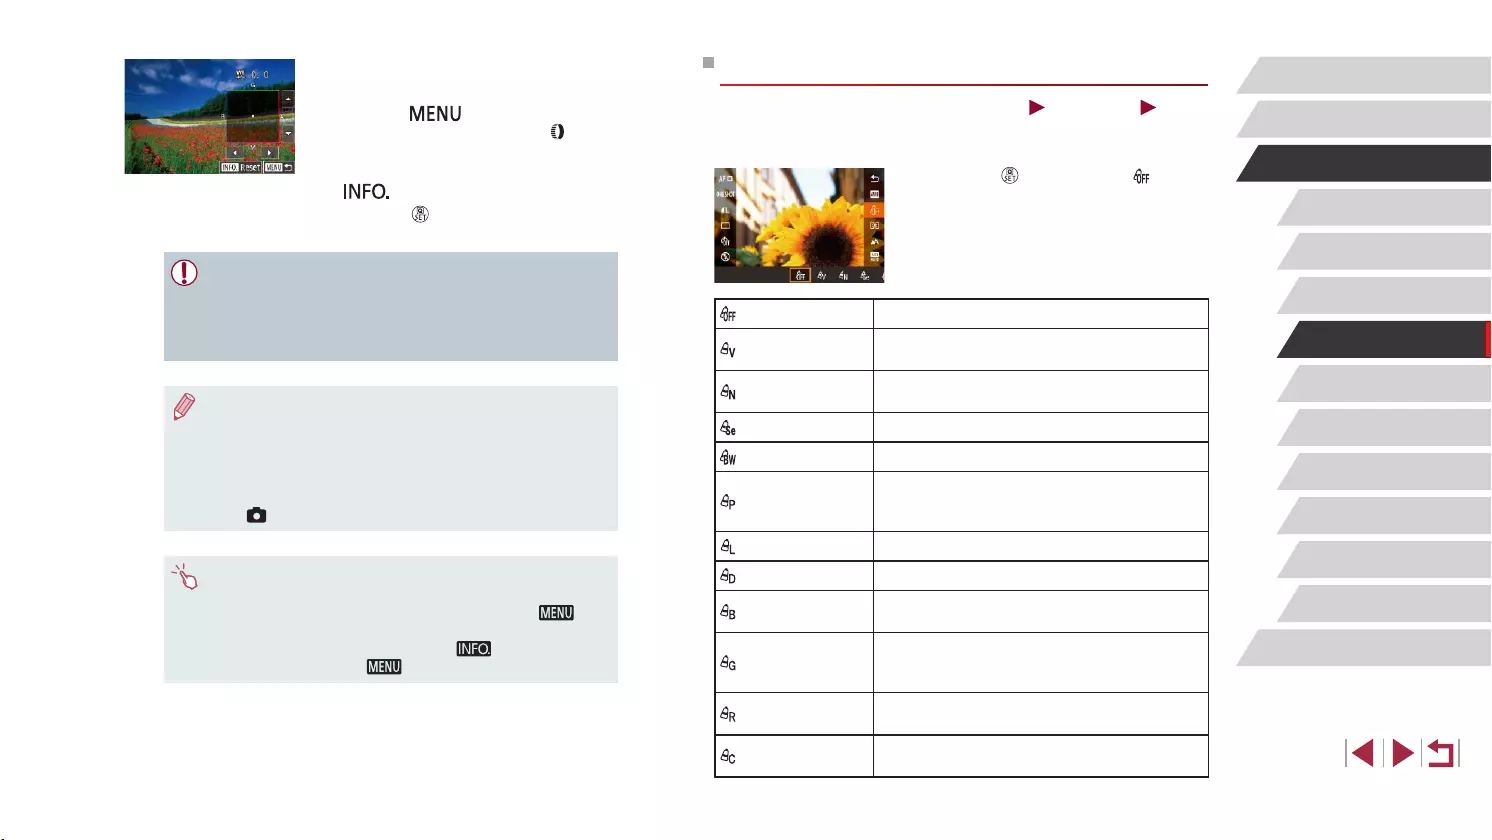
79
Tv, Av, M, and C Mode
Playback Mode
Wi-Fi Functions
Setting Menu
Accessories
Appendix
Before Use
Index
Basic Guide
Advanced Guide
Camera Basics
Auto Mode /
Hybrid Auto Mode
Other Shooting Modes
P Mode
Changing Image Color Tones (My Colors)
Still Images Movies
Change image color tones as desired, such as converting images to sepia
or black and white.
zPress the [ ] button, choose [ ] in the
menu, and choose the desired option
(=
28).
zThe option you congured is now
displayed.
My Colors Off –
Vivid Emphasizes contrast and color saturation,
making images sharper.
Neutral Tones down contrast and color saturation for
subdued images.
Sepia Creates sepia tone images.
B/W Creates black and white images.
Positive Film
Combines the effects of Vivid Blue, Vivid Green,
and Vivid Red to produce intense yet natural-
looking colors resembling images on positive lm.
Lighter Skin Tone Lightens skin tones.
Darker Skin Tone Darkens skin tones.
Vivid Blue Emphasizes blues in images. Makes the sky,
ocean, and other blue subjects more vivid.
Vivid Green
Emphasizes greens in images. Makes
mountains, foliage, and other green subjects
more vivid.
Vivid Red Emphasizes reds in images. Makes red
subjects more vivid.
Custom Color
Adjust contrast, sharpness, color saturation, and
other qualities as desired (
=
80).
2 Congure advanced settings.
zTo congure more advanced settings,
press the [ ] button and adjust the
correction level (either turn the [ ] ring or
touch or drag the frame).
zTo reset the correction level, press the
[] button.
zPress the [ ] button to complete the
setting.
●The camera will retain white balance correction levels even if
you switch to another white balance option (by following steps
in “Capturing Natural Colors (White Balance)” (=
78)), but
correction levels will be reset if you record custom white balance
data.
●B: blue; A: amber; M: magenta; G: green
●One level of blue/amber correction is equivalent to about 7
mireds on a color temperature conversion lter. (Mired: Color
temperature unit representing color temperature conversion lter
density)
●You can also congure this setting by choosing MENU (=
29)
► [ 6] tab ► [WB Correction].
●You can also choose the correction level by touching or dragging
the bar in step 1 or the frame in step 2.
●You can also access the screen in step 2 by touching [ ] in
step 1.
●On the screen in step 2, you can touch [ ] to restore the
original level and touch [ ] to return to the shooting screen.
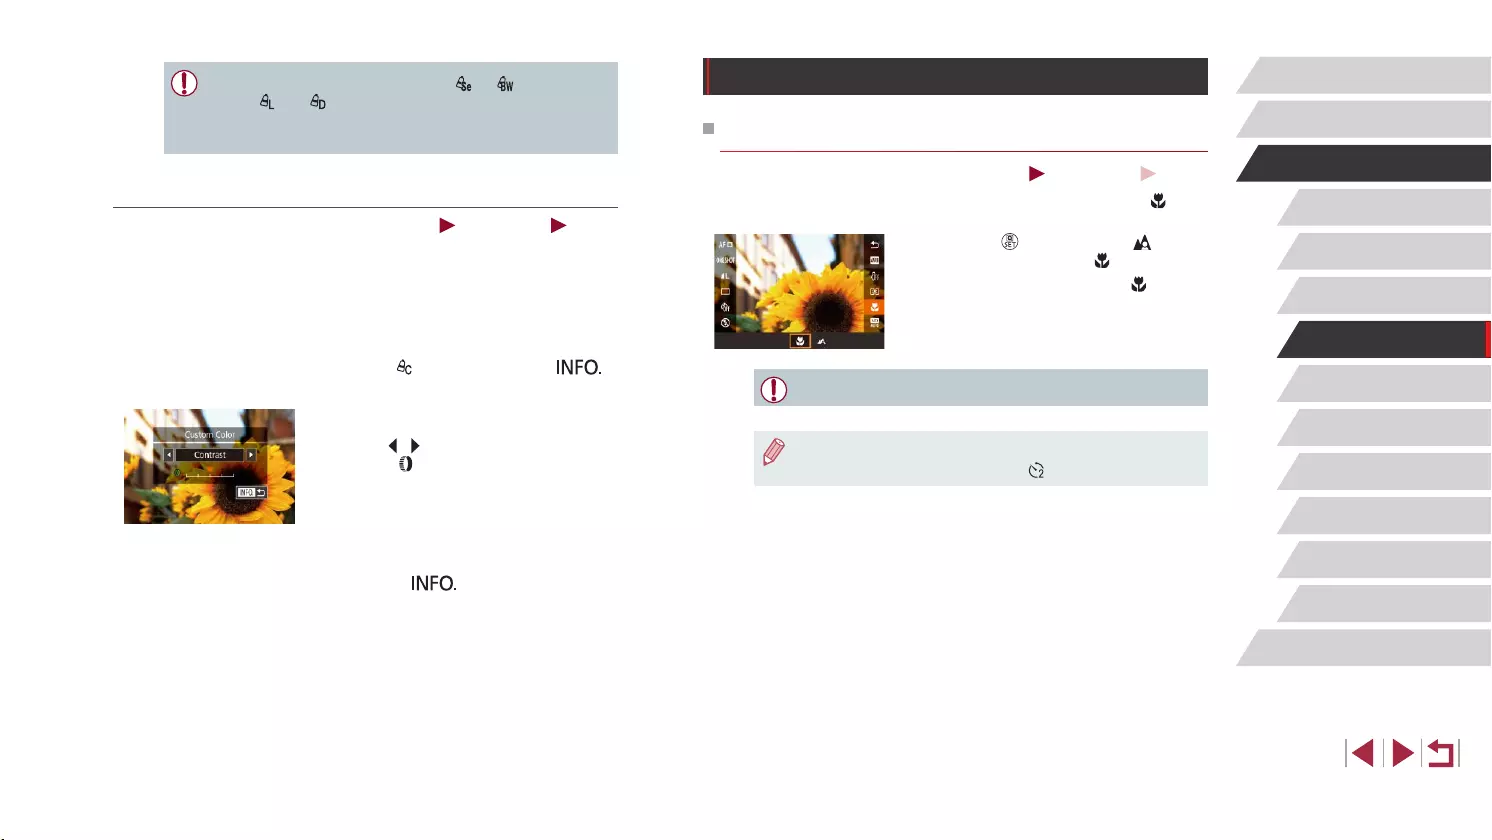
80
Tv, Av, M, and C Mode
Playback Mode
Wi-Fi Functions
Setting Menu
Accessories
Appendix
Before Use
Index
Basic Guide
Advanced Guide
Camera Basics
Auto Mode /
Hybrid Auto Mode
Other Shooting Modes
P Mode
Shooting Range and Focusing
Shooting Close-Ups (Macro)
Still Images Movies
To restrict the focus to subjects at close range, set the camera to [ ]. For
details on the range of focus, see “Shooting Range” (=
205).
zPress the [ ] button, choose [ ] in the
menu, and then choose [ ] (=
28).
zOnce the setting is complete, [ ] is
displayed.
●If the ash res, vignetting may occur.
●To prevent camera shake, try mounting the camera on a tripod
and shooting with the camera set to [ ] (=
41).
●White balance (=
78) cannot be set in [ ] or [ ] modes.
●With [ ] and [ ] modes, colors other than people’s skin tone
may change. These settings may not produce the expected
results with some skin tones.
Custom Color
Still Images Movies
Choose the desired level of image contrast, sharpness, color saturation,
red, green, blue, and skin tones in a range of 1 – 5.
1 Access the setting screen.
zFollow the steps in “Changing Image
Color Tones (My Colors)” (=
79) to
choose [ ], and then press the [ ]
button.
2 Congure the setting.
zTouch [ ][ ] to choose an item, and then
turn the [ ] ring to specify a value.
zFor stronger/more intense effects (or
darker skin tones), adjust the value to
the right, and for weaker/lighter effects
(or lighter skin tones), adjust the value to
the left.
zPress the [ ] button to complete the
setting.
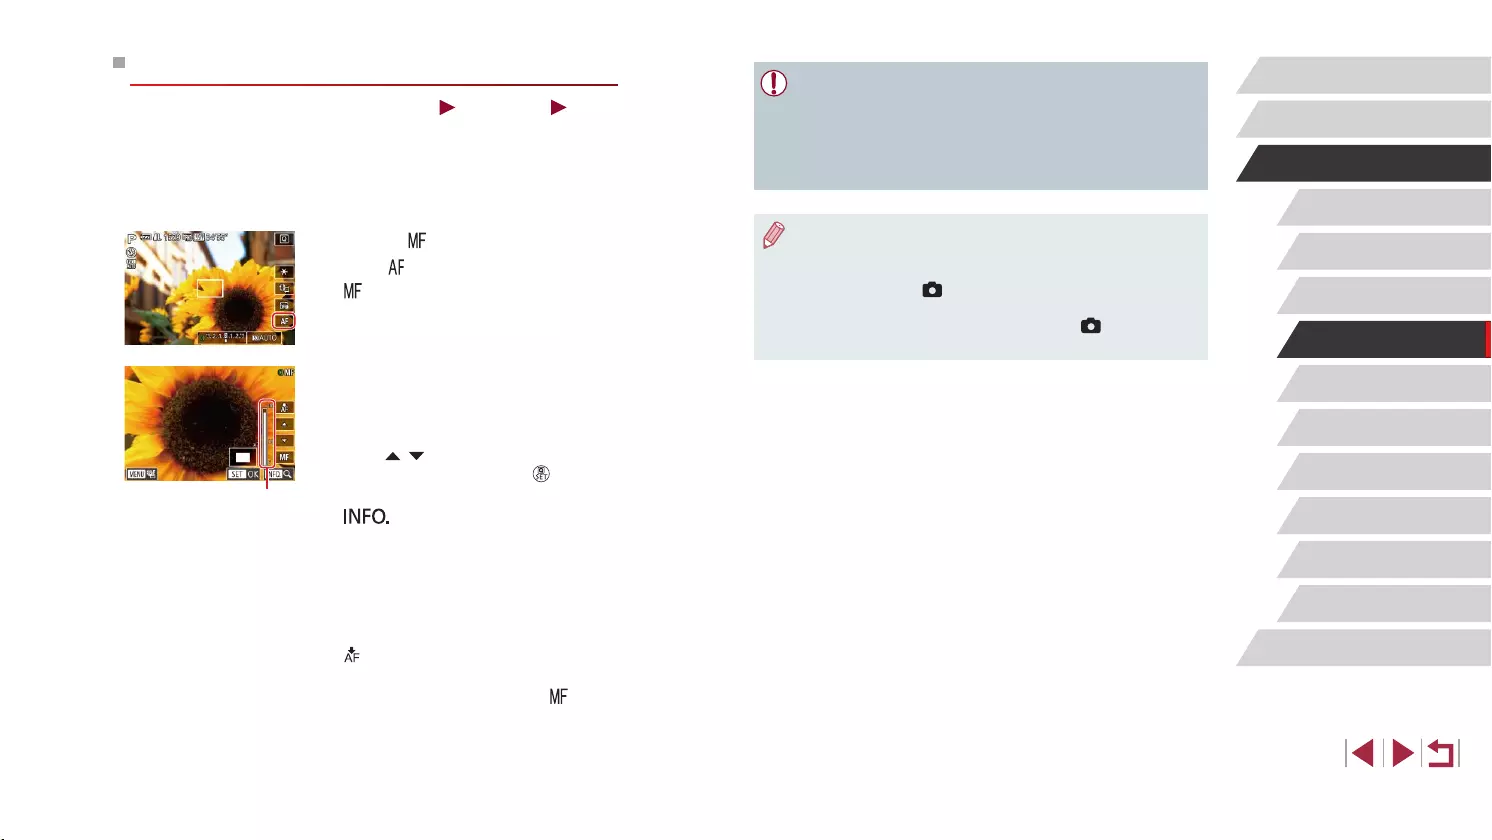
81
Tv, Av, M, and C Mode
Playback Mode
Wi-Fi Functions
Setting Menu
Accessories
Appendix
Before Use
Index
Basic Guide
Advanced Guide
Camera Basics
Auto Mode /
Hybrid Auto Mode
Other Shooting Modes
P Mode
●When you focus manually, the AF method (=
83) is [1-point
AF] and AF frame size (=
84) is [Normal], and these settings
cannot be changed.
●Focusing is possible when using the digital zoom (=
39) or
digital tele-converter (=
83), or when using a TV as a display
(=
170), but the magnied display will not appear.
●To focus more accurately, try attaching the camera to a tripod to
stabilize it.
●You can enlarge or hide the magnied display area by adjusting
MENU (=
29) ► [ 4] tab ► [MF-Point Zoom] settings.
●To deactivate automatic focus ne-tuning when the shutter button
is pressed halfway, choose MENU (=
29) ► [ 4] tab ►
[Safety MF] ► [Off].
Shooting in Manual Focus Mode
Still Images Movies
When focusing is not possible in AF mode, use manual focus. You can
specify the general focal position and then press the shutter button
halfway to have the camera determine the optimal focal position near the
position you specied. For details on the range of focus, see “Shooting
Range” (=
205).
1 Choose [ ].
zTouch [ ].
z[] and the MF indicator are displayed.
2 Specify the general focal position.
zReferring to the on-screen MF indicator
(1, which shows the distance and focal
position) and the magnied display,
touch [ ][ ] to specify the general focal
position, and then press the [ ] button.
zTo adjust the magnication, press the
[] button.
zDuring magnied display, you can move
the focusing frame by dragging on the
screen.
3 Fine-tune the focus.
zPress the shutter button halfway or touch
[] to have the camera ne-tune the
focal position (Safety MF).
zTo cancel manual focus, touch [ ].
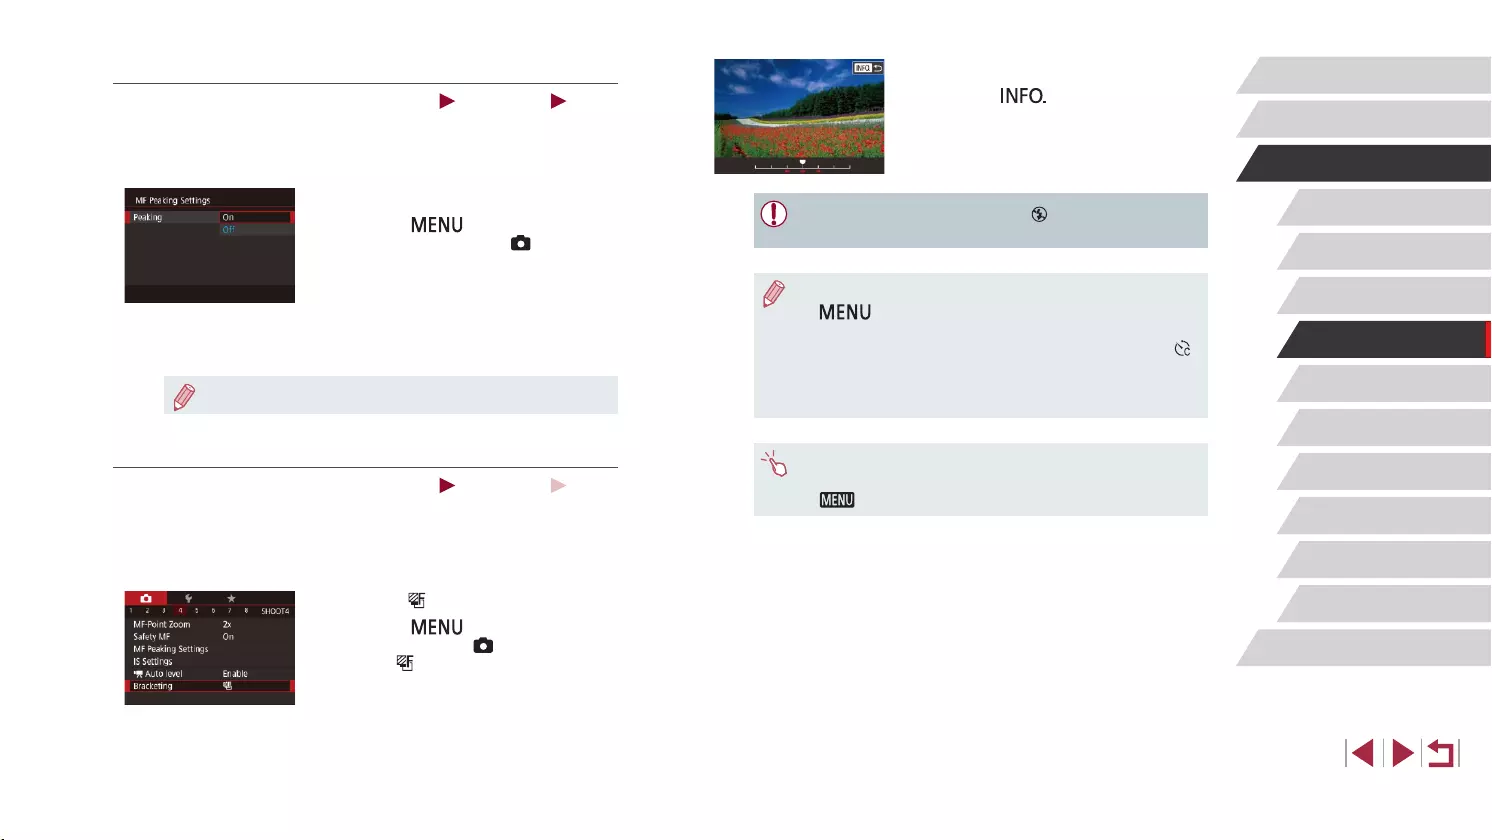
82
Tv, Av, M, and C Mode
Playback Mode
Wi-Fi Functions
Setting Menu
Accessories
Appendix
Before Use
Index
Basic Guide
Advanced Guide
Camera Basics
Auto Mode /
Hybrid Auto Mode
Other Shooting Modes
P Mode
2 Congure the setting.
zPress the [ ] button, and then
specify a value by touching or dragging
the bar on the setting screen.
●Focus bracketing is only available in [ ] mode (=
87).
●Continuous shooting (=
42) is not available in this mode.
●You can also access the setting screen in step 2 by pressing the
[] button in step 2 of “Shooting in Manual Focus Mode”
(=
81).
●Three shots are taken, regardless of any quantity specied in [ ]
(=
41).
●In [Blink Detection] mode (=
51), this function is only available
for the nal shot.
●You can also congure this setting by touching or dragging the
bar on the screen in step 2 to specify a value and then touching
[].
Easily Identifying the Focus Area (MF Peaking)
Still Images Movies
Edges of subjects in focus are displayed in color to make manual focusing
easier. You can adjust the colors and the sensitivity (level) of edge
detection as needed.
1 Access the setting screen.
zPress the [ ] button, choose [MF
Peaking Settings] on the [ 4] tab,
choose [Peaking], and then choose [On]
(=
29).
2 Congure the setting.
zChoose a menu item to congure, and
then choose the desired option (=
29).
●Colors displayed for MF peaking are not recorded in your shots.
Focus Bracketing (Focus-BKT Mode)
Still Images Movies
Three consecutive images are captured each time you shoot, with the
rst one at the focal distance you set manually and the others at farther
and nearer focal positions determined by presets. The distance from your
specied focus can be set in three levels.
1 Choose [ ].
zPress the [ ] button, choose
[Bracketing] on the [ 4] tab, and then
choose [ ] (=
29).
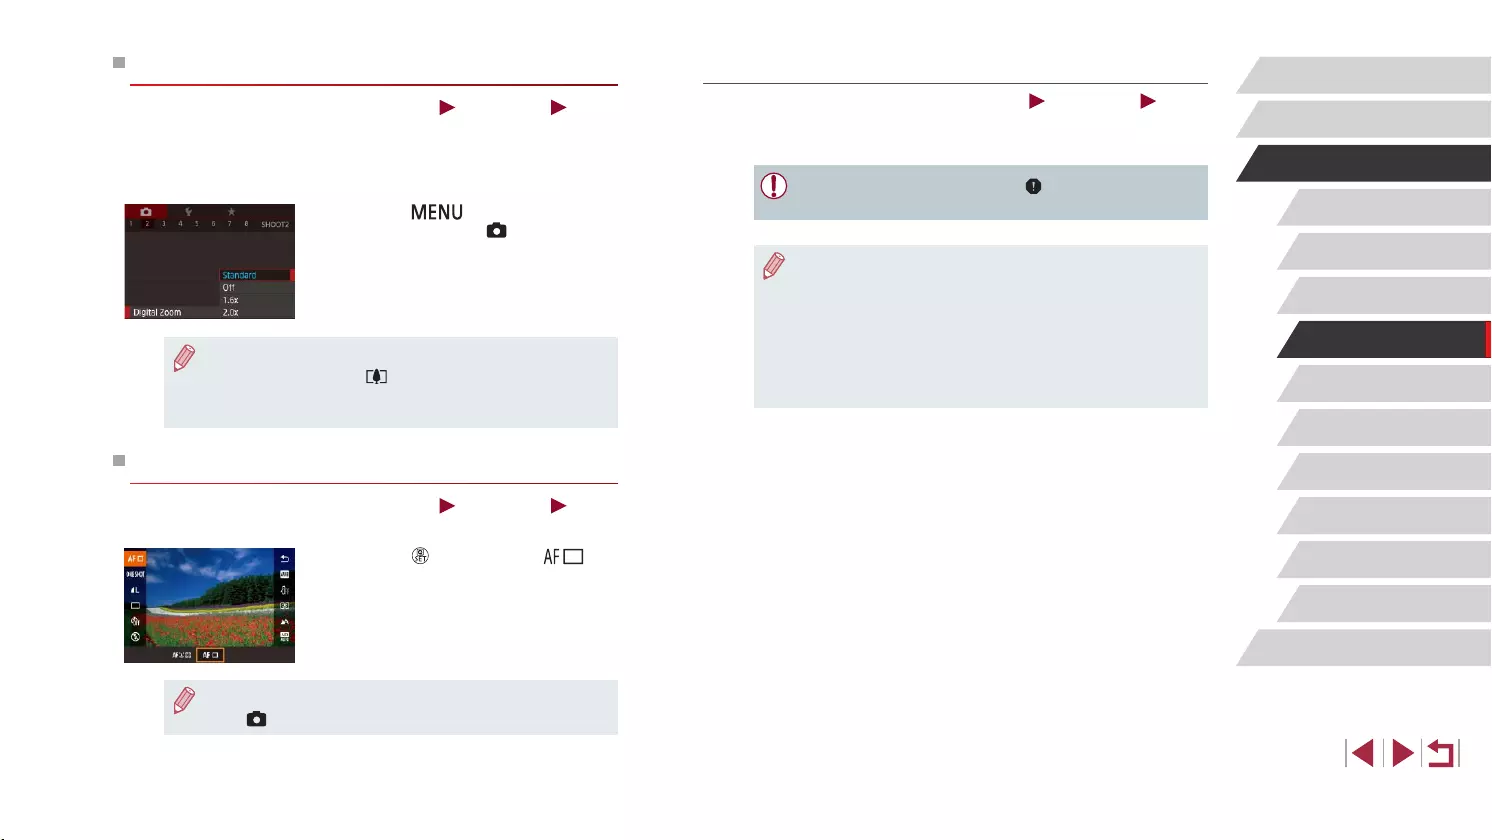
83
Tv, Av, M, and C Mode
Playback Mode
Wi-Fi Functions
Setting Menu
Accessories
Appendix
Before Use
Index
Basic Guide
Advanced Guide
Camera Basics
Auto Mode /
Hybrid Auto Mode
Other Shooting Modes
P Mode
1-point AF
Still Images Movies
The camera focuses using a single AF frame. Effective for reliable
focusing. You can also move the frame by touching the screen (=
86).
●A yellow AF frame is displayed with [ ] if the camera cannot
focus when you press the shutter button halfway.
●To compose shots so that subjects are positioned at the edge or
in a corner, rst aim the camera to capture the subject in an AF
frame, and then hold the shutter button halfway down. As you
continue to hold the shutter button halfway, recompose the shot
as desired, and then press the shutter button all the way down
(Focus Lock).
●The AF frame position is enlarged when you press the shutter
button halfway with [AF-Point Zoom] (=
50) set to [On].
Digital Tele-Converter
Still Images Movies
The focal length of the lens can be increased by approximately 1.6x or
2.0x. This can reduce camera shake because the shutter speed is faster
than it would be if you zoomed (including using digital zoom) in to the
same zoom factor.
zPress the [ ] button, choose
[Digital Zoom] on the [ 2] tab, and then
choose the desired option (=
29).
zThe view is enlarged and the zoom factor
is displayed on the screen.
●The shutter speed may be equivalent when you move the zoom
lever all the way toward [ ] for maximum telephoto, and when
you zoom in to enlarge the subject to the same size following
step 2 in “Zooming In Closer on Subjects (Digital Zoom)” (=
39).
Choosing the AF Method
Still Images Movies
Change the auto focus (AF) mode to suit shooting conditions.
zPress the [ ] button, choose [ ] in
the menu, and choose the desired option
(=
28).
●You can also congure this setting by accessing MENU (=
29)
► [ 3] tab ► [AF method].
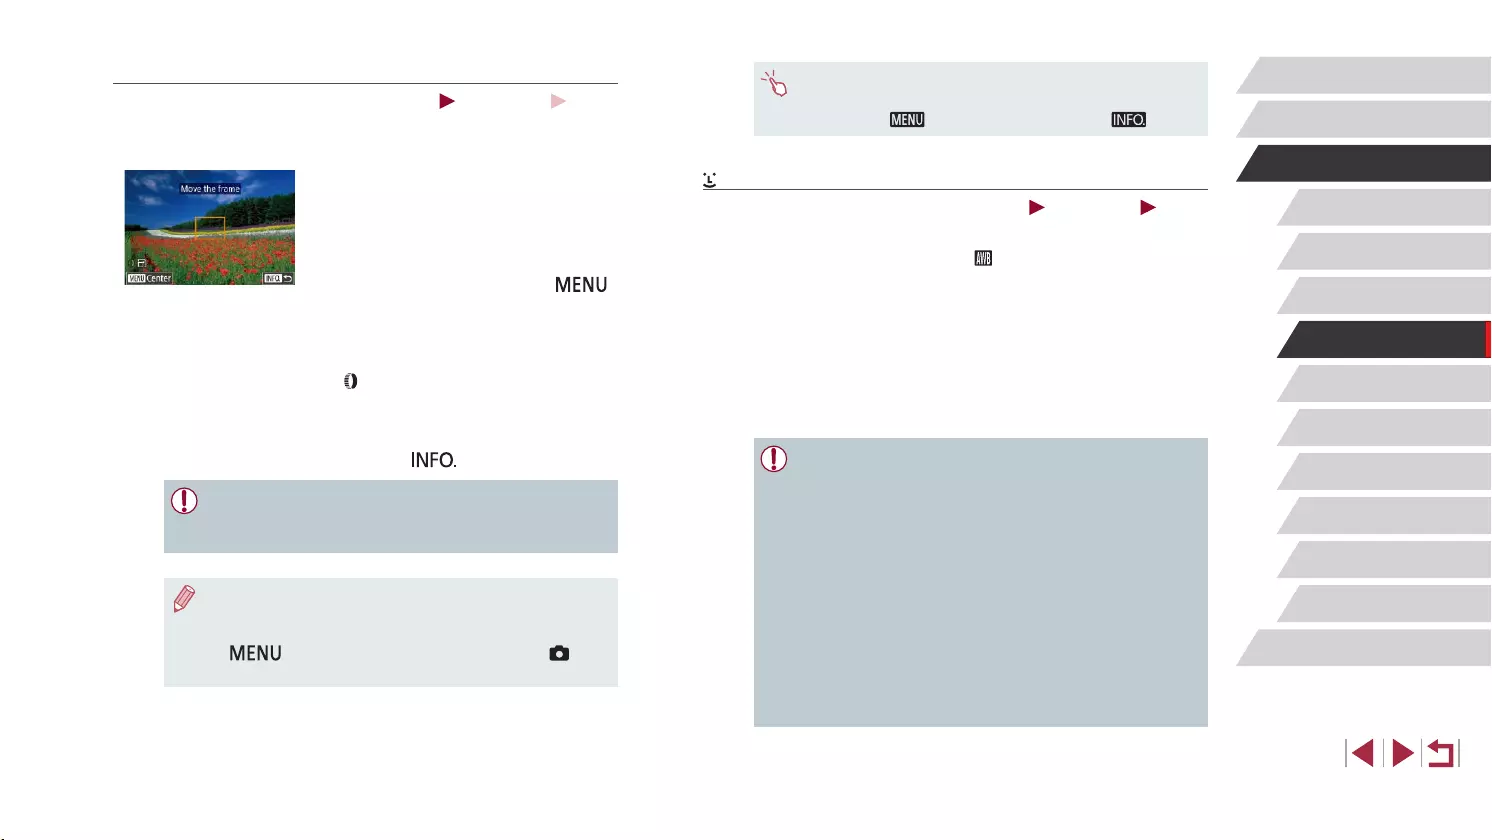
84
Tv, Av, M, and C Mode
Playback Mode
Wi-Fi Functions
Setting Menu
Accessories
Appendix
Before Use
Index
Basic Guide
Advanced Guide
Camera Basics
Auto Mode /
Hybrid Auto Mode
Other Shooting Modes
P Mode
●On the screen in step 2, you can also move the AF frame by
touching the screen, restore the AF frame to the original position
by touching [ ], or exit the setting by touching [ ].
+Tracking
Still Images Movies
●Detects people’s faces, and then sets the focus, exposure (evaluative
metering only), and white balance ([ ] only).
●After you aim the camera at the subject, a white frame is displayed
around the person’s face determined by the camera to be the main
subject, and up to two gray frames are displayed around other
detected faces.
●When the camera detects movement, frames will follow moving
subjects, within a certain range.
●After you press the shutter button halfway, up to nine green frames are
displayed around faces in focus.
●When no faces are detected, or when only gray frames are
displayed (without a white frame), pressing the shutter button
halfway will display green frames in the areas in focus. Note that
the maximum number of frames depends on the aspect ratio
(=
47) setting.
●If no faces are detected in Servo AF (=
85) mode, the AF
frame is displayed in the center of the screen when you press the
shutter button halfway.
●Examples of faces that cannot be detected:
— Subjects that are distant or extremely close
— Subjects that are dark or light
— Faces in prole, at an angle, or partly hidden
●The camera may misinterpret non-human subjects as faces.
●No AF frames are displayed if the camera cannot focus when you
press the shutter button halfway.
Moving and Resizing AF Frames (1-point AF)
Still Images Movies
When you want to change the position or size of the AF frame, set the AF
method to [1-point AF].
1 Move the AF frame.
zTouch the screen. An AF frame is
displayed in orange where you touched
(Touch AF).
zTo return the AF frame to the original
position in the center, press the [ ]
button.
2 Resize the AF frame.
zTo reduce the AF frame size, turn the
[] ring. Turn it again to restore it to the
original size.
3 Finish the setup process.
zPress the [ ] button.
●AF frames are displayed at normal size when you use the digital
zoom (=
39) or digital tele-converter (=
83), and in manual
focus mode (=
81).
●You can also link the Spot AE Point frame to the AF frame
(=
75).
●You can also congure the AF frame size by pressing the
[] button and choosing [AF Frame Size] on the [ 3] tab
(=
29).
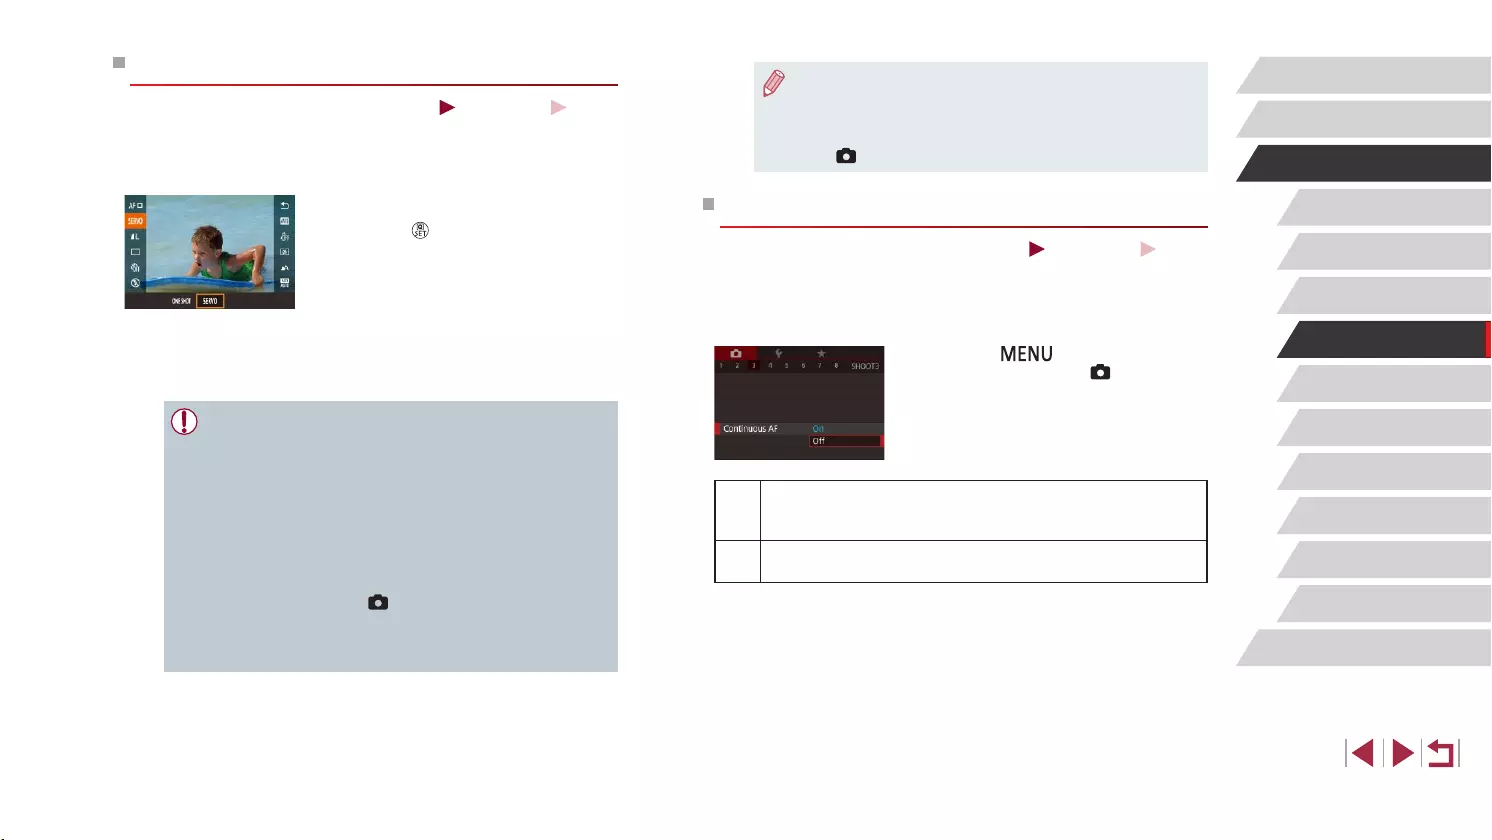
85
Tv, Av, M, and C Mode
Playback Mode
Wi-Fi Functions
Setting Menu
Accessories
Appendix
Before Use
Index
Basic Guide
Advanced Guide
Camera Basics
Auto Mode /
Hybrid Auto Mode
Other Shooting Modes
P Mode
●To have the camera keep adjusting the focus during continuous
shooting (=
42), specify Servo AF with [AF method] set to
[1-point AF].
●You can also congure this setting by accessing MENU (=
29)
► [ 3] tab ► [AF operation].
Changing the Focus Setting
Still Images Movies
You can change default camera operation of constantly focusing on
subjects it is aimed at, even when the shutter button is not pressed.
Instead, you can limit camera focusing to the moment you press the
shutter button halfway.
zPress the [ ] button, choose
[Continuous AF] on the [ 3] tab, and
then choose [Off] (=
29).
On
Helps avoid missing sudden photo opportunities, because
the camera constantly focuses on subjects until you press the
shutter button halfway.
Off Conserves battery power, because the camera does not focus
constantly.
Shooting with Servo AF
Still Images Movies
This mode helps avoid missing shots of subjects in motion, because the
camera continues to focus on the subject and adjust the exposure as long
as you press the shutter button halfway.
1 Congure the setting.
zPress the [ ] button, choose [ONE
SHOT] in the menu, and then choose
[SERVO].
2 Focus.
zThe focus and exposure are maintained
where the blue AF frame is displayed
while you are pressing the shutter button
halfway.
●Focusing may not be possible in some shooting conditions.
●In low-light conditions, Servo AF may not be activated (AF frames
may not turn blue) when you press the shutter button halfway.
In this case, the focus and exposure are set according to the
specied AF method.
●Continuous shooting (=
42) is slower in Servo AF mode.
●If optimum exposure cannot be obtained, the shutter speed and
aperture value are displayed in orange. Release the shutter
button, and then press it halfway again.
●AF lock shooting is not available.
●[AF-Point Zoom] on the [ 3] tab (=
29) is not available.
●Not available when using the self-timer (=
40).
●Using the self-timer (=
40) will restrict the AF mode to [ONE
SHOT].
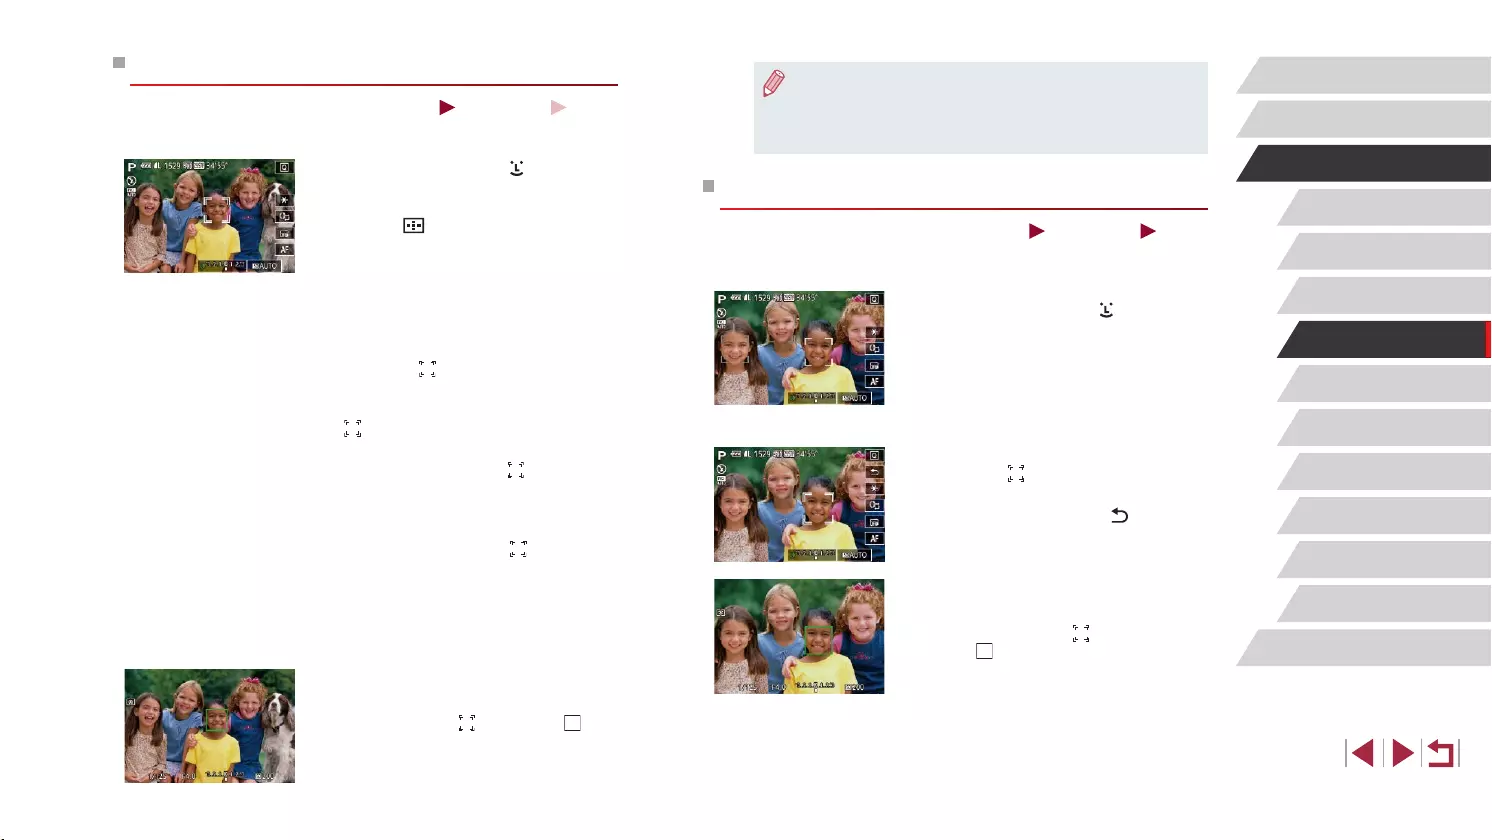
86
Tv, Av, M, and C Mode
Playback Mode
Wi-Fi Functions
Setting Menu
Accessories
Appendix
Before Use
Index
Basic Guide
Advanced Guide
Camera Basics
Auto Mode /
Hybrid Auto Mode
Other Shooting Modes
P Mode
●When [Face ID] is set to [On], only the name of the registered
person chosen as the main subject is displayed, even if other
registered people have been detected. However, their names will
be recorded in the still images (=
43).
Choosing Subjects to Focus On (Touch AF)
Still Images Movies
You can shoot after choosing a person’s face or another subject to focus
on.
1 Set the AF method to [ +Tracking]
(=
83).
2 Choose a person’s face or another
subject to focus on.
zTouch the subject or person on the
screen.
zWhen the subject is detected, the camera
beeps and [ ] is displayed. Focus is
maintained even if the subject moves.
zTo cancel Touch AF, touch [ ].
3 Shoot.
zPress the shutter button halfway. After
the camera focuses, [ ] changes to a
green [ ].
zPress the shutter button all the way down
to shoot.
Choosing a Person to Focus On (Face Select)
Still Images Movies
You can shoot after choosing a specic person’s face to focus on.
1 Set the AF method to [ +Tracking]
(=
83).
2 Assign [ ] to the movie button
(=
99).
3 Enter Face Select mode.
zAim the camera at the person’s face and
press the movie button.
zAfter [Face Select : On] is displayed, a
face frame [ ] is displayed around the
face detected as the main subject.
zEven if the subject moves, the face frame
[] follows the subject within a certain
range.
zIf a face is not detected, [ ] is not
displayed.
4 Choose the face to focus on.
zTo switch the face frame [ ] to another
detected face, press the movie button.
zOnce you cycle through all detected
faces, [Face Select : Off] is displayed,
followed by the selected AF method
screen.
5 Shoot.
zPress the shutter button halfway. After the
camera focuses, [ ] changes to [ ].
zPress the shutter button all the way down
to shoot.
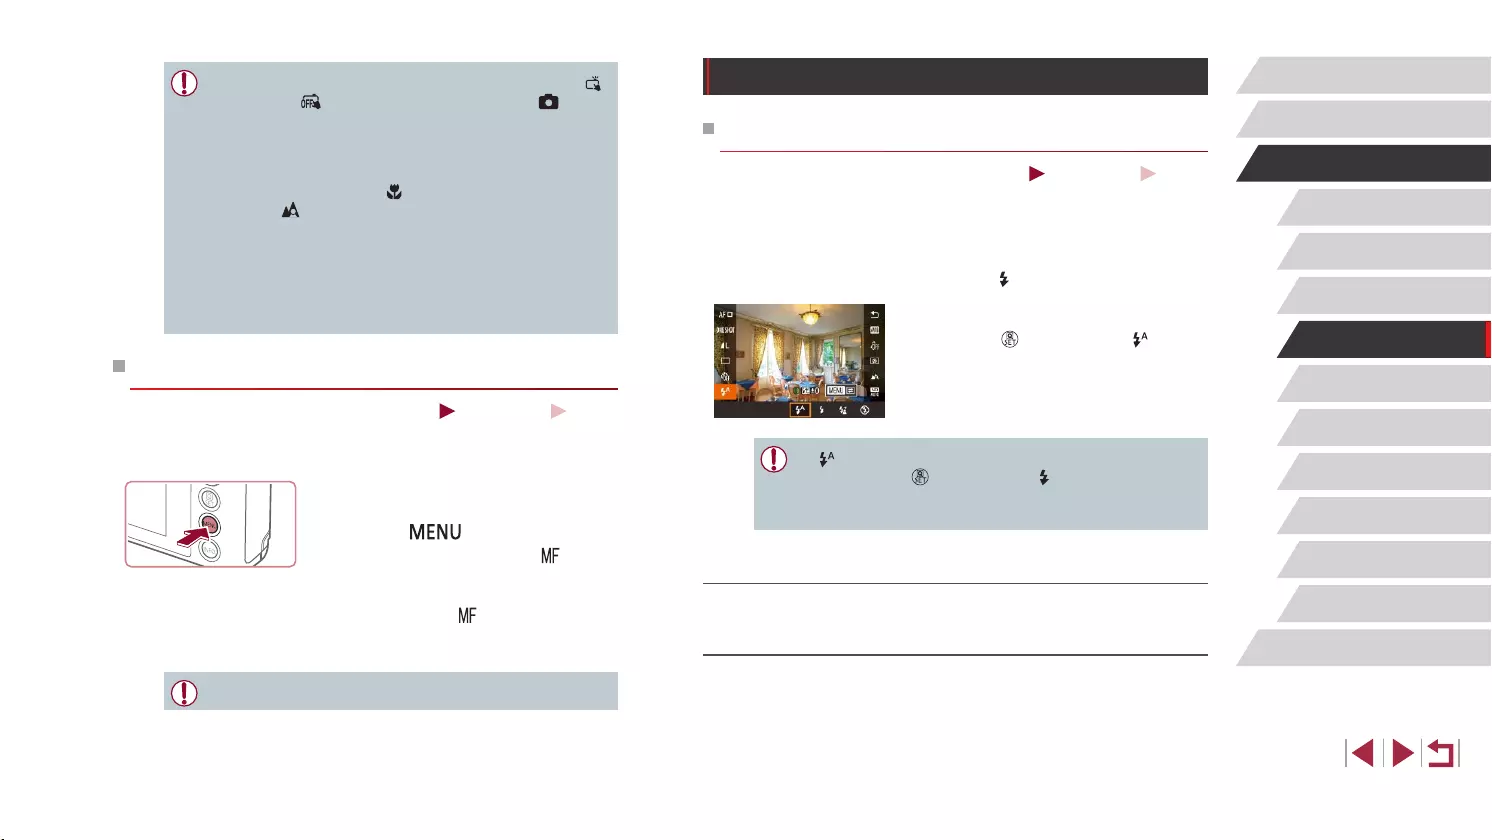
87
Tv, Av, M, and C Mode
Playback Mode
Wi-Fi Functions
Setting Menu
Accessories
Appendix
Before Use
Index
Basic Guide
Advanced Guide
Camera Basics
Auto Mode /
Hybrid Auto Mode
Other Shooting Modes
P Mode
Flash
Changing the Flash Mode
Still Images Movies
You can change the ash mode to match the shooting scene. For details
on the ash range, see “Camera” (=
204).
1 Raise the ash.
zMove the [ ] switch.
2 Congure the setting.
zPress the [ ] button, choose [ ] in the
menu, and choose the desired option.
zThe option you congured is now
displayed.
●[] is not displayed in the menu when the ash is lowered, even
if you press the [ ] button. Move the [ ] switch to raise the ash,
then congure the setting.
●If the ash res, vignetting may occur.
Auto
Fires automatically in low-light conditions.
On
Fires for each shot.
●If the camera shoots when you touch the screen, either touch [ ]
and choose [ ] (=
42) or choose MENU (=
29) ► [ 2]
tab ► [Touch Shutter] ► [Disable].
●Tracking may not be possible when subjects are too small or
move too rapidly, or when there is inadequate contrast between
subjects and the background.
●Even if you are shooting in [ ] mode (=
80), the camera will
revert to [ ] mode if you touch the screen to specify where to
focus.
●If [Face ID] is set to [On], names will not be displayed when
registered people are detected, but the names will be recorded in
the still images (=
43). However, a name will be displayed if
the subject chosen to focus on is the same as a person detected
with Face ID.
Shooting with the AF Lock
Still Images Movies
The focus can be locked. After you lock the focus, the focal position will
not change even when you release your nger from the shutter button.
1 Lock the focus.
zWith the shutter button pressed halfway,
press the [ ] button.
zThe focus is now locked, and [ ] and the
MF indicator are displayed.
zTo unlock the focus, release the shutter
button and touch
[ ]
.
2 Compose the shot and shoot.
●Cannot be used with Touch Shutter (=
42).
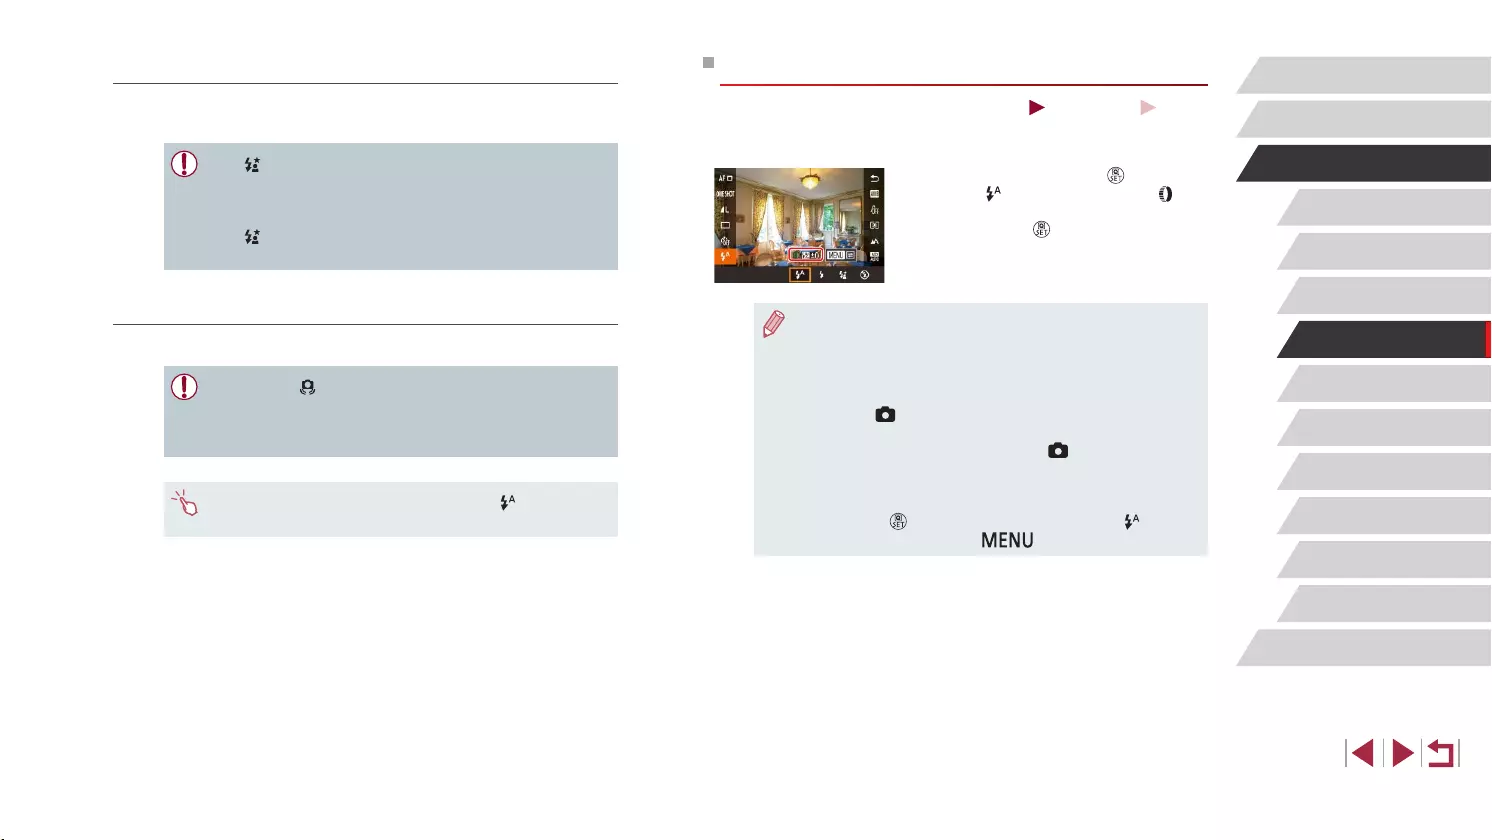
88
Tv, Av, M, and C Mode
Playback Mode
Wi-Fi Functions
Setting Menu
Accessories
Appendix
Before Use
Index
Basic Guide
Advanced Guide
Camera Basics
Auto Mode /
Hybrid Auto Mode
Other Shooting Modes
P Mode
Adjusting the Flash Exposure Compensation
Still Images Movies
Just as with regular exposure compensation (=
74), you can adjust the
ash exposure from –2 to +2 stops, in 1/3-stop increments.
zRaise the ash, press the [ ] button, and
choose [ ] in the menu. Turn the [ ] ring
to choose the compensation level, and
then press the [ ] button.
●When there is a risk of overexposure, the camera automatically
adjusts the shutter speed or aperture value for ash shots to
reduce washed-out highlights and shoot at optimal exposure.
However, you can deactivate automatic adjustment of the shutter
speed and aperture value by accessing MENU (=
29) and
choosing [ 5] tab ► [Flash Settings] ► [Safety FE] ► [Off].
●You can also congure the ash exposure compensation by
accessing MENU (=
29) and choosing [ 5] tab ► [Flash
Settings] ► [Flash Exp. Comp].
●You can also access the [Built-in Flash Settings] screen (=
29)
as follows.
— Press the [ ] button when the ash is up, choose [ ] in the
menu, and then press the [ ] button.
Slow Synchro
Fires to illuminate the main subject (such as people) while shooting at a
slower shutter speed to illuminate backgrounds out of ash range.
●In [ ] mode, mount the camera on a tripod or take other
measures to keep it still and prevent camera shake. Additionally,
you should set [IS Mode] to [Off] when using a tripod or other
means to secure the camera (=
52).
●In [ ] mode, even after the ash res, ensure that the main
subject does not move until the shutter sound is nished playing.
Off
For shooting without the ash.
●If a blinking [ ] icon is displayed when you press the shutter
button halfway in camera-shake inducing, low-light conditions,
mount the camera on a tripod or take other measures to keep it
still.
●You can also congure this setting by touching [ ], touching an
option, and then touching it again.
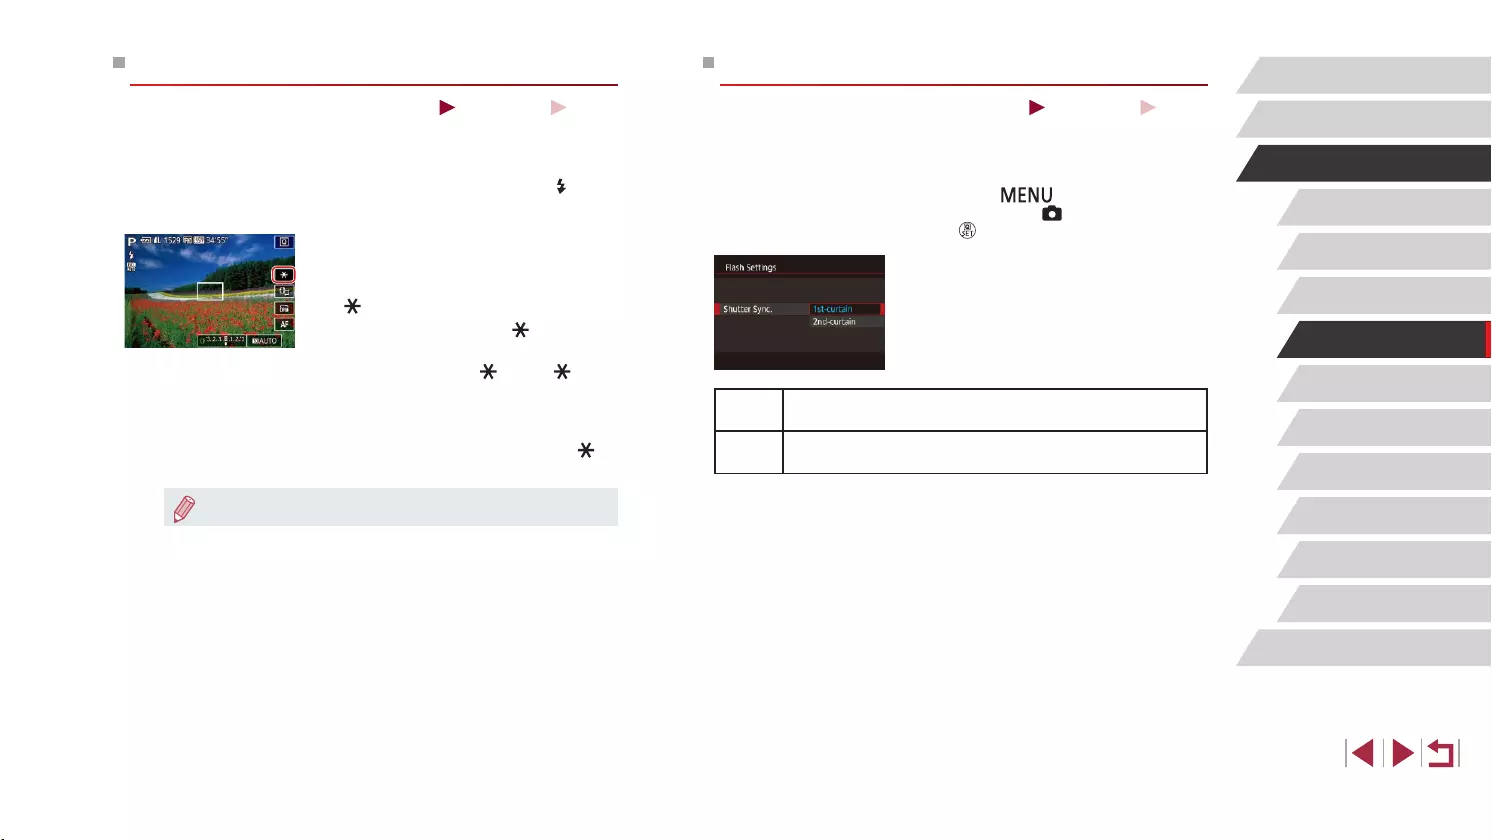
89
Tv, Av, M, and C Mode
Playback Mode
Wi-Fi Functions
Setting Menu
Accessories
Appendix
Before Use
Index
Basic Guide
Advanced Guide
Camera Basics
Auto Mode /
Hybrid Auto Mode
Other Shooting Modes
P Mode
Changing the Flash Timing
Still Images Movies
Change the timing of the ash and shutter release as follows.
1 Access the setting screen.
zPress the [ ] button, choose [Flash
Settings] on the [ 5] tab, and then press
the [ ] button (=
29).
2 Congure the setting.
zChoose [Shutter Sync.], and then choose
the desired option (=
29).
1st-
curtain The ash res immediately after the shutter opens.
2nd-
curtain The ash res immediately before the shutter closes.
Shooting with the FE Lock
Still Images Movies
Just as with the AE lock (=
74), you can lock the exposure for ash
shots.
1 Raise the ash and set it to [ ]
(=
87).
2 Lock the ash exposure.
zAim the camera at the subject to shoot
with the exposure locked, and then touch
[ ].
zThe ash res, and when [ ] is displayed,
the ash output level is retained.
zTo unlock FE, touch [ ] again. [ ] is no
longer displayed.
3 Compose the shot and shoot.
zAfter one shot, FE is unlocked and [ ] is
no longer displayed.
●FE: Flash Exposure

90
Tv, Av, M, and C Mode
Playback Mode
Wi-Fi Functions
Setting Menu
Accessories
Appendix
Before Use
Index
Basic Guide
Advanced Guide
Camera Basics
Auto Mode /
Hybrid Auto Mode
Other Shooting Modes
P Mode
Capturing in RAW Format
The camera can capture images in JPEG and RAW format.
JPEG Images
Processed in the camera for optimal image quality
and compressed to reduce le size. However, the
compression process is irreversible, and images
cannot be restored to their original, unprocessed
state. Image processing may also cause some loss of
image quality.
RAW Images
“Raw” (unprocessed) data, recorded with essentially
no loss of image quality from the camera’s image
processing. The data cannot be used in this state for
viewing on a computer or printing. You must rst use
the software (Digital Photo Professional, =
173)
to convert images to ordinary JPEG or TIFF les.
Images can be adjusted with minimal loss of image
quality.
zPress the [ ] button, and then choose
[] in the menu (=
28).
zTo capture in RAW format only, choose
the [ ] option.
zTo capture images in both JPEG and
RAW format simultaneously, choose the
JPEG image quality, and then press the
[] button. A [ ] mark is displayed
next to [RAW]. To undo this setting, follow
the same steps and remove the [ ] mark
next to [RAW].
●When transferring RAW images (or RAW and JPEG images
recorded together) to a computer, always use the dedicated
software (=
173).
●Digital zoom (=
39) is not available when capturing images
in RAW format. Additionally, noise reduction level (=
76),
dynamic range correction (=
77), shadow correction (=
77),
and My Colors (=
79) cannot be congured.
Other Settings
Changing Image Quality
Still Images Movies
Choose from 8 combinations of size (number of pixels) and compression
(image quality). Also specify whether to capture images in RAW format
(=
90). For guidelines on how many of each kind of image can t on a
memory card, see “Number of Shots per Memory Card” (=
205).
zFollow the steps in “Changing Image
Quality” (=
48) to adjust the settings.
●[] and [ ] indicate different levels of image quality depending
on the extent of compression. At the same size (number of
pixels), [ ] offers higher image quality. Although [ ] images
have slightly lower image quality, more t on a memory card.
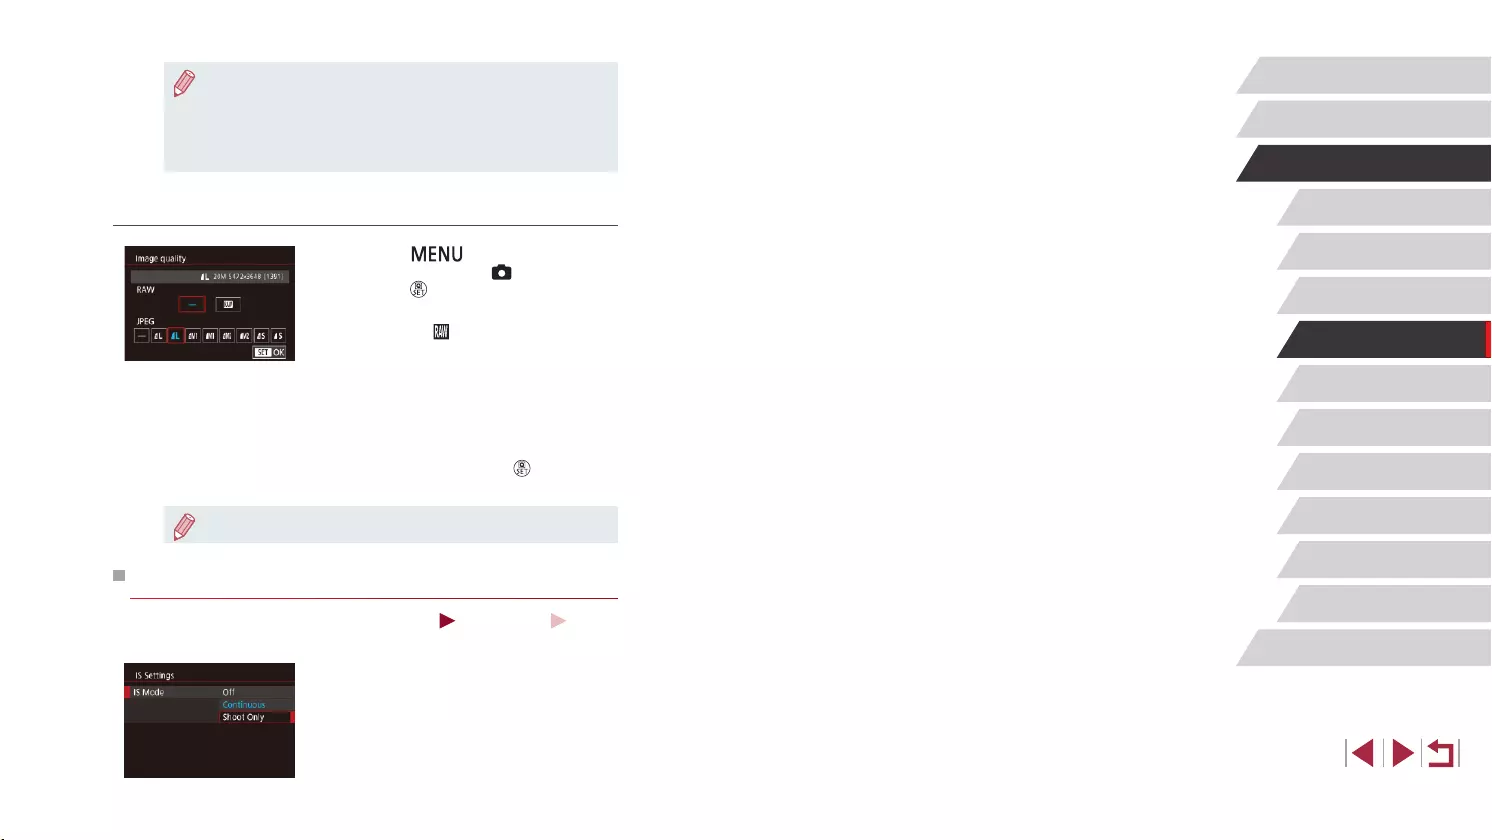
91
Tv, Av, M, and C Mode
Playback Mode
Wi-Fi Functions
Setting Menu
Accessories
Appendix
Before Use
Index
Basic Guide
Advanced Guide
Camera Basics
Auto Mode /
Hybrid Auto Mode
Other Shooting Modes
P Mode
●For details on the relationship between the number of recording
pixels and the number of shots that will t on a card, see “Number
of Shots per Memory Card” (=
205).
●The le extension for JPEG images is .JPG, and the extension for
RAW images is .CR2.
Using the Menu
zPress the [ ] button, choose
[Image quality] on the [ 1] tab, and then
press the [ ] button (=
29).
zTo capture in RAW format at the same
time, choose [ ] under [RAW]. Note that
only JPEG images are captured when [−]
is selected.
zIn [JPEG], choose the number of pixels
and compression ratio. Note that only
RAW images are captured when [−] is
selected.
zWhen nished, press the [ ] button to
return to the menu screen.
●[RAW] and [JPEG] cannot both be set to [−].
Changing the IS Mode Settings
Still Images Movies
You can keep image stabilization off until the moment you shoot.
zFollow the steps in “Deactivating Image
Stabilization” (=
52) to choose [Shoot
Only].
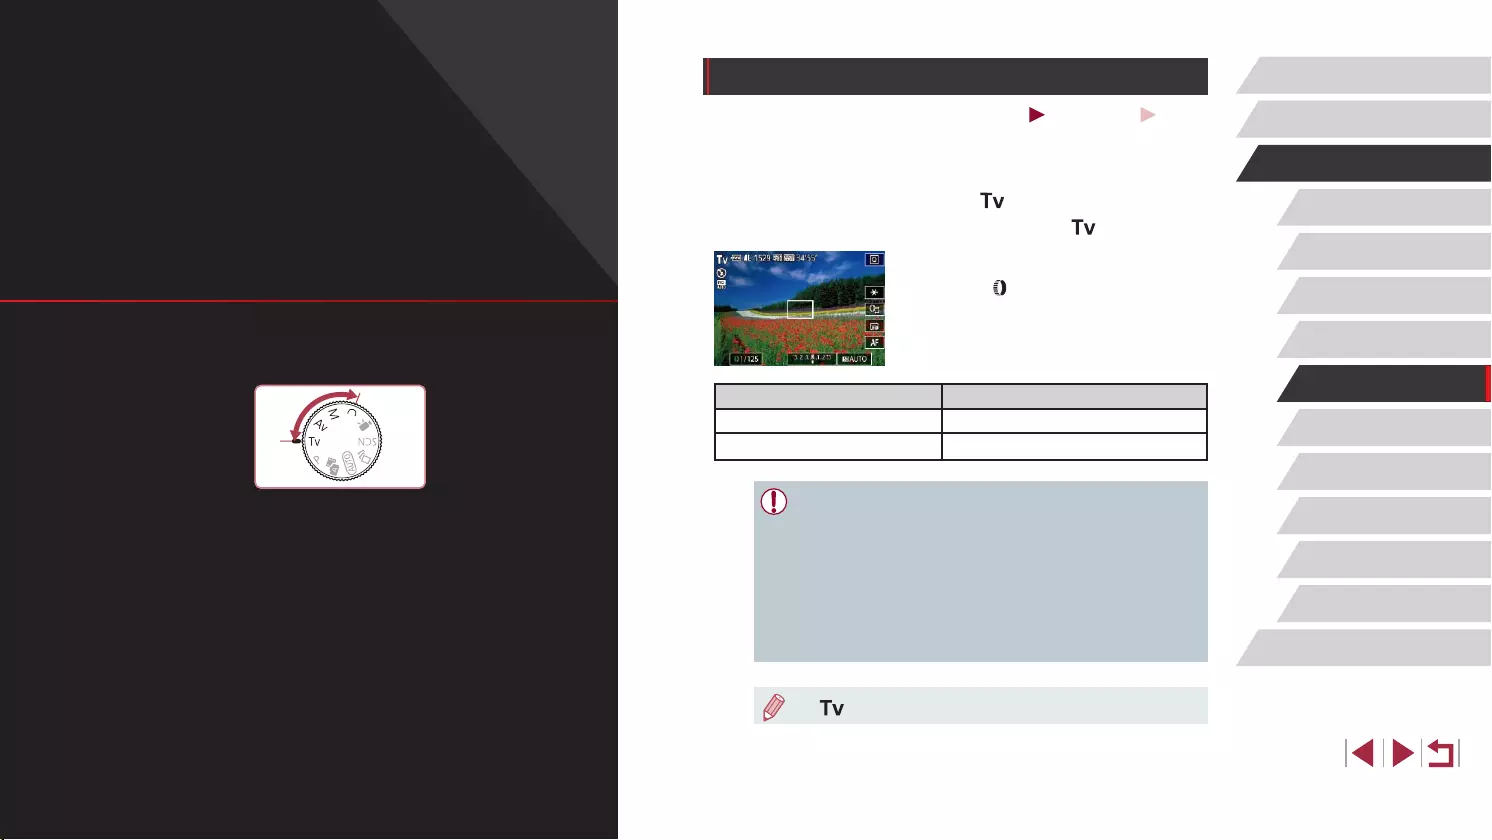
92
Playback Mode
Wi-Fi Functions
Setting Menu
Accessories
Appendix
Before Use
Index
Basic Guide
Advanced Guide
Camera Basics
Auto Mode /
Hybrid Auto Mode
Other Shooting Modes
P Mode
Tv, Av, M, and C Mode
Specic Shutter Speeds ([Tv] Mode)
Still Images Movies
Set your preferred shutter speed before shooting as follows. The camera
automatically adjusts the aperture value to suit your shutter speed.
For details on available shutter speeds, see “Camera” (=
204).
1 Enter [ ] mode.
zSet the mode dial to [ ].
2 Set the shutter speed.
zTurn the [ ] ring to set the shutter speed.
Shutter Speed (Sec.) Available ISO Speed (=
75)
30 – 1.3 [AUTO], [125] – [3200]
1 – 1/2000 [AUTO], [125] – [12800]
●In conditions requiring slower shutter speeds, there may be a
delay before you can shoot again, as the camera processes
images to reduce noise.
●When shooting at low shutter speeds on a tripod, you should set
[IS Mode] to [Off] (=
52).
●Orange display of the aperture value when you press the shutter
button halfway indicates that the optimum exposure has not been
obtained. Adjust the shutter speed until the aperture value is
displayed in white, or use safety shift (=
93).
●[]: Time value
Tv, Av, M, and C Mode
Take smarter, more sophisticated shots, and
customize the camera for your shooting style
●Instructions in this chapter apply to the camera as set to the
respective mode.
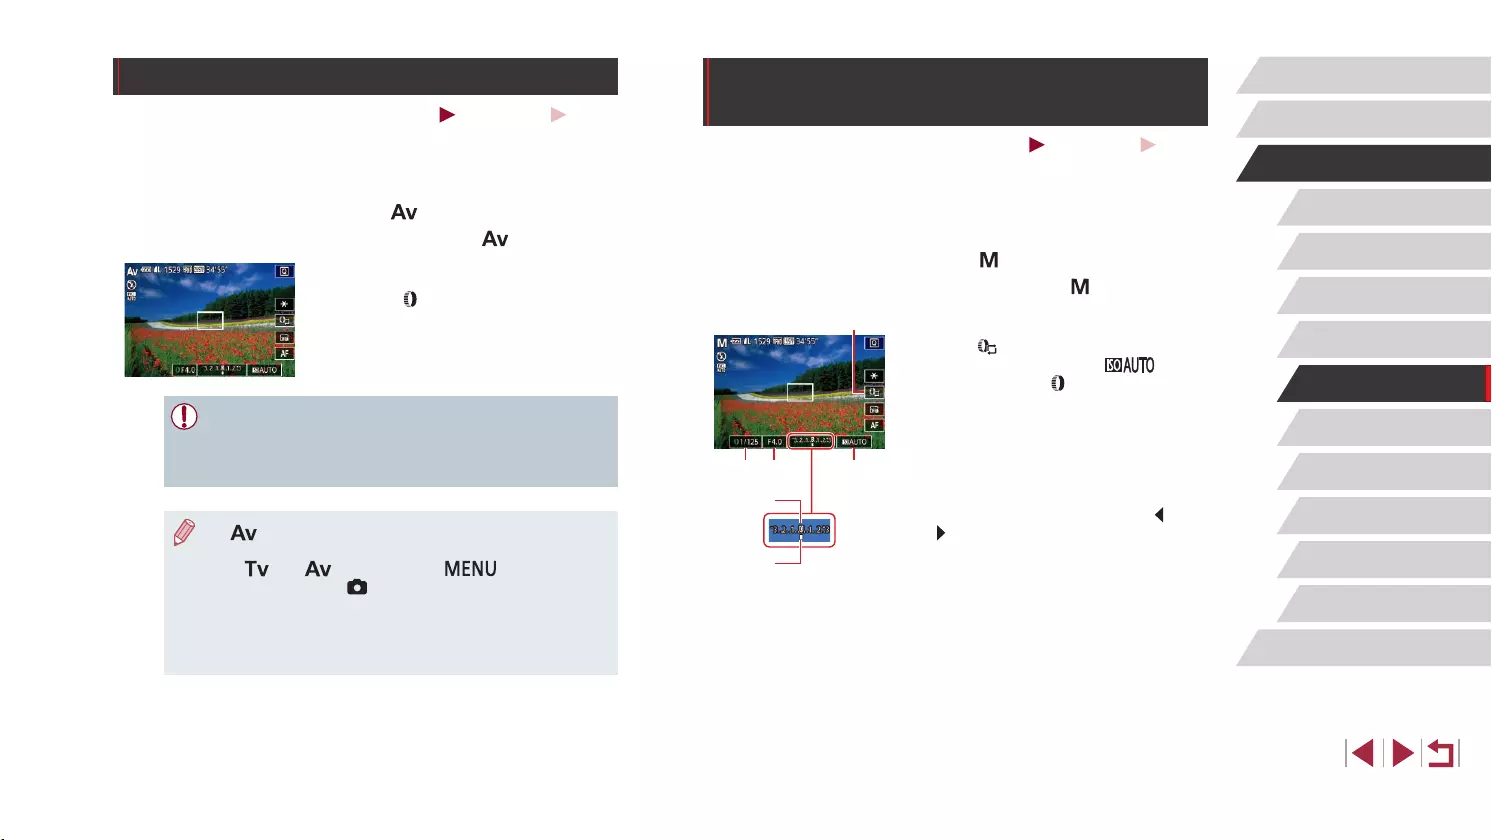
93
Playback Mode
Wi-Fi Functions
Setting Menu
Accessories
Appendix
Before Use
Index
Basic Guide
Advanced Guide
Camera Basics
Auto Mode /
Hybrid Auto Mode
Other Shooting Modes
P Mode
Tv, Av, M, and C Mode
Specic Shutter Speeds and Aperture
Values ([M] Mode)
Still Images Movies
Follow these steps before shooting to set your preferred shutter speed
and aperture value to obtain the desired exposure.
For details on available shutter speeds and aperture values, see “Camera”
(=
204).
1 Enter [ ] mode.
zSet the mode dial to [ ].
2 Congure the setting.
zTouch [ ] (1), choose the shutter speed
(2), aperture value (3), or [ ] (4),
and then turn the [ ] ring to specify a
value.
zWhen the ISO speed is xed, an
exposure level mark (6) based on
your specied values is shown on the
exposure level indicator for comparison
to the standard exposure level (5). The
exposure level mark is shown as [ ] or
[] when the difference from standard
exposure exceeds 3 stops.
zThe ISO speed is determined and screen
brightness changes when you press
the shutter button halfway after setting
the ISO speed to [AUTO]. If standard
exposure cannot be obtained with your
specied shutter speed and aperture
value, the ISO speed is displayed in
orange.
(2) (3)
(5)
(
)
(4)
Specic Aperture Values ([Av] Mode)
Still Images Movies
Set your preferred aperture value before shooting as follows. The camera
automatically adjusts the shutter speed to suit your aperture value.
For details on available aperture values, see “Camera” (=
204).
1 Enter [ ] mode.
zSet the mode dial to [ ].
2 Set the aperture value.
zTurn the [ ] ring to set the aperture
value.
●Orange display of the shutter speed when you press the shutter
button halfway indicates that the optimum exposure has not been
obtained. Adjust the aperture value until the shutter speed is
displayed in white, or use safety shift (see below).
●[]: Aperture value (size of the opening made by the
diaphragm in the lens)
●In [ ] and [ ] modes, press the [ ] button and set
[Safety Shift] on the [ 6] tab to [On] (=
29) to have the
camera automatically adjust the shutter speed and aperture value
when there are exposure problems, so that you can shoot at the
optimum exposure.
However, safety shift is disabled when the ash res.
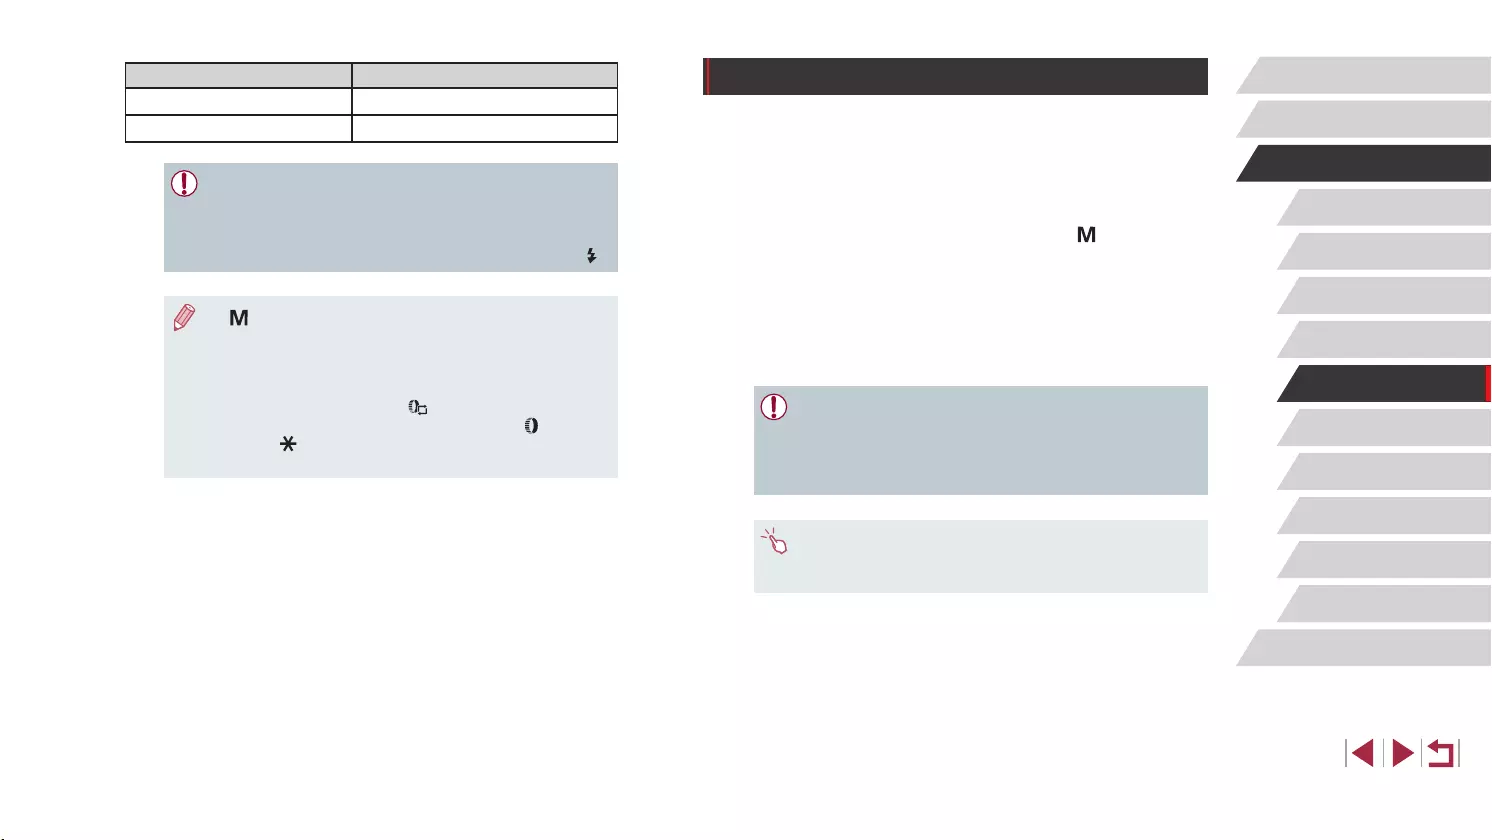
94
Playback Mode
Wi-Fi Functions
Setting Menu
Accessories
Appendix
Before Use
Index
Basic Guide
Advanced Guide
Camera Basics
Auto Mode /
Hybrid Auto Mode
Other Shooting Modes
P Mode
Tv, Av, M, and C Mode
Shooting Long Exposures (Bulb)
With bulb exposures, shots are exposed for as long as you hold down the
shutter button.
1 Specify bulb exposure.
zSet the shutter speed to [BULB], following
steps 1 – 3 in “Specic Shutter Speeds
and Aperture Values ([ ] Mode)”
(=
93).
2 Shoot.
zShots are exposed for as long as you
hold the shutter button all the way down.
The elapsed exposure time is displayed
during exposure.
●Maximum continuous shooting time with this feature is 4 min.
16 sec.
●Mount the camera on a tripod or take other measures to keep it
still and prevent camera shake. In this case, also disable image
stabilization (=
52).
●When [Touch Shutter] is set to [On], shooting is started by
touching the screen once and stopped by touching it again. Be
careful not to move the camera when touching the screen.
Shutter Speed (Sec.) Available ISO Speed (=
75)
[BULB], 30 – 1.3 [AUTO], [125] – [3200]
1 – 1/2000 [AUTO], [125] – [12800]
●After you set the shutter speed and aperture value, the exposure
level may change if you adjust the zoom or recompose the shot.
●Screen brightness may change depending on your specied
shutter speed and aperture value. However, screen brightness
remains the same when the ash is up and the mode is set to [ ].
●[]: Manual
●Calculation of optimum exposure is based on the specied
metering method (=
74).
●The following operations are available when ISO speed is set to
[AUTO].
— Adjust exposure by touching [ ] a few times to choose the
exposure compensation bar and then turning the [ ] ring.
— Touch [ ] to lock the ISO speed. Screen brightness changes
accordingly.
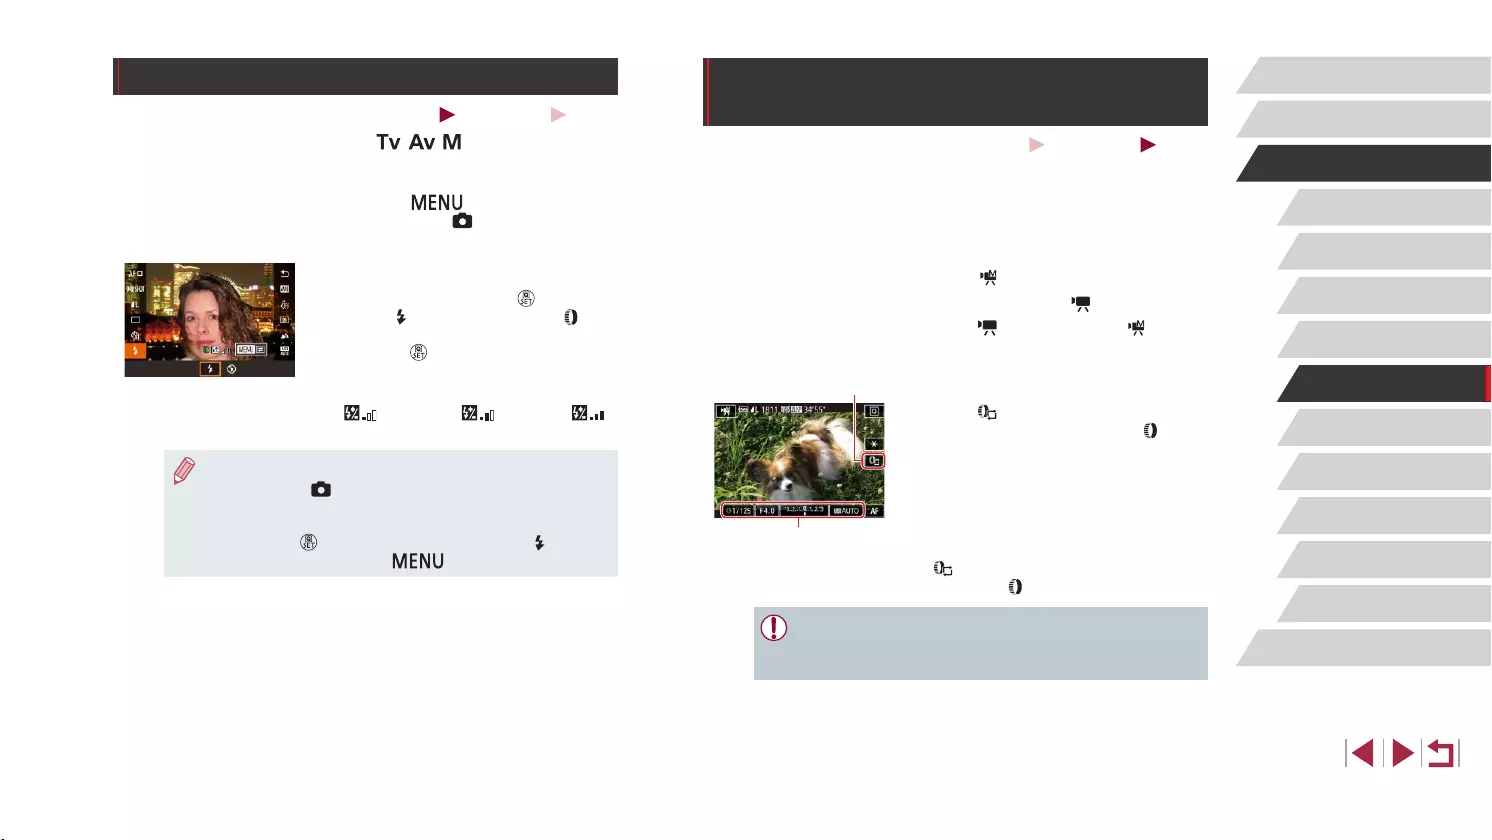
95
Playback Mode
Wi-Fi Functions
Setting Menu
Accessories
Appendix
Before Use
Index
Basic Guide
Advanced Guide
Camera Basics
Auto Mode /
Hybrid Auto Mode
Other Shooting Modes
P Mode
Tv, Av, M, and C Mode
Recording Movies at Specic Shutter
Speeds and Aperture Values
Still Images Movies
Set your preferred shutter speed, aperture value, exposure, and ISO
speed.
For details on available shutter speeds and aperture values, see “Camera”
(=
204), and for available ISO speeds, see “Changing the ISO Speed”
(=
75).
1 Enter [ ] mode.
zSet the mode dial to [ ].
zTouch [ ], and then choose [ ].
zTo conrm your choice, touch [OK].
2 Congure the settings.
zTouch [ ] (1), choose an item to
congure (2), and then turn the [ ] ring to
specify a value.
3 Shoot.
zPress the movie button.
zDuring recording, you can switch
the setting to congure by touching
[] repeatedly and adjust the value by
turning the [ ] ring.
●Some shutter speeds may cause ickering on the screen when
recording under uorescent or LED lighting, which may be
recorded.
(
)
Adjusting the Flash Output
Still Images Movies
Choose from the three ash levels in [ ][ ][ ] modes.
1 Specify the ash mode.
zPress the [ ] button, choose [Flash
Settings] on the [ 5] tab, and then set
[Flash Mode] to [Manual].
2 Congure the setting.
zRaise the ash, press the [ ] button, and
choose [ ] in the menu. Turn the [ ] ring
to choose the ash output level, and then
press the [ ] button.
zOnce the setting is complete, the ash
output level is displayed.
[]: Minimum, [ ]: Medium, [ ]:
Maximum
●You can also set the ash level by accessing MENU (=
29)
and choosing [ 5] tab ► [Flash Settings] ► [Flash Output].
●You can also access the [Flash Settings] screen (=
29) as
follows.
— Press the [ ] button when the ash is up, choose [ ] in the
menu, and then press the [ ] button.
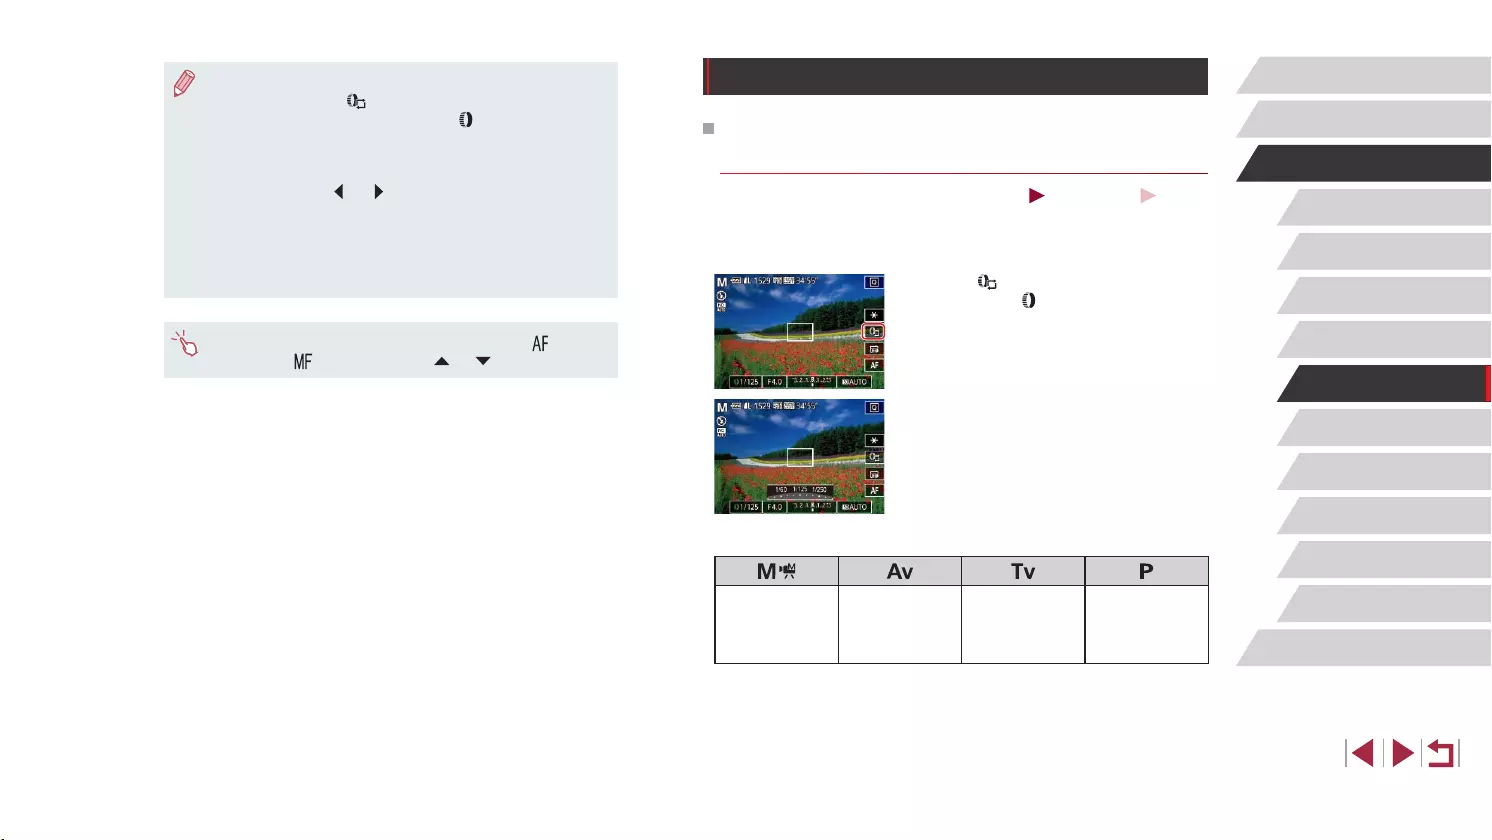
96
Playback Mode
Wi-Fi Functions
Setting Menu
Accessories
Appendix
Before Use
Index
Basic Guide
Advanced Guide
Camera Basics
Auto Mode /
Hybrid Auto Mode
Other Shooting Modes
P Mode
Tv, Av, M, and C Mode
Customizing Controls and Display
Adjusting Settings while Switching Control
Ring Functions
Still Images Movies
You can touch the screen to switch the function (ISO speed, exposure
compensation, shutter speed, and aperture value) congured with the
control ring, and quickly adjust the setting by turning the ring.
zTouch [ ] to switch to another item, and
then turn the [ ] ring to set a value.
Available setting items vary by shooting mode.
Tv
Av
+/–
ISO
Av
+/–
ISO
Tv
+/–
ISO
+/–
ISO
●+/–: exposure compensation (=
74); ISO: ISO speed (=
75); Tv:
shutter speed (=
92); Av: aperture value (=
93).
●You can also adjust the exposure when ISO speed is set to
[AUTO] by touching [ ] a few times, choosing the exposure
compensation bar, and then turning the [ ] ring.
●When the ISO speed is xed, an exposure level mark based on
your specied value is shown on the exposure level indicator for
comparison to the standard exposure level. The exposure level
mark is shown as [ ] or [ ] when the difference from standard
exposure exceeds 3 stops.
●You can check the ISO speed in [AUTO] mode by pressing the
shutter button halfway. If standard exposure cannot be obtained
with your specied shutter speed and aperture value, the ISO
speed is displayed in orange.
●Focus can be adjusted during recording by touching [ ] (to
switch it to [ ]) and then touching [ ] or [ ].
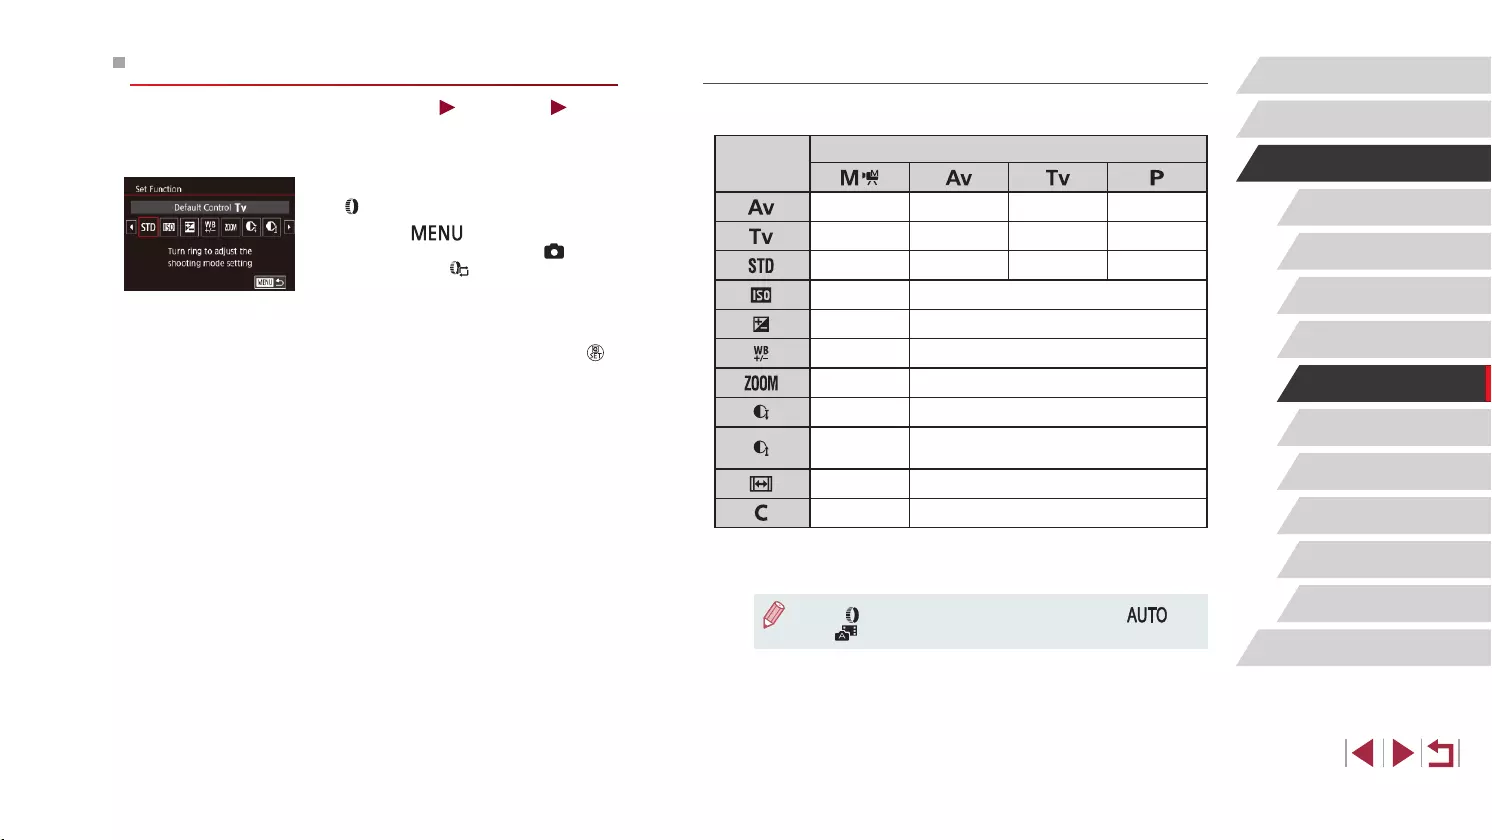
97
Playback Mode
Wi-Fi Functions
Setting Menu
Accessories
Appendix
Before Use
Index
Basic Guide
Advanced Guide
Camera Basics
Auto Mode /
Hybrid Auto Mode
Other Shooting Modes
P Mode
Tv, Av, M, and C Mode
Functions Assignable to the Control Ring
Functions you can assign to the control ring vary depending on shooting
mode.
Item
Shooting Mode
Av –––
Tv – – –
–Av Tv +/–
–Adjust the ISO speed (=
75)
–Correct the exposure (=
74)
–Correct white balance (=
78)
–Perform step zooming (=
40)
–Congure dynamic range (=
77)
–Enable or disable shadow correction
(=
77)
–Adjust the aspect ratio (=
47)
–Assign functions as desired (=
98)
●+/–: exposure compensation (=
74); Tv: shutter speed (=
92);
Av: aperture value (=
93).
●The [ ] ring can be used for step zooming (=
40) in [ ]
or [ ] mode.
Changing Control Ring Settings
Still Images Movies
Reassign control ring functions as follows. Using the control ring is an
enjoyable way to control the camera as you would a fully manual camera.
1 Choose a function to assign to the
[ ] ring.
zPress the [ ] button and choose
[Control Ring Settings] on the [ 2] tab.
Set [Switch with ] to [Disable].
zChoose [Set Function].
2 Congure the assigned function.
zTouch an option, and then press the [ ]
button.
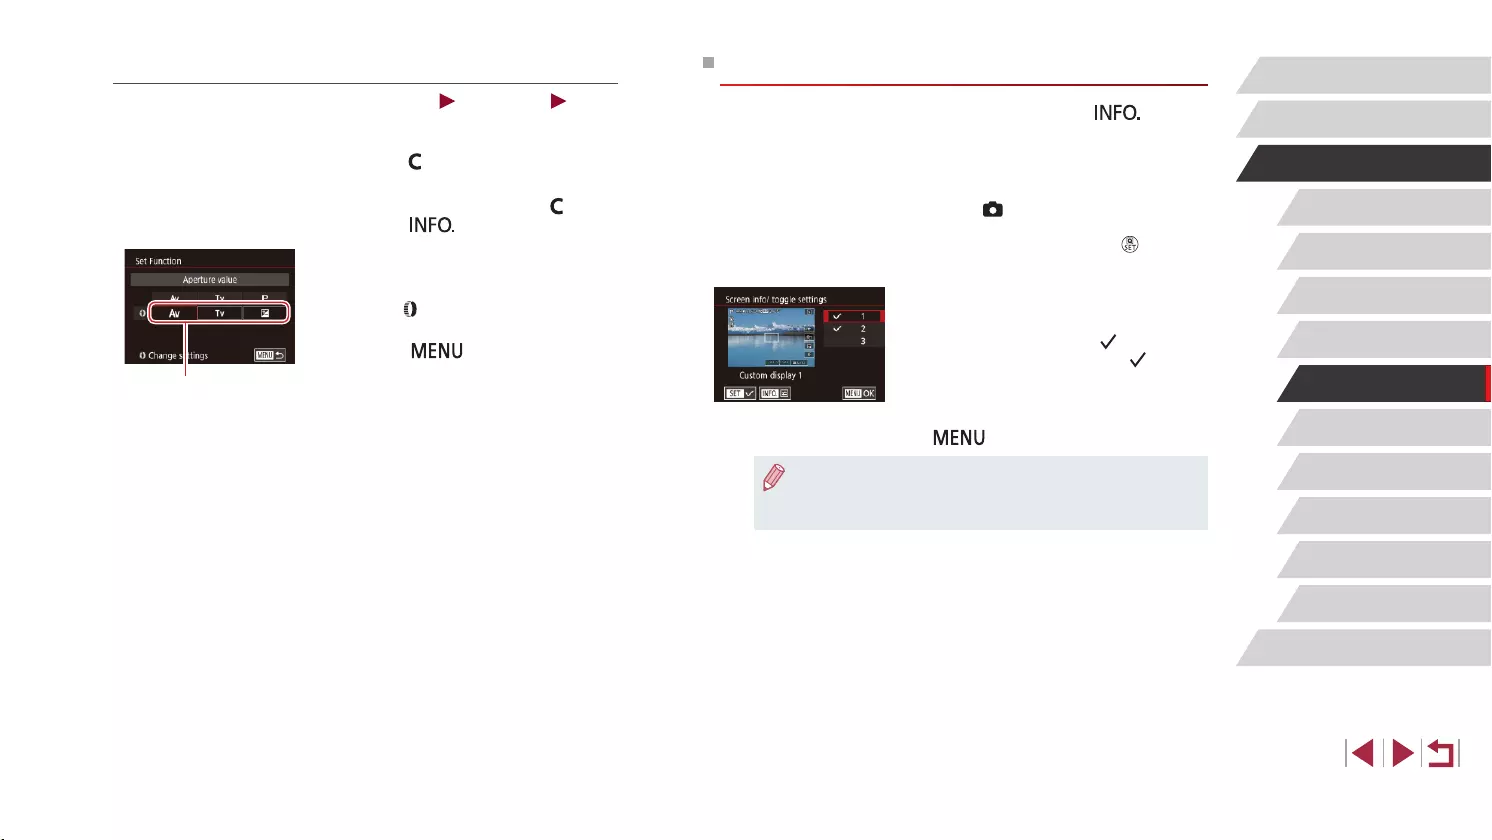
98
Playback Mode
Wi-Fi Functions
Setting Menu
Accessories
Appendix
Before Use
Index
Basic Guide
Advanced Guide
Camera Basics
Auto Mode /
Hybrid Auto Mode
Other Shooting Modes
P Mode
Tv, Av, M, and C Mode
Customizing Display Information
Customize what screen is displayed when you press the [ ] button
on the shooting screen. You can also customize what information is
displayed.
1 Access the setting screen.
zOn the [ 1] tab, choose [Screen info/
toggle settings] in [Shooting information
display], and then press the [ ] button
(=
29).
2 Congure the setting.
zTouch any screen that you prefer not
to display, to remove the [ ] mark.
Touching it again will add the [ ] mark,
which indicates that it is included in
display.
zTo return to the menu screen, press the
[] button.
●An example of display with the options selected in step 2 is shown
at left for reference.
●At least one option must be selected.
Assigning Functions to the Control Ring
Still Images Movies
Assign functions to the control ring based on each shooting mode.
1 Choose [ ].
zFollowing step 1 in “Changing Control
Ring Settings” (=
97), choose [ ] and
press the [ ] button.
2 Congure the setting.
zTouch a shooting mode to choose it.
zTurn the [ ] ring to choose a function to
assign to the control ring (1).
zPress the [ ] button to return to the
shooting screen.
(
)
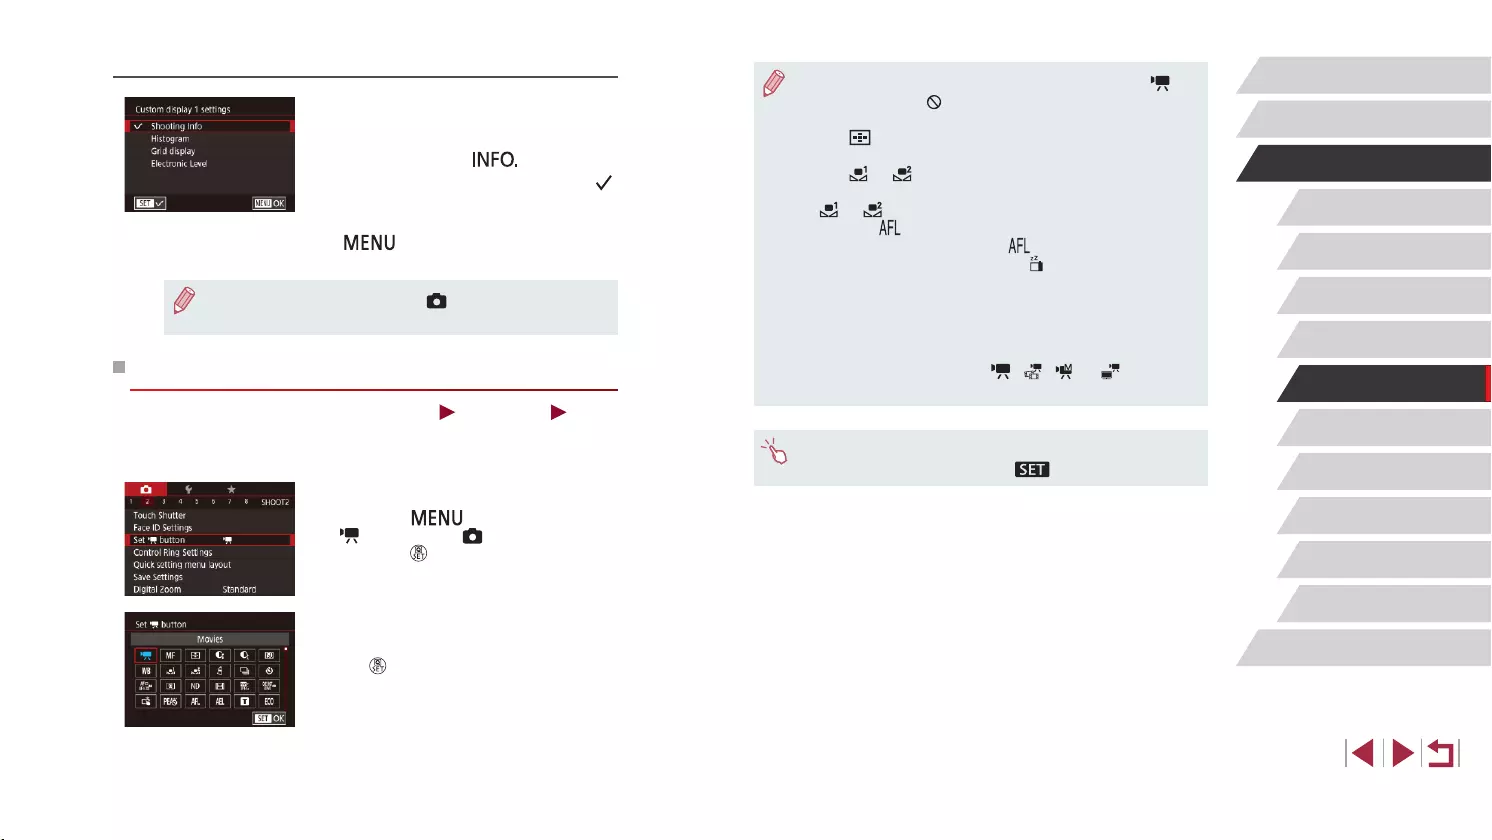
99
Playback Mode
Wi-Fi Functions
Setting Menu
Accessories
Appendix
Before Use
Index
Basic Guide
Advanced Guide
Camera Basics
Auto Mode /
Hybrid Auto Mode
Other Shooting Modes
P Mode
Tv, Av, M, and C Mode
Customizing the Information Displayed
zFollow steps 1 – 2 in “Customizing
Display Information” (=
98) to choose
[Custom display 1] or [Custom display 2],
and then press the [ ] button.
zTouch information to display, to add a [ ]
mark.
zTo see an example of display, press the
[] button to return to the [Screen
info/ toggle settings] screen.
●For a smaller grid pattern, access [ 1] tab ► [Shooting
information display] ► [Grid display].
Assigning Functions to the Movie Button
Still Images Movies
You can quickly and easily activate functions that you assign to the movie
button.
1 Access the setting screen.
zPress the [ ] button, choose [Set
button] on the [ 2] tab, and then
press the [ ] button (=
29).
2 Congure the setting.
zTouch an option to assign, and then press
the [ ] button.
●To restore the default setting to the movie button, choose [ ].
●Icons labeled with [ ] indicate that the function is not available in
the current shooting mode or under current function conditions.
●With [ ], you can move and resize the AF frame by pressing the
movie button in [1-point AF] mode (=
83, =
84).
●With [ ] or [ ], each press of the movie button records white
balance data (=
78), and the white balance setting changes to
[] or [ ].
●When the [ ] function is used, each press of the movie button
adjusts and locks the focus, and [ ] is displayed on the screen.
●Pressing the movie button when the [ ] function is used
deactivates screen display. To restore the display, do any of the
following.
— Press any button other than the power button
— Hold the camera in another orientation
— Raise or lower the ash
●You can still record movies in [ ], [ ], [ ], or [ ] mode even
if you assign a function to the movie button.
●You can also congure settings by touching a desired option and
then touching it again or touching [ ].
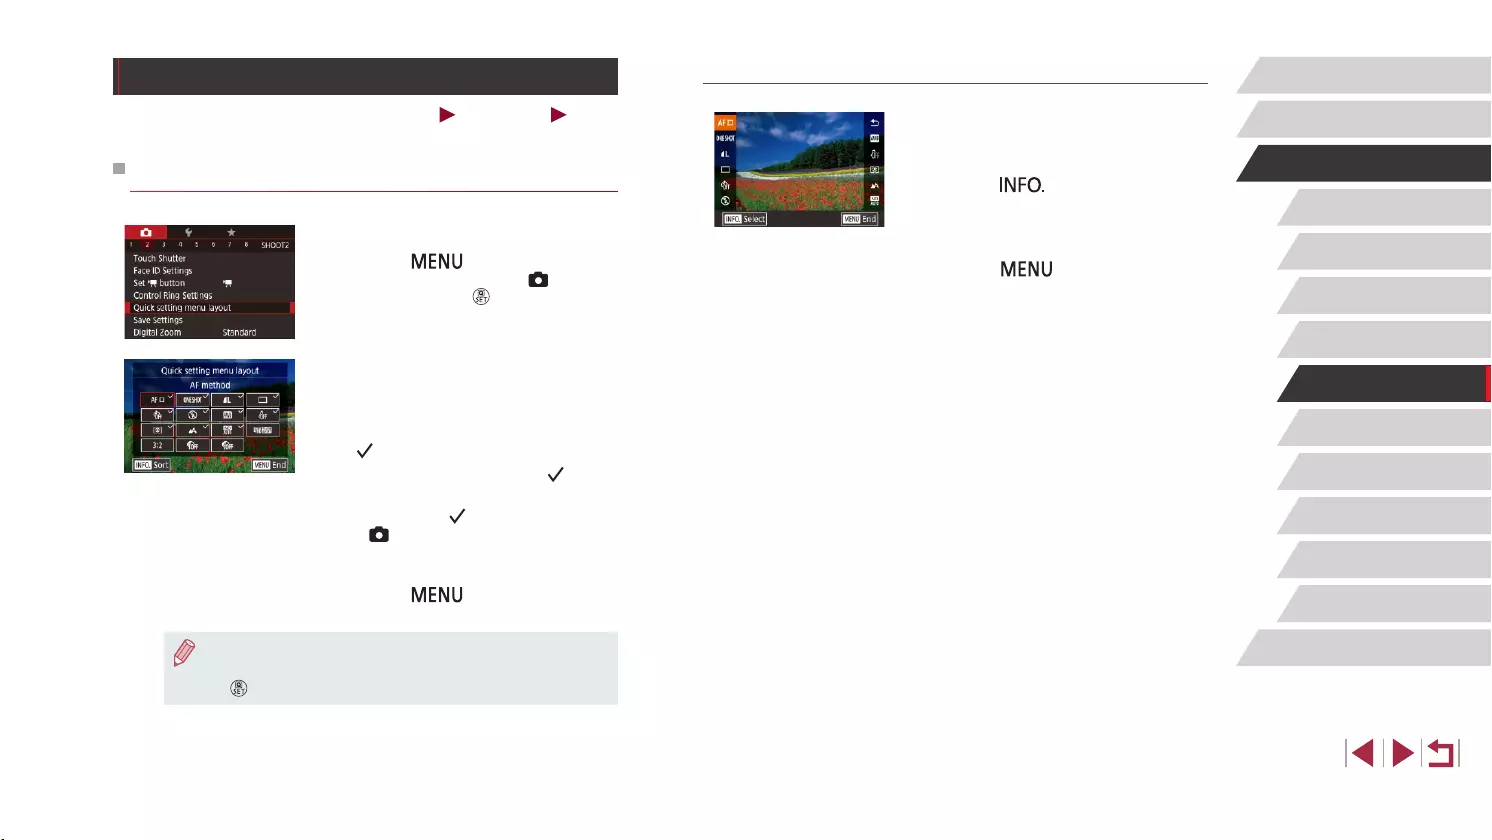
100
Playback Mode
Wi-Fi Functions
Setting Menu
Accessories
Appendix
Before Use
Index
Basic Guide
Advanced Guide
Camera Basics
Auto Mode /
Hybrid Auto Mode
Other Shooting Modes
P Mode
Tv, Av, M, and C Mode
Customizing the Quick Set Menu
Still Images Movies
The display of Quick Set menu items can be customized.
Choosing Items to Include in the Menu
1 Access the setting screen.
zPress the [ ] button, choose [Quick
setting menu layout] on the [ 2] tab,
and then press the [ ] button (=
29).
2 Choose icons to include in the
menu.
zTouch icons to include in the Quick Set
menu. Selected icons are marked with
a [ ].
zSelected items (labeled with a [ ]) will
be included in display.
zItems without a [ ] can be congured on
the [ ] tab of the menu screen.
3 Complete the setting.
zPress the [ ] button, and then
touch [OK].
●Up to 11 items can be displayed in the menu.
●The screen in step 2 can also be accessed by holding down the
[] button when the Quick Set menu is displayed.
Rearranging Menu Items
1 Access the setting screen.
zOn the screen in step 2 of “Choosing
Items to Include in the Menu” (=
100),
press the [ ] button.
zDrag an icon to move it to a new position.
2 Complete the setting.
zPress the [ ] button, and then
touch [OK].
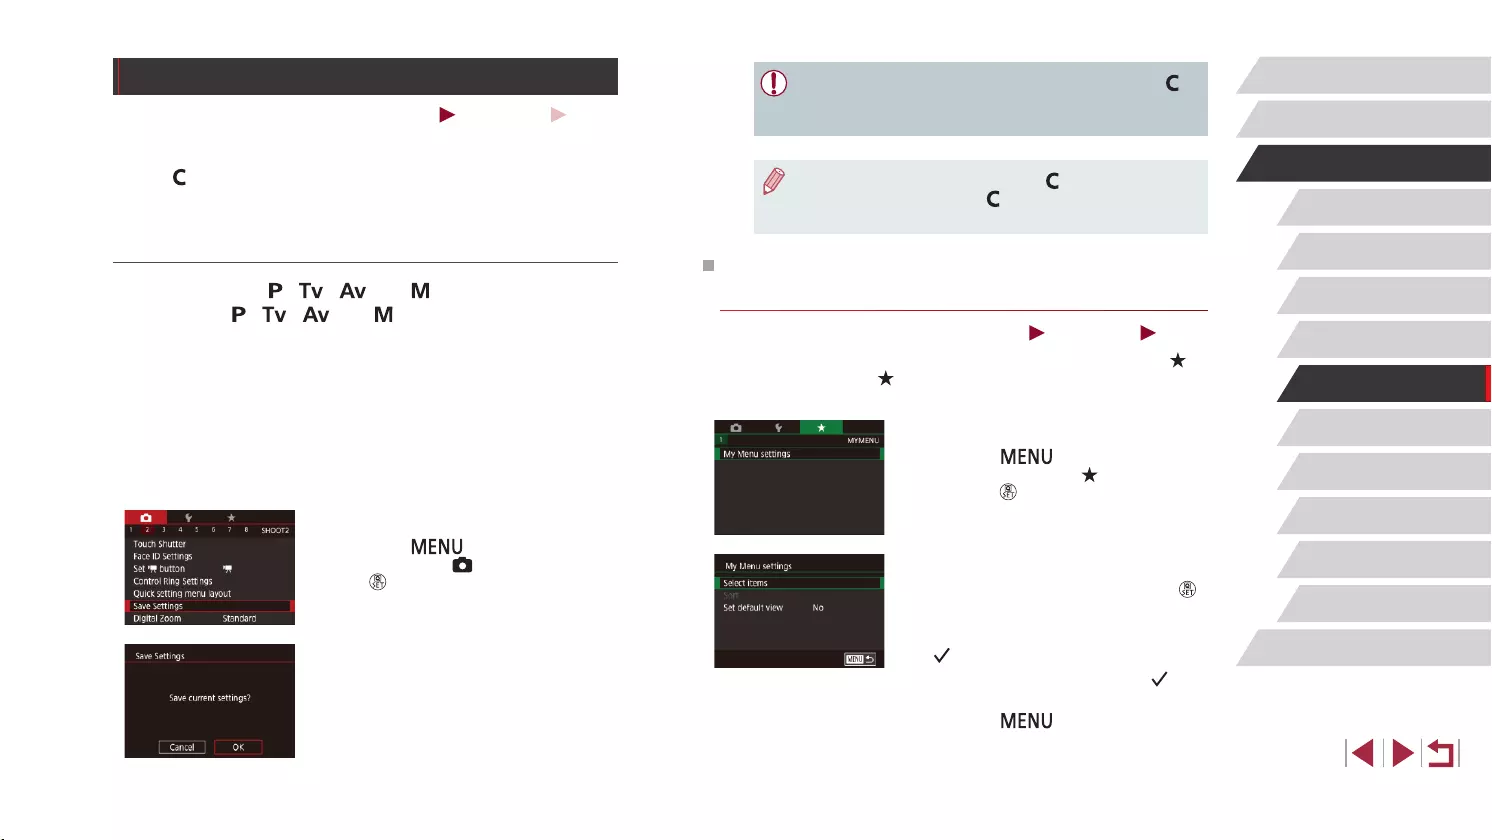
101
Playback Mode
Wi-Fi Functions
Setting Menu
Accessories
Appendix
Before Use
Index
Basic Guide
Advanced Guide
Camera Basics
Auto Mode /
Hybrid Auto Mode
Other Shooting Modes
P Mode
Tv, Av, M, and C Mode
●To edit saved settings (except their shooting mode), choose [ ],
change the settings, and then repeat steps 2 – 3. These setting
details are not applied in other shooting modes.
●To clear information you have saved to [ ] and restore default
values, turn the mode dial to [ ] and choose [Reset All]
(=
166).
Saving Commonly Used Shooting Menu Items
(My Menu)
Still Images Movies
You can save up to six commonly used shooting menu items on the [ 1]
tab. By customizing the [ 1] tab, you can access these items quickly
from a single screen.
1 Access the setting screen.
zPress the [ ] button, choose [My
Menu settings] on the [ 1] tab, and then
press the [ ] button (=
29).
2 Congure the setting.
zChoose [Select items] and press the [ ]
button.
zTouch up to six menu items to save.
z[] is displayed.
zTo cancel saving, touch an item. [ ] is no
longer displayed.
zPress the [ ] button.
Saving Shooting Settings
Still Images Movies
Save commonly used shooting modes and your congured function
settings for reuse. To access saved settings later, simply turn the mode
dial to [ ]. Even settings that are usually cleared when you switch
shooting modes or turn the camera off (such as self-timer settings) can be
retained this way.
Settings That Can Be Saved
●Shooting modes ([ ], [ ], [ ], and [ ])
●Items set in [ ], [ ], [ ], and [ ] modes (=
74 – =
93)
●Shooting menu settings
●Zoom positions
●Manual focus positions (=
81)
●My Menu settings (=
101)
1 Enter a shooting mode with settings
you want to save, and change the
settings as desired.
2 Congure the setting.
zPress the [ ] button, choose [Save
Settings] on the [ 2] tab, and then press
the [ ] button.
3 Save the settings.
zTouch [OK].

102
Playback Mode
Wi-Fi Functions
Setting Menu
Accessories
Appendix
Before Use
Index
Basic Guide
Advanced Guide
Camera Basics
Auto Mode /
Hybrid Auto Mode
Other Shooting Modes
P Mode
Tv, Av, M, and C Mode
3 Rearrange menu items, as needed.
zChoose [Sort] and press the [ ] button.
zDrag items to change the display order.
zPress the [ ] button.
●Grayed-out items in step 2 can also be specied, but they may
not be available in some shooting modes.
●To make My Menu immediately accessible by pressing the
[] button in Shooting mode, set [Set default view] to [Yes].

103
Wi-Fi Functions
Setting Menu
Accessories
Appendix
Before Use
Index
Basic Guide
Advanced Guide
Camera Basics
Auto Mode /
Hybrid Auto Mode
Other Shooting Modes
P Mode
Tv, Av, M, and C Mode
Playback Mode
Viewing
Still Images Movies
After shooting images or movies, you can view them on the screen as
follows.
1 Enter Playback mode.
zPress the [ ] button.
zYour last shot is displayed.
2 Choose images.
zTo view the next image, drag right to
left across the screen, and to view the
previous image, drag left to right.
zYou can also view the next image by
touching the right edge of the screen (1).
In this case, [ ] is displayed. Similarly,
you can view the previous image by
touching the left edge of the screen (2),
and in this case, [ ] is displayed.
zTo access this screen (Scroll Display
mode), quickly drag left or right
repeatedly.
zIn this mode, drag left or right to browse
through images.
zTouching the central image will restore
single-image display.
zTo browse images grouped by shooting
date in Scroll Display mode, quickly drag
up or down.
Playback Mode
Have fun reviewing your shots, and browse or edit
them in many ways
●To prepare the camera for these operations, press the [ ]
button to enter Playback mode.
●It may not be possible to play back or edit images that were
renamed or already edited on a computer, or images from other
cameras.

104
Wi-Fi Functions
Setting Menu
Accessories
Appendix
Before Use
Index
Basic Guide
Advanced Guide
Camera Basics
Auto Mode /
Hybrid Auto Mode
Other Shooting Modes
P Mode
Tv, Av, M, and C Mode
Playback Mode
●To switch to Shooting mode from Playback mode, press the
shutter button halfway.
●To deactivate Scroll Display, choose MENU (=
29) ► [ 5]
tab ► [Scroll Display] ► [Off].
●To have the most recent shot displayed when you enter Playback
mode, choose MENU (=
29) ► [ 5] tab ► [Resume] ►
[Last shot].
●To change the transition shown between images, access MENU
(=
29) and choose your desired effect on the [ 5] tab ►
[Transition Effect].
●Touching the volume indicator displays the volume panel. You can
adjust the volume by touching [ ][ ].
zMovies are identied by a [ ] icon. To
play movies, go to step 3.
3 Play movies.
zTo start playback, press the [ ] button,
choose [ ], and then press the [ ]
button again.
4 Adjust the volume.
zQuickly drag up or down to adjust the
volume.
zTo adjust the volume when the volume
indicator (1) is no longer displayed,
quickly drag up or down across the
screen.
5 Pause playback.
zTo pause or resume playback, press the
[] button.
zTo pause playback, touch the screen.
The movie control panel is displayed. To
resume playback, touch [ ].
zAfter the movie is nished, [ ] is
displayed.
(
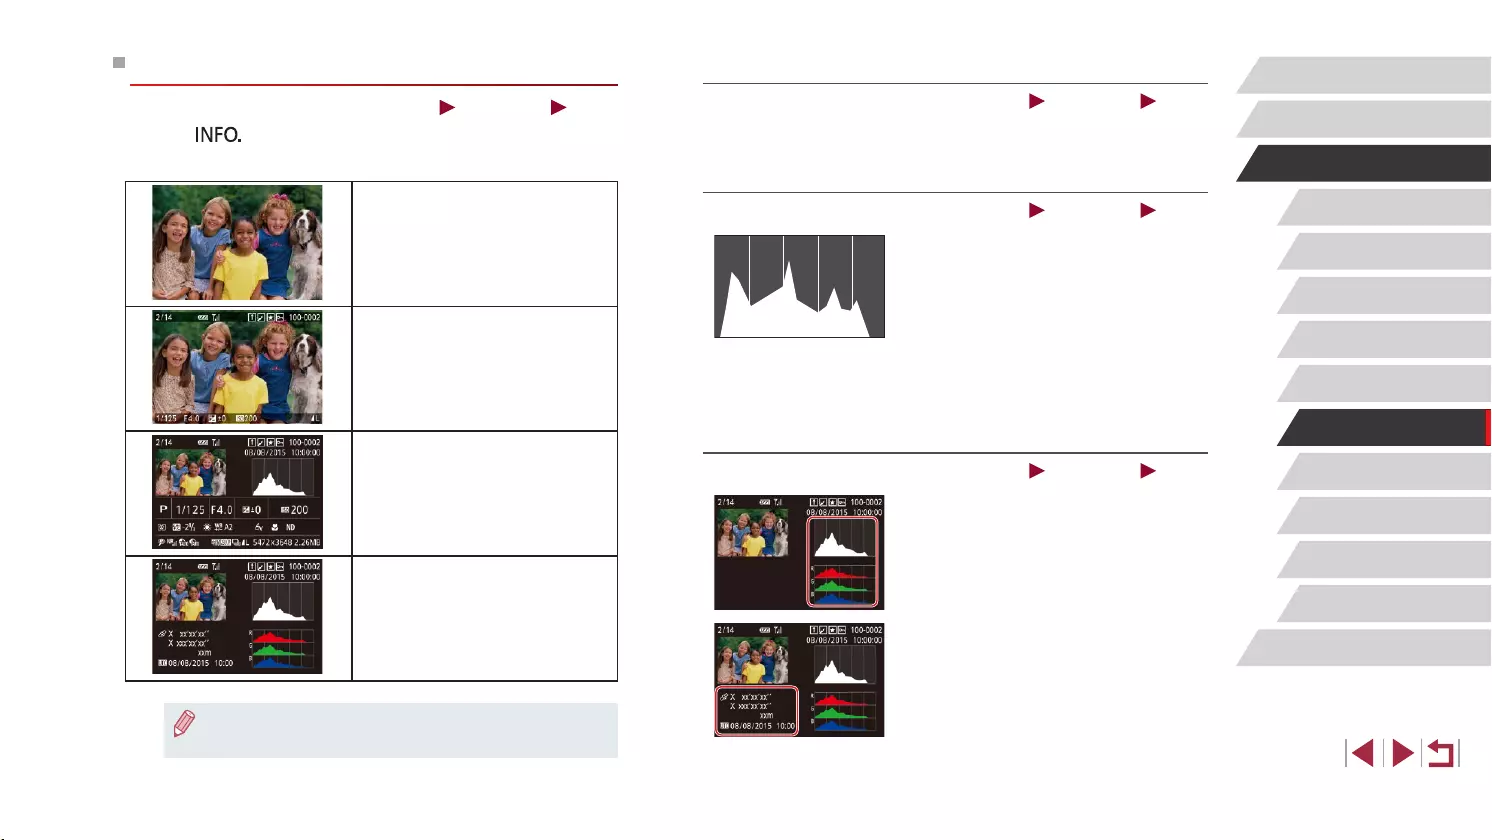
105
Wi-Fi Functions
Setting Menu
Accessories
Appendix
Before Use
Index
Basic Guide
Advanced Guide
Camera Basics
Auto Mode /
Hybrid Auto Mode
Other Shooting Modes
P Mode
Tv, Av, M, and C Mode
Playback Mode
Overexposure Warning (for Image Highlights)
Still Images Movies
Washed-out highlights in the image ash on the screen in detailed
information display (=
105).
Histogram
Still Images Movies
zThe graph in detailed information display
(=
105) is a histogram showing the
distribution of brightness in the image.
The horizontal axis represents the degree
of brightness, and the vertical axis, how
much of the image is at each level of
brightness. Viewing the histogram is a
way to check exposure.
zThe histogram can also be accessed
while shooting (=
99, =
188).
RGB Histogram, GPS Information Display
Still Images Movies
zThe RGB histogram shows the distribution
of shades of red, green, and blue in an
image. The horizontal axis represents R,
G, or B brightness, and the vertical axis,
how much of the image is at that level of
brightness. Viewing this histogram enables
you to check image color characteristics.
zUsing a smartphone connected to the
camera via Wi-Fi, you can geotag images
on the camera, adding information such
as latitude, longitude, and elevation
(=
155). You can review this information
in the GPS information display.
zLatitude, longitude, elevation, and UTC
(shooting date and time) are listed from
top to bottom.
Switching Display Modes
Still Images Movies
Press the [ ] button to view other information on the screen, or
to hide the information. For details on the information displayed, see
“Playback (Detailed Information Display)” (=
189).
No Information Display
Simple Information Display
Detailed Information Display
RGB Histogram, GPS Information
Display
●Switching display modes is not possible while the camera is
connected via Wi-Fi to devices other than printers.
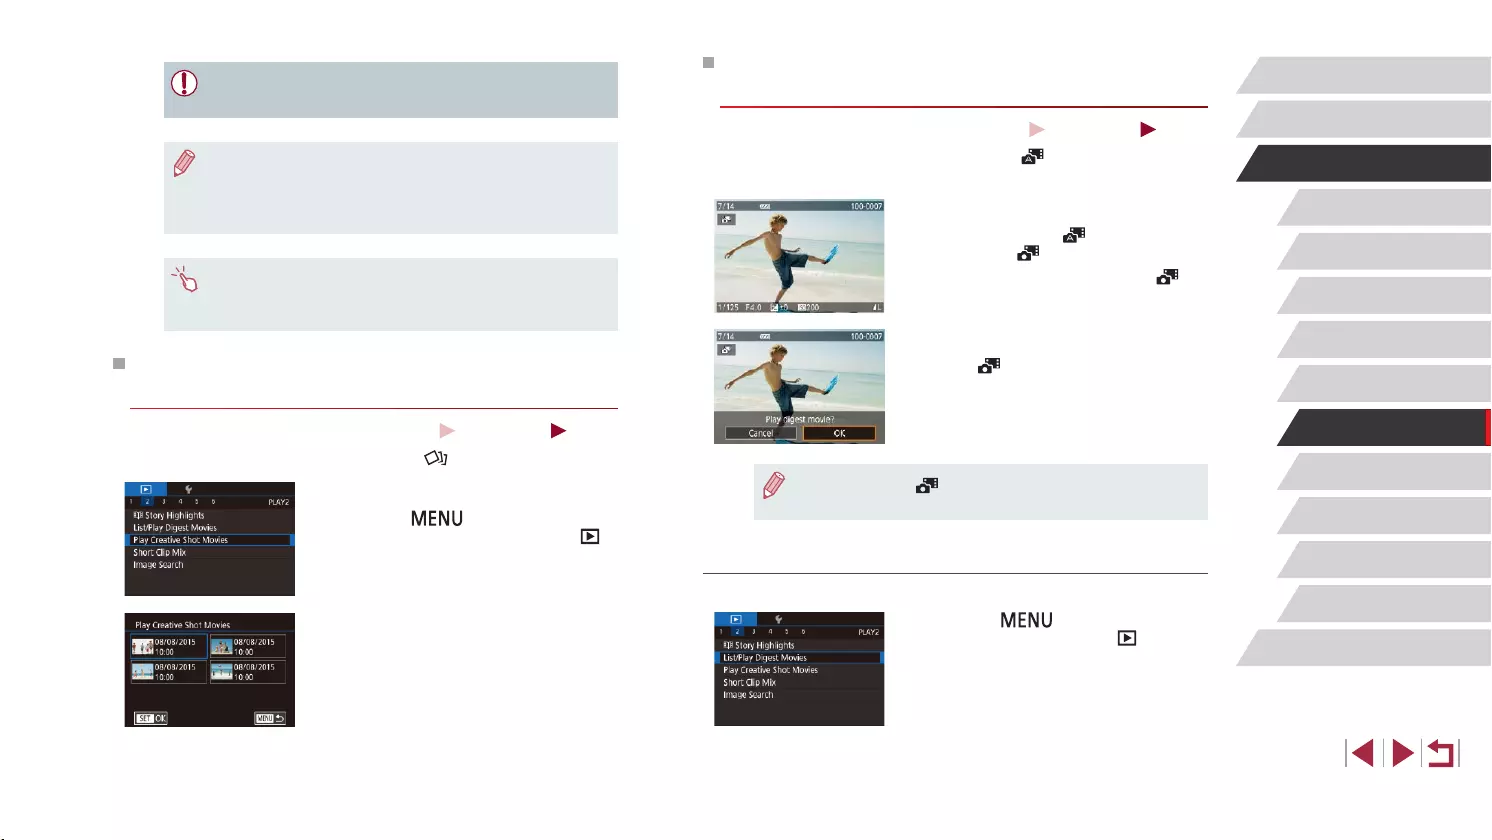
106
Wi-Fi Functions
Setting Menu
Accessories
Appendix
Before Use
Index
Basic Guide
Advanced Guide
Camera Basics
Auto Mode /
Hybrid Auto Mode
Other Shooting Modes
P Mode
Tv, Av, M, and C Mode
Playback Mode
Viewing Short Movies Created When Shooting
Still Images (Digest Movies)
Still Images Movies
View digest movies recorded automatically in [ ] mode (=
35) on a
day of still image shooting as follows.
1 Choose an image.
zStill images shot in [ ] mode are
labeled with [ ] icon.
zChoose a still image labeled with [ ].
2 Play the digest movie.
zTouch [ ], and then touch [OK].
zThe movie recorded automatically on the
day of still image shooting is played back,
from the beginning.
●After a moment, [ ] will no longer be displayed when you are
using the camera with information display deactivated (=
105).
Viewing by Date
Digest movies can be viewed by date.
zPress the [ ] button, choose [List/
Play Digest Movies] on the [ 2] tab,
and then touch a date (=
29).
●[—] is shown instead of numerical values for items not available
on your smartphone or items not recorded correctly.
●UTC: Coordinated Universal Time, essentially the same as
Greenwich Mean Time
●GPS information display is not available for images that lack this
information.
●You can also switch between the RGB histogram and GPS
information display by dragging the lower half of the screen
upward or downward in detailed information display.
Viewing Short Movies Recorded in Creative
Shot Mode (Creative Shot Movies)
Still Images Movies
Play back Creative Shot movies recorded in [ ] mode (=
55).
1 Choose a movie.
zPress the [ ] button and choose
[Play Creative Shot Movies] on the [ 2]
tab (=
29).
2 Play the movie.
zTouch a movie to play it.

107
Wi-Fi Functions
Setting Menu
Accessories
Appendix
Before Use
Index
Basic Guide
Advanced Guide
Camera Basics
Auto Mode /
Hybrid Auto Mode
Other Shooting Modes
P Mode
Tv, Av, M, and C Mode
Playback Mode
Browsing and Filtering Images
Navigating through Images in an Index
Still Images Movies
By displaying multiple images in an index, you can quickly nd the images
you are looking for.
1 Display images in an index.
zMove the zoom lever toward [ ] to
display images in an index. Moving the
lever again will increase the number of
images shown.
zTo display fewer images, move the zoom
lever toward [ ]. Fewer images are
shown each time you move the lever.
2 Choose an image.
zDrag up or down on the screen to scroll
through displayed images.
zTouch an image to choose it, and touch it
again to view it in single-image display.
zYou can also drag left or right across the
screen to move the orange frame, and
then hold the zoom lever toward [ ] to
view an image in single-image display.
Checking People Detected in Face ID
Still Images Movies
If you switch the camera to simple information display mode (=
105),
the names of up to ve detected people registered in Face ID (=
43)
will be displayed.
zPress the [ ] button several times to
enter simple information display, and then
choose an image by dragging left or right
on the screen.
zNames will be displayed on detected
people.
●If you prefer not to have names displayed on images shot using
Face ID, choose MENU (=
29) ► [ 3] tab ► [Face ID Info]
► [Name Display] ► [Off].
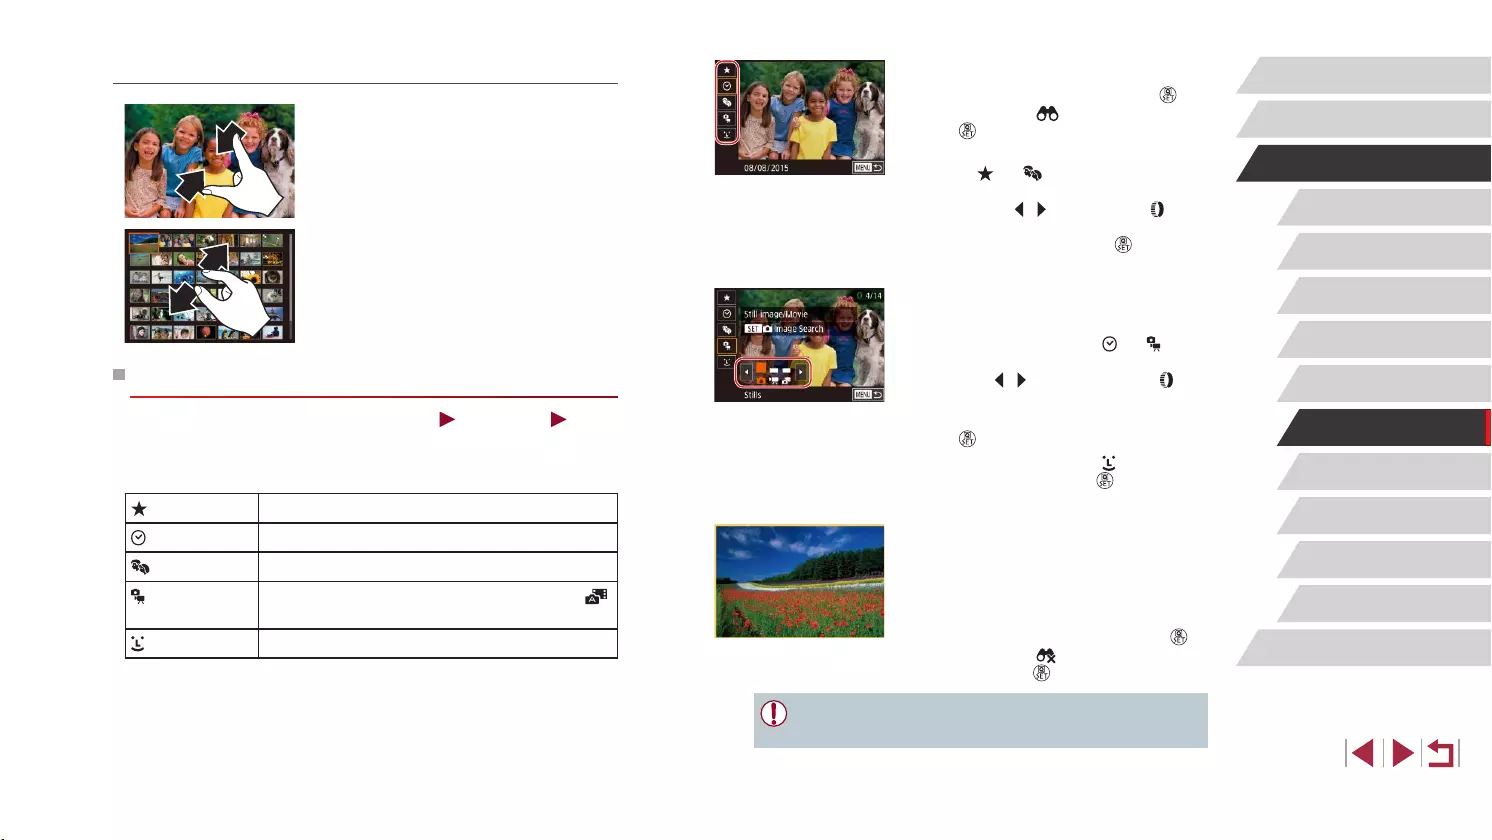
108
Wi-Fi Functions
Setting Menu
Accessories
Appendix
Before Use
Index
Basic Guide
Advanced Guide
Camera Basics
Auto Mode /
Hybrid Auto Mode
Other Shooting Modes
P Mode
Tv, Av, M, and C Mode
Playback Mode
1 Choose the rst condition.
zIn single-image display, press the [ ]
button, choose [ ] in the menu, press
the [ ] button again, and choose a
condition.
zWhen [ ] or [ ] is selected, you can
view only images matching this condition
by touching [ ][ ] or turning the [ ]
ring. To perform an action for all of these
images together, press the [ ] button
and go to step 3.
2 Choose the second condition and
view the ltered images.
zWhen you have selected [ ] or [ ] as
the rst condition, choose the second by
touching [ ][ ], and then turn the [ ] ring
to view only matching images.
zTo switch to ltered image display, press
the [ ] button and go to step 3.
zWhen you have selected [ ] as the
rst condition, press the [ ] button and
choose a person on the next screen.
3 View the ltered images.
zImages matching your conditions are
displayed in yellow frames. To view only
these images, drag left or right across the
screen.
zTo cancel ltered display, press the [ ]
button, choose [ ] in the menu, and
then press the [ ] button.
●When the camera has found no corresponding images for some
conditions, those conditions will not be available.
Touch-Screen Operations
zPinch in to switch from single-image
display to index display.
zTo view more thumbnails per screen,
pinch in again.
zDrag up or down on the screen to scroll
through displayed images.
zTo view fewer thumbnails per screen,
spread your ngers apart.
zTouch an image to choose it, and touch it
again to view it in single-image display.
Finding Images Matching Specied Conditions
Still Images Movies
Find desired images quickly on a memory card full of images by ltering
image display according to your specied conditions. You can also protect
(=
113) or delete (=
115) these images all at once.
Favorites Displays images tagged as favorites (=
118).
Shot Date Displays the images shot on a specic date.
People Displays images with detected faces.
Still image/
Movie
Displays still images, movies, or movies shot in [ ]
mode (=
35).
Name Displays images of a registered person (=
44).
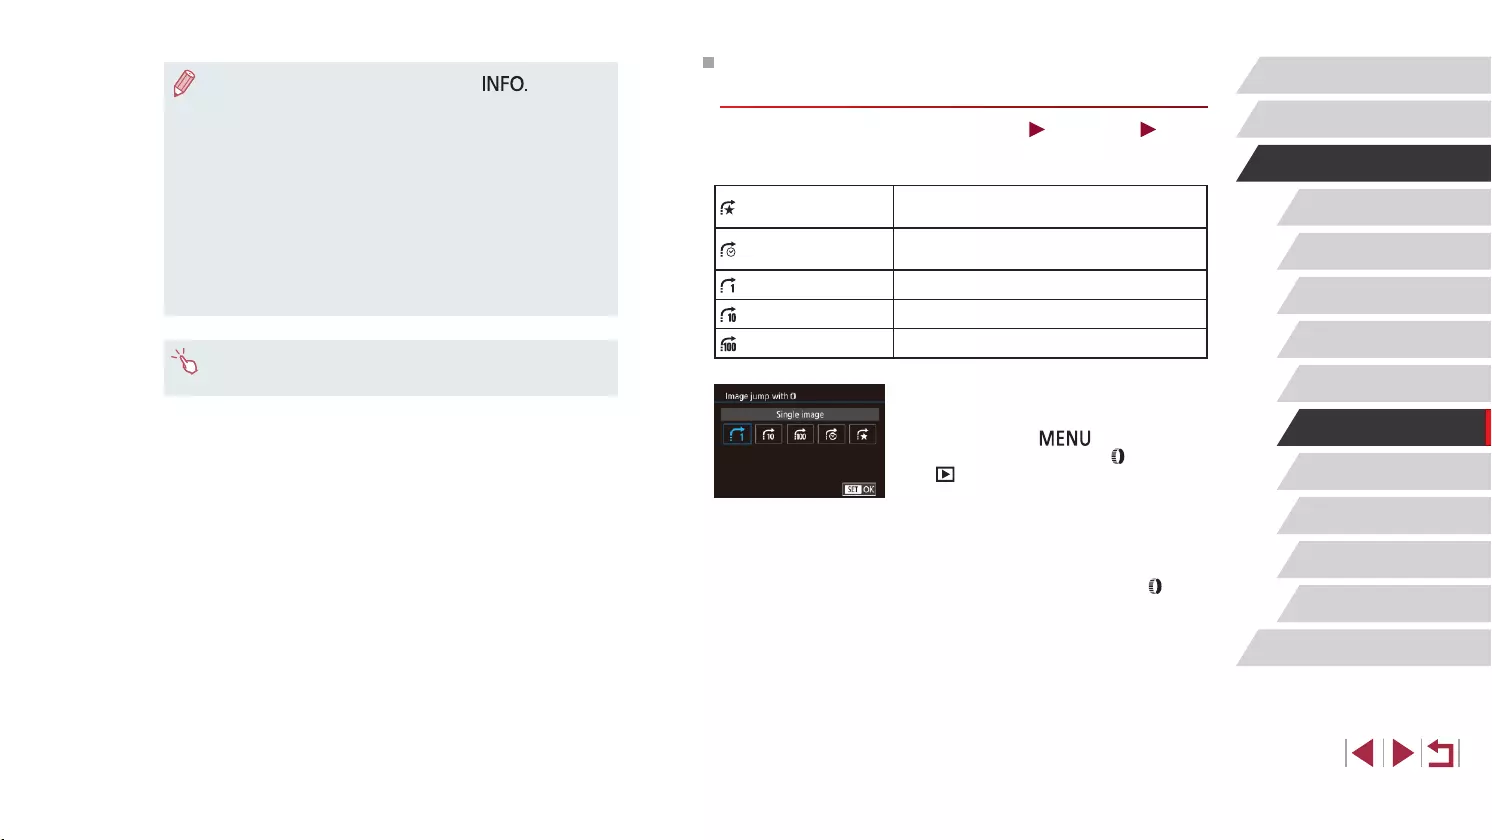
109
Wi-Fi Functions
Setting Menu
Accessories
Appendix
Before Use
Index
Basic Guide
Advanced Guide
Camera Basics
Auto Mode /
Hybrid Auto Mode
Other Shooting Modes
P Mode
Tv, Av, M, and C Mode
Playback Mode
Using the Control Ring to Jump between
Images
Still Images Movies
Use the control ring to nd and jump between desired images quickly by
ltering image display according to your specied conditions.
Jump to Favorites Displays images tagged as favorites
(=
118).
Jump Shot Date Jumps to the rst image in each group of
images that were shot on the same date.
Single image Jumps by 1 image at a time.
Jump 10 Images Jumps by 10 images at a time.
Jump 100 Images Jumps by 100 images at a time.
1 Choose a condition.
zChoose a condition (or jump method)
by pressing the [ ] button and
choosing [Image jump with ] on the
[5] tab.
2 View images matching your
specied condition, or jump by the
specied amount.
zIn single-image display, turn the [ ]
ring to view only images matching the
condition or jump by the specied number
of images forward or back.
●To hide or view other information, press the [ ] button in
step 3.
●Options for viewing the images found (in step 3) include
“Navigating through Images in an Index” (=
107), “Magnifying
Images” (=
112), and “Viewing Slideshows” (=
113). You can
also apply image operations to all images found, by choosing
[Protect All Images in Search] in “Protecting Images” (=
113) or
[Select All Images in Search] in “Erasing Multiple Images at Once”
(=
116), “Adding Images to the Print List (DPOF)” (=
179), or
“Adding Images to a Photobook” (=
181).
●If you edit images and save them as new images (=
121 –
=
126), a message is displayed, and the images that were
found are no longer shown.
●After choosing conditions, you can view images matching your
conditions by touching a condition again.
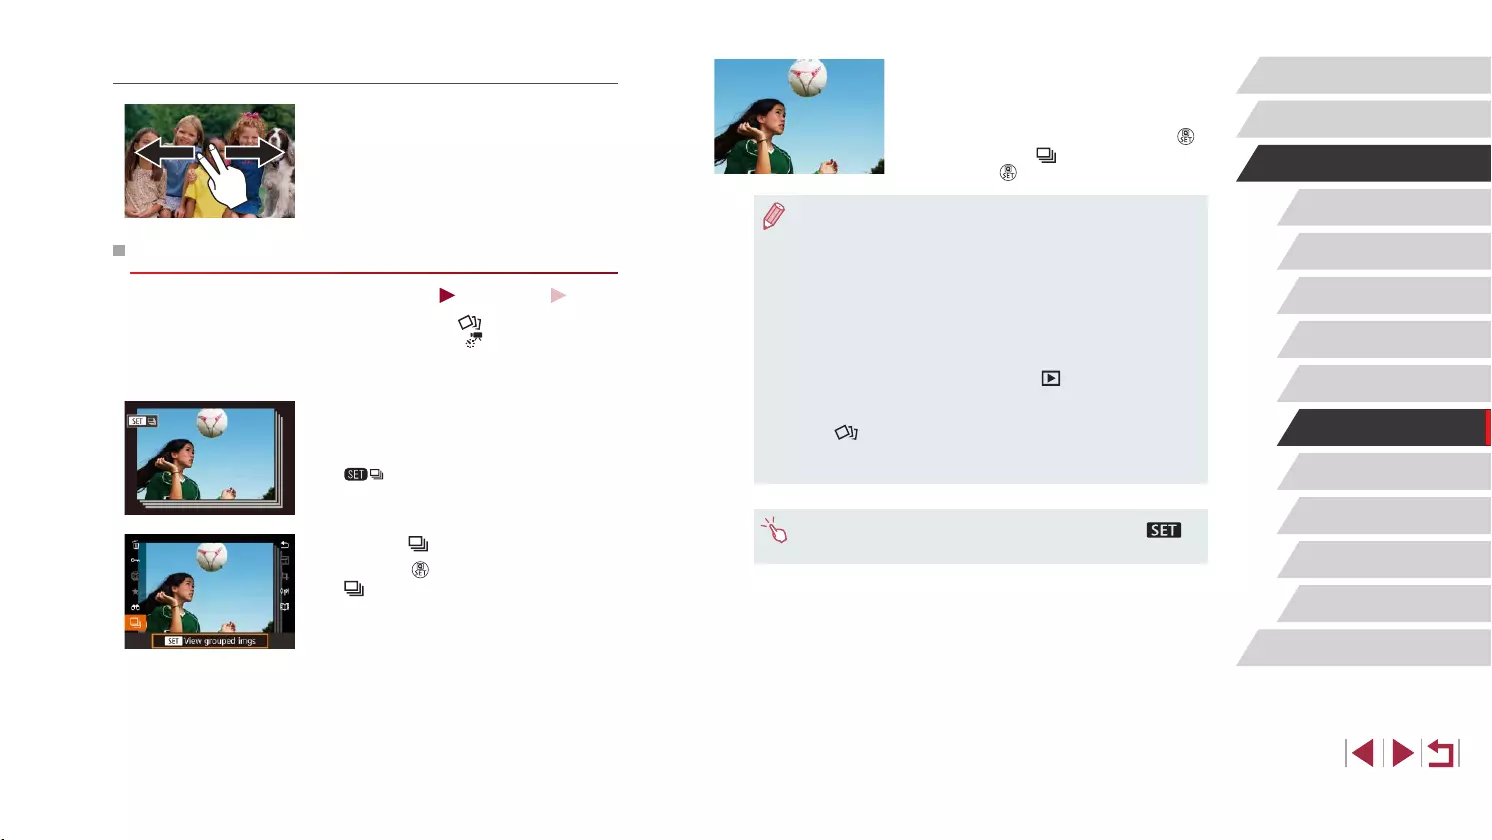
110
Wi-Fi Functions
Setting Menu
Accessories
Appendix
Before Use
Index
Basic Guide
Advanced Guide
Camera Basics
Auto Mode /
Hybrid Auto Mode
Other Shooting Modes
P Mode
Tv, Av, M, and C Mode
Playback Mode
3 View images in the group individually.
zDragging images left or right will display
only images in the group.
zTo cancel group playback, press the [ ]
button, choose [ ] in the menu, and
press the [ ] button again (=
28).
●During group playback (step 3), you can browse through images
quickly “Navigating through Images in an Index” (=
107) and
magnify them “Magnifying Images” (=
112). You can apply
your actions to all images in the group at once by specifying
[Protect All Images in Group] in “Protecting Images” (=
113),
or by specifying [Select All Images] in “Erasing Multiple Images
at Once” (=
116), “Adding Images to the Print List (DPOF)”
(=
179), or “Adding Images to a Photobook” (=
181).
●To ungroup images so that they are displayed only as single
still images, choose MENU (=
29) ► [ 5] tab ► [Group
Images] ► [Off] (=
29). However, grouped images cannot be
ungrouped during individual playback.
●In [ ] mode, the simultaneous display after step 2 in “Enjoying
a Variety of Images from Each Shot” (=
55) is only shown
immediately after you shoot.
●You can also view group images individually by touching [ ]
on the screen in steps 1 and 2.
Touch-Screen Operations
zYou can also jump to the previous or next
image according to your jump method
chosen in step 1 of “Using the Control
Ring to Jump between Images” (=
109)
by dragging left or right with two ngers.
Viewing Individual Images in a Group
Still Images Movies
Images shot continuously (=
42), images shot in [ ] mode (=
55),
and individual still images saved as source data in [ ] mode (=
66)
are grouped, and only the rst image is displayed. However, you can also
view the images individually.
1 Choose a grouped image.
zBrowse images by dragging left or right
until you nd a desired image labeled
[ ].
2 Choose [ ].
zPress the [ ] button, and then choose
[] in the menu (=
28).
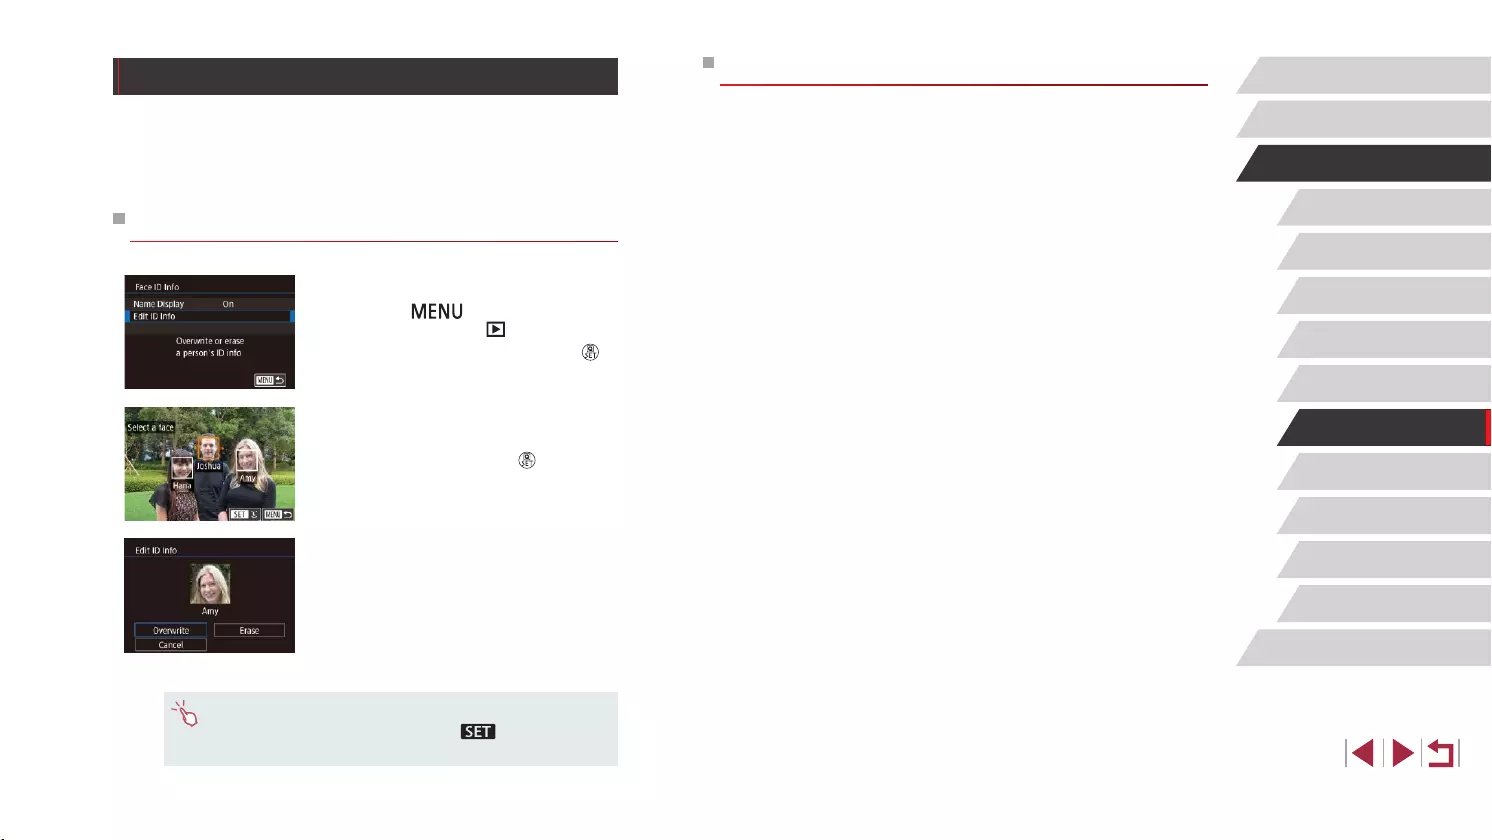
111
Wi-Fi Functions
Setting Menu
Accessories
Appendix
Before Use
Index
Basic Guide
Advanced Guide
Camera Basics
Auto Mode /
Hybrid Auto Mode
Other Shooting Modes
P Mode
Tv, Av, M, and C Mode
Playback Mode
Erasing Names
zOn the screen displayed in step 3 in
“Changing Names” (=
111), touch
[Erase].
zAfter [Erase?] is displayed, touch [OK].
Editing Face ID Information
If you notice that a name is incorrect during playback, you can change it
or erase it.
However, you cannot add names for people who are not detected by Face
ID (names are not displayed), and for people whose names have been
erased.
Changing Names
1 Access the setting screen.
zPress the [ ] button and choose
[Face ID Info] on the [ 3] tab (=
29).
zChoose [Edit ID Info] and press the [ ]
button.
2 Choose an image.
zChoose an image after dragging left or
right to browse. Press the [ ] button.
zTo choose the name you want to
overwrite, touch that person’s face.
3 Choose the editing option.
zTouch [Overwrite].
4 Choose the name of the person to
overwrite with.
zTouch the name of the person to use for
overwriting.
●You can also access the [Edit ID Info] screen by touching an
image on the screen in step 2, touching [ ] to display the
orange frame, and then touching the face to overwrite its name.
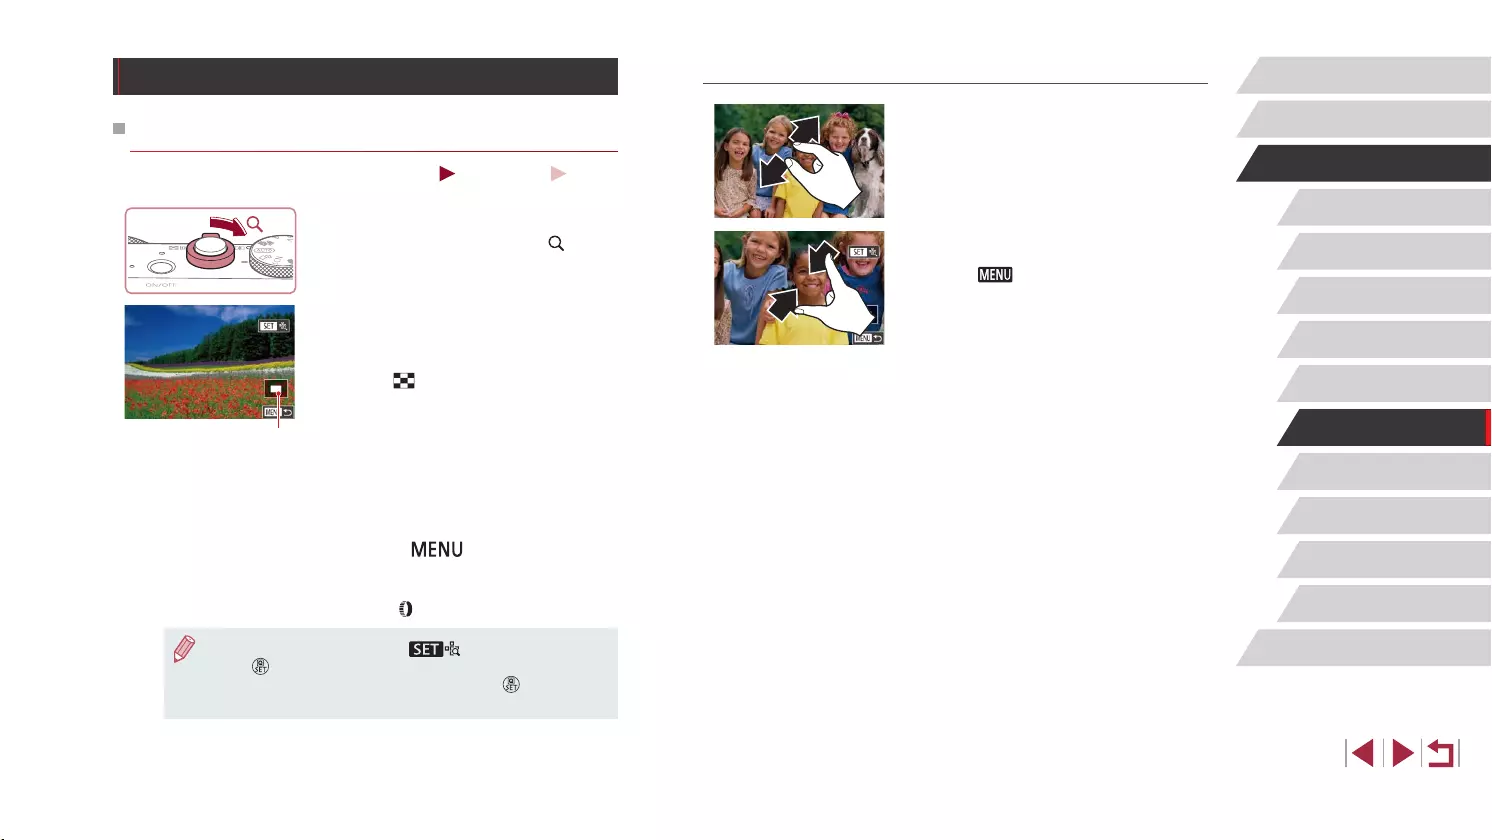
112
Wi-Fi Functions
Setting Menu
Accessories
Appendix
Before Use
Index
Basic Guide
Advanced Guide
Camera Basics
Auto Mode /
Hybrid Auto Mode
Other Shooting Modes
P Mode
Tv, Av, M, and C Mode
Playback Mode
Touch-Screen Operations
zSpread your ngers apart (pinch out) to
zoom in.
zYou can magnify images up to about 10x
by repeating this action.
zTo move the display position, drag across
the screen.
zPinch in to zoom out.
zTouch [ ] to restore single-image
display.
Image Viewing Options
Magnifying Images
Still Images Movies
1 Magnify an image.
zMoving the zoom lever toward [ ] will
zoom in and magnify the image. You
can magnify images up to about 10x by
continuing to hold the zoom lever.
zThe approximate position of the displayed
area (1) is shown for reference.
zTo zoom out, move the zoom lever
toward [ ]. You can return to single-
image display by continuing to hold it.
2 Move the display position and
switch images as needed.
zTo move the display position, drag across
the screen.
zPress the [ ] button to restore
single-image display.
zTo switch to other images while zoomed,
turn the [ ] ring.
●You can check the focus when [ ] is displayed by pressing
the [ ] button to show the position in focus (Focus Check).
When multiple positions are in focus, press the [ ] button
repeatedly to switch to other positions.
(
)
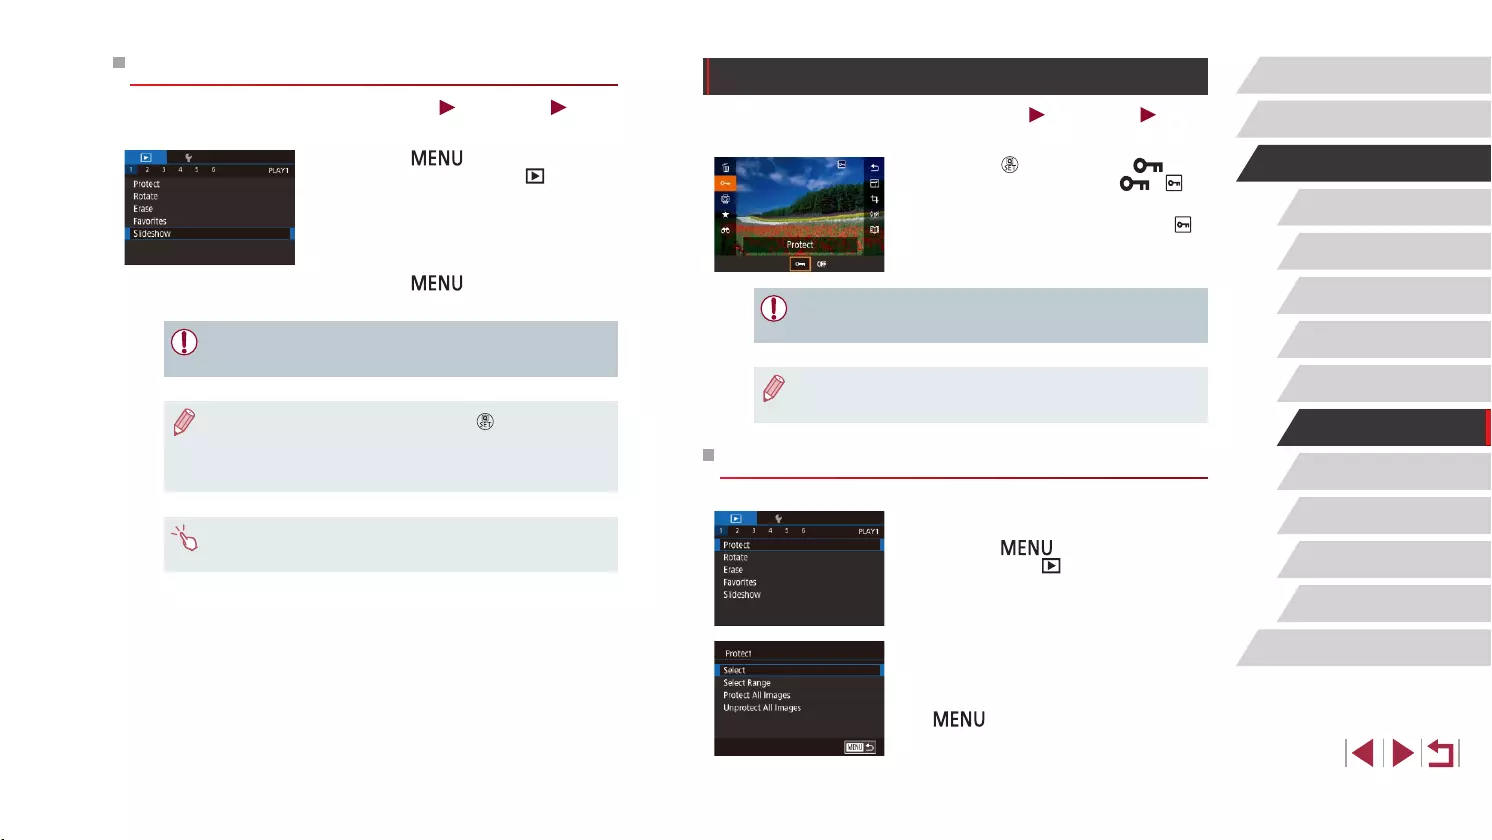
113
Wi-Fi Functions
Setting Menu
Accessories
Appendix
Before Use
Index
Basic Guide
Advanced Guide
Camera Basics
Auto Mode /
Hybrid Auto Mode
Other Shooting Modes
P Mode
Tv, Av, M, and C Mode
Playback Mode
Protecting Images
Still Images Movies
Protect important images to prevent accidental erasure (=
115).
zPress the [ ] button, choose [ ] in
the menu, and then choose [ ]. [ ] is
displayed.
zTo cancel protection, choose [OFF]. [ ]
is no longer displayed.
●Protected images on a memory card will be erased if you format
the card (=
160).
●Protected images cannot be erased using the camera’s erasure
function. To erase them this way, rst cancel protection.
Using the Menu
1 Access the setting screen.
zPress the [ ] button and choose
[Protect] on the [ 1] tab (=
29).
2 Choose a selection method.
zChoose an option as desired (=
29).
zTo return to the menu screen, press the
[] button.
Viewing Slideshows
Still Images Movies
Automatically play back images from a memory card as follows.
zPress the [ ] button, and then
choose [Slideshow] on the [ 1] tab
(=
29).
zTouch [Start].
zThe slideshow will start after [Loading
image] is displayed for a few seconds.
zPress the [ ] button to stop the
slideshow.
●The camera’s power-saving functions (=
26) are deactivated
during slideshows.
●To pause or resume slideshows, press the [ ] button.
●You can congure slideshow repetition, the display time per
image, and the transition between images on the screen
accessed by touching [Set up] (=
29).
●You can also stop slideshows by touching the screen.
●Slideshows can also be started by using Touch Actions (=
119).
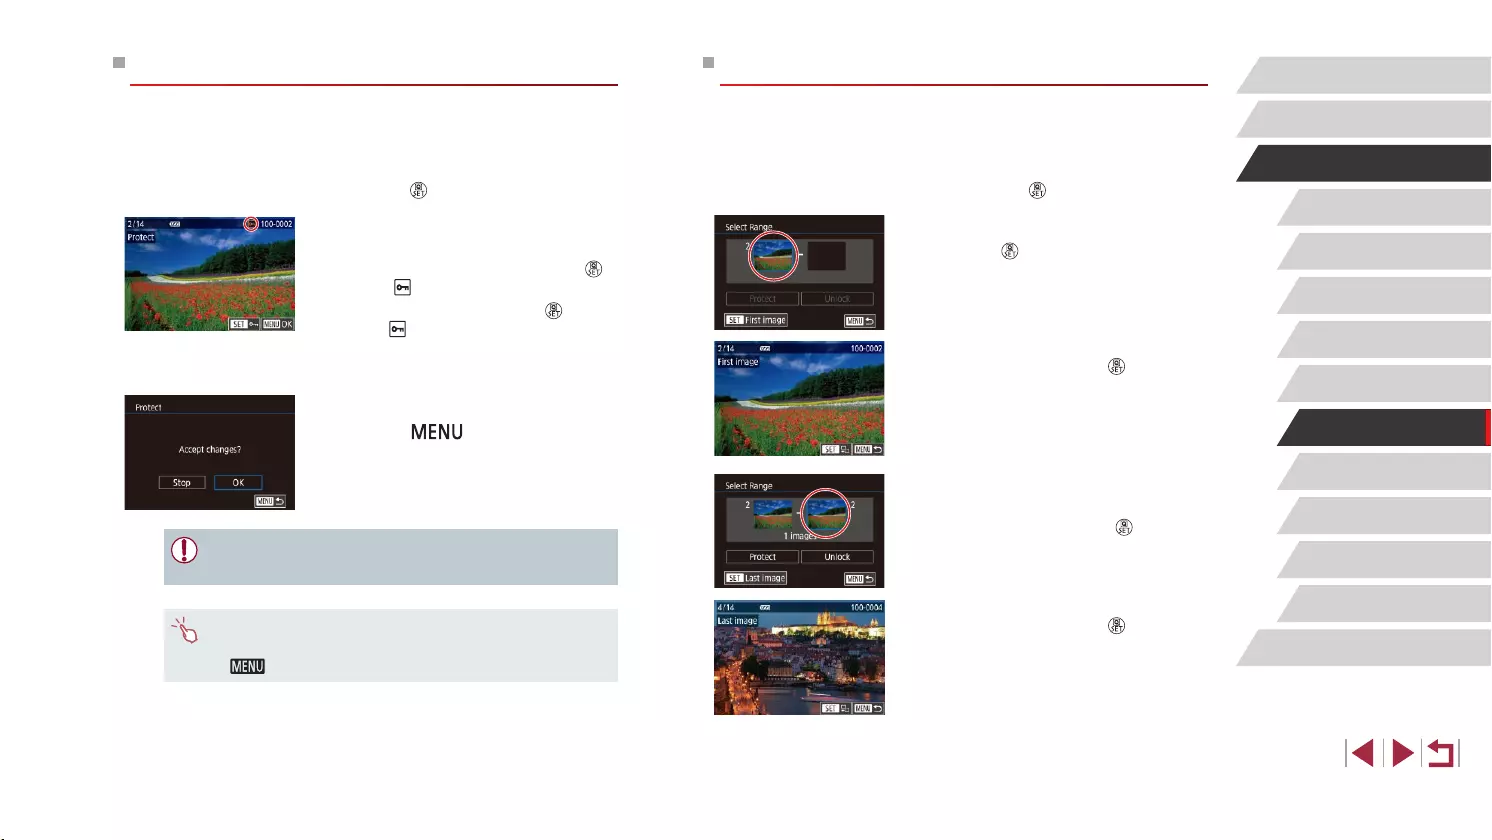
114
Wi-Fi Functions
Setting Menu
Accessories
Appendix
Before Use
Index
Basic Guide
Advanced Guide
Camera Basics
Auto Mode /
Hybrid Auto Mode
Other Shooting Modes
P Mode
Tv, Av, M, and C Mode
Playback Mode
Selecting a Range
1 Choose [Select Range].
zFollowing the procedure in “Using the
Menu” (=
113), choose [Select Range]
and press the [ ] button.
2 Choose a starting image.
zPress the [ ] button.
zChoose an image after dragging left or
right to browse. Press the [ ] button.
3 Choose an ending image.
zTouch the bounded area to activate [Last
image], and then press the [ ] button.
zChoose an image after dragging left or
right to browse. Press the [ ] button.
zImages before the rst image cannot be
selected as the last image.
Choosing Images Individually
1 Choose [Select].
zFollowing the procedure in “Using the
Menu” (=
113), choose [Select] and
press the [ ] button.
2 Choose an image.
zChoose an image after dragging left or
right to browse. Once you press the [ ]
button, [ ] is displayed.
zTo cancel selection, press the [ ] button
again. [ ] is no longer displayed.
zRepeat this process to specify other
images.
3 Protect the image.
zPress the [ ] button. A conrmation
message is displayed.
zTouch [OK].
●Images will not be protected if you switch to Shooting mode or
turn the camera off before nishing the setup process in step 3.
●You can also select or clear images by touching the screen in
step 2, and you can access the conrmation screen by touching
[].
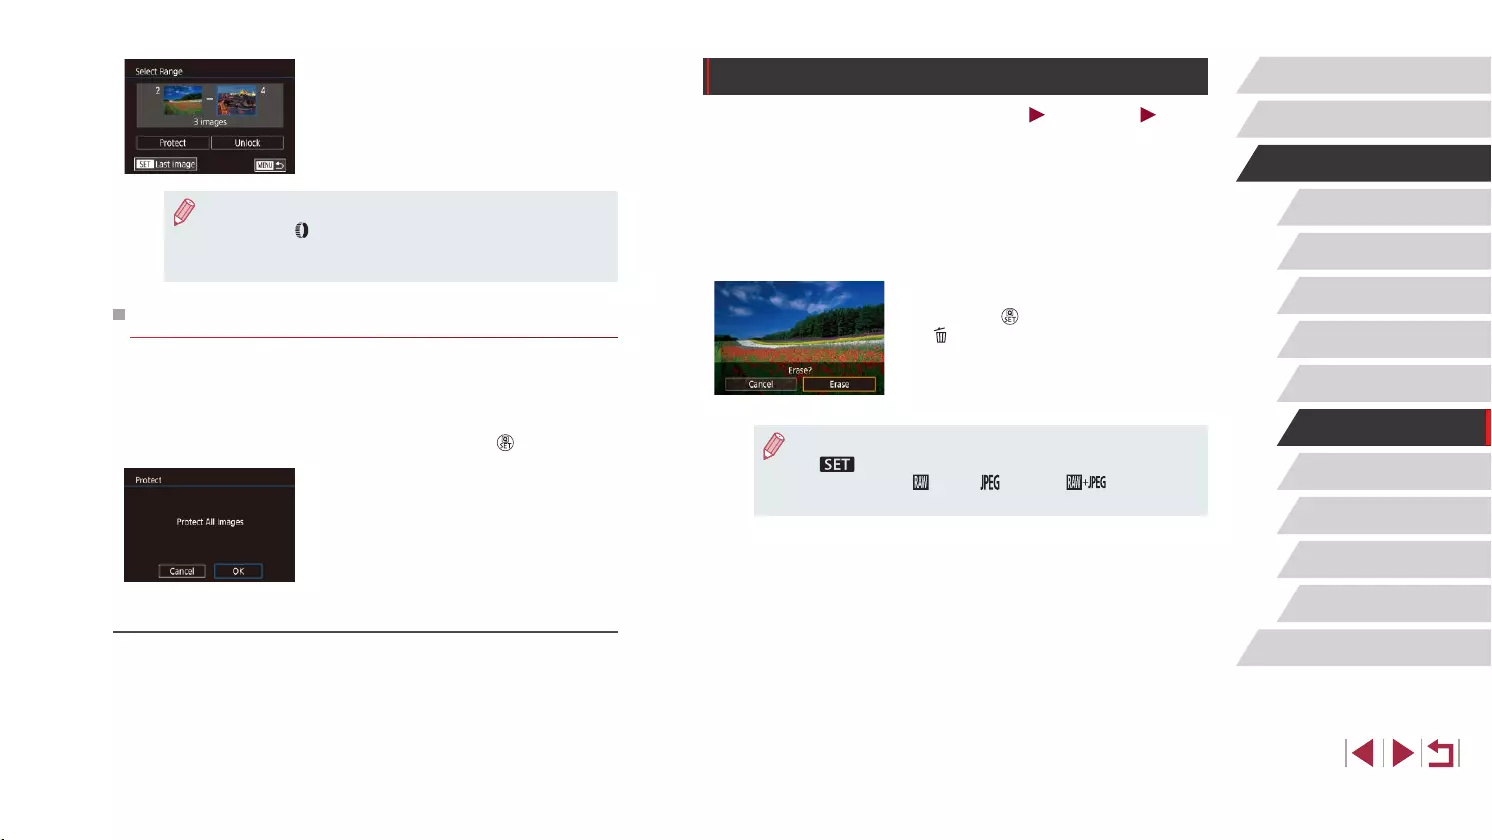
115
Wi-Fi Functions
Setting Menu
Accessories
Appendix
Before Use
Index
Basic Guide
Advanced Guide
Camera Basics
Auto Mode /
Hybrid Auto Mode
Other Shooting Modes
P Mode
Tv, Av, M, and C Mode
Playback Mode
Erasing Images
Still Images Movies
You can choose and erase unneeded images one by one. Be careful
when erasing images, because they cannot be recovered. However,
protected images (=
113) cannot be erased.
1 Choose an image to erase.
zDrag left or right across the screen to
choose an image.
2 Erase the image.
zPress the [ ] button, and then choose
[] in the menu (=
28).
zAfter [Erase?] is displayed, touch [Erase].
zThe current image is now erased.
zTo cancel erasure, touch [Cancel].
●For images captured in both RAW and JPEG format, touching
[ Erase] while the image is displayed gives you the option of
choosing [Erase ], [Erase ], or [Erase ].
●Images can also be erased by using Touch Actions (=
119).
4 Protect the images.
zTouch [Protect].
●You can also choose images on the screens in steps 2 and 3 by
turning the [ ] ring.
●To cancel protection for groups of images, choose [Unlock] in
step 4.
Protecting All Images at Once
1 Choose [Protect All Images].
zFollowing the procedure in “Using the
Menu” (=
113), choose [Protect All
Images] and press the [ ] button.
2 Protect the images.
zTouch [OK].
Clearing All Protection at Once
You can clear protection from all images at once.
To clear protection, choose [Unprotect All Images] in step 1 of “Protecting
All Images at Once”, and then complete step 2.
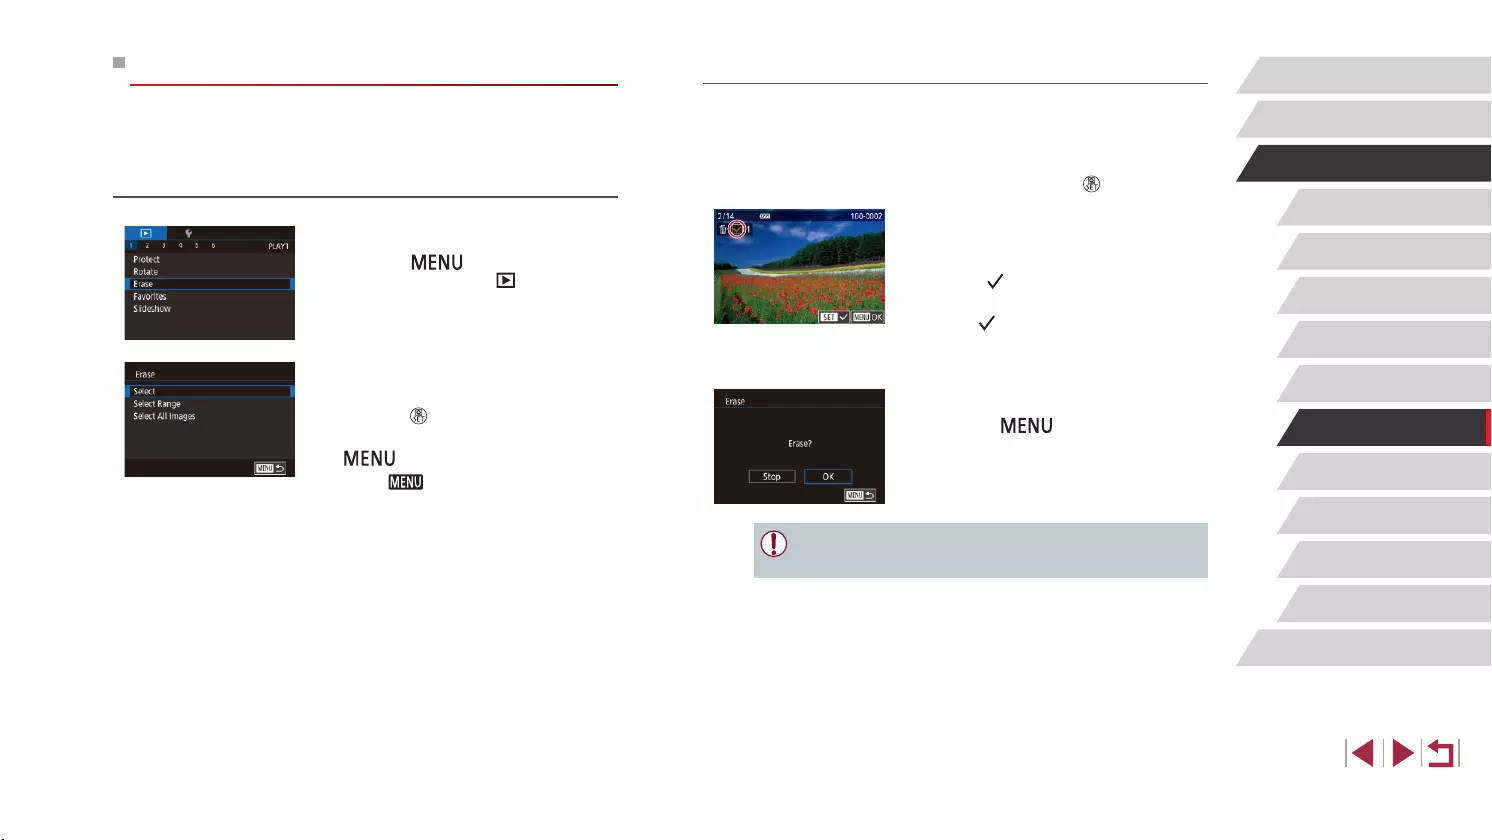
116
Wi-Fi Functions
Setting Menu
Accessories
Appendix
Before Use
Index
Basic Guide
Advanced Guide
Camera Basics
Auto Mode /
Hybrid Auto Mode
Other Shooting Modes
P Mode
Tv, Av, M, and C Mode
Playback Mode
Choosing Images Individually
1 Choose [Select].
zFollowing the procedure in “Choosing
a Selection Method” (=
116), choose
[Select] and press the [ ] button.
2 Choose an image.
zChoose an image after dragging left
or right to browse. Once you touch the
screen, [ ] is displayed.
zTo cancel selection, touch the screen
again. [ ] is no longer displayed.
zRepeat this process to specify other
images.
3 Erase the images.
zPress the [ ] button. A conrmation
message is displayed.
zTouch [OK].
●Choosing an image captured in both RAW and JPEG format will
erase both versions.
Erasing Multiple Images at Once
You can choose multiple images to erase at once. Be careful when
erasing images, because they cannot be recovered. However, protected
images (=
113) cannot be erased.
Choosing a Selection Method
1 Access the setting screen.
zPress the [ ] button, and then
choose [Erase] on the [ 1] tab
(=
29).
2 Choose a selection method.
zChoose the selection method, and then
press the [ ] button.
zTo return to the menu screen, press the
[] button.
zTouch [ ] to return to the menu
screen.
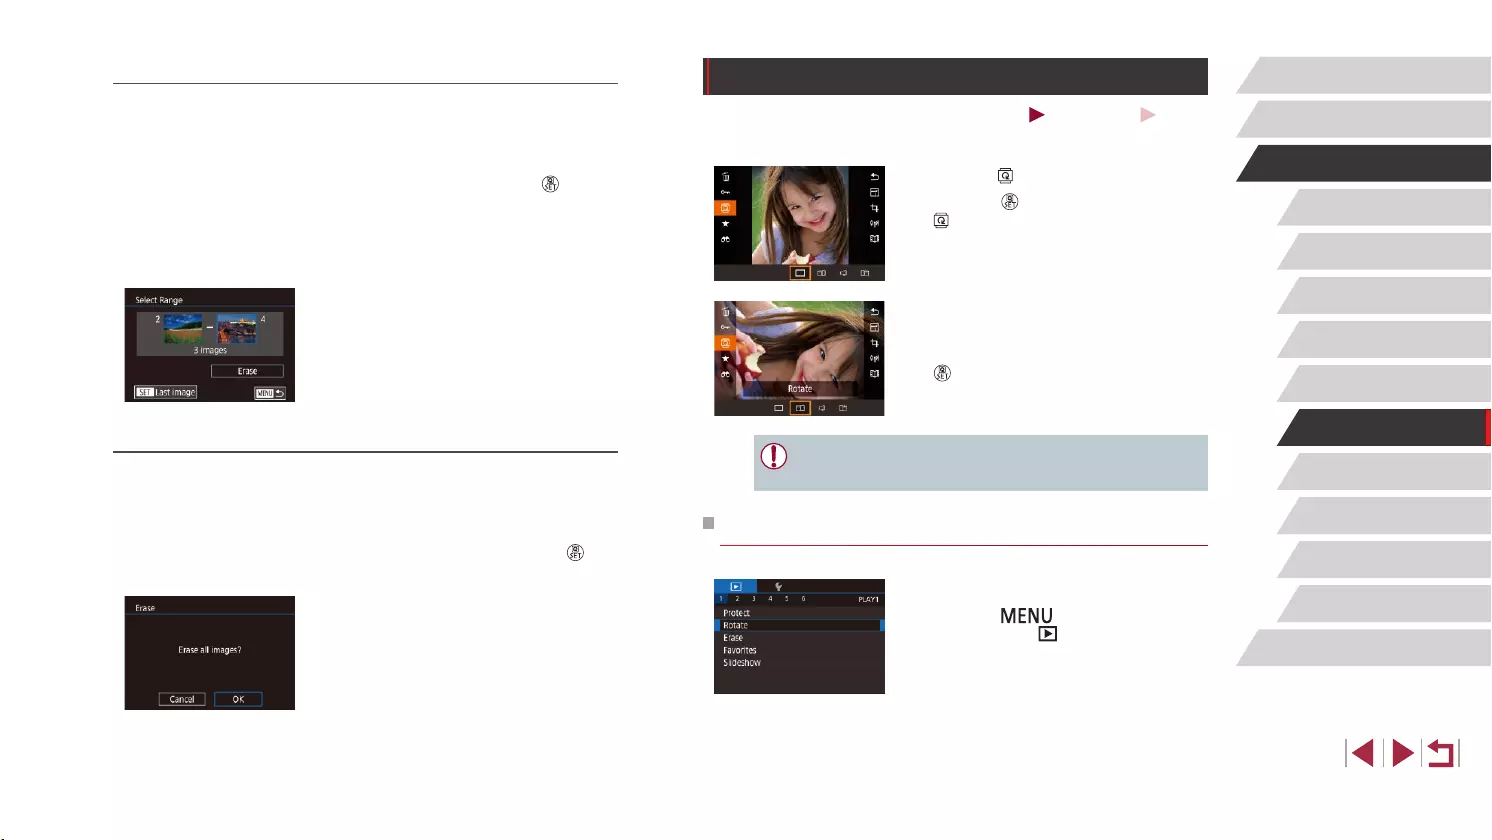
117
Wi-Fi Functions
Setting Menu
Accessories
Appendix
Before Use
Index
Basic Guide
Advanced Guide
Camera Basics
Auto Mode /
Hybrid Auto Mode
Other Shooting Modes
P Mode
Tv, Av, M, and C Mode
Playback Mode
Rotating Images
Still Images Movies
Change the orientation of images and save them as follows.
1 Choose [ ].
zPress the [ ] button, and then choose
[] in the menu (=
28).
2 Rotate the image.
zEach time you drag an option, the image
is rotated 90° in that direction. Press the
[] button to complete the setting.
●Rotation is not possible when [Auto Rotate] is set to [Off]
(=
118).
Using the Menu
1 Choose [Rotate].
zPress the [ ] button and choose
[Rotate] on the [ 1] tab (=
29).
Selecting a Range
1 Choose [Select Range].
zFollowing the procedure in “Choosing
a Selection Method” (=
116), choose
[Select Range] and press the [ ] button.
2 Choose images.
zFollow steps 2 – 3 in “Selecting a Range”
(=
114) to specify images.
3 Erase the images.
zTouch [Erase].
Specifying All Images at Once
1 Choose [Select All Images].
zFollowing the procedure in “Choosing
a Selection Method” (=
116), choose
[Select All Images] and press the [ ]
button.
2 Erase the images.
zTouch [OK].

118
Wi-Fi Functions
Setting Menu
Accessories
Appendix
Before Use
Index
Basic Guide
Advanced Guide
Camera Basics
Auto Mode /
Hybrid Auto Mode
Other Shooting Modes
P Mode
Tv, Av, M, and C Mode
Playback Mode
Tagging Images as Favorites
Still Images Movies
You can organize images by tagging them as favorites. By choosing a
category in ltered playback, you can restrict the following operations to
all of those images.
●“Viewing” (=
103), “Viewing Slideshows” (=
113), “Protecting
Images” (=
113), “Erasing Images” (=
115), “Adding Images to
the Print List (DPOF)” (=
179), “Adding Images to a Photobook”
(=
181)
zPress the [ ] button, choose [ ] in
the menu, and then choose [ ]. [ ] is
displayed.
zTo untag the image, repeat this process
and choose [OFF], and then press the
[] button.
Using the Menu
1 Choose [Favorites].
zPress the [ ] button and choose
[Favorites] on the [ 1] tab (=
29).
2 Choose an image.
zChoose an image after dragging left or
right to browse. Once you press the [ ]
button, [ ] is displayed.
zTo untag the image, press the [ ] button
again. [ ] is no longer displayed.
zRepeat this process to choose additional
images.
2 Rotate the image.
zDrag left or right across the screen to
choose an image.
zThe image is rotated 90° each time you
press the [ ] button.
zTo return to the menu screen, press the
[] button.
●On the screen in step 2, you can also touch [ ] to rotate
images or touch [ ] to return to the menu screen.
Deactivating Auto Rotation
Follow these steps to deactivate automatic image rotation, which rotates
images based on the current camera orientation.
zPress the [ ] button, choose [Auto
Rotate] on the [ 5] tab, and then
choose [Off] (=
29).
●Images cannot be rotated (=
117) when you set [Auto Rotate]
to [Off]. Additionally, images already rotated will be displayed in
the original orientation.
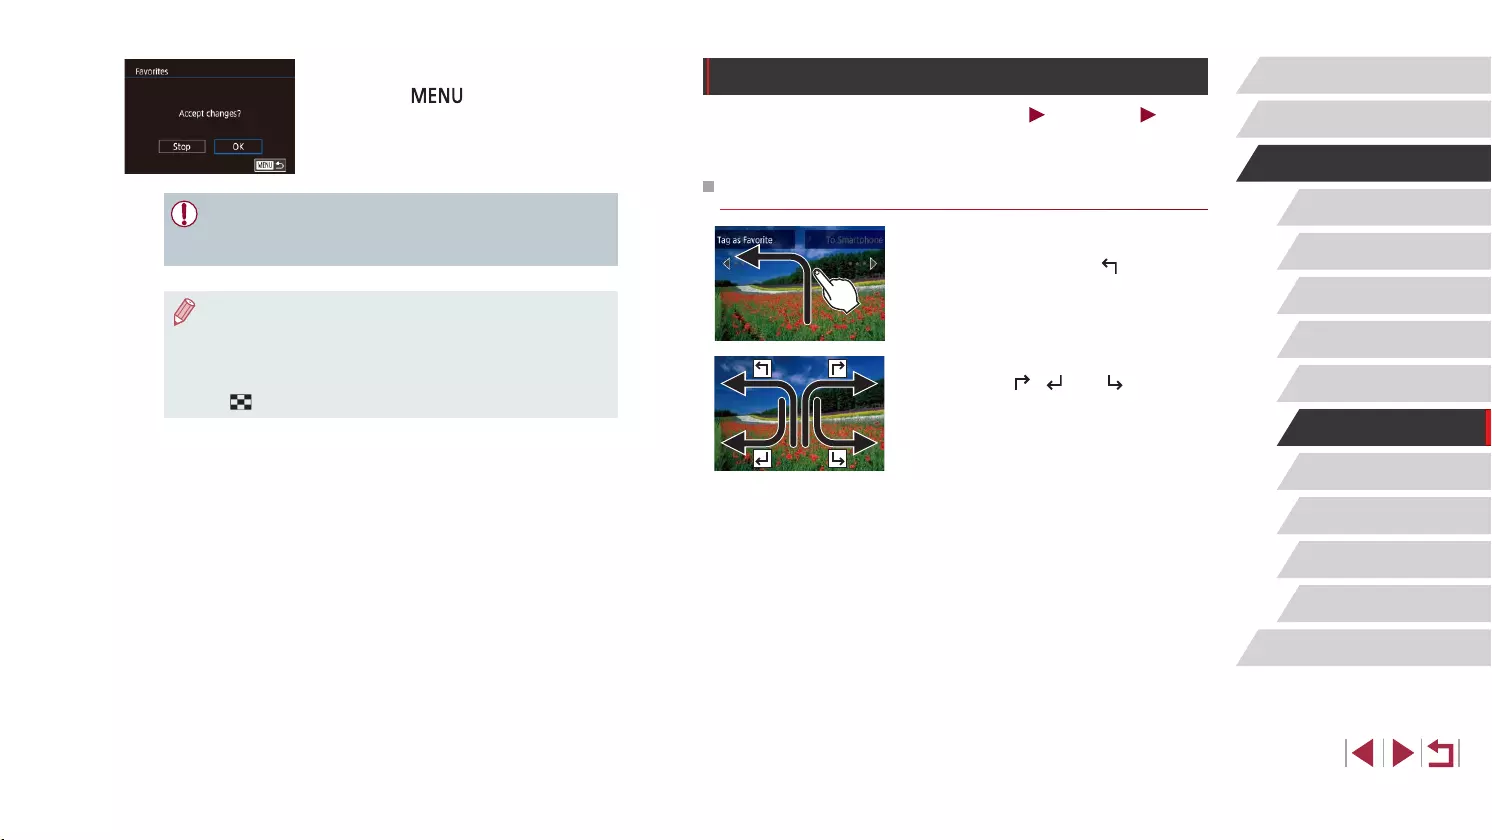
119
Wi-Fi Functions
Setting Menu
Accessories
Appendix
Before Use
Index
Basic Guide
Advanced Guide
Camera Basics
Auto Mode /
Hybrid Auto Mode
Other Shooting Modes
P Mode
Tv, Av, M, and C Mode
Playback Mode
Convenient Control: Touch Actions
Still Images Movies
You can quickly and easily activate functions that you have assigned to
four touch gestures (Touch Actions), in single-image display.
Using Touch Actions Functions
zDrag across the screen as shown.
zThe function assigned to [ ] is now
activated.
zSimilarly, you can also activate functions
assigned to [ ], [ ], and [ ] by
dragging across the screen.
zCustomize functions assigned to Touch
Actions as desired.
3 Finish the setup process.
zPress the [ ] button. A conrmation
message is displayed.
zTouch [OK].
●Images will not be tagged as favorites if you switch to Shooting
mode or turn the camera off before nishing the setup process in
step 3.
●Tagging images as favorites makes it easier to add them when
creating albums (=
127).
●Images can also be tagged as favorites by using Touch Actions
(=
119).
●To specify multiple images at once, move the zoom lever toward
[] for index display, and then touch images to choose them.
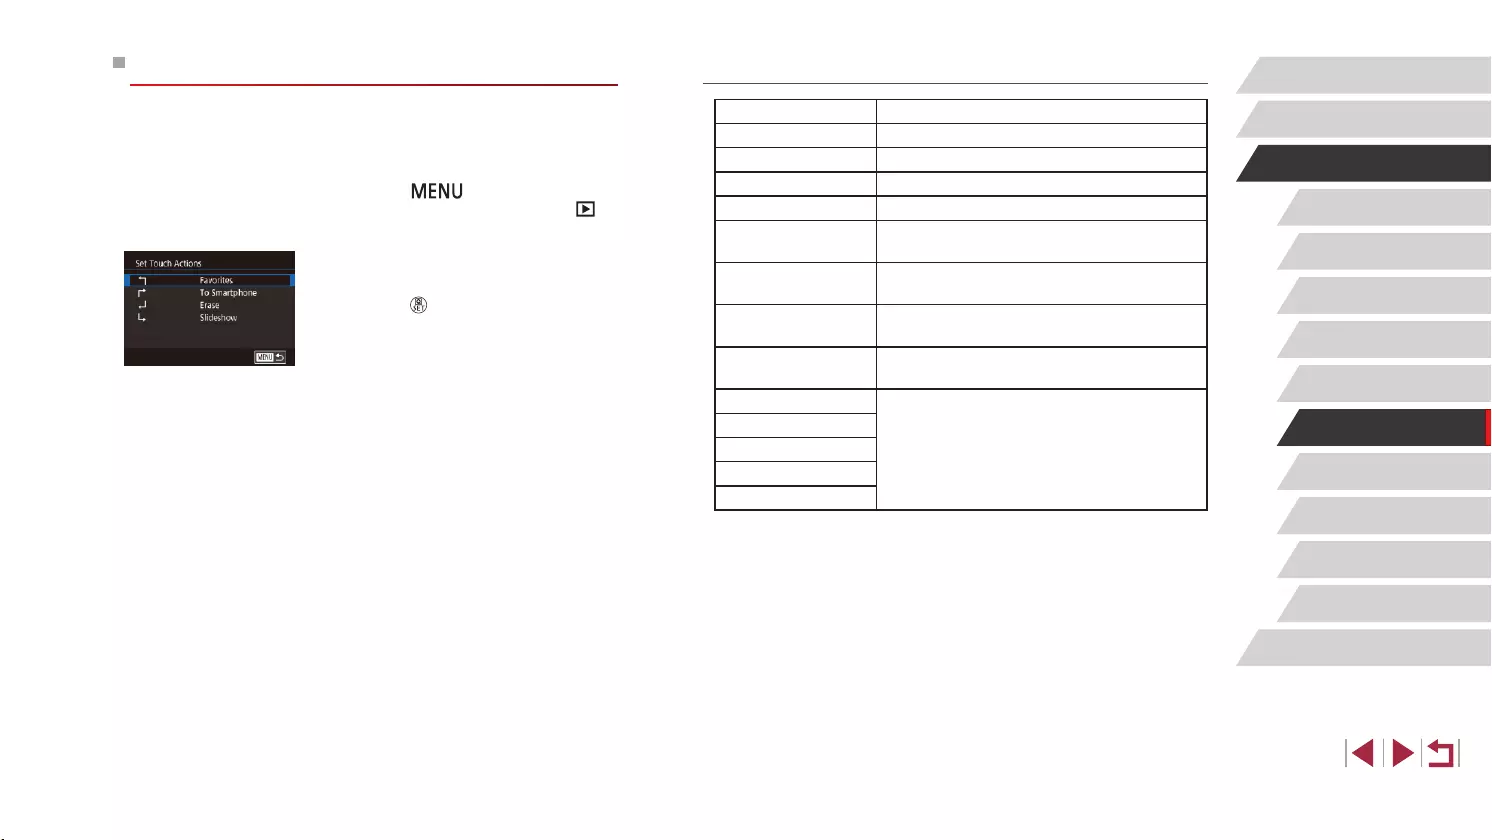
120
Wi-Fi Functions
Setting Menu
Accessories
Appendix
Before Use
Index
Basic Guide
Advanced Guide
Camera Basics
Auto Mode /
Hybrid Auto Mode
Other Shooting Modes
P Mode
Tv, Av, M, and C Mode
Playback Mode
Assignable Functions
Slideshow Start a slideshow.
Erase Erase an image.
Protect Protect an image or cancel protection.
Rotate Rotate an image.
Favorites Tag images as favorites, or untag the image.
Next Favorite Switch to displaying the next image tagged as
a favorite.
Previous Favorite Switch to displaying the previous image tagged
as a favorite.
Next Date Switch to displaying the rst image with the next
shooting date.
Previous Date Switch to displaying the rst image with the
previous shooting date.
To Camera
Access the Wi-Fi connection screen.
For Wi-Fi details, see “Wi-Fi Functions”
(=
131).
To Smartphone
To Computer
To Printer
To Web Service
Changing Touch Actions Functions
Simplify your preferred camera operations by reassigning dragging
patterns to them as desired.
1 Access the setting screen.
zPress the [ ] button, and then
choose [Set Touch Actions] on the [ 6]
tab (=
29).
2 Assign a function to a Touch Action.
zChoose a dragging pattern, and then
press the [ ] button.
zChoose a function to assign.
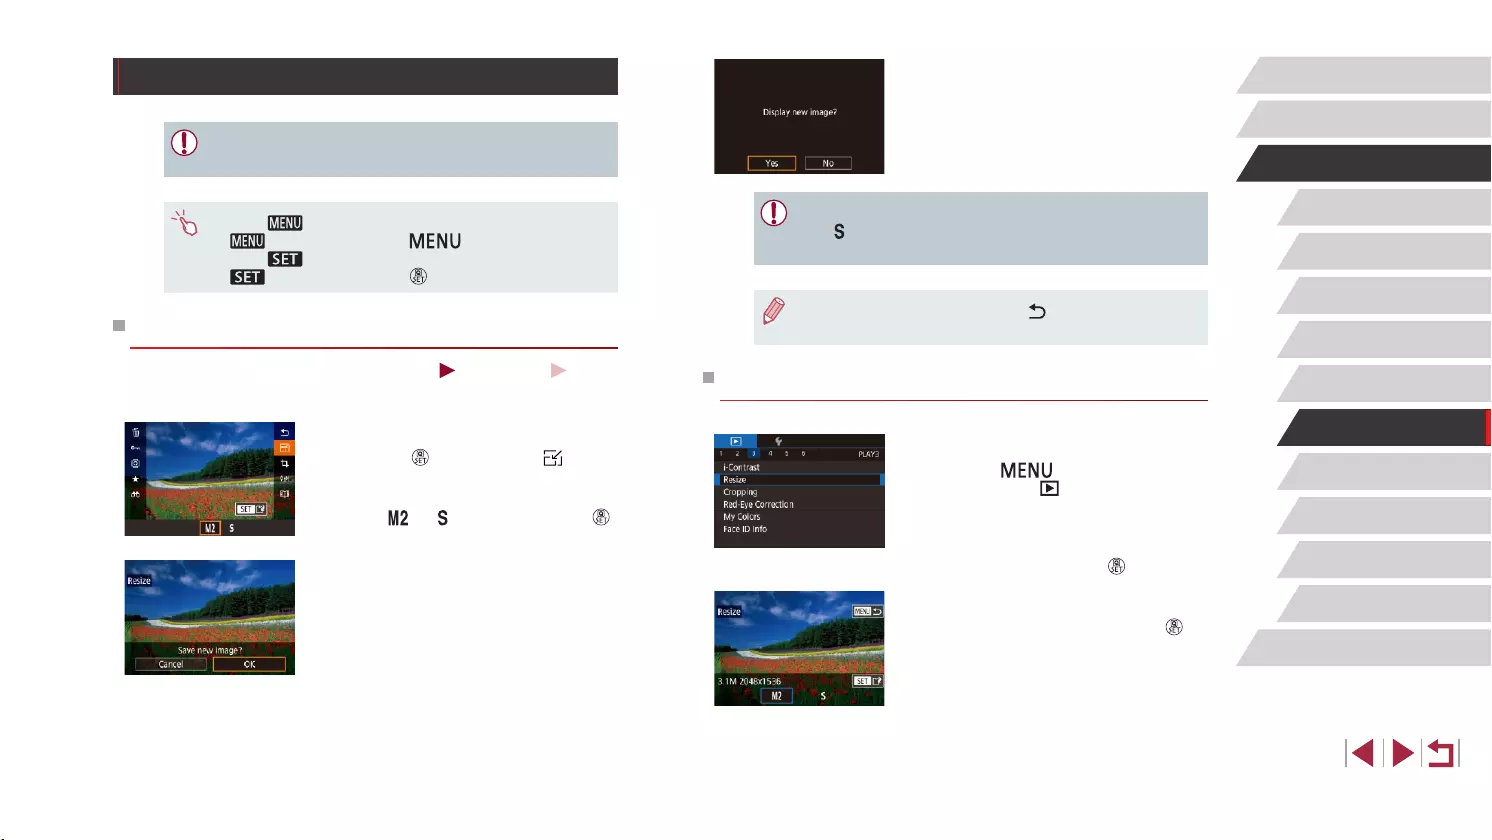
121
Wi-Fi Functions
Setting Menu
Accessories
Appendix
Before Use
Index
Basic Guide
Advanced Guide
Camera Basics
Auto Mode /
Hybrid Auto Mode
Other Shooting Modes
P Mode
Tv, Av, M, and C Mode
Playback Mode
3 Review the new image.
zTouch [Yes].
zThe saved image is now displayed.
●Editing is not possible for images shot at a recording pixel setting
of [ ].
●RAW images cannot be edited.
●To cancel resizing in step 1, choose [ ].
●Images cannot be resized to a higher number of recording pixels.
Using the Menu
1 Choose [Resize].
zPress the [ ] button and choose
[Resize] on the [ 3] tab (=
29).
2 Choose an image.
zChoose an image after dragging left or
right to browse. Press the [ ] button.
3 Choose an image size.
zChoose a size, and then press the [ ]
button.
zFollow steps 4 – 5 in “Changing Image
Color Tones (My Colors)” (=
123).
Editing Still Images
●Image editing (=
121 – =
124) is only available when the
memory card has sufcient free space.
●When [ ] is shown on an editing screen, you can touch
[] instead of pressing the [ ] button, if you prefer.
●When [ ] is shown on an editing screen, you can touch
[] instead of pressing the [ ] button, if you prefer.
Resizing Images
Still Images Movies
Save a copy of images at a lower number of recording pixels.
1 Choose an image size.
zPress the [ ] button, choose [ ] in
the menu, and choose an image size
(=
28).
zTouch [ ] or [ ], and then press the [ ]
button.
2 Save the new image.
zTouch [OK].
zThe image is now saved as a new le.
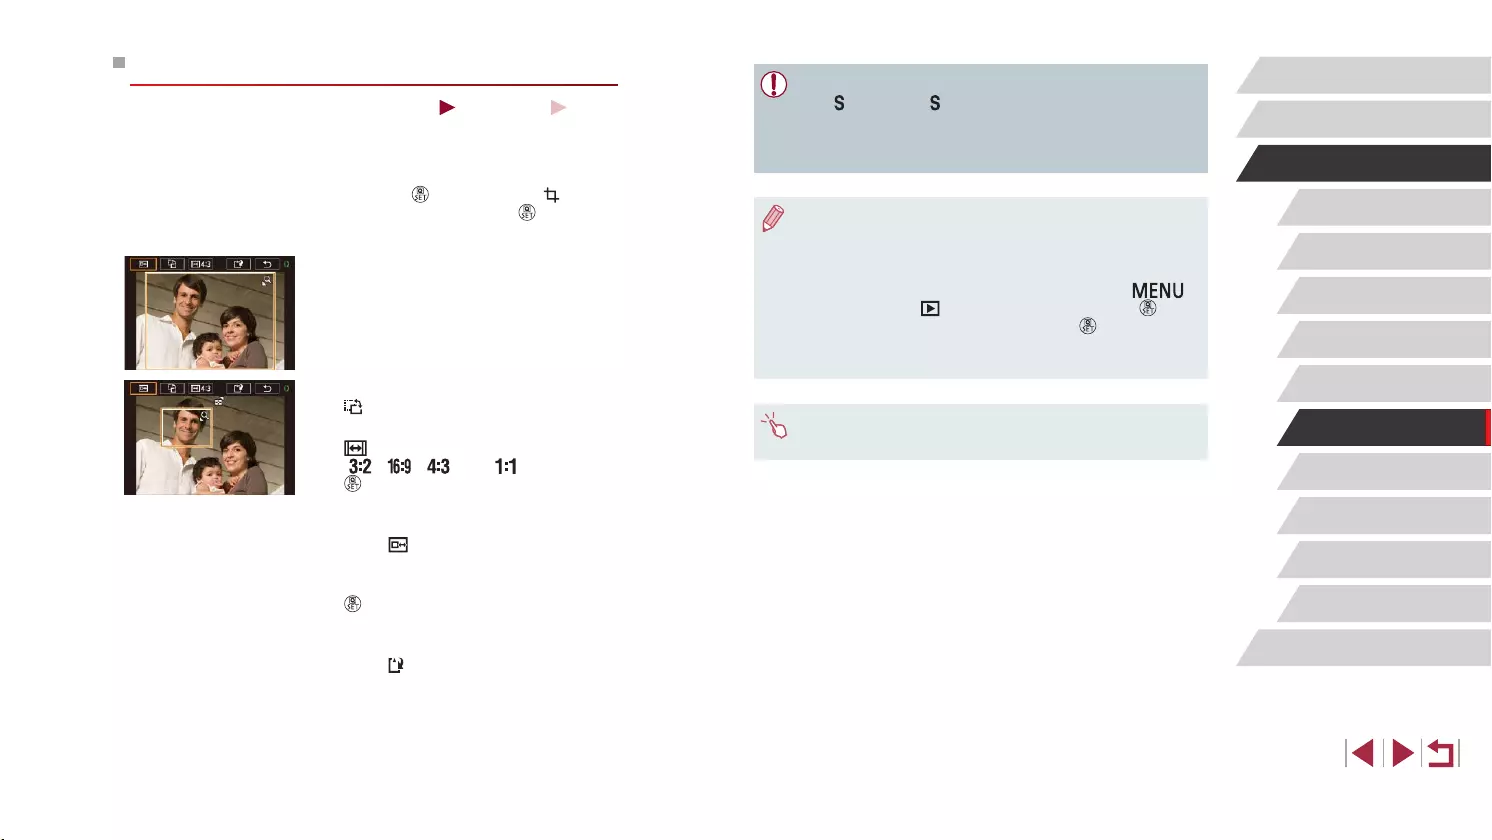
122
Wi-Fi Functions
Setting Menu
Accessories
Appendix
Before Use
Index
Basic Guide
Advanced Guide
Camera Basics
Auto Mode /
Hybrid Auto Mode
Other Shooting Modes
P Mode
Tv, Av, M, and C Mode
Playback Mode
●Editing is not possible for images shot at a recording pixel setting
of [ ] or resized to [ ] (=
121).
●RAW images cannot be edited.
●Cropped images cannot be cropped again.
●Cropped images cannot be resized.
●Cropped images will have a lower number of recording pixels than
uncropped images.
●While previewing the cropped image in step 3, you can resize,
move, and adjust the aspect ratio of the cropping frame.
●Operations in step 2 are also possible by pressing the [ ]
button, choosing [ 3] tab ► [Cropping], pressing the [ ]
button, choosing an image, and pressing the [ ] button again.
●If you crop still images shot using Face ID (=
43), only the
names of the people left in the cropped image will remain.
●You can also resize frames by pinching in or out (=
112) on the
screen.
Cropping
Still Images Movies
You can specify a portion of an image to save as a separate image le.
1 Access the setting screen.
zPress the [ ] button, choose [ ] in the
menu, and then press the [ ] button
(=
28).
2 Resize, move, and adjust the aspect
ratio of the cropping frame.
zTo resize the frame, move the zoom
lever.
zTo move the frame, drag on the screen.
zTo change the frame orientation, touch
[].
zTo change the frame aspect ratio, touch
[]. To switch between aspect ratios
([ ], [ ], [ ], and [ ]), press the
[] button repeatedly.
3 Preview the cropped image.
zTouch [ ].
zTo switch display between the cropped
image and the cropping frame, press the
[] button repeatedly.
4 Save as a new image and review.
zTouch [ ].
zFollow steps 2 – 3 in “Resizing Images”
(=
121).
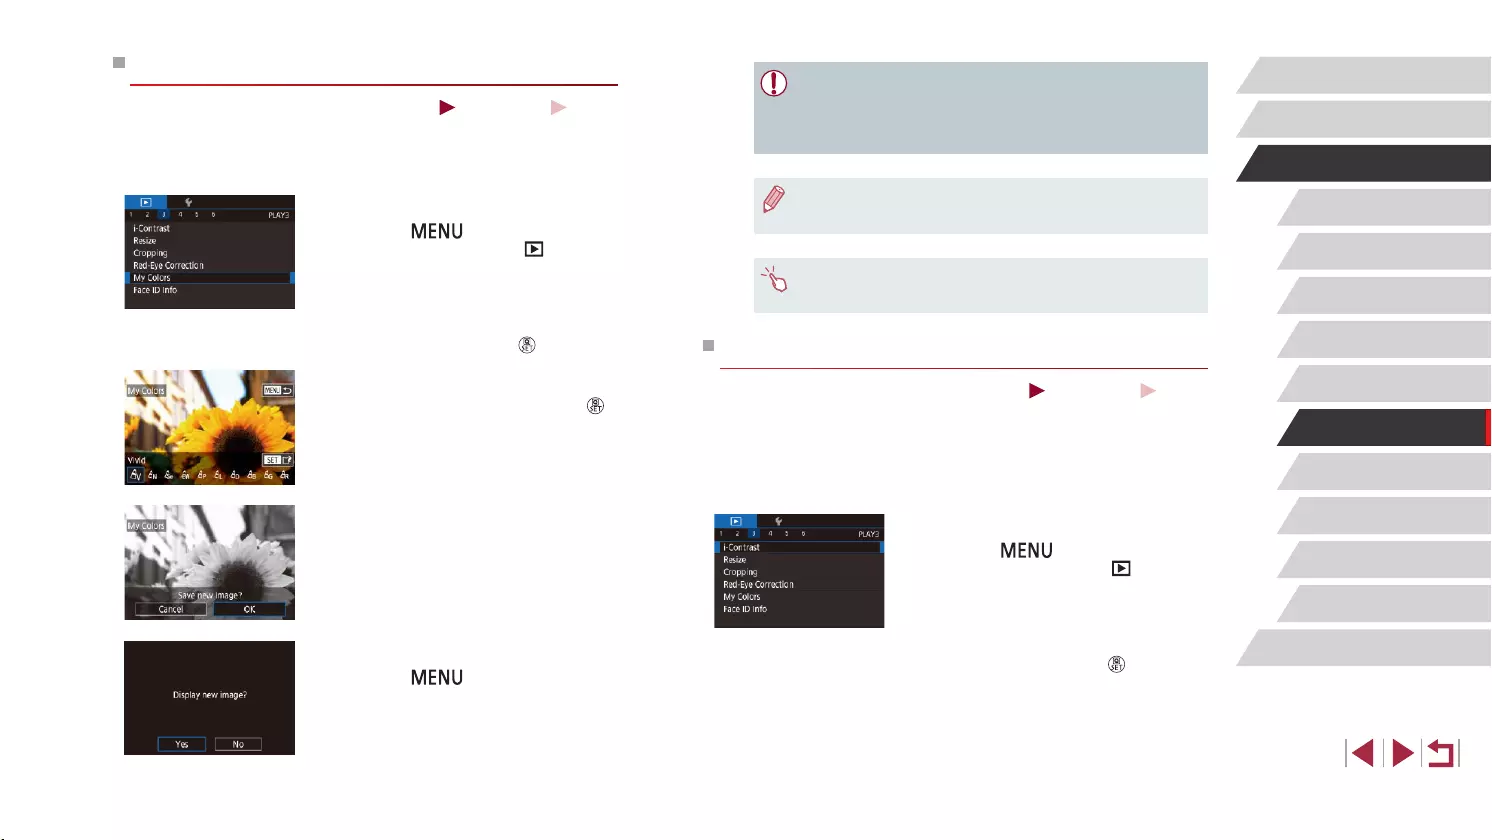
123
Wi-Fi Functions
Setting Menu
Accessories
Appendix
Before Use
Index
Basic Guide
Advanced Guide
Camera Basics
Auto Mode /
Hybrid Auto Mode
Other Shooting Modes
P Mode
Tv, Av, M, and C Mode
Playback Mode
●Image quality of pictures you repeatedly edit this way will be
a little lower each time, and you may not be able to obtain the
desired color.
●Colors of RAW images cannot be edited.
●The color of images edited using this function may vary slightly
from the color of images shot using My Colors (=
79).
●You can also congure this setting by touching an option to select
it on the screen in step 3 and then touching it again.
Correcting Image Brightness (i-Contrast)
Still Images Movies
Excessively dark image areas (such as faces or backgrounds) can be
detected and automatically adjusted to the optimal brightness. Insufcient
overall image contrast is also automatically corrected, to make subjects
stand out better. Choose from four correction levels, and then save the
image as a separate le.
1 Choose [i-Contrast].
zPress the [ ] button, and then
choose [i-Contrast] on the [ 3] tab
(=
29).
2 Choose an image.
zChoose an image after dragging left or
right to browse. Press the [ ] button.
Changing Image Color Tones (My Colors)
Still Images Movies
You can adjust image colors and then save the edited image as a
separate le. For details on each option, see “Changing Image Color
Tones (My Colors)” (=
79).
1 Choose [My Colors].
zPress the [ ] button, and then
choose [My Colors] on the [ 3] tab
(=
29).
2 Choose an image.
zChoose an image after dragging left or
right to browse. Press the [ ] button.
3 Choose an option.
zTouch an option, and then press the [ ]
button.
4 Save the new image.
zTouch [OK].
zThe image is now saved as a new le.
5 Review the new image.
zPress the [ ] button.
zTouch [Yes].
zThe saved image is now displayed.
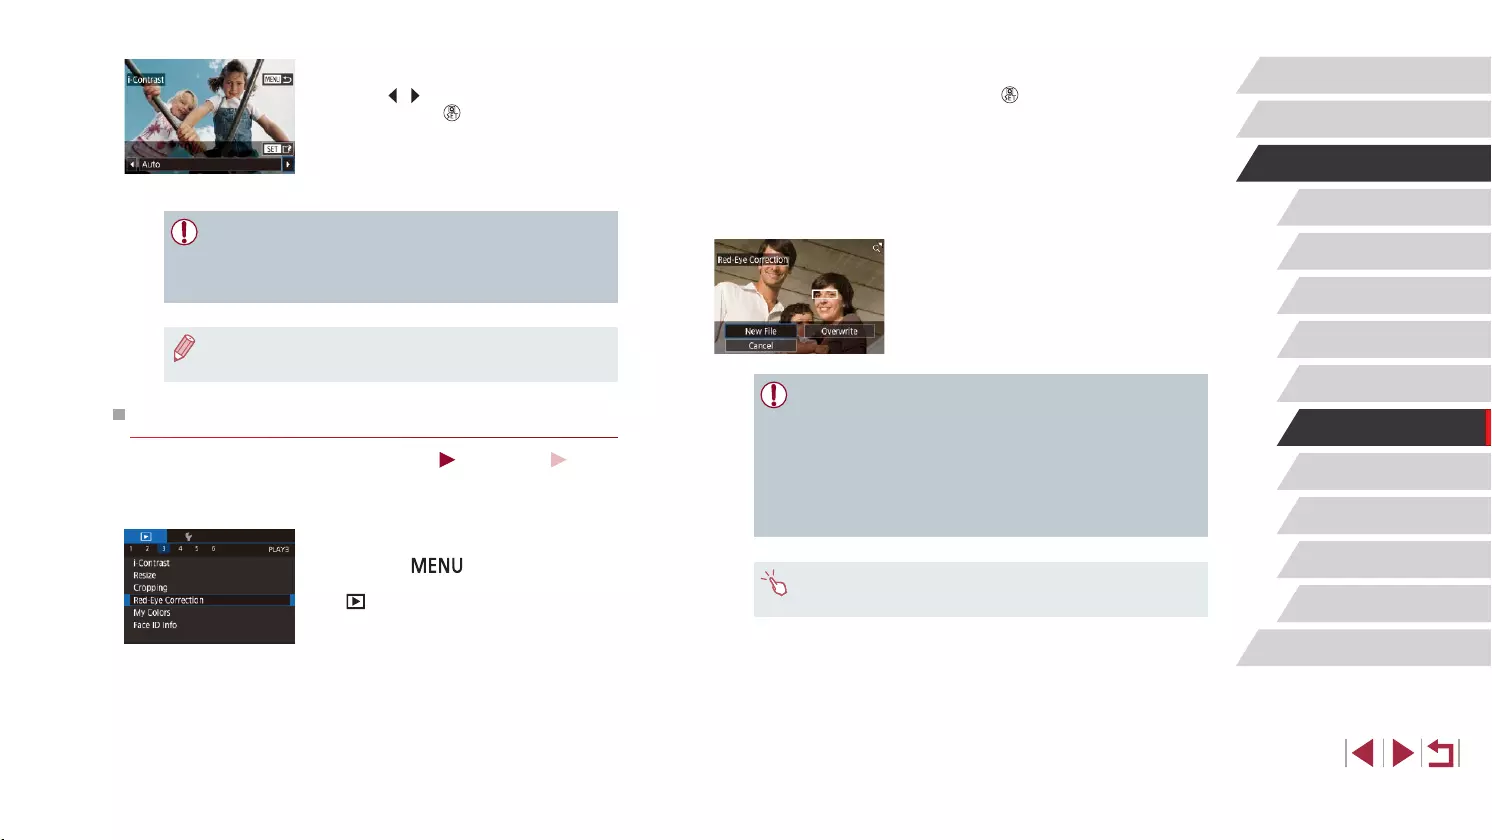
124
Wi-Fi Functions
Setting Menu
Accessories
Appendix
Before Use
Index
Basic Guide
Advanced Guide
Camera Basics
Auto Mode /
Hybrid Auto Mode
Other Shooting Modes
P Mode
Tv, Av, M, and C Mode
Playback Mode
3 Correct the image.
zPress the [ ] button.
zRed-eye detected by the camera is now
corrected, and frames are displayed
around corrected image areas.
zEnlarge or reduce images as needed.
Follow the steps in “Magnifying Images”
(=
112).
4 Save as a new image and review.
zTouch [New File].
zThe image is now saved as a new le.
zFollow step 5 in “Changing Image Color
Tones (My Colors)” (=
123).
●Some images may not be corrected accurately.
●To overwrite the original image with the corrected image, choose
[Overwrite] in step 4. In this case, the original image will be
erased.
●Protected images cannot be overwritten.
●RAW images cannot be edited this way.
●Red-eye correction can be applied to JPEG images also captured
in RAW format, but the original image cannot be overwritten.
●You can also save images by touching [New File] or [Overwrite]
on the screen in step 4.
3 Choose an option.
zTouch [ ][ ] to choose an option, and
then press the [ ] button.
4 Save as a new image and review.
zFollow steps 4 – 5 in “Changing Image
Color Tones (My Colors)” (=
123).
●For some images, correction may be inaccurate or may cause
images to appear grainy.
●Images may look grainy after repeated editing using this function.
●RAW images cannot be edited this way.
●If [Auto] does not produce the expected results, try correcting
images using [Low], [Medium], or [High].
Correcting Red-Eye
Still Images Movies
Automatically corrects images affected by red-eye. You can save the
corrected image as a separate le.
1 Choose [Red-Eye Correction].
zPress the [ ] button, and then
choose [Red-Eye Correction] on the
[3] tab (=
29).
2 Choose an image.
zDrag left or right across the screen to
choose an image.
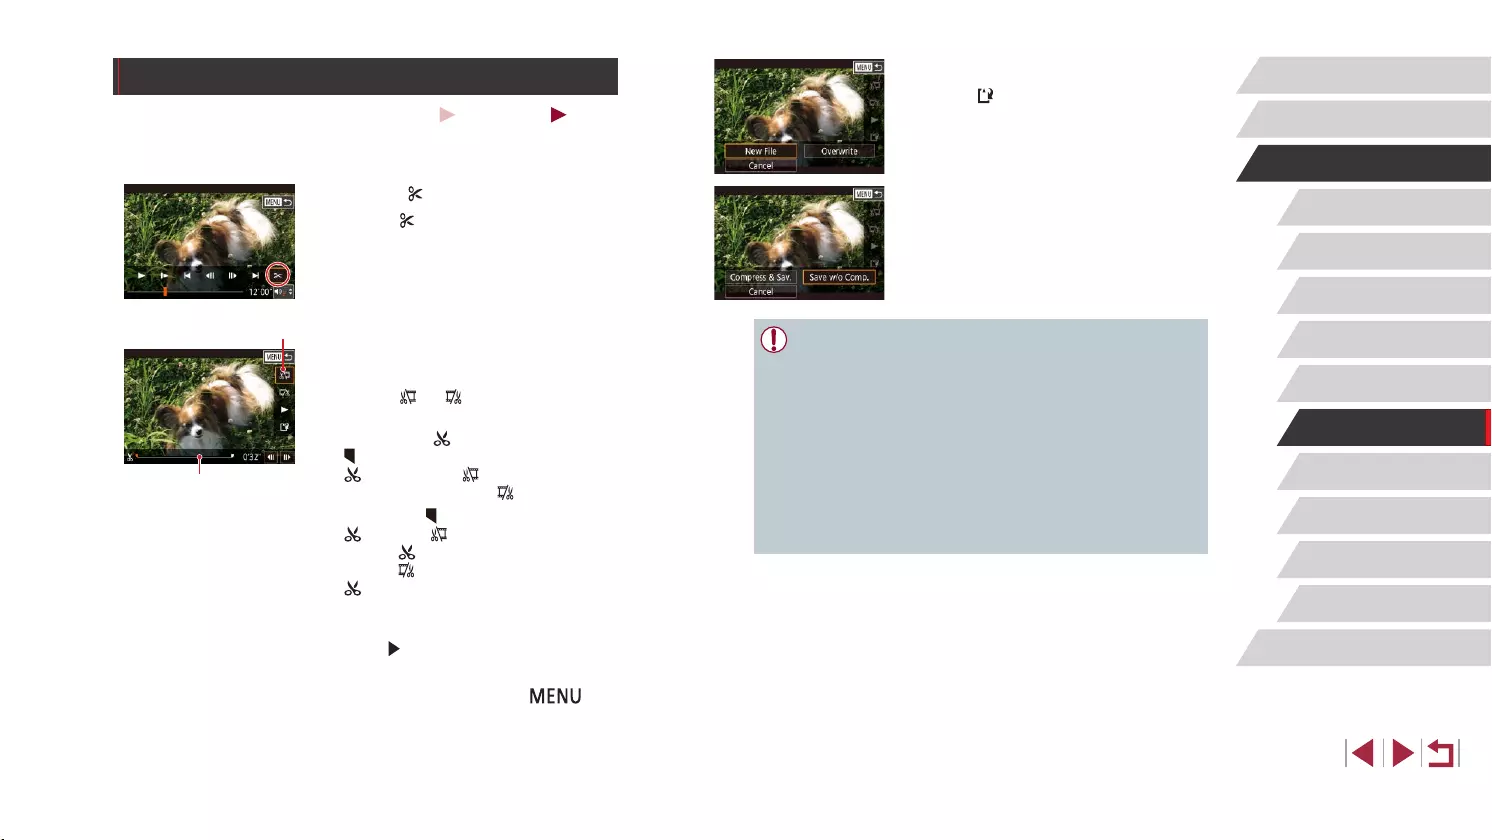
125
Wi-Fi Functions
Setting Menu
Accessories
Appendix
Before Use
Index
Basic Guide
Advanced Guide
Camera Basics
Auto Mode /
Hybrid Auto Mode
Other Shooting Modes
P Mode
Tv, Av, M, and C Mode
Playback Mode
4 Save the edited movie.
zTouch [ ].
zTouch [New File].
zTouch [Save w/o Comp.].
zThe movie is now saved as a new le.
●The following movies cannot be edited this way: digest movies
(=
35), Creative Shot movies (=
56), or albums without
background music (=
128).
●To overwrite the original movie with the cut one, choose
[Overwrite] in step 4. In this case, the original movie will be
erased.
●If the memory card lacks sufcient space, only [Overwrite] will be
available.
●Movies may not be saved if the battery pack runs out while saving
is in progress.
●When editing movies, you should use a fully charged battery pack
or an AC adapter kit (sold separately, =
168).
Editing Movies
Still Images Movies
You can remove unneeded portions from the beginning and end of
movies.
1 Choose [ ].
zChoose [ ] as described in steps 1 – 5 in
“Viewing” (=
103).
zThe movie editing panel and editing bar
are now displayed.
2 Specify portions to cut.
z(1) is the movie editing panel, and (2) is
the editing bar.
zChoose [ ] or [ ].
zTo view the portions you can cut
(identied by [ ] on the screen), drag
[]. Cut the beginning of the movie (from
[]) by choosing [ ], and cut the end of
the movie by choosing [ ].
zIf you move [ ] to a position other than a
[] mark, in [ ] the portion before the
nearest [ ] mark on the left will be cut,
while in [ ] the portion after the nearest
[] mark on the right will be cut.
3 Review the edited movie.
zTouch [ ] to play the edited movie.
zTo edit the movie again, repeat step 2.
zTo cancel editing, press the [ ]
button, and then touch [OK].
(
)
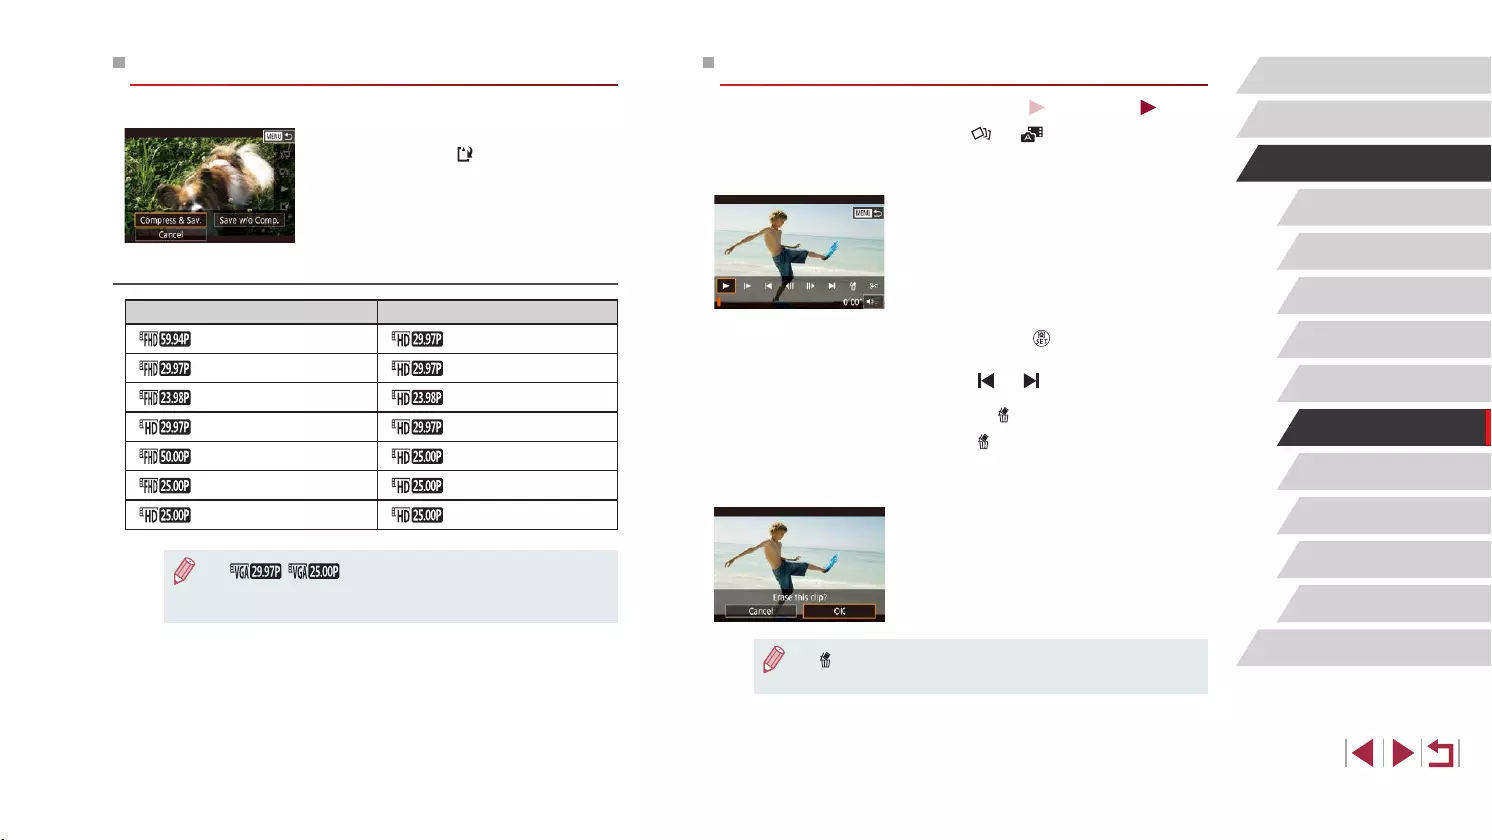
126
Wi-Fi Functions
Setting Menu
Accessories
Appendix
Before Use
Index
Basic Guide
Advanced Guide
Camera Basics
Auto Mode /
Hybrid Auto Mode
Other Shooting Modes
P Mode
Tv, Av, M, and C Mode
Playback Mode
Erasing Movie Chapters
Still Images Movies
Individual chapters (clips) recorded in [ ] or [ ] mode (=
35,
=
56) can be erased. Be careful when erasing clips, because they
cannot be recovered.
1 Select the clip to erase.
zPlay a short movie as described in steps
1 – 2 of “Viewing Short Movies Recorded
in Creative Shot Mode (Creative Shot
Movies)” (=
106) or “Viewing Short
Movies Created When Shooting Still
Images (Digest Movies)” (=
106), and
then press the [ ] button to access the
movie control panel.
zTouch [ ] or [ ] to choose a chapter.
2 Choose [ ].
zTouch [ ].
zThe selected clip is played back
repeatedly.
3 Conrm erasure.
zTouch [OK].
zThe clip is erased, and the short movie is
overwritten.
●[] is not displayed if you select a clip when the camera is
connected to a printer.
Reducing File Sizes
Movie le sizes can be reduced by compressing movies as follows.
zOn the screen in step 2 of “Editing
Movies”, choose [ ], and then choose
[New File].
zTouch [Compress & Sav.].
Image Quality of Compressed Movies
Before Compression After Compression
●[ ][ ] movies cannot be compressed.
●Edited movies cannot be saved in compressed format when you
choose [Overwrite].
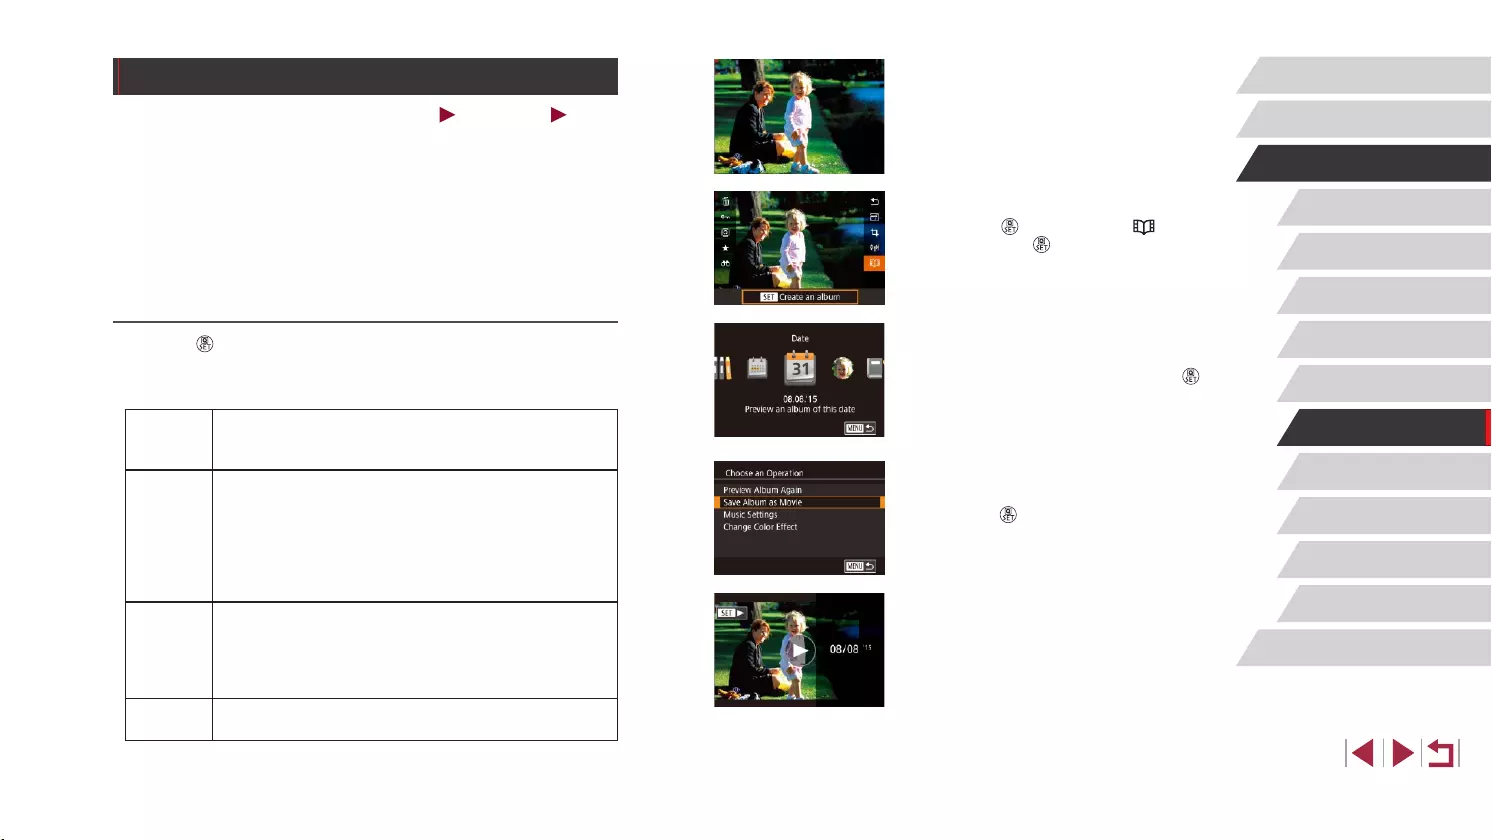
127
Wi-Fi Functions
Setting Menu
Accessories
Appendix
Before Use
Index
Basic Guide
Advanced Guide
Camera Basics
Auto Mode /
Hybrid Auto Mode
Other Shooting Modes
P Mode
Tv, Av, M, and C Mode
Playback Mode
1 Choose an image.
zChoose an image in single-image display.
zThemes available in step 3 will vary
depending on image shooting date and
Face ID information.
2 Access the home screen.
zPress the [ ] button, choose [ ], and
then press the [ ] button (=
28).
zAfter [Busy] is displayed, the home
screen is displayed.
3 Preview an album.
zChoose a person or [Date] or [Event] as
the album theme, and then press the [ ]
button.
zAfter [Loading] is displayed for a few
seconds, the album is played.
4 Save the album.
zChoose [Save Album as Movie], and then
press the [ ] button.
zOnce the album is saved, [Saved] is
displayed.
5 Play the album (=
103).
Viewing Albums (Story Highlights)
Still Images Movies
You can choose themes such as a date or person’s name to create an
album of automatically selected images that match the theme. These
images are combined into a slideshow that can be saved as a short movie
of about 2 – 3 minutes.
Before using this feature, make sure the battery pack is fully charged.
Creating albums also requires free space on the memory card. As a
guideline, use a memory card with a capacity of 16 GB or higher, and
ensure at least 1 GB of free space.
Choosing Themes for Albums
Press the [ ] button and choose the Story Highlights icon. The home
screen is displayed, and you can choose the theme for the camera to use
when selecting album elements. Note that the camera is more likely to
add images tagged as favorites (=
118) to albums.
Date
Creates an album of images shot on the same day.
Images are selected from those shot on the same day as
the image displayed before you access the home screen.
Person’s
name
Can be used to create monthly albums of people, such as
albums of children as they grow up.
Subjects whose Face ID information you registered before
shooting may be selected for albums.
Images selected are those that have the same subject shot
during the same month as the image displayed before you
access the home screen.
Event
A good choice for albums of vacations, parties, or other
events.
Images are selected from those shot during the event
before and after the image displayed before you access
the home screen.
Custom Includes images based on your specied images, dates, or
people registered in Face ID.
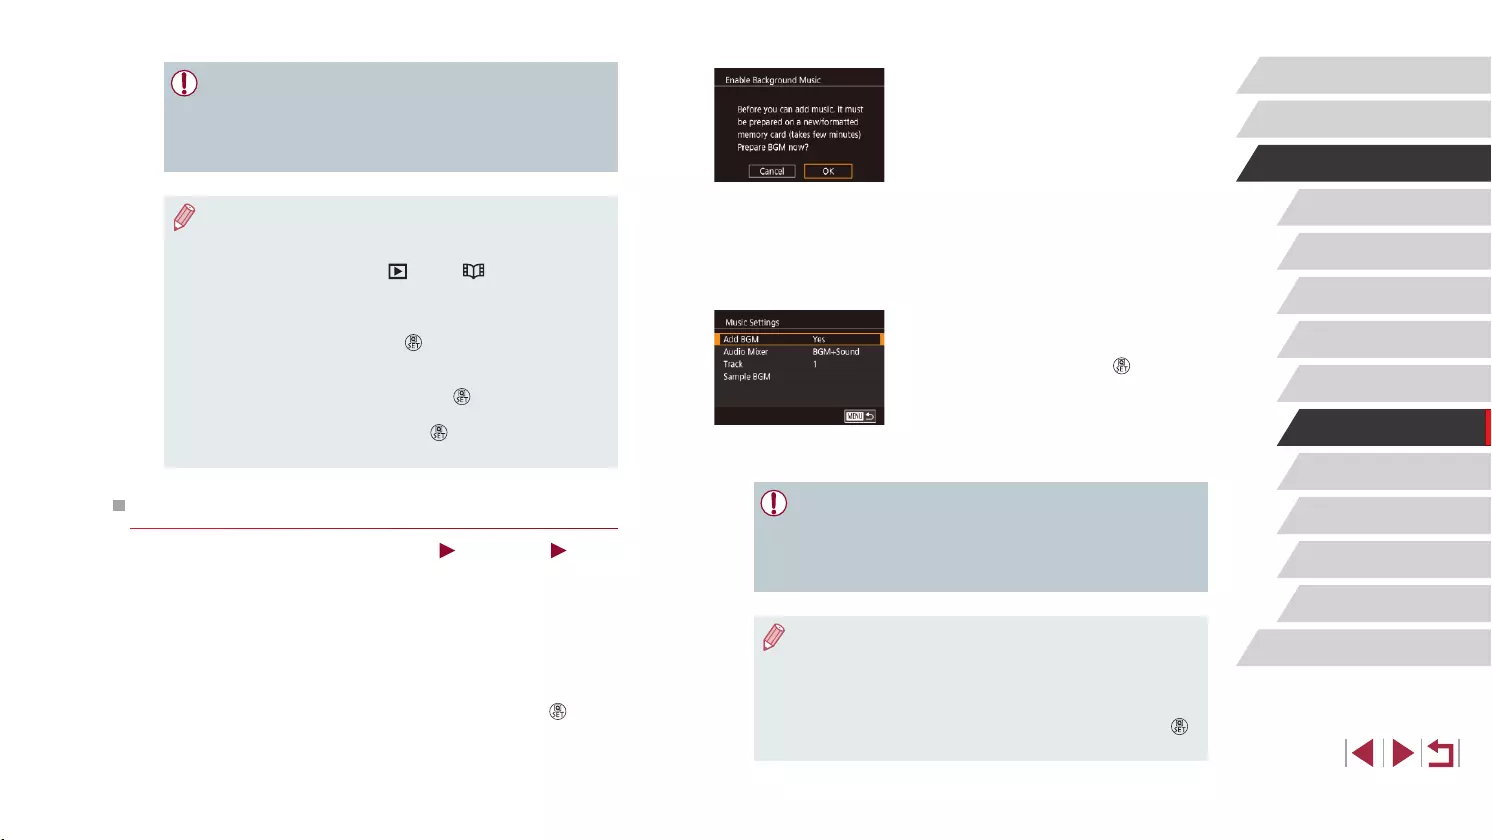
128
Wi-Fi Functions
Setting Menu
Accessories
Appendix
Before Use
Index
Basic Guide
Advanced Guide
Camera Basics
Auto Mode /
Hybrid Auto Mode
Other Shooting Modes
P Mode
Tv, Av, M, and C Mode
Playback Mode
zThe screen at left is displayed when you
use a new or recently formatted memory
card. Touch [OK] and wait until the seven
types of music are registered to the card,
which takes about four minutes.
zWhen using a memory card with music
already registered to it, go to step 2.
2 Create the album.
zFollow steps 1 – 3 in “Viewing Albums
(Story Highlights)” (=
127) to create an
album.
3 Congure background music
settings.
zChoose an item, press the [ ] button,
and choose an option (=
29).
4 Save the album.
zFollow step 4 in “Viewing Albums (Story
Highlights)” (=
127) to save albums.
●Once albums are saved, background music cannot be added
later. Background music in albums cannot be removed or
changed.
●Chapters of albums with background music cannot be edited
(=
126).
●If you prefer not to add background music, set [Add BGM] to [No]
on the screen in step 3.
●To use only background music instead of movie audio, set [Audio
Mixer] to [BGM only] on the screen in step 3.
●To listen to a sample of the background music selected in [Track],
choose [Sample BGM] on the screen in step 3 and press the [ ]
button.
●Albums can include following images captured by the camera.
— Still images
— Digest movies (=
35), except compressed movies
— Short movie clips (=
71) of two seconds or longer, or
Creative Shot movies (=
56), except compressed movies
●Albums cannot be saved unless there is enough space on the
memory card.
●You can also access the Story Highlights home screen by
choosing MENU (=
29) ► [ 2] tab ► [ Story Highlights].
●To jump to the next chapter during the preview, drag left, and to
jump to the previous chapter, drag right.
●You can specify the color effect in step 4 by choosing [Change
Color Effect] and pressing the [ ] button. To preview how the
album looks with your selected effect applied, choose [Preview
Album Again] on the screen in step 4 after dragging left or right to
choose a color effect and pressing the [ ] button.
●To play saved albums, choose [List of Albums] on the Story
Highlights home screen, press the [ ] button, and touch a listed
album.
Adding Background Music to Albums
Still Images Movies
Choose from seven kinds of background music to play during album
playback.
1 Register background music to a
memory card.
zFollowing steps 1 – 4 in “Viewing Albums
(Story Highlights)” (=
127), choose
[Music Settings] and press the [ ]
button.

129
Wi-Fi Functions
Setting Menu
Accessories
Appendix
Before Use
Index
Basic Guide
Advanced Guide
Camera Basics
Auto Mode /
Hybrid Auto Mode
Other Shooting Modes
P Mode
Tv, Av, M, and C Mode
Playback Mode
5 Choose a color effect.
zOn the screen in step 4, choose [Change
Color Effect].
zDrag left or right to choose a color effect,
and then press the [ ] button.
6 Save the album.
zFollow step 4 in “Viewing Albums (Story
Highlights)” (=
127) to save albums.
●You can specify up to 40 les (or 10 movie les) after choosing
[Image Selection]. The second time you create a custom album,
[Select images based on previous settings?] is displayed. To
use previously selected images as the basis, choose [Yes]. The
previous stills, clips, or Creative Shot movies are labeled with
[], and multiple images are displayed.
●Up to 15 dates can be selected if you choose [Date Selection].
●The color effect may not be applied to some images.
Creating Your Own Albums
Still Images Movies
Create your own albums by choosing desired images.
1 Choose to create a Custom album.
zFollowing steps 1 – 3 in “Viewing Albums
(Story Highlights)” (=
127), choose
[Custom] and press the [ ] button.
2 Choose a selection method.
zChoose [Image Selection], [Date
Selection], or [Person Selection], and
then press the [ ] button.
3 Choose album elements.
zTouch elements for your album to label
them with [ ].
zPress the [ ] button after you are
nished selecting still images, short
clips, or Creative Shot movies in [Image
Selection], dates in [Date Selection], or
people in [Person Selection].
zChoose [Preview] and press the [ ]
button.
4 Choose background music.
zWhen the screen at left is displayed,
choose [Music Settings]. Add background
music as described in “Adding
Background Music to Albums” (=
128),
and then press the [ ] button.
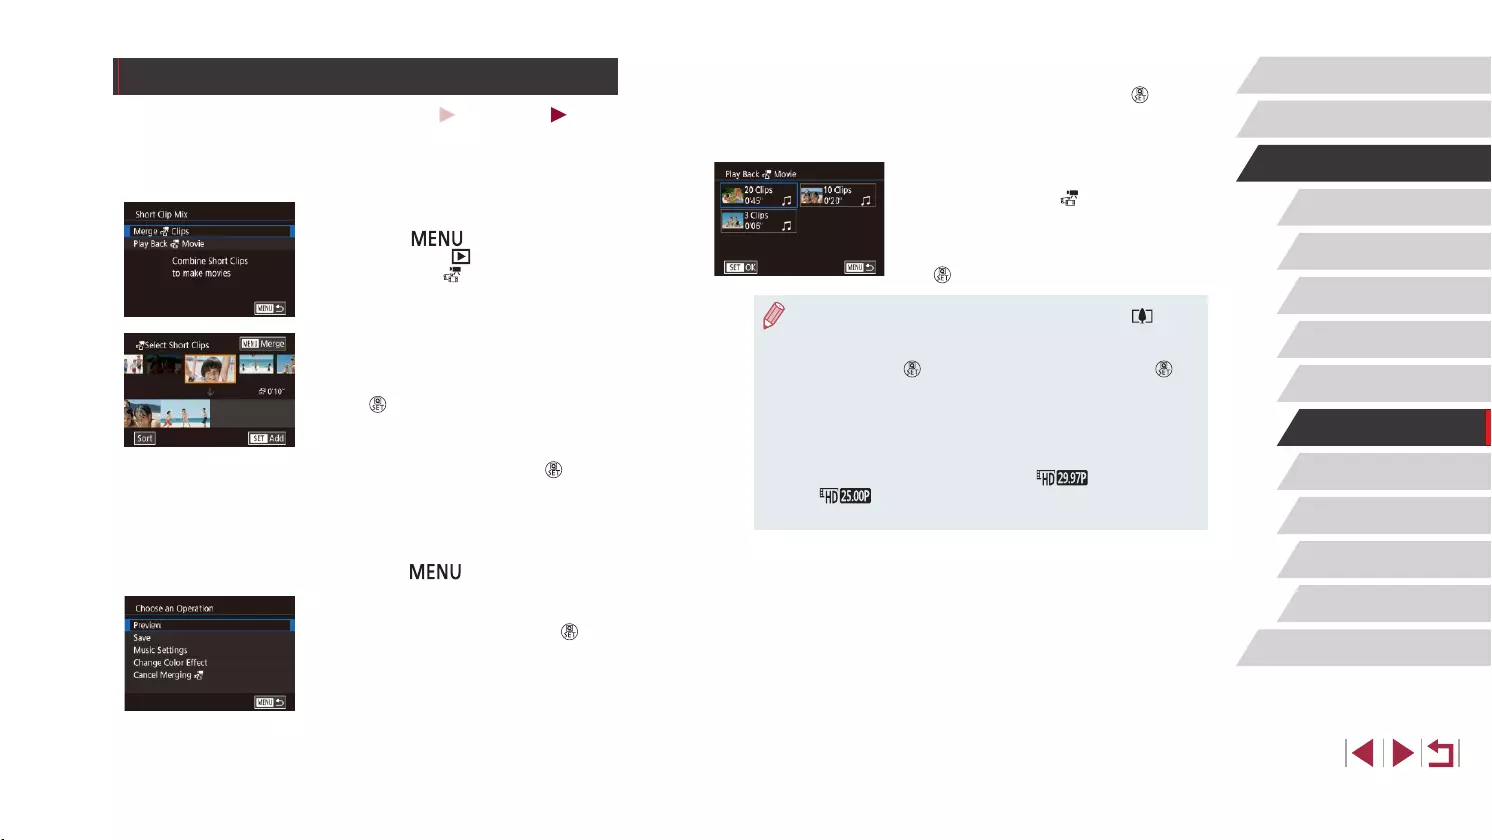
130
Wi-Fi Functions
Setting Menu
Accessories
Appendix
Before Use
Index
Basic Guide
Advanced Guide
Camera Basics
Auto Mode /
Hybrid Auto Mode
Other Shooting Modes
P Mode
Tv, Av, M, and C Mode
Playback Mode
4 Save the movie.
zChoose [Save] and press the [ ] button.
zOnce the movie is saved, [Saved] is
displayed.
5 Play the movie.
zChoose [Play Back Movie] on the
screen in step 1 to view a list of movies
you have created.
zChoose the movie to play and press the
[] button.
●To play the selected clip, move the zoom lever toward [ ] on the
screen in step 2.
●To rearrange clips, touch [Sort] on the screen in step 2, select a
clip, press the [ ] button, drag left or right, and press the [ ]
button again.
●To apply a color effect, choose [Change Color Effect] on the
screen in step 3.
●To add background music, choose [Music Settings] on the screen
in step 3 (=
128).
●The image quality of movies saved is [ ] (for NTSC) or
[] (for PAL).
●Use a fully charged battery pack, if possible.
Combining Short Clips
Still Images Movies
Combine short clips to create a longer movie.
Note that movies created this way are not included in Story Highlights
albums (=
127).
1 Access the editing screen.
zPress the [ ] button, choose [Short
Clip Mix] on the [ 2] tab, and then
choose [Merge Clips] (=
29).
2 Specify clips to combine.
zDrag clips on the top of the screen left or
right, choose a clip to combine, and press
the [ ] button.
zYour selected clip is displayed on the
bottom of the screen.
zTo cancel selection, press the [ ] button
again.
zRepeat these steps to specify other clips
to combine.
zAfter you are nished selecting clips,
press the [ ] button.
3 Preview the movie.
zChoose [Preview] and press the [ ]
button.
zAfter [Loading] is displayed for a few
seconds, a preview of the combined clips
is played.

131
Setting Menu
Accessories
Appendix
Before Use
Index
Basic Guide
Advanced Guide
Camera Basics
Auto Mode /
Hybrid Auto Mode
Other Shooting Modes
P Mode
Tv, Av, M, and C Mode
Playback Mode
Wi-Fi Functions
Available Wi-Fi Features
You can send and receive images and control the camera remotely by
connecting it to these devices and services via Wi-Fi.
●Smartphones and Tablets
Send images to smartphones and tablet computers that have Wi-Fi
functions. You can also shoot remotely and geotag your shots from a
smartphone or tablet.
For convenience in this manual, smartphones, tablets, and other
compatible devices are collectively referred to as “smartphones”.
●Computer
Use software to save camera images to a computer connected via
Wi-Fi.
●Web Services
Add your account information to the camera for CANON iMAGE
GATEWAY online photography service or other Web services to
send camera images to the services. Unsent images on the camera
can also be sent to a computer or Web service via CANON iMAGE
GATEWAY.
●Printers
Send images wirelessly to a PictBridge-compatible printer (supporting
DPS over IP) to print them.
●Another Camera
Send images wirelessly between Wi-Fi-compatible Canon cameras.
Wi-Fi Functions
Send images wirelessly from the camera to a variety
of compatible devices, and use the camera with Web
services
●Before using Wi-Fi, be sure to read “Wi-Fi (Wireless LAN)
Precautions” (=
209).
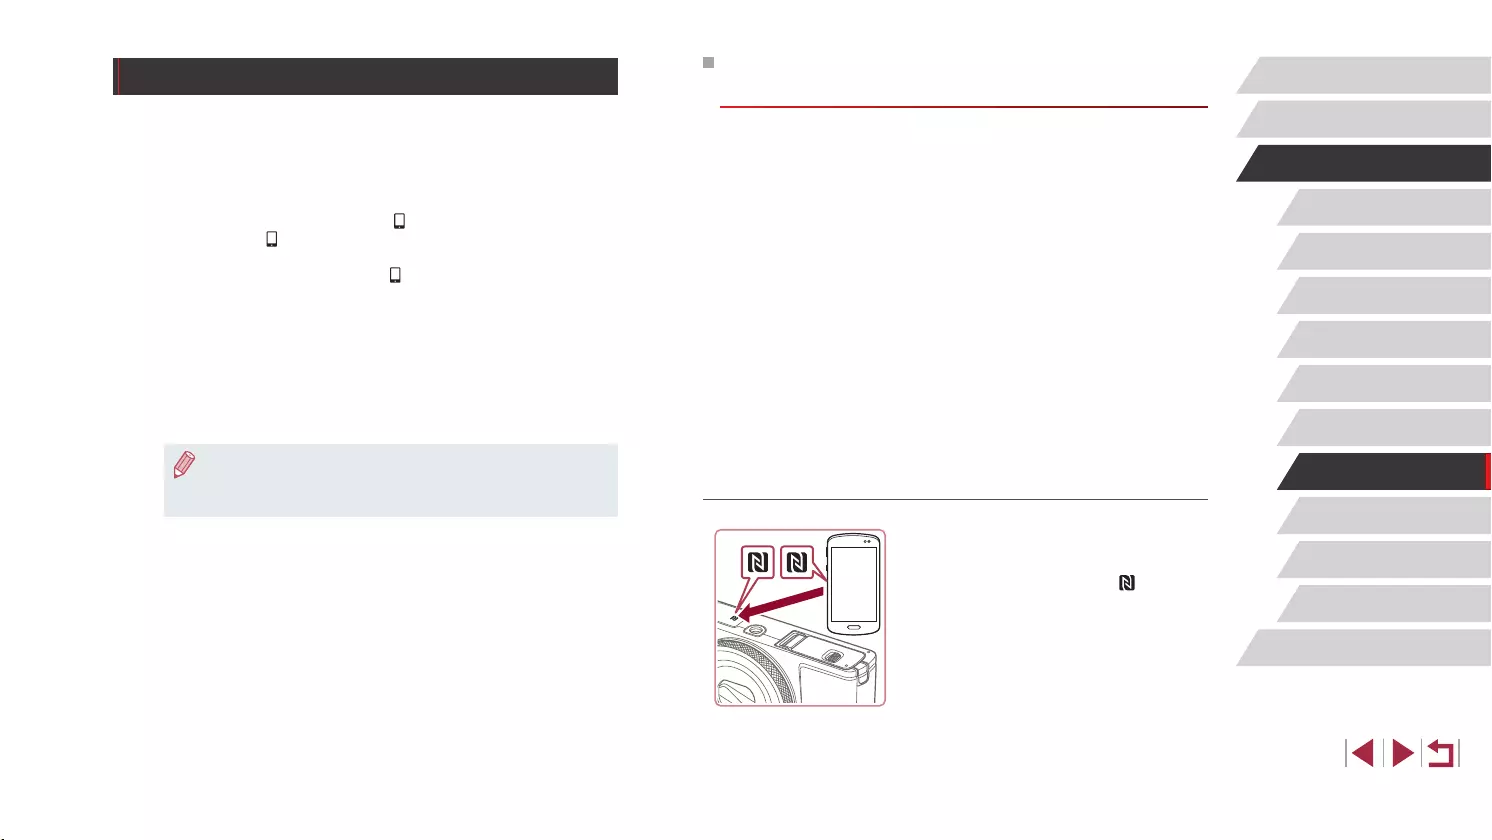
132
Setting Menu
Accessories
Appendix
Before Use
Index
Basic Guide
Advanced Guide
Camera Basics
Auto Mode /
Hybrid Auto Mode
Other Shooting Modes
P Mode
Tv, Av, M, and C Mode
Playback Mode
Wi-Fi Functions
Sending Images to an NFC-Compatible
Smartphone
Use an Android (OS version 4.0 or later) smartphone’s NFC to simplify the
process of installing Camera Connect and connecting to the camera.
Operation when devices are initially connected via NFC varies depending
on the camera mode when the devices are touched together.
●If the camera is off or in Shooting mode when the devices are touched
together, you can choose and send images on the image selection
screen. Once the devices are connected, you can also shoot remotely
and geotag your shots (=
155). It’s easy to reconnect to recent
devices, which are listed in the Wi-Fi menu.
●If the camera is in Playback mode when the devices are touched
together, you can choose and send images from the index display
shown for image selection. The connection is ended automatically
after image transfer.
Follow the instructions in the following section for NFC-initiated connection
to a camera that is off or in Shooting mode.
Connecting via NFC When Camera Is Off or in Shooting
Mode
1 Install Camera Connect.
zActivate NFC on the smartphone and
touch the devices’ N-Marks ( ) together
to start Google Play on the smartphone
automatically. Once the Camera Connect
download page is displayed, download
and install the app.
Sending Images to a Smartphone
There are several ways to connect the camera to a smartphone and send
images.
●Connect via NFC (=
132)
Simply touch an NFC-compatible Android smartphone (OS version 4.0
or later) against the camera to connect the devices.
●Connect to a device assigned to the [ ] button (=
134)
Simply press the [ ] button to connect the devices. This simplies
sending images to a smartphone (=
134). Note that only one
smartphone can be assigned to the [ ] button.
●Connect via the Wi-Fi menu (=
136)
You can connect the camera to a smartphone as you would connect it
to a computer or other device. Multiple smartphones can be added.
Before connecting to the camera, you must install the free dedicated
Camera Connect app on the smartphone. For details on this application
(supported smartphones and included functions), refer to the Canon
website.
●Canon Wi-Fi-compatible camera owners who use CameraWindow
to connect their camera via Wi-Fi to a smartphone should
consider switching to the Camera Connect mobile app.
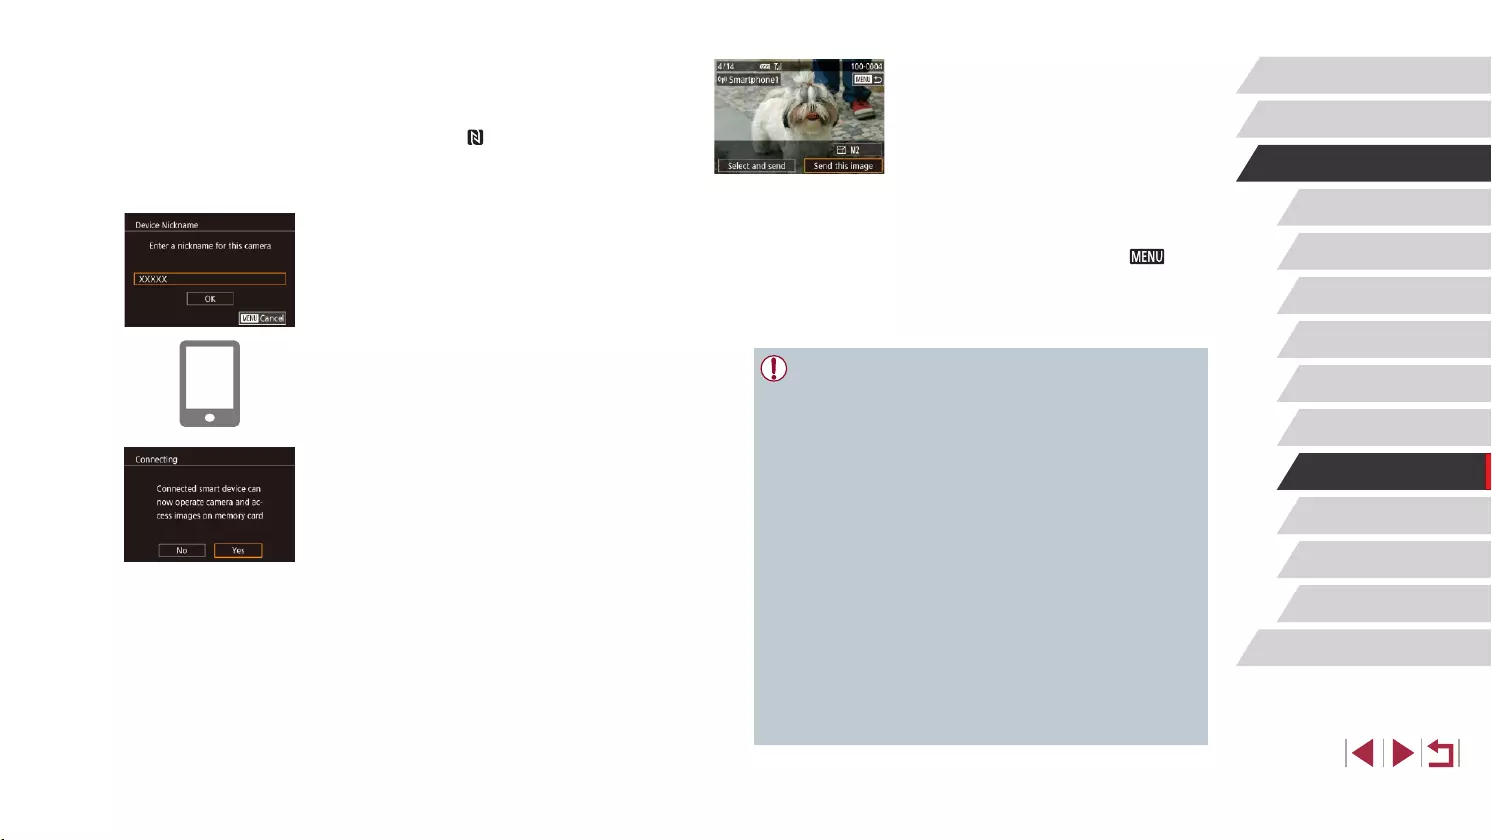
133
Setting Menu
Accessories
Appendix
Before Use
Index
Basic Guide
Advanced Guide
Camera Basics
Auto Mode /
Hybrid Auto Mode
Other Shooting Modes
P Mode
Tv, Av, M, and C Mode
Playback Mode
Wi-Fi Functions
4 Send an image.
zDrag images left or right to choose an
image to send, and then touch [Send this
image].
zImage transfer will begin. The screen
darkens during image transfer.
z[Transfer completed] is displayed after
the image is sent, and the image transfer
screen is displayed again.
zTo end the connection, touch [ ] in
the upper right of the screen, and then
touch [OK] on the conrmation screen.
You can also use the smartphone to end
the connection.
●When using NFC, keep the following points in mind.
— Avoid strong impact between the camera and smartphone. This
may damage the devices.
— Depending on the smartphone, the devices may not recognize
each other immediately. In this case, try holding the devices
together in slightly different positions. If connection is not
established, keep the devices together until the camera screen
is updated.
— If you attempt connection when the camera is off, a message
may be displayed on the smartphone reminding you to turn on
the camera. If so, turn the camera on and touch the devices
together again.
— Do not place other objects between the camera and
smartphone. Also, note that camera or smartphone covers or
similar accessories may block communication.
●All images in the camera can be viewed from the connected
smartphone when you choose [Yes] in step 3. To keep camera
images private, so that they cannot be viewed from the
smartphone, choose [No] in step 3.
●Once you have registered a smartphone, you can change privacy
settings for it on the camera (=
156).
2 Establish the connection.
zMake sure the camera is off or in
Shooting mode.
zTouch the N-Mark ( ) on the smartphone
with Camera Connect installed against
the camera’s N-Mark.
zThe camera starts up automatically.
zIf the [Device Nickname] screen is
displayed, touch [OK].
zCamera Connect is started on the
smartphone.
zThe devices are connected automatically.
3 Adjust the privacy setting.
zWhen this screen is displayed, touch
[Yes].
zYou can now use the smartphone to
browse, import, or geotag images on the
camera or shoot remotely.
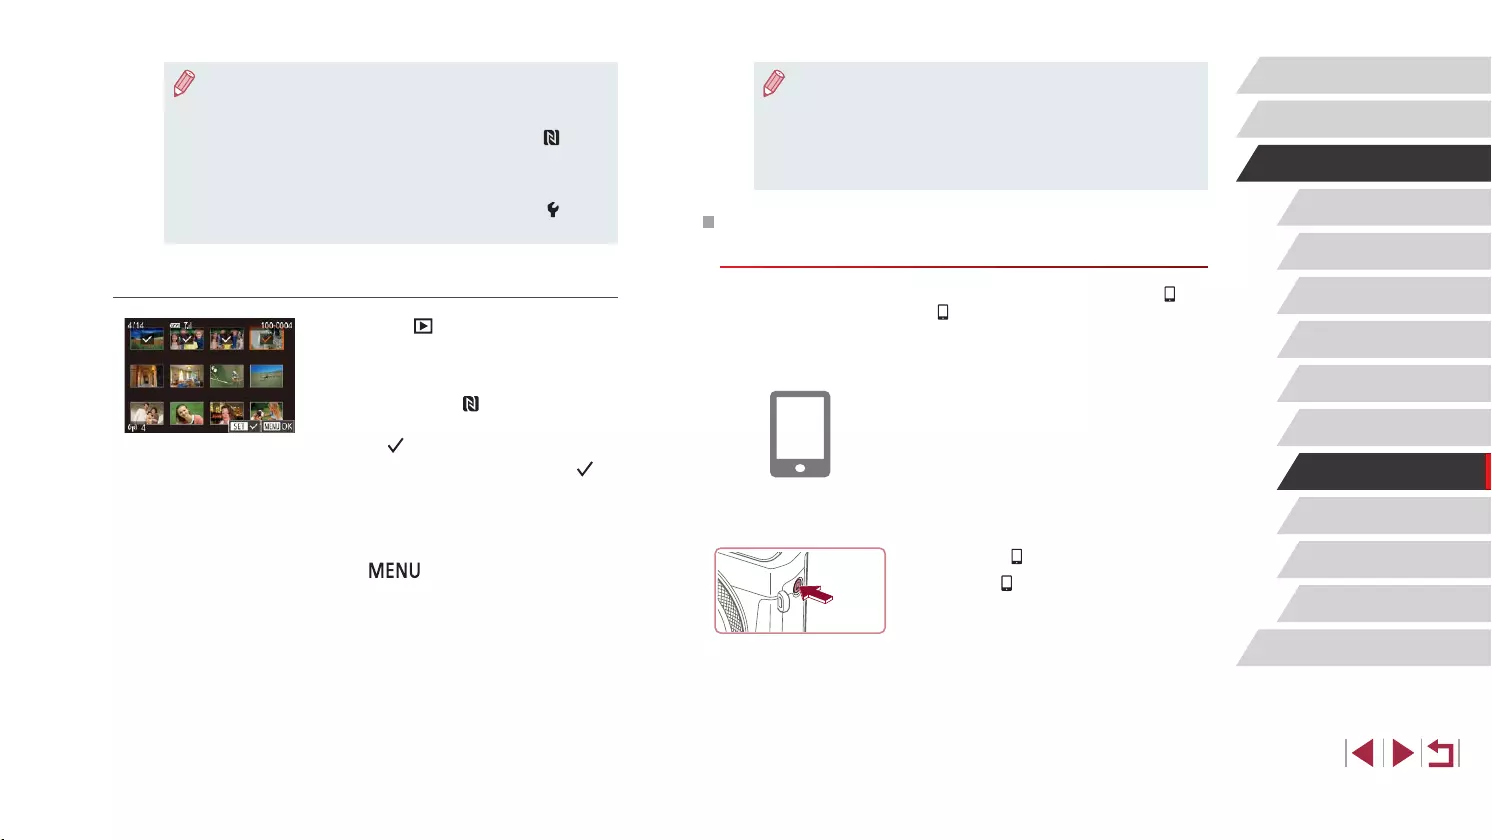
134
Setting Menu
Accessories
Appendix
Before Use
Index
Basic Guide
Advanced Guide
Camera Basics
Auto Mode /
Hybrid Auto Mode
Other Shooting Modes
P Mode
Tv, Av, M, and C Mode
Playback Mode
Wi-Fi Functions
●If during connection a message on the camera requests you
to enter the nickname, enter it as described in “On-Screen
Keyboard” (=
30).
●The camera does not keep a record of smartphones you connect
to via NFC in Playback mode.
●You can preset images to transfer at your desired size (=
150).
Sending to a Smartphone Assigned to the
Button
Once you have connected to a smartphone initially by pressing the [ ]
button, you can simply press the [ ] button after that to connect again for
viewing and saving camera images on your connected device.
These steps show how to use the camera as an access point, but you can
also use an existing access point (=
137).
1 Install Camera Connect.
zFor an iPhone or iPad, nd Camera
Connect in the App Store and download
and install the app.
zFor Android smartphones, nd Camera
Connect in Google Play and download
and install the app.
2 Press the [ ] button.
zPress the [ ] button.
●Connections require that a memory card be in the camera.
●You can also change the camera nickname on the screen in step
2 (=
157).
●Not all NFC-compatible smartphones have an N-Mark ( ). For
details, refer to the smartphone user manual.
●You can also send multiple images at once and change the image
size before sending (=
150).
●To disable NFC connections, choose MENU (=
29) ► [ 4] tab
► [Wi-Fi Settings] ► [NFC] ► [Off].
Connecting via NFC When Camera Is in Playback Mode
zPress the [ ] button to turn the camera
on.
zTouch the smartphone with Camera
Connect installed (=
132) against the
camera’s N-Mark ( ).
zTouching an image to send will label it
with a [ ] icon.
zTo cancel selection, touch it again. [ ] is
no longer displayed.
zRepeat this process to choose additional
images.
zAfter you nish choosing images, press
the [ ] button, and then touch [OK].
zTouch [Send].
zThe images are now sent. The
connection is ended automatically after
the image is sent.
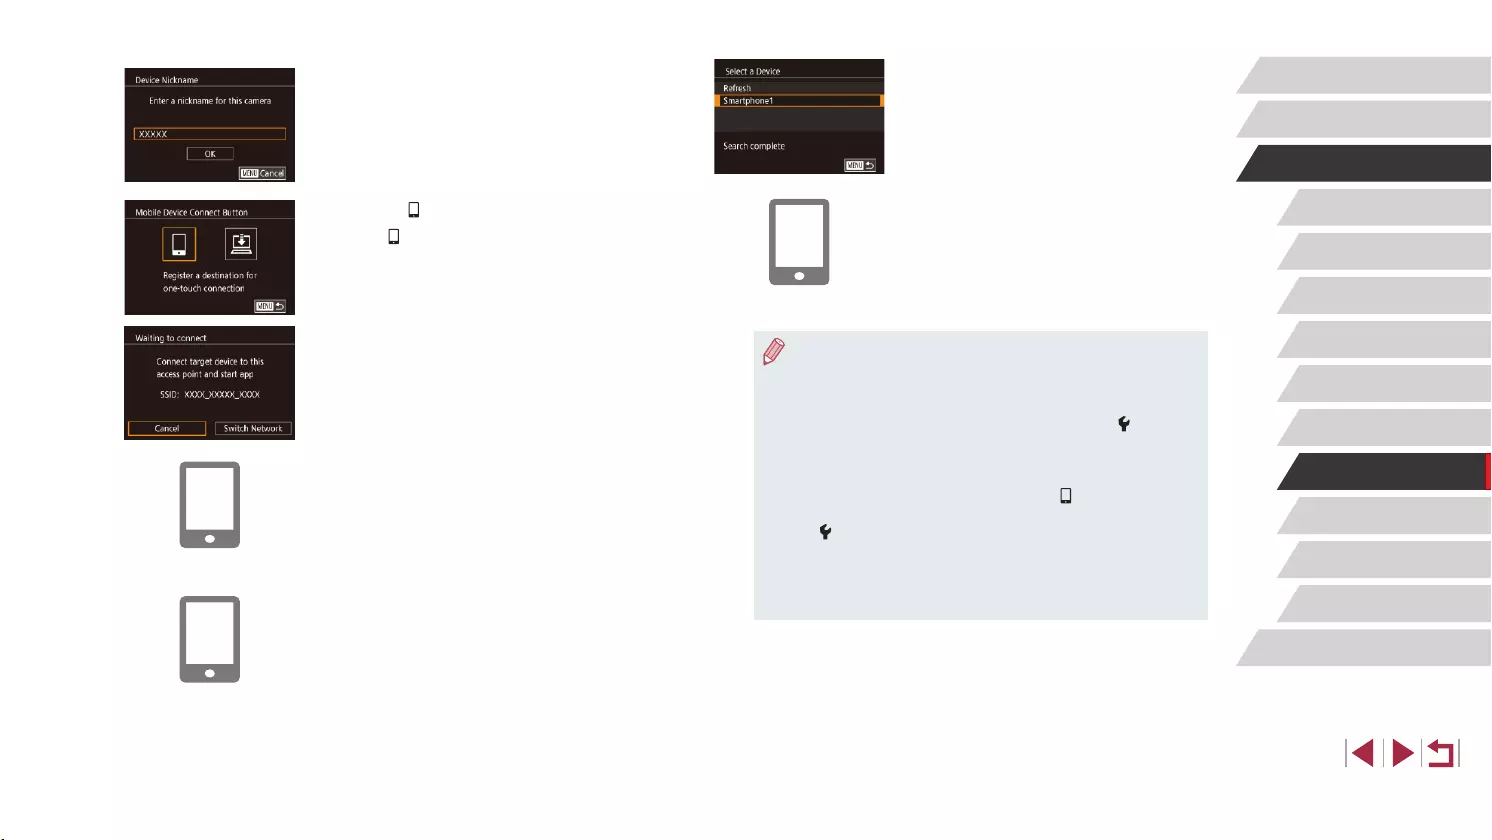
135
Setting Menu
Accessories
Appendix
Before Use
Index
Basic Guide
Advanced Guide
Camera Basics
Auto Mode /
Hybrid Auto Mode
Other Shooting Modes
P Mode
Tv, Av, M, and C Mode
Playback Mode
Wi-Fi Functions
6 Choose the smartphone to connect to.
zTouch the name of the smartphone.
zAfter a connection is established with
the smartphone, the smartphone name
is displayed on the camera. (This screen
will close in about one minute.)
7 Import images.
zUse the smartphone to import images
from the camera to the smartphone.
zUse the smartphone to end the
connection; the camera will automatically
turn off.
●Connections require that a memory card be in the camera.
●You can also change the camera nickname on the screen in
step 2 (=
157).
●For better security, you can display a password on the screen
in step 3 by accessing MENU (=
29) and choosing [ 4] tab
► [Wi-Fi Settings] ► [Password] ► [On]. In this case, in the
password eld on the smartphone in step 4, enter the password
displayed on the camera.
●One smartphone can be registered to the [ ] button. To assign
a different one, rst clear the current one in MENU (=
29) ►
[4] tab ► [Mobile Device Connect Button].
●Once a connection destination is assigned in Touch Actions
(=
119), you can automatically reconnect to a previous
destination simply by dragging across the screen with the
assigned gesture.
zIf the [Device Nickname] screen is
displayed, touch [OK].
3 Choose [ ].
zTouch [ ].
zThe camera’s SSID is displayed.
4 Connect the smartphone to the
network.
zIn the smartphone’s Wi-Fi setting menu,
choose the SSID (network name)
displayed on the camera to establish a
connection.
5 Start Camera Connect.
zStart Camera Connect on the
smartphone.
zAfter the camera recognizes the
smartphone, a device selection screen is
displayed.
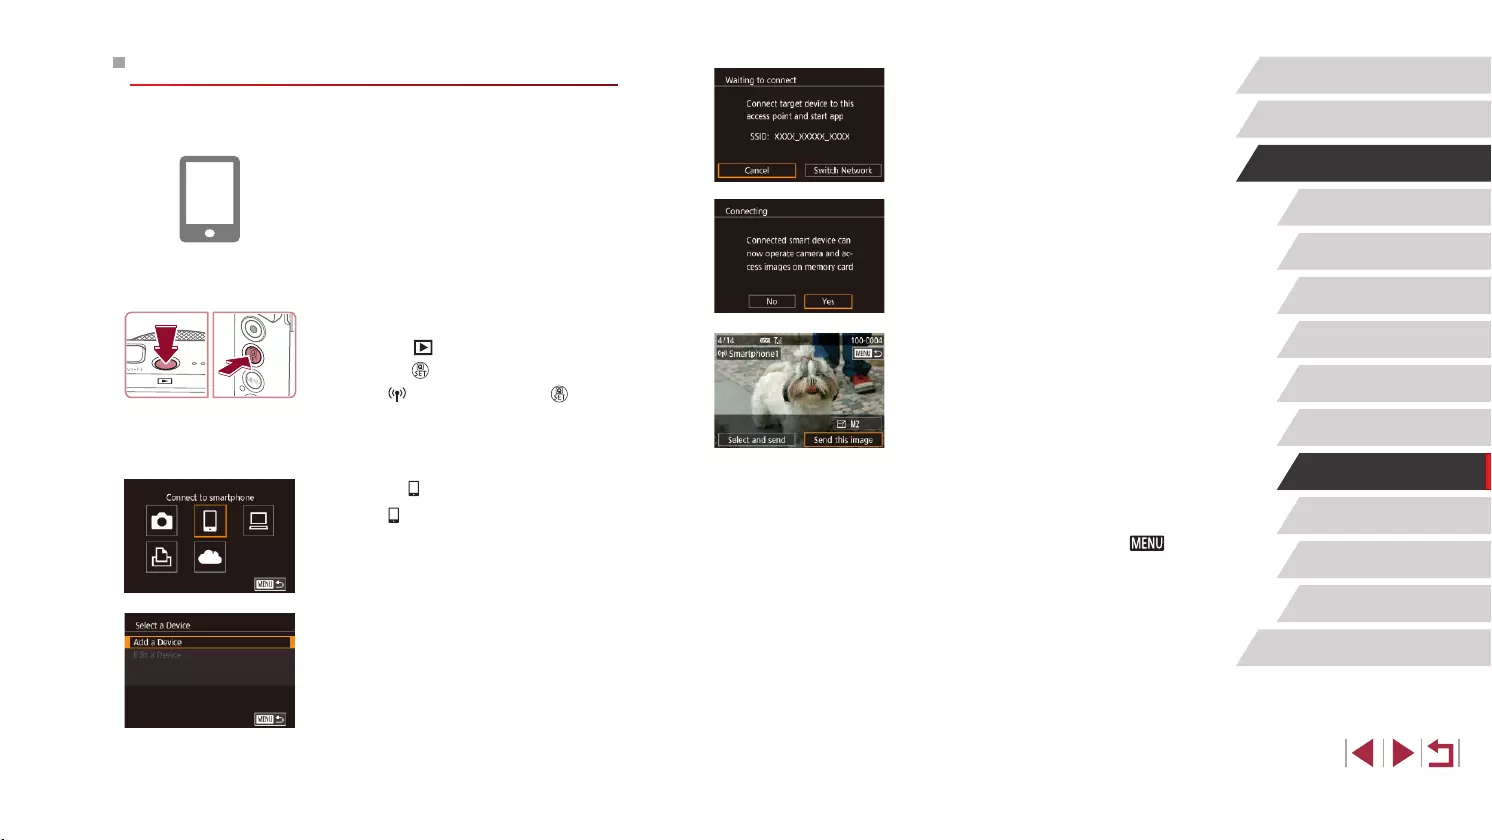
136
Setting Menu
Accessories
Appendix
Before Use
Index
Basic Guide
Advanced Guide
Camera Basics
Auto Mode /
Hybrid Auto Mode
Other Shooting Modes
P Mode
Tv, Av, M, and C Mode
Playback Mode
Wi-Fi Functions
zThe camera’s SSID is displayed.
zChoose the smartphone to connect to,
as described in steps 4 – 6 of “Sending
to a Smartphone Assigned to the Button”
(=
134).
5 Adjust the privacy setting.
zTouch [Yes].
zYou can now use the smartphone to
browse, import, or geotag images on the
camera or shoot remotely.
6 Send an image.
zDrag images left or right to choose an
image to send, and then touch [Send this
image].
zImage transfer will begin. The screen
darkens during image transfer.
z[Transfer completed] is displayed after
the image is sent, and the image transfer
screen is displayed again.
zTo end the connection, touch [ ] in
the upper right of the screen, and then
touch [OK] on the conrmation screen.
You can also use the smartphone to end
the connection.
zTo add multiple smartphones, repeat the
above procedure starting from step 1.
Adding a Smartphone Using the Wi-Fi Menu
These steps show how to use the camera as an access point, but you can
also use an existing access point (=
137).
1 Install Camera Connect.
zFor an iPhone or iPad, nd Camera
Connect in the App Store and download
and install the app.
zFor Android smartphones, nd Camera
Connect in Google Play and download
and install the app.
2 Access the Wi-Fi menu.
zPress the [ ] button.
zPress the [ ] button.
zTouch [ ], and then press the [ ]
button.
zIf the [Device Nickname] screen is
displayed, choose [OK] (=
134).
3 Choose [ ].
zTouch [ ].
4 Choose [Add a Device].
zTouch [Add a Device].
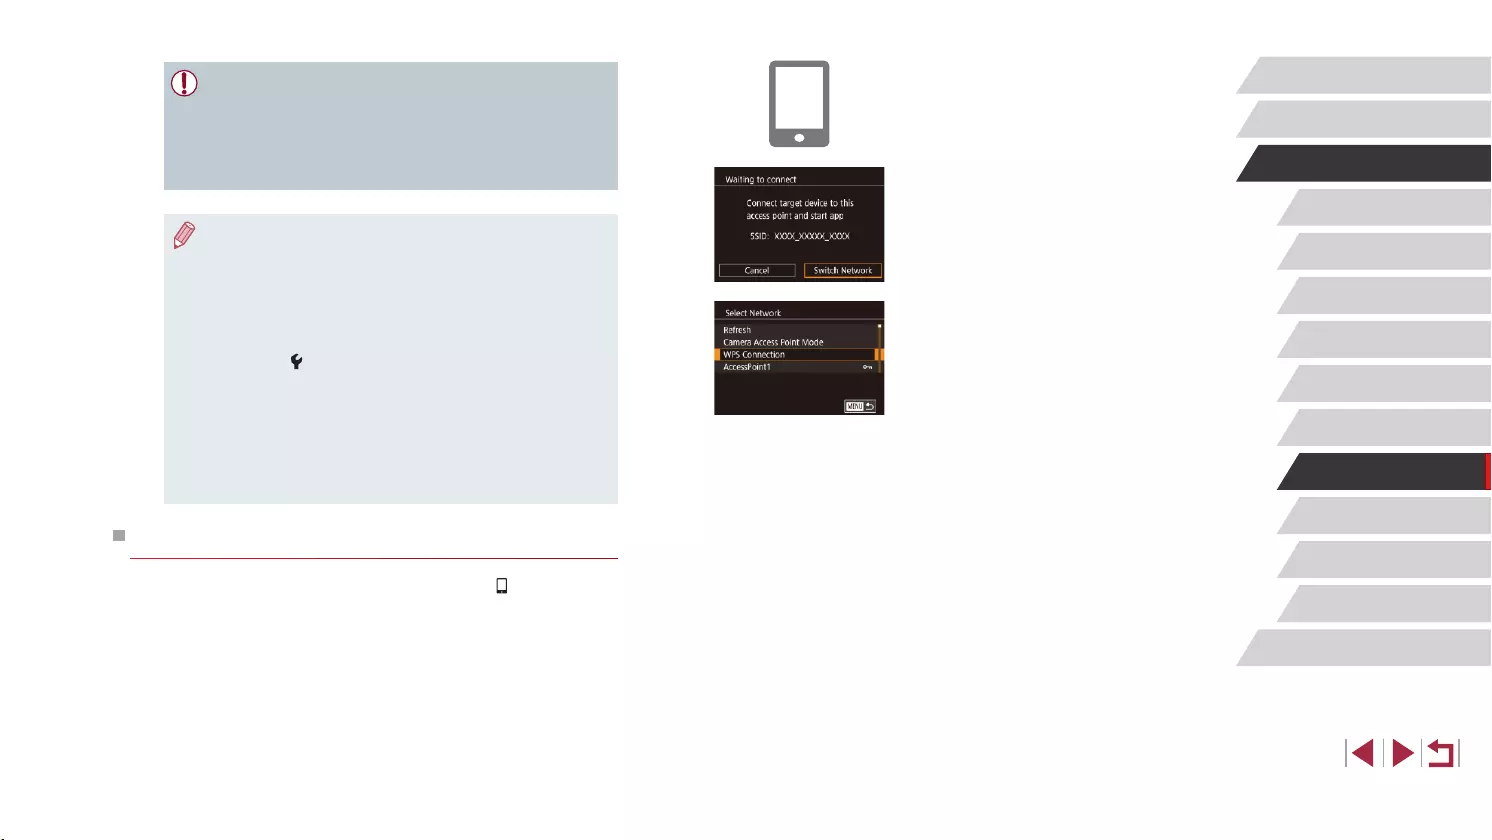
137
Setting Menu
Accessories
Appendix
Before Use
Index
Basic Guide
Advanced Guide
Camera Basics
Auto Mode /
Hybrid Auto Mode
Other Shooting Modes
P Mode
Tv, Av, M, and C Mode
Playback Mode
Wi-Fi Functions
2 Connect the smartphone to the
access point.
3 Choose [Switch Network].
zTouch [Switch Network].
zA list of detected access points will be
displayed.
4 Connect to the access point and
choose the smartphone.
zFor WPS-compatible access points,
connect to the access point and choose
the smartphone as described in steps
5 – 8 in “Using WPS-Compatible Access
Points” (=
140).
zFor non-WPS access points, follow steps
2 – 4 in “Connecting to Listed Access
Points” (=
142) to connect to the
access point and choose the smartphone.
5 Congure the privacy settings and
send images.
zFollow steps 5 – 6 in “Adding a
Smartphone Using the Wi-Fi Menu”
(=
136) to congure the privacy
settings and send images.
●All images in the camera can be viewed from the connected
smartphone when you choose [Yes] in step 5. To keep camera
images private, so that they cannot be viewed from the
smartphone, choose [No] in step 5.
●Once you have registered a smartphone, you can change privacy
settings for it on the camera (=
156).
●Connections require that a memory card be in the camera.
●Once you have connected to devices via the Wi-Fi menu, recent
destinations will be listed rst when you access the Wi-Fi menu.
Simply touch a listed device to connect again. You can register
new devices by dragging left or right to access the device
selection screen.
●If you prefer not to display recent target devices, choose MENU
(=
29) ► [ 4] tab ► [Wi-Fi Settings] ► [Target History] ►
[Off].
●You can also send multiple images at once and change the image
size before sending (=
150).
●Once a connection destination is assigned in Touch Actions
(=
119), you can automatically reconnect to a previous
destination simply by dragging across the screen with the
assigned gesture.
Using Another Access Point
When connecting the camera to a smartphone with the [ ] button or
through the Wi-Fi menu, you can also use an existing access point.
1 Prepare for the connection.
zAccess the [Waiting to connect] screen
by either following steps 1 – 3 in “Sending
to a Smartphone Assigned to the Button”
(=
134) or steps 1 – 4 in “Adding a
Smartphone Using the Wi-Fi Menu”
(=
136).
138
Setting Menu
Accessories
Appendix
Before Use
Index
Basic Guide
Advanced Guide
Camera Basics
Auto Mode /
Hybrid Auto Mode
Other Shooting Modes
P Mode
Tv, Av, M, and C Mode
Playback Mode
Wi-Fi Functions
Saving Images to a Computer
Preparing to Register a Computer
Checking Your Computer Environment
The camera can connect via Wi-Fi to computers running the following
operating systems. For detailed system requirements and compatibility
information, including support in new operating systems, visit the Canon
website.
●Windows 8/8.1
●Windows 7 SP1
●Mac OS X 10.9
●Mac OS X 10.8.2 or later
●Windows 7 Starter and Home Basic editions are not supported.
●Windows 7 N (European version) and KN (South Korean version)
require a separate download and installation of Windows Media
Feature Pack.
For details, check the following website.
http://go.microsoft.com/fwlink/?LinkId=159730
Installing the Software
Windows 7 and Mac OS X 10.8 are used here for the sake of illustration.
1 Download the software.
zVisit the following site from a computer
connected to the Internet.
http://www.canon.com/icpd/
Previous Access Points
To reconnect to a previous access point automatically, follow step 3 in
“Sending to a Smartphone Assigned to the Button” (=
134) or step 4 in
“Adding a Smartphone Using the Wi-Fi Menu” (=
136).
●To use the camera as an access point, choose [Switch Network] on the
screen displayed when you establish a connection, and then choose
[Camera Access Point Mode].
●To reconnect to a previous access point, follow the procedure from
step 5 in “Using Another Access Point” (=
137).
●To switch access points, choose [Switch Network] on the screen
displayed when you establish a connection, and then follow the
procedure in “Using Another Access Point” (=
137) from step 4.
139
Setting Menu
Accessories
Appendix
Before Use
Index
Basic Guide
Advanced Guide
Camera Basics
Auto Mode /
Hybrid Auto Mode
Other Shooting Modes
P Mode
Tv, Av, M, and C Mode
Playback Mode
Wi-Fi Functions
Conguring the Computer for a Wi-Fi Connection
(Windows Only)
On a computer running Windows, congure the following settings before
connecting the camera to the computer wirelessly.
1 Conrm that the computer is
connected to an access point.
zFor instructions on checking your network
connection, refer to the computer user
manual.
2 Congure the setting.
zClick in the following order: [Start] menu
► [All Programs] ► [Canon Utilities] ►
[CameraWindow] ► [Wi-Fi connection
setup].
zIn the application that opens, follow the
on-screen instructions and congure the
setting.
●The following Windows settings are congured when you run the
utility in step 2.
— Turn on media streaming.
This will enable the camera to see (nd) the computer to access
via Wi-Fi.
— Turn on network discovery.
This will enable the computer to see (nd) the camera.
— Turn on ICMP (Internet Control Message Protocol).
This allows you to check the network connection status.
— Enable Universal Plug & Play (UPnP).
This will enable network devices to detect each other
automatically.
●Some security software may prevent you from completing the
settings as described here. Check the settings of your security
software.
zChoose your country or region, and
then follow the instructions displayed to
prepare for downloading.
zThe compressed software is now
downloaded to your computer.
2 Begin the installation.
zDouble-click the downloaded le, and
when the screen at left is displayed, click
[Easy Installation]. Follow the on-screen
instructions to complete the installation
process.
zInstallation may take some time,
depending on computer performance and
the Internet connection.
zClick [Finish] or [Restart] on the screen
after installation.
●Internet access is required, and any ISP account charges and
access fees must be paid separately.
●To uninstall the software, follow these steps.
— Windows: Select [Start] menu ► [All Programs] ► [Canon
Utilities], and then choose the software for uninstallation.
— Mac OS: In the [Canon Utilities] folder within the [Applications]
folder, drag the folder of the software for uninstallation to the
Trash, and then empty the Trash.
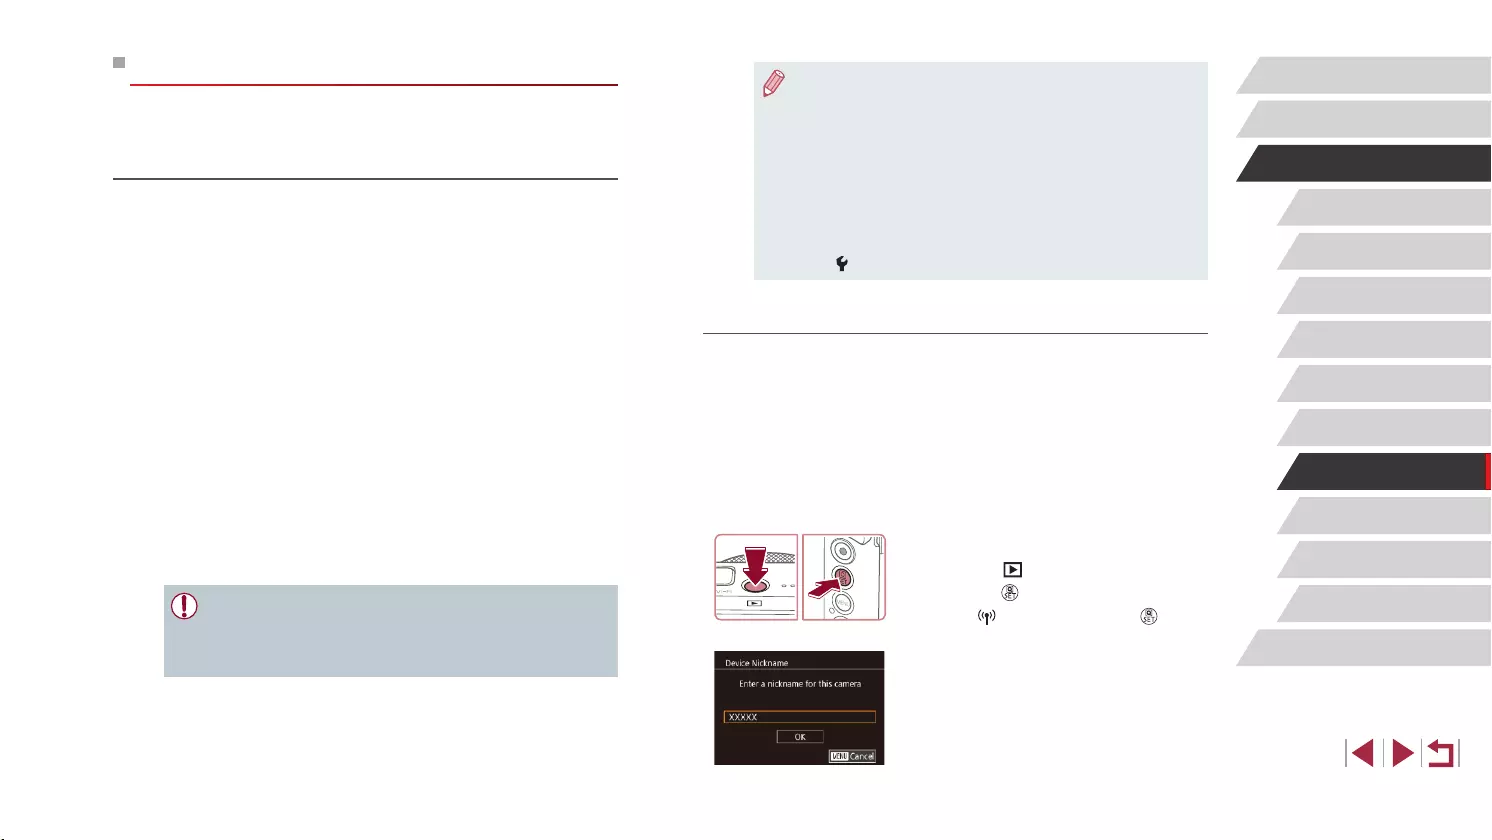
140
Setting Menu
Accessories
Appendix
Before Use
Index
Basic Guide
Advanced Guide
Camera Basics
Auto Mode /
Hybrid Auto Mode
Other Shooting Modes
P Mode
Tv, Av, M, and C Mode
Playback Mode
Wi-Fi Functions
●For information on WPS compatibility and for instructions on
checking settings, refer to the access point user manual.
●A router is a device that creates a network (LAN) structure for
connecting multiple computers. A router that contains an internal
Wi-Fi function is called a “Wi-Fi router”.
●This guide refers to all Wi-Fi routers and base stations as “access
points”.
●If you use MAC address ltering on your Wi-Fi network, be sure
to add the camera’s MAC address to your access point. You can
check your camera’s MAC address by choosing MENU (=
29)
► [ 4] tab ► [Wi-Fi Settings] ► [Check MAC Address].
Using WPS-Compatible Access Points
WPS makes it easy to complete settings when connecting devices over
Wi-Fi. You can use either Push Button Conguration Method or PIN
Method for settings on a WPS supported device.
1 Conrm that the computer is
connected to an access point.
zFor instructions on checking the
connection, refer to the device and
access point user manuals.
2 Access the Wi-Fi menu.
zPress the [ ] button.
zPress the [ ] button.
zTouch [ ], and then press the [ ]
button.
zIf the [Device Nickname] screen is
displayed, touch [OK].
Saving Images to a Connected Computer
Connect to your access point via Wi-Fi as follows.
Also refer to the access point user manual.
Conrming Access Point Compatibility
Conrm that the Wi-Fi router or base station conforms to the Wi-Fi
standards in “Camera” (=
204).
Connection methods vary depending on whether the access point
supports Wi-Fi Protected Setup (WPS, =
140) or not (=
142). For
non-WPS access points, check the following information.
●Network name (SSID/ESSID)
The SSID or ESSID for the access point you use. Also called the
“access point name” or “network name”.
●Network authentication / data encryption (encryption method /
encryption mode)
The method for encrypting data during wireless transmission. Check
which security setting is used: WPA2-PSK (AES), WPA2-PSK
(TKIP), WPA-PSK (AES), WPA-PSK (TKIP), WEP (open system
authentication), or no security.
●Password (encryption key / network key)
The key used when encrypting data during wireless transmission. Also
called the “encryption key” or “network key”.
●Key index (transmit key)
The key set when WEP is used for network authentication / data
encryption. Use “1” as the setting.
●If system administrator status is needed to adjust network
settings, contact the system administrator for details.
●These settings are very important for network security. Exercise
adequate caution when changing these settings.
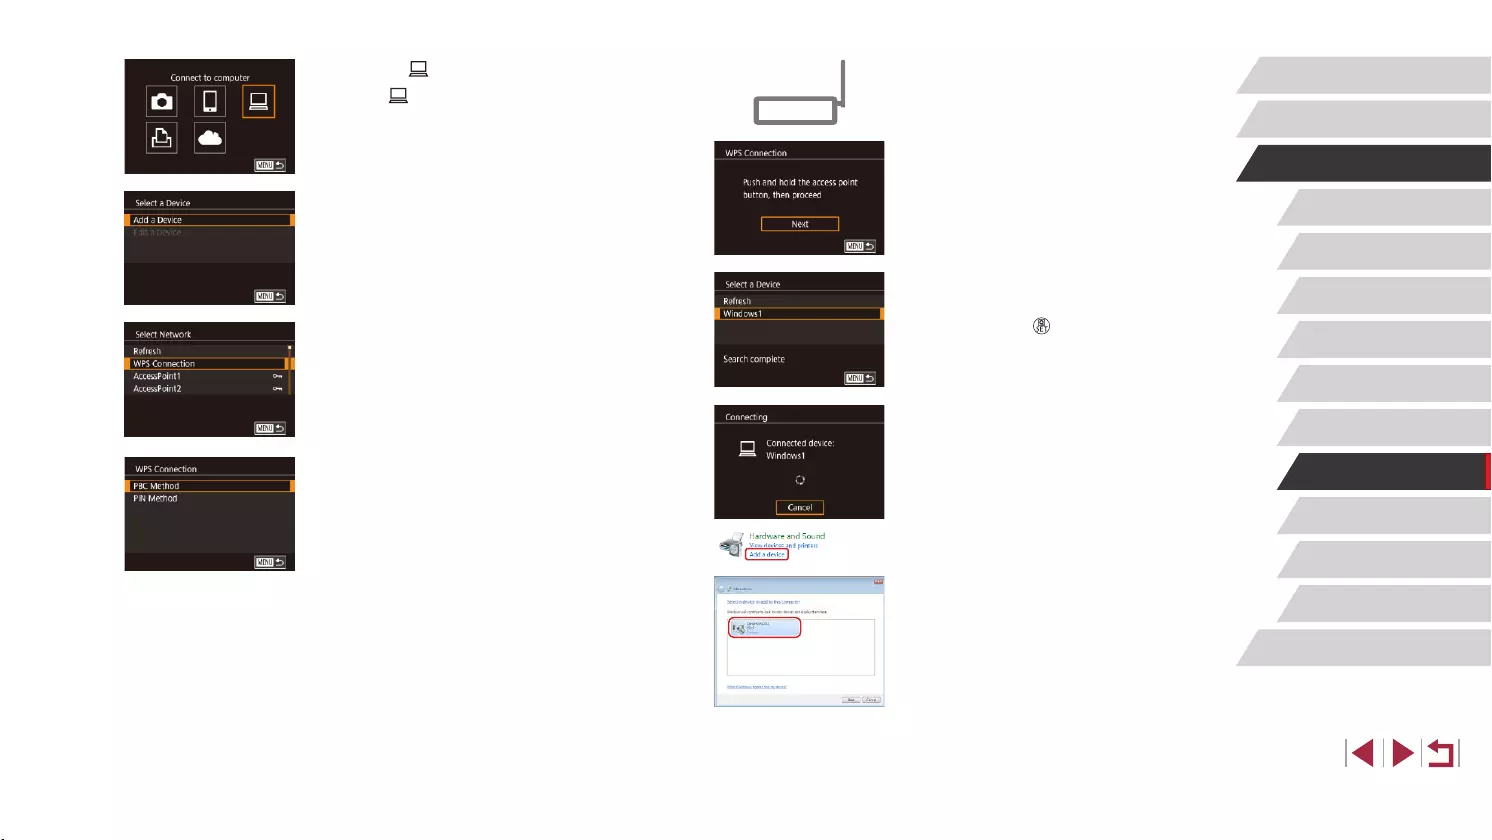
141
Setting Menu
Accessories
Appendix
Before Use
Index
Basic Guide
Advanced Guide
Camera Basics
Auto Mode /
Hybrid Auto Mode
Other Shooting Modes
P Mode
Tv, Av, M, and C Mode
Playback Mode
Wi-Fi Functions
7 Establish the connection.
zOn the access point, hold down the WPS
connection button for a few seconds.
zTouch [Next].
zThe camera connects to the access point
and lists devices connected to it on the
[Select a Device] screen.
8 Choose the target device.
zTouch the name of the target device, and
then press the [ ] button.
9 Install a driver (rst Windows
connection only).
zWhen this screen is displayed on the
camera, click the Start menu on the
computer, click [Control Panel], and then
click [Add a device].
zDouble-click the connected camera icon.
zDriver installation will begin.
zAfter driver installation is complete, and
the camera and computer connection
is enabled, the AutoPlay screen will be
displayed. Nothing will be displayed on
the camera screen.
3 Choose [ ].
zTouch [ ].
4 Choose [Add a Device].
zTouch [Add a Device].
5 Choose [WPS Connection].
zTouch [WPS Connection].
6 Choose [PBC Method].
zTouch [PBC Method].

142
Setting Menu
Accessories
Appendix
Before Use
Index
Basic Guide
Advanced Guide
Camera Basics
Auto Mode /
Hybrid Auto Mode
Other Shooting Modes
P Mode
Tv, Av, M, and C Mode
Playback Mode
Wi-Fi Functions
●Once you have connected to devices via the Wi-Fi menu, recent
destinations will be listed rst when you access the Wi-Fi menu.
Simply touch a listed device to connect again. To add a new
device, display the device selection screen by touching [ ][ ],
and then congure the setting.
●If you prefer not to display recent target devices, choose MENU
(=
29) ► [ 4] tab ► [Wi-Fi Settings] ► [Target History] ►
[Off].
●You can also change the camera nickname on the screen in step
2 (=
157).
●When the camera is connected to a computer, the camera screen
is blank.
●Mac OS: If CameraWindow is not displayed, click the
[CameraWindow] icon in the Dock.
●To disconnect from the camera, turn off the camera.
●If you chose [PIN Method] in step 6, a PIN code will be displayed
on the screen. Be sure to set this code in the access point.
Choose a device in the [Select a Device] screen. For further
details, refer to the user manual included with your access point.
●Once a connection destination is assigned in Touch Actions
(=
119), you can automatically reconnect to a previous
destination simply by dragging across the screen with the
assigned gesture.
Connecting to Listed Access Points
1 View the listed access points.
zView the listed networks (access points)
as described in steps 1 – 4 of “Using
WPS-Compatible Access Points”
(=
140).
10 Display CameraWindow.
zWindows: Access CameraWindow by
clicking [Downloads Images From Canon
Camera].
zMac OS: CameraWindow is automatically
displayed when a Wi-Fi connection is
established between the camera and
computer.
11 Import images.
zClick [Import Images from Camera], and
then click [Import Untransferred Images].
zImages are now saved to the Pictures
folder on the computer, in separate
folders named by date.
zClick [OK] in the screen that is displayed
after image import is complete.
zUse Digital Photo Professional to view
images you save to a computer. To view
movies, use preinstalled or commonly
available software compatible with
movies recorded by the camera.

143
Setting Menu
Accessories
Appendix
Before Use
Index
Basic Guide
Advanced Guide
Camera Basics
Auto Mode /
Hybrid Auto Mode
Other Shooting Modes
P Mode
Tv, Av, M, and C Mode
Playback Mode
Wi-Fi Functions
Previous Access Points
You can reconnect to any previous access points automatically by
following step 4 in “Using WPS-Compatible Access Points” (=
140).
●To connect to a device via an access point, conrm that the target
device is already connected to the access point, and then follow the
procedure from step 8 in “Using WPS-Compatible Access Points”
(=
140).
●To switch access points, choose [Switch Network] on the screen
displayed when you establish a connection, and then either follow
the procedure in “Using WPS-Compatible Access Points” (=
140)
from step 5 or the procedure in “Connecting to Listed Access Points”
(=
142) from step 2.
2 Choose an access point.
zTouch a network (access point) to choose
it.
3 Enter the access point password.
zTouch the text box (in the area outlined,
in this example) to access the keyboard,
and then enter the password (=
30).
zTouch [Next].
4 Choose [Auto].
zTouch [Auto].
zTo save images to a connected computer,
follow the procedure from step 8 in
“Using WPS-Compatible Access Points”
(=
140).
●To determine the access point password, check on the access
point itself or refer to the user manual.
●If no access points are detected even after you choose [Refresh]
in step 2 to update the list, choose [Manual Settings] in step 2
to complete access point settings manually. Follow on-screen
instructions and enter an SSID, security settings, and a password
(=
140).
●When you use an access point that you have already connected
to for connecting to another device, [*] is displayed for the
password in step 3. To use the same password, touch [Next].
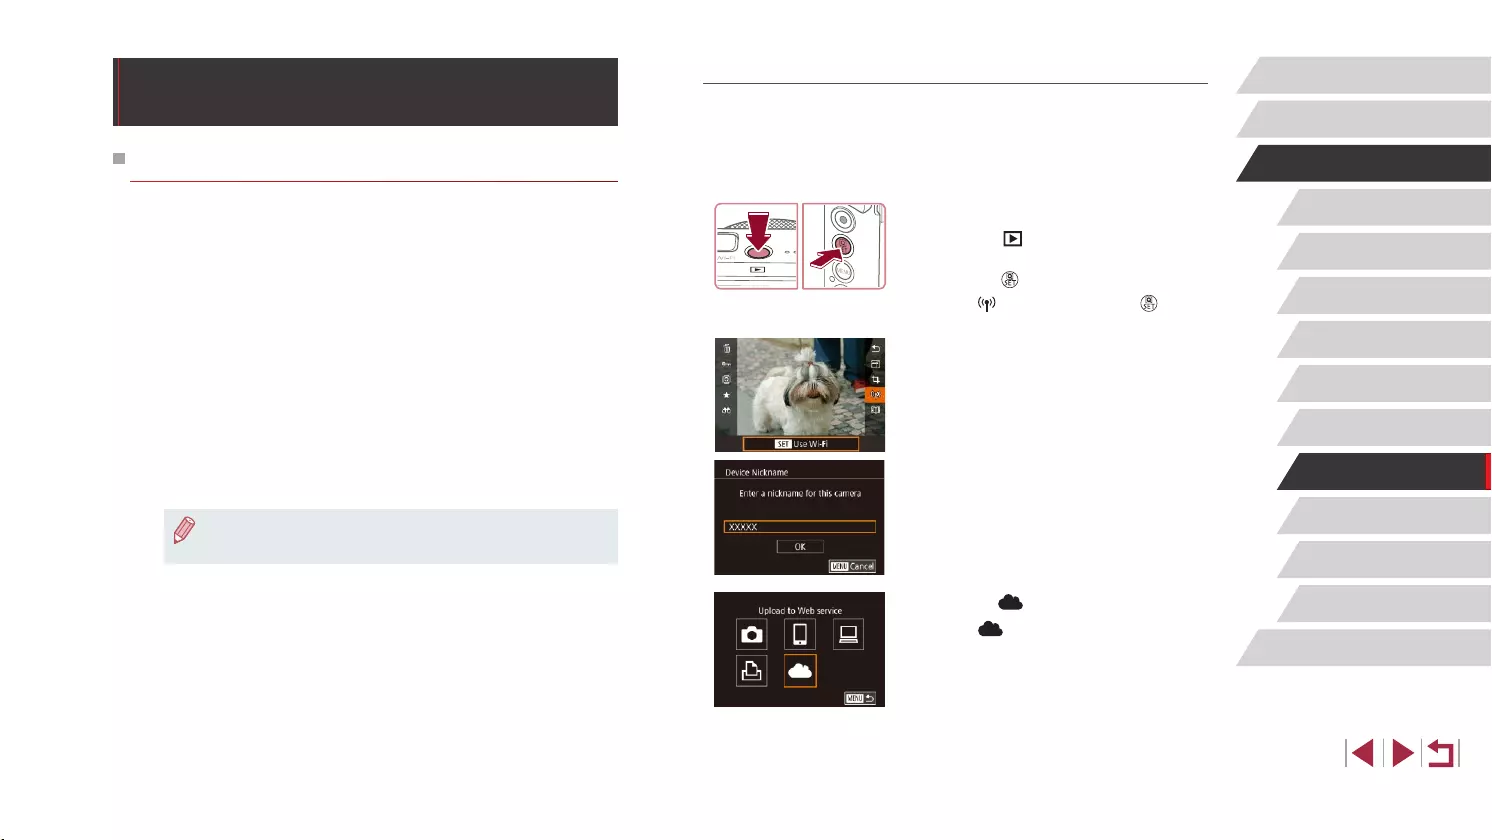
144
Setting Menu
Accessories
Appendix
Before Use
Index
Basic Guide
Advanced Guide
Camera Basics
Auto Mode /
Hybrid Auto Mode
Other Shooting Modes
P Mode
Tv, Av, M, and C Mode
Playback Mode
Wi-Fi Functions
Registering CANON iMAGE GATEWAY
Link the camera and CANON iMAGE GATEWAY by adding CANON
iMAGE GATEWAY as a destination Web service on the camera. Note
that you will need to enter an email address used on your computer or
smartphone to receive a notication message for completing linkage
settings.
1 Access the Wi-Fi menu.
zPress the [ ] button to turn the camera
on.
zPress the [ ] button.
zTouch [ ], and then press the [ ]
button.
zIf the [Device Nickname] screen is
displayed, touch [OK].
2 Choose [ ].
zTouch [ ].
Sending Images to a Registered Web
Service
Registering Web Services
Use a smartphone or computer to add to the camera Web services that
you want to use.
●A smartphone or computer with a browser and Internet connection is
required to complete camera settings for CANON iMAGE GATEWAY
and other Web services.
●Check the CANON iMAGE GATEWAY website for details on browser
(Microsoft Internet Explorer, etc.) requirements, including settings and
version information.
●For information on countries and regions where CANON iMAGE
GATEWAY is available, visit the Canon website (http://www.canon.
com/cig/).
●You must have an account with Web services other than CANON
iMAGE GATEWAY if you desire to use them. For further details, check
the websites for each Web service you want to register.
●Separate ISP connection and access point fees may be applicable.
●CANON iMAGE GATEWAY also provides user guides for
downloading.
145
Setting Menu
Accessories
Appendix
Before Use
Index
Basic Guide
Advanced Guide
Camera Basics
Auto Mode /
Hybrid Auto Mode
Other Shooting Modes
P Mode
Tv, Av, M, and C Mode
Playback Mode
Wi-Fi Functions
7 Check for the notication message.
zOnce information has been sent to
CANON iMAGE GATEWAY, you will
receive a notication message at the
email address entered in step 5.
zTouch [OK] on the next screen, which
indicates that notication has been sent.
z[] now changes to [ ].
8 Access the page in the notication
message and complete camera link
settings.
zFrom a computer or smartphone,
access the page linked in the notication
message.
zFollow the instructions to complete the
settings on the camera link settings page.
9 Complete CANON iMAGE GATEWAY
settings on the camera.
zTouch [ ].
z[] (=
152) and CANON iMAGE
GATEWAY are now added as
destinations.
zYou can add other Web services,
as needed. In this case, follow the
instructions from step 2 in “Registering
Other Web Services” (=
146).
3 Accept the agreement to enter an
email address.
zRead the agreement displayed and touch
[I Agree].
4 Establish a connection with an
access point.
zConnect to the access point as described
in steps 5 – 7 in “Using WPS-Compatible
Access Points” (=
140) or in steps 2 – 4
in “Connecting to Listed Access Points”
(=
142).
5 Enter your email address.
zOnce the camera is connected to CANON
iMAGE GATEWAY via the access point, a
screen is displayed for entering an email
address.
zEnter your email address and touch
[Next].
6 Enter a four-digit number.
zEnter a four-digit number of your choice
and touch [Next].
zYou will need this four-digit number later
when setting up linkage with CANON
iMAGE GATEWAY in step 8.
146
Setting Menu
Accessories
Appendix
Before Use
Index
Basic Guide
Advanced Guide
Camera Basics
Auto Mode /
Hybrid Auto Mode
Other Shooting Modes
P Mode
Tv, Av, M, and C Mode
Playback Mode
Wi-Fi Functions
3 Choose [ ].
zIn Playback mode, press the [ ] button.
zTouch [ ], and then press the [ ]
button.
zDrag left or right on the screen, and then
touch [ ].
zThe Web service settings are now
updated.
●If any congured settings change, follow these steps again to
update the camera settings.
Uploading Images to Web Services
1 Access the Wi-Fi menu.
zPress the [ ] button to turn the camera
on.
zPress the [ ] button.
zTouch [ ], and then press the [ ]
button.
2 Choose the destination.
zTouch the icon of the Web service to
connect to.
zIf multiple recipients or sharing options
are used with a Web service, touch the
desired item on the [Select Recipient]
screen displayed, and then press the [ ]
button.
●Make sure initially that your computer or smartphone mail
application is not congured to block email from relevant domains,
which may prevent you from receiving the notication message.
●You can also change the camera nickname on the screen in
step 1 (=
157).
●Once you have connected to devices via the Wi-Fi menu, recent
destinations will be listed rst when you access the menu. Drag
left or right to access the device selection screen and then
congure the setting.
●Once a connection destination is assigned in Touch Actions
(=
119), you can automatically reconnect to a previous
destination simply by dragging across the screen with the
assigned gesture.
Registering Other Web Services
You can also add Web services besides CANON iMAGE GATEWAY to the
camera.
1 Log in to CANON iMAGE GATEWAY and
access the camera link settings page.
zFrom a computer or smartphone, access
http://www.canon.com/cig/ to visit
CANON iMAGE GATEWAY.
2 Congure the Web service you want
to use.
zFollow the instructions displayed on the
smartphone or computer to set up the
Web service.
147
Setting Menu
Accessories
Appendix
Before Use
Index
Basic Guide
Advanced Guide
Camera Basics
Auto Mode /
Hybrid Auto Mode
Other Shooting Modes
P Mode
Tv, Av, M, and C Mode
Playback Mode
Wi-Fi Functions
Printing Images Wirelessly from a
Connected Printer
Connect the camera to a printer via Wi-Fi to print as follows.
These steps show how to use the camera as an access point, but you can
also use an existing access point (=
137).
1 Access the Wi-Fi menu.
zAccess the Wi-Fi menu as described in
step 2 in “Adding a Smartphone Using
the Wi-Fi Menu” (=
136).
2 Choose [ ].
zTouch [ ].
3 Choose [Add a Device].
zTouch [Add a Device].
zThe camera’s SSID is displayed.
3 Send an image.
zDrag images left or right to choose an
image to send, and then touch [Send this
image].
zWhen uploading to YouTube, read the
terms of service, and touch [I Agree].
zImage transfer will begin. The screen
darkens during image transfer.
zAfter the image is sent, touch [OK] on the
screen displayed to return to the playback
screen.
●Connections require that a memory card with saved images be in
the camera.
●You can also send multiple images at once, resize images, and
add comments before sending (=
150).
●To view images uploaded to CANON iMAGE GATEWAY on a
smartphone, try the dedicated Canon Online Photo Album app.
Download and install the Canon Online Photo Album app for
iPhones or iPads from the App Store or for Android devices from
Google Play.
148
Setting Menu
Accessories
Appendix
Before Use
Index
Basic Guide
Advanced Guide
Camera Basics
Auto Mode /
Hybrid Auto Mode
Other Shooting Modes
P Mode
Tv, Av, M, and C Mode
Playback Mode
Wi-Fi Functions
●Connections require that a memory card with saved images be in
the camera.
●Once you have connected to devices via the Wi-Fi menu, recent
destinations will be listed rst when you access the Wi-Fi menu.
You can easily connect again by choosing the device. To add
a new device, drag left or right to access the device selection
screen, and then congure the setting.
●If you prefer not to display recent target devices, choose MENU
(=
29) ► [ 4] tab ► [Wi-Fi Settings] ► [Target History] ► [Off].
●To use another access point, follow steps 3 – 4 in “Using Another
Access Point” (=
137).
●Once a connection destination is assigned in Touch Actions
(=
119), you can automatically reconnect to a previous
destination simply by dragging across the screen with the
assigned gesture.
4 Connect the printer to the network.
zIn the printer’s Wi-Fi setting menu,
choose the SSID (network name)
displayed on the camera to establish a
connection.
5 Choose the printer.
zTouch the name of the printer.
6 Choose an image to print.
zDrag left or right across the screen to
choose an image.
zPress the [ ] button, choose [ ], and
then press the [ ] button.
zTouch [Print].
zFor detailed printing instructions, see
“Printing Images” (=
175).
zTo end the connection, touch [Cancel]
and then touch [OK] on the conrmation
screen.
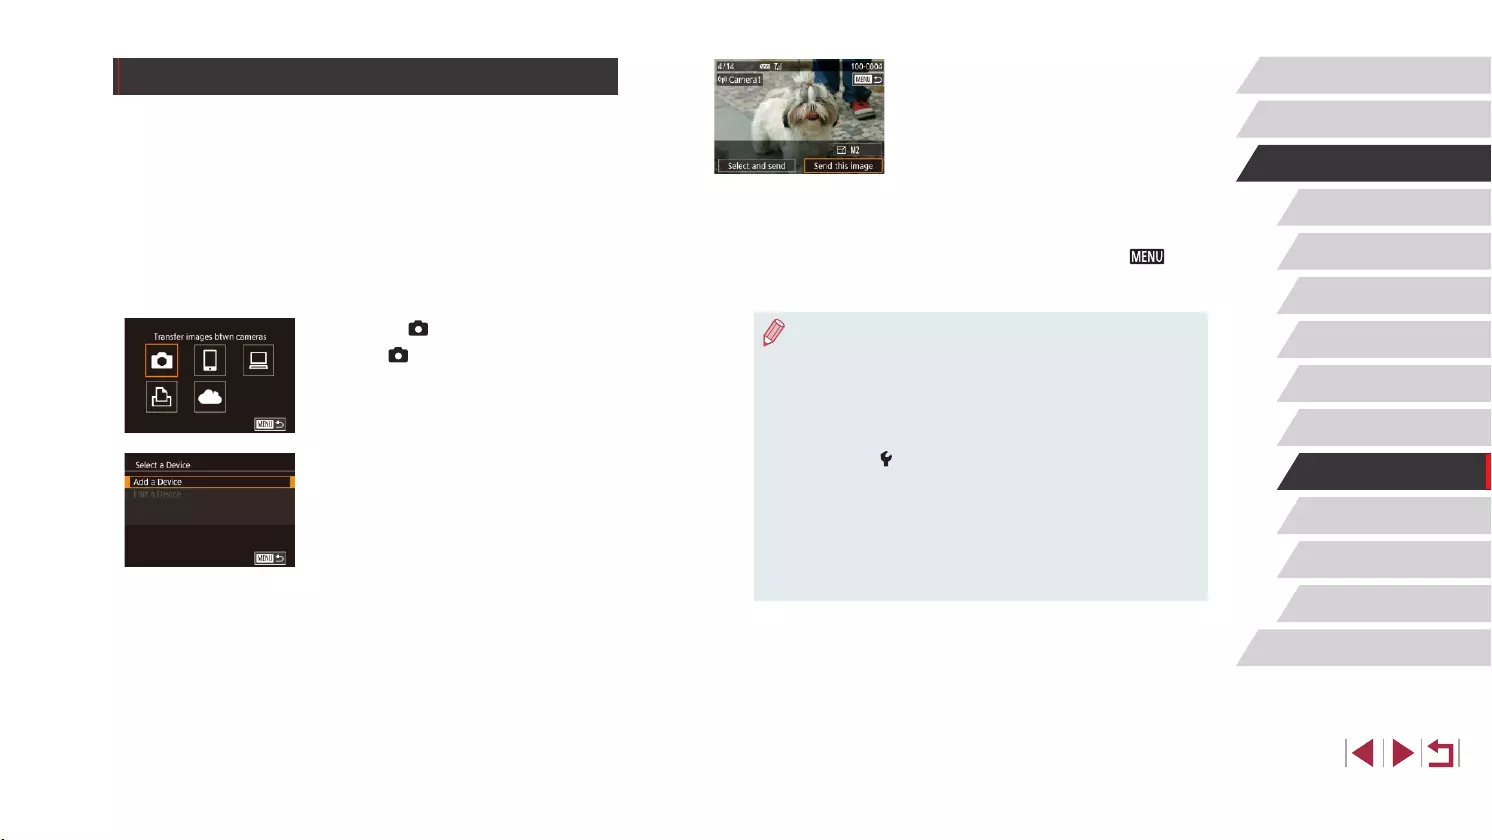
149
Setting Menu
Accessories
Appendix
Before Use
Index
Basic Guide
Advanced Guide
Camera Basics
Auto Mode /
Hybrid Auto Mode
Other Shooting Modes
P Mode
Tv, Av, M, and C Mode
Playback Mode
Wi-Fi Functions
4 Send an image.
zDrag images left or right to choose an
image to send, and then touch [Send this
image].
zImage transfer will begin. The screen
darkens during image transfer.
z[Transfer completed] is displayed after
the image is sent, and the image transfer
screen is displayed again.
zTo end the connection, touch [ ] in
the upper right of the screen, and then
touch [OK] on the conrmation screen.
●Connections require that a memory card be in the camera.
●Once you have connected to devices via the Wi-Fi menu, recent
destinations will be listed rst when you access the Wi-Fi menu.
You can easily connect again by choosing the device. To add
a new device, drag left or right to access the device selection
screen, and then congure the setting.
●If you prefer not to display recent target devices, choose MENU
(=
29) ► [ 4] tab ► [Wi-Fi Settings] ► [Target History] ►
[Off].
●You can also send multiple images at once and change the image
size before sending (=
152).
●Once a connection destination is assigned in Touch Actions
(=
119), you can automatically reconnect to a previous
destination simply by dragging across the screen with the
assigned gesture.
Sending Images to Another Camera
Connect two cameras via Wi-Fi and send images between them as
follows.
●Only Canon-brand cameras equipped with a Wi-Fi function can be
connected to wirelessly. You cannot connect to a Canon-brand camera
that does not have a Wi-Fi function, even if it supports Eye-Fi cards.
1 Access the Wi-Fi menu.
zAccess the Wi-Fi menu as described in
step 2 in “Adding a Smartphone Using
the Wi-Fi Menu” (=
136).
2 Choose [ ].
zTouch [ ].
3 Choose [Add a Device].
zTouch [Add a Device].
zFollow steps 1 – 3 on the target camera
too.
zCamera connection information will be
added when [Start connection on target
camera] is displayed on both camera
screens.
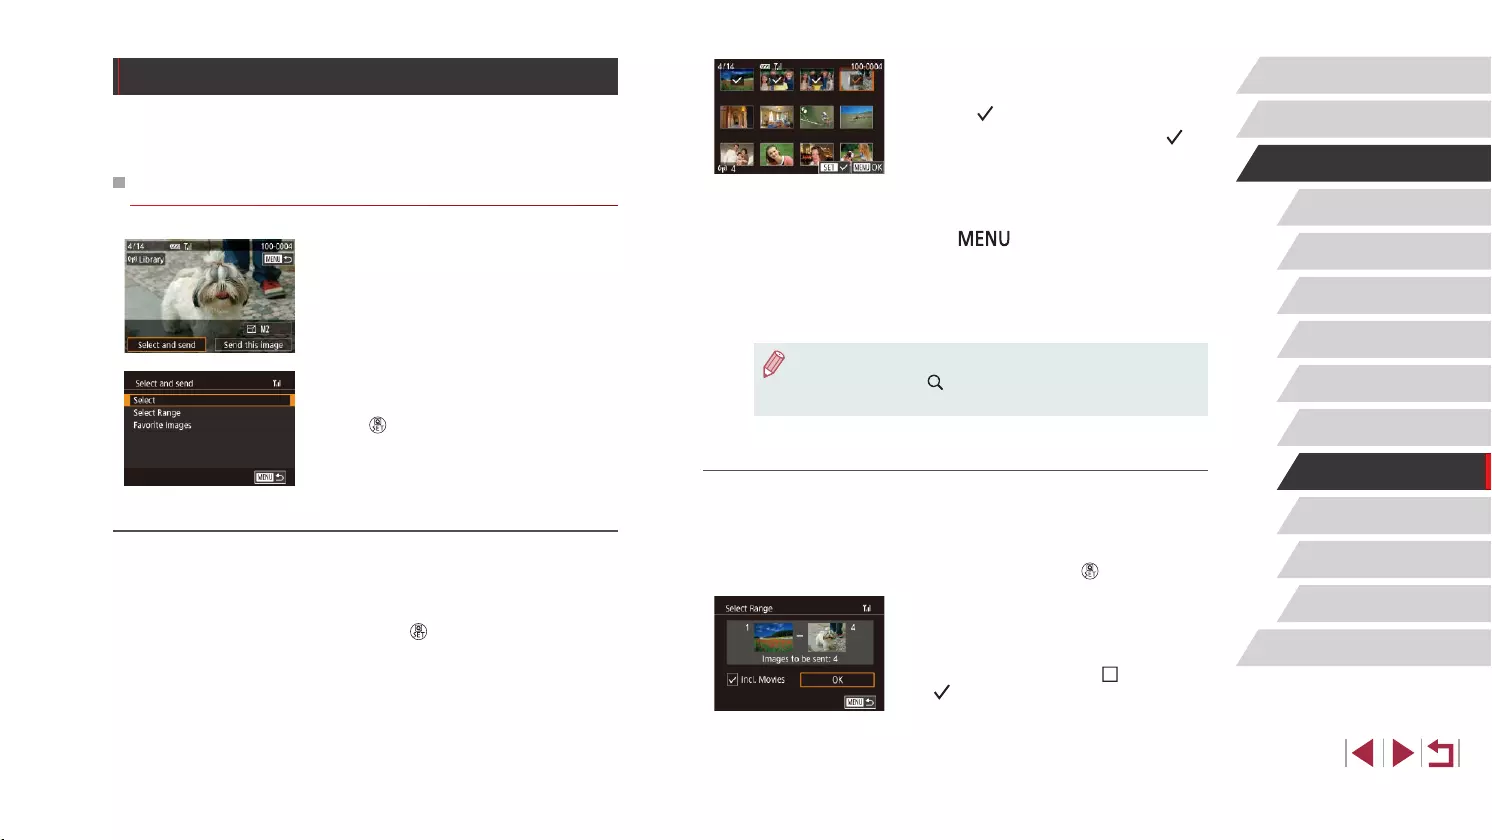
150
Setting Menu
Accessories
Appendix
Before Use
Index
Basic Guide
Advanced Guide
Camera Basics
Auto Mode /
Hybrid Auto Mode
Other Shooting Modes
P Mode
Tv, Av, M, and C Mode
Playback Mode
Wi-Fi Functions
2 Choose an image.
zTouching an image to send will label it
with a [ ] icon.
zTo cancel selection, touch it again. [ ] is
no longer displayed.
zRepeat this process to choose additional
images.
zAfter you nish choosing images, press
the [ ] button.
zTouch [OK].
3 Send the images.
zTouch [Send].
●You can also choose images in step 2 by moving the zoom
lever twice toward [ ] to access single-image display and then
touching images.
Selecting a Range
1 Choose [Select Range].
zFollowing step 2 in “Sending Multiple
Images” (=
150), choose [Select
Range] and press the [ ] button.
2 Choose images.
zFollow steps 2 – 3 in “Selecting a Range”
(=
114) to specify images.
zTo include movies, touch [ ] to add a
[] next to [Incl. Movies].
zTouch [OK].
3 Send the images.
zTouch [Send].
Image Sending Options
You can choose multiple images to send at once and change the image
recording pixel setting (size) before sending. Some Web services also
enable you to annotate the images you send.
Sending Multiple Images
1 Choose [Select and send].
zOn the image transfer screen, touch
[Select and send].
2 Choose a selection method.
zTouch a selection method, and then press
the [ ] button.
Choosing Images Individually
1 Choose [Select].
zFollowing step 2 in “Sending Multiple
Images” (=
150), choose [Select] and
press the [ ] button.
151
Setting Menu
Accessories
Appendix
Before Use
Index
Basic Guide
Advanced Guide
Camera Basics
Auto Mode /
Hybrid Auto Mode
Other Shooting Modes
P Mode
Tv, Av, M, and C Mode
Playback Mode
Wi-Fi Functions
Notes on Sending Images
●Depending on the condition of the network you are using, it may take
a long time to send movies. Be sure to keep an eye on the camera
battery level.
●Web services may limit the number of images or length of movies you
can send.
●For movies that you do not compress (=
126), a separate,
compressed le is sent instead of the original le. Note that this may
delay transmission, and the le cannot be sent unless there is enough
space for it on the memory card.
●When sending movies to smartphones, note that the supported image
quality varies depending on the smartphone. For details, refer to the
smartphone user manual.
●On the screen, wireless signal strength is indicated by the following
icons.
[] high, [ ] medium, [ ] low, [ ] weak
●Sending images to Web services will take less time when resending
images you have already sent that are still on the CANON iMAGE
GATEWAY server.
Sending Favorite Images
Send only images tagged as favorites (=
118).
1 Choose [Favorite Images].
zFollowing step 2 in “Sending Multiple
Images” (=
150), choose [Favorite
Images] and press the [ ] button.
zAn image selection screen for favorites is
displayed. If you prefer not to include an
image, touch the image to remove [ ].
zAfter you nish choosing images, press
the [ ] button.
zTouch [OK].
2 Send the images.
zTouch [Send].
●In step 1, [Favorite Images] is not available unless you have
tagged images as favorites.

152
Setting Menu
Accessories
Appendix
Before Use
Index
Basic Guide
Advanced Guide
Camera Basics
Auto Mode /
Hybrid Auto Mode
Other Shooting Modes
P Mode
Tv, Av, M, and C Mode
Playback Mode
Wi-Fi Functions
Sending Images Automatically
(Image Sync)
Images on the memory card that have not been transferred already can
be sent to a computer or Web services via CANON iMAGE GATEWAY.
Note that images cannot be sent only to Web services.
Initial Preparations
Preparing the Camera
Register [ ] as the destination. You can also assign [ ] to the [ ] button,
so that you can simply press the [ ] button to send any unsent images on
the memory card to a computer via CANON iMAGE GATEWAY.
On the destination computer, you will install and congure Image Transfer
Utility, free software compatible with Image Sync.
1 Add [ ] as a destination.
zAdd [ ] as a destination, as described in
“Registering CANON iMAGE GATEWAY”
(=
144).
zTo include a Web service as the
destination, log in to CANON iMAGE
GATEWAY (=
144), select your camera
model, access the Web service settings
screen, and choose the destination
Web service in Image Sync settings.
For details, refer to CANON iMAGE
GATEWAY Help.
Choosing the Number of Recording Pixels
(Image Size)
On the image transfer screen, you can choose the recording pixel setting
(size) of images to send by touching [ ].
●To send images at original size, select [No] as the resizing option.
●Choosing [ ] will resize images that are larger than the selected size
before sending.
●Movies cannot be resized.
●Image size can also be congured in MENU (=
29) ► [ 4] tab
► [Wi-Fi Settings] ► [Resize for Sending].
Adding Comments
Using the camera, you can add comments to images that you send
to e-mail addresses, social networking services, etc. The number of
characters and symbols that can be entered may differ depending on the
Web service.
1 Access the screen for adding
comments.
zOn the image transfer screen, touch [ ].
2 Add a comment (=
30).
3 Send the image.
●When a comment is not entered, the comment set in CANON
iMAGE GATEWAY is automatically sent.
●You can also annotate multiple images before sending them. The
same comment is added to all images sent together.
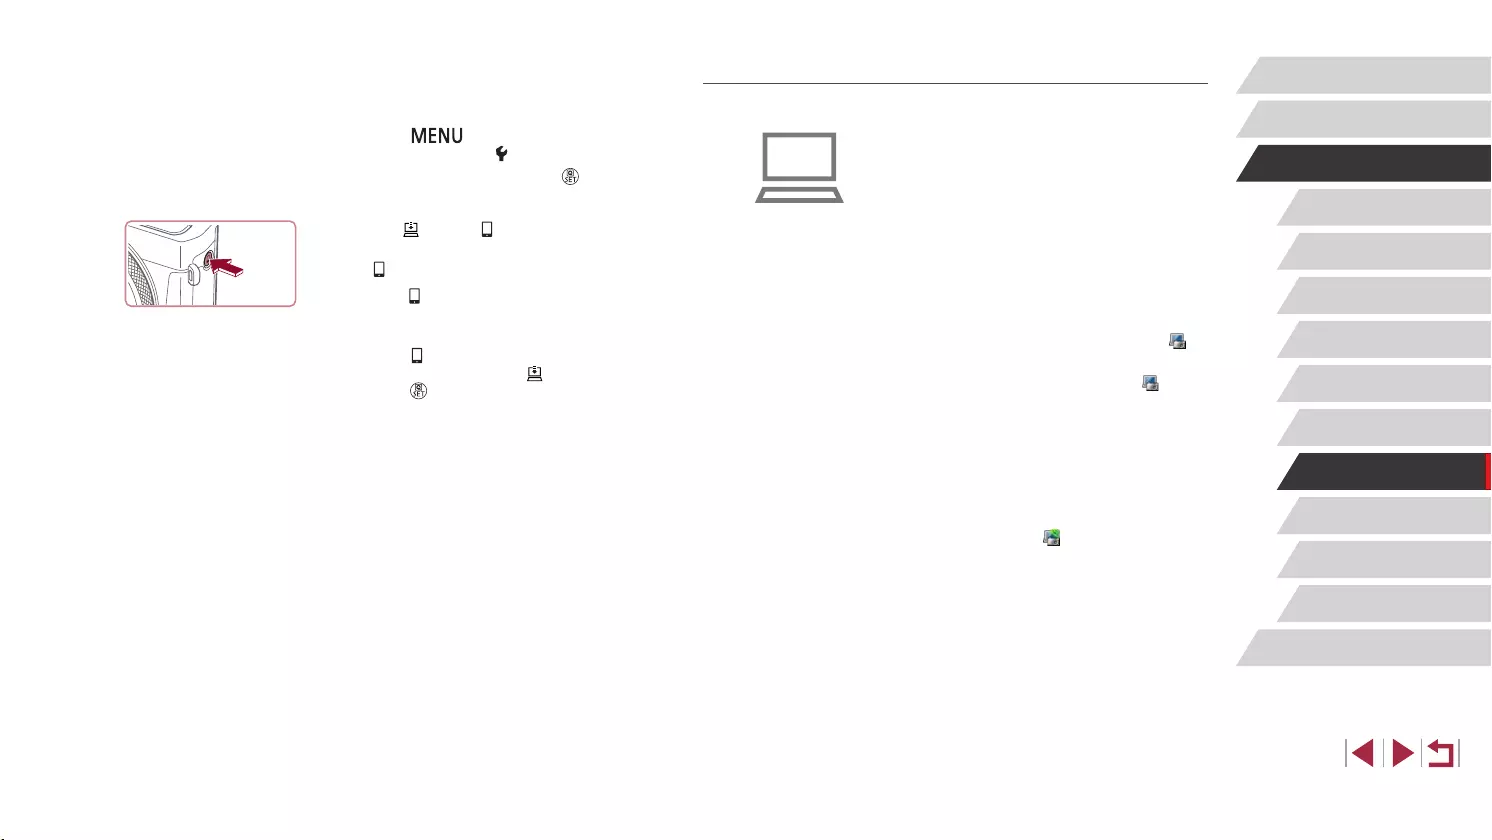
153
Setting Menu
Accessories
Appendix
Before Use
Index
Basic Guide
Advanced Guide
Camera Basics
Auto Mode /
Hybrid Auto Mode
Other Shooting Modes
P Mode
Tv, Av, M, and C Mode
Playback Mode
Wi-Fi Functions
Preparing the Computer
Install and congure the software on the destination computer.
1 Install Image Transfer Utility.
zInstall Image Transfer Utility on a
computer connected to the Internet
(=
138).
zImage Transfer Utility can also be
downloaded from the Image Sync
settings page of CANON iMAGE
GATEWAY (=
152).
2 Register the camera.
zWindows: In the taskbar, right-click [ ],
and then click [Add new camera].
zMac OS: In the menu bar, click [ ], and
then click [Add new camera].
zA list of cameras linked to CANON
iMAGE GATEWAY is displayed. Choose
the camera from which images are to be
sent.
zOnce the camera is registered and the
computer is ready to receive images, the
icon changes to [ ].
2 Choose the type of images to send
(only when sending movies with
images).
zPress the [ ] button and choose
[Wi-Fi Settings] on the [ 4] tab (=
29).
zChoose [Image Sync], press the [ ]
button, and then choose [Stills/Movies].
3 Assign [ ] to the [ ] button (only
when sending images by pressing
the [ ] button).
zClear the [ ] button setting if a
smartphone is already assigned to the
button (=
134).
zPress the [ ] button to access the mobile
connection screen, choose [ ], and then
press the [ ] button.
154
Setting Menu
Accessories
Appendix
Before Use
Index
Basic Guide
Advanced Guide
Camera Basics
Auto Mode /
Hybrid Auto Mode
Other Shooting Modes
P Mode
Tv, Av, M, and C Mode
Playback Mode
Wi-Fi Functions
Viewing Images Sent via Image Sync on a Smartphone
By installing the Canon Online Photo Album (Canon OPA) app, you can
use your smartphone to view and download images sent via Image Sync
while they are stored temporarily on the CANON iMAGE GATEWAY
server.
In preparation, enable smartphone access as follows.
●Make sure you have completed the settings described in “Preparing
the Computer” (=
153).
●Download and install the Canon Online Photo Album app for iPhones
or iPads from the App Store or for Android devices from Google Play.
●Log in to CANON iMAGE GATEWAY (=
144), select your camera
model, access the Web service settings screen, and enable viewing
and downloading from a smartphone in the Image Sync settings. For
details, refer to CANON iMAGE GATEWAY Help.
●Once images stored temporarily on the CANON iMAGE
GATEWAY server have been deleted, they can no longer be
viewed.
●Images you sent before enabling smartphone viewing and
downloading in Image Sync settings cannot be accessed this way.
●For Canon Online Photo Album instructions, refer to Canon
Online Photo Album Help.
Sending Images
Images sent from the camera are automatically saved to the computer.
If the computer that you intend to send images to is turned off, the images
will be stored temporarily on the CANON iMAGE GATEWAY server.
Stored images are regularly erased, so make sure to turn on the computer
and save the images.
1 Send images.
zIf you have already assigned [ ] to the
[] button, press the [ ] button.
zIf you have not assigned the button this
way, choose [ ] as described in steps
1 – 2 in “Uploading Images to Web
Services” (=
146).
zSent images are labeled with a [ ] icon.
2 Save the images to the computer.
zImages are automatically saved to the
computer when you turn it on.
zImages are automatically sent to Web
services from the CANON iMAGE
GATEWAY server, even if the computer
is off.
●When sending images, you should use a fully charged battery
pack or an AC adapter kit (sold separately, =
168).
●Even if images were imported to the computer through a different
method, any images not sent to the computer via CANON iMAGE
GATEWAY will be sent to the computer.
●Sending is faster when the destination is a computer on the same
network as the camera, because images are sent via the access
point instead of CANON iMAGE GATEWAY. Note that images
stored on the computer are sent to CANON iMAGE GATEWAY, so
the computer must be connected to the Internet.
155
Setting Menu
Accessories
Appendix
Before Use
Index
Basic Guide
Advanced Guide
Camera Basics
Auto Mode /
Hybrid Auto Mode
Other Shooting Modes
P Mode
Tv, Av, M, and C Mode
Playback Mode
Wi-Fi Functions
Shooting Remotely
As you check a shooting screen on your smartphone, you can use it to
shoot remotely.
1 Choose a shooting mode.
zTurn the mode dial to choose [ ], [ ],
[], [ ], or [ ] as the mode.
2 Secure the camera.
zOnce remote shooting begins, the
camera lens will come out. Lens motion
from zooming may also move the camera
out of position. Keep the camera still by
mounting it on a tripod or taking other
measures.
3 Connect the camera and
smartphone (=
134, =
136).
zIn the privacy settings, choose [Yes].
4 Choose remote shooting.
zIn Camera Connect on the smartphone,
choose remote shooting.
zThe camera lens will come out. Keep
your ngers away from the lens, and
make sure no objects will obstruct it.
zOnce the camera is ready for remote
shooting, a live image from the camera
will be displayed on the smartphone.
zAt this time, a message is displayed on
the camera, and all operations except
pressing the power button are disabled.
5 Shoot.
zUse the smartphone to shoot.
Using a Smartphone to View Camera
Images and Control the Camera
You can do the following with the dedicated smartphone app Camera
Connect.
●Browse images on the camera and save them to the smartphone
●Geotag images on the camera (=
155)
●Shoot remotely (=
155)
●Privacy settings must be congured in advance to allow image
viewing on the smartphone (=
134, =
136, =
156).
Geotagging Images on the Camera
GPS data recorded on a smartphone using the dedicated Camera
Connect application can be added to images on the camera. Images are
tagged with information including the latitude, longitude, and elevation.
●Before shooting, make sure the date and time and your home
time zone are set correctly, as described in “Setting the Date and
Time” (=
20). Also follow the steps in “World Clock” (=
162)
to specify any shooting destinations in other time zones.
●Others may be able to locate or identify you by using location data
in your geotagged still images or movies. Be careful when sharing
these images with others, as when posting images online where
many others can view them.
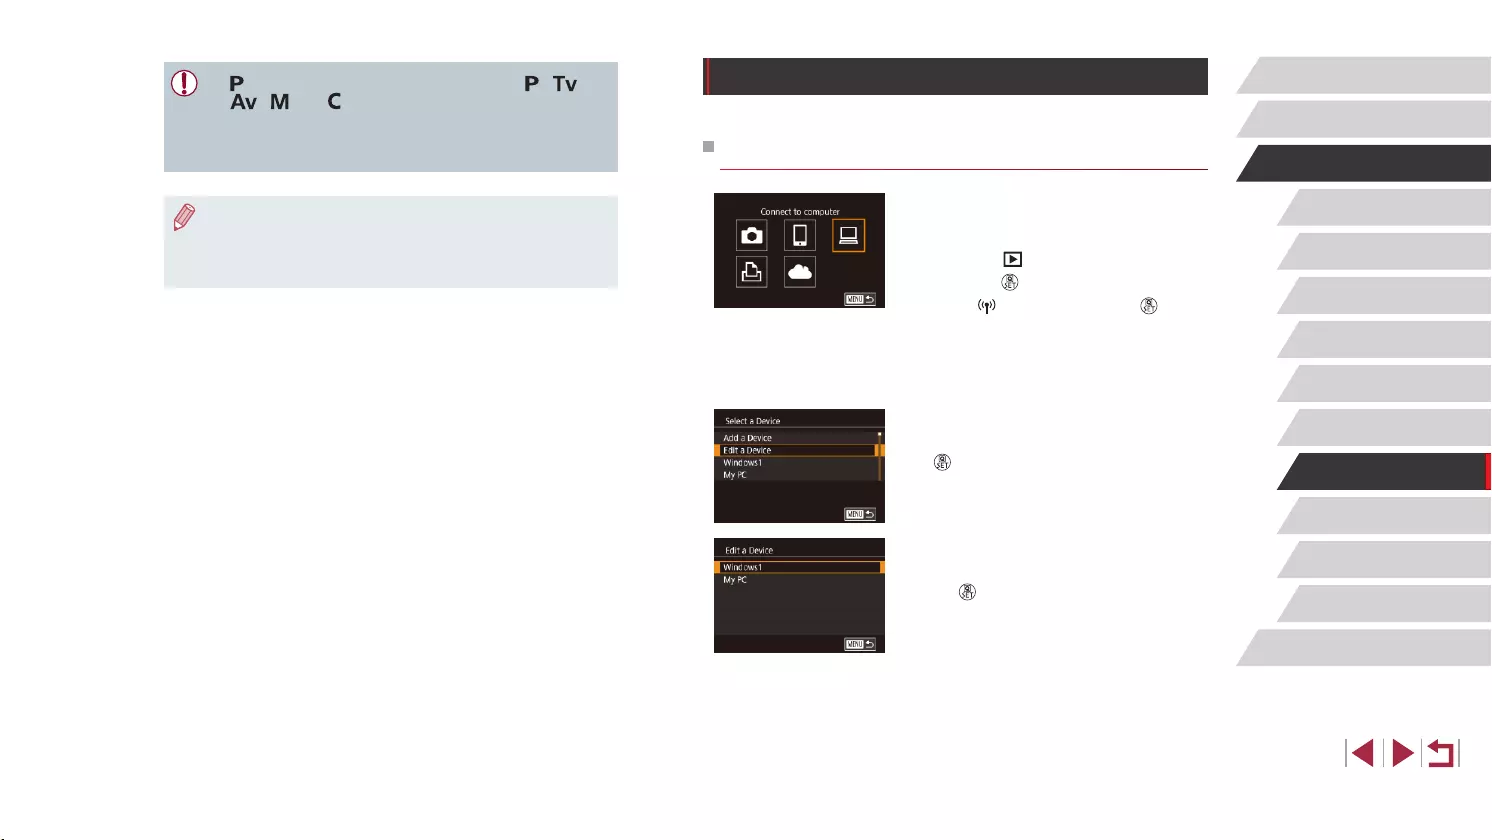
156
Setting Menu
Accessories
Appendix
Before Use
Index
Basic Guide
Advanced Guide
Camera Basics
Auto Mode /
Hybrid Auto Mode
Other Shooting Modes
P Mode
Tv, Av, M, and C Mode
Playback Mode
Wi-Fi Functions
Editing or Erasing Wi-Fi Settings
Edit or erase Wi-Fi settings as follows.
Editing Connection Information
1 Access the Wi-Fi menu and choose
a device to edit.
zPress the [ ] button.
zPress the [ ] button.
zTouch [ ], and then press the [ ]
button.
zDrag left or right to access the device
selection screen, and then touch the icon
of a device to edit.
2 Choose [Edit a Device].
zTouch [Edit a Device], and then press the
[] button.
3 Choose the device to edit.
zTouch the device to edit, and then press
the [ ] button.
4 Choose the item to edit.
zTouch the item you want to edit.
zThe items you can change depend on the
device or service.
●[] mode is used for shooting in modes other than [ ], [ ],
[], [ ], and [ ]. However, some Quick Set and MENU
settings you have congured in advance may be changed
automatically.
●Movie shooting is not available.
●Any jerky subject motion shown on the smartphone due to the
connection environment will not affect recorded images.
●Captured images are not transferred to the smartphone. Use the
smartphone to browse and import images from the camera.
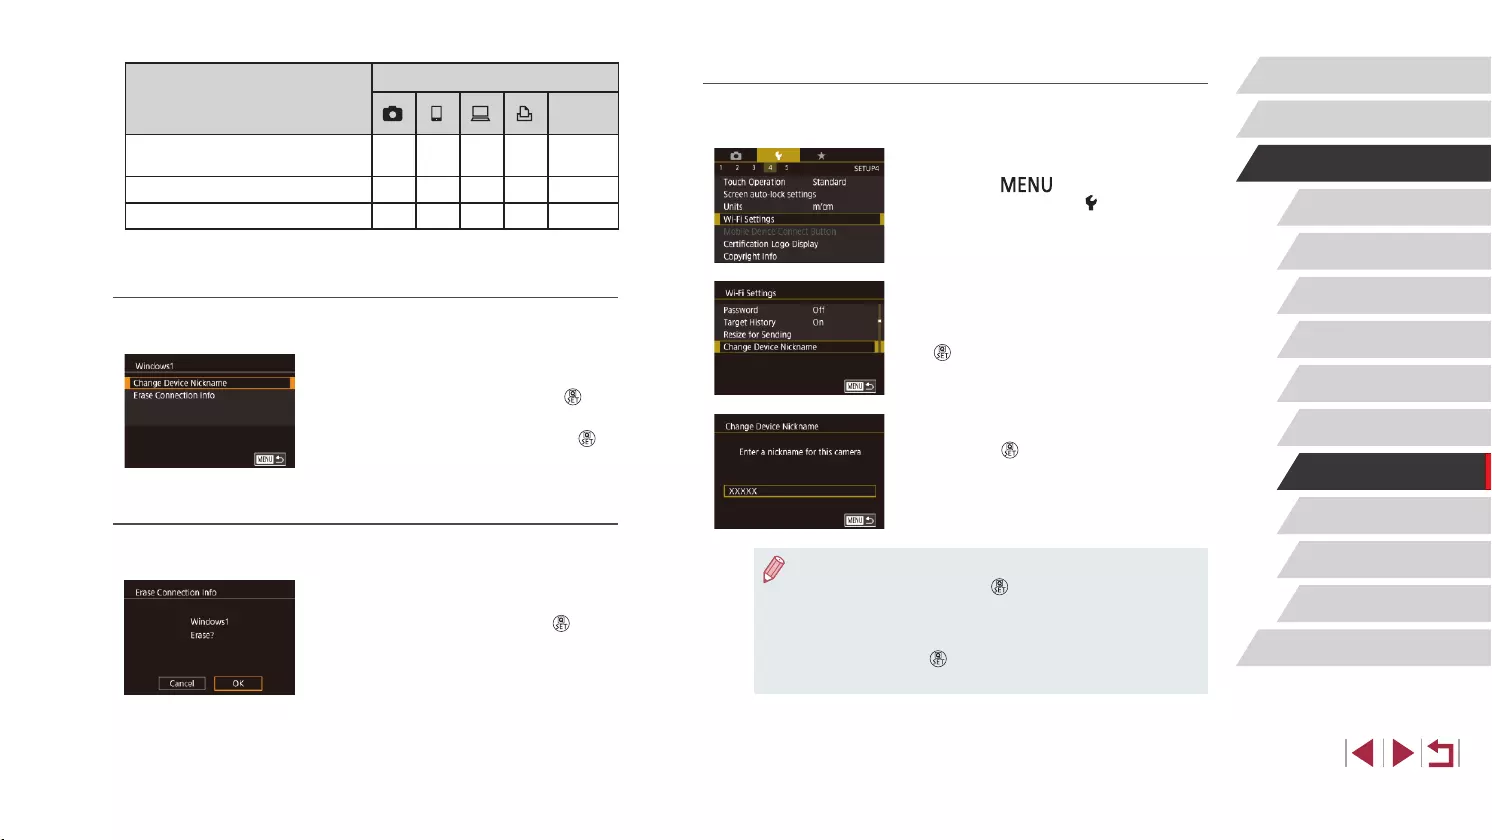
157
Setting Menu
Accessories
Appendix
Before Use
Index
Basic Guide
Advanced Guide
Camera Basics
Auto Mode /
Hybrid Auto Mode
Other Shooting Modes
P Mode
Tv, Av, M, and C Mode
Playback Mode
Wi-Fi Functions
Changing the Camera Nickname
Change the camera nickname (displayed on connected devices) as
desired.
1 Choose [Wi-Fi Settings].
zPress the [ ] button and choose
[Wi-Fi Settings] on the [ 4] tab (=
29).
2 Choose [Change Device Nickname].
zDrag up or down to touch [Change
Device Nickname], and then press the
[] button.
3 Change the nickname.
zPress the [ ] button to access the
keyboard (=
30), and then enter a
nickname.
●A message is displayed if the nickname you enter begins with
a symbol or space. Press the [ ] button and enter a different
nickname.
●You can also change the nickname from the [Device Nickname]
screen displayed when you rst use Wi-Fi. In this case, select the
text box, press the [ ] button to access the keyboard, and then
enter a new nickname.
Congurable Items
Connection
Web
Services
[Change Device Nickname]
(=
157)
OOOO
–
[View Settings] (=
134) –
O
– – –
[Erase Connection Info] (=
157)
OOOO
–
O
: Congurable – : Not congurable
Changing a Device Nickname
You can change the device nickname (display name) that is displayed on
the camera.
zFollowing step 4 in “Editing Connection
Information” (=
156), choose [Change
Device Nickname] and press the [ ]
button.
zSelect the input eld and press the [ ]
button. Use the keyboard displayed to
enter a new nickname (=
30).
Erasing Connection Information
Erase connection information (information about devices that you have
connected to) as follows.
zFollowing step 4 in “Editing Connection
Information” (=
156), choose [Erase
Connection Info] and press the [ ]
button.
zAfter [Erase?] is displayed, touch [OK].
zThe connection information will be
erased.
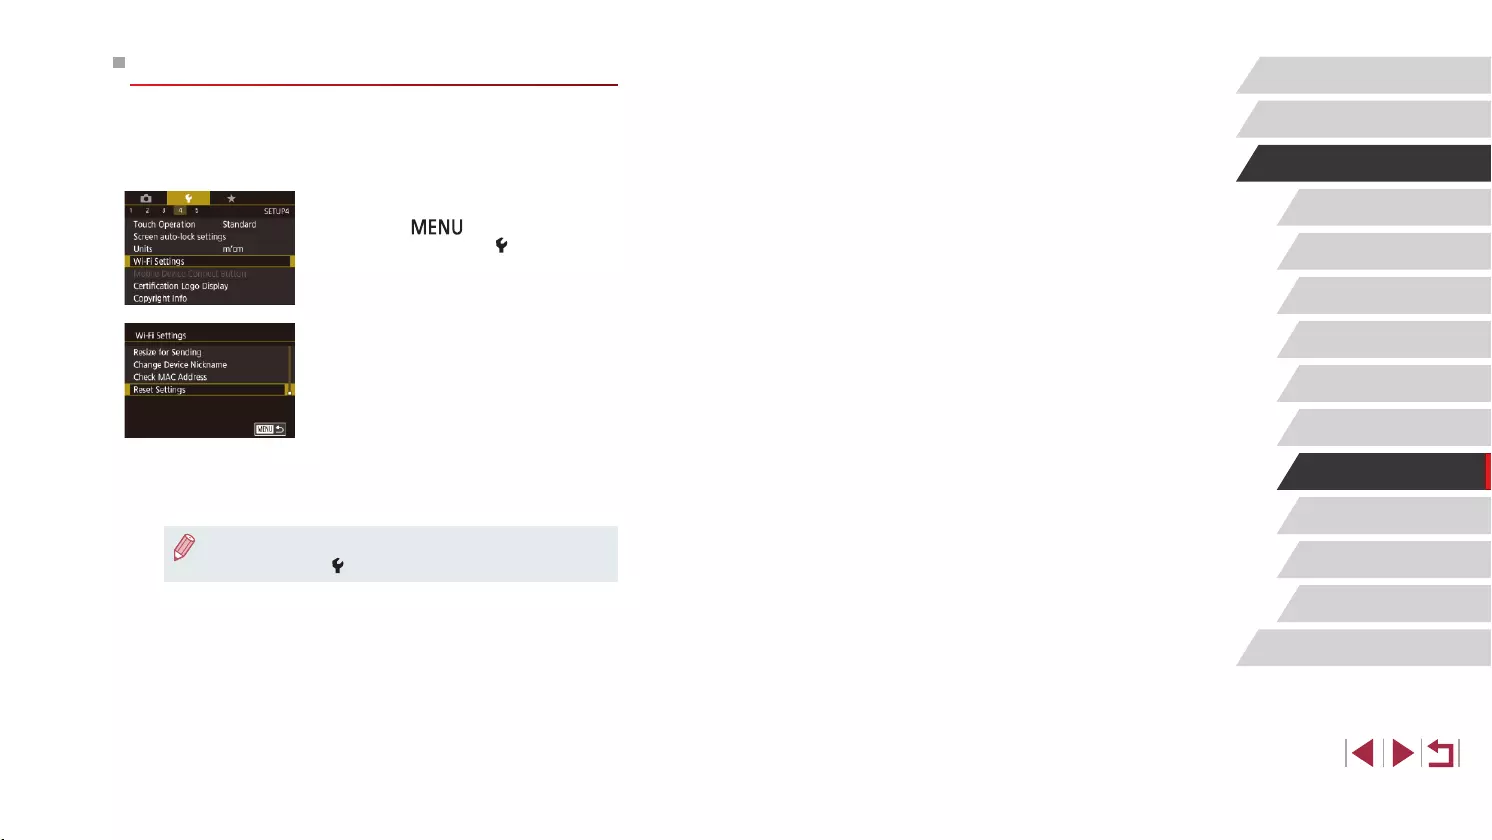
158
Setting Menu
Accessories
Appendix
Before Use
Index
Basic Guide
Advanced Guide
Camera Basics
Auto Mode /
Hybrid Auto Mode
Other Shooting Modes
P Mode
Tv, Av, M, and C Mode
Playback Mode
Wi-Fi Functions
Returning the Wi-Fi Settings to Default
Return the Wi-Fi settings to default if you transfer ownership of the
camera to another person, or dispose of it.
Resetting the Wi-Fi settings will also clear all Web service settings. Be
sure that you want to reset all Wi-Fi settings before using this option.
1 Choose [Wi-Fi Settings].
zPress the [ ] button and choose
[Wi-Fi Settings] on the [ 4] tab (=
29).
2 Choose [Reset Settings].
zDrag up or down and touch [Reset
Settings].
3 Restore the default settings.
zTouch [OK].
zThe Wi-Fi settings are now reset.
●To reset other settings (aside from Wi-Fi) to defaults, choose
[Reset All] on the [ 4] tab (=
166).
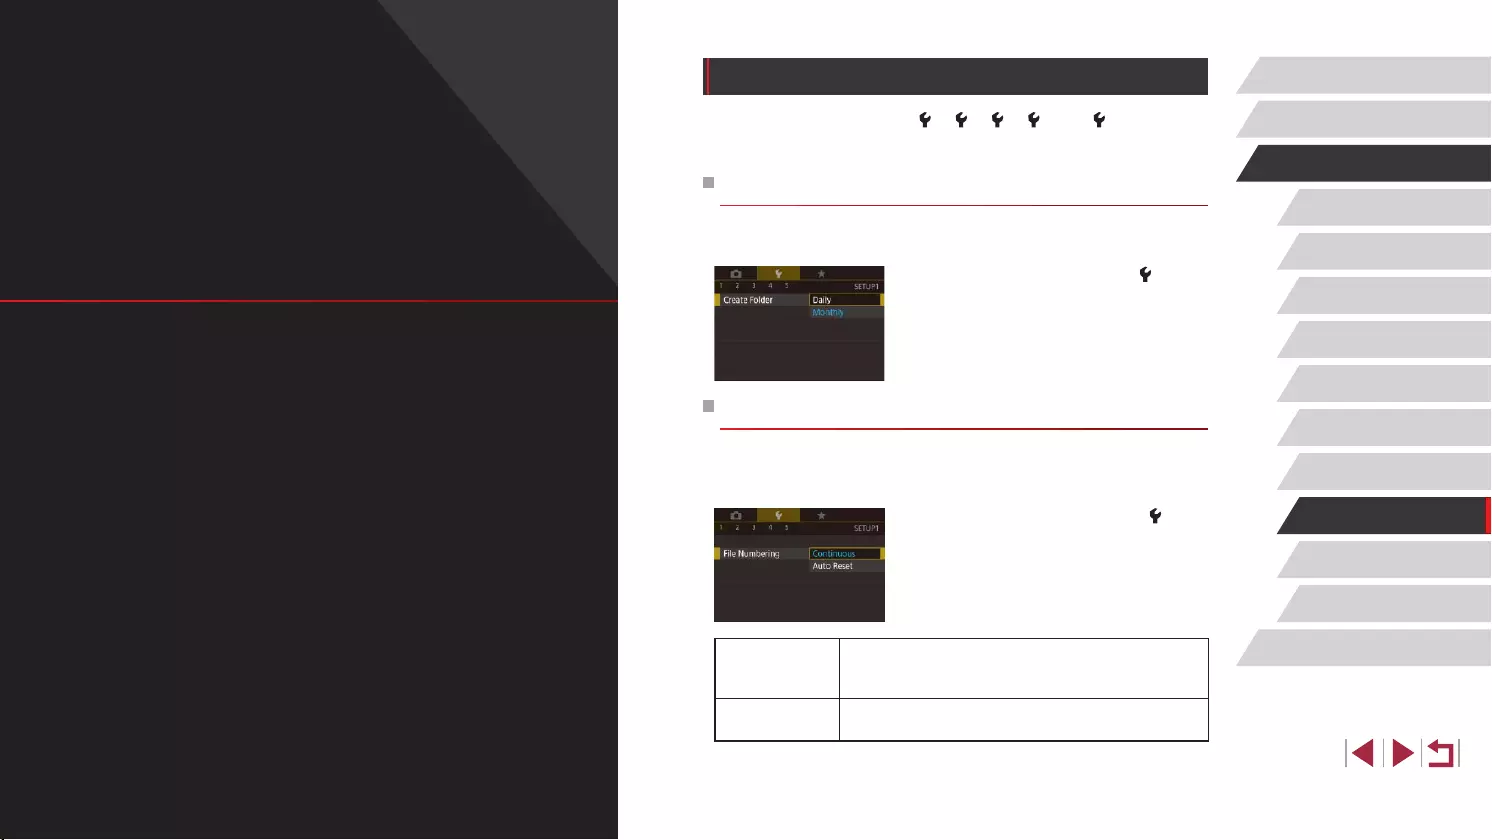
159
Accessories
Appendix
Before Use
Index
Basic Guide
Advanced Guide
Camera Basics
Auto Mode /
Hybrid Auto Mode
Other Shooting Modes
P Mode
Tv, Av, M, and C Mode
Playback Mode
Wi-Fi Functions
Setting Menu
Adjusting Basic Camera Functions
MENU (=
29) settings on the [ 1], [ 2], [ 3], [ 4], and [ 5] tabs
can be congured. Customize commonly used functions as desired, for
greater convenience.
Date-Based Image Storage
Instead of saving images in folders created each month, you can have the
camera create folders each day you shoot to store shots taken that day.
zChoose [Create Folder] on the [ 1] tab,
and then choose [Daily].
zImages will now be saved in folders
created on the shooting date.
File Numbering
Your shots are automatically numbered in sequential order (0001 – 9999)
and saved in folders that store up to 2,000 images each. You can change
how the camera assigns le numbers.
zChoose [File Numbering] on the [ 1] tab,
and then choose an option.
Continuous
Images are numbered consecutively (until the 9999th
shot is taken/saved) even if you switch memory
cards.
Auto Reset Image numbering is reset to 0001 if you switch
memory cards, or when a new folder is created.
Setting Menu
Customize or adjust basic camera functions for
greater convenience

160
Accessories
Appendix
Before Use
Index
Basic Guide
Advanced Guide
Camera Basics
Auto Mode /
Hybrid Auto Mode
Other Shooting Modes
P Mode
Tv, Av, M, and C Mode
Playback Mode
Wi-Fi Functions
Setting Menu
Low-Level Formatting
Perform low-level formatting in the following cases: [Memory card error] is
displayed, the camera is not working correctly, card image reading/writing
is slower, continuous shooting is slower, or movie recording suddenly
stops. Low-level formatting erases all data on a memory card. Before low-
level formatting, copy images on the memory card to a computer, or take
other steps to back them up.
zOn the screen in step 2 of “Formatting
Memory Cards” (=
160), press the
[] button to choose [Low Level
Format]. A [ ] icon is displayed.
zFollow step 2 in “Formatting Memory
Cards” (=
160) to continue with the
formatting process.
●Low-level formatting takes longer than “Formatting Memory
Cards” (=
160), because data is erased from all storage regions
of the memory card.
●You can cancel low-level formatting in progress by choosing
[Stop]. In this case, all data will be erased, but the memory card
can be used normally.
Changing the Video System
Set the video system of any television used for display. This setting
determines the image quality (frame rate) available for movies.
zChoose [Video system] on the [ 1] tab,
and then choose an option.
●Regardless of the option selected in this setting, shots may be
numbered consecutively after the last number of existing images
on newly inserted memory cards. To start saving shots from 0001,
use an empty (or formatted, =
160) memory card.
Formatting Memory Cards
Before using a new memory card or a card formatted in another device,
you should format the card with this camera.
Formatting erases all data on a memory card. Before formatting, copy
images on the memory card to a computer, or take other steps to back
them up.
1 Access the [Format] screen.
zChoose [Format] on the [ 1] tab, and
then press the [ ] button.
2 Choose [OK].
zTouch [OK].
zThe memory card is now formatted.
●Formatting or erasing data on a memory card only changes le
management information on the card and does not erase the data
completely. When transferring or disposing of memory cards,
take steps to protect personal information if necessary, as by
physically destroying cards.
●The total card capacity indicated on the formatting screen may be
less than the advertised capacity.
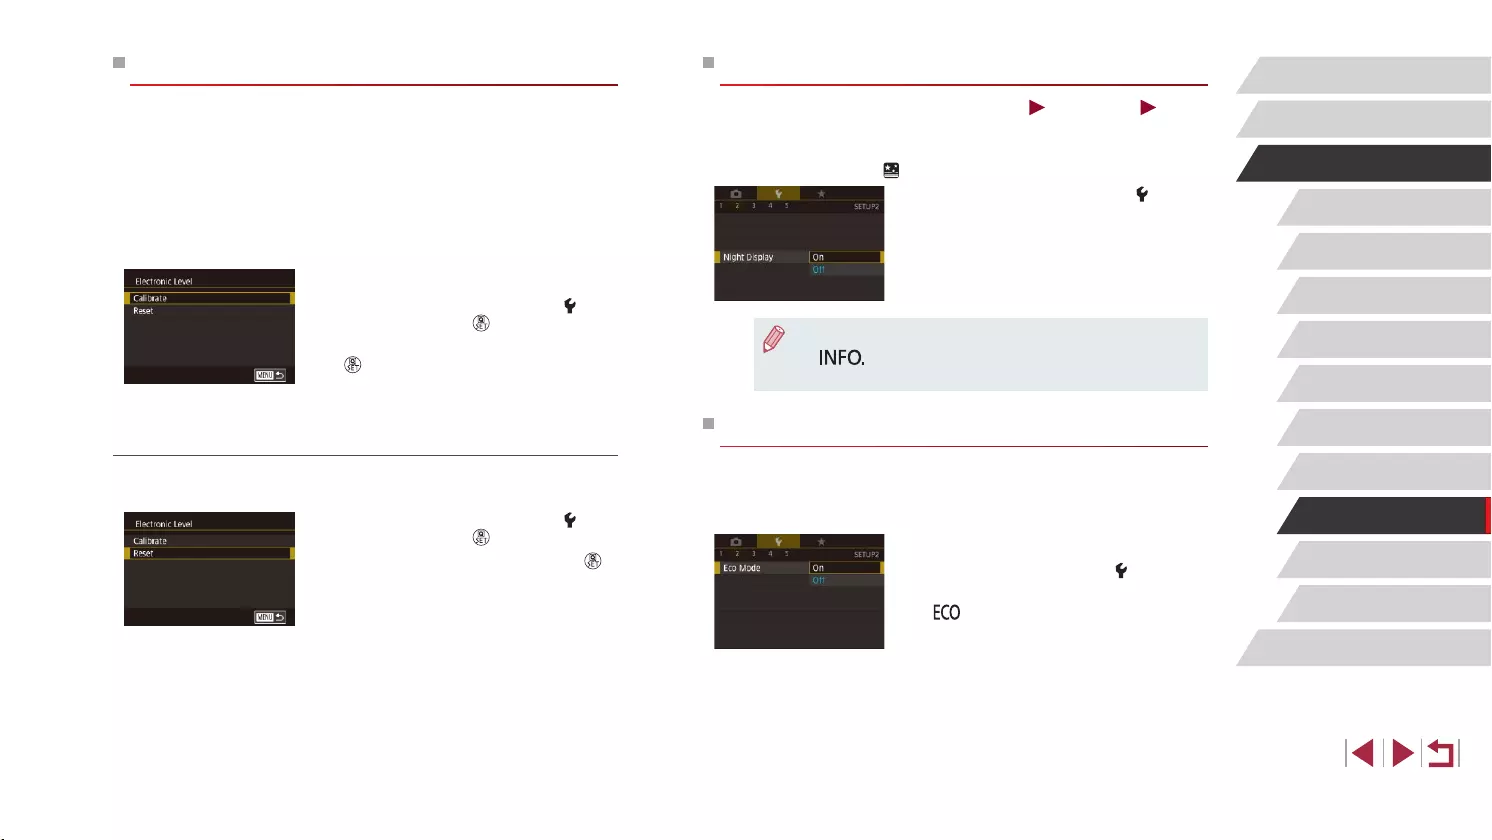
161
Accessories
Appendix
Before Use
Index
Basic Guide
Advanced Guide
Camera Basics
Auto Mode /
Hybrid Auto Mode
Other Shooting Modes
P Mode
Tv, Av, M, and C Mode
Playback Mode
Wi-Fi Functions
Setting Menu
Switching the Color of Screen Information
Still Images Movies
Information displayed on the screen and menus can be changed to a color
suitable for shooting under low-light conditions. Enabling this setting is
useful in modes such as [ ] (=
63).
zChoose [Night Display] on the [ 2] tab,
and then choose [On] (=
29).
zTo restore the original display, choose
[Off].
●You can also return the setting to [Off] by holding down the
[] button for at least one second on the shooting screen or
in Playback mode during single-image display.
Using Eco Mode
This function allows you to conserve battery power in Shooting mode.
When the camera is not in use, the screen quickly darkens to reduce
battery consumption.
1 Congure the setting.
zChoose [Eco Mode] on the [ 2] tab, and
then choose [On].
z[] is now shown on the shooting
screen (=
188).
zThe screen darkens when the camera
is not used for approximately two
seconds; approximately ten seconds
after darkening, the screen turns off.
The camera turns off after approximately
three minutes of inactivity.
Electronic Level Calibration
Calibrate the electronic level if it seems ineffective in helping you level the
camera.
For greater calibration accuracy, display grid lines (=
98) to help you
level the camera in advance.
1 Make sure the camera is level.
zPlace the camera on a at surface, such
as a table.
2 Calibrate the electronic level.
zChoose [Electronic Level] on the [ 1] tab,
and then press the [ ] button.
zChoose [Calibrate] and press the
[] button. A conrmation message is
displayed.
zTouch [OK].
Resetting the Electronic Level
Restore the electronic level to its original state as follows. Note that this is
not possible unless you have calibrated the electronic level.
zChoose [Electronic Level] on the [ 1] tab,
and then press the [ ] button.
zChoose [Reset], and then press the [ ]
button.
zTouch [OK].
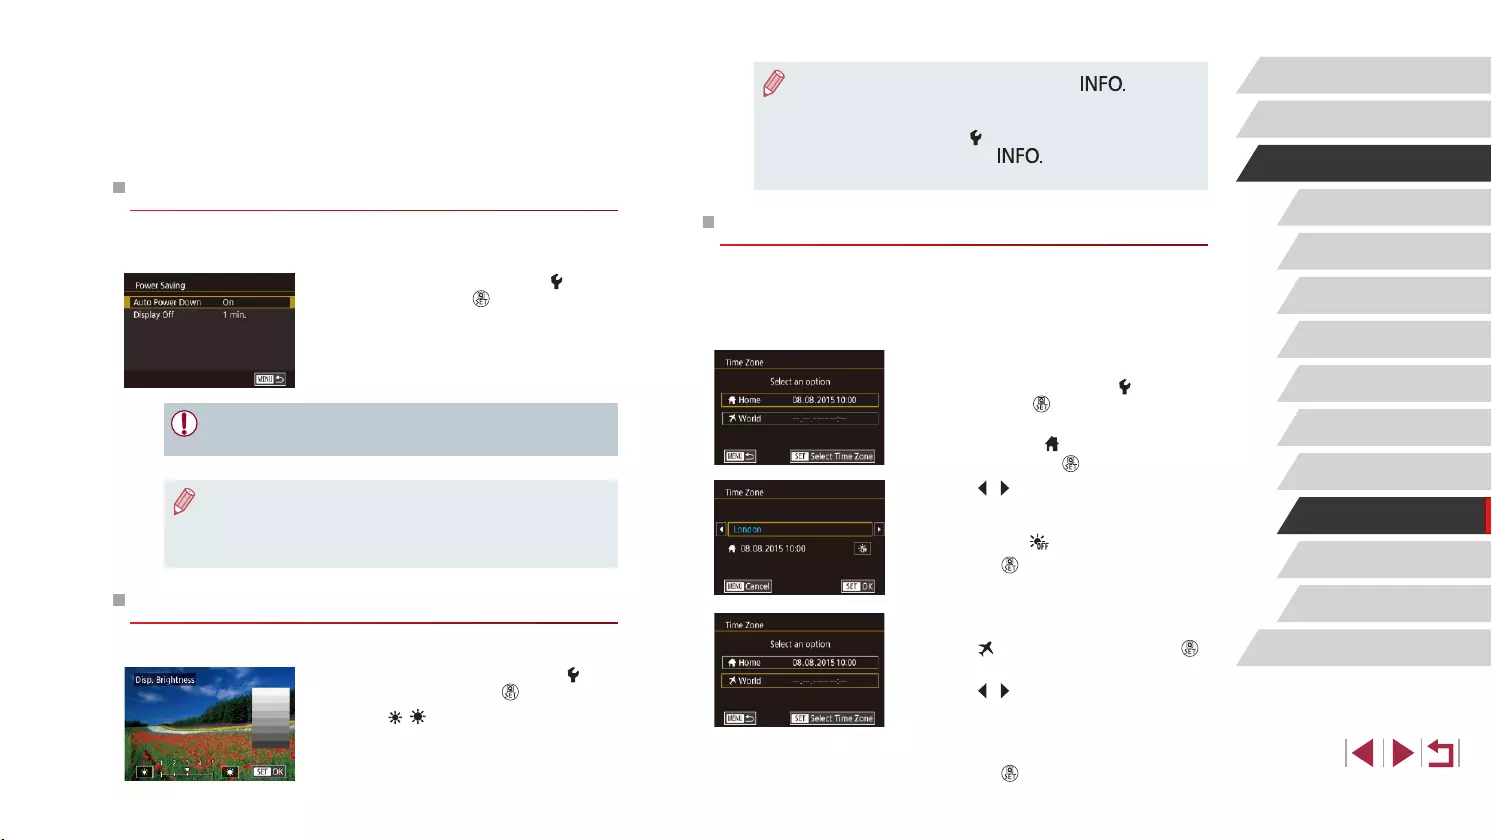
162
Accessories
Appendix
Before Use
Index
Basic Guide
Advanced Guide
Camera Basics
Auto Mode /
Hybrid Auto Mode
Other Shooting Modes
P Mode
Tv, Av, M, and C Mode
Playback Mode
Wi-Fi Functions
Setting Menu
●For maximum brightness, press and hold the [ ] button
for at least one second when the shooting screen is displayed
or when in single-image display. (This will override the [Disp.
Brightness] setting on the [ 2] tab.) To restore the original
brightness, press and hold the [ ] button again for at least
one second or restart the camera.
World Clock
To ensure that your shots will have the correct local date and time when
you travel abroad, simply register the destination in advance and switch to
that time zone. This convenient feature eliminates the need to change the
Date/Time setting manually.
1 Specify your home time zone.
zChoose [Time Zone] on the [ 2] tab, and
then press the [ ] button.
zWhen conguring this setting for the rst
time, make sure [ Home] is selected,
and then press the [ ] button.
zTouch [ ][ ] to choose the home time
zone.
To set daylight saving time (1 hour
ahead), touch [ ].
zPress the [ ] button.
2 Specify your destination.
zTouch [ World], and then press the [ ]
button.
zTouch [ ][ ] to choose the destination
time zone.
zIf necessary, specify daylight saving time
as in step 1.
zPress the [ ] button.
2 Shoot.
zTo activate the screen and prepare for
shooting when the screen is off but the
lens is still out, press the shutter button
halfway.
Power-Saving Adjustment
Adjust the timing of automatic camera and screen deactivation (Auto
Power Down and Display Off, respectively) as needed (=
26).
zChoose [Power Saving] on the [ 2] tab,
and then press the [ ] button.
zChoose an item, and then choose an
option.
●To conserve battery power, you should normally choose [On] for
[Auto Power Down] and [1 min.] or less for [Display Off].
●The [Display Off] setting is applied even if you set [Auto Power
Down] to [Off].
●These power-saving functions are not available when you have
set Eco mode (=
161) to [On].
Screen Brightness
Adjust screen brightness as follows.
zChoose [Disp. Brightness] on the [ 2]
tab, and then press the [ ] button.
zTouch [ ][ ] to adjust the brightness.
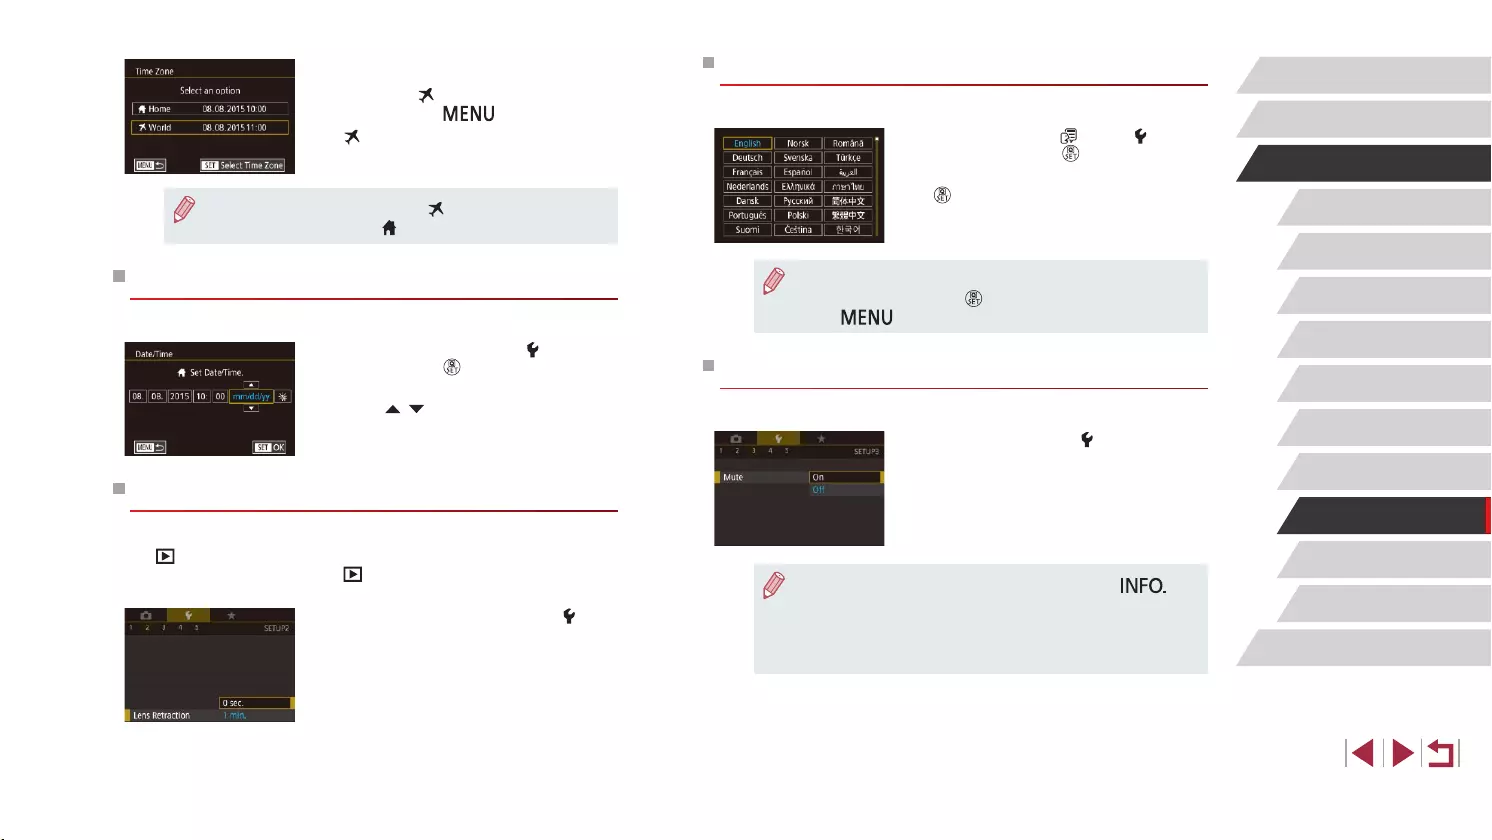
163
Accessories
Appendix
Before Use
Index
Basic Guide
Advanced Guide
Camera Basics
Auto Mode /
Hybrid Auto Mode
Other Shooting Modes
P Mode
Tv, Av, M, and C Mode
Playback Mode
Wi-Fi Functions
Setting Menu
Display Language
Change the display language as needed.
zChoose [Language ] on the [ 3] tab,
and then press the [ ] button.
zChoose a language, and then press the
[] button.
●You can also access the [Language] screen in Playback mode by
pressing and holding the [ ] button and immediately pressing
the [ ] button.
Silencing Camera Operations
Silence camera sounds and movies as follows.
zChoose [Mute] on the [ 3] tab, and then
choose [On].
●Operation can also be silenced by holding down the [ ]
button as you turn the camera on.
●Sound is not played during movies (=
103) if you mute camera
sounds. To restore sound during movies, drag up across the
screen. Adjust volume by dragging up or down, as needed.
3 Switch to the destination time zone.
zMake sure [ World] is selected, and
then press the [ ] button.
z[] is now shown on [Time Zone] and
shooting screens (=
188).
●Adjusting the date or time while in [ ] mode (=
21) will
automatically update your [ Home] time and date.
Date and Time
Adjust the date and time as follows.
zChoose [Date/Time] on the [ 2] tab, and
then press the [ ] button.
zTouch the option to congure, and then
touch [ ][ ] to specify the date and
time.
Lens Retraction Timing
The lens is normally retracted for safety about one minute after you press
the [ ] button in Shooting mode (=
25). To have the lens retracted
immediately after you press the [ ] button, set the retraction timing to
[0 sec.].
zChoose [Lens Retraction] on the [ 2] tab,
and then choose [0 sec.].
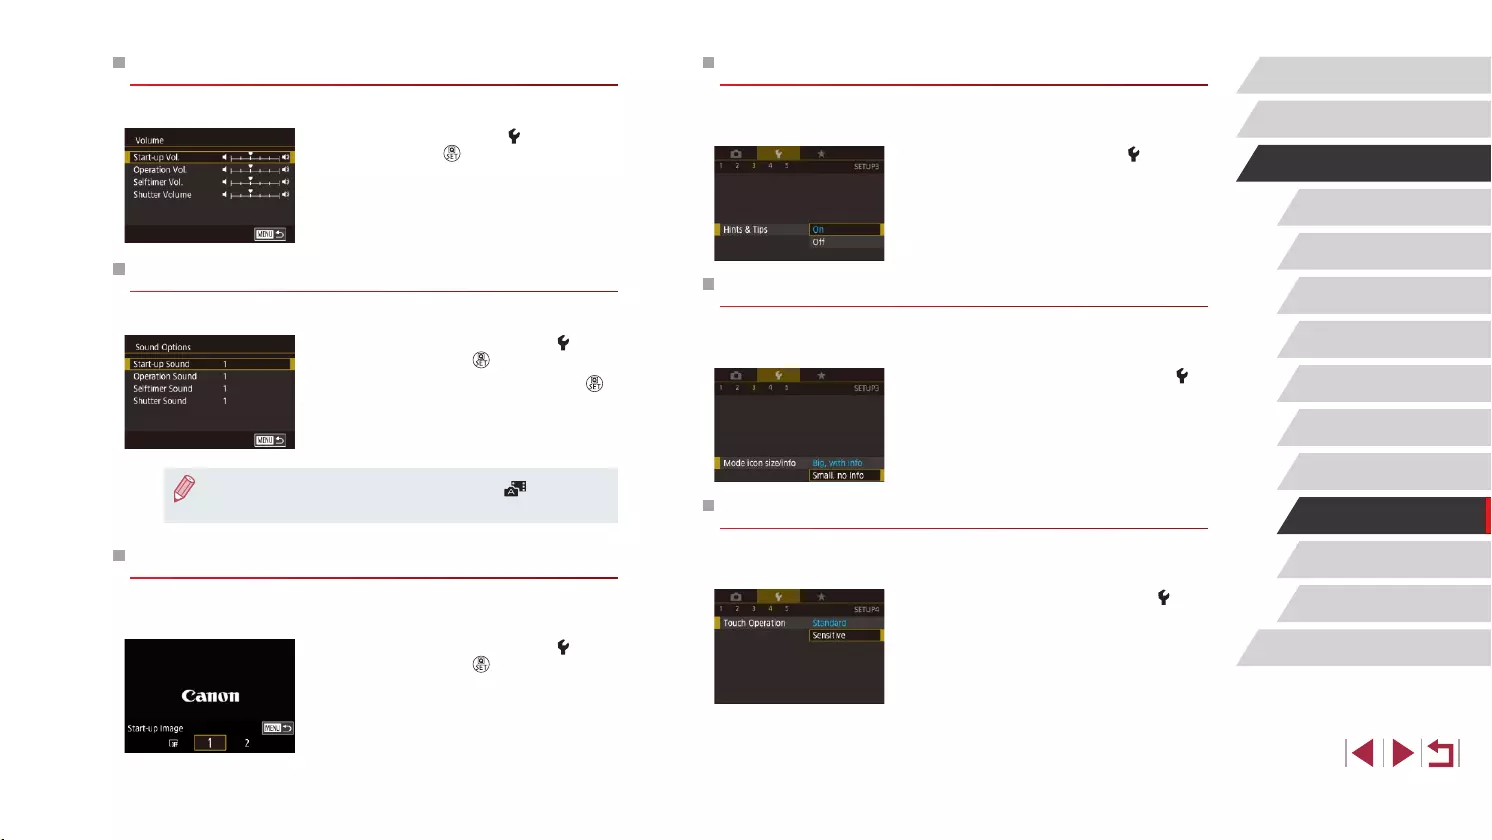
164
Accessories
Appendix
Before Use
Index
Basic Guide
Advanced Guide
Camera Basics
Auto Mode /
Hybrid Auto Mode
Other Shooting Modes
P Mode
Tv, Av, M, and C Mode
Playback Mode
Wi-Fi Functions
Setting Menu
Hiding Hints and Tips
Hints and tips are normally shown when you choose Quick Set menu
(=
28) items. If you prefer, you can deactivate this information.
zChoose [Hints & Tips] on the [ 3] tab,
and then choose [Off].
Listing Shooting Modes by Icon
List shooting modes on the selection screen by icon only, without mode
names, for faster selection.
zChoose [Mode icon size/info] on the [ 3]
tab, and then choose [Small, no info].
Increasing Touch-Screen Panel Sensitivity
Sensitivity of the touch-screen panel can be increased, so that the camera
responds to a lighter touch.
zChoose [Touch Operation] on the [ 4]
tab, and then choose [Sensitive].
Adjusting the Volume
Adjust the volume of individual camera sounds as follows.
zChoose [Volume] on the [ 3] tab, and
then press the [ ] button.
zDrag up or down to choose an item, and
then adjust the volume by touching the
desired position on the bar.
Customizing Sounds
Customize camera operating sounds as follows.
zChoose [Sound Options] on the [ 3] tab,
and then press the [ ] button.
zChoose an item, and then press the [ ]
button.
zChoose an option.
●The shutter sound in digest movies recorded in [ ] mode
(=
35) cannot be changed.
Start-Up Screen
Customize the start-up screen shown after you turn the camera on as
follows.
zChoose [Start-up Image] on the [ 1] tab,
and then press the [ ] button.
zChoose an option.
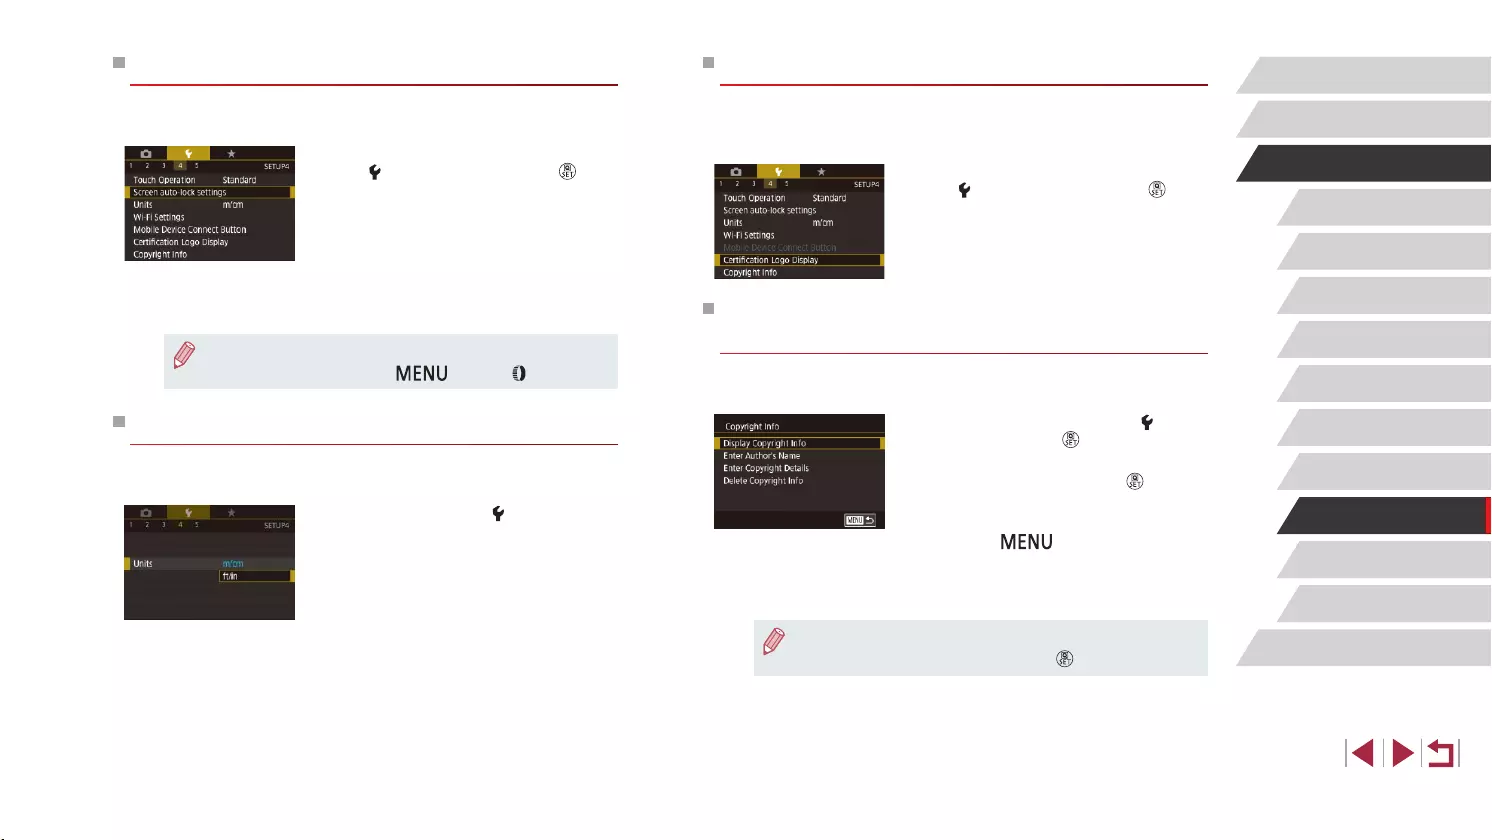
165
Accessories
Appendix
Before Use
Index
Basic Guide
Advanced Guide
Camera Basics
Auto Mode /
Hybrid Auto Mode
Other Shooting Modes
P Mode
Tv, Av, M, and C Mode
Playback Mode
Wi-Fi Functions
Setting Menu
Checking Certication Logos
Some logos for certication requirements met by the camera can be
viewed on the screen. Other certication logos are printed in this guide, on
the camera packaging, or on the camera body.
zChoose [Certication Logo Display] on
the [ 4] tab, and then press the [ ]
button.
Setting Copyright Information to Record in
Images
To record the author’s name and copyright details in images, set this
information beforehand as follows.
zChoose [Copyright Info] on the [ 4] tab,
and then press the [ ] button.
zChoose [Enter Author’s Name] or [Enter
Copyright Details], press the [ ] button
to access the keyboard, and then enter
the name (=
30).
zPress the [ ] button. When [Accept
changes?] is displayed, touch [Yes].
zThe information set here will now be
recorded in images.
●To check the information entered, choose [Display Copyright Info]
on the screen above, and then press the [ ] button.
Automatically Locking the Touch-Screen Panel
To prevent unintended operations, you can set up automatic locking of the
touch-screen panel.
zChoose [Screen auto-lock settings] on
the [ 4] tab, and then press the [ ]
button.
zChoose [Screen auto lock], and then
choose [Enable].
zChoose [Auto-locks after], and then
choose an option.
zTo unlock the touch-screen panel, press
the shutter button halfway.
●The touch-screen panel can also be unlocked by pressing or
turning controls, such as the [ ] button or [ ] ring.
Metric / Non-Metric Display
Change the unit of measurement shown in the zoom bar (=
33), the
MF indicator (=
81), and elsewhere from m/cm to ft/in as needed.
zChoose [Units] on the [ 4] tab, and then
choose [ft/in].
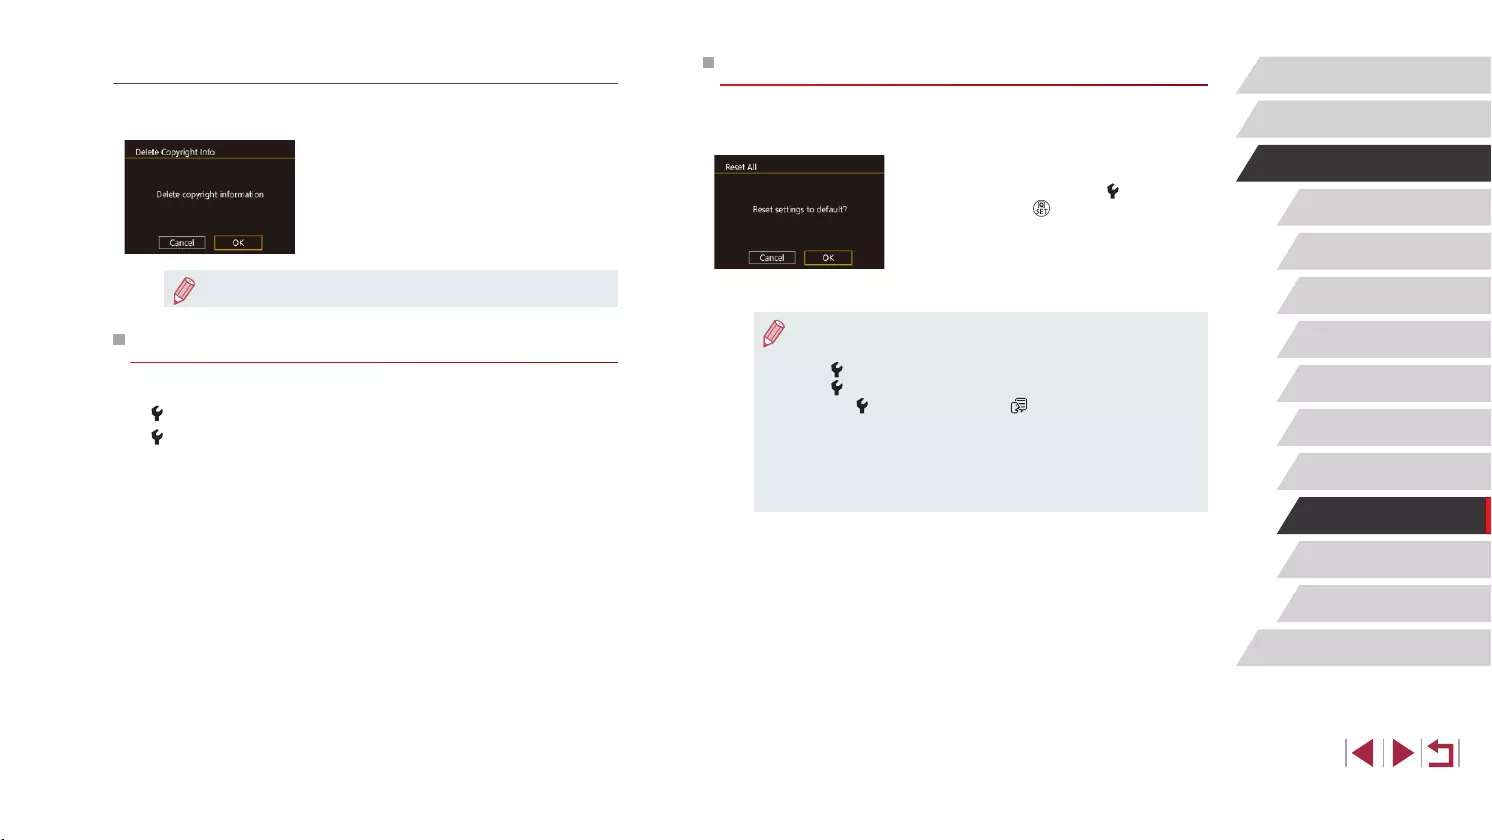
166
Accessories
Appendix
Before Use
Index
Basic Guide
Advanced Guide
Camera Basics
Auto Mode /
Hybrid Auto Mode
Other Shooting Modes
P Mode
Tv, Av, M, and C Mode
Playback Mode
Wi-Fi Functions
Setting Menu
Restoring Default Camera Settings
If you accidentally change a setting, you can restore default camera
settings.
1 Access the [Reset All] screen.
zChoose [Reset All] on the [ 5] tab, and
then press the [ ] button.
2 Restore default settings.
zTouch [OK].
zDefault settings are now restored.
●The following functions are not restored to default settings.
— Information registered using Face ID (=
43)
— [1] tab setting [Video system] (=
160)
— [2] tab settings [Time Zone] (=
162), [Date/Time] (=
163),
and [ 3] tab setting [Language ] (=
163)
— Custom white balance data you have recorded (=
78)
— Shooting Mode
— Wi-Fi settings (=
131)
— Calibrated value for the electronic level (=
161)
— Copyright information (=
165)
Deleting All Copyright Information
You can delete both the author’s name and copyright details at the same
time as follows.
zFollow the steps in “Setting Copyright
Information to Record in Images”
(=
165) and choose [Delete Copyright
Info].
zTouch [OK].
●The copyright info already recorded in images will not be deleted.
Adjusting Other Settings
The following settings can also be adjusted.
●[4] tab setting [Wi-Fi Settings] (=
131)
●[4] tab setting [Mobile Device Connect Button] (=
134)
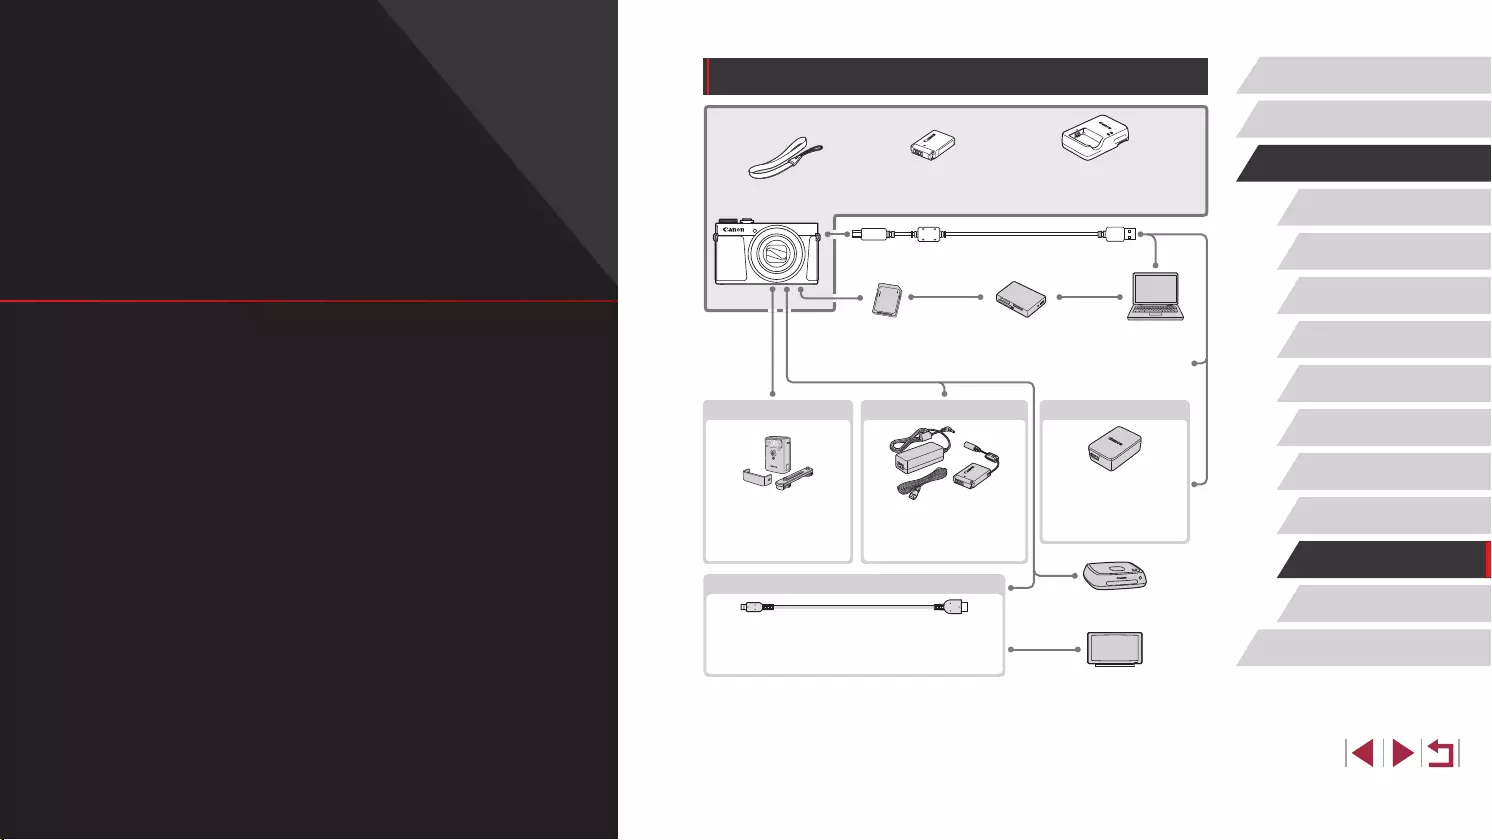
167
Appendix
Before Use
Index
Basic Guide
Advanced Guide
Camera Basics
Auto Mode /
Hybrid Auto Mode
Other Shooting Modes
P Mode
Tv, Av, M, and C Mode
Playback Mode
Wi-Fi Functions
Setting Menu
Accessories
System Map
*1 Also available for purchase separately.
*2 A genuine Canon accessory is also available (Interface Cable IFC-600PCU).
*3 Use a commercially available cable no longer than 2.5 m (8.2 ft.).
Wrist Strap Battery Pack
NB-13L*1
Battery Charger
CB-2LH/CB-2LHE*1
USB Cable (camera end: Micro-B)*2
Memory Card Card Reader Computer
TV/Video
System
Connect
Station CS100
AC Adapter Kit
ACK-DC110
Included Accessories
Power
Cables
HDMI Cable
(camera end: Type D)*3
Power
PictBridge-Compatible Printers
High-Power Flash
HF-DC2
Compact Power
Adapter
CA-DC30/CA-DC30E
Flash Unit
Accessories
Enjoy the camera in more ways with optional Canon
accessories and other compatible accessories sold
separately
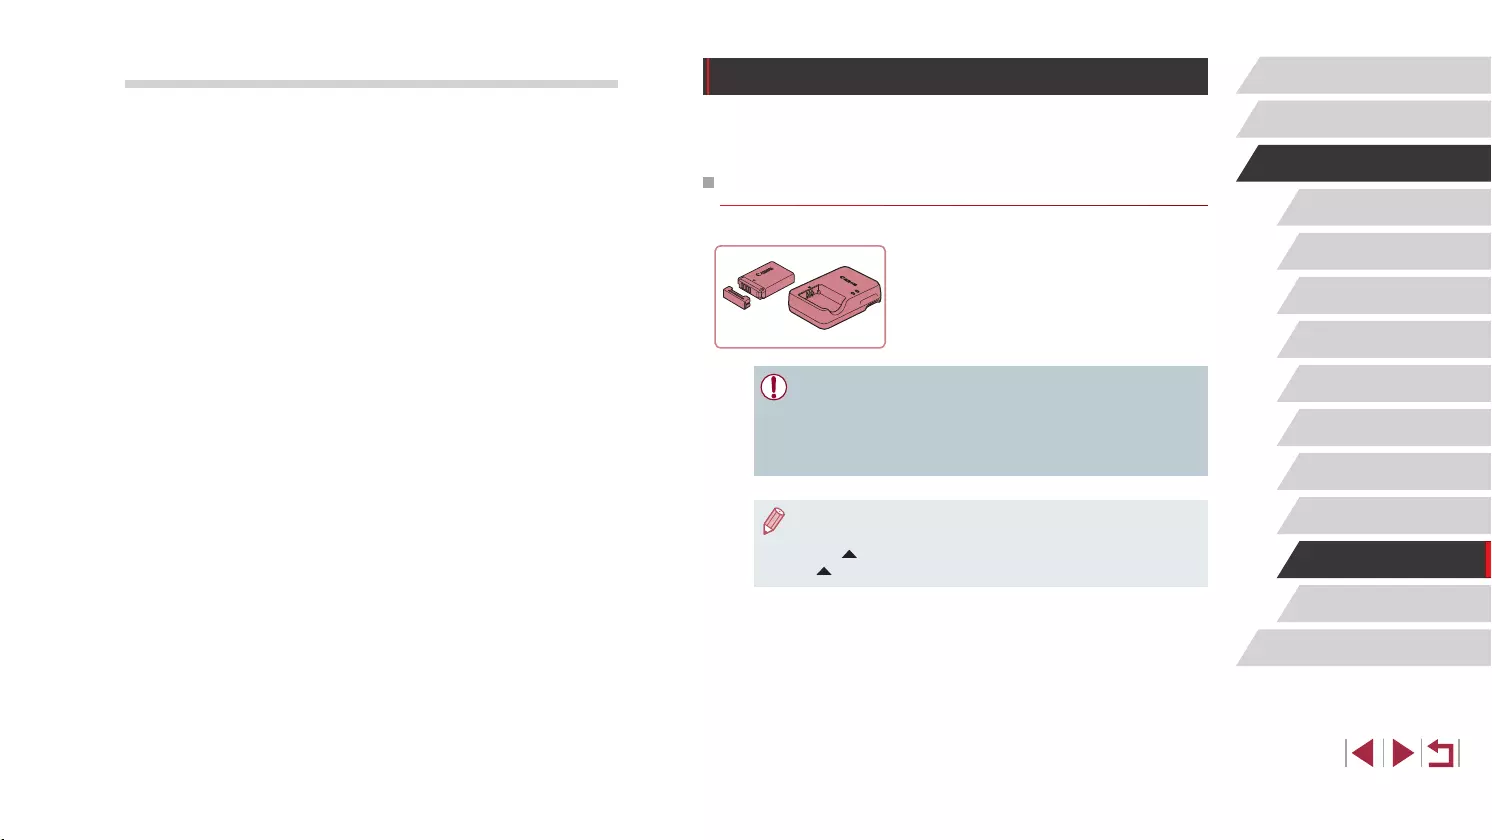
168
Appendix
Before Use
Index
Basic Guide
Advanced Guide
Camera Basics
Auto Mode /
Hybrid Auto Mode
Other Shooting Modes
P Mode
Tv, Av, M, and C Mode
Playback Mode
Wi-Fi Functions
Setting Menu
Accessories
Optional Accessories
The following camera accessories are sold separately. Note that
availability varies by area, and some accessories may no longer be
available.
Power Supplies
Battery Pack NB-13L
zRechargeable lithium-ion battery
Battery Charger CB-2LH/CB-2LHE
zCharger for Battery Pack NB-13L
●The message [Battery communication error] is displayed if you
use a non-genuine Canon battery pack, and user response is
required. Note that Canon shall not be liable for any damages
resulting from accidents, such as malfunction or re, that occur
due to use of non-genuine Canon battery packs.
●The battery pack includes a convenient cover which you can
attach to know the charge status at a glance. Attach the cover so
that is visible on a charged battery pack, and attach it so that
is not visible on an uncharged battery pack.
Use of genuine Canon accessories is recommended.
This product is designed to achieve excellent performance when used
with genuine Canon accessories.
Canon shall not be liable for any damage to this product and/or accidents
such as re, etc., caused by the malfunction of non-genuine Canon
accessories (e.g., a leakage and/or explosion of a battery pack). Please
note that any repairs your Canon product may require as a result of such
malfunction are not covered under warranty and will incur a fee.
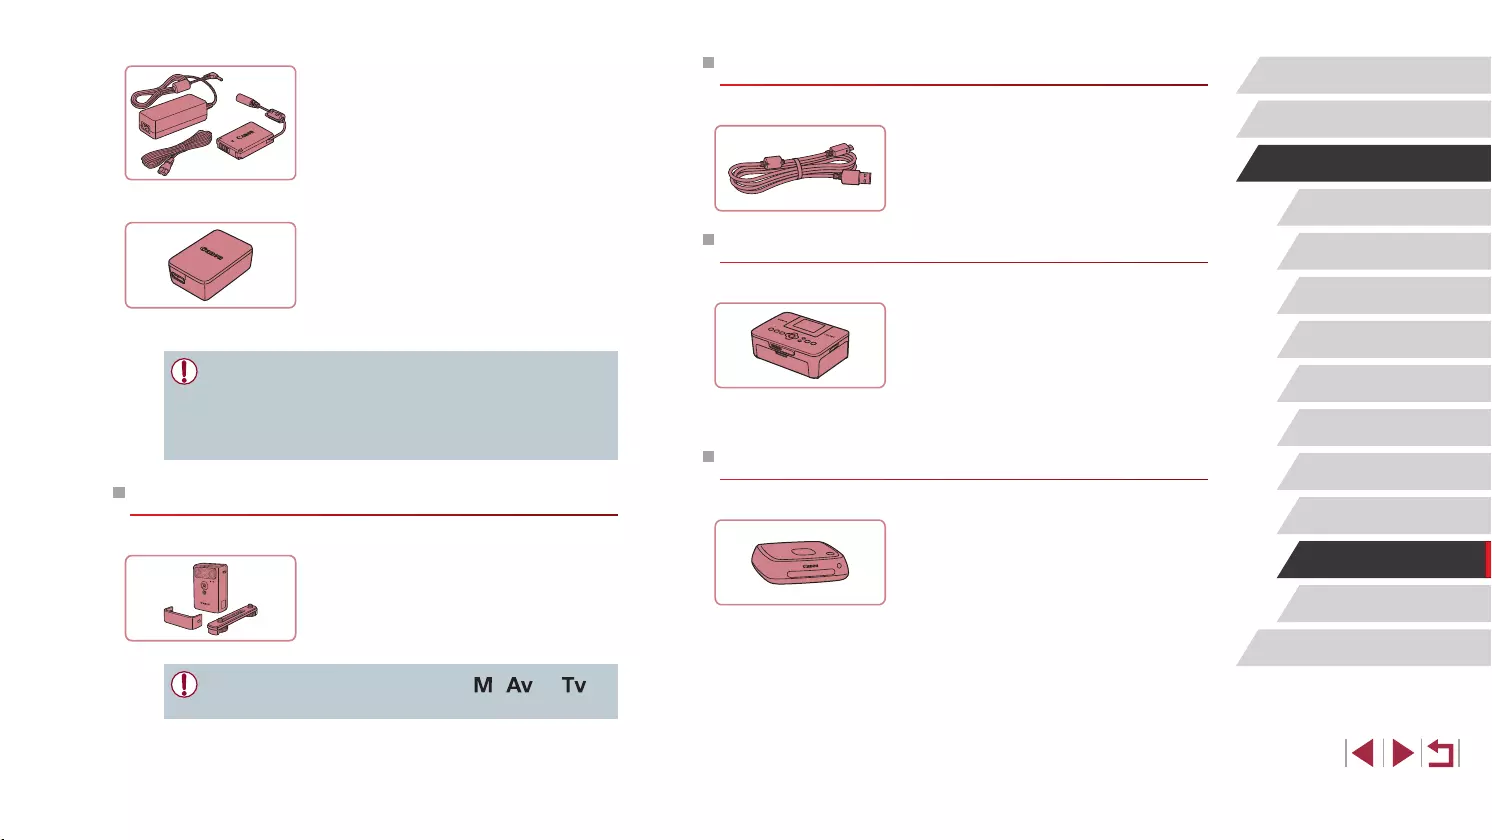
169
Appendix
Before Use
Index
Basic Guide
Advanced Guide
Camera Basics
Auto Mode /
Hybrid Auto Mode
Other Shooting Modes
P Mode
Tv, Av, M, and C Mode
Playback Mode
Wi-Fi Functions
Setting Menu
Accessories
Other Accessories
Interface Cable IFC-600PCU
zFor connecting the camera to a computer
or printer.
Printers
Canon-Brand PictBridge-Compatible
Printers
zEven without using a computer, you can
print images by connecting the camera
directly to a printer.
For details, visit your nearest Canon
retailer.
Photo and Movie Storage
Connect Station CS100
●A media hub for storing camera images,
viewing on a connected TV, printing
wirelessly on a Wi-Fi-compatible printer,
sharing over the Internet, and more.
AC Adapter Kit ACK-DC110
zFor powering the camera using
household power. Recommended when
using the camera over extended periods,
or when connecting the camera to a
printer or computer. Cannot be used to
charge the battery pack in the camera.
Compact Power Adapter
CA-DC30/CA-DC30E
zInsert the included battery pack into the
camera for charging. Interface Cable
IFC-600PCU (sold separately) is required
to connect the adapter to the camera.
●The battery charger, AC adapter kit, and compact power adapter
can be used in areas with 100 – 240 V AC power (50/60 Hz).
●For power outlets in a different format, use a commercially
available adapter for the plug. Never use an electrical transformer
designed for traveling, which may damage the battery pack.
Flash Unit
High-Power Flash HF-DC2
zExternal ash for illuminating subjects
that are out of range of the built-in ash.
High-Power Flash HF-DC1 can also be
used.
●High-Power Flash units cannot be used in [ ], [ ], or [ ]
shooting mode when [Flash Mode] is set to [Manual].
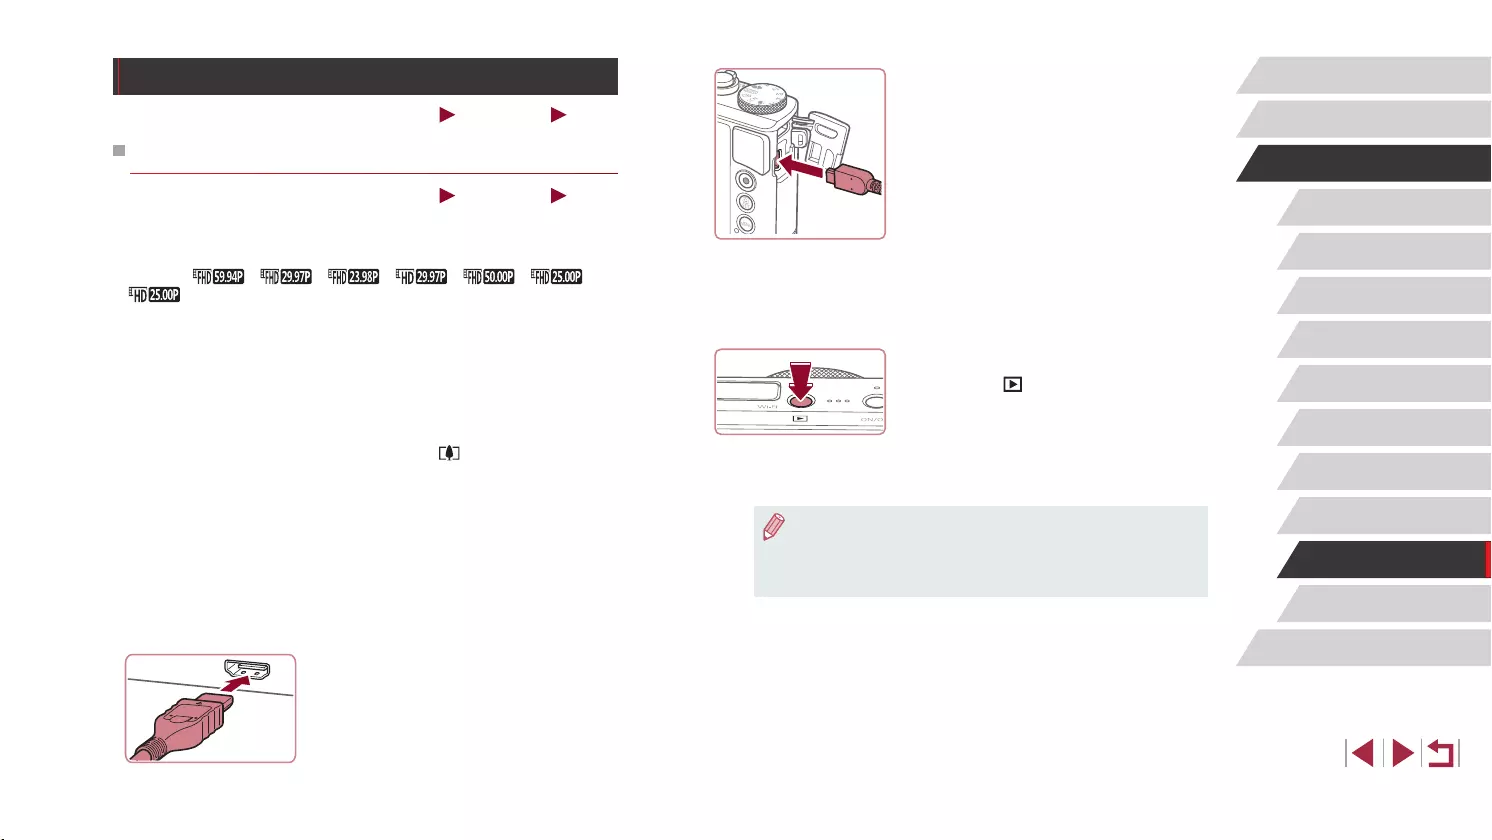
170
Appendix
Before Use
Index
Basic Guide
Advanced Guide
Camera Basics
Auto Mode /
Hybrid Auto Mode
Other Shooting Modes
P Mode
Tv, Av, M, and C Mode
Playback Mode
Wi-Fi Functions
Setting Menu
Accessories
zOn the camera, open the terminal cover
and insert the cable plug fully into the
camera terminal.
3 Turn the TV on and switch to
external input.
zSwitch the TV input to the external input
you connected the cable to in step 2.
4 Turn the camera on.
zPress the [ ] button.
zImages from the camera are now
displayed on the TV. (Nothing is
displayed on the camera screen.)
zWhen nished, turn off the camera and
TV before disconnecting the cable.
●Some information may not be displayed when viewing images on
a TV (=
189).
●Camera operating sounds are not played while the camera is
connected to an HDTV.
Using Optional Accessories
Still Images Movies
Playback on a TV
Still Images Movies
You can view your shots on a TV by connecting the camera to an HDTV
with a commercially available HDMI cable (not exceeding 2.5 m / 8.2 ft.,
with a Type D terminal on the camera end). Movies shot at an image
quality of [ ], [ ], [ ], [ ], [ ], [ ], or
[] can be viewed in high denition.
For details on connection or how to switch inputs, refer to the TV manual.
●The following camera functions are available when using a TV for
display.
— Browsing images
Drag left or right across the screen (=
103).
— Playing movies (=
104)
— Zoom in (=
112)
To zoom in, move the zoom lever toward [ ] or spread your ngers
apart (pinch out).
— Group playback (=
110)
— Touch Actions (=
119)
Erasing is not available.
Note that when the camera is connected to a TV, nothing is displayed on
the camera screen. Watch the TV screen as you control the camera.
1 Make sure the camera and TV are
off.
2 Connect the camera to the TV.
zOn the TV, insert the cable plug fully into
the HDMI input as shown.
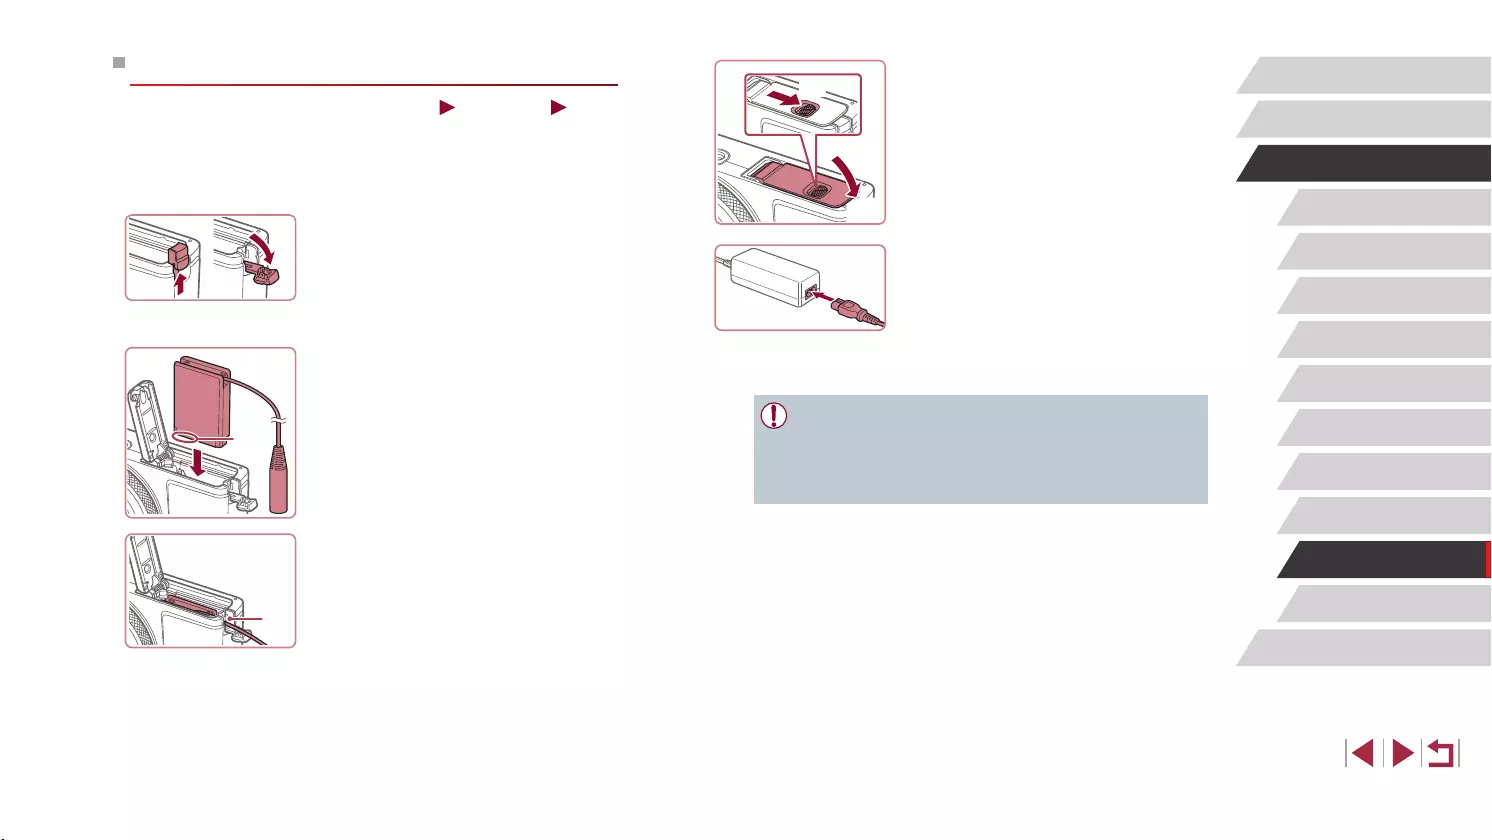
171
Appendix
Before Use
Index
Basic Guide
Advanced Guide
Camera Basics
Auto Mode /
Hybrid Auto Mode
Other Shooting Modes
P Mode
Tv, Av, M, and C Mode
Playback Mode
Wi-Fi Functions
Setting Menu
Accessories
4 Close the cover.
zLower the cover (1) and hold it down as
you slide the switch, until it clicks into the
closed position (2).
5 Connect the power cord.
zInsert one end of the power cord into the
compact power adapter, and then plug
the other end into a power outlet.
zTurn the camera on and use it as desired.
zWhen nished, turn the camera off and
unplug the power cord from the outlet.
●Do not disconnect the adapter or unplug the power cord while
the camera is still on. This may erase your shots or damage the
camera.
●Do not attach the adapter or adapter cord to other objects. Doing
so could result in malfunction or damage to the product.
(
)
(2)
Powering the Camera with Household Power
Still Images Movies
Powering the camera with AC Adapter Kit ACK-DC110 (sold separately)
eliminates the need to monitor the remaining battery level.
1 Make sure the camera is off.
2 Open the cover.
zFollow step 1 in “Inserting the Battery
Pack and Your Memory Card” (=
19)
to open the memory card/battery cover,
and then open the coupler cable port
cover as shown.
3 Insert the coupler.
zHolding the coupler with the terminals (1)
facing as shown, insert the coupler just
as you would a battery pack (following
step 2 in “Inserting the Battery Pack and
Your Memory Card” (=
19)).
zMake sure the coupler cable passes
through the port (1).
(2)
(1)
(1)
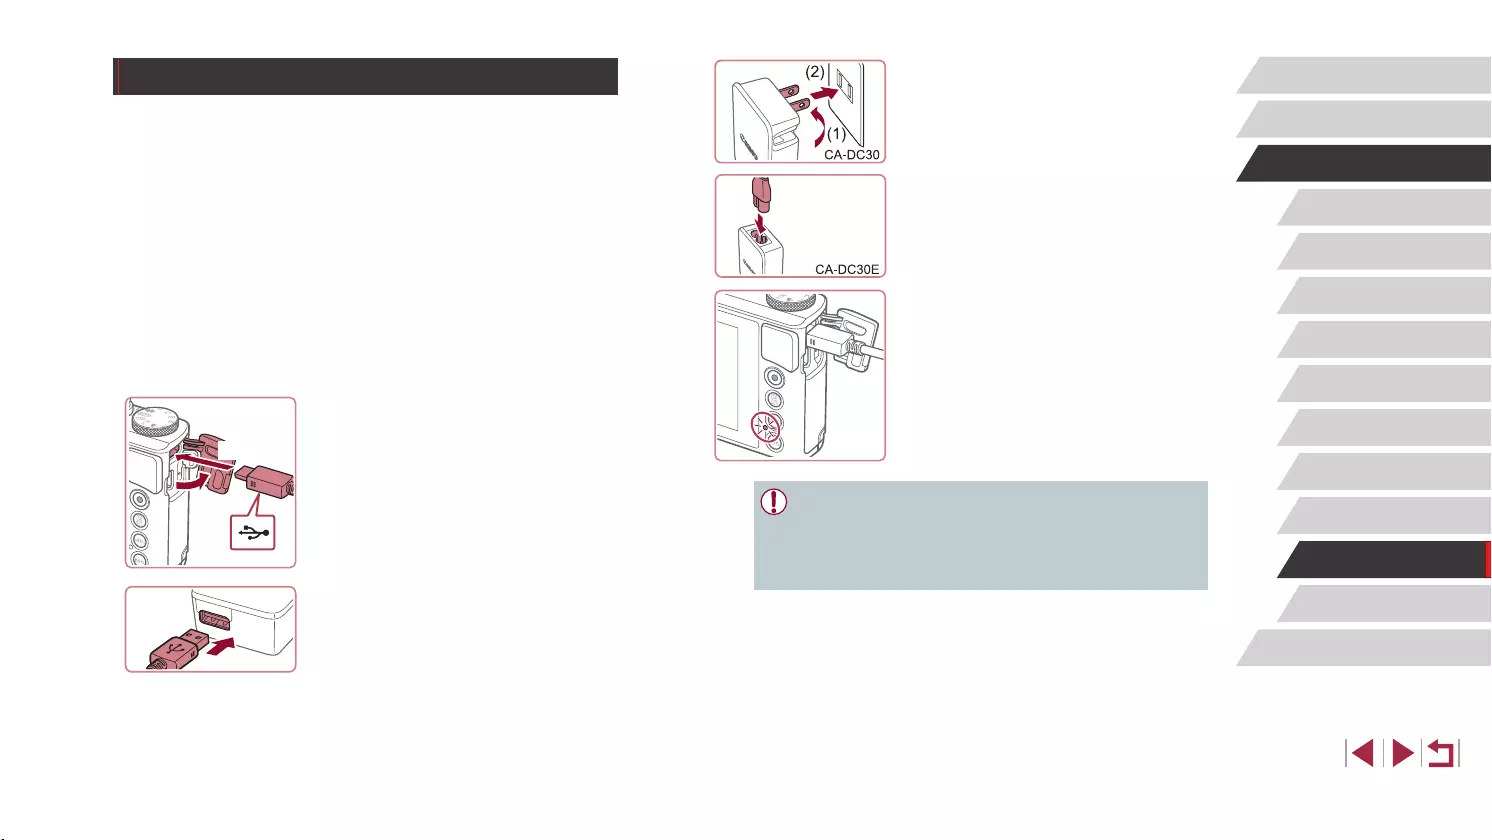
172
Appendix
Before Use
Index
Basic Guide
Advanced Guide
Camera Basics
Auto Mode /
Hybrid Auto Mode
Other Shooting Modes
P Mode
Tv, Av, M, and C Mode
Playback Mode
Wi-Fi Functions
Setting Menu
Accessories
3 Charge the battery pack.
zCA-DC30: Flip out the plug (1) and plug
the compact power adapter into a power
outlet (2).
zCA-DC30E: Plug the power cord into the
compact power adapter, then plug the
other end into a power outlet.
zCharging begins and the USB charge
lamp lights up.
zThe lamp turns off when charging
nishes.
zRemove the compact power adapter from
the power outlet and the interface cable
from the camera.
●To protect the battery pack and keep it in optimal condition, do not
charge it continuously for more than 24 hours.
●When charging a different battery pack, be sure rst to disconnect
the interface cable from the camera and then insert another
battery pack for charging.
Inserting and Charging the Battery Pack
Charge the battery pack by using the supplied battery pack with an
optional Compact Power Adapter CA-DC30/CA-DC30E or Interface Cable
IFC-600PCU.
1 Insert the battery pack.
zFollow step 1 in “Inserting the Battery
Pack and Your Memory Card” (=
19)
to open the cover.
zInsert the battery pack as described in
step 2 of “Inserting the Battery Pack and
Your Memory Card” (=
19).
zFollow step 4 in “Inserting the Battery
Pack and Your Memory Card” (=
19)
to close the cover.
2 Connect the compact power adapter
to the camera.
zWith the camera turned off, open the
cover (1). Hold the smaller plug of the
interface cable (sold separately) facing
as shown and insert the plug fully into the
camera terminal (2).
zInsert the larger plug of the interface
cable into the compact power adapter.
(1)
(2)

173
Appendix
Before Use
Index
Basic Guide
Advanced Guide
Camera Basics
Auto Mode /
Hybrid Auto Mode
Other Shooting Modes
P Mode
Tv, Av, M, and C Mode
Playback Mode
Wi-Fi Functions
Setting Menu
Accessories
Using the Software
To utilize the features of the following software, download the software
from the Canon website and install it on your computer.
●CameraWindow
— Import images to your computer
●Image Transfer Utility
— Set up Image Sync (=
152) and receive images
●Map Utility
— Use a map to view GPS information that has been added to images
●Digital Photo Professional
— Browse, process and edit RAW images
●To view and edit movies on a computer, use preinstalled or
commonly available software compatible with movies recorded by
the camera.
●For details on charging time and the number of shots and
recording time possible with a fully charged battery pack, see
“Number of Shots/Recording Time, Playback Time” (=
205).
●You can view images even while the battery is charging, by
turning the camera on and entering Playback mode (=
23).
However, you cannot shoot while the battery is charging.
●Charged battery packs gradually lose their charge, even when
they are not used. Charge the battery pack on (or immediately
before) the day of use.
●The charger can be used in areas with 100 – 240 V AC power
(50/60 Hz). For power outlets in a different format, use a
commercially available adapter for the plug. Never use an
electrical transformer designed for traveling, which may damage
the battery pack.
Using a Computer to Charge the Battery
You can also charge the battery pack by inserting the larger plug of the
interface cable into a computer’s USB terminal in step 2 of “Inserting and
Charging the Battery Pack” (=
172). For details about USB connections
on the computer, refer to the computer user manual.
●Charging is not possible when the camera is off.
●With some computers, battery charging may require the memory
card to be in the camera. Insert the memory card in the camera
(=
19) before connecting the cable to the computer’s USB port.
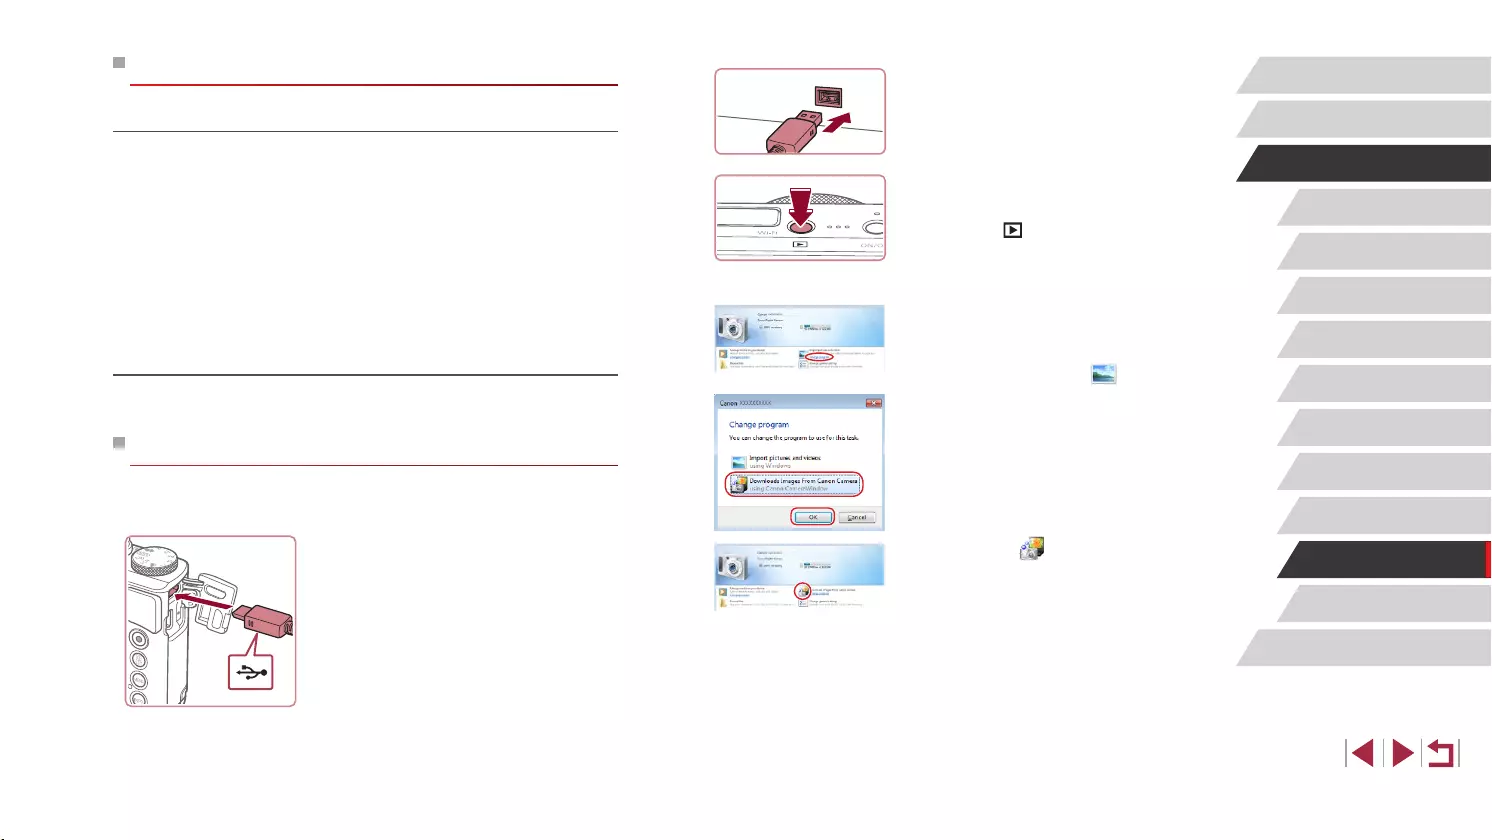
174
Appendix
Before Use
Index
Basic Guide
Advanced Guide
Camera Basics
Auto Mode /
Hybrid Auto Mode
Other Shooting Modes
P Mode
Tv, Av, M, and C Mode
Playback Mode
Wi-Fi Functions
Setting Menu
Accessories
zConnect the larger cable plug to the
computer. For details on computer
connections, refer to the computer user
manual.
2 Turn the camera on to access
CameraWindow.
zPress the [ ] button.
zMac OS: CameraWindow is displayed
when a connection is established
between the camera and computer.
zWindows: Follow the steps introduced
below.
zIn the screen that is displayed, click the
change program link of [ ].
zChoose [Downloads Images From Canon
Camera] and then click [OK].
zDouble-click [ ].
Computer Connections via a Cable
Checking Your Computer Environment
The software can be used on the following computers. For detailed
system requirements and compatibility information, including support in
new operating systems, visit the Canon website.
●Windows 8/8.1
●Windows 7 SP1
●Mac OS X 10.10
●Mac OS X 10.9
When sending images to a computer via Wi-Fi, check the system
requirements in “Checking Your Computer Environment” (=
138).
Installing the Software
For software installation instructions, see “Installing the Software”
(=
138).
Saving Images to a Computer
Using a USB cable (sold separately; camera end: Micro-B), you can
connect the camera to the computer and save images to the computer.
1 Connect the camera to the computer.
zWith the camera turned off, open the
cover. With the smaller plug of the cable
in the orientation shown, insert the plug
fully into the camera terminal.
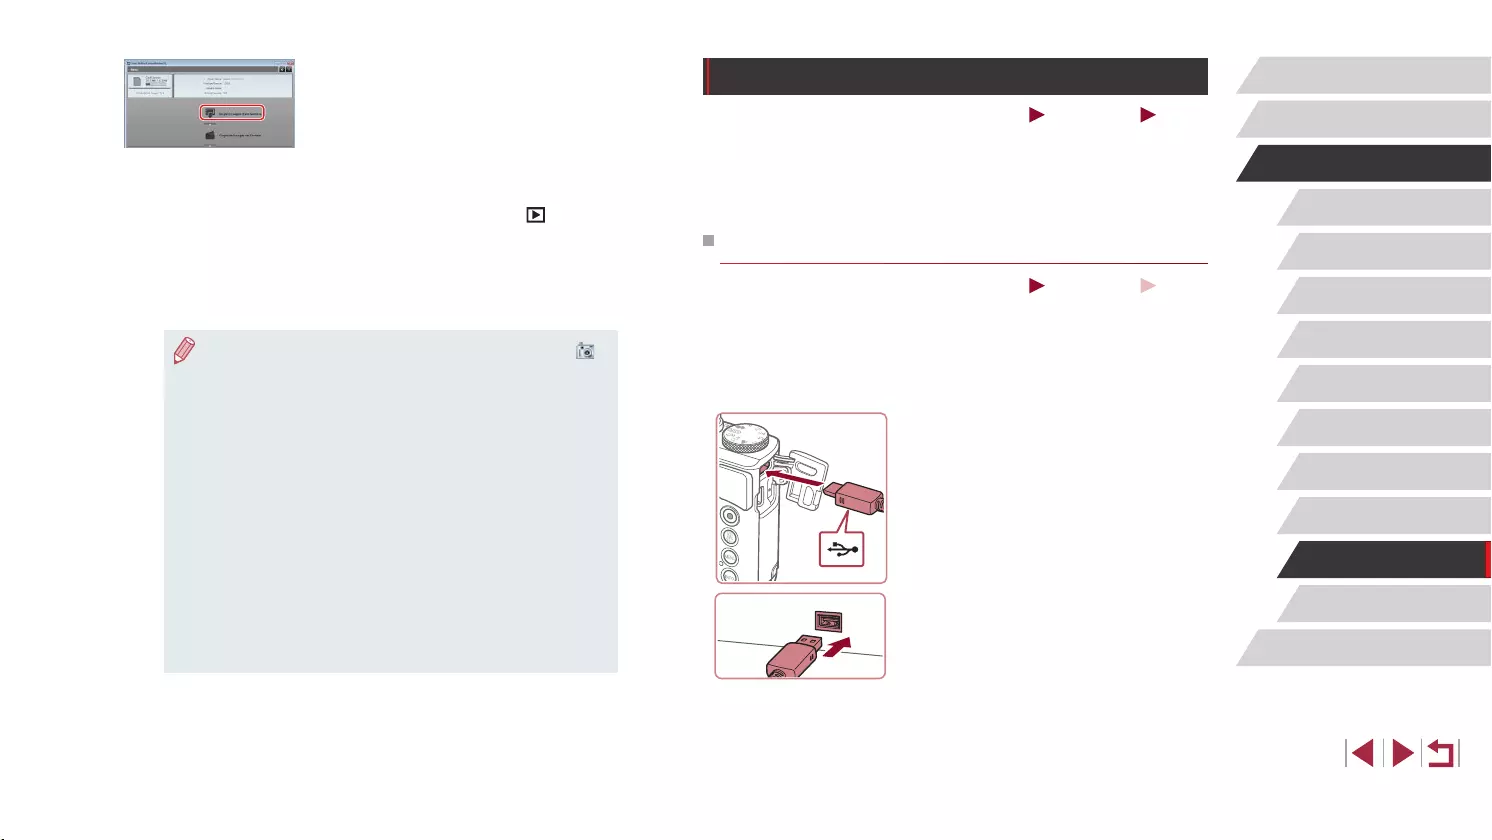
175
Appendix
Before Use
Index
Basic Guide
Advanced Guide
Camera Basics
Auto Mode /
Hybrid Auto Mode
Other Shooting Modes
P Mode
Tv, Av, M, and C Mode
Playback Mode
Wi-Fi Functions
Setting Menu
Accessories
Printing Images
Still Images Movies
Print your shots and congure a variety of settings used for your printer
or photo printing services by connecting the camera to a PictBridge-
compatible printer with a cable.
A Canon SELPHY CP printer is used in this example of PictBridge
printing. Also refer to your printer user manual.
Easy Print
Still Images Movies
Print your shots by connecting the camera to a PictBridge-compatible
printer with a USB cable (sold separately; camera end: Micro-B).
1 Make sure the camera and printer
are off.
2 Connect the camera to the printer.
zOpen the terminal cover. Holding the
smaller cable plug in the orientation
shown, insert the plug fully into the
camera terminal.
zConnect the larger cable plug to the
printer. For other connection details, refer
to the printer manual.
3 Turn the printer on.
4 Choose an image.
zDrag left or right across the screen to
choose an image.
3 Save the images to the computer.
zClick [Import Images from Camera], and
then click [Import Untransferred Images].
zImages are now saved to the Pictures
folder on the computer, in separate
folders named by date.
zAfter images are saved, close
CameraWindow, press the [ ] button to
turn the camera off, and unplug the cable.
zTo view images you save to a computer,
use preinstalled or commonly available
software compatible with images
captured by the camera.
●Windows 7: If the screen in step 2 is not displayed, click the [ ]
icon in the taskbar.
●Mac OS: If CameraWindow is not displayed after step 2, click the
[CameraWindow] icon in the Dock.
●Although you can save images to a computer simply by
connecting your camera to the computer without using the
software, the following limitations apply.
— It may take a few minutes after you connect the camera to the
computer until camera images are accessible.
— Images shot in vertical orientation may be saved in horizontal
orientation.
— RAW images (or JPEG images recorded with RAW images)
may not be saved.
— Image protection settings may be cleared from images saved
to a computer.
— Some problems may occur when saving images or image
information, depending on the operating system version, the
software in use, or image le sizes.

176
Appendix
Before Use
Index
Basic Guide
Advanced Guide
Camera Basics
Auto Mode /
Hybrid Auto Mode
Other Shooting Modes
P Mode
Tv, Av, M, and C Mode
Playback Mode
Wi-Fi Functions
Setting Menu
Accessories
Conguring Print Settings
Still Images Movies
1 Access the printing screen.
zFollow steps 1 – 5 in “Easy Print”
(=
175) to access this screen.
2 Congure the settings.
zTouch an item, and on the next screen,
choose an option. Press the [ ] button to
return to the printing screen.
Default Matches current printer settings.
Date Prints images with the date added.
File No. Prints images with the le number added.
Both Prints images with both the date and le
number added.
Off –
Default Matches current printer settings.
Off –
On Uses information from the time of shooting to
print under optimal settings.
Red-Eye 1 Corrects red-eye.
No. of
Copies Choose the number of copies to print.
Cropping –Specify a desired image area to print (=
177).
Paper
Settings –Specify the paper size, layout, and other details
(=
177).
5 Access the printing screen.
zPress the [ ] button, choose [ ], and
press the [ ] button again.
6 Print the image.
zChoose [Print] and press the [ ] button.
zPrinting now begins.
zTo print other images, repeat the above
procedures starting from step 4 after
printing is nished.
zWhen you are nished printing, turn the
camera and printer off and disconnect
the cable.
●For Canon-brand PictBridge-compatible printers (sold separately),
see “Printers” (=
169).
●RAW images cannot be printed.
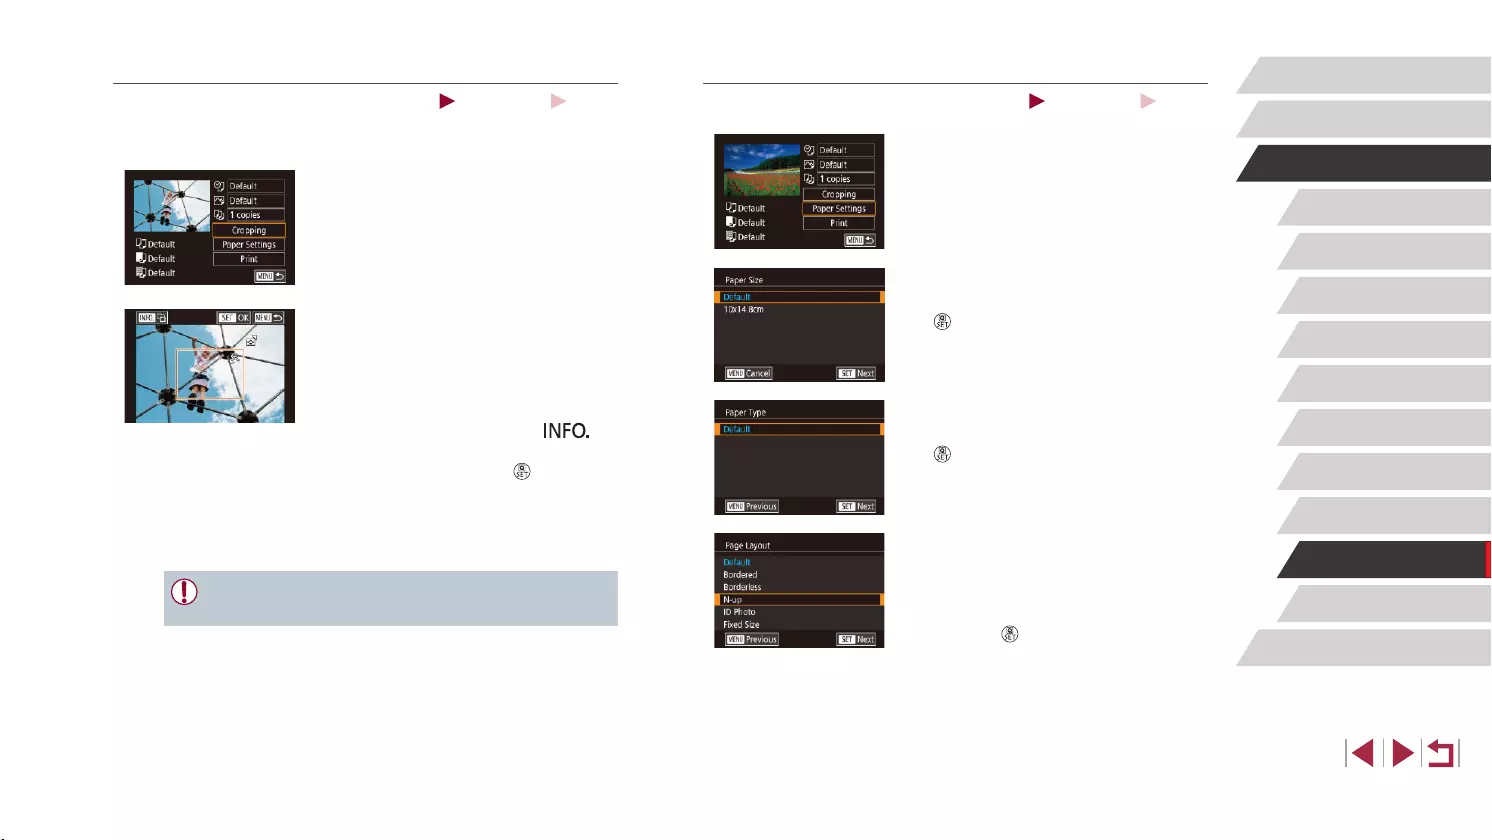
177
Appendix
Before Use
Index
Basic Guide
Advanced Guide
Camera Basics
Auto Mode /
Hybrid Auto Mode
Other Shooting Modes
P Mode
Tv, Av, M, and C Mode
Playback Mode
Wi-Fi Functions
Setting Menu
Accessories
Choosing Paper Size and Layout before Printing
Still Images Movies
1 Choose [Paper Settings].
zAfter following step 1 in “Conguring Print
Settings” (=
176) to access the printing
screen, touch [Paper Settings].
2 Choose a paper size.
zChoose an option, and then press the
[] button.
3 Choose a type of paper.
zChoose an option, and then press the
[] button.
4 Choose a layout.
zDrag up or down to choose an option.
zWhen choosing [N-up], specify the
number of images per sheet.
zPress the [ ] button.
5 Print the image.
zFollow step 6 in “Easy Print” (=
175)
to print.
Cropping Images before Printing
Still Images Movies
By cropping images before printing, you can print a desired image area
instead of the entire image.
1 Choose [Cropping].
zAfter following step 1 in “Conguring Print
Settings” (=
176) to access the printing
screen, touch [Cropping].
zA cropping frame is now displayed,
indicating the image area to print.
2 Adjust the cropping frame as
needed.
zTo resize the frame, move the zoom
lever.
zTo move the frame, drag it.
zTo rotate the frame, press the [ ]
button.
zWhen nished, press the [ ] button.
3 Print the image.
zFollow step 6 in “Easy Print” (=
175)
to print.
●Cropping may not be possible at small image sizes, or at some
aspect ratios.

178
Appendix
Before Use
Index
Basic Guide
Advanced Guide
Camera Basics
Auto Mode /
Hybrid Auto Mode
Other Shooting Modes
P Mode
Tv, Av, M, and C Mode
Playback Mode
Wi-Fi Functions
Setting Menu
Accessories
4 Print the image.
zFollow step 6 in “Easy Print” (=
175)
to print.
Printing Movie Scenes
Still Images Movies
1 Access the printing screen.
zFollow steps 1 – 5 in “Easy Print”
(=
175) to choose a movie. The screen
at left is displayed.
2 Choose a printing method.
zChoose [ ] and press the [ ] button.
On the next screen, choose an option,
and then press the [ ] button to return to
the printing screen.
3 Print the image.
zFollow step 6 in “Easy Print” (=
175)
to print.
Movie Printing Options
Single Prints the current scene as a still image.
Sequence
Prints a series of scenes, a certain interval apart, on a single
sheet of paper. You can also print the folder number, le
number, and elapsed time for the frame by setting [Caption]
to [On].
●To cancel printing in progress, press the [ ] button, and then
touch [OK].
●After displaying a scene to print as described in steps 2 – 5 of
“Viewing” (=
103), you can also access the screen in step 1
here by touching [ ] in the movie control panel.
Available Layout Options
Default Matches current printer settings.
Bordered Prints with blank space around the image.
Borderless Borderless, edge-to-edge printing.
N-up Choose how many images to print per sheet.
ID Photo
Prints images for identication purposes.
Only available for images with a recording pixel setting of L
and an aspect ratio of 3:2.
Fixed Size Choose the print size.
Choose from 3.5 x 5 in., postcard, or wide-format prints.
Printing ID Photos
Still Images Movies
1 Choose [ID Photo].
zFollowing steps 1 – 4 in “Choosing
Paper Size and Layout before Printing”
(=
177), choose [ID Photo] and press
the [ ] button.
2 Choose the long and short side
length.
zChoose an item and press the [ ]
button. On the next screen, choose the
length, and then press the [ ] button.
3 Choose the printing area.
zFollow step 2 in “Cropping Images before
Printing” (=
177) to choose the printing
area.
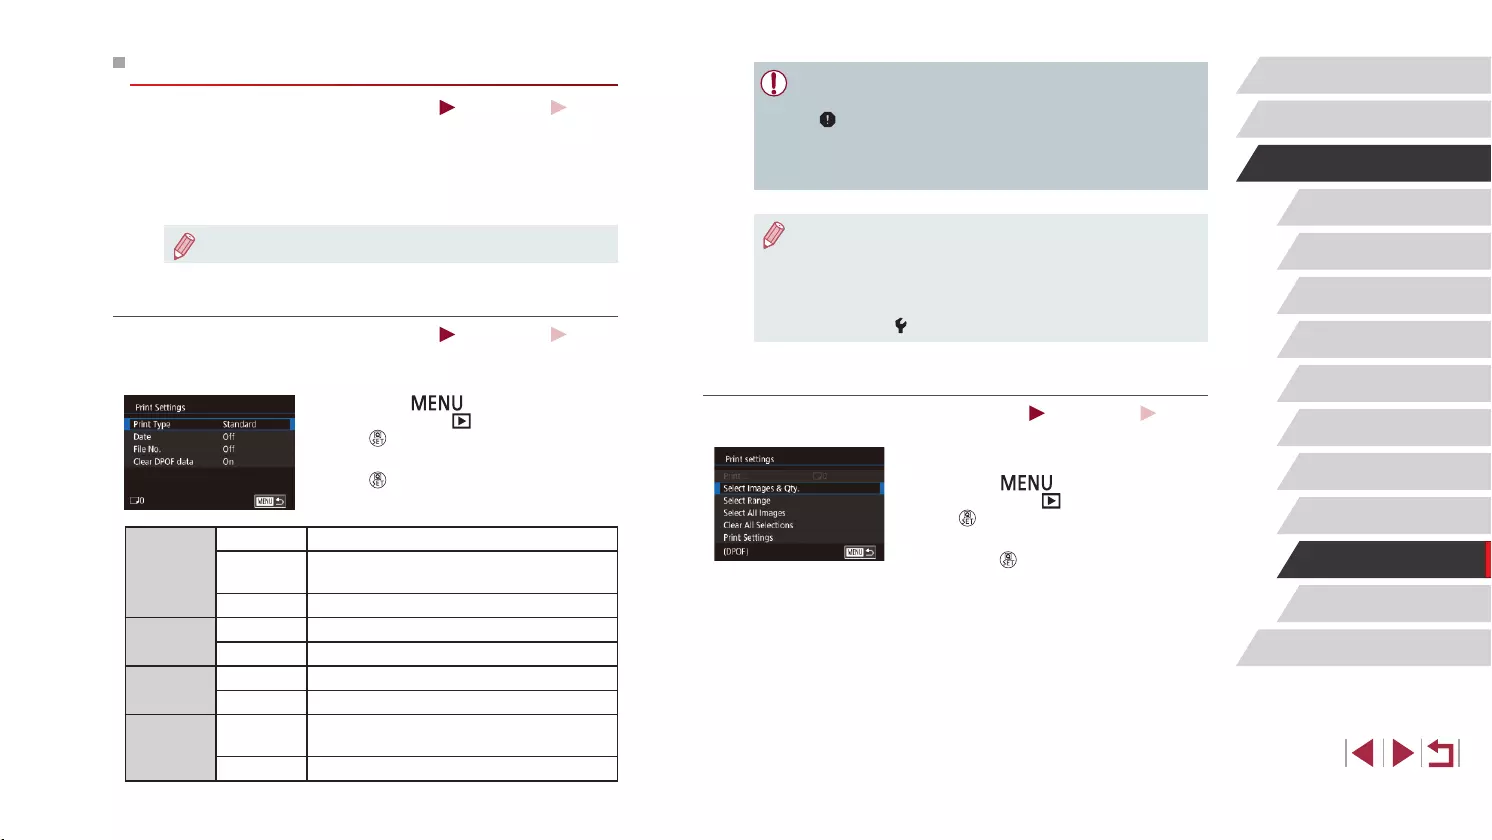
179
Appendix
Before Use
Index
Basic Guide
Advanced Guide
Camera Basics
Auto Mode /
Hybrid Auto Mode
Other Shooting Modes
P Mode
Tv, Av, M, and C Mode
Playback Mode
Wi-Fi Functions
Setting Menu
Accessories
●Not all of your DPOF settings may be applied in printing by the
printer or photo development service, in some cases.
●[] may be displayed on the camera to warn you that the
memory card has print settings that were congured on another
camera. Changing the print settings using this camera may
overwrite all previous settings.
●Specifying [Index] will prevent you from choosing [On] for both
[Date] and [File No.] at the same time.
●Index printing is not available on some Canon-brand PictBridge-
compatible printers (sold separately).
●The date is printed in a format matching setting details in [Date/
Time] on the [ 2] tab (=
20).
Setting Up Printing for Individual Images
Still Images Movies
1 Choose [Select Images & Qty.].
zPress the [ ] button, choose [Print
settings] on the [ 4] tab, and then press
the [ ] button.
zChoose [Select Images & Qty.], and then
press the [ ] button.
2 Choose an image.
zDrag left or right across the screen to
choose an image.
zImages you specify for index printing are
labeled with a [0] icon.
Adding Images to the Print List (DPOF)
Still Images Movies
Batch printing (=
180) and ordering prints from a photo development
service can be set up on the camera. Choose up to 998 images on a
memory card and congure relevant settings, such as the number of
copies, as follows. The printing information you prepare this way will
conform to DPOF (Digital Print Order Format) standards.
●RAW images cannot be included in print list.
Conguring Print Settings
Still Images Movies
Specify the printing format, whether to add the date or le number, and
other settings as follows. These settings apply to all images in the print list.
zPress the [ ] button, choose [Print
settings] on the [ 4] tab, and then press
the [ ] button.
zChoose [Print Settings], and then press
the [ ] button. On the next screen,
choose and congure items as needed.
Print Type
Standard One image is printed per sheet.
Index Smaller versions of multiple images are
printed per sheet.
Both Both standard and index formats are printed.
Date On Images are printed with the shooting date.
Off –
File No. On Images are printed with the le number.
Off –
Clear DPOF
data
On All image print list settings are cleared after
printing.
Off –
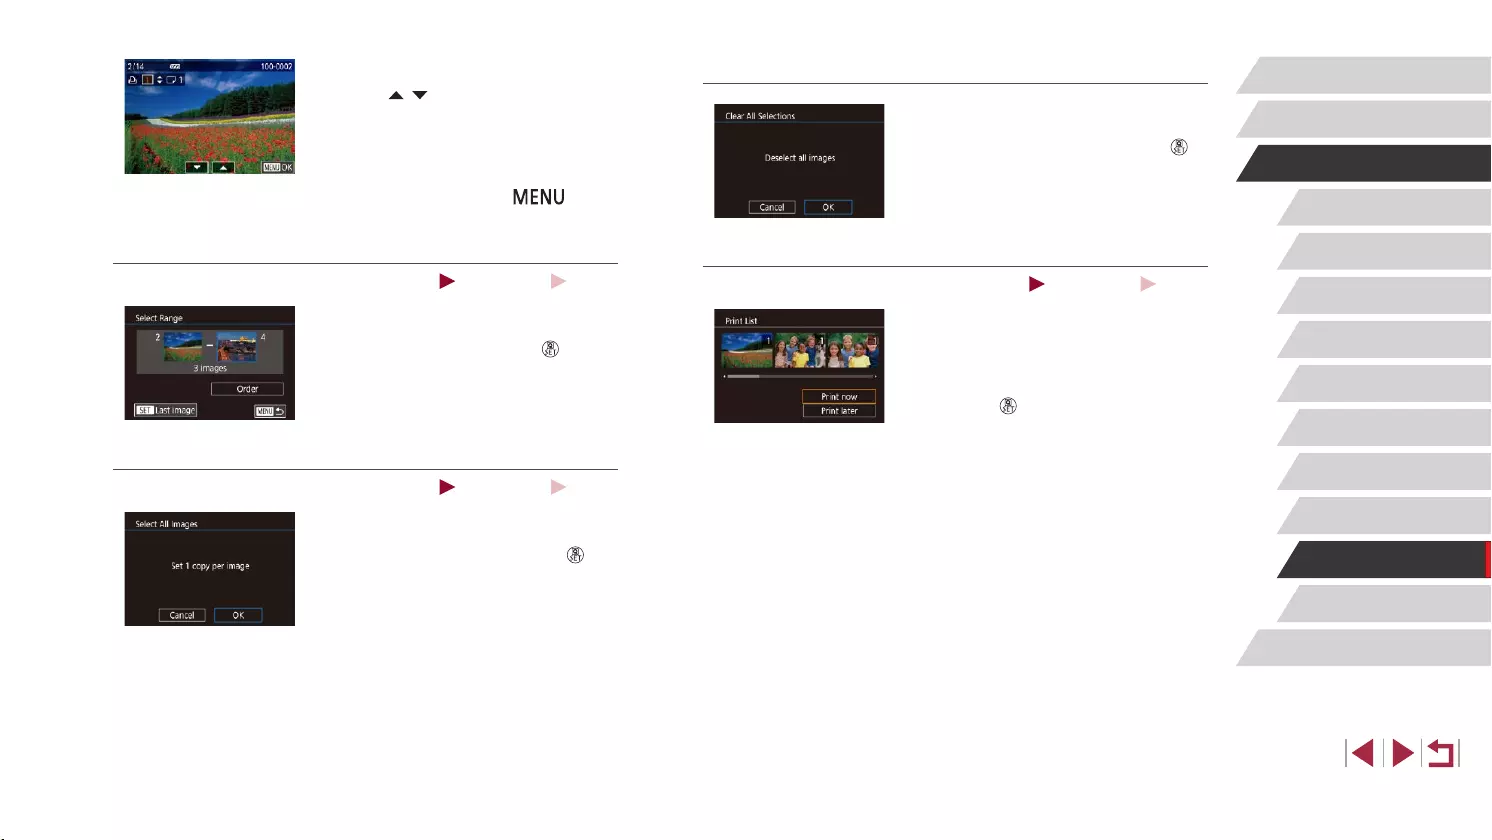
180
Appendix
Before Use
Index
Basic Guide
Advanced Guide
Camera Basics
Auto Mode /
Hybrid Auto Mode
Other Shooting Modes
P Mode
Tv, Av, M, and C Mode
Playback Mode
Wi-Fi Functions
Setting Menu
Accessories
Clearing All Images from the Print List
zFollowing step 1 in “Setting Up Printing
for Individual Images” (=
179), choose
[Clear All Selections] and press the [ ]
button.
zTouch [OK].
Printing Images Added to the Print List (DPOF)
Still Images Movies
zWhen images have been added to the
print list (=
179 – =
180), this screen
is displayed after you connect the camera
to a PictBridge-compatible printer.
Choose [Print now], and then simply
press the [ ] button to print the images
in the print list.
zAny DPOF print job that you temporarily
stop will be resumed from the next image.
3 Specify the number of prints.
zTouch [ ][ ] to specify the number of
prints (up to 99).
zTo set up printing for other images and
specify the number of prints, repeat
steps 2 – 3.
zWhen nished, press the [ ] button
to return to the menu screen.
Setting Up Printing for a Range of Images
Still Images Movies
zFollowing step 1 in “Setting Up Printing
for Individual Images” (=
179), choose
[Select Range] and press the [ ] button.
zFollow steps 2 – 3 in “Selecting a Range”
(=
114) to specify images.
zTouch [Order].
Setting Up Printing for All Images
Still Images Movies
zFollowing step 1 in “Setting Up Printing
for Individual Images” (=
179), choose
[Select All Images] and press the [ ]
button.
zTouch [OK].
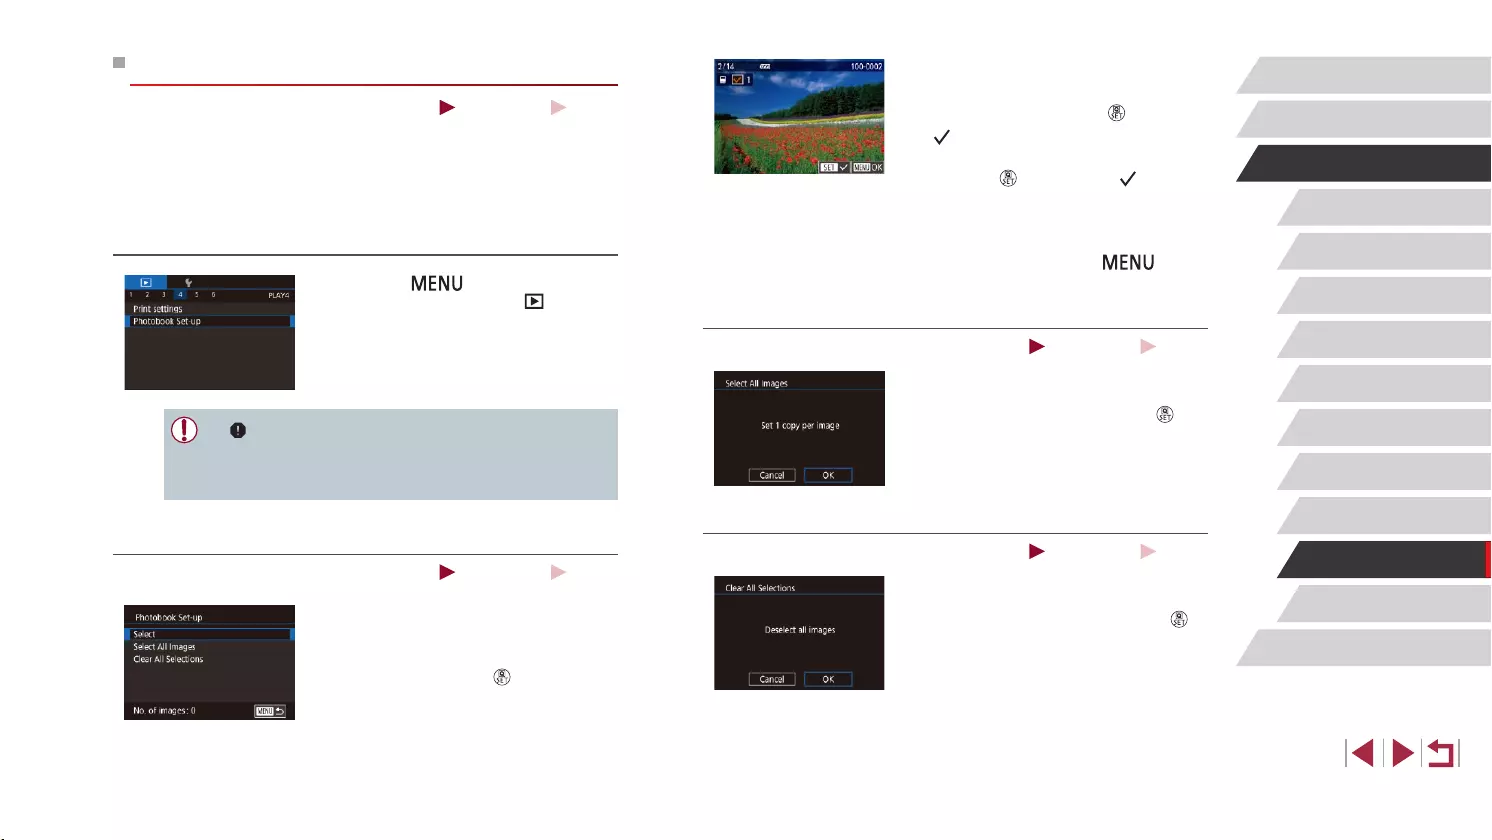
181
Appendix
Before Use
Index
Basic Guide
Advanced Guide
Camera Basics
Auto Mode /
Hybrid Auto Mode
Other Shooting Modes
P Mode
Tv, Av, M, and C Mode
Playback Mode
Wi-Fi Functions
Setting Menu
Accessories
2 Choose an image.
zChoose an image after dragging left or
right to browse. Press the [ ] button.
z[] is displayed.
zTo remove the image from the photobook,
press the [ ] button again. [ ] is no
longer displayed.
zRepeat this process to specify other
images.
zWhen nished, press the [ ] button
to return to the menu screen.
Adding All Images to a Photobook
Still Images Movies
zFollowing the procedure in “Choosing
a Selection Method” (=
181), choose
[Select All Images] and press the [ ]
button.
zTouch [OK].
Removing All Images from a Photobook
Still Images Movies
zFollowing the procedure in “Choosing
a Selection Method” (=
181), choose
[Clear All Selections] and press the [ ]
button.
zTouch [OK].
Adding Images to a Photobook
Still Images Movies
Photobooks can be set up on the camera by choosing up to 998 images
on a memory card and using CameraWindow to import them to your
computer (=
173), where they are copied to their own folder. This
is convenient when ordering printed photobooks online or printing
photobooks with your own printer.
Choosing a Selection Method
zPress the [ ] button, choose
[Photobook Set-up] on the [ 4] tab, and
then choose how you will select images.
●[] may be displayed on the camera to warn you that the
memory card has print settings that were congured on another
camera. Changing the print settings using this camera may
overwrite all previous settings.
Adding Images Individually
Still Images Movies
1 Choose [Select].
zFollowing the procedure in “Choosing
a Selection Method” (=
181), choose
[Select] and press the [ ] button.

182
Before Use
Index
Basic Guide
Advanced Guide
Camera Basics
Auto Mode /
Hybrid Auto Mode
Other Shooting Modes
P Mode
Tv, Av, M, and C Mode
Playback Mode
Wi-Fi Functions
Setting Menu
Accessories
Appendix
Troubleshooting
If you think there is a problem with the camera, rst check the following.
If the items below do not solve your problem, contact a Canon Customer
Support Help Desk.
Power
Nothing happens when the power button is pressed.
●Conrm that the battery pack is charged (=
18).
●Conrm that the battery pack is inserted facing the correct way (=
19).
●Conrm that the memory card/battery cover is fully closed (=
19).
●Dirty battery terminals reduce battery performance. Try cleaning the terminals
with a cotton swab and reinserting the battery pack a few times.
The battery pack runs out of power quickly.
●Battery performance decreases at low temperatures. Try warming the battery
pack a little by putting it in your pocket, for example, ensuring that the terminals
do not touch any metal objects.
●Dirty battery terminals reduce battery performance. Try cleaning the terminals
with a cotton swab and reinserting the battery pack a few times.
●If these measures do not help and the battery pack still runs out of power soon
after charging, it has reached the end of its life. Purchase a new battery pack.
The lens is not retracted.
●Do not open the memory card/battery cover while the camera is on. Close the
cover, turn the camera on, and then turn it off again (=
19).
The battery pack is swollen.
●Battery swelling is normal and does not pose any safety concerns. However, if
battery swelling prevents the battery pack from tting in the camera, contact a
Canon Customer Support Help Desk.
Display on a TV
Camera images look distorted or are not displayed on a TV (=
170).
Appendix
Helpful information when using the camera

183
Before Use
Index
Basic Guide
Advanced Guide
Camera Basics
Auto Mode /
Hybrid Auto Mode
Other Shooting Modes
P Mode
Tv, Av, M, and C Mode
Playback Mode
Wi-Fi Functions
Setting Menu
Accessories
Appendix
No AF frames are displayed and the camera does not focus when the
shutter button is pressed halfway.
●To have AF frames displayed and the camera focus correctly, try composing the
shot with higher-contrast subject areas centered before you press the shutter
button halfway. Otherwise, try pressing the shutter button halfway repeatedly.
Subjects in shots look too dark.
●Raise the ash and set the ash mode to [ ] (=
87).
●Adjust brightness by using exposure compensation (=
74).
●Use AE lock or spot metering (=
74, =
74).
Subjects look too bright, highlights are washed-out.
●Lower the ash and set the ash mode to [ ] (=
33).
●Adjust brightness by using exposure compensation (=
74).
●Use AE lock or spot metering (=
74, =
74).
●Reduce the lighting on subjects.
Shots look too dark despite the ash ring (=
36).
●Shoot within ash range (=
204).
●Adjust brightness by using ash exposure compensation or changing the ash
output level (=
88, =
95).
●Increase the ISO speed (=
75).
Subjects in ash shots look too bright, highlights are washed-out.
●Shoot within ash range (=
204).
●Lower the ash and set the ash mode to [ ] (=
33).
●Adjust brightness by using ash exposure compensation or changing the ash
output level (=
88, =
95).
White spots appear in ash shots.
●This is caused by light from the ash reecting off dust or airborne particles.
Shots look grainy.
●Lower the ISO speed (=
75).
●High ISO speeds in some shooting modes may cause grainy images (=
57).
Subjects are affected by red-eye.
●Set [Red-Eye Lamp] to [On] (=
53). The red-eye reduction lamp (=
4)
will light up for ash shots. For best results, have subjects look at the red-eye
reduction lamp. Also try increasing the lighting in indoor scenes and shooting at
closer range.
●Edit images using red-eye correction (=
124).
Recording to the memory card takes too long, or continuous shooting is
slower.
●Use the camera to perform low-level formatting of the memory card (=
160).
Shooting
Cannot shoot.
●In Playback mode (=
103), press the shutter button halfway (=
26).
Strange display on the screen under low light (=
27).
Strange display on the screen when shooting.
●Note that the following display problems are not recorded in still images but are
recorded in movies.
— The screen may icker and horizontal banding may appear under uorescent
or LED lighting.
Full-screen display is not available while shooting (=
90).
[] ashes on the screen when the shutter button is pressed, and shooting
is not possible (=
36).
[] is displayed when the shutter button is pressed halfway (=
36).
●Set [IS Mode] to [Continuous] (=
52).
●Raise the ash and set the ash mode to [ ] (=
87).
●Increase the ISO speed (=
75).
●Mount the camera on a tripod or take other measures to keep it still. Additionally,
you should set [IS Mode] to [Off] when using a tripod or other means to secure
the camera (=
52).
Shots are out of focus.
●Press the shutter button halfway to focus on subjects before pressing it all the
way down to shoot (=
26).
●Make sure subjects are within focusing range (=
205).
●Set [AF-assist Beam] to [On] (=
53).
●Conrm that unneeded functions such as macro are deactivated.
●Try shooting with focus lock or AF lock (=
83, =
87).
Shots are blurry.
●Blurring may occur more often when Touch Shutter is used to shoot, depending
on shooting conditions. Hold the camera still when shooting.
Continuous shooting suddenly stops.
●Continuous shooting stops automatically after about 2,000 shots are taken at one
time. Release the shutter button a moment before you resume shooting.

184
Before Use
Index
Basic Guide
Advanced Guide
Camera Basics
Auto Mode /
Hybrid Auto Mode
Other Shooting Modes
P Mode
Tv, Av, M, and C Mode
Playback Mode
Wi-Fi Functions
Setting Menu
Accessories
Appendix
Playback
Playback is not possible.
●Image or movie playback may not be possible if a computer is used to rename
les or alter the folder structure.
Playback stops, or audio skips.
●Switch to a memory card that you have performed low-level formatting on with the
camera (=
160).
●There may be brief interruptions when playing movies copied to memory cards
that have slow read speeds.
●When movies are played on a computer, frames may be dropped and audio may
skip if computer performance is inadequate.
Sound is not played during movies.
●Adjust the volume (=
23) if you have activated [Mute] (=
163) or the sound
in the movie is faint.
●No sound is played for [ ] mode movies (=
60), [ ] mode movies
(=
66), or Creative Shot movies, because audio is not recorded in these
modes.
Cannot access the Story Highlights home screen by touching [ ].
●Home screen display is not possible when connected to a printer. Disconnect the
camera from the printer.
●Home screen display is not possible during Wi-Fi connections. End the Wi-Fi
connection.
A desired subject icon for an album is not displayed on the Story
Highlights home screen.
●In simple information display mode (=
105), choose an image that shows the
name of the person for the album before accessing the Story Highlights home
screen (=
127).
Memory Card
The memory card is not recognized.
●Restart the camera, with the memory card in it (=
25).
Shooting settings or Quick Set menu settings are not available.
●Available setting items vary by shooting mode. Refer to “Functions Available
in Each Shooting Mode”, “Quick Set Menu”, and “Shooting Tab” (=
190 –
=
195).
The Babies or Children icon is not displayed.
●The Babies and Children icons will not be displayed if the birthday is not set in
face information (=
43). If the icons still are not displayed even when you set
the birthday, re-register face information (=
44), or make sure that the date/
time is set correctly (=
163).
Touch AF or Touch Shutter does not work.
●Touch AF or Touch Shutter will not work if you touch the edges of the screen.
Touch closer to the center of the screen.
●If [Screen auto-lock settings] is set to [Enable], unlock the touch-screen panel
(=
165).
Shooting Movies
The elapsed time shown is incorrect, or recording is interrupted.
●Use the camera to format the memory card, or switch to a card that supports
high-speed recording. Note that even if the elapsed time display is incorrect, the
length of movies on the memory card corresponds to the actual recording time
(=
160, =
206).
[] is displayed and shooting stops automatically.
●The camera’s internal memory buffer lled up as the camera could not record to
the memory card quickly enough. Try one of the following measures.
— Use the camera to perform low-level formatting of the memory card (=
160).
— Lower the image quality (=
49).
— Switch to a memory card that supports high-speed recording (=
206).
Zooming is not possible.
●Zooming is not possible in [ ] mode (=
63).
●Zooming is not possible when shooting movies in [ ] (=
60), [ ], and [ ]
modes.
Subjects look distorted.
●Subjects that pass in front of the camera quickly may look distorted. This is not a
malfunction.
Linear noise is recorded.
●Linear noise may be recorded if lights or other sources of bright light are visible
on the shooting screen in an otherwise dark scene. Recompose the shot so that
the bright light is not visible on the shooting screen or nearby.
185
Before Use
Index
Basic Guide
Advanced Guide
Camera Basics
Auto Mode /
Hybrid Auto Mode
Other Shooting Modes
P Mode
Tv, Av, M, and C Mode
Playback Mode
Wi-Fi Functions
Setting Menu
Accessories
Appendix
Cannot send images.
●The destination device has insufcient storage space. Increase the storage space
on the destination device and resend the images.
●The write-protect switch of the memory card in the destination camera is set to
the locked position. Slide the write-protect switch to the unlocked position.
●RAW images cannot be sent. For images captured in both JPEG and RAW format,
only the JPEG version is sent. However, RAW images can be sent using Image Sync.
●Images cannot be sent to CANON iMAGE GATEWAY or other Web services if
you move or rename image les or folders on the computer that received images
sent using Image Sync via an access point (=
152). Before moving or renaming
these image les or folders on the computer, make sure the images have already
been sent to CANON iMAGE GATEWAY or other Web services.
Cannot resize images for sending.
●Images cannot be resized to be bigger than the recording pixel setting of their
original size.
●Movies cannot be resized.
Images take a long time to send./The wireless connection is disrupted.
●Multiple images may take a long time to send. Try resizing the image to reduce
sending time (=
152).
●Movies may take a long time to send.
●Do not use the camera near sources of Wi-Fi signal interference, such as
microwave ovens, Bluetooth devices, or other equipment operating on the
2.4 GHz band. Note that images may take a long time to send even when [ ]
is displayed.
●Bring the camera closer to the other device you are trying to connect to (such as
the access point), and make sure there are no objects between the devices.
No notication message is received on a computer or smartphone after
adding CANON iMAGE GATEWAY to the camera.
●Make sure the email address you entered is correct, and try adding the
destination again.
●Check the email settings on the computer or smartphone. If they are congured to
block email from certain domains, you may not be able to receive the notication
message.
Want to erase Wi-Fi connection information before disposing of the
camera or giving it to someone else.
●Reset the Wi-Fi settings (=
158).
Computer
Cannot transfer images to a computer.
●When attempting to transfer images to the computer via a cable, try reducing the
transfer speed as follows.
— While holding the shutter button and zoom lever toward [ ], press the [ ]
button. In Playback mode, move the zoom lever toward [ ], and on the next
screen, choose [B] and press the [ ] button.
Wi-Fi
Cannot access the Wi-Fi menu.
●The Wi-Fi menu is not available in Shooting mode. Switch to Playback mode and
try again.
●In Playback mode, the Wi-Fi menu cannot be accessed during magnied display
or index display. Switch to single-image display and try again. Similarly, the
Wi-Fi menu cannot be accessed during group playback or ltered image display
according to specied conditions. Cancel group or ltered image playback.
●The Wi-Fi menu cannot be accessed while the camera is connected to a printer,
computer, or TV via a cable. Disconnect the cable.
Cannot add a device/destination.
●A total of 20 items of connection information can be added to the camera. Erase
unneeded connection information from the camera rst, and then add new
devices/destinations (=
156).
●Use a computer or smartphone to register Web services (=
144).
●To add a smartphone, rst install the dedicated application Camera Connect on
your smartphone (=
134).
●To add a computer, rst install the software CameraWindow on your computer. Also
check your computer and Wi-Fi environment and settings (=
138, =
140).
●Do not use the camera near sources of Wi-Fi signal interference, such as
microwave ovens, Bluetooth devices, or other equipment operating on the
2.4 GHz band.
●Bring the camera closer to the other device you are trying to connect to (such as
the access point), and make sure there are no objects between the devices.
Cannot connect to the access point.
●Conrm that the access point channel is set to a channel supported by the
camera (=
204). Note that instead of auto channel assignment, it is advisable to
specify a supported channel manually.

186
Before Use
Index
Basic Guide
Advanced Guide
Camera Basics
Auto Mode /
Hybrid Auto Mode
Other Shooting Modes
P Mode
Tv, Av, M, and C Mode
Playback Mode
Wi-Fi Functions
Setting Menu
Accessories
Appendix
Unidentied Image/Incompatible JPEG/Image too large./Cannot play back
MOV/Cannot play back MP4
●Unsupported or corrupt images cannot be displayed.
●It may not be possible to display images that were edited or renamed on a
computer, or images shot with another camera.
Cannot magnify!/Cannot rotate/Cannot modify image/Cannot modify/
Cannot assign to category/Unselectable image./No identication
information
●The following functions may be unavailable for images that were renamed or
already edited on a computer, or images shot with another camera. Note that
starred (*) functions are not available for movies.
Edit ID Info* (=
111), Magnify* (=
112), Rotate* (=
117), Favorites (=
118),
Edit* (=
121), Print List* (=
179), and Photobook Set-up* (=
181).
Invalid selection range
●When specifying a range for image selection (=
114, =
117, =
180), you
attempted to choose an initial image that was after the nal image, or vice-versa.
Exceeded selection limit
●More than 998 images were selected for Print List (=
179) or Photobook Set-up
(=
181). Choose 998 images or less.
●Print List (=
179) or Photobook Set-up (=
181) settings could not be saved
correctly. Reduce the number of selected images and try again.
●You attempted to choose more than 500 images in Protect (=
113), Erase
(=
115), Favorites (=
118), Print List (=
179), or Photobook Set-up (=
181).
Naming error!
●The folder could not be created or images could not be recorded, because the
highest supported folder number (999) for storing images on the card has been
reached and the highest supported image number (9999) for images in folders
has been reached. On the [ 1] tab, change [File Numbering] to [Auto Reset]
(=
159), or format the memory card (=
160).
Lens Error
●This error may occur if the lens is held while it is moving, or when the camera is
used in dusty or sandy locations.
●Frequent display of this error message may indicate camera damage. In this
case, contact a Canon Customer Support Help Desk.
On-Screen Messages
If an error message is displayed, respond as follows.
Shooting or Playback
No memory card
●The memory card may be inserted facing the wrong way. Reinsert the memory
card facing the correct way (=
19).
Memory card locked
●The write-protect switch of the memory card is set to the locked position. Switch
the write-protect switch to the unlocked position (=
19).
Cannot record!
●Shooting was attempted without a memory card in the camera. To shoot, insert a
memory card facing the correct way (=
19).
Memory card error (=
160)
●If the same error message is displayed even after you have formatted a
supported memory card (=
2) and have inserted it facing the correct way
(=
19), contact a Canon Customer Support Help Desk.
Insufcient space on card
●There is not enough free space on the memory card to shoot (=
33, =
55,
=
73, =
92) or edit images (=
121). Either erase unneeded images
(=
115) or insert a memory card with enough free space (=
19).
Touch AF unavailable
●Touch AF is not available in the current shooting mode (=
190).
Touch AF canceled
●The subject selected for Touch AF can no longer be detected (=
86).
Charge the battery (=
18)
No Image.
●The memory card does not contain any images that can be displayed.
Protected! (=
113)

187
Before Use
Index
Basic Guide
Advanced Guide
Camera Basics
Auto Mode /
Hybrid Auto Mode
Other Shooting Modes
P Mode
Tv, Av, M, and C Mode
Playback Mode
Wi-Fi Functions
Setting Menu
Accessories
Appendix
Disconnected/Receiving failed/Sending failed
●You may be in an environment where Wi-Fi signals are obstructed.
●Avoid using the camera’s Wi-Fi function around microwave ovens, Bluetooth
devices, and other devices that operate on the 2.4 GHz band.
●Bring the camera closer to the other device you are trying to connect to (such as
the access point), and make sure there are no objects between the devices.
●Check the connected device to make sure it is not experiencing errors.
Sending failed
Memory card error
●If the same error message is displayed even when you have inserted a formatted
memory card facing the correct way, contact a Canon Customer Support Help
Desk.
Receiving failed
Insufcient space on card
●There is not enough free space on the memory card in the target camera to
receive images. Erase images to create space on the memory card, or insert a
memory card with sufcient space.
Receiving failed
Memory card locked
●The write-protect switch of the memory card in the camera to receive the images
is set to the locked position. Slide the write-protect switch to the unlocked
position.
Receiving failed
Naming error!
●When the highest folder number (999), and the highest image number (9999)
have been reached on the receiving camera, images cannot be received.
Insufcient space on server
●Delete unnecessary images uploaded to CANON iMAGE GATEWAY to create
space.
●Save the images sent via Image Sync (=
152) to your computer.
Check network settings
●Check to make sure your computer can connect to the Internet with the current
network settings.
A camera error was detected (error number)
●If this error message is displayed immediately after a shot, the image may not
have been saved. Switch to Playback mode to check for the image.
●Frequent display of this error message may indicate camera damage. In this
case, write down the error number (Exx) and contact a Canon Customer Support
Help Desk.
File Error
●Correct printing (=
175) may not be possible for photos from other cameras or
images that have been altered using computer software, even if the camera is
connected to the printer.
Print error
●Check the paper size setting (=
177). If this error message is displayed when
the setting is correct, restart the printer and complete the setting on the camera
again.
Ink absorber full
●Contact a Canon Customer Support Help Desk to request assistance with ink
absorber replacement.
Wi-Fi
Connection failed
●No access points were recognized. Check the access point settings (=
140).
●A device could not be found. Turn the camera off and on again, and retry the
connection.
●Check the device you want to connect to and make sure it is ready for connection.
Cannot determine access point
●The WPS buttons on numerous access points were pressed simultaneously. Try
reconnecting again.
No access points found
●Check to make sure that the access point is turned on.
●When connecting to an access point manually, make sure that you entered the
correct SSID.
Incorrect password/Incorrect Wi-Fi security settings
●Check the access point security settings (=
140).
IP address conict
●Reset the IP address so that it does not conict with another.
188
Before Use
Index
Basic Guide
Advanced Guide
Camera Basics
Auto Mode /
Hybrid Auto Mode
Other Shooting Modes
P Mode
Tv, Av, M, and C Mode
Playback Mode
Wi-Fi Functions
Setting Menu
Accessories
Appendix
(20) AE lock (=
74), FE lock
(=
89)
(21) AF frame (=
83), Spot AE point
frame (=
74)
(22) Control ring function switching
(=
96)
(23) Manual focus switching (=
81)
(24) Grid lines (=
98)
(25) Shutter speed (=
92, =
93)
(26) Aperture value (=
93, =
93)
(27) Electronic level (=
50)
(28) Exposure level (=
93)
(29) ISO speed (=
75)
(30) DR correction (=
77)
(31) Hybrid Auto mode (=
35)
(32) Star Emphasis (=
64)
(33) High ISO NR (=
76)
(34) Eco mode (=
161)
(35) Self-timer (=
40)
(36) Camera shake warning (=
36)
(37) Zoom bar (=
33)
(38) Blink detection (=
51)
(39) Manual focus (=
81)
(40) Flash exposure compensation
/ Flash output level (=
88,
=
95)
(41) Exposure compensation (=
74)
(42) Wind filter (=
36, =
70)
(43) Time zone (=
162)
(44) Image stabilization (=
52)
(45) Auto Level (=
51)
(46) Auto Slow Shutter (=
70)
(47) Attenuator (=
71)
* In [ ] mode, indicates the number of shots available.
Battery Level
An on-screen icon or message indicates the battery charge level.
Display Details
Sufcient charge
Slightly depleted, but sufcient
(Blinking red) Nearly depleted—charge the battery
pack soon
[Charge the battery] Depleted—charge the battery pack
immediately
On-Screen Information
Shooting (Information Display)
(1)
(2)
(3)
(4)
(5)
(6)
(8)
(7)
34
)
(
10
)(
11
)(
12
) (
13
)(
14
) (
15
) (
16
) (
17
)
(
18
)
(
19
)
(
21
)
(
39
)
(
38
)
(
41
)(
40
)
(
25
)
31
)
36
)
(
26
) (
28
)(
27
) (
29
)
(
45
) (
46
)
(
20
)
(
22
)
(9)
(
23
)
(
24
)
(
30
)
(9)
32
)
(
20
)
33
)
35
)
(
47
)(
42
) (
43
) (
44
)
(1) Shooting mode (=
190), Scene
icon (=
37)
(2) Flash mode (=
87)
(3) Shadow correction (=
77)
(4) Metering method (=
74)
(5) ND filter (=
77)
(6) Drive mode (=
42), AEB
shooting (=
76), Focus
bracketing (=
82)
(7) White balance (=
78), Mercury
lamp correction (=
48)
(8) My Colors (=
79)
(9) Touch Shutter (=
42)
(10) IS mode icon (=
38)
(11) Battery level (=
188)
(12) Still image compression (=
90),
Recording pixel setting (=
90)
(13) Recordable shots (=
205)*
(14) Zoom magnification (=
39),
Digital tele-converter (=
83)
(15) Movie quality (=
49)
(16) Remaining time (=
206)
(17) Histogram (=
105)
(18) Quick Set menu (=
28)
(19) Focus range (=
80, =
81),
AF lock (=
87)
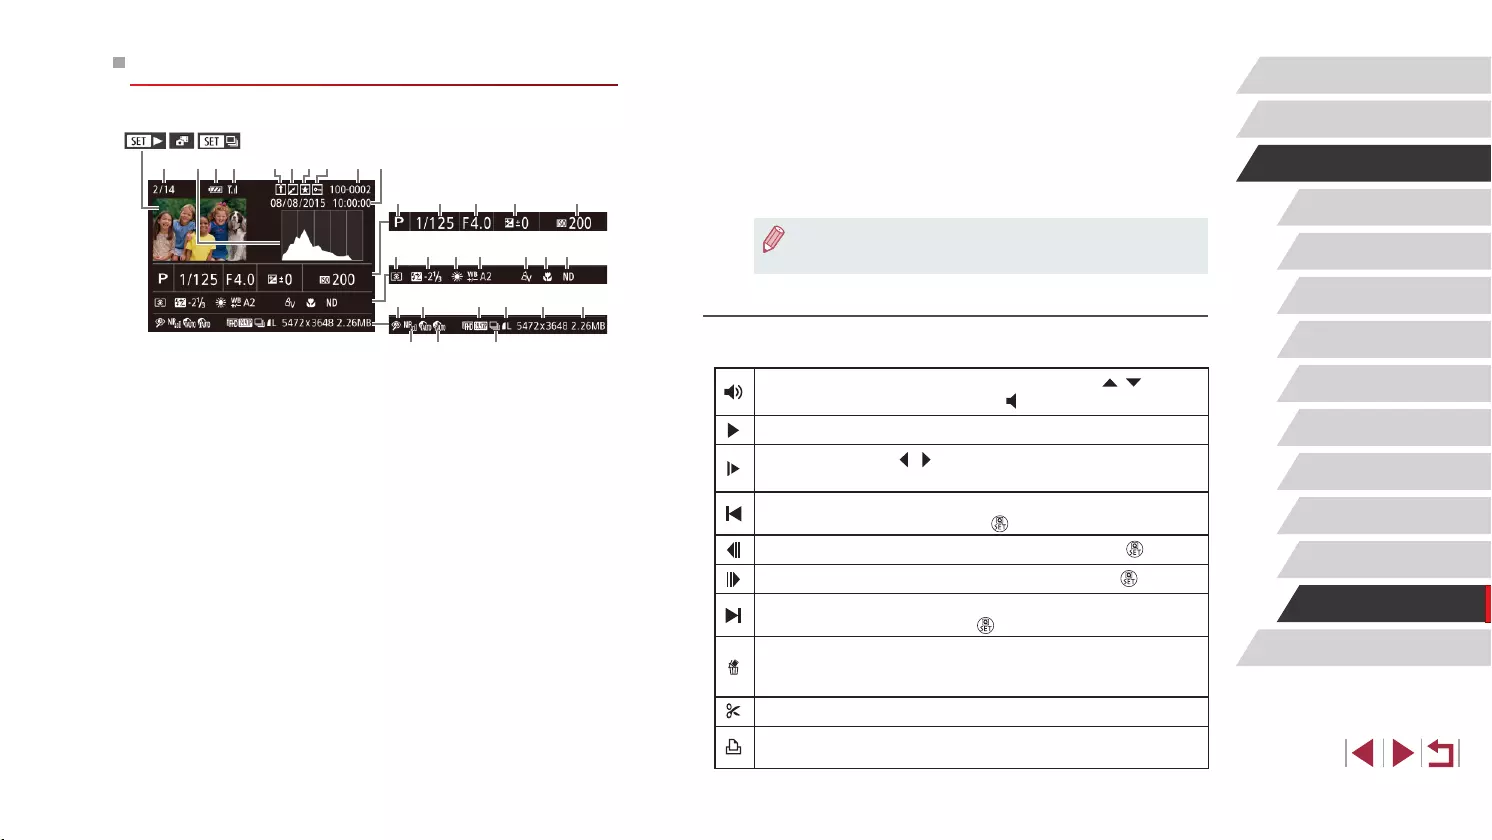
189
Before Use
Index
Basic Guide
Advanced Guide
Camera Basics
Auto Mode /
Hybrid Auto Mode
Other Shooting Modes
P Mode
Tv, Av, M, and C Mode
Playback Mode
Wi-Fi Functions
Setting Menu
Accessories
Appendix
(30) Image quality / Frame rate
(movies) (=
49)
(31) Group playback (=
110)
(32) Compression (image quality)
(=
90) / Recording pixel
setting (=
49), Digest movies
(=
35), RAW (=
90), MP4
(movies), Albums (=
127)
(33) Still images: Recording pixel
setting (=
205)
Movies: Playback time (=
206)
(34) File size
●Some information may not be displayed when viewing images on
a TV (=
170).
Summary of Movie Control Panel
The following operations are available on the movie control panel,
accessed as described in “Viewing” (=
103).
Touch to display the volume panel, and then touch [ ][ ] to
adjust the volume. At a volume of 0, [ ] is displayed.
Play
Slow Motion (Touch [ ][ ] to adjust the playback speed. No sound
is played.)
Skip Backward* or Previous Clip (=
126) (To continue skipping
backward, keep holding down the [ ] button.)
Previous Frame (For fast-rewind, keep holding down the [ ] button.)
Next Frame (For fast-forward, keep holding down the [ ] button.)
Skip Forward* or Next Clip (=
126) (To continue skipping
forward, keep holding down the [ ] button.)
Erase Clip (Displayed when any of the following is selected: digest
movies (=
106), Creative Shot movies (=
106), or albums
without background music (=
128).)
Edit (=
125)
Shown when the camera is connected to a PictBridge-compatible
printer (=
175).
* Displays the frame approx. 4 sec. before or after the current frame.
Playback (Detailed Information Display)
(4) (5) (6)(7) (8)(9)(
10
)(
11
) (
12
) (
13
)
(
14
) (
15
) (
16
) (
17
) (
18
)
(
19
)
(
26
) (
28
) (
30
) (
32
)
(
) (
) (
)
(
33
) (
34
)
(
20
) (
21
) (
22
) (
23
) (
24
) (
25
)
(1) Movies (=
33, =
103)
(2) Digest movies (=
106)
(3) Group playback (=
110)
(4) Current image no. / Total no. of
images
(5) Histogram (=
105)
(6) Battery level (=
188)
(7) Wi-Fi signal strength (=
151)
(8) Image Sync (=
152)
(9) Image editing (=
121), Movie
compression (=
126)
(10) Favorites (=
118)
(11) Protection (=
113)
(12) Folder number — File number
(=
159)
(13) Shooting date/time (=
20)
(14) Shooting mode (=
190)
(15) Shutter speed (=
92, =
93)
(16) Aperture value (=
93, =
93)
(17) Exposure compensation level
(=
74)
(18) ISO speed (=
75)
(19) Metering method (=
74)
(20) Flash (=
87), Flash exposure
compensation (=
88)
(21) White balance (=
78)
(22) White balance correction
(=
78), Mercury lamp
correction (=
48
), Creative Shot
effect (=
56)
(23) My Colors (=
79, =
123)
(24) Focus range (=
80, =
81)
(25) ND filter (=
77)
(26) Red-eye correction (=
124),
Short clip playback effect
(=
71)
(27) High ISO NR (=
76)
(28) DR correction (=
77)
(29) Shadow correction (=
77)
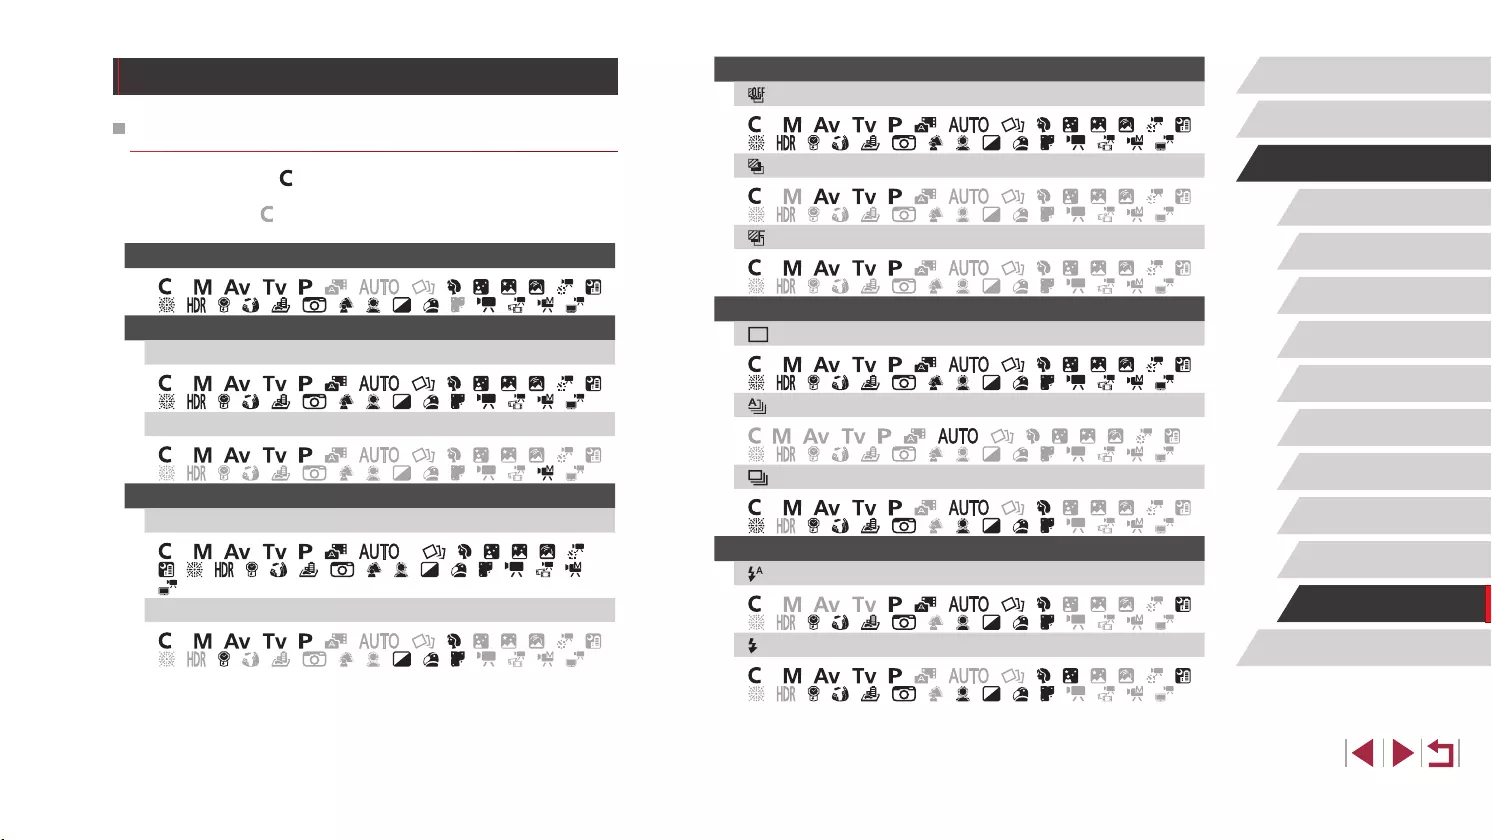
190
Before Use
Index
Basic Guide
Advanced Guide
Camera Basics
Auto Mode /
Hybrid Auto Mode
Other Shooting Modes
P Mode
Tv, Av, M, and C Mode
Playback Mode
Wi-Fi Functions
Setting Menu
Accessories
Appendix
Bracketing (=
76, =
82)
*1 / / / / / / / / / / / / / /
/ / / / / / / / / / / / / /
*1 / / / / / / / / / / / / / /
/ / / / / / / / / / / / / /
*1 / / / / / / / / / / / / / /
/ / / / / / / / / / / / / /
Drive Mode (=
42)
*1 / / / / / / / / / / / / / /
/ / / / / / / / / / / / / /
/ / / / / / / / / / / / / /
/ / / / / / / / / / / / / /
*1 / / / / / / / / / / / / / /
/ / / / / / / / / / / / / /
Flash (=
87)
*1 / / / / / / / / / / / / / /
/ / / / / / / / / / / / / /
*1 / / / / / / / / / / / / / /
/ / / / / / / / / / / / / /
Functions and Menu Tables
Functions Available in Each Shooting Mode
Icons in black, such as , indicate that the function is available or
automatically set in that shooting mode.
Gray icons, such as , indicate that the function is unavailable in that
shooting mode.
Exposure Compensation (=
74)
*1 / / / / / / / / / / / / / /
/ / / / / / / / / / / / / /
ISO Speed (=
75)
Auto
*1 / / / / / / / / / / / / / /
/ / / / / / / / / / / / / /
125 – 12800
*1 / / / / / / / / / / / / / /
/ / / / / / / / / / / / / /
AF Operation (=
85)
ONE SHOT
*1 / / / / / / *2 / / / / / / /
/ / / / / / / / / / / / / / /
SERVO
*1 / / / / / / / / / / / / / /
/ / / / / / / / / / / / / /
191
Before Use
Index
Basic Guide
Advanced Guide
Camera Basics
Auto Mode /
Hybrid Auto Mode
Other Shooting Modes
P Mode
Tv, Av, M, and C Mode
Playback Mode
Wi-Fi Functions
Setting Menu
Accessories
Appendix
AE Lock (during recording)/Exposure Compensation (=
69)
*1 / / / / / / / / / / / / / /
/ / / / / / / / / / / / / /
AF Lock (when assigned to the movie button (=
87))
*1 / / / / / / / / / / / / / /
/ / / / / / / / / / / / / /
Focus Range (=
80, =
81)
*1 / / / / / / / / / / / / / /
/ / / / / / / / / / / / / /
*1 / / / / / / / / / / / / / /
/ / / / / / / / / / / / / /
Manual Focus Switching When Recording Movies (=
69)
*1 / / / / / / / / / / / / / /
/ / / / / / / / / / / / / /
Move AF Frame (=
84)
Center
*1 / / / / / / / / / / / / / /
/ / / / / / / / / / / / / /
Periphery
*1 / / / / / / / / / / *5 / *5 /
*5 / / / / / / / / / / / / / / /
/
Touch AF (=
86)
*1 / / / / / / / / / / *5 / *5 /
*5 / / / / / / / / / / / / / / /
/
*1 / / / / / *3 / *3 / / / / / / /
*3 / / / / / / / / / / / / / / /
*1 / / / / / / / / / / / / / /
/ / / / / / / / / / / / / /
Flash Exposure Compensation (=
88)
*1 / / / / / / / / / / / / / /
/ / / / / / / / / / / / / /
Flash Output Level (=
95)
*1 / / / / / / / / / / / / / /
/ / / / / / / / / / / / / /
Av/Tv Settings (=
92, =
93)
Aperture Value
*1 / / / / / / / / / / / / / /
/ / / / / / / / / / / / / /
Shutter Speed
*1 / / / / / / / / / / / / / /
/ / / / / / / / / / / / / /
Bulb Setting
*1 / / / / / / / / / / / / / /
/ / / / / / / / / / / / / /
Program Shift (=
74)
*1 / / / / / / / / / / / / / /
/ / / / / / / / / / / / / /
AE Lock/FE Lock in Standby (=
74, =
89)*4
*1 / *6 / / / / / / / / / / / /
/ / / / / / / / / / / / / / /
192
Before Use
Index
Basic Guide
Advanced Guide
Camera Basics
Auto Mode /
Hybrid Auto Mode
Other Shooting Modes
P Mode
Tv, Av, M, and C Mode
Playback Mode
Wi-Fi Functions
Setting Menu
Accessories
Appendix
Quick Set Menu
AF method (=
83)
+Tracking
*1 / / / / / / / / / / / / / /
/ / / / / / / / / / / / / /
1-point AF
*1 / / / / / / / / / / / / / /
/ / / / / / / / / / / / / /
Image quality
For details, see “Shooting Tab” (=
195).
Movie Quality (=
49, =
49)
When Set to NTSC
*1 / / / / / / / / / / / / / /
/ / / / / / / / / / / / / /
*1 / / / / / / / / / / / / / /
/ / / / / / / / / / / / / /
*1 / / / / / / / / / / / / / /
/ / / / / / / / / / / / / /
*1 / / / / / / / / / / / / / /
/ / / / *2 / / / / / / / / / /
*1 / / / / / / / / / / / / / /
/ / / / *2 / / / / / / / / / /
Face Select (=
86)
*1 / / / / / / / / / / / / / /
/ / / / / / / / / / / / / /
Touch Shutter (=
42)
*1 / / / / / / / / / / / / / /
*7 / / / *6 / / / / / / / / / / /
Change Display (=
27)
*1 / / / / / / / / / / / / / /
/ / / / / / / / / / / / / /
*1 Options vary depending on the assigned shooting mode.
*2 [SERVO] when subject movement is detected.
*3 Not available, but switches to [ ] in some cases.
*4 FE lock not available in [ ] ash mode.
*5 Only when [ ] is selected.
*6 Only available when faces are detected.
*7 Only available for shooting. Subject designation not available.
193
Before Use
Index
Basic Guide
Advanced Guide
Camera Basics
Auto Mode /
Hybrid Auto Mode
Other Shooting Modes
P Mode
Tv, Av, M, and C Mode
Playback Mode
Wi-Fi Functions
Setting Menu
Accessories
Appendix
ND Filter (=
77)
*1 / / / / / / / / / / / / / /
/ / / / / / / / / / / / / /
*1 / / / / / / / / / / / / / /
/ / / / / / / / / / / / / /
*1 / / / / / / / / / / / / / /
/ / / / / / / / / / / / / /
Still Image Aspect Ratio (=
47)
*1 / / / / / / / / / / / / / /
/ / / / / / / / / / / *5 / / *5 /
*1 / / / / / / / / / / / / / /
/ / / / / / / / / / / / / /
*1 / / / / / / / / / / / / / /
/ / / / / / / / / / / / / /
*1 / / / / / / / / / / / / / /
/ / / / / / / / / / / / / /
White Balance (=
78)
*1 / / / / / / / / / / / / / /
/ / / / / / / / / / / / / /
/ / / / /
*1 / / / / / / / / / / / / / /
/ / / / / / / / / / / / / /
When Set to PAL
*1 / / / / / / / / / / / / / /
/ / / / / / / / / / / / / /
*1 / / / / / / / / / / / / / /
/ / / / / / / / / / / / / /
*1 / / / / / / / / / / / / / /
/ / / / *2 / / / / / / / / / /
*1 / / / / / / / / / / / / / /
/ / / / *2 / / / / / / / / / /
Self-Timer (=
40)
*1 / / / / / / / / / / / / / /
/ / / / / / / / / / / / / /
/ /
*1 / / / / / / / / / / / / / /
/ / / / / / / / / / / / / /
Self-Timer Settings (=
41)
Delay*3
*1 / / / / / / / / / / / / / /
/ / / / / / / / / / / / / /
Shots*4
*1 / / / / / / / / / / / / / /
/ / / / / / / / / / / / / /
194
Before Use
Index
Basic Guide
Advanced Guide
Camera Basics
Auto Mode /
Hybrid Auto Mode
Other Shooting Modes
P Mode
Tv, Av, M, and C Mode
Playback Mode
Wi-Fi Functions
Setting Menu
Accessories
Appendix
Shadow Correct (=
77)
*1 / / / / / / / / / / / / / /
/ / / / / / / / / / / / / /
*1 / / / / / / / / / / / / / /
/ / / / / / / / / / / / / /
Light Metering (=
74)
*1 / / / / / / / / / / / / / /
/ / / / / / / / / / / / / /
/
*1 / / / / / / / / / / / / / /
/ / / / / / / / / / / / / /
*1 Options vary depending on the assigned shooting mode.
*2 Synchronizes with the aspect ratio setting and is automatically set (=
60).
*3 Cannot be set to 0 seconds in modes without selection of the number of shots.
*4 One shot (cannot be modied) in modes without selection of the number of
shots.
*5 Automatically set, matching the aspect ratio specied in [Movie rec. size].
*6 White balance is not available.
*7 Set in a range of 1 – 5: contrast, sharpness, color saturation, red, green, blue,
and skin tone.
*1 / / / / / / / / / / / / / /
/ / / / / / / / / / / / / /
/
*1 / / / / / / / / / / / / / /
/ / / / / / / / / / / / / /
WB Correction (=
78)
*1 / / / / / / / / / / / / / /
/ / / / / / / / / / / / / /
Color Adjustment (=
68)
/ / / / / / / / / / / / / /
/ / / / / / / / / / / / / /
My Colors (=
79)
*1 / / / / / / / / / / / / / /
/ / / / / / / / / / / / / /
/ / *6 / *6 / / / / / / / *7
*1 / / / / / / / / / / / / / /
/ / / / / / / / / / / / / /
DR Correction (=
77)
*1 / / / / / / / / / / / / / /
/ / / / / / / / / / / / / /
*1 / / / / / / / / / / / / / /
/ / / / / / / / / / / / / /
*1 / / / / / / / / / / / / / /
/ / / / / / / / / / / / / /
195
Before Use
Index
Basic Guide
Advanced Guide
Camera Basics
Auto Mode /
Hybrid Auto Mode
Other Shooting Modes
P Mode
Tv, Av, M, and C Mode
Playback Mode
Wi-Fi Functions
Setting Menu
Accessories
Appendix
Shooting Tab
[ 1] Tab
Rec. Mode (=
57, =
58, =
69)
/ / / / / / / / / / / / / /
/ / / / / / / / / / / / / /
Image quality (=
48, =
90)
JPEG
*1 / / / / / / / / / / / / / /
/ / / / / / / / / / / / / /
*1 / / / / / / / / / / / / / /
/ / / / / / / / / / / / / /
*1 / / / / / / / / / / / / / /
/ / / / / / / / / / / / / /
*1 / / / / / / / / / / / / / /
/ / / / / / / / / / / / / /
*1 / / / / / / / / / / / / / /
/ / / / / / / / / / / / / /
*1 / / / / / / / / / / / / / /
/ / / / / / / / / / / / / /
*1 / / / / / / / / / / / / / /
/ / / / / / / / / / / / / /
*1 / / / / / / / / / / / / / /
/ / / / / / / / / / / / / /
*1 / / / / / / / / / / / / / /
/ / / / / / / / / / / / / /
RAW
–
*1 / / / / / / / / / / / / / /
/ / / / / / / / / / / / / /
*1 / / / / / / / / / / / / / /
/ / / / / / / / / / / / / /
Still Image Aspect Ratio (=
47)
For details, see “Quick Set Menu” (=
192).
Shooting information display (=
98)
Screen info/ toggle settings
*1 / / / / / / / / / / / / / /
/ / / / / / / / / / / / / /
Grid display
Grid 1 /Grid 2
*1 / / / / / / / / / / / / / /
/ / / / / / / / / / / / / /
Histogram
Brightness/RGB
*1 / / / / / / / / / / / / / /
/ / / / / / / / / / / / / /
196
Before Use
Index
Basic Guide
Advanced Guide
Camera Basics
Auto Mode /
Hybrid Auto Mode
Other Shooting Modes
P Mode
Tv, Av, M, and C Mode
Playback Mode
Wi-Fi Functions
Setting Menu
Accessories
Appendix
Touch shutter icon
On
*1 / / / / / / / / / / / / / /
/ / / / / / / / / / / / / /
Off
*1 / / / / / / / / / / / / / /
/ / / / / / / / / / / / / /
Face ID Settings (=
43)
On/Off
*1 / / / / / / / / / / / / / /
/ / / / / / / / / / / / / /
Set button (=
99)
*1 / / / / / / / / / / / / / /
/ / / / / / / / / / / / / /
Control Ring Settings (=
97)
Switch with
On/Off
*1 / / / / / / / / / / / / / /
/ / / / / / / / / / / / / /
Set Function
*1 / / / / / / / / / / / / / /
/ / / / / / / / / / / / / /
Quick setting menu layout (=
100)
*1 / / / / / / / / / / / / / /
/ / / / / / / / / / / / / /
Save Settings (=
101)
*1 / / / / / / / / / / / / / /
/ / / / / / / / / / / / / /
Review image after shooting (=
54)
Display Time
Off/Quick
*1 / / / / / / / / / / / / / /
/ / / / / / / / / / / / / /
2 sec./4 sec./8 sec.
*1 / / / / / / / / / / / / / /
/ / / / / / / / / / / / / /
Hold
*1 / / / / / / / / / / / / / /
/ / / / / / / / / / / / / /
Display Info
Off
*1 / / / / / / / / / / / / / /
/ / / / / / / / / / / / / /
Detailed
*1 / / / / / / / / / / / / / /
/ / / / / / / / / / / / / /
[ 2] Tab
Touch Shutter (=
42)
Touch Shutter
Enable
*1 / / / / / / / / / / / / / /
/ / / / / / / / / / / / / /
Disable
*1 / / / / / / / / / / / / / /
/ / / / / / / / / / / / / /
197
Before Use
Index
Basic Guide
Advanced Guide
Camera Basics
Auto Mode /
Hybrid Auto Mode
Other Shooting Modes
P Mode
Tv, Av, M, and C Mode
Playback Mode
Wi-Fi Functions
Setting Menu
Accessories
Appendix
AF Frame Size (=
84)*2
Normal
*1 / / / / / / / / / / / / / /
/ / / / / / / / / / / / / /
Small
*1 / / / / / / / / / / / / / /
/ / / / / / / / / / / / / /
Continuous AF (=
85)
On
*1 / / / / / / / / / / / / / /
/ / / / / / / / / / / / / /
Off
*1 / / / / / / / / / / / / / /
/ / / / / / / / / / / / / /
Focus Range (=
80, =
81)
For details, see “Functions Available in Each Shooting Mode”
(=
190).
AF-assist Beam (=
53)
On
*1 / / / / / / / / / / / / / /
/ / / / / / / / / / / / / /
Off
*1 / / / / / / / / / / / / / /
/ / / / / / / / / / / / / /
Digital Zoom (=
39)
Standard
*1 / / / / / / / / / / / / / /
/ / / / / / / / / / / / / /
Off
*1 / / / / / / / / / / / / / /
/ / / / / / / / / / / / / /
Lock
/ / / / / / / / / / / / / /
/ / / / / / / / / / / / / /
1.6x/2.0x
*1 / / / / / / / / / / / / / /
/ / / / / / / / / / / / / /
[ 3] Tab
AF-Point Zoom (=
50)
On
*1 / / / / / / / / / / / / / /
/ / / / / / / / / / / / / /
Off
*1 / / / / / / / / / / / / / /
/ / / / / / / / / / / / / /
AF operation (=
85)
For details, see “Functions Available in Each Shooting Mode”
(=
190).
AF method (=
83)
For details, see “Quick Set Menu” (=
192).
198
Before Use
Index
Basic Guide
Advanced Guide
Camera Basics
Auto Mode /
Hybrid Auto Mode
Other Shooting Modes
P Mode
Tv, Av, M, and C Mode
Playback Mode
Wi-Fi Functions
Setting Menu
Accessories
Appendix
IS Settings (=
52)
IS Mode
Off
*1 / / / / / / / / / / / / / /
/ / / / / / / / / / / / / /
Continuous
*1 / / / / / / / / / / / / / /
/ / / / / / / / / / / / / /
Shoot Only
*1 / / / / / / / / / / / / / /
/ / / / / / / / / / / / / /
Dynamic IS
Low
*1 / / / / / / / / / / / / / /
/ / / / / / / / / / / / / /
Standard
*1 / / / / / / / / / / / / / /
/ / / / / / / / / / / / / /
High
/ / / / / / / / / / / / / /
/ / / / / / / / / / / / / /
Auto level
Enable
*1 / / / / / / / / / / / / / /
/ / / / / / / / / / / / / /
Disable
*1 / / / / / / / / / / / / / /
/ / / / / / / / / / / / / /
[ 4] Tab
MF-Point Zoom (=
81)
Off
*1 / / / / / / / / / / / / / /
/ / / / / / / / / / / / / /
2x/4x
*1 / / / / / / / / / / / / / /
/ / / / / / / / / / / / / /
Safety MF (=
81)
On
*1 / / / / / / / / / / / / / /
/ / / / / / / / / / / / / /
Off
*1 / / / / / / / / / / / / / /
/ / / / / / / / / / / / / /
MF Peaking Settings (=
82)
Peaking
On/Off
*1 / / / / / / / / / / / / / /
/ / / / / / / / / / / / / /
Level
Low/High
*1 / / / / / / / / / / / / / /
/ / / / / / / / / / / / / /
Color
Red/Yellow/Blue
*1 / / / / / / / / / / / / / /
/ / / / / / / / / / / / / /
199
Before Use
Index
Basic Guide
Advanced Guide
Camera Basics
Auto Mode /
Hybrid Auto Mode
Other Shooting Modes
P Mode
Tv, Av, M, and C Mode
Playback Mode
Wi-Fi Functions
Setting Menu
Accessories
Appendix
Flash Exp. Comp
For details, see “Functions Available in Each Shooting Mode”
(=
190).
Flash Output
For details, see “Functions Available in Each Shooting Mode”
(=
190).
Shutter Sync.
1st-curtain
*1 / / / / / / / / / / / / / /
/ / / / / / / / / / / / / /
2nd-curtain
*1 / / / / / / / / / / / / / /
/ / / / / / / / / / / / / /
Red-Eye Lamp
On/Off
*1 / / / / / / / / / / / / / /
/ / / / / / / / / / / / / /
Safety FE
On
*1 / / / / / / / / / / / / / /
/ / / / / / / / / / / / / /
Off
*1 / / / / / / / / / / / / / /
/ / / / / / / / / / / / / /
Save Stills (=
66)
On/Off
/ / / / / / / / / / / / / /
/ / / / / / / / / / / / / /
Bracketing (=
76, =
82)
For details, see “Functions Available in Each Shooting Mode”
(=
190).
[ 5] Tab
ISO speed (=
76)
Max ISO Speed
*1 / / / / / / / / / / / / / /
/ / / / / / / / / / / / / /
Rate of Change
*1 / / / / / / / / / / / / / /
/ / / / / / / / / / / / / /
DR Correction (=
77)
For details, see “Quick Set Menu” (=
192).
Shadow Correct (=
77)
For details, see “Quick Set Menu” (=
192).
Light Metering (=
74)
For details, see “Quick Set Menu” (=
192).
ND Filter (=
77)
For details, see “Quick Set Menu” (=
192).
Flash Settings (=
53, =
88, =
89, =
95)
Flash Mode
Auto
*1 / / / / / / / / / / / / / /
/ / / / / / / / / / / / / /
Manual
*1 / / / / / / / / / / / / / /
/ / / / / / / / / / / / / /
200
Before Use
Index
Basic Guide
Advanced Guide
Camera Basics
Auto Mode /
Hybrid Auto Mode
Other Shooting Modes
P Mode
Tv, Av, M, and C Mode
Playback Mode
Wi-Fi Functions
Setting Menu
Accessories
Appendix
[ 6] Tab
White Balance (=
78)
For details, see “Quick Set Menu” (=
192).
WB Correction (=
78)
For details, see “Quick Set Menu” (=
192).
My Colors (=
123)
For details, see “Quick Set Menu” (=
192).
High ISO NR (=
76)
Low/Standard/High
*1 / / / / / / / / / / / / / /
/ / / / / / / / / / / / / /
Hg Lamp Corr. (=
48)
On/Off
/ / / / / / / / / / / / / /
/ / / / / / / / / / / / / /
Spot AE Point (=
74)
Center/AF Point
*1 / / / / / / / / / / / / / /
/ / / / / / / / / / / / / /
Safety Shift (=
93)
On
*1 / / / / / / / / / / / / / /
/ / / / / / / / / / / / / /
Off
*1 / / / / / / / / / / / / / /
/ / / / / / / / / / / / / /
Star Emphasis (=
64)
Sharp/Off/Soft
/ / / / / / / / / / / / / /
/ / / / / / / / / / / / / /
Star Time-Lapse Movie Setting (=
66)
Effect
/ / / /
/ / / / / / / / / / / / / /
/ / / / / / / / / / / / / /
Shot Interval
15 sec./30 sec./1 min.
/ / / / / / / / / / / / / /
/ / / / / / / / / / / / / /
Frame Rate
/ (NTSC), / (PAL)
/ / / / / / / / / / / / / /
/ / / / / / / / / / / / / /
Shooting Time
60 min./90 min./120 min./Unlimited
/ / / / / / / / / / / / / /
/ / / / / / / / / / / / / /
201
Before Use
Index
Basic Guide
Advanced Guide
Camera Basics
Auto Mode /
Hybrid Auto Mode
Other Shooting Modes
P Mode
Tv, Av, M, and C Mode
Playback Mode
Wi-Fi Functions
Setting Menu
Accessories
Appendix
Auto
*1 / / / / / / / / / / / / / /
/ / / / / / / / / / / / / /
Auto slow shutter (=
70)
Enable
/ / / / / / / / / / / / / /
/ / / / / / / / / / / / / /
Disable
*1 / / / / / / / / / / / / / /
/ / / / / / / / / / / / / /
*1 Options vary depending on the assigned shooting mode.
*2 Available when the AF frame is set to [1-point].
*3 [Enable] for functions other than Creative Zone and movies.
[ 7] Tab
Blink Detection (=
51)
On
*1 / / / / / / / / / / / / / /
/ / / / / / / / / / / / / /
Off
*1 / / / / / / / / / / / / / /
/ / / / / / / / / / / / / /
Digest Type (=
35)
Include Stills/No Stills
/ / / / / / / / / / / / / /
/ / / / / / / / / / / / / /
[ 8] Tab
Movie Quality (=
49)
For details, see “Quick Set Menu” (=
192).
Wind Filter (=
70)
Auto
*1 / / / / / / / / / / / / / /
/ / / / / / / / / / / / / /
Off
*1 / / / / / / / / / / / / / /
/ / / / / / / / / / / / / /
Attenuator (=
71)
On/Off
*1 / / / / / / / / / / / / / /
/ / / / / / / / / / / / / /
202
Before Use
Index
Basic Guide
Advanced Guide
Camera Basics
Auto Mode /
Hybrid Auto Mode
Other Shooting Modes
P Mode
Tv, Av, M, and C Mode
Playback Mode
Wi-Fi Functions
Setting Menu
Accessories
Appendix
Tab Item Reference
Page
4
Touch Operation =
164
Screen auto-lock settings =
165
Units =
165
Wi-Fi Settings =
131
Mobile Device Connect Button =
134
Certication Logo Display =
165
Copyright Info =
165
5Reset All =
166
My Menu Tab
Tab Item Reference
Page
1My Menu settings =
101
Playback Tab
Tab Item Reference
Page
1
Protect =
113
Rotate =
117
Erase =
115
Favorites =
118
Slideshow =
113
Set Up Tab
Tab Item Reference
Page
1
Create Folder =
159
File Numbering =
159
Format =
160
Video system =
160
Electronic Level =
50
Start-up Image =
164
2
Eco Mode =
161
Power Saving =
26
Disp. Brightness =
162
Night Display =
161
Time Zone =
162
Date/Time =
163
Lens Retraction =
163
3
Language =
163
Mute =
163
Volume =
164
Sound Options =
164
Hints & Tips =
164
Mode icon size/info =
164
203
Before Use
Index
Basic Guide
Advanced Guide
Camera Basics
Auto Mode /
Hybrid Auto Mode
Other Shooting Modes
P Mode
Tv, Av, M, and C Mode
Playback Mode
Wi-Fi Functions
Setting Menu
Accessories
Appendix
Handling Precautions
●The camera is a high-precision electronic device. Avoid dropping it or
subjecting it to strong impact.
●Never bring the camera near magnets, motors, or other devices that
generate strong electromagnetic elds, which may cause malfunction
or erase image data.
●If water droplets or dirt adheres to the camera or screen, wipe with
a dry soft cloth, such as an eyeglass cloth. Do not rub hard or apply
force.
●Never use cleaners containing organic solvents to clean the camera
or screen.
●Use a blower brush to remove dust from the lens. If cleaning is difcult,
contact a Canon Customer Support Help Desk.
●To prevent condensation from forming on the camera after sudden
temperature changes (when the camera is transferred from cold to
warm environments), put the camera in an airtight, resealable plastic
bag and let it gradually adjust to the temperature before removing it
from the bag.
●If condensation does form on the camera, stop using it immediately.
Continuing to use the camera in this state may damage it. Remove
the battery pack and memory card, and wait until the moisture has
evaporated before resuming use.
●Store unused battery packs in a plastic bag or other container. To
maintain battery performance if you will not use the battery pack for
some time, about once a year charge it and then use the camera until
it runs out of power before storing the battery pack.
Tab Item Reference
Page
2
Story Highlights =
127
List/Play Digest Movies =
106
Play Creative Shot Movies =
106
Short Clip Mix =
130
Image Search =
108
3
i-Contrast =
123
Resize =
121
Cropping =
122
Red-Eye Correction =
124
My Colors =
123
Face ID Info =
107
4Print settings =
176
Photobook Set-up =
181
5
Transition Effect =
103
Index Effect =
107
Scroll Display =
103
Group Images =
110
Auto Rotate =
118
Resume =
103
Image jump with =
109
6Set Touch Actions =
119

204
Before Use
Index
Basic Guide
Advanced Guide
Camera Basics
Auto Mode /
Hybrid Auto Mode
Other Shooting Modes
P Mode
Tv, Av, M, and C Mode
Playback Mode
Wi-Fi Functions
Setting Menu
Accessories
Appendix
Built-in Flash
Metering Range (Wide angle end) ….50 cm – 6.0 m (1.6 – 20 ft.)
Metering Range (Telephoto end) ……50 cm – 2.4 m (1.6 – 7.9 ft.)
Shutter Speed
Auto Mode (Auto Settings)…………….1 – 1/2000 sec.
Other Modes Combined………………..30 – 1/2000 sec., bulb supported
Aperture
f/number…………………………………….. 2.0 – 11 (W)
4.9 – 11 (T)
AF Type ………………………………………… 1-point, Face+Tracking
(AF points: up to 31)
File Format …………………………………….. Design rule for Camera File
system, DPOF (version 1.1)
compliant
Data Type (Still Images)
Image File Format………………………..Exif 2.3 (DCF 2.0)
Image Formats……………………………. JPEG, RAW (CR2, a Canon 14-bit
RAW format)
Data Type (Movies)
Recording Format ……………………….. MP4
Video ………………………………………….MPEG-4 AVC/H.264
Audio………………………………………….MPEG-4 AAC LC (stereo)
Power Source
Battery Pack ……………………………….NB-13L
Charging via USB ……………………….. Using Compact Power Adapter
CA-DC30/CA-DC30E
AC Adapter Kit …………………………….ACK-DC110
Interface
Wired …………………………………………USB (Micro-B), HDMI (Type D)
Wireless …………………………………….. Specications: IEEE 802.11b/g/n
Frequency: 2.4 GHz
Channels: 1 – 11
Security: WEP, WPA-PSK (AES/
TKIP), WPA2-PSK (AES/TKIP)
Specications
Camera
Image Sensor
Camera Effective Pixels
(Image processing may cause
a decrease in the number of pixels.) …….Approx. 20.2 million pixels
Total Pixels………………………………….Approx. 20.9 million pixels
Image Size …………………………………. 1.0 type
Lens
Focal Length
(35mm lm equivalent) …………………….. 10.2 – 30.6 mm (28 – 84 mm)
Zoom Factor ……………………………….3x
Digital Zoom
Maximum with Optical Zoom …………Approx. 12x
Focal Length
(Telephoto end, 35mm lm equivalent) …..Equivalent to approx. 336 mm
ZoomPlus
(L size) ………………………….……………..Approx. 6.0x
Screen (Monitor)
Type ………………………………………….. Color TFT LCD
Screen Size ………………………………..3.0-type
Effective Pixels ……………………………Approx. 1,040,000 dots
Continuous Shooting
Speed
(Varies depending on the subject,
zoom position, and other shooting
factors, as well as memory card
brands.) ……………………………………… One-Shot AF:
Approx. 6.0 shots/sec.
Servo AF: Approx. 4.3 shots/sec.
205
Before Use
Index
Basic Guide
Advanced Guide
Camera Basics
Auto Mode /
Hybrid Auto Mode
Other Shooting Modes
P Mode
Tv, Av, M, and C Mode
Playback Mode
Wi-Fi Functions
Setting Menu
Accessories
Appendix
Shooting Range
Shooting
Mode
Focus
Range
Maximum Wide Angle
()
Maximum Telephoto
( )
–5 cm (2.0 in.) – innity 35 cm (1.1 ft.) – innity
Other
modes
5 cm (2.0 in.) – innity 35 cm (1.1 ft.) – innity
*5 – 50 cm
(2.0 in. – 1.6 ft.) –
*5 cm (2.0 in.) – innity 35 cm (1.1 ft.) – innity
* Not available in some shooting modes.
Number of Shots per Memory Card
The number of shots at an aspect ratio (=
47) of 3:2 per memory card is
as follows. Note that the number of shots available varies by aspect ratio.
Number of shots per 16 GB memory card (approx. shots)
1786
2999
2857
4810
8377
14724
48592
69418
RAW 610
●The values in the table are based on Canon measurement conditions and
may change depending on the subject, memory card and camera settings.
Operating Environment
Temperatures ………………………………0 – 40 °C (32 – 104 °F)
Dimensions (WxHxD) ……………………… 98.0 x 57.9 x 30.8 mm
(3.86 x 2.28 x 1.21 in.)
Weight
Including Battery Pack,
Memory Card ………………………………Approx. 209 g (7.37 oz.)
Camera Only……………………………….Approx. 185 g (6.53 oz.)
Number of Shots/Recording Time, Playback
Time
Number of Shots Approx. 220
Number of Shots (Eco Mode On) Approx. 335
Movie Recording Time (Actual Use)*1Approx. 55 minutes
Movie Recording Time
(Continuous Shooting)*2Approx. 1 hour 30 minutes
Playback Time*3Approx. 5 hours
*1 Total time when shooting repeatedly under the following conditions:
— In [ ] mode, with all other settings set to defaults
— With recording, stopping, zooming, and turning the camera on and off
*2 Total time when shooting repeatedly under the following conditions:
— In [ ] mode, with all other settings set to defaults
— Automatically stop/resume after the time or capacity per recording is reached
*3 Time when playing back a slideshow of still images.
206
Before Use
Index
Basic Guide
Advanced Guide
Camera Basics
Auto Mode /
Hybrid Auto Mode
Other Shooting Modes
P Mode
Tv, Av, M, and C Mode
Playback Mode
Wi-Fi Functions
Setting Menu
Accessories
Appendix
Battery Pack NB-13L
Type: Rechargeable lithium-ion battery
Nominal Voltage: 3.6 V DC
Nominal Capacity: 1250 mAh
Charging Cycles: Approx. 300 times
Operating Temperatures: 0 – 40 °C (32 – 104 °F)
Battery Charger CB-2LH/CB-2LHE
Rated Input: 100 – 240 V AC (50/60 Hz)
0.09 A (100 V) – 0.06 A (240 V)
Rated Output: 4.2 V DC, 0.7 A
Charging Time: Approx. 2 hr. 10 min. (when using NB-13L)
Operating Temperatures: 5 – 40 °C (41 – 104 °F)
Compact Power Adapter CA-DC30/CA-DC30E
Rated Input: 100 – 240 V AC (50/60 Hz)
0.07 A (100 V) – 0.045 A (240 V)
Rated Output: 5.0 V DC, 0.55 A
Charging Time: Approx. 5 hr.*
(when charged with NB-13L in the camera)
* Charging time varies greatly depending on the
remaining battery level.
Operating Temperatures: 5 – 40 °C (41 – 104 °F)
●Size, weight, and number of shots available are based on
measurement guidelines of the Camera & Imaging Products
Association (CIPA).
●Under some shooting conditions, the number of shots and recording
time may be less than mentioned above.
●Number of shots/time with a fully charged battery pack.
Recording Time per Memory Card
Size Frame Rate/
Video System
Recording Time
per 16 GB Memory
Card (Approx.)
Recording Time
for Individual
Movies (Approx.)
(1920 x 1080)
(NTSC)
(PAL) 59 min. 30 sec. 10 min.
,
(NTSC)
(PAL)
1 hr. 26 min. 05 sec. 29 min. 59 sec.
(1280 x 720)
(NTSC)
(PAL) 4 hr. 05 min. 15 sec. 29 min. 59 sec.
(640 x 480)
(NTSC)
(PAL)
10 hr. 22 min. 35 sec.
1 hr.
●The values in the table are based on Canon measurement conditions
and may change depending on the subject, memory card and camera
settings.
●Recording times for individual movies are based on memory cards
rated at an SD speed class of 10. Recording may stop when cards
rated at lower speed classes are used. Recording will also stop
automatically when the le size reaches 4 GB, or when the card
becomes full.

207
Camera Basics
Auto Mode /
Hybrid Auto Mode
Other Shooting Modes
P Mode
Tv, Av, M, and C Mode
Playback Mode
Wi-Fi Functions
Setting Menu
Accessories
Appendix
Before Use
Basic Guide
Advanced Guide
Index
Index
A
AC adapter kit 168, 171
Accessories 168
AEB shooting 76
AE lock 74
AF frames 83
AF lock 87
AF method 83
Aspect ratio 47
AUTO mode (shooting mode) 22, 33
Av (shooting mode) 93
B
Background defocus (shooting mode)
61
Batteries → Date/time (date/time
battery)
Battery charger 2, 168
Battery pack
Charging 18
Eco mode 161
Level 188
Power saving 26
Black and white images 79
Blink detection 51
C
C (shooting mode) 98
Camera
Reset all 166
Camera access point mode 138
Camera Connect 132
CameraWindow 173
CANON iMAGE GATEWAY 144
Clock 32
Color (white balance) 78
Compression 90
Connecting via an access point 140
Continuous shooting 38, 42
Control ring 97
Control ring function selector button
97
Creative shot 55
Cropping 122, 177
Custom white balance 78
D
Date/time
Changing 21
Date/time battery 21
Settings 20
World clock 162
DC coupler 171
Defaults → Reset all
Digital tele-converter 83
Digital zoom 39
Display language 21
DPOF 179
Dragging 17
Dynamic Range Correction 77
E
Eco mode 161
Editing
Cropping 122
i-Contrast 123
My Colors 123
Red-eye correction 124
Resizing images 121
Editing or erasing connection
information 156
Electronic level 50
Erasing 115
Erasing all 116
Error messages 186
Exposure
AE lock 74
Compensation 74
FE lock 89
F
Face ID 43
Face select 86
Favorites 118
FE lock 89
File numbering 159
Fireworks (shooting mode) 57
Fish-eye effect (shooting mode) 59
Flash
Deactivating ash 88
Flash exposure compensation 88
On 87
Slow synchro 88
Focus bracketing 82
Focus check 112
Focusing
AF frames 83
AF lock 87
AF-point zoom 50
MF peaking 82
Servo AF 85
Touch AF 86
Focus lock 83
Focus range
Macro 80
Manual focus 81
G
Geotagging images 155
GPS information display 105
Grid lines 98
H
Handheld nightscene (shooting mode)
57
HDMI cable 170
High dynamic range (shooting mode)
58
High ISO NR 76
Household power 171
Hybrid Auto (shooting mode) 35
I
i-Contrast 123
iFrame movies (movie mode) 72
Image quality → Compression ratio
(image quality)
Images
Display period 54
Erasing 115
Playback → Viewing
Protecting 113
Image stabilization 52, 91
Image Sync 152
Indicator 31, 53
ISO speed 75
J
Jump display 109
M
M (shooting mode) 93
Macro (focus range) 80
Magnied display 112

208
Camera Basics
Auto Mode /
Hybrid Auto Mode
Other Shooting Modes
P Mode
Tv, Av, M, and C Mode
Playback Mode
Wi-Fi Functions
Setting Menu
Accessories
Appendix
Before Use
Basic Guide
Advanced Guide
Index
Soft focus (shooting mode) 62
Software
Installation 138, 174
Saving images to a computer
174
Sounds 163
Standard (movie mode) 69
Star (shooting mode) 63
Star nightscape (shooting mode)
64
Star time-lapse movie (shooting
mode) 66
Star trails (shooting mode) 65
Story Highlights 127
Strap 2, 18
Super vivid (shooting mode) 58
T
Terminal 170, 175
Touch Actions 119
Touch AF 86
Touching 17
Touch-screen panel 17
Touch Shutter 42
Toy camera effect (shooting mode)
61
Traveling with the camera 162
Troubleshooting 182
TV display 170
Tv (shooting mode) 92
V
Viewing 23
Image search 108
Index display 107
Jump display 109
Magnied display 112
Single-image display 23
Slideshow 113
TV display 170
W
White balance (color) 78
Wi-Fi functions 131
Wi-Fi menu 136
Wind lter 36
World clock 162
Wrist strap → Strap
Z
Zoom 22, 34, 39, 40
Manual focus (focus range) 81
Manual (movie mode) 95
Memory cards 2
Recording time 206
Menu
Basic operations 29
Table 190
Mercury lamp correction 48
Metering method 74
Miniature effect (shooting mode) 60
Mobile device connection button 134
Monochrome (shooting mode) 62
Movies
Editing 125
Image quality (recording pixels/
frame rate) 49
Recording time 206
Multi-area White Balance 48
My Colors 79, 123
N
ND lter 77
Nostalgic (shooting mode) 59
P
P (shooting mode) 73
Package contents 2
Photobook set-up 181
PictBridge 169, 175
Playback → Viewing
Portrait (shooting mode) 57
Poster effect (shooting mode) 58
Power 168 → AC adapter kit,
→ Battery charger, → Battery pack
Power saving 26
Printing 175
Program AE 73
Protecting 113
Q
Quick Set menu
Table 192
R
RAW 90
Recording pixels (image size) 48, 90
Red-eye correction 124
Remote shooting 155
Reset all 166
Resizing images 121
Rotating 117
S
Saving images to a computer 174
Screen
Display language 21
Icons 188, 189
Menu → Quick Set menu, Menu
SD/SDHC/SDXC memory cards
→ Memory cards
Searching 108
Self-timer 40
2-second self-timer 41
Customizing the self-timer 41
Sending images 149
Sending images to another camera
149
Sending images to a smartphone 132
Sending images to Web services 144
Sepia tone images 79
Servo AF 85
Shadow correction 77
Shooting
Shooting date/time → Date/time
Shooting information 98, 188
Short clips (movie mode) 71
Slideshow 113

209
Camera Basics
Auto Mode /
Hybrid Auto Mode
Other Shooting Modes
P Mode
Tv, Av, M, and C Mode
Playback Mode
Wi-Fi Functions
Setting Menu
Accessories
Appendix
Before Use
Basic Guide
Advanced Guide
Index
Wi-Fi (Wireless LAN) Precautions
●Countries and Regions Permitting WLAN Use
— Use of WLAN is restricted in some countries and regions, and illegal
use may be punishable under national or local regulations. To avoid
violating WLAN regulations, visit the Canon website to check where
use is allowed.
Note that Canon cannot be held liable for any problems arising from
use in other countries and regions.
●Doing any of the following may incur legal penalties:
— Altering or modifying the product
— Removing the certication labels from the product
●According to foreign exchange and foreign trade law regulations,
export permission (or service transaction permission) from the
Japanese government is necessary to export strategic resources or
services (including this product) outside Japan.
●Because this product includes American encryption software, it falls
under U.S. Export Administration Regulations, and cannot be exported
to or brought into a country under U.S. trade embargo.
●Be sure to make notes of the wireless LAN settings you use.
The wireless LAN settings saved to this product may change or be
erased due to incorrect operation of the product, the effects of radio
waves or static electricity, or accident or malfunction. Be sure to make
notes of wireless LAN settings as a precaution. Please note that
Canon accepts no responsibility for direct or indirect damages or loss
of earnings resulting from a degradation or disappearance of content.
●When transferring this product to another person, disposing of it, or
sending it for repair, be sure to note the wireless LAN settings and
reset the product to its default settings (erase settings) if necessary.
●Canon will not make compensation for damages resulting from loss or
theft of the product.
Canon accepts no responsibility for damages or loss resulting from
unauthorized access or use of target devices registered on this
product due to loss or theft of the product.
●Be sure to use the product as directed in this guide.
Be sure to use the wireless LAN function of this product within the
guidelines noted in this guide. Canon accepts no responsibility for
damages or loss if the function and product are used in ways other
than as described in this guide.
●Do not use the wireless LAN function of this product near medical
equipment or other electronic equipment.
Use of the wireless LAN function near medical equipment or other
electronic equipment may affect operation of those devices.
Radio Wave Interference Precautions
●This product may receive interference from other devices that emit
radio waves. To avoid interference, be sure to use this product as far
away as possible from such devices, or avoid using the devices at the
same time as this product.
Security Precautions
Because Wi-Fi uses radio waves to transmit signals, security precautions
more stringent than when using a LAN cable are required.
Keep the following points in mind when using Wi-Fi.
●Only use networks you are authorized to use.
This product searches for Wi-Fi networks in the vicinity and displays
the results on the screen. Networks you are not authorized to use
(unknown networks) may also be displayed. However, attempting to
connect to or using such networks could be regarded as unauthorized
access. Be sure to use only networks you are authorized to use, and
do not attempt to connect to other unknown networks.

210
Camera Basics
Auto Mode /
Hybrid Auto Mode
Other Shooting Modes
P Mode
Tv, Av, M, and C Mode
Playback Mode
Wi-Fi Functions
Setting Menu
Accessories
Appendix
Before Use
Basic Guide
Advanced Guide
Index
Trademarks and Licensing
●Microsoft and Windows are trademarks or registered trademarks of
Microsoft Corporation in the United States and/or other countries.
●Macintosh and Mac OS are trademarks of Apple Inc., registered in the
U.S. and other countries.
●App Store, iPhone, and iPad are trademarks of Apple Inc.
●The SDXC logo is a trademark of SD-3C, LLC.
●HDMI, the HDMI logo and High-Denition Multimedia Interface are
trademarks or registered trademarks of HDMI Licensing, LLC.
●The iFrame logo and the iFrame symbol are trademarks of Apple Inc.
●Wi-Fi®, Wi-Fi Alliance®, WPA™, WPA2™ and Wi-Fi Protected Setup™
are trademarks or registered trademarks of the Wi-Fi Alliance.
●The N-Mark is a trademark or registered trademark of NFC Forum, Inc.
in the United States and in other countries.
●All other trademarks are the property of their respective owners.
●This device incorporates exFAT technology licensed from Microsoft.
●This product is licensed under AT&T patents for the MPEG-4 standard
and may be used for encoding MPEG-4 compliant video and/or
decoding MPEG-4 compliant video that was encoded only (1) for
a personal and non-commercial purpose or (2) by a video provider
licensed under the AT&T patents to provide MPEG-4 compliant
video. No license is granted or implied for any other use for MPEG-4
standard.
Disclaimer
●Unauthorized reproduction of this guide is prohibited.
●All measurements based on Canon testing standards.
●Information subject to change without notice, as are product
specications and appearance.
●Illustrations and screenshots in this guide may differ slightly from the
actual equipment.
●The above items notwithstanding, Canon cannot be held liable for any
loss arising from the use of this product.
If security settings have not been properly set, the following problems may
occur.
●Transmission monitoring
Third parties with malicious intent may monitor Wi-Fi transmissions
and attempt to acquire the data you are sending.
●Unauthorized network access
Third parties with malicious intent may gain unauthorized access to
the network you are using to steal, modify, or destroy information.
Additionally, you could fall victim to other types of unauthorized access
such as impersonation (where someone assumes an identity to gain
access to unauthorized information) or springboard attacks (where
someone gains unauthorized access to your network as a springboard
to cover their tracks when inltrating other systems).
To prevent these types of problems from occurring, be sure to thoroughly
secure your Wi-Fi network.
Only use this camera’s Wi-Fi function with a proper understanding of
Wi-Fi security, and balance risk and convenience when adjusting security
settings.
The camera can print to PictBridge-compatible printers
via Wi-Fi. PictBridge technical standards make it easy
to connect digital cameras, printers, and other devices
directly. Additionally, a new standard called DPS
over IP enables PictBridge connections in network
environments, and the camera is also compatible with
this standard.
![]()
Руководство пользователя камеры
●Перед началом работы с камерой обязательно ознакомьтесь с данным Руководством, включая раздел «Меры предосторожности» (= 14).
●Ознакомление с данным Руководством поможет научиться правильному обращению с камерой.
●Храните это Руководство в надежном месте, чтобы его можно было использовать в будущем.
●Для перехода на другие страницы нажимайте кнопки в правом нижнем углу.
 : следующая страница
 : предыдущая страница
 : страница до нажатия ссылки
●Для перехода в начало главы нажмите название главы справа.
РУССКИЙ
|
© CANON INC. 2015 |
CEL-SW2MA200 |
Перед использованием
Основные операции
Руководство по расширенным операциям
Основные сведения о камере
Автоматический/гибридный автоматический режим
Другие режимы съемки
Режим P
Режимы Tv, Av, M и C
Режим воспроизведения
Функции Wi-Fi
Меню настройки
Принадлежности
Приложение
Алфавитный указатель
1
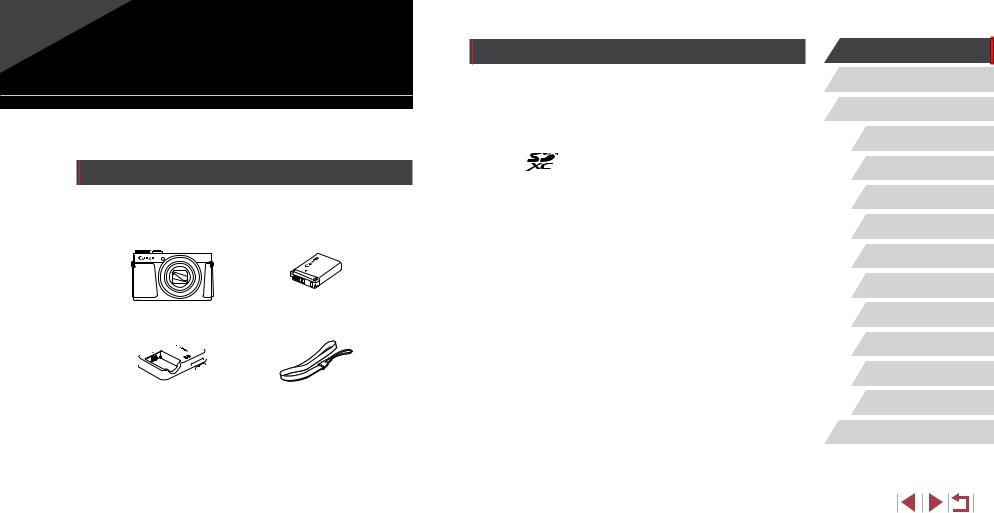
Перед использованием
Начальные сведения
Комплект поставки
Перед использованием проверьте наличие в комплекте поставки камеры перечисленных ниже комплектующих.
Если что-либо отсутствует, обращайтесь по месту приобретения камеры.
|
Камера |
Аккумулятор |
|
|
NB-13L* |
||
|
Зарядное устройство |
Ремень для запястья |
|
|
CB-2LH/CB-2LHE |
||
* Запрещается удалять с аккумулятора наклеенную на него оболочку.
●● В комплект поставки также входят печатные документы. ●● Карта памяти не входит в комплект поставки (=2).
Поддерживаемые карты памяти
Могут использоваться указанные ниже карты памяти (продаются отдельно), независимо от их емкости.
●● Карты памяти SD*1
●● Карты памяти SDHC*1*2
●● Карты памяти SDXC*1*2
*1 Карты, соответствующие стандартам SD. Однако работа с данной камерой проверена не для всех карт памяти.
*2 Также поддерживаются карты памяти UHS-I.
Перед использованием
Основные операции
Руководство по расширенным операциям
Основные сведения о камере
Автоматический/гибридный автоматический режим
Другие режимы съемки
Режим P
Режимы Tv, Av, M и C
Режим воспроизведения
Функции Wi-Fi
Меню настройки
Принадлежности
Приложение
Алфавитный указатель
2

Предварительные замечания и юридическая
информация
●● Сначала снимите и проверьте несколько тестовых снимков, чтобы убедиться
вправильности их записи. Обратите внимание на то, что компания Canon Inc., ее филиалы и дочерние компании, а также дистрибьюторы не несут никакой ответственности за любой ущерб, обусловленный какой-либо неисправностью камеры и ее принадлежностей (включая карты памяти), приводящей к сбою
взаписи изображения или к записи изображения не тем способом, на который рассчитан аппарат.
●● Законодательство некоторых стран допускает использование фотографий, а также защищенной авторскими правами музыки или изображений с музыкой, хранящихся на карте памяти, только для личных целей. Не производите несанкционированную съемку, нарушающую законы об охране авторских прав, и обратите внимание, что фотосъемка даже для личного использования, производимая на представлениях и выставках, а также в некоторых коммерческих ситуациях, может нарушать автор ские права или другие юридические права.
●● Условия гарантии на камеру и сведения о службе поддержки клиентов компании Canon приведены в гарантийной информации в комплекте руководств пользо вателя камеры.
●● Хотя экран изготавливается с использованием высокопрецизионных технологий и более 99,99% пикселов соответствуют техническим требованиям, в редких случаях отдельные пикселы могут иметь дефекты или отображаться в виде красных или черных точек. Это не свидетельствует о повреждении камеры и не влияет на запи сываемые изображения.
●● При длительном использовании камеры она может стать теплой. Это не является признаком неисправности.
|
Соглашения, принятые в данном Руководстве |
Перед использованием |
||
|
Основные операции |
|||
|
●● |
В данном Руководстве значки служат для обозначения кнопок и дисков камеры, |
||
|
на которые эти значки нанесены или на которые они похожи. |
|||
|
●● Значками обозначаются следующие кнопки и органы управления камеры. Цифры |
Руководство по расширенным операциям |
||
|
в скобках показывают номер соответствующего элемента управления в разделе |
|||
|
«Названия компонентов» (=4). |
Основные сведения о камере |
||
|
[ ] Кольцо управления (10) на передней панели |
|||
|
●● |
Режимы съемки, а также значки и текст, отображаемые на экране, указываются |
Автоматический/гибридный |
|
|
в скобках. |
автоматический режим |
|
●● : Важные сведения, которые следует знать |
|
|
●● : Примечания и советы для квалифицированного использования камеры |
|
|
●● |
: Обозначает операции с сенсорным экраном |
|
●● |
=xx: Страницы со связанной информацией (в этом примере символы «xx» |
|
означают номер страницы) |
●● Инструкции данного Руководства относятся к камере с настройками по умолчанию.
●● Для удобства все поддерживаемые карты памяти обозначаются просто как «карта памяти».
●● Символы « Фотографии» и «
 Видеофильмы» под заголовками указывают, как используется функция – для фотографий или видеофильмов.
Другие режимы съемки
Режим P
Режимы Tv, Av, M и C
Режим воспроизведения
Функции Wi-Fi
Меню настройки
Принадлежности
Приложение
Алфавитный указатель
3

Названия компонентов
|
(5) (6) (7) |
(9) (10) (12) (3) |
|
|
(8) |
(11) |
|
|
(4) |
(13)(14) |
(16) (17) |
|
(3) |
||
|
(2) |
(15) |
|
|
(1) |
|
(1) |
Объектив |
(9) |
Кнопка [ |
(Воспроизведение)] |
||
|
(2) |
Лампа |
(10) |
Кольцо управления |
|||
|
(3) |
Крепление ремня |
(11) |
Вспышка |
|||
|
(4) |
Рычаг зумирования |
(12) |
Кнопка [ |
(Подключение мобильного |
||
|
Съемка: [ |
(положение телефото)]/ |
устройства)] |
||||
|
[ |
(широкоугольное |
(13) |
Серийный номер (номер корпуса) |
|||
|
положение)] |
||||||
|
(14) |
(N-метка)*1 |
|||||
|
Воспроизведение: [ |
(увеличение)]/ |
|||||
|
[ |
(индекс)] |
(15) |
Штативное гнездо |
|||
|
(5) |
Диск установки режима |
(16) |
Крышка гнезда карты памяти/отсека |
|||
|
(6) |
Кнопка спуска затвора |
элементов питания |
||||
|
(7) |
Кнопка ON/OFF |
(17) |
Крышка переходника постоянного тока |
|||
(8)Динамик
|
Перед использованием |
|||||
|
Основные операции |
|||||
|
(1) |
(2) |
(3) |
(4) (5) |
(6) |
|
|
Руководство по расширенным операциям |
|||||
|
Основные сведения о камере |
|||||
|
Автоматический/гибридный |
|||||
|
(7) |
автоматический режим |
||||
|
(8) |
Другие режимы съемки |
||||
|
(9) |
Режим P |
||||
|
(10) |
|||||
|
Режимы Tv, Av, M и C |
|
Режим воспроизведения |
|||||||
|
(1) |
Переключатель [ (Подъем вспышки)] |
(6) |
Кнопка видеосъемки |
||||
|
(2) |
Экран*2 |
(7) |
Кнопка [ |
(Меню быстрой установки/ |
Функции Wi-Fi |
||
|
(3) |
Микрофон |
Установка)] |
|||||
|
Меню настройки |
|||||||
|
(4) |
Разъем DIGITAL |
(8) |
Кнопка [ |
] |
|||
|
(5) |
Разъем HDMI™ |
(9) |
Индикатор/лампа заряда по USB |
||||
|
Принадлежности |
|||||||
|
(10) |
Кнопка [ |
(Информация)] |
|||||
|
*1 |
Используется с функциями NFC (=132). |
Приложение |
|
|
*2 |
При установке защиты экрана эффективность распознавания жестов может ухудшиться. |
||
В таком случае увеличьте чувствительность сенсорного экрана (=164).
Алфавитный указатель
4

|
Содержание |
|
|
Перед использованием |
|
|
Начальные сведения……………………………………………………………………. |
2 |
|
Комплект поставки…………………………………………………………………………….. |
2 |
|
Поддерживаемые карты памяти…………………………………………………………. |
2 |
|
Предварительные замечания и юридическая информация…………………… |
3 |
|
Соглашения, принятые в данном Руководстве.……………………………………. |
3 |
|
Названия компонентов.……………………………………………………………………… |
4 |
|
Обычные операции с камерой.…………………………………………………………. |
12 |
|
Меры предосторожности………………………………………………………………….. |
14 |
|
Основные операции |
|
|
Основные операции…………………………………………………………………… |
17 |
|
Использование сенсорного экрана.………………………………………………….. |
17 |
|
Нажатие……………………………………………………………………………………………… |
17 |
|
Перетаскивание………………………………………………………………………………….. |
17 |
|
Начальная подготовка.…………………………………………………………………….. |
18 |
|
Закрепление ремня…………………………………………………………………………….. |
18 |
|
Как правильно держать камеру……………………………………………………………. |
18 |
|
Зарядка аккумулятора………………………………………………………………………… |
18 |
|
Установка аккумулятора и вашей карты памяти……………………………………. |
19 |
|
Извлечение аккумулятора и карты памяти……………………………………….. |
20 |
|
Установка даты и времени…………………………………………………………………… |
20 |
|
Изменение даты и времени…………………………………………………………….. |
21 |
|
Язык…………………………………………………………………………………………………… |
21 |
|
Опробование камеры……………………………………………………………………….. |
22 |
|
Съемка (Smart Auto)……………………………………………………………………………. |
22 |
|
Просмотр…………………………………………………………………………………………… |
23 |
|
Стирание изображений…………………………………………………………………… |
24 |
|
Руководство по расширенным операциям |
|
|
Основные сведения о камере……………………………………………………. |
25 |
|
Включение и выключение…………………………………………………………………. |
25 |
|
Функции экономии энергии (Автовыключение).……………………………………. |
26 |
|
Экономия энергии в режиме съемки……………………………………………….. |
26 |
|
Экономия энергии в режиме воспроизведения.……………………………….. |
26 |
|
Кнопка спуска затвора.……………………………………………………………………. |
26 |
|
Режимы съемки……………………………………………………………………………….. |
27 |
|
Варианты индикации при съемке………………………………………………………. |
27 |
|
Использование меню быстрой установки…………………………………………… |
28 |
|
Настройка параметров с помощью сенсорного экрана…………………………. |
28 |
|
Использование экрана меню.…………………………………………………………… |
29 |
|
Использование сенсорного экрана………………………………………………………. |
30 |
|
Экранная клавиатура……………………………………………………………………….. |
30 |
|
Индикатор……………………………………………………………………………………….. |
31 |
|
Часы.………………………………………………………………………………………………. |
32 |
|
Автоматический/гибридный автоматический режим……………….. |
33 |
|
Съемка с настройками, определенными камерой……………………………… |
33 |
|
Съемка (Smart Auto)……………………………………………………………………………. |
33 |
|
Съемка в гибридном автоматическом режиме……………………………………… |
35 |
|
Запуск воспроизведения видеоподборки…………………………………………. |
36 |
|
Фотографии/видеофильмы.……………………………………………………………. |
36 |
|
Фотографии…………………………………………………………………………………… |
36 |
|
Видеофильмы………………………………………………………………………………… |
36 |
|
Значки сюжетов………………………………………………………………………………….. |
37 |
|
Эпизоды, для которых производится серийная съемка…………………….. |
38 |
|
Значки стабилизации изображения……………………………………………………… |
38 |
|
Рамки на экране…………………………………………………………………………………. |
39 |
|
Часто используемые удобные функции……………………………………………… |
39 |
|
Дополнительное увеличение объектов (Цифровой зум).……………………….. |
39 |
Перед использованием
Основные операции
Руководство по расширенным операциям
Основные сведения о камере
Автоматический/гибридный автоматический режим
Другие режимы съемки
Режим P
Режимы Tv, Av, M и C
Режим воспроизведения
Функции Wi-Fi
Меню настройки
Принадлежности
Приложение
Алфавитный указатель
5

|
Съемка с заранее установленными фокусными расстояниями |
|
|
(Пошаговый зум).……………………………………………………………………………….. |
40 |
|
Использование таймера автоспуска…………………………………………………….. |
40 |
|
Использование таймера автоспуска для исключения |
|
|
сотрясения камеры………………………………………………………………………… |
41 |
|
Настройка таймера автоспуска……………………………………………………….. |
41 |
|
Съемка путем нажатия на экран (Съемка при касании).……………………….. |
42 |
|
Серийная съемка………………………………………………………………………………… |
42 |
|
Отображение изображений во время воспроизведения.…………………… |
43 |
|
Использование функции идентификации лица………………………………….. |
43 |
|
Личные сведения………………………………………………………………………………… |
43 |
|
Регистрация информации функции идентификации лица…………………….. |
44 |
|
Съемка………………………………………………………………………………………………. |
45 |
|
Проверка и редактирование зарегистрированной информации…………….. |
45 |
|
Перезапись и добавление информации о лице………………………………… |
46 |
|
Удаление зарегистрированной информации.…………………………………… |
47 |
|
Функции настройки изображения……………………………………………………… |
47 |
|
Изменение формата кадра.………………………………………………………………… |
47 |
|
Изменение качества изображения………………………………………………………. |
48 |
|
Коррекция зеленоватых оттенков областей изображения |
|
|
при освещении ртутными лампами………………………………………………………. |
48 |
|
Изменение качества видеоизображения………………………………………………. |
49 |
|
Для видеосистемы NTSC………………………………………………………………… |
49 |
|
Для видеосистемы PAL.………………………………………………………………….. |
49 |
|
Полезные функции съемки.……………………………………………………………… |
50 |
|
Использование электронного уровня.………………………………………………….. |
50 |
|
Увеличение области, на которую произведена фокусировка…………………. |
50 |
|
Проверка наличия закрытых глаз………………………………………………………… |
51 |
|
Отключение автоматического уровня…………………………………………………… |
51 |
|
Изменение настроек режима IS…………………………………………………………… |
52 |
|
Отключение стабилизации изображения…………………………………………. |
52 |
|
Съемка видеофильмов с объектами того же размера, |
|
|
с которым они отображаются до начала съемки…………………………………… |
52 |
|
Настройка работы камеры………………………………………………………………… |
53 |
|
Отключение подсветки для автофокусировки………………………………………. |
53 |
|
Предотвращение включения лампы уменьшения эффекта |
|
|
«красных глаз»……………………………………………………………………………………. |
53 |
|
Изменение стиля отображения изображения после съемки…………………… |
54 |
|
Изменение времени отображения изображения после съемки…………. |
54 |
|
Изменение экрана, отображаемого после съемки……………………………. |
54 |
|
Другие режимы съемки……………………………………………………………… |
55 |
|
Автоматическое применение эффектов (Творческий снимок)……………. |
55 |
|
Съемка нескольких разных изображений для каждого кадра………………… |
55 |
|
Выбор эффектов………………………………………………………………………………… |
56 |
|
Съемка видеофильмов с различными эффектами……………………………….. |
56 |
|
Воспроизведение творческого видеофильма…………………………………… |
56 |
|
Определенные сюжеты…………………………………………………………………….. |
57 |
|
Применение специальных эффектов………………………………………………… |
58 |
|
Съемка эпизодов с высокой контрастностью |
|
|
(Высокий динамический диапазон).…………………………………………………….. |
58 |
|
Добавление художественных эффектов.…………………………………………. |
59 |
|
Съемка с выцветшими цветами (Эффект старины)………………………………. |
59 |
|
Съемка с эффектом объектива «Рыбий глаз» (Эффект Рыбий глаз)………. |
59 |
|
Снимки, напоминающие миниатюрные модели (Эффект миниатюры)……. |
60 |
|
Скорость воспроизведения и приблизительное время |
|
|
воспроизведения (для клипов длительностью 1 мин)……………………….. |
60 |
|
Съемка с эффектом игрушечной камеры |
|
|
(Эффект игрушечной камеры)…………………………………………………………….. |
61 |
|
Выделение объектов (Размытие фона)…………………………………………………. |
61 |
|
Съемка с эффектом мягкого фокуса…………………………………………………… |
62 |
|
Съемка в монохромном режиме………………………………………………………….. |
62 |
|
Специальные режимы для других целей……………………………………………. |
63 |
|
Съемка звездного неба (Звезды)…………………………………………………………. |
63 |
|
Съемка людей на фоне звездного неба (Портрет на фоне звезд)……… |
63 |
|
Съемка ночных сцен под звездным небом (Звездное небо)……………… |
64 |
Перед использованием
Основные операции
Руководство по расширенным операциям
Основные сведения о камере
Автоматический/гибридный автоматический режим
Другие режимы съемки
Режим P
Режимы Tv, Av, M и C
Режим воспроизведения
Функции Wi-Fi
Меню настройки
Принадлежности
Приложение
Алфавитный указатель
6

|
Съемка следов перемещения звезд (Звездный след).……………………… |
65 |
|
|
Съемка видеофильмов движения звезд |
||
|
(Покадровая видеосъемка звезд).…………………………………………………… |
66 |
|
|
Настройка цветов.………………………………………………………………………….. |
68 |
|
|
Настройка фокусировки.………………………………………………………………… |
68 |
|
|
Съемка различных видеофильмов……………………………………………………. |
69 |
|
|
Съемка видеофильмов в режиме [ ]…………………………………………………. |
69 |
|
|
Фиксация или изменение яркости изображения перед съемкой.………. |
69 |
|
|
Отмена |
медленного автоматического затвора………………………………… |
70 |
|
Корректировка сильных сотрясений камеры.……………………………………….. |
70 |
|
|
Параметры звука………………………………………………………………………………… |
70 |
|
|
Отключение фильтра шумов…………………………………………………………… |
70 |
|
|
Использование аттенюатора…………………………………………………………… |
71 |
|
|
Съемка коротких клипов……………………………………………………………………… |
71 |
|
|
Эффекты воспроизведения…………………………………………………………….. |
71 |
|
|
Съемка видеофильмов iFrame.……………………………………………………………. |
72 |
|
|
Режим P……………………………………………………………………………………… |
73 |
|
|
Съемка в режиме программной автоэкспозиции (режим [P])……………… |
73 |
|
|
Яркость изображения (Экспозиция).…………………………………………………. |
74 |
|
|
Настройка яркости изображения (Компенсация экспозиции)………………… |
74 |
|
|
Фиксация яркости изображения/экспозиции (Фиксация AE).………………… |
74 |
|
|
Изменение способа экспозамера………………………………………………………… |
74 |
|
|
Связывание рамки точечного замера автоэкспозиции |
||
|
с рамкой автофокусировки.……………………………………………………………. |
75 |
|
|
Изменение числа ISO…………………………………………………………………………. |
75 |
|
|
Регулировка автоматической настройки ISO.…………………………………… |
76 |
|
|
Изменение уровня шумоподавления |
||
|
(Шумоподавление при высокой чувствительности ISO)…………………………. |
76 |
|
|
Автоматический брекетинг (съемка в режиме AEB)………………………………. |
76 |
|
|
Коррекция динамического диапазона (Корр.д.диап.)……………………….. |
77 |
|
|
Коррекция темных участков.…………………………………………………………… |
77 |
|
|
Настройка параметров автоматического фильтра |
||
|
нейтральной плотности……………………………………………………………………….. |
77 |
|
Цвета изображения………………………………………………………………………….. |
78 |
|
Съемка с естественными цветами (Баланс белого)……………………………….. |
78 |
|
Пользовательский баланс белого.…………………………………………………… |
78 |
|
Ручная коррекция баланса белого…………………………………………………… |
78 |
|
Изменение цветовых тонов изображения (Мои цвета)…………………………… |
79 |
|
Ручная настройка.………………………………………………………………………….. |
80 |
|
Диапазон съемки и фокусировка.…………………………………………………….. |
80 |
|
Съемка с близкого расстояния (Макро)……………………………………………….. |
80 |
|
Съемка в режиме ручной фокусировки………………………………………………… |
81 |
|
Простое определение области фокусировки |
|
|
(Выделение цветом MF)………………………………………………………………….. |
82 |
|
Фокусировочная вилка (режим «Фокус-BKT»)………………………………….. |
82 |
|
Цифровой телеконвертер……………………………………………………………………. |
83 |
|
Выбор способа автофокусировки.……………………………………………………….. |
83 |
|
AF по одной точке.…………………………………………………………………………. |
83 |
|
Перемещение рамок автофокусировки и изменение |
|
|
их размера (AF по одной точке)………………………………………………………. |
84 |
|
+Слежение…………………………………………………………………………………. |
84 |
|
Съемка в режиме следящей автофокусировки.……………………………………. |
85 |
|
Изменение настройки фокусировки…………………………………………………….. |
85 |
|
Выбор человека для фокусировки (Выбор лица)…………………………………… |
86 |
|
Выбор объектов для фокусировки (Тактильный АФ).…………………………….. |
86 |
|
Съемка с фиксацией автофокусировки.………………………………………………. |
87 |
|
Вспышка.………………………………………………………………………………………… |
87 |
|
Изменение режима вспышки.……………………………………………………………… |
87 |
|
Авто.……………………………………………………………………………………………… |
87 |
|
Вкл………………………………………………………………………………………………… |
87 |
|
Замедл. синхр……………………………………………………………………………….. |
88 |
|
Откл………………………………………………………………………………………………. |
88 |
|
Настройка компенсации экспозиции при съемке со вспышкой……………… |
88 |
|
Съемка с фиксатором FE.…………………………………………………………………… |
89 |
|
Изменение момента срабатывания вспышки………………………………………… |
89 |
Перед использованием
Основные операции
Руководство по расширенным операциям
Основные сведения о камере
Автоматический/гибридный автоматический режим
Другие режимы съемки
Режим P
Режимы Tv, Av, M и C
Режим воспроизведения
Функции Wi-Fi
Меню настройки
Принадлежности
Приложение
Алфавитный указатель
7

|
Прочие настройки.…………………………………………………………………………… |
90 |
|
Изменение качества изображения………………………………………………………. |
90 |
|
Запись в формате RAW.…………………………………………………………………. |
90 |
|
С помощью меню…………………………………………………………………………… |
91 |
|
Изменение настроек режима IS…………………………………………………………… |
91 |
|
Режимы Tv, Av, M и C………………………………………………………………….. |
92 |
|
Конкретные значения выдержки затвора (режим [Tv])………………………… |
92 |
|
Конкретные значения диафрагмы (режим [Av])………………………………….. |
93 |
|
Конкретные значения выдержки затвора и диафрагмы (режим [M]).…… |
93 |
|
Съемка с длительной выдержкой (Ручная выдержка)…………………………. |
94 |
|
Настройка мощности вспышки.………………………………………………………… |
95 |
|
Съемка видеофильмов с определенными значениями |
|
|
выдержки затвора и диафрагмы……………………………………………………….. |
95 |
|
Настройка органов управления и индикации……………………………………… |
96 |
|
Настройка параметров при переключения функций |
|
|
кольца управления……………………………………………………………………………… |
96 |
|
Изменение настроек кольца управления.…………………………………………….. |
97 |
|
Функции, которые можно назначить кольцу управления.………………….. |
97 |
|
Назначение функций кольцу управления…………………………………………. |
98 |
|
Настройка отображаемой информации.………………………………………………. |
98 |
|
Настройка отображаемой информации.………………………………………….. |
99 |
|
Назначение функций кнопке видеосъемки…………………………………………… |
99 |
|
Настройка меню быстрой установки………………………………………………… |
100 |
|
Выбор пунктов для включения в меню………………………………………………… |
100 |
|
Изменение порядка пунктов меню…………………………………………………. |
100 |
|
Сохранение параметров съемки……………………………………………………… |
101 |
|
Параметры, которые можно сохранить…………………………………………… |
101 |
|
Сохранение часто используемых пунктов меню съемки (Моё меню)………. |
101 |
|
Режим воспроизведения…………………………………………………………. |
103 |
|
Просмотр.……………………………………………………………………………………… |
103 |
|
Переключение режимов отображения………………………………………………… |
105 |
|
Предупреждение о передержке (для ярких участков изображения)……… |
105 |
|
Гистограмма.……………………………………………………………………………….. |
105 |
|
Гистограмма RGB, отображение информации GPS………………………… |
105 |
|
Просмотр коротких видеофильмов, снятых в режиме |
|
|
творческого снимка (творческие видеофильмы)…………………………………. |
106 |
|
Просмотр коротких видеофильмов, созданных при съемке |
|
|
фотографий (видеоподборка)……………………………………………………………. |
106 |
|
Просмотр по дате…………………………………………………………………………. |
106 |
|
Проверка людей, обнаруженных функцией идентификации лица………… |
107 |
|
Обзор и фильтрация изображений………………………………………………….. |
107 |
|
Переход между изображениями в индексе…………………………………………. |
107 |
|
Использование сенсорного экрана………………………………………………… |
108 |
|
Поиск изображений, удовлетворяющих определенным условиям………… |
108 |
|
Переход между изображениями с помощью кольца управления………….. |
109 |
|
Использование сенсорного экрана………………………………………………… |
110 |
|
Просмотр отдельных изображений из группы……………………………………… |
110 |
|
Редактирование информации функции идентификации лица…………… |
111 |
|
Изменение имен……………………………………………………………………………….. |
111 |
|
Удаление имен………………………………………………………………………………….. |
111 |
|
Варианты просмотра изображений………………………………………………….. |
112 |
|
Увеличение изображений………………………………………………………………….. |
112 |
|
Использование сенсорного экрана………………………………………………… |
112 |
|
Просмотр слайд-шоу…………………………………………………………………………. |
113 |
|
Защита изображений……………………………………………………………………… |
113 |
|
С помощью меню……………………………………………………………………………… |
113 |
|
Выбор изображений по одному………………………………………………………….. |
114 |
|
Выбор диапазона………………………………………………………………………………. |
114 |
|
Защита сразу всех изображений.………………………………………………………. |
115 |
|
Снятие защиты сразу со всех изображений……………………………………. |
115 |
|
Удаление изображений…………………………………………………………………… |
115 |
|
Удаление сразу нескольких изображений…………………………………………… |
116 |
|
Указание способа выбора……………………………………………………………… |
116 |
|
Выбор изображений по одному……………………………………………………… |
116 |
|
Выбор диапазона………………………………………………………………………….. |
117 |
|
Задание сразу всех изображений………………………………………………….. |
117 |
Перед использованием
Основные операции
Руководство по расширенным операциям
Основные сведения о камере
Автоматический/гибридный автоматический режим
Другие режимы съемки
Режим P
Режимы Tv, Av, M и C
Режим воспроизведения
Функции Wi-Fi
Меню настройки
Принадлежности
Приложение
Алфавитный указатель
8

|
Поворот изображений…………………………………………………………………….. |
117 |
|
С помощью меню……………………………………………………………………………… |
117 |
|
Отключение автоматического поворота.…………………………………………….. |
118 |
|
Пометка изображений как избранных……………………………………………… |
118 |
|
С помощью меню……………………………………………………………………………… |
118 |
|
Удобное управление: жесты сенсорного экрана……………………………….. |
119 |
|
Использование функций, назначенных жестам сенсорного экрана……… |
119 |
|
Изменение функций для жестов сенсорного экрана.………………………….. |
120 |
|
Назначаемые функции.………………………………………………………………… |
120 |
|
Редактирование фотографий………………………………………………………….. |
121 |
|
Изменение размера изображений……………………………………………………… |
121 |
|
С помощью меню……………………………………………………………………………… |
121 |
|
Кадрирование…………………………………………………………………………………… |
122 |
|
Изменение цветовых тонов изображения (Мои цвета)…………………………. |
123 |
|
Коррекция яркости изображения (i-Contrast).……………………………………… |
123 |
|
Коррекция «красных глаз»…………………………………………………………………. |
124 |
|
Редактирование видеофильмов………………………………………………………. |
125 |
|
Уменьшение размера файлов……………………………………………………………. |
126 |
|
Качество изображения сжатых видеозаписей.……………………………….. |
126 |
|
Удаление глав видеофильмов……………………………………………………………. |
126 |
|
Просмотр альбомов (Яркие моменты)……………………………………………… |
127 |
|
Выбор тем для альбомов.……………………………………………………………… |
127 |
|
Добавление в альбомы музыкального сопровождения………………………… |
128 |
|
Создание собственных альбомов………………………………………………………. |
129 |
|
Объединение коротких клипов………………………………………………………… |
130 |
|
Функции Wi-Fi…………………………………………………………………………… |
131 |
|
Доступные функции Wi-Fi……………………………………………………………….. |
131 |
|
Отправка изображений в смартфон………………………………………………… |
132 |
|
Отправка изображений в NFC-совместимый смартфон.……………………… |
132 |
|
Подключение с помощью NFC, когда камера выключена |
|
|
или находится в режиме съемки.…………………………………………………… |
132 |
|
Подключение с помощью NFC, когда камера находится |
|
|
в режиме воспроизведения…………………………………………………………… |
134 |
|
Передача на смартфон, назначенный кнопке…………………………………….. |
134 |
|
Добавление смартфона с помощью меню Wi-Fi………………………………….. |
136 |
|
Использование другой точки доступа…………………………………………………. |
137 |
|
Предыдущие точки доступа……………………………………………………………….. |
138 |
|
Сохранение изображений в компьютере………………………………………….. |
138 |
|
Подготовка к регистрации компьютера………………………………………………. |
138 |
|
Проверка компьютерной среды…………………………………………………….. |
138 |
|
Установка программного обеспечения…………………………………………… |
138 |
|
Настройка компьютера для подключения по Wi-Fi (только Windows).……. |
139 |
|
Сохранение изображений в подключенном компьютере……………………… |
140 |
|
Проверка совместимости точки доступа………………………………………… |
140 |
|
Использование WPS-совместимых точек доступа…………………………… |
140 |
|
Подключение к точкам доступа из списка.…………………………………….. |
142 |
|
Предыдущие точки доступа…………………………………………………………… |
143 |
|
Отправка изображений в зарегистрированную веб-службу………………. |
144 |
|
Регистрация веб-служб……………………………………………………………………… |
144 |
|
Регистрация портала CANON iMAGE GATEWAY.…………………………….. |
144 |
|
Регистрация других веб-служб………………………………………………………. |
146 |
|
Отправка изображений в веб-службы…………………………………………………. |
146 |
|
Беспроводная печать изображений на подключенном принтере……….. |
147 |
|
Отправка изображений в другую камеру.………………………………………… |
149 |
|
Варианты отправки изображений.…………………………………………………… |
150 |
|
Отправка нескольких изображений……………………………………………………. |
150 |
|
Выбор изображений по одному……………………………………………………… |
150 |
|
Выбор диапазона………………………………………………………………………….. |
150 |
|
Отправка избранных изображений.……………………………………………….. |
151 |
|
Примечания по отправке изображений.……………………………………………… |
151 |
|
Выбор разрешения (размер изображения)…………………………………………. |
152 |
|
Добавление комментариев………………………………………………………………… |
152 |
|
Автоматическая отправка изображений |
|
|
(Синхронизация изображений).………………………………………………………. |
152 |
|
Начальная подготовка……………………………………………………………………….. |
152 |
|
Подготовка камеры.……………………………………………………………………… |
152 |
|
Подготовка компьютера………………………………………………………………… |
153 |
Перед использованием
Основные операции
Руководство по расширенным операциям
Основные сведения о камере
Автоматический/гибридный автоматический режим
Другие режимы съемки
Режим P
Режимы Tv, Av, M и C
Режим воспроизведения
Функции Wi-Fi
Меню настройки
Принадлежности
Приложение
Алфавитный указатель
9

|
Отправка изображений……………………………………………………………………… |
154 |
|
Просмотр на смартфоне изображений, отправленных |
|
|
с помощью функции синхронизации изображений…………………………. |
154 |
|
Просмотр изображений из камеры и управление камерой |
|
|
с помощью смартфона…………………………………………………………………… |
155 |
|
Геопривязка изображений в камере…………………………………………………… |
155 |
|
Дистанционная съемка.…………………………………………………………………….. |
155 |
|
Изменение или удаление параметров Wi-Fi.……………………………………. |
156 |
|
Изменение информации о подключении.…………………………………………… |
156 |
|
Изменение имени устройства……………………………………………………….. |
157 |
|
Удаление информации о подключении………………………………………….. |
157 |
|
Изменение имени камеры…………………………………………………………….. |
157 |
|
Восстановление значений по умолчанию для параметров Wi-Fi…………… |
158 |
|
Меню настройки………………………………………………………………………. |
159 |
|
Настройка основных функций камеры…………………………………………….. |
159 |
|
Сохранение изображений на основе даты.…………………………………………. |
159 |
|
Нумерация файлов.………………………………………………………………………….. |
159 |
|
Форматирование карт памяти……………………………………………………………. |
160 |
|
Низкоуровневое форматирование…………………………………………………. |
160 |
|
Изменение видеосистемы.………………………………………………………………… |
160 |
|
Калибровка электронного уровня………………………………………………………. |
161 |
|
Сброс настроек электронного уровня…………………………………………….. |
161 |
|
Изменение цвета информации на экране…………………………………………… |
161 |
|
Использование эко-режима………………………………………………………………. |
161 |
|
Настройка экономии энергии…………………………………………………………….. |
162 |
|
Яркость экрана…………………………………………………………………………………. |
162 |
|
Мировое время…………………………………………………………………………………. |
162 |
|
Дата и время…………………………………………………………………………………….. |
163 |
|
Время закрытия объектива………………………………………………………………… |
163 |
|
Язык…………………………………………………………………………………………………. |
163 |
|
Отключение звуковых сигналов при работе камеры.…………………………… |
163 |
|
Регулировка громкости……………………………………………………………………… |
164 |
|
Настройка звуковых сигналов……………………………………………………………. |
164 |
|
Начальная заставка.…………………………………………………………………………. |
164 |
|
Скрытие подсказок.………………………………………………………………………….. |
164 |
|
Отображение в списке режимов съемки только значков……………………… |
164 |
|
Повышение чувствительности сенсорного экрана……………………………….. |
164 |
|
Автоматическая блокировка сенсорного экрана…………………………………. |
165 |
|
Метрические/неметрические единицы измерения………………………………. |
165 |
|
Проверка логотипов сертификации……………………………………………………. |
165 |
|
Задание записи в изображениях сведений об авторских правах………….. |
165 |
|
Удаление всех сведений об авторских правах………………………………… |
166 |
|
Настройка других параметров……………………………………………………………. |
166 |
|
Восстановление настроек камеры по умолчанию.………………………………. |
166 |
|
Принадлежности………………………………………………………………………. |
167 |
|
Состав системы……………………………………………………………………………… |
167 |
|
Дополнительно приобретаемые принадлежности.……………………………. |
168 |
|
Источники питания.…………………………………………………………………………… |
168 |
|
Вспышка…………………………………………………………………………………………… |
169 |
|
Прочие принадлежности……………………………………………………………………. |
169 |
|
Принтеры………………………………………………………………………………………….. |
169 |
|
Хранение фотографий и видеофильмов…………………………………………….. |
169 |
|
Использование дополнительно приобретаемых принадлежностей.…… |
170 |
|
Воспроизведение на экране телевизора…………………………………………….. |
170 |
|
Питание камеры от бытовой электросети……………………………………………. |
171 |
|
Установка и зарядка аккумулятора………………………………………………….. |
172 |
|
Зарядка аккумулятора с помощью компьютера……………………………… |
173 |
|
Использование программного обеспечения…………………………………….. |
173 |
|
Подключение к компьютеру с помощью кабеля………………………………….. |
174 |
|
Проверка компьютерной среды…………………………………………………….. |
174 |
|
Установка программного обеспечения…………………………………………… |
174 |
|
Сохранение изображений в компьютере…………………………………………….. |
174 |
Перед использованием
Основные операции
Руководство по расширенным операциям
Основные сведения о камере
Автоматический/гибридный автоматический режим
Другие режимы съемки
Режим P
Режимы Tv, Av, M и C
Режим воспроизведения
Функции Wi-Fi
Меню настройки
Принадлежности
Приложение
Алфавитный указатель
10
![]()
|
Печать изображений………………………………………………………………………. |
175 |
|
Простая печать.………………………………………………………………………………… |
175 |
|
Настройка параметров печати.………………………………………………………….. |
176 |
|
Обрезка изображений перед печатью……………………………………………. |
177 |
|
Выбор формата бумаги и компоновки перед печатью…………………….. |
177 |
|
Доступные варианты компоновки………………………………………………….. |
178 |
|
Печать фотографий для документов……………………………………………… |
178 |
|
Печать эпизодов из видеофильма……………………………………………………… |
178 |
|
Параметры печати видеофильмов…………………………………………………. |
178 |
|
Добавление изображений в список печати (DPOF)……………………………… |
179 |
|
Настройка параметров печати.……………………………………………………… |
179 |
|
Настройка печати отдельных изображений…………………………………….. |
179 |
|
Настройка печати диапазона изображений.…………………………………… |
180 |
|
Настройка печати всех изображений……………………………………………… |
180 |
|
Удаление всех изображений из списка печати……………………………….. |
180 |
|
Печать изображений, добавленных в список печати (DPOF)……………. |
180 |
|
Добавление изображений в фотокнигу.……………………………………………… |
181 |
|
Указание способа выбора……………………………………………………………… |
181 |
|
Добавление изображений по одному.……………………………………………. |
181 |
|
Добавление всех изображений в фотокнигу…………………………………… |
181 |
|
Удаление всех изображений из фотокниги…………………………………….. |
181 |
|
Приложение……………………………………………………………………………… |
182 |
|
Устранение неполадок……………………………………………………………………. |
182 |
|
Экранные сообщения…………………………………………………………………….. |
186 |
|
Информация на экране.…………………………………………………………………. |
188 |
|
Съемка (Отображение информации)………………………………………………….. |
188 |
|
Уровень заряда аккумулятора……………………………………………………….. |
188 |
|
Воспроизведение (Подробная информация)………………………………………. |
189 |
|
Сводка для панели управления видеофильмами……………………………. |
189 |
|
Таблицы функций и меню……………………………………………………………….. |
190 |
|
Функции, доступные в различных режимах съемки.……………………………. |
190 |
|
Меню быстрой установки…………………………………………………………………… |
192 |
|
Вкладка съемки………………………………………………………………………………… |
195 |
|
|
Вкладка [ |
1].…………………………………………………………………………….. |
195 |
|
Вкладка [ |
2].…………………………………………………………………………….. |
196 |
|
Вкладка [ |
3].…………………………………………………………………………….. |
197 |
|
Вкладка [ |
4].…………………………………………………………………………….. |
198 |
|
Вкладка [ |
5].…………………………………………………………………………….. |
199 |
|
Вкладка [ |
6].…………………………………………………………………………….. |
200 |
|
Вкладка [ |
7].…………………………………………………………………………….. |
201 |
|
Вкладка [ |
8].…………………………………………………………………………….. |
201 |
|
Вкладка «Настройка».……………………………………………………………………….. |
202 |
|
|
Вкладка «Моё меню»…………………………………………………………………………. |
202 |
|
|
Вкладка воспроизведения…………………………………………………………………. |
202 |
|
|
Правила обращения……………………………………………………………………….. |
203 |
|
|
Технические характеристики…………………………………………………………… |
204 |
|
|
Камера…………………………………………………………………………………………….. |
204 |
|
|
Количество снимков/время съемки, время воспроизведения.……………… |
205 |
|
|
Диапазон съемки………………………………………………………………………………. |
205 |
|
|
Количество снимков, которые можно записать на карту памяти…………… |
205 |
|
|
Время записи на карту памяти…………………………………………………………… |
206 |
|
|
Аккумулятор NB-13L…………………………………………………………………………. |
206 |
|
|
Зарядное устройство CB-2LH/CB-2LHE………………………………………………. |
206 |
|
|
Компактный сетевой адаптер CA-DC30/CA-DC30E………………………………. |
206 |
|
|
Алфавитный указатель.………………………………………………………………….. |
207 |
|
|
Меры предосторожности в отношении Wi-Fi (беспроводной сети)……… |
209 |
|
|
Меры предосторожности в отношении радиопомех.……………………………. |
209 |
|
|
Меры предосторожности в отношении безопасности…………………………… |
209 |
|
|
Торговые марки и лицензирование………………………………………………… |
210 |
|
|
Ограничение ответственности……………………………………………………….. |
210 |
Перед использованием
Основные операции
Руководство по расширенным операциям
Основные сведения о камере
Автоматический/гибридный автоматический режим
Другие режимы съемки
Режим P
Режимы Tv, Av, M и C
Режим воспроизведения
Функции Wi-Fi
Меню настройки
Принадлежности
Приложение
Алфавитный указатель
11
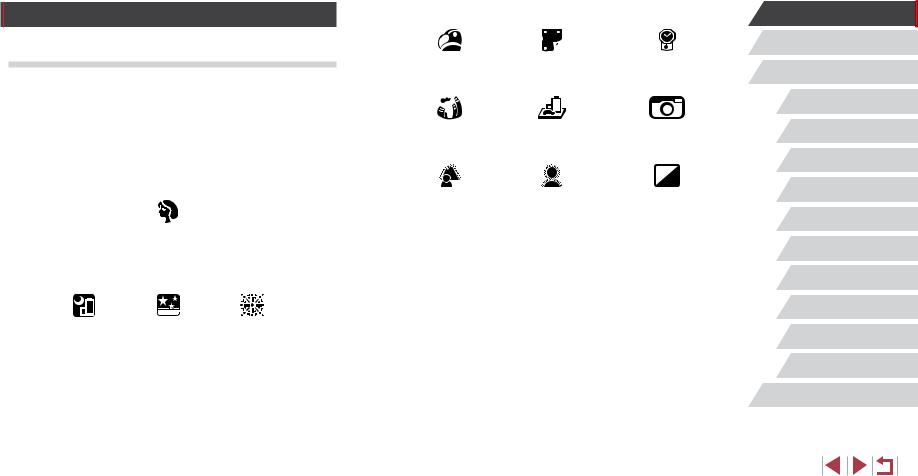
Обычные операции с камерой
 Съемка
●● Использование настроек, выбираемых камерой (автоматический режим, гибридный автоматический режим)
— =33, =35
●● Применение нескольких эффектов к каждому снимку с использованием параметров, определяемых камерой (режим творческого снимка)
— =55 Качественная съемка людей
Портреты (=57)
В соответствии с конкретными сюжетами
|
Ночные сюжеты |
Звездное небо |
Фейерверк |
|
(=57) |
(=63) |
(=57) |
|
Применение специальных эффектов |
|||
|
Яркие цвета |
Эффект плаката |
«Старые» фотографии |
|
|
(=58) |
(=58) |
(=59) |
|
|
Эффект «Рыбий глаз» |
Эффект миниатюры |
Эффект игрушечной камеры |
|
|
(=59) |
(=60) |
(=61) |
|
|
Размытие фона |
Мягкий фокус |
Монохромный |
|
|
(=61) |
(=62) |
(=62) |
|
|
●● |
Фокусировка на лица |
||
|
— =33, =57, =84 |
|||
|
●● Без использования вспышки (вспышка выключена) |
|||
|
— =33 |
|||
|
●● |
Включение себя в кадр (Автоспуск) |
||
|
— =40 |
|||
|
●● |
Сочетание видеоклипов и фотографий (Подборка видео) |
||
|
— =35 |
Перед использованием
Основные операции
Руководство по расширенным операциям
Основные сведения о камере
Автоматический/гибридный автоматический режим
Другие режимы съемки
Режим P
Режимы Tv, Av, M и C
Режим воспроизведения
Функции Wi-Fi
Меню настройки
Принадлежности
Приложение
Алфавитный указатель
12

 Просмотр
●● Просмотр изображений (режим воспроизведения) — =103
●● Автоматическое воспроизведение (Слайд-шоу) — =113
●● На экране телевизора — =170
●● На экране компьютера — =174
●● Быстрый обзор изображений — =107
●● Удаление изображений — =115
●● Автоматическое создание альбомов — =127
 Запись/просмотр видеофильмов
●● Запись видеофильмов — =33, =69, =95
●● Просмотр видеофильмов (режим воспроизведения) — =103
 Печать
●● Печать изображений — =175
 Сохранение
●● Сохранение изображений в компьютере — =174
 Использование функций Wi-Fi
●● Отправка изображений в смартфон — =132
●● Публикация изображений в Интернете — =144
●● Отправка изображений в компьютер — =152
Перед использованием
Основные операции
Руководство по расширенным операциям
Основные сведения о камере
Автоматический/гибридный автоматический режим
Другие режимы съемки
Режим P
Режимы Tv, Av, M и C
Режим воспроизведения
Функции Wi-Fi
Меню настройки
Принадлежности
Приложение
Алфавитный указатель
13

Меры предосторожности
●● Перед использованием изделия обязательно прочтите приведенные ниже правила техники безопасности. Строго следите за соблюдением правил надлежащего обращения с камерой.
●● Приведенные здесь меры предосторожности призваны предотвратить получение травм пользователем или другими лицами, а также повреждение имущества.
●● Также обязательно изучите руководства, входящие в комплект поставки всех используемых Вами дополнительных принадлежностей.
|
Предостережение |
Указывает на возможность серьезной |
|
травмы, вплоть до смертельного исхода. |
|
●● Запрещается применять вспышку в непосредственной близости от глаз людей. Воздействие света повышенной интенсивности, испускаемого вспышкой, может привести к ухудшению зрения. В частности, при съемке детей минимально допустимое расстояние до ребенка составляет 1 м.
●● Оборудование следует хранить в местах, недоступных для детей и подростков. Попадание ремня на шею ребенка может привести к удушению.
Если в изделии используется кабель питания, при случайном попадании на шею ребенка он может стать причиной удушения.
●● Используйте только рекомендованные источники питания.
●● Запрещается разбирать, модифицировать или нагревать изделие.
●● Запрещается снимать с аккумулятора клейкую оболочку (если она есть). ●● Не допускайте падения изделия или сильных ударов по нему.
●● Не дотрагивайтесь до внутренних деталей изделия, если оно повреждено, например в результате падения.
●● Если из изделия идет дым, ощущается посторонний запах или изделие работает неправильно, немедленно прекратите его использование.
●● Запрещается чистить изделие органическими растворителями, такими как спирт, бензин или разбавитель для краски.
●● Не допускайте контакта с жидкостями , а также попадания жидкости или посторонних предметов внутрь изделия.
Возможно поражение электрическим током или возгорание.
Если изделие намокло или внутрь него попала жидкость либо посторонние предметы, немедленно извлеките аккумулятор/элементы питания или отсоедините вилку питания.
●● Если ваша модель камеры оснащена видоискателем или сменным объективом, не смотрите через видоискатель или объектив на яркие источники света (например, на солнце в ясный день или на яркий искусственный источник света).
Это может привести к повреждению глаз.
●● Если ваша модель камеры оснащена сменным объективом, не оставляйте объектив (или камеру с установленным объективом) на солнце без установленной крышки объектива.
Это может привести к возгоранию.
●● Не дотрагивайтесь до изделия во время грозы, если оно подключено к сетевой розетке.
Возможно поражение электрическим током или возгорание. Немедленно прекратите пользоваться изделием и отойдите от него.
●● Пользуйтесь только рекомендованными аккумуляторами/элементами питания.
●● Не оставляйте аккумуляторы/элементы питания рядом с открытым огнем и не бросайте их в огонь.
В результате возможен взрыв или утечка электролита из аккумулятора или элементов питания и, как следствие, поражение электрическим током, пожар или травмирование. Если электролит, вытекший из аккумуляторов или элементов питания, попал в глаза, рот, на кожу или на одежду, немедленно смойте электролит водой.
●● Если с изделием используется зарядное устройство, соблюдайте следующие меры предосторожности.
— Регулярно отсоединяйте вилку кабеля питания и сухой тканью удаляйте пыль и загрязнения, скапливающиеся на вилке, внутренних поверхностях электри ческой розетки и на окружающих областях.
— Запрещается вставлять или извлекать вилку влажными руками.
— При использовании оборудования следите, чтобы его мощность не превышала номинальной нагрузочной способности электрической розетки или соедини тельных проводов. Не используйте оборудование, если вилка кабеля питания повреждена или неполностью вставлена в розетку.
— Не допускайте соприкосновения металлических предметов (например, булавок или ключей) с контактами или вилкой, а также накопления на них пыли.
— Если используемое изделие оснащается кабелем питания, не допускайте порезов или повреждений кабеля, не вносите изменений в его конструкцию и не ставьте на него тяжелые предметы.
Возможно поражение электрическим током или возгорание.
Перед использованием
Основные операции
Руководство по расширенным операциям
Основные сведения о камере
Автоматический/гибридный автоматический режим
Другие режимы съемки
Режим P
Режимы Tv, Av, M и C
Режим воспроизведения
Функции Wi-Fi
Меню настройки
Принадлежности
Приложение
Алфавитный указатель
14

●● Выключайте камеру в местах, в которых ее использование запрещено. Излучаемые камерой электромагнитные волны могут мешать работе электронных приборов или других устройств. Соблюдайте необходимую осторожность при исполь зовании изделия в местах, в которых ограничено использование электронных устройств, например в самолетах или в медицинских учреждениях.
●● Не допускайте длительного контакта камеры с кожей.
Даже если камера не кажется горячей, она может вызывать низкотемпературные ожоги, которые проявляются в виде покраснения кожи или волдырей. В местах с высокой температурой, а также если у вас замедленное кровообращение или чувствительная кожа, пользуйтесь штативом.
 Предупреждение Указывает на возможность травмы.
●● Перенося изделие за ремень, соблюдайте осторожность, чтобы не допускать ударов по изделию, не подвергать его чрезмерным механическим нагрузкам и тряске, а также не допускать зацепления ремня за другие предметы.
●● Будьте осторожны, чтобы не допускать ударов или сильного нажатия на объектив. Это может привести к травме или к поломке камеры.
●● Будьте осторожны, чтобы не допускать сильных ударов по экрану. Если экран треснет, осколки могут стать причиной травмы.
●● Следите, чтобы в процессе съемки не закрывать вспышку пальцами или одеждой. Это может привести к ожогам или повреждению вспышки.
●● Не используйте, не оставляйте и не храните изделие в следующих местах: — под прямыми солнечными лучами;
— при температуре выше 40 °C;
— во влажных или пыльных местах.
В противном случае возможна протечка, перегрев или взрыв аккумулятора или элемен тов питания, и, в результате, поражение электрическим током, возникновение пожара или причинение ожогов и других травм.
Перегрев и повреждения могут приводить к поражению электрическим током, возго ранию, ожогам или другим травмам.
●● При длительном просмотре эффекты перехода между кадрами слайд-шоу могут вызывать дискомфорт.
●● При использовании дополнительно приобретаемых конвертеров, фильтров для объективов или переходников фильтров (если применимо), обязательно следите за надежностью их крепления.
В случае падения принадлежности из-за плохого крепления она может разбиться, и можно порезаться об осколки стекла.
●● При использовании изделий, на которых вспышка поднимается и опускается автоматически, соблюдайте осторожность, чтобы опускающаяся вспышка не прищемила пальцы.
Это может привести к травме.
Предупреждение Указывает на возможность повреждения имущества.
●● Запрещается направлять камеру на яркие источники света, например на солнце
вясный день или мощный источник искусственного освещения.
Впротивном случае возможно повреждение датчика изображения или других внут ренних компонентов.
●● При использовании камеры на песчаном пляже или в ветреных местах не допускайте попадания внутрь камеры пыли или песка.
●● На изделиях, в которых вспышка поднимается и убирается автоматически, запре щается принудительно закрывать или открывать вспышку руками.
Это может привести к неполадкам в работе изделия.
●● Убирайте со вспышки всю пыль, грязь и другие посторонние вещества с помощью ватной палочки или ткани.
Под воздействием тепла от вспышки посторонние материалы могут начать дымиться или изделие может выйти из строя.
●● Если изделие не используется, извлеките из него аккумулятор или элементы питания и уберите их на хранение.
В случае протечки аккумулятора или элементов питания изделие может быть повреждено.
●● Перед тем как выбросить аккумулятор или элементы питания, закройте их клеммы лентой или другим изоляционным материалом.
Контакт с другими металлическими предметами может привести к возгоранию или взрыву.
Перед использованием
Основные операции
Руководство по расширенным операциям
Основные сведения о камере
Автоматический/гибридный автоматический режим
Другие режимы съемки
Режим P
Режимы Tv, Av, M и C
Режим воспроизведения
Функции Wi-Fi
Меню настройки
Принадлежности
Приложение
Алфавитный указатель
15

●● Когда зарядное устройство, прилагаемое к изделию, не используется, отсоединяйте его от сети. Во время использования запрещается закрывать изделие тканью или другими предметами.
Если устройство длительное время остается подключенным к электрической розетке, оно может перегреться и деформироваться, что, в свою очередь, может привести к возгоранию.
●● Не оставляйте специальные аккумуляторы рядом с домашними животными. Если животное укусит аккумулятор, возможна протечка, перегрев или взрыв аккуму лятора и, как следствие, пожар или повреждение изделия.
●● Если в изделии используется несколько элементов питания, не следует одновременно устанавливать элементы с разным уровнем заряда или старые и новые элементы. Не устанавливайте аккумуляторы/элементы питания в обратной полярности (клеммы + и –).
Это может привести к неполадкам в работе изделия.
●● Убирая камеру в сумку, следите, чтобы твердые предметы не касались экрана камеры. Кроме того, закройте экран (чтобы он был обращен к корпусу), если это допускается конструкцией изделия.
●● Не закрепляйте на изделии никакие твердые предметы.
В противном случае возможно возникновение неполадок или повреждение экрана.
Перед использованием
Основные операции
Руководство по расширенным операциям
Основные сведения о камере
Автоматический/гибридный автоматический режим
Другие режимы съемки
Режим P
Режимы Tv, Av, M и C
Режим воспроизведения
Функции Wi-Fi
Меню настройки
Принадлежности
Приложение
Алфавитный указатель
16

Основные операции
Основные операции
Основные сведения и инструкции, от первоначальной подготовки до съемки и воспроизведения
Использование сенсорного экрана
Сенсорный экран камеры обеспечивает интуитивно понятное управление путем нажатия на экран или постукивания по нему.
Нажатие
Кратковременно нажмите на экран пальцем.
zzЭтот жест используется для съемки, настройки функций камеры и т. п.
Перетаскивание
Прикоснитесь к экрану и проведите по нему пальцем.
zzЭтот жест используется в режиме воспроизве дения для перехода к следующему изображению, изменению отображаемой области увеличенного изображения и других операций.
Перед использованием
Основные операции
Руководство по расширенным операциям
Основные сведения о камере
Автоматический/гибридный автоматический режим
Другие режимы съемки
Режим P
Режимы Tv, Av, M и C
Режим воспроизведения
Функции Wi-Fi
Меню настройки
Принадлежности
Приложение
Алфавитный указатель
17
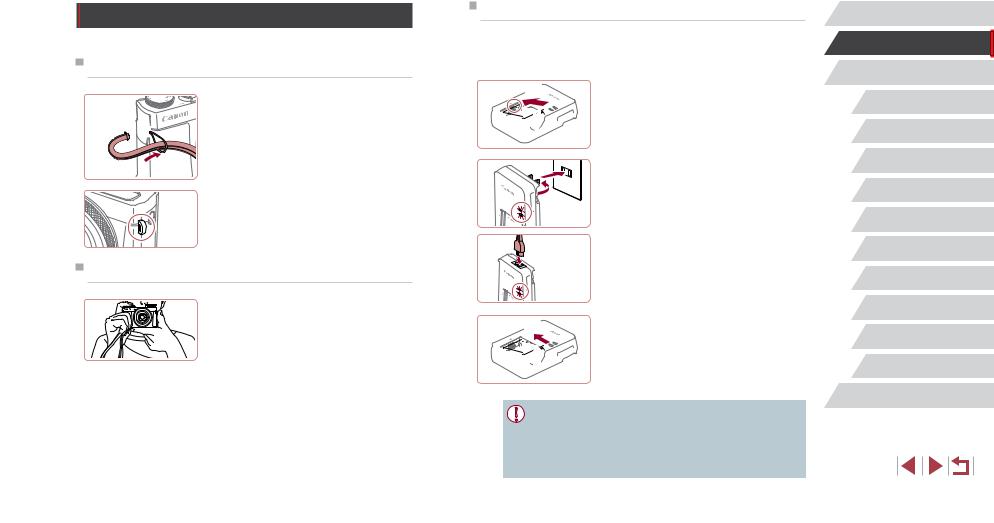
Начальная подготовка
Выполните указанную ниже подготовку к съемке.
Закрепление ремня
(1)

(2)
zzПроденьте конец ремня через крепление для ремня (1), затем протяните другой конец ремня через петлю на продетом конце (2).
zzРемень можно также закрепить на левой стороне камеры.
Как правильно держать камеру
zzНаденьте ремень на запястье.
zzВо время съемки прижмите локти к туловищу и надежно держите камеру, чтобы исключить ее перемещение. Если Вы подняли вспышку, не кладите на нее пальцы.
Зарядка аккумулятора
Перед использованием зарядите аккумулятор с помощью прилагаемого зарядного устройства. Обязательно сначала зарядите аккумулятор, так как камера продается с незаряженным аккумулятором.
(1) 
 (2)
(2) 
(2)
(1)
CB-2LH
CB-2LHE
1 Установите аккумулятор.
zzСовместив метки на аккумуляторе и зарядном устройстве, установите аккумулятор, нажав на него внутрь (1) и опустив (2).
2 Зарядите аккумулятор.
zzCB-2LH: откройте контакты вилки (1) и подклю чите зарядное устройство к электрической розетке (2).
zzCB-2LHE: подключите кабель питания к заряд ному устройству, затем подключите другой конец кабеля к электрической розетке.
zzИндикатор зарядки загорается оранжевым цветом, и начинается зарядка.
zzПосле завершения зарядки цвет индикатора изменяется на зеленый.
3 Извлеките аккумулятор.
zzОтсоединив зарядное устройство от сети, извлеките аккумулятор, нажав на него внутрь (1) и вверх (2).
●● Для защиты аккумулятора и поддержания его оптимального состояния длительность непрерывной зарядки не должна превышать 24 ч.
●● В случае зарядных устройств, в которых используется кабель питания, запре щается подключать зарядное устройство или кабель питания к посторонним предметам. Несоблюдение этого требования может привести к неполадкам или повреждению изделия.
Перед использованием
Основные операции
Руководство по расширенным операциям
Основные сведения о камере
Автоматический/гибридный автоматический режим
Другие режимы съемки
Режим P
Режимы Tv, Av, M и C
Режим воспроизведения
Функции Wi-Fi
Меню настройки
Принадлежности
Приложение
Алфавитный указатель
18
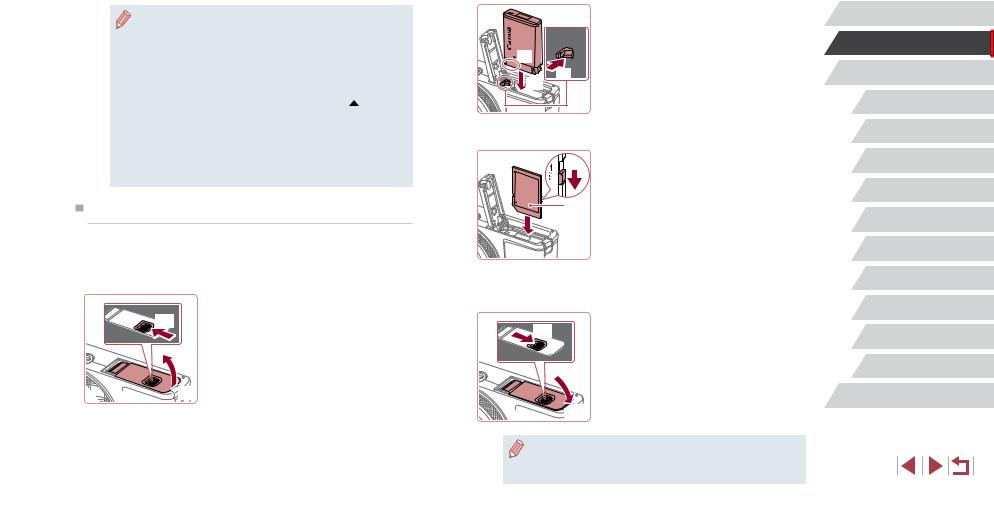
|
●● Подробные сведения о времени зарядки, а также о количестве кадров |
2 Установите аккумулятор. |
||
|
zzДержа аккумулятор клеммами в показанном |
|||
|
и времени съемки с полностью заряженным аккумулятором см. в разделе |
|||
|
положении (1), сдвиньте фиксатор аккумуля |
|||
|
«Количество снимков/время съемки, время воспроизведения» (= 205). |
|||
|
(1) |
тора в направлении (2) и вставьте аккумулятор |
||
|
●● Заряженные аккумуляторы постепенно разряжаются, даже если они не |
|||
|
в направлении (3), пока фиксатор не закроется |
|||
|
используются. Заряжайте аккумулятор в день использования (или непос |
(2) |
со щелчком. |
|
|
редственно накануне). |
(3) |
||
|
zzАккумулятор, вставленный в неправильной ориен |
|||
|
●● Для визуальной индикации состояния аккумулятора устанавливайте крышку |
|||
|
тации, не фиксируется в правильном положении. |
|||
|
таким образом, чтобы у заряженного аккумулятора символ |
был виден, |
||
|
При установке аккумулятора обязательно прове |
|||
|
а у разряженного – не виден. |
|||
|
ряйте правильность его ориентации и надежность |
|||
|
●● Зарядное устройство можно использовать в местах с напряжением сети |
|||
|
фиксации. |
|||
|
переменного тока 100 – 240 В (50/60 Гц). Для электрических розеток другой |
|||
|
3 Проверьте переключатель защиты от записи |
|||
|
формы используйте имеющиеся в продаже переходники для вилки. Запре |
(1) |
||
|
щается пользоваться электрическими трансформаторами, предназначен |
|||
|
на карте и установите карту памяти. |
|||
|
ными для путешествий, так как они могут повредить аккумулятор. |
|||
|
zzЗапись на карты памяти с переключателем |
|||
|
(2) |
защиты от записи невозможна, если переклю |
||
|
Установка аккумулятора и вашей карты памяти |
чатель находится в положении блокировки. |
||
|
Переместите переключатель в направлении (1). |
|||
|
Установите прилагаемый аккумулятор и карту памяти (продается отдельно). |
zzУстановите карту памяти этикеткой (2) в пока |
||
|
занной ориентации до фиксации со щелчком. |
|||
|
Обратите внимание, что перед использованием новой карты памяти или карты памяти, |
|||
|
zzПри установке карты памяти проверьте правиль |
|||
|
отформатированной в другом устройстве, необходимо отформатировать эту карту |
|||
|
ность ее ориентации. Установка карт памяти |
|||
|
памяти в данной камере (=160). |
|||
|
1 Откройте крышку. |
в неправильной ориентации может привести |
||
|
к повреждению камеры. |
|||
|
4 Закройте крышку. |
|||
|
(1) |
zzСдвиньте переключатель (1) и откройте |
(2) |
|
|
крышку (2). |
zzОпустите крышку (1) и, прижимая крышку вниз, |
||
сдвиньте переключатель до фиксации в закрытом
положении (2).


 (2)
(2)
 (1)
(1)
●● Сведения о количестве кадров, которые можно записать на карту памяти, или о времени видеозаписи на карту памяти см. в разделе «Количество снимков, которые можно записать на карту памяти» (= 205).
Перед использованием
Основные операции
Руководство по расширенным операциям
Основные сведения о камере
Автоматический/гибридный автоматический режим
Другие режимы съемки
Режим P
Режимы Tv, Av, M и C
Режим воспроизведения
Функции Wi-Fi
Меню настройки
Принадлежности
Приложение
Алфавитный указатель
19
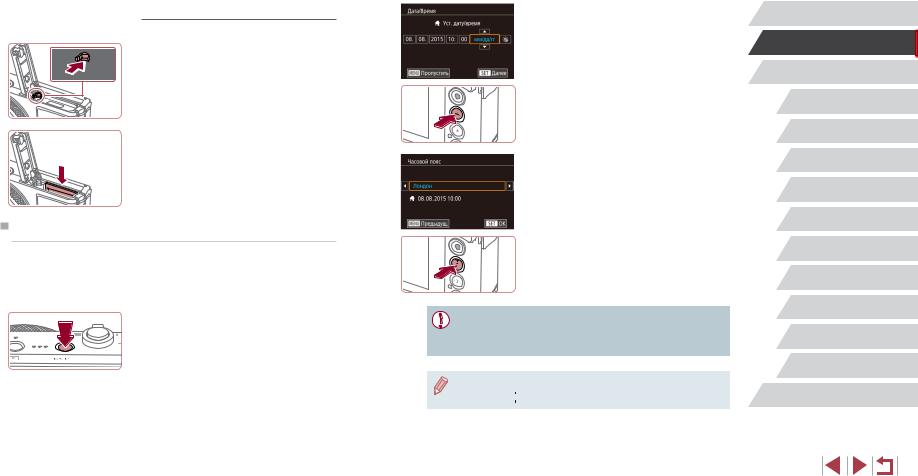
Извлечение аккумулятора и карты памяти
Извлеките аккумулятор.
zzОткройте крышку и нажмите фиксатор акку мулятора в направлении стрелки.
zzАккумулятор выдвинется вверх.
Извлеките карту памяти.
zzНажмите на карту памяти до щелчка, затем медленно отпустите ее.
zzКарта памяти выдвинется вверх.
Установка даты и времени
Если при включении камеры отображается экран [Дата/Время], установите правильные дату и время, как указано ниже. Заданная таким образом информация записывается
всвойства снимаемых изображений и используется для управления изображениями
всоответствии с датой их съемки, а также для печати изображений с указанием даты.
1 Включите камеру. zzНажмите кнопку ON/OFF.
zzОтображается экран [Дата/Время].
2 Установите дату и время.
zzНажмите параметр, который требуется задать, затем установите дату и время, нажимая [ ][
][ ].
].
zzПосле завершения нажмите кнопку [ ].
].
3 Укажите свой местный (домашний) часовой пояс.
zzВыберите свой местный (домашний) часовой пояс, нажимая [ ][
][ ].
].
4 Завершите процесс настройки.
zzПосле завершения нажмите кнопку [ ]. После подтверждающего сообщения экран настройки больше не отображается.
zzЧтобы выключить камеру, нажмите кнопку ON/OFF.
●● Если дата, время и домашний часовой пояс не установлены, экран [Дата/Время] будет отображаться при каждом включении камеры. Укажите правильную информацию.
●● Для установки летнего времени (перевода часов на 1 час вперед) нажмите [

 ] и выберите [
 ] на шаге 2.
Перед использованием
Основные операции
Руководство по расширенным операциям
Основные сведения о камере
Автоматический/гибридный автоматический режим
Другие режимы съемки
Режим P
Режимы Tv, Av, M и C
Режим воспроизведения
Функции Wi-Fi
Меню настройки
Принадлежности
Приложение
Алфавитный указатель
20
![]()
Изменение даты и времени
Дата и время настраиваются следующим образом.
1 Откройте экран настройки. zzНажмите кнопку [ ].
].
2 Выберите пункт [Дата/Время]. zzНажмите [ ], затем нажмите [2].
zzНажмите пункт [Дата/Время], затем нажмите кнопку [ ].
].
3 Измените дату и время.
zzВыполните настройку в соответствии с инструк циями шага 2 раздела «Установка даты и времени» (=20).
zzДля закрытия экрана меню нажмите кнопку [ ].
].
●● После извлечения аккумулятора настройки даты и времени сохраняются в течение приблизительно 3 недель за счет встроенного в камеру аккуму лятора календаря (аккумулятор резервного питания).
●● Аккумулятор календаря заряжается приблизительно за 4 ч после установки заряженного аккумулятора или подключения камеры к адаптеру переменного тока (продается отдельно, =168), даже если камера оставлена выключенной.
●● Если аккумулятор календаря разряжен, при включении камеры отображается экран [Дата/Время]. Установите правильную дату и время, как описано в разделе «Установка даты и времени» (= 20).
Язык
Установите требуемый язык отображаемого интерфейса.
1 Перейдите в режим воспроизведения. zzНажмите кнопку [ ].
].
2 Откройте экран настройки.
zzНажмите кнопку [ ] и, не отпуская ее, сразу же нажмите кнопку [
 ].
].
3 Установите язык.
zzВыберите язык, нажав его на экране, затем нажмите кнопку [ ].
].
zzПосле задания языка экран настройки больше не отображается.
●● Если на шаге 2 промежуток между нажатием кнопки [ ] и кнопки [
 ] был слишком большим, отображается текущее время. В таком случае нажмите кнопку [
 ], чтобы убрать индикацию времени, и повторите шаг 2.
●● Язык для отображения текста на экране можно также изменить, нажав кнопку [ ] и выбрав пункт [Язык
  ] на вкладке [
 3].
3].
●● Язык для отображения текста на экране можно также изменить, нажав язык на экране из шага 3, затем нажав его еще раз.
Перед использованием
Основные операции
Руководство по расширенным операциям
Основные сведения о камере
Автоматический/гибридный автоматический режим
Другие режимы съемки
Режим P
Режимы Tv, Av, M и C
Режим воспроизведения
Функции Wi-Fi
Меню настройки
Принадлежности
Приложение
Алфавитный указатель
21
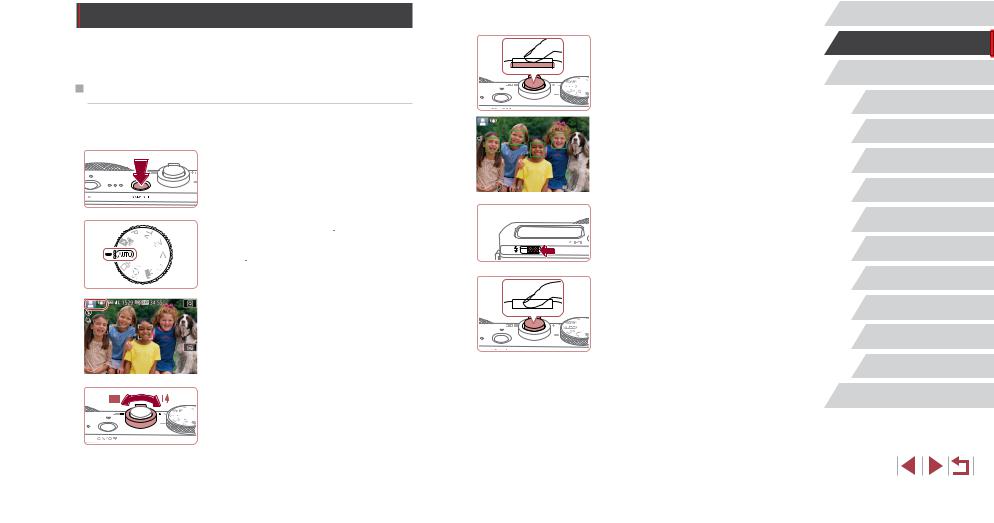
Опробование камеры
 Фотографии
  Видеофильмы
Следуйте этим инструкциям для включения камеры, съемки фотографий или виде фильмов и последующего их просмотра.
Съемка (Smart Auto)
Для полностью автоматического выбора оптимальных настроек для определенных сюжетов просто позвольте камере определять объект и условия съемки.
1 Включите камеру.
zzНажмите кнопку ON/OFF. zzОтображается начальный экран.
2 Перейдите в режим [
 ].
].
zzПоверните диск установки режима в положение [
 ].
].
zzНаведите камеру на объект. При определении сюжета камера издает слабые щелкающие звуки.
zzВ левом верхнем углу экрана отображаются значки, обозначающие сюжет и режим стаби лизации изображения.
zzРамки, отображаемые вокруг любых опреде ленных объектов, указывают, что эти объекты находятся в фокусе.
3 Выберите композицию кадра.
zzДля увеличения объекта переместите рычаг зумирования в направлении символа [ ] (положение телефото), а для уменьшения объекта переместите этот рычаг в направлении символа [
 ] (широкоугольное положение).
4 Произведите съемку. Съемка фотографий
1)Сфокусируйтесь.
zzСлегка (наполовину) нажмите кнопку спуска затвора. После завершения фокусировки камера подает два звуковых сигнала и отображаются рамки, указывающие области изображения, находящиеся в фокусе.
zzЕсли отображается сообщение [Поднимите вспышку], поднимите вспышку с помощью переключателя [ ]. При съемке сработает вспышка. Если требуется отключить вспышку, пальцем опустите ее вниз в камеру.
2)Произведите съемку.
zzПолностью нажмите кнопку спуска затвора.
zzВо время съемки слышен звук срабатывания затвора; если вспышка была поднята, то при недостаточной освещенности она автомати чески срабатывает.
zzДержите камеру неподвижно, пока не закон чится звук срабатывания затвора.
zzПосле отображения снятого кадра камера возвращается на экран съемки.
Перед использованием
Основные операции
Руководство по расширенным операциям
Основные сведения о камере
Автоматический/гибридный автоматический режим
Другие режимы съемки
Режим P
Режимы Tv, Av, M и C
Режим воспроизведения
Функции Wi-Fi
Меню настройки
Принадлежности
Приложение
Алфавитный указатель
22

Съемка видеофильмов
|
1) |
Запустите съемку. |
|
zzНажмите кнопку видеосъемки. В начале съемки |
|
|
камера подает один звуковой сигнал и отобра |
|
|
(1) |
жается индикатор [ ЗАП] с указанием прошед |
|
шего времени съемки (1). |
|
|
zzВверху и внизу экрана отображаются черные |
|
|
полосы, и объект немного увеличивается. Черные |
|
|
полосы обозначают области изображения, которые |
|
|
не записываются. |
|
|
zzРамки, отображаемые вокруг любых опреде |
|
|
ленных лиц, указывают, что эти лица находятся |
|
|
в фокусе. |
|
|
zzПосле начала съемки отпустите кнопку |
|
|
видеосъемки. |
2) Завершите съемку.
zzДля остановки съемки снова нажмите кнопку видеосъемки. При остановке съемки камера подает два звуковых сигнала.
Просмотр
После съемки фотографий или видеофильмов их можно просмотреть на экране в соответствии с приведенными ниже инструкциями.
1 Перейдите в режим воспроизведения.
zzНажмите кнопку [ ]. zzОтображается последний снимок.
2 Выберите изображения.
zzДля просмотра следующего снимка проведите пальцем по экрану справа налево, для просмотре предыдущего снимка проведите пальцем слева направо.
zzДля перехода на этот экран (режим прокрутки экрана) быстро несколько раз проведите пальцем по экрану влево или вправо. В этом режиме для перехода между снимками проводите пальцем по экрану.
zzПри нажатии кнопки [ ] восстанавливается режим отображения одного изображения.
zzВидеофильмы обозначаются значком [ ]. Для воспроизведения видеофильмов перехо дите к шагу 3.
Перед использованием
Основные операции
Руководство по расширенным операциям
Основные сведения о камере
Автоматический/гибридный автоматический режим
Другие режимы съемки
Режим P
Режимы Tv, Av, M и C
Режим воспроизведения
Функции Wi-Fi
Меню настройки
Принадлежности
Приложение
Алфавитный указатель
23

3 Запустите воспроизведение видеофильмов.
zzНажмите кнопку [ ], выберите значок [
 ], затем нажмите кнопку [
 ].
].
zzНачинается воспроизведение, и после заверше ния видеофильма отображается значок [ ].
].
zzДля регулировки громкости во время воспроиз ведения быстро проведите пальцем по экрану вверх или вниз.
●● Для переключения из режима воспроизведения в режим съемки наполовину нажмите кнопку спуска затвора.
●● Воспроизведение видеофильма можно также запустить, нажав [ ].
].
Стирание изображений
Ненужные изображения можно выбирать и удалять по одному. Будьте осторожны при удалении изображений, так как их невозможно восстановить.
1 Выберите изображение для удаления.
zzПроводя пальцем влево или вправо по экрану, выберите изображение.
2 Удалите изображение.
zzНажмите кнопку [ ], выберите значок [
 ], затем нажмите кнопку [
 ].
].
zzПосле появления запроса [Стереть?] нажмите [Стереть].
zzТекущее изображение удаляется. zzДля отмены удаления нажмите [Отмена].
●● Изображения можно также удалять с помощью жестов сенсорного экрана (=119).
●● Можно выбрать несколько изображений и удалить их за одну операцию (=116).
Перед использованием
Основные операции
Руководство по расширенным операциям
Основные сведения о камере
Автоматический/гибридный автоматический режим
Другие режимы съемки
Режим P
Режимы Tv, Av, M и C
Режим воспроизведения
Функции Wi-Fi
Меню настройки
Принадлежности
Приложение
Алфавитный указатель
24
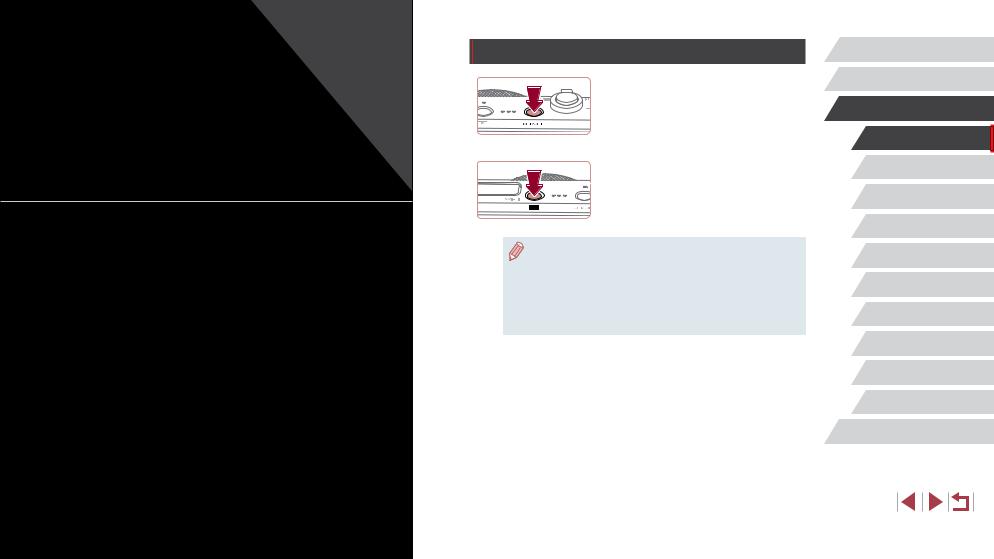
Руководство по расширенным операциям
Основные сведения о камере
Прочие основные операции и дополнительные функции камеры, включая варианты съемки и воспроизведения
Включение и выключение
Режим съемки
zzНажмите кнопку ON/OFF, чтобы включить камеру и подготовить ее к съемке.
zzЧтобы выключить камеру, еще раз нажмите кнопку ON/OFF.
Режим воспроизведения
zzДля включения камеры и просмотра снимков нажмите кнопку [ ].
].
zzЧтобы выключить камеру, еще раз нажмите кнопку [ ].
].
●● Для переключения в режим воспроизведения из режима съемки нажмите кнопку [ ].
].
●● Для переключения из режима воспроизведения в режим съемки наполовину нажмите кнопку спуска затвора (=26).
●● Объектив закрывается приблизительно через 1 мин после переключения камеры в режим воспроизведения. Камеру можно выключить при закрытом объективе, нажав кнопку [ ].
].
Перед использованием
Основные операции
Руководство по расширенным операциям
Основные сведения о камере
Автоматический/гибридный автоматический режим
Другие режимы съемки
Режим P
Режимы Tv, Av, M и C
Режим воспроизведения
Функции Wi-Fi
Меню настройки
Принадлежности
Приложение
Алфавитный указатель
25
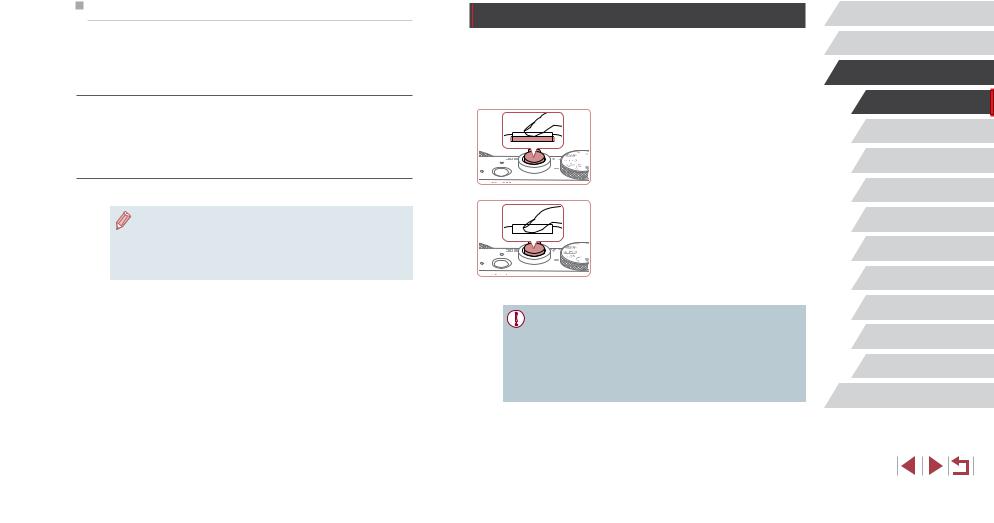
Функции экономии энергии (Автовыключение)
Для экономии энергии аккумуляторов/элементов питания после определенного периода бездействия камера автоматически выключает экран (Дисплей Выкл.), а затем выключается.
Экономия энергии в режиме съемки
Экран автоматически выключается приблизительно через 1 мин простоя. Приблизи тельно через 2 мин закрывается объектив, и камера выключается. Чтобы включить экран и подготовиться к съемке, когда экран выключен, но объектив еще не закрыт, нажмите наполовину кнопку спуска затвора (=26).
Экономия энергии в режиме воспроизведения
Камера автоматически выключается приблизительно через 5 мин простоя.
●● Если требуется, можно отключить функцию автовыключения и настроить время выключения дисплея (=162).
●● Функция экономии энергии не работает, когда камера подключена к другим устройствам по соединению Wi-Fi (=131) или подключена к компьютеру (=174).
Кнопка спуска затвора
Для обеспечения резкости снимков обязательно сначала нажмите кнопку спуска затвора наполовину, а затем, когда объект окажется в фокусе, полностью нажмите кнопку спуска затвора для съемки.
В данном руководстве операции с кнопкой спуска затвора описываются как нажатие кнопки наполовину и полное нажатие кнопки.
1 Нажмите наполовину. (Слегка нажмите для фокусировки.)
zzНажмите наполовину кнопку спуска затвора. Камера подает два звуковых сигнала, и вокруг областей изображения, находящихся в фокусе, отображаются рамки.
2 Полностью нажмите. (Из наполовину нажатого положения полностью нажмите
кнопку, чтобы произвести съемку.)
zzКамера производит съемку, и воспроизводится
звук срабатывания затвора.
zzДержите камеру неподвижно, пока не закончится звук срабатывания затвора.
●● Если при съемке кнопка спуска затвора не была предварительно нажата наполовину, снимки могут получаться нерезкими.
●● Длительность воспроизведения звука срабатывания затвора зависит от времени, необходимого для съемки. Для съемки определенных сюжетов может потребоваться больше времени, и в случае перемещения камеры (или снимаемого объекта) до завершения звука срабатывания затвора изображения могут быть смазаны.
Перед использованием
Основные операции
Руководство по расширенным операциям
Основные сведения о камере
Автоматический/гибридный автоматический режим
Другие режимы съемки
Режим P
Режимы Tv, Av, M и C
Режим воспроизведения
Функции Wi-Fi
Меню настройки
Принадлежности
Приложение
Алфавитный указатель
26
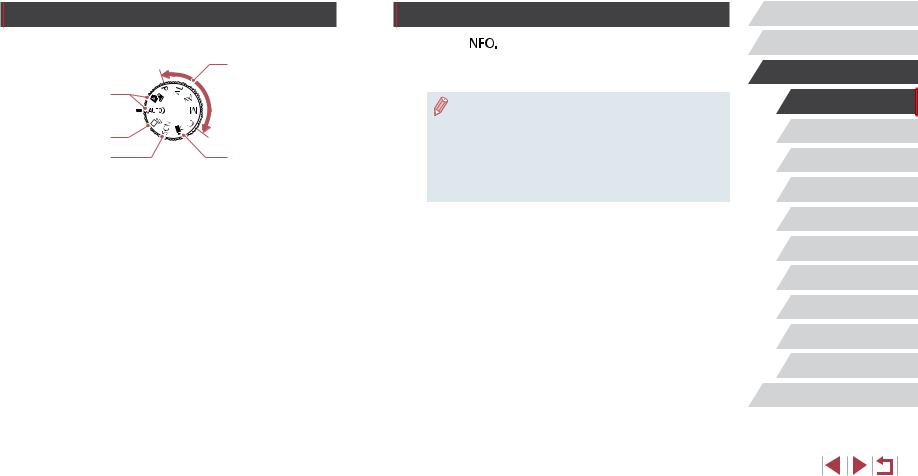
Режимы съемки
Диск установки режима служит для доступа к каждому из режимов съемки.
(1)Автоматический/гибридный автомати ческий режим Полностью автоматическая съемка
с настройками, определенными камерой (=22, =33, =35).
(2)Режим творческого снимка
Автоматическое применение нескольких эффектов к каждому снимку (=55).
(3)Режим специального сюжета Съемка с настройками, предназначен
ными для каждого конкретного сюжета,
или добавление различных эффектов (=57).
(4)Режим видеосъемки
Для съемки видеофильмов (=69, =95).
Видеофильмы можно также снимать, когда диск установки режима не нахо дится в положении режима видеосъемки, просто нажимая кнопку видеосъемки.
(5)Режимы P, Tv, Av, M и C
Различные виды съемки с использо ванием требуемых настроек (=73, =92).
Варианты индикации при съемке
|
Нажимая кнопку [ |
], можно отображать или скрывать линии сетки и электронный |
уровень.
Для более подробной настройки экранной индикации откройте вкладку [ 1] ► [Отображение информации о съемке] (=98).
●● При съемке в условиях недостаточной освещенности яркость экрана авто матически увеличивается функцией ночного отображения, упрощая проверку композиции кадра. Однако яркость изображения на экране может не соот ветствовать яркости снимков. Обратите внимание, что любые искажения изображения на экране или прерывистое движение объекта на экране не влияют на записываемое изображение.
●● Варианты индикации при воспроизведении см. в разделе «Переключение режимов отображения» (= 105).
Перед использованием
Основные операции
Руководство по расширенным операциям
Основные сведения о камере
Автоматический/гибридный автоматический режим
Другие режимы съемки
Режим P
Режимы Tv, Av, M и C
Режим воспроизведения
Функции Wi-Fi
Меню настройки
Принадлежности
Приложение
Алфавитный указатель
27
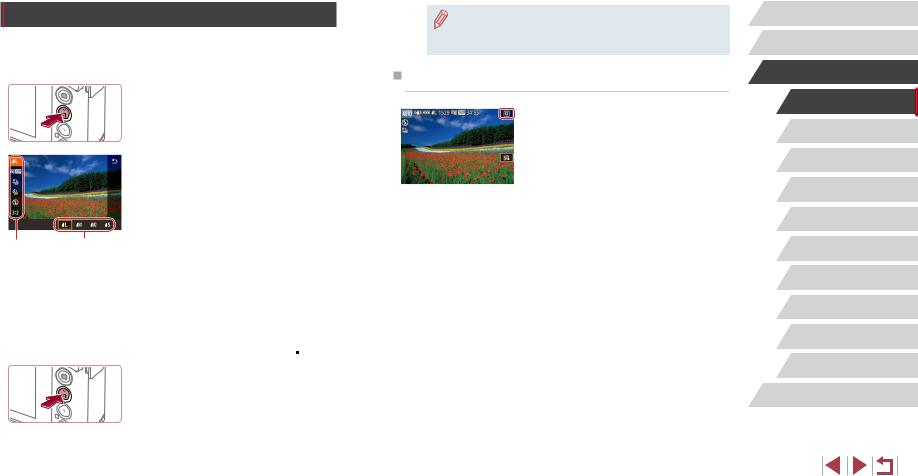
Использование меню быстрой установки
Часто используемые функции можно настроить в меню  (Быстрая установка). Обратите внимание, что состав меню и значения его пунктов зависят от режима съемки (=192).
1 Откройте меню  . zzНажмите кнопку [
 ].
].
2 Выберите пункт меню.
zzНажмите пункт меню (1), чтобы выбрать его.
zzДоступные значения (2) отображаются в нижней части экрана.
(1) (2)
3 Выберите вариант.
zzПеретащите вариант влево или вправо, чтобы выбрать его.
zzПункты, помеченные значком [ ], можно настраивать, нажимая кнопку [
 ].
].
zzПункты, помеченные значком [ ], можно настраивать, нажимая кнопку [

 ].
].
4 Подтвердите выбор и выйдите из меню. zzНажмите кнопку [ ].
].
zzСнова отображается экран, который отображался до нажатия кнопки [ ] на шаге 1, показывающий настроенное значение.
●● Чтобы отменить случайные изменения настроек, можно восстановить настройки камеры по умолчанию (=166).
●● Для выхода можно также нажать [ ] в меню.
Настройка параметров с помощью сенсорного экрана
zzНажмите [ ] в правом верхнем углу экрана, чтобы открыть меню быстрой установки.
zzДля завершения настройки нажмите пункт меню, затем его значение.
zzДля возврата на предыдущий экран нажмите пункт меню [ ] или снова нажмите выбранный вариант.
zzДля доступа к пунктам, помеченным значком [ ], нажмите [
 ].
].
zzДля доступа к пунктам, помеченным значком [ ], нажмите [
 ].
].
Перед использованием
Основные операции
Руководство по расширенным операциям
Основные сведения о камере
Автоматический/гибридный автоматический режим
Другие режимы съемки
Режим P
Режимы Tv, Av, M и C
Режим воспроизведения
Функции Wi-Fi
Меню настройки
Принадлежности
Приложение
Алфавитный указатель
28
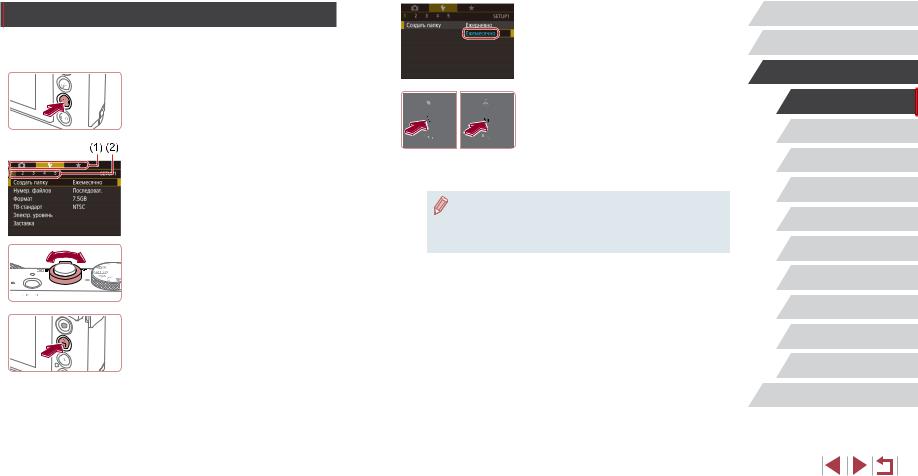
Использование экрана меню
Различные функции камеры можно настраивать с помощью экрана меню, как показано ниже.
1 Откройте экран настройки. zzНажмите кнопку [ ].
].
2 Выберите вкладку.
zzДля выбора вкладки нажмите ее.
zzВкладки соответствуют функциям (1), таким как съемка ([ ]), воспроизведение ([
 ]) или настройка ([
 ]), либо страницам в каждой функции (2). Вкладки в этом руководстве обозначаются сочетанием функции и страницы, например [
 1].
1].
zzВкладки страниц можно также выбирать, пере мещая рычаг зумирования или проводя пальцем по экрану влево или вправо.
3 Выберите пункт меню.
zzНажмите пункт, чтобы выбрать его, затем нажмите кнопку [ ].
].
zzПункты меню можно также выбирать, повора чивая кольцо [ ].
].
zzДля пунктов меню, значения которых не отобра жаются, сначала нажмите кнопку [ ], чтобы переключить экраны, затем нажмите пункт, чтобы выбрать его.
zzДля возврата на экран меню нажмите кнопку [ ].
].
4 Выберите вариант.
zzНажмите вариант, чтобы выбрать его.
5 Подтвердите выбор и выйдите из меню.
zzНажмите кнопку [ ], чтобы подтвердить сделанный выбор и вернуться на экран выбора пункта меню.
zzНажмите кнопку [ ] для возврата на экран, который отображался до нажатия кнопки [
 ] на шаге 1.
●● Чтобы отменить случайные изменения настроек, можно восстановить настройки камеры по умолчанию (=166).
●● Доступные пункты меню зависят от выбранного режима съемки или воспро изведения (=195 – =202).
Перед использованием
Основные операции
Руководство по расширенным операциям
Основные сведения о камере
Автоматический/гибридный автоматический режим
Другие режимы съемки
Режим P
Режимы Tv, Av, M и C
Режим воспроизведения
Функции Wi-Fi
Меню настройки
Принадлежности
Приложение
Алфавитный указатель
29
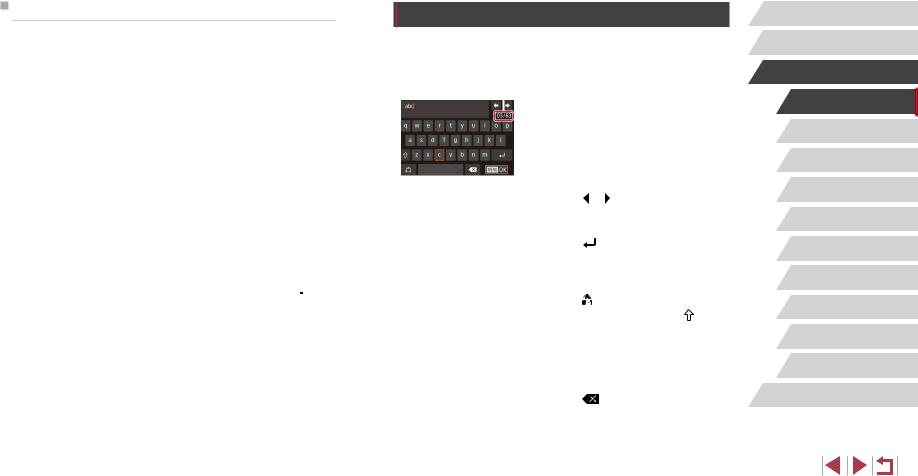
Использование сенсорного экрана
●● Для выбора вкладок нажмите кнопку [ ], чтобы открыть экран меню, затем нажмите требуемые вкладку функции и вкладку страницы.
●● Проведите пальцем вверх или вниз по пунктам меню для прокрутки или нажмите пункт меню, чтобы выбрать его.
●● Нажмите значение, чтобы завершить настройку и вернуться на экран выбора пункта меню.
●● Для пунктов меню, отображаемых со шкалой, показывающей значение, нажмите требуемое место на шкале.
●● Для настройки пунктов меню, варианты для которых не отображаются, сначала нажмите пункт, чтобы открыть экран настройки. На экране настройки выберите пункт, перетаскивая или нажимая на экран, затем нажмите для выбора варианта. Для возврата на предыдущий экран нажмите [ ].
].
●● Можно также выбирать элементы ввода (такие как флажки или текстовые поля), нажимая их, и вводить текст, нажимая кнопки на экранной клавиатуре.
●● Когда отображается значок [ ], при желании вместо кнопки [
 ] можно нажимать значок [
 ].
].
●● Когда отображается значок [ ], при желании вместо кнопки [
 ] можно нажимать значок [
 ].
].
●● Когда отображается значок [ ], при желании вместо кнопки [

 ] можно нажимать значок [
 ].
].
●● Чтобы закрыть меню, еще раз нажмите кнопку [ ].
].
Экранная клавиатура
Экранная клавиатура позволяет вводить информацию для идентификации лиц (=43), подключений Wi-Fi (=131) и т. д. Обратите внимание, что длина и тип вводимой информации зависят от используемой функции.
|
(1) |
Ввод символов |
|||||
|
zzДля ввода символов нажимайте их. |
||||||
|
zzОбъем вводимой информации (1) зависит |
||||||
|
от используемой функции. |
||||||
|
Перемещение курсора |
||||||
|
zzНажмите [ |
][ |
]. |
||||
|
Ввод символов новой строки |
||||||
|
zzНажмите [ |
]. |
|||||
|
Переключение режимов ввода |
||||||
|
zzДля переключения на цифры или символы |
||||||
|
нажмите [ |
]. |
|||||
|
zzДля ввода заглавных букв нажмите [ ]. |
||||||
|
zzДоступные режимы ввода зависят от исполь |
||||||
|
зуемой функции. |
||||||
|
Удаление символов |
||||||
|
zzДля удаления предыдущего символа |
||||||
|
нажмите [ |
]. |
zzЕсли нажать кнопку [ ] и удерживать
ее нажатой, символы будут удаляться груп пами по пять.
Перед использованием
Основные операции
Руководство по расширенным операциям
Основные сведения о камере
Автоматический/гибридный автоматический режим
Другие режимы съемки
Режим P
Режимы Tv, Av, M и C
Режим воспроизведения
Функции Wi-Fi
Меню настройки
Принадлежности
Приложение
Алфавитный указатель
30
![]()
Подтверждение ввода и возврат к предыдущему экрану
zzНажмите кнопку [ ].
].
●● Для некоторых функций [ ] не отображается и не может использоваться.
Индикатор
Индикатор на задней панели камеры (=4) загорается или мигает в зависимости от состояния камеры.
|
Цвет |
Состояние |
Состояние камеры |
|
|
индикатора |
|||
|
Начальная загрузка, запись/чтение/передача |
|||
|
изображений, съемка с длительной выдержкой |
|||
|
Зеленый |
Мигает |
(=92, =93), выполнено подключение |
|
|
к компьютеру (=174), подключение/передача |
|||
|
данных по Wi-Fi или дисплей выключен (=26, |
|||
|
=161, =162) |
|||
|
Оранжевый |
Горит |
Зарядка по USB |
●● Когда этот индикатор мигает зеленым цветом, не выключайте камеру, не открывайте крышку гнезда карты памяти/отсека элементов питания,
не встряхивайте камеру и не стучите по ней; несоблюдение этих требований может привести к повреждению изображений, камеры или карты памяти.
Перед использованием
Основные операции
Руководство по расширенным операциям
Основные сведения о камере
Автоматический/гибридный автоматический режим
Другие режимы съемки
Режим P
Режимы Tv, Av, M и C
Режим воспроизведения
Функции Wi-Fi
Меню настройки
Принадлежности
Приложение
Алфавитный указатель
31

Часы
Можно посмотреть текущее время.
zzНажмите кнопку [ ] и удерживайте ее нажатой. zzОтображается текущее время.
zzЕсли при использовании функции часов камера ориентирована вертикально, индикация изменя ется на вертикальную.
zzДля изменения цвета поворачивайте кольцо [ ].
].
zzДля отмены отображения часов снова нажмите кнопку [ ].
].
●● Если камера выключена, для отображения часов нажмите кнопку [ ] и, удерживая ее нажатой, нажмите кнопку ON/OFF.
Перед использованием
Основные операции
Руководство по расширенным операциям
Основные сведения о камере
Автоматический/гибридный автоматический режим
Другие режимы съемки
Режим P
Режимы Tv, Av, M и C
Режим воспроизведения
Функции Wi-Fi
Меню настройки
Принадлежности
Приложение
Алфавитный указатель
32

Автоматический/гибридный автоматический режим
Удобный режим для простой съемки с увеличенными возможностями управления
Съемка с настройками, определенными камерой
Для полностью автоматического выбора оптимальных настроек для определенных сюжетов просто позвольте камере определять объект и условия съемки.
Съемка (Smart Auto)
 Фотографии
  Видеофильмы
1 Включите камеру. zzНажмите кнопку ON/OFF. zzОтображается начальный экран.
2 Перейдите в режим [
 ].
].
zzПоверните диск установки режима в положение [
 ].
].
zzНаведите камеру на объект. При определении сюжета камера издает слабые щелкающие звуки.
zzВ левом верхнем углу экрана отображаются значки, обозначающие сюжет и режим стаби лизации изображения (=37, =38).
zzРамки, отображаемые вокруг любых опреде ленных объектов, указывают, что эти объекты находятся в фокусе.
Перед использованием
Основные операции
Руководство по расширенным операциям
Основные сведения о камере
Автоматический/гибридный автоматический режим
Другие режимы съемки
Режим P
Режимы Tv, Av, M и C
Режим воспроизведения
Функции Wi-Fi
Меню настройки
Принадлежности
Приложение
Алфавитный указатель
33

|
3 Выберите композицию кадра. |
2) Произведите съемку. |
|
|
zzДля увеличения объекта переместите рычаг зуми |
zzПолностью нажмите кнопку спуска затвора. |
|
|
рования в направлении символа [ ] (положение |
zzВо время съемки слышен звук срабатывания |
|
|
телефото), а для уменьшения объекта перемес |
||
|
затвора; если вспышка была поднята, то при |
||
|
тите этот рычаг в направлении символа [ ] |
||
|
недостаточной освещенности она автомати |
||
|
(широкоугольное положение). (Отображается |
||
|
чески срабатывает. |
||
|
шкала зумирования (1), показывающая поло |
||
|
zzДержите камеру неподвижно, пока не закон |
||
|
жение зумирования и область, находящуюся |
||
|
чится звук срабатывания затвора. |
||
|
в фокусе (2).) |
||
|
zzПосле отображения снятого кадра камера |
||
|
возвращается на экран съемки. |
|
4 Произведите съемку. |
Съемка видеофильмов |
||
|
1) Запустите съемку. |
|||
|
Съемка фотографий |
zzНажмите кнопку видеосъемки. В начале съемки |
||
|
1) Сфокусируйтесь. |
камера подает один звуковой сигнал и отобра |
||
|
жается индикатор [ ЗАП] с указанием прошед |
|||
|
zzНажмите наполовину кнопку спуска затвора. |
(1) |
||
|
шего времени съемки (1). |
|||
|
После завершения фокусировки камера подает |
|||
|
zzВверху и внизу экрана отображаются черные |
|||
|
два звуковых сигнала и отображаются рамки, |
|||
|
полосы, и объект немного увеличивается. Черные |
|||
|
указывающие области изображения, находящиеся |
|||
|
полосы обозначают области изображения, которые |
|||
|
в фокусе. |
|||
|
не записываются. |
|||
|
zzЕсли в фокусе находятся несколько областей, |
|||
|
zzРамки, отображаемые вокруг любых опреде |
|||
|
отображаются несколько рамок. |
|||
|
ленных лиц, указывают, что эти лица находятся |
|||
|
в фокусе. |
|||
|
zzПосле начала съемки отпустите кнопку видеосъемки. |
2) Требуемым образом измените размер
|
zzЕсли отображается сообщение [Поднимите |
объекта и композицию кадра. |
|
|
zzЧтобы изменить размер объекта, повторите |
||
|
вспышку], поднимите вспышку с помощью |
||
|
операции из шага 3. |
||
|
переключателя [ ]. При съемке сработает |
||
|
Однако помните, что звуки работы камеры |
||
|
вспышка. Если требуется отключить вспышку, |
||
|
записываются. Обратите внимание, что на |
||
|
пальцем опустите ее вниз в камеру. |
||
|
видеофильмах, которые сняты с коэффици |
||
|
ентом зумирования, отображаемым синим |
||
|
цветом, будет заметно зерно. |
||
|
zzПри изменении композиции кадров фокусировка, |
||
|
яркость и цвета автоматически настраиваются. |
Перед использованием
Основные операции
Руководство по расширенным операциям
Основные сведения о камере
Автоматический/гибридный автоматический режим
Другие режимы съемки
Режим P
Режимы Tv, Av, M и C
Режим воспроизведения
Функции Wi-Fi
Меню настройки
Принадлежности
Приложение
Алфавитный указатель
34

3)Завершите съемку.
zzДля остановки съемки снова нажмите кнопку видеосъемки. При остановке съемки камера подает два звуковых сигнала.
zzПри полном заполнении карты памяти съемка автоматически останавливается.
●● Срабатывание вспышки во время съемки означает, что камера автоматически пытается обеспечить оптимальные цвета главного объекта и заднего плана (многозонный баланс белого).
Съемка в гибридном автоматическом режиме
 Фотографии
  Видеофильмы
Можно снять короткий видеофильм о проведенном дне, просто снимая фотографии. Перед каждым кадром камера записывает клипы длительностью 2 – 4 с, которые впоследствии объединяются в видеоподборку.
1 Перейдите в режим [ ].
].
zzВ соответствии с шагом 2 раздела «Съемка (Smart Auto)» (=33) выберите значок [ ].
].
2 Выберите композицию кадра.
zzДля компоновки кадра и фокусировки выполните шаги 3 – 4 из раздела «Съемка (Smart Auto)» (=33).
zzДля большей выразительности видеоподборок перед съемкой фотографий держите камеру наведенной на объект около четырех секунд.
3 Произведите съемку.
zzДля съемки фотографии выполните шаг 4 из раздела «Съемка (Smart Auto)» (=33).
zzКамера записывает как фотографию, так и видеоклип. Клип, который завершается
фотографией и звуком срабатывания затвора, образует одну главу в видеоподборке.
●● Время работы от аккумулятора в этом режиме меньше, чем в режиме [
 ], так как для каждого кадра снимается клип видеоподборки.
●● Клип видеоподборки может не записываться при съемке фотографии сразу же после включения камеры, выбора режима [ ] или управления камерой другими способами.
●● Звуки и вибрация, вызываемые работой с камерой, записываются в видео подборках.
●● Для качества изображения видеоподборки автоматически устанавливается значение [ ] для NTSC и [
 ] для PAL, изменить это значение невозможно (=160).
●● При нажатии наполовину кнопки спуска затвора или при срабатывании таймера автоспуска звуковые сигналы не воспроизводятся (=164).
●● В указанных ниже случаях клипы видеоподборки записываются как отдель ные файлы видеофильмов, даже если они были сняты в один и тот же день в режиме [ ].
].
— Размер файла видеоподборки достигает прибл. 4 Гбайт или общее время съемки достигает прибл. 16 мин и 40 с.
— Видеоподборка защищена от стирания (=113).
— Изменены настройки летнего времени (=20) или часового пояса (=162).
— Создается новая папка (=159).
●● Изменение или удаление записанных звуков срабатывания затвора невозможно.
●● Если вы предпочитаете записывать видеоподборки без фотографий, произ ведите такую настройку заранее. Выберите MENU (=29) ► вкладку [ 7] ► [Тип подборки] ► [Без фото].
●● Отдельные главы можно редактировать (=126).
Перед использованием
Основные операции
Руководство по расширенным операциям
Основные сведения о камере
Автоматический/гибридный автоматический режим
Другие режимы съемки
Режим P
Режимы Tv, Av, M и C
Режим воспроизведения
Функции Wi-Fi
Меню настройки
Принадлежности
Приложение
Алфавитный указатель
35

Запуск воспроизведения видеоподборки
Для воспроизведения видеоподборки за определенный день выведите на экран фотографию, снятую в режиме [ ], или укажите дату, для которой требуется воспроизвести видеоподборку (=106).
Фотографии/видеофильмы
●● Если камера не подает звуковые сигналы операций, возможно, что при ее включении удерживалась нажатой кнопка [

 ]. Чтобы включить звуковые сигналы, нажмите кнопку [
 ], выберите пункт [Тихо] на вкладке [
 3], затем выберите значение [Откл.].
Фотографии
●● Мигающий значок [ ] предупреждает о повышенной вероятности смазывания изображения из-за сотрясения камеры. В таком случае установите камеру на штатив или примите другие меры для обеспечения ее неподвижности.
●● Если снимки получаются темными несмотря на срабатывание вспышки, подойдите ближе к объекту. Подробные сведения о радиусе действия вспышки см. в разделе «Камера» (= 204).
●● Если при нажатии наполовину кнопки спуска затвора камера подает только один звуковой сигнал, это может означать, что объект находится слишком близко. Подробные сведения о диапазоне фокусировки (диапазоне съемки) см. в разделе «Диапазон съемки» (= 205).
●● Для уменьшения эффекта «красных глаз» и для помощи в фокусировке при съемке в местах с недостаточной освещенностью может загораться лампа.
●● Значок [ ], мигающий при попытке съемки, означает, что съемка невозможна, пока не завершится зарядка вспышки. Съемка может возобновиться сразу после того, как будет готова вспышка, поэтому либо полностью нажмите кнопку спуска затвора и подождите, либо отпустите кнопку и снова нажмите ее.
●● Если отображается значок «Спит» или «Спящие малыши» (=37), звук срабатывания затвора не воспроизводится.
●● Хотя следующий кадр можно снимать еще до появления экрана съемки, используемая фокусировка, яркость и цвета могут определяться преды дущим кадром.
●● Длительность отображения изображений после съемки можно изменить (=54).
Видеофильмы
●● Перед видеосъемкой опустите вспышку пальцем. Во время съемки следите, чтобы не закрыть микрофон (1) пальцем. Если оставить вспышку поднятой или перекрыть микрофон, это может помешать записи звука или привести к приглушенной записи звука.
(1)
●● Во время съемки видеофильмов не касайтесь никаких органов управления камерой, кроме кнопки видеосъемки, так как издаваемые камерой звуки записываются.
●● После начала видеосъемки область изображения изменяется и объекты увеличиваются для обеспечения возможности коррекции значительных сотрясений камеры. Чтобы снимать объекты с тем же размером, с которым они отображаются до начала съемки, задайте для параметра «Динамич. IS» значение [Низкий] (=52).
●● Звук записывается в стереорежиме.
●● Можно уменьшить искажения звука, возникающие при съемке на сильном ветру. Однако в случае использования этой функции при отсутствии ветра записи могут звучать неестественно. Если ветер слабый, выберите MENU (=29) ► вкладку [ 7] ► [Фильтр шумов] ► [Откл.] (=70).
●● Во время видеосъемки может также записывать звук работы системы авто фокусировки объектива.
Перед использованием
Основные операции
Руководство по расширенным операциям
Основные сведения о камере
Автоматический/гибридный автоматический режим
Другие режимы съемки
Режим P
Режимы Tv, Av, M и C
Режим воспроизведения
Функции Wi-Fi
Меню настройки
Принадлежности
Приложение
Алфавитный указатель
36

|
Значки сюжетов |
|||||||
|
Фотографии |
Видеофильмы |
||||||
|
В режимах [ |
] и [ |
] определенные камерой снимаемые сюжеты обозначаются |
|||||
|
значком, и автоматически выбираются соответствующие настройки для обеспечения |
|||||||
|
оптимальной фокусировки, яркости объекта и цвета. В зависимости от сюжетов может |
|||||||
|
производиться серийная съемка (=38). |
|||||||
|
Фон |
|||||||
|
Объект |
Контровой |
||||||
|
Нормальный |
Темный*1 |
Закаты |
Прожекторы |
||||
|
свет |
|||||||
|
Люди |
*2 |
*3 |
– |
||||
|
Движущиеся |
*3 |
*3 |
– |
– |
– |
||
|
люди |
|||||||
|
Тени на лице |
*2 |
– |
– |
– |
– |
||
|
Улыбается |
*3 |
*3 |
– |
– |
– |
||
|
Спит |
*2 |
*3 |
– |
– |
– |
||
|
Малыши |
*3 |
*3 |
– |
– |
– |
||
|
Улыбающиеся |
*3 |
*3 |
– |
– |
– |
||
|
малыши |
|||||||
|
Спящие малыши |
*2 |
*3 |
– |
– |
– |
||
|
Движущиеся |
*3 |
*3 |
– |
– |
– |
||
|
дети |
|||||||
|
Прочие объекты |
*2 |
*3 |
|||||
|
Прочие движу |
*3 |
*3 |
– |
– |
– |
||
|
щиеся объекты |
|||||||
|
Прочие близкие |
*2 |
*3 |
– |
– |
|||
|
объекты |
|||||||
|
*1 |
Со штативом. |
||||||
|
*2 Фон значков имеет светло-синий цвет, если на заднем плане находится синее небо, темно- |
|||||||
|
синий цвет, если задний план темный, и серый цвет для всех остальных задних планов. |
|||||||
|
*3 Фон значков имеет светло-синий цвет, если на заднем плане находится синее небо, и серый |
|||||||
|
цвет для всех остальных задних планов. |
●● У значков [ ], [
], [ ], [
], [ ], [
], [ ] и [
] и [ ] фоновый цвет темно-синий, у значка [
 ] фоновый цвет оранжевый.
●● В случае видеофильмов отображаются только значки «Люди», «Прочие объекты» и «Прочие близкие объекты».
●● В режиме [ ] отображаются только значки «Люди», «Тени на лице», «Прочие объекты» и «Прочие близкие объекты».
●● При съемке с автоспуском значки не отображаются для следующих объектов: движущиеся, улыбающиеся или спящие люди; улыбающиеся или спящие малыши; движущиеся дети; и прочие движущиеся объекты.
●● Значки улыбающихся или спящих объектов съемки и движущихся детей не отобра жаются в режимах работы затвора, отличных от [ ] (=38, =42), а также когда для параметра [Корр. рт. лампы] задано значение [Вкл.] и выполняется автоматическая коррекция эпизодов (=48).
●● Если для вспышки установлен режим [ ], значки с обратной засветкой для движущихся детей и улыбающихся людей не отображаются.
●● Значки малышей (включая улыбающихся и спящих) и движущихся детей отобра жаются, если для параметра [Идентиф. лица] задано значение [Вкл.] и обнаружены лица зарегистрированных малышей (не старше 2 лет) или детей (2 – 12 лет)
(=44). Заранее убедитесь в правильности даты и времени (=20).
●● Если значок не соответствует фактическим условиям съемки или если съемка с ожидаемым эффектом, цветом или яркостью невозможна, попробуйте произвести съемку в режиме [ ] (=73).
Перед использованием
Основные операции
Руководство по расширенным операциям
Основные сведения о камере
Автоматический/гибридный автоматический режим
Другие режимы съемки
Режим P
Режимы Tv, Av, M и C
Режим воспроизведения
Функции Wi-Fi
Меню настройки
Принадлежности
Приложение
Алфавитный указатель
37

Эпизоды, для которых производится серийная съемка
Если во время съемки фотографии отображается значок одного из приведенных ниже (в левом столбце таблице) эпизодов, камера производит серийную съемку. Если при наполовину нажатой кнопке спуска затвора отображается значок одного из приве денных ниже (в левом столбце таблице) эпизодов, появляется один из значков [ ], [
], [ ] или [
 ], показывающий, что камера производит серийную съемку.
|
Улыбается |
Снимаются последовательные изображения, и камера |
|
|
(включая «Малыши») |
анализирует такие детали, как выражение лиц, чтобы |
|
|
сохранить изображение, определенное как наилучшее. |
||
|
Превосходные кадры спящих лиц, полученные за счет |
||
|
Спит |
сочетания последовательных кадров для снижения |
|
|
сотрясения камеры и уменьшения шумов изображения. |
||
|
(включая «Малыши») |
||
|
Подсветка автофокусировки не включается, вспышка |
||
|
не срабатывает и звук срабатывания затвора не воспро |
||
|
изводится. |
||
|
Дети |
Чтобы не упустить удачный кадр бегающих вокруг детей, |
|
|
камера снимает три последовательных кадра при каждой |
||
|
съемке. |
||
●● В некоторых эпизодах ожидаемые изображения могут быть не сохранены, а изображения могут выглядеть иначе, чем ожидалось.
●● Фокусировка, яркость изображения и цвет определяются для первого кадра.
●● Если требуется снимать только одиночные изображения, нажмите [ ], выберите в меню значок [
 ], затем выберите значок [
 ].
].
Значки стабилизации изображения
 Фотографии
  Видеофильмы
Автоматически применяется стабилизация изображения, оптимальная для условий съемки (интеллектуальная стабилизация изображения), и отображаются следующие значки.
Стабилизация изображения для фотографий (нормальная).
Стабилизация изображения для фотографий при панорамировании (панорамирование)*.
Стабилизация изображения по углу поворота и смещению при макро съемке (гибридная стабилизация изображения).
Для видеофильмов отображается значок [

 ] и также применяется стабилизация изображения [
 ].
].
Стабилизация изображения для видеофильмов, уменьшающая сильные сотрясения камеры, возникающие, например, во время ходьбы (динамическая).
Стабилизация изображения для медленных сотрясений камеры, например при съемке видеофильмов в диапазоне телефото (усиленная).
Стабилизация изображения не используется, так как камера установлена на штатив или удерживается неподвижно другими способами. Однако во время видеосъемки отображается значок [

 ] и система стабилизации используется для исключения вибрации, вызываемой ветром и другими источниками (штативная стабилизация изображения).
*Отображается при панорамировании, когда камера поворачивается вслед за движущимися объектами. Когда камера следует за объектами по горизонтали, стабилизация изображения компенсирует только вертикальные сотрясения камеры, а горизонтальная стабилизация прекращается. Аналогично, когда камера следует за объектами по вертикали, стабилизация изображения компенсирует только горизонтальные сотрясения камеры.
●● Для отмены стабилизации изображения установите для параметра [Режим IS] значение [Откл.] (=52). В таком случае значок стабилизации изображения не отображается.
●● В режиме [ ] значок [
 ] не отображается.
Перед использованием
Основные операции
Руководство по расширенным операциям
Основные сведения о камере
Автоматический/гибридный автоматический режим
Другие режимы съемки
Режим P
Режимы Tv, Av, M и C
Режим воспроизведения
Функции Wi-Fi
Меню настройки
Принадлежности
Приложение
Алфавитный указатель
38

Рамки на экране
 Фотографии
  Видеофильмы
В режиме [
 ], когда камера обнаруживает объекты, на которые она направлена, на экране отображаются различные рамки.
●● Вокруг объекта (или лица человека), выбранного камерой в качестве главного объекта, отображается белая рамка, вокруг остальных обнаруженных лиц отобра жаются серые рамки. Рамки в определенных пределах следуют за движущимися объектами, чтобы эти объекты оставались в фокусе. Однако если камера обнару живает перемещение объекта, на экране остается только белая рамка.
●● Если при наполовину нажатой кнопке спуска затвора камера обнаруживает перемещение объекта, отображается синяя рамка и производится постоянная настройка фокусировки и яркости изображения (Следящая AF).
●● Если рамки отсутствуют, не отображаются вокруг требуемых объектов или отображаются на заднем плане или аналогичных областях, попробуйте произвести съемку в режиме [ ] (=73).
●● Чтобы выбрать объект, на который требуется сфокусироваться, нажмите этот объект на экране. Отображается значок [


 ], и камера переходит в режим тактильной автофокусировки (=86). При наполовину нажатой кнопке спуска затвора отображается синяя рамка, и камера поддерживает фокусировку на объект и настройку яркости изображения (Следящая AF).
Часто используемые удобные функции
Дополнительное увеличение объектов (Цифровой зум)
 Фотографии
  Видеофильмы
Если расстояние до удаленных объектов слишком велико для увеличения с помощью оптического зума, используйте цифровой зум с максимальным 12-кратным увеличением.
1 Переместите рычаг зумирования в направлении [ ].
].
zzУдерживайте рычаг нажатым до тех пор, пока
зумирование не остановится.
zzЗумирование останавливается при достижении максимального коэффициента зумирования, при котором зернистость изображения еще незаметна; и этот коэффициент отображается на экране.
|
(1) |
2 Снова переместите рычаг зумирования |
|
в направлении [ ]. |
zzКамера производит дальнейшее увеличение объекта.
zz(1) — это текущий коэффициент зумирования.
●● При перемещении рычага зумирования отображается шкала зумирования (на которой отображается позиция зумирования). Цвета на шкале зумиро вания обозначают разные диапазоны зумирования.
— Белый диапазон: диапазон оптического зумирования, в котором на изобра жении отсутствует зернистость.
— Желтый диапазон: диапазон цифрового зумирования, в котором на изобра жении отсутствует заметная зернистость (ZoomPlus).
— Синий диапазон: диапазон цифрового зумирования, в котором на изобра жении заметна зернистость.
●● Так как при некоторых значениях разрешения синий диапазон не доступен (=90), максимальный коэффициент зумирования может быть достигнут в соответствии с инструкциями шага 1.
Перед использованием
Основные операции
Руководство по расширенным операциям
Основные сведения о камере
Автоматический/гибридный автоматический режим
Другие режимы съемки
Режим P
Режимы Tv, Av, M и C
Режим воспроизведения
Функции Wi-Fi
Меню настройки
Принадлежности
Приложение
Алфавитный указатель
39

●● Чтобы отключить цифровой зум, выберите MENU (=29) ► вкладку [ 2] ► [Цифровой зум] ► [Откл.].
Съемка с заранее установленными фокусными расстояниями (Пошаговый зум)
 Фотографии
  Видеофильмы
Снимайте с часто используемыми значениями фокусного расстояния в диапазоне 28 – 84 мм (в пересчете на 35-миллиметровый эквивалент).
zzЧтобы изменить фокусное расстояние с 28 на 35 мм, поверните кольцо [ ] против часовой стрелки до щелчка. Поворачивайте кольцо [
 ] против часовой стрелки для увеличения изображения или по часовой стрелке для его уменьшения.
●● При съемке видеофильмов пошаговый зум недоступен, даже если повора чивать кольцо [ ].
].
●● При использовании цифрового зума (=39) коэффициент зумирования нельзя настраивать, поворачивая кольцо [ ] против часовой стрелки. Однако можно установить фокусное расстояние 84 мм, повернув кольцо по часовой стрелке.
Использование таймера автоспуска
 Фотографии
  Видеофильмы
С помощью таймера автоспуска фотограф может включить себя в групповую фото графию или делать другие снимки с задержкой. Камера производит съемку прибли зительно через 10 с после нажатия кнопки спуска затвора.
1 Выполните настройку.
zzНажмите кнопку [ ], выберите значок [
 ] в меню, затем выберите [
 ] (=28).
zzПосле завершения настройки отображается значок [ ].
].
2 Произведите съемку.
zzДля фотографий: нажмите наполовину кнопку спуска затвора для фокусировки на объект, затем нажмите эту кнопку полностью.
zzДля видеофильмов: нажмите кнопку видеосъемки.
zzПосле запуска таймера автоспуска начинает мигать соответствующая лампа, и камера воспро изводит звук таймера автоспуска.
zzЗа 2 с до съемки мигание и звуковая сигнали зация ускоряются. (Если должна сработать вспышка, лампа остается гореть, не мигая.)
zzДля отмены съемки после запуска таймера автоспуска нажмите кнопку [ ].
].
zzДля восстановления исходной настройки выбе рите на шаге 1 значок [
 ].
].
Перед использованием
Основные операции
Руководство по расширенным операциям
Основные сведения о камере
Автоматический/гибридный автоматический режим
Другие режимы съемки
Режим P
Режимы Tv, Av, M и C
Режим воспроизведения
Функции Wi-Fi
Меню настройки
Принадлежности
Приложение
Алфавитный указатель
40
![]()
●● Можно также отменить съемку после начала отсчета, нажав на экран.
Использование таймера автоспуска для исключения сотрясения камеры
 Фотографии
  Видеофильмы
В этом варианте спуск затвора производится приблизительно через 2 с после нажатия кнопки спуска затвора. Если при нажатии кнопки спуска затвора возникают сотрясения камеры, они не повлияют на снимок.
zzВыполните шаг 1 из раздела «Использование таймера автоспуска» (=40) и выберите значок [ ].
].
zzПосле завершения настройки отображается значок [ ].
].
zzДля съемки выполните шаг 2 из раздела «Использование таймера автоспуска» (=40).
Настройка таймера автоспуска
 Фотографии
  Видеофильмы
Можно задать задержку спуска (0 – 30 с) и количество снимков (1 – 10 снимков).
1 Выберите значок [ ].
].
zzВ соответствии с инструкциями шага 1 раздела «Использование таймера автоспуска» (=40) выберите значок [ ] и нажмите кнопку [

 ].
].
2 Выполните настройку.
zzКоснитесь времени задержки или количества снимков, чтобы выбрать один из этих параметров.
zzНажимая [ ][
][ ], выберите значение, затем дважды нажмите кнопку [
 ].
].
zzПосле завершения настройки отображается значок [ ].
].
zzДля съемки выполните шаг 2 из раздела «Использование таймера автоспуска» (=40).
●● Для видеофильмов, снимаемых с использованием таймера автоспуска, съемка начинается с указанной задержкой, но заданное количество снимков не учитывается.
●● Если задано несколько кадров, яркость изображения и баланс белого опреде ляются для первого кадра. Необходимое время между кадрами увеличива ется, если срабатывает вспышка или если задана съемка большого количества кадров. При полном заполнении карты памяти съемка автоматически останавливается.
●● Если указана задержка больше 2 с, за 2 с до съемки частота мигания лампы и подачи звуковых сигналов увеличивается. (Если должна сработать вспышка, лампа остается гореть, не мигая.)
Перед использованием
Основные операции
Руководство по расширенным операциям
Основные сведения о камере
Автоматический/гибридный автоматический режим
Другие режимы съемки
Режим P
Режимы Tv, Av, M и C
Режим воспроизведения
Функции Wi-Fi
Меню настройки
Принадлежности
Приложение
Алфавитный указатель
41

Съемка путем нажатия на экран (Съемка при касании)
 Фотографии
  Видеофильмы
Эта функция позволяет снимать, не используя кнопку спуска затвора, а просто нажимая на экран и отпуская палец. Камера автоматически фокусируется на объекты и настра ивает яркость изображения.
1 Включите функцию съемки при касании. zzНажмите значок [
 ] и измените его на [
 ].
].
2 Произведите съемку.
zzДля съемки коснитесь объекта на экране.
zzКамера производит съемку, и воспроизводится звук срабатывания затвора.
zzДля отмены съемки при касании выберите значок [ ] на шаге 1.
●● Даже когда на экране отображается снимок, можно подготовиться к съемке следующего кадра, нажав [ ].
].
●● Настройки съемки при касании можно также задать, выбрав меню MENU (=29) ►вкладку [ 2] ►[Съем. при кас.]. Чтобы скрыть значок настройки съемки при касании, задайте для параметра [Знач.съем.при касан.] значение [Откл.].
Серийная съемка
 Фотографии
  Видеофильмы
В режиме [
 ] для серийной съемки полностью нажмите кнопку спуска затвора и удерживайте ее нажатой.
Подробные сведения о скорости серийной съемки см. в разделе «Камера» (= 204).
1 Выполните настройку.
zzНажмите кнопку [ ], выберите значок [
 ] в меню, затем выберите [
 ] (=28).
zzПосле завершения настройки отображается значок [ ].
].
2 Произведите съемку.
zzДля серийной съемки полностью нажмите кнопку спуска затвора и удерживайте ее нажатой.
●● Во время серийной съемки фокусировка, экспозиция и цвета фиксируются в положении/на уровне, определенном при наполовину нажатой кнопке спуска затвора.
●● Не может использоваться с таймером автоспуска (=40).
●● Съемка может на короткое время останавливаться или скорость серийной съемки может снижаться в зависимости от условий съемки, параметров камеры и положения зумирования.
●● По мере увеличения количества снятых кадров скорость съемки может уменьшаться.
●● При срабатывании вспышки скорость съемки может снижаться.
●● Многозонный баланс белого (=33) недоступен. Также обратите внимание, что недоступны указанные ниже функции.
— [Корр. рт. лампы] (=48) — [Обн. моргания] (=51)
●● В режиме съемки при касании (=42) камера производит серийную съемку, пока вы касаетесь экрана. Фокусировка и экспозиция во время серийной съемки определяются для первого кадра и затем остаются постоянными.
Перед использованием
Основные операции
Руководство по расширенным операциям
Основные сведения о камере
Автоматический/гибридный автоматический режим
Другие режимы съемки
Режим P
Режимы Tv, Av, M и C
Режим воспроизведения
Функции Wi-Fi
Меню настройки
Принадлежности
Приложение
Алфавитный указатель
42

Отображение изображений во время воспроизведения
Каждый набор изображений, снятых в режиме серийной съемки, рассматривается как единая группа, и отображается только первое изображение из этой группы. Для обозначения того, что изображение входит в группу, в левом верхнем углу экрана отображается значок [
 ].
].
●● При удалении сгруппированного изображения (=115) также удаляются все изображения из этой группы. Будьте внимательны при удалении изображений.
●● Сгруппированные изображения можно воспроизводить индивидуально (=110) и в разгруппированном виде (=110).
●● При установке защиты (=113) сгруппированного изображения защищаются все изображения в группе.
●● Сгруппированные изображения можно просматривать индивидуально при воспроизведении с помощью функции поиска изображений (=107). В этом случае изображения временно разгруппировываются.
●● Для сгруппированных изображений недоступны следующие действия: редакти рование информации функции идентификации лица (=111), увеличение (=112), пометка как избранных (=118), редактирование (=121), печать (=175), настройка печати отдельных изображений (=179)
и добавление в фотокнигу (=181). Для выполнения этих операций либо просматривайте сгруппированные изображения индивидуально (=110), либо сначала отмените группирование (=110).
Использование функции идентификации лица
Если заранее зарегистрировать человека, камера будет обнаруживать его лицо и во время съемки отдавать ему приоритет при выборе фокусировки, яркости и цвета.
В режиме [
 ] камера может обнаруживать малышей и детей на основе зарегис трированных дат рождения и во время съемки оптимизировать для них настройки. Эта функция также позволяет искать снятые изображения, на которых присутствуют зарегистрированные люди (=108).
Личные сведения
●● В камере сохраняются такие сведения, как изображение лица (информация о лице), зарегистрированное с помощью функции идентификации лица, и личные сведения (имя, дата рождения). Кроме того, при обнаружении зарегистрированных людей их имена записываются в фотографиях. При использовании функции идентифи кации лица будьте осторожны, отдавая камеру или изображения другим лицам, а также при размещении изображений в Интернете, где их могут просматривать многие другие люди.
●● При утилизации камеры или передаче ее другому лицу после использования функции идентификации лица обязательно удалите из камеры всю информацию (зарегистрированные лица, имена и даты рождения) (=47).
Перед использованием
Основные операции
Руководство по расширенным операциям
Основные сведения о камере
Автоматический/гибридный автоматический режим
Другие режимы съемки
Режим P
Режимы Tv, Av, M и C
Режим воспроизведения
Функции Wi-Fi
Меню настройки
Принадлежности
Приложение
Алфавитный указатель
43

Регистрация информации функции идентификации лица
Для использования с функцией идентификации лица можно зарегистрировать инфор мацию (информация о лице, имена и даты рождения) максимум для 12 человек.
1 Откройте экран настройки.
zzНажмите кнопку [ ], выберите пункт [Парам. идентификатора лица] на вкладке [
 2], затем нажмите кнопку [
 ] (=29).
zzНажмите пункт [Добавить], чтобы выбрать его, затем нажмите кнопку [ ].
].
zzВыберите пункт [Добавить новое лицо] и нажмите кнопку [ ].
].
2 Зарегистрируйте информацию о лице.
zzНаправьте камеру таким образом, чтобы лицо человека, которого требуется зарегистрировать, находилось в серой рамке в центре экрана.
zzБелая рамка на лице человека означает, что лицо распознано. Убедитесь, что на лице появилась белая рамка, затем произведите съемку.
zzЕсли лицо не распознано, регистрация инфор мации о лице невозможна.
zzПосле появления запроса [Регистрировать?] нажмите [OK].
zzОтображается экран [Ред. профиль].
3 Зарегистрируйте имя и дату рождения человека.
zzНажмите текстовое поле имени для открытия клавиатуры, затем введите имя (=30).
zzДля регистрации даты рождения на экране [Ред. профиль] нажмите текстовое поле дня рождения.
zzНажмите вариант, чтобы выбрать его. zzДля задания даты нажимайте [ ][
][ ]. zzПосле завершения нажмите кнопку [
 ].
].
4 Сохраните настройки. zzНажмите [Сохранить].
zzПосле отображения сообщения нажмите [Да].
5 Продолжите регистрацию информации о лице.
zzЧтобы зарегистрировать еще до 4 экземпляров информации о лице (с разными выражениями лица или углами съемки), повторите шаг 2.
zzЗарегистрированные лица легче распознаются, если добавлена различная информация о лице. Помимо изображения анфас, добавьте изобра жение под небольшим углом сбоку, снимок улыбающегося лица, а также снимки в помещении и на улице.
Перед использованием
Основные операции
Руководство по расширенным операциям
Основные сведения о камере
Автоматический/гибридный автоматический режим
Другие режимы съемки
Режим P
Режимы Tv, Av, M и C
Режим воспроизведения
Функции Wi-Fi
Меню настройки
Принадлежности
Приложение
Алфавитный указатель
44

●● При выполнении шага 2 вспышка не срабатывает.
●● Если на шаге 3 не была зарегистрирована дата рождения, значки «Малыши»
|
и «Дети» (=37) в режиме [ |
] не отображаются. |
●● Можно перезаписать зарегистрированную информацию о лице или добавить информацию о лице позже, если не все 5 позиций информации о лице заняты (=44).
Съемка
Если заранее зарегистрировать человека, камера будет приоритетно выбирать его
вкачестве главного объекта и во время съемки оптимизировать фокусировку, яркость
ицвета для этого человека.
zzКогда камера направлена на людей, отобража ются имена максимум 3 зарегистрированных человек, если они обнаружены.
zzПроизведите съемку.
zzОтображаемые имена записываются в фото графиях. Имена обнаруженных людей (не более 5 человек) записываются, даже если они не отображаются.
●● Возможно ошибочное определение других людей, отличных от зарегистри рованных, если их лица имеют похожие черты.
●● Зарегистрированные люди могут неправильно определяться, если снимаемое изображение или эпизод существенно отличаются от зарегистрированной информации о лице.
●● Если зарегистрированное лицо не определяется или плохо определяется, запишите вместо зарегистрированной информации новую информацию о лице. Регистрация информации о лице непосредственно перед съемкой упрощает определение зарегистрированных лиц.
●● Если человек ошибочно определен как другой человек, но съемка была продолжена, записанное в изображении имя можно отредактировать или удалить во время воспроизведения (=111).
●● Так как лица малышей и детей быстро изменяются по мере роста, необходимо регулярно обновлять информацию об их лицах (=44).
●● Имена остаются записанными в изображениях, даже если снять описанный в разделе «Настройка отображаемой информации» (= 99) флажок [Инф.о съемке] для отключения отображения имен.
●● Если не требуется записывать имена в изображениях, выберите пункт [Парам. идентификатора лица] на вкладке [ 2], выберите пункт [Идентиф. лица], затем выберите значение [Откл.].
●● Имена, записанные в изображении, можно проверять на экране воспроиз ведения (режим простой информации) (=105).
●● В режиме [ ] имена не отображаются на экране съемки, но записываются на фотографиях.
●● Имена, записанные при серийной съемке (=42), записываются в том же положении, что и на первом кадре, даже если объекты перемещаются.
Проверка и редактирование зарегистрированной информации
1 Откройте экран [Проверить/ред.].
zzВ соответствии с шагом 1 раздела «Регистрация информации функции идентификации лица» (=44) выберите [Проверить/ред.].
Перед использованием
Основные операции
Руководство по расширенным операциям
Основные сведения о камере
Автоматический/гибридный автоматический режим
Другие режимы съемки
Режим P
Режимы Tv, Av, M и C
Режим воспроизведения
Функции Wi-Fi
Меню настройки
Принадлежности
Приложение
Алфавитный указатель
45

2 Выберите человека для проверки или редактирования информации о нем.
zzНажмите изображение человека, инфор мацию о котором требуется проверить или отредактировать.
3 Проверьте или требуемым образом отредактируйте информацию.
zzЧтобы проверить имя или дату рождения, нажмите [Ред. профиль]. На открывшемся экране можно изменить имя или дату рождения, как описано в шаге 3 раздела «Регистрация информации функции идентификации лица» (=44).
zzЧтобы проверить информацию о лице, нажмите [Инф. о лицах]. Чтобы удалить информацию о лице, нажмите [Стереть] на отображаемом экране, затем нажмите информацию о лице, которую требуется удалить. После появления запроса [Стереть?] нажмите [OK].
●● Даже если изменить имена в пункте [Ред. профиль], имена, записанные в ранее снятых фотографиях, не изменяются.
Перезапись и добавление информации о лице
Вместо существующей информации о лице можно записать новую информацию. Информацию о лице следует регулярно обновлять, особенно в случае малышей и детей, так как их лица быстро изменяются по мере роста.
Можно также добавлять информацию о лице, если заняты не все 5 позиций инфор мации о лице.
1 Откройте экран [Добавить инф. о лице].
zzВ соответствии с шагом 1 раздела «Регистрация информации функции идентификации лица» (=44) выберите [Добавить инф. о лице].
2 Выберите человека, информацию о лице которого требуется перезаписать.
zzНажмите имя человека, для которого требуется перезаписать информацию о лице.
zzЕсли уже зарегистрированы пять вариантов информации о лице, отображается сообщение. Нажмите [OK].
zzЕсли зарегистрировано менее пяти вариантов информации о лице, переходите к шагу 4 для добавления варианта.
3 Выберите информацию о лице, которую требуется перезаписать.
zzНажмите информацию о лице, которую требуется перезаписать.
4 Зарегистрируйте информацию о лице.
zzПроизведите съемку в соответствии с шагом 2 раздела «Регистрация информации функции идентификации лица» (=44), затем зарегис трируйте новую информацию о лице.
zzЗарегистрированные лица легче распознаются, если добавлена различная информация о лице. Помимо изображения анфас, добавьте изобра жение под небольшим углом сбоку, снимок улыбающегося лица, а также снимки в помещении и на улице.
●● Если все 5 позиций информации заполнены, добавление информации о лице невозможно. Выполните приведенные выше шаги для перезаписи информации о лице.
●● Если имеется по крайней мере одна свободная позиция, с помощью приве денных выше шагов можно добавить новую информацию о лице, но перезапись информации о лице невозможна. Вместо перезаписи информации о лице сначала удалите ненужную существующую информацию (=45), затем зарегистрируйте требуемую новую информацию о лице (=44).
Перед использованием
Основные операции
Руководство по расширенным операциям
Основные сведения о камере
Автоматический/гибридный автоматический режим
Другие режимы съемки
Режим P
Режимы Tv, Av, M и C
Режим воспроизведения
Функции Wi-Fi
Меню настройки
Принадлежности
Приложение
Алфавитный указатель
46

Удаление зарегистрированной информации
Можно удалить информацию (информация о лице, имена и даты рождения), зарегис трированную в функции идентификации лиц. Однако имена, записанные в ранее снятых изображениях, не удаляются.
1 Откройте экран [Стереть инф.].
zzВ соответствии с инструкциями шага 1 раздела «Регистрация информации функции иденти фикации лица» (=44) выберите пункт [Стереть инф.].
2 Выберите человека для стирания информации о нем.
zzНажмите имя человека для удаления.
zzПосле появления запроса [Стереть?] нажмите [OK].
●● После удаления информации о зарегистрированных людях отображение их имен (=107), перезапись их информации (=111) и поиск изобра жений с этими людьми (=108) будут невозможны.
●● Можно также удалить имена из информации об изображении (=111).
Функции настройки изображения
Изменение формата кадра
 Фотографии
  Видеофильмы
Формат кадра (отношение ширины к высоте) можно изменить в соответствии с приве денными ниже инструкциями.
zzНажмите кнопку [ ], выберите в меню значок
[
 ], затем выберите требуемый вариант
(=28).
zzПосле завершения настройки будет обновлено
соотношение сторон экрана.
zzЧтобы восстановить исходную настройку, повто рите эту операцию, но выберите значок [
 ].
].
Используется для отображения на широкоэкранных телевизорах высокой четкости или аналогичных устройствах отображения.
Собственный формат экрана камеры. Формат кадра, совпадающий с форматом 35-миллиметровой пленки и используемый для печати изображений на бумаге формата 130 × 180 мм или формата почтовой открытки.
Используется для отображения на телевизорах стандартной четкости или аналогичных устройствах отображения. Также используется для печати изображений на бумаге формата 90 × 130 мм или форматов серии A.
Квадратный формат кадра.
●● Недоступно в режиме [ ].
].
●● Эту настройку можно также задать, выбрав меню MENU (=29) ► вкладку [ 1] ► [Формат кадра фотографий].
Перед использованием
Основные операции
Руководство по расширенным операциям
Основные сведения о камере
Автоматический/гибридный автоматический режим
Другие режимы съемки
Режим P
Режимы Tv, Av, M и C
Режим воспроизведения
Функции Wi-Fi
Меню настройки
Принадлежности
Приложение
Алфавитный указатель
47

Изменение качества изображения
 Фотографии
  Видеофильмы
Выберите одно из 4 значений качества изображения. Сведения о количестве изобра жений каждого типа, которые можно записать на карту памяти, см. в разделе «Количество снимков, которые можно записать на карту памяти» (= 205).
zzНажмите кнопку [ ], выберите в меню значок [
 ], затем выберите требуемый вариант (=28).
zzОтображается настроенное значение.
zzЧтобы восстановить исходную настройку, повто рите эту операцию, но выберите значок [ ].
].
Рекомендации по выбору качества изображения в зависимости от формата бумаги (для изображений 3:2)
A2 (420 × 594 мм)
A3 – A5 (297 × 420 – 148 × 210 мм)
90 × 130 мм, 130 × 180 мм, Открытка
Для отправки по электронной почте и аналогичных целей
●● Недоступно в режиме [ ].
].
●● Качество изображения можно также изменить, выбрав меню MENU (=29) ► вкладку [ 1] ► [Качество] (=90).
Коррекция зеленоватых оттенков областей изображения при освещении ртутными лампами
 Фотографии
  Видеофильмы
В режиме [
 ] объекты или задний план на снимках ночных сюжетов с освеще нием ртутными лампами могут приобретать зеленоватый оттенок. Этот зеленоватый оттенок можно автоматически исправлять при съемке, используя многозонный баланс белого.
zzНажмите кнопку [ ], выберите пункт
[Корр. рт. лампы] на вкладке [ 6], затем
выберите значение [Вкл.] (=29).
zzПосле завершения настройки отображается значок [ ].
].
zzЧтобы восстановить исходную настройку, повто рите эту операцию, но выберите значение [Откл.].
●● После завершения съемки с освещением ртутными лампами следует вернуть для параметра [Корр. рт. лампы] значение [Откл.]. В противном случае возможна ошибочная коррекция зеленых оттенков, не связанных с освеще нием ртутными лампами.
●● Попробуйте сначала сделать несколько тестовых снимков и проверьте, достигнут ли требуемый результат.
●● При серийной съемке (=42) для этого параметра устанавливается значение [Откл.], которое невозможно изменить.
Перед использованием
Основные операции
Руководство по расширенным операциям
Основные сведения о камере
Автоматический/гибридный автоматический режим
Другие режимы съемки
Режим P
Режимы Tv, Av, M и C
Режим воспроизведения
Функции Wi-Fi
Меню настройки
Принадлежности
Приложение
Алфавитный указатель
48

Изменение качества видеоизображения
 Фотографии
  Видеофильмы
Настройте качество видеоизображения (размер изображения и частоту кадров). Частота кадров указывает число кадров, записываемых каждую секунду, и определяется авто матически в зависимости от настройки NTSC или PAL (=160). Сведения об общей длительность видеозаписей, которые поместятся на карту памяти при каждом уровне качества, см. в разделе «Время записи на карту памяти» (= 206).
zzНажмите кнопку [ ], выберите пункт меню
качества видео, затем выберите требуемый
вариант (=28).
zzОтображается настроенное значение.
Для видеосистемы NTSC
|
Качество |
Количество |
Частота |
|||
|
записываемых |
Сведения |
||||
|
изображения |
кадров |
||||
|
пикселов (разрешение) |
|||||
|
* |
1920 × 1080 |
59,94 кадра/с |
Для съемки с разреше |
||
|
нием высокой четкости |
|||||
|
1920 |
× 1080 |
29,97 кадра/с |
] |
||
|
Full HD. Режим [ |
|||||
|
обеспечивает более плав |
|||||
|
× 1080 |
|||||
|
1920 |
23,98 кадра/с |
ную передачу движения. |
|||
|
1280 |
× 720 |
29,97 кадра/с |
Для съемки с разреше |
||
|
нием высокой четкости. |
|||||
|
640 × 480 |
29,97 кадра/с |
Для съемки со стандарт |
|||
|
ным разрешением. |
* Доступно в режиме [ ] или [
 ].
].
Для видеосистемы PAL
|
Качество |
Количество |
Частота |
|||
|
записываемых |
Сведения |
||||
|
изображения |
кадров |
||||
|
пикселов (разрешение) |
|||||
|
* |
1920 |
× 1080 |
50,00 кадра/с |
Для съемки с разреше |
|
|
нием высокой четкости |
|||||
|
× 1080 |
|||||
|
1920 |
25,00 кадра/с |
Full HD. |
|||
|
1280 |
× 720 |
25,00 кадра/с |
Для съемки с разреше |
||
|
нием высокой четкости. |
|||||
|
640 × 480 |
25,00 кадра/с |
Для съемки со стан |
|||
|
дартным разрешением. |
|||||
* Доступно в режиме [ ] или [
 ].
].
●● После многократной съемки в режиме [ ] или [
 ] видео съемка с таким уровнем качества может стать временно невозможной (даже при нажатии кнопки видеосъемки), пока камера не остынет. Чтобы продолжить съемку в режиме [
 ] или [
 ], после появления сообщения с уведомлением нажмите [Да]. В противном случае перед продол жением съемки выключите камеру и немного подождите, пока она не остынет.
●● Черные полосы (слева и справа экрана в режимах [ ] и [
] и [ ] или вверху и внизу в режимах [
 ], [
], [ ], [
], [

 ], [
], [ ], [
], [ ], [
], [ ] и [
] и [ ]) обозначают незаписываемую область изображения.
●● Эту настройку можно также задать, выбрав меню MENU (=29) ► вкладку [ 8] ► [Качество видео].
Перед использованием
Основные операции
Руководство по расширенным операциям
Основные сведения о камере
Автоматический/гибридный автоматический режим
Другие режимы съемки
Режим P
Режимы Tv, Av, M и C
Режим воспроизведения
Функции Wi-Fi
Меню настройки
Принадлежности
Приложение
Алфавитный указатель
49

Полезные функции съемки
Использование электронного уровня
 Фотографии
  Видеофильмы
При съемке на экране может отображаться электронный уровень, помогающий контролировать горизонтальность камеры.
1 Выведите на экран электронный уровень.
zzНажмите кнопку [

 ], чтобы вывести на экран электронный уровень.
2 Требуемым образом выровняйте камеру по горизонтали.
zzВыровняйте камеру, чтобы центральная часть электронного уровня приобрела зеленый цвет.
●● Если на шаге 1 электронный уровень не отображается, нажмите кнопку [ ] и проверьте настройку на вкладке [
 1] ► [Отображение информации о съемке].
●● Если камера слишком сильно наклонена вперед или назад, использовать электронный уровень невозможно и он отображается серым цветом.
●● Во время съемки видеофильмов электронный уровень не отображается. ●● Если держать камеру вертикально, ориентация электронного уровня авто
матически обновляется в соответствии с ориентацией камеры.
●● Если электронный уровень неэффективен для обеспечения горизонтальности камеры, выполните его калибровку (=161).
●● Недоступно в режиме [ ].
].
Увеличение области, на которую произведена фокусировка
 Фотографии
  Видеофильмы
Фокусировку можно проверить, наполовину нажав кнопку спуска затвора — при этом будет увеличена сфокусированная область изображения в рамке автофокусировки.
1 Выполните настройку.
zzНажмите кнопку [ ], выберите пункт [Зум точки AF] на вкладке [
 3], затем выбе рите значение [Вкл.] (=29).
2 Проверьте фокусировку.
zzНажмите наполовину кнопку спуска затвора. Лицо, определенное в качестве главного объекта, увеличивается.
zzДля восстановления исходной настройки выбе рите на шаге 1 значение [Откл.].
●● В указанных ниже случаях при наполовину нажатой кнопке спуска затвора область фокусировки не увеличивается.
— Если лицо не обнаружено, если человек находится слишком близко к камере и его лицо не помещается на экране или если камера обнару живает перемещение объекта.
— При использовании цифрового зума (=39) ●● Недоступно в режиме [ ].
].
Перед использованием
Основные операции
Руководство по расширенным операциям
Основные сведения о камере
Автоматический/гибридный автоматический режим
Другие режимы съемки
Режим P
Режимы Tv, Av, M и C
Режим воспроизведения
Функции Wi-Fi
Меню настройки
Принадлежности
Приложение
Алфавитный указатель
50
 Loading…
-
Драйверы
2
-
Инструкции по эксплуатации
51
Языки:

Canon PowerShot G9 X инструкция по эксплуатации
(183 страницы)
- Языки:Русский
-
Тип:
PDF -
Размер:
29.59 MB -
Описание:
This document contains instructions on how to use Digital Photo Professional software.
Просмотр

Canon PowerShot G9 X инструкция по эксплуатации
(210 страниц)
- Языки:Русский
-
Тип:
PDF -
Размер:
15.88 MB -
Описание:
Фотокамера
Просмотр

Canon PowerShot G9 X инструкция по эксплуатации
(210 страниц)
- Языки:Русский
-
Тип:
PDF -
Размер:
14.36 MB -
Описание:
This file is an electronic guide (PDF file) for the PowerShot G9 X.
Просмотр

Canon PowerShot G9 X инструкция по эксплуатации
(149 страниц)
- Языки:Русский
-
Тип:
PDF -
Размер:
28.04 MB -
Описание:
This document contains instructions on how to use your product. It corresponds to version 4.8 of the software.
Просмотр

Canon PowerShot G9 X инструкция по эксплуатации
(11 страниц)
- Языки:Русский
-
Тип:
PDF -
Размер:
734.14 KB -
Описание:
This file is an electronic guide (PDF file) for the PowerShot G9 X.
Просмотр

Canon PowerShot G9 X инструкция по эксплуатации
(183 страницы)
- Языки:Английский
-
Тип:
PDF -
Размер:
29.53 MB -
Описание:
This document contains instructions on how to use Digital Photo Professional software.
Просмотр

Canon PowerShot G9 X инструкция по эксплуатации
(149 страниц)
- Языки:Английский
-
Тип:
PDF -
Размер:
31.71 MB -
Описание:
This document contains instructions on how to use your product. It corresponds to version 4.8 of the software.
Просмотр

Canon PowerShot G9 X инструкция по эксплуатации
(183 страницы)
- Языки:Украинский
-
Тип:
PDF -
Размер:
29.85 MB -
Описание:
This document contains instructions on how to use Digital Photo Professional software.
Просмотр

Canon PowerShot G9 X инструкция по эксплуатации
(183 страницы)
- Языки:Шведский
-
Тип:
PDF -
Размер:
29.67 MB -
Описание:
This document contains instructions on how to use Digital Photo Professional software.
Просмотр

Canon PowerShot G9 X инструкция по эксплуатации
(183 страницы)
- Языки:Финский
-
Тип:
PDF -
Размер:
29.67 MB -
Описание:
This document contains instructions on how to use Digital Photo Professional software.
Просмотр

Canon PowerShot G9 X инструкция по эксплуатации
(183 страницы)
- Языки:Словацкий
-
Тип:
PDF -
Размер:
29.93 MB -
Описание:
This document contains instructions on how to use Digital Photo Professional software.
Просмотр

Canon PowerShot G9 X инструкция по эксплуатации
(183 страницы)
- Языки:Португальский
-
Тип:
PDF -
Размер:
29.73 MB -
Описание:
This document contains instructions on how to use Digital Photo Professional software.
Просмотр

Canon PowerShot G9 X инструкция по эксплуатации
(183 страницы)
- Языки:Нидерландский
-
Тип:
PDF -
Размер:
29.74 MB -
Описание:
This document contains instructions on how to use Digital Photo Professional software.
Просмотр

Canon PowerShot G9 X инструкция по эксплуатации
(183 страницы)
- Языки:Венгерский
-
Тип:
PDF -
Размер:
29.84 MB -
Описание:
This document contains instructions on how to use Digital Photo Professional software.
Просмотр

Canon PowerShot G9 X инструкция по эксплуатации
(183 страницы)
- Языки:Казахский
-
Тип:
PDF -
Размер:
29.77 MB -
Описание:
This document contains instructions on how to use Digital Photo Professional software.
Просмотр

Canon PowerShot G9 X инструкция по эксплуатации
(183 страницы)
- Языки:Итальянский
-
Тип:
PDF -
Размер:
53.89 MB -
Описание:
This document contains instructions on how to use Digital Photo Professional software.
Просмотр

Canon PowerShot G9 X инструкция по эксплуатации
(183 страницы)
- Языки:Французский
-
Тип:
PDF -
Размер:
28.44 MB -
Описание:
This document contains instructions on how to use Digital Photo Professional software.
Просмотр

Canon PowerShot G9 X инструкция по эксплуатации
(183 страницы)
- Языки:Испанский
-
Тип:
PDF -
Размер:
26.77 MB -
Описание:
This document contains instructions on how to use Digital Photo Professional software.
Просмотр

Canon PowerShot G9 X инструкция по эксплуатации
(183 страницы)
- Языки:Эстонский
-
Тип:
PDF -
Размер:
30.13 MB -
Описание:
This document contains instructions on how to use Digital Photo Professional software.
Просмотр

Canon PowerShot G9 X инструкция по эксплуатации
(183 страницы)
- Языки:Греческий
-
Тип:
PDF -
Размер:
30.28 MB -
Описание:
This document contains instructions on how to use Digital Photo Professional software.
Просмотр

Canon PowerShot G9 X инструкция по эксплуатации
(183 страницы)
- Языки:Немецкий
-
Тип:
PDF -
Размер:
51.58 MB -
Описание:
This document contains instructions on how to use Digital Photo Professional software.
Просмотр

Canon PowerShot G9 X инструкция по эксплуатации
(183 страницы)
- Языки:Датский
-
Тип:
PDF -
Размер:
29.64 MB -
Описание:
This document contains instructions on how to use Digital Photo Professional software.
Просмотр

Canon PowerShot G9 X инструкция по эксплуатации
(183 страницы)
- Языки:Чешский
-
Тип:
PDF -
Размер:
29.85 MB -
Описание:
This document contains instructions on how to use Digital Photo Professional software.
Просмотр

Canon PowerShot G9 X инструкция по эксплуатации
(210 страниц)
- Языки:Персидский
-
Тип:
PDF -
Размер:
21.02 MB -
Описание:
This file is an electronic guide (PDF file) for the PowerShot G9 X.
Просмотр

Canon PowerShot G9 X инструкция по эксплуатации
(210 страниц)
- Языки:Шведский
-
Тип:
PDF -
Размер:
18.75 MB -
Описание:
This file is an electronic guide (PDF file) for the PowerShot G9 X.
Просмотр

Canon PowerShot G9 X инструкция по эксплуатации
(210 страниц)
- Языки:Португальский
-
Тип:
PDF -
Размер:
19.31 MB -
Описание:
This file is an electronic guide (PDF file) for the PowerShot G9 X.
Просмотр

Canon PowerShot G9 X инструкция по эксплуатации
(210 страниц)
- Языки:Польский
-
Тип:
PDF -
Размер:
19.2 MB -
Описание:
This file is an electronic guide (PDF file) for the PowerShot G9 X.
Просмотр

Canon PowerShot G9 X инструкция по эксплуатации
(210 страниц)
- Языки:Нидерландский
-
Тип:
PDF -
Размер:
19 MB -
Описание:
This file is an electronic guide (PDF file) for the PowerShot G9 X.
Просмотр

Canon PowerShot G9 X инструкция по эксплуатации
(210 страниц)
- Языки:Итальянский
-
Тип:
PDF -
Размер:
19.07 MB -
Описание:
This file is an electronic guide (PDF file) for the PowerShot G9 X.
Просмотр

Canon PowerShot G9 X инструкция по эксплуатации
(210 страниц)
- Языки:Эстонский
-
Тип:
PDF -
Размер:
15.96 MB -
Описание:
This file is an electronic guide (PDF file) for the PowerShot G9 X.
Просмотр

Canon PowerShot G9 X инструкция по эксплуатации
(210 страниц)
- Языки:Греческий
-
Тип:
PDF -
Размер:
19.66 MB -
Описание:
This file is an electronic guide (PDF file) for the PowerShot G9 X.
Просмотр

Canon PowerShot G9 X инструкция по эксплуатации
(210 страниц)
- Языки:Немецкий
-
Тип:
PDF -
Размер:
19.09 MB -
Описание:
This file is an electronic guide (PDF file) for the PowerShot G9 X.
Просмотр

Canon PowerShot G9 X инструкция по эксплуатации
(210 страниц)
- Языки:Чешский
-
Тип:
PDF -
Размер:
19.06 MB -
Описание:
This file is an electronic guide (PDF file) for the PowerShot G9 X.
Просмотр

Canon PowerShot G9 X инструкция по эксплуатации
(149 страниц)
- Языки:Украинский
-
Тип:
PDF -
Размер:
27.92 MB -
Описание:
This document contains instructions on how to use your product. It corresponds to version 4.8 of the software.
Просмотр

Canon PowerShot G9 X инструкция по эксплуатации
(149 страниц)
- Языки:Шведский
-
Тип:
PDF -
Размер:
31.77 MB -
Описание:
This document contains instructions on how to use your product. It corresponds to version 4.8 of the software.
Просмотр

Canon PowerShot G9 X инструкция по эксплуатации
(149 страниц)
- Языки:Финский
-
Тип:
PDF -
Размер:
32.12 MB -
Описание:
This document contains instructions on how to use your product. It corresponds to version 4.8 of the software.
Просмотр

Canon PowerShot G9 X инструкция по эксплуатации
(149 страниц)
- Языки:Португальский
-
Тип:
PDF -
Размер:
32 MB -
Описание:
This document contains instructions on how to use your product. It corresponds to version 4.8 of the software.
Просмотр

Canon PowerShot G9 X инструкция по эксплуатации
(149 страниц)
- Языки:Нидерландский
-
Тип:
PDF -
Размер:
31.77 MB -
Описание:
This document contains instructions on how to use your product. It corresponds to version 4.8 of the software.
Просмотр

Canon PowerShot G9 X инструкция по эксплуатации
(149 страниц)
- Языки:Венгерский
-
Тип:
PDF -
Размер:
32.35 MB -
Описание:
This document contains instructions on how to use your product. It corresponds to version 4.8 of the software.
Просмотр

Canon PowerShot G9 X инструкция по эксплуатации
(149 страниц)
- Языки:Литовский
-
Тип:
PDF -
Размер:
27.72 MB -
Описание:
This document contains instructions on how to use your product. It corresponds to version 4.8 of the software.
Просмотр

Canon PowerShot G9 X инструкция по эксплуатации
(149 страниц)
- Языки:Латышский
-
Тип:
PDF -
Размер:
27.69 MB -
Описание:
This document contains instructions on how to use your product. It corresponds to version 4.8 of the software.
Просмотр

Canon PowerShot G9 X инструкция по эксплуатации
(149 страниц)
- Языки:Казахский
-
Тип:
PDF -
Размер:
27.8 MB -
Описание:
This document contains instructions on how to use your product. It corresponds to version 4.8 of the software.
Просмотр

Canon PowerShot G9 X инструкция по эксплуатации
(149 страниц)
- Языки:Итальянский
-
Тип:
PDF -
Размер:
32.62 MB -
Описание:
This document contains instructions on how to use your product. It corresponds to version 4.8 of the software.
Просмотр

Canon PowerShot G9 X инструкция по эксплуатации
(149 страниц)
- Языки:Французский
-
Тип:
PDF -
Размер:
32.03 MB -
Описание:
This document contains instructions on how to use your product. It corresponds to version 4.8 of the software.
Просмотр

Canon PowerShot G9 X инструкция по эксплуатации
(149 страниц)
- Языки:Испанский
-
Тип:
PDF -
Размер:
30.77 MB -
Описание:
This document contains instructions on how to use your product. It corresponds to version 4.8 of the software.
Просмотр

Canon PowerShot G9 X инструкция по эксплуатации
(149 страниц)
- Языки:Эстонский
-
Тип:
PDF -
Размер:
28.41 MB -
Описание:
This document contains instructions on how to use your product. It corresponds to version 4.8 of the software.
Просмотр

Canon PowerShot G9 X инструкция по эксплуатации
(149 страниц)
- Языки:Греческий
-
Тип:
PDF -
Размер:
33.13 MB -
Описание:
This document contains instructions on how to use your product. It corresponds to version 4.8 of the software.
Просмотр

Canon PowerShot G9 X инструкция по эксплуатации
(149 страниц)
- Языки:Немецкий
-
Тип:
PDF -
Размер:
32.48 MB -
Описание:
This document contains instructions on how to use your product. It corresponds to version 4.8 of the software.
Просмотр

Canon PowerShot G9 X инструкция по эксплуатации
(149 страниц)
- Языки:Датский
-
Тип:
PDF -
Размер:
32.04 MB -
Описание:
This document contains instructions on how to use your product. It corresponds to version 4.8 of the software.
Просмотр

Canon PowerShot G9 X инструкция по эксплуатации
(149 страниц)
- Языки:Чешский
-
Тип:
PDF -
Размер:
31.87 MB -
Описание:
This document contains instructions on how to use your product. It corresponds to version 4.8 of the software.
Просмотр

Canon PowerShot G9 X инструкция по эксплуатации
(11 страниц)
- Языки:Итальянский
-
Тип:
PDF -
Размер:
1.03 MB -
Описание:
This file is an electronic guide (PDF file) for the PowerShot G9 X.
Просмотр
На NoDevice можно скачать инструкцию по эксплуатации для Canon PowerShot G9 X. Руководство пользователя необходимо для ознакомления с правилами установки и эксплуатации Canon PowerShot G9 X. Инструкции по использованию помогут правильно настроить Canon PowerShot G9 X, исправить ошибки и выявить неполадки.