
Данная лицензия не предназначена для продажи этого Руководства и Вы не становитесь владельцем этого Руководства после приобретения любого продукта, загрузки и/или использования. Nikon сохраняет за собой право владения данным Руководством и, следовательно, всеми копиями и все соответствующие права, относящиеся к интеллектуальной собственности, и сохраняет за собой все права, которые явно не предоставлены Вам в рамках данного Соглашения. Данное Соглашение представляет собой полное и эксклюзивное соглашение, устное и письменное, между Вами и Nikon.
1. РУКОВОДСТВО
Руководство предназначено для клиентов, которые приобрели наши продукты. Мы можем не иметь возможности ответить на запрос физических лиц, которые не приобрели наши продукты. Пожалуйста, имейте в виду, что данное руководство и контактная информация, указанные здесь, могут быть изменены без уведомления.
Данное Руководство защищено Законом об авторском праве Японии и международными законами об авторском праве и международными договорами. Вам необходимо воспроизвести на каждой копии уведомление об авторском праве Nikon и любую другую информацию о праве собственности, которые присутствовали на оригинале.
2. ОГРАНИЧЕНИЯ
Кроме случаев, когда в данном Соглашении указано иное, нельзя делать или передавать копии данного Руководства другим или передавать в электронной форме Руководство с одного компьютера на другой по сети. НЕЛЬЗЯ ИЗМЕНЯТЬ ИЛИ УДАЛЯТЬ ЛЮБЫЕ УВЕДОМЛЕНИЯ ОБ АВТОРСКОМ ПРАВЕ, ТОРГОВОЙ МАРКЕ ИЛИ ДРУГИЕ ЗАЩИТНЫЕ УВЕДОМЛЕНИЯ, СОДЕРЖАЩИЕСЯ В ДАННОМ РУКОВОДСТВЕ. НЕЛЬЗЯ ПРИСВАИВАТЬ ИЛИ ИНЫМ ОБРАЗОМ ИЗБАВЛЯТЬСЯ, МОДИФИЦИРОВАТЬ, НАСТРАИВАТЬ, ПЕРЕВОДИТЬ, АРЕНДОВАТЬ, БРАТЬ В НАЕМ, ЗАНИМАТЬ, ПЕРЕПРОДАВАТЬ, РАСПРОСТРАНЯТЬ, ПЕРЕДАВАТЬ ПО СЕТИ ИЛИ СОЗДАВАТЬ ИЛИ ИМЕТЬ СОЗДАННЫЕ ПРОИЗВОДСТВЕННЫЕ РАБОТЫ, ОСНОВАННЫЕ НА ДАННОМ РУКОВОДСТВЕ ИЛИ ЛЮБОЙ ЧАСТИ ТАКОВОГО.
3. ОГРАНИЧЕННАЯ ГАРАНТИЯ И ОТКАЗ
В НАИБОЛЬШЕЙ СТЕПЕНИ, РАЗРЕШЕННОЙ В СИЛУ ДЕЙСТВУЮЩЕГО ЗАКОНОДАТЕЛЬСТВА, ДАННОЕ РУКОВОДСТВО ПРЕДОСТАВЛЕНО НА ОСНОВЕ ПРИНЦИПА «КАК ЕСТЬ», БЕЗ ГАРАНТИИ В ЛЮБОЙ ФОРМЕ, И КОМПАНИЯ NIKON, ЕЕ СОТРУДНИКИ, РАСПРОСТРАНИТЕЛИ, ДИЛЕРЫ И АГЕНТЫ ПРЯМО НЕ ПРИЗНАЮТ ЛЮБУЮ ГАРАНТИЮ В ЛЮБОЙ ФОРМЕ, ВЫРАЖЕННУЮ ИЛИ ПОДРАЗУМЕВАЕМУЮ, ВКЛЮЧАЯ, НО НЕ ОГРАНИЧИВАЯСЬ, ЛЮБОЙ ПОДРАЗУМЕВАЕМОЙ ГАРАНТИЕЙ ПРИГОДНОСТИ ДЛЯ ТОРГОВЛИ, ПРИГОДНОСТИ ДЛЯ ОПРЕДЕЛЕННОГО НАЗНАЧЕНИЯ ИЛИ ОТСУТСТВИЯ НАРУШЕНИЙ. В НАИБОЛЬШЕЙ СТЕПЕНИ, РАЗРЕШЕННОЙ В СИЛУ ДЕЙСТВУЮЩЕГО ЗАКОНОДАТЕЛЬСТВА, КОМПАНИЯ NIKON, ЕЕ СОТРУДНИКИ, РАСПРОСТРАНИТЕЛИ, ДИЛЕРЫ И АГЕНТЫ НЕ ГАРАНТИРУЮТ ИСПОЛНЕНИЕ ИЛИ РЕЗУЛЬТАТЫ, КОТОРЫЕ ВЫ МОЖЕТЕ ПОЛУЧИТЬ ИЗ ДАННОГО РУКОВОДСТВА, ИЛИ ЧТО ДАННОЕ РУКОВОДСТВО БУДЕТ СООТВЕТСТВОВАТЬ ВАШИМ ТРЕБОВАНИЯМ ИЛИ ЧТО РАБОТА РУКОВОДСТВА БУДЕТ БЕСПЕРЕБОЙНОЙ, БЕЗОШИБОЧНОЙ ИЛИ НЕ БУДЕТ СОДЕРЖАТЬ ВИРУСОВ. В НАИБОЛЬШЕЙ СТЕПЕНИ, РАЗРЕШЕННОЙ В СИЛУ ДЕЙСТВУЮЩЕГО ЗАКОНОДАТЕЛЬСТВА, НИ КОМПАНИЯ NIKON, НИ ЕЕ СОТРУДНИКИ, РАСПРОСТРАНИТЕЛИ, ДИЛЕРЫ И АГЕНТЫ НЕ ДОЛЖНЫ НЕСТИ ПЕРЕД ВАМИ ОТВЕТСТВЕННОСТЬ ЗА ЛЮБЫЕ КОСВЕННЫЕ, ПОСЛЕДУЮЩИЕ ИЛИ НЕПРЕДНАМЕРЕННЫЕ УБЫТКИ, ПОТЕРИ ИЛИ ИЗДЕРЖКИ ЛЮБОГО ТИПА, БУДЬ ТО ПОТЕРЯ ПРИБЫЛИ, ПЕРЕРЫВ В ДЕЯТЕЛЬНОСТИ ИЛИ ИНЫМ СПОСОБОМ ВОЗНИКАЮЩИЙ ИЛИ ЯВЛЯЮЩИЙСЯ СЛЕДСТВИЕМ ДАННОГО РУКОВОДСТВА, ВЫЗВАННЫЙ КАКИМ-ЛИБО СПОСОБОМ, ДАЖЕ ЕСЛИ КОМПАНИЯ NIKON, ЕЕ СОТРУДНИКИ, РАСПРОСТРАНИТЕЛИ, ДИЛЕРЫ ИЛИ АГЕНТЫ УВЕДОМЛЕНЫ О ВОЗМОЖНОСТИ ВОЗНИКНОВЕНИЯ ТАКИХ УБЫТКОВ, ПОТЕРЬ ИЛИ ИЗДЕРЖЕК. ЭТОТ ОТКАЗ СОСТАВЛЯЕТ СУЩЕСТВЕННУЮ ЧАСТЬ ДАННОГО СОГЛАШЕНИЯ, И НЕИСПОЛЬЗОВАНИЕ ДАННОГО РУКОВОДСТВА УПОЛНОМОЧЕНО, КРОМЕ СЛУЧАЕВ В РАМКАХ ДАННОГО ОТКАЗА.
4. ОБЩИЕ СВЕДЕНИЯ
Данное соглашение регулируется и должно истолковываться в соответствии с законами Японии независимо от его принципов коллизионного права. В случае возникновения спора в рамках или в связи с данным соглашением Вы, таким образом, даете согласие на персональную юрисдикцию Японии и отказываетесь от любого возражения, что такая дискуссия вызывает затруднение. Далее Вы соглашаетесь на получение судебных извещений в любом действии, возникающем из данного Соглашения по обычной почте или другими коммерчески оправданными способами доставки расписки в получении. Если любое положение данного Соглашения должно быть определено недействительным по какой-либо причине, то оставшиеся положения не должны быть признаны недействительными и должны остаться в силе без изменений. Данное Соглашение устанавливает в дальнейшем целое соглашение и понимание между Вами и компанией Nikon, и замещает собой и заменяет любые другие соглашения, относящиеся к сути дела данного Соглашения. Неуспех любой стороны в настаивании на строгом исполнении любого правила или положения данного соглашения, или выполнение любой опции, права или защиты прав, содержащихся в данном документе, не должны толковаться в качестве отказа от любого применения такого правила, положения, опции, права или защиты прав в будущем, и такое правило, положение, опция, право или защита прав должны продолжиться и сохранить полную юридическую силу и действие. Заголовки разделов данного Соглашения вставлены только для удобства и не должны составлять часть данного документа или влиять каким-либо образом на значение или толкование данного Соглашения. Кроме случаев, когда иначе явно указано в данном документе, положения раздела 3 и раздела 4 вместе с любыми положениями, которые с помощью своих прямо выраженных условий относятся к периодам после прекращения срока действия данного Соглашения, должны оставаться в силе после прекращения действия данного Соглашения по какой-либо причине.
Руководства для продуктов Nikon/ 2018/02/15/ Вер. 2.0.0
-
Инструкции по эксплуатации
18
Языки:

Nikon COOLPIX P510 инструкция по эксплуатации
(260 страниц)
- Языки:Русский
-
Тип:
PDF -
Размер:
17.82 MB
Просмотр

Nikon COOLPIX P510 инструкция по эксплуатации
(260 страниц)
- Языки:Английский
-
Тип:
PDF -
Размер:
16.11 MB
Просмотр

Nikon COOLPIX P510 инструкция по эксплуатации
(260 страниц)
- Языки:Тайский
-
Тип:
PDF -
Размер:
18.97 MB
Просмотр

Nikon COOLPIX P510 инструкция по эксплуатации
(260 страниц)
- Языки:Шведский
-
Тип:
PDF -
Размер:
17.58 MB
Просмотр

Nikon COOLPIX P510 инструкция по эксплуатации
(260 страниц)
- Языки:Словенский
-
Тип:
PDF -
Размер:
17.59 MB
Просмотр

Nikon COOLPIX P510 инструкция по эксплуатации
(260 страниц)
- Языки:Португальский
-
Тип:
PDF -
Размер:
16.89 MB -
Описание:
Brasil
Просмотр

Nikon COOLPIX P510 инструкция по эксплуатации
(260 страниц)
- Языки:Нидерландский
-
Тип:
PDF -
Размер:
17.27 MB
Просмотр

Nikon COOLPIX P510 инструкция по эксплуатации
(260 страниц)
- Языки:Корейский
-
Тип:
PDF -
Размер:
17.43 MB
Просмотр

Nikon COOLPIX P510 инструкция по эксплуатации
(260 страниц)
- Языки:Исландский
-
Тип:
PDF -
Размер:
17.49 MB
Просмотр

Nikon COOLPIX P510 инструкция по эксплуатации
(260 страниц)
- Языки:Венгерский
-
Тип:
PDF -
Размер:
17.83 MB
Просмотр

Nikon COOLPIX P510 инструкция по эксплуатации
(260 страниц)
- Языки:Французский
-
Тип:
PDF -
Размер:
17.71 MB
Просмотр

Nikon COOLPIX P510 инструкция по эксплуатации
(258 страниц)
- Языки:Китайский
-
Тип:
PDF -
Размер:
17.85 MB
Просмотр

Nikon COOLPIX P510 инструкция по эксплуатации
(260 страниц)
- Языки:Португальский
-
Тип:
PDF -
Размер:
17.83 MB
Просмотр

Nikon COOLPIX P510 инструкция по эксплуатации
(260 страниц)
- Языки:Японский
-
Тип:
PDF -
Размер:
23.6 MB
Просмотр

Nikon COOLPIX P510 инструкция по эксплуатации
(260 страниц)
- Языки:Итальянский
-
Тип:
PDF -
Размер:
17.36 MB
Просмотр

Nikon COOLPIX P510 инструкция по эксплуатации
(260 страниц)
- Языки:Немецкий
-
Тип:
PDF -
Размер:
17.39 MB
Просмотр

Nikon COOLPIX P510 инструкция по эксплуатации
(260 страниц)
- Языки:Чешский
-
Тип:
PDF -
Размер:
17.71 MB
Просмотр

Nikon COOLPIX P510 инструкция по эксплуатации
(260 страниц)
- Языки:Арабский
-
Тип:
PDF -
Размер:
18.31 MB
Просмотр
На NoDevice можно скачать инструкцию по эксплуатации для Nikon COOLPIX P510. Руководство пользователя необходимо для ознакомления с правилами установки и эксплуатации Nikon COOLPIX P510. Инструкции по использованию помогут правильно настроить Nikon COOLPIX P510, исправить ошибки и выявить неполадки.
![]()
DIGITAL CAMERA
Reference Manual
En
Trademark Information
•Microsoft, Windows and Windows Vista are either registered trademarks or trademarks of Microsoft Corporation in the United States and/or other countries.
•Macintosh, Mac OS, and QuickTime are trademarks of Apple Inc., registered in the U.S. and other countries. The iFrame logo and the iFrame symbol are trademarks of Apple Inc.
•Adobe and Acrobat are registered trademarks of Adobe Systems Inc.
•SDXC, SDHC and SD Logos are trademarks of SD-3C, LLC.
•PictBridge is a trademark.
•HDMI, 
 logo and High-Definition Multimedia Interface are trademarks or registered trademarks of HDMI Licensing LLC.
•All other trade names mentioned in this manual or the other documentation provided with your Nikon product are trademarks or registered trademarks of their respective holders.
AVC Patent Portfolio License
This product is licensed under the AVC Patent Portfolio License for the personal and non-commercial use of a consumer to (i) encode video in compliance with the AVC standard (“AVC video”) and/or (ii) decode AVC video that was encoded by a consumer engaged in a personal and non-commercial activity and/or was obtained from a video provider licensed to provide AVC video. No license is granted or shall be implied for any other use. Additional information may be obtained from MPEG LA, L.L.C.
See http://www.mpegla.com.

Introduction
Parts of the Camera and Basic Operations
The Basics of Shooting and Playback
Shooting Features
Playback Features
Recording and Playing Back Movies
Using GPS
General Camera Setup
Reference Section
Technical Notes and Index
i
Introduction
Introduction
Read This First
Thank you for purchasing the Nikon COOLPIX P510 digital camera.
Before using the camera, please read the information in “For Your Safety” (Avi) and familiarize yourself with the information provided in this manual. After reading, please keep this manual handy and refer to it to enhance your enjoyment of your new camera.
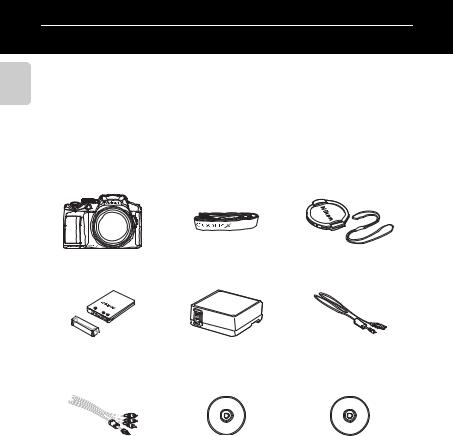
Confirming the Package Contents
In the event that any items are missing, please contact the store where you purchased the camera.
|
COOLPIX P510 |
Camera Strap |
Lens Cap LC-CP24 |
|
Digital Camera |
(with cord) |
|
Rechargeable Li-ion |
Charging AC Adapter |
USB Cable UC-E6 |
|
Battery EN-EL5 |
EH-69P* |
|
|
(with terminal cover) |
|
Audio Video Cable EG-CP16 |
ViewNX 2 Installer CD |
Reference Manual CD |
• Warranty
*A plug adapter is included if the camera was purchased in a country or region that requires a plug adapter. The shape of the plug adapter varies with the country or region of purchase.
NOTE: A memory card is not included with the camera.
ii

Read This First
About This Manual
If you want to start using the camera right away, see “The Basics of Shooting and Playback” (A17).
To learn about the parts of the camera and basic operations, see “Parts of the Camera and Basic Operations” (A1).
Other Information
•Symbols and Conventions
To make it easier to find the information you need, the following symbols and conventions are used in this manual:
BThis icon indicates cautions and information that should be read before using the camera.
CThis icon marks notes, information that should be read before using the camera.
|
A/E/F |
These icons indicate other pages containing relevant information; |
|
E: “Reference Section”, F: “Technical Notes and Index.” |
•SD, SDHC and SDXC memory cards are referred to as “memory cards” in this manual.
•The setting at the time of purchase is referred to as the “default setting.”
•The names of menu items displayed in the camera monitor, and the names of buttons or messages displayed on a computer monitor appear in bold.
•In this manual, images are sometimes omitted from monitor and viewfinder display samples so that monitor indicators can be more clearly shown.
•Illustrations and monitor content shown in this manual may differ from the actual product.
Introduction
iii

Read This First
Introduction
Information and Precautions
Life-Long Learning
As part of Nikon’s “Life-Long Learning” commitment to ongoing product support and education, continually updated information is available online at the following sites:
•For users in the U.S.A.: http://www.nikonusa.com/
•For users in Europe and Africa: http://www.europe-nikon.com/support/
•For users in Asia, Oceania, and the Middle East: http://www.nikon-asia.com/
Visit these sites to keep up-to-date with the latest product information, tips, answers to frequently asked questions (FAQs), and general advice on digital imaging and photography. Additional information may be available from the Nikon representative in your area. Visit the site below for contact information:
http://imaging.nikon.com/
Use Only Nikon Brand Electronic Accessories
Nikon COOLPIX cameras are designed to the highest standards and include complex electronic circuitry. Only Nikon brand electronic accessories (including battery chargers, batteries, Charging AC Adapter and AC adapters) certified by Nikon specifically for use with this Nikon digital camera are engineered and proven to operate within the operational and safety requirements of this electronic circuitry.
THE USE OF NON-NIKON ELECTRONIC ACCESSORIES COULD DAMAGE THE CAMERA AND MAY VOID YOUR NIKON WARRANTY.
The use of third-party rechargeable Li-ion batteries not bearing the Nikon holographic seal could interfere with normal operation of the camera or result in the batteries overheating, igniting, rupturing, or leaking.
For more information about Nikon brand accessories, contact a local authorized Nikon dealer.
Holographic seal: Identifies this device as an authentic Nikon product.
Before Taking Important Pictures
Before taking pictures on important occasions (such as at weddings or before taking the camera on a trip), take a test shot to ensure that the camera is functioning normally. Nikon will not be held liable for damages or lost profits that may result from product malfunction.
About the User’s Manual
•No part of the documentation included with this product may be reproduced, transmitted, transcribed, stored in a retrieval system, or translated into any language in any form, by any means, without Nikon’s prior written permission.
•Nikon will not be held liable for any damages resulting from the use of this product.
•Nikon reserves the right to change the specifications of the hardware and software described in the documentation at any time and without prior notice.
•While every effort was made to ensure that the information in the documentation is accurate and complete, we would appreciate it were you to bring any errors or omissions to the attention of the
ivNikon representative in your area (address provided separately).

Read This First
Notice Concerning Prohibition of Copying or Reproduction
Note that simply being in possession of material that was digitally copied or reproduced by means of a scanner, digital camera or other device may be punishable by law.
• Items prohibited by law from being copied or reproduced
Do not copy or reproduce paper money, coins, securities, government bonds or local government bonds, even if such copies or reproductions are stamped “Sample.” The copying or reproduction of paper money, coins, or securities which are circulated in a foreign country is prohibited. Unless the prior permission of the government was obtained, the copying or reproduction of unused postage stamps or post cards issued by the government is prohibited.
The copying or reproduction of stamps issued by the government and of certified documents stipulated by law is prohibited.
• Cautions on certain copies and reproductions
The government has issued cautions on copies or reproductions of securities issued by private companies (shares, bills, checks, gift certificates, etc.), commuter passes, or coupon tickets, except when a minimum of necessary copies are to be provided for business use by a company. Also, do not copy or reproduce passports issued by the government, licenses issued by public agencies and private groups, ID cards and tickets, such as passes and meal coupons.
• Comply with copyright notices
The copying or reproduction of copyrighted creative works such as books, music, paintings, woodcut prints, maps, drawings, movies, and photographs is governed by national and international copyright laws. Do not use this product for the purpose of making illegal copies or to infringe copyright laws.
Disposing of Data Storage Devices
Please note that deleting images or formatting data storage devices such as memory cards or built-in camera memory does not completely erase the original image data. Deleted files can sometimes be recovered from discarded storage devices using commercially available software, potentially resulting in the malicious use of personal image data. Ensuring the privacy of such data is the user’s responsibility.
Before discarding a data storage device or transferring ownership to another person, erase all data using commercial deletion software, or format the device and then completely refill it with images containing no private information (for example, pictures of empty sky). Be sure to also replace any pictures selected for the Select an image option in the Welcome screen setting (A108). Care should be taken to avoid injury or damage to property when physically destroying data storage devices.
For the COOLPIX P510, the log data saved on the memory card is handled in the same way as other data. You can delete unsaved log data from the memory card using Create log End log Erase log.
Introduction
v

For Your Safety
Introduction
To prevent damage to your Nikon product or injury to yourself or to others, read the following safety precautions in their entirety before using this equipment. Keep these safety instructions where all those who use the product will read them.
This icon marks warnings, information that should be read before using this Nikon product, to prevent possible injury.
WARNINGS
Turn off in the event of malfunction
Should you notice smoke or an unusual smell coming from the camera or Charging AC Adapter, unplug the Charging AC Adapter and remove the battery immediately, taking care to avoid burns. Continued operation could result in injury. After removing or disconnecting the power source, take the equipment to a Nikon-authorized service representative for inspection.
Do not disassemble
Touching the internal parts of the camera or Charging AC Adapter could result in injury. Repairs should be performed only by qualified technicians. Should the camera or Charging AC Adapter break open as the result of a fall or other accident, take the product to a Nikon-authorized service representative for inspection, after unplugging the product and/or removing the battery.
Do not use the camera or Charging AC Adapter in the presence of flammable gas
Using the camera in the presence of flammable gases such as propane and gasoline, as well as flammable sprays or dust could result in explosion or fire.
Handle the camera strap with care
Never place the strap around the neck of an infant or child.
Keep out of reach of children
Do not keep the products within reach of children. Doing so may cause injury. Particular care should be taken to prevent infants from putting the battery or other small parts into their mouths.
Do not remain in contact with the camera, Charging AC Adapter, or AC adapter for extended periods while the devices are on or in use.
Parts of the devices become hot. Leaving the devices in direct contact with the skin for extended periods may result in low-temperature burns.
vi

For Your Safety
Observe caution when handling the battery
The battery may leak, overheat, or explode if improperly handled. Observe the following precautions when handling the battery for use in this product:
•Before replacing the battery, turn the product off. If you are using the Charging AC Adapter/AC adapter, be sure it is unplugged.
•Use only a Rechargeable Li-ion Battery EN-EL5 (included). Charge the battery by inserting it into the camera and connecting the Charging AC Adapter. EH-69P (included).
•When inserting the battery, do not attempt to insert it upside down or backwards.
•Do not short or disassemble the battery or attempt to remove or break the battery insulation or casing.
•Do not expose the battery to flame or to excessive heat.
•Do not immerse in or expose to water.
•Replace the terminal cover when transporting the battery. Do not transport or store with metal objects such as necklaces or hairpins.
•The battery is prone to leakage when fully discharged. To avoid damage to the product, be sure to remove the battery when no charge remains.
•Discontinue use immediately should you notice any change in the battery, such as discoloration or deformation.
•If liquid from the damaged battery comes in contact with clothing or skin, rinse immediately with plenty of water.
•If leaked battery fluid gets into your eyes, rinse them out immediately with clean running water and get medical treatment.
•Do not attempt to charge batteries that are not rechargeable.
Observe the following precautions when handling the Charging AC Adapter
•Keep dry. Failure to observe this precaution could result in fire or electric shock.
•Dust on or near the metal parts of the plug should be removed with a dry cloth. Continued use could result in fire.
•Do not handle the plug or go near the Charging AC Adapter during lightning storms. Failure to observe this precaution could result in electric shock.
•Do not damage, modify, forcibly tug or bend the USB cable, place it under heavy objects, or expose it to heat or flames. Should the insulation be damaged and the wires become exposed, take it to a Nikonauthorized service representative for inspection. Failure to observe these precautions could result in fire or electric shock.
•Do not handle the plug or Charging AC Adapter with wet hands. Failure to observe this precaution could result in electric shock.

For Your Safety
Introduction
•Do not use with travel converters or adapters designed to convert from one voltage to another or with DC- to-AC inverters. Failure to observe this precaution could damage the product or cause overheating or fire.
Use appropriate cables
When connecting cables to the input and output jacks, use only the cables provided or sold by Nikon for the purpose, to maintain compliance with product regulations.
Handle moving parts with care
Be careful that your fingers or other objects are not pinched by the lens cover or other moving parts.
CD-ROMs
The CD-ROMs included with this device should not be played back on audio CD equipment. Playing CD-ROMs on an audio CD player could cause hearing loss or damage the equipment.
Observe caution when using the flash
Using the flash close to your subject’s eyes could cause temporary visual impairment. Particular care should be observed if photographing infants, when the flash should be no less than 1 m (3 ft 4 in.) from the subject.
Do not operate the flash with the flash window touching a person or object
Failure to observe this precaution could result in burns or fire.
Avoid contact with liquid crystal
Should the monitor break, care should be taken to avoid injury caused by broken glass and to prevent liquid crystal from the monitor touching the skin or entering the eyes or mouth.
Turn the power off when using inside an airplane or the hospital
Turn the power off while inside the airplane during take off or landing. Also, before boarding an airplane, set the GPS tracking information recording function to OFF. Follow the instructions of the hospital when using while in a hospital. The electromagnetic waves emitted by this camera may disrupt the electronic systems of the airplane or the instruments of the hospital.
3D Images
Do not continuously view 3D images recorded with this device for extended periods, whether on a television, monitor, or other display.
In the case of children whose visual systems are still maturing, consult a pediatrician or ophthalmologist prior to use and follow their instructions. Prolonged viewing of 3D images may cause eye strain, nausea, or discomfort. Cease use should any of these symptoms occur and consult a physician if necessary.
viii
![]()
Notices
Notices for Customers in the U.S.A.
IMPORTANT SAFETY
INSTRUCTIONS —
SAVE THESE INSTRUCTIONS.
DANGER — TO REDUCE THE RISK OF FIRE OR ELECTRIC SHOCK, CAREFULLY FOLLOW THESE INSTRUCTIONS
For connection to a supply not in the U.S.A., use an attachment plug adapter of the proper configuration for the power outlet if needed.
The power supply unit is intended to be correctly orientated in a vertical or floor mount position.
Federal Communications
Commission (FCC) Radio
Frequency Interference
Statement
This equipment has been tested and found to comply with the limits for a Class B digital device, pursuant to Part 15 of the FCC rules. These limits are designed to provide reasonable protection against harmful interference in a residential installation. This equipment generates, uses, and can radiate radio frequency energy and, if not installed and used in accordance with the instructions, may cause harmful interference to radio communications. However, there is no guarantee that interference will not occur in a particular installation. If this
equipment does cause harmful interference to radio or television reception, which can be determined by turning the equipment off and on, the user is encouraged to try to correct the interference by one or more of the following measures:
•Reorient or relocate the receiving antenna.
•Increase the separation between the equipment and receiver.
•Connect the equipment into an outlet on a circuit different from that to which the receiver is connected.
•Consult the dealer or an experienced radio/television technician for help.
CAUTIONS
Modifications
The FCC requires the user to be notified that any changes or modifications made to this device that are not expressly approved by Nikon Corporation may void the user’s authority to operate the equipment.
Interface Cables
Use the interface cables sold or provided by Nikon for your equipment. Using other interface cables may exceed the limits of Class B Part 15 of the FCC rules.
Introduction
ix

Notices
Introduction
Notice for Customers in the State of California
WARNING
Handling the cord on this product will expose you to lead, a chemical known to the State of California to cause birth defects or other reproductive harm.
Wash hands after handling.
Nikon Inc.,
1300 Walt Whitman Road, Melville, New York 11747-3064 USA
Tel: 631-547-4200
Notice for Customers in Canada
CAUTION
This Class B digital apparatus complies with Canadian ICES-003.
ATTENTION
Cet appareil numérique de la classe B est conforme à la norme NMB-003 du Canada.
Notices for Customers in Europe
CAUTIONS
RISK OF EXPLOSION IF BATTERY IS REPLACED BY AN INCORRECT TYPE.
DISPOSE OF USED BATTERIES ACCORDING TO THE INSTRUCTIONS.
This symbol indicates that this product is to be collected separately.
The following apply only to users in European countries:
•This product is designated for separate collection at an appropriate collection point. Do not dispose of as household waste.
•For more information, contact the retailer or the local authorities in charge of waste management.
This symbol on the battery indicates that the battery is to be collected separately. The following apply only to users in European countries:
•All batteries, whether marked with this symbol or not, are designated for separate collection at an appropriate collection point. Do not dispose of as household waste.
•For more information, contact the retailer or the local authorities in charge of waste management.
x

Table of Contents
|
Introduction ………………………………………………………………………………………………………………………… |
ii |
|
Read This First ………………………………………………………………………………………………………………………. |
ii |
|
Confirming the Package Contents……………………………………………………………………………………………….. |
ii |
|
About This Manual…………………………………………………………………………………………………………………………….. |
iii |
|
Information and Precautions………………………………………………………………………………………………………… |
iv |
|
For Your Safety…………………………………………………………………………………………………………………….. |
vi |
|
WARNINGS …………………………………………………………………………………………………………………………………………… |
vi |
|
Notices ………………………………………………………………………………………………………………………………….. |
ix |
|
Parts of the Camera and Basic Operations ……………………………………………………………………… |
1 |
|
Parts of the Camera……………………………………………………………………………………………………………… |
2 |
|
The Camera Body……………………………………………………………………………………………………………………………….. |
2 |
|
Controls Used in Shooting Mode ………………………………………………………………………………………………… |
4 |
|
Controls Used in Playback Mode …………………………………………………………………………………………………. |
5 |
|
Changing the Angle of the Monitor …………………………………………………………………………………………… |
6 |
|
Attaching the Camera Strap and Lens Cap ……………………………………………………………………………… |
7 |
|
The Monitor………………………………………………………………………………………………………………………………………….. |
8 |
|
Basic Operations…………………………………………………………………………………………………………………. |
11 |
|
Switching Between Shooting Mode and Playback Mode ……………………………………………….. |
11 |
|
Using the Rotary Multi Selector………………………………………………………………………………………………….. |
12 |
|
Using Menus (the dButton) ………………………………………………………………………………………………….. |
13 |
|
Switching the Information on the Monitor (sbutton)……………………………………………… |
15 |
|
Switching the Monitor Display (xbutton)…………………………………………………………………………. |
16 |
|
Using the Viewfinder………………………………………………………………………………………………………………………. |
16 |
|
The Basics of Shooting and Playback……………………………………………………………………………. |
17 |
|
Preparation 1 Insert the Battery……………………………………………………………………………………….. |
18 |
|
Preparation 2 Charge the Battery…………………………………………………………………………………….. |
20 |
|
Preparation 3 Insert a Memory Card……………………………………………………………………………….. |
22 |
|
Internal Memory and Memory Cards……………………………………………………………………………………….. |
23 |
|
Approved Memory Cards ……………………………………………………………………………………………………………… |
23 |
|
Step 1 Turn the Camera On ………………………………………………………………………………………………. |
24 |
|
Turning the Camera On and Off…………………………………………………………………………………………………. |
25 |
|
Setting the Display Language, Date, and Time…………………………………………………………………….. |
26 |
|
Step 2 Select a Shooting Mode………………………………………………………………………………………… |
28 |
|
Available Shooting Modes……………………………………………………………………………………………………………. |
29 |
|
Step 3 Frame a Picture……………………………………………………………………………………………………….. |
30 |
|
Using the Zoom………………………………………………………………………………………………………………………………… |
31 |
|
Step 4 Focus and Shoot …………………………………………………………………………………………………….. |
32 |
|
Step 5 Play Back Images ……………………………………………………………………………………………………. |
34 |
|
Changing How Images Are Displayed……………………………………………………………………………………… |
35 |
|
Step 6 Delete Unwanted Images……………………………………………………………………………………… |
36 |
Introduction
xi

Table of Contents
Introduction
|
Shooting Features ……………………………………………………………………………………………………………. |
39 |
|
A(Auto) Mode…………………………………………………………………………………………………………………… |
40 |
|
Changing A(Auto) Mode Settings………………………………………………………………………………………….. |
40 |
|
Scene Mode (Shooting Suited to Scenes) ………………………………………………………………………. |
41 |
|
Changing Scene Mode Settings…………………………………………………………………………………………………. |
42 |
|
Characteristics of Each Scene ……………………………………………………………………………………………………… |
42 |
|
Using Skin Softening ………………………………………………………………………………………………………………………. |
54 |
|
Special Effects Mode (Applying Effects When Shooting) …………………………………………….. |
55 |
|
Characteristics of Each Special Effect……………………………………………………………………………………….. |
55 |
|
Changing Special Effects Mode Settings………………………………………………………………………………… |
56 |
|
j, k, l, m Modes (Setting the Exposure for Shooting)……………………………………………… |
57 |
|
Changing j, k, l, m Modes…………………………………………………………………………………………………….. |
60 |
|
Options Available in the Shooting Menu ……………………………………………………………………………….. |
60 |
|
M (User Setting Modes) …………………………………………………………………………………………………….. |
63 |
|
Saving Settings in M Mode ………………………………………………………………………………………………………….. |
64 |
|
Features That Can Be Set Using the Multi Selector……………………………………………………….. |
65 |
|
Available Functions …………………………………………………………………………………………………………………………. |
65 |
|
Using the Flash (Flash Modes) …………………………………………………………………………………………………….. |
66 |
|
Using the Self-timer ………………………………………………………………………………………………………………………… |
69 |
|
Smile Timer (Shooting Smiling Faces) ……………………………………………………………………………………… |
70 |
|
Using Focus Mode …………………………………………………………………………………………………………………………… |
72 |
|
Adjusting Brightness (Exposure Compensation)…………………………………………………………………. |
74 |
|
List of the Default Settings……………………………………………………………………………………………………………. |
75 |
|
Changing the Image Quality and Image Size ………………………………………………………………… |
77 |
|
Available Image Quality…………………………………………………………………………………………………………………. |
77 |
|
Available Image Size ……………………………………………………………………………………………………………………….. |
78 |
|
Features That Cannot Be Used Simultaneously …………………………………………………………….. |
80 |
|
The Control Range of the Shutter Speed (j, k, l, m Modes) …………………………………….. |
83 |
|
Focusing on Subject…………………………………………………………………………………………………………… |
84 |
|
Using the Target Finding AF ………………………………………………………………………………………………………… |
84 |
|
Using Face Detection……………………………………………………………………………………………………………………… |
85 |
|
Focus Lock…………………………………………………………………………………………………………………………………………… |
86 |
|
Playback Features…………………………………………………………………………………………………………….. |
87 |
|
Features Available in Playback Mode (Playback Menu) ……………………………………………….. |
88 |
|
Connecting the Camera to a TV, Computer, or Printer…………………………………………………. |
90 |
|
Using ViewNX 2…………………………………………………………………………………………………………………… |
91 |
|
Installing ViewNX 2………………………………………………………………………………………………………………………….. |
91 |
|
Transferring Images to the Computer ……………………………………………………………………………………… |
93 |
|
Viewing Images ………………………………………………………………………………………………………………………………… |
94 |
xii

Table of Contents
|
Recording and Playing Back Movies……………………………………………………………………………… |
95 |
|
Recording Movies ………………………………………………………………………………………………………………. |
96 |
|
Changing Movie Recording Settings (Movie Menu) ………………………………………………………….. |
99 |
|
Playing Back Movies………………………………………………………………………………………………………… |
100 |
|
Using GPS………………………………………………………………………………………………………………………… |
101 |
|
Starting GPS Data Recording………………………………………………………………………………………. |
… 102 |
|
Changing the GPS Settings (GPS Options Menu)……………………………………………………….. |
105 |
|
General Camera Setup…………………………………………………………………………………………………… |
107 |
|
The Setup Menu ………………………………………………………………………………………………………………. |
108 |
|
Reference Section………………………………………………………………………………………………………… |
E1 |
|
Taking Pictures with Manual Focus …………………………………………………………………………….. |
E2 |
|
Using Easy Panorama (Shooting and Playing back) …………………………………………………. |
E3 |
|
Taking Pictures with Easy Panorama……………………………………………………………………………………. |
E3 |
|
Viewing Easy Panorama (Scroll) …………………………………………………………………………………………….. |
E5 |
|
Using Panorama Assist………………………………………………………………………………………………….. |
E6 |
|
Using 3D Photography………………………………………………………………………………………………….. |
E8 |
|
j, k, l, m Modes ……………………………………………………………………………………………………… |
E10 |
|
j (Programmed auto), k (Shutter-priority auto) or |
|
|
l (Aperture-priority auto)……………………………………………………………………………………………………. |
E10 |
|
m (Manual) Mode……………………………………………………………………………………………………………………. |
E11 |
|
Playing and Deleting Images Captured Using Continuous Shooting Mode |
|
|
(Sequence)……………………………………………………………………………………………………………………. |
E13 |
|
Playing Images in a Sequence…………………………………………………………………………………………….. |
E13 |
|
Deleting Images in a Sequence………………………………………………………………………………………….. |
E14 |
|
Editing Still Images……………………………………………………………………………………………………… |
E15 |
|
Editing Features ………………………………………………………………………………………………………………………… |
E15 |
|
kQuick Retouch: Enhancing Contrast and Saturation…………………………………………… |
E17 |
|
ID-Lighting: Enhancing Brightness and Contrast …………………………………………………… |
E17 |
|
eSkin Softening: Softening Skin Tones ………………………………………………………………………… |
E18 |
|
pFilter Effects: Applying Digital Filter Effects ……………………………………………………………….. |
E19 |
|
gSmall Picture: Reducing the Size of an Image………………………………………………………… |
E20 |
|
jBlack Border: Adding a Black Border to Pictures ……………………………………………………. |
E21 |
|
aCrop: Creating a Cropped Copy……………………………………………………………………………………. |
E22 |
|
Connecting the Camera to a TV (Viewing Images on a TV) …………………………………. |
E23 |
|
Connecting the Camera to a Printer (Direct Print) …………………………………………………. |
E25 |
|
Connecting the Camera to a Printer…………………………………………………………………………………. |
E26 |
|
Printing Individual Images ……………………………………………………………………………………………………. |
E27 |
|
Printing Multiple Images……………………………………………………………………………………………………….. |
E28 |
Introduction
xiii

Table of Contents
Introduction
|
Editing Movies……………………………………………………………………………………………………………… |
E31 |
|
Extracting Only the Desired Portions of the Movie…………………………………………………….. |
E31 |
|
Saving a Frame from a Movie as a Still Picture ……………………………………………………………… |
E32 |
|
Shooting Menu (j, k, l or m Mode)…………………………………………………………………….. |
E33 |
|
Image Quality and Image Size…………………………………………………………………………………………….. |
E33 |
|
Picture Control (COOLPIX Picture Control) …………………………………………………………………….. |
E33 |
|
Custom Picture Control (COOLPIX Custom Picture Control)…………………………………… |
E37 |
|
White Balance (Adjusting Hue) …………………………………………………………………………………………… |
E38 |
|
Metering………………………………………………………………………………………………………………………………………. |
E40 |
|
Continuous Shooting……………………………………………………………………………………………………………… |
E41 |
|
ISO Sensitivity…………………………………………………………………………………………………………………………….. |
E45 |
|
Exposure Bracketing ……………………………………………………………………………………………………………….. |
E46 |
|
AF Area Mode ……………………………………………………………………………………………………………………………. |
E47 |
|
Autofocus Mode……………………………………………………………………………………………………………………….. |
E51 |
|
Flash Exp. Comp. ………………………………………………………………………………………………………………………. |
E52 |
|
Noise Reduction Filter…………………………………………………………………………………………………………….. |
E52 |
|
Active D-Lighting……………………………………………………………………………………………………………………… |
E53 |
|
Save User Settings/Reset User Settings…………………………………………………………………………… |
E53 |
|
Zoom Memory ………………………………………………………………………………………………………………………….. |
E54 |
|
Startup Zoom Position …………………………………………………………………………………………………………… |
E54 |
|
The Playback Menu …………………………………………………………………………………………………….. |
E55 |
|
aPrint Order (Creating a DPOF Print Order) ……………………………………………………………….. |
E55 |
|
bSlide Show……………………………………………………………………………………………………………………………. |
E57 |
|
dProtect…………………………………………………………………………………………………………………………………… |
E58 |
|
The Image Selection Screen ………………………………………………………………………………………………… |
E59 |
|
fRotate Image……………………………………………………………………………………………………………………….. |
E60 |
|
EVoice Memo…………………………………………………………………………………………………………………………… |
E61 |
|
hCopy (Copy Between Internal Memory and Memory Card)…………………………….. |
E62 |
|
CSequence Display Options…………………………………………………………………………………………….. |
E63 |
|
xChoose Key Picture……………………………………………………………………………………………………………. |
E63 |
|
The Movie Menu………………………………………………………………………………………………………….. |
E64 |
|
Movie Options …………………………………………………………………………………………………………………………… |
E64 |
|
Recording Movies in Slow Motion and Fast Motion (HS Movie)……………………………. |
E66 |
|
Autofocus Mode……………………………………………………………………………………………………………………….. |
E68 |
|
GPS Setting Menu……………………………………………………………………………………………………….. |
E69 |
|
GPS Settings……………………………………………………………………………………………………………………………….. |
E69 |
|
Create Log (Record the log of moving information) ………………………………………………….. |
E71 |
|
View Log………………………………………………………………………………………………………………………………………. |
E73 |
xiv

Table of Contents
|
The Setup Menu ………………………………………………………………………………………………………….. |
E74 |
|
Welcome Screen ………………………………………………………………………………………………………………………. |
E74 |
|
Time Zone and Date……………………………………………………………………………………………………………….. |
E75 |
|
Monitor Settings……………………………………………………………………………………………………………………….. |
E78 |
|
Print Date (Imprinting Date and Time on Pictures)…………………………………………………….. |
E79 |
|
Vibration Reduction ………………………………………………………………………………………………………………… |
E80 |
|
Motion Detection…………………………………………………………………………………………………………………….. |
E81 |
|
AF Assist……………………………………………………………………………………………………………………………………….. |
E82 |
|
Digital Zoom………………………………………………………………………………………………………………………………. |
E82 |
|
Assign Side Zoom Control ……………………………………………………………………………………………………. |
E83 |
|
Sound Settings………………………………………………………………………………………………………………………….. |
E84 |
|
Auto Off ……………………………………………………………………………………………………………………………………….. |
E84 |
|
Format Memory/Format Card……………………………………………………………………………………………… |
E85 |
|
Language…………………………………………………………………………………………………………………………………….. |
E85 |
|
TV Settings ………………………………………………………………………………………………………………………………….. |
E86 |
|
Fn Button …………………………………………………………………………………………………………………………………….. |
E87 |
|
Charge by Computer………………………………………………………………………………………………………………. |
E88 |
|
Toggle Av/Tv Selection…………………………………………………………………………………………………………… |
E90 |
|
Reset File Numbering……………………………………………………………………………………………………………… |
E90 |
|
Blink Warning …………………………………………………………………………………………………………………………….. |
E91 |
|
Filmstrip ……………………………………………………………………………………………………………………………………….. |
E92 |
|
Eye-Fi Upload …………………………………………………………………………………………………………………………….. |
E93 |
|
Reverse Indicators ……………………………………………………………………………………………………………………. |
E94 |
|
Reset All ……………………………………………………………………………………………………………………………………….. |
E94 |
|
Firmware Version………………………………………………………………………………………………………………………. |
E97 |
|
File and Folder Names………………………………………………………………………………………………… |
E98 |
|
Optional Accessories ………………………………………………………………………………………………… |
E100 |
|
Error Messages…………………………………………………………………………………………………………… |
E101 |
Introduction
xv

Table of Contents
Introduction
|
Technical Notes and Index …………………………………………………………………………………………… |
F1 |
|
Caring for the Products………………………………………………………………………………………………….. |
F2 |
|
The Camera ……………………………………………………………………………………………………………………………………. |
F2 |
|
The Battery……………………………………………………………………………………………………………………………………… |
F3 |
|
Charging AC Adapter …………………………………………………………………………………………………………………. |
F4 |
|
The Memory Cards………………………………………………………………………………………………………………………. |
F5 |
|
Caring for the Camera ……………………………………………………………………………………………………. |
F6 |
|
Cleaning ………………………………………………………………………………………………………………………………………….. |
F6 |
|
Storage…………………………………………………………………………………………………………………………………………….. |
F6 |
|
Troubleshooting……………………………………………………………………………………………………………… |
F7 |
|
Specifications ………………………………………………………………………………………………………………… |
F15 |
|
Supported Standards ……………………………………………………………………………………………………………….. |
F18 |
|
Index……………………………………………………………………………………………………………………………….. |
F19 |
xvi

Parts of the Camera and
Basic Operations
This chapter describes the parts of the camera and also explains the main functions of each part and the basic camera operations.
|
Parts of the Camera ………………………………………… |
2 |
|
The Camera Body ……………………………………………………………………………… |
2 |
|
Controls Used in Shooting Mode …………………………………………………… |
4 |
|
Controls Used in Playback Mode ……………………………………………………. |
5 |
|
Changing the Angle of the Monitor ………………………………………………. |
6 |
|
Attaching the Camera Strap and Lens Cap…………………………………… |
7 |
|
The Monitor……………………………………………………………………………………….. |
8 |
|
Basic Operations………………………………………….. |
11 |
|
Switching Between Shooting Mode and Playback Mode ……….. |
11 |
|
Using the Rotary Multi Selector……………………………………………………. |
12 |
|
Using Menus (the dButton) ……………………………………………………. |
13 |
|
Switching the Information on the Monitor (sbutton) ……… |
15 |
|
Switching the Monitor Display (xbutton) ……………………………… |
16 |
|
Using the Viewfinder……………………………………………………………………… |
16 |
Operations Basic and Camera the of Parts
 If you want to start using the camera right away, see “The Basics of Shooting
and Playback” (A17).
1
Parts of the Camera and Basic Operations
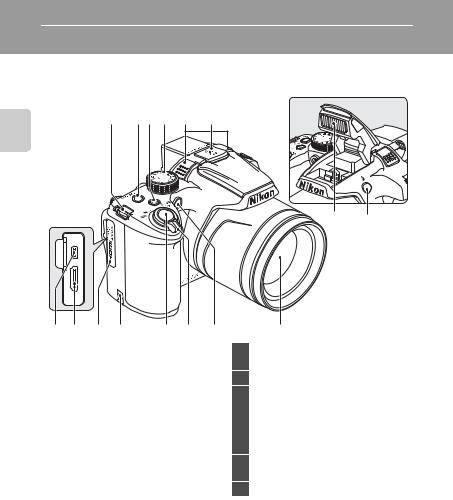
Parts of the Camera
The Camera Body
Flash raised
|
1 |
2 3 |
4 |
5 |
6 |
|
Operations Basic and Camera the of Parts |
7 8
|
9 |
10 |
11 |
12 |
13 |
14 |
15 |
|
|
1 |
Eyelet for camera strap ………………………….. |
7 |
|||||
|
2 |
Power switch/power-on lamp |
………….. |
25 |
||||
|
3 |
w(FUNC) button……………………………… |
110 |
|||||
|
4 |
Mode dial………………………………………………….. |
28 |
|||||
|
5 |
Microphone (stereo) ………………………… |
88, 96 |
|||||
|
6 |
GPS antenna…………………………………………. |
103 |
|||||
|
7 |
Flash |
……………………………………………………………. |
66 |
||||
|
8 |
m(flash ……………………..pop-up) button |
66 |
|||||
|
9 |
USB/Audio ……….video connector |
20, 90 |
|||||
|
10 |
HDMI …………mini connector (Type C) |
90 |
|||||
|
11 |
Connector ……………………………..cover |
20, 90 |
|||||
16
|
12 |
Power connector cover (for connection |
|
|
with an optional AC Adapter)……. |
E100 |
|
|
13 |
Shutter-release button……………………. |
4, 32 |
|
Zoom control………………………………………….. |
31 |
|
|
f: Wide …………………………………………… |
31 |
|
|
14 |
g : Tele……………………………………………… |
31 |
|
h: Thumbnail playback…………….. |
35 |
|
|
i : Playback zoom……………………….. |
35 |
|
|
j: Help ……………………………………………. |
41 |
|
|
15 |
Self-timer lamp……………………………………….. |
69 |
|
AF-assist illuminator…………………………… |
109 |
|
|
16 |
Lens |
2

Parts of the Camera
|
1 |
2 |
3 |
4 |
5 |
6 |
7 |
8 |
|
9 |
10 |
11 12 13 |
14 |
15 |
19 20 21 |
|
Side zoom control………………………………. |
109 |
||
|
1 |
f: Wide …………………………………………… |
31 |
|
|
g : Tele……………………………………………… |
31 |
||
|
2 |
Speaker …………………………………… |
88, 100, 109 |
|
|
3 |
x(monitor) button …………………………… |
16 |
|
|
4 |
Diopter adjustment control |
……………….16 |
|
|
5 |
Electronic viewfinder …………………………… |
16 |
|
|
6 |
s(display) button …………………………. |
15 |
|
|
7 |
b(emovie-record) button |
||
|
……………………………………………………….. |
11, 34, 96 |
||
|
8 |
Command dial ……………………………………….. |
57 |
|
|
9 |
Monitor…………………………………………………. |
8, 28 |
|
|
10 |
Charge lamp……………………………… |
20, E89 |
|
|
Flash lamp………………………………………………… |
66 |
|
11 |
c(playback) button……………………. |
11, 34 |
|
12 |
Rotary multi selector |
|
|
(multi selector) ……………………………………….. |
12 |
|
|
13 |
k(apply selection) button ………………. |
12 |
|
14 |
d(menu) button……………………………… |
13 |
|
15 |
l(delete) button………………………… |
36, 100 |
|
16 |
Tripod socket |
|
|
17 |
Battery-chamber/ |
|
|
memory card slot cover ………………. |
18, 22 |
|
|
18 |
Cover latch………………………………………… |
18, 22 |
|
19 |
Memory card slot ………………………………….. |
22 |
|
20 |
Battery latch……………………………………… |
18, 19 |
|
21 |
Battery chamber…………………………………….. |
18 |
Operations Basic and Camera the of Parts
3

Operations Basic and Camera the of Parts
Parts of the Camera
Controls Used in Shooting Mode
|
Control |
Name |
Main Function |
A |
|
Mode dial |
Change the shooting mode. |
28 |
|
|
Rotate toward g(i) (telephoto zoom |
|||
|
Zoom control |
position) to zoom in, and rotate toward |
31 |
|
|
f(h) (wide-angle position) to zoom |
|||
|
out. |
|||
|
Rotary multi |
See “Using the Rotary Multi Selector” for |
12 |
|
|
selector |
more information. |
||
|
Set the flexible program (during shooting |
57, |
||
|
Command dial |
mode j) or shutter speed (during |
59, |
|
|
shooting modes k or m). |
110 |
||
|
d(menu) |
Display and hide the menu. |
13 |
|
|
button |
|||
|
When pressed halfway (i.e., if you stop |
|||
|
pressing when you feel resistance slightly): |
|||
|
Shutter- |
Set focus and exposure. |
32 |
|
|
release button |
When pressed all the way (i.e., if you press |
||
|
the button all the way down): Release the |
|||
|
shutter. |
|||
|
w(FUNC) |
Display the setting menu of pre-assigned |
110 |
|
|
button |
function. |
||
|
Playback |
Play back images. |
11, |
|
|
button |
34 |
||
|
Delete button |
Delete the last image that was saved. |
36 |
|
|
b(emovie- |
Start and stop movie recording. |
96 |
|
|
record) button |
4
|
Parts of the Camera |
|||
|
Control |
Name |
Main Function |
A |
|
x(monitor) |
Switch the monitor display. |
16 |
|
|
button |
|||
|
s(display) |
Switch the information displayed on the |
15 |
|
|
button |
monitor. |
||
|
Side zoom |
Use the function assigned with Assign |
109 |
|
|
control |
side zoom control. |
||
Controls Used in Playback Mode
|
Control |
Name |
Main Function |
A |
|
• When the camera is turned off, press |
25 |
||
|
Playback |
and hold this button to turn the camera |
||
|
button |
on in playback mode. |
||
|
• Return to shooting mode. |
11 |
||
|
• Enlarge the image when rotated toward |
35 |
||
|
g(i); display image thumbnail or the |
|||
|
Zoom control |
calendar when rotated toward f(h). |
||
|
• Adjust the volume for voice memo and |
88, |
||
|
movie playback. |
100 |
||
|
Rotary multi |
See “Using the Rotary Multi Selector” for |
12 |
|
|
selector |
more information. |
||
|
Command dial |
Switch the magnification of an enlarged |
35 |
|
|
image. |
|||
|
• Display individual images of a |
E13 |
||
|
sequence in full-frame. |
|||
|
Apply |
• Scroll an image recorded with easy |
E3 |
|
|
panorama. |
|||
|
selection |
|||
|
• Play back movies. |
100 |
||
|
button |
|||
|
• Switch from image thumbnail or |
12 |
||
|
zoomed image display to full-frame |
|||
|
playback mode. |
|||
|
d(menu) |
Display and hide the menu. |
13 |
|
|
button |
|||
Operations Basic and Camera the of Parts
5
Operations Basic and Camera the of Parts
Parts of the Camera
|
Control |
Name |
Main Function |
A |
||||||
|
Delete button |
Delete images. |
36 |
|||||||
|
Shutter- |
|||||||||
|
release button |
|||||||||
|
Return to shooting mode. |
– |
||||||||
|
b(emovie- |
|||||||||
|
record) button |
|||||||||
|
x(monitor) |
Switch the monitor display. |
16 |
|||||||
|
button |
|||||||||
|
s(display) |
Switch the information displayed on the |
15 |
|||||||
|
button |
monitor. |
||||||||
|
Display the shooting location of an image |
|||||||||
|
w(FUNC) |
during log recording (latitude, longitude, |
E73 |
|||||||
|
button |
and current location of the movement |
||||||||
|
being tracked for creating a log). |
|||||||||
Changing the Angle of the Monitor
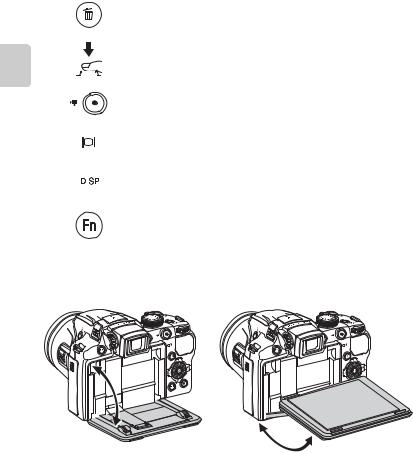
The angle of the monitor can be lowered down to 82° or raised upward to 90°. This is convenient when taking pictures with the camera held at high or low positions.
B Notes on Monitor
•Do not apply excessive force when changing the angle of the monitor.
•The monitor cannot be moved horizontally.
6 • Put the monitor back in the original position when using in normal situations.
Parts of the Camera
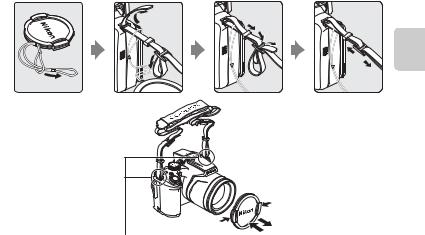
Attaching the Camera Strap and Lens Cap
Attach the lens cap to the strap, and then attach the strap to the camera.
Attach the strap at two places.
Operations Basic and Camera the of Parts
B Lens Cap
• Remove the lens cap before you shoot a picture.
• At times when you are not shooting pictures such as when the power is off, or while you are carrying the camera, attach the lens cap to the camera to protect the lens.
• Do not attach other than the lens cap to the lens.
7
Operations Basic and Camera the of Parts
Parts of the Camera
The Monitor
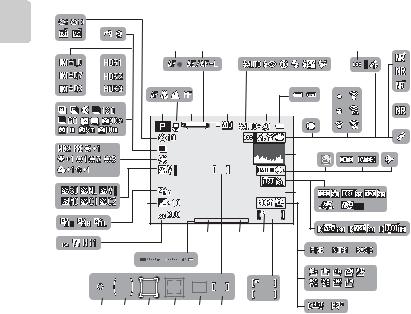
•The information that is displayed on the monitor during shooting and playback changes depending on the camera’s settings and state of use. Press the s (display) button to hide or show the information on the monitor (A15).
Shooting Mode
|
47 |
|||||||||
|
46 |
14 |
||||||||
|
4 |
5 |
7 |
12 13 |
||||||
|
45 |
44 |
2 |
9 |
11 |
|||||
15
|
43 |
1 |
3 |
6 |
8 |
10 |
||
|
16 |
||
|
42 |
18 |
19 |
|
17 |
20 |
|
|
41 |
39 |
29m 0s |
23 |
21 |
|||||
|
1/250 |
F5.6 |
22 |
|||||||
|
40 |
999 |
||||||||
|
38 |
36 |
29 |
28 |
||||||
|
24 |
|||||||||
|
37 |
|||||||||
|
999 |
25 |
||||||||
|
9999 |
|||||||||
|
35 |
34 |
33 |
32 |
31 |
30 |
27 |
26 |
8

|
1 |
Shooting mode……………………………….. |
28, 29 |
|
2 |
Focus mode……………………………………………… |
73 |
|
3 |
Zoom indicator ………………………………………. |
31 |
|
4 |
Focus indicator……………………………………….. |
32 |
|
5 |
AE/AF-L indicator……………………………… |
E7 |
|
6 |
Zoom memory……………………………………….. |
62 |
|
7 |
Flash mode ………………………………………………. |
67 |
|
8 |
Flash exp. comp……………………………………… |
62 |
|
9 |
Battery level indicator ………………………….. |
24 |
|
10 |
Vibration reduction icon ………………….. |
108 |
|
11 |
Eye-Fi communication indicator |
|
|
…………………………………………………….. |
111, E93 |
|
|
12 |
Log display…………………………………………….. |
105 |
|
13 |
GPS reception ………………………………………. |
104 |
|
14 |
Noise reduction filter……………………………….. |
62 |
|
15 |
Noise reduction burst ……………………………… |
43 |
|
16 |
Motion detection icon ……………………… |
109 |
|
17 |
View/hide histograms……………….. |
74, 108 |
|
18 |
“Date not set” indicator……………… |
27, 108 |
|
19 |
Print date………………………………………………… |
108 |
|
20 |
Travel destination indicator…………….. |
108 |
|
21 |
Movie options (normal speed movies) |
|
|
………………………………………………………………………. |
99 |
|
|
22 |
Movie options (HS movies)………………… |
99 |
|
23 |
Movie length ……………………………………. |
96, 98 |
|
24 |
Image quality ………………………………………….. |
77 |
|
25 |
Image size…………………………………………………. |
78 |
|
26 |
Easy panorama…………………………………………….. |
51 |
|
Number of exposures remaining |
||
|
27 |
(still pictures)…………………………………….. |
24, 79 |
|
28 |
Internal memory indicator…………………. |
24 |
|
Parts of the Camera |
|||
|
29 |
Aperture value……………………………………….. |
57 |
|
|
Focus area (for manual, |
|||
|
30 |
for center) ……………………………… |
32, 49, 50, 61 |
|
|
Focus area (for auto, target |
|||
|
31 |
finding AF)……………………………………………….. |
61 |
|
|
Focus area (for face detection, |
|||
|
32 |
pet detection) ……………………. |
52, 61, 70, 85 |
|
|
Focus area (for subject |
|||
|
33 |
tracking)……………………………………………………. |
61 |
|
|
34 |
Center-weighted area……………………………… |
61 |
|
|
35 |
Spot metering area …………………………………… |
61 |
|
|
36 |
Shutter speed…………………………………………. |
57 |
|
|
37 |
Exposure indicator…………………………………….. |
59 |
|
|
38 |
ISO sensitivity …………………………………… |
30, 61 |
|
|
39 |
Exposure compensation value |
………… 74 |
|
|
40 |
Active D-Lighting………………………………….. |
62 |
|
|
41 |
COOLPIX Picture Control……………………….. |
60 |
|
|
42 |
White balance………………………………………………. |
61 |
|
|
43 |
Continuous shooting mode…………. |
52, 61 |
|
|
44 |
Backlighting (HDR) ……………………………………. |
44 |
|
|
45 |
Exposure bracketing………………………………… |
61 |
|
|
46 |
Hand-held/Tripod ………………………………. |
42, 47 |
|
|
Self-timer………………………………………………….. |
69 |
||
|
47 |
Smile timer …………………………………………………….. |
70 |
|
|
Pet portrait auto release ………………………… |
52 |
Operations Basic and Camera the of Parts
9

Operations Basic and Camera the of Parts
|
Parts of the Camera |
|||||||||||
|
Playback Mode |
|||||||||||
|
Full-frame display (A15) |
Shooting information (A15) |
||||||||||
|
1 |
2 |
3 |
4 |
5 |
26 |
||||||
|
15/05/2012 |
12:00 |
6 |
100NIKON |
25 |
|||||||
|
24 |
25 |
0004.JPG |
|||||||||
|
9999.JPG |
7 |
27 |
|||||||||
|
23 |
22 |
P |
|||||||||
|
1/250 |
F5.6 |
28 |
|||||||||
|
21 |
29 |
||||||||||
|
19 |
20 |
8 |
9 |
10 |
+1.0 |
30 |
|||||
|
17 |
ISO |
||||||||||
|
18 |
999/ 999 |
200 |
31 |
||||||||
|
4 |
132 |
32 |
|||||||||
|
16 |
15 |
14 |
13 |
11 |
33 |
||||||
|
999/ 999 |
1m 0s |
||||||||||
|
12 |
|||||||||||
|
9999/9999 |
1m 0s |
||||||||||
|
a |
b |
||||||||||
|
1 |
Date of recording………………………………….. 26 |
16 |
Volume indicator…………………………..88, 100 |
|
2 |
Time of recording …………………………………. |
26 |
|
|
3 |
Voice memo indicator…………………………. |
88 |
|
|
4 |
Battery level indicator …………………………. |
24 |
|
|
5 |
Protect icon……………………………………………… |
88 |
|
|
6 |
Eye-Fi communication indicator |
||
|
111, |
E93 |
||
|
7 |
Recorded GPS information indicator |
||
|
104 |
|||
|
……………………………………………………………………. |
|||
|
8 |
Print order icon………………………………………. |
88 |
|
|
9 |
Image quality………………………………………….. |
77 |
|
|
10 |
Image size………………………………………………… |
78 |
|
|
11 |
Movie options ………………………………….. |
96, 99 |
|
|
12 |
Easy panorama indicator……………………. |
51 |
|
|
(a) Current image number/total |
|||
|
13 |
number of images………………………….. |
34 |
|
|
(b) Movie length ………………………………….. |
100 |
||
|
14 |
Internal memory indicator………………… |
34 |
|
|
Easy panorama playback guide ….. |
E5 |
||
|
15 |
Sequence playback guide………….. |
E13 |
|
|
Movie playback guide……………………….. |
100 |
|
17 |
Black border indicator …………………………. |
88 |
|
|
18 |
D-Lighting icon ……………………………………… |
88 |
|
|
19 |
Quick retouch icon……………………………….. |
88 |
|
|
20 |
Filter effects icon……………………………………. |
88 |
|
|
21 |
Small picture …………………………….. |
88, E22 |
|
|
22 |
Skin softening icon……………………………….. |
88 |
|
|
23 |
Sequence display…………………………… |
E13 |
|
|
24 |
3D picture indicator……………………………… |
53 |
|
|
25 |
File number and type …………………… |
E98 |
|
|
26 |
Folder name …………………………………….. |
E98 |
|
|
27 |
Shooting mode1 ……………………………………. |
29 |
|
|
28 |
Aperture value ……………………………………….. |
32 |
|
|
29 |
Shutter speed …………………………………………. |
32 |
|
|
30 |
Exposure compensation value |
………… 74 |
|
|
31 |
ISO sensitivity………………………………………….. |
61 |
|
|
Current image number/ |
|||
|
32 |
total number of images ……………………… |
34 |
|
|
33 |
Histogram2 |
1 j is displayed when the shooting mode A, y, j, c, W, uor j is selected.
2A histogram is a graph showing the distribution of tones in the image. The horizontal axis corresponds to pixel brightness, with dark tones to the left and bright tones to the right. The vertical axis shows the number of pixels.
10
Basic Operations
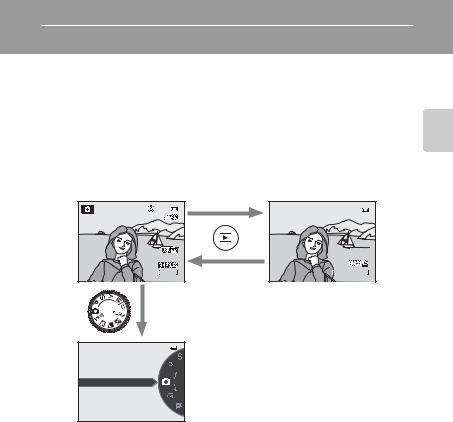
Switching Between Shooting Mode and Playback Mode
The camera has two modes of operation: Shooting mode, which is used for taking pictures, and playback mode, which is used for viewing pictures.
Press the c(playback) button to switch between shooting mode and playback mode.
•While using playback mode, you can also switch to shooting mode by pressing the shutter-release button or the b(emovie-record) button.
Playback mode
|
15/05/2012 15:30 |
|
0004.JPG |
|
4/ 132 |
Operations Basic and Camera the of Parts
Auto mode
•Rotate the mode dial and align an icon to the mark to select different shooting modes (A28, 29).
11
Operations Basic and Camera the of Parts
Basic Operations
Using the Rotary Multi Selector
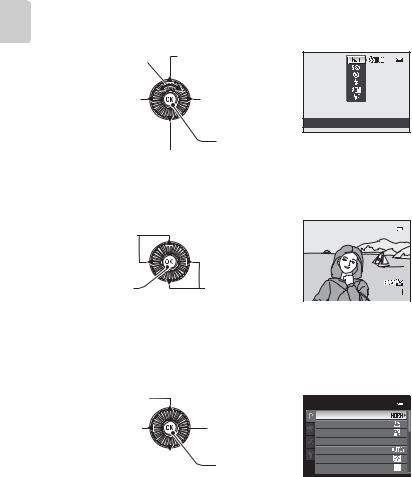
Operate by rotating the rotary multi selector, pressing up (H), down (I), left (J) or right (K) on the rotary multi selector, or pressing the kbutton.
•The “rotary multi selector” is also referred to as the “multi selector” in this manual.
When Using Shooting Mode
|
Rotate to set the aperture |
Display m(flash mode) |
||
|
value*/Select an item |
|||
|
(A66) menu |
|||
|
Display n |
(Self-timer/ |
Display the o |
|
|
(exposure |
|||
|
Smile timer) menu |
|||
|
compensation) guide |
|||
|
(A69, 70) |
Auto |
||
|
(A74) |
|||
Apply selection
Display D(focus mode) menu (A72)
*The aperture value can be set in shooting mode l or m (A59). Items can be chosen while a menu is displayed.
When Using Playback Mode
Select the previous image1/Move the displayed area when the image is magnified (A35).
Play back movies (A100)2
Select the next image1/Move the displayed area when the image is magnified (A35).
|
15/05/2012 15:30 |
|
0004.JPG |
|
4/ 132 |
1 Previous or next images can also be chosen by rotating the rotary multi selector.
2When displaying image thumbnail or when the image is magnified, this button switches the camera to full-frame playback mode.
When Displaying Menus
Select the item above*
Select the item on the left/Return display to the previous screen
Select the item  below*
Select the item on the right/Display 
 sub-menu (apply selection)
Apply selection
Shooting menu
Image quality Image size
Picture Control
Custom Picture Control 

White balance
Metering
Continuous
12 * Items above or below can also be chosen by rotating the rotary multi selector.
![]()
Basic Operations
Using Menus (the dButton)
When the dbutton is pressed while the shooting screen or playback screen is displayed, the menu for the current mode is displayed. Once the menu is displayed, various settings can be changed.
Playback mode
|
15/05/2012 15:30 |
|
0004.JPG |
|
4/ 132 |
Shooting menu
|
Image quality |
|||
|
Tabs |
Image size |
||
|
Picture Control |
|||
|
Custom Picture Control |
|||
|
White balance |
|||
|
Metering |
|||
|
Continuous |
Playback menu
 Quick retouch
 D-Lighting Tabs
 Skin softening
Filter effects
 Print order
 Slide show
 Protect
Shooting menu
jtab:
Displays the settings that can be changed for the current shooting mode (A28). Depending on the current shooting mode, the tab icon that is displayed will be different.
Dtab:
Displays movie recording settings.
ztab:
Displays the GPS setup menu (A105) items.
ztab:
Displays the setup menu, where you can change general settings.
Playback menu
ctab:
Displays the settings available for the playback mode.
ztab:
Displays the GPS setup menu (A105) items.
ztab:
Displays the setup menu, where you can change general settings.
Operations Basic and Camera the of Parts
13

Basic Operations
Switching Between Tabs
|
Shooting menu |
Shooting menu |
Set up |
|||||
|
Image quality |
Image quality |
Welcome screen |
|||||
|
Image size |
Image size |
Time zone and date |
|||||
|
Picture Control |
Picture Control |
Monitor settings |
|||||
|
Custom Picture Control |
Custom Picture Control |
Print date |
|||||
|
White balance |
White balance |
Vibration reduction |
|||||
|
Metering |
Metering |
Motion detection |
|||||
|
Continuous |
Continuous |
AF assist |
Operations Basic and Camera the of Parts
Press the rotary multi selector Jto highlight the tab.
Selecting Menu Items
Shooting menu
Image quality
Image size
Picture Control
Custom Picture Control 

White balance
Metering
Continuous
Press the rotary multi selector Hor Ito select an item, and then press Kor the kbutton.
|
Press the rotary multi |
The selected menu is |
|
selector Hor Ito select a |
displayed. |
|
tab, and press the k |
|
|
button or K. |
Metering
Matrix
Center-weighted
Spot
|
Press Hor Ito select an |
When you finished |
|
item and then press the |
changing settings, press |
|
kbutton. |
the d(menu) button |
|
to exit the menu. |
C Note on the Command Dial Operation When Menus are Displayed
Rotating the command dial when menus are displayed allows you to change the setting values of a selected item. There are some setting values that cannot be changed using the command dial.
C When the Menu Contains Two or More Pages
|
Shooting menu |
The scroll bar is displayed to indicate the current page. |
||
|
Image quality |
|||
|
Image size |
|||
|
Picture Control |
|||
|
Custom Picture Control |
|||
|
White balance |
|||
|
Metering |
|||
|
Continuous |
14

Basic Operations
Switching the Information on the Monitor (sbutton)
To switch the information displayed on the monitor during shooting and playback, press the s(display) button.
For Shooting
Display information
Display the picture and the shooting information.
Movie frame
Display the range of a movie in a frame.
Information hidden
Display the picture only.
|
For Playback |
|||
|
15/05/2012 15:30 |
100NIKON |
||
|
0004.JPG |
|||
|
0004.JPG |
|||
|
P |
|||
|
1/250 |
F5.6 |
||
|
ISO |
+1.0 |
||
|
4/ 132 |
200 |
||
|
4 |
132 |
||
Operations Basic and Camera the of Parts
Display photo information
Display the picture taken and the photo information.
Display shooting information
(except for movies) Display the histogram and shooting information*.
Information hidden
Display only the taken picture.
* See A10 for more information on histogram and shooting information.
C Histogram and Framing Grid Displays for Shooting
|
The display options for the monitor can be changed in Monitor settings in the setup menu |
|
|
(A108). A histogram and framing grid are available as the display options. |
15 |

Operations Basic and Camera the of Parts
Basic Operations
Switching the Monitor Display (xbutton)
Press the x(monitor) button to switch between the monitor and viewfinder. Switch to the one that suits the shooting conditions.
Using the Viewfinder
Use the viewfinder to frame pictures when bright light makes it difficult to see the display on the monitor. Press the xbutton to switch to the viewfinder.
When the image in the viewfinder is difficult to see, adjust by rotating the diopter adjustment control while looking through the viewfinder.
•Take care not to scratch your eye with your fingertips or nails.
Diopter adjustment control
16

The Basics of Shooting and
Playback
|
Preparation |
|
|
Preparation 1 Insert the Battery …………………………………………………………………………. |
18 |
|
Preparation 2 Charge the Battery ………………………………………………………………………. |
20 |
|
Preparation 3 Insert a Memory Card………………………………………………………………….. |
22 |
|
Shooting |
|
|
Step 1 Turn the Camera On…………………………………………………………………………………. |
24 |
|
Setting the Display Language, Date, and Time (First Use Only) ………………… |
26 |
|
Step 2 Select a Shooting Mode…………………………………………………………………………… |
28 |
|
Step 3 Frame a Picture …………………………………………………………………………………………. |
30 |
|
Step 4 Focus and Shoot……………………………………………………………………………………….. |
32 |
Playback and Shooting of Basics The
|
Playback |
|
|
Step 5 Play Back Images ………………………………………………………………………………………. |
34 |
|
Step 6 Delete Unwanted Images ……………………………………………………………………….. |
36 |
17

Playback and Shooting of Basics The
The Basics of Shooting and Playback
Preparation 1 Insert the Battery
1 Open the battery-chamber/memory card slot cover.
2 Insert the included EN-EL5 battery (rechargeable Li-ion battery).
|
• Use the battery to push the |
|
|
orange battery latch down in the |
|
|
direction indicated by the arrow |
|
|
(1), and fully insert the battery |
|
|
(2). |
|
|
• When the battery is inserted |
Battery latch |
|
correctly, the battery latch will |
|
|
lock the battery in place. |
B Inserting the Battery Correctly
Inserting the battery upside down or backwards could damage the camera. Be sure to check that the battery is in the correct orientation.
3 Close the battery-chamber/memory card slot cover.
• Charge the battery before the first use or when the battery is running low (A20).
• While the battery-chamber/memory card slot cover is open, the camera cannot be turned on. Additionally, the battery inserted in the camera cannot be charged.
18

Preparation 1 Insert the Battery
Removing the Battery
Turn the camera off (A25) and be sure that the poweron lamp and the monitor have turned off before opening the battery-chamber/memory card slot cover. To eject the battery, open the battery-chamber/ memory card slot cover and push the orange battery latch in the direction shown (1). Then, remove the battery straight (2).
Playback and Shooting of Basics The
B High Temperature Caution
The camera, battery, and memory card may be hot immediately after using the camera. Observe caution when removing the battery or memory card.
B Notes on Battery
•Be sure to read and follow the warnings of “For Your Safety” (Avi) thoroughly before using the battery.
|
• Be sure to read and follow the warnings for “The Battery” (F3) before using the battery. |
19 |

Preparation 2 Charge the Battery
Playback and Shooting of Basics The
1 Prepare the included Charging AC Adapter EH-69P.
If a plug adapter* is included with your camera, attach the plug adapter to the plug on the Charging AC Adapter. Push the plug adapter firmly until it is securely held in place. Once the two are connected, attempting to forcibly remove the plug adapter could damage the product.
* The shape of the plug adapter varies according to the country or region in which the camera was purchased.
The Charging AC Adapter comes with the plug adapter attached in Argentina and Korea.
2 Make sure the battery is inserted in the camera, and then connect the camera to the Charging AC Adapter in order of 1to 3.
•Keep the camera turned off.
•When connecting the cable, be sure that the plug is properly oriented. Do not use force when connecting the cable to the camera. When disconnecting the cable, do not pull the plug at an angle.
•Close the battery-chamber/memory card slot cover.
Charge lamp
Electrical outlet
USB Cable UC-E6 (included)
•When charging starts, the charge lamp flashes slowly in green.
•About four hours and 30 minutes are required to charge a fully exhausted battery.
•When the battery has been completely charged, the charge lamp turns off.
•See “Understanding the Charge Lamp” (A21) for more information.
3 Disconnect the Charging AC Adapter from the electrical outlet and then disconnect the USB cable.
•When the camera is connected to an electrical outlet with the Charging AC Adapter, the camera cannot be turned on.
20

Preparation 2 Charge the Battery
Understanding the Charge Lamp
|
Status |
Description |
|
|
Flashes slowly (green) |
The battery is charging. |
|
|
Off |
The battery is not charging. When charging is complete, the |
|
|
charge lamp flashing slowly in green stops and is turned off. |
||
|
• The ambient temperature is not suited to charging. Charge the |
||
|
battery indoors with an ambient temperature of 5°C to 35°C |
||
|
(41°F to 95°F). |
||
|
Flashes quickly (green) |
• The USB cable or Charging AC Adapter is not properly |
|
|
connected, or there is a problem with the battery. Disconnect |
||
|
the USB cable or unplug the Charging AC Adapter and correctly |
||
|
connect it again, or change the battery. |
Playback and Shooting of Basics The
B Notes on Charging AC Adapter
•Be sure to read and follow the warnings of “For Your Safety” (Avi) thoroughly before using the Charging AC Adapter.
•Be sure to read thoroughly and follow the warnings for “Charging AC Adapter” (F4) before use.
B Charging Using Computer or Battery Charger
• You can also charge the Rechargeable Li-ion Battery EN-EL5 by connecting the camera to a computer (A90, 110).
• The EN-EL5 can be charged without using the camera by using the Battery Charger MH-61 (available separately; E100).
C AC Power Source
•You can take pictures and play back images while using the AC Adapter EH-62A (available separately; E100) to power the camera from an electrical outlet.
•Do not, under any circumstances, use another make or model of AC adapter other than EH-62A.
|
Failure to observe this precaution could result in overheating or damage to the camera. |
21 |

Preparation 3 Insert a Memory Card
Playback and Shooting of Basics The
1 Confirm that the power-on lamp and the monitor are turned off and open the batterychamber/memory card slot cover.
• Be sure to turn off the camera before opening the cover.
2 Insert the memory card.
•Slide the memory card until it clicks into place.
B Inserting the Memory Card
Correctly
|
Inserting the memory card upside down |
||
|
or backwards could damage the camera |
||
|
or the memory card. Be sure to confirm |
Memory card slot |
|
|
that the memory card is in the correct |
||
|
orientation. |
3 Close the battery-chamber/memory card slot cover.
B Formatting a Memory Card
•The first time you insert a memory card that has been used in another device into this camera, be sure to format it with this camera.
•All data stored on a memory card is permanently deleted when the card is formatted. Be sure to make copies of any data you wish to keep before formatting the memory card.
•To format a memory card, insert the memory card into the camera, press the dbutton and select Format card from the setup menu (A108).
B Note on Memory Cards
Refer to the documentation included with the memory card, as well as “The Memory Cards” (F5) in 22 “Caring for the Products”.
![]()
Preparation 3 Insert a Memory Card
Removing Memory Cards
Before opening the battery-chamber/memory card slot cover, turn the camera off and confirm that the poweron lamp and the monitor are off.
Press the memory card in lightly with your finger (1) to partially eject it, and then pull it out straight (2).
B High Temperature Caution
The camera, battery, and memory card may be hot immediately
after using the camera. Observe caution when removing the battery or memory card.
Internal Memory and Memory Cards
Camera data, including images and movies, can be saved in either the camera’s internal memory (approximately 90 MB) or on a memory card. To use the camera’s internal memory for shooting or playback, first remove the memory card.
Approved Memory Cards
The following Secure Digital (SD) memory cards have been tested and approved for use in this camera.
•When recording a movie onto a memory card, a memory card with an SD speed class of Class 6 or higher is recommended. If the transfer speed of the card is slow, the movie recording may end unexpectedly.
|
SD memory cards |
SDHC memory cards2 |
SDXC memory cards3 |
|
|
SanDisk |
2 GB1 |
4 GB, 8 GB, 16 GB, 32 GB |
64 GB |
|
TOSHIBA |
2 GB1 |
4 GB, 8 GB, 16 GB, 32 GB |
64 GB |
|
Panasonic |
2 GB1 |
4 GB, 8 GB, 12 GB, |
48 GB, 64 GB |
|
16 GB, 32 GB |
|||
|
Lexar |
— |
4 GB, 8 GB, 16 GB, 32 GB |
64 GB, 128 GB |
1Before using a card reader or similar device, check that the device supports 2 GB cards.
2SDHC-compliant. Before using a card reader or similar device, check that the device supports SDHC.
3SDXC-compliant. Before using a card reader or similar device, check that the device supports SDXC.
• Contact the manufacturer for details on the above cards.
Playback and Shooting of Basics The
23

Step 1 Turn the Camera On
Playback and Shooting of Basics The
1 Remove the lens cap and press the power switch to turn on the camera.
• If you are turning the camera on for the first time, see “Setting the Display Language, Date, and Time” (A26).
• The lens extends, and the monitor is turned on.
2 Check the battery level and number of exposures remaining.
Battery level indicator
Number of exposures remaining
Battery Level
|
Display |
Description |
|
b |
Battery level high. |
|
B |
Battery level low. Prepare to charge or replace the battery. |
N
Cannot take pictures. Charge or replace the battery.
Battery exhausted.
Number of Exposures Remaining
The number of exposures remaining is displayed.
•When a memory card is not inserted, Cis displayed and pictures are recorded to the internal memory (approx. 90 MB).
•The number of pictures that can be stored depends on the remaining capacity of the internal memory or memory card, the image quality, and the image size (A77).
•The number of exposures remaining shown in the illustration differs from the actual value.
C Monitor Display
Press the sbutton to switch between showing and hiding the photo information or shooting 24 information that is displayed on the monitor (A15).

Step 1 Turn the Camera On
Turning the Camera On and Off
•When the camera is turned on, the power-on lamp (green) lights and the monitor is turned on (the power-on lamp turns off when the monitor is turned on).
•To turn off the camera, press the power switch. Both the monitor and the power-on lamp are turned off.
•To turn on the camera in playback mode, press and hold the c(playback) button. At this time, the lens does not extend.
C Power Saving Function (Auto Off)
If no operations are performed for a while, the monitor will turn off, the camera will enter standby mode, and the power-on lamp will flash. If no operations are performed for another three minutes, the camera will turn off automatically.
To turn on the monitor again in standby mode, perform either one of the following operations.
•Press the power switch, shutter-release button, cbutton, or b(emovie-record) button.
•Rotate the mode dial.
|
Flashes |
|
|
No operations |
No operations |
|
performed. |
performed. |
|
3 min |
|
Camera enters |
Camera turns off. |
|
standby mode. |
•The time that elapses before the camera enters standby mode can be changed using the Auto off setting in the setup menu (A108).
•By default, the camera enters standby mode in about one minute when you are using shooting mode or playback mode.
•If you are using the optional AC Adapter EH-62A, the camera enters standby mode after
Playback and Shooting of Basics The
|
30 minutes. This setting cannot be changed. |
25 |

Playback and Shooting of Basics The
Step 1 Turn the Camera On
Setting the Display Language, Date, and Time
Dialogs for language selection and camera clock setting are displayed the first time the camera is turned on.
1 Press the multi selector Hor I to choose the desired language and press the kbutton.
Language
Čeština
Dansk
Deutsch
English
Español
Ελληνικά
Cancel
Multi selector
2 Press Hor Ito choose Yes and press the k button.
Time zone and date
Choose time zone and set date and time?
Yes
No
 Cancel
3 Press Jor Kto select your home time zone (Time zone), and press the kbutton.
•See “Daylight Saving Time” (A27) for more information.
London
Casablanca
 Back
Back
|
4 Press Hor Ito choose the date display order |
|||||
|
Date format |
|||||
|
and press the kbutton or K. |
|||||
|
Year/Month/Day |
|||||
|
Month/Day/Year |
|||||
|
Day/Month/Year |
|||||
5 Press H, I, Jor Kto set date and time, and press the kbutton.
•Choose an item: Press Kor J(selected in the following order: D (day) M (month) Y (year) hour minute). The item can also be chosen by rotating the multi selector.
•Set the contents: Press Hor I. Date and time can also be set by rotating the command dial.
|
Date and time |
||
|
D |
M |
Y |
|
15 |
05 |
2012 |
|
15 |
10 |
|
|
Edit |
• Confirm the settings: Select the minute field and press the kbutton or K.
26

Step 1 Turn the Camera On
6 Press Hor Ito choose Yes and press the k button.
•After finishing the setting, the lens extends slightly and the shooting screen is displayed.
Date and time
15/05/2012 15:10
OK?
Yes
No
Daylight Saving Time
If daylight saving time is in effect, press the multi selector Hto enable the daylight saving time function while setting the region in step 3.
Wis displayed at the top of the monitor.
Press Ito disable the daylight saving time function.
London
Casablanca
 Back
Back
C Changing the Language Setting and the Date and Time Setting
•You can change these settings using the Language and Time zone and date settings in zsetup menu (A108).
•In the Time zone setting of Time zone and date in zsetup menu, when the daylight saving time function is enabled, the camera’s clock is set forward by one hour, and when disabled, set back by one hour. When the xtravel destination is set, the camera automatically calculates the time difference between the travel destination and the whome time zone, and saves images using the date and time of the travel destination.
•If you exit without setting the date and time, Oflashes when the shooting screen is displayed. Use the Time zone and date setting in the setup menu (A108) to set the date and time.
C The Clock Battery
•The camera’s clock is powered by a backup battery that is separate from the camera’s main battery.
•The backup battery charges after about ten hours of charging when the main battery is inserted into the camera or when the camera is connected to an optional AC adapter, and can store the set date and time for several days.
•If the camera’s backup battery becomes exhausted, the date and time setting screen is displayed when the camera is turned on. Set the date and time again. See step 2 of “Setting the Display Language, Date, and Time” (A26) for more information.
C Imprinting the Shooting Date in Printed Images
•Set the date and time before shooting.
•You can imprint the shooting date in images as they are captured by setting Print date in the setup menu (A108).
•If you want the shooting date to be printed without using the Print date setting, print using the
Playback and Shooting of Basics The
|
ViewNX 2 software (A91). |
27 |

Step 2 Select a Shooting Mode
Rotate the mode dial to select the shooting mode.
•The following describes how to take pictures in A(auto) mode as an example. Rotate the mode dial to A.
|
Auto mode |
|||
|
The |
to A. |
||
|
ofBasics |
|||
|
• The camera switches to A(auto) mode and the shooting mode icon changes |
|||
|
Shooting |
Shooting mode icon |
||
|
and |
|||
|
Playback |
25m 0s |
||
|
1/250 |
F5.6 |
840 |
• See “The Monitor” (A  for more information.
28

Step 2 Select a Shooting Mode
Available Shooting Modes
j, k, l, m mode (A57)
Choose these modes for greater control over shutter speed and aperture value.
Settings in the shooting menu (A60) are available to suit the shooting conditions and the type of shot you want to capture.
A(auto) mode (A40)
Shoot easily with basic camera operations without going into detailed settings.
Scene mode (A41)
M User settings mode (A63)
Setting combinations that are frequently used for shooting can be saved. The saved settings can be immediately retrieved for shooting simply by rotating the mode dial to M.
uSpecial effects mode (A55)
Effects can be applied to pictures during shooting. Nine different effects are available.
When one of the scene modes is selected, pictures are captured using settings that are optimized for the selected scene.
y(Scene): Choose the desired scene from 16 different scene types using the scene menu, and the camera’s settings are automatically optimized for the selected scene.
In scene auto selector mode, the camera automatically selects the optimum scene mode for simpler shooting.
• To select a scene, first rotate the mode dial to yand press the dbutton. Select the desired scene by pressing the multi selector Hor I, and then press the k button.
j(Night landscape): Captures the atmosphere of night landscapes. c(Landscape): Use this mode for vivid landscapes and cityscapes.
W(Backlighting): The flash fires when there is backlight to prevent the subject from being hidden in shadow, or use the HDR function to shoot when there are very bright areas and very dark areas in the same frame.
C Note on the Flash
When the flash is lowered, the flash setting is fixed at off and Wis displayed at the top of the monitor. In situations where a flash is needed, such as in dark locations or when the subject is backlit, be sure to raise the flash (A66).
C Features That Are Available in Shooting Mode
•The functions of the multi selector H(m), I(p), J(n) or K(o) can be set.
See “Features That Can Be Set Using the Multi Selector” (A65) for more information.
•Press the dbutton to display the menu for the selected shooting mode. See “Shooting Features” (A39) for more information about the settings available in the menu for the current
Playback and Shooting of Basics The

Step 3 Frame a Picture
1 Ready the camera.
•Keep your fingers, hair, strap and other objects away from the lens, flash, AF-assist illuminator and microphone.
Playback and Shooting of Basics The
2 Frame the picture.
• Point the camera at the subject.
C ISO Sensitivity
E(ISO sensitivity, A may be displayed on the shooting screen. When Eis displayed, the ISO sensitivity is automatically raised.
C Viewfinder
Use the viewfinder to frame pictures (A16) when bright light makes it difficult to see the display on the monitor.
C Using a Tripod
•In the following situations, use of a tripod is recommended to avoid the effects of camera shake:
—When shooting in a dark location or with the flash mode (A66) set to W(off)
—When shooting in the telephoto zoom position
•To take a picture with the camera attached to a tripod, set Vibration reduction in the setup

Using the Zoom
Rotate the zoom control to activate the optical zoom.
•To zoom in so that the subject fills a larger area of the frame, rotate toward g(telephoto zoom position).
•To zoom out so that the area visible increases in the frame, rotate toward f(wide-angle position).
•Rotating the zoom control all the way in either direction adjusts the zoom quickly, while rotating the control partially adjusts the zoom slowly (except during movie recording).
•A zoom indicator is displayed at the top of the monitor when the zoom control is rotated.
•The zoom can also be operated by rotating the side zoom control (A3) toward gor f.
The function of the side zoom control can be set in the control in the setup menu (A108).
Digital Zoom
Step 3 Frame a Picture
Zoom out Zoom in
|
Optical |
Digital |
|
zoom |
zoom |
Assign side zoom
When the camera is already at the maximum optical zoom position, rotating the zoom control toward g(telephoto zoom position) triggers the digital zoom. Digital zoom can magnify the subject up to about 2× beyond the maximum magnification of the optical zoom.
|
Maximum optical zoom |
Digital zoom enabled |
|||||||
•The focus will be at the center of the frame and the focus area will not be displayed when the digital zoom is in effect.
C Digital Zoom and Interpolation
Unlike the optical zoom, the digital zoom uses a digital imaging process known as interpolation to magnify images, resulting in slight deterioration of image quality depending on the image size (A78) and digital zoom magnification.
Vindicates the zoom position where interpolation is applied when shooting still pictures. When the zoom is increased beyond the Vposition, interpolation is initiated and the zoom indicator also turns yellow.
Vmoves to the right as the image size becomes smaller, allowing you to confirm the zoom position that can be used to capture still images without image degradation before shooting at the current image size setting.
When the image size is small
• Digital zoom can be disabled from the Digital zoom option in the setup menu (A108).
C More Information
Playback and Shooting of Basics The
|
• |
See “Zoom memory” (A62) for more Information. |
|
|
• |
See “Startup zoom position” (A62) for more Information. |
31 |

Step 4 Focus and Shoot
Playback and Shooting of Basics The
1 Press the shutter-release button halfway, i.e., press the button slightly until you feel resistance.
•When you press the shutter-release button halfway, the camera sets the focus and exposure (shutter speed and aperture value). Focus and exposure remain locked while the shutter-release button is pressed halfway.
•When the camera detects the main subject, it focuses on that subject. When the subject is in focus, the focus areas (up to 12 areas) light in green.
Shutter Aperture speed value
• The camera has nine focus areas, and if it does not detect the main subject, it automatically selects the focus areas containing the subject closest to the camera. When the subject is in focus, the focus areas that are in focus (up to nine areas) light in green.
1/250 F5.6
•When the digital zoom is in effect, the camera focuses
on the subject at the center of the screen, and the focus area is not displayed. When the subject is in focus, the focus indicator (A lights in green.
•When the shutter-release button is pressed halfway and the focus area or focus indicator flashes in red, the subject is out of focus. Change the composition and press the shutter-release button halfway again.
2 Press the shutter-release button all the way, i.e., press the button the rest of the way down.
• The shutter is released and the picture is recorded.
• If you press the shutter-release button with too much force, the camera may shake, causing images to be blurred. Press the button gently.
32
 Loading…
- Инструкции и руководства
- Бренды
- Nikon
- COOLPIX P510
![]()
Справочник (English)Справочник ПользователяСправочник ПользователяСправочник Пользователя
Справочник
Содержание
-
Introduction
4
-
Read This First
4
-
Confirming the Package Contents
4
-
About This Manual
5
-
Information and Precautions
6
-
-
For Your Safety
8
-
WARNINGS
8
-
-
Notices
11
-
-
Parts of the Camera and Basic Operations
19
-
Parts of the Camera
20
-
The Camera Body
20
-
Controls Used in Shooting Mode
22
-
Controls Used in Playback Mode
23
-
Changing the Angle of the Monitor
24
-
Attaching the Camera Strap and Lens Cap
25
-
The Monitor
26
-
-
Basic Operations
29
-
Switching Between Shooting Mode and Playback Mode
29
-
Using the Rotary Multi Selector
30
-
Using Menus (the MENU Button)
31
-
Switching the Information on the Monitor (DISP button)
33
-
Switching the Monitor Display (Monitor button)
34
-
Using the Viewfinder
34
-
-
-
The Basics of Shooting and Playback
35
-
Preparation 1 Insert the Battery
36
-
Preparation 2 Charge the Battery
38
-
Preparation 3 Insert a Memory Card
40
-
Internal Memory and Memory Cards
41
-
Approved Memory Cards
41
-
-
Step 1 Turn the Camera On
42
-
Turning the Camera On and Off
43
-
Setting the Display Language, Date, and Time
44
-
-
Step 2 Select a Shooting Mode
46
-
Available Shooting Modes
47
-
-
Step 3 Frame a Picture
48
-
Using the Zoom
49
-
-
Step 4 Focus and Shoot
50
-
Step 5 Play Back Images
52
-
Changing How Images Are Displayed
53
-
-
Step 6 Delete Unwanted Images
54
-
-
Shooting Features
57
-
Auto Mode
58
-
Changing Auto Mode Settings
58
-
-
Scene Mode (Shooting Suited to Scenes)
59
-
Changing Scene Mode Settings
60
-
Characteristics of Each Scene
60
-
Using Skin Softening
72
-
-
Special Effects Mode (Applying Effects When Shooting)
73
-
Characteristics of Each Special Effect
73
-
Changing Special Effects Mode Settings
74
-
-
P, S, A, M Modes (Setting the Exposure for Shooting)
75
-
Changing P, S, A, M Modes
78
-
Options Available in the Shooting Menu
78
-
-
U (User Setting Modes)
81
-
Saving Settings in U Mode
82
-
-
Features That Can Be Set Using the Multi Selector
83
-
Available Functions
83
-
Using the Flash (Flash Modes)
84
-
Using the Self-timer
87
-
Smile Timer (Shooting Smiling Faces)
88
-
Using Focus Mode
90
-
Adjusting Brightness (Exposure Compensation)
92
-
List of the Default Settings
93
-
-
Changing the Image Quality and Image Size
95
-
Available Image Quality
95
-
Available Image Size
96
-
-
Features That Cannot Be Used Simultaneously
98
-
The Control Range of the Shutter Speed (P, S, A, M Modes)
101
-
-
Focusing on Subject
102
-
Using the Target Finding AF
102
-
Using Face Detection
103
-
Focus Lock
104
-
-
-
Playback Features
105
-
Features Available in Playback Mode (Playback Menu)
106
-
Connecting the Camera to a TV, Computer, or Printer
108
-
Using ViewNX 2
109
-
Installing ViewNX 2
109
-
Transferring Images to the Computer
111
-
Viewing Images
112
-
-
-
Recording and Playing Back Movies
113
-
Recording Movies
114
-
Changing Movie Recording Settings (Movie Menu)
117
-
-
Playing Back Movies
118
-
-
Using GPS
119
-
Starting GPS Data Recording
120
-
Changing the GPS Settings (GPS Options Menu)
123
-
-
General Camera Setup
125
-
The Setup Menu
126
-
-
Reference Section
131
-
Taking Pictures with Manual Focus
132
-
Using Easy Panorama (Shooting and Playing back)
133
-
Taking Pictures with Easy Panorama
133
-
Viewing Easy Panorama (Scroll)
135
-
-
Using Panorama Assist
136
-
Using 3D Photography
138
-
P, S, A, M Modes
140
-
P (Programmed auto), S (Shutter-priority auto) or A (Aperture-priority auto)
140
-
M (Manual) Mode
141
-
-
Playing and Deleting Images Captured Using Continuous Shooting Mode (Sequence)
143
-
Playing Images in a Sequence
143
-
Deleting Images in a Sequence
144
-
-
Editing Still Images
145
-
Editing Features
145
-
Quick Retouch: Enhancing Contrast and Saturation
147
-
D-Lighting: Enhancing Brightness and Contrast
147
-
Skin Softening: Softening Skin Tones
148
-
Filter Effects: Applying Digital Filter Effects
149
-
Small Picture: Reducing the Size of an Image
150
-
Black Border: Adding a Black Border to Pictures
151
-
Crop: Creating a Cropped Copy
152
-
-
Connecting the Camera to a TV (Viewing Images on a TV)
153
-
Connecting the Camera to a Printer (Direct Print)
155
-
Connecting the Camera to a Printer
156
-
Printing Individual Images
157
-
Printing Multiple Images
158
-
-
Editing Movies
161
-
Extracting Only the Desired Portions of the Movie
161
-
Saving a Frame from a Movie as a Still Picture
162
-
-
Shooting Menu (P, S, A or M Mode)
163
-
Image Quality and Image Size
163
-
Picture Control (COOLPIX Picture Control)
163
-
Custom Picture Control (COOLPIX Custom Picture Control)
167
-
White Balance (Adjusting Hue)
168
-
Metering
170
-
Continuous Shooting
171
-
ISO Sensitivity
175
-
Exposure Bracketing
176
-
AF Area Mode
177
-
Autofocus Mode
181
-
Flash Exp. Comp.
182
-
Noise Reduction Filter
182
-
Active D-Lighting
183
-
Save User Settings/Reset User Settings
183
-
Zoom Memory
184
-
Startup Zoom Position
184
-
-
The Playback Menu
185
-
Print Order (Creating a DPOF Print Order)
185
-
Slide Show
187
-
Protect
188
-
The Image Selection Screen
189
-
Rotate Image
190
-
Voice Memo
191
-
Copy (Copy Between Internal Memory and Memory Card)
192
-
Sequence Display Options
193
-
Choose Key Picture
193
-
-
The Movie Menu
194
-
Movie Options
194
-
Recording Movies in Slow Motion and Fast Motion (HS Movie)
196
-
Autofocus Mode
198
-
-
GPS Setting Menu
199
-
GPS Settings
199
-
Create Log (Record the log of moving information)
201
-
View Log
203
-
-
The Setup Menu
204
-
Welcome Screen
204
-
Time Zone and Date
205
-
Monitor Settings
208
-
Print Date (Imprinting Date and Time on Pictures)
209
-
Vibration Reduction
210
-
Motion Detection
211
-
AF Assist
212
-
Digital Zoom
212
-
Assign Side Zoom Control
213
-
Sound Settings
214
-
Auto Off
214
-
Format Memory/Format Card
215
-
Language
215
-
TV Settings
216
-
Fn Button
217
-
Charge by Computer
218
-
Toggle Av/Tv Selection
220
-
Reset File Numbering
220
-
Blink Warning
221
-
Filmstrip
222
-
Eye-Fi Upload
223
-
Reverse Indicators
224
-
Reset All
224
-
Firmware Version
227
-
-
File and Folder Names
228
-
Optional Accessories
230
-
Error Messages
231
-
-
Technical Notes and Index
237
-
Caring for the Products
238
-
The Camera
238
-
The Battery
239
-
Charging AC Adapter
240
-
The Memory Cards
241
-
-
Caring for the Camera
242
-
Cleaning
242
-
Storage
242
-
-
Troubleshooting
243
-
Specifications
251
-
Supported Standards
254
-
-
Index
255
-

-
- Размер:
- 16,1 МБ
-
- Страницы:
- 260
-
- Язык:
- English
Просмотреть
Справочник Пользователя
Содержание
-
Introducción
4
-
Lea esto primero
4
-
Comprobación del contenido del embalaje
4
-
Acerca de este manual
5
-
Información y precauciones
6
-
-
Seguridad
8
-
ADVERTENCIAS
8
-
-
Avisos
11
-
-
Partes de la cámara y operaciones básicas
19
-
Partes de la cámara
20
-
Cuerpo de la cámara
20
-
Controles usados en el modo de disparo
22
-
Controles usados en el modo de reproducción
23
-
Cambio del ángulo de la pantalla
24
-
Colocación de la correa de la cámara y la tapa del objetivo
25
-
Pantalla
26
-
-
Operaciones básicas
29
-
Cambio entre el modo de disparo y el modo de reproducción
29
-
Uso del multiselector giratorio
30
-
Uso de los menús (botón MENU)
31
-
Cambio de la información en la pantalla (botón DISP)
33
-
Cambio de la visualización (botón pantalla)
34
-
Uso del visor
34
-
-
-
Funcionamiento básico del disparo y la reproducción
35
-
Preparativos — 1 Introducción la batería
36
-
Preparativos — 2 Carga de la batería
38
-
Preparativos — 3 Introducción de una tarjeta de memoria
40
-
Memoria interna y tarjetas de memoria
41
-
Tarjetas de memoria aprobadas
41
-
-
Paso 1 Encienda la cámara
42
-
Encendido y apagado de la cámara
43
-
Ajuste del idioma, la fecha y la hora de la pantalla
44
-
-
Paso 2 Seleccione un modo de disparo
46
-
Modos de disparo disponibles
47
-
-
Paso 3 Encuadre una imagen
48
-
Uso del zoom
49
-
-
Paso 4 Enfoque y dispare
50
-
Paso 5 Reproducción de imágenes
52
-
Cambio en la visualización de las imágenes
53
-
-
Paso 6 Borrado de imágenes no deseadas
54
-
-
Funciones de disparo
57
-
Modo automático
58
-
Cambio de los ajustes del modo automático
58
-
-
Modo de escena (disparo adecuado a las escenas)
59
-
Cambio de los ajustes del modo de escena
60
-
Características de cada escena
60
-
Uso de Suavizado de piel
72
-
-
Modo de efectos especiales (aplicación de efectos al disparar)
73
-
Características de cada efecto especial
73
-
Cambio de los ajustes del modo de efectos especiales
74
-
-
Modos P, S, A, M (ajuste de la exposición para el disparo)
75
-
Cambio de los modos P, S, A, M
78
-
Opciones disponibles en el menú de disparo
78
-
-
U (modos User Setting (configuración de usuario))
81
-
Cómo guardar los ajustes en el modo U
82
-
-
Funciones que se pueden ajustar con el multiselector
83
-
Funciones disponibles
83
-
Uso del flash (modos de flash)
84
-
Uso del Disparador automático
87
-
Temporizador sonrisa (disparo de rostros sonrientes)
88
-
Uso del modo de enfoque
90
-
Ajuste del brillo (Compens. de exposición)
92
-
Lista de ajustes predeterminados
93
-
-
Cambio de Calidad imagen y Tamaño imagen
95
-
Calidad imagen disponible
95
-
Tamaño imagen disponible
96
-
-
Funciones que no pueden utilizarse simultáneamente
98
-
Rango de control de la velocidad de obturación (modos P, S, A, M)
101
-
-
Enfoque del sujeto
102
-
Uso del AF detector de destino
102
-
Uso de detección de rostros
103
-
Bloqueo de enfoque
104
-
-
-
Funciones de reproducción
105
-
Funciones disponibles en el modo de reproducción (menú de reproducción)
106
-
Conexión de la cámara a una televisión, un ordenador o una impresora
108
-
Uso de ViewNX 2
109
-
Instalación de ViewNX 2
109
-
Transferencia de imágenes al ordenador
111
-
Visualización de imágenes
112
-
-
-
Grabación y reproducción de vídeos
113
-
Grabación de vídeos
114
-
Cambio de los ajustes de grabación de vídeo (menú de vídeo)
117
-
-
Reproducción de vídeos
118
-
-
Uso del GPS
119
-
Grabación de datos GPS
120
-
Cambio de los ajustes del GPS (menú de opciones del GPS)
123
-
-
Configuración general de la cámara
125
-
Menú de configuración
126
-
-
Sección de referencia
131
-
Toma de imágenes con Enfoque manual
132
-
Uso de panorama sencillo (disparo y reproducción)
133
-
Toma de imágenes con Panorama sencillo
133
-
Visualización de Panorama sencillo (desplazamiento)
135
-
-
Uso de Asist. panorama
136
-
Uso de Fotografía en 3D
138
-
Modos P, S, A, M
140
-
P (Automático programado), S (Autom. prioridad obtur.) o A (Autom. prioridad diafr.)
140
-
Modo M (Manual)
141
-
-
Reproducción y borrado de imágenes capturadas con el modo de disparo continuo (secuencia)
143
-
Reproducción de imágenes de una secuencia
143
-
Borrado de imágenes de una secuencia
144
-
-
Edición de imágenes estáticas
145
-
Funciones de edición
145
-
Retoque rápido: mejora del contraste y la saturación
147
-
D-Lighting: mejora del brillo y el contraste
147
-
Suavizado de piel: suavizado de los tonos de la piel
148
-
Efectos de filtro: aplicación de efectos de filtro digitales
149
-
Imagen pequeña: reducción del tamaño de una imagen
150
-
Borde negro: adición de un borde negro a las imágenes
151
-
Recorte: creación de una copia recortada
152
-
-
Conexión de la cámara a la televisión (visualización de imágenes en una televisión)
153
-
Conexión de la cámara a una impresora (Direct Print)
155
-
Conexión de la cámara a una impresora
156
-
Impresión de imágenes individuales
157
-
Impresión de varias imágenes
158
-
-
Edición de vídeos
161
-
Extraer solamente las partes del vídeo que se deseen
161
-
Guardar como fotografía un fotograma de un vídeo
162
-
-
Menú de disparo (modo P, S, A o M)
163
-
Calidad imagen y Tamaño imagen
163
-
Picture Control (COOLPIX Picture Control)
163
-
Picture Control pers. (COOLPIX Picture Control pers.)
167
-
Balance blancos (ajuste del tono)
168
-
Medición
170
-
Disparo Continuo
171
-
Sensibilidad ISO
175
-
Horquillado de la exposición
176
-
Modo zona AF
177
-
Modo autofoco
181
-
Comp. exposic. flash
182
-
Filtro de reducc. de ruido
182
-
D-Lighting activo
183
-
Guardar user settings/Restaurar user settings (configuración de usuario)
183
-
Memoria de zoom
184
-
Posición inicial del zoom
184
-
-
Menú de reproducción
185
-
Pedido de impresión (creación de un pedido de impresión DPOF)
185
-
Pase diapositiva
187
-
Proteger
188
-
Pantalla de selección de imágenes
189
-
Girar imagen
190
-
Anotación de voz
191
-
Copiar (copiar entre la memoria interna y la tarjeta de memoria)
192
-
Opciones visual. secuencia
193
-
Elegir imagen clave
193
-
-
Menú de vídeo
194
-
Opcio. vídeo
194
-
Grabación de vídeos a cámara lenta y cámara rápida (vídeo HS)
196
-
Modo autofoco
198
-
-
Menú de ajuste de GPS
199
-
Ajustes de GPS
199
-
Crear registro (grabación del registro de información de desplazamiento)
201
-
Ver registro
203
-
-
Menú de configuración
204
-
Pantalla inicio
204
-
Zona horaria y fecha
205
-
Config. pantalla
208
-
Impresión fecha (impresión de la fecha y la hora en las imágenes)
209
-
Reducc. vibraciones
210
-
Detección de movim.
211
-
Ayuda AF
212
-
Zoom digital
212
-
Asignación de control lateral del zoom
213
-
Config. sonido
214
-
Desconexión aut.
214
-
Format. memoria/Format. tarjeta
215
-
Idioma/Language
215
-
Ajustes TV
216
-
Botón Fn
217
-
Carga con ordenador
218
-
Cambiar selección Av/Tv
220
-
Rest. num. archivos
220
-
Adverten de parpad.
221
-
Tira de diapositivas
222
-
Carga de Eye-Fi
223
-
Invertir indicadores
224
-
Restaurar todo
224
-
Versión firmware
227
-
-
Nombres de carpetas y archivos
228
-
Accesorios opcionales
230
-
Mensajes de error
231
-
-
Observaciones técnicas e índice
237
-
Cuidados de los productos
238
-
La cámara
238
-
La batería
239
-
Cargador con adaptador de CA
240
-
Las tarjetas de memoria
241
-
-
Cuidados de la cámara
242
-
Limpieza
242
-
Almacenamiento
242
-
-
Solución de problemas
243
-
Especificaciones
251
-
Estándares admitidos
254
-
-
Índice alfabético
255
-

-
- Размер:
- 9,9 МБ
-
- Страницы:
- 260
Просмотреть
Справочник Пользователя
Содержание
-
Parts of the Camera and Basic Operations
1
-
Parts of the Camera
2
-
The Camera Body
2
-
Controls Used in Shooting Mode
4
-
Controls Used in Playback Mode
5
-
Changing the Angle of the Monitor
6
-
Attaching the Camera Strap and Lens Cap
7
-
The Monitor
8
-
Basic Operations
11
-
Switching Between Shooting Mode and Playback Mode
11
-
Using the Rotary Multi Selector
12
-
Using Menus (the d Button)
13
-
Switching the Information on the Monitor (s button)
15
-
Switching the Monitor Display (x button)
16
-
Using the Viewfinder
16
-
The Basics of Shooting and Playback
17
-
Preparation 1 Insert the Battery
18
-
Preparation 2 Charge the Battery
20
-
Preparation 3 Insert a Memory Card
22
-
Internal Memory and Memory Cards
23
-
Approved Memory Cards
23
-
Step 1 Turn the Camera On
24
-
Turning the Camera On and Off
25
-
Setting the Display Language, Date, and Time
26
-
Step 2 Select a Shooting Mode
28
-
Available Shooting Modes
29
-
Step 3 Frame a Picture
30
-
Using the Zoom
31
-
Step 4 Focus and Shoot
32
-
Step 5 Play Back Images
34
-
Changing How Images Are Displayed
35
-
Step 6 Delete Unwanted Images
36
-
Shooting Features
39
-
A (Auto) Mode
40
-
Changing A (Auto) Mode Settings
40
-
Scene Mode (Shooting Suited to Scenes)
41
-
Changing Scene Mode Settings
42
-
Characteristics of Each Scene
42
-
Using Skin Softening
54
-
Special Effects Mode (Applying Effects When Shooting)
55
-
Characteristics of Each Special Effect
55
-
Changing Special Effects Mode Settings
56
-
j, k, l, m Modes (Setting the Exposure for Shooting)
57
-
Changing j, k, l, m Modes
60
-
Options Available in the Shooting Menu
60
-
M (User Setting Modes)
63
-
Saving Settings in M Mode
64
-
Features That Can Be Set Using the Multi Selector
65
-
Available Functions
65
-
Using the Flash (Flash Modes)
66
-
Using the Self-timer
69
-
Smile Timer (Shooting Smiling Faces)
70
-
Using Focus Mode
72
-
Adjusting Brightness (Exposure Compensation)
74
-
List of the Default Settings
75
-
Changing the Image Quality and Image Size
77
-
Available Image Quality
77
-
Available Image Size
78
-
Features That Cannot Be Used Simultaneously
80
-
The Control Range of the Shutter Speed (j, k, l, m Modes)
83
-
Focusing on Subject
84
-
Using the Target Finding AF
84
-
Using Face Detection
85
-
Focus Lock
86
-
Playback Features
87
-
Features Available in Playback Mode (Playback Menu)
88
-
Connecting the Camera to a TV, Computer, or Printer
90
-
Using ViewNX 2
91
-
Installing ViewNX 2
91
-
Transferring Images to the Computer
93
-
Viewing Images
94
-
Recording and Playing Back Movies
95
-
Recording Movies
96
-
Changing Movie Recording Settings (Movie Menu)
99
-
Playing Back Movies
100
-
Using GPS
101
-
Starting GPS Data Recording
102
-
Changing the GPS Settings (GPS Options Menu)
105
-
General Camera Setup
107
-
The Setup Menu
108
-
Parts of the Camera
2
-
The Camera Body
2
-
Controls Used in Shooting Mode
4
-
Controls Used in Playback Mode
5
-
Changing the Angle of the Monitor
6
-
Attaching the Camera Strap and Lens Cap
7
-
The Monitor
8
-
Basic Operations
11
-
Switching Between Shooting Mode and Playback Mode
11
-
Using the Rotary Multi Selector
12
-
Using Menus (the d Button)
13
-
Switching the Information on the Monitor (s button)
15
-
Switching the Monitor Display (x button)
16
-
Using the Viewfinder
16
-
Eyelet for camera strap
7
-
Power switch/power-on lamp
25
-
w (FUNC) button
110
-
Zoom control
31
-
Mode dial
28
-
f : Wide
31
-
g : Tele
31
-
h: Thumbnail playback
35
-
GPS antenna
103
-
i : Playback zoom
35
-
Flash
66
-
j : Help
41
-
m (flash pop-up) button
66
-
Self-timer lamp
69
-
AF-assist illuminator
109
-
10 HDMI mini connector (Type C)
90
-
Side zoom control
109
-
f : Wide
31
-
g : Tele
31
-
(multi selector)
12
-
13 k (apply selection) button
12
-
x (monitor) button
16
-
14 d (menu) button
13
-
Diopter adjustment control
16
-
Electronic viewfinder
16
-
s (display) button
15
-
Command dial
57
-
19 Memory card slot
22
-
21 Battery chamber
18
-
Flash lamp
66
-
29 Aperture value
57
-
Focus mode
73
-
Zoom indicator
31
-
Focus indicator
32
-
31 finding AF)
61
-
Zoom memory
62
-
Flash mode
67
-
Flash exp. comp
62
-
Battery level indicator
24
-
33 tracking)
61
-
Vibration reduction icon
108
-
34 Center-weighted area
61
-
35 Spot metering area
61
-
36 Shutter speed
57
-
37 Exposure indicator
59
-
Noise reduction burst
43
-
39 Exposure compensation value
74
-
40 Active D-Lighting
62
-
41 COOLPIX Picture Control
60
-
42 White balance
61
-
Travel destination indicator
108
-
44 Backlighting (HDR)
44
-
Exposure bracketing
61
-
Movie options (HS movies)
99
-
Self-timer
69
-
47 Smile timer
70
-
Pet portrait auto release
52
-
Easy panorama
51
-
Internal memory indicator
24
-
Date of recording
26
-
Time of recording
26
-
17 Black border indicator
88
-
Voice memo indicator
88
-
18 D-Lighting icon
88
-
Battery level indicator
24
-
19 Quick retouch icon
88
-
Protect icon
88
-
20 Filter effects icon
88
-
22 Skin softening icon
88
-
Print order icon
88
-
24 3D picture indicator
53
-
Image quality
77
-
10 Image size
78
-
27 Shooting mode1
29
-
12 Easy panorama indicator
51
-
28 Aperture value
32
-
29 Shutter speed
32
-
number of images
34
-
30 Exposure compensation value
74
-
(b) Movie length
100
-
31 ISO sensitivity
61
-
14 Internal memory indicator
34
-
32 total number of images
34
-
Movie playback guide
100
-
Preparation 1 Insert the Battery
18
-
Preparation 2 Charge the Battery
20
-
Preparation 3 Insert a Memory Card
22
-
Step 1 Turn the Camera On
24
-
Setting the Display Language, Date, and Time (First Use Only)
26
-
Step 2 Select a Shooting Mode
28
-
Step 3 Frame a Picture
30
-
Step 4 Focus and Shoot
32
-
Step 5 Play Back Images
34
-
Step 6 Delete Unwanted Images
36

-
- Размер:
- 15,5 МБ
-
- Страницы:
- 260
Просмотреть
Справочник Пользователя
Содержание
-
Introduction
4
-
À lire impérativement
4
-
Vérification du contenu de l’emballage
4
-
À propos de ce manuel
5
-
Informations et recommandations
6
-
-
Pour votre sécurité
8
-
DANGER
8
-
-
Remarques
11
-
-
Descriptif de l’appareil photo et fonctions de base
19
-
Descriptif de l’appareil photo
20
-
Boîtier de l’appareil photo
20
-
Commandes utilisées en mode de prise de vue
22
-
Commandes utilisées en mode de visualisation
23
-
Modification de l’inclinaison du moniteur
24
-
Fixation de la courroie de l’appareil photo et du bouchon d’objectif
25
-
Moniteur
26
-
-
Fonctions de base
29
-
Basculement entre le mode de prise de vue et le mode de visualisation
29
-
Utilisation du sélecteur rotatif
30
-
Utilisation des menus (la commande MENU)
31
-
Navigation entre les informations affichées sur le moniteur (commande DISP)
33
-
Navigation entre les affichages du moniteur (commande moniteur)
34
-
Utilisation du viseur
34
-
-
-
Notions fondamentales de prise de vue et de visualisation
35
-
Étape préliminaire 1 Insertion de l’accumulateur
36
-
Étape préliminaire 2 Charge de l’accumulateur
38
-
Étape préliminaire 3 Insertion d’une carte mémoire
40
-
Mémoire interne et cartes mémoire
41
-
Cartes mémoire approuvées
41
-
-
Étape 1 Mise sous tension de l’appareil photo
42
-
Mise sous tension et hors tension de l’appareil photo
43
-
Réglage de la langue, de la date et de l’heure
44
-
-
Étape 2 Sélection d’un mode de prise de vue
46
-
Modes de prise de vue disponibles
47
-
-
Étape 3 Cadrage d’une photo
48
-
Utilisation du zoom
49
-
-
Étape 4 Mise au point et prise de vue
50
-
Étape 5 Visualisation des photos
52
-
Modification de l’affichage des photos
53
-
-
Étape 6 Suppression des photos inutiles
54
-
-
Fonctions de prise de vue
57
-
Mode auto
58
-
Modification des paramètres du mode auto
58
-
-
Mode Scène (Prise de vue adaptée aux scènes)
59
-
Modification des paramètres du mode Scène
60
-
Caractéristiques de chaque scène
60
-
Utilisation de l’option Maquillage
72
-
-
Mode d’effets spéciaux (Application d’effets lors de la prise de vue)
73
-
Caractéristiques de chaque effet spécial
73
-
Modification des paramètres du mode Effets spéciaux
74
-
-
Modes P, S, A, M (Réglage de l’exposition pour la prise de vue)
75
-
Changement des modes P, S, A, M
78
-
Options disponibles dans le menu de prise de vue
78
-
-
U (Modes réglages utilisateur)
81
-
Enregistrement des réglages en mode U
82
-
-
Fonctions pouvant être réglées à l’aide du sélecteur multidirectionnel
83
-
Fonctions disponibles
83
-
Utilisation du flash (Modes de flash)
84
-
Utilisation du retardateur
87
-
Détecteur de sourire (Prise de vue de visages souriants)
88
-
Utilisation du mode de mise au point
90
-
Réglage de la luminosité (Correction d’exposition)
92
-
Liste des réglages par défaut
93
-
-
Modification de la qualité d’image et de la taille d’image
95
-
Qualité d’image disponible
95
-
Taille d’image disponible
96
-
-
Fonctions ne pouvant pas être utilisées simultanément
98
-
Plage de contrôle de la vitesse d’obturation (Modes P, S, A, M)
101
-
-
Mise au point sur des sujets
102
-
Utilisation de AF sur le sujet principal
102
-
Utilisation de la détection des visages
103
-
Mémorisation de la mise au point
104
-
-
-
Fonctions de visualisation
105
-
Fonctions disponibles en mode de visualisation (menu Visualisation)
106
-
Connexion de l’appareil photo à un téléviseur, un ordinateur ou une imprimante
108
-
Utilisation de ViewNX 2
109
-
Installation de ViewNX 2
109
-
Transfert d’images vers l’ordinateur
111
-
Affichage des images
112
-
-
-
Enregistrement et lecture de vidéos
113
-
Enregistrement de vidéos
114
-
Modification des réglages de l’enregistrement vidéo (menu Vidéo)
117
-
-
Lecture de vidéos
118
-
-
Utilisation du GPS
119
-
Démarrage de l’enregistrement des données GPS
120
-
Modification des réglages GPS (menu des options GPS)
123
-
-
Réglages généraux de l’appareil photo
125
-
Menu configuration
126
-
-
Section Référence
131
-
Utilisation de la Mise au point manuelle
132
-
Utilisation de la fonction Panoramique simplifié (prise de vue et visualisation)
133
-
Prises de vue avec la fonction Panoramique simplifié
133
-
Affichage d’un panoramique simplifié (défilement)
135
-
-
Utilisation de la fonction Panoramique assisté
136
-
Utilisation de la photo 3D
138
-
Modes P, S, A, M
140
-
P (Auto programmé), S (Auto à priorité vitesse) ou A (Auto priorité ouverture)
140
-
Mode M (Manuel)
141
-
-
Visualisation et suppression de photos prises en mode de prise de vue en Rafale (séquence)
143
-
Visualisation des photos d’une séquence
143
-
Suppression des photos d’une séquence
144
-
-
Édition d’images fixes
145
-
Fonctions d’édition
145
-
Retouche rapide : amélioration du contraste et de la saturation
147
-
D-Lighting : amélioration de la luminosité et du contraste
147
-
Maquillage : adoucissement des tons chair
148
-
Filtres : application des effets d’un filtre numérique
149
-
Mini-photo : réduction de la taille d’une image
150
-
Bordure noire : ajout d’une bordure noire aux photos
151
-
Recadrage : création d’une copie recadrée
152
-
-
Connexion de l’appareil photo à un téléviseur (visualisation d’images sur un téléviseur)
153
-
Connexion de l’appareil photo à une imprimante (impression directe)
155
-
Connexion de l’appareil photo à une imprimante
156
-
Impression d’images individuelles
157
-
Impression de plusieurs images
158
-
-
Édition de vidéos
161
-
Extraction des séquences souhaitées de la vidéo uniquement
161
-
Enregistrement d’une vue extraite d’une vidéo en tant qu’image fixe
162
-
-
Menu Prise de vue (mode P, S, A ou M)
163
-
Taille d’image et Qualité d’image
163
-
Picture Control (Fonction Picture Control du COOLPIX)
163
-
Picture Control perso. (Fonction Picture Control perso. du COOLPIX)
167
-
Balance des blancs (réglage des teintes)
168
-
Mesure
170
-
Prise de vue en rafale
171
-
Sensibilité
175
-
Bracketing de l’exposition
176
-
Mode de zones AF
177
-
Mode autofocus
181
-
Intensité de l’éclair
182
-
Filtre antibruit
182
-
D-Lighting actif
183
-
Enreg. régl. utilisateur/Réinit. régl. utilisateur
183
-
Sélection focales fixes
184
-
Position de zoom initiale
184
-
-
Menu Visualisation
185
-
Commande d’impression (Création d’une commande d’impression DPOF)
185
-
Diaporama
187
-
Protéger
188
-
Écran de sélection des images
189
-
Rotation image
190
-
Annotation vocale
191
-
Copier (Copie entre la mémoire interne et la carte mémoire)
192
-
Options affichage séquence
193
-
Choix image représentative
193
-
-
Menu Vidéo
194
-
Options vidéo
194
-
Enregistrement de vidéos au ralenti et en accéléré (vidéo HS)
196
-
Mode autofocus
198
-
-
Menu Réglage GPS
199
-
Réglages GPS
199
-
Créer un journal (enregistrement du journal contenant les informations sur les déplacements)
201
-
Voir le journal
203
-
-
Menu Configuration
204
-
Écran d’accueil
204
-
Fuseau horaire et date
205
-
Réglages du moniteur
208
-
Imprimer la date (Impression de la date et de l’heure sur les photos)
209
-
Réduction vibration
210
-
Détection mouvement
211
-
Assistance AF
212
-
Zoom numérique
212
-
Commande zoom latérale
213
-
Réglages du son
214
-
Extinction auto
214
-
Formater la mémoire/Formatage de la carte
215
-
Langue/Language
215
-
Réglages TV
216
-
Commande Fn
217
-
Charge par ordinateur
218
-
Permuter Av/Tv
220
-
Réinitialiser n fichier
220
-
Détect. yeux fermés
221
-
Pellicule
222
-
Transfert Eye-Fi
223
-
Inverser les indicateurs
224
-
Réinitialisation
224
-
Version firmware
227
-
-
Noms des fichiers et des dossiers
228
-
Accessoires optionnels
230
-
Messages d’erreur
231
-
-
Notes techniques et index
237
-
Entretien des produits
238
-
Appareil photo
238
-
Accumulateur
239
-
Adaptateur de charge
240
-
Cartes mémoire
241
-
-
Entretien de l’appareil photo
242
-
Nettoyage
242
-
Stockage
242
-
-
Dépannage
243
-
Fiche technique
251
-
Normes prises en charge
254
-
-
Index
255
-

-
- Размер:
- 17,0 МБ
-
- Страницы:
- 260
Просмотреть

Ru
Подробное руководство пользователя
ЦИФРОВАЯ ФОТОКАМЕРА