
Характеристики, спецификации
Тип управления:
электромеханическое
Система измерения размера пуговиц:
есть
Количество швейных операций:
14
Выполнение петли:
полуавтомат
Строчки:
обметочная, потайная, эластичная, эластичная потайная
Максимальная длина стежка:
4 мм
Максимальная ширина стежка:
5 мм
Лапки:
для вшивания молнии,для пришивания пуговиц
Автоматическая вставка нити:
есть
Отсек для аксессуаров:
есть
Размеры (ШxГxВ):
41x18x30 см
Руководство по эксплуатации

ИНСТРУКЦИИ ПО БЕЗОПАСНОСТИ
При эксплуатации швейной машины следует всегда соблюдать следующие основные меры
безопасности:
Перед началом эксплуатации внимательно прочтите все инструкции.
ВНИМАНИЕ! Для предотвращения возможности поражения
электрическим током:
1. Никогда не оставляйте швейную машину без присмотра при вставленной в розетку вилке
сетевого шнура. Сразу же после использования швейной машины или перед ее чисткой
всегда вынимайте вилку сетевого шнура из розетки.
2. Перед заменой лампочки подсветки всегда вынимайте вилку сетевого шнура из розетки.
Для замены используйте лампочку того же типа, имеющую мощность 15 Ватт.
ПРЕДУПРЕЖДЕНИЕ: Для уменьшения риска возгорания,
поражения электрическим током, получения ожогов или травм:
1. Не допускайте использования машины в качестве игрушки. Необходимо быть особенно
внимательным, когда машина используется детьми или когда во время работы на машине
рядом находятся дети.
2. Используйте машину только по ее прямому назначению, как описано в настоящем
руководстве. Используйте только те принадлежности, которые рекомендованы
изготовителем и указаны в данном руководстве.
3. Никогда не используйте швейную машину, если у нее поврежден сетевой шнур или вилка,
если машина плохо работает, если ее уронили или повредили, если в машину попала вода.
В этих случаях машину следует отправить официальному дилеру компании BROTHER
вашего региона или в уполномоченный сервисный центр для проверки, ремонта и наладки
ее электрической или механической части.
4. Никогда не работайте на машине при закрытых вентиляционных отверстиях. Содержите
вентиляционные отверстия машины и педаль в чистоте, своевременно очищайте их от
пыли, грязи, обрывков ткани и ворса.
5. Не роняйте в отверстия машины и не вставляйте в них никаких посторонних предметов.
6. Не используйте машину для работы вне помещения.
7. Не используйте машину в помещениях, в которых распыляют те или иные аэрозоли или
применяют чистый кислород.
8. Для отключения машины от электрической сети установите сетевой выключатель в
положение “»”, соответствующее выключению, а затем выньте вилку сетевого шнура из
розетки.
9. При отключении машины от сети не вытягивайте вилку за шнур. Возьмитесь за вилку и
выньте ее из электрической розетки.
10. Держите пальцы вдали от движущихся частей машины. Будьте особенно осторожны при
работе рядом с иглой.
11. Применяйте только соответствующую игольную пластину. Использование неподходящей
игольной пластины может привести к поломке иглы.
12. Не используйте погнутые иглы.
13. Не тяните и не подталкивайте ткань во время шитья. Это может привести к отклонению
иглы и ее поломке.
1
————————————————————————————————————————————————————————————————————
14. При выполнении любых операций в районе иглы, например при заправке нити в иглу,
замене иглы или шпульки или смене прижимной лапки и т. п., выключите машину,
установив сетевой выключатель в положение, обозначенное символом “»”.
15. При снятии крышек, смазке или выполнении любых других регулировок, разрешенных
пользователю и описанных в данном руководстве, всегда отключайте машину от
электрической сети.
16. Малолетним детям или людям пожилого возраста пользоваться швейной машиной без
присмотра не разрешается.
17. Следите за детьми. Не допускайте, чтобы они играли со швейной машиной.
СОХРАНИТЕ ЭТО РУКОВОДСТВО
Эта машина предназначена только для бытового применения.
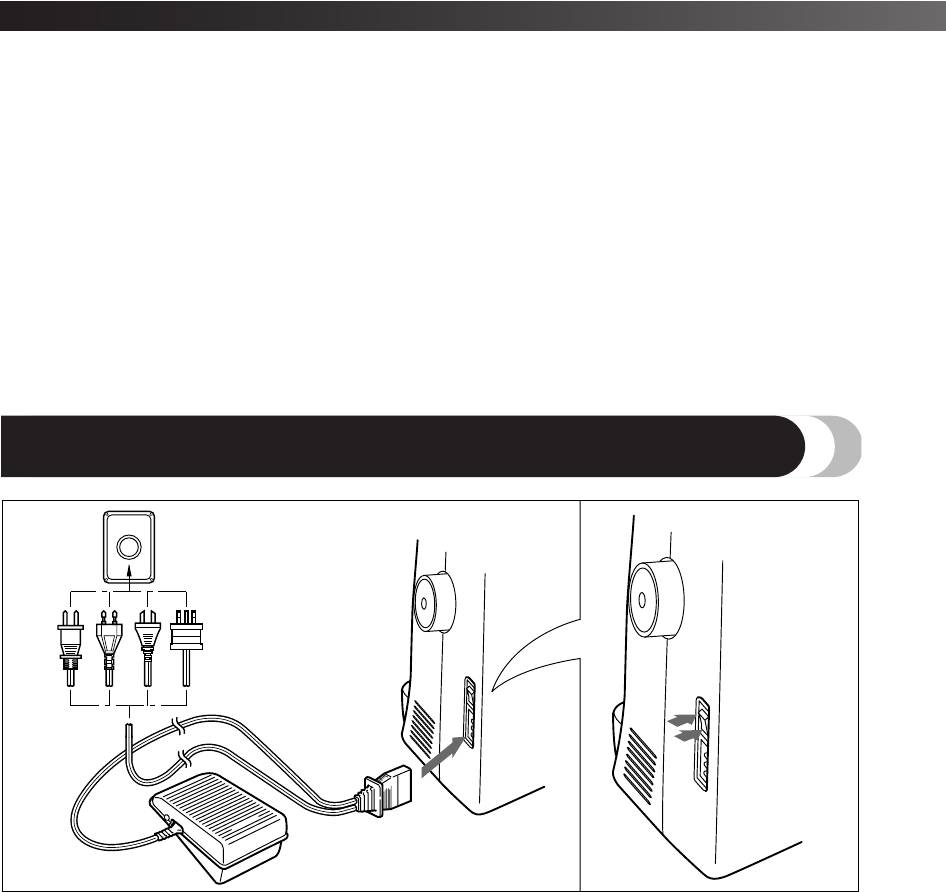
ПОДКЛЮЧЕНИЕ СОЕДИНИТЕЛЕЙ И ВЫКЛЮЧАТЕЛЬ ПИТАНИЯ/ЛАМПОЧКИ ПОДСВЕТКИ
1
2
1. Вставьте трехконтактный разъем сетевого шнура в
Выключатель питания/лампочки подсветки служит для
гнездо на машине.
включения и выключения электропитания машины и
2. Вставьте вилку сетевого шнура в настенную
лампочки подсветки.
розетку.
1 Включен
2 Выключен
• Перед тем как оставить машину без присмотра,
• При выполнении технического обслуживания
выключите ее сетевым выключателем и выньте
машины, снятии крышек и замене лампочки также
вилку сетевого шнура из настенной розетки.
необходимо вынуть вилку сетевого шнура из
розетки.
2
Страницы и текст этой инструкции
 Инструкция швейной машинки Brother XL-5050_XL-5060_XL-5070
 Информация отображена на картинке
 Информация отображена на картинке
 Информация отображена на картинке
 Информация отображена на картинке
Как использовать наш сайт инструкций OnlineManuals.ru
Наша цель состоит в том, чтобы предоставить вам быстрый доступ к содержанию инструкции для швейной машинки Brother XL-5050_XL-5060_XL-5070.
С помощью онлайн просмотра, Вы можете быстро просмотреть содержимое инструкции и найти решение проблемы с швейной машинки Brother XL-5050_XL-5060_XL-5070.
Для Вашего удобства
Если листать руководство пользователя швейной машинки Brother XL-5050_XL-5060_XL-5070 прямо на сайте, не очень удобно для Вас, есть два возможных решения:
• Просмотр в полноэкранном режиме — легко просмотреть руководство пользователя (без загрузки его на свой компьютер), Вы можете использовать режим полноэкранного просмотра.
Для просмотра инструкции пользователя швейной машинки Brother XL-5050_XL-5060_XL-5070 на полном экране, используйте кнопку «Открыть в Pdf-viewer».
• Загрузка на компьютер — Вы можете также скачать Инструкция швейной машинки Brother XL-5050_XL-5060_XL-5070 на свой компьютер и сохранить его в файлах.
Многие люди предпочитают читать документы не на экране, а в печатной версии.
Возможность печати руководства пользователя также была предусмотрена на нашем сайте,
и вы можете использовать ее, нажав на иконку «печать» в Pdf-viewer.
Нет необходимости печатать все руководство швейной машинки Brother XL-5050_XL-5060_XL-5070, можно выбрать только нужные страницы инструкции.
-
Инструкции по эксплуатации
1

Brother XL-5050 инструкция по эксплуатации
(50 страниц)
- Языки:Русский
-
Тип:
PDF -
Размер:
1.9 MB -
Описание:
Электромеханическая швейная машина
Просмотр
На NoDevice можно скачать инструкцию по эксплуатации для Brother XL-5050. Руководство пользователя необходимо для ознакомления с правилами установки и эксплуатации Brother XL-5050. Инструкции по использованию помогут правильно настроить Brother XL-5050, исправить ошибки и выявить неполадки.
![]()
XL5050us_cover
Operation Manual
English 885-448 XC6752-021 Printed in China
XC6752-021 XL5050 (NA03J061) Bk
XL5000us.book Page 1 Tuesday, November 11, 2003 9:25 AM
IMPORTANT SAFETY INSTRUCTIONS
When using this machine, basic safety precautions, including the following, should always be taken: Read all instructions before use.
DANGER — To reduce the risk of electric shock:
1.The machine should never be left unattended while plugged in. Always unplug the machine from the electrical outlet immediately after using it and before cleaning it.
2.Always unplug the machine before you change the light bulb. Replace the bulb with the same type and rated 15 watts.
WARNING — To reduce the risk of burns, fire, electric shock, or injury to persons:
1.Do not allow this machine to be used as a toy. Close attention is necessary when the machine is used by or near children.
2.Use this machine only for its intended use as described in this manual. Use only accessories recommended by the manufacturer as contained in this manual.
3.Never operate this machine if it has a damaged cord or plug, if it is not working properly, if it has been dropped or damaged, or dropped into water. Return the machine to the nearest authorized dealer or service center for examination, repair, or electrical or mechanical adjustment.
4.Never operate the machine with any air openings blocked. Keep ventilation openings of the machine and foot controller free from the accumulation of lint, dust, and loose cloth.
5.Never drop or insert any object into any opening.
6.Do not use outdoors.
7.Do not operate where aerosol (spray) products are being used or where oxygen is being administered.
8.To disconnect the machine, set the main switch to the “{” position (which represents off), and then remove the plug from the outlet.
9.Do not unplug by pulling on the cord. To unplug, grasp the plug, not the cord.
10.Keep fingers away from all moving parts. Special care is required around the machine needle.
11.Always use the proper needle plate. The wrong plate can cause the needle to break.
12.Do not use bent needles.
13.Do not pull or push fabric while stitching. It may deflect the needle, causing it to break.
14.Switch the machine to the “{” position to turn it off when making any adjustments in the needle area, such as threading the needle, changing the needle, threading the bobbin, or changing the presser foot.
15.Always unplug the machine from the electrical outlet when removing covers, lubricating, or when making any other user servicing adjustments mentioned in the instruction manual.
16.This sewing machine is not intended for use by young children or infirm persons without supervision.
17.Young children should be supervised to ensure that they do not play with this machine.
SAVE THESE INSTRUCTIONS
This machine is intended for household use.
1

XL5000us.book Page 2 Tuesday, November 11, 2003 9:25 AM
——————————————————————————————————————————————————————————————
FOR USERS IN THE UK, EIRE, MALTA AND CYPRUS ONLY
If this machine is fitted with a three-pin non-rewireable BS plug then please read the following.
IMPORTANT (in the United Kingdom)
Main supply (AC 230/240V, 50Hz)
DO NOT cut off the main plug from the equipment. If the plug fitted is not suitable for the power outlet in your home or the cable is too short to reach a power outlet, then obtain an appropriate safety-approved extension lead or consult your dealer.
BE SURE to replace the fuse only with an identical approved type, as originally fitted, and to replace the fuse cover.
If the main plug is cut off, be sure to remove the fuse and dispose of the plug immediately, to avoid a possible shock hazard by inadvertent connection to the main power supply.
IMPORTANT (in the other countries)
If the available socket outlet is not suitable for the plug supplied with this equipment, it should be cut off and an appropriate three-pin plug should be fitted. With alternative plugs, an approved fuse must be fitted in the plug.
NOTE: The plug severed from the main leads must be destroyed as a plug with bared flexible cords is hazardous if engaged in a live socket outlet. In the event that the plug fuse is replaced, use a fuse approved by ASTA to BS 1362, i.e., carrying the  mark, rated as marked on the plug.
Always replace the fuse cover. Never use plugs with the fuse cover omitted.
WARNING: DO NOT CONNECT EITHER WIRE TO THE EARTH TERMINAL WHICH IS MARKED WITH THE LETTER ‘E’ OR BY THE EARTH SYMBOL , OR COLORED GREEN OR GREEN AND YELLOW.
The wires in this main lead are colored in accordance with the following code:
As the colors of the wiring in the main lead of this appliance may not correspond with the colored markings identifying the terminals in your plug, proceed as follows:
The wire that is colored blue must be connected to the terminal marked with the letter ‘N’ or colored black or blue.
The wire that is colored brown must be connected to the terminal marked with the letter ‘L’ or colored red or brown.
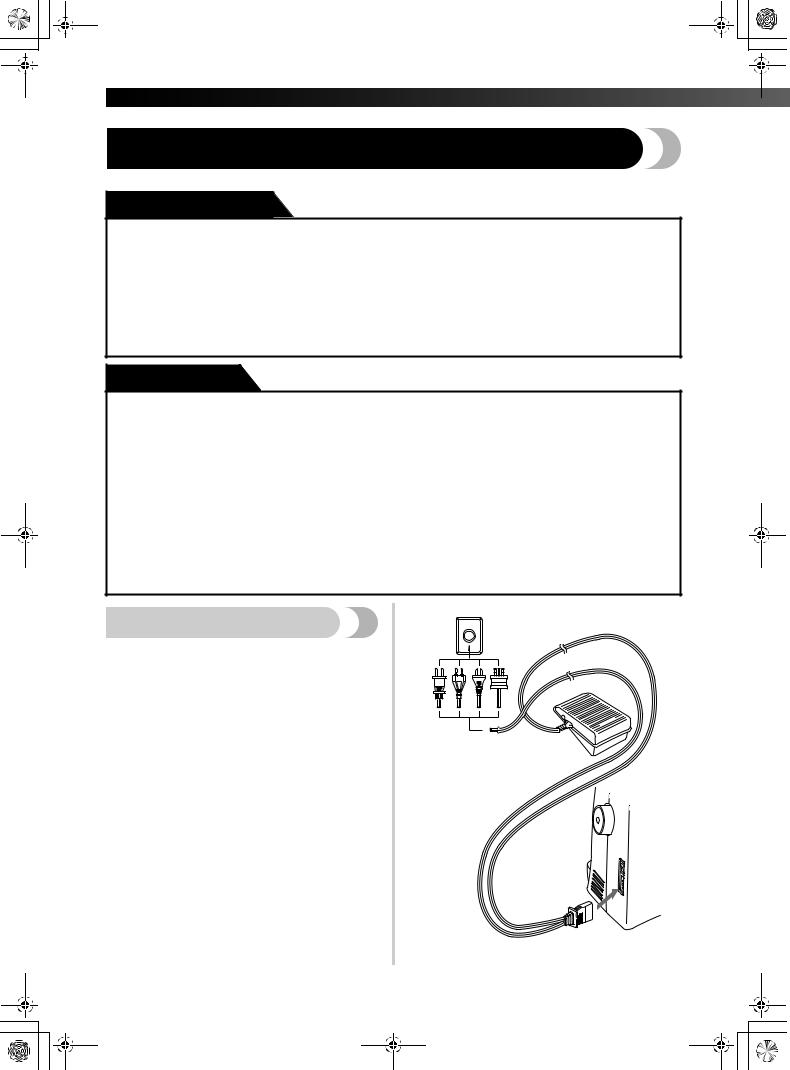
CONNECTING PLUGS AND MAIN POWER/SEWING LIGHT SWITCH
1
2
1.Connect the three-prong plug into the machine.
2.Connect the electrical supply plug into a wall outlet.
•When leaving the machine unattended, the main power switch of the machine should be switched off or the plug must be removed from the socket outlet.
2
The main power/sewing light switch turns the main power and sewing light on or off.
1 Turn on
2Turn off
•When servicing the machine, removing covers or changing bulbs, the machine must be unplugged.

XL5000us.book Page 3 Tuesday, November 11, 2003 9:25 AM
|
CONTENTS |
|
|
IMPORTANT SAFETY INSTRUCTIONS ……………………………………………………………………. |
1 |
|
CONNECTING PLUGS AND MAIN POWER/SEWING LIGHT SWITCH ……………………….. |
2 |
|
CONTENTS …………………………………………………………………………………………………………. |
3 |
|
PRINCIPAL PARTS ………………………………………………………………………………………………… |
4 |
|
ACCESSORIES ……………………………………………………………………………………………………… |
5 |
|
USING YOUR SEWING MACHINE …………………………………………………………………………. |
6 |
|
Connecting Plugs ……………………………………………………………………………………………………………………………. |
6 |
|
Main Power/Sewing Light Switch ………………………………………………………………………………………………………. |
7 |
|
Foot Controller ……………………………………………………………………………………………………………………………….. |
7 |
|
Inserting the Needle ………………………………………………………………………………………………………………………… |
7 |
|
Checking the Needle ……………………………………………………………………………………………………………………….. |
8 |
|
Changing the Presser Foot ………………………………………………………………………………………………………………… |
8 |
|
Converting to Free-arm Style …………………………………………………………………………………………………………….. |
9 |
|
Steadying the Machine …………………………………………………………………………………………………………………….. |
9 |
|
THE CONTROLS ………………………………………………………………………………………………… |
10 |
|
Pattern Selection Dial …………………………………………………………………………………………………………………….. |
10 |
|
Recommended Widths and Lengths for Stitches …………………………………………………………………………………. |
11 |
|
Stitch Length Dial ………………………………………………………………………………………………………………………….. |
14 |
|
Stretch Stitching ……………………………………………………………………………………………………………………………. |
14 |
|
Reverse Sewing Lever …………………………………………………………………………………………………………………….. |
14 |
|
Drop Feed Lever (if the machine is equipped with a drop feed lever) …………………………………………………….. |
14 |
|
THREADING THE MACHINE ……………………………………………………………………………….. |
15 |
|
Winding the Bobbin ………………………………………………………………………………………………………………………. |
15 |
|
Lower Threading …………………………………………………………………………………………………………………………… |
16 |
|
Upper Threading …………………………………………………………………………………………………………………………… |
18 |
|
Using the Needle Threader (models equipped with a needle threader) …………………………………………………… |
19 |
|
Quick Thread-Setting System FAST START BOBBIN (models equipped with a quick thread-setting system) …. |
20 |
|
Drawing up the lower thread ………………………………………………………………………………………………………….. |
21 |
|
Sewing with a Twin Needle ……………………………………………………………………………………………………………. |
21 |
|
Tension of the Thread ……………………………………………………………………………………………………………………. |
22 |
|
CHART OF SEWING FABRICS, NEEDLES AND THREAD COMBINATIONS ………………… |
24 |
|
Please Read Before Sewing …………………………………………………………………………………………………………….. |
25 |
|
Straight Stitching …………………………………………………………………………………………………………………………… |
25 |
|
Zigzag Stitching ……………………………………………………………………………………………………………………………. |
26 |
|
Blind Hem Stitching ………………………………………………………………………………………………………………………. |
27 |
|
Shell Tuck Stitching ……………………………………………………………………………………………………………………….. |
27 |
|
Elastic Stitching …………………………………………………………………………………………………………………………….. |
28 |
|
Scallop Stitching …………………………………………………………………………………………………………………………… |
28 |
|
Overedge Stitching ………………………………………………………………………………………………………………………… |
29 |
|
Feather Stitching …………………………………………………………………………………………………………………………… |
29 |
|
Triple Zigzag Stretch Stitching …………………………………………………………………………………………………………. |
30 |
|
Decorative Stitching ………………………………………………………………………………………………………………………. |
30 |
|
Making a Buttonhole (1-Step Automatic Buttonhole) …………………………………………………………………………… |
30 |
|
Making a Buttonhole (4-Step Buttonhole) ………………………………………………………………………………………….. |
31 |
|
Adjusting Buttonholes ……………………………………………………………………………………………………………………. |
33 |
|
Sewing Buttons …………………………………………………………………………………………………………………………….. |
33 |
|
Zipper Insertion …………………………………………………………………………………………………………………………….. |
34 |
|
Gathering …………………………………………………………………………………………………………………………………….. |
35 |
|
Darning ……………………………………………………………………………………………………………………………………….. |
35 |
|
Appliqués …………………………………………………………………………………………………………………………………….. |
36 |
|
Monogramming and Embroidering ………………………………………………………………………………………………….. |
36 |
|
MAINTENANCE …………………………………………………………………………………………………. |
38 |
|
Changing the Light Bulb …………………………………………………………………………………………………………………. |
38 |
|
Oiling …………………………………………………………………………………………………………………………………………. |
38 |
|
Cleaning ……………………………………………………………………………………………………………………………………… |
39 |
|
Performance Checklist …………………………………………………………………………………………………………………… |
40 |
|
Repacking the Machine ………………………………………………………………………………………………………………….. |
42 |
|
INDEX ………………………………………………………………………………………………………………. |
43 |
3

XL5000us.book Page 4 Tuesday, November 11, 2003 9:25 AM
KNOWING YOUR SEWING MACHINE —————————————————————————————————————————————
PRINCIPAL PARTS
1Bobbin-winding assembly (page 15)
This winds the thread onto the bobbin, which you use for the lower thread.
2Spool pin (page 15 and 18)
Holds the spool of thread.
3Bobbin-winding tension disc and thread guide (page 15)
4 Thread take-up lever (page 18)
5 Thread cutter (page 26)
6Upper tension-control dial (page 22)
This controls the tension of the upper thread.
7Pattern selection dial (page 10)
You can turn this in either direction to choose the stitch you want.
8Stitch length dial (page 14)
This controls the length of the stitches.
9Reverse-sewing lever (page 14)
You can push this to stitch in the reverse direction.
0 Buttonhole fine adjustment screw (page 33)
AButtonhole lever (1-Step automatic buttonhole) (page 30)
BNeedle threader (page 19)
This is only available on certain models.
C Handle
DBalance wheel
Turn toward you (counterclockwise) to raise and lower the needle.
EMain power/sewing light switch (page 7)
You can turn the main power and sewing light on and off.
FFoot controller receptacle (page 6)
Plug in the foot controller plug and connect the machine to the power supply.
GPresser foot lever (page 
This raises and lowers the presser foot.
HFoot controller (page 7)
You can use this to control the sewing speed, and to start and stop sewing.
I Zigzag presser foot
4
XL5000us.book Page 5 Tuesday, November 11, 2003 9:25 AM
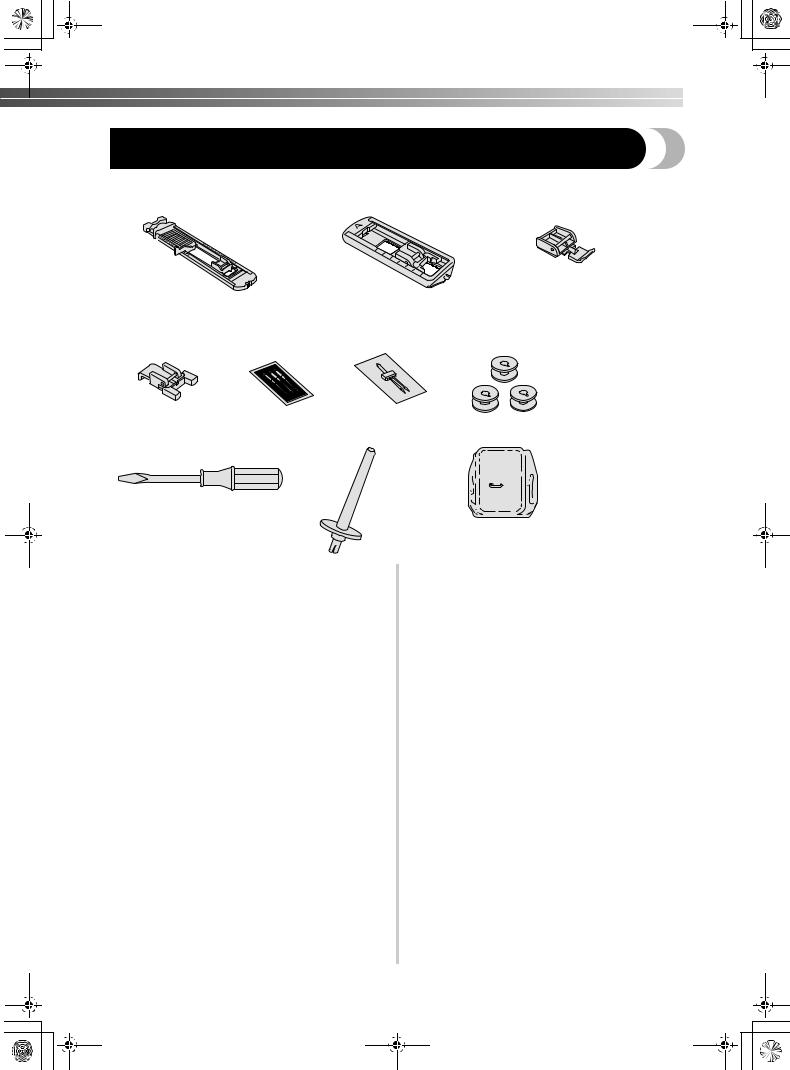
ACCESSORIES
|
1 |
2 X59370-021 |
|
XA4911-151 |
X59369-321 |
|
(For 1 Step Automatic Buttonhole) |
(For 4 Step Buttonhole) |
||
|
3 X59375-121 |
4 129583-001 |
5 X57521-001 |
6 SA156(For U.S.A.) |
SFB(XA5539-151)(For other countries)
|
7 X55467-021 |
8 130920-021 |
9 XA3442-121 |
1 Buttonhole foot (1 pc.)
2 Zipper foot (1 pc.)
3 Button sewing foot (1 pc.)
4 Needle pack (regular single needle HAX130) (3 pcs.)
5 Twin needle (1 pc.)
6 Bobbins (3 pcs.)
7 Screwdriver (1 pc.)
8 Extra spool pin (1 pc.)
9Darning plate (1pc.) (When the machine is not equipped with a Drop Feed.)
Parts code for zigzag presser foot: 138135-122 Foot controller:
XC7359-021 (110/120V areas) XC7438-021 (220/240V areas) XC7456-021 (U.K.)
XC7455-021 (Australia, New Zealand)
The above accessories are stored in the accessory bag inside the extension table. These accessories have been designed to help you carry out most sewing tasks.
5
XL5000us.book Page 6 Tuesday, November 11, 2003 9:25 AM
KNOWING YOUR SEWING MACHINE —————————————————————————————————————————————
USING YOUR SEWING MACHINE

 WARNING
●Use only regular household electricity for the power source. Using other power sources may result in fire, electric shock, or damage to the machine.
●Turn off the main power and remove the plug in the following circumstances:
•When you are away from the machine
•After using the machine
•When the power fails during use
•When the machine does not operate correctly due to a bad connection or a disconnection
•During electrical storms
 CAUTION
●Do not use extension cords or multi-plug adapters with many other appliances plugged in to them. Fire or electric shock may result.
●Do not touch the plug with wet hands. Electric shock may result.
●When unplugging the machine, always turn off the main power first. Always grasp the plug to remove it from the outlet. Pulling on the cord may damage the cord, or lead to fire or electric shock.
●Do not allow the power cord to be cut, damaged, modified, forcefully bent, pulled, twisted, or bundled. Do not place heavy objects on the cord. Do not subject the cord to heat. These
things may damage the cord and cause fire or electric shock. If the cord or plug is damaged, take the machine to your authorized dealer for repairs before continuing use.
●Unplug the power cord if the machine is not to be used for a long period of time, otherwise a fire may result.
Connecting Plugs
1Connect the power cord plug to the machine.
2Connectoutlet. the power supply plug to a wall
6
XL5000us.book Page 7 Tuesday, November 11, 2003 9:25 AM
 Note
Note
●When leaving the machine unattended, the main switch of the machine should be switched off or the plug must be removed from the socket outlet.
●When servicing the machine, removing covers or changing bulbs, the machine must
be unplugged. (For U.S.A. only)
●This appliance has a polarized plug (one blade wider than the other). To reduce the risk of electric shock, this plug is intended to fit in a polarized outlet only one way. If the plug does not fit fully in the outlet, reverse the plug.
If it still does not fit, contact a qualified electrician to install the proper outlet. Do not modify the plug in any way.
Main Power/Sewing
Light Switch
This switch turns the main power and sewing light on or off.
1 Turn on (toward the “I” mark)
2 Turn off (toward the “O” mark)
1
2
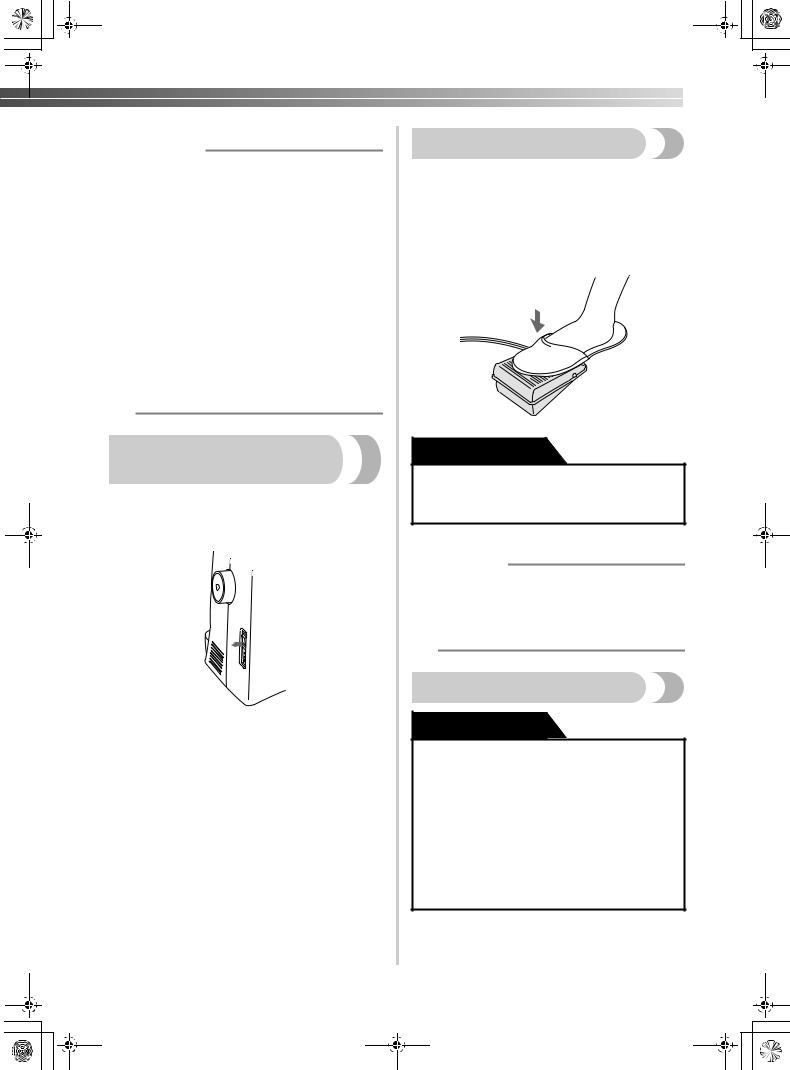
Foot Controller
When you press the foot controller down lightly, the machine will run at a low speed. When you press harder, the machine’s speed will increase. When you take your foot off the foot controller, the machine will stop. You should make sure that nothing is placed on the foot controller when the machine is not in use.

 CAUTION
●Do not allow pieces of cloth and dust to build up on the foot controller, otherwise a fire or an electric shock could occur.
 Note
Note
(For U.S.A. only)
●Foot Controller: Model KD-1902 This foot controller can be used with Models XL-5050/XL-5060/XL-5070/ XL-5051/XL-5061/XL-5071.
.
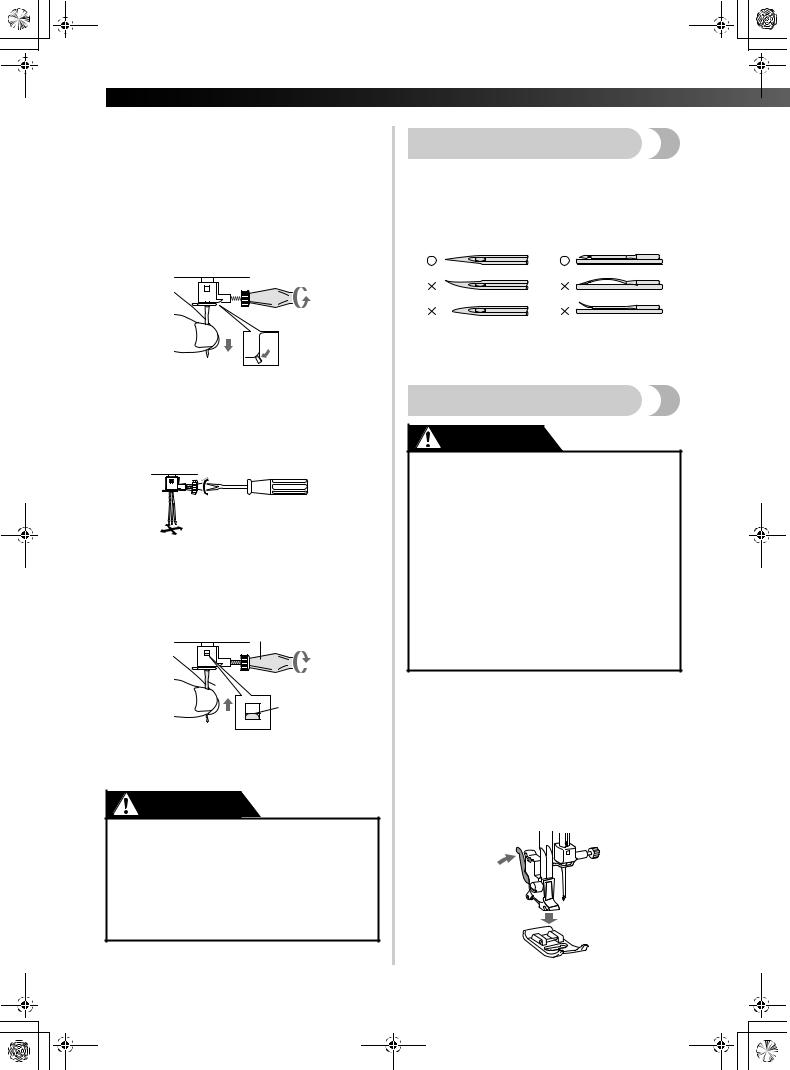
Inserting the Needle
 CAUTION
●Turn the main power switch off before you change the needle. If you leave the main power on and step on the foot controller, the machine will start and you may be injured.
●Only use sewing-machine needles for home use. Other needles may bend or break and cause injury.
●Never sew with a bent needle. A bent needle will easily break and cause injury.
1Remove the power supply plug from the electrical outlet.
7
XL5000us.book Page 8 Tuesday, November 11, 2003 9:25 AM
KNOWING YOUR SEWING MACHINE —————————————————————————————————————————————
2Raise the needle bar to its highest position.
Checking the Needle
|
3 |
Lower the presser foot. |
The sewing needle must always be straight |
||||||
|
1and sharp for smooth sewing. |
||||||||
|
If a needle is already installed, remove it by |
To check if the needle is bent, place the flat |
|||||||
|
4loosening the needle clamp with a |
2side of the needle on a flat surface as shown. |
|||||||
|
screwdriver and pulling the needle down. |
||||||||
|
1 |
||||||||
|
3Replace the needle if it is bent or dull. |
||
|
1 Screwdriver |
||
|
• Do not use extreme force when |
Changing the Presser Foot |
|
|
loosening or tightening the needle |
CAUTION |
|
|
clamp screw, otherwise certain parts of |
||
|
the sewing machine may be damaged. |
● Always turn off the power before you |
|
|
change the presser foot. If you leave the |
||
|
power on and step on the controller, the |
||
|
machine will start and you may be injured. |
||
|
● Always use the correct presser foot for |
||
|
the stitch pattern you have chosen. If you |
||
|
With the flat side of the needle toward the |
use the wrong presser foot, the needle |
|
|
5back of the machine, insert the needle until it |
may strike the presser foot and bend or |
|
|
touches the needle stopper. |
break, and may cause injury. |
|
|
Tighten the needle clamp. |
● Only use presser feet that have been |
|
|
1 |
designed to be used with this machine. |
|
|
Using other any presser feet may cause |
||
|
an accident or injury. |
||
|
3 |
You will have to change the presser foot depending |
|
|
2 |
on what you want to sew and how. |
|
|
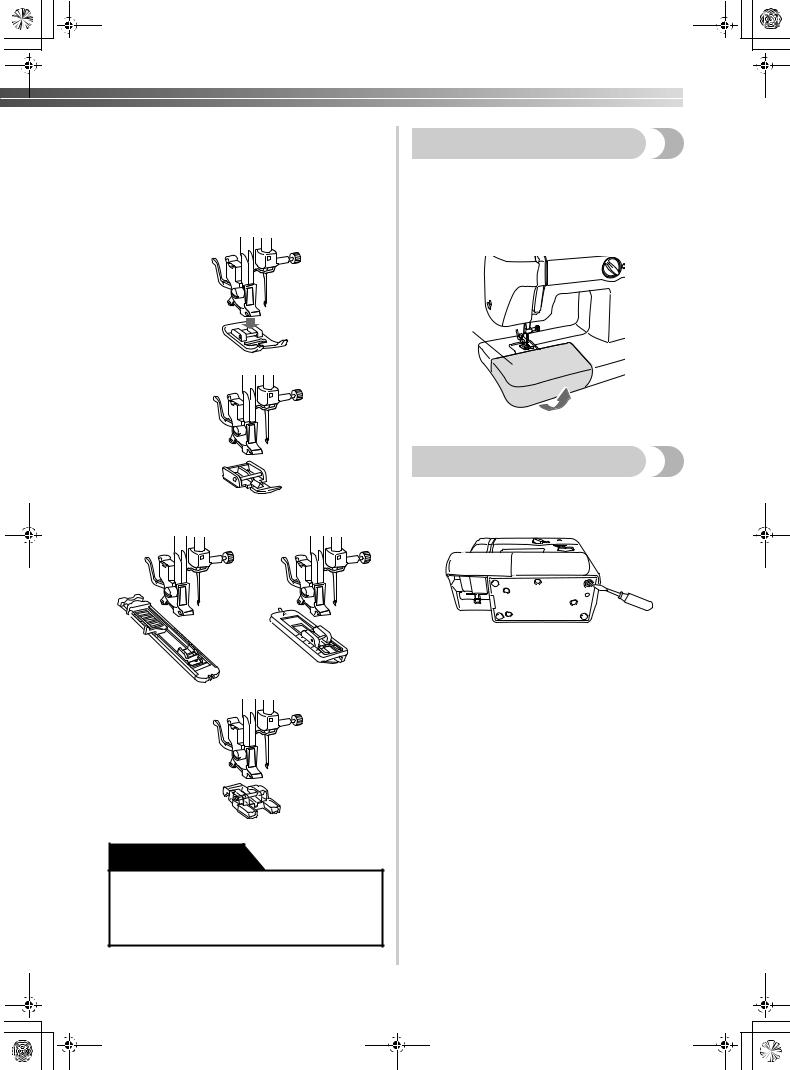
■ Snap-On Type |
||
|
1 Screwdriver |
Raise the needle to its highest position by turning |
|
|
2 Needle stopper |
1the balance wheel toward you (counterclockwise) |
|
|
3 Needle |
and raise the presser foot lever. |
|
|
CAUTION |
Release the foot by raising the lever at the |
|
|
2back of the holder assembly. |
● Make sure to push in the needle until it touches the stopper, and securely tighten the needle clamp screw with a screwdriver. If the needle is not in fully, or if the needle clamp screw is loose, the needle may break or the machine may be damaged.
8
XL5000us.book Page 9 Tuesday, November 11, 2003 9:25 AM
3Put a different presser foot on the needle plate so that the bar on the presser foot is in line with the slot on the shank.
4Lower the presser foot lever and fix the presser foot onto the shank. If the presser foot is in the correct place, the bar should snap in.

 CAUTION
●If the presser foot is not installed with the correct orientation, the needle may strike the presser foot, which may bend or break the needle and cause injury.
Converting to Free-arm Style
Free-arm sewing is convenient for sewing tubular and hard-to-reach areas. To change your machine to the free-arm style, lift out the extension table attachment.
1Lift the bottom of the extension table up toward you.
2 Pull the extension table out to remove it.
1
1 Extension table
Steadying the Machine
When the machine is placed on an uneven surface, turn the rubber cushion on the front right-hand side of the base plate to adjust it until the machine is stable.
9
![]()
XL5000us.book Page 10 Tuesday, November 11, 2003 9:25 AM
KNOWING YOUR SEWING MACHINE —————————————————————————————————————————————
THE CONTROLS
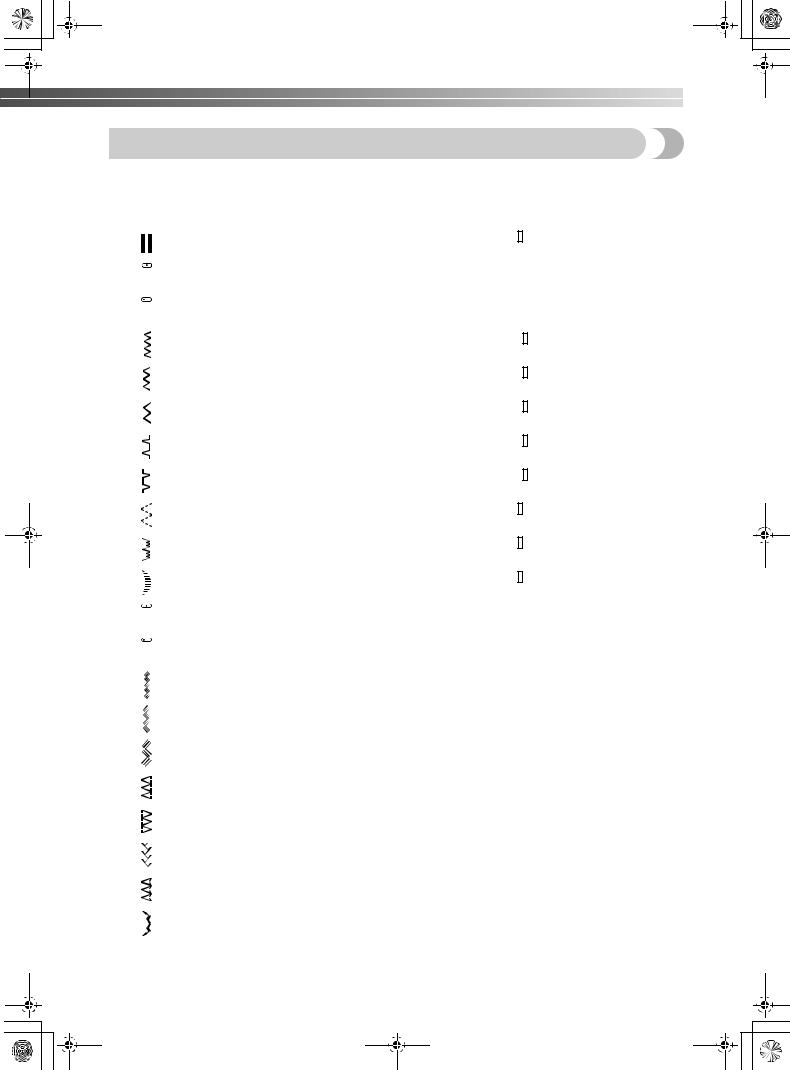
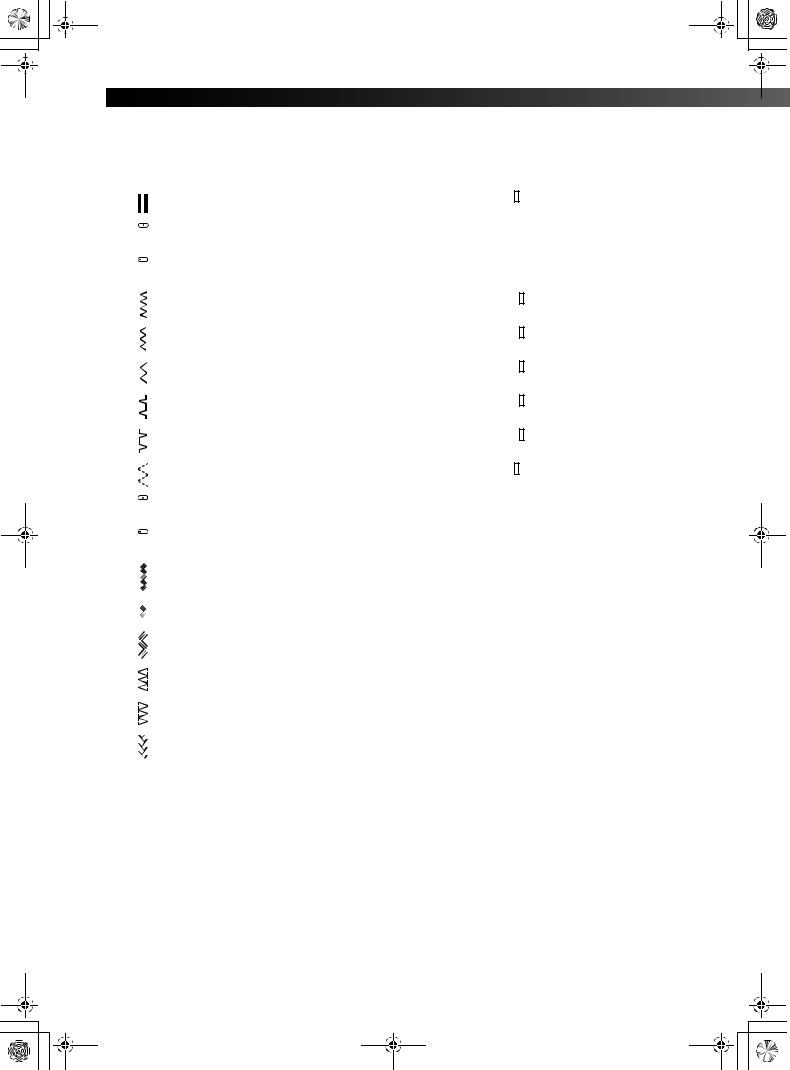
Pattern Selection Dial
To choose a stitch, simply turn the pattern selection dial in either direction. Stitch widths and lengths are shown on the following page.
1
 Note
Note
●Since the pattern selection dial is not continuous, it cannot be turned directly from the last stitch to the first one or from the first stitch to the last one. To select the first stitch when the last one is displayed or to select the last stitch when the first one is displayed, turn the pattern selection dial in the opposite direction until the desired stitch is displayed.
1Pattern selection dial
■21 Stitches (1-Step Automatic Buttonhole)
|
1 |
2 |
3 |
4 |
5 |
6 |
7 |
8 |
9 |
10 |
11 |
12 |
13 |
14 |
15 |
16 |
17 |
18 |
19 |
20 |
21 |
||||||||
■ 17 Stitches (1-Step Automatic Buttonhole)
|
1 |
2 |
3 |
4 |
5 |
6 |
7 |
8 |
9 |
10 |
11 |
12 |
13 |
14 |
15 |
16 |
17 |
||||||||
■ 17 Stitches (4-Step Buttonhole)
|
1 |
2 |
3 |
4 |
5 |
6 |
7 |
8 |
9 |
10 |
11 |
12 |
13 |
14 |
15 |
16 |
17 |
||||||||
10
XL5000us.book Page 11 Tuesday, November 11, 2003 9:25 AM
Recommended Widths and Lengths for Stitches
■ 21 Stitches (1-Step Automatic Buttonhole)
|
Recommended |
Recommended |
Page in |
|||||||
|
Pattern |
Stitch Name |
Width |
Length |
||||||
|
Instructions |
|||||||||
|
[mm (inch)] |
[mm (inch)] |
||||||||
|
1 |
1-STEP AUTOMATIC |
5 |
-1.5 |
30 |
|||||
|
BUTTONHOLE |
(3/16) |
(1/64-1/16) |
|||||||
|
2 |
STRAIGHT STITCH |
— |
1-4 |
25, 34, 35 |
|||||
|
(CENTER) |
(1/16-3/16) |
||||||||
|
3 |
STRAIGHT STITCH |
— |
1-4 |
25, 34, 35 |
|||||
|
(LEFT) |
(1/16-3/16) |
||||||||
|
4 |
ZIGZAG STITCH |
1.7 |
-4 |
26, 33, 36 |
|||||
|
(1/16) |
(1/64-3/16) |
||||||||
|
5 |
ZIGZAG STITCH |
3.5 |
-4 |
26, 33, 36 |
|||||
|
(1/8) |
(1/64-3/16) |
||||||||
|
6 |
ZIGZAG STITCH |
5 |
-4 |
26, 33, 36 |
|||||
|
(3/16) |
(1/64-3/16) |
||||||||
|
7 |
BLIND HEM STITCH |
3.5 |
-2 |
27 |
|||||
|
(1/8) |
(1/64-1/16) |
||||||||
|
8 |
SHELL TUCK STITCH |
5 |
-3 |
27 |
|||||
|
(3/16) |
(1/64-1/8) |
||||||||
|
9 |
ELASTIC STITCH |
5 |
-2.5 |
28 |
|||||
|
(3/16) |
(1/64-3/32) |
||||||||
|
10 |
STRETCH BLIND HEM STITCH |
5 |
-1.5 |
27 |
|||||
|
(3/16) |
(1/64-1/16) |
||||||||
|
11 |
SCALLOP STITCH |
5 |
-1.5 |
28 |
|||||
|
(3/16) |
(1/64-1/16) |
||||||||
|
12 |
TRIPLE STRETCH STITCH |
— |
Fixed |
25 |
|||||
|
(CENTER) |
2.5 (3/32) |
||||||||
|
13 |
TRIPLE STRETCH STITCH |
— |
Fixed |
25 |
|||||
|
(LEFT) |
2.5 (3/32) |
||||||||
|
14 |
TRIPLE ZIGZAG STRETCH STITCH |
1.7 |
Fixed |
30 |
|||||
|
(1/16) |
2.5 (3/32) |
||||||||
|
15 |
TRIPLE ZIGZAG STRETCH STITCH |
3.5 |
Fixed |
30 |
|||||
|
(1/8) |
2.5 (3/32) |
||||||||
|
16 |
TRIPLE ZIGZAG STRETCH STITCH |
5 |
Fixed |
30 |
|||||
|
(3/16) |
2.5 (3/32) |
||||||||
|
17 |
STRETCH OVERLOCK STITCH |
3.5 |
Fixed |
29 |
|||||
|
(1/8) |
2.5 (3/32) |
||||||||
|
18 |
ELASTIC OVERLOCK STITCH |
5 |
Fixed |
29 |
|||||
|
(3/16) |
2.5 (3/32) |
||||||||
|
19 |
FEATHER STITCH |
5 |
Fixed |
29 |
|||||
|
(3/16) |
2.5 (3/32) |
||||||||
|
20 |
ARROWHEAD STITCH |
5 |
Fixed |
29 |
|||||
|
(3/16) |
2.5 (3/32) |
||||||||
|
21 |
DECORATIVE STITCH |
5 |
Fixed |
30 |
|||||
|
(3/16) |
2.5 (3/32) |
||||||||
11
XL5000us.book Page 12 Tuesday, November 11, 2003 9:25 AM
KNOWING YOUR SEWING MACHINE —————————————————————————————————————————————
■ 17 Stitches (1-Step Automatic Buttonhole)
|
Recommended |
Recommended |
Page in |
|||||||
|
Pattern |
Stitch Name |
Width |
Length |
||||||
|
Instructions |
|||||||||
|
[mm (inch)] |
[mm (inch)] |
||||||||
|
1 |
1-STEP AUTOMATIC |
5 |
-1.5 |
30 |
|||||
|
BUTTONHOLE |
(3/16) |
(1/64-1/16) |
|||||||
|
2 |
STRAIGHT STITCH |
— |
1-4 |
25, 34, 35 |
|||||
|
(CENTER) |
(1/16-3/16) |
||||||||
|
3 |
STRAIGHT STITCH |
— |
1-4 |
25, 34, 35 |
|||||
|
(LEFT) |
(1/16-3/16) |
||||||||
|
4 |
ZIGZAG STITCH |
1.7 |
-4 |
26, 33, 36 |
|||||
|
(1/16) |
(1/64-3/16) |
||||||||
|
5 |
ZIGZAG STITCH |
3.5 |
-4 |
26, 33, 36 |
|||||
|
(1/8) |
(1/64-3/16) |
||||||||
|
6 |
ZIGZAG STITCH |
5 |
-4 |
26, 33, 36 |
|||||
|
(3/16) |
(1/64-3/16) |
||||||||
|
7 |
BLIND HEM STITCH |
3.5 |
-2 |
27 |
|||||
|
(1/8) |
(1/64-1/16) |
||||||||
|
8 |
SHELL TUCK STITCH |
5 |
-3 |
27 |
|||||
|
(3/16) |
(1/64-1/8) |
||||||||
|
9 |
ELASTIC STITCH |
5 |
-2.5 |
28 |
|||||
|
(3/16) |
(1/64-3/32) |
||||||||
|
10 |
TRIPLE STRETCH STITCH |
— |
Fixed |
25 |
|||||
|
(CENTER) |
2.5 (3/32) |
||||||||
|
11 |
TRIPLE STRETCH STITCH |
— |
Fixed |
25 |
|||||
|
(LEFT) |
2.5 (3/32) |
||||||||
|
12 |
TRIPLE ZIGZAG STRETCH STITCH |
1.7 |
Fixed |
30 |
|||||
|
(1/16) |
2.5 (3/32) |
||||||||
|
13 |
TRIPLE ZIGZAG STRETCH STITCH |
3.5 |
Fixed |
30 |
|||||
|
(1/8) |
2.5 (3/32) |
||||||||
|
14 |
TRIPLE ZIGZAG STRETCH STITCH |
5 |
Fixed |
30 |
|||||
|
(3/16) |
2.5 (3/32) |
||||||||
|
15 |
STRETCH OVERLOCK STITCH |
3.5 |
Fixed |
29 |
|||||
|
(1/8) |
2.5 (3/32) |
||||||||
|
16 |
ELASTIC OVERLOCK STITCH |
5 |
Fixed |
29 |
|||||
|
(3/16) |
2.5 (3/32) |
||||||||
|
17 |
FEATHER STITCH |
5 |
Fixed |
29 |
|||||
|
(3/16) |
2.5 (3/32) |
||||||||
12

XL5000us.book Page 13 Tuesday, November 11, 2003 9:25 AM
■ 17 Stitches (4-Step Buttonhole)
|
Recommended |
Recommended |
Page in |
|||||||||
|
Pattern |
Stitch Name |
Width |
Length |
||||||||
|
Instructions |
|||||||||||
|
[mm (inch)] |
[mm (inch)] |
||||||||||
|
1 |
4-STEP BUTTONHOLE |
5 |
-1.5 |
31 |
|||||||
|
(3/16) |
(1/64-1/16) |
||||||||||
|
2 |
ZIGZAG STITCH |
1.7 |
-4 |
26, 33, 36 |
|||||||
|
(1/16) |
(1/64-3/16) |
||||||||||
|
3 |
ZIGZAG STITCH |
3.5 |
-4 |
26, 33, 36 |
|||||||
|
(1/8) |
(1/64-3/16) |
||||||||||
|
4 |
ZIGZAG STITCH |
5 |
-4 |
26, 33, 36 |
|||||||
|
(3/16) |
(1/64-3/16) |
||||||||||
|
5 |
STRAIGHT STITCH |
— |
1-4 |
25, 34, 35 |
|||||||
|
(CENTER) |
(1/16-3/16) |
||||||||||
|
6 |
STRAIGHT STITCH |
— |
1-4 |
25, 34, 35 |
|||||||
|
(LEFT) |
(1/16-3/16) |
||||||||||
|
7 |
STRETCH BLIND HEM STITCH |
5 |
-1.5 |
27 |
|||||||
|
(3/16) |
(1/64-1/16) |
||||||||||
|
8 |
SHELL TUCK STITCH |
5 |
-3 |
27 |
|||||||
|
(3/16) |
(1/64-1/8) |
||||||||||
|
9 |
ELASTIC STITCH |
5 |
-2.5 |
28 |
|||||||
|
(3/16) |
(1/64-3/32) |
||||||||||
|
10 |
TRIPLE ZIGZAG STRETCH STITCH |
1.7 |
Fixed |
30 |
|||||||
|
(1/16) |
2.5 (3/32) |
||||||||||
|
11 |
TRIPLE ZIGZAG STRETCH STITCH |
3.5 |
Fixed |
30 |
|||||||
|
(1/8) |
2.5 (3/32) |
||||||||||
|
12 |
TRIPLE ZIGZAG STRETCH STITCH |
5 |
Fixed |
30 |
|||||||
|
(3/16) |
2.5 (3/32) |
||||||||||
|
13 |
TRIPLE STRETCH STITCH |
— |
Fixed |
25 |
|||||||
|
(CENTER) |
2.5 (3/32) |
||||||||||
|
14 |
TRIPLE STRETCH STITCH |
— |
Fixed |
25 |
|||||||
|
(LEFT) |
2.5 (3/32) |
||||||||||
|
15 |
ARROWHEAD STITCH |
5 |
Fixed |
29 |
|||||||
|
(3/16) |
2.5 (3/32) |
||||||||||
|
16 |
ELASTIC OVERLOCK STITCH |
5 |
Fixed |
29 |
|||||||
|
(3/16) |
2.5 (3/32) |
||||||||||
|
17 |
FEATHER STITCH |
5 |
Fixed |
29 |
|||||||
|
(3/16) |
2.5 (3/32) |
||||||||||
13
3
СОДЕРЖАНИЕ
ИНСТРУКЦИИ ПО БЕЗОПАСНОСТИ …………………………………………………………….. 1
ПОДКЛЮЧЕНИЕ СОЕДИНИТЕЛЕЙ И ВЫКЛЮЧАТЕЛЬ ПИТАНИЯ/ЛАМПОЧКИ
ПОДСВЕТКИ ………………………………………………………………………………………………… 2
СОДЕРЖАНИЕ ……………………………………………………………………………………………… 3
ОСНОВНЫЕ ЧАСТИ ……………………………………………………………………………………… 4
ПРИНАДЛЕЖНОСТИ ……………………………………………………………………………………. 5
ИСПОЛЬЗОВАНИЕ ШВЕЙНОЙ МАШИНЫ ……………………………………………………. 6
Подключение электропитания …………………………………………………………………………………………………………. 7
Выключатель питания и лампочки подсветки ……………………………………………………………………………………. 7
Педаль ……………………………………………………………………………………………………………………………………………. 7
Установка иглы ……………………………………………………………………………………………………………………………….. 8
Проверка иглы ………………………………………………………………………………………………………………………………… 8
Замена прижимной лапки ………………………………………………………………………………………………………………… 9
Переоборудование машины для работы с функцией “свободный рукав” ……………………………………………..10
Обеспечение устойчивости машины …………………………………………………………………………………………………10
ОРГАНЫ УПРАВЛЕНИЯ ………………………………………………………………………………. 11
Ручка выбора строчки ……………………………………………………………………………………………………………………..11
Рекомендуемые значения ширины строчек и длины стежков ……………………………………………………………..12
Регулятор длины стежка ………………………………………………………………………………………………………………….15
Эластичная строчка …………………………………………………………………………………………………………………………15
Клавиша шитья в обратном направлении ………………………………………………………………………………………….16
Переключатель положения гребенок транспортера (если машина оснащена таковым) …………………………16
ЗАПРАВКА НИТИ В МАШИНУ …………………………………………………………………….. 17
Намотка шпульки ……………………………………………………………………………………………………………………………17
Заправка нижней нити …………………………………………………………………………………………………………………….18
Заправка верхней нити …………………………………………………………………………………………………………………….20
Использование устройства заправки нити в иглу (для моделей, оснащенных таким устройством) …………21
Система быстрой заправки нити FAST START BOBBIN (для моделей, оснащенных такой системой) ……22
Вытягивание нижней нити ………………………………………………………………………………………………………………23
Шитье двойной иглой ……………………………………………………………………………………………………………………..24
Натяжение нитей …………………………………………………………………………………………………………………………….25
ТАБЛИЦА КОМБИНАЦИЙ ТКАНЕЙ, ИГЛ И НИТЕЙ ПРИ ШИТЬЕ …………………. 26
Перед шитьем прочтите следующие главы …………………………………………………………………………………………27
Прямая строчка ………………………………………………………………………………………………………………………………27
Строчка “зигзаг” …………………………………………………………………………………………………………………………….29
Потайная строчкаCмережка ……………………………………………………………………………………………………………..29
СтрочкаCракушка ……………………………………………………………………………………………………………………………30
Эластичная строчка …………………………………………………………………………………………………………………………30
Фестонная строчка ………………………………………………………………………………………………………………………….31
Краеобметочная строчка ………………………………………………………………………………………………………………….32
Строчка “елочка” ……………………………………………………………………………………………………………………………32
Тройная эластичная строчка “зигзаг” ……………………………………………………………………………………………….33
Декоративные строчки …………………………………………………………………………………………………………………….33
Выполнение выметывания петель (автоматиCческое выметывание петель за один прием) …………………….33
Выполнение выметывания петель (автоматиCческое выметывание петель за четыре приема) ………………..34
Настройка выметывания петель ……………………………………………………………………………………………………….36
Пришивание пуговиц ………………………………………………………………………………………………………………………36
Вшивание застежки “молния” ………………………………………………………………………………………………………….37
Выполнение сборок …………………………………………………………………………………………………………………………38
Штопка ………………………………………………………………………………………………………………………………………….39
Аппликации ……………………………………………………………………………………………………………………………………39
Выстрачивание монограмм и вышивание …………………………………………………………………………………………40
ТЕХНИЧЕСКОЕ ОБСЛУЖИВАНИЕ ………………………………………………………………. 42
Замена лампочки подсветки …………………………………………………………………………………………………………….42
Смазка ……………………………………………………………………………………………………………………………………………42
Очистка ………………………………………………………………………………………………………………………………………….43
Таблица контрольных проверок технических характеристик ………………………………………………………………44
Повторная упаковка машины …………………………………………………………………………………………………………..46
УКАЗАТЕЛЬ ………………………………………………………………………………………………… 47
XL5050ru.book Page 3 Wednesday, August 24, 2005 5:52 PM
Перейти к контенту
Швейные машинки Brother

- Размер инструкции: 1.13 Мб
- Формат файла: pdf
Если вы потеряли инструкцию от швейной машинки Brother XL-5050, можете скачать файл для просмотра на компьютере или печати.
Инструкция для швейной машинки Brother XL-5050 на русском языке. В руководстве описаны возможности и полезные функции, а также правила эксплуатации. Перед использованием внимательно ознакомьтесь с инструкцией.
Чтобы не читать всю инструкцию вы можете выполнить поиск по содержимому внутри инструкции и быстро найти необходимую информацию. Рекомендации по использованию помогут увеличить срок службы швейной машинки Brother XL-5050. Если у вас появилась проблема, то найдите раздел с описанием неисправностей и способами их решения. В нем указаны типичные поломки и способы их решения.