
![]()
Компания Husqvarna сумела выстроить на машинки широкий ценовой диапазон, что значительно повысило спрос на продукцию. Это нисколько не повлияло на качество работы машин, выставленных по вполне демократической стоимости – экономия стала возможной благодаря некоторому уменьшению рабочих операций.
История швейных машин Хускварна
Более 300 лет назад король Швеции велел построть фабрику по производству огнестрельного оружия в живописном местечке Хускварна, однако спустя 200 лет знаменитый производитель перешел на вполне мирное производство. Несмотря на то, что современный ассортимент продукции Husqvarna весьма разнообразен, название компании из Швеции ассоциируется не только с бензопилами, садовой техникой и мотоциклами, но и качественными швейными машинами.
Даже модели швейных машин Husqvarna с богатыми техническими возможностями просты в управлении, которое может быть и электромеханическим, и полностью электронным.
Модели
Швейная машина Husqvarna Emerald 118
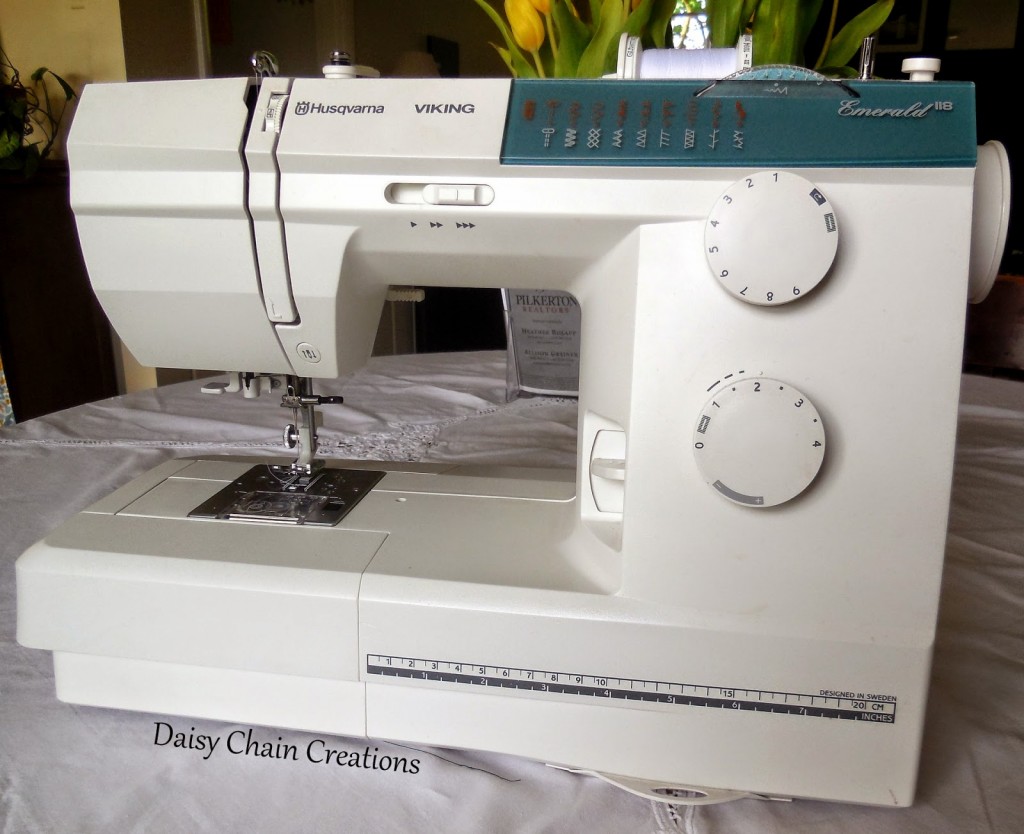
- Тип: электромеханическая швейная машина
- Тип челнока: горизонтальный
- Кол-во швейных операций: 18
- Длина/ширина стежка: 4/5 мм. (макс.)
- Регулировка давления лапки: есть
- Строчки: потайная, обмёточная, эластичная
Среди всех швейных машин от производителя, модель Emerald 118, по отзывам пользователей, считается одной из самых производительных и популярных. Признание и любовь опытных мастериц машинка завоевала благодаря следующим техническим характеристикам:
- плавный ход работы без рывков и вибрации;
- наличие электронного стабилизатора, регулирующего усилие прокола;
- наличие системы измерения размера пуговиц;
- возможность регулировки скорости;
- возможность автостопа при намотке нити на шпульку;
- горизонтальное положение катушки.
Несмотря на отсутствие вышивального блока и электронного дисплея, Эмеральд 118 покоряет мастериц богатой дополнительной комплектацией лапок. Кроме стандартного варианта, здесь присутствуют обметочная лапка, для подрубки ткани и вшивания молнии.
Весь рабочий арсенал легко помещается в просторном отсеке для аксессуаров, а на самом корпусе присутствует измерительная линейка.
Представленную модель можно с уверенностью назвать оптимальным сочетанием привлекательной цены, качества и богатого функционала.
Швейная машина Husqvarna Viking E10
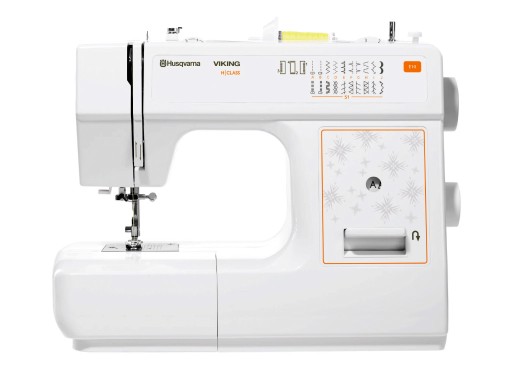
- Тип челнока: вертикальный, качающийся
- Длина/ширина стежка: 4/5 мм. (макс.)
- Кол-во швейных операций: 21
- Режим вымётывания петель: полуавтомат
- Мощность: 85 Вт.
- Освещение: лампа 15 Вт.
- Масса: 7,1 кг.
- Где купить педаль – https://aliexpress.ru/item/32922519297.html;
- Где купить винт иглодержателя – https://aliexpress.ru/item/32954311692.html.
Модель швейной машины Викинг Е10 предусматривает электромеханическое управление при отсутствии электронного дисплея. К её основным техническим параметрам относятся следующие характеристики:
- возможность полуавтоматического выполнения петли;
- наличие рукавной платформы;
- металлическая внутренняя конструкция;
- наличие дополнительного освещения и кнопки реверса;
- выполнение потайной и эластичной строчки;
- возможность обметки.
Чехол жёсткий, вышивальный блок отсутствует.
Инструкция к швейной машине Husqvarna Viking E10
Скачать инструкцию к швейной машинке Хускварна Викинг Е10
Швейная машина Husqvarna Viking E20
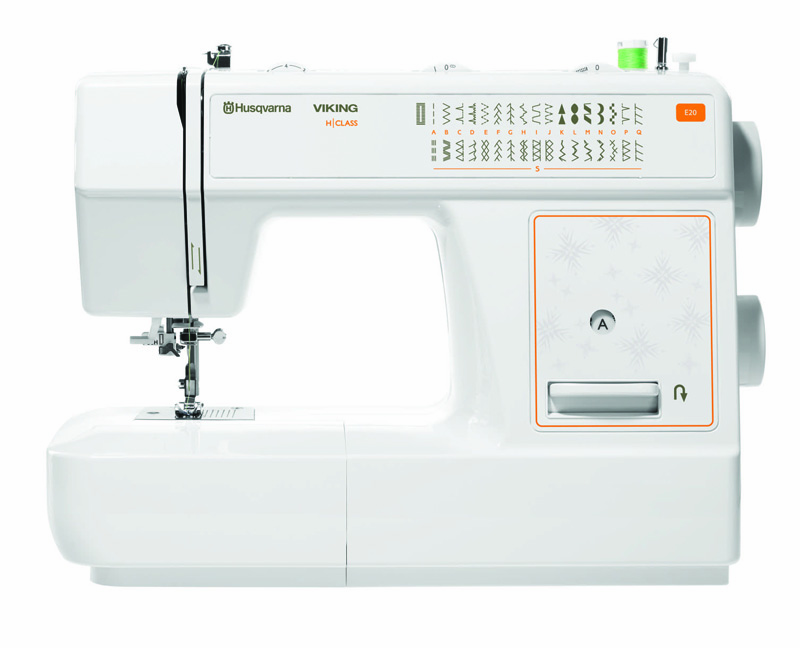
- Тип: электромеханическая швейная машина
- Длина/ширина стежка: 4/5 мм. (макс.)
- Кол-во швейных операций: 34
- Режим вымётывания петель: автоматический
- Вышивальный блок: отсутствует
- Встроенный заправщик нити: да
- Освещение: светодиод
- Мощность: 70 Вт.
- Масса: 6,4 кг.
Viking E 20 – улучшенный и усовершенствованный аналог Е10. Количество швейных операций увеличилось до 34, а выполнение петли стало полностью автоматическим. У обеих моделей отсутствует вышивальный блок, они обе довольно тяжелые благодаря металлическим внутренним деталям. Существует и внешнее различие – чехол E 20 стал мягким в отличие жесткого E 10. При этом максимальная длина и ширина стежка не изменились.
Машинка имеет очень большой набор рабочих и декоративных строчек, и поможет Вам создать настоящий шедевр!
Инструкция к швейной машине Husqvarna Viking E20
Скачать инструкцию к швейной машинке Хускварна Викинг Е20
Швейная машина Husqvarna Opal 670
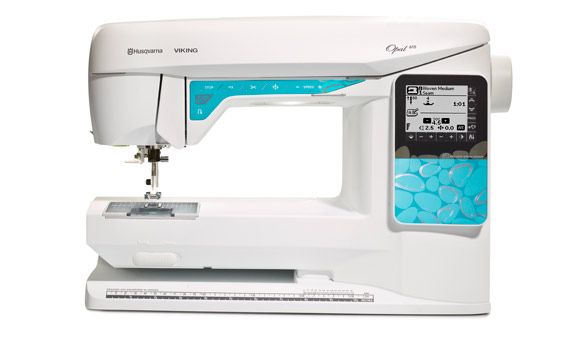
- Тип: электронная швейная машина
- Челнок: горизонтальный ротационный
- Выполнение петли: автомат
- Кол-во швейных операций: 200
- Кол-во видов петель: 7 шт.
- Переключатель положения иглы: есть
- Мощность: 90 Вт.
- Масса: 10 кг.
Для профессиональной швейной деятельности идеальным вариантом станет Опал 670. Опытные мастерицы смогут по достоинству оценить все положительные качества модели:
- Возможность определять длину стежка;
- Регулировка длины стежка с максимальным шагом в 6 мм;
- Дополнительная комплектация нитевдевателем и лапками для вшивания молнии и обметки;
- Возможность регулирования давления лапки на ткань;
- Легко справляется даже с очень плотными тканями.
Машинка работает тихо и плавно, без вибрации. Необычный современный дизайн, измерительная линейка на корпусе и освещение – дополнительные приятные бонусы. Единственное, чего не предусматривает данная модель – это вышивальный блок.
Благодаря многовековому опыту торговая марка “Хускварна” стала достойным конкурентом современным производителям аналогичной продукции.

- Регистрация
- Войти
Инструкции » Швейные машинки » HUSQVARNA
|
Всего инструкций в разделе: 21 |


| инструкция | устройство | размер |
| HUSQVARNA Viking E10 | швейная машина | 984.19 kB |
| HUSQVARNA Sapphire 960Q | швейная машина | 5.52 MB |
| HUSQVARNA Sapphire 930 | швейная машина | 3.56 MB |
| HUSQVARNA Sapphire 835 | швейная машина | 3.99 MB |
| HUSQVARNA Opal 690Q | швейная машина | 4.74 MB |
| HUSQVARNA Emerald 203 | швейная машина | 10.99 MB |
| HUSQVARNA Emerald 183 | швейная машина | 10.99 MB |
| HUSQVARNA Emerald 118 | швейная машина | 1016.48 kB |
| HUSQVARNA Emerald 116 | швейная машина | 1016.48 kB |
| HUSQVARNA Designer Topaz 30 | швейно-вышивальная машина | 12.23 MB |
| HUSQVARNA Designer Ruby Royal | швейно-вышивальная машина | 12.61 MB |
| HUSQVARNA Designer Epic | швейно-вышивальная машина | 3.98 MB |
| HUSQVARNA Designer Diamond Royale | швейно-вышивальная машина | 15.53 MB |
| HUSQVARNA Viking Sapphire 965Q | швейная машина с микропроцессорным управлением | 26.41 MB |
| HUSQVARNA Viking Opal 690Q | швейная машина с микропроцессорным управлением | 4.74 MB |
| HUSQVARNA Viking E20 | электромеханическая швейная машина | 10.35 MB |
| HUSQVARNA Opal 670 | швейная машина с микропроцессорным управлением | 6.82 MB |
| HUSQVARNA Opal 650 | швейная машина с микропроцессорным управлением | 6.82 MB |
| HUSQVARNA Jade 20 | швейная машина с микропроцессорным управлением | 3.84 MB |
| HUSQVARNA Designer Topaz 50 | швейная машина | 6.43 MB |
| HUSQVARNA Designer Ruby | швейная машина | 12.61 MB |
Что удобнее для чтения книг?
Планшет
Электронная книга
Смартфон
Книга в бумажном переплёте
Не читаю книг

© 2010- ManualBase.ru
- Статьи
- О сайте
- Помощь
- Контакты
- Пользовательское соглашение
- Политика обработки персональных данных
© 2010- ManualBase.ru
Выберите свой регион
Мы покажем вам актуальные контакты и цены на доставку
Купить курс могут только авторизованные пользователи
- Состав курса
- Отзывы
- Вопросы
- Состав курса
- Отзывы
- Вопросы
Оставить отзыв
Видео инструкция Husqvarna Viking E20
Загрузить изображения
Можно перетащить с помощью Drag’n’drop

Спасибо!
Видео инструкция Husqvarna Viking E20
Ваш отзыв отправлен! Скоро мы опубликуем его на сайте
- Состав курса
- Отзывы
- Вопросы
Задать вопрос о товаре
Видео инструкция Husqvarna Viking E20
Спасибо!
Видео инструкция Husqvarna Viking E20
Ваш вопрос отправлен! Мы ответим на вопрос и опубликуем его на сайте.
- Uploaded by: Pasi Heiskanen
- 0
- 0
- November 2020
- Bookmark
Embed- Share
Download
This document was uploaded by user and they confirmed that they have the permission to share
it. If you are author or own the copyright of this book, please report to us by using this DMCA
report form. Report DMCA
Overview
Download & View Husqvarna Viking Model 6020 Sewing Machine Manual as PDF for free.
More details
- Pages: 58
![]()
SERVICE MANUAL
Designer I
Designer II
Quilt Designer
Printed in Sweden
Made in Sweden 104 72 53-26
Jan-2002
Replaces 104 72 50-26

|
Contence |
|
|
Directions for use |
4 |
|
ESD |
4 |
|
Service tools |
5 |
|
SETTINGS |
6 |
|
1. The play of the hook gear |
7 |
|
2. Setting the hook in relation to the feeding eccentric (after feeding) |
8 |
|
3. Belt tension, arm/lower shaft belt |
9 |
|
4. Belt tension, motor belt |
9 |
|
5. Setting the feeding unit sideways |
10 |
|
6. Basic setting — the step motor of the needle |
11 |
|
7. Setting of the needle in relation to the presser foot |
13 |
|
8. The gap between the needle and the hook |
14 |
|
9. The timing of the hook in relation to the needle |
15 |
|
10. The needle height |
16 |
|
11. Presser foot parallelism to the feed dog |
17 |
|
12.Presser foot height to the stitch plate |
17 |
|
13. Setting the stitch plate (the hook cover) in relation to the needle in the feeding direction. |
18 |
|
14. The sideways setting of the stitch plate (the hook cover) in relation to the presser foot. |
18 |
|
15. The height of the hook |
19 |
|
16.Pre-setting of the step motor for the side feeding |
20 |
|
17.Setting the feeding mechanism sideways |
21 |
|
18. Feed dog height |
22 |
|
19.Threading device |
23 |
|
20.Stitch length balance basic setting |
24 |
|
21. Pre-setting the step motor of the feed dog |
25 |
|
22.Stitch length balance |
26 |
|
23. Lower thread tension (thread tension of the bobbin case) |
27 |
|
24.Upper thread tension — Position «Norm» — Designer I |
28 |
|
24.Upper thread tension — Position «Norm» — Designer II and Quilt Designer |
29 |
|
25. Upper thread tension — Position «Embr/Dec» — Designer I |
30 |
|
25. Upper thread tension — Position «Embr/Dec» — Designer II |
31 |
|
25. Upper thread tension — Position «Decor» — Quilt Designer |
32 |
|
26. Upper thread guard sensor |
33 |
|
27. Setting the thread take-up spring |
34 |
|
28. Disconnection when winding the bobbin |
35 |
|
29. Pivot height |
36 |
|
SERVICE PROGRAM |
|
|
Service program — Designer I |
37 |
|
Functions of the service menu 2 — Designer I -Sensor check |
40 |
|
Functions of the service menu 3 — Designer I — Upper thread tension |
41 |
|
Calibration of the touch panel — Designer I |
42 |
|
Update of the memory — Designer I |
43 |
|
Service program Designer II |
44 |
|
Functions of the service menu 2 — Designer II |
47 |
|
Sensor check — Function of the Service menu 1 |
47 |
|
Functions of the service menu 3 — Designer II. |
48 |
|
Upper thread tension and Pivot position |
48 |
|
Functions of the Service Menu 4 — Designer II |
48 |
|
Log menu |
48 |
|
Calibration of the touch panel — Designer II |
49 |
|
Update of the memory — Designer II (Read & write unit) |
50 |
|
Service program for Quilt Designer |
51 |
|
Functions of the service menu 2 — Sensor check |
54 |
|
Function of the Service menu 1 |
54 |
|
Functions of the service menu 3 — Quilt Designer |
55 |

|
Upper thread tension — Pivot position |
55 |
||
|
Functions of the Service Menu 4 — Log menu |
55 |
||
|
Calibration of the touch panel — Quilt Designer |
56 |
||
|
Update of the memory — Quilt Designer (Read & write unit) |
57 |
||
|
DEMOUNT AND MOUNTING |
|||
|
Upper rear cover |
58 |
||
|
Lower rear cover |
58 |
||
|
Front cover — Designer I |
59 |
||
|
Parts of the front cover — Designer I |
60 |
||
|
Front cover — Designer II and Quilt Designer |
61 |
||
|
Parts of the front cover — Designer II and Quilt Designer |
62 |
||
|
Presentation Unit |
62 |
||
|
Presentation Unit — d-Card Connection board |
62 |
||
|
Presentation Unit — Display board |
62 |
||
|
Touch Panel |
62 |
||
|
Base Plate |
63 |
||
|
TransformerDesigner I, Designer II |
64 |
||
|
TransformerQuilt Designer |
65 |
||
|
Circuit board — Circuit diagram — Designer I |
66 |
||
|
Circuit board — Circuit diagram — Designer II |
67 |
||
|
Circuit board — Circuit diagram — Quilt Designer |
68 |
||
|
Stop right circuit board |
69 |
||
|
Sewing head |
70 |
||
|
The step motor of the needle |
71 |
||
|
The step motor of the presserfoot lifter |
72 |
||
|
The thread tension compl. |
73 |
||
|
The hook cover compl, step motor house. |
74 |
||
|
Parts of the hook cover compl.- Designer I and Designer II |
75 |
||
|
Feeding unit |
76 |
||
|
Feed dog. |
77 |
||
|
The side feeding mechanism complete |
78 |
||
|
The side feeding mechanism step motor |
78 |
||
|
The feeding unit step motor |
79 |
||
|
Hook compl. |
80 |
||
|
Bobbin winding device |
81 |
||
|
Cover Y-slide |
82 |
||
|
Step motor cover |
82 |
||
|
Cover upper part |
83 |
||
|
Cover lower part |
83 |
||
|
Locker switch |
83 |
||
|
EMBROIDERY UNIT |
|||
|
Embroidery unit |
— |
X-unit |
84 |
|
Belt tension |
84 |
||
|
Calibration of the end position, X-unit. |
84 |
||
|
Embroidery unit |
— |
Y-unit |
85 |
|
Belt tension |
85 |
||
|
Calibration of the end position, Y -unit. |
85 |
||
|
Hoop holder |
86 |
||
|
The hoop sensor. |
86 |
||
|
Step motor, Y-unit |
87 |
||
|
Step motor, X-unit |
87 |
||
|
FAULT FINDING |
|||
|
Fault finding diagram D I |
88 |
||
|
Fault finding diagram D II |
89 |
||
|
Fault finding diagram D I / DII |
90 |
||
|
Fault finding diagram D I / DII |
91 |
||
|
Fault finding diagram D I / DII |
92 |
Directions for use
These service instructions are intended to be used by service workshop personnel, or by salesmen who carry out servicing their own districts. They assume a thorough knowledge of the handling of precision appliances and accessibility to service tools.
The manual is divided into two sections and covers all service operations and checks which should be carried out when making a complete overhaul of a sewing machine. The first section deals with the various settings which must be maintained to ensure that the machine functions satisfactorily.
The second section covers dismantling and mounting instructions.
The diagrams only give indication as to where the detail or mechanism is located in the machine. For more detailed information regarding the construction, etc., refer to the diagrams in the spare parts list.
ESD
ATTENTION!
It is of the utmost importance that precautions are being taken in order to avoid damage of the electronics by electro static discharges ESD (=Electro Static Discharge). To avoid that these errors arise it is important to handle loose circuit boards in a controlled way.
Always use wrist band 412 23 02-01 when servicing.

Service tools
A reasonable requirement in a domestic sewing machine is that it should able to sew all types of fabrics used in the home. The settings made when assembling and sewing-in the machines are those most suited to give the best results in the majority of fabrics and fabric combinations. In doing so, consideration has been given to the requirements of different markets. This does, however, mean that when sewing extreme fabrics, better results may be obtained in certain cases by altering the settings. It must be pointed out that these altered settings can cause poorer results on more normal fabrics. How
the different standard ratings are set can be seen from the description under each setting instruction. The following list of setting gauges and service tools is intended as an instruction about the special service tools needed to servicing this machine.
1. On several different occasions the needle is used as a setting gauge.
The setting ratings are adapted to needle 90. Make sure to use an undamaged needle.
2.Gauge for setting the timing of the hook in relation to the needle .
Ref. No 411 17 52-01.
3.Gauge for the feed dog lift.
Ref. No 411 49 93-01.
4.Gauge for the needle height . Ref. No 412 35 29-01.
5.Adam key — Shortened 2.5 mm Ref. No 412 27 65-01
6.Adam Key 2 mm
Ref. No 411 86 00-01
7.Adam key 1.5 mm Ref. No 411 66 89-01
8.Distance gauge 0.05-1,00 mm Ref: No. 412 38 85-01
9.Angel key Torx 6
Ref No 412 27 67-01
10. Angel key Torx 8
|
Ref No 412 68 04-01 |
|
|
11. Screwdriver Torx 10 |
|
|
Ref. No 412 36 48-01. |
|
|
12. Screwdriver Torx 20 |
|
|
Ref. No 412 36 49-01. |
|
|
13. Screwdriver Torx 25 |
|
|
Ref. No 412 36 50-01 |
|
|
14. Cable for service -Designer I |
15. Calibration of touch panel |
|
Ref. 412 66 04-01 |
Ref. No 412 22 33-01 |
|
16. Service d-Card Designer II and Quilt Designer |
|
|
Ref. 412 66 96-01 |

Settings
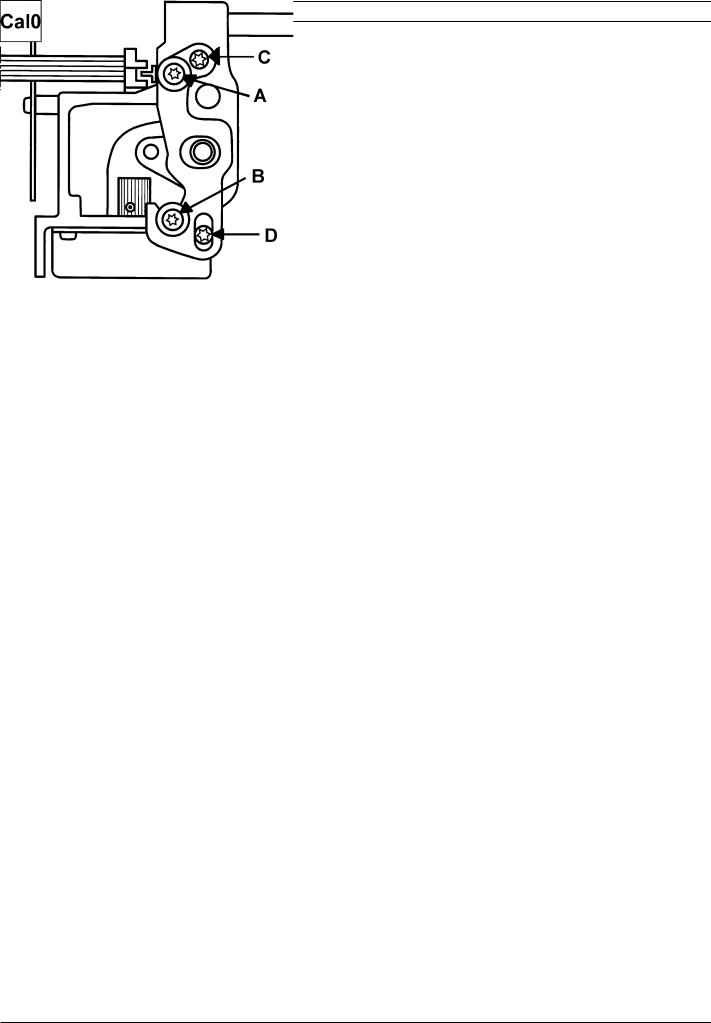
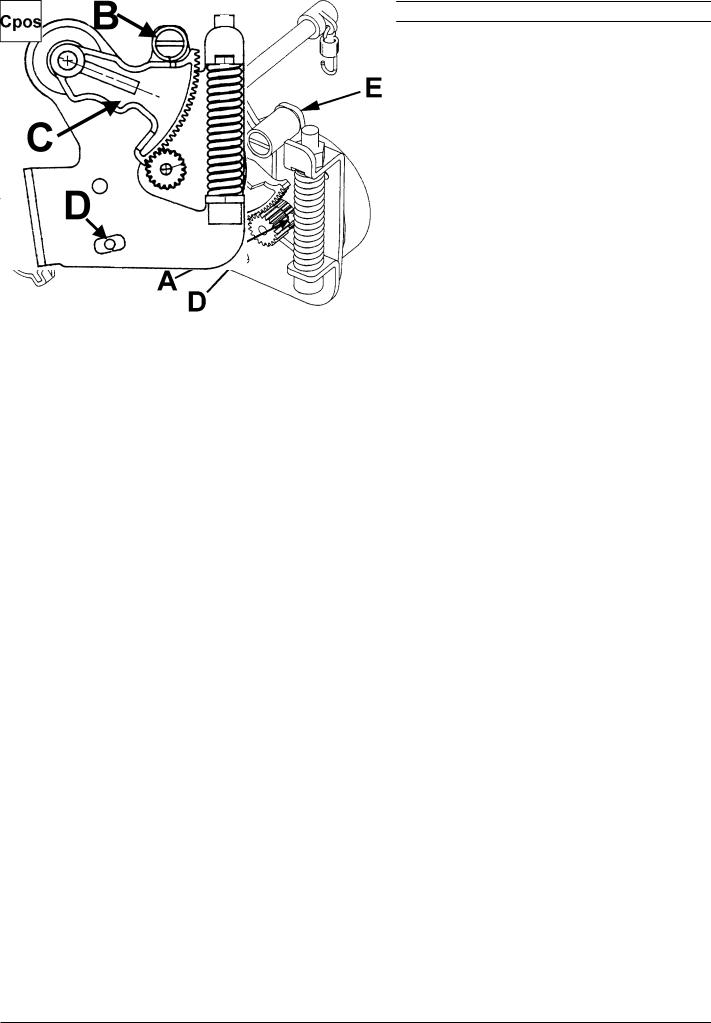
1. The play of the hook gear
It is impossible to obtain an equally large play in one rotation of the cog wheel, but it should be as small as possible at the tightest spot during the revolution.
Check
1.Rotate the hook back and forth and check the play.
2.Do this check on at least 3 different spots during the revolution of the cog wheel. (Move the cog wheel with the hand wheel).
Adjustment
1.Loosen, screw (A) in the bearing clamp
2.The play can now be adjusted by turning the eccentric bearing (C).
NOTE! The hole (B) in the bearing shall always be on the lower half.
Settings
2. Setting the hook in relation to the feeding eccentric (after feeding)
Check
1.The needle shall be in its centre position, straight stitching.
2.Set the tip of hook (A) so is centred behind the needle, the tap of the worm gear should now be positioned according to fig. 1.
Note! The position of the upper pin shall be aligned with the frame opening.
Alt. Check
1. When the two taps of the worm gear are positioned according to fig. 1 the tip (A) of the hook should point straight backwards.
Note! The position of the upper pin shall be aligned with the frame opening.
Adjustment
1. Loosen screw (B). Remove the hook and set it into its correct position.
Note! The position of the upper pin shall be aligned with the frame opening.
Settings
3.Belt tension, arm/lower shaft belt
1.Dismount rear cover and front cover.
2.Dismount the bobbin winding device.
3.Loosen the two screws (A) of the bearing clamps.
4.The belt tension can now be adjusted by turning bearing (B) which is eccentric.
NOTE! The hole (C) should always be on the front half.
4.Belt tension, motor belt
1.Dismount rear cover .
2.Loosen the 2 screws (A) and adjust the belt tension by displacing the motor.
NOTE! The adjustment of the arm/lower shaft belt affects this adjustment.

Settings
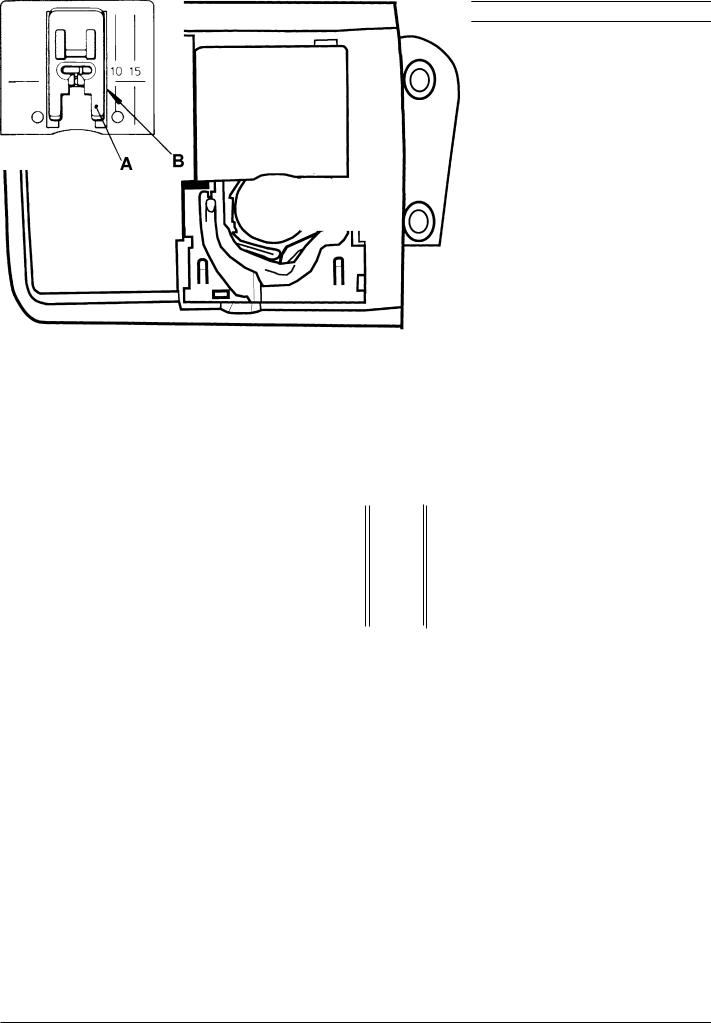
5. Setting the feeding unit sideways
Check
1. The distance A and B shall be equal between the screw (C) and the edge of feeding device shaft (D).
Adjustment
1.Loosen the 2 screws in the feeding device.
2.Move the feeding device sideways until the distance A and B is equal between the screws (C) and the edge of feeding device shaft (D)
3.Tighten the screws.
![]()
Settings
6. Basic setting — the step motor of the needle
Check
1.Insert a new needle size 90 universal in the machine.
2.Set the needle in its upper turning position.
3.The needle should always get to the centre position, when the main switch is turned on repeatedly.
|
Check |
Needle point |
|
Go to the service program of the machine. |
|
|
The needle should be in its upper turning position. |
Touch Needle —
The needle should now take its centre position in the presser foot.
Touch Needle —
The needle shall now take its left position.
The gap between the segment (A) and the calibration stop (B) should now be zero (0 mm).
Note! The position of the eccentric.
Settings
Adjustment
Go to the service program of the machine.
The needle should be in its highest position.
Touch Needle —
Loosen screw (E) in the cog wheel (D) on the step motor shaft. Turn the cog wheel until the needle is in the centre of
the presser foot.
Touch Needle —
Loosen screw (F) in the calibration stop (G) and turn it until the gap is correct (0mm).
Note! The position of the eccentric.
Turn the screw (H) until the gap is correct (0 mm). This setting is only a sideways limitation.
The needle should now take its centre position into the needle hole of the presser foot.
Settings
7. Setting of the needle in relation to the presser foot
Check
Insert a new needle size 90 universal in the machine.
When the machine is set at straight stitching centre position, the needle bar shall be set in such a way that a needle 90 passes through the centre of the needle hole in
the presser foot.
1 = seen from the front
2 = seen from the side
|
Adjustment |
Needle point |
|
|
1. Turn on the main switch |
||
|
Keep the machine set at straight stitching centre position |
||
|
alt. service menu 1, touch Needle- |
, |
2. Loosen the two screws (A) and (B).
Move the needle bar with the two eccentric screws (C) or (D) until the requirement is obtained.
—The length movement is adjusted by moving the eccentric screw (C)
—The side movement is adjusted by moving the eccentric screw (D)
3.Tighten the screws (A) and (B).
4.Check the setting by turning the main switch on and off a couple of times.
NOTE! «The Setting of the needle in relation to the presser foot» affects the function of «6. Basic setting — the step motor of the needle».

Settings
8. The gap between the needle and the hook
Check
1.Set the machine on straight stitching.
2.Insert a new needle size 90 universal in the machine.
3.Rotate hand wheel until the tip of the hook arrives behind the needle. Check the gap by pressing a small screw driver against the needle. The gap should be as small as possible, but max 0.15 mm.
Adjustment
If the gap is too large:
1.Loosen the screw (A).
2.Turn screw (B) clockwise until the needle touches the tip of the hook
3.Turn screw (A) until the gap is correct
If the gap is too small:
1.Loosen the screw (B)
2.Turn screw (A) to make the gap larger and then loosen the screw (A).
3.Turn screw (B) clockwise until the needle touches the tip of the hook
4.Turn screw (A) until the gap is correct
NOTE! Always tighten screw (A).
Check!
Settings
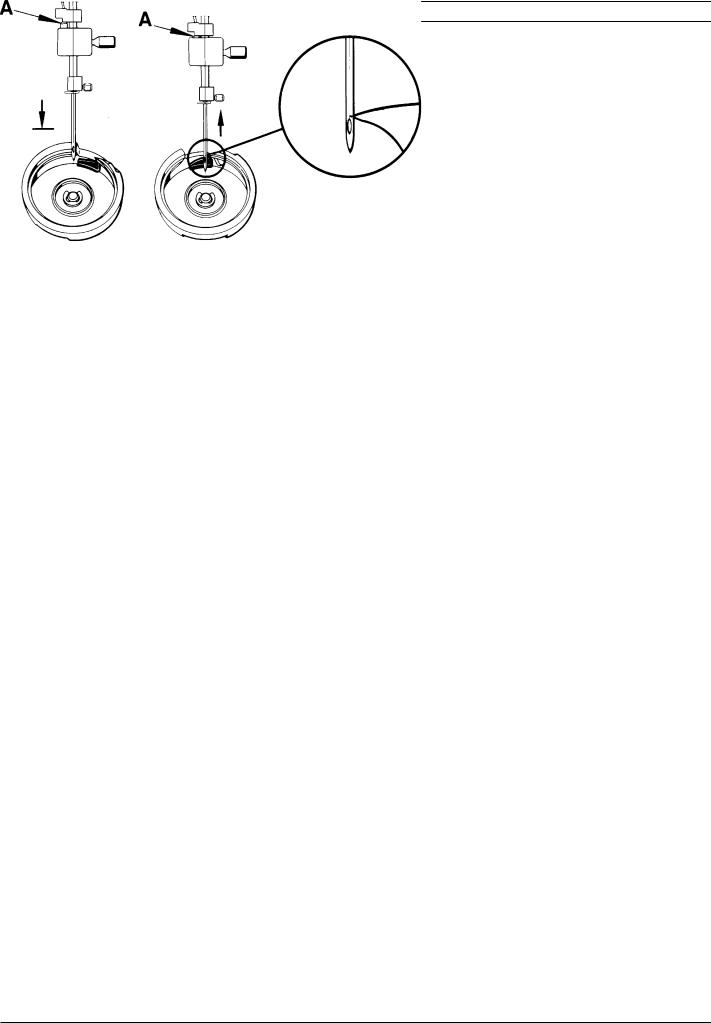
9. The timing of the hook in relation to the needle
Check
—Set a new needle size 90 universal into the machine
—Dismount the stitch plate, bobbin case holder and the bobbin case.
—Set machine on straight stitching.
—As the needle is moving upwards, the tip of the hook should pass behind the centre of the needle, when the needle is 2.5 mm above its lower turning position.
NOTE! Before any adjustment is done check that the setting
» 2. Setting the hook in relation to the feeding eccentric» is correct.
Check with setting gauge 411 17 52-01.
1.Turn the handwheel until the needle is at its lower turning position.
2.Place the setting gauge on the needle bar so that the springloaded stud (A) just touches the needle bar frame and tighten the screw.
3.Move the needle upwards with the handwheel until the springloaded stud (A) rests against its stop in the setting gauge.
4.The tip of the hook should now be behind the centre line of the needle.
Adjustment
1.Remove the blank pointed screw (B) and loosen the other 2 screws in the belt wheel of the arm shaft.
2.Repeat checking points 1, 2 and 3 with setting gauge 411 17 52-01 .
3.Hold the arm shaft and turn the hook until its tip arrives behind the centre line of the needle.
4.Tighten one of the black screws.
5.Make sure the screw descends into the groove of the shaft so that the belt wheel is placed correctly sideways.
6.Check.
7.Tighten all the screws.
Settings
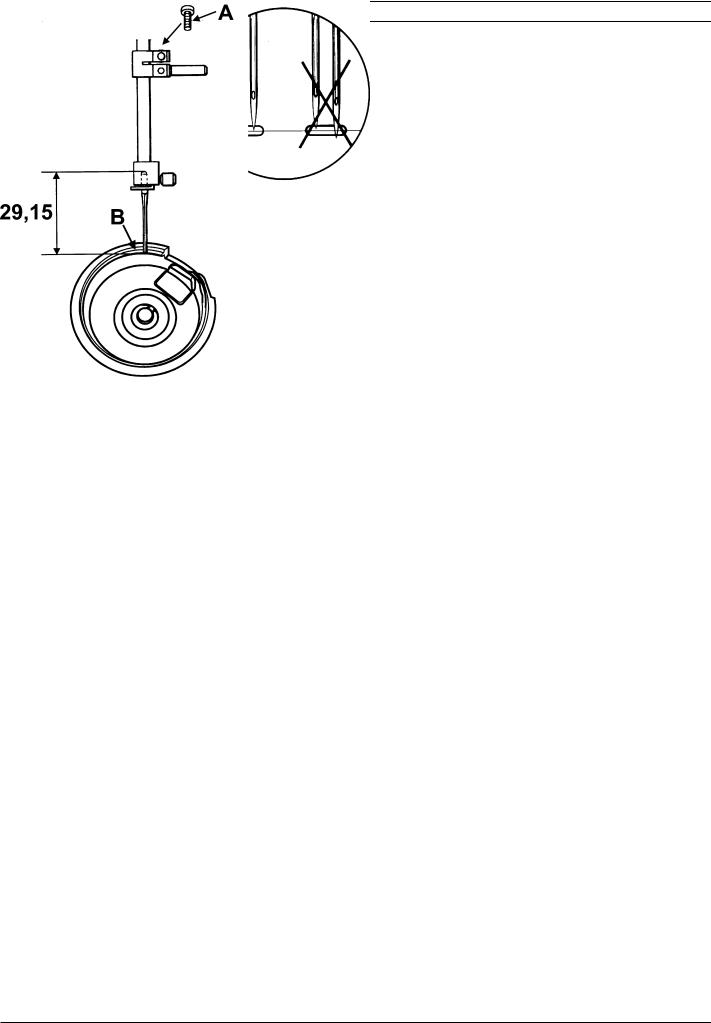
10. The needle height
Check
1.Bring the needle into its lower turning position.
2.The gap between the upper end of the needle and the surface (B) of the hook ring should be 29.15 ± 0.2 mm.
The check is executed with a polished needle 90 which is 29.15 mm long. Order nr. 412 35 29 — 01
Adjustment
1.Bring the needle to its lower turning position.
2.Loosen screw (A) and move the needle bar until the correct measure is obtained.
3.Tighten the screw.
NOTE! Check by means of a twin needle that the needle bar is not twisted. May cause jump stitches when sewing with a twin needle.

Settings
11.Presser foot parallelism to the feed dog
Check
The presser foot (A) should be parallel to the feed dog (B) .
Adjustment
1.Loosen screw (C) and turn the presser foot until it is parallel to the feed dog.
2.Tighten the screw (C).
12.Presser foot height to the stitch plate
Check
When the pressar foot is in its highest lifting position it shall be approx. 13 mm above the stitch plate.
Adjustment
1.Go to the service program
2.Touch Servo —
The pressar bar now takes its highest lifting position.
3.Loosen screw (C) and move the presser bar until
the presser foot is approx. 13 mm above the stitch plate.
4.Tighten the screw (C).
13
Note! This setting affects:
11. Presser foot parallelism to the feed dog
29. Pivot height
Settings
13. Setting the stitch plate (the hook cover) in relation to the needle in the feeding direction.
Check
1.Insert a new needle size 90 universal in the machine.
2.In the feeding direction the needle should descend right into the middle of the needle hole of the stitch plate.
14. The sideways setting of the stitch plate (the hook cover) in relation to the presser foot.
Check
The presser foot (A) should be centred and parallel to the feed dog groove (B).
Adjustment
Loosen the 4 screws of the hook cover and move it so that:
—the needle in feeding direction decends in the middle of the stitch plate.
—the presser foot is centered and parallel to the feed dog groove .

-0,05
+ 0.1
Settings
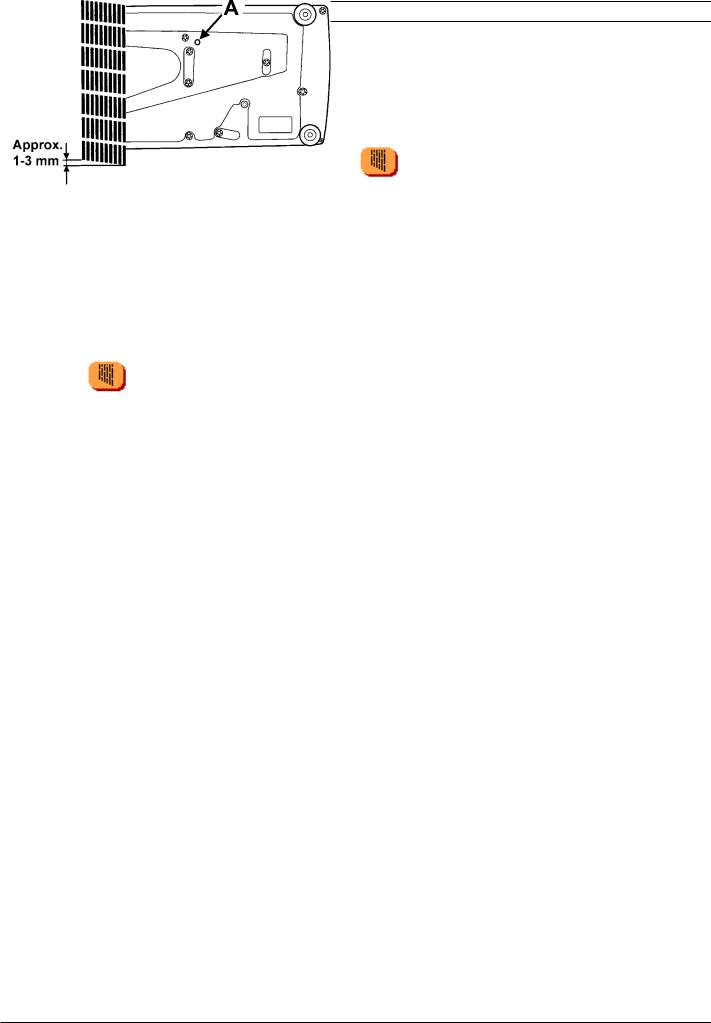
15. The height of the hook
Is checked between the bobbin case and the case holder
Check
The distance between the bobbin case and the case holder should be 0.5 mm.
The check is carried out at the tightest spot between the bobbin case and the case holder. Check at the two marked positions according to fig. 1.
Adjustment
1.Loosen screw (A).
2.The gap between the hook and its cover can now be adjusted by turning the stud (C) right or left.
—To the right, the gap becomes larger.
—To the left, the gap becomes smaller..
3.When the adjustment is done. Remove stitch plate, bobbin case holder and bobbin case.
4.Push the hook shaft (B)downwards and tighten the screw (A).
5.Re-check.
|
Note! This setting affects: |
1.The play of the hook gear. |
|
9.The timing of the hook and the needle |
|
|
10.The needle height |
Check with distance gauge 412 38 85-01.
Fig 1
B
Settings
16.Pre-setting of the step motor for the side feeding
Check
1.Dismount the circuit board.
2.Dismount the side feeding unit.
3.Mount the circuit board.
4.Connect the side feeding unit. Hold the side feeding unit in your hand.
|
5.Touch Side-M — |
. Turn the handwheel in such a way that the cog |
|
segment changes between its 2 positions. |
|
|
Touch Side-M — |
. Turn the handwheel in such a way that the |
step motor changes between its 2 positions.
The distance between the pins (A) and the side of the segment shall be equally large in both positions.
Note ! The movement of the segment is different from left position to the right position.
Adjustment
1.Loosen screw (B).
2.Adjust the cog segment in such way that the distance (A) between the pins and the side of the segment is equally large in both positions.
|
NOTE! The adjustment must be done in both Side-M — |
and Side-M — |
postitions. |
3.Tighten screw (B). 4. Re-check .
![]()
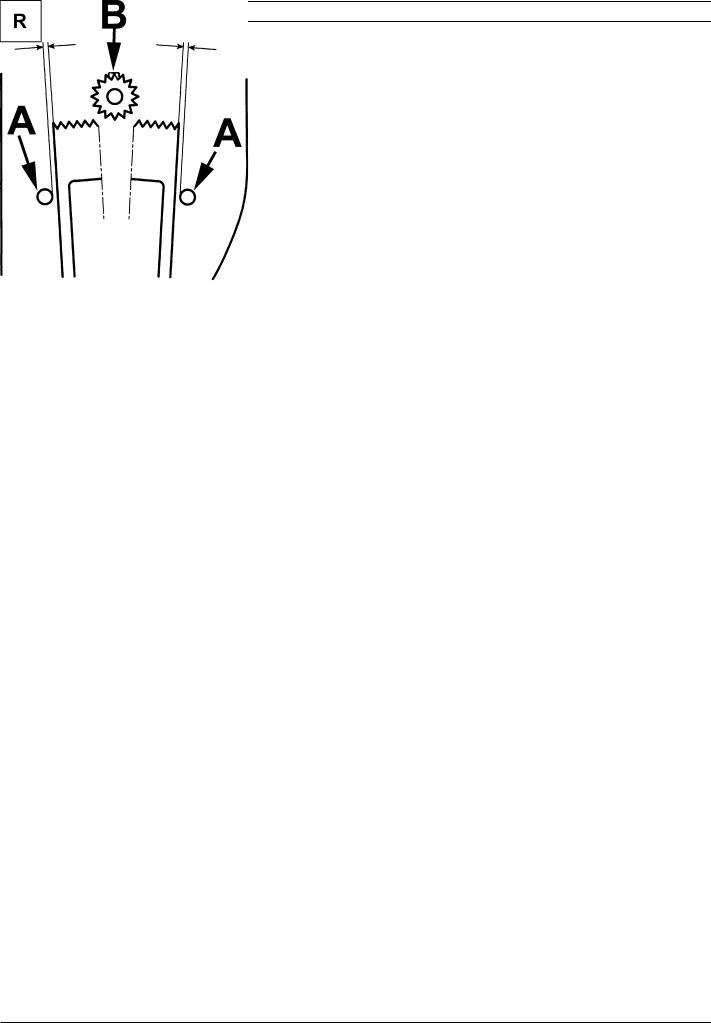
Settings
17.Setting the feeding mechanism sideways
Check
1. Go to the service program
|
2. Touch Side-M — |
. Turn the handwheel in such a way that the step motor |
changes between its 2 positions. The feed dog should not at any point touch the stitchplate.
|
3. Touch Side-M — |
. Turn the handwheel in such a way that the step motor |
changes between its 2 positions. The feed dog should not at any point touch the stitchplate.
Adjusment
1.Loosen the 3 screws (A), located behind the circuit board .
2.Move the feeding device sideways until a correct position of the feed dog is accomplished by turning adjustment screw (B),located behind the circuit board .
3.Tighten the 3 screws (A).
4.Re-check the positions of the feed dog.
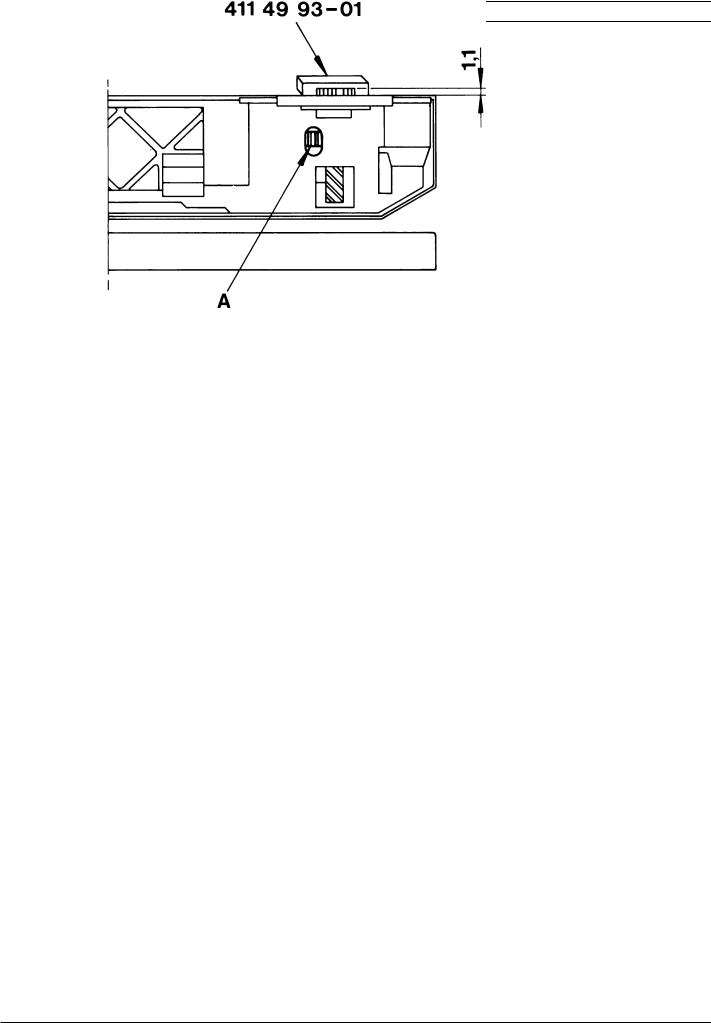
Settings
18. Feed dog height
Check
1.Bring the feed dog to its highest position.
2.The top of the feed dog should be 0.9-1.1 mm above the stitch plate.
Check with setting gauge 411 49 93-01
Adjustment
1.Bring the feed dog to its highest position.
2.Adjust with a screw driver the adjustment nut (A) until a correct feed dog height (0.9-1.1 mm) is obtained.
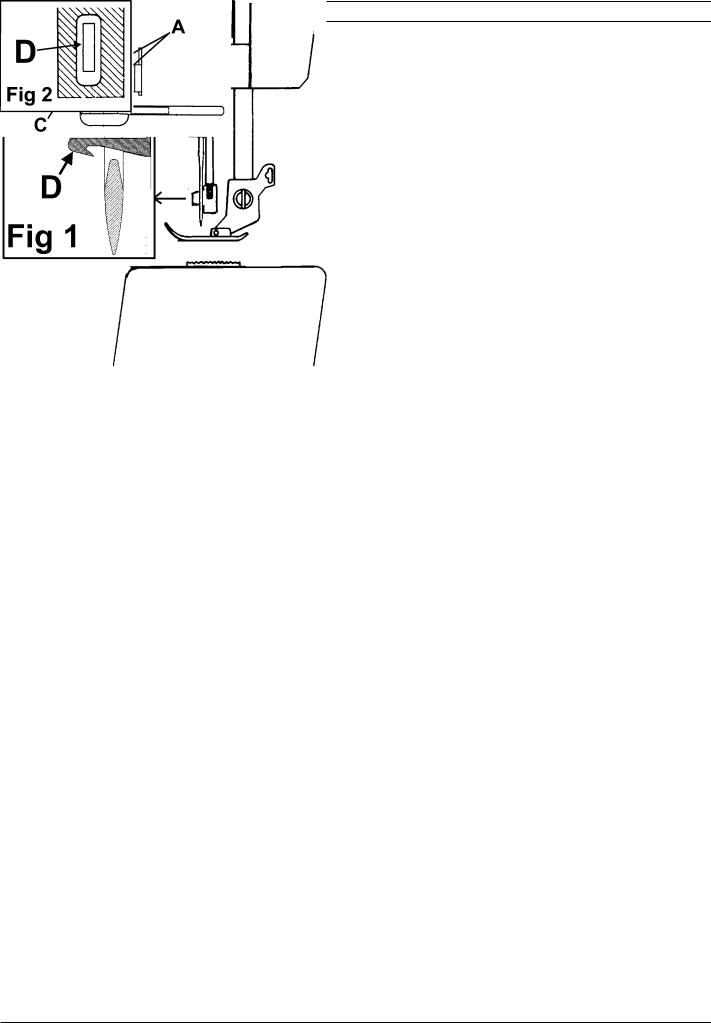
Settings
19.Threading device
Check
1.Insert a new needle.
2.Bring the needle to its highest turning position.
3.The threader hook shall go smoothly into the needles eye. See Fig 1 and Fig 2.
Adjustment
1.Loosen the the two screws (A) on the back of the threader head (B).
2.Move the thread head (B) so that the threader hook (D) does not touch the needle heightways (See fig 1)
3.Move the thread hook holder (C) so that the threader hook (D) does not touch the needle sideways (See fig 2) .
4.Tighten the screws.
NOTE! Both settings are adjusted at the same time
Settings
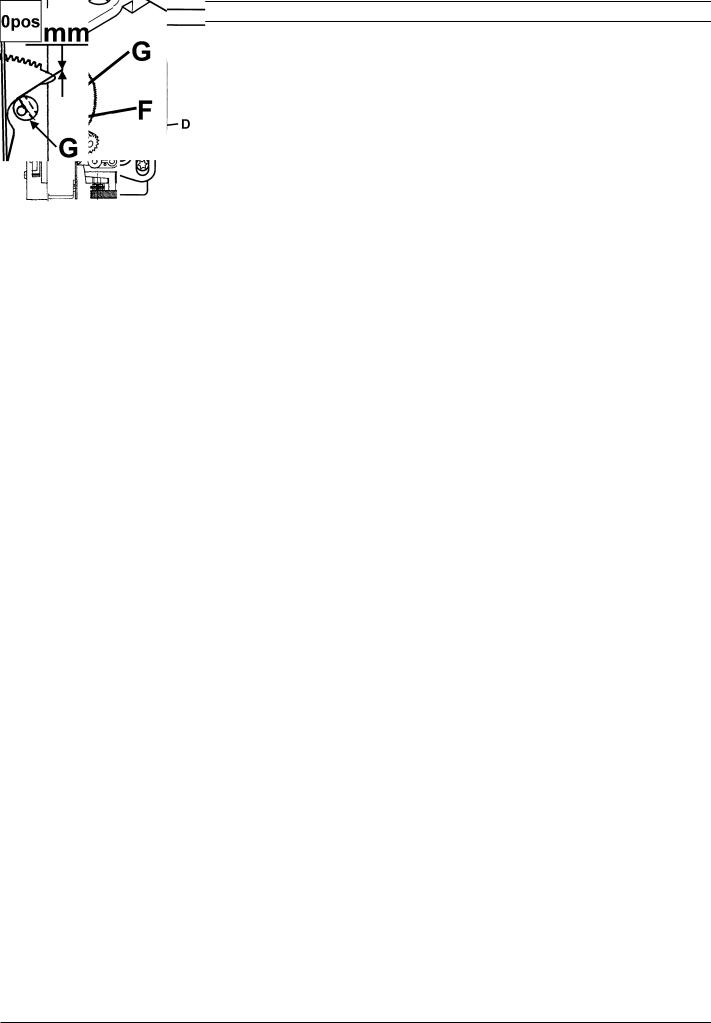
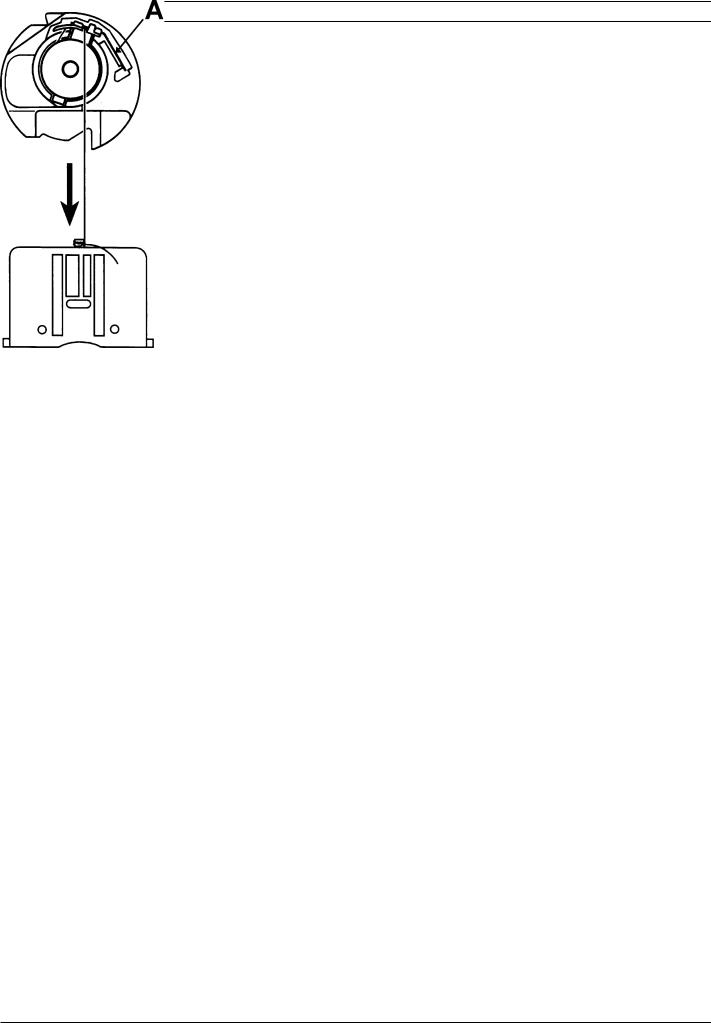
20.Stitch length balance basic setting
Check
Go to the service program.
|
Touch Feed- |
, the feed dog shall now stand still when the foot control is |
pressed (0-feeding).
Adjustment
1. Touch Feed- .Loosen the screw (A) of the cog wheel and turn it until the feed dog comes to a
stand-still when the foot control is pressed.
2. Turn the hand wheel until the needle arrives at its lower turning position.
3.Touch Feed- .
4. The gap between the segment (C) and the calibration stop (B) should now be Zero (0 mm). To do adjustment of the distance see «21. Pre-setting of the feeding step motor».
Note! Make sure that distance is equal on both sides of the stop screw (D) before a basic setting is performed.

Settings
21. Pre-setting the step motor of the feed dog
Check 1
Set the needle in its lower turning position.
The feed dog should after turning the mains switch several times on and off always reach such a position that 2.5 mm straight stitching will be obtained.
Check 2
Get into the service program.
Turn the hand wheel until the needle arrives at its lower turning position.
Touch Feed-
The gap between the segment (C) and the calibration stop (B) should now be Zero (0 mm).
Adjustment
|
1. Touch Feed- |
.Loosen the screw (A) of the cog wheel and turn it until the feed dog comes to a |
stand-still when the foot control is pressed.
Turn the hand wheel untill the needle arrives at it’s lower turning position
Touch Feed-
Loosen screw (E). Turn the eccentric calibration stop (B) until the gap between segment (C) and the calibration stop (B) is 0 mm.
Check by first turn the hand wheel until the needle arrives at its lower turning position.
|
then touch Needle — |
several times. |
The motor should now run smoothly and the gap should remain 0 mm.
Settings
22.Stitch length balance
Check
A Both columns of the buttonhole should be of the same density. B The machine should sew a motif according to the symbol.
C The mending stitch should look according to the illustration.
|
(Use the mending stitch in the service menu — touch |
, row 5 ) |
Fine adjustment
|
Touch |
, row 5 in the service menu 1. |
Turn screw (A) until the machine sews a mending stitch according to the illustration. This adjustment may be done without dismounting the covers (see illustration.).
Settings
23. Lower thread tension (thread tension of the bobbin case)
Check
1.Insert a full bobbin into the bobbin case.
2.The thread tension spring of the bobbin case shall give a resistance of 12 — 20 g when pulling the thread slowly.
Adjustment
1. Turn screw (A) until the correct thread tension is obtained.
NOTE ! Before any adjustment is made remove any loose pieces of thread or fluff from the thread tension discs
Settings
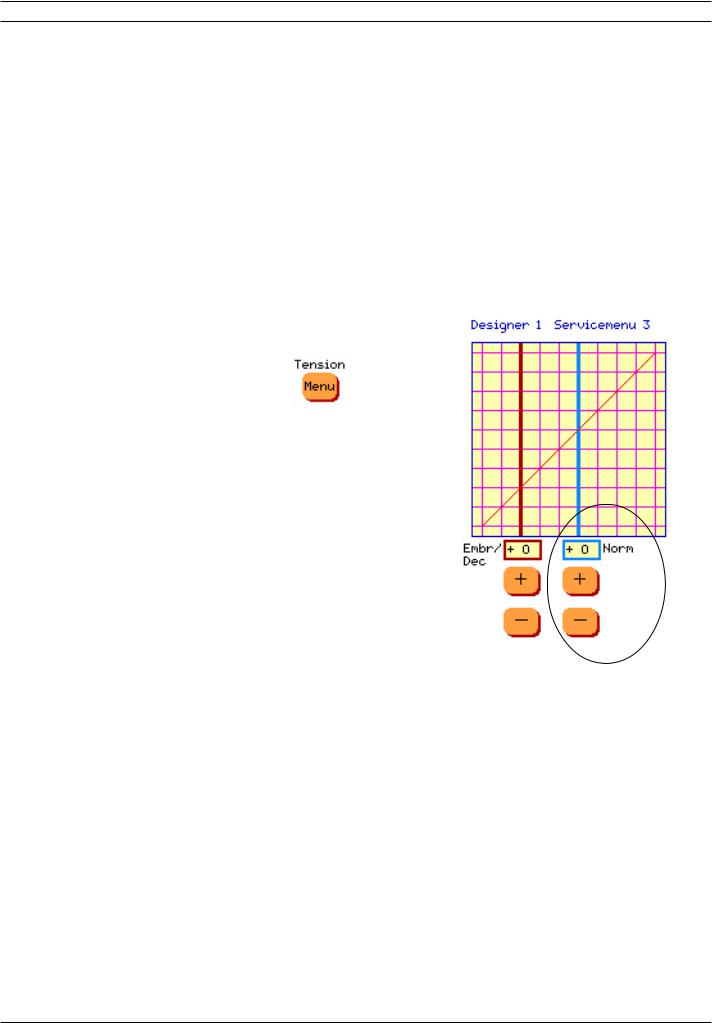
24.Upper thread tension — Position «Norm» — Designer I
Norm is for setting the higher upper thread tension
Check
A correct take-up should be obtained on straight stitch and zig-zag when the sewing advisor is set on woven medium.
Comment 1
The sewing advisor adjusts the thread tension according to the selection of fabric and sewing technique.
This is done by means of the computer and the thread tension step motor.
Comment 2
The thread tension that is set in the set menu is to be regarded as a general indication. This general indication can be raisedand lowered by means of the thread tension buttons in the Set menu and remains until the machine is turned off.
Adjustment
|
1. Get into the service program and select |
. |
2. To adjust the HIGHER upper thread tension
e.g on straight stitching or zick-zack sewing use «Norm» and adjust with or
or  .
.
3. «Norm» adjustments can be done between -10 and +10 if embroidery thread tension (Embr/Dec) is set on 0 (zero).
If «Embr/Dec» is not set on 0 (zero) there are limitations in the setting. The value of the setting could be higher or lower then -10 or +10.
The adjustment is automatically saved.
NOTE ! Before any adjustment is made, remove any loose pieces of thread or fluff from the thread tension discs.
 Loading…
Швейная машинка Husqvarna Viking E10 — это надежное и простое в использовании устройство, которое позволяет создавать высококачественные швы и шить различные типы тканей. Но прежде чем приступить к шитью, необходимо правильно настроить машинку.
В данной подробной инструкции будут описаны все необходимые шаги по настройке швейной машинки Husqvarna Viking E10. Следуя этим рекомендациям, вы сможете быстро и легко настроить машинку и начать шить свои красивые изделия.
Перед началом настройки машинки, убедитесь, что у вас есть все необходимые аксессуары: ножницы, нитки, иглы, боковая рукоятка и проволоковый фиксатор.
Важно помнить, что перед началом любой работы с швейной машинкой необходимо ее выключить и отключить от электрической сети.
Содержание
- Распаковка машинки и подготовка к работе
- Подключение и включение машинки
- Работа с нитками: намотка и подготовка
- Вставка и подготовка иглы
- Установка нужного стежка и длины
- Работа с ножным контролем
- Изучение дополнительных функций
- Уход за машинкой и решение проблем
Распаковка машинки и подготовка к работе
Перед началом работы с швейной машинкой Husqvarna Viking E10 необходимо правильно распаковать ее и подготовить к использованию. В этом разделе мы рассмотрим этот процесс подробно.
1. Распакуйте коробку, в которой была упакована машинка.
2. Внимательно извлеките швейную машинку Husqvarna Viking E10 из коробки, чтобы не повредить ее.
3. Проверьте комплектацию. Убедитесь, что внутри коробки находятся:
- Швейная машинка Husqvarna Viking E10
- Педаль управления скоростью
- Шнур питания
- Набор игл
- Набор ниток
- Крышка для шпульки
- Щеточка для чистки
- Руководство пользователя
4. Проверьте, что все комплектующие находятся в хорошем состоянии и не имеют повреждений.
5. Подготовьте рабочее место. Разместите швейную машинку на ровной и стабильной поверхности. Убедитесь, что вам удобно работать с машинкой и все необходимые принадлежности находятся рядом.
6. Подключите шнур питания к машинке и в розетку. Убедитесь, что машинка включена в сеть и готова к работе.
После того, как вы выполните все эти шаги, швейная машинка Husqvarna Viking E10 будет готова к использованию, и вы сможете приступить к освоению ее возможностей.
Подключение и включение машинки
Перед началом работы со швейной машинкой Husqvarna Viking E10 необходимо правильно подключить ее к источнику питания и включить.
1. Убедитесь, что машинка находится на ровной и устойчивой поверхности.
2. Проверьте питание. Убедитесь, что шнур питания вставлен в машинку и подключен к розетке.
3. Включите машинку, нажав на кнопку питания. Обычно она находится на передней панели машинки.
4. Убедитесь, что индикатор питания загорелся. Это означает, что машина подключена и готова к работе.
5. Проверьте правильность подключения педали. Педаль должна быть подключена к машинке и находиться на полу рядом с ногами пользователя.
Теперь ваша швейная машинка Husqvarna Viking E10 готова к использованию. Следующий шаг — подготовка нити и ткани перед началом шитья.
Работа с нитками: намотка и подготовка
Прежде чем начать работу на швейной машинке Husqvarna Viking E10, необходимо правильно настроить и подготовить нитки. Ниже приведены шаги, которые помогут вам выполнить эту задачу.
1. Проверьте, что шпульная нить правильно намотана на шпульный держатель. Убедитесь, что нить плотно и ровно намотана и не образует петель. Отрежьте конец нити, чтобы она не перехватывала нижнюю нить.
2. Установите шпульку с намотанной нитью в шпульный держатель. Будьте внимательны, чтобы нить свободно распределялась вдоль шпульки. Убедитесь, что шпульный держатель надежно закреплен.
3. Подвиньте рычаг иглы вверх и вставьте верхнюю нить в петлю лостка иглы. Протяните верхнюю нить через направляющую пластину и протяните ее через зажим нити. Не забудьте отрезать конец нити после зажима, чтобы не повредить машинку.
4. Переместите рычаг иглы обратно вниз и натяните нить. Отрежьте конец нити после зажима. Убедитесь, что нить свободно проходит через все направляющие пазы и не затрудняет движение иглы.
5. Поместите нитку через держатель для ниток. Убедитесь, что нижняя нить проходит через все нужные отверстия и направляющие пазы, чтобы гарантировать правильное образование шва.
Готово! Теперь вы готовы к использованию швейной машинки Husqvarna Viking E10. Следуя этим простым инструкциям, вы сможете правильно настроить и подготовить нитки для работы на машинке.
Вставка и подготовка иглы
Для правильной работы швейной машинки Husqvarna Viking E10 необходимо правильно вставить иглу и подготовить ее перед началом работы. В этом разделе представлена подробная инструкция по вставке и подготовке иглы.
| Шаги | Описание |
|---|---|
| Шаг 1 | Убедитесь, что швейная машинка выключена и шнур питания отключен от розетки. |
| Шаг 2 | Аккуратно откройте крышку иглы швейной машинки. |
| Шаг 3 | Убедитесь, что игла, которую вы собираетесь использовать, подходит для выбранного вами типа ткани и нити. |
| Шаг 4 | Внимательно посмотрите на иглу. Она имеет острие и заостренное основание. Убедитесь, что острие обращено в нужную сторону — вперед и вверх. |
| Шаг 5 | Опустите иглу в отверстие для иглы швейной машинки. Убедитесь, что игла входит глубоко и равномерно. |
| Шаг 6 | Подтяните винт иглы, чтобы закрепить ее в нужной позиции. Не затягивайте слишком сильно, чтобы не повредить иглу или швейную машинку. |
| Шаг 7 | Закройте крышку иглы швейной машинки. |
| Шаг 8 | При необходимости, протестируйте работу иглы на ненужном кусочке ткани, чтобы убедиться, что она правильно вставлена и готова к работе. |
Правильная вставка и подготовка иглы — важный шаг перед началом шитья. Следуйте этой инструкции, чтобы успешно использовать швейную машинку Husqvarna Viking E10.
Установка нужного стежка и длины
Для настройки швейной машинки Husqvarna Viking E10 на нужный стежок и его длину выполните следующие шаги:
- Выберите нужный стежок на панели управления машинки. Для этого поверните ручку стежкового кода до того, пока не появится нужный номер стежка на дисплее.
- Настройте желаемую длину стежка. Для этого поворачивайте рукоятку длины стежка вправо или влево, пока не будет достигнута нужная длина на дисплее.
- Установите ткань между лапкой и лапкодержателем. Убедитесь, что ткань правильно выровнена и зафиксирована.
- Проверьте правильность выполнения стежка на отрезке ткани. Если стежок соответствует вашим требованиям, можете продолжить шитье.
Установка нужного стежка и его длины в швейной машинке Husqvarna Viking E10 позволит вам создавать разнообразные швы и достичь желаемого результата при шитье.
Работа с ножным контролем
Швейная машинка Husqvarna Viking E10 оснащена ножным контролем, который позволяет регулировать скорость работы машины. Это удобно при выполнении разных видов швейных операций.
Для использования ножного контроля следуйте инструкциям:
- Подключите ножной контроль к машинке, вставив его в специальный разъем.
- Удобно расположьте ножной контроль рядом с собой, чтобы было удобно перемещать ногой во время работы.
- Нажмите на педаль ножного контроля, чтобы активировать машинку. Чем сильнее нажимаете на педаль, тем быстрее будет работать швейная машинка.
- Чтобы замедлить работу машины, отпустите педаль или нажмите на нее меньше. Машина должна замедлиться или остановиться.
- Если вам требуется контролировать скорость работы машины более точно, можно использовать функцию ручного регулирования скорости на самой машинке.
Работа с ножным контролем на швейной машинке Husqvarna Viking E10 позволит вам удобно выполнять различные виды швейных операций и контролировать скорость работы машины во время работы.
Изучение дополнительных функций
Помимо базовых функций, швейная машинка Husqvarna Viking E10 также имеет несколько дополнительных функций, которые могут быть полезны при выполнении различных швейных работ:
- Регулировка длины и ширины стежка. С помощью специальных регуляторов вы можете изменить длину и ширину стежка в зависимости от выбранной техники шитья.
- Выбор иглы. Швейная машинка Husqvarna Viking E10 позволяет выбрать различные типы игл для шитья разных материалов. Это может быть полезно при работе с различными тканями.
- Подсветка рабочей зоны. Швейная машинка оснащена подсветкой, которая освещает рабочую зону и облегчает видимость при шитье. Это особенно полезно при работе в условиях недостаточного освещения.
- Автоматическая нитевдевательница. Швейная машинка имеет функцию автоматической нитевдевательницы, которая упрощает процесс нитьевдевания. Просто следуйте инструкциям в руководстве пользователя, и машина автоматически проведет нить через иглу.
- Регулировка напряжения нити. Если вам нужно изменить напряжение нити для достижения оптимальной прошивки, вы можете использовать специальные регуляторы на швейной машинке.
- Быстрая переход к задержке иглы вниз или вверх. Швейная машинка позволяет быстро изменить положение иглы — вниз или вверх — чтобы облегчить повороты ткани и точные манипуляции с материалом.
Изучите руководство пользователя для получения более подробной информации о дополнительных функциях и способах их использования на швейной машинке Husqvarna Viking E10.
Уход за машинкой и решение проблем
Для того чтобы ваша швейная машинка Husqvarna Viking E10 всегда работала на высоком уровне, необходимо следить за ее состоянием и проводить регулярные профилактические работы. В этом разделе мы рассмотрим основные меры по уходу за машинкой и предоставим решения для возможных проблем.
1. Чистка и смазка
Периодически проверяйте состояние швейной машинки и удаляйте накопившуюся пыль и волокна. Для этого используйте мягкую кисточку или салфетку. Также не забудьте смазывать машинку регулярно с помощью специального масла, предназначенного для швейных машинок. Следуйте инструкции производителя для правильного проведения процедуры.
2. Замена иглы
Игла швейной машинки со временем ступенькуется и тупеет. Регулярно проверяйте состояние иглы и заменяйте ее при первых признаках повреждения. Использование тупой иглы может привести к повреждению ткани и плохому качеству шва.
3. Решение проблем
В случае возникновения проблем с работой швейной машинки, попробуйте следующие решения:
— Если машинка не включается, проверьте подключение к электросети и убедитесь, что кнопка питания включена.
— Если игла сломалась или застряла, отключите машинку от электросети, аккуратно удалите осколки иглы и установите новую иглу.
— Если швейная машинка плохо шьет или образует петли, проверьте правильность нанизывания нити и наличие скоплений пыли в зубцах транспортера. Также убедитесь, что нитка правильно натянута.
Если указанные решения не помогли решить проблему, обратитесь к инструкции пользователя или к сервисному центру для получения дополнительной помощи.