
Предпросмотр документа
· инструкция (руководство, документация) для проводного телефона Siemens Euroset 5020
·
14 ноября 2021 етырий
Руководство по эксплуатации
Файл: man3481-um_euroset-5020_rus.pdf
Размер: 565.56 Кб
Открыть файл
2 156 просмотров
добавить комментарий
| новый вызов в списке вызовов: Siemens Euroset 5020
euroset 5020 / IM eng-frk-rus-kro / A30350-M209-A801-2-UP19 / 5020.fm / 24.07.2006
1
RU
память пуста
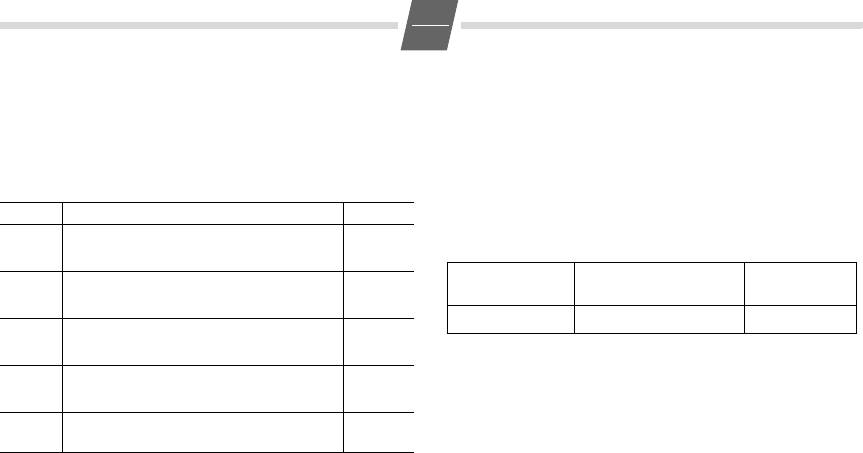
Обзор телефона Euroset 5020
z
{ телефон заблокирован
1211109
1
zzzz
при попытки соединения: телефон
заблокирован
0
–
9
номер телефона
В тоновом режиме:
n
– нажата клавиша *
—
– нажата клавиша #
При дополнительных услугах городской АТС:
| новый вызов в списке вызовов
† (мигающий) поступило новое сообщение
ë ожидание вызова
™ немедленная переадресация вызова
8
˜ переадресация вызова при неответе
7
— переадресация вызова, если занято
6
š абонент неопределен
Меры предосторожности
45
23
При установке, подключении и использовании
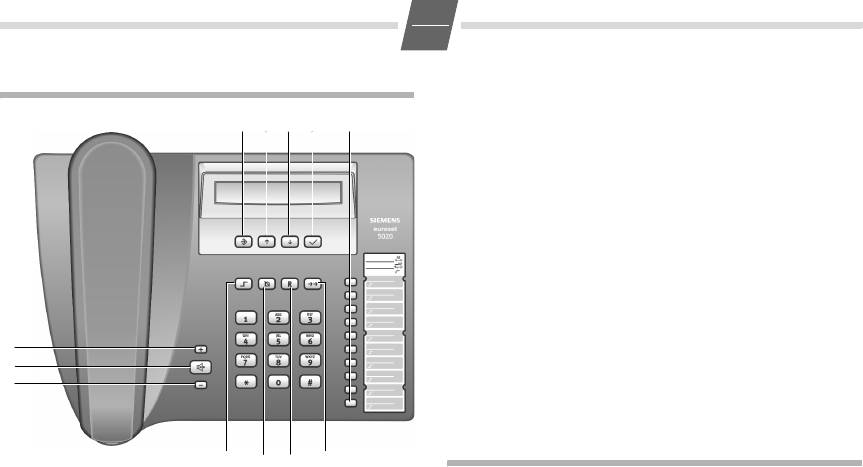
Клавиши
телефона следует обязательно выполнять следующие
1 Клавиши быстрого набора
требования:
2 Клавиша повторного набора
◆ Используйте только прилагаемые штекеры и шнуры!
3 Клавиша наведения справки
◆ Подключайте соединительный шнур только к
4 Клавиша отключения звука
предназначенной для этого розетке.
5 Клавиша регистра
◆ Подключайте только разрешенные к использованию
аксессуары.
6 Клавиша уменьшения громкости
◆ Прокладывайте соединительный шнур так, чтобы
7 Клавиша динамика (громкая связь)
исключить возможность несчастного случая!
8 Клавиша увеличения громкости
◆ Устанавливайте телефон на нескользкую
9 Клавиша сохранения
поверхность!
10 Клавиша Вверх
◆ Для обеспечения вашей безопасности телефон не
11 Клавиша Вниз
следует использовать в ванной или в душе
12 Клавиша OK (набор отображенного номера)
(помещениях с повышенной влажностью). Телефон
Дисплейные символы
не защищен от брызг.
◆ Не подвергайте телефон воздействию источников
P в режиме сохранения
тепла, прямых солнечных лучей или других
‡ нажата клавиша регистра
электрических устройств.
— готовность к работе
◆ Защищайте телефон от влаги, пыли, агрессивных
y микрофон отключен
жидкостей и паров.
} динамик включен
◆ Никогда не разбирайте телефон самостоятельно!
è установлен номер прямого вызова
◆ Не прикасайтесь к контактам острыми и
металлическими предметами!
o
ввод при настройке (напр. громкость)
◆ Не переносите телефон, держа его за шнур!
u
нажата клавиша наведения справки
◆ Передавайте телефон Euroset 5020 другим только
P
пауза
вместе с этой инструкцией по эксплуатации.
euroset 5020 / IM eng-frk-rus-kro / A30350-M209-A801-2-UP19 / 5020.fm / 24.07.2006
2
RU
Подготовка к работе
Рекомендации по установке телефона
◆ Телефон не должен подвергаться воздействию
прямых солнечных лучей или других источников
тепла.
◆ Рабочая температура от +5°C до +40°C.
◆ Расстояние между телефоном и
радиоустройствами, например, радиотелефонами,
пейджерами или телевизорами должно быть не
менее одного метра. Если это требование не
выполнено, возможно создание помех телефонной
связи.
◆ Не устанавливайте телефон в пыльных
помещениях, так как это сокращает срок службы
телефона.
◆ Для чистки телефона используйте влажную ткань
или антистатическую салфетку. Никогда не
пользуйтесь сухой тканью (опасность
Настройка внутренних часов телефона
электростатического разряда) или сильными
?3 Включите функцию.
чистящими средствами!
Текущее установленное время
◆ Мебельный лак и полировка могут портиться при
отображается в 24-часовом режиме (по
контакте с частями телефона (например, ножками).
умолчанию: 00:00).
o Введите верное время в часах <чч> и
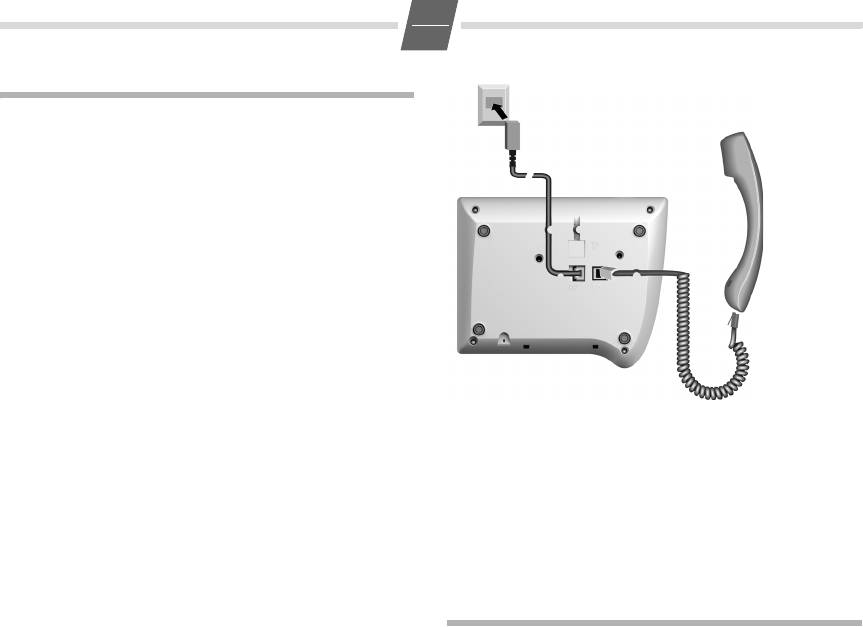
Подключение
минутах <мм> (24-часовой режим).
Подключите короткий конец витого кабеля телефонной
? Нажмите клавишу сохранения.
трубки в гнездо трубки, а длинный конец — в гнездо в
нижней части устройства, обозначенное символом
a.
Подключите телефонный кабель в настенную розетку, а
Разговор по телефону
второй конец кабеля в гнездо в нижней части телефона,
обозначенное символом
Y. Телефон готов к работе.
Набор номера
co Снимите трубку, наберите номер.
или…
o Bc Наберите номер (неверно введенные
цифры можно удалить с помощью клавиши
A и ввести заново), нажмите клавишу
OK.
Через 2 сек. начинается набор.
Снимите трубку, если вы хотите говорить
через трубку.
Цифры после 20-й позиции смещаются на дисплее
справа налево. С помощью клавиши
; можно
добавлять паузы при наборе, начиная со второй
позиции.

euroset 5020 / IM eng-frk-rus-kro / A30350-M209-A801-2-UP19 / 5020.fm / 24.07.2006
3
RU
Набор номера из списка вызовов (если услуга
Быстрый набор
доступна): стр.7.
c Снимите трубку. (Если необходимо,
нажмите клавишу
= для использования
Включение/отключение громкой связи
второго ряда клавиш быстрого набора).
Вы также можете разговаривать по телефону, не
: Нажмите клавишу быстрого набора.
поднимая трубку (громкая связь) или осуществлять
настройки. Оптимальное расстояние от говорящего до
или…
микрофона составляет около 50 см.
: Нажмите клавишу быстрого набора. (Если
◆ Включение функции во время разговора с
необходимо, нажмите клавишу
= для
использованием телефонной трубки:
использования второго ряда клавиш
L + a Нажмите клавишу динамика и положите
быстрого набора).
трубку.
Bc Нажмите клавишу OK или L.
◆ Включение набора номера
Через 2 секунды начинается набор.
Снимите трубку, если вы хотите говорить с
L Перед набором: Удерживайте клавишу
использованием трубки.
динамика нажатой до тех пор, пока не
услышите гудок набора.
Сохранение номеров
Отключение громкой связи
c Снимите трубку во время разговора.
Различные настройки телефона должны завершаться
нажатием клавиши сохранения
?, чтобы настройки
Повторный набор
оставались доступными длительное время.
Последние 5 набранных номеров (максимум 32 цифры)
Для того, чтобы прервать настройку без сохранения
сохраняются автоматически. Вы можете вызвать
(например, при неправильном вводе), положите трубку,
данные номера из списка повторного набора и еще раз
не нажимая клавишу сохранения
?. В этом случае
набрать номер.
сохраняется старая настройка.
Повторный набор последнего набранного номера
Сохранение номеров быстрого набора
c; Снимите трубку, нажмите клавишу
На обоих уровнях клавиш быстрого набора вы можете
повторного набора.
сохранить до 20 абонентских номеров (или функций,
Набирается последний набранный ранее
см. стр.8).
номер.
? Нажмите клавишу сохранения. (Для
Вызов из списка повторного набора
второго уровня дополнительно нажмите
; При положенной трубке: нажмите клавишу
клавишу регистра
=.)
повторного набора.
: Нажмите клавишу быстрого набора, для
Отображается последний набранный
которой вы хотите сохранить номер.
номер. (В любое время вы можете выйти из
На дисплее отображается уже
списка повторного набора, нажав клавишу
сохраненный номер. Если ячейка памяти
>.)
данной клавиши быстрого набора пуста, на
A…C С помощью клавиш Вверх/Вниз выберите
дисплее отображается
z
необходимый номер.
o Введите номер, который вы хотите
B Нажмите клавишу OK или L.
сохранить (максимум 32 цифры).
Через 2 секунды начинается набор.
Снимите трубку, если вы хотите говорить с
использованием трубки.
euroset 5020 / IM eng-frk-rus-kro / A30350-M209-A801-2-UP19 / 5020.fm / 24.07.2006
4
RU
или …
?6 Начните настройку.
Сохранение из списка вызовов (если услуга
1…3 Нажмите клавишу от 1 до 3:
доступна)
1: быстрый; 3: медленный.
A…C Нажимайте клавишу Вверх/Вниз до тех пор,
? Нажмите клавишу сохранения.
пока на дисплее не отобразится
необходимый номер.
Настройка мелодии звонка
или …
Вы можете выбрать одну из 10 мелодий (настройка при
Сохранение из списка повторного набора:
поставке: мелодия 9).
◆ Настройка в режиме готовности:
; Нажмите клавишу повторного набора.
?7 Начните настройку.
A…C Если необходимо, нажимайте клавишу
Вверх/Вниз до тех пор, пока на дисплее не
0…9 Нажмите клавишу от 0 до 9.
отобразится необходимый номер.
? Нажмите клавишу сохранения.
Для завершения процедуры:
◆ Настройка во время сигнализации вызова
? Нажмите клавишу сохранения.
0…9 Нажмите клавишу от 0 до 9.
Сохранение во время соединения
Настройка громкости телефона
Вы можете сохранять номера во время соединения,
Вы можете выбрать один из трех уровней громкости
выполнив описанную выше процедуру (функция
телефона (настройка при поставке:1).
записной книжки).
?9 Активируйте функцию.
Рекомендация:
H…I Настройте громкость с помощью клавиш
После двадцатой цифры последующие цифры на дисплее
увеличения и уменьшения громкости.
сдвигаются справа налево.
? Нажмите клавишу сохранения.
Удаление всех номеров быстрого набора
Отключение звука
?1251
Активируйте функцию.
Вы можете отключить динамик и микрофон телефона.
Ваш собеседник не будет вас слышать.
? Нажмите клавишу сохранения.
J Во время разговора: Нажмите клавишу
отключения звука.
Настройки телефона
Включение звука: Нажмите эту клавишу
еще раз.
Громкость звонка
Настройка динамика
Вы можете выбрать один из четырех уровней громкости
При разговоре по громкой связи вы можете выбрать
звонка и полностью отключить звонок (настройка при
один из семи уровней громкости (настройка при
поставке: 4).
поставке: 1).
◆ Настройка в режиме готовности:
H…I Настройте громкость с помощью клавиш
?5 Начните настройку.
увеличения и уменьшения громкости.
H…I С помощью клавиши Вверх/Вниз настройте
громкость.
Включение/отключение мелодии отключения
? Нажмите клавишу сохранения.
звука
◆ Настройка во время сигнализации вызова:
Вы можете включить или отключить мелодию
отключения звука (настройка при поставке: вкл).
Перед снятием трубки нажмите
H…I.
Последняя выбранная настройка сохраняется.
?19 #
Начните настройку.
Настройка тональности звука
0/1 0: отключено; 1: включено.
Вы можете выбрать одну из трех тональностей звонка
? Нажмите клавишу сохранения.
(настройка при поставке: 3).

euroset 5020 / IM eng-frk-rus-kro / A30350-M209-A801-2-UP19 / 5020.fm / 24.07.2006
5
RU
Функция прямого вызова
Включение/выключение индикации
Если установлен номер для прямого вызова, то при
продолжительности разговора
заблокированном телефоне (см. „Включение/
Телефон может отображать приблизительную
выключение блокировки телефона“) после снятия
продолжительность разговора (максимум 99 мин. 59
трубки (или нажатия клавиши громкой связи) и нажатия
сек., настройка при поставке: включено). Если данная
любой клавиши (кроме
?, L,H и I)
функция включена, то индикация времени запускается
автоматически набирается этот номер. Набор другого
через 8 секунд после набора последней цифры.
номера при заблокированном телефоне невозможен,
?18#
все же можно принимать входящие звонки.
Начните настройку.
?82
0/ 1 0: выключить; 1: включить
Начните настройку.
? Нажмите клавишу сохранения.
o Введите номер прямого вызова (максимум
32 цифры).
Настройка времени паузы
? Нажмите клавишу сохранения.
Если необходимо, вы можете изменить время паузы
При включенной функции прямого вызова на дисплее
клавиши
; (функция установки паузы со второй
вы видите символы
è и {.
цифры номера) на 1, 3 или 6 секунд (настройка при
поставке: 3 секунды).
Отключение прямого вызова
?102
?80
Начните настройку.
Начните настройку
0…2 0: 1 сек.; 1: 3 сек.; 2: 6 сек..
? Нажмите клавишу сохранения.
? Нажмите клавишу сохранения.
Удаление номера прямого вызова
Переключение способа набора номера
?1253
Начните настройку.
?# Начните настройку.
? Нажмите клавишу сохранения.
1/ 2 1: Тональный набор
2: Импульсный набор без размыкания
Включение/выключение блокировки телефона
шлейфа.
Можно полностью заблокировать набор номеров (за
? Нажмите клавишу сохранения.
исключением установленного номера прямого вызова).
Входящие звонки можно принимать как обычно.
Переключение способа набора номера во время
?8 Начните настройку.
соединения
0/ 1 0: разблокировать; 1: заблокировать
Если включен импульсный набор номера и вы хотите
использовать функции, для которых необходим
? Нажмите клавишу сохранения.
тональный набор (например, дистанционное
При заблокированном телефоне на дисплее вы видите
управление автоответчиком), вы можете переключить
символ
{.
способ набора номера во время соединения.
* Во время соединения: нажмите клавишу
звездочка.
o Введите цифровой код для дистанционного
управления/передачи данных.
После того, как трубка положена, снова включается
первоначальный способ набора номера.

euroset 5020 / IM eng-frk-rus-kro / A30350-M209-A801-2-UP19 / 5020.fm / 24.07.2006
6
RU
Подключение к офисной АТС
Настройка времени размыкания клавиши наведения
справки
?195
Ввод/удаления кода выхода в город
Начните настройку.
При подключении телефона к офисной АТС может
0…4 Введите цифру для нужного времени
потребоваться сохранение кода выхода в город из
размыкания шлейфа:
одной или несколько цифр. При сохранении кода
0: 90 мс (состояние при поставке);
выхода в город автоматически добавляется пауза при
1:120мс; 2: 270 мс; 3: 375 мс; 4:600мс.
наборе. Можно сохранить максимум 3 кода выхода в
город.
? Нажмите клавишу сохранения.
?0 Начните настройку.
Если в памяти нет сохраненных кодов
Функции дополнительных услуг
выхода в город, на дисплее отображается
телефонной сети общего пользования
символ
z
.
Если сохранены несколько кодов выхода в
Если вы хотите использовать услуги, которые
город, то они отображаются рядом друг с
активируются с помощью клавиши наведения справки,
другом; мигает текущий рабочий код
убедитесь в том, что установлено правильное время
выхода в город.
размыкания шлейфа для данной клавиши.
Если необходимо, выберите с помощью
клавиши
; один из отображенных кодов
Клавиша наведения справки (при подключении к
выхода в город, чтобы обработать его
сети общего пользования)
следующим образом:
При подключении к городской АТС клавиша наведения
Удаление кода выхода в город:
справки применяется для использования некоторых
? Нажмите клавишу сохранения.
дополнительных услуг.
Ввод кода выхода в город:
Перед использованием клавиши наведения справки
нужно настроить для нее время размыкания шлейфа,
o Введите код выхода в город, состоящий из
используемое в вашей стране:
одной до трех цифр.
◆ Бельгия, Голландия, Швейцария: 120 мс (цифра 1)
Ввод дополнительных кодов выхода в
◆ Франция, Люксембург, Португалия, Германия,
город:
Греция: 270 мс (цифра 2)
; o Нажмите клавишу повторного набора,
◆ Остальные европейские страны: 90 мс (цифра 0).
введите следующий код выхода в город.
? Нажмите клавишу сохранения.
Клавиша наведения справки (при подключении к
офисной АТС)
При звонке из город вы можете навести справку или
осуществить переадресацию вызова. Для этого
нажмите клавишу наведения справки
>. Дальнейшие
функции зависят от вашей АТС. При поставке для
клавиши наведения справки настроено размыкание
шлейфа 90 мс для использования функций
телефонной сети общего пользования. При
подключении к офисной АТС может потребоваться
изменение времени размыкания шлейфа (например,
600 мс). При изменении этой настройки прочитайте
инструкцию по эксплуатации вашей офисной АТС.

euroset 5020 / IM eng-frk-rus-kro / A30350-M209-A801-2-UP19 / 5020.fm / 24.07.2006
7
RU
Использование функции передачи номера
Просмотр списка вызова и набор номера
При следующих условиях телефонные номера
Если в списке вызовов есть записи, которые еще не
входящих вызовов
были просмотрены, на дисплее мигает
| .
(a) отображаются на дисплее (максимум первые 20
Вы можете открыть список вызовов, пролистать записи,
цифр), а также
просмотреть дополнительную информацию звонка и
(b) осуществляется автоматическое сохранение
перезвонить по номеру:
входящих вызовов в списке вызовов:
A Нажмите клавишу Вниз.
◆ Как ваш сетевой оператор, так и оператор звонящего
На дисплее отображается номер телефона
должны предоставлять данную услугу.
последнего входящего вызова. Слева,
◆ Как вы, так и звонящий, заказали данную услугу
рядом с номером телефона вы видите его
(если необходимо) у соответствующего сетевого
номер позиции „01“.
оператора.
Если номер телефона состоит из более
Если присутствуют данные условия, но звонящий
чем 17 цифр, то сначала отображаются
отклонил функцию передачи номера, на дисплее вы
первые 17 цифр, а через 1 секунду —
видите вместо телефонного номера только символы
—
выводятся остальные. (Вы можете в любое
P—. Если передача номера невозможна по другим
время выйти из списка вызовов, нажав
(техническим) причинам, на дисплее отображается
—
клавишу
>
0— или —E— .
Просмотр списка вызовов:
На дисплее могут быть отображены до 20 цифр
A…C Нажмите клавишу Вниз или Вверх.
телефонного номера. Номера, состоящие из более чем
Просмотр дополнительной
20 цифр, сокращаются.
информации:
Список вызовов
= Нажмите клавишу регистра.
Список вызовов может включать в себя до 50 записей.
Отображается дата и время выбранной
Если один и тот же абонент звонит несколько раз, новая
записи с количеством звонков (справа).
запись не добавляется. В качестве дополнительной
Возврат в список вызовов (Отображение
информации отображаются до 99 многократных
номеров):
звонков.
= Нажмите клавишу регистра еще раз.
Порядок записей в списке: Последний звонок
Выбор номера телефона:
отображается на первой позиции (номер позиции„01“).
B Нажмите клавишу OK или L.
Предыдущие записи смещаются вниз после каждого
Через 2 секунды начинается набор.
нового входящего вызова, пока
они полностью не
Снимите трубку, если вы хотите говорить с
исчезнут из списка. В списке вызова можно
использованием трубки.
◆ пролистать отображенные номера,
◆ вызвать дополнительную информацию:
Удаление записей списка вызовов
(a) дату и время, если она передается телефонной
Удаление всех записей
сетью, в противном случае только время согласно
A/ C Нажмите клавишу Вниз или Вверх.
часам в телефоне
(b) частоту входящих телефонных номеров,
?*?Нажмите последовательно клавишу
сохранения, “звездочку” и снова клавишу
◆ удалять записи,
сохранения.
◆ сохранять номера телефонов из списка вызова под
Список вызовов удален.
клавишами быстрого набора (см. стр.3),
Удаление отдельных записей
◆ набрать отображенный номер телефона.
A…C Выберите необходимую запись.
?? Дважды нажмите клавишу сохранения.
Запись удалена.

euroset 5020 / IM eng-frk-rus-kro / A30350-M209-A801-2-UP19 / 5020.fm / 24.07.2006
8
RU
Включение/отключение отображения кода
Использование клавиш быстрого набора в
региона
качестве
„ функциональных клавиш“
Вы можете настроить телефон таким образом, чтобы
Различные услуги/функции телефонной сети общего
при входящем звонке не отображался код региона
пользования — при необходимости, по заказу/запросу–
входящего звонка. Это может быть полезным в том
можно выбрать с помощью заданных комбинаций
случае, если вы не можете видеть последние позиции
клавиш, которые вы можете узнать у вашего сетевого
длинного номера.
оператора.
Вы можете отключить индикацию для 2 кодов региона
Необходимые комбинации клавиш вы можете
(до 5 цифр каждый).
сохранить как обычные номера телефонов под
?4 Начните настройку.
клавишами быстрого набора и также набрать или
отключить услугу.
Если ни один номер не настроен в ячейки
Указание:
памяти, на дисплее отображается
Если вы активируете
отображение символов и
символ
z
.
сохраняете функциональные вызовы во втором ряду
Если заняты обе ячейки памяти, они
клавиш быстрого набора, вы можете связать
отображаются друг рядом с другом,
включение и выключение различных услуг для каждой
текущая ячейка, которую можно настроить,
„функциональной клавиши“ с индикацией или
мигает.
“гашением” определенных символов на дисплее.
С помощью клавиши
; вы можете
При настройке клавиш быстрого набора второго
поменять ячейку памяти и настроить ее
ряда обращайте внимание на то, чтобы включение и
следующим образом:
выключение дисплейных символов
™, ˜, —,ë и š
Удаление номера:
были связаны с совершенно определенной клавишей —
? Нажмите клавишу сохранения.
независимо от сохраненными на этом ряду номерами
Ввод номера:
или функциональными вызовами!
o Введите номер, состоящий из одной до
Включение/выключение индикации символов для
пяти цифр.
дополнительных услуг
Ввод дополнительных кодов региона:
Если необходимо, можно активировать или
; o Нажмите клавишу повторного вызова,
деактивировать индикацию символов. При поставке
введите следующий номер.
индикация активирована.
? Нажмите клавишу сохранения.
?145
Индикация „Поступило новое сообщение“
Начните настройку.
Различные сетевые операторы предлагают услуги по
0/1 0: деактивировать; 1: активировать.
сохранению поступивших сообщений (например,
? Нажмите клавишу сохранения.
службы голосовой почты).
Если одно или несколько новых поступивших
сообщений были сохранены на сервере оператора,
сетевой оператор может вас проинформировать об
этом по телефону. На дисплее отображается мигающий
символ
† и номер телефона.
Теперь вы можете набрать соответствующий номер,
чтобы проверить сохраненные сообщения. Если для
вас больше нет новых сообщений, символ
† на
дисплее телефона исчезает.
euroset 5020 / IM eng-frk-rus-kro / A30350-M209-A801-2-UP19 / 5020.fm / 24.07.2006
9
RU
Рекомендуемое распределение символов для
Пример: Переадресация вызова
клавиш
Ниже приведен пример использования клавиш
Если при активированной индикации символа
= вы
быстрого набора в качестве „функциональных клавиш“.
нажмете одну из следующих клавиш быстрого набора,
Если индикация символов активирована, то в примере
на дисплее включается или отключается
„Переадресация вызова“ при включении услуги на
соответствующий дисплейный символ (нумерация
дисплее отображается соответствующий символ или
клавиш сверху вниз):
же гаснет при ее отключении.
=+ Распределение функций Символ
Порядок клавиш для включения функции
„Переадресация вызова“ у вашего телефонного
: 1 Переадресация вызова вкл
™
оператора состоит, например, из трех частей
:
:
2 выкл
Вызов функции Место
Конец
: 3 Переадресация вызова при
вкл
˜
переадресации
функции
неответе
:
4 выкл
*21*
Номер телефона
#
: 5 Переадресация вызова, если
вкл
—
занято
У вас существуют следующие возможности:
:
6 выкл
◆ Вы набираете полную последовательность клавиш
: 7 Ожидание вызова вкл
ë
каждый раз через клавиатуру.
:
8 выкл
◆ Вы можете сохранить порядок клавиш под
: 9 Абонент неопределен (только
š
клавишами быстрого набора в качестве общей
следующий вызов)
функции вместе с номером телефона заданного
места переадресации
Присвоение функции/изменение функциональных
или
клавиш
сохранить только вызов функции и завершение
?= Начните настройку.
функции. При этом вы можете установить номер
места переадресации с возможностью его
: Нажмите ту функциональную клавишу
последующего изменения.
(=клавишу быстрого набора), которой
необходимо присвоить функцию.
Сохранение переадресации вызова под
Если функциональная клавиша уже
функциональной клавишей
“занята”, на дисплее отображается
?= Начните настройку.
соответствующая функция. Если ячейка
: Нажмите клавишу быстрого набора,
памяти для этой функциональной клавиши
которая предусмотрена для индикации
пуста, на дисплее отображается z
символа „
™
вкл“, см. „Включение/
o Введите комбинацию клавиш/код
выключение индикации символов для
необходимой услуги.
дополнительных услуг“ стр.8.
Внимание!
На дисплее отображается уже
Если одна часть комбинации клавиш для
сохраненный номер телефона. Если
сохранения состоит из цифр/символов,
ячейка памяти для данной клавиши
которые позднее должны быть изменены
быстрого набора пустая, то на дисплее
(например, номер телефона места
отображается символ
z
.
переадресации или время для
*21*
напоминания), то в такой позиции
Введите функцию вызова для
необходимо использовать клавишу
„Переадресации вызова“.
регистра
=.
Во время следующей активации услуги, эта
клавиша устанавливает курсор для ввода
данных в изменяемой части записи.
? Нажмите клавишу сохранения.

euroset 5020 / IM eng-frk-rus-kro / A30350-M209-A801-2-UP19 / 5020.fm / 24.07.2006
10
RU
(a) Установка номера телефона места
Сохранение функции “Отключение переадресации
переадресации
вызова“ под функциональной клавишей
o Введите номер телефона места
Переадресация вызова, представленная в примере,
переадресации.
может быть отключена, например, с помощью
# Нажмите клавишу “решетка”, чтобы
последовательности клавиш
#21#.
“пометить” конец функции.
Также вы можете сохранить данную
? Нажмите клавишу сохранения.
последовательность клавиш под предусмотренной
клавишей быстрого набора. Если индикация символа
или …
активирована, а услуга включается согласно
(b) Резервирование изменяемого
указаниям, представленным выше, после отключения
номера телефона переадресации
услуги символ
™ исчезает с дисплея.
= Нажмите клавишу регистра.
?= Начните настройку.
Если в дальнейшем включается функция
: Нажмите клавишу быстрого набора,
„Переадресация вызова“ эта клавиша
которая предусмотрена для индикации
устанавливает курсор в место ввода
символа „
™ выкл“, см. „Включение/
номера телефона переадресации.
выключение индикации символов для
# Нажмите клавишу “решетка”, чтобы
дополнительных услуг“ стр.8.
“пометить” конец функции.
#21#
? Нажмите клавишу сохранения.
Введите функцию вызова
„Переадресации“.
Включение переадресации вызова при помощи
? Нажмите клавишу сохранения.
функциональной клавиши
c = Снимите трубку, нажмите клавишу
Отключение переадресации вызова с помощью
регистра.
функциональной клавиши
: Нажмите клавишу быстрого набора для
c= Снимите трубку, нажмите клавишу
индикации символа „
™
вкл“. На дисплее
регистра.
отображается символ
™
.
: a Нажмите клавишу быстрого набора для
(a) Номер телефона переадресации
индикации символа „
™ выкл“. Положите
вызова установлен
трубку.
Вы услышите сообщение, что услуга
Символ
™ гаснет. Вы услышите сообщение, что услуга
включена.
отключена.
a Положите трубку.
Теперь входящие вызовы переадресуются
на телефон места переадресации,
сигнализация вызова вашего телефона не
производится.
(b) Изменяемое место переадресации
o ; Введите номер телефона переадресации,
нажмите клавишу повторного набора,
чтобы отметить конец введенного номера
телефона.
Вы услышите сообщение, что услуга
включена.
a Положите трубку.
Теперь входящие вызовы переадресуются
на телефон места переадресации,
сигнализация вызова вашего телефона не
производится.
euroset 5020 / IM eng-frk-rus-kro / A30350-M209-A801-2-UP19 / 5020.fm / 24.07.2006
11
RU
Приложение
Вкладыши
Ненадписанные вкладыши для клавиш быстрого
Уход
набора вы найдете в интернете по адерсу http://
www.siemens.com/euroset.
Для чистки телефона используйте влажную ткань или
антистатическую салфетку. Никогда не пользуйтесь
Контактные лица
сухой тканью (опасность электростатического разряда)
При возникновении проблем при подключении
или сильными чистящими средствами!
телефона к аналоговому абонентскому вводу
Если телефон работает неправильно
обращайтесь в вашу телефонную компанию или к
продавцу.
Нет звонка телефона: Громкость звонка могла быть
установлена на 0
.
Допуск к эксплуатации
Трубка снята, нет гудка: Проверьте, правильно ли
Это устройство предназначено для подключения к
подключен шнур к телефону и к телефонной розетке?
аналоговым абонентским вводам в российских
Слышен гудок, но телефон не набирает номер:
телефонных сетях.
Телефон подключен правильно. Проверьте
Устройство адаптировано к условиям эксплуатации в
правильность настройки способа набора номера
России.
(см. стр.5).
Т
олько при подключении к офисной АТС: Нет соединения,
неправильное соединение при наборе из памяти телефона
ССС
(например, повторный набор, быстрый набор): сохраните
Минсвязи России
код выхода в город.
Собеседник вас не слышит: Нажата клавиша
Настоящим фирма Siemens Home and Office
отключения звука? Нажмите эту клавишу еще раз.
Communication Devices GmbH & Co. KG заявляет, что
Правильно ли установлен штекер кабеля подключения
это данное устройство соответствует основным
трубки?
требованиями и другим положениям рекомендаций
Не работает клавиша наведения справки: Выберите
1999/5/EC.
правильное время размыкания шлейфа.
Копию сертификата соответствия требованиям 1999/5/
Не отображаются номер телефона звонящего и
EC вы найдете в интернете по адресу
список вызовов:
http://www.siemens.com/gigasetdocs
.
Подключен ли сетевой блок питания (см. стр.2)?
Можно ли использовать передачу номера
телефона (см. стр.7)?
Оглавление
Топ 10 инструкций
Другие инструкции

euroset 5020 / IM eng-frk-rus-kro / A30350-M209-A801-2-UP19 / 5020.fm / 24.07.2006
5
RU
Функция прямого вызова
Если установлен номер для прямого вызова, то при
заблокированном телефоне (см. „Включение/
выключение блокировки телефона“) после снятия
трубки (или нажатия клавиши громкой связи) и нажатия
любой клавиши (кроме
?
,
L
,
H
и
I
)
автоматически набирается этот номер. Набор другого
номера при заблокированном телефоне невозможен,
все же можно принимать входящие звонки.
?82
Начните настройку.
o
Введите номер прямого вызова (максимум
32 цифры).
?
Нажмите клавишу сохранения.
При включенной функции прямого вызова на дисплее
вы видите символы
è
и
{
.
Отключение прямого вызова
?80
Начните настройку
?
Нажмите клавишу сохранения.
Удаление номера прямого вызова
?1253
Начните настройку.
?
Нажмите клавишу сохранения.
Включение/выключение блокировки телефона
Можно полностью заблокировать набор номеров (за
исключением установленного номера прямого вызова).
Входящие звонки можно принимать как обычно.
?8
Начните настройку.
0
/
1
0: разблокировать; 1: заблокировать
?
Нажмите клавишу сохранения.
При заблокированном телефоне на дисплее вы видите
символ
{
.
Включение/выключение индикации
продолжительности разговора
Телефон может отображать приблизительную
продолжительность разговора (максимум 99 мин. 59
сек., настройка при поставке: включено). Если данная
функция включена, то индикация времени запускается
через 8 секунд после набора последней цифры.
?18#
Начните настройку.
0
/
1
0: выключить; 1: включить
?
Нажмите клавишу сохранения.
Настройка времени паузы
Если необходимо, вы можете изменить время паузы
клавиши
;
(функция установки паузы со второй
цифры номера) на 1, 3 или 6 секунд (настройка при
поставке: 3 секунды).
?102
Начните настройку.
0
…
2
0: 1 сек.; 1: 3 сек.; 2: 6 сек..
?
Нажмите клавишу сохранения.
Переключение способа набора номера
?#
Начните настройку.
1
/
2
1: Тональный набор
2: Импульсный набор без размыкания
шлейфа.
?
Нажмите клавишу сохранения.
Переключение способа набора номера во время
соединения
Если включен импульсный набор номера и вы хотите
использовать функции, для которых необходим
тональный набор (например, дистанционное
управление автоответчиком), вы можете переключить
способ набора номера во время соединения.
*
Во время соединения: нажмите клавишу
звездочка.
o
Введите цифровой код для дистанционного
управления/передачи данных.
После того, как трубка положена, снова включается
первоначальный способ набора номера.
![]()
Euroset 5020 Quick Guide
8 
7 
6 
5 4 3 2
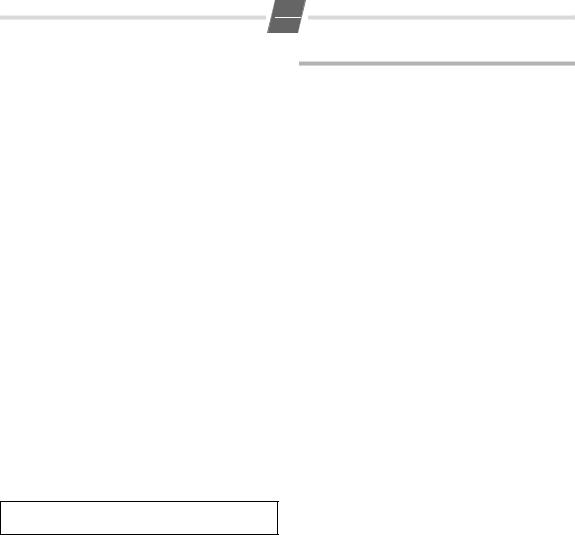
Keys
1 Repertory keys
2 Redial key
3 Recall key
4 Mute key
5 Shift key
6 Quiet key
7 Loudspeaker key (handsfree)
8 Loud key
9 Set key
10 Up key
11 Down key
12 OK key (dial number displayed)
Display symbols
PIn setting mode
‡Shift key pressed
—Ready for use
yMicrophone off
èBaby Call (direct call) number set
OEntry mark when setting (e.g. volume)
URecall key pressed
PPause
ZNo memory content
1
GB
{Telephone locked
ZZZZ When trying to connect: telephone locked 0 – 9 Phone number
With tone dialling:
N– * key pressed
—– # key pressed
With additional services from public network providers:
|New call in calls list
†(Flashing) A new message has arrived
ëCall waiting
™Call forwarding immediately
|
˜ |
Call forwarding on no reply |
—Call forwarding when busy
šAnonymous call on
Safety precautions
When installing, connecting and operating the telephone, always observe the following precautions:
Only use the plugs and leads supplied.
Only connect the connecting lead to the socket/jack provided for that purpose.
Only connect approved accessories.
Arrange the connecting lead where it will not cause accidents.
Position the telephone on a non-slip surface.
For your safety and protection, the telephone must not be used in bath or shower rooms (wet locations).
The telephone is not splash proof.
Never expose the telephone to sources of heat, direct sunlight or other electrical devices.
Protect your telephone from moisture, dust, corrosive liquids and vapours.
Never open up the telephone yourself.
Do not touch the plug contact with pointed or metallic objects.
Do not carry the telephone by the leads.
If you give your Euroset 5020 to someone else, make sure you also give them the user guide.

2
GB
All electrical and electronic products should be dis-
posed of separately from the municipal waste stream
 via designated collection facilities appointed by the government or the local authorities.
This crossed-out wheeled bin symbol on the product means the product is covered by the European Directive 2002/96/ EC.
The correct disposal and separate collection of your old appliance will help prevent potential negative consequences for the environment and human health. It is a precondition for reuse and recycling of used electrical and electronic equipment.
For more detailed information about disposal of your old appliance, please contact your city office, waste disposal service or the shop where you purchased the product.
Preparing the telephone for use
Recommended installation of telephone
Do not expose the telephone to direct sunlight or other sources of heat.
Operate at temperatures between +5°C and +40°C.
Maintain a distance of at least one metre between the telephone and radio equipment, e.g. wireless telephones, wireless pagers or TV sets. Otherwise, telephone communication could be impaired.
Do not install the telephone in dusty areas as this can shorten the service life of the telephone.
To clean, wipe with a moist or antistatic cloth only, never with a dry cloth (risk of electrostatic charging and discharge) or harsh cleaning agent.
Furniture lacquer and polish can be damaged by contact with parts of the unit (e.g. device feet).
Connecting
Insert the short end of the coiled handset cord in the socket provided in the handset and the long end in the socket marked with an aon the underside of the device. Plug the phone cord into the outlet on the wall and the other end into the socket marked with a Y on the underside of the device. Then your telephone is ready to use.
Setting the internal clock
?3 Initiate function.
The current set time is displayed in 24-hour mode (default setting: 00:00).
oEnter the correct time in hours <hh> and minutes <mm> (24-hour mode).
?Press the Set key.
Making calls
Dialling a number
co Lift handset, dial number. or …
o Bc Dial number (you can delete wrongly entered digits with A and then enter the correct digit) and press the OK key.
After 2 seconds the number is dialled. Lift the handset if you want to talk via the handset.
Any digits after the 20th digit are moved from right to left in the display. The Last number redial key ; can be used to insert pauses when dialling, starting from the 2nd digit.
Select phone number from the calls list (if available): see 6.
3
GB
Activating/deactivating handsfree talking |
Saving numbers |
With this telephone you can also make calls (handsfree mode) or settings without lifting the handset. The best distance from the microhone for speaking is about 50 cm.
Activating during a call via the handset
L + a With the Loudspeaker key pressed replace the handset.
Activating before dialling the number
LBefore dialling: hold down the Loudspeaker key until you can hear the dialling tone.
Deactivating handsfree talking
cLift the handset during the call.
Last number redial
The last 5 numbers dialled (up to 32 digits) are saved automatically. You can retrieve these numbers from the last number redial list and dial them again:
Redialling the last number dialled
c; Lift the handset and press the last number redial key. The last number dialled is redialled immediately.
Dialling from the last number redial list
;Without lifting the handset: Press the last number redial key.
The last number dialled is displayed. (You can leave the last number redial list at any time by pressing >.)
A…C Using the Down/Up key, scroll through the list to the desired number.
BPress OK or L key.
After 2 seconds the number is dialled. Lift the handset if you want to talk via the handset.
Dialling using the repertory keys
cLift handset. (If necessary, press =for a 2nd level repertory key).
:Press repertory key.
or …
:Press repertory key. (If necessary, press =for a 2nd level repertory key).
Bc Press OK or L key.
After 2 seconds the number is dialled. Lift the handset if you want to talk via the handset.
Different telephone settings must be completed with the Set key ? so that they are available permanently.
In order to cancel without saving, e. g. after an incorrect entry, replace the handset instead of pressing ? at the end. The original setting is then retained.
Saving with notebook function
You can also save phone numbers during a conversation with the notebook function.
Saving repertory numbers
You can save up to 20 phone numbers (or even functions, see page 7) on both levels of the repertory keys.
?Press the Set key. (For 2nd memory level, also press =.)
:Press the repertory key under which you want to save the repertory number.
A number that has already been saved is shown in the display. If the memory for this repertory key is empty, Z appears in the display
|
o |
Enter the number to be saved (up to 32 digits). |
or …
Saving from the calls list (if service is available)
A…C Press the Down/Up key until the desired number appears in the display.
or …
Saving from the redial list:
;Press the last number redial key.
A…C If necessary, press the Down/Up key until the desired number appears in the display.
To terminate the process:
?Press the Set key.
Saving during a call
You can also save phone numbers in the same way during a call (notebook function).
Note:
After the 20th digit, any following digits are moved from right to left in the display.
Delete all repertory numbers
?1251
Initiate function.
?Press the Set key.

Adjusting the telephone
Adjusting the ringer volume
The volume of the ringer can be set to one of 4 levels and can also be deactivated completely (default setting: level 4).
To adjust when the telephone is idle:
?5 Initiate function.
H…I Adjust the volume with the Loud/Quiet key. ? Press the Set key.
To adjust while the telephone is ringing:
Press H…I before lifting the handset.
The last value set is saved.
Setting the ringer frequency
The frequency (speed) of the ringer can be set to one of three levels (default setting: level 3).
|
?6 |
Initiate function. |
|
|
1…3 |
Press one of the keys 1 |
…3: |
|
1: highest frequency; |
3: lowest frequency. |
|
|
? |
Press the Set key. |
Setting the ringtone
Ten different ringtones can be set for the ringer (default setting: ringtone 9).
To set with the telephone is idle:
?7 Initiate function. 0…9 Press one of the keys 0 … 9 ? Press the Set key.
To set while the telephone is ringing:
0…9 Press one of the keys 0 to 9.
Setting the handset volume
The volume on the handset can be set to one of 3 levels and saved (default setting: level 1).
?9 Initiate function.
H…I Adjust the volume with the Loud/Quiet key.
?Press the Set key.
Mute
You can deactivate the telephone’s handset and microphone. Then the other party can no longer hear you.
JDuring a call: Press the Mute key Activate: Press the key again.
Adjusting the loudspeaker
While in handsfree mode, you can set the volume to one of 7 levels and save it (default setting: 1).
H…I Adjust the volume with the Loud/Quiet key.
Activating/deactivating the mute melody
You can activate and deactivate the mute melody for the mute (default setting: on).
?19#
Initiate function.
0/1 0: deactivate; 1: activate.
?Press the Set key.
Baby call (direct call) number setting
If a phone number is set for the Baby Call function, it is dialled automatically when the telephone is locked
(s. «Activating/deactivating the telephone lock») after you lift the handset (or press the Loudspeaker key) and press any key (except ?, L,H and I). The telephone does not allow other phone numbers to be dialled, but incoming calls can be received.
?82
Initiate function.
|
o |
Enter direct call number (max. 32 digits). |
?Press the Set key.
When the baby call function is activated, you will see è and { in the display.
Deactivating
?80
Initiate function.
?Press the Set key.
Deleting a baby call phone number
?1253
Initiate function.
?Press the Set key.
Activating/deactivating the telephone lock
The telephone can be locked completely (with the exception of a baby call phone number if set) so that it cannot dial any phone numbers, including the baby call phone number. You can continue to receive incoming calls.
?8 Initiate function.. 0/ 1 0: unlock; 1: lock
?Press the Set key.

5
GB
When the telephone is locked, you will see { in the display.
Activate/deactivate call duration display
The telephone can display the approximate call duration in the display (up to 99 min. 59 sec., default setting: on). If the call duration display is activated, the time display begins
8 seconds after the last digit is dialled.
?18#
Initiate function.
0/ 1 0: deactivate; 1: activate.
?Press the Set key.
Setting the pause time
If necessary, the pause time of the Pause key ; (pause function from second input position) can be changed to 1, 3 or 6 seconds (default setting: 3 seconds).
?102
Initiate function.
0…2 0: 1 sec.; 1: 3 sec.; 2: 6 sec..
?Press the Set key.
Changing the dialling mode
?# Initiate function.
1/ 2 1: Tone dialling.
2: Pulse dialling without flash function.
?Press the Set key.
Changing dialling modes during a call
If your telephone is set to pulse dialling and you want to use functions that require tone dialling (e.g. remote access to an answering machine), you can change the dialling mode during a call.
*With an open connection: press the star key.
oEnter digits for remote control/data transfer.
The telephone is reset to the original dialling mode by hanging up the handset.
Operation on a PABX
Enter/delete an external line prefixe
If you are using your telephone on a PABX, you may have to save one or more external line prefixes. A dialling pause is set automatically with the external line prefixe. You can save up to three external line prefixes.
?0 Initiate function.
If no external line prefixe has been set in a location, Z appears in the display.
If several external line prefixes are saved, these are displayed next to one another; the current external line prefixe to be edited flashes.
If necessary, use the ; key to toggle between the external line prefixes displayed, to edit them as follows:
To delete an external line prefix:
?Press the Set key.
To enter an external line prefixe:
oEnter a oneto three-digit code.
Enter additional external line prefixes:
; o Press the Redial key, enter next external line prefixe.
?Press the Set key.
Recall key (on a PABX)
During an external call, you can make a recall or divert the call. To do this, press the Recall key >. The subsequent procedure depends on your PABX. By default, the Recall key is preset to a flash time (interruption time) of 90 ms for use of new features on public telephone systems. With a connection to a PABX, it may be necessary to change the flash time (e.g. 600 ms). To do this, please refer to the operating instructions for your PABX.

Setting the flash time for the Recall key
?195
|
Initiate function. |
|||
|
0…4 Enter desired flash code: |
|||
|
0: |
90 ms (default setting); |
1: 120 ms; |
|
|
2: |
270 ms; |
3: 375 ms; |
4: 600 ms. |
?Press the Set key.
Using functions for additional services of public telephone systems
If you want to use services that are to be triggered with the Recall key, make sure beforehand that the correct flash time is set for the key.
Recall key (in public telephone systems)
In public telephone systems, this key is required to use certain additional services.
The appropriate flashtime for the specific country must be set before using the Recall key can be used:
Belgium, Netherlands, Switzerland: 120 ms (access code 1)
France, Luxemburg, Portugal, Germany, Greece: 270 ms (access code 2)
other European countries: 90 ms (access code 0).
Using Calling Line Identification
Under the following conditions, the phone numbers of incoming calls are
(a)shown on the display (up to the first 20 digits) and
(b)automatically saved in a calls list:
Both your network provider and the caller’s network provider must offer Calling Line Identification.
Both you and the caller must have requested this service (if necessary) from your respective network providers.
If these conditions are met, but a caller has suppressed Calling Line Identification before making the call, you will see —P— on the display instead of the phone number. If it has not been possible to identify the number for other (technical) reasons, you will see —0— or —E— on the display.
Up to 20 digits can be shown on the display. Longer phone numbers are shown with the end of the number shortened.
Calls list
The calls list includes up to 50 entries. If the same subscriber calls more than once, a new entry is not created. Up to 99 repeated calls are displayed in the additional information.
Sequence of list entries: The most recent call is displayed in the first position (position number «01»). Older entries are moved downwards with each new incoming phone number until they are deleted from the list.
In the calls list
you can scroll through the phone numbers displayed,
query additional information:
(a)date and time, if this is transferred from the telephone system, otherwise only the time according to the telephone’s internal clock,
(b)frequency of an incoming phone number,
delete entries,
save phone numbers from the calls list to a repertory key (see page 3),
dial a displayed phone number directly.
Viewing caller histories and dialling phone numbers
If there are entries in the calls list that have you have not yet seen, |flashes in the display.
You can retrieve the calls list, scroll through its entries, view additional information about a call and call back directly:
APress the Down key.
The phone number of the most recent call appears in the display. Its position number «01» is displayed to the left of the number.
If the phone number contains more than 17 digits, the first 17 digits will be displayed
first, then the rest after one second. (You can leave the calls list at any time by pressing >.)
To scroll through the calls list:
A…C Press the Down/Up key.
To view additional information:
=Press the Shift key.
The date and time of the displayed entry is displayed with the number of calls (on the right). Back to the calls list (calling line display):
=Press the Shift key again.
Dial the phone number:
BPress OK or L key.
After 2 seconds the number is dialled. Lift the handset if you want to talk via the handset.

Deleting entries in the calls list
Delete all entries at the same time
A/C Press the Down/Up key.
?*?Press the Set key, star key and Set key one after another.
The calls list is deleted and closed.
Delete individual entries
A…C Scroll to the desired entry.
??Press the Set key twice. The entry is deleted.
Activating/deactivating display of the area code
You can set the telephone so that the area code is not displayed for incoming calls. This can be useful, for example, if you cannot see the last digits of a long phone number on the display.
You can deactivate the display for 2 area codes (up to 5 digits each).
?4 Initiate function.
If no number has been set in a storage location Z appears in the display.
If both storage locations are in use, these are displayed side by side; the current storage location to be edited flashes. If necessary, use the ; key to toggle between the storage locations displayed to edit them as follows:
Delete a number:
?Press the Set key. Enter a number:
oEnter a one to five digit number.
Enter another prefix:
; o Press the last number redial key, enter next prefix.
?Press the Set key.
«You have a message» display
Different network providers offer services for saving messages (e.g. voice mail services).
If one or more newly received messages have been stored with the network provider, it may inform you via your telephone. In the display, this notification from the network provider is displayed with the flashing † symbol and the phone number.
You can now dial the corresponding phone number in order to check the stored messages. If there are no more new messages for you, the † symbol disappears.
Using the repertory keys as «function keys»
Different public telephone services/functions – possibly by order/request – can be selected via predetermined key combinations which you can obtain from your network provider.
You can save the necessary key combinations like normal phone numbers on repertory keys and similarly «select» and also deactivate the service again.
Note:
If you activate the symbol display and save the function calls on the 2nd level of the repertory keys, you can link the activation and deactivation of different services for each «function key» with the display or hiding of certain symbols on the display.
Therefore, when setting the repertory keys on the 2nd level, bear in mind that activating and deactivating the display symbols ™, ˜, —,ëand šis linked to very specific keys in the 2nd level – regardless of the phone numbers or function calls stored on it!
Deactivating/activating the symbol display for additional services
Displaying the symbols can be activated or deactivated as needed. In the default setting, the display is activated.
?145
Initiate function.
0/1 0: deactivate; 1: activate.
?Press the Set key.
Recommended assignment of symbols to keys
When the symbol display = is activated and you then press one of the following repertory keys, the display symbol assigned to each is activated or deactivated respectively (key numbering from top to bottom):
|
=+ |
Assignment |
Display |
|
|
icon |
|||
|
: 1 |
Call forwarding immediately |
on |
™ |
|
: 2 |
off |
||
|
: 3 |
Call forwarding on no reply |
on |
˜ |
|
: 4 |
off |
||
|
: 5 |
Call forwarding when busy |
on |
— |
|
: 6 |
off |
||
|
: 7 |
Call waiting |
on |
ë |
|
: 8 |
off |
||
|
: 9 |
Anonymous call (only the next call) |
š |

Assigning/changing function keys
?= Initiate function.
:Press the function key (=repertory key) that is to be assigned.
If the function key is already assigned, the key assignment appears in the display. If the memory for this function key is empty, Z appears in the display.
oEnter the key combination/code for the desired service.
Important!
If a part of the key combination to be saved includes numbers/characters that must be changeable (e.g. a phone number for a forwarded call destination, or a time for the appointment reminder), the shift key = must be used in this place.
During a later activation of the service, this key makes the cursor for entering the changeable part flash.
?Press the Set key.
Example: Call forwarding
In the following, you will see an example of repertory keys used as «function keys». If the symbol display is activated, in the «call forwarding» example when the service is activated, the symbol provided for it is displayed, or hidden when the service is deactivated.
The key sequence for activating the function «call forwarding immediately» from your network provider consists of e.g. three parts:
|
Select function |
Forwarded call destination |
End of |
|
function |
||
|
*21* |
Phone number of the |
# |
|
forwarded call destination |
You now have the following options:
You can dial the entire key sequence each time on the keypad.
You can save the key sequence on Repertory keys as an entire function together with the phone number of a set forwarded call destination
or
only the select function and the function end. With this, you still have the option to set a forwarded call destination that may change on a case-by-case basis.
Saving call forwarding on a function key
?= Initiate function.
:Press the repertory key that is designated for the symbol display «™on«, see «Deactivating/ activating the symbol display for additional services» on page 7.
A number already saved is shown in the display. If the memory for this repertory key is empty, Z appears in the display.
*21*
Enter the select function for «Immediate call forwarding».
(a) Set the phone number for the call forwarding
oEnter the phone number of the forwarded call destination.
|
# |
Press the hash key to mark the function end. |
|
? |
Press the Set key. |
or …
(b) Reserve changeable call forwarding
=Press the Shift key.
When «Call forwarding immediately» is activated later, this key makes the cursor for entering the phone number of the forwarded call destination flash.
|
# |
Press the hash key to mark the function end. |
?Press the Set key.
Activating call forwarding with a function key c= Lift handset, press Shift key.
:Press the repertory key for the symbol display «™on«.
™ appears in the display.
(a) Phone number for call forwarding set
You may hear an announcement that the service is activated.
aReplace the handset.
From now on, incoming calls will be forwarded to the forwarded call destination. Your telephone will not ring.
9
GB
(b) Changeable call forwarding
o ; Enter the phone number of the forwarded call destination, press the last number redial key to mark the end of the phone number entered.
You may hear an announcement that the service is activated.
aReplace the handset.
Incoming calls will be forwarded from now on to the forwarded call destination. Your telephone will not ring.
Saving «Deactivate call forwarding» on a function key
The call forwarding, as described in the previous example, can be deactivated again with your network provider e.g. with key sequence #21#.
You can save this key sequence on a dedicated repertory key as well. If the symbol display is activated and the service is activated as described, the ™ symbol in the display disappears after the service is deactivated.
?= Initiate function.
:Press the repertory key that is designated for symbol display «™ off«, see «Deactivating/activating the symbol display for additional services» on page 7.
#21#
Enter the select function for «Immediate call forwarding».
?Press the Set key.
Deactivating call forwarding with a function key c= Lift handset, press the Shift key.
:a Press the repertory key for symbol display «™ off«. Replace handset.
The ™symbol disappears. You may hear an announcement that the service is deactivated.
Appendix
Care
To clean, wipe with a moist or antistatic cloth only, never with a dry cloth (risk of electrostatic charging and discharge) or harsh cleaning agent.
If your telephone is not working perfectly
No signal tone: The tone volume might be set to 0.
Lift handset, no dialling tone: Is the connecting lead correctly plugged into the telephone and the telephone socket?
Dialling tone audible but telephone will not dial:
The connection is OK. Is the dialling mode set correctly (see page 5)?
PABX only: No connection or incorrect connection when
dialling from memory (e. g. redial, speed dial):
Program external line prefixe.
The other party cannot hear you: Have you pressed the Mute key? Press the key again. Is the plug from the handset cord inserted correctly?
Recall key does not work: Set appropriate flash time.
The caller’s phone number and the calls list are not
displayed:
Is the adapter connected (see page 2)?
Can Calling Line Identification be used (see page 6)?
Insert strips
Blank insert strips for the repertory keys can be found on the Internet at http://www.siemens.com/euroset.
Contacts
If you should encounter any problems when operating the telephone connected to a communication system with analogue network access, please contact the network operator responsible or your dealer.
Authorisation
This device is intended for analogue phone lines in your network.
Country-specific requirements have been taken into consideration.
We, Siemens Home and Office Communication Devices GmbH & Co. KG, declare that this device meets the essential requirements and other relevant regulations laid down in Directive 1999/5/EC.
A copy of the 1999/5/EC Declaration of Conformity is available at this Internet address: http://www.siemens.com/gigasetdocs.

Présentation Euroset 5020
8 
7 
6 
5 4 3 2
Touches
1 Touches d’accès rapide
2 Touche bis
3 Touche de double appel
4 Touche de mode secret (Mute)
5 Touche Shift
6 Touche de réduction du volume
7 Touche haut-parleur (mode mains libres)
8 Touche d’augmentation du volume
9 Touche Enregistrer
10 Touche de retour
11 Touche d’avance
12 Touche OK (composer le numéro affiché)
Icônes d’affichage
PMode mémoire activé
‡Touche Shift enfoncée
—Opérationnel
yMicro éteint
}Haut-parleur activé
èNuméro d’appel baby call (appel direct) enregistré
OCurseur de saisie des paramètres (par ex. volume)
1
F
UTouche de double appel enfoncée
PPause
ZAucun contenu mémorisé
{Téléphone verrouillé
ZZZZPendant une tentative de connexion : téléphone verrouillé
0 – 9 Numéro d’appel En mode fréquence vocale :
N– Touche * enfoncée
—– Touche # enfoncée
Pour les services supplémentaires proposés par des opérateurs publics :
|Nouvel appel dans le journal d’appels
†(clignotant) nouveau message
ëSignal d’appel activé
™Renvoi d’appel immédiat
|
˜ |
Renvoi d’appel si non réponse |
—Renvoi d’appel si occupé
šAppel anonyme activé
Consignes de sécurité
Au cours de l’installation, du raccordement et pendant l’utilisation du téléphone, respecter absolument les consignes suivantes :
Utiliser uniquement les fiches et cordons livrés avec l’appareil.
Enficher le cordon de raccordement uniquement dans la prise/douille prévue à cet effet.
Ne jamais raccorder d’accessoire non autorisé.
Disposer le cordon de raccordement de façon à éviter tout risque d’accident.
Placer le téléphone à un endroit où il ne risque pas de glisser.
Pour des raisons de sécurité, le téléphone ne doit pas être utilisé dans un lieu humide (par ex. salle de bain, etc.). Il n’est pas étanche aux projections d’eau.
Ne jamais exposer le téléphone à des sources de chaleur telles que les rayons directs du soleil ou le rayonnement d’appareils électriques.
Protéger le téléphone contre l’humidité, la poussière et les vapeurs et liquides corrosifs.
Ne jamais ouvrir le téléphone sans les conseils d’un spécialiste.
![]()
2
F
Ne jamais toucher les contacts à fiches avec des objets métalliques et pointus.
Ne jamais porter le téléphone par les cordons.
Lorsque vous confiez votre téléphone Euroset 5020 à un tiers, joignez-y toujours le mode d’emploi.
La procédure d’élimination des produits électriques et
électroniques diffère de celle des déchets municipaux
 et nécessite l’intervention de services désignés par le gouvernement ou les collectivités locales.
Le symbole de la poubelle barrée signifie que la directive européenne 2002/96/EC s’applique à ce produit.
Le tri et la collecte séparée de vos appareils usagés aide à prévenir toute conséquence négative pour l’environnement ou pour la santé publique. Il s’agit d’une condition primordiale pour le traitement et le recyclage des équipements électriques et électroniques usagés.
Pour plus d’informations sur le traitement des appareils usagés, contacter votre mairie, la déchetterie la plus proche ou le revendeur du produit.
Raccordement
Brancher l’extrémité courte du cordon en spirale sur la prise prévue à cet effet sur le combiné, et l’extrémité longue sur la prise signalée par l’icône a sous l’appareil. Brancher le cordon du téléphone sur la prise de téléphone murale, et insérer l’autre extrémité dans la prise signalée par l’icône Y sous l’appareil. Votre téléphone est prêt à fonctionner.
Mise en service du téléphone
Conseils pour l’installation du téléphone
Ne pas exposer le téléphone aux rayons du soleil ou à d’autres sources de chaleur.
Utiliser le téléphone à une température comprise entre +5°C et +40°C.
Prévoir une distance minimale d’un mètre entre le téléphone et les appareils radio, par ex. téléphones ou dispositifs d’appel de personnes, ou les postes de télévision, car des interférences risqueraient de perturber les communications téléphoniques.
Ne pas installer le téléphone dans un endroit poussiéreux, au risque de réduire sa durée de vie.
Pour nettoyer l’appareil, utiliser uniquement un chiffon humide ou antistatique ; ne jamais utiliser de chiffon sec (risque de charge et de décharge électrostatiques) ou de détergent agressif.
Les peintures et vernis des meubles en contact avec des composants du téléphone (par ex. pieds) risquent de subir des détériorations.
Régler l’horloge
?3 Introduire la fonction.
L’heure configurée est affichée en mode 24 heures (par défaut à la livraison : 00:00).
oSaisir l’heure exacte en heures <hh> et minutes <mm> (mode 24 heures).
?Appuyer sur la touche Enregistrer.

3
F
Téléphoner
Composer un numéro d’appel
co Décrocher le combiné, composer un numéro. ou …
o Bc Composer un numéro (vous pouvez effacer les chiffres erronés en appuyant sur A puis retaper le numéro correct), confirmer avec la touche OK.
Après 2 s, le numéro est composé. Décrocher le combiné si vous souhaitez l’utiliser pour la communication.
Si le numéro excède 20 caractères, les chiffres se décalent sur l’écran de la droite vers la gauche. La touche ; permet d’insérer des pauses dans la numérotation à partir du deuxième caractère.
Composer un numéro à partir du journal d’appels (si ce service est disponible) : p. 7.
Activer/Désactiver le mode mains libres
Cet appareil vous permet, même lorsque le combiné est raccroché, de téléphoner (mode mains libres) ou de modifier des paramètres. La distance optimale par rapport au microphone est d’environ 50 cm.
Activation au cours d’une communication :
L + a La touche haut-parleur étant enfoncée, raccrocher le combiné.
Activation avant la composition du numéro :
LAvant de composer le numéro : appuyer sur la touche haut-parleur jusqu’à ce que la tonalité soit audible.
Désactiver le mode mains libres
cDécrocher le combiné pendant la communication.
Rappel (Bis)
Les 5 derniers numéros composés (32 caractères maxi) sont automatiquement sauvegardés. Vous pouvez consulter ces numéros dans la liste de numéros bis, et les composer à nouveau à partir de cette liste.
Composer un numéro à partir de la liste de numéros bis
;Avec le combiné raccroché : appuyer sur la touche bis. Le dernier numéro composé s’affiche. (La touche > vous permet de quitter à tout moment la liste des numéros bis.)
A…C Avec les touches d’avance et de retour, faire défiler la liste jusqu’au numéro à appeler.
BAppuyer la touche OK ou L. Après 2 s, le numéro est composé.
Décrocher le combiné si vous souhaitez l’utiliser pour la communication.
Composer un numéro avec les touches d’accès rapide
cDécrocher le combiné (au besoin, appuyer sur la touche = pour accéder à une touche d’accès rapide de second niveau).
:Appuyer sur la touche d’accès rapide appropriée.
ou …
:Appuyer sur la touche d’accès rapide appropriée (au besoin, appuyer sur la touche = pour accéder à une touche d’accès rapide de second niveau).
Bc Appuyer la touche OK ou L. Après 2 s, le numéro est composé.
Décrocher le combiné si vous souhaitez l’utiliser pour la communication.
Enregistrer un numéro d’appel
Pour être disponibles en permanence, certains paramétrages du téléphone doivent être confirmés avec la touche Enregistrer ?.
Pour interrompre le paramétrage (par ex. après une saisie incorrecte) sans sauvegarder, raccrocher au lieu d’appuyer sur la touche ?. Le réglage précédent reste ainsi en mémoire.
Enregistrer à l’aide de la fonction bloc-notes
Vous pouvez enregistrer des numéros pendant une communication au moyen de la fonction bloc-notes.
Rappel du dernier numéro appelé
c; Décrocher le combiné et appuyer sur la touche bis.
Le dernier appel composé est composé automatiquement.
4
F
Enregistrer un numéro d’accès rapide
Grâce aux deux niveaux de touches d’accès rapide, vous pouvez enregistrer jusqu’à 20 numéros (ou fonctions, voir p. 8).
?Appuyer sur la touche Enregistrer (pour accéder au second niveau de mémoire, appuyer en plus sur la touche =).
:Appuyer sur la touche d’accès rapide sous laquelle le numéro d’accès rapide doit être mémorisé.
Si un numéro est déjà enregistré sur cette touche, il s’affiche à l’écran. Si aucun numéro n’est enregistré sur cette touche, l’icône Z s’affiche à l’écran.
oSaisir le numéro d’appel à enregistrer (32 caractères maxi).
ou …
Enregistrer un numéro à partir du journal d’appels (si ce service est disponible) :
A…C Appuyer sur les touches d’avance et de retour jusqu’à ce que le numéro à enregistrer s’affiche à l’écran.
ou …
Enregistrer un numéro à partir de la liste des numéros bis :
;Appuyer sur la touche bis.
A…C Appuyer si nécessaire sur les touches d’avance et de retour jusqu’à ce que le numéro d’appel à enregistrer s’affiche à l’écran.
Pour terminer l’opération :
?Appuyer sur la touche Enregistrer.
Enregistrer en cours de communication
De la même manière, vous pouvez enregistrer des numéros en cours de communication (fonction bloc-notes).
Remarque :
Lorsque le numéro excède 20 chiffres, les caractères suivants se décalent sur l’écran de la droite vers la gauche.
Effacer tous les numéros d’accès rapide
?1251
Introduire la fonction.
?Appuyer sur la touche Enregistrer.
Réglages téléphone
Régler le volume de la sonnerie
Il existe 4 niveaux de réglage de la sonnerie, qui peut également être désactivée (par défaut à la livraison : niveau 4).
Réglage lorsque le téléphone est au repos :
?5 Introduire la fonction.
H…I Régler le volume avec les touches d’augmentation et de diminution du volume.
?Appuyer sur la touche Enregistrer.
Réglage lorsque le téléphone sonne :
Appuyer sur H…I avant de décrocher. Le dernier volume réglé est mémorisé.
Régler la fréquence de sonnerie
Il existe 3 niveaux de réglage de la fréquence (rapidité) de la sonnerie (par défaut à la livraison : niveau 4).
?6 Introduire la fonction.
1…3 Appuyer sur une des touches de 1 à 3 : 1 : fréquence la plus élevée ;
3 : fréquence la plus faible.
?Appuyer sur la touche Enregistrer.
Régler la mélodie de la sonnerie
10 mélodies différentes sont disponibles pour la sonnerie (par défaut à la livraison : mélodie 9).
Réglage lorsque le téléphone est au repos :
?7 Introduire la fonction.
0…9 Appuyer sur une des touches de 0 à 9. ? Appuyer sur la touche Enregistrer.
Réglage lorsque le téléphone sonne :
0…9 Appuyer sur une des touches de 0 à 9.
Régler le volume de l’écouteur du combiné
Il existe 3 niveaux de réglage et de mémorisation du volume de l’écouteur du combiné (par défaut à la livraison : niveau 1).
?9 Introduire la fonction.
H…I Régler le volume au moyen des touches d’augmentation et de diminution du volume.
?Appuyer sur la touche Enregistrer.
 Loading…

euroset 5020 / IM eng-fra-russ-kro / A30350-M209-A801-2-UP19 / 5020.fm / 24.07.2006
1
GB
Euroset 5020 Quick Guide
Keys
1 Repertory keys
2 Redial key
3 Recall key
4Mute key
5Shift key
6Quiet key
7 Loudspeaker key (handsfree)
8Loud key
9Set key
10 Up key
11 Down key
12 OK key (dial number displayed)
Display symbols
P In setting mode
‡ Shift key pressed
— Ready for use
y Microphone off
è Baby Call (direct call) number set
o Entry mark when setting (e.g. volume)
u
Recall key pressed
P
Pause
z
No memory content
{ Telephone locked
zzzz
When trying to connect: telephone locked
0
–
9
Phone number
With tone dialling:
n
– * key pressed
—
– # key pressed
With additional services from public network providers:
| New call in calls list
† (Flashing) A new message has arrived
ë Call waiting
™ Call forwarding immediately
˜ Call forwarding on no reply
— Call forwarding when busy
š Anonymous call on
Safety precautions
When installing, connecting and operating the telephone,
always observe the following precautions:
◆ Only use the plugs and leads supplied.
◆ Only connect the connecting lead to the socket/jack
provided for that purpose.
◆ Only connect approved accessories.
◆ Arrange the connecting lead where it will not cause
accidents.
◆ Position the telephone on a non-slip surface.
◆ For your safety and protection, the telephone must not
be used in bath or shower rooms (wet locations).
The telephone is not splash proof.
◆ Never expose the telephone to sources of heat, direct
sunlight or other electrical devices.
◆ Protect your telephone from moisture, dust, corrosive
liquids and vapours.
◆ Never open up the telephone yourself.
◆ Do not touch the plug contact with pointed or metallic
objects.
◆ Do not carry the telephone by the leads.
◆ If you give your Euroset 5020 to someone else, make
sure you also give them the user guide.
1
23
45
6
7
8
1211109