
В настоящий момент товары недоступны для заказа на samsung.com/ru
В настоящий момент товары недоступны для заказа на samsung.com/ru
Выберите свое местоположение и язык.
LED телевизор 40″ Серия 6 3D SMART TV Full HD UE40D6510W
UE40D6510WS
-
Установка / Подключение
Как подключить компьютер на Windows к телевизору через кабель HDMIКак подключить компьютер на Windows к телевизору через кабель HDMI
-
Аксессуары
Как подключить интеллектуальный пульт к телевизору SamsungКак подключить интеллектуальный пульт к телевизору Samsung
-
Каналы
Как настроить порядок каналов на телевизоре SamsungКак настроить порядок каналов на телевизоре Samsung
-
Сеть / Интернет
Как подключить телевизор Samsung к интернету по кабелю (проводу)Как подключить телевизор Samsung к интернету по кабелю (проводу)
-
TV_Прочее
Что делать, если забыл PIN-код от телевизора SamsungЧто делать, если забыл PIN-код от телевизора Samsung
-
Программное обеспечение
Где скачать прошивку для телевизора SamsungГде скачать прошивку для телевизора Samsung
-
Каналы
Как удалить ненужные каналы на телевизоре SamsungКак удалить ненужные каналы на телевизоре Samsung
-
Использование
Как использовать Bixby на телевизоре Samsung Smart TVКак использовать Bixby на телевизоре Samsung Smart TV
-
Использование
Как устранить неисправность телевизора Samsung, который непрерывно включается сам по себеКак устранить неисправность телевизора Samsung, который непрерывно включается сам по себе
-
Приложения Samsung
Не работает приложение в Smart Hub на телевизоре SamsungНе работает приложение в Smart Hub на телевизоре Samsung
-
TV_Прочее
Как включить голосовое сопровождение на телевизоре SamsungКак включить голосовое сопровождение на телевизоре Samsung
-
Программное обеспечение
Как обновить прошивку на телевизоре Samsung через флешку (по USB)Как обновить прошивку на телевизоре Samsung через флешку (по USB)
-
Каналы
Как найти и настроить эфирные и кабельные каналы на телевизоре SamsungКак найти и настроить эфирные и кабельные каналы на телевизоре Samsung
-
Использование
Как сделать сброс настроек на телевизоре SamsungКак сделать сброс настроек на телевизоре Samsung
-
Сеть / Интернет
Как подключить телевизор Samsung к интернету по Wi-FiКак подключить телевизор Samsung к интернету по Wi-Fi
-
Питание
Что делать, если телевизор Samsung не включаетсяЧто делать, если телевизор Samsung не включается
-
Технические характеристики
Как узнать серию и год выпуска телевизора SamsungКак узнать серию и год выпуска телевизора Samsung
-
Использование
Как создать учетную запись (Samsung Account) для использования телевизора SamsungКак создать учетную запись (Samsung Account) для использования телевизора Samsung
-
Использование
Использование приложений в Smart Hub на телевизорах Samsung 2023 годаИспользование приложений в Smart Hub на телевизорах Samsung 2023 года
-
Использование
Как установить приложение на телевизор SamsungКак установить приложение на телевизор Samsung
-
Использование
Почему неактивен пункт в меню «Трансляция» на телевизоре SamsungПочему неактивен пункт в меню «Трансляция» на телевизоре Samsung
-
Использование
Почему неактивен пункт в меню «Поддержка» на телевизоре SamsungПочему неактивен пункт в меню «Поддержка» на телевизоре Samsung
-
Использование
Как изменить PIN-код на телевизоре SamsungКак изменить PIN-код на телевизоре Samsung
-
Использование
Что делать, если телевизор Samsung теряет сеть Wi-FiЧто делать, если телевизор Samsung теряет сеть Wi-Fi
-
TV_Прочее
Что делать, если не работает пульт от телевизора Samsung?Что делать, если не работает пульт от телевизора Samsung?
-
Использование
Что делать, если пропадает соединение между Bluetooth-пультом и телевизором SamsungЧто делать, если пропадает соединение между Bluetooth-пультом и телевизором Samsung
-
Использование
Сообщение о несоответствии сертификата безопасности на телевизоре SamsungСообщение о несоответствии сертификата безопасности на телевизоре Samsung
-
Программное обеспечение
На экране телевизора Samsung появилась картинка «Подключите USB-накопитель»На экране телевизора Samsung появилась картинка «Подключите USB-накопитель»
-
Использование
Почему неактивен пункт в меню «Изображение» на телевизоре SamsungПочему неактивен пункт в меню «Изображение» на телевизоре Samsung
-
Использование
Почему неактивен пункт в меню «Звук» на телевизоре SamsungПочему неактивен пункт в меню «Звук» на телевизоре Samsung
-
Использование
Как найти приложение в Samsung Apps на телевизоре SamsungКак найти приложение в Samsung Apps на телевизоре Samsung
-
Программное обеспечение
Как обновить прошивку Smart-телевизора Samsung через интернетКак обновить прошивку Smart-телевизора Samsung через интернет
-
Установка / Подключение
Что делать, если нет сигнала при подключении по HDMI на телевизоре SamsungЧто делать, если нет сигнала при подключении по HDMI на телевизоре Samsung
-
Использование
Как использовать HDMI ARC в телевизорах Samsung Smart TVКак использовать HDMI ARC в телевизорах Samsung Smart TV
-
Использование
Как включить игровой режим на телевизоре Samsung?Как включить игровой режим на телевизоре Samsung?
-
Звук
Что делать, если прерывается звук на телевизоре SamsungЧто делать, если прерывается звук на телевизоре Samsung
-
Использование
Что делать, если не воспроизводятся видео с USB на телевизоре SamsungЧто делать, если не воспроизводятся видео с USB на телевизоре Samsung
-
Изображение
Что делать, если мерцает изображение на телевизоре SamsungЧто делать, если мерцает изображение на телевизоре Samsung
-
Изображение
Что делать, если искажаются цвета на телевизоре SamsungЧто делать, если искажаются цвета на телевизоре Samsung
-
Питание
Загорается экран на выключенном телевизоре Samsung. Телевизор сам включаетсяЗагорается экран на выключенном телевизоре Samsung. Телевизор сам включается
-
Изображение
Линии, полосы, темные пятна, разводы на экране телевизора SamsungЛинии, полосы, темные пятна, разводы на экране телевизора Samsung
-
Звук
Нет звука на телевизоре SamsungНет звука на телевизоре Samsung
-
Изображение
Размытое, нечеткое изображение на экране телевизора SamsungРазмытое, нечеткое изображение на экране телевизора Samsung
-
Каналы
Что делать, если телевизор Samsung не видит CAM-модульЧто делать, если телевизор Samsung не видит CAM-модуль
-
Использование
Что делать, если не работают кнопки на пульте Smart Control от телевизора SamsungЧто делать, если не работают кнопки на пульте Smart Control от телевизора Samsung
-
TV_Прочее
Что делать, если телевизор Samsung зависЧто делать, если телевизор Samsung завис
-
Изображение
Что делать, если периодически пропадает изображение на телевизоре SamsungЧто делать, если периодически пропадает изображение на телевизоре Samsung
-
Использование
Что делать, если телевизор Samsung не включается и зависает на логотипе Smart TVЧто делать, если телевизор Samsung не включается и зависает на логотипе Smart TV
-
Использование
Как установить родительский контроль (заблокировать каналы) на телевизоре SamsungКак установить родительский контроль (заблокировать каналы) на телевизоре Samsung
-
Использование
Как настроить управление несколькими устройствами с помощью пульта Smart ControlКак настроить управление несколькими устройствами с помощью пульта Smart Control
-
Использование
Как войти в аккаунт YouTube на телевизоре SamsungКак войти в аккаунт YouTube на телевизоре Samsung
-
Использование
Как транслировать видео из приложения YouTube на телевизор SamsungКак транслировать видео из приложения YouTube на телевизор Samsung
-
Использование
Как отключить панель быстрого доступа, появляющуюся при включении телевизора SamsungКак отключить панель быстрого доступа, появляющуюся при включении телевизора Samsung
-
Использование
Как добавить приложение на панель быстрого доступа в телевизоре SamsungКак добавить приложение на панель быстрого доступа в телевизоре Samsung
-
Использование
Как включить субтитры на цифровых каналах на телевизоре SamsungКак включить субтитры на цифровых каналах на телевизоре Samsung
-
Приложения Samsung
Что делать, если не хватает памяти при установке приложения на телевизоре SamsungЧто делать, если не хватает памяти при установке приложения на телевизоре Samsung
-
Использование
Как установить приложение для телевизора Samsung на USB-накопительКак установить приложение для телевизора Samsung на USB-накопитель
-
Использование
Что делать, если звук отстает от видео на телевизоре Samsung при подключении аудиоустройств через HDMIЧто делать, если звук отстает от видео на телевизоре Samsung при подключении аудиоустройств через HDMI
-
Звук
Что делать, если уровень громкости изменяется при переключении каналов на телевизоре SamsungЧто делать, если уровень громкости изменяется при переключении каналов на телевизоре Samsung
-
Использование
Как установить возрастные ограничения (родительский контроль) на просмотр цифровых каналов в телевизоре SamsungКак установить возрастные ограничения (родительский контроль) на просмотр цифровых каналов в телевизоре Samsung
-
Использование
Как добавить канал в список «Избранное» на телевизоре SamsungКак добавить канал в список «Избранное» на телевизоре Samsung
-
Программное обеспечение
Как посмотреть версию прошивки на телевизоре SamsungКак посмотреть версию прошивки на телевизоре Samsung
-
Звук
Как настроить или отключить звуковые сигналы на телевизоре SamsungКак настроить или отключить звуковые сигналы на телевизоре Samsung
-
Использование
Как настроить дату и время на телевизоре SamsungКак настроить дату и время на телевизоре Samsung
-
Каналы
Как записывать ТВ программы на телевизоре SamsungКак записывать ТВ программы на телевизоре Samsung
-
Изображение
Как запустить тест изображения на телевизоре SamsungКак запустить тест изображения на телевизоре Samsung
-
Звук
Как запустить звуковой тест на телевизоре SamsungКак запустить звуковой тест на телевизоре Samsung
-
Каналы
Как найти и настроить спутниковые каналы на телевизоре SamsungКак найти и настроить спутниковые каналы на телевизоре Samsung
-
Использование
Как устранить неисправность телевизора Samsung, который непрерывно выключается сам по себеКак устранить неисправность телевизора Samsung, который непрерывно выключается сам по себе
-
Использование
Как заменить батарейки в пульте ДУ от телевизора Samsung?Как заменить батарейки в пульте ДУ от телевизора Samsung?
-
Использование
Как настроить управление голосом через Google Assistant на телевизоре SamsungКак настроить управление голосом через Google Assistant на телевизоре Samsung
-
Изображение
Что делать, если на телевизоре Samsung изображение распадается на квадраты на цифровых каналахЧто делать, если на телевизоре Samsung изображение распадается на квадраты на цифровых каналах
-
Установка / Подключение
Как подключить внешнее устройство через тюльпаны (RCA) к телевизору SamsungКак подключить внешнее устройство через тюльпаны (RCA) к телевизору Samsung
-
Установка / Подключение
Как подключить ТВ-приставку (ресивер) кабелем HDMI к телевизору SamsungКак подключить ТВ-приставку (ресивер) кабелем HDMI к телевизору Samsung
-
Использование
Как снять защитную плёнку с телевизора SamsungКак снять защитную плёнку с телевизора Samsung
-
Использование
Как настроить телевизор Samsung T-серии (2020 год) в первый разКак настроить телевизор Samsung T-серии (2020 год) в первый раз
-
Каналы
Как посмотреть информацию о цифровом сигнале на телевизоре SamsungКак посмотреть информацию о цифровом сигнале на телевизоре Samsung
-
Изображение
Что делать, если изображение на телевизоре Samsung слишком тёмноеЧто делать, если изображение на телевизоре Samsung слишком тёмное
-
Использование
Как подключить Bluetooth-наушники к телевизору SamsungКак подключить Bluetooth-наушники к телевизору Samsung
-
TV_Прочее
Не работает Smart Hub на телевизоре SamsungНе работает Smart Hub на телевизоре Samsung
-
Изображение
Что делать, если на телевизоре Samsung искажены пропорцииЧто делать, если на телевизоре Samsung искажены пропорции
-
TV_Прочее
Что делать, если телевизор Samsung начал самостоятельно озвучивать все действияЧто делать, если телевизор Samsung начал самостоятельно озвучивать все действия
-
Сеть / Интернет
Как посмотреть MAC-адрес на телевизоре SamsungКак посмотреть MAC-адрес на телевизоре Samsung
-
Изображение
Что делать, если на телевизоре Samsung появляется реклама и изменяются настройкиЧто делать, если на телевизоре Samsung появляется реклама и изменяются настройки
-
Использование
Как использовать мышь или клавиатуру в браузере на телевизоре SamsungКак использовать мышь или клавиатуру в браузере на телевизоре Samsung
-
Использование
Что делать, если не удается подключиться по AirPlay 2 к телевизору SamsungЧто делать, если не удается подключиться по AirPlay 2 к телевизору Samsung
-
Использование
Как дублировать экран iOS-устройства на телевизор Samsung по AirPlay 2Как дублировать экран iOS-устройства на телевизор Samsung по AirPlay 2
-
Использование
Как очистить экран телевизора SamsungКак очистить экран телевизора Samsung
-
TV_Прочее
Как подключить Яндекс Алису к телевизору SamsungКак подключить Яндекс Алису к телевизору Samsung
-
Установка / Подключение
Как снять подставку на телевизоре Samsung K-серии (2016)Как снять подставку на телевизоре Samsung K-серии (2016)
-
Использование
Как отличить сертифицированный телевизор?Как отличить сертифицированный телевизор?
-
TV_Прочее
Почему могут быть слышны щелчки от корпуса телевизора SamsungПочему могут быть слышны щелчки от корпуса телевизора Samsung
-
TV_Прочее
Что делать, если слышен писк от телевизора SamsungЧто делать, если слышен писк от телевизора Samsung
-
{{file.description}}
- Версия {{file.fileVersion}}
- {{file.fileSize}} MB
- {{file.fileModifiedDate}}
- {{file.osNames}}
ДОПОЛНИТЕЛЬНАЯ ИНФОРМАЦИЯ
Информация о гарантии
Узнайте, что входит в гарантийные обязательства


Индивидуальная поддержка
Получите помощь от официальных центров поддержки


Новости и уведомления
Обьявления о важных продуктах и услугах


Раздел: Бытовая, кухонная техника, электроника и оборудование
Тип: Телевизор
Инструкция к Телевизору Samsung UE40D6510WS
LED TV
user manual
imagine the possibilities
Thank you for purchasing this Samsung product.
To receive more complete service, please register
your product at
www.samsung.com/register
Model _____________ Serial No. _____________
E-MANUAL
LED TV user manual
Contact SAMSUNG WORLDWIDE
If you have any questions or comments relating to Samsung products, please contact the SAMSUNG customer care centre.
Country
Customer Care Centre
Web Site
ALBANIA 42 27 5755 —
AUSTRIA 0810 — SAMSUNG (7267864, € 0.07/min) www.samsung.com
BELGIUM 02-201-24-18 www.samsung.com/be (Dutch)
www.samsung.com/be_fr (French)
BOSNIA 05 133 1999 —
BULGARIA 07001 33 11 www.samsung.com
CROATIA 062 SAMSUNG (062 726 7864) www.samsung.com
CZECH 800 — SAMSUNG (800-726786) www.samsung.com
Samsung Zrt., česká organizační složka, Oasis Florenc, Sokolovská394/17, 180 00, Praha 8
DENMARK 70 70 19 70 www.samsung.com
FINLAND 030 — 6227 515 www.samsung.com
FRANCE 01 48 63 00 00 www.samsung.com
GERMANY 01805 — SAMSUNG (726-7864 € 0,14/Min) www.samsung.com
GREECE 2106293100 www.samsung.com
HUNGARY 06-80-SAMSUNG (726-7864) www.samsung.com
ITALIA 800-SAMSUNG (726-7864) www.samsung.com
KOSOVO +381 0113216899 —
LUXEMBURG 261 03 710 www.samsung.com
MACEDONIA 023 207 777 —
MONTENEGRO 020 405 888 —
NETHERLANDS 0900-SAMSUNG (0900-7267864) (€ 0,10/Min) www.samsung.com
NORWAY 815-56 480 www.samsung.com
POLAND 0 801 1SAMSUNG (172678)
www.samsung.com
022-607-93-33
PORTUGAL 80820-SAMSUNG (726-7864) www.samsung.com
RUMANIA 08010 SAMSUNG (08010 7267864) – doar din reţeaua
www.samsung.com
Romtelecom, tarif local;
021.206.01.10 – din orice reţea, tarif normal
SERBIA 0700 Samsung (0700 726 7864) www.samsung.com
SLOVAKIA 0800 — SAMSUNG (0800-726 786) www.samsung.com/sk
SPAIN 902 — 1 — SAMSUNG (902 172 678) www.samsung.com
SWEDEN 0771 726 7864 (SAMSUNG) www.samsung.com
Switzerland 0848 — SAMSUNG(7267864, CHF 0.08/min) www.samsung.com/ch
www.samsung.com/ch_fr/(French)
U.K 0330 SAMSUNG (7267864) www.samsung.com
EIRE 0818 717100 www.samsung.com
LITHUANIA 8-800-77777 www.samsung.com
LATVIA 8000-7267 www.samsung.com
ESTONIA 800-7267 www.samsung.com
Turkey 444 77 11 www.samsung.com
© 2011 Samsung Electronics Co., Ltd. All rights reserved.
BN68-03776D-00
[UD6500-XH]BN68-03776D-00L17.indb 1 2011-05-03 오후 2:22:26

For more information on how to use the e-Manual (p. 14)
Figures and illustrations in this User Manual are provided for reference only and may differ from actual product
appearance. Product design and specifications may be changed without notice.
Digital TV notice
1. Functionalities related to Digital TV (DVB) are only available in countries/areas where DVB-T (MPEG2 and MPEG4 AVC) digital terrestrial signals are
broadcasted or where you are able to access to a compatible DVB-C (MPEG2 and MPEG4 AAC) cable-TV service. Please check with your local
dealer the possibility to receive DVB-T or DVB-C signal.
2. DVB-T is the DVB European consortium standard for the broadcast transmission of digital terrestrial television and DVB-C is that for the broadcast
transmission of digital TV over cable. However, some differentiated features like EPG (Electric Programme Guide), VOD (Video On Demand) and so
on, are not included in this specification. So, they cannot be workable at this moment.
3. Although this TV set meets the latest DVB-T and DVB-C standards, as of [August, 2008], the compatibility with future DVB-T digital terrestrial and
DVB-C digital cable broadcasts cannot be guaranteed.
4. Depending on the countries/areas where this TV set is used some cable-TV providers may charge an additional fee for such a service and you may
be required to agree to terms and conditions of their business.
5. Some Digital TV functions might be unavailable in some countries or regions and DVB-C might not work correctly with some cable service providers.
6. For more information, please contact your local Samsung customer care centre.
✎
The reception quality of TV may be affected due to differences in broadcasting method between the countries. Please check the TV
performance in the local SAMSUNG Authorized Dealer, or the Samsung Call Centre whether it can be improved by reconfiguring TV setting or
not.
Still image warning
Avoid displaying still images (like jpeg picture files) or still image element (like TV programme logo, panorama or 4:3 image format, stock or news bar at
screen bottom etc.) on the screen. Constant displaying of still picture can cause ghosting of LED screen, which will affect image quality. To reduce risk of
this effect, please follow below recommendations:
• Avoid displaying the same TV channel for long periods.
• Always try do display any image on full screen, use TV set picture format menu for best possible match.
• Reduce brightness and contrast values to minimum required to achieve desired picture quality, exceeded values may speed up the burnout process.
• Frequently use all TV features designed to reduce image retention and screen burnout, refer to e-Manual for details.
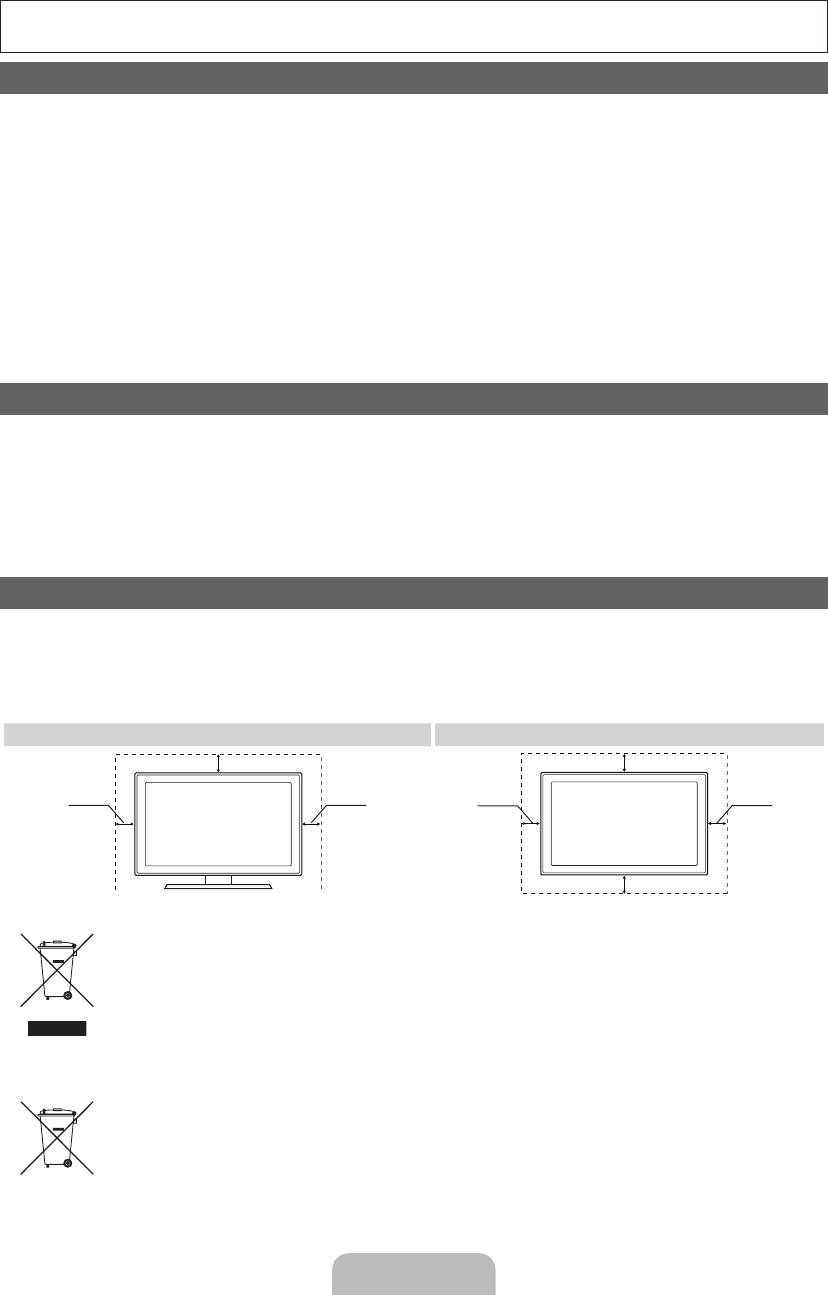
Securing the Installation Space
Keep the required distances between the product and other objects (e.g. walls) to ensure proper ventilation.
Failing to do so may result in fire or a problem with the product due to an increase in the internal temperature of the product.
✎
When using a stand or wall-mount, use parts provided by Samsung Electronics only.
• If you use parts provided by another manufacturer, it may result in a problem with the product or an injury due to the product falling.
✎
The appearance may differ depending on the product.
• Be careful when you contact the TV because some parts can be somewhat hot.
Installation with a stand. Installation with a wall-mount.
10 cm
10 cm
10 cm10 cm
10 cm
10 cm
10 cm
Correct Disposal of This Product (Waste Electrical & Electronic Equipment)
(Applicable in the European Union and other European countries with separate collection systems)
This marking on the product, accessories or literature indicates that the product and its electronic accessories (e.g. charger,
headset, USB cable) should not be disposed of with other household waste at the end of their working life. To prevent possible
harm to the environment or human health from uncontrolled waste disposal, please separate these items from other types of waste
and recycle them responsibly to promote the sustainable reuse of material resources. Household users should contact either the
retailer where they purchased this product, or their local government office, for details of where and how they can take these items
for environmentally safe recycling. Business users should contact their supplier and check the terms and conditions of the purchase
contract. This product and its electronic accessories should not be mixed with other commercial wastes for disposal.
Correct disposal of batteries in this product
(Applicable in the European Union and other European countries with separate battery return systems)
This marking on the battery, manual or packaging indicates that the batteries in this product should not be disposed of with other
household waste at the end of their working life. Where marked, the chemical symbols Hg, Cd or Pb indicate that the battery
contains mercury, cadmium or lead above the reference levels in EC Directive 2006/66. If batteries are not properly disposed of,
these substances can cause harm to human health or the environment. To protect natural resources and to promote material
reuse, please separate batteries from other types of waste and recycle them through your local, free battery return system.
English — 2
[UD6500-XH]BN68-03776D-00L17.indb 2 2011-05-03 오후 2:22:27
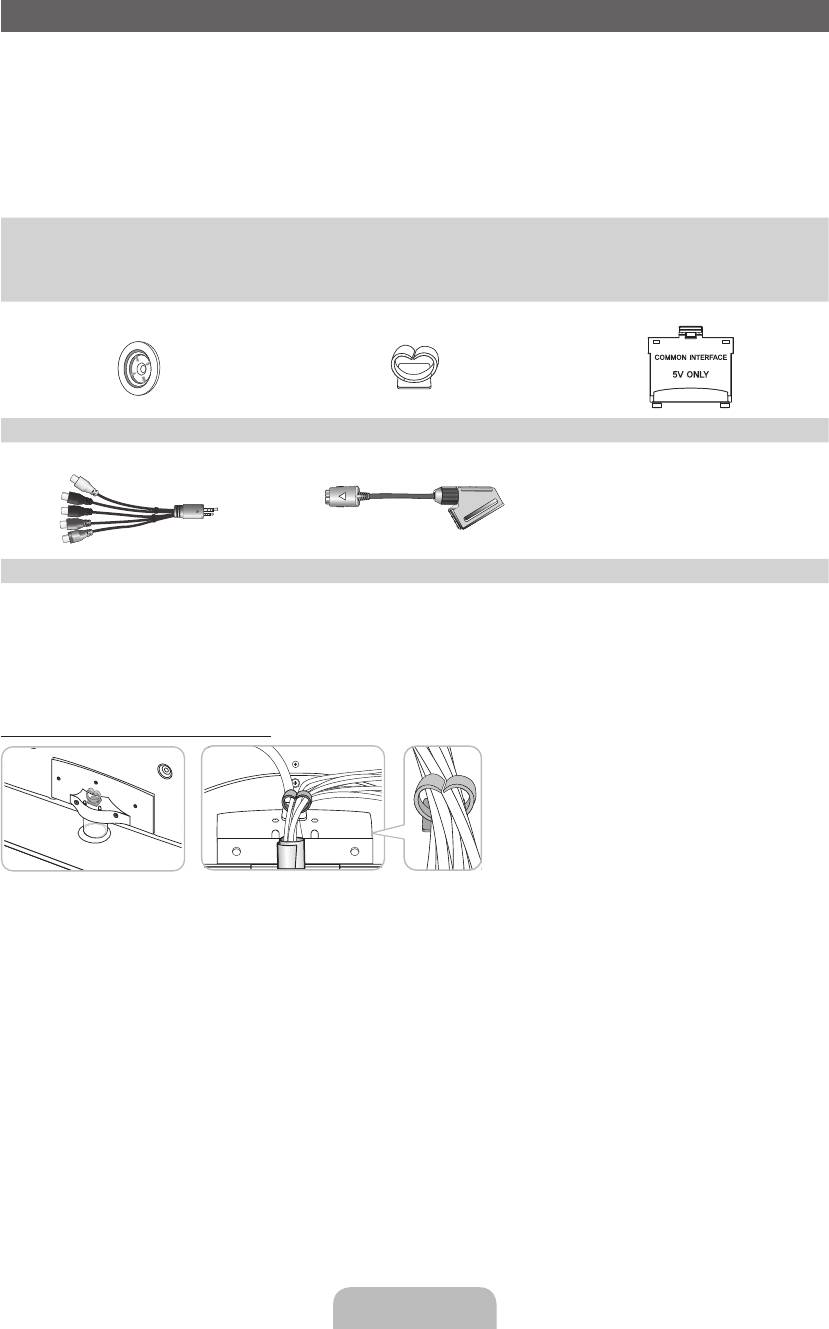
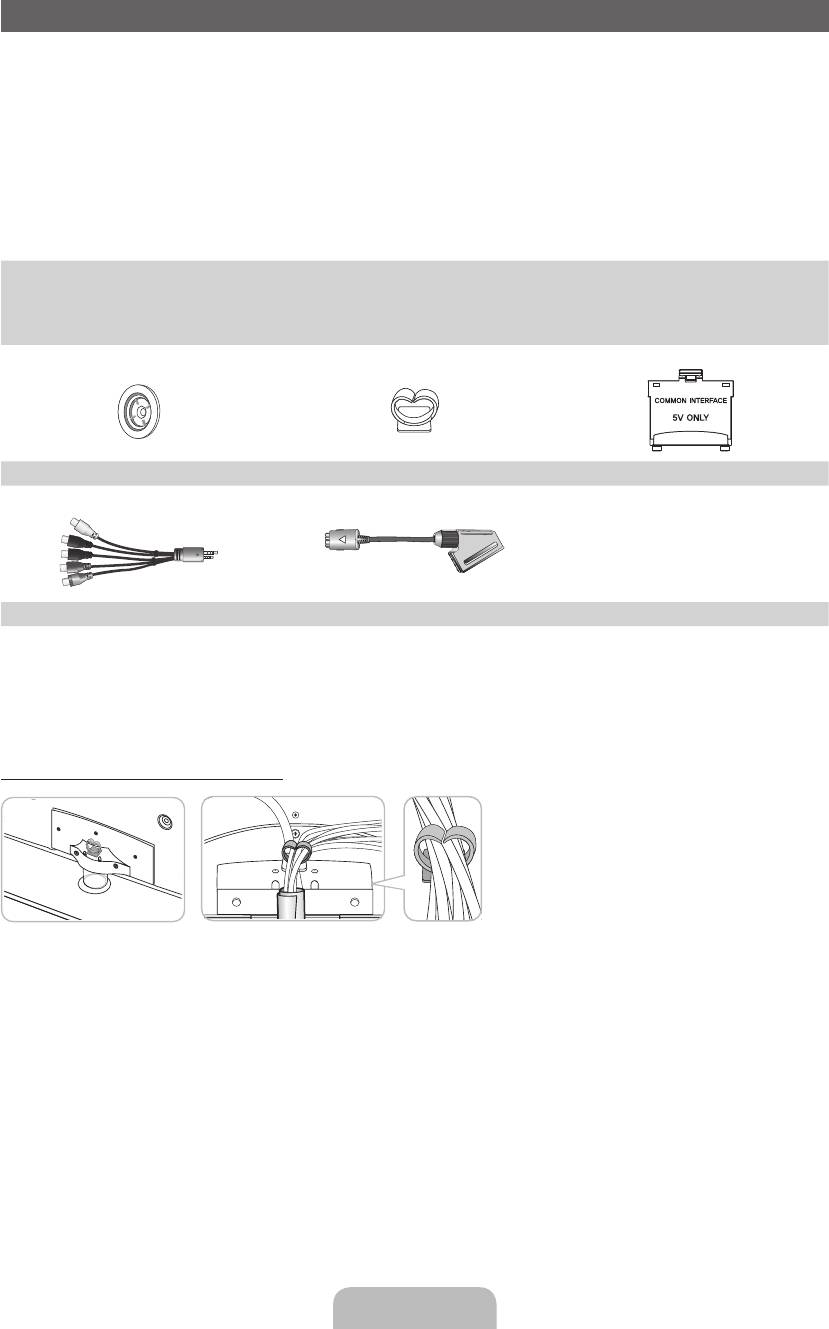
Accessories
✎
Please make sure the following items are included with your TV. If any items are missing, contact your
dealer.
✎
The items’ colours and shapes may vary depending on the models.
✎
Cables not included in the package contents can be purchased separately.
✎
Check that there is no accessory hidden behind packing materials when you open the box.
[
CAUTION: INSERT SECURELY LEST SHOULD BE DETACHED IN SET
•
Remote Control & Batteries (AAA x 2)
•
Cleaning-Cloth
•
Owner’s Instructions
•
Power cord
•
Warranty Card (Not available in some locations) / Safety Guide
Holder Ring (4 EA) Holder-Wire Stand CI Card Adapter
AV / Component Adapter Scart Adapter
An administration fee may be charged if either
– (a) an engineer is called out at your request and there is no defect in the product
(i.e. where you have failed to read this user manual)
– (b) you bring the unit to a repair centre and there is no defect in the product
(i.e. where you have failed to read this user manual).
• The amount of such administration charge will be advised to you before any work or home visit is carried out.
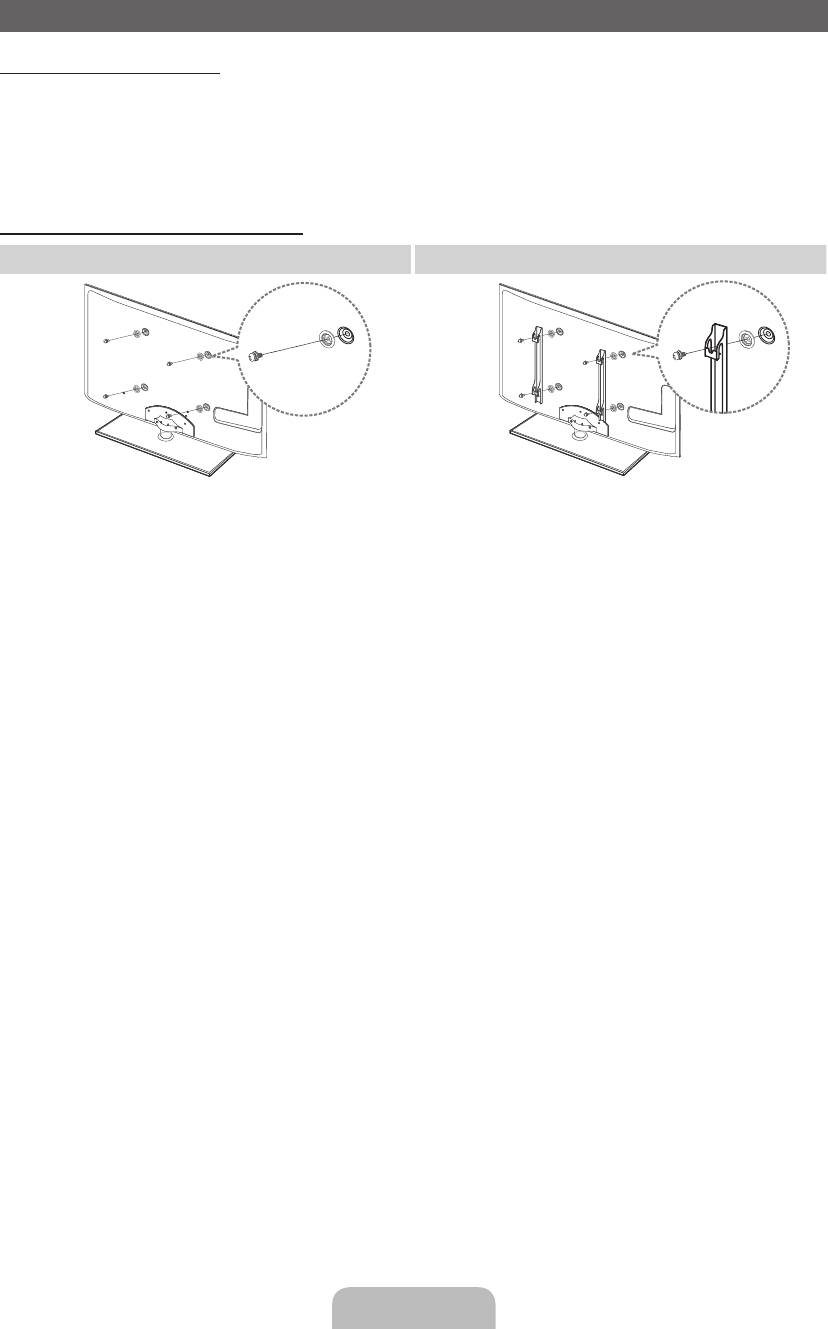
Assembling the Holder-Wire stand
English — 3
[UD6500-XH]BN68-03776D-00L17.indb 3 2011-05-03 오후 2:22:29
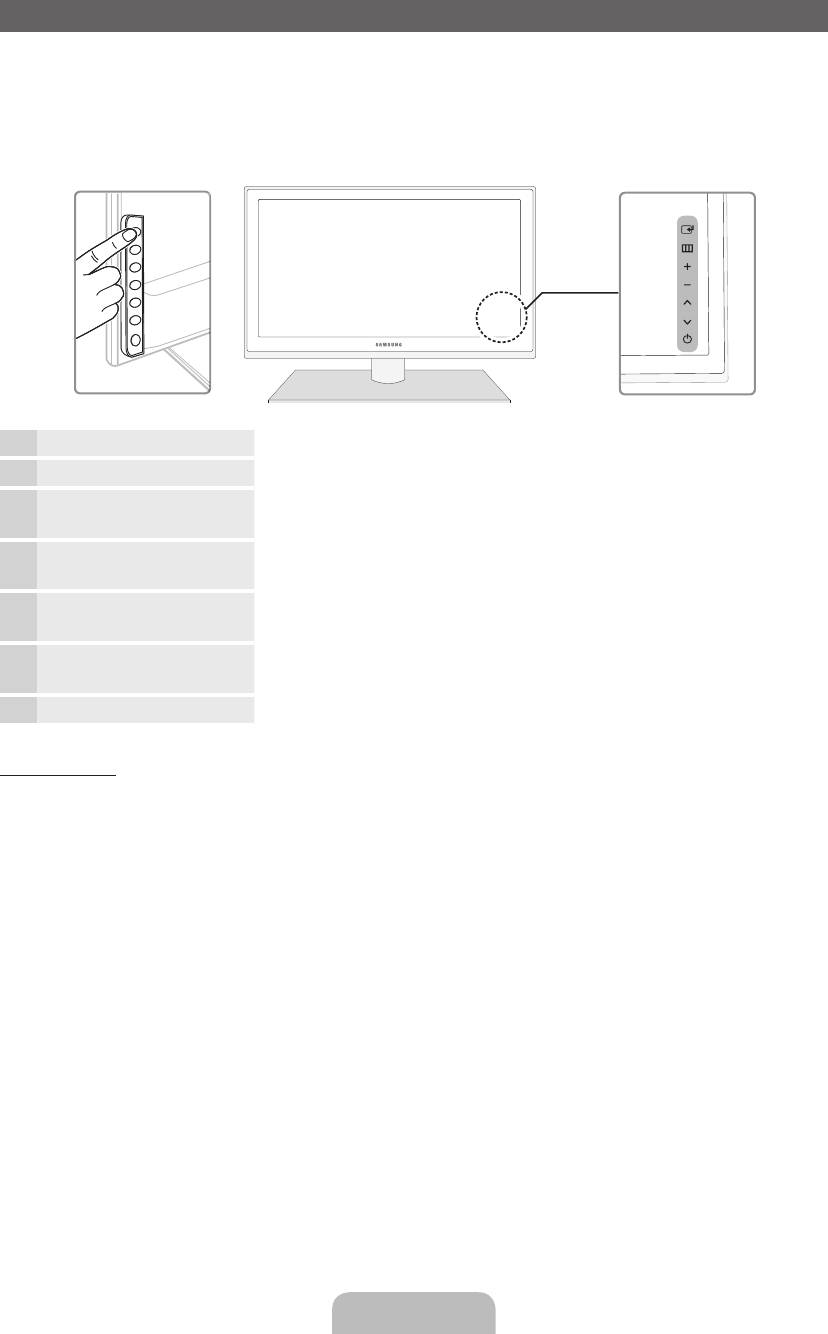
Viewing the Control Panel
✎
The product colour and shape may vary depending on the model.
✎
There are control buttons in rear of TV. When you touch the button, control icons appears.
✎
Any object (an electric wire, etc.) near the control panel may cause unintended activation of the OSD.
✎
Press the POWER button a little longer when you turn off the TV.
TV Rear
Remote control sensor Aim the remote control towards this spot on the TV.
Power Indicator Blinks and turns off when the power is on and lights up in standby mode.
E
(Source)
Toggles between all the available input sources. In the on-screen menu, use
this button as you would use the ENTER
E
button on the remote control.
m
(Menu)
Displays an on-screen menu, the OSD (on screen display) of your TV’s
features.
o (Volume)
Adjusts the volume. In the OSD, use the
wv
buttons as you would use the
◄ and ► buttons on the remote control.
k
(Channel) Changes the channels. In the OSD, use the
<>
buttons as you would
use the ▼ and ▲ buttons on the remote control.
P
(Power)
Turns the TV on or off.
Standby mode
Do not leave your TV in standby mode for long periods of time (when you are away on a holiday, for example).
A small amount of electric power is still consumed even when the power button is turned off. It is best to unplug
the power cord.
English — 4
[UD6500-XH]BN68-03776D-00L17.indb 4 2011-05-03 오후 2:22:29

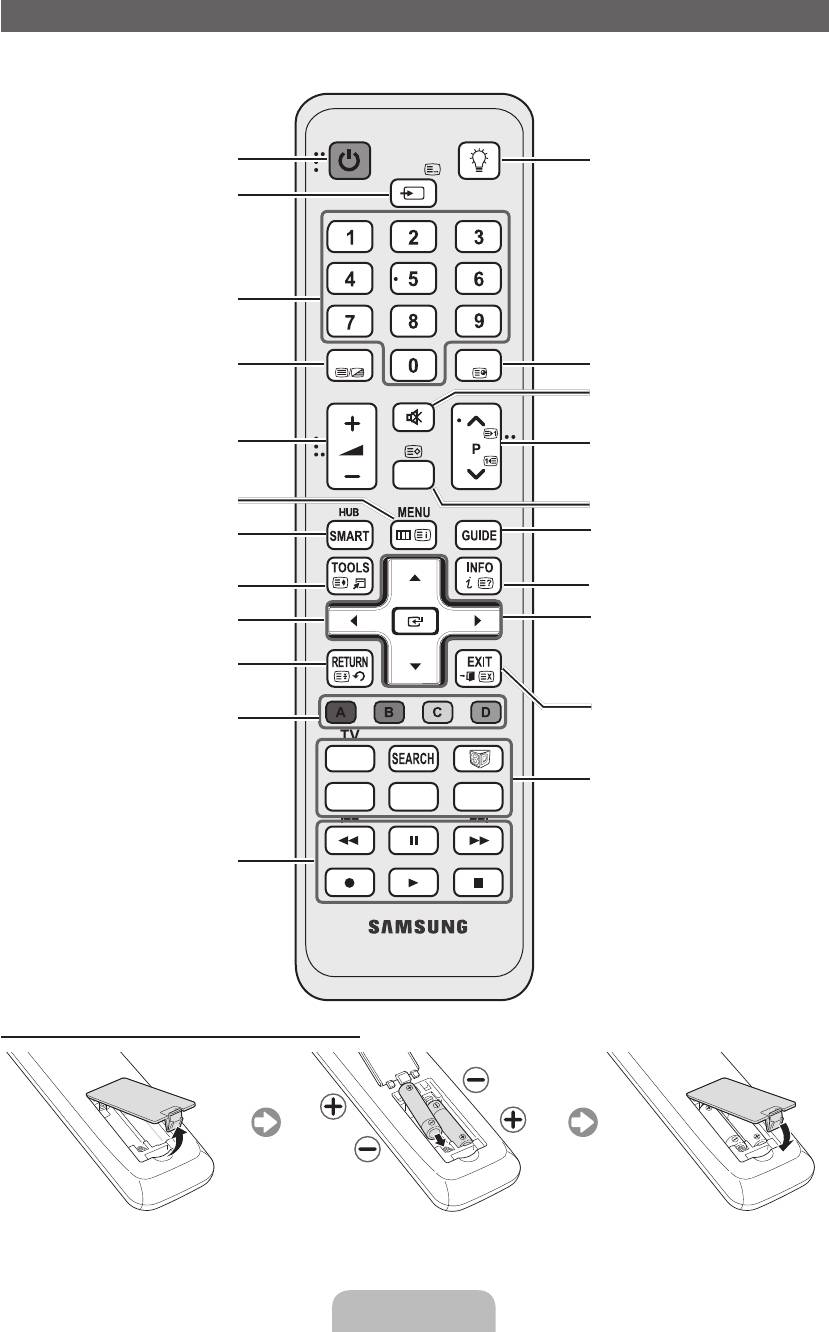
Viewing the Remote Control
✎
This is a special remote control for the visually impaired persons and has Braille points on the Power,
Channel and Volume buttons.
POWER
ON/OFF
Turns the TV on and off.
SOURCE
Turns the remote control light on or off.
Displays and selects the available video
When on, the buttons become illuminated
sources.
for a moment when pressed.
(Using the remote control with this button
set to On will reduce the battery usage
time.)
Have direct access to channels.
Alternately select Teletext ON, Double,
TTX/MIX
PRE-CH
Returns to the previous channel.
Mix or OFF.
MUTE
Cuts off the sound temporarily.
Adjusts the volume.
Changes channels.
CH LIST
Opens the OSD.
Displays channel lists on the screen.
Link to various application services.
Displays the EPG (Electronic Programme
Guide).
Quickly select frequently used functions.
Displays information on the TV screen.
u
/
d
/
l
/
r
: Move the cursor on-screen
menu item.
ENTER
E
: Selects the menu and
Returns to the previous menu.
changes the corresponding item value.
Exits the on-screen menu.
These buttons are for the Channel
Manager, SMART HUB menu, etc.
TV
SOCIAL
SOCIAL TV: Displays the Social TV
E-MANUAL
P.SIZE
AD/SUBT.
screen.
SEARCH: Support to recommendation
search word and search function.
W: Sets the video, which provided with
Use these buttons in a specific feature.
3D signal.
For details, refer to e-Manual.
E-MANUAL: Displays the e-Manual.
P.SIZE: Selects the Picture Size.
AD/SUBT.: Turns the audio description
on and off. This is not available in some
locations. / Displays digital subtitles.
Installing batteries (Battery size: AAA)
English — 5
[UD6500-XH]BN68-03776D-00L17.indb 5 2011-05-03 오후 2:22:30
Changing the Input Source
✎
When connecting a PC to the HDMI IN 1(DVI)
port with HDMI cable, you should set the TV
to PC mode under Edit Name.
Source
✎
When connecting a PC to the HDMI IN 1(DVI)
Use to select TV or an external input
SOURCE
port with HDMI to DVI cable, you should set
sources such as a DVD / Blu-ray player /
the TV to DVI PC mode under Edit Name.
cable box / STB satellite receiver.
✎
When connecting an AV devices to the HDMI
■ TV / Ext. / PC / AV / Component
IN 1(DVI) port with HDMI to DVI cable, you
/ HDMI1/DVI / HDMI2 / HDMI3 /
should set the TV to DVI Devices mode
HDMI4 / USB / AllShare
under Edit Name.
✎
In the Source, connected inputs
will be highlighted.
Edit Favourites
✎
Ext. and PC always stay activated.
In the Source, press the TOOLS button to select Edit
✎
If the connected external devices are not
Favourites. You can set an external input source to
highlighted, press the red button. The TV will
Favorites.
search for connected devices.
Information
Edit Name
You can see detailed information about the selected
In the Source, press the TOOLS button, and then you
external device.
can set an external input sources name you want.
■ VCR / DVD / Cable STB / Satellite STB / PVR
Refresh
STB / AV Receiver / Game / Camcorder / PC
In the Source, If the external devices are not
/ DVI PC / DVI Devices / TV / IPTV / Blu-ray
displayed, press the TOOLS button to select Refresh.
/ HD DVD / DMA: Name the device connected
Search for connected devices.
to the input jacks to make your input source
selection easier.
✎
For best cable connection to this product, be sure to use cables with a maximum thickness as below:
•
Maximum thickness — 0.55 inches (14mm)
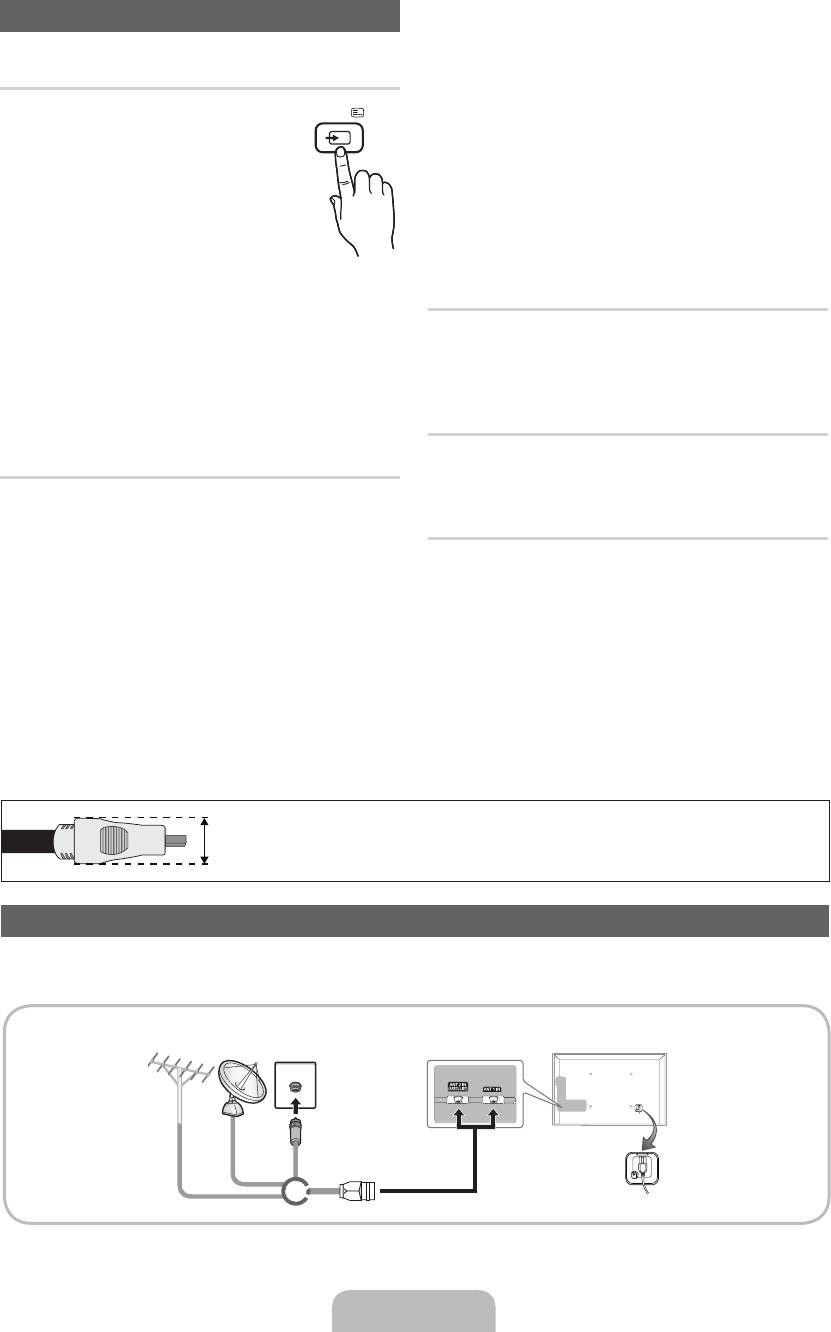
Connecting to an Antenna
When the TV is initially powered on, basic settings proceed automatically.
✎
Preset: Connecting the mains and antenna.
VHF/UHF
Antenna
Satellite
Cable
or
English — 6
[UD6500-XH]BN68-03776D-00L17.indb 6 2011-05-03 오후 2:22:31
Plug & Play (Initial Setup)
When the TV is initially powered on, a sequence of on-screen prompts will assist in configuring basic settings.
Press the POWER
P
button. Plug & Play is available only when the Input source is set to TV.
✎
Before turning on the TV, make sure the antenna cable is connected (p. 6).
✎
The option may differ depending on country.
Selecting the OSD
Press the ▲ or ▼ button, then press the ENTER
E
button.
1
Language
Select the desired OSD (On Screen Display) language.
Setting up the Network
Set up your network connection. Press the ENTER
E
button to start. If you do
2
not know your network set up information or want to set to it later, select Skip.
We suggest you skip network connection setup now and refer to “Network
menu” in the e-Manual for set up requirements and instructions, and the
Network Connection section of this manual (Page 13).
You can set up the network connection later using the Network menu.
Software upgrade When network connection settings are complete, Software Upgrade is available.
3
Select Next to upgrade TV software. Your TV will automatically upgrade, if your
TV need a software upgrade. If you want to upgrade later, select the Skip. For
more information, refer to «Software Upgrade» (Preference → Support) in the
e-Manual.
✎
This may take some time, depending on network status.
Selecting the usage
Press the ▲ or ▼ button to select Home Use, and then press the ENTER
E
4
mode
button twice.
Select the Home Use mode. Store Demo mode is for retail environments.
Selecting a country
Press the ▲ or ▼ button, then press the ENTER
E
button.
5
(Depending on the
Select the appropriate country.
country)
✎
After selecting the country in the Country menu, some models may
proceed with an additional option to setup the pin number.
✎
When you input the PIN number, “0-0-0-0” is not available.
✎
The option may differ depending on country.
Setting the Clock
Set the Clock Mode automatically or manually.
6
Mode
Selecting search
Press the ▲ or ▼ button, then press the ENTER
E
button. Select the channel
7
options for auto tuning
source to memorise. When setting the antenna source to Cable, a step appears
allowing you to assign numerical values (channel frequencies) to the channels.
For more information, refer to Channel — Memorising Channels — Auto Tuning.
✎
When Aerial or Cable is selected first: After all Aerial or Cable channels are
stored, the step for storing Satellite channels is displayed.
✎
When Satellite is selected first: After all Satellite channels are stored, the
step for storing Aerial or Cable channels is displayed.
✎
Press the ENTER
E
button at any time to interrupt the memorisation
process.
Enjoy your TV. If you want to watch a broadcast program, select Close. If you want to enjoy the
8
Smart Hub, select the Smart Hub. The Smart Hub will start. For more detailed
information, refer to “Smart Hub” in the e-Manual.
If You Want to Reset This Feature…
Select System — Plug & Play (Initial Setup). Enter your 4 digit PIN number. The default PIN number is “0-0-0-0.”
If you want to change the PIN number, use the Change PIN function.
You should do Plug & Play (MENU → System) again at home although you did in shop.
✎
If you forget the PIN code, press the remote control buttons in the following sequence in Standby mode,
which resets the PIN to “0-0-0-0”: MUTE → 8 → 2 → 4 → POWER (on).
English — 7
[UD6500-XH]BN68-03776D-00L17.indb 7 2011-05-03 오후 2:22:31

Connecting to an AV devices
Available devices: DVD, Blu-ray player, HD cable box, HD STB (Set-Top-Box) satellite
¦
receiver, VCR
HDMI connection
HDMI OUT
HDMI to DVI connection
DVI OUT
AUDIO OUT
R-AUDIO-L
Using an HDMI or an HDMI to DVI cable (up to 1080p)
✎
HDMI IN 1(DVI), 2(ARC), 3, 4 / PC/DVI AUDIO IN
x
For better picture and audio quality, connect to a digital device using an HDMI cable.
x
An HDMI cable supports digital video and audio signals, and does not require an audio cable.
– To connect the TV to a digital device that does not support HDMI output, use an HDMI/DVI and
audio cables.
x
The picture may not display normally (if at all) or the audio may not work if an external device that
uses an older version of HDMI mode is connected to the TV. If such a problem occurs, ask the
manufacturer of the external device about the HDMI version and, if out of date, request an upgrade.
x
Be sure to use an HDMI cable with a thickness of 14 mm or less.
x
Be sure to purchase a certified HDMI cable. Otherwise, the picture may not display or a connection
error may occur.
x
A basic high-speed HDMI cable or one with ethernet is recommended. This product does not support
the ethernet function via HDMI.
x
This product supports the 3D and ARC (Audio Return Channel) functions via an HDMI cable. Note
that the ARC function is supported by the HDMI IN 2(ARC) port only.
x
The ARC function allows digital audio to output via the HDMI IN 2(ARC) port. It can be enabled only
when the TV is connected with an audio receiver that supports the ARC function.
English — 8
[UD6500-XH]BN68-03776D-00L17.indb 8 2011-05-03 오후 2:22:32

Component connection
COMPONENT OUT
G
G
B
B
P
R
P
B
Y
R
R
AUDIO OUT
R
R
W
W
R-AUDIO-L
AV connection
VIDEO OUT
Y
Y
AUDIO OUT
RW
R W
R-AUDIO-L
SCART connection
EXT
Using a Component (up to 1080p) or an Audio/Video (480i only) and a Scart Cable
✎
In Ext. mode, DTV Out supports MPEG SD Video and Audio only.
✎
When connecting to AV IN, the colour of the AV IN [VIDEO] jack (green) will not match the video cable
(yellow).
✎
To obtain the best picture quality, the Component connection is recommended over the A/V
connection.
English — 9
[UD6500-XH]BN68-03776D-00L17.indb 9 2011-05-03 오후 2:22:33

Connecting to a PC and Audio device
¦ Using an HDMI cable or an HDMI to DVI cable or a D-sub cable
✎
Connecting through the HDMI cable may not be supported depending on the PC.
PC connection
HDMI OUT
DVI OUT
AUDIO OUT
AUDIO OUT
PC OUT
Display Modes (D-Sub and an HDMI to DVI Input)
Optimal resolution is 1920 X 1080 @ 60 Hz.
Mode Resolution
Horizontal Frequency
(KHz)
Vertical Frequency (Hz) Pixel Clock Frequency (MHz) Sync Polarity (H / V)
IBM
640 x 350
31.469
70.086
25.175
+/-
720 x 400
31.469
70.087
28.322
-/+
640 x 480
35.000
66.667
30.240
-/-
MAC
832 x 624
49.726
74.551
57.284
-/-
1152 x 870
68.681
75.062
100.000
-/-
640 x 480
31.469
59.940
25.175
-/-
640 x 480
37.861
72.809
31.500
-/-
640 x 480
37.500
75.000
31.500
-/-
800 x 600
37.879
60.317
40.000
+/+
800 x 600
48.077
72.188
50.000
+/+
800 x 600
46.875
75.000
49.500
+/+
1024 x 768
48.363
60.004
65.000
-/-
1024 x 768
56.476
70.069
75.000
-/-
1024 x 768
60.023
75.029
78.750
+/+
VESA DMT
1152 x 864
67.500
75.000
108.000
+/+
1280 x 1024
63.981
60.020
108.000
+/+
1280 x 1024
79.976
75.025
135.000
+/+
1280 x 800
49.702
59.810
83.500
-/+
1280 x 800
62.795
74.934
106.500
-/+
1280 x 960
60.000
60.000
108.000
+/+
1360 x 768
47.712
60.015
85.500
+/+
1440 x 900
55.935
59.887
106.500
-/+
1440 x 900
70.635
74.984
136.750
-/+
1680 x 1050
65.290
59.954
146.250
-/+
VESA DMT / DTV CEA 1920 x 1080p 67.500 60.000 148.500 +/+
✎
NOTE
x
For HDMI/DVI cable connection, you must use the HDMI IN 1(DVI) jack.
x
The interlace mode is not supported.
x
The set might operate abnormally if a non-standard video format is selected.
x
Separate and Composite modes are supported. SOG(Sync On Green) is not supported.
English — 10
[UD6500-XH]BN68-03776D-00L17.indb 10 2011-05-03 오후 2:22:34

¦ Available devices: digital audio system, amplifier, home theatre
Audio connection
OPTICAL
Headphones connection
Using an Optical (Digital) or a Headphone Connection
✎
DIGITAL AUDIO OUT (OPTICAL)
x
When a digital audio system is connected to the DIGITAL AUDIO OUT (OPTICAL) jack, decrease the
volume of both the TV and the system.
x
5.1 CH (channel) audio is available when the TV is connected to an external device supporting 5.1 CH.
x
When the receiver (home theatre) is set to on, you can hear sound output from the TV’s optical jack.
When the TV is receiving a DTV signal, the TV will send 5.1 CH sound to the home theatre receiver.
When the source is a digital component such as a DVD / Blu-ray player / cable box / STB (Set-Top-
Box) satellite receiver and is connected to the TV via HDMI, only 2 CH audio will be heard from the
home theatre receiver. If you want to hear 5.1 CH audio, connect the digital audio out jack from your
DVD / Blu-ray player / cable box / STB satellite receiver directly to an amplifier or home theatre.
✎
Headphones
H
: You can connect your headphones to the headphones output on your set. While the
headphones are connected, the sound from the built-in speakers will be disabled.
x
Sound function may be restricted when connecting headphones to the TV.
x
Headphone volume and TV volume are adjusted separately.
English — 11
[UD6500-XH]BN68-03776D-00L17.indb 11 2011-05-03 오후 2:22:34

Connecting to a COMMON INTERFACE slot
Attaching the CI Card Adapter
Attach the adapter as shown below.
To connect the CI CARD Adapter, follow these steps.
✎
We recommend attaching the adapter before
installing the wall mount, or inserting the “CI or CI+
CARD.”
1. Insert the CI CARD Adapter into the two holes on the
TV Rear
product 1.
✎
Please find a two holes on the rear of the TV. A
two holes is beside the COMMON INTERFACE
port.
2. Connect the CI CARD Adapter into the COMMON INTERFACE port on the product 2.
3. Insert the “CI or CI+ CARD”.
We recommand that you insert the CI card before you mount the TV on a wall.
It may be difficult to insert after the mounting.
Insert the card after attaching the CI CARD Adapter, on TV.
It is difficult to attach the module if you insert the card before attaching.
Using the “CI or CI+ CARD”
To watch paid channels, the “CI or CI+ CARD” must be inserted.
•
If you don’t insert the “CI or CI+ CARD,” some channels will display
the message “Scrambled Signal”.
•
The pairing information containing a telephone number, the “CI or CI+
CARD” ID the Host ID and other information will be displayed in about
2~3 minutes. If an error message is displayed, please contact your
service provider.
•
When the configuration of channel information has finished, the
message “Updating Completed” is displayed, indicating the channel
list is updated.
✎
NOTE
x
You must obtain a “CI or CI+ CARD” from a local cable service provider.
x
When removing the “CI or CI+ CARD”, carefully pull it out with your hands since dropping the “CI or CI+
CARD” may cause damage to it.
x
Insert the “CI or CI+ CARD” in the direction marked on the card.
x
The location of the COMMON INTERFACE slot may be different depending on the model.
x
“CI or CI+ CARD” is not supported in some countries and regions; check with your authorized dealer.
x
If you have any problems, please contact a service provider.
x
Insert the “CI or CI+ CARD” that supports the current antenna settings. The screen will be distorted or
will not be seen.
English — 12
[UD6500-XH]BN68-03776D-00L17.indb 12 2011-05-03 오후 2:22:36
Network Connection
You can connect your TV to your LAN through a standard wireless router or modem. You can use a wireless
network to use the Samsung Wireless LAN Adapter where is built-in the TV.
Network Connection — Wireless
You can connect your TV to your LAN through a standard wireless router or modem.
Wireless IP sharer
The LAN Port on
(router having DHCP server)
TV
the Wall
LAN Cable
Samsung’s Wireless LAN adapter supports the IEEE 802.11a/b/g and n communication protocols. Samsung
recommends using IEEE 802.11n. When you play the video over a IEEE 802.11b/g connection, the video may
not play smoothly.
Most wireless network systems incorporate a security system that requires devices that access the network
through an access point or wireless router (typically a wireless IP Sharer) to transmit an encrypted security code
called an access key.
If Pure High-throughput (Greenfield) 802.11n mode is selected and the Encryption type is set to WEP, TKIP or
TKIP AES (WPS2Mixed) for your wireless router, Samsung TVs will not support a connection in compliance with
new Wi-Fi certification specifications.
Network Connection — Wired
There are two main ways to connect your TV to your network using cable, depending on your network setup.
They are illustrated below:
The Modem Port on the Wall
External Modem
TV Rear Panel
(ADSL / VDSL / Cable TV)
Modem Cable
LAN Cable
The LAN Port on the Wall
TV Rear Panel
LAN Cable
✎
It is not supported when the network speed is under 10 Mbps.
English — 13
[UD6500-XH]BN68-03776D-00L17.indb 13 2011-05-03 오후 2:22:37
How to use the e-Manual
E-MANUAL
You can read the introduction and instructions about the TV features stored
in your TV.
O
MENU
m
→ Support → e-Manual → ENTER
E
✎
If you want to return to e-Manual, press E-MANUAL button on remote.
✎
You can’t use the Try Now function, if the menu is not activated.
Screen Display
TV Screen: Displays the current input
Change the category. Press
l
or
r
source screen.
Basic Features
button to select category you want.
Changing the Preset Picture Mode
Adjusting Picture Settings
Changing the Picture Size
Displays the sub-menu list. Press
ENTER
E
button to select sub-
Changing the Picture Options
menu you want.
Setting up the TV with Your PC
Help: Displays the e-Manual Guide
IndexHelp
or Product guide. Press ENTER
E
button.
Index: Displays index screen.
X: Exit the e-Manual.
Using the Help
Display the e-Manual Guide & the Product Guide by pressing Help.
Changing the Preset Picture Mode
You can read the introduction and instructions about
the TV features stored in your TV.
Basic Features
Sync media from multiple devices with AllShare
Changing the Preset Picture Mode
AllShare™ syncs your digital devices so you can
O MENU
m
→ Support → e-Manual →
Adjusting Picture Settings
enjoy music, movies and photos from your PC,
camera and mobile devices, on your larger TV
ENTER
E
Changing the Picture Size
screen. Connects you to multiple PCs, as well.
Changing the Picture Options
Setting up the TV with Your PC
IndexHelp
Return
Return
<e-Manual Guide>
<Product Guide>
The e-Manual guide appears as above.
The product guide appears as above.
How to toggle between the e-Manual and the corresponding menu(s).
Basic Features > Changing the Preset Picture Mode (5/10)
Picture
Changing the Preset Picture Mode
O MENU
m
→ Picture → Picture Mode → ENTER
E
Picture Mode Standard
■
Picture Mode t
Select your preferred picture type.
Try Now
Backlight 14
• Dynamic: Suitable for a bright room.
• Standard: Suitable for a normal environment.
Contrast 100
• Natural: Suitable for reducing eye strain.
• Movie: Suitable for watching movies in a dark room.
• Entertain: Suitable for watching movies and games.
Brightness 45
N It is only available when connecting a PC.
E-MANUAL
Sharpness 50
Colour 50
Help Try Now Home Zoom Index
Tint (G/R) G 50 R 50
✎
This function is not enabled in some menus.
English — 14
[UD6500-XH]BN68-03776D-00L17.indb 14 2011-05-03 오후 2:22:49
Method 1 Method 2
1. During watching the e-Manual, move the cursor
1. Press the ENTER
E
button when selecting
to select Try Now, when you want to execute the
Contents Area. The “Are you sure?” is displayed.
corresponding menu(s).
Select Yes and then press the ENTER
E
2. To return to the e-Manual screen, press the
button. The OSD window will be displayed.
E-MANUAL button.
2. To return to the e-Manual screen, press the
E-MANUAL button.
Viewing the Contents
Basic Features > Changing the Preset Picture Mode (5/10)
Changing the Preset Picture Mode
O MENU
m
→ Picture → Picture Mode → ENTER
E
Contents Area: You can view the corresponding
contents, if you selected a sub-menu. To move
■
Picture Mode t
Select your preferred picture type.
previous or next page, press the
l
or
r
button.
• Dynamic: Suitable for a bright room.
• Standard: Suitable for a normal environment.
• Natural: Suitable for reducing eye strain.
• Movie: Suitable for watching movies in a dark room.
• Entertain: Suitable for watching movies and games.
N It is only available when connecting a PC.
Help Try Now Home Zoom Index
Try Now: Displays the corresponding menu(s).
Home: Moves to the e-Manual home screen.
Zoom: Magnifies a screen.
Index: Displays index screen.
Using the Zoom mode
When you view the e-Manual instruction, select the
Changing the Preset Picture Mode
Zoom to magnify the screen. You can scroll through
O MENU
m
→ Picture → Picture Mode → ENTER
E
the magnified screen by using the
u
or
d
buttons.
■
Picture Mode t
Select your preferred picture type.
✎
To return to the previous screen, press the RETURN
• Dynamic: Suitable for a bright room.
button.
• Standard: Suitable for a normal environment.
• Natural: Suitable for reducing eye strain.
• Movie: Suitable for watching movies in a dark room.
• Entertain: Suitable for watching movies and games.
N It is only available when connecting a PC.
Return
How to search a keyword by using index page
✎
This function may not supported depending on the language.
1. If you want to search a keyword, select Index.
2. Press the
l
or
r
button to select a character order you want, and then press the ENTER
E
button.
3. Press the
u
or
d
button to select a keyword you want to see, and then press the ENTER
E
button.
4. You can view the corresponding e-Manual instruction screen.
✎
To close the Index screen, press the RETURN button.
English — 15
[UD6500-XH]BN68-03776D-00L17.indb 15 2011-05-03 오후 2:22:50
Installing the Wall Mount
Installing the Wall Mount Kit
The wall mount kit (sold separately) allows you to mount the TV on the wall.
For detailed information on installing the wall mount, see the instructions provided with the wall mount. Contact a
technician for assistance when installing the wall mount bracket.
Samsung Electronics is not responsible for any damage to the product or injury to yourself or others if you elect
to install the TV on your own.
Preparing before installing Wall-Mount
Case A. Installing the SAMSUNG Wall-Mount Case B. Installing another company’s Wall-Mount
1
1
To install a wall-mount, use the Holder-Ring 1.
English — 16
[UD6500-XH]BN68-03776D-00L17.indb 16 2011-05-03 오후 2:22:51
Wall Mount Kit Specifications (VESA)
Install your wall mount on a solid wall perpendicular to the floor. When attaching to other building materials,
please contact your nearest dealer. If installed on a ceiling or slanted wall, it may fall and result in severe personal
injury.
✎
NOTE
x
Standard dimensions for wall mount kits are shown in the table below.
x
When purchasing our wall mount kit, a detailed installation manual and all parts necessary for assembly
are provided.
x
Do not use screws that do not comply with the VESA standard screw specifications.
x
Do not use screws that are longer than the standard dimension or do not comply with the VESA standard
screw specifications. Screws that are too long may cause damage to the inside of the TV set.
x
For wall mounts that do not comply with the VESA standard screw specifications, the length of the
screws may differ depending on the wall mount specifications.
x
Do not fasten the screws that are too strongly; this may damage the product or cause the product to fall,
leading to personal injury. Samsung is not liable for these kinds of accidents.
x
Samsung is not liable for product damage or personal injury when a non-VESA or non-specified wall
mount is used or the consumer fails to follow the product installation instructions.
x
Our 55” model do not comply with VESA Specifications. Therefore, you should use our dedicated wall
mount kit for this model.
x
Do not mount the TV at more than a 15 degree tilt.
Product Family inches VESA Spec. (A * B) Standard Screw Quantity
19~22 75 X 75
M4
23~27 200 X 100
LED-TV
32~40 200 X 200
4
M846~60 400 X 400
65~75 600 X 400
Do not install your Wall Mount Kit while your TV is turned on. It may result in personal injury
due to electric shock.
English — 17
[UD6500-XH]BN68-03776D-00L17.indb 17 2011-05-03 오후 2:22:52
Troubleshooting
If you have any questions about the TV, first refer to this list. If none of these troubleshooting tips apply, please
visit “www.samsung.com”, then click on Support, or contact the call centre listed on the back-cover of this
manual.
Issues Solutions and Explanations
The TV won’t turn on. • Make sure the AC power cord is securely plugged in to the wall outlet and the TV.
• Make sure the wall outlet is working.
• Try pressing the POWER button on the TV to make sure the problem is not the remote. If the TV turns
on, refer to “Remote control does not work” below.
There is no picture/video. • Check cable connections (remove and reconnect all cables connected to the TV and external
devices).
• Set your external device’s (Cable/Sat Box, DVD, Blu-ray etc) video outputs to match the connections
to the TV input. For example, if an external device’s output is HDMI, it should be connected to an
HDMI input on the TV.
• Make sure your connected devices are powered on.
• Be sure to select the TV’s correct source by pressing the SOURCE button on the remote control.
• Reboot the connected device by reconnecting the device’s power cable.
The remote control does not work. • Replace the remote control batteries with the poles (+/–) in the right direction.
• Clean the sensor’s transmission window on the remote.
• Try pointing the remote directly at the TV from 5~6 feet away.
The cable/set top box remote control
• Programme the Cable/Set remote control to operate the TV. Refer to the Cable/Set user manual for
doesn’t turn the TV on or off, or adjust the
the SAMSUNG TV code.
volume.
✎
This TFT LED panel uses a panel consisting of sub pixels which require sophisticated technology to
produce. However, there may be a few bright or dark pixels on the screen. These pixels will have no impact
on the performance of the product.
✎
You can keep your TV as optimum condition to upgrade the latest firmware on web site (samsung.com →
Support → Downloads) by USB.
Licence
English — 18
[UD6500-XH]BN68-03776D-00L17.indb 18 2011-05-03 오후 2:22:52
List of Features
Excellent Digital Interface & Networking: With a built-in HD digital tuner, nonsubscription HD broadcasts can be
viewed without a cable box / STB (Set-Top-Box) satellite receiver.
3D
This exciting new feature enables you to view 3D content.
SMART HUB
The Gateway to all content integrated in one place
•
It’s all integrated to guide you to easier and diverse entertainment choices.
•
Control your entertainment life with easy and simple user friendly UI.
•
Access to diverse Apps that are adding up every day.
•
Customize your TV, by App grouping & sorting to your taste.
AllShare™
AllShare™ connects your TV and compatible Samsung mobile phones/devices through a network.
Anynet+(HDMI-CEC)
Allows you to control all connected Samsung devices that support anynet+ with your Samsung TV’s remote.
Storage and Maintenance
✎
If you attached some stickers on the TV screen, it remains some debris after removing the sticker. Please
clean it to watch TV.
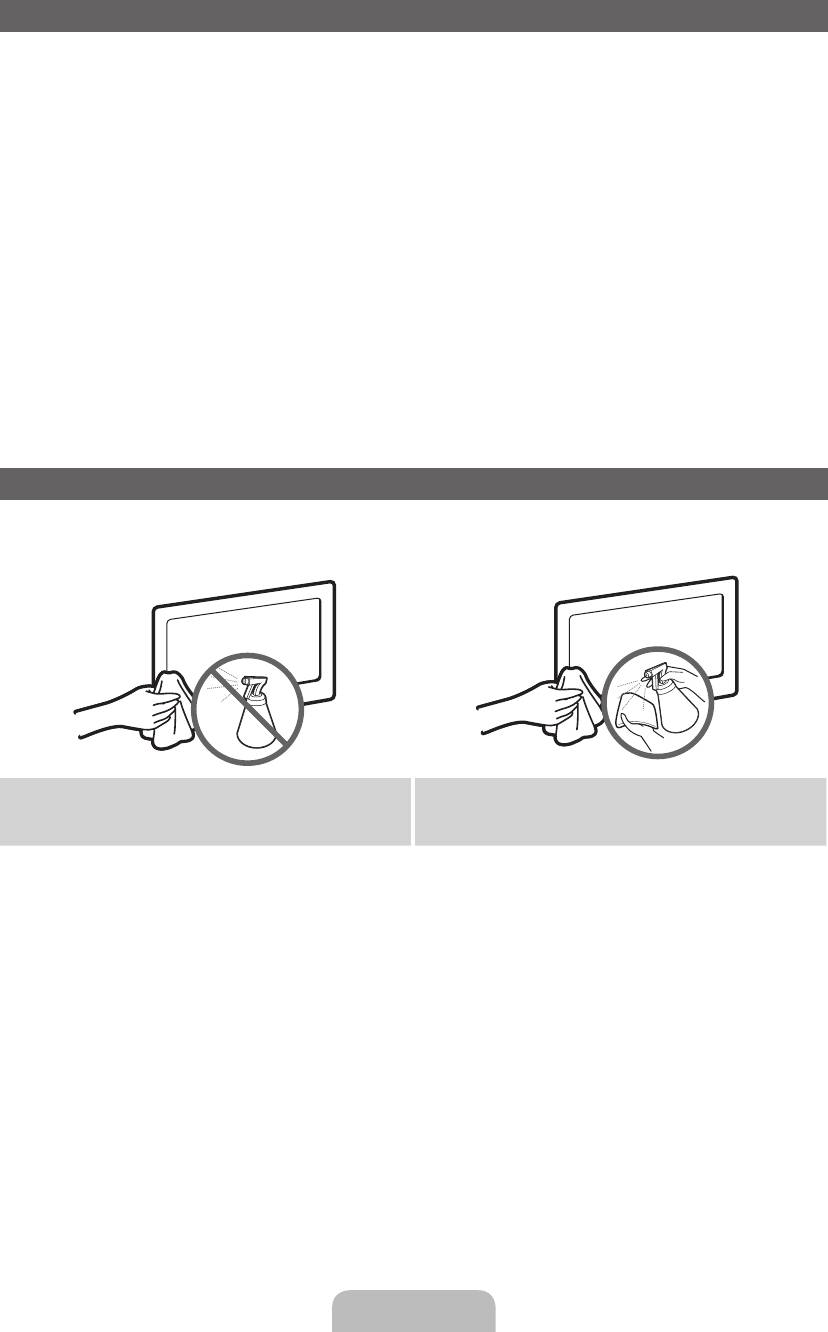
Do not spray water or a cleaning agent directly onto
Clean the product with a soft cloth dapped in a small
the product. Any liquid that goes into the product may
amount of water.
cause a failure, fire, or electric shock.
English — 19
[UD6500-XH]BN68-03776D-00L17.indb 19 2011-05-03 오후 2:22:53
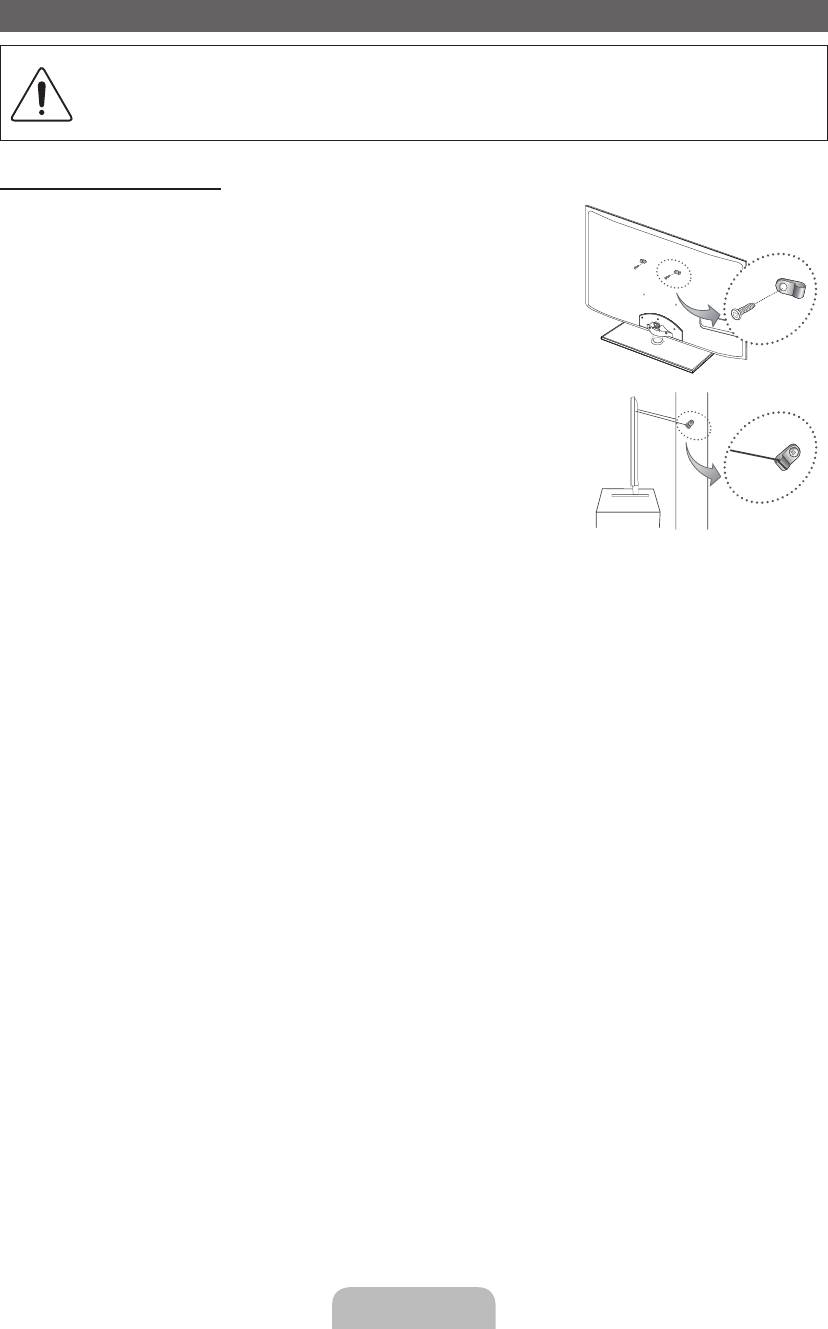
Securing the TV to the wall
Caution: Pulling, pushing, or climbing onto the TV may cause the TV to fall. In particular, ensure
that your children do not hang over or destabilize the TV; doing so may cause the TV to tip over,
resulting in serious injuries or death. Follow all safety precautions provided in the included Safety
Flyer. For added stability and safety, install the anti-fall device as follows.
To Avoid the TV from Falling
1. Put the screws into the clamps and firmly fasten them onto the wall.
Confirm that the screws have been firmly installed onto the wall.
✎
You may need additional material such as an anchor depending on
the type of wall.
✎
Since the necessary clamps, screws, and string are not supplied,
please purchase these additionally.
2. Remove the screws from the back centre of the TV, put the screws into
the clamps, and then fasten the screws onto the TV again.
✎
Screws may not be supplied with the product. In this case, please
purchase the screws of the following specifications.
✎
Screw Specifications
x
For a 19 ~ 27 inch: M4
Wall
x
For a 32 ~ 75 inch: M8
3. Connect the clamps fixed onto the TV and the clamps fixed onto the wall with a strong cable and then tie the
string tightly.
✎
NOTE
x
Install the TV near to the wall so that it does not fall backwards.
x
It is safe to connect the string so that the clamps fixed on the wall are equal to or lower than the
clamps fixed on the TV.
x
Untie the string before moving the TV.
4. Verify all connections are properly secured. Periodically check connections for any sign of fatigue for failure. If
you have any doubt about the security of your connections, contact a professional installer.
English — 20
[UD6500-XH]BN68-03776D-00L17.indb 20 2011-05-03 오후 2:22:53
Specifications
Display Resolution 1920 x 1080
Environmental Considerations
Operating Temperature
10°C to 40°C (50°F to 104°F)
Operating Humidity
10% to 80%, non-condensing
Storage Temperature
-20°C to 45°C (-4°F to 113°F)
Storage Humidity
5% to 95%, non-condensing
TV System Analogue: B/G, D/K, L, I (Depending on your country selection)
Digital: DVB-T/DVB-C/DVB-S2
Colour/Video System Analogue: PAL, SECAM, NTSC-4.43, NTSC-3.58, PAL60
Digital: MPEG-2 MP@ML, MPEG-4, H.264/AVC MP@L3, MP@L4.0, HP@L4.0
Sound System BG, DK, L, NICAM, MPEG1, DD, DD+, HEAAC.
HDMI IN Video: 1080 24p, 1080p, 1080i, 720p, 576p, 480p
Audio: 2Ch Linear PCM 32/44.1/48kHz, 16/20/24bits.
Stand Swivel (Left / Right) -20˚ ~ 20˚
Model Name UE32D6500 / UE32D6510
UE37D6500 / UE37D6510
UE40D6500 / UE40D6510
/ UE32D6530 / UE32D6540 /
/ UE37D6530 / UE37D6540 /
/ UE40D6530 / UE40D6540 /
UE32D6570
UE37D6570
UE40D6570
Screen Size 32 inches 37 inches 40 inches
Sound
(Output) 10 W X 2
Dimensions (WxDxH)
Body
745.8 X 29.9 X 443.4 mm
867.7 X 29.9 X 512.3 mm
933.0 X 29.9 X 548.8 mm
With stand
745.8 X 240.0 X 503.8 mm
867.7 X 255.0 X 571.6 mm
933.0 X 255.0 X 608.2 mm
Weight
Without Stand
7.1 kg
9.1 kg
10.7 kg
With Stand
9.8 kg
12.4 kg
14.0 kg
Model Name UE46D6500 / UE46D6510
UE55D6500 / UE55D6510
UE60D6500
/ UE46D6530 / UE46D6540 /
/ UE55D6530 / UE55D6540 /
UE46D6570
UE55D6570
Screen Size 46 inches 55 inches 60 inches
Sound
(Output) 10 W X 2 15 W X 2
Dimensions (WxDxH)
Body
1068.4 X 29.9 X 625.2 mm
1258.8 X 29.9 X 731.7 mm
1379.0 x 30.4 x 799.4 mm
With stand
1068.4 X 275.0 X 683.6 mm
1258.8 X 305.0 X 791.4 mm
1379.0 x 335.0 x 860.3 mm
Weight
Without Stand
13.2 kg
17.3 kg
23.5 kg
With Stand
17.2 kg
21.5 kg
29.1 kg
✎
Design and specifications are subject to change without prior notice.
✎
For information about power supply, and more about power consumption, refer to the label attached to the
product.
¦ Recommendation — EU Only
•
Hereby, Samsung Electronics, declares that this LED TV is in compliance with the essential requirements
and other relevant provisions of Directive 1999/5/EC.
•
The official Declaration of Conformity may be found at http://www.samsung.com, go to Support > Search
Product Support and enter the model name.
•
This equipment may only be used indoors.
•
This equipment may be operated in all EU countries.
English — 21
[UD6500-XH]BN68-03776D-00L17.indb 21 2011-05-03 오후 2:22:54
További információk az elektronikus útmutató használatáról (p. 14)
A jelen Használati útmutatóban szereplő képek csak illusztrációk, és eltérhetnek az Ön által megvásárolt
termék megjelenésétől. A termék kivitele és műszaki jellemzői előzetes értesítés nélkül megváltozhatnak.
A digitális televízióval kapcsolatos figyelmeztetés
1. A digitális televízióhoz (DVB) kapcsolódó funkciók csak azokban az országokban, illetve régiókban érhetők el, ahol DVB-T (MPEG2 és MPEG4 AVC)
digitális földi jeleket sugároznak, illetve elérhető kompatibilis DVB-C (MPEG2 és MPEG4 AAC) kábeltelevízió-szolgáltatás. A DVB-T vagy DVB-C jelek
vételének lehetőségét illetően tájékozódjon a helyi szolgáltatónál.
2. A DVB-T nem más, mint az európai konzorciumnak a földfelszíni digitális televíziós műsorszórásra vonatkozó szabványa, a DVB-C pedig a kábeles
digitális műsorszórásra vonatkozó szabvány. Azonban ebben a specifikációban nem szerepel néhány megkülönböztetett funkció, például az EPG
(elektronikus műsorújság), a VOD (igény szerinti videoszolgáltatás) stb. Így ezek a funkciók jelenleg nem használhatók.
3. Jóllehet a tv-készülék megfelel a legújabb DVB-T és DVB-C szabványoknak [2008. augusztus], nem garantált, hogy a jövőben is meg fog felelni a
mindenkori DVB-T földi digitális és a DVB-C kábeles digitális műsorszórásra vonatkozó szabványoknak.
4. Attól függően, hogy mely országban, illetve régióban használják a tv-készüléket, bizonyos kábeltelevízió-szolgáltatók külön díjat számolhatnak fel az
ilyen szolgáltatásért, és előfordulhat, hogy az előfizetőnek a szolgáltató által meghatározott feltételeket kell elfogadnia.
5. Előfordulhat, hogy bizonyos digitális televízióval kapcsolatos funkciók egyes országokban vagy régiókban nem érhetők el, és hogy a DVB-C bizonyos
kábelszolgáltatók esetén nem működik megfelelően.
6. Amennyiben további információra van szüksége, lépjen kapcsolatba a legközelebbi Samsung ügyfélszolgálattal.
✎
A tv-készülék vételi minőségét befolyásolhatják az egyes országok műsorszórási eljárásai között tapasztalható eltérések. A tv-készülék
teljesítményével kapcsolatban forduljon a legközelebbi SAMSUNG forgalmazóhoz vagy a Samsung telefonos ügyfélszolgálatához, hogy
megtudhassa, lehet-e azon javítani a tv-készülék beállításainak újrakonfigurálásával.
Állóképre vonatkozó figyelmeztetés
Kerülje az állóképek (például jpeg képfájlok) vagy állókép elemek (például tv-csatorna logója, panoráma vagy 4:3 képformátum, tőzsdei információs vagy
hírsáv a képernyő alján stb.) megjelenítését a képernyőn. Ugyanazon állókép folyamatos megjelenítése szellemképeket okozhat a LED-képernyőn, rontva a
képminőséget. Ha szeretné csökkenteni ennek mértékét, kérjük, tartsa be az alábbi javaslatokat:
• Ne nézze hosszú időn keresztül ugyanazt a tv-csatornát.
• Mindig próbálja meg teljes képernyőn megjeleníteni a képet. A lehető legjobb illeszkedés beállításához használja a tv-készülék Képformátum menüjét.
• Csökkentse a kívánt képminőség eléréséhez szükséges minimumra a fényerő és a kontraszt értékét. A magas értékek felgyorsíthatják a kiégési
folyamatot.
• Rendszeresen használja a tv-készülék összes olyan funkcióját, amely mérsékli a képernyőbeégést és a képernyő kiégését. A további részleteket lásd
az elektronikus útmutatóban.
Felszerelési távolság
Tartsa be az előírt távolságot a készülék és más tárgyak (pl. a fal) között a megfelelő szellőzés biztosítása érdekében.
Ennek elmulasztása tüzet okozhat, vagy a készülék meghibásodását eredményezheti a megemelkedő belső hőmérséklet miatt.
✎
Állvány vagy falikonzol használata esetén csak a Samsung Electronics termékeit használja.
• Más gyártó alkatrészeinek használata a készülék meghibásodásához vagy a készülék leesésének következtében személyi sérüléshez vezethet.
✎
A termék külseje típustól függően eltérhet a képen láthatótól.
• Óvatosan érjen a tv-készülékhez, mert egyes részei forrók lehetnek.
Felszerelés állványra. Felszerelés falikonzolra.
10 cm
10 cm
10 cm10 cm
10 cm
10 cm
10 cm
A termék hulladékba helyezésének módszere(WEEE – Elektromos és elektronikus berendezések hulladékai)
Ez a jelzés a terméken, tartozékain vagy dokumentációján arra utal, hogy hasznos élettartama végén a terméket és elektronikus
tartozékait (pl. töltőegység, fejhallgató, USB kábel) nem szabad a háztartási hulladékkal együtt kidobni. A szabálytalan hulladékba
helyezés által okozott környezet- és egészségkárosodás megelőzése érdekében ezeket a tárgyakat különítse el a többi hulladéktól,
és felelősségteljesen gondoskodjon az újrahasznosításukról az anyagi erőforrások fenntartható újrafelhasználásának elősegítése
érdekében. A háztartási felhasználók a termék forgalmazójától vagy a helyi önkormányzati szervektől kérjenek tanácsot arra
vonatkozóan, hová és hogyan vihetik el az elhasznált termékeket a környezetvédelmi szempontból biztonságos újrahasznosítás
céljából. Az üzleti felhasználók lépjenek kapcsolatba beszállítójukkal, és vizsgálják meg az adásvételi szerződés feltételeit. Ezt a
terméket és tartozékait nem szabad az egyéb közületi hulladékkal együtt kezelni.
A termékhez tartozó akkumulátorok megfelelő ártalmatlanítása
(Az Európai Unió területén és más, önálló akkumulátorleadó rendszerrel rendelkező európai országok területén alkalmazandó.)
Az akkumulátoron, a kézikönyvön vagy a csomagoláson szereplő jelzés arra utal, hogy hasznos élettartama végén a terméket nem
szabad egyéb háztartási hulladékkal együtt kidobni. Ahol szerepel a jelzés, a Hg, Cd vagy Pb kémiai elemjelölések arra utalnak,
hogy az akkumulátor az EK 2006/66. számú irányelvben rögzített referenciaszintet meghaladó mennyiségű higanyt, kadmiumot
vagy ólmot tartalmaz. Az akkumulátorok nem megfelelő kezelése esetén ezek az anyagok veszélyt jelenthetnek az egészségre vagy
a környezetre. A természeti erőforrások megóvása és az anyagok újrafelhasználásának ösztönzése érdekében kérjük, különítse el
az akkumulátorokat a többi hulladéktól és vigye vissza a helyi, ingyenes akkumulátorleadó helyre.
Magyar — 2
[UD6500-XH]BN68-03776D-00L17.indb 2 2011-05-03 오후 2:22:54
Tartozékok
✎
Győződjön meg róla, hogy a tv-készülék következő tartozékai rendelkezésre állnak. Ha bármelyik tartozék
hiányzik, forduljon a márkakereskedőhöz.
✎
A tartozékok színe és formája típustól függően eltérhet a képen láthatótól.
✎
A csomagban nem mellékelt kábelek külön szerezhetők be.
✎
A doboz kicsomagolásakor ellenőrizze, hogy a csomagolóanyagok mögött vagy között nem található-e
további tartozék.
[
VIGYÁZAT: ÜGYELJEN A MEGFELELŐ CSATLAKOZTATÁSRA, KÜLÖNBEN A VEZETÉKEK
KICSÚSZHATNAK A KÉSZÜLÉKBŐL
•
Távirányító és elemek (2 db AAA)
•
Törlőkendő
•
Használati útmutató
•
Tápkábel
•
Garanciajegy (nem minden régióban) / Biztonsági útmutató
Rögzítőgyűrű (4 db) Kábeltartó-rögzítő CI-kártyaadapter
AV/Komponens csatlakozó SCART-csatlakozó
Előfordulhat, hogy adminisztrációs díjat kell fizetnie, ha
– (a) szerelőt hív, de a termék nem hibás
(azaz ha Ön elmulasztotta elolvasni a használati útmutatót)
– (b) szervizbe viszi a terméket, de a termék nem hibás
(azaz ha Ön elmulasztotta elolvasni a használati útmutatót).
• Az adminisztrációs díj összegét munkatársaink még a munka megkezdése, illetve a kiszállás előtt közlik Önnel.
A kábeltartó-rögzítő összeszerelése
Magyar — 3
[UD6500-XH]BN68-03776D-00L17.indb 3 2011-05-03 오후 2:22:55

A vezérlőpanel
✎
A termék színe és formája típustól függően különbözhet.
✎
A tv-készülék hátulján vezérlőgombok találhatók. A gombok megérintésekor megjelennek a vezérlőikonok.
✎
A vezérlőpanel közelében elhelyezett bármilyen tárgy (pl. elektromos vezeték stb.) a képernyőmenü nem
kívánatos aktiválódását okozhatja.
A tv-készülék hátulja
A távirányító érzékelője Irányítsa a távirányítót a tv-készülék ezen pontjára.
Tápfeszültségjelző Ha a készülék be van kapcsolva, villog és elalszik, készenléti állapotban
pedig folyamatosan világít.
E
(Forrás)
Váltás a különböző bemeneti források között. A képernyőmenüben ezt a
gombot ugyanúgy használja, ahogy a távirányító ENTER
E
gombját.
m
(Menü)
A tv-készülék funkcióihoz tartozó képernyőmenü megjelenítése.
o
(Hangerő)
A hangerő beállítása. A képernyőmenüben a gombokat ugyanúgy használja,
ahogy a távirányítón a ◄ és a ► gombokat.
k
(Csatorna)
Csatornaváltás. A képernyőmenüben a
<>
gombokat ugyanúgy
használja, ahogy a távirányítón a ▲ és a ▼ gombokat.
P
(Tápellátás)
A tv-készülék ki- és bekapcsolása.
Készenléti üzemmód
A televíziót ne hagyja hosszabb ideig (például nyaralás idejére) készenléti állapotban. A készülék akkor is fogyaszt
egy kevés elektromos áramot, ha a be-/kikapcsoló gombbal ki van kapcsolva. Ilyenkor a legjobb, ha megszünteti
a tápcsatlakozást.
Magyar — 4
[UD6500-XH]BN68-03776D-00L17.indb 4 2011-05-03 오후 2:22:56
A távirányító
✎
Ez a különleges távirányító gyengén látók számára készült, ezért a be-/kikapcsoló, a csatorna és a
hangerő gomb Braille-írással van jelölve.
POWER
ON/OFF
A televízió be- és kikapcsolása.
A távirányító világításának be- vagy
SOURCE
kikapcsolása. Bekapcsolt állapotban
Az elérhető videoforrások megjelenítése
a távirányító rövid időre megvilágítja a
és kiválasztása.
megnyomott gombot.
(Ha úgy használja a távirányítót, hogy ez a
gomb be van kapcsolva, csökken az elem
élettartama.)
Közvetlen hozzáférés a csatornákhoz.
Váltás a Teletext BE, Dupla, Mix vagy KI
TTX/MIX
PRE-CH
Visszalépés az előző csatornára.
opciók között.
MUTE
A hang átmeneti kikapcsolása.
A hangerő beállítása.
Csatornaváltás.
CH LIST
A képernyőmenü megnyitása.
A csatornalista megjelenítése a képernyőn.
Különféle alkalmazások szolgáltatásainak
Az elektronikus műsorújság (EPG)
elérése.
megjelenítése.
A gyakran használt funkciók gyors
Információk megjelenítése a tv-képernyőn.
kiválasztása.
A képernyőmenü-elem kiválasztása és a
u
/
d
/
l
/
r
: a kurzor mozgatása a
menüben található értékek módosítása.
képernyőmenü valamelyik elemére.
ENTER
E
: a menü kiválasztása és az
Visszatérés az előző menübe.
adott elem értékének módosítása.
Kilépés a képernyőmenüből.
Ezek a gombok például a
Csatornakezelő, SMART HUB menühöz
TV
használatosak.
SOCIAL
SOCIAL TV: a Social TV képernyő
E-MANUAL
P.SIZE
AD/SUBT.
megjelenítése.
SEARCH: támogatás az ajánlott keresőszó
és a keresési funkcióhoz.
W: 3D jellel rendelkező videó beállítása.
Ezek a gombok egy bizonyos funkcióval
E-MANUAL: : Az e-Manual megjelenítése.
használhatók. A részleteket lásd az
P.SIZE: A Képméret kiválasztása.
elektronikus útmutatóban.
AD/SUBT.: A hangalámondás be- és
kikapcsolása. Bizonyos régiókban nem
elérhető. / A digitális felirat megjelenítése.
Az elemek behelyezése (elemek mérete: AAA)
Magyar — 5
[UD6500-XH]BN68-03776D-00L17.indb 5 2011-05-03 오후 2:22:57
A bemeneti forrás módosítása
✎
Amikor a számítógépet HDMI-kábellel a HDMI IN
1(DVI) porthoz csatlakoztatja, a tv-készüléket PC
értékre kell állítani a Névszerkesztés pontban.
Forrás
✎
Amikor a számítógépet HDMI–DVI kábellel
A tv-készülék vagy egyéb, a tv-
SOURCE
a HDMI IN 1(DVI) porthoz csatlakoztatja, a
készülékhez kapcsolódó külső bemeneti
tv-készüléket DVI PC értékre kell állítani a
forrás, pl. DVD-/Blu-ray lejátszó,
Névszerkesztés pontban.
kábeltelevíziós egység vagy műholdvevő
✎
Amikor AV-eszközöket csatlakoztat HDMI–
beltéri egység kiválasztása.
DVI kábellel a HDMI IN 1(DVI) porthoz, a tv-
■ TV / Külső / PC / AV / Komponens
készüléket DVI-eszközök értékre kell állítani a
/ HDMI1/DVI / HDMI2 / HDMI3 /
Névszerkesztés pontban.
HDMI4 / USB / AllShare
✎
A Forrás alatt a csatlakoztatott
Kedv. szerk.
bemenetek kiemelve szerepelnek.
A Forrás pont alatt nyomja meg a TOOLS gombot a
✎
A Külső és a PC lehetőség mindig aktív marad.
Kedv. szerk. opció kiválasztásához. A külső bemeneti
✎
Ha a csatlakoztatott külső eszközök nincsenek
forrást beállíthatja Kedvencek értékre.
kiemelve, nyomja meg a piros gombot. A tv-
készülék megkeresi a csatlakoztatott eszközöket.
Információ
A kiválasztott külső eszközre vonatkozó információk
Névszerkesztés
megtekintése.
A külső bemeneti forrás nevének megadásához a
Forrás menüpontban nyomja meg a TOOLS gombot.
Frissítés
■ Videomagnó / DVD / Kábelvevő egység /
Műholdvevő / PVR-vevő / AV-vevő egység
A Forrás alatt, ha a külső eszközök nincsenek
/ Játék / Videokamera / PC / DVI PC / DVI-
megjelenítve, nyomja meg a TOOLS gombot a
eszközök / TV / IPTV / Blu-ray / HD DVD /
Frissítés kiválasztásához. Search for connected
DMA: A bemeneti csatlakozókhoz csatlakoztatott
devices.
eszközök nevének megadásával megkönnyíthető
a bemeneti forrás kiválasztása.
✎
A termék kábeles csatlakoztatásához csak az alábbi maximális vastagságú kábeleket használja:
•
Maximális vastagság — 0,55
«
(14 mm)
Antenna csatlakoztatása
A tv-készülék legelső bekapcsolásakor az alapbeállítások automatikusan elvégezhetők.
✎
Ehhez szükséges: A hálózati csatlakozó és az antenna csatlakoztatása.
VHF/UHF
antenna
Satellite
Kábel
vagy
Magyar — 6
[UD6500-XH]BN68-03776D-00L17.indb 6 2011-05-03 오후 2:22:57
Plug & Play (Kezdeti beállítás)
A tv-készülék legelső bekapcsolásakor a képernyőn egymás után megjelenő utasítások segítik az alapbeállítások
elvégzését. Nyomja meg az POWER
P
gombot. A Plug & Play funkció csak akkor áll rendelkezésre, ha a
Bemenet beállítása TV.
✎
A tv-készülék bekapcsolása előtt ellenőrizze, hogy csatlakoztatva van-e az antennakábel (6. oldal).
✎
Az opció az országtól függően eltérő lehet.
A képernyőmenü
Nyomja meg a ▲ vagy a ▼ gombot, majd nyomja meg az ENTER
E
gombot.
1
nyelvének kiválasztása
Válassza ki a képernyőn megjelenő menü kívánt nyelvét.
A hálózat beállítása
A hálózati kapcsolat beállítása. Indításhoz nyomja meg az ENTER
E
gombot. Ha nem
2
ismeri a hálózat beállítási adatait, vagy ha később szeretné elvégezni a beállítást, válassza
az Ugrás lehetőséget. Javasoljuk, hogy most ugorja át a hálózati beállításokat, és tekintse
meg a beállítási követelményeket és utasításokat az elektronikus útmutató „Hálózat menü”
című részében, illetve a jelen útmutató Hálózati kapcsolat című részében (13. oldal).
Később a Hálózat menü segítségével végezheti el a hálózati kapcsolat beállítását.
Szoftverfrissítés A tv-készülék szoftverének frissítéséhez válassza a Következő gombot. A tv-
3
készülék automatikusan elvégzi a frissítést, ha frissíteni kell a szoftvert. Ha
később szeretné elvégezni a frissítést, válassza az Ugrás lehetőséget. További
tájékoztatást az elektronikus útmutató „Szoftverfrissítés” című részében talál
(Preferenciabeállítások → Terméktámogatás menü).
✎
Ez a hálózat állapotától függően hosszabb időt is igénybe vehet.
A használati mód
Nyomja meg a ▲ vagy ▼ gombot, és válassza ki a Otthon lehetőséget, majd nyomja meg
4
kiválasztása
kétszer az ENTER
E
gombot.
Válassza ki az Otthon lehetőséget. Az Üzlet mód üzemmódot kereskedelmi környezetbe
szánták.
Ország kiválasztása
Nyomja meg a ▲ vagy a ▼ gombot, majd nyomja meg az ENTER
E
gombot.
5
(országfüggő)
Válassza ki a megfelelő országot.
✎
Miután kiválasztotta az országot az Ország menüben, bizonyos modellek
felkínálják a PIN kód beállításának lehetőségét.
✎
A PIN kód nem lehet „0-0—0-0”.
✎
Az opció az országtól függően eltérő lehet.
Az Óra mód beállítása Az Óra mód automatikusan vagy manuálisan is beállítható.
6
A keresési opciók
Nyomja meg a ▲ vagy a ▼ gombot, majd nyomja meg az ENTER
E
gombot. A tárolni
7
kiválasztása az
kí
vánt csatornaforrás kiválasztása. Ha a kiválasztott antennaforrás Kábel, a következő
automatikus hangoláshoz
lépésben megadhatja a csatornákhoz tartozó számértékeket (csatornafrekvenciákat).
További információkért lásd a Csatorna → Csatornák tárolása → Automatikus hangolás.
✎
Ha a Légi vagy Kábel lehetőséget választotta először: Az összes Légi vagy Kábel
csatorna tárolása után megjelenik a Műholdas csatornák tárolására szolgáló lépés.
✎
Ha a Műhold lehetőséget választotta először: Az összes Műholdas csatorna tárolása
után megjelenik a Légi vagy Kábel csatornák tárolására szolgáló lépés.
✎
Az ENTER
E
gomb megnyomásával bármikor megszakíthatja a tárolás folyamatát.
Kellemes tévézést! Ha a jelenleg sugárzott műsort szeretné nézni, válassza a Bezárás lehetőséget. A Smart
8
Hub használatához válassza a Smart Hub lehetőséget. A Smart Hub elindul. További
részletes tájékoztatásért tekintse meg az elektronikus útmutató „Smart Hub” című részét.
Ha vissza kívánja állítani ezt a funkciót…
Válassza a Rendszer – Plug & Play (Kezdeti beállítás) lehetőséget. Adja meg 4 számjegyű PIN kódját. Az
alapértelmezett PIN kód „0-0-0-0”. A PIN kód megváltoztatásához használja a PIN módosítása funkciót.
A Plug & Play (MENU→ Rendszer) funkciót otthon újból futtatni kell annak ellenére, hogy ez az üzletben már
megtörtént.
✎
Ha elfelejtette a PIN kódot, a kód „0-0-0-0”-ra történő visszaállításához nyomja meg a távirányító alábbi
gombjait a következő sorrendben: POWER (ki) → MUTE → 8 → 2 → 4 → POWER (be).
Magyar — 7
[UD6500-XH]BN68-03776D-00L17.indb 7 2011-05-03 오후 2:22:58
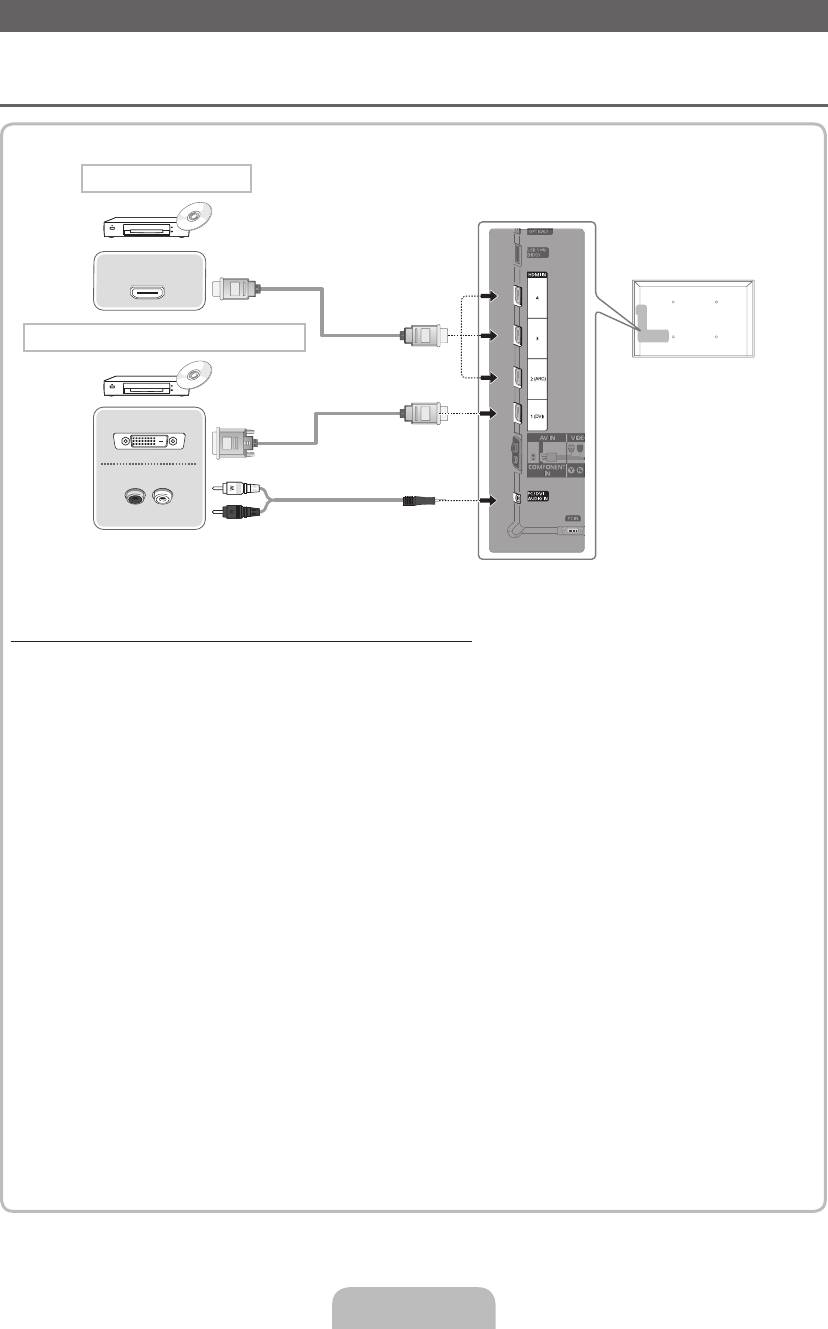
AV-eszköz csatlakoztatása
Csatlakoztatható eszközök: DVD, Blu-ray lejátszó, HD-dekóder, HD beltéri egység,
¦
műholdvevő egység, videomagnó
HDMI-csatlakoztatás
HDMI OUT
HDMI–DVI csatlakoztatás
DVI OUT
AUDIO OUT
R-AUDIO-L
HDMI- vagy HDMI–DVI kábel (legfeljebb 1080p) használata
✎
HDMI IN 1(DVI), 2(ARC), 3, 4 / PC/DVI AUDIO IN
x
A jobb kép- és hangminőség érdekében digitális eszközök csatlakoztatásához használjon HDMI-
kábelt.
x
A HDMI-kábel támogatja a digitális video— és audiojeleket, és feleslegessé teszi a hangkábel
használatát.
– Ha olyan digitális eszközt kíván a tv-készülékhez csatlakoztatni, amely nem támogatja a HDMI-
kimenetet, használjon HDMI-DVI és hangkábeleket.
x
Ha olyan külső eszköz csatlakozik a tv-készülékhez, amely egy korábbi verziójú HDMI üzemmódot
használ, előfordulhat, hogy a kép hibásan (vagy egyáltalán nem) jelenik meg, vagy a hang nem
működik. Ebben az esetben érdeklődjön a külső eszköz gyártójánál a HDMI verzióval kapcsolatban,
és ha az elévült, kérjen frissítést.
x
Ellenőrizze, hogy 14 mm vagy kisebb vastagságú HDMI-kábelt használ-e.
x
Mindenképpen tanúsított HDMI-kábelt vásároljon. Ellenkező esetben előfordulhat, hogy nem jelenik
meg kép, illetve csatlakozási hiba léphet fel.
x
Alapkivitelű nagysebességű HDMI-kábel vagy Ethernet kábel használata javasolt. A készülék nem
támogatja az Ethernet funkciót HDMI-csatlakozáson keresztül.
x
A készülék támogatja a 3D és az ARC (Audio Return Channel, Visszirányú hangcsatorna) funkciókat
HDMI-kábelen keresztül. Ne feledje, hogy az ARC funkciót csak aHDMI IN 2(ARC) port támogatja.
x
Az ARC funkció digitális hang kimenetét teszi lehetővé a HDMI IN 2(ARC) csatlakozón keresztül.
Csak akkor érhető el, amikor a TV olyan audiovevőhöz csatlakozik, amely támogatja az ARC funkciót.
Magyar — 8
[UD6500-XH]BN68-03776D-00L17.indb 8 2011-05-03 오후 2:22:58
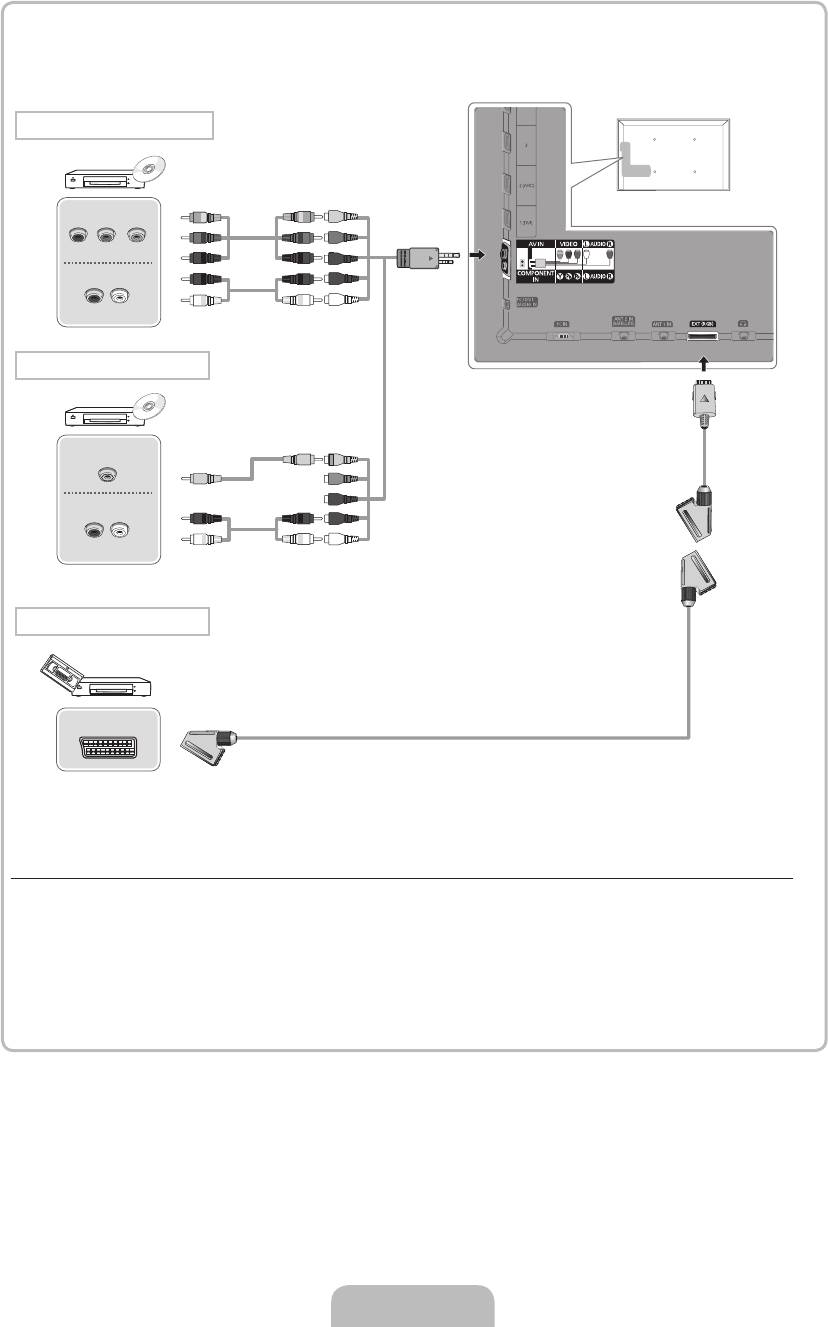
Komponens csatlakoztatás
COMPONENT OUT
G
G
B
B
P
R
P
B
Y
R
R
AUDIO OUT
R
R
W
W
R-AUDIO-L
AV-csatlakoztatás
VIDEO OUT
Y
Y
AUDIO OUT
RW
R W
R-AUDIO-L
SCART-csatlakoztatás
EXT
Komponenskábel (legfeljebb 1080p) vagy audio-/videokábel (csak 480i) és SCART-kábel használata
✎
Külső módban a DTV-kimenet csak az MPEG SD képet és hangot támogatja.
✎
Az AV IN bemenethez való csatlakoztatás esetén az AV IN [VIDEO] csatlakozó színe (zöld) nem egyezik
meg a videokábel színével (sárga).
✎
A legjobb képminőség elérése érdekében a komponenscsatlakozót ajánlott az A/V csatlakozón
keresztül használni.
Magyar — 9
[UD6500-XH]BN68-03776D-00L17.indb 9 2011-05-03 오후 2:22:59
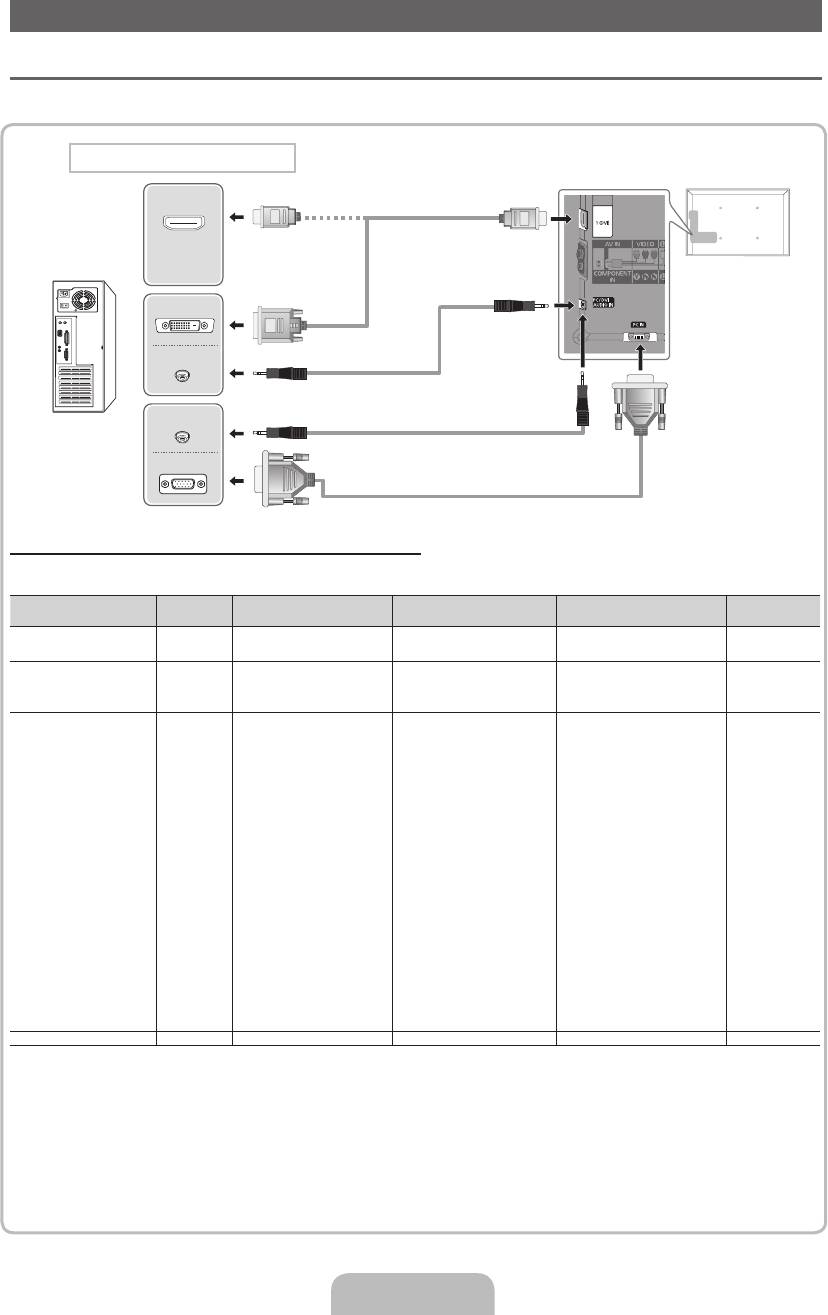
Számítógép vagy audioeszköz csatlakoztatása
¦ HDMI-kábel vagy HDMI–DVI vagy D-sub kábel használata
✎
A számítógéptől függően előfordulhat, hogy a HDMI-kábellel való csatlakoztatás nem támogatott.
Számítógép csatlakoztatása
HDMI OUT
DVI OUT
AUDIO OUT
AUDIO OUT
PC OUT
Megjelenítési módok (D-Sub és HDMI–DVI bemenet)
Az optimális felbontás 1920 × 1080 60 Hz-en.
Üzemmód Felbontás Vízszintes frekvencia (kHz) Függőleges frekvencia (Hz) Képpontóra-frekvencia (MHz)
Szinkronizációs
polaritás (V/F)
640 × 350
31,469
70,086
25,175
+/-
IBM
720 × 400
31,469
70,087
28,322
-/+
640 × 480
35,000
66,667
30,240
-/-
MAC
832 × 624
49,726
74,551
57,284
-/-
1152 × 870
68,681
75,062
100,000
-/-
640 × 480
31,469
59,940
25,175
-/-
640 × 480
37,861
72,809
31,500
-/-
640 × 480
37,500
75,000
31,500
-/-
800 × 600
37,879
60,317
40,000
+/+
800 × 600
48,077
72,188
50,000
+/+
800 × 600
46,875
75,000
49,500
+/+
1024 × 768
48,363
60,004
65,000
-/-
1024 × 768
56,476
70,069
75,000
-/-
1024 × 768
60,023
75,029
78,750
+/+
VESA DMT
1152 × 864
67,500
75,000
108,000
+/+
1280 × 1024
63,981
60,020
108,000
+/+
1280 × 1024
79,976
75,025
135,000
+/+
1280 × 800
49,702
59,810
83,500
-/+
1280 × 800
62,795
74,934
106,500
-/+
1280 × 960
60,000
60,000
108,000
+/+
1360 × 768
47,712
60,015
85,500
+/+
1440 × 900
55,935
59,887
106,500
-/+
1440 × 900
70,635
74,984
136,750
-/+
1680 × 1050
65,290
59,954
146,250
-/+
VESA DMT/ DTV CEA 1920 × 1080p 67,500 60,000 148,500 +/+
✎
MEGJEGYZÉS
x
HDMI–DVI csatlakoztatás esetén a HDMI IN 1(DVI) csatlakozót kell használnia.
x
A sorváltós módot a rendszer nem támogatja.
x
Nem szabványos videoformátum kiválasztása esetén a készülék működése rendellenes lehet.
x
A készülék az önálló és az összetett módokat támogatja. Az SOG-módot (Sync On Green) nem támogatja.
Magyar — 10
[UD6500-XH]BN68-03776D-00L17.indb 10 2011-05-03 오후 2:23:00
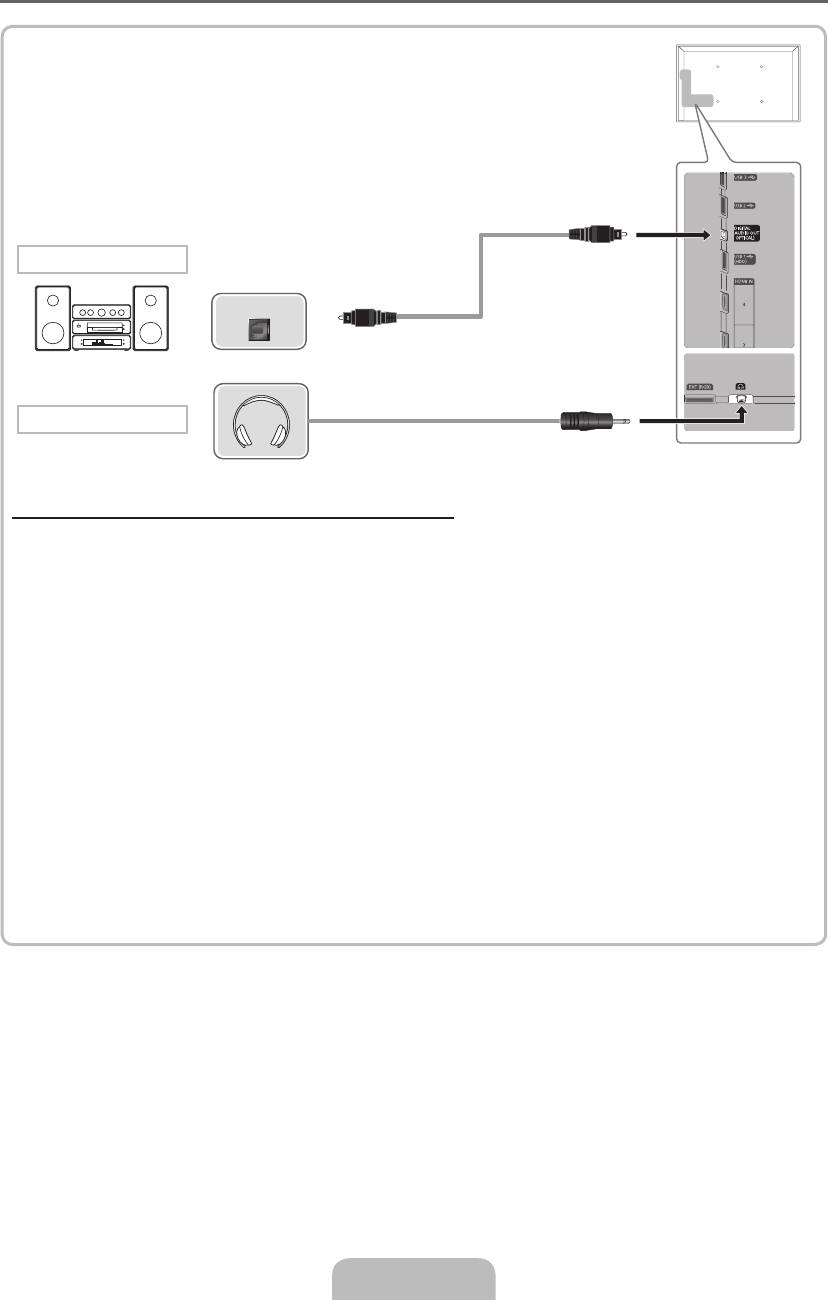
¦ Csatlakoztatható eszközök: digitális hangrendszer, erősítő, házimozi
Audio csatlakozó
OPTICAL
Fejhallgató csatlakoztatása
Optikai (digitális) vagy fejhallgató-csatlakozó használata
✎
DIGITAL AUDIO OUT (OPTICAL)
x
Amikor a digitális hangrendszer a DIGITAL AUDIO OUT (OPTICAL) kimenethez van csatlakoztatva,
csökkentse mind a tv-készülék, mind a rendszer hangerejét.
x
5.1 csatornás hang akkor hallható, ha a tv-készülék olyan külső eszközhöz van csatlakoztatva, amely
támogatja az 5.1 csatornás hangot.
x
Ha a vevőegység (pl. házimozi-rendszer) be van kapcsolva, a hang a tv-készülék optikai csatlakozóján
keresztül hallható. Ha a tv-készülék DTV-jelet vesz, a tv-készülék 5.1 csatornás hangot küld a házimozi-
rendszer vevőberendezésének. Ha a forrás valamilyen digitális komponens, például DVD-/Blu-ray
lejátszó/kábeltelevíziós egység/műholdvevő (beltéri egység), amely HDMI-kábelen keresztül csatlakozik
a tv-készülékhez, a házimozi-rendszerről csak kétcsatornás hang hallható. Ha 5.1 csatornás hangot
szeretne hallgatni, a DVD-/Blu-ray lejátszó/kábeltelevíziós egység/műholdvevő (beltéri egység) digitális
kimenetének csatlakozóját közvetlenül az erősítőhöz vagy a házimozi-rendszerhez csatlakoztassa.
✎
Fejhallgató
H
: A fejhallgatót a készüléken található fejhallgató-kimenethez csatlakoztathatja. Amíg a
fejhallgató csatlakoztatva van, a beépített hangszórókból nem hallható hang.
x
Ha fejhallgatót csatlakoztat a tv-készülékhez, a hang funkció használata korlátozott lehet.
x
A fejhallgató és a tv-készülék hangereje külön állítható.
Magyar — 11
[UD6500-XH]BN68-03776D-00L17.indb 11 2011-05-03 오후 2:23:01
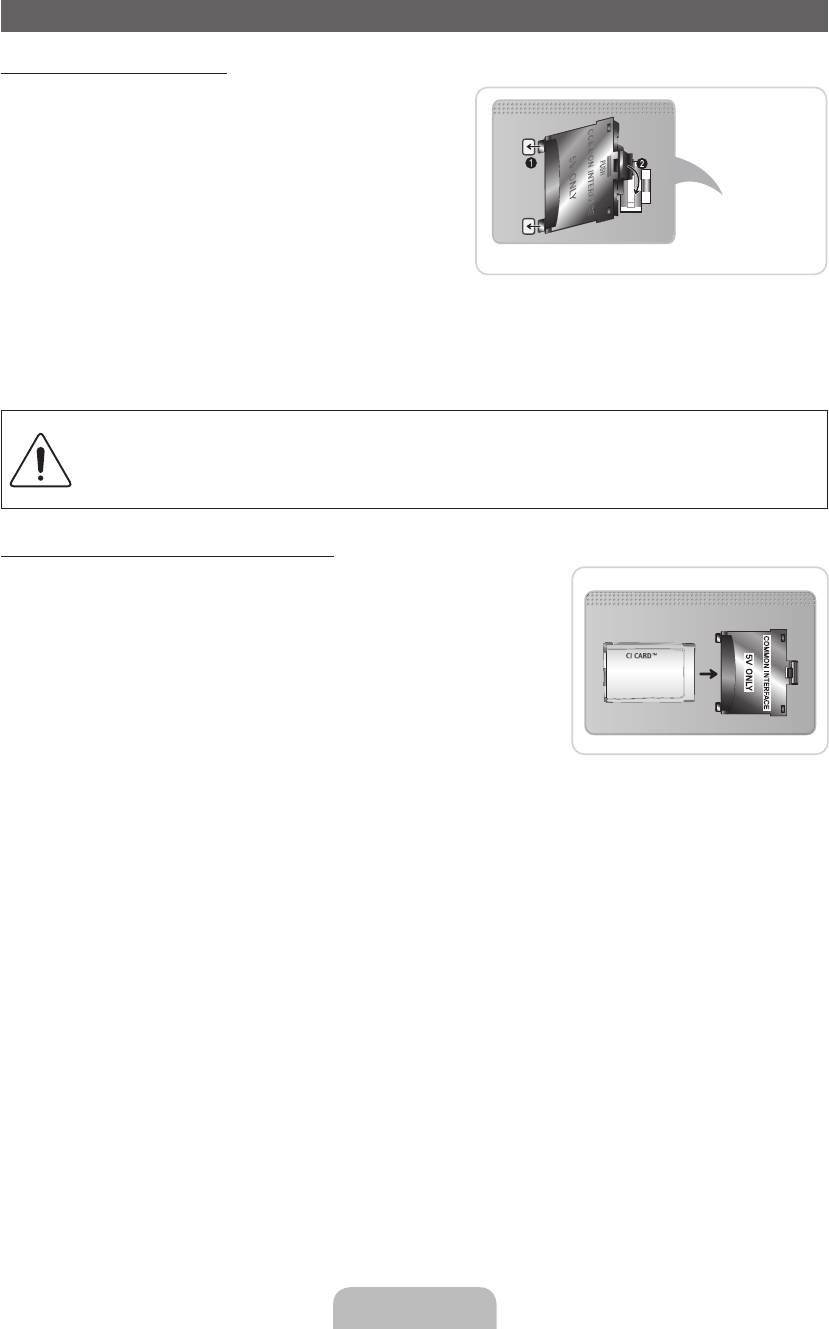
Csatlakoztatás KÖZÖS ILLESZTŐFELÜLETŰ CSATLAKOZÓK nyílásához
A CI-kártyaadapter rögzítése
Az adaptert az alább látható módon kell rögzíteni.
A CI-kártyaadapter csatlakoztatásához kövesse az alábbi
lépéseket.
✎
Javasoljuk, hogy az adaptert a falikonzol felszerelése
vagy a „CI vagy CI+ CARD” kártya behelyezése előtt
csatlakoztassa.
A tv-készülék hátulja
1. Helyezze be a CI-kártyaadaptert a terméken található
két nyílásból álló bemenetbe. 1.
✎
Keressen egy kétlyukas bemenetet a tv-készülék
hátulján. Található egy két nyílásból álló bemenet
a COMMON INTERFACE port mellett.
2. Csatlakoztassa a CI-kártyaadaptert a terméken található COMMON INTERFACE portba 2.
3. Helyezze be a „CI vagy CI+ CARD” kártyát.
A tv-készülék falra szerelése előtt javasoljuk, hogy előbb helyezze be a CI-kártyát. Felszerelés után
ez nehézségekbe ütközhet.
Rögzítse a CI-CARD a tv-készüléken, majd helyezze be a kártyát. Behelyezett kártyával a modult
nehéz rögzíteni.
A „CI vagy a CI+ CARD” kártya használata
Fizetős csatornák megtekintéséhez be kell helyezni a „CI vagy CI+ CARD”
kártyát.
•
Ha nem helyezi be a „CI vagy CI+ CARD” kártyát, bizonyos
csatornáknál a „Kódolt jel” üzenet jelenik meg a képernyőn.
•
Körülbelül 2–3 perc múlva megjelenik a telefonszámot, a „CI vagy
CI+ CARD” kártya azonosítóját, a készülék azonosítóját és egyéb
adatokat tartalmazó párosítási információ. Ha hibaüzenet jelenik meg,
lépjen kapcsolatba a szolgáltatóval.
•
Ha a csatornaadatok konfigurálása befejeződött, megjelenik a
csatornalista frissítésének végrehajtását jelző „Frissítés kész” üzenet.
✎
MEGJEGYZÉS
x
A „CI vagy CI+ CARD” kártya a helyi kábelszolgáltatótól szerezhető be.
x
Eltávolításkor óvatosan húzza ki a „CI vagy CI+ CARD” kártyát, mivel az leesés esetén károsodhat.
x
A „CI vagy CI+ CARD” kártyát a kártyán jelzett irányba helyezze be.
x
A COMMON INTERFACE nyílás elhelyezkedése a készülék típusától függően eltérő lehet.
x
A „CI vagy CI+ CARD” bizonyos országokban és régiókban nem támogatott. Tájékoztatásért forduljon
márkakereskedőjéhez.
x
Ha problémák merülnének fel, lépjen kapcsolatba a szolgáltatóval.
x
Helyezze be az aktuális antennabeállításokat támogató „CI vagy CI+ CARD” kártyát. Előfordulhat, hogy a
kép torz vagy nem jelenik meg.
Magyar — 12
[UD6500-XH]BN68-03776D-00L17.indb 12 2011-05-03 오후 2:23:02
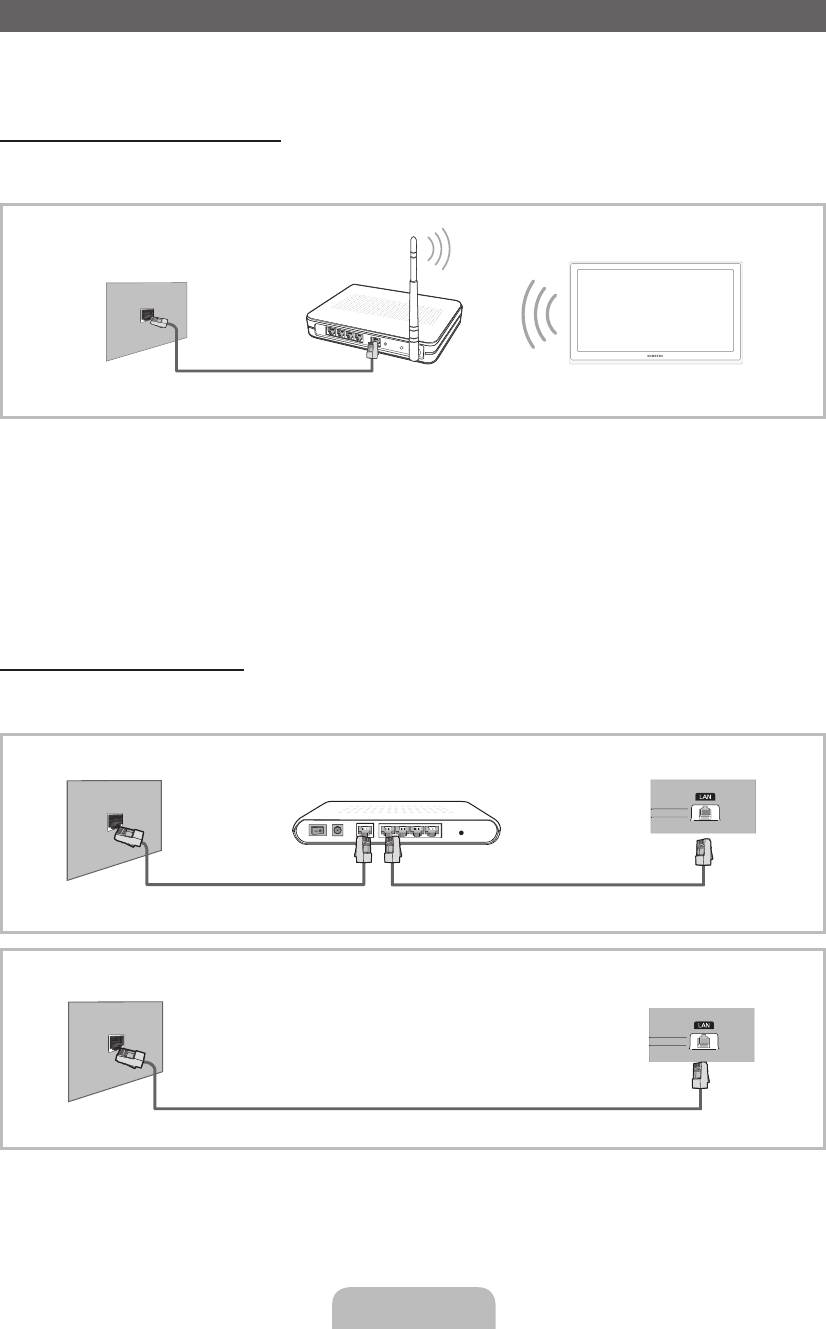
Hálózati kapcsolat
A tv-készüléket LAN hálózaton keresztül, szabványos vezeték nélküli útválasztó vagy modem használatával
csatlakoztathatja. Z siecią bezprzewodową można połączyć się przy użyciu wbudowanego adaptera
bezprzewodowej sieci LAN firmy Samsung.
Hálózati kapcsolat – Vezeték nélküli
A tv-készüléket LAN hálózaton keresztül, szabványos vezeték nélküli útválasztó vagy modem használatával
csatlakoztathatja.
Vezeték nélküli IP-megosztó
Fali LAN-
(Útválasztó DHCP-
TV
csatlakozó
kiszolgálóval)
LAN-kábel
A Samsung vezeték nélküli LAN-adapter támogatja az IEEE 802,11a/b/g és n kommunikációs protokollokat. A
Samsung az IEEE 802,11n használatát javasolja. Ha videót játszik le IEEE 802,11b/g kapcsolatnál, előfordulhat,
hogy a videó lejátszása akadozik.
A legtöbb vezeték nélküli hálózatnak része egy biztonsági rendszer, amely a hálózathoz hozzáférési ponton (ez
általában egy vezeték nélküli IP-megosztó) keresztül csatlakozni kívánó eszközöktől egy titkosított biztonsági
kód, a hozzáférési kulcs megadását kéri.
Ha a Valódi magas átbocsátóképességű (Greenfield) 802,11n módot választja, és ha a vezeték nélküli útválasztó
titkosítását WEP, TKIP vagy TKIP-AES (WPS2Mixed) típusúra állítja, a Samsung TV-k az új Wi-Fi tanúsítványok
előírásainak értelmében nem támogatják a csatlakozást.
Hálózati kapcsolat – Vezetékes
A hálózati beállítástól függően két fő módon csatlakoztatható a tv-készülék a hálózathoz kábel használatával.
Ezek az alábbi ábrákon láthatók:
Fali modemcsatlakozó
Külső modem
A tv-készülék hátlapja
(ADSL/VDSL/Kábeltévé)
Modemkábel
LAN-kábel
Fali LAN-csatlakozó
A tv-készülék hátlapja
LAN-kábel
✎
10 Mb/s alatti hálózati sebesség esetén nem támogatott.
Magyar — 13
[UD6500-XH]BN68-03776D-00L17.indb 13 2011-05-03 오후 2:23:04
Аннотация для Телевизора Samsung UE40D6510WS в формате PDF
Топ 10 инструкций
Другие инструкции
-
Инструкции по эксплуатации
1

Samsung UE40D6510WS инструкция по эксплуатации
(318 страниц)
- Языки:Русский
-
Тип:
PDF -
Размер:
13.67 MB -
Описание:
3D-телевизор
Просмотр
На NoDevice можно скачать инструкцию по эксплуатации для Samsung UE40D6510WS. Руководство пользователя необходимо для ознакомления с правилами установки и эксплуатации Samsung UE40D6510WS. Инструкции по использованию помогут правильно настроить Samsung UE40D6510WS, исправить ошибки и выявить неполадки.
![]()
E-MANUAL
imagine the possibilities
Thank you for purchasing this Samsung product. To receive more complete service, please register your product at
www.samsung.com/register
Model______________ Serial No.______________

Contents
|
Channel |
Preference |
||||
|
• |
Using the INFO button (Now & Next guide) 3 |
• |
Setting the network |
||
|
• |
Using the Channel Menu |
4 |
• |
Setting the Time |
|
|
• |
Using the Channel |
12 |
• |
Locking Programme |
|
|
• |
Economical Solutions |
||||
|
• |
Using Favourite Channels |
22 |
|||
|
• |
Other Features |
||||
|
• |
Memorising Channels |
24 |
|||
|
• Picture In Picture (PIP) |
|||||
|
• Using the Channel (for satellite TV) |
33 |
||||
|
• |
Support |
||||
|
• Using Favourite Channels (for satellite TV) |
38 |
||||
|
• Memorising Channels (for satellite TV) |
40 |
Advanced Features |
|||
|
• |
Other Features |
52 |
• |
Using the 3D function |
Basic Features
•Changing the Preset Picture Mode
•Adjusting Picture Settings
•Changing the Picture Size
•Changing the Picture Options
•Setting up the TV with Your PC
•Changing the Preset Sound Mode
•Adjusting Sound Settings
•Viewing TV using the 3D function
•Getting Started with Smart Hub
•Setting up Smart Hub
55• Using the Smart Hub service
56• About AllShare™
57• Setting Up AllShare™
74• Setting Up Anynet+
•Switching between Anynet+ Devices
77• Listening through a Receiver
|
78 |
• Using the Media Contents |
|
• Connecting a USB Device |
224 |
|||
|
88 |
• Connecting to the PC through network |
225 |
||
|
• |
Recorded TV |
234 |
||
|
124 |
||||
|
• |
Videos |
245 |
||
|
133 |
||||
|
• |
Music |
253 |
||
|
136 |
||||
|
• |
Photos |
258 |
||
|
139 |
||||
|
• |
Media Contents — Additional Function |
260 |
||
|
147 |
||||
|
150 |
Other Information |
|||
|
• |
Troubleshooting |
273 |
||
|
157 |
• |
Connecting to a |
||
|
158 |
COMMON INTERFACE slot |
296 |
||
|
170 |
• |
Teletext Feature |
||
|
183 |
(depending on the country) |
300 |
||
|
186 |
• |
Anti-theft Kensington Lock |
305 |
|
|
207 |
• |
Licence |
307 |
|
|
208 |
||||
|
212 |
e-Manual Guide |
|||
|
217 |
• How to view the e-Manual |
310 |
||
|
219 |
||||
|
221 |
Product Guide |
317 |
||
|
223 |
||||
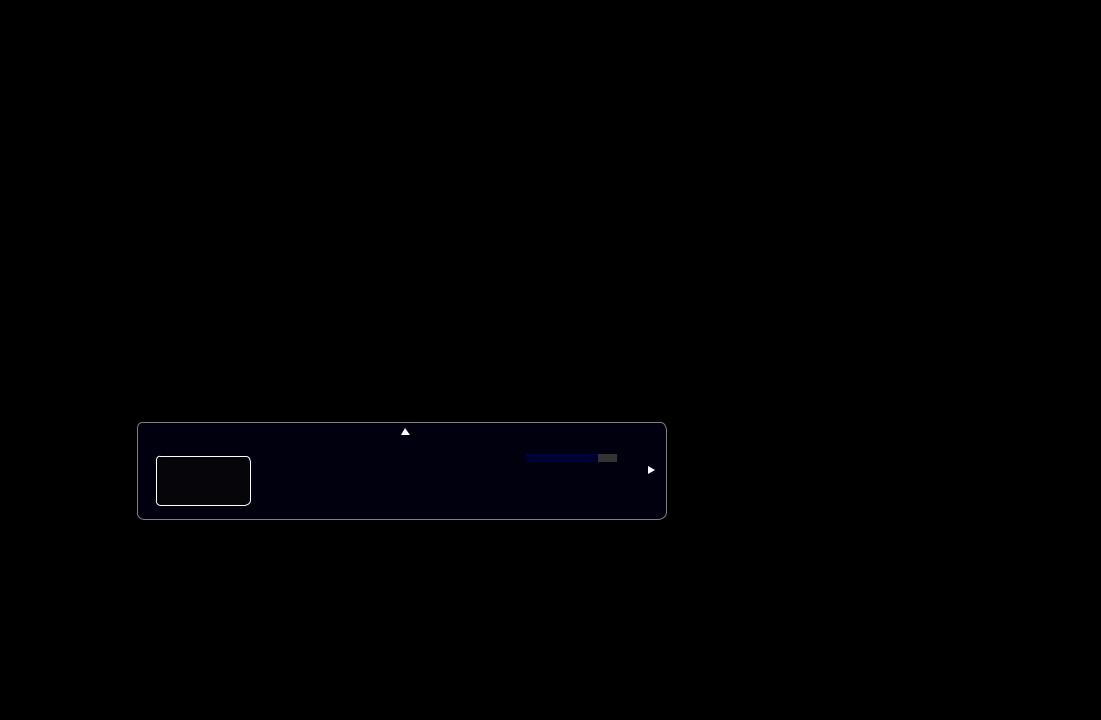
Channel
Using the INFO button (Now & Next guide)
The display identifies the current channel and the status of certain audio-video settings.
The Now & Next guide shows daily TV programme information for each channel according to the broadcasting time.
●● Scroll l, rto view information for a desired programme while watching the current channel.
|
●● Scroll u, dto view information for other channels. If you want to move to the |
||||
|
currently selected channel, press the ENTEREbutton. |
||||
|
abc1 |
18:11 Thu 6 Jan |
|||
|
DTV Air |
,Life On Venus Avenue |
18:00 ~ 6:00 |
||
|
15 |
Unclassified |
aInformation |
||
|
No Detaild Information |
||||
English
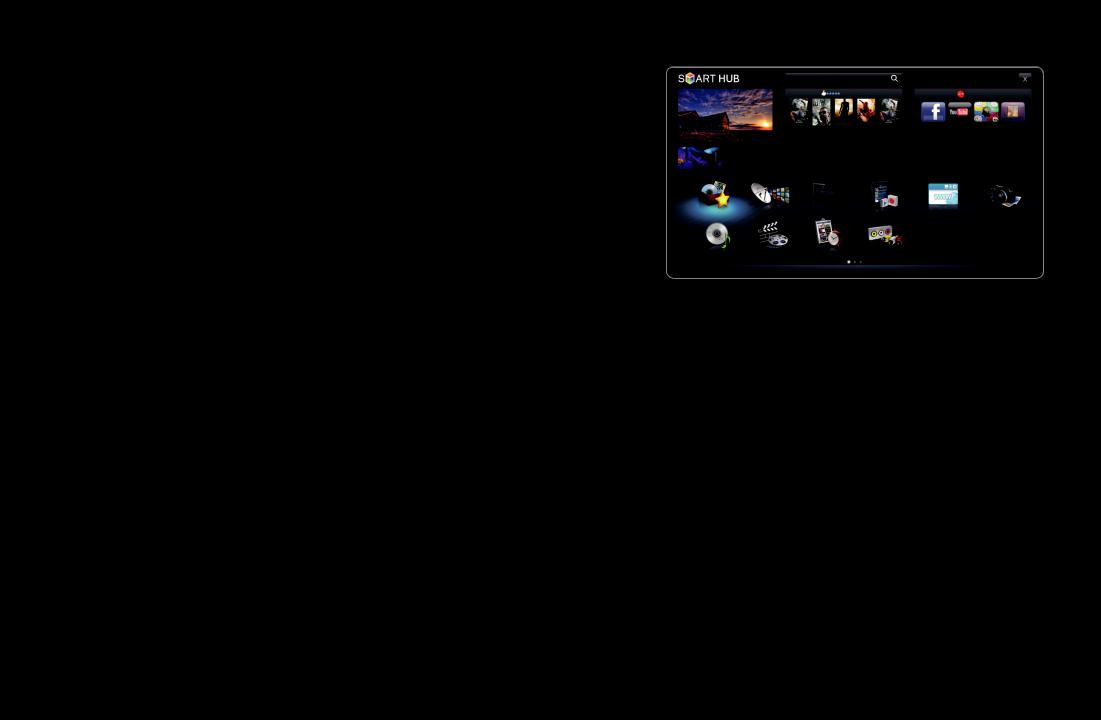
Using the Channel Menu
Press the SMART HUB button to select the menu you want to use. Each screen will be displayed.
■■ Guide
Search
Connect to the Internet and enjoy a variety of contents throuth Smart Hub.
This feature may not be available in some countries.
For some of the countries listed, local language characters might not be displayed properly.
|
Favourites |
Channel |
Guide |
Record TV |
Web Browser |
Videos |
|
The EPG (Electronic Programme Guide) |
Photos |
Music Schedule Manager Source |
|
|
aLogin bSort by {Edit Mode }Settings |
|||
|
information is provided by broadcasters. |
●● The displayed image may differ depending on the |
||
|
model. |
|||
|
Using programme schedules provided by |
|||
broadcasters, you can specify programmes you want to watch in advance so that the channel automatically changes to the selected programme channel at the specified time. Programme entries may appear blank or out of date depending on a channel status.
English
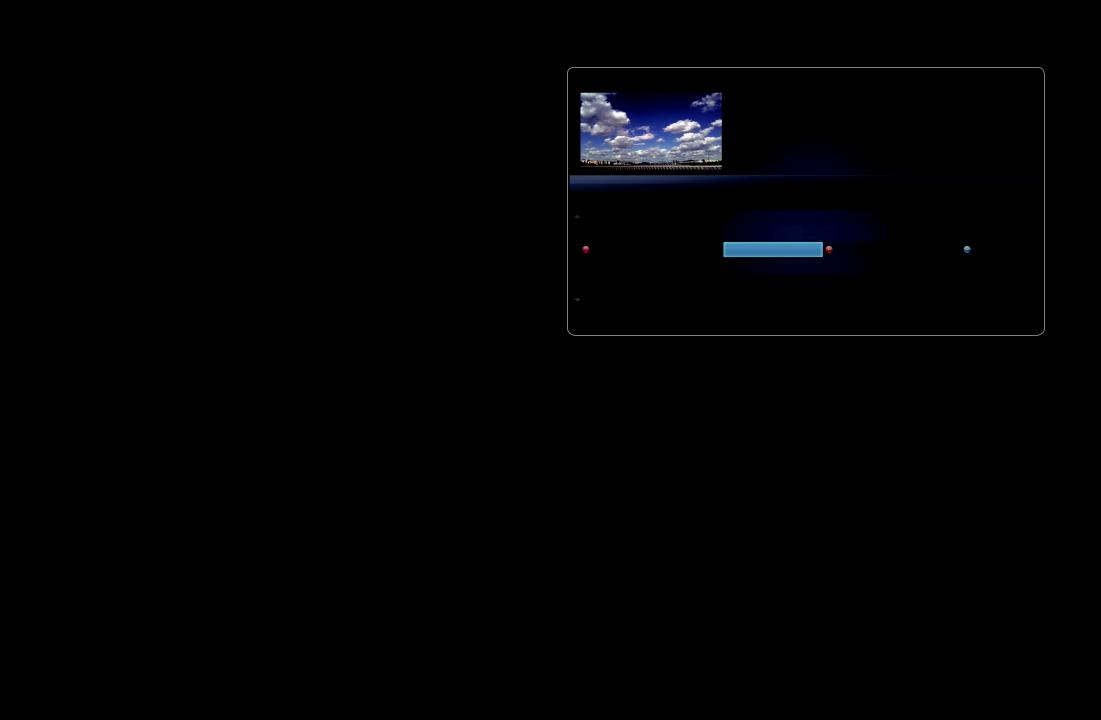
|
Using Channel View |
||||||
|
aRed (Sche. Mgr): Displays the |
Guide |
2:10 Tue 1 Jun |
||||
|
Schedule Manager. |
DTV Air 800 five |
|||||
|
18:00 — 18:30 |
||||||
|
Home and Away |
||||||
|
bGreen (-24 Hours): Viewing the list |
Drama |
|||||
|
Dani is devastated when scott makes clear his views on marriage… |
||||||
|
of programmes to be broadcasted |
Channel View — All Channels |
|||||
|
Today |
18:00 — 19:00 |
19:00 — 20:00 |
||||
|
before 24 hours. |
27 |
Discovery |
American Chopper |
No Information |
Tine Team |
|
|
800 |
five |
Home and… |
Fiv… Dark Angel |
|||
|
28 |
DiscoveryH&L |
Programmes resume at 06:00 |
||||
|
{Yellow (+24 Hours): Viewing the |
24 |
price-drop.tv |
No Information |
|||
|
6 |
R4DTT |
No Information |
||||
|
16 |
QVC |
QVC Selection |
||||
|
list of programmes to be broadcasted |
aSche. Mgr b |
-24 Hours {+24 Hours }Ch Mode ;Information kPage ESchedule |
||||
|
after 24 hours. |
}Blue (Ch Mode): Select the type of channels you want to display on the
Channel View window.
English

;Information: Displays details of the selected programme. k(Page): Move to next or previous page.
E(Watch / Schedule): When selecting the current programme, you can watch the selected programme. / When the selecting the next programme, you can reserve the selected programme.
English

■■ Schedule Manager
OO SMART HUB → Schedule Manager → ENTERE
You can view, modify or delete a channel you have reserved to watch.
Using the Timer Viewing
You can set a desired channel to be displayed automatically at the intended time. Set the current time first to use this function.
|
1. |
Press the ENTEREbutton to select Schedule Manager. The Schedule |
|
|
Manager screen will be displayed. |
||
|
2. |
Press the ENTEREbutton to add manual booking. A pop up screen will |
|
|
appear. |
||
|
3. |
Press the lor rbutton to select the Timer Viewing. |
English

4.Press the l/ r/ u/ dbuttons to set the Antenna, Channel, Repeat or
Start Time.
|
●● |
Antenna: Select the desired antenna source. |
||
|
●● |
Channel: Select the desired channel. |
||
|
●● |
Repeat: Select Once, Manual, Sat~Sun, Mon~Fri or Everyday to set at |
||
|
your convenience. If you select Manual, you can set the day you want. |
|||
|
NN The cmark indicates the date is selected. |
|||
|
●● |
Date: You can set the desired date. |
||
|
NN It is available when you select Once in Repeat. |
|||
|
●● |
Start Time: You can set the start time you want. |
English

NN On the Information screen, you can change or cancel a reserved information. ●● Cancel Schedules: Cancel a show you have reserved to watch.
●● Edit: Change a show you have reserved to watch. ●● Return: Return to the previous screen.
NN Only memorised channels can be reserved.
English

■■ Channel List
You can view all the channel searched.
OO When you press the CH LIST button on the remote control, Channel List screen will be displayed at once.
Channel List
All
1A
2B
3C
4D
5E
No Information
6F
7G
8H
9I
10J
11K
12L
|
Air |
aAntenna {Programme View LCh.Mode EWatch kPage |
●● The displayed image may differ depending on the model.
English
![]()
NN Using the operation buttons with the Channel List.
●● aRed (Antenna): Switches to Air, Cable or Satellite.
NN The option may differ depending on country.
|
●● |
{Yellow (Programme View / Channel View): Displays the programme when |
||
|
digital channel is selected. Returns to the channel view. |
|||
|
●● |
lrCh. Mode: Move to the type of channels you want to display on the |
||
|
Channel List screen. |
|||
|
NN The option may differ depending on country. |
|||
|
●● |
EWatch / Information: Watches the channel you select. / Displays details of |
||
|
the selected programme. |
|||
|
●● |
kPage: Move to next or previous page. |
English

Using the Channel
NN The option may differ depending on country.
■■ Channel
OO SMART HUB → Channel → ENTERE
Delete added channels or set favourites channels and use the programme guide for digital broadcasts. Change the antenna or channel settings using the menus in the top right corner of the screen.
English

●●  Antenna: Toggle among antenna sources. NN The option may differ depending on country.
●●  Sort: Sorting by Channel Number or Channel Name.
●●  Edit Mode: Delete channels assigned to Favourites. Refer to “Using the Favourite Channels” for details on how to assign a channel to favourite. Setting channels you watch frequently as Favourites.
|
1. Select the |
Edit Mode icon on the upper right of your screen, and then |
||
|
press the ENTEREbutton. |
|||
English

2.Press the arrow buttons to select a channel as a Favourite, and then press ENTERE. A check appears to the left of the channel.
NN You can select more than one channel.
NN Pressing ENTEREagain deselects the channel.
3.Select Edit Favourites at the bottom of your screen, and then press
ENTEREbutton. The Edit Favourites pop-up appears.
English

4.Highlight a group on the Favourites list, and then press ENTERE.
NN The Edit Favourites screen has five groups (Favourites 1, Favourites 2, etc.). You can add a Favourite channel to any one of the groups. Select a group using the up and down arrows on your remote.
5.Select OK, press ENTERE.
6.Press RETURNRto exit Edit Mode.
English

●● Using Edit Mode to Delete a Channel from the Channel List.
|
1. |
Select the Edit Mode icon on the upper right of your screen, and then |
||
|
press the ENTEREbutton. |
|||
|
2. |
Press the l/ r/ u/ dbuttons to select a channel, and then press |
||
|
ENTERE. A check appears to the left of the channel. |
|||
|
NN You can select more than one channel. |
|||
|
NN Pressing ENTEREagain deselects the channel. |
|||
|
3. |
Select Delete at the bottom of your screen, and then press ENTERE. |
||
|
A pop-up appears asking if you want to delete the item. |
English

4.Select OK, press ENTERE, and then press ENTEREagain. The channel is deleted from the Channel List.
5.Press RETURNRto exit Edit Mode.
●● Select All: Select all the channels.
English

Using the TOOLS button with the Channel
●● Upcoming programme (digital channels only): View details on the programme being aired on a selected digital channel.
●● Edit Favourites: Set channels you watch frequently as favourites.
1.Select the Edit Favourites, then press the ENTEREbutton.
2.Press the ENTEREbutton to select Favourite 1—5, then press the OK button.
|
NN One favourite channel can be added in several of favourite channels |
||
|
among Favourite 1—5. |
English

|
●● |
Lock / Unlock: Lock a channel so that the channel cannot be selected and |
|
|
viewed. |
||
|
NN NOTE |
||
|
●● This function is available only when the Channel Lock is set to On. |
||
|
●● |
Edit Channel Name (analogue channels only): Assign your own channel name. |
|
|
NN This function may not be supported depending on the region. |
||
|
●● |
Edit Channel Number : Select the channel number to change. |
|
|
NN This function may not be supported depending on the region. |
English

●● Search (when the Antenna was set to Satellite): You can search the desired channels according to the settings.
●● Reorder (when the Antenna was set to Satellite): Rearrange the channel manager in numerical order.
●● Delete: Delete a channel to display the channels you want.
English
![]()
Channel Status Display Icons
|
Icon |
Operations |
||
|
a |
An analogue channel. |
||
|
c |
A channel selected. |
||
|
F |
A channel set as a Favourite 1—5. |
||
|
\ |
A locked channel. |
||
|
) |
Reserved programme |
||
English

Using Favourite Channels
■■ Favourites
OO SMART HUB → Favourites → ENTERE
Shows all favourite channels.
●● Edit Favourites t: You can set the selected channels to desired favourites channels.
NN The “F” symbol wil be displayed and the channel will be set as a favourite.
English

|
1. |
On the Channel screen, select a channel and press the TOOLS button. |
||
|
NN If you want to add mulitple channels, use the Edit Mode menu in the top |
|||
|
right corner of the Channel screen. |
|||
|
2. |
Add or delete a channel in the favourite channels you want among 1, 2, 3, 4 |
||
|
and 5. |
|||
|
NN One or more groups can be selected. |
|||
|
NN The cmark appears to the left of the selected files. |
|||
|
3. |
After you have changed the settings, the channel list for each group can be |
||
|
viewed in favourite channels. |
English

Memorising Channels
OO MENUm→ Channel → ENTERE
■■ Antenna (Air / Cable) t
NN The option may differ depending on country.
Before your television can begin memorising the available channels, you must specify the type of signal source that is connected to the TV.
English

■■ Country
NN The PIN input screen appears. Enter your 4 digit PIN number.
NN Select your country so that the TV can correctly auto-tune the broadcasting channels.
●● Digital Channel: Change the country for digital channels.
●● Analogue Channel: Change the country for analogue channels.
English

|
■■ Auto Tuning |
|
|
Scans for a channel automatically and stores in the TV. |
|
|
NN Automatically allocated programme numbers may not correspond to actual or |
|
|
desired programme numbers. If a channel is locked using the Channel Lock |
|
|
function, the PIN input window appears. |
|
|
–– Digital & Analogue / Digital / Analogue: Select the channel source to |
|
|
memorise. When selecting Cable → Digital & Analogue or Digital: Provide |
|
|
a value to scan for cable channels. |
|
|
–– Search Mode (Full / Network / Quick): Scans for all channels with active |
|
|
broadcast stations and stores them in the TV. |
English
English
Symbol Rate: Displays available symbol rates.
Network ID: When Network is Manual, you can set up Network ID using the numeric buttons.
––
Network (Auto / Manual): Selects the Network ID setting mode among
Auto or Manual.
––
NN If you select Quick, you can set up the Network, Network ID, Frequency, Modulation, and Symbol Rate manually by press the button on the remote control.
|
–– |
Frequency: Displays the frequency for the channel. (differs in each country) |
||
|
–– |
Modulation: Displays available modulation values. |
||
|
–– |
|||

–– Automatic Ordering for Italy : Channels found will be automatically ordered following a criterion established by all the main national and local televisions.
–– Others Ordering for Italy : If you select this menu you will find others channels ordering directly organized from private national televisions.
NN Automatic Ordering and Others Ordering are available when antenna source is set to Air.
NN The option may differ depending on country.
English

●● Cable Search Option
(depending on the country)
Sets additional search options such as the frequency and symbol rate for a cable network search.
|
–– Freq.Start / Freq.Stop: Set the start or stop frequency (differs in each |
||
|
country) |
||
|
–– Symbol Rate: Displays available symbol rates. |
||
|
–– Modulation: Displays available modulation values. |
●● Standby Auto Store (Off / On) for Italy : Enables or disables auto-tune while TV is in standby mode.
●● Wake-up Timer (1 hour later / 2 hours later / 00:00 / 02:00 / 12:00 /
14:00) for Italy : Selects the schedule timer to turn the TV on and scan channels automatically.
English

■■ Manual Tuning
Scans for a channel manually and stores in the TV.
NN If a channel is locked using the Channel Lock function, the PIN input window
|
appears. |
|
|
●● |
Digital Channel Tuning: Scans for a digital channel. |
|
1. Press the u/ d/ l/ rbutton to select New. |
|
|
NN When selecting Antenna → Air: Channel, Frequency, Bandwidth |
|
|
NN When selecting Antenna → Cable: Frequency, Modulation, Symbol |
|
|
Rate |
2.Press the dbutton to select Search. When scanning has finnished, a channel is updated in the channel list.
English
![]()
●● Analogue Channel Tuning: Scans for a analogue channel.
1.Press the u/ d/ l/ rbutton to select New.
2.Set the Programme, Colour System, Sound System, Channel and Search.
3.Press the dbutton to select Store. When scanning has finnished, a channel is updated in the channel list.
English

NN Channel mode
●● P (programme mode): When tuning is complete, the broadcasting stations in your area have been assigned to position numbers from P0 to P99. You can select a channel by entering the position number in this mode.
●● C (aerial channel mode) / S (cable channel mode): These two modes allow you to select a channel by entering the assigned number for each aerial broadcasting station or cable channel.
English

Using the Channel (for satellite TV) for LED 6200 series and above, Not for UK
|
NN The option may differ depending on country. |
|||
|
■■ Channel |
|||
|
OO SMART HUB → Channel → ENTERE |
|||
|
Delete added channels or set favourites channels and use the programme guide |
|||
|
for digital broadcasts. Select a channel in the All Channels, Analogue, TV, Radio |
|||
|
and Data / Other screen. Change the antenna or channel settings using the |
|||
|
menus in the top right corner of the screen. |
|||
|
●● |
Antenna: Toggle among the antenna sources. |
NN The option may differ depending on country.
●●  Sort: Sorting by Channel Number or Channel Name.
●●  Edit Mode: Edit the channels as you want. Refer to “Using the Favourite Channels” for details on how to assign a channel to favourite.
●● Select All: Select all the channels.
English

Using the TOOLS button with the Channel
●● Edit Favourites: Set channels you watch frequently as favourites.
1.Select the Edit Favourites, then press the ENTEREbutton.
2.Press the ENTEREbutton to select Favourite 1—5, then press the OK button.
NN One favourite channel can be added in several of favourite channels among Favourite 1—5.
English

|
●● |
Lock / Unlock: Lock a channel so that the channel cannot be selected and |
|
|
viewed. |
||
|
NN NOTE |
||
|
●● This function is available only when the Channel Lock is set to On. |
||
|
●● |
Edit Channel Name (analogue channels only): Assign your own channel name. |
|
|
NN This function may not be supported depending on the region. |
||
|
●● |
Edit Channel Number : Select the channel number to change. |
|
|
NN This function may not be supported depending on the region. |
English

●● Upcoming programme (digital channels only): View details on the programme being aired on a selected digital channel.
●● Search (when the Antenna was set to Satellite): You can search the desired channels according to the settings.
●● Reorder: (when the Antenna was set to Satellite): Rearrange the channel manager in numerical order.
●● Delete: Delete a channel to display the channels you want.
English

Channel Status Display Icons
|
Icon |
Operations |
|
a |
An analogue channel. |
|
c |
A channel selected. |
|
F |
A channel set as a Favourite 1—5. |
|
\ |
A locked channel. |
English

Using Favourite Channels (for satellite TV)
■■ Favourites
Shows all favourite channels.
|
●● |
Edit Favourites t: You can set the |
|
selected channels to desired favourites |
|
|
channels. |
|
|
NN The “F” symbol wil be displayed and |
|
|
the channel will be set as a favourite. |
Channel
Select All All Channels Selected Item(s) : 1
Edit Mode
|
Edit Favourites Edit Channel Number |
Lock |
Unlock |
Delete |
|
|
●● The displayed image may differ depending on the |
||||
|
model. |
English

|
1. |
On the Channel screen, select a channel and press the TOOLS button. |
||
|
NN If you want to add mulitple channels, use the Edit Mode menu in the top |
|||
|
right corner of the Channel screen. |
|||
|
2. |
Add or delete a channel in the favourite channels you want among 1, 2, 3, 4 |
||
|
and 5. |
|||
|
NN One or more groups can be selected. |
|||
|
NN The cmark appears to the left of the selected files. |
|||
|
3. |
After you have changed the settings, the channel list for each group can be |
||
|
viewed in favourite channels. |
English

Memorising Channels (for satellite TV)
OO MENUm→ Channel → ENTERE
■■ Antenna t
NN The option may differ depending on country.
Before your television can begin memorising the available channels, you must specify the type of signal source that is connected to the TV.
English
![]()
■■ Country
NN The PIN input screen appears. Enter your 4 digit PIN number.
NN Select your country so that the TV can correctly auto-tune the broadcasting
|
channels. |
|
|
NN The option may differ depending on country. |
|
|
●● |
Digital Channel: Change the country for digital channels. |
|
●● |
Analogue Channel: Change the country for analogue channels. |
English

|
■■ Auto Tuning |
||
|
Scans for a channel automatically and stores in the TV. |
||
|
NN Automatically allocated programme numbers may not correspond to actual or |
||
|
desired programme numbers. If a channel is locked using the Channel Lock |
||
|
function, the PIN input window appears. |
||
|
–– Antenna Source: Select the antenna source to memorise. The option may |
||
|
differ depending on country. |
||
|
–– Channel Type: Select the Channel type to memorise. |
||
|
–– Satellite: Selects the satellite to scan. The option may differ depending on |
||
|
country. |
||
|
–– Scan Mode: Selects the scanning mode of the selected satellite. |
English

–– Automatic Ordering for italy : Channels found will be automatically ordered following a criterion established by all the main national and local televisions.
–– Others Ordering for italy : If you select this menu you will find others channels ordering directly organized from private national televisions.
NN Automatic Ordering and Others Ordering are available when antenna source is set to Air.
NN The option may differ depending on country.
English

●● Cable Search Option
(depending on the country)
Sets additional search options such as the frequency and symbol rate for a cable network search.
|
–– Freq.Start / Freq.Stop: Set the start or stop frequency (differs in each |
||
|
country) |
||
|
–– Symbol Rate: Displays available symbol rates. |
||
|
–– Modulation: Displays available modulation values. |
●● Standby Auto Store (Off / On) for Italy : Enables or disables auto-tune while TV is in standby mode.
●● Wake-up Timer (1 hour later / 2 hours later / 00:00 / 02:00 / 12:00 /
14:00) for Italy : Selects the schedule timer to turn the TV on and scan channels automatically.
English

|
■■ Manual Tuning |
||
|
Scans for a channel manually and stores in the TV. |
||
|
NN If a channel is locked using the Channel Lock function, the PIN input window |
||
|
appears. |
||
|
●● |
Transponder: Selects the transponder using the up/down buttons. |
|
|
●● |
Scan Mode: Selects either free or all channels to store. |
|
|
●● |
Network Search (Disable / Enable): Network search using the up/down |
|
|
buttons. |
||
|
●● |
Signal Quality: Display the current status of broadcasting signal. |
NN Information on a satellite and its transponder is subject to change depending on the broadcasting conditions.
NN When setting is completed, move to Search and press the ENTEREbutton. Channel scan is started.
English

■■ Satellite System
The PIN input screen appears. Enter your 4 digit PIN number. Satellite System is available when Antenna is set to Satellite. Before running Auto Store, set Satellite System. Then channel scan is run normally.
●● Satellite Selection: You can choose the satellites for this TV.
●● LNB Power (Off / On): Enables or disables the power supply for the LNB.
English

|
●● |
LNB Settings: Configures the outdoor equipment. |
|
–– Satellite: Selects the satellite for receiving digital broadcasts. |
|
|
–– Transponder: Selects a transponder from the list or adds a new |
|
|
transponder. |
|
|
–– DiSEqC Mode: Selects DiSEqC mode for the selected LNB. |
|
|
–– Lower LNB Oscillators: Sets the LNB oscillators to a lower frequency. |
|
|
–– Upper LNB Oscillators: Sets the LNB oscillators to a higher frequency. |
|
|
–– Tone 22 kHz (Off / On / Auto): Selects the Tone 22 kHz depending on the |
|
|
LNB type. For a universal LNB it should be Auto. |
|
|
–– Signal Quality : Display the current status of broadcasting signal. |
English

●● Positioner Settings: Configures the antenna positioner. Positioner (On / Off): Enables or disables the positioned control.
Positioner Type (USALS / DiSEqC 1.2): Sets the positioned type between DiSEqC 1.2 and USALS(Universal Satellite Automatic Location System).
–– My Longitude: Sets the longitude for my location.
–– My Latitude: Sets the latitude for my location.
–– Satellite Longitude Settings: Sets the longitude of user defined satellites.
English

User Mode: Sets the position of satellite antenna according to each satellite. If you store the current position of satellite antenna according to a certain satellite, when the signal of that satellite is needed, the satellite antenna can be moved to pre-populated position.
|
–– Satellite: Selects the satellite to set the position for. |
||
|
–– Transponder: Selects a transponder from the list for signal reception. |
||
|
–– Moving Mode: Selects the movement mode between discrete and |
||
|
continuous movement. |
||
|
–– Step Size: Adjusts the step size degrees for the antenna rotation. Step Size |
||
|
is available when Moving Mode is set to Step. |
English

––
––
Go to Stored Position: Rotates the antenna to the stored satellite position.
Antenna Position: Adjusts and stores the antenna position for the selected satellite.
–– Store Current Position: Stores current position as the selected positioner limit.
–– Signal Quality: Display the current status of broadcasting signal.
English
 Loading…