
В текущем разделе сайта Вы найдете инструкции и мини уроки как пользоваться программой компании Sony. В каждом из них кратко, но содержательно изложено начало работы с соответствующей версией программы. После того, как Вы определились с версией программы, необходимо изучить основные моменты при работе с редактором, а именно: управление, сохранение, навигация и пр. Без этих азов редактирования и обработки Вам будет сложно приступить к работе и выполнять различные операции, например, по удалению шумов с записи, применения эффектов затухания, усиления громкости, увеличению (снижению) темпа воспроизведения и т.д. Даже распространенная и простая операция по созданию рингтонов из музыкальной композиции требует определенных навыков и знаний.
Каждое из этих руководств не сделает из новичка профессионала, но позволит быстро освоиться с интерфейсом, поможет сделать первые шаги в познании обработки музыкального мира.
Хотите научиться основам редактирования аудио? Или же эффективно удалять шумы? Вам необходим короткий обучающий видеоролик? Здесь Вы узнаете больше про SOUND FORGE Pro & SOUND FORGE Audio Studio.
Введение

Вступительное видео
В этом вступительном видео Вы ознакомитесь с основными функциями SOUND FORGE Audio Studio. Мы расскажем вам, как выполняется загрузка аудиофайлов, а также воспроизведение и обработка. На последнем этапе Вы сможете конвертировать конечный материал в нужный формат и записать на CD-диск.
Основные функции

Основная обработка
В этом видеоролике Вы узнаете, как вырезать, удалить, скопировать или перенести материал. Подробно разбираются два режима «перетаскивания», копирование и микширование.

Событийная обработка
При копировании и монтаже автоматически создаются виртуальные составляющие, которые на конечном этапе можно заново сгруппировать, доработать или переписать. В этом видео Вы сможете узнать больше о событийной обработке.

Работа с эффектами
В этом видеоролике продемонстрировано, что эффекты могуть быть применены как ко всему файлу целиком, так и к отдельным его частям. В дополнение мы продемонстрируем вам, как работать с одним или несколькими VST-модулями.

Маркеры и разделы
Особая функция позволяет выделать отдельные места и фрагменты в имеющемся звуковом материале. В этом видео Вы сможете увидеть, как это работает.

Оцифровка и восстановление записей с пластинок
В этом видеоролике демонстрируется, как оцифровывать пластинки, доводить звучание до идеального и записывать CD-диски.
Sound Forge
Одним из наиболее популярных звуковых редакторов является программа Sound Forge производства компании Sony. Рассмотрим основы работы с этой программой на примере версии 7.0.
ПРИМЕЧАНИЕ.
Компания Sony не производит русскоязычный вариант программы Sound Forge. Таким образом, все русифицированные копии программы являются продуктами деятельности «хакеров», причем продуктами побочными и не качественными: перевод английских терминов там сделан без понятия о том, что на самом деле эти термины обозначают в музыке. Это же относится к русификациям большинства других музыкальных программ.
Программа Sound Forge позволяет открывать и создавать звуковые файлы стандартного для ОС Windows формата WAV, а также некоторых других, среди которых – форматы для Macintosh AIFF и SND, стандартные файлы программы Sound Designer (DIG и SD), сжатые файлы MP3, OGG и т. д. Можно также открывать видеофайлы формата AVI, но для редакции будет доступна только их звуковая часть. Поддерживаются файлы, записанные с любой частотой дискретизации – от 2 кГц до 192 кГц (хотя возможность правильного воспроизведения файлов с нестандартной частотой дискретизации зависит еще и от установленной звуковой карты). С помощью пункта Open в меню File вы можете загрузить в программу любой звуковой файл. В диалоговом окне загрузки файлов (рис. 15.1) установите флажок Auto play, чтобы вы могли, щелкнув мышью на имени файла, предварительно прослушать его. Также предварительно прослушать выбранный файл можно, нажав в этом же окне кнопку Play.
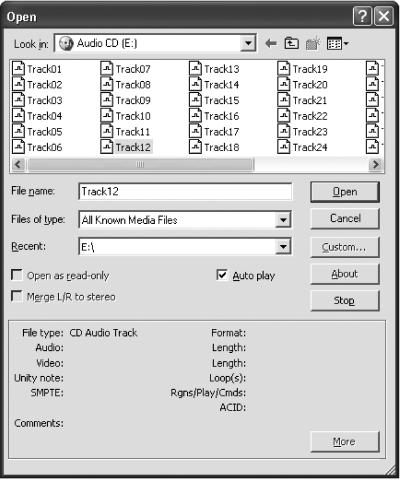
Рис. 15.1. Диалоговое окно загрузки файлов.
Временные файлы программа создает в той папке, которая определена в предварительных установках. Чтобы узнать или изменить ее, выберите в меню Options пункт Preferences и в открывшемся окне вкладку Perform (рис. 15.2). Временная папка будет указана в поле Temporary files and record folder. Если вы хотите изменить ее, нажмите кнопку Browse (ввести имя папки вручную программа не позволит).
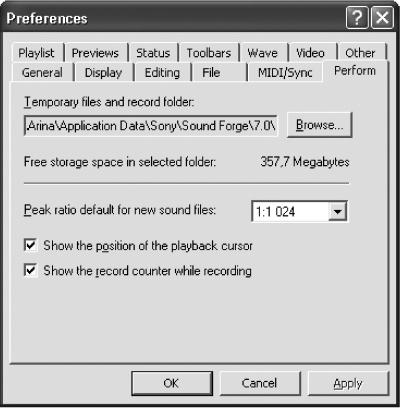
Рис. 15.2. Настройка папки для временных файлов.
Все вносимые вами звуковые изменения отражаются во временном файле. Когда вы выбираете пункт Save в меню File (или нажимаете Ctrl+S), содержимое временного файла копируется в основной файл. Этот процесс может занять некоторое время, особенно если, например, вы вырезали из длинного файла небольшие отрезки.
На жестком диске должно быть достаточно свободного места. При изменении какого-либо фрагмента звука его старое содержимое также записывается, чтобы можно было отменить сделанную операцию. В итоге каждая операция со звуковым файлом уменьшает количество свободного места на диске. Для повтора последнего действия нажмите Ctrl+Y, для его отмены – Ctrl+Z, а для возврата – Shift+Ctrl+Z.
При открытии звукового файла Sound Forge отобразит его в волновой форме. Вы можете открыть несколько звуковых файлов одновременно (волновая форма каждого из них будет отображена в отдельном окне). Внизу, в статусной строке, вместе с атрибутами звука отображается длина открытого файла в часах, минутах, секундах и их тысячных долях (рис. 15.3). В правом нижнем углу той же строки вы можете видеть количество свободного места на том жестком диске, где расположена папка для временных файлов.
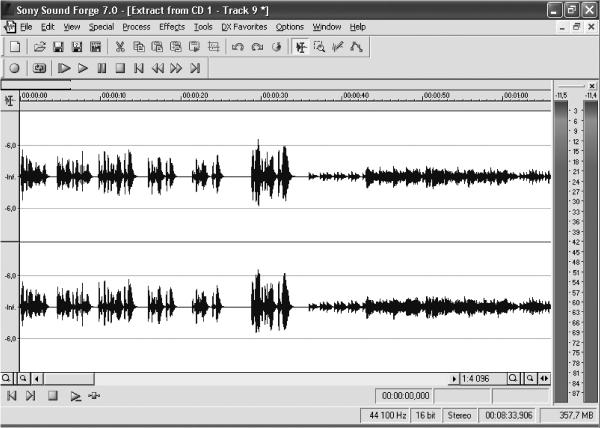
Рис. 15.3. Основное окно программы Sound Forge.
Теперь поговорим о режимах работы в программе Sound Forge. На панели инструментов их всего три – Edit, Magnify и Pencil По умолчанию обычно выбран первый. В этом режиме щелчок мышью в любом месте волновой формы устанавливает в это место текущую позицию, с которой будет начинаться проигрывание. Текущая позиция обозначается мигающей вертикальной полосой, движущейся при проигрывании звука. Перемещать ее можно также и клавишами ? и ?. При нажатии клавиши М в текущую позицию устанавливается маркер. Впоследствии вы можете быстро перемещаться по маркерам с помощью сочетаний Ctrl + ? и Ctrl + ?. Сами маркеры можно перемещать, перетаскивая их мышью за манипулятор в верхней части.
В режиме редакции вы можете выделить фрагмент звуковой волны, перемещая по ней мышь при нажатой левой кнопке. Можно также более точно настроить выделение, удерживая клавишу Shift и используя клавиши ? и ?. Двойной щелчок мыши выделяет область звука, находящуюся между маркерами, тройной – весь звук целиком. Если этого не произошло, откройте окно Preferences, выбрав соответствующий пункт в меню Options, перейдите на вкладку Editing и проверьте, не установлен ли флажок Disable triple-clicking to select all sound file data (рис. 15.4). Если да, снимите его, а если нет, значит, вы плохо щелкаете.
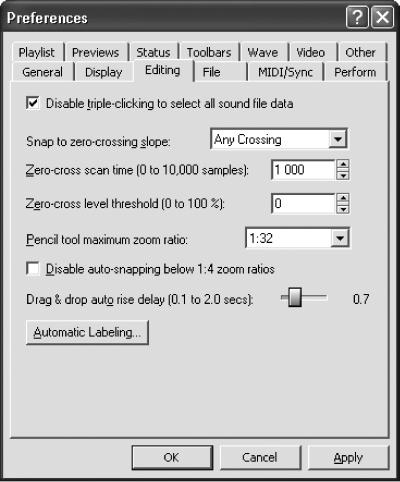
Рис. 15.4. Окно Preferences, вкладка Editing.
Выделенную область можно корректировать, перетаскивая мышью границы выделения. Выделить часть файла можно и во время воспроизведения. Для этого достаточно нажать клавишу [(начало) и клавишу] (конец). Клавишей S вы можете отключить или снова включить выделение.
В основном все действия в данной программе производятся в режиме редакции. Например, чтобы применить какой-либо звуковой эффект к фрагменту файла, следует сначала его выделить одним из описанных выше способов.
При выборе инструмента Magnify указатель мыши примет вид лупы. Этот режим применяется для изменения масштаба просмотра волновой формы.
Если вы выберете инструмент Pencil, указатель мыши примет форму карандаша. С помощью этого инструмента вы можете в активном окне рисовать произвольную волновую форму. Так можно корректировать плохие места в имеющихся звуках или рисовать с нуля некоторые ударные звуки. Но нарисовать этим инструментом периодические колебания вам вряд ли удастся.
Помимо работы с готовыми звуковыми файлами, программа Sound Forge позволяет записывать звук с внешнего источника, причем предоставляет для этого наиболее удобные средства. Для создания пустого звукового файла нажмите Ctrl+N (или выберите в меню File пункт New). В появившемся окне вы сможете указать, с какими частотой дискретизации и амплитудным разрешением следует записывать новый файл, будет ли он моно или стерео (рис. 15.5). Устанавливая частоту дискретизации, отличную от стандартных (11 025, 16 000, 22 050, 32 000, 44 100, 48 000, 88 200, 96 000, 192 000 Гц), или большую, чем 48 000 Гц, убедитесь, что ваша звуковая карта может работать с этой частотой. С перечисленными стандартными частотами дискретизации, как правило, работают все звуковые карты.
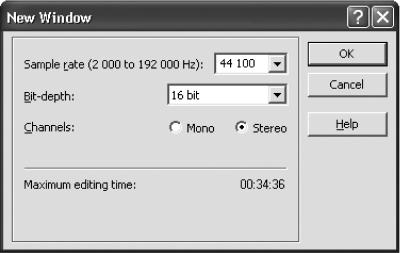
Рис. 15.5. Создание нового звукового файла.
При нажатии кнопки OK откроется новое окно для звукового файла. Теперь нажмите Ctrl+R или кнопку Record – и вы увидите окно записи (рис. 15.6).
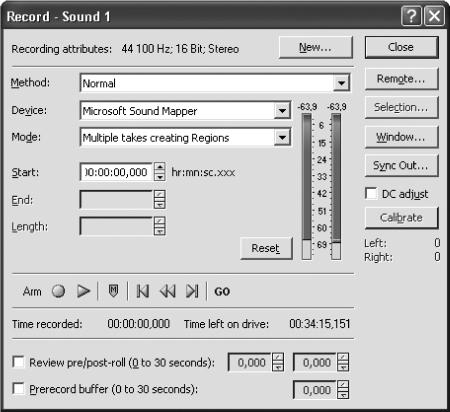
Рис. 15.6. Окно записи.
Выберите нужный источник звука в системном микшере, если вы не сделали этого раньше.
Иногда излишне высокий уровень бесполезного сигнала на входе определяется наличием постоянной электрической наводки, перманентно отклоняющей напряжение в ту или иную сторону. На первый взгляд, на качество записи такая постоянная наводка не влияет. Но это только в смысле наличия шумов и слышимых помех. Однако, во-первых, она уменьшает динамический диапазон записи, а во-вторых, будет мешать при дальнейшей цифровой обработке звука.
Чтобы избежать этого, вернитесь к окну Record, изображенному на рис. 15.6, и установите флажок DC adjust и нажмите кнопку Calibrate. При этом помните: в момент нажатия кнопки Calibrate на вход не должен подаваться какой-либо сигнал! Если вы нечаянно нажмете эту кнопку во время подачи полезного сигнала, обязательно отключите его и нажмите ее еще раз, иначе в записи появятся странные искажения.
Теперь установите максимальную громкость записи, которую вы хотите подать на вход, или громко попойте в микрофон. При этом индикаторы входного уровня на пиках должны доходить приблизительно до уровня -1 дБ (максимальный входной уровень программа запоминает и показывает непосредственно над индикаторами). Если этот уровень у вас ниже, можете несколько приподнять его в системном микшере. Если же у вас уровень выше, чем нужно, на громких звуках будут возникать перегрузки, при которых над индикатором соответствующего канала появится слово Clip на красном фоне и останется до тех пор, пока вы не нажмете кнопку Reset рядом с индикаторами. Если у вас так случилось, обязательно уменьшите входной уровень в системном микшере. Не допускайте перегрузок при записи! При цифровой записи перегрузки порождают очень неприятные искажения, с которыми впоследствии очень сложно бороться.
Информация о том, сколько вы уже записали и сколько места осталось на диске, отображается в окне Record в соответствующих строках – Time recorded и Time left on drive. Правда, если на диске осталось очень много свободного места, программа дает в строке Time left on drive довольно неопределенное значение Over 2 hours. По умолчанию время отображается в часах, минутах, секундах и миллисекундах, но можно задать и другие единицы измерения.
Когда уровень записи установлен, нажмите кнопку Record или клавишу R, и начнется сама запись. При этом одновременно в окне записи будет мигать красная надпись Recording и изменяться информация в строках Time recorded и Time left on drive. По окончании нажмите кнопку Stop, которая появится на том же месте, что и кнопка записи, или снова клавишу R. После этого, нажав кнопку Play или клавишу P, вы можете прослушать то, что у вас получилось. Как во время записи, так и во время воспроизведения можно вставлять в вашу запись маркеры кнопкой Drop Marker. Маркеры вам пригодятся при дальнейшем монтаже или редакции записи.
Обратите внимание на раскрывающийся список Mode. Здесь вы можете задавать поведение программы в том случае, если после остановки записи вам снова надо нажимать кнопку записи, не выходя из окна Record.
Если вы выберете в этом меню пункт Automatic retake, то при каждом нажатии кнопки записи программа будет создавать новую запись поверх уже созданной, то есть уничтожая старую запись. Этот режим полезен, если вы хотите сделать несколько попыток живой записи, которая при любой ошибке может считаться испорченной и более не пригодится. Так вы экономите место на диске.
Следующие два режима позволяют производить запись в несколько этапов (с остановками), чтобы каждое последующее нажатие кнопки записи продолжало запись с того места, на котором она была остановлена. При этом режим Multiple takes creating Regions автоматически создает в файле регион для каждого сеанса записи, а режим Multiple takes просто продолжает запись без каких-либо дополнительных действий.
Если вы хотите, чтобы каждое нажатие кнопки записи начинало запись в новый файл (с сохранением старого), выберите режим Create a new window for each take. Например, это поможет, если вы хотите скопировать запись с кассеты, поместив все песни в разные файлы. В этом случае по окончании каждой песни вам достаточно будет нажать на кнопку Stop и снова на кнопку записи. Программа автоматически будет создавать новые файлы. С помощью кнопки Window вы можете выбрать окно для записи (независимо от режима), а посредством кнопки New – создать новое окно вручную.
Режим Punch-In позволяет внести в имеющийся файл запись фиксированной длины (например, заменить в записи текста одно слово другим). Время начала и конца записи можно определить в полях Start и End (вместо изменения поля End можно вводить длину записи в поле Length). Тогда при нажатии кнопки записи программа, как обычно, начнет писать с указанного места, а по достижении метки конца записи автоматически остановится.
Запись начинается не мгновенно, а с некоторой едва заметной задержкой, поскольку программе нужно время на подготовительную работу. Но если вам необходимо начать запись точно в данную миллисекунду, заблаговременно нажмите кнопку Prepare – программа произведет подготовительные действия заранее, и тогда в момент нажатия кнопки записи задержки не произойдет.
Если вы используете в качестве источника записи другую программу, запущенную на том же компьютере, воспользуйтесь кнопкой Remote. При ее нажатии окно Record вместе со всей программой Sound Forge сворачивается до маленького окошка, имеющего только самые необходимые кнопки управления и индикатор уровня записи. Это окошко может оставаться видимым поверх всех активных программ. Чтобы окно приобрело нормальный вид, нажмите кнопку Back.
По окончании записи нажмите кнопку Close. Результаты вашей работы будут внесены в один или несколько временных файлов. Для сохранения временного файла нажмите Ctrl+S или выберите пункт Save в меню File. Вы сможете задать имя файла и нужный формат.
ПРИМЕЧАНИЕ.
В системе Windows рекомендуется пользоваться стандартным форматом WAV.
Кнопка Summary позволит сохранить вместе с файлом сведения о названии записанного произведения, фамилию звукорежиссера (вашу), знак авторского права и т. д. Не удивляйтесь, если сам процесс сохранения произойдет моментально – на самом деле временный файл будет переименован в постоянный с заданным вами именем. При этом программа предложит открыть его вновь.
В основном окне программы Sound Forge для начала воспроизведения с текущей позиции используют клавишу Пробел. Чтобы остановить воспроизведение, нажмите ее повторно, при этом текущая позиция возвратится к тому месту, на котором она была до начала воспроизведения. Остановить запись можно и клавишей Enter, но в этом случае текущая позиция останется в месте остановки.
Если выделен фрагмент звукового файла, то при нажатии клавиши Пробел проигрывается не весь файл, а только этот фрагмент. Кстати, можно также использовать кнопку Play на панели инструментов. Если же нажать Play All, то будет в любом случае воспроизведен весь звуковой файл.
В каждом окне звукового файла в левом нижнем углу имеется своя панель управления (рис. 15.7), на которой расположены следующие кнопки (слева направо):
? текущую позицию в начало файла;
? текущую позицию в конец файла;
? стоп;
? обычное воспроизведение;
? цепочка подключаемых модулей;
? воспроизведение в режиме списка вырезанных фрагментов (cutlist); эта кнопка не отображается, если не включен соответствующий режим.

Рис. 15.7. Панель воспроизведения.
В программе Sound Forge можно воспроизводить файл не весь подряд, а только обозначенные области, то есть осуществлять простейший недеструктивный монтаж (недеструктивным он называется потому, что не изменяет сам звуковой файл).
Чтобы осуществить такой монтаж, вы можете определить области, которые будут воспроизводиться в специальном окне – их принято называть регионами, а окно – списком регионов – Regions List, в котором также обозначены все маркеры. В окне Playlist необходимо определить порядок исполнения регионов. Если у вас на экране нет этих окон, нажмите сочетания Alt+1 и Alt+2.
Для создания региона нажмите правую кнопку мыши в окне Regions List и выберите пункт Add. Можно также выделить фрагмент звукового файла и нажать клавишу R (или перетащить выделенную область мышью в окно Regions List). Чтобы проиграть регион, нажмите в окне Regions List слева от названия региона маленькую кнопку проигрывания. Удалять ненужные элементы из обоих окон вы можете клавишей Delete.
Теперь можно приступать к созданию списка воспроизведения. Для этого в нужной последовательности перетащите мышью нужные регионы из окна Regions List в окно Playlist (или, выделив регион, нажмите в окне Playlist правую кнопку мыши и выберите в меню пункт Add). В этом окне вы можете изменять порядок проигрывания регионов, перетаскивая их мышью. Если вам надо установить, сколько раз тот или иной регион должен повторяться, дважды щелкните мышью на названии региона в окне Playlist и в появившемся окне Edit Playlist введите нужное число в окно Play Count. Если ввести число 0, проигрывание остановится на этом регионе.
Чтобы проиграть список воспроизведения с любого места, нажмите маленькую кнопку проигрывания, расположенную в окне Playlist слева от названия каждого региона.
Впоследствии вы можете конвертировать смонтированный Playlist в звуковой файл. Для этого достаточно щелкнуть на нем правой кнопкой мыши и выбрать в контекстном меню пункт Convert to New – программа откроет новое окно и создаст в нем звуковой файл, состоящий из заданной последовательности регионов. Исходный файл при этом не изменится.
Иногда при недеструктивном монтаже удобнее указывать не области, которые следует исполнять, а области, которые следует пропускать при воспроизведении всего звукового файла. Например, это может пригодиться при вырезании пауз из речи диктора или чтеца. В этом случае вы можете вместо списка воспроизведения использовать список пропускаемых областей (cutlist), для чего надо щелкнуть правой кнопкой мыши на окне Playlist и отметить пункт Treat as Cutlist.
Чтобы быстро создать пропускаемый регион и добавить его в список пропускаемых областей, можно при открытом окне ?utlist выделить ненужный фрагмент файла и нажать клавишу Delete. Фрагмент будет преобразован в регион и добавлен в список, причем соответствующий фрагмент звукового файла будет заштрихован. Если же режим Cutlist не выбран (окно ?utlist выглядит так же, как Playlist), то нажатие клавиши Delete приведет к удалению выбранного фрагмента из звукового файла. Для проигрывания файла без вырезанных областей нажмите кнопку Play as cutlist – крайняя справа.
Когда список пропускаемых областей составлен, нажмите на нем правую кнопку мыши и выберите в контекстном меню Convert to New – будет создан новый файл, в котором будут пропущены все регионы из этого списка. Для экономии дискового пространства можно вместо этого выбрать пункт Delete Cut Regions – и все регионы, включенные в список пропускаемых областей, будут удалены из звукового файла. Имейте в виду, что эту операцию нельзя отменить с помощью команды Undo, о чем вас предупредит программа.
Помимо недеструктивного монтажа, в программе Sound Forge возможен и обычный, деструктивный монтаж. Для этого в ней используются операции с буфером обмена и некоторые их модификации. Деструктивный монтаж разрушает первоначальную структуру звукового файла, поэтому, если вам надо сохранить оригинальный файл, пользуйтесь недеструктивным монтажом или заранее сделайте копию вашего звукового файла.
Удалить выделенный фрагмент можно клавишей Delete (программа при этом не должна быть в режиме cutlist). Чтобы, наоборот, удалить из файла все, кроме выделенного фрагмента, нажмите сочетание Ctrl+T или выберите в меню Edit пункт Trim/Crop.
Если нажать сочетание Ctrl+X, то выделенный фрагмент будет не просто удален, а вырезан и помещен в буфер обмена, откуда его можно затем вклеить в другое место. Скопировать выделенный фрагмент в буфер обмена можно, нажав сочетание Ctrl+C.
Чтобы вклеить фрагмент из буфера обмена в нужное место, установите в это место текущую позицию и нажмите сочетание Ctrl+V или выберите в меню Edit пункт Paste. При этом весь последующий материал будет сдвинут вперед на соответствующее количество секунд. Если же перед этим вы выделите другой фрагмент, то он будет заменен на фрагмент из буфера обмена.
При нажатии сочетания Ctrl+E фрагмент из буфера обмена будет вставлен в новый файл. Далее, у вас есть еще некоторые возможности, например, вклеить фрагмент из буфера обмена вместо фрагмента заранее заданной длины. Выделите тот, который должен быть заменен, и выберите в меню Edit пункт Paste special ? Overwrite.
Если выделенный фрагмент меньше фрагмента из буфера обмена, последний будет обрезан, а если больше, то останется немного тишины. Выделенный фрагмент большого размера можно также заполнить копиями фрагмента из буфера обмена, для чего следует выбрать в меню Edit пункт Paste Special ? Replicate. При этом программа спросит вас, поместить ли в конец выделения обрезанную копию фрагмента, если целая уже не будет помещаться (пункт Copy Partials), или же оставить в конце свободное место, чтобы все копии фрагмента были полными (Whole Copies).
Чтобы вставить в нужное место фрагмент из буфера обмена, наложив его на уже имеющийся сигнал, нужно установить текущую позицию в то место, откуда следует начинать наложение, и затем нажать Ctrl+M или выбрать в меню Edit пункт Paste Special ? Mix. Откроется окно Mix, представляющее собой маленький двухканальный микшер (рис. 15.8). Соотношение уровней фрагмента из буфера обмена и файла, в который производится вставка, регулируется с помощью ползунковых регуляторов (левый – уровень фрагмента из буфера обмена, а правый – уровень файла). Желательно не изменять положение правого регулятора или, если уж вы его изменяете, установить флажок Apply destination volume to overlapping area only, чтобы правый регулятор управлял громкостью только той части файла, на которую производится наложение фрагмента из буфера обмена. Если этот флажок снять, правый регулятор будет изменять громкость всего файла. В любом случае перед тем, как нажимать кнопку OK, лучше предварительно прослушать результат с помощью кнопки Preview. Правда, в некоторых случаях вы услышите при этом не весь накладывающийся фрагмент целиком.
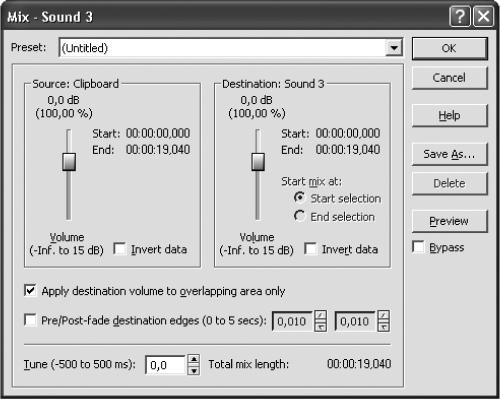
Рис. 15.8. Микширование двух фрагментов.
Все операции по вырезанию/копированию/вставке звукового фрагмента можно производить не только внутри одного окна звукового файла, но и между несколькими открытыми файлами. Также можно, вырезав или скопировав звуковой фрагмент в программе Sound Forge, вставить его в файл, открытый в другом звуковом редакторе, и наоборот.
Если выделить звуковой фрагмент и перетащить его мышью в окно другого открытого файла, то откроется окно Mix и фрагмент будет смикширован с другим файлом (аналогично нажатию Ctrl+C и Ctrl+M). Если перетащить его в пустую рабочую область программы, то будет создан новый файл с выделенным фрагментом (аналогично нажатию Ctrl+C и Ctrl+E).
Прежде чем перейти к рассмотрению других возможностей программы Sound Forge, обратим внимание на элементы интерфейса, общие для большинства окон программы. После вызова в программе Sound Forge какой-либо функции, открывается окно, основная часть которого содержит специфические для данной функции настройки, а по краям расположены стандартные для Sound Forge элементы управления. Их мы и рассмотрим.
В верхней части окна вы найдете раскрывающийся список Preset, в котором расположены шаблоны – готовые наборы настроек для данной функции. Каждый шаблон имеет свое название, так или иначе объясняющее его действие.
Если вы настроили какую-либо функцию так, как необходимо именно вам, можно запомнить эту настройку как новый шаблон. Для этого нажмите кнопку Save As. Откроется окно Save Preset, в котором вы можете ввести название собственного шаблона. После нажатия кнопки OK дополнительное окно закрывается, а в раскрывающемся списке Preset появляется название нового шаблона, который теперь доступен так же, как все остальные.
Ненужный созданный вами шаблон можно удалить. Для этого выберите его в раскрывающемся списке и нажмите кнопку Delete. При выборе же одного из шаблонов, входящих в программу, кнопка Delete недоступна.
Кнопка Preview позволяет предварительно прослушать результат применения той или иной функции, не применяя ее к самому файлу. Правда, если вы применяете функцию к достаточно большому фрагменту файла (и она не может выполняться в реальном времени через интерфейс DirectX), вы услышите после нажатия кнопки Preview не весь фрагмент, а только его часть. Для экономии времени в программе по умолчанию включен лимит на предварительное прослушивание фрагментов – 4 сек. Поэтому вы услышите только первые четыре секунды вашего фрагмента с примененной функцией, после чего все будет повторяться сначала.
Имейте в виду, что все сказанное о режиме предварительного прослушивания действительно только для тех функций Sound Forge, которые не работают через интерфейс DirectX. Если же вы нажимаете кнопку Preview при настройке функции, работающей через DirectX, то эффект применяется в реальном времени прямо во время прослушивания. Вы можете даже двигать регуляторы настройки в режиме предварительного прослушивания и тут же слышать результат. При этом в нижней части окна появляется информационная строка, которая показывает, на сколько процентов загружен процессор.
Чтобы можно было сравнить результат предварительного прослушивания с исходным звучанием, существует параметр Bypass. Установив данный флажок, вы услышите в режиме предварительного прослушивания исходное звучание фрагмента.
Кнопка Selection позволяет установить или изменить границы выбранного фрагмента. При ее нажатии перед вами возникнет окно Set Selection, в котором можно установить границы выделения в числовых полях Start и End, а также выбрать любой маркер или регион в раскрывающемся списке Selection. Нажав кнопку Play, вы можете прослушать выделенный фрагмент.
Во всех окнах есть стандартные кнопки: OK – для применения функции, Cancel – для отказа от функции и Help – для вызова соответствующей страницы файла помощи.
А теперь перейдем, наконец, к самим функциям и рассмотрим простейшие операции со звуком.
Для оптимизации амплитуды звукового файла в программе имеется функция Normalize. Открыть ее окно вы можете, выбрав в меню Process пункт Normalize (рис. 15.9).
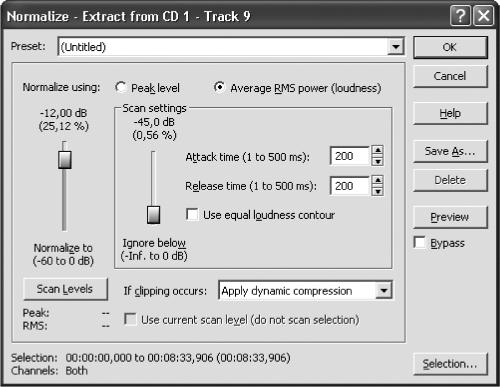
Рис. 15.9. Оптимизация уровня звука.
С помощью этой функции вы можете изменить амплитуду так, чтобы ее максимальное значение соответствовало заданному. Для этого установите переключатель Normalize using в положение Peak level и регулятор Normalize to в соответствующее положение, например, – 2 дБ. Программа просмотрит файл, найдет максимальный уровень, изменит его до -2 дБ и пересчитает все остальные уровни.
Иногда это не дает желаемых результатов. Тогда попробуйте установить переключатель Normalize using в положение Average RMS power (loudness). В этом случае за точку отсчета при изменении амплитуды программа возьмет не максимальный уровень, а среднюю громкость. Правда, могут возникнуть перегрузки, и вы должны указать программе, что с ними делать. Для этого используйте раскрывающийся список If clipping occurs, в котором следует выбрать пункт Apply dynamic compression (применить активное сжатие).
Чтобы, ничего не изменяя, определить максимальный и средний уровень амплитуды, нажмите кнопку Scan Levels. Информация об уровнях будет показана под этой кнопкой. После этого можно не заставлять программу определять уровни снова, отметив пункт Use current scan level (do not scan selection).
Чтобы произвольно изменить амплитуду выделенного звукового фрагмента, выберите в меню Process пункт Volume и с помощью единственного регулятора установите любую степень усиления или ослабления громкости звука (от -60 дБ до +20 дБ).
Такая важная и полезная функция, как DC Offset (также находится в меню Process), предназначена для удаления из звукового файла постоянной составляющей, которая может сильно помешать последующей цифровой обработке сигнала.
Поэтому перед началом практически любой серьезной работы стоит воспользоваться функцией DC Offset. Если вы установите флажок Automatically detect and remove, то программа автоматически определит наличие постоянной составляющей и удалит ее. Для специальных случаев предназначен пункт Adjust DC offset by, отметив который, вы сможете вручную установить значение, на которое следует сдвинуть амплитуду.
При пересчитывании больших файлов для экономии времени можно установить флажок Compute DC offset from first 5 seconds only. При этом определение постоянной составляющей будет происходить только в пределах первых пяти секунд файла. Это может сэкономить время, но дает повод сомневаться, что наличие и величина постоянной составляющей определена правильно.
В программе возможно постепенное изменение громкости. В меню Process выберите пункт Fade – откроется небольшое подменю, состоящее из трех подпунктов. Если вы в нем выберете Out, то громкость будет постепенно ослабевать, уменьшаясь до нуля. При выборе пункта In, наоборот, громкость будет постепенно возрастать. И, наконец, третий пункт Graphic позволяет произвольно регулировать изменение уровня громкости с помощью огибающей (рис. 15.10). Обратите внимание, что с ее помощью в обычном режиме можно управлять только ослаблением уровня сигнала – самое верхнее положение точки на ней соответствует уровню 100 %, то есть неизмененному оригинальному сигналу. Усилить сигнал таким образом невозможно.
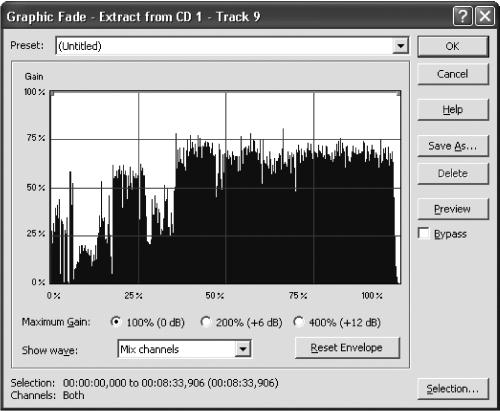
Рис. 15.10. Графическое изменение громкости.
Две специальные функции в программе Sound Forge предназначены для изменения основных атрибутов сигнала – частоты дискретизации и амплитудного разрешения. Для изменения частоты дискретизации выберите в меню Process пункт Resample. Откроется окно, в котором необходимо указать желаемую частоту дискретизации в числовом поле New sample rate, а также точность интерполяции (регулятор Interpolation accuracy). Чем выше точность интерполяции, тем меньше вероятность искажений при изменении частоты дискретизации. Учтите, что понижение частоты дискретизации неизбежно влечет за собой ухудшение качества звучания, а повышение частоты дискретизации вовсе не улучшит качество – в лучшем случае оставит его на прежнем уровне. Поэтому этой функцией не следует пользоваться без необходимости.
Если в окне изменения частоты дискретизации установить флажок Set the sample rate only (do not resample), программа просто назначит выставленную частоту дискретизации, не производя никаких изменений в самом звуке. При этом изменится высота и длительность звука, как при воспроизведении с другой скоростью.
Что же касается амплитудного разрешения, то для его изменения можно воспользоваться пунктом Bit-Depth Converter в меню Process. Здесь можно выполнить достаточно аккуратное преобразование амплитудного разрешения звука (от 8-битного до 32-битного), по необходимости настраивая с помощью соответствующих раскрывающихся списков дополнительные параметры преобразования.
Программа Sound Forge позволяет создавать совершенно новые звуки с использованием звукового синтеза.
Простейший звуковой синтез сводится к генерации элементарных волновых форм. Чтобы войти в его режим, выберите в меню Tools пункт Synthesis и далее – Simple. Вы можете выбрать желаемую форму звуковой волны в раскрывающемся списке Waveform shape. Это может быть синусоидальная волна (Sine), прямоугольная (Square), пилообразная (Saw), треугольная (Triangle), а также случайная (Noise – генерация звука этим способом порождает шумовой сигнал) и форма под названием Absolute Sine – синусоида, у которой все отрицательные значения амплитуды заменены на положительные.
Генерировать простейшие волновые формы может показаться не очень интересным занятием, поэтому можно обратиться к различным способам синтеза методом искажений. В программе есть модуль частотной модуляции на основе простых операторов (операторами при синтезе методом частотной модуляции принято называть звуковые генераторы).
Для осуществления частотно-модуляционного синтеза выберите в меню Tools пункт Synthesis и далее – FM. Откроется окно, изображенное на рис. 15.11.
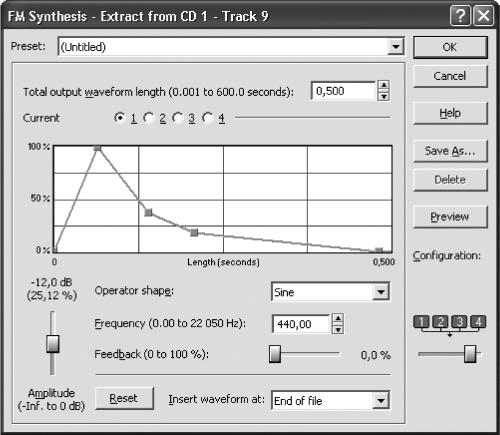
Рис. 15.11. Частотно-модуляционный синтез.
Прежде всего необходимо задать в поле Total output waveform length общую длину будущего звука, которая может быть в пределах от 1 мс до 1 мин. С помощью регулятора Configuration вы можете выбрать конфигурацию виртуальной коммутации операторов.
Все конфигурации строго фиксированы и отображаются в виде схем коммутации. При этом соединение операторов горизонтальной чертой означает простое сложение их сигналов, а соединение вертикальной чертой означает, что верхний оператор модулирует нижний. Стрелка, направленная вниз – выход на звук. Как видите, собственно частотная модуляция присутствует не во всех конфигурациях. Например, существует конфигурация, состоящая всего из одного оператора, или конфигурация, в которой просто микшируются сигналы всех четырех операторов.
С помощью переключателя Current вы можете выбрать оператора, настройки которого отображаются во всей остальной части окна. Для каждого оператора предусмотрены свои настройки. Прежде всего, это амплитудная огибающая текущего оператора. Амплитудная огибающая операторов, выходящих непосредственно на звук, влияет на громкость звука, а амплитудная огибающая модулирующих операторов – на тембр звука (количество спектральных составляющих).
Волновую форму текущего оператора вы можете выбрать в раскрывающемся списке Operator shape. При этом, если вы применяете частотную модуляцию, наилучшим выбором будет синусоидальная форма звуковой волны (во избежание получения неприятного на слух эффекта перемодуляции).
Ниже есть поле для указания частоты текущего оператора (Frequency) и регулятор Amplitude, отвечающий за его общую громкость. Последний применяется для ослабления сигнала, уже обработанного с помощью амплитудной огибающей. С помощью регулятора Feedback можно установить величину обратной связи, то есть посыла выходного сигнала оператора на вход. Установка слишком больших значений Feedback, как правило, приводит к эффекту перемодуляции, так что не следует устанавливать регулятор в положение правее 20-30 %. Как видите, обратную связь вы можете установить на каждый оператор в отдельности.
В заключение хочу добавить, что программу Sound Forge можно использовать для очистки фонограммы от шумов. Для этого в ней предусмотрены три модуля: модуль подавления шума, удаления щелчков и удаления треска виниловой пластинки.
Модуль подавления шума сначала анализирует образец шума, а потом старается удалить соответствующие спектральные составляющие из всей фонограммы. Этот модуль может поставляться вместе с программой или отдельно. Если он работает через DirectX, то его интерфейс несколько отличается от «обычного» модуля.
Данный текст является ознакомительным фрагментом.
![]()
After the Sound Forge software is installed and you start it for the first time, the registration wizard appears. This wizard offers easy steps that allow you to register the software online with Sony Pictures Digital Media Software and Services. Alternatively, you may register online at www.sony.com/mediasoftware at any time.
Registering your product will provide you with exclusive access to a variety of technical support options, notification of product updates, and special promotions exclusive to Sound Forge registered users.
Registration Assistance
If you do not have access to the Internet, registration assistance is available during normal weekday business hours. Please contact our Customer Service Department by dialing one of the following numbers:
|
Telephone/Fax |
Country |
|
1-800-577-6642 (toll-free) |
US, Canada, and Virgin Islands |
|
+608-204-7703 |
for all other countries |
|
1-608-250-1745 (Fax) |
All countries |
Customer Service/Sales
For a detailed list of Customer Service options, we encourage you to visit http://mediasoftware.sonypictures.com/support/custserv.asp. Use the following numbers for telephone support during normal weekday business hours:
|
Telephone/Fax/E-mail |
Country |
|
1-800-577-6642 (toll-free) |
US, Canada, and Virgin Islands |
|
+608-204-7703 |
for all other countries |
|
1-608-250-1745 (Fax) |
All countries |
http://mediasoftware.sonypictures.com/custserv
Technical Support
For a detailed list of Technical Support options, we encourage you to visit
http://mediasoftware.sonypictures.com/support/default.asp.
•To listen to your support options, please call 608-256-5555.
•Customers who have purchased the full version of Sound Forge receive 60 days of complimentary phone support. The complimentary support begins the date of your first call. (Registration is required to received this complimentary support.) Please call (608) 204-7704 if you need assistance with your full version product. This offer does not apply to Screenblast Sound Forge users.

Sony Pictures Digital Inc.
Media Software and Services
1617 Sherman Avenue
Madison, WI 53704
USA
The information contained in this manual is subject to change without notice and does not represent a guarantee or commitment on behalf of Sony Pictures Digital Inc. in any way. All updates or additional information relating to the contents of this manual will be posted on the Sony Pictures Digital Media Software web site, located at www.sony.com/mediasoftware. The software is provided to you under the terms of the End User License Agreement and Software Privacy Policy, and must be used and/or copied in accordance therewith. Copying or distributing the software except as expressly described in the End User License Agreement is strictly prohibited. No part of this manual may be reproduced or transmitted in any form or for any purpose without the express written consent of Sony Pictures Digital Inc.
Sound Forge, ACID, Vegas, Acoustic Mirror, Wave Hammer, XFX, and Perfect Clarity Audio are trademarks or registered trademarks of Sony Pictures Digital Inc. or its affiliates in the United States and other countries. All other trademarks or registered trademarks are the property of their respective owners in the United States and other countries.
Copyright 2003. Sony Pictures Digital Inc.
Program Copyright 2003. Sony Pictures Digital Inc. All rights reserved.

1
Table of Contents
Introduction. . . . . . . . . . . . . . . . . . . . . . . . . . . . . . . . . . . . . . . . . . . . . 15
Introducing Sound Forge. . . . . . . . . . . . . . . . . . . . . . . . . . . . . . . . . . . . . . . . . . . . . . . . .15
Sample files. . . . . . . . . . . . . . . . . . . . . . . . . . . . . . . . . . . . . . . . . . . . . . . . . . . . . . . . . . . . .15
Full version of Sound Forge versus Screenblast Sound Forge. . . . . . . . . . . . . . . .15 Shortcuts . . . . . . . . . . . . . . . . . . . . . . . . . . . . . . . . . . . . . . . . . . . . . . . . . . . . . . . . . . . . . . .15 System requirements . . . . . . . . . . . . . . . . . . . . . . . . . . . . . . . . . . . . . . . . . . . . . . . . . . . .16
Installing Sound Forge . . . . . . . . . . . . . . . . . . . . . . . . . . . . . . . . . . . . . . . . . . . . . . . . . . .16
Getting help within Sound Forge. . . . . . . . . . . . . . . . . . . . . . . . . . . . . . . . . . . . . . . . . .16
Online help . . . . . . . . . . . . . . . . . . . . . . . . . . . . . . . . . . . . . . . . . . . . . . . . . . . . . . . . . . . . . . . . . . . . . . . . .16 What’s This? help . . . . . . . . . . . . . . . . . . . . . . . . . . . . . . . . . . . . . . . . . . . . . . . . . . . . . . . . . . . . . . . . . . . .17 Help on the Web . . . . . . . . . . . . . . . . . . . . . . . . . . . . . . . . . . . . . . . . . . . . . . . . . . . . . . . . . . . . . . . . . . . . .17
About your rights in Sound Forge software . . . . . . . . . . . . . . . . . . . . . . . . . . . . . . . .17
About Your Privacy . . . . . . . . . . . . . . . . . . . . . . . . . . . . . . . . . . . . . . . . . . . . . . . . . . . . . . . . . . . . . . . . . .18
Proper Use of Software . . . . . . . . . . . . . . . . . . . . . . . . . . . . . . . . . . . . . . . . . . . . . . . . . . . . . . . . . . . . . .18
Optimizing for Sound Forge . . . . . . . . . . . . . . . . . . . . . . . . . . . . . . 19
Defragmenting your hard drive . . . . . . . . . . . . . . . . . . . . . . . . . . . . . . . . . . . . . . . . . . .19
Increasing total buffer size . . . . . . . . . . . . . . . . . . . . . . . . . . . . . . . . . . . . . . . . . . . . . . . .19
Increasing preload size . . . . . . . . . . . . . . . . . . . . . . . . . . . . . . . . . . . . . . . . . . . . . . . . . . .20
Turning off the playback cursor and record counter . . . . . . . . . . . . . . . . . . . . . . . . .20
Turning off the play (output) meters . . . . . . . . . . . . . . . . . . . . . . . . . . . . . . . . . . . . . . .20
Turning on passive updating for video and time displays . . . . . . . . . . . . . . . . . . . .20
Turning on passive updating for time displays . . . . . . . . . . . . . . . . . . . . . . . . . . . . . . . . . . . . . . . . . .20 Turning on passive updating for video displays . . . . . . . . . . . . . . . . . . . . . . . . . . . . . . . . . . . . . . . . .21
Learning the Sound Forge Workspace. . . . . . . . . . . . . . . . . . . . . 23
Using the mouse . . . . . . . . . . . . . . . . . . . . . . . . . . . . . . . . . . . . . . . . . . . . . . . . . . . . . . . .23
Using the mouse wheel . . . . . . . . . . . . . . . . . . . . . . . . . . . . . . . . . . . . . . . . . . . . . . . . . .24
TABLE OF CONTENTS

2 
The main screen . . . . . . . . . . . . . . . . . . . . . . . . . . . . . . . . . . . . . . . . . . . . . . . . . . . . . . . . 24
Main screen components . . . . . . . . . . . . . . . . . . . . . . . . . . . . . . . . . . . . . . . . . . . . . . . . . . . . . . . . . . . . 24 Floating and docking windows . . . . . . . . . . . . . . . . . . . . . . . . . . . . . . . . . . . . . . . . . . . . . . . . . . . . . . . . 25
The data window. . . . . . . . . . . . . . . . . . . . . . . . . . . . . . . . . . . . . . . . . . . . . . . . . . . . . . . . 27
Displaying data window components . . . . . . . . . . . . . . . . . . . . . . . . . . . . . . . . . . . . . . . . . . . . . . . . . 28 Playbar . . . . . . . . . . . . . . . . . . . . . . . . . . . . . . . . . . . . . . . . . . . . . . . . . . . . . . . . . . . . . . . . . . . . . . . . . . . . . 28
Toolbars. . . . . . . . . . . . . . . . . . . . . . . . . . . . . . . . . . . . . . . . . . . . . . . . . . . . . . . . . . . . . . . . 29
Docking a toolbar . . . . . . . . . . . . . . . . . . . . . . . . . . . . . . . . . . . . . . . . . . . . . . . . . . . . . . . . . . . . . . . . . . . . 29 Floating a toolbar . . . . . . . . . . . . . . . . . . . . . . . . . . . . . . . . . . . . . . . . . . . . . . . . . . . . . . . . . . . . . . . . . . . . 29 Displaying a toolbar . . . . . . . . . . . . . . . . . . . . . . . . . . . . . . . . . . . . . . . . . . . . . . . . . . . . . . . . . . . . . . . . . 29 Customizing a toolbar . . . . . . . . . . . . . . . . . . . . . . . . . . . . . . . . . . . . . . . . . . . . . . . . . . . . . . . . . . . . . . . . 29 Standard toolbar . . . . . . . . . . . . . . . . . . . . . . . . . . . . . . . . . . . . . . . . . . . . . . . . . . . . . . . . . . . . . . . . . . . . 30 Transport bar . . . . . . . . . . . . . . . . . . . . . . . . . . . . . . . . . . . . . . . . . . . . . . . . . . . . . . . . . . . . . . . . . . . . . . . 30 Navigation toolbar . . . . . . . . . . . . . . . . . . . . . . . . . . . . . . . . . . . . . . . . . . . . . . . . . . . . . . . . . . . . . . . . . . . 31 Views toolbar . . . . . . . . . . . . . . . . . . . . . . . . . . . . . . . . . . . . . . . . . . . . . . . . . . . . . . . . . . . . . . . . . . . . . . . 31 Status/Selection toolbar . . . . . . . . . . . . . . . . . . . . . . . . . . . . . . . . . . . . . . . . . . . . . . . . . . . . . . . . . . . . . . 32 Regions/Playlist toolbar . . . . . . . . . . . . . . . . . . . . . . . . . . . . . . . . . . . . . . . . . . . . . . . . . . . . . . . . . . . . . . 32 Process toolbar . . . . . . . . . . . . . . . . . . . . . . . . . . . . . . . . . . . . . . . . . . . . . . . . . . . . . . . . . . . . . . . . . . . . . . 33 Effects toolbar . . . . . . . . . . . . . . . . . . . . . . . . . . . . . . . . . . . . . . . . . . . . . . . . . . . . . . . . . . . . . . . . . . . . . . . 34 Tools toolbar . . . . . . . . . . . . . . . . . . . . . . . . . . . . . . . . . . . . . . . . . . . . . . . . . . . . . . . . . . . . . . . . . . . . . . . . 35 Levels toolbar . . . . . . . . . . . . . . . . . . . . . . . . . . . . . . . . . . . . . . . . . . . . . . . . . . . . . . . . . . . . . . . . . . . . . . . 35 ACID Loop Creation Tools toolbar . . . . . . . . . . . . . . . . . . . . . . . . . . . . . . . . . . . . . . . . . . . . . . . . . . . . . 35 Play Device toolbar . . . . . . . . . . . . . . . . . . . . . . . . . . . . . . . . . . . . . . . . . . . . . . . . . . . . . . . . . . . . . . . . . . 36
ToolTips. . . . . . . . . . . . . . . . . . . . . . . . . . . . . . . . . . . . . . . . . . . . . . . . . . . . . . . . . . . . . . . . 36
Turning off ToolTips . . . . . . . . . . . . . . . . . . . . . . . . . . . . . . . . . . . . . . . . . . . . . . . . . . . . . . . . . . . . . . . . . 36
Command descriptions . . . . . . . . . . . . . . . . . . . . . . . . . . . . . . . . . . . . . . . . . . . . . . . . . . 36
Meters . . . . . . . . . . . . . . . . . . . . . . . . . . . . . . . . . . . . . . . . . . . . . . . . . . . . . . . . . . . . . . . . . 37
Resetting clipping indicators . . . . . . . . . . . . . . . . . . . . . . . . . . . . . . . . . . . . . . . . . . . . . . . . . . . . . . . . . . 37 Scaling meters . . . . . . . . . . . . . . . . . . . . . . . . . . . . . . . . . . . . . . . . . . . . . . . . . . . . . . . . . . . . . . . . . . . . . . 37 Displaying VU/PPM meters . . . . . . . . . . . . . . . . . . . . . . . . . . . . . . . . . . . . . . . . . . . . . . . . . . . . . . . . . . . 38 Showing labels . . . . . . . . . . . . . . . . . . . . . . . . . . . . . . . . . . . . . . . . . . . . . . . . . . . . . . . . . . . . . . . . . . . . . . 38 Holding peaks and valleys . . . . . . . . . . . . . . . . . . . . . . . . . . . . . . . . . . . . . . . . . . . . . . . . . . . . . . . . . . . . 38
Controls. . . . . . . . . . . . . . . . . . . . . . . . . . . . . . . . . . . . . . . . . . . . . . . . . . . . . . . . . . . . . . . . 39
Faders and sliders . . . . . . . . . . . . . . . . . . . . . . . . . . . . . . . . . . . . . . . . . . . . . . . . . . . . . . . . . . . . . . . . . . . 39 Envelope graphs . . . . . . . . . . . . . . . . . . . . . . . . . . . . . . . . . . . . . . . . . . . . . . . . . . . . . . . . . . . . . . . . . . . . 39 Displaying the waveform on an envelope graph . . . . . . . . . . . . . . . . . . . . . . . . . . . . . . . . . . . . . . . . 41
Stereo files . . . . . . . . . . . . . . . . . . . . . . . . . . . . . . . . . . . . . . . . . . . . . . . . . . . . . . . . . . . . . 41
Working with stereo files . . . . . . . . . . . . . . . . . . . . . . . . . . . . . . . . . . . . . . . . . . . . . . . . . . . . . . . . . . . . . 41 Selecting data in stereo files . . . . . . . . . . . . . . . . . . . . . . . . . . . . . . . . . . . . . . . . . . . . . . . . . . . . . . . . . . 42
Getting Started . . . . . . . . . . . . . . . . . . . . . . . . . . . . . . . . . . . . . . . . . . 45
TABLE OF CONTENTS

 3
3
Creating a project. . . . . . . . . . . . . . . . . . . . . . . . . . . . . . . . . . . . . . . . . . . . . . . . . . . . . . . .45
Getting media files. . . . . . . . . . . . . . . . . . . . . . . . . . . . . . . . . . . . . . . . . . . . . . . . . . . . . . .46
Using the Open dialog . . . . . . . . . . . . . . . . . . . . . . . . . . . . . . . . . . . . . . . . . . . . . . . . . . . . . . . . . . . . . . .46 Using the Explorer window . . . . . . . . . . . . . . . . . . . . . . . . . . . . . . . . . . . . . . . . . . . . . . . . . . . . . . . . . . .47 Peak files . . . . . . . . . . . . . . . . . . . . . . . . . . . . . . . . . . . . . . . . . . . . . . . . . . . . . . . . . . . . . . . . . . . . . . . . . . .48
Working with video files. . . . . . . . . . . . . . . . . . . . . . . . . . . . . . . . . . . . . . . . . . . . . . . . . .49 Playing a file . . . . . . . . . . . . . . . . . . . . . . . . . . . . . . . . . . . . . . . . . . . . . . . . . . . . . . . . . . . .50
Viewing the current position . . . . . . . . . . . . . . . . . . . . . . . . . . . . . . . . . . . . . . . . . . . . . . . . . . . . . . . . . .50 Playing a file from a specified point . . . . . . . . . . . . . . . . . . . . . . . . . . . . . . . . . . . . . . . . . . . . . . . . . . . .50 Playing in Loop Playback mode . . . . . . . . . . . . . . . . . . . . . . . . . . . . . . . . . . . . . . . . . . . . . . . . . . . . . . .51 Playing a selection . . . . . . . . . . . . . . . . . . . . . . . . . . . . . . . . . . . . . . . . . . . . . . . . . . . . . . . . . . . . . . . . . . .51 Viewing selection status . . . . . . . . . . . . . . . . . . . . . . . . . . . . . . . . . . . . . . . . . . . . . . . . . . . . . . . . . . . . . .51 Viewing selection statistics . . . . . . . . . . . . . . . . . . . . . . . . . . . . . . . . . . . . . . . . . . . . . . . . . . . . . . . . . . .52
Creating a new data window. . . . . . . . . . . . . . . . . . . . . . . . . . . . . . . . . . . . . . . . . . . . . .52
Active data windows vs. inactive data windows . . . . . . . . . . . . . . . . . . . . . . . . . . . . . . . . . . . . . . . . .53 Copying data to a new file . . . . . . . . . . . . . . . . . . . . . . . . . . . . . . . . . . . . . . . . . . . . . . . . . . . . . . . . . . . .53
Saving a file. . . . . . . . . . . . . . . . . . . . . . . . . . . . . . . . . . . . . . . . . . . . . . . . . . . . . . . . . . . . .53
Using the Save As dialog . . . . . . . . . . . . . . . . . . . . . . . . . . . . . . . . . . . . . . . . . . . . . . . . . . . . . . . . . . . . .54 Creating custom templates . . . . . . . . . . . . . . . . . . . . . . . . . . . . . . . . . . . . . . . . . . . . . . . . . . . . . . . . . . .55 Saving all open audio files . . . . . . . . . . . . . . . . . . . . . . . . . . . . . . . . . . . . . . . . . . . . . . . . . . . . . . . . . . . .55 Saving files as a workspace . . . . . . . . . . . . . . . . . . . . . . . . . . . . . . . . . . . . . . . . . . . . . . . . . . . . . . . . . . .56
Editing audio . . . . . . . . . . . . . . . . . . . . . . . . . . . . . . . . . . . . . . . . . . . . . . . . . . . . . . . . . . .56
Copying . . . . . . . . . . . . . . . . . . . . . . . . . . . . . . . . . . . . . . . . . . . . . . . . . . . . . . . . . . . . . . . . . . . . . . . . . . . .57
Pasting . . . . . . . . . . . . . . . . . . . . . . . . . . . . . . . . . . . . . . . . . . . . . . . . . . . . . . . . . . . . . . . . . . . . . . . . . . . . .58
Cutting . . . . . . . . . . . . . . . . . . . . . . . . . . . . . . . . . . . . . . . . . . . . . . . . . . . . . . . . . . . . . . . . . . . . . . . . . . . . .58
Deleting . . . . . . . . . . . . . . . . . . . . . . . . . . . . . . . . . . . . . . . . . . . . . . . . . . . . . . . . . . . . . . . . . . . . . . . . . . . .59
Trimming/Cropping . . . . . . . . . . . . . . . . . . . . . . . . . . . . . . . . . . . . . . . . . . . . . . . . . . . . . . . . . . . . . . . . . .60
Mixing . . . . . . . . . . . . . . . . . . . . . . . . . . . . . . . . . . . . . . . . . . . . . . . . . . . . . . . . . . . . . . . . . . . . . . . . . . . . . .60
Using undo and redo . . . . . . . . . . . . . . . . . . . . . . . . . . . . . . . . . . . . . . . . . . . . . . . . . . . .61
Using the Undo/Redo History window . . . . . . . . . . . . . . . . . . . . . . . . . . . . . . . . . . . . . . . . . . . . . . . . .62
Selecting status formats. . . . . . . . . . . . . . . . . . . . . . . . . . . . . . . . . . . . . . . . . . . . . . . . . .64
Experimenting with status formats . . . . . . . . . . . . . . . . . . . . . . . . . . . . . . . . . . . . . . . . . . . . . . . . . . . .65 Configuring the Measures & Beats format . . . . . . . . . . . . . . . . . . . . . . . . . . . . . . . . . . . . . . . . . . . . . .66
Rendering files . . . . . . . . . . . . . . . . . . . . . . . . . . . . . . . . . . . . . . . . . . . . . . . . . . . . . . . . . .67
Exporting to Net MD devices . . . . . . . . . . . . . . . . . . . . . . . . . . . . . . . . . . . . . . . . . . . . .67
Exporting to CLIÉ handheld devices . . . . . . . . . . . . . . . . . . . . . . . . . . . . . . . . . . . . . . .67 Recovering files after a crash. . . . . . . . . . . . . . . . . . . . . . . . . . . . . . . . . . . . . . . . . . . . . .68
Recovering files . . . . . . . . . . . . . . . . . . . . . . . . . . . . . . . . . . . . . . . . . . . . . . . . . . . . . . . . . . . . . . . . . . . . .68 Deleting recovered files . . . . . . . . . . . . . . . . . . . . . . . . . . . . . . . . . . . . . . . . . . . . . . . . . . . . . . . . . . . . . .68
TABLE OF CONTENTS

4 
Navigating, Zooming, and Selecting. . . . . . . . . . . . . . . . . . . . . . . 69
Setting the cursor position . . . . . . . . . . . . . . . . . . . . . . . . . . . . . . . . . . . . . . . . . . . . . . . 69
Previewing audio with pre-roll . . . . . . . . . . . . . . . . . . . . . . . . . . . . . . . . . . . . . . . . . . . . 70
Using the overview bar . . . . . . . . . . . . . . . . . . . . . . . . . . . . . . . . . . . . . . . . . . . . . . . . . . 70
Understanding the overview bar . . . . . . . . . . . . . . . . . . . . . . . . . . . . . . . . . . . . . . . . . . . . . . . . . . . . . . 70 Navigating in the overview bar . . . . . . . . . . . . . . . . . . . . . . . . . . . . . . . . . . . . . . . . . . . . . . . . . . . . . . . . 71 Playing audio in the overview bar . . . . . . . . . . . . . . . . . . . . . . . . . . . . . . . . . . . . . . . . . . . . . . . . . . . . . 72 Navigating with the audio event locator . . . . . . . . . . . . . . . . . . . . . . . . . . . . . . . . . . . . . . . . . . . . . . . . 72
Zooming and magnifying . . . . . . . . . . . . . . . . . . . . . . . . . . . . . . . . . . . . . . . . . . . . . . . . 72
Zooming the time ruler (horizontal) . . . . . . . . . . . . . . . . . . . . . . . . . . . . . . . . . . . . . . . . . . . . . . . . . . . . 73 Zooming the level ruler (vertical) . . . . . . . . . . . . . . . . . . . . . . . . . . . . . . . . . . . . . . . . . . . . . . . . . . . . . . 74 Using custom zoom settings . . . . . . . . . . . . . . . . . . . . . . . . . . . . . . . . . . . . . . . . . . . . . . . . . . . . . . . . . . 75 Using zooming shortcuts . . . . . . . . . . . . . . . . . . . . . . . . . . . . . . . . . . . . . . . . . . . . . . . . . . . . . . . . . . . . . 76 Using the Magnify tool . . . . . . . . . . . . . . . . . . . . . . . . . . . . . . . . . . . . . . . . . . . . . . . . . . . . . . . . . . . . . . . 76
Selecting audio using start and end values. . . . . . . . . . . . . . . . . . . . . . . . . . . . . . . . . 78
Using the Set Selection dialog . . . . . . . . . . . . . . . . . . . . . . . . . . . . . . . . . . . . . . . . . . . . . . . . . . . . . . . . 78
Selecting audio during playback . . . . . . . . . . . . . . . . . . . . . . . . . . . . . . . . . . . . . . . . . . 79
Fine-tuning a selection . . . . . . . . . . . . . . . . . . . . . . . . . . . . . . . . . . . . . . . . . . . . . . . . . . . 79
Adjusting a selection with the mouse . . . . . . . . . . . . . . . . . . . . . . . . . . . . . . . . . . . . . . . . . . . . . . . . . . 79 Adjusting a selection with the keyboard . . . . . . . . . . . . . . . . . . . . . . . . . . . . . . . . . . . . . . . . . . . . . . . . 79 Restoring a selection . . . . . . . . . . . . . . . . . . . . . . . . . . . . . . . . . . . . . . . . . . . . . . . . . . . . . . . . . . . . . . . . . 80
Understanding snapping. . . . . . . . . . . . . . . . . . . . . . . . . . . . . . . . . . . . . . . . . . . . . . . . . 80
Snapping to time divisions . . . . . . . . . . . . . . . . . . . . . . . . . . . . . . . . . . . . . . . . . . . . . . . . . . . . . . . . . . . 80 Snapping to zero-crossings . . . . . . . . . . . . . . . . . . . . . . . . . . . . . . . . . . . . . . . . . . . . . . . . . . . . . . . . . . . 80 Snapping the current selection to time divisions or zero-crossings . . . . . . . . . . . . . . . . . . . . . . . . 80 Disabling Auto Snap to Zero at high magnifications . . . . . . . . . . . . . . . . . . . . . . . . . . . . . . . . . . . . . 80
Creating and using views . . . . . . . . . . . . . . . . . . . . . . . . . . . . . . . . . . . . . . . . . . . . . . . . 80
Displaying the Views toolbar . . . . . . . . . . . . . . . . . . . . . . . . . . . . . . . . . . . . . . . . . . . . . . . . . . . . . . . . . . 81 Creating views . . . . . . . . . . . . . . . . . . . . . . . . . . . . . . . . . . . . . . . . . . . . . . . . . . . . . . . . . . . . . . . . . . . . . . 81
Changing File Attributes and Formats. . . . . . . . . . . . . . . . . . . . . . 83
Editing file attributes. . . . . . . . . . . . . . . . . . . . . . . . . . . . . . . . . . . . . . . . . . . . . . . . . . . . . 83
|
Editing attributes in the Properties dialog . . . . . . . . . . . . . . . . . . . . . . . . . . . . . . . . . . . . . . . . . . . . . . |
83 |
|
Editing attributes in the status bar . . . . . . . . . . . . . . . . . . . . . . . . . . . . . . . . . . . . . . . . . . . . . . . . . . . . . |
83 |
Changing the sample rate. . . . . . . . . . . . . . . . . . . . . . . . . . . . . . . . . . . . . . . . . . . . . . . . 84
TABLE OF CONTENTS

 5
5
Changing the bit depth. . . . . . . . . . . . . . . . . . . . . . . . . . . . . . . . . . . . . . . . . . . . . . . . . . .84
Increasing bit depth . . . . . . . . . . . . . . . . . . . . . . . . . . . . . . . . . . . . . . . . . . . . . . . . . . . . . . . . . . . . . . . . . .84 Decreasing bit depth . . . . . . . . . . . . . . . . . . . . . . . . . . . . . . . . . . . . . . . . . . . . . . . . . . . . . . . . . . . . . . . . .85 Understanding dither and noise shaping . . . . . . . . . . . . . . . . . . . . . . . . . . . . . . . . . . . . . . . . . . . . . . .85 Minimizing quantization error . . . . . . . . . . . . . . . . . . . . . . . . . . . . . . . . . . . . . . . . . . . . . . . . . . . . . . . . .86
Converting mono/stereo channels. . . . . . . . . . . . . . . . . . . . . . . . . . . . . . . . . . . . . . . . .87
Converting from mono to stereo . . . . . . . . . . . . . . . . . . . . . . . . . . . . . . . . . . . . . . . . . . . . . . . . . . . . . .87 Converting from stereo to mono . . . . . . . . . . . . . . . . . . . . . . . . . . . . . . . . . . . . . . . . . . . . . . . . . . . . . .88 Using the Channel Converter . . . . . . . . . . . . . . . . . . . . . . . . . . . . . . . . . . . . . . . . . . . . . . . . . . . . . . . . .88
Converting file formats. . . . . . . . . . . . . . . . . . . . . . . . . . . . . . . . . . . . . . . . . . . . . . . . . . .88
Save as type . . . . . . . . . . . . . . . . . . . . . . . . . . . . . . . . . . . . . . . . . . . . . . . . . . . . . . . . . . . . . . . . . . . . . . . .88 Template . . . . . . . . . . . . . . . . . . . . . . . . . . . . . . . . . . . . . . . . . . . . . . . . . . . . . . . . . . . . . . . . . . . . . . . . . . .88
Adding summary information . . . . . . . . . . . . . . . . . . . . . . . . . . . . . . . . . . . . . . . . . . . .89
Viewing and editing summary information . . . . . . . . . . . . . . . . . . . . . . . . . . . . . . . . . . . . . . . . . . . . .89 Viewing extended summary information . . . . . . . . . . . . . . . . . . . . . . . . . . . . . . . . . . . . . . . . . . . . . .89 Editing extended summary information . . . . . . . . . . . . . . . . . . . . . . . . . . . . . . . . . . . . . . . . . . . . . . . .90 Saving summary information . . . . . . . . . . . . . . . . . . . . . . . . . . . . . . . . . . . . . . . . . . . . . . . . . . . . . . . . .90 Including additional embedded information . . . . . . . . . . . . . . . . . . . . . . . . . . . . . . . . . . . . . . . . . . . .90
Using Markers, Regions, and the Playlist/Cutlist . . . . . . . . . . . . 91
Why use markers, regions, and the playlist?. . . . . . . . . . . . . . . . . . . . . . . . . . . . . . . .91
Rapid navigation . . . . . . . . . . . . . . . . . . . . . . . . . . . . . . . . . . . . . . . . . . . . . . . . . . . . . . . . . . . . . . . . . . . .91 Added effects for streaming media . . . . . . . . . . . . . . . . . . . . . . . . . . . . . . . . . . . . . . . . . . . . . . . . . . . .91 Multiple versions of edits . . . . . . . . . . . . . . . . . . . . . . . . . . . . . . . . . . . . . . . . . . . . . . . . . . . . . . . . . . . . .91 MIDI synchronization and triggering . . . . . . . . . . . . . . . . . . . . . . . . . . . . . . . . . . . . . . . . . . . . . . . . . . .91
Using markers . . . . . . . . . . . . . . . . . . . . . . . . . . . . . . . . . . . . . . . . . . . . . . . . . . . . . . . . . .92
Inserting markers . . . . . . . . . . . . . . . . . . . . . . . . . . . . . . . . . . . . . . . . . . . . . . . . . . . . . . . . . . . . . . . . . . . .92 Naming markers . . . . . . . . . . . . . . . . . . . . . . . . . . . . . . . . . . . . . . . . . . . . . . . . . . . . . . . . . . . . . . . . . . . .92 Changing the marker position . . . . . . . . . . . . . . . . . . . . . . . . . . . . . . . . . . . . . . . . . . . . . . . . . . . . . . . . .94 Detecting and marking clipping . . . . . . . . . . . . . . . . . . . . . . . . . . . . . . . . . . . . . . . . . . . . . . . . . . . . . . .95 Using markers to create regions . . . . . . . . . . . . . . . . . . . . . . . . . . . . . . . . . . . . . . . . . . . . . . . . . . . . . . .95
Using command markers in streaming media files. . . . . . . . . . . . . . . . . . . . . . . . . .96
Defining streaming media commands . . . . . . . . . . . . . . . . . . . . . . . . . . . . . . . . . . . . . . . . . . . . . . . . .96 Defining Scott Studios data commands . . . . . . . . . . . . . . . . . . . . . . . . . . . . . . . . . . . . . . . . . . . . . . . .97 Inserting command markers . . . . . . . . . . . . . . . . . . . . . . . . . . . . . . . . . . . . . . . . . . . . . . . . . . . . . . . . . .97 Editing command properties . . . . . . . . . . . . . . . . . . . . . . . . . . . . . . . . . . . . . . . . . . . . . . . . . . . . . . . . . .98 Saving command properties as a custom template . . . . . . . . . . . . . . . . . . . . . . . . . . . . . . . . . . . . .98 Moving the cursor to a command marker . . . . . . . . . . . . . . . . . . . . . . . . . . . . . . . . . . . . . . . . . . . . . .98 Deleting command markers . . . . . . . . . . . . . . . . . . . . . . . . . . . . . . . . . . . . . . . . . . . . . . . . . . . . . . . . . .98
TABLE OF CONTENTS

6 
Using regions . . . . . . . . . . . . . . . . . . . . . . . . . . . . . . . . . . . . . . . . . . . . . . . . . . . . . . . . . . 99
Inserting regions . . . . . . . . . . . . . . . . . . . . . . . . . . . . . . . . . . . . . . . . . . . . . . . . . . . . . . . . . . . . . . . . . . . . 99 Inserting regions automatically . . . . . . . . . . . . . . . . . . . . . . . . . . . . . . . . . . . . . . . . . . . . . . . . . . . . . .100 Editing regions . . . . . . . . . . . . . . . . . . . . . . . . . . . . . . . . . . . . . . . . . . . . . . . . . . . . . . . . . . . . . . . . . . . . .102 Creating new files from regions . . . . . . . . . . . . . . . . . . . . . . . . . . . . . . . . . . . . . . . . . . . . . . . . . . . . . .103
Using the Regions List . . . . . . . . . . . . . . . . . . . . . . . . . . . . . . . . . . . . . . . . . . . . . . . . . . 104
Displaying the Regions List . . . . . . . . . . . . . . . . . . . . . . . . . . . . . . . . . . . . . . . . . . . . . . . . . . . . . . . . . .104 Working with the Regions List . . . . . . . . . . . . . . . . . . . . . . . . . . . . . . . . . . . . . . . . . . . . . . . . . . . . . . .104
Using the playlist. . . . . . . . . . . . . . . . . . . . . . . . . . . . . . . . . . . . . . . . . . . . . . . . . . . . . . . 106
|
Displaying the playlist . . . . . . . . . . . . . . . . . . . . . . . . . . . . . . . . . . . . . . . . . . . . . . . . . . . . . . . . . . . . . . . |
106 |
|
Adding regions to the playlist . . . . . . . . . . . . . . . . . . . . . . . . . . . . . . . . . . . . . . . . . . . . . . . . . . . . . . . . |
106 |
|
Understanding the playlist display . . . . . . . . . . . . . . . . . . . . . . . . . . . . . . . . . . . . . . . . . . . . . . . . . . . |
107 |
|
Customizing the playlist display . . . . . . . . . . . . . . . . . . . . . . . . . . . . . . . . . . . . . . . . . . . . . . . . . . . . . . |
107 |
|
Repeating a region during playlist playback . . . . . . . . . . . . . . . . . . . . . . . . . . . . . . . . . . . . . . . . . . . |
107 |
|
Playing from the playlist . . . . . . . . . . . . . . . . . . . . . . . . . . . . . . . . . . . . . . . . . . . . . . . . . . . . . . . . . . . . . |
108 |
|
Arranging the playlist . . . . . . . . . . . . . . . . . . . . . . . . . . . . . . . . . . . . . . . . . . . . . . . . . . . . . . . . . . . . . . . |
108 |
|
Replicating a region in the playlist . . . . . . . . . . . . . . . . . . . . . . . . . . . . . . . . . . . . . . . . . . . . . . . . . . . . |
108 |
|
Using stop points . . . . . . . . . . . . . . . . . . . . . . . . . . . . . . . . . . . . . . . . . . . . . . . . . . . . . . . . . . . . . . . . . . . |
109 |
|
Deleting a region from the playlist . . . . . . . . . . . . . . . . . . . . . . . . . . . . . . . . . . . . . . . . . . . . . . . . . . . . |
109 |
|
Creating a new file from the playlist . . . . . . . . . . . . . . . . . . . . . . . . . . . . . . . . . . . . . . . . . . . . . . . . . . |
109 |
|
Configuring the playlist as a cutlist . . . . . . . . . . . . . . . . . . . . . . . . . . . . . . . . . . . . . . . . . . . . . . . . . . . |
110 |
|
Saving a playlist/cutlist file . . . . . . . . . . . . . . . . . . . . . . . . . . . . . . . . . . . . . . . . . . . . . . . . . . . . . . . . . . . |
111 |
|
Opening a playlist/cutlist file . . . . . . . . . . . . . . . . . . . . . . . . . . . . . . . . . . . . . . . . . . . . . . . . . . . . . . . . . |
111 |
|
Copying the playlist/cutlist to the clipboard . . . . . . . . . . . . . . . . . . . . . . . . . . . . . . . . . . . . . . . . . . . . |
111 |
Recording, Extracting, and Burning. . . . . . . . . . . . . . . . . . . . . . . 113
Recording audio . . . . . . . . . . . . . . . . . . . . . . . . . . . . . . . . . . . . . . . . . . . . . . . . . . . . . . . 113
Recording manually . . . . . . . . . . . . . . . . . . . . . . . . . . . . . . . . . . . . . . . . . . . . . . . . . . . . . . . . . . . . . . . .113 Recording automatically . . . . . . . . . . . . . . . . . . . . . . . . . . . . . . . . . . . . . . . . . . . . . . . . . . . . . . . . . . . .115 Recording a specific length (punch-in) . . . . . . . . . . . . . . . . . . . . . . . . . . . . . . . . . . . . . . . . . . . . . . . .117 Choosing a recording mode . . . . . . . . . . . . . . . . . . . . . . . . . . . . . . . . . . . . . . . . . . . . . . . . . . . . . . . . .119 Adjusting for DC offset . . . . . . . . . . . . . . . . . . . . . . . . . . . . . . . . . . . . . . . . . . . . . . . . . . . . . . . . . . . . . .121 Playing back recorded audio . . . . . . . . . . . . . . . . . . . . . . . . . . . . . . . . . . . . . . . . . . . . . . . . . . . . . . . . .122 Using remote recording mode . . . . . . . . . . . . . . . . . . . . . . . . . . . . . . . . . . . . . . . . . . . . . . . . . . . . . . .123 Synchronizing with other devices . . . . . . . . . . . . . . . . . . . . . . . . . . . . . . . . . . . . . . . . . . . . . . . . . . . .124 Viewing input levels . . . . . . . . . . . . . . . . . . . . . . . . . . . . . . . . . . . . . . . . . . . . . . . . . . . . . . . . . . . . . . . .125 Inserting markers while recording . . . . . . . . . . . . . . . . . . . . . . . . . . . . . . . . . . . . . . . . . . . . . . . . . . . .125 Configuring gap detection . . . . . . . . . . . . . . . . . . . . . . . . . . . . . . . . . . . . . . . . . . . . . . . . . . . . . . . . . . .126 Automatically labeling windows and regions . . . . . . . . . . . . . . . . . . . . . . . . . . . . . . . . . . . . . . . . . .126 Changing blinking status . . . . . . . . . . . . . . . . . . . . . . . . . . . . . . . . . . . . . . . . . . . . . . . . . . . . . . . . . . . .126
TABLE OF CONTENTS

 7
7
Extracting audio from CDs. . . . . . . . . . . . . . . . . . . . . . . . . . . . . . . . . . . . . . . . . . . . . . .127
Previewing CD tracks . . . . . . . . . . . . . . . . . . . . . . . . . . . . . . . . . . . . . . . . . . . . . . . . . . . . . . . . . . . . . . .128 Refreshing the Extract Audio from CD dialog . . . . . . . . . . . . . . . . . . . . . . . . . . . . . . . . . . . . . . . . . .128
Burning CDs . . . . . . . . . . . . . . . . . . . . . . . . . . . . . . . . . . . . . . . . . . . . . . . . . . . . . . . . . . .128
|
Correcting the sample rate for CD burning . . . . . . . . . . . . . . . . . . . . . . . . . . . . . . . . . . . . . . . . . . . . |
128 |
|
Writing mono tracks to a CD . . . . . . . . . . . . . . . . . . . . . . . . . . . . . . . . . . . . . . . . . . . . . . . . . . . . . . . . . |
128 |
|
Adding tracks to a CD . . . . . . . . . . . . . . . . . . . . . . . . . . . . . . . . . . . . . . . . . . . . . . . . . . . . . . . . . . . . . . . |
128 |
|
Closing a CD . . . . . . . . . . . . . . . . . . . . . . . . . . . . . . . . . . . . . . . . . . . . . . . . . . . . . . . . . . . . . . . . . . . . . . . |
130 |
Proper use of software . . . . . . . . . . . . . . . . . . . . . . . . . . . . . . . . . . . . . . . . . . . . . . . . . .130
Editing, Repairing, and Synthesizing Audio . . . . . . . . . . . . . . . 131
Crossfading, overwriting, and replicating. . . . . . . . . . . . . . . . . . . . . . . . . . . . . . . . . .131
Crossfading . . . . . . . . . . . . . . . . . . . . . . . . . . . . . . . . . . . . . . . . . . . . . . . . . . . . . . . . . . . . . . . . . . . . . . . .131
Overwriting . . . . . . . . . . . . . . . . . . . . . . . . . . . . . . . . . . . . . . . . . . . . . . . . . . . . . . . . . . . . . . . . . . . . . . . .131
Replicating . . . . . . . . . . . . . . . . . . . . . . . . . . . . . . . . . . . . . . . . . . . . . . . . . . . . . . . . . . . . . . . . . . . . . . . . .132
Repeating an operation . . . . . . . . . . . . . . . . . . . . . . . . . . . . . . . . . . . . . . . . . . . . . . . . .134 Using drag-and-drop. . . . . . . . . . . . . . . . . . . . . . . . . . . . . . . . . . . . . . . . . . . . . . . . . . . .134
Dragging mono selections into stereo destinations . . . . . . . . . . . . . . . . . . . . . . . . . . . . . . . . . . . . .134 Snapping to events in drag-and-drop operations . . . . . . . . . . . . . . . . . . . . . . . . . . . . . . . . . . . . . . .134 Pasting, mixing, and crossfading with drag-and-drop . . . . . . . . . . . . . . . . . . . . . . . . . . . . . . . . . .135 Creating new windows with drag-and-drop . . . . . . . . . . . . . . . . . . . . . . . . . . . . . . . . . . . . . . . . . . .137
Finding and repairing audio glitches. . . . . . . . . . . . . . . . . . . . . . . . . . . . . . . . . . . . . .137
Locating glitches . . . . . . . . . . . . . . . . . . . . . . . . . . . . . . . . . . . . . . . . . . . . . . . . . . . . . . . . . . . . . . . . . . .137 Repairing audio . . . . . . . . . . . . . . . . . . . . . . . . . . . . . . . . . . . . . . . . . . . . . . . . . . . . . . . . . . . . . . . . . . . .138
Synthesizing audio . . . . . . . . . . . . . . . . . . . . . . . . . . . . . . . . . . . . . . . . . . . . . . . . . . . . .141
Generating DTMF/MF tones . . . . . . . . . . . . . . . . . . . . . . . . . . . . . . . . . . . . . . . . . . . . . . . . . . . . . . . . .141 Generating audio with frequency modulation . . . . . . . . . . . . . . . . . . . . . . . . . . . . . . . . . . . . . . . . .142 Generating simple waveforms . . . . . . . . . . . . . . . . . . . . . . . . . . . . . . . . . . . . . . . . . . . . . . . . . . . . . . .144
Processing Audio. . . . . . . . . . . . . . . . . . . . . . . . . . . . . . . . . . . . . . . 145
Applying presets . . . . . . . . . . . . . . . . . . . . . . . . . . . . . . . . . . . . . . . . . . . . . . . . . . . . . . .145
Using presets . . . . . . . . . . . . . . . . . . . . . . . . . . . . . . . . . . . . . . . . . . . . . . . . . . . . . . . . . . . . . . . . . . . . . .145 Creating presets . . . . . . . . . . . . . . . . . . . . . . . . . . . . . . . . . . . . . . . . . . . . . . . . . . . . . . . . . . . . . . . . . . . .146 Deleting presets . . . . . . . . . . . . . . . . . . . . . . . . . . . . . . . . . . . . . . . . . . . . . . . . . . . . . . . . . . . . . . . . . . . .146 Resetting parameters . . . . . . . . . . . . . . . . . . . . . . . . . . . . . . . . . . . . . . . . . . . . . . . . . . . . . . . . . . . . . . .146 Managing presets . . . . . . . . . . . . . . . . . . . . . . . . . . . . . . . . . . . . . . . . . . . . . . . . . . . . . . . . . . . . . . . . . .146
Previewing processed audio. . . . . . . . . . . . . . . . . . . . . . . . . . . . . . . . . . . . . . . . . . . . .146
Setting custom preview parameters . . . . . . . . . . . . . . . . . . . . . . . . . . . . . . . . . . . . . . . . . . . . . . . . . .146 Preview parameters . . . . . . . . . . . . . . . . . . . . . . . . . . . . . . . . . . . . . . . . . . . . . . . . . . . . . . . . . . . . . . . .147 Bypassing a process while previewing . . . . . . . . . . . . . . . . . . . . . . . . . . . . . . . . . . . . . . . . . . . . . . . .148
TABLE OF CONTENTS

8 
Sound Forge processes. . . . . . . . . . . . . . . . . . . . . . . . . . . . . . . . . . . . . . . . . . . . . . . . . 148
Auto Trim/Crop . . . . . . . . . . . . . . . . . . . . . . . . . . . . . . . . . . . . . . . . . . . . . . . . . . . . . . . . 149
Using Auto Trim/Crop . . . . . . . . . . . . . . . . . . . . . . . . . . . . . . . . . . . . . . . . . . . . . . . . . . . . . . . . . . . . . . .149 Auto Trim/Crop controls . . . . . . . . . . . . . . . . . . . . . . . . . . . . . . . . . . . . . . . . . . . . . . . . . . . . . . . . . . . . .149
Bit-Depth Converter . . . . . . . . . . . . . . . . . . . . . . . . . . . . . . . . . . . . . . . . . . . . . . . . . . . . 150
Converting a file’s bit depth . . . . . . . . . . . . . . . . . . . . . . . . . . . . . . . . . . . . . . . . . . . . . . . . . . . . . . . . . .151
Channel Converter . . . . . . . . . . . . . . . . . . . . . . . . . . . . . . . . . . . . . . . . . . . . . . . . . . . . . 152
Using the Channel Converter . . . . . . . . . . . . . . . . . . . . . . . . . . . . . . . . . . . . . . . . . . . . . . . . . . . . . . . .153 Channel Converter controls . . . . . . . . . . . . . . . . . . . . . . . . . . . . . . . . . . . . . . . . . . . . . . . . . . . . . . . . . .153
DC Offset . . . . . . . . . . . . . . . . . . . . . . . . . . . . . . . . . . . . . . . . . . . . . . . . . . . . . . . . . . . . . . 154
Estimating DC Offset . . . . . . . . . . . . . . . . . . . . . . . . . . . . . . . . . . . . . . . . . . . . . . . . . . . . . . . . . . . . . . . .154 DC Offset controls . . . . . . . . . . . . . . . . . . . . . . . . . . . . . . . . . . . . . . . . . . . . . . . . . . . . . . . . . . . . . . . . . .154
EQ . . . . . . . . . . . . . . . . . . . . . . . . . . . . . . . . . . . . . . . . . . . . . . . . . . . . . . . . . . . . . . . . . . . . 155
Fade — Graphic fade. . . . . . . . . . . . . . . . . . . . . . . . . . . . . . . . . . . . . . . . . . . . . . . . . . . . . 155
Creating a graphic fade . . . . . . . . . . . . . . . . . . . . . . . . . . . . . . . . . . . . . . . . . . . . . . . . . . . . . . . . . . . . . .155 Creating a custom graphic fade . . . . . . . . . . . . . . . . . . . . . . . . . . . . . . . . . . . . . . . . . . . . . . . . . . . . . .156 Graphic Fade Controls . . . . . . . . . . . . . . . . . . . . . . . . . . . . . . . . . . . . . . . . . . . . . . . . . . . . . . . . . . . . . .156
Fade — Fade In. . . . . . . . . . . . . . . . . . . . . . . . . . . . . . . . . . . . . . . . . . . . . . . . . . . . . . . . . . 156
Fade — Fade Out . . . . . . . . . . . . . . . . . . . . . . . . . . . . . . . . . . . . . . . . . . . . . . . . . . . . . . . . 157
Insert Silence . . . . . . . . . . . . . . . . . . . . . . . . . . . . . . . . . . . . . . . . . . . . . . . . . . . . . . . . . . 157
Inserting silence into a file . . . . . . . . . . . . . . . . . . . . . . . . . . . . . . . . . . . . . . . . . . . . . . . . . . . . . . . . . . .157 Insert Silence controls . . . . . . . . . . . . . . . . . . . . . . . . . . . . . . . . . . . . . . . . . . . . . . . . . . . . . . . . . . . . . . .157
Invert/Flip. . . . . . . . . . . . . . . . . . . . . . . . . . . . . . . . . . . . . . . . . . . . . . . . . . . . . . . . . . . . . . 158
Mute. . . . . . . . . . . . . . . . . . . . . . . . . . . . . . . . . . . . . . . . . . . . . . . . . . . . . . . . . . . . . . . . . . 158
Muting an audio selection . . . . . . . . . . . . . . . . . . . . . . . . . . . . . . . . . . . . . . . . . . . . . . . . . . . . . . . . . . .158
Normalize . . . . . . . . . . . . . . . . . . . . . . . . . . . . . . . . . . . . . . . . . . . . . . . . . . . . . . . . . . . . . 158
Normalizing Audio . . . . . . . . . . . . . . . . . . . . . . . . . . . . . . . . . . . . . . . . . . . . . . . . . . . . . . . . . . . . . . . . .159
Normalize Controls . . . . . . . . . . . . . . . . . . . . . . . . . . . . . . . . . . . . . . . . . . . . . . . . . . . . . . . . . . . . . . . . .159
Pan/Expand. . . . . . . . . . . . . . . . . . . . . . . . . . . . . . . . . . . . . . . . . . . . . . . . . . . . . . . . . . . . 161
Creating a pan . . . . . . . . . . . . . . . . . . . . . . . . . . . . . . . . . . . . . . . . . . . . . . . . . . . . . . . . . . . . . . . . . . . . .162 Creating a custom pan . . . . . . . . . . . . . . . . . . . . . . . . . . . . . . . . . . . . . . . . . . . . . . . . . . . . . . . . . . . . . .162 Pan/Expand controls . . . . . . . . . . . . . . . . . . . . . . . . . . . . . . . . . . . . . . . . . . . . . . . . . . . . . . . . . . . . . . . .163
Resample . . . . . . . . . . . . . . . . . . . . . . . . . . . . . . . . . . . . . . . . . . . . . . . . . . . . . . . . . . . . . 163
Downsampling audio . . . . . . . . . . . . . . . . . . . . . . . . . . . . . . . . . . . . . . . . . . . . . . . . . . . . . . . . . . . . . . .164 Upsampling audio . . . . . . . . . . . . . . . . . . . . . . . . . . . . . . . . . . . . . . . . . . . . . . . . . . . . . . . . . . . . . . . . . .164 Resample controls . . . . . . . . . . . . . . . . . . . . . . . . . . . . . . . . . . . . . . . . . . . . . . . . . . . . . . . . . . . . . . . . . .164
Reverse . . . . . . . . . . . . . . . . . . . . . . . . . . . . . . . . . . . . . . . . . . . . . . . . . . . . . . . . . . . . . . . 165
Smooth/Enhance. . . . . . . . . . . . . . . . . . . . . . . . . . . . . . . . . . . . . . . . . . . . . . . . . . . . . . . 165
TABLE OF CONTENTS
![]()
 9
9
Swap Channels . . . . . . . . . . . . . . . . . . . . . . . . . . . . . . . . . . . . . . . . . . . . . . . . . . . . . . . .166
Time Stretch . . . . . . . . . . . . . . . . . . . . . . . . . . . . . . . . . . . . . . . . . . . . . . . . . . . . . . . . . . .166
Volume. . . . . . . . . . . . . . . . . . . . . . . . . . . . . . . . . . . . . . . . . . . . . . . . . . . . . . . . . . . . . . . .166
Increasing the volume of a selection . . . . . . . . . . . . . . . . . . . . . . . . . . . . . . . . . . . . . . . . . . . . . . . . . .166 Volume control . . . . . . . . . . . . . . . . . . . . . . . . . . . . . . . . . . . . . . . . . . . . . . . . . . . . . . . . . . . . . . . . . . . . .167
Applying Effects. . . . . . . . . . . . . . . . . . . . . . . . . . . . . . . . . . . . . . . . 169
Adding an effect. . . . . . . . . . . . . . . . . . . . . . . . . . . . . . . . . . . . . . . . . . . . . . . . . . . . . . . .169
|
Saving effect settings as a custom preset . . . . . . . . . . . . . . . . . . . . . . . . . . . . . . . . . . . . . . . . . . . . . |
170 |
Adding a chain of effects . . . . . . . . . . . . . . . . . . . . . . . . . . . . . . . . . . . . . . . . . . . . . . . .170
Applying effects using the Plug-In Chainer . . . . . . . . . . . . . . . . . . . . . . . . . . . . . . . . . . . . . . . . . . . .171 Adding plug-ins to a chain . . . . . . . . . . . . . . . . . . . . . . . . . . . . . . . . . . . . . . . . . . . . . . . . . . . . . . . . . . .172 Selecting the processing mode for audio tail data . . . . . . . . . . . . . . . . . . . . . . . . . . . . . . . . . . . . . .173 Arranging plug-ins on a chain . . . . . . . . . . . . . . . . . . . . . . . . . . . . . . . . . . . . . . . . . . . . . . . . . . . . . . . .174 Bypassing effects . . . . . . . . . . . . . . . . . . . . . . . . . . . . . . . . . . . . . . . . . . . . . . . . . . . . . . . . . . . . . . . . . . .174 Removing plug-ins from a chain . . . . . . . . . . . . . . . . . . . . . . . . . . . . . . . . . . . . . . . . . . . . . . . . . . . . .175 Configuring chained plug-ins . . . . . . . . . . . . . . . . . . . . . . . . . . . . . . . . . . . . . . . . . . . . . . . . . . . . . . . .175 Saving individual plug-in settings as a custom preset . . . . . . . . . . . . . . . . . . . . . . . . . . . . . . . . . .175 Saving plug-in chains . . . . . . . . . . . . . . . . . . . . . . . . . . . . . . . . . . . . . . . . . . . . . . . . . . . . . . . . . . . . . . .175 Loading plug-in chains . . . . . . . . . . . . . . . . . . . . . . . . . . . . . . . . . . . . . . . . . . . . . . . . . . . . . . . . . . . . . .176
Managing effects . . . . . . . . . . . . . . . . . . . . . . . . . . . . . . . . . . . . . . . . . . . . . . . . . . . . . . .176
Using the Plug-In Manager window . . . . . . . . . . . . . . . . . . . . . . . . . . . . . . . . . . . . . . . . . . . . . . . . . .176 Organizing effects in the DX Favorites menu . . . . . . . . . . . . . . . . . . . . . . . . . . . . . . . . . . . . . . . . . .177 Using the Preset Manager . . . . . . . . . . . . . . . . . . . . . . . . . . . . . . . . . . . . . . . . . . . . . . . . . . . . . . . . . . .177
Automating Effect Parameters . . . . . . . . . . . . . . . . . . . . . . . . . . . . . . . . . . . . . . . . . . .178
Adding an effect automation envelope . . . . . . . . . . . . . . . . . . . . . . . . . . . . . . . . . . . . . . . . . . . . . . . .178 Adding a volume or panning envelope . . . . . . . . . . . . . . . . . . . . . . . . . . . . . . . . . . . . . . . . . . . . . . .178 Adjusting effect parameters with envelopes . . . . . . . . . . . . . . . . . . . . . . . . . . . . . . . . . . . . . . . . . . .179 Previewing effect automation . . . . . . . . . . . . . . . . . . . . . . . . . . . . . . . . . . . . . . . . . . . . . . . . . . . . . . . .179 Applying effects automation . . . . . . . . . . . . . . . . . . . . . . . . . . . . . . . . . . . . . . . . . . . . . . . . . . . . . . . . .179 Showing or hiding effect automation envelopes . . . . . . . . . . . . . . . . . . . . . . . . . . . . . . . . . . . . . . .179 Enabling or bypassing effect automation envelopes . . . . . . . . . . . . . . . . . . . . . . . . . . . . . . . . . . . .179 Removing effect automation envelopes . . . . . . . . . . . . . . . . . . . . . . . . . . . . . . . . . . . . . . . . . . . . . . .180
Adjusting envelopes . . . . . . . . . . . . . . . . . . . . . . . . . . . . . . . . . . . . . . . . . . . . . . . . . . . .180
Adding envelope points . . . . . . . . . . . . . . . . . . . . . . . . . . . . . . . . . . . . . . . . . . . . . . . . . . . . . . . . . . . . .180 Flipping an envelope . . . . . . . . . . . . . . . . . . . . . . . . . . . . . . . . . . . . . . . . . . . . . . . . . . . . . . . . . . . . . . . .180 Setting fade properties . . . . . . . . . . . . . . . . . . . . . . . . . . . . . . . . . . . . . . . . . . . . . . . . . . . . . . . . . . . . . .181 Cutting, copying, and pasting envelope points . . . . . . . . . . . . . . . . . . . . . . . . . . . . . . . . . . . . . . . . .181 Copying an envelope to another data window . . . . . . . . . . . . . . . . . . . . . . . . . . . . . . . . . . . . . . . . .181
Using Acoustic Mirror and Wave Hammer. . . . . . . . . . . . . . . . 183
TABLE OF CONTENTS

10 
What is Acoustic Mirror? . . . . . . . . . . . . . . . . . . . . . . . . . . . . . . . . . . . . . . . . . . . . . . . . 183
The acoustic signature . . . . . . . . . . . . . . . . . . . . . . . . . . . . . . . . . . . . . . . . . . . . . . . . . . . . . . . . . . . . . .183
Adding an acoustic signature to an audio file. . . . . . . . . . . . . . . . . . . . . . . . . . . . . . 183
Adjusting the acoustic signature . . . . . . . . . . . . . . . . . . . . . . . . . . . . . . . . . . . . . . . . . . . . . . . . . . . . .184
The Acoustic Mirror dialog . . . . . . . . . . . . . . . . . . . . . . . . . . . . . . . . . . . . . . . . . . . . . . 185
General tab controls . . . . . . . . . . . . . . . . . . . . . . . . . . . . . . . . . . . . . . . . . . . . . . . . . . . . . . . . . . . . . . . .185 Envelope tab controls . . . . . . . . . . . . . . . . . . . . . . . . . . . . . . . . . . . . . . . . . . . . . . . . . . . . . . . . . . . . . . .186 Summary tab controls . . . . . . . . . . . . . . . . . . . . . . . . . . . . . . . . . . . . . . . . . . . . . . . . . . . . . . . . . . . . . .187 Recover tab controls . . . . . . . . . . . . . . . . . . . . . . . . . . . . . . . . . . . . . . . . . . . . . . . . . . . . . . . . . . . . . . . .188
Creating impulse files. . . . . . . . . . . . . . . . . . . . . . . . . . . . . . . . . . . . . . . . . . . . . . . . . . . 189
What you need to create custom impulses . . . . . . . . . . . . . . . . . . . . . . . . . . . . . . . . . . . . . . . . . . . .189 Recording the impulse in an acoustic space . . . . . . . . . . . . . . . . . . . . . . . . . . . . . . . . . . . . . . . . . . .190 Recording the impulse through an electronic device . . . . . . . . . . . . . . . . . . . . . . . . . . . . . . . . . . .190 Recovering the impulse . . . . . . . . . . . . . . . . . . . . . . . . . . . . . . . . . . . . . . . . . . . . . . . . . . . . . . . . . . . . .191 Trimming the impulse file . . . . . . . . . . . . . . . . . . . . . . . . . . . . . . . . . . . . . . . . . . . . . . . . . . . . . . . . . . .192 Adding summary information to your impulse file . . . . . . . . . . . . . . . . . . . . . . . . . . . . . . . . . . . . .192 Using the new impulse file . . . . . . . . . . . . . . . . . . . . . . . . . . . . . . . . . . . . . . . . . . . . . . . . . . . . . . . . . .193
Using impulse files in creative ways. . . . . . . . . . . . . . . . . . . . . . . . . . . . . . . . . . . . . . 193
Processing individual audio elements . . . . . . . . . . . . . . . . . . . . . . . . . . . . . . . . . . . . . . . . . . . . . . . .193 Adding realistic stereo to mono recordings . . . . . . . . . . . . . . . . . . . . . . . . . . . . . . . . . . . . . . . . . . . .193 Creating special effects . . . . . . . . . . . . . . . . . . . . . . . . . . . . . . . . . . . . . . . . . . . . . . . . . . . . . . . . . . . . . .193 Recreating spaces for foley effects and dialog replacement . . . . . . . . . . . . . . . . . . . . . . . . . . . . .194 Panning with head-related transfer functions . . . . . . . . . . . . . . . . . . . . . . . . . . . . . . . . . . . . . . . . . .194
Troubleshooting Acoustic Mirror. . . . . . . . . . . . . . . . . . . . . . . . . . . . . . . . . . . . . . . . . 195
Stuttering during real-time previewing . . . . . . . . . . . . . . . . . . . . . . . . . . . . . . . . . . . . . . . . . . . . . . . .195 Impulses do not recover properly . . . . . . . . . . . . . . . . . . . . . . . . . . . . . . . . . . . . . . . . . . . . . . . . . . . .195 Recovered impulse is too noisy . . . . . . . . . . . . . . . . . . . . . . . . . . . . . . . . . . . . . . . . . . . . . . . . . . . . . .196 Error message explanations . . . . . . . . . . . . . . . . . . . . . . . . . . . . . . . . . . . . . . . . . . . . . . . . . . . . . . . . .196
What is Wave Hammer? . . . . . . . . . . . . . . . . . . . . . . . . . . . . . . . . . . . . . . . . . . . . . . . . 197
Displaying Wave Hammer . . . . . . . . . . . . . . . . . . . . . . . . . . . . . . . . . . . . . . . . . . . . . . . . . . . . . . . . . . .197
The Wave Hammer dialog . . . . . . . . . . . . . . . . . . . . . . . . . . . . . . . . . . . . . . . . . . . . . . 197
Compressor tab . . . . . . . . . . . . . . . . . . . . . . . . . . . . . . . . . . . . . . . . . . . . . . . . . . . . . . . . . . . . . . . . . . . .197 Volume Maximizer tab . . . . . . . . . . . . . . . . . . . . . . . . . . . . . . . . . . . . . . . . . . . . . . . . . . . . . . . . . . . . . .199
Working with MIDI/SMPTE . . . . . . . . . . . . . . . . . . . . . . . . . . . . . . 201
What is MIDI?. . . . . . . . . . . . . . . . . . . . . . . . . . . . . . . . . . . . . . . . . . . . . . . . . . . . . . . . . . 201
TABLE OF CONTENTS

 11
11
MIDI triggers . . . . . . . . . . . . . . . . . . . . . . . . . . . . . . . . . . . . . . . . . . . . . . . . . . . . . . . . . . .201
|
Playback versus triggered playback . . . . . . . . . . . . . . . . . . . . . . . . . . . . . . . . . . . . . . . . . . . . . . . . . . . |
201 |
|
Triggering file playback . . . . . . . . . . . . . . . . . . . . . . . . . . . . . . . . . . . . . . . . . . . . . . . . . . . . . . . . . . . . . |
202 |
|
Triggering region playback . . . . . . . . . . . . . . . . . . . . . . . . . . . . . . . . . . . . . . . . . . . . . . . . . . . . . . . . . . |
203 |
|
Triggering playback from additional internal/external MIDI devices . . . . . . . . . . . . . . . . . . . . . . |
205 |
|
Advantages of external MIDI controllers . . . . . . . . . . . . . . . . . . . . . . . . . . . . . . . . . . . . . . . . . . . . . . |
205 |
Sound Forge and MIDI timecode synchronization. . . . . . . . . . . . . . . . . . . . . . . . . .206
Playing regions using MTC from a sequencer . . . . . . . . . . . . . . . . . . . . . . . . . . . . . . . . . . . . . . . . .206 Playing regions using MTC from an external device . . . . . . . . . . . . . . . . . . . . . . . . . . . . . . . . . . . .207 Using Sound Forge to generate MTC for a MIDI sequencer . . . . . . . . . . . . . . . . . . . . . . . . . . . . .207 Using Sound Forge to generate MTC for an external device . . . . . . . . . . . . . . . . . . . . . . . . . . . . .208
Sampling. . . . . . . . . . . . . . . . . . . . . . . . . . . . . . . . . . . . . . . . . . . . . . 209
Samplers . . . . . . . . . . . . . . . . . . . . . . . . . . . . . . . . . . . . . . . . . . . . . . . . . . . . . . . . . . . . . .209
External samplers . . . . . . . . . . . . . . . . . . . . . . . . . . . . . . . . . . . . . . . . . . . . . . . . . . . . . . . . . . . . . . . . . .209 Internal samplers . . . . . . . . . . . . . . . . . . . . . . . . . . . . . . . . . . . . . . . . . . . . . . . . . . . . . . . . . . . . . . . . . . .210
Configuring the Sampler Tool. . . . . . . . . . . . . . . . . . . . . . . . . . . . . . . . . . . . . . . . . . . .210
Creating a sampler configuration. . . . . . . . . . . . . . . . . . . . . . . . . . . . . . . . . . . . . . . . .211
Open loop versus closed loop . . . . . . . . . . . . . . . . . . . . . . . . . . . . . . . . . . . . . . . . . . . . . . . . . . . . . . . .212
Saving sampler configurations. . . . . . . . . . . . . . . . . . . . . . . . . . . . . . . . . . . . . . . . . . .213
Sending and receiving samples. . . . . . . . . . . . . . . . . . . . . . . . . . . . . . . . . . . . . . . . . .213
Sending a sample . . . . . . . . . . . . . . . . . . . . . . . . . . . . . . . . . . . . . . . . . . . . . . . . . . . . . . . . . . . . . . . . . .213 Receiving a sample . . . . . . . . . . . . . . . . . . . . . . . . . . . . . . . . . . . . . . . . . . . . . . . . . . . . . . . . . . . . . . . . .213 MIDI unity note and Fine tune . . . . . . . . . . . . . . . . . . . . . . . . . . . . . . . . . . . . . . . . . . . . . . . . . . . . . . . .214
Using the MIDI Keyboard. . . . . . . . . . . . . . . . . . . . . . . . . . . . . . . . . . . . . . . . . . . . . . . .214
Displaying the MIDI Keyboard . . . . . . . . . . . . . . . . . . . . . . . . . . . . . . . . . . . . . . . . . . . . . . . . . . . . . . .214 Turning on the MIDI Keyboard . . . . . . . . . . . . . . . . . . . . . . . . . . . . . . . . . . . . . . . . . . . . . . . . . . . . . . .214 Configuring the MIDI Keyboard output port and channel . . . . . . . . . . . . . . . . . . . . . . . . . . . . . . .215 Troubleshooting the MIDI Keyboard . . . . . . . . . . . . . . . . . . . . . . . . . . . . . . . . . . . . . . . . . . . . . . . . . .215 Specifying instruments . . . . . . . . . . . . . . . . . . . . . . . . . . . . . . . . . . . . . . . . . . . . . . . . . . . . . . . . . . . . . .215 Generating chords . . . . . . . . . . . . . . . . . . . . . . . . . . . . . . . . . . . . . . . . . . . . . . . . . . . . . . . . . . . . . . . . . .215
Setting up MIDI/SDS hardware. . . . . . . . . . . . . . . . . . . . . . . . . . . . . . . . . . . . . . . . . . .216
Troubleshooting MIDI/SDS with open loop. . . . . . . . . . . . . . . . . . . . . . . . . . . . . . . .216
Setting up SCSI/SMDI hardware . . . . . . . . . . . . . . . . . . . . . . . . . . . . . . . . . . . . . . . . .216 Troubleshooting SCSI/SMDI. . . . . . . . . . . . . . . . . . . . . . . . . . . . . . . . . . . . . . . . . . . . .217
Conflicting SCSI IDs . . . . . . . . . . . . . . . . . . . . . . . . . . . . . . . . . . . . . . . . . . . . . . . . . . . . . . . . . . . . . . . . .217 Periodic transfer failures . . . . . . . . . . . . . . . . . . . . . . . . . . . . . . . . . . . . . . . . . . . . . . . . . . . . . . . . . . . . .217 Sampler is recognized but does not transfer reliably . . . . . . . . . . . . . . . . . . . . . . . . . . . . . . . . . . . .217
Looping . . . . . . . . . . . . . . . . . . . . . . . . . . . . . . . . . . . . . . . . . . . . . . . 219
TABLE OF CONTENTS

12 
Loops . . . . . . . . . . . . . . . . . . . . . . . . . . . . . . . . . . . . . . . . . . . . . . . . . . . . . . . . . . . . . . . . . 219
Sustaining and release loops . . . . . . . . . . . . . . . . . . . . . . . . . . . . . . . . . . . . . . . . . . . . . . . . . . . . . . . .219 Creating a sustaining loop . . . . . . . . . . . . . . . . . . . . . . . . . . . . . . . . . . . . . . . . . . . . . . . . . . . . . . . . . . .220 Creating a sustaining loop with a release loop . . . . . . . . . . . . . . . . . . . . . . . . . . . . . . . . . . . . . . . . .221
Looping techniques . . . . . . . . . . . . . . . . . . . . . . . . . . . . . . . . . . . . . . . . . . . . . . . . . . . . 222
Match endpoint amplitudes . . . . . . . . . . . . . . . . . . . . . . . . . . . . . . . . . . . . . . . . . . . . . . . . . . . . . . . . .222 Match endpoint waveform slope . . . . . . . . . . . . . . . . . . . . . . . . . . . . . . . . . . . . . . . . . . . . . . . . . . . . .222 Match endpoint sound levels . . . . . . . . . . . . . . . . . . . . . . . . . . . . . . . . . . . . . . . . . . . . . . . . . . . . . . . .222 Avoid very short loops . . . . . . . . . . . . . . . . . . . . . . . . . . . . . . . . . . . . . . . . . . . . . . . . . . . . . . . . . . . . . .223
Editing loops. . . . . . . . . . . . . . . . . . . . . . . . . . . . . . . . . . . . . . . . . . . . . . . . . . . . . . . . . . . 223
Editing a loop without the Loop Tuner . . . . . . . . . . . . . . . . . . . . . . . . . . . . . . . . . . . . . . . . . . . . . . . .223 Editing a loop with the Loop Tuner . . . . . . . . . . . . . . . . . . . . . . . . . . . . . . . . . . . . . . . . . . . . . . . . . . .223
Crossfading loops . . . . . . . . . . . . . . . . . . . . . . . . . . . . . . . . . . . . . . . . . . . . . . . . . . . . . . 226
Using the Crossfade Loop tool . . . . . . . . . . . . . . . . . . . . . . . . . . . . . . . . . . . . . . . . . . . . . . . . . . . . . . .227
Creating loops for ACID . . . . . . . . . . . . . . . . . . . . . . . . . . . . . . . . . . . . . . . . . . . . . . . . . 228
Creating an ACID one-shot file . . . . . . . . . . . . . . . . . . . . . . . . . . . . . . . . . . . . . . . . . . . . . . . . . . . . . . .228 Creating an ACID loop file . . . . . . . . . . . . . . . . . . . . . . . . . . . . . . . . . . . . . . . . . . . . . . . . . . . . . . . . . . .228 Creating an ACID 2.0 disk-based file . . . . . . . . . . . . . . . . . . . . . . . . . . . . . . . . . . . . . . . . . . . . . . . . . .229 Creating an ACID beatmapped file . . . . . . . . . . . . . . . . . . . . . . . . . . . . . . . . . . . . . . . . . . . . . . . . . . . .230
Using the ACID Loop Creation Tools toolbar . . . . . . . . . . . . . . . . . . . . . . . . . . . . . . 230 Editing loops for ACID . . . . . . . . . . . . . . . . . . . . . . . . . . . . . . . . . . . . . . . . . . . . . . . . . . 231
Halving or doubling a loop . . . . . . . . . . . . . . . . . . . . . . . . . . . . . . . . . . . . . . . . . . . . . . . . . . . . . . . . . .231 Shifting a selection left or right . . . . . . . . . . . . . . . . . . . . . . . . . . . . . . . . . . . . . . . . . . . . . . . . . . . . . . .231 Rotating audio . . . . . . . . . . . . . . . . . . . . . . . . . . . . . . . . . . . . . . . . . . . . . . . . . . . . . . . . . . . . . . . . . . . . .232 Setting loop tempo . . . . . . . . . . . . . . . . . . . . . . . . . . . . . . . . . . . . . . . . . . . . . . . . . . . . . . . . . . . . . . . . .233
Saving loop points . . . . . . . . . . . . . . . . . . . . . . . . . . . . . . . . . . . . . . . . . . . . . . . . . . . . . 233
Working with Video. . . . . . . . . . . . . . . . . . . . . . . . . . . . . . . . . . . . . 235
Viewing video. . . . . . . . . . . . . . . . . . . . . . . . . . . . . . . . . . . . . . . . . . . . . . . . . . . . . . . . . . 235
Using the video strip . . . . . . . . . . . . . . . . . . . . . . . . . . . . . . . . . . . . . . . . . . . . . . . . . . . . . . . . . . . . . . . .235 Previewing files with video . . . . . . . . . . . . . . . . . . . . . . . . . . . . . . . . . . . . . . . . . . . . . . . . . . . . . . . . . .238 Using an external monitor . . . . . . . . . . . . . . . . . . . . . . . . . . . . . . . . . . . . . . . . . . . . . . . . . . . . . . . . . . .239
Attaching video to an audio file . . . . . . . . . . . . . . . . . . . . . . . . . . . . . . . . . . . . . . . . . . 240
Detaching video from an audio file . . . . . . . . . . . . . . . . . . . . . . . . . . . . . . . . . . . . . . . 241 Setting video options . . . . . . . . . . . . . . . . . . . . . . . . . . . . . . . . . . . . . . . . . . . . . . . . . . . 241
Video file properties . . . . . . . . . . . . . . . . . . . . . . . . . . . . . . . . . . . . . . . . . . . . . . . . . . . . . . . . . . . . . . . .241 Configuring your video settings . . . . . . . . . . . . . . . . . . . . . . . . . . . . . . . . . . . . . . . . . . . . . . . . . . . . . .242
Saving a video file. . . . . . . . . . . . . . . . . . . . . . . . . . . . . . . . . . . . . . . . . . . . . . . . . . . . . . 242
Using Spectrum Analysis. . . . . . . . . . . . . . . . . . . . . . . . . . . . . . . . 245
TABLE OF CONTENTS

 13
13
Working in the frequency domain . . . . . . . . . . . . . . . . . . . . . . . . . . . . . . . . . . . . . . . .245
Fast Fourier Transform . . . . . . . . . . . . . . . . . . . . . . . . . . . . . . . . . . . . . . . . . . . . . . . . . . . . . . . . . . . . . .246
Using a spectrum graph. . . . . . . . . . . . . . . . . . . . . . . . . . . . . . . . . . . . . . . . . . . . . . . . .246
Displaying a spectrum graph . . . . . . . . . . . . . . . . . . . . . . . . . . . . . . . . . . . . . . . . . . . . . . . . . . . . . . . .246 Monitoring an input and output source . . . . . . . . . . . . . . . . . . . . . . . . . . . . . . . . . . . . . . . . . . . . . . .247 Displaying frequency and amplitude values, notes and statistics . . . . . . . . . . . . . . . . . . . . . . . . .247 Navigating a spectrum graph . . . . . . . . . . . . . . . . . . . . . . . . . . . . . . . . . . . . . . . . . . . . . . . . . . . . . . . .248 Changing the graph type . . . . . . . . . . . . . . . . . . . . . . . . . . . . . . . . . . . . . . . . . . . . . . . . . . . . . . . . . . . .248 Changing the zoom level . . . . . . . . . . . . . . . . . . . . . . . . . . . . . . . . . . . . . . . . . . . . . . . . . . . . . . . . . . . .249 Working with stereo files . . . . . . . . . . . . . . . . . . . . . . . . . . . . . . . . . . . . . . . . . . . . . . . . . . . . . . . . . . . .249 Updating a spectrum graph . . . . . . . . . . . . . . . . . . . . . . . . . . . . . . . . . . . . . . . . . . . . . . . . . . . . . . . . . .249 Viewing multiple spectrum graphs . . . . . . . . . . . . . . . . . . . . . . . . . . . . . . . . . . . . . . . . . . . . . . . . . . .249 Creating and comparing snapshots of the Spectrum Analysis window . . . . . . . . . . . . . . . . . . .250 Printing the graph . . . . . . . . . . . . . . . . . . . . . . . . . . . . . . . . . . . . . . . . . . . . . . . . . . . . . . . . . . . . . . . . . .250
Using a sonogram. . . . . . . . . . . . . . . . . . . . . . . . . . . . . . . . . . . . . . . . . . . . . . . . . . . . . .251
Displaying a sonogram . . . . . . . . . . . . . . . . . . . . . . . . . . . . . . . . . . . . . . . . . . . . . . . . . . . . . . . . . . . . . .251 Displaying frequency and amplitude values, notes and statistics . . . . . . . . . . . . . . . . . . . . . . . . .251 Updating a sonogram . . . . . . . . . . . . . . . . . . . . . . . . . . . . . . . . . . . . . . . . . . . . . . . . . . . . . . . . . . . . . . .252 Monitoring an input and output source . . . . . . . . . . . . . . . . . . . . . . . . . . . . . . . . . . . . . . . . . . . . . . .252 Tuning a sonogram . . . . . . . . . . . . . . . . . . . . . . . . . . . . . . . . . . . . . . . . . . . . . . . . . . . . . . . . . . . . . . . . .252 Returning to a spectrum graph . . . . . . . . . . . . . . . . . . . . . . . . . . . . . . . . . . . . . . . . . . . . . . . . . . . . . . .253 Printing the sonogram . . . . . . . . . . . . . . . . . . . . . . . . . . . . . . . . . . . . . . . . . . . . . . . . . . . . . . . . . . . . . .253
Adjusting Spectrum Analysis settings . . . . . . . . . . . . . . . . . . . . . . . . . . . . . . . . . . . .253
Saving spectrum graph settings . . . . . . . . . . . . . . . . . . . . . . . . . . . . . . . . . . . . . . . . . . . . . . . . . . . . . .255
Shortcuts. . . . . . . . . . . . . . . . . . . . . . . . . . . . . . . . . . . . . . . . . . . . . . 257
Keyboard shortcuts. . . . . . . . . . . . . . . . . . . . . . . . . . . . . . . . . . . . . . . . . . . . . . . . . . . . .257
Project file commands . . . . . . . . . . . . . . . . . . . . . . . . . . . . . . . . . . . . . . . . . . . . . . . . . . . . . . . . . . . . . .257 Magnification and view commands . . . . . . . . . . . . . . . . . . . . . . . . . . . . . . . . . . . . . . . . . . . . . . . . . .257 Data window edit commands . . . . . . . . . . . . . . . . . . . . . . . . . . . . . . . . . . . . . . . . . . . . . . . . . . . . . . . .258 Cursor movement . . . . . . . . . . . . . . . . . . . . . . . . . . . . . . . . . . . . . . . . . . . . . . . . . . . . . . . . . . . . . . . . . .260 Selecting data . . . . . . . . . . . . . . . . . . . . . . . . . . . . . . . . . . . . . . . . . . . . . . . . . . . . . . . . . . . . . . . . . . . . . .261 Navigation and playback . . . . . . . . . . . . . . . . . . . . . . . . . . . . . . . . . . . . . . . . . . . . . . . . . . . . . . . . . . . .262 Record dialog keyboard shortcuts . . . . . . . . . . . . . . . . . . . . . . . . . . . . . . . . . . . . . . . . . . . . . . . . . . . .262 Plug-In Chainer . . . . . . . . . . . . . . . . . . . . . . . . . . . . . . . . . . . . . . . . . . . . . . . . . . . . . . . . . . . . . . . . . . . . .263 Regions List . . . . . . . . . . . . . . . . . . . . . . . . . . . . . . . . . . . . . . . . . . . . . . . . . . . . . . . . . . . . . . . . . . . . . . .263 Playlist . . . . . . . . . . . . . . . . . . . . . . . . . . . . . . . . . . . . . . . . . . . . . . . . . . . . . . . . . . . . . . . . . . . . . . . . . . . . .263
Mouse wheel shortcuts . . . . . . . . . . . . . . . . . . . . . . . . . . . . . . . . . . . . . . . . . . . . . . . . .264
Additional mouse shortcuts . . . . . . . . . . . . . . . . . . . . . . . . . . . . . . . . . . . . . . . . . . . . . . . . . . . . . . . . .264
Microsoft Audio Compression Manager . . . . . . . . . . . . . . . . . . 267
TABLE OF CONTENTS

14 
Audio data compression and decompression . . . . . . . . . . . . . . . . . . . . . . . . . . . . . 267
Transparent playback and recording of non-hardware supported audio files . 267
SMPTE Timecode . . . . . . . . . . . . . . . . . . . . . . . . . . . . . . . . . . . . . . 269
SMPTE 25 EBU (25 fps, Video). . . . . . . . . . . . . . . . . . . . . . . . . . . . . . . . . . . . . . . . . . . 269 SMPTE Drop Frame (29.97 fps, Video) . . . . . . . . . . . . . . . . . . . . . . . . . . . . . . . . . . . . 269
SMPTE Non-Drop Frame (29.97 fps, Video) . . . . . . . . . . . . . . . . . . . . . . . . . . . . . . . 269
SMPTE 30 (30 fps, Audio) . . . . . . . . . . . . . . . . . . . . . . . . . . . . . . . . . . . . . . . . . . . . . . . 270 SMPTE Film Sync (24 fps) . . . . . . . . . . . . . . . . . . . . . . . . . . . . . . . . . . . . . . . . . . . . . . . 270
Using CSOUND, MTU, IRCAM, BICSF, and EBICSF Files. . . . 271
About IRCAM files. . . . . . . . . . . . . . . . . . . . . . . . . . . . . . . . . . . . . . . . . . . . . . . . . . . . . . 271
About BICSF and EBICSF files . . . . . . . . . . . . . . . . . . . . . . . . . . . . . . . . . . . . . . . . . . . 271 Opening files. . . . . . . . . . . . . . . . . . . . . . . . . . . . . . . . . . . . . . . . . . . . . . . . . . . . . . . . . . . 271
BICSF and EBICSF files . . . . . . . . . . . . . . . . . . . . . . . . . . . . . . . . . . . . . . . . . . . . . . . . . . . . . . . . . . . . . .271 IRCAM, CSOUND and MTU files . . . . . . . . . . . . . . . . . . . . . . . . . . . . . . . . . . . . . . . . . . . . . . . . . . . . .271
Saving files . . . . . . . . . . . . . . . . . . . . . . . . . . . . . . . . . . . . . . . . . . . . . . . . . . . . . . . . . . . . 272
Index . . . . . . . . . . . . . . . . . . . . . . . . . . . . . . . . . . . . . . . . . . . . . . . . . . . . .i
TABLE OF CONTENTS

 15
15
CHAPTER
Introduction
1
Introducing Sound Forge
Thank you for purchasing Sound Forge® and for your continued support of the Sony Pictures Digital family of products. Sound Forge provides you with the powerful features you have come to expect, as well as a number of new features designed to make digital audio editing quick and easy.
Sample files
Throughout the manual, you will find references to six sample audio files. The manual directs you to use these files as you experiment with different Sound Forge features. These files are installed in the same folder as the application:
•Drumhit.pca
•Fill.pca
•Loop.pca
•Musicbed.pca
•Saxriff.pca
•Voiceover.pca
The files are in Perfect Clarity Audio® (PCA) format, a Sony Pictures Digital proprietary lossless audio compression format.
Full version of Sound Forge versus Screenblast Sound Forge
This manual is provided to assist users of the full version of Sound Forge as well as Screenblast Sound Forge users. For this reason, product features exclusive to the full version of Sound Forge are identified throughout the manual using the following icon: 
In addition, Screenblast Sound Forge-only issues are identified and described where appropriate.
Shortcuts
As experienced users of Sound Forge products know, there are often several methods of executing a command, including menus, shortcut menus, and keystrokes. Throughout this manual, the typical method of executing a command is identified in the procedure, and alternate methods are identified in a section indicated by the following icon: 
A full list of keyboard and mouse shortcuts appears in the first appendix to this manual. For more information, see Shortcuts on page 257.
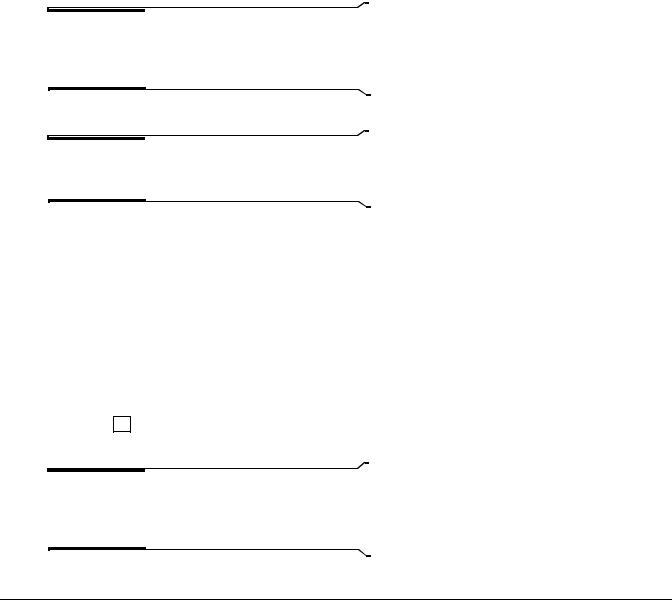
16 
System requirements
The following lists the minimum system requirements for using Sound Forge and Screenblast Sound Forge:
•400 MHz processor
•64 MB RAM, 128 MB recommended
•60 MB hard-disk space for program installation
•Microsoft Windows® 2000 or Windows® XP
•Microsoft Windows®-compatible sound card
•CD-ROM drive (for installation from a CD only)
•Supported CD-Recordable drive (for CD burning only)
•DirectX® Media 8.0 Runtime (included on CD-ROM)
•Microsoft® Internet Explorer 4.0 or later to view online help (version 5.0 included on CD-ROM)
Installing Sound Forge
The install utility, setup.exe, located on the Sound Forge CD-ROM, creates the necessary folders and copies all files required to operate Sound Forge.
Note: Sound Forge requires Microsoft DirectX 8.0 or later and Internet Explorer 4.0 or later. The setup program alerts you if either is not detected on your system and prompts their installation from the Sound Forge CD-ROM.
1.Place the Sound Forge CD-ROM in your system’s CD-ROM drive. AutoPlay launches the Setup menu.
Note: If AutoPlay is not turned on, click the Start button and choose Run. Type “D:\setup.exe”, where D is the drive letter of your CD-ROM drive.
2.Click Install, and follow the instructions in the dialogs to complete the installation.
Getting help within Sound Forge
You can access two varieties of help within Sound Forge:
•Online help
•What’s This? help (also referred to as context-sensitive help)
Online help
To access online help, choose Contents and Index from the Help menu.
 Press F1 .
Note: To view online help, Internet Explorer 4.0 or later must be installed on your system. If you purchased the boxed version of Sound Forge, Internet Explorer version 5.0 is included on your CD-ROM.

17
Toolbar 
Tabs
Information pane
The Contents tab provides a list of available help topics. Double-click a closed book ( ) to open the pages, and then click on a topic page (
 ).
).
The Index tab provides a complete listing of the help topics available. Scroll through the list of available topics or type a word in the Type in the keyword to find box to quickly locate topics related to that word. Select the topic and click the  button.
The Search tab allows you to enter a keyword and display all of the topics in the online help that contain the keyword you have entered. Type a keyword in the Type in the word(s) to search for box and click the  button. Select the topic from the list and click the
  button.
The Favorites tab allows you to keep topics that you revisit often in a separate folder. To add a topic to your favorites, click the  button on the Favorites tab.
What’s This? help
What’s This? help allows you to view pop-up descriptions of controls in dialog boxes.
1.Click the question mark ( ) in the upper-right corner of the dialog box. The cursor changes to a question mark icon (
  ).
).
2.Click a control in the dialog box. A pop-up description of the item appears.
 Click a control in the dialog box and press Shift + F1 .
Help on the Web
Additional Sound Forge information is available on the Sony Pictures Digital Media Software Web site. From the Help menu, choose Sony on the Web, and choose the desired location from the submenu. Sound Forge starts your system’s Web browser and attempts to connect to the appropriate page on the Sony Web site.
About your rights in Sound Forge software
Sound Forge software is licensed to you under the terms of the End User License Agreement. The End User License Agreement is first presented to you when you install the software. Please review the End User License Agreement carefully as its terms affect your rights with respect to the software. For your reference, a copy of the End User License Agreement for Sound Forge software is located at http://www.sony.com/mediasoftware.

18 
About Your Privacy
Sony Pictures Digital respects your privacy and are committed to protecting personal information. Your use of the software is governed by the Software Privacy Policy. A copy of this policy is incorporated into the registration process and you are asked to agree to its terms prior to accepting the terms of the End User License Agreement. Please review its contents carefully as its terms and conditions affect your rights with respect to the information that is collected by the software. For your reference, a copy of the Software Privacy Policy is located at http://www.sony.com/mediasoftware.
Proper Use of Software
The Sound Forge software is not intended, and should not be used for, illegal or infringing purposes, such as the illegal copying or sharing of copyrighted materials. Using Sound Forge software for such purposes is, among other things, against United States and international copyright laws and contrary to the terms and conditions of the End User License Agreement. Such activity may be punishable by law and may also subject you to the breach remedies set forth in the End User License Agreement.
![]()
 19
19
CHAPTER
|
Optimizing for |
|
|
2 |
Sound Forge |
This chapter contains information on configuring your system to optimize the performance of Sound Forge.
Defragmenting your hard drive
Sound Forge is a disk-based digital audio editor that allows editing operations to be performed on the system’s hard drive rather than in memory. Because of this, Sound Forge is able to edit large files as well as retain extensive undo/redo information and clipboard data.This also means that the hard drive specified for temporary storage must have sufficient free space to store large quantities of data.
With time and usage, hard drives become fragmented, leading to discontiguous files and slow access. This is particularly true for older hard drives. Since Sound Forge is hard drive intensive, faster disk access equates better performance. Therefore, the initial step in improving system performance is hard drive defragmentation. The computer’s operating system is typically equipped with a defragmenting program that should be run prior to using Sound Forge.
Increasing total buffer size
The total buffer size value determines the amount of RAM used for recording to/playing from the hard drive. A total buffer size of 512 KB is recommended, but increased buffering may be necessary if you detect gaps during playback.
Increasing the total buffer size requires additional memory. Combined with a large preload size, this may result in a delay when starting and stopping playback. For more information, see Increasing preload size on page 20.
1.From the Options menu, choose Preferences. The Preferences dialog appears.
2.Click the Wave tab.
3.Use the Total buffer size slider to configure an appropriate buffer size value and click OK.
|
CHP. 2 |
OPTIMIZING FOR SOUND FORGE |

20 
Increasing preload size
The preload size value determines how much sound data Sound Forge prepares and loads into the sound card driver prior to starting playback. Preloading occurs between the time you click the Play button ( ) and the first sound of playback.
Increasing preload size may eliminate the dropouts evident at the beginning of playback that are characteristic of slow and/or fragmented hard drives. The trade-off for increasing the preload size is a delay prior to the start of playback. The length of the delay is proportional to the size of the preload.
1.From the Options menu, choose Preferences. The Preferences dialog appears.
2.Click the Wave tab.
3.Use the Preload size slider to configure an appropriate preload size value and click OK.
Note: Certain Windows sound drivers do not support this option. If you detect noise or dropouts at the start of playback and the system’s sound drivers do not support preloading, turn off this option by setting the Preload size to 0.
Turning off the playback cursor and record counter
The playback cursor and record counter options determine whether these displays are updated during recording and playback. If you detect dropouts and skipping at high sample rates (greater than 44,100 Hz), turn these displays off to minimize processing overhead.
1.From the Options menus, choose Preferences. The Preferences dialog appears.
2.Click the Perform tab.
3.Clear the Show the position of the playback cursor and Show the record counter while recording check boxes and click OK.
Turning off the play (output) meters
Sound Forge’s play meters use a small amount of processing overhead during playback. However, if you detect dropouts during playback and previous fixes have failed, try turning off these meters.
From the View menu, choose Play Meters. The check mark adjacent to the command is cleared, indicating that the play meters are turned off.
Turning on passive updating for video and time displays
Passive update options lower the priority of redrawing the video and time displays during playback. When these options are turned on, the displays update only if there is ample time. Frequently this goes unnoticed, and enabling these options minimizes playback overhead with little or no inconvenience.
Turning on passive updating for time displays
From the Options menu, choose Time Display, and choose Passive Update from the submenu. A check mark appears next to the command to indicate that this option is turned on.
|
OPTIMIZING FOR SOUND FORGE |
CHP. 2 |

21
Turning on passive updating for video displays
From the Options menu, choose Video, and choose Passive Update from the submenu. A check mark appears next to the command to indicate that this option is turned on.
|
CHP. 2 |
OPTIMIZING FOR SOUND FORGE |

22 
|
OPTIMIZING FOR SOUND FORGE |
CHP. 2 |

 23
23
CHAPTER
|
Learning the Sound |
|
|
3 |
Forge Workspace |
This chapter provides a detailed overview of Sound Forge toolbars and controls.
Using the mouse
The following table defines the mouse-related terms used throughout this manual.
|
Pointing |
Moving the mouse pointer over an item. |
|
Clicking |
Pointing to an item and quickly pressing and releasing the left mouse button. If there is no left or |
|
right specification, left-clicking is implied. |
|
|
Right-clicking |
Pointing to an item and quickly pressing and releasing the right mouse button. Right-clicking is |
|
frequently used to display shortcut menus. |
|
|
Double-clicking |
Identical to clicking, but instead of pressing and releasing the mouse button once, it is done twice |
|
in quick succession. Double-clicking always indicates the left mouse button. |
|
|
Triple-clicking |
Identical to clicking, but instead of pressing and releasing the mouse button once, it is done three |
|
times in quick succession. Triple-clicking always indicates the left mouse button. |
|
|
Toggle-clicking |
Clicking the right mouse button while holding down the left mouse button. This is used to toggle |
|
options and is a shortcut for drag-and-drop editing and using the Magnify tool. |
|
|
Shift-clicking |
Holding down the Shift key while clicking the mouse. Shift-clicking is typically used to skip |
|
dialogs and quickly repeat operations. |
|
|
Ctrl-clicking |
Holding down the Ctrl key while clicking the mouse. Ctrl-clicking is used to modify the operation |
|
of a normal click. |
|
|
Dragging |
Holding down the left mouse button while moving the mouse pointer and releasing the mouse at |
|
the desired location. Dragging is used to quickly move sections of data between windows, as well |
|
|
as to adjust sliders, scrollbars, and faders. |
|
|
Slow-dragging |
Holding down the right and left mouse buttons while adjusting sliders and faders increases the |
|
resolution of the movement. This is useful when making fractional adjustments to parameters. |
|
Tip: Once you are familiar with Sound Forge basics, you may want to use mouse and keyboard shortcuts. For more information, see Shortcuts on page 257.
|
CHP. 3 |
LEARNING THE SOUND FORGE WORKSPACE |

24 
Using the mouse wheel
Sound Forge allows you to use your mouse wheel to navigate audio files. The following table briefly describes the available mouse wheel functionality.
|
Wheel Up |
Zoom in horizontally |
|
Wheel Down |
Zoom out horizontally |
|
Ctrl+Wheel Up |
Zoom in vertically |
|
Ctrl+Wheel Down |
Zoom out vertically |
|
Shift+Wheel Up |
Scroll left (in 10ths of screen width) |
|
Shift+Wheel Down |
Scroll right (in 10ths of screen width) |
|
Ctrl+Shift+ Wheel Up |
Cursor left or current selection point left (if there is a selection) |
|
Ctrl+Shift+ Wheel Down |
Cursor right or current selection point right (if there is a selection) |
The main screen
When you start Sound Forge, the main screen appears. The main screen’s workspace is where you perform all audio editing.
Menu bar
Standard toolbar
Transport bar
Play Meters (docked)
Workspace
Status bar
Main screen components
The following table describes the major components of the main screen.
|
Menu bar |
Displays the menu headings for the available functions. |
||
|
Standard toolbar |
Provides quick access to some of the most common tasks in Sound Forge (pg. 30). |
||
|
Transport bar |
Provides quick access to basic audio transport functions (pg. 30). |
||
|
Status bar |
Help and processing information appears on the left side. The boxes on the right side display the |
||
|
playback sample rate, bit depth, channel configuration (mono/stereo), length of the active data |
|||
|
window, and total free storage space (pg. 83). With the exception of the free storage space box, |
|||
|
you can edit these boxes by double-clicking or right-clicking them. When no data windows are |
|||
|
open, only the free storage space box contains a value. |
|||
|
Workspace |
This is the area located behind the data windows. Audio selections dragged to the workspace |
||
|
automatically become new data windows. Windows such as the Regions List and Playlist can be |
|||
|
docked along the edges of the workspace. |
|||
|
Play Meters |
Displays the level of the output audio signal. These meters can be toggled on/off by choosing |
||
|
Play Meters from the View menu. Right-clicking the play meters displays a shortcut menu |
|||
|
that allows you to precisely configure the appearance of the meters. |
|||
|
LEARNING THE SOUND FORGE WORKSPACE |
CHP. 3 |
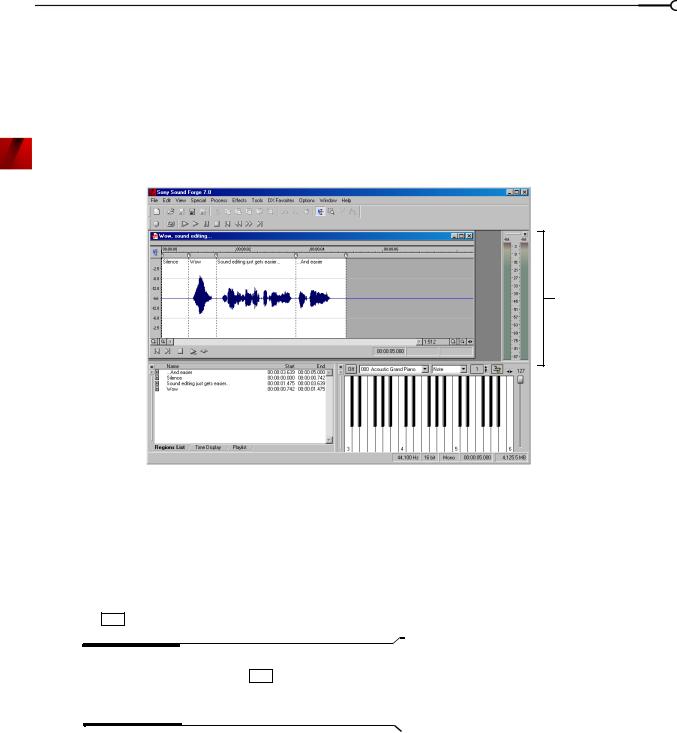
25
Floating and docking windows
With the many features in Sound Forge, it is easy for the workspace to become cluttered. Docking windows allows you to keep more windows open while maintaining a greater degree of organization. You can choose to float or dock the windows listed in the View menu, including the Regions List, Playlist (available only in the full version of Sound Forge), and Time Display (available only in the full version of Sound Forge) windows.
You can dock windows individually or in a stack. When stacked, each window has a tab at the bottom with its name on it. Click the window’s tab to bring it to the top.
Docked
Play
Meters
|
Stacked |
Docked |
|||||
|
windows |
Keyboard |
|||||
|
with tabs |
||||||
Docking a window
1.Drag a window to the edge of the workspace. The outline of the window changes shape as you approach the edge.
2.Release the mouse. The window docks against the edge of the workspace.
Preventing a window from docking
Press Ctrl while dragging a window to prevent it from docking in the workspace.
Tip: You can choose to reverse this behavior so that windows will not dock unless you press Ctrl . From the Options menu, choose Preferences, and clear the Allow floating windows to dock check box on the General tab.
|
CHP. 3 |
LEARNING THE SOUND FORGE WORKSPACE |
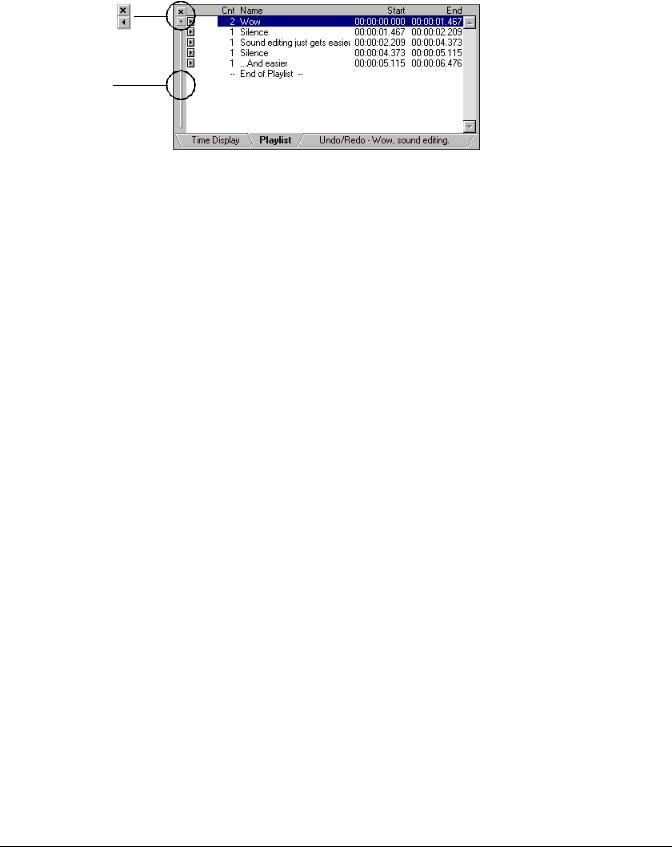
26 
Floating a window
Drag the handle on the left side of a docked window away from the edge of the workspace.
Close window
Expand window
Drag the handle away from the edge of the workspace to float the window.
Hiding the window docking area
You can double-click the separator between the workspace and window docking area to hide the docking area. You can also use shortcut keys to manage the workspace.
|
Shortcut key |
Description |
|||||||
|
F11 |
Show/hide window docking area at |
|||||||
|
bottom of workspace. |
||||||||
|
+ |
Show/hide windows docked on left/ |
|||||||
|
Shift |
F11 |
|||||||
|
right sides of workspace. |
||||||||
|
Ctrl |
+ |
F11 |
Show/hide all docked windows. |
|||||
|
LEARNING THE SOUND FORGE WORKSPACE |
CHP. 3 |

27
The data window
Data windows contain audio data (as a waveform) as well as a number of controls and commands used to edit and process audio.
|
Title bar Time ruler |
|||||||||||||||||||||||||||||
|
Edit Tool |
Overview bar |
||||||||||||||||||||||||||||
|
Selector |
Ruler tags |
||||||||||||||||||||||||||||
|
Level ruler |
|||||||||||||||||||||||||||||
|
Waveform display |
Time zoom resolution |
||||||||||||||||||||||||||||
|
Level zoom in/out |
Time zoom in/out |
||||||||||||||||||||||||||||
|
Maximize width |
|||||||||||||||||||||||||||||
|
Playbar |
Selection |
status boxes |
|||||||||||||||||||||||||||
|
Position |
|||||||||||||||||||||||||||||
|
scroll bar |
|||||||||||||||||||||||||||||
|
Component |
Description |
||||||||||||||||||||||||||||
|
Title bar |
Displays the file name. If title information is included in the summary of a file, it appears here |
||||||||||||||||||||||||||||
|
instead of the file name. Double-click to maximize and restore the window. |
|||||||||||||||||||||||||||||
|
Level ruler |
Displays the amplitude of the waveform. Right-click to display the level ruler shortcut menu. |
||||||||||||||||||||||||||||
|
Drag to shift the view up/down when zoomed in vertically. |
|||||||||||||||||||||||||||||
|
Time ruler |
Displays the current location in the data window as well as ruler tags. Right-click to display the |
||||||||||||||||||||||||||||
|
time ruler shortcut menu. Drag to scroll the data window. |
|||||||||||||||||||||||||||||
|
Ruler tags |
Indicates the position of region end points, loop end points, and markers. Right-click a tag to |
||||||||||||||||||||||||||||
|
display the ruler tag shortcut menu. Drag to edit a tag’s position. Double-click anywhere within a |
|||||||||||||||||||||||||||||
|
region to select it. |
|||||||||||||||||||||||||||||
|
Edit Tool Selector |
Toggles through the Edit, Magnify, and Pencil tools. Right-click to display a shortcut menu that |
||||||||||||||||||||||||||||
|
allows you to display or hide data window elements. |
|||||||||||||||||||||||||||||
|
Playbar |
Contains audio transport buttons, including Go to Start, Go to End, Stop, Play Normal, Open/ |
||||||||||||||||||||||||||||
|
Play Plug-In Chainer (available only in the full version of Sound Forge), Play as Cutlist, and Play |
|||||||||||||||||||||||||||||
|
as Sample. For more information on the playbar, please see page 28. |
|||||||||||||||||||||||||||||
|
Selection status boxes |
Displays the beginning, end, and length of a selection. If no selection exists, only the cursor |
||||||||||||||||||||||||||||
|
position displays. Double-click the leftmost box to display the Go To dialog. Double-click either of |
|||||||||||||||||||||||||||||
|
the other two boxes to display the Set Selection dialog. Right-click to display the status format |
|||||||||||||||||||||||||||||
|
shortcut menu. |
|||||||||||||||||||||||||||||
|
Waveform display |
Displays a graphical representation of an audio file. The horizontal axis represents time, and the |
||||||||||||||||||||||||||||
|
vertical axis represents amplitude. Right-click within this display to open the waveform display |
|||||||||||||||||||||||||||||
|
shortcut menu. |
|||||||||||||||||||||||||||||
|
Position scroll bar |
Scrolls forward/backward through an audio file to display sections of the file not visible in the |
||||||||||||||||||||||||||||
|
current area of the waveform display. |
|||||||||||||||||||||||||||||
|
Overview bar |
Allows for quick navigation and playback of any part of an audio file. The overview bar also |
||||||||||||||||||||||||||||
|
indicates the portion of the waveform currently depicted in the waveform display, as well as the |
|||||||||||||||||||||||||||||
|
selected region. Click to move the cursor. Double-click to center the cursor in the waveform |
|||||||||||||||||||||||||||||
|
display. Right-click to start or pause playback. Drag to activate the audio event locator. |
|||||||||||||||||||||||||||||
|
Time zoom resolution |
Specifies the number of samples of data represented by each horizontal point on the screen. This |
||||||||||||||||||||||||||||
|
determines the length of time displayed in the data window. Smaller resolution values display |
|||||||||||||||||||||||||||||
|
less time. |
|||||||||||||||||||||||||||||
|
Time zoom in/out |
Changes the zoom resolution for the time (horizontal) axis. |
||||||||||||||||||||||||||||
|
Level zoom in/out |
Changes the zoom resolution for the level (vertical) axis. |
||||||||||||||||||||||||||||
|
Maximize width |
Resizes the data window to maximize its size within the workspace. |
||||||||||||||||||||||||||||
|
CHP. 3 |
LEARNING THE SOUND FORGE WORKSPACE |
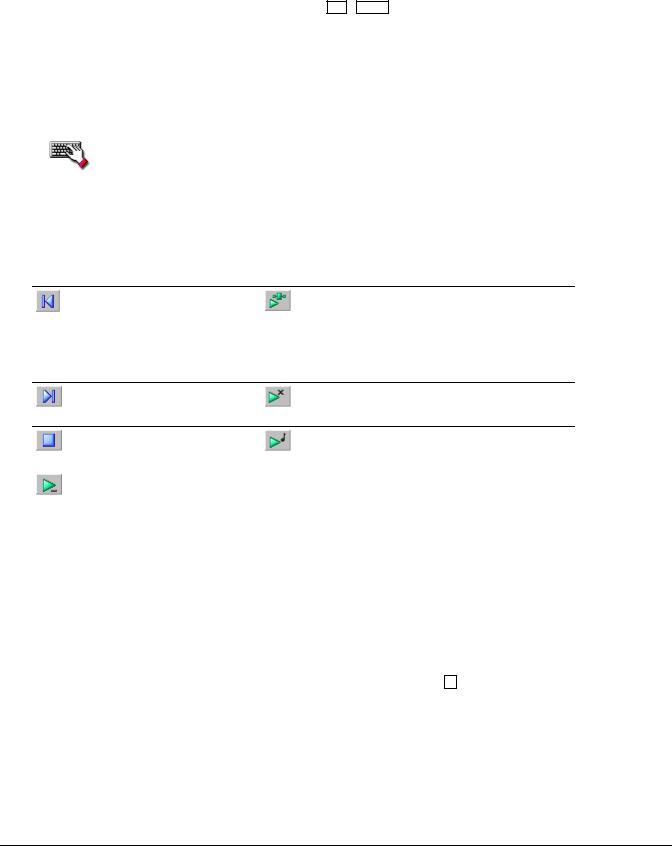
28 
Displaying data window components
Sound Forge allows you to customize the appearance of individual data windows.
1.From the File menu, choose Properties or press Alt + Enter . The current file’s Properties dialog appears.
2.Click the Display tab.
3.Display/hide specific components by selecting/clearing the corresponding check boxes.
4.Select the Save as the default for all new windows check box if you want to set the new configuration as the default data window display.
5.Click OK.
Right-click the Edit Tool Selector (upper-left corner of data window) to display or hide components for the selected data window.
Playbar
The playbar is located in the bottom-left corner of a data window. You can use the playbar to navigate and play audio files in a variety of ways.
Go to Start: moves the cursor to the start of the file.
Play Plug-In Chainer: previews the audio processed through plug-ins when the Plug-In Chainer window is open.
If there is a selection, plays from the beginning of the selection to the end of the selection.
If the Plug-In Chainer window is not open, the Open Plug-In Chainer button ( ) appears instead.
Go to End: moves the cursor to the end of the file.
Play as Cutlist: plays the file with the regions in the cutlist omitted. This button appears only if you treat the playlist as a cutlist.
|
Stop: stops playback and |
Play as Sample: plays the file with the sustaining and release |
|
returns the cursor to its position |
loops repeating the specified number of times. This button |
|
prior to playback. |
appears only if you have defined a sample loop. |
|
Play Normal: plays from the |
|
|
cursor to the end of the file. |
|
|
If there is a selection, plays from |
|
|
the beginning of the selection to |
|
|
the end of the selection. |
|
Current playback mode
When you play a file from the playbar, a small horizontal line appears beneath the selected Play button’s icon ( ). This indicates Sound Forge’s current playback mode, which is the mode used when you click the transport bar Play (
 ) button. For more information, see Transport bar on page 30.
Changing the current playback mode
To change the current playback mode, click a playbar button or press X .
Optional Backward and Forward buttons
You can choose to display Rewind ( ) and Forward (
 ) shuttle controls on the playbar. From the Options menu, choose Preferences, and select the Show shuttle controls on Data Window transport check box on the General tab.
|
LEARNING THE SOUND FORGE WORKSPACE |
CHP. 3 |
![]()
29
Toolbars
Sound Forge’s toolbars contain buttons used to quickly execute many of the program’s commands and functions. Toolbars can be dragged throughout the workspace, docked, resized, hidden, and customized.
Docking a toolbar
When you drag a floating toolbar to any edge of the main screen, the toolbar docks on that edge.
Floating a toolbar
When you drag a docked toolbar away from an edge, the toolbar becomes a floating toolbar.
Displaying a toolbar
1.From the View menu, choose Toolbars. The Preferences dialog appears with a list of available toolbars.
2.To display a toolbar, select the corresponding check box and click OK.
Select a check box to display a toolbar.
Click Customize to add, remove, or rearrange buttons on a toolbar.
Note: The dialog box pictured above is from the full version of Sound Forge. If you have Screenblast Sound Forge, you will not have all of the tabs and options pictured above available to you.
Customizing a toolbar
1.From the View menu, choose Toolbars. The Preferences dialog appears with a list of available toolbars.
2.Select the check box for a toolbar and click Customize. The Customize Toolbar dialog appears.
3.Use the controls in the Customize Toolbar dialog to add, remove, or rearrange the buttons on the selected toolbar. Click Reset to restore the toolbar to its default setting.
|
CHP. 3 |
LEARNING THE SOUND FORGE WORKSPACE |

30 
Standard toolbar
The Standard toolbar displays by default when you start Sound Forge. The buttons on this toolbar provide quick access to many common commands.
New: creates a new data window.
Play Clipboard: plays the audio on the clipboard.
Open: displays the Open dialog.
Trim/Crop: removes all data from the file that is not currently selected. This command has no effect if there is no selected data. This command does not copy data to the clipboard.
|
Save: saves the current audio data. |
Undo: reverses the last edit operation. |
|
Save As: saves the current file with a new |
Redo: reverts the previously undone edit |
|
name or format. |
operation. |
|
Render As: renders the current project file to a |
Repeat: repeats the last operation. This |
|
media file. |
command can be used with most processing |
|
functions. The previous operation’s parameters |
|
|
are repeated. To specify new parameters, hold |
|
|
Shift and click this button. |
Cut: removes selected audio data and places it on the clipboard. This command has no effect if there is no selection.
Edit Tool: selects the Editing tool.
Copy: copies selected audio data to the clipboard. This command has no effect if there is no selection.
Magnify Tool: selects the Magnify tool.
Paste: inserts a copy of the clipboard data at the current insertion point. If there is a selection, this command replaces the selected data with the clipboard data.
Pencil Tool: selects the Pencil tool.
Mix: mixes a copy of the clipboard data with the current audio file. The mix start point is either the cursor point or the start or end of the selection in the destination data window.
Envelope Tool: selects the Envelope tool.
Transport bar
The transport bar also displays by default and contains basic audio transport buttons.
|
Record: records data to a new or existing data |
Stop: stops playback and returns the cursor to |
|
window. |
its prior position. |
|
Loop Playback: toggles Loop Playback mode on |
Go to Start: moves the cursor to the start of |
|
and off. |
the file. |
|
Play All: plays the entire file from beginning to |
Rewind: moves the cursor backward in the |
|
end, regardless of cursor position, selection, or |
current file. |
|
playlist. |
Play: plays the file in current playback mode (Play Normal, Play Plug-In Chainer, Play as Cutlist, or Play as Sample).
Forward: moves the cursor forward in the current file.
Pause: pauses playback and maintains the cursor at its current position.
Go to End: moves the cursor to the end of the file.
|
LEARNING THE SOUND FORGE WORKSPACE |
CHP. 3 |

31
Navigation toolbar
The Navigation toolbar contains buttons used to navigate within the current data window.
Zoom In Full: magnifies the selected area to a 24:1 ratio.
Go To: displays the Go To dialog and allows you to quickly move the cursor to a specific point in a file.
Zoom Normal: resets the audio data to its original magnification.
Cursor Center: centers the display with the cursor displayed in the center of the data window.
|
Zoom Selection: maximizes the selection |
Cursor to Selection Start: moves the cursor to |
|
vertically and horizontally. |
the beginning of the selection. |
|
Custom Zoom 1: sets the audio data to a |
Cursor to Selection End: moves the cursor to |
|
custom time magnification level. |
the end of the selection. |
|
Custom Zoom 2: sets the audio data to a |
Center Sustaining Start: moves the cursor to |
|
custom time magnification level. |
the beginning of the sustaining loop. |
|
Insert Marker: drops a marker at the current |
Center Sustaining End: moves the cursor to the |
|
cursor position. |
end of the sustaining loop. |
|
Mark In: marks the “in” point of a new |
Center Release Start: moves the cursor to the |
|
selection. |
beginning of the release loop. |
|
Mark Out: marks the “out” point of a new |
Center Release End: moves the cursor to the |
|
selection. |
end of the release loop. |
Views toolbar
The Views toolbar contains buttons used to store and retrieve data window views.
|
Toggles views 1-8 between setting and |
Stores and recalls specific selection views. |
|
restoring. |
|
|
CHP. 3 |
LEARNING THE SOUND FORGE WORKSPACE |

32 
Status/Selection toolbar
The Status/Selection toolbar contains buttons used to specify a file’s status format and control snapping functions..
Samples: changes the status format to Samples.
SMPTE EBU: changes the status format to SMPTE EBU (25 fps). Available only in the full version of Sound Forge.
Time: changes the status format to Time.
SMPTE Non-Drop: changes the status format to SMPTE Non-Drop (29.97 fps, Video). Available only in the full version of Sound Forge.
Seconds: changes the status format to Seconds.
SMPTE Drop: changes the status format to SMPTE Drop (29.97 fps, Video). Available only in the full version of Sound Forge.
Time and Frames: changes the status format to Time and Frames.
SMPTE 30: changes the status format to SMPTE 30 (30 fps, Audio). Available only in the full version of Sound Forge.
Absolute Frames: changes the status format to Absolute Frames.
Auto Snap to Zero: forces the ends of selections to the nearest zero-crossing. Available only in Screenblast Sound Forge.
|
Measures and Beats: changes the status format |
Auto Snap to Time: forces the ends of |
|
to Measures and Beats. |
selections to the nearest whole time division on |
|
the time ruler. Available only in Screenblast |
|
|
Sound Forge. |
|
|
SMPTE Film Sync (24 fps): changes the status |
|
|
format to SMPTE Film Sync (24 fps). Available |
|
|
only in the full version of Sound Forge. |
|
Regions/Playlist toolbar
The Regions/Playlist toolbar contains the Regions List and Playlist buttons as well as buttons corresponding to synchronization commands and status displays.
Regions List: displays the Regions List.
Generate MIDI Timecode: configures Sound Forge to send MIDI timecode through the MIDI output port. The MIDI output port is specified on the MIDI/Sync tab of the Preferences dialog.
|
Playlist: displays the playlist. |
Pre-Queue for MIDI Timecode: opens the wave |
|
device and preloads data for the next region to |
|
|
be played from the playlist. |
|
|
Trigger from MIDI Timecode: configures |
|
|
Sound Forge to be triggered by MIDI |
|
|
commands received through the MIDI input |
|
|
port. The MIDI input port is specified on the |
|
|
MIDI/Sync tab in the Preferences dialog. For |
|
|
more information, see Turning on MIDI input |
|
|
synchronization on page 202. |
|
Playlist Position display
Displays the current playback position of an audio file being played from the playlist. Right-clicking this box displays a shortcut menu that allows you to specify a new format.
Sync Status display
Allows you to monitor the status of incoming/outgoing MIDI commands.
|
LEARNING THE SOUND FORGE WORKSPACE |
CHP. 3 |

33
Process toolbar
The Process toolbar contains buttons corresponding to all commands located in the Process menu.
Auto Trim/Crop: removes silence and automatically fades in/out the end-points of each phrase.
Insert Silence: inserts user-configurable silence into audio files.
|
Bit-Depth Converter: converts a file to a |
Invert/Flip: inverts (or flips) the polarity of the |
|
different bit depth. |
current selection. |
|
Channel Converter: converts between mono |
Mute: mutes the current selection. |
|
and stereo formats. Can also intermix the left |
|
|
and right channels of a stereo file to create |
|
|
panning effects. |
|
|
DC Offset: changes the baseline of an audio |
Normalize: normalizes the loudness of an audio |
|
file. |
file. |
|
Graphic EQ: opens Sony Pictures Digital’s XFX |
Pan/Expand: creates custom pans, expands, |
|
Graphic EQ. |
and mixes. |
|
Paragraphic EQ: opens Sony Pictures |
Resample: creates a copy of the audio file with |
|
Digital’s XFX Paragraphic EQ. |
a new sample rate. |
|
Parametric EQ: opens Sony Pictures Digital’s |
Reverse: reverses the current selection. |
|
XFX Parametric EQ. |
Graphic Fade: creates user-configurable fades.
Smooth/Enhance: opens Sony Pictures Digital’s XFX Smooth/Enhance tool.
|
Fade In: fades-in the selection. |
Time Stretch: opens Sony Pictures Digital’s |
|
XFX Time Stretch tool. |
|
|
Fade Out: fades-out the selection. |
Volume: adjusts the volume of an audio file. |
|
CHP. 3 |
LEARNING THE SOUND FORGE WORKSPACE |

34 
Effects toolbar
If you are using the full version of Sound Forge, the Effects toolbar contains buttons corresponding to all Sound Forge’s built-in XFX™ plug-ins.
|
Acoustic Mirror: adds environmental coloration |
Flange/Wah-Wah: mixes a modulated delay |
|
to your existing recordings. |
signal with the original signal. |
|
Amplitude Modulation: applies a sinusoidal or |
Gapper/Snipper: removes/inserts sections of |
|
square-shaped periodic gain to the input signal. |
silence at regular intervals to create unusual |
|
effects. |
|
|
Chorus: simulates multiple audio sources from |
Noise Gate: removes signals below a set |
|
a single sound. |
amplitude threshold. |
|
Multi-Tap Delay: creates a delay with up to |
Pitch Bend: creates a modified sound envelope |
|
eight delay-taps spaced anywhere within 2.5 |
that corresponds to increasing or decreasing |
|
seconds of the original sound. |
the pitch of a sound file over time. |
|
Simple Delay: adds a delayed copy of the audio |
Pitch Shift: changes the pitch of a selection |
|
signal to the file. |
with or without preserving the duration of the |
|
file. |
|
|
Distortion: simulates the overloading of an |
Reverb: simulates the acoustics of different |
|
amplifier. |
environments. |
|
Graphic Dynamics: applies compression, |
Vibrato: creates periodic pitch modulation in an |
|
expansion, and limiting to affect the dynamic |
audio file. |
|
range of an audio file. |
|
|
Multi-Band Dynamics: allows compression and |
Wave Hammer: acts as a classic compressor |
|
limiting to be placed on up to four different |
and volume maximizer. |
|
frequency bands. |
|
|
Envelope: forces the amplitude envelope of a |
|
|
waveform to match a specified envelope shape. |
|
|
LEARNING THE SOUND FORGE WORKSPACE |
CHP. 3 |

35
Tools toolbar
The Tools toolbar contains buttons corresponding to commands in the Tools menu.
Burn CD: writes the selected audio track to CD.
Replace: replaces selected audio data with previous adjacent data.
Extract Audio from CD: extracts audio from CD and opens in Sound Forge for editing.
Interpolate: replaces selected audio with interpolated audio data based on the selection’s beginning and end samples.
Auto Region: creates regions in an audio file according to rapid sound attacks or a specified time interval.
Sampler: allows you to transfer samples to/ from Sound Forge.
Crossfade Loop: mixes audio occurring before the loop start point into the end of the loop to smooth transitions.
Clip Detect: performs clip detection on the current file or selection. Note: clip detection is available only in the full version of Sound Forge.
|
Extract Regions: extracts all file regions and |
Statistics: displays statistics corresponding to |
|
saves them as individual files. |
the current file or selection. |
|
Find: searches for clicks and pops, volume |
DTMF/MF Tones Synthesis: generates dial |
|
levels, or silent breaks in an audio signal. |
tones used by telephone companies. |
|
Preset Manager: backs up and transfers user- |
FM Synthesis: uses frequency modulation and |
|
configured presets from effects, processes, |
additive synthesis to create complex sounds |
|
and plug-ins. |
from simple waveforms. Note: FM synthesis is |
|
available only in the full version of Sound |
|
|
Forge. |
Copy Other Channel: replaces selected audio with a corresponding selection from the opposite channel.
Simple Synthesis: generates a simple waveform of a given shape, pitch, and length.
Levels toolbar
The Levels toolbar displays the audio levels in the left and right channels in the user-specified format. You can right-click to choose the format from a shortcut menu.
|
Left |
Right |
|
channel level |
channel level |
ACID Loop Creation Tools toolbar
The ACID Loop Creation Tools toolbar contains buttons corresponding to commands used when creating audio loops for Sony Pictures Digital’s ACID® family of products. For more information, see Creating loops for ACID on page 228.
Edit ACID Properties: displays the Edit ACID Properties dialog.
Shift Selection Left: shifts the current selection to the left so the current start point becomes the end point.
|
Edit Tempo: calculates the musical tempo |
Shift Selection Right: shifts the current |
|
(beats per minute) based upon the current |
selection to the right so the current end point |
|
selection. |
becomes the start point. |
|
Double Selection: doubles the size of the |
Rotate Audio: moves the current selection to |
|
current selection. |
the opposite end of the file. |
|
Halve Selection: divides the current selection in |
Selection Grid Lines: toggles the selection grid |
|
half. |
line display on/off. |
|
CHP. 3 |
LEARNING THE SOUND FORGE WORKSPACE |

36 
Tempo window
The ACID Loop Creation Tools toolbar also contains a Tempo window that appears to the right of the toolbar buttons. This window calculates and displays the ACID project’s tempo as if the current selection represents a complete measure.
Play Device toolbar
The Play Device toolbar allows you to choose a playback device on the fly.
Play Device drop-down list
Play Device drop-down list
Choose a playback device from the drop-down list. Use the Play Device drop-down list as a shortcut for choosing Preferences from the Options menu and choosing a Playback device on the Wave tab.
ToolTips
Hovering the mouse pointer over a button or status bar box for longer than one second displays a small text box adjacent to the pointer. This text, called a ToolTip, is a brief description of the item’s function. Using ToolTips is an effective way to quickly familiarize yourself with Sound Forge.
ToolTip
Turning off ToolTips
1.From the View menu, choose Toolbars. The Preferences dialog appears.
2.Clear the Show ToolTips check box and click OK.
Command descriptions
When you click and hold a menu item or a button in a toolbar, a brief description of the command appears in the lower-left corner of the status bar. If you release the mouse button outside of the menu item or toolbar, Sound Forge does not execute the command.
|
LEARNING THE SOUND FORGE WORKSPACE |
CHP. 3 |

Reset Clip
37
Meters
Meters display audio levels in a number of different places in Sound Forge: the Play Meters show audio file levels; meters in the Record dialog help you adjust levels for recording; and meters in the Wave Hammer® dialog help you adjust levels when applying this effect. Regardless of where the meters appear, you can control them in much the same way.
The full version of Sound Forge provides peak and VU/PPM (peak program) meters that you can use to monitor your audio levels.
The peak meters display instantaneous levels during playback to help you determine the loudest level in your audio signal and whether the signal is clipping.
Volume unit (VU) and peak program (PPM) meters help you determine the perceived loudness of your audio signal (peak program meters provide faster response times to volume increases than VU meters). VU/ PPM meters are especially helpful when you’re mastering: comparing two audio files’ VU/PPM readings will help take the guesswork out of matching levels.
VU/PPM readings should fall near the 0 (or reference) mark. 0 VU is merely a reference level, and your signal may exceed 0 VU. To prevent clipping, keep an eye on your peak meters. Peak levels should never exceed 0 dB. To accommodate louder or softer intensity material, you can use the Other tab in the Preferences dialog to calibrate the VU/PPM meters to their associated levels on the peak meters and adjust the VU meters’ sensitivity (to access the Preferences dialog, choose Preferences from the Options menu).
Resetting clipping indicators
When audio levels are too high, clipping can occur. A red indicator appears at the top of the meter to show when audio is clipping. Click to reset the indicator, or right-click the meters and choose from the shortcut menu.
|
Clipping |
Click the clipping |
|
indicator |
indicator to reset it. |
You can also detect and mark clipped audio using the detect clipping tool. For more information, see Detecting and marking clipping on page 95.
Scaling meters
Meters can display a peak range and a VU (volume unit)/PPM (peak program) scale. To change the meter’s display levels, right-click the meter and do one of the following:
•Choose Peak Range from the shortcut menu, followed by the desired range from the submenu.
•Choose VU/PPM Scale from the shortcut menu, followed by the desired scale from the submenu.
VU and PPM scales are most useful for displaying the average volume of the signal: the meter represents the RMS average level during playback, and their attack and decay are not as sensitive as the peak meter.
|
CHP. 3 |
LEARNING THE SOUND FORGE WORKSPACE |

38 
PPM scales are useful for monitoring peak levels. The meters use a fixed integration time (5 or 10 ms) that is sensitive to increases in volume, but the meters are less sensitive to decreases in volume than the VU scales, which produces less meter activity and decreased eyestrain.
Displaying VU/PPM meters
Sound Forge provides peak and VU/PPM (peak program) meters that you can use to monitor your audio levels.
You can toggle the display of the meter’s VU/PPM scale on and off. Right-click the meter and choose Show VU/PPM from the shortcut menu.
Adjusting the VU meters’ sensitivity
Unlike peak meters — which read instantaneous changes in your audio signal — the VU/PPM meters read a portion of the signal and calculate the average level. The size of the signal that the meters read is determined by the meters’ integration time.
To set the amount of data surrounding the cursor that will be used to calculate levels in the VU meters, specify a value in the VU meter integration time box on the Other tab of the Preferences dialog (to access the Preferences dialog, choose Preferences from the Options menu).
The PPM scales use a fixed integration time:
|
Scale |
Integration time |
|
UK PPM |
10 ms |
|
EBU PPM |
10 ms |
|
DIN PPM |
5 ms |
|
Nordic PPM |
5 ms |
Showing labels
Right-click the meters and choose Show Labels from the shortcut menu to toggle the meter dB markings on and off.
Holding peaks and valleys
Right-click the meters to access the Hold Peaks and Hold Valleys commands in the shortcut menu.
•Choose Hold Peaks to display a marker on the meters indicating the highest reading.
•Choose Hold Valleys to display a marker on the meters indicating the lowest reading.
|
LEARNING THE SOUND FORGE WORKSPACE |
CHP. 3 |
![]()
39
Controls
A major step in mastering Sound Forge is becoming familiar with the controls used to set and adjust feature parameters, including faders, sliders, and envelope graphs.
Faders and sliders
Faders and sliders are frequently used to edit effect and process parameters. To use either control, drag the control to the desired position and release.
Fader
Drag to set value
Slider
Resetting fader and slider values
Double-click to return the control to its default value.
Fader and slider shortcuts
There are numerous keyboard shortcuts available when using faders and sliders.
•

 ,
, 

 ,
, 

 , and
, and 

 change the value in small increments.
•Page Up and Page Down change the value in larger increments.
•Home and End set the control to its maximum and minimum values respectively.
•Hover the mouse over the fader or slider control and move the mouse wheel to change the value in larger
increments. Press Ctrl while using the mouse wheel to change the value in small increments.
Envelope graphs
Envelope graphs are used to configure the shape of frequency or amplitude envelopes applied to audio waveforms.

 Envelope point
 Envelope
Time axis
Amplitude or frequency axis
|
CHP. 3 |
LEARNING THE SOUND FORGE WORKSPACE |

40 
Understanding the envelope graph
To use the envelope graph, you must first understand what it represents. In the previous example, the horizontal axis represents time, with the leftmost point representing the start of the selection and the rightmost point representing the end of the selection. The vertical axis represents either amplitude or frequency, depending upon the operation.
Moving an envelope point
1.Drag an envelope point to a new position.
2.Release the mouse button. The point is repositioned and the envelope adjusts.
Moving multiple envelope points
1.Starting in an unused area of the envelope graph, drag the mouse to create a selection box containing all points to be moved.
Select the envelope points
2.Release the button. The selected envelope points are displayed with a white square center.
3.Drag any of the selected envelope points to the desired position. The pointer displays as a multidirectional arrow and the selected points move together.
4.Release the mouse button. The entire envelope graph adjusts.
Reposition multiple envelope points
Changing the fade curve between two points
To change the type of fade between two envelope points, right-click an envelope segment and choose a fade type (Linear Fade, Fast Fade, Slow Fade, Smooth Fade, Sharp Fade, and Hold) from the shortcut menu.
Selecting or clearing all envelope points
Press Ctrl + A to select or clear all envelope points.
|
LEARNING THE SOUND FORGE WORKSPACE |
CHP. 3 |

41
Adding an envelope point
1. Hover over the envelope.
Place the pointer on the envelope and double-click to add a point.
2.Double-click the mouse. A point is added to the envelope graph and can be positioned as needed. For more information, see Moving an envelope point on page 40.
Deleting an envelope point
Right-click the point to be deleted and choose Delete from the shortcut menu. The point is deleted and the envelope adjusts.
Delete all points
Delete all envelope points by clicking the Reset Envelope button.
Displaying the waveform on an envelope graph
Certain envelope graphs (such as in the Graphic Fade dialog) allow you to view the audio waveform on the graph. If the selection is small, the waveform automatically displays. Otherwise, selecting an option from the Show wave drop-down list displays the waveform.
Displaying stereo waveforms
The Show Wave drop-down list allows you to specify how stereo files display in the envelope graph.
Specify the channel to be displayed
Stereo files
When a data window displays a stereo file, the upper half of the data window shows the left channel and the lower half shows the right channel.
Working with stereo files
When playing, editing, or processing stereo files, you can select the left channel, the right channel, or both channels. However, certain processing tasks cannot be performed on an individual channel of a stereo file.
For more information, see Single-channel editing on page 44.
|
CHP. 3 |
LEARNING THE SOUND FORGE WORKSPACE |

42 
Selecting data in stereo files
When editing a stereo file, the waveform display is divided into three sections. The mouse pointer location determines which channel (or channels) is selected.
•The upper quarter of the data window selects the left channel.
•The lower quarter of the data window selects the right channel.
•The middle half of the data window selects both channels.
Left channel only
Both channels
Right channel only
1. Open a stereo file.
2.Select the Edit tool by choosing Tool from the Edit menu and Edit from the submenu.
 Press Ctrl + D or click the Edit Tool button (
  ) on the Standard toolbar.
3.Position the tool near the top of the left channel and notice its appearance. The tool displays as  . This indicates that only audio data in the left channel will be selected.
4.Position the tool in the middle portion of the data window and notice its appearance. The tool displays as a standard cursor. This indicates that it will select a mono file or both channels of a stereo file.
|
LEARNING THE SOUND FORGE WORKSPACE |
CHP. 3 |

43
5.Position the tool near the bottom of the right channel and notice its appearance. The tool displays as  . This indicates that only audio data in the right channel will be selected.
|
Cursor selects only the |
Cursor selects |
Cursor selects only the |
|
left channel |
both channels |
right channel |
Toggling channel selections
Once you place the cursor or create a selection in a stereo file, you can cycle through channel options (left, right, both) by pressing Tab .
Previewing channels
The single channel selection option allows you to preview channels in a stereo file individually.
1.Open a stereo file and select all data.
2.Click the Play Normal button ( ). The file plays in stereo.
3.Press Tab . The left channel is selected.
4.Click the Play Normal button ( ). Only the mono left channel plays.
5.Press Tab . The right channel is selected.
6.Click the Play Normal button ( ). Only the mono right channel plays.
|
CHP. 3 |
LEARNING THE SOUND FORGE WORKSPACE |

44 
Single-channel editing
Stereo files are held together by the nature of their stereo format. Because of this, you cannot perform certain editing operations (such as cut or paste) on a single channel of a stereo file.
Channel lengths must remain equal in stereo files. Frequently, this issue can be side-stepped by copying a single channel of a stereo file to the clipboard. Once this mono selection is located on the clipboard, you can do any of the following:
•Paste it into a mono file.
•Paste it into both channels of a stereo file.
•Mix it into a single channel of a stereo file.
•Mix it into both channels of a stereo file.
Note: When mixing mono clipboard data to a stereo file, the Mono to Stereo dialog prompts you to mix it to the right, left, or both channels.
|
LEARNING THE SOUND FORGE WORKSPACE |
CHP. 3 |

 45
45
CHAPTER
Getting Started
4
Sound Forge is a state-of-the-art digital audio editing tool for users from all musical backgrounds. It is an extremely deep program, containing features that may only be required by the most advanced or specialized users. Nonetheless, a firm grasp of Sound Forge basics is essential. This chapter is designed to provide you with information on Sound Forge fundamentals.
Creating a project
You can use project files in Sound Forge to organize and work with your media files nondestructively. When you save a project file, Sound Forge creates a .frg file and a subfolder that contains your media file and all of the temporary files created while working on your project. This file is not a multimedia file, but is used to render the final file after editing is finished. When you copy, cut, paste, and otherwise edit your project, the process is nondestructive—meaning you can edit without worrying about corrupting your source files. Within the project file, you can also undo any past operations, including those occurring before your last save. Once you are finished working with a project file, you can save your work to a media file using the Render As option on the File menu.
Note: To use the advanced undo/redo capabilities mentioned above, you must have the Allow Undo past Save check box selected on the File tab of the Preferences dialog. To access the Preferences dialog, choose Preferences from the Options menu.
1.From the File menu, choose Save As to save the current data window to a project file. The Save As dialog appears.
2.Using the Save in drop-down list, locate the folder where you want to save the project.
3.From the Save as type drop-down list, choose Sound Forge Project File (*.frg).
4.In the File name box, enter a name for the file.
5.Click the Save button.
Sound Forge creates a .frg file with the name you specified, and creates a folder with a similar name (projectname_frg, for example) in the same location for the temporary files.
Important: The associated project folder created by Sound Forge should not be deleted, as this will cause your project file to be unusable.

46 
Getting media files
Sound Forge can open a variety of audio and video files. There are three main methods for locating, previewing, and opening media files:
•From the File menu, choose Open to display the Open dialog. -or-
•From the View menu, choose Explorer to display the Explorer window. -or-
These methods are explained in greater detail in the following sections.
Note: To have Sound Forge automatically remove pulldown fields when opening 24 fps progressive-scan DV video files, select the Allow pulldown removal when opening 24p DV check box on the Video tab of the Preferences dialog. To open your 24p DV video files as 29.97 fps interlaced video (60i), clear this check box.
Using the Open dialog
1.From the File menu, choose Open. The Open dialog appears.
 Click the Open button (
  ).
).
Select to Preview Files
File Information Display
The Open dialog contains several features that allow you to locate and open audio files. These features are detailed below.
|
Files of type |
Use this drop-down list to specify the file format that Sound Forge displays in |
|
the system. Sound Forge supports a variety of file formats. |
|
|
Tip: Choose the CD Audio (*.cda) option from this list to extract audio tracks |
|
|
from a CD. |
|
|
Recent |
Use this drop-down list to locate recently accessed folders. |
|
Auto play |
Select this check box to automatically preview files as you select them in the |
|
Open dialog. |
|
|
Merge L/R to stereo |
Select this check box to merge two mono files to left and right channels of a |
|
stereo file when opening. |
|

47
2.Locate and select a media file using the Look in drop-down list at the top of the dialog.
3.To preview the file before adding it to your project, click the Play button.
Note: If you have the Auto play check box selected, your file will automatically begin previewing when you select it.
4.Click Open. Sound Forge opens the file and displays a data window containing the waveform.
File displays in the data window
Using the Explorer window
In addition to using the Explorer window for locating, previewing and opening media, you can drag files or regions from the Explorer window to an open data window to paste, mix, or crossfade the data. Click the right mouse button while dragging to toggle mix, crossfade, and paste drag-and-drop modes. You can also extract audio from a CD.
Previewing media
The Explorer window allows you to easily preview files before you open them. The Explorer window has a mini-transport bar with Play, Stop, and Auto Preview buttons ( ). When you preview a file, its stream is sent to the play meters on the main workspace (for audio files) or to the Video Preview window (for video files).
Note: To preview video files, you must have the Video Preview window open. To display the Video Preview window, choose Video Preview from the View menu.
1.Select a file in the Explorer window.
2.Click the Play button ( ) to listen to the file.
3.Click the Stop button ( ) or select a different file to stop previewing the file.
Tip: To automatically preview selected files, click the Auto Preview button ( ) on the Explorer window’s transport bar.
Opening media
To open a media file into a new data window from the Explorer window, double-click the file. To open a media file in a specific data window, drag the media file from the Explorer window to the data window.

48 
Extracting audio from CD
The Explorer window allows you to easily extract audio from a CD into a data window. Each audio track on the CD is extracted into a separate data window.
1.Use the Explorer window to browse to and select your CD drive. The CD’s audio tracks display in the right pane of the Explorer window.
2.Select the track(s) you want to extract.
3.Drag the track(s) to the main Sound Forge workspace. Sound Forge begins extracting the selected tracks into individual data windows.
4.To stop the extraction process, you can click the Cancel button on the status bar to stop the whole process or on the individual data windows to stop extracting a specific track.
Tip: To extract a single audio track into a new data window, double-click the track in the right pane of the Explorer window.
Using Explorer views
You can control the information that is displayed in the Explorer window by clicking the Views button ( ) and selecting a view. These options are explained below:
|
Item |
Description |
|
Tree View |
Displays all of the available drives and folders that you may choose |
|
from to find files. |
|
|
Region View |
Displays any regions that have been defined in the selected media file. |
|
Summary View |
Displays a short description of the selected media file at the bottom of |
|
the Explorer window. |
|
|
Details |
Displays the file size, date and when the file was last created or last |
|
modified. |
|
|
All Files |
Displays all file types in the active folder. |
Peak files
When you first open a file, Sound Forge scans the entire file and creates a peak file. The peak file is stored with the same name and in the same location as the audio file, but it is given an .sfk extension. Sound Forge automatically updates this peak file whenever the original file is edited.
If you modify a file in an application other than Sound Forge, you can regenerate the peak file by choosing
Rebuild Peak Data from the Special menu.
 Loading…
![]()
Мощный инструмент для профессиональной работы с аудио. Редактор Sound Forge включает в себя огромный набор передовых функций, способных делать удивительные вещи, но требующих от пользователей определенных навыков по их использованию. Современный интерфейс позволяет новичкам легко управляться с поверхностным инструментарием. Если же капнуть глубже, перед подготовленным пользователем открываются крутые возможности, способные выдавать удивительный результат.
О том, как использовать потенциал программы на полную, Вам подробно расскажет следующий видеокурс.
Уроки по Sound Forge Pro
Структурированный курс для новичков, желающих быстрее овладеть богатым функционалом редактора. Обучение состоит из 41-го видеоурока, общей продолжительностью 120 минут. Здесь нет лишней воды, а только конкретная инструкция по использованию Sound Forge и всех его компонентов.
Для ознакомления с форматом обучения, представляем Вам первые 10 уроков. Скачать курс целиком, можно в конце новости (как обычно).
{banner_lesson}
По прохождения курса, Вы будете точно знать, как пользоваться Sound Forge эффективно и научитесь делать действительно качественную музыку.
- 60
- 1
- 2
- 3
- 4
- 5
Похожие материалы
Больше статей
Полезные программы Больше программ

Многие музыканты занимаются записью гитары в домашних условиях. Практически всегда требуется редактировать музыкальную дорожку. Это может быть и наложение каких-то эффектов, либо изменение различных параметров. Для данных целей прекрасно подойдёт современный аудиоредактор под названием Sound Forge. Название переводится, как звуковая кузница. Это полностью отражает возможности программы. Вы можете совершать какие-то крупные действия со всей композицией, либо как скальпелем удалять ненужные участки звуковой дорожки или совершать «микронные» манипуляции. Эта музыкальная кузня полностью в Вашем распоряжении.
Установка программы Sound Forge
Сейчас мы проведём небольшой обзор по возможностям программы. Кратко расскажем, как пользоваться программой Sound Forge.
На данный момент самой актуальной версией программы является Sound Forge 11. Описание Sound Forge мы начнём с того, что взглянем на рабочую область программы.
Рабочее поле программы Sound Forge
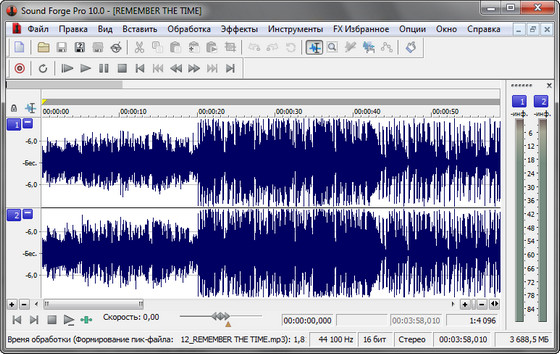
Здесь осуществляется редактирование всех аудиоданных. Мы видим, что загружена звуковая дорожка с разделением на два канала. Справа находятся два индикатора каналов (отображают уровень выходного аудиосигнала) в виде столбцов. Также можно видеть простой набор инструментов для проигрывания записи, информация о дорожке выдается внизу экрана (частота сэмплирования воспроизведения, разрешающую способность, настройку каналов, длительность активного окна данных и общую область свободной памяти), а весь мощный инструментарий программы находится в функциях меню.
Элементы интерфейса Sound Forge (часть 1)
Элементы интерфейса Sound Forge (часть 2)
Аудиоредактор Sound Forge имеет в своем арсенале большое количество обработок и эффектов, с помощью которых вы можете изменять звучание аудиофайлов. Имеющиеся плагины позволяют существенно улучшить звучание файлов или создать совершенно новые звуки. Из основных эффектов стоит отметить следующие: хорус, дилэй, дисторшн, реверберация, вибрато, флэнджер и множество других. Спектр настроек, а также точных настроек каждого эффекта или процесса поражает.
Для полноты представления возможностей программы Sound Forge стоит отметить то, что звуковые дорожки можно склеивать. Накладывать друг на друга, вырезать ненужные куски, делать реверс и ещё много-много всего.
Диалоговое окно записи Sound Forge

И ещё одна очень полезная функция программы – это запись звука. Вы можете записывать аудио через микрофон, через линейный вход звуковой карты, можете писать голос или инструменты. А после смело редактируете свои записи.
Обработка голоса в Sound Forge 10
Это было краткое описание программы Sound Forge. Надеюсь, оно было полезным для Вас. Пишите комментарии и делитесь ссылками в социальных сетях.