
Прежде, чем собирать кубик Рубика 5×5, научитесь собирать классический кубик 3х3, т.к. сборка кубика 5х5 состоит из тех же алгоритмов, что и 3х3, но дополнена несколькими новыми формулами. Сборка кубика 5х5 даже проще, чем сборка кубика 4х4.
Шаг 1.
В начале этого этапа кубик полностью разобран.
В конце этапа у Вас должны быть собраны все серединки (по 9 кубиков одного цвета)
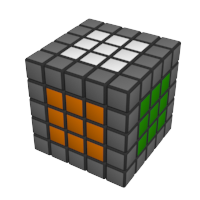
В отличие от кубика 4х4 в этом кубике все серединки фиксированы, как и в кубике 3х3, что значительно упрощает сбороку.
Для того, что бы выполнить этот шаг, Вам нужно переставлять между собой серединные кубики (ближние и дальние).
Поставьте нужные кубики друг напротив друга, и выполните формулу
>
Поделиcь успехами, будь мужиком!
Поделиcь успехами, будь мужиком!
Похоже, что вы уже овладели сборкой кубика 3х3 и теперь вас волнует вопрос — как собрать кубик Рубика 5х5?
Королю головоломок кубику Рубика 3х3 в этом году исполняется 44 года. Несмотря на почтенный возраст, непростой характер и высокотехнологичность конкурентов, игрушка по-прежнему тепло любима большими и маленькими жителями Земли.
Кто и зачем придумал кубик Рубика?
 Преподавателю Академии прикладных искусств и ремесел города Будапешта Эрно Рубику было 29, когда он задумался о создании учебного пособия, наглядно объясняющего основы математической теории групп. Перед изобретателем стояла задача рассчитать конструкцию так, чтобы отдельные блоки свободно вращались на местах, сохраняя при этом конструктивное единство.
Первая механическая головоломка была шестицветной и состояла из 27 деревянных кубиков — 3х3. Именно она считается классической. Со временем поклонники «магической» игрушки научились собирать ее за 30 секунд с завязанными глазами. Нужно было идти дальше, и были разработаны новые версии кубика — 4х4 и 5х5. Последнюю из-за высокой сложности называют «профессорской».
Кубик Рубика 5х5 инструкция для начинающих
В семействе Рубикс модель 5х5 самая неприступная, поэтому над ее решением чаще всего бьются профессионалы.
Принцип тот же что и в предыдущих версиях головоломок: каждой грани соответствует определенный цвет. Пара неверных движений – и кубики разбегутся по сторонам. Расшифровать алгоритм и вернуть беглецов на места для опытных спидкуберов все равно что завоевать золото олимпийских игр.
 С чего начать изучать методику сборки кубика 5х5, если вы новичок?
Запомните главное: перемещение элементов только кажется хаотичным. На самом деле оно подчиняется строгому порядку. Можно крутить кубик 5х5 как угодно, но боковые кубики так и останутся боковыми, угловые – угловыми, а центральные – центральными.
Например, если в вашем случае оранжевый и синий центры находятся в противоположных плоскостях, то никуда они оттуда не денутся. Получается, что справиться даже со сверхсложным кубиком можно, зная принципы вращения и алгоритм сборки кубика 3х3. Один из самых простых вариантов, а также алгоритмы сборки кубика Рубика 5х5 в картинках представлены на нашем ресурсе.
Самый легкий способ собрать кубик Рубика 5х5
Пять – цифра нечетная. Это значит, что на кубике 5х5 нет паритета углов, как в моделях 2х2 и 4х4, а цвета центров уже расположены на своих местах.
Поэтому, сборка кубика 5х5 только кажется такой сложной. Для того чтобы собрать кубик 5х5, достаточно знать алгоритмы для сборки кубика Рубика 3х3 и несколько дополнительных формул.
Ниже, вы найдете все этапы сборки кубика 5х5 в картинках и с пояснениями для новичков.
Сборка кубика Рубика 5х5 для начинающих
В нашем видео мы подробно покажем понятную схему сборки кубик Рубика 5х5. Так же, как и в других случаях, кубик Рубика 5×5 можно собрать с помощью специальных алгоритмов, однако здесь многое также зависит от логики и интуитивного выполнения этапов.
После просмотра нашего видео, Вы научитесь сборке, и сможете объяснить другим, как собрать кубик 5х5!
0:14 Введение
1:46Строение
2:21 Язык вращения
3:25 Этапы сборки
3:51 Сборка центров (Первый центр)
11:52 Второй центр
15:17 Третий центр
17:16 Четвертый центр
19:24 Последние 2 центра
28:13 Сборка рёбер
33:01 Последние 4 ребра
36:22 Паритет рёбер
37:46 Сборка
После видео вы точно узнаете, как собрать кубик рубика 5×5. Вы можете купить кубик Рубика 5х5 в нашем интернет-магазине, чтобы тренироваться сборке.
У нас в наличии кубики Рубика 5 на 5 от известных производителей:
- MoFangGe;
- MoYu;
- Cyclone Boys.
- ShengShou.
- Yuxin.
Чтобы узнать, как собрать кубик Рубика самым простым способом, читайте нашу статью.
Сборка кубика Рубика 5х5 происходит в несколько этапов:
- Сборка центров
- Сборка ребер
- Этап 3х3
Первые 2 этапа почти полностью выполняются интуитивно. Формулы могут понадобиться при сборке последних двух ребер.
Последний этап выполняется точно так же, как и сборка кубика 3х3. В отличие от кубика 4х4, в кубике Рубика 5х5 все
центры фиксированные. Поэтому паритетов на данном кубике не возникает.
Сборка последних двух ребер
#
Поменять левый нижний кубик с правым верхним
#

d (R F’ U R’ F) d’
Поменять левый верхний кубик с правым нижним
#

u (R F’ U R’ F) u’
Поменять местами центральные кубики
#

Uw2 Rw2 F2 u2 F2 Rw2 Uw2
Разворот двух центральных кубиков на месте
#

e (R F’ U R’ F) e’
Разворот одного центрального кубика на месте
#

r2 B2 U2 l U2 r’ U2 r U2 F2 r F2 l’ B2 r2
На самом деле центральный кубик останется в прежнем положении, а развернутся соседние от него.
![]()
Download Article
![]()
Download Article
The 98-piece, 5x5x5 Rubik’s cube (also known as the “Professor’s Cube”) is a great challenge if you’ve already solved the regular 3x3x3 cube or the 4x4x4 puzzle. While this puzzle is tricky, it can be solved as long as you carefully follow an algorithm known as the reduction method. First, focus on learning the Rubik’s cube shorthand, as this will make the algorithms much easier to understand and follow. Next, work on solving the 3×3 centers of each cube face, before trying to line up the edges. Once you’ve solved the bulk of the puzzle, take a moment to get rid of any parities, or wrongly colored cubes.
-

Hold your Rubik’s cube in 1 hand, keeping the puzzle upright as you hold it. To have an easier time solving the puzzle, assign labels to all 6 faces. Label the top face as “Upper” (or “U”), the bottom face as “Down” (or “D”), the leftmost face as “Left” (or “L”), the rightmost face as “Right” (or “R”), the front face as “Front” (or “F”), and the back face as “Back” (or “B”).[1]
- Always keep the cube in the same position as you complete the puzzle, or else you won’t be able to solve it properly.
-
Grip the edges of a cube face and rotate it clockwise by 90 degrees. Use this small turn whenever the algorithm specifies a single letter. [2]
- Unless specified, always perform a ¼ turn in a clockwise direction.
- For example: Imagine that the upper face is completely green, while the front face is completely red. Grab the edge of the front face and rotate it 90 degrees clockwise to perform a ¼ turn. At this point, 1 row of the green squares will now be visible of the right face of the cube.
Advertisement
-
Keep an eye out for algorithm shorthand that includes both numbers and letters. If you see a “2” immediately after a letter, rotate 1 face of the cube by a full 180 degrees. Keep in mind that ½ turns are also clockwise, unless the algorithm specifies otherwise.[3]
- For instance: Pretend that the upper face of the cube is white, the right face is blue, the bottom/down face is orange, the left face is red, and the front face is green. If the algorithm says “F2,” grip the front face of the cube and rotate it 180 degrees. Once you finish turning the front face, the bottom row of the upper face will be orange.
-
Keep an eye out for stray apostrophes, as they can make your puzzle-solving experience much more difficult. While most algorithm steps require you to turn the cube clockwise, this punctuation requires you to turn the cube in the opposite direction. Double check all algorithms before you rotate anything so your puzzle doesn’t get jumbled.[4]
- For example: Imagine again that upper face is green, while the front face is red. Turn the front face 90 degrees to the left whenever you see an apostrophe listed in the algorithm (e.g., U’, F’).
- More often than not, counter-clockwise movements are used for ¼ turns, but not ½ turns.
-
Rotate 2 columns 90 degrees to the right whenever you see a lowercase “w” next to a cube face (e.g., Rw, Uw). Since the Professor cube is much larger than its 3x3x3 counterpart, you‘ll need to rotate the cube in larger amounts in order to solve the puzzle.[5]
- For instance, if a puzzle algorithm reads “Rw,” perform a ¼ turn using 2 layers of the right face.
- If you see an apostrophe after the “w,” be sure to turn the cube counter-clockwise.
-
Keep your eyes peeled for an additional number included in the puzzle algorithm. Whenever you see the number “3,” rotate 3 layers beneath the face specified in the algorithm.[6]
- Depending on the algorithms you reference, you might not run into any instructions telling you to rotate 3 layers of the cube at once.
-
Solve complicated algorithms by physically rotating the cube in the middle of the puzzle. When you see the letter “x,” turn the cube clockwise on its invisible x-axis. If you see the letter “y,” rotate the cube clockwise on its invisible y-axis. If you notice an apostrophe next to the “x” or “y,” rotate the cube counter-clockwise instead.[7]
- Imagine that you have a Rubik’s cube with a white upper face, a red front face, a yellow bottom/down face, an orange back face, a blue right face, and a green left face. If you see “x” listed in the algorithm, rotate the cube so that red becomes the upper face. If you see “y” in the algorithm, turn the cube so that white remains the upper face, but blue becomes the front face. If you see x’ or y’ in the algorithm, perform these actions in reverse.


Advertisement
-
To make the puzzle-solving process less overwhelming, start solving the centers of the large Rubik’s cube. In this case, pretend that you’re tinkering with a generic, 3x3x3 cube instead of the more complex puzzle. To start, try using the F R’ D’ R F2 algorithm to get a cross on the upper layer of the cube.[8]
- This algorithm is most commonly used on 3x3x3 cubes. For more information on algorithms specific to 5x5x5 cubes, check out this resource: https://protofusion.org/idiots_guide_to_rubiks_cube/oldsite/5x5x5.html.
- Make sure that you have a center cross/plus sign in the middle of each cube face before continuing.
-
Begin filling in a solid 3x3x3 center on each cube face by rotating the upper layer of the cube in a counter-clockwise ¼ turn. Next, turn the right face of the cube in a counter-clockwise ¼ turn.[9]
- Take the algorithm one step at a time. If you think you’ve made a mistake, try turning the cube in the opposite direction that you just rotated it in.
-
After completing the first 2 steps of the puzzle, continue by rotating the upper face of the cube in a clockwise ¼ turn. Next, turn the right face of the cube in a counter-clockwise ¼ turn. Finally, rotate the upper face again, but in a counter-clockwise ¼ turn.[10]
- Pay close attention to the apostrophes in any Rubik’s cube algorithm. The can be easy to miss!
-
Proceed by rotating the right face of the cube in a clockwise ½ turn. Next, complete the algorithm by turning the upper face in a clockwise ¼ turn.[11]
- This is the only portion of the algorithm that involves a ½ turn.


Advertisement
-
Choose a method to begin adjusting the edges on your 5x5x5 Rubik’s cube. For the first algorithm, rotate the right face clockwise, the upper face counter-clockwise, and the right face counter-clockwise. To solve the second algorithm, turn the front face clockwise, the right face counter-clockwise, the front face counter-clockwise, and the right face clockwise.[12]
- Choose 1 or the other to start aligning the edges, as you don’t need to use both.
- Keep in mind that all of these rotations will be ¼ turns.
-
Adjust the front-right edge by turning the right cube face clockwise, then rotating the upper face in a clockwise direction as well. Continue by turning the right face counter-clockwise, the front face clockwise, the right face counter-clockwise again, and the front face counter-clockwise. Finish by rotating the right face clockwise.[13]
- All of these cube rotations are still going to be ¼ turns.
-
Once you’ve assembled most of the edges together, use a “slice-flip-slice” technique to complete the last few edges without messing up the center colors. All of these rotations will be ¼ turns. First, rotate the top 2 layers of the cube in a counter-clockwise direction.[14]
- Next, “flip” the colors of the cube by rotating the right face clockwise, the upper clockwise, the right face counter-clockwise, the front face clockwise, the right face counter-clockwise, the front face counter-clockwise, and the right face clockwise.
- Finally, finish off the algorithm by rotating the top 2 layers of the cube clockwise.
-
Follow the Rw U2 x Rw U2 Rw U2 Rw’ U2 Lw U2 3Rw’ U2 Rw U2 Rw’ U2 Rw’ algorithm when you go to remove the parities, or mismatched cubes. First, rotate 2 of the rightmost layers in a clockwise ¼ turn, then turn the upper face in a clockwise ½ turn. Physically roll the entire cube backward before proceeding.[15]
- Next, turn 2 right layers clockwise in a ¼ turn, 1 upper layer clockwise in a ½ turn, 2 right layers clockwise in a ¼ turn again, and 1 upper layer clockwise in a ½ turn again.
- Continue following this algorithm until there are no more parities leftover on the cube.
- This algorithm repeats itself a lot, so do your best to keep track of how many steps you’ve completed.
-
Now that the bulk of the large cube is solved, pretend that you’re solving a simpler Rubik’s cube. Follow the basic principles of the layer by layer method to complete the Professor’s Cube.[16]
To see a visual step-by-step guide to solve a 3x3x3 cube, look here: http://www.alchemistmatt.com/cube/rubikcenter.html.- Don’t be discouraged if you can’t solve the puzzle correctly on your first try. The Professor’s Cube is extremely difficult to play with, and even more tricky to master.
- If you’re still stuck, use a 5x5x5 Rubik’s cube solver to get a customized tutorial on how to solve your exact puzzle. Use the digital coloring system to fill in each block with the precise colors that are on your cube! Check it out here: https://www.grubiks.com/solvers/professors-cube-5x5x5.


Advertisement
Add New Question
-
Question
Why would anyone even do this?

It’s a personal challenge like a crossword puzzle or a memory game.
-
Question
How do I verify the edges? All the edges on my cube are in the wrong position, and I don’t know how to do it.
BobsonJoe
Community Answer
Make sure the cube is now composed of corners, 3×3 centers, and 1×3 blocks of the same color (the edges).
-
Question
Should I solve one layer at a time on a Rubik’s Cube?
If you’re talking about the 3x3x3 cube, then that is a great way to get started. Don’t try to solve a cube bigger than that by using the layer by layer method, as it is very time consuming, complicated, and will not work.
See more answers
Ask a Question
200 characters left
Include your email address to get a message when this question is answered.
Submit
Advertisement
Thanks for submitting a tip for review!
About This Article
Thanks to all authors for creating a page that has been read 422,665 times.
Did this article help you?
Перейти к контенту
В 1974 году венгерский инженер Эрне Рубик изобрел головоломку, которую в дальнейшем назвали его именем. Сборка кубика 5х5 – увлекательный алгоритм для профессионалов и новичков.
Содержание
- Сбор кубика Рубика 5х5 пошагово
- Особенности алгоритма сборки Рубика 5х5
- Что запомнить новичкам
Перед вами поэтапная подробная схема сборки кубика 5х5 послойно:
- Начинать необходимо со сборки центров. На картинке кубика Рубика 5х5 они показаны цветными, в отличие от остальных рядов:

- Затем сформировать один белый узор сверху.
- Найти ребра без наличия желтого.
- Поставить ребро согласно цвету центральной части.
- Разместить головоломку лицом к себе на сорок пять градусов.
- Установить цветовую панель назад, вращать грани один раз.
- Поднять правый угол.
- Возвратить «спрятавшееся» ребро.
- Возвратить угол.

Результат: две панели на месте.
Эту комбинацию повторять, пока все фрагменты не займут на свои места.
Особенности алгоритма сборки Рубика 5х5
Обучение сборке Рубика 5х5 проходит легко и быстро, если соблюдать следующие правила:
- Главная ориентация – цвет центра.
- Панели располагаются напротив друг друга: белый – желтый, красный – оранжевый, синий – зеленый.
- Центр кубика стабилен. Пары по цвету статичны: белый – сверху, а желтый – снизу, зеленый — на передней панели, а синий – на задней, красный и оранжевый – справа и слева.
- Во время сборки надо двигать как головоломку, так и каждую грань.
- Вращать панели следует, ориентируясь на центральную палитру.
- Очередное движение формирует новый рисунок.
- Ребра (грани) имеют две стороны, а углы — три.

Поскольку цвета центра стабильны, головоломка собирается стандартно.
Что запомнить новичкам
Схема кубика Рубика 5х5 для начинающих предполагает ориентацию на последовательность:
- Грани одной цветовой середины сверху.
- Угол цветовой середины сверху.
- Грани одной цветовой середины снизу.
- Угол цветовой середины снизу.
- Грани цветовой середины среднего тройного слоя.
На видео можно посмотреть подробно, как собрать кубик Рубика 5х5:
( 12 оценок, среднее 2.75 из 5 )