
(Ocr-Read Summary of Contents of some pages of the Peg-Perego GT3 Document (Main Content), UPD: 05 October 2023)
-
30, — 30 — o enganche da capota do sítio onde se encontra (efectuar procedimento idêntico em ambos os lados). 10 COBERTA: unir a coberta ao apoio para pés através do fecho (fig_a), enganchar esta lateralmente com o velcro (fig_b) e fixá-la com o botão (fig_c). 11 CINTO DE SEGURANÇA DE 5 PONTOS: para apertar, insira as duas fivelas do cinto abdominal (com os cintos peitorais encaixados seta_a) no cinto entre- pernas até ouvir …
-
23, — 23 — éléments en tissu pour enlever la poussière et laver à la main à une température maximale de 30° ; ne pas tordre ; ne pas utiliser d’eau de javel ; ne pas repasser ; ne pas laver à sec ; ne pas détacher à l’aide de solvants ; ne pas sécher dans un sèche-linge à tambour rotatif. PEG-PÉREGO S.p.A. Peg-Pérego S.p.A. est certifiée ISO 9001. La certification offre à la clientèle une garantie de transparence et représente un gage de confiance dans la façon de travailler de l�…
-
36, — 36 — luftmængde (fig_b). For at fjerne kalechen, skal man lukke sidestængerne, knappe kalechen af, trykke sidetrykknappen (fig_c) og samtidig trække kalechens hængsel fra sin plads (foretag dette på begge sider). 10 KØREPOSE: sammensæt køreposen med benstøtten ved hjælp af lynlåsen (fig_a), sæt den på siden med velcro (fig_b) og sæt den fast med knappen (fig_c). 11 5-PUNKTS SIKKERHEDSSELE: Hægt sikkerhedsselen på ved at indsætte de 2 spænder på bækkenselen (med påhægtede skulderse…
-
46, Peg-Perego GT3 — 46 — HU_Magyar Köszönjük, hogy a Peg-Pérego termékét választották. FIGYELMEZTETÉS _ FONTOS: figyelmesen olvassák el az alábbi utasításokat és azokat őrizzék meg a későbbi alkalmazás céljából. A gyermek biztonságát veszélyeztethetik azzal, ha nem tartják be ezeket az utasításokat. _ E szállítóeszközt az ülésen 1 gyermek szállítására tervezték. Ne használják a benneülők nagyobb száma esetén _ E szállítóeszköz újszülött és maximum 15 kg-os …
-
33, — 33 — aan de beensteun vast (fig_a), bevestig haar aan de zijkant met de velcro (fig_b) en zet haar met de knoop vast (fig_c). 11 VIJFPUNTSVEILIGHEIDSGORDEL: om deze te sluiten steekt u de twee gespen van het buikriempje (met bevestigde schouderriemen pijl_a) in het riempje tussen de benen, tot u het hoort klikken (pijl_b). Om hem los te maken drukt u op de ronde knop in het midden van de gesp (pijl_c) en trekt u het buikriempje eruit (pijl_d). 12 Om de buik…
-
25, — 25 — (Pfeil d). Zum Verkürzen des Vorderbügels die lange Taste betätigen und den Bügel nach innen drücken. 19 SEITLICHE FLASCHENHALTER: Der Kinderwagen ist auf beiden Seiten mit ausklappbaren Flaschenhaltern ausgestattet. Zum Ausklappen der Flaschenhalter den oberen Teil des Halters nach oben drehen (Pfeil a) und den unteren Teil nach unten klappen (Pfeil b). Dann die Scheibe nach außen drehen (Pfeil c) und die Flasche in den Halter stellen (Abb. d). Zum E…
-
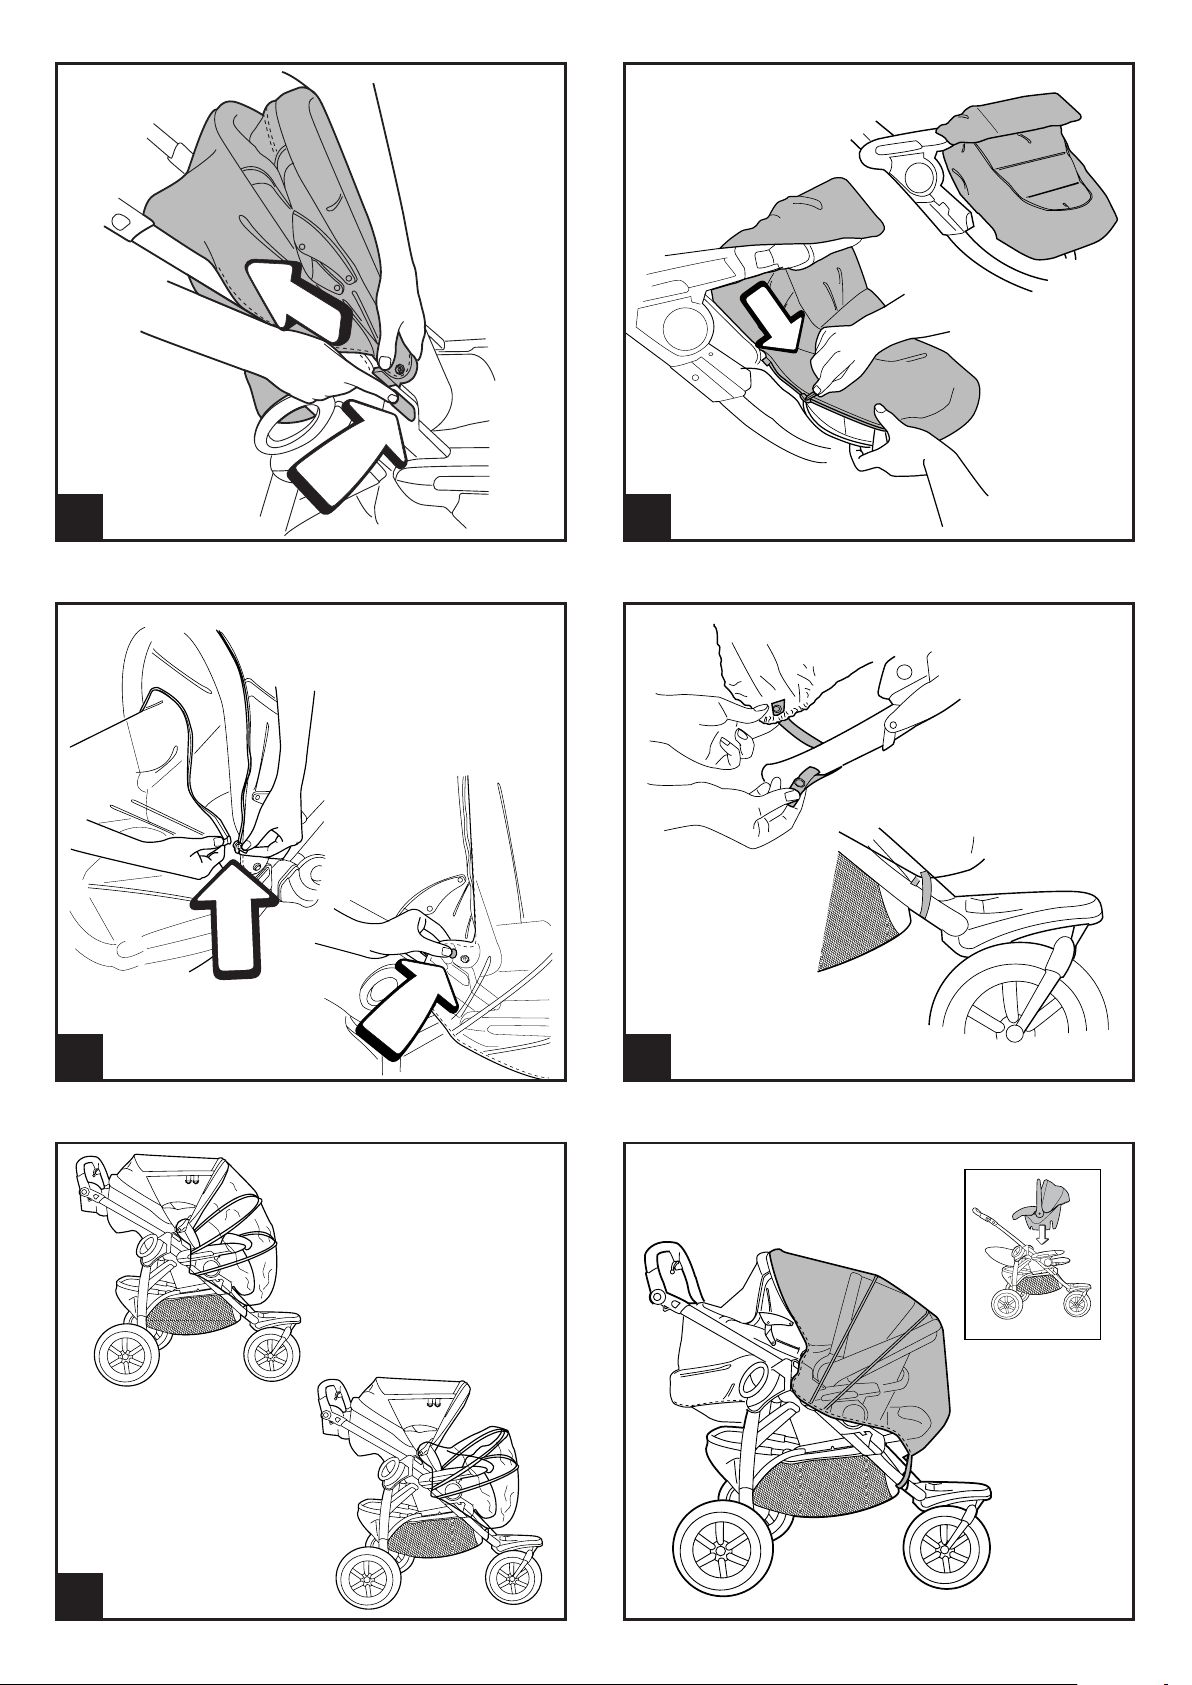
64, GT3 PEG PEREGO S.p.A. VIA DE GASPERI 50 20862 ARCORE MB ITALIA tel. 0039 039 60881 fax 0039 039 615869/616454 Servizio Post Vendita — After Sale: tel. 0039 039 6088213 fax: 0039 039 3309992 PEG PEREGO U.S.A. Inc. 3625 INDEPENDENCE DRIVE FORT WAYNE INDIANA 46808 phone 260 482 8191 fax 260 484 2940 Call us toll free: 1 800 671 1701 PEG PEREGO CANADA Inc. 585 GRANITE COURT PICKERING ONTARIO CANADA L1W3K1 phone 905 839 3371 fax 905 839 9542 Call us toll free: 1 800 661 5050 www.pegpere…
-
28, — 28 — regulación en las dos ruedas posteriores. GANCIOMATIC SYSTEM Ganciomatic System es el sistema práctico y veloz que permite enganchar la silla de paseo gracias a los enganches Ganciomatic, la Navetta XL y la silla de auto Primo Viaggio. A la venta por separado. 26 ENGANCHES GANCIOMATIC DE LA SILLA DE PASEO: para alzar los enganches Ganciomatic de la silla de paseo, levantar las esquinas del forro del asiento. Alzar los dos enganches Ganciomatic que automáticamente se moverán hacia el exterior. _ Para bajar los e…
-
45, — 45 — 23 OTOČNÉ ALEBO PEVNÉ PREDNÉ KOLESO: Aby ste predné koleso zafixovali, otočte gombík tak, že k značke smeruje symbol zamknutého zámku (obr. a). Ak chcete, aby sa predné koleso dalo natáčať, k značke otočte symbol otvoreného zámku (obr. b). 24 VZDUCHOVÁ PUMPA: Na nafúkanie pneumatík použite pumpu umiestnenú pod sedadlom (obr. a). Vysuňte hadičku z pumpy (obr. b) a naskrutkujte ju na jej opačný koniec (obr. c). Odstráňte vrchnáčik z pneumatiky (obr. d) a pripevnite koniec had…
-
50, — 50 — MED TEKANJEM ALI ROLANJEM. — MED ODPIRANJEM IN ZAPIRANJEM PAZITE, DA OTROK NE BO PREBLIZU, DA SE NE BI POŠKODOVAL. — PAZITE, DA SE OTROK S TEM IZDELKOM NE BO IGRAL. KOMPONENTE IZDELKA Preverite vsebino paketa; če imate kakršne koli pritožbe, se obrnite na službo za pomoč uporabnikom. _ GT3 sestavljajo: košarica; 1 vrtljivo oz. zaskočno sprednje kolo; 2 zadnji kolesi; sprednja zapora; prevleka; strehic…
-
29, — 29 — PT_Português Obrigado por ter escolhido um produto Peg-Pérego. ADVERTÊNCIA _ IMPORTANTE: leia atentamente estas instruções e conserve-as para uma futura utilização. A segurança da criança pode vir a ser colocada em risco se estas instruções não forem efectuadas. _ Este veículo foi projectado para transportar uma criança sentada. Não utilizar em caso de um número maior de ocupantes _ Este veículo é destinado à crianças recém-nascidas ou até que atinjam 15 kg de peso. _ Este artigo fo…
-
53, Peg-Perego GT3 — 53 — 8 СКЛАДНОЙ ВЕРХ. Для того чтобы надеть складной верх, вставьте его боковые крепления в особые гнезда (рис. a) и пристегните верх на кнопки с обратной стороны спинки (рис. b) и с внутренней стороны подлокотников (рис. c). 9 Опусти…
-
22, — 22 — boutonnez-le latéralement à la capote (fig_a), boutonnez les deux extrémités de l’élastique de l’habillage pluie à la base des montants avant (fig_b). 21 L’habillage pluie permet d’être abaissé tout en restant fixé à la poussette grâce aux boutons. 22 SAC BANANE : positionnez le sac banane à proximité des fixations situées sur le guidon, et fixez-le (fig_a). Le sac banane devient un a…
-
56, — 56 — arkalığı halkalarına takın (ok_b). Omuz kayýţlarýný bezden çýkarýn (ok_c) ve en uygun halkaya sabitleyin (ok _d), ardýndan arkalýđýn arkasýndaki her iki tokayý da yeniden takýn (ok_e). 14 FREN: Puseti durdurmak için, gidonu kendinize doğru çekin (ok_a), freni bırakmak için, kolu serbest bırakın (ok_b). Freni her zaman puset hareket etmiyorken ayarlayın. Freni ayarlayıp, sıkmak için, gidondaki ayar vidasını (şek_c) dış tarafa doğru gev�…
-
15, — 15 — IT_Italiano Grazie per aver acquistato un prodotto Peg-Pérego. AVVERTENZA _ IMPORTANTE: leggere attentamente queste istruzioni e conservarle per un futuro utilizzo. La sicurezza del bambino potrebbe essere messa a rischio se non si eseguono queste istruzioni. _ Questo veicolo è stato progettato per il trasporto di 1 bambino nella seduta. Non utilizzare per un numero superiore di occupanti _ Questo veicolo e’ omologato per bambini dalla nascita, fino a 15 kg di peso. _ Questo articolo e’ stato prog…
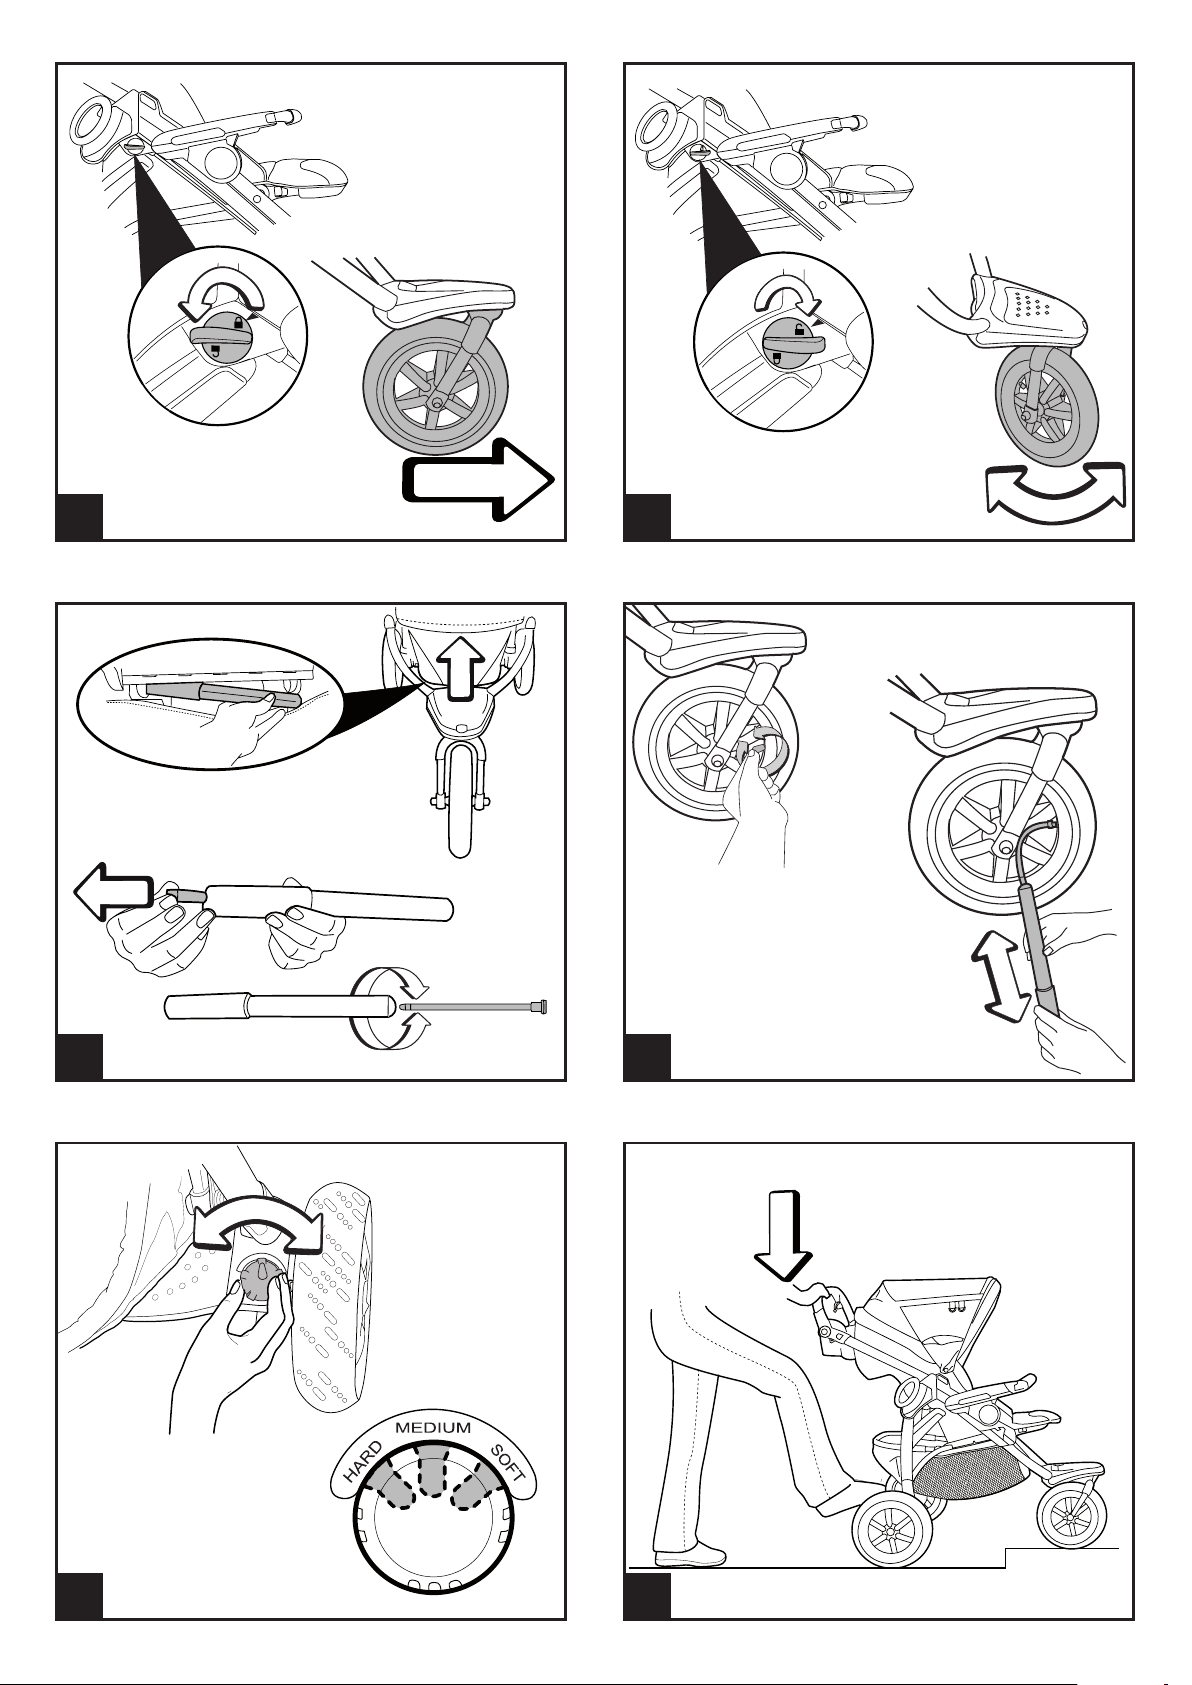
-
49, Peg-Perego GT3 — 49 — mechanizmusok, kerekek…) és szükség esetén könnyű olajjal kenjék be. AZ ESŐVÉDŐ TISZTÍTÁSA: egy szivaccsal és szappanos vízzel, mosószerek használata nélkül mossák le. A SZÖVETRÉSZEK TISZTÍTÁSA: keféljék le a szövetrészeket a por eltávolításához és legfeljebb 30°- os hőmérsékleten, kézzel mossák ki; ne facsarják; ne fehérítsék klórral; ne vasalják; ne végezzenek száraz tisztítást; ne távolítsák el a foltokat oldószerekkel és ne szárítsák forgódobos ruhaszárító…
-
59, — 59 — Για το άνοιγμα, πιέστε το πλήκτρο της προστατευτικής μπάρας που βρίσκεται κάτω από τον βραχίονα (βέλος a) και ταυτόχρονα τραβήξτε την προστατευτική μπάρα προς τα έξω (βέλος b). Για να κλείσετε την προστατευτική μπάρα ενεργήστε προς την αντίθετη κατεύθυνση. Η προστατευτική μπάρα μπορεί κ�…
-
42, — 42 — _ Než začnete kočárek používat, doporučujeme nejprve nahustit pneumatiky na tlak 25 P.S.I./1,7 baru. 25 TLUMIČE NÁRAZŮ: všechna kola jsou vybavena tlumičem nárazů. Tlumiče nárazů na zadních kolech jsou nastavitelné. Můžete zvolit mezi „HARD (TVRDÉ)“ – jestliže jedete po měkkém terénu, jako je například písek nebo trávník; „SOFT (MĚKKÉ)“ – jestliže jedete po hrubém povrchu, jako je například štěrk nebo dlažební kostky; nebo „MEDIUM (STŘEDNÍ)“ – jestliže jedete po hladkém…
-
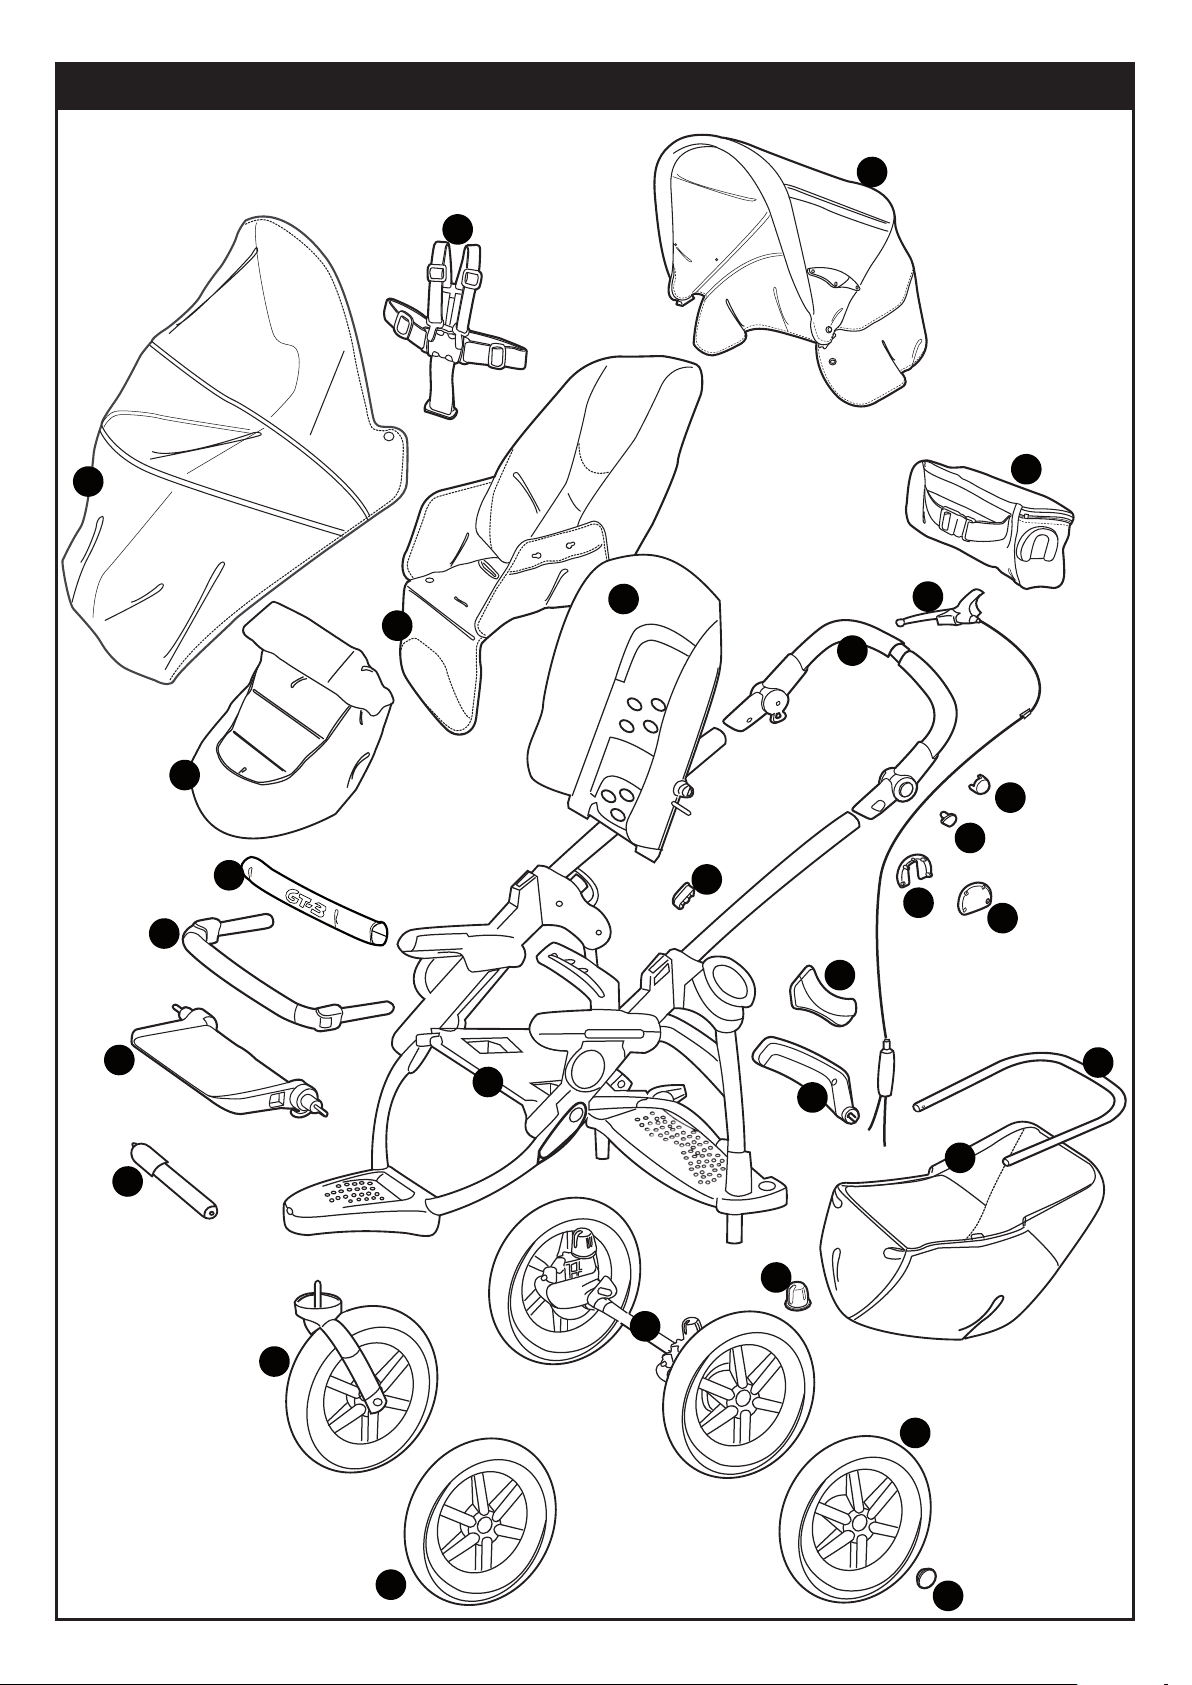
14, Peg-Perego GT3 1 2 3 4 5 6 7 11 32 22 13 15 16 19 20 21 24 14 25 18 27 26 17 8 12 28 29 30 31 10 9 23 33 GT3 1 ITNGT300NL65 2 SAPI5635KNGR 3 SPST5664N 4 SPST5665DGR SPST5665SGR 5 SPST5677N 6 SPST5676N 7 SPST5553DGR SPST5553SGR 8 SPST5658N 9 ASPI0059L31 10 ERSHG300—NY01 11 SPST5582GR 12 SPST6122N 13 SAPI6078JGRN 14 SPST6081KN 15 ASPI0081GRN 16 SAPI6118KL65NGR 17 MMMV0010 18 EAMAT400—NY01 19 ASPI00…
Скачать
FI000701I71
GT3
Istruzioni
dʼuso IT
Instructions for use EN
Notice
dʼemploi FR
Gebrauchsanleitung
DE
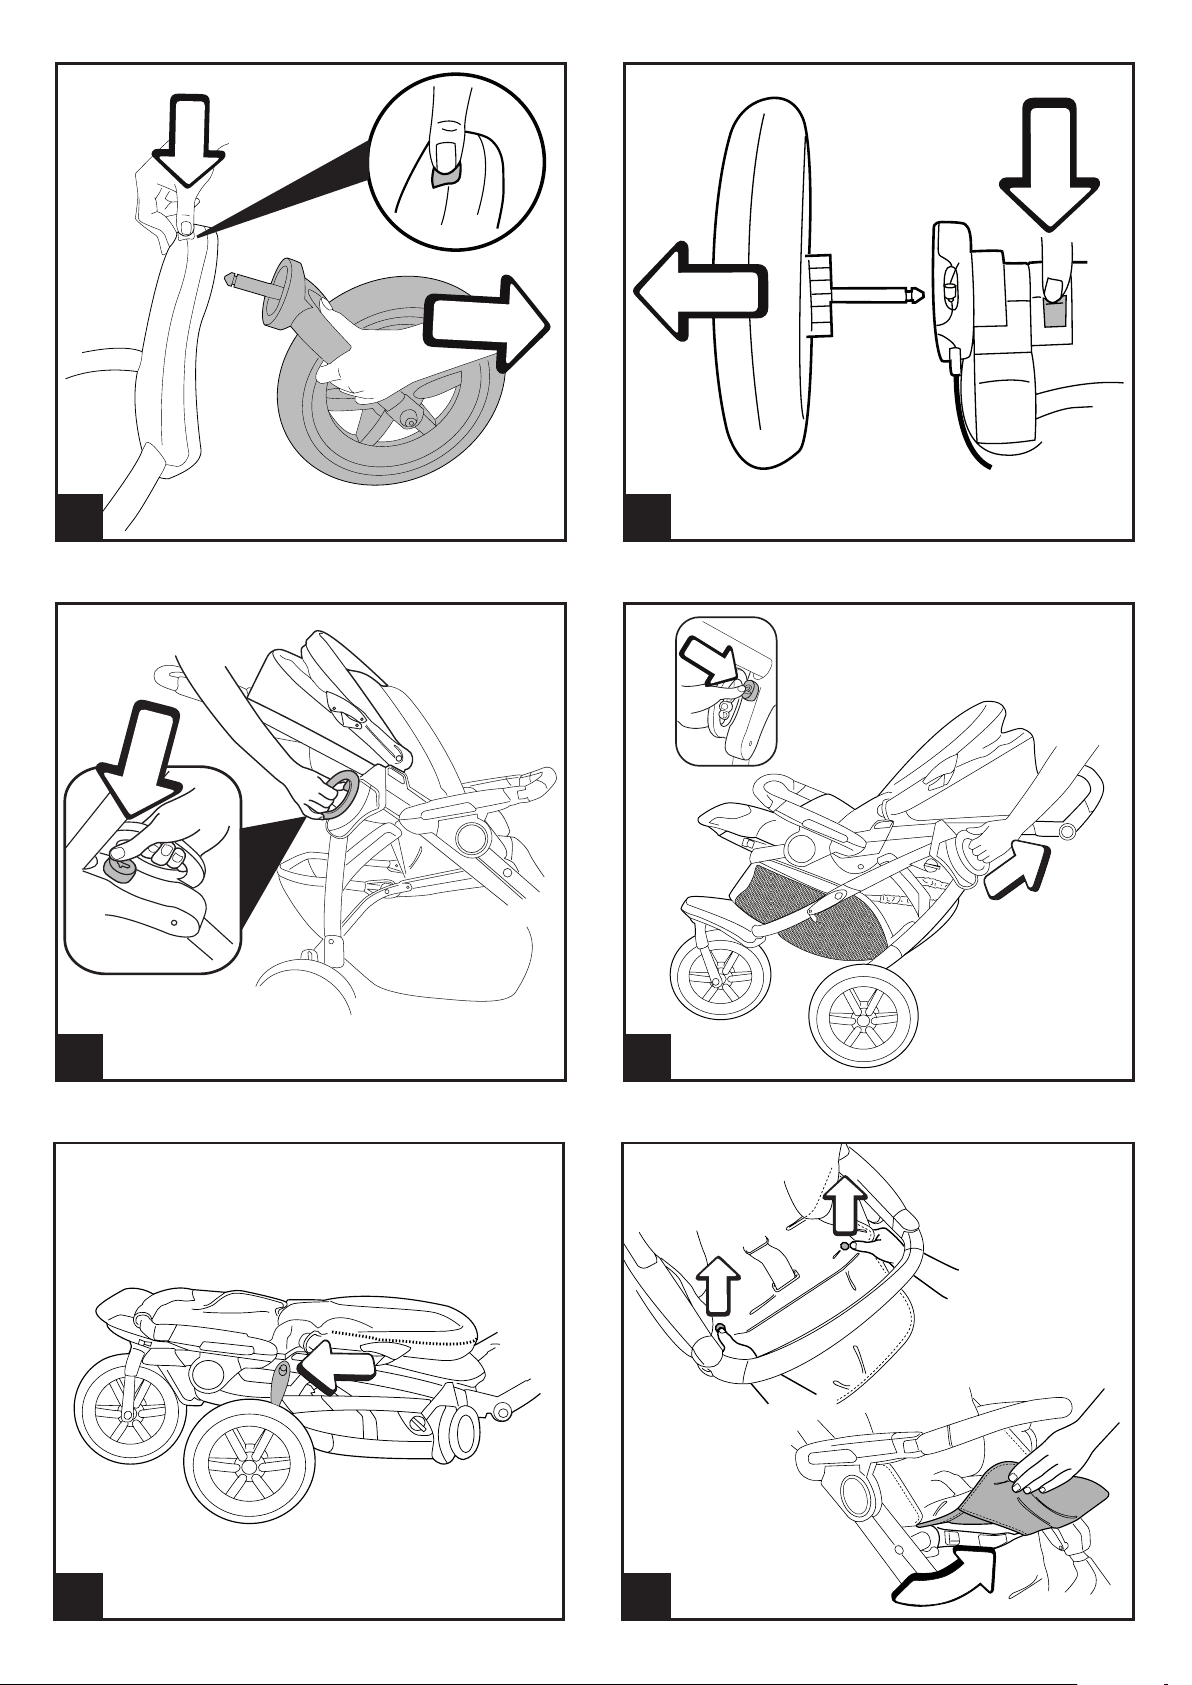
Instrucciones de uso ES
Instruções para uso PT
Gebruiksaanwijzing
NL
Brugsanvisning
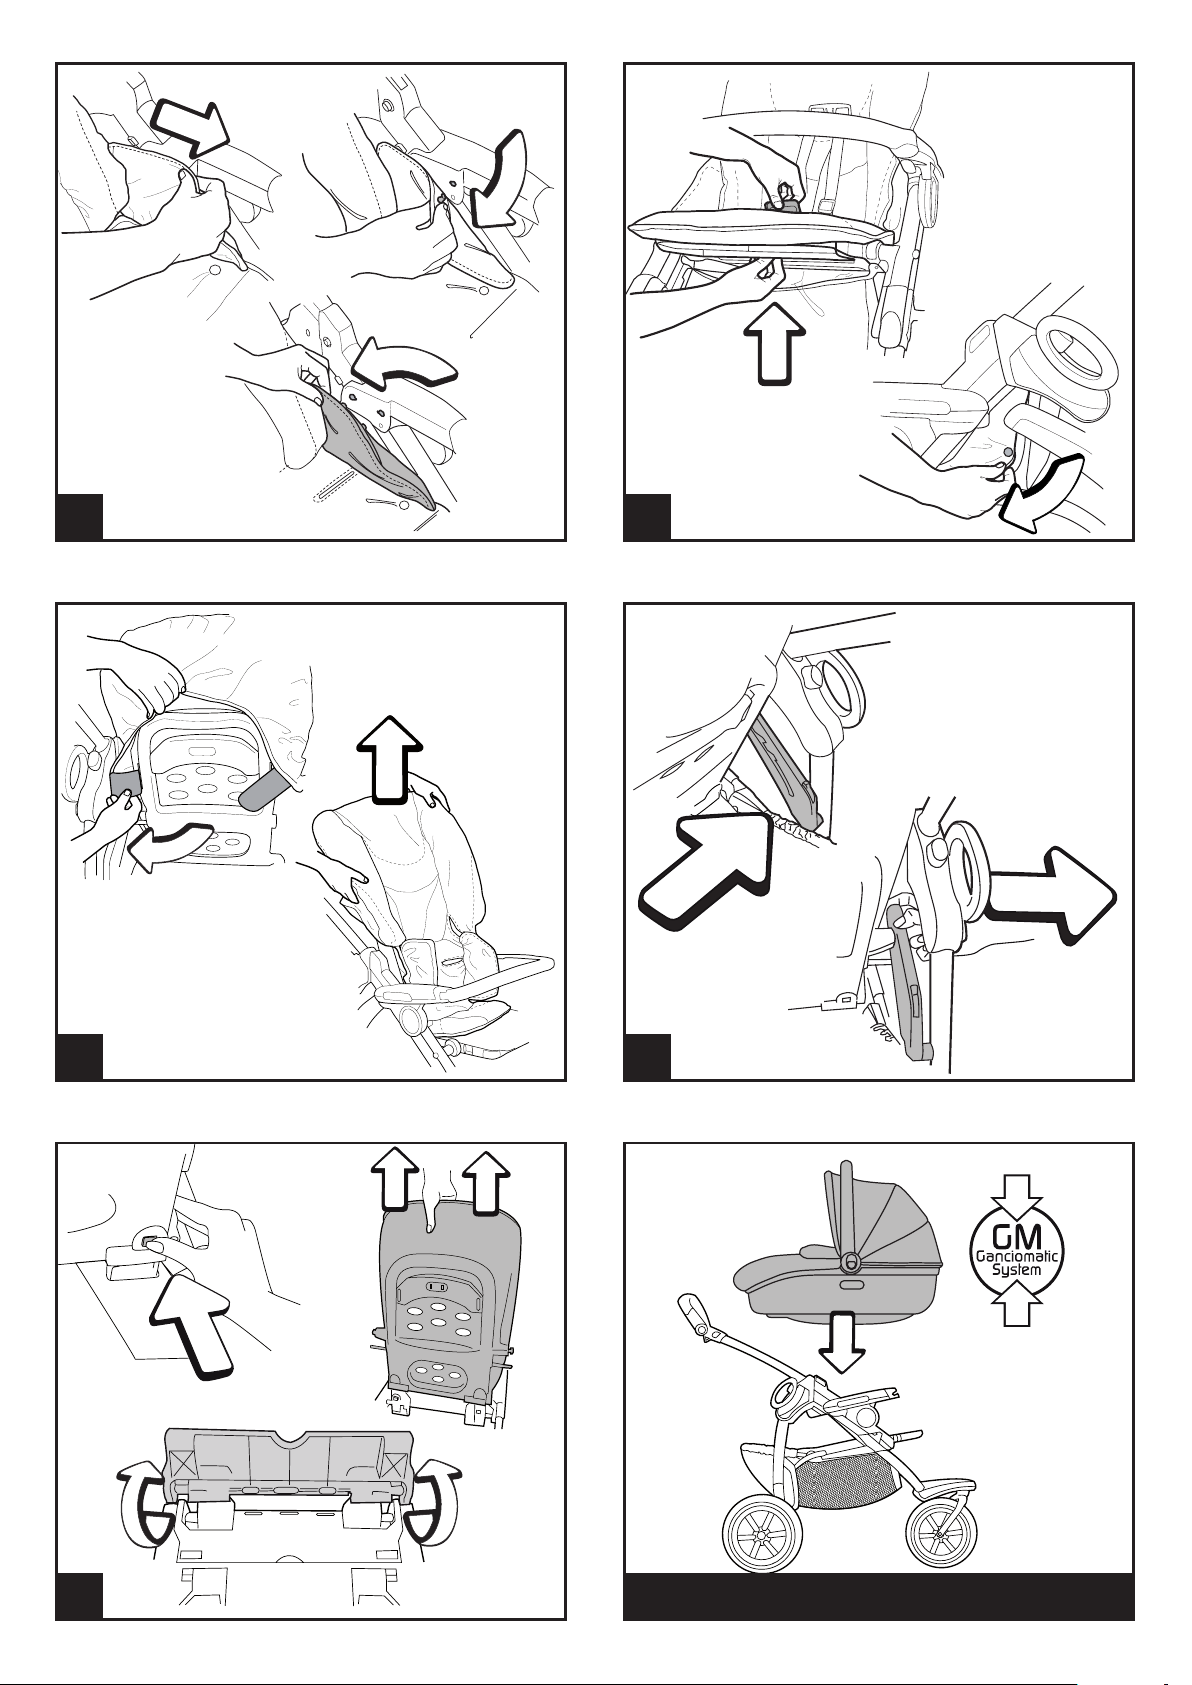
DK
Käyttöohjeet
FI
Návod na použití CZ
Návod na použitie SK
Használati
útmutató
HU
Navodila za uporab SL
Инструкции по пользованию RU
Kullanim
klavuzu
TR
ΟΔΗΓΙΕΣ ΧΡΗΣΕΩΣ EL
FI000601I71
GT3
Istruzioni dʼuso IT
Instructions for use EN
Notice dʼemploi FR
Gebrauchsanleitung DE
Instrucciones de uso ES
Instruções para uso PT
Gebruiksaanwijzing NL
Brugsanvisning DK
Käyttöohjeet FI
Návod na použití CZ
Návod na použitie SK
Használati útmutató HU
Navodila za uporab SL
Инструкции по пользованию RU
Kullanim klavuzu TR
ΟΔΗΓΙΕΣ ΧΡΗΣΕΩΣ EL
OK
NO
4
6
21
3
5
7
9
11 12
10
8
17
13 14
1615
18
A
B
22
23 24
21
19 20

A
A
B
A
B
A
B
27
29 30
25 26
28
A
B
A
B
35
31 32
33 34
36

A
B
39
40
41 42
3837
A
B
A B C
45
46
47
43
44
48
B
C
A
50
5453
49
5251
A
B
C
5655
59 60 GT3 Naked + Navetta
57 58

61 GT3 Naked + Primo Viaggio 62 Accessory
63 Accessory
1
2
3
4
5
6
7
8
11
22
9
10
12
13
15
16
17
18
19
20
21
24
23
14
25
28
27
26
29
GT3

1 ASPI0076
2 SAPI5635KNGR
3 SPST5664N
4 SPST5665DGR
SPST5665SGR
5 SPST5677N
6 SPST5676N
7 SPST5553DGR
SPST5553SGR
8 ASPI0058DN
ASPI0058SN
9 ASPI0059L31
10 ERSHG300—NY01
11 SPST5582GR
12 ASPI0077NGR
13 SAPI6078KGRN
14 SPST6081KN
15 SAPI6078GRN
16 SAPI6118NGR
17 ARPI0400L65L31NGR
18 SPST5562DN
SPST5562SN
19 ASPI0078NGR
20 ARPI0401NGR
21 SAPI5464NGR
22 ERPCGT00—QL13
23 BCOAT4•
24 BSAAT4•
25 EAPPA400—PLTR01
26 MUCI5P14NERO
27 BCAAT4•
28 EAMGT300—NY01
29 MMMV0010
IT• Ricambi disponibili in piú colori da specificare nella richiesta.
EN• Spare parts available in different colours to be specified when ordering.
FR• Pièces de rechange disponibles en plusieurs couleurs à spécifier dans la demande.
DE• Ersatzteile in mehr Farben vorhanden, die in der Anfrage spezifiziert werden müssen.
ES• Repuestos disponibles en otros colores que se especificarán en el pedido.
PT• Peças de reposição disponíveis em cores alternativas a serem especificadas no pedido.
NL• Reserveonderdelen verkrijgbaar in meerdere kleuren, bij bestelling te specificeren.
DK• Reservedele kan leveres i flere farver som bør specificeres ved bestillingen.
FI• Varaosia saatavana eri värisinä: ilmoita väri tilauksessa.
CZ• U náhradních dílů, které jsou k dispozici ve více barvách, je nutné na objednávce specifikovat
příslušnou barvu.
SK• Pri náhradných dieloch, ktoré sú k dispozícii vo viacerých farbách, je potrebné pri objednávke
špecifikovať želanú farbu.
HU• A tartalék alkatrészek különböző színekben elérhetők, melyeket rendeléskor kell kiválasztani.
SL• Rezervni deli so na voljo v več barvah, ki jih je treba navesti pri naročilu.
RU• Запчасти имеются различных цветов, необходимый указать в запросе.
TR• Siparişte belirtilen değişik renklerdeki yedek parçalari mevcuttur.
EL• Ανταλλακτικά διαθέσιμα σε διάψορα χρώματα. Προσδιορίστε όταν παραγγείλετε.

lʼasta con il cestello nella sua sede fino al click.
11• Agganciare il cestello anteriormente infilando le
asole ai gancini posti sotto il poggiagambe. Per
agganciare il cestello lateralmente, abbassare
lʼasta di questo e infilare le asole nei gancini come
in figura.
MARSUPIO
12• Il marsupio in dotazione è applicabile al manubrio;
posizionarlo come in figura e spingerlo verso il
basso fino in fondo nella sede del maniglione
(procedere da ambo i lati).
13• Il marsupio diventa accessorio borsa perchè può
essere anche indossato utilizzando lʼapposita
cintura.
CAPOTTINA
14• Per applicare la capottina inserire gli attacchi nelle
apposite sedi come in figura.
15• Abbottonare la capottina sul retro dello schienale
e allʼinterno dei braccioli come in figura.
16• Abbassare il compasso per tendere la capottina.
17• La capottina segue lʼinclinazione dello schienale.
Alzando la parte mobile della capottina scopriamo
un inserto in rete che garantisce al bebé una
maggiore areazione e ti permette di vederlo da
ogni posizione.
18• La capottina può facilmente trasformarsi in
parasole, vedi figura.
19• Per togliere la capottina, chiudere i compassi,
sbottonare la capottina, premere il pulsante come
in figura e contemporaneamente sfilare lʼaggancio
della capottina dalla sua sede (procedere da ambo
i lati).
COPERTINA
20• Per agganciare la copertina unire la cerniera di
questa con quella del poggiagambe come in
figura.
PARAPIOGGIA
21• Per montare il parapioggia, occorre unire la
cerniera di questo con quella della capottina e
abbottonarlo lateralmente alla capottina.
22• Infilare l’elastico del parapioggia alla base dei
montanti anteriori e abbottonare come in figura.
23• Il pratico parapioggia consente di essere
abbassato aprendo la cerniera e rimanendo fissato
al passeggino grazie ai bottoni.
24• Questo parapioggia è stato studiato anche nel
caso in cui sul passeggino ci sia agganciato il
seggiolino auto Primo Viaggio, garantendo la
totale protezione.
• Non utilizzare il parapioggia in ambienti chiusi
e controllare sempre che il bambino non sia
accaldato.
• Non collocare il parapioggia in PVC vicino a fonti
di calore e fare attenzione alle sigarette.
• Assicurarsi che il parapioggia non interferisca con
nessun meccanismo in movimento del carrello o
passeggino.
• Togliere sempre il parapioggia prima di chiudere il
vostro carrello o passeggino.
• Lavare con una spugna e dell’acqua saponata,
senza utilizzare detersivi.
FRENO
25• Per frenare il passeggino, tirare verso di se la
maniglia posta sul maniglione (freno dinamico).
Per bloccare il freno azionare la leva di blocco
come in figura (freno di parcheggio). Da fermi,
azionare sempre il freno.
CINTURA DI SICUREZZA
26• A: Assicurarsi che la bretella sia correttamente
inserita spingendo come in figura. B: Agganciare
la cintura agendo come in figura.
27• Per sganciare la cintura, premere ai lati della fibbia
• IMPORTANTE: leggere attentamente le istruzioni
prima dellʼuso e conservarle per riutilizzarle in
futuro.
• Peg Perego potrà apportare in qualunque
momento modifiche ai modelli descritti in questa
pubblicazione, per ragioni di natura tecnica o
commerciale.
Peg Perego S.p.A. è certificata ISO 9001.
La certificazione offre ai clienti e
ai consumatori la garanzia di una
trasparenza e fiducia nel modo di lavorare
dell’impresa.
SERVIZIO ASSISTENZA
Se fortuitamente parti del modello vengono perse o
danneggiate, usare solo pezzi di ricambio originali
Peg Perego. Per eventuali riparazioni, sostituzioni,
informazioni sui prodotti, la vendita di ricambi
originali e accessori, contatta il Servizio Assistenza
Peg-Perego:
tel.:0039-039-60.88.213,
fax: 0039-039-33.09.992,
e-mail: assistenza@pegperego.it,
www.pegperego.com
La Peg Perego è a disposizione dei suoi Consumatori
per soddisfare al meglio ogni loro esigenza. Per
questo, conoscere il parere dei ns. Clienti, è per noi
estremamente importante e prezioso. Le saremo
quindi molto grati se, dopo aver utilizzato un
ns. prodotto, vorrà compilare il QUESTIONARIO
SODDISFAZIONE CONSUMATORE che troverà in
internet al seguente indirizzo: www.pegperego.com/
SSCo.html.it,
segnalando eventuali osservazioni o suggerimenti.
ISTRUZIONI DʼUSO
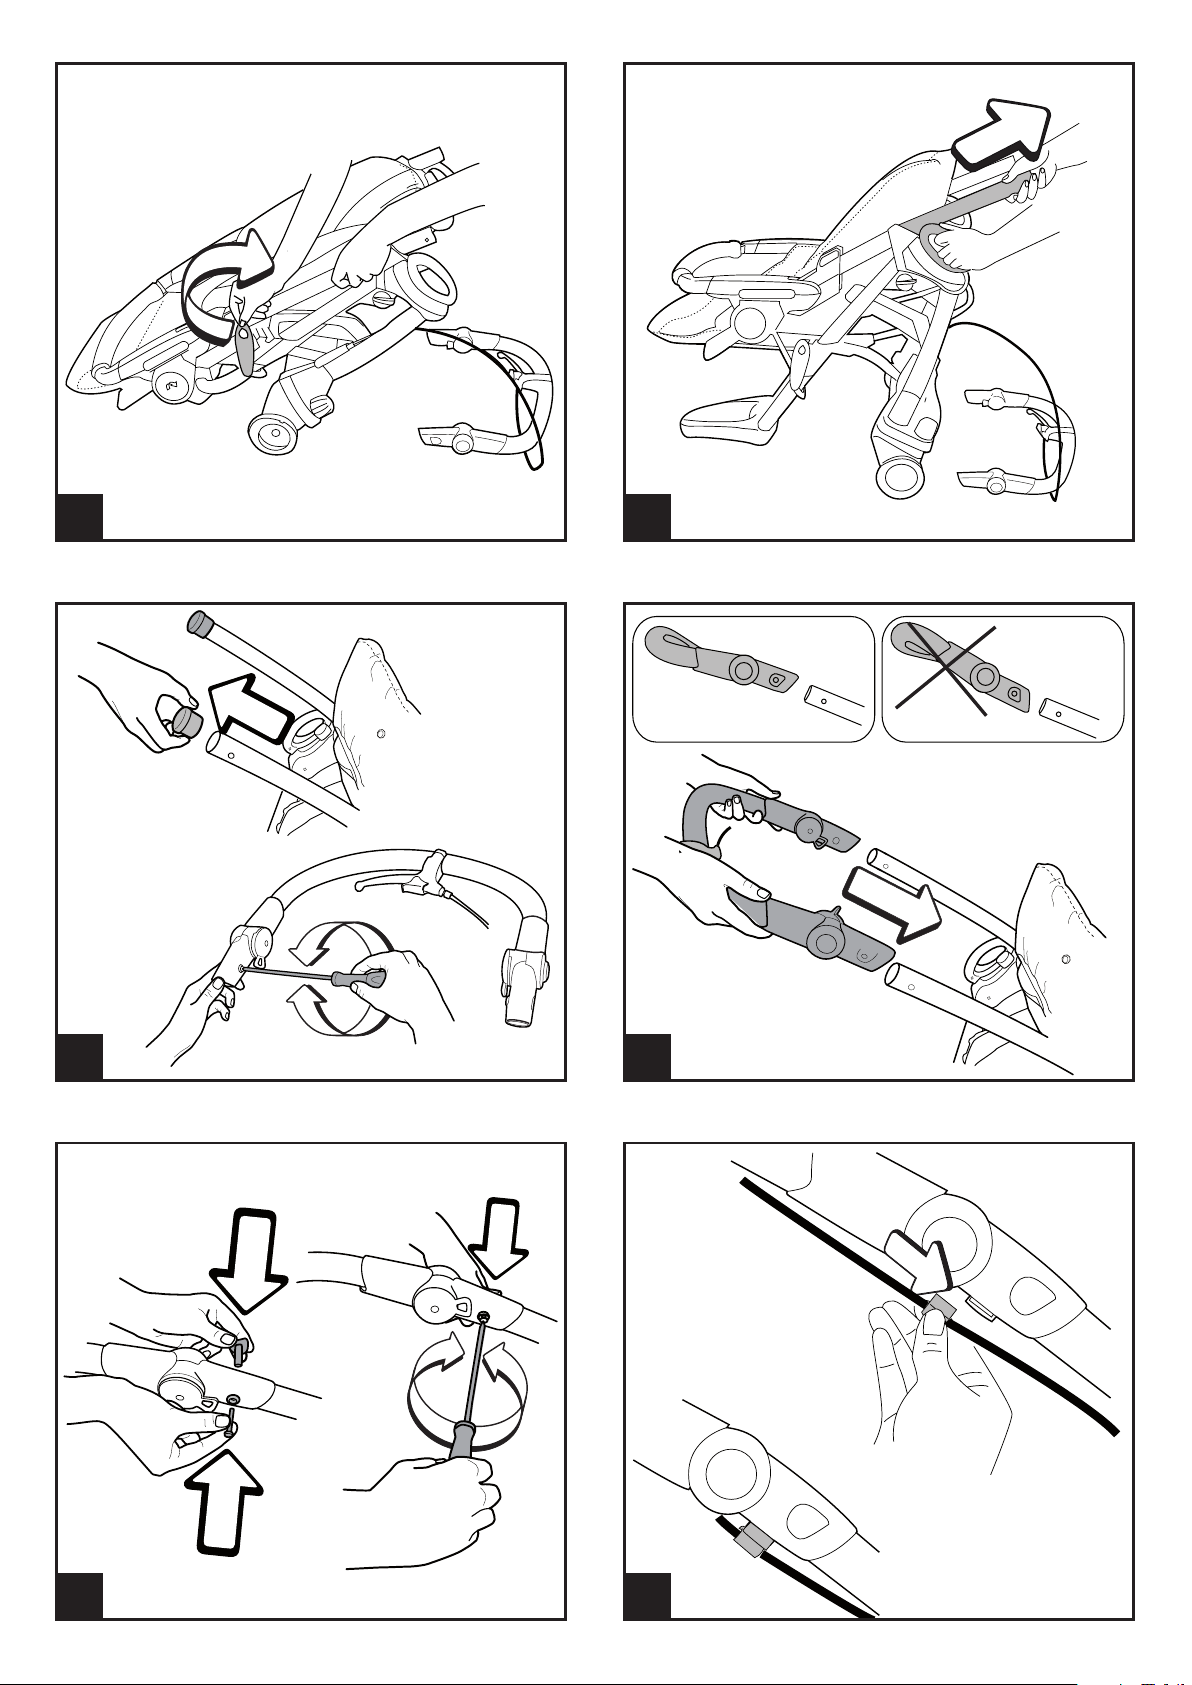
APERTURA
1• Prima di aprire il passeggino sganciare il gancio di
sicurezza, come in figura.
2• Con la mano sinistra impugnare la maniglia come
in figura e con la mano destra alzare verso lʼalto il
tubo fino allo scatto finale.
ASSEMBLAGGIO DEL PASSEGGINO
3• Per montare il maniglione, occorre togliere i tappi
di protezione imballo dai tubi del passeggino
come in figura. Con lʼaiuto di un cacciavite, svitare
le due viti e i due tappini dal maniglione, facendo
attenzione a non perderle.
4• Posizionare il maniglione in coincidenza dei due
tubi spingendolo fino in fondo. Fare attenzione al
verso del maniglione, posizionarlo come in figura
per evitare di montarlo al contrario.
5• Posizionare il tappino e la vite come in figura,
quindi avvitare con il cacciavite fino in fondo ma
senza forzare, da entrambi i lati del maniglione.
6• Per fissare il filo del freno infilarlo nella sede come
in figura.
7• Per montare le ruote posteriori infilare
lateralmente la ruota nell’apposita sede fino al
click.
8• Per infilare la ruota anteriore premere il pulsante
situato sulla pedanetta e infilare la ruota.
Controllare il corretto aggancio tirando le ruoe
verso il basso.
9• Per montare il cestello, premere i pulsanti laterali
e tirare per estrarre lʼasta del cestello.
10• Infilare lʼasta nel tessuto del cestello. Inserire
IT•ITALIANO

PORTABIBITE LATERALI
41• Il passeggino è dotato di due portabibite laterali a
scomparsa estraibili nellʼeventuale necessità. Per
estrarre il portabibite, alzare la parte superiore e
abbassare la parte inferiore come in figura.
42• Ruotare verso lʼesterno il disco e posizionare la
bibita. Per chiudere il portabibite procedere in
senso contrario.
MANIGLIONE REGOLABILE
43• Il maniglione del passeggino é regolabile in
altezza. Per regolare lʼaltezza del maniglione,
premere contemporaneamente i pulsanti laterali
come in figura e bloccare il maniglione nella
posizione desiderata.
CESTELLO
44• Il cestello del passeggino ha tre regolazioni.
A: posizione normale.
B: Il cestello si abbassa per permettere lʼutilizzo
anche quando lo schienale è completamente
abbassato, premendo su di esso, è più facile
riempirlo senza disturbare il bebé.
C: cestello alzato per accedere alla pedana
posteriore.
GANCIOMATIC SYSTEM
Il Ganciomatic System è il sistema pratico e veloce
che permette di agganciare al passeggino, grazie
agli attacchi Ganciomatic, i seguenti prodotti
acquistabili separatamente dotati anchʼessi di sistema
Ganciomatic.
• Primo Viaggio: seggiolino auto con base, si
sgancia dalla sua base (che rimane in auto) e si
aggancia agli attacchi Ganciomatic del passeggino
per trasportare, senza disturbare, il bambino.
• Navetta: la navicella con confort, diventa
carrozzina agganciandola agli attacchi
Ganciomatic del passeggino. Dotata di capottina
reclinabile e maniglione di trasporto, ha un
sistema di regolazione della circolazione dell’aria
all’interno della navicella e l’inclinazione dello
schienalino entrambi regolabili dall’esterno.
In casa dondola come una culla ed estraendo i
cavalletti diventa un vero lettino.
ATTACCHI GANCIOMATIC DEL PASSEGGINO
45• Per alzare gli attacchi Ganciomatic del passeggino,
sollevare la sacca negli angoli della seduta.
46• Alzare i due attacchi Ganciomatic che
automaticamente si sposteranno verso lʼesterno.
• Per abbassare gli attacchi agire in senso contrario.
GT3 + PRIMO VIAGGIO
47• Per agganciare il seggiolino auto al passeggino,
occorre:
— frenare il passeggino;
— togliere la capottina del passeggino;
— abbassare completamente lo schienale del
passeggino;
— alzare gli attacchi Ganciomatic del passeggino;
— posizionare il seggiolino auto verso la mamma e
spingerlo verso il basso fino al click.
— Si raccomanda di non rimuovere il frontalino dal
passeggino, quando si aggancia il seggiolino auto
ed assicurarsi che si trovi nella prima posizione.
• Per sganciare il seggiolino auto dal passeggino
consultare il suo manuale istruzioni.
GT3 + NAVETTA
48• Per agganciare la navicella Navetta al passeggino,
occorre:
— frenare il passeggino;
— togliere la capottina dal passeggino;
— abbassare completamente lo schienale del
e contemporaneamente tirare verso lʼesterno, il
cinturino girovita.
28• La nuova cintura di sicurezza da oggi, é più facile
da indossare grazie al sistema “attacca e stacca”.
Infatti prima di agganciare la cintura, attacca la
fibbietta allo schienale inserendo la linguetta
nellʼapposito passante come in figura; poi quando
hai agganciato la cintura al tuo bambino staccala
dallo schienale per lasciare il tuo bambino più
libero di muoversi. La fibbietta deve rimanere
sotto le spalle del bambino.
REGOLAZIONE SCHIENALE
29• Lo schienale del passeggino è reclinabile in più
posizioni. Per abbassare lo schienale, sollevare
la maniglia verso lʼalto e contemporaneamente
reclinare lo schienale bloccandolo nella posizione
desiderata. Per alzarlo, spingere lo schienale verso
lʼalto.
REGOLAZIONE POGGIAGAMBE
30• Il poggiagambe é regolabile in due posizioni. Per
abbassare il poggiagambe, tirare le due levette
laterali verso il basso e contemporaneamente
abbassarlo. Per alzare il poggiagambe, spingerlo
verso lʼalto fino al click.
RUOTA ANTERIORE FISSA O STERZANTE
31• Per rendere la ruote anteriore fissa, occorre girare
la manopola in senso antiorario (lucchetto chiuso).
32• Per rendere la ruota anteriore sterzante, occorre
girare la manopola in senso orario (lucchetto
aperto).
POMPETTA
33• Per pompare le ruote, servirsi della pompetta
posta sotto alla seduta.
SÞ lare il cordino dalla pompetta come in Þ gura (A)
e avvitarlo dalla parte opposta (B).
34• Svitare il tappino della ruota (A) e avvitare la parte
terminale del cordino della pompetta (B) come in
figura.
MOLLEGGIO RUOTE
35• Tutte le ruote sono dotate di molleggio. Le
ruote posteriori hanno il molleggio regolabile;
è possibile scegliere tra molleggio ”HARD” per
superfici morbide tipo sabbia e prati, “SOFT”
per superfici sconnesse tipo sterrati e ciottolati,
“MEDIUM” per superfici lisce e compatte. Per
regolare il molleggio sulle ruote posteriori
girare la manopola scegliendo tra una delle
tre regolazioni. Si consiglia di tenere la stessa
regolazione su entrambe le ruote posteriori.
PEDANETTA SUPERA OSTACOLI
36• La pedanetta posteriore agevola la mamma nel
superare piccoli dislivelli.
FRONTALINO
37• Il pratico frontalino apri e chiudi facilita lʼentrata
e lʼuscita del bambino quando é più grande.
Per aprire, premere il pulsante del frontalino,
posto sotto il bracciolo e contemporaneamente
tirare il frontalino verso lʼesterno. Per chiudere il
frontalino agire in senso contrario.
38• Per togliere il frontalino premere tutti e due i
pulsanti del frontalino posti sotto i braccioli e
contemporaneamente tirare il frontalino verso
lʼesterno.
39• Il frontalino è anche estendibile, per allungarlo
premere il pulsante lungo posto sotto il bracciolo
e tirare il frontalino verso lʼesterno (procedere da
ambo i lati).
40• Per far rientrare il frontalino, premere il pulsante
lungo e spingere in dentro il frontalino nel
bracciolo (procedere da ambo i lati).
GT3 Naked+ NAVETTA
60• Per agganciare Navetta al GT3 Naked versione
carrello occorre:
— Frenare GT3 Naked;
— Sollevare gli attacchi Ganciomatic;
— Alzare il poggiagambe del carrello nella posizione
più alta;
— GT3 Naked versione carrello ora è pronto per
poter agganciare la Navetta;
— Impugnare il maniglione di Navetta e posizionarla
sugli attacchi Ganciomatic del carrello, tenendo il
lato della testa della Navetta dalla parte opposta ai
manici del carrello;
— Premere con entrambe le mani sui lati di Navetta
fino al click;
— Per sganciare la Navetta dal carrello consultare il
suo manuale istruzioni.
GT3 Naked + PRIMO VIAGGIO
61• Per agganciare il seggiolino auto al carrello
occorre:
— Frenare GT3 Naked;
— Agganciare il frontalino;
— GT3 Naked versione carrello è pronto per
agganciare il seggiolino Primo Viaggio;
— Impugnare il maniglione del seggiolino e
posizionarlo sugli attacchi Ganciomatic del
carrello, tenendo il lato della testa del seggiolino
dalla parte opposta al maniglione del carrello.
Premere con entrambe le mani sui lati del
seggiolino fino al click;
— Per sganciare il seggiolino auto dal carrello
consultare il suo manuale istruzioni.
LINEA ACCESSORI
62• Borsa Cambio: Borsa con materassino per il
cambio del bebè, agganciabile al passeggino.
63• Zanzariera: Zanzariera con zip, applicabile alla
capottina con zip.
PULIZIA E MANUTENZIONE
Il vostro prodotto necessita un minimo di
manutenzione. Le operazioni di pulizia e
manutenzione devono essere effettuate solo da adulti.
• Si raccomanda di tenere pulite tutte le parti in
movimento e se occorre, lubrificarle con olio
leggero.
• Asciugare le parti in metallo del prodotto per
prevenire la ruggine.
• Periodicamente pulire le parti in plastica con un
panno umido, non usare solventi o altri prodotti
simili.
• Spazzolare le parti in tessuto per allontanare la
polvere.
• Tenere pulite le ruote da polvere e sabbia.
• Proteggere il prodotto da agenti atmosferici, acqua,
pioggia o neve; lʼesposizione continua e prolungata
al sole potrebbe causare cambiamenti di colore in
molti materiali.
• Conservare il prodotto in un posto asciutto.
• Per il lavaggio della sacca, seguire le suguenti
indicazioni.
ATTENZIONE
• QUESTO VEICOLO È INTESO PER UN BAMBINO DALLA
NASCITA FINO A 15 KG DI PESO.
• LE OPERAZIONI DI ASSEMBLAGGIO E PREPARAZIONE
DELLʼ ARTICOLO DEVONO ESSERE EFFETTUATE DA
passeggino;
— alzare gli attacchi Ganciomatic del passeggino;
— rimuovere il frontalino;
— alzare il poggiagambe del passeggino nella
posizione più alta;
— impugnare il maniglione di Navetta;
— posizionare Navetta su gli attacchi Ganciomatic
del passeggino, tenendo il lato della testa della
navicella dalla parte opposta al maniglione del
passeggino;
— premere con entrambe le mani sui lati di Navetta
fino al click.
• Per sganciare la navicella Navetta dal passeggino
consultare il suo manuale istruzioni.
ESTRAZIONE RUOTE
49• Per togliere le ruote posteriori premere il pulsante
come in figura e sfilare lateralmente la ruota dalle
apposite sedi.
50• Per sfilare la ruota anteriore premere il pulsante
situato sulla pedanetta e sfilare la ruota.
CHIUSURA
Prima di chiudere il passeggino rendere le ruote
anteriori fisse e se é applicata la capottina,
allentare i compassi.
51• Per chiudere, premere il pulsante numero 1 (A)
con la mano di destra.
52• Con la mano di sinistra impugnare la maniglia
come in figura, premere il pulsante numero 2 (B)
e alzare la maniglia verso lʼalto (C) fino allo scatto
finale.
53• Per completare la chiusura, ruotare il gancio di
sicurezza ed agganciare come in figura.
SFODERABILITÁ
54• Per sfoderare il passeggino, sbottonare la sacca
dalla seduta e sfilare la sacca dal poggiagambe
come in figura.
55• Sganciare gli attacchi della sacca dai braccioli
come indicano le frecce in figura.
56• Sfilare dal basso verso lʼalto lo spartigambe della
cintura di sicurezza da sotto la seduta. Sbottonare
la sacca dalle alette laterali dello schienale.
57• Sfilare le alette dallo schienale come in figura.
Togliere la sacca e procedere al lavaggio,
seguendo le indicazioni qui riportate.
GT3 Naked versione carrello
Per convertire GT3 in versione carrello occorre:
58• Posizionare lo schienale nella seconda posizione
e staccare entrambe le creste laterali che
sorreggono lo schienale;
59• Premere entrambi i pulsanti posti alla base dello
schienale (A) e contemporaneamente sollevarlo
come in figura (B). Prima di agganciare Navetta o
Primo Viaggio, sollevare la parte posteriore della
base Ganciomatic come in figura (C).
• Per convertire nuovamente il carrello in
passeggino ripetere le operazioni precedenti in
senso contrario.
GANCIOMATIC SYSTEM con
GT3 Naked versione carrello
Il Ganciomatic System è il sistema pratico e veloce che
permette di agganciare al GT3 Naked versione carrello,
grazie agli attacchi Ganciomatic, la Navetta e il Primo
Viaggio, dotati anchʼessi di sistema Ganciomatic.
ATTACCHI GANCIOMATIC DEL CARRELLO
• Per alzare gli attacchi Ganciomatic del carrello,
ruotare verso lʼalto i due attacchi fino al click,
come in figura.
• Per abbassare gli attacchi agire in senso contrario.

ADULTI
• NON UTILIZZATE IL PRODOTTO SE PRESENTA PARTI
MANCANTI O ROTTURE
• UTILIZZATE SEMPRE LE CINTURE A CINQUE PUNTI;
UTILIZZATE SEMPRE LO SPARTIGAMBE DELLA
CINTURA IN COMBINAZIONE CON IL GIROVITA
• POTREBBE ESSERE PERICOLOSO LASCIARE IL VOSTRO
BAMBINO INCUSTODITO
• DA FERMI UTILIZZARE SEMPRE I FRENI
• PRIMA DELLʼ USO ASSICURARSI CHE TUTTI I
MECCANISMI DI AGGANCIO SIANO INGAGGIATI
CORRETTAMENTE
• PRIMA DELLʼ USO ASSICURARSI CHE IL SEGGIOLINO
AUTO O LA SEDUTA RIPORTATA SIANO
CORRETTAMENTE AGGANCIATI
• EVITARE DI INTRODURRE LE DITA NEI MECCANISMI
• PRESTARE ATTENZIONE ALLA PRESENZA DEL
BAMBINO QUANDO SI EFFETTUANO OPERAZIONI
DI REGOLAZIONE DEI MECCANISMI (MANIGLIONE,
SCHIENALE)
• OGNI CARICO APPESO AL MANIGLIONE O ALLE
MANIGLIE PUÒ RENDERE INSTABILE IL PRODOTTO;
SEGUIRE LE INDICAZIONI DEL COSTRUTTORE
RIGUARDO AI MASSIMI CARICHI UTILIZZABILI
• IL FRONTALINO NON È PROGETTATO PER REGGERE
IL PESO DEL BAMBINO; IL FRONTALINO NON È
DISEGNATO PER MANTENERE IL BAMBINO NELLA
SEDUTA E NON SOSTITUISCE IL CINTURINO DI
SICUREZZA
• NON INTRODURRE NEL CESTELLO CARICHI PER
UN PESO SUPERIORE A 5 KG. NON INSERIRE NEI
PORTABIBITE PESI SUPERIORI A QUANTO SPECIFICATO
NEL PORTABIBITE STESSO E MAI BEVANDE CALDE.
NON INSERIRE NELLE TASCHE DELLE CAPOTTE (SE
PRESENTI) PESI SUPERIORI A 0.2 KG
• NON UTILIZZARE IL PRODOTTO IN VICINANZA DI
SCALE O GRADINI; NON UTILIZZARE VICINO A FONTI
DI CALORE, FIAMME LIBERE OD OGGETTI PERICOLOSI
A PORTATA DELLA BRACCIA DEL BAMBINO
• POTREBBE ESSERE PERICOLOSO UTILIZZARE
ACCESSORI NON APPROVATI DAL COSTRUTTORE
• IMPORTANT: read the instructions carefully before
using the stroller. Save the instructions for future
reference.
• PEG PEREGO reserves the right to make any
necessary changes or improvements to the products
shown at any time without notice.
Peg Perego S.p.A. is an ISO 9001 certified
company.
The fact that we are certified provides
a guarantee of our honesty for our
customers, and fosters trust in the
companyʼs way of working.
CUSTOMER SERVICE
If parts of the model are accidentally lost or damaged,
use only original Peg Perego spare parts. Contact
the Peg Perego Customer Service for all repair work,
replacements, information about products, and sale of
original spare parts and accessories, at the following:
tel.: 0039-039-60.88.213
fax: 0039-039-33.09.992
e-mail: assistenza@pegperego.it,
www.pegperego.com
Peg Perego is at the consumer’s service, meeting
every need in the best way possible. This is why our
customers’ opinions are so important and valuable
to us. We would be very grateful if you would kindly
fill in the CUSTOMER SATISFACTION QUESTIONNAIRE
after using one of our products. You will find the
questionnaire on the Internet at «www.pegperego.
com/SSCo.html.en-UK».
Please note any observations or suggestions you may
have on the questionnaire.
INSTRUCTIONS FOR USE
OPENING THE STROLLER
1• Unfasten the safety hook before opening the
stroller, as shown in the figure.
2• Grab the handle with your left hand as shown in
the figure and use your right hand to lift the rod
all the way up to the last click.
ASSEMBLING THE STROLLER
3• To mount the handle, remove the protective
packing caps from the stroller pipes, as shown
in the figure. Use a screwdriver to loosen the two
screws and the two caps from the handle, taking
care not to lose them.
4• Line the handle up with the two pipes by pushing
it all the way in. Pay attention to the direction the
handle is in; place it as shown in the figure, and
not backwards!
5• Place the cap and the screw as shown in the
figure, then use a screwdriver to fasten the screws
on both sides of the handle firmly, without forcing
them.
6• Fasten the brake cord by slipping it into the slot,
as shown in the figure.
7• To mount the rear wheels, push them into the
openings on the sides of the stroller and click
them into place.
8• To mount the front wheel, press the button on the
footboard while slipping the wheel into place. Pull
downward on the wheels to make sure they are
securely fastened.
9• To mount the basket, press the side buttons and
pull to extract the basket rod.
10• Slip the rod through the basket fabric. Insert the
EN•ENGLISH

rod with the basket into its housing, and press
until it clicks into place.
11• Attach the basket in the front by slipping the
buttonholes over the hooks under the footboard.
To fasten the side of the basket, lower the basket
rod and slip the buttonholes over the hooks, as
shown in the figure.
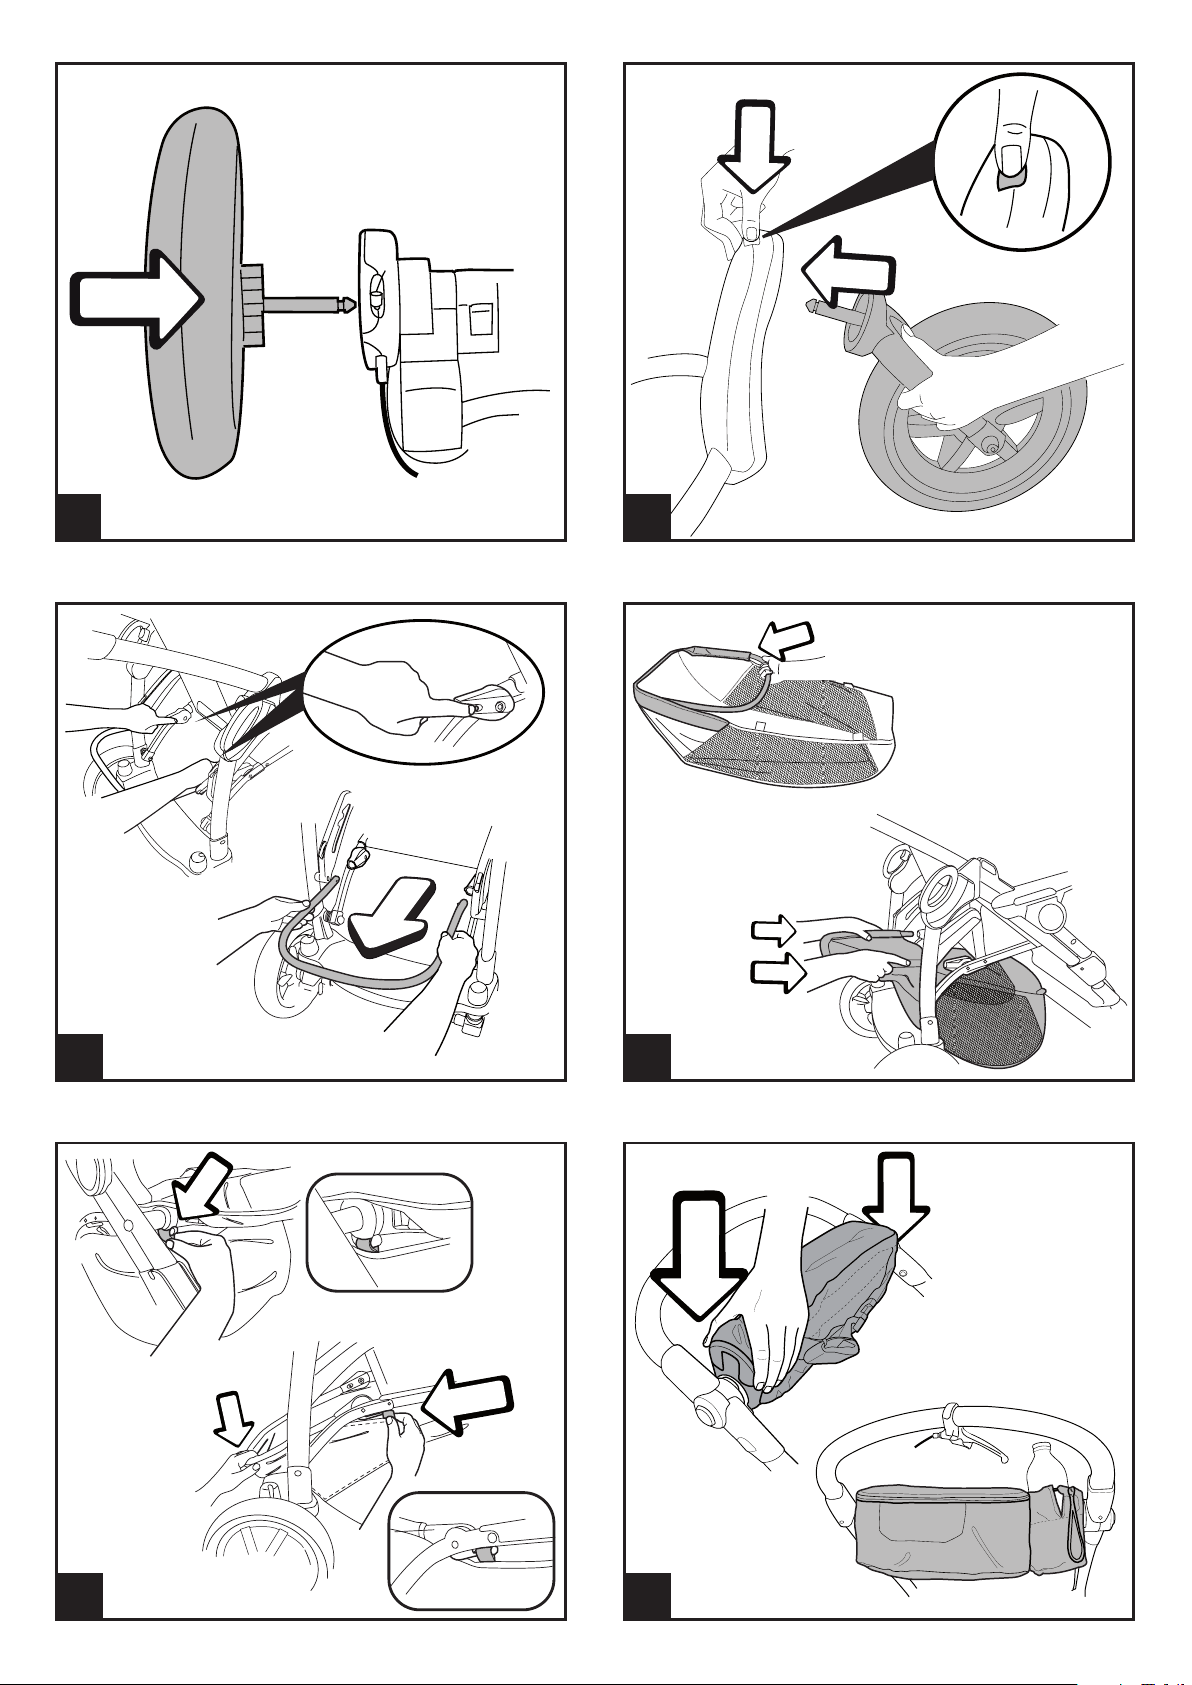
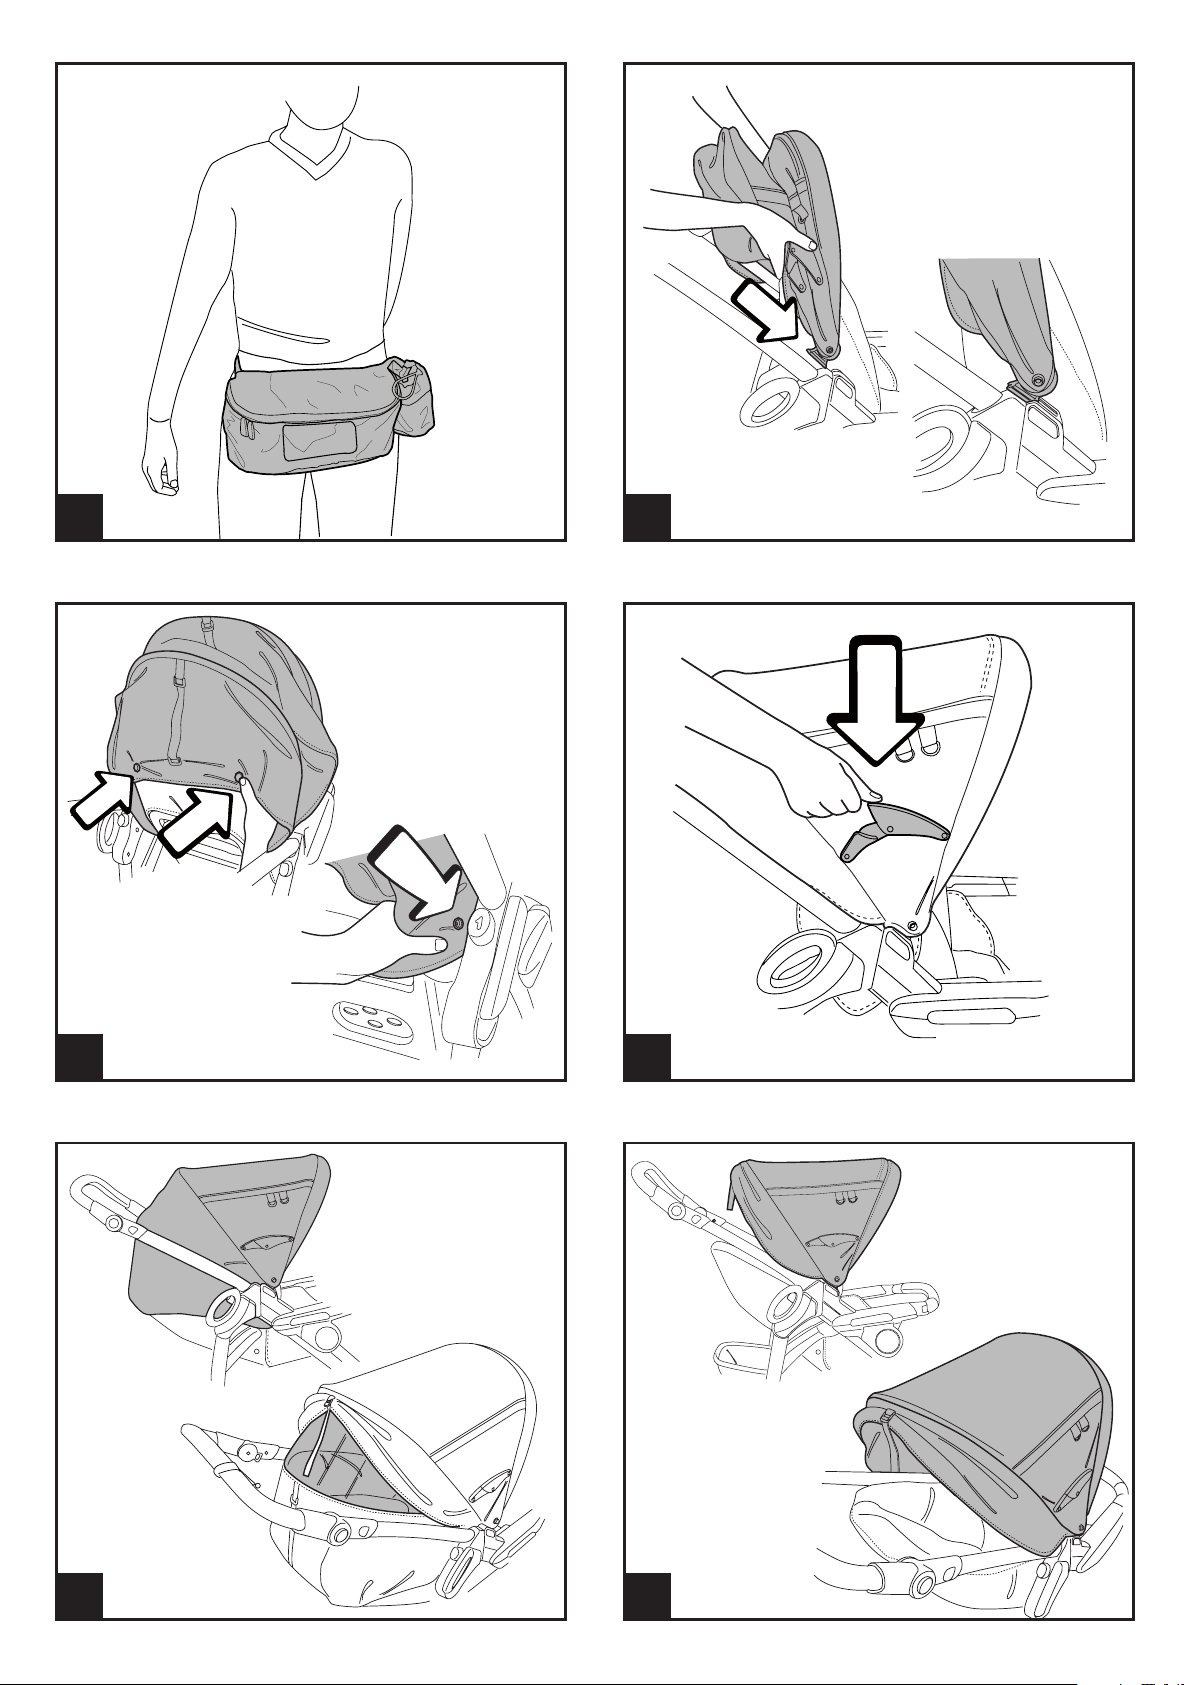
POUCH
12• The pouch that comes with the stroller attaches
to the handle. Place the pouch as shown in the
figure and press it downwards, all the way into the
housing on the handle. (Repeat on the other side).
13• The pouch can be worn as an accessory, using the
special belt.
HOOD
14• To attach the hood, insert the fasteners into the
special housings, as shown in the figure.
15• Button the hood to the back of the backrest and
the inside of the armrests, as shown in the figure.
16• Lower the braces to stretch the hood.
17• The hood reclines along with the backrest. When
you lift the moveable part of the hood, you will
find a net insert that will provide better ventilation
for the baby, while allowing you to see him from
any position.
18• The hood can easily be turned into a sun canopy,
as shown in the figure.
19• To remove the hood, fold the braces, unbutton
the hood, and press the button as shown in the
figure while slipping the hood fastener out of its
housing. (Repeat on the other side).
COVER
20• Fasten the cover by zipping it to the footboard, as
shown in the figure.
RAIN CANOPY
21• To mount the rain canopy, fasten the zipper on
the canopy to the zipper on the hood, and button
the sides to the hood.
22• Slip the rain canopy elastic over the bottom of the
front frame and button it as shown in the figure.
23• The practical rain canopy can be lowered by
opening the zipper and leaving the canopy
buttoned to the stroller.
24• This rain canopy has also been designed for use
with the Primo Viaggio child car seat attached to
the stroller, to guarantee total protection for your
child.
• Do not use the rain canopy in closed areas. Always
check to make sure that the child is not too hot.
• Do not place the PVC rain canopy near heat
sources. Be careful with cigarettes when near the
rain canopy.
• Make sure that the rain canopy does not become
entangled in any moving mechanism on the
stroller or chassis.
• Always remove the rain canopy before closing the
chassis or the stroller.
• Wash using a sponge and soapy water; do not use
detergents.
BRAKE
25• To brake the stroller while moving, pull the handle
on the handlebar towards you. To set the parking
brake, use the lever as shown in the figure.Always
set the brake when the stroller is not moving.
SAFETY BELT
26• A: Make sure that the brace is properly inserted by
pushing as shown in the figure. B: Fasten the belt
as shown in the figure.
27• To unfasten the belt, press on the buckle sides
and pull out the waist strap.
28• The new safety belt is now easier to fasten thanks
to the «snap-open-and-shut» device. Before
fastening the safety belt, attach the buckle to the
backrest by inserting the tab through the special
holder, as shown in the figure. After fastening
the safety belt on your child, detach it from the
backrest to allow the child more freedom of
movement. The buckle must remain below the
child’s shoulders.
BACKREST ADJUSTMENT
29• The backrest of the stroller can be reclined in
several positions. To lower the backrest, lift the
handle as you recline the backrest, locking it at
the desired height. To raise it, push the backrest
up.
ADJUSTING THE FOOTREST
30• The footrest can be adjusted to two positions.
To lower it, pull the two levers downwards while
lowering the footrest, as shown in the figure. To
raise the footrest, lift it upwards until it clicks into
place.
SWIVEL OR STATIONARY FRONT WHEEL
31• To set the front wheel on stationary, turn the knob
counterclockwise (picture of padlock closed).
32• To swivel the front wheel, turn the knob clockwise
(padlock open).
AIR PUMP
33• To inflate the tires, use the pump located under
the seat. Slip the hose off the pump as shown in
figure A and screw it onto the opposite end of the
pump (Fig. B).
34• Remove the cap from the tire (Fig. A) and fasten
the end of the hose to the tire as shown in figure
B.
SHOCK ABSORBERS
35• All of the wheels are equipped with shock
absorbers. The rear wheels have adjustable
shocks; you can choose from “HARD” for soft
terrain such as sand and lawns, “SOFT” for rough
surfaces such as gravel and cobble stones, and
“MEDIUM” for smooth, firm surfaces. To adjust
the shocks on the rear wheels, turn the knob
to choose one of the three settings. We advise
adjusting both rear wheels to the same setting.
LEVERAGE BOARD
36• The rear leverage board helps the mother push
the stroller over slightly uneven ground.
FRONT BAR
37• The practical front bar opens and closes to make
it easier for the child to get in and out of the
stroller when he is older. To open the bar, press
the front bar button, which is located under the
armrest. Pull the bar outwards at the same time.
To close the front bar, carry out the instructions in
reverse order.
38• To remove the front bar, press both front bar
buttons under the armrest, while pulling the front
bar outwards.
39• The front bar is also extendible. To extend the
front bar, press the long button located under the
armrest and pull the front bar outwards. (Repeat
on the other side).
40• To shorten the front bar, press the long button
and push the front bar into the armrest. (Repeat
on the other side.)
SIDE DRINK HOLDERS
41• The stroller is equipped with two side drink
holders that fold away or pull out as necessary. To
pull the drink holders out, lift the upper part and
lower the bottom part, as shown in the figure.
42• Turn the disk outwards, and place your drink in
the holder. To clos e the drink holder, carry out

the instructions in reverse order.
ADJUSTABLE HANDLEBAR
43• The handlebar on the stroller is height-
adjustable. To adjust the height of the handlebar,
simultaneously press the side buttons as shown in
the figure and block the handlebar in the desired
position.
BASKET
44• The basket on the stroller has three positions.
A: Regular position.
B: Lower position allows you to use the basket
even when the backrest is completely lowered. By
pressing on the basket, it is easier to fill it without
disturbing the baby.
C: Raised basket allows the rear footboard to be
used.
GANCIOMATIC SYSTEM
The Ganciomatic System is the swift, practical system
that allows one to fasten the following products,
which can be bought separately and are also equipped
with Ganciomatic System, to the stroller, thanks to
Ganciomatic fasteners.
• Primo Viaggio: a car seat with base, it can be
detached from its base (which stays in the car)
and attached to the Ganciomatic fasteners of the
stroller to transport your child without disturbing
him/her.
• Navetta: the comfortable bassinet unit becomes
a carriage when attached to the fasteners of
the stroller. Equipped with a foldable hood and
carrying handle, both the air circulation regulation
system inside the bassinet and the inclination
of the backrest are adjustable from outside. At
home, it rocks like a cradle and, when the stand is
taken away, it becomes a little bed.
GANCIOMATIC HOOKS ON THE STROLLER
45• To raise the Ganciomatic hooks on the stroller, lift
the sack at the corners of the seat.
46• Raise the two Ganciomatic hooks. They will
automatically move outwards.
• To lower the hooks, pull them inward and down.
GT3 + PRIMO VIAGGIO
47• To fasten the car seat to the stroller:
— set the brake on the stroller;
— remove the hood from the stroller;
— completely lower the backrest on the stroller;
— raise the Ganciomatic hooks on the stroller;
— place the car seat, turned towards the adult, on
the stroller and push downward until it clicks into
place.
— Do not remove the front bar of the stroller when
attaching the car seat, and make sure that it is in
its original position.
• See the userʼs manual for instructions on how to
detach the car seat from the stroller.
GT3 + NAVETTA
48• To fasten the Navetta bassinet unit to the stroller,
you must:
— put the brakes on the stroller;
— remove the hood from the stroller;
— lower the backrest of the stroller completely;
— raise the Ganciomatic fasteners on the stroller;
— remove the front bar;
— raise the footrest on the stroller to the highest
possible position;
— hold onto the handle of the Navetta;
— position the Navetta on the Ganciomatic fasteners
of the the stroller, keeping the head end of the
bassinet at the end of the stroller opposite the
handlebar;
— press down with both hands on the sides of the
Navetta until you hear a click.
• To unfasten the Navetta bassinet unit from the
stroller, consult its instruction manual.
REMOVING THE WHEELS
49• To remove the rear wheels, press the button as
shown in the figure and pull the wheels off the
sides of the stroller.
50• To remove the front wheel, press the button under
the footboard and pull the wheel off.
FOLDING UP THE STROLLER
Before folding the stroller up, set the front wheels
to stationary. If the hood is mounted, lower the
braces.
51• To fold the stroller up, press button number 1 (A)
using your right hand.
52• Using your left hand, grab the handle as shown in
the figure. Press button number 2 (B) and lift the
handle (C) to the top notch.
53• After folding the stroller, fasten the safety hook as
shown in the figure.
REMOVABLE LINING
54• To remove the lining from the stroller, unbutton
the sack from the seat and slip it off the
footboard, as shown in the figure.
55• Detach the sack from the armrests, as shown by
the arrows in the figure.
56• Pull the safety belt leg divider up from under the
seat. Unbutton the side tabs from the backrest.
57• Slip the tabs off the backrest as shown in the
figure. Remove the sack and wash it, following the
instructions printed here.
GT3 Naked Chassis
To convert GT3 into a chassis:
58• Place the backrest in the second position and
remove both the side pieces that support the
backrest.
59• Press both buttons at the bottom of the backrest
(Fig. A) while lifting the backrest as shown in
figure B. Before fastening the Navetta bassinet
unit or the Primo Viaggio car seat to the chassis,
pull the rear part of the Ganciomatic base upwards
as shown in figure C.
• To turn the chassis back into a stroller, repeat the
instructions above in reverse order.
THE GANCIOMATIC SYSTEM with
GT3 NAKED CHASSIS
The Ganciomatic system is a practical, fast way
to fasten the Navetta bassinet unit and the Primo
Viaggio car seat – which are both equipped with the
Ganciomatic system — to the GT3 Naked chassis, using
the Ganciomatic hooks.
GANCIOMATIC HOOKS ON THE CHASSIS
• To raise the Ganciomatic hooks on the chassis,
turn them upwards until they click into place, as
shown in the figure.
• To lower the fasteners, turn them the opposite
direction.
GT3 Naked + NAVETTA
60• To fasten the Navetta bassinet unit to the GT3
Naked chassis:
— Set the brake on the GT3 Naked chassis.
— Raise the Ganciomatic fasteners.
— Pull the footboard upwards to the top position.
— The GT3 Naked chassis is now ready for fastening

CARRIER SEAT IS CORRECTLY FASTENED.
• DO NOT STICK FINGERS INTO THE MOVING PARTS.
• MAKE SURE YOUR CHILD IS OUT OF THE WAY WHEN
ADJUSTING DEVICES SUCH AS THE HANDLEBAR,
BACKREST, ETC.
• ANY LOAD ON THE HANDLEBAR OR HANDLES
MAY UPSET THE PRODUCT. FOLLOW THE
MANUFACTURERʼS INSTRUCTIONS ABOUT MAXIMUM
LOAD.
• THE FRONT BAR IS NOT DESIGNED TO HOLD THE
CHILDʼS WEIGHT. THE FRONT BAR IS NOT DESIGNED
TO RESTRAIN THE CHILD IN THE SEAT; IT MUST NOT
BE USED AS A SUBSTITUTE FOR THE SAFETY BELT.
• DO NOT PLACE OBJECTS WEIGHING MORE THAN 5
KG. IN THE BASKET. DO NOT PLACE OBJECTS IN
THE DRINK-HOLDER THAT ARE HEAVIER THAN THE
WEIGHT PRINTED ON THE DRINK-HOLDER. NEVER
PUT HOT DRINKS INTO THE DRINK-HOLDER. FOR
MODELS WITH HOOD POCKETS, DO NOT PUT
OBJECTS WEIGHING MORE THAN 0.2 KG. INTO THE
POCKETS.
• DO NOT USE THE PRODUCT NEAR STAIRWAYS OR
STEPS. DO NOT USE NEAR SOURCES OF HEAT, OPEN
FLAMES, OR DANGEROUS OBJECTS WITHIN THE
CHILDʼS REACH.
• USING ACCESSORIES THAT HAVE NOT BEEN
APPROVED BY THE MANUFACTURER MAY BE
DANGEROUS.
the Navetta bassinet unit.
— Pick up the bassinet unit by the handlebar and
place it on the Ganciomatic fasteners on the
chassis, placing the head of the bassinet unit
opposite the chassis handlebar.
— Using both hands, press downwards on the sides
of the bassinet unit until it clicks into place.
— To remove the Navetta bassinet unit from the
chassis, see the instruction manual that comes
with the Navetta.
GT3 Naked + PRIMO VIAGGIO
61• To fasten the car seat to the chassis:
— Set the brake on the GT3 Naked chassis.
— Attach the front bar.
— The GT3 Naked chassis is now ready for fastening
the Primo Viaggio car seat.
— Pick up the car seat by the handlebar and place
it on the Ganciomatic fasteners on the chassis,
placing the head of the car seat opposite the
chassis handlebar. Using both hands, press
downwards on the sides of the car seat until it
clicks into place.
— To remove the car seat from the chassis, see the
instruction manual that comes with the Primo
Viaggio.
ACCESSORY LINE
62• Diaper-Changing Bag: Satchel with pad for
changing babyʼs diaper. Attaches to the stroller.
63• Mosquito Netting: Mosquito netting zips onto the
hood.
CLEANING & MAINTENANCE
Your product requires only minimal maintenance.
Cleaning and maintenance operations must be
performed only by adults.
• Be sure to keep all moving parts clean, lubricating
them with light oil if necessary.
• Dry off metal parts to prevent rusting.
• Regularly clean the plastic parts with a damp cloth.
Do not use solvents or similar products.
• Brush the fabric parts to remove dust.
• Remove any dust and sand from the wheels.
• Protect the product against smog, water, rain and
snow. Continued and extended exposure to sunlight
can change the colours of many materials.
• Store the product in a dry area.
• To wash the lining, carry out the following
instructions.
WARNING
• THIS VEHICLE IS DESIGNED FOR CHILDREN FROM
BIRTH TO A WEIGHT OF 15 KG.
• ASSEMBLY AND PREPARATION FOR USE MUST BE
CARRIED OUT BY ADULTS ONLY.
• DO NOT USE THE PRODUCT IF PARTS OF IT ARE
BROKEN OR MISSING.
• ALWAYS USE THE FIVE-POINT SAFETY BELTS.
ALWAYS USE THE LEG DIVIDER TOGETHER WITH THE
WAIST BELT.
• LEAVING THE CHILD ALONE IN THE PRODUCT MAY BE
DANGEROUS.
• ALWAYS SET THE BRAKE WHEN AT A STANDSTILL.
• BEFORE USING, MAKE SURE THAT ALL FASTENERS
ARE PROPERLY ATTACHED.
• BEFORE USING, MAKE SURE THE CAR SEAT OR

• AVERTISSEMENT: lire attentivement les instructions
avant dʼutiliser le produit et les conserver pour toute
référence ultérieure.
• Pour des raisons techniques et commerciales,
PEG PEREGO pourra apporter à tout moment des
modifications aux modèles décrits dans ce manuel.
Peg Perego S.p.A. bénéficie de la
certification ISO 9001.
La certification assure aux clients et
aux consommateurs une garantie de
transparence et de confiance dans la
façon dont travaille lʼentreprise.
SERVICE DʼASSISTANCE
En cas de perte ou dommage fortuit de pièces
du modèle, utilisez exclusivement les pièces de
rechange originales Peg Perego. Pour les éventuelles
réparations, substitutions, informations sur les
produits, la vente de pièces de rechange originales et
dʼaccessoires, contactez le Service dʼassistance Peg-
Perego:
tél.: 0039-039-60.88.213
fax: 0039-039-33.09.992
e-mail: assistenza@pegperego.it
www.pegperego.com
Peg Perego est à la disposition de ses consommateurs
pour satisfaire au mieux toutes leurs exigences.
À cette fin, connaître lʼavis de nos clients est pour
nous extrêmement important et précieux. Nous vous
saurions donc gré, après avoir utilisé lʼun de nos
produits, de bien vouloir remplir le QUESTIONNAIRE
SATISFACTION DU CONSOMMATEUR que vous
trouverez sur Internet à lʼadresse suivante:
“www.pegperego.com/SSCo.html.en-UK”,
et de nous faire vos éventuelles observations ou
suggestions.
NOTICE DʼEMPLOI
OUVERTURE
1• Avant dʼouvrir la poussette, défaire le crochet de
sécurité, comme indiqué sur la figure.
2• De la main gauche, se saisir de la poignée (voir
figure) et, de la main droite, relever le montant
jusquʼà entendre le déclic final.
ASSEMBLAGE DE LA POUSSETTE
3• Pour monter la poignée, retirer tout dʼabord des
tubes de la poussette les bouchons de protection
de transport, comme sur la figure. Utiliser un
tournevis pour dévisser les deux vis et les deux
petits bouchons de la poignée, en faisant attention
à ne pas les perdre.
4• Positionner la poignée de manière à ce quʼelle
corresponde avec les deux tubes et lʼinsérer
jusquʼau bout. Faire attention au sens de la
poignée ; la positionner comme sur la figure pour
éviter de la monter à lʼenvers.
5• Positionner le petit bouchon et la vis comme sur la
figure, puis, de chaque côté de la poignée, visser
à fond mais sans forcer au moyen du tournevis.
6• Pour fixer le câble de frein, lʼinsérer dans son
logement, comme indiqué sur la figure.
7• Pour monter les roues arrière, insérer la roue
sur le côté dans lʼemplacement prévu à cet effet,
jusquʼà entendre le déclic.
8• Pour insérer la roue avant, appuyer sur le bouton
situé sur la pédale et la monter. Contrôler que les
roues sont correctement accrochées en les tirant
vers le bas.
9• Pour monter le panier, appuyer sur les boutons
latéraux et tirer pour faire sortir la tige du panier.
10• Introduire la tige dans le tissu du panier. Insérer
la tige assemblée au panier dans son logement,
jusqu’à entendre un déclic.
11• Monter le panier à l’avant en faisant passer les
boutonnières dans les petits crochets situés sous
le repose-pied. Pour monter le panier sur le côté,
abaisser sa tige et faire passer les boutonnières
dans les petits crochets, comme sur la figure.
SAC BANANE
12• Le sac banane fourni avec la poussette peut être
installé sur la poignée ; le positionner comme sur
la figure et le faire glisser sur la poignée jusquʼau
bout (procéder de même pour lʼautre côté).
13• Le sac banane devient un accessoire pratique, car
il peut aussi être porté sur soi grâce à la ceinture
prévue à cet effet.
CAPOTE
14• Pour installer la capote, insérer les attaches dans
les logements prévus à cet effet, comme indiqué
sur la figure.
15• Boutonner la capote sur lʼarrière du dossier et à
lʼintérieur des accoudoirs, comme indiqué sur la
figure.
16• Abaisser le compas pour tendre la capote.
17• La capote suit lʼinclinaison du dossier. En
soulevant la partie mobile de la capote, un
élément en toile apparaît, qui garantit au bébé une
meilleure aération et permet de toujours lʼavoir
sous les yeux.
18• La capote peut facilement se transformer en
parasol, voir figure.
19• Pour retirer la capote, fermer les compas,
déboutonner la capote, presser le bouton comme
sur la figure et, dans le même temps, enlever de
son logement lʼattache de la capote (procéder de
la sorte des deux côtés).
TABLIER
20• Pour accrocher le tablier, unir sa fermeture-Éclair
à celle du repose-pieds, comme indiqué sur la
figure.
PARAPLUIE
21• Pour monter le parapluie, assembler sa
fermeture éclair à celle de la capote et boutonner
latéralement à la capote.
22• Insérer lʼélastique de la bâche sur la base des
montants avant et le boutonner, comme indiqué
sur la figure
23• Ce pratique parapluie peut être abaissé en ouvrant
la fermeture éclair, tout en restant fixé à la
poussette grâce aux boutons pressions.
24• Ce parapluie a également été étudié pour le cas
où le siège auto Primo Viaggio serait monté sur
la poussette, garantissant ainsi une protection
optimale.
• Ne pas utiliser le parapluie dans un lieu fermé et
vérifier régulièrement que lʼenfant nʼa pas trop
chaud.
• Ne pas approcher le parapluie en PVC dʼ
une
source de chaleur et faire attention aux cigarettes.
• Sʼassurer que le parapluie nʼest en contact avec
aucun mécanisme mobile du chariot ou de la
poussette.
• Toujours retirer le parapluie avant de refermer
votre chariot ou poussette.
• Laver avec une éponge et de lʼeau savonneuse, ne
pas utiliser de détergents.
FREIN
25• Pour freiner la poussette, tirer vers soi le levier
situé sur la poignée principale (frein dynamique).
FR•FRANÇAIS

Pour bloquer le frein, actionner le levier de
bloquage, comme indiqué sur la figure (frein de
stationnement). Maintenir en permanence le frein
enclenché lorsque la poussette est immobile.
CEINTURES DE SECURITE
26• A: Assurez-vous que la bretelle soit correctement
insérée en vérifiant comme indiqué sur le schéma
correspondant. B: Accrochez la ceinture comme
indiqué sur le schéma.
27• Pour détacher la ceinture, appuyez de chaque côté
de la boucle et tirez pour que les deux parties se
désolidarisent.
28• Grâce à son système de fixation particulier, la
nouvelle ceinture de sécurité est désormais plus
pratique à attacher. En effet, avant dʼattacher la
ceinture, fixer la boucle au dossier en insérant
la languette dans le passant prévu à cet effet,
comme indiqué sur la figure. Après avoir attaché
la ceinture, la détacher du dossier pour permettre
au bébé de bouger en toute liberté. La boucle doit
rester sous les épaules du bébé.
RÉGLAGE DOSSIER
29• Le dossier de la poussette est inclinable en
plusieurs positions. Pour abaisser le dossier,
soulever la poignée tout en inclinant le dossier et
en le bloquant dans la position désirée. Pour le
relever, pousser le dossier vers le haut.
REGLAGE DU REPOSE-PIED
30• Le repose-pied est réglable en deux positions.
Pour l’abaisser, tirer les deux doigts vers le bas
tout en abaissant le repose-pied, comme indiqué
sur la figure. Pour le relever, le soulever jusqu’à
entendre le déclic dʼenclenchement.
ROUE AVANT FIXE OU PIVOTANTE
31• Pour rendre la roue avant fixe, tourner le bouton
dans le sens inverse des aiguilles dʼune montre
(cadenas fermé).
32• Pour rendre la roue avant pivotante, tourner le
bouton dans le sens des aiguilles dʼune montre
(cadenas ouvert).
GONFLAGE
33• Pour gonfler les roues, utiliser la pompe placée
sous le siège.
Tirer le raccord de la pompe (A) et le visser du
côté opposé (B).
34• Dévisser le bouchon de la roue (A) et visser
lʼextrémité du raccord de la pompe (B) comme
indiqué sur la figure.
SUSPENSION ROUES
35• Toutes les roues sont équipées de suspension.
Les roues arrière sont dotées dʼune suspension
réglable, il est possible de choisir un réglage
de suspension, “HARD” pour terrains souples
comme le sable et la pelouse, “SOFT” pour terrains
accidentés comme les chemins de terre battue
ou de pierre, “MEDIUM” pour terrains plats et
compacts. Pour régler la suspension sur les roues
arrière, tourner le bouton et choisir lʼun des
trois réglages. Il est recommandé dʼappliquer un
réglage identique sur chacune des roues arrière.
PEDALE FRANCHISSEMENT OBSTACLES
36• La pédale arrière aide maman à franchir les petites
différences de terrain.
BARRE FRONTALE
37• La pratique barre frontale sʼouvre et se referme
pour faciliter lʼentrée et la sortie de lʼenfant une
fois plus grand. Pour ouvrir, presser le bouton
de la barre frontale situé sous lʼaccoudoir et,
dans le même temps, tirer la barre frontale vers
lʼextérieur. Pour fermer la barre frontale, effectuer
lʼopération inverse.
38• Pour retirer la barre frontale, presser les deux
boutons de la barre frontale situés sous les
accoudoirs et tirer en même temps la barre
frontale vers lʼextérieur.
39• La barre frontale peut aussi être rallongée ; pour
le rallonger, presser le long bouton situé sous
lʼaccoudoir et tirer la barre frontale vers lʼextérieur
(procéder de même pour lʼautre côté).
40• Pour réduire la barre frontale, presser le long
bouton et rentrer la barre frontale à lʼintérieur de
lʼaccoudoir (reproduire lʼopération pour lʼautre
côté).
PORTE BOISSONS LATERAUX
41• La poussette est équipée de deux porte boissons
latéraux escamotables ou extractibles si
nécessaire. Pour retirer le porte boissons, relever
la partie supérieure et abaisser la partie inférieure,
comme indiqué sur la figure.
42• Faire tourner le disque vers lʼextérieur et insérer
la boisson. Pour refermer le porte boissons,
procéder à lʼinverse.
POIGNÉE RÉGLABLE
43• La poignée de la poussette est réglable en
hauteur. Pour régler la hauteur de la poignée,
appuyer simultanément sur les boutons latéraux
comme indiqué sur la figure et bloquer la poignée
dans la position désirée.
PANIER
44• Le panier de la poussette dispose de trois
réglages.
A: position normale.
B: le panier peut être abaissé pour permettre
son utilisation même lorsque le dossier est
complètement abaissé. En appuyant sur le panier,
il est plus facile de le remplir sans déranger bébé.
C: panier relevé pour accéder à la pédale arrière.
SYSTEME GANCIOMATIC
Grâce à ses fixations spéciales, le Système
Ganciomatic, pratique et rapide, permet de monter sur
la poussette les produits suivants (vendus séparément
et également munis du Système Ganciomatic).
• Primo Viaggio: siège auto et sa base. Il peut être
détaché de sa base (qui reste dans la voiture) et
accroché aux fixations Ganciomatic de la poussette
pour transporter le bébé sans le déranger.
• Navetta: nacelle confortable qui se transforme
en landau lorsquʼelle est accrochée aux fixations
Ganciomatic de la poussette. Munie dʼune capote
réglable et dʼune poignée de transport, elle est
également dotée dʼun système de régulation de
la circulation de lʼair à lʼintérieur de la nacelle et
dʼun dossier inclinable, tous deux réglables depuis
lʼextérieur. A la maison, elle se balance comme
une berceuse et se transforme en un véritable petit
lit lorsque ses pieds sont retirés.
FIXATIONS GANCIOMATIC DE LA POUSSETTE
45• Pour relever les fixations Ganciomatic de la
poussette, soulever la housse aux angles du siège.
46• Relever les deux fixations Ganciomatic qui se
déplaceront automatiquement vers lʼextérieur.
• Pour baisser les fixations, procéder à lʼopération
inverse.
GT3 + PRIMO VIAGGIO
47• Pour monter le siège auto sur la poussette, il faut:
— bloquer la poussette;
— retirer la capote de la poussette;
— abaisser complètement le dossier de la poussette;
— soulever les fixations Ganciomatic de la poussette;

poussette, répéter les opérations décrites
précédemment mais en sens inverse.
SYSTEME GANCIOMATIC avec
GT3 NAKED VERSION CHARIOT
Grâce aux fixations Ganciomatic, le système
Ganciomatic permet dʼaccrocher facilement et
rapidement la nacelle Navetta et le siège auto Primo
Viaggio (eux aussi équipés du système Ganciomatic) à
GT3 Naked version chariot.
FIXATIONS GANCIOMATIC DU CHARIOT
• Pour relever les fixations Ganciomatic du chariot,
orienter les deux fixations vers le haut jusquʼau
déclic, comme sur la figure.
• Pour abaisser les fixations, procéder à lʼopération
inverse.
GT3 Naked + NAVETTA
60• Pour monter Navetta sur GT3 Naked version
chariot, il convient de :
— Bloquer GT3 Naked ;
— Soulever les fixations Ganciomatic ;
— Relever le repose-pieds du chariot jusquʼà la
position la plus haute ;
— GT3 Naked version chariot est désormais prêt à
recevoir la nacelle Navetta ;
— Saisir la nacelle Navetta par sa poignée et la
positionner sur les fixations Ganciomatic du
chariot, en plaçant la tête de la nacelle du côté
opposé à la poignée du chariot ;
— Appuyer des deux mains sur les côtés de la
nacelle Navetta jusquʼau déclic ;
— Pour décrocher Navetta du chariot, consulter son
mode dʼemploi.
GT3 Naked + PRIMO VIAGGIO
61• Pour accrocher le siège auto au chariot, il convient
de :
— Bloquer GT3 Naked ;
— Accrocher la barre frontale ;
— GT3 Naked version chariot est désormais prêt à
recevoir le siège auto Primo Viaggio ;
— Saisir le siège auto par sa poignée et le
positionner sur les fixations Ganciomatic du
chariot, en plaçant la tête du siège auto du côté
opposé à la poignée du chariot. Appuyer des deux
mains sur les côtés du siège auto jusquʼau déclic ;
— Pour décrocher le siège auto du chariot, consulter
son mode dʼemploi.
LIGNE ACCESSOIRES
62• Sac à langer: Sac muni dʼun petit matelas
pour changer bébé, qui peut être monté sur la
poussette.
63• Moustiquaire: Moustiquaire avec fermeture-Eclair
adaptable à la capote munie de fermeture-Eclair.
NETTOYAGE ET ENTRETIEN
Votre produit nécessite un minimum dʼentretien. Les
opérations de nettoyage et dʼentretien doivent être
effectuées uniquement par des adultes.
• Il est recommandé de maintenir toutes les parties
mobiles propres et, au besoin, de les lubrifier avec
une huile légère.
• Essuyer les parties métalliques du produit pour
prévenir la formation de rouille.
•
Nettoyer régulièrement les parties en plastique avec
un chiffon humide, ne pas utiliser de solvants ou
dʼautres produits du même type.
• Brosser les parties en tissu pour les dépoussiérer.
• Éliminer les dépôts de poussière et de sable des
— positionner le siège auto vers maman et le pousser
vers le bas jusquʼau déclic.
— Il est recommandé de ne pas enlever la barre
frontale de la poussette pendant le montage du
siège auto. Sʼassurer en outre quʼelle soit dans la
première position.
• Pour démonter le siège auto de la poussette, se
reporter au manuel dʼinstructions correspondant.
GT3 + NAVETTA
48• Pour monter la nacelle Navetta sur la poussette,
suivre les instructions ci-après:
— actionner le frein de la poussette;
— enlever la capote de la poussette;
— abaisser complètement le dossier de la poussette;
— relever les fixations Ganciomatic de la poussette;
— retirer la barre frontale;
— relever le repose-pieds de la poussette jusquʼà la
position la plus haute;
— se saisir de la poignée de Navetta;
— positionner la nacelle Navetta sur les fixations
Ganciomatic de la poussette, en mettant le côté de
la tête de la nacelle à lʼopposé de la poignée de la
poussette;
— appuyer des deux mains sur les côtés de Navetta
jusquʼà entendre un déclic.
• Pour démonter la nacelle Navetta de la poussette,
consulter le manuel dʼinstructions.
DÉMONTAGE ROUES
49• Pour démonter les roues arrière, appuyer sur le
bouton, comme indiqué sur le figure, et les retirer
de leur logement par un mouvement latéral.
50• Pour démonter la roue avant, appuyer sur le
bouton situé sur la pédale repose-pieds et la
retirer.
FERMETURE
Avant de fermer la poussette, rendre les roues
antérieures fixes et, si la capote est installée,
desserrer les compas.
51• Pour refermer la poussette, presser le bouton 1 (A)
de la main droite.
52• Saisir la poignée de la main gauche, comme
indiqué sur la figure, presser le bouton numéro
2 (B) et relever la poignée (C) jusquʼà entendre le
déclic.
53• Pour achever de refermer la poussette, faire
pivoter le crochet de sécurité et lʼaccrocher
comme sur la figure.
RETIRER LA HOUSSE
54• Pour retirer la housse de la poussette,
déboutonner la housse du siège et la retirer du
repose-pieds, comme indiqué sur la figure.
55• Défaire des accoudoirs les attaches de la poche,
comme le montrent les flèches sur la figure.
56• Retirer de bas en haut, par le dessous de lʼassise,
lʼentrejambe de la ceinture de sécurité. Défaire la
poche des ailettes latérales du dossier.
57• Retirer les ailettes du dossier, comme sur la
figure. Retirer la poche et la laver, en suivant les
instructions mentionnées dans ce manuel.
GT3 Naked version chariot
Pour transformer GT3 en version chariot, il
convient de :
58• Mettre le dossier sur la deuxième position et
détacher les deux supports latéraux du dossier ;
59• Appuyer sur les deux boutons situés à la base
du dossier (A) et, dans le même temps, soulever
ce dernier comme indiqué sur la figure (B). Avant
de monter Navetta ou Primo Viaggio, soulever la
partie arrière de la base Ganciomatic, comme sur
la figure (C).
• Pour transformer à nouveau le chariot en
 Loading…
| Recognized languages: |
English Русский Deutsch Español Français Italiano Čeština |
|---|---|
| Pages: | 76 |
| Size | 3.91 MB |
Type the characters you see in the picture below.
Similar Devices: Bassinet, Swifty 2, Geo2
-
REEFStroller/PoussetteInstruction ManualManuel d’instructionsCOVERS INNERS1OO% PANTONE 324U1OO% PANTONE 424UA5IM-RXB-220223-02r04 — REEF Seat and Chassis CAN.indd 1IM-RXB-220223-02r04 — REEF Seat and Chassis CAN.indd 1 11/05/2022 16:5111/05/2022 16:51 …
REEF, 24
-
ITClassica BALESTRINOManuale d’usoGBClassica BALESTRINOUser’s manual FRClassica BALESTRINOManuel d’utilisationDEClassica BALESTRINOGebrauchsanweisungPLClassica BALESTRINOInstrukcja użycia ESClassica BALESTRINOManual de usoRUClassica BALESTRINOуководство по эксплуатацииClassicaBalestrinoREAD THESE INSTRUCTIONS CAREFULLY BEFOR …
classica balestrino, 28
-
SILLA RUNNERConforme a la norma EN 1888:2012Guardar instrucciones para consultas futurasEste producto está destinado a niños de entre 6 y 36 meses y hasta 15 kg de peso.www.asalvo.com www.clubasalvo.comINSTRUCCIONES DE USOREF: 13682 — 13699 …
13682, 36
-
Read these instructions carefully before use and keep them for future reference. Your child’s safety may be affected if you do not follow these instructions.Assembly InstructionsCity Mini DoubleAmazing 360° Turns Make For Extreme ManeuverabilityThis product complies with BS EN 1888:2003 inc. A1,2,3: 2005This product complies with ASTM F833-07a …
CITY MINI DOUBLE, 9
-
OWNER’S MANUALMANUEL D’UTILISATEURMANUAL DEL PROPIETARIO©2002 Graco ISPA007AA 8/0232Check or money order enclosed (payable to Graco Children’s Products Inc.)Cheque o giro adjunto (a nombre de Graco Children’s Products Inc.)Charge to credit card •Cargar a la tarjeta de créditoAccount #: •Cuenta N°:VisaExp. date•Fecha de vencim …
ISPA007AA, 124
-
EchoStrollerOwner’s ManualManual del propietario Read all instructions BEFOREassembly and USE of product. KEEP INSTRUCTIONS FOR FUTURE USE.Lea todas las instrucciones ANTES de armar y USAR este producto. CONSERVE LAS INSTRUCCIONES PARA USO FUTURO.IS0069.4 ES©2012 Artsana USA, INC. 05/13 …
Echo, 30
-
124800106WARRANTYThank you for purchasing this quality Babylove product from our exclusive range of baby products.We are confident that you will appreciate its many highlights including durability and reliability.Your new product has been manufactured to comply with the Australian Standard AS/NZS 2088 and comes with a 12 month warranty.Please keep this instr …
Aurora, 6
-
English page 18-33Deutsch Seite 34-49Suomi sivu 50-65City Cross / Twin City Cross & City CarrycotSvenska sida 2 — 17Dansk side 66-81Sportstroller, Sportwagen, Sport-rattaat & KlapvognInstruktionsmanual • Brugsanvisning • Gebrauchsanweisung • Instruction manual • Seuraavien tuotteiden käyttöohjeet1SE VIKTIG INFORMATION — SPARA FÖR …
City Cross, 82
-
Страница 1
FI000701I71 GT3 Istruzioni d ʼ uso IT Instructions for use EN Notice d ʼ emploi FR Gebrauchsanleitung DE Instrucciones de uso ES Instruções para uso PT Gebruiksaanwijzing NL Brugsanvisning DK Käyttöohjeet FI Návod na použití CZ Návod na použitie SK Használati útmutató HU Navodila za uporab SL Инструкции по пользова[…]
-
Страница 2
OK NO 4 6 2 1 3 5[…]
-
Страница 3
B A 7 9 11 12 10 8[…]
-
Страница 4
17 13 14 16 15 18[…]
-
Страница 5
A B 22 23 24 21 19 20[…]
-
Страница 6
A A B A B A B 27 29 30 25 26 28[…]
-
Страница 7
A B A B 35 31 32 33 34 36[…]
-
Страница 8
A B 39 40 41 42 38 37[…]
-
Страница 9
A B A B C 45 46 47 43 44 48[…]
-
Страница 10
B C A 50 54 53 49 52 51[…]
-
Страница 11
A B C 56 55 59 60 GT3 Naked + Navetta 57 58[…]
-
Страница 12
61 GT3 Naked + Primo Viaggio 62 Accessory 63 Accessory[…]
-
Страница 13
1 2 3 4 5 6 7 11 22 9 10 13 15 16 19 20 21 24 23 14 25 18 27 26 17 8 12 28 29 30 GT3[…]
-
Страница 14
1 ITPGT300NL65 2 SAPI5635KNGR 3 SPST5664N 4 SPST5665DGR SPST5665SGR 5 SPST5677N 6 SPST5676N 7 SPST5553DGR SPST5553SGR 8 SPST5658N 9 ASPI0059L31 10 ERSHG300—NY01 11 SPST5582GR 12 SPST6122N 13 SAPI6078KGRN 14 SPST6081KN 15 ASPI0081GRN 16 SAPI6118KL65NGR 17 MMMV0010 18 EAMAT400—NY01 19 ASPI0078NGR 20 ARPI0401NGR 21 SAPI5464NGR 22 ERPCGT00—QL13 23 B[…]
-
Страница 15
10• Infilare l ʼ asta nel tessuto del cestello. Inserire l ʼ asta con il cestello nella sua sede fino al click. 11• Agganciare il cestello anteriormente infilando le asole ai gancini posti sotto il poggiagambe. Per agganciare il cestello lateralmente, abbassare l ʼ asta di questo e infilare le asole nei gancini come in figura. MARSUPIO 12•[…]
-
Страница 16
lungo e spingere in dentro il frontalino nel bracciolo (procedere da ambo i lati). PORTABIBITE LATERALI 41• Il passeggino è dotato di due portabibite laterali a scomparsa estraibili nell ʼ eventuale necessità. Per estrarre il portabibite, alzare la parte superiore e abbassare la parte inferiore come in figura. 42• Ruotare verso l ʼ esterno […]
-
Страница 17
ruotare verso l ʼ alto i due attacchi fino al click, come in figura. • Per abbassare gli attacchi agire in senso contrario. GT3 Naked+ NAVETTA 60• Per agganciare Navetta al GT3 Naked versione carrello occorre: — Frenare GT3 Naked; — Sollevare gli attacchi Ganciomatic; — Alzare il poggiagambe del carrello nella posizione più alta; — GT3 Naked […]
-
Страница 18
ATTENZIONE • QUESTO VEICOLO È STATO PROGETTATO PER IL TRASPORTO DI 1 BAMBINO NELLA SEDUTA. NON UTILIZZARE PER UN NUMERO SUPERIORE DI OCCUPANTI • QUESTO VEICOLO E ʼ OMOLOGATO PER BAMBINI DALLA NASCITA, FINO A 15 KG DI PESO. • QUESTO VEICOLO E ʼ STATO PROGETTATO PER ESSERE USATO IN COMBINAZIONE CON I PRODOTTI PEG PEREGO GANCIOMATIC: NAVETTA,[…]
-
Страница 19
rod with the basket into its housing, and press until it clicks into place. 11• Attach the basket in the front by slipping the buttonholes over the hooks under the footboard. To fasten the side of the basket, lower the basket rod and slip the buttonholes over the hooks, as shown in the figure. POUCH 12• The pouch that comes with the stroller at[…]
-
Страница 20
lower the bottom part, as shown in the figure. 42• Turn the disk outwards, and place your drink in the holder. To clos e the drink holder, carry out the instructions in reverse order. ADJUSTABLE HANDLEBAR 43• The handlebar on the stroller is height- adjustable. To adjust the height of the handlebar, simultaneously press the side buttons as show[…]
-
Страница 21
BROKEN OR MISSING. • ALWAYS USE THE FIVE-POINT SAFETY BELTS. ALWAYS USE THE LEG DIVIDER TOGETHER WITH THE WAIST BELT. • LEAVING THE CHILD ALONE IN THE PRODUCT MAY BE DANGEROUS. • ALWAYS SET THE BRAKE WHEN AT A STANDSTILL. • BEFORE USING, MAKE SURE THAT ALL FASTENERS ARE PROPERLY ATTACHED. • BEFORE USING, MAKE SURE THE CAR SEAT OR CARRIER […]
-
Страница 22
• IMPORTANT : Lire ces instructions avec attention et les conserver pour toute référence future. La sécurité de votre enfant pourrait être menacée si ces instructions ne sont pas respectées. • Pour des raisons techniques et commerciales, PEG PEREGO pourra apporter à tout moment des modifications aux modèles décrits dans ce manuel. Peg[…]
-
Страница 23
de frein (frein dynamique). Pour bloquer le frein, actionner le levier de blocage, comme indiqué sur la figure (frein de stationnement). Maintenir en permanence le frein enclenché lorsque la poussette est immobile. CEINTURES DE SECURITE 26• A: Assurez-vous que la bretelle soit correctement insérée en vérifiant comme indiqué sur le schéma c[…]
-
Страница 24
dernier comme indiqué sur la figure (B). Avant de monter Navetta ou Primo Viaggio, soulever la partie arrière de la base Ganciomatic, comme sur la figure (C). • Pour transformer le châssis en poussette, répéter les opérations décrites précédemment en sens inverse. SYSTEME GANCIOMATIC avec GT3 NAKED VERSION CHASSIS Grâce aux fixations Ga[…]
-
Страница 25
un chiffon humide, ne pas utiliser de solvants ou d ʼ autres produits du même type. • Brosser les parties en tissu pour les dépoussiérer. • Éliminer les dépôts de poussière et de sable des roues. • Protéger le produit contre les agents atmosphériques, l ʼ eau, la pluie ou la neige; l ʼ exposition continue et prolongée au soleil p[…]
-
Страница 26
korrekt montiert sind, indem Sie sie nach untern ziehen. 9• Zum Montieren des Korbes die sich an der Seite befindlichen Knöpfe betätigen und die Stange des Korbes herausziehen. 10• Die Stange in das Korbnetz einführen. Die Stange mit dem Korb in die dafür vorgesehene Position bis zum Klickgeräusch einführen. 11• Die Ösen in die Haken u[…]
-
Страница 27
entfernen • Den Regenschutz mit Seifenwasser und einem Schwamm reinigen und dabei keine Reinigungsmittel verwenden. BREMSE 25• Um den Kinderwagen zu bremsen, den Hebel auf dem Lenkergriff in die eigene Richtung ziehen (dynamische Bremse). Um die Bremse zu blockieren, den Blockierhebel betätigen (siehe Abbildung; Parkbremse). Beim Stillstand de[…]
-
Страница 28
es wie eine Wiege und wird beim Herausziehen der beiden Füße zu einem echten Kinderbett. GANCIOMATIC-VERBINDUNGSSTÜCKE DES SPORTWAGENS 45• Zum Hochklappen der Ganciomatic- Verbindungsstücke des Sportwagens den Bezug an den Ecken des Sitzes anheben. 46• Die beiden Ganciomatic-Verbindungsstücke, die sich automatisch nach außen verstellen, n[…]
-
Страница 29
die GT3 Naked- Untergestell- Version montieren; — Den Griff des Autositzes in die Hand nehmen und den Sitz auf die Ganciomatic-Verbindungsstücke des Wagens stellen; dabei das Kopfteil des Sitzes auf diejenige Seite halten, die dem Lenkergriff des Wagens gegenüber liegt. Mit beiden Händen auf die Sitzseiten drücken, bis ein Klicken zu hören ist[…]
-
Страница 30
• IMPORTANTE: Leer atentamente estas instruccio- nes y conservarlas para futuras consultas. La seguridad del niño puede ponerse en peligro si no se siguen estas instrucciones. • PEG PEREGO podrá modificar los modelos descritos en este prospecto, por razones técnicas o comerciales. Peg Perego S.p.A. cuenta con la certificación ISO 9001. Dich[…]
-
Страница 31
correctamente introducidos, empujando tal y como muestra la figura. B: Enganchar el cinturón actuando como muestra la figura. 27• Para desenganchar el cinturón, pulsar en los lados de la hebilla y al mismo tiempo tirar hacia fuera, el cinturón. 28• El nuevo cinturón de seguridad desde hoy es más fácil de poner gracias al sistema “quita […]
-
Страница 32
posición. • Para desenganchar la silla de auto de la silla de paseo consultar el manual de instrucciones. GT3 + NAVETTA 48• Para enganchar el capazo Navetta en la silla de paseo: — frenar la silla de paseo; — quitar la capota de la silla de paseo; — bajar completamente el respaldo de la silla de paseo; — levantar los acoples Ganciomatic de la […]
-
Страница 33
• Conservar el producto en un sitio seco. • Para lavar los revestimientos, seguir las indicaciones siguientes. ATENCIÓN • ÉSTE VEHÍCULO HA SIDO PROYECTADO PARA TRANSPORTAR UN SOLO NIÑO EN SU ASIENTO. NO UTILIZAR EN CASO DE UN NÚMERO SUPERIOR DE PASAJEROS • ESTE VEHÍCULO ESTÁ CONCEBIDO DESDE EL NACI- MIENTO HASTA 15 KG DE PESO. • ES[…]
-
Страница 34
9• Para montar o cestinho, carregar nos botões laterais e puxar para retirar a haste do cestinho. 10• Enfiar a haste no tecido do cestinho. Inserir a haste com o cestinho no seu lugar até fazer um estalido. 11• Encaixar o cestinho na parte da frente enfiando as casas dos botões nos ganchos colocados por baixo do apoio para pés. Para encai[…]
-
Страница 35
braços e, ao mesmo tempo, puxar o pousa-mãos para fora. 39• O pousa-mãos também é extensível. Para alongar, premir o botão comprido colocado debaixo do braço e puxar o pousa-mãos para fora (proceder de ambos os lados). 40• Para reintroduzir o pousa-mãos, premir o botão comprido e empurrar o pousa-mãos para dentro do braço (proceder[…]
-
Страница 36
• Para transformar novamente o carrinho em cadeira de passeio, repita as operações precedentes no sentido contrário. GANCIOMATIC SYSTEM com GT3 NAKED VERSÃO CARRINHO O Ganciomatic System é o sistema prático e rápido que permite de enganchar ao GT3 Naked versão carrinho, graças às ligações Ganciomatic, a Navetta e o Primo Viaggio, dota[…]
-
Страница 37
• BELANGRIJK: Lees aandachtig deze instructies en bewaar ze ook voor toekomstig gebruik. De veiligheid van uw kind zou in gevaar kunnen komen als u deze instructies niet naleeft. • Peg Perego kan op ieder gewenst moment wijzigingen aanbrengen op de modellen die in deze publicatie beschreven worden, om reden van technische of commerciële aard. […]
-
Страница 38
onderstel of de wandelwagen sluit. • Wassen met een spons en zeepsop, zonder reinigingsproducten te gebruiken. REM 25• Om de wandelwagen te remmen, trekt u de handgreep op het stuur naar u toe (dynamische rem). Om de rem te blokkeren, activeert u de blokkeerhendel zoals de afbeelding toont (parkeerrem).Activeer altijd de rem wanneer u stilstaat[…]
-
Страница 39
voor het vervoer beschikt de reiswieg over een systeem voor de luchtcirculatie en kan de rugleuning ingesteld worden. Beide instellingen vinden buiten de reiswieg plaats. Thuis kan de reiswieg schommelen als een heuse wieg en door de pootjes uit te trekken wordt het een echt kinderbedje. GANCIOMATIC AANSLUITPUNTEN VAN DE WANDELWAGEN 45• Om de Gan[…]
-
Страница 40
de Navetta. GT3 Naked + PRIMO VIAGGIO 61• Om het autozitje aan de wagen vast te koppelen, handelt u als volgt: — Rem de GT3 Naked; — Koppel het voorzetstuk vast; — Nu is de GT3 Naked versie wagen gereed voor de vastkoppeling van het zitje Primo Viaggio; — Neem de handgreep van het zitje beet en plaats het op de Ganciomatic bevestigingspunten van […]
-
Страница 41
• VIGTIGT: Læs brugsanvisningen omhyggeligt og opbevar den til senere brug. Barnets sikkerhed vil være i fare, såfremt disse anvisninger ikke følges. • Peg Perego kan til enhver tid foretage ændringer på modellerne, som er beskrevet heri, af tekniske eller kommercielle årsager. Peg Perego S.p.A. er ISO 9001 certificeret. Certificeringen […]
-
Страница 42
samtidigt trækkes udad. 28• Med den nye type sikkerhedssele er det idag blevet nemmere at få selen på, takket være ”hægt- på og hægt-af” systemet. Før sikkerhedsselen spændes, sættes det lille spænde fast på ryglænet, mens tappen stikkes ind som vist på tegningen; efter at have spændt selen på barnet kan du hægte den af rygl?[…]
-
Страница 43
— løft klapvognens benstøtte til den højeste indstilling; — grib fat i bærehåndtaget på Navetta-liften; — anbring Navetta-liften på klapvognens Ganciomatic spænder, hvor liftens hovedstykke anbringes i den modsatte side af klapvognens håndtag; — tryk nedad med begge hænder på Navetta-liftens sider, indtil du hører et klik. • For at l?[…]
-
Страница 44
SIP. • SAMLING OG FORBEREDELSE AF PRODUKTET MÅ UDELUKKENDE UDFØRES AF VOKSNE. • PRODUKTET MÅ IKKE ANVENDES, HVIS DER ER BES- KADIGEDE ELLER MANGLENDE DELE. • BENYT ALTID SELERNE MED FEMPUNKTSFÆSTE; AN- VEND ALTID SELEN MELLEM BENENE PÅ SIKKERHEDS- SELEN SAMMEN MED MAVESELEN. • DET KAN VÆRE FARLIGT AT EFTERLADE BARNET UDEN OPSYN. • I[…]
-
Страница 45
10• Pujota aisa korin kankaassa olevaan kujaan. Vie aisa niin pitkälle, että kuulet naksahduksen. 11• Kiinnitä kori edestä pujottamalla reiät reisituen alla oleviin koukkuihin. Kiinnitä kori sivuilta laskemalla korin aisaa alaspäin ja pujottamalla reiät koukkuihin kuvassa esitetyllä tavalla. HOITOLAUKKU 12• Rattaiden mukana toimitett[…]
-
Страница 46
Pane juomanpidike pois toimimalla päinvastoin. SÄÄDETTÄVÄ TYÖNTÖAISA 43• Rattaiden työntöaisan korkeutta voi säätää. Kun haluat säätää aisan korkeutta, paina samanaikaisesti sivuilla olevia painikkeita kuvassa esitetyllä tavalla ja lukitse työntöaisa haluamaasi asentoon. KORI 44• Rattaiden kori voidaan säätää kolmeen eri[…]
-
Страница 47
pääpuoli vastakkaisessa päässä vaunujen työntöaisaan nähden; — Paina molemmin käsin korin reunoja, kunnes kuulet naksahduksen; — Katso ohjeet Navetta-korin vaunuista irrottamiseksi korin käyttöohjeista. GT3 Naked + PRIMO VIAGGIO 61• Kiinnitä turvaistuin vaunuihin seuraavasti: — Lukitse GT3 Naked vaunun jarru; — Kiinnitä suojakaari; -[…]
-
Страница 48
• D LEŽITÉ: Pozorn si p e t te tyto pokyny a uschovejte je pro budoucí použití. Bezpe nost dít te m že být ohrožena, pokud tyto pokyny nebudou dodrženy. • Spole č nost Peg Perego m ů že kdykoliv provést zm ě ny a úpravy na modelech, které jsou popsány v této publikaci, jestliže si to vyžádaj[…]
-
Страница 49
Pro zablokování brzd aktivujte brzdovou pá č ku tak, jak je to vyzna č ené na obrázku (parkovací brzda). Jestliže je ko č árek v klidu, musí být vždy zabrzd ě ný. BEZPE Č NOSTNÍ PÁS 26• A: Ujist ě te se, že je popruh správn ě zasunutý tak, že na n ě ho zatla č íte, jak je to znázorn ě né na obrázku. B: P ř ipn ě […]
-
Страница 50
— zcela snižte op ě rku zad ko č árku; — p ř esu ň te úchyty Ganciomatic ko č árku sm ě rem nahoru; — umíst ě te autoseda č ku sm ě rem k mamince a zatla č te na ni sm ě rem dol ů , dokud neuslyšíte cvaknutí. — P ř i p ř ipev ň ování autoseda č ky doporu č ujeme nechat v ko č árku p ř ední madlo a ujistit se, že je v[…]
-
Страница 51
prost ř edky. • Textilní č ásti vykartá č ujte, č ímž odstraníte prach. • Odstra ň te z kol prach a písek. • Chra ň te výrobek p ř ed atmosférickými vlivy, vodou, dešt ě m a sn ě hem; nep ř etržité a dlouhodobé vystavení slune č nímu zá ř ení m ů že zp ů sobit zm ě nu barvy mnohých materiál ů . • Uchová[…]
-
Страница 52
jednoducho nasu ň te. Skontrolujte správne nasadenie kolies tak, že na ne zatla č íte smerom nadol. 9• Pre montáž košíka stla č te bo č né tla č idlá a vytiahnite ty č košíka. 10• Vsu ň te ty č do látkového po ť ahu košíka. Vsu ň te ty č s košíkom do príslušného otvoru, pokia ľ nebudete po č u ť cvaknutie. 11?[…]
-
Страница 53
PREDNÁ RUKOVÄ Ť 37• Praktická ochranná predná rukovä ť umož ň uje, aby si Vaše die ť a, až bude vä č šie, mohlo do ko č íku ľ ahšie sadnú ť alebo z neho vysadnú ť . Pre otvorenie prednej rukoväti stla č te tla č idlo umiestnené pod lak ť ovým operadlom a sú č asne vysu ň te rukovä ť smerom von. Ak chcete prednú[…]
-
Страница 54
č asti opierky chrbta (A) a sú č asne opierku presu ň te smerom nahor tak, ako je to uvedené na obrázku (B). Pred pripnutím korby Navetta alebo autoseda č ky Primo Viaggio nadvihnite zadnú č as ť základne Ganciomatic tak, ako je to uvedené na obrázku (C). • Ak chcete ma ť z podvozku opä ť ko č ík, zopakujte vyššie popísané […]
-
Страница 55
• FONTOS: Figyelmesen olvassák el ezeket az utasításokat és rizzék meg a jöv beni felhasználás céljából. A gyermek biztonságát veszélyeztethetik azzal, ha nem tartják be ezeket az utasításokat. • A Peg Perego az ebben a kiadásban ismertetett modelleknél m ű szaki vagy kereskedelmi jelleg ű okokból kifolyólag bárm[…]
-
Страница 56
a tolókarra felszerelt fogantyút (dinamikus fék). A fék rögzítéséhez reteszeljék a fékkart az ábra szerint (parkoló fék). Álló helyzetben mindig m ű ködtessék a féket. BIZTONSÁGI ÖV 26• A: Gy ő z ő djenek meg arról, hogy a vállpánt helyesen be van-e vezetve oly módon, hogy nyomják azt be az ábra szerint. B: Kapcsoljá[…]
-
Страница 57
kapcsolásához szükséges: — a sportkocsi lefékezése; — a sportkocsi tetejének levétele; — a sportkocsi háttámlájának teljes lehajtása; — a sportkocsi Ganciomatic kapcsainak felemelése; — az autós gyerekülésnek a mama irányába történ ő beállítása és lefelé nyomása kattanásig. — Nem ajánlatos a biztosítópánt levétele […]
-
Страница 58
be azokat. • Szárítsák meg a termék fémb ő l készült részeit a rozsdásodás megel ő zése céljából. • Egy nedves törl ő ruhával rendszeresen tisztítsák meg a m ű anyagból készült részeket, ne használjanak oldószereket vagy egyéb hasonló termékeket. • A szövetrészeket keféljék le a por eltávolításához. • […]
-
Страница 59
obešala, kot je prikazano na risbi. TORBICA ZA OKOLI PASU 12• Priloženo torbico za okoli pasu lahko zapnete na ro č aj; postavite jo, kot prikazuje risba in jo potisnite navzdol, do konca ležiš č a ro č aja (na obeh straneh hkrati). 13• S priloženim pasom ga lahko nosite tudi okoli pasu kot uporaben modni dodatek. STREHICA 14• Da bi n[…]
-
Страница 60
B: Nakupovalna košara je spuš č ena, tako da jo je mogo č e uporabljati, tudi ko je hrbtni naslon popolnoma spuš č en. Č e jo nekoliko pritisnete ob strani, jo lahko napolnite, ne da bi motili otroka. C: dvignjena košara, da je omogo č en dostop do zadnjega podnožnika SISTEM GANCIOMATIC Sistem Ganciomatic je prakti č ni in hitri sistem, […]
-
Страница 61
z vzglavjem avtosedeža držite na nasprotni strani od ro č ajev ogrodja. Z obema rokama pritisnite ob straneh avtosedeža, dokler priklju č ki ne kliknejo. — Da bi avtosedež sneli z ogrodja, preberite navodila za uporabo avtosedeža. DODATKI 62• Torba za previjanje: Torba s podlogo za previjanje otroka, ki jo je mogo č e pripeti na vozi č e[…]
-
Страница 62
• : . ?[…]
-
Страница 63
• Промывайте его губкой и мыльной водой , не пользуйтесь моющими средствами . ТОРМОЗ 25• Чтобы поставить прогулочную коляску на тормоз , сместите к себе ручку тормоза , расположенную на ручке ([…]
-
Страница 64
креплениям Ganciomatic прогулочной коляски . Она оборудована опускаемым капотом и ручкой для ношения , имеет систему для регулировки циркуляции воздуха внутри люльки и наклона спинки , обе регули?[…]
-
Страница 65
GT3 Naked + PRIMO VIAGGIO 61• Чтобы прикрепить автомобильное кресло к шасси необходимо выполнить следующие операции : — Поставьте GT3 Naked на тормоз ; — Закрепите передник ; — Теперь прогулочная коляска GT3 Naked,[…]
-
Страница 66
• ÖNEMLI: Bu talimatlar ı dikkatlice okuyunuz ve ileride de istifade edebilmek amac ı yla muhafaza ediniz. Bu talimatlara uyulmamas ı halinde çocu un güvenli i tehlikeye girebilir. • Pegperego ihbarsiz olarak herhangi bir zamanda üründe de ğ i ş iklik yapmak ve islah etmek haklarini sakli tutar. Peg Perego S.p.A. ISO 9001 sert[…]
-
Страница 67
kolunu ş ekilde gösterildi ğ i gibi hareket ettiriniz (park freni). Arabay ı durdu ğ unuz zaman daima frenleri devreye sokun. EMN İ YET KEMER İ 26• A: res ı mdek ı g ı b ı bastirarak ucun tam olarak takildi ğ indan em ı n olun. B: kemer ı res ı mde göster ı ld ı ğ ı g ı b ı bastirin. ı 27• Kemer ı açmak ı ç ı n kenar[…]
-
Страница 68
t ı k sesini duyana kadar bast ı r ı n ı z. — Araba kunda ğ ı n ı ba ğ larken ve ilk pozisyonda bulunmas ı garanti oluncaya kadar pusetten al ı nl ı ğ ı hareket ettirmemeniz tavsiye edilir. • Araba koltu ğ unu takmak için el k ı lavuzundaki talimatlara ba ş vurunuz. GT3 + NAVETTA 48• Navetta pusete ba ğ lamak için yap ı lmas[…]
-
Страница 69
malzemede renk de ğ i ş imine sebep olabilir. • Ürünü kuru bir ortamda muhafaza edin. • Torban ı n y ı kanmas ı için, a ş a ğ ı daki talimatlara riayet ediniz. UYARI • BU ARAÇ, OTURMA GRUBUNDA 1 ADET ÇOCUK TA Ş INMASI İ Ç İ N TASARLANMI Ş TIR. A Ş IRI SAYIDA K İŞİ TARAFINDAN KULLANMAYINIZ • BU ÜRÜN DO Ğ UMDAN 15 KI[…]
-
Страница 70
σφίξετε υπερβολικά , και από τις δύο πλευρές της χειρολαβής . 6• Για να στερεώσετε το καλώδιο του φρένου περάστε το στην έδρα όπως φαίνεται στην εικόνα . 7• Για να συναρμολογήσετε τους πίσω τρο?[…]
-
Страница 71
ΤΡΟΜΠΙΤΣΑ 33• Για να φουσκώσετε τους τροχούς , χρησιμοποιήστε την τρομπίτσα που βρίσκεται κάτω από το κάθισμα . Τραβήξτε το κορδονάκι από την τρομπίτσα όπως φαίνεται στην εικόνα ( Α ) και βιδώσ?[…]
-
Страница 72
— να σηκώσετε το στήριγμα των ποδιών του καροτσιού περιπάτου στην πιο ψηλή θέση ; — να πιάσετε τη χειρολαβή του Navetta; — τοποθετείστε το Navetta επάνω στους συνδέσμους Ganciomatic του καροτσιού περιπάτου ,[…]
-
Страница 73
• Στεγνώνετε τα μεταλλικά μέρη του προϊόντος για να αποφύγετε τη σκουριά . • Περιοδικά καθαρίζετε τα πλαστικά μέρη με ένα υγρό πανί , μη χρησιμοποιείτε διαλυτικά ή άλλα παρόμοια προϊόντα . • ?[…]
-
Страница 74
PEG PEREGO SpA Via De Gasperi, 50 20043 Arcore (MI) Italy www.pegperego.com Η PEG – PEREGO εγγυάται για τυχόν εργοστασιακά ελαττώματα των προιόντων της για […]
-
Страница 75
[…]
-
Страница 76
PEG PEREGO S.p.A. VIA DE GASPERI 50 20043 ARCORE MI ITALIA tel. 0039•039•60881 fax 0039•039•615869-616454 Servizio Post Vendita — After Sale: tel. 0039•039•6088213 fax: 0039•039•3309992 PEG PEREGO U.S.A. Inc. 3625 INDEPENDENCE DRIVE FORT WAYNE INDIANA 46808 phone 260•482•8191 fax 260•484•2940 Call us toll free 1•800•671?[…]