
Suggest us how to improve StudyLib
(For complaints, use
another form
)
Your e-mail
Input it if you want to receive answer
Rate us
1
2
3
4
5

StarBoard T-17SXL
User’s Guide
How to Request a User’s Guide
When requesting a separate copy of this user’s guide, specify T269-2-201.
T269-2-201
Hitachi Software Engineering Co., Ltd.
Read this user’s guide and carefully retain it for future reference.
Before using this product, carefully read and fully understand the safety instructions.
Stor e this User’s Guide nearby for ease of reference.


1
StarBoard
-17SXL
English
Notices
Reproduction or reprinting, without permission, of this manual or any part thereof is prohibited.
The contents of this manual are subject to change without prior notice.
Every effort has been made to ensure that this manual is complete and correct. However, should
any questionable points, mistakes, etc., come to your attention, please inform the vendor.
Please be advised in advance that this company will assume no responsibility for losses, etc.,
resulting from the operation of this product, regardless of the preceding clauses.
FCC Warning
The user is cautioned that changes and modifications made to the equipment without approval
of the manufacturer could void the user’s authority to operate this equipment.
This Class B digital apparatus complies with Canadian ICES-003.
Cet appareil numérique de la classe B est conforme à la norme NMB-003 du Canada.
Disclaimers
Hitachi Software Engineering Co., Ltd. assumes no liability and makes no warranty, either
express or implicit, regarding the contents of this user’s guide.
Also, the company makes no warranty as to the product’s suitability, merchantability or fitness
for a particular intended use.
All products of Hitachi Software Engineering Co., Ltd., described in this user’s guide are
presently for sale or are site-licensed.
Users who purchased the aforesaid product(s) will bear the costs of all required services, repairs,
and damages resulting from defects in this product, and will bear the costs of direct or indirect
damages (including the loss of profits or required information) that resulted from the product
defects.
Moreover, Hitachi Software Engineering Co., Ltd., retains the right to revise this user’s guide
and to modify the contents thereof, without any obligation to notify anyone.

2
StarBoard
-17SXL
English
Product Assurance Provisions
This product is limited to use in the United States and Canada markets.
For warranty details, refer to Appendix 3.6 at the end of this user’s guide.
This First edition of the user’s guide (T269-2-201) is for the following products:
95.64301G00A (StarBoard T-17SXL)
The StarBoard T-17SXL incorporates WALTOP’s 17-inch LCD monitor integrated digitizer
technology.
Windows, Windows 98, Windows Me, Windows NT 4.0, Windows 2000, Windows XP and
PowerPoint are trademarks of Microsoft Corporation (U.S.) and in other countries.
Other trademarks and product names are trademarks and/or registered trademarks of their
respective holders.
Manual Creation Dates
June 2005, First Edition T269-2-201
All Rights Reserved. Copyright © 2005, Hitachi Software Engineering Co., Ltd.
Manufacturer for Repairs
Contact the department below for technical questions concerning this product.
Hitachi Software Engineering America, Ltd.
601 Gateway Blvd, Suite 750
South San Francisco, CA 94080
Phone : 650-615-7614
Fax : 650-615-7639
E-mail : Starboard_Support@hitachi-soft.com
3
StarBoard
-17SXL
Safe Handling
English
Safe Handling
Markings and Symbols
Various markings and symbols are used in this user’s guide and on this product, to ensure the
safe and correct use of this product and to prevent personal injury and property damage. These
symbols and their meanings are as explained below. Understand the information well before
reading the body of the user’s guide.
WARNING
This symbol indicates the presence of potential dangers that, if ignored or
applied incorrectly, could lead to death or serious injury.
CAUTION
This symbol indicates the presence of potential dangers that, if ignored or
applied incorrectly, could lead to slight or moderate injury.
CAUTION
This symbol indicates the presence of potential dangers that, if ignored or
applied incorrectly, could lead to damage to surrounding property.
This symbol draws attention to cautions (including warnings).
This symbol indicates something prohibited.
This symbol indicates something that must be done.

4
StarBoard
-17SXL
Safe Handling
English
Securely insert the power plug into the
power outlet.
If it is not plugged in securely,
overheating will occur, possibly
resulting in electric shock or fire.
Do not plug in the power plug with a wet
hand.
Electric shock will result.
Before cleaning this product, unplug the
power plug.
Electric shock sometimes results.
Do not use this product near water.
Electric shock will result.
Do not damage, break, process, or for cibly
bend the power cable.
The power cable will be damaged,
resulting in fire or electric shock.
When plugging in or unplugging the
power plug, hold the plug.
If the power cord is pulled, it might
be damaged, possibly resulting in
electric shock or fire.
Periodically clean the power plug to
remove dust.
If a dirty plug is plugged into an
outlet, fire or electric shock might
result.
Be careful about the locations of the power
cable, etc.
The power cable might trip
someone, possibly causing the
product to fall, etc., thereby causing
injury or product failure. Be careful
with their locations.
Use the product at the indicated power
supply voltage.
If the product is used at a power
sup-ply voltage other than the one
indicated, it will fail, resulting in fire
or electric shock.
Safety Precautions
Alwa
s com
l
with them
WARNINGS
Before moving this product, detach the
power plug and the power cable.
The power cable might be damaged,
possibly resulting in electric shock
or fire.

5
StarBoard
-17SXL
Safe Handling
English
Unplug the power plug if you do not plan
on using the product for an extended
period of time.
Failure to do so could result in a fire.
Do not use a power cable other than the
accessory power cable.
If a power cable other than the
accessory power cable is used, fire
or electric shock might result.
Only place specified objects on this
product.
If a liquid or a metal object enters
this product, electric shock or fire
might result. If either should enter,
unplug the power plug from the
outlet and contact your dealer.
Do not use this product in a location with
high temperature or high humidity .
This product’s usage environment
conditions:
Temp.: 50 °F to 95 °F
Humidity: 30% to 80%
(But no condensation may be
allowed to form..)
Do not open or alter the cabinet of this
product.
The cabinet contains high-voltage
areas, so electric shock or other
injury will result.
Do not leave this product or any of its
accessories on the floor .
Someone might step on it and
break it, or might be injured by
tripping on it.
This Product must be disposed of as
industrial waste, in accordance with the
relevant laws and regulations.
Do not place a heavy object on the power
cable, heat or pull it.
The power cable will be damaged,
causing fire or electric shock.
Safety Precautions
Alwa
s com
l
with them
WARNINGS
6
StarBoard
-17SXL
Safe Handling
English
In the following cases, unplug the product from the AC Adaptor outlet
and ask the technical support of Hitachi Software.
a. After the power cord or AC Adaptor plug is damaged.
b. After a liquid is spilled onto the main unit.
c. After the main unit is exposed to rain or water.
d. After this product malfunctions, even when operated according to the instruction
manual. Adjust this product within the ranges specified in the instruction manual. Do
not make other adjustments. A qualified service representative is required to correct
improper adjustments.
e. After this product falls or after its cabinet is damaged.
f. After the functionality of this product changes and repair by a service representative
is considered necessary.
Safety Precautions
Alwa
s com
l
with them
WARNINGS
WARNINGS
This product contains the substance mercury. When disposing this
product, abide by state law legislating the disposal and handling of
mercury.
7
StarBoard
-17SXL
Safe Handling
English
Careful thought was given to the cautions on this device and in this user’s guide. However,
unanticipated circumstances might occur. When operating this product, users themselves must
exercise caution as well as follow instructions.
Warning Details Page
Use the AC Adaptor supplied with this product.
Use only AC Adaptor or power cables specified by the manufacturer. Use
of improper adaptors or cables can damage the product or cause a fire.
P. 1-10
Warning Details Page
Hold the body firmly and slide the stand slowly when
adjusting it.
When adjusting the stand, if you pull up the lever without holding onto the
body, the body may move suddenly, resulting in unexpected injuries or
damage to the body.
P. 1—8
Use the screen at an easily viewable angle.
Use the screen at an easily viewable angle, taking into account external
light and ceiling lighting, which may reflect off the screen.
P. 1—8
Warning Details Page
When changing the battery, be careful not to close the pen’s
rear part too forcefully.
If too much force is applied when closing the rear part of the stylus pen, the
pen may be damaged.
P. 2—4
CAUTION
WARNINGS
CAUTION

8
StarBoard
-17SXL
English
Contents
1. Introduction…………………………………………………………………………………….1-1
1.1 Preparations before Use………………………………………………………………………….. 1-1
1.1.1 Product Overview…………………………………………………………………………………………. 1-1
1.1.2 Features …………………………………………………………………………………………………..….. 1-1
1.2 Parts Check…………………………………………………………………………………………… 1-2
1.3 Part Names and Functions ………………………………………………………………………. 1-3
1.3.1 Front Screen ………………………………………………………………………………………………... 1-3
1.3.2 Front Switch Panel……………………………………………………………………………………….. 1-4
1.3.3 Connector Panel …………………………………………………………………………………………… 1-5
1.3.4 Function Buttons………………………………………………………………………………………….. 1-6
1.4 Assembly and Setup……………………………………………………………………………….. 1-7
1.4.1 Adjusting the Stand ………………………………………………………………………………………. 1-7
1.4.2 How to Use the Pen Holder……………………………………………………………………………. 1-8
1.4.3 Connection Procedure…………………………………………………………………………………… 1-9
2. Usage Procedures ……………………………………………………………………………. 2-1
2.1 Turning the StarBoard On……………………………………………………………………….. 2-1
2.2 Using the Stylus Pen………………………………………………………………………………. 2-2
2.2.1 How to Use the Stylus Pen…………………………………………………………………………….. 2-2
2.2.2 Basic Stylus Pen Operations ………………………………………………………………………….. 2-2
2.2.3 Stylus Pen Settings……………………………………………………………………………………….. 2-3
2.2.4 Changing the Battery in the Stylus Pen……………………………………………………………. 2-4
2.2.5 Replacing the Stylus Pen Tip …………………………………………………………………………. 2-5
2.3 Using the OSD Menu……………………………………………………………………………… 2-6
2.3.1 OSD Buttons and Their Functions…………………………………………………………………..2-6
2.3.2 OSD Adjustment Options………………………………………………………………………………. 2-7
3. Appendix …………………………………………………………………………………………3-1
3.1 Troubleshooting…………………………………………………………………………………….. 3-1
3.2 System Specifications…………………………………………………………………………….. 3-4
3.3 How to Take Care of the StarBoard………………………………………………………….. 3-5
3.4 Consumables…………………………………………………………………………………………. 3-5
3.5 LCD Panel ……………………………………………………………………………………………. 3-5
3.6 Provisions of Product Warranty……………………………………………………………….. 3-6


1-1
StarBoard
-17SXL
Introduction
English
1. Introduction
1.1 Preparations before Use
This section covers preparations before using the StarBoard. Please read this section
thoroughly if you are using the StarBoard for the first time.
1.1.1 Product Overview
StarBoard T-17SXL is a convenient and easy-to-use tablet-type interactive electronic
board that lets you operate a PC with a stylus pen, and write text and images to a PC
screen in real time as well as simultaneously input those to the PC. Those features work
when the included software is set up on a PC connected to the StarBoard.
1.1.2 Features
{Write directly to the PC screen
Use the stylus pen just like a mouse to operate the PC on the screen displayed on the
LCD monitor. The StarBoard Software allows text and images to be written to the PC,
and allows the text and images to be input to the PC as digital data in real time. That
data can then be saved, printed, or otherwise manipulated.
{Use as soon as the PC is started up
The StarBoard can be used as soon as the PC is started up, by just installing the
StarBoard Software package included.
{Compatible with presentations in PowerPoint
Text and images can be written into presentation materials prepared in Microsoft
PowerPoint. That allows you to further enhance presentation expression. Presentations
can also be linked to remote meetings.
{Write on video images
Write text and images to screens of captured video. That allows for easy use of video
materials in classes and presentations.
{Eight function buttons
Standard functions used frequently in the StarBoard Software are assigned to the eight
function buttons located on the top left side of the StarBoard. Those buttons act as
shortcuts when using the software.
 Loading…
Table of Contents: HitachiSoft StarBoard FX-TRIO-88W Interactive whiteboard Owner’s Manual
-
HitachiSoft StarBoard FX-TRIO-88W 8 StarBoard FX-TRIO Series Safe Handling Englis h (5) Precautions Regarding Setup Environment WARNINGS Wall mounting work should be performed by a construction specialist. Improper work may result in death or personal injury due to the product falling during operation. Always use the specified mounting unit . Improper assembly may cause the product to fall over. There is risk of personal injury if the product falls over. Completely tighten the screws of all individual parts. Do not place in a location with flammable or corrosive gas
-
HitachiSoft StarBoard FX-TRIO-88W 3-6 Englis h StarBoard FX-TRIO Series Appendix 3.2.3 Sensor Adjustment Procedure (Mac version) [1] Press the «OK» button on the «LSaDrv Touch Sensor Error» dialog box displayed on the Mac screen. [2] Start the sensor adjustment wizard. Start «Go» → «Applications» → «StarBoard» → «Lsadrv» folder → «LsCamWiz.» [3] The sensor adjustment wizard starts. Click the «All adjust» button.
-
HitachiSoft StarBoard FX-TRIO-88W 1-15 StarBoard FX-TRIO Series Introduction Englis h [3] To change the position of the penholder (a) Remove the installation part from the pen holder. (b) Insert the installation part into the opposite groove. (c) Insert the pen holder into the rail on the left side on the back of the board and slide it to the desired position. (a) (b) (c)
-
HitachiSoft StarBoard FX-TRIO-88W 9 StarBoard FX-TRIO Series Safe Handling Englis h NOTICE Regarding the setup environment Set up this product on a level floor surface with a weight bearing capacity of 150 kg/m 2 or more, and which is made of floor materials that will not deform or become depressed due to movement by casters. Do not use this product in locations subject to high temperature or high humidity. This product’s usage environment conditions: Temperature: 5°C – 35°C Humidity: 20%RH – 80%RH (no condensation) Do not set up in locations subje
-
3-8 Englis h StarBoard FX-TRIO Series Appendix 3.3 Regularly Auto Sensor Adjustment (For Windows) While using StarBoard, auto sensor adjustment will execute regularly. To use StarBoard comfortably this function is recommended to use. You cannot use this Adjustment for Mac. 3.3.1 Sensor Auto Adjustment Procedure [1] Confirmation message of auto sensor adjustment will be displayed after 7days as default passed from first connect of StarBoard to PC. If you press “Yes”, auto sensor adjustment program will execute. If you pr
-
HitachiSoft StarBoard FX-TRIO-88W 3-7 Englis h StarBoard FX-TRIO Series Appendix [4] Wait a while. If the «LsCamWiz ERROR» message does not appear, sensor adjustment was successful. If an error such as the following appears, click the «OK» button and then perform adjustment again while referring to Section 3.2.1. If adjustment is still not successful, the FX-TRIO unit may be defective. [5] If adjustment was successful, click the «Exit» button. * Note that just clicking the button does not complete the adjustment process. [6] To save the adjustment result, click the «Yes» button.
-
HitachiSoft StarBoard FX-TRIO-88W 7 StarBoard FX-TRIO Series Safe Handling Englis h NOTICE Disconnect the USB cable during extended periods of non-use. For safety reasons, disconnect the USB cable if the product is not going to be used for an extended period of time. Failure to comply may result in malfunction. Handle the connection cable properly. Improper handling of the connection cable such as jamming it against a wall, undue bending, pulling, or twisting may result in overheating or damage due to exposure of the conductive core, electrical short, or severing of the cable. (4) Precautions
-
3-9 Englis h StarBoard FX-TRIO Series Appendix [2] Sensor adjusting screen will be displayed during auto adjustment. Do not touch the board surface until auto adjustment completed. [3] Following window will be displayed when sensor auto adjustment finished. Press “OK”. This is all of auto sensor adjustment. Confirm the normal input after adjustment * In case of adjustment error, following window will be d
-
2-3 StarBoard FX-TRIO Series How to use Englis h CAUTION Do not strike the board forcefully with the stylus pen, bend it, or apply an excessive load to it. Failure to comply may result in damage to the stylus pen or personal injury. Important Keep the stylus pen in the pen holder when not in use. If you leave it on the reflective tape, it might cause a sensor error or incorrect detection.
-
HitachiSoft StarBoard FX-TRIO-88W 2-4 StarBoard FX-TRIO Series How to use Englis h 2.2 How to User the Electronic Pen This section gives a basic description of how to use the electronic pen (option). 2.2.1 Inserting the Battery Perform the preparations for using the electronic pen. [1] Insert the battery into the electronic pen. (1) Open the battery cover by moving it in the direction of the arrow. (2) As shown in the figure, insert the AAA alkaline battery so that the + side faces the outside. (3) Close the battery cover by moving it in the direction of the arrow. CAUTION Be sure to install batteries correctly. Do not ins
-
HitachiSoft StarBoard FX-TRIO-88W 11 StarBoard FX-TRIO-77 Englis h Safe Handling Notice Contents Page(s) — Select a level and stable position. — Do not set it up near equipment that might generate electromagnetic waves or radio frequencies, such as radio transmitters, televisions, copying machines or air conditioners. — Avoid locations that are dusty, that are subject to extremely high or low temperatures or humidity, or that are exposed to direct sunlight. P.1-7 When detaching the wall the paint might peel off from the wall and the doble-faced tape might remain on the wall by the adhesiveness of the double-faced tape’s
-
HitachiSoft StarBoard FX-TRIO-88W 1-7 StarBoard FX-TRIO Series Introduction Englis h 1.3.3 Electronic Pen (option) (1) Battery cover Open the cover when inserting or replacing the battery. Refer to page 2-4 in this User’s Guide for details. (2) Side buttons Mouse Operations assigned to these buttons.Refer to page 2-6 in this User’s Guide for details. 1.4 Assembly and Setup When setting up the board, keep the following in mind. NOTICE — Select a level and stable position. — Do not set it up near equi
-
HitachiSoft StarBoard FX-TRIO-88W 4 StarBoard FX-TRIO Series Safe Handling Englis h Safe Handling Markings and Symbols Various markings and symbols are used in this User’s Guide and on this product, to ensure the safe and correct use of this product and to prevent personal injury and property damage. These symbols and their meanings are as explained below. Understand the information well before reading the body of the User’s Guide. This is a Safety Warning symbol. This symbol will appear to raise the attention of the user to existing risks that may cause harm to
-
HitachiSoft StarBoard FX-TRIO-88W 6 StarBoard FX-TRIO Series Safe Handling Englis h (2) Dealing with Trouble CAUTIONS What to do in case of emission of smoke, strange odor, or strange noise If an abnormal condition such as emission of smoke, strange odor, or strange noise happens to occur for some reason, immediately disconnect the product’s USB cable from the PC. Confirm that the smoke or strange odor is no longer being emitted and contact a support center to request repairs. Continued operation without repair may result in fire. What to do if the product breaks or the USB
-
HitachiSoft StarBoard FX-TRIO-88W 1-11 StarBoard FX-TRIO Series Introduction Englis h 1.4.2 Stand Setup Method Reconfirm that all the parts are present before assembling and setting up the stand (option). [1] Assemble the stand FX-TRIO is available with the stand. Assemble the stand according to the following diagram. The numbers in the diagram correspond to the numbers in the parts list on page 1-3. WARNINGS Tighten the screws securely. Failure to comply may cause the stand to collapse, resulting in personal injury, or may cause damage to this produc
-
2-5 StarBoard FX-TRIO Series How to use Englis h 2.2.2 Using the Electronic Pen To use the electronic pen to draw characters or images, place the tip of the electronic pen on the board and then move the pen. When you release the tip of the electronic pen from the board, the writing is complete. Be careful of the following two points when using the electronic pen. (1) When drawing with the electronic pen, keep the pen as perpendicular as possible to the board and apply force sufficient enough to cause th
-
HitachiSoft StarBoard FX-TRIO-88W 2-7 StarBoard FX-TRIO Series How to use Englis h 2.3 Start Method 2.3.1 Start Method (Windows version) (1) Connect the devices with reference to the connection method on page 1-16. (2) Turn on the power switch of the projector. (3) Turn on the power switch of the PC to start Windows. (4) Adjust the position of the projector so that the Windows screen projected by the projector is within the input area (refer to page 1-5 of this User’s Guide). (5) Select «Start» → «All Programs» → «StarBoard Software,» or double-click the StarBoard icon on the desktop. If
-
HitachiSoft StarBoard FX-TRIO-88W 3-13 Englis h StarBoard FX-TRIO Series Appendix (8) In the event of a malfunction in this product caused by the connection to this product of equipment other than the equipment specified by our company. (9) In the event that there is no abnormality in this product, but a defect in a part other than this product was detected or remedied. (10) In the event of ordinary wear and tear, wear, deterioration, etc., of consumables, even during normal use. 5. If this product malfunctions, review the contents of this user’s guide. If the problems remain irreparable, contact the dealer. The dealer will determine whether or
-
1-3 StarBoard FX-TRIO Series Introduction Englis h 1.2.2 Stand (option) [1] Parts No. Name Qty (1) Stand vertical support 2 (2) Stand crossbar 2 (3) Stand foot with casters 2 (4) Board receiving bracket (left-hand version) 1 (5) Board receiving bracket (right-hand version) 1 (6) Board fixing bracket 2 (7) Hex socket head cap screw, with collar 8 (8) Hex socket head cap screw 4 (9) Pan head screw 8 (10) Triangular knob screw 2
-
HitachiSoft StarBoard FX-TRIO-88W 1-8 StarBoard FX-TRIO Series Introduction Englis h 1.4.1 Wall-Mounting Setup Method [1] Install the wall-mounting brackets Determine the height at which the board will be installed, and install the wall-mounting brackets on the wall at the positions shown in the following diagram below. The wall-mounting brackets are provided with the StarBoard. ((4) on page 1-2) WAR N I N G S Keep the wall material in mind when installing. Installing the board on to the wall in a way that does not suite the wall material, may result in the board falling off the wall causing injuries or damage to
-
HitachiSoft StarBoard FX-TRIO-88W 1-9 StarBoard FX-TRIO Series Introduction Englis h [2] Install the board Attach the small sponge lower of height adjustment stay as shown in figure. Attach the wall-mounting brackets to the top hookng holes (both sides) of the stays on the back of the board. Fix the board by attaching the sponge mat on the wall. CAUTION Be sure to use two or more people for this work. Failure to comply may cause the board to fall, resulting in personal injury, or may cause damage to this product due to shock of impact. Sponge mat (small)
-
HitachiSoft StarBoard FX-TRIO-88W StarBoard FX-TRIO Series User’s Guide How to Request a User’s Guide When requesting a separate copy of this User’s Guide, specify FXT-ML100701. FXT-ML100701 Read this User’s Guide and carefully retain it for future reference. Before using this product, carefully read and fully understand the safety instructions. Store this User’s Guide nearby for ease of reference.
-
5 StarBoard FX-TRIO Series Safe Handling Englis h (1) Precautions Regarding Operation WARNINGS Do not make modifications. Do not make any adjustments, repairs, or modifications not given in this User’s Guide as doing so may lead to personal injury or damage to the product. Do not open or remove cover of this product. Failure to comply may lead to personal injury or damage to the product. Refer internal inspections, adjustments, and repairs to your dealer or s
-
1-4 StarBoard FX-TRIO Series Introduction Englis h 1.2.3 Electronic Pen (option) [1] Parts No. Name Qty (1) Electronic pen 1 (2) AAA alkaline battery 1 (3) Spare pen tip 2 (1) (2) (3)
-
HitachiSoft StarBoard FX-TRIO-88W 2-9 StarBoard FX-TRIO Series How to use Englis h If the positions of the pen tip and cursor are out of alignment, select «MENU» on the StarBoard Software toolbar → «Settings» → «StarBoard» → «Calibrate,» and then perform position alignment. Important Conduct sensor adjustments upon first-time operations and whenever the board has been moved. Not doing so may cause operation errors.
-
3-5 Englis h StarBoard FX-TRIO Series Appendix [2] «Camera Adjustment Wizard Start» window appears. Press «All Adjust.» [3] Press “Finish” This completes sensor adjustment. After making adjustments, check that input can be performed normally.
-
1-13 StarBoard FX-TRIO Series Introduction Englis h [3] Adjust the height The StarBoard can be positioned at six height levels. Adjust the height according to the following procedure. Note that this work should be performed by two or more people. (a) Remove the triangular knob screw at the bottom of each side. (b) Raise the board and attach the receiving brackets to the square holes at the desired height. (c) Tighten the triangular knob screw at the b
-
3-2 Englis h StarBoard FX-TRIO Series Appendix Input-Related Problems Problem What to check What to do Has position alignment been performed properly? Perform proper position alignment. The input position does not match. Other than the above Contact a support center. Have the StarBoard and p rojector been placed in the proper orientation? Adjust the position of the StarBoard and the projector. If undue correction is performed, it may not be
-
HitachiSoft StarBoard FX-TRIO-88W 12 StarBoard FX-TRIO Series Englis h Contents Contents 1. INTRODUCTION ………………………………………………………………………………………….. 1-1 1.1 PREPARATIONS………………………………………………………………………………………………. 1-1 1.1.1 Product Outline ………………………………………………………………………………………. 1-1 1.1.2 Features ………………………………………………….
-
HitachiSoft StarBoard FX-TRIO-88W 2-6 StarBoard FX-TRIO Series How to use Englis h 2.2.3 Basic Operations of the Electronic Pen In the default settings of the electronic pen, the pen tip button is set to the left button of the mouse in Windows and the main button click in Mac. You can use the pen tip button to perform the following mouse operations while Windows or Mac is running. The following xxxx/xxxx description is for functions and operations in a Windows environment or Mac environment. — Left click / Primary mouse button click Push the pen tip onto the board wit
-
HitachiSoft StarBoard FX-TRIO-88W 1-6 StarBoard FX-TRIO Series Introduction Englis h 1.3.2 Function Area The function area is provided with shortcut keys for the functions that are frequently used in the StarBoard Software. Use by clicking the middle of the symbol with your pen or finger. With the exception of touch mode/pen mode selection and one-time right click, you can customize the shortcuts with the software for Windows. You cannot customize the shortcuts with the software for Mac. Refer to the online help for details. The default settings are as f
-
HitachiSoft StarBoard FX-TRIO-88W 1 StarBoard FX-TRIO Series Englis h Notices Reproduction or reprinting, without permission, of this User’s Guide or any part thereof is prohibited. The contents of this User’s Guide are subject to change without prior notice. Every effort has been made to ensure that this User’s Guide is complete and correct. However, should any questionable points, mistakes, etc., come to your attention, please inform the vendor. Hitachi Software Engineering Co., Ltd., assumes no responsibility for losses resulting from or related to the use of this product. Refer to &quo
-
3 StarBoard FX-TRIO Series Englis h Introduction Thank you very much for purchasing Hitachisoft’s StarBoard FX-TRIO (henceforth referred to as «StarBoard»). This User’s Guide has been created for people who already have a working knowledge of personal computers (henceforth referred to as «PC»). Please make sure that you understand the contents of this User’s Guide and use the software correctly. We hope that you make the most of this product.
-
1-12 StarBoard FX-TRIO Series Introduction Englis h [2] Install the board Install the board on the stand assembled in step [1]. Install the board according to the following procedure. Note that this work should be performed by two or more people. The numbers in the diagram correspond to the numbers in the parts list on page 1-3 of this User’s Guide. (a) Decide the level (out of six) at which the board will be installed, and attach the board receiving brackets (4) and (5) to the square holes of the stays
-
HitachiSoft StarBoard FX-TRIO-88W 3-10 Englis h StarBoard FX-TRIO Series Appendix 3.4 System Specifications Item Specification Model name StarBoard FX-TRIO-77 StarBoard FX-TRIO-88W Detection method Infrared image sensor system* 1 Digitiser resolution 0.05mm Sampling rate Approx. 100 points/second when using (USB1.1 Full Speed) Interface USB 1.1 (cable length:4.7m) USB 1.1 (cable length:4.5m) Effective screen size (mm) Approx. 77inches 1,573(W)×1,180(H) Approx. 88inches 1,888(W)×1,180(H) Board dimensions (mm) 1,765(W)×1,408(H)×69 (D) (not including the pen holder) 2,080(W)×1,431(H)×69 (D) (not in
-
HitachiSoft StarBoard FX-TRIO-88W 1-14 StarBoard FX-TRIO Series Introduction Englis h 1.4.3 Pen Holder Setup Method [1] Installation method Insert the pen holder into the rail on the right side on the back of the board and slide it to the desired position. [2] Removal method To remove the pen holder, apply pressure to the top of the pen holder and pull it back.
-
HitachiSoft StarBoard FX-TRIO-88W 10 StarBoard FX-TRIO Series Safe Handling Englis h Careful thought was given to the cautions on this device and in this User’s Guide. However, unanticipated circumstances might occur. When operating this product, users themselves must exercise caution as well as follow instructions. Warnings Contents Page(s) Keep the wall material in mind when installing. Installation by means not suited to the wall material in question may result in the board falling. Furthermore, wall installation may not
-
HitachiSoft StarBoard FX-TRIO-88W 3-11 Englis h StarBoard FX-TRIO Series Appendix 3.5 Proper Care and Cleaning Clean the StarBoard periodically so that you may use it for a long time to come. (1) Cleaning the StarBoard ・ To clean the StarBoard, use a soft cloth dampened with whiteboard cleaner or a diluted neutral cleansing agent that does not contain a polishing compound. ・ Never use a solvent such as thinner. ・ Note that rubbing or striking the StarBoard surface with a finger nail or other hard object may result in scratching. (2) Cl
-
2 StarBoard FX-TRIO Series Englis h Product Assurance Provisions This product is limited to use in the country where the user bought this product. For warranty details, refer to «3. Appendix 3.7 Product Warranty Policy» at the end of this User’s Guide. This first edition of the User’s Guide (FXT-ML100701) is for the following products: AH00243: StarBoard FX-TRIO-77 AH00257: StarBoard FX-TRIO-88W AH00180: Electronic
-
HitachiSoft StarBoard FX-TRIO-88W 1-10 StarBoard FX-TRIO Series Introduction Englis h [3] Settle the board (The following work is necessary for FX-TRIO-88W.) 1. Make sure that the 2 wall-mount stabilizing sponges are touching the wall when the board is mounted on the wall. If either of the sponges do not touch the wall, apply the sponge mat (large) to the wall-mount stabilizing sponge, and adjust the space between the sponge and the wall. 2. Remove the tape cover and fix the board on to the wall. NOTICE When detaching the wall the paint might peel off
-
HitachiSoft StarBoard FX-TRIO-88W 3-3 Englis h StarBoard FX-TRIO Series Appendix Problem What to check What to do Is a remote controller for AV equipment being operated while using the pen? Stop operating the remote controller. The battery charge of the electronic pen may be low. Replace the batteries. (For details on battery replacement, see page 2-4 of this User’s Guide.) StarBoard Software files may be broken or installation may not be complete correctly. Uninstall the StarBoard Software and then re-install it. (For details on installing StarBoard Software, see the StarBoard Software x.x Installation Guide.) Restart Windows/Mac OS or
-
1-1 StarBoard FX-TRIO Series Introduction Englis h 1. Introduction 1.1 Preparations This chapter describes the preparations to be made before using StarBoard. First-time users of StarBoard should read through this chapter. 1.1.1 Product Outline The StarBoard FX-TRIO is an extremely convenient and easy-to-use electronic whiteboard. After setting up the provided software on a PC that is connected to a projector, you can use your finger or the stylus pen that is included with the product to operate the PC or import to the PC in real time c
-
HitachiSoft StarBoard FX-TRIO-88W 1-16 StarBoard FX-TRIO Series Introduction Englis h 1.4.4 Equipment Connection Method Connect the PC, projector and StarBoard according to the following procedure. (1) Connect the RGB cable to the projector’s RGB connector, and fasten with screws. (2) Connect the opposite side of the RGB cable to the PC’s RGB connector, and fasten with screws. (3) Connect the USB cable from the lower right of the StarBoard to a USB port on the PC. (4) Connect the power supply cables of the PC and projector to the power supply. Depending on your PC, an incorrec
-
HitachiSoft StarBoard FX-TRIO-88W 2-1 StarBoard FX-TRIO Series How to use Englis h 2. How to Use 2.1 How to Use Touch Mode This section gives a basic description of how to use the board in touch mode. 2.1.1 Character Input To input characters, use your finger or the stylus that was provided with the product. — Using the stylus pen and Electronic pen Use the pen on the board with your body kept sufficiently away, so that your palm and elbow do not touch the board. If your hand or elbow touches the board, or you are within 1 cm of the board, it might cause an
-
3-4 Englis h StarBoard FX-TRIO Series Appendix 3.2 Adjusting the Sensor 3.2.1 Items to Check Before Making Sensor Adjustments The following error may appear while using this product. Check the following items if this error appears. ・Check that light is not blocked from reaching the board surface or reflective tape. ・Check that the reflective tape is not dirty. If the problem is not corrected despite making the above checks, In the
-
HitachiSoft StarBoard FX-TRIO-88W 2-2 StarBoard FX-TRIO Series How to use Englis h — Using your finger Extend your finger and touch the board. In the same way as the stylus pen, if you touch the board with anything other than your finger or you are too close to the board, it might cause an incorrect operation. 2.1.2 PC Operations When performing PC operations by pointing or giving presentations without inputting characters, it is convenient to extend the stylus pen and use it as a pointer.
-
1-2 StarBoard FX-TRIO Series Introduction Englis h 1.2 Parts Check After unpacking, make sure that all the following parts are present. 1.2.1 StarBoard [1] Parts No. Name Qty (1) StarBoard 1 (2) Pen holder (with installation part) 1 (3) Stylus pen 2 (4) Wall-mounting bracket 2 (5) StarBoard Software x.x (DVD-ROM) (*1) 1 (6) StarBoard Software Startup Guide 1 (7) StarBoard FX-TRIO Startup guide 1 (8) Warranty Sheet 1 (9) Sponge mat (small) 2 (10) Spon
-
1-5 StarBoard FX-TRIO Series Introduction Englis h 1.3 Role of Each Part 1.3.1 StarBoard (1) Digitiser Storage Area Receives information regarding characters or images drawn with the pen or the user’s finger, and transmits this data to the PC. (2) Function Area (Left and Right) Shortcut buttons for functions that are frequently used in applications are located here. (Refer to the next page for details.) (3) Input Area Cha
-
3-1 Englis h StarBoard FX-TRIO Series Appendix 3. Appendix 3.1 Troubleshooting Before assuming the product is broken, be sure to check adjustments, proper handling procedures, the possibility of faulty cable connections, etc. Recognition-Related Problems Problem What to check What to do Is the USB cable connected to the PC? Connect the USB cable to the PC. When viewing the central region of the digitiser storage area (page 1-5) from the bottom, is the LED lit green? Check the USB cable connection. Did you sta
-
3-12 Englis h StarBoard FX-TRIO Series Appendix 3.7 Product Warranty Policy 1. During the free warranty service period, if a malfunction occurs during normal use, the malfunction will be corrected without charge, according to the provisions of the warranty. Furthermore, if the customer registration card accompanying the warranty is not returned to our company, the customer information will not be registered; so free repairs might be unavailable. After receiving this product, please immediately fill out and return this c
Глава 6
Работа с ПО интерактивной доски Hitachi StarBoard
Для запуска программы StarBoard Software необходимо воспользоваться ярлыком на рабочем столе, пиктограммой на панели задач или меню Пуск. Далее в зависимости от выбранных во время установки программного обеспечения параметров на экране отобразится панель инструментов с минимальным набором функций для работы в режиме экрана ПК или первая страница заметки и развернутая панель инструментов для работы в режиме создания заметки. Если интерактивная доска в момент запуска программы не подключена к компьютеру, на экране появится окно предупреждения (рис. 6.1).
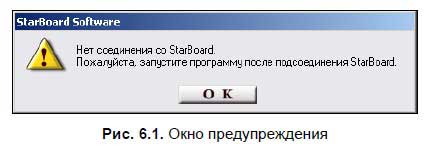
После щелчка по кнопке OK программа будет запущена по одному из вариантов, описанных выше. В режиме создания заметки на ее страницах будет отображаться сообщение «Панель Starboard не подключена» и не будет доступна функция калибровки. При этом все остальные функции будут выполняться корректно, что удобно учителю при подготовке к урокам.
Данный текст является ознакомительным фрагментом.
Читайте также
Глава 16. Обеспечение интерактивной помощи
Глава 16. Обеспечение интерактивной помощи
Большинство приложений предоставляют своим пользователям систему помощи, работающую в интерактивном режиме. В некоторых случаях эта помощь носит форму коротких сообщений, например, в виде всплывающих подсказок, комментариев
Запуск интерактивной сессии gsec
Запуск интерактивной сессии gsec
В командной строке в каталоге Firebird /bin введите следующее. Для POSIX:./gsec -user sysdba -password masterkeyДля Windows:gsec -user sysdba -password masterkeyПодсказка командной строки изменится на GSEO, указывающую, что вы запустили gsec в интерактивном режиме.Для завершения
Выход из интерактивной сессии isql
Выход из интерактивной сессии isql
Для выхода из утилиты isql и отката (roll back) всей неподтвержденной работы введите:SQL> QUIT;Для выхода из утилиты isql и подтверждения всей работы введите:SQL>
На что обращать внимание при выборе и изучении интерактивной доски
На что обращать внимание при выборе и изучении интерактивной доски
Сформулируем конкретные рекомендации, основанные на имеющемся практическом опыте. Несомненно, все нюансы предусмотреть невозможно, тем более что технологии создания интерактивных систем активно
Глава 2 Установка и настройка интерактивной доски и ее программного обеспечения
Глава 2
Установка и настройка интерактивной доски и ее программного обеспечения
Материал этой главы может и не понадобиться педагогам, если в образовательном учреждении существует надежная инженерная поддержка, и преподаватель не касается вопросов включения и
Начало работы с интерактивной доской
Начало работы с интерактивной доской
Для работы любой ИД необходимо:1. Установить саму интерактивную доску.2. В доске Interwrite Board маркеры вставить в зарядное устройство.3. Установить мультимедийный проектор.4. Подключить интерактивную доску к
Установка интерактивной доски
Установка интерактивной доски
Самый надежный вариант, если установка ИД осуществляется поставщиком, что следует предусмотреть при оформлении покупки. Если это условие не оговорено, необходимо прежде всего внимательно изучить алгоритм, прописанный в прилагаемом к ИД
Установка ПО интерактивной доски
Установка ПО интерактивной доски
Прежде всего, следует внимательно изучить рекомендации производителя по установке ПО. Заметим также, что для установки на компьютере такого рода ПО обычно необходимо обладать правами администратора.Следует вставить диск «Программное
Калибровка интерактивной доски
Калибровка интерактивной доски
После подключения интерактивной доски к компьютеру необходимо произвести процедуру калибровки для синхронизации положения наконечника маркера с положением курсора на экране. Калибровка требуется каждый раз, когда интерактивная доска
Глава 3 Работа с ПО интерактивной доски Interwrite Board
Глава 3
Работа с ПО интерактивной доски Interwrite Board
Самый быстрый способ запуска ПО — использование значка InterWrite (см. рис. 2.7) на панели задач, который символизирует работу Диспетчера устройств (рис. 3.1).
Диспетчер устройств не только позволяет управлять различными
Глава 4 Работа с ПО интерактивной доски ACTIVboard
Глава 4
Работа с ПО интерактивной доски ACTIVboard
Рассмотрим программное обеспечение ACTIVstudio, которое позволяет добавлять пометки, создавать объекты, применять специальные эффекты, использовать интерактивные элементы и многое другое. Доступ к этим возможностям
Глава 5 Работа с ПО интерактивной доски SMART Board
Глава 5
Работа с ПО интерактивной доски SMART Board
Самый быстрый способ запуска ПО — использование значка SMART Board (см. рис. 2.7) на панели задач, который символизирует работу Диспетчера устройств.ПО доски SMART Board позволяет работать в двух режимах:? режим ПК, включающий возможность
Принцип работы с инструментами интерактивной доски
Принцип работы с инструментами интерактивной доски
Одной из особенностей программного обеспечения интерактивной доски Hitachi является возможность настройки собственной панели инструментов. Каждый педагог в силу специфики своего предмета использует определенный
Глава 8 Работа с ПО интерактивной доски QOMO
Глава 8
Работа с ПО интерактивной доски QOMO
Для запуска программы Flow!Works необходимо воспользоваться ярлыком на рабочем столе или меню Пуск.Программное обеспечение позволяет работать в двух режимах: в интерактивном режиме и в режиме экрана ПК. Переход между этими режимами
Принцип работы с инструментами интерактивной доски
Принцип работы с инструментами интерактивной доски
Как и у большинства интерактивных досок, программное обеспечение Flow!Works имеет графический интерфейс, интуитивно понятный пользователю за счет продуманных зрительных образов инструментов.Чтобы воспользоваться
ОКНО ДИАЛОГА: Объединяй и властвуй! Hitachi GST намерена интегрировать флэш-память в HDD
ОКНО ДИАЛОГА: Объединяй и властвуй! Hitachi GST намерена интегрировать флэш-память в HDD
Автор: Сергей ВильяновНа прошлой неделе Москву посетил Николя Фропар, менеджер канала продаж Hitachi GST в регионе EMEA. Мы не упустили шанса встретиться с человеком, который пережил переход