
Instruction Book


IMPORTANT SAFETY INSTRUCTIONS
When using an electrical appliance, basic safety precautions should always be followed, including the
following:
This sewing machine is designed and manufactured for household use only.
Read all instructions before using this sewing machine.
To reduce the risk of electric shock:
DANGER
1. An appliance should never be left unattended when plugged in. Always unplug
this sewing machine from the electric outlet immediately after using and before
cleaning.
WARNING
1. Do not allow to be used as a toy. Close attention is necessary when this sewing machine is used
by or near children.
2. Use this appliance only for its intended use as described in this owner’s manual.
Use only attachments recommended by the manufacturer as contained in this owner’s manual.
3. Never operate this sewing machine if it has a damaged cord or plug, if it is not working properly, if
it has been dropped or damaged, or dropped into water.
Return this sewing machine to the nearest authorized dealer or service center for examination,
repair, electrical or mechanical adjustment.
4. Never operate the appliance with any air opening blocked. Keep ventilation openings of this
sewing machine and foot controller free from accumulation of lint, dust and loose cloth.
5. Never drop or insert any object into any opening.
6. Do not use outdoors.
7. Do not operate where aerosol (spray) products are being used or where oxygen is being
administered.
8. To disconnect, turn all controls to the off (“O”) position, then remove plug from outlet.
9. Do not unplug by pulling on cord. To unplug, grasp the plug, not the cord.
10. Keep ngers away from all moving parts. Special care is required around the sewing machine
needle and/or cutting blade.
11. Always use the proper needle plate. The wrong plate can cause the needle to break.
12. Do not use bent needles.
13. Do not pull or push fabric while stitching. It may deect the needle causing it to break.
14. Switch this sewing machine off (“O”) when making any adjustment in the needle area, such as
threading the needle, changing the needle, threading the bobbin or changing the presser foot, and
the like.
15. Always unplug this sewing machine from the electrical outlet when removing covers, lubricating, or
when making any other adjustments mentioned in this owner’s manual.
—
—
To reduce the risk of burns, re, electric shock, or injury to persons:
SAVE THESE INSTRUCTIONS
For Europe only:
This appliance can be used by children aged from 8 years and above and persons with reduced
physical, sensory or mental capabilities or lack of experience and knowledge if they have been given
supervision or instruction concerning use of the appliance in a safe way and understand the hazards
involved. Children shall not play with the appliance. Cleaning and user maintenance shall not be made
by children without supervision.
For outside Europe (except U.S.A and Canada):
This appliance is not intended for use by persons (including children) with reduced physical, sensory or
mental capabilities, or lack of experience and knowledge, unless they have been given supervision or
instruction concerning use of the appliance by a person responsible for their safety.
Children should be supervised to ensure that they do not play with the appliance.
Please note that on disposal, this product must be safely recycled in accordance with relevant
National legislation relating to electrical/electronic products. If in doubt please contact your
retailer for guidance. (European Union only)

TABLE OF CONTENTS
GETTING READY TO SEW
Names of Parts ……………………………………………………… 3
Standard Accessories ……………………………………………. 4
Extra Wide Table …………………………………………………… 5
Anti-slipping sticker (for Embroidery hoop RE28b) …….. 5
Connecting the Power Supply …………………………………. 6
Machine Operating Buttons …………………………………….. 6
Raising and Lowering the Presser Foot ……………………. 7
Common Keys ………………………………………………………. 7
Setting the Spool of Thread ……………………………………. 8
Extra spool pin …………………………………………………… 8
Winding the Bobbin …………………………………………… 8 -10
Removing the bobbin ………………………………………….. 8
Winding the bobbin …………………………………………….. 9
Inserting the bobbin ………………………………………….. 10
Threading the Machine…………………………………………..11
Built-in Needle Threader ………………………………………. 12
Replacing Needles ………………………………………………. 13
Fabric and Needle Chart ………………………………………. 13
On-screen Help …………………………………………………… 14
Removing and Attaching the Embroidery Foot ………… 15
Bobbin Holder for Embroidery (high tension) …………… 16
Embroidery Hoops ………………………………………………. 16
Stabilizers …………………………………………………………… 17
Types of the stabilizers ………………………………………. 17
Setting the Fabric in an Embroidery Hoop ………………. 18
Attaching the Embroidery Hoop to the Machine ………. 19
Thread Holder …………………………………………………….. 20
Selecting Built-in Embroidery Designs ……………………. 20
Monogramming …………………………………………………… 21
Function Keys ……………………………………………………… 22
Programming a Monogram……………………………….. 23-24
Color change ……………………………………………………. 23
Monogram placement ……………………………………….. 23
2-Letter monogram ……………………………………………. 24
Editing a Monogram …………………………………………….. 25
Ready to Sew Window …………………………………….. 26-31
Function keys …………………………………………………… 26
Pattern information ……………………………………………. 26
Stitch back/forward keys ……………………………………. 27
Jump key …………………………………………………………. 27
Cross mark ………………………………………………………. 27
Color section key ………………………………………………. 27
Tr a ce key …………………………………………………………. 28
Thread color/Jog key …………………………………………. 28
Fine position/angle adjustment key ……………………… 29
Rotating a design ……………………………………………… 29
Moving a design ……………………………………………….. 29
Color list key …………………………………………………….. 30
Adjust key ………………………………………………………… 30
Auto thread tension level …………………………………. 30
Cutting the tails of jump threads……………………….. 30
Hoop back key ………………………………………………….. 31
Starting to Sew Embroidery ………………………………….. 32
Editing Mode …………………………………………………..33-43
Selecting a hoop size ………………………………………… 33
Opening the embroidery designs ………………………… 33
Editing tool bar information…………………………………. 34
Selecting a pattern ……………………………………………. 34
Moving a pattern……………………………………………….. 34
Duplicating a pattern …………………………………………. 35
Deleting a pattern ……………………………………………… 35
Resizing a pattern …………………………………………….. 35
Rotating a pattern ……………………………………………… 36
Flipping a pattern ……………………………………………… 36
Monogramming in an arc …………………………………… 37
Grouping patterns …………………………………………….. 38
Customizing the display colors ……………………………. 39
Color grouping ………………………………………………….. 40
Sewing order ……………………………………………………. 41
Center positioning …………………………………………….. 41
Creating a square frame …………………………………….. 42
Single color sewing …………………………………………… 42
Zooming in the editing window ……………………………. 43
Pantry Designs for Applique ………………………………44-45
Alternative method ……………………………………………. 45
Celebration Designs …………………………………………….. 46
Bracelet Designs …………………………………………………. 47
CUSTOMIZING MACHINE SETTINGS
Machine Setting Mode …………………………………………. 48
Registering the custom settings ………………………….. 48
Common Setting Mode …………………………………….49-50
CUSTOMIZING EMBROIDERY MODE SETTINGS
Embroidery Mode Settings ……………………………….. 51-54
Language Selection Mode ……………………………………. 54
Saving and Opening a File ……………………………………. 55
Creating a new folder ………………………………………… 55
Deleting a le or folder ………………………………………. 56
Opening a le …………………………………………………… 56
Changing a name of the le or folder …………………… 57
Direct PC-Link …………………………………………………….. 57
CARE AND MAINTENANCE
Cleaning the Hook Area ……………………………………….. 58
Cleaning the Thread Path …………………………………….. 59
Oiling the Machine……………………………………………60-64
Troubleshooting …………………………………………………… 65
DESIGN CHART
Embroidery …………………………………………………….. 66-71

!1
q
w
r
e
!2
!3
t
y
u oi !0
!4
GETTING READY TO SEW
Names of Parts
Thread take-up lever
q
Upper thread guide
w
Pre-tension thread guide
e
Bobbin winder thread guide
r
Spool pin
t
Spool holder (large)
y
Hole for extra spool pin
u
Bobbin thread cutter
i
Bobbin winder spindle
o
Bobbin winder stopper
!0
Face plate
!1
Start/stop button
!2
Thread cutter button
!3
Visual touch screen
!4
Carriage
!5
!6
!7
!8
!9
@0
@1
@7
@8
#2
@2
@3
@4
@5
@6
!5
Thread cutter/holder
!6
Needle threader
!7
Setscrew
!8
Embroidery foot
!9
Needle plate
@0
Thread cutter
@1
Lower thread guide
@2
Needle clamp screw
@3
Needle
@4
Hook cover plate
@5
Hook cover release button
@6
Carrying handle
@7
Handwheel
@8
Touch panel stylus holder
@9
USB port (type B)
#0
USB port (type A)
#1
Presser foot lifter
#2
Power switch
#3
Power inlet
#4
@9
#3
#0
#4
#1
* Design and specications are subject to change without prior notice.
3
NOTE:
To carry the sewing machine,
hold the carrying handle with your
hand, and support the sewing
machine with the other hand.

q w e r
t y u
i o !0 !1
!2 !3 !4
Standard Accessories
Bobbin x 5 (1 set on the machine)
q
Screwdriver (Large)
w
Screwdriver key (for needle plate)
e
Lint brush
r
Scissors
t
Needle set
y
Spool holder (large) X 2 (1 set on the machine)
u
Spool holder (small) X 2
i
Spool holder (special) X 2
o
Extra spool pin
!0
Special bobbin holder for Embroidery (high tension)
!1
Touch panel stylus
!2
Bobbin holder cleaner
!3
Instruction book
!4
Quick reference guide
!5
Instructional DVD
!6
Embroidery Editor/Installation guide
!7
Soft machine cover
!8
USB cable
!9
Power cable**
@0
Embroidery hoop SQ14b (with template)*
@1
Embroidery hoop RE20b (with template)*
@2
Embroidery hoop SQ20b (with template)*
@3
Embroidery hoop RE28b (with template)* and
@4
anti-slipping sticker
@5
Clamp X 8
Extra wide table
@6
!5 !6 !7
!8 !9
@0
* The embroidery hoops supplied with your machine vary
depending on your model.
** The power cable included may differ from the illustration.
@1 @2
@3 @4
@5 @6
4
q
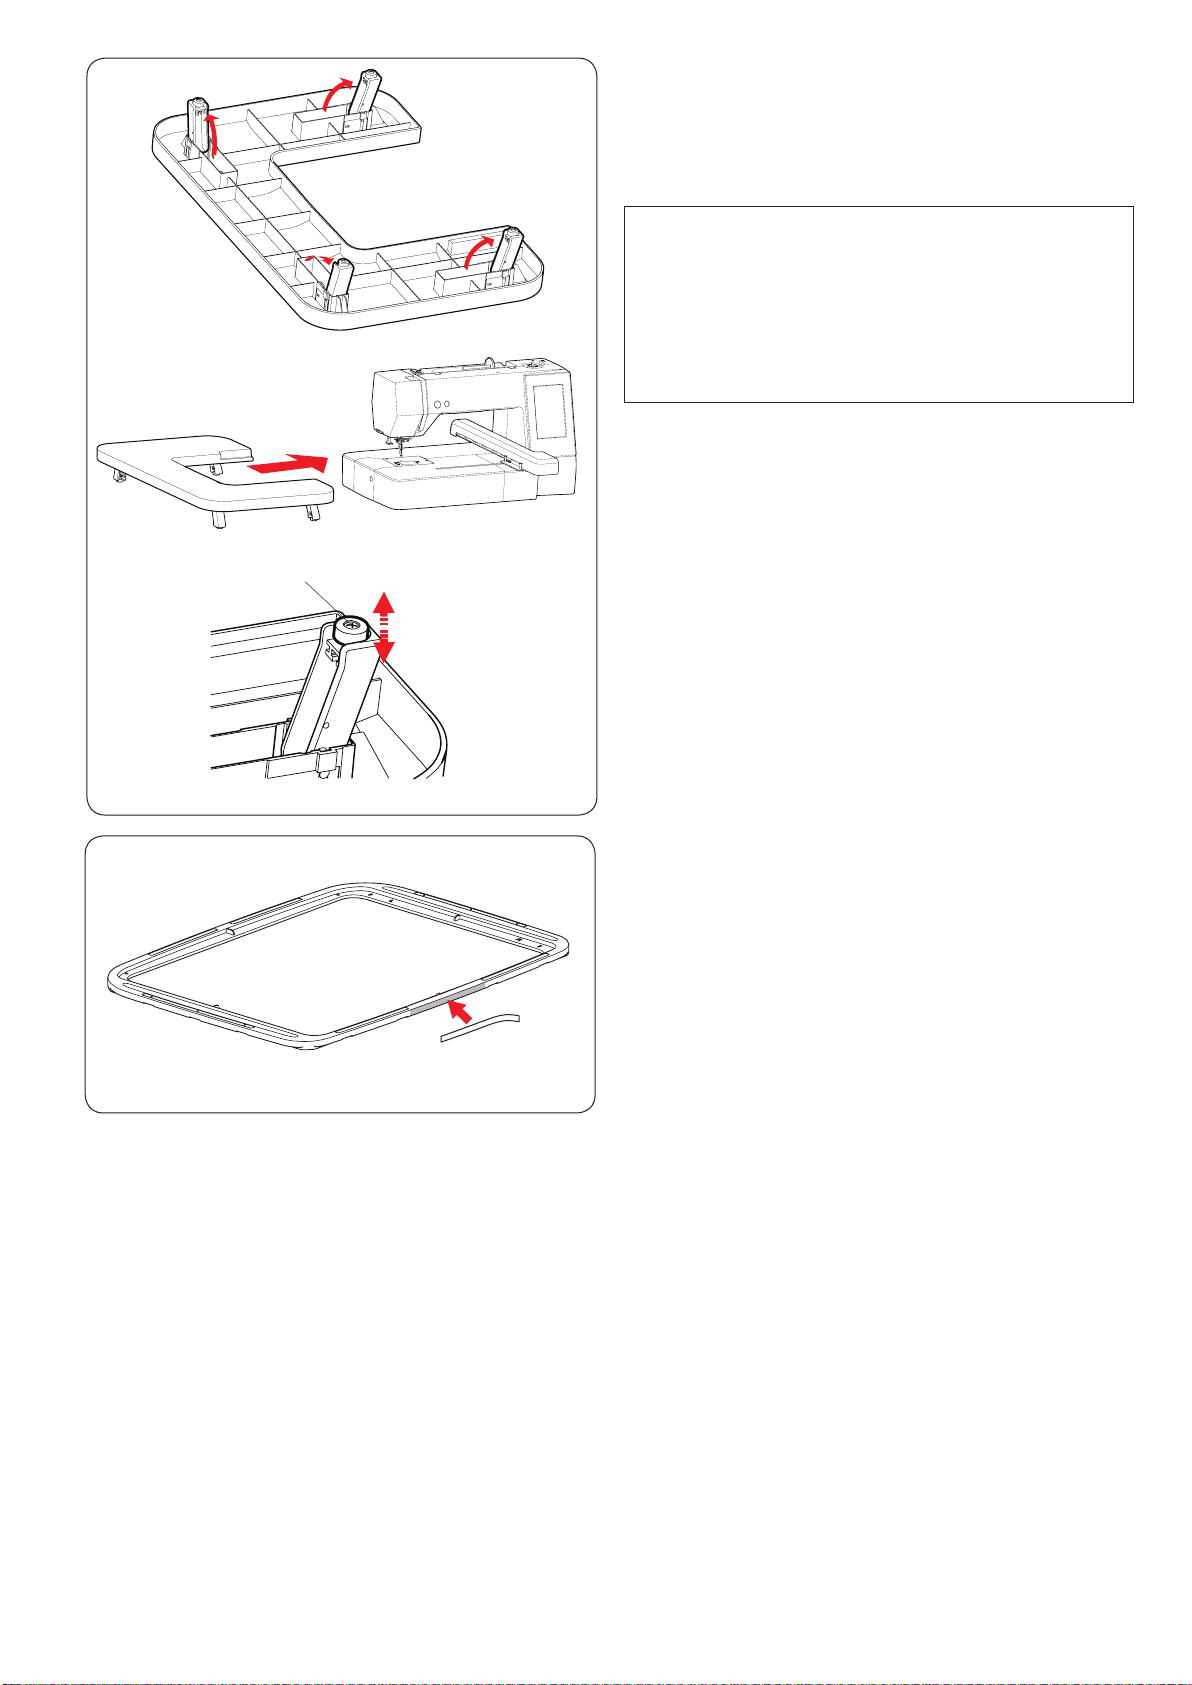
Extra Wide Table
Use the extra wide table when the Embroidery hoop
RE20b, SQ20b or RE28b is attached to the machine.
Extract the 4 legs located the underside of the table.
Place the extra wide table on the machine.
NOTE:
Adjust the height of the extra wide table to the height
of the machine table by turning the adjusting screws
of 4 legs. Otherwise the carriage may hit the extra
wide table when attached. Use a phillips screwdriver*
to turn the adjusting screw.
q Adjusting screw
* Phillips screwdriver is not included with the machine.
Anti-slipping sticker (for Embroidery hoop RE28b)
Embroidery hoop RE28b unit includes the anti-slipping
sti c ker.
Peel and paste the sticker on the Embroidery RE28 as
shown to prevent slipping of the ne fabrics.
5
e
w
r
q
t
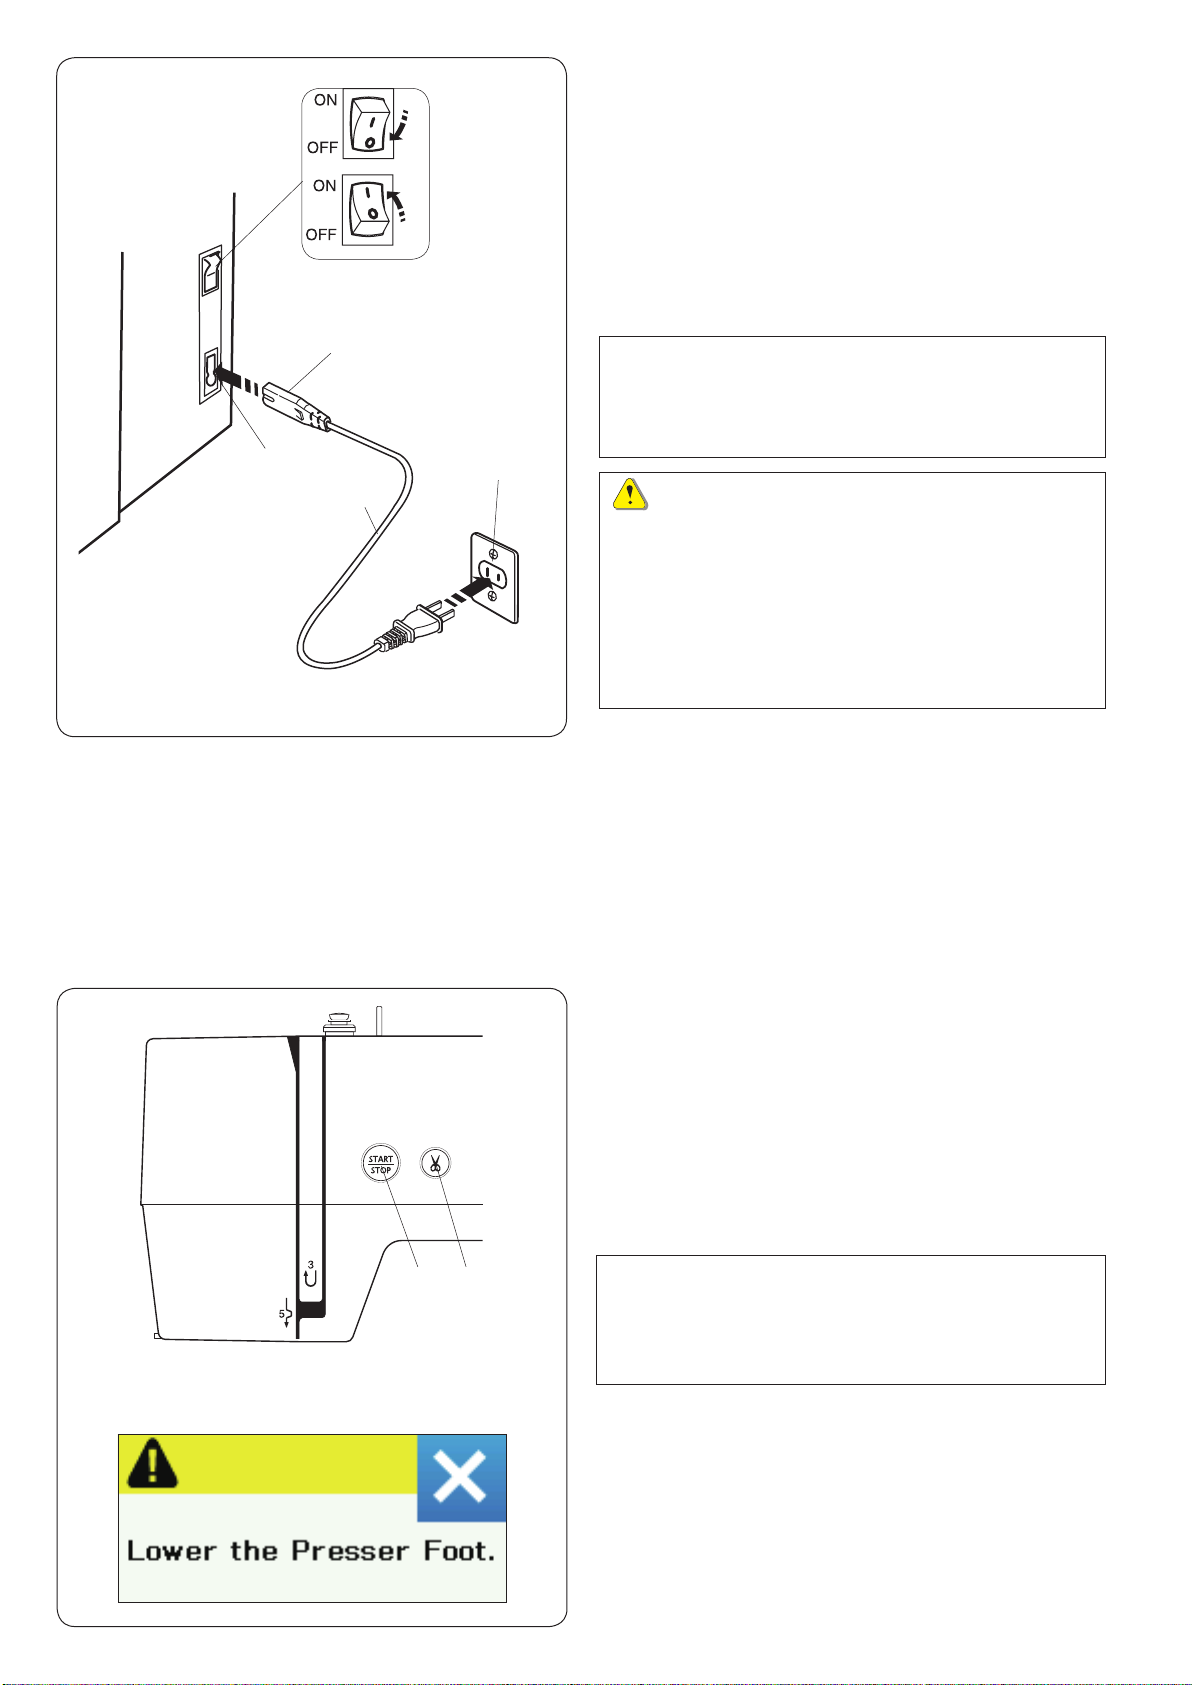
Connecting the Power Supply
z First make sure the power switch q is off.
x Insert the machine plug w of the power supply cord
into the power inlet e.
c Insert the power supply plug r into the wall outlet t,
and turn the power switch q on.
q Power switch
w Machine plug
e Power inlet
r Power supply plug
t Wall outlet
NOTE:
Make sure to use the power cable that came with the
machine.
If you turn off the power switch, wait for 5 seconds
before turning it on again.
WARNING:
While in operation, always keep your eyes on the
sewing area, and do not touch any moving parts such
as the thread take-up lever, handwheel or needle.
Always turn off the power switch and unplug the
machine from the power supply:
— when leaving the machine unattended.
— when attaching or removing parts.
— when cleaning the machine.
q w
For the U.S.A. and Canada only
Polarized plug (one blade wider than the other):
To reduce the risk of electric shock, this plug is intended
to t in a polarized outlet only one way. If it does not t
fully in the outlet, reverse the plug. If it still does not t,
contact a qualied electrician to install the proper outlet.
Do not modify the plug in any way.
Machine Operating Buttons
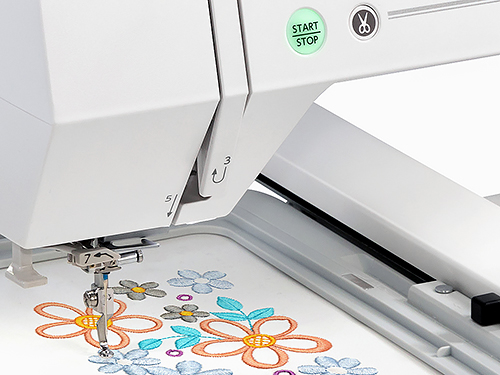
q Start/stop button
Press this button to start or stop the machine. The button
turns red when the machine is running, and green when
it stops.
w Thread cutter button
Press this button when you nish sewing to trim the
threads. The needle bar automatically rise after trimming
the threads.
NOTE:
If you press the start/stop button without lowering the
presser foot, the warning message e appears on the
visual touch screen.
Lower the presser foot and press the start/stop button.
e
6
q
w
q
w
e
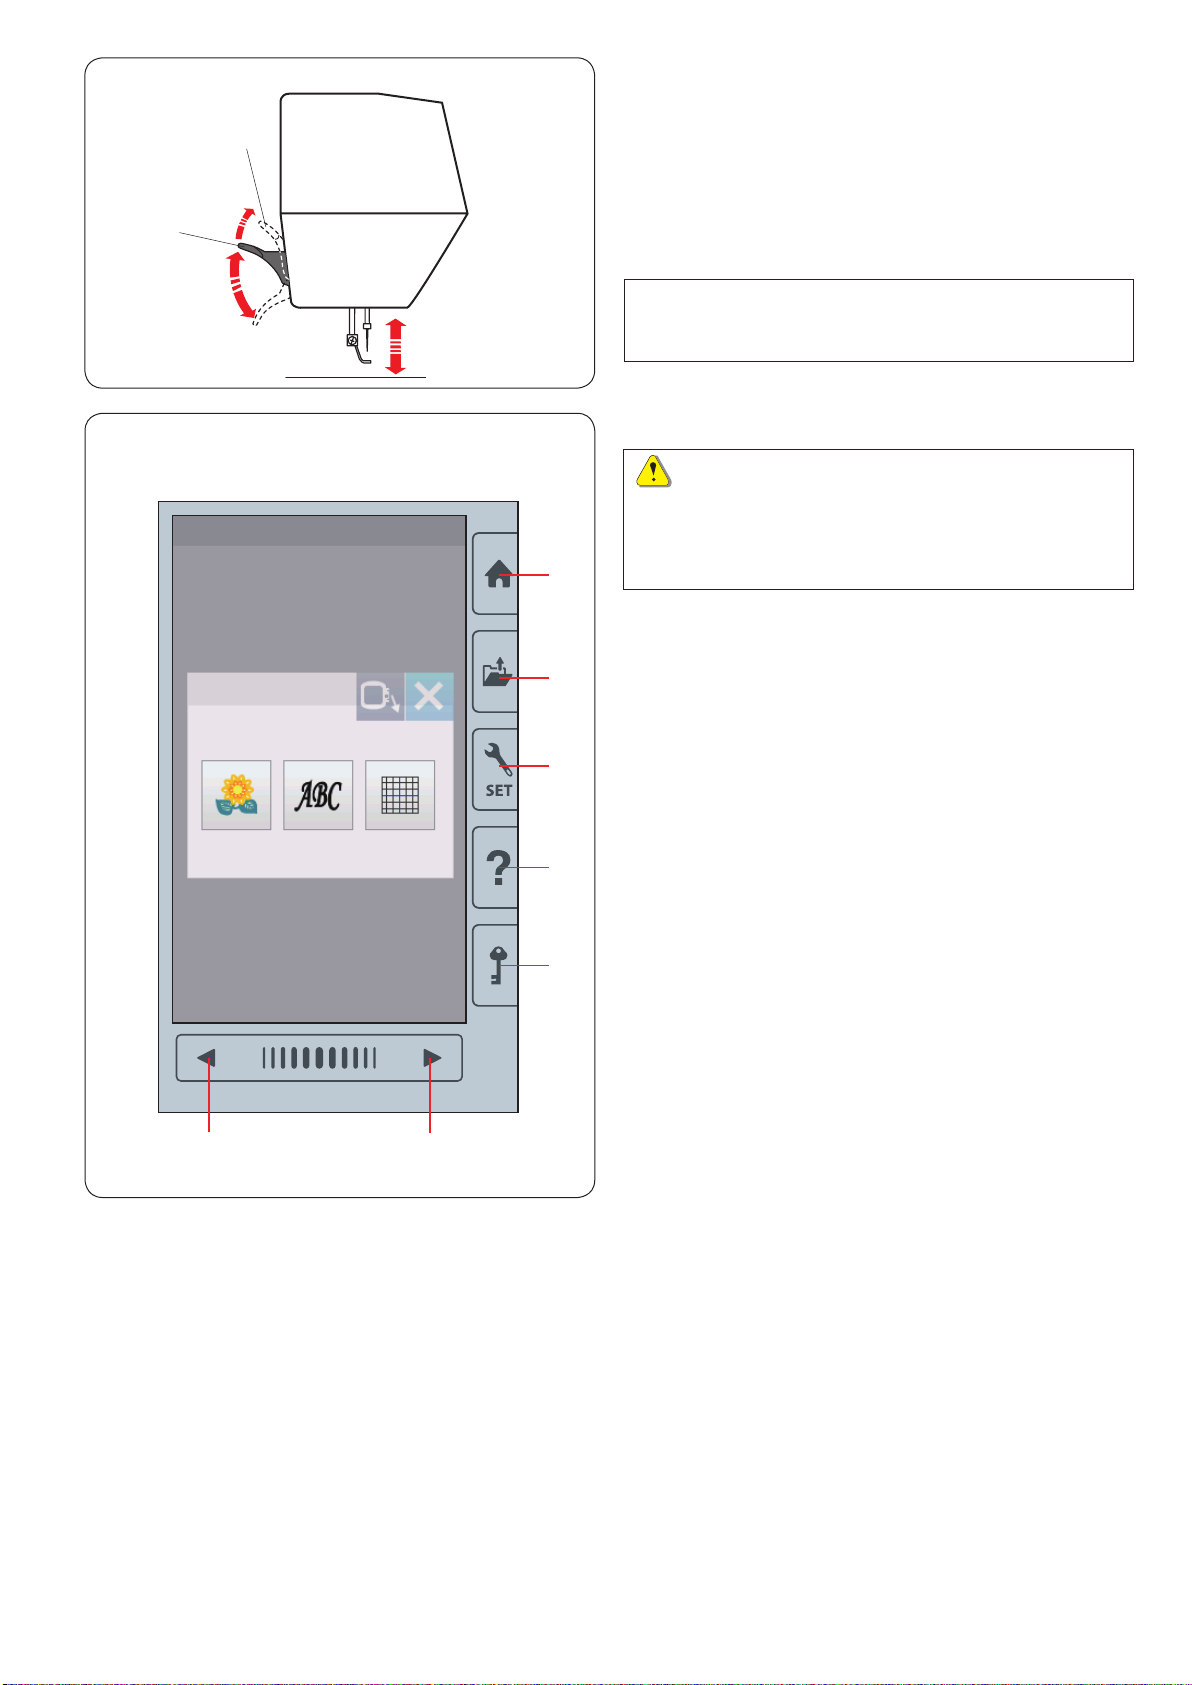
Raising and Lowering the Presser Foot
You can raise and lower the presser foot with the presser
fo ot lifter.
q Presser foot lifter
w Extra lifted position
You can raise the presser foot about 7 mm (1/4˝) higher
than the normal up position by exerting more pressure
when lifting the presser foot lifter.
NOTE:
Do not turn the hand wheel when the presser foot is in
the extra lifted position.
Common Keys
CAUTION:
Do not press the visual touch screen with hard or
sharp objects like pencils, screwdrivers or the like.
Use the touch panel stylus included in the standard
accessories.
q Home key
Press this key to enter the category selection.
w Open le key
Press this key and the open le window will open.
You can open embroidery designs saved in the machine’s
internal memory or on a USB ash drive.
e Set mode key
Press this key to enter the setting mode. You can
r
t
yu
customize the machine settings to your preference.
The machine settings for common settings, embroidery
and language selection are available in this mode.
r Help key
Press this key to view the step-by-step visual guide about
the essential operations.
t Lockout key
Press this key to lockout the machine when threading the
machine, replacing the accessories etc.
To reduce the risk of injury, all the buttons and keys are
deactivated.
To unlock the machine, press the lockout key t again.
y Next page key
To view the next page, press the next page key.
u Previous page key
To view the previous page, press the previous page key.
7
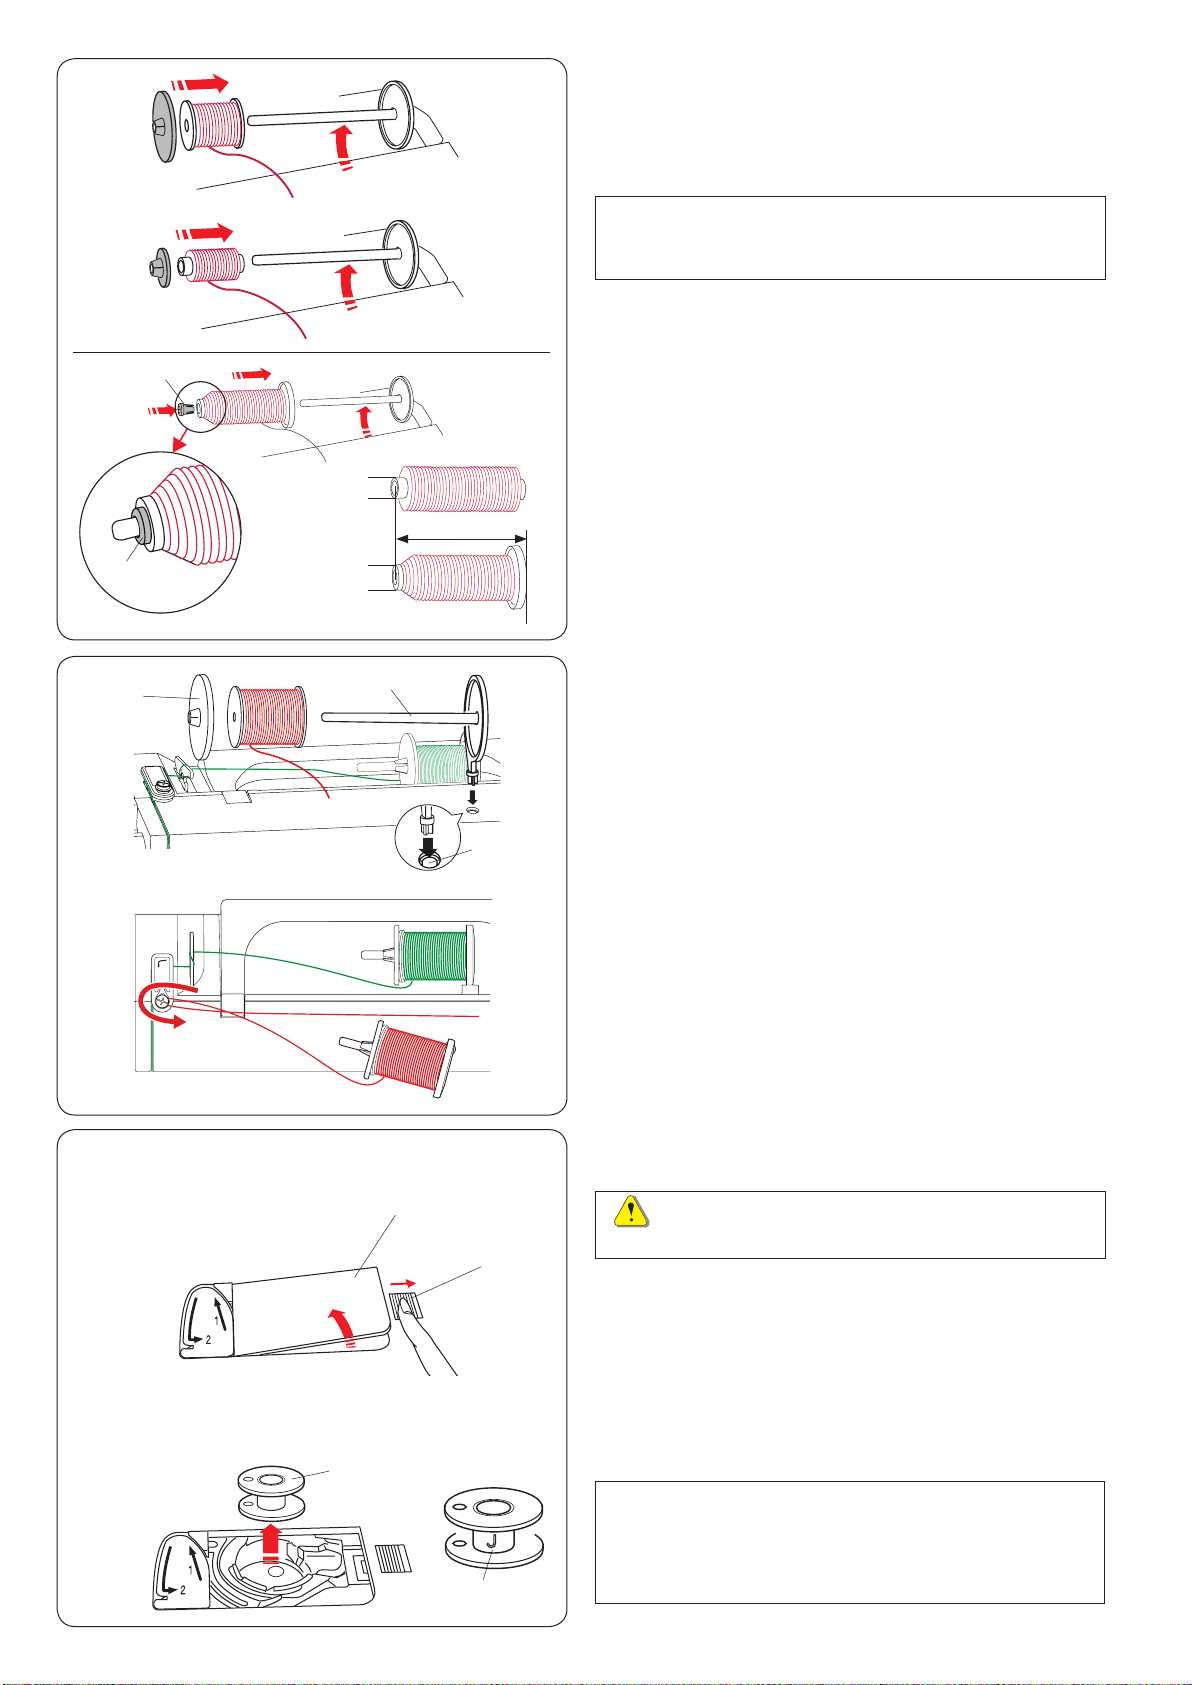
Setting the Spool of Thread
Lift up the spool pin. Place the spool of thread on the
spool pin.
Attach the large spool holder, and press it rmly against
the spool of thread.
NOTE:
Use the small spool holder to hold narrow or small
spools of thread.
q
e
q
w
w
q
e
w
Use the spool holder (special) to hold the specic size of
the spool of threads as shown.
The sizes of the spools of thread are as follows;
The hole diameter of the spool has a range of 3/8˝ to
7/16˝ (9.5 to 10.5 mm)), and the spool length has a range
of 2 3/4˝ to 3˝ (70 to 75 mm).
q Spool holder (special)
w Hole diameter (3/8˝ to 7/16˝)
e Spool length (2 3/4˝ to 3˝)
Firmly insert the spool holder (special) into the hole and
hold the spool as illustrated.
Extra spool pin
Use the extra spool pin when you need to wind a bobbin
without unthreading the machine while working on a
sewing project.
Insert the extra spool pin into the hole as shown.
Place a spool of thread on the extra spool pin and x the
spool with the spool holder.
q Extra spool pin
w Hole for extra spool pin
e Large spool holder
z
x
e
w
r
Draw the thread to the left and forward around the bobbin
winder thread guide as shown.
Firmly pull the thread to the right.
Follow the procedure from x to , of page 9 to wind the
bobbin.
Winding the Bobbin
Removing the bobbin
CAUTION:
Press the lockout key or turn the power switch off.
q
z Slide the hook cover release button q to the right,
and remove the hook cover plate w.
q Hook cover release button
w Hook cover plate
x Remove the bobbin e from the bobbin holder.
e Bobbin
NOTE:
Use the plastic bobbins for horizontal hook marked
with a “J” r. Using other bobbins, such as pre-wound
paper bobbins, may cause stitching problems and/
or damage to the bobbin holder.
8
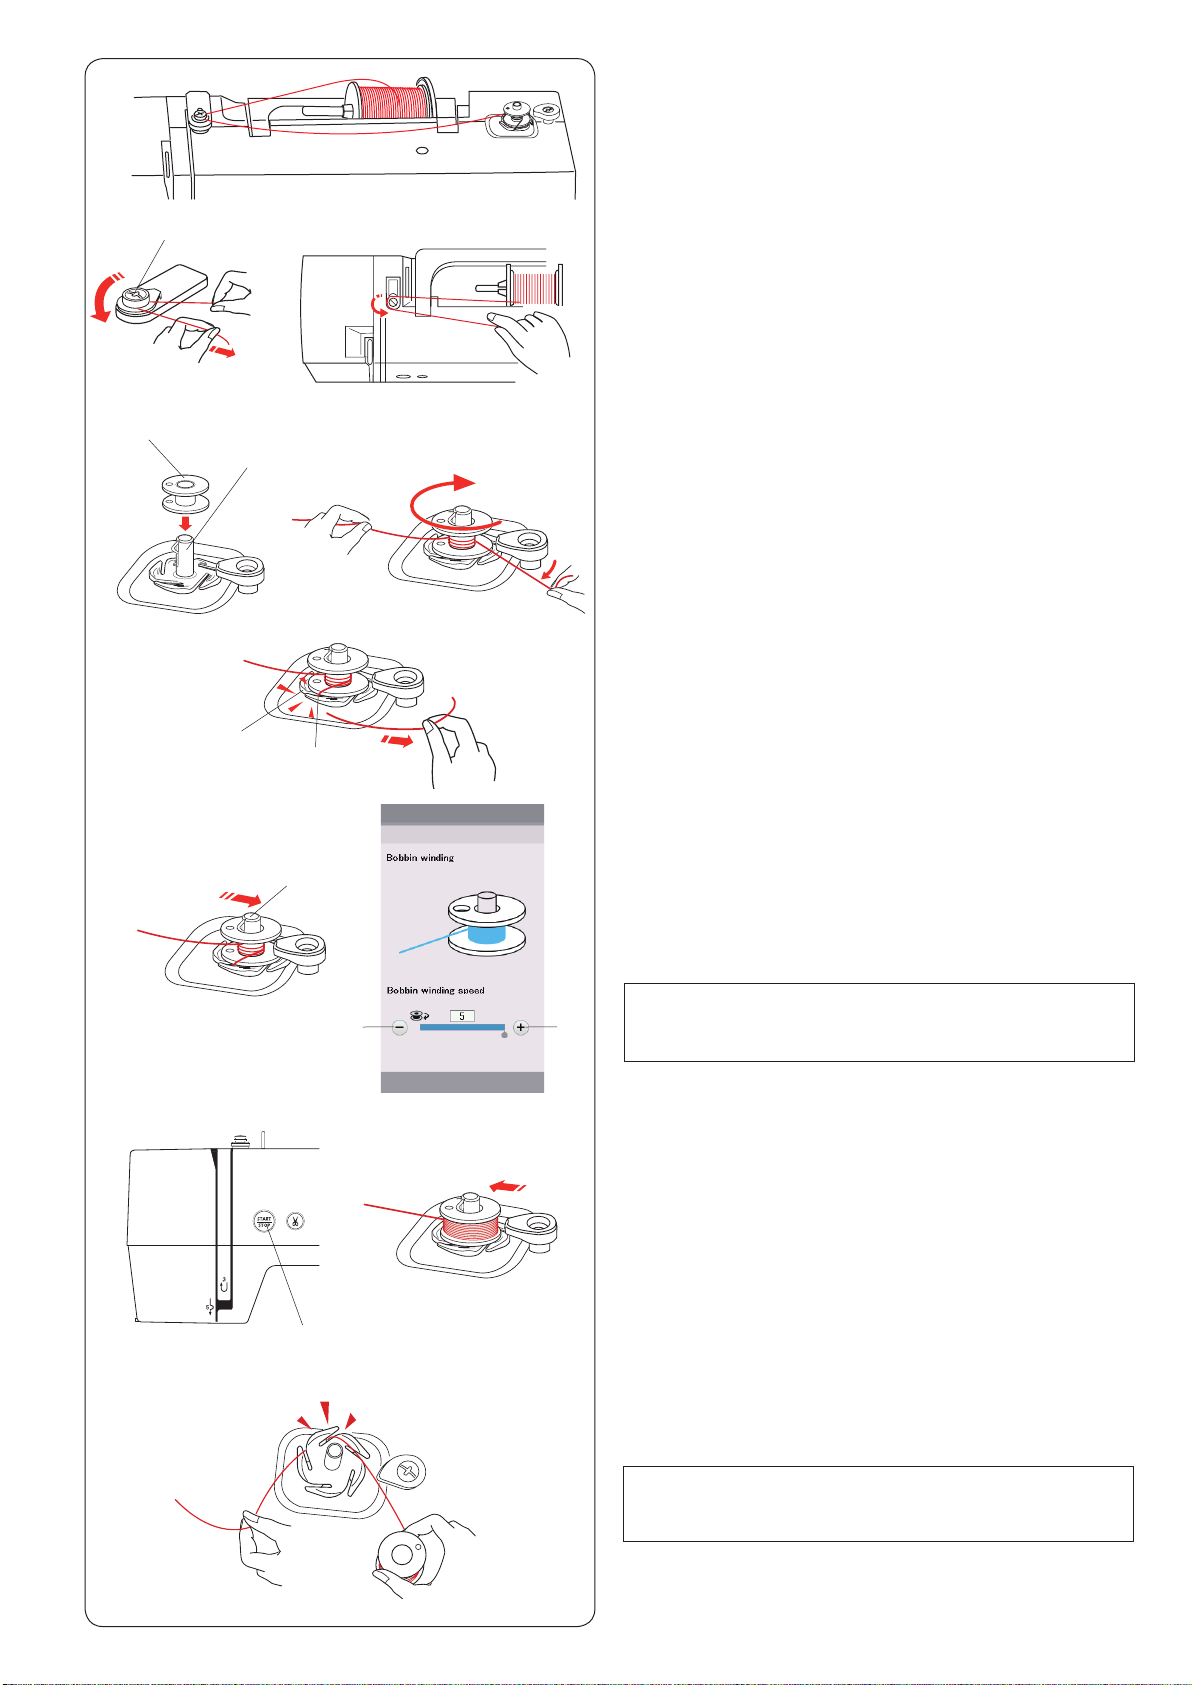
Winding the bobbin
z
x
w
q
v
r
e
c
z Draw the thread from the spool.
Guide the thread around the bobbin winder thread
guide.
q Bobbin winder thread guide
x Put the bobbin on the bobbin winder spindle.
w Bobbin
e Bobbin winder spindle
c Pass the thread to the bobbin.
Hold the thread with both hands and wind it around
the bobbin clockwise several times.
v Insert the thread into one of the slits t of the ange
plate r and pull the thread to cut.
r Flange plate
t Slit
t
n
,
b
e
i
u
m
y
b Push the bobbin winder spindle e to the right.
The visual touch screen will show the bobbin winding
sign.
If you wish to wind the bobbin thread more quickly or
slowly, you can adjust the maximum bobbin winding
speed by pressing the “+” key y or “–” key u.
NOTE:
Do not move the bobbin winder spindle while the
machine is running.
n Press the start/stop button i.
i Start/stop button
When the bobbin is fully wound, it will stop spinning
automatically.
Press the start/stop button i to stop the machine.
m Return the bobbin winder to its original position by
moving the spindle to the left.
, Remove the bobbin.
Insert the thread into one of the slits of the ange
plate and pull the thread to cut.
NOTE:
For safety purposes, the machine will automatically
stop 1.5 minutes after starting bobbin winding.
9
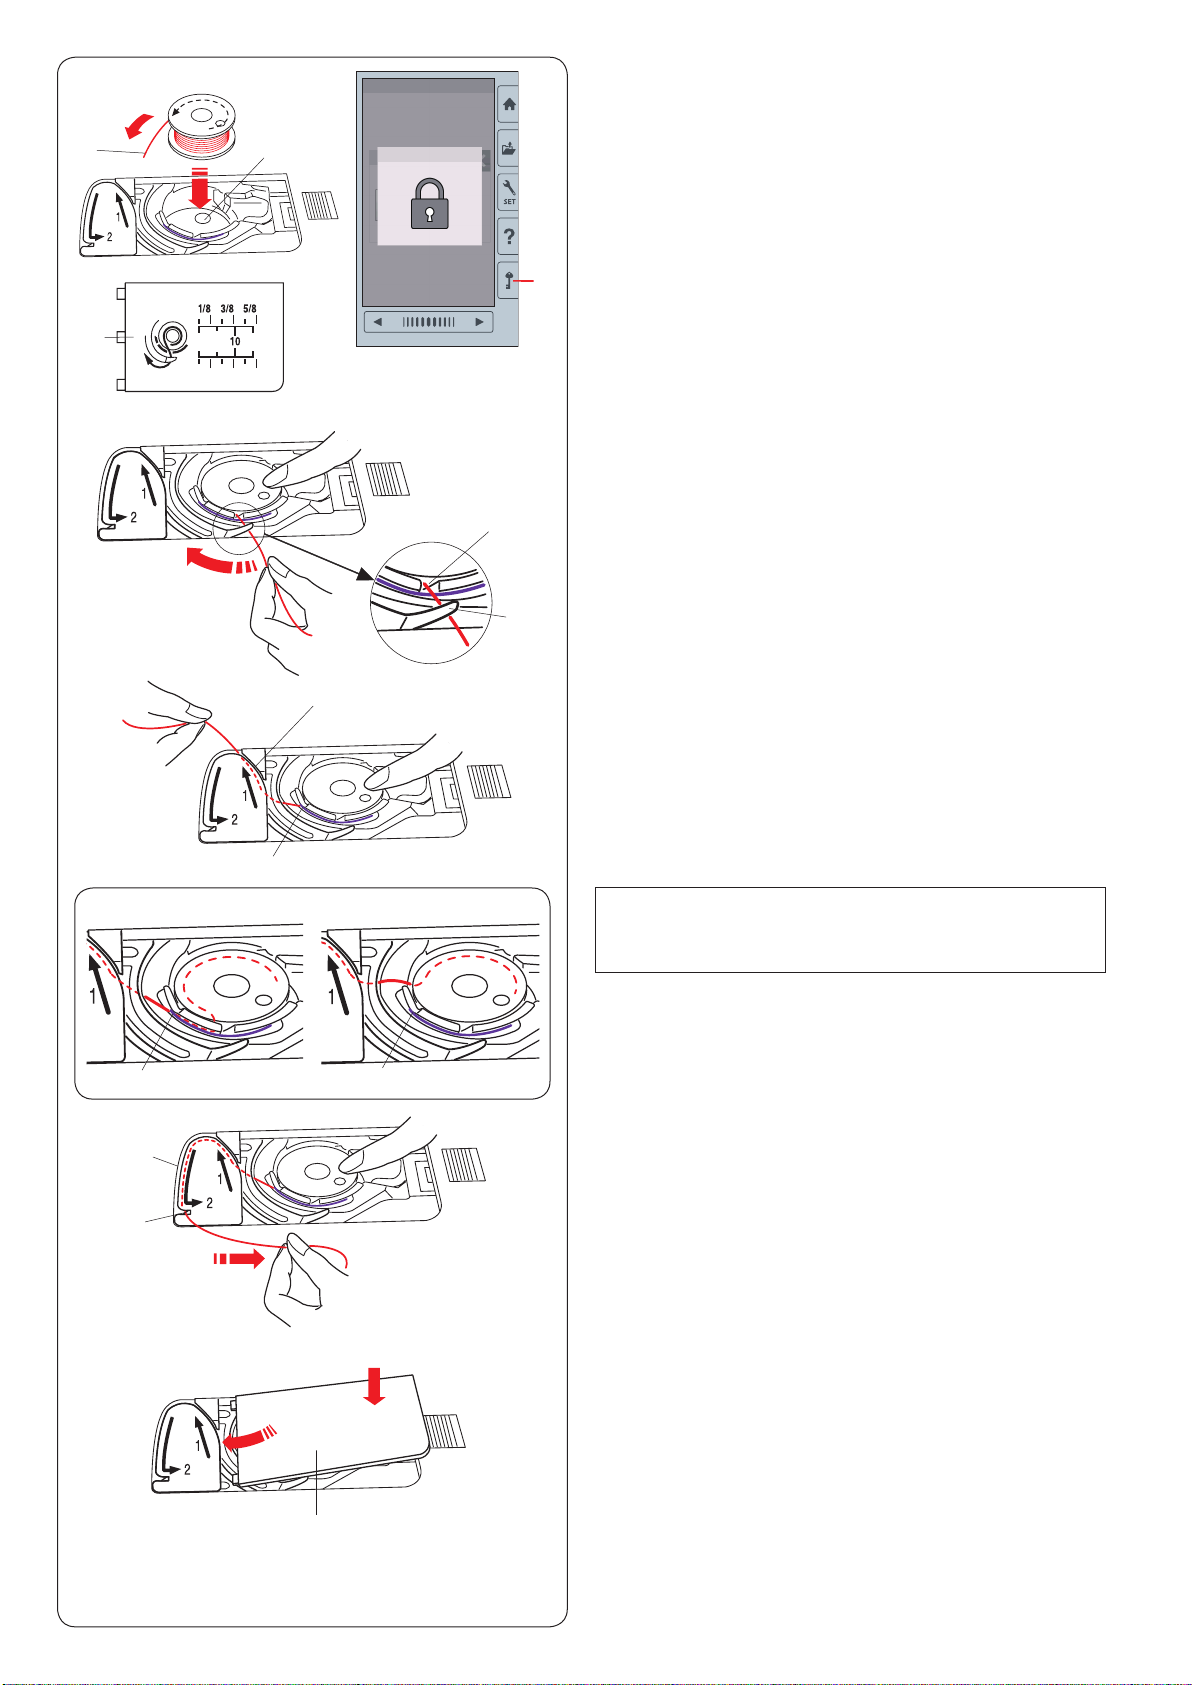
Inserting the bobbin
z
x
r
z Press the lockout key.
Place a bobbin in the bobbin holder with the thread
ew
q
t
running off counterclockwise as shown on the hook
cover plate.
q Lockout key
w End of thread
e Bobbin holder
r Hook cover plate
x Hold the bobbin with your ngertip so it does not
rotate.
Guide the thread into the front notch of the bobbin
hol d er.
Pull the thread to the left to pass it under the guide.
t Front notch
y Guide
y
c
v
i
o
!0
Correct
i
u
i
Wrong
c Draw the thread to the left to pass it into the guide
path marked “1”.
Make sure that the thread comes out from the side
notch of the bobbin holder.
u Guide path 1
i Side notch
NOTE:
If the thread does not come out from the side notch,
rethread from step z.
v Continue to draw the thread along the guide path
marked “2” and pull the thread to the right through the
slit. The thread will be cut to a proper length and held
in place.
o Guide path 2
! 0 Slit (Thread cutter)
b
b Set the left edge of the hook cover plate into opening.
Push down the hook cover plate to t in place.
r
10
q
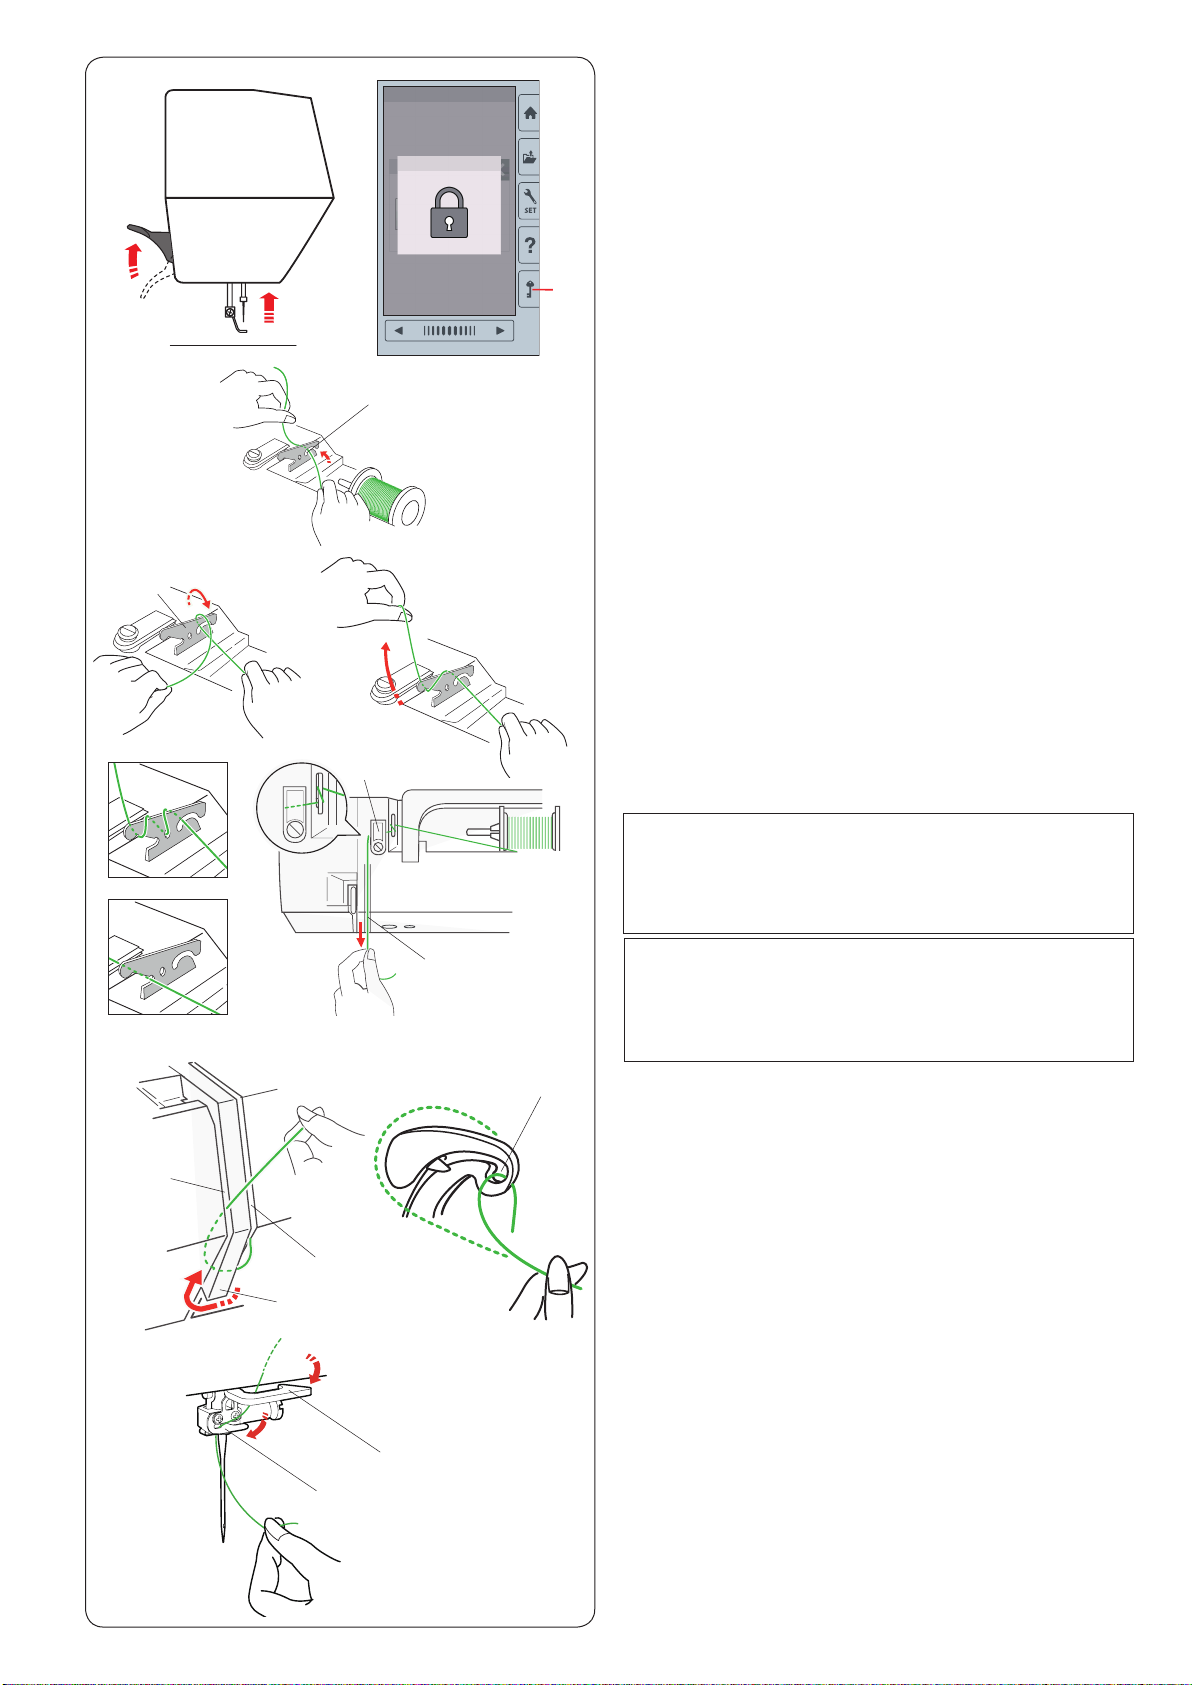
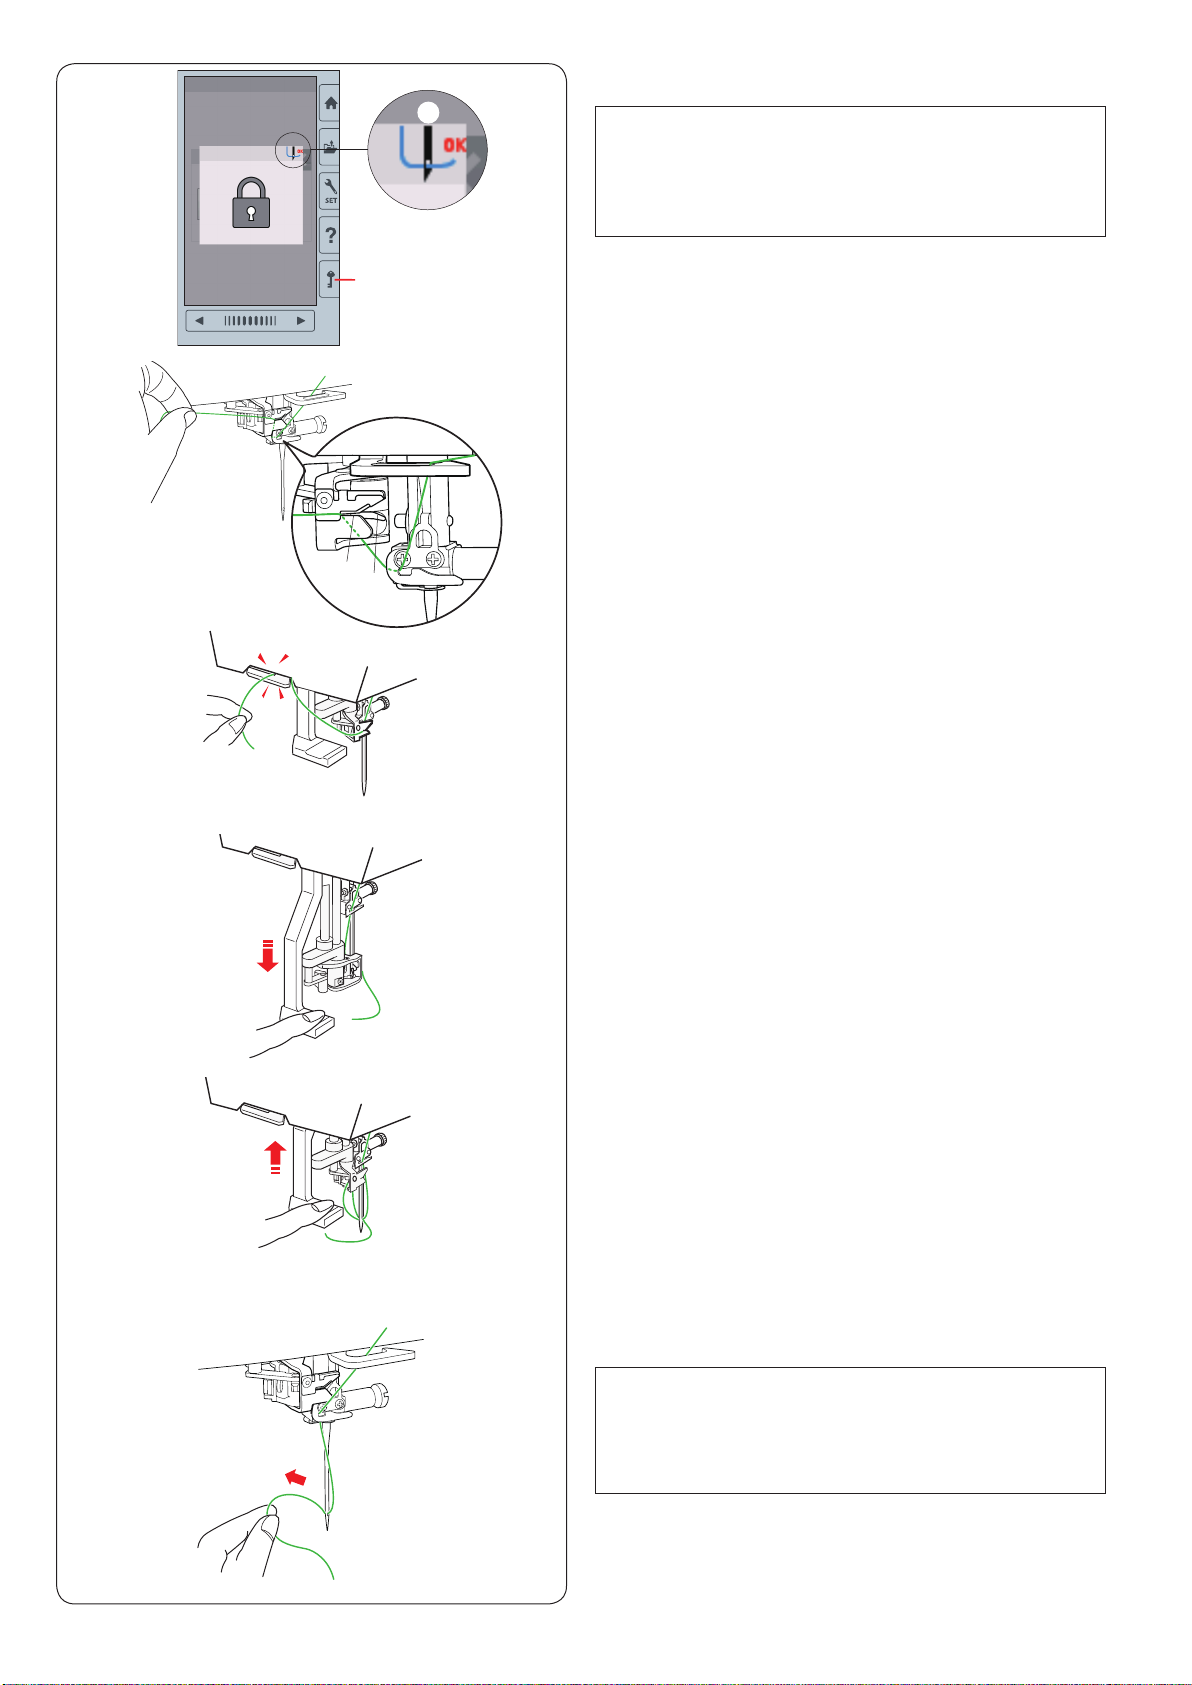
Threading the Machine
Raise the presser foot lifter.
Press the lockout key to lockout the machine.
Turn the handwheel toward you to raise the needle at its
highest position.
q Lockout key
Pass the thread in order from z to m.
z
x
c
b
e
y
u
o
n m
i
t
r
w
v
t
!0
z Pull the thread from the spool.
Hold the thread with both hands and pass the thread
into the slit of the pre-tension thread guide.
w Slit
x Wind the thread around the pre-tension thread guide
once as shown.
Draw the thread around the corner of the upper thread
guide.
Firmly pull the thread toward you along the right
channel until the thread snaps.
e Pre-tension thread guide
r Upper thread guide
t Right channel
NOTE:
If the thread slips out of the pre-tension thread guide
while sewing, wind the thread through the hole as
shown y when threading through the pre-tension
thread guide.
NOTE:
If the thread coming out from the needle eye is too
short after auto thread cutting and skipped stitch
occurs, draw the thread through the pre-tension
thread guide as shown u.
c Draw the thread down along the right channel and
around the bottom of the thread guide plate.
Pull the thread up along the left channel.
t Right channel
i Thread guide plate
o Left channel
v While holding the thread at the spool, rmly draw the
thread up and to the back of the take-up lever. Draw
the thread forward to draw it into the eye of the takeup lever.
!0 Eye of the take-up lever
b Then pull the thread down along the left channel and
through the lower thread guide.
!1 Lower thread guide
!2
!1
n Slide the thread from the right of the needle bar thread
guide to the left.
!2 Needle bar thread guide
m Thread the needle with the needle threader (refer to
the next page).
11
z
w
Built-in Needle Threader
NOTE:
The needle threader can be used with a #11 to #14
needle.
Thread size 50 to 90 is recommended.
Do not use thread size 30 or thicker.
x
c
v
e
q
z Press the lockout key to lock the machine.
Lower the presser foot.
Turn the handwheel toward you to until the needle
thread sign w appears on the right upper corner of
the lockout window.
q Lockout key
w Needle threader sign
x Draw the thread through the slit e of the needle
threader. The thread should pass under the hook r.
e Slit
r Hook
r
c Pull the thread up and slip it between the thread cutter
and face plate from behind.
Pull the thread toward you to cut.
v Pull down the needle threader knob as far as it will go.
b
n
b Raise the threader slowly so a loop of the thread is
pulled up through the needle eye.
n Pull the thread loop to take the thread end out through
the needle eye to the rear.
NOTE:
If the thread is caught in the hook and the thread loop
is not formed, remove the thread from the hook and
pull it to take the thread end out through the needle
eye.
12
w
e
q
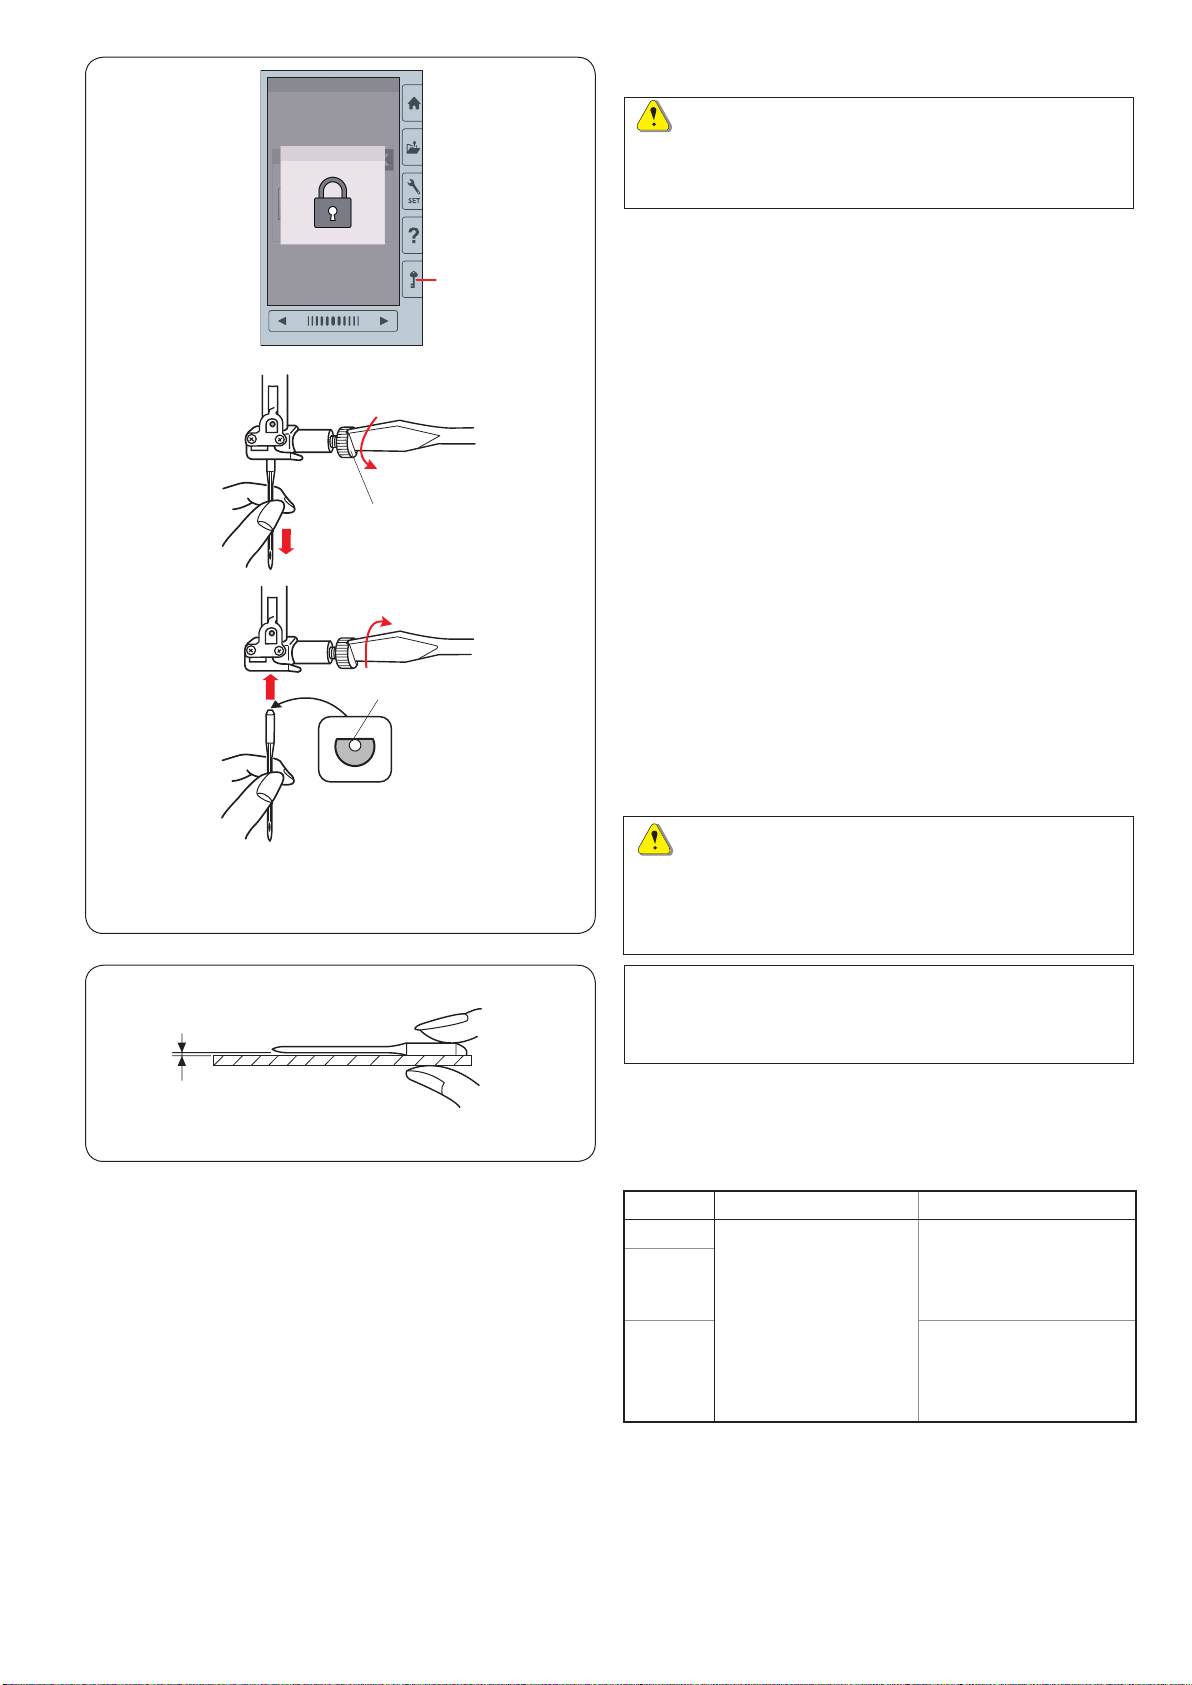
Replacing Needles
CAUTION:
Always make sure to press the lockout key to lockout
the machine or turn the power switch off before
replacing the needle.
Raise the needle by turning the handwheel.
Turn the power switch off or press the lockout key.
q Lockout key
Loosen the needle clamp screw by turning it
counterclockwise.
Remove the needle from the clamp.
w Needle clamp screw
Insert a new needle into the needle clamp with the at
side of the needle to the rear.
e Flat side
When inserting the needle into the needle clamp, push it
up against the stopper pin and tighten the needle clamp
screw rmly with a screwdriver.
To check needle straightness, place the at side of the
needle onto something at (a needle plate, glass etc.).
The gap between the needle and the at surface should
be consistent.
Gap
r
r
Never use a blunt needle.
CAUTION:
Be sure to tighten the needle clamp screw rmly
with a screwdriver when attaching a needle to the
machine, otherwise the needle may break or cause
malfunction.
NOTE:
Use size 11 blue tipped needle for ne fabrics.
For medium to heavy weight fabrics, use size 14
needles.
Fabric and Needle Chart
Fabric Thread Needle
Fine
Medium
Embroidery thread
Heavy
weight
Janome bobbin thread for embroidery is recommended
for bobbin.
Blue tip needle
or
EL x 705
Size 12/80
Universal needle #14
or
EL x 705
Si ze 14/90
13
w
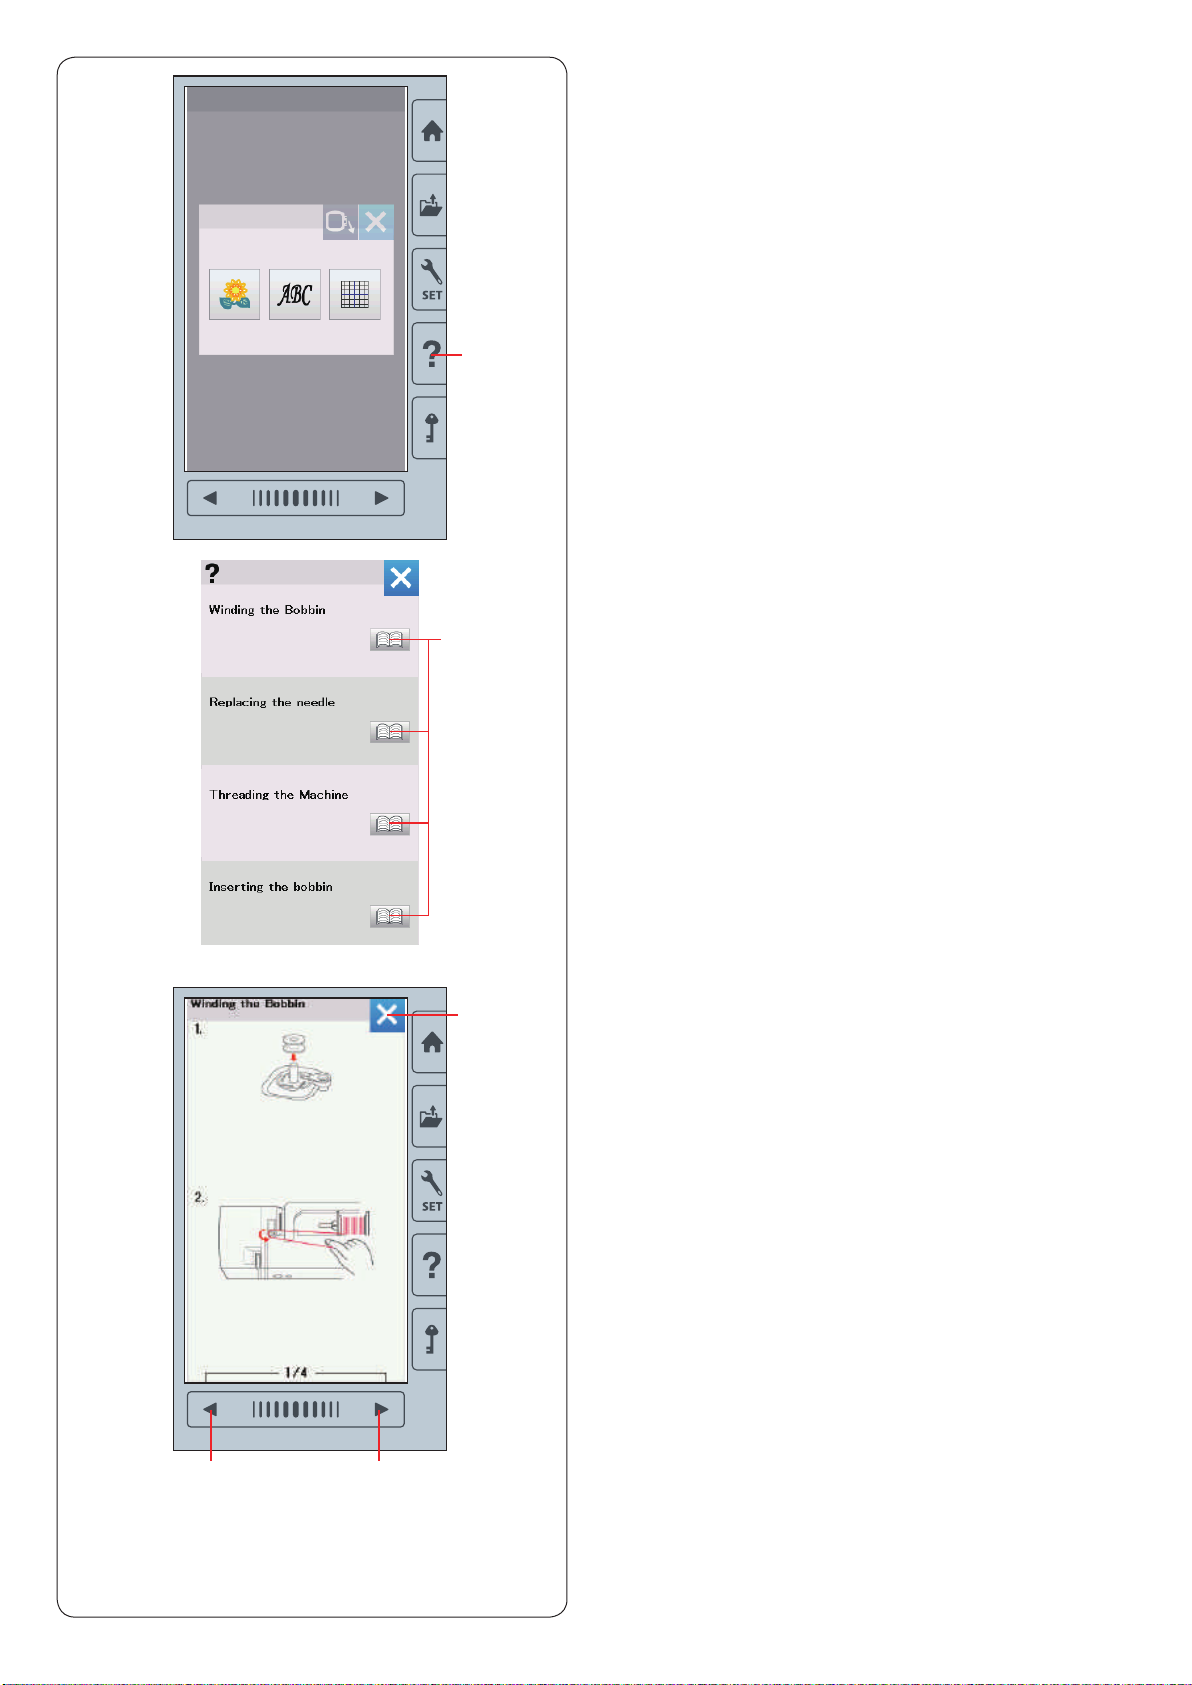
On-screen Help
Press the help key to open the help menu.
You can view instructions on 4 topics of essential
operations of the machine.
Select the help topic by pressing the book icon and the
step-by-step instruction will open.
q Help key
w Book icon
q
t
To view the next page, press the next page key.
To view the previous page, press the previous page key.
Press the X key to close the current window.
e Next page key
r Previous page key
t X key
er
14
z
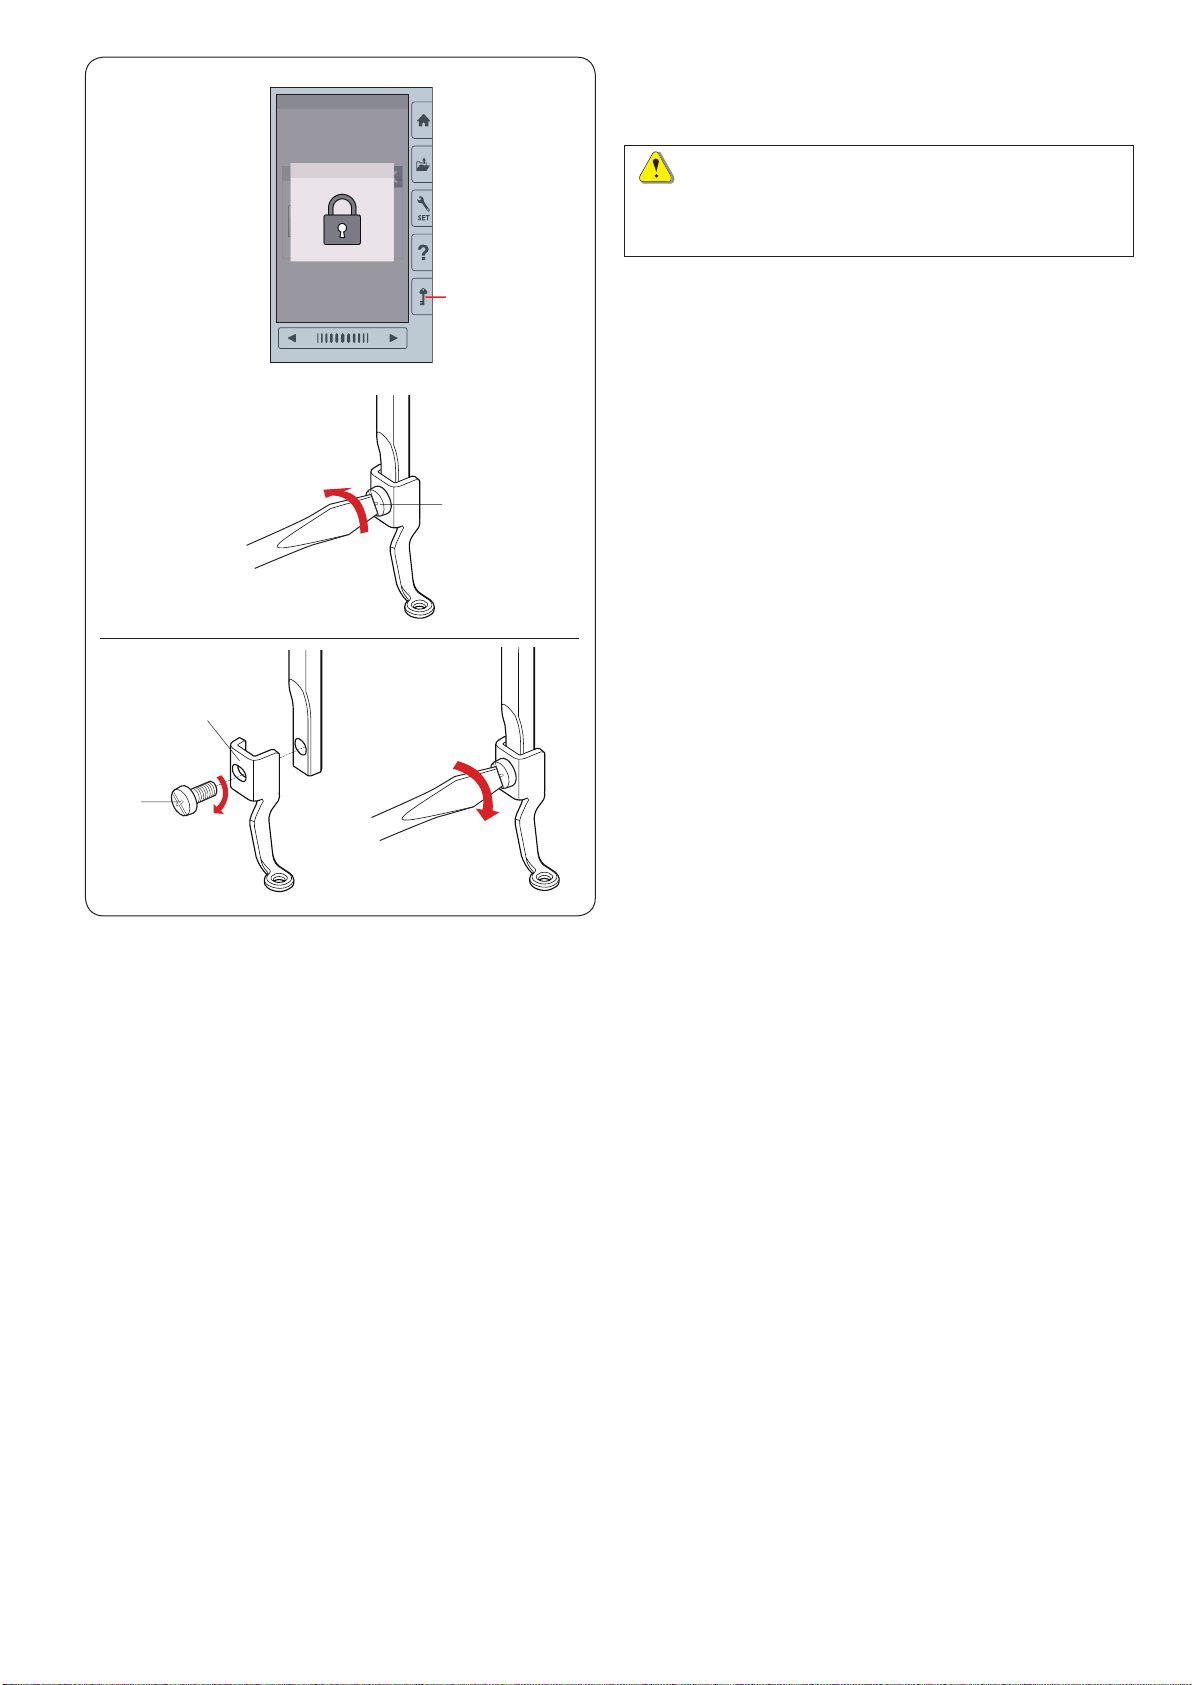
Removing and Attaching the Embroidery Foot
Remove the embroidery foot when removing the needle
plate for the maintenance, etc.
CAUTION:
Always make sure to press the lockout key to lockout
the machine or turn the power switch off before
removing or attaching the embroidery foot.
x
z x
w
e
q
w
To remove:
z Turn the power switch off or press the lockout key.
Raise the needle by turning the handwheel toward
you.
q Lockout key
x Loosen the setscrew with the screwdriver and remove
the embroidery foot.
w Setscrew
To attach:
z Attach the embroidery foot to the presser bar from the
left side.
w Setscrew
e Embroidery foot
x Tighten the setscrew securely with the screwdriver.
15
z
x
w
q
e
r
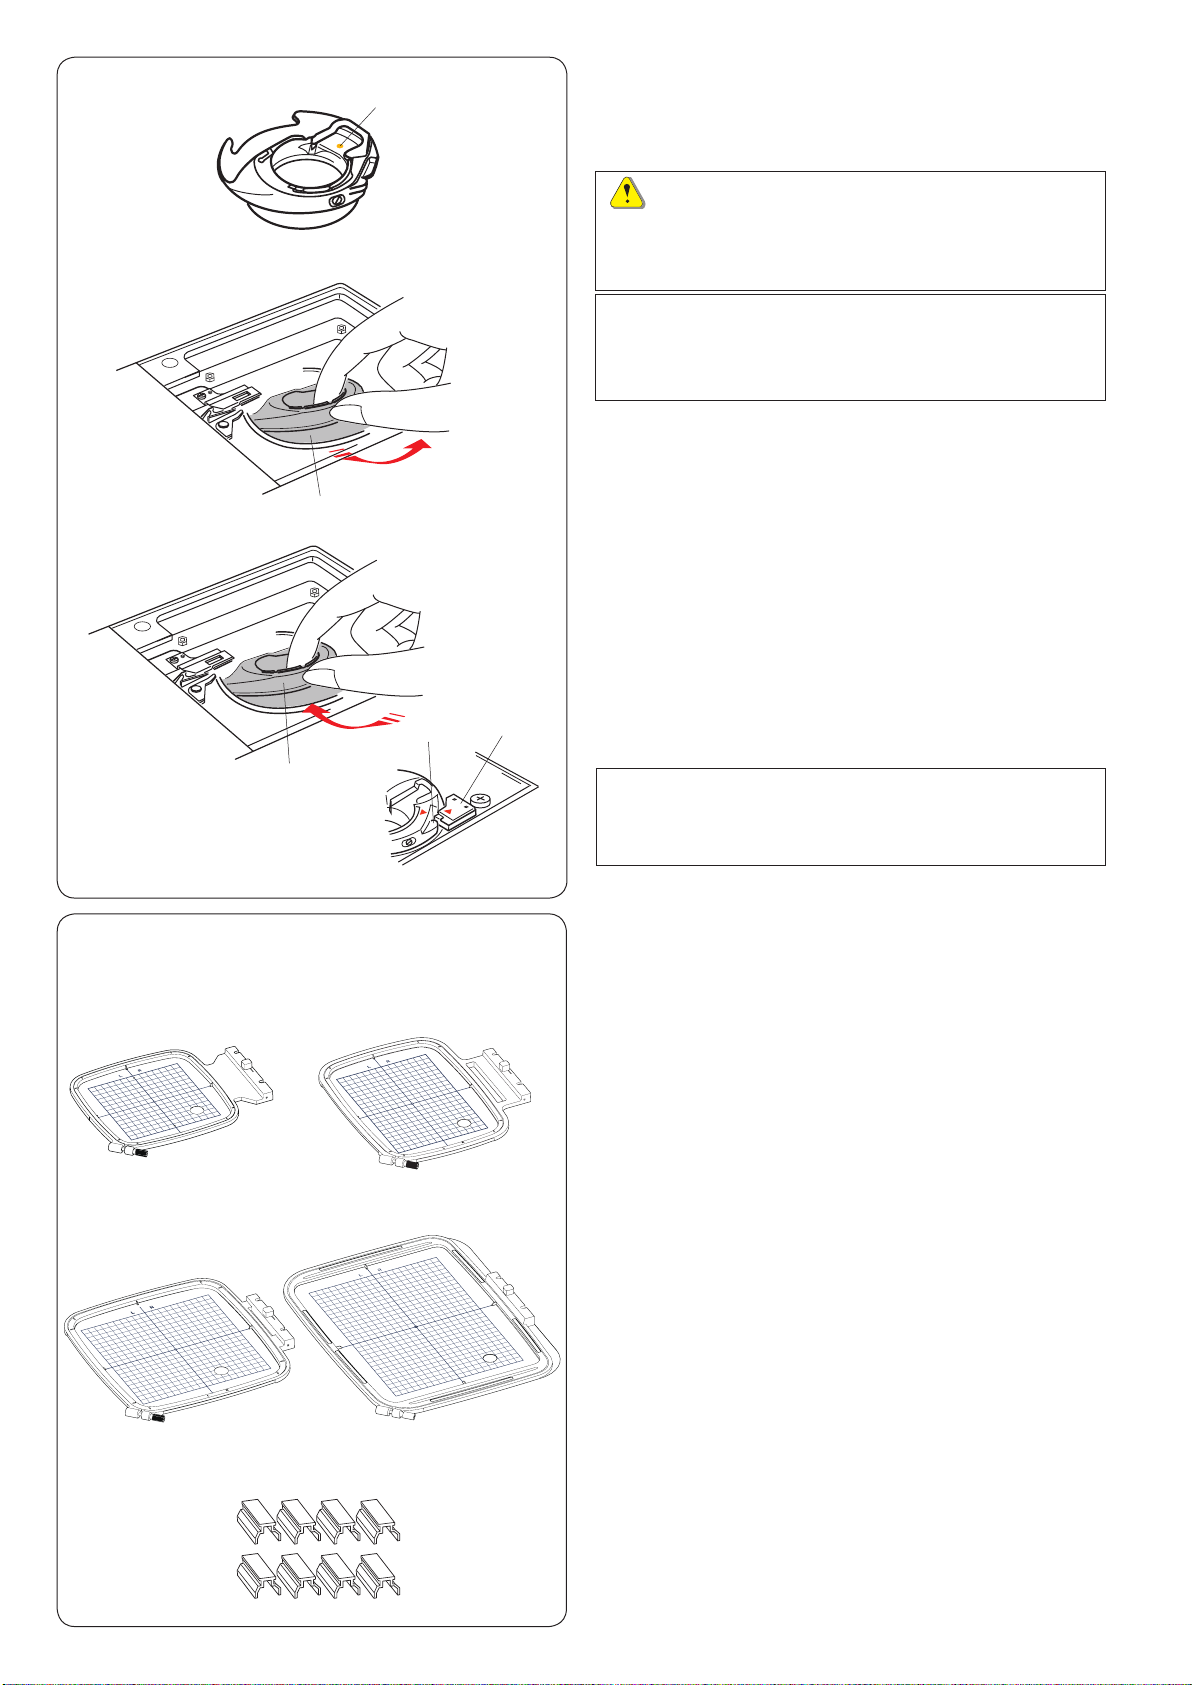
Bobbin Holder for Embroidery (high tension)
Replace the standard bobbin holder with the bobbin
holder for embroidery (high tension) when using bobbin
threads other than Janome bobbin thread for embroidery.
CAUTION:
Always make sure to press the lockout key to lockout
the machine or turn the power switch off before
attaching the bobbin holder.
NOTE:
The special bobbin holder for embroidery (high
tension) is marked with a yellow dot for identication.
q Yellow dot
z Remove the needle, embroidery foot and needle plate
(refer to the pages 13, 15 and 58).
Take out the standard bobbin holder.
w Standard bobbin holder
x Insert the special bobbin holder into the hook race.
Make sure to match the knob of the bobbin holder with
the stopper on the machine.
Attach the needle plate, presser foot and needle.
e Knob
r Stopper
t Special bobbin holder for embroidery (high tension)
t
q w
re
NOTE:
Use the standard bobbin holder when sewing quilting
designs that use the same thread for the bobbin as the
needle thread.
Embroidery Hoops
q Embroidery hoop SQ14b
A square embroidery hoop with a 14 cm (5.5˝) square
embroidery area.
w Embroidery hoop RE20b
An extra large embroidery hoop with a 14 cm by 20 cm
(5.5˝ by 7.9˝) embroidery area.
e Embroidery hoop SQ20b
A square embroidery hoop with a 20 cm (7.9˝) square
embroidery area.
r Embroidery hoop RE28b
An extra large embroidery hoop with a 20 cm by 28 cm
(7.9˝ by 11˝) embroidery area.
t
t Clamp (RE20b, SQ20b and RE28b)
A clamp for holding the fabric to the embroidery hoops
RE20b, SQ20b and RE28b.
* The embroidery hoops supplied with your machine vary
depending on your model.
16
Stabilizers
To create the best quality embroidery, it is important to
use stabilizers.
How to use:
Attach the stabilizer to the wrong side of the fabric.
You may need to use more than one layer.
For rm fabrics, you may place a thin sheet of paper
under the fabric.
The non-adhesive type should be used when
embroidering fabric which cannot be ironed or for
sections which are difcult to iron.
Cut the stabilizer larger than the embroidery hoop and
set it on the hoop so that the entire piece is fastened to
the hoop to prevent any looseness in the fabric.
Attaching the stabilizer
Place the wrong side of fabric and the glossy side of
the stabilizer together. Fold up a corner of the stabilizer
and fuse it with an iron.
NOTE:
Fold up a corner of the stabilizer, to make it easier
to peel off the excess stabilizer after stitching.
Ironing temperatures vary depending on the kind of
adhesive stabilizer you are using.
Types of the stabilizers
Type Usage Property
Tear- away Stable woven fabrics Made from a ber that will tear easily.
Iron-on Knits and all kinds of unstable fabrics Adhesive type fusible with an iron.
Cut-away Knits and all kinds of unstable fabrics Non-woven fabric that does not tear.
Water soluble Cutwork or lace embroidery
Right side of looped fabrics such as towels to avoid loops
coming through the embroidery
Heat-away Cutwork or lace embroidery A thin lm that will melt away with
NOTE:
Sticky type stabilizers can be used only for securing a small piece of fabric or work that cannot be secured in the
hoop, or for securing velvet and other napped fabric that would be permanently marked by the hoop.
Clean the bobbin holder after stitching as glue can get stuck on it.
A thin lm that will dissolve in water.
heat.
17
z
q
w
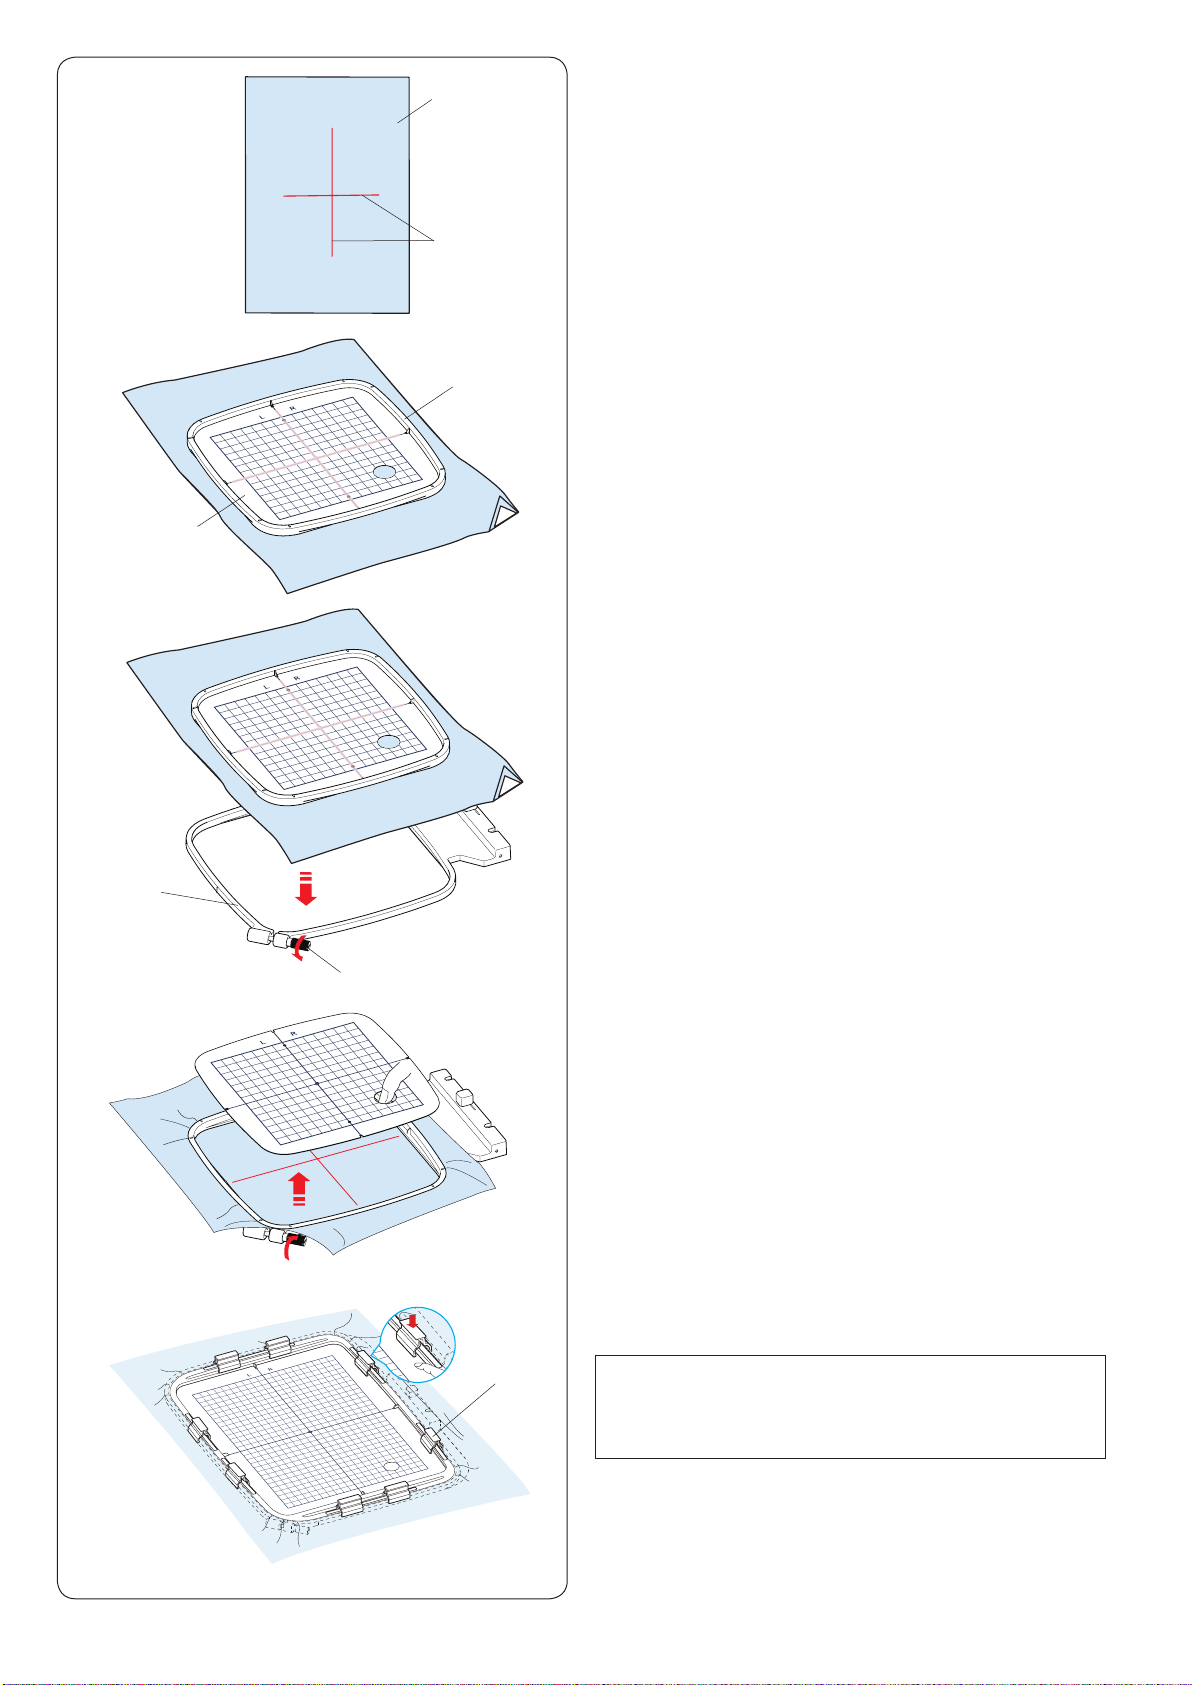
Setting the Fabric in an Embroidery Hoop
z Prepare a fabric and attach a stabilizer to the wrong
side of the fabric.
The fabric and stabilizer should be larger than the
hoop size.
Draw the centerlines on the fabric with tailor’s chalk.
q Fabric
w Centerlines
x
c
y
r
e
x Lay the inner hoop and template on the fabric,
matching the centerlines of the fabric with the
template.
e Inner hoop
r Template
c Loosen the hoop tightening screw on the outer hoop.
Place the inner hoop and fabric on the outer hoop.
t Hoop tightening screw
y Outer hoop
v
b
t
u
v Push the inner hoop and fabric into the outer hoop.
Tighten the screw on the outer hoop to stretch the
fabric. Make sure that the fabric is stretched tightly in
the hoop.
Remove the template.
b Clamp the fabric to the hoop with the clamps when
using hoop SQ20b, RE20b or hoop RE28b.
u Clamp
NOTE:
Thick layers of fabric and stabilizer may cause
skipped stitches, or broken threads and needles.
Avoid sewing on the layers thicker than 3 mm (1/8˝).
18

z
x
e
e
r
q
ry
e
e
t
Attaching the Embroidery Hoop to the Machine
To attach:
z Raise the presser foot.
Turn the handwheel toward you to raise the needle at
its highest position. Turn the power switch on.
If the carriage is not at the home position, the caution
message appears to move the carriage to the home
position.
Press OK key to move the carriage to the home
position.
q OK key
Select or edit the desired pattern and press OK key.
w
Ready to Sew screen appears and the carriage moves
to the start position.
Press the lockout key to lockout the machine.
w Lockout key
x Place the prepared hoop on the machine.
Position the hoop by aligning the notches of the hoop
with the carriage pins.
e Notch
r Carriage pin
t Carriage
y Lever
y
r
e
c b
v
y
z x
r
y
c Shift the lever in the direction of the arrow.
y Lever
v Attach the hoop by pushing it against the carriage
pins.
b Push the lever in the direction of arrow to lock the
hoop in place.
To remove:
z Raise the presser foot. Turn the handwheel toward
you to raise the needle at its highest position.
Press the lockout key to lock the machine.
x Shift the lever in the direction of the arrow and remove
the hoop.
y Lever
u
CAUTION:
• Be careful not to place the excess of fabric
between the carriage and machine body u.
• Never try to move the carriage by hand or touch
the carriage while it is moving.
19
q
Thread Holder
To avoid sewing over a tail of the needle thread, place
the thread end on the thread holder.
Pass the needle thread through the hole in the
embroidery foot and draw it up to the thread holder.
Hang the thread on the thread holder from front to back.
q Thread holder
q
w e
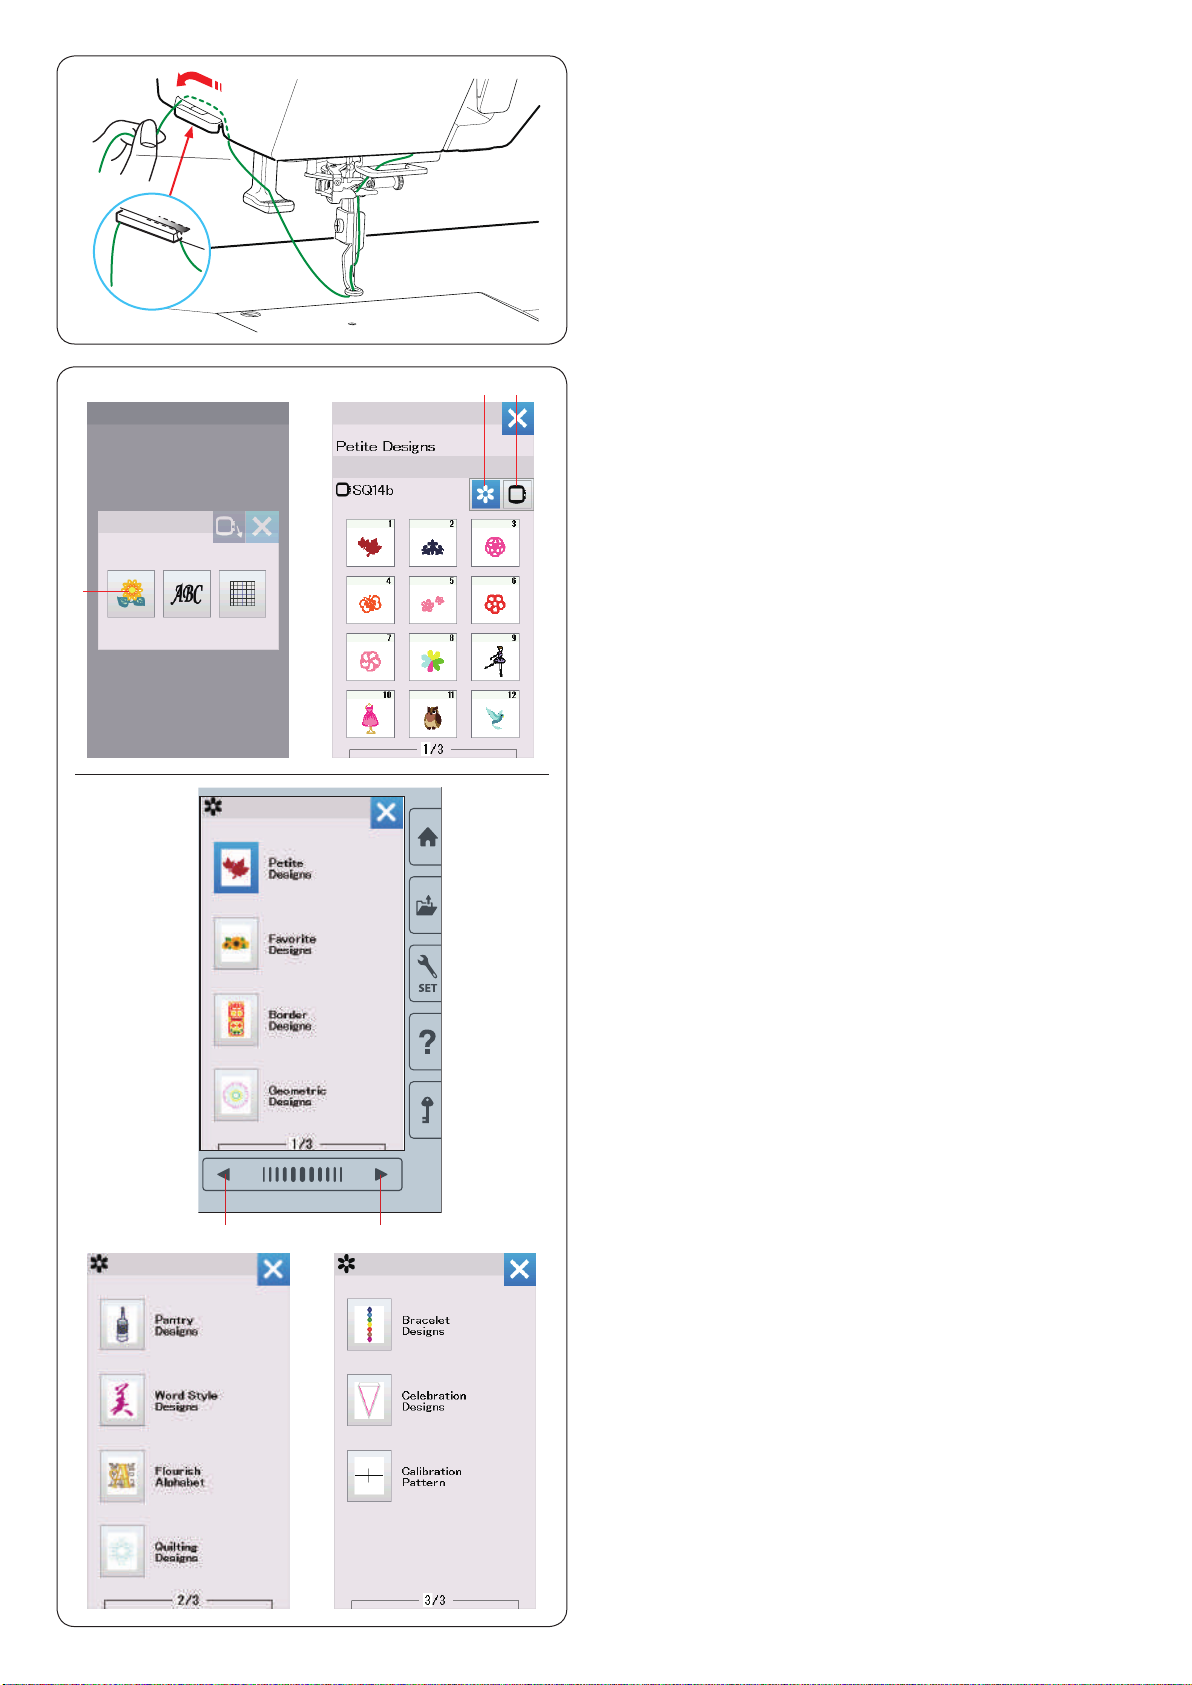
Selecting Built-in Embroidery Designs
Press the built-in design key and the rst page of the
design list of Petite Designs will open.
q Built-in design key
Press the design category key to browse the design list
by design category, or press the hoop selection key to
browse the designs by hoop size.
w Design category key
e Hoop selection key
Design category
Press the design category key w to show the design lists
by category.
Press the previous/next page keys to browse the design
lists.
r Previous page key
t Next page key
r
Page 1 of 3
• Petite Designs
• Favorite Designs
• Border Designs
• Geometric Designs
Page 2 of 3
• Pantry Designs
• Word Style Designs
• Flourish Alphabet
• Quilting Designs
t
Page 3 of 3
• Bracelet Designs
• Celebration Designs
• Calibration Pattern
Press the desired category to select and the pattern
selection window will open.
Browse the pattern list with the previous/next page keys,
and select the desired pattern by pressing the pattern
ic on key.
20
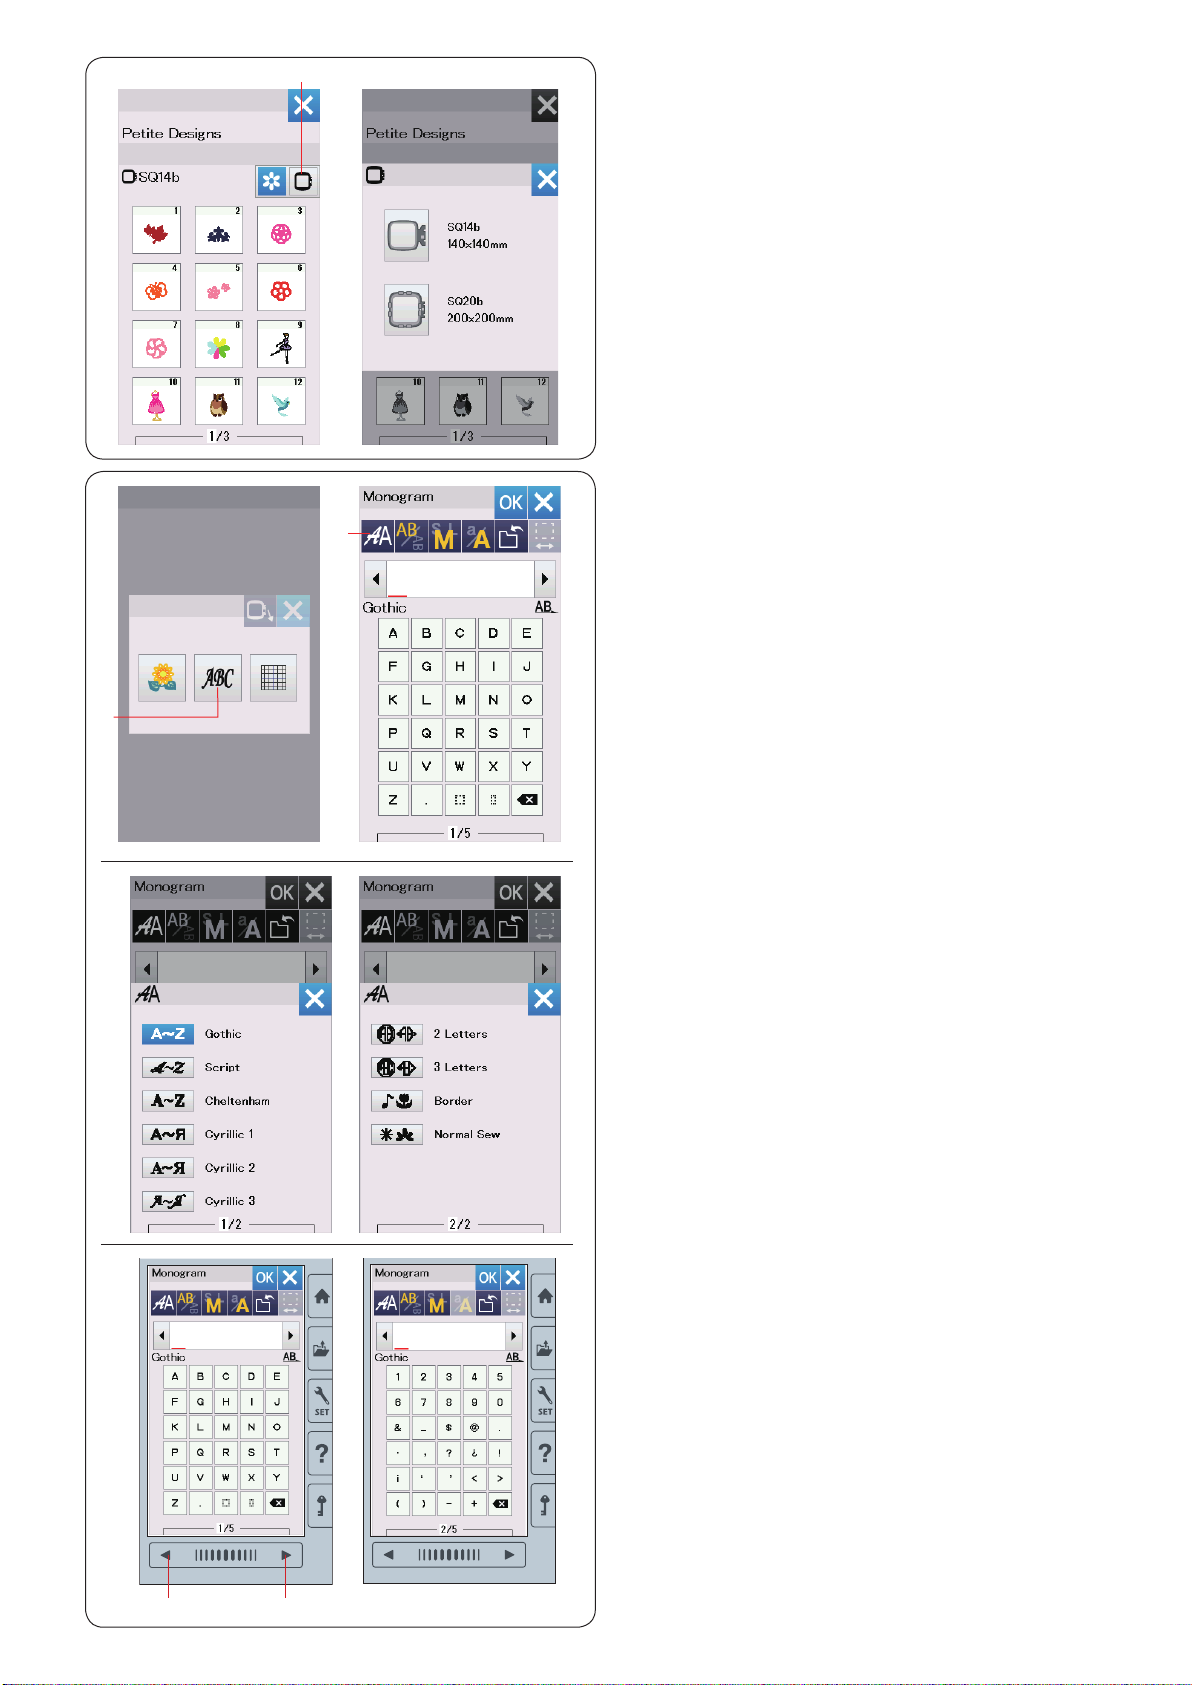
q
e
w
Selecting the design by hoop size
Press the hoop selection key e and the hoop selection
window will open. Select a hoop size the same or smaller
than the one you will attach.
Browse the design list with the previous/next page keys,
and select the desired pattern by pressing the pattern
ic on key.
Monogramming
Press the monogram key and the monogram window will
open.
Press the font selection key to open the font selection
window.
q Monogram key
w Font selection key
You can select one of the 10 fonts for monogramming as
well as 2-letter, 3-letter, border patterns and normal sew
patterns.
The following fonts and patterns are available:
Page 1 of 2
• Gothic font
• Script font
• Cheltenham font
• Cyrillic 1 font
• Cyrillic 2 font
• Cyrillic 3 font
Page 2 of 2
• 2-Letter
• 3-Letter
• Border patterns
• Normal sew patterns
Press the icon key of the desired font and the monogram
window will open.
Browse pages with the previous/next page keys.
You can enter alphabet letters, numbers, symbols,
Cyrillic and European letters.
e Previous page key
r Next page key
e
r
21
 Loading…

Фирменный интернет-магазин швейных машин Janome
+7 495 766-56-75
![]() Корзина пуста
Корзина пуста
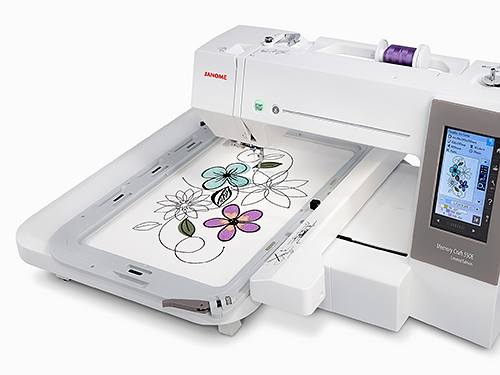
Вышивальная машина Джаноме Мемори Крафт 550е

219 000 руб.RUB
Наличие: Мало


Усовершенствованная вышивальная машина Janome Memory Craft 550E теперь способна вышивать на пяльцах еще большего размера — до 360х200 мм! Увеличенный до 180 набор встроенных дизайнов, 6 алфавитов, включая русский, и возможность создания 2-х или 3-х буквенных монограмм открывают еще больше возможностей для проявления ваших творческих идей. А если этого будет недостаточно, то вы сможете легко перенести свои дизайны в машину с помощью USB. Цветной сенсорный дисплей позволяет совершать редактирование вышивок, а встроенный швейный советник поможет разобраться с основными операциями при работе на этой машине. Возможность смазки машины без обращения в сервисный центр — еще один неоспоримый плюс.
Если вы давно мечтали не только шить, но и декорировать изделия с помощью изящной элегантной вышивки, то Janome Memory Craft 550E — идеальное дополнение к вашей швейной технике.
Особенности:
Размер вышивки до 360 х 200 мм
Машина способна вышивать дизайны размером до 360х200 мм без поворота пялец. Крупная, привлекающая внимание вышивка будет смотреться еще более эффектно! Специальный увеличенный расширительный столик и пяльцы 4-х размеров входят в комплект.
180 встроенных дизайнов
В машину встроены 180 различных дизайнов, включая классические, квилтовые, цветочные монограммы, в стиле ручной вышивки Сашико и другие. Будет нелегко выбрать из большого разнообразия представленных вышивок. Но помимо этого у вас будет возможность использовать и свои собственные, просто перенесите их на машину с помощью USB.
6 алфавитов и монограммы
Помимо готовых встроенных дизайнов у вас будет возможность дополнить изделия с помощью инициалов или слов, используя латинский алфавит или кириллицу с различными видами начертания. А функция создания монограмм позволит создать 2-х или 3-х буквенные сочетания нескольких видов.
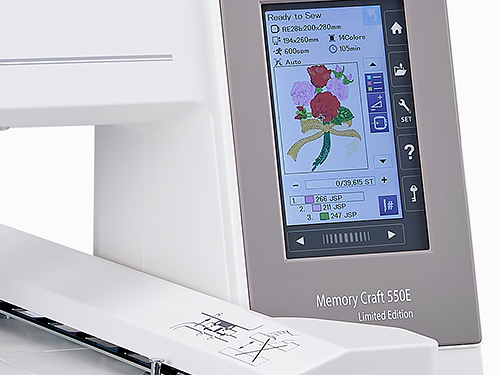
Цветной сенсорный дисплей
Управление машиной осуществляется на цветном сенсорном дисплее, на котором вы можете видеть образцы дизайнов вышивки, различные параметры и рекомендации, а также при необходимости изменять настройки.
Возможности машины
Вы сможете управлять скоростью вышивки в настройках на экране машины, изменяя ее в пределах от 400 до 860 стежков в минуту. Функция автоматической обрезки позволяет запрограммировать машину на обрезку нити при длине стежка более 3 мм, при смене цвета/окончании или просто при нажатии на соответствующую кнопку. Датчик окончания шпульной нити подскажет, когда необходимо выполнить намотку. При обрыве нити машина останавливается и возвращается на нужную позицию.
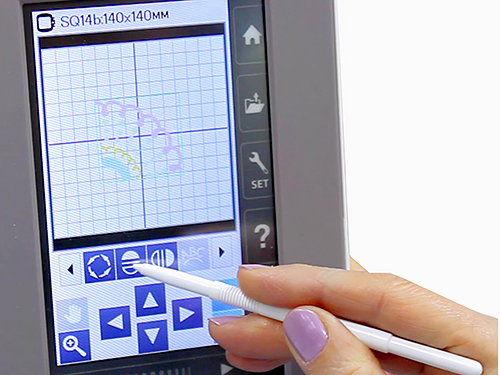
Редактирование на экране
Основные операции редактирования дизайнов вы можете осуществлять непосредственно на экране машины: изменение размера, поворот, перемещение, комбинирование, копирование, изменение цветов и некоторые другие. Измененные дизайны вы можете сохранить в памяти машины или на USB и затем возвращаться к ним, когда вам будет удобно.
Инструкции для Janome Memory Craft 550e:
Строчки Janome Memory Craft 550e:
Комплектация Janome Memory Craft 550e:
- Шнур
- USB кабель
- Мягкий чехол (накидка на машину)
- Расширительный столик
- Вышивальные пяльцы SQ14b с шаблоном 140х140
- Вышивальные пяльцы RE20b с шаблоном 140х200
- Вышивальные пяльцы SQ20b с шаблоном 200х200
- Вышивальные пяльцы RE36b с шаблоном 200х360
- Зажимы для пялец, 8 шт
- Шпульки
- Отвертка
- Ключ-отвертка (для игольной пластины)
- Щеточка для чистки
- Ножницы
- Набор игл
- Держатели катушки большие
- Держатели катушки маленькие
- Держатель катушки специальные
- Дополнительный катушечный стержень
- Специальный шпуледержатель для вышивки с высоким натяжением
- Стилус для сенсорного экрана
- Средство для очистки шпуледержателя
Новая вышивальная машина Memory Craft 550E от компании Janome — идеальное дополнение к Вашей швейной машине. Декорирование изделий вышивкой еще никогда не было таким легким и быстрым! Максимальный размер вышивки теперь составляет 200 х 360 мм, а благодаря широкому приставному столику Вы сможете воплотить в жизнь самые объемные и сложные проекты!
Вышивальная машина Memory Craft 550E имеет 180 встроенных вышивальных дизайнов и 6 видов шрифта для создания уникальных монограмм. Новая функция создания монограмм позволяет создать 2-х или 3-х буквенные сочетания нескольких видов. Вышивальные дизайны легко и просто передать на машину посредством USB-кабеля и отредактировать непосредственно на ярком и красочном сенсорном дисплее машины. В электронном меню машины предусмотрено множество профессиональных инструментов для редактирования дизайнов вышивки.
Вышивальные функции:
- Максимальный размер вышивки — 200х360 мм
- Встроенная память 4 MB
- Максимальная скорость вышивки — 860 ст./мин.
- 180 встроенных дизайнов вышивки
- Вышивальные алфавиты – 6 видов
- 52 вида декоративных строчек
- 46 видов декоративных бордюров
- Стандартные пяльцы в комплекте: 140х140 мм, 140х200 мм, 200х200 мм, 200х360 мм.
Функции редактирования:
- Функция зеркального отображения вышивки (по горизонтали и по вертикали)
- Увеличение/уменьшение размера вышивки от 80% до 120% (по 1%)
- Поворот вышивки по и против часовой стрелки по 1 и по 45 градусов
- Копирование дизайнов
- Возможность повторного редактирования
- Возможность установить порядок вышивания
- Функция расположения по углам
- Функция объединения цветов
- Возможность изменения цвета
- Вышивка одним цветом
- Группировка и комбинирование дизайнов
- Мощность 55 Вт
Автоматическая обрезка нити
да
Встроенный нитевдеватель
да
Регулятор скорости шитья
да
Русифицированное меню
да
Сенсор обрыва нити
да
Чехол для швейной машины
да
Вес брутто, кг
17.4
Вес нетто, кг
14.3
Встроенная память, мб
4
Вышивальные форматы
JEF
Вышивальные форматы
JPX
Вышивальные форматы
DST
Количество встроенных алфавитов
6
Количество вышивальных дизайнов
180
Максимальная скорость вышивания, ст./мин
860
Максимальный размер вышивки, мм
200×360
Рабочая поверхность, мм
303,5×120
Скорость намотки шпульки, ст./мин
1600
Соединение с ПК
Прямое
Тип освещения
Светодиодное
Вышивальные пяльцы SQ14b с шаблоном 140х140
1 шт.
Вышивальные пяльцы RE20b с шаблоном 140х200
1 шт.
Вышивальные пяльцы SQ20b с шаблоном 200х200
1 шт.
Вышивальные пяльцы RE36b с шаблоном 200х360
1 шт.
Зажимы для пялец
1 шт.
Расширительный столик
1 шт.
Шпулька
5 шт.
Отвертка
1 шт.
Ключ-отвертка (для игольной пластины)
1 шт.
Щеточка для чистки
1 шт.
Ножницы
1 шт.
Набор игл Organ
3 шт.
Держатели катушки большие
2 шт.
Держатели катушки маленькие
2 шт.
Держатель катушки специальные
2 шт.
Дополнительный катушечный стержень
1 шт.
Специальный шпуледержатель для вышивки с высоким натяжением
1 шт.
Стилус для сенсорного экрана
1 шт.
Масленка
1 шт.
Инструкция
1 шт.
Краткое руководство
1 шт.
Инструкция на DVD
1 шт.
Embroidery Editor и гид по установке
1 шт.
USB кабель
1 шт.
Шнур питания машины
1 шт.
Мягкий чехол
1 шт.
Скачать инструкцию Janome Memory Craft 550e
Вышивальная машина Janome Memory Craft 550E способна вышивать на пяльцах большого размера — до 360х200 мм. Увеличенный до 180 набор встроенных дизайнов, 6 алфавитов, включая русский, и возможность создания 2-х или 3-х буквенных монограмм открывают еще больше возможностей для проявления ваших творческих идей. А если этого будет недостаточно, то вы сможете легко перенести свои дизайны в машину с помощью USB. Цветной сенсорный дисплей позволяет совершать редактирование вышивок, а встроенный швейный советник поможет разобраться с основными операциями при работе на этой машине. Возможность смазки машины без обращения в сервисный центр — еще один неоспоримый плюс.
Если вы давно мечтали не только шить, но и декорировать изделия с помощью изящной элегантной вышивки, то Janome Memory Craft 550E — идеальное дополнение к вашей швейной технике.
Особенности Janome Memory Craft 550e:
- Размер вышивки до 360х200 мм. Машина способна вышивать дизайны размером до 360х200 мм без поворота пялец. Специальный увеличенный расширительный столик и пяльцы 4-х размеров входят в комплект.
- 180 встроенных дизайнов. В машину встроены 180 различных дизайнов, включая классические, квилтовые, цветочные монограммы, в стиле ручной вышивки Сашико и другие. Будет нелегко выбрать из большого разнообразия представленных вышивок. Но помимо этого у вас будет возможность использовать и свои собственные, просто перенесите их на машину с помощью USB.
- 6 алфавитов и монограммы. Помимо готовых встроенных дизайнов у вас будет возможность дополнить изделия с помощью инициалов или слов, используя латинский алфавит или кириллицу с различными видами начертания. А функция создания монограмм позволит создать 2-х или 3-х буквенные сочетания нескольких видов.
- Цветной сенсорный дисплей. Управление машиной осуществляется на цветном сенсорном дисплее, на котором вы можете видеть образцы дизайнов вышивки, различные параметры и рекомендации, а также при необходимости изменять настройки.
- Великолепные возможности машины. Вы сможете управлять скоростью вышивки в настройках на экране машины, изменяя ее в пределах от 400 до 860 стежков в минуту. Функция автоматической обрезки позволяет запрограммировать машину на обрезку нити при длине стежка более 3 мм, при смене цвета/окончании или просто при нажатии на соответствующую кнопку. Датчик окончания шпульной нити подскажет, когда необходимо выполнить намотку. При обрыве нити машина останавливается и возвращается на нужную позицию.
- Редактирование на экране. Основные операции редактирования дизайнов вы можете осуществлять непосредственно на экране машины: изменение размера, поворот, перемещение, комбинирование, копирование, изменение цветов и некоторые другие. Измененные дизайны вы можете сохранить в памяти машины или на USB и затем возвращаться к ним, когда вам будет удобно.
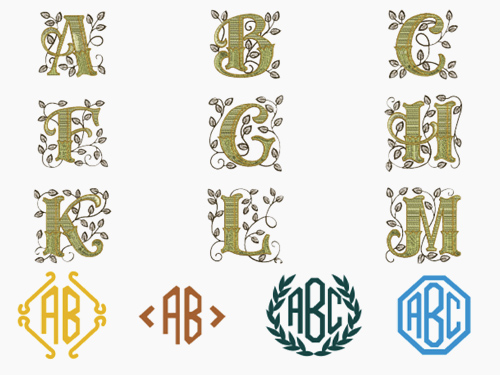
Типы вышивальных дизайнов: Миниатюры, Любымые дизайны, Бордюры, Геометрические орнаменты, Кухня, Слова, Цветущий алфавит, Квилтинг, Дизайны для браслетов, Дизайны для празников, Дизайны Сашико, Калибровочный шаблон, Дизайны для создания красивых фирменных 2-х или 3-х буквенных монограмм, 3 англоязычных шрифта (цифры, буквы, знаки): готический, скрипт, челтнем, 3 русскоязычных шрифта (цифры, буквы, знаки): кириллица 1, кириллица 2, кириллица 3.
Комплектация Janome Memory Craft 550e:
- Педаль.
- Шнур.
- USB кабель.
- Мягкий чехол.
- Расширительный столик.
- Инструкция.
- Краткое руководство.
- Инструкция на DVD.
- Embroidery Editor / гид по установке.
- Вышивальные пяльцы SQ14b с шаблоном 140х140.
- Вышивальные пяльцы RE20b с шаблоном 140х200.
- Вышивальные пяльцы SQ20b с шаблоном 200х200.
- Вышивальные пяльцы RE36b с шаблоном 200х360.
- Зажимы для пялец, 8 шт.
- Шпульки.
- Отвертка.
- Ключ-отвертка (для игольной пластины).
- Щеточка для чистки.
- Ножницы.
- Набор игл.
- Держатели катушки большие.
- Держатели катушки маленькие.
- Держатель катушки специальные.
- Дополнительный катушечный стержень.
- Специальный шпуледержатель для вышивки с высоким натяжением.
- Стилус для сенсорного экрана.
- Масленка.


Рекомендуем купить аксессуары для этой машины:
 |
Набор для нашивания пряжи для MC 550E, 500E, 450E, 400E |
 |
Пяльцы RE10b 100х40 мм для Janome 500E, 550E |
 |
Пяльцы RE28b 280х200 мм для Janome 500E, 550E |
 |
Стойка на пять катушек для Janome MC 550E, 500E, 9900, 12000, 15000 |
 |
Набор ниток Gutermann Rayon 20 катушек 200м |
 |
Стол для точной заправки ткани в пяльцы для Janome 500E, 550E |
 |
Набор для квилтинга для Janome 550E, 500E, 450E, 400E |
 |
Приcпособление для вышивки на бейсболках для Janome 500E, 550E |
Внимание! В случае, когда при покупке товара предлагаются и скидка, и подарки, вы можете выбрать либо скидку, либо один подарок.
Разбейте
оплату
на части
без переплат
График платежей
-
Добавляйте товары
в корзину -
Оплачивайте сегодня только
25% картой любого банка -
Получайте товар
выбранный способом -
Оставшиеся 75% будут
списываться
с вашей карты
по 25% каждые 2
недели
- Что такое оплата Частями?
-
Это короткая мгновенная беспроцентная
рассрочка. Вы оплачиваете сразу только 25%,
а оставшиеся 75% вы оплачиваете в течение 6
недель, по 25% каждые 2 недели. - Есть ли переплата?
-
Нет. Вы ничего не переплачиваете. Нет
никаких скрытых комиссий. - Мне нужно иметь карту «Халва»?
-
Нет. Частями доступно для клиентов всех
банков. - При чём здесь Халва и Совкомбанк?
-
Мы в Халве (а Халва это карта Совкомбанка)
являемся экспертами в рассрочке. Поэтому
мы решили разработать сервис с короткой
рассрочкой, который будет доступен всем
клиентам с картами любых банков. - Это кредит?
-
Нет, это не кредит. Кредитный договор не
оформляется. -
Как будут списывать деньги за оставшиеся
части? -
Всё работает также как в сервисах подписки,
например, Яндекс.Музыка или ivi. Вы делаете
первый платёж, а дальше с вашей карты
списываются средства один раз
в 2 недели.