
Приобреталась на Алиэкспресс комплектом из 5 камер и видеорегистратора. Позднее появились еще 3 камеры.
- Низкая цена
- Питание POE
- IP камеры
- Удаленный просмотр
- Поддержка ONVIF
Куплено

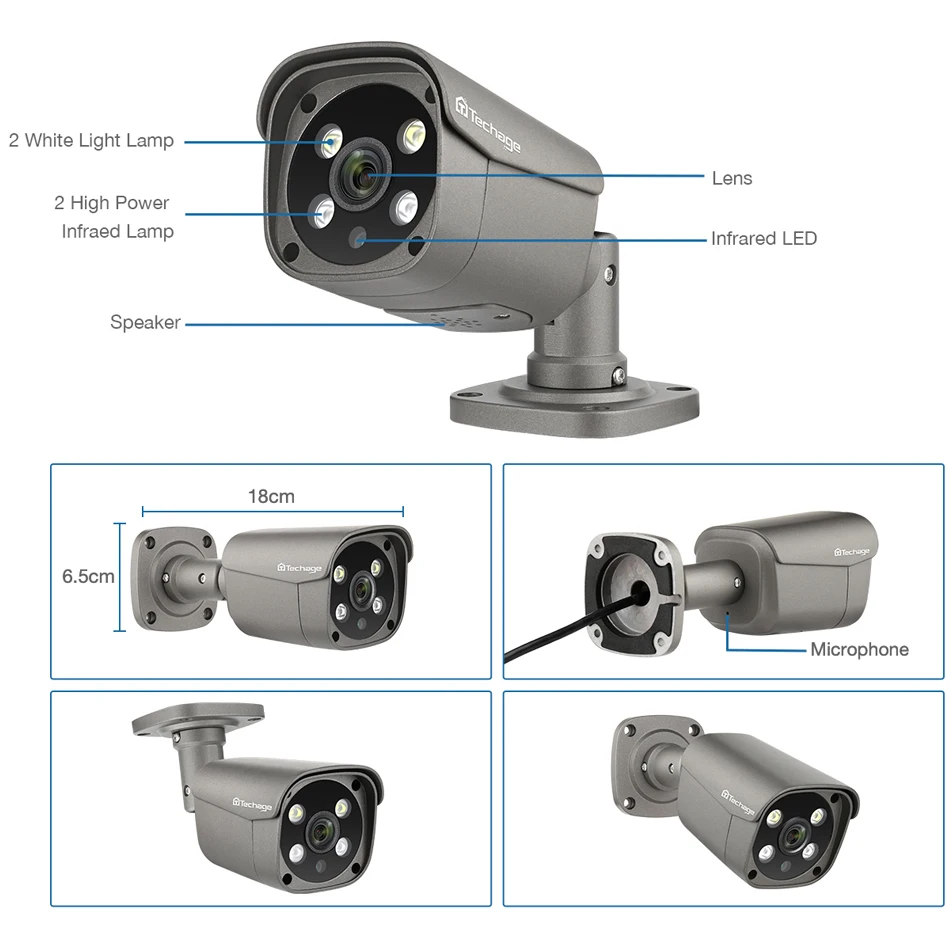
Камеры с разрешением 2 Mп., заявлено Full-HD. Объектив 3.6 мм., есть ИК подсветка для записи ночью, датчик движения и освещенности, микрофон.

Регистратор на 8 каналов со встроенным питанием POE. Мышь в комплекте. Поддерживает отправку уведомлений по эл. почте о потери связи, движении в камере, различные варианты записи.

Жесткий диск Western Digital Purple объемом 1 Tb покупался отдельно.
Эксплуатация
Чуть больше двух лет. Все работает отлично. Качество изображения приемлемое, днем номера автомобилей читаются примерно до 20 метров. Ночью при уличном освещении номера видны хуже. Если смотреть на телевизоре, то качество выводимого изображения низкое даже с основного потока. При этом в мобильном приложении качество хорошее хоть при просмотре онлайн, хоть в записи.
Почти через год вышла из строя 1 камера. Продавцом заявлена гарантия 30 дней для бесплатной замены и 1 год с частичной оплатой заказа. В результате общения с продавцом было куплено 4 камеры за 56% от рыночной стоимости на тот момент.
Зимой камеры стали отключаться. При температуре ниже минус 15 градусов отключалось несколько камер. В минус 25 и ниже отключались все.
В характеристиках камеры заявлена рабочая температура до минус 10 градусов, на момент покупки в описании этого не было. Проблема была решена установкой регулируемого блока питания и пассивного POE инжектора.

1. Наша новая система камеры POE 5 Мп. NVR поддерживает 5MP max, вы можете подключить камеры 2MP,4MP,5MP с нашим NVR. Вам нужно только купить один коммутатор POE, тогда NVR может до 16CH 5MP, пожалуйста, свяжитесь с нами, чтобы купить его.
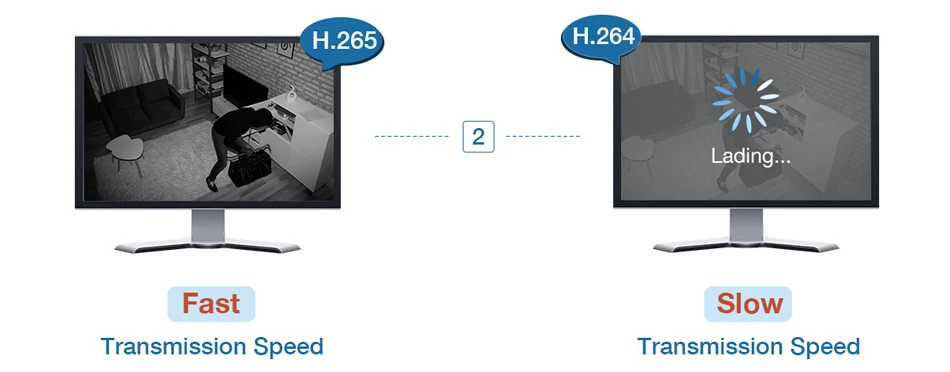
2, все наши NVR и камеры H.265 5MP, другие бренды имеют только камеры 4MP.
3. Все камеры встроены в микрофон и динамик, Поддержка двусторонней аудиозаписи.
Посылка включает в себя:
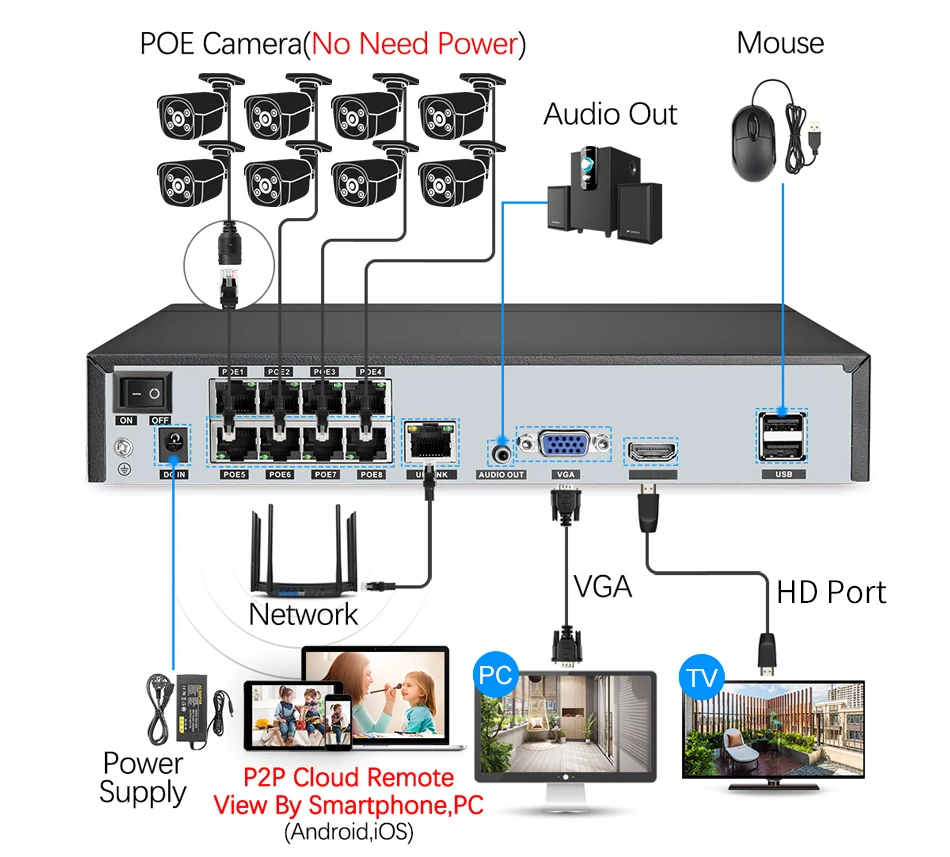
1 х H.265 8CH 5MP POE NVR Встроенный 8 POE порт
4/6/8 x 5MP ip-камеры с питанием по POE с двухсторонним аудио
4 /6/8×20 м сетевой кабель для камер
Источник питания для NVR-1 шт. usb-мышь для NVR-1 шт.
1 x Руководство пользователя
2 x Предупреждение Стикеры (подарок)
4/6/8 x водонепроницаемый разъем для кабеля (подарок)
1 X пульт дистанционного управления (без аккумулятора)
Без жесткого диска или 2 ТБ HDD 3 ТБ 4 ТБ по желанию:
Двусторонняя аудиосвязь в режиме реального времени
Камера имеет встроенный микрофон и динамик. Никогда не пропустите ни минуты с вашей семьей.

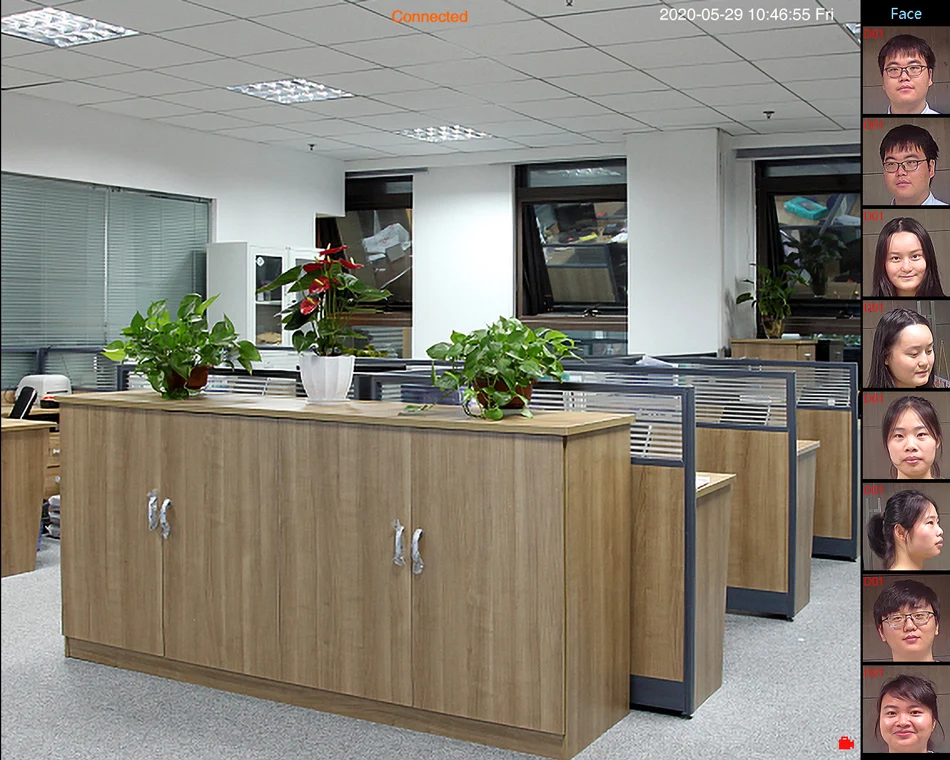
Запись лица/распознавание лица/воспроизведение лица
Функция записи распознавания лица: при обнаружении лица NVR сохранит кадры на жестком диске, не пропуская ни одного человека, тем самым улучшая точность оповещения.

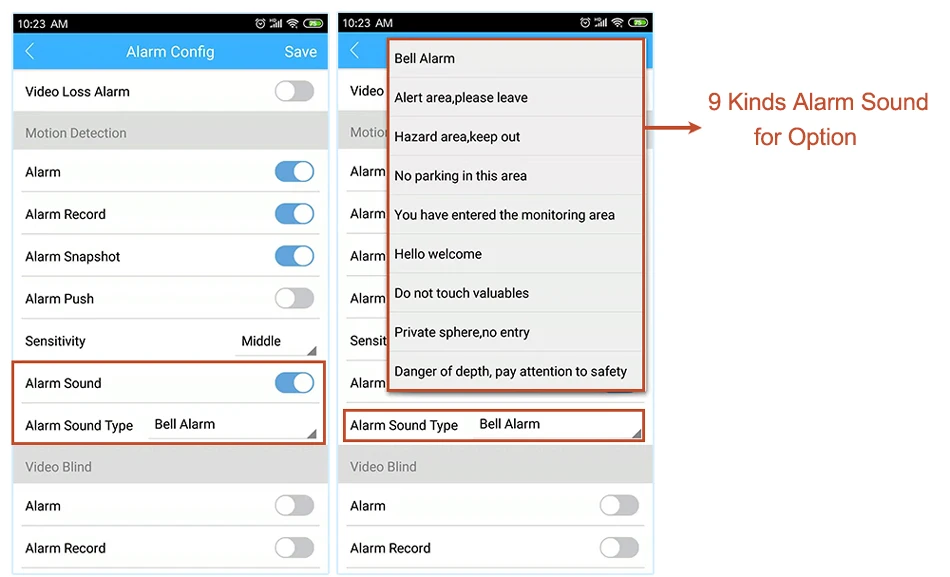
Обнаружение движения и оповещение по электронной почте и сигнал тревоги
9 видов звукового сигнала для опции (только поддержка английского звука)
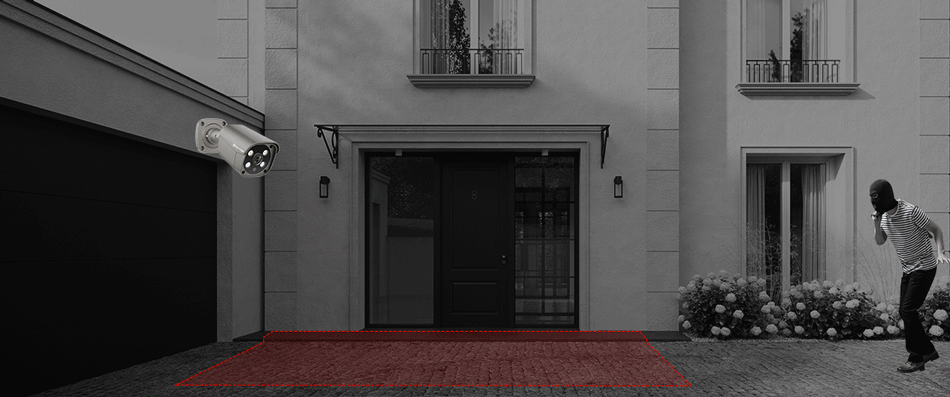
Интеллектуальная идентификационная сигнализация
Только когда люди проходят зону сигнализации, камера отправляет сигнал тревоги, повышая точность сигнала.
Умное ИК-ночное видение
Вы можете выбрать три режима ночной съемки. Когда 2 белых светодиода освещают, камера будет показывать красочное видение ночью,
、
Ip-камера 5 Мп и ip-камера 4 МП: очень четкие изображения
Система видеонаблюдения H.265 POE
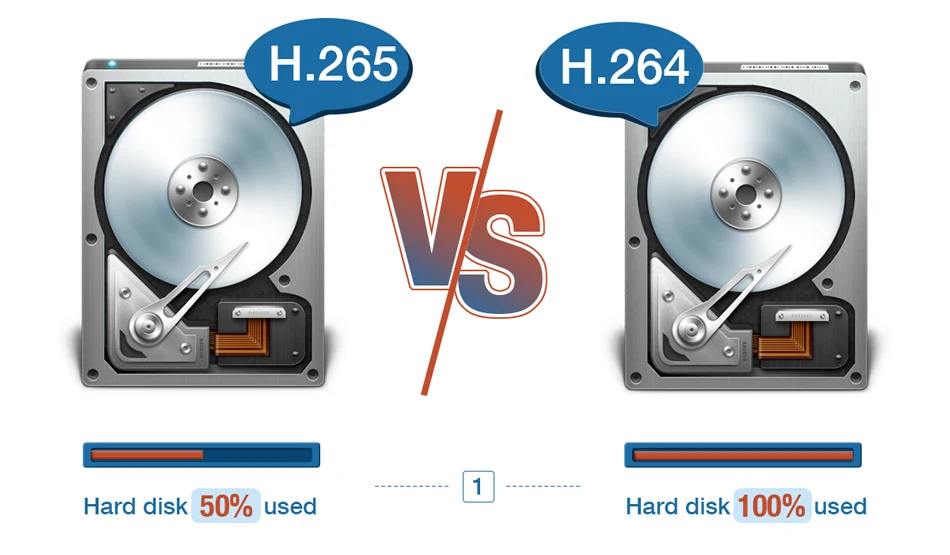
H.265 более четкий, HD разрешение предлагает вам лучшее качество изображения в более низкой скорости. Экономьте больше места для хранения, вы можете уменьшить размер файлов 40%-50%, сэкономить место для хранения HDD и снизить стоимость покупки.

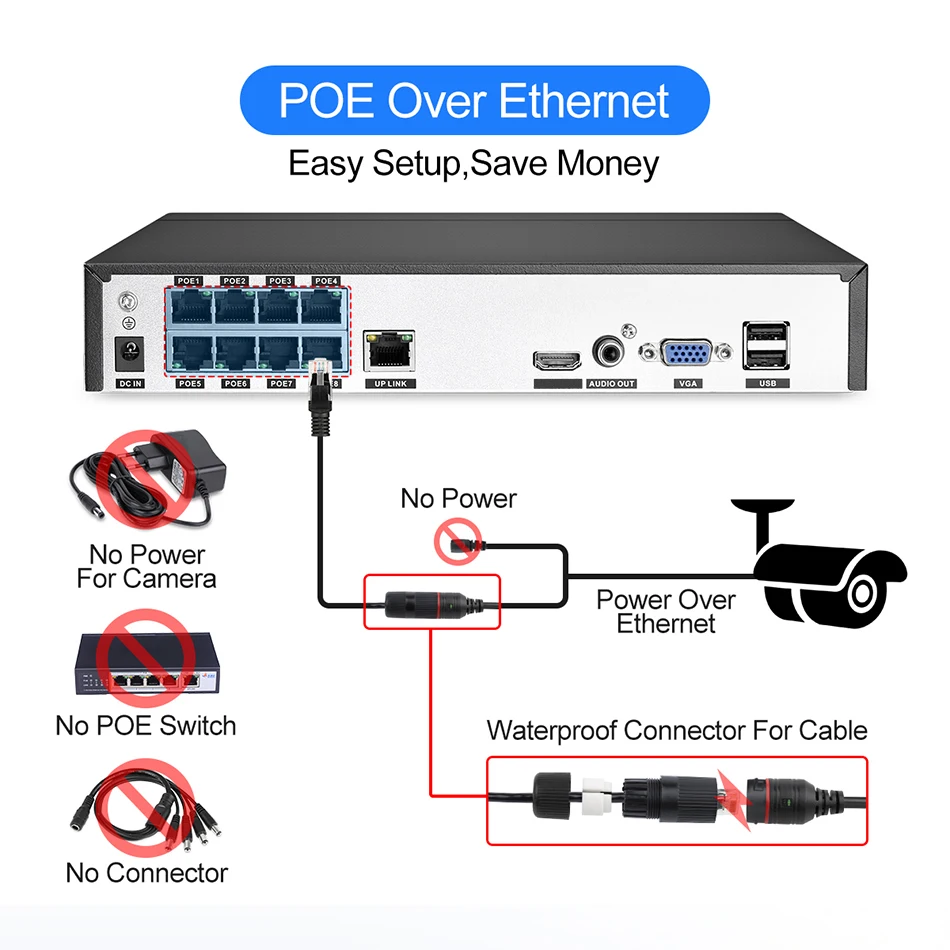
Преимущество POE, почему стоит выбрать POE?
Не нужны дополнительные кабели питания или адаптеры или переключатели. Подключи и работай и простая настройка. Экономьте деньги и удобно, POE NVR = NVR + POE коммутатор
Система видеонаблюдения Techage POE
Максимальная поддержка 100 метров расстояние передачи
Установите и подключите его
Его можно легко и быстро настроить любым. Мгновенно просматривайте видео в реальном времени с помощью компьютера, планшета или телефона из любого места. Не нужны дополнительные кабели питания, адаптеры или переключатели.
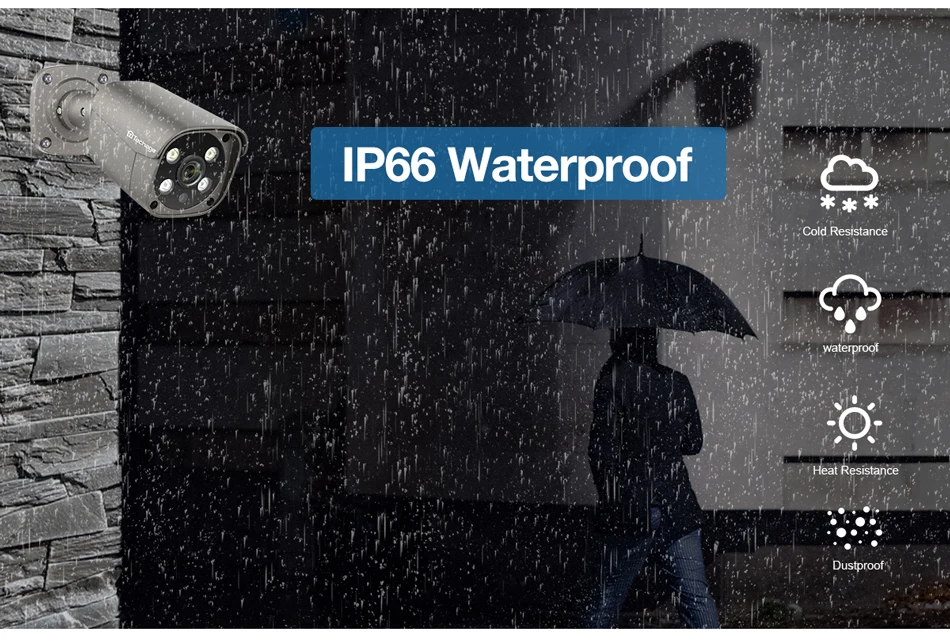
Водонепроницаемая камера безопасности IP66
Наша камера подходит как для наружного, так и для внутреннего использования
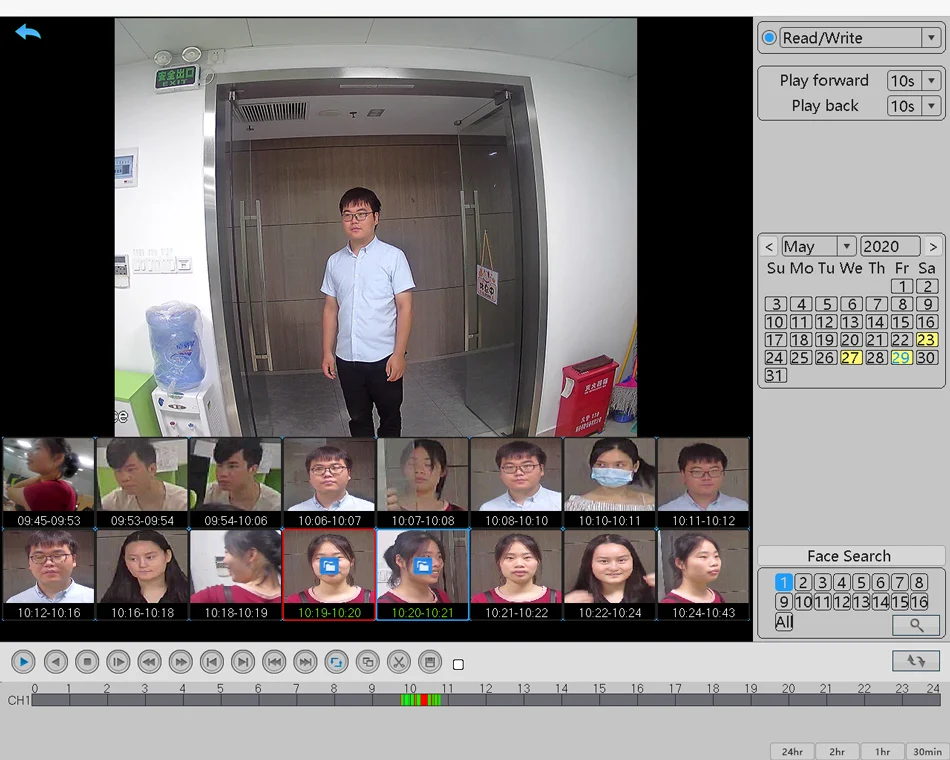
Видео с умным воспроизведением
Умное воспроизведение Доступно с настраиваемой областью поиска, время воспроизведения значительно уменьшается за счет превышения скорости через неважные видео

Удаленный доступ в любое время и в любом месте
На основе технологии P2P (peer to peer), поддержка установки plug-and-play. Доступ к ip-камере через веб-интерфейс через Интернет-проводник, также поставляется с бесплатным приложением для смартфонов (Android и iPhone) для удаленного просмотра из любого места. Поддержка доступа к устройствам iOS и Android. Сканируйте qr-код для входа в систему. Загрузите бесплатное приложение в Apple app store / Google play.

Мобильный телефон
Простая настройка, всего 4 шага для просмотра мобильный телефон (Android и iPhone iOS)

H.265 5MP POE NVR рекордер
Сжатие видео: H.265/H.264
Вся поддержка Encode Емкость: 8CH 5MP (может до 16CH 5MP)
Видеовыход: HD порт, VGA
Сетевой интерфейс: RJ45
Разрешение записи: 5 Мп
Режимы записи: Руководство/движение/Расписание/P2P Удаленный просмотр
Жесткий диск (HDD): 1 * SATA порт (поддержка до 4 ТБ)
Удаленный просмотр P2P: Поддержка iOS, Android
Доступно 20 языков: русский, английский, итальянский, португальский, испанский, французский, немецкий и т. Д.

Камера H.265 5 Мп
Эффективный пиксель: 5 Мп 2592*1944 Мин Освещение: 0.01Lux @(F1.2,AGC ON), 0,001 Люкс с ИК-объективом камеры: 3,6 мм объектив

Как установить AI Обнаружение человека в приложении для телефона

Как открыть или закрыть 2 светодиодный светильник S
Подключаем камеру видеонаблюдения Techage 1080P HD IR IP Camera
Techage 1080P HD IR IP Camera

Почти пошаговая инструкция с набитыми шишками на голове и не только.
- Нужно изменить IP — адрес камеры который прописан по умолчанию: 192.168.1.10 — у нас на камере не написан адрес — будем верить что он такой же.
Причем у нас может быть другая подсеть, поэтому и меняем IP-адрес камеры — и потом — задать уже наш (свой) IP-адрес!
Начали:
Интернет-кабель — отключаем от компьютера!
И подключаем саму камеру пачкордом на прямую к компьютеру!
Далее твориться волшебство с настройками соединения..
интуитивно двигаемся по ситуации, кликаем на настройках вроде «Сетевого Адаптера»,


ЖМЕМ ОК! — ДОЛЖНА УСТАНОВИТЬСЯ СЕТЬ С КАМЕРОЙ

( В ДРУГОМ БРАУЗЕРЕ РАБОТАТЬ НЕ БУДЕТ! )

Моя версия браузера:

И вводим наш прописанный IP-адрес:

Браузер будет ругаться.

Поэтому, изменим настройки.

Везде где упоминается ActiveX — ставим ВКЛЮЧИТЬ:


Дело в том что не некоторых компьютерах (В ТОМ ЧИСЛЕ И НА МОЕМ) — при нажатии на «Установить» предложенный компонент ActiveX — браузер — тупо игнорирует установку!
Приобреталась на Алиэкспресс комплектом из 5 камер и видеорегистратора. Позднее появились еще 3 камеры.
Требования:
-
- Низкая цена
- Питание POE
- IP камеры
- Удаленный просмотр
- Поддержка ONVIF
Куплено

Камеры с разрешением 2 Mп., заявлено Full-HD. Объектив 3.6 мм., есть ИК подсветка для записи ночью, датчик движения и освещенности, микрофон.

Регистратор на 8 каналов со встроенным питанием POE. Мышь в комплекте. Поддерживает отправку уведомлений по эл. почте о потери связи, движении в камере, различные варианты записи.

Жесткий диск Western Digital Purple объемом 1 Tb покупался отдельно.
Эксплуатация
Чуть больше двух лет. Все работает отлично. Качество изображения приемлемое, днем номера автомобилей читаются примерно до 20 метров. Ночью при уличном освещении номера видны хуже. Если смотреть на телевизоре, то качество выводимого изображения низкое даже с основного потока. При этом в мобильном приложении качество хорошее хоть при просмотре онлайн, хоть в записи.
Почти через год вышла из строя 1 камера. Продавцом заявлена гарантия 30 дней для бесплатной замены и 1 год с частичной оплатой заказа. В результате общения с продавцом было куплено 4 камеры за 56% от рыночной стоимости на тот момент.
Зимой камеры стали отключаться. При температуре ниже минус 15 градусов отключалось несколько камер. В минус 25 и ниже отключались все.
В характеристиках камеры заявлена рабочая температура до минус 10 градусов, на момент покупки в описании этого не было. Проблема была решена установкой регулируемого блока питания и пассивного POE инжектора.
Подключаем камеру видеонаблюдения Techage 1080P HD IR IP Camera
Techage 1080P HD IR IP Camera

Почти пошаговая инструкция с набитыми шишками на голове и не только.
- Нужно изменить IP — адрес камеры который прописан по умолчанию: 192.168.1.10 — у нас на камере не написан адрес — будем верить что он такой же.
Причем у нас может быть другая подсеть, поэтому и меняем IP-адрес камеры — и потом — задать уже наш (свой) IP-адрес!
Начали:
Интернет-кабель — отключаем от компьютера!
И подключаем саму камеру пачкордом на прямую к компьютеру!
Далее твориться волшебство с настройками соединения..
интуитивно двигаемся по ситуации, кликаем на настройках вроде «Сетевого Адаптера»,
ЖМЕМ ОК! — ДОЛЖНА УСТАНОВИТЬСЯ СЕТЬ С КАМЕРОЙ
( В ДРУГОМ БРАУЗЕРЕ РАБОТАТЬ НЕ БУДЕТ! )
Моя версия браузера:
И вводим наш прописанный IP-адрес:
Браузер будет ругаться.
Поэтому, изменим настройки.
Везде где упоминается ActiveX — ставим ВКЛЮЧИТЬ:
Дело в том что не некоторых компьютерах (В ТОМ ЧИСЛЕ И НА МОЕМ) — при нажатии на «Установить» предложенный компонент ActiveX — браузер — тупо игнорирует установку!
Читайте также:
- Нива задние колеса тормозят раньше
- Пежо 206 свистит ремень генератора
- Стойки рено логан крутятся
- Неисправности передней подвески ваз 2123
- Ndcn w55 инструкция на русском японская магнитола
-
0 ₽ 0 товаров
Каталог инструкций по эксплуатации на русском языке
В нашем каталоге более 90.000 инструкций по эксплуатации и руководств пользователя на русском языке к бытовой технике и электронике. Чтобы скачать инструкцию по эксплуатации выберите интересую вас категорию или воспользуйтесь поиском в верхнем правом углу сайта.


WIRELSEE KIT Statement Thank you for purchasing our product! This quick user guide will talk about main usages of the product.More information can be found on our website and the help center. This user guide may contain inaccurate content due to hardware and software upgrade.It is subject to change without previous notice. Safety Caution 1.Please do not put any fluid container on the product. 2.Please use the product in ventilated environment and prevent blocking the vents. 3.Please use included power supply with the product to prevent damage to the product. 4.Please use the product under its standard working temperature and humidity.(advised in this manual or distributor’s website) 5.Dust on PCB may cause short circuit.It is suggested to clean the dust on PCB timely to make the product work properly. 6.Please obey the regulation and policy in your country and area during the installation of this. Before Installation This product may require cabling , we suggest to test all products&parts before installation and cabling. NVR 1、WIFI Antenna Ports:Double antennas to WIFI range 2、WAN Port:Connect your NVR to Internet 3、VGA Port:For viewing on VGA monitor 4、HDMI Port:For viewing on HDTV 5、USB Ports:For mouse and backup 6、Power Input IPC 1. IPC with RJ45 connector ①W WIFI antenna:: WiFi connecction with NV VR; ②DC C Port: input power 12V 1A; ③RJJ45 Port: for matching cod de and wiredd connection between IPC and NVR. Ouur WIFI NVR KIT is alreaady matched d code beforre leaving faactory. If use ers need to re‐match coode or use wired conn nection, please refer to ho ow to add IP camera as be elow. 2. IP PC without RJ45 conne ector ①W WIFI antenna:: WiFi connecction with NV VR; ②DC C Port: input power 12V 1A; ③Reeset button::press reset button for 110 seconds to t restore fa actory settingg and enter into matcching‐code mode. Insttallation Instructio n Of WIFI NVR KIT Notte: Wireless NVR can’t be co onnected too WIFI route er wirelessly at presennt. They can be onlyy connected d by networrk cable. Settup The Syystem This system m is standalone with eembedded Linux Operrating Systeem in the NVR. Justt like a deskktop PC, ne eed to hookk a screen to t the NVR to enter thhe OS. Any TV , mon nitor with VGA V or HDM MI input shoould work fo or it. 1、IInstall antenn nas for camerras and the N NVR; 2、C Connect a scrreen to the NVR N via its HD DMI or VGA port(HDMI and VGA cable not included); 3、P Plug the NVR to power(use bigger 12V V 2A power ad dapter); 4、P Plug camerass to power(usse smaller 12V V 1A power adapters); 5、W Within seconds, you should see camerra’s images on the screen; 6、P Plug the mouse(included) to an USB poort on back off NVR. You sh hall then be aable to operatte on the ssystem. In th he OS you caan find fullestt functionalitties includingg live view, re ecord, playbaack, video ba ackup and all settings. Defaault ID: admin Password: none (meanss leaving the password em mpty, just clicck login) Tips:To protectt your privacyy, please set your passwo ord at earliesst conveniencce. Right click the mou use→Go to Syystem Setup→ →System Ad min →User Management to set passw word. HD Install the system may not include hard disk deepending on the kit you selected. the NVR works most 3.5" SATA HDD or o 2.5"SATA HDD Unplug your NVR from po ower,unscrew w and remove e the top cove er. 1、U 2、C Connect the SATA power and data ca bles from the NVR to the e correspond ing ports on your HDD D (as shown). 3、h holding the hard drive an nd the DVR ,,gently turn it over and line up the hholes on the hard drivee with the ho oles on the NVR. using a pphillips screw wdriver,screw w the provideed screws into o the holees and assemble the coverr. Notee:New HDD D have to be formatted beefore recordin ng. To get better WIFI sign nal, it had bettter place the e NVR in open area and hiigh position. Reccord Video Reco ord video is very easy on camera syste m. 1、TTime Recordiing: Setup pe eriod of timee of recordingg on NVR GU UI .Right clickk mouse→Syystem Setu up→Record setup→Reco ord Plan.Clicck “time”aand put mo ouse icon onn the upperr left corn ner(for examp ple“1”as picture showss),press and drag the mou use to the rigght to choose e the timee.The list will turn to red. 2、M Motion Reco ording: Only detect motioon and then start recordin ng.Right clickk mouse→Syystem Setu up→Record setup→Reco ord Plan.Clickk“motion”and put mo ouse icon onn the upperr left corn ner(for examp ple“1”as picture showss),press and drag the mou use to the rigght to choose e the timee. The list willl turn to gree en. 3、A Alarm record ding: Right click mousee→System Setup→Reco rd setup→RRecord Plan.Click “Allarm”and put mouse icon on thhe upper le eft corner(fo or example “1”as piccture show ws),press and d drag the mo ouse to the riight to choose the time. The list will tu rn to yellow. Notee: Users can setup any period of tim me they want,for example e 0:00:00‐23: 59:59,That’s 24 hourrs *7 days recording.Whe en NVR deteccts hard disk,tthe default setting will bee 24 hours*7 days reco ording. Vid deo Playbaack Step ps:right clik mouse in ma ain menu→V Video playbaack→choose date,channeel,record mode→ clickk search→theen can view playback file. Warrm prompt: 1. IIIustration fo or playback button: play, pause: fast forward *2,*4,*8; 2. Play file: Cho oose the reco ording file in file list,as nu umber“1”sshown in piccture. Choose e one of the record ding, click “p play”to playy to recordingg file; 3. Video backup: Choose th he recording file in file lisst,as numberr“1”shownn in picture.insert the U flash disk, click “video backup” ”to backup the t file; 4. Timeline: Click “date”a and “time” ”at left bottom to check k the timelinee of recordin ng, as number“2” ”shown in picture; 5. On the timeline with reco ording file,leftt click the mo ouse, the can playback thee file. Vid deo Backup Usee U disk to o copy vide eo,so easyy and convvenient! 1、22 USB ports: Plug U flash disk d into the USB port of NVR. Right click on main m menu→Video backkup→choose backup chan nnel→choosee video mode e→setup searching time→ →search→cho oose reco ording file on the list→video backup (s upport 32G U flash disk at a max. Recorrding file is packked one hourr per time.) 2、1 USB port: Riight click on main m menu→ →video backup→choose backup channnel→choose video mod de→setup seaarching time→search→chhoose record ding file on the list→videoo backup, inse ert U flash h disk within reminding 1 minute, thenn the system will w backup re ecording file to U flash dissk. Vieew On PC Via V IE(Inte ernet Explorer) 1、W When your PC is in same LAN L with the NVR(normally means th hey are conneected to the same routter) Step p1.Find the IP address an nd port# of yyour NVR(IP address can be found inn System Setup→ Netw work Setup). Step p2.Enter the NVR’s IP ad ddress in yourr IE browser for f example: http://192.11.1.7(If the de efault WEB B port 80 hass been changed e.g. to 1000,you’ll need to add new port numbber when inp put IP addrress in the brrowser, for exxample: http:://192.168.1..7:100). 2、W When your PC P is out of local area nnetwork with h the NVR(Fo or example: view your home cameras from your office PC).Access with D Device Cloud d ID Step p 1. Open you ur Internet Exxplorer(IE) broowser and vissit:www.e‐se eenet.com. Step p2. Input Device ID, User name and passsword to loggin. (Devvice ID can be found at the right bbottom corne er of the NV VR monitor, status should be “ONLINE”, default User name is “admin”, aand default Paassword is em mpty.) Vieew On Mo obile 1、D Download thee APP “IP PRO O3.0” Userrs can use cellphone to sccan the QR coode below to o install the APP A free of chharge,or users can searrch “IP Pro 3.0”on APP store or Googgle Play then install the APP . Notee:For IOS systtem,it require es IOS 8.0 verrsion or abovve.For android d, android 4.44 or above. 2、A Add the NVR system to yo our APP devicce list Run the APP “IP PRO”, login with w your accoount or choosse Trial→Click“+”to “A b ID” Add device by (fin nd it the NV VR’s Networkk setup, or rright bottom corner on screen),Descr ription(e.g. Home Cam mera), User naame (default user name iis “admin”)an nd password(default is em mpty)→Subm mit to get b back to your device list→C Click the deviice to view th he cameras. Tips: if you’ve sett a password on your NVR R system, pleaase update yo our passwordd on APP to view. Playback On Mobiles In th he IP PRO AP PP,while viewing live vvideo of the system, click k Playback, yyou will enter the remote playbackk menu. The APP A automattically playbaack camera 1, you can sw witch channels the CH. Tips: Videos in playback are HD@real timee which requ uires very goo od transmissiion condition n. We sugggest to playbaack in LAN. Remote playbback out of LA AN may not 100% work ddue to connection & neetwork condittion. MEENU‐DO What Meenu bar Clickk right button n you can entter the main menu; click right button again you ca n exit the current men nu or return. Splitt screen: chaange status of o live view. YYou can choo ose to view multiple cameeras or any single camera. Videeo Manage: manage IP cameras and NV VR channels. System setup: all system settings. Videeo playback: playback reco orded videoss. Videeo backup: baackup recorded videos. Colo or adjust: adjust the image e setting of e ach camera. Man nual record: shortcut to ch hange the reccord settings.. Volu ume: Adjust volume of aud dio cameras(w works only fo or audio came eras). Setu up Wizard: steep by step gu uide of 1st tim me general se ettings. Fast Network: sh hortcut to nettwork settinggs. Wifi add: add IP cameras into o NVR channeels wirelessly. Adju ust channel: adjust the ord der of the NV VR channels. Exit System: logo out, reboot, close screen ooutput and sh hut down the e system. Sysstem Setup Clickk right button n→Choose Syystem setup;; you then sh hall enter the menu that eenables you to t do all seettings relateed to this systtem. General setup(This enab bles you to seet) Langguage Timee Disp play resolution HDD D informaion System adm min(This enab bles you to seet) System version System maintenaance including system upggrade Userr and passwo ord managem ment Resttore to default settings System log Record setu up(This enables you to sett) Reco ord plan for each channel video detecttion Network settup(This enables you to seet) All network relaated settings Channel settup(This enab bles you to seet) Man nage channelss and camera as Add d wirelesss camera Befo ore leaving faactory, NVR kit is already m matched code, the image will come ouut when the kit is pow wered. Anywaay, there is range limitatioon for the WIFI signal from m NVR. Whenn cameras are e out of th his range, they can’t be connected too NVR wirelessly. Then ussers can use network cab ble to conn nect camerass and NVR, as picture show wed below: Step p 1: plug NV VR and cam meras to pow wer, after NVR N start, right click moouse→Wifi add →m match‐code interface, NVR will search camera unde er matchinng code model auto omatically. Step p 2: wirelesss camera has h two kinnds, includiing camera with RJ45 connector and cam mera withou ut RJ45 conn nector, theirr way to maatch code ass below: ① for camera with RJ45 connector,, after startt, use network cable tto connect with R, match code automattically, no n eed to resto ore. NVR ② for camera without RJ45 connecttor, after staar, hold the bottom lin e of cameraa for de automattically, no need 10 sseconds to get in mattch code m odel, it will match cod netw work cable.. Step p 3: when you y can find d IP addresss of cameraa on screen,, matching ccode complete, clickk “Exit” to finish. Nottes: for cam mera withou ut RJ45 connnector, its process of getting into matching code will last 10 minuets. Afte er 10 minueets, please restore cam mera to gett into matcching code model again. Exttend WIFI Range Wireeless connecttion is easy and a convenieent, but it’ss not universal applicationn. Because of o the charracter of WIFI, the WIFI signal will ddecrease wh hen going through some obstacles. Some methods can be applied to byypass obstaclees and extend WIFI range. 1、Position The Anten nna Correectly WIFI range is likee an apple and d the antenn a of NVR is in n the center of o it. WIFI signnal is strong all und the WIFI range. Anten nna of NVR shhould be put straight up, if not, WIFI siignal will be weak. arou Acco ording to the signal transm mission charaacter of anten nna, the antenna of camerras should overrlap or paralleel to NVR WIFI range, as ppictures show wed below: 2、Use Ante enna Exten nsion Cord d to prolo ong WIFI distance Instaallation meth hod of antenn na extension cord Notees:When WIFFI signal is not strong enouugh against walls,users can take off thee original antenna and subtitute an ntenna exten nsion cord. D Drill a hole on o the wall to let the eextension corrd go thro ough and simp ply it where WIFI W signal is strong. Sett up cascading conn nection in n a reasonable soluttion,extennd wifi siggnal tran nsfer distaance Notee: 1. Reepeater functtion can’t strengthen WIFI signal for wireless NVR R kit, but can extend the distaance by repeaaters ‐‐ WIFI cameras. 2. Only when thee repeater cameras and reepeated came eras are posittioned correcctly, WIFI distaance will be extended. 3. Reepeater functtion and 3 meters antennna extension cord are two methods to eextend WIFI rangge. Users can choose one according to real situation n. Rep peater Settup Step p 1: Right click on NVR’S GUI, G left clickk “video management”→ then left cclick “repeatter” Step p 2: Add repeater As p picture shown n below, clickk icon + besidees channel 3,, choose othe er channel. Step p 3: As picturee shown belo ow, it means IPC1 is conne ected to NVR through IPC22 and IPC3. IP PC2 is co onnected to NVR N through IPC3. IPC3 is connected to o NVR directlyy. Step p 4: Click “Apply” and th hen click “reefresh” to check if the se etting is succeessful. Dellete Repeaater Movve the mousee to targeted channels, left ft click to dele ete, and then click “Applly” and “O OK”. App plication Example As p picture shown n above, when IPCAM1 is put somewhe ere is out of NVR N WIFI rannge, and there is IPCA AM2 between n them with strong WIFI s ignal, users can c put IPCAM M1 close to N NVR and powe er it, setu up IPCAM1 repeated by IPCAM2, and thhen install IPCAM1 to the presupposedd place. warning otes: No Devvice will not in n guarantee if caused by bbelow reason n: A.Acccident;negligence;disaste er; mis‐operaation. and conditio B.Do o not conform to the environment ons,such as power imprroper, workin ng tem mperature Too o hight or too o low, lightninng stroke.ectt. C.Evver be maintaained by othe er center whiich not belong to the real factory. D.G Goods alreadyy sold more than 12 montths. FCC C RADIATION NORM FCC This device complies with Pa art 15 of thee FCC Rules. Operation is subject to tthe followingg two cond ditions: (1) th his device ma ay not causee harmful inte erference, an nd (2) this deevice must acccept any interference received, inccluding interfeerence that may m cause undesired operration. FCC C Compliance Statement This equipment has h been testted and founnd to comply with the limits for a Classs B digital de evice, purssuant to part 15 of the FCC Rules. Thesse limits are designed to provide reasoonable protection against harmful interference in a residenttial installatio on. This equip pment generaates uses and d can radiaate radio freq quency energgy and, if nott installed and d used in accordance withh the instructtions, mayy cause harmful interferen nce to radio communicattions. However, there is nno guarantee e that interrference will not occur in i a particulaar installatio on. If this equipment doees cause harrmful interrference to raadio or televiision receptioon, which can n be determined by turninng the equipment off aand on, the user is enco ouraged to trry to correctt the interferrence by onee or more of the follo owing measurres: ‐ Reo orient or relo ocate the rece eiving antennna. ‐ Inccrease the sep paration betw ween the equuipment and receiver. ‐Con nnect the equipment into o an outlet oon a circuit different from that to whicch the receivver is conn nected. ‐Con nsult the dealler or an expe erienced radiio/TV techniccian for help. FCC C Radiatio on Exposure Statem ment: This equipment complies with FCC rad iation expossure limits set forth for an uncontrrolled environment. Th his equipmen nt should be installed and d operated with w minimu m distance 20cm betw ween the radiator & your body. CAU UTION! The Federal Com mmunicationss Commissionn warns the user that changes or moodifications to o the unit not expresssly approved d by the parrty responsib ble for comp pliance couldd void the user’s auth hority to operrate the equip pment.
Highlight all
Match case
Current View
Current View
Enter the password to open this PDF file:
File name:
—
File size:
—
Title:
—
Author:
—
Subject:
—
Keywords:
—
Creation Date:
—
Modification Date:
—
Creator:
—
PDF Producer:
—
PDF Version:
—
Page Count:
—
Preparing document for printing…
0%
| Language | Type | Pages | |
|---|---|---|---|
| Spanish | User Manual | 30 | > Go to the manual |
752239
1
-
Where is the best place to learn how to understand the display screen?
Submitted on 2-7-2023 at 22:21Reply Report abuse
-
i cant remember my password. how do I go about resetting my password so that I can log in to change my settings?
Submitted on 19-9-2022 at 16:12Reply Report abuse
Report abuse
Libble takes abuse of its services very seriously. We’re committed to dealing with such abuse according to the laws in your country of residence. When you submit a report, we’ll investigate it and take the appropriate action. We’ll get back to you only if we require additional details or have more information to share.
Product: Hiseeu NVR K8208
Forumrules
To achieve meaningful questions, we apply the following rules:
- First, read the manual;
- Check if your question has been asked previously;
- Try to ask your question as clearly as possible;
- Did you already try to solve the problem? Please mention this;
- Is your problem solved by a visitor then let him/her know in this forum;
- To give a response to a question or answer, do not use this form but click on the button ‘reply to this question’;
- Your question will be posted here and emailed to our subscribers. Therefore, avoid filling in personal details.
Your question has been posted on this page
Would you like to receive an email when new answers and questions are posted? Please enter your email address.
Features
- 3M H.265 wireless network NVR;
- Built-in special wireless WIFI module for security, strong signal stability and strong anti-interference ability;
- No need for WIFI pairing, the image will be displayed right out of the box;
- Support P2P , remote smooth, smooth and stable picture;
- Support multiple alarm triggers (video loss / moving human detectiondetection, etc.) and alarm output (sound / E-Mail / etc.);
- Support Android / Apple phone (or tablet) remote (LAN and Internet) access and control.
Technical Parameters
|
Wireless NVR |
||
|
model |
K8204-W |
|
|
processor |
Professional Industrial Grade Processor |
|
|
operating system |
Embedded linux operating system |
|
|
Video and audio input |
IP video input |
4CH |
|
Video and audio output |
HDMI output |
Resolution:1920x1080p,Support audio output |
|
VGA output |
Resolution:1920x1080p |
|
|
Video and audio codec parameters |
Video resolution |
720P/960P/1080P/3MP |
|
Synchronized playback |
4CH |
|
|
Video management |
Video management |
Timing recording, moving human shape detection recording, alarm recording |
|
Playback mode |
Instant playback, regular playback |
|
|
Backup mode |
U disk backup and network backup |
|
|
Hard disk drive |
Storage type |
1 SATA interface |
|
Storage |
Supports up to 6TB hard drives per interface |
|
|
External interface |
Network Interface |
RJ45 10M / 100M adaptive Ethernet port, |
|
USB interfaceb |
Default single USB, optional dual USB |
|
|
audio port |
One 3.5mm headphone jack (optional) |
|
|
Network management |
||
|
Network protocol |
||
|
ONVIF、N1 |
||
|
IEEE 802.11Wi-Fi |
||
|
UPnP |
||
|
SMTP |
||
|
PPPoE |
||
|
DHCP |
||
|
other |
power input |
DC 12V 2A |
|
Power consumption (excluding hard disk) |
≤5W |
|
|
Operating temperature |
-10 degrees-55 degrees |
|
|
Working humidity |
10%-90% |
|
|
size |
258×210×42mm |
|
|
Weight (without hard drive) |
<1KG |