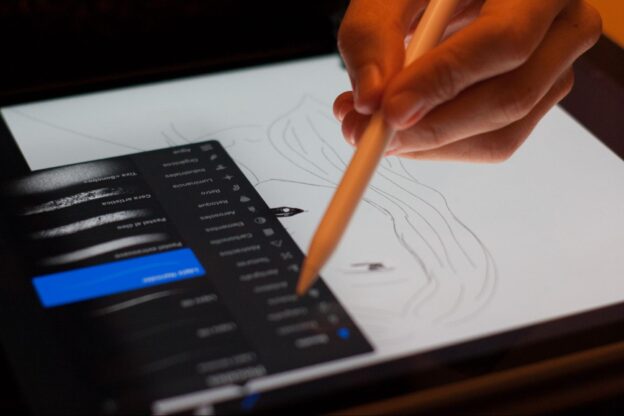
Многие задаются вопросом: «Как научиться рисовать на графическом планшете?». В этой статье мы поделимся опытом освоения чудесной и удобной программы Прокриэйт (Procreate).
Расскажем, как научиться рисовать в Procreate с нуля, а именно:
- Какие гаджеты потребуются?
- Какие есть тонкости?
- Где можно найти уроки?
- Где скачать текстуры и кисти?
- Какие удобства и фишки есть у этого приложения для Айпада?
С каждым годом разнообразие графических планшетов только расширяется. Есть модели с графической доской, подключенной к экрану компьютера. Есть графические планшеты с экраном, рисовать на которых, конечно, удобнее, но их приобретение более затратное.
А есть планшеты, которые поддерживают функции компьютера и могут также использоваться как графические планшеты. Об этих чудо-гаджетах мы и поговорим.
Программа Procreate доступна только на планшетах iOS фирмы Apple.
На наш взгляд, именно планшеты этой фирмы и именно эта программа помогут вам получить наилучшие результаты работы. Подойдут они, как новичку, желающему научиться рисованию с нуля, так и профессионалу. И если вы задаетесь вопросом: «Как научиться рисовать на планшете Ipad?» в этом тексте мы расскажем вам, насколько это просто.
Первый iPad Pro со стилусом Apple представили в 2015 году. С каждым годом компания совершенствует это устройство для того, чтобы Эппл Пенсил мог выполнять как можно больше функций. На данный момент стилус совместим со всей текущей линейкой айпадов от Apple. А графическое приложение Procreate усовершенствовано, чтобы удовлетворить потребности самых взыскательных художников и дизайнеров.
К ранним моделям Айпада стилус не предусматривался, поэтому для рисования подходят модели:
- iPad Pro 12.9 (1 и 2 поколение);
- iPad Air (3 поколение);
- iPad Pro 12.9 (3 поколение);
- iPad Pro 10.5;
- iPad Pro 9.7;
- iPad (6 поколение);
- iPad (7 поколение);
- iPad Pro 11.
Самый бюджетный вариант для рисования — iPad 2018 года, стоимость которого начинается от 24 тысяч рублей. В средней ценовой категории находится модель iPad Air 2019 стоимостью от 45 тысяч рублей. И, конечно же, лучший вариант среди Айпадов — iPad Pro 2018 и 2020 года от 63 тысячи рублей. Еще вам потребуется стилус, его можно купить отдельно.
Стилусы бывают 1-го и 2-го поколения. Нужно обязательно обратить внимание на то, какие модели подходят для вашего Айпада, потому что стилусы второго поколения совместимы не со всеми современными моделями. А стилусы 1-го поколения (более экономичные по цене) не подойдут к некоторым новинкам.
Цена стилуса варьируется от 8000 тысяч рублей. Да, устройство достаточно дорогое, зато вопрос о том, как научиться рисовать на планшете стилусом, обычно не задают. Этот инструмент настолько точно имитирует любые инструменты (кисти, карандаши, уголь), что у художников не возникнет абсолютно никаких сложностей в работе с ним.
Иллюстрация преподавателей Procreateschool
Начну с того, что рисование на любом графическом планшете, безусловно, имеет много плюсов перед рисованием настоящими карандашами или красками.
- Все инструменты художника собраны в одном месте: тут есть карандаши, фломастеры, мелки, кисти, краски.
- Не нужно ни бумаги, ни воды.
- Можно стирать много раз, не портя бумагу, можно отматывать действия обратно (признавайтесь, кому ни раз хотелось иметь такую возможность в реальности?).
- Можно записывать видео о том, как поэтапно создавалась ваша работа.
- Можно импортировать и экспортировать файлы в различных форматах и многие другие функции.
Минус такого рисования, пожалуй, один — планшет и ручку нужно заряжать. Но и это в современном мире решаемо. Существует большой выбор пауэрбанков (внешних аккумуляторов).
У нас есть отдельная статья о том, какой айпад выбрать для рисования. Советуем прочитать её, ведь в ней мы разобрали самые популярные модели и те характеристики, на которые вам стоит обращать внимание при покупке.
Теперь самое важное — скачать графическую программу.
В приложении Apple Store есть несколько графических редакторов для рисования. Программа Procreate является не только лидером по скачиваниям, но и лидером по положительным откликам.
Этот графический редактор самый простотой в работе. У него интуитивный интерфейс, большой функционал и множество приятных дополнений. Приложение часто обновляется новыми полезными функции.
По сравнению с другими приложениями в Apple Store, Прокриейт максимально дешевое – около 750 рублей. В отличие от других программ, для которых нужно покупать ежегодные лицензии или платить ежемесячно, за Procreate вы платите единоразово, скачиваете и пользуетесь.
Программа Прокриэйт максимально приближена к редактору фотошоп
и обладает очень большим функционалом. Для начала работы в программе требуется подключить стилус. Он работает как художественный инструмент
и как мышка. Подключается с помощью блютуз, а заряжается через шнур или непосредственно от планшета.
Иллюстрация преподавателей Procreateschool
Если вы хотите освоить все фишки и техники создания цифровой иллюстрации на IPad, то мы приглашаем вас на курс «Procreate 5» преподавателя Procreateschool Светланы Скляр.
Конечно, всему этому можно обучиться самостоятельно, но это займёт у вас в несколько раз больше времени (на курсе вы получите всю самую нужную информацию, выжатую из почти двухлетнего опыта преподавателя) и вы также не сможете получать обратной связи, чтобы понимать и улучшать свои слабые места.
На курсе вы полностью освоите программу Procreate, узнаете секреты и фишки, о которых не написано в бесплатных материалах на официальном сайте, и примените эти знания на практике. Вас будет сопровождать преподаватель, который будет помогать вам совершенствоваться.
По окончанию курса вы разработаете свой авторский дизайн и сможете зарабатывать на коммерческих иллюстрациях.
Открывая программу, сразу видим галерею работ. Это очень удобно.
Все работы можно собирать в стейки (папки), которые, как и файлы, можно переименовывать, копировать, удалять, создавать новые или сохранять в разных форматах. Можно сразу импортировать файлы в почту, мессенджеры и другие приложения.
Для того чтобы создать файл, нужно нажать на плюсик в верхнем углу экрана. Можно выбрать формат, который предлагает программа, а можно создать свой. Нажимаем на кнопочку «Создать размер» и задаем ширину, высоту и разрешение. Лучше брать высокое — 300 пикселей. Кстати, очень удобно, что размер холста можно изменять во время работы.
К сожалению, в программе нет цветового режима CMYK, только RGB, но файл очень легко перенести на компьютер и отредактировать.
После того, как мы создали файл, у нас открывается интерфейс программы.
Он достаточно прост и интуитивно понятен. В правом верхнем углу у нас находится панель цвета. Тут можно создавать свои палитры или пользоваться теми, что есть. Можно задавать цвету свои значения. Палитру также можно использовать в виде цветового круга или растяжки цветов по вашему желанию.
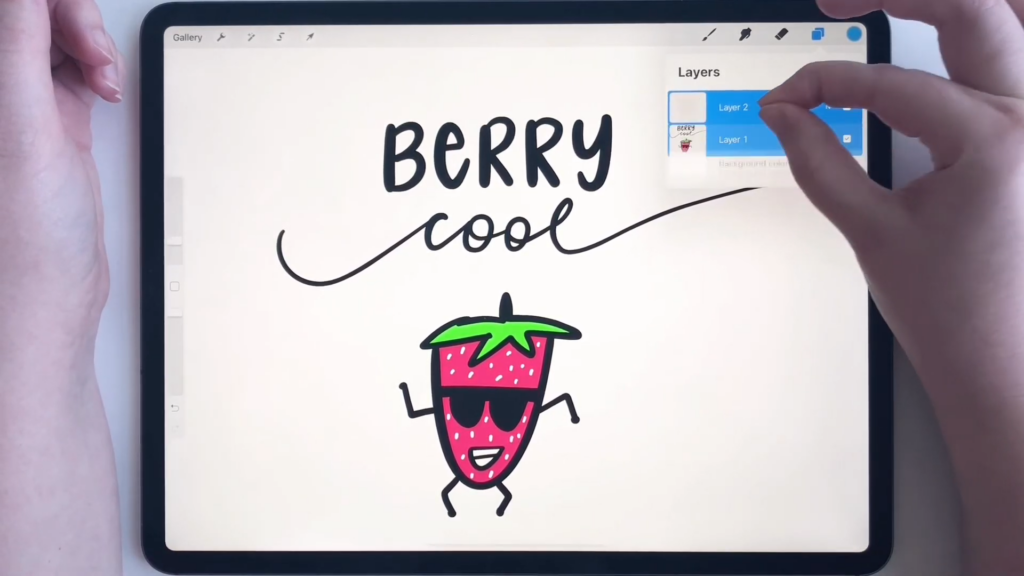
Следующая верхняя кнопка — это слои. Тут тоже все очень просто.
Нажав на +, можно создать слой. Потянув слой влево, можно дублировать или удалить слой. Блокировать и разблокировать слой можно, проведя по экрану вправо.
Это действие очень удобное. Оно поможет случайно не нарисовать на другом слое. На заблокированном слое также можно рисовать, но только на той области, где есть рисунок. Это напоминает эффект обтравочной маски. Функция обтравочной маски в программе тоже есть. О ней мы более подробно говорили в статье «Основны рисования портрета в Procreate». Но если у вас не хватает слоев, функция блокировки может ее заменить без использования нового слоя.
Для того, чтобы объединить слои, достаточно просто свести их двумя пальцами. В Procreate ограниченное количество слоев, зависящее от оперативной памяти устройства. Чем больше разрешение и формат, тем меньшее количество слоев вы сможете создать. Поэтому периодически приходится объединять слои.
Это и другие действия возможно отменить только до окончания сеанса работы (выхода из программы).
Следующие инструменты на панели — это ластик, палец и кисть.
Все три инструмента имеют похожий интерфейс и разнообразные вариации форм и материалов. В программе есть стандартные наборы кистей, настройки которых можно подстроить под свои потребности. Самые важные настройки кистей — «Стим лайн» — находятся в «Обводке». Размер и непрозрачность находятся во вкладке «Pencil».
Кисти можно скачивать, можно создавать свои, менять местами, формировать папки с наборами. Об этом у нас есть отдельная статья. Там же мы делимся с вами авторским набором кистей для фэшн-иллюстраций.
У каждого художника свои любимые инструменты, карандаши, кисти.
Мне, как автору этой статьи, нравится делать наброски карандашом 6В. В чернилах мне нравятся сухие чернила, потому что они дают текстурный контур цвета и рапидограф с высоким значением стим лайна. Заливки я делаю мягким и женским аэрографом.
В программе можно перемещать объекты на слое. Для этого нужно выбрать стрелочку в верхнем левом углу и слой, на котором находится объект, и можно просто его двигать ручкой. Так же можно его увеличивать, уменьшать, делать искажение, деформацию, отражение. Можно растягивать по точкам.
При деформировании и увеличении теряется качество изображения, поэтому лучше делать это на этапе эскиза. Можно применять разные эффекты: размытие по гауссу, размытие движения, размытие в перспективе. Можно добавить резкость, шум.
Еще очень удобная функция — пластика. С помощью нее можно что-то подтянуть, сжать, исправить, сделать больше, меньше. Это очень поможет начинающим художникам.
В левой вкладке панели находится панель «направляющие рисования». Включив эту функцию можно сделать направляющие. Например, 2D решетку и рисовать по квадратикам. Это может очень пригодиться, если вы срисовываете с какого-то изображения. Кстати, если хотите нарисовать портрет по фото, у нас есть пошаговая инструкция.
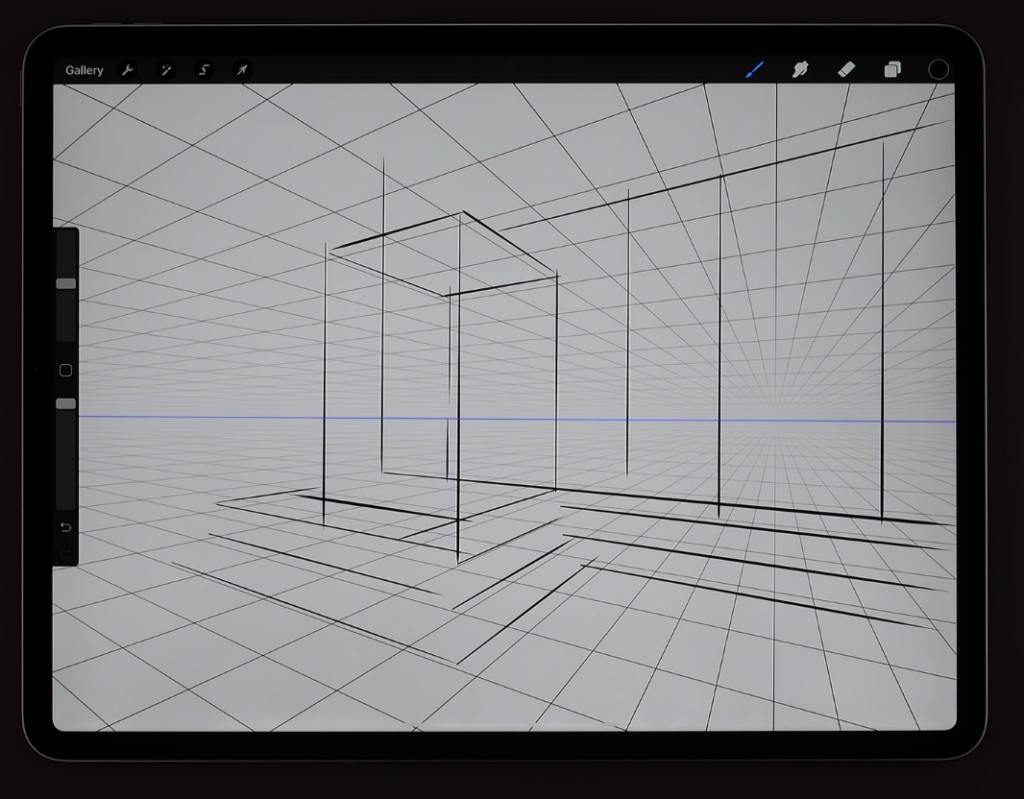
Еще одна очень удобная функция в направляющих — перспектива. Поставив точки на холсте и за его пределами, вы можете ориентироваться, куда будут сходиться линии перспективы.
Очень классная функция в программе — это запись видео. С её помощью можно записать все этапы работы. Видео можно экспортировать полностью или создав 30-секундный ролик.
Горячие клавиши:
- двумя пальцами по экрану вы отменяете действие.
- тремя пальцами по экрану возвращаете отмененное действие.
- при нажатии четырьмя пальцами прячется интерфейс.
Эти клавиши можно включать и отключать.
Инструмент пипетка появляется, когда вы длительно нажимаете пальцем на экран. На боковом экране слева также есть функции кисти: размер, прозрачность, пипетка.
Еще очень удобная функция для новичков — выравнивания.
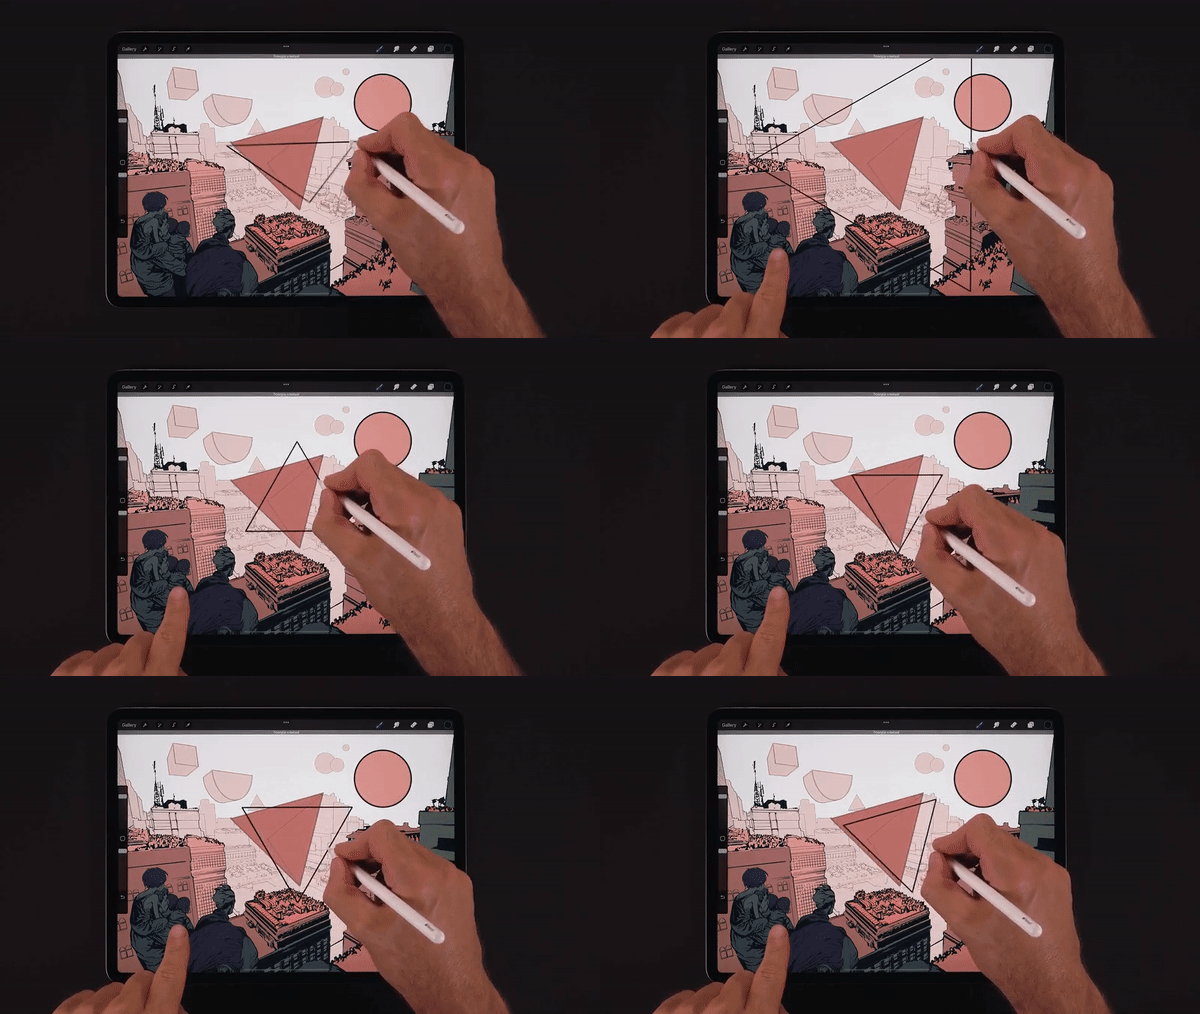
К примеру, вы рисуете квадрат, но он получается неровным (тоже относится к кругу и эллипсу). Замыкаете четыре стороны и задерживаете стилус — квадрат автоматически выравнивается. Это действие можно сделать только на этапе создания формы.
Иллюстрация преподавателей Procreateschool
Что же, мы освоили некоторые функции. Приступим к процессу рисования.
В начале любой хорошей работы лежит набросок. Он рисуется, как правило, карандашами или тонкой кистью. Из карандашей лучше использовать инструмент с высокой степенью мягкости.
Попробуйте нарисовать какое-то несложное изображение. К примеру, цветок, листок или перышко. Если у вас дрожит рука, и линии получаются неровными, корявыми, учебу нужно начать с прорисовки простых форм.
Каждый день по нескольку минут пытайтесь рисовать прямые параллельные линии, круги, овалы, зигзаги и волны, пока у вас не станут получаться красивые, четкие, одинаковые линии. Такие упражнения помогут набить руку и придадут уверенности. Уже через несколько занятий вы заметите прогресс.
На этом этапе обучения очень полезно пробовать пользоваться разными карандашами и кистями. Вы будете тренироваться и изучать инструменты программы. Когда почувствуете уверенность в руках, можно попробовать набросать несложный рисунок. Лучше, если он будет тем же, что и в ваш первый опыт. Улучшение результатов очень мотивирует. Набросок намечивается тонкими светлыми линиями. Постепенно можно увеличивать нажим и толщину. Этот этап называется прорисовкой.
После рисования карандашом можно приступать к раскрашиванию.
Здесть у вас будет огромный выбор вариантов. В программе Procreate можно рисовать красками с эффектом акварели, гуаши, чернил, напыления аэрографом. Заливками или мазками. Выбор вариантов огромен.
Обо всех техниках и фишках мы рассказываем на курсе «Procreate 5»:
Иллюстрация преподавателей Procreateschool
Что важно в процессе учебы рисованию – это настрой на успех и мотивация.
И не сдаваться после первых неудач. Научиться рисовать
в Procreate, поставив такую цель, может абсолютно любой желающий.
После того как вы набьете руку, обзаведетесь собственными приемами
и наработками, процесс рисования станет еще приятнее и увлекательнее.
Совладав с тонкостями программы, вы сможете создавать красивые иллюстрации не хуже, а может и лучше тех, которыми вдохновляетесь сейчас.
Профессия диджитал-художника с каждым годом становится все более популярной и востребованной. Если это ваша мечта, если вы задаетесь вопросом, как научиться рисовать арты на планшете, и хотите научиться рисовать красиво, зарабатывать своим талантом, получая удовольствие от работы, – приходите на нашобучающий курс Procreate 5.
На наших уроках мы поделимся с вами секретами цифрового рисования. Расскажем, как быстро научиться рисовать на графическом планшете, как рисовать арты в своём авторском стиле и как продавать свои работы, чтобы зарабатывать на любимом хобби и призвании.
- Уроки
- 1 мин на чтение
- 199297
Procreate как никогда популярен среди диджитал-иллюстраторов: множество кистей, возможностей и настроек для создания графики. В этой подборке мы собрали 57 наиболее интересных и полезных уроков для тех, кто хочет освоить Procreate.
- #ipad
- #procreate
- #графический дизайн
- #иллюстрации
- #планшет
- #рисунок
- 0
-
33
Где брать иллюстрации: 25 бесплатных и платных источников
- 0
-
14870
12 уроков по основам графического дизайна
- 1
-
34153
Тренды в графическом и UI дизайне в 2019 году
- 2
-
6138
Earth Primer: Приложение для iPad
- 0
-
3236
-
2 366
-
0
-
03 Июл 2023
Показываем крутые функции Procreate. Расскажем о работе со слоями, формами, цветом и некоторых других функциях.
Procreate — приложение для рисования на iPad и iPhone. Программа соединяет в себе хорошие возможности и простой интерфейс. Если вы выбрали профессию художника, то многие функции из этой статьи помогут вам лучше понять, как рисовать в программе, и сделают процесс удобнее.
Инструменты выравнивания
Выпрямляем геометрические фигуры
Треугольники, круги, прямоугольники и другие формы можно выпрямлять, не отрываясь от самого рисунка. Нарисуйте от руки нужную вам фигуру, но после не отрывайте стилус от экрана — вместо этого подержите его на экране две секунды.
В приложении можно рисовать и равносторонние геометрические фигуры в два действия. Инструкция проста: задержите стилус на экране, а потом поставьте на экран палец.
Создаем вспомогательные линии
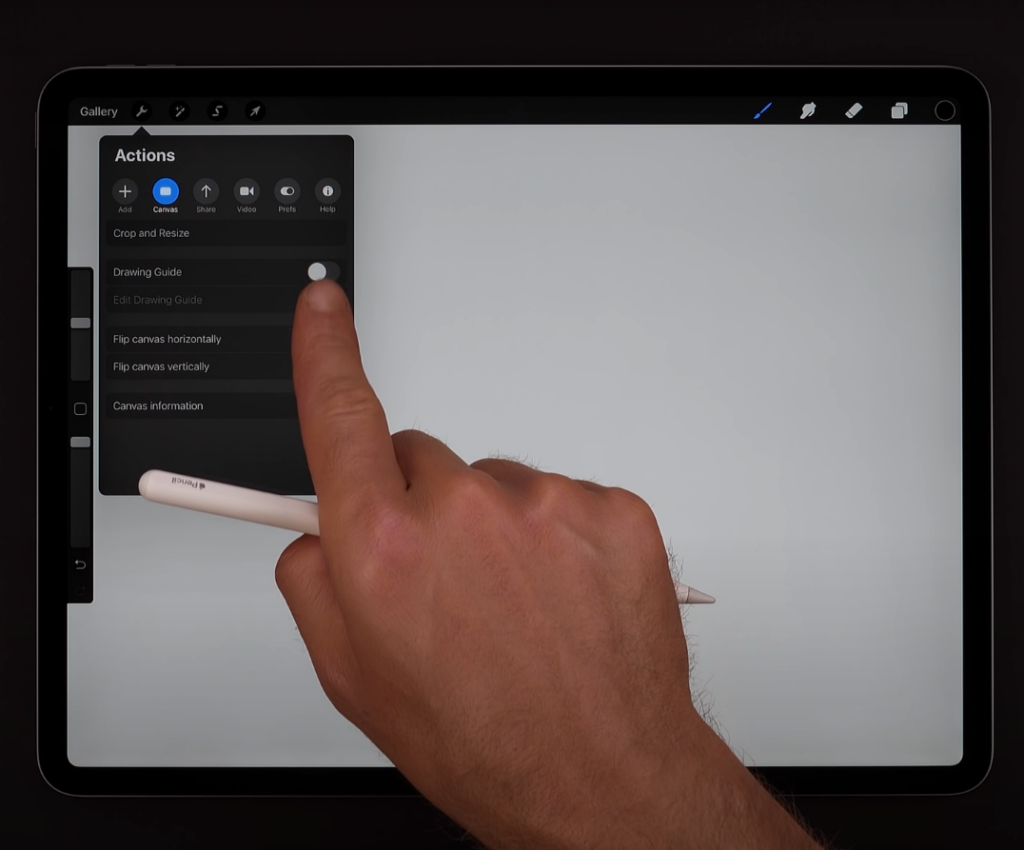
В Procreate они расчерчивают фон и помогают в работе с перспективой. Чтобы активировать линии, откройте раздел «Действия» и выберите подраздел «Холст». В этом подразделе нажмите кнопку «Направляющие линии».
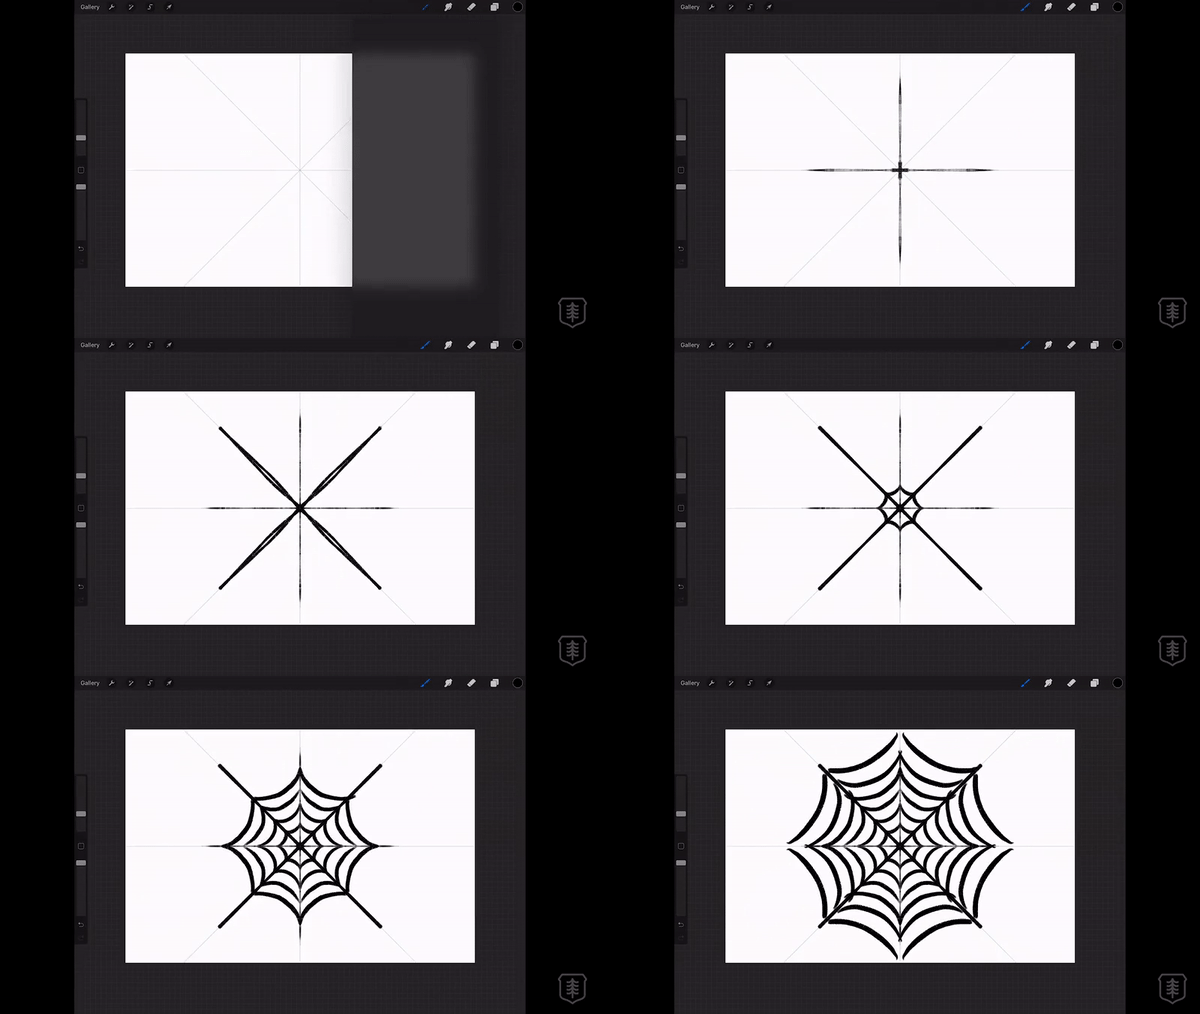
У этих линий есть 4 типа. Изометрическая сетка помогает в создании рисунков с видом сверху-сбоку, как в некоторых компьютерных играх. Двумерная сетка подходит для плоских рисунков, симметричная для рисования узоров в стиле калейдоскопа, а перспективная сетка идеальна для создания окружения и фона.
В опциях функции можно включить привязку к вспомогательным линиям — это когда линии магнитятся к осям сетки, словно вы начали рисовать по линейке.
Делаем линию плавной
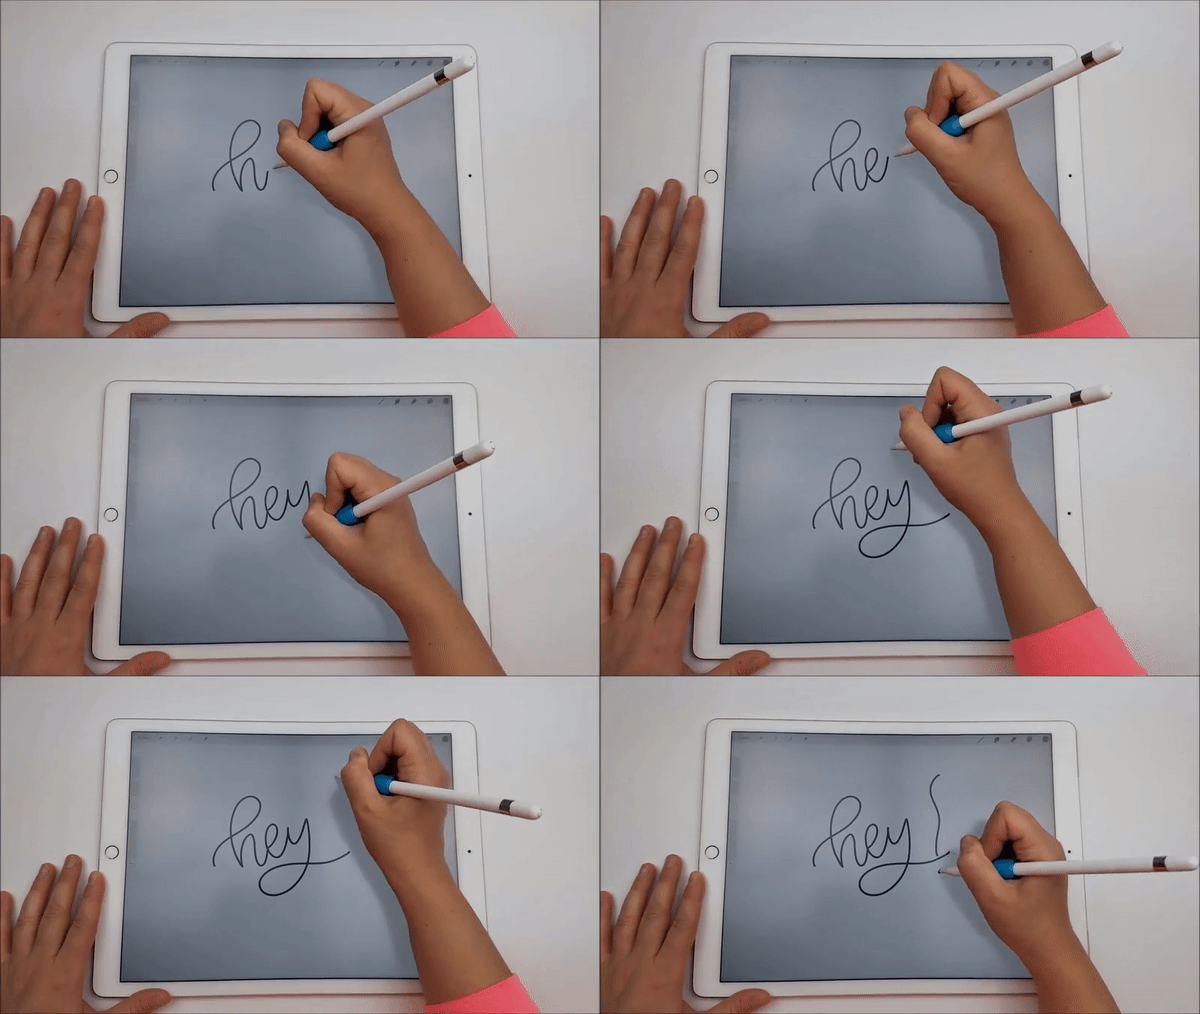
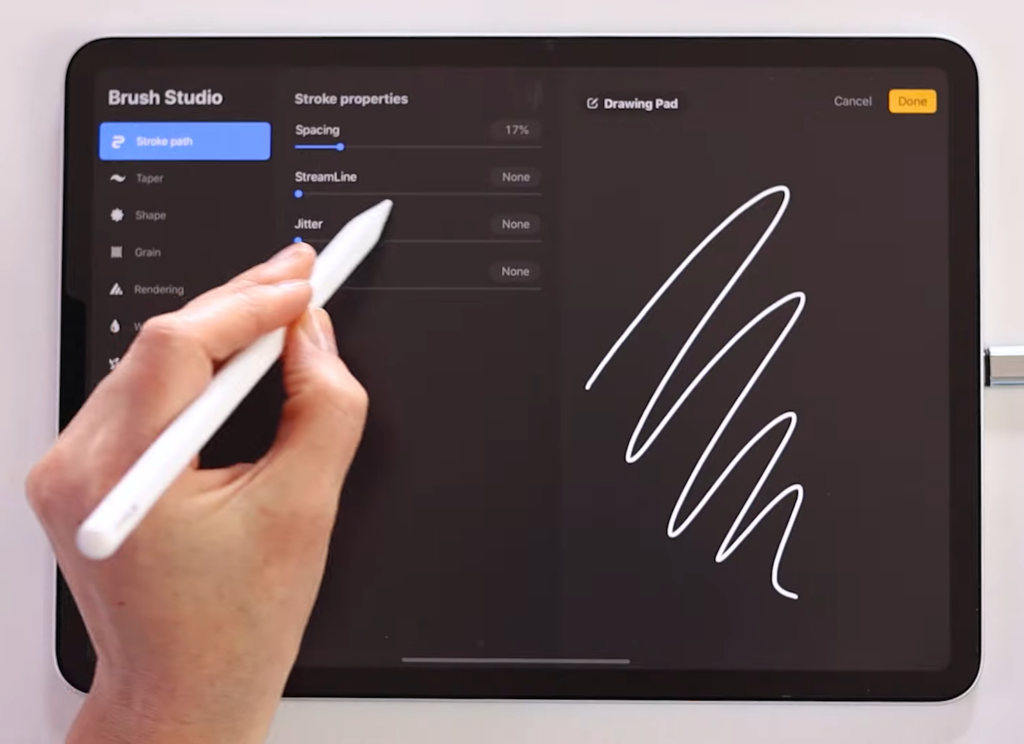
При рисовании в цифре довольно сложно от руки нарисовать гладкую уверенную линию. Разработчики приложения решили эту проблему с помощью StreamLine.
StreamLine сглаживает линии при создании рисунка. Учитывайте, что при включенной функции линия от стилуса iPad будет идти с задержкой.
У настройки нет перевода на русский язык, поэтому вы быстро её найдете среди других. Инструкция по активации StreamLine: нажмите на любую кисть, чтобы открыть её опции, и затем отрегулируйте второй ползунок.
Инструменты управления цветом
Раскрашиваем форму
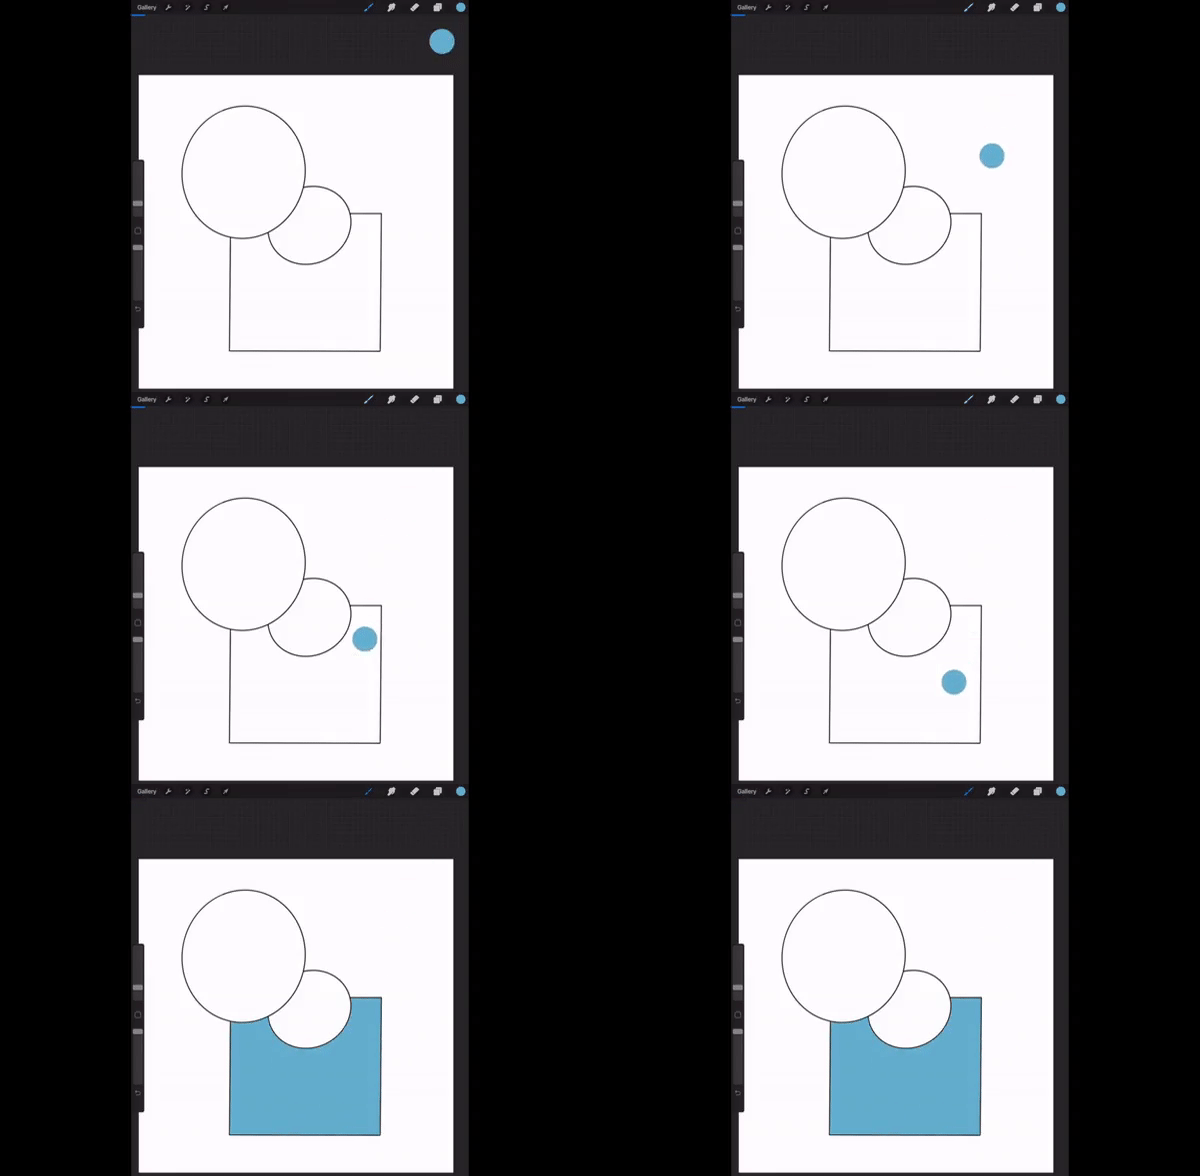
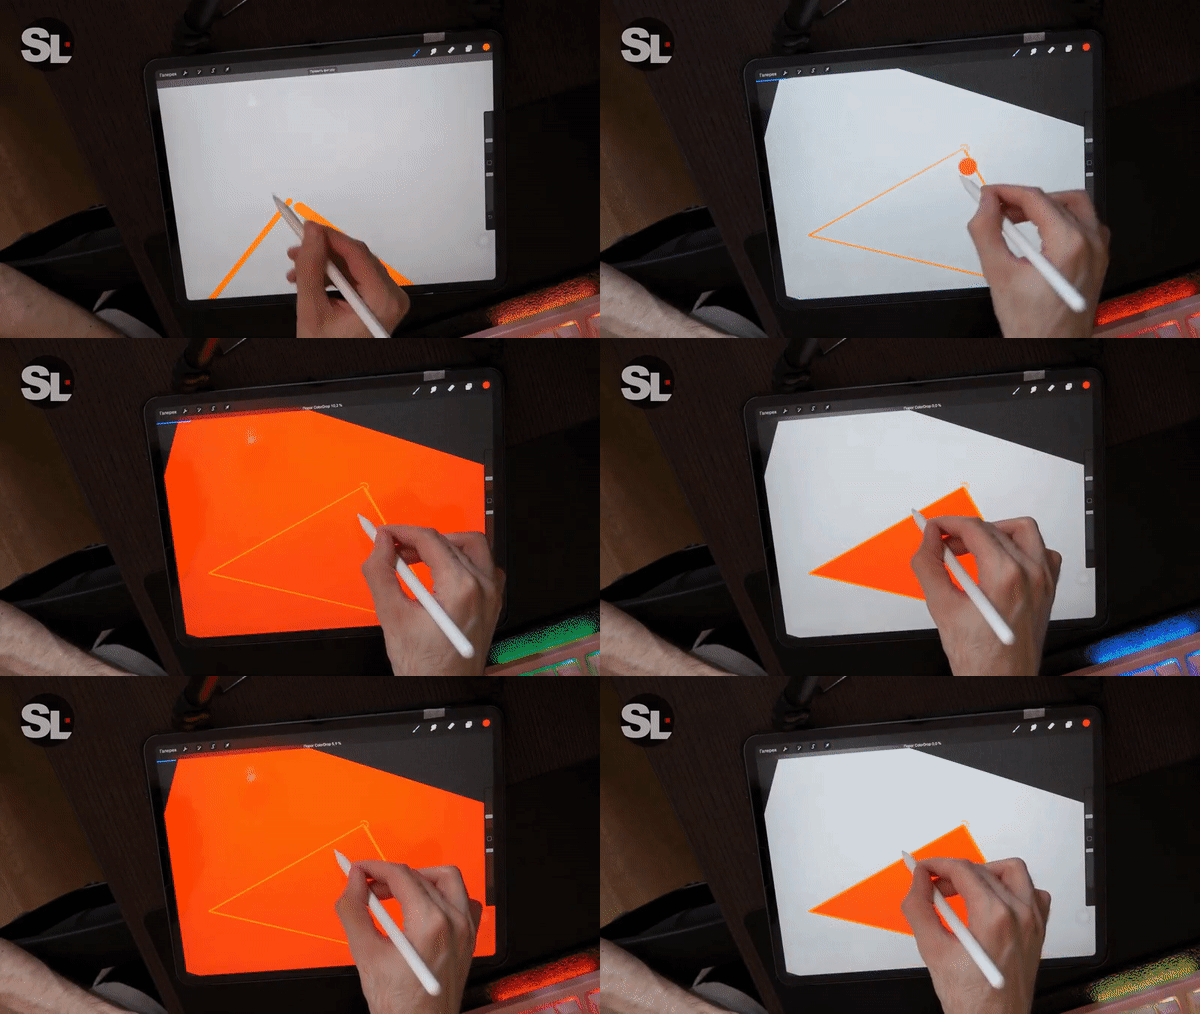
В Procreate, как и в Photoshop, есть быстрая заливка — перекиньте в закрытую фигуру знак палитры и всё внутри окрасится в нужный цвет.
Если форма разорвана, то есть имеет пустоты в своем контуре, то вместо формы окрасится весь холст. Чтобы можно было рисовать без проблем с заливкой, разработчики придумали «порог ColorDrop».
Идём по инструкции — после залития формы не отрывайте стилус от экрана две секунды, а затем двигайте им, не отрывая в разные стороны — так вы меняете уровень порога функции.
При малом уровне порога ColorDrop программа окрасит форму, не обращая внимания на разрывы контура. При большом уровне — закрасятся сразу несколько объектом или весь холст.
У этой функции тоже нет перевода на русский язык, поэтому если будете искать русскоязычные гайды, то используйте английское название.
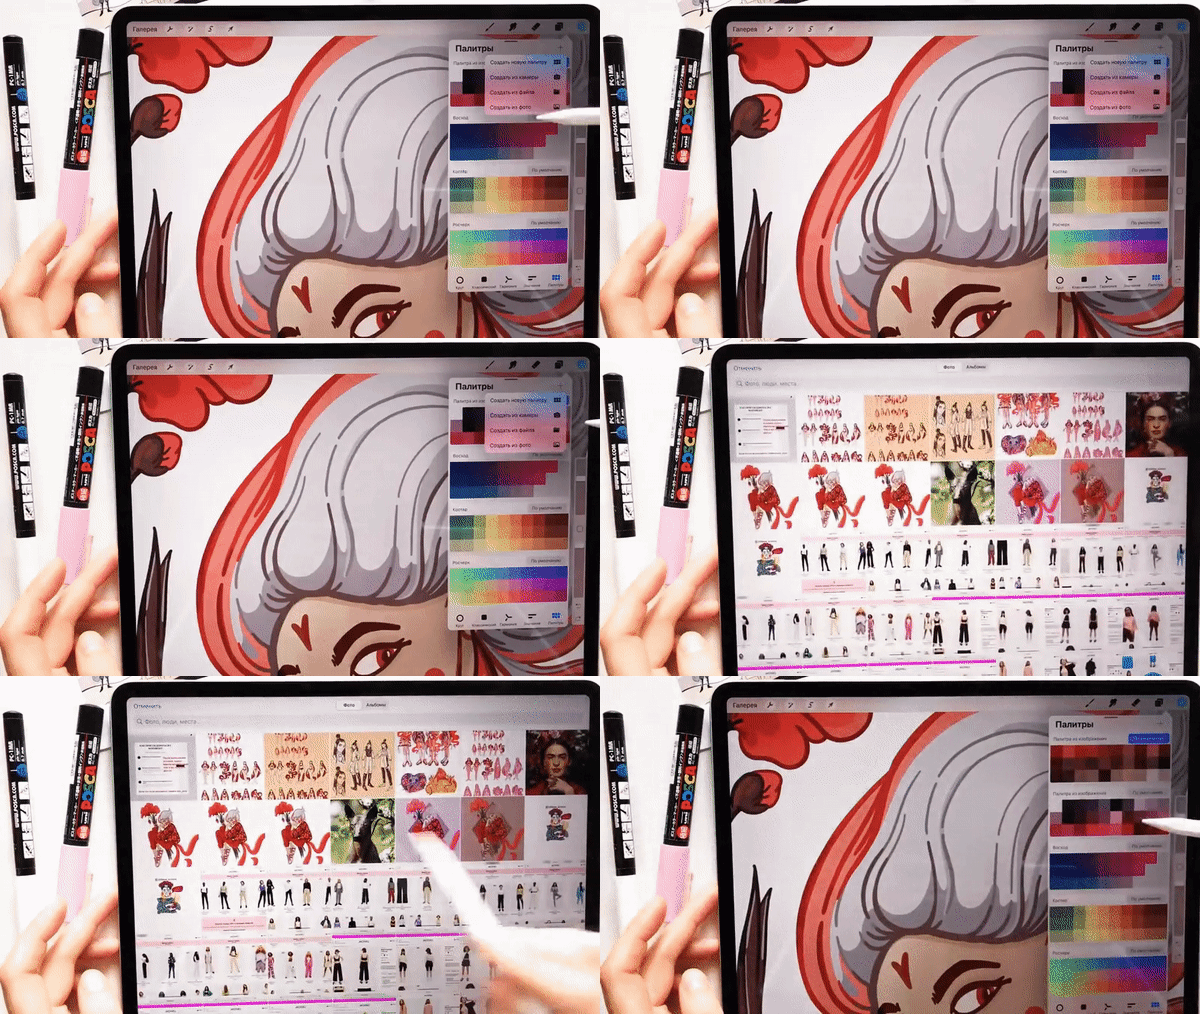
Копируем цвета с картинки
С любой картинки копируются все её цвета — затем их можно поместить в свою палитру. Для копирования цветов закиньте рисунок в меню палитры — программа считает цвета и сделает из них новую палитру.
Возвращаемся к прошлому цвету
В Procreate есть функция быстрого возвращения к прошлому цвету цвет, который использовал художник. Для этого нажмите стилусом по значку палитры и подержите его не отрывая несколько секунд.
Инструменты управления слоями
Соединение слоев
В Procreate объединяются слои в пару действий. Для этого зажмите на экране iPad верхний и нижний слой, а потом сомкните пальцы.
Скрываем слои
В приложении можно скрывать все слои разом. Для этого нажмите и подержите стилусом на галочке слоя. После этого все слои скроются из приложения. Чтобы вернуть обратно — нажмите и подержите стилусом на том же слое.
Переносим слои на другое изображение
В Procreate можно перенести несколько слоев, соединив на одном холсте зарисовки с разных скетчей. Выберете необходимые слои свайпом вправо, а потом перенесите их на нужный рисунок. Не отпускайте слои во время переноса их на другой холст.
Инструменты демонстрации рисунка
Показываем процесс рисования
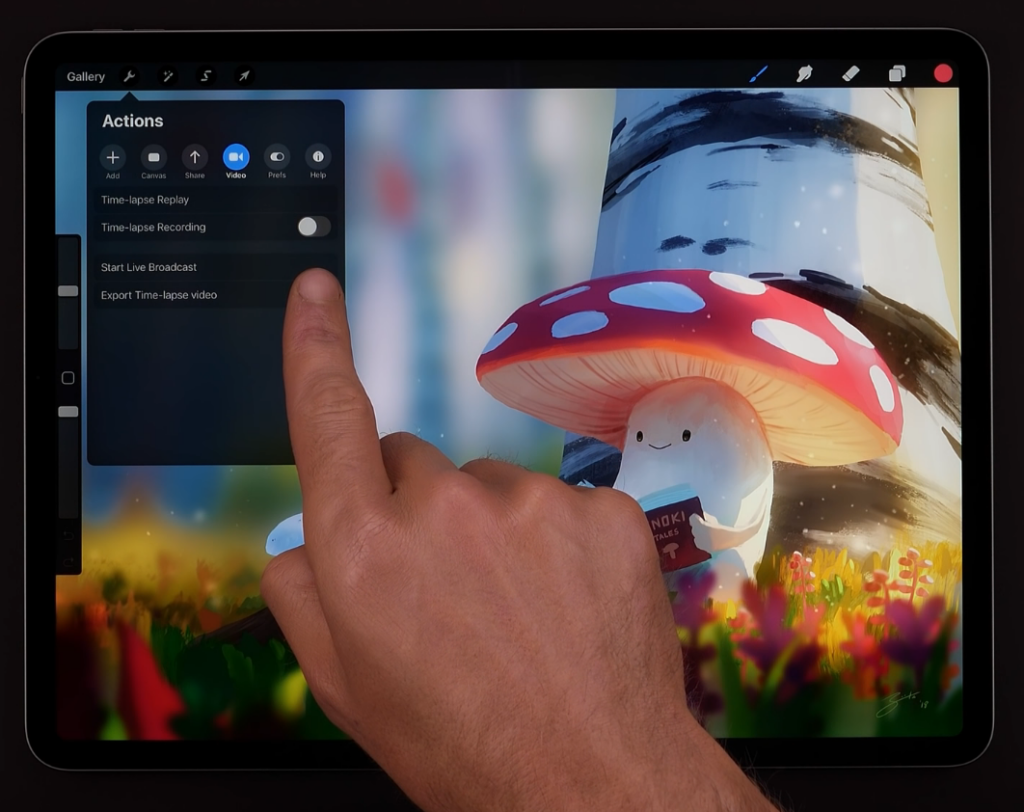
Художники снимают таймлапсы — ускоренное видео, в котором они показывают, как рисовали тот или иной рисунок. Для приложения Procreate не нужны сторонние инструменты для записи таких роликов — всё есть внутри программы.
Для записи таймлапса следуйте инструкции: перейдите в раздел «Действия», потом во вкладку Видео», а затем включите настройку записи таймлапса. Активировать запись нужно до начала рисования, иначе таймлапс не запишется.
Записанное видео можно просмотреть в приложении, а потом отправить полную версию или сжатую 30-секундную в YouTube или в виде Stories в одной из соцсетях.
Экспортируем рисунок в соцсети
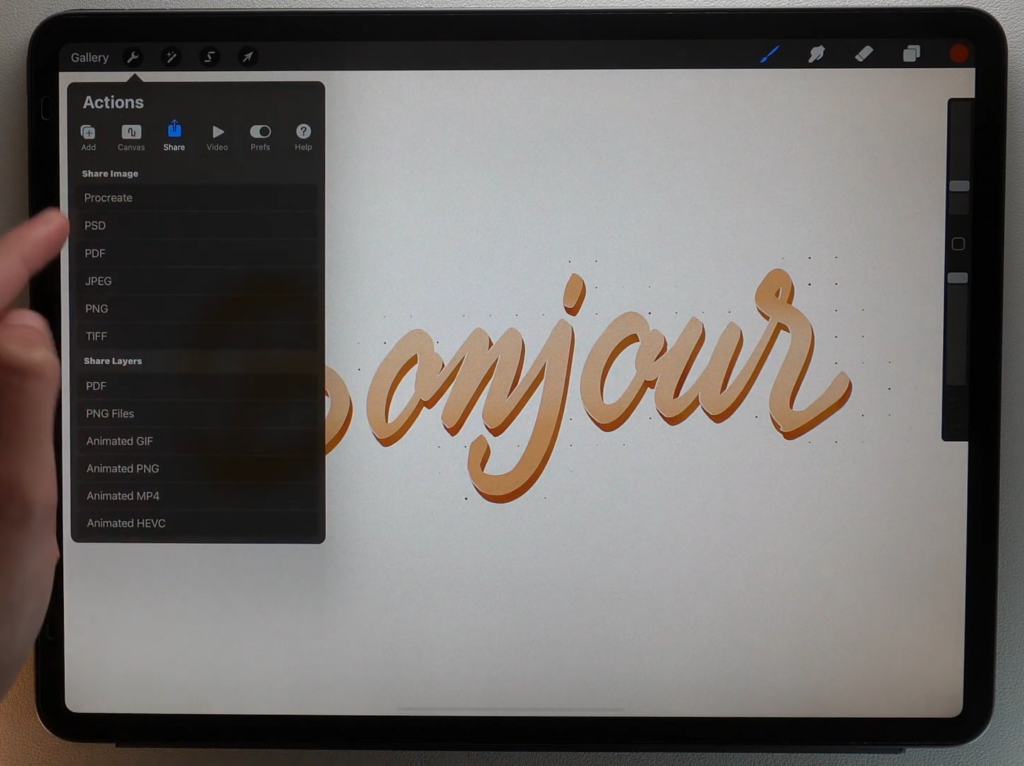
Своими работами можно делиться не выходя из приложения. Для этого идите в раздел «Действия», а потом нажмите кнопку «Поделиться». После этого выберете один из предложенных форматов и необходимую платформу, куда вы хотите отправить свой рисунок. Рисунок можно отправить и себе на компьютер или другое устройство.
Ориентируемся на референс
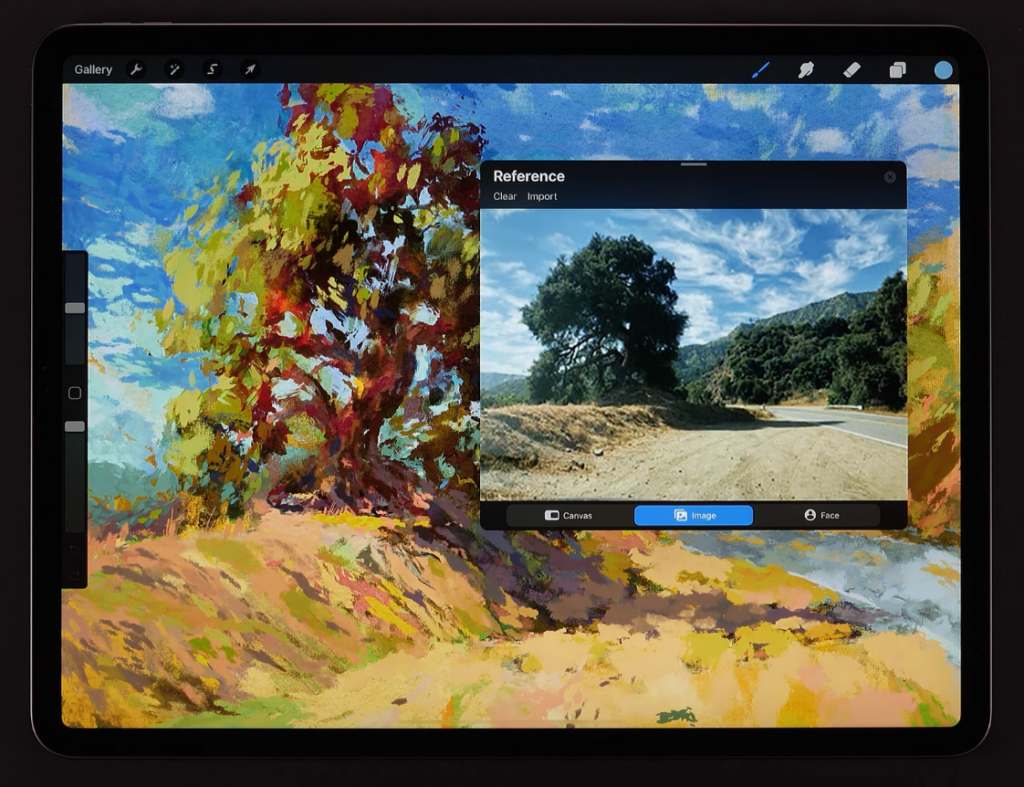
Инструмент «референс» открывает отдельное окно рядом с рисунком, на котором отображается сторонняя картинка, на которую вы хотите ориентироваться по ходу работы. Для включения функции перейдите в раздел «Действия», подраздел «Холст» и прожмите пункт «референс».
Инструменты, ускоряющие работу над рисунком
Избавляемся от случайных касаний
В Procreate можно отключить все касания, которые совершаются рукой — это полезно, если нет специальной перчатки, спасающей от случайных прикосновений рукой по экрану. В таком режиме с экраном будет работать только стилус. Касания отключается в настройках в разделе управления жестами во вкладке «Общие».
Исправляем ошибки
В Procreate можно отменять действия с помощью касаний пальцами. Для этого надо нажать несколькими пальцами по экрану и подержать их несколько секунд. Нажатие двумя пальцами отменит прошлое действие, а тремя — отменит отмену.
Быстрый вызов функций
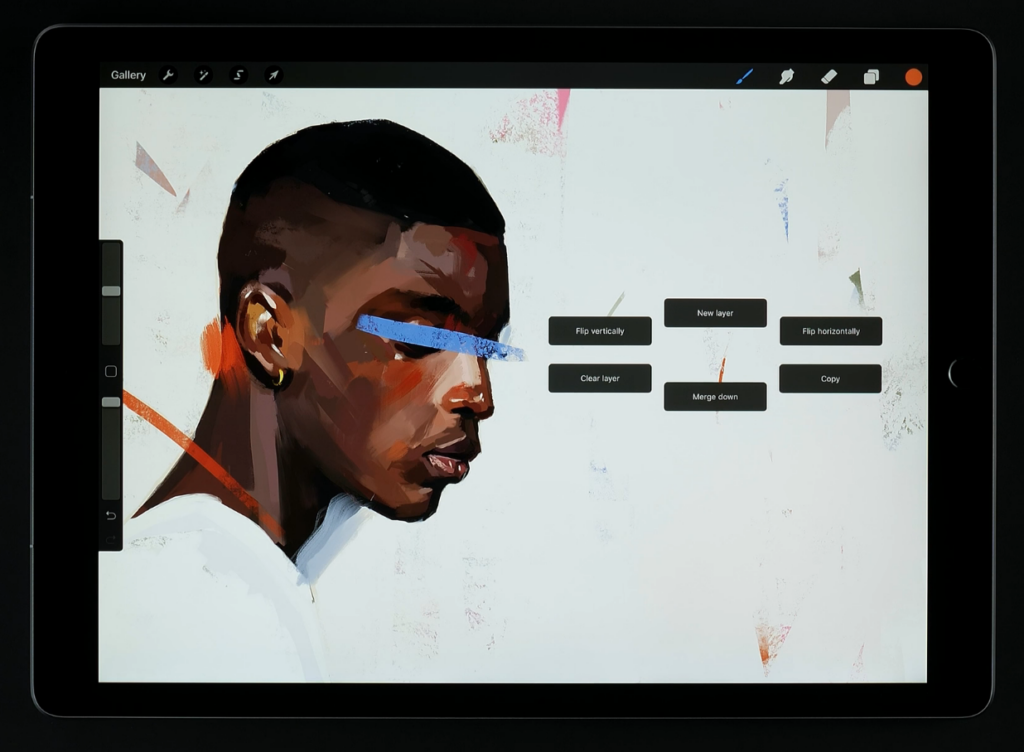
В Procreate есть инструмент, который быстро вызывает нужную функцию — «Быстрое меню». Оно открывает шесть кнопок, которые соединяются с любой функцией программы.
Меню редактируется по следующей инструкции: перейдите в настройки во вкладку управления жестами. Англоязычная настройка «QuickMenu» — это и есть наша функция.
Собираем рисунки в одну группу
Это полезно в двух случаях:
- Разделение по группам завершённых рисунков и скетчей.
- Разделение разных скетчей или рисунков по типам (окружение, персонажка и тд).
Для включения функции нажмите кнопку «Выбрать» на главном экране приложения, а затем выберете необходимые работы и нажмите на кнопку «Группа».
{«id»:14186,»url»:»\/distributions\/14186\/click?bit=1&hash=144e8984b6b6ed7e26caec197b7fef054c31c2b514d7f9eb0054f858b5b05e63″,»title»:»\u041e\u0431\u0435\u0440\u0435\u0433 \u043e\u0442 \u043d\u0435\u0433\u0430\u0442\u0438\u0432\u043d\u044b\u0445 \u043e\u0442\u0437\u044b\u0432\u043e\u0432 \u2014 \u0431\u044b\u0441\u0442\u0440\u0430\u044f \u0434\u043e\u0441\u0442\u0430\u0432\u043a\u0430 \u043f\u043e \u0441\u0442\u0440\u0430\u043d\u0435″,»buttonText»:»\u0414\u0435\u0442\u0430\u043b\u0438″,»imageUuid»:»32887b29-33d7-5d50-b4b6-441a8d017967″}
Сегодня я покажу вам свой метод рисования персонажа в Procreate, используя технику блоков. Это простой и эффективный способ создания основы персонажа, который позволяет легко контролировать пропорции и анатомию. Давайте начнем!
1. Подготовка и настройка
Прежде чем начать рисовать, я настраиваю свой холст. В меню Procreate я выбираю размер холста и его разрешение в соответствии с моими предпочтениями. Я также добавляю слой, который позже буду использовать для создания блоков персонажа.
Теперь, когда настройка завершена, перейдем к созданию блоков персонажа.
2. Создание блоков
Я выбираю референс, с которым дальше продолжу работать. Остановимся на этом ковбое, мне нравится поза здесь, она хоть и статичная, но выглядит живой и достаточно динамичной, за счет этого интересной.
Я начинаю с грубых очертаний, создавая блоки, которые будут определять форму и пропорции персонажа. На самом первом этапе я использую кисть Sketch с низкой прозрачностью, чтобы иметь возможность вносить коррективы, если это необходимо.
Важно помнить, что в этом этапе не обязательно уделять внимание деталям. Мы только определяем общую форму и пропорции персонажа, здесь важно понять, какой блок куда крепится. Поэтому не беспокойтесь, если ваш рисунок выглядит грубо.
3. Разработка деталей
Как только основные блоки созданы, я начинаю намечать более мелкие детали изображения. В основном на данном этапе я использую кисть Sketch 2, она больше напоминает карандашный набросок, за счет более четких контуров.
Здесь можно проявить свою фантазию и добавить уникальные особенности персонажа. Не бойтесь экспериментировать и играть с различными элементами. На этом этапе я не копирую референс, я стараюсь сразу придать персонажу стилизованный вид.
4. Финальный лайн и доработка
Последний шаг — это добавление финального лайна и доработка деталей. На этом этапе я использую мой любимый карандаш, он идеально подходит для рисования контуров, очень нравится, что в зависимости от силы нажатия можно изменять толщину лайна. Это очень полезно в том случае, когда нужно показать границы с тенями или предать дополнительный объем в какой-либо области.
Дополнительно я полностью заливаю каждый отдельный элемент рисунка серыми оттенками разной яркости, чтобы на этапе покраса было более понятно, какой по яркости оттенок должен быть на фоне общей композиции.
На этом этапе можно добавить тени, подсветки и другие детали, чтобы сделать персонажа более реалистичным или выразительным.
Я очень надеюсь, что эта статья была вам полезна, потому что этот способ действительно работает абсолютно в любом случае.
Не бойтесь экспериментировать и находить свой собственный стиль. Тренируйте насмотренность за анатомией и пропорциями, и ваши рисунки будут становиться все лучше и лучше!
1. How to Use Layers in Procreate
Step 1
In this tutorial on drawing in Procreate, I’m using an iPad Pro, an Apple Pencil, and the Procreate 5.2 app.
First, we need to create a Canvas. Open Procreate and press the + icon in the top-right corner of the screen.
Then press the + icon in the top right of the New Canvas menu to create a custom size.
I’m going to be using a 3000px by 3000px canvas size. I find this works well for square pieces that are high quality whilst retaining a larger number of Maximum layers. You can see the Maximum layers for your canvas size at the bottom of the table. Then hit the orange Done button to launch your canvas.
Step 2
Now, let’s look at using the Layers panel. The panel can be found by tapping the double square icon in the right-hand corner of the screen.
To create a new layer, tap the + icon in the top-right corner of the menu.
You can switch layers by tapping to select the layer you’ll be drawing on. If you keep drawing on a single layer, you’ll notice that all of your shapes will move together.
Step 3
You can move objects on a layer by tapping the Transform tool icon.
If you would like to separate your lines, make sure to select a separate layer to draw on. You can now move your shapes separately from one another.
Step 4
You can move layers around by pressing and holding on a layer and dragging it. Moving a layer behind another one will place that shape behind the shape on the other layer.
Step 5
You can hide and reveal layers by tapping on the checkbox at the edge of each layer.
2. How to Use Brushes in Procreate
Step 1
If you want to learn how to draw in Procreate, next up we’ll look at brushes. The Brush Library is opened by tapping on the Brush Library icon at the top of the screen.
Here you’ll find a variety of default Procreate brushes, organised into the categories shown on the left. There’s a mixture of both traditional and digital style brushes, as well as textures and stamps.
To select a brush, simply tap on it, and it will now be ready to use.
Step 2
You can adjust the size of the brush by dragging the Brush size slider, which is located to the left of the screen. Dragging the slider upwards will increase the brush size, whilst dragging it downwards will decrease it.
Step 3
You can save a brush size by holding the Brush size slider with one finger, whilst tapping the plus icon on the menu that pops up with another finger.
Repeat this process and tap the — icon to remove the marker. To select the saved brush size, simply drag the slider over the marker.
Step 4
The bottom slider controls the opacity of the brush. The lower you drag the Brush opacity slider, the lower the opacity of your brush will become.
3. How to Sketch in Procreate
Step 1
Next up in how to draw with Procreate, it’s time to begin sketching! First, I’m going to open my reference photo.
One way of doing this is to open the Actions menu, tap on Canvas, and then turn on the Reference switch.
This will open a Reference box, and you can move this by holding and dragging the top of the box.
You can use the Canvas setting to use existing drawings on your canvas as a reference. This is helpful if you’d like to reference another part of your canvas whilst being able to zoom in on a different section.
The Face option allows you to take a reference photograph, which could be helpful if you want to recreate an expression, for example.
The Image option allows you to import an image from your photos library. Here I’m going to add the image I downloaded earlier by tapping the Import image button to import my photo.
The image will now appear inside the Reference box. To close the Reference box, tap on the x icon in the top-right corner.
Step 2
Another method of working from a reference photo is to split the screen between two applications. This is my preferred method.
Simply open your reference image, and then swipe upwards from the bottom of the screen to open the shortcut menu.
Tap and hold the Procreate icon, and drag it to the left of the screen.
With a half split screen, some of the Procreate menu bar items are hidden, so I prefer to work in 3/4 screen by dragging the divider in the middle to the right slightly using my finger.
You can now use both applications simultaneously, allowing you to zoom and move around both parts of the screen using your fingers and a pinching motion.
Step 3
Now it’s time to sketch! First, I’m going to map out the rough shapes of my drawing. I’m using an Airbrush for this because I just want to create loose guides.
I begin with a circle for the head, and I continue to use shapes and loose lines to mark out the rough proportions of the drawing. I’m not going to add any detail at this point—I’m just marking where the main shapes and features will go. This will serve as a guide before I begin the next stage of sketching and adding more detail.
Step 4
Once this sketch is complete, I’m going to increase the size using the Transform tool set to Uniform, which means the shape will hold its current proportions.
Step 5
Now it’s time to create a more refined and detailed sketch layer. First, I’m lowering the opacity of my initial sketch to make it easier to draw over.
To lower the layer Opacity setting, tap on your layer to open the menu, and drag the slider.
I’m then creating a new layer above this to draw on, before selecting my sketch brush.
Step 6
I’m going to edit this brush slightly by tapping on it to open the Brush Studio.
You can change a variety of settings here. I’m increasing the StreamLine setting to the maximum. This makes the brush create smoothed lines, which is very helpful when sketching as it steadies your outlines. Press Done to confirm your changes.
Step 7
Next, I’m going to begin to create my refined sketch with this brush.
I create all the separate elements of my drawing on different layers to make them easier to edit, but you could draw on a single layer if you prefer to work this way.
Step 8
Once I’m happy with this sketch, I’m going to Flatten the multiple layers into a single image and layer. To do this, I will first need to select all of my layers.
You can select multiple layers and group them by swiping each layer to the left and then tapping Group in the top-right corner of the menu.
The layers are now grouped.
Tap the group and select Flatten from the menu that will open to the left. This merges all layers from the group into a single layer.
Step 9
Before we move on, let’s look at a few more helpful tools which can assist you whilst you sketch.
To flip or rotate a layer, select the Transform tool and tap on the rotation you would like to perform using the menu at the bottom. Here, I tapped Flip horizontal to reflect my layer.
With the Transform tool selected, you can use the guidelines that appear whilst moving an object to help you align it.
Step 10
To erase, tap the Erase tool in the top-right menu. This will allow you to erase any drawings on your selected layer.
You can edit your Erase brush to create different eraser effects using the Brush Library. To do this, tap the Erase icon and select the brush of your choice.
Step 11
I like to flip my canvas regularly whilst drawing as it helps me to spot any issues with proportions that I might have missed.
To do this, open the Actions menu and tap Flip horizontal or Flip vertical depending on your needs.
Step 12
Once I’m happy with this sketch, it’s time to create the final line art.
First I’m going to lower the Opacity of my sketch layer to make it easier to draw over, and then I’ll create a new layer above it.
Step 13
Now I’m drawing over the sketch with my line art brush to create the lines that will be used in the final drawing.
You can skip this step if you don’t use line art, or you could choose to do this at the end instead. I create each part on a separate layer to make it easier to recolour later.
Step 14
As you can see below, some of the lines from the dress layer are overlapping the flowers in front of it. To solve this issue, I’m going to create a Mask over the dress layer.
To create a mask, tap the layer and select Mask.
This creates a mask above the selected layer that allows you to erase things on the layer, but as this mask can be switched on and off, the changes can be reversed at any time by switching off or deleting the mask. This is a great tool to use if you’re unsure about permanently erasing something, or if you just want to test out how it would look without risking losing anything on your original layer.
Step 15
Now that my line art is complete, I’m going to select and Group all of these layers to keep them ready for later.
I’m then going to Duplicate this group and Flatten it into one layer, so that I can use this as a guide for adding the flat colours.
You can Duplicate a layer by selecting it, swiping over it to the left, and tapping the Duplicate button. This will create a duplicate of that layer or group, which can now be selected and moved.
4. How to Use Colours in Procreate
To continue learning how to draw in Procreate, now we’ll cover colouring.
Step 1
First, I want to prepare my guide layer.
I’m going to select the flattened line art layer and tap on the layer to open up the Blend Modes.
Blend Modes can have different effects on the colours and opacities of your layer and how it interacts with other layers and objects.
Step 2
I’m going to be setting my layer to Linear Burn mode, which produces a darkening effect over the base layer. This will help the colours of my guide layer to match better with the colours I will be adding beneath it, making it easier to see the outlines.
Step 3
I’m turning the Opacity of the layer down so that I can see the outlines of the shapes I will be drawing beneath it. This ensures I can create clean edges around my base colours.
The effects of the Linear Burn mode are demonstrated here. As you can see, the line art layer becomes a darker version of the colour on the layer below.
Increasing the opacity of the layer will increase the darkness of the lines.
Step 4
Before we begin to add our base colours, let’s look at how to use the Colours panel in Procreate. To open the Colours panel, tap the circular colour swatch in the top-right corner.
The Disc is the first option on the menu for selecting colours. You can drag the swatch around the colour wheel to pick the colour, and then drag the swatch in the middle section of the wheel to control the depth of your selected colour.
Next is the Classic option. This contains settings to control the Hue, Saturation, and Brightness of the colour. These can be adjusted by dragging the three sliders, and the depth of the colour can be edited by dragging the swatch around the square at the top.
Next is the Harmony option, which can be used to find complementary colours. Dragging one of the swatches will automatically move the other three swatches into complementary colours for your selected swatch.
Then we have the Values option. Here, you can input specific colour values for RGB or CMYK colour codes, depending on the colour mode your canvas is set to.
Finally, at the end of the menu, you can find the Palettes option, which contains saved colour Swatches.
To select a Palette, simply tap on a Swatch within that Palette.
To create a new Palette, select your chosen colour, open the Palettes menu, and tap the + icon in the top-right corner.
There are a few options you can use to create Palettes from. I’m going to select Create new palette to make an empty one.
To add Swatches, simply tap on any grey empty square within the palette, and your swatch will now be saved.
Step 5
Now let’s add the flat colours. I’m selecting an ink liner brush so that the edges of my shapes will be slightly grainy.
On a layer behind the guide layer, I’m going to start to outline the first shape, which is going to be her face. The most important thing here is to ensure that there are no gaps in the outline.
Step 6
Once the shape is outlined, there are two ways of colouring it. You can either colour by hand if you prefer the look of this or enjoy this process, or to speed things up you can use the ColorDrop tool.
To do this, drag the colour Swatch from the top-right corner into the centre of your shape, and keep the Apple Pencil held down.
You can adjust the level of fill by dragging the pencil across the screen to adjust the ColorDrop Threshold slider at the top.
Step 7
Now I’m going to draw the rest of the base colour shapes by creating new layers for each of them and using the same process.
Keeping them on separate layers will allow you to edit the colours more easily if you change your mind, and it will also help when shading later on. Here you can see how my drawing is looking with all the base colours filled in.
5. How to Shade in Procreate
Step 1
When drawing in Procreate, it’s important to know about this technique. Now it’s time to add some shading.
To begin, I’m going to create a new layer above the shape I want to shade, tap on the layer, and select the Clipping Mask option.
This creates a Clipping Mask around the layer so that you can only colour inside the shape the mask is created on top of.
I’m going to add some blush to my character, so I’m choosing an airbrush and shading under her cheeks.
You can see how the colour is contained within the face shape due to the Clipping Mask.
Step 2
You can add additional Clipping Masks by creating a layer above or below the current mask using the + icon and setting it to clipping mask.
Clipping Mask layers layered above or below each other will become masks of the same base layer beneath them.
Step 3
You can colour pick any colour within your drawing to set your current swatch to this shade.
To do this, hold your finger over any part of the drawing to launch the Eyedropper tool, and the colour beneath will become selected. You can hold and drag your finger around until you find your desired shade.
The selected colour will now match the shade you collected using the Eyedropper.
Step 4
Now I’m going to show you how you can use Blend Modes to assist with shading and adding highlights to your drawings.
I’m adding the iris and pupil colours as Clipping Masks over the eye base layer as I want to shade over all three, and I’m creating another Clipping Mask layer above these to shade on.
I’m then going to select the eye base colour and create a deeper and warmer version of it, which will be used as the base colour for my Blend Mode.
Next I’m going to open the Blend Mode menu and set the layer to Multiply mode. This mode darkens and increases the saturation of the colour the brush is set to, as well as the base colour beneath this layer.
I’m adding the shadow to the top of the eyes, and then once I’m happy with this I can play around with the Opacity to adjust the darkness of the shadow.
Step 5
Now I want to add some highlights, so I create another new Clipping Mask layer above the rest and this time set the Blend Mode to Add.
This brightens the base colour and can have a glowing or shiny effect at higher opacities.
Step 6
If you struggle to find good shading colours, here is a tip using the Multiply Blend Mode.
First, create a clipping mask above your layer and set it to Multiply mode.
Then, use the Eyedropper tool to select the base colour of the layer you’re shading over, and drag the colour wheel to a less saturated version of this colour.
This should now have created a shading colour that complements the base layer and that can also easily be adjusted using the Opacity slider to control the depth of the shadow.
Step 7
And here is how the character looks after adding the rest of the shading! Now it’s time to add some line art back in.
First, I am switching off the guide sketch layer and then dragging the grouped line art that I created earlier above all of the other layers and switching it back on.
I can now go through each layer and recolour the lines by creating darker versions of the base colours using the Eyedropper and dragging the swatch to fill them with the ColorDrop tool.
6. How to Edit in Procreate
Step 1
Once all the line art is edited, my drawing is almost complete! But first, let’s add some finishing touches.
I’m going to begin by adding a simple background.
I’m creating a layer behind everything else, and selecting my background colour.
Step 2
I can then drag the Swatch into the background to fill the canvas.
Step 3
Next, I’m going to draw a circle behind my character. To create a perfect circle, simply hold the pencil on the screen after drawing your shape, and then press the Edit Shape button that will appear at the top of the screen.
Tap the Circle option to create a perfect circle.
Your shape should now be in proportion. You can also do this for a variety of other simple shapes.
I’m going to fill the circle with a solid colour by dragging the Swatch in the top-right corner into the centre of the circle using the ColorDrop tool.
Step 4
I want to centre my circle, but as there are so many layers, the guides are getting a little confused. To fix this, I want to Flatten my character into one layer, so I’m going to select all of my layers and make a group.
Before I Flatten the layers, I want to make sure I have a backup of them. I can’t Duplicate the group due to the limited number of layer numbers on my canvas, so I’m going to Duplicate my canvas instead.
I can do this by heading back to the Procreate Gallery, pressing Select, tapping on my drawing to select it, and finally pressing Duplicate to duplicate my drawing and back up my layers.
I can then go into the Duplicated version and Flatten the layers without worrying about losing them.
I can now use the guides easily to centre my character and the circle behind her.
Adding a shape behind a character is a really easy way to help it stand out against the background.
Step 5
Now I’m going to select my character layer and add a special effect from the Adjustments menu. There are a variety of colour edits and special effects within this menu, so this is where you can really play around and have fun!
I like a grainy effect on my drawings, so I’m selecting Noise.
I’m going to set this to 3%; you can edit the percentage by dragging your finger across the screen.
Step 6
Let’s look at making final colour adjustments. I’m going to select Curves from the Adjustments menu, which controls the levels of various colours within your drawing.
To edit the levels, drag the lines to create a new point on them. You can instantly see the effects of doing this on your selected layer. I don’t usually like to edit these much, but it can be a really helpful tool for quickly editing the tone of a drawing.
7. How to Export in Procreate
Finally, it’s time to export the finished drawing. Open the Actions menu and tap on the Share tab. You can now choose your preferred file type. I’m selecting JPEG and then pressing Save Image to add the file to my photos app.
And We’re Finished! You Learned How to Draw in Procreate!
Our character is now complete! Thank you for following this tutorial with me, and I hope you have lots of fun trying out these brushes for yourself.
5 Amazing Procreate Brush Sets From Envato Elements
Now you know how to use Procreate to create beautiful works of art. If you use Procreate on a regular basis, why not check out Envato Elements to expand your brush library and take your art to the next level?
The subscription-based marketplace offers unlimited Procreate brush sets, add-ons for Photoshop and Illustrator, premium fonts, and much more. The entire library is included for one flat monthly fee.
If you’d like to discover more premium Procreate brushes, here we have five amazing options:
1. Texture Brushes for Procreate (BRUSHSET)
Take your art to the next level with the beautiful textures in this Procreate texture brush set. Containing a variety of textures made from natural materials such as sand, cardboard, paper, and sugar, these brushes will add dimension to any flat shape.
2. Procreate Pencil Brushes (BRUSHSET)
Check out this must-have Procreate pencil brush set, containing 24 amazing textured pencil style sketch brushes. They’re perfect for doodling, sketching, colouring, and more, so release your inner child and let your imagination go wild!
3. Procreate Lettering Brushes (BRUSHSET)
Take your lettering to the next level with this amazing Procreate lettering brush set. Every lettering artist needs to have this set in their brush library. The set contains textured, monoline, calligraphy, and signature brushes to suit all of your needs.
4. Graphite Pencils for Procreate (BRUSHSET)
Do you want to use the freedom and capabilities of digital art, but miss the traditional look of pencil on paper? Then this is the perfect brush set for you! Containing 16 realistic graphite style brushes, this is the perfect set for replicating traditional methods in the digital realm.
5. Pattern Brushes for Procreate (BRUSHSET)
Check out one of the coolest pattern brush Procreate sets on Envato Elements. This set contains 36 unique pattern brushes to help you speed up your drawing process and add a sprinkle of fun to your designs. The brushes are also perfect for creating seamless patterns.
Discover More Helpful Procreate Tutorials and Resources
If you enjoyed this drawing with Procreate tutorial, make sure to visit these other helpful Procreate tutorials and resources from Envato Tuts+:
Приложение Procreate, обладатель приза Apple Design и удостоенное в App Store категории «Самое необходимое» (Essentials), — это самое мощное приложение для создания набросков, рисования и иллюстрирования среди всех подобных приложений, предназначенных для мобильных устройств и созданных для профессионалов. Приложение содержит полный комплект инструментов художника, помогает вам создавать красивые наброски, вдохновляющие картины и потрясающие иллюстрации, где бы вы ни были. Procreate обладает холстом потрясающего разрешения, комплектом из 136 невероятных кистей, улучшенной системой слоев и теперь работает на основе Siica M, самого быстрого 64-битного движка на iOS.
Скачать Procreate
- Продавец
- Savage Interactive Pty Ltd
- Размер
- 174.5 МБ
- Совместимость
- Требуется iOS 11.1 или более поздняя версия. Совместимо с iPad.
- Языки
- русский, английский, арабский, испанский, итальянский, корейский, немецкий, португальский, традиционный китайский, турецкий, упрощенный китайский, французский, японский
- Copyright
- © Savage Interactive
- Цена
- 749 р. (на момент написания статьи)
Скачать Procreate
Создание нового холста
- О чем вы узнаете
- Ваша Галерея иллюстраций
- Создание нового холста
- Формат файлов Procreate
- Предустановленные размеры холста
- Редактирование / удаление шаблонов холста
- Создание собственного размера холста
- Выберите P3 или SRGB
Основы работы
- Основы работы
- Кисть, Смазывание и Ластик
- Отмена действия
- Повтор действия
- Быстрая Фигура
- Очистка слоя
- Приближение/Отдаление
- Поворот холста
- Подгон по размеру экрана
- Меню Вырезать/ Копировать/ Вставить
- Полноэкранный режим
- Настройте жесты по-своему
Кисти в Procreate
- Кисти в Procreate
- Совершенно новые кисти
- Библиотека кистей
- Навигация по вашей библиотеке кистей
- Перестановка кистей
- Множественный выбор
- Действия с кистями
- Обмен кистью
- Импорт кистей
- Перетаскивание кистей
- Пользовательские наборы
- Пользовательские настройки
Расширенные настройки кисти
- Расширенные настройки кисти
- Свойства штриха
- Конус нажима
- Конус касания
- Настройки формы
- Настройки зерна
- Динамические настройки
- Динамические настройки — глянец
- Динамические настройки — влага
- Настройки карандаша
- Настройки карандаша
- Кривые натиска
- Общие параметры настройки
- Настройки источника
Создание иллюстраций со слоями
- Создание иллюстраций со слоями
- Создание слоя
- Основной и Второстепенный слои
- Выбор слоя
- Группы слоев
- Выбор групп
- Перемещение слоев
- Видимость слоя
- Наложение и непрозрачность
- Сливание слоев
- Щипок для сливания различных слове
- Фоновый цвет
- Экспорт Перетаскиванием
- Перемещайте слои между холстами
Слой маски
- Слой маски
- Обзор
- Создание маски слоя
- Использование оттенков серого для редактирования
- Выбор маски или слоя
- Перемещение слоя с маской
- Удаление маски слоя
Обтравочные маски
- Обтравочные маски
- Обзор
- Создание обтравочной маски
- Использование обтравочных масок
- Трансформация и корректировка
- Перемещение обтравочных масок
- Действия с обтравочной маской
Применение эффекта
- Применение эффекта
- Меню Корректировки
- Отрегулируйте непрозрачность
- Размытие по Гауссу
- Размытие в движении
- Размытие перспективы
- Размытие по позиции перспективы
- Размытие по направлению перспективы
- Резкость
- Шум
- Пластика
- Динамика Пластики
- Регулировка Пластики
Обзор
- Обзор
- Включение режима «Выделение»
- Свободный выбор
- Рисование при помощи выделения
- Отменить и Повторить
Расширенное выделение
- Расширенное выделение
- Добавить выделение
- Удалить из выделения
- Инвертировать выделение
- Дублирование содержимого
- Растушёвка выделения
- Очистка выделения
- Перезагрузка маски
- Выделение содержимого слоя
- Настройка пользовательского интерфейса маски выделения
Создайте новый холст, выберите любую двухтекстурную кисть из обширного набора Procreate — и начинайте рисовать. Приятно отзывчивый инструмент «Растушевка» поможет добиться идеального наложения цвета. Procreate поддерживает создание холстов сверхвысокого разрешения — специально для плакатной печати. Опробуйте в деле мощные инструменты для выделения, трансформации объектов и работы с перспективой, разработанные специально для мультитач-экранов и позволяющие создать в вашей иллюстрации потрясающие эффекты кинематографического качества. Несмотря на огромное богатство функций, интерфейс Procreate интуитивно понятен и никогда не мешает работать.
Обширный набор профессиональных инструментов придется по душе любому художнику.
- Самое важное
- Оптимизация для iPad Pro и Apple Pencil
- Огромные холсты сверхвысокого разрешения, до 16к по 4k на iPad Pro 12.9″ и 10.5”
- Работает на основе Silica M, самого быстрого 64-битного движка
- Потрясающие 64-битные цвета
- Невероятно отзывчивая 64-битная растушевка
- Многопоточность и оптимизация для многоядерных процессоров iPad
- 250 шагов отмены и повтора
- Непрерывное автосохранение — ваша работа не пропадет
- Возможность подключить клавиатуру и пользоваться сочетаниями клавиш
- Меню быстрых действий Quick Menu, повышающее скорость работы с интерфейсом
- Радикально новые кисти
- Содержит комплект из 136 превосходно сделанных кистей
- Уникальные двухтекстурные кисти
- 35 настраиваемых параметров для каждой кисти
- Возможность создавать собственные кисти
- Удобная организация кистей в наборы
- Импорт и экспорт пользовательских кистей
- Продвинутая система слоев:
- Гибкий контроль над отдельными элементами иллюстрации благодаря слоям
- Маски слоев для неразрушающего редактирования
- Организация слоев по группам
- Одновременное выделение нескольких слоев для синхронного перемещения и редактирования объектов
- 17 продвинутых режимов наложения
- Бескомпромиссная мощность цвета
- 64-битный цвет для лучшей цветопередачи
- Поддержка P3 Wide Color
- Бесшовная заливка ColorDrop
- Возможность задавать цвета в RGB или шестнадцатеричном формате
- Богатство спецэффектов:
- Ускорение графического процессора
- Размытие перспективы (эксклюзивная функция Procreate)
- Размытие по Гауссу, размытие движения
- Добавление резкости и шума
- Тон, насыщенность, яркость
- Цветовой баланс, кривые, изменение цвета
- Мощная поддержка видео
- Возможность записать все этапы создания иллюстрации в таймлапс-видео и в любой момент пересмотреть их
- Трансляция происходящего на экране в реальном времени на различные платформы потокового вещания
- Публикация записанного видео в любые подключенные сервисы
- Публикация и интеграция в рабочие процессы
- Изображения, кисти и палитры можно перетаскивать из приложения в приложение
- Импорт и экспорт файлов PSD (формат Adobe® Photoshop®)
- Экспорт в AirDrop, iCloud Drive, Фото, iTunes, Twitter, Dropbox, Google Drive, Facebook и Weibo, отправка по электронной почте
- Экспорт как в нативном формате файла .procreate, так и в PSD, TIFF, transparent PNG, multi-page PDF или web ready JPEG
Источник: https://itunes.apple.com/ru/app/procreate/id425073498?mt=8


