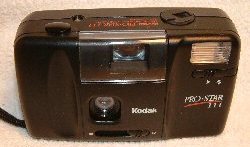
Руководство по эксплуатации фотоаппарат KODAK Pro Star 111.
Это уже раритет! Но по-прежнему фотографии получаются хорошие, потому, что до сих пор качество изображения аналоговой обработки цифровая обработка не догнала.
Пусть приходится возиться с пленкой, ради качественного изображения помучиться стоит.
Kodak Pro Star 111 – это простейшая «мыльница» без настроек и фокусировки, которая умудрялась, при удачном освещение, делать такие фотографии, которые в разы превосходили по качеству изображения, сделанные современными цифровыми фотоаппаратами. И пусть эти аналоговые изображения невозможно просматривать в фоторамке, зато их приятнее держать в руках!
Мануал на русском языке рекомендует не фотографировать объекты от фотоаппарата ближе 1,2 метра и при недостаточной освещенности использовать вспышку.
загрузить файл документа
KODAK Pro Star 111. формат pdf. File-Size: 1.03 Мб
This is already a rarity! But still the photos are good, because so far the image quality of analog processing has not caught up with digital processing.
Even if you have to tinker with the film, it’s worth suffering for the sake of a high-quality image.
Kodak Pro Star 111 is the simplest «soap dish» without settings and focusing, which managed, with good lighting, to take such photos that were several times superior in image quality to those taken by modern digital cameras. And let these analog images be impossible to view in photo frame, but they are more pleasant to hold in your hands!
The manual in Russian recommends not to photograph objects from the camera closer than 1.2 meters and use flash.
Ваш город:
Доставка Почтой России ~ 450 ₽
Kodak PR0 Star 111 — винтажная компактная 35-миллиметровая камера.
Легендарная классическая «мыльница» с характерной ламповой картинкой из 90-х, именно с этих камер печатали снимки в лабораториях Kodak Экспресс по всей стране.
Широкоугольный объектив 28 мм с диафрагмой f/5.6, который защищен сдвижной крышкой. Конструкция объектива 3 элемента в 3 группах.
Дистанция фокусировки от 1,2 метров до бесконечности.
Выдержка 1/125 секунды.
Ручная перемотка и продвижение пленки.
Вспышка встроенная с возможностью выключения, со светодиодной индикацией заряда.
Использует пленку чувствительностью ISO 100-400 единиц.
Счетчик плёнки механический на 38 кадров.
Спуск механический кнопочный, с блокировкой затвора при закрытой защитной шторке объектива.
Питание от двух батарей АА.
Что входит в комплект: винтажная фотокамера Kodak PR0 Star 111, ремешок на руку, крафтовая коробка, гарантийный талон.
Состояние оптики: идеальное. Состояние автоматики: идеальное. Состояние механики: идеальное. Внешнее состояние корпуса: незначительные потертости.
Your Donation Will Be Matched 1-to-1! Can You Chip In?
Dear Patron: Please don’t scroll past this. The Internet Archive is a nonprofit fighting for universal access to quality information. We build and maintain all our own systems, but we don’t charge for access, sell user information, or run ads. Instead, we’re powered by online donations averaging about $14. We’d be deeply grateful if you’d join the one in a thousand users that support us financially.
Right now, we have a matching gift campaign that will double the impact of every donation. We understand that not everyone can donate right now, but if you can afford to contribute this Tuesday, we promise it will be put to good use. Our resources are crucial for knowledge lovers everywhere—so if you find all these bits and bytes useful, please pitch in.
Your Donation Will Be Matched! Can You Chip In?
Dear Patron: Please don’t scroll past this. Right now we have a matching gift campaign that will double the impact of every donation. We understand that not everyone can give right now, but if you can afford to contribute this Tuesday, we promise it will be put to good use. If you find all these bits and bytes useful, please pitch in.

Prostar
Archive Processor 220-240 V
Prostar
Archive Processor 120 V
Operator’s Manual
Safety
User Precautions
•Place the processor on a sturdy, level work surface capable of supporting 63.5 kg (140 lbs) and a table height between 53 cm (21 in.) and 68 cm (27 in.).
•Make sure the electrical power outlet is located within 1.52 meters (5 feet) of the processor and is easily accessible.
•Use only the power cord(s) that was provided with the processor. Using any other power cord may cause electrical shock and/or damage the product.
•Be sure the power cord is securely plugged into the wall outlet. Failure to do so may cause electrical shock or fire.
•Do not damage, knot, cut or modify the power cord. This may cause electrical shock or fire.
•The scanner requires a dedicated power outlet. Do not use an extension cord or power strip with the scanner.
•Do not connect the processor to an extension cord of multi-plug power strip. Use a dedicated power outlet.
•Leave sufficient space around the power outlet so it can be easily unplugged in case of an emergency.
•Do not use the processor if it becomes inordinately hot, has a strange odor, emits smoke, or makes unfamiliar noises. Immediately stop the processor and disconnect the power cord from the power outlet. Contact Kodak Service.
•Follow the Kodak recommended maintenance and cleaning procedures.
•Material Safety Data Sheets (MSDS) are available on the Kodak website at: www.kodak.com/go/msds. When accessing the MSDSs from the website, you will be required to provide the catalog number of the consumable you want the Material Safety Data Sheet for. See the section entitled, “Supplies and consumables” later in this guide for supplies and catalog numbers.
•For disposal or recycling information, contact your local authorities, or in the USA, visit the Electronics Industry Alliance website: www.eiae.org.
CAUTION: Moving parts, avoid contact.
CAUTION: Hot surface, avoid contact
Acoustic emission
Maschinenlärminformationsverordnung – 3, GSGV
Der arbeitsplatzbezogene Emissionswert beträgt <70 db(A).
[Machine Noise Information Ordinance — 3, GSGV
The operator-position noise emission value is <70 dB(A).]
EMC statements
United States: This equipment has been tested and found to comply with the limits for a Class A digital device pursuant to Part 15 of the FCC rules. These limits are designed to provide reasonable protection against harmful interference when the equipment is operated in a commercial environment. This equipment generates, uses, and can radiate radio frequency energy and, if not installed and used in accordance with the instruction manual, may cause harmful interference to radio communications. Operation of this equipment in a residential area is likely to cause harmful interference in which case the user will be required to correct the interference at his own expense.
European Union: WARNING: This is a Class A product. In a domestic environment this product may cause radio interference in which case the user may be required to take adequate measures.
Japan: This is a Class A product based on the standard of the Voluntary Control Council for interference by information Technology Equipment (VCCI). If this is used in a domestic environment, radio disturbance may arise. When such trouble occurs, the user may be required to take corrective actions.

Taiwan: WARNING: This is a Class A product. In a domestic environment this product may cause radio interference in which case the user may be required to take adequate measures.
Peoples Republic of China: WARNING: This is a Class A product. In a domestic environment this product may cause radio interference in which case the user may be required to take adequate measures.
A
Korean: Please note that this equipment has obtained EMC registration for commercial use. In the event that it has been mistakenly sold or purchased, please exchange it for equipment certified for home use.

Contents
Introduction . . . . . . . . . . . . . . . . . . . . . . . . . . . . . . . . . . . . . . . . . . . . . . . . . . . . 1 Specifications. . . . . . . . . . . . . . . . . . . . . . . . . . . . . . . . . . . . . . . . . . . . . . . . . . . 2
Archive Processor Overview . . . . . . . . . . . . . . . . . . . . . . . . . . . . . . . . . . . . . . 4
Front . . . . . . . . . . . . . . . . . . . . . . . . . . . . . . . . . . . . . . . . . . . . . . . . . . . . . . 4 Rear . . . . . . . . . . . . . . . . . . . . . . . . . . . . . . . . . . . . . . . . . . . . . . . . . . . . . . . 5
Start-up Procedures. . . . . . . . . . . . . . . . . . . . . . . . . . . . . . . . . . . . . . . . . . . . . . 6
Daily start-up . . . . . . . . . . . . . . . . . . . . . . . . . . . . . . . . . . . . . . . . . . . . . . . . 6 Uncovering the processing section . . . . . . . . . . . . . . . . . . . . . . . . . . . . . 6 Filling the fixer tanks . . . . . . . . . . . . . . . . . . . . . . . . . . . . . . . . . . . . . . . . 7 Filling the developer tank. . . . . . . . . . . . . . . . . . . . . . . . . . . . . . . . . . . . . 8 Installing the processing racks. . . . . . . . . . . . . . . . . . . . . . . . . . . . . . . . . 9 Installing the dryer rack . . . . . . . . . . . . . . . . . . . . . . . . . . . . . . . . . . . . . . 9 Adjusting the inlet water temperature . . . . . . . . . . . . . . . . . . . . . . . . . . 10 Adjusting the developer temperature control. . . . . . . . . . . . . . . . . . . . . .11 Checking the dryer temperature . . . . . . . . . . . . . . . . . . . . . . . . . . . . . . 13 Checking the film transport . . . . . . . . . . . . . . . . . . . . . . . . . . . . . . . . . . 14
Operating the Archive Processor . . . . . . . . . . . . . . . . . . . . . . . . . . . . . . . . . . 15
Attaching film to a take-up reel . . . . . . . . . . . . . . . . . . . . . . . . . . . . . . . . . . 15 Using a trailer holder . . . . . . . . . . . . . . . . . . . . . . . . . . . . . . . . . . . . . . . 15 Looping the film . . . . . . . . . . . . . . . . . . . . . . . . . . . . . . . . . . . . . . . . . . . 16 When to start processing . . . . . . . . . . . . . . . . . . . . . . . . . . . . . . . . . . . . . . 17 Single-strand processing . . . . . . . . . . . . . . . . . . . . . . . . . . . . . . . . . . . . . . 17 Dual-strand processing . . . . . . . . . . . . . . . . . . . . . . . . . . . . . . . . . . . . . . . 21
Replenishing the Archive Processor . . . . . . . . . . . . . . . . . . . . . . . . . . . . . . . 26
Replenishment tables . . . . . . . . . . . . . . . . . . . . . . . . . . . . . . . . . . . . . . . . . 26 Mixed film sizes . . . . . . . . . . . . . . . . . . . . . . . . . . . . . . . . . . . . . . . . . . . 26 Changing chemicals during processing . . . . . . . . . . . . . . . . . . . . . . . . . . . 26 Replenishment unit. . . . . . . . . . . . . . . . . . . . . . . . . . . . . . . . . . . . . . . . . . . 28
Maintenance . . . . . . . . . . . . . . . . . . . . . . . . . . . . . . . . . . . . . . . . . . . . . . . . . . . 29
Cleaning the Archive Processor (daily) . . . . . . . . . . . . . . . . . . . . . . . . . . . 29 Cleaning the Archive Processor (periodic cleaning). . . . . . . . . . . . . . . . . . 31 Cleaning the developer racks and tank . . . . . . . . . . . . . . . . . . . . . . . . . . . 31 Cleaning the fixer racks, wash racks, and fixer tanks. . . . . . . . . . . . . . . . . 33 Cleaning the air filter . . . . . . . . . . . . . . . . . . . . . . . . . . . . . . . . . . . . . . . . . 34
Troubleshooting . . . . . . . . . . . . . . . . . . . . . . . . . . . . . . . . . . . . . . . . . . . . . . . . 35
Clearing a film jam . . . . . . . . . . . . . . . . . . . . . . . . . . . . . . . . . . . . . . . . . . . 35 Troubleshooting chart. . . . . . . . . . . . . . . . . . . . . . . . . . . . . . . . . . . . . . . . . 36
Accessories and Supplies. . . . . . . . . . . . . . . . . . . . . . . . . . . . . . . . . . . . . . . . 38
New Equipment Warranty . . . . . . . . . . . . . . . . . . . . . . . . . . . . . . . . . . . . . . . . 40
For installations in the United States . . . . . . . . . . . . . . . . . . . . . . . . . . . . . 40 For installations outside the United States . . . . . . . . . . . . . . . . . . . . . . . . . 41
Introduction
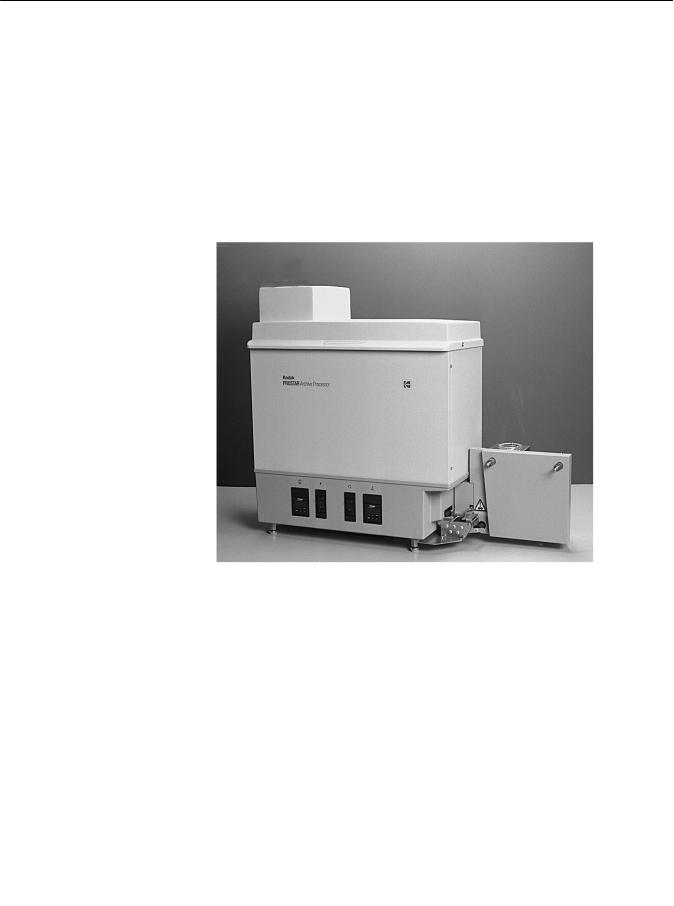
The Kodak Prostar Archive Processor 220-240 V and the Kodak Prostar Archive Processor 120 V are room-light-loading processors that process 16 mm and 35 mm silver halide microfilms with Kodak Prostar Chemicals (or equivalent).
The Archive Processors are self-threading, tabletop units with roller transport.
The Archive Processors feature an energy conservation package that automatically turns off the film transport, rinse water, and film drying system after processing is complete.
Kodak Prostar Archive Processor with dual-strand take-up spindles

Specifications
|
Archive Processor 220-240 V |
Archive Processor 120 V |
|||||
|
Power |
220 to 240 VAC, 50 Hz, single phase, |
120 VAC, 50 Hz, single phase, 12 amp |
||||
|
requirements |
7.5 amp |
120 VAC, 60 Hz, single phase, 12 amp |
||||
|
Two-prong electrical plug with ground |
Three-prong electrical plug with ground |
|||||
|
connection |
connection |
|||||
|
Dimensions and |
Height: |
91 cm (36 in.) with the cover open |
Height: |
91 cm (36 in.) with the cover open |
||
|
weight |
Length: 110 cm (43 in.) with reel on take-up |
Length: 99 cm (39 in.) without reel on |
||||
|
spindle |
take-up spindle |
|||||
|
Depth: |
56 cm (22 in.) with the cover open |
110 cm (43 in.) with large reel on |
||||
|
Weight: 52.2 kg (115 Ib) empty |
take-up spindle |
|||||
|
Depth |
61 cm (24 in.) with the cover open |
|||||
|
63.5 kg (140 Ib) with chemicals, |
||||||
|
water, and processing racks |
Weight: |
52.2 kg (115 Ib) empty |
||||
|
Support: Table or stand between |
||||||
|
63.5 kg (140 Ib) with chemicals, |
||||||
|
53 and 68 cm (21 and 27 in.) high |
||||||
|
water, and processing racks |
||||||
|
Support: Table or stand between |
||||||
|
53 and 68 cm (21 and 27 in.) high |
||||||
|
Operating |
Ambient Temperature: 18.5 to 30°C |
Ambient Temperature: 18.5 to 30°C |
||||
|
environment |
(65 to 86°F) |
(65 to 86°F) |
||||
|
Relative Humidity: 20 to 76% |
Relative Humidity: 20 to 76% |
|||||
|
Heat emissions |
Maximum: |
5100 BTU (5380 Kjoules) |
Maximum: |
5100 BTU (5380 Kjoules) |
||
|
Standby: |
350 BTU (366 Kjoules) |
Standby: |
350 BTU (366 Kjoules) |
|||
|
Processing Film: 4100 BTU (4325 Kjoules) |
Processing Film: 4100 BTU (4325 Kjoules) |
|||||
|
Noise emission |
Operator Position Standby Mode |
Operator Position Standby Mode |
||||
|
• Sound Pressure Level (LA): 51.2 dB(A) |
• Sound Pressure Level (LA): 51.2 dB(A) |
|||||
|
Operator Position Full System |
Operator Position Full System |
|||||
|
Operating Mode |
Operating Mode |
|||||
|
• Sound Pressure Level (LA): 59.3 dB(A) |
• Sound Pressure Level (LA): 59.3 dB(A) |
|||||
|
• Instantaneous Peak Values 130 dB(C): |
• Instantaneous Peak Values 130 dB(C): |
|||||
|
None |
None |
|||||
|
• Sound Power Level (LWA) |
Sound Power Level (LWA) |
|||||
|
• Standby: 63.4 dB(A) |
||||||
|
• Full System: 69.6 dB(A) |
• Standby: 63.4 dB(A) |
|||||
|
• Full System: 69.6 dB(A) |

|
Archive Processor 220-240 V |
Archive Processor 120 V |
|||||
|
Water supply |
NOTE: An auxiliary hot water heater should be located within 6 m (20 ft) of the |
|||||
|
Archive Processor to provide consistent water temperature. |
||||||
|
To Mixing Valve: |
To Mixing Valve: |
|||||
|
• Hot Water |
46°C (114°F) minimum |
• Hot Water |
46°C (114°F) minimum |
|||
|
• Cold Water |
24°C (75°F) maximum |
• Cold Water |
24°C (75°F) maximum |
|||
|
Pressure |
276 to 621 kPa (40 to 90 psi) |
• Pressure |
276 to 621 kPa (40 to 90 psi) |
|||
|
From Mixing Valve: |
From Mixing Valve: |
|||||
|
• Mixed Water |
34.5 to 36.5°C (94 to 98°F) |
• Mixed Water |
34.5 to 36.5°C (94 to 98°F) |
|||
|
• Pressure |
207 kPa (30 psi) minimum |
• Pressure |
207 kPa (30 psi) minimum |
|||
|
Drain: Minimum 22.7 L/min (6 gal/min) |
Drain: Minimum 22.7 L/min (6 gal/min) |
|||||
|
capacity floor drain or wall drain located a |
capacity floor drain or wall drain located a |
|||||
|
minimum of 20 cm (8 in.) lower than the |
minimum of 20 cm (8 in.) lower than the |
|||||
|
Archive Processor to prevent wash water from |
Archive Processor to prevent wash water from |
|||||
|
backing up |
backing up |
|||||
|
Water Consumption: 1.9 L/min (0.5 gal/min) |
Water Consumption: 1.9 L/min (0.5 gal/min) |
|||||
|
while processing |
while processing |
|||||
|
Film Widths |
16 mm or 35 mm single strand |
16 mm or 35 mm single strand |
||||
|
16 mm dual strand in lengths up to 65.5 m |
16 mm dual strand in lengths up to 65.5 m |
|||||
|
(215 ft) |
(215 ft) |
|||||
|
Film Lengths and |
30.5 m (100 ft) of 0.14 mm/5.2 mil-thick film |
30.5 m (100 ft) of 0.14 mm/5.2 mil-thick film |
||||
|
Thicknesses |
38.1 m (125 ft) of 0.11 mm/4.2 mil-thick film |
38.1 m (125 ft) of 0.11 mm/4.2 mil-thick film |
||||
|
65.5 m (215 ft) of 0.07 mm/2.7 mil-thick film |
65.5 m (215 ft) of 0.07 mm/2.7 mil-thick film |
|||||
|
Film Transport |
3 m/min. (10 ft/min) |
3 m/min. (10 ft/min) |
||||
|
Speed |
||||||
|
Film Processing |
30.5 m (100 ft): |
11 minutes |
30.5 m (100 ft): |
11 minutes |
||
|
Time |
65.5 m (215 ft): |
22.5 minutes |
65.5 m (215 ft): |
22.5 minutes |
||
|
Process |
Approximately 55 seconds for the self- |
Approximately 55 seconds for the self- |
||||
|
Duration |
threader to exit from the Archive Processor |
threader to exit from the Archive Processor |
||||
|
Film Loading |
Room-light conditions with camera film spools |
Room-light conditions with camera film spools |
||||
|
only |
Archive Processor Overview
Front
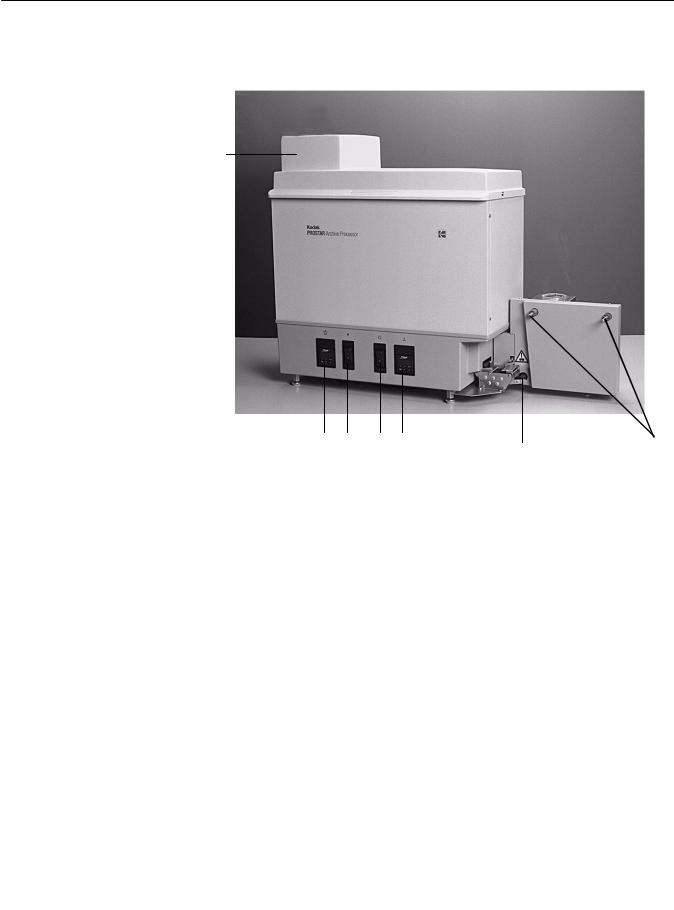
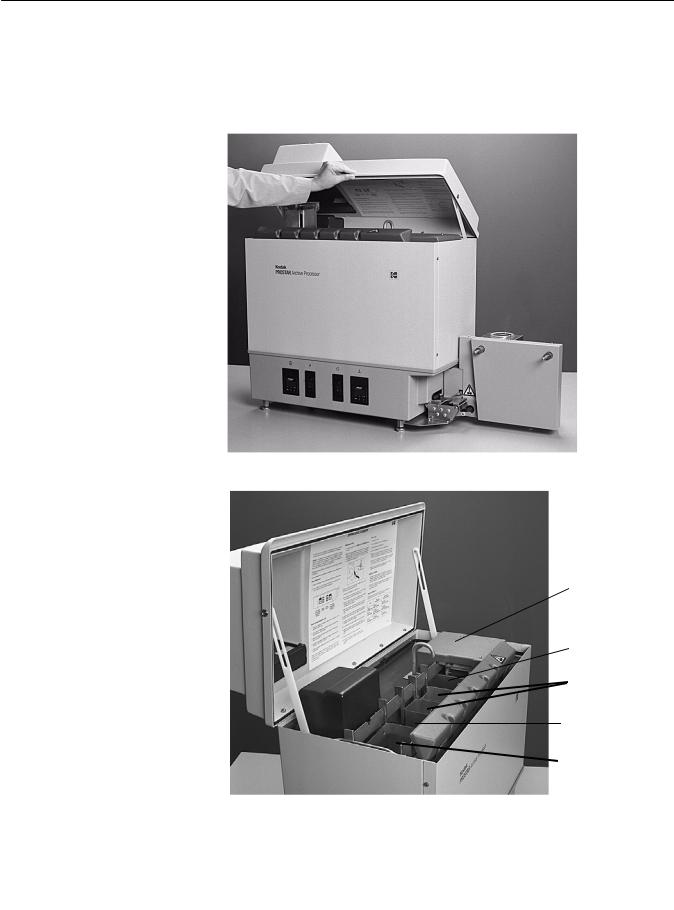
Shown throughout this manual is an Archive Processor equipped with Dual-Strand Take-up Spindles
A
B C D E F G
AProcessing Section Cover — light-tight cover for the film processing section.
BDeveloper Temperature Control and Display — controls the developer temperature and displays a value relative to the water temperature surrounding the developer tank.
CPower Switch — turns the power on (l) and off (O).
DMode Switch — the standby position (O) maintains the developer temperature. The run position (l) activates the film transport, rinse water, and film dryer blower.
EFilm Dryer Temperature Control and Display — controls the dryer air temperature and displays the air temperature in the drying chamber.
FTension Roller — loss of film tension after processing causes the tension roller to be released, initiating a time delay prior to activating energy conservation mode. Once energy conservation is activated, the film transport, rinse water, and film dryer blower will all turn off.
GTake-Up Spindles — mechanisms that wind the processed film onto the take-up reel.
Rear
G
F
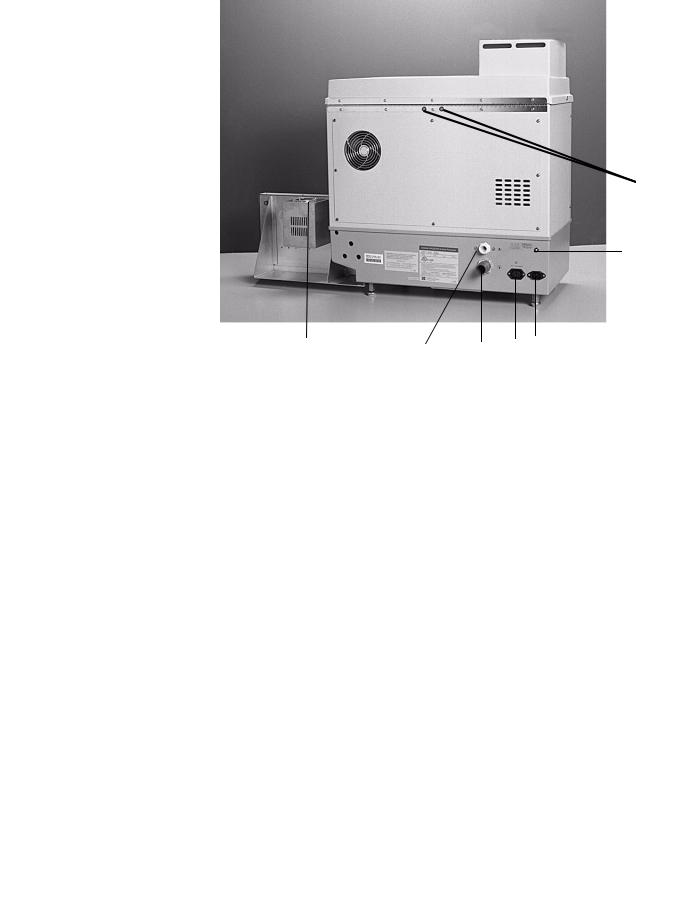
A B C D E
AUsage Meter — displays the total number of hours the film transport motors have been operating. You can use the usage meter to determine when to change the processing chemicals.
BWater Inlet — connection to thermostatic mixing valve.
CWater Outlet — connection to drain line.
DAccessory Receptacle — supplies power to the optional automatic Replenishment Unit accessory.
EPower Receptacle — connection for main power cord.
FCircuit Breaker — safety feature in case of electrical overload.
GHose Input — connectors for the optional automatic Replenishment Unit accessory hoses.
Start-up Procedures
Daily start-up
Follow these procedures when starting up the Archive Processor at the beginning of the day, assuming that the Archive Processor was properly shut down.
Uncovering the processing • Lift the processing section cover until it is in an upright position. section
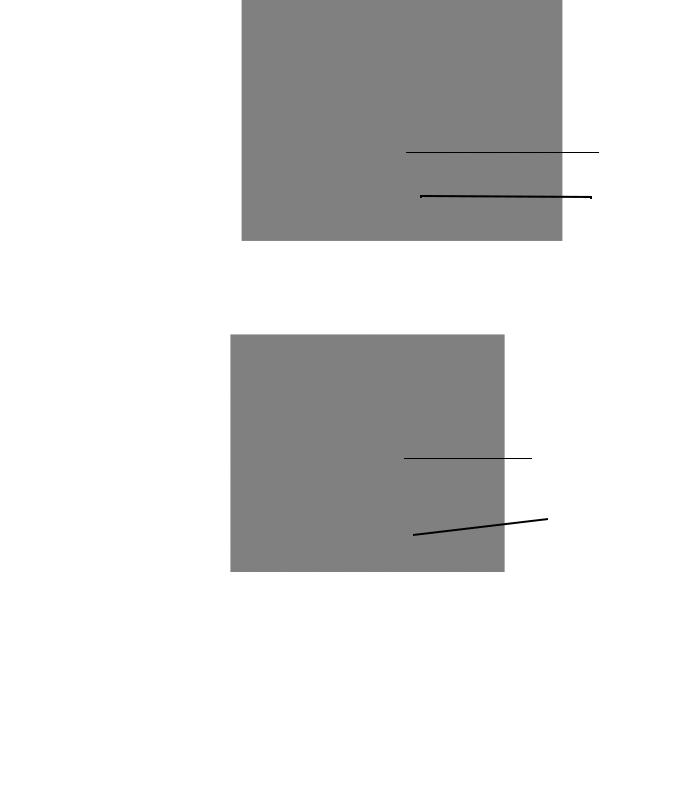
The inside of the Archive Processor is shown below without racks.
Dryer Section (Rack #7)
Wash (Rack #6)
Fixer Tanks (Racks #4 and 5)
Wash (Rack #3)
Developer Tank (Racks #1 and 2)

Filling the fixer tanks |
If the Archive Processor is powered up, shut it off before you |
|
remove the fixer tanks or turn off the water. This reduces the |
|
|
possibility of water overflowing the water jacket later when you reinsert |
|
|
the tanks. |
|
|
NOTE: Use proper precautions when using fixer. Review the MSDS for |
|
|
the fixer. |
|
|
1. Pull the gear cover back and lift the fixer tanks out of the |
|
|
Archive Processor. Each fixer tank is labeled with an F. |
2.Fill the fixer tanks with Kodak Prostar Plus Fixer, or equivalent, until the level reaches the fill line (approximately ¼ gallon or 0.65 liters per tank).
3.Hold the gear cover back and slowly and carefully lower the fixer tanks into the fourth and fifth position in the Archive Processor.
NOTE: Make sure that the tanks are fully seated and level with the fill lines toward the rear of the Archive Processor.

Filling the developer tank If the Archive Processor is powered up, shut it off before you remove the developer tank or turn off the water. This prevents water from overflowing the water jacket later when you reinsert the tank.
NOTE: Use proper precautions when using developer. Review the MSDS for the developer.
1.Pull the gear cover back and lift the developer tank out of the Archive Processor. The developer tank is labeled with a D.
2.Fill the developer tank with Kodak Prostar Plus Developer, or equivalent, until the level reaches the fill line (approximately ½ gallon or 1.3 liters).
3.Wrap the overflow tubing closely around the right side of the developer tank.
4.Hold the gear cover back and slowly and carefully lower the developer tank into the first position in the Archive Processor.
NOTE: Make sure the tank is fully seated and level with the fill line toward the rear of the Archive Processor.
5. Fill the squeeze bottle with developer.
The squeeze bottle will be needed later to top off the developer tank between processing rolls of film.
|
Installing the processing |
1. |
Make sure that the rollers of each rack turn freely when you rotate |
|
racks |
the drive gear. |
|
|
2. |
Drain off any excess water if the racks were left submerged in water |
|
|
since the last time film was processed. |
||
|
3. |
Hold the gear cover back and lower the processing racks into the |
|
|
processor (#6 rack first, then #5, #4, #3, #2, and #1). |
The rack number is located just above the drive gear.
Rack #6
Gear Cover
CAUTION: Lower the racks slowly and carefully into the
Archive Processor to avoid splashing any chemicals.
Installing the dryer rack 1. Lift off the dryer section cover.
Dryer Section Cover


2.Make sure that the rollers of the dryer rack turn freely when rotating the drive gear.
3.Pull the gear cover back and lower the dryer rack into the dryer section.
4.Replace the dryer section cover.
Adjusting the inlet water temperature
1.Turn on the water supply using the thermostatic mixing valve.
2.Turn the power switch to the On position.
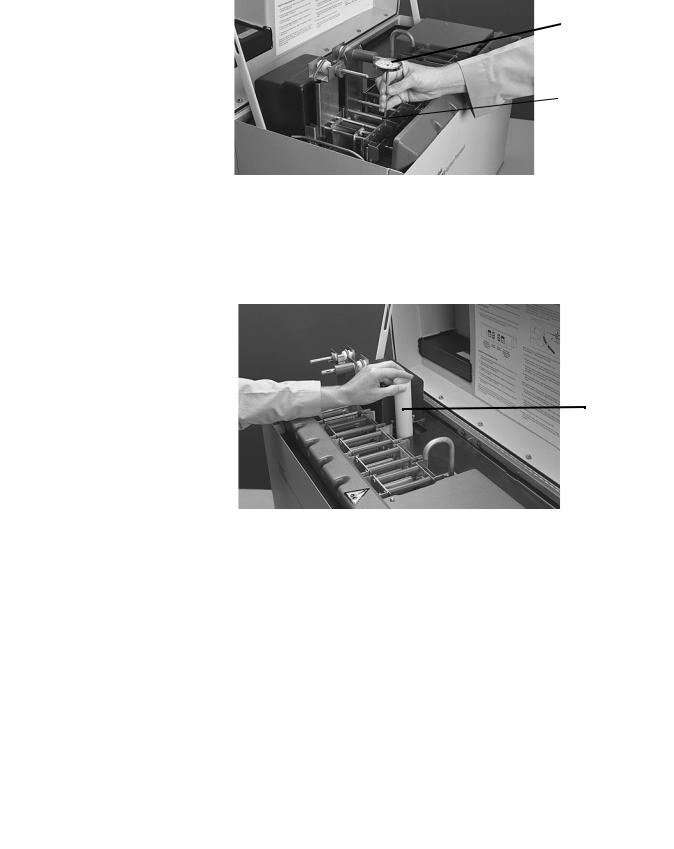
3.Insert the thermometer in the thermometer fixed measuring point sleeve located in the front right corner of the #1 rack.

Thermometer
Sleeve
4.Install the standpipe in the Archive Processor tank after the water temperature, indicated on the mixing valve, reaches 34.5 to 36.5°C (94 to 98°F).
Installing the standpipe after the water reaches the proper temperature at the mixing valve enables the developer solution to reach operating temperature sooner.
Standpipe
5.Route the tubing from the developer tank through the notch in the partition.
6.Insert the tubing into the standpipe.
7.Allow the water jacket to fill up.
8.A float switch automatically turns off the water flow when the water level is just below the top of the standpipe.
9.Close the processing section cover.
10.Allow approximately 25 minutes for the developer temperature to stabilize before adjusting the temperature control setting.
1 docs – User Manuals, Help Guides and Specs – for the Kodak Prostar product are present in our data base.
Tips for Finding Manuals:
This web-page provides a list of 1 accessible operating manuals and information books describing Kodak Prostar.
All manuals and instructions for Kodak Prostar are introduced in an easy-to-use PDF format and may be gratuitously downloaded or looked through directly from the site.
The page offers the following types of manuals: Computer Hardware.
Helpful hints: While selecting a necessary guide for Kodak Prostar one should pay special attention to the type of the document.
We try to supply you with the fullest possible set of papers we or our users are able to find. These may be overviews and specifications of the device, mounting and installing instructions, the unit operating rules and maintenance regulations and much more.
Haven’t found a required manual for your Kodak Prostar?
Check in a while. We update our guides collection and add new documents on a daily basis for you to be always able to find the very paper you need on our web-site. In case you own a directory or an instruction for Kodak Prostar, which is absent on our site, and you’d like to share it with the public, please send it to us as a scanned copy or a PDF file, and we’ll definitely place it on our page while providing your name as a supplier of the doc. Lots of our users will be grateful for your assistance!

