
Korg KAOSSILATOR. Ðóêîâîäñòâî ïîëüçîâàòåëÿ
1
Î
Îô
ôè
èö
öè
èà
àë
ëüüí
íû
ûé
é è
è ýýê
êññê
êë
ëþ
þççè
èââí
íû
ûé
é ä
äè
èññò
òð
ðè
èááüüþ
þò
òîîð
ð ê
êîîì
ìï
ïà
àí
íè
èè
è K
Koorrgg í
íà
à ò
òååð
ðð
ðè
èò
òîîð
ðè
èè
è Ð
Ðîîññññè
èè
è,, ññò
òð
ðà
àí
í
Á
Áà
àë
ëò
òè
èè
è è
è Ñ
ÑÍ
ÍÃ
à —
— ê
êîîì
ìï
ïà
àí
íè
èÿ
ÿ A
A&
&T
T T
Trra
ad
dee..
Ä
Äà
àí
íí
íîîåå ð
ðóóê
êîîââîîä
äññò
òââîî ï
ïð
ðååä
äîîññò
òà
àââë
ëÿ
ÿååò
òññÿ
ÿ ááååññï
ïë
ëà
àò
òí
íîî.. Å
Åññë
ëè
è ââû
û ï
ïð
ðè
èîîááð
ðååë
ëè
è ä
äà
àí
íí
íû
ûé
é ï
ïð
ðè
èááîîð
ð í
íåå óó
îîô
ôè
èö
öè
èà
àë
ëüüí
íîîããîî ä
äè
èññò
òð
ðè
èááüüþ
þò
òîîð
ðà
à ô
ôè
èð
ðì
ìû
û K
Koorrgg è
èë
ëè
è à
àââò
òîîð
ðè
èççîîââà
àí
íí
íîîããîî ä
äè
èë
ëååð
ðà
à ê
êîîì
ìï
ïà
àí
íè
èè
è A
A&
&T
T T
Trra
ad
dee,,
ê
êîîì
ìï
ïà
àí
íè
èÿ
ÿ A
A&
&T
T T
Trra
ad
dee í
íåå í
íååññååò
ò îîò
òââååò
òññò
òââååí
íí
íîîññò
òè
è ççà
à ï
ïð
ðååä
äîîññò
òà
àââë
ëååí
íè
èåå ááååññï
ïë
ëà
àò
òí
íîîããîî ï
ïååð
ðååââîîä
äà
à í
íà
à
ð
ðóóññññê
êè
èé
é ÿ
ÿççû
ûê
ê ð
ðóóê
êîîââîîä
äññò
òââà
à ï
ïîîë
ëüüççîîââà
àò
òååë
ëÿ
ÿ,, à
à ò
òà
àê
êæ
æåå ççà
à îîññóóù
ùååññò
òââë
ëååí
íè
èåå ããà
àð
ðà
àí
íò
òè
èé
éí
íîîããîî ññååð
ðââè
èññí
íîîããîî
îîááññë
ëóóæ
æè
èââà
àí
íè
èÿ
ÿ..
©
© ®
® A
A&
&T
T T
Trra
ad
dee,, IIn
ncc..
Гарантийное обслуживание
Ïî âñåì âîïðîñàì, ñâÿçàííûì ñ ðåìîíòîì èëè ñåðâèñíûì îáñëóæèâàíèåì äèíàìè÷åñêîãî ôðàçîâîãî
ñèíòåçàòîðà KAOSSILATOR, îáðàùàéòåñü ê ïðåäñòàâèòåëÿì ôèðìû Korg — êîìïàíèè A&T Trade.
Òåëåôîí äëÿ ñïðàâîê (495) 796-9262; e-mail: synth@soundmanage.ru
Korg KAOSSILATOR
Ðóêîâîäñòâî ïîëüçîâàòåëÿ
Äèíàìè÷åñêèé ôðàçîâûé ñèíòåçàòîð
1) All intellectual property contained in this library — including owner’s manuals and product literature — is the sole property of KORG Inc. Duplication of contents of owner’s manuals and/or product literature in part or in whole without the permission of the Company for the purposes of sharing, mass-producing, posting online, or personal gain of any kind is prohibited by copyright law. Users are permitted to create one (1) copy for their personal non-commercial use.
2) Materials such as owner’s manuals and related product information are intended for the use of customers who purchase and use the product (End User). The Company assumes that this material is utilized by the End User. Please be aware that the Company may not be able to respond to inquiries regarding owner’s manuals made public in this library from anyone other than customers who have purchased the products.
3) This library does not provide owner’s manuals and product information for all of the products sold by the Company. Owner’s manuals or product information may not be available for all products indefinitely or at all, and may be permanently discontinued at the Company’s discretion.
4) Contents of owner’s manuals and content as found on korg.com may differ. Information on korg.com may be updated as necessary based on changes to the product specification, operating system, included contents, and so on. Additionally, owner’s manuals may be updated to reflect these and other changes with updated production of the product.
5) Company takes no responsibility for any loss including but not limited to loss of data, financial loss, or personal loss) that might arise from the use of, or the inability to use, the manual library or the specified software.
6) Please be aware that this service may be modified or terminated at any time by the Company without specific notice.
7) Contacts for questions regarding the product, as well as other addresses, phone numbers, or email addresses listed in the owner’s manuals are current as of the date the manual was produced. For the latest contact information, please refer to the Korg.com website.
 Cautions regarding the use of the product are stated at the beginning and end of each owner’s manual. Because these cautions were based on the laws and societal understandings at the time when each manual was produced, they might not be appropriate for the present time. It is advised that End User review and strictly adhere to these Cautions.
4015-2 Yanokuchi, Inagi-city, Tokyo 206-0812 Japan
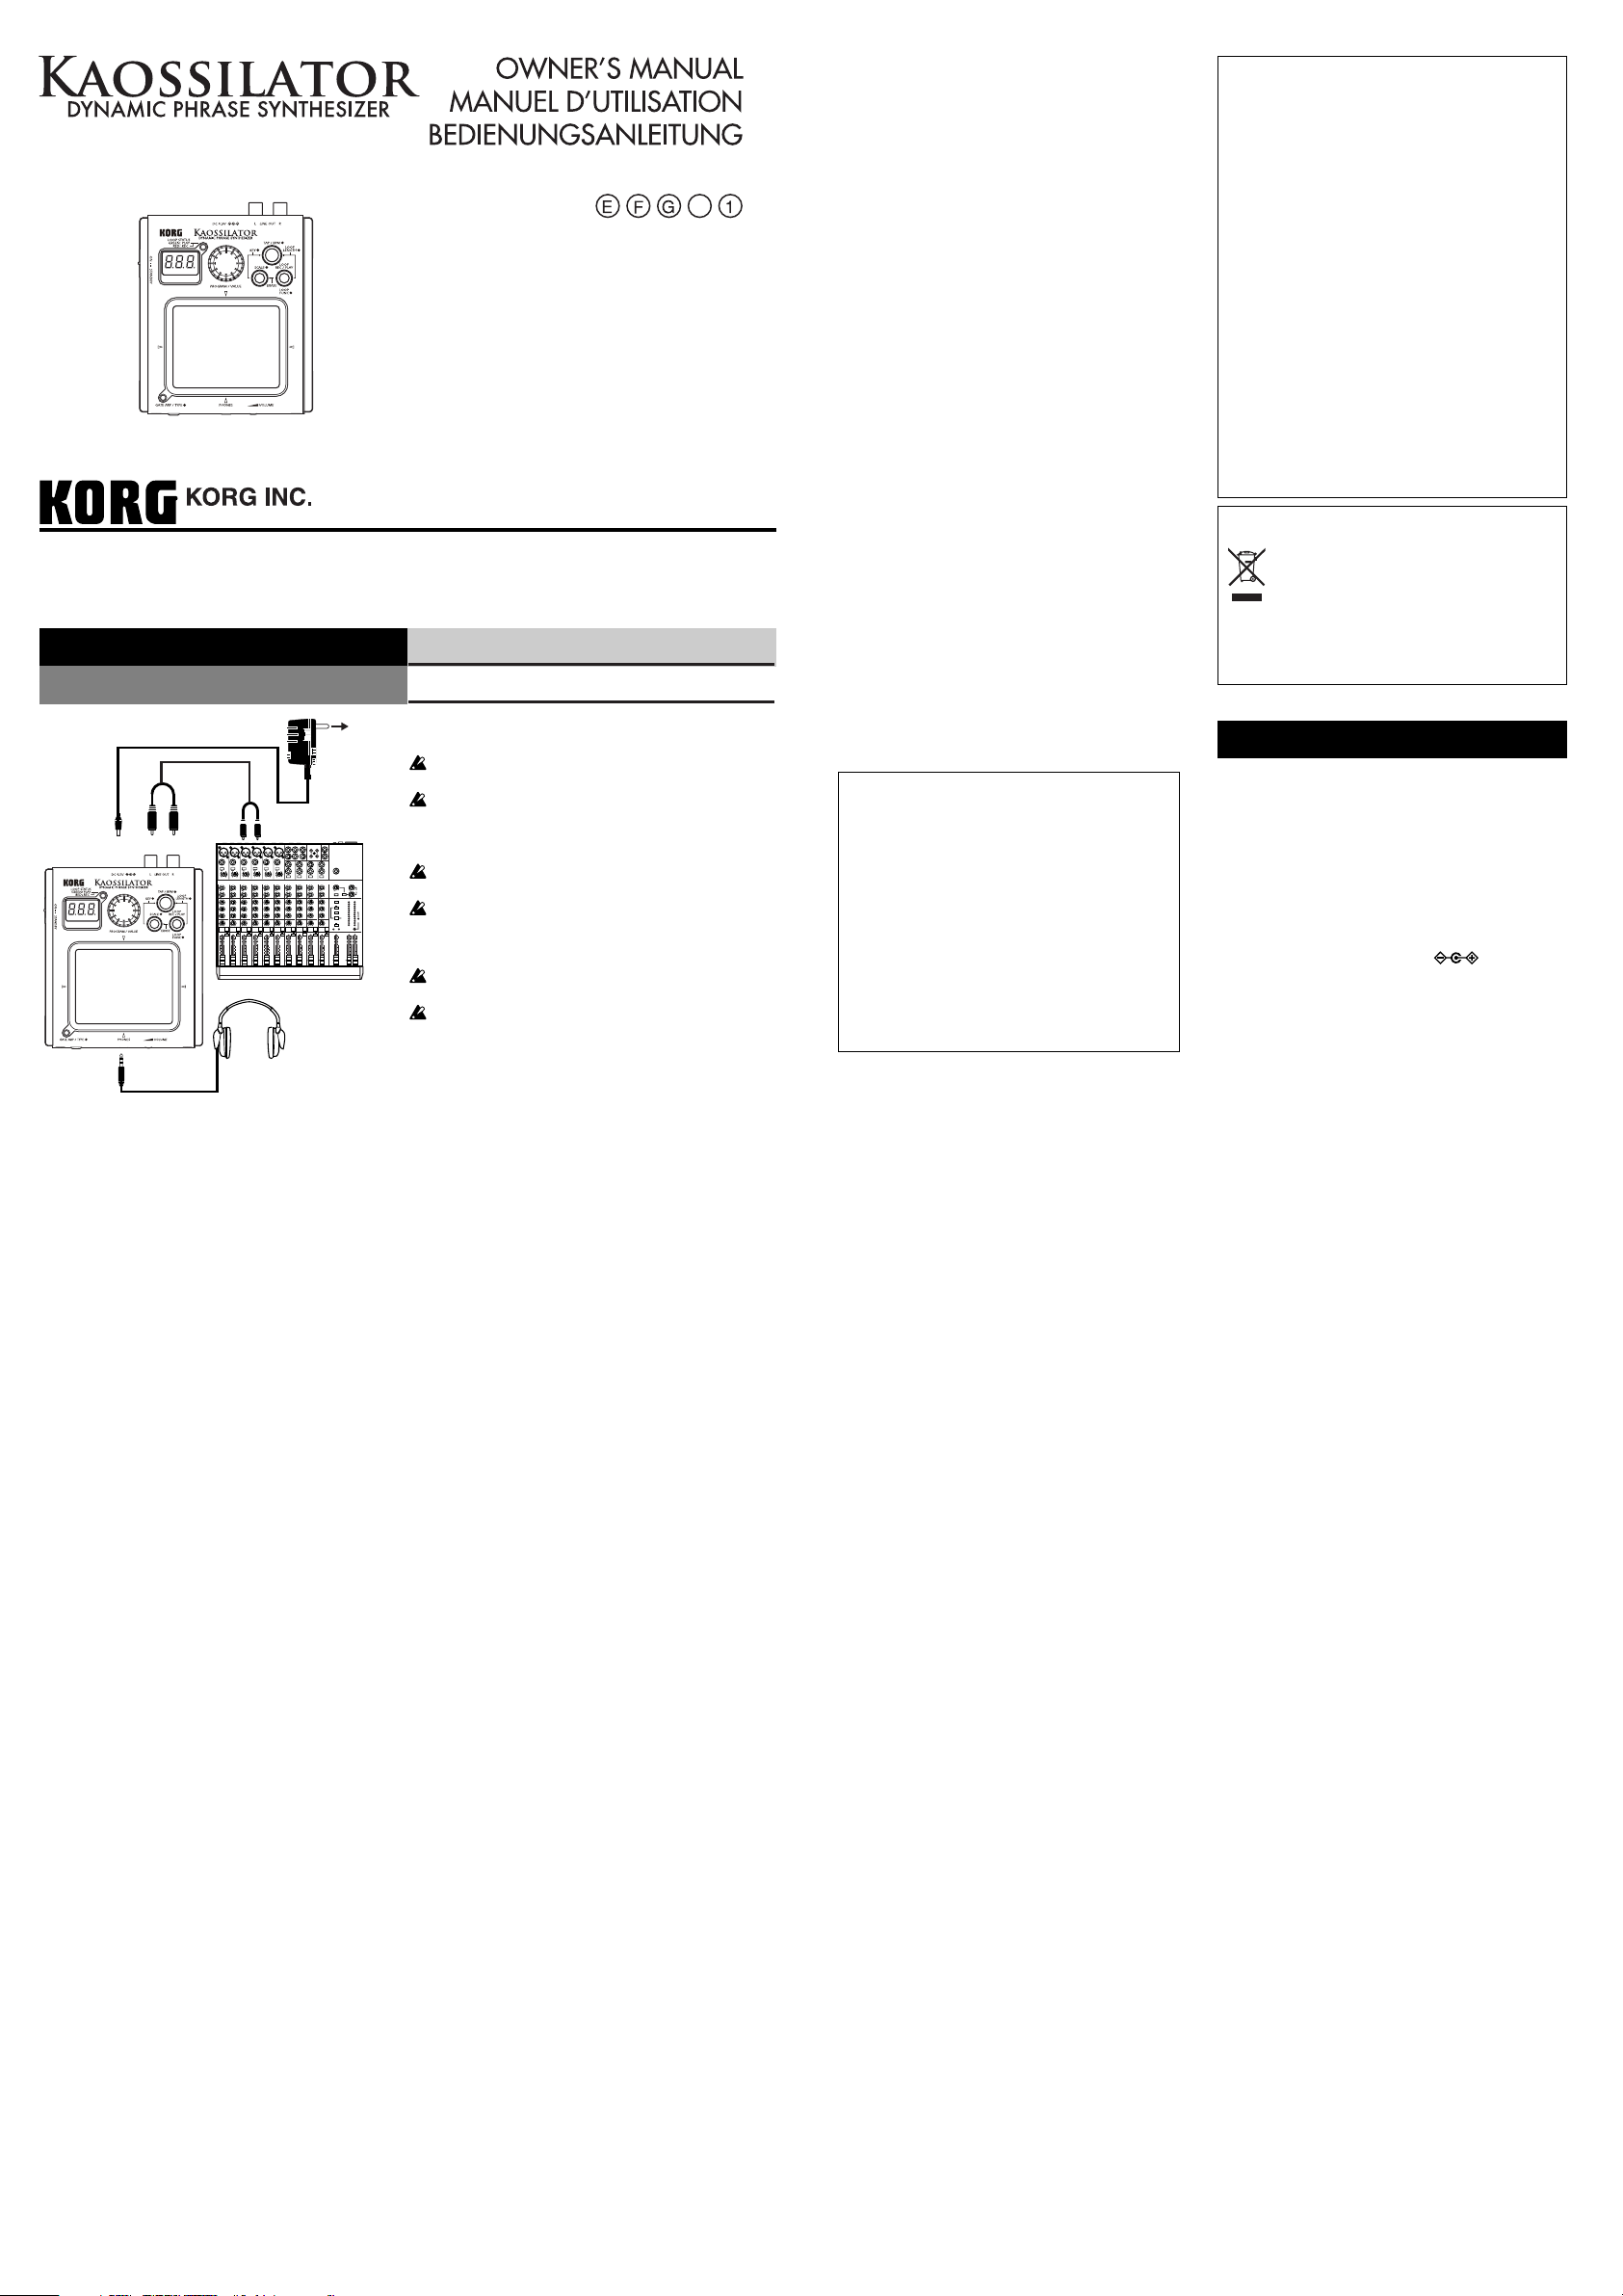
Connections
Anschlüsse
Option: AC ADAPTER
DC4.5V
LINE OUT
PHONES
MIXER
Precautions
Location
Using the unit in the following locations can result in a
malfunction.
• In direct sunlight
• Locations of extreme temperature or humidity
• Excessively dusty or dirty locations
• Locations of excessive vibration
• Close to magnetic fields
Power supply
Please connect the designated AC adapter to an AC outlet having the correct voltage. Do not connect it to an AC
outlet having a voltage other than that specified for your
unit.
Interference with other electrical devices
Radios and televisions placed nearby may experience
reception interference. Operate this unit at a suitable distance from radios and televisions.
Handling
To avoid breakage, do not apply excessive force to the
switches or controls.
Care
If the exterior becomes dirty, wipe it with a clean, dry cloth.
Do not use liquid cleaners such as benzene or thinner, or
2007 KORG INC.
Liaisons
AC Adapter (sold separately)
AC
Connect the optional AC adapter to the DC 4.5 V jack.
Be sure to set the ON/STANDBY switch to the STANDBY
position before connecting the AC adapter.
Be sure to use only the specified AC adapter.
Adaptateur secteur (vendu séparément)
Branchez l’adaptateur secteur optionnel sur la prise DC 4.5 V.
N’oubliez pas de régler le commutateur ON/STANDBY sur la
position STANDBY avant de brancher l’adaptateur secteur.
Veillez à utiliser seulement l’adaptateur secteur spécifié.
Netzteil (getrennt erhältlich)
Schließen Sie das optionale Netzteil an die Buchse DC 4.5V an.
Stellen Sie den ON/STANDBY-Schalter auf STANDBY, be-
vor Sie das Netzteil anschließen.
Verwenden Sie nur das vorgeschriebene Netzteil.
cleaning compounds or flammable polishes.
Keep this manual
After reading this manual, please keep it for later reference.
Keeping foreign matter out of your equipment
Never set any container with liquid in it near this equipment. If liquid gets into the equipment, it could cause a
breakdown, fire, or electrical shock.
Be careful not to let metal objects get into the equipment.
If something does slip into the equipment, unplug the AC
adapter from the wall outlet. Then contact your nearest
Korg dealer or the store where the equipment was purchased.
IMPORTANT NOTICE TO CONSUMERS
This product has been manufactured according to strict
specifications and voltage requirements that are applicable in the country in which it is intended that this
product should be used. If you have purchased this
product via the internet, through mail order, and/or via
a telephone sale, you must verify that this product is
intended to be used in the country in which you reside.
WARNING: Use of this product in any country other
than that for which it is intended could be dangerous
and could invalidate the manufacturer’s or distributor’s
warranty.
Please also retain your receipt as proof of purchase
otherwise your product may be disqualified from the
manufacturer’s or distributor’s warranty.
THE FCC REGULATION WARNING (for USA)
This equipment has been tested and found to comply
with the limits for a Class B digital device, pursuant to
Part 15 of the FCC Rules. These limits are designed to
provide reasonable protection against harmful interference in a residential installation. This equipment generates, uses, and can radiate radio frequency energy and,
if not installed and used in accordance with the instructions, may cause harmful interference to radio communications. However, there is no guarantee that interference will not occur in a particular installation. If this equipment does cause harmful interference to radio or television reception, which can be determined by turning the
equipment off and on, the user is encouraged to try to
correct the interference by one or more of the following
measures:
• Reorient or relocate the receiving antenna.
•Increase the separation between the equipment and
receiver.
• Connect the equipment into an outlet on a circuit different from that to which the receiver is connected.
• Consult the dealer or an experienced radio/TV technician for help.
Unauthorized changes or modification to this system can
void the user’s authority to operate this equipment.
Notice regarding disposal (for EU)
If this “crossed-out wheeled bin” symbol is shown
on the product or in the operating manual, you
must dispose of the product in an appropriate
way. Do not dispose of this product along with
your household trash. By disposing of this product correctly, you can avoid environmental harm or health
risk. The correct method of disposal will depend on your
locality, so please contact the appropriate local authorities for details.
Specifications
Connectors:
Power supply:
Battery life: approximately five hours (with alka-
Dimensions: 106 mm (W) x 129 mm (D) x 29 mm
Weight: 163 g / 5.75 oz. (without batteries)
Included items: owner’s manual, parameter sheet,
Options (sold separately):
* Specifications and appearance are subject to change without
notice for improvement.
* All other product and conpany names are trademarks or
registerd trademarks of their respective holders.
LINE OUT jacks (RCA jacks), PHONES
jack (Stereo mini phone jacks)
four alkaline AA (LR6) batteries (6 V)
line batteries)
(H) / 4.17″ (W) x 5.08″ (D) x 1.14″ (H)
four AA “test” batteries
AC adapter ( , DC4.5V )
Thank you for purchasing Korg’s KAOSSILATOR dynamic
phrase synthesizer. In order to enjoy your KAOSSILATOR,
please read this owner’s manual carefully and retain it for future reference.
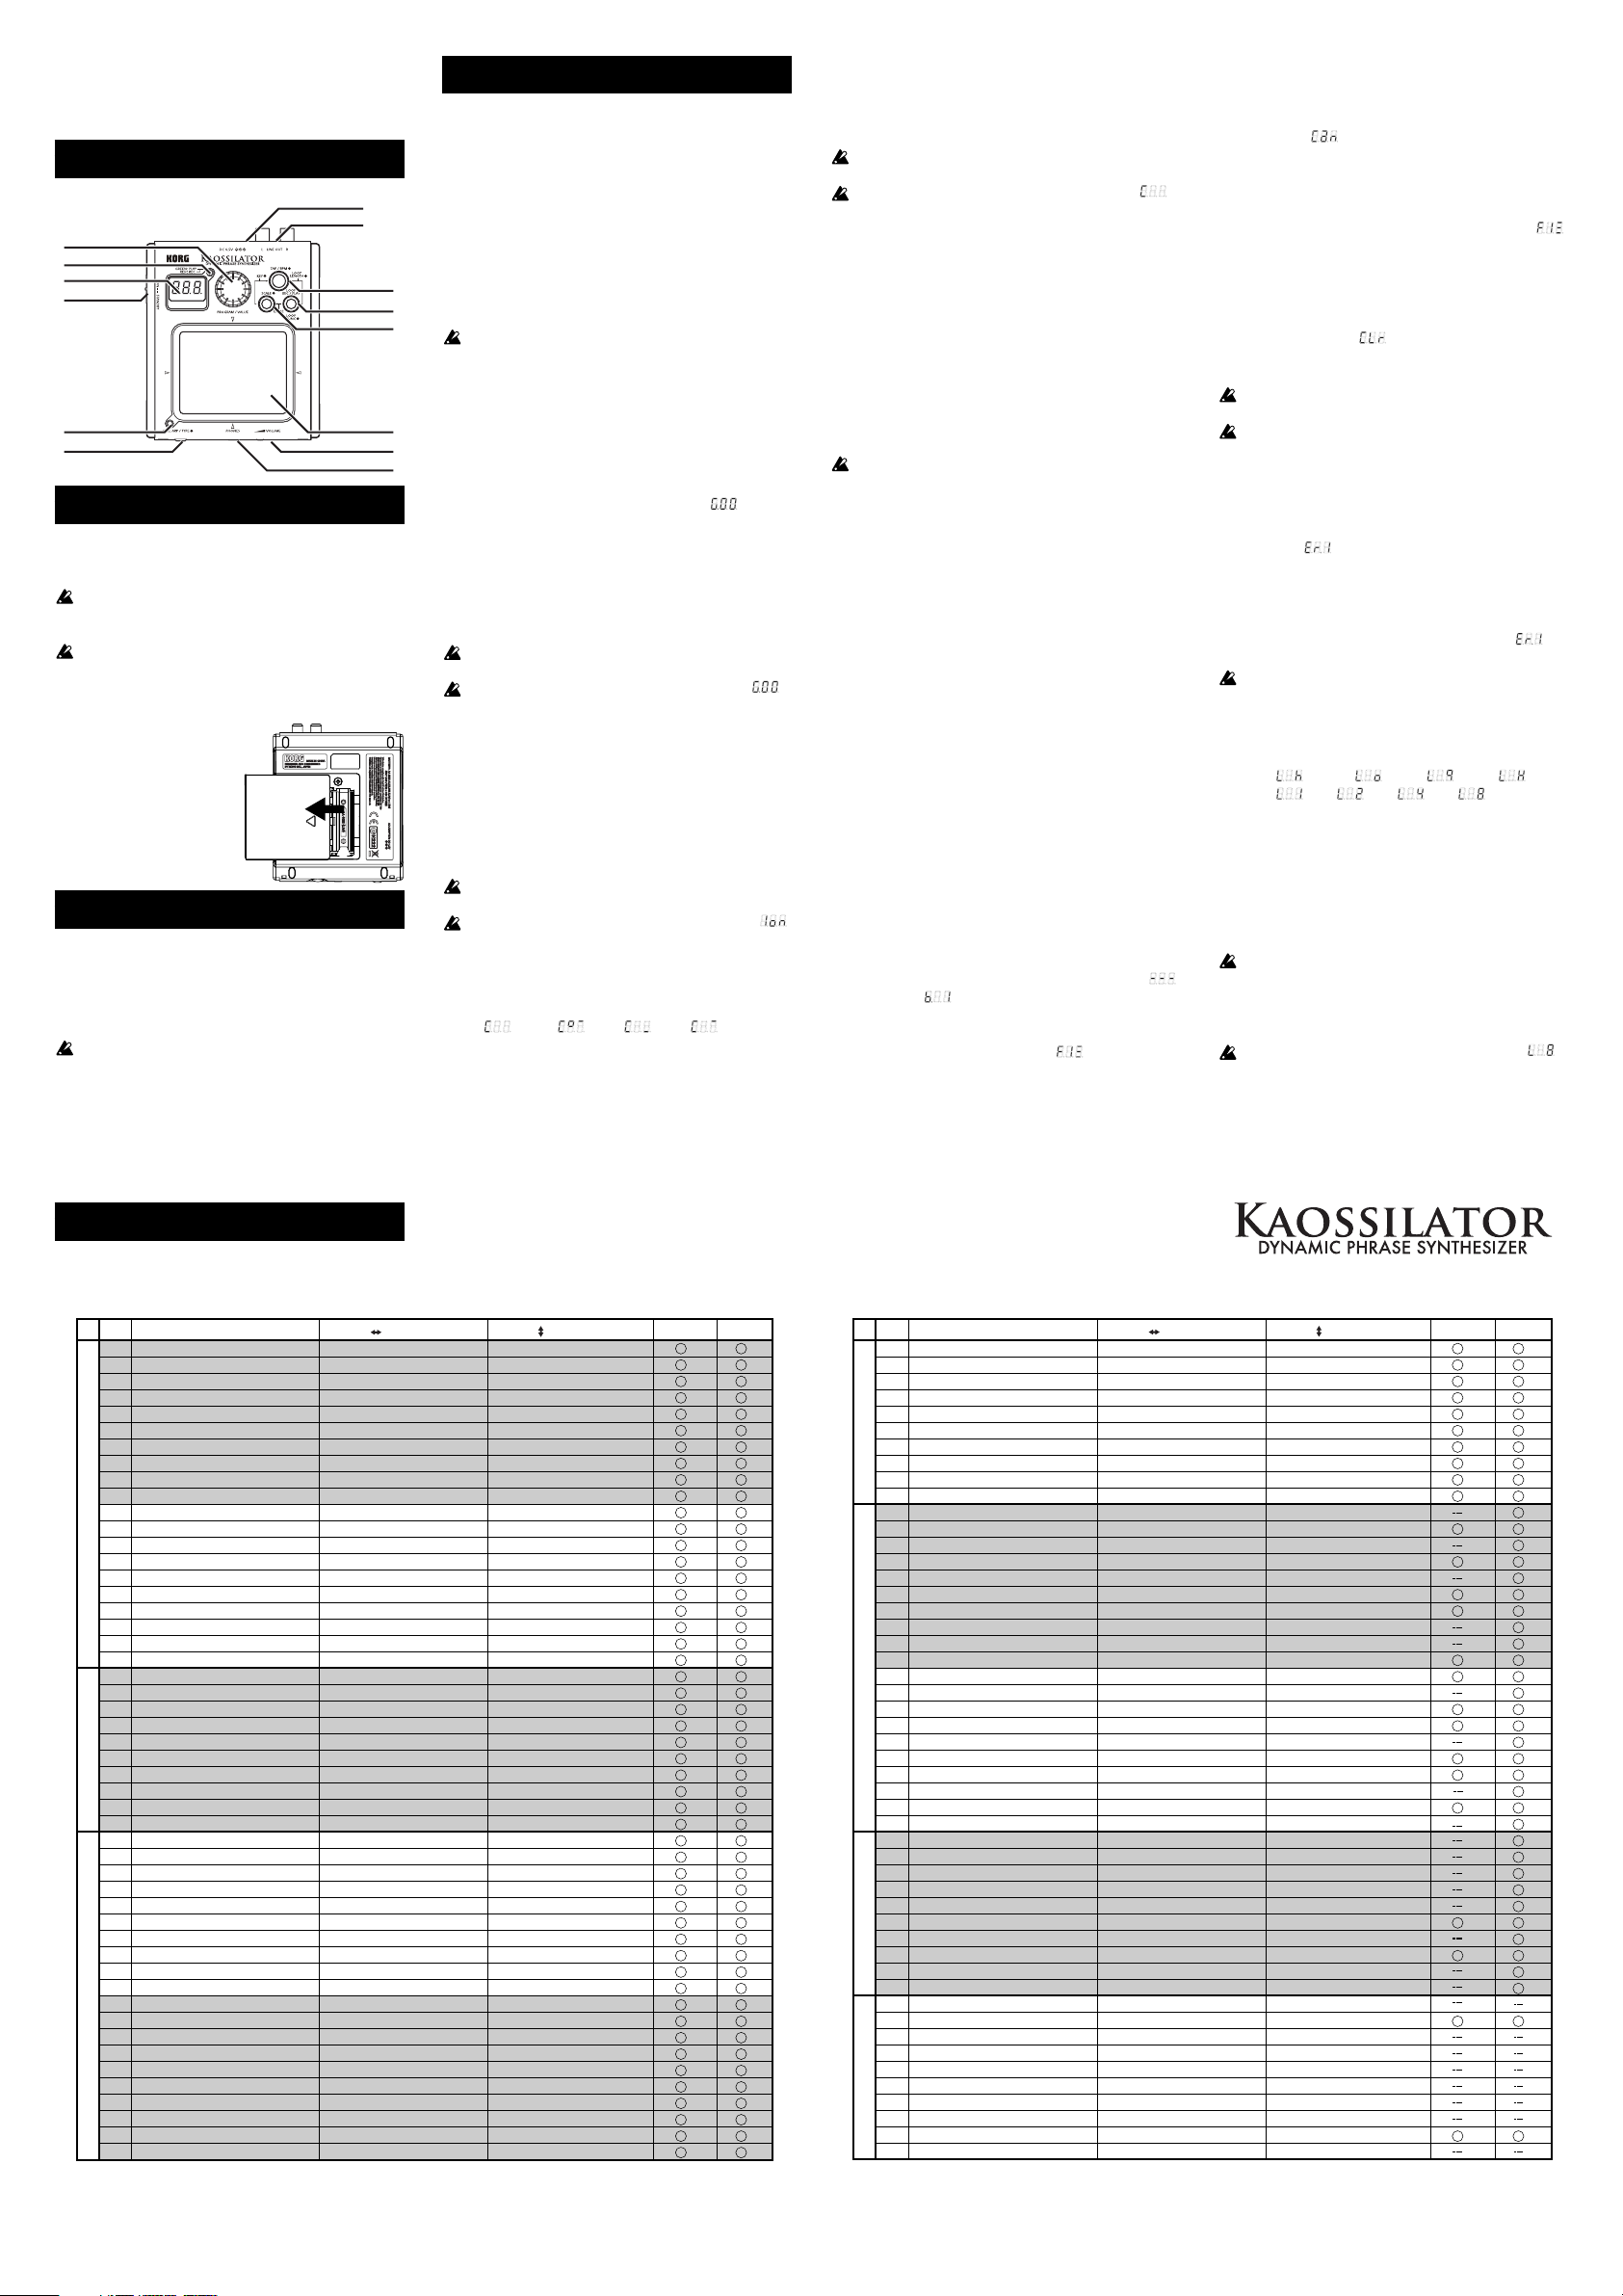
KAOSSILATOR Controls & Jacks
DC jack
LINE OUT jacks
PROGRAM/VALUE knob
LOOP STATUS indicator
Display
ON/STANDBY switch
GATE ARP indicator
GATE ARP button
TAP/BPM button
LOOP REC/PLAY button
SCALE button
Touch pad
VOLUME
PHONES jack
Changing the Batteries
The display will indicate “Lo” when the batteries are running
low. When this occurs, please replace the batteries as soon as
possible.
“Test” batteries are provided so that you can verify that
your KAOSSILATOR operates properly. These batteries may
have a shorter than expected lifespan .
When the batteries become unusable, remove them immediately. You should also remove the batteries if you won’t be
using the unit for an extended period of time.
1. Set the ON/STANDBY switch to the STANDBY position.
2. Slide the battery case cover
on the bottom panel in the direction of the arrow to open it.
3. Install four AA batteries (Use
alkaline only).
Note the polarity (+, -) and be
sure the batteries are inserted
with the correct orientation.
4. Close the battery case cover.
Turning the power on/off
Turning the power on
Set the ON/STANDBY switch to the ON position.
Turning the power off
Set the ON/STANDBY switch to the STANDBY position.
If you’re using the KAOSSILATOR on battery power, don’t
forget to turn the power off when you are through using it.
Operation
Volume knob
The VOLUME knob affects only the headphone volume.
The VOLUME knob will not affect the LINE OUT volume.
Selecting a program
Tu rn the PROGRAM/VALUE knob to select one of the 100
programs, from *.00–*.99 (* indicates the category).
Playing the touch pad
Move your finger around on (or tap on) the touchpad to control
the sound. The parameters controlled by the X axis and Y axis
are shown on the PROGRAM LIST.
Touching the extreme outer edges won’t control the sound.
Using the gate arpeggiator
Press the GATE ARP button; the GATE ARP indicator will light.
Now when you play the touch pad, the KAOSSILATOR will
“gate” the sound using the currently selected gate arpeggiator
pattern.
Selecting a gate arpeggiator pattern
1. Press and hold the GATE ARP button; the display will indicate the currently selected pattern number [
2. Turn the PROGRAM/VALUE knob to select a gate
arpeggiator pattern from G.00–G.49.
3. Press and hold the GATE ARP button again and the
KAOSSILATOR will switch back to the program selection
state. The KAOSSILATOR will also return to the program selection state automatically after five seconds, if no additional
setting operations are performed.
The Arp cannot be applied to certain programs—please re-
fer to the PROGRAM LIST.
Turning the power off reverts to the default value [ ].
Selecting the scale
1. Press the SCALE button; the display will indicate the abbreviation of the currently selected scale.
2. Turn the PROGRAM/VALUE knob to select the scale.
3. Press the SCALE button again and the KAOSSILATOR will
switch from the scale setting back to the program selection
state. The KAOSSILATOR will also return to the program selection state automatically after five seconds, if no additional
setting operations are performed.
The Scale cannot be applied to certain programs—please
refer to the PROGRAM LIST.
Turning the power off reverts to the default value [ ]
(Ionian).
Selecting the key (root note/octave)
1. While holding down the SCALE button, press the TAP button; the display will indicate the current key.
], C#4=[ ], C3=[ ], C5=[ ]
C4=[
2. Turn the PROGRAM/VALUE knob to select the key.
3. While the display is still showing the Key Select function,
press the TAP button again with the SCALE button de-
].
pressed, the KAOSSILATOR will switch from the key setting
back to the program selection state. The KAOSSILATOR will
also return to the program selection state automatically after five seconds, if no additional setting operations are performed.
When applying a Key to certain Programs, noise may oc-
cur or no sound may be produced.
Turning the power off reverts to the default value [ ].
Setting the BPM
1. Press the TAP button; the current BPM setting will be displayed.
2. Manual: Turn the PROGRAM/VALUE knob while the BPM
setting is displayed to change the BPM setting.
3. Tap Tempo: Hit the TAP button several times in tempo with
your song, the detected BPM will be used as the current setting.
4. Press and hold the TAP button and the KAOSSILATOR will
switch from the BPM setting back to the program selection
state. The KAOSSILATOR will also return to the program selection state automatically after five seconds, if no additional
setting operations are performed.
Turning the power off reverts to the default value [120].
Loop (Phrase) recording
The KAOSSILATOR can record and playback phrases and
patterns that you play on the touch pad — loop style. During
playback, you can play along. You can even add another layer
to the loop recording. This process can be repeated, adding
new layers. Phrases Can be up to 8 beats (2 bars of 4/4) in
length.
1. Press and hold the LOOP REC/PLAY button. The LOOP
STATUS indicator will light red and you can record by playing the touchpad.
2. When you release the LOOP REC/PLAY button, the LOOP
STATUS indicator will light green. Playback will continue, but
recording will stop.
3. If you press the LOOP REC/PLAY button during loop playback, the LOOP STATUS indicator will go out and playback
will stop.
4. If you press the LOOP REC/PLAY button while playback is
stopped, the LOOP STATUS indicator will light green, and
the recorded phrase will start.
Overdubbing (layering) recorded phrases
Once you have recorded a phrase, you can play along, or you
can add another layer on top (overdub) of the recorded phrase.
Once you get a layered phrase that you like, you can save it.
That way, if you add additional layers that you don’t like, you
can go back and start again from this last saved version.
1. If you hold down the LOOP REC/PLAY button for an extended period of time after the phrases are recorded, [
(Stopped) or [
the beat position) will be displayed.
2. Continue to hold down the LOOP REC/PLAY button and turn
the PROGRAM/VALUE knob so that [
the display. When you release the LOOP REC/PLAY button,
the recorded phrase/layers are saved.
] (Playback: the numerical figure shows
] (Fix) appears in
]
3. Press and hold the LOOP REC/PLAY button to start recording as you make new layers.
4. If you do not like the new phrases, continue to hold down the
LOOP REC/PLAY button and turn the PROGRAM/VALUE
knob so that [
you release the LOOP REC/PLAY button, only the newly recorded phrases will be deleted.
5. If you want to merge the newly recorded phrases with the
saved phrases, continue to hold down the LOOP REC/PLAY
button and turn the PROGRAM/VALUE knob so that [
appears on the display. When you release the LOOP REC/
PLAY button, the newly recorded phrases will be mixed with
the saved phrases.
6. To delete all recorded phrases and layers, continue to hold
down the LOOP REC/PLAY button and turn the PROGRAM/
VALUE knob so that [
When you release the LOOP REC/PLAY button, all phrases
including the saved phrases will be completely deleted.
The display blinks and the LOOP STATUS indicator lights
orange while each process is being performed.
When the power is turned off, all recorded phrases includ-
ing the saved phrases will be deleted.
] (Cancel) appears in the display. When
] (Clear) appears in the display.
Deleting elements of recorded phrases
During playback, if you hold down the LOOP REC/PLAY button and press the SCALE button, the phrase elements played
when the SCALE button is depressed will be deleted. During
this operation, [
beat position) will appear in the display.
In addition, if you press the SCALE button while you are recording sounds with the LOOP REC/PLAY button depressed during playback of the recorded phrase, the reproduced phrases
previously recorded will be replaced with new ones. [
appear on the display.
The operations above don’t delete the saved phrases.
] (Deleting: the numerical figure shows the
] will
Setting the length of each phrase
1. While holding down the LOOP REC/PLAY button, press the
TA P button. The display will indicate the current phrase
length for recording and playback.
2. Turn the PROGRAM/VALUE knob to set the phrase length
for recording and playback.
3. If you press the TAP button again with the LOOP REC/PLAY
button depressed, the KAOSSILATOR will switch from the
length setting back to the program selection state. The
KAOSSILATOR will also return to the program selection
state automatically after fifteen seconds, if no additional setting operations are performed.
When the BPM setting is between 20 and 37.5, the actual
length for recording and playback will be 1/4 of the indicated
length. When the BPM setting is between 37.5 and 75.0, the
actual length for recording and playback will be 1/2 of the indicated length.
Turning the power off reverts to the default value [ ].
] =1/16, [ ] =1/8, [ ] =1/4, [ ] =1/2
[
] =1, [ ] =2, [ ] =4, [ ] =8
[
]
PROGRAM LIST
No. Program Name X AXIS Y AXIS SCALE
L.00 Ambient Lead Note Ambient Depth, Vibrato
L.01 LR 5th Lead Note Pan, Delay Cutoff
L.02 Unison Lead Note Cutoff
L.03 Tell Min Note Level
L.04 Feedback Lead Note Feedback Mod
L.05 Sync Lead Note OSC Sync Pitch
L.06 Square Bell Note Decay Time
L.07 Wide Saw Lead Note Delay&AutoPan Depth
L.08 XMod Lead Note Mod Depth
L.09 Square Lead Note Cutoff
L.10 Unison Sweep Note Cutoff
LEADACOUSTICBASS
L.11 3Octave Lead Note Octave
L.12 XY Scale Note Bass Note
L.13 Wave Seq Note, Pan Sequence Speed
L.14 Digital Talk Note Formant
L.15 LFO Lead Note LFO Speed
L.16 XMod Saw Lead Note Cutoff
L.17 Flap Lead Note LFO Speed
L.18 Tape Bell Lead Note Echo Time, Feedback
L.19 Pitch Mod Lead Note Pitch Mod Depth
a.20 Trumpet Note Breath Pressure
a.21 Piano Note Velocity
a.22 Digerido Note LFO Speed
a.23 Electric Sitar Note Sound Character
a.24 Duo Strings Note 2nd Strings Level
a.25 VPM Bell Note Sound Character
a.26 Jazz Guitar Note Velocity
a.27 Tenor Sax Note Breath Pressure
a.28 Harmonica Note 2nd Reed Level
a.29 Flute Note Breath Pressure
b.30 Hoover Note Cutoff, Pitch EG
b.31 Kick Bass Note Decay Time
b.32 Reso Bass Note Cutoff
b.33 Acid Bass Note Distortion
b.34 Sync LFO Bass Note LFO Speed
b.35 Unison Bass Note Cutoff
b.36 Boost Bass Note Cutoff
b.37 XMod Bass Note Cutoff
b.38 Fall Bass Note Cutoff
b.39 VPM Bass Note Decay Time
b.40 Modulation Bass Note Mod Depth
b.41 Dark Bass Note Mod Depth
b.42 Ring Bass Note Cutoff
b.43 Square Bass Note Cutoff
b.44 Dist Saw Bass Note Cutoff
b.45 MG Bass Note Cutoff
b.46 Bit Bass Note Cutoff
b.47 Synth Bass Note Cutoff
b.48 Valve Bass Note Decay Time
b.49 Organ Bass Note 3rd Percussion
GATE ARP
No. Program Name X AXIS Y AXIS SCALE
c.50 Trance Chord Note Cutoff
c.51 Sine Chord Note Octave
c.52 Organ Chord Note Drawbar Level
c.53 Sweep Chord Note LFO Speed
c.54 Choir Chord Note Formant
c.55 Power Chord Note Sound Character
CHORDSEDRUMPATTERN
c.56 BPF Chord Note Cutoff
c.57 E.Piano Chord Note Chord (Maj7, min7)
c.58 Rave Chord Note Cutoff
c.59 Chord Hit Note Chord (Maj7, min7)
S.60 Kaoss Drone Cutoff Feedback
S.61 Rise & Fall Note Rise, Fall
S.62 Feedback Loop Feedback Filter Delay Time
S.63 L->R Note LFO Speed
S.64 Noise Filter Cutoff Resonance
S.65 8bit Game Note Pitch Mod Depth
S.66 Metal Note, Cutoff LFO Speed
S.67 Siren LFO Speed, Cutoff Pitch Mod Depth
S.68 Missile Missile, Hit Decay Time
S.69 Random Note LFO Speed
S.70 Beam Saber Modulator Note Mod Depth
S.71 Synth Looper Cutoff, Looper Speed Looper, Noise Level
S.72 Ring Mod SFX Note LFO Depth
S.73 Square LFO Note, LFO Speed Cutoff
S.74 Dot Eat Loop Pitch Dot Eat
S.75 Voice Looper Note, Looper Speed, Pan Looper, Formant
S.76 Sweep Note, Pan LFO Speed
S.77 Jet Comb Freq Feedback
S.78 Reflection SFX Note Decay Time
S.79 Drop Cutoff Impulse Speed
d.80 BD/SD1 BD, SD Sound Character
d.81 Zap/HH Zap, HH, Pan Decay Time
d.82 Conga Conga Hi/Low Mute
d.83 BD/SD2 BD, SD SD Decay Time
d.84 Breakdown Decay Time Ambient Depth
d.85 XMod Perc Pitch Mod Depth, Mod Pitch
d.86 BD/SD3 BD, SD BD Pitch, SD Level
d.87 Timpani Note Velocity
d.88 Filter Snare Noise Cutoff SD Body Level
d.89 BD/SD4 BD, SD Reverse
P.90 Grain Beat1 Pattern Grain Depth
P.91 Bass&Drum Bass Note Pattern, Flanger Depth
P.92 HPF Drum Pattern Cutoff, Delay Depth
P.93 Grain Beat2 Pattern Grain Speed
P.94 Beat Box Pattern Delay Depth
P.95 Dirty Drum Pattern Decimator Depth
P.96 Grain Beat3 Pattern Grain Depth
P.97 House Pattern Delay Depth
P.98 Auto Techno Bass Note Pattern, Cutoff
P.99 Electro Noise Cutoff Noise Decay, Delay Depth
GATE ARP
|
10 898 торговых марок |
Скачайте инструкцию БЕСПЛАТНО! Diplodocs позволяет скачать несколько типов инструкций для наилучшего использования KORG KAOSSILATOR KO-1 |

|
Вам требуется помощь по использованию изделия? Все инструкции по категориям |
инструкция по эксплуатации KORG KAOSSILATOR KO-1Diplodocs поможет скачать инструкцию KORG KAOSSILATOR KO-1 .
Введите модель изделия KORG…
|

Copyright © 2005 — 2012 — Diplodocs —
Все права защищены.
Торговые марки принадлежат их соответствующим владельцам.
Просмотр
Доступно к просмотру 4 страницы. Рекомендуем вам скачать файл инструкции, поскольку онлайн просмотр документа может сильно отличаться от оригинала.
-
ВНИМАНИЕ
- Перед первым использованием консервного ножа внимательно прочитайте инструкцию.
- Беречь от детей!
- Данный прибор не предназначен для использования людьми (включая детей), у которых есть
физические, нервные или психические отклонения или недостаток опыта и знаний, за
исключением случаев, когда за такими лицами осуществляется надзор или проводится их
инструктирование относительно использования данного прибора лицом, отвечающим за их
безопасность. Необходимо осуществлять надзор за детьми с целью недопущения их игр с
прибором.
- Использовать только в бытовых целях!
- Не открывайте банки, находящиеся под давлением!
- Не открывайте баллончики с легковоспламеняющейся жидкостью!
- Убедитесь, что нож выключен, прежде чем выдвинуть заднюю часть крышки и поменять
батарейки!
Извлеките батарейки, если не планируете пользоваться ножом в течение длительного времени.
- Не нажимайте кнопки, находящиеся на ноже во время рабочего процесса!
- Перед тем, как помыть или почистить нож, необходимо вынуть батарейки!
- Во избежание получения травм избегайте соприкосновения с движущимися деталями!
- Ни в коем случае не погружайте прибор в воду или другие жидкости!
- Не меняйте самостоятельно резец ножа!
- Не подходит для мытья в посудомоечной машине!
- После окончания срока службы не выбрасывайте прибор вместе с бытовыми отходами.
Передайте его в специализированный пункт для дальнейшей утилизации. Этим Вы поможете
защитить окружающую среду.
ОПИСАНИЕ ПРИБОРА
-
НАЧАЛО РАБОТЫ
Установка батареек
1.   Снимите крышку батарейного отсека, сдвинув ее в направлении, указанном
стрелкой.
2.   Вставьте 2 батарейки типа АА, соблюдая полярность
3.   Закройте крышку.
! Внимание: ни в коем случае не используйте старую и новую батарейки одновременно.
ИСПОЛЬЗОВАНИЕ КОНСЕРВНОГО НОЖА
1.  Прежде чем начать использовать устройство,
убедитесь в том, что крышка ножевого отсека
плотно закрыта.
2.  Поставьте банку на плоскую поверхность.
3.  Установите нож на консервной банке так,
чтобы края устройства вошли в канавку
нижней части устройства.
4.  Удерживайте нож в таком положении, и,
нажимая на кнопки старта в течение 2-3
секунд, обеспечьте полное размещение
устройства на банке.
5.  Консервный нож начнет двигаться по краю
банки, открывая крышку.
6.  После открытия нож автоматически прекратит
движение.
7.  Открывая крышки большого диаметра,
необходимо надавить на кнопки еще раз до
полного их открытия.
8.  В конце работы, при снятии ножа с банки,
магнит, находящийся на внутренней стороне
прибора, удержит открытую крышку.
-
Примечание: Будьте осторожны при контакте с острыми краями открытой банки!
9.  Если при работе нож застопорился, нажмите на кнопку обратного хода, расположенную
в нижней части устройства. Произойдет разблокировка и активизируется задний ход.
10.   Если батарейки недостаточно заряжены, кнопка заднего хода может не сработать. В
этом случае открутите винт разблокировки с помощью отвертки.
11.   Консервные банки со швами, крышками необычной формы и неровными краями
могут также стать причиной остановки ножа. В этих случаях необходимо произвести
операцию, описанную в п. 10.
ЧИСТКА И УХОД
1.   Необходимо очищать нож после каждого использования.
2.   Для того, чтобы почистить прибор, сначала необходимо вынуть батарейки. Затем
вытереть нож влажной тканью или губкой (можно использовать мягкое не
абразивное моющее средство), далее следует протереть лезвие сухой тканью.
3.   В случае если движения консервного ножа очень медленные, это может означать,
что заряд батареек недостаточен и требуется их замена. Если нож остановился в
процессе работы, обратитесь к параграфу «Использование ножа», пункты 9-10.
4.   Не подвергайте устройство воздействию прямых солнечных лучей, не оставляйте в
помещениях с высокой температурой, повышенной влажностью и запыленностью.
5.   Не погружайте устройство в воду или в другие жидкости, в противном случае
могут произойти повреждения электронных и механических частей устройства.
ВНИМАНИЕ! Разряженные батареи подлежат немедленной и безопасной утилизации. Храните
батареи в недоступном для детей месте. Являясь предметами довольно маленьких размеров,
батареи могут быть по случайности проглочены. В случае проглатывания, немедленно
обратитесь к врачу. Не пытайтесь открыть батарею, утилизировать с помощью огня или
подзарядить.
ТЕХНИЧЕСКИЕ ХАРАКТЕРИСТИКИ
Питание: 2 х АА батарейки (поставляются в комплекте)
Расчетный срок службы изделия: 3 года
Гарантийный срок: 1 год со дня покупки
Производитель:
Texton Corporation LLC - ООО "Текстон Корпорэйшн"
State of Delaware USA, 1313 N. Market Street, Suite 5100, Wilmington, DE 19801, USA.
1313 Н. Маркет Стрит, Помещение 5100, г. Уилмингтон, штат Делавэр, 19801, США
- 1
- 2
- 3
- 4
Производитель: KORG
Характеристики и комплектация могут быть изменены фирмой-производителем без предварительного уведомления.
Фото и описания товара на сайте могут не точно соответствовать товару.
Описание
Динамический фразовый синтезатор. 100 программ. Диапазон клавиатуры: ±12 полутонов. Коммутация: выходы LINE OUT (разъемы RCA), выход PHONES (стерео мини-джек). Частота сэмплирования: 48 кГц. Питание: 4 щелочные батареи типа АА (LR6) или сетевой адаптер (приобретается отдельно). Время работы от батарей: около пяти часов (от щелочных батарей).
Подробное описаниеОчередная новинка в суперпопулярной серии ди-джейских приборов от компании KORG! KAOSSILATOR представляет собой новый карманный динамический фразовый синтезатор, объединяющий знаменитые аналоговые звуки от Korg и впечатляющие исполнительские возможности в одном ультракомпактном приборе. На этом инструменте может играть практически любой человек – просто перемещайте палец по сенсорной панели KAOSSILATOR. Забудьте о долгом обучении! KAOSSILATOR легок и компактен, он обладает безграничными исполнительскими возможностями и при этом работает от батарей – так что теперь Вы можете создавать музыку в любом месте!
Основные возможности:
Портативный синтезатор в сверхкомпактном корпусе с питанием от батарей.
Синтезаторные звуки, ударные инструменты и спецэффекты – всего 100 мощных программ.
31 шаблон для выбора звукоряда, позволяющий исполнять музыкальные фразы в различных вариантах строя.
50 типов арпеджиаторных рисунков с гейтированием, использующиеся для воспроизведения сложных ритмических рисунков.
Функция Loop Recording, предназначенная для записи одной музыкальной фразы поверх другой, что позволяет создавать сложные, насыщенные грувы.
KAOSSILATOR – это совершенно новый инструмент, в котором понятие «синтезатор» полностью отделено от понятия «фортепианная клавиатура». Теперь как клавишники, так и гитаристы или ди-джеи смогут обогатить новыми элементами звучание живой группы или клубный сет, причем простота KAOSSILATOR в управлении позволяет вывести на принципиально новый уровень исполнительского мастерства даже музыканта-новичка.
Благодаря поистине карманным размерам, возможности питания от батарей и наличию специальных гнезд для крепления ремня, KAOSSILATOR наверняка станет для Вас источником неиссякаемого музыкального вдохновения – где бы Вы ни находились!
Мощные синтезаторные и ударные тембры, а также спецэффектыНа борту KAOSSILATOR установлено сто мощных звуковых программ, сочетающих легендарный моделирующий синтез от Korg и блестящие эффекты приборов серии KAOSS PAD. Эти программы позволяют работать практически в любом музыкальном стиле. Движение пальца по горизонтали отвечает за высоту звука, в то время как движение по вертикали управляет сопутствующими параметрами, например, частотой среза, глубиной модуляции или обратной связи*, что придает исполнению исключительную выразительность. В дополнение к классическим синтезаторным сольным тембрам, басам и спецэффектам, в памяти инструмента находятся также реалистичные звуки фортепиано, гитары и трубы, а также ударные сэмплы и лупы. Таким образом, KAOSSILATOR буквально заставит Вас заняться творчеством.
Функции Scale и Key – вы никогда не попадете «мимо ноты»KAOSSILATOR оснащен функцией Scale, позволяющей точно и аккуратно воспроизводить ноты из того или иного звукоряда. Пользователь может выбирать из 31 варианта строя, включая хроматический, уменьшенный, мажорный и минорный блюз, а также пентатонику. Для установки тональности служит функция Key. Наконец, нестандартные варианты строя, такие как испанский, риукиу и рага, помогут обогатить исполнение экзотическими элементами.
Арпеджиатор для расширения исполнительских возможностейВстроенный арпеджиатор с гейтированием может воспроизводить различные нотные рисунки в заданном пользователем темпе, что еще более расширяет исполнительские возможности прибора. Просто выберите один из 50 ритмических паттернов и начните создавать совершенно невероятные музыкальные рисунки!
Еще больше креатива с функцией Loop RecordingДанная функция позволяет записывать музыкальные фразы заданной длительности (максимум 8 долей = 2 такта) для воспроизведения в зацикленном режиме. Например, Вы можете записать фразу с использованием солирующего синтезатора, а затем наложить на нее бас или ударные. Процесс невероятно прост – выбираете инструмент, играете и записываете звук. Еще никогда создание грува не было настолько простым!
Функциональное назначение контроллера зависит от выбранной программы.
Внешний вид и характеристики устройства могут быть изменены без предварительного уведомления.
Все названия продуктов и компаний, использованные в документе, являются зарегистрированными торговыми марками и принадлежат своим правообладателям.
Характеристики:
- Программ: 100
- Категории программ:
“NOTE” (мелодические инструменты) = LEAD: 20, ACOUSTIC:10, BASS:20, CHORD:10
“SE” (специальные эффекты) = SE:20
“DRUM” (ударные инструменты) = DRUM: 10, DRUM PATTERN: 10 - Вариантов строя: 31
- Диапазон клавиатуры: ±12 полутонов
- Коммутация: выходы LINE OUT (разъемы RCA), выход PHONES (стерео мини-джек)
- Частота сэмплирования: 48 кГц
- ЦА-преобразование: 24-битное, линейное
- Питание: 4 щелочные батареи типа АА (LR6) или сетевой адаптер (приобретается отдельно)
- Время работы от батарей: около пяти часов (от щелочных батарей)
- Комплект поставки: Руководство пользователя, список параметров, четыре батареи типа «АА» для проверки работоспособности прибора.
- Габариты: 106 х 129 х 29 мм.
- Вес: 154 г (без батарей)
- Опциональные аксессуары:
Адаптер питания ( – 4.5 В) - Габариты и вес товара в заводской упаковке:
0.11 x 0.04 x 0.16 м. - Вес: 0.32 кг.
- Гарантия: 12 месяцев.
Производитель имеет право менять комплектацию и конструкцию, не внося изменения в инструкцию.
Место сборки товара может отличаться от указанного.