

User Guide
IdeaPad Gaming 3i (15″, 6) and IdeaPad Gaming 3 (15″, 6)

Read this first
Before using this documentation and the product it supports, ensure that you read and understand the
following:
• Generic Safety and Compliance Notices
• Safety and Warranty Guide
• Setup Guide
First Edition (April 2021)
© Copyright Lenovo 2021.
LIMITED AND RESTRICTED RIGHTS NOTICE: If data or software is delivered pursuant to a General Services
Administration “GSA” contract, use, reproduction, or disclosure is subject to restrictions set forth in Contract No. GS-
35F-05925.

Contents
About this guide . . . . . . . . . . . . . iii
Chapter 1. Meet your computer . . . . . 1
Front . . . . . . . . . . . . . . . . . . . . 1
Base . . . . . . . . . . . . . . . . . . . . 2
Left . . . . . . . . . . . . . . . . . . . . 3
Right . . . . . . . . . . . . . . . . . . . . 4
Bottom . . . . . . . . . . . . . . . . . . . 5
Features and specifications . . . . . . . . . . . 6
Statement on USB transfer rate . . . . . . . . 7
Operating environment . . . . . . . . . . . 7
Chapter 2. Get started with your
computer . . . . . . . . . . . . . . . . . 9
Get started with Windows 10 . . . . . . . . . . 9
Windows account . . . . . . . . . . . . . 9
Windows desktop . . . . . . . . . . . . 10
Windows Updates . . . . . . . . . . . . 11
Lenovo Vantage and Lenovo PC Manager . . . . 11
Connect to networks . . . . . . . . . . . . . 11
Connect to wired networks . . . . . . . . 12
Connect to Wi-Fi networks. . . . . . . . . 12
The Novo Button menu . . . . . . . . . . . . 12
Open the Novo Button menu . . . . . . . . 13
Interact with your computer . . . . . . . . . . 13
Keyboard hotkeys . . . . . . . . . . . . 13
Numeric keypad . . . . . . . . . . . . . 14
Chapter 3. Explore your computer . . 15
Manage power . . . . . . . . . . . . . . . 15
Check the battery status . . . . . . . . . 15
Charge the battery . . . . . . . . . . . . 15
Set power button behavior. . . . . . . . . 15
A power plan . . . . . . . . . . . . . . 15
Set performance mode . . . . . . . . . . 16
Change settings in UEFI/BIOS setup utility . . . . 16
What is UEFI/BIOS setup utility . . . . . . . 16
Open the UEFI/BIOS setup utility . . . . . . 16
Change the startup sequence . . . . . . . 16
Change hotkey mode . . . . . . . . . . . 16
Set passwords in UEFI/BIOS setup utility . . . . . 17
Password types . . . . . . . . . . . . . 17
Set administrator password . . . . . . . . 17
Change or remove administrator password . . 17
Set user password . . . . . . . . . . . . 18
Enable power-on password . . . . . . . . 18
Set hard disk password . . . . . . . . . . 18
Change or remove hard disk password . . . . 19
Reset or restore Windows . . . . . . . . . . . 19
Windows 10 recovery options . . . . . . . 19
Windows System Restore . . . . . . . . . 19
Reset Windows . . . . . . . . . . . . . 20
Create a recovery drive . . . . . . . . . . 20
Use a recovery drive to restore or reset
Windows . . . . . . . . . . . . . . . 21
Chapter 4. Help and support . . . . . 23
Frequently asked questions . . . . . . . . . . 23
Self-help resources . . . . . . . . . . . . . 23
What is a CRU? . . . . . . . . . . . . . . . 24
CRUs for your product model . . . . . . . . . 24
Call Lenovo . . . . . . . . . . . . . . . . 25
Before you contact Lenovo . . . . . . . . 25
Lenovo Customer Support Center . . . . . . 25
Purchase additional services. . . . . . . . . . 26
Appendix A. Accessibility and
ergonomic information . . . . . . . . 27
Appendix B. Compliance
information . . . . . . . . . . . . . . . 33
Appendix C. Notices and
trademarks . . . . . . . . . . . . . . . 35
© Copyright Lenovo 2021 i

ii User Guide

About this guide
• This guide applies to Lenovo product model(s) listed below. Illustrations in this guide may look slightly
different from your product model.
Model name Machine type (MT)
IdeaPad Gaming 3 15IHU6 82K1, 82MG
IdeaPad Gaming3 15IHU6D 82K1
IdeaPad Gaming 3 15ACH6 82K2, 82MJ
IdeaPad Gaming3 15ACH6D 82K2
• This guide may contain information about accessories, features, and software that are not available on all
models.
• This guide contains instructions that are based on the Windows 10 operating system. These instructions
are not applicable if you install and use other operating systems.
• Microsoft® makes periodic feature changes to the Windows® operating system through Windows Update.
As a result, the operating system related instructions may become outdated. Refer to Microsoft resources
for the latest information.
• The content of the guide is subject to change without notice. To obtain the latest version, go to https://
support.lenovo.com.
© Copyright Lenovo 2021 iii

iv User Guide
Chapter 1. Meet your computer
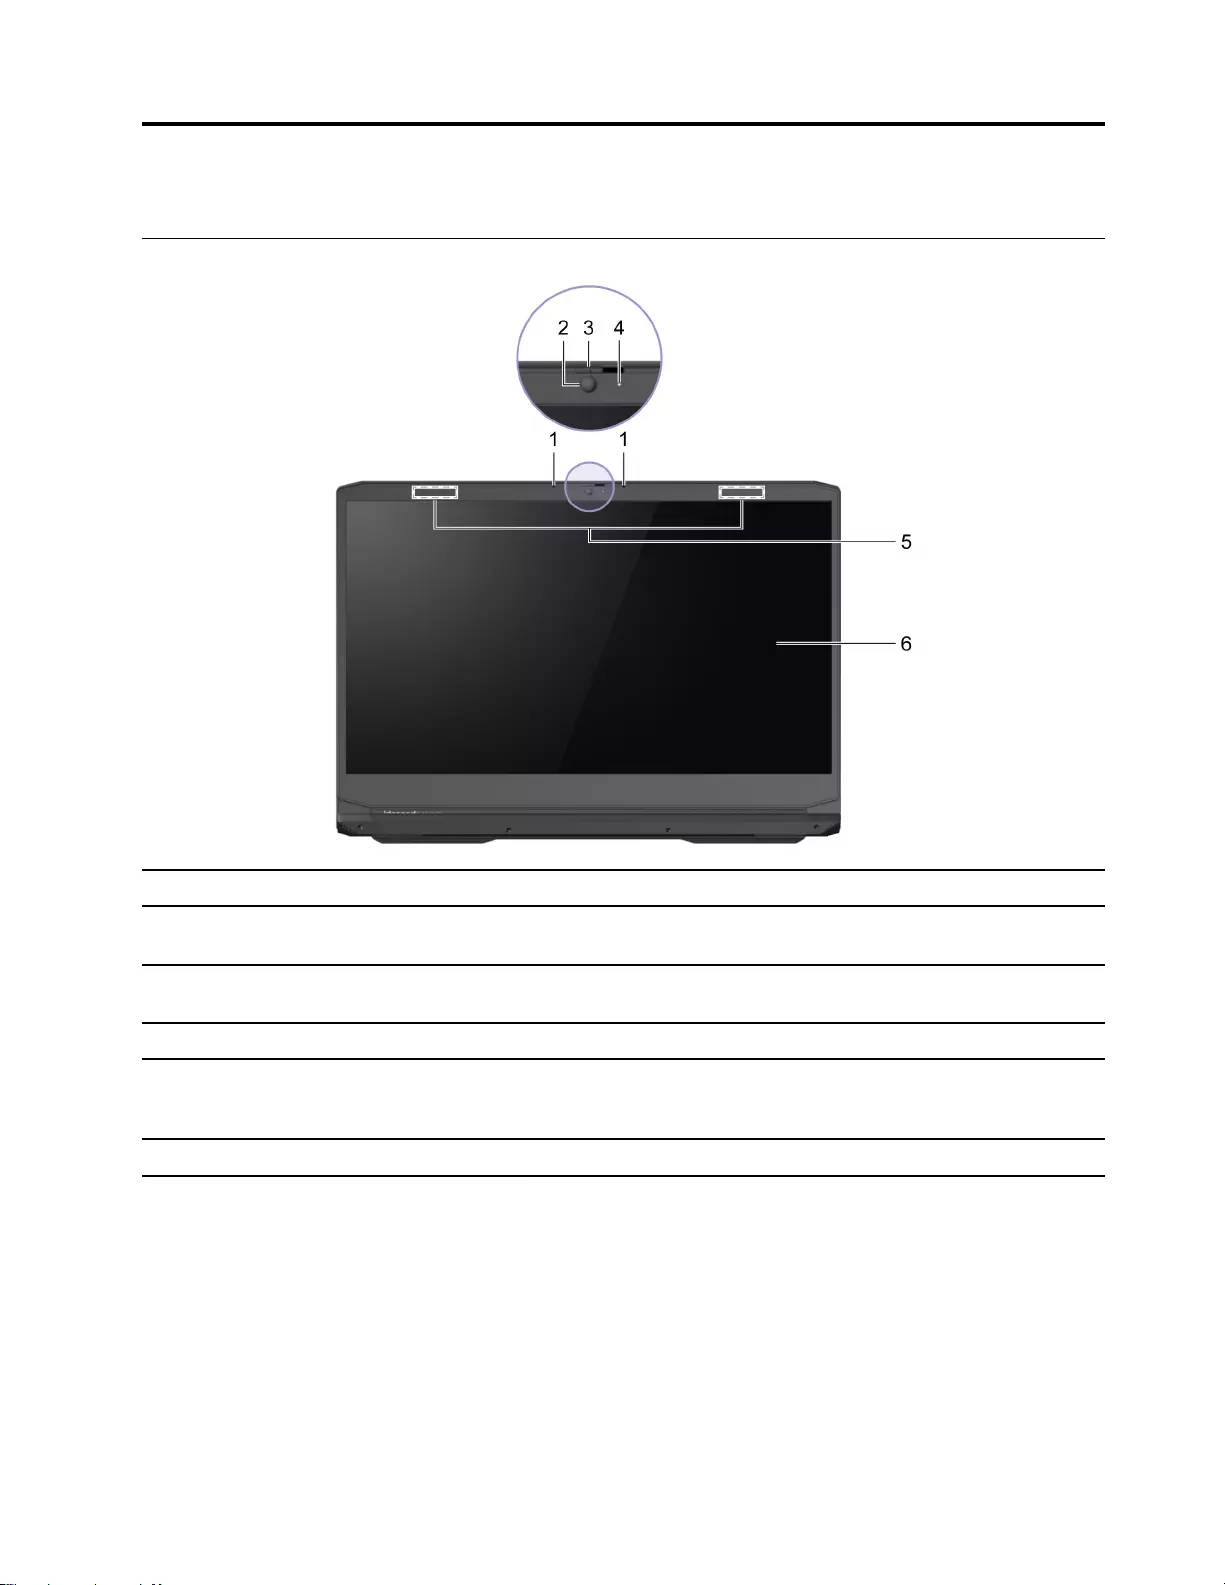
Front
1. Microphones Capture or record sound and voice.
2. Camera Capture still and moving images for taking photos, recording videos,
and video chatting.
3. Camera cover slider Move the slider to cover or uncover the camera lens.
Note: The camera cover helps you better protect your privacy.
4. Camera light If the light is on, the camera is in use.
5. Wireless antennas Send and receive radio waves for the built-in wireless LAN (local area
network) and Bluetooth module.
Note: The antennas are not visible from the outside of the computer.
6. Screen Display text, graphics, and videos.
© Copyright Lenovo 2021 1
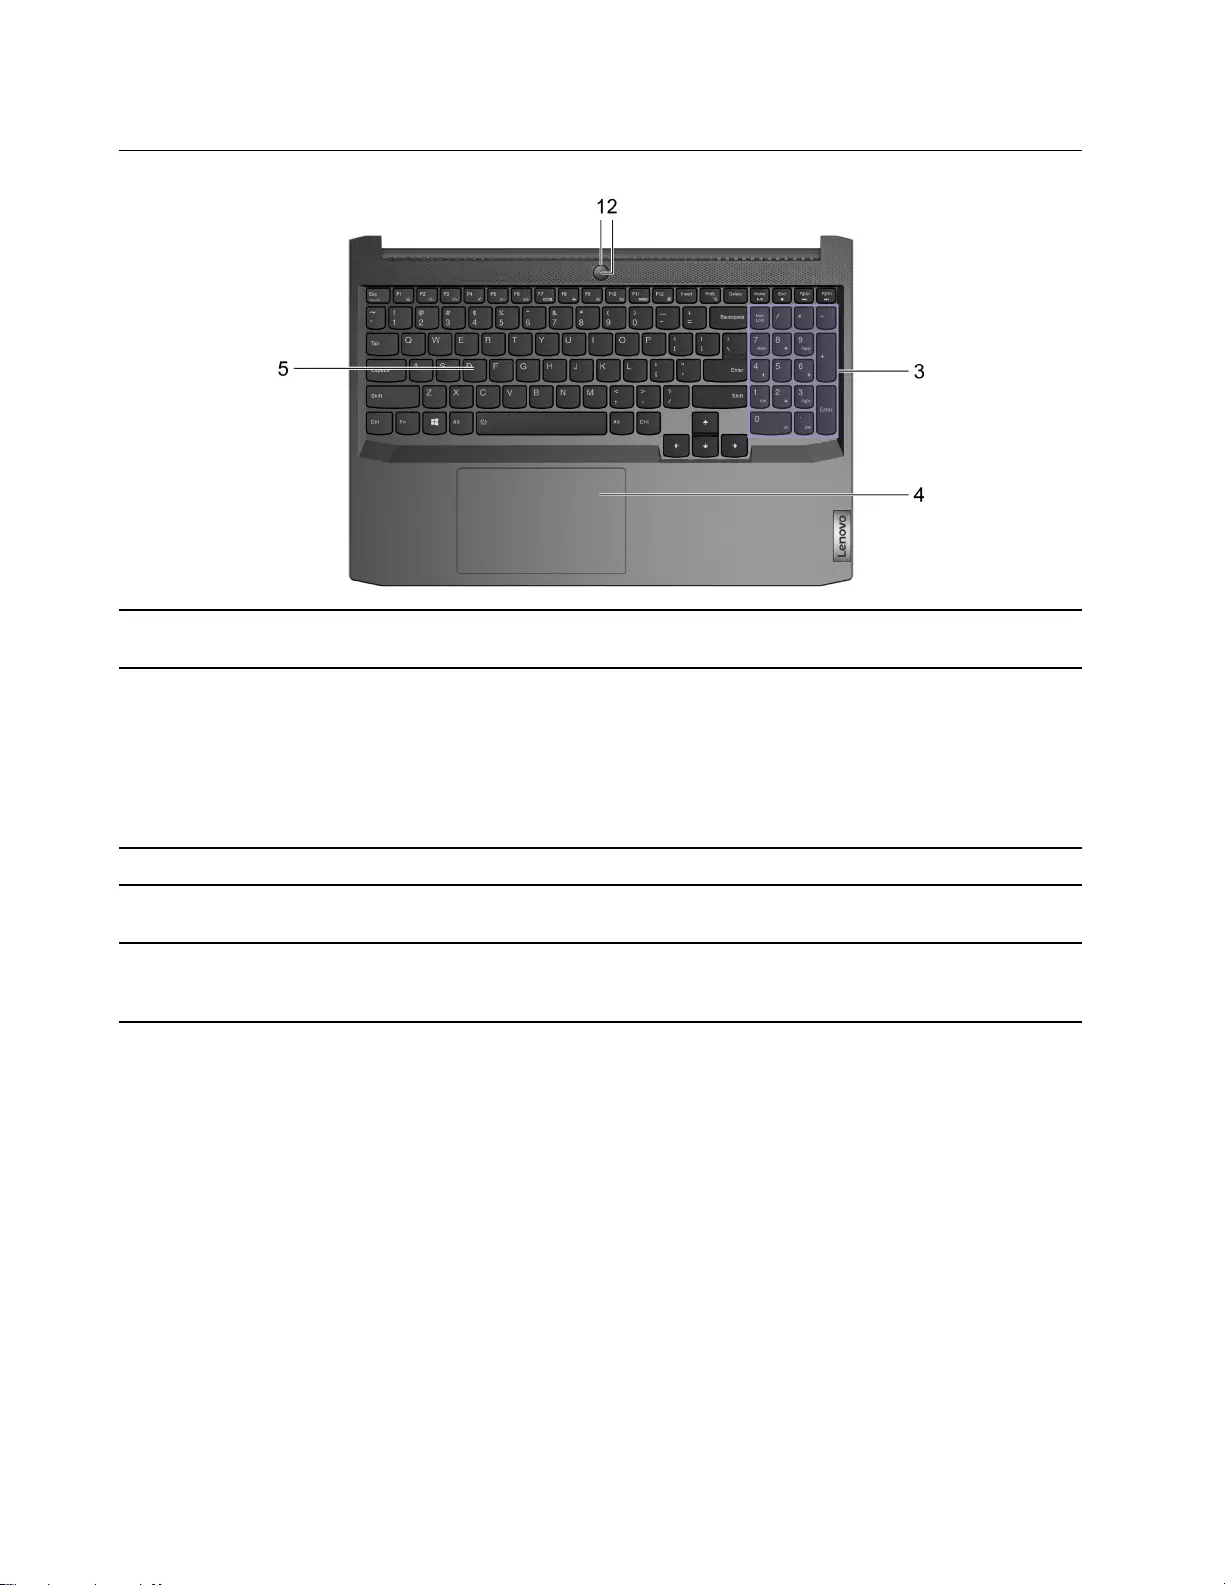
Base
1. Power button Press the button to turn on the computer or put the computer into
sleep mode.
2. Power light • Solid white: The computer is turned on; battery charge percentage
21% — 100%
• Blinking fast: The computer is turned on; battery charge
percentage 1% — 20%
• Blinking slowly: The computer is in sleep mode.
• Off: The computer is turned off or in hibernation mode.
3. Numeric keypad To enable or disable the numeric keypad, press the Num Lock key.
4. Touchpad Perform finger touch and all the functions of a traditional mouse.
Note: The touchpad also supports multi-touch function.
5. Keyboard Enter characters and interact with programs.
Note: The keyboard also includes hotkeys and function keys for
changing settings and performing tasks quickly.
2User Guide
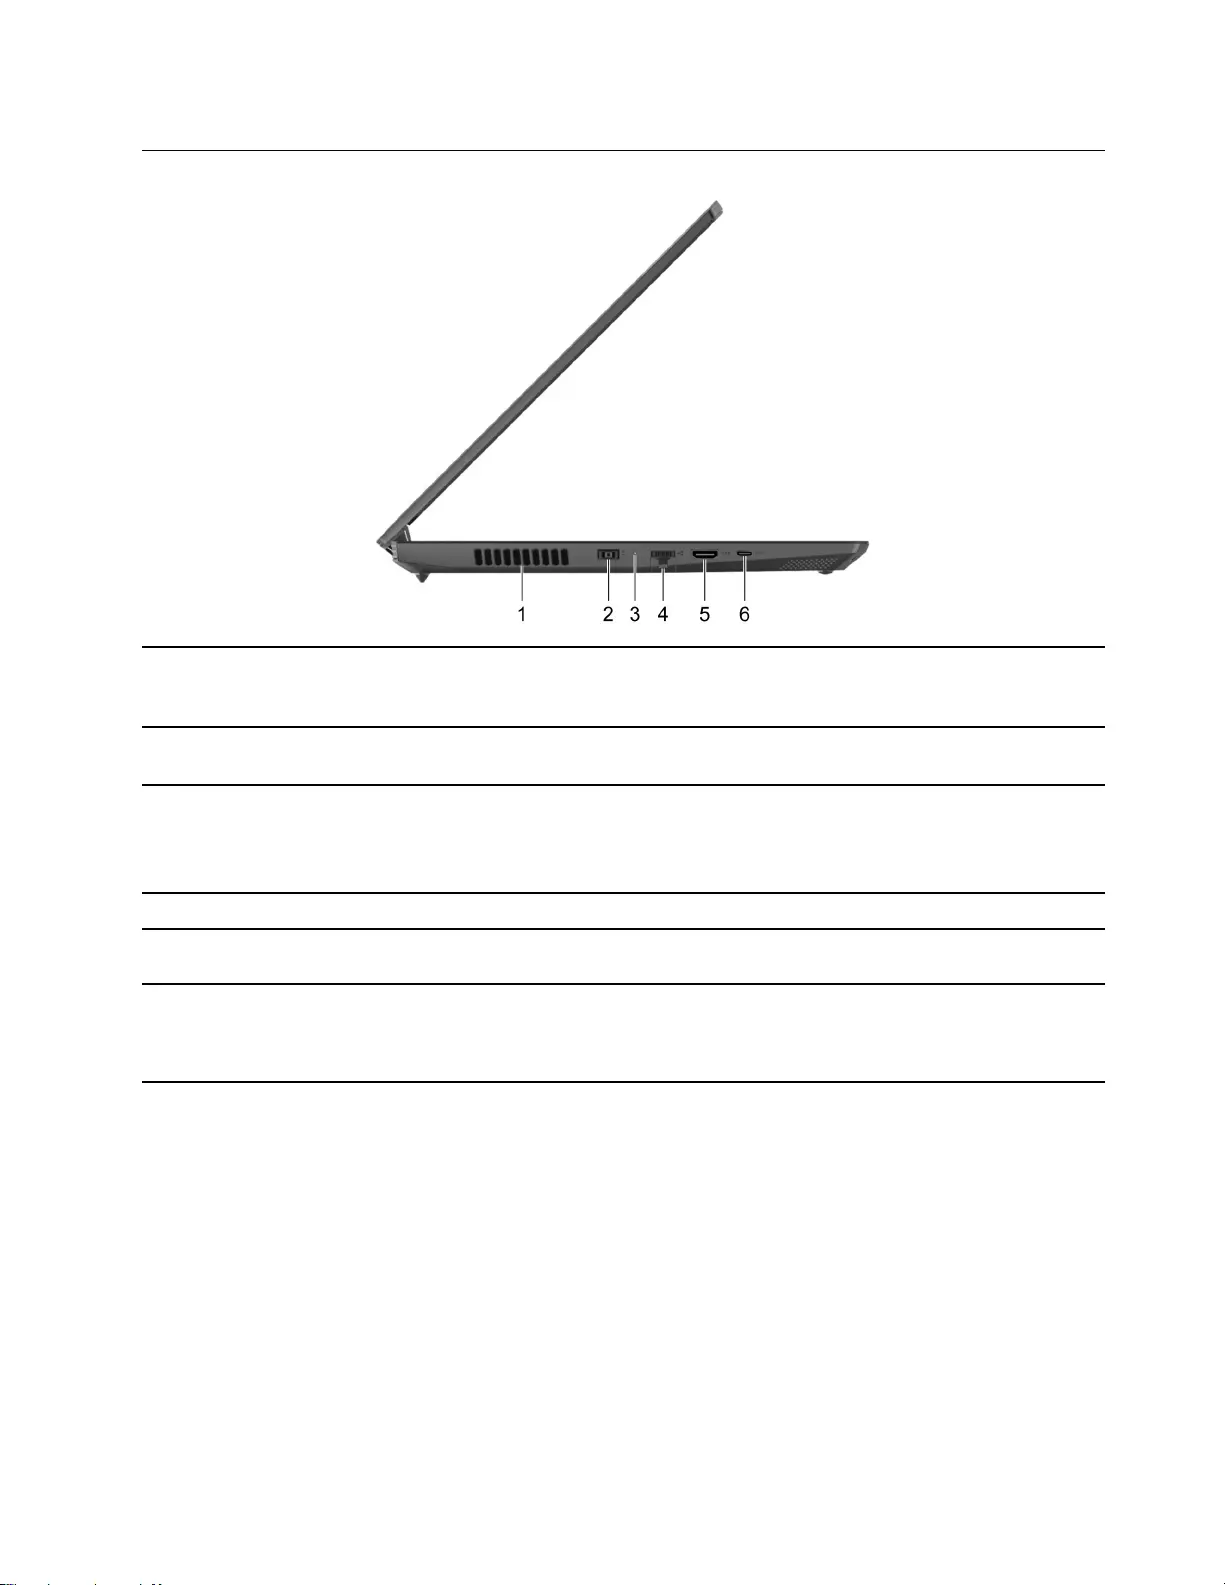
Left
1. Ventilation slots (outlet) Maintain the outgoing airflow to dissipate internal heat.
Attention: Do not block the ventilation slots. Otherwise, the computer
might overheat.
2. Power connector Connect to power with the included power cord and ac power
adapter.
3. Charging light • Solid white: Connected to ac power; battery capacity 91%–100%
• Solid amber: Connected to ac power; battery capacity 1%–90%
• Off: Not connected to ac power
4. Ethernet connector Connect to a local area network (LAN).
5. HDMI™ connector Connect to a compatible digital audio device or video monitor, such as
an HDTV.
6. USB-C® connector Connect to USB storage or data devices. This USB-C port does not
support DisplayPort™ Alt Mode.
Note: An appropriate adapter may be needed for connecting to
external devices.
Chapter 1.Meet your computer 3
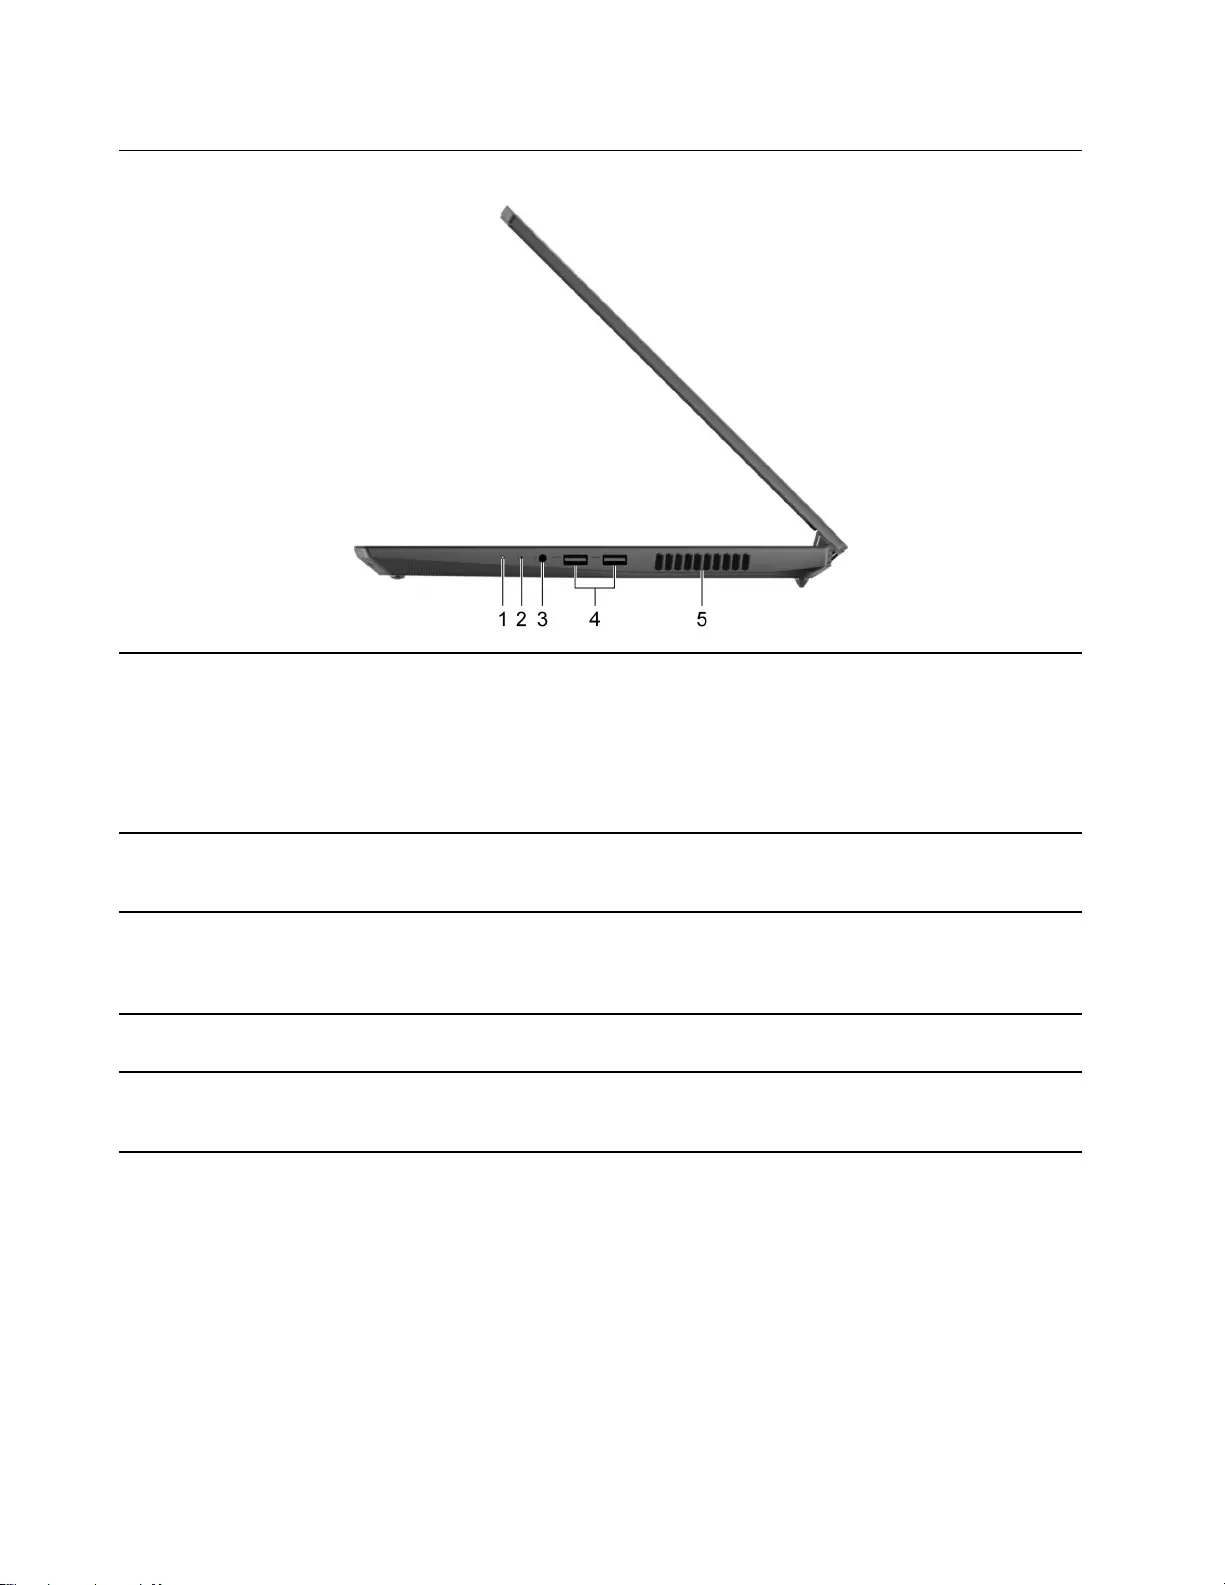
Right
1. Power light • Solid white: The computer is turned on; battery charge percentage
21% — 100%
• Blinking fast: The computer is turned on; battery charge
percentage 1% — 20%
• Blinking slowly: The computer is in sleep mode.
• Off: The computer is turned off or in hibernation mode.
2. Novo button hole Press the Novo button to open the Novo Button menu. From the
menu, you can choose to open the UEFI/BIOS setup utility, the Boot
menu, or the Windows startup options screen.
3. Combo audio jack Connect to headphones or headsets with a 3.5 mm (0.14 inch), 4-pole
plug.
Note: This jack does not support standalone external microphones. If
you use headsets, choose one with a single plug.
4. USB (3.2 Gen 1) Type-A connector (2) Connect to a USB-compatible device, such as a USB keyboard, a
USB mouse, a USB storage device, or a USB printer.
5. Ventilation slots (outlet) Maintain the outgoing airflow to dissipate internal heat.
Attention: Do not block the ventilation slots. Otherwise, the
computer might overheat.
4User Guide
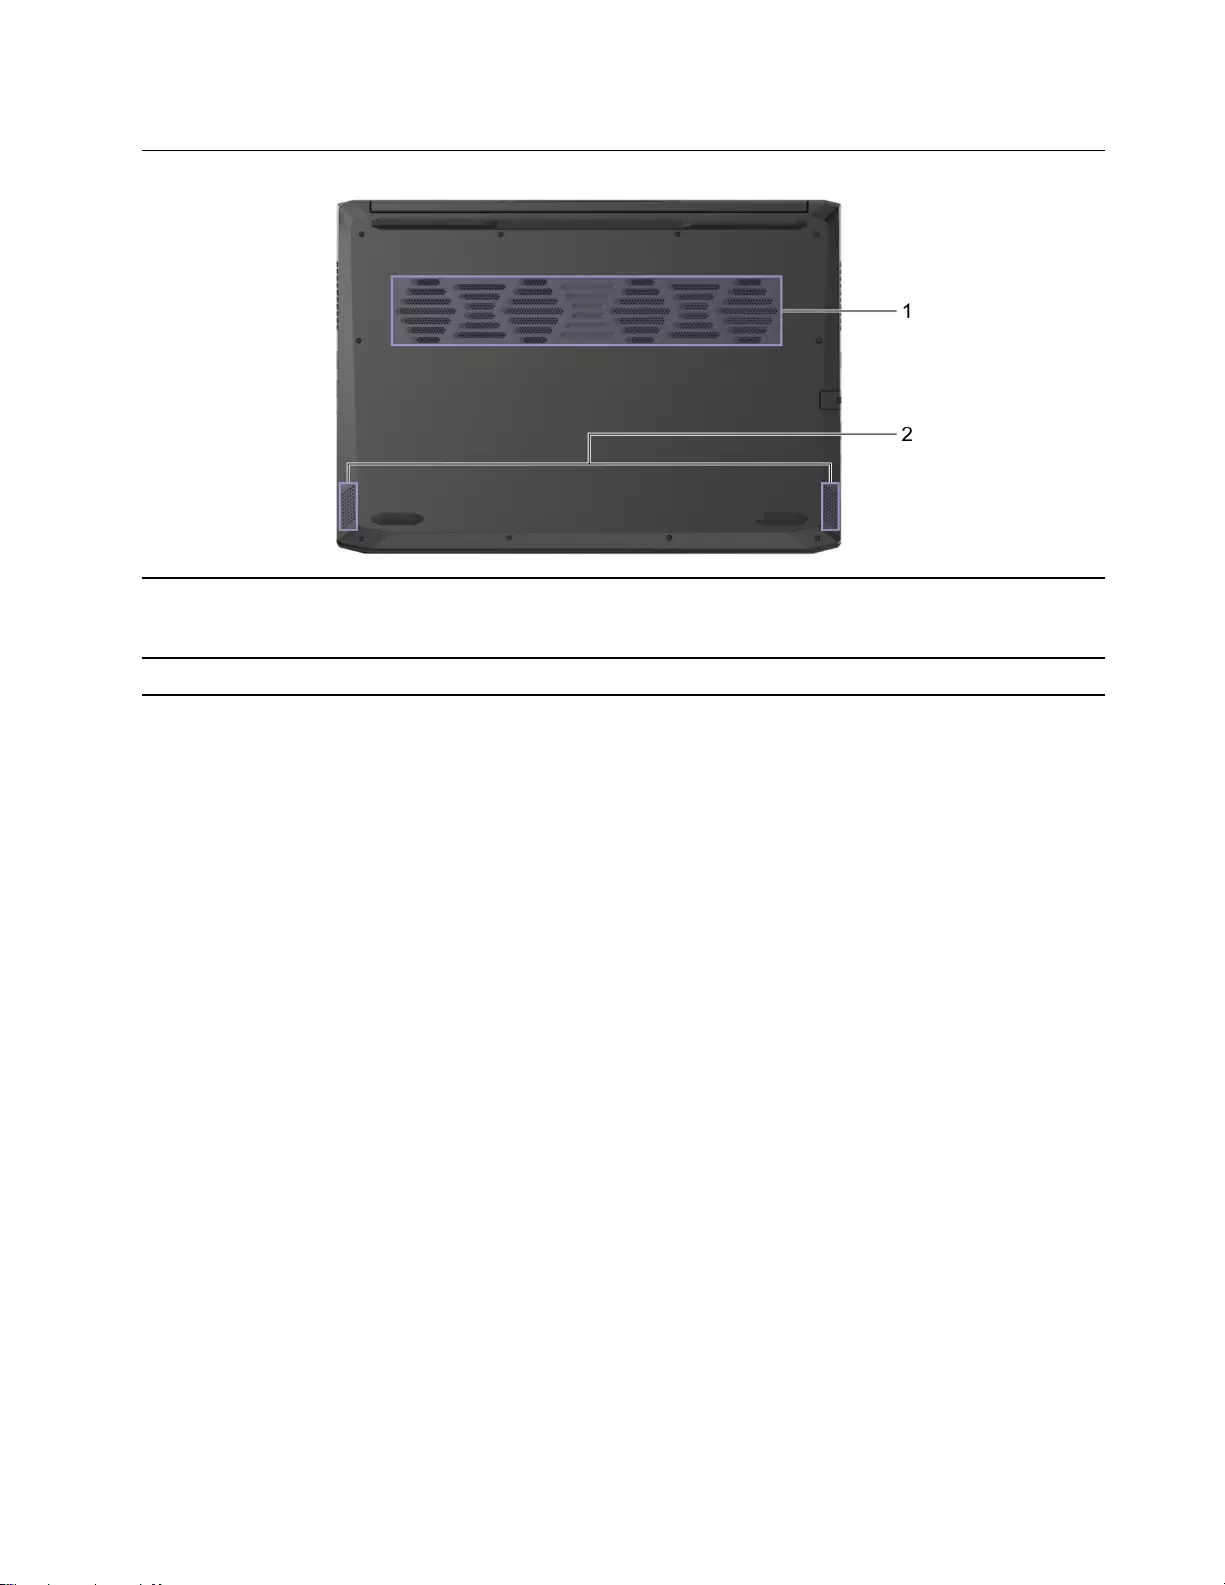
Bottom
1. Ventilation slots (inlet) Maintain the incoming airflow to dissipate internal heat.
Attention: Do not block the ventilation slots. Otherwise, the
computer might overheat.
2. Speakers Produce sound.
Chapter 1.Meet your computer 5

Features and specifications
Dimensions • Width: 359.6 mm
• Depth: 251.9 mm
• Thickness: 24.2 mm
ac power adapter • Input: 100 V ac–240 V ac, 50 Hz–60 Hz
• Output: 20 V dc, 6.75 A/20 V dc, 8.5 A
• Power: 135 W/170 W
Battery pack • Capacity
– 45 Wh
– 60 Wh
• Number of cells:
– 3
– 4
Note: The battery capacity is the typical or average capacity as measured in a specific test
environment. Capacities measured in other environments may differ but are no lower than the
rated capacity (see product label).
Microprocessor To view the microprocessor information of your computer, right-click the Start button and then
select System.
Memory • Type: Double data rate 4 (DDR4) small outline dual in-line memory module (SODIMM)
• Number of physical slots: 2
Storage device • Type:
– solid-state drive (SSD)
– hard disk drive (HDD)
• Form factor:
– SSD: M.2 (2242 or 2280)
– HDD: 2.5-inch (7 mm)
• Bus:
– PCI Express
– SATA
Note: Hard disk drives (HDD) are pre-installed on selected models.
Screen • Size: 15.6 inches
• Display resolution: 1920 × 1080 pixels
Keyboard • Function keys
• Hotkeys
• Numeric keypad
• Keyboard backlight
6User Guide

Connectors and slots • Power connector
• Combo audio jack
• Ethernet connector
• USB Type-A connector × 2
• USB-C connector
– Power output up to 5 V and 3 A
– USB data transfer rate up to 5 Gbps for USB 3.2 Gen 1
• HDMI 2.0 connector
Security • UEFI/BIOS passwords
– Administrator password
– User password
– Master hard disk password
– User hard disk password
Network • Ethernet (10/100/1000 Mbps) network adapter
• Bluetooth and Wi-Fi combo adapter
Statement on USB transfer rate
Depending on many factors such as the processing capability of the host and peripheral devices, file
attributes, and other factors related to system configuration and operating environments, the actual transfer
rate using the various USB connectors on this device will vary and will be slower than the data rate listed
below for each corresponding device.
USB device Data rate (Gbit/s)
3.2 Gen 1 5
3.2 Gen 2 10
Operating environment
Maximum altitude (without pressurization)
3048 m (10 000 ft)
Temperature
• At altitudes up to 2438 m (8000 ft)
– Operating: 5°C to 35°C (41°F to 95°F)
– Storage: 5°C to 43°C (41°F to 109°F)
• At altitudes above 2438 m (8000 ft)
– Maximum temperature when operating under the unpressurized condition: 31.3°C (88°F)
Note: When you charge the battery, its temperature must be no lower than 10°C (50°F).
Relative humidity
• Operating: 8% to 95% at wet-bulb temperature 23°C (73°F)
• Storage: 5% to 95% at wet-bulb temperature 27°C (81°F)
Chapter 1.Meet your computer 7

8User Guide

Chapter 2. Get started with your computer
Get started with Windows 10
Learn the basics of Windows 10 and start working with it right away. For more information about Windows
10, see the Windows help information.
Windows account
You must create at least one account to use the Windows operating system. It can be either a local account
or a Microsoft account.
Local accounts
A local account is created on a particular Windows-enabled device and it can only be used on that device. It
is recommended that you set a password for each local account to prevent unauthorized access to the
device.
Microsoft accounts
A Microsoft account is a user account that you use to sign in to Microsoft software and services. If you use
Microsoft services like OneDrive, Outlook.com, Xbox Live, Office 365, and Skype, you might already have
one. If you don’t have it, you can create one for free.
There are two main benefits of using a Microsoft account:
• Sign in only once. If you use a Microsoft account to sign in to Windows 10, you don’t need to sign in again
to use OneDrive, Skype, Outlook.com, and other Microsoft services.
• Settings can be synced. If you use your Microsoft account to sign in to multiple Windows-enabled
devices, certain Windows settings can be synced among the devices.
Switch between a local and a Microsoft account
If you are using a local account to sign in to Windows 10, you can switch to use a Microsoft account instead.
Step 1. Open the Start menu and select Settings ➙ Accounts.
Step 2. Select Sign in with a Microsoft account instead.
Step 3. If you already have a Microsoft account, enter the account name and password to sign in.
Otherwise, select Create one to create a new Microsoft account.
Note: The device must have Internet access the first time you use a Microsoft account on that
device.
If you want to switch back to use a local account, open the Start menu and select Settings ➙ Accounts ➙
Sign in with a local account instead.
Add additional user accounts
Your user account must be of the “Administrator” type to add additional user accounts to Windows.
Add additional user accounts if you need to share your computer with family members or other users.
Step 1. Open the Start menu and select Settings ➙ Accounts ➙ Family & other users.
Step 2. Select Add someone else to this PC.
© Copyright Lenovo 2021 9
Note: To add family members, you need to sign in with a Microsoft account.
Step 3. Set the user name and password for the user account.
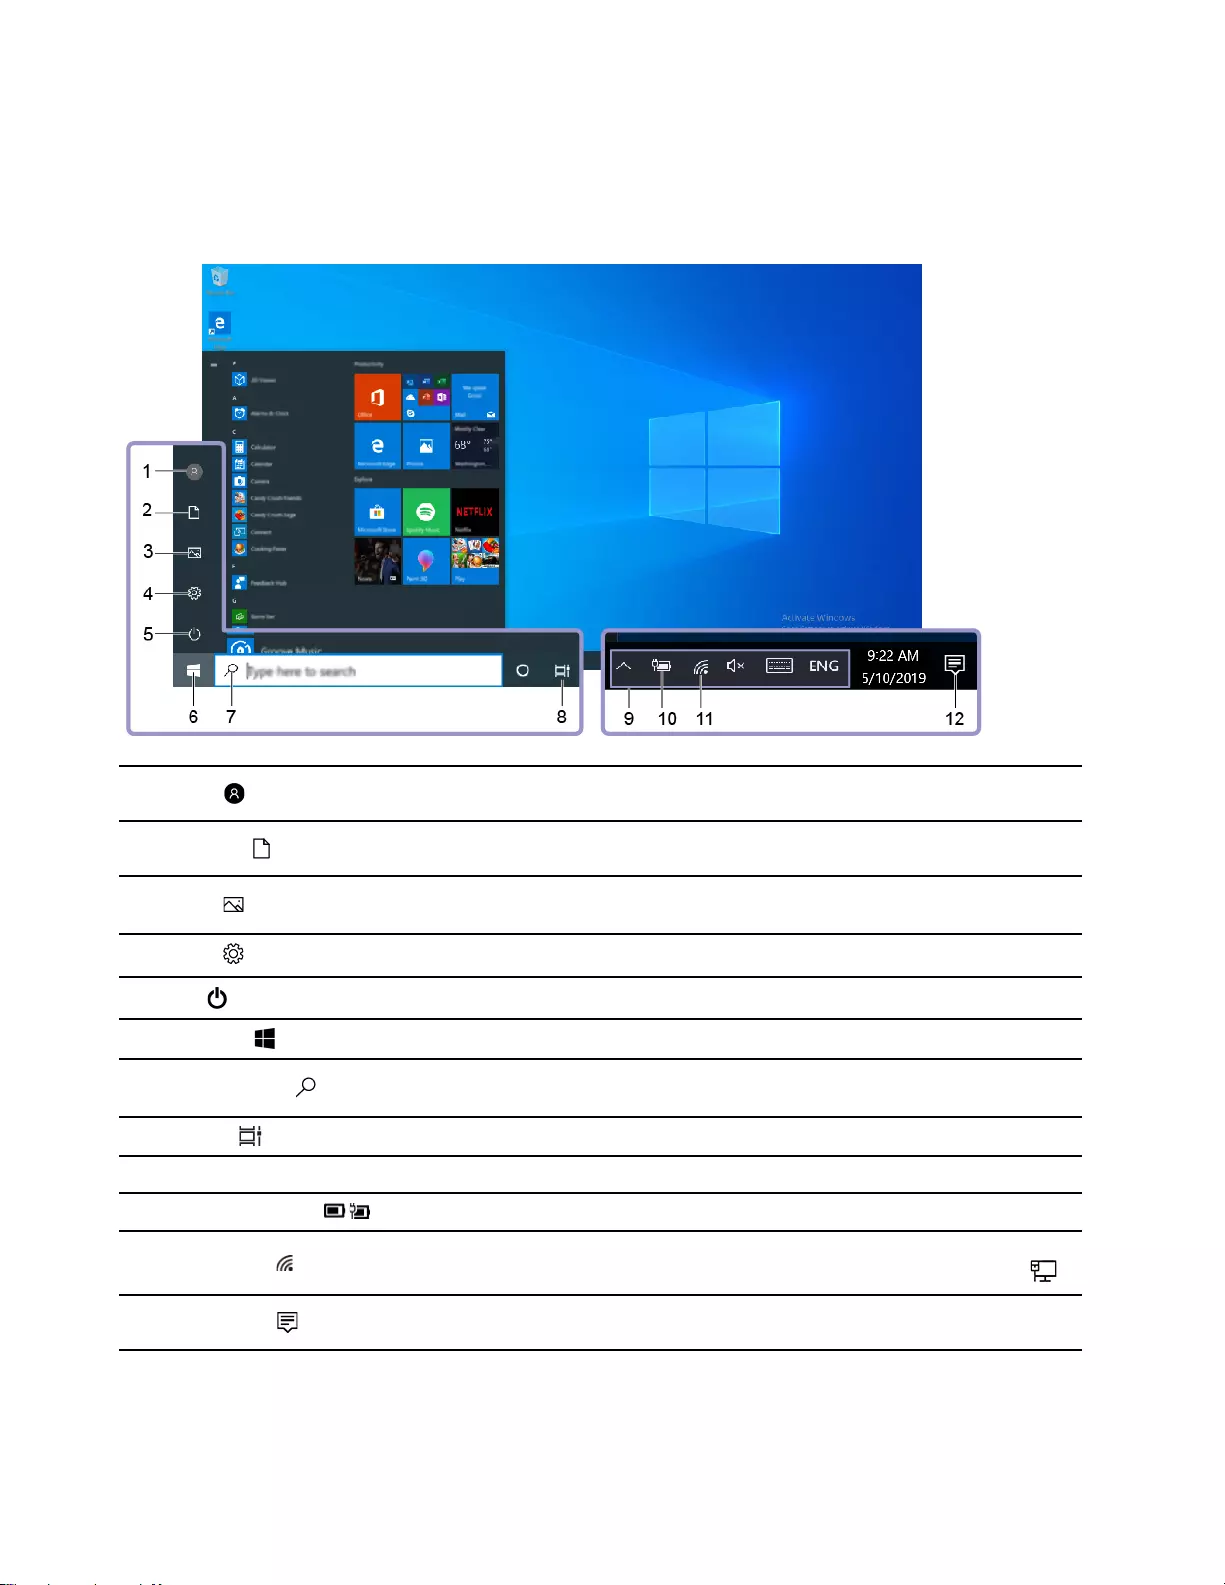
Windows desktop
1. Account Change account settings, lock the computer, or sign out of the
current account.
2. Documents Open the Documents folder, a default folder to save your received
files.
3. Pictures Open the Pictures folder, a default folder to save your received
pictures.
4. Settings Open Settings.
5. Power Shut down, restart, or put the computer into sleep mode.
6. Start button Open the Start menu.
7. Windows Search Enter what you are looking for in the search box and get search
results from your computer and the Web.
8. Task View Display all opened apps and switch between them.
9. Windows notification area Display notifications and status of some features.
10. Battery status icon Display power status and change battery or power settings.
11. Network icon Connect to an available wireless network and display the network
status. When connected to a wired network, the icon changes to .
12. Action center Display the latest notifications from apps and provide quick access to
some features.
Open the Start menu
• Click the Start button.
10 User Guide

• Press the Windows logo key on the keyboard.
Open Control Panel
• Open the Start menu and select Windows System ➙ Control Panel.
• Use Windows Search.
Open an app
• Open the Start menu and select the app you want to open.
• Use Windows Search.
Windows Updates
Microsoft periodically releases feature and security updates to the Windows operating system. Updates that
are applicable to your version of Windows are downloaded automatically when your computer is connected
to the Internet. When updates are downloaded, you are prompted to restart the computer to install these
updates.
Manually check for updates
Updates to Windows are downloaded automatically. However, you can also manually check if there are
available updates for the installed version of Windows.
Attention: Only download and install updates using Windows Update. Updates downloaded from other
sources may include security risks.
Step 1. Select Start ➙ Settings ➙ Update & Security.
Step 2. Click Check for updates.
Lenovo Vantage and Lenovo PC Manager
They are both apps developed by Lenovo. Using either of them, you can:
• View product information and system status
• Manage and change device settings
• Check for and perform system update
Note: This feature is only available on Lenovo Vantage. In Lenovo PC Manager, you can check for and
perform driver update.
Depending on the country or region in which your computer is purchased, one of the apps may be pre-
installed on your computer. To open it, type its name in the Windows Search box and select the matched
result. If neither of the apps is pre-installed, you may install one on your own. Lenovo Vantage is available for
download free of charge from the Microsoft Store.
Note: App features are subject to change with updates and specific features may not be available on all
Lenovo products.
Connect to networks
Your computer helps you connect to the world through a wired or wireless network.
Chapter 2.Get started with your computer 11

Connect to wired networks
If your computer includes an Ethernet (RJ-45) connector, you can use an Ethernet cable to connect your
computer to a wired network.
Connect to Wi-Fi networks
If your computer includes a wireless LAN module, you can connect your computer to Wi-Fi® networks. The
wireless LAN module on your computer may support different standards. For some countries or regions, use
of 802.11ax may be disabled according to local regulations.
Step 1. Click the network icon in the Windows notification area. A list of nearby networks is displayed.
Note: If no network is displayed, check to ensure that the airplane mode is not turned on.
Step 2. Select a network and click Connect. Provide security key if prompted.
Note: The network key is usually managed by the network administrator.
Forget a Wi-Fi network
Windows saves a list of Wi-Fi networks you have connected to, along with their passwords and other
settings. By doing this, your computer is automatically connected when it is in the range of a previously
connected network. However, if the network password has been changed, you need to forget the network in
order to enter a new password.
Step 1. Select Start ➙ Settings ➙ Network & Internet ➙ Wi-Fi.
Step 2. Click Manage known networks.
Step 3. Click the network name and click Forget.
Turn airplane mode on and off
Airplane mode is a convenient setting to turn all wireless communications of your computer on and off. You
may need to turn it on when boarding an airplane.
Step 1. Click the action center icon in the Windows notification area.
Step 2. Click the Airplane mode icon to turn it on or off.
Note: Click Expand if you cannot find the airplane mode icon.
The Novo Button menu
The Novo Button menu can be displayed before the operating system starts. From the menu, you can
choose to
• Open the BIOS/UEFI setup utility
• Open the boot device selection menu
• Open the Windows startup options screen
Note: From the Windows startup options screen, you can then choose to
Start your computer using a recovery drive
Reset your computer
Open advanced options screen
12 User Guide
Open the Novo Button menu
For Lenovo computers with a Novo button, you can press the button to open the Novo Button menu.
Step 1. Turn off the computer.
Step 2. Open the LCD screen and press the Novo button.
Interact with your computer
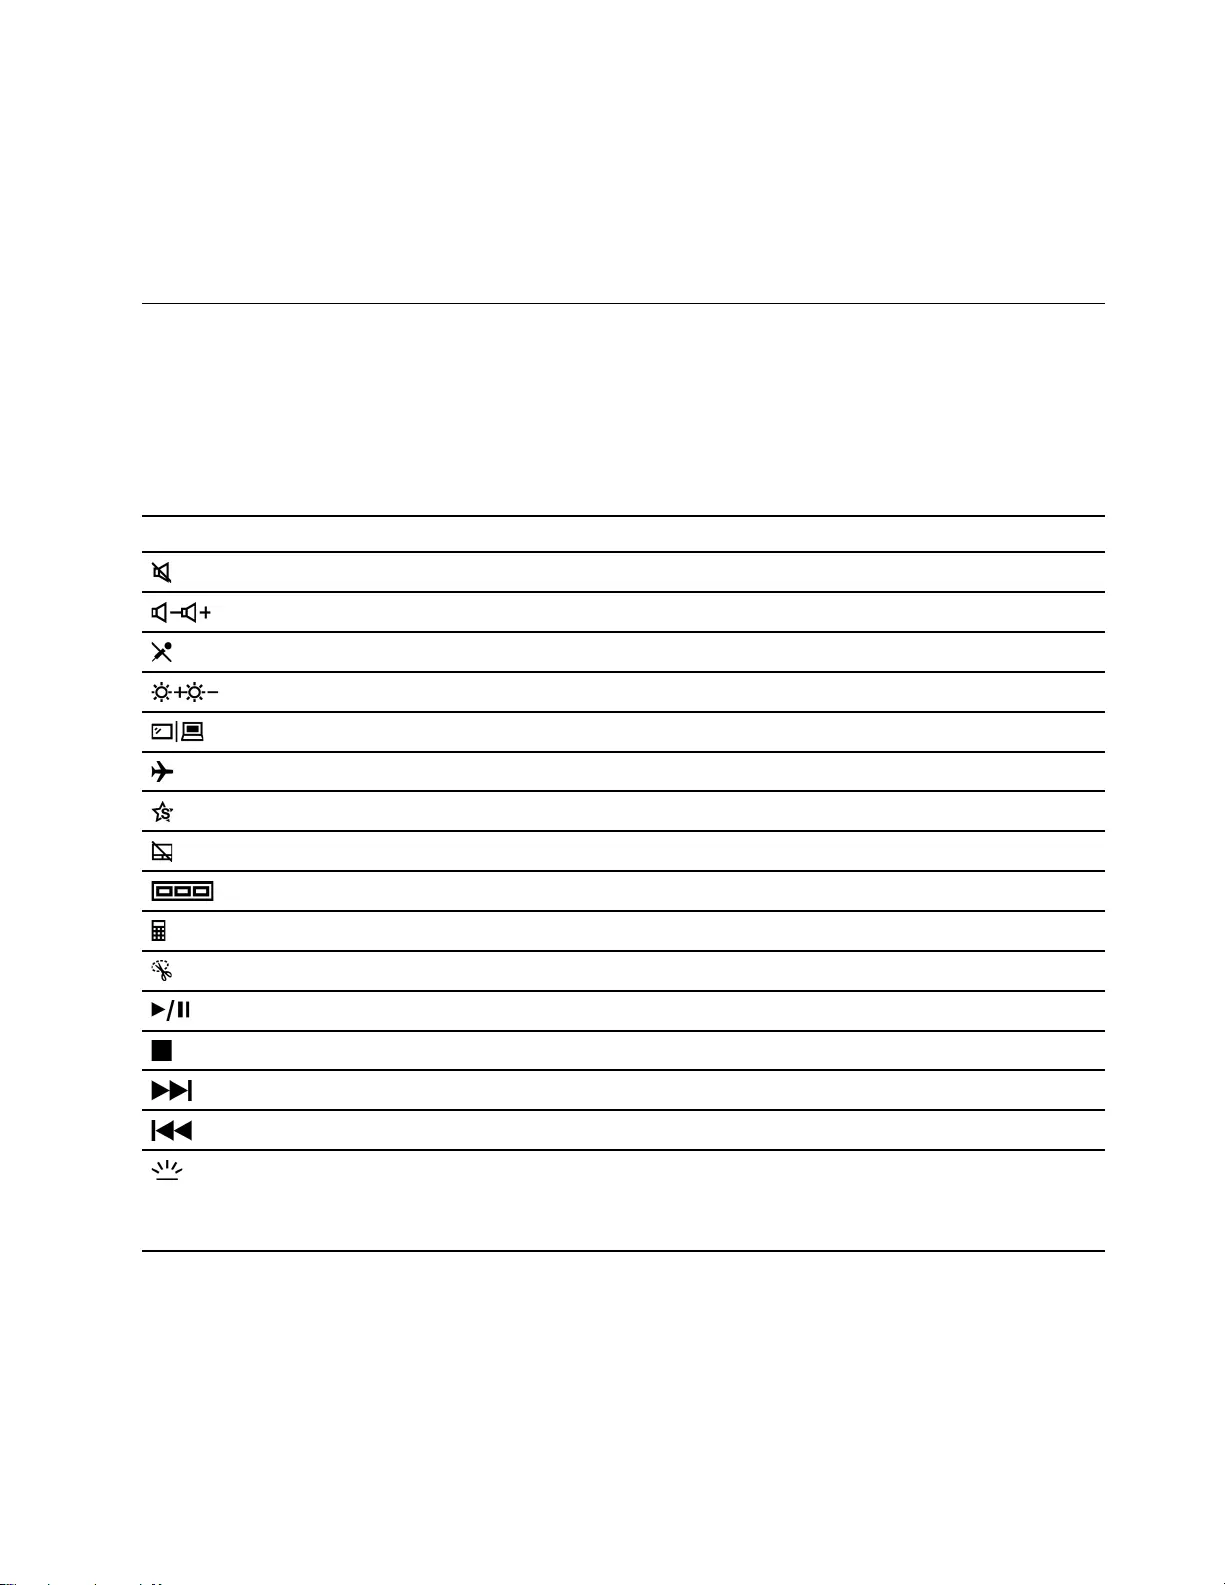
Keyboard hotkeys
Some keys on the keyboard are printed with icons. These keys are called hotkeys and can be pressed alone
or in combination with the Fn key to open certain apps or change certain settings quickly. The functions of
the hotkeys are symbolized by the icons printed on them.
Hotkey Function
Mute/Unmute sound.
Decrease/Increase system volume.
Mute/Unmute the microphone.
Increase/Decrease screen brightness.
Switch display devices.
Turn airplane mode on and off.
Open Lenovo Vantage, Lenovo PC Manager, or an app launch bar.
Enable/Disable the touchpad.
Display thumbnails of all open apps.
Open the Windows Calculator app.
Open the Windows snipping tool.
Play or pause playback of media.
Stop playback of media.
Go the next media file in the playlist or folder.
Go to the previous media file in the playlist or folder.
Turn on/off or adjust the brightness of the keyboard backlight.
Note: Selected models include a RGB keyboard. For such a keyboard, this
hotkey switches the color and effect of the keyboard backlight. Additional control
is available in Lenovo Vantage.
Hotkey mode
Some hotkeys share keys with function keys (F1 to F12). The hotkey mode is a UEFI/BIOS setting that
changes how hotkeys (or function keys) are used.
Chapter 2.Get started with your computer 13

Hotkey mode setting How to use hotkeys How to use function keys
Disabled Hold down the Fn key and press one
of the hotkeys.
Press the function keys directly.
Enabled Press the hotkeys directly. Hold down the Fn key and press one
of the function keys.
Note: Hotkeys that do not share keys with function keys are not affected by the hotkey mode setting. They
should always be used with the Fn key.
The FnLock switch
The FnLock is a switch that reverses the default and hidden function of a hotkey. The following table
provides an example of how the FnLock switch changes the default function of the F1 key.
FnLock FnLock light Default function of the F1 key
Off Off Mute/Unmute sound
On On F1 function *
Note: The F1 function is application-dependent. It may have no function if the active application does not
have a definition for the key.
The FnLock switch shares the ESC key (in the upper left corner of the keyboard). To turn it on or off, press Fn
+ ESC.
Numeric keypad
Some Lenovo computers includes a dedicated numeric keypad on the far right of the keyboard. The keypad
is used for entering numbers and operators quickly.
Press the NumLock key to enable or disable the numeric keypad.
14 User Guide

Chapter 3. Explore your computer
Manage power
Use the information in this section to achieve the best balance between performance and power efficiency.
Check the battery status
The battery status icon or is in the Windows notification area. You can check the battery status, view
the current power plan, and access battery settings quickly.
Click the battery status icon to display the percentage of battery power remaining and change the power
mode. A warning message is displayed when the battery is low.
Charge the battery
When the remaining battery power is low, charge your battery by connecting your computer to ac power.
The battery is fully charged in about two to four hours. The actual charging time depends on the battery
capacity, the physical environment, and whether you are using the computer.
Battery charging is also affected by its temperature. The recommended temperature range for charging the
battery is between 10°C (50°F) and 35°C (95°F).
Note:
You can check the battery temperature in Lenovo Vantage.
To maximize the life of the battery, once the battery is fully charged, it must discharge to 94% or lower
before it will be allowed to recharge again.
Set power button behavior
By default, pressing the power button puts the computer to sleep mode. However, you can change the
power button behavior in Windows Control Panel.
Step 1. Right-click the battery status icon in the Windows notification area.
Step 2. Select Power Options ➙ Choose what the power buttons do.
A power plan
A power plan is a collection of power-saving settings made available by an operating system. With a power
plan, you can set idle time-outs for different hardware components to enter a low-power state. The default
power plan and some of its idle time-out settings are listed below for computer models pre-installed with
Windows 10.
The listed settings are active when the computer is connected to an electrical outlet. If your computer include
a built-in battery pack, a different collection of time-out settings is set to take effect when the computer is
operating on battery power.
• Default power plan: Balanced
• Turn off the display: after 10 minutes
• Put the computer to sleep: after 10 minutes
© Copyright Lenovo 2021 15

Note: To wake the computer from the sleep state, press the power button or any key on the keyboard.
Change or customize a power plan
This operation is applicable to computers with pre-installed Windows 10.
Step 1. Right-click the battery status icon in the Windows notification area.
Step 2. Select Power Options ➙ Change plan settings.
You may select a different power plan or you can customize a plan by selecting Change plan settings.
Set performance mode
Your computer can work in different performance modes. The performance and power consumption of the
computer vary in different performance modes.
Change settings in UEFI/BIOS setup utility
This section introduces what is UEFI/BIOS and the operations you can perform in its setup utility.
What is UEFI/BIOS setup utility
UEFI/BIOS is the first program that runs when a computer starts. UEFI/BIOS initializes hardware components
and loads the operating system and other programs. Your computer may include a setup program (setup
utility) with which you can change certain UEFI/BIOS settings.
Open the UEFI/BIOS setup utility
Step 1. Turn on or restart the computer.
Step 2. Press F2 repeatedly.
Change the startup sequence
You may need to change the startup sequence to allow the computer to start from another device or a
network location.
Step 1. Open the UEFI/BIOS setup utility.
Step 2. Navigate to the Boot menu.
Step 3. Follow on-screen instructions to change the order of devices under Boot Priority Order.
Note: You can also change startup sequence temporarily without opening the setup utility. To do so, start
the computer. When the Lenovo logo appears, press F12 repeatedly.
Change hotkey mode
Step 1. Open the UEFI/BIOS setup utility.
Step 2. Select Configuration ➙ Hotkey Mode and press Enter.
Step 3. Change the setting to Disabled or Enabled.
Step 4. Select Exit ➙ Exit Saving Changes.
16 User Guide

Set passwords in UEFI/BIOS setup utility
This section introduces the types of passwords that you can set in the UEFI (Unified Extensible Firmware
Interface) or BIOS (Basic Input/Output System) setup utility.
Password types
You can set various types of passwords in the UEFI/BIOS setup utility.
Password type Pre-requisite Usage
Administrator password No You must enter it to start the setup
utility.
User password The administrator password must be
set.
You can use the user password to
start the setup utility.
Master hard disk password No You must enter it to start the
operating system.
User hard disk password The master hard disk password must
be set.
You can use the user hard disk
password to start the operating
system.
Notes:
• All passwords set in the setup utility consist of alphanumeric characters only.
• If you start the setup utility using the user password, you can only change a few settings.
Set administrator password
You set the administrator password to prevent unauthorized access to the UEFI/BIOS setup utility.
Attention: If you forget the administrator password, a Lenovo authorized service personnel cannot reset
your password. You must take your computer to a Lenovo authorized service personnel to have the system
board replaced. Proof of purchase is required and a fee will be charged for parts and service.
Step 1. Open the UEFI/BIOS setup utility.
Step 2. Select Security ➙ Set Administrator Password and press Enter.
Step 3. Enter a password string that contains only letters and numbers and then press Enter
Step 4. Enter the password again and press Enter.
Step 5. Select Exit ➙ Exit Saving Changes.
Next time you start the computer, you must enter the administrator password to open the setup utility. If
Power on Password is enabled, you must enter the administrator password or the user password to start
the computer.
Change or remove administrator password
Only the administrator can change or remove the administrator password.
Step 1. Open the UEFI/BIOS setup utility using the administrator password.
Step 2. Select Security ➙ Set Administrator Password and press Enter.
Step 3. Enter the current password.
Chapter 3.Explore your computer 17

Step 4. In the Enter New Password text box, enter the new password.
Step 5. In the Confirm New Password text box, enter the new password again.
Note: If you want to remove the password, press Enter in both text boxes without entering any
character.
Step 6. Select Exit ➙ Exit Saving Changes.
If you remove the administrator password, the user password is also removed.
Set user password
You must set the administrator password before you can set the user password.
The administrator of the setup utility might need to set a user password for use by others.
Step 1. Open the UEFI/BIOS setup utility using the administrator password.
Step 2. Select Security ➙ Set User Password and press Enter.
Step 3. Enter a password string that contains only letters and numbers and then press Enter. The user
password must be different from the administrator password.
Step 4. Enter the password again and press Enter.
Step 5. Select Exit ➙ Exit Saving Changes.
Enable power-on password
If the administrator password has been set, you can enable power-on password to enforce greater security.
Step 1. Open the UEFI/BIOS setup utility.
Step 2. Select Security ➙ Power on Password and press Enter.
Note: The administrator password must be set in advance.
Step 3. Change the setting to Enabled.
Step 4. Select Exit ➙ Exit Saving Changes.
If power-on password is enabled, a prompt appears on the screen every time you turn on the computer. You
must enter the administrator or user password to start the computer.
Set hard disk password
You can set a hard disk password in the setup utility to prevent unauthorized access to your data.
Attention: Be extremely careful when setting a hard disk password. If you forget the hard disk password, a
Lenovo authorized service personnel cannot reset your password or recover data from the hard disk. You
must take your computer to a Lenovo authorized service personnel to have the hard disk drive replaced.
Proof of purchase is required and a fee will be charged for parts and service.
Step 1. Open the UEFI/BIOS setup utility.
Step 2. Select Security ➙ Set Hard Disk Passwords and press Enter.
Note: If you start the setup utility using the user password, you cannot set hard disk password.
Step 3. Follow on-screen instructions to set both master and user passwords.
Note: The master and user hard disk passwords must be set at the same time.
18 User Guide

Step 4. Select Exit ➙ Exit Saving Changes.
If the hard disk password is set, you must provide the correct password to start the operating system.
Change or remove hard disk password
Step 1. Open the UEFI/BIOS setup utility.
Step 2. Select Security.
Step 3. Change or remove the hard disk password.
To change or remove master password, select Change Master Password and press Enter.
Note: If you remove the master hard disk password, the user hard disk password is also removed.
To change user password, select Change User Password and press Enter.
Note: The user hard disk password cannot be removed separately.
Step 4. Select Exit ➙ Exit Saving Changes.
Reset or restore Windows
This section introduces the recovery options of Windows 10. Ensure that you read and follow the on-screen
recovery instructions.
Attention: The data on your computer might be deleted during the recovery process. To avoid data loss,
make a backup copy of all the data that you want to keep.
Windows 10 recovery options
Windows 10 provides several options for you to restore or reset your computer. The following table helps you
decide which option to choose if you are having problems with Windows.
Problem Option
Your computer is not working well after installing apps,
drivers, or updates.
Restore to a system restore point.
Your computer is not working well and you don’t know
what causes the problem.
Reset your computer.
You want to recycle or donate your computer. Reset your computer.
Windows cannot start properly. Use a recovery drive to restore or reset your computer.
Windows System Restore
System Restore is a tool included in Windows 10. It monitors changes to Windows system files and saves
system state as a restore point. If your computer does not work well after installing apps, drivers, or updates,
you can revert your system to a previous restore point.
Note: If you revert your system to a previous restore point, personal data is not affected.
System Restore creates restore points:
• automatically (when it detects changes to Windows system files)
• at regular intervals (if set up by the user)
Chapter 3.Explore your computer 19

• at any time (if initiated manually by the user)
Note: In order for System Restore to create restore points, system protection must be turned on for the
system drive.
Create a system restore point manually
You can use Windows System Restore to create a restore point at any time.
Step 1. In the Windows 10 search box, enter Create a restore point and select the matched result.
Step 2. Select the System Protection tab and then select Create.
Note: System protection must be turned on for the system drive (typically with drive letter C)
before you can create restore points. Select a drive and then select Configure to turn on or disable
system protection.
Restore from a system restore point
Step 1. In Windows 10 search box, enter Recovery and select the matched result.
Step 2. Select Open System Restore ➙ Next.
Step 3. Select a restore point and then select Next ➙ Finish.
Note: You may select Scan for affected programs to check which program and driver installation
is associated with a particular restore point.
Reset Windows
If Windows is not running well as usual, you can choose to reset it.
Step 1. Open the Start menu and then select Settings ➙ Update & Security ➙ Recovery.
Step 2. Under Reset this PC, click Get started.
Step 3. Choose either Keep my files or Remove everything.
Attention: Back up personal data before choosing Remove everything.
Step 4. Follow on-screen instructions to complete the reset process.
Create a recovery drive
Use a USB drive (not supplied) to create a Windows recovery drive. If Windows will not start, you can use the
recovery drive to restore or reset Windows.
Notes: Most USB drives utilize the Type-A connector. If your computer does not include a USB Type-A
connector, you have two options:
• Purchase and use a USB drive with the Type-C connector, or
• Purchase and use a USB Type-C to Type-A adapter
Step 1. In the Windows 10 search box, enter Create a recovery drive and select the matched result.
Step 2. Make sure Back up system files to the recovery drive is selected and then select Next.
Step 3. Plug a USB drive into your computer, select it, and then select Next ➙ Create.
Attention: Previous files on the drive will be deleted. Back up personal files before using it to
create a recovery drive.
20 User Guide

When the recovery drive is created, you may see a Delete the recovery partition from your PC option. If
you want to free up drive space on your computer, select it and then select Delete. Otherwise, select Finish.
Use a recovery drive to restore or reset Windows
If Windows cannot start, you can use a recovery drive (created in advance) to restore or reset Windows.
Step 1. Connect the recovery drive to your computer; restart your computer and set it to start from the
recovery drive.
Note: For computers without a USB Type-A connector, you may need to purchase and use an
adapter (USB Type-C to Type-A) to use a recovery drive.
Step 2. On the Choose an option screen, select Troubleshoot.
Step 3. Choose a recovery option.
Select Advanced Options ➙ System Restore to restore your computer to a system restore point.
Or select Recover from a drive to reset your computer.
Note: If you did not select the Back up system files to the recovery drive option when creating
the recovery drive, Recovery from a drive is not available.
Attention: All personal files created on your computer will be deleted after recovering from the
drive.
Chapter 3.Explore your computer 21

22 User Guide

Chapter 4. Help and support
Frequently asked questions
How do I open the Control Panel? • Open the Start menu and select Windows System ➙ Control Panel.
• Use Windows Search.
How should I turn off my
computer? Open the Start menu and select Power ➙ Shut down.
How do I partition my storage
drive? Refer to https://support.lenovo.com/solutions/ht503851
What should I do if my computer
stops responding.
Press and hold the power button until the computer turns off. Then restart the
computer.
What should I do if I spill liquid on
the computer?
1. Carefully unplug the ac power adapter and turn off the computer immediately.
The more quickly you stop the current from passing through the computer the
more likely you will reduce damage from short circuits.
Attention: Although you might lose some data or work by turning off the
computer immediately, leaving the computer on might make your computer
unusable.
2. Wait until you are certain that all the liquid is dry before turning on your
computer.
CAUTION:
Do not try to drain out the liquid by turning over the computer. If your
computer has keyboard drainage holes on the bottom, the liquid will be
drained out through the holes.
Where can I get the latest device
drivers and UEFI/BIOS?
• Lenovo Vantage or Lenovo PC Manager
• Lenovo Support Web site at https://support.lenovo.com
Self-help resources
Use the following self-help resources to learn more about the computer and troubleshoot problems.
Resources How to access?
Use Lenovo Vantage or Lenovo PC Manager to:
• Download and install the latest drivers and firmware.
• Configure hardware settings
• Diagnose computer hardware problems.
• Check the computer warranty status.
• Open the Start menu and select Lenovo Vantage or
PC Manager.
• Use Windows Search.
Product documentation:
• Safety and Warranty Guide
• Setup Guide
• This User Guide
• Regulatory Notice
1. Go to https://support.lenovo.com.
2. Detect your computer or select computer model
manually.
3. Select Documentation and filter out the
documentation you want.
© Copyright Lenovo 2021 23

Resources How to access?
Lenovo Support Web site with the latest support
information of the following:
• Drivers and software
• Diagnostic solutions
• Product and service warranty
• Product and parts details
• Knowledge base and frequently asked questions
Visit https://support.lenovo.com
Windows help information
• Open the Start menu and select Get Help or Tips.
• Use Windows Search or the Cortana® personal
assistant.
• Microsoft support Web site: https://
support.microsoft.com
What is a CRU?
Customer replaceable units (CRUs) are parts that can be upgraded or replaced by the customer. A Lenovo
computer may contain the following types of CRUs:
Self-service CRU Parts that can be installed or replaced easily by
customer themselves or by trained service
technicians at an additional cost.
Optional-service CRU Parts that can be installed or replaced by customers
with a greater skill level. Trained service technicians
can also provide service to install or replace the
parts under the type of warranty designated for the
customer’s machine.
If you intend to install a CRU, Lenovo will ship the CRU to you. You might be required to return the defective
part that is replaced by the CRU. When return is required: (1) return instructions, a prepaid shipping label,
and a container will be included with the replacement CRU; and (2) you might be charged for the
replacement CRU if Lenovo does not receive the defective CRU within thirty (30) days of your receipt of the
replacement CRU. For full details, see the Lenovo Limited Warranty at https://www.lenovo.com/warranty/llw_
02.
CRUs for your product model
The table below lists the CRUs and CRU types that are defined for your product model.
Part Self-service CRU Optional-service CRU
Power cord X
ac power adapter X
Note: CRU replacement instruction is provided in one or more of the following publications and are available
from Lenovo at any time upon your request.
the product User Guide
the printed publications that came with the product
24 User Guide

Call Lenovo
If you have tried to correct the problem yourself and still need help, you can call Lenovo Customer Support
Center.
Before you contact Lenovo
Record product information and problem details before you contact Lenovo.
Product information Problem symptoms and details
• Product name
• Machine type and serial number
• What is the problem? Is it continuous or intermittent?
• Any error message or error code?
• What operating system are you using? Which version?
• Which software applications were running at the time
of the problem?
• Can the problem be reproduced? If so, how?
Note: The product name and serial number can usually be found on the bottom of the computer, either
printed on a label or etched on the cover.
Lenovo Customer Support Center
During the warranty period, you can call Lenovo Customer Support Center for help.
Telephone numbers
For a list of the Lenovo Support phone numbers for your country or region, go to https://
pcsupport.lenovo.com/supportphonelist.
Note: Phone numbers are subject to change without notice. If the number for your country or region is not
provided, contact your Lenovo reseller or Lenovo marketing representative.
Services available during the warranty period
• Problem determination — Trained personnel are available to assist you with determining if you have a
hardware problem and deciding what action is necessary to fix the problem.
• Lenovo hardware repair — If the problem is determined to be caused by Lenovo hardware under warranty,
trained service personnel are available to provide the applicable level of service.
• Engineering change management — Occasionally, there might be changes that are required after a product
has been sold. Lenovo or your reseller, if authorized by Lenovo, will make selected Engineering Changes
(ECs) that apply to your hardware available.
Services not covered
• Replacement or use of parts not manufactured for or by Lenovo or non warranted parts
• Identification of software problem sources
• Configuration of UEFI/BIOS as part of an installation or upgrade
• Changes, modifications, or upgrades to device drivers
• Installation and maintenance of network operating systems (NOS)
• Installation and maintenance of programs
For the terms and conditions of the Lenovo Limited Warranty that apply to your Lenovo hardware product,
see “Warranty information” in the Safety and Warranty Guide that comes with your computer.
Chapter 4.Help and support 25

Purchase additional services
During and after the warranty period, you can purchase additional services from Lenovo at https://
pcsupport.lenovo.com/warrantyupgrade.
Service availability and service name might vary by country or region.
26 User Guide

Appendix A. Accessibility and ergonomic information
This chapter provides information about accessibility and ergonomics.
Accessibility information
Lenovo is committed to providing users who have hearing, vision, and mobility limitations with greater
access to information and technology. This section provides information about the ways these users can get
the most out of their computer experience. You also can get the most up-to-date accessibility information
from the following Web site:
https://www.lenovo.com/accessibility
Keyboard shortcuts
The following list contains keyboard shortcuts that can help make your computer easier to use.
Note: Depending on your keyboard, some of the following keyboard shortcuts might not be available.
• Windows logo key + U: Open Ease of Access Center
• Right Shift for eight seconds: Turn on or turn off Filter Keys
• Shift five times: Turn on or turn off Sticky Keys
• Num Lock for five seconds: Turn on or turn off Toggle Keys
• Left Alt+Left Shift+Num Lock: Turn on or turn off Mouse Keys
• Left Alt+Left Shift+PrtScn (or PrtSc): Turn on or turn off High Contrast
For more information, go to https://windows.microsoft.com/, and then search using any of the following
keywords: keyboard shortcuts, key combinations, shortcut keys.
Ease of Access Center
Ease of Access Center on the Windows operating system enables you to configure your computers to suit
their physical and cognitive needs.
To access Ease of Access Center:
1. Go to Control Panel and view by Category.
2. Click Ease of Access ➙ Ease of Access Center.
3. Choose the appropriate tool by following the on-screen instructions.
Ease of Access Center mainly includes the following tools:
• Magnifier
Magnifier is a useful utility that enlarges the entire screen or part of the screen so that you can see the
items better.
• Narrator
Narrator is a screen reader that reads what is displayed on the screen aloud and describes events such as
error messages.
• On-Screen Keyboard
If you prefer to type or enter data into your computer using a mouse, joystick, or other pointing device
instead of a physical keyboard, you can use On-Screen Keyboard. On-Screen Keyboard displays a visual
© Copyright Lenovo 2021 27

keyboard with all the standard keys. You can select keys using the mouse or another pointing device, or
you can tap to select the keys if your computer supports multi-touch screen.
• High Contrast
High Contrast is a feature that heightens the color contrast of some text and images on your screen. As a
result, those items are more distinct and easier to identify.
• Personalized keyboard
Adjust keyboard settings to make your keyboard easier to use. For example, you can use your keyboard
to control the pointer and make the keyboard easier to type certain key combinations.
• Personalized mouse
Adjust mouse settings to make your mouse easier to use. For example, you can change the pointer
appearance and make your mouse easier to manage windows.
Speech Recognition
Speech Recognition enables you to control your computer by voice.
You can use verbal instructions to control the keyboard and mouse. With verbal instructions, you can start
programs, open menus, click objects on the screen, dictate text into documents, and write and send e-mails.
To use Speech Recognition:
1. Go to Control Panel and view by Category.
2. Click Ease of Access ➙ Speech Recognition.
3. Follow the on-screen instructions.
Screen-reader technologies
Screen-reader technologies are primarily focused on software program interfaces, help systems, and various
online documents. For additional information about screen readers, see the following:
• Using PDFs with screen readers:
https://www.adobe.com/accessibility.html?promoid=DJGVE
• Using the JAWS screen reader:
https://www.freedomscientific.com/Products/Blindness/JAWS
• Using the NVDA screen reader:
Screen resolution
You can make the text and images on your screen easier to read by adjusting the screen resolution of your
computer.
To adjust the screen resolution:
1. Right-click a blank area on the desktop and then click Display settings ➙ Display.
2. Follow the on-screen instructions.
Note: Setting a resolution too low might prevent some items from fitting on the screen.
Customizable item size
You can make the items on your screen easier to read by changing the item size.
• To change the item size temporarily, use the Magnifier tool in Ease of Access Center.
• To change the item size permanently:
28 User Guide
– Change the size of all the items on your screen.
1. Right-click a blank area on the desktop and then click Display settings ➙ Display.
2. Change the item size by following the on-screen instructions. For some applications, your
configuration might not take effect until you sign out and then sign in again.
– Change the size of the items on a Web page.
Press and hold Ctrl, and then press the plus-sign key (+) to enlarge or the minus-sign key (–) to reduce
the text size.
– Change the size of the items on the desktop or a window.
Note: This function might not work on some windows.
If your mouse has a wheel, press and hold Ctrl, and then scroll the wheel to change the item size.
Industry-standard connectors
Your computer provides industry-standard connectors that enable you to connect assistive devices.
Documentation in accessible formats
Lenovo provides electronic documentation in accessible formats, such as properly tagged PDF files or
HyperText Markup Language (HTML) files. Lenovo electronic documentation is developed to ensure that
visually impaired users can read the documentation through a screen reader. Each image in the
documentation also includes adequate alternative text so that visually impaired users can understand the
image when they use a screen reader.
Ergonomic information
Good ergonomic practice is important to get the most from your personal computer and to avoid discomfort.
Arrange your workplace and the equipment you use to suit your individual needs and the kind of work that
you perform. In addition, use healthy work habits to maximize your performance and comfort when using
your computer.
Working in the virtual office might mean adapting to frequent changes in your environment. Adapting to the
surrounding light sources, active seating, and the placement of your computer hardware, can help you
improve your performance and achieve greater comfort.
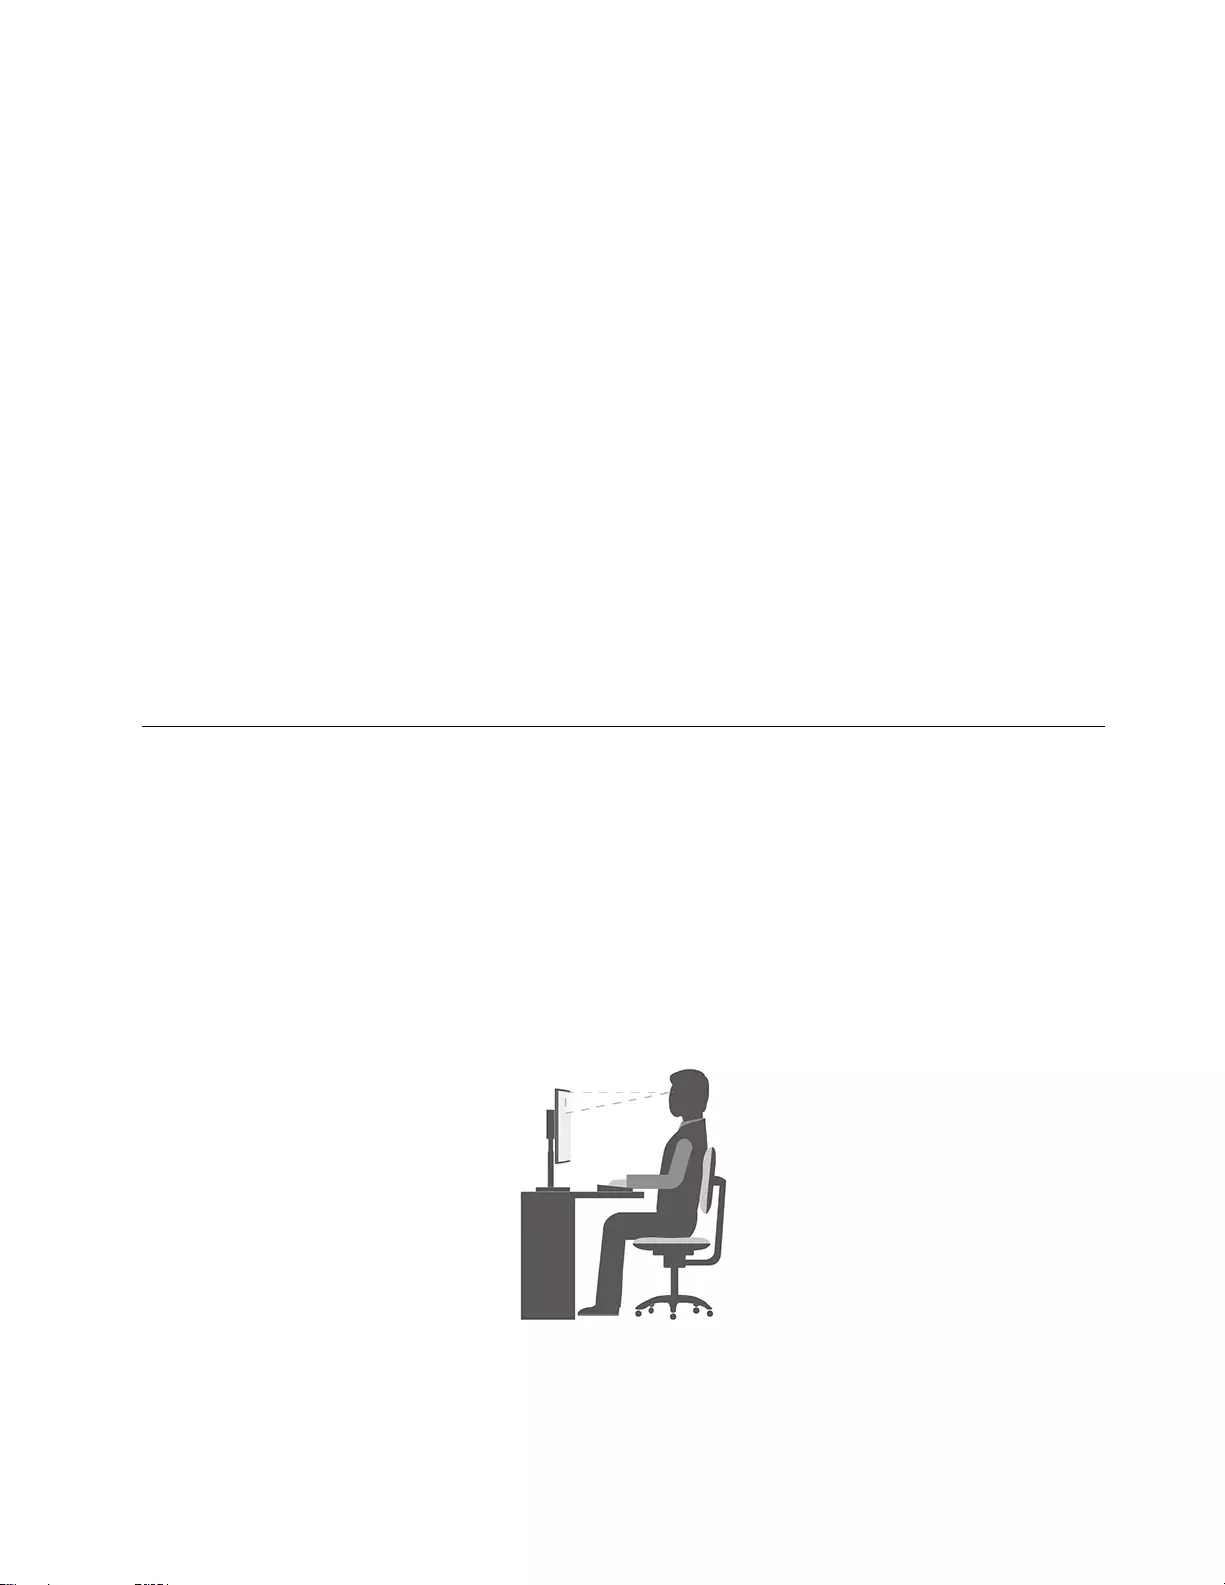
This example shows someone in a conventional setting. Even when not in such a setting, you can follow
many of these tips. Develop good habits, and they will serve you well.
General posture: Make minor modifications in your working posture to deter the onset of discomfort caused
by long periods of working in the same position. Frequent short breaks from your work also help to prevent
minor discomfort associated with your working posture.
Appendix A. Accessibility and ergonomic information 29

Display: Position the display to maintain a comfortable viewing distance of 510 mm to 760 mm (20 inches to
30 inches). Avoid glare or reflections on the display from overhead lighting or outside sources of light. Keep
the display screen clean and set the brightness to levels that enable you to see the screen clearly. Press the
brightness control keys to adjust display brightness.
Head position: Keep your head and neck in a comfortable and neutral (vertical, or upright) position.
Chair: Use a chair that gives you good back support and seat height adjustment. Use chair adjustments to
best suit your comfort posture.
Arm and hand position: If available, use chair arm rests or an area on your working surface to provide
weight support for your arms. Keep your forearms, wrists, and hands in a relaxed and neutral (horizontal)
position. Type with a soft touch without pounding the keys.
Leg position: Keep your thighs parallel to the floor and your feet flat on the floor or on a footrest.
What if you are traveling?
It might not be possible to observe the best ergonomic practices when you are using your computer while on
the move or in a casual setting. Regardless of the setting, try to observe as many of the tips as possible.
Sitting properly and using adequate lighting, for example, helps you maintain desirable levels of comfort and
performance. If your work area is not in an office setting, ensure to take special note of employing active
sitting and taking work breaks. Many product solutions are available to help you modify and expand your
computer to best suit your needs. You can find some of these options at https://www.lenovo.com/accessories.
Explore your options for docking solutions and external products that provide the adjustability and features
that you want.
Questions about vision?
The visual display screens of notebook computers are designed to meet the highest standards. These visual
display screens provide you with clear, crisp images and large, bright displays that are easy to see, yet easy
on the eyes. Any concentrated and sustained visual activity can be tiring. If you have questions on eye
fatigue or visual discomfort, consult a vision-care specialist for advice.
Turn on night light
Night light is a switch in Windows that you can turn on and off. When it is turned on, your screen shows
warmer colors and the amount of emitted blue light is reduced. Enabling night light reduces the chances of
developing eye fatigue or eye strain.
Step 1. Click the notification icon in the Windows notification area.
Step 2. Click the Night light icon to turn it on or off.
Note: Click Expand if you cannot find the night light icon.
For more guidance on reducing eye fatigue or eye strain, go to https://www.lenovo.com/us/en/compliance/
visual-fatigue.
Adjust color temperature
If Windows 10 night light mode is turned on, you can adjust the color temperature of the screen.
Step 1. Select Start ➙ Settings.
Step 2. Select System ➙ Display ➙ Night light settings.
Step 3. Move the slider to adjust the color temperature.
30 User Guide

Note: Selected Lenovo computers are low blue-light certified. These computers are tested with night light
turned on and color temperature set to the default value of 48.
Appendix A. Accessibility and ergonomic information 31

32 User Guide
Appendix B. Compliance information
This appendix provides compliance statements that are specific to your computer model. The Generic Safety
and Compliance Notices contains compliance statements that are common to all Lenovo personal computer
products. If your computer includes factory-preinstalled wireless modules, the Regulatory Notice contains
compliance information for all the supported wireless modules. To download these publications, go to
https://www.lenovo.com/compliance.
Federal Communications Commission (FCC) Supplier’s Declaration of
Conformity
The following information refers to Lenovo product model(s) listed below.
Model name Machine type (MT)
IdeaPad Gaming 3 15IHU6 82K1, 82MG
IdeaPad Gaming3 15IHU6D 82K1
IdeaPad Gaming 3 15ACH6 82K2, 82MJ
IdeaPad Gaming3 15ACH6D 82K2
This equipment has been tested and found to comply with the limits for a Class B digital device, pursuant to
Part 15 of the FCC Rules. These limits are designed to provide reasonable protection against harmful
interference in a residential installation. This equipment generates, uses, and can radiate radio frequency
energy and, if not installed and used in accordance with the instructions, may cause harmful interference to
radio communications. However, there is no guarantee that interference will not occur in a particular
installation. If this equipment does cause harmful interference to radio or television reception, which can be
determined by turning the equipment off and on, the user is encouraged to try to correct the interference by
one or more of the following measures:
• Reorient or relocate the receiving antenna.
• Increase the separation between the equipment and receiver.
• Connect the equipment into an outlet on a circuit different from that to which the receiver is connected.
• Consult an authorized dealer or service representative for help.
Lenovo is not responsible for any radio or television interference caused by using cables and connectors
other than those recommended by Lenovo or by unauthorized changes or modifications to this equipment.
Unauthorized changes or modifications could void the user’s authority to operate the equipment.
This device complies with Part 15 of the FCC Rules. Operation is subject to the following two conditions: (1)
this device may not cause harmful interference, and (2) this device must accept any interference received,
including interference that may cause undesired operation.
Responsible Party:
Lenovo (United States) Incorporated
7001 Development Drive
Morrisville, NC 27560
Email: FCC@lenovo.com
© Copyright Lenovo 2021 33

Location for the FCC ID and IC ID
If you purchased your computer in the United States or Canada and the computer includes factory-
preinstalled wireless modules, a piece of text containing identification strings for these modules (FCC ID and
IC ID) is visible on the computer’s bottom cover. The text may either be laser etched on the bottom cover or
on a physical label affixed to it. To obtain the FCC ID or IC ID for the factory-preinstalled wireless module,
check the bottom cover for strings directly after “FCC ID” or “IC ID”.
Korea radio frequency compliance statement
무선설비 전파 혼신 (사용주파수 2400∼2483.5 , 5725∼5825 무선제품해당)
해당 무선설비가 전파혼신 가능성이 있으므로 인명안전과 관련된 서비스는 할 수 없음
SAR 정보
본 장치는 전파 노출에 대한 가이드라인을 충족합니다.
본 장치는 무선 송수신기 입니다. 본 장치는 국제 가이드라인으로 권장되는 전파 노출에 대한 제한을 초과하지
않도록 설계되었습니다. 장치 액세서리 및 최신 부품을 사용할 경우 SAR 값이 달라질 수 있 습니다. SAR 값은
국가 보고 및 테스트 요구 사항과 네트워크 대역에 따라 다를 수 있습니다. 본 장치 는 사람의 신체에서 10mm
이상의 거리에서 사용할 수 있습니다.
34 User Guide

Appendix C. Notices and trademarks
Notices
Lenovo may not offer the products, services, or features discussed in this document in all countries. Consult
your local Lenovo representative for information on the products and services currently available in your
area. Any reference to a Lenovo product, program, or service is not intended to state or imply that only that
Lenovo product, program, or service may be used. Any functionally equivalent product, program, or service
that does not infringe any Lenovo intellectual property right may be used instead. However, it is the user’s
responsibility to evaluate and verify the operation of any other product, program, or service.
Lenovo may have patents or pending patent programs covering subject matter described in this document.
The furnishing of this document does not give you any license to these patents. You can send license
inquiries, in writing, to:
Lenovo (United States), Inc.
8001 Development Drive
Morrisville, NC 27560
U.S.A.
Attention: Lenovo Director of Licensing
LENOVO PROVIDES THIS PUBLICATION «AS IS» WITHOUT WARRANTY OF ANY KIND, EITHER EXPRESS
OR IMPLIED, INCLUDING, BUT NOT LIMITED TO, THE IMPLIED WARRANTIES OF NON-INFRINGEMENT,
MERCHANTABILITY OR FITNESS FOR A PARTICULAR PURPOSE. Some jurisdictions do not allow
disclaimer of express or implied warranties in certain transactions, therefore, this statement may not apply to
you.
Changes are made periodically to the information herein; these changes will be incorporated in new editions
of the publication. To provide better service, Lenovo reserves the right to improve and/or modify the
products and software programs described in the manuals included with your computer, and the content of
the manual, at any time without additional notice.
The software interface and function and hardware configuration described in the manuals included with your
computer might not match exactly the actual configuration of the computer that you purchase. For the
configuration of the product, refer to the related contract (if any) or product packing list, or consult the
distributor for the product sales. Lenovo may use or distribute any of the information you supply in any way it
believes appropriate without incurring any obligation to you.
The products described in this document are not intended for use in implantation or other life support
applications where malfunction may result in injury or death to persons. The information contained in this
document does not affect or change Lenovo product specifications or warranties. Nothing in this document
shall operate as an express or implied license or indemnity under the intellectual property rights of Lenovo or
third parties. All information contained in this document was obtained in specific environments and is
presented as an illustration. The result obtained in other operating environments may vary.
Lenovo may use or distribute any of the information you supply in any way it believes appropriate without
incurring any obligation to you.
Any references in this publication to non-Lenovo Web sites are provided for convenience only and do not in
any manner serve as an endorsement of those Web sites. The materials at those Web sites are not part of the
materials for this Lenovo product, and use of those Web sites is at your own risk.
© Copyright Lenovo 2021 35

Any performance data contained herein was determined in a controlled environment. Therefore, the result
obtained in other operating environments may vary significantly. Some measurements may have been made
on development-level systems and there is no guarantee that these measurements will be the same on
generally available systems. Furthermore, some measurements may have been estimated through
extrapolation. Actual results may vary. Users of this document should verify the applicable data for their
specific environment.
This document is copyrighted by Lenovo and is not covered by any open source license, including any Linux
agreement(s) which may accompany software included with this product. Lenovo may update this document
at any time without notice.
For the latest information or any questions or comments, contact or visit the Lenovo Web site:
https://support.lenovo.com
Trademarks
Lenovo, the Lenovo logo and IdeaPad are trademarks of Lenovo. Microsoft, Windows, OneDrive, Outlook,
Skype, Office 365 and Cortana are trademarks of the Microsoft group of companies. DisplayPort is a
trademark of the Video Electronics Standards Association. The terms HDMI and HDMI High-Definition
Multimedia Interface, and the HDMI logo are trademarks or registered trademarks of HDMI Licensing
Administrator, Inc. in the United States and other countries. Wi-Fi is a registered trademark of Wi-Fi Alliance.
USB-C is a trademark of USB Implementers Forum. All other trademarks are the property of their respective
owners.
36 User Guide

Summary of Content for Lenovo IdeaPad Gaming 3 15IAH7 Laptop User Guide PDF
User Guide
IdeaPad Gaming 3i (15, 7), IdeaPad Gaming 3 (15, 7), IdeaPad
Gaming 3i (16, 7) and IdeaPad Gaming 3 (16, 7)
Read this first
Before using this documentation and the product it supports, ensure that you read and understand the following:
Generic Safety and Compliance Notices
Safety and Warranty Guide
Setup Guide
First Edition (April 2022)
Copyright Lenovo 2022.
LIMITED AND RESTRICTED RIGHTS NOTICE: If data or software is delivered pursuant to a General Services Administration GSA contract, use, reproduction, or disclosure is subject to restrictions set forth in Contract No. GS- 35F-05925.
Contents
About this guide . . . . . . . . . . . . . iii
Chapter 1. Meet your computer . . . . . 1 Front . . . . . . . . . . . . . . . . . . . . 1 Base . . . . . . . . . . . . . . . . . . . . 2 Left . . . . . . . . . . . . . . . . . . . . 3 Right . . . . . . . . . . . . . . . . . . . . 4 Rear . . . . . . . . . . . . . . . . . . . . 5 Bottom . . . . . . . . . . . . . . . . . . . 6 Features and specifications . . . . . . . . . . . 7
Statement on USB transfer rate . . . . . . . . 9 Operating environment . . . . . . . . . . . 9 Avoid constant body contact with specific hot sections . . . . . . . . . . . . . . . . . 9
Chapter 2. Get started with your computer . . . . . . . . . . . . . . . . 11 Work with Windows . . . . . . . . . . . . . 11
Windows help information . . . . . . . . . 11 Lenovo Vantage and Lenovo PC Manager . . . . 12 The Novo Button menu . . . . . . . . . . . . 12
Open the Novo Button menu . . . . . . . . 12 Interact with your computer . . . . . . . . . . 12
Keyboard hotkeys . . . . . . . . . . . . 12 Numeric keypad . . . . . . . . . . . . . 14
Chapter 3. Explore your computer . . 15 Manage power . . . . . . . . . . . . . . . 15
Check the battery status . . . . . . . . . 15 Charge the battery . . . . . . . . . . . . 15 Set power button behavior. . . . . . . . . 15
A power plan . . . . . . . . . . . . . . 15 Set performance mode . . . . . . . . . . 16
Change settings in UEFI/BIOS setup utility . . . . 16 What is UEFI/BIOS setup utility . . . . . . . 16 Open the UEFI/BIOS setup utility . . . . . . 16 Enable or disable Fool Proof Fn Ctrl . . . . . 16 Enable or disable Flip to Boot . . . . . . . 16 Select boot devices . . . . . . . . . . . 17 Change hotkey mode . . . . . . . . . . . 17
Set passwords in UEFI/BIOS setup utility . . . . . 17 Password types . . . . . . . . . . . . . 17 Set administrator password . . . . . . . . 18 Change or remove administrator password . . 18 Set user password . . . . . . . . . . . . 18 Enable power-on password . . . . . . . . 18 Set hard disk password . . . . . . . . . . 19 Change or remove hard disk password . . . . 19
Chapter 4. Help and support . . . . . 21 Frequently asked questions . . . . . . . . . . 21 Self-help resources . . . . . . . . . . . . . 21 What is a CRU? . . . . . . . . . . . . . . . 22 CRUs for your product model . . . . . . . . . 23 Call Lenovo . . . . . . . . . . . . . . . . 24
Before you contact Lenovo . . . . . . . . 24 Lenovo Customer Support Center . . . . . . 24
Purchase additional services. . . . . . . . . . 25
Appendix A. Notices and trademarks. . . . . . . . . . . . . . . 27
Copyright Lenovo 2022 i
About this guide
This guide applies to Lenovo product model(s) listed below. Illustrations in this guide may look slightly different from your product model.
Model name Machine type (MT)
IdeaPad Gaming 3 15IAH7 82S9, 82UJ
IdeaPad Gaming3 15IAH7D 82S9
IdeaPad Gaming 3 15ARH7 82SB, 82UK
IdeaPad Gaming3 15ARH7D 82SB
IdeaPad Gaming 3 16IAH7 82SA
IdeaPad Gaming3 16IAH7D 82SA
IdeaPad Gaming 3 16ARH7 82SC
IdeaPad Gaming3 16ARH7D 82SC
For further compliance information, refer to the Generic Safety and Compliance Notices at https:// pcsupport.lenovo.com/docs/generic_notices.
This guide may contain information about accessories, features, and software that are not available on all models.
This guide contains instructions that are based on the Windows operating system. These instructions are not applicable if you install and use other operating systems.
Microsoft makes periodic feature changes to the Windows operating system through Windows Update. As a result, the operating system related instructions may become outdated. Refer to Microsoft resources for the latest information.
The content of the guide is subject to change without notice. To obtain the latest version, go to https:// support.lenovo.com.
Copyright Lenovo 2022 iii
Chapter 1. Meet your computer
Front
1. Microphones Capture or record sound and voice.
2. Camera Capture still and moving images for taking photos, recording videos, and video chatting.
3. Camera switch Turn the camera on or off.
4. Camera light If the light is on, the camera is in use.
5. Wireless antennas Send and receive radio waves for the built-in wireless LAN (local area network) and Bluetooth module. Note: The antennas are not visible from the outside of the computer.
6. Screen Display text, graphics, and videos.
Copyright Lenovo 2022 1
Base
1. Charging light Indicate whether the computer is connected to ac power.
Solid white: Connected to ac power; battery capacity 91%100%
Solid amber: Connected to ac power; battery capacity 1%90%
Off: Not connected to ac power
2. Power button Press the button to turn on the computer or put the computer into sleep mode. Note: You can turn on the computer by flipping open the LCD screen if Flip to Boot is enabled.
3. Power light Indicate the power status of the computer. The color of the power light also reflects the currently activated operating mode. Refer to Set performance mode on page 16 for how to switch performance modes.
Solid on: The computer is turned on; battery charge percentage 21% — 100%.
White: in balance mode
Red: in performance mode
Blue: in quiet mode
Blinking fast: The computer is turned on; battery charge percentage 1% — 20%.
Blinking slowly: The computer is in sleep mode.
Off: The computer is turned off or in hibernation mode.
4. Numeric keypad To enable or disable the numeric keypad, press the Num Lock key.
5. Touchpad Perform finger touch and all the functions of a traditional mouse. Note: The touchpad also supports multi-touch function.
6. Keyboard Enter characters and interact with programs. Note: The keyboard also includes hotkeys and function keys for changing settings and performing tasks quickly.
2 User Guide
Left
1. Ventilation slots (outlet) Maintain the outgoing airflow to dissipate internal heat. Attention: Do not block the ventilation slots. Otherwise, the computer might overheat.
2. USB (3.2 Gen 1) Type-A connector Connect to a USB-compatible device, such as a USB keyboard, a USB mouse, a USB storage device, or a USB printer.
3. Combo audio jack Connect to headphones or headsets with a 3.5 mm (0.14 inch), 4-pole plug. Note: This jack does not support standalone external microphones. If you use headsets, choose one with a single plug.
Chapter 1. Meet your computer 3
Right
1. Novo button hole Press the Novo button to open the Novo Button menu. From the menu, you can choose to open the UEFI/BIOS setup utility, the Boot menu, or the Windows startup options screen.
2. USB (3.2 Gen 1) Type-A connector Connect to a USB-compatible device, such as a USB keyboard, a USB mouse, a USB storage device, or a USB printer.
3. Ventilation slots (outlet) Maintain the outgoing airflow to dissipate internal heat. Attention: Do not block the ventilation slots. Otherwise, the computer might overheat.
4 User Guide
Rear
1. Ventilation slots (outlet) Maintain the outgoing airflow to dissipate internal heat. Attention: Do not block the ventilation slots. Otherwise, the computer might overheat.
2. HDMI connector Connect to a compatible digital audio device or video monitor, such as an HDTV.
3. Ethernet connector Connect to a local area network (LAN).
4. USB-C connector Connect to an external display, storage, or data devices. Note: An appropriate adapter may be needed for connecting to external devices.
5. Power connector Connect to power with the included power cord and ac power adapter.
Chapter 1. Meet your computer 5
Bottom
1. Ventilation slots (inlet) Maintain the incoming airflow to dissipate internal heat. Attention: Do not block the ventilation slots. Otherwise, the computer might overheat.
2. Speakers Produce sound.
6 User Guide
Features and specifications Dimensions 15-inch models
Width: 359.6 mm (14.16 inches)
Depth: 266.4 mm (10.49 inches)
Thickness
Thinnest: 21.8 mm (0.86 inches)
Thickest: 25.9 mm (1.02 inches)
16-inch models
Width: 359.6 mm (14.16 inches)
Depth: 277.8 mm (10.94 inches)
Thickness
Thinnest: 20.9 mm (0.82 inches)
Thickest: 25.9 mm (1.02 inches)
ac power adapter IdeaPad Gaming 3 15IAH7, IdeaPad Gaming3 15IAH7D, IdeaPad Gaming 3 16IAH7 and
IdeaPad Gaming3 16IAH7D
Input: 100 V ac240 V ac, 50 Hz60 Hz
Output: 20 V dc, 6.75 A/20 V dc, 8.5 A/20 V dc, 11.5 A
Power:
models with GPU of P0P1: 135 W (6.75 A, 20 V) and 170 W (8.5 A, 20 V)
models with GPU of DG2: 135 W (6.75 A, 20 V) and 170 W (8.5 A, 20 V)
models with GPU of E3: 170 W (8.5 A, 20 V) and 230 W (11.5 A, 20 V)
IdeaPad Gaming 3 15ARH7, IdeaPad Gaming3 15ARH7D, IdeaPad Gaming 3 16ARH7 and IdeaPad Gaming3 16ARH7D
Input: 100 V ac240 V ac, 50 Hz60 Hz
Output: 20 V dc, 6.75 A/20 V dc, 8.5 A
Power: 135 W/170 W
Battery pack IdeaPad Gaming 3 15IAH7, IdeaPad Gaming3 15IAH7D, IdeaPad Gaming 3 15ARH7 and
IdeaPad Gaming3 15ARH7D
Capacity:
45 Wh
60 Wh
Number of cells:
3
4
IdeaPad Gaming 3 16IAH7, IdeaPad Gaming3 16IAH7D, IdeaPad Gaming 3 16ARH7 and IdeaPad Gaming3 16ARH7D
Capacity: 71 Wh
Number of cells: 4
Note: The battery capacity is the typical or average capacity as measured in a specific test environment. Capacities measured in other environments may differ but are no lower than the rated capacity (see product label).
Chapter 1. Meet your computer 7
Microprocessor To view the microprocessor information of your computer, type system information in the Windows search box and then press Enter.
Memory IdeaPad Gaming 3 15IAH7, IdeaPad Gaming3 15IAH7D, IdeaPad Gaming 3 16IAH7 and
IdeaPad Gaming3 16IAH7D
Type: Double data rate 4 (DDR4) small outline dual in-line memory module (SODIMM)
Number of physical slots: 2
IdeaPad Gaming 3 15ARH7, IdeaPad Gaming3 15ARH7D, IdeaPad Gaming 3 16ARH7 and IdeaPad Gaming3 16ARH7D
Type: Double data rate 5 (DDR5) small outline dual in-line memory module (SODIMM)
Number of physical slots: 2
Storage device Type: solid-state drive
Form factor:
SSD1: M.2 (2242)
SSD2: M.2 (2242 or 2280)
Bus: PCI Express
Screen 15-inch models
Size: 396.24 mm (15.6 inches)
Display resolution
1920 1080 pixels (FHD model)
2560 1440 pixels (WQHD model)*
16-inch models
Size: 406.4 mm (16.0 inches)
Display resolution
1920 1200 pixels (WUXGA model)
2560 1600 pixels (WQXGA model)
Keyboard Function keys
Hotkeys
Numeric keypad
Keyboard backlight
Connectors and slots Power connector
Combo audio jack
Ethernet connector
USB Type-A connector 2
USB-C connector
Power input 20 V and 4.75 A
Power output up to 5 V and 3 A
USB data transfer rate up to 10 Gbps for USB 3.2 Gen 2
DisplayPort 1.4. Supports maximum output resolution of 5120 3200, at 60 Hz frame rate and color depth of 24 bpp (bits per pixel).
Up to 40 Gbps bi-directional data transfer rate in Thunderbolt mode.*
HDMI 2.0 connector
8 User Guide
Security UEFI/BIOS passwords
Administrator password
User password
Master hard disk password
User hard disk password
Network Ethernet (10/100/1000 Mbps) network adapter
Bluetooth and Wi-Fi combo adapter
* for selected models
Statement on USB transfer rate Depending on many factors such as the processing capability of the host and peripheral devices, file attributes, and other factors related to system configuration and operating environments, the actual transfer rate using the various USB connectors on this device will vary and will be slower than the data rate listed below for each corresponding device.
USB device Data rate (Gbit/s)
3.2 Gen 1 5
3.2 Gen 2 10
Operating environment
Maximum altitude (without pressurization)
3048 m (10 000 ft)
Temperature
Operating: 0C to 40C (32F to 104F)
Storage: -20C to 60C (-4F to 140F)
Maximum temperature when operating under the unpressurized condition: 31.3C (88F)
Note: When you charge the battery, its temperature must be no lower than 10C (50F).
Relative humidity
Operating: 0% to 90% at wet-bulb temperature 23C (73F)
Storage: 20% to 90% at wet-bulb temperature 27C (81F)
Avoid constant body contact with specific hot sections CAUTION: When the computer is operating, it should be placed on a hard and flat surface with its bottom area not in contact with users bare skin. Under normal operating conditions, the temperature of the bottom surface will remain within an acceptable range as defined in IEC 62368-1, but such temperatures can still be high enough to cause discomfort or harm to the user if directly touched for over 60 seconds at a time. As such, it is recommended that users avoid prolonged direct contact with the bottom of the computer.
Chapter 1. Meet your computer 9
Chapter 2. Get started with your computer
Work with Windows The following table contains Windows frequently used settings. You can learn the basics and start working with Windows right away.
To configure settings, type the corresponding keywords in the Windows search box and select the best match. Follow the on-screen instructions to customize settings.
Table 1. Basic settings
Functions Descriptions Search by keywords
Control Panel View or change Windows settings, including hardware and software setup and configuration.
Control Panel
Connect to Wi-Fi networks
For models with a wireless LAN module, you can connect your computer to a Wi-Fi network. Click the network icon in the Windows notification area, and then select a network for connection. Note: The wireless LAN module on your computer may support different standards. For some countries or regions, use of 802.11ax may be disabled according to local regulations.
Wi-Fi
Connect to wired networks
For models with an Ethernet (RJ-45) connector, you can use an Ethernet cable to connect your computer to a wired network.
Airplane mode Airplane mode is a convenient setting to turn all wireless communications of your computer on and off. You may need to turn it on when boarding an airplane.
Airplane mode
Night light mode Night light is a switch in Windows that you can turn on and off. When it is turned on, your screen shows warmer colors and the amount of emitted blue light is reduced. Enabling night light reduces the chances of developing eye fatigue or eye strain.
Night light
Adjust color temperature
If night light mode is turned on, you can adjust the color temperature of the screen. Note: Selected Lenovo computers are low blue light certified. These computers are tested with night light turned on and color temperature set to the default value of 48.
Night light
Windows Updates
Microsoft periodically releases feature and security updates to the Windows operating system. Updates that are applicable to your Windows version are downloaded automatically when your computer is connected to the Internet. When updates are downloaded, you are prompted to restart the computer to install these updates. You can also manually check if there are available updates for the installed version of Windows. Attention: Only use Windows Update to download and install updates. Updates downloaded from other sources may include security risks.
Windows Updates
Windows help information If the on-screen instructions cannot solve your problem, refer to the following to get the online Windows help information.
Type Get Help or Tips in the Windows search box and then press Enter. When the app opens, type the problem description and select the matched result.
Copyright Lenovo 2022 11
Visit Microsoft support Web site: https://support.microsoft.com. Enter what you are looking for in the search box and get search results.
Lenovo Vantage and Lenovo PC Manager They are both apps developed by Lenovo. Using either of them, you can:
View product information and system status
Manage and change device settings
Check for and perform system update
Note: This feature is only available on Lenovo Vantage. In Lenovo PC Manager, you can check for and perform driver update.
Depending on the country or region in which your computer is purchased, one of the apps may be pre- installed on your computer. To open it, type its name in the Windows Search box and select the matched result. If neither of the apps is pre-installed, you may install one on your own. Lenovo Vantage is available for download free of charge from the Microsoft Store.
Note: App features are subject to change with updates and specific features may not be available on all Lenovo products.
The Novo Button menu The Novo Button menu can be displayed before the operating system starts. From the menu, you can choose to
Open the BIOS/UEFI setup utility
Open the boot device selection menu
Open the Windows startup options screen
Note: From the Windows startup options screen, you can then choose to
Start your computer using a recovery drive
Reset your computer
Open advanced options screen
Open the Novo Button menu For Lenovo computers with a Novo button, you can press the button to open the Novo Button menu.
Step 1. Turn off the computer.
Step 2. Open the LCD screen and press the Novo button.
Interact with your computer
Keyboard hotkeys Some keys on the keyboard are printed with icons. These keys are called hotkeys and can be pressed alone or in combination with the Fn key to open certain apps or change certain settings quickly. The functions of the hotkeys are symbolized by the icons printed on them.
12 User Guide
Hotkey Function
Mute/Unmute sound.
Decrease/Increase system volume.
Mute/Unmute the microphone.
Increase/Decrease screen brightness.
Switch display devices.
Turn airplane mode on and off.
Open Lenovo Vantage, Lenovo PC Manager, or an app launch bar.
Enable/Disable the touchpad.
Display thumbnails of all open apps.
Open the Windows Calculator app.
Open the Windows snipping tool.
Play or pause playback of media.
Stop playback of media.
Go to the previous media file in the playlist or folder.
Go the next media file in the playlist or folder.
Turn on/off or adjust the brightness of the keyboard backlight. Note: Selected models include a RGB keyboard. For such a keyboard, this hotkey switches the color and effect of the keyboard backlight. Additional control is available in Lenovo Vantage.
Hotkey mode Some hotkeys share keys with function keys (F1 to F12). The hotkey mode is a UEFI/BIOS setting that changes how hotkeys (or function keys) are used.
Hotkey mode setting How to use hotkeys How to use function keys
Disabled Hold down the Fn key and press one of the hotkeys.
Press the function keys directly.
Enabled Press the hotkeys directly. Hold down the Fn key and press one of the function keys.
Note: Hotkeys that do not share keys with function keys are not affected by the hotkey mode setting. They should always be used with the Fn key.
The FnLock switch The FnLock is a switch that reverses the default and hidden function of a hotkey. The following table provides an example of how the FnLock switch changes the default function of the F1 key.
Chapter 2. Get started with your computer 13
FnLock FnLock light Default function of the F1 key
Off Off F1 function *
On On Mute/Unmute sound
Note: The F1 function is application-dependent. It may have no function if the active application does not have a definition for the key.
The FnLock switch shares the ESC key (in the upper left corner of the keyboard). To turn it on or off, press Fn + ESC.
Numeric keypad Some Lenovo computers includes a dedicated numeric keypad on the far right of the keyboard. The keypad is used for entering numbers and operators quickly.
Press the NumLock key to enable or disable the numeric keypad.
14 User Guide
Chapter 3. Explore your computer
Manage power Use the information in this section to achieve the best balance between performance and power efficiency.
Check the battery status The battery status icon or is in the Windows notification area. You can check the battery status, view the current power plan, and access battery settings quickly.
Click the battery status icon to display the percentage of battery power remaining and change the power mode. A warning message is displayed when the battery is low.
Charge the battery When the remaining battery power is low, charge your battery by connecting your computer to ac power.
The battery is fully charged in about two to four hours. The actual charging time depends on the battery capacity, the physical environment, and whether you are using the computer.
Battery charging is also affected by its temperature. The recommended temperature range for charging the battery is between 10C (50F) and 35C (95F).
Note:
You can check the battery temperature in Lenovo Vantage or Lenovo PC Manager.
To maximize the life of the battery, once the battery is fully charged, it must discharge to 94% or lower before it will be allowed to recharge again.
To extend your batterys lifespan, the battery may optimize its full charge capacity based on your usage. After prolonged periods of limited use, full battery capacity may not be available until you discharge to as low as 20% and recharge completely. For more information, refer to the power section of Lenovo Vantage.
Set power button behavior By default, pressing the power button puts the computer to sleep mode. However, you can change the power button behavior in Windows Control Panel.
Step 1. Type Control Panel in the Windows search box and then press Enter. Open the control panel and view by large or small icons.
Step 2. Select the power options and then click choose what the power button does.
A power plan A power plan is a collection of power-saving settings made available by an operating system. With a power plan, you can set idle time-outs for different hardware components to enter a low-power state. The default power plan and some of its idle time-out settings are listed below for computer models pre-installed with Windows.
The listed settings are active when the computer is connected to an electrical outlet. If your computer include a built-in battery pack, a different collection of time-out settings is set to take effect when the computer is operating on battery power.
Copyright Lenovo 2022 15
Default power plan: Balanced
Turn off the display: after 10 minutes
Put the computer to sleep: after 10 minutes
Note: To wake the computer from the sleep state, press the power button or any key on the keyboard.
Change or customize a power plan This operation is applicable to computers with pre-installed Windows.
Step 1. Type power plan in the Windows search box and then press Enter.
Step 2. Customize a power plan of your preference.
Set performance mode Your computer can work in different performance modes. The performance and power consumption of the computer vary in different performance modes. Press Fn + Q to cycle through different performance modes.
Note: Performance mode is not available when your computer runs on battery power.
Change settings in UEFI/BIOS setup utility This section introduces what is UEFI/BIOS and the operations you can perform in its setup utility.
What is UEFI/BIOS setup utility UEFI/BIOS is the first program that runs when a computer starts. UEFI/BIOS initializes hardware components and loads the operating system and other programs. Your computer may include a setup program (setup utility) with which you can change certain UEFI/BIOS settings.
Open the UEFI/BIOS setup utility Step 1. Turn on or restart the computer.
Step 2. When the power button light is on, press F2 repeatedly.
Step 3. On the welcome screen, select More Settings.
Enable or disable Fool Proof Fn Ctrl Step 1. Open the UEFI/BIOS setup utility.
Step 2. Select Configuration.
Step 3. Change the Fool Proof Fn Ctrl setting to Enabled or Disabled.
Step 4. Select Exit Exit Saving Changes.
When enabled, the Fn key and the Ctrl key can be used interchangeably for key combinations involving the Ctrl key. For example, you can press either Ctrl + A or Fn + A to select all text in a text editing application.
Enable or disable Flip to Boot When Flip to Boot is enabled, you can turn on the computer by flipping open the screen.
Step 1. Open the UEFI/BIOS setup utility.
Step 2. Select Configuration.
Step 3. Change the setting for Flip to Boot.
16 User Guide
Note: You may also set Flip to Boot in Lenovo Vantage or Lenovo PC Manager.
Select boot devices Normally, the computer starts to a boot manager loaded from the secondary storage device of the computer. Occasionally, you may need to start the computer to a program or boot manager loaded from another device or a network location. After the system firmware initializes all devices, you can press an interruption key to display the boot menu and select a desired boot device.
Step 1. Turn on or restart the computer.
Step 2. When the power button light is on, press F12 repeatedly.
Step 3. From the boot device menu, select a boot device to start the computer.
You can make a permanent change on boot devices in the UEFI/BIOS setup utility. Select the Boot menu; in the EFI section, select the desired boot device and move it to the top of the device list. Save changes and exit the setup utility for the change to take effect.
Change hotkey mode Step 1. Open the UEFI/BIOS setup utility.
Step 2. Select Configuration Hotkey Mode and press Enter.
Step 3. Change the setting to Disabled or Enabled.
Step 4. Select Exit Exit Saving Changes.
Set passwords in UEFI/BIOS setup utility This section introduces the types of passwords that you can set in the UEFI (Unified Extensible Firmware Interface) or BIOS (Basic Input/Output System) setup utility.
Password types You can set various types of passwords in the UEFI/BIOS setup utility.
Password type Pre-requisite Usage
Administrator password No You must enter it to start the setup utility.
User password The administrator password must be set.
You can use the user password to start the setup utility.
Master hard disk password No You must enter it to start the operating system.
User hard disk password The master hard disk password must be set.
You can use the user hard disk password to start the operating system.
Notes:
All passwords set in the setup utility consist of alphanumeric characters only.
If you start the setup utility using the user password, you can only change a few settings.
Chapter 3. Explore your computer 17
Set administrator password You set the administrator password to prevent unauthorized access to the UEFI/BIOS setup utility.
Attention: If you forget the administrator password, a Lenovo authorized service personnel cannot reset your password. You must take your computer to a Lenovo authorized service personnel to have the system board replaced. Proof of purchase is required and a fee will be charged for parts and service.
Step 1. Open the UEFI/BIOS setup utility.
Step 2. Select Security Set Administrator Password and press Enter.
Step 3. Enter a password string that contains only letters and numbers and then press Enter
Step 4. Enter the password again and press Enter.
Step 5. Select Exit Exit Saving Changes.
Next time you start the computer, you must enter the administrator password to open the setup utility. If Power on Password is enabled, you must enter the administrator password or the user password to start the computer.
Change or remove administrator password Only the administrator can change or remove the administrator password.
Step 1. Open the UEFI/BIOS setup utility using the administrator password.
Step 2. Select Security Set Administrator Password and press Enter.
Step 3. Enter the current password.
Step 4. In the Enter New Password text box, enter the new password.
Step 5. In the Confirm New Password text box, enter the new password again.
Note: If you want to remove the password, press Enter in both text boxes without entering any character.
Step 6. Select Exit Exit Saving Changes.
If you remove the administrator password, the user password is also removed.
Set user password You must set the administrator password before you can set the user password.
The administrator of the setup utility might need to set a user password for use by others.
Step 1. Open the UEFI/BIOS setup utility using the administrator password.
Step 2. Select Security Set User Password and press Enter.
Step 3. Enter a password string that contains only letters and numbers and then press Enter. The user password must be different from the administrator password.
Step 4. Enter the password again and press Enter.
Step 5. Select Exit Exit Saving Changes.
Enable power-on password If the administrator password has been set, you can enable power-on password to enforce greater security.
18 User Guide
Step 1. Open the UEFI/BIOS setup utility.
Step 2. Select Security Power on Password and press Enter.
Note: The administrator password must be set in advance.
Step 3. Change the setting to Enabled.
Step 4. Select Exit Exit Saving Changes.
If power-on password is enabled, a prompt appears on the screen every time you turn on the computer. You must enter the administrator or user password to start the computer.
Set hard disk password You can set a hard disk password in the setup utility to prevent unauthorized access to your data.
Attention: Be extremely careful when setting a hard disk password. If you forget the hard disk password, a Lenovo authorized service personnel cannot reset your password or recover data from the hard disk. You must take your computer to a Lenovo authorized service personnel to have the hard disk drive replaced. Proof of purchase is required and a fee will be charged for parts and service.
Step 1. Open the UEFI/BIOS setup utility.
Step 2. Select Security Set Hard Disk Password and press Enter.
Note: If you start the setup utility using the user password, you cannot set hard disk password.
Step 3. Follow on-screen instructions to set both master and user passwords.
Note: The master and user hard disk passwords must be set at the same time.
Step 4. Select Exit Exit Saving Changes.
If the hard disk password is set, you must provide the correct password to start the operating system.
Change or remove hard disk password Step 1. Open the UEFI/BIOS setup utility.
Step 2. Select Security.
Step 3. Change or remove the hard disk password.
To change or remove master password, select Change Master Password and press Enter.
Note: If you remove the master hard disk password, the user hard disk password is also removed.
To change user password, select Change User Password and press Enter.
Note: The user hard disk password cannot be removed separately.
Step 4. Select Exit Exit Saving Changes.
Chapter 3. Explore your computer 19
Chapter 4. Help and support
Frequently asked questions How do I partition my storage drive?
Refer to https://support.lenovo.com/solutions/ht503851
What should I do if my computer stops responding.
Press and hold the power button until the computer turns off. Then restart the computer.
What should I do if I spill liquid on the computer?
1. Carefully unplug the ac power adapter and turn off the computer immediately. The more quickly you stop the current from passing through the computer the more likely you will reduce damage from short circuits.
Attention: Although you might lose some data or work by turning off the computer immediately, leaving the computer on might make your computer unusable.
2. Wait until you are certain that all the liquid is dry before turning on your computer.
CAUTION: Do not try to drain out the liquid by turning over the computer. If your computer has keyboard drainage holes on the bottom, the liquid will be drained out through the holes.
Where can I get the latest device drivers and UEFI/BIOS?
Lenovo Vantage or Lenovo PC Manager
Lenovo Support Web site at https://support.lenovo.com
Self-help resources Use the following self-help resources to learn more about the computer and troubleshoot problems.
Resources How to access?
Troubleshooting and frequently asked questions https://www.lenovo.com/tips
https://forums.lenovo.com
Accessibility information https://www.lenovo.com/accessibility
Reset or restore Windows
Use Lenovo recovery options.
1. Go to https://support.lenovo.com/ HowToCreateLenovoRecovery.
2. Follow the on-screen instructions.
Use Windows recovery options.
1. Go to https://pcsupport.lenovo.com.
2. Detect your computer or manually select your computer model.
3. Click Diagnostics Operating System Diagnostics and then follow the on-screen instructions.
Copyright Lenovo 2022 21
Resources How to access?
Use Lenovo Vantage or Lenovo PC Manager to:
Download and install the latest drivers and firmware.
Configure hardware settings
Diagnose computer hardware problems.
Check the computer warranty status.
Use Windows Search.
Product documentation:
Generic Safety and Compliance Notices
Safety and Warranty Guide
Setup Guide
This User Guide
Regulatory Notice
1. Go to https://support.lenovo.com.
2. Detect your computer or select computer model manually.
3. Select Documentation and filter out the documentation you want.
Lenovo Support Web site with the latest support information of the following:
Drivers and software
Diagnostic solutions
Product and service warranty
Product and parts details
Knowledge base and frequently asked questions
Visit https://support.lenovo.com
Windows help information
Use Get Help or Tips.
Use Windows Search or the Cortana personal assistant.
Microsoft support Web site: https:// support.microsoft.com
What is a CRU? Customer replaceable units (CRUs) are parts that can be upgraded or replaced by the customer. A Lenovo computer may contain the following types of CRUs:
Self-service CRU Parts that can be installed or replaced easily by customer themselves or by trained service technicians at an additional cost.
Optional-service CRU Parts that can be installed or replaced by customers with a greater skill level. Trained service technicians can also provide service to install or replace the parts under the type of warranty designated for the customers machine.
If you intend to install a CRU, Lenovo will ship the CRU to you. You might be required to return the defective part that is replaced by the CRU. When return is required: (1) return instructions, a prepaid shipping label, and a container will be included with the replacement CRU; and (2) you might be charged for the replacement CRU if Lenovo does not receive the defective CRU within thirty (30) days of your receipt of the replacement CRU. For full details, see the Lenovo Limited Warranty at https://www.lenovo.com/warranty/llw_ 02.
22 User Guide
CRUs for your product model The table below lists the CRUs and CRU types that are defined for your product model.
Part Self-service CRU Optional-service CRU
Power cord X
ac power adapter X
Notes:
CRU replacement instruction is provided in one or more of the following publications and are available from Lenovo at any time upon your request.
the product User Guide
the printed publications that came with the product
Replacement of any parts not listed above, including the built-in rechargeable battery, must be done by a Lenovo-authorized repair facility or technician. Go to https://support.lenovo.com/partnerlocation for more information.
Chapter 4. Help and support 23
Call Lenovo If you have tried to correct the problem yourself and still need help, you can call Lenovo Customer Support Center.
Before you contact Lenovo Record product information and problem details before you contact Lenovo.
Product information Problem symptoms and details
Product name
Machine type and serial number
What is the problem? Is it continuous or intermittent?
Any error message or error code?
What operating system are you using? Which version?
Which software applications were running at the time of the problem?
Can the problem be reproduced? If so, how?
Note: The product name and serial number can usually be found on the bottom of the computer, either printed on a label or etched on the cover.
Lenovo Customer Support Center During the warranty period, you can call Lenovo Customer Support Center for help.
Telephone numbers
For a list of the Lenovo Support phone numbers for your country or region, go to https:// pcsupport.lenovo.com/supportphonelist.
Note: Phone numbers are subject to change without notice. If the number for your country or region is not provided, contact your Lenovo reseller or Lenovo marketing representative.
Services available during the warranty period
Problem determination — Trained personnel are available to assist you with determining if you have a hardware problem and deciding what action is necessary to fix the problem.
Lenovo hardware repair — If the problem is determined to be caused by Lenovo hardware under warranty, trained service personnel are available to provide the applicable level of service.
Engineering change management — Occasionally, there might be changes that are required after a product has been sold. Lenovo or your reseller, if authorized by Lenovo, will make selected Engineering Changes (ECs) that apply to your hardware available.
Services not covered
Replacement or use of parts not manufactured for or by Lenovo or nonwarranted parts Identification of software problem sources Configuration of UEFI/BIOS as part of an installation or upgrade Changes, modifications, or upgrades to device drivers Installation and maintenance of network operating systems (NOS) Installation and maintenance of programs
For the terms and conditions of the Lenovo Limited Warranty that apply to your Lenovo hardware product, see Warranty information in the Safety and Warranty Guide that comes with your computer.
24 User Guide
Purchase additional services During and after the warranty period, you can purchase additional services from Lenovo at https:// pcsupport.lenovo.com/warrantyupgrade.
Service availability and service name might vary by country or region.
Chapter 4. Help and support 25
Appendix A. Notices and trademarks
Notices
Lenovo may not offer the products, services, or features discussed in this document in all countries. Consult your local Lenovo representative for information on the products and services currently available in your area. Any reference to a Lenovo product, program, or service is not intended to state or imply that only that Lenovo product, program, or service may be used. Any functionally equivalent product, program, or service that does not infringe any Lenovo intellectual property right may be used instead. However, it is the user’s responsibility to evaluate and verify the operation of any other product, program, or service.
Lenovo may have patents or pending patent programs covering subject matter described in this document. The furnishing of this document does not give you any license to these patents. You can send license inquiries, in writing, to: Lenovo (United States), Inc. 8001 Development Drive Morrisville, NC 27560 U.S.A. Attention: Lenovo Director of Licensing
LENOVO PROVIDES THIS PUBLICATION «AS IS» WITHOUT WARRANTY OF ANY KIND, EITHER EXPRESS OR IMPLIED, INCLUDING, BUT NOT LIMITED TO, THE IMPLIED WARRANTIES OF NON-INFRINGEMENT, MERCHANTABILITY OR FITNESS FOR A PARTICULAR PURPOSE. Some jurisdictions do not allow disclaimer of express or implied warranties in certain transactions, therefore, this statement may not apply to you.
Changes are made periodically to the information herein; these changes will be incorporated in new editions of the publication. To provide better service, Lenovo reserves the right to improve and/or modify the products and software programs described in the manuals included with your computer, and the content of the manual, at any time without additional notice.
The software interface and function and hardware configuration described in the manuals included with your computer might not match exactly the actual configuration of the computer that you purchase. For the configuration of the product, refer to the related contract (if any) or product packing list, or consult the distributor for the product sales. Lenovo may use or distribute any of the information you supply in any way it believes appropriate without incurring any obligation to you.
The products described in this document are not intended for use in implantation or other life support applications where malfunction may result in injury or death to persons. The information contained in this document does not affect or change Lenovo product specifications or warranties. Nothing in this document shall operate as an express or implied license or indemnity under the intellectual property rights of Lenovo or third parties. All information contained in this document was obtained in specific environments and is presented as an illustration. The result obtained in other operating environments may vary.
Lenovo may use or distribute any of the information you supply in any way it believes appropriate without incurring any obligation to you.
Any references in this publication to non-Lenovo Web sites are provided for convenience only and do not in any manner serve as an endorsement of those Web sites. The materials at those Web sites are not part of the materials for this Lenovo product, and use of those Web sites is at your own risk.
Copyright Lenovo 2022 27
Any performance data contained herein was determined in a controlled environment. Therefore, the result obtained in other operating environments may vary significantly. Some measurements may have been made on development-level systems and there is no guarantee that these measurements will be the same on generally available systems. Furthermore, some measurements may have been estimated through extrapolation. Actual results may vary. Users of this document should verify the applicable data for their specific environment.
This document is copyrighted by Lenovo and is not covered by any open source license, including any Linux agreement(s) which may accompany software included with this product. Lenovo may update this document at any time without notice.
For the latest information or any questions or comments, contact or visit the Lenovo Web site:
https://support.lenovo.com
Trademarks
Lenovo, the Lenovo logo, and IdeaPad are trademarks of Lenovo. Thunderbolt is a trademark of Intel Corporation or its subsidiaries. Microsoft, Windows, and Cortana are trademarks of the Microsoft group of companies. DisplayPort is a trademark of the Video Electronics Standards Association. The terms HDMI and HDMI High-Definition Multimedia Interface, and the HDMI logo are trademarks or registered trademarks of HDMI Licensing Administrator, Inc. in the United States and other countries. Wi-Fi is a registered trademark of Wi-Fi Alliance. USB-C is a trademark of USB Implementers Forum. All other trademarks are the property of their resp
Manualsnet FAQs
If you want to find out how the IdeaPad Gaming 3 15IAH7 Lenovo works, you can view and download the Lenovo IdeaPad Gaming 3 15IAH7 Laptop User Guide on the Manualsnet website.
Yes, we have the User Guide for Lenovo IdeaPad Gaming 3 15IAH7 as well as other Lenovo manuals. All you need to do is to use our search bar and find the user manual that you are looking for.
The User Guide should include all the details that are needed to use a Lenovo IdeaPad Gaming 3 15IAH7. Full manuals and user guide PDFs can be downloaded from Manualsnet.com.
The best way to navigate the Lenovo IdeaPad Gaming 3 15IAH7 Laptop User Guide is by checking the Table of Contents at the top of the page where available. This allows you to navigate a manual by jumping to the section you are looking for.
This Lenovo IdeaPad Gaming 3 15IAH7 Laptop User Guide consists of sections like Table of Contents, to name a few. For easier navigation, use the Table of Contents in the upper left corner.
You can download Lenovo IdeaPad Gaming 3 15IAH7 Laptop User Guide free of charge simply by clicking the “download” button in the upper right corner of any manuals page. This feature allows you to download any manual in a couple of seconds and is generally in PDF format. You can also save a manual for later by adding it to your saved documents in the user profile.
To be able to print Lenovo IdeaPad Gaming 3 15IAH7 Laptop User Guide, simply download the document to your computer. Once downloaded, open the PDF file and print the Lenovo IdeaPad Gaming 3 15IAH7 Laptop User Guide as you would any other document. This can usually be achieved by clicking on “File” and then “Print” from the menu bar.

Руководство пользователя
IdeaPad Gaming 3 (15″, 05)
Прочтите вначале
Прежде чем использовать этот документ и сам продукт, обязательно ознакомьтесь со следующими разделами:
•Приложение A «Важная информация по технике безопасности» на странице 27
•Руководство по технике безопасности и гарантии
•Руководство по установке
Первое издание (Апрель 2020)
© Copyright Lenovo 2020.
УВЕДОМЛЕНИЕ ОБ ОГРАНИЧЕНИИ ПРАВ: Если данные или программное обеспечение предоставляются в соответствии с контрактом Управления служб общего назначения США (GSA), на их использование, копирование и разглашение распространяются ограничения, установленные соглашением № GS-35F-05925.

Содержание
Об этом руководстве . . . . . . . . . .iii
Глава 1. Знакомство с компьютером . . . . . . . . . . . . . . 1
|
Вид спереди . . . . |
. . . . . |
. . |
. |
. . . . |
. |
1 |
|
Вид основания . . . |
. . . . . |
. . |
. |
. . . . |
. |
2 |
|
Вид слева . . . . . |
. . . . . |
. . |
. |
. . . . |
. |
3 |
|
Вид справа . . . . |
. . . . . |
. . |
. |
. . . . |
. |
4 |
Вид снизу . . . . . . . . . . . . . . . . . . 5
|
Компоненты и спецификации . . . . . . . . . |
. |
6 |
|
Заявление о скорости передачи данных |
||
|
через интерфейс USB . . . . . . . . . . |
. |
7 |
|
Условия эксплуатации . . . . . . . . . . |
. |
7 |
Глава 2. Начало работы с компьютером . . . . . . . . . . . . . . 9
|
Начало работы с Windows 10 . . . . . . . . . |
. |
9 |
|
Учетная запись Windows . . . . . . . . . |
. |
9 |
|
Рабочий стол Windows. . . . . . . . . . |
10 |
|
|
Lenovo Vantage и Lenovo PC Manager . . . . . |
11 |
|
|
Подключение к сетям . . . . . . . . . . . . |
11 |
|
|
Подключение к проводным сетям . . . . . |
11 |
|
|
Подключение к сетям Wi-Fi . . . . . . . . |
11 |
|
|
Меню «Кнопка Novo» . . . . . . . . . . . . |
12 |
|
|
Открытие меню «Кнопка Novo» . . . . . . |
12 |
|
|
Взаимодействие с компьютером . . . . . . . |
13 |
|
|
Быстрые клавиши на клавиатуре . . . . . |
13 |
|
|
Числовая клавиатура . . . . . . . . . . |
14 |
Глава 3. Подробнее о компьютере . . . . . . . . . . . . . . 15
|
Управление питанием . . . . . . . . . . . . |
15 |
|
Проверка состояния аккумулятора . . . . |
15 |
|
Зарядка аккумулятора. . . . . . . . . . |
15 |
|
Проверка температуры аккумулятора . . . |
15 |
|
Настройка поведения кнопки питания . . . |
15 |
|
Изменение или создание плана |
|
|
электропитания . . . . . . . . . . . . |
16 |
|
Установка режима производительности . . |
16 |
|
Изменение параметров в UEFI/BIOS Setup |
|
|
Utility . . . . . . . . . . . . . . . . . . . |
16 |
|
Что такое UEFI/BIOS Setup Utility . . . . . |
16 |
|
Запуск программы UEFI/BIOS Setup |
|
|
Utility . . . . . . . . . . . . . . . . . |
16 |
|
Изменение последовательности |
|
|
загрузки. . . . . . . . . . . . . . . . |
16 |
|
Изменение режима горячих клавиш . . . . |
17 |
|
Включение или отключение функции Always- |
|
|
On . . . . . . . . . . . . . . . . . . |
17 |
|
Установка паролей в UEFI/BIOS Setup Utility. . . |
17 |
|
Типы паролей . . . . . . . . . . . . . |
17 |
|
Задание пароля администратора . . . . . |
17 |
|
Изменение и удаление пароля |
|
|
администратора . . . . . . . . . . . . |
18 |
|
Задание пароля пользователя . . . . . . |
18 |
|
Включение пароля на включение |
|
|
компьютера . . . . . . . . . . . . . . |
18 |
|
Задание пароля на доступ к жесткому |
|
|
диску . . . . . . . . . . . . . . . . . |
19 |
|
Изменение или удаление пароля на доступ |
|
|
к жесткому диску . . . . . . . . . . . . |
19 |
|
Возврат в исходное состояние или |
|
|
восстановление Windows . . . . . . . . . . |
20 |
|
Варианты восстановления Windows 10 . . . |
20 |
|
Восстановление системы Windows . . . . |
20 |
|
Возврат Windows в исходное состояние . . |
21 |
|
Создание диска восстановления . . . . . |
21 |
|
Восстановление предыдущего состояния |
|
|
Windows или возврат ее в исходное |
|
|
состояние с помощью диска |
|
|
восстановления . . . . . . . . . . . . |
22 |
|
Глава 4. Справка и поддержка . . . |
23 |
|
Часто задаваемые вопросы . . . . . . . . . |
23 |
|
Ресурсы для самостоятельного устранения |
|
|
неполадок. . . . . . . . . . . . . . . . . |
23 |
|
Как обратиться в центр поддержки клиентов |
|
|
Lenovo . . . . . . . . . . . . . . . . . . |
25 |
|
Перед тем как связаться с Lenovo . . . . . |
25 |
|
Центр поддержки клиентов Lenovo . . . . |
25 |
|
Приобретение дополнительных услуг . . . . . |
26 |
Приложение A. Важная информация по технике
безопасности . . . . . . . . . . . . . 27
Приложение B. Информация о специальных возможностях и эргономике . . . . . . . . . . . . . . 41
Приложение C. Информация о соответствии . . . . . . . . . . . . . 47
Приложение D. Замечания и
товарные знаки . . . . . . . . . . . . 59
|
© Copyright Lenovo 2020 |
i |
ii Руководство пользователя

Об этом руководстве
•Это руководство распространяется на модели продуктов Lenovo, перечисленные ниже. Ваша модель продукта может выглядеть несколько иначе, чем на рисунках в данном руководстве пользователя.
|
Название модели |
Тип компьютера (MT) |
|
|
IdeaPad Gaming 3 15IMH05 |
81Y4 |
|
|
IdeaPad Gaming3 15IMH05D |
81Y4 |
|
|
IdeaPad Gaming 3 |
15IMH05 |
82CG |
|
IdeaPad Gaming 3 |
15ARH05 |
82EY |
|
IdeaPad Gaming3 15ARH05D |
82EY |
•Это руководство может содержать информацию об аксессуарах, функциях и программном обеспечении, которые доступны не на всех моделях.
•Это руководство содержит инструкции для устройств с операционной системой Windows 10. Эти инструкции неприменимы, если устанавливаются и используются другие операционные системы.
•Корпорация Microsoft® периодически вносит изменения в функции операционной системы Windows® через Центр обновления Windows. Следовательно, инструкции, связанные с операционной системой, могут устареть. Для получения самой актуальной информации см. ресурсы корпорации Майкрософт.
•Содержимое этого руководства может меняться без уведомления. Получить актуальную версию руководства можно по адресу https://support.lenovo.com.
|
© Copyright Lenovo 2020 |
iii |
iv Руководство пользователя
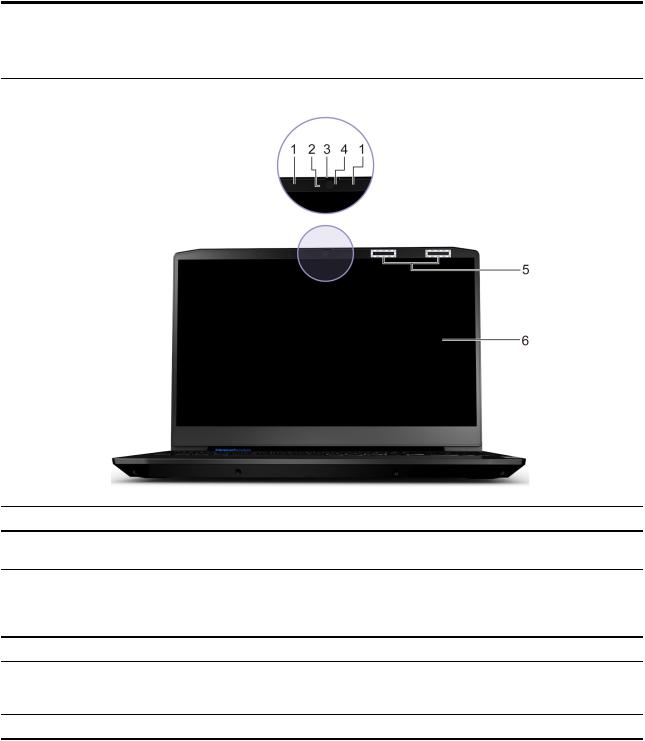
Глава 1. Знакомство с компьютером
Вид спереди
|
1. |
Микрофоны |
Улавливание и запись звука и голоса. |
|
2. |
Камера |
Захват неподвижных и подвижных изображений для создания |
|
фотографий, записи видео и видеочата. |
||
|
3. |
Ползунок шторки камеры |
Сдвиньте ползунок, чтобы закрыть или открыть объектив |
|
камеры. |
||
|
Примечание: Шторка камеры помогает сохранить |
||
|
конфиденциальность. |
||
|
4. |
Индикатор камеры |
Если этот индикатор горит, камера используется. |
|
5. |
Антенны беспроводной связи |
Отправка и получение радиоволн для встроенного модуля |
|
беспроводной локальной сети и Bluetooth. |
||
|
Примечание: Антенны не видны снаружи компьютера. |
||
|
6. |
Экран |
Отображение текста, графики и видео. |
|
© Copyright Lenovo 2020 |
1 |
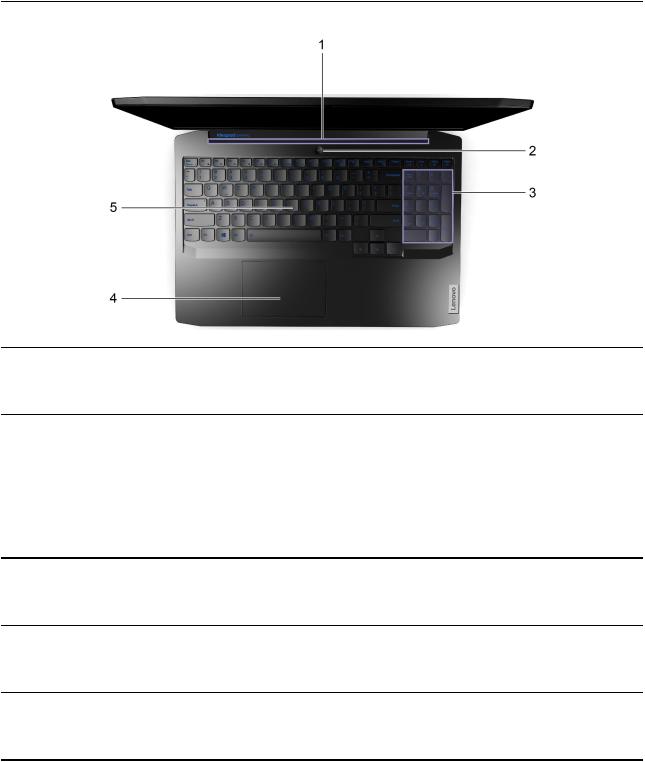
Вид основания
|
1. |
Вентиляционные щели (на выходе) |
Для рассеивания внутреннего тепла должен обеспечиваться |
|
исходящий поток воздуха. |
||
|
Примечание: Не перекрывайте вентиляционные щели. В |
||
|
противном случае компьютер может перегреться. |
||
|
2. |
Кнопка питания (с подсветкой) |
Нажмите кнопку, чтобы включить компьютер или перевести его в |
|
спящий режим. |
||
|
Индикатор на кнопке питания показывает состояние системы |
||
|
компьютера. |
||
|
• Горит: Компьютер включен. |
||
|
• Не горит: Компьютер выключен или находится в режиме |
||
|
гибернации. |
||
|
• Мигает: Компьютер в спящем режиме. |
||
|
3. |
Числовая клавиатура |
Чтобы включить или выключить цифровую клавиатуру, нажмите |
|
клавишу Num Lock. |
||
|
Примечание: Если индикатор Num Lock горит, то цифровая |
||
|
клавиатура работает в режиме ввода цифр. |
||
|
4. |
Сенсорная панель |
Поддержка прикосновений пальцами и всех функций обычной |
|
мыши. |
||
|
Примечание: Также сенсорная панель поддерживает |
||
|
одновременное распознавание нескольких точек касания. |
||
|
5. |
Клавиатура |
Ввод символов и взаимодействие с программами. |
|
Примечание: Также клавиатура оснащена сочетаниями клавиш |
и функциональными клавишами для быстрого изменения параметров и выполнения задач.
2 Руководство пользователя
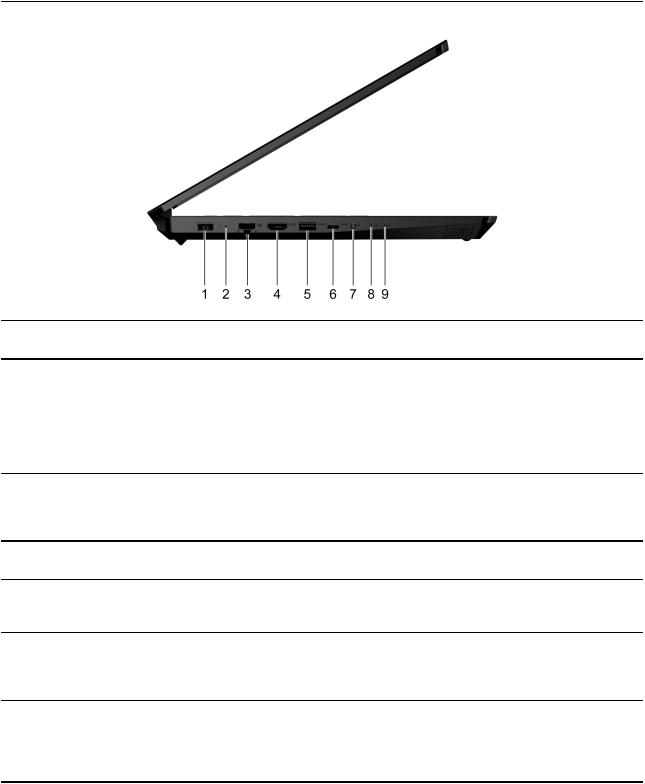
Вид слева
|
1. |
Разъем питания |
Служит для подключения к электросети с помощью входящих в |
|
комплект поставки адаптера электропитания и шнура питания. |
||
|
2. |
Индикатор зарядки |
Показывает, подключен ли компьютер к сети переменного тока. |
|
• Горит белым светом: Компьютер подключен к сети |
||
|
переменного тока; аккумулятор заряжен на 91–100% |
||
|
• Горит желтым светом: Компьютер подключен к сети |
||
|
переменного тока; аккумулятор заряжен на 1–90% |
||
|
• Не горит: Компьютер не подключен к сети переменного тока |
||
|
3. |
Разъем Ethernet |
Используется для подключения к локальной сети (LAN). |
|
Примечание: Если зеленый индикатор горит, компьютер |
||
|
подключен к локальной сети. Когда желтый индикатор мигает, |
||
|
выполняется передача данных. |
||
|
4. |
Разъем HDMITM |
Используется для подключения совместимых цифровых |
|
аудиоустройств и видеомониторов, например HDTV. |
||
|
5. |
Разъем USB (3.2 Gen 1) Type-A |
Подключение к устройств, поддерживающих интерфейс USB, |
|
например USB-клавиатуры, USB-мыши, USB-накопителя или |
||
|
USB-принтера. |
||
|
6. |
Разъем USB-CTM |
Подключение к внешнему накопителю или устройствам данных. |
|
Примечание: Для подключения внешних устройств может |
||
|
потребоваться соответствующий адаптер. Этот разъем нельзя |
||
|
использовать для подключения внешних устройств отображения. |
||
|
7. |
Комбинированный аудиоразъем |
Служит для подключения наушников или гарнитуры с 3,5 мм 4- |
|
контактным разъемом. |
||
|
Примечание: Этот разъем не поддерживает автономные |
внешние микрофоны. Гарнитура должна быть оборудована одиночным разъемом.
Глава 1. Знакомство с компьютером 3
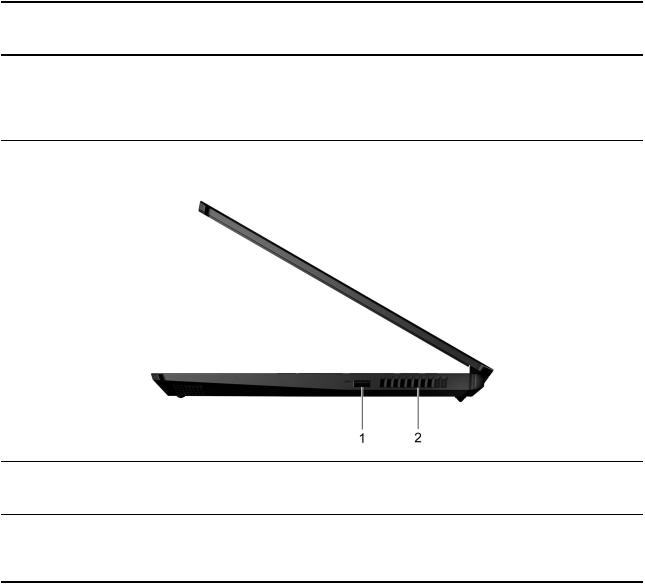
8.Отверстие для кнопки Novo
9.Индикатор питания
Вид справа
Нажмите кнопку Novo, чтобы открыть меню Кнопка Novo В этом меню можно открыть программу UEFI/BIOS Setup Utility, меню загрузки или экран параметров загрузки Windows.
•Горит: Компьютер включен.
•Не горит: Компьютер выключен или находится в режиме гибернации.
•Мигает: Компьютер в спящем режиме.
|
1. |
Разъем USB (3.2 Gen 1) Type-A |
Подключение к устройств, поддерживающих интерфейс USB, |
|
например USB-клавиатуры, USB-мыши, USB-накопителя или |
||
|
USB-принтера. |
||
|
2. |
Вентиляционные щели (на выходе) |
Для рассеивания внутреннего тепла должен обеспечиваться |
|
исходящий поток воздуха. |
||
|
Примечание: Не перекрывайте вентиляционные щели. В |
||
|
противном случае компьютер может перегреться. |
4 Руководство пользователя
![]()
Вид снизу
|
1. |
Вентиляционные щели |
Для рассеивания внутреннего тепла должен обеспечиваться входящий поток |
|
воздуха. |
||
|
(на входе) |
Примечание: Не перекрывайте вентиляционные щели. В противном случае |
|
|
компьютер может перегреться. |
||
|
2. |
Динамики |
Воспроизводят звук. |
Глава 1. Знакомство с компьютером 5

Компоненты и спецификации
Размеры
Адаптер электропитания от сети переменного тока
Аккумуляторный
блок
Микропроцессор
Память
Встроенный
накопитель
Экран
Клавиатура
Разъемы и гнезда
•Ширина: 359 мм
•Глубина: 249,6 мм
•Толщина: 24,9 мм
•Вход: 100–240 В перем. тока, 50–60 Гц
•Выход: 20 В пост. тока, 6,75 А
•Мощность: 135 Вт
|
• |
Емкость: 45 Вт |
ч |
|
|
• |
Число ячеек: 3 |
Для просмотра сведений о микропроцессоре своего компьютера щелкните кнопку «Пуск» правой кнопкой мыши и выберите Система
•Тип: Двойной линейный модуль памяти (DIMM)
•Число гнезд: 2
•Тип: M.2 твердотельный диск
•Форм-фактор
–2242
–2280
•Шина: PCI Express
•Размер: 396,24 мм
•Разрешение дисплея: 1920 × 1080 пикселей
•Функциональные клавиши
•Горячие клавиши
•Числовая клавиатура
•Подсветка клавиатуры
•Разъем питания
•Комбинированный аудиоразъем
•Разъем Ethernet
•Разъем USB (3.2 Gen 1) Type-A × 2
•Разъем USB-C
–Поддержка передачи данных со скоростью до 5 Гбит/с при использовании интерфейса USB 3.2 Gen 1
–Выходная мощность до 5 В и 1.5 А
•Разъем HDMI
6 Руководство пользователя

|
Функции |
• |
Пароли UEFI/BIOS |
||
|
безопасности |
||||
|
– |
Пароль администратора |
|||
|
– |
Пароль пользователя |
|||
|
– Главный пароль на доступ к жесткому диску |
||||
|
– Пользовательский пароль на доступ к жесткому диску |
||||
|
Компоненты для |
• |
Bluetooth |
||
|
беспроводной |
||||
|
• |
Беспроводная локальная сеть |
|||
|
связи |
Примечание: Емкость аккумулятора является типовой или средней емкостью, измеренной в определенной тестовой среде. Емкость, измеренная в других условиях, может отличаться, но она не будет ниже номинальной (см. ярлык изделия).
Заявление о скорости передачи данных через интерфейс USB
В зависимости от многих факторов, таких как вычислительная мощность компьютера и периферийных устройств, свойства файлов и другие особенности конфигурации системы и условий эксплуатации, фактическая скорость передачи данных через разные разъемы USB этого устройства будет различаться и будет ниже указанной далее скорости обмена данными для каждого соответствующего устройства.
|
USB-устройство |
Скорость обмена данными (Гбит/с) |
|
3.2 Gen 1 |
5 |
|
3.2 Gen 2 |
10 |
|
3.2 Gen 2 × 2 |
20 |
Условия эксплуатации
Максимально допустимая высота над уровнем моря без герметизации
3 048 м
Температура
•До высоты над уровнем моря 2 438 м
–Рабочая: от 5 до 35°C
–Хранение: от 5 до 43°C
•На высоте над уровнем моря выше 2 438 м
–Максимальная температура при работе в условиях пониженного давления: 31,3°C
Примечание: При зарядке аккумулятора его температура должна быть не ниже 10°C.
Относительная влажность
•Рабочая: от 8 до 95%, по мокрому термометру 23°C
•Хранение: от 5 до 95%, по мокрому термометру 27°C
Глава 1. Знакомство с компьютером 7
8 Руководство пользователя

Глава 2. Начало работы с компьютером
Начало работы с Windows 10
Изучите основные концепции Windows 10 и приступите к работе немедленно. Подробные сведения о Windows 10 см. в справочной информации по Windows.
Учетная запись Windows
Для использования операционной системы Windows необходимо создать хотя бы одну учетную запись. Это может быть локальная учетная запись или учетная запись Майкрософт.
Локальные учетные записи
Локальная учетная запись создается на конкретном устройстве с Windows и может использоваться только на этом устройстве. Рекомендуется установить пароль для каждой локальной учетной записи, чтобы предотвратить несанкционированный доступ к устройству.
Учетные записи Майкрософт
Учетная запись Майкрософт — это учетная запись пользователя, с помощью которой выполняется вход в ПО и службы Microsoft. Если вы используете службы Microsoft, например OneDrive, Outlook. com, Xbox Live, Office 365 и Skype, у вас, возможно, уже есть учетная запись Майкрософт. Если у вас нет этой учетной записи, ее можно создать бесплатно.
Есть два главных преимущества использования учетной записи Майкрософт:
•Вход только один раз. При использовании для входа в Windows 10 учетной записи Майкрософт не нужно входить еще раз для использования OneDrive, Skype, Outlook.com и других служб Microsoft.
•Параметры можно синхронизировать. Если использовать учетную запись Майкрософт для входа на нескольких устройствах с Windows, определенные параметры Windows можно синхронизировать между этими устройствами.
Переключение между локальной учетной записью и учетной записью Майкрософт
Если для входа в Windows 10 используется локальная учетная запись, можно переключиться на учетную запись Майкрософт.
Шаг 1. Откройте меню «Пуск» и выберите Параметры Учетные записи
Шаг 2. Выберите Выполнять вход с учетной записью Майкрософт
Шаг 3. Если у вас уже есть учетная запись Майкрософт, введите имя и пароль этой учетной записи для входа. В противном случае выберите Создать учетную запись чтобы создать новую учетную запись Майкрософт.
Примечание: При первом использовании учетной записи Майкрософт устройство должно иметь доступ к Интернету.
Чтобы вернуться к локальной учетной записи, откройте меню «Пуск» и выберите Параметры Учетные записи Войти вместо этого с локальной учетной записью
Добавление учетных записей пользователей
Для добавления учетных записей пользователей в Windows необходима учетная запись администратора.
|
© Copyright Lenovo 2020 |
9 |
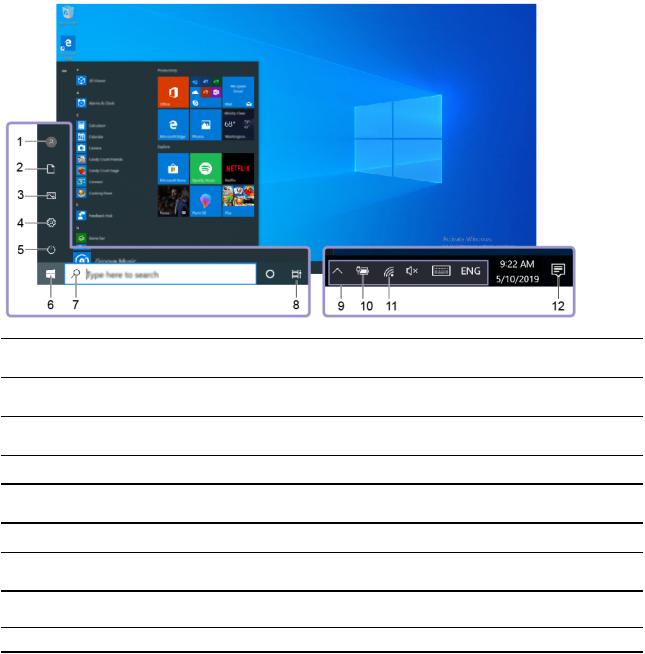
Добавьте дополнительные учетные записи пользователей, если компьютером будут пользоваться члены семьи или другие люди.
Шаг 1. Откройте меню «Пуск» и выберите Параметры Учетные записи Семья и другие
пользователи
Шаг 2. Выберите Добавить пользователя для этого компьютера
Примечание: Чтобы добавить членов семьи, необходимо войти в систему с использованием учетной записи Майкрософт.
Шаг 3. Задайте имя пользователя и пароль для учетной записи пользователя.
Рабочий стол Windows
1.Учетная запись 
2.Документы 
3.Изображения 
4.Параметры 
5.Питание 
6.Кнопка «Пуск» 
7.Windows Search 
8.Представление задач 
9.Область уведомлений Windows
Изменение параметров учетной записи, блокировка компьютера или выход из текущей учетной записи.
Откройте папку Документы в которую по умолчанию направляются для хранения полученные файлы.
Откройте папку Изображения в которую по умолчанию направляются для хранения полученные изображения.
Откройте раздел «Параметры».
Завершение работы, перезапуск или перевод компьютера в спящий режим.
Откройте меню «Пуск».
Введите искомый термин в поле поиска и получите результаты на компьютере и в Интернете.
Отображение всех открытых приложений и переключение между ними.
Отображение уведомлений и состояния некоторых функций.
10 Руководство пользователя
|
10. |
Значок состояния аккумулятора |
Отображение состояния питания и изменение параметров |
|
|
аккумулятора или питания. |
|||
|
Подключение к доступной беспроводной сети и отображение |
|||
|
11. |
Значок сети |
состояния сети. При подключении к проводной сети значок |
|
|
изменится на . |
|||
|
12. |
Центр уведомлений |
Отображение последних уведомлений из приложений и |
|
|
предоставление быстрого доступа к некоторым функциям. |
|||
|
Открытие меню «Пуск» |
|||
|
• Нажмите кнопку Пуск |
. |
• Нажмите клавишу с логотипом Windows на клавиатуре.
Открытие панели управления
•Откройте меню «Пуск» и выберите Служебные — Windows Панель управления
•Используйте Windows Search.
Запуск приложения
•Откройте меню «Пуск» и выберите приложение, которое требуется открыть.
•Используйте Windows Search.
Lenovo Vantage и Lenovo PC Manager
Программное обеспечение Lenovo Vantage и Lenovo PC Manager разработано компанией Lenovo. Оно предоставляет следующие возможности:
•Просмотр сведений о продукте
•Просмотр сведений о гарантии и поддержке
•Запуск проверки оборудования и диагностики проблем
•Изменение параметров оборудования
•Обновление Windows, драйверов и UEFI/BIOS
ПО Lenovo Vantage или PC Manager может быть предустановлено на вашем компьютере. Чтобы открыть это ПО, введите его название в Windows Search и выберите соответствующий результат.
Примечание: Если приложение Lenovo Vantage не предустановлено, его можно скачать в Microsoft Store.
Подключение к сетям
Компьютер можно подключить с помощью проводной или беспроводной сети.
Подключение к проводным сетям
Если компьютер оснащен разъемом Ethernet (RJ-45), его можно подключить к проводной сети кабелем Ethernet.
Подключение к сетям Wi-Fi
Для подключения к сетям Wi-Fi компьютер должен быть оснащен адаптером беспроводной связи.
Глава 2. Начало работы с компьютером 11

Шаг 1. Щелкните значок сети в области уведомлений Windows.Отображается список сетей поблизости.
Примечание: Если сети не отображаются, убедитесь, что режим «в самолете» отключен.
Шаг 2. Выберите сеть и нажмите Подключиться Если необходимо, укажите ключ безопасности.
Примечание: Как правило, за ключ сети отвечает ее администратор.
Удаление сети Wi-Fi
Windows сохраняет список сетей Wi-Fi, к которым выполнялось подключение, включая их пароли и другие параметры. Это позволяет автоматически подключать компьютер к сохраненной сети, если он находится в зоне ее действия. Однако если пароль сети изменился, ее необходимо удалить, чтобы ввести новый пароль.
|
Шаг 1. |
Выберите Пуск Параметры Сеть и Интернет Wi-Fi |
. |
|
Шаг 2. |
Щелкните Управление известными сетями |
|
|
Шаг 3. |
Щелкните имя сети и выберите Забыть |
. |
Включение и отключение режима «в самолете»
Режим «в самолете» позволяет легко включить или отключить беспроводную передачу данных на компьютере. Этот режим может пригодиться при посадке на самолет.
Шаг 1. Щелкните значок центра поддержки в области уведомлений Windows.
Шаг 2. Щелкните значок Режим «в самолете» чтобы включить или отключить его.
Примечание: Нажмите Развернуть если значка режима «в самолете» не видно.
Меню «Кнопка Novo»
Меню «Кнопка Novo» можно отобразить до запуска операционной системы. В меню можно выполнить следующие операции:
•Запуск программы BIOS/UEFI Setup Utility
•Открыть меню выбора загрузочного устройства
•Открыть экран параметров загрузки Windows
На экране параметров загрузки Windows можно выполнить следующие операции:
•Продолжение: Выйти и перейти к Windows 10
•Использовать устройство: Использовать USB-накопитель, сетевое подключение или DVD-диск для восстановления Windows
•Устранять неполадки: Сбросить настройки компьютера или посмотреть дополнительные параметры
•Выключить компьютер
Открытие меню «Кнопка Novo»
На компьютерах Lenovo с кнопкой Novo можно нажать кнопку, чтобы открыть меню «Кнопка Novo».
Шаг 1. Выключите компьютер.
Шаг 2. Откройте ЖК-экран и нажмите кнопку Novo.
12 Руководство пользователя
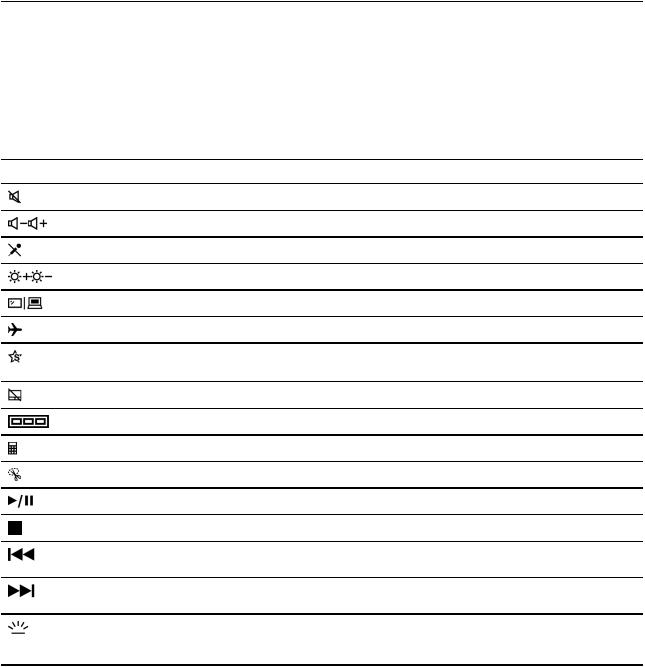
Примечание: Либо выключите компьютер. Нажмите клавишу Fn и кнопку питания, чтобы открыть меню «Кнопка Novo».
Взаимодействие с компьютером
Быстрые клавиши на клавиатуре
Некоторые клавиши на клавиатуре содержат значки. Такие клавиши называются клавишами быстрого доступа. Их можно использовать по отдельности или в комбинации с клавишей Fn для быстрого открытия некоторых приложений или изменения определенных настроек. Функции горячих клавиш указываются значками на них.
|
Горячая клавиша |
Функция |
|
Включение/отключение звука. |
|
|
Уменьшение/увеличение громкости. |
|
|
Выключение/включение микрофона. |
|
|
Увеличение или уменьшение яркости экрана. |
|
|
Переключение устройств отображения. |
|
|
Включение и отключение режима «в самолете». |
|
|
Открыть Lenovo Vantage, Lenovo PC Manager или панель запуска |
|
|
приложений. |
|
|
Включение/отключение сенсорной панели. |
|
|
Отобразить миниатюры окон всех открытых приложений. |
|
|
Откройте приложение «Калькулятор Windows». |
|
|
Открыть приложение «Ножницы Windows». |
|
|
Начать или приостановить воспроизведение. |
|
|
Остановить воспроизведение. |
|
|
Перейти к предыдущему файлу мультимедиа в списке воспроизведения или |
|
|
папке. |
|
|
Перейти к следующему файлу мультимедиа в списке воспроизведения или |
|
|
папке. |
|
|
Включение/отключение подсветки клавиатуры или регулировка ее яркости. |
|
|
Примечание: Эту быструю клавишу необходимо использовать в сочетании |
|
|
с клавишей Fn. |
Режим горячих клавиш
Некоторые горячие клавиши используются вместе с функциональными клавишами (F1–F12). Hotkey Mode — это параметр UEFI/BIOS, с помощью которого можно изменить способ использования горячих (или функциональных) клавиш.
Глава 2. Начало работы с компьютером 13

|
Значение параметра Hotkey |
Использование горячих клавиш |
|
Mode |
|
|
Disabled |
Нажатие и удержание клавиши Fn |
|
и нажатие одной из горячих |
|
|
клавиш. |
|
|
Enabled |
Непосредственное нажатие |
|
горячих клавиш. |
Использование функциональных клавиш
Непосредственное нажатие функциональных клавиш.
Нажатие и удержание клавиши Fn и нажатие одной из функциональных клавиш.
Примечание: На горячие клавиши, которые не используются вместе с функциональными клавишами, параметр режима горячих клавиш не влияет. Такие клавиши всегда следует использовать вместе с клавишей Fn.
Числовая клавиатура
Некоторые компьютеры Lenovo оснащены выделенной цифровой панелью, расположенной с правой стороны клавиатуры. Эта панель используется для быстрого ввода чисел и операторов.
|
Нажмите клавишу NumLock чтобы включить или отключить цифровую панель. |
, |
14 Руководство пользователя
 Loading…
Перейти к контенту
Ноутбуки Lenovo

- Размер инструкции: 4.74 Мб
- Формат файла: pdf
Если вы потеряли инструкцию от ноутбука Lenovo IdeaPad Gaming 3 15IMH05D, можете скачать файл для просмотра на компьютере или печати.
Инструкция для ноутбука Lenovo IdeaPad Gaming 3 15IMH05D на русском языке. В руководстве описаны возможности и полезные функции, а также правила эксплуатации. Перед использованием внимательно ознакомьтесь с инструкцией.
Чтобы не читать всю инструкцию вы можете выполнить поиск по содержимому внутри инструкции и быстро найти необходимую информацию. Рекомендации по использованию помогут увеличить срок службы ноутбука Lenovo IdeaPad Gaming 3 15IMH05D. Если у вас появилась проблема, то найдите раздел с описанием неисправностей и способами их решения. В нем указаны типичные поломки и способы их решения.