
Приложение Project позволяет:
-
создавать планы проектов;
-
создавать проектные группы и выделять ресурсы;
-
просматривать различные представления задач и ресурсов;
-
оценивать ход выполнения задач;
-
управлять бюджетом.
Примечания:
-
Это краткое руководство относится к Microsoft Project 2019, 2016 и классическому клиенту Project Online, доступному по подписке на Microsoft 365. В Project Online имеются дополнительные функции, поддерживающие взаимодействие по сети.
-
Дополнительные сведения о создании нового проекта см. в статье Создание нового проекта.
Создание проекта на основе шаблона
-
Откройте приложение Project.
Если вы уже работаете над планом проекта, выберите пункты Файл > Создать. -
Выберите шаблон или введите запрос в поле Поиск шаблонов в сети и нажмите клавишу ВВОД.
Чтобы создать проект с нуля, выберите Новый проект. -
Выберите шаблон, настройте параметры и нажмите кнопку Создать.
Измените ресурсы, задачи и сроки в шаблоне в соответствии с требованиями проекта.
Примечание: Чтобы создать новый проект на основе существующего, измените даты начала и завершения проекта, а затем сохраните файл проекта с новым именем в другом месте.
Нужна дополнительная помощь?
Нужны дополнительные параметры?
Изучите преимущества подписки, просмотрите учебные курсы, узнайте, как защитить свое устройство и т. д.
В сообществах можно задавать вопросы и отвечать на них, отправлять отзывы и консультироваться с экспертами разных профилей.
How to Use Microsoft Project
Microsoft Project is a powerful tool for the creation of charts, timelines, task sheets, and more. Use it to help your team keep track of project progress, create schedules, and visualize data.
For this tutorial, we’ll be using Microsoft Project 2016. There are many versions available, but many of the steps will translate well among them. This MS Project tutorial will cover the basic features that are found in most versions.
Features of Microsoft Project
Microsoft Project includes features to set up projects and run automated reports based on progress, budget, and time tracking. With it, you can set up timelines, add and schedule tasks, set up dependencies, add resources, and track progress.
See a head-to-head comparison of Smartsheet and Microsoft Project

Discover how these two tools compare across six key factors, including: user experience, shareability, reporting, automation, integrations, and price.
Watch the full comparison video
How to Create a Timeline in Microsoft Project Tutorial
To create a timeline in Microsoft Project, create a list of tasks with start and end dates for each. Then, add those tasks to the timeline. We’ll guide you through the process step by step below:
1. Create a Task List
You’ll need to build a list of required tasks. While building the list, try to prioritize them in the order they need to be completed. To get started, open Microsoft Project, click Blank Project, and type each task into a cell under Task Name.
2. Add Start and Finish Dates to Each Task
To enter start and end dates, click the Start cell that corresponds to the first task and enter a date (if you click the down arrow in the cell, a calendar will appear and you can use that to select a date). Then tab over to the Finish row and enter an end date. Microsoft will automatically enter the amount of time it will take to complete the task in the Duration row. You’ll notice that as you add the dates, bar charts will be added to the timeline in the right-hand pane.
3. Add Tasks to the Timeline
To add tasks to the Timeline, click the View tab and click the Timeline bar that appears above the task list. Then right-click on a Task cell and choose Add to Timeline from the list and click it to add the task to the timeline.
Tip: You can select all tasks in the list and then right-click on the mouse and select Add to Timeline to add all the tasks simultaneously.
How to Set Up Resources in Microsoft Project
Set up resources in Microsoft Project through the Resource tab in your project. Use this tab to establish the people, or resources, that will be assigned to tasks on your timeline. We’ll guide you through the steps below:
1. Open the Resource Sheet
From the View tab, click Resource Sheet. The Resource Sheet will appear on the screen.
2. Add Resources
Type the name of the resource needed in the Resource Name field and complete the remainder of the information: Type, Material (if it’s a material), Initials, Max (max amount of time), Standard Rate, Overtime, Cost/Use, Accrue, Base, and Code.
Once your resources are added to the project, you can easily view who is available to take on the task based on their workload, and manage how much time each team member will spend on tasks in the Resource Management view. (Smartsheet is an ideal tool for project managers because the Resource Management feature provides real-time information about your team’s availability in one sheet, so you can easily make decisions on assignments and update responsibilities to maximize your team’s time.)
How to Assign Tasks in Microsoft Project
Once you have created a timeline and set up your resources in Microsoft Project, use the Gantt chart view to assign tasks. We’ll walk you through using the task form to assign tasks to your resources below.
One benefit of MS Project is that it can calculate the time it will take a person to complete a task based on their availability. If an important part of the project needs to be done quickly, you can assign multiple people and the program will estimate the time needed to complete the task accordingly. This also alerts the people assigned to the project to the time that is required of them.
1. Switch to the Gantt chart
To assign tasks, you’ll need to switch to the Gantt chart. Click the Gantt chart icon in top left corner of the window.
2. Open the Task Form
You should still be in the View tab. Click the Details box in the ribbon. The Task Form should appear on the lower half of the screen. If it doesn’t appear, click the down arrow in the Details box and select Task Form.
3. Select a Task to Assign
Click a task in the Gantt chart view and it will appear in the Name section of the Task Form. Click the box under Resource Name and choose a resource from the drop-down menu. Then click OK.
You can add another person to the same task by clicking the area under Resource Name and choosing the name you want. Click OK. As you assign tasks, the amount of time will be added to the Gantt chart.
Repeat steps to assign all the tasks.
Note: Clicking the Next button (located on the right side of the OK button) will load the next task in the Gantt chart.
How to Schedule Tasks Automatically in Microsoft Project
When scheduling tasks with Microsoft Project, you have two options. You can assign and track tasks manually, or use the automatic feature to schedule tasks based on dependencies, calendars, and constraints. Learn how to use the automatic feature below:
1. Access Microsoft Project Settings
Click File on the menu bar and choose Options (it’s the last choice in the left column). Click Edit project settings.
2. Change Schedule Options
When the Project Options form appears on the screen, click Schedule in the left column.
Next, under Scheduling Options for this Project section, click the drop-down menu for New Tasks Created. The default is set to Manually Scheduled. Select and click Auto Scheduled and click the OK button.
How to Create Task Dependencies in Microsoft Project
Dependencies occur when one task requires another’s completion to move on to the next phase. To create task dependencies in Microsoft Projects, link any two tasks in Gantt chart view. When linked, all changes made to the first task affect the second.
1. Switch to Gantt Chart View
You should still be in the Gantt chart view. If you’re not, click the Gantt chart icon in top left corner of the window.
2. Select Tasks to Link
Click the Task tab in the menu bar. Identify the two tasks in the list that you want to link. Click the first task and press and hold the Ctrl key and select the second task. Click the chain icon in the ribbon to link the tasks. You’ll see an arrow appear on the Gantt chart that connects the items.
Follow the same steps to link additional items.
Generate a Cost Repost in Microsoft Project
Once you have entered your timeline and resource information, you can use Microsoft Project to run a cost overview with the Reports tab. We’ll walk you through the process of generating a cost report below:
1. Select the Report Tab
Click the Report tab to get a quick overview of the reports you can run.
2. Choose a Cost Report to Run
Click the arrow below Costs in the ribbon and click Resource Cost Overview.
A report like the one below will be generated.
Track the Progress of Your Microsoft Project
To track the progress of your Microsoft Project, ensure that you keep the status of tasks updated at all times. Mark tasks on track, and use the completion percentage tools to note which tasks are on time or behind schedule.
1. Mark Tasks That Are on Track
Click the Task tab in the menu bar to see all the task options. Click a task that you want to update. If the task is on track, click the Mark on Track button in the ribbon.
2. Use Predetermined Percentages to Track Tasks
To the left of the Mark on Track option, there are percentages that you can use to denote the progress of a task. Click a task to update and click 0%,25%, 50%, 75%, or 100%. You’ll see a line drawn through the corresponding bar on the Gantt chart that signifies how much of the task is complete.
3. Update Tasks
Sometimes tasks fall behind or get accomplished ahead of schedule. You can use the Update Task option to update the status. Click the down arrow next to Mark on Track and click Update Tasks.
A dialogue box will appear where you can update status and change start and end dates. Make any changes and click OK.
These are all the steps you need to get started and create a project, assign and manage tasks, and run reports in Microsoft Project 2016.
How to Easily Create a Project Plan and Manage Tasks in Smartsheet
Smartsheet offers a plethora of templates to help you get started using the tool, so there’s no need to start from scratch. You can track and manage projects based on specific industries and uses like basic Agile projects, project management, marketing campaign analysis, customer order tracking, and more. You can even get started with a timeline template and customize it to track your business needs. Best of all, you can share your project with an infinite number of internal and external stakeholders (even if they don’t have a Smartsheet account).
How to Create a Project in Smartsheet
Since we used a timeline to walk you through how to create a project in Microsoft Project, we’re going to do the same process using Smartsheet. We’re also use the example of creating an RFP. Once you create your RFP project in Smartsheet, you can share it with anyone.
Create a Timeline with Smartsheet
Let’s start by creating a timeline, which is easy to do when using a pre-formatted template. There are several templates available that cover the work management needs of many different verticals.
1. Search for a Template
Open Smartsheet, click the Home tab, and click the blue Create New button and select Browse Templates.
In the Search Templates box, type “Timeline” and click the magnifying glass icon.
2. Choose a Template
There will be a few options, but for this tutorial, click Simple Project with Gantt Timeline. Next, click the blue Use Template button.
3. Name and save the Template
In the Name Your Sheet box, type the name of the template and select where to save it in Smartsheet. Click OK.
4. Add Tasks and Dates
Double click the first gray bar (called Section 1), highlight the existing content, and type your first task. Add start and end dates by clicking the calendar icon and click a start or end date. Continue to fill out all your tasks and start/end dates.
Tip: To remove the yellow Need Help copy at the top of the template, click the box and press Delete on your keyboard. To remove the color, click the color fill option in the toolbar and click Automatic.
5. Add Resources and Assign Tasks
Choose a task to assign a resource and type the name of the resource in the corresponding box in the Assigned To column.
6. Add Task Dependencies
If a specific task can’t be completed until another one is finished, you can add dependencies. Click a column in the sheet, right-click the mouse button and click Edit Project Settings.
Click the box for Dependencies Enabled, and Predecessor and Duration columns will be added to the sheet. Click the blue OK button. The time is takes to complete each task will automatically be filled in the Duration column.
If any task is dependent on another task, type the number of that row in the Predecessor column. For example, in order to write an RFP document, research must be completed first. The task “Research Requirements” is row 2 and “Write Document” is row 3, so type the number 2 in the Predecessors column for row 3.
Click the Grid View icon to see the relationship between tasks appear on In the Gantt chart.
Get More Project Management Flexibility with Smartsheet
From simple task management and project planning to complex resource and portfolio management, Smartsheet helps you improve collaboration and increase work velocity — empowering you to get more done.
The Smartsheet platform makes it easy to plan, capture, manage, and report on work from anywhere, helping your team be more effective and get more done. Report on key metrics and get real-time visibility into work as it happens with roll-up reports, dashboards, and automated workflows built to keep your team connected and informed.
When teams have clarity into the work getting done, there’s no telling how much more they can accomplish in the same amount of time. Try Smartsheet for free, today.
Ниже находятся учебные видео по изучению Microsoft Project.
К данному курсу имеется Самоучитель, который актуализуется нашим Сообществом на Facebook из более чем 12000 профессионалов. Чтобы получить к нему доступ вам нужно вступить нашу Группу Facebook и самоучитель вы увидите закрепленным сверху по этой ссылке
Чтобы не ожидать подтверждения модератором вступления в группу заполните короткую анкету о своих интересах, а также примите Правила группы, после этого робот Facebook вас запустит в группу авоматически.
Для пользователей ВКонтакта для доступа к Самоучителю и помощи можно использовать эту группу
Чтобы не ожидать подтверждения модератором своего вступления используйте эту специальную ссылку с приглашением и вы получите доступ к материалам сразу же.
Зачем нужен Microsoft Project?
Данный видеоурок рассказывает, что такое MS Project и чем он управляет: сроками, ресурсами и бюджетом.
Как настроить Microsoft Project 2016 перед началом работы
Мучаетесь с непонятными задачами «со скрепкой»? Минимальные стартовые настройки в этом видео.
Календари Microsoft Project 2016
Календари MS Project довольно сложная система и подробнее об них будет рассказано в следующих уроках, но как ввести выходные нужно знать сразу.
Иерархическая структура задач (ИСР) в Microsoft Project 2016
Работы в Microsoft Project всегда управляют с помощью иерархии для видимости итогов по этапам.
Даты и длительности задач в Microsoft Project 2016
Вы можете задавать в Microsoft Project даты и длительности зада директивно.
Связи задач в Microsoft Project 2016
Обычно 90% сроков в MS Project не задаются директивно, а рассчитываются с помощью связей.
Диаграмма Гантта и настройка шкалы времени в Microsoft Project 2016
Основная визуализация задач проекта во времени — это диаграмма Ганта. Никак не можете заставить ее отображать нужные единицы времени? Это видео для вас!
Дорожная карта проекта в Microsoft Project 2016
Обычно руководителям не интересна детальная диаграмма Ганта и они используют сокращенные «Дорожные карты» проектов с важнейшими контрольными точками и этапами.
Критический путь в Microsoft Project 2016
Далеко не все задачи в проекте определяют его длительность, а только те задачи, которые по связям образовали его «критический путь».
Назначение ресурсов в MS Project 2016
Microsoft Project умеет управлять ресурсами. Начнем с того как их назначить.
Выравнивание ресурсов в Microsoft Project 2016
Ресурсы требуют оптимального использования без перегрузки или простоев. Выравнивание — это инструмент для решения данной проблемы.
Визуальный ресурсный оптимизатор в Microsoft Project 2016
Хотите убирать ресурсные конфликты просто растаскивая задачи мышкой как в календаре Outlook? Визуальный ресурсный оптимизатор будет вам понятен по концепции.
Смета проекта в Microsoft Project 2016
Microsoft Project отличный инструмент для создания смет проекта ресурсным методом.
План-фактный анализ в Microsoft Project 2016
Если у вас есть план, то очень важно собирать фактическое исполенение и делать план-фактный анализ.
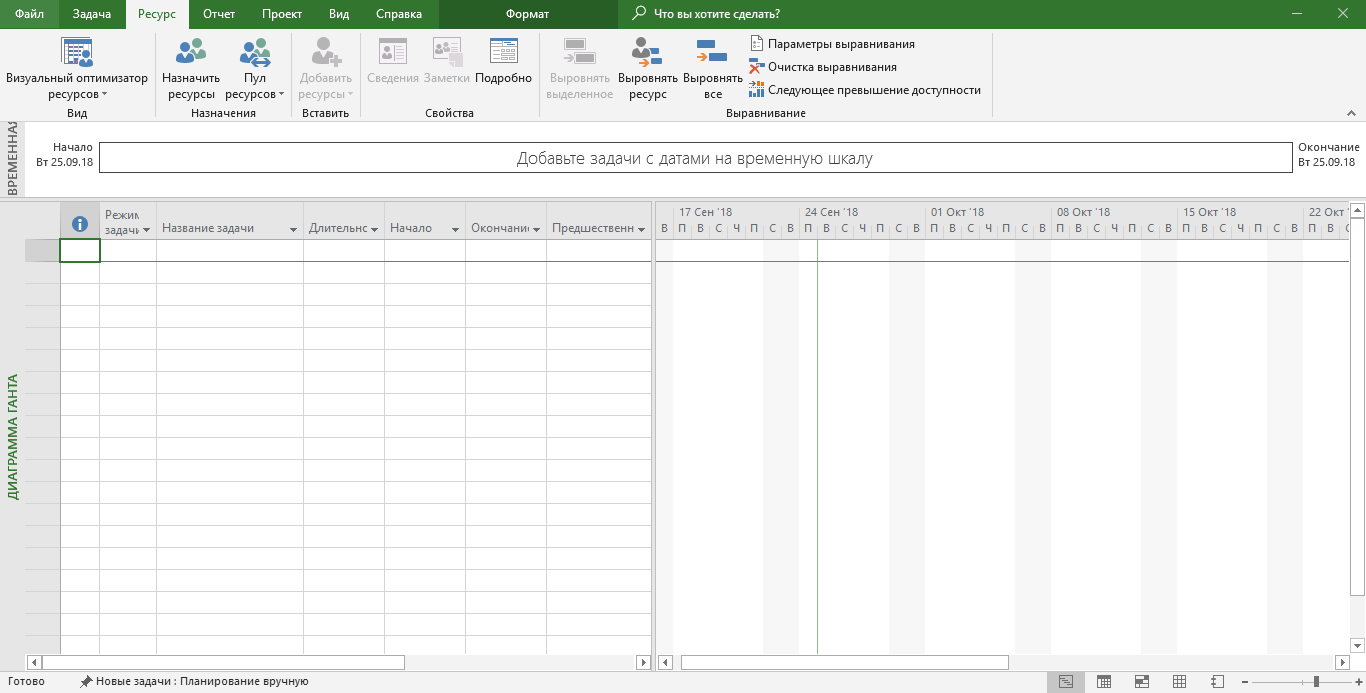
Знакомьтесь, это Microsoft Project, сложное ПО для управления проектами. Помогает менеджеру в текущих задачах: планировать, распределять ресурсы, анализировать сложность проекта. Автоматически делает отчеты и считает сметы. Если в нем разобраться, может стать незаменимым.
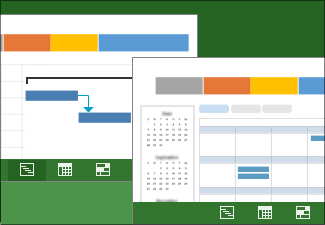
Программа похожа на MS Excel, но содержит больше функций. Визуально выглядит так: в левой части — таблица с данными: задачи, время и трудозатраты. В правой — графики, например, диаграмма Ганта.
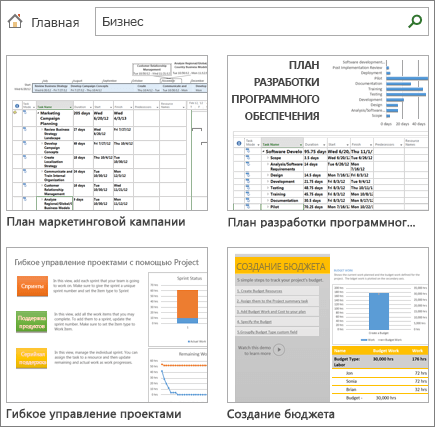
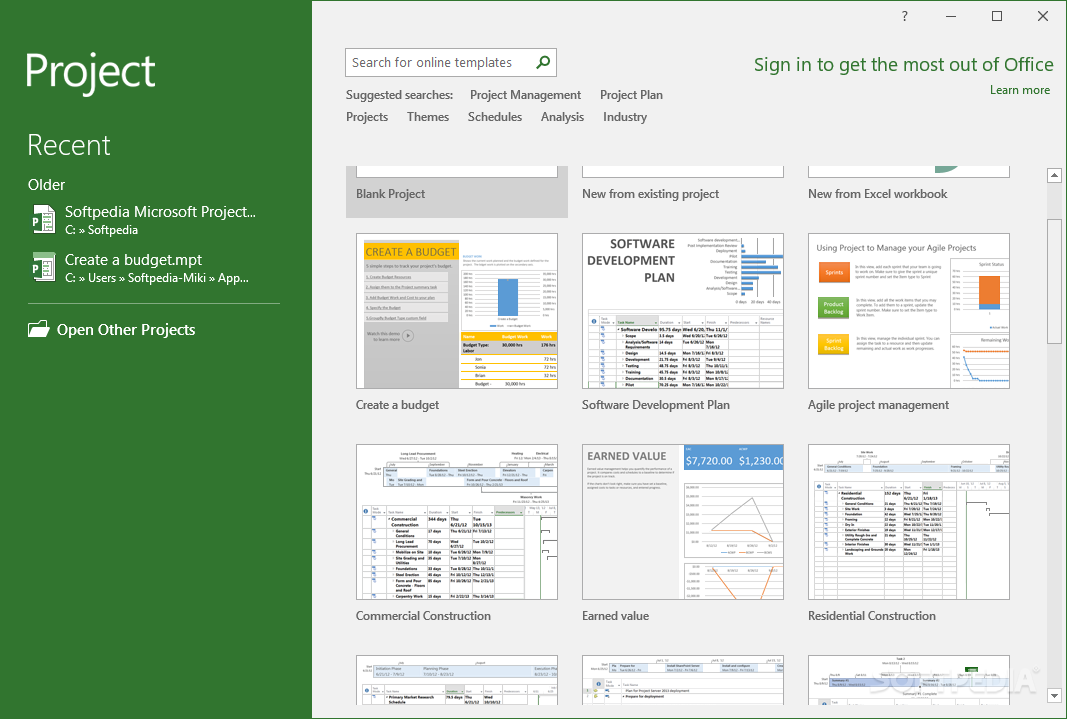
В программе есть разные шаблоны, например, Простой план проекта, Запуск нового продукта или Гибкое управление проектами. Выберите подходящую структуру или откройте Новый проект.
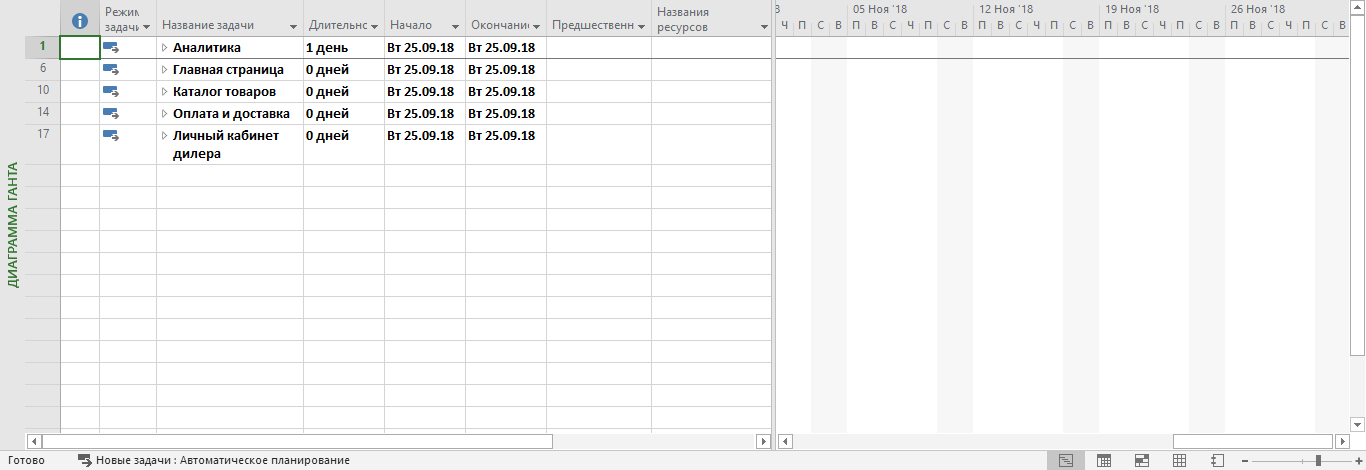
Они зависят от типа проекта. Сначала пропишите общие этапы, а потом разделите на конкретные. Для примера будем делать простой интернет-магазин. Этапы могут быть такими: аналитика, главная страница, каталог товаров, интеграция с сервисами оплаты и доставки, личный кабинет.
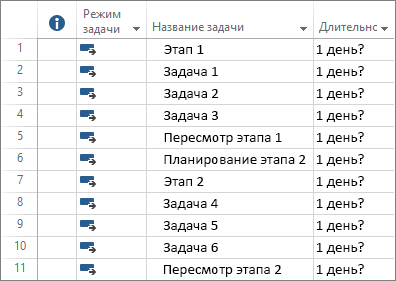
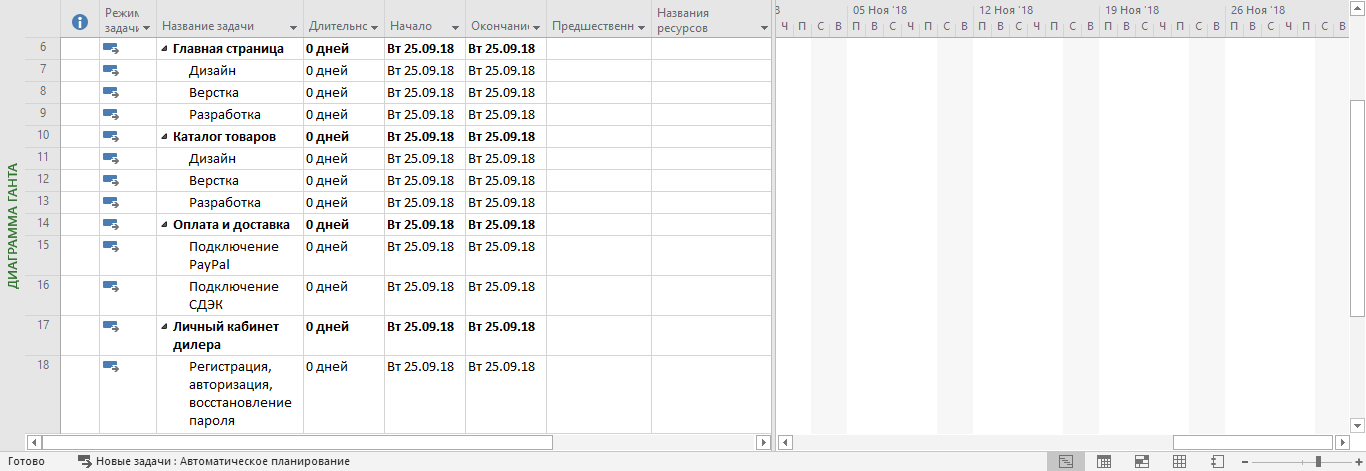
На верхней панели выберите блок Задача и найдите кнопку Суммарная задача. С ее помощью создайте все общие этапы. Позже добавьте подробностей.
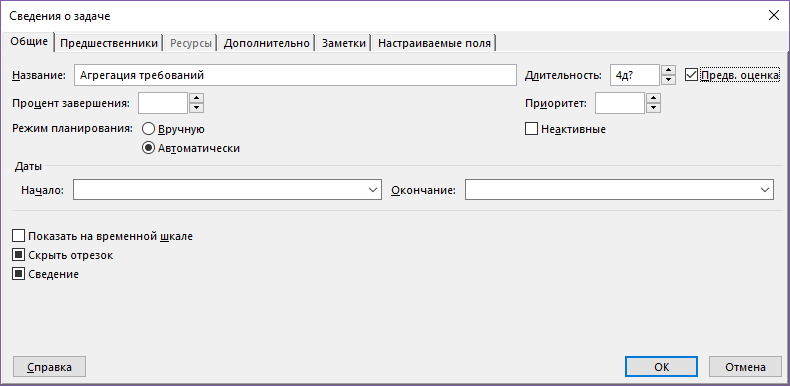
Подумайте, какие войдут в каждый этап. Добавьте их в таблицу с помощью кнопки + Задача. Или дважды кликните мышкой по пустой графе, куда хотите вставить задачу. Откроется такое окно.
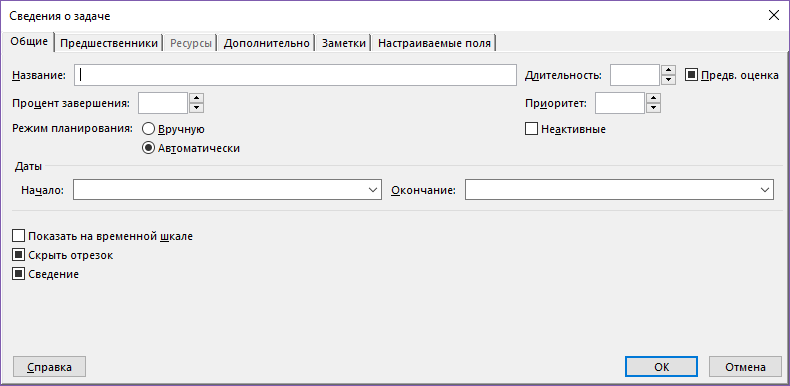
В этом окне отредактируйте сведения о задаче. Например, название или длительность, если она уже известна. Когда нет точных данных, ставьте галочку в графе Предварительная оценка. Примерная длительность задачи отобразится в таблице со знаком вопроса.
Добавьте задачи в таблицу. У нашего интернет-магазина они будут следующие.
Для аналитики:
- агрегация требований;
- прототипирование;
- техническое задание;
- проектирование базы данных.
Для главной страницы и каталога товаров:
- дизайн;
- верстка;
- разработка.
Для оплаты и доставки:
- подключение PayPal;
- подключение СДЭК.
Для личного кабинета:
- авторизация;
- регистрация;
- восстановление пароля;
- бонусная система;
- отложенные заказы;
- персонализация;
- интеграция с Axapta.
Для этого слева от каждой из них есть графа, в которой можно выбрать тип планирования. При автоматическом программа определяет длительность задачи, при ручном вы сами меняете даты. Выберите подходящий.

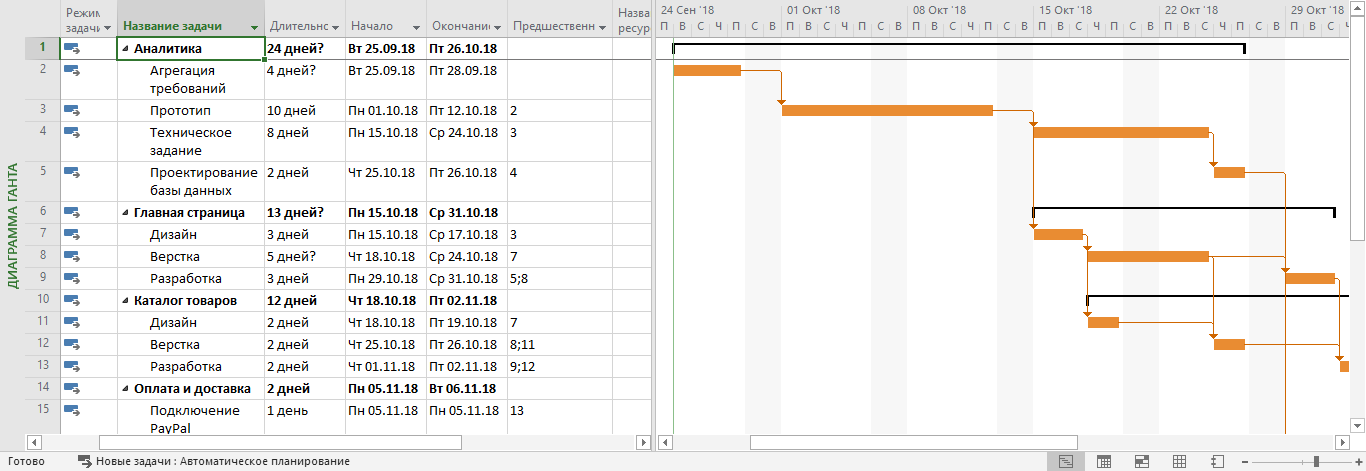
Пока вы вносите начальные данные о проекте в таблицу слева, справа автоматически строится диаграмма Ганта. Чтобы она отображалась корректно, установите зависимости между задачами. Например, чтобы сделать прототип интернет-магазина, сначала нужно собрать требования. То есть, третья задача списка зависит от второй. Все задачи программа нумерует автоматически по мере их появления.
Проставьте зависимости в графе Предшественники. Получится так.
Теперь раздайте задачи команде и отразите это в таблице. В правом нижнем углу есть пять разных вкладок. Диаграмма Ганта (большую часть времени вы будете проводить в ней), Использование задач, Визуальный оптимизатор ресурсов, Лист ресурсов и Отчет.
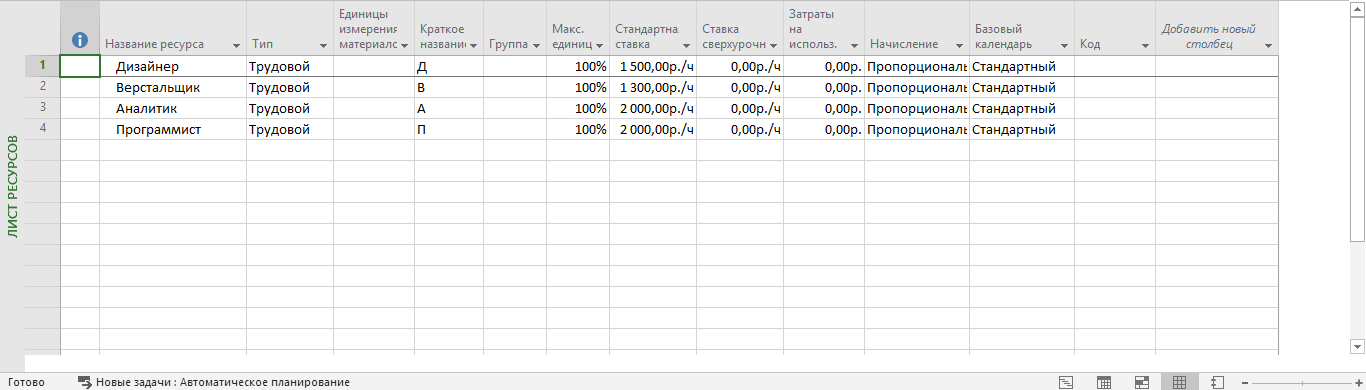
Выберите Лист ресурсов. В него внесите всех сотрудников, которые работают на проекте, их ставки за час работы и график. Укажите должности или фамилии, если в команде несколько сотрудников занимают одинаковую позицию. Так вы сможете избежать путаницы.
Допустим, что в команде по одному сотруднику на каждую должность. Вот, что получится.
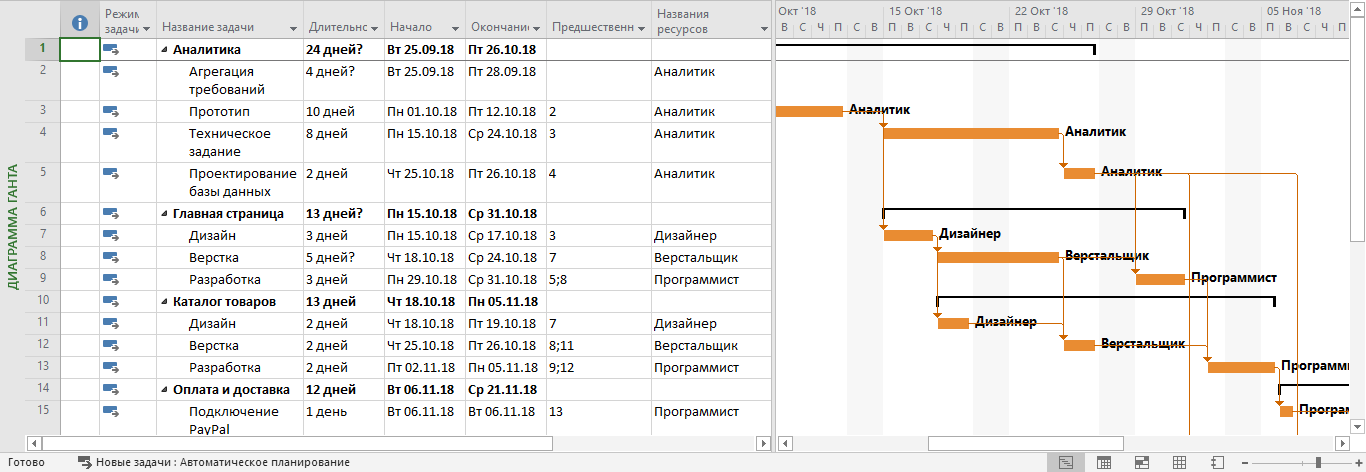
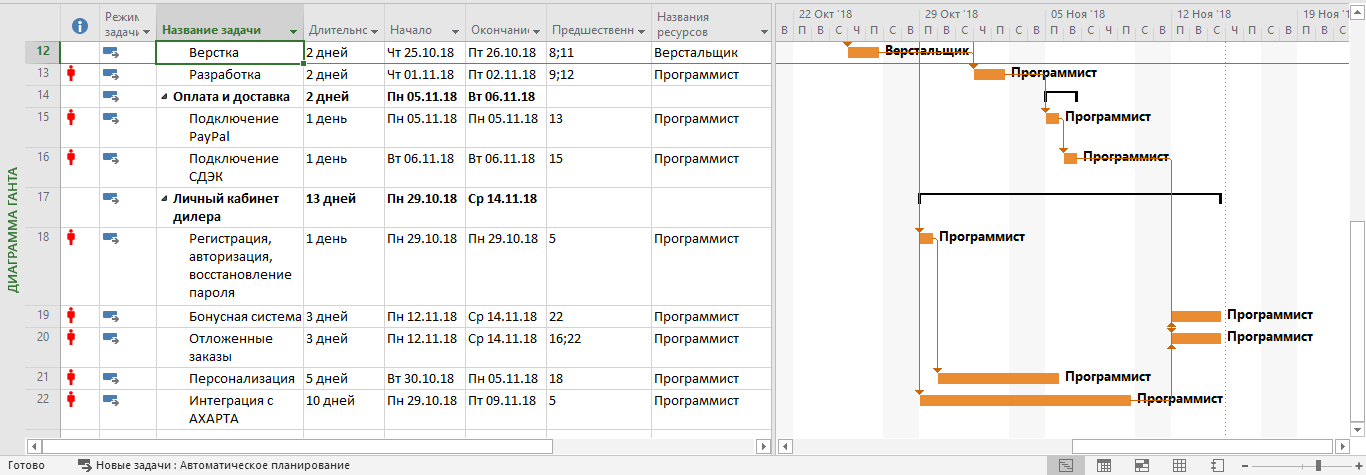
Вернитесь во вкладку Диаграмма Ганта. Найдите графу Ресурсы и проставьте должности исполнителей напротив каждой задачи.
В проекте по созданию интернет-магазина аналитик отвечает за все задачи по аналитике, дизайнер — за дизайн, верстальщик — за вестку, программист — за разработку.
Если какой-то ресурс перегружен, программа это покажет: слева от задачи появятся красные человечки.
Для этого перейдите в Визуальный оптимизатор ресурсов. Он выглядит так.
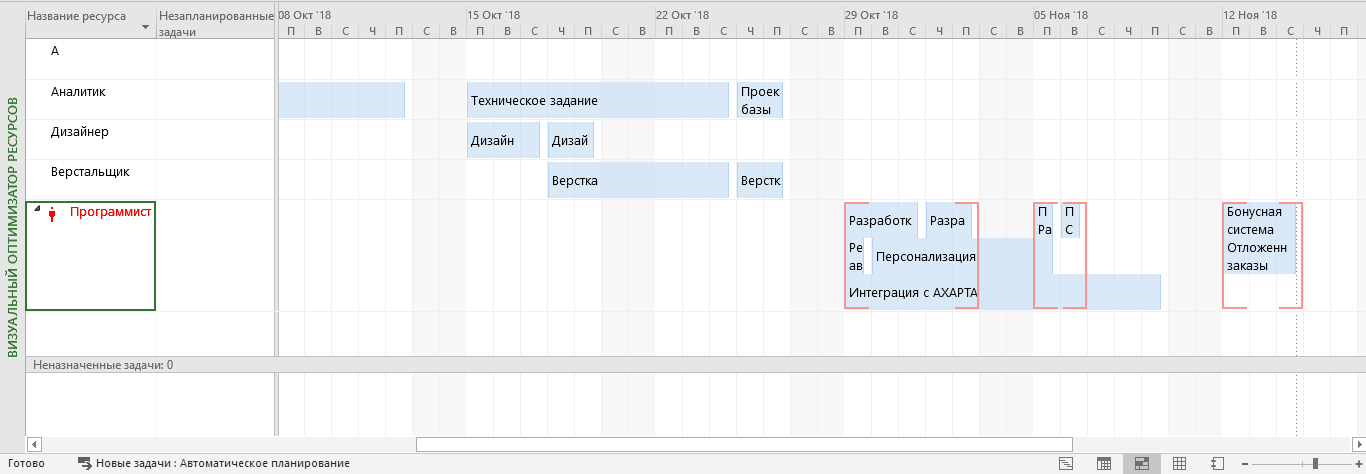
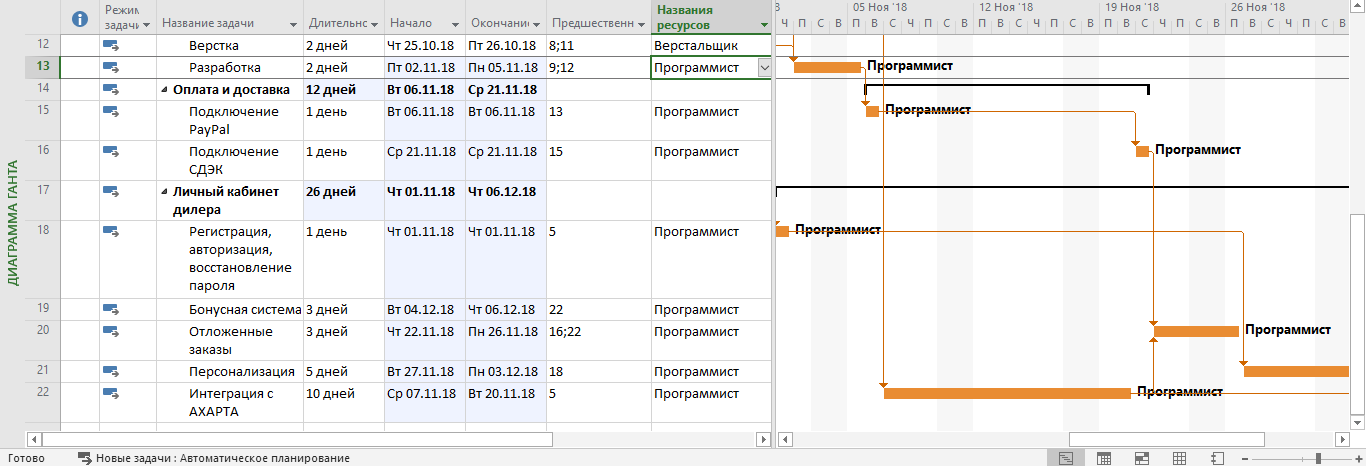
Видно, что перегружен программист. Вернитесь назад в Диаграмму Ганта. На верхней панели выберите вкладку Ресурс, а потом кнопку Автоматическое выравнивание ресурсов. Программа сама перераспределит задачи так, чтобы разгрузить программиста. Но учитывайте, что время работы над проектом при этом увеличится.
Мы немного познакомились с MS Project. Теперь с ее помощью вы можете планировать, распределять задачи и анализировать работу. Это только базовые навыки. Программа сложная, в ней много разных функций, некоторые никогда не пригодятся. Другие здорово упрощают жизнь, но не так просто их найти и научиться ими пользоваться.
Начинающему менеджеру проектов не обойтись без опытного наставника. На курсе Skillbox вас научат правильно работать с программой MS Project. Покажут, как ее использовать, чтобы упростить не только планирование, но и весь контроль над проектом.