
В какие сроки происходит доставка техники Miele?
Товар из наличия доставят завтра в удобное для вас время или передадут в транспортную компанию, в случае отправки товара в другие регионы России. При наличии свободного транспорта возможна доставка в течение 2-5 часов, необходимо уточнить у оператора. Товар под заказ согласовывается дополнительно и в некоторых случаях требует частичную предоплату, обычно срок поставки занимает 1-4 недели.
Мы непрерывно работаем с 2010 года, наш магазин был среди первых официальных фирменных интернет магазинов Miele в России

Откуда бытовая техника? Это оригинал?
Вся техника оригинальная, привозится из Евросоюза и стран СНГ в заводской упаковке и обрешетке для большей безопасности ее сохранности.


Возможны установка и подключение техники?
Да. Техника будет установлена и подключена специалистами сервисного центра, тарифы подразумевают установку на готовые коммуникации. Все необходимые дополнительные работы согласовываются на месте с мастером.
Где можно посмотреть товары? Есть ли самовывоз?
Ознакомиться с товаром вы можете в нашем магазине на Рублевке, там же находится наш склад, который мы с радостью покажем. Посетив склад, вы сможете лично убедиться в широком ассортименте, качестве товара и его происхождении. При желании можно забрать товар со склада самостоятельно.
Действует ли гарантия на товар?
На все приборы действует гарантия 1 год. При желании за дополнительную плату +5% к стоимости товара, можно приобрести продленную гарантию общим сроком в 2 года. В этот период мы ремонтируем технику Miele за свой счет или меняем ее на новую в случае, если она не подлежит ремонту.
Как можно оплатить товар, и когда внести оплату?
После доставки и приема товара оплату можно совершить наличным средствами или банковской картой (предварительно требуется уведомить оператора для выделения экипажа с терминалом).Так же можно произвести оплату по выставленному банковскому счету (отправка товаров в регионы России осуществляется после полной предоплаты).
Техника в наличии в России или это предзаказ?
На складе в Москве хранится около 1500 — 2500 ед техники Miele в наличии. Это позволяет оперативно собирать полноценные комплекты для покупателей. При необходимости так же возможна поставка практически любого товара из ЕС в максимально короткие сроки, 1-4 недели.


Перейти к контенту
![]()
Русские электронные инструкции по эксплуатации
Постоянно обновляемый большой каталог документации по эксплуатации и использованию современных устройств и оборудования на русском языке. Бесплатное скачивание файлов.
Поиск:
Главная
Просмотр инструкции в pdf


Инструкция по эксплуатации стиральной машины Miele Active W1 WSA023WCS.
Скачать инструкцию к стиральной машине Miele Active W1 WSA023WCS (2,32 МБ)

Инструкции по эксплуатации стиральных машин Miele
« Инструкция к стиральной машине Miele ModernLife WWD660WCS
» Инструкция к стиральной машине Bosch (Бош) Serie | 4 WGA242XVOE
Вам также может быть интересно

Инструкция к сушильной машине Miele TCA220WP

Инструкция к холодильнику Miele KFN29132D ws

Инструкция к холодильнику Miele KFN29283D bb

Инструкция к стиральной машине Miele W690 F WPM

Инструкция к холодильнику Miele KFN29162D edt-cs

Инструкция к сушильной машине Miele TCE630WP ChromeEdition

Инструкция к стиральной машине Miele WW650WCS

Инструкция к встраиваемой микроволновой печи Miele M7240TC EDST-CLST
Добавить комментарий
Имя *
Email *
Сайт
Комментарий


![]()


Сохранить моё имя, email и адрес сайта в этом браузере для последующих моих комментариев.
- Добавить инструкцию
- Заказать инструкцию
- Политика конфиденциальности
![]()
Operating instructions
for washing machines
To avoid the risk of accidents or damage to the machine, it is essential to read these instructions before it is installed and used for the first time.

|
Contents |
||
|
Caring for the environment ………………………………………………………………………. |
6 |
|
|
Warning and Safety instructions ………………………………………………………………. |
7 |
|
|
Operating the washing machine ……………………………………………………………… |
14 |
|
|
Control panel…………………………………………………………………………………………… |
14 |
|
|
Examples on how to operate the machine…………………………………………………… |
16 |
|
|
Before using for the first time …………………………………………………………………. |
17 |
|
|
Inserting detergent cartridges ……………………………………………………………………. |
17 |
|
|
Setting the language ………………………………………………………………………………… |
19 |
|
|
Removing the transit bars …………………………………………………………………………. |
19 |
|
|
Starting the calibration programme…………………………………………………………….. |
20 |
|
|
TwinDos…………………………………………………………………………………………………. |
21 |
|
|
Washing environmentally and economically ……………………………………………. |
22 |
|
|
EcoFeedback…………………………………………………………………………………………… |
23 |
|
|
1. |
Prepare the laundry…………………………………………………………………………….. |
24 |
|
2. |
Select a programme……………………………………………………………………………. |
25 |
|
3. |
Load the washing machine………………………………………………………………….. |
26 |
|
4. |
Select programme settings …………………………………………………………………. |
27 |
|
5. |
Add detergent …………………………………………………………………………………….. |
29 |
|
TwinDos………………………………………………………………………………………………….. |
29 |
|
|
Detergent dispenser drawer ………………………………………………………………………. |
30 |
|
|
CapDosing………………………………………………………………………………………………. |
31 |
|
|
6. |
Start the programme — the end of a programme …………………………………… |
33 |
|
Spinning…………………………………………………………………………………………………. |
34 |
|
|
Delay start ……………………………………………………………………………………………… |
36 |
|
|
To select delay start …………………………………………………………………………………. |
36 |
|
|
To change delay start ……………………………………………………………………………….. |
36 |
|
|
To cancel delay start and begin the programme straight away ………………………. |
36 |
2

|
Contents |
|
|
Programme chart …………………………………………………………………………………… |
37 |
|
Options ………………………………………………………………………………………………….. |
42 |
|
Short………………………………………………………………………………………………………. |
42 |
|
Water plus ………………………………………………………………………………………………. |
42 |
|
Stains……………………………………………………………………………………………………… |
42 |
|
Programme sequence…………………………………………………………………………….. |
44 |
|
Garment care label symbols……………………………………………………………………. |
46 |
|
Changing the programme sequence ………………………………………………………. |
47 |
|
Cancelling a programme …………………………………………………………………………… |
47 |
|
Interrupting a programme………………………………………………………………………….. |
47 |
|
Changing a programme…………………………………………………………………………….. |
47 |
|
Adding or removing laundry after the programme has started ……………………….. |
48 |
|
Safety lock………………………………………………………………………………………………. |
49 |
|
Detergent ………………………………………………………………………………………………. |
50 |
|
The correct detergent……………………………………………………………………………….. |
50 |
|
Water softeners ……………………………………………………………………………………….. |
50 |
|
Dispensing aids ……………………………………………………………………………………….. |
50 |
|
Fabric conditioner and liquid starch……………………………………………………………. |
50 |
|
Miele recommended detergents ………………………………………………………………… |
51 |
|
Recommended detergents in accordance with Directive (EU) Nr. 1015/2010…… |
52 |
|
Cleaning and care ………………………………………………………………………………….. |
55 |
|
Cleaning the drum (Hygiene info) ……………………………………………………………….. |
55 |
|
External casing and fascia panel………………………………………………………………… |
55 |
|
Cleaning the detergent dispenser drawer ……………………………………………………. |
55 |
|
Cleaning the TwinDos system ……………………………………………………………………. |
57 |
|
Starting the maintenance programme…………………………………………………….. |
57 |
|
Cleaning the compartments………………………………………………………………….. |
58 |
|
Cleaning the water inlet filters ……………………………………………………………………. |
59 |
3

|
Contents |
|
|
Problem solving guide ……………………………………………………………………………. |
60 |
|
The programme does not start…………………………………………………………………… |
60 |
|
The following fault messages appear in the display and the programme stops… |
61 |
|
A message appears in the display at the end of the programme ……………………. |
62 |
|
A message appears in the display at the end of the programme ……………………. |
63 |
|
Problems with TwinDos …………………………………………………………………………….. |
64 |
|
General problems with the washing machine ………………………………………………. |
65 |
|
An unsatisfactory wash result ……………………………………………………………………. |
67 |
|
The door will not open………………………………………………………………………………. |
68 |
|
Opening the door in the event of a blocked drain outlet and/or power failure ….. |
69 |
|
After sales service………………………………………………………………………………….. |
71 |
|
Repairs …………………………………………………………………………………………………… |
71 |
|
Optional accessories………………………………………………………………………………… |
71 |
|
Guarantee: U.K………………………………………………………………………………………… |
71 |
|
Guarantee: Other countries ……………………………………………………………………….. |
71 |
|
Installation and connection …………………………………………………………………….. |
72 |
|
Front view ……………………………………………………………………………………………….. |
72 |
|
Rear view………………………………………………………………………………………………… |
73 |
|
Installation surface …………………………………………………………………………………… |
74 |
|
Transporting the washing machine to its installation site……………………………….. |
74 |
|
Removing the transit bars …………………………………………………………………………. |
74 |
|
Re-fitting the transit bars…………………………………………………………………………… |
76 |
|
Levelling the machine……………………………………………………………………………….. |
77 |
|
Screwing out and adjusting the feet……………………………………………………….. |
77 |
|
Building under a continuous worktop/ in a kitchen run……………………………… |
78 |
|
Washer-dryer stack ……………………………………………………………………………… |
78 |
|
The water protection system……………………………………………………………………… |
79 |
|
Connection to the water supply …………………………………………………………………. |
80 |
|
Connection to the drainage system ……………………………………………………………. |
81 |
|
Electrical connection U.K. …………………………………………………………………………. |
82 |
|
Technical data………………………………………………………………………………………… |
83 |
|
Consumption data………………………………………………………………………………….. |
84 |
|
Note for test institutes ………………………………………………………………………………. |
85 |
4

|
Contents |
|
|
Settings …………………………………………………………………………………………………. |
86 |
|
Language …………………………………………………………………………………………….. |
87 |
|
TwinDos………………………………………………………………………………………………….. |
87 |
|
Degree of soiling………………………………………………………………………………………. |
89 |
|
Buzzer volume…………………………………………………………………………………………. |
89 |
|
Keypad tone ……………………………………………………………………………………………. |
89 |
|
Consumption…………………………………………………………………………………………… |
89 |
|
Code………………………………………………………………………………………………………. |
90 |
|
Temperature unit………………………………………………………………………………………. |
90 |
|
Display brightness……………………………………………………………………………………. |
90 |
|
Dark display…………………………………………………………………………………………….. |
90 |
|
Machine switch-off…………………………………………………………………………………… |
91 |
|
Display maximum load ……………………………………………………………………………… |
91 |
|
Display programme name …………………………………………………………………………. |
91 |
|
Memory ………………………………………………………………………………………………….. |
91 |
|
Pre-wash Cottons…………………………………………………………………………………….. |
92 |
|
Soak duration ………………………………………………………………………………………….. |
92 |
|
Gentle action …………………………………………………………………………………………… |
92 |
|
Reduce temp…………………………………………………………………………………………… |
92 |
|
Water plus ………………………………………………………………………………………………. |
93 |
|
Water plus level ……………………………………………………………………………………….. |
93 |
|
Maximum rinse level…………………………………………………………………………………. |
93 |
|
Suds cooling……………………………………………………………………………………………. |
93 |
|
Low water pressure ………………………………………………………………………………….. |
94 |
|
Anti-crease ……………………………………………………………………………………………… |
94 |
|
Optional accessories ……………………………………………………………………………… |
95 |
|
Detergent………………………………………………………………………………………………… |
95 |
|
Specialist detergents………………………………………………………………………………… |
95 |
|
Fabric care………………………………………………………………………………………………. |
96 |
|
Additives…………………………………………………………………………………………………. |
96 |
5

Caring for the environment
Disposal of the packing mater-
ial
The packaging is designed to protect the washing machine from damage during transportation. The packaging materials used are selected from materials which are environmentally friendly for disposal and should be recycled.
Recycling the packaging reduces the use of raw materials in the manufacturing process and also reduces the amount of waste in landfill sites. Ensure that any plastic wrappings, bags etc. are disposed of safely and kept out of the reach of babies and young children. Danger of suffocation.
Disposal of your old machine
Electrical and electronic machines often contain valuable materials. They also contain materials which, if handled or disposed of incorrectly, could be potentially hazardous to human health and to the environment. They are, however, essential for the correct functioning of your machine. Please do not therefore dispose of it with your household waste.
Please dispose of it at your local community waste collection / recycling centre or contact your Dealer for advice.
Ensure that it presents no danger to children while being stored for disposal.
6

Warning and Safety instructions
This washing machine complies with current safety requirements. Inappropriate use can, however, lead to personal injury and damage to property.
To avoid the risk of accidents and damage to the machine, please read these instructions carefully before using it for the first time. They contain important information on its safety, use and maintenance.
Keep these instructions in a safe place and ensure that new users are familiar with the content. Pass them on to any future user.
Correct application
This washing machine is intended for use in domestic households and similar working and residential environments.
The washing machine is not intended for outdoor use.
It must be used only as a domestic appliance to wash items which are specified by the manufacturer as being washable on the wash care label. Miele cannot be held liable for damage resulting from incorrect or improper use or operation.
The washing machine can only be used by people with reduced physical, sensory or mental capabilities, or lack of experience or knowledge, if they are supervised whilst using it or have been shown how to use it safely and recognise and understand the consequences of incorrect operation.
7

Warning and Safety instructions
Safety with children
Children under 8 years of age must be kept away from the washing machine unless they are constantly supervised.
Children 8 years and older may only use the washing machine unsupervised if they have been shown how to use it safely and recognise and understand the consequences of incorrect operation.
Children must not be allowed to clean or maintain the washing machine unsupervised.
Please supervise children in the vicinity of the washing machine and do not let them play with it.
Technical safety
Please observe the instructions in «Installation and connection» and «Technical data».
Before setting up the washing machine, check it for any externally visible damage. Do not install or use a damaged machine.
Before connecting the communication module, ensure that the connection data on the data plate (fuse rating, voltage and frequency) match the mains electricity supply. If in any doubt, consult a qualified electrician.
Reliable and safe operation of this washing machine can only be assured if it has been connected to the mains electricity supply.
8

Warning and Safety instructions
The electrical safety of this washing machine can only be guaranteed when correctly earthed.
It is essential that this standard safety requirement is met. If in any doubt, please have the wiring system of the building tested by a qualified electrician.
Miele cannot be held liable for the consequences of an inadequate earthing system (e.g. electric shock).
Do not connect the washing machine to the mains electricity supply by a multi-socket adapter, extension lead or similar. These do not guarantee the required safety of the machine (fire hazard due to the risk of overheating).
Faulty components must only be replaced by genuine Miele original spare parts. Only when these parts are fitted can Miele guarantee the safety standards of the machine.
The electrical socket must be easily accessible after installation so that the machine can be disconnected from the electricity supply if necessary.
Unauthorised repairs could result in unforeseen dangers for the user, for which the manufacturer cannot accept liability. Repairs should only be undertaken by a Miele authorised service technician, otherwise any subsequent damage will not be covered by the guarantee.
If the electrical connection cable is faulty it must only be replaced by a Miele authorised service technician to protect the user from danger.
9

Warning and Safety instructions
The machine must be isolated from the electricity supply when cleaning and maintaining the machine and in the event of a fault.
The machine must only be connected to the on-site water supply using a new hose kit. Old hose kits must not be re-used. Check the condition of the hoses regularly so that you can replace them in good time and avoid the risk of any water damage.
The water flow pressure must be at least 100 kPa and should not exceed 1000 kPa.
In areas which may be subject to infestation by cockroaches or other vermin, pay particular attention to keeping the machine and its surroundings in a clean condition at all times. Any damage which may be caused by cockroaches or other vermin will not be covered by the guarantee.
The machine must not be used in a non-stationary location (e.g. on a ship).
Do not make any alterations to the machine, unless authorised to do so by Miele.
10
![]()
Warning and Safety instructions
Correct use
Do not install the washing machine in a room where there is a risk of frost. Frozen hoses may burst or split. The reliability of the electronic control unit may be impaired at temperatures below freezing point.
Before using the machine for the first time, check that the transit bars at the rear of the machine have been removed (see «Installation and connection — Removing the transit bars»). During spinning, a transit bar which is still in place may result in damage to both the machine and adjacent furniture or appliances.
Turn off the stopcock if the machine is to be left for any length of time (e.g. holiday), especially if there is no floor drain (gully) in the immediate vicinity.
Flooding danger.
If hooking the drain hose into a wash basin, check that the water can drain off quickly enough to prevent the sink from overflowing. Make sure the drain hose is secure, so that the force of the water flowing out of the hose does not dislodge it.
Take care to ensure that foreign objects (e.g. nails, pins, coins, paper clips) do not find their way into the machine with the laundry. These may damage components of the machine (e.g. suds container, drum), which in turn can result in damage to the laundry.
11

Warning and Safety instructions
Take care when opening the drum door after using the steam function. Danger of burning due to escaping steam and the high temperature of the surface of the drum as well as the porthole glass. Stand back away from the machine and wait until the steam has dissipated.
The maximum load for this washing machine is 8 kg (dry weight). See the «Programme chart» for the maximum recommended loads for individual programmes.
If the correct amount of detergent is dispensed, the machine should not need to be descaled. If, however, you do wish to descale it, only use a proprietary natural citric acid based descaling agent. Miele recommends using Miele descaling agent which is available to order online at www.miele-shop.com or from Miele. Strictly observe the instructions on the packaging.
Textiles which have been pre-treated in solvent based cleaning agents must be thoroughly rinsed in clean water before being washed in the machine.
Do not use solvent based cleaning agents, e.g. those containing benzine, in this machine, as this may result in damage to component parts and create toxic fumes. Such agents also pose a fire and explosion hazard.
Do not use solvent based cleaning agents, e.g. those containing benzine, to clean the surfaces of the machine. They can cause damage to plastic surfaces.
Only use dyes specified by the manufacturer as being suitable for use in a domestic washing machine. Always observe the manufacturer’s instructions carefully.
12

Warning and Safety instructions
Colour run and dye removers contain sulphur compounds which can cause damage such as corrosion. Do not use these products in this machine.
If detergent comes into contact with the eyes, rinse them thoroughly with lukewarm water immediately. If swallowed, seek medical assistance immediately and retain the packaging or label for reference. Those with skin problems or sensitive skin should avoid their skin coming into contact with detergent.
Accessories
Accessory parts may only be fitted when expressly approved by Miele. If other parts are used, guarantee, performance and product liability claims will be invalidated.
A Miele tumble dryer can be stacked on top of a Miele washing machine using the appropriate stacking kit (available as an optional accessory). Please make sure you order the correct one for the Miele washing machine and Miele tumble dryer.
If installing the machine on a Miele plinth, (available as an optional accessory, depending on country), please make sure you order the correct one for this washing machine.
Miele cannot be held liable for damage caused by non-compliance
with these Warning and Safety instructions.
13
Operating the washing machine
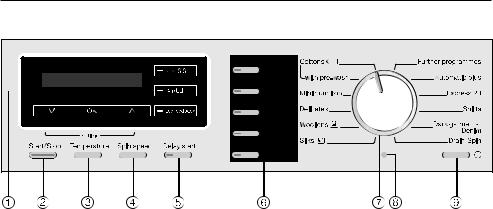
Control panel
a Display with sensors
See the next page for more information.
b Start/Stop button
For starting the programme selected and cancelling a programme once it has started.
c Temperature button
For selecting the temperature.
d Spin speed button
For selecting the spin speed.
e Delay start button
For selecting delay start.
f Option buttons
Various options can be added to the wash programme.
g Programme selector
For selecting the wash programme.
h Optical interface PC
For service technicians.
i button
For switching the washing machine on and off.
To save energy the washing machine will switch off automatically 15 minutes after the end of the pro- gramme/anti-crease phase or after being switched on if no other selection is made.
14
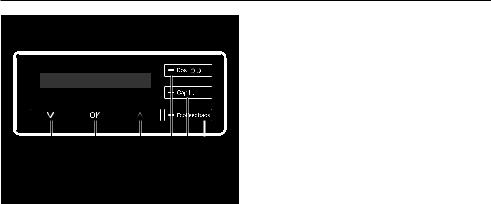
Operating the washing machine
j sensor
Scrolls down the list to the next option or decreases a value.
k OK button
Confirms the programme selected, a value set or opens a sub-menu.
l sensor
Scrolls up the list to the next option or increases a value.
m Dos sensor
Switches on automatic detergent dispensing.
n Cap sensor
Activates cap dosing via the detergent dispenser drawer.
o EcoFeedback sensor
Provides information about the energy and water consumption of the programme. Please also refer to «Washing environmentally and economically — EcoFeedback».
Sensors to light up when the display can be operated via the sensors.
Programme duration
After the programme has started the programme duration will appear in the display in hours and minutes.
If delay start has been selected, the programme duration will appear at the end of the delay start time.
Delay start
The delay start time selected will appear in the display.
After the programme has started the delay start time will begin to count down.
Once the delay start time has elapsed, the estimated programme duration will appear in the display.
15

Operating the washing machine
Standard display
The standard display shows the following from left to right:
2:59 1600
–the programme duration
–the selected wash temperature
–the selected spin speed
Examples on how to operate
the machine
Scrolling through a list
The arrows in the display indicate that a list is available.
Touching the sensor scrolls down the list to the next option and touching the
sensor scrolls up the list to the next option. The OK sensor is used to activate the option which is currently in the display.
Identifying options selected
If an option has been activated, this will be indicated by a tick next to it.
Setting numerical values
A numerical value is highlighted in white. Touching the sensor decreases the value and touching the sensor increases it. The OK sensor is used to activate the value which is currently in the display.
Exiting a sub-menu
Select Back to exit a sub-menu.
16

Before using for the first time
Removing the detergent cart-
ridges from the drum
There are two cartridges containing UltraPhase1 and UltraPhase2 detergent for automatic detergent dispensing in the drum.
Reach under the door grip and pull the door open.
Take the two cartridges out of the drum.
Shut the door with a gentle swing.
Inserting detergent cartridges
The detergent cartridges removed from the drum are components of the Miele 2-phase system consisting of:
1.UltraPhase 1 (base detergent)
2.UltraPhase 2 (detergent enhancer)
These detergent cartridges are for single use only. Replacement detergent cartridges are available to order from Miele or via the internet at www.miele-shop.com (see end of this booklet for details). Empty cartridges should be disposed of via your local recycling system.
Remove the caps from the detergent cartridges.
17
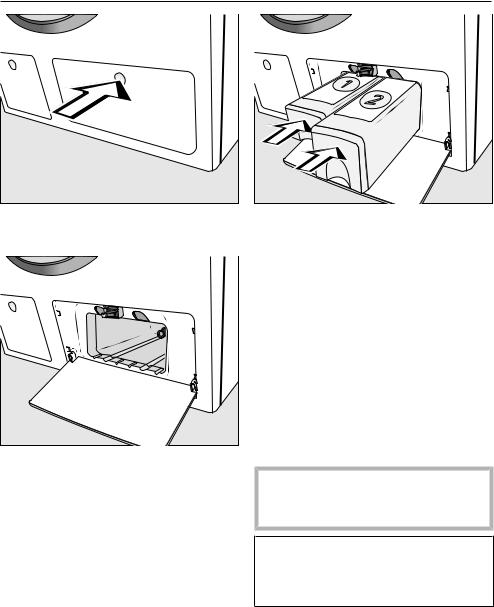
Before using for the first time
Press the TwinDos access panel. The panel will spring open.
Drop the panel down.
Push the UltraPhase 1 cartridge into compartment 1 and the
UltraPhase 2 cartridge into compartment 2, until they lock into position.
The TwinDos system is now ready for use.
Removing the protective foil
and stickers
Remove
–the protective foil from the door.
–any stickers from the front and the lid.
Please do not remove any labels (e.g. the data plate), visible when you open the door.
This washing machine has undergone a complete functional test at the factory and there will be some residual water in the drum from this process.
18

Before using for the first time
Before using the machine for the first time ensure that it is correctly installed and connected. See «Installation and connection». Also check that the drain filters are securely tightened to prevent the risk of water leaks during use.
Switch on the washing ma-
chine
Press the button.
The welcome screen will light up.
Setting the language
You will be asked to select the language you want for the display. It is possible to change the language at any time via «Settings».
Touch the or sensor until the language you want appears in the display.
Confirm your selection of the language by touching the OK sensor.
Removing the transit bars
A reminder to remove the transit bars will appear in the display.
Failure to remove the transit bars can result in damage to the washing machine and to adjacent cabinetry or appliances.
Remove the transit bars as described in «Installation and connection».
Confirm the removal of the transit bars with the OK sensor.
19

Before using for the first time
Starting the calibration pro-
gramme
The following message appears in the
display:
Open and run Cottons 90°C without
laundry
Touch the sensor repeatedly until you have read all the rows of text.
The OK sensor will light up.
Confirm the message with the
OK sensor.
For optimum water and energy consumption and excellent wash results, it is important to calibrate the washing machine.
To do this the Cottons 90 °C must be started without laundry and without detergent.
No other programmes can be started until calibration has been carried out.
Open the stopcock.
Turn the programme selector to Cottons.
Press the Start/Stop button.
The calibration programme has started. This will take approx. 2 hours.
At the end of the programme the following message will be displayed:
Set up complete
Reach under the door grip and pull the door open.
Tip: Leave the door slightly open to allow the drum to dry.
Switch the washing machine off with the button.
20
![]()
TwinDos
The washing machine has an integrated detergent dispensing unit.
The TwinDos system can be used in two ways:
1.with the Miele 2 Phase System or
2.with any other liquid detergent and/or fabric conditioner.
The Miele 2 Phase system
The Miele 2 Phase system uses a base detergent (UltraPhase 1) and a detergent enhancer (UltraPhase 2). In order to achieve optimum results, the agents are dispensed separately during the wash process. The 2 Phase system cleans both white and coloured textiles thoroughly. UltraPhase 1 and UltraPhase 2 single use cartridges are available to order from Miele or via the internet at www.miele-shop.com (see end of this booklet for contact details).
Liquid detergent/Fabric conditioner
Refillable TwinDos containers are required for liquid detergent and/or fabric conditioner. These are available to order from Miele or via the internet at www.miele-shop.com (see end of this booklet for details).
How TwinDos works
Automatic detergent dispensing for a wash cycle is activated via the Dos sensor.
Tip: The washing machine is delivered pre-set for the Miele 2 Phase system for hardness range II ( ).
The settings only need to be changed if you wish to use a different detergent or if the water hardness is different.
See «Settings — TwinDos» for more information.
Automatic dispensing cannot be selected with some programmes, depending on the detergent present in the TwinDos system. For example, automatic dispensing cannot be activated for the Woollens programme if the Miele 2 Phase system is being used. This prevents woollen garments being damaged by a detergent which is not suitable for washing wool.
21

Washing environmentally and economically
Energy and water consumption
–Water consumption and energy usage are determined by the size of the load.
To make the most of your machine, load the maximum dry load for the programme you are using.
–When smaller amounts of laundry are washed, the automatic load recognition system will reduce the amount of water and energy used.
–Use the Express 20 programme for small, lightly soiled loads.
–Modern detergents make it possible to wash at lower temperatures (e.g.
20 °C). Washing using lower temperature settings will save energy.
–To maintain the hygiene of the machine, carry out a hot wash (60 °C or above) using powder detergent at regular intervals. Hygiene info will appear in the display to remind you to carry out a hot wash.
Detergent
–For precise dispensing use automatic detergent dispensing.
–Adjust the dosage to the degree of soiling of the laundry.
–Do not exceed the amounts of detergent recommended by the manufacturer on the packaging.
When drying with a tumble dryer
Selecting the highest possible spin speed for the wash programme will save energy when drying in a tumble dryer afterwards.
22

Washing environmentally and economically
EcoFeedback
You can call up information about the energy and water consumption of your washing machine with the EcoFeedback sensor.
The following information will appear in the display:
–an estimate of the energy and water consumption before the programme begins.
–the actual energy and water consumption during the programme or at the end of the programme.
1. Estimate
After selecting a programme, touch the EcoFeedback sensor.
The estimated energy consumption levels will be displayed as a bar chart.
Touch the or sensor to change to the estimated water consumption levels.
The more bars ( ) visible, the higher the energy or water consumption.
The estimate will vary depending on the wash programme, temperature and any options selected.
The display will change automatically or you can return to the standard display by touching the OK sensor.
2. Actual consumption
You can view the actual amount of energy and water used by the programme which has just been run both during and at the end of the programme.
Touch the EcoFeedback sensor.
Touch the or to switch to the water consumption display.
The consumption will alter as the programme progresses.
If the door is opened or the washing machine has switched off automatically at the end of the programme, the data will revert to the estimated consumption.
Tip: You can view the consumption data for the last wash programme in
Settings under Consumption.
23
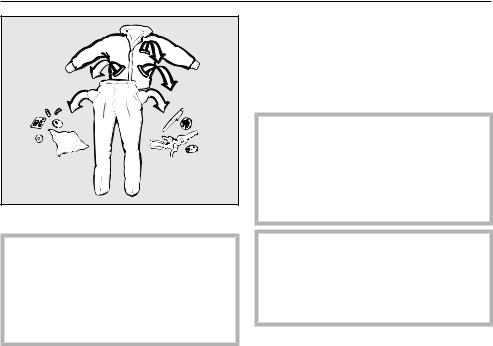
1. Prepare the laundry
Empty all pockets.
Foreign objects (e.g. nails, coins, paper clips, etc.) can cause damage to garments and to components in the machine.
Check the laundry before washing and remove any foreign objects.
Sort the laundry
Sort the laundry by colour and by care label. Most garments have a textile care label in the collar or side seam.
Tip: Dark textiles often contain excess dye and should be washed separately several times before being included in a mixed load. Always wash whites and coloureds separately.
Pre-treat stains
Badly soiled areas, stains etc. should be cleaned as soon as possible, preferably whilst still fresh. Spillages should be carefully dabbed off using a soft, colourfast cloth. Do not rub.
Tip: Badly soiled areas can be pretreated with liquid detergent, stain removers etc. first, following the manufacturer’s instructions. With particularly stubborn stains ask your dry cleaner for advice.
Solvent-based cleaners (e.g. benzine) can damage plastic parts. When pre-treating garments, make sure that any plastic parts (e.g. buttons) are protected from cleaning agent.
Chemical (solvent-based) cleaning agents can cause severe damage to the washing machine.
Do not use solvent-based cleaning agents in this machine.
General tips
–Curtains: Remove lead weights first or place in a laundry bag.
–Underwiring and collar stiffeners: Any loose wiring in bras, shirt collar stiffeners, etc. should be removed or sewn in.
–Close any zips, attach velcro fasteners, fasten hooks and eyes etc. before washing.
–Fasten duvet covers, pillow cases etc. to prevent small items from being rolled up inside them.
Do not wash any items in this washing machine which are specified by the manufacturer as not washable on the care label ( symbol).
24
2. Select a programme
Switch on the washing ma-
chine
Press the button.
Programme selection
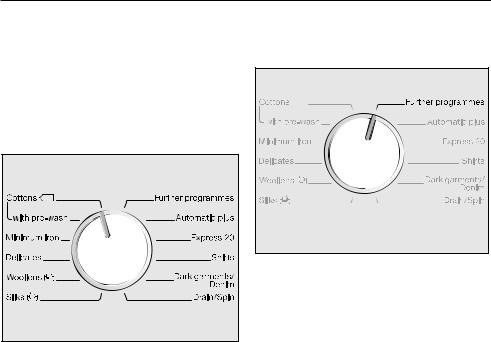
A. Selecting a programme via the programme selector:
Turn the programme selector to the required programme.
The load for the programme selected will appear in the display. This will then be replaced by the standard display.
B. Selecting a programme using the programme selector at the «Further programmes» position:
Turn the programme selector to Further programmes.
The following will appear in the display:
Touch the or sensor until the programme you want appears in the display.
Confirm the programme with the OK sensor.
The maximum load for the relevant programme will appear in the display. Preset programme parameters will be displayed depending on the programme selected.
25

3. Load the washing machine
Open the door |
Close the door |
Reach under the door grip and pull the door open.
Check the drum for pets or foreign objects before loading it with laundry.
Unfold the laundry and load loosely into the drum.
Mixing both large and small items gives better wash results and also helps distribute the load evenly during spinning.
Please note the maximum load for the different wash programmes. The relevant programme load is always shown in the display when you select a programme.
The most efficient use of energy and water is achieved when a full load is washed. However, do not overload as this reduces cleaning efficiency and causes creases.
Make sure that no items are caught between the door and the seal.
Shut the door with a gentle swing.
26
4. Select programme settings
Degree of soiling
Lightly soiled
No visible dirt or stains. Possibly slight body odour.
Normally soiled
Visibly dirty and/or just a few slight stains.
Heavily soiled
Soiling and/or stains clearly visible.
The following will appear in the display:
Degree of soiling
The display will change automatically to the degree of soiling query:
Set the degree of soiling with the and sensors and confirm your selection with the OK sensor.
The following parameters will change depending on the degree of soiling selected:
–the detergent dosage amount with automatic detergent dispensing
–with the Heavy degree of soiling setting, a pre-wash will be carried out automatically for some programmes (see «Options»).
–the rinse water level will be adjusted
–the programme durations (with light soiling the programme duration will be shorter)
In the Express 20 programme the degree of soiling cannot be selected. Express 20 is designed for lightly soiled laundry.
Tip: You can alter the default setting for the degree of soiling or switch off the degree of soiling query in Settings (see «Settings — Degree of soiling»).
Select a temperature
You can alter the pre-set temperature of a wash programme.
Press the Temperature button.
The following will appear in the display:
Temperature
Set the temperature you want with the and sensors and confirm your selection with the OK sensor.
27
4. Select programme settings
Selecting a spin speed
You can alter the pre-set spin speed of a wash programme.
Press the Spin speed button.
The following will appear in the display:
Set the spin speed you want with the
and sensors and confirm your selection with the OK sensor.
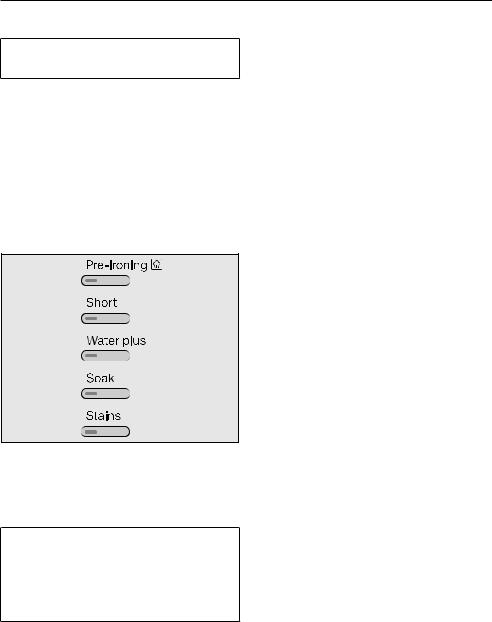
Select options
Press the button for the option you want.
The indicator light in the button will come on.
Not all options are suitable for use with every programme. You can only select options which are compatible with the programme being used.
See «Options».
Switch on delay start (if re-
quired)
The start of a programme can be delayed from 15 minutes up to 24 hours, allowing you to make use of night-time economy electricity rates, for example.
See «Delay start».
28
5. Add detergent
There are several options for adding detergent.
TwinDos
Before using TwinDos for the first time the display will show information about the factory default settings for TwinDos. The following will appear in the display:
UltraPhase 1+2 set for medium water hard-
ness level. Change in «Settings»/ «TwinDos»
Touch the sensor repeatedly until until you have read all the rows of text.
The OK sensor will light up.
Touch the OK sensor to confirm.
Miele 2 Phase system
UltraPhase 1 and UltraPhase 2 need to be dispensed in different ratios depending on the colour mix of the laundry load.
Touch the Dos sensor.
Use the and sensors to select the colour mix of the laundry and confirm with the OK sensor.
UltraPhase 1 and UltraPhase 2 will be dispensed accordingly.
Liquid detergent/Fabric conditioner
It is possible to use other types of liquid detergent/fabric conditioner. Refillable TwinDos containers (optional accessories) are required for this.
The washing machine’s electronic settings need to be adjusted accordingly. See «Settings — TwinDos».
Touch the Dos sensor.
Confirm the option displayed with the
OK button or select another detergent or fabric conditioner with the and sensors.
Tip: The recommended detergent(s) is shown in the display and marked with a tick ( ).
The appropriate amount of detergent and/or fabric conditioner for the programme will now be dispensed.
Adding stain remover
There are two options for adding stain remover in addition to using the automatic dispensing system:
–Use the Booster cap
–Add stain remover to the compartment.
29
5. Add detergent
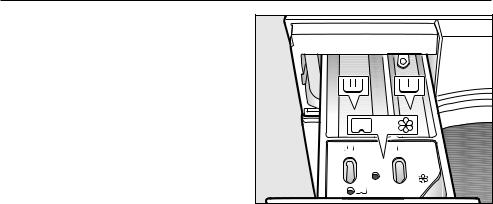
Detergent dispenser drawer
Too little detergent results in:
–Laundry not getting properly clean and with time it may become grey and hard to the touch.
–Greasy particles clinging to laundry.
–Limescale deposits on the heater elements.
Too much detergent results in:
–Excessive foam which causes a low level of agitation and poor wash, rinse and spin results.
–High water consumption (an additional rinse cycle will automatically switch in).
–A burden to the environment.
Pull out the detergent dispenser drawer and add detergent to the compartments as follows:
Detergent for the pre-wash (divide the total recommended amount as follows: add ⅓ to compartment and ⅔ to compartment )
Detergent for the main wash, including Soak, if selected
/
Fabric conditioner, liquid starch or capsules.
See «Detergent» for further information.
30
 Loading…
Перейти к контенту
Перейти к контенту
![]()
Русские электронные инструкции по эксплуатации
Постоянно обновляемый большой каталог документации по эксплуатации и использованию современных устройств и оборудования на русском языке. Бесплатное скачивание файлов.
Просмотр инструкции в pdf
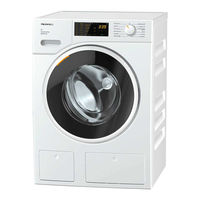
Инструкция по эксплуатации стиральной машины Miele Active W1 WSA023WCS.
Скачать инструкцию к стиральной машине Miele Active W1 WSA023WCS (2,32 МБ)
Инструкции по эксплуатации стиральных машин Miele
« Инструкция к стиральной машине Miele ModernLife WWD660WCS
» Инструкция к стиральной машине Bosch (Бош) WAN24290OE
Вам также может быть интересно
Инструкция к встраиваемой микроволновой печи Miele M7240TC EDST-CLST

Инструкция к стиральной машине Miele WKR571WPS Chrome Edition

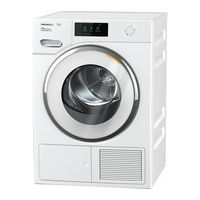
Инструкция к сушильной машине Miele TWD260WP

Инструкция к стиральной машине Miele Active W1 WEA025WCS
Инструкция к холодильнику Miele KFN29162D edt-cs

Инструкция к стиральной машине Miele WED125WCS

Инструкция к холодильнику Miele KFN29683D obsw

Инструкция к сушильной машине Miele TED265WP
- Добавить инструкцию
- Заказать инструкцию
Инструкция по эксплуатации и монтажу
| Описание | Формат | Загрузить |
|---|---|---|
| Инструкция по эксплуатации | Загрузить |
Данные CAD / BIM
| Описание | Формат | Загрузить |
|---|---|---|
| ZIP архив с 3D форматом RFA | zip | Загрузить |
| ZIP архив с 3D форматом DWG | zip | Загрузить |
| ZIP архив с 3D форматом FBX | zip | Загрузить |
| ZIP архив с 3D форматом RVT | zip | Загрузить |
| ZIP архив с 3D форматом IFC | zip | Загрузить |
Схемы встраивания
Схемы встраивания
Для того, чтобы загрузить и сохранить схему встраивания, пожалуйста, щёлкните правой кнопкой мыши и выберите «Сохранить как».
пояснения
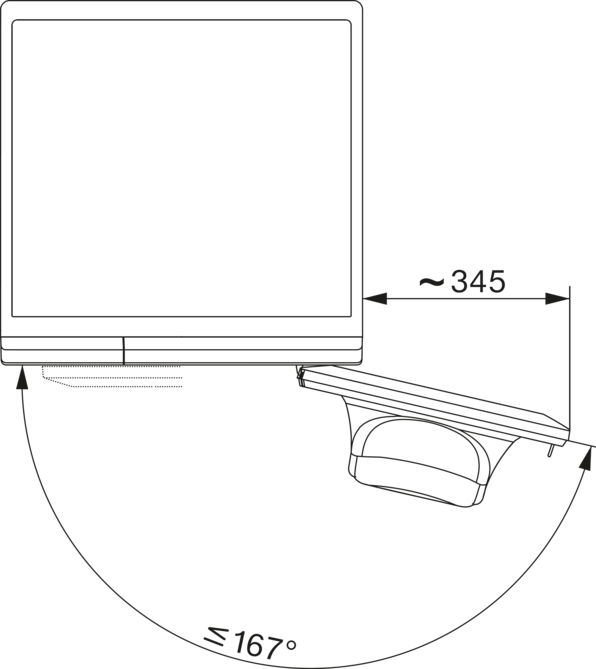
W1 drawing, slanted facia, straight facia, measures in mm
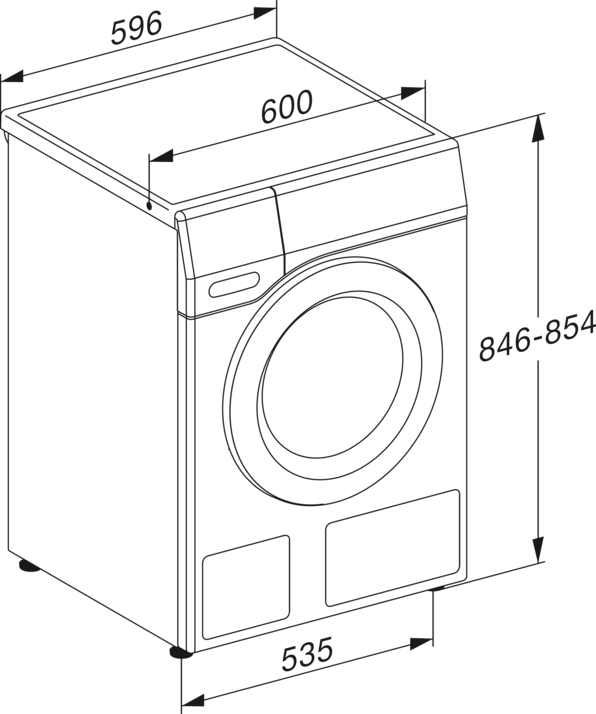
пояснения
W1 drawing, slanted facia, straight facia, measures in mm
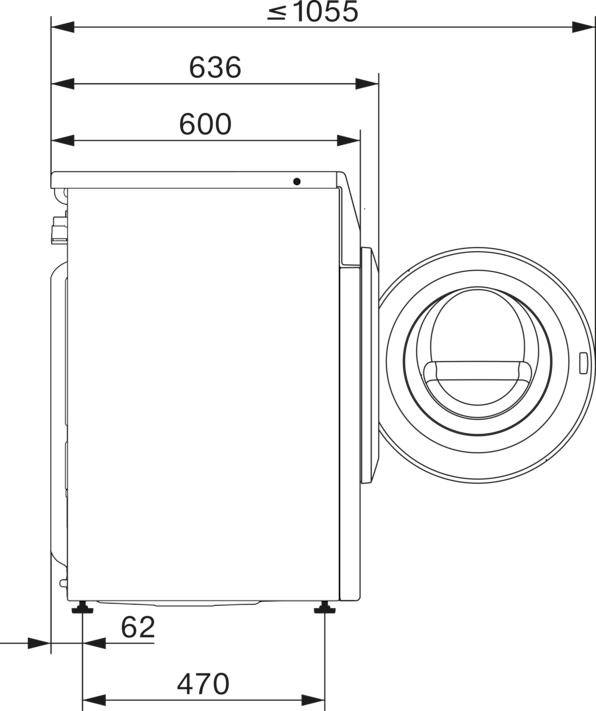
пояснения
W1 drawing, slanted facia, straight facia, measures in mm
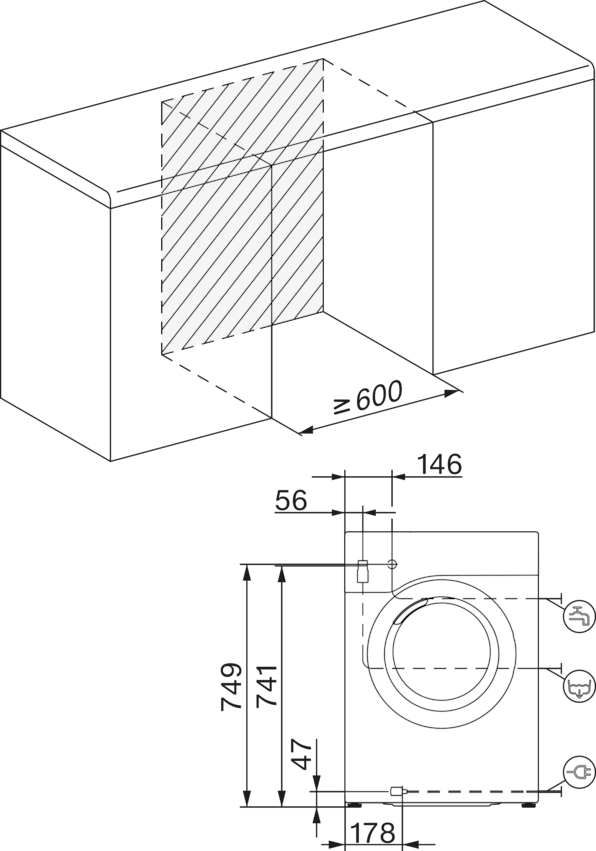
пояснения
W1 installation drawing, slanted facia, straight facia, measures in mm
- Manuals
- Brands
- Miele Manuals
- Washer
- W1
Manuals and User Guides for Miele W1. We have 2 Miele W1 manuals available for free PDF download: Additional Instructions, Operating Instructions Manual
Miele W1 Additional Instructions (160 pages)
ctions for Miele@home with WiFi module
Brand: Miele
|
Category: Washer
|
Size: 2.06 MB
Table of Contents
-
-
Einbindung ins WLAN-Netzwerk
5
-
T1 und W1 mit 1-Zeiligem Display
6
-
-
Integration I Trådløst Netværk
18
-
T1 Og W1 Med 1-Linjet Display
19
-
T1 Og W1 Med 4-Linjet Display
25
-
-
Integration into a Wifi Network
31
-
T1 and W1 with 1 Line Display
32
-
-
Controlling Your Washing Machine or Tumble Dryer Remotely
39
-
-
Conexión a Su Red Wifi
44
-
T1 y W1 con Display de 1 Línea
45
-
T1 y W1 con Display de 4 Líneas
48
-
-
-
Manejar a Distancia la Secadora O la Lavadora
52
-
-
Ajustar un Intervalo de Tiempo
53
-
-
Liittäminen WLAN-Verkkoon
57
-
T1 Ja W1, Joissa Yksirivinen Näyttö
58
-
T1 Ja W1, Joissa 4-Rivinen Näyttö
61
-
-
-
Pesukoneen Tai Kuivausrummun Etäkäyttö
65
-
-
T1 Et W1 Avec Écran 1 Ligne
71
-
T1 Et W1 Avec Écran 4Lignes
74
-
-
-
Commande À Distance du Sèche-Linge Ou du Lave-Linge
78
-
-
Définir Une Plage Horaire
79
-
-
Collegamento Alla Rete WLAN
83
-
T1 E W1 Display a 1 Riga
84
-
Funzionamento da Remoto
85
-
T1 E W1 con Display a 4 Righe
87
-
Funzionamento da Remoto
88
-
-
Funzionamento da Remoto
91
-
Comandare da Remoto L’asciugabiancheria O la Lavatrice
91
-
-
T1 Og W1, Med Display Med 1 Linje
113
-
T1 Og W1 Med 4 Linjers Display
116
-
-
Innstilling Av Tidsrom
118
-
-
-
T1 E W1 Com Visor de 1Linha
126
-
-
Comandar À Distância O Secador Ou a Máquina de Lavar Roupa
130
-
-
Definir um Período de Tempo
131
-
-
T1 I W1 Z 1-Wierszowym Wyświetlaczem
139
-
-
Zdalna Obsługa Suszarki Lub Pralki
143
-
-
Ustawianie Przedziału Czasu
144
-
-
T1 Och W1 Med 1-Delad Display
149
-
Miele@Home (Ej I Sverige)
149
-
T1 Och W1 Med 4-Delad Display
152
-
Miele@Home (Ej I Sverige)
152
-
-
-
Miele@Home (Ej I Sverige)
155
-
-
Advertisement
Miele W1 Operating Instructions Manual (96 pages)
Brand: Miele
|
Category: Washer
|
Size: 1.96 MB
Table of Contents
-
Caring for the Environment
6
-
Warning and Safety Instructions
7
-
Operating the Washing Machine
14
-
How the Control Field Works
15
-
Before Using for the First Time
16
-
Remove the Transit Bars
18
-
Starting the Calibration Programme
20
-
Washing Environmentally and Economically
21
-
Load the Washing Machine
24
-
Select Programme Settings
25
-
Degree of Soiling of the Laundry
27
-
Replacing Detergent Cartridges
27
-
Detergent Dispenser Drawer
28
-
Starting the Programme
32
-
Adding Laundry During a Programme Sequence (Addload)
32
-
Delay Start/Smartstart
35
-
The Following Extra Options Can be Selected in Addition to the Programmes
40
-
Garment Care Label Symbols
41
-
Changing the Programme Sequence
44
-
Changing a Programme (Safety Lock)
44
-
Cancelling a Programme
44
-
Fabric Conditioner and Liquid Starch
45
-
Recommended Miele Detergents
46
-
Recommended Detergents in Accordance with Directive (EU) Nr. 1015/2010
47
-
Cleaning the External Casing and the Control Panel
48
-
Cleaning the Detergent Dispenser Drawer
48
-
Hygiene Info(Cleaning the Drum)
50
-
Cleaning the Water Inlet Filter
50
-
The Programme Does Not Start
52
-
The Programme Is Cancelled and a Fault Indicator Light Lights up in the Control Panel
53
-
During the Programme Sequence, a Symbol Appears in the Time Display
54
-
At the End of the Programme, an Indicator Light Lights up in the Control Panel
55
-
Messages or Faults with the Twindos System
56
-
General Problems with the Washing Machine
57
-
An Unsatisfactory Wash Result
59
-
The Door will Not Open
60
-
Opening the Door in the Event of a Blocked Drain Outlet And/Or Power Cut
61
-
Contact in the Event of a Fault
63
-
Transporting the Washing Machine to Its Installation Site
66
-
Removing the Transit Bars
67
-
Fitting the Transit Bars
69
-
Screwing out and Adjusting the Feet
70
-
Installing under a Continuous Worktop
71
-
The Water Protection System
72
-
Connection to the Water Supply
72
-
EU Conformity Declaration
77
-
Conformity Declaration
77
-
Programmable Functions
79
-
Choosing and Selecting a Programmable Function
79
-
Editing and Saving a Programmable Function
80
-
Exit Programming Level
80
-
Control Panel Switch-Off Status
81
-
Longer Pre-Wash Cottons
82
-
Backlight Brightness Dimmed
84
-
Ultraphase 1 Dispensing Quantity
84
-
Ultraphase 2 Dispensing Quantity
84
-
Copyrights and Licences for the Communication Module
88
-
Detergents and Care Products
89
Advertisement
Related Products
-
Miele W 1213 WASHING MACHINE
-
Miele W1113-WASHER
-
Miele W1215-WASHER
-
MIELE W 1918A WASHING MACHINE
-
MIELE W 1930I WASHING MACHINE
-
MIELE W 1119I WASHING MACHINE
-
Miele NOVOTRONIC W 1966
-
Miele NOVOTRONIC W 1986
-
Miele W 1113
-
Miele W 1215
Miele Categories
![]()
Dishwasher
![]()
Washer
![]()
Oven
Ventilation Hood
![]()
Dryer
More Miele Manuals
В какие сроки происходит доставка техники Miele?
Товар из наличия доставят завтра в удобное для вас время или передадут в транспортную компанию, в случае отправки товара в другие регионы России. При наличии свободного транспорта возможна доставка в течение 2-5 часов, необходимо уточнить у оператора. Товар под заказ согласовывается дополнительно и в некоторых случаях требует частичную предоплату, обычно срок поставки занимает 1-4 недели.
Мы непрерывно работаем с 2010 года, наш магазин был среди первых официальных фирменных интернет магазинов Miele в России
Откуда бытовая техника? Это оригинал?
Вся техника оригинальная, привозится из Евросоюза и стран СНГ в заводской упаковке и обрешетке для большей безопасности ее сохранности.

Возможны установка и подключение техники?
Да. Техника будет установлена и подключена специалистами сервисного центра, тарифы подразумевают установку на готовые коммуникации. Все необходимые дополнительные работы согласовываются на месте с мастером.
Где можно посмотреть товары? Есть ли самовывоз?
Ознакомиться с товаром вы можете в нашем магазине на Рублевке, там же находится наш склад, который мы с радостью покажем. Посетив склад, вы сможете лично убедиться в широком ассортименте, качестве товара и его происхождении. При желании можно забрать товар со склада самостоятельно.
Действует ли гарантия на товар?
На все приборы действует гарантия 1 год. При желании за дополнительную плату +5% к стоимости товара, можно приобрести продленную гарантию общим сроком в 2 года. В этот период мы ремонтируем технику Miele за свой счет или меняем ее на новую в случае, если она не подлежит ремонту.
Как можно оплатить товар, и когда внести оплату?
После доставки и приема товара оплату можно совершить наличным средствами или банковской картой (предварительно требуется уведомить оператора для выделения экипажа с терминалом).Так же можно произвести оплату по выставленному банковскому счету (отправка товаров в регионы России осуществляется после полной предоплаты).
Техника в наличии в России или это предзаказ?
На складе в Москве хранится около 1.500 — 2.500 ед техники Miele в наличии. Это позволяет оперативно собирать полноценные комплекты для покупателей. При необходимости так же возможна поставка практически любого товара из ЕС в максимально короткие сроки, 1-4 недели.


Стиральная машина Miele Active W1 WSA023WCS — инструкция пользователя по применению, эксплуатации и установке на русском языке. Мы надеемся, она поможет вам решить возникшие у вас вопросы при эксплуатации техники.
Вы можете скачать инструкцию к Miele Active W1 WSA023WCS по ссылке ниже, если не хотите ждать загрузки. Если остались вопросы, задайте их в комментариях после инструкции.
«Загружаем инструкцию», означает, что нужно подождать пока файл загрузится и можно будет его читать онлайн. Некоторые инструкции очень большие и время их появления зависит от вашей скорости интернета.
Полезные видео
Характеристики
Остались вопросы?
Не нашли свой ответ в руководстве или возникли другие проблемы? Задайте свой вопрос в форме ниже с подробным описанием вашей ситуации, чтобы другие люди и специалисты смогли дать на него ответ. Если вы знаете как решить проблему другого человека, пожалуйста, подскажите ему
![:)]()
Часто задаваемые вопросы

Как посмотреть инструкцию к Miele Active W1 WSA023WCS?
Необходимо подождать полной загрузки инструкции в сером окне на данной странице или скачать кликнув по специальной кнопке.
Руководство на русском языке?
Все наши руководства представлены на русском языке или схематично, поэтому вы без труда сможете разобраться с вашей моделью
Как можно распечатать инструкцию?
Скачайте ее по специальной кнопке над формой чтения на ваше устройства и отправьте на печать.