

Operating instructions Washer-dryer
WT 945 S WPS
To avoid the risk of accidents or damage to the machine
it is essential to read
these instructions before it is installed or used for the first time.

Contents
Caring for the environment . . . . . . . . . . . . . . . . . . . . . . . . . . . . . . . . . . . . . . . . . . 5 Disposal of the packing material . . . . . . . . . . . . . . . . . . . . . . . . . . . . . . . . . . . . . . . 5 Disposal of your old appliance or machine . . . . . . . . . . . . . . . . . . . . . . . . . . . . . . . 5
Warning and Safety instructions . . . . . . . . . . . . . . . . . . . . . . . . . . . . . . . . . . . . . 6
Description of the appliance. . . . . . . . . . . . . . . . . . . . . . . . . . . . . . . . . . . . . . . . . 9 Features . . . . . . . . . . . . . . . . . . . . . . . . . . . . . . . . . . . . . . . . . . . . . . . . . . . . . . . . . . 9 Special programmes . . . . . . . . . . . . . . . . . . . . . . . . . . . . . . . . . . . . . . . . . . . . . 9 Delay start. . . . . . . . . . . . . . . . . . . . . . . . . . . . . . . . . . . . . . . . . . . . . . . . . . . . . . 9 Programme lock . . . . . . . . . . . . . . . . . . . . . . . . . . . . . . . . . . . . . . . . . . . . . . . . . 9 Programmable functions. . . . . . . . . . . . . . . . . . . . . . . . . . . . . . . . . . . . . . . . . . . 9 Future updates (PC) . . . . . . . . . . . . . . . . . . . . . . . . . . . . . . . . . . . . . . . . . . . . . . 9 Control panel . . . . . . . . . . . . . . . . . . . . . . . . . . . . . . . . . . . . . . . . . . . . . . . . . . . . . 10 Important control panel features . . . . . . . . . . . . . . . . . . . . . . . . . . . . . . . . . . . . . . 11 Programme selector . . . . . . . . . . . . . . . . . . . . . . . . . . . . . . . . . . . . . . . . . . . . . 11 Additional option buttons . . . . . . . . . . . . . . . . . . . . . . . . . . . . . . . . . . . . . . . . . 11 «Spin» button with indicator lamps . . . . . . . . . . . . . . . . . . . . . . . . . . . . . . . . . . 11
Washing and drying environmentally . . . . . . . . . . . . . . . . . . . . . . . . . . . . . . . . 12
Before using for the first time . . . . . . . . . . . . . . . . . . . . . . . . . . . . . . . . . . . . . . . 13
WASHING . . . . . . . . . . . . . . . . . . . . . . . . . . . . . . . . . . . . . . . . . . . . . . . . . . . . . . . 14 Programme overview . . . . . . . . . . . . . . . . . . . . . . . . . . . . . . . . . . . . . . . . . . . . . . . 14
How to wash correctly . . . . . . . . . . . . . . . . . . . . . . . . . . . . . . . . . . . . . . . . . . . . . 17 Care symbols — washing . . . . . . . . . . . . . . . . . . . . . . . . . . . . . . . . . . . . . . . . . . 17 Separate washing . . . . . . . . . . . . . . . . . . . . . . . . . . . . . . . . . . . . . . . . . . . . . . . . . 19 Before washing . . . . . . . . . . . . . . . . . . . . . . . . . . . . . . . . . . . . . . . . . . . . . . . . . . . 19 Select a programme . . . . . . . . . . . . . . . . . . . . . . . . . . . . . . . . . . . . . . . . . . . . . . . 20 Selecting additional options for the wash programme . . . . . . . . . . . . . . . . . . . 21 Delay start. . . . . . . . . . . . . . . . . . . . . . . . . . . . . . . . . . . . . . . . . . . . . . . . . . . . . 23 At the end of a programme . . . . . . . . . . . . . . . . . . . . . . . . . . . . . . . . . . . . . . . . . . 23 Adding and removing laundry . . . . . . . . . . . . . . . . . . . . . . . . . . . . . . . . . . . . . . . 24 Programme cycle. . . . . . . . . . . . . . . . . . . . . . . . . . . . . . . . . . . . . . . . . . . . . . . . . . 25
2

Contents
Adding detergent . . . . . . . . . . . . . . . . . . . . . . . . . . . . . . . . . . . . . . . . . . . . . . . . . 27 Water softener . . . . . . . . . . . . . . . . . . . . . . . . . . . . . . . . . . . . . . . . . . . . . . . . . . . . 27 Washing with several components . . . . . . . . . . . . . . . . . . . . . . . . . . . . . . . . . . . . 27
Fabric conditioners / starch formulations . . . . . . . . . . . . . . . . . . . . . . . . . . . . . 28 Fabric conditioners, texturisers and starch . . . . . . . . . . . . . . . . . . . . . . . . . . . . . . 28
Automatic dispensing of fabric conditioners, texturisers or liquid starch to laundry at the end of a programme . . . . . . . . . . . . . . . . . . . . . . . . . . . . . . . . . 28 Adding fabric conditioner or liquid starch separately . . . . . . . . . . . . . . . . . . . 28 Separate starching . . . . . . . . . . . . . . . . . . . . . . . . . . . . . . . . . . . . . . . . . . . . . . 28
DRYING . . . . . . . . . . . . . . . . . . . . . . . . . . . . . . . . . . . . . . . . . . . . . . . . . . . . . . . . . 29 Tips on drying . . . . . . . . . . . . . . . . . . . . . . . . . . . . . . . . . . . . . . . . . . . . . . . . . . . . 29 Programme overview . . . . . . . . . . . . . . . . . . . . . . . . . . . . . . . . . . . . . . . . . . . . . . . 30 Separate drying . . . . . . . . . . . . . . . . . . . . . . . . . . . . . . . . . . . . . . . . . . . . . . . . . . . 32 Before drying . . . . . . . . . . . . . . . . . . . . . . . . . . . . . . . . . . . . . . . . . . . . . . . . . . . . . 32 Programme selection . . . . . . . . . . . . . . . . . . . . . . . . . . . . . . . . . . . . . . . . . . . . . . . 33
Additional options for the drying programmes . . . . . . . . . . . . . . . . . . . . . . . . . 33 Delay start. . . . . . . . . . . . . . . . . . . . . . . . . . . . . . . . . . . . . . . . . . . . . . . . . . . . . 34 At the end of a programme . . . . . . . . . . . . . . . . . . . . . . . . . . . . . . . . . . . . . . . . . . 34
WASHING AND DRYING . . . . . . . . . . . . . . . . . . . . . . . . . . . . . . . . . . . . . . . . . . . 35 Washing and drying in a continuous sequence . . . . . . . . . . . . . . . . . . . . . . . . . . 35
After each washing or drying programme. . . . . . . . . . . . . . . . . . . . . . . . . . . . . 36
Changing a programme sequence . . . . . . . . . . . . . . . . . . . . . . . . . . . . . . . . . . . 38
Safety lock . . . . . . . . . . . . . . . . . . . . . . . . . . . . . . . . . . . . . . . . . . . . . . . . . . . . . . 39
Cleaning and care . . . . . . . . . . . . . . . . . . . . . . . . . . . . . . . . . . . . . . . . . . . . . . . . 40 Cleaning the machine . . . . . . . . . . . . . . . . . . . . . . . . . . . . . . . . . . . . . . . . . . . . . . 40 Cleaning the filter in the water inlet . . . . . . . . . . . . . . . . . . . . . . . . . . . . . . . . . . . . 42
3

Contents
Problem solving guide. . . . . . . . . . . . . . . . . . . . . . . . . . . . . . . . . . . . . . . . . . . . . 43 What to do if … ? . . . . . . . . . . . . . . . . . . . . . . . . . . . . . . . . . . . . . . . . . . . . . . . . . . 43 The programme does not start. . . . . . . . . . . . . . . . . . . . . . . . . . . . . . . . . . . . . . . . 44 The wash programme stops and a fault indicator light comes on. . . . . . . . . . . . . 45 A fault indicator lamp comes on but the wash programme continues as normal. 46 General problems or an unsatisfactory wash or drying result. . . . . . . . . . . . . . . . 47 Opening the drum door in the event of a blocked drain outlet and/or power
failure . . . . . . . . . . . . . . . . . . . . . . . . . . . . . . . . . . . . . . . . . . . . . . . . . . . . . . . . . . . 53 Blocked drain outlet . . . . . . . . . . . . . . . . . . . . . . . . . . . . . . . . . . . . . . . . . . . . . 53 Opening the drum door . . . . . . . . . . . . . . . . . . . . . . . . . . . . . . . . . . . . . . . . . . 54 After sales service . . . . . . . . . . . . . . . . . . . . . . . . . . . . . . . . . . . . . . . . . . . . . . . . . 55
Installation and connection . . . . . . . . . . . . . . . . . . . . . . . . . . . . . . . . . . . . . . . . 56 Front view. . . . . . . . . . . . . . . . . . . . . . . . . . . . . . . . . . . . . . . . . . . . . . . . . . . . . . . . 56 Installation surface. . . . . . . . . . . . . . . . . . . . . . . . . . . . . . . . . . . . . . . . . . . . . . . . . 57 Installation . . . . . . . . . . . . . . . . . . . . . . . . . . . . . . . . . . . . . . . . . . . . . . . . . . . . . . . 57 Removing the transit fitting . . . . . . . . . . . . . . . . . . . . . . . . . . . . . . . . . . . . . . . . . . 58 Levelling the machine . . . . . . . . . . . . . . . . . . . . . . . . . . . . . . . . . . . . . . . . . . . . . . 59
Screwing out and adjusting the feet . . . . . . . . . . . . . . . . . . . . . . . . . . . . . . . . . 59 Building under a continous worktop / in a row of kitchen units . . . . . . . . . . . . . . . 60 The Miele Waterproof system . . . . . . . . . . . . . . . . . . . . . . . . . . . . . . . . . . . . . . . . 61 Connection to the water supply . . . . . . . . . . . . . . . . . . . . . . . . . . . . . . . . . . . . . . . 62 Connection to the drainage system. . . . . . . . . . . . . . . . . . . . . . . . . . . . . . . . . . . . 65 Electrical connection U.K. . . . . . . . . . . . . . . . . . . . . . . . . . . . . . . . . . . . . . . . . . . . 66
Consumption data . . . . . . . . . . . . . . . . . . . . . . . . . . . . . . . . . . . . . . . . . . . . . . . . 67
Technical data . . . . . . . . . . . . . . . . . . . . . . . . . . . . . . . . . . . . . . . . . . . . . . . . . . . 68
Programmable functions. . . . . . . . . . . . . . . . . . . . . . . . . . . . . . . . . . . . . . . . . . . 70 High water level . . . . . . . . . . . . . . . . . . . . . . . . . . . . . . . . . . . . . . . . . . . . . . . . . . . 70 Additional rinse for the COTTONS programme . . . . . . . . . . . . . . . . . . . . . . . . . . . 71 Buzzer . . . . . . . . . . . . . . . . . . . . . . . . . . . . . . . . . . . . . . . . . . . . . . . . . . . . . . . . . . 72 Opening the door at high temperatures . . . . . . . . . . . . . . . . . . . . . . . . . . . . . . . . 73 Final residual moisture after drying . . . . . . . . . . . . . . . . . . . . . . . . . . . . . . . . . . . . 74
4
Caring for the environment
Disposal of the packing material
The transport and protective packing has been selected from materials which are environmentally friendly for disposal and can normally be recycled.
Ensure that any plastic wrappings, bags etc. are disposed safely and kept out of the reach of babies and young children. Danger of suffocation!
Rather than just throwing these materials away, please ensure they are offered for recycling.
Disposal of your old appliance or machine
Electrical and electronic appliances / machines often contain materials which, if handled or disposed of incorrectly, could be potentially hazardous to human health and to the environment. They are, however, essential for the correct functioning of your appliance or machine. Please do not therefore dispose of your old machine or appliance with your household waste.
Please dispose of it at your local community waste collection / recycling centre and ensure that it presents no danger to children while being stored for disposal.
It should be unplugged or disconnected from the mains electricity supply by a competent person. The plug must be rendered useless and the cable cut off directly behind it to prevent misuse. See the «Warning and Safety» section of this booklet for further details
5

Warning and Safety instructions
Read the operating instructions before using this machine for the first time. They contain important information about the safety, installation, use and maintenance of the machine. This way you will avoid the risk of accidents and damage to the machine.
Keep these operating instructions in a safe place and ensure that new users are familiar with the content. Pass them on to any future owner of the machine.
Correct usage
This washer-dryer must only be used:
–to wash textiles which are declared by the manufacturer on the care label to be machine washable, as well as hand washable woollens.
–to dry textiles which have been washed in a water solution, marked on the manufacturer’s wash care label as being suitable for tumble drying.
Any other applications may be dangerous. The manufacturer cannot be held responsible for damage caused by improper or incorrect use of the appliance.
Do not let small children play with the machine and its controls or
operate it. Supervise its use by the elderly or infirm.
Technical safety
Before setting up the machine, check it for any externally visible
damage. Do not install or use a damaged machine.
Before connecting the machine, ensure that the connection data on
the data plate (fusing, voltage and frequency) matches the mains electricity supply. If in any doubt, consult a qualified electrician.
The electrical safety of this machine can only be guaranteed
when continuity is complete between the machine and an effective earthing system which complies with local and national safety regulations.
It is most important that this basic safety requirement is regularly tested by a qualified electrician.
The manufacturer cannot be held responsible for the consequences of an inadequate earthing system.
Do not connect the appliance to the mains electricity supply by an
extension lead. Extension leads do not guarantee the required safety of the appliance (e.g. danger of overheating).
The machine is built in accordance with current safety requirements.
Unauthorised repairs could result in unforeseen dangers for the user, for which the manufacturer cannot accept responsibility. Repairs should only be undertaken by a Miele approved technician.
The machine is only completely isolated from the electricity supply
when:
–it is switched off at the wall socket and the plug is withdrawn, or
–it is switched off at the mains, or
–the mains fuse is withdrawn, or
–the screw-out fuse is removed in countries where this is applicable.
6

Warning and Safety instructions
The Miele «Waterproof system» protects from water damage
provided the following conditions have been met:
–the machine is correctly plumbed in and connected to the electricity supply.
–if a fault has been identified, the machine must be examined by a competent person before further use, and repaired if necessary.
Faulty components must only be exchanged for Miele original spare
parts. Only when these parts are fitted can the safety standards of the machine be guaranteed.
If the connection cable is faulty it must only be replaced by a Miele approved service technician to protect
the user from danger.
In countries where there are areas which may be subject to infestation
by cockroaches or other vermin, pay particular attention to keeping the appliance and its surroundings in a clean condition at all times. Any damage which may be caused by cockroaches or other vermin will not be covered by the appliance guarantee.
Use
This equipment is not designed for maritime use or for use in mobile
installations such as caravans, aircraft etc. However it may be suitable for such usage subject to a risk assessment of the installation being carried out by a suitably qualified engineer.
Take care, the metal cap is hot after drying. Open the door wide
after the drying cycle. Do not touch the metal cap located on the inside of the door glass. It will still be hot and could cause a burn.
Do not install your machine in rooms where temperatures below
freezing may occur. Frozen hoses may burst under pressure.The reliability of the electronic control unit may be impaired at temperatures below freezing point.
Before using the machine for the first time, check that the transit
fitting at the rear of the machine has been removed (see section on «Installation»). During spinning, a transit fitting which is still in place may result in damage to both the machine and adjacent furniture or appliances.
Turn off the stopcock if the machine is to be left for any length of time
(e.g. holiday), especially if there is no floor drain (gully) in the immediate vicinity.
Flooding danger. If hooking the drain hose into a wash basin, check that
the water can drain off quickly enough to prevent the sink from overflowing. Make sure the drain hose is secure, so that the force of the water flowing out of the hose does not dislodge it.
Take care to ensure that foreign objects (e.g. nails, pins, coins,
paper clips) do not find their way into the machine with the laundry. These may damage components of the machine (e.g. suds container, drum), which in turn can result in damage to the laundry.
7

Warning and Safety instructions
For machines with a ‘porthole’ door, remember that the porthole
glass will be hot when washing at very high temperatures.
Do not let children touch it during a hot wash programme.
If the correct amount of detergent is dispensed, the machine should not need to be descaled. If, however,
you do wish to descale the machine only use proprietary non-corrosive descaling agents and strictly observe the instructions on the packaging. If in doubt contact the Miele Customer Service Dept. or your Miele Dealer.
Never use solvent based cleaning agents in this machine, as this may
result in damage to component parts and create toxic fumes. Such detergents also pose a fire and explosion hazard.
Textiles which have been pre-treated in solvent based
cleaning agents must be thoroughly rinsed in clean water before being washed in the machine.
Only use dyes specified by the manufacturer as being suitable for
use in a domestic washing machine. Always observe the manufacturer’s instructions carefully.
Colour run and dye removers contain sulphur compounds which
can cause damage such as corrosion. Do not use these products in this machine.
Always make sure the drum is stationary before reaching in to
remove laundry. Reaching into a moving drum is extremely dangerous.
There is a danger of fire during drying with fabrics which:
–contain rubber, foam rubber or rubber like materials
–have been treated with inflammable cleaning agents
–have been splashed with hair lacquer, hair spray, nail varnish remover or similar substances
–which contain padding or fillings (e.g. pillows, jackets). If these were damaged, the filling could get out with the risk of igniting in the dryer.
Make sure that any dispensing balls etc. are removed from laundry
before the drying programme. These dispensers can melt during the drying programme and cause damage to the machine and the laundry. Do not use liquid dispenser balls or similar if you are planning to wash and then dry in one continuous sequence.
Using accessories
Accessory parts may only be fitted when expressly approved by Miele.
If other parts are used, guarantee, performance and product liability claims will be invalidated.
Disposal of your old machine
Disconnect and remove the mains plug from the socket. Render the plug useless. Cut off the cable directly behind the appliance to prevent misuse.
8

Description of the appliance
This washer-dryer can be used:
–to wash separately
with a max. load (depending on programme) of 5 kg;
–to dry separately
with a max. load (depending on programme) of 2.5 kg;
or
–to wash and dry in a continuous sequence
with a max. load (depending on programme) of 2.5 kg;
Features
Special programmes
–Programme for hand-washable fabrics (WOOLLENS /)
Hand-washable or machine-washable wool or wool blend fabrics can be washed in the WOOLLENS / programme.
–Programme for small loads (Quick wash)
This is a Cottons programme for very lightly soiled fabrics.
– Rinse programme (Separate rinse)
Articles are only rinsed and spun in the machine.
Delay start
Delay start allows you to delay the start of a programme from 1 hour up to a maximum of 9 hours.
Programme lock
Electronic programme locking prevents the door from being opened or the programme cancelled during a wash programme. The electronic programme locking is automatically cancelled at the end of the programme.
Programmable functions
The programmable functions can be used to tailor washing programmes to suit your individual requirements. The selected function is displayed when in programming mode.
Future updates (PC)
The indicator or check lamp marked PC allows a service engineer to update your machine in future years.
When, for example, new programmes are developed or new fabrics are introduced, a service engineer will be able to modify existing programme cycles accordingly.
9
Description of the appliance
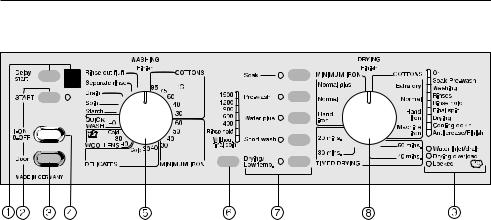
Control panel
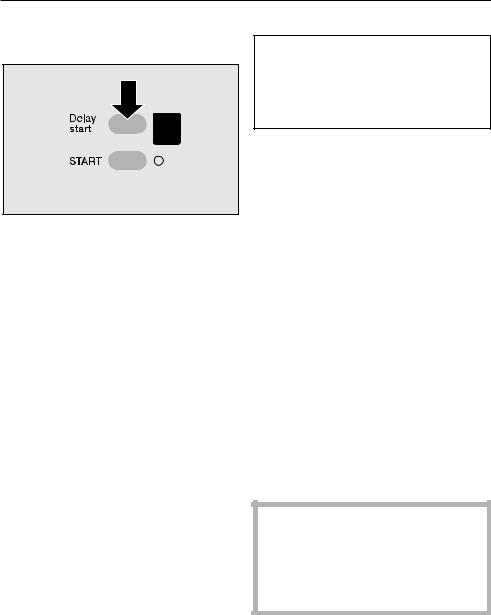
a Delay start button and display
This is used to delay the start of a programme.
The delay time will appear in the display.
b «START» button
Press the Start button to start a programme.
The Start indicator lamp will flash as soon as a programme can be started.
c Door button
Opens the drum door.
d I-ON / 0-OFF button
to switch the machine on and off and to interrupt a programme that is currently running.
e WASHING programme selector for selecting a basic wash programme and temperature. The programme selector can be
turned clockwise or anti-clockwise.
f «Spin» button
for changing a spin speed or selecting
–Rinse hold or
–Without final spin.
g Additional option buttons
for selecting additional functions. When an additional option is selected the relevant indicator lamp will come on.
h DRYING programme selector
for selecting the drying programme and the drying level required. The programme selector can be turned clockwise or anti-clockwise.
i Programme sequence
Programme sequence indicator lamps show which section of the programme has been reached and fault / check indicator lamps.
10
![]()
Description of the appliance
Important control panel features
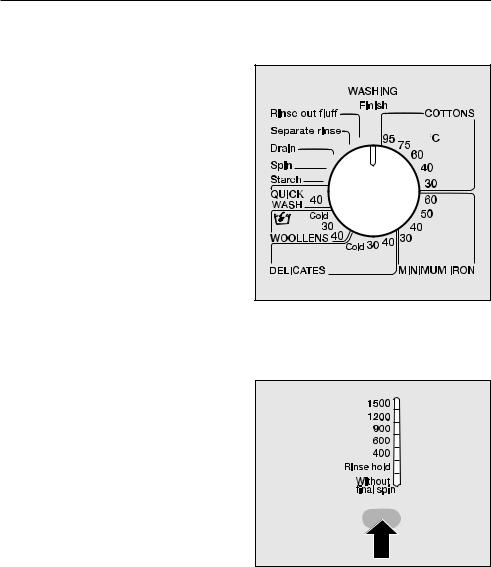
Programme selector
The programme selector is used to set the
–basic wash programmes and temperatures
and
–the drying programmes and temperatures.
Additional option buttons
Additional options can be added to the basic programme. Pressing the relevant button selects or de-selects the particular option. An additional option is selected if its indicator lamp is on.
If the lamp does not come on, the function is not compatible with the programme you are trying to use it with. The indicator lamp will go out when the option button is released.
«Spin» button with indicator lamps
To change the spin speed press the «Spin» button.
It is not possible to select a spin speed higher than the permitted maximum spin for the basic wash programme. The indicator lamps show the setting selected.
Spinning at 400 — 1500 rpm
The spin can be set within this range for the
–final spin during a wash programme or
–for «Thermospin» during drying (see «DRYING — Programme selection» for information on the «Thermospin»).
The final spin in a wash programme can also be deactivated:
^Press the «Spin» button until you reach
«Rinse hold»
The laundry is not spun and remains suspended in the final rinse water. This reduces creasing if the laundry is not going to be removed from the drum immediately after the end of the programme.
To continue the programme:
–with a final spin
press the «Spin» button until you reach the spin speed you want.
–without a final spin
Press the «Spin» button repeatedly until the Without final spin indicator lamp lights up.
Without final spin
The laundry is not spun after the final rinse but the water is drained away and the machine goes straight into the anti-crease stage.
11

Washing and drying environmentally
–Ideally load the maximum amount specified for the programme you are using.
This way energy and water consumption will be kept to a minimum.
–Use the QUICK WASH programme for small loads.
–Use the Short wash option for lightly soiled laundry.
–A main wash (programme without pre-wash) is sufficient for cleaning normally soiled laundry.
–Use the Soak option for heavily soiled laundry. The wash temperature can be reduced for the main wash when using the additonal soak option.
–Use the additional option Soak instead of Pre-wash with heavily soiled laundry. If Soak is followed immediately by a main wash the same suds are used.
–Do not exceed the amounts of detergent which may be recommended by the manufacturer on the packaging.
–Reduce the amount of detergent with smaller loads (approx. 1/3 less than the amount recommended can be used when washing a half load).
–Load recognition can cause the duration of a programme to vary greatly. The main wash may be shortened and a rinse cycle omitted depending on the amount of laundry.
–Select a high spin speed for the wash programme, as well as for the Thermospin, if tumble drying the laundry afterwards. This saves time and energy.
12
Before using for the first time
Before using the machine for the first time ensure that it is correctly installed and connected. See the relevant section under «Installation».
Flushing out the drum
^Turn on the stopcock.
^Turn both programme selectors to the Finish position.
^Switch the machine on with the I-ON / 0-OFF button.
Do not load any laundry.
^Add max. 1/4 of the amount of detergent recommended for a full load into Compartment j of the detergent dispenser.
^Turn the WASHING programme selector to the «COTTONS 60°C» position.
Important! This programme is required to prepare the machine for operation.
^Press the Water plus button.
^Press the «Spin» button repeatedly until the Without final spin indicator lamp comes on.
^Press the START button.
This will flush out any residues in the machine by the end of the programme.
Water hardness reminder
The amount of detergent required will depend on various factors, including water hardness. The dial in the detergent dispenser can be set as a water hardness reminder.
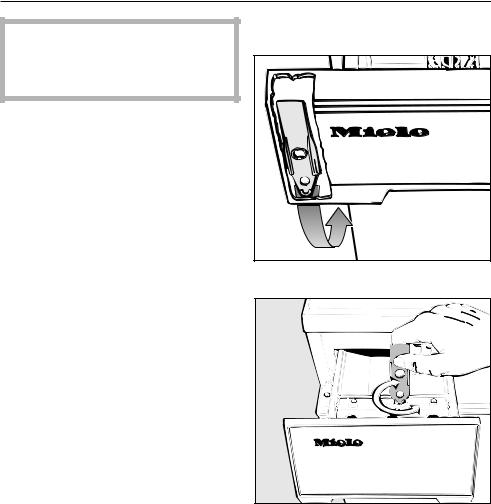
There is a yellow lever behind the detergent drawer facia panel.
^ Remove the lever.
^Use it to turn the dial to the position which represents your water hardness level.
Your local water authority can advise on water hardness in your area.
13

WASHING
Programme overview
COTTONS e
|
Fabric type |
Cottons and linen fabrics, e.g. bed linen, table linen, |
|
towelling, jeans, underwear, T-shirts, nappies. |
|
|
Additional options |
Soak, Pre-wash, Water plus, Short. |
|
Notes |
– Only use the COTTONS 95°C programme for heavily |
|
soiled and incontinent laundry. |
|
|
– For heavily soiled laundry select the Soak or Pre-wash |
|
|
additional option. |
|
|
– For lightly soiled laundry select the Short option. |
|
|
– For dark coloured fabrics use a detergent for coloured |
|
|
fabrics, or liquid detergent. |
|
|
Detergent |
Powder detergent, detergent for coloured fabrics, liquid |
|
detergent. |
|
|
Max. load |
5 kg |
Note for test institutes:
Programme setting for the EN 50229 Standard Cottons 60°C
MINIMUM IRON e f
|
Fabric type |
White nylon (60°C), white polyester fabrics (50°C), |
|
coloured nylon, polyester, cotton and viscose fabrics with |
|
|
special finishes, acrylic, cotton fabrics, coloured |
|
|
polyester / cotton fabrics, (40°/30°C) minimun iron fabrics |
|
|
not washable at higher temperatures. |
|
|
Additional options |
Soak, Pre-wash, Water plus, Short. |
|
Notes |
– For heavily soiled laundry select the Soak or Pre-wash |
|
additional option. |
|
|
– For lightly soiled laundry select the Short option. |
|
|
Detergent |
Powder detergent, detergent for coloured fabrics, liquid |
|
detergent, detergent for delicates. |
|
|
Max. load |
2 kg |
14

|
WASHING |
|
|
Programme overview |
|
|
DELICATES f |
|
|
Fabric type |
Acrylics, acetate and triacetate, 100% cotton easy care |
|
shirts and blouses. |
|
|
Curtains, specified machine-washable by the |
|
|
manufacturer. |
|
|
Additional options |
Soak, Pre-wash, Short |
|
Notes |
– Laundry remains relatively crease-free for easier |
|
ironing. |
|
|
– Dust in curtains usually makes using a programme with |
|
|
Pre-wash advisable. |
|
|
– For curtains made from delicate fabrics reduce the |
|
|
spin speed or select Without final spin. |
|
|
Detergent |
Detergent for delicates |
|
Max. load |
1 kg |
|
WOOLLENS g |
|
|
Fabric type |
Machine-washable or hand-washable wool or wool blend |
|
fabrics. Please note that hand-washable wool or wool |
|
|
blend fabrics will not shrink, stretch, matt or felt beyond |
|
|
the accepted tolerance of the item. |
|
|
Notes |
– For hand-washable garments made from delicate |
|
fabrics reduce the spin speed or select Without final |
|
|
spin. |
|
|
Detergent |
Liquid detergent for machine washable woollens |
|
Max. load |
1 kg |
|
Quick wash |
|
|
Fabric type |
Very lightly soiled fabrics, which can be washed in the |
|
Cottons programme. |
|
|
Additional option |
Water plus |
|
Notes |
– Use less detergent (as for a half load). |
|
Detergent |
Powder detergent, detergent for coloured fabrics, liquid |
|
detergent. |
|
|
Max. load |
2.5 kg |
15

WASHING
Programme overview
Starch
|
Fabric type |
Table cloths, napkins, overalls, aprons. |
|
Notes |
– The laundry should be washed but not treated with |
|
fabric conditioner. |
|
|
Max. load |
5 kg |
|
Drain / Spin |
|
|
Notes |
– Drain only: Select Without final spin. |
|
Max. load |
5 kg |
|
Separate rinse |
|
|
Fabric type |
Articles which have been washed by hand and only need |
|
to be rinsed and spun in the machine. |
|
|
Notes |
– Do not use for woollens. |
|
Max. load |
5 kg |
|
Flushing out the drum |
|
|
Notes |
– Fluff residues left in the drum after a Drying |
|
programme can be rinsed out. |
|
|
Important: there must be no items of laundry left in |
|
|
the drum! Always check that it is empty before |
|
|
selecting this option. |
If «cold» is selected, the water is warmed to 24°C. This is to even out any fluctuations in the incoming water and helps the detergent to dissolve properly.
16
|
How to wash correctly |
|||
|
Care symbols — washing |
|||
|
Care |
Fabric |
Description of |
Programme: |
|
symbols |
types |
process |
(select the appropriate temperature |
|
according to the temperature on the |
|||
|
care label symbol) |
|||
|
e |
Cottons |
Normal |
Cottons, Minimum iron, Quick wash |
|
no bar |
(maximum) |
||
|
machine action |
|||
|
and normal |
|||
|
spinning |
|||
|
f |
Synthetics |
Reduced |
Delicates |
|
single bar |
(medium) |
||
|
machine action |
|||
|
and reduced |
|||
|
spinning |
|||
|
g |
Woollens |
Much reduced |
Hand Wash Woollens programmes. |
|
broken |
(minimum) |
||
|
bar |
machine action |
||
|
but with normal |
|||
|
spinning |
|||
17

How to wash correctly
Important — other care symbols
|
/ |
Hand wash |
|
h |
Do not wash |
|
apf |
Dry clean |
|
D |
Do not dry clean |
|
y |
Suitable for chlorine |
|
bleaching |
|
|
z |
Do not use chlorine bleach |
|
Tumble dry |
|
|
q |
At normal temperature |
|
r |
At low temperature |
|
s |
Do not tumble dry |
|
Ironing |
|
|
I |
Hot iron |
|
H |
Medium hot iron |
|
G |
Cool iron |
|
J |
Do not iron |
18

How to wash correctly
Separate washing
Make sure that the DRYING programme selector is at theFinish position. Otherwise the drying programme set will follow on from the washing programme.
Before washing
A Sort the laundry
^ Empty all pockets.
,Foreign objects (e.g. nails, coins, paper clips, etc.) can cause damage to garments and components in the machine.
^Stains etc. should be removed as soon as possible whilst still fresh. Spillages should be carefully dabbed off using a soft, colourfast cloth. Do not rub!
Badly soiled areas can be pre-treated with liquid detergent, stain removers etc. first, following the manufacturer’s instructions. With particularly stubborn stains ask your dry cleaner for advice.
,Do not use solvent-based cleaning agents in this machine.
^Sort the laundry by colour and by care label symbol. Most garments have a textile care label in the collar or side seam. See the «Programme overview chart» for information on which programmes to use for different fabric types.
Dark textiles often contain excess dye and should be washed separately several times before being included in a mixed load.
–Curtains: Remove lead weights and strips or place in a laundry bag.
–Bras: Ensure any underwiring is securely sewn in. If not, remove it.
–Knitted garments, trousers and jeans, T-shirts and sweat shirts: Turn inside out, if recommended by the manufacturer.
–Close any zips, fasten hooks and eyes etc before washing.
–Fasten duvet covers etc. to prevent small items from being rolled up inside them.
Do not wash any items in this machine which are specified by the manufacturer as non-machine washable on the care label (h symbol).
19
How to wash correctly
B Switch the machine on
^ Press in the I-ON/0-OFF button.
C Open the drum door
^Press the Door button and open the drum door.
D Load the drum
^Unfold the laundry and load loosely in the drum. To achieve best results make up mixed loads consisting of both large and small items.
Do not exceed the maximum load for the programme selected. This uses the energy and water to the best advantage. Exceeding the maximum load will result in poorer wash results and an increased level of creasing.
E Close the drum door
Make sure that no garments are caught between the drum door and seal.
F Open the stopcock
Select a programme
G Select the wash programme.
^Turn the programme selector to the required programme.
H Select a spin speed.
^Press the «Spin» button repeatedly until the indicator lamp for the spin speed you want comes on.
In some programmes, the maximum spin speed is limited. The machine will not allow a higher spin speed to be selected.
20
![]()
How to wash correctly
Selecting additional options for the wash programme
I Select additional option(s)
^Press the required addtional option button(s).
Additional options which are not compatible with the basic programme cannot be selected. The indicator lamp will go out when the option button is released.
Soak
For heavily soiled and stained items with dried-on stains, or ones which can be bleached out, (e.g. blood, fats and oils, cocoa).
Duration of soak: 2 hours.
Detergent dispensing when selecting the soak option:
The amount to dispense will depend on which programme is to follow on from the soak process.
For programmes without a pre-wash:
–Add the total amount to compartment j or directly into the drum on top of the laundry.
For programmes with a pre-wash:
–Add 1/4 of the detergent for the soak and pre-wash into compartment i, and 3/4 into compartment j for the main wash.
Pre-wash
For heavily soiled and stained items.
Water plus
The water level increases in all sections of the COTTONS / MINIMUM IRON and QUICK WASH 40°C programmes.
–for particularly delicate fabrics.
–if more water is required for dispensing the detergent.
–where a higher quality rinse is required.
Short
For lightly soiled items.
This shortens the programme running time. In the COTTONS and MINIMUM IRON programmes only two rinses are carried out with a higher water level.
21

How to wash correctly
J Adding detergent
It is important to dispense the correct amount, because… . .
. . . too little detergent results in:
–Laundry not being cleaned properly and with time it may become grey and hard to the touch.
–Greasy particles clinging to the laundry.
–Limescale deposits on the heater elements.
. . . too much detergent results in:
–Excessive foam, which causes a low level of agitation and poor wash, rinse and spin results.
–Higher water consumption because an extra rinse is automatically activated.
–A burden to the environment.
Add detergent for the pre-wash to compartment i and to compartment j for the main wash. If the capacity of compartment j is not sufficient (e.g. in water hardness area III), some of the main wash detergent can be added to compartment i.
^Pull out the detergent drawer and place detergent in the compartments as follows:
i = Pre-wash
(if selected, 1/4 of the total amount recommended for the programme)
j = Main wash
including the Soak period if selected
p= Fabric conditioner or liquid starch.
See «Detergent» section for further information.
22
How to wash correctly
Delay start
K Select Delay start
^Press the Delay start button repeatedly until the required delay start period shows up in the display (from i to 9 hours).
Press the «START» button. The chosen time will start to count down hour by hour. The programme will then start automatically.
To cancel «Delay start»:
^Press the Delay start button once when 9 is showing in the display, or
^Switch the machine off with the I-ON / 0-OFF button.
Memory function
If an additional option(s) is selected for a programme, and / or the spin speed is altered, the machine stores these changes in memory at the start of a programme.
When that particular programme is chosen again, the display will show the additional option(s) and / or spin speed which have been stored for that programme in the memory.
Exception: Delay start
L Start the programme
The START indicator lamp will flash as soon as a programme can be started.
^Press the START button.
After the programme has started the START indicator lamp will light up constantly.
At the end of a programme
A buzzer will sound (see «Programmable functions») and the anti-crease / Finish light will come on.
After washing a full load
If you have washed a full load of laundry and you wish to dry the laundry in the dryer afterwards you will have to remove half the load. Carry out the drying procedure in two batches.
For further information on drying see section «After each washing or drying programme».
23
 Loading…
Page 1 — WT 945 S
Operating instructionsWasher-dryerWT 945 SWPSTo avoid the risk of accidentsor damage to the machineit is essential to readthese instructions before it
Page 2 — Contents
Control panela Delay start button and displayThis is used to delay the start of aprogramme.The delay time will appear in thedisplay.b «START»
Page 3
Important control panelfeaturesProgramme selectorThe programme selector is used to setthe–basic wash programmes andtemperaturesand–the drying programm
Page 4
–Ideally load the maximum amountspecified for the programme you areusing.This way energy and waterconsumption will be kept to aminimum.–Use the QUICK
Page 5 — Caring for the environment
Before using the machine for the firsttime ensure that it is correctlyinstalled and connected. See therelevant section under «Installation».
Page 6 — Technical safety
Programme overviewCOTTONS eFabric type Cottons and linen fabrics, e.g. bed linen, table linen,towelling, jeans, underwear, T-shirts, nappies.Additiona
Page 7
Programme overviewDELICATES fFabric type Acrylics, acetate and triacetate, 100% cotton easy careshirts and blouses.Curtains, specified machine-washabl
Page 8 — Disposal of your old machine
Programme overviewStarchFabric type Table cloths, napkins, overalls, aprons.Notes–The laundry should be washed but not treated withfabric conditioner.
Page 9
Care symbols — washingCaresymbolsFabrictypesDescription ofprocessProgramme:(select the appropriate temperatureaccording to the temperature on thecare
Page 11
Separate washingMake sure that the DRYINGprogramme selector is at theFinishposition. Otherwise the dryingprogramme set will follow on fromthe washing
Page 12 — Pre-wash
Caring for the environment . . . . . . . . . . . . . . . . . . . . . . . . . . . . . . . . . . . . . . . . . . 5Disposal of the packing material . . .
Page 13 — Flushing out the drum
B Switch the machine on^Press in theI-ON/0-OFF button.C Open the drum door^Press theDoor buttonand open thedrum door.D Load the drum^Unfold the laundr
Page 14 — Programme overview
Selecting additional options for thewash programmeI Select additional option(s)^ Press the required addtional optionbutton(s).Additional options which
Page 15
J Adding detergentIt is important to dispense the correctamount, because… . .. . . too little detergent results in:–Laundry not being cleaned proper
Page 16
Delay startK Select Delay start^Press theDelay startbuttonrepeatedly until the required delaystart period shows up in the display(from i to 9 hours).P
Page 17 — How to wash correctly
Adding and removing laundryLaundry can be added or removedafter the start of one of the followingprogrammes:–COTTONS–MINIMUM IRON–QUICK WASH 40°C^Pres
Page 18
Programme cycleThis washing machine has fullyelectronic controls with automatic loadrecognition. This machine takes in theright amount of water requir
Page 19
QUICK WASHMain washWater level: lowWash rhythm: normalRinsesWater level: mediumNo of rinses: 2SpinningRinse and interim spin2): yesFinal spin: yesSta
Page 20
DetergentAll modern detergents produced forautomatic washing machines aresuitable, including liquid, compact(concentrated), tablets and specialapplica
Page 21
Fabric conditioners, texturisersand starchFabric conditioners make garments softand fluffy to handle and help preventstatic cling when tumble drying.T
Page 22
Tips on drying^Before drying check the dryingsymbol on the wash care label.q Dry at normal temperaturer Dry at low temperature(select theDrying/low te
Page 23
Adding detergent . . . . . . . . . . . . . . . . . . . . . . . . . . . . . . . . . . . . . . . . . . . . . . . . . 27Water softener . . . . . . . . .
Page 24
Programme overviewCOTTONSExtra dryFabric type Multi-layered fabrics, which are thoroughly dried in theNormalprogramme.Additional options Thermospin ma
Page 25
Programme overviewMINIMUM IRONNormal plusFabric type Minimum iron items which are made of synthetic or blendedfabrics (e.g. pullovers, dresses, trouse
Page 26
Separate dryingThe separate drying programmemust be used if the load in the washprogramme is greater than themaximum load permitted for drying,or if y
Page 27 — Adding detergent
Programme selectionG Select a drying programmeThe programmes are described in the»Drying programme charts».^ Turn the programme selector to
Page 28
Delay startI Select Delay start^Press theDelay startbuttonrepeatedly until the required delaystart period shows up in the display(from i to 9 hours).P
Page 29 — Tips on drying
Washing and drying in acontinuous sequenceWhere the amount of laundry to bewashed and dried in one programmedoes not exceed the maximumweight permitte
Page 30
At the end of a programme^A buzzer will sound (see»Programmable functions») and theAnti crease / Finish light will come on.Press theDoorbutt
Page 31
After drying»Rinse out fluff» programmeThe fluff which occurs during dryingcan collect in the drum and also inthe suds container. It is best
Page 32 — Before drying
Programme sequences can bechanged after the START button hasbeen pressed. It is also possible toselect a follow-on drying programmeany time up to the
Page 33 — Programme selection
Safety lockElectronic programme locking (theLockedindicator lamp is on)prevents the door from being openedor the programme cancelled during aprogramme
Page 34 — After drying
Problem solving guide. . . . . . . . . . . . . . . . . . . . . . . . . . . . . . . . . . . . . . . . . . . . . 43What to do if … ? . . . . . . . . .
Page 35 — WASHING AND DRYING
,Disconnect the machine from theelectricity supply by switching off atthe wall socket and withdrawing theplug before any cleaning andmaintenance work.
Page 36
^Clean the siphon tube.1. Remove the siphon fromcompartment p and rinse underwarm running water. The channel incompartment p should also becleaned.2.
Page 37
Cleaning the filter in the waterinletThe machine has a filter to protect thewater inlet valve.The filter in the open end of the inlethose should be ch
Page 39 — Safety lock
The programme does not start.Problem Possible cause RemedyThe On indicator lampdoes not light up in theprogramme sequencedisplay or the STARTbutton in
Page 40 — Cleaning and care
The wash programme stops and a fault indicator light comeson.Problem Possible cause RemedyThe Water inlet/drainindicator lamp isflashing and the load
Page 41
A fault indicator lamp comes on but the wash programmecontinues as normal.Problem Possible cause RemedyThe Water inlet/drainindicator lamp flashesduri
Page 42
General problems or an unsatisfactory wash or drying result.Problem Possible cause RemedyThe door cannot beopened.The machine is notconnected to theel
Page 43 — Problem solving guide
Problem Possible cause RemedyThe door cannot beopened during or afterdrying.For safety reasons thedoor cannot beopened when theinternal temperature is
Page 44
Problem Possible cause RemedyThe laundry is stilldamp after a dryingcycle.The load weighed lessthan 1 kg. The moisturesensing system cannotoperate wit
Page 45
Disposal of the packingmaterialThe transport and protective packinghas been selected from materials whichare environmentally friendly for disposaland
Page 46
Problem Possible cause RemedyThe laundry is notspun satisfactorily.The spin speed selectedwas too low.Select a higher spin speedfor the next washprogr
Page 47
Problem Possible cause RemedyThere is an excessivebuild-up of foam.Too much detergentwas used.–Follow the manufacturer’sinstructions on dosagegiv
Page 48
Problem Possible cause RemedyLiquid detergent doesnot give the requiredresult.Liquid detergents usuallycontain no bleachingagents. They do notremove f
Page 49
Opening the drum door in theevent of a blocked drain outletand/or power failure^Switch the machine off.There is a yellow filter flap openerbehind the
Page 50
Once the flow of water ceases:^ Remove the fluff filter completely.^ Clean the fluff filter thoroughly.^Check that the impeller can turneasily. Remove
Page 51
After sales serviceIn the event of any faults which youcannot remedy yourself, please contact–Your Miele Dealer or–The Miele Service Department (seead
Page 52
Front viewa Electrical connectionb Inlet hose with «Waterproof» systemc Drain hose with flexible / detachableswivel elbowd Detergent dispens
Page 53
Installation surfaceA concrete floor is the most suitableinstallation surface. It is far less proneto vibration during the spin cycle thanwooden floor
Page 54
Removing the transit fittingA Turn the left-hand transit bar 90°.B Turn the right-hand transit bar 90°.C Withdraw the two bars together withthe suppor
Page 55
Levelling the machineThe machine must stand perfectly levelon all four feet to ensure safe andproper operation.Incorrect installation may increaseelec
Page 56 — Installation and connection
Read the operating instructionsbefore using this machine for thefirst time. They contain importantinformation about the safety,installation, use and m
Page 57
Building under a continousworktop / in a row of kitchenunitsThe building under kit* must befitted by a suitably qualified fitter.–A special building u
Page 58
The Miele Waterproof systemThe Miele Waterproof system protectsthe washing machine from waterdamage.The system consists of three maincomponents:1) the
Page 59
Connection to the water supplyInstallationFor the Miele Waterproof system tofunction correctly, it may only be fittedin the positions shown in theillu
Page 60
The plastic casing of the safety valve contains electrical components. TheWaterproof system must only be connected to its own stopcock. It must not be
Page 61
Maintenance and careIf you intend to unscrew the MieleWaterproof system hose from thestopcock it is essential to disconnectthe machine from the electr
Page 62
Connection to the drainagesystemThe machine drains via a drain pumpwith a delivery head of 1 metre.The drain hose is 1.5 m long. It mustnot be kinked
Page 63
Electrical connection U.K.All electrical work should be carried outby a suitably qualified and competentperson, in strict accordance withnational and
Page 64
ProgrammesFullloadEnergyconsumptionWaterconsumptionProgrammedurationkg kWh l h minWASHINGCOTTONS 95°C 5.0 1.70 59 1 53COTTONS 60°C(1)5.0 0.95 56 1
Page 65
Height 85.0 cmWidth 59.5 cmDepth with lid fitted 60.0 cmDepth without lid 57.5 cmWeight, empty 99 kgMax. floor load 1600 Newton (approx. 160 kg)Capaci
Page 66
Programmable functionsfor changingstandard settings
Page 67 — Consumption data
The Miele «Waterproof system»protects from water damageprovided the following conditions havebeen met:–the machine is correctly plumbed inan
Page 68 — Technical data
The programmable functions can beused to tailor programmes to suityour individual requirements. Onceactivated the programmablefunctions remain in memo
Page 69 — Programmable functions
Additional rinse for theCOTTONS programmeSuitable for areas with soft water(hardness range I).If a particularly good rinsing effect isrequired in an a
Page 70
BuzzerAn audible tone will sound at the endof a washing / drying programme.The machine is delivered with thisprogrammable function activated.Follow st
Page 71
Opening the door at hightemperaturesIt is possible to open the door duringa washing or drying programme,even if the temperature is above70°C.,Warning:
Page 72
Final residual moisture afterdryingThe machine is set to give the bestdrying results. You do, however, havethe option of shortening orlengthening the
Page 74
Alteration rights reserved / 3404 / WT 945 SThis paper consists of cellulose which has been bleached without the use of chlorine.M.-Nr. 05 876 080 / 0
Page 75
For machines with a ‘porthole’door, remember that the portholeglass will be hot when washing at veryhigh temperatures.Do not let children to
Page 76 — M.-Nr. 05 876 080 / 02
This washer-dryer can be used:–to wash separatelywith a max. load (depending onprogramme) of 5 kg;–to dry separatelywith a max. load (depending onprog

Operating instructions
Washer-dryer
WT 945 S
WPS
To avoid the risk of accidents
or damage to the machine
it is
essential
to read
these instructions before it is
installed or used for the first time.
G
M.-Nr. 05 876 080
-
Страница 1
Oper ating instr uctions W asher-dr y er WT 945 S WPS T o avoid the risk of accidents or damage to the machine it is essential to read these instructions before it is installed or used for the first time. G M.-Nr . 05 876 080[…]
-
Страница 2
Caring f or the en vir onment . . . . . . . . . . . . . . . . . . . . . . . . . . . . . . . . . . . . . . . . . . 5 Disposal of the packing material . . . . . . . . . . . . . . . . . . . . . . . . . . . . . . . . . . . . . . . 5 Disposal of your old appliance or machine . . . . . . . . . . . . . . . . . . . . . . . . . . . . . . . 5 W arning and Sa[…]
-
Страница 3
Adding deter gent . . . . . . . . . . . . . . . . . . . . . . . . . . . . . . . . . . . . . . . . . . . . . . . . . 27 W ater softener . . . . . . . . . . . . . . . . . . . . . . . . . . . . . . . . . . . . . . . . . . . . . . . . . . . . 27 W ashing with several components . . . . . . . . . . . . . . . . . . . . . . . . . . . . . . . . . . . . 27 […]
-
Страница 4
Prob lem solving guide . . . . . . . . . . . . . . . . . . . . . . . . . . . . . . . . . . . . . . . . . . . . . 43 What to do if … ? . . . . . . . . . . . . . . . . . . . . . . . . . . . . . . . . . . . . . . . . . . . . . . . . . . 43 The programme does not start. . . . . . . . . . . . . . . . . . . . . . . . . . . . . . . . . . . . . . . . 44 […]
-
Страница 5
Disposal of the pac king material The transport and protective packing has been selected from materials which are envir onmentally friendly for disposal and can normally be recycled. Ensure that any plastic wrappings, bags etc. are disposed safely and kept out of the reach of babies and young children. Danger of suf focation! Rather than just throw[…]
-
Страница 6
Read the operating instructions before using this machine for the first time. They contain important information about the safety , installation, use and maintenance of the machine. This way you will avoid the risk of accidents and damage to the machine. Keep these operating instructions in a safe place and ensure that new users are familiar with t[…]
-
Страница 7
The Miele «W aterpr oof system» protects fr om water damage provided the following conditions have been met: – the machine is correctly plumbed in and connected to the electricity supply . – if a fault has been identified, the machine must be examined by a competent person before further use, and repair ed if necessary . Faulty compon[…]
-
Страница 8
For machines with a ‘porthole’ door , remember that the porthole glass will be hot when washing at ver y high temperatures. Do not let children touch it during a hot wash programme. If the correct amount of detergent is dispensed, the machine should not need to be descaled. If, however , you do wish to descale the machine only use proprie[…]
-
Страница 9
This washer -dr yer can be used: – to wash separately with a max. load (depending on programme) of 5 kg; – to dry separately with a max. load (depending on programme) of 2.5 kg; or – to wash and dry in a continuous sequence with a max. load (depending on programme) of 2.5 kg; Features Special programmes – Programme for hand-washable fabrics[…]
-
Страница 10
Contr ol panel a Delay start button and displa y This is used to delay the start of a programme. The delay time will appear in the display . b «ST AR T» b utton Press the Start button to start a programme. The Start indicator lamp will flash as soon as a programme can be started. c Door b utton Opens the drum door . d I-ON / 0-OFF b utton[…]
-
Страница 11
Impor tant contr ol panel features Programme selector The programme selector is used to set the – basic wash programmes and temperatures and – the drying programmes and temperatures. Additional option b uttons Additional options can be added to the basic programme. Pr essing the r elevant button selects or de-selects the particular option. An a[…]
-
Страница 12
– Ideally load the maximum amount specified for the programme you ar e using. This way energy and water consumption will be kept to a minimum. – Use the QUICK W ASH pr ogramme for small loads. – Use the Short wash option for lightly soiled laundry . – A main wash (programme without pre-wash) is suf ficient for cleaning normally soiled laund[…]
-
Страница 13
Before using the machine for the first time ensure that it is corr ectly installed and connected. See the relevant section under «Installation». Flushing out the drum ^ T urn on the stopcock. ^ T urn both programme selectors to the Finish position. ^ Switch the machine on with the I-ON / 0-OFF button. Do not load any laundry . ^ Add max. […]
-
Страница 14
Pr ogramme o verview COTTONS e Fabric type Cottons and linen fabrics, e.g. bed linen, table linen, towelling, jeans, underwear, T-shirts, nappies. Additional options Soak, Pre-wash, Water plus, Short. Notes – Only use the COTTONS 95°C programme for heavily soiled and incontinent laundry. – For heavily soiled laundry select the Soak or Pre-wash[…]
-
Страница 15
Pr ogramme o verview DELICATES f Fabric type Acrylics, acetate and triacetate, 100% cotton easy care shirts and blouses. Curtains, specified machine-washable by the manufacturer. Additional options Soak, Pre-wash, Short Notes – Laundry remains relatively crease-free for easier ironing. – Dust in curtains usually makes using a programme with Pre[…]
-
Страница 16
Pr ogramme o verview Starch Fabric type Table cloths, napkins, overalls, aprons. Notes – The laundry should be washed but not treated with fabric conditioner. Max. load 5 kg Drain / Spin Notes – Drain only: Select Without final spin . Max. load 5 kg Separate rinse Fabric type Articles which have been washed by hand and only need to be rinsed an[…]
-
Страница 17
Care symbols — washing Care symbols Fabric types Description of process Programme: (select the appropriate temperature according to the temperature on the care label symbol) e no bar Cottons Normal (maximum) machine action and normal spinning Cottons, Minimum iron, Quick wash f single bar Synthetics Reduced (medium) machine action and reduced spinn[…]
-
Страница 18
Impor tant — other care symbols / Hand wash h Do not wash apf Dry clean D Do not dry clean y Suitable for chlorine bleaching z Do not use chlorine bleach T umble dry q At normal temperature r At low temperature s Do not tumble dry Ironing I Hot iron H Medium hot iron G Cool iron J Do not iron How to wash correctl y 18[…]
-
Страница 19
Separate washing Make sure that the DR YING programme selector is at the Finish position. Otherwise the drying programme set will follow on fr om the washing programme. Bef ore washing A Sor t the laundry ^ Empty all pockets. , Foreign objects (e.g. nails, coins, paper clips, etc.) can cause damage to garments and components in the machine. ^ Stain[…]
-
Страница 20
B Switch the mac hine on ^ Press in the I-ON/0-OFF button. C Open the drum door ^ Press the Door button and open the drum door . D Load the drum ^ Unfold the laundry and load loosely in the drum. T o achieve best results make up mixed loads consisting of both large and small items. Do not exceed the maximum load for the programme selected. This use[…]
-
Страница 21
Selecting additional options f or the wash programme I Select additional option(s) ^ Press the r equir ed addtional option button(s). Additional options which are not compatible with the basic programme cannot be selected. The indicator lamp will go out when the option button is released. Soak For heavily soiled and stained items with dried-on stai[…]
-
Страница 22
J Adding deter gent It is important to dispense the correct amount, because… . . . . . too little detergent results in : – Laundry not being cleaned properly and with time it may become grey and hard to the touch. – Greasy particles clinging to the laundry . – Limescale deposits on the heater elements. . . . too much detergent results in : […]
-
Страница 23
Delay start K Select Delay start ^ Press the Delay start button repeatedly until the r equir ed delay start period shows up in the display (from i to 9 hours). Press the «ST ART» button. The chosen time will start to count down hour by hour . The programme will then start automatically . T o cancel «Delay start»: ^ Press the Del[…]
-
Страница 24
Adding and remo ving laundry Laundry can be added or removed after the start of one of the following programmes: – COTTONS – MINIMUM IRON – QUICK W ASH 40°C ^ Press the Door button in and hold it until the door springs open. ^ Add or remove items. ^ Close the door . The programme will continue automatically . The door cannot be opened, if: ?[…]
-
Страница 25
Pr ogramme cyc le This washing machine has fully electronic contr ols with automatic load recognition. This machine takes in the right amount of water requir ed for the programme, depending on the amount of laundry and its absorbancy rate. This means that programme cycles and durations can vary . The programme sequences outlined below are based on […]
-
Страница 26
QUICK WASH Main wash Water level: low Wash rhythm: normal Rinses Water level: medium No of rinses: 2 Spinning Rinse and interim spin 2) : yes Final spin: yes Starch Water level: low Wash rhythm: normal Final spin: yes Separate rinse Water level: high No of rinses: 2 Final spin: yes Special features in the pr ogramme sequences: Anti-crease : At the […]
-
Страница 27
Detergent All modern detergents produced for automatic washing machines are suitable, including liquid, compact (concentrated), tablets and special application detergents. Woollens and knitwear containing wool mixtures and hand-washable garments should be washed using a detergent specifically designed for washing woollens. Instructions for use and […]
-
Страница 28
F abric conditioners, texturiser s and star ch Fabric conditioners make gar ments soft and fluffy to handle and help pr event static cling when tumble drying. T exturisers are synthetic star ch formulations, which stiffen items of laundry , e.g. shir ts, tablecloths and bed linen. Starch stif fens and gives body to items of laundry , e.g. shir ts, […]
-
Страница 29
Tips on drying ^ Before drying check the drying symbol on the wash care label. q Dry at nor mal temperature r Dry at low temperature (select the Drying/low temp additional option) s Do not tumble dry If there is no symbol, dry at your own risk applying the following principles: – Cottons and minimum iron items should be dried using the appropriat[…]
-
Страница 30
Pr ogramme o verview COTTONS Extra dry Fabric type Multi-layered fabrics, which are thoroughly dried in the Normal programme. Additional options Thermospin max. 1500 rpm, Drying / Low temp. Note – Do not dry jerseywear in the Extra dry programme (tendency to shrink) Max. load 2.5 kg Normal Fabric type Single and multi-layered fabrics, e.g. mixed […]
-
Страница 31
Pr ogramme o verview MINIMUM IRON Normal plus Fabric type Minimum iron items which are made of synthetic or blended fabrics (e.g. pullovers, dresses, trousers) which are not dried adequately in the Normal programme. Additional options Thermospin max. 900 rpm, Drying / Low temp. Note – Spin fabrics for approx. 30 seconds before drying. Max. load 1[…]
-
Страница 32
Separate drying The separate drying programme must be used if the load in the wash programme is gr eater than the maximum load permitted for dr ying, or if you only want to dry par t of the load that was washed. Make sure that the W ASHING programme selector is at the Finish position. Otherwise the washing programme will begin befor e the drying pr[…]
-
Страница 33
Pr ogramme selection G Select a drying programme The programmes ar e described in the «Drying programme charts». ^ T urn the programme selector to the requir ed drying programme. ^ For minimum iron fabrics which ar e being dried in the TIMED DR YING programme, you should always select the Drying/ Low temp. additional option. The sensor dr[…]
-
Страница 34
Delay start I Select Delay start ^ Press the Delay start button repeatedly until the r equir ed delay start period shows up in the display (from i to 9 hours). Press the»ST ART» button. The chosen time will start to count down hour by hour . The programme will then start automatically . T o cancel «Delay start»: ^ Press the Dela[…]
-
Страница 35
W ashing and dr ying in a continuous sequence Where the amount of laundry to be washed and dried in one programme does not exceed the maximum weight permitted for the dr ying programme, washing and drying in one continuous sequence is recommended. It is essential to read both sections «Separate washing» and «Separate drying» fir[…]
-
Страница 36
At the end of a pr ogramme ^ A buzzer will sound (see «Programmable functions») and the Anti crease / Finish light will come on. Press the Door button and open the drum door wide. , T ake care, the metal cap is hot after drying . Do not touch the metal cap located on the inside of the door glass. Danger of burning! ^ Remove the laundry . […]
-
Страница 37
After drying «Rinse out fluff» programme The fluff which occurs during drying can collect in the drum and also in the suds container . It is best to rinse out this fluff befor e the machine is used again, so that it cannot be deposited on the next load of laundry . The Rinse out fluff programme must not be used for rinsing items of laundr[…]
-
Страница 38
Programme sequences can be changed after the ST ART button has been pressed. It is also possible to select a follow-on drying programme any time up to the end of a washing programme. T o cancel a programme ^ T urn both programme selectors to the Finish position. The programme sequence indicators will flash one after the other in the programme seque[…]
-
Страница 39
Safety loc k Electronic pr ogramme locking (the Locked indicator lamp is on) prevents the door fr om being opened or the programme cancelled during a programme. – The Anti-crease/Finish lamp flashes to show that an attempt has been made to alter a programme. This has no effect on the pr ogramme sequence. – The locking function is switched off a[…]
-
Страница 40
, Disconnect the machine from the electricity supply by switching off at the wall socket and withdrawing the plug before any cleaning and maintenance work. Cleaning the machine ^ Clean the casing with a mild non-abrasive cleaning agent or with soap and water . Wipe dry with a soft cloth. ^ Clean the drum with a suitable proprietary cleaner for stai[…]
-
Страница 41
^ Clean the siphon tube. 1. Remove the siphon from compartment p and rinse under warm running water . The channel in compartment p should also be cleaned. 2. Replace the siphon securely . Over time, detergent residue can build up in the water jets in the top of the detergent drawer housing. Before r eplacing the detergent drawer , use a bottle brus[…]
-
Страница 42
Cleaning the filter in the water inlet The machine has a filter to protect the water inlet valve. The filter in the open end of the inlet hose should be checked and cleaned approx. every 6 months. It should also be checked after an interruption to the external water supply . ^ First turn off the stopcock. ^ Unscrew the thr eaded union connecting th[…]
-
Страница 43
What to do if … ? With the aid of the following guide, minor problems can be easily corr ected without calling in a Miele service technician, saving you both time and money . The following charts are designed to help you establish the cause of a fault or problem, and r ectify it. Please note the following: , Repair work to electrical appliances s[…]
-
Страница 44
The programme does not start. Problem Possible cause Remedy The On indicator lamp does not light up in the programme sequence display or the START button indicator lamp does not flash. There is no power to the machine. Check whether – the door is properly closed. – the mains plug is plugged in. – the mains fuse has blown. If one of the follow[…]
-
Страница 45
The wash programme stops and a fault indicator light comes on. Problem Possible cause Remedy The Water inlet/drain indicator lamp is flashing and the load in the machine has not been washed. The water inlet system is blocked. – Turn the programme selectors to Finish . – Open the stopcock. – Select and start the programme again. The Water inle[…]
-
Страница 46
A fault indicator lamp comes on but the wash programme continues as normal. Problem Possible cause Remedy The Water inlet/drain indicator lamp flashes during a programme, but the wash programme has run normally. There is a blockage in the water inlet. Check whether: – the stopcock is opened wide enough. – the inlet hose is kinked. The water pre[…]
-
Страница 47
General problems or an unsatisfactory wash or drying result. Problem Possible cause Remedy The door cannot be opened. The machine is not connected to the electricity supply. Insert the plug in the socket. Power cut. Open the door as described at the end of this section. The door was not correctly closed. Press hard against the left hand side of the[…]
-
Страница 48
Problem Possible cause Remedy The door cannot be opened during or after drying. For safety reasons the door cannot be opened when the internal temperature is above 70°C. Option 1 Wait until the temperature has dropped below 70°C and then open the door. Option 2 Select the cooling down phase*: – Turn the DRYING programme selector to the Finish p[…]
-
Страница 49
Problem Possible cause Remedy The laundry is still damp after a drying cycle. The load weighed less than 1 kg. The moisture sensing system cannot operate with too small a load. In future dry small loads in a TIMED DRYING programme. When washing and drying in one continuous sequence : during the spin the laundry formed a ring in the drum because the[…]
-
Страница 50
Problem Possible cause Remedy The laundry is not spun satisfactorily. The spin speed selected was too low. Select a higher spin speed for the next wash programme. The machine was not able to distribute the laundry load evenly. Laundry was spun at a reduced spin speed to protect the machine. Always mix large and small items in a load to avoid imbala[…]
-
Страница 51
Problem Possible cause Remedy There is an excessive build-up of foam. Too much detergent was used. – Follow the manufacturer’s instructions on dosage given on the packaging. – Take the water hardness level into account. – Use less detergent for lightly soiled or small loads. White residues which look like powder detergent are seen on dar[…]
-
Страница 52
Problem Possible cause Remedy Liquid detergent does not give the required result. Liquid detergents usually contain no bleaching agents. They do not remove fruit, coffee and tea stains. – Use a general purpose detergent containing a bleaching agent. – Pour stain removers into compartment j and liquid detergent into a dispensing ball ( Remember […]
-
Страница 53
Opening the drum door in the event of a b loc ked drain outlet and/or power failure ^ Switch the machine off. There is a yellow filter flap opener behind the detergent drawer fascia panel. ^ Remove the opener . ^ Use it to open the access flap. Blocked drain outlet If the drain outlet is clogged, a large amount of water will be retained in the mach[…]
-
Страница 54
Once the flow of water ceases: ^ Remove the fluff filter completely . ^ Clean the fluff filter thor oughly . ^ Check that the impeller can tur n easily . Remove any foreign objects (e.g. buttons, coins, etc.) and fluff. Clean the fluff filter housing. ^ Replace the fluff filter . , Make sure it is secur ely tightened. Otherwise there is a risk of w[…]
-
Страница 55
After sales service In the event of any faults which you cannot remedy yourself, please contact – Y our Miele Dealer or – The Miele Service Department (see address on back cover). When contacting the Service Department, please quote the model and serial number of your appliance, both of which are shown on the data plate. , Please note that tele[…]
-
Страница 56
Fr ont view a Electrical connection b Inlet hose with «W aterpr oof» system c Drain hose with flexible / detachable swivel elbow d Detergent dispenser e Control panel f Door g Flap for fluff filter and drain pump h Four height adjustable screw feet Installation and connection 56[…]
-
Страница 57
Installation surface A concrete floor is the most suitable installation surface. It is far less prone to vibration during the spin cycle than wooden floorboards or a carpeted surface. Please note the f ollowing: ^ The machine must be level and securely positioned. ^ T o avoid vibrations during spinning the machine should not be installed on soft fl[…]
-
Страница 58
Remo ving the transit fitting A T urn the left-hand transit bar 90°. B T urn the right-hand transit bar 90°. C Withdraw the two bars together with the support plate. D Plug the holes with the plastic caps supplied. The machine must not be moved without the transit fitting in place. Store the transit fitting in a safe place for future use. It must[…]
-
Страница 59
Levelling the mac hine The machine must stand per fectly level on all four feet to ensure safe and proper operation. Incorrect installation may incr ease electricity and water consumption and may cause the machine to move about. The four adjustable feet are used to level the machine. All four feet are screwed in when the machine is delivered. Screw[…]
-
Страница 60
Building under a continous w orktop / in a r ow of kitc hen units The building under kit* must be fitted by a suitably qualified fitter . – A special b uilding under kit * is requir ed. The cover plate supplied with the building under kit* replaces the machine’s lid. T o ensure electrical safety the cover plate must be fitted. – When insta[…]
-
Страница 61
The Miele W aterproof system The Miele W aterpr oof system pr otects the washing machine from water damage. The system consists of three main components: 1) the inlet hose 2) the electronic unit and the washing machine housing 3) the drain hose 1) Inlet hose – The inlet hose is fitted with an additional electrical safety valve which works like an[…]
-
Страница 62
Connection to the water supply Installation For the Miele W aterpr oof system to function correctly , it may only be fitted in the positions shown in the illustrations above. The machine should be connected to a mains water supply in accordance with local and national safety regulations. The German authorities do not require it to have a non-return[…]
-
Страница 63
The plastic casing of the safety valve contains electrical components. The W aterpr oof system must only be connected to its own stopcock. It must not be connected to mixer taps or similar and must not be fitted in areas wher e ther e is the risk of water or other liquids reaching it. Do not get wet. The protective slee ve of the hose must not be d[…]
-
Страница 64
Maintenance and care If you intend to unscrew the Miele W aterpr oof system hose fr om the stopcock it is essential to disconnect the machine from the electricity supply first. Only use a Miele W aterpr oof system hose should you need a replacement. In order to pr otect the water inlet valves, the dirt filter in the water inlet safety valve connect[…]
-
Страница 65
Connection to the drainage system The machine drains via a drain pump with a delivery head of 1 metre. The drain hose is 1.5 m long. It must not be kinked as this restricts drainage. The swivel elbow at the end of the hose can be turned in either direction, or can be detached if requir ed, with a sharp twist and pull. Drain hose connection: 1 . Dir[…]
-
Страница 66
Electrical connection U .K. All electrical work should be carried out by a suitably qualified and competent person, in strict accordance with national and local safety regulations. Ensure power is not supplied to the appliance until after installation work has been carried out. The appliance is supplied with a mains cable with moulded plug ready fo[…]
-
Страница 67
Programmes Full load Energy consumpti on Water consumpt ion Programme duration kg kWh l h min WASHING COTTONS 95°C 5.0 1.70 59 1 53 COTTONS 60°C (1) 5.0 0.95 56 1 56 COTTONS 40°C 5.0 0.50 56 1 56 MINIMUM IRON 40°C 2.0 0.45 57 1 20 DELICATES 30°C 1.0 0.40 75 1 00 WOOLLENS 30°C 1.0 0.15 25 0 38 DRYING COTTONS Normal (2) 2.5 1.45 9 1 03 1) EN 60[…]
-
Страница 68
Height 85.0 cm Width 59.5 cm Depth with lid fitted 60.0 cm Depth without lid 57.5 cm Weight, empty 99 kg Max. floor load 1600 Newton (approx. 160 kg) Capacity – Washing Capacity – Drying max. 5.0 kg dry laundry max. 2.5 kg Cottons Voltage see data plate Rated load see data plate Fuse rating see data plate Consumption data see «Consumption […]
-
Страница 69
Progr ammab le functions f or changing standard settings[…]
-
Страница 70
The programmable functions can be used to tailor programmes to suit your individual requir ements. Once activated the programmable functions remain in memory until they are deactivated. High water level This is useful where a higher quality rinse is requir ed. It is available for the rinses in the following wash programmes: – COTTONS – MINIMUM […]
-
Страница 71
Additional rinse f or the CO TT ONS pr ogramme Suitable for areas with soft water (hardness range I). If a particularly good rinsing effect is requir ed in an ar ea with soft water , then the high water level can be activated in addition to the additional rinse. Follow steps A to G to programme and store in memory . The programmable functions ar e […]
-
Страница 72
Buzzer An audible tone will sound at the end of a washing / drying programme. The machine is delivered with this programmable function activated. Follow steps A to G to programme and store in memory . The programmable functions ar e activated with the help of the additional option buttons and the W ASHING programme selector . Before you begin, firs[…]
-
Страница 73
Opening the door at high temperatures It is possible to open the door during a washing or drying programme, even if the temperature is above 70°C. , W arning: The water in the machine will be very hot and could cause b urning or scalding. The machine is delivered with the programmable function switched of f. Follow steps A to G to programme and st[…]
-
Страница 74
Final residual moisture after drying The machine is set to give the best drying results. Y ou do, however , have the option of shortening or lengthening the drying time if you prefer . Shortening the drying time: by : 1 minute 2 minutes 3 minutes 4 minutes the display will show: I 2 3 4 Lengthening the drying time: by : 1 minute 2 minutes 3 minutes[…]
-
Страница 75
75[…]
-
Страница 76
Alteration rights reserved / 3404 / WT 945 S This paper consists of cellulose which has been bleached without the use of chlorine. M.-Nr . 05 876 080 / 02 e n-G B[…]
Если у вас отсутствует техническая возможность для скачивания Руководство по эксплуатации для Miele WT 945 S WPS
вы можете прочесть документ прямо на нашем сайте или
Скачать Miele WT 945 S WPS Руководство по эксплуатации

- 1
- 2
- 3
- 4
- 5
- 6
- 7
- 8
- 9
- 10
- 11
- 12
- 13
- 14
- 15
- 16
- 17
- 18
- 19
- 20
- 21
- 22
- 23
- 24
- 25
- 26
- 27
- 28
- 29
- 30
- 31
- 32
- 33
- 34
- 35
- 36
- 37
- 38
- 39
- 40
- 41
- 42
- 43
- 44
- 45
- 46
- 47
- 48
- 49
- 50
- 51
- 52
- 53
- 54
- 55
- 56
- 57
- 58
- 59
- 60
- 61
- 62
- 63
- 64
- 65
- 66
- 67
- 68
- 69
- 70
- 71
- 72
- 73
- 74
- 75
- 76
- 77
Инструкции для прочих Miele Стиральные машины
Инструкции для прочих Miele
-
Page 1: Miele WT 945 S WPS
Oper ating instr uctions W asher-dr y er WT 945 S WPS T o avoid the risk of accidents or damage to the machine it is essential to read these instructions before it is installed or used for the first time. G M.-Nr . 05 876 080[…]
-
Page 2: Miele WT 945 S WPS
Caring f or the en vir onment . . . . . . . . . . . . . . . . . . . . . . . . . . . . . . . . . . . . . . . . . . 5 Disposal of the packing material . . . . . . . . . . . . . . . . . . . . . . . . . . . . . . . . . . . . . . . 5 Disposal of your old appliance or machine . . . . . . . . . . . . . . . . . . . . . . . . . . . . . . . 5 W arning and Sa[…]
-
Page 3: Miele WT 945 S WPS
Adding deter gent . . . . . . . . . . . . . . . . . . . . . . . . . . . . . . . . . . . . . . . . . . . . . . . . . 27 W ater softener . . . . . . . . . . . . . . . . . . . . . . . . . . . . . . . . . . . . . . . . . . . . . . . . . . . . 27 W ashing with several components . . . . . . . . . . . . . . . . . . . . . . . . . . . . . . . . . . . . 27 […]
-
Page 4: Miele WT 945 S WPS
Prob lem solving guide . . . . . . . . . . . . . . . . . . . . . . . . . . . . . . . . . . . . . . . . . . . . . 43 What to do if … ? . . . . . . . . . . . . . . . . . . . . . . . . . . . . . . . . . . . . . . . . . . . . . . . . . . 43 The programme does not start. . . . . . . . . . . . . . . . . . . . . . . . . . . . . . . . . . . . . . . . 44 […]
-
Page 5: Miele WT 945 S WPS
Disposal of the pac king material The transport and protective packing has been selected from materials which are envir onmentally friendly for disposal and can normally be recycled. Ensure that any plastic wrappings, bags etc. are disposed safely and kept out of the reach of babies and young children. Danger of suf focation! Rather than just throw[…]
-
Page 6: Miele WT 945 S WPS
Read the operating instructions before using this machine for the first time. They contain important information about the safety , installation, use and maintenance of the machine. This way you will avoid the risk of accidents and damage to the machine. Keep these operating instructions in a safe place and ensure that new users are familiar with t[…]
-
Page 7: Miele WT 945 S WPS
The Miele «W aterpr oof system» protects fr om water damage provided the following conditions have been met: – the machine is correctly plumbed in and connected to the electricity supply . – if a fault has been identified, the machine must be examined by a competent person before further use, and repair ed if necessary . Faulty compon[…]
-
Page 8: Miele WT 945 S WPS
For machines with a ‘porthole’ door , remember that the porthole glass will be hot when washing at ver y high temperatures. Do not let children touch it during a hot wash programme. If the correct amount of detergent is dispensed, the machine should not need to be descaled. If, however , you do wish to descale the machine only use proprie[…]
-
Page 9: Miele WT 945 S WPS
This washer -dr yer can be used: – to wash separately with a max. load (depending on programme) of 5 kg; – to dry separately with a max. load (depending on programme) of 2.5 kg; or – to wash and dry in a continuous sequence with a max. load (depending on programme) of 2.5 kg; Features Special programmes – Programme for hand-washable fabrics[…]
-
Page 10: Miele WT 945 S WPS
Contr ol panel a Delay start button and displa y This is used to delay the start of a programme. The delay time will appear in the display . b «ST AR T» b utton Press the Start button to start a programme. The Start indicator lamp will flash as soon as a programme can be started. c Door b utton Opens the drum door . d I-ON / 0-OFF b utton[…]
-
Page 11: Miele WT 945 S WPS
Impor tant contr ol panel features Programme selector The programme selector is used to set the – basic wash programmes and temperatures and – the drying programmes and temperatures. Additional option b uttons Additional options can be added to the basic programme. Pr essing the r elevant button selects or de-selects the particular option. An a[…]
-
Page 12: Miele WT 945 S WPS
– Ideally load the maximum amount specified for the programme you ar e using. This way energy and water consumption will be kept to a minimum. – Use the QUICK W ASH pr ogramme for small loads. – Use the Short wash option for lightly soiled laundry . – A main wash (programme without pre-wash) is suf ficient for cleaning normally soiled laund[…]
-
Page 13: Miele WT 945 S WPS
Before using the machine for the first time ensure that it is corr ectly installed and connected. See the relevant section under «Installation». Flushing out the drum ^ T urn on the stopcock. ^ T urn both programme selectors to the Finish position. ^ Switch the machine on with the I-ON / 0-OFF button. Do not load any laundry . ^ Add max. […]
-
Page 14: Miele WT 945 S WPS
Pr ogramme o verview COTTONS e Fabric type Cottons and linen fabrics, e.g. bed linen, table linen, towelling, jeans, underwear, T-shirts, nappies. Additional options Soak, Pre-wash, Water plus, Short. Notes – Only use the COTTONS 95°C programme for heavily soiled and incontinent laundry. – For heavily soiled laundry select the Soak or Pre-wash[…]
-
Page 15: Miele WT 945 S WPS
Pr ogramme o verview DELICATES f Fabric type Acrylics, acetate and triacetate, 100% cotton easy care shirts and blouses. Curtains, specified machine-washable by the manufacturer. Additional options Soak, Pre-wash, Short Notes – Laundry remains relatively crease-free for easier ironing. – Dust in curtains usually makes using a programme with Pre[…]
-
Page 16: Miele WT 945 S WPS
Pr ogramme o verview Starch Fabric type Table cloths, napkins, overalls, aprons. Notes – The laundry should be washed but not treated with fabric conditioner. Max. load 5 kg Drain / Spin Notes – Drain only: Select Without final spin . Max. load 5 kg Separate rinse Fabric type Articles which have been washed by hand and only need to be rinsed an[…]
-
Page 17: Miele WT 945 S WPS
Care symbols — washing Care symbols Fabric types Description of process Programme: (select the appropriate temperature according to the temperature on the care label symbol) e no bar Cottons Normal (maximum) machine action and normal spinning Cottons, Minimum iron, Quick wash f single bar Synthetics Reduced (medium) machine action and reduced spinn[…]
-
Page 18: Miele WT 945 S WPS
Impor tant — other care symbols / Hand wash h Do not wash apf Dry clean D Do not dry clean y Suitable for chlorine bleaching z Do not use chlorine bleach T umble dry q At normal temperature r At low temperature s Do not tumble dry Ironing I Hot iron H Medium hot iron G Cool iron J Do not iron How to wash correctl y 18[…]
-
Page 19: Miele WT 945 S WPS
Separate washing Make sure that the DR YING programme selector is at the Finish position. Otherwise the drying programme set will follow on fr om the washing programme. Bef ore washing A Sor t the laundry ^ Empty all pockets. , Foreign objects (e.g. nails, coins, paper clips, etc.) can cause damage to garments and components in the machine. ^ Stain[…]
-
Page 20: Miele WT 945 S WPS
B Switch the mac hine on ^ Press in the I-ON/0-OFF button. C Open the drum door ^ Press the Door button and open the drum door . D Load the drum ^ Unfold the laundry and load loosely in the drum. T o achieve best results make up mixed loads consisting of both large and small items. Do not exceed the maximum load for the programme selected. This use[…]
-
Page 21: Miele WT 945 S WPS
Selecting additional options f or the wash programme I Select additional option(s) ^ Press the r equir ed addtional option button(s). Additional options which are not compatible with the basic programme cannot be selected. The indicator lamp will go out when the option button is released. Soak For heavily soiled and stained items with dried-on stai[…]
-
Page 22: Miele WT 945 S WPS
J Adding deter gent It is important to dispense the correct amount, because… . . . . . too little detergent results in : – Laundry not being cleaned properly and with time it may become grey and hard to the touch. – Greasy particles clinging to the laundry . – Limescale deposits on the heater elements. . . . too much detergent results in : […]
-
Page 23: Miele WT 945 S WPS
Delay start K Select Delay start ^ Press the Delay start button repeatedly until the r equir ed delay start period shows up in the display (from i to 9 hours). Press the «ST ART» button. The chosen time will start to count down hour by hour . The programme will then start automatically . T o cancel «Delay start»: ^ Press the Del[…]
-
Page 24: Miele WT 945 S WPS
Adding and remo ving laundry Laundry can be added or removed after the start of one of the following programmes: – COTTONS – MINIMUM IRON – QUICK W ASH 40°C ^ Press the Door button in and hold it until the door springs open. ^ Add or remove items. ^ Close the door . The programme will continue automatically . The door cannot be opened, if: ?[…]
-
Page 25: Miele WT 945 S WPS
Pr ogramme cyc le This washing machine has fully electronic contr ols with automatic load recognition. This machine takes in the right amount of water requir ed for the programme, depending on the amount of laundry and its absorbancy rate. This means that programme cycles and durations can vary . The programme sequences outlined below are based on […]
-
Page 26: Miele WT 945 S WPS
QUICK WASH Main wash Water level: low Wash rhythm: normal Rinses Water level: medium No of rinses: 2 Spinning Rinse and interim spin 2) : yes Final spin: yes Starch Water level: low Wash rhythm: normal Final spin: yes Separate rinse Water level: high No of rinses: 2 Final spin: yes Special features in the pr ogramme sequences: Anti-crease : At the […]
-
Page 27: Miele WT 945 S WPS
Detergent All modern detergents produced for automatic washing machines are suitable, including liquid, compact (concentrated), tablets and special application detergents. Woollens and knitwear containing wool mixtures and hand-washable garments should be washed using a detergent specifically designed for washing woollens. Instructions for use and […]
-
Page 28: Miele WT 945 S WPS
F abric conditioners, texturiser s and star ch Fabric conditioners make gar ments soft and fluffy to handle and help pr event static cling when tumble drying. T exturisers are synthetic star ch formulations, which stiffen items of laundry , e.g. shir ts, tablecloths and bed linen. Starch stif fens and gives body to items of laundry , e.g. shir ts, […]
-
Page 29: Miele WT 945 S WPS
Tips on drying ^ Before drying check the drying symbol on the wash care label. q Dry at nor mal temperature r Dry at low temperature (select the Drying/low temp additional option) s Do not tumble dry If there is no symbol, dry at your own risk applying the following principles: – Cottons and minimum iron items should be dried using the appropriat[…]
-
Page 30: Miele WT 945 S WPS
Pr ogramme o verview COTTONS Extra dry Fabric type Multi-layered fabrics, which are thoroughly dried in the Normal programme. Additional options Thermospin max. 1500 rpm, Drying / Low temp. Note – Do not dry jerseywear in the Extra dry programme (tendency to shrink) Max. load 2.5 kg Normal Fabric type Single and multi-layered fabrics, e.g. mixed […]
-
Page 31: Miele WT 945 S WPS
Pr ogramme o verview MINIMUM IRON Normal plus Fabric type Minimum iron items which are made of synthetic or blended fabrics (e.g. pullovers, dresses, trousers) which are not dried adequately in the Normal programme. Additional options Thermospin max. 900 rpm, Drying / Low temp. Note – Spin fabrics for approx. 30 seconds before drying. Max. load 1[…]
-
Page 32: Miele WT 945 S WPS
Separate drying The separate drying programme must be used if the load in the wash programme is gr eater than the maximum load permitted for dr ying, or if you only want to dry par t of the load that was washed. Make sure that the W ASHING programme selector is at the Finish position. Otherwise the washing programme will begin befor e the drying pr[…]
-
Page 33: Miele WT 945 S WPS
Pr ogramme selection G Select a drying programme The programmes ar e described in the «Drying programme charts». ^ T urn the programme selector to the requir ed drying programme. ^ For minimum iron fabrics which ar e being dried in the TIMED DR YING programme, you should always select the Drying/ Low temp. additional option. The sensor dr[…]
-
Page 34: Miele WT 945 S WPS
Delay start I Select Delay start ^ Press the Delay start button repeatedly until the r equir ed delay start period shows up in the display (from i to 9 hours). Press the»ST ART» button. The chosen time will start to count down hour by hour . The programme will then start automatically . T o cancel «Delay start»: ^ Press the Dela[…]
-
Page 35: Miele WT 945 S WPS
W ashing and dr ying in a continuous sequence Where the amount of laundry to be washed and dried in one programme does not exceed the maximum weight permitted for the dr ying programme, washing and drying in one continuous sequence is recommended. It is essential to read both sections «Separate washing» and «Separate drying» fir[…]
-
Page 36: Miele WT 945 S WPS
At the end of a pr ogramme ^ A buzzer will sound (see «Programmable functions») and the Anti crease / Finish light will come on. Press the Door button and open the drum door wide. , T ake care, the metal cap is hot after drying . Do not touch the metal cap located on the inside of the door glass. Danger of burning! ^ Remove the laundry . […]
-
Page 37: Miele WT 945 S WPS
After drying «Rinse out fluff» programme The fluff which occurs during drying can collect in the drum and also in the suds container . It is best to rinse out this fluff befor e the machine is used again, so that it cannot be deposited on the next load of laundry . The Rinse out fluff programme must not be used for rinsing items of laundr[…]
-
Page 38: Miele WT 945 S WPS
Programme sequences can be changed after the ST ART button has been pressed. It is also possible to select a follow-on drying programme any time up to the end of a washing programme. T o cancel a programme ^ T urn both programme selectors to the Finish position. The programme sequence indicators will flash one after the other in the programme seque[…]
-
Page 39: Miele WT 945 S WPS
Safety loc k Electronic pr ogramme locking (the Locked indicator lamp is on) prevents the door fr om being opened or the programme cancelled during a programme. – The Anti-crease/Finish lamp flashes to show that an attempt has been made to alter a programme. This has no effect on the pr ogramme sequence. – The locking function is switched off a[…]
-
Page 40: Miele WT 945 S WPS
, Disconnect the machine from the electricity supply by switching off at the wall socket and withdrawing the plug before any cleaning and maintenance work. Cleaning the machine ^ Clean the casing with a mild non-abrasive cleaning agent or with soap and water . Wipe dry with a soft cloth. ^ Clean the drum with a suitable proprietary cleaner for stai[…]
-
Page 41: Miele WT 945 S WPS
^ Clean the siphon tube. 1. Remove the siphon from compartment p and rinse under warm running water . The channel in compartment p should also be cleaned. 2. Replace the siphon securely . Over time, detergent residue can build up in the water jets in the top of the detergent drawer housing. Before r eplacing the detergent drawer , use a bottle brus[…]
-
Page 42: Miele WT 945 S WPS
Cleaning the filter in the water inlet The machine has a filter to protect the water inlet valve. The filter in the open end of the inlet hose should be checked and cleaned approx. every 6 months. It should also be checked after an interruption to the external water supply . ^ First turn off the stopcock. ^ Unscrew the thr eaded union connecting th[…]
-
Page 43: Miele WT 945 S WPS
What to do if … ? With the aid of the following guide, minor problems can be easily corr ected without calling in a Miele service technician, saving you both time and money . The following charts are designed to help you establish the cause of a fault or problem, and r ectify it. Please note the following: , Repair work to electrical appliances s[…]
-
Page 44: Miele WT 945 S WPS
The programme does not start. Problem Possible cause Remedy The On indicator lamp does not light up in the programme sequence display or the START button indicator lamp does not flash. There is no power to the machine. Check whether – the door is properly closed. – the mains plug is plugged in. – the mains fuse has blown. If one of the follow[…]
-
Page 45: Miele WT 945 S WPS
The wash programme stops and a fault indicator light comes on. Problem Possible cause Remedy The Water inlet/drain indicator lamp is flashing and the load in the machine has not been washed. The water inlet system is blocked. – Turn the programme selectors to Finish . – Open the stopcock. – Select and start the programme again. The Water inle[…]
-
Page 46: Miele WT 945 S WPS
A fault indicator lamp comes on but the wash programme continues as normal. Problem Possible cause Remedy The Water inlet/drain indicator lamp flashes during a programme, but the wash programme has run normally. There is a blockage in the water inlet. Check whether: – the stopcock is opened wide enough. – the inlet hose is kinked. The water pre[…]
-
Page 47: Miele WT 945 S WPS
General problems or an unsatisfactory wash or drying result. Problem Possible cause Remedy The door cannot be opened. The machine is not connected to the electricity supply. Insert the plug in the socket. Power cut. Open the door as described at the end of this section. The door was not correctly closed. Press hard against the left hand side of the[…]
-
Page 48: Miele WT 945 S WPS
Problem Possible cause Remedy The door cannot be opened during or after drying. For safety reasons the door cannot be opened when the internal temperature is above 70°C. Option 1 Wait until the temperature has dropped below 70°C and then open the door. Option 2 Select the cooling down phase*: – Turn the DRYING programme selector to the Finish p[…]
-
Page 49: Miele WT 945 S WPS
Problem Possible cause Remedy The laundry is still damp after a drying cycle. The load weighed less than 1 kg. The moisture sensing system cannot operate with too small a load. In future dry small loads in a TIMED DRYING programme. When washing and drying in one continuous sequence : during the spin the laundry formed a ring in the drum because the[…]
-
Page 50: Miele WT 945 S WPS
Problem Possible cause Remedy The laundry is not spun satisfactorily. The spin speed selected was too low. Select a higher spin speed for the next wash programme. The machine was not able to distribute the laundry load evenly. Laundry was spun at a reduced spin speed to protect the machine. Always mix large and small items in a load to avoid imbala[…]
-
Page 51: Miele WT 945 S WPS
Problem Possible cause Remedy There is an excessive build-up of foam. Too much detergent was used. – Follow the manufacturer’s instructions on dosage given on the packaging. – Take the water hardness level into account. – Use less detergent for lightly soiled or small loads. White residues which look like powder detergent are seen on dar[…]
-
Page 52: Miele WT 945 S WPS
Problem Possible cause Remedy Liquid detergent does not give the required result. Liquid detergents usually contain no bleaching agents. They do not remove fruit, coffee and tea stains. – Use a general purpose detergent containing a bleaching agent. – Pour stain removers into compartment j and liquid detergent into a dispensing ball ( Remember […]
-
Page 53: Miele WT 945 S WPS
Opening the drum door in the event of a b loc ked drain outlet and/or power failure ^ Switch the machine off. There is a yellow filter flap opener behind the detergent drawer fascia panel. ^ Remove the opener . ^ Use it to open the access flap. Blocked drain outlet If the drain outlet is clogged, a large amount of water will be retained in the mach[…]
-
Page 54: Miele WT 945 S WPS
Once the flow of water ceases: ^ Remove the fluff filter completely . ^ Clean the fluff filter thor oughly . ^ Check that the impeller can tur n easily . Remove any foreign objects (e.g. buttons, coins, etc.) and fluff. Clean the fluff filter housing. ^ Replace the fluff filter . , Make sure it is secur ely tightened. Otherwise there is a risk of w[…]
-
Page 55: Miele WT 945 S WPS
After sales service In the event of any faults which you cannot remedy yourself, please contact – Y our Miele Dealer or – The Miele Service Department (see address on back cover). When contacting the Service Department, please quote the model and serial number of your appliance, both of which are shown on the data plate. , Please note that tele[…]
-
Page 56: Miele WT 945 S WPS
Fr ont view a Electrical connection b Inlet hose with «W aterpr oof» system c Drain hose with flexible / detachable swivel elbow d Detergent dispenser e Control panel f Door g Flap for fluff filter and drain pump h Four height adjustable screw feet Installation and connection 56[…]
-
Page 57: Miele WT 945 S WPS
Installation surface A concrete floor is the most suitable installation surface. It is far less prone to vibration during the spin cycle than wooden floorboards or a carpeted surface. Please note the f ollowing: ^ The machine must be level and securely positioned. ^ T o avoid vibrations during spinning the machine should not be installed on soft fl[…]
-
Page 58: Miele WT 945 S WPS
Remo ving the transit fitting A T urn the left-hand transit bar 90°. B T urn the right-hand transit bar 90°. C Withdraw the two bars together with the support plate. D Plug the holes with the plastic caps supplied. The machine must not be moved without the transit fitting in place. Store the transit fitting in a safe place for future use. It must[…]
-
Page 59: Miele WT 945 S WPS
Levelling the mac hine The machine must stand per fectly level on all four feet to ensure safe and proper operation. Incorrect installation may incr ease electricity and water consumption and may cause the machine to move about. The four adjustable feet are used to level the machine. All four feet are screwed in when the machine is delivered. Screw[…]
-
Page 60: Miele WT 945 S WPS
Building under a continous w orktop / in a r ow of kitc hen units The building under kit* must be fitted by a suitably qualified fitter . – A special b uilding under kit * is requir ed. The cover plate supplied with the building under kit* replaces the machine’s lid. T o ensure electrical safety the cover plate must be fitted. – When insta[…]
-
Page 61: Miele WT 945 S WPS
The Miele W aterproof system The Miele W aterpr oof system pr otects the washing machine from water damage. The system consists of three main components: 1) the inlet hose 2) the electronic unit and the washing machine housing 3) the drain hose 1) Inlet hose – The inlet hose is fitted with an additional electrical safety valve which works like an[…]
-
Page 62: Miele WT 945 S WPS
Connection to the water supply Installation For the Miele W aterpr oof system to function correctly , it may only be fitted in the positions shown in the illustrations above. The machine should be connected to a mains water supply in accordance with local and national safety regulations. The German authorities do not require it to have a non-return[…]
-
Page 63: Miele WT 945 S WPS
The plastic casing of the safety valve contains electrical components. The W aterpr oof system must only be connected to its own stopcock. It must not be connected to mixer taps or similar and must not be fitted in areas wher e ther e is the risk of water or other liquids reaching it. Do not get wet. The protective slee ve of the hose must not be d[…]
-
Page 64: Miele WT 945 S WPS
Maintenance and care If you intend to unscrew the Miele W aterpr oof system hose fr om the stopcock it is essential to disconnect the machine from the electricity supply first. Only use a Miele W aterpr oof system hose should you need a replacement. In order to pr otect the water inlet valves, the dirt filter in the water inlet safety valve connect[…]
-
Page 65: Miele WT 945 S WPS
Connection to the drainage system The machine drains via a drain pump with a delivery head of 1 metre. The drain hose is 1.5 m long. It must not be kinked as this restricts drainage. The swivel elbow at the end of the hose can be turned in either direction, or can be detached if requir ed, with a sharp twist and pull. Drain hose connection: 1 . Dir[…]
-
Page 66: Miele WT 945 S WPS
Electrical connection U .K. All electrical work should be carried out by a suitably qualified and competent person, in strict accordance with national and local safety regulations. Ensure power is not supplied to the appliance until after installation work has been carried out. The appliance is supplied with a mains cable with moulded plug ready fo[…]
-
Page 67: Miele WT 945 S WPS
Programmes Full load Energy consumpti on Water consumpt ion Programme duration kg kWh l h min WASHING COTTONS 95°C 5.0 1.70 59 1 53 COTTONS 60°C (1) 5.0 0.95 56 1 56 COTTONS 40°C 5.0 0.50 56 1 56 MINIMUM IRON 40°C 2.0 0.45 57 1 20 DELICATES 30°C 1.0 0.40 75 1 00 WOOLLENS 30°C 1.0 0.15 25 0 38 DRYING COTTONS Normal (2) 2.5 1.45 9 1 03 1) EN 60[…]
-
Page 68: Miele WT 945 S WPS
Height 85.0 cm Width 59.5 cm Depth with lid fitted 60.0 cm Depth without lid 57.5 cm Weight, empty 99 kg Max. floor load 1600 Newton (approx. 160 kg) Capacity – Washing Capacity – Drying max. 5.0 kg dry laundry max. 2.5 kg Cottons Voltage see data plate Rated load see data plate Fuse rating see data plate Consumption data see «Consumption […]
-
Page 69: Miele WT 945 S WPS
Progr ammab le functions f or changing standard settings[…]
-
Page 70: Miele WT 945 S WPS
The programmable functions can be used to tailor programmes to suit your individual requir ements. Once activated the programmable functions remain in memory until they are deactivated. High water level This is useful where a higher quality rinse is requir ed. It is available for the rinses in the following wash programmes: – COTTONS – MINIMUM […]
-
Page 71: Miele WT 945 S WPS
Additional rinse f or the CO TT ONS pr ogramme Suitable for areas with soft water (hardness range I). If a particularly good rinsing effect is requir ed in an ar ea with soft water , then the high water level can be activated in addition to the additional rinse. Follow steps A to G to programme and store in memory . The programmable functions ar e […]
-
Page 72: Miele WT 945 S WPS
Buzzer An audible tone will sound at the end of a washing / drying programme. The machine is delivered with this programmable function activated. Follow steps A to G to programme and store in memory . The programmable functions ar e activated with the help of the additional option buttons and the W ASHING programme selector . Before you begin, firs[…]
-
Page 73: Miele WT 945 S WPS
Opening the door at high temperatures It is possible to open the door during a washing or drying programme, even if the temperature is above 70°C. , W arning: The water in the machine will be very hot and could cause b urning or scalding. The machine is delivered with the programmable function switched of f. Follow steps A to G to programme and st[…]
-
Page 74: Miele WT 945 S WPS
Final residual moisture after drying The machine is set to give the best drying results. Y ou do, however , have the option of shortening or lengthening the drying time if you prefer . Shortening the drying time: by : 1 minute 2 minutes 3 minutes 4 minutes the display will show: I 2 3 4 Lengthening the drying time: by : 1 minute 2 minutes 3 minutes[…]
-
Page 75: Miele WT 945 S WPS
75[…]
-
Page 76: Miele WT 945 S WPS
Alteration rights reserved / 3404 / WT 945 S This paper consists of cellulose which has been bleached without the use of chlorine. M.-Nr . 05 876 080 / 02 e n-G B[…]