
View the manual for the Mini Countryman (2020) here, for free. This manual comes under the category cars and has been rated by 1 people with an average of a 9.3. This manual is available in the following languages: English. Do you have a question about the Mini Countryman (2020) or do you need help? Ask your question here
The 2020 Mini Countryman is a compact crossover SUV designed for versatility and style. With its distinctive Mini design elements and compact dimensions, the Countryman offers a unique blend of urban practicality and off-road capabilities.
The Countryman is available in several trims, including the base Cooper, the sporty Cooper S, and the high-performance John Cooper Works. All trims come equipped with a turbocharged engine, providing sufficient power for everyday driving.
Inside, the Countryman offers comfortable seating for up to five passengers and a well-designed cabin with high-quality materials. The cargo space is decent for its class and can be expanded by folding the rear seats.
Infotainment features include a touchscreen display, Bluetooth connectivity, and smartphone integration. Safety features, such as forward collision warning, automatic emergency braking, and lane departure warning, are also available.
On the road, the Countryman delivers a smooth and composed ride, thanks to its responsive suspension and precise steering. It offers good handling and maneuverability, making it suitable for urban driving. The optional all-wheel-drive system enhances traction on slippery surfaces.
In terms of fuel efficiency, the Countryman achieves respectable mileage for a compact SUV. The exact figures may vary depending on the trim and engine choice.
Overall, the 2020 Mini Countryman is a well-rounded compact crossover that combines Mini’s iconic styling with practicality and a fun driving experience.
General
| Mini | |
| Countryman (2020) | |
| car | |
| English | |
| User manual (PDF) |
Can’t find the answer to your question in the manual? You may find the answer to your question in the FAQs about the Mini Countryman (2020) below.
How do I convert miles into kilometres?
1 mile equals 1.609344 kilometers and 1 kilometer equals 0.62137119 miles.
Where can I find the VIN number of my Mini?
The location of the VIN number of the car differs per brand and type of car. The code may be stamped on the frame of the car or mounted on a plate. It is best to consult the manual of the Mini Countryman (2020)for the exact location of the VIN number.
What is a VIN number?
The VIN number of a car is an identification number unique to each car. The abbreviation VIN therefore stands for Vehicle Identification Number.
When does my Mini need maintenance?
Regular maintenance is necessary for every car. How often the car needs maintenance and what exactly needs to be done can be found in the maintenance instructions. For major periodic service, this should generally be done every 2 years or after 30,000 kilometres.
When should I change the brake fluid of my Mini?
It is recommended to change the brake fluid every two years.
What is the difference between E10 and E5 petrol?
E10 petrol consists of up to ten per cent ethanol while E5 petrol will contain less than five per cent ethanol. As a result, the percentage of E10 petrol is lower than that of E5 petrol, making it less bad for the environment.
One or more doors won’t open from the inside. Now what?
The lock is most likely set to the child safety lock so it cannot be opened from the inside. How to unset the child safety lock differs per brand and type.
My car radio does not turn on, now what?
If your car radio does not turn on, it will not receive any power. Check that the red wire is connected to the contact power supply and the yellow wire to the constant power supply.
How do I adjust the temperature control in my Mini Countryman (2020)?
To adjust the temperature control in your Mini Countryman, locate the climate control knobs on the center console. Turn the knob labeled «Temperature» clockwise to increase the temperature and counterclockwise to decrease it.
How can I pair my phone with the Mini Connected system?
To pair your phone with the Mini Connected system, go to the «Settings» menu on the infotainment screen. Select «Bluetooth» and make sure it is enabled. Then, on your phone, go to the Bluetooth settings and search for available devices. Choose «Mini Connected» from the list and follow the prompts to complete the pairing process.
What is the procedure for changing a flat tire on my Mini Countryman?
In the event of a flat tire, first, locate the spare tire, jack, and lug wrench in the designated storage areas of your Mini Countryman. Use the lug wrench to loosen the lug nuts on the flat tire, but do not remove them completely. Position the jack under the vehicle’s recommended jacking point and lift the car until the flat tire is off the ground. Fully remove the lug nuts and carefully take off the flat tire. Mount the spare tire onto the wheel hub and hand-tighten the lug nuts. Lower the vehicle with the jack and then use the lug wrench to securely tighten the lug nuts.
How can I activate or disable the automatic start-stop feature?
To activate or disable the automatic start-stop feature, locate the start-stop button near the gear selector. Press the button to enable or disable the system according to your preference. When the automatic start-stop feature is active, the engine will automatically shut off when the vehicle comes to a complete stop and restart when you release the brake pedal.
How do I adjust the side mirrors on my Mini Countryman?
To adjust the side mirrors on your Mini Countryman, find the mirror adjustment button on the driver’s door armrest. Press the button corresponding to the desired mirror (left or right) and use the directional pad or joystick to adjust the mirror’s position. Once you have achieved the desired angle and visibility, release the button to set the mirror in place.
Is the manual of the Mini Countryman (2020) available in English?
Yes, the manual of the Mini Countryman (2020) is available in English .
Is your question not listed? Ask your question here
![]()
Contents
A — Z
OWNER’S MANUAL
MINI COUNTRYMAN
Online Edition for Part no. 01 40 2 606 301 — © 10/10 BMW AG
Online Edition for Part no. 01 40 2 606 301 — © 10/10 BMW AG

Cooper
Cooper S
Cooper S ALL4
Congratulations on your new MINI
This Owner’s Manual should be considered a permanent part of this vehicle. It should stay with the vehicle when sold to provide the next owner with important operating, safety and maintenance information.
We wish you an enjoyable driving experience.
Online Edition for Part no. 01 40 2 606 301 — © 10/10 BMW AG
© 2010 Bayerische Motoren Werke Aktiengesellschaft
Munich, Germany
Reprinting, including excerpts, only with the written consent of BMW AG, Munich.
US English X/10
Printed on environmentally friendly paper, bleached without chlorine, suitable for recycling.
Online Edition for Part no. 01 40 2 606 301 — © 10/10 BMW AG
CONTENTS
The fastest way to find information on a particular topic or item is by using the index, refer to page 162.
Using this Owner’s Manual
4 Notes
6 Reporting safety defects
AT A GLANCE
10 Cockpit
Controls
18 Opening and closing
30 Adjustments
36 Transporting children safely
39 Driving
48 Controls overview
56 Technology for driving comfort and safety
67 Lamps
72 Climate
77 Practical interior accessories
Driving tips
86 Things to remember when driving
Communications
98 Telephone
Mobility
|
112 |
Refueling |
|
114 |
Wheels and tires |
|
121 |
Under the hood |
|
125 |
Maintenance |
|
127 |
Care |
|
131 |
Replacing components |
|
140 |
Giving and receiving assistance |
|
144 |
Indicator and warning lamps |
Reference
158 Technical data
162 Everything from A to Z
3
Online Edition for Part no. 01 40 2 606 301 — © 10/10 BMW AG
AT A GLANCE
Controls
Communications Driving tips
Mobility
Reference

Notes
Notes
Using this Owner’s
Manual
We have tried to make all the information in this Owner’s Manual easy to find. The fastest way to find specific topics is to refer to the detailed index at the back of the manual. If you wish to gain an initial overview of your vehicle, you will find this in the first chapter.
Should you wish to sell your MINI at some time in the future, remember to hand over this Owner’s Manual to the new owner; it is an important part of the vehicle.
Additional sources of information
Should you have any other questions, your MINI dealer will be glad to advise you at any time.
You can find more information about the MINI, for example on its technology, on the Internet at www.MINI.com.
Symbols used
Indicates precautions that must be followed precisely in order to avoid the pos-
sibility of personal injury and serious damage to the vehicle.<
Indicates information that will assist you in gaining the optimum benefit from your
vehicle and enable you to care more effectively for your vehicle.<
Refers to measures that can be taken to help protect the environment.<
< Marks the end of a specific item of information.
* Indicates special equipment, country-specific equipment and optional accessories, as well as equipment and functions not yet available at the time of printing.
Symbols on vehicle components
Indicates that you should consult the relevant section of this Owner’s Manual for
information on a particular part or assembly.
The individual vehicle
The manufacturer of your MINI is the Bayerische Motoren Werke Aktiengesellschaft, BMW AG.
When you ordered your MINI, you chose various items of equipment. This Owner’s Manual describes the entire array of options and equipment that the manufacturer of your MINI makes available with a specific model range.
Bear in mind that the manual may contain information on accessories and equipment that you have not specified for your own vehicle. Sections describing options and special equipment are marked by asterisks * to assist you in identifying possible differences between the descriptions in this manual and your own vehicle’s equipment.
If your MINI features equipment not described in this Owner’s Manual, observe the enclosed Supplementary Owner’s Manuals.
Editorial notice
The manufacturer pursues a policy of continuous, ongoing development that is conceived to ensure that MINI vehicles continue to embody the highest quality and safety standards combined with advanced, state-of-the-art technology. For this reason, it is possible in exceptional cases that features described in this Owner’s Manual could differ from those on your vehicle.
4
Online Edition for Part no. 01 40 2 606 301 — © 10/10 BMW AG

For your safety
Maintenance and repair
Advanced technology, e.g. the use of modern materials and high-performance
electronics, requires specially adapted maintenance and repair methods. Therefore, have the necessary work on your MINI only carried out by a MINI dealer or a workshop that has specially trained personnel working in accordance with the specifications of the MINI manufacturer. If this work is not carried out properly, there is a danger of subsequent damage and related safety hazards.<
nents, brake dust shields, telephones, including operation of any mobile phone from within the vehicle without using an externally mounted antenna, or transceiver equipment, for instance, CBs, walkie-talkies, ham radios or similar accessories, may cause extensive damage to the vehicle, compromise its safety, interfere with the vehicle’s electrical system or affect the validity of the MINI Limited Warranty. See your MINI dealer for additional information.<
Maintenance, replacement, or repair of the emission control devices and systems
may be performed by any automotive repair establishment or individual using any certified automotive part.<
Parts and accessories
For your own safety, use genuine parts and accessories approved by the manu-
facturer of the MINI.
When you purchase accessories tested
and approved by the manufacturer of the MINI and Original MINI Parts, you simultaneously acquire the assurance that they have been thoroughly tested by the manufacturer of the MINI to ensure optimum performance when installed on your vehicle.
The manufacturer of the MINI warrants these parts to be free from defects in material and workmanship.
The manufacturer of the MINI will not accept any liability for damage resulting from installation of parts and accessories not approved by the manufacturer of the MINI.
The manufacturer of the MINI cannot test every product made by other manufacturers to verify if it can be used on a MINI safely and without risk to either the vehicle, its operation, or its occupants.
Original MINI Parts, MINI Accessories and other products approved by the manufacturer of the MINI, together with professional advice on using these items, are available from all MINI dealers.
Installation and operation of accessories that have not been approved by the manufacturer of your MINI, such as alarms, radios, amplifiers, radar detectors, wheels, suspension compo-
California Proposition 65 warning
California law requires us to issue the following warning:
Engine exhaust and a wide variety of automobile components and parts,
including components found in the interior furnishings in a vehicle, contain or emit chemicals known to the State of California to cause cancer and birth defects and reproductive harm. In addition, certain fluids contained in vehicles and certain products of component wear contain or emit chemicals known to the State of California to cause cancer and birth defects or other reproductive harm.
Battery posts, terminals and related accessories contain lead and lead compounds. Wash your hands after handling.
Used engine oil contains chemicals that have caused cancer in laboratory animals. Always protect your skin by washing thoroughly with soap and water.<
Service and warranty
We recommend that you read this publication thoroughly.
Your MINI is covered by the following warranties:
>New Vehicle Limited Warranty
>Rust Perforation Limited Warranty
5
Online Edition for Part no. 01 40 2 606 301 — © 10/10 BMW AG
AT A GLANCE
Controls
Communications Driving tips
Mobility
Reference
Notes
>Federal Emissions System Defect Warranty
>Federal Emissions Performance Warranty
>California Emission Control System Limited Warranty
Detailed information about these warranties is listed in the Service and Warranty Information Booklet for US models or in the Warranty and Service Guide Booklet for Canadian models.
Your vehicle has been specifically adapted and designed to meet the particular operating conditions and homologation requirements in your country and continental region in order to deliver the full driving pleasure while the vehicle is operated under those conditions. If you wish to operate your vehicle in another country or region, you may be required to adapt your vehicle to meet different prevailing operating conditions and registration requirements. You should also be aware of any applicable warranty limitations or exclusions for such country or region. In such a case, please contact Customer Relations for further information.
Reporting safety defects
For US customers
The following applies only to vehicles owned and operated in the US.
If you believe that your vehicle has a defect that could cause a crash or could cause injury or death, you should immediately inform the National Highway Traffic Safety Administration, NHTSA, in addition to notifying MINI of North America, LLC, P.O. Box 1227, Westwood, New Jersey 07675-1227, Telephone 1-800-831- 1117.
If NHTSA receives similar complaints, it may open an investigation, and if it finds that a safety defect exists in a group of vehicles, it may order a recall and remedy campaign. However, NHTSA cannot become involved in individual problems between you, your dealer, or MINI of North America, LLC.
To contact NHTSA, you may call the Vehicle Safety Hotline toll-free at 1-888-327-4236 (TTY: 1-800-424-9153); go to http://www.safercar.gov; or write to: Administrator, NHTSA, 400 Seventh Street, SW., Washington, DC 20590. You can also obtain other information about motor vehicle safety from http://www.safercar.gov
For Canadian customers
Canadian customers who wish to report a safety-related defect to Transport Canada, Defect Investigations and Recalls, may telephone the toll-free hotline1-800-333-0510. You can also obtain other information about motor vehicle safety from http://www.tc.gc.ca/ roadsafety.
6
Online Edition for Part no. 01 40 2 606 301 — © 10/10 BMW AG
AT A GLANCE
Controls
Communications Driving tips
Mobility
Reference
7
Online Edition for Part no. 01 40 2 606 301 — © 10/10 BMW AG
Online Edition for Part no. 01 40 2 606 301 — © 10/10 BMW AG
![]()
AT A GLANCE
AT A GLANCE
Controls
Driving tips
Communications
Mobility
Reference
Online Edition for Part no. 01 40 2 606 301 — © 10/10 BMW AG
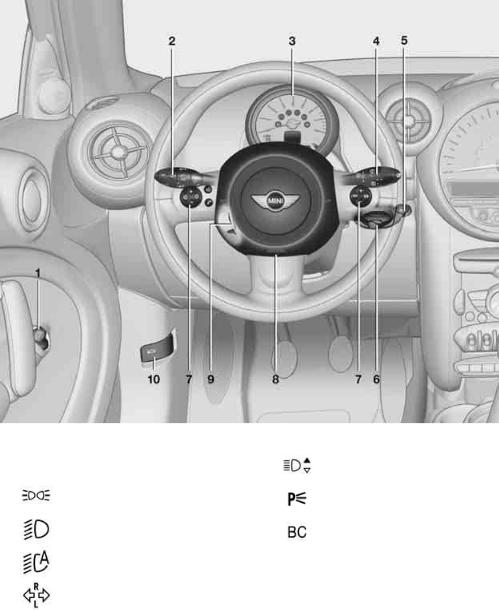
Cockpit
Cockpit
Around the steering wheel: Controls and displays
1Adjusting the exterior mirrors, folding them in and out* 34
2Parking lamps 67
Low beams 67
Automatic headlamp control* 67 Adaptive Light Control* 69
Turn signals 43
High beams 69
Headlamp flasher 43
Roadside parking lamps* 69
Computer* 49
10
Online Edition for Part no. 01 40 2 606 301 — © 10/10 BMW AG
3 Tachometer 12
Instrument lighting 70
Resetting the trip odometer 48
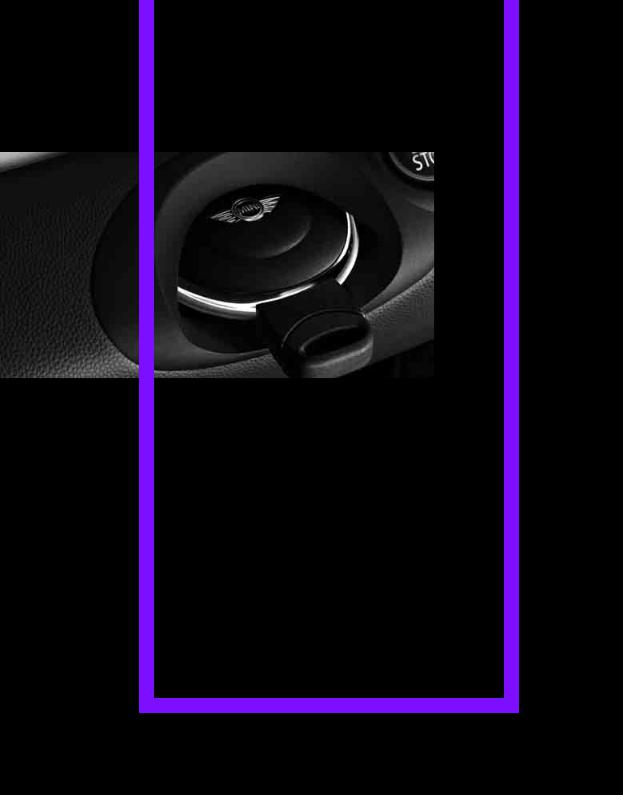
5Switching the ignition on/off and starting/stopping the engine 39
6Ignition lock 39
7Buttons* on steering wheel
Continuing cruise control* 46
Right:
Storing speed and accelerating or decelerating
Left:
Increase or reduce volume
Activating/deactivating cruise control* 47
Telephone*:
Accepting and ending a call, starting dialing* of selected phone number and redialing if no phone number is selected Activating/deactivating voice activation system*
Changing the radio station
Selecting a music track
Scrolling through the redial list
8Horn: the entire surface
9Adjusting the steering wheel 35
10Releasing the hood 121
 Controls AT A GLANCE
Communications Driving tips
Mobility
Reference
11
Online Edition for Part no. 01 40 2 606 301 — © 10/10 BMW AG

|
1 |
Tachometer 48 |
5 |
Instrument lighting 70 |
|
|
with indicator and warning lamps |
13 |
6 |
Speedometer |
|
|
2 |
Display for |
with indicator and warning lamps 13 |
||
|
> Current vehicle speed 48 |
7 |
Fuel gauge 48 |
||
|
> Indicator and warning lamps |
13 |
8 |
Radio display, refer to separate Owner’s |
|
|
3 |
Resetting the trip odometer 48 |
Manual |
||
|
4 |
Display for |
9 |
Radio, refer to separate Owner’s Manual |
|
>Outside temperature 48
>Position of automatic transmission* 41
>Computer* 49
>Date of next scheduled service, and remaining distance to be driven 52
>Odometer and trip odometer 48
>Initializing the Flat Tire Monitor* 59
>Resetting the Tire Pressure Monitor* 61
>Settings and information 50
>Personal Profile settings 18
12
Online Edition for Part no. 01 40 2 606 301 — © 10/10 BMW AG
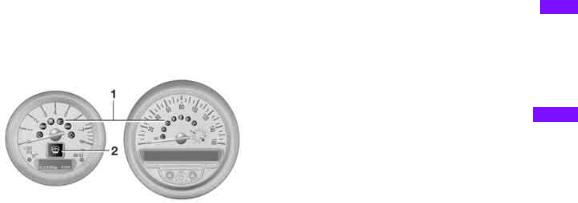
Indicator and warning lamps
The concept
Indicator and warning lamps can light up in various combinations and colors in indicator area 1 or 2.
Some lamps are checked for proper functioning and thus come on briefly when the engine is started or the ignition is switched on.
What to do in case of a malfunction
A list of all indicator and warning lamps, as well as notes on possible causes of malfunctions and on how to respond, can be found starting on page 144.
 Controls AT A GLANCE
Communications Driving tips
Mobility
Reference
13
Online Edition for Part no. 01 40 2 606 301 — © 10/10 BMW AG

Cockpit
Around the center console
14
Online Edition for Part no. 01 40 2 606 301 — © 10/10 BMW AG
1Microphone for voice activation system* and for telephone in hands-free mode*
2Indicator/warning lamp* for front passenger airbags 65
3Reading lamps* 71 Ambient lighting* 71 Glass sunroof, electric* 27 Interior lamps 70
4Hazard warning flashers
5Speedometer 12
6Radio/CD, refer to separate Owner’s Manual
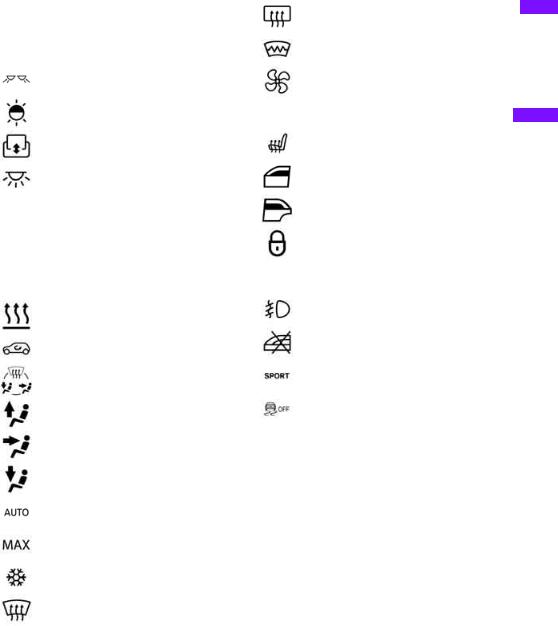
7Air conditioner or automatic climate control* 72
Temperature
Recirculated-air mode
Air distribution for air conditioner
Air distribution to the windshield*
Air distribution to the upper body area*
Air distribution to the footwell*
Automatic air distribution and flow rate*
Maximum cooling*
Cooling function
Defrosting windows*
Rear window defroster
Windshield heating*
Air flow rate
8 Switches in the center console
Seat heating* 33
Power windows, front 28
Power windows, rear 28
Central locking system, inside 22
9 Buttons in the center console
Fog lamps* 70
Safety switch for power windows in rear passenger compartment 29
Sport button* 59
Driving stability control systems
Dynamic Stability Control DSC 57
Dynamic Traction Control
DTC* 57
10AUX-IN connection/USB audio interface* 79
 Controls AT A GLANCE
Communications Driving tips
Mobility
Reference
15
Online Edition for Part no. 01 40 2 606 301 — © 10/10 BMW AG
Online Edition for Part no. 01 40 2 606 301 — © 10/10 BMW AG

AT A GLANCE
Controls
Controls
Driving tips
Communications
Mobility
Reference
Online Edition for Part no. 01 40 2 606 301 — © 10/10 BMW AG
Opening and closing
Opening and closing
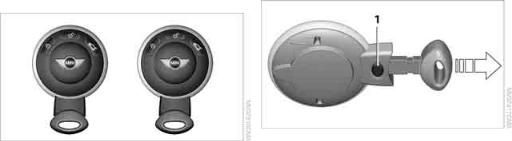
Keys/remote controls |
Integrated key |
Remote control
Each remote control contains a rechargeable battery that is recharged when it is in the ignition lock while the car is being driven. You should therefore use each remote control at least twice a year to maintain the charge status. In vehicles equipped with Comfort Access*, the remote control contains a replaceable battery, page 27.
If more than one remote control unit is used, the settings called up and implemented depend on which remote control is recognized when the car is unlocked, refer to Personal Profile,
page 18.
In addition, information about service requirements is stored in the remote control, refer to Service data in the remote control, page 125.
New remote controls
Your MINI dealer can supply new remote controls as additional units or as replacements in the event of loss.
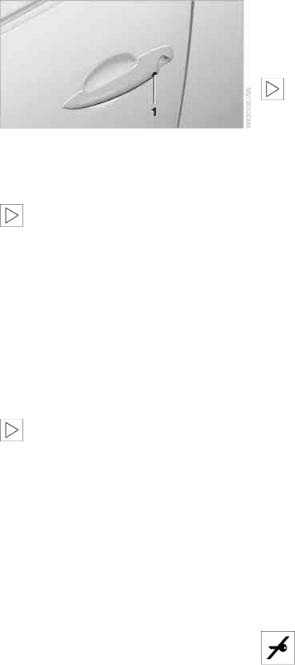
Press button 1 to release the key.
The integrated key fits the following locks: > Driver’s door, page 21.
Personal Profile
The concept
The functions of your MINI can be set individually. By means of Personal Profiles, most of these settings are stored for the remote control currently in use. When you unlock the car, the remote control is recognized and the settings stored for it are called up and implemented.
This means that your settings will be activated for you, even if in the meantime your car was used by someone else with another remote control and the corresponding settings.
At most three remote controls can be set for three different people. A prerequisite is that each person uses a separate remote control.
Personal Profile settings
For more information on specific settings, refer to the specified pages.
>Response of the central locking system when the car is being unlocked 19
>Automatic locking of the vehicle 22
>Triple turn signal activation 43
18
Online Edition for Part no. 01 40 2 606 301 — © 10/10 BMW AG
![]()
>Settings for the displays in the speedometer and tachometer:
>12h/24h mode of the clock, refer to Formats and units of measure 51
>Date format, refer to Formats and units of measure 51
>Units of measure for fuel consumption, distance covered/remaining distances and temperature, refer to Formats and units of measure 51
>Light settings:
>Pathway lighting 67
>Daytime running lights 68
>Automatic climate control*: activating/ deactivating the AUTO program, setting the temperature, air volume and air distribution 74
>Entertainment:
>Adjusting volume levels, refer to separate Owner’s Manual
>Adjusting tone, refer to separate Owner’s Manual
The alarm system* is also activated or deactivated, page 24.
Operating from inside
Button for central locking system, page 22.
In the event of a sufficiently severe accident, the central locking system unlocks automatically. In addition, the hazard warning flashers and interior lamps come on.
Opening and closing: from outside
Persons or animals in a parked vehicle could lock the doors from the inside. Take
the key with you when you leave the vehicle so that the vehicle can be opened from the outside.<
Using the remote control
Unlocking
Press the  button.
The welcome lamps and interior lamps come on.
Central locking system
The concept
The central locking system is ready for operation whenever the driver’s door is closed.
The system simultaneously engages and releases the locks on the following:
>Doors
>Liftgate
>Fuel filler flap
Operating from outside
>Via the remote control
>Via the door lock*
>In cars with Comfort Access*, via the door handles on the driver’s and passenger’s sides
The remote control can also be used to switch on/off the welcome lamps and interior lamps.
Unlocking mode
You can also set which parts of the car are unlocked. The setting is stored for the remote control in use.
1.Switch on the ignition, refer to page 39.
2.Briefly press the button in the turn signal lever repeatedly until «SET/INFO» is displayed.
3.Press and hold the button until the display changes.
19
Online Edition for Part no. 01 40 2 606 301 — © 10/10 BMW AG
 Communications Driving tips Controls AT A GLANCE
Mobility
Reference
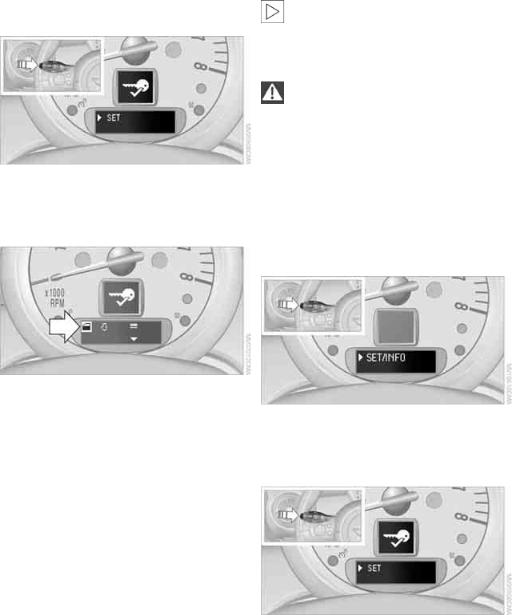
Opening and closing
|
4. Briefly press the button repeatedly until the |
Convenient closing is not possible by |
|
symbol and «SET» are displayed. |
means of the remote control.< |
|
Locking |
5.Press and hold the button until the display changes.
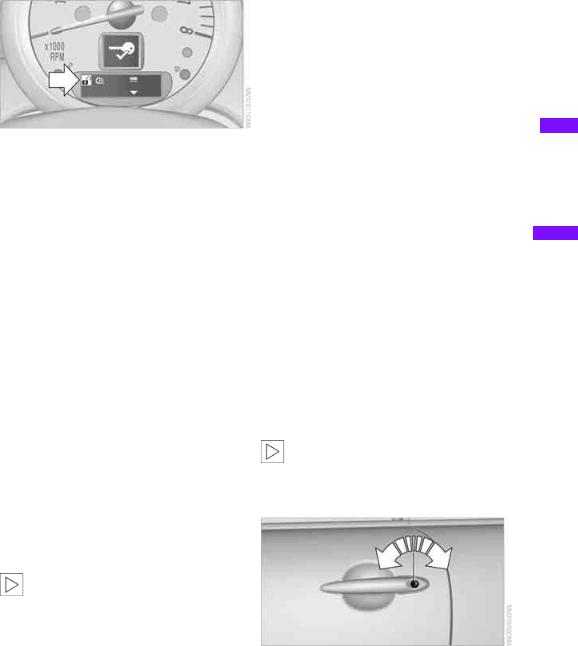
6.Briefly press the button repeatedly until the display shows the illustrated symbol, arrow.
7.Press and hold the button until the display changes.
8.Briefly press the button to select:
>
Press the  button once to unlock only the driver’s door and the fuel filler flap*.
Press the button twice to unlock the entire vehicle.
>
Press the  button once to unlock the entire vehicle.
9.Press and hold the button until the display changes. The setting is stored for the remote control currently in use.
Convenient opening
Hold the  button down.
The power windows are opened and the glass sunroof* is tilted.
Press the  button.
Do not lock the vehicle from the outside if there is any person inside, because the
vehicle cannot be unlocked from inside without special knowledge.<
Setting confirmation signals
To have the vehicle confirm when it has been locked or unlocked.
1.Switch on the ignition, refer to page 39.
2.Briefly press the button in the turn signal lever repeatedly until «SET/INFO» is displayed.
3.Press and hold the button until the display changes.
4.Briefly press the button repeatedly until the symbol and «SET» are displayed.
5.Press and hold the button until the display changes.
6.Briefly press the button to select, arrow:
> Confirmation signal during unlocking
> Confirmation signal during locking
20
Online Edition for Part no. 01 40 2 606 301 — © 10/10 BMW AG
Malfunctions
7.Press and hold the button until the display changes.
8.Briefly press the button to select:
>
The hazard warning flashers light up during unlocking/locking.
>
An acoustic signal sounds during unlocking/locking.
>
The hazard warning flashers light up and an acoustic signal* sounds during unlocking/locking.
>
The function is deactivated.
9.Press and hold the button until the display changes. The setting is stored.
Switching on interior lamps
While the car is locked: Press the  button.
You can also use this function to locate your vehicle in parking garages, etc.
Unlocking liftgate
Press the  button for approx. 1 second and then release it.
When it is opened, the liftgate swings out and up toward the rear. Make sure that
adequate clearance is available before opening. To prevent accidentally locking yourself out, do not place the key down in the cargo area. If the liftgate was locked before opening, it will be locked again after it is closed.
Before and after each trip, check that the liftgate has not been inadvertently unlocked.<
The remote control may malfunction due to local radio waves. If this occurs, unlock and lock the car at the door lock with the integrated key.
If the car can no longer be locked with a remote control, the battery in the remote control is discharged. Use this remote control during an extended drive; this will recharge the battery, page 18.
For US owners only
The transmitter and receiver units comply with part 15 of the FCC/Federal Communications Commission regulations. Operation is governed by the following:
FCC ID:
LX8766S
LX8766E
LX8CAS
Compliance statement:
This device complies with part 15 of the FCC Rules. Operation is subject to the following two conditions:
>This device must not cause harmful interference, and
>this device must accept any interference received, including interference that may cause undesired operation.
Any unauthorized modifications or changes to these devices could void the
user’s authority to operate this equipment.<
Using the door lock
You can set which parts of the car are unlocked, page 19.
21
Online Edition for Part no. 01 40 2 606 301 — © 10/10 BMW AG
 Communications Driving tips Controls AT A GLANCE
Mobility
Reference
Opening and closing
Do not lock the vehicle from the outside if there is any person inside, because the
vehicle cannot be unlocked from inside without special knowledge.<
When there is no alarm system* or Comfort Access*, only the driver’s door is
locked with the door lock.<
To lock all doors, the fuel filler flap, and the liftgate together:
>With the doors closed, press the interior central locking button, page 22 to lock the vehicle.
>Unlocking and opening the driver or passenger door, page 22.
Locking the vehicle.
>Lock the driver’s door with the integrated key via the door lock, or
>press the safety lock button on the passenger’s door and close the door from the outside.
Convenient operation
With an alarm system* or Comfort Access*, the windows and glass sunroof* can be operated via the door lock.
Opening/closing
Hold the key in the position for unlocking or locking.
Watch during the closing process to be sure that no one is injured. Releasing the
key stops the operation.<
Manual operation
In the event of an electrical malfunction, the driver’s door can be unlocked or locked by turning the integrated key in the door lock to the end positions.
Opening and closing: from inside
The switch locks or unlocks the doors and liftgate when the doors are closed, but the antitheft system is not activated. The fuel filler flap remains unlocked*.
Unlocking and opening
>Either unlock the doors together using the switch for the central locking system and then pull the door handle above the armrest or
>pull on the door handle of either door twice: the first time unlocks the door, the second time opens it.
Locking
>Press the switch or
>press down the safety lock button of a door. To prevent you from being locked out, the open driver’s door cannot be locked using the lock button.
Persons or animals in a parked vehicle could lock the doors from the inside. Take
the key with you when you leave the vehicle so that the vehicle can be opened from the outside.<
Automatic locking*
You can also set the situations in which the car locks. The setting is stored for the remote control in use.
22
Online Edition for Part no. 01 40 2 606 301 — © 10/10 BMW AG
1.Switch on the ignition, refer to page 39.
2.Briefly press the button in the turn signal lever repeatedly until «SET/INFO» is displayed.
3.Press and hold the button until the display changes.
4.Briefly press the button repeatedly until the symbol and «SET» are displayed.
locks the vehicle after some time if no door has been opened.
>
The central locking system automatically locks the vehicle as soon as you drive off.
>
The central locking system automatically locks the vehicle after some time if no door has been opened, or as soon as you drive off.
>
The central locking system remains unlocked.
9.Press and hold the button until the display changes. The setting is stored.
Liftgate
To avoid damage, make sure there is sufficient clearance before opening the lift-
gate.<
Opening
|
In some market-specific versions, the lift- |
||
|
gate cannot be unlocked using the remote |
||
|
control unless the vehicle is unlocked first. |
||
|
5. Press and hold the button until the display |
Only drive with the liftgate fully closed; other- |
|
|
wise, the tail lamps will be obscured and driving |
||
|
changes. |
||
|
safety will be compromised.< |
||
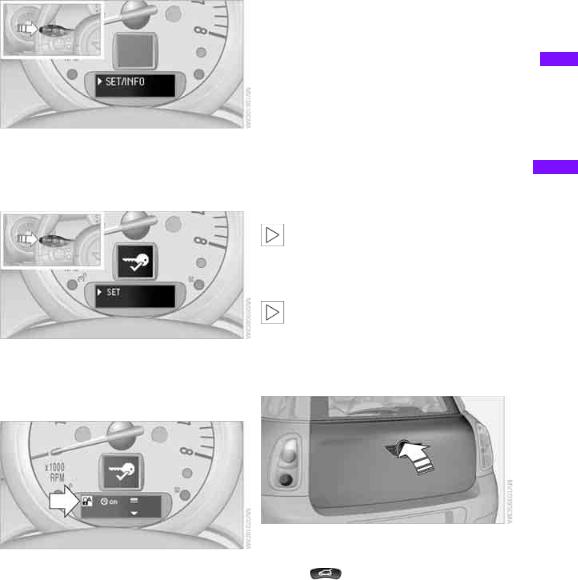
6.Briefly press the button repeatedly until the display shows the illustrated symbol, arrow.
|
Press the top side of the MINI emblem, arrow, |
|||
|
7. Press and hold the button until the display |
or |
||
|
press the |
button for approx. 1 second |
||
|
changes. |
|||
|
and then release it. The liftgate is unlocked. |
|||
8.Briefly press the button to select:
>
The central locking system automatically
23
Online Edition for Part no. 01 40 2 606 301 — © 10/10 BMW AG
 Communications Driving tips Controls AT A GLANCE
Mobility
Reference
Opening and closing
Closing
Make sure that the closing path of the liftgate is clear; otherwise, injuries may
occur.<
The handle recesses on the interior trim panel of the liftgate make it easier to pull it down.
In certain market-specific versions, unlocking via the door lock triggers the
alarm.<
Panic mode*
You can activate the alarm system if you find yourself in a dangerous situation.
Press the  button for at least two seconds.
Switching off the alarm: Press any button.
Switching off an alarm
>Unlock the car with the remote control.
>Insert the key fully into the ignition lock.
>In cars with Comfort Access*, press the button on the door lock.
Alarm system*
The concept
The alarm system, when activated, reacts if:
>A door, the engine compartment lid or the liftgate is opened
>There is movement inside the car
>The car’s inclination changes, for instance if an attempt is made to jack it up and steal the wheels or to raise it prior to towing it away
>There is an interruption in the power supply from the battery
The alarm system briefly indicates unauthorized entry or tampering by means of:
>An acoustic alarm
>Switching on the hazard warning flashers
Arming and disarming
Whenever the car is locked or unlocked, the alarm system is armed or disarmed.
Even when the alarm system is armed, you can open the liftgate by means of the  button on the remote control.
When you subsequently close the liftgate it is again locked and monitored.
Display on the revolution counter
When the system is armed, all LEDs pulse. After approx. 16 minutes one LED flashes.
>LEDs pulse or LED flashes: system is armed.
>One LED flashes at short intervals:
A door, the hood or the liftgate is not properly closed. Even if these are not closed fully, the remaining items are deadlocked and the LEDs pulse after approx. 10 seconds for approx. 16 minutes. Afterwards, one LED flashes.
The interior movement detector is not activated.
>LEDs go out after the vehicle is unlocked: No attempt was made to tamper with the car.
>LEDs flash after unlocking until the key is inserted in the ignition, but for no longer
24
Online Edition for Part no. 01 40 2 606 301 — © 10/10 BMW AG

than approx. 5 minutes: an attempt was made to tamper with the car.
Tilt alarm sensor
The vehicle’s inclination is monitored. The alarm is triggered, for instance, if an attempt is made to steal the car’s wheels or tow it away.
Interior movement detector
Before the interior movement detector can operate correctly, the windows and glass roof must be closed.
Avoiding false alarms
The tilt alarm sensor and the interior movement detector can be switched off together.
This prevents false alarms, e.g. in the following situations:
>In duplex garages
>When being transported on car-carrying trains, ferries or trailers
>If pets are to remain inside the car
Switching off the tilt alarm sensor and interior movement detector
>Press the  button on the remote control twice in succession.
>Lock the vehicle twice with the integrated key.
LEDs flash in short succession for approx. 2 seconds.
The tilt alarm sensor and the interior movement detector are switched off until the car is next unlocked and locked.
Comfort Access*
Comfort Access enables you to enter your vehicle without having to hold the remote control in your hand. All you need to do is wear the remote control close to your body, e.g. in your jacket pocket. The vehicle automatically detects the remote control within the immediate vicinity or in the passenger compartment.
Functional requirements
>The vehicle or the liftgate can only be locked when the vehicle detects that the remote control currently in use is outside of the vehicle.
>The vehicle cannot be locked or unlocked again until after approx. 2 seconds.
>The engine can only be started when the vehicle detects that the remote control is inside the vehicle.
>The doors and liftgate must be closed to be
able to operate the windows and glass sunroof*.
Comfort Access supports the following functions:
>Unlocking/locking the vehicle
>Convenient closing
>Unlocking the liftgate by itself
>Starting the engine
Comparison to standard remote controls
Essentially, it makes no difference whether you control the above-mentioned functions using Comfort Access or by pressing the buttons on the remote control for Comfort Access.
Instructions on opening and closing are found starting on page 18.
Special features regarding the use of Comfort Access are described below.
If you notice a brief delay while opening or closing the windows or glass sunroof, the system is checking whether a remote control is inside the vehicle. Repeat the opening or closing
procedure, if necessary.<
 Communications Driving tips Controls AT A GLANCE
Mobility
Reference
25
Online Edition for Part no. 01 40 2 606 301 — © 10/10 BMW AG
Opening and closing
Unlocking
Press button 1.
Depending on the setting, refer to Unlocking mode on page 19, only the driver’s door or the entire vehicle is unlocked.
Press the button again to lock the vehicle again.<
Convenient opening with the remote control, refer to page 20.
Locking
Press button 1.
For convenient closing, press and hold button 1.
In addition, the windows and the glass sunroof* are closed.
Unlocking the liftgate separately
Press the top side of the MINI emblem.
If the vehicle detects that a remote control has been accidentally left inside the
locked vehicle’s cargo area after the liftgate is closed, the liftgate will reopen slightly. The hazard warning flashers flash and an acoustic signal* sounds.<
Windows and glass sunroof, electric*
If the engine is switched off, you can still operate the windows and glass sunroof so long as a door or the liftgate has not been opened.
If the doors and liftgate are closed again and the remote control is located inside the vehicle, the windows and the glass sunroof can be operated again.
Insert the remote control into the ignition lock to be able to operate the windows or glass sunroof
when the engine is switched off and the doors are open.
Switching on radio readiness
Switch on radio readiness by briefly pressing the Start/Stop button, page 39.
Do not depress the brake or the clutch; otherwise, the engine will start.<
Starting the engine
The engine can be started or the ignition can be switched on when a remote control is inside the vehicle. It is not necessary to insert a remote control into the ignition lock, page 39.
Switching off the engine in cars with automatic transmission
The engine can only be switched off when the selector lever is in position P, page 40.
To switch the engine off when the selector lever is in position N, the remote control must be in the ignition lock.
Before driving a vehicle with automatic transmission into a car wash
1.Insert remote control into ignition lock.
2.Depress the brake.
3.Move the selector lever to position N.
4.Switch off the engine.
The vehicle can roll.
Malfunction
Comfort Access may malfunction due to local radio waves.
If this happens, open or close the vehicle via the buttons on the remote control or using the integrated key.
Insert the remote control into the ignition lock and start the engine.
Warning lamps
The warning lamp lights up when an attempt is made to start the engine: the engine cannot be started. The remote
control is not inside the vehicle or is malfunc-
26
Online Edition for Part no. 01 40 2 606 301 — © 10/10 BMW AG
tioning. Take the remote control with you inside the vehicle or have it checked. If necessary, insert another remote control into the ignition lock.
The warning lamp lights up when the engine is running: the remote control is no longer inside the vehicle. After the
engine is switched off, the engine can only be restarted within approx. 10 seconds.
The indicator lamp lights up: replace the battery in the remote control.
Replacing the battery
The remote control for Comfort Access contains a battery that will need to be replaced from time to time.
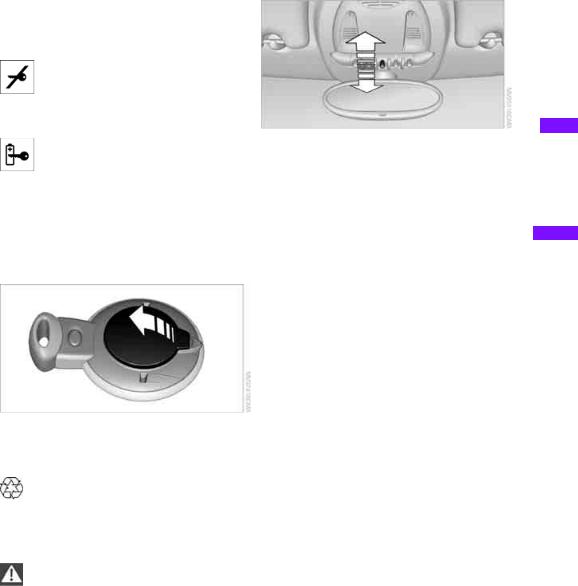
1. Remove the cover.
2.Insert the new battery with the plus side facing up.
3.Press the cover on to close.
Take the old battery to a recycling center or to your MINI dealer.<
Glass sunroof, electric*
To prevent injuries, exercise care when closing the glass sunroof and keep it in
your field of vision until it is shut.
Take the key with you when you leave the car; otherwise, children could operate the sunroof and possibly injure themselves.<
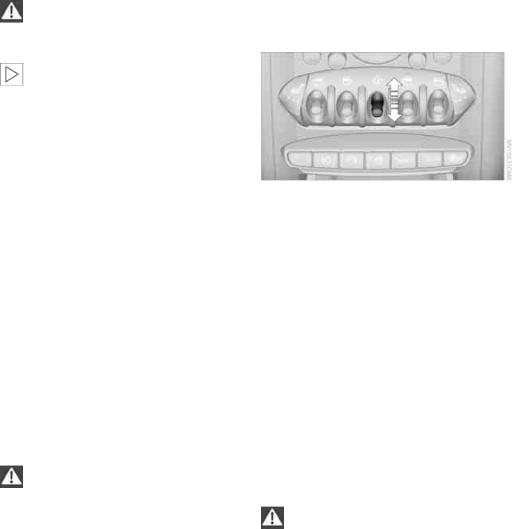
Tilting
>Press the switch backward to the resistance point and hold it there.
Both glass sunroofs are tilted.
Releasing the switch stops the movement.
>With the ignition switched on, press the switch backward beyond the resistance point.
Both closed sunroofs are tilted fully. Pressing again stops the movement.
Opening, closing
With the ignition switched on and the glass sunroof tilted, press the switch backward and hold it there.
The front glass sunroof opens. The rear glass sunroof is closed.
Releasing the switch stops the movement.
The glass sunroof can be closed in the same way by pressing the switch forward.
The front glass sunroof remains in a tilted position. The rear glass sunroof is tilted. Pressing on the switch again closes both sunroofs completely.
Convenient operation via door lock or Comfort Access, refer to page 20, 22, 26.
Roller sun blind
The roller sun blind can be opened and closed independently of the glass sunroof.
Following interruptions in electrical power supply
After a power failure, there is a possibility that the glass sunroof can only be tilted. In this case, have the system initialized. The manufacturer of
27
Online Edition for Part no. 01 40 2 606 301 — © 10/10 BMW AG
 Communications Driving tips Controls AT A GLANCE
Mobility
Reference
Opening and closing
your MINI recommends that you have this work done by your MINI dealer.
Windows
To prevent injuries, exercise care when closing the windows.
Take the remote control with you when you leave the car; otherwise, children could operate the electric windows and possibly injure themselves.<
If, after a window is opened and closed several times in close succession, the win-
dow can only be closed and not opened, the system is overheated. Let the system cool for several minutes with the ignition switched on or the engine running.<
Opening, closing
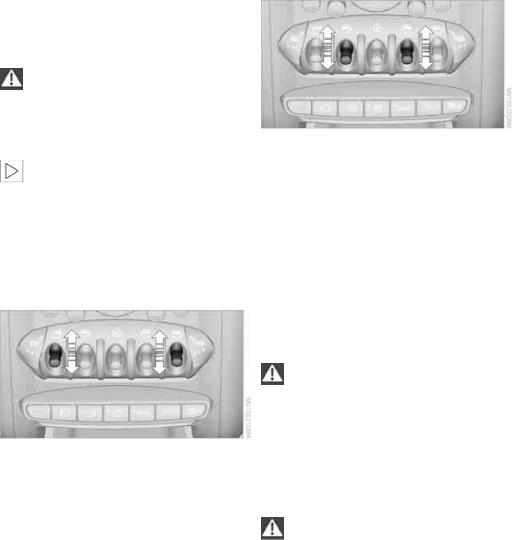
Front window
>Press the switch downward.
The window opens until you release the switch.
>Tap the switch downward.
As of radio readiness, the windows will open automatically. Tap the switch again to stop the opening movement.
The window can be closed in the same way by pressing the switch up.
Rear window
>Press the switch downward.
The window opens until you release the switch.
>Tap the switch downward.
As of radio readiness, the windows will open automatically. Tap the switch again to stop the opening movement.
The window can be closed in the same way by pressing the switch up.
After switching off the ignition
When the ignition is switched off, the windows can still be operated for approx. 1 minute as long as no door is opened.
Take the key with you when you leave the car; otherwise, children could operate the
electric windows and possibly injure themselves.<
Pinch protection system
If the closing force rises beyond a predefined threshold during closing, the system will stop moving the window prior to lowering it again slightly.
Even though there is the pinch protection system, always ensure that the window’s travel path is clear; otherwise, the safety system might fail to detect certain kinds of obstructions, such as thin objects, and the window would con-
tinue closing.
Do not install any accessories that might interfere with window movement. Otherwise, the pinch protection system could be impaired.<
28
Online Edition for Part no. 01 40 2 606 301 — © 10/10 BMW AG
![]()
Closing without pinch protection
If there is an external danger, or if ice on the windows, etc., prevents you from closing the windows normally, the window can be closed manually.
1.Press the switch upward and hold it there. Pinch protection is limited and the window reopens slightly if the closing force exceeds a certain value.
2.Press the switch upward again within approx. 4 seconds and hold it there. The window closes without pinch protection.
Safety switch
With the safety switch, you can prevent the rear windows from being opened or closed via the switches in the rear passenger area, by children, for example.
Press the button, arrow.
The LED lights up when this safety feature is activated.
Always press the safety switch when children ride in the rear, otherwise uncon-
trolled closing of the windows could lead to injuries.<
 Communications Driving tips Controls AT A GLANCE
Mobility
Reference
29
Online Edition for Part no. 01 40 2 606 301 — © 10/10 BMW AG

Adjustments
Adjustments
Sitting safely
The ideal sitting position can make a vital contribution to relaxed, fatigue-free driving. In conjunction with the safety belts, the head restraints and the airbags, the seated position has a major influence on your safety in the event of an accident. To ensure that the safety systems operate with optimal efficiency, we strongly urge you to observe the instructions contained in the following section.
For additional information on transporting children safely, refer to page 36.
Airbags
Always maintain an adequate distance between yourself and the airbags. Always
grip the steering wheel on the rim, with your hands in the 3 o’clock and 9 o’clock positions, to minimize the risk of injury to the hands or arms in the event of the airbag being triggered off. No one and nothing should come between the airbags and the seat occupant.
Do not use the cover of the front airbag on the front passenger side as a storage area. Ensure that the front passenger is correctly seated, e.g. that no feet or legs are propped against the dashboard. Otherwise, leg injury could result if the front airbag suddenly deployed.
Make sure that passengers keep their heads away from the side airbag and do not lean against the cover of the head airbag, otherwise injuries can occur when the airbags are triggered.<
Even if you follow all the instructions, injuries resulting from contact with airbags cannot be fully excluded, depending on the circumstances. The ignition and inflation noise may provoke a mild hearing loss in extremely sensitive individuals. This effect is usually only temporary.
For airbag locations and additional information on airbags, refer to page 64.
Head restraint
A correctly adjusted head restraint reduces the risk of neck injury in the event of an accident.
Adjust the head restraint in such a way that its center is at approx. ear level. Oth-
erwise, there is an increased risk of injury in the event of an accident.<
Head restraints, refer to page 32.
Safety belt
Before every drive, make sure that all occupants wear their safety belts. Airbags complement the safety belt as an additional safety device, but they do not represent a substitute.
Number of safety belts
Never allow more than one person to wear a single safety belt. Never allow
infants or small children to ride in a passenger’s lap.
Make sure that the belt in the lap area sits low across the hips and does not press against the abdomen. The safety belt must not rest against the throat, run across sharp edges, pass over hard or fragile objects or be pinched. Fasten the safety belt so that it is pulled taut across the lap and shoulder, fitting the body snugly without any twists. Otherwise, the belt could slide over the hips in the event of a frontal collision and injure the abdomen. Avoid wearing bulky clothing and regularly pull the belt in the upper-body area taut; otherwise, its restraining effect could be impaired.<
Safety belts, refer to page 33.
Seats
Note before adjusting
Never attempt to adjust your seat while the vehicle is moving. The seat could
respond with unexpected movement, and the ensuing loss of vehicle control could lead to an
30
Online Edition for Part no. 01 40 2 606 301 — © 10/10 BMW AG

accident.
On the front passenger seat as well, do not incline the backrest too far to the rear while the vehicle is being driven; otherwise, there is a danger in the event of an accident of sliding under the safety belt, eliminating the protection normally provided by the belt.<
Comply with the instructions on head restraint height on page 32 and on damaged safety belts on page 33.
Seat adjustment, front
Observe the instructions on page 30 to ensure the best possible personal protec-
tion.<
Backrest
Pull lever, arrow 1, and apply weight to or remove weight from the backrest as needed.
Lumbar support*
You can also adjust the contour of the backrest to obtain additional support in the lumbar region.
The upper hips and spinal column receive supplementary support to help you maintain a relaxed, upright sitting position.
Longitudinal direction
Pull the lever, arrow 1, and slide the seat into the desired position, arrows 2.
After releasing the lever, move the seat slightly forward or back so that it engages properly.
Height
Pull up or push down the lever repeatedly, arrows 1, until the desired height is reached.
Turn the wheel to increase or decrease the curvature.
Seat adjustment, rear
Do not adjust rear seats while the vehicle is moving; otherwise, passengers could be
injured.
Make sure that the locking devices of the rear seats engage properly. Otherwise the restraining effect of the safety belts during an accident could be reduced.<
 Communications Driving tips Controls AT A GLANCE
Mobility
Reference
31
Online Edition for Part no. 01 40 2 606 301 — © 10/10 BMW AG

Adjustments
|
Longitudinal adjustment |
Removing |
1.Pull the lever and slide the seat into the desired position.
2.Release the lever and move the seat slightly forward or back so that it engages properly.
Backrest
Adjusting backrest angle, refer to page 88.
Head restraints
Correctly adjusted head restraint
A correctly adjusted head restraint reduces the risk of neck injury in the event of an accident.
Correctly adjust the head restraints of all occupied seats; otherwise, there is an
increased risk of injury in an accident.<
Height
Adjust the head restraint so that its center is approximately at ear level.
Height adjustment
To raise: pull up.
To lower: press the button, arrow 1, and slide the head restraint down.
Only remove a head restraint if no one will be sitting on the seat in question.
Reinstall the head restraint before transporting passengers, as otherwise the head
restraint cannot provide its protective function.<
Front
1.Pull up as far as it will go.
2.Fold the backrest back slightly.
3.Press button 1 and pull the head restraint out as far as it will go.
4.Also press button 2 with a suitable tool and pull the head restraint all the way out.
5.Fold back the backrest.
Rear
1.Pull up as far as it will go.
2.Fold the backrest forward slightly.
3.Press button 1 and pull the head restraint out completely.
4.Also press button 2 with a suitable tool and completely remove the head restraint.
5.Fold rear seat backrest back into position.
32
Online Edition for Part no. 01 40 2 606 301 — © 10/10 BMW AG

Seat heating*
Switching on
Press once for each temperature level. Three LEDs indicate the highest temperature.
If you continue driving within the next 15 minutes, the seat heating is automatically activated at the previously set temperature.
The temperature is lowered or the heating is switched off entirely to reduce the drain on the battery.
The LEDs stay lit.
Switching off
Press button longer.
Safety belts
Observe the instructions on page 30 to ensure the best possible personal protec-
tion.<
Before every drive, make sure that all occupants wear their safety belts. Airbags complement the safety belt as an additional safety device, but they do not represent a substitute.
Front and rear seats
Closing
Make sure you hear the lock engage in the belt buckle.
The upper belt anchor is suitable for adults of any stature as long as the seat is adjusted properly, page 30.
Opening
1.Grasp the belt firmly.
2.Press the red button in the buckle.
3.Guide the belt into its reel.
Height adjustment for rear seat belt tongues
When the outer rear seats are unoccupied, the seat belt tongues can be slid back to the cargo area trim panel with a clasp to prevent noise.
Safety belt reminder
Front seats
The indicator lamps come on and an acoustic signal sounds.Check whether the safety belt has been fastened correctly. The ‘Fasten safety belts’
reminder is issued when the driver’s safety belt has not been fastened. The ‘Fasten safety belts’ reminder is also activated at road speeds above approx. 5 mph or 8 km/h if the front passenger’s safety belt has not been fastened, if objects are placed on the front passenger seat, or if driver or front passenger unfasten their safety belts.
Damage to safety belts
If the safety belts are damaged or stressed in an accident: have the safety belt system
and its seat-belt tensioners replaced and the belt anchors checked. Have this work carried out only by a MINI dealer or by a workshop that has specially trained personnel working in accordance with the specifications of the MINI manufacturer; otherwise, correct operation of these safety systems is not ensured.<
 Communications Driving tips Controls AT A GLANCE
Mobility
Reference
33
Online Edition for Part no. 01 40 2 606 301 — © 10/10 BMW AG

Adjustments
Mirrors
Exterior mirrors
The mirror on the passenger’s side is more curved than the driver’s mirror. The
objects seen in the mirror are closer than they appear. Do not gauge your distance from traffic behind you on the basis of what you see in the mirror; otherwise, there is an increased risk of an accident.<
1Adjusting the left or right exterior mirror
2Folding mirrors in and out*
Manual adjustment
The mirrors can also be adjusted manually: press the edge of the glass.
Folding mirrors in and out*
Turn the knob beyond the pressure point in direction 2. The mirrors can be folded in at road speeds up to approx. 20 mph/30 km/h.
This can be beneficial in narrow streets, for example, or for moving mirrors that were folded in by hand back out into their correct positions.
Automatic heating*
At outside temperatures below a certain limit, both exterior mirrors are automatically heated while the engine is running or the ignition switched on.
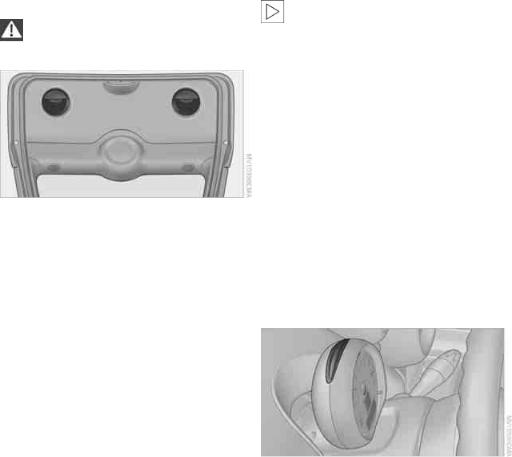
Interior rearview mirror
To reduce glare from vehicles behind you when you are driving at night:
Turn the knob.
Interior and exterior mirrors, automatic dimming feature*
It is controlled by two photosensors:
>inside the interior rearview mirror, arrow.
>on the back of the mirror.
For proper function:
>Keep the photosensors clean.
>Do not cover the area between the interior rearview mirror and the windshield.
>Do not place stickers or decals on the windshield in front of the mirror.
34
Online Edition for Part no. 01 40 2 606 301 — © 10/10 BMW AG

Steering wheel
Adjustments
Do not adjust the steering wheel position while the car is in motion; otherwise, there is a risk of accident due to an unexpected move-
ment.<
1.Fold the lever down.
2.Move the steering wheel to the preferred distance and angle to suit your seated position.
3.Swing the lever back up.
Do not use force to swing the lever back up; otherwise, the mechanism
will be damaged.<
 Communications Driving tips Controls AT A GLANCE
Mobility
Reference
35
Online Edition for Part no. 01 40 2 606 301 — © 10/10 BMW AG

Transporting children safely
Transporting children safely
The right place for children
Do not leave children unattended in the vehicle; otherwise, they could endanger
themselves and/or other persons by opening the doors, for example.<
Children should always sit in the rear
Accident research has shown that the safest place for children is on the rear seat.
Only transport children under the age of 13 or smaller than 5 ft/150 cm in the rear in a child restraint system suitable for their age,
weight and size. Otherwise, there is an increased risk of injury in the event of an accident.<
Children 13 years of age or older must be buckled in with a safety belt as soon as there no longer is any child restraint system that is appropriate for their age, size and weight.
Child restraint systems, installation
Before installing a child restraint system on the rear seats, move the seat as far back as possible.
After the child restraint system has been installed on the respective rear seat, move the backrest forward so that the it rests lightly against the child restraint system, refer to Rear seat backrests on page 88.
Observe the child restraint system manufacturer’s instructions when selecting,
installing and using child restraint systems. Otherwise, the protective effect may be diminished.<
On the front passenger seat
After installing a child restraint system on the front passenger seat, make sure that
the front, side, and knee airbags for the front passenger are deactivated; otherwise, there is an increased risk of injury if the airbags deploy.<
Exception for front passenger seat
Front passenger airbags
Should it be necessary to use a child restraint system on the front passenger
seat, the front and side airbags must be deactivated. Otherwise, there is an increased risk of injury to the child if the airbags deploy, even if the child is seated in a child restraint system.<
For more information on automatic deactivation of the front passenger airbags, refer to page 65.
Seat position
Before installing a child restraint system, move the front passenger seat as far back and up* as possible to obtain the best possible position for the belt. Do not change the seat position after this.
Child seat security
All rear safety belts and the safety belt for the front passenger can be prevented from being
36
Online Edition for Part no. 01 40 2 606 301 — © 10/10 BMW AG

|
pulled out in order to secure child restraint sys- |
backrest; otherwise, the protective function of |
|
tems. |
the seat may be compromised.< |
To lock the safety belt
1.Secure the child restraint system with the belt.
2.Pull the belt strap all the way out.
3.Allow the belt strap to retract and pull it taut against the child restraint system.
The safety belt is locked.
To unlock the safety belt
1.Open the belt buckle.
2.Remove the child restraint system.
3.Allow the safety belt strap to retract all the way.
Child restraint system with tether strap
Use the tether strap anchors to secure child restraint systems only; otherwise, the
anchors could be damaged.<
There are two additional anchors for child restraint systems with tether straps, arrows.
LATCH child restraint fixing system
LATCH: Lower Anchors and Tethers for CHildren.
To install and use the LATCH child restraint system, follow the operating and safety
instructions provided by the manufacturer of the system; otherwise, the protective function of the seat may be compromised.<
Placement of the tether strap
Make sure the upper retaining strap does not run over sharp edges and is not
twisted as it passes to the top anchor. Otherwise, the strap will not properly secure the child restraint system in the event of an accident.<
Anchor points for LATCH anchors
Before installing the child seat, pull the belt out of the area for the child restraint fixing system.
|
1 |
Direction of travel |
||
|
2 |
Head restraint |
||
|
3 |
Rear cargo well |
||
|
4 |
Tether strap hook |
||
|
5 |
Anchor |
||
|
The mounts for the lower LATCH anchors are |
6 |
Seat backrest |
|
|
7 |
Tether strap of the child restraint system |
||
|
located at the points indicated by the arrows. |
|||
Make sure that both lower LATCH anchors are properly engaged and that the child
restraint system rests firmly against the seat
37
Online Edition for Part no. 01 40 2 606 301 — © 10/10 BMW AG
 Communications Driving tips Controls AT A GLANCE
Mobility
Reference

Transporting children safely
Attaching upper retaining strap to the attachment point
1.Slide the head restraint upward.
2.Guide the tether strap between the head restraint holders.
3.Attach the tether strap to the anchor using the hook.
4.Push the head restraint into its lowermost position.
5.Pull the retaining strap tight.
Securing doors and windows
Rear doors
Slide down the safety lever on the rear doors.
The door can now be opened from the outside only.
Safety switch for power windows
The rear power windows are blocked and cannot be operated from the rear. Press the safety switch, refer to page 29.
38
Online Edition for Part no. 01 40 2 606 301 — © 10/10 BMW AG
![]()
Driving
Ignition lock
Inserting the key into the ignition lock
Insert the key all the way into the ignition lock.
Radio readiness
Individual electrical consumers can operate.
Removing the key from the ignition lock
Press in the key briefly. It is ejected slightly. At the same time:
>The ignition is switched off if it was on beforehand.
Automatic transmission
The key can only be removed if the selector lever is in position P: interlock.
Start/Stop button
If the Start/Stop button is pressed while the clutch is depressed in the manual
transmission or the brake pedal is depressed in the automatic transmission, the engine starts.<
Radio readiness
Individual electrical consumers can operate. The time and outside temperature are displayed in the tachometer.
Radio readiness is switched off automatically:
>When the key is removed from the ignition lock
>When using Comfort Access* by pushing the button on the door handle or the
 button on the remote control, refer to Locking on page 26
>After a certain has elapsed
Ignition on
Most indicator and warning lamps in indicator area 1, page 13, light up for varying lengths of time.
When the engine is off, switch off the ignition and any unnecessary electrical con-
sumers in order to preserve the battery.<
Radio readiness and ignition off
All indicator and warning lamps in the displays go out.
The ignition switches off automatically if the driver’s door is opened. Pressing the Start/Stop button again switches the ignition back on.
The ignition is not switched off in situations such as the following:
>The clutch or brake is depressed
>The low beams are switched on
Press the Start/Stop button to switch radio readiness or the ignition on and off. Do not depress the brake or clutch while doing so.
39
Online Edition for Part no. 01 40 2 606 301 — © 10/10 BMW AG
 Communications Driving tips Controls AT A GLANCE
Mobility
Reference

Driving
Starting the engine
Do not allow the engine to run in enclosed areas; otherwise, inhalation of the noxious exhaust gases can lead to loss of consciousness and death. Exhaust gases contain carbon monoxide, an odorless and colorless, but highly toxic gas. Never leave an unattended vehicle with the engine running; otherwise, such a vehicle repre-
sents a potential safety hazard.
Before leaving the car while the engine is running, place the transmission in neutral or move the selector lever to position P and forcefully apply the parking brake to prevent the car from moving.<
Avoid frequent starting in quick succession or repeated start attempts in which
the engine does not start. Otherwise, the fuel is not burned or inadequately burned and there is a danger of overheating and damaging the catalytic converter.<
Do not let the engine warm up with the vehicle at a standstill. Move off immediately at a moderate engine speed.
When starting the engine, do not depress the accelerator pedal.
Manual transmission
Key in ignition lock or inside vehicle with Comfort Access, refer to page 25.
1.Depress the brake.
2.Depress the clutch.
3.Press the Start/Stop button.
Automatic transmission*
Key in ignition lock or inside vehicle with Comfort Access, refer to page 25.
1.Depress the brake.
2.Shift the selector lever into position P or N.
3.Press the Start/Stop button.
The starter operates automatically for a certain time, and stops automatically as soon as the engine has started.
Switching off the engine
Always take the key with you when you leave the vehicle.
When parking, apply the parking brake forcefully; otherwise, the vehicle could begin to roll.<
Manual transmission
1.With the car at a standstill, press the Start/ Stop button.
2.Shift into first gear or reverse.
3.Forcefully apply the parking brake.
Automatic transmission*
1.With the car at a stop, move the selector lever to position P.
2.Press the Start/Stop button.
3.Forcefully apply the parking brake.
Before driving into a car wash
By following these steps, the vehicle is able to roll:
1.Place the remote control, even with Comfort Access, in the ignition lock.
2.Depress the brake.
3.Move the selector lever to position N.
4.Switch off the engine.
Parking brake
The parking brake is primarily intended to prevent the vehicle from rolling while parked; it brakes the rear wheels.
Applying
The lever locks in position automatically.
40
Online Edition for Part no. 01 40 2 606 301 — © 10/10 BMW AG

Releasing
Pull upward slightly, press the button, arrow, and guide the lever down.
In exceptional cases, if the parking brake has to be used to slow or stop the car, do not pull the lever up too hard. In doing so, con-
tinuously press the button of the parking brake lever.
Otherwise, excessive force could lead to overbraking and loss of traction, i.e. fishtailing, at the rear axle.<
Manual transmission
When shifting into 5th or 6th gear, press the gearshift lever to the right. Otherwise,
the engine could be damaged if you inadvertently shift into 3rd or 4th gear.<
Reverse gear
Select this only when the vehicle is stationary. When the gearshift lever is pressed to the left, a slight resistance has to be overcome.
Automatic transmission* with Steptronic
In addition to the fully automatic mode, you can shift gears manually using Steptronic, page 42.
Parking the vehicle
To prevent the vehicle from rolling, always select position P and apply the parking
brake before leaving the vehicle with the engine running.<
Removing the key
To remove the key from the ignition lock, first move the selector lever into position P and then switch off the engine: interlock. Remove the key from the ignition lock, refer to page 39.
Selector lever positions
P R N D M/S + –
Displays in the tachometer
P R N D DS M1 to M6
The selector lever position is displayed, or the current gear in the manual mode.
Changing selector lever positions
>The selector lever can only be moved out of position P when the ignition is switched on or the engine is running.
>Before moving the lever away from P or N with the vehicle stationary, first depress the brake; otherwise, the selector lever will refuse to move: shiftlock.
 Communications Driving tips Controls AT A GLANCE
Mobility
Reference
41
Online Edition for Part no. 01 40 2 606 301 — © 10/10 BMW AG

Driving
To prevent the vehicle from creeping after you select a driving position,
depress the brake until you are ready to start.<
A lock prevents accidental shifting into selector lever positions R and P.
Overriding the selector lever lock
Press the button on the front of the selector lever, arrow.
P Park
Select this only when the vehicle is stationary. The transmission locks to prevent the drive wheels from turning.
R Reverse
Select this only when the vehicle is stationary.
N Neutral
Select this when you are in a car wash, for example. The vehicle can roll.
D Drive, automatic position
Position for normal vehicle operation. All forward gears are selected automatically.
Under normal operating conditions, the fuel consumption is lowest when driving in position D.
Sport program and manual mode M/S
Move the selector lever from position D to the left into the M/S shifting slot:
The Sport program is activated and DS is displayed. This position is recommended for a per- formance-oriented driving style.
To deactivate the Sport program or manual mode M/S, move the selector lever to the right into position D.
Shifting with the selector lever
Push the selector lever forward or pull it back to activate manual operation. Steptronic shifts the gear.
>Pull the selector lever in the + direction. Transmission shifts up.
>Push the selector lever in the – direction. Transmission shifts down.
The selected gear is displayed in the tachometer, e.g. M1.
To use the automatic mode again, move the selector lever to the right into position D.
Upshifts and downshifts are executed only when they will result in a plausible combination of engine and vehicle speed; thus, for example, a downshift that would cause the engine to overrev will not be executed by the system. The selected gear is displayed briefly, followed by the current gear.
Kickdown
Kickdown enables you to achieve maximum performance.
Depress the accelerator pedal beyond the fullthrottle resistance point.
Shifting on the steering wheel*
With the selector lever in position D, automatic drive, you can shift gears using the shift paddles on the steering wheel. The transmission automatically switches to manual mode.
42
Online Edition for Part no. 01 40 2 606 301 — © 10/10 BMW AG

If you do not shift gears with the shift paddles or accelerate for a certain amount of time, the transmission automatically returns to D, automatic drive.
5.Move the selector lever into the desired position by pressing the button on the front of the selector lever.
Before manually unlocking the selector lever lock, firmly set the parking brake to
prevent the vehicle from rolling away.<
Turn signals/ headlamp flasher
>Pull one of the shift paddles. Transmission shifts up.
>Push one of the shift paddles. Transmission shifts down.
M1 through M6 are displayed in the tachometer.
Manually releasing the selector lever lock
Should the selector lever refuse to move out of position P even though the ignition is switched on, the brake is depressed and the button on the selector lever is pressed, the selector lever lock can be overridden:
1.Unclip the sleeve of the selector lever.
2.Pull the sleeve up over the selector lever until the sleeve is inside out. Disconnect the cable connector if necessary.
1Turn signal
2Headlamp flasher
Using turn signals
Press the lever beyond the resistance point.
To turn off manually, press the lever to the resistance point.
Unusually rapid flashing of the indicator lamp indicates that an indicator bulb has
failed.<
Indicating a turn briefly
Press the lever as far as the resistance point for as long as you wish to indicate a turn.
Triple turn signal activation
Press the lever as far as the resistance point.
You can set whether the turn signal flashes once or three times.
3.Insert extractor hook 1 into the loop on the passenger’s side.
4.Pull the loop up.
 Communications Driving tips Controls AT A GLANCE
Mobility
Reference
43
Online Edition for Part no. 01 40 2 606 301 — © 10/10 BMW AG

Driving
1.Switch on the ignition, refer to page 39.
2.Briefly press the button in the turn signal lever repeatedly until «SET/INFO» is displayed.
3.Press and hold the button until the display changes.
4.Briefly press the button repeatedly until the symbol and «SET» are displayed.
5.Press and hold the button until the display changes.
6.Briefly press the button repeatedly until the display shows the illustrated symbol, arrow.
8.Briefly press the button to select:
>
Brief indication of a turn.
>
Triple turn signal.
9.Press and hold the button until the display changes. The setting is stored.
Wiper system
1Switching on wipers
2Switching off wipers or brief wipe
3Activating/deactivating intermittent wipe or rain sensor*
4Cleaning windshield and headlamps*
Switching on wipers
Press the lever upward, arrow 1.
The lever automatically returns to its initial position when released.
7.Press and hold the button until the display changes.
Normal wiper speed
Press once.
The system switches to intermittent operation when the vehicle is stationary.
Fast wiper speed
Press twice or press beyond the resistance point. The system switches to normal speed when the vehicle is stationary.
Intermittent wipe or rain sensor*
If the car is not equipped with a rain sensor, the intermittent-wipe time is preset.
44
Online Edition for Part no. 01 40 2 606 301 — © 10/10 BMW AG

If the car is equipped with a rain sensor, the time between wipes is controlled automatically and depends on the intensity of the rainfall. The rain sensor is mounted on the windshield, directly in front of the interior rearview mirror.
Activating intermittent wipe or rain sensor
Press button, arrow 3.
This symbol is displayed in the tachometer.
Deactivate the rain sensor before entering an automatic car wash. Failure to do so
could result in damage caused by undesired wiper activation.<
5.Press and hold the button until the display changes.
6.Press the button to select the desired sensitivity.
7.Wait, or press and hold the button until the display changes.
The settings are stored.
Adjusting the sensitivity of the rain sensor
1.Switch on the ignition, refer to page 39.
2.Briefly press the button in the turn signal lever repeatedly until «SET/INFO» is displayed.
3.Press and hold the button until the display changes.
4.Briefly press the button repeatedly until the symbol and «SET» are displayed.
Deactivating intermittent wipe or rain sensor
Press the button again, arrow 3.
Brief wipe
Press the lever downward once, arrow 2.
Cleaning windshield and headlamps*
Pull the lever, arrow 4.
Washer fluid is sprayed onto the windshield and the wipers are operated briefly.
When the vehicle lighting system is switched on, the headlamps are cleaned at regular and appropriate intervals.
In cars equipped with an alarm system, the headlamps cannot be cleaned when the hood is open.
Do not use the washers when the washer fluid reservoir is empty; otherwise, you will
damage the washer pump.
Only use the washers if the hood has been completely closed; otherwise, the headlamp washer system* may be damaged. Do not use the washers if there is any danger that the fluid will freeze on the windshield. If you do, your vision could be obscured. For this reason, use antifreeze.<
 Communications Driving tips Controls AT A GLANCE
Mobility
Reference
45
Online Edition for Part no. 01 40 2 606 301 — © 10/10 BMW AG

Driving
Window washer nozzles
The window washer nozzles are heated automatically* while the engine is running or the ignition is switched on.
Rear window wiper
0Rear wipers parked
1To switch on intermittent wipe  : Turn the cap to level 1.
Operation is continuous in reverse gear.
The rear wiper does not move if the cap is in interval stage 1 before the ignition is switched on.
Cleaning the rear window
2To clean the rear window during intermit-
tent wipe  :
:
Turn the cap further to level 2 and hold it there.
3To clean the rear window when wipers are
parked  :
:
Turn the cap to level 3 and hold it there.
Do not use the washers when the washer fluid reservoir is empty; otherwise, you will
damage the washer pump.<
Washer fluid
Washer fluid is flammable. Keep it away from ignition sources, only store it in the closed, original container, and keep out of reach
of children; otherwise, there is a danger of injury. Comply with the instructions on the container.<
Washer fluid reservoir
Only refill washer fluid that contains antifreeze when the engine is cool, to avoid
contact with hot engine parts. Otherwise, fluid spills constitute a fire hazard and a risk to personal safety.<
Fill with water and, if required, with a washer antifreeze, according to manufacturer’s recommendations.
Mix the water and antifreeze before filling the washer fluid reservoir to make sure
the correct concentration is maintained.<
Capacity
Approx. 4.2 US quarts/4 liters.
Cruise control*
The concept
Cruise control is available at vehicle speeds of at least approx. 20 mph or 30 km/h. The car then stores and maintains the speed that you specify using the button on the steering wheel.
Do not use cruise control when driving at constant speed is prevented by adverse
conditions, e.g. winding roads, dense traffic or poor road conditions due to, e.g., snow, rain, ice or loose surfaces. Otherwise, you could lose control of the vehicle and cause an accident as a result.<
46
Online Edition for Part no. 01 40 2 606 301 — © 10/10 BMW AG

Activating
1Resuming cruise control
2Activating/deactivating cruise control
3Maintaining, storing and increasing speed
4Maintaining, storing and decreasing speed
Indicator lamp in the speedometer lights up. The cruise control system is ready and can be activated.
Increasing speed
Press button 3 repeatedly until the desired speed is reached. Every time you press the button, the speed increases by approx. 1 mph or 2 km/h.
Accelerating using the button
Press and hold button 3.
The vehicle accelerates without pressure on the accelerator pedal. After the button is released, the driving speed is maintained and stored.
Decreasing speed
Press button 4 repeatedly until the desired speed is reached.
The functions here are the same as for increasing the speed or accelerating, except that the speed will be decreased.
Activating/deactivating cruise control
Press button 2.
In addition, the system is automatically deactivated:
>When the brakes are applied
>When the clutch is depressed
>When the automatic transmission is in selection lever position N
>When the driving stability control system is active
Cruise control is not deactivated by depressing the accelerator pedal. Once the accelerator pedal is released, the stored speed is achieved again and maintained.
The stored speed is cleared when the ignition is switched off.
Maintaining current speed
Press button 3.
The system maintains and stores the current vehicle speed.
If, on a downhill grade, the engine braking effect is not sufficient, the controlled speed may be exceeded. On uphill grades vehicle speed may drop if the engine output is insufficient.
Resuming a speed stored beforehand
Press button 1.
The last speed stored is achieved again and maintained.
The stored speed is cleared when the ignition is switched off.
Display in tachometer*
Selected speed is displayed briefly.
If — mph or — km/h is displayed briefly in the tachometer, the conditions necessary
for operation may not be fulfilled.<
Malfunction
The warning lamp in the tachometer lights up if the system fails.
47
Online Edition for Part no. 01 40 2 606 301 — © 10/10 BMW AG
 Communications Driving tips Controls AT A GLANCE
Mobility
Reference

Controls overview
Controls overview
Tachometer
Never operate the engine with the needle in the red overspeed zone of the gauge. In this range, the fuel supply is interrupted to protect the engine.
Displays in tachometer
Odometer and trip odometer
Resetting the trip odometer
With the ignition switched on, press knob 3 in the tachometer.
Units of measure
Select the respective units of measure, miles or km for the odometer as well as 7 or 6 for the outside temperature, page 51.
Coolant temperature
A warning lamp will come on if the coolant, and therefore the engine, becomes too hot.
Check coolant level, refer to page 123.
Fuel gauge
1Current vehicle speed
2Odometer, trip odometer, and outside temperature display
3Resetting the trip odometer
Outside temperature warning
When the displayed temperature sinks to approx. +377/+36, a signal sounds and a warning lamp lights up. There is an increased risk of black ice.
Even at temperatures above +377/+36 ice can form. Therefore, drive carefully,
e.g. on bridges and sections of road in the shade; otherwise, there is an increased accident risk.<
Fuel tank capacity
Approx. 12.4 US gallons/47 liters.
You will find information on refueling on page 112.
If the tilt of the vehicle varies for a longer period, when you are driving in mountainous areas, for example, the indicator may fluctuate slightly.
The arrow next to the gas pump symbol of the fuel gauge points toward the side of the vehicle with the fuel filler flap.
48
Online Edition for Part no. 01 40 2 606 301 — © 10/10 BMW AG
 Loading…
Free Cooper S Countryman Workshop, Owners, Service and Repair Manuals download
Find your Cooper S Countryman pdf manuals easily from below;
We have collected Mini’s Cooper S Countryman manuals and the list is being increasing day by day. find the below list and you can check preview before download as well in the next page.
Popular Manuals
People are enjoying the manuals we provide

Let us keep you updated for a new Mini Cooper S Countryman Manuals
We’ll send Spam Free and maximum one(1) mail per month once a new Cooper S Countryman pdf/documents is added.
Didn’t find it above? Check out all vehicles we covered from Mini Cooper S Countryman
Хорошее руководство по эксплуатации
Законодательство обязывает продавца передать покупателю, вместе с товаром, руководство по эксплуатации Mini Countryman (2015). Отсутствие инструкции либо неправильная информация, переданная потребителю, составляют основание для рекламации в связи с несоответствием устройства с договором. В законодательстве допускается предоставлении руководства в другой, чем бумажная форме, что, в последнее время, часто используется, предоставляя графическую или электронную форму инструкции Mini Countryman (2015) или обучающее видео для пользователей. Условием остается четкая и понятная форма.
Что такое руководство?
Слово происходит от латинского «instructio», тоесть привести в порядок. Следовательно в инструкции Mini Countryman (2015) можно найти описание этапов поведения. Цель инструкции заключается в облегчении запуска, использования оборудования либо выполнения определенной деятельности. Инструкция является набором информации о предмете/услуге, подсказкой.
К сожалению немного пользователей находит время для чтения инструкций Mini Countryman (2015), и хорошая инструкция позволяет не только узнать ряд дополнительных функций приобретенного устройства, но и позволяет избежать возникновения большинства поломок.
Из чего должно состоять идеальное руководство по эксплуатации?
Прежде всего в инструкции Mini Countryman (2015) должна находится:
— информация относительно технических данных устройства Mini Countryman (2015)
— название производителя и год производства оборудования Mini Countryman (2015)
— правила обслуживания, настройки и ухода за оборудованием Mini Countryman (2015)
— знаки безопасности и сертификаты, подтверждающие соответствие стандартам
Почему мы не читаем инструкций?
Как правило из-за нехватки времени и уверенности в отдельных функциональностях приобретенных устройств. К сожалению само подсоединение и запуск Mini Countryman (2015) это слишком мало. Инструкция заключает ряд отдельных указаний, касающихся функциональности, принципов безопасности, способов ухода (даже то, какие средства стоит использовать), возможных поломок Mini Countryman (2015) и способов решения проблем, возникающих во время использования. И наконец то, в инструкции можно найти адресные данные сайта Mini, в случае отсутствия эффективности предлагаемых решений. Сейчас очень большой популярностью пользуются инструкции в форме интересных анимаций или видео материалов, которое лучше, чем брошюра воспринимаются пользователем. Такой вид инструкции позволяет пользователю просмотреть весь фильм, не пропуская спецификацию и сложные технические описания Mini Countryman (2015), как это часто бывает в случае бумажной версии.
Почему стоит читать инструкции?
Прежде всего здесь мы найдем ответы касательно конструкции, возможностей устройства Mini Countryman (2015), использования отдельных аксессуаров и ряд информации, позволяющей вполне использовать все функции и упрощения.
После удачной покупки оборудования/устройства стоит посвятить несколько минут для ознакомления с каждой частью инструкции Mini Countryman (2015). Сейчас их старательно готовят или переводят, чтобы они были не только понятными для пользователя, но и чтобы выполняли свою основную информационно-поддерживающую функцию.