

![]()
Parts
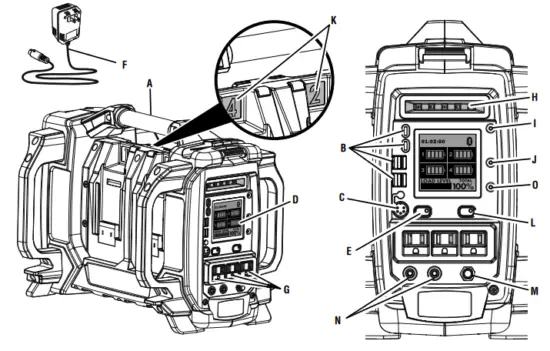
- Carry handle
- USB charging ports
- Charger input jack
- GENCONTROL™ display
- Main power button
- Charger
- Battery pack
- Battery ports
- Latch
- LED
- High-temp charging
- Low-temp charging
- High-temp shutdown
- Low-temp shutdown
- High-temp reset
- Low-temp reset
- Low-voltage shutdown
- Low-voltage warning
- Overload warning
- Main power button
- AC output button
- AC receptacles
- LED task light
- Task light control button
pairing button
- Protective cover
- Vent opening
- Drawstring
- Panel access cover
SAFETY INSTRUCTIONS
- To reduce the risk of injury, close supervision is necessary when this product is used near children.
- Do not put fingers, hands, or foreign objects into the product.
- Use of an attachment not recommended or sold by the product manufacturer may result in a risk of fire, electric shock, or injury to persons.
- To reduce risk of damage to the electric plug and cord, pull by the plug rather than cord when disconnecting charger from the product.
- Do not use a battery pack or appliance that is damaged or modified. Damaged or modified batteries may exhibit unpredictable behavior resulting in fire, explosion or risk of injury.
- Do not operate the product with a damaged cord or plug, or a damaged output cable.
- Do not disassemble the product; take it to a qualified service person when service or repair is required. Incorrect reassembly may result in a risk of fire or electric shock.
- To reduce the risk of electric shock, unplug the product from the outlet before attempting any instructed servicing.
- To reduce risk of battery explosion, follow these instructions and those published by battery manufacturer and manufacturer of any equipment you intend to use in vicinity of the batteries. Review cautionary markings on the product.
- Do not expose the power station to rain or wet conditions. Water entering the power station will increase the risk of electric shock.
- Do not disassemble the product.
- For indoor use only.
- Store product indoors and away from children.
- As with all electrical devices, use caution when plugging and unplugging this unit into an outlet or plugging/unplugging other devices into this unit. Do not force this unit into an outlet. Do not force plugs into this unit.
- If this unit is used in a manner not specified by the manufacturer, the protection provided by this equipment may be impaired.
- Operate this product using only the AC power type listed in the product specifications.
- Do not force a polarized plug (one prong larger than the other) into this product. Flip plug over and retry.
- Risk of electric shock. When using a grounded appliance this tool will not provide an electrical path to earth ground.
- Do not power devices with damaged or frayed power cords.
- Never block air vents. Blocked vents may cause overheating. Product will automatically shut off when overheated.
- peeKproduct cool. Do not place near heat vents or in direct sunlight.
- Use only with the provided charger or a charger approved by the manufacturer.
- Do not use the product around flammable fumes and gasses, such as in the bilge of a boat or near propane tanks.
- Do not use the power station if it has been dropped or received a sharp blow. A damaged power source will increase the risk of fire.
- Use only in a dry location. Do not allow any liquid to get inside the power station or charger. Do not submerge the power station or charger in any liquid.
- Do not store the power station near fertilizers, gasoline, or other chemicals.
- Do not overload the power station. It must be used for powering devices less than the product rating.
- For use with RYOBI 40 V battery packs, see tool/appliance/battery pack/charger correlation supplement 988000-842.
- NEVER smoke or allow a spark or flame in vicinity of battery.
- Be extra cautious to reduce risk of dropping a metal tool onto product. It might spark or short-circuit battery or another electrical part that may cause explosion.
- Remove personal metal items such as rings, bracelets, necklaces, and watches when working with a battery. A battery can produce a short-circuit current high enough to weld a ring or the like to metal, causing a severe burn.
- When charging the internal battery, work in a well-ventilated area and do not restrict ventilation in any way.
- Under abusive conditions, liquid may be ejected from the battery; avoid contact. If contact accidentally occurs, Do not expose a power pack to fire or excessive temperature. Exposure to fire or temperature above 265°F may cause explosion.
- Have servicing performed by a qualified repair person using only identical replacement parts. This will ensure that the safety of the product is maintained.
- This inverter has not been tested for use with medical devices.
- Do not power life critical medical devices with this tool.
- This product should never be hard wired into a circuit.
- This product should never be wired into an AC distribution circuit.
- Save these instructions. Refer to them frequently and use them to instruct others who may use this product. If you loan someone this product, loan them these instructions also.
SAFETY RULES FOR CHARGER
- Before using battery charger, read all instructions and cautionary markings in this manual, on battery charger, battery, and product using battery to prevent misuse of the products and possible injury or damage.
- Do not use charger outdoors or expose to wet or damp conditions. Water entering charger will increase the risk of electric shock.
- Use of an attachment not recommended or sold by the battery charger manufacturer may result in a risk of fire, electric shock, or injury to persons. Following this rule will reduce the risk of electric shock, fire, or serious personal injury.
- Do not abuse cord or charger. Never use the cord to carry the charger. Do not pull the charger cord rather than the plug when disconnecting from receptacle. Damage to the cord or charger could occur and create an electric shock hazard. If cord or charger is damaged, have the charger replaced by an authorized serviceman.
- Make sure cord is located so that it will not be stepped on, tripped over, come in contact with sharp edges or moving parts or otherwise subjected to damage or stress. This will reduce the risk of accidental falls, which could cause injury, and damage to the cord, which could result in electric shock.
- Keep cord and charger from heat to prevent damage to housing or internal parts.
- Do not let gasoline, oils, petroleum-based products, etc. come in contact with plastic parts. They contain chemicals that can damage, weaken, or destroy plastic.
- An extension cord should not be used unless absolutely necessary. Use of improper extension cord could result in a risk of fire and electric shock. If extension cord must be used, make sure:
- Do not operate charger with a damaged cord or plug, which could cause shorting and electric shock. If damaged, have the charger replaced by an authorized serviceman.
- Do not operate charger if it has received a sharp blow, been dropped, or otherwise damaged in any way. Take it to an authorized serviceman for electrical check to determine if the charger is in good working order.
- Do not disassemble charger. Take it to an authorized serviceman when service or repair is required. Incorrect reassembly may result in a risk of electric shock or fire.
- Unplug charger from outlet before attempting any maintenance or cleaning to reduce the risk of electric shock.
- Disconnect charger from the power supply when not in use. This will reduce the risk of electric shock or damage to the charger if metal items should fall into the opening. It also will help prevent damage to the charger during a power surge.
- Risk of electric shock. Do not touch the uninsulated portion of output connector or uninsulated battery terminal.
- Do not use, store, or charge battery packs or products in locations where the temperature is less than -4°F or more than 113°F. Do not store outside or in vehicles.
- Save these instructions. Refer to them frequently and use them to instruct others who may use this tool. If you loan someone this tool, loan them these instructions also to prevent misuse of the product and possible injury.
SYMBOLS
| Les termes de mise en garde suivants et leur signification ont pour but d’expliquer le degré de risques associé à l’utilisation de ce produit. | ||
| SYMBOLE | SIGNAL | SIGNIFICATION |
 |
DANGER : | Indique une situation dangereuse qui, si elle n’est pas évitée, aura pour conséquences des blessures graves, voire mortelles. |
|
AVERTISSEMENT : | Indique une situation dangereuse qui, si elle n’est pas évitée, aura pour conséquences des blessures graves ou mortelles. |
|
ATTENTION : | Indique une situation dangereuse qui, si elle n’est pas évitée, pourrait entraîner des blessures légères ou de gravité modérée. |
|
AVIS : | (Sans symbole d’alerte de sécurité) Indique les informations jugées importantes sans toutefois représenter un risque de blessure (ex. : messages concernant les dommages matériels). |
ELECTRICAL
| Current in Amperes | Load in Watts | Maximum Allowable Cord Length | |||||
| At 120V | At 240V | #8 Wire | #10 Wire | #12 Wire | #14 Wire | #16 Wire | |
| 2.5 | 300 | 600 | 1000 ft. | 600 ft. | 375 ft. | 250 ft. | |
| 5 | 600 | 1200 | 500 ft. | 300 ft. | 200 ft. | 125 ft. | |
| 7.5 | 900 | 1800 | 350 ft. | 200 ft. | 125 ft. | 100 ft. | |
| 10 | 1200 | 2400 | 250 ft. | 150 ft. | 100 ft. | 50 ft. | |
| 15 | 1800 | 3600 | 150 ft. | 100 ft. | 65 ft. | ||
| 20 | 2400 | 4800 | 175 ft. | 125 ft. | 75 ft. | ||
| 25 | 3000 | 6000 | 150 ft. | 100 ft. | |||
| 30 | 3600 | 7200 | 125 ft. | 65 ft. | |||
| 40 | 4800 | 9600 | 90 ft. |
ELECTRIC MOTOR LOADS
| Motor Size (H.P.) | Running Watts | Watts Required to Start Motor | ||
| Universal | Capacitor | Split Phase | ||
| 1/8 | 275 | N/A | 850 | 1200 |
| 1/6 | 275 | 600 | 850 | 2050 |
| 1/4 | 400 | 800 | 1050 | 2400 |
| 1/3 | 450 | 950 | 1350 | 2700 |
| 1/2 | 600 | 1000 | 1800 | 3600 |
| 3/4 | 850 | 1200 | 2600 | — |
| 1 | 1100 | N/A | 3300 | — |
Make sure the product can supply enough continuous (run- ning) and surge (starting) watts for the items you will power at the same time. Follow these simple steps.
- Select the items you will power at the same
- Total the continuous (running) watts of these items. This is the amount of power the product must produce to keep the items See the wattage reference chart at right.
- Estimate how many surge (starting) watts you will Surge wattage is the short burst of power needed to start electric motor-driven tools or appliances such as a circular saw or refrigerator. Because not all motors start at the same time, total surge watts can be estimated by adding only the item(s) with the highest additional surge watts to the total rated watts from step 2.
Tool or Appliance Running Watts* Starting Watts* Inflator Pump 50 150 Laptop 250 0 46 in. Flat Panel Television 190 0 Light (75 Watts) 75 0 565 Total Running Watts 150 Highest Starting Watts
POWER MANAGEMENT
- To prolong the life of the product and attached devices, it is important to take care when adding electrical loads to the product. There should be nothing connected to the product outlets before starting. The correct and safe way to manage product power is to sequentially add loads as follows:
- With nothing connected, press the main power button, then press the AC output button to power the AC
- Plug in and turn on the first load, preferably the largest load you have.
- Make sure the attached device operates
- Plug in and turn on the next
- Again, verify correct operation of the
- Repeat steps 4 and 5 for each additional
Never add more loads than the product capacity. Take special care to consider surge loads in product capacity as previously described.
| Application/Equipment | Estimated Running Watts* | Estimated Starting Watts* |
| Emergency / Home Standby | ||
| Lights (qty. 4 x 75 W) | 300 | 0 |
| Refrigerator | 600 | 780 |
| 46 in. Flat Panel Television | 190 | 0 |
| Satelite Receiver | 250 | 0 |
| Portable Fan | 40 | 120 |
| Heater | 1300 | 1300 |
| Laptop | 250 | 0 |
| Air Conditioner (10,000 BTU) | 600 | 1200 |
| Radio | 200 | 0 |
| Job Site | ||
| Electric Drill − 3/8 in. | 440 | 600 |
| Quartz Halogen Work Light | 1000 | 0 |
| Reciprocating Saw | 960 | 960 |
| Circular Saw − 7-1/4 in. | 1400 | 2300 |
| Miter Saw − 10 in. | 1800 | 1800 |
| Air Compressor − 1/4 HP | 970 | 1600 |
| Airless Sprayer − 1/3 HP | 600 | 1200 |
FEATURES
- Power Source.……………………………………………. 40 Volt DC
- Rated AC Output……………120 Volt AC, 60 Hz., 13.3 Amps (15.0 Amps for 3 min. Max)
Rated DC Output: - USB-A.……………………………….5 Volts, up to 2.1 Amps
- USB-C.…………………………5/12/20 Volts, up to 3 Amps
- Rated Output.……………..1,600 W (1,800 W for 3 min. Max)
- Starting Watts.……………………………………………….. 3,000 W
- Charger Input……………(nominal) 120V/60Hz AC only, 80 W
- Charging Time ……… Dependent on quantity and amp hour
- capacity of the battery pack(s)
- Operating Temp……………………………………………32°–104°F
KNOW YOUR PRODUCT
The safe use of this product requires an understanding of the information on the product and in this operator’s manual as well as a knowledge of the project you are attempting. Before use of this product, familiarize yourself with all operating features and safety rules. 120 V AC RECEPTACLES Your product has three single phase, 60 Hz outlets that are 120 Volt AC, 15 Amp receptacles. These can be used for operating appropriate appliances, electrical lighting, tools, and motor loads. AC OUTPUT BUTTON The AC output button is used to activate the 120V AC outlets when the power station is on. If an overload occurs, remove all loads, then press the AC output button again to reset. CARRY HANDLE The product is equipped with a carry handle for easy transport. The handle should be used to carry the product. CHARGER Using the charger before storing the power station helps keep the power station’s battery charged and ready at all times. GENCONTROL™ WITH BLUETOOTH® The GENCONTROL™ monitoring system with Bluetooth® tracks battery level, runtime, load, and other functions.
ASSEMBLY
UNPACKING
This product has been shipped completely assembled. n Carefully remove the product and any accessories from the box. Make sure that all items listed in the Packing List are included.
WARNING:
Do not use this product if it is not completely assembled or if any parts appear to be missing or damaged. Use of a product that is not properly and completely assembled could result in serious personal injury. n Inspect the product carefully to make sure no breakage or damage occurred during shipping. n Do not discard the packing material until you have carefully inspected and satisfactorily operated the product. n If any parts are damaged or missing, please call
PACKING LIST
Power Station Protective Cover Charger Cord and Adaptor Operator’s Manual WARNING: If any parts are damaged or missing do not operate this product until the parts are replaced. Use of this product with damaged or missing parts could result in serious personal injury.
WARNING:
Do not attempt to modify this product or create accessories not recommended for use with this product. Any such alteration or modification is misuse and could result in a hazardous condition leading to possible serious personal injury
OPERATION
APPLICATIONS
This product is designed to supply electrical power for operating compatible electrical lighting, appliances, tools, and motor loads.
SPECIAL REQUIREMENTS:
There may be General or State Occupational Safety and Health Administration (OSHA) regulations, local codes or ordinances that apply to the intended use of the product. Please consult a qualified electrician, electrical inspector, or the local agency having jurisdiction:
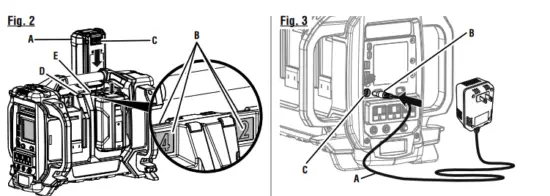
INSTALLING/REMOVING BATTERY PACKS
The power station has a total of four battery ports, but will function even if only one battery pack is installed. The more batteries installed, however, the greater the amount of power available and/or length of run or charge time provided, up to the full capacity noted in the Product Specifications section of this manual. For best performance, use at least two 5Ah or greater batteries.
Battery packs are shipped in a low charge condition and should be charged before first use. To install:
- Install the desired number of battery packs.
NOTE: If not using all of the available battery slots, the location of the batteries installed does not matter and will not affect power station charging performance. - Connect the charger cord to the power station, then plug the charger into a standard electrical outlet that is nominal 120/60 Hz AC (typical U.S. household type circuit).
- Once the charging cable is connected and plugged in, sequential charging of the batteries will begin.
NOTE: If connecting the charger immediately after using the power station at a high AC load, the battery temperature may be outside the acceptable charging range and cause the LCD display to show an error condition. If this occurs, charging will begin automatically once the battery temperature reaches an acceptable level.
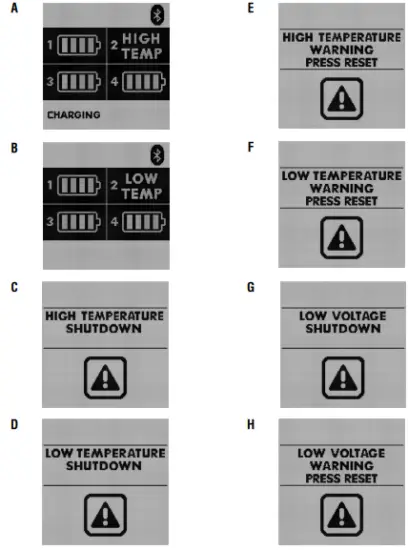
LED FUNCTIONS
| IF LCD DISPLAYS: | THE CONDITION IS: | TO RESOLVE: |
| HIGH TEMP or LOW TEMP when the battery is installed for charging.
See figures 4a – 4b. |
The battery you are charging is outside of the acceptable charging temperature range. | Allow the battery to reach acceptable tem- perature range. Battery may have to be removed from the port and reinstalled before charging will begin. |
| HIGH TEMPERATURE SHUTDOWN
or LOW TEMPERATURE SHUTDOWN. See figures 4c – 4d. |
The power station is outside of the acceptable operating temperature range. | Move the power station to a cooler or warmer area as needed and allow the unit to reach the acceptable temperature range. |
| HIGH TEMPERATURE WARNING or
LOW TEMPERATURE WARNING PRESS RESET. See figures 4e – 4f. |
The power station is nearing the maximum high or minimum low temperature acceptable to operate. | After allowing time for the power station to cool or warm to an acceptable temperature, press the reset button to continue operation. |
| LOW VOLTAGE SHUTDOWN.
See figure 4g. |
The power station’s batteries are discharged. | Charge the power station. If condition per- sists, the power station’s batteries should be replaced. |
| LOW VOLTAGE WARNING PRESS RESET.
See figure 4h. |
The power station’s batteries do not have sufficient charge to run the connected devices. | Disconnect some of the devices. If condi- tion persists, disconnect all devices and recharge the power station’s batteries. |
An LED light located at the top of each battery port will indicate the status of each battery. Refer to the Battery Port LED Functions chart for a description of the lights. In addition to the LED indicator, the LCD screen will also provide information about the battery and charging status of the power station.
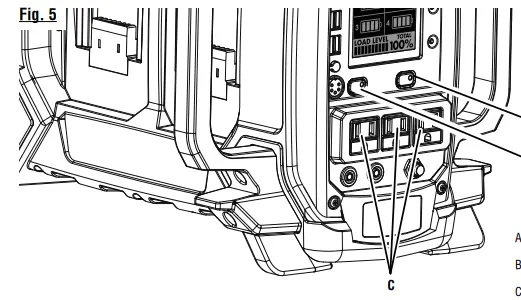
USING THE POWER STATION
See Figure 5.
To power the product on:
- Press and hold the main power button for two seconds to turn the product This will activate the LCD display and allow the USB charging ports and LED task light to be used.
NOTE: The main power button will illuminate when power to the unit is on.
To use the AC outlets:
- After powering the product on, press and hold the AC output button to activate the AC outlets.
NOTE: For normal operation of the power station, the main power button and the AC output button (if using AC outlets) will be solid green and there will be one audible beep. If any other light pattern or beeps occur, refer to the Alert Functions chart that follows.
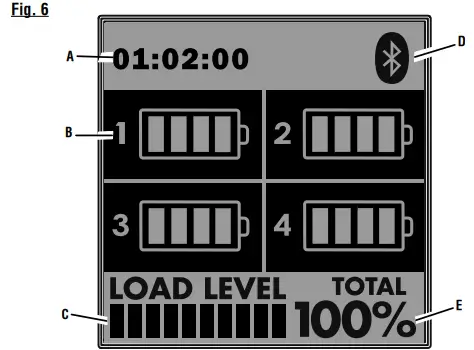
GENCONTROL™ LCD DISPLAY
NOTE: The LCD display will not work unless the product is powered on. Battery charge level: The battery charge level indicator shows how much charge is remaining in the battery. Load level: The load level indicator shows the connected load. If the product is approaching the maximum wattage/amperage capacity, the indicator will blink. If the load level capacity is exceeded, the LCD display will show OVERLOADED. Re-move all loads from the product and press the AC output button to reset (see fig. 5). Add loads back to the product one at a time, being careful not to exceed theproduct’s wattage rating. Run time: The LCD display shows the run time based on when the unit was switched on. Bluetooth®:Once paired, the LCD display indicates whether or not the GENCONTROL™ app is connected through Bluetooth®. Input charging power: The LCD display will show charging condition and full charge output.
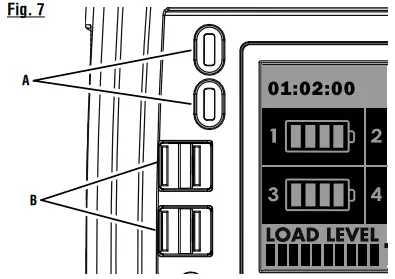
USB CHARGING PORTS
NOTE: The main power button must be on for the USB ports to be active. The USB-dedicated charging ports will charge most USB-compatible devices when used with the appropriate USB-A or USB-C cable (not provided). From the app store on your iOS or Android Bluetooth® enabled device, locate and install the RYOBI™ GENCONTROL™ app.
- Open the app and follow the directions as shown in the GENCONTROL™ app.
NOTE: Make sure Bluetooth® is enabled on your device. - Press the main power button on the power station to turn the LCD display on.
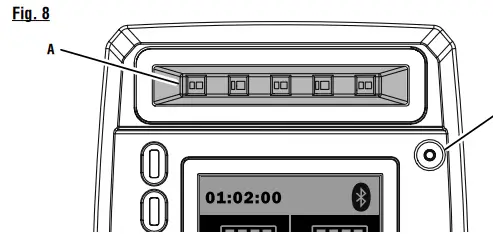
- Push and hold the “Hold to Pair” button to the right of the LCD panel on the product until the LCD panel displays “Pairing Mode.”
- The LCD screen on the product and the app on your device will indicate a successful pairing.
NOTE: If the product and app do not pair, make sure that “Pairing Mode” is displayed during the pairing process and that Bluetooth® is enabled on your device. - Press the menu icon in the top left corner of the app screen. This will show you the available features that can be controlled through the app. Install the cover over the power station as shown. NOTE: Make sure the vent opening is to the back of the unit and the front panel is visible through the panel access cover.
- Snug the protective cover around the unit by adjusting the drawstring to secure it.
- The panel access cover will unzip and allows you to adjust settings when using the protective cover.
- The handle zipper can be opened for carrying or moving the unit.
NOTE: Always keep zippers closed during storage to keep dust and liquids from entering into the unit.
MAINTENANCE
- GENERAL MAINTENANCE
Avoid using solvents when cleaning plastic parts. Most plastics are susceptible to damage from various types of commercial solvents and may be damaged by their use. Use clean cloths to remove dirt, dust, oil, grease, etc. WARNING: Do not at any time let brake fluids, gasoline, penetrating oils, etc., come in contact with plastic parts. Chemicals can damage, weaken, or destroy plastic which may result in serious personal injury. - STORING THE POWER STATION
Store indoors, without battery packs, in a dry, locked-up place, out of the reach of children. Store without battery packs unless actively charging/maintaining with the charger. Keep away from corrosive agents such as garden chemicals and de-icing salts.
TROUBLESHOOTING
| PROBLEM | POSSIBLE CAUSE | SOLUTION |
| Unit will not power on. | Battery is not charged.
Main power button released too quickly. |
Charge battery.
Press and hold main power button for two seconds. |
| AC receptacle does not work. | AC output is not active or AC power button released too quickly.
Item plugged in is defective. Power station is overloaded. |
Press and hold the AC output button for two seconds.
Try a different item. Remove loads and press the AC output button to reset. |
| Unit powers off unexpectedly. | Battery temperature is outside of normal operating thresholds.
Low or no battery charge. Battery fault. |
Battery operating temperature must be between -4˚F and 120˚F. The unit cannot be powered on until the temperature reaches normal operating thresholds. Allow the power station to warm or cool as needed.
Charge the battery. Units needs repair. Take to an autho- rized service center. |
| Charger is not working. | Battery temperature is outside the normal charging thresholds. | Battery charging temperature must be between 32˚F and 113˚F. Allow the pow- er station to warm or cool as needed, then charging will begin. |
| Power Station displays overload message when pulling less than the maximum load. | User exchanged batteries on the unit (removed and installed), at the same time. | Power Station load level should be be- low 40% (720 Watts) before exchanging batteries. |
| If problem persists after trying the above solutions, contact customer service or an authorized service center for assistance. |
FCC Statment
This device complies with part 15 of the FCC rules. Operation is subject to the following two conditions: (1) this device may not cause harmful interference, and (2) this device must accept any interference received, including interference that may cause undesired operation. NOTE: The grantee is not responsible for any changes or modifications not expressly approved by the party responsible for compliance. Such modifications could void the user’s authority to operate the equipment. NOTE: This equipment has been tested and found to comply with the limits for a Class B digital device, pursuant to part 15 of the FCC Rules. These limits are designed to provide reasonable protection against harmful interference in a residential installation. This equipment generates, uses and can radiate radio frequency energy and, if not installed and used in accordance with the instructions, may cause harmful interference to radio communications. However, there is no guarantee that interference will not occur in a particular installation. If this equipment does cause harmful interference to radio or television reception, which can be determined by turning the equipment off and on, the user is encouraged to try to correct the interference by one or more of the following measures: This device complies with Industry Canada license-exempt RSS standard(s). Operation is subject to the following two conditions: (1) this device may not cause interference, and (2) this device must accept any interference, including interference that may cause undesired operation of the device.
Under Industry Canada regulations, this radio transmitter may only operate using an antenna of a type and maximum (or lesser) gain approved for the transmitter by Industry Canada. To reduce potential radio interference to other users, the antenna type and its gain should be so chosen that the equivalent isotropically radiated power (e.i.r.p.) is not more than that necessary for successful communication.
SUPPLIER’S DECLARATION OF CONFORMITY
The responsible party declares that this device complies with Part 15 of the FCC Rules. Operation is subject to the following two conditions: (1) this device may not cause harmful interference, and (2) this device must accept any interference received, including interference that may cause undesired operation.
Report No.:
| Responsible Party: | One World Technologies |
| Address: | 115 Innovation Way, Anderson, SC 29621 |
| Telephone: | (864) 226-6511 |
| Fax: | (864) 965-6274 |
| Printed Name/Title: | John Collins / Director Regulatory |
Signature: |
Description
EGO Power+ Nexus 56-Volt Power Station 2000W (3000W Peak)
Model number # PST3042 Power Station and 7.5 Ah (2) batteries included
Introducing the EGO Nexus Power Station; Quiet Clean Power for Indoor and Outdoor Use. The Nexus Power Station is the 1st portable power station of its kind, use in a power outage to plug in your refrigerator so the food does not spoil or plug in your microwave to cook the family a quick dinner. Bring the power station anywhere you do not have convenient power; camping, hiking, boating, tailgating, the possibilities are endless.
The user must read and understand the Operator’s Manual before using this product. Save these instructions for future reference.
OPERATOR’S MANUAL in English (EN), French (FR) and Spanish (ES) languages.
TABLE OF CONTENTS:
– Safety Symbols
– Important Safety Instructions
– Introduction
– Specifications
– Packing list
– Description.
– Know your power station: Charger. Handle. Cover. Velcro Straps. Power Cords. LCD Screen. Front/Back Waterproof Cover. Latch. Charger Socket. Power Button. Reset Button. AC and USB Ports. AC and USB Button. WI-FI/Bluetooth Setting Button.
– Know the icons and indicators on the LCD screen: Output Indicator. Charging Indicator. Charge-complete Indicator. Actual Output Power Indicator. Rated Power Indicator (600W, 1200W, 2000W). Peak-power Indicator (3000W). Overload Indicator. Low-power Indicator. Warning Indicator. Battery Indicator Area. Over-heat Icon. WI-FI Icon. Bluetooth Icon. USB/AC Icon. Countdown Timer.
– Operation. Application. Charging EGO portable batteries. Powering the AC/USB devices. Overload condition. Overheat condition. “EGO Power+” APP (App Installation). Bluetooth and Wi-Fi connection. Connecting via Bluetooth. Connecting Nexus to a Wi-Fi network.
– Maintenance. General maintenance. Transporting the unit. Storing the unit.
– Troubleshooting:
The Nexus power station cannot charge EGO portable batteries when using the supplied charger.
No power indicator of the battery displayed. The overheat ion on the LCD screen illuminates in red.
The battery indicator on the LCD screen is flashing. The Nexus power station can work normally. During charging, you may notice that charging alternates between batteries.
The Nexus power station stops discharging. During discharging, previous generation batteries will flash in red, green or orange while the new generation batteries (with 5-segment fuel gauge) show solid green.
– Warranty
Helped you out?
Glad to hear that. It would be awesome if you could . . .

Аккумулятор Allpowers S300
Руководство пользователя

Продукты и материалы, описанные в данном руководстве, могут быть изменены в связи с техническими обновлениями, мы оставляем за собой право изменять содержание данного руководства без предварительного уведомления.
Поздравляем вас с покупкой электростанции, которая интегрируется с системой регулирования солнечной энергии, системой хранения энергии и облачным контролем (приложение Bluetooth позволяет вам контролировать зарядку от солнечной энергии в удобное для вас время). Благодаря мощности в 288 ватт-часов вы сможете дольше поддерживать работоспособность своих ноутбуков, светильников и бытовой техники переменного / постоянного тока. Добро пожаловать в солнечную жизнь.
Меры предосторожности перед началом эксплуатации:
- Во-первых, вам необходимо убедиться, что уровень заряда этой электростанции не слишком низкий, прежде чем использовать ее. Она способна заряжаться и разряжаться одновременно, стоит помнить, что солнечная зарядка сильно зависит от погоды.
- Срок службы аккумуляторов Lion может значительно увеличиться при правильном обращении и использовании. Самое важное примечание: вы должны использовать его при комнатной температуре: 0 ~ +40 (°C) / 32-104 (°F). Обязательно избегайте влажной среды и не храните на улице.
- Убедитесь в номинальной рабочей мощности вашего устройства 300 Вт, а пиковой мощности <500 Вт. В некоторых случаях мгновенная мощность определенных приборов в 3 раза превышает их номинальную рабочую мощность.
- Это нормально, что данное устройство нагревается во время зарядки/ разрядки. Пожалуйста, используйте его в прохладном и хорошо проветриваемом месте. (При зарядке аккумулятора держите его подальше от открытого огня, искр или токопроводящих материалов).
5.Напряжение и частота от источника переменного тока могут варьироваться в зависимости от страны (США /JP 110 В 60 Гц или ЕС /ВЕЛИКОБРИТАНИЯ 230 В AU 240 В 50 Гц). Пожалуйста, следуйте местным правилам, чтобы выбрать правильную версию перед использованием.
Познакомьтесь со своим устройством.
- Кнопка включения (Bluetooth):
Нажмите кнопку питания, чтобы включить ЖК-дисплей, система отобразит текущий уровень заряда батареи, в состоянии включения питания долго нажимайте кнопку, пока на экране не появится “значок”, чтобы перейти в режим Bluetooth. Затем отсканируйте QR-код для загрузки приложения и разрешите этому приложению использовать ваше местоположение, затем выполните регистрацию. - Кнопка постоянного тока:
Нажмите для включения или выключения питания, при этом значок выхода постоянного тока будет включен или выключен, включая выходной порт USB, беспроводную зарядку, автомобильный прикуриватель, порт DC5525. - Мастер для выходов переменного тока:
Чтобы включить / выключить розетки переменного тока, вам нужно нажать и удерживать в течение 3 секунд, пока не появится значок переменного тока. Чтобы включить / выключить выход переменного тока, вам нужно долго нажимать кнопку в течение 3 секунд, пока не появится значок переменного тока. (Включается режим переменного тока, и одновременно автоматически включается охлаждающий вентилятор.) (При включении режима переменного тока охлаждающий вентилятор будет работать около одной секунды в ответ на самотестирование перед включением режима переменного тока.) - Базовая LED.
- Выключатель для светодиодной лампы (справа/слева). Нажмите на эту кнопку, чтобы включить светодиодную лампу, вы можете нажать и удерживать в течение 3 секунд, чтобы перейти в режим вспышки/стробоскопа в аварийной ситуации.
- ЖК-дисплей в режиме реального времени.
- Автомобильная розетка 12 В.
- Режим Bluetooth: при нормальном использовании эффективный диапазон для Bluetooth работает на расстоянии 5-10 м, но обстановка внутри помещения может сильно отличаться, поскольку препятствия, такие как бетонная стена, ослабляют сигнал и дальность действия может резко сократиться. Мы предлагаем попробовать это на открытом воздухе, в чистом поле.
- Активирован режим переменного тока, и одновременно автоматически работает охлаждающий вентилятор, а при выключении режима выхода переменного тока охлаждающий вентилятор автоматически выключится при падении внутренней температуры.
- Индикатор входа / выхода.
- Выход постоянного тока: Нажмите кнопку постоянного тока еще раз, чтобы выключить его, если он разряжен.
- Время разрядки/заполнения.
- Ausgangs-/Eingangsleistung.
- Выходя из сети переменного тока: снова нажмите и удерживайте AC Master, чтобы выключить его, если он не загружен.
Зарядка вашей электростанции
Время полной зарядки
(Только для справки, примите практичность за стандарт.)
Способы зарядки/Расчетное время зарядки
Способ 1: Розетка 220 Вольт (максимальная мощность 60 Вт) – около 5-6 часов.
Способ 2: Автомобильный прикуриватель (максимальная мощность BDW) – около 4-5 часов.
Способ 3: Зарядка от солнечной энергии (максимальная потребляемая мощность MPPT 80 Вт) – около 4-5 часов.
Способ 4: Зарядное устройство USB-C (максимальная потребляемая мощность 60 Вт) – около 5-6 часов.
Способ 5: Способ 1,2,3 + Способ 4 (Максимальная потребляемая мощность 140 Вт) – около 2-3 часов.
Идеальное время суток
Панели работают с высокой эффективностью при прямом солнечном свете – обычно примерно в середине дня.
Солнечный свет и его угол наклона
Чем ярче светит солнце и чем яснее день, тем лучше будут работать панели. Панель, обращенная на юг под углом 30-60 градусов к плоской поверхности, будет эффективнее поглощать солнечную энергию.
Избегайте любой возможной тени
Убедитесь, что на ваших панелях нет тени, даже незначительное или частичное затенение снижает эффективность. Кроме того, любая накопившаяся грязь со временем может привести к снижению мощности, поэтому рекомендуется периодически чистить панель.
Время года
Количество дневного света меняется от сезона к сезону. Но для временной зарядки от солнечных батарей важно знать, что холодная погода не окажет негативного влияния на производительность панелей, поскольку они работают от света, а не от тепла.
- Проверьте совместимость
Перед началом работы, пожалуйста, проверьте напряжение, включая пусковую и рабочую мощность ваших устройств. При перегрузке он отключит вывод переменного тока, отличный от портов постоянного тока, с помощью усовершенствованного встроенного модуля схемы управления системой. (Пожалуйста, снова подключите другое устройство переменного тока и перезапустите его через 30-секундные интервалы.)
2. Убедитесь, что порты включены
В целях безопасности все порты USB, переменного тока и беспроводная зарядка активируются соответствующим образом с помощью главной кнопки питания. Вы можете увидеть общее значение выходных Ватт на жидкокристаллическом дисплее.
3. Выключите мастер, чтобы прекратить потерю энергии
Чтобы предотвратить потерю энергии, каждый раз по завершении пользования снова нажимайте главную кнопку, чтобы отключить вывод, и отключайте нагрузку от станции (особенно для режима переменного тока, нажмите и удерживайте в течение 3 секунд.)
4. Беспроводная зарядка
Выход: DC5V1Aat макс.
Расстояние передачи: 5-8 мм
Преобразование передачи: 272%
Частота зарядки: 110-205 кГц
Совместимость: беспроводная зарядка поддерживает большинство устройств оснащенных стандартной технологией QI. Корпуса некоторых телефонов (особенно более толстых), металлические предметы, такие как металлические чехлы для телефонов или пластины для магнитного крепления в машине, могут мешать работе беспроводный зарядке. Пожалуйста, удалите их перед зарядкой.
Для максимальной производительности Ваш телефон всегда должен находиться в центре поля зарядки.
Во время работу зона зарядки может нагреваться.
Справочное время работы для обычных устройств
Для разных устройств требуется разная рабочая мощность, и если Вы подключите высокомощные устройства (250 Вт и более), то уровень зарядки этого устройства может очень быстро упасть, и вы не сможете получить точно 288 Втч энергии. С другой стороны, если Вы заряжаете устройства с медленным энергопотреблением (небольшой мощности), Вы приблизитесь к 288 Втч от этого устройства.
Хранение и техническое обслуживание
- Рекомендуется полностью заряжать устройство не реже одного раза в 3 месяца для поддержания наилучшей производительности, надежности и долговечности.
- Если зарядка завершена, пожалуйста, не забудьте выключить устройство для экономии энергии.
- Из-за химических характеристик аккумулятора доступная емкость аккумулятора может несколько варьироваться в зависимости от окружающей среды, например, при холодной погоде или нагреве (вы можете услышать шум охлаждающего вентилятора). Поэтому, пожалуйста, всегда используйте его при комнатной температуре (0 °C- 40°C) также не рекомендуется хранить на открытом воздухе или во влажной среде.
- Если Вы живете без доступа к сети в условиях минусовой температуры, Мы рекомендуем Вам хранить устройство в изолированном боксе и подключать к источнику питания (солнечным панелям). Вырабатываемое естественным путем тепло позволит поддерживать емкость аккумулятора на самом высоком уровне.
- Батарейные блоки внутри несъемные, их нельзя разбирать, срок службы при зарядке и разрядке составляет более 800 раз, но со временем они изнашиваются.
- Непрерывная разрядка аккумулятора до 0% и последующее хранение с разряженным аккумулятором могут серьезно сократить срок его службы. Рекомендуется всегда держать его с неиспользованными 15-20% емкости.
| Емкость устройства | 78000 мАч 3,7 В (288 Втч) |
| Размер/Вес | 206×165×110 мм, 3,4 кг |
| Вход (зарядка от авто) | Напряжение 12-20 В, ток 5А Макс. (провод для подключения к прикуривателю авто в комплект не входит) |
| Входное (солнечное, MPPT) | Напряжение 16,6-22В, Ток 5А Макс. |
| Вход (переменный ток) | Напряжение от 100-240 В до 20 В Ток 5А Макс. Пожалуйста, используйте адаптер (20 В–3,0 А) входит в комплект поставки, НЕ используйте дополнительный или другой. |
| Выход (переменный ток) | 2 × ЕС 220 В, 300 Вт (максимальная пиковая мощность 500 Вт) |
| Выход (постоянный ток) | 3 × USB-A: 5V 3.0A (Общий ток трех портов составляет максимум 7,2 А). 2 × DC5525/1 × Автомобильная розетка: 12V5.0A (Общий ток трех портов не более 5,0 А.) 1 × USB-C: (Двусторонний PD мощностью 60 Вт при максимальной мощности 100 Вт.). Беспроводная зарядка: 5V1A. |
| Температура | Рабочая температура: 0~+40 (°C) |
| Защита от перегрева при зарядке | 65°C~75 (°C) |
| Защита от низких температур | -10°C~0 (°C) |
| Температура хранения | В течение 1 месяца: от -20 до 60(“C) |
| В течение 3 месяцев | от -20 до45 (°C) |
| В течение 12 месяцев | от -20 до 25 (°C) При длительном хранении, пожалуйста, избегайте хранения на улице или во влажной среде. |
| Чистая синусоидальная волна | Внутри находится встроенный инвертор с чистой синусоидальной волной, что означает, что он генерирует выходной сигнал, точно такой же, как при подключении к настенной розетке. |
| Средства защиты | Перегрузка по току/пониженное напряжение/Защита от перезаряда /перегрузок/короткого замыкания /перегрева. |
- Могу ли я пользоваться генератором во время его подзарядки?
Да, он способен выдавать питание во время зарядки.
2.Как часто его нужно подзаряжать, когда он не используется?
Мы рекомендуем заряжать его через настенные розетки не реже одного раза в 3 месяца. В противном случае низкий уровень заряда батареи может усугубить проблемы с саморазрядом, и срок службы батареи истечет раньше.
- Какой размер солнечной панели в Ваттах будет наилучшим для зарядки данного устройства?
Для зарядки электростанции рекомендуется выбрать солнечную панель мощностью 100-140 Вт, время зарядки составляет около 4-5 часов (время зарядки зависит от погодных условий).
- Могу ли я пользоваться этим устройством во время путешествия (общественный транспорт)?
Нет, этот товар может быть отправлен только грузовым транспортом или может быть отправлен автотранспортом до места назначения, не может быть отправлен гражданским рейсом.
- Как я узнаю, будут ли мои многочисленные гаджеты работать с этим устройством или нет? Повредит ли это мои устройства при перегрузке?
Во-первых, вы должны проверить мощность, необходимую вашим устройствам, убедитесь, что общая рабочая мощность не превышает допустимых значений 300± 15 Вт. Даже при перегрузке аккумулятор отключит вывод переменного тока, в отличии от портов постоянного тока, с помощью расширенного встроенного системного управления модуль-схемы. (Пожалуйста, снова подключите вилку, используя другое устройство переменного тока и перезапустите его через 1 минуту.)
Руководство по утилизации
- Если позволяют условия, убедитесь, что аккумулятор полностью разряжен, прежде чем выбрасывать его в специально отведенный контейнер для утилизации аккумуляторов. Изделие содержит батарейки с потенциально опасными химическими веществами, поэтому категорически запрещается выбрасывать его в обычные мусорные баки. Для получения более подробной информации, пожалуйста, следуйте местным законам и нормативным актам по повторному использованию или утилизации аккумуляторов.
- Если аккумулятор не может быть полностью разряжен из-за неисправности устройства, пожалуйста, не выбрасывайте аккумулятор непосредственно в коробку для утилизации аккумуляторов. В таком случае вам следует обратиться в профессиональную компанию по переработке аккумуляторных батарей для дальнейшей переработки.
3.Пожалуйста, утилизируйте разряженные батареи, которые невозможно подзарядить.
Связаться с нами
Если у вас есть какие-либо сомнения относительно наших продуктов или услуг, пожалуйста, свяжитесь с нами allpowers.ru/kontakty мы свяжемся с вами в течение 1 рабочего дня. Пожалуйста, также сообщите нам информацию, предоставив описание того, как произошел сбой, и подробности проблемы.
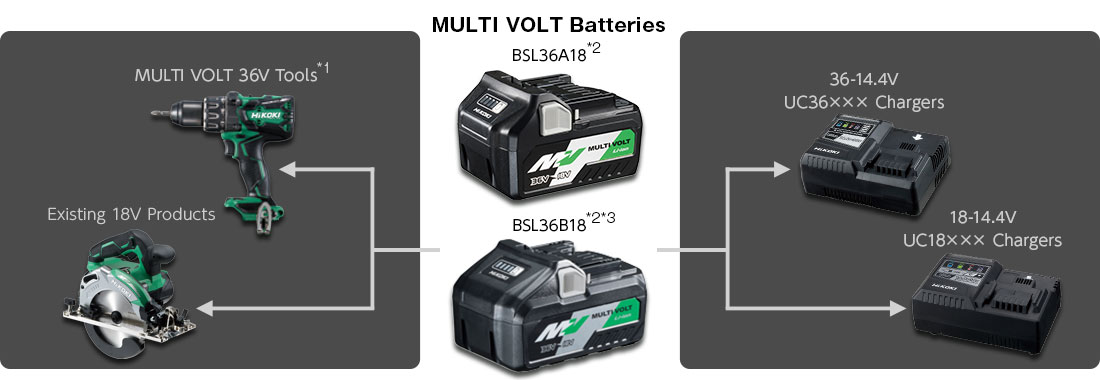
FEATURES
1,080W (BSL36A18) & 1,440W (BSL36B18) High Power Output
The MULTI VOLT Lithium-ion batteries, paired with MULTI VOLT 36V tools, offer unprecedented cordless power over 1,000W.
Compact & Lightweight (BSL36A18)
-
The BSL36A18 MULTI VOLT battery has almost the same size and weight of a 18V battery
(BSL1850/1860), and produces the power of a 36V.
Automatic Voltage Change between 36V and 18V
-
The MULTI VOLT batteries are designed to compatible with the current 18V slide range, and automatically change between 2 voltages, 36V 2.5Ah (BSL36A18) / 4.0Ah (BSL36B18) and 18V 5.0Ah (BSL36A18) / 8.0Ah (BSL36B18), according to the tool used.
- Not compatible with the following existing batteries: BSL3620/3625/3626/3660, BSL18xx and BSL14xx series.
- Not compatible with the existing 36V products that are compatible with BSL3620/3625/3626/3660.
- See the list below for incompatible models.
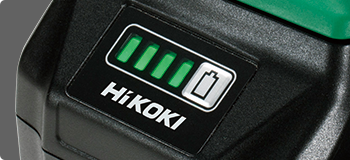
Remaining Battery Indicator
-
Displays the charging state in four stages.
Specifications
BSL36A18 / BSL36B18 MULTI VOLT Batteries
| Model | BSL36A18 | BSL36B18 |
|---|---|---|
| Voltage & Capacity | 36V — 2.5Ah / 18V — 5.0Ah (dual voltage) | 36V — 4.0Ah / 18V — 8.0Ah (dual voltage) |
| Cooling System | Yes | |
| Dimensions | 116 x 69 x 76mm (4-9/16″ x 2-23/32″ x 2-63/64″) | 134 x 83 x 75mm (5-9/32″ x 3-17/64″ x 2-61/64″) |
| Charging Time | Approx. 32 min.*1 (when using the UC18YSL3 charger) |
Approx. 52 min.*1 (when using the UC18YSL3 charger) |
| Compatible Products | 18V | Existing 18V slide-type tools*2 |
| 36V | MULTI VOLT 36V tools | |
| Compatible Chargers | All chargers compatible with 14.4-36V slide-type Lithium-ion batteries |
- The actual charging time can be longer depending on the surrounding temperature and battery condition.
- See the list below for incompatible models.
Models NOT Compatible with the BSL36B18 MULTI VOLT Battery
Note: As for the models in green, HiKOKI-branded products are compatible.
| Product | Model |
|---|---|
| Cordless High Pressure Washer | AW18DBL |
| Cordless Circular Saw | C18DBL, C18DSL, C18DBAL |
| Cordless Shear | CE18DSL |
| Cordless Nibbler | CN18DSL |
| Cordless Multi Tool | CV18DBL |
| Cordless Rotary Hammer | DH18DBL, DH18DBDL, DH18DBQL, DH18DBML |
| Cordless Disc Grinder | G18DSL, G18DBL, G18DBAL, G18DBVL, G18DBBAL, G18DBBL, G18DBBVL |
| Cordless Cleaner | R18DSAL |
| Cordless Worklight | UB18DGL |
| Cordless Fan | UF18DSL, UF18DSAL |
| Cordless Radio | UR18DSL, UR18DSL2, UR18DSAL, UR18DSDL, UR18DSML |
| Charger | UC36YRSL |
MULTI VOLT TOOLS
Drunky Horse
Автопутешествия и приключения Копытного или пение бороды в скитании праздника
Пусковое портативное устройство. Бустер. Старт-джампер для авто
Если сел аккумулятор на авто. Портативное устройство для запуска двигателя
Пусковое портативное устройство для севшего аккумулятора. Мнение, отзыв, впечатления
 Пусковое портативное устройство
Нет ничего вечного. Только заявил аккумулятор о своём «выходе на пенсию», конечно же неожиданно.
И вот как…
Держал я путь по ночной дороге и остановился сделать парочку фото. При этом, машину заглушил, а накануне дальних перегонов не было, и, слушая музыку и подсвечивая дорогу и капли дождя фарами я экспериментировал с кадрами. Несколько фото на длинной выдержке заняли около 40 минут простоя. И да, на улице температура стремилась к нулю. Кадр, конечно, красивый я сделал. В итоге. (Фото — ниже. Посмотреть про то, как эффектно снимать подобное и проч можно по этому линку: ССЫЛКА )
 Кадр с той ночной съёмки
Пусковое портативное устройство хорошо бы иметь под рукой
После той своей остановки, вставив ключ в замок зажигания я обнаружил…что заводиться мой авто и не собирается. Аккумулятор сел и его мощности хватало только на тусклое подсвечивание ламп приборной панели. Той ночью меня выручил приятель. Побеспокоить которого мне пришлось внезапным своим звонком. И он примчал ко мне на выручку. С его авто и «прикурил» я свой севший аккумулятор.
Хорошо, когда ситуация в подобном случае — такова. И есть кому подъехать и дать «прикурить» вашему, севшему аккумулятору. А если вы далеко от знакомых? Где-то вдали за городом? На пустой дороге? Вам не знакома подобная ситуация? Хм…да в общем и мне не приходится часто сталкиваться с подобным. А забираться приходится не редко в ой какую в дальнюю глухомань.
Есть вещи, которые происходят вне зависимости от наших желаний, а предусмотреть всё практически не возможно. И чтобы не оплошать, не оказаться беспомощным в подобное ситуации, в которой оказался я, чтобы не беспокоить кого-то внезапно или не уповать на случайную помощь, не плохим вариантом выхода из такой ситуации может быть пусковое портативное устройство. О подобно гаджете — мой рассказ
Power bank, бустер, джампер (старт-джампер) — что это за устройство и для чего оно нужно
В этой статье я рассказываю о своём гаджете. И мой пост не является рекламой и пиаром фирмы производителя. И данного гаджета. Описываемое устройство у меня в наличии и я его не единожды опробовал. И потому — это отзыв на основе личного опыта. Который может быть кому-то полезным.
Т.е. если коротко, то портативное пусковое устройство — это гаджет для пуска «севшего» аккумулятора. Устройства эти чрезвычайно компактны, а несомненным плюсом некоторых из них является и то, что они могут быть использовании для автономного питания других электронных устройств и для зарядки гаджетов.
Какой я использую бустер. Описание. Фото и разбор в деталях технических характеристик устройства
Данное описание не является заказной рекламной статьёй. И не несёт в себе задачи пиара описываемого устройства. Я рассказываю о старт-джампере, который эксплуатирую сам. И на данном примере каждый может сделать для себя вывод о необходимости или нужности данного гаджета в своём арсенале.
Я использую старт-джампер Atom Evolution от производителя Aurora. Из информации о фирме, следует, что она российская, но само устройство производится в Китае. Выглядит данное пусковое портативное устройство так:
Специально сфотографировал со спичечным коробком для масштаба
 Пусковое портативное устройство
Сразу приведу примеры некоторых технических характеристик этого power bank-а. А после, немного разберу их и опишу комплектацию и способы использования гаджета.
Некоторые технические характеристики заявленные производителем Atom Evolution 18 EVO :
Габариты устройства: 223 х 80 х 28,5 мм
Вес: 720 г
Емкость батареи: 18 000 мА/ч (66,7 Вт/ч)
Тип батареи: Li-Po
Пусковой ток: 300 А
Пиковый ток: 600 А
Время полной зарядки устройства: 8 ч
Здесь, пожалуй, стоит немного упомянуть про аккумуляторы джампер-стартеров. И, в том числе, про тот, который используется в EVO 18.
Аккумуляторы портативных пусковых устройств. Честная ёмкость и нюансы, о которых стоит помнить
Появление подобных компактных устройств, стало возможным не так давно. Прогресс не стоит на месте. И развитие технологий идёт семимильными шагами. Каких-то несколько лет назад о литий-полимерных аккумуляторах ни кто и слыхом не слыхивал. Благодаря ( в том числе) им сейчас широко вошли в нашу жизнь смартфоны, планшеты и компактные гаджеты с приличным автономным временем эксплуатации. На данный момент, в области компактных электронных устройств, литий-полимерные элементы питания (Li-pol, Li-Po) – это наиболее совершенные и массово используемые аккумуляторы.
 Портативное пусковое устройство с аксессуарами
Преимущество данных питающих элементов в том, что в них используется гелеобразный электролит. Подобные аккумуляторы – усовершенствованная конструкция хорошо зарекомендовавших себя — литий-ионных. Но, в отличие от последних, гелиевый наполнитель позволяет выпускать изделия практически любой формы. А также сделать его максимально компактным. Литий-полимерные аккумуляторы конструктивно схожи с АКБ, которые используют в некоторых электромобилях и радиоуправляемых устройствах. В конструкции этих батарей – прямоугольные пластины с номинальным напряжением в 3,7 вольта. Три последовательно соединённые пластины занимают часть корпуса старт-джампера. А внутри его конструкции обязательно присутствуют транзисторы, конденсаторы, различные контроллеры и проч.
Пусковое портативное устройство Atom Evolution 18 «разбор полётов»
Заявленная ёмкость Atom Evo 18 – 18 000 mA/ч или 66, 6 Вт/ч.
 Характеристики старт-джампера Aurora EVO 18
Но при зарядке смартфона от 5 вольтового выхода устройства (таких выходов у него два) получим честную рабочую ёмкость 66 600/5=13 320 мА/ч. И вот её и нужно иметь в виду при расчётах на сколько зарядок хватит полностью заряженного power bank-а для зарядки смартфона.
В техническом описании Atom Evo 18 указано, что его аккумулятора приблизительно хватит на 8 зарядок iPhone 6. Так как ёмкость аккумулятора этого iPhone — 1810 мА/ч. У меня смартфон на ОС Android и емкость аккумулятора 3000 мА/ч. Соответственно свой гаджет я смогу полностью зарядить от Evo 18 всего лишь раза четыре. Опять же при условии, что аккумулятор power bank-a полностью заряжен, и я не собираюсь производить зарядку на холоде. В общем, производитель не обманывает, приводя техническую информацию. Он только опускает числовые значения. Используя приблизительные формулировки. (Возможно, что для большинства потребителей так даже понятнее).
Приведу ниже несколько ответов из инструкции этого устройства на «часто задаваемые вопросы»
Комплектация устройства
Как я уже упоминал, на моём power bank-е несколько выходов. Два выхода USB ( оба пяти вольтовые, один на 1 А и второй — 2,1 А.
 USB — выходы, разъём для подключения пусковых проводов и фонарик
Два выхода под «джек» ( 12 в, один на 12 V и 10 А, второй — 19 V и 3,5 А)
 12 вольтовые выходы
Устройство поставляется в удобном кейсе, в котором помимо зарядного шнура и пусковых проводов с удобными «крокодилами» ( длина их разве что маловата, её хватает, но можно было бы и подлиннее сделать) масса переходников для разных устройств.
Само устройство можно заряжать как от бытовой сети в 220 В так и от источника в 12 вольт. Например, от прикуривателя авто. Все шнуры и переходники есть в комплекте. Удобно.
 Комплектация Aurora Evo 18
Как запустить «севший» аккумулятор авто с помощью пускового портативного устройства (power banka-а, старт-джампера)
Здесь, думаю особо нечего расписывать. Ответ на вопрос знает практически любой. И запускать севшие аккумуляторы доводилось многим за время своего водительского стажа. Но, на всякий случай, всякое бывает и, часто некоторые настолько далеки от техники, как Земля от Альфа Центавра, что приведу здесь несколько самых простых советов и правил. Может пригодится кому-то.
Процедура «прикуривания» «севшего» аккумулятора от старт-джампера ни чем не отличается практически от подобного пуска от аккумулятора другого авто.
Конечно же наш «донор» должен быть заряжен. (Не обязательно полностью, но желательно не ниже 50-75 процентов от штатной ёмкости).
Подключаем пусковые кабели к разъёму пускового устройства. Провода эти, кстати, как и разъём — «умные». На блоке контактов проводов даже есть индикация. Которая подскажет неправильность подключения устройства к аккумулятора ( несоблюдение полярности — защита от «дурака»), подскажет сильно ли сел аккумулятор, который нужно зарядить перед пуском подольше. И кнопка «boost» — которая служит палочкой выручалочкой в том случае, если ваш аккумулятор сел совсем в полный ноль и совсем «умер».
 Старт-джампер. Блок проводов с индикацией
Подключив кабели к устройству — подключаем их затем к аккумулятору авто с помощью зажимов «крокодилов».
Сперва садим красный провод «плюс» — на плюсовую клемму, а после — чёрный зажим — на «минус». Далее ждём некоторое время. Так как наш севший аккумулятор уже начал подзаряжаться от пускового устройства. Подождали секунд 30 или минуту — и можно пробовать заводить авто. В зависимости от разряженности вашего аккумулятора, температуры на улице — время подзаряда лучше увеличить. Подождать чуть дольше перед тем, как заводить авто.
Когда авто завелось — снимаем зажимы пускового устройства с аккумулятора авто. Сначала снимаем «минус», потом плюс.
Да, конечно не рекомендуется оставлять переносное пусковое устройство при минусовых температурах в машине. Как и любой аккумулятор — оно не любит холода. И разряжается кратно быстрее, чем при плюсовой температуре.
И да, не рекомендуется крутить стартёр от зарядного более двух-трёх секунд.
Пусковое портативное устройство. Плюсы и минусы. Выводы
Возможность всегда иметь под рукой подстраховку в виде зарядного устройства.
У многих подобных устройств достаточно широкий функционал. Можно использовать в автономном режиме всевозможные портативные устройства с питанием от старт-джампера. Автомобильные холодильники, ноутбуки, смартфоны, осветительная техника с питанием от 5 до 19 вольт.
Минусы:
В силу своей технологичности основным минусом таких устройств считаю цену. Не каждый захочет приобретать устройство, которое может сгодиться в лучшем случае один два раза в год., а цена при этом достаточно высока. ( Старт цены для простейших джамперов примерно от 3- тыс рублей и выше) Считаю, что если вы не собираетесь использовать такое устройство и как power bank в своих путешествиях, то, в принципе — оно и не нужно. Не вижу смысла в том, чтобы просто возить с собой «зарядник». Здесь альтернативы нет:
Только исправный аккумулятор! И ни какое переносное пусковое или зарядное устройство не может быть ему заменой!
Вот такой отчёт у меня получился. В дальнейшем я продолжу эту рубрику и буду описывать здесь и другие устройства и техсредства, которые я использую в своих путешествиях. Следите за обновлениями.
Хорошей дороги! Ни гвоздя ни жезла!
 Дорога. Осень
О безлошадной кибитке Копытного можно прочитать: ЗДЕСЬ
Личная страничка автора в ВК: romahram
Оставить комментарий или подписаться на обновления сайта можно ниже:
Подписаться на новые статьи на сайте:
Источник
Как завести автомобиль пуско-зарядным устройством
В жизни автовладельца случается очень много разнообразных неприятностей, каждую из которых приходится преодолевать. Среди них и невозможность запуска двигателя по довольно простой и банальной причине – «села» аккумуляторная батарея. То есть, она получила глубокий разряд и не способна раскрутить коленчатый вал, чтобы произошел пуск мотора.

Произойти такая неприятность может по разным причинам:
В результате водитель утром получает лениво ворчащий мотор или вообще просто щелканье реле стартера, без включения в работу силового электродвигателя. И, как всегда, это случается в самый неблагоприятный момент, когда машинка очень нужна.
Вариаций решить такую проблему несколько:
Последний метод – один из самых оптимальных, но требуется наличие такого прибора. Благо, рынок автомобильных аксессуаров не испытывает недостатка в таком оборудовании и приобрести его несложно.

Чем можно завести машину
Но вариантов таких устройств большое количество, поэтому необходимо сначала определиться, какой из приборов будет оптимальным для вашего авто.
Все эти устройства можно подразделить на 3 вида:
Видео: Пуско-зарядные устройства Carku 37 и Carku 43 Обзор
Разновидности пуско-зарядных устройств, их особенности
Пуско-зарядное устройство – оборудование, совмещающее в себе две функции. То есть его можно использовать как обычный прибор для подзарядки. Но при надобности он переводится в режим, когда ПЗУ будет выдавать токи большой силы, так называемые – пусковые. Остается только подключить прибор к бортовой сети и завести мотор. Но при этом должны соблюдаться определенные правила использования, чтобы при попытке запустить силовую установку не причинить вред электрооборудованию.
Вариаций ПЗУ очень много, и основное различие у них сводится к особенностям конструкции. Сейчас выпускаются пуско-зарядные устройства следующих типов:
1. Импульсные
Импульсные аппараты отличаются тем, что при воздействии высокочастотных импульсов происходит понижение и преобразование напряжения. При этом такие приборы не способны выдать пусковые токи очень больших значений. Это сказывается на особенностях работы в пусковом режиме.
Чтобы обеспечить пусковой разряд, такое устройство работает в паре с аккумулятором. Чтобы было понятнее, рассмотрим на таком примере: батарея разряжена, но не полностью, и способна выдать пусковые токи в 100 А, а для нормальной работы стартера необходимо 150 А, то есть заряда батареи явно недостаточно. Но зато имеется импульсное ПЗУ, выдающее в режиме пуска 60 А. Подключаем устройство к АКБ в результате на выходе из этой спарки получаем 160 А, что более чем достаточно, чтобы завести мотор.
В итоге выходит, что импульсное устройство способно лишь дополнить аккумулятор. В случае очень глубокого разряда аккумулятора завести машину не получится, придется вначале немного зарядить батарею. Зато такие аппараты компактны, что делает их вполне неплохим вариантом для использования.
2. Трансформаторные

Трансформаторные – классический вариант. Преобразование электроэнергии производится понижающим трансформатором. Но в отличие от обычного зарядного устройства, в пуско-зарядных используется мощный трансформатор с усиленной обмоткой, что позволяет ему выдерживать значительные нагрузки, а количество витков позволяет регулировать выходные токи в значительном диапазоне, что и дает возможность на выходе получить пусковые токи.
Такое устройство запросто может завести мотор даже без АКБ, но делать так не стоит, батарея должна обязательно присутствовать и подключение к бортовой сети ПЗУ должно проводиться через нее. Все потому, что в момент запуска в сети от генератора образуются сильные скачки напряжения, и АКБ в этом случае выступает в роли демпфера, то есть принимает их все на себя. Если делать запуск без аккумулятора – высока вероятность повреждения ПЗУ этими скачками. Основным недостатком таких устройств является достаточно большие габариты и вес из-за усиленного трансформатора.
3. Конденсаторные
Конденсаторные пуско-зарядные устройства в своей конструкции используют конденсаторы. Вся работа такого устройства сводится к тому, что сначала заряжаются конденсаторы, а во время запуска они отдают энергию. Причем заряд от этих элементов достаточно мощный, чтобы завести мотор. Но такие приборы встречаются редко.
Зарядно-предпусковые приборы

Зарядно-предпусковые устройства вообще не рассчитаны на выдачу токов большой мощности. То есть, запуск двигателя от них не производится. Техника запуска мотора от такого прибора несколько иная, чем от пуско-зарядного. Особенность зарядно-предпусковых устройств заключается в том, что они могут работать в режиме подачи токов повышенных значений. К примеру, для подзарядки АКБ емкостью 65 Ач необходим ток в 6,5 А (10% от номинальной емкости). Но можно прибор перевести в режим, когда на выходе будет 20 А. В результате получим интенсивную зарядку батареи.
То есть, при помощи зарядно-предпускового прибора просто «разгоняется» аккумулятор, после чего от нее можно завести мотор. Но при этом интенсивная зарядка негативно сказывается на самой батарее.
Видео: Испытание портативного пуско-зарядного устройства S-START
Пусковые приборы
Последний тип – пусковые устройства (они же – аккумуляторные или «бустеры»). У таких приборов в конструкции используется аккумулятор, который и позволяет запускать мотор. Причем эти бустеры могут использовать в своей конструкции самые разные батареи – от обычных кислотных необслуживаемых до литий-полимерных, которые сейчас стали очень популярны (так называемые «PowerBank»).

Работают пусковые устройства по тому же принципу, что и импульсные пуско-зарядные устройства, то есть они просто дополняют заряд АКБ своим, что и позволяет завести машину.
Достоинства и недостатки
Исходя из указанной информации, приборы можно разделить на:
К преимуществам первых относится:
Основным же недостатком стационарных средств является все та же надобность к подключению к электросети.
Мобильные же устройства можно всегда возить с собой, что дает возможность запустить мотор с севшим АКБ в любом месте. Они часто имеют дополнительные выходы для зарядки всевозможных гаджетов (телефонов, планшетов). Отличаются компактностью.

Недостатком же их является надобность в периодическом подзаряде батареи прибора и постоянным слежением за уровнем заряда. К тому же они не могут выполнять роль зарядного устройства для АКБ авто.
У каждого из указанных приборов имеются свои определенные правила использования, поэтому обязательно следует ознакомиться с инструкцией пользователя. Но всё же имеются общие правила использования, которые ниже рассмотрим.
Как завести машину от ПЗУ
Для начала возьмем импульсное пуско-зарядное устройство. Итак, есть такой прибор и автомобиль с разряженным АКБ. Далее действия таковы:
Видео: ЗАВОДИМ МАШИНУ БЕЗ АКБ
Запуск при помощи зарядно-предпускового прибора
Правила запуска мотора при помощи зарядно-предпускового устройства такие:
Источник
Выбираем портативное пусковое устройство для автомобиля — рейтинг на начало 2019 года

Для удобства выбора пускового устройства транслируются только основные характеристики и рейтинг разделен на 5-ть частей, по возможности запуска бензиновых и дизельных двигателей по заданному литражу:
1 — Бензиновый до 2 литров, не для дизельных
2 — Бензиновый до 4 литров, дизельный до 2 литров
3 — Бензиновый до 6 литров, дизельный до 3,5 литров
4 — Бензиновый больше 6 литров, дизельный до 4 литров
5 — Для 24-вольтового аккумулятора
Хочется отдельно отметить надежность ПЗУ отмеченных в рейтинге, они все способны прослужить свыше пяти лет, при этом отлично справляясь со своим основным предназначением. Данные по литражу запускаемого двигателя были приведены к объективным значениям в условиях работы при низких температурах.
1 — Бензиновый до 2 литров, не для дизельных:
1.1 — Hummer H3 — Самое компактное ПЗУ!

Емкость АКБ — 6000 мА⋅ч
Максимальный ток — 300 А
Номинальный ток — 150 А
Вес устройства — 0,23 кг
Гарантия 5 лет

Емкость АКБ — 7000 мА⋅ч
Максимальный ток — 300 А
Номинальный ток — 200 А
Вес устройства — 0,25 кг
Гарантия 1 год
2 — Бензиновый до 4 литров, дизельный до 2 литров:
2.1 — Carku E-Power Elite

Емкость АКБ — 12000 мА⋅ч
Максимальный ток — 400 А
Номинальный ток — 200 А
Вес устройства — 0,42 кг
Гарантия 1 год
Купить Carku E-Power Elite со скидкой по промокоду Drive2: topradar.ru/product/pusko…u-e-power-elite-444-vtch/
2.2 — Hummer H2 — Лучшая защита электроники автомобиля при запуске двигателя!

Емкость АКБ — 12000 мА⋅ч
Максимальный ток — 600 А
Номинальный ток — 300 А
Вес устройства — 0,43 кг
Гарантия 5 лет
2.3 — Aurora Atom 10

Емкость АКБ — 9600 мА⋅ч
Максимальный ток — 600 А
Номинальный ток — 300 А
Вес устройства — 0,42 кг
Гарантия 1 год
Купить Aurora Atom 10 со скидкой по промокоду Drive2: topradar.ru/product/pusko…stvo-aurora-atom-10-9600/

Емкость АКБ — 12000 мА⋅ч
Максимальный ток — 450 А
Номинальный ток — 200 А
Вес устройства — 0,45 кг
Гарантия 1 год
2.5 — Neoline Jump Starter 500A

Емкость АКБ — 10400 мА⋅ч
Максимальный ток — 500 А
Номинальный ток — 200 А
Вес устройства — 0,45 кг
Гарантия 1 год
Купить Neoline Jump Starter 500A со скидкой по промокоду Drive2: topradar.ru/product/neoline-jump-starter-500a/
3 — Бензиновый до 6 литров, дизельный до 3,5 литров:
3.1 — Hummer H1 — Самое компактное устройство с данными характеристиками!

Емкость АКБ — 15000 мА⋅ч
Максимальный ток — 800 А
Номинальный ток — 400 А
Вес устройства — 0,54 кг
Гарантия 5 лет
3.2 — Carku E-Power-21

Емкость АКБ — 18000 мА⋅ч
Максимальный ток — 600 А
Номинальный ток — 300 А
Вес устройства — 0,67 кг
Гарантия 1 год
Купить Carku E-Power-21 со скидкой по промокоду Drive2: topradar.ru/product/carku-e-power-21/
3.3 — Aurora Atom 18 Evolution

Емкость АКБ — 18000 мА⋅ч
Максимальный ток — 600 А
Номинальный ток — 300 А
Вес устройства — 0,61 кг
Гарантия 1 год
Купить Aurora Atom 18 Evolution со скидкой по промокоду Drive2: topradar.ru/product/pusko…aurora-atom-18-evolution/
3.4 — Berkut Specialist JSL-18000

Емкость АКБ — 18000 мА⋅ч
Максимальный ток — 600 А
Номинальный ток — 300 А
Вес устройства — 0,61 кг
Гарантия 1 год
Купить Berkut Specialist JSL-18000 со скидкой по промокоду Drive2: topradar.ru/product/pusko…kut-specialist-jsl-18000/

Емкость АКБ — 18000 мА⋅ч
Максимальный ток — 600 А
Номинальный ток — 300 А
Вес устройства — 0,61 кг
Гарантия 1 год
4 — Бензиновый больше 6 литров, дизельный до 4 литров
4.1 — Aurora Atom 28

Емкость АКБ — 28000 мА⋅ч
Максимальный ток — 1700 А
Номинальный ток — 850 А
Вес устройства — 1,04 кг
Гарантия 1 год
Купить Aurora Atom 28 со скидкой по промокоду Drive2: topradar.ru/product/pusko…strojstvo-aurora-atom-28/
4.2 — Neoline Jump Starter 850A — Имеет большой потенциал за счет повышенного вольтажа!

Емкость АКБ — 20000 мА⋅ч
Максимальный ток — 850 А
Номинальный ток — 450 А
Вес устройства — 0,75 кг
Гарантия 1 год
Купить Neoline Jump Starter 850A со скидкой по промокоду Drive2: topradar.ru/product/neoline-jump-starter-850a/
4.3 — Berkut Specialist JSL-20000

Емкость АКБ — 18000 мА⋅ч
Максимальный ток — 800 А
Номинальный ток — 600 А
Вес устройства — 0,62 кг
Гарантия 1 год
Купить Berkut Specialist JSL-20000 со скидкой по промокоду Drive2: topradar.ru/product/pusko…kut-specialist-jsl-20000/
4.4 — Aurora Atom 24

Емкость АКБ — 24000 мА⋅ч
Максимальный ток — 1000 А
Номинальный ток — 500 А
Вес устройства — 0,81 кг
Гарантия 1 год
Купить Aurora Atom 24 со скидкой по промокоду Drive2: topradar.ru/product/profe…strojstvo-aurora-atom-24/
5 — Для 24-вольтового аккумулятора
5.1 — Aurora Atom 40

Емкость АКБ — 40000 мА⋅ч
Максимальный ток — 2000 А
Номинальный ток — 1000 А
Вес устройства — 2,2 кг
Гарантия 1 год
Купить Aurora Atom 40 со скидкой по промокоду Drive2: topradar.ru/product/profe…strojstvo-aurora-atom-40/

Емкость АКБ — 26000 мА⋅ч
Максимальный ток — 1200 А
Номинальный ток — 800 А
Вес устройства — 1,6 кг
Гарантия 5 лет
5.3 — Aurora Atom 30

Емкость АКБ — 30000 мА⋅ч
Максимальный ток — 1200 А
Номинальный ток — 600 А
Вес устройства — 2,2 кг
Гарантия 1 год
Источник
If you don’t have a portable battery charger in your tech tool chest, I honestly don’t know how you survive. I have a variety of batteries for smart devices in our home, ranging from what I call “lipstick” chargers (small, easily carried batteries that my kids use to quickly charge their iPhone), to solar power batteries for emergencies, to larger battery packs that can charge up iPhones and iPads a few times. You can’t be overly prepared, right? And my kids actually get lazy and use these portable batteries even though they are near plugs…they just like the convenience. Well, I now have a high-capacity portable battery, the Naztech VOLT Power Station, which tops out my battery collection thanks to the folks at Naztech. And it’s pretty darn nice. (*Disclosure below.)
A battery is a battery is a battery, right? Well, not exactly. When shopping for a portable charging solution, I have found that there are several things you should think about, specifically
- Do you want something light and portable? If so, it’s probably a lower capacity battery.
- Does size and weight not matter? Well, you might want to consider a larger capacity battery.
- How many devices are you looking to charge? That could determine the capacity requirements as well.
- How many simultaneous devices do you want to charge? In this case, you need to consider how many ports and the types of ports.
- Do you want to charge devices other than USB-connected ones? You may need to go to a larger sized and larger capacity battery and one that has an AC plug.
Bottom line here, think about what you are trying to solve before just grabbing any old portable charging solution. Larger capacity batteries with more features will push the price up a bit. But in the long run, having one (or more) high-capacity batteries is a good safety practice (or it may just help those lazy kids avoid from having to find a wall plug).
Let’s take a look at the Naztech VOLT Power Station. At 27,000 mAh, it is what I would consider to be a larger capacity yet still portable battery. A quick scan through Amazon shows that 27,000 mAh is probably the top end of portable batteries that don’t have a really large form factor. So for me, that is fairly significant. Here are some high-level features and capabilities of the Naztech VOLT:
- Did I already mention 27,000 mAh capacity?
- Universal AC “Wall” outlet – at 110V/85W, you can power many types of wall plug devices
- 3 different USB ports: USB-C, Quick Charge 3.0/2.0, and regular 5V/2.4A USB
- Rapidly charge up the battery in about 4 hours (20V/40W)
- Built-in LED flashlight
There are some pretty advanced safety features as well which I will go into shortly.
Unpacking & Using the Naztech VOLT
The Naztech VOLT Power Station comes with just a few important things. Obviously, the VOLT itself. And a wall charging cable. But what is really nice, and something that travelers will appreciate is the fact that it comes with international plug adapters as well. So what that means is that you can take this battery overseas and charge and use it wherever you go. While the weight might be a bit more than you want (it’s actually only about 1.6 lbs.), you have to “weigh” that (sorry) against NOT having emergency power when you are on the go.

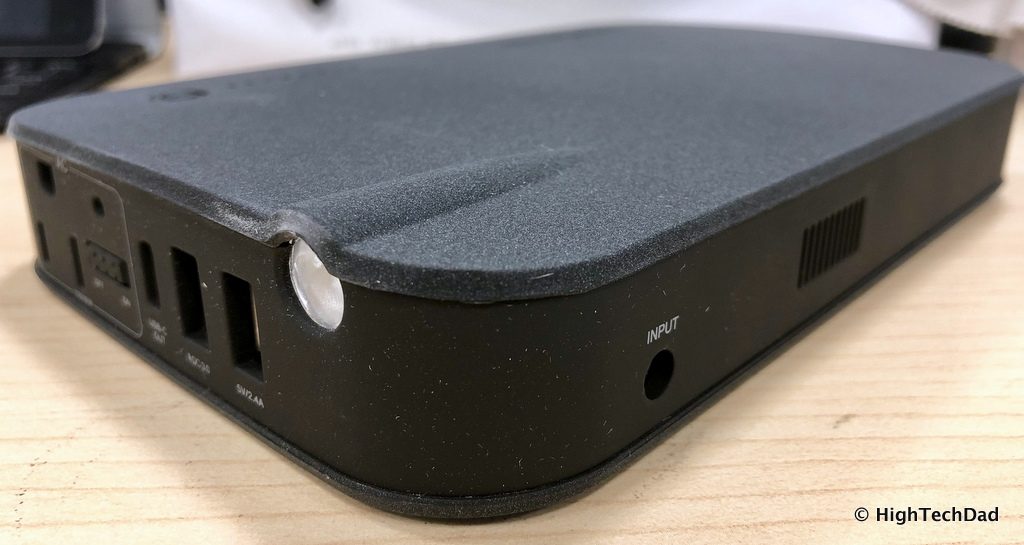
Out of the box, I was impressed by the sleek design. On one of the short sides, you have all of the ports that matter: the AC plug, the three USB ports, and the LED light. On each of the longer sides, there are some heat vents (I believe) which made me think that the VOLT would heat up charging or discharging. In fact, the Naztech VOLT does not seem to produce a ton of heat when doing either action. It’s warm but not hot. And near one of the vents is the port where you plug in to charge the VOLT. It is recommended that you use the appropriate charging plug.
The VOLT itself measures 7.5″ x 4.75″ x 1.125″ and as I said, weighs 1.6 lbs. The majority of the body seems to be wrapped in a sort of a fuzzy, felt-like material. This feels good to the hand and prevents it from sliding on slick surfaces, but I did notice it tends to like to attract dust. (There could be some electromagnetic action going on here as well, I’m not sure.) But, that’s not a big deal. This is a utilitarian device.

The included plug adaptors simply attach to the standard US plug. Again, it’s nice to have that convenience if you are a traveler. And since I’m talking about the plug, I have to talk about the initial charge. My Naztech VOLT came fully discharged. This allowed me to actually time the initial charge. The product documentation says that the VOLT can be fully charged in about 4 hours. So I put that to the test. First charges may differ than subsequent ones. I found that from empty, it actually took almost exactly 5 hours to fully charge up the VOLT.
On the top of the VOLT, there is a button that does a few things. If you tap on it, there are 8 blue LED lights that indicate the charge state of the battery. If you double-click the button, you can turn on the LED flashlight. And if you press and hold the power button, the VOLT powers down. So, when I tapped on the button initially, none of the blue LEDs lit up (as expected). I plugged it in and over time, I could watch the VOLT charging up with the current battery level blinking blue.
So, after about 5 hours for the initial charge, I was ready to do some other testing. Since I have an iPhone, I wasn’t able to fully test the Quick Charge 3.0 capabilities. However, I have read (and will be testing) that if you have a USB-C to Lightning cable, you can actually achieve “quick charge” capabilities on the iPhone 8/8 Plus and X. I have ordered a cable in order to test this out in the future.
You can charge 3 USB devices at the same time with the Naztech VOLT (assuming one of them has a USB-C connection). This is extremely convenient for parents who want to charge up their kids devices. (Just don’t forget those multiple charging cables!)
But the true “power” (again sorry) of the Naztech VOLT comes in the form of the AC plug. I haven’t seen that many high-capacity portable batteries that have this option. With this plug, you can charge up and/or power other devices like laptops. One important thing to note, when you use the AC plug, you have to physically flip a switch next to the plug to turn on power to the AC plug. And, I believe, you cannot charge USB devices while you are using the AC plug.
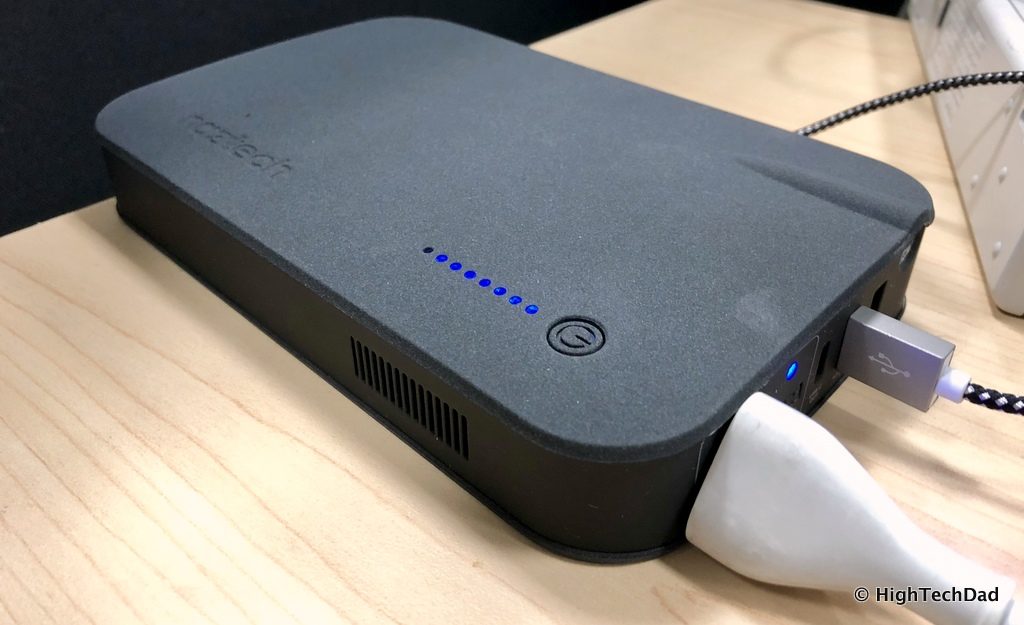
The next step in my testing was to see how the AC plug power might work with my MacBook Pro. Most of my tests are less scientific and more driven by real-world scenarios. So, in this case, I wanted to see what happened if I was just powering my MacBook Pro (MBP) with the Naztech VOLT. But there is an inherent problem with my testing. My MBP has a battery too, one that I can’t remove. So I would have had to either fully drain my MBP until it shut down, or just figure out a different way to test it.
So, I just decided to see how long it would take the VOLT to drain when plugged into my MBP. When I started, my MPB’s battery was at 85%. That meant that once I plugged it into the VOLT, the power that was drawn would be used to re-charge the MBP battery. And, my assumption was that once the MBP battery was full, it would just pull a trickle charge to keep it topped off. (Of course, my assumptions could be wrong.) So, I just continued using my MBP with it plugged directly into the VOLT. And after a little over 2 hours, I had fully drained the VOLT. Note: my MBP had its own screen on as well as two monitors connected to it. And I was fully using the MPB (it wasn’t sitting idle).
Therefore, from just one, non-scientific test, I can conclude that I gained about 2 hours of battery on my Mac. But again, your mileage may differ and it depends on the power draw from your computer.
The last test that I decided to do was one completely not related to charging tech. And I wanted to see if the Naztech VOLT could even handle it. I decided to plug in a hair dryer and run it. One, I wanted to see if it would work at all. Two, I wanted to see how long the hair dryer would work if it indeed did power on. And three, I wanted to see if any of the built-in safety features would kick in.
The result? The hair dryer powered on…for about 1/2 a second and then it shut off. The Naztech VOLT’s internal protection prevented too much power flowing through it. Hair dryers draw a lot of energy. However, the Naztech website does say that you can power a flat iron…but I haven’t tested that.
Since I briefly mentioned the safety features of the Naztech VOLT, I think it is important to give a little more detail on them. First, I talked earlier about the heat vents and how the VOLT didn’t really get hot, only warm. The VOLT has built-in temperature controls that prevent overheating. There is also an Over-Voltage circuit that stops inbound surges (e.g., when you are charging the VOLT) from damaging it. In my hair dryer test above, I was curious to see if the overcurrent protection would kick in. It did. If too much current is flowing through, the VOLT is designed to shut off the power. There is short-circuit and power-overload protection design to product the VOLT as well, and if one of these protection safeguards is tripped, you can reset it after the VOLT cools down.
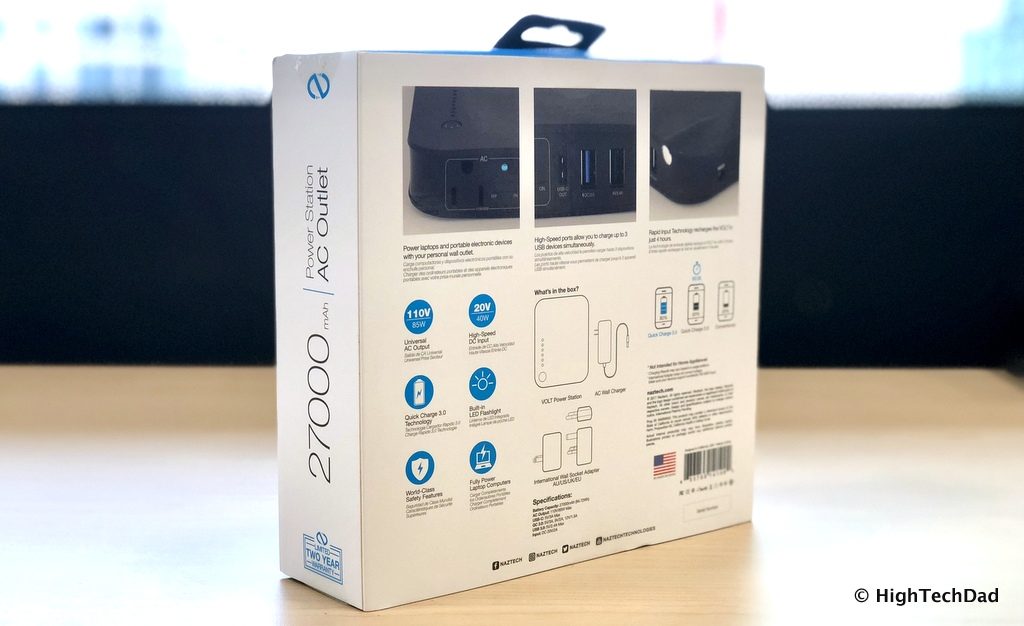
Lastly, due to built-in circuitry, the Naztech VOLT knows what type of power the attached devices require and will stabilize and regulate the charge current going to those devices. If too much charge heads toward your device, it will shut itself off, protecting the VOLT and the attached device(s). If your devices can handle fast charging, it will send the proper amount of power for those devices.
The Naztech VOLT Power Station currently retails for $199 (and is also available on Amazon for $199).
Buy on HighTechDad
The product shown below (and related products that have been reviewed on HighTechDad) is available within the HighTechDad Shop. This review has all of the details about this particular product and you can order it directly by clicking on the Buy button or clicking on the image/title to view more. Be sure to review other products available in the HighTechDad Shop.
-

Naztech Power Bank
$115.00
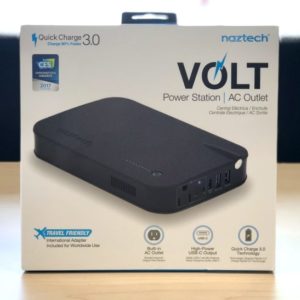
Overall, I feel the Naztech VOLT is an important portable battery to have in your tech and gadget collection. It offers a good blend of charging options from various types of USB ports to the all-important AC plug (something not really found in many batteries). While you obviously couldn’t power a refrigerator or a TV, having the ability to juice up a variety of smart devices and even a laptop is truly nice. And the extra high-capacity battery means you can charge quite a few gadgets when you are on the go!
Disclosure: I have a material connection because I received a sample of a product for consideration in preparing to review the product and write this content. I was/am not expected to return this item after my review period. All opinions within this article are my own and are typically not subject to editorial review from any 3rd party. Also, some of the links in the post above may be “affiliate” or “advertising” links. These may be automatically created or placed by me manually. This means if you click on the link and purchase the item (sometimes but not necessarily the product or service being reviewed), I will receive a small affiliate or advertising commission. More information can be found on my About page.
HTD says: There is nothing worse than a dead or dying battery on your device, especially when you need to use it. The 27,000 mAh Naztech VOLT Power Station gives you the ability to charge multiple USB devices and even plug in a laptop to give you additional gadget time on the go!
HighTechDad’s Ratings:
- Ease-of-Use
- Family-Friendly
- Price Point
- Features
Summary
There is nothing worse than a dead or dying battery on your device, especially when you need to use it. The 27,000 mAh Naztech VOLT Power Station gives you the ability to charge multiple USB devices and even plug in a laptop to give you additional gadget time on the go! With this balance of power and plug-in options, what’s not to like? The VOLT is easy enough to use, fully charges in about 4 hours, and let’s you take advantage of quick charging capabilities. You can even plug in non-technology electric devices. At $200 it is a bit hard on the wallet, but you are also paying for a very large capacity, lots of electrical protections, and the peace-of-mind knowing you have that extra power when you truly need it.