
Раздел: Бытовая, кухонная техника, электроника и оборудование
Тип: Мясорубка

Характеристики, спецификации
Производительность:
1 кг/мин
Максимальная мощность:
1400 Вт
Насадки-решетки:
Есть, 2 штуки
Насадки для шинковки:
Есть, 2 штуки
Прочие насадки:
для нарезки кубиками, для приготовления кеббе, для приготовления колбас
Отделение для хранения насадок:
есть
Лоток для подачи продуктов:
есть, пластик
Отделение для хранения кабеля:
есть
Инструкция к Мясорубке Moulinex HV 4 ME41513E
EN
p 1 – p 8
LT
p 9 – p 16
LV
p 17 – p 24
ET
p 25 – p 32
PL
p 33 – p 40
RU
p 41 – p 49
UK
p 50 – p 58
HU
p 59 – p 66
CS
p 67 – p 74
SK
p 75 – p 82
BS
p 83 – p 90
BG
p 91 – p 99
HR
p 100 – p 107
RO
p 108 – p 115
SR
p 116 – p 123
SL
p 124 – p 131
EN
LT
LV
ET
PL
RU
UK
HU
CS
SK
BS
BG
HR
RO
SR
SL
www.moulinex.com
Réf. 2643049A
Notice_2643049A:Mise en page 1 29/10/10 16:23 Pagea1
!#
8><496026F7<4A>@<B286//L
<?2/j.?=>6=>.B25
%<j6@285B59.169;68A
Sestavine za testo za kibbé:
280=,U6:D,<0.2-?<2?7,D/<:-75090;`094.0U%:7
Sestavine za omako:
625:2?<>,U`:;066:<4,9/<,U=><:64i0=9,U5?`90b74.06:<?D0U%:7;:;0<
0=:<,D<0b4>09,6:=0!,@,`=0675,79469,80=>4>0889,=>,@06+80754>080=:49-?<2?7%:74>049;?=>4>0
>0=>:=>,>49,37,/908?<:
»-746:@,9506<:274.64—J9,=0675,79469,80=>4>0/:/,>0664—J&0=>:/,5>0@=0675,7946492,:-746?5>0@6<:27:>,6:
/,9,<:-:@09,90=0>08,7:@:/0
#<4;<,@,:8,60?845>0`:;066:<4,9/<,:=?`4>02,D@;:5948;,;4<50849:/><2,5>074=>0h0=09:7?;4>049=><4>0
h0=09496:<4,9/0<6?3,5>0/:849?>49,8,53908:295?@;:9@4D@4`548<:-:8»/=>,@4>0
:2?<>496:<?D:D80`,5>0=6?;,59,>:;:=:74>049;:;:;<,5>0(=0D745>0@09:;:=:/:=6:D4.0/47:D8,5394847?
695,84#:i,6,5>0/,80`,94.,D,@<09,>:D8,95`,5>08:i:295, 0/6?3,9508;,D4>0/,=05:2?<>90D,=?`49,
;:90@
:/,5>0i0=09496:<4,9/0<<:274.064—J/:/,5>0i0D849?>
Različica
<:274.07,36:>?/49,/0@,>0DD80=5:i0-?7049870>02,80=,64=>05:;<0/>08;:;<,b474@:75?D906,5D<94;49450
%&$
:.75;<>6/72=206B<
<?2/2j.?=>6=>.B2:6;
i.?8A5.;7.:6;
Sestavine:
274=>9,>02,>0=>, U26?3,90<4-0,74/48750902,7:=:=, U></:6?3,945,5.4 U`:;066:;<, Ui0-?74 U2
=:750902,8,=7,@8,539436:.6,3 U»750
!,80=>4>0889,=>,@069,=0675,7946$,D<0b4>0i0-?7:9,6:=:@495:=><0=4>0@=0675,7946#<,b4>09,8,53908
:295?@;:9@4D8,7::75,%3<,94>0
+80754>08,7:<4-09,>:54/:/,5>0;<,b09:i0-?7:8,=7:6:;0<49`0;<0:=>,7:<4-:
4=>9,>:>0=>:<,D@,75,5>0/,-:/:6,5>,96:<,D<0b4>02,9,6<:20=6:D,<.08,74D/:6,5@0746:;:=:/:
#0i4.:;<0/3:/9::2<05>09,R=>
!,@=,66<:29,7:b4>08,7:9,/0@,492,D,;:294>0>,6:/,D@450>0<:-:@0
#?=>4>0@;0i4.4/:849?>>,6:/,;:<5,@45:
Recepti:
Pomnite: Pri receptih, kjer morate sekljati z zvišano močjo (približno 500 W), naprave ne uporabljajte več kot 20
sekund.
Primer recepta (z nastavkom s srednje velikimi luknjami 4,7 mm A4a):
Ovčetina z grahom
2:@i0>490U2D/<:-750902,2<,3,U28:60U.7@:/0U=<0/950@0746,i0-?7,U=><:6,i0=9,U%:7
;:;0<
(;:=:/4D80`,5>0=0=0675,9:8,=:498:6:9,>:;,/:/,5,5>0@:/:>,6:/,/:-4>03:8:209:80`,94.:#<4b24>0
9,;<,@:4909,6:80<9:/:/,5,5>0D80=9,;7:`i:>0<;:i,=4;:>4=6,5>080`,94.:=6:D4@<,>=;:>4=946:8C
$,D<0b4>0i0-?7:i0=094980=:9,8,53906:=09,>:;,543/:/,5>0=0=0675,908?80=?
(;:=:/:D745>074><,@:/0/:/,5>054=:7;:;0<499,>:`080`,94.:
?3,5>0?<:;<48,95`08:295?;:6<45>06:=0D,i906,/4>4
131
Notice_2643049A:Mise en page 1 29/10/10 16:23 Pagea4
Notice_2643049A:Mise en page 1 29/10/10 16:23 Pagea7

Notice_2643049A:Mise en page 1 29/10/10 16:23 Pagea8

Thank you for choosing an appliance from the Moulinex range.
EN
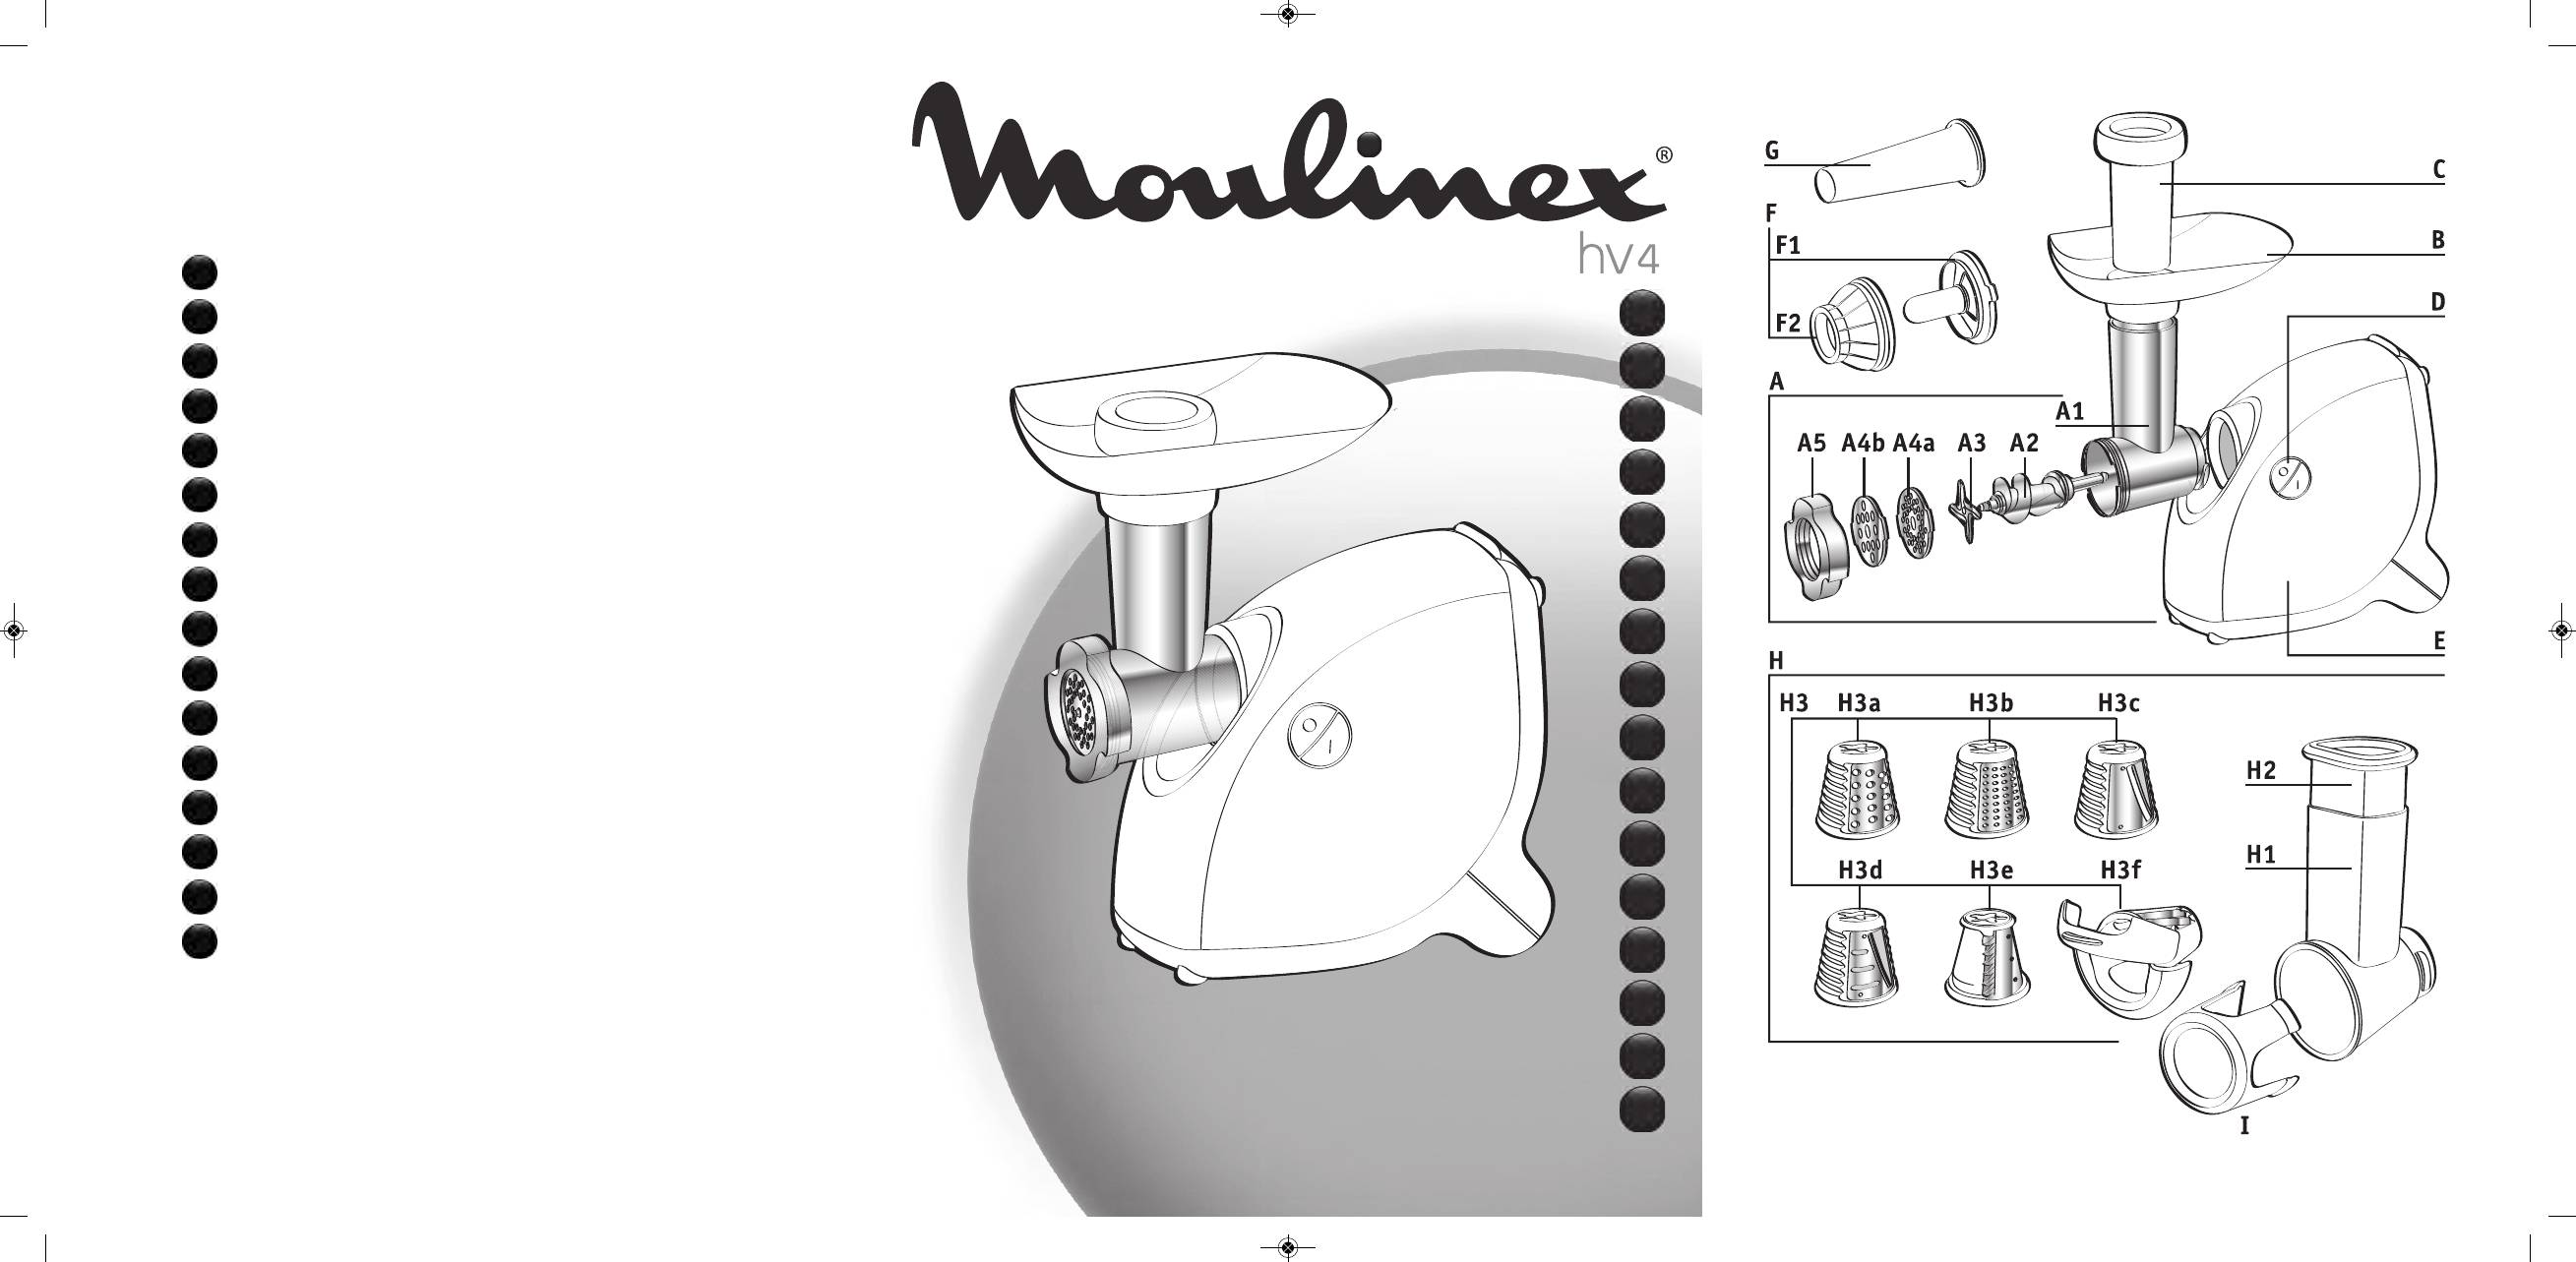
DESCRIPTION:
A Removable mincer head
A1 Aluminium body
A2 Feed screw
A3 Self-sharpening stainless steel cutter
A4 Screens
A4a Medium hole screen
(4.7 mm) fine mincing
A4b Large hole screen
(7.5 mm) coarse mincing
A5 Aluminium nut
B Removable tray
C Meat pusher
D Start/stop button
E Motor unit
F KEBBE attachment
F1 KEBBE making end
F2 Ring
G Sausage filler tube
H Vegetable cutter
H1 Cone storage unit/feed tube
H2 Pusher
H3 Cones
H3a Coarse grater cone (red)
H3b Fine grater cone (orange)
H3c Coarse slicer cone (dark green)
H3d Fine slicer cone (light green)
H3e Chip slicer cone
H3f Dicer attachment
I Storage attachment
SAFETY INSTRUCTIONS:
— Read the instructions carefully.
— Before first using your appliance, note that any use that does not conform to the instructions for use absolves
Moulinex from any liability.
— This appliance is not intended for use by persons (including children) with reduced physical, sensory or mental
capabilities, or lack of experience and knowledge, unless they have been given supervision or instruction
concerning use of the appliance by a person responsible for their safety
— Children must be supervised to ensure that they do not play with the appliance.
— Check that the power rating of your appliance corresponds to your electrical supply.
— Any connection fault invalidates the guarantee.
— This product has been designed for domestic use only. Any commercial use, inappropriate use or failure to comply
with the instructions, the manufacturer accepts no responsibility and the guarantee will not apply.
— Use your appliance on a flat, stable, heat resistant, clean and dry surface.
— Never let long hair, scarves or ties dangle over attachments during operation.
— Unplug your appliance as soon as you have finished using it, when you clean it and when you fit or remove
attachments.
— Do not use your appliance if it does not work correctly or if it has been damaged. In such cases, contact a Moulinex
approved service centre (see the list in the service booklet).
1
Notice_2643049A:Mise en page 1 29/10/10 16:23 Page1

— Any intervention other than normal cleaning and maintenance by the customer must be carried out by a Moulinex
approved service centre.
— If the cord is damaged, do not use the appliance. In order to avoid any risk, have the cord replaced by an approved
Moulinex service centre (see the list in the service booklet).
— Do not place the appliance, the supply cord or the plug in water or any other liquid.
— Do not leave the supply cord within reach of children.
— The supply cord should never be near to or in contact with hot surfaces, near to a heat source or sharp edges.
— Do not leave the appliance unattended whilst in operation.
— For your own safety, only use the Moulinex accessories and spare parts suitable for your appliance.
— For your safety, this appliance complies with applicable standards and laws:
Low Voltage Directive
Electromagnetic Compatibility
Environment
Materials in contact with foodstuffs.
— Do not use your appliance for more than 14 minutes.
BEFORE FIRST USE
Wash all accessories in soapy water. Rinse, and carefully dry them straight away.
The screen and the cutter must remain greased. Coat them with oil.
Do not use your product when empty if the screens are not greased.
ATTENTION: The blades of the cones are extremely sharp; handle the cones with precaution, always holding them
by the plastic parts.
USING YOUR APPLIANCE FOR THE FIRST TIME:
MINCER HEAD (A):
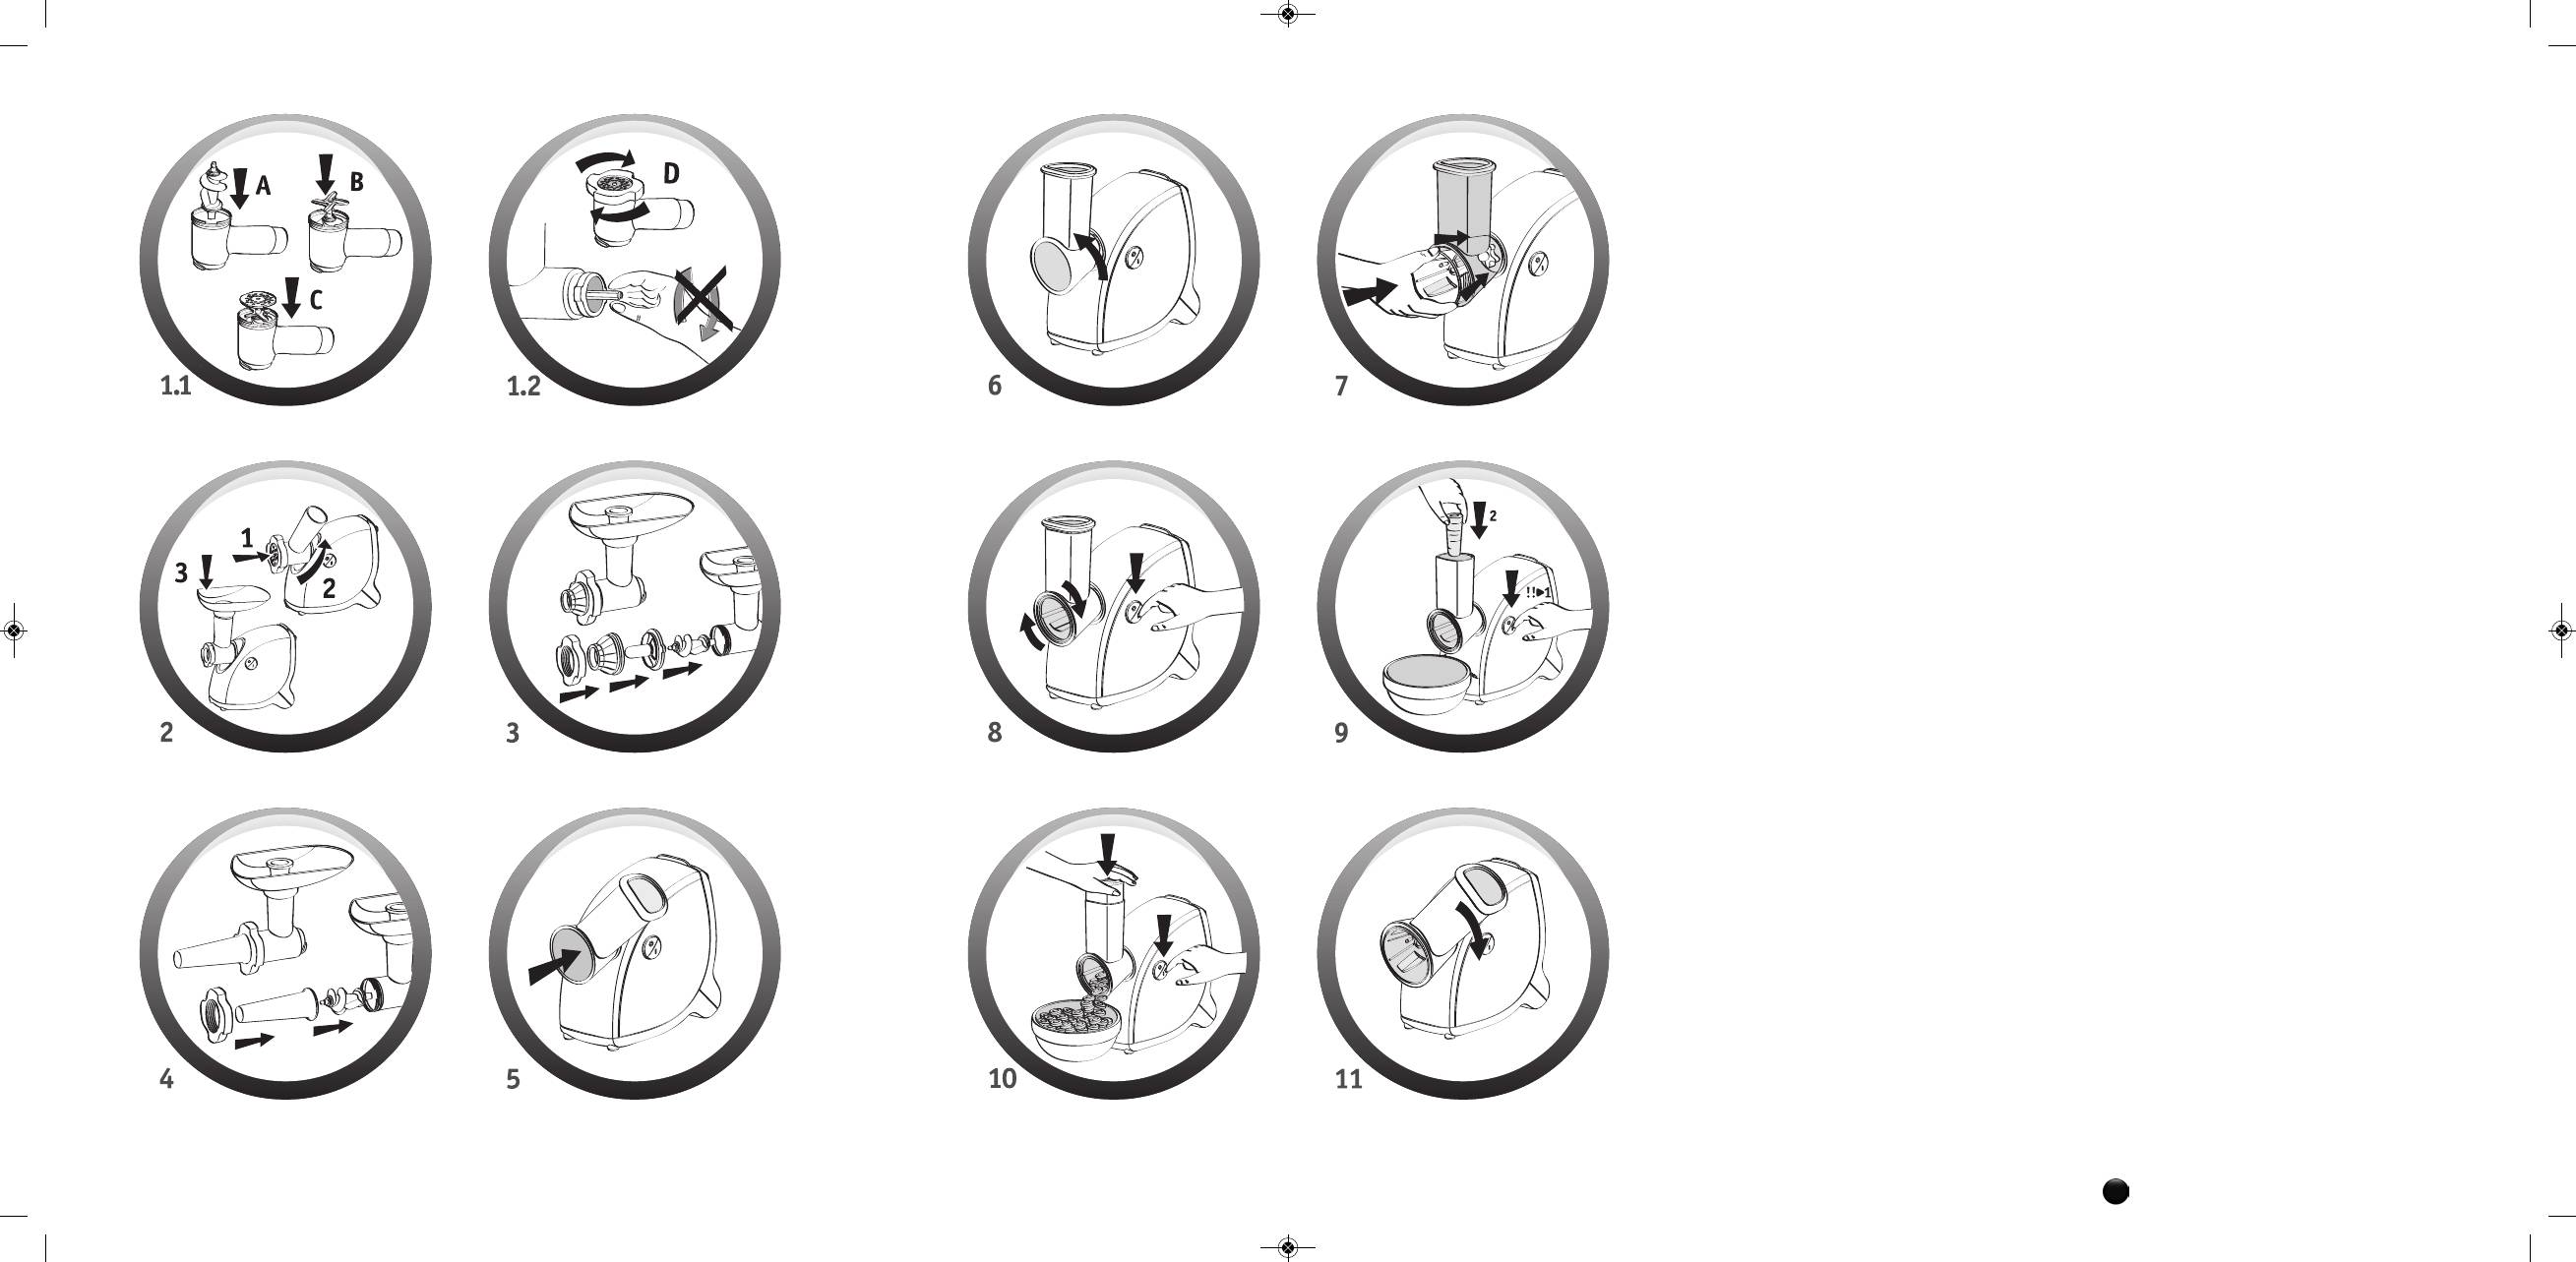
Assembling the mincer head (diagrams 1.1 and 1.2)
Hold the body A1 by the feed tube, with the wider opening uppermost. Insert the feed screw A2 (long shaft first) into
the body A1.
Fit the stainless steel cutter A3 on the short shaft that protrudes from the feed screw A2 with the cutting edges facing
outwards. Fit the screen of your choice on the cutter A3, locating the two lugs in the corresponding two notches in
the body A1.
Screw tight (without locking) the nut A5.
Fitting the mincer head to the appliance (diagram 2):
Facing the unplugged motor unit E, insert the mincer head with the feed tube inclined to the right.
Line up the two pins of the mincer head with the two notches of the motor unit.
Push the mincer head home into the motor unit E and then turn the feed tube to the left until it comes to a stop (the
feed tube should now be vertical).
Engage the removable tray B with the lugs on the mincer head feed tube.
Plug the appliance in; it is ready to use.
Use:
Prepare the entire quantity of foodstuffs to be minced, removing bones and gristle. Cut the meat into pieces (approxi-
mately 2 cm x 2 cm).
Place a bowl beneath the mincer head.
Press position “1” of button D to start the appliance, place the pieces of meat on the tray and slide them one by one
into the feed tube with the help of the pusher C.
Never push in the feed tube with the fingers or any other implement.
Tip:
At the end of the operation, you can feed a few pieces of bread into the feed tube to clear any meat remaining in the
machine.
KEBBE ATTACHMENT
Fitting (diagram 3):
Insert the feed screw A2 into the body A1 of the mincer head. Fit the kebbe making head F1, locating the lugs in the
2
Notice_2643049A:Mise en page 1 29/10/10 16:23 Page2

corresponding notches in the body A1.
Position the ring F2 on the kebbe making head, then screw the nut A5 tight.
Place the head thus assembled on the motor unit as indicated in diagram 2.
Note: this attachment is used without screen or cutter.
SAUSAGE FILLER TUBE (G)
This attachment, which fits to the mincer head, enables you to produce all sorts of sausages that you can season to
your own taste.
Fitting (diagram 4)
Insert the feed screw A2 into the body A1 of the mincer head A. Position the filler tube G, then the nut A5, and
tighten firmly. Place the head thus assembled on the motor unit E as indicated in diagram 2.
Note: this attachment is used without screen or cutter.
Use:
Important: this attachment should only be used after you have minced the meat, added the seasoning and thoroughly
mixed the filling.
After having soaked the sausage skin in lukewarm water to make it supple, thread it onto the filler tube G, leaving 5 cm
at the end (which you close by making a knot with a tie). Start the appliance, feed the mincer with mince and guide
the sausage skin as it fills up.
Note: this job is easier with two people, one to feed the appliance with mince, and the other to control the filling
of the sausage skin.
Make the sausages the required length by pinching and turning the sausage skin.
To make a good quality sausage, take care to avoid trapping air when filling and make the sausages 10 to 15 cm long
(separate the sausages by using a tie to make a knot).
VEGETABLE CUTTER (H)
Fitting (diagram 5 and 6):
Facing the motor unit, which should be unplugged, insert the storage unit H1 inclined to the right, aligning the ears
on the storage unit with the openings on the motor unit E. Insert the stem protruding from the storage unit H1 into
the shaft of the motor unit E. Turn the feed tube of the storage unit H1 to the left until it reaches the stop.
Use:
• Select the cone corresponding to the required use.
• Place the selected cone in the opening at the front of the storage unit H1. The cone must be inserted fully into the
guide (fig.7).
• Connect the appliance.
• Press once or twice on the start/stop button (D) to lock the cone (fig.  .
.
• Insert the foodstuffs into the feed tube of the storage unit H1 (fig.9) and push the foodstuff with the help of the
pusher H2 (fig.10).
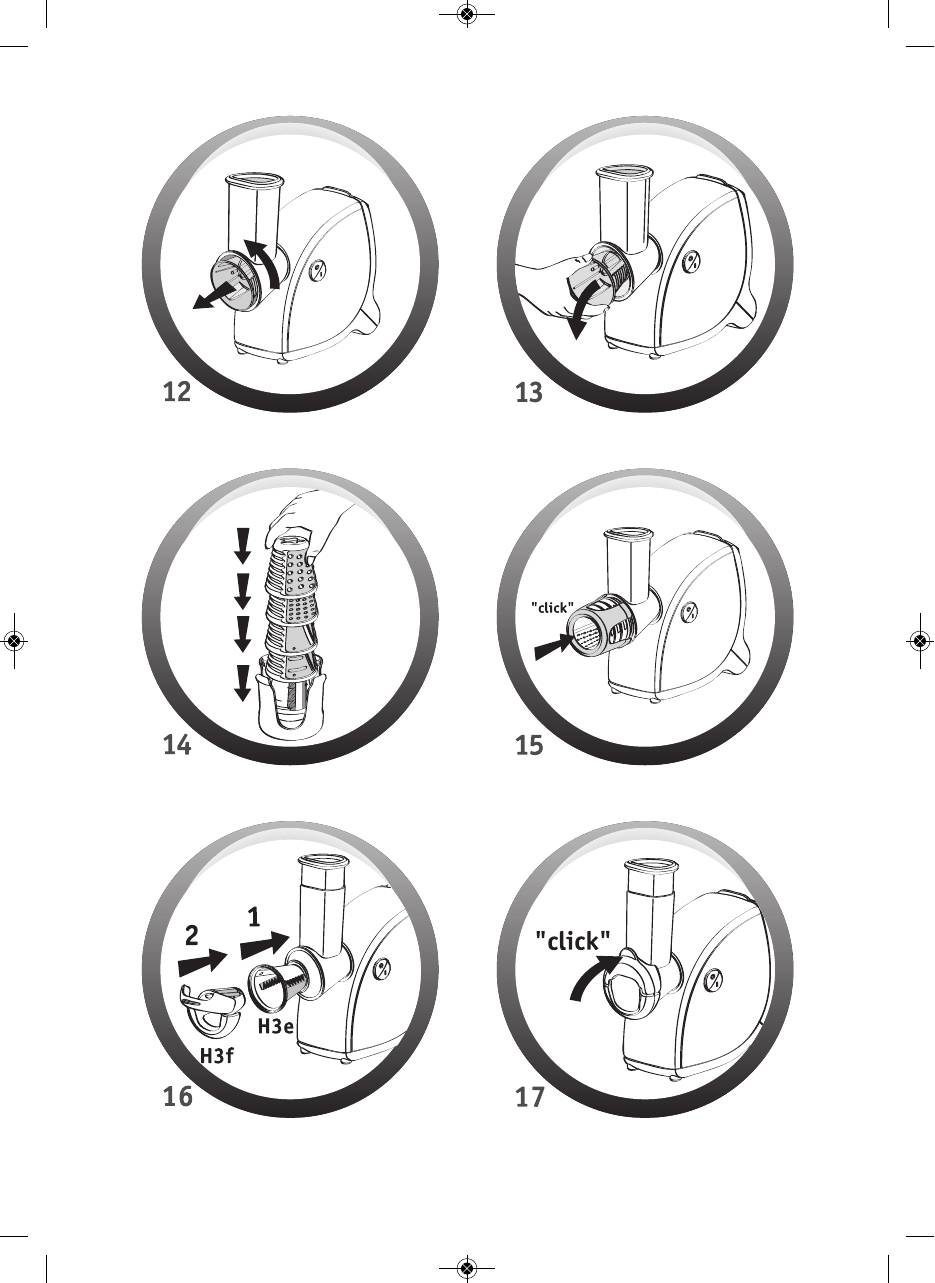
• To change cone, turn the storage unit H1 by a quarter turn to the right, then turn it back to the vertical position
(fig. 11 and 12). Then remove the cone (fig. 13).
Fitting the dicer attachment:
• Place the chip slicer cone in the opening at the front of the storage unit H1. The cone must be inserted fully into the
guide (fig.16).
• Next fit the dicer attachment with the safety hinge open, centring the safety hinge in relation to the storage unit
feed tube (fig.16).
• Check that the dicer attachment ring is correctly clipped to the base of the storage unit (fig.17).
• Close the safety hinge onto the storage unit (fig.17).
• Use the dicer function by inserting ingredients via the feed tube of the storage unit.
• Remove the dicer attachment by pulling the tab on the top of the safety hinge.
Tip: to make it easier to unlock the safety hinge H3f, simultaneously lift upwards and pull the tab to the front
with one finger (fig.18).
ATTENTION: Before using the appliance, ensure that the cone is correctly positioned on the guide.
3
Notice_2643049A:Mise en page 1 29/10/10 16:23 Page3
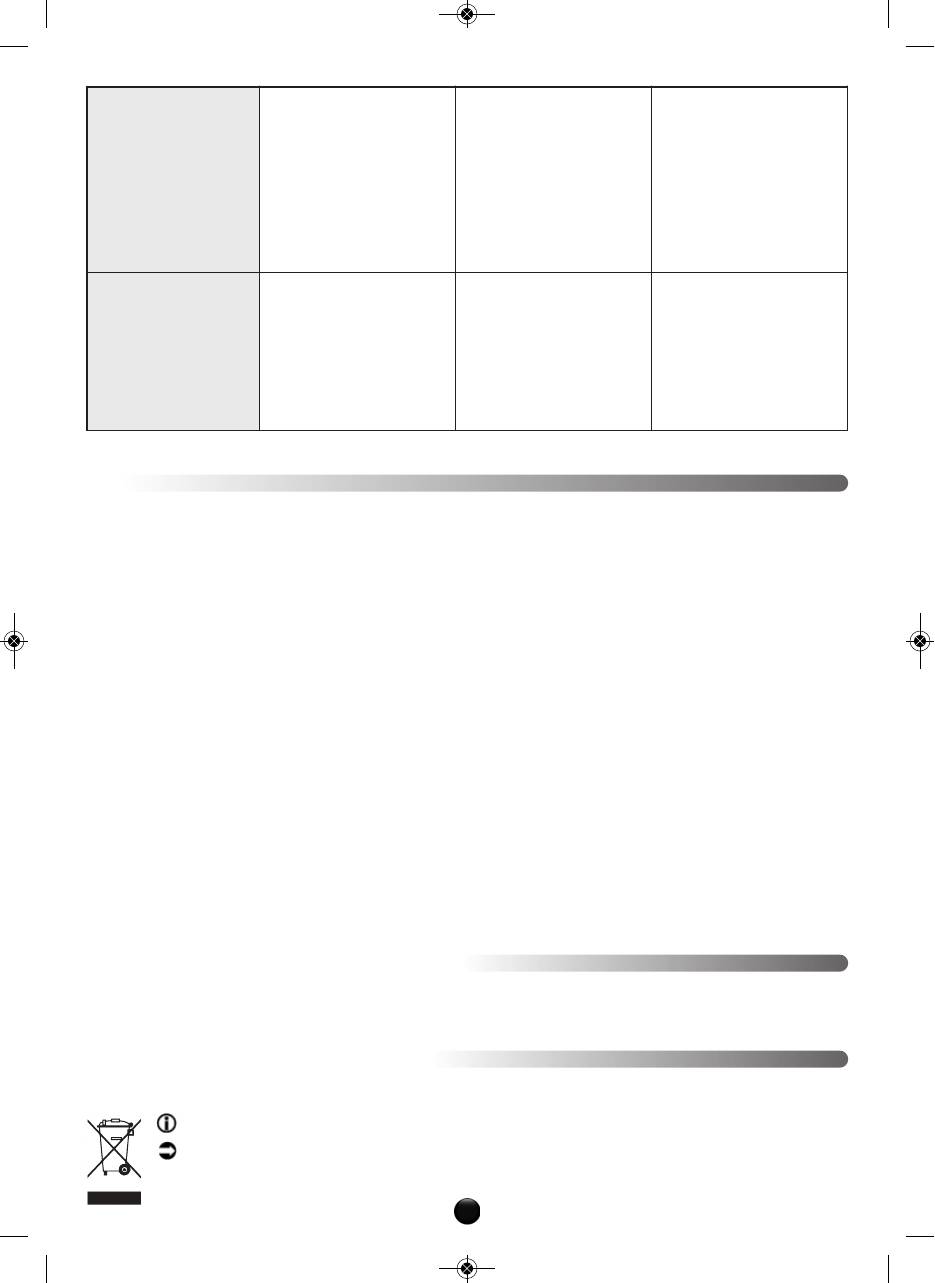
Use the cone recommended for each food type:
Coarse grater cone
Fine grater cone H3b
Coarse slicer cone H3c
Fine slicer cone H3d
* Dicer cone H3e/H3f
H3a (red)
(orange)
(dark green)
(dark green)
(yellow)
Carrots x x x x x (raw only)
Courgettes x x x x x (raw only)
Potatoes x x x x (raw only)
Cucumber x x x (raw only)
Pepper x x x
Onions x x x (raw only)
Beetroot x x x (raw only)
Cabbage (white/red) x x
Apples x x x (raw only)
Chinese radish x (raw only)
Celeriac x (raw only)
Banana x
Gruyère x x x x x
Chocolate x x
Coconut x
To achieve good results:
The ingredients that you use must be firm in order obtain satisfactory results and to avoid any build up of foodstuff in
the storage unit. Do not use the appliance to grate or slice foodstuffs that are too hard, such as sugar or pieces of meat.
Cut the foodstuffs into pieces to insert them more easily into the feed tube of the storage unit.
RECIPES
CONES
PREPARATION INGREDIENTS ADVICE
Dark green cone
Gratin dauphinois
800 g potatoes – 250 ml milk – 200 ml li-
Slice the potatoes with the coarse slicer
(for 4 people)
quid cream – 1 clove of garlic – 2 egg
cone (H3c). Arrange the slices in a
yolks – 100 g gruyère – salt and pepper
greased oven-proof dish that has been
rubbed with the clove of garlic. In a large
bowl, mix the egg yolks, milk and liquid
cream. Pour this mixture over the
potatoes. Season and sprinkle with
COARSE SLICER
gruyère grated with the coarse grater
cone (H3a). Cook in the oven at 200 °C.
(H3c)
Light green cone
Greek salad
1 cucumber – 2 large tomatoes – 1 red
Slice the cucumber in fine slices with the
(for 4 people)
pepper – 1 green pepper – 1 medium
fine slicer cone (H3d). Cut the peppers in
onion – 200 g feta cheese – 50 g black
half and remove the seeds. Thinly slice
olives (optional) –
the peppers and the onion. Cut the
FINE SLICER
4 tablespoons oil – 1 lemon – 30 g fresh
tomatoes and feta into small dice. In a
herbs (choice of: basil, parsley, mint,
salad bowl, mix all these ingredients and
coriander)
add the olives. Prepare the dressing by
(H3d)
mixing the oil with the juice of the lemon.
Combine carefully and sprinkle the salad
with the chopped fresh herbs.
Red cone
Gratin du soleil
6 small courgettes –
Grate the courgettes and potatoes with
(for 6 people)
2 potatoes – 1 onion – 1 cup cooked rice –
the coarse grater cone (H3a). Thinly slice
COARSE GRATER
1 egg – 1 glass of milk – 150 g gruyère —
the onion with the coarse slicer cone
(H3a)
butter
(H3c). Brown all the vegetables in butter.
In an oven-proof dish, alternate a layer of
vegetables, a layer of cooked rice and
another of vegetables. Add the milk
beaten with
the egg; season. Sprinkle with grated
gruyère and knobs of butter. Cook in the
oven at 180 °C.
4
Notice_2643049A:Mise en page 1 29/10/10 16:23 Page4
Orange cone
Coleslaw
¼ white cabbage – 2 carrots – 3 tables-
Thinly slice the white cabbage with the
(for 4 people)
poons mayonnaise – 3 tablespoons liquid
coarse slicer cone (H3c) and grate the
cream – 2 tablespoons vinegar –
carrots with the fine grater cone (H3b).
2 tablespoons sugar
Mix them in a salad bowl. Prepare the
dressing by mixing the mayonnaise,
liquid cream, oil, vinegar and sugar.
Dress the grated vegetables with the
sauce, then combine and leave to stand
FINE GRATER
in the refrigerator for one hour.
(H3b)
Yellow cone
Russian Vinaigrette 400 g beetroot – 300 g carrots – 400 g
Cut the potatoes, beetroot, carrots,
potatoes –
onions and cucumbers into dice with the
200 g cabbage –
dicer cone (H3e/H3f).
Dicer cone
200 g cucumber (marinated or salted) –
Steam the potatoes, beetroot and carrots.
150 g onions – 100 g tinned peas – salt –
Mix the cooked vegetables and add the
2 tablespoons oil
cabbage, peas, onion and cucumber. Add
(H3e / H3f)
salt and oil.
Leave the vinaigrette to stand in the
refrigerator for an hour.
CLEANING:
• Always disconnect the appliance before cleaning the motor unit E.
• Do not submerge the motor unit, nor put it under running water. Clean the motor unit with a damp cloth. Dry it
carefully.
1) Meat mincer attachments:
— Turn the mincer head A to the right and pull it towards you to remove it from the motor unit E.
— To dismantle the mincer head A, remove the pusher C and the tray B, unscrew the nut A5, remove the screen A4,
the cutter A3 and the screw A2.
— Handle cutting parts with care.
– Wash all parts with hot soapy water, rinse and wipe carefully.
— Do not put the mincer head A in the dish washer (this applies to the body A1, screw A2, nut A5, cutter A3, and
screens A4).
2) Vegetable cutter attachments:
• The storage unit (H1), the pusher (H2), the cones (H3a, H3b, H3c, H3d, H3e, H3f) and the storage attachment
(I) may be put in the top basket of the dish washer, using the «ECO» or «LIGHTLY SOILED» programme.
• Handle the cones with care, as the blades of the cones are extremely sharp.
• In the case of colouration of the plastic parts by foodstuffs such as carrots, rub with a cloth soaked in cooking oil,
then proceed with normal cleaning.
STORAGE:
All of the cones (H3a, H3b, H3c, H3d, H3e) can be stored on the appliance.
Stack the 5 cones (fig.14) and slide them into the opening at the front of the storage unit H1. The storage
attachment I clips to the opening at the front of the storage unit H1 (fig.15).
WHAT TO DO IF YOUR APPLIANCE DOES NOT WORK
Check the electrical connection.
If your appliance still does not work, contact a Moulinex approved service centre(see the list in the service booklet).
END-OF-LIFE ELECTRICAL OR ELECTRONIC PRODUCTS
Think of the environment!
Your appliance contains valuable materials which can be recovered or recycled
Leave it at a local civic waste collection point or to an approved service centre.
5
Notice_2643049A:Mise en page 1 29/10/10 16:23 Page5

RECIPES
Meat balls
4 people – Preparation 20 min.
Cooking time: 10 — 15 min.
Ingredients:
1 kg beef – 1 onion – 1 clove of garlic – 2 slices of black bread soaked in milk – 2 eggs – 1 potato – Flour –
Salt, pepper
1. For this recipe, select a cut of beef with a low fat content. Feed the meat into the mincer with the slices of bread.
2. Slice the onion with the fine slicer cone (H3d) and grate the garlic and potato with the fine grater cone (H3b).
3. Mix the minced meat with the bread, sliced onion, garlic and potato.
4. Add the eggs, the freshly ground black pepper and the salt, and form into balls.
5. Roll the meatballs in the flour and fry them in oil.
Chicken and mushroom meatballs
4 people – Preparation 50 min.
Cooking time: 10 — 15 min.
Ingredients:
200 g chicken breast – Salt, pepper – 1 egg – 10 g dried mushrooms – 1 onion – 30 g oil – 1 egg – Breadcrumbs –
Salt, pepper
1. Mince the chicken breast in the meat mincer. Season the mince and mix it well with the egg.
2. Add the milk and mix carefully until the mixture becomes crumbly. Divide it into portions.
3. Soak the mushrooms for a while then cook them in boiling water. Once cooked, cut them into little pieces. Slice
the onion with the fine slicer cone (H3d), then fry it. Mix the chopped mushrooms with the onion.
4. Spread out each portion of the mince mixture to make a thin paste and put a little of the mushroom mixture in
the middle. Fold the edges of the paste together to form a meatball.
5. Soak the meatballs in beaten egg and roll them in breadcrumbs, then fry them in oil.
Mini-meatballs with mustard sauce
4 people – Preparation 1 hour
Cooking time: 16 min.
Standing time: 30 minutes in refrigerator
Ingredients:
800 g beef – 1 large onion – 2 cloves of garlic – 1 bunch of parsley – 1 egg – 2 tablespoons of oil – 3 tablespoons of
mustard – 300 ml 22% fat cream – Salt, pepper
1. Peel the onion and slice it with the fine slicer cone (H3d), and grate the garlic with the coarse grater cone
(H3a).
2. Wash, dry and chop the parsley.
3. Mince the beef in the mincer, then mix the mince with the onion, garlic, parsley and egg in a large bowl. Season.
Leave the mince to stand in the refrigerator for 30 minutes.
4. Form round meatballs with the mince and fry them in oil for 6 minutes, turning them from time to time. Beat the
cream with the mustard and pour the mixture into the pan containing the meatballs. Reduce the heat, cover and
cook for 10 minutes.
Potato soup with meatballs
4 people – Preparation 30 min.
Cooking time: 20 — 25 min.
Ingredients:
500 g minced beef – 700 g potatoes – 250 g carrots – 250 g onions – 3 tablespoons of breadcrumbs – 2 — 3 bay leaves
– Salt – Freshly ground black pepper – Peppercorns
1. The quantities indicated above correspond to a 4 litre saucepan. Peel and cut the potatoes and onions into dice
with the dicer cone (H3e / H3f). Grate the carrots with the coarse grater cone (H3a).
2. Mince the beef with the mincer head, then mix the mince with the breadcrumbs in a large bowl. Season. Stir
again.
3. Form meatballs with the minced meat.
4. Put the potatoes, onions and carrots into boiling water. Season and bring to the boil. Add the meatballs and cook
for 15 to 20 minutes.
Add the bay leaves 5 minutes before the end of cooking.
6
Notice_2643049A:Mise en page 1 29/10/10 16:23 Page6

Oven baked potato pudding
4 people – Preparation 30 min.
Cooking time: 45 min.
Ingredients:
400 g minced beef – 1 kg potatoes – 2 eggs – 2 glasses of milk – 1 clove of garlic –1.5 tablespoons of butter –
2 tablespoons of oil – Salt, pepper
1. Clean, wash and dry the potatoes. Cut them with the fine grater cone (H3d).
2. Mince the beef with the mincer head and fry it in oil in a frying pan for 5 minutes.
3. Rub the inside of an oven-proof dish with garlic, then grease it with a little of the butter.
4. Arrange two-thirds of the potatoes and the minced meat in alternating layers. Season, then add the remaining
potatoes.
5. Beat the eggs with the warm milk and pour the resulting mixture over the potatoes. Add the rest of the butter.
Cook in the oven for 45 minutes at medium temperature.
SAMOSAS
4 people – Preparation: 40 min.
Cooking time: 35 min.
Ingredients:
250 g puff pastry – 350 g beef – 1 onion – 2 eggs – Paprika – Powdered cinnamon and ginger – Parsley – Coriander –
Chervil – Sugar – 60 g butter – Olive oil
1. Fit the 4.7 mm screen to the mincer. Cut the onion in 8, then mince it with the mincer head. Heat 4 tablespoons of
olive oil in a frying pan, then add the onion. Allow it to sweat on a low heat without browning. Put to one side.
2. Mince the beef. Brown it on a low heat with the onion for 10 minutes. Put to one side.
3. Chop the herbs with the mincing head. Then add them to the frying pan with salt and pepper, half a teaspoon of
paprika, a pinch of ginger and a small teaspoon of cinnamon.
4. Next incorporate the beaten eggs, stir and remove from the heat.
5. Roll out the puff pastry quite thinly. Cut into 10 cm squares. Butter the edge of each square.
6. Put a little spoonful of stuffing on each square. Roll them up, pinching the ends.
7. Fry the samosas in boiling water. Once fried, leave them to stand for a little while on kitchen paper. Sprinkle them
with sugar and cinnamon. Serve very hot.
Variant:
Fit the 4.7 mm screen to the mincer. Mince a little meat. Cut the onion in 8, then mince it with the mincer head.
Add a little more meat, then the herbs, then the rest of the meat. Beat the eggs, and incorporate them into the
stuffing with salt and pepper, half a teaspoon of paprika, a pinch of ginger and a small teaspoon of cinnamon. Mix
well. Repeat steps 5 to 7.
LAHMA BI AJEEN
(stuffed focaccia)
4 people – Preparation: 20 min.
Cooking time: 45 min. – 1 h
Ingredients:
300 g pizza dough – 300 g beef or lamb – 4 ripe tomatoes –1 onion – 1 dried red pepper – Fresh tarragon, mint and
thyme – 1 lemon – Sugar – Milk – Olive oil
1. Mix the dough with a spoonful of oil and half a glass of milk, and form into a ball. Cover and leave to rise for
1 hour.
2. Fit the 4.7 mm screen to the mincer. Mince a little meat. Cut the onion in 8, then mince it with the mincer head.
Mince a little more meat, then the herbs, then the rest of the meat.
3. Heat 3 tablespoons of olive oil in a frying pan, then add the mixture. Incorporate the finely chopped tomatoes,
salt and pepper, and a teaspoon of sugar. Leave to cook for 10 minutes.
4. While stirring, add a small glass of water mixed with lemon juice.
5. Add the pepper. Cover and cook on a low heat for 20 minutes. Remove the lid and reduce for a little while.
Remove from the heat and leave to cool.
6. Preheat the oven to 220 °C (mark 6/7).
7. Cut four discs from the dough. Top with stuffing and fold.
8. Cook for 10 minutes in the oven. Serve immediately.
Variant:
Use tomato purée instead of fresh tomatoes.
7
Notice_2643049A:Mise en page 1 29/10/10 16:23 Page7

KIBBE BI LABAN
(kibbe meatballs with yoghurt)
6 people – Preparation: 1 h
Standing time: 1 hour in refrigerator
Ingredients for the kibbe:
400 g beef – 1 glass (180 g) of bulghur (cracked wheat) – Salt
Ingredients for the sauce: – 1 kg yoghurt – 1 bunch of coriander – 4 cloves of garlic –3 tablespoons of cornflour – Salt,
pepper
1. Cut the meat in 4 pieces. Fit the 4.7 mm screen to the mincer. Mince the meat, at the same time adding the bulghur.
Add salt, then leave the mixture to stand in the refrigerator for 1 hour.
2. To form the kibbe meatballs: fit the kibbe attachment to the meat mincer. Feed the mixture through the mincer,
closing the meatball by sealing the ends with a little water.
3. To prepare the sauce: wash the bunch of coriander, sponge it dry with kitchen paper and remove the leaves. Peel and
crush the garlic. Brown the garlic and coriander leaves in a frying pan for 1 to 2 minutes on low heat. Put to one
side.
4. Beat the yoghurt and cornflour together, then season. Pour the yoghurt and cornflour mix into a saucepan through
a fine sieve. Bring the mixture to the boil, then reduce the heat. Cook carefully, stirring so that the yoghurt does
not stick.
5. Add the garlic and coriander. Poach the kibbe meatballs for 10 minutes.
Variant:
You can also stuff the meatballs (with a mixture of onion and minced meat, browned in a little oil with a few pine nuts.)
PIROJKI
small fish pasties)
4 people – Preparation: 25 min.
Cooking time: 10 — 15 min.
Ingredients:
250 g puff pastry – 300 g cooked fish or smoked salmon – 2 hard boiled eggs – 1 bunch of dill – 2 onions –
100 g salted butter, in small cubes – Oil
1. Fit the 4.7 mm screen to the mincer. Cut the onions into 8 and mince them with the mincer head. Brown them on a
low heat in a frying pan with a little oil. Put to one side.
2. Mince a little fish, then the cooked onion, butter and dill, and finally the rest of the fish.
3. Roll out the puff pastry quite thinly, and cut out discs with a glass or small bowl of the desired size.
4. Preheat the oven to 210 °C (mark 6).
5. Place a little stuffing on each pastry disc and fold the pastry over, sealing the edges.
6. Cook for 10 to 15 minutes in the oven until golden brown.
Recipe:
N. B.: For the recipes requiring high power (approximately 500 W), the use time of the appliance must not
exceed 20 seconds.
Example recipe (with medium hole screen 4.7 mm A4a):
Lamb with split peas:
150 g lamb – 45 g split peas – 30 g flour –150 ml water –1 medium onion – 2 cloves of garlic – Salt, pepper
In a container mix the split peas and flour, then add the water gradually to obtain a smooth mixture. Start the
appliance and gradually pour the mixture onto the tray, while gently pushing the preparation into the feed tube with
the pusher C.
Cut the onion, garlic and meat into small pieces and add them to the mince.
Pour 800 ml water into a saucepan, season and add the preparation.
Simmer over a low heat for 1 hour, skim and cover.
8
Notice_2643049A:Mise en page 1 29/10/10 16:23 Page8
Оглавление
Аннотация для Мясорубки Moulinex HV 4 ME41513E в формате PDF
Топ 10 инструкций
Другие инструкции
(Ocr-Read Summary of Contents of some pages of the Moulinex hv4 Document (Main Content), UPD: 21 May 2023)
-
43, 37 Dėkojame, kad pasirinkote Moulinex gaminį. A Nuimamas malimo priedas A1 Aliuminis mėsmalės korpusas A2 Spiralinis velenas A3 Nerūdijančio plieno peiliukas A4 Sieteliai (priklausomai nuo modelio): A4a Smulkus sietelis (3mm) itin smulkiam malimui A4b Vidutinis sietelis (4,7mm) smulkiam malimui A4c Sietelis su didelmis skylutmis (7,5mm) grubiam malimui A5 Aliuminė pritvirtinimo veržlė B Nuimamas latakėlis C Stumtuvas E Įjungta/Išjungta mygtukas F Variklio korpusas APRAŠYMAS SAUGUMO INSTRUKCIJOS • Prieš…
-
54, 48 RETSEPTID BRIOUATS (täidisega pannkoogid) 4 inimesele, valmistamisaeg: 40 minutit Kuumtöötlemine: 35 minutit Ained: 250 g lehttaigent, 350 g loomaliha, 1 sibul, 2 muna, jahvatatud paprikat, kaneeli, jahvatatud ingverit, peterselli, koriandrit ja aed-harakputke. Suhkrut, 60 g võid, oliiviõli 1. Paigaldage hakklihamasinale 4,7 mm sõel. Lõigake sibul kaheksaks tükiks ja laske see hakklihamasinast läbi. Kuumutage pannil 4 …
-
50, Moulinex hv4 44 RECEPTES BRIOUATS (pankūkas ar pildījumu) 4 porcijas – gatavošanas laiks: 40 minūtes Cepšanas laiks: 35 minūtes Sastāvdaļas: 250 g kārtainās mīklas, 350 g liellopu gaļas, 1 sīpols, 2 olas, malta paprika, kanēlis & malts ingvers, pētersīļi, koriandrs un lapu kārvele. Cukurs, 60 g sviesta, olīveļļa 1. Ievietojiet sietiņu 4,7 dzirnaviņās. Sagrieziet sīpolu 8 daļās un samaliet to dzirnaviņās. Uz pannas sakarsējiet 4 ēdamkarotes olīveļļas un pievienojiet sīpolu. Apcepiet to uz lēnas ug…
-
7, 1 ООППИИССААННИИЕЕ Благодарим вас за то, что вы выбрали продукцию марки Moulinex AA Съемная головка мясорубки AA11 Алюминиевый корпус AA22 Шнек AA33 Режущий нож из нержавеющей стали с устройством самозаточки AA44 Решетки (в зависимости от модели) AA44aa Pешетка с маленькими отверстиями (3мм): для очен�…
-
32, Moulinex hv4 26 — Не оставяйте захранващия кабел на достъпно за Захранващият кабел никога не трябва да бъде близо до или в контакт с нагорещени повърхности, близо до източници на топлина или до остри ръбове — За вашата безопасност използвайте единствено приставки и резервни части на Moulinex подходящи за вашия уре…
-
12, 6 ГГооллооввккаа мм’’яяссооррууббккии ((AA)):: ССккллааддаанннняя ггооллооввккии мм’’яяссооррууббккии ((ссххееммаа 11)) Вiзьмiть корпус ((AA11)) за трубку так, щоб найбiльший отвiр був догори. Потiм вставте гвинт AA22 (довгою вiссю вперед) у корпус AA11 . Насадiть нiж з не…
-
11, Moulinex hv4 5 ООППИИСС Дякуємо за вибiр приладу з асортименту фiрми “Мулiнекс”. AA Знiмна головка м’ясорубки AA11 Алюмiнiєвий корпус AA22 Гвинт AA33 Самозагострювальний нiж з нержавiючої сталi AA44 Сiточки – залежно вiд моделi AA44aa сiточка з малими отворами (3 мм) для дуже тонкого помелу AA44…
-
21, 15 HA AZ ÖN KÉSZÜLÉKE NEM MŰKÖDIK Ellenőrizze a csatlakozást. Ha az ön készüléke nem mindig működik , forduljon egy szerződéses Moulinex szervizhez (lásd a szerviz listát). TARTOZÉKOK Déli gyümölcs szorító Steak Moulding System KEBBE tartozék Keksz tartozék Kolbásztölcsér Zöldség-vágó Vágó dob Durvára reszelő dob Finomra reszelő dob Parmezán dob Jég dob Kis lyukas rács (3mm) Közepes lyukas rács (4,7mm) Nagy lyukas rács (7,5mm) LEJÁRT ELEKTROM…
-
20, 14 BEINDÍTÁS DARÁLÓ FEJ (A): A daráló fej felszerelése (1 ábra): Fogja az (A1) testet a kéményétől fogva a legnagyobb nyílását felfele fordítva. Helyezze be az A2 csavart (hosszú tengelyt először) az A1 testbe; Illessze egymásba a rozsdamentes acél A3 kés az A2-es csavar rövid tengelyén a vágó fékezőket kifelé fordítva. Helyezze az ön által kiválasztott rácsot az A3 késre, vigyázva arra, hogy találjon az A1 test 2 sarkantyúja a 2 rovátkájával. Csavarja be (an…
-
58, Moulinex hv4 52 YEMEK TARİFLERİ BRİUAT (Milföylü küçük rulolar) 4 Kişilik – Hazırlama süresi: 40 dakika – Pişirme süresi: 35 dakika İçindekiler: 250 gr milföy hamuru 350 gr dana eti 1 soğan 2 yumurta Kırmızı biber (paprika), toz tarçın & zencefil maydanoz, kişniş ve frenkmaydanozu şeker 60 gr tereyağ zeytinyağı 1. 4.7 doğrama diskini kıyma makinesine yerleştirin. Soğanı 8 parçaya bölün …
-
18, Moulinex hv4 12 RECEPTY BRIOUAT (rolky) 4 porce – příprava: 40 min. – Vaření: 35 min. Ingredience: 250 g lístkového těsta 350 g hovězího masa 1 cibule 2 vejce mletá paprika, mletá skořice & zázvor petržel, koriandr a kerblík cukr 60 g másla olivový olej 1. Nasaďte do mlýnku děrovaný kotouč 4.7. Nakrájejte cibuli na 8 dílků a protlačte je přes mlýnek. Na pánvi zahřejte 4 polévkové lžíce olivového oleje a pak přidejte cibuli. Zpěňte ji na mírném plameni, aniž…
-
42, 36 РРЕЕЦЦЕЕППТТЫЫ BRIOUAT (mielone mięso wo łowe w cieście francuskim) 4 Porcje – Przygotowanie : 40 min. Gotowanie : 35 min. Składniki: 250 g ciasta francuskiego 350 g wołowiny 1 cebula 2 jajka papryka, cynamon i imbir w proszku pietruszka, kolendra i trybula cukier 60 g masła oliwa z oliwek 1. Nałożyć na maszynkę sitko 4.7. Przekroić cebulę na 8 części i przepuścić przez maszynkę. Rozgrzać 4 łyżki…
-
19, 13 LEÍRÁS Köszönjük, hogy egy Moulinex termékcsoporthoz tartozó készüléket választott AA Eltávolítható darálófej AA11 Alumínium test AA22 Csavar AA33 Önélező rozsdamentes acél kés AA44 Modell szerinti rácsok AA44aa Kis lyukas rácsok (3mm) nagyon apróra darálás AA44bb Közepes lyukas rácsok (4,7mm) apróra darálás AA44cc Nagy lyukas rácsok (7,5mm) durva darálás AA55 Alumínium csavar BB El…
-
47, 41 Pateicamies, ka esat izvēlējušies Moulinex sērijas izstrādājumu. A Dzirnaviņu noņemamā galviņa A1 Dzirnaviņu alumīnija korpuss A2 Skrūve A3 Nerūsējošs nazis ar automātisku uzasināšanos A4 Sietiņi (atkarībā no tipa): A4a Sietiš ar mazām acīm (3mm) oti smalkai malšanai A4b Sietiš ar vidēji lielām acīm (4,7mm) smalkai malšanai A4c Sietiš ar lielām acīm (7,5mm) rupjai malšanai A5 Alumīnija skrūvējamais gredzens B Noņemamā bļodiņa C Piespiedējs E Taustiņš “ieslēgts/izslēgts“ F Motor…
-
34, 28 РРЕЕЦЦЕЕППТТИИ РРУУЛЛЦЦАА ООТТ ММННООГГООЛЛИИСС ТТННОО ТТЕЕССТТОО 4 порции – Приготвяне: 40 минути – Печене: 35 минути ППррооддууккттии:: 250 г многолистно тесто 350 г говеждо месо 1 глава лук 2 яйца червен пипер, канела и джинджифил на прах магдан�…
-
33, 27 ААККОО УУРРЕЕДДЪЪТТ ННЕЕ РРААББООТТИИ Проверете дали е свързан с мрежата. Ако уредът продължава да не работи, обърнете се към одобрен от MMoouulliinneexx сервиз (виж списъка в гаранционната книжка). ППРРИИССТТААВВККИИ Можете да оборудвате апарата си както желаете като си набавите от мага…
-
16, Moulinex hv4 10 HLAVICE MLÝNKU (A) : Sestavení hlavice mlýnku (schéma 1) Uchopte tělo (A1) za hrdlo nejširším otvorem směrem nahoru. Následně zasuňte šnek A2 (dlouhou osou napřed) do těla A1 ; Nasaďte křížový nerezový nůž A3 na kratší osu šneku A2 tak, aby řezné hrany nože směřovaly vně. Nasaďte zvolený děrovaný kotouč za křížový nůž A3 tak, aby jeho 2 výčnělky zapadly do 2 výřezů t�…
Просмотр
Доступно к просмотру 60 страниц. Рекомендуем вам скачать файл инструкции, поскольку онлайн просмотр документа может сильно отличаться от оригинала.
-
DESCRIPTION
FR
A Tete de hachoir amovible             I4 Moule pour petites portions
A1 Corps aluminium                    I5 Collecteur de jus
A2 Vis                              J Accessoire presse agrumes (selon modele)
A3 Couteau inox auto affutable        J1 Cone / Filtre
A4 Grilles (selon modele)             J2 Entraineur
A4a Grille petits trous - hache tres fin  J3 Collecteur a jus
A4b Grille trous moyens - hache fin
A4c Grille gros trous - hache gros  K Accessoire coulis (selon modele)
A5 Ecrou aluminium                    K1 Joint etancheite
K2 Vis
B Plateau amovible                     K3 Filtre a petits trous pour les jus
C Poussoir a viande                    K4 Filtre a trous mixtes pour les coulis
D Bouton marche / arret                K5 Guide jus
K6  Brosse de nettoyage
E Bloc moteur
L Coupe legumes (selon modele)
F Accessoire saucisse (selon modele)   L1 Magasin a cones / cheminee
G Accessoire Kebbe (selon modele)      L2 Poussoir
G1 Embout de filiere                  L3 Cones (selon modele)
G2 Bague                               L3a Cone rape gros (rouge)
H Accessoire biscuits (selon modele)    L3b Cone rape fin (orange)
H1 Support                             L3c Cone tranche gros (vert fonce)
H2 Moule                               L3d Cone tranche fin (vert clair)
L3e Cone decoupe en lamelles frites
I Accessoire Steack (selon modele)      L3f Accessoire decoupe en des
I1 Base Moule
I2 Moule en forme de poisson        M/N Accessoire de rangement (selon modele)
I3 Moule en forme de steack
CONSEILS D’UTILISATION
Avant la premiere utilisation, lavez tous les accessoires a l’eau savonneuse. Rincez, et essuyez-les aussitot
soigneusement.
La grille et le couteau doivent rester gras. Enduisez-les d’huile.
Ne faites pas tourner votre produit a vide si les grilles ne sont pas graissees.
Ne poussez jamais avec les doigts ou un autre ustensile dans les cheminees.
N’utilisez pas votre appareil plus de 14 min.
UTILISATION : tete hachoir (cf. fig. 1.1 a 1.4)
Preparez toute la quantite d’aliment a hacher, eliminez les os, cartilages et nerfs. Coupez la viande en morceaux
(2cm X 2cm environ).
Astuce : En fin d’operation, vous pouvez passer quelques morceaux de pain afin de faire sortir tout le hachis.
ACCESSOIRE SAUCISSES (cf. fig. 2.1 a 2.3)
Important : cet accessoire n’est a utiliser qu’apres avoir hache la viande, avoir rajoute l’assaisonnement et avoir
bien brasse la preparation.
Apres avoir laisse le boyau tremper dans de l’eau tiede pour retrouver son elasticite, enfilez le sur l’entonnoir en
laissant depasser 5 cm (que vous obturerez en faisant un noeud avec un lien). Mettez en marche l’appareil,
alimentez le hachoir en hachis et faire suivre le boyau a mesure que celui-ci se remplit.
Nota : ce travail se fera plus facilement a deux, l’un s’occupera d’approvisionner en hachis, l’autre
s’occupera du remplissage du boyau.
7
-
Donner aux saucisses la longueur desiree en pincant et en tournant le boyau.
Pour avoir une saucisse de qualite, prenez soin d’eviter d’emprisonner de l’air lors du remplissage et faites des
saucisses de 10 a 15 cm (separez les saucisses en placant un lien et en faisant un noeud a l’aide de celui-ci).
ACCESSOIRE KEBBE (cf. fig.3.1 et 3.2)
Conseil pratique :
Pour la realisation de la pate fine de Kebbe ou Kefta, passer la viande 2 a 3 fois dans la tete de hachoir jusqu’a
obtention de la finesse desiree.
ACCESSOIRE BISCUITS (cf. fig. 4.1 et 4.2)
Preparez la pate. Vous obtiendrez de meilleurs resultats avec une pate un peu molle. Choisissez le dessin en
faisant correspondre la fleche et la forme choisie. Approvisionnez jusqu’a ce que vous ayiez obtenu la quantite
de biscuits desiree.
ACCESSOIRE STEACK (cf. fig. 5)
ACCESSOIRE PRESSE AGRUMES (cf. fig. 6.1 et 6.2)
ACCESSOIRE COULIS (cf. fig. 7)
Utilisation : Placez un recipient pour recuperer le jus sous le guide jus K5 et un autre en bout de filtre pour
recuperer les dechets. Pour la realisation de coulis et de jus, il est imperatif de n’utiliser que des fruits frais.
Suivant la saison et la qualite des fruits, il est conseille de repasser une deuxieme fois la pulpe pour extraire le
maximum de coulis ou de jus.
Jus : Utilisez le filtre K3
Coulis : Utilisez le filtre K4
COUPE LEGUMES (cf. fig. 8.1 a 8.6 / fig.10)
Utilisez le cone preconise pour chaque type d’aliment : cf. tableau fig.10.
Conseils pour obtenir de bons resultats :
Les ingredients que vous utilisez doivent etre fermes pour obtenir des resultats satisfaisants et eviter toute
accumulation d’aliment dans le magasin. Ne pas utiliser l’appareil pour raper ou trancher des aliments trop durs
tels que le sucre ou morceaux de viande.
NETTOYAGE (cf. fig. 9.1 a 9.6)
8
-
DESCRIPTION
EN
A Removable meat mincing head          I5 Juice collector
A1 Aluminum body                    J Vegetable pressing accessory (according to model)
A2 Screw                              J1 Cone / Filter
A3 Stainless steel self-sharpening blade  J2 Axis
A4 Grids (according to model)         J3 Juice collector
A4a  Small holes grid - for very fine mincing
A4b  Medium holes grid - for fine mincing  K Coulis accessory (according to model)
A4c Large holes grid - for large chopping  K1 Watertightness joint
A5 Aluminum nut                       K2 Screw
K3 Small holes filter for juice
B Removable tray                       K4 Mixed holes filter for coulis
C Meat pusher                          K5 Juice guide
D START/STOP button                    K6 Cleaning brush
E Motor unit                         L Vegetable cutter (according to model)
L1 Cone compartment / spout
F Sausage accessory (according to model)
L2 Pusher
G Kebbe accessory (according to model)  L3 Cones (according to model)
G1 Connector cap                       L3a Coarse grating cone (red)
G2 Ring                                L3b Fine grating cone (orange)
H Biscuit accessory (according to model)  L3c Thick slicing cone (dark green)
H1 Support                             L3d Fine slicing cone (light green)
H2 Mould                               L3e Fine dicing cone
I Steak Accessory (according to model)  L3f Dice cutting accessory
I1 Mould base                       M/N Storing accessory (according to model)
I2 Fish-shaped mould
I3 Steak-shaped mould
I4 Nuggets-shaped mould
RECOMMENDATIONS FOR USE
Before using for the first time, wash all the accessories in soapy water. Rinse them and dry them carefully
straight afterwards.
The grids and the blade must remain oiled. Keep these parts coated with a little cooking oil.
Do not activate the appliance while empty, if the grids are not properly coated with a little cooking oil.
Never use your fingers or other utensils to push food through the spout.
Do not operate your appliance for more than 14 min.
USE : MEAT MINCING HEAD (fig. 1.1 to 1.4)
Prepare the amount of meat you wish to mince, removing any bones, cartilage and sinew. Cut the meat into
pieces (about 2cm x 2cm). Thaw frozen food completely before mincing.
Tip: At the end, you can pass a few pieces of bread through the mincer head in order to extract all the minced
meat.
SAUSAGE ACCESSORY (fig. 2.1 to 2.3)
Important: This accessory must only be used after having minced the meat, added the flavorings and kneaded
the preparation well.
9
- 1
- 2
- 3
- 4
- 60

EN
p 1
–
p 8
LT
p 9
–
p 16
LV
p 17
–
p 24
ET
p 25
–
p 32
PL
p 33
–
p 40
RU
p 41
–
p 49
UK
p 50
–
p 58
HU
p 59
–
p 66
CS
p 67
–
p 74
SK
p 75
–
p 82
BS
p 83
–
p 90
BG
p 91
–
p 99
HR
p 100 – p 107
RO
p 108 – p 115
SR
p 116 – p 123
SL
p 124 – p 131
www.moulinex.com
EN
LT
LV
ET
PL
RU
UK
HU
CS
SK
BS
BG
HR
RO
SR
SL
Réf. 2643049A
Notice_2643049A:Mise en page 1 29/10/10 16:23 Pagea1