

Summary of Content for Nespresso Lattissima One Descaling Guide PDF
1
D E S C A L I N G G U I D E
2
I M P O R TA N T I N F O R M AT I O N B E F O R E Y O U B E G I N
Nespresso recommends descaling every 3 months or 300 capsules (whichever comes first).
(such as vinegar or store-bought descalers) may cause damage to your Nespresso machine.
In case of contact with eyes, rinse immediately with plenty of water for 15 minutes and seek medical advice.
Avoid filling up the water tank during the descaling process.
After descaling, wipe down the machine with a damp cloth.
Nespresso machines should be descaled with a Nespresso Descaling Kit which contains a natural solution that thoroughly dissolves the scale build up. Other solutions
Descaling solution can damage or discolor surfaces so we suggest placing something underneath your machine in case a spill should occur. If a spill does occur, please make sure
to clean up the solution immediately to avoid any damage.
Keep descaling solution out of reach of children.
Do not swallow or ingest the descaling solution.
The descaling solution may be irritating to the eyes and skin.
LATTISSIMA ONE
4
Duration: 20 minutes
S T E P 1
When the descaling indicator light shines orange, it is time to descale.
S T E P 2
Eject the capsule. Close the lever.
S T E P 3
Empty the capsule container and drip tray and then reinsert. The cup support can be removed during the descaling process.
S T E P 4
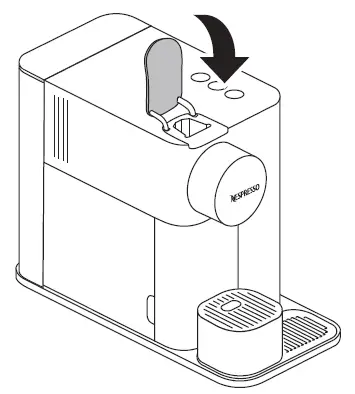
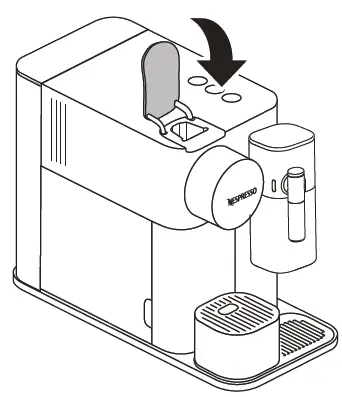
After removing the water tank, remove the descaling pipe from the back of the machine.
S T E P 5
Plug the pipe into the steam connector on the right of the machine.
S T E P 6
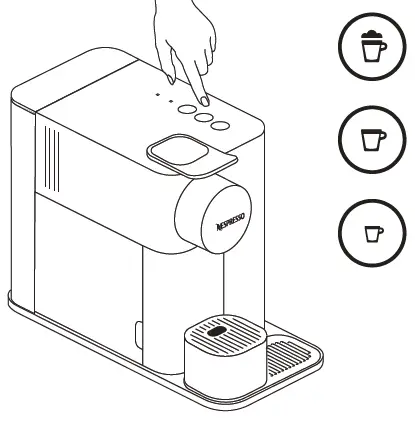
The espresso button will blink white and the descaling light will begin blinking orange.
S T E P 7
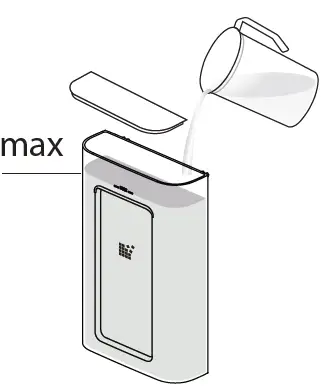
Fill the water tank two thirds full with water and add 1 packet of Nespresso descaling solution and place tank on the machine.
S T E P 8
Place a receptacle underneath the coffee outlet and descaling pipe.
S T E P 9
Press and release the espresso button and descaling solution will begin to flow alternately from the coffee outlet, descaling pipe and drip tray outlets.
LATTISSIMA ONE
5
S T E P 1 0
The descaling light will blink orange throughout the entire process. The Espresso button will begin blinking white when descaling solution is done running through.
S T E P 1 1
Discard the descaling solution, rinse and wash the water tank thoroughly and refill the tank to MAX line with fresh water before placing back onto the machine.
S T E P 1 2
Empty the capsule container and drip tray and reinsert.
S T E P 1 3 S T E P 1 4 S T E P 1 5
Place the empty receptacle under the coffee outlet.
Press and release the espresso button and rinsing will alternate between the coffee outlet, descaling pipe, and drip tray outlets.
The machine will automatically power off once the rinsing is complet
Manualsnet FAQs
If you want to find out how the Lattissima One Nespresso works, you can view and download the Nespresso Lattissima One Descaling Guide on the Manualsnet website.
Yes, we have the Descaling Guide for Nespresso Lattissima One as well as other Nespresso manuals. All you need to do is to use our search bar and find the user manual that you are looking for.
The Descaling Guide should include all the details that are needed to use a Nespresso Lattissima One. Full manuals and user guide PDFs can be downloaded from Manualsnet.com.
The best way to navigate the Nespresso Lattissima One Descaling Guide is by checking the Table of Contents at the top of the page where available. This allows you to navigate a manual by jumping to the section you are looking for.
This Nespresso Lattissima One Descaling Guide consists of sections like Table of Contents, to name a few. For easier navigation, use the Table of Contents in the upper left corner.
You can download Nespresso Lattissima One Descaling Guide free of charge simply by clicking the “download” button in the upper right corner of any manuals page. This feature allows you to download any manual in a couple of seconds and is generally in PDF format. You can also save a manual for later by adding it to your saved documents in the user profile.
To be able to print Nespresso Lattissima One Descaling Guide, simply download the document to your computer. Once downloaded, open the PDF file and print the Nespresso Lattissima One Descaling Guide as you would any other document. This can usually be achieved by clicking on “File” and then “Print” from the menu bar.
I may get commissions for purchases made through links in this post.
The water used to brew your espresso or coffee pods contains minerals that cause limescale to build up inside your machine; descaling Nespresso removes those minerals. If left untreated, this can have a negative impact on the temperature and taste of your coffee as well as the machine’s water flow. Nespresso machines are not cheap, so learning how to give it a proper deep clean is essential to extending their life.
Keep reading to learn more about how to descale Nespresso machines. I have written step by step descaling instructions for every single Nespresso model, including Vertuo and Original. To begin the process, you will need a descaling solution kit like one of those we review below.

Descaling a Nespresso Machine
How Often To Descale Nespresso Machines
In addition to daily cleaning, Nespresso recommends you descale your machine every 3 months or 300 capsules, whichever comes first. If your tap has “hard water,” meaning it contains higher level of minerals, then you should clean your machine more frequently. If you are not sure about the level of minerals in your water, you can get a low-cost water testing kit.
The more premium Nespresso Original models with a built in display will have an alert that will let you know that it is time to descale your machine. The Nespresso Vertuoline has a light that will let you know that it is time to descale. On the VertuoPlus, the light will be half red and half green, though the green may look yellow to some people. On The Vertuo Next, Vertuo and Evoluo it will be an orange blinking light. To some people, this light may look yellow. You can still use your machine a few times after this warning light turns on, but it’s best to descale soon as possible.

You can still use your machine a few times after this warning light turns on, but it’s best to descale soon as possible. It takes around 15 to 20 minutes to finish the process. It cannot be stopped so be sure to start only once you have all of the supplies you need and have enough time to finish it.
Why Descaling Nespresso With Vinegar Is A Bad Idea
Nespresso warns that you should NOT descale your machine with vinegar. White vinegar contains 5-8% acetic acid. This specific type of acid can wear down metal and cause your machine to leak. As a result, using vinegar to clean your Nespresso can void the warranty on your machine.
Instead of damaging your machine by using vinegar, you can use one of these descaling kits to maintain your Nespresso machine. These kits contain safer and effective types of cleansing acids.
Nespresso Descaling Solution Reviews
Nespresso Descaling Solution

This is the official descaling solution kit made by Nespresso. Nespresso strongly recommends only using this descaler. It is compatible with all Original models. This descaling solution will gently eliminate the lime scale that has built up in your machine. Each pack contains 2 kits, so you’ll get two total uses out of it.
Impresa Coffee Machine Descaler

The Impresa descaler is a top selling coffee machine cleaner. It uses citric and sulfamic acids. Both are gentle on metal and aluminum. A pack has two bottles, each enough solution for two uses.
De’Longhi EcoDecalk Descaler

The De’Longhi Descaler is another Amazon customer favorite. It is made in Italy with high quality, plant-based lactic acid. This solution can be used to solve a descaling issue with any coffee machine, including those made by Breville. A 16.90 fl oz bottle contains enough solution for up to 5 uses.
How To Descale Nespresso: Instructions For Every Model
Vertuo Next, Vertuo, Vertuo Pop or Evoluo

The Nespresso Vertuo Next, Vertuo, Vertuo Pop and Evoluo all have the same descaling instructions. You need a descaling solution before you get started.
- Empty the capsule container. Remove the drip tray and empty it.
- Add the solution and clean water to the tank, following the instructions on your solution.
- Close and lock the machine to turn it on. Allow it to heat up. When the light stops flashing, it has finished heating up.
- Open the machine head and empty any used capsule. Close it and leave the lever in unlocked position towards the front.
- Press and hold the button for at least 7 seconds to enter descaling mode. The button will blink rapidly when it is ready. You then have 45 seconds to start the next steps in the descaling process.
- Turn the lever left towards the lock symbol, then unlock by turning right. Hold the button in the unlocked position for at least 7 seconds.
- Place a container that is at least 34 fl oz under the coffee outlet.
- To start descaling, turn the lever left to lock the machine. Push the button. It will stop when the first phase is done.
- Empty and rinse the water tank, drip tray and cup support.
- Fill the water tank with fresh water. Push the button to rinse.
- When the light stops flashing and becomes steady, the process is done.
- Let it sit and dry for at least 10 minutes.
Vertuo Plus

The descale instructions for Nespresso Vertuo Plus are a bit different than other models. You need a descaling solution. If you would like to see an illustrated step by step guide for the VertuoPlus, click on the link and see pages 21-23 in the user manual.
- Turn the machine on by pressing the button.
- Eject any used capsule. Push the lever down to close.
- Push the lever for 3 seconds to turn off the coffee maker. Empty the cup support and capsule container.
- Add the solution and water to the tank, following the instructions on your kit.
- Start descaling by pushing the button and lever down at the same time for 3 seconds. An orange light will turn on.
- Press the lever down one time in the next 2 minutes to select descaling. An orange light will come on.
- Place a 20 fl oz bowl under the coffee outlet.
- Click on the button to start. It will stop when the process is done.
- Empty and rinse the water tank and cup support. Then fill the tank with fresh water and put it back.
- Push the button again to rinse. It will stop when it is complete, but you can also stop the process by pushing the button once the orange light flashes every 2 seconds.
- Press the button and the lever down for 3 seconds to exit descaling mode. The light should turn green.
- Let it sit and dry for 10 minutes before use.
Lattissima Pro
- Open the lever to eject any used capsule. Empty the drip tray and used capsule container.
- Enter the menu and browse until you see the descaling option. Select it. The display will guide you through the following steps:
- Add the solution and water to the tank, following the instructions on your kit.
- Insert the hot water spout.
- Place a 1L container under both the hot water spout and the coffee outlet.
- Press to confirm and the descaling cycle will begin.
- When done, empty the drip tray and capsule container again. Rinse with clean water.
- Fill the water reservoir to the MAX line with fresh drinking water only.
- Empty the 1L container and put it back in place.
- Press to confirm and the rinse cycle will start.
- The machine will switch off when the rinsing is done. Rinse the hot water spout with clean water.
Gran Lattissima
- Open the lever to eject any used capsule. Empty the drip tray, used capsule container, cup support and drop collector.
- Remove the water tank. Add the solution and water to the tank, following the instructions on your kit.
- Locate the descaling pipe at the back of the machine. Plug it into the steam connector. Replace the water tank.
- The machine will enter descale mode. The descaling alert will blink orange while the flat white button turns a steady white.
- Place a 1L container under the descaling pipe nozzle and coffee outlet. Press the flat white button to begin the cycle. It will continue until the water tank is empty.
- Empty and rinse the drip tray, used capsule container, cup support and drop collector. Also empty the 1L container and put it back in its place.
- Rinse the water tank and fill it with fresh drinking water to the MAX line.
- Press the flat white button again to start the rinse cycle.
- The machine will turn off when the rinse cycle is done. Carefully remove the descaling pipe (it may be hot) and return to the back of the machine.
- Fill the water reservoir with fresh drinking water to the MAX line.
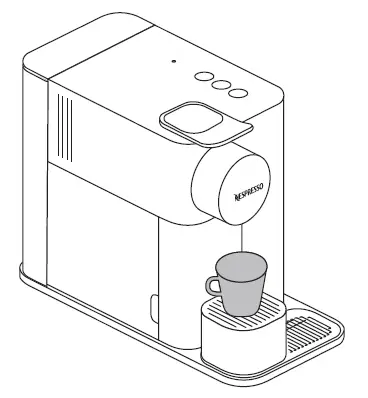
Lattissima One
The Lattissima One has a descaling alert that will shine orange when it is time to clean the machine. Follow these steps:
- Open the lever to eject any used capsule. Empty the drip tray and used capsule container.
- Add the solution and water to the tank, following the instructions on your kit.
- Place a 1L container under the coffee outlet. Turn the machine on.
- Locate the descaling pipe at the back of the machine. Plug it into the steam connector.
- The machine will enter descale mode. The descaling alert will blink orange while the espresso button turns a steady white.
- Press the espresso button to begin the cycle. It will continue until the water tank is empty.
- Empty and rinse the used capsule container, drip tray and container. Also empty the 1L container and put it back in its place.
- Rinse the water tank and fill it with fresh drinking water to the MAX line.
- Press the espresso button again to start the rinse cycle.
- The machine will turn off when the rinse cycle is done. Carefully remove the descaling pipe (it may be hot) and return to the back of the machine.
- Fill the water reservoir with fresh drinking water to the MAX line.
Lattissima Plus
When the cappuccino button turns orange, it is time to descale the machine. Follow these steps:
- Open the lever to eject any used capsule. Empty the drip tray and used capsule container.
- Add the solution and water to the tank, following the instructions on your kit. If using the Nespresso solution, fill the tank half way with water.
- Locate the descaling pipe from its storage area. Push it onto the steam connector. You should now see that the cappuccino button is blinking orange.
- Place a 1L container under the coffee outlet and descaling pipe.
- Press the cappuccino button to begin the cycle. It will continue until the water tank is empty.
- Empty and rinse the used capsule container, drip tray and container. Also empty the 1L container and put it back in its place.
- Rinse the water tank and fill it with fresh drinking water to the top.
- Press the cappuccino button again to start the rinse cycle.
- The machine will turn off when the rinse cycle is done. Carefully remove the descaling pipe (it may be hot) and return to the storage area
- Fill the water tank with fresh drinking water.
Lattissima Touch
- Open the lever to eject any used capsule. Empty the drip tray and used capsule container.
- Add the solution and water to the tank, following the steps on your kit. If using the Nespresso solution, fill the tank half way with water.
- Locate the descaling pipe from its storage area. Push it onto the steam connector. You should now see that the warm milk button is blinking orange.
- Place a 1L container under the coffee outlet and descaling pipe.
- Press the warm milk button to begin the cycle. It will continue until the water tank is empty.
- Empty and rinse the used capsule container, drip tray and container. Also empty the 1L container and put it back in its place.
- Rinse the water tank and fill it with fresh drinking water to the top.
- Press the warm milk button again to start the rinse cycle.
- The machine will turn off when the rinse cycle is done. Carefully remove the descaling pipe (it may be hot) and return to the storage area
- Fill the water tank with fresh drinking water.
CitiZ, Pixie or Inissia

The Nespresso CitiZ, Pixie and Inissia all have the same descaling instructions. To clean them, you need a descaling solution.
- Open the lever to eject any used capsule. Empty the drip tray and used capsule container.
- Add the solution and water to the tank, following the instructions on your kit.
- Place a 1L container under the coffee outlet. Turn the machine on.
- Press and hold both the Espresso and Lungo buttons for 3 seconds to enter descaling mode. Both buttons will blink.
- Press the Lungo button only and the descaling process will start. Wait until the water tank is empty.
- Pour the contents of the container back into the water tank. Repeat steps 3 and 5.
- Empty and rinse the water tank thoroughly. Fill it with fresh drinking water only.
- Perform a rinse cycle to remove any residue from inside the machine. To do this, repeat steps 3 and 5.
- Press and hold both the Espresso and Lungo buttons for 3 seconds to exit descale mode. If you do not, the lights will continue to blink.
Essenza Mini

To clean your machine, you need a descaling solution. Your manual has instructions on how to descale. You may also see pdf pages 18-19 in the Nespresso Essenza Mini manual.
- Open the lever to eject any used capsule. Empty the drip tray and used capsule container.
- Add the solution and water to the tank, following the instructions on your kit.
- Place a 1L container under the coffee outlet. Turn the machine on.
- Press and hold both the Espresso and Lungo buttons for 5 seconds to enter descaling mode. Both buttons will blink.
- Press the Lungo button only and the descaling process will start. Wait until the water tank is empty.
- Pour the contents of the container back into the water tank. Repeat steps 3 and 5.
- Empty and rinse the water tank thoroughly. Fill it with fresh drinking water only.
- Perform a rinse cycle to remove any residue from inside the machine. To do this, repeat steps 3 and 5.
- Press and hold both the Espresso and Lungo buttons for 5 seconds to exit descale mode.
- Empty the drip base.
Essenza Plus
To clean your machine, you need a descaling solution. Your manual has instructions on how to descale. You may also see pdf pages 17-18 in the Essenza Plus manual.
- Open the lever to eject any used capsule. Empty the drip tray and used capsule container.
- Add the solution and water to the tank, following the instructions on your kit. If using the Nespresso solution, fill the tank with fresh water to the half level. Then add one packet of descaler.
- Place a 1L container under the coffee outlet. Turn the machine on.
- Press and hold the Espresso, Lungo and Hot Water buttons for 5 seconds to enter descaling mode. All three buttons will blink.
- Press the Hot Water button only and the descaling process will start. Wait until the water tank is empty.
- Discard the contents of the 1L container.
- Empty and rinse the water tank thoroughly. Fill it with fresh drinking water only.
- Perform a rinse cycle to remove any residue from inside the machine. To do this, press the Hot Water button only.
- The Essenza Plus will shut off automatically once the rinse cycle is over.
- Empty the drip base.
Creatista Pro
Turn on the machine. On the menu, navigate to Descale and select. Follow the on screen instructions. Add the solution and water to the tank, following the instructions on your kit.
Creatista Plus

Turn on your machine. Rotate the dial to navigate to Maintenance and select. Turn the dial to Descale and select. Follow the on screen instructions. Add the solution and water to the tank, following the instructions on your kit.
Creatista Uno
- Open the lever to eject any used capsule. Empty the drip tray and used capsule container.
- Add the solution and water to the tank, following the instructions on your kit.
- Place a 1L container under the coffee outlet. Turn the machine on.
- While the machine is turned OFF, press and hold both the Ristretto and Steam button together for 5 seconds. This will enter the unit into descale mode. Both buttons will illuminate steadily. Press either the Ristretto or Lungo button to begin descaling.
- When the cycle is over, discard the liquid from the 1L container and return to it to its former position.
- Empty the water tank and rinse clean. Fill the water tank to the MAX line with fresh drinking water.
- Press either the Ristretto or Steam button to begin a rinse cycle.
- When the first rinse cycle is done, empty the 1L container and return it. Repeat steps 6 and 7 to run the rinse cycle a second time.
- When this cycle is done, the Ristretto and Steam buttons will flash three times and the machine will turn off.
- Rinse the drip tray and water tank and reattach them to the machine. Fill the tank with clean water to the MAX line.
Now that your Nespresso machine is clean, stock up on your favorite pods or try something new. For inspiration, see our buying guides. Shop by caffeine level or by intensity level.
Nespresso U
Prep
- Empty the drip tray and used capsule container. Make sure there is no pod in the machine.
- Empty the water tank. Add 1 packet of the Nespresso descaling solution to the reservoir. Then fill it up with 0.5L fresh water.
- Place a container that is at least 0.6L under the coffee outlet.
- Turn the machine on by opening the slider.
Descale Cycle
- Once all buttons have stopped flashing, press and hold the three controls for three seconds. The machine will beep and the three buttons will blink quickly.
- Close the slider to begin the descaling cycle. It will stop when the tank is empty.
- When it stops, refill the water tank with the water-solution mix that is in the container.
- Press any button to continue the descale cycle until the tank empties again.
Rinse
- Empty the container. Rinse the empty water tank, drip tray and cup support to remove any residue.
- Fill the water reservoir with fresh water to the max line.
- Touch any button to start the rinse cycle. It will stop when the water tank has completely emptied.
- Empty the drip tray.
- To exit descale mode, push all 3 buttons for 3 seconds. You will hear a beep and the Nespresso U is now ready for use.
Nespresso Expert
Follow the below instructions carefully. The descaling steps are the same whether you have a Nespresso Expert or an Expert&Milk machine.
Prep
- Empty the drip tray and used capsule container. Make sure there is no pod in the machine.
- Empty the water tank. Add 2 packets of the Nespresso descaling solution to the reservoir. Then fill it up with fresh water to the MAX line. Do not fill above this line!
- Place a container that is at least 1.2L under the coffee and hot water outlets.
- Turn the machine off and close the slider. To turn off the machine, turn the temperature dial counter-clockwise until it reaches 0. The light will blink for 5 seconds and then the unit will turn off.
Descale Cycle
- Press and hold the brew button for 6 seconds. Both dials will flash to confirm that you have entered the special functions menu.
- Turn the recipe dial to the ristretto icon and then press the brew button once.
- Turn the temperature dial to high and then press the brew button once. The ristretto icon will start to blink. This confirms that your Nespresso Expert is in descaling mode. It will continue to blink during the entire process. The maintenance light, however, will be steady most of the time. Keep an eye on the maintenance light because it will blink at times when you need to take action during the process.
- Press the brew button one more time to start descaling.
- After a few minutes, the descaling process will temporarily stop and the maintenance light will blink. Empty both the container and the drip tray and return them back to the machine.
- Push the brew button again. Descaling will resume and keep going until the water tank is completely empty, at which point it will stop.
Rinse
- Empty the container. Rinse the empty water tank, drip tray and cup support to remove any residue.
- Fill the water reservoir with 1.2L or 41 oz of fresh water. Be sure to not under-fill the tank! if you do, the descale maintenance light will keep blinking after the process is done.
- Empty the 1.2L container and put it back in place and press the brew button once to start the rinse cycle.
- The machine will switch off when the water tank is empty and rinsing is done.
What To Do If the Nespresso Descaling Alert Stays On?
Depending on the Nespresso model you have, you may have to manually exit descaling mode. If you don’t, the descaling alert may stay on. Eventually you be blocked from making coffee. See my related post for detailed steps on how to exit descaling.
| Auto Exit Descaling | Manual Exit Descaling |
|---|---|
| Vertuo Next Gran Lattissima Lattissima Pro Lattissima One Lattissima Touch Creatista Pro Creatista Plus Creatista Uno Essenza Plus Nespresso Expert |
Vertuo Plus Vertuo Evoluo Essenza Mini CitiZ Pixie Inissia Nespresso U |
Another common reason why the descale alert stays on is because a step was not completed quickly enough or did not finish. For example, the Vertuo Plus requires you to complete each step within two minutes of the last. Also, many models will require that you let the water tank completely empty during the rinse cycle. If it doesn’t empty all the way, the light will stay on. In that case, you can try running the descaling again from start to finish, this time using only water and no solution.
If all else fails and you can’t get out of descaling mode, you may need to reset your Nespresso.
get our latest guides, reviews, recipes and more for your coffee machine in your inbox
Thank you for subscribing. Check your email and confirm your subscription.
Something went wrong.

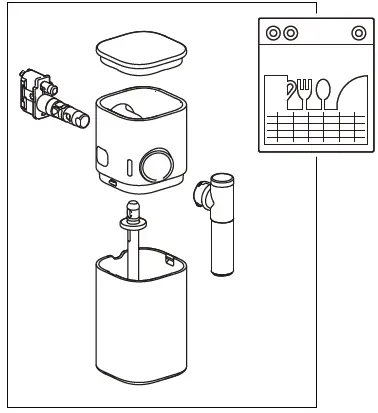
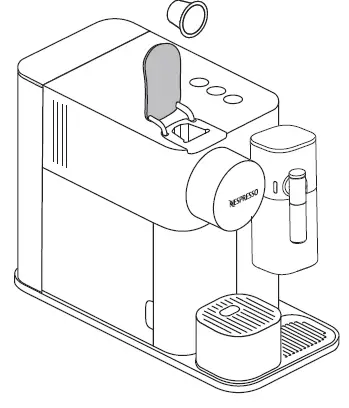
Overview
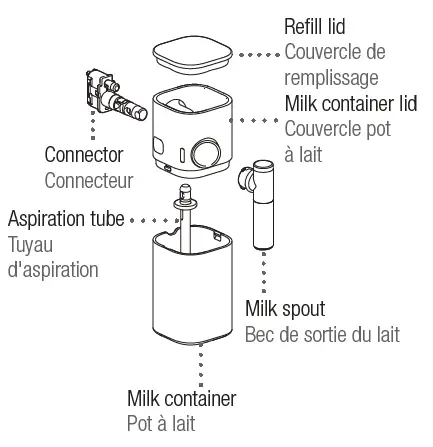
1. Rapid Cappuccino system
2. Refill lid
3. Water tank (1 L)
4. Rapid Cappucino system connector
5. Coffee outlet
6. Lever
7. Base grid
8. Cup support
9. Drip tray
10. Used capsule container
16. Descaling pipe
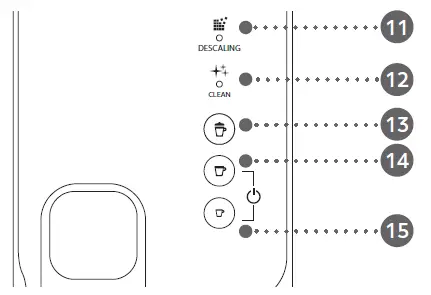
Alerts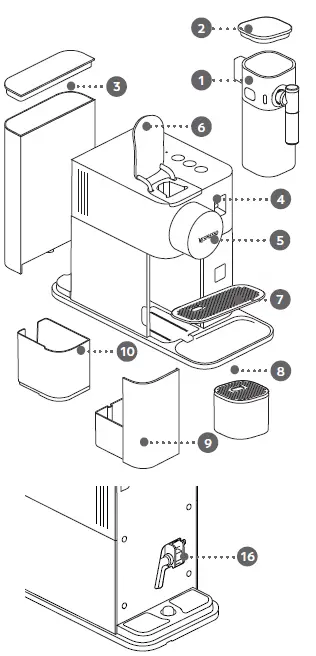
11.DESCALING : descaling alert refer to section “Descaling”
12. CLEAN : milk system cleaning alert refer to section “Preparing Espresso Macchiato – Cappuccino – Latte Macchiato”
13. Milk drink (Espresso Macchiato, Cappuccino, Latte Macchiato)
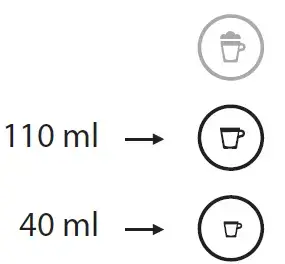
14. Lungo 110 ml
15. Espresso 40 ml
Safety Precautions
CAUTION:
- WHEN YOU SEE THIS SIGN, PLEASE REFER TO THE SAFETY PRECAUTIONS TO AVOID POSSIBLE HARM AND DAMAGE.
- THE SAFETY PRECAUTIONS ARE PART OF THE APPLIANCE. READ ALL INSTRUCTIONS CAREFULLY BEFORE USING YOUR NEW APPLIANCE FOR THE FIRST TIME. KEEP THEM IN A PLACE WHERE YOU CAN FIND AND REFER TO THEM LATER ON.
- WHEN YOU SEE THIS SIGN, PLEASE TAKE NOTE OF THE ADVICE FOR THE CORRECT AND SAFE USAGE OF YOUR APPLIANCE.
- The appliance is intended to prepare beverages according to these instructions.
- Do not use the appliance for other than its intended use.
- This appliance has been designed for indoor and non-extreme temperature conditions use only.
- Protect the appliance from direct sunlight effect, prolonged water splash and humidity.
- This is a household appliance only. It is not intended to be used in: staff kitchen areas in shops, offices and other working environments; farm houses; by clients in hotels, motels and other residential type environments; bed and breakfast type environments.
- This appliance shall not be placed in a cabinet when in use.
- This appliance may be used by children of at least 8 years of age, as long as they are supervised and have been given instructions about using the appliance safely and are fully aware of the dangers involved. Cleaning and user maintenance shall not be made by children unless they are older than 8 and they are supervised by an adult.
- Keep the appliance and its cord out of reach of children under 8 years of age.
- This appliance may be used by persons with reduced physical, sensory or mental capabilities, or whose experience or knowledge is not sufficient, provided they are supervised or have received instruction to use the device safely and understand the dangers.
- Children shall not use the device as a toy.
- The manufacturer accepts no responsibility and the guarantee will not apply for any commercial use, inappropriate handling or use of the appliance, any damage resulting from use for other purposes, faulty operation, non-professionals’ repair or failure to comply with the instructions.
- If an extension cord is required: for voltage 230V, the conductor cross-section for an extension should be at least 1.0 mm2. For voltage 120V, the cross-section should be at least 1.5 mm2.
Avoid risk of fatal electric shock and fire.
- In case of an emergency: immediately remove the plug from the power socket.
- Only plug the appliance into suitable, easily accessible, earthed mains connections. Make sure that the voltage of the power source is the same as that specified on the rating plate. The use of an incorrect connection voids the guarantee.
- In case of plug incompatibility with the socket, use an adaptor ensuring the ground continuity between the machine and the network.
The appliance must only be connected after installation.
- Do not pull the cord over sharp edges, clamp it or allow it to hang down.
- Keep the cord away from heat and damp.
- If the supply cord or the plug are damaged, they must be replaced by the manufacturer, its service agent or similarly qualified persons, in order to avoid all risks.
- Do not operate any appliance with a damaged cord or plug or after the appliance malfunctions, or has been damaged in any manner. Return appliance to the nearest authorized service facility for examination, repair or adjustment.
- If an extension cord is required, use only an earthed cord with a conductor cross-section of at least 1.5 mm2 or matching input power.
- To avoid hazardous damage, never place the appliance on or beside hot surfaces such as radiators, stoves, ovens, gas burners, open flame, or similar.
- Always place it on a horizontal, stable and even surface. The surface must be resistant to heat and fluids, like water, coffee, descaler or similar liquids.
- Disconnect the appliance from the mains when not in use for a long period. Disconnect by pulling out the plug and not by pulling the cord itself or the cord may become damaged.
- Unplug from outlet when not in use and before cleaning. Allow to cool before putting on or taking off parts, and before cleaning the appliance.
- Always attach plug to appliance first, then plug cord into the wall outlet. To disconnect, stop any preparation, turn any control to “off”, then remove plug from wall outlet.
- Never touch the cord and the plug with wet hands.
- To protect against fire, electric shock and injury to persons, do not immerse cord, or plugs, in water or other liquid.
- Never immerse the appliance in any liquid.
- Never put the appliance or part of it in a dishwasher, except the disassembled Rapid Cappuccino System, base grid, cup support, drip tray and used capsule container.
- Electricity and water together is dangerous and can lead to fatal electrical shocks.
- Do not open the appliance. Hazardous voltage inside!
- Do not put anything into any openings. Doing so may cause fire or electrical shock!
- The use of accessory attachments not recommended by the appliance manufacturer may result in fire, electric shock or injury to persons.
- Close supervision is necessary when any appliance is used by or near children.
- Do not use outdoors.
Avoid possible harm when operating the appliance.
- Never leave the appliance unattended during operation.
- Do not use the appliance if it is damaged, has been dropped or not operating perfectly. Immediately remove the plug from the power socket. Contact Nespresso or Nespresso authorized representative for examination, repair or adjustment.
- A damaged appliance can cause electrical shocks, burns and fire.
- Always completely close the lever and never lift it during operation. Scalding may occur.
- Do not put fingers under coffee outlet. Risk of scalding.
- The surface of the heating element remains hot after use and the outside of the appliance may retain the heat for several minutes depending on use.
- Do not put fingers into capsule compartment or the capsule shaft. Danger of injury!
- Water could flow around a capsule when not perforated by the blades and damage the appliance.
- Never use an already used, damaged or deformed capsule.
- If a capsule is blocked in the capsule compartment, turn the machine off and unplug it before any operation. Call Nespresso or Nespresso authorized representative.
- Always fill the water tank with cold, drinking water.
- Empty water tank if the appliance will not be used for an extended time (holidays, etc.).
- Replace water in water tank when the appliance is not operated for a weekend or a similar period of time.
- Do not use the appliance without the drip tray and drip grid to avoid spilling any liquid on surrounding surfaces.
- The machine is not intended for use with raw milk.
- Do not use any strong cleaning agent or solvent cleaner. Use a damp cloth and mild cleaning agent to clean the surface of the appliance.
- To clean machine, use only clean tools.
- When unpacking the machine, remove the protective film and dispose.
- This appliance is designed for Nespresso coffee capsules available exclusively through Nespresso or your Nespresso authorized representative.
- This equipment is specific for cow milk, not to use with other products/alternative beverages (soya, oat, almond beverages), therefore it is not fit for lactose intolerants or milk allergics. The cow milk beverages delivered by this equipment are not suitable for children under age of 3.
- All Nespresso appliances pass stringent controls. Reliability tests under practical conditions are performed on randomly selected units. This can show traces of any previous use.
- Nespresso reserves the right to change instructions without prior notice.
Descaling
- Nespresso descaling agent, when used correctly, helps ensure the proper functioning of your machine over its lifetime and that your coffee experience is as perfect as the first day.
- Descale according to user manual recommendations, or consult the descaling information by visiting the Nespresso website www.nespresso.com/machine-maintenance.
CAUTION: the descaling solution can be harmful. Avoid contact with eyes, skin and surfaces. The use of any unsuitable descaling agent may lead to machine component damage or an insufficient descaling process. For any additional questions you may have regarding descaling, please contact Nespresso.
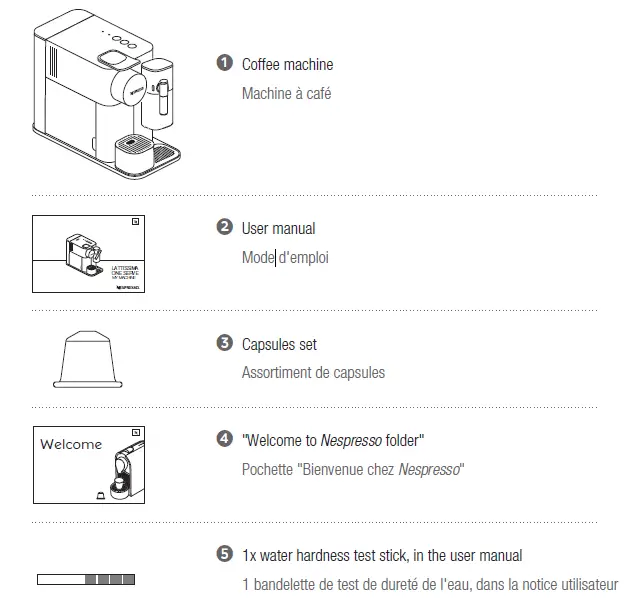
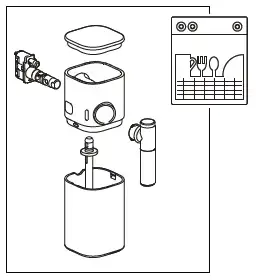
Packaging Content
Lattissima One
THE CLASSIC ESPRESSO EXPERIENCE
With the Nespresso Original system, you’re invited to enjoy the essence of an espresso, with or without milk. Inspired by the Italian coffee tradition, it’s a timeless experience at the touch of a button. The Nespresso Original machines and capsules offer an array of aromas to fit all coffee tastes. Espresso or lungo, black or in a recipe, always layered with a soft crema or an indulgent foam. This is only made possible thanks to the 19-bar pressure in every machine. It extracts the optimal flavours from each capsule, to reveal them in your cup. Nespresso Original, classic in its own way
First use
CAUTION: first read the safety precautions to avoid risks of fatal electrical shock and fire.
Please ensure ground continuity when plugging the machine in the power outlet.
- When unpacking the machine, remove the protective film, water tank, drip tray, and used capsule container. Adjust the cable length and store the excess in the cable guide under the machine.
 Remove the sticker on the grid. You can register your machine on www.nespresso.com
 - Plug machine into the mains. Rinse the water tank before filling with drinking water up to maximum level.
- Switch the machine on by pressing any buttons:
- Blinking lights: heating-up (18 sec)
- Illuminates white: ready to use
- Rinse the machine by placing a 500 ml container under the coffee outlet and pressing the Lungo button. Repeat three times.
- Clean the milk jug, refer to Cleaning Rapid Cappucino System section.
 Remove the sticker on the grid. You can register your machine on www.nespresso.com
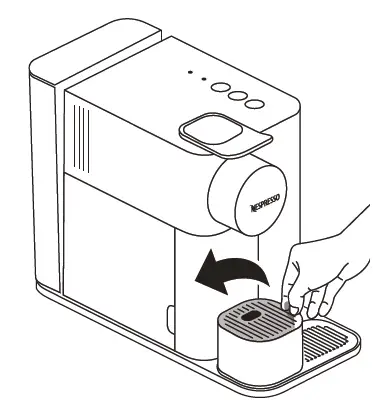

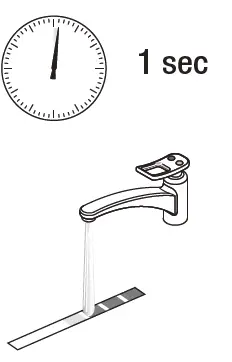
Setting water hardness
- Take water hardness sticker placed on the first page of the user manual and place it under water for 1 second.
- The number of red squares indicates the water hardness level.
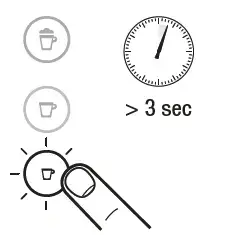
- Remove milk jug and switch the machine on.
- Press the milk drink button for 3 seconds to enter Menu mode: descaling and clean alerts start blinking.
NOTE: the Menu mode exits automatically after 30 sec. if no actions are performed. It can be exit manually b
y pressing the milk drink button for 3 seconds. - Press the Espresso button.
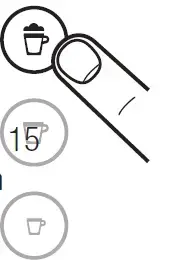
- Now, within 15 sec, you can set the desired value by pressing the corresponding button (see below table). They blink 3 times rapidly to confirm new value. The menu exits automatically and machine returns to ready mode.
 Press the milk drink button for 3 seconds to enter Menu mode: descaling and clean alerts start blinking.
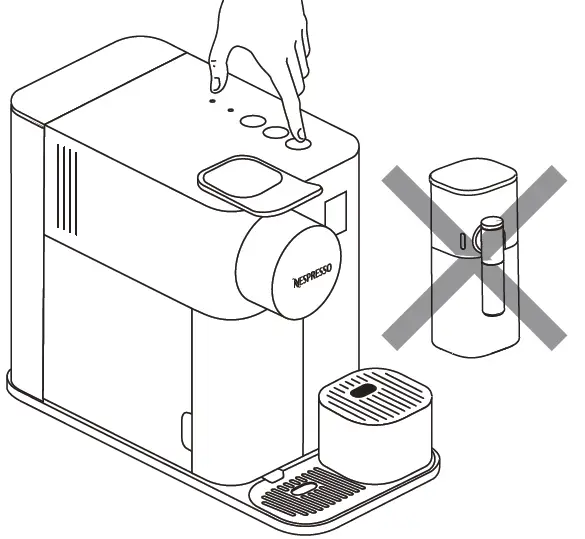 NOTE: the Menu mode exits automatically after 30 sec. if no actions are performed. It can be exit manually b

Coffee preparation
- Lift the lever completely and insert the capsule.
- Close the lever and place a cup adapted to the desired beverage under the coffee outlet.
- Press the Espresso (40 ml) or the Lungo (110 ml) button. Preparation will stop automatically. To stop the coffee flow or top up your coffee, press again.
NOTE: during heat up, you can press any coffee button. You need to insert a capsule first then the coffee will flow automatically when the machine is ready. - Few seconds after the end of the preparation, lift and close the lever to eject the capsule into the used capsule container. Do not open the lever too early.

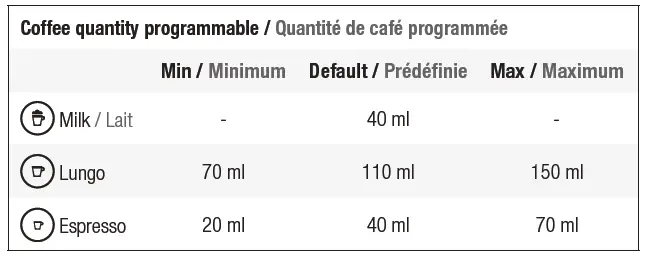
Programming coffee quantity
NOTE: We recommend you to keep factory settings for Espresso and Lungo to ensure the best in cup results for each of our coffee varieties.
- Follow the step 1-2 of section “coffee preparation”.
- Touch and hold Espresso or Lungo button for at least 3 sec to enter the programming mode. Brewing starts and button blinks fast.
- Release button when desired volume is reached. Coffee volume is now stored for the next coffee preparations. Button blinks 3 times to confirm the new coffee volume.
NOTE: for milk recipes, coffee quantity cannot be programmed.
Preparing Espresso Macchiato-Cappuccino-Latte Macchiato
- Fill the milk container up to one of the 4 levels indicators (see figure).Place the lid and connect the Rapid Cappuccino System to the machine.CAUTION: The milk system has not been designed to work with vegetable beverages and does not work with water: use ONLY pasteurized/UHT cow milk. It is not suitable for use for persons Cappuccino: 60 ml suffering from cow milk intolerance or allergies.
The machine will use all milk quantity in the milk jug and will stop automatically when empty.
For a perfect milk froth, use skimmed or semi-skimmed cow milk at refrigerator temperature (about 4° C). The milk froth volume depends on the kind of milk that is used and its temperature. - Lift the lever completely and insert the capsule. Close the lever.
- Place a cup adapted to the quantity of milk you poured under the coffee outlet and adjust milk spout position by lifting it up to the right level.
- Press the milk button.
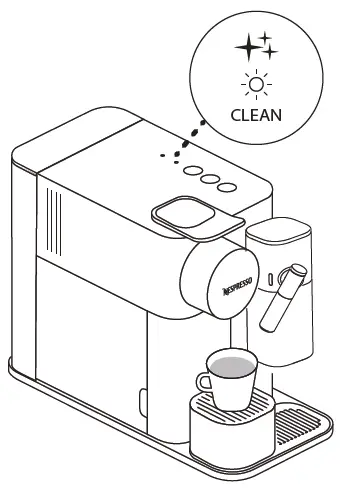
The preparation starts after approximately 15 seconds blinking lights (first milk and then coffee). - At the end of the preparation, the clean alert blinks orange to indicate it is advisable to clean the Rapid Cappuccino System.
It is necessary to clean if not more beverage are required. - Lift and close the lever to eject the capsule into the used capsule container.
- To prepare a second beverage, remove the milk container lid and fill the milk container up. Do not exceed the MAX level. Repeat operations 1 to 6.Be careful: When pouring the milk into the milk container pay attention it does not spill out of it. If necessary, clean well with a cloth.
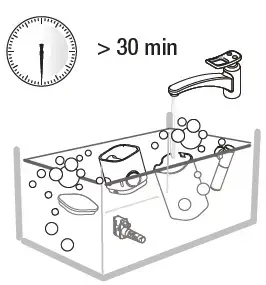
Do not place the milk pack on the milk container because the container could unhooking from the machine. - After a period of non use of maximum 30 minutes after your milk recipe preparation, disassemble the milk jug refer to section “Assembling / Disassembling of Rapid Cappuccino System”, and clean all 6 dismantled components in dishwasher or hand wash refer to section “Cleaning Rapid Cappuccino System”.
 CAUTION: The milk system has not been designed to work with vegetable beverages and does not work with water: use ONLY pasteurized/UHT cow milk. It is not suitable for use for persons Cappuccino: 60 ml suffering from cow milk intolerance or allergies.
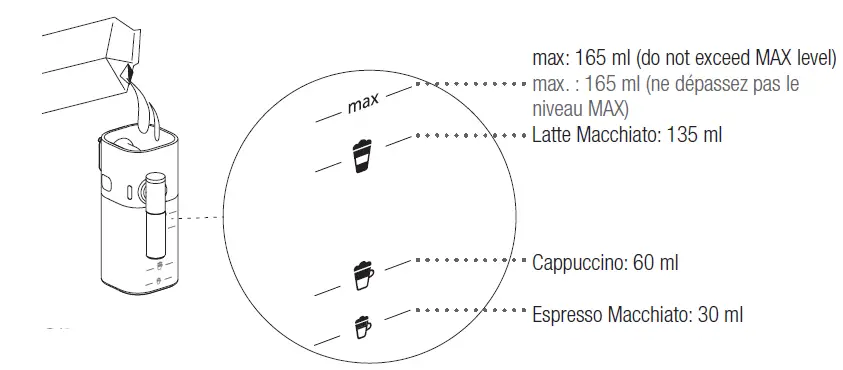
 Be careful: When pouring the milk into the milk container pay attention it does not spill out of it. If necessary, clean well with a cloth.
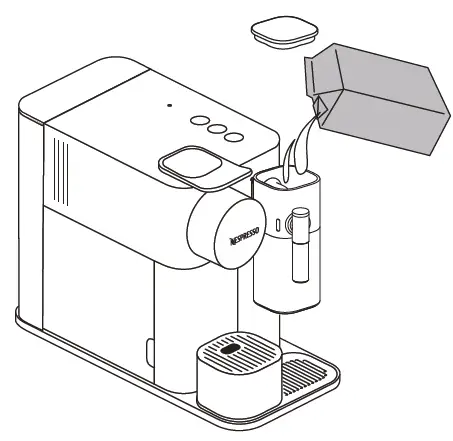
The number of consecutive milk beverages should not exceed 5. We recommend cleaning the Rapid Cappuccino System between each milk preparation.
Cleaning Rapid Cappuccino System
Disassemble the milk jug. Refer to section “Assembling / Disassembling of Rapid Cappuccino System”. Rinse away carefully any milk residue with hot drinking water.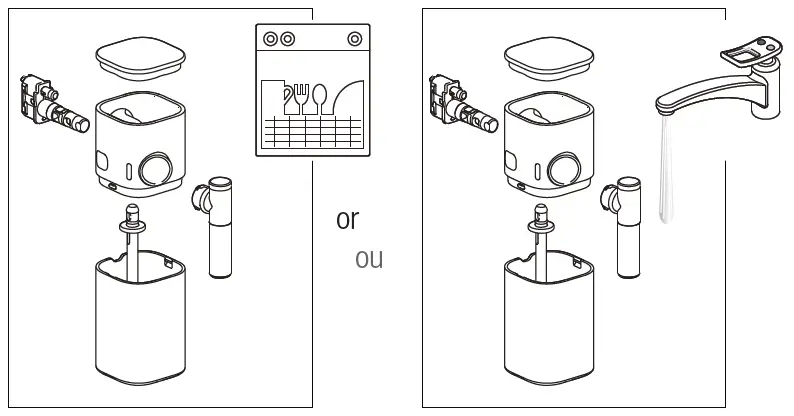
When a dishwasher is not available, the Rapid Cappuccino System components can be hand washed. The cleaning procedure must be performed after each use.
DISHWASHER:
Put the six dismantled components in the upper tray of your dishwasher and run a program at high temperature (50°/60°C).
HAND WASH:
- Soak all components in with hot drinking water together with mild / soft detergent for at least 30 minutes and rinse thoroughly with hot drinking water.
- Clean the interior of the milk tank with mild / soft detergent and rinse with hot drinking water. Do not use abrasive material that might damage the surface of the equipment.
Ensure air inlet is clean. - Dry all parts with a clean towel, cloth or paper and reassemble.
Power off
MANUAL POWER OFF:
To turn off the machine press simultaneously the Espresso and Lungo buttons. A ‘click’ sound indicates that the machine is now off.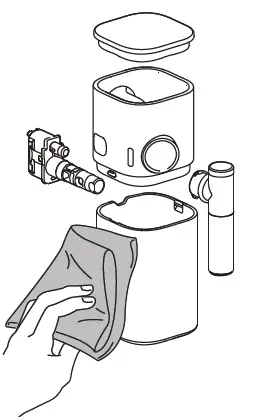
AUTOMATIC POWER OFF:
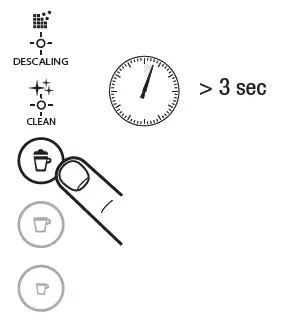
- It is possible to program the automatic power off time: Remove milk jug and switch the machine on.
- Press the milk button for 3 seconds to enter Menu mode: the descaling and clean alerts start blinking.
NOTE: the Menu mode exits automatically after 30 sec. If no actions are performed. It can be exit manually by pressing the milk button for 3 seconds. - Press Lungo button to enter the Power Off Menu. Clean & descaling alerts indicators turn off. One of the recipe buttons is blinking, indicating what is the current setting (ref to table aside).
- Now, within 15 seconds, you can set the desired value by pressing the corresponding button. They blink 3 times rapidly to confirm new value. The menu exits automatically and machine returns to ready mode.

Maintenance
Do not use any strong cleaning agent or solvent cleaner. Use a clean damp cloth and mild cleaning agent to clean the surface of the machine.
- Lift and close the lever to eject the capsule into the used capsule container. Remove drip tray and capsule container. Empty and rinse. Remove water tank. Empty, rinse it before filling with drinking water. Clean cup support and grid. Lift the removable grid and clean.
- Place a container under coffee outlet and press the Lungo button to rinse.
- Clean the coffee outlet and machine surface with a clean damp cloth.
Not dishwasher safe.
Dishwasher safe.
 Clean cup support and grid. Lift the removable grid and clean.
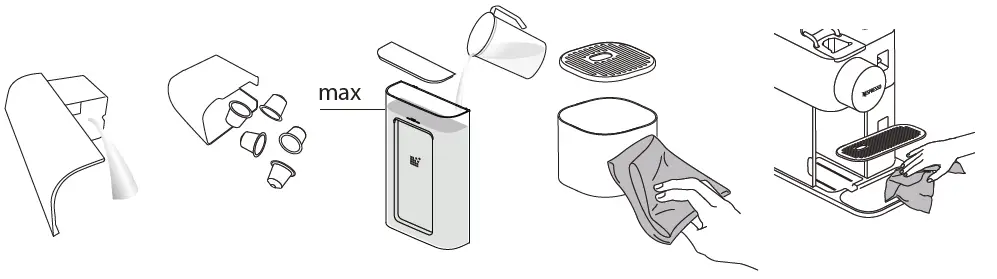 Clean the coffee outlet and machine surface with a clean damp cloth.
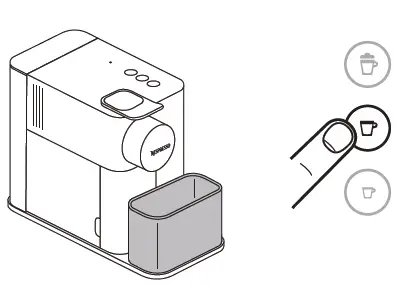 Not dishwasher safe.
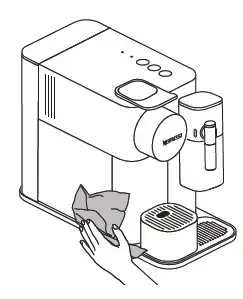
Restoring quantity to default settings
NOTE: to ensure the proper functioning of your machine over its lifetime and that your coffee experience is as perfect as the first day, follow the below process. Descaling time is approximately 20 minutes. To ensure a perfect coffee experience time after time and a good functioning of the machine this is important to descale your machine when needed. When the descaling alert starts to blink, it is time to descale your machine. The machine can still prepare several milk beverages before it is blocked preventively. The blockage prevents any damages to the machine and ensure its proper functioning over its lifetime. In case the machine is blocked, please descale your machine or contact the Nespresso club. Please make sure to complete the entire descaling procedure. If it is not completed, the machine will remain blocked.
NOTE: This procedure resets coffee volumes & power off timing to the default values.
- Remove the milk jug and switch the machine on.
- Press the milk drink button for 3 seconds to enter Menu mode: descaling and clean alert start blinking.
NOTE: the Menu mode exits automatically after 30 sec if no actions are performed or can be exited manually by pressing the milk button 3 seconds. - Press the milk button. The milk button blinks to indicate reset mode. Press it to confirm. All buttons blink 3 times: all volumes are reset to default settings. The menu exits automatically and machine returns to ready mode.
Emptying the system before a period of non-use, for frost protection or before a transportation to be repaired
- Remove the milk jug and switch the machine on.
- Remove the water tank. Lift and close the lever to eject any remaining capsule. Place a container under the coffee outlet.
- Press the milk drink button for 3 seconds to enter Menu mode: the descaling and clean alerts start blinking.
- Press milk drink and Lungo buttons simultaneously.
- The milk drink button blinks to confirm that machine is ready. Once pressed, the emptying starts. The coffee buttons blink alternatively: emptying mode in progress. When the process is finished, the machine switches off automatically.
NOTE: appliance will be blocked for approximately 10 minutes after emptying.
![]()
For Nespresso – Recipe Visit: https://appliance.recipes/category/nespresso
More Manuals From Nespresso
Quick Navigation
I have a feeling that you have come in search of answers to ambiguities about your Nespresso Lattissima. Are you struggling to find answers to the question How to use your Nespresso Lattissima one?Are you a new buyer struggling to understand the usage instructions from the manual or an experienced user who has misplaced their manual and is seeking solutions online? No matter what is the reason, I am thrilled to tell you that you have come to the right place. In this article, you will find all the information you need to fully utilize and enjoy your
From the opening of the box to taking your first sip of that delicious coffee, I will be with you every step of the way. Join me on this journey and let’s get started!
Safety Precautions
Taking safety precautions is essential to protect yourself and others from harm. By adhering to preventative measures, you can effectively safeguard your family and yourself from potential accidents To protect yourself and others, it’s crucial to take safety precautions. By following preventive measures, you can safeguard yourself and your family from any accidents.
Specifications Of Nespresso Lattissima One
Do not get tired, we are in the middle of our journey. Now we have stopped at the station of Specifications of Nespresso Lattissima One so that you can get an idea about its strength and abilities. Understanding the characteristics of your new coffee machine is important, as it will help you use it effectively and make the most of its capabilities. If these specifications are not compatible with your needs, contact the retailer and return your device as you should invest your money in things which are fulfilling your needs.
| Features | Details |
| Product Line/System | OriginalLine |
| US/CA Partners | Breville, DeLonghi |
| UK Partners | Krups, Magimix |
| Brew Sizes | 0.85 oz/ 25.1 m Ristretto1.35 oz/ 39.7ml Espresso 3.70 oz/ 109.4 ml Lungo3.05 oz/ 90.16 ml Cappuccino 6.40 oz/ 189.3 ml Latte |
| Water Reservoir | 34 oz |
| Milk Container | 4oz |
| Pressure | 19 bars |
| Frother | Automatic frother included |
| Spent Capsules | 8 capsules |
| Wireless Connectivity | No |
| External Material | ABS plastic |
| Dimensions | Width 6.1″W Depth 12.8″D Length 10.1″H |
| Weight | 9.3 lbs |
| Watts | 1300W |
| Other Features | Auto-Off after 9 minutes, programmable water hardness |
What Is Inside The Box
For all the coffee lovers, unboxing a coffee machine is an exciting experience, as you get to see and touch your new appliance for the first time. First of all, you have to make sure that you have received every part of the machine mentioned below. If you find anything, make an urgent call to your seller or supplier.
1. Coffee Machine
The first thing you will find in the box is your Favorite Nespresso Lattissima Coffee Machine. Make sure you will get the same model in the box that you have bought.
2. User Manual
This is a guide that provides instructions on how to use and maintain it. The user manual typically includes information on how to set up the machine, brew coffee, and troubleshoot common issues.
3. Capsules Set
This is a set of coffee capsules that are designed to be used with the coffee machine. These capsules come in a variety of flavors and strengths, allowing you to create a range of different coffee drinks.
4. Welcome to the Nespresso folder
It is a folder which provides information about Nespresso products and services. This folder may include information on how to order new capsules, tips on how to use the coffee machine, and
5. 1 x water hardness test stick in the user manual.
This is a small test strip or stick that is included in the user manual and can be used to test the hardness of your water
Nespresso Lattissima One has been designed in two ways for coffee lovers to enjoy their favourite flavours. Youcan use your Nespresso designs according to your needs and requirements.
1. Machine Without A Rapid Cappuccino System
The version of the Lattissima One without the rapid cappuccino system is designed to froth milk in a separate container and then add it to the coffee manually. This version may require a bit more effort to make a cappuccino or latte macchiato, but it still produces high-quality frothed milk.
2. Machine With Rapid Cappuccino System
(for cappuccino and latte macchiato)
The version of the Lattissima One with the rapid cappuccino system is designed to froth milk directly into the cup, making it quicker and more convenient to create a cappuccino or latte macchiato. This system automates the milk frothing process and is particularly useful if you frequently make these types of drinks.
Characteristic Parts Of Lattissima One
To use Nespresso Lattissima One, you need to know about the parts of it so that you can use it with all the ease and care. Let me tell you about the parts and how they need to be handled in Nespresso Lattissima One:
1. Lever
The lever is used to close the coffee capsule compartment and puncture the capsule, allowing hot water to be forced through the coffee grounds and produce the coffee.
2. Capsule Compartment
This is where you insert the coffee capsule to be brewed. The compartment is designed to hold the capsule securely in place while the machine brews the coffee.
3. Water Tank
The water tank holds the water used to brew the coffee. It typically has a capacity of 1 liter.
4. Coffee Outlet
This is where the brewed coffee comes out of the machine and into your cup. It’s typically positioned at the front of the machine, below the capsule compartment.
5. Sensor Window
The sensor window is a small window on the machine that allows you to see how much water is left in the water tank. This is useful for knowing when you need to refill the tank.
6. Used Capsule Container
This is where the used coffee capsules are stored after they’ve been brewed. It can hold several capsules before it needs to be emptied.
7. Drip Tray
The drip tray sits below the coffee outlet and is designed to catch any drips or spills that may occur during the brewing process. It’s typically removable for easy cleaning.
8. Cup Support
The cup support is a platform that holds your cup in place while the coffee is being brewed. It’s designed to be adjustable to accommodate different cup sizes.
9. Grid
The grid is a small plastic grid that sits on top of the drip tray. Its purpose is to prevent any spilled coffee from getting into the drip tray and making a mess.
10. Descaling Pipe Storage
Nespresso Lattissima One machine comes with a small storage compartment for the descaling pipe. This is a plastic tube that’s used to help remove mineral buildup in the machine’s internal plumbing.
11. Descaling Pipe
The descaling pipe is a small plastic tube that’s used to help remove mineral buildup from the Nespresso machine’s internal plumbing. It’s typically inserted into a designated opening on the machine and used in conjunction with a descaling solution.
12. Steam Connector Door
It come with a steam wand that’s used to froth milk for drinks like cappuccinos and lattes. The steam connector door is a small flap that covers the opening where the steam wand connects to the machine.
13. Steam Connector
The steam connector is a metal tube that’s used to deliver steam to the frothing wand. It’s typically detachable for easy cleaning.
Alert
Nespresso Lattissima One has some alert signal that indicates warnings for its users
Descaling alert
Nespresso will display a Descaling alert when it becomes essential to descale the brewer, otherwise the brewer will stop working after some brews.
Clean
This is a clean alert, displayed to warn the user to clean the brewer and the milk compartment after a prolonged usage.
Tactile Beverage Buttons:
Tactile beverage buttons are buttons on your Nespresso Lattissima One that allow you to choose the type of drink you want to make. These buttons are designed to be tactile, meaning you can feel them when you press them, which makes them easy to use and navigate even without looking at them
14. Milk Drink( Cappuccino-Latte Macchiato)
You can make Milk drinks like Cappuccino and Latte Macchiato by pressing this button
15. Lungo 110ml
You can make lungo by pressing this button. It will give you 110 ml cup of freshly brewed lungo
16. Espresso 40ml
You can make Espresso by pressing this button. It will produce 40 ml of cups of freshly brewed Espresso.
Rapid Cappuccino System:
These are functions that come under the rapid cappuccino system.
17. Lid Detaches Button
This is a button or latch that allows you to detach the lid of the coffee machine or a detachable component.
18. Milk Container Lid
This is the lid that covers the milk container, which is typically used in coffee machines with a built-in milk frothing system.
19. Rapid Cappuccino System Connector
This is a component that connects the milk container to the coffee machine, allowing milk to be frothed and dispensed directly into your cup.
20. Air Inlet (Mobile)
This is an opening or vent in the coffee machine that allows air to enter and circulate, helping to regulate temperature and pressure.
21. Milk Spout
This is the part of the coffee machine that dispenses frothed milk or steamed milk into your cup.
22. Milk Spout Lever
This lever allows you to adjust the height of the milk spout, allowing you to accommodate different cup sizes and prevent splashing or spilling.
23. Milk Aspiration Tube
This is a small tube that is inserted into the milk container and draws milk into the coffee machine’s frothing system.
24. Milk Container(125ml)
This is a container that holds the milk that is used for frothing and steaming.
Unpacking Instructions
Yeah, Finally, you have reached here. Unpacking your coffee machine is the first step to enjoying a delicious coffee in the comfort of your home. To ensure a smooth and safe unboxing, it’s important to follow these steps;
First use or after a long period of non-use
Either you are using your Nespresso Lattissima first time or after a prolonged non use period, you must know how to assemble your brewer and how to make most out of its features. Let’s dive into the details of your Nespresso Lattissima One usage guide.
CAUTION: Read safety precautions first to reduce the risk of death from electric shock or fire.
Note: To turn off the Lattissima One, press the lungo and espresso buttons for 2 seconds.
1. Remove the plastic wrap, water tank, drip tray, and capsule container when unpacking the machine. Adjust the cable length and push the excess into the cable duct under the machine.
2. Rinse the water tank before filling it to the maximum level with drinking water. Connect the machine to mains power.
3. Turn on the Lattissima One by pressing the power button
The light will start blinking when the brewer turns on, It will take 25 second pre heat and during this process the lights will continuously blink. Whenthe heating process will be done, the light will trun steady.
– Flashing light
– Heat up (25 seconds)
– Steady mode.
4. Rinse: Place a container under the coffee spout and press the Lungo button. Repeat the process thrice.
Don’t worry if you find water in your newly bought machine because the factory tests the machine working before parceling it.
5. Disassemble the Rapid Cappuccino System and clean all five components on the dishwasher. If water for washing dishes is not available, please refer to the “Hand Washing Rapid Cappuccino System” section.
Refer to the “Assembling / Disassembling of Rapid Cappuccino System” section.
Coffee Preparation
Your wait is over now, you have reached your favourite part, which you have been waiting for since the beginning of this article. It’s time to start brewing your Nespressio Lattissima One. So what are you waiting for? Let’s get started.
Note: During the heating-up process, you can still press any of the coffee buttons on the control panel, and the machine will automatically start brewing the selected coffee when it is ready.
1. Fully raise the lever and insert the capsule
2. Close the lever and place the cup under the coffee spout.
3. Press the Espresso (40 ml) or Lungo (110 ml) button.
Preparation will start automatically. Press the similar button again to stop the coffee flow or refill the coffee.
4. Lift and shut the lever to discharge the capsule into the used capsule container.
Assembling / Disassembling Of Rapid Cappuccino System
Do you know that assembling or disassembling a Rapid Cappuccino System can seem intimidating? I never intended to scare you because, with proper instructions and tools, it can be a straightforward process. Before starting, make sure to gather all the necessary tools and parts. Follow the instructions mentioned below to do this process smoothly.
1. Press the button on the side of the milk jug and remove the milk container and aspiration tube.
2. To detach and reassemble the milk spout, hold it vertically. Turn the switch on.Pull the milk spout from the side of the milk jug.
3. Press the button on the side of the milk jug and pull to unlock the quick-release system connector.
Preparing Cappuccino-Latte Macchiato
Are you ready to devour yourself with the delicious taste of Cappuccino-Latte Macchiato? So what are you waiting for? Let’s get started with the process.
The milk system is not used to operate with plant-based milk.
For the best milk froth, use skimmed or semi-skimmed cow milk at refrigerator temperature (approximately at 4° C).
- Fill the milk container upto the quantity based on your desired coffee, Cappuccino or Latte.Close the milk container and connect the rapid cappuccino system to the Lattissima One. It will heat up for about 15 seconds (light flashes).
Note: The Rapid Cappuccino System does not work efficiently with water.
Note: Make sure to use all the milk to prepare the drink.
2. Fully lift the lever and insert the capsule. Close the lever.
3. Place a Cappuccino cup or Latte Macchiato glass under the coffee spout and lift and adjust the position of the milk spout to the desired height.
4. Press the milk button.
NOTE: Use all the milk to prepare the drink.
Preparation begins after a few seconds (first milk, then coffee) and stops automatically.
5. When ready, the cleaning alarm will turn orange to indicate that the Rapid Cappuccino system needs cleaning.
6. Lift the lever to eject the capsule into the used capsule drawer.
7. After preparing the milk recipe, disassemble the Rapid Cappuccino System and clean all components in the dishwasher for 30 minutes. Please refer to the “Hand Washing Rapid Cappuccino System” section if a dishwasher is unavailable.
See the section “Assembling/Disassembling Rapid Cappuccino System.” do not use the Rapid Cappuccino System in the refrigerator.
Programming Coffee Quantity
What if I tell you that your Nespresso Lattissima One has a programmable coffee quantity feature, allowing you to adjust the amount of espresso or milk in your cup according to your preference? Follow the instructions and serve yourself a customized cup of Coffee.
Follow steps 1-2 of the section “coffee preparation”
NOTE: please refer to the factory settings section for min/max programmable quantities.
1. Press the Espresso or Lungo button and hold on for more than 3 seconds to enter programming mode. The brewing process will start, and the button will flash quickly.
2. Release the button when you obtain a desired volume. Now this information has been stored in the data for your next coffee preparation. The button will blink three times to configure the new settings.
Daily Care:
As an experienced user, I can tell you that cleaning is the key to giving a long lifespan to your Nespresso Lattissima One. Daily care of your Nespresso Lattissima One is important to ensure that it continues to function properly and provide delicious coffee drinks. Regular cleaning of the machine and its components will keep it functioning efficiently, while descaling will prevent mineral build-up that can affect the taste and quality of your coffee. Follow the instructions to ensure proper cleaning.
Don’t use strong detergents or solvent cleaners; use a clean, damp cloth and mild detergent to clean the Lattissima One surface. Do not put appliance components other than the Rapid Cappuccino System components in the dishwasher.
1. To eject the capsule into the used capsule container, lift and shut the lever.
Take out the drip tray and capsule container. Rinse and empty. Take out the water tank.
Before filling with potable water, empty it and then rinse it.
2. Place a container under the coffee spout and press the Lungo button to rinse.
3. Wipe the coffee spout and machine surface with a damp, clean cloth.
Hand Washing Of Rapid Cappuccino System
Hand washing the Rapid Cappuccino System is a simple and effective way to keep your machine clean and hygienic. Follow the instructions to handwash the rapid Cappuccino System accurately.
If a dishwasher is not available, the components of the Rapid Cappuccino system can be hand washed. Perform these steps each time you use it.
1. Disassemble the rapid cappuccino system. See the section “Assembling/Disassembling Rapid Cappuccino System.” Carefully rinse off milk residue with warm drinking water (40°C / 104°F).
2. Soak all components in hot water (40°C / 104°F) with mild/neutral detergent for at least 30 minutes and rinse thoroughly with hot water (40°C / 104°F). Do not use odourless/soft detergents.
3. Clean the inside of the milk tank with a mild/neutral detergent and rinse with warm water (40°C/104°F). Do not use abrasive materials that can damage the surface of your device. * Make sure the air inlet is clean.
4. Dry all parts with a clean towel, cloth, or paper and reassemble.
Restore Factory Default Settings
Your Nespresso Lattissima comes with an amazing feature of factor resorting. It is a simple process that can resolve many common issues and will erase all personal settings and return the machine to its default setting.
Note: Menu mode will automatically exit after 30 seconds of inactivity. Alternatively, you can manually exit by pressing the milk button for 3 seconds.
- Switch ON the Lattissima One.
- Push the milk button for 3 seconds to enter the main menu. The descaling and cleaning alerts will start flashing.
- Select the milk option. The milk button blinks to indicate that the machine is in reset mode. To confirm, press the button. All buttons blink three times to indicate that all volumes have been reset. The menu is automatically exited, and the system returns to ready mode.
Factory Settings
You must know what are the default setting your Nespresso Lattissima One come with, before change the factory setting. All of the default settings are listed below.
Note: If the coffee volume is programmed to exceed 150 ml: Allow the Lattissima One to cool for 5 minutes before brewing the next coffee. The danger of overheating!
Coffee 40 ml / Milk drink: from 50 to 125 ml corresponding to the level and on the milk container
Lungo: 110 m
Espresso: 40 ml
1. Automatic power off 9 min
Note: The amount of frothed milk depends on the type of the milk and temperature used for frothing
Note: We recommend keeping the factory settings for Espresso and Lungo to ensure the best in-cup results for each style of coffee.
Youcan program the coffeerange according to your own desir. Nespresso Lattissima one offers the range for coffee volume from 25 to 150 ml.
Descaling
You should know that Descaling your coffee maker is an important step in maintaining the health and longevity of your machine, as well as ensuring that your coffee taste remain the best. Moreover, minerals such as calcium and magnesium can build up in your coffee maker over time and negatively impact the taste of your coffee. Follow the mentioned steps to De-scale your brewer properly.
NOTE: Descaling time is approximately 20 minutes.
To ensure your Lattissima One will perform flawlessly throughout its life and your coffee experience will be as perfect as day one, Please follow the process below.
- Descale the Nespresso Lattissima One when the descaling alarm lights orange.
2. Lift and close the lever and remove all capsules in the used capsule container.
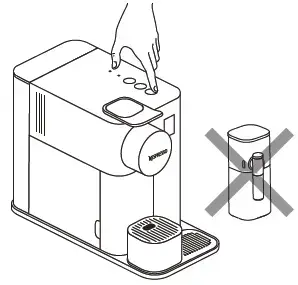
3. Empty the drip tray and used capsule form the capsule contaner. Fill the water tank with 100ml Nespresso descaler and 500ml water.
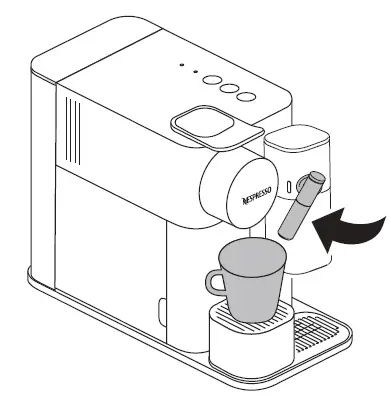
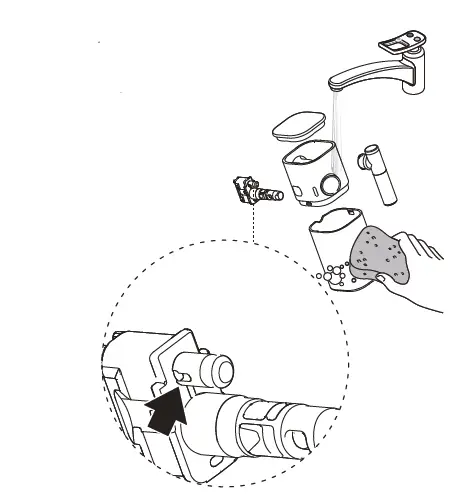
4. Take the descaling pipe on the back of the Lattissima One and insert the descaling pipe into the machine’s steam connection.
5.The machine switches to descaling mode. Throughout the descaling process, the descaling indicator blinks orange.
White is illuminated by the Espresso button.
6. Place a container with at least a 1-liter capacity under the coffee spout and the nozzle of the descaling tube.
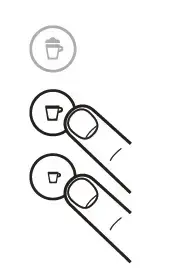
7.Press the Espresso button. The descaling product flows alternately through the coffee spout, descaling tube, and drip tray. The espresso button lights up when the descaling process is complete (the water tank is empty).
8. Empty the used capsule container and collection container, rinse the water tank and fill it to the MAX level with fresh drinking water.
9.Press the Espresso button again. The rinsing continues through the coffee spout, descaling tube, and drip tray until the water tank is empty.
10. After finishing the rinsing process, the machine turns off. Remove the descaling tube and empty the drip tray and container for used capsules. Pour drinking water in the water tank.
11. Clean the Lattissima One with a damp cloth. Congratulations, you have successfully descale your coffee maker.
Water Hardness Settings
You may not be familiar with the words ‘ Water Hardness”, so let me discuss it first. Water hardness settings refer to the level of minerals such as calcium and magnesium in the water that is used to make coffee. If you have not done this setting before, do not worry, I am here to guide you. Let’s start.
Note: Menu mode automatically exits after 30 seconds. You can manually exit by pressing the milk button for 3 seconds.
- Take the water hardness sticker present on the first side of the and hold it under water for 1 second.
2. The number of red squares represents the hardness of the water.
3. Switch ON your Lattissima One.
4. Push the milk button for 3 seconds to enter the main menu. The descaling and cleaning alert will start blinking.
5. Press the Espresso button.
6. Press the corresponding button to set the desired value within 15 seconds. The button will blink three times quickly to confirm the new status. The menu will automatically exit, and the machine will return to ready mode
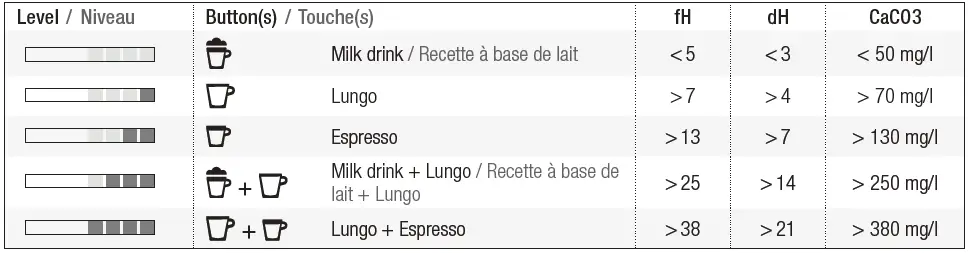
| Coffee Setting | Level | fH | dH | CaCO3 |
| Milk Drink | 0 | >5 | >3 | >50 |
| Lungo | 1 | >7 | >4 | >70 |
| Espresso | 2 | >13 | >7 | >130 |
| Milk Drink + Lungo | 3 | >25 | >14 | >250 |
| Lungo+ Latte | 4 | >38 | >21 | >380 |
Emptying The Lattissima One Before A Period Of Non-Use
As an experienced user, I would definitely recommend you empty your Nespresso Lattissima One before a period of non-use because it is very important to preserve the health and longevity of your machine. Here are the steps to follow you need to follow to perform this task.
- Switch on the Lattissima One.
NOTE: Remove the milk jug.
- . Take out the water tank. To expel any leftover capsules, lift and shut the lever. Under the coffee outle, place a container.
- Push the milk button for 3 seconds to enter the main menu. The descaling and cleaning warning will start blinking.
Note: Menu mode automatically exits after 30 seconds. You can manually exit by pressing the milk button for 3 seconds.
- Press the milk and Lungo buttons simultaneously.
- To confirm, the milk button blinks. When pushed, the emptying process begins. The coffee buttons alternately blink: emptying mode is active. When the procedure is completed, the machine automatically shuts off.
NOTE: The Lattissima One willbe blocked for approximately 10 minutes after draining.
Automatic Power Off
The Automatic Power Off feature in the Nespresso Lattissima One is a safety feature that helps conserve energy and prevent accidents. I would advise you to use this feature and save power.
The Nespresso Lattissima One has an excellent energy consumption profile and an automatic switch-off function (0 W) to save energy. The device switches off after 9 minutes after the last use (factory setting).
- Switch on the Nespresso Lattissima One.
Note: Remove the milk plug.
- Push the milk button for 3 seconds to enter the main menu. The descaling and cleaning warning will start blinking.
Note: Menu mode automatically exits after 30 seconds. Press the milk button for 3 seconds to manually finish.
3. Press the Lungo button.
4. You can now set the desired value within 15 seconds by pressing a corresponding button which will blink thrice to confirm the new value. The menu will automatically exit, and the device will return to standby mode.
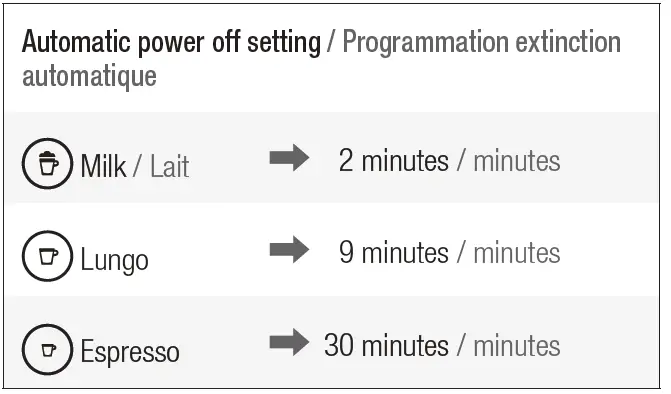
| Automatic power off | |
| Espresso | 8h |
| Cappuccino | 30 min |
| Latte Macchiato | 9 min |
Troubleshooting
It is common to face problems while using an appliance. The best thing you can do is to get acquainted with all necessary information needed to resolve troubleshooting! Down below are some issues and their possible solutions.
| Problems | Possible Solutions |
| No light indicator | Check the power supply, plug, voltage, and fuse. In case of problems, please call the Nespresso Club. |
| No coffee, no water | The water tank is empty. Please fill up the water tank. Descale if necessary. See section “Descaling.” |
| Coffee comes out very slowly | The flow rate depends on the type of coffee. Descale if necessary. See section Descaling. |
| No coffee, just water runs out (despite the inserted capsule). | In case of problems, have your device repaired or call the Nespresso Club. |
| Coffee is not hot enough | Preheat the cup. Descale if necessary; see the Descaling section. |
| Capsule area is draining (water in the capsule container). | Place the capsules correctly. In case of spillage, please get in touch with the Nespresso authorities. |
| Irregular flashing | Send Lattissima One to repair or call the Nespresso authorities. |
| All buttons wink simultaneously for 10 seconds, and then the machine switches off automatically. | Error warning, Lattissima One repair is required. Send your device for repair or call the Nespresso Club. |
| All three buttons blink fast three times, and then the machine returns to ready mode. | The water tank is empty. |
| Descaling and cleaning alert blink. | You are in menu mode. You should press the milk button for 3 seconds to exit menu mode or wait 30 seconds to exit menu mode automatically. |
| Descaling alert shines orange. | The Lattissima One triggers descaling alarms depending on drink consumption. Descale your coffee maker |
| The descaling alert blinks orange and the Espresso button steady light. | Lattissima One is in the descaling mode. Push the Espresso button to start the descaling process. |
| Clean alerts shine orange. | Dismantle the Rapid Cappuccino system and clean all components in the dishwasher. Please refer to the Hand Washing Rapid Cappuccino System section if a dishwasher is unavailable. |
| All coffee buttons and all milk recipe buttons flash alternatively | The Lattissima One is overheating. Wait until the machine cools down. The device will lock for approx. 10 minutes after emptying. |
| The lever cannot be closed completely. | Empty the capsule container. Make sure the capsule container is not full of capsules. |
| The quality of Milk froth is not up to standard. | Use skim or semi-skim milk at refrigerator temperature (approximately 4° C). Rinse after each milk preperation (see section “Hand washing the Rapid Cappuccino System”). Descale your machine (see Desacle instructions). – Do not use frozen milk. Make sure the air inlet is clean. See the section “Hand washing of the Rapid Cappuccino system.” |
| I cannot enter the Menu mode. | Carefully remove the milk jug. Be sure to press the milk button for 3 seconds. Remove the descaling tube. |
| The milk system does not start. | Top up with at least 30 ml of milk. The milk system does not work with water. The milk system should not be used for plant-based milk (e.g., rice). |
| Milk jugs cannot be dismantled. | Push the side of the milk jug to remove the parts. See the section “Assembly/Disassembly of Rapid Cappuccino System.” |
| Turn off the machine. | Press Espresso and Lungo buttons for 2 seconds. |
| Sound when the machine switches off. | This sound indicates that the Lattissima One is now off. |
Contact The Nespresso Club
For more information, problem resolution, or advice, please call the Nespresso Club. For details, contact the Nespresso authorities in the ‘Welcome to Nespresso’ folder in your machine packaging or on nespresso.com.
Limited Guarantee:
- De’Longhi warrants this product against material defects for two years from the date of purchase. During this period, De’Longhi will, at its option, repair or replace defective products free of charge to the owner.
- Replacement products or repaired parts are warranted only for the unexpired part of the original warranty or six months, whichever period is longer.
- This limited warranty does not apply to defects resulting from accidents, abuse, improper maintenance, or normal wear and tear.
“EXCEPT AS PERMITTED BY LAW, THE TERMS OF THIS LIMITED WARRANTY DO NOT EXCLUDE, LIMIT, OR CHANGE, OR IN ADDITION TO, ANY REQUIRED STATUTORY RIGHTS GOVERNING THE SALE OF THE PRODUCT TO YOU.”
If you think your product is defective, please get in touch with Nespresso to find out where to send or bring it for repair.
Conclusion
With a thorough understanding of each component of the Nespresso Lattissima Touch Brewer, you can confidently brew your favorite coffee, lattes, and other beverages with ease. Armed with the knowledge gained from this article, you can find the brewing experience to be as simple and enjoyable as the taste of a freshly brewed cup of coffee.
For those who are passionate about coffee, it’s more than just a beverage – it’s a way of life. That’s why websites like coffeeaim.com exist, to provide incredible content on the subject. Whether you’re a casual coffee drinker or a serious coffee enthusiast, you can find valuable information and resources to help you enjoy the perfect cup of coffee. So, happy brewin.
FAQs
What Drinks Can Be Made From The Nespresso Lattissima One?
You can make a variety of beverages which include Cappuccino, latte macchiato,Espresso and lungo too as per your desired volume.
What Is The Black Window On The Front Of The Machine?
It is a sensor that detects how much milk is left in the jug. A sensor allows the machine to automatically stop the milk frothing process when the milk jug is empty.
What Are The Buttons On Nespresso Lattissima?
Thie Nespresso Lattissima One can prepare six drinks, which are controlled by six tactile buttons (Espresso, Lungo, Cappuccino, Latte macchiato, Creamy Latte, Warm milk froth).
How Will I Make A Latte Macchiato From My Lattissima One?
Fill the milk jug of your Nespresso machine up to the second mark to make a wonderful latte macchiato. After that, insert your preferred coffee capsule and hit the “milk” button. The machine will then froth the milk and deliver it into your cup automatically. In the meantime, it will brew a shot of espresso and pour it into the cup, resulting in a perfectly layered latte macchiato for you to enjoy. You may have a great latte macchiato in a matter of minutes by following a few simple steps.
3.0
Rated 3.0 out of 5
3.0 out of 5 stars (based on 1 review)
Your overall rating
NESPRESSO LATTISSIMA ONE (01) PDF MANUAL
Click here to download NESPRESSO LATTISSIMA ONE (01) PDF MANUAL
NESPRESSO LATTISSIMA ONE (01) PDF MANUAL
FREE ENGLISH PDF
OPERATING INSTRUCTIONS
USER GUIDE – USER MANUAL
OWNER GUIDE – OWNER MANUAL
REFERENCE GUIDE – REFERENCE MANUAL
INSTRUCTION GUIDE – INSTRUCTION MANUAL
Your overall rating
- YouTube
NESPRESSO LATTISSIMA ONE (01) PDF MANUAL
NESPRESSO LATTISSIMA ONE (01) PDF MANUAL