

Техподдержка
P5G41T-M LX3
Найти другую модель
Регистрация устройства поможет вам управлять его гарантией, получать техническую поддержку и отслеживать статус ремонта.
Регистрация продукта
Руководства пользователя
Версия C6280
3.74 MB
P5G41T-M LX3 User’s Manual (Chinese Simplified)
СКАЧАТЬ
Версия E6280
3.36 MB
P4G41T-M LX3 user’s manual(English)
СКАЧАТЬ
Версия f6280
2.13 MB
P5G41T-M LX3 User’s Manual (French)
СКАЧАТЬ

A6809
P5G41T-M LX3 PLUS
Motherboard
Quick Start Guide
Français
日本語
한국어
ไทย
Bahasa Indonesia
Tiếng Việt
Türkçe
First Edition
July 2011
Copyright © 2011 ASUSTeK Computer Inc.
All Rights Reserved
Bienvenue ! / ようこそ! / 환영합니다! / ยินดีต้อนรับ! /
Selamat datang! / Chào mừng! / / /
Hoş Geldiniz!
Ce guide contient les informations essentielles à la conguration de votre système. Suivez
les étapes numérotées apparaissant dans le diagramme de la carte mère pour garantir le bon
fonctionnement du système. Reportez-vous au manuel de l’utilisateur pour plus de détails sur
les composants, le BIOS ainsi que l’installation et la conguration des logiciels.
本クイックスタートガイドは、新しいシステムのセットアップに最も必要な情報をお届けします。次
のマザーボードのレイアウトにある手順に従い、新しいシステムをセットアップしてください。ハー
ドウェア、BIOS、ソフトウエアのインストール、設定などの詳細につきましては、マザーボードユー
ザーマニュアルをご参照ください。
이 빠른 시작 안내 설명서는 새로운 시스템을 설정하기 위한 가장 중요한 정보를 제공합니다.
아래 마더보드 구조에 표시된 지시 순서에 따라 설치를 수행해 주십시오. 하드웨어, BIOS,
소프트웨어 설치 및 구성에 관한 추가 정보는 마더보드에 포함된 사용 설명서를 참고해 주십
시오.
* 이 기기는 가정용 기기입니다.
คู่มือเริ่มต้นอย่างเร็ว ให้ข้อมูลที่คุณจำเป็นมากที่สุดเพื่อตั้งค่าระบบใหม่ของคุณ ปฏิบัติตาม
ขั้นตอนที่ทำเครื่องหมายไว้บนเลย์เอาต์ของเมนบอร์ดด้านล่าง เพื่อตั้งค่าระบบใหม่ของคุณ ดูคู่มือ
ผู้ใช้เมนบอร์ดของคุณสำหรับรายละเอียดเพิ่มเติมเกี่ยวกับการติดตั้งและการกำหนดค่าฮาร์ดแวร์,
BIOS และซอฟต์แวร
Panduan ringkas ini berisi informasi yang paling diperlukan untuk menyiapkan sistem baru
Anda. Ikuti langkah-langkah yang ditandai pada tata letak motherboard di bawah ini untuk
menyiapkan sistem baru Anda. Untuk info lebih rinci tentang perangkat keras, BIOS, serta
penginstalan dan kongurasi perangkat lunak, lihat panduan pengguna motherboard Anda.
Bu hızlı başlangıç kılavuzu yeni sisteminizi kurmak için en gerekli bilgileri sağlamaktadır. Yeni
sisteminizi kurmak için aşağıdaki anakart düzeninde işaretli olan adımları izleyin. Donanım,
BIOS ve yazılım kurulumu ve yapılandırması hakkında daha fazla bilgi için ana kart kullanım
kılavuzunuza başvurun.
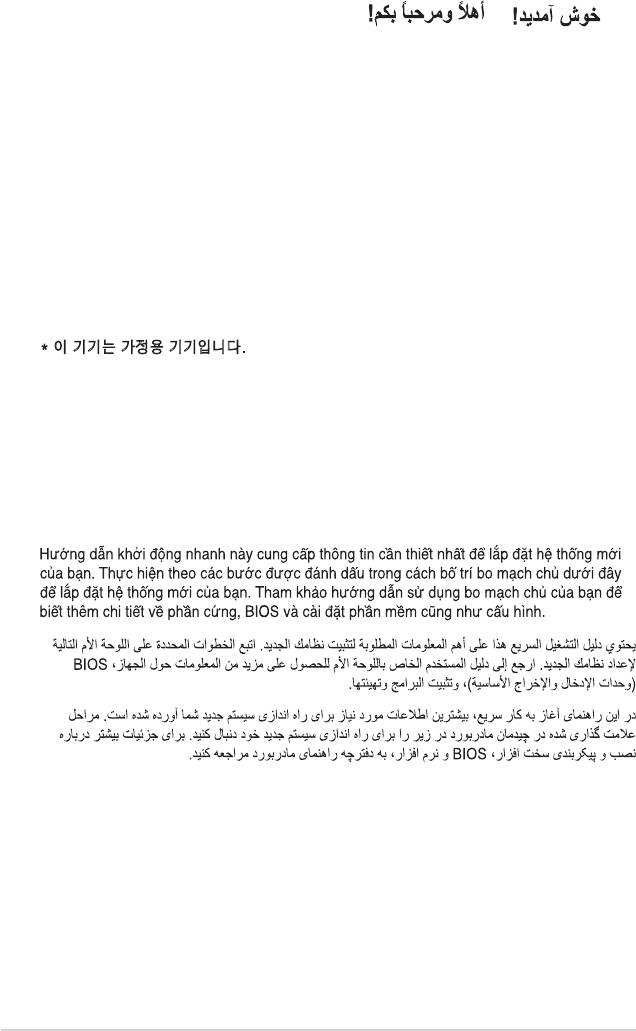
2 ASUS P5G41T-M LX3 PLUS
ASUS P5G41T-M LX3 PLUS 3
5
KBMS
CPU_FAN
ATX12V
KBPWR
COM1
USBPW1-4
LGA775
VGA
USB34
RTL
8103EL
LAN1_USB12
®
Intel
DDR3 DIMM_A1 (64bit, 240-pin module)
DDR3 DIMM_B1 (64bit, 240-pin module)
G41
CHA_FAN
ICS
9LRS954
AUDIO
Lithium Cell
PCIEX1_1
CMOS Power
EATXPWR
ATHEROS
8151
PCIEX16
Super
I/O
PCIEX1_2
®
Intel
P5G41T-M LX3 PLUS
ICH7
PCI1
SATA4
ALC887
8Mb
SPEAKER
SB_PWR
USB56 USB78
F_PANEL
BIOS
SATA1 SATA2
SPDIF_OUT
CLRTC
SATA3
AAFP
USBPW5-8
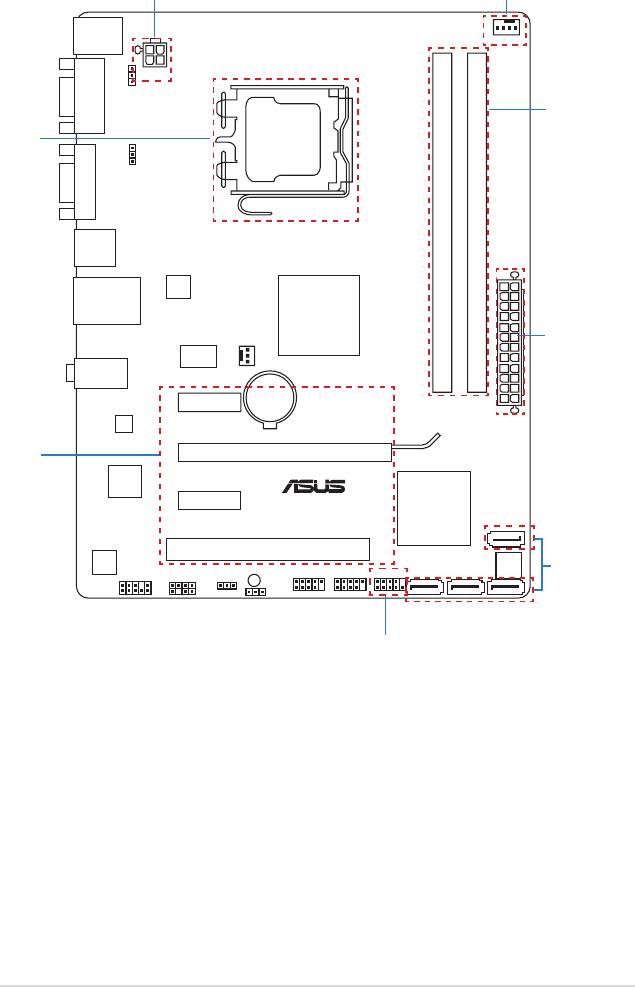
Step 7
Step 2
Step 3
Step 1
Step 7
Step 5
Step 4
Step 6
Step 1
Installer le CPU
CPUを設置する
CPU 설치
ติดตั้ง CPU
Pasang CPU
Lắp CPU
CPU’yu takın
1 2 3
4 5
4 ASUS P5G41T-M LX3 PLUS
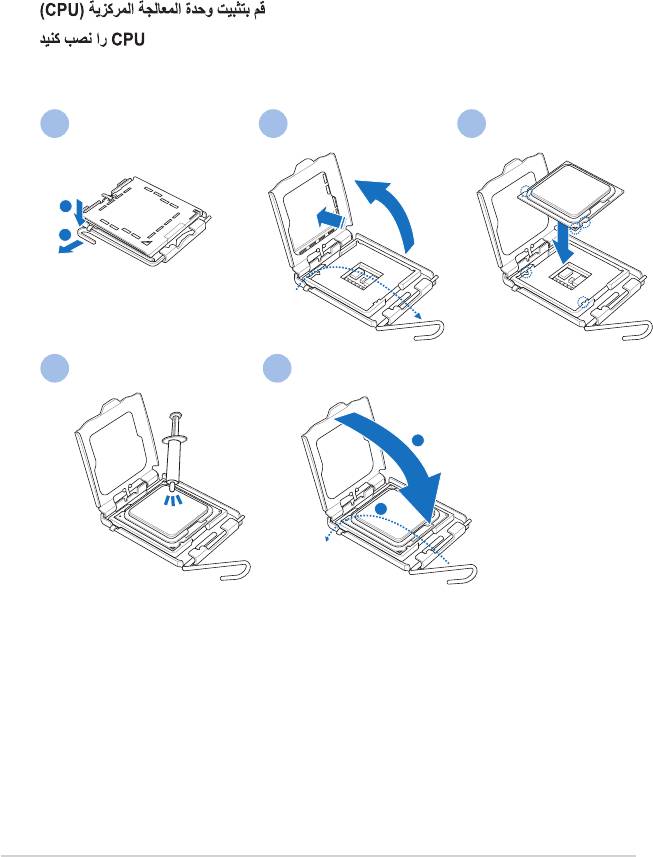
Step 2
Installer le ventilateur de CPU
CPUファン を設置する
CPU 팬 설치
ติดตั้งพัดลม CPU
Pasang kipas CPU
Lắp quạt CPU
CPU fanını takın
A
1 2
B
B
A
ASUS P5G41T-M LX3 PLUS 5
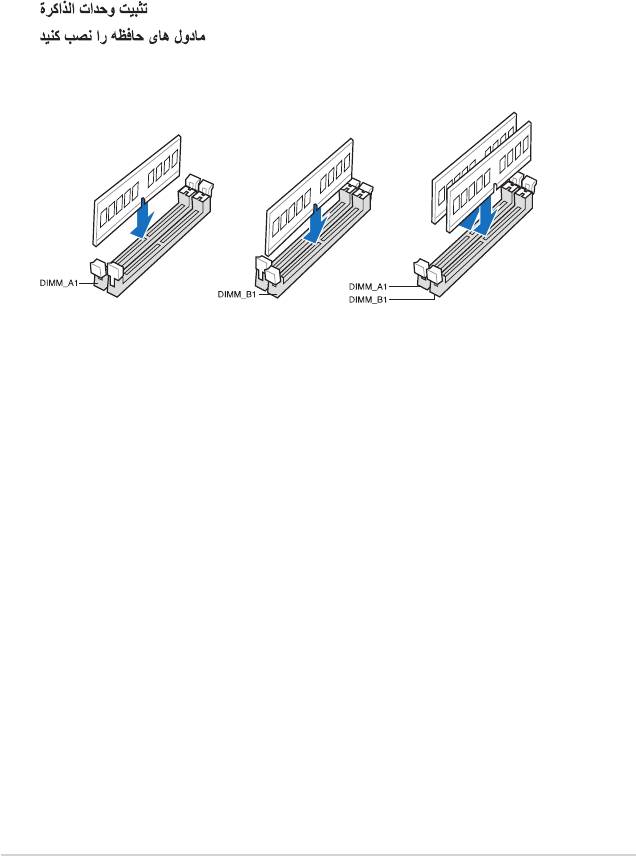
Step 3
Installer les modules mémoire
メモリーモジュールを設置する
메모리 모듈 설치
ติดตั้งโมดูลหน่วยความจำ
Pasang modul memori
Lắp các thanh nhớ
Bellek modüllerini takın
6 ASUS P5G41T-M LX3 PLUS
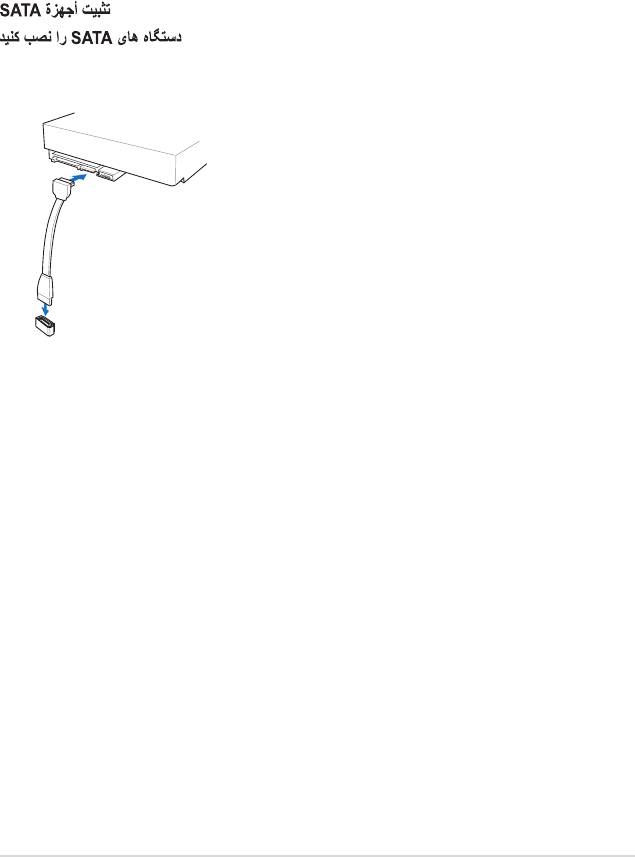
Step 4
Installer des périphériques SATA
SATA デバイスを取り付ける
SATA 장치 설치
ติดตั้งอุปกรณ์ SATA
Pasang perangkat SATA
Lắp các thiết bị SATA
SATA aygıtlarını takın
ASUS P5G41T-M LX3 PLUS 7
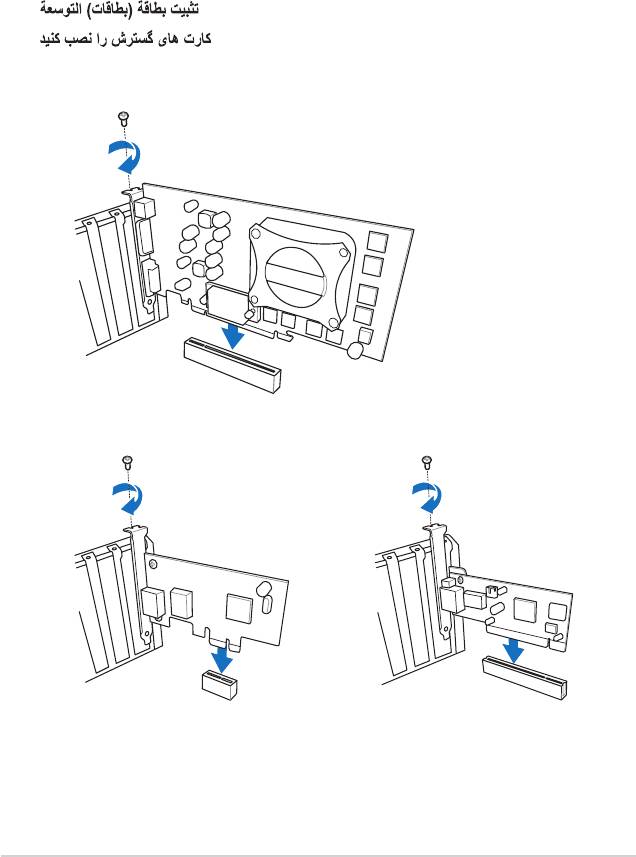
Step 5
Installer une carte d’extension
拡張カードを設置する
확장 카드 설치
ติดตั้งเอ็กซ์แพนชั่นการ์ด
Pasang kartu ekspansi
Lắp (các) thẻ mở rộng
Genişletme kartlarını takın
8 ASUS P5G41T-M LX3 PLUS
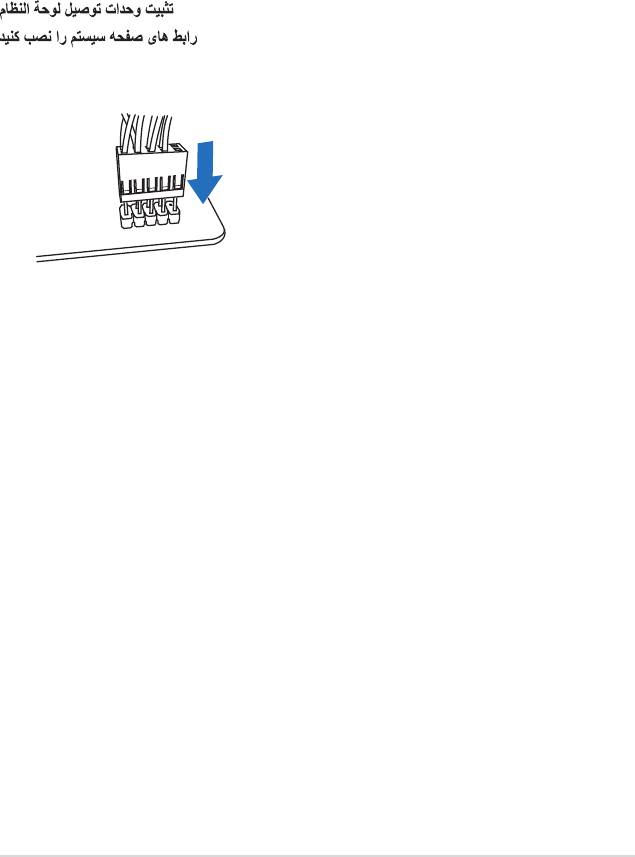
Step 6
Installer les connecteurs système
システムパネルコネクターを取り付ける
시스템 패널 커넥터 설치
ติดตั้งขั้วต่อแผงระบบ
Pasang konektor panel sistem
Lắp các đầu nối hệ thống ra ngoài
Sistem paneli konnektörlerini takın
ASUS P5G41T-M LX3 PLUS 9
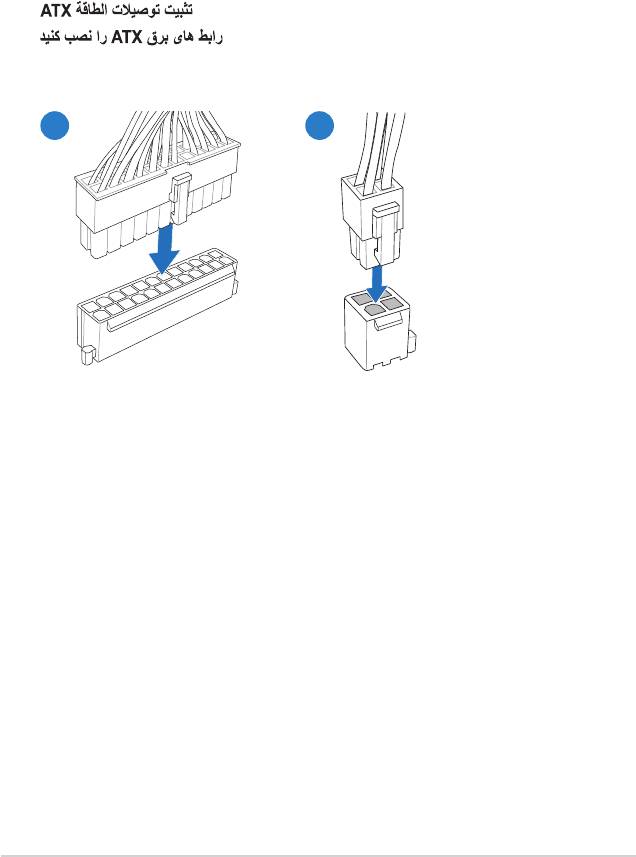
Step 7
Installer les connecteurs d’alimentation ATX
ATX 電源コネクターを取り付ける
ATX 전원 커넥터 설치
ติดตั้งขั้วต่อ ATX เพาเวอร์
Pasang konektor daya ATX
Lắp các đầu nối nguồn ATX
ATX güç konnektörlerini takın
21
10 ASUS P5G41T-M LX3 PLUS
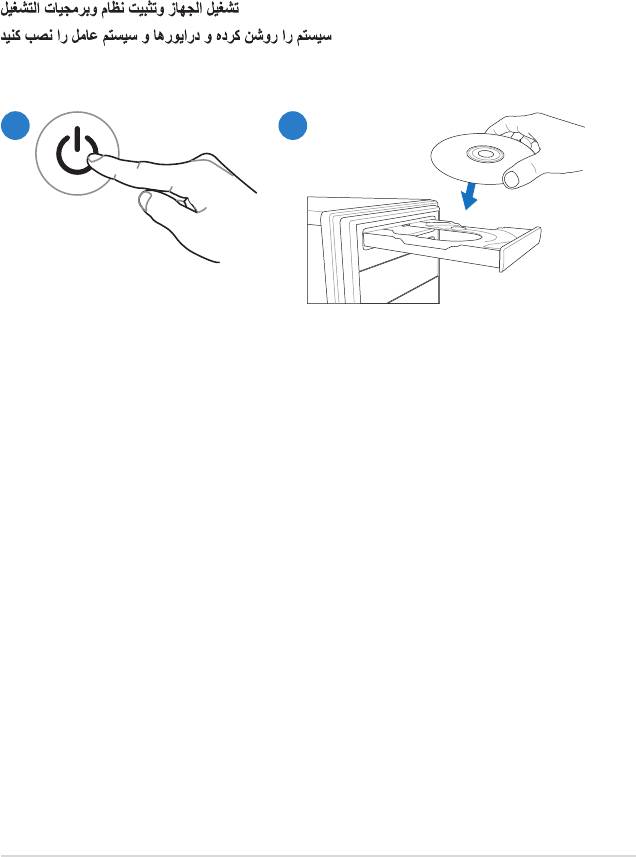
Step 8
Allumer le système et installer le système d’exploitation et les pilotes
システムの電源をONにし、OSとドライバーをインストールする
시스템 전원 켜기 및 운영체제와 드라이버 설치
เปิดระบบ และติดตั้งระบบปฏิบัติการและไดรเวอร์
Hidupkan sistem, lalu instal sistem operasi dan driver
Bật nguồn hệ thống và cài đặt hệ điều hành cũng như các driver
Sistemi açıp işletim sistemini ve sürücüleri yükleyin
21
ASUS P5G41T-M LX3 PLUS 11

www.asus.com
15060-1370B000
-
Драйверы
22
-
Инструкции по эксплуатации
7
Языки:

ASUS P5G41T-M LX3 инструкция по эксплуатации
(60 страниц)
- Языки:Английский
-
Тип:
PDF -
Размер:
3.45 MB -
Описание:
P4G41T-M LX3 user’s manual(English)
Просмотр

ASUS P5G41T-M LX3 инструкция по эксплуатации
(58 страниц)
- Языки:Английский
-
Тип:
PDF -
Размер:
2.64 MB -
Описание:
P5G41T-M user’s manual (English)
Просмотр

ASUS P5G41T-M LX3 инструкция по эксплуатации
(60 страниц)
- Языки:Немецкий
-
Тип:
PDF -
Размер:
3.74 MB -
Описание:
P5G41T-M user’s manual (German)
Просмотр

ASUS P5G41T-M LX3 инструкция по эксплуатации
(58 страниц)
- Языки:Японский
-
Тип:
PDF -
Размер:
2.84 MB -
Описание:
P5G41T-M user’s manual (Japanese)
Просмотр

ASUS P5G41T-M LX3 инструкция по эксплуатации
(59 страниц)
- Языки:Французский
-
Тип:
PDF -
Размер:
2.61 MB -
Описание:
P5G41T-M user’s manual (French)
Просмотр

ASUS P5G41T-M LX3 инструкция по эксплуатации
(58 страниц)
- Языки:Китайский
-
Тип:
PDF -
Размер:
2.96 MB -
Описание:
P5G41T-M user’s manual (Traditional Chinese)
Просмотр

ASUS P5G41T-M LX3 инструкция по эксплуатации
(27 страниц)
-
Тип:
PDF -
Размер:
3.39 MB -
Описание:
P5G41T-M Asian Quick Start Guide for Multiple Languages
Просмотр
На NoDevice можно скачать инструкцию по эксплуатации для ASUS P5G41T-M LX3. Руководство пользователя необходимо для ознакомления с правилами установки и эксплуатации ASUS P5G41T-M LX3. Инструкции по использованию помогут правильно настроить ASUS P5G41T-M LX3, исправить ошибки и выявить неполадки.
ASUS
P5G41TM_LX3 Руководство по эксплуатации
Популярность:
1277 просмотры
Подсчет страниц:
60 страницы
Тип файла:
Размер файла:
3.45 Mb
-
Page 1: Asus P5G41T-M LX3
Motherboard P5G41T -M LX3[…]
-
Page 2: Asus P5G41T-M LX3
ii E6280 First Edition V1 December 2010 Copyright © 2010 ASUST eK Computer Inc. All Rights Reserved. No part of this manual, including the products and software described in it, may be reproduced, transmitted, transcribed, stored in a retrieval system, or translated into any language in any form or by any means, except documentation kept by the pu[…]
-
Page 3: Asus P5G41T-M LX3
iii Contents Notices …………………………………………………………………………………………… vi Safety information …………………………………………………………………………. vii About this guide ……………………………………………………………………………. vii P[…]
-
Page 4: Asus P5G41T-M LX3
iv Contents 1.1 1 Software support ……………………………………………………………… 1-25 1.1 1.1 Installing an operating system ……………………………….. 1-25 1.1 1.2 Support DVD information ………………………………………. 1-25 Chapter 2: BIOS information 2.1 Managing and updating your BIOS ……[…]
-
Page 5: Asus P5G41T-M LX3
v Contents 2.5.4 APM Conguration ……………………………………………….. 2-16 2.5.6 Hardware Monitor ………………………………………………… 2-16 2.6 Boot menu ………………………………………………………………………. 2-17 2.6.1 Boot Device Priority ……………………………….[…]
-
Page 6: Asus P5G41T-M LX3
vi Notices Federal Communications Commission Statement This device complies with Part 15 of the FCC Rules. Operation is subject to the following two conditions: • This device may not cause harmful interference, and • This device must accept any interference received including interference that may cause undesired operation. This equipment has b[…]
-
Page 7: Asus P5G41T-M LX3
vii Safety information Electrical safety • T o prevent electric shock hazard, disconnect the power cable from the electric outlet before relocating the system. • When adding or removing devices to or from the system, ensure that the power cables for the devices are unplugged before the signal cables are connected. If possible, disconnect all po[…]
-
Page 8: Asus P5G41T-M LX3
viii Conventions used in this guide T o ensure that you perform certain tasks properly , take note of the following symbols used throughout this manual. DANGER/W ARNING: Information to prevent injury to yourself when trying to complete a task. CAUTION: Information to prevent damage to the components when trying to complete a task. NOTE: T ips and a[…]
-
Page 9: Asus P5G41T-M LX3
ix P5G41T -M LX3 specications summary (continued on the next page) CPU LGA775 socket for Intel ® Core™2 Quad / Core™2 Extreme / Core™2 Duo / Pentium ® dual-core / Celeron ® dual-core / Celeron ® processors Compatible with Intel ® 05B/05A/06 processors Supports Intel ® 45nm multi-core CPU * Refer to www .asus.com for Intel ® CPU supp[…]
-
Page 10: Asus P5G41T-M LX3
x P5G41T -M LX3 specications summary * Specications are subject to change without notice. ASUS unique features ASUS CrashFree BIOS 3 ASUS Q-Fan ASUS EZ Flash 2 ASUS MyLogo 2 ASUS T urbo Key ASUS EPU-L Back panel I/O ports 1 x PS/2 keyboard port 1 x PS/2 mouse port 1 x COM port 1 x VGA port 1 x LAN (RJ-45) port 4 x USB 2.0/1.1 ports 3 x audio […]
-
Page 11: Asus P5G41T-M LX3
ASUS P5G41T -M LX3 1-1 Chapter 1 Product introduction Motherboard ASUS P5G41T -M LX3 motherboard Cables 2 x Serial A T A 3.0Gb/s cables Accessories 1 x I/O shield Application DVD ASUS motherboard support DVD Documentation User Manual If any of the above items is damaged or missing, contact your retailer . 1.3 Special features 1.3.1 Product highligh[…]
-
Page 12: Asus P5G41T-M LX3
1-2 Chapter 1: Product introduction Intel ® G41 Chipset The Intel ® G41 Express Chipset is designed to support dual-channel DDR3 1333 (overclocking)/1066 architecture, 1333/1066 Front Side Bus (FSB), PCIe 1.1, and mutli-core CPUs. It especially includes Intel ® Fast memory bandwidth and reduces the latency of the memory accesses. Dual channel DD[…]
-
Page 13: Asus P5G41T-M LX3
ASUS P5G41T -M LX3 1-3 ASUS CrashFree BIOS 3 ASUS CrashFree BIOS 3 is an auto-recovery tool that allows you to restore a corrupted BIOS le using the bundled support DVD or USB ash disk that contains the latest BIOS le. ASUS EZ Flash 2 ASUS EZ Flash 2 is a utility that allows you to update the BIOS without using an OS-based utility . C.P .R[…]
-
Page 14: Asus P5G41T-M LX3
1-4 Chapter 1: Product introduction 1.4 Before you proceed T ake note of the following precautions before you install motherboard components or change any motherboard settings. • Unplug the power cord from the wall socket before touching any component. • Before handling components, use a grounded wrist strap or touch a safely grounded object or[…]
-
Page 15: Asus P5G41T-M LX3
ASUS P5G41T -M LX3 1-5 1.5 Motherboard overview Before you install the motherboard, study the conguration of your chassis to ensure that the motherboard ts into it. Ensure that you unplug the power cord before installing or removing the motherboard. Failure to do so can cause you physical injury and damage motherboard components. 1.5.1 Placem[…]
-
Page 16: Asus P5G41T-M LX3
1-6 Chapter 1: Product introduction 1.5.3 Motherboard layout P5G41T-M LX3 PCIEX16 PCIEX1_2 PCIEX1_1 PCI1 USB56 USB78 F_PANEL AAFP ICS 9LRS954 ATX12V EATXPWR CPU_FAN Intel ® G41 Lithium Cell CMOS Power Super I/O AUDIO ALC887 ATHEROS 8151 RTL 8103EL KBMS 8Mb BIOS SB_PWR CLRTC SPEAKER SPDIF_OUT USBPW1-4 USBPW5-8 KBPWR 18.8cm(7.4in) 24.4cm(9.6in) LGA7[…]
-
Page 17: Asus P5G41T-M LX3
ASUS P5G41T -M LX3 1-7 • Unplug all power cables before installing the CPU. • Connect the CPU fan cable to the CPU_F AN connector and chassis fan cable to the CHA_F AN connector to ensure system stability . Before installing the CPU, ensure that the cam box is facing towards you and the load lever is on your left. 1.6 Central Processing Unit (C[…]
-
Page 18: Asus P5G41T-M LX3
1-8 Chapter 1: Product introduction T o prevent damage to the socket pins, do not remove the PnP cap unless you are installing a CPU. 2. Press the load lever with your thumb (A), then move it to the left (B) until it is released from the retention tab. A B Load lever Retention tab 4. Lift the load plate with your thumb and forenger to a 100º an[…]
-
Page 19: Asus P5G41T-M LX3
ASUS P5G41T -M LX3 1-9 6. Apply some Thermal Interface Material to the exposed area of the CPU that the heatsink will be in contact with, ensuring that it is spread in an even thin layer . DO NOT eat the Thermal Interface Material. If it gets into your eyes or touches your skin, ensure that you wash it off immediately , and seek professional medica[…]
-
Page 20: Asus P5G41T-M LX3
1-10 Chapter 1: Product introduction 1.6.2 Installing the CPU heatsink and fan The Intel ® LGA775 processor requires a specially designed heatsink and fan assembly to ensure optimum thermal condition and performance. • When you buy a boxed Intel ® processor , the package includes the CPU fan and heatsink assembly . If you buy a CPU separately ,[…]
-
Page 21: Asus P5G41T-M LX3
ASUS P5G41T -M LX3 1-1 1 3. Connect the CPU fan cable to the connector on the motherboard labeled CPU_F AN. Do not forget to connect the CPU fan connector! Hardware monitoring errors can occur if you fail to plug this connector . 1.6.3 Uninstalling the CPU heatsink and fan T o uninstall the CPU heatsink and fan: 1. Disconnect the CPU fan cable from[…]
-
Page 22: Asus P5G41T-M LX3
1-12 Chapter 1: Product introduction P5G41T-M LX3 P5G41T -M LX3 240-pin DDR3 DIMM sockets DIMM_A1 DIMM_B1 1.7 System memory 1.7.1 Overview The motherboard comes with two Double Data Rate 3 (DDR3) Dual Inline Memory Modules (DIMM) sockets. The gure illustrates the location of the DDR3 DIMM sockets: Channel Sockets Channel A DIMM_A1 Channel B DIMM[…]
-
Page 23: Asus P5G41T-M LX3
ASUS P5G41T -M LX3 1-13 1.7.2 Memory congurations Y ou may install 512MB, 1GB, 2GB, and 4GB unbuffered non-ECC DDR3 DIMMs into the DIMM sockets. • Y ou may install varying memory sizes in Channel A and Channel B. The system maps the total size of the lower-sized channel for the dual-channel conguration. Any excess memory from the higher-siz[…]
-
Page 24: Asus P5G41T-M LX3
1-14 Chapter 1: Product introduction DDR3-1333 MHz (O.C.) capability SS — Single-sided / DS — Double — sided DIMM support: • A*: Supports one module inserted into any slot as Single-channel memory conguration. • B*: Supports one pair of modules inserted into both the blue slots as one pair of Dual-channel memory conguration. Visit the ASU[…]
-
Page 25: Asus P5G41T-M LX3
ASUS P5G41T -M LX3 1-15 1.7.3 Installing a DIMM Unplug the power supply before adding or removing DIMMs or other system components. Failure to do so can cause severe damage to both the motherboard and the components. T o install a DIMM: 1. Press the retaining clips outward to unlock a DIMM socket. 2. Align a DIMM on the socket such that the notch o[…]
-
Page 26: Asus P5G41T-M LX3
1-16 Chapter 1: Product introduction 1.8 Expansion slots In the future, you may need to install expansion cards. The following sub-sections describe the slots and the expansion cards that they support. Unplug the power cord before adding or removing expansion cards. Failure to do so may cause you physical injury and damage motherboard components. 1[…]
-
Page 27: Asus P5G41T-M LX3
ASUS P5G41T -M LX3 1-17 1.9 Jumpers 1. Clear RTC RAM (3-pin CLRTC) This jumper allows you to clear the Real T ime Clock (RTC) RAM in CMOS. Y ou can clear the CMOS memory of date, time, and system setup parameters by erasing the CMOS RTC RAM data. The onboard button cell battery powers the RAM data in CMOS, which include system setup information suc[…]
-
Page 28: Asus P5G41T-M LX3
1-18 Chapter 1: Product introduction 2. Keyboard power (3-pin KBPWR) This jumper allows you to enable or disable the keyboard wake-up feature. When you set this jumper to pins 2–3 (+5VSB), you can wake up the computer by pressing a key on the keyboard. This feature requires an A TX power supply that can supply at least 1A on the +5VSB lead, and a[…]
-
Page 29: Asus P5G41T-M LX3
ASUS P5G41T -M LX3 1-19 1.10 Connectors 1.10.1 Rear panel connectors 2 6 7 8 9 10 1 3 4 5 1. PS/2 mouse port (green) . This port is for a PS/2 mouse. 2. LAN (RJ-45) port. This port allows Gigabit connection to a Local Area Network (LAN) through a network hub. Refer to the table below for the LAN port LED indications. LAN port LED indications ACT/LI[…]
-
Page 30: Asus P5G41T-M LX3
1-20 Chapter 1: Product introduction 6. USB 2.0 ports 1 and 2. These two 4-pin Universal Serial Bus (USB) ports are available for connecting USB 2.0 devices. 7. USB 2.0 ports 3 and 4. These two 4-pin Universal Serial Bus (USB) ports are available for connecting USB 2.0 devices. 8. VGA port. This 15-pin port is for a VGA monitor or other VGA-compati[…]
-
Page 31: Asus P5G41T-M LX3
ASUS P5G41T -M LX3 1-21 2. A TX power connectors (24-pin EA TXPWR, 4-pin A TX12V) These connectors are for A TX power supply plugs. The power supply plugs are designed to t these connectors in only one orientation. Find the proper orientation and push down rmly until the connectors completely t. • We recommend that you use an A TX 12V Sp[…]
-
Page 32: Asus P5G41T-M LX3
1-22 Chapter 1: Product introduction 3. Serial A T A connectors (7-pin SA T A1-4) These connectors are for the Serial A T A signal cables for Serial A T A 3Gb/s hard disk and optical disk drives. The Serial A T A 3Gb/s is backward compatible with Serial A T A 1.5Gb/s specication. The data transfer rate of the Serial A T A 3Gb/s is faster than th[…]
-
Page 33: Asus P5G41T-M LX3
ASUS P5G41T -M LX3 1-23 5. CPU and chassis fan connectors (4-pin CPU_F AN, 3-pin CHA_F AN) Connect the fan cables to the fan connectors on the motherboard, ensuring that the black wire of each cable matches the ground pin of the connector . Do not forget to connect the fan cables to the fan connectors. Insufcient air ow inside the system may […]
-
Page 34: Asus P5G41T-M LX3
1-24 Chapter 1: Product introduction 7. System panel connector (10-1 pin F_P ANEL) This connector supports several chassis-mounted functions. • System power LED (2-pin PLED) This 2-pin connector is for the system power LED. Connect the chassis power LED cable to this connector . The system power LED lights up when you turn on the system power , a[…]
-
Page 35: Asus P5G41T-M LX3
ASUS P5G41T -M LX3 1-25 1.1 1 Software support 1.1 1.1 Installing an operating system This motherboard supports Windows ® XP/Vista/7 Operating Systems (OS). Always install the latest OS version and corresponding updates to maximize the features of your hardware. • Motherboard settings and hardware options vary . Refer to your OS documentation fo[…]
-
Page 36: Asus P5G41T-M LX3
1-26 Chapter 1: Product introduction[…]
-
Page 37: Asus P5G41T-M LX3
ASUS P5G41T -M LX3 2-1 Chapter 2 BIOS information Save a copy of the original motherboard BIOS le to a USB ash disk in case you need to restore the BIOS in the future. Copy the original motherboard BIOS using the ASUS Update utility . • ASUS Update requires an Internet connection either through a network or an Internet Service Provider (ISP[…]
-
Page 38: Asus P5G41T-M LX3
2-2 Chapter 2: BIOS information 2.1.2 ASUS EZ Flash 2 The ASUS EZ Flash 2 feature allows you to update the BIOS without using an OS-based utility . Before you start using this utility , download the latest BIOS le from the ASUS website at www .asus.com. T o update the BIOS using EZ Flash 2: 1. Insert the USB ash disk that contains the latest […]
-
Page 39: Asus P5G41T-M LX3
ASUS P5G41T -M LX3 2-3 Ensure to load the BIOS default settings to ensure system compatibility and stability . Select the Load Setup Defaults item under the Exit menu. Refer to section 2.8 Exit menu for details. DO NOT shut down or reset the system while updating the BIOS! Doing so can cause system boot failure! • Before using this utility , rena[…]
-
Page 40: Asus P5G41T-M LX3
2-4 Chapter 2: BIOS information 2.2 BIOS setup program Use the BIOS Setup program to update the BIOS or congure its parameters. The BIOS screens include navigation keys and brief online help to guide you in using the BIOS Setup program. Entering BIOS Setup at startup T o enter BIOS Setup at startup: • Press <Delete> during the Power-On S[…]
-
Page 41: Asus P5G41T-M LX3
ASUS P5G41T -M LX3 2-5 2.2.2 Menu bar The menu bar on top of the screen has the following main items: Main For changing the basic system conguration. Advanced For changing the advanced system settings. Power For changing the advanced power management (APM) conguration. Boot For changing the system boot conguration. T ools For conguring […]
-
Page 42: Asus P5G41T-M LX3
2-6 Chapter 2: BIOS information Select Screen Select Item +- Change Field Tab Select Field F1 General Help F10 Save and Exit ESC Exit v02.58 (C)Copyright 1985-2010, American, American Megatrends, Inc. BIOS SETUP UTILITY Main Advanced Power Boot Tools Exit Suspend Mode [Auto] ACPI 2.0 Support [Disabled] ACPI APIC support [Enabled] APM Conguration[…]
-
Page 43: Asus P5G41T-M LX3
ASUS P5G41T -M LX3 2-7 2.3 Main menu When you enter the BIOS Setup program, the Main menu screen appears, giving you an overview of the basic system information. 2.3.1 System Time [xx:xx:xx] Allows you to set the system time. 2.3.2 System Date [Day xx/xx/xxxx] Allows you to set the system date. 2.3.3 SA T A1~4 While entering Setup, the BIOS automat[…]
-
Page 44: Asus P5G41T-M LX3
2-8 Chapter 2: BIOS information Block (Multi-sector T ransfer) M [Auto] Enables or disables data multi-sectors transfers. When set to [Auto] , the data transfer from and to the device occurs multiple sectors at a time if the device supports multi-sector transfer feature. When set to [Disabled] , the data transfer from and to the device occurs one s[…]
-
Page 45: Asus P5G41T-M LX3
ASUS P5G41T -M LX3 2-9 2.4 Advanced menu The Advanced menu items allow you to change the settings for the CPU and other system devices. T ake caution when changing the settings of the Advanced menu items. Incorrect eld values can cause the system to malfunction. JumperFree Conguration CPU Conguration Chipset Onboard Devices Conguration […]
-
Page 46: Asus P5G41T-M LX3
2-10 Chapter 2: BIOS information FSB / CPU External Frequency Synchronization Front Side Bus CPU External Frequency FSB 1333 333 MHz FSB 1066 266 MHz FSB 800 200 MHz PCI Express Frequency [Auto] Allows you to select the PCI Express frequency . Conguration options: [Auto] [90] [91] [92]~[150] Overclock Options [Overclock 5%] Allows you to select […]
-
Page 47: Asus P5G41T-M LX3
ASUS P5G41T -M LX3 2-1 1 2.4.2 CPU Conguration The items in this menu show the CPU-related information that the BIOS automatically detects. Ratio CMOS Setting [Auto] Sets the ration between CPU core clock and the FSB frequency . Conguration option: [Auto] C1E Support [Enabled] Allows you to enable or disable C1E Support. Conguration option[…]
-
Page 48: Asus P5G41T-M LX3
2-12 Chapter 2: BIOS information 2.4.3 Chipset The Chipset menu allows you to change the advanced chipset settings. Select an item then press <Enter> to display the sub-menu. North Bridge Conguration Memory Remap Feature [Enabled] Allows you to enable or disable the remapping of overlapped PCI memory above the total physical memory . Con?[…]
-
Page 49: Asus P5G41T-M LX3
ASUS P5G41T -M LX3 2-13 2.4.4 Onboard Devices Conguration Onboard Gigabit LAN [Enabled] Allows you to enable or disable the onboard Gigabit LAN controller . Conguration options: [Enabled] [Disabled] Onboard LAN Boot ROM [Disabled] Allows you to enable or disable the boot ROM in the onboard LAN controller . This item appears only when the Onbo[…]
-
Page 50: Asus P5G41T-M LX3
2-14 Chapter 2: BIOS information USB Functions [Enabled] Allows you to disable or enable the USB functions. Conguration options: [Disabled] [Enabled] USB 2.0 Controller [Enabled] Allows you to enable or disable USB 2.0 controller . Conguration options: [Enabled] [Disabled] Legacy USB Support [Auto] Allows you to enable or disable support for […]
-
Page 51: Asus P5G41T-M LX3
ASUS P5G41T -M LX3 2-15 2.5 Power menu The Power menu items allow you to change the settings for the Advanced Power Management (APM). Select an item then press <Enter> to display the conguration options. Suspend Mode [Auto] ACPI 2.0 Support [Enabled] ACPI APIC Support [Enabled] APM Conguration Hardware Monitor BIOS SETUP UTILITY Main Ad[…]
-
Page 52: Asus P5G41T-M LX3
2-16 Chapter 2: BIOS information 2.5.4 APM Conguration Restore on AC Power Loss [Power Off] When set to [Power Off] , the system goes into off state after an AC power loss. When set to [Power On] , the system goes on after an AC power loss. When set to [Last State] , the system goes into either off or on state, whatever the system state was befo[…]
-
Page 53: Asus P5G41T-M LX3
ASUS P5G41T -M LX3 2-17 2.6.1 Boot Device Priority 1st ~ xxth Boot Device These items specify the boot device priority sequence from the available devices. The number of device items that appears on the screen depends on the number of devices installed in the system. Conguration options: [Removable Dev .] [Hard Drive] [A T API CD-ROM] [Disabled][…]
-
Page 54: Asus P5G41T-M LX3
2-18 Chapter 2: BIOS information AddOn ROM Display Mode [Force BIOS] Sets the display mode for option ROM. Conguration options: [Force BIOS] [Keep Current] Bootup Num-Lock [On] Allows you to select the power-on state for the NumLock. Conguration options: [Off] [On] W ait For ‘F1’ If Error [Enabled] When set to Enabled , the system waits f[…]
-
Page 55: Asus P5G41T-M LX3
ASUS P5G41T -M LX3 2-19 After you have set a supervisor password, the other items appear to allow you to change other security settings. User Access Level [Full Access] This item allows you to select the access restriction to the Setup items. Conguration options: [No Access] [View Only] [Limited] [Full Access] [No Access] — prevents user access […]
-
Page 56: Asus P5G41T-M LX3
2-20 Chapter 2: BIOS information ASUS EZ Flash 2 Allows you to run ASUS EZ Flash 2. When you press <Enter> , a conrmation message appears. Use the left/right arrow key to select between [Y es ] or [No] , then press <Enter> to conrm your choice. See section 2.1.2 ASUS EZ Flash 2 for details. ASUS EZ Flash 2 BIOS SETUP UTILITY Main […]
-
Page 57: Asus P5G41T-M LX3
ASUS P5G41T -M LX3 2-21 2.8 Exit menu The Exit menu items allow you to load the optimal or failsafe default values for the BIOS items, and save or discard your changes to the BIOS items. Pressing <Esc> does not immediately exit this menu. Select one of the options from this menu or <F10> from the legend bar to exit. Exit system setup af[…]
-
Page 58: Asus P5G41T-M LX3
2-22 Chapter 2: BIOS information[…]
-
Page 59: Asus P5G41T-M LX3
ASUS contact information ASUST eK COMPUTER INC. Address 15 Li-T e Road, Peitou, T aipei, T aiwan 1 1259 T elephone +886-2-2894-3447 Fax +886-2-2890-7798 E-mail info@asus.com.tw Web site www .asus.com.tw T echnical Support T elephone +86-21-3842991 1 Online support support.asus.com ASUS COMPUTER INTERNA TIONAL (America) Address 800 Corporate Way , F[…]
-
Page 60: Asus P5G41T-M LX3
EC Declaration of Conformity We, the undersigned, Manufacturer: ASUSTek COMPUTER INC. Address, City: No. 150, LI-TE RD., PEITOU, TAIPEI 112, TAIWAN R.O.C. Country: TAIWAN Authorized representative in Europe: ASUS COMPUTER GmbH Address, City: HARKORT STR. 21-23, 40880 RATINGEN Country: GERMANY declare the following apparatus: Product name : Motherbo[…]
-
Страница 1
Motherboard P5G41T -M LX3[…]
-
Страница 2
ii E6280 First Edition V1 December 2010 Copyright © 2010 ASUST eK Computer Inc. All Rights Reserved. No part of this manual, including the products and software described in it, may be reproduced, transmitted, transcribed, stored in a retrieval system, or translated into any language in any form or by any means, except documentation kept by the pu[…]
-
Страница 3
iii Contents Notices …………………………………………………………………………………………… vi Safety information …………………………………………………………………………. vii About this guide ……………………………………………………………………………. vii P[…]
-
Страница 4
iv Contents 1.1 1 Software support ……………………………………………………………… 1-25 1.1 1.1 Installing an operating system ……………………………….. 1-25 1.1 1.2 Support DVD information ………………………………………. 1-25 Chapter 2: BIOS information 2.1 Managing and updating your BIOS ……[…]
-
Страница 5
v Contents 2.5.4 APM Conguration ……………………………………………….. 2-16 2.5.6 Hardware Monitor ………………………………………………… 2-16 2.6 Boot menu ………………………………………………………………………. 2-17 2.6.1 Boot Device Priority ……………………………….[…]
-
Страница 6
vi Notices Federal Communications Commission Statement This device complies with Part 15 of the FCC Rules. Operation is subject to the following two conditions: • This device may not cause harmful interference, and • This device must accept any interference received including interference that may cause undesired operation. This equipment has b[…]
-
Страница 7
vii Safety information Electrical safety • T o prevent electric shock hazard, disconnect the power cable from the electric outlet before relocating the system. • When adding or removing devices to or from the system, ensure that the power cables for the devices are unplugged before the signal cables are connected. If possible, disconnect all po[…]
-
Страница 8
viii Conventions used in this guide T o ensure that you perform certain tasks properly , take note of the following symbols used throughout this manual. DANGER/W ARNING: Information to prevent injury to yourself when trying to complete a task. CAUTION: Information to prevent damage to the components when trying to complete a task. NOTE: T ips and a[…]
-
Страница 9
ix P5G41T -M LX3 specications summary (continued on the next page) CPU LGA775 socket for Intel ® Core™2 Quad / Core™2 Extreme / Core™2 Duo / Pentium ® dual-core / Celeron ® dual-core / Celeron ® processors Compatible with Intel ® 05B/05A/06 processors Supports Intel ® 45nm multi-core CPU * Refer to www .asus.com for Intel ® CPU supp[…]
-
Страница 10
x P5G41T -M LX3 specications summary * Specications are subject to change without notice. ASUS unique features ASUS CrashFree BIOS 3 ASUS Q-Fan ASUS EZ Flash 2 ASUS MyLogo 2 ASUS T urbo Key ASUS EPU-L Back panel I/O ports 1 x PS/2 keyboard port 1 x PS/2 mouse port 1 x COM port 1 x VGA port 1 x LAN (RJ-45) port 4 x USB 2.0/1.1 ports 3 x audio […]
-
Страница 11
ASUS P5G41T -M LX3 1-1 Chapter 1 Product introduction Motherboard ASUS P5G41T -M LX3 motherboard Cables 2 x Serial A T A 3.0Gb/s cables Accessories 1 x I/O shield Application DVD ASUS motherboard support DVD Documentation User Manual If any of the above items is damaged or missing, contact your retailer . 1.3 Special features 1.3.1 Product highligh[…]
-
Страница 12
1-2 Chapter 1: Product introduction Intel ® G41 Chipset The Intel ® G41 Express Chipset is designed to support dual-channel DDR3 1333 (overclocking)/1066 architecture, 1333/1066 Front Side Bus (FSB), PCIe 1.1, and mutli-core CPUs. It especially includes Intel ® Fast memory bandwidth and reduces the latency of the memory accesses. Dual channel DD[…]
-
Страница 13
ASUS P5G41T -M LX3 1-3 ASUS CrashFree BIOS 3 ASUS CrashFree BIOS 3 is an auto-recovery tool that allows you to restore a corrupted BIOS le using the bundled support DVD or USB ash disk that contains the latest BIOS le. ASUS EZ Flash 2 ASUS EZ Flash 2 is a utility that allows you to update the BIOS without using an OS-based utility . C.P .R[…]
-
Страница 14
1-4 Chapter 1: Product introduction 1.4 Before you proceed T ake note of the following precautions before you install motherboard components or change any motherboard settings. • Unplug the power cord from the wall socket before touching any component. • Before handling components, use a grounded wrist strap or touch a safely grounded object or[…]
-
Страница 15
ASUS P5G41T -M LX3 1-5 1.5 Motherboard overview Before you install the motherboard, study the conguration of your chassis to ensure that the motherboard ts into it. Ensure that you unplug the power cord before installing or removing the motherboard. Failure to do so can cause you physical injury and damage motherboard components. 1.5.1 Placem[…]
-
Страница 16
1-6 Chapter 1: Product introduction 1.5.3 Motherboard layout P5G41T-M LX3 PCIEX16 PCIEX1_2 PCIEX1_1 PCI1 USB56 USB78 F_PANEL AAFP ICS 9LRS954 ATX12V EATXPWR CPU_FAN Intel ® G41 Lithium Cell CMOS Power Super I/O AUDIO ALC887 ATHEROS 8151 RTL 8103EL KBMS 8Mb BIOS SB_PWR CLRTC SPEAKER SPDIF_OUT USBPW1-4 USBPW5-8 KBPWR 18.8cm(7.4in) 24.4cm(9.6in) LGA7[…]
-
Страница 17
ASUS P5G41T -M LX3 1-7 • Unplug all power cables before installing the CPU. • Connect the CPU fan cable to the CPU_F AN connector and chassis fan cable to the CHA_F AN connector to ensure system stability . Before installing the CPU, ensure that the cam box is facing towards you and the load lever is on your left. 1.6 Central Processing Unit (C[…]
-
Страница 18
1-8 Chapter 1: Product introduction T o prevent damage to the socket pins, do not remove the PnP cap unless you are installing a CPU. 2. Press the load lever with your thumb (A), then move it to the left (B) until it is released from the retention tab. A B Load lever Retention tab 4. Lift the load plate with your thumb and forenger to a 100º an[…]
-
Страница 19
ASUS P5G41T -M LX3 1-9 6. Apply some Thermal Interface Material to the exposed area of the CPU that the heatsink will be in contact with, ensuring that it is spread in an even thin layer . DO NOT eat the Thermal Interface Material. If it gets into your eyes or touches your skin, ensure that you wash it off immediately , and seek professional medica[…]
-
Страница 20
1-10 Chapter 1: Product introduction 1.6.2 Installing the CPU heatsink and fan The Intel ® LGA775 processor requires a specially designed heatsink and fan assembly to ensure optimum thermal condition and performance. • When you buy a boxed Intel ® processor , the package includes the CPU fan and heatsink assembly . If you buy a CPU separately ,[…]
-
Страница 21
ASUS P5G41T -M LX3 1-1 1 3. Connect the CPU fan cable to the connector on the motherboard labeled CPU_F AN. Do not forget to connect the CPU fan connector! Hardware monitoring errors can occur if you fail to plug this connector . 1.6.3 Uninstalling the CPU heatsink and fan T o uninstall the CPU heatsink and fan: 1. Disconnect the CPU fan cable from[…]
-
Страница 22
1-12 Chapter 1: Product introduction P5G41T-M LX3 P5G41T -M LX3 240-pin DDR3 DIMM sockets DIMM_A1 DIMM_B1 1.7 System memory 1.7.1 Overview The motherboard comes with two Double Data Rate 3 (DDR3) Dual Inline Memory Modules (DIMM) sockets. The gure illustrates the location of the DDR3 DIMM sockets: Channel Sockets Channel A DIMM_A1 Channel B DIMM[…]
-
Страница 23
ASUS P5G41T -M LX3 1-13 1.7.2 Memory congurations Y ou may install 512MB, 1GB, 2GB, and 4GB unbuffered non-ECC DDR3 DIMMs into the DIMM sockets. • Y ou may install varying memory sizes in Channel A and Channel B. The system maps the total size of the lower-sized channel for the dual-channel conguration. Any excess memory from the higher-siz[…]
-
Страница 24
1-14 Chapter 1: Product introduction DDR3-1333 MHz (O.C.) capability SS — Single-sided / DS — Double — sided DIMM support: • A*: Supports one module inserted into any slot as Single-channel memory conguration. • B*: Supports one pair of modules inserted into both the blue slots as one pair of Dual-channel memory conguration. Visit the ASU[…]
-
Страница 25
ASUS P5G41T -M LX3 1-15 1.7.3 Installing a DIMM Unplug the power supply before adding or removing DIMMs or other system components. Failure to do so can cause severe damage to both the motherboard and the components. T o install a DIMM: 1. Press the retaining clips outward to unlock a DIMM socket. 2. Align a DIMM on the socket such that the notch o[…]
-
Страница 26
1-16 Chapter 1: Product introduction 1.8 Expansion slots In the future, you may need to install expansion cards. The following sub-sections describe the slots and the expansion cards that they support. Unplug the power cord before adding or removing expansion cards. Failure to do so may cause you physical injury and damage motherboard components. 1[…]
-
Страница 27
ASUS P5G41T -M LX3 1-17 1.9 Jumpers 1. Clear RTC RAM (3-pin CLRTC) This jumper allows you to clear the Real T ime Clock (RTC) RAM in CMOS. Y ou can clear the CMOS memory of date, time, and system setup parameters by erasing the CMOS RTC RAM data. The onboard button cell battery powers the RAM data in CMOS, which include system setup information suc[…]
-
Страница 28
1-18 Chapter 1: Product introduction 2. Keyboard power (3-pin KBPWR) This jumper allows you to enable or disable the keyboard wake-up feature. When you set this jumper to pins 2–3 (+5VSB), you can wake up the computer by pressing a key on the keyboard. This feature requires an A TX power supply that can supply at least 1A on the +5VSB lead, and a[…]
-
Страница 29
ASUS P5G41T -M LX3 1-19 1.10 Connectors 1.10.1 Rear panel connectors 2 6 7 8 9 10 1 3 4 5 1. PS/2 mouse port (green) . This port is for a PS/2 mouse. 2. LAN (RJ-45) port. This port allows Gigabit connection to a Local Area Network (LAN) through a network hub. Refer to the table below for the LAN port LED indications. LAN port LED indications ACT/LI[…]
-
Страница 30
1-20 Chapter 1: Product introduction 6. USB 2.0 ports 1 and 2. These two 4-pin Universal Serial Bus (USB) ports are available for connecting USB 2.0 devices. 7. USB 2.0 ports 3 and 4. These two 4-pin Universal Serial Bus (USB) ports are available for connecting USB 2.0 devices. 8. VGA port. This 15-pin port is for a VGA monitor or other VGA-compati[…]
-
Страница 31
ASUS P5G41T -M LX3 1-21 2. A TX power connectors (24-pin EA TXPWR, 4-pin A TX12V) These connectors are for A TX power supply plugs. The power supply plugs are designed to t these connectors in only one orientation. Find the proper orientation and push down rmly until the connectors completely t. • We recommend that you use an A TX 12V Sp[…]
-
Страница 32
1-22 Chapter 1: Product introduction 3. Serial A T A connectors (7-pin SA T A1-4) These connectors are for the Serial A T A signal cables for Serial A T A 3Gb/s hard disk and optical disk drives. The Serial A T A 3Gb/s is backward compatible with Serial A T A 1.5Gb/s specication. The data transfer rate of the Serial A T A 3Gb/s is faster than th[…]
-
Страница 33
ASUS P5G41T -M LX3 1-23 5. CPU and chassis fan connectors (4-pin CPU_F AN, 3-pin CHA_F AN) Connect the fan cables to the fan connectors on the motherboard, ensuring that the black wire of each cable matches the ground pin of the connector . Do not forget to connect the fan cables to the fan connectors. Insufcient air ow inside the system may […]
-
Страница 34
1-24 Chapter 1: Product introduction 7. System panel connector (10-1 pin F_P ANEL) This connector supports several chassis-mounted functions. • System power LED (2-pin PLED) This 2-pin connector is for the system power LED. Connect the chassis power LED cable to this connector . The system power LED lights up when you turn on the system power , a[…]
-
Страница 35
ASUS P5G41T -M LX3 1-25 1.1 1 Software support 1.1 1.1 Installing an operating system This motherboard supports Windows ® XP/Vista/7 Operating Systems (OS). Always install the latest OS version and corresponding updates to maximize the features of your hardware. • Motherboard settings and hardware options vary . Refer to your OS documentation fo[…]
-
Страница 36
1-26 Chapter 1: Product introduction[…]
-
Страница 37
ASUS P5G41T -M LX3 2-1 Chapter 2 BIOS information Save a copy of the original motherboard BIOS le to a USB ash disk in case you need to restore the BIOS in the future. Copy the original motherboard BIOS using the ASUS Update utility . • ASUS Update requires an Internet connection either through a network or an Internet Service Provider (ISP[…]
-
Страница 38
2-2 Chapter 2: BIOS information 2.1.2 ASUS EZ Flash 2 The ASUS EZ Flash 2 feature allows you to update the BIOS without using an OS-based utility . Before you start using this utility , download the latest BIOS le from the ASUS website at www .asus.com. T o update the BIOS using EZ Flash 2: 1. Insert the USB ash disk that contains the latest […]
-
Страница 39
ASUS P5G41T -M LX3 2-3 Ensure to load the BIOS default settings to ensure system compatibility and stability . Select the Load Setup Defaults item under the Exit menu. Refer to section 2.8 Exit menu for details. DO NOT shut down or reset the system while updating the BIOS! Doing so can cause system boot failure! • Before using this utility , rena[…]
-
Страница 40
2-4 Chapter 2: BIOS information 2.2 BIOS setup program Use the BIOS Setup program to update the BIOS or congure its parameters. The BIOS screens include navigation keys and brief online help to guide you in using the BIOS Setup program. Entering BIOS Setup at startup T o enter BIOS Setup at startup: • Press <Delete> during the Power-On S[…]
-
Страница 41
ASUS P5G41T -M LX3 2-5 2.2.2 Menu bar The menu bar on top of the screen has the following main items: Main For changing the basic system conguration. Advanced For changing the advanced system settings. Power For changing the advanced power management (APM) conguration. Boot For changing the system boot conguration. T ools For conguring […]
-
Страница 42
2-6 Chapter 2: BIOS information Select Screen Select Item +- Change Field Tab Select Field F1 General Help F10 Save and Exit ESC Exit v02.58 (C)Copyright 1985-2010, American, American Megatrends, Inc. BIOS SETUP UTILITY Main Advanced Power Boot Tools Exit Suspend Mode [Auto] ACPI 2.0 Support [Disabled] ACPI APIC support [Enabled] APM Conguration[…]
-
Страница 43
ASUS P5G41T -M LX3 2-7 2.3 Main menu When you enter the BIOS Setup program, the Main menu screen appears, giving you an overview of the basic system information. 2.3.1 System Time [xx:xx:xx] Allows you to set the system time. 2.3.2 System Date [Day xx/xx/xxxx] Allows you to set the system date. 2.3.3 SA T A1~4 While entering Setup, the BIOS automat[…]
-
Страница 44
2-8 Chapter 2: BIOS information Block (Multi-sector T ransfer) M [Auto] Enables or disables data multi-sectors transfers. When set to [Auto] , the data transfer from and to the device occurs multiple sectors at a time if the device supports multi-sector transfer feature. When set to [Disabled] , the data transfer from and to the device occurs one s[…]
-
Страница 45
ASUS P5G41T -M LX3 2-9 2.4 Advanced menu The Advanced menu items allow you to change the settings for the CPU and other system devices. T ake caution when changing the settings of the Advanced menu items. Incorrect eld values can cause the system to malfunction. JumperFree Conguration CPU Conguration Chipset Onboard Devices Conguration […]
-
Страница 46
2-10 Chapter 2: BIOS information FSB / CPU External Frequency Synchronization Front Side Bus CPU External Frequency FSB 1333 333 MHz FSB 1066 266 MHz FSB 800 200 MHz PCI Express Frequency [Auto] Allows you to select the PCI Express frequency . Conguration options: [Auto] [90] [91] [92]~[150] Overclock Options [Overclock 5%] Allows you to select […]
-
Страница 47
ASUS P5G41T -M LX3 2-1 1 2.4.2 CPU Conguration The items in this menu show the CPU-related information that the BIOS automatically detects. Ratio CMOS Setting [Auto] Sets the ration between CPU core clock and the FSB frequency . Conguration option: [Auto] C1E Support [Enabled] Allows you to enable or disable C1E Support. Conguration option[…]
-
Страница 48
2-12 Chapter 2: BIOS information 2.4.3 Chipset The Chipset menu allows you to change the advanced chipset settings. Select an item then press <Enter> to display the sub-menu. North Bridge Conguration Memory Remap Feature [Enabled] Allows you to enable or disable the remapping of overlapped PCI memory above the total physical memory . Con?[…]
-
Страница 49
ASUS P5G41T -M LX3 2-13 2.4.4 Onboard Devices Conguration Onboard Gigabit LAN [Enabled] Allows you to enable or disable the onboard Gigabit LAN controller . Conguration options: [Enabled] [Disabled] Onboard LAN Boot ROM [Disabled] Allows you to enable or disable the boot ROM in the onboard LAN controller . This item appears only when the Onbo[…]
-
Страница 50
2-14 Chapter 2: BIOS information USB Functions [Enabled] Allows you to disable or enable the USB functions. Conguration options: [Disabled] [Enabled] USB 2.0 Controller [Enabled] Allows you to enable or disable USB 2.0 controller . Conguration options: [Enabled] [Disabled] Legacy USB Support [Auto] Allows you to enable or disable support for […]
-
Страница 51
ASUS P5G41T -M LX3 2-15 2.5 Power menu The Power menu items allow you to change the settings for the Advanced Power Management (APM). Select an item then press <Enter> to display the conguration options. Suspend Mode [Auto] ACPI 2.0 Support [Enabled] ACPI APIC Support [Enabled] APM Conguration Hardware Monitor BIOS SETUP UTILITY Main Ad[…]
-
Страница 52
2-16 Chapter 2: BIOS information 2.5.4 APM Conguration Restore on AC Power Loss [Power Off] When set to [Power Off] , the system goes into off state after an AC power loss. When set to [Power On] , the system goes on after an AC power loss. When set to [Last State] , the system goes into either off or on state, whatever the system state was befo[…]
-
Страница 53
ASUS P5G41T -M LX3 2-17 2.6.1 Boot Device Priority 1st ~ xxth Boot Device These items specify the boot device priority sequence from the available devices. The number of device items that appears on the screen depends on the number of devices installed in the system. Conguration options: [Removable Dev .] [Hard Drive] [A T API CD-ROM] [Disabled][…]
-
Страница 54
2-18 Chapter 2: BIOS information AddOn ROM Display Mode [Force BIOS] Sets the display mode for option ROM. Conguration options: [Force BIOS] [Keep Current] Bootup Num-Lock [On] Allows you to select the power-on state for the NumLock. Conguration options: [Off] [On] W ait For ‘F1’ If Error [Enabled] When set to Enabled , the system waits f[…]
-
Страница 55
ASUS P5G41T -M LX3 2-19 After you have set a supervisor password, the other items appear to allow you to change other security settings. User Access Level [Full Access] This item allows you to select the access restriction to the Setup items. Conguration options: [No Access] [View Only] [Limited] [Full Access] [No Access] — prevents user access […]
-
Страница 56
2-20 Chapter 2: BIOS information ASUS EZ Flash 2 Allows you to run ASUS EZ Flash 2. When you press <Enter> , a conrmation message appears. Use the left/right arrow key to select between [Y es ] or [No] , then press <Enter> to conrm your choice. See section 2.1.2 ASUS EZ Flash 2 for details. ASUS EZ Flash 2 BIOS SETUP UTILITY Main […]
-
Страница 57
ASUS P5G41T -M LX3 2-21 2.8 Exit menu The Exit menu items allow you to load the optimal or failsafe default values for the BIOS items, and save or discard your changes to the BIOS items. Pressing <Esc> does not immediately exit this menu. Select one of the options from this menu or <F10> from the legend bar to exit. Exit system setup af[…]
-
Страница 58
2-22 Chapter 2: BIOS information[…]
-
Страница 59
ASUS contact information ASUST eK COMPUTER INC. Address 15 Li-T e Road, Peitou, T aipei, T aiwan 1 1259 T elephone +886-2-2894-3447 Fax +886-2-2890-7798 E-mail info@asus.com.tw Web site www .asus.com.tw T echnical Support T elephone +86-21-3842991 1 Online support support.asus.com ASUS COMPUTER INTERNA TIONAL (America) Address 800 Corporate Way , F[…]
-
Страница 60
EC Declaration of Conformity We, the undersigned, Manufacturer: ASUSTek COMPUTER INC. Address, City: No. 150, LI-TE RD., PEITOU, TAIPEI 112, TAIWAN R.O.C. Country: TAIWAN Authorized representative in Europe: ASUS COMPUTER GmbH Address, City: HARKORT STR. 21-23, 40880 RATINGEN Country: GERMANY declare the following apparatus: Product name : Motherbo[…]