
Manuals for DEH-1500UBB | Pioneer
- Главная
- Support
- Manuals for DEH-1500UBB
Manuals for DEH-1500UBB
Найти продукт
Просмотр
Доступно к просмотру 108 страниц. Рекомендуем вам скачать файл инструкции, поскольку онлайн просмотр документа может сильно отличаться от оригинала.
-
English  Francais  Italiano  Espanol  Deutsch  Nederlands  Русский
Manual  d’emploi  d’istruzioni  instrucciones  Handleiding  пользователя
Owner’s  Mode  Manuale  de  Bedienungsanleitung
Manual     Руководство
RDS
RECEPTOR
CON
RDS  CD  DE
RDS
RECEIVER  CD  CD  RDS-EMPFANGER  RDS-ONTVANGER  ПРИЕМНИК  DEH-1500UB  DEH-1500UBG  DEH-1500UBA  DEH-1500UBB
RDS  AUTORADIO  SINTOLETTORE  REPRODUCTOR  RDS
CD          CD  CD  CD
-
start  trouble Should this unit fail to operate properly, please
you   of  contact your dealer or nearest authorized
Before  case  PIONEER Service Station.
In
unit The tuner frequencies on this unit are allocated for use in Western Europe, Asia, the Middle East, Africa and Oceania. Use in other areas may result in poor reception. The RDS (radio data system) function only operates in areas with broadcasting RDS signals for FM stations.  This product is a class 1 laser product
this                         CAUTION       outside sounds. Avoid exposure to moisture.  this  to as “USB storage device”.
About         CAUTION  60825-1:2007.  !  liquids.  !  Germany.  !  !  !  Note  are confirmed.  About
start    To ensure proper use, please read through this manual before using this product. It is especially INGs and CAUTIONs in this manual. Please keep the manual in a safe and accessible place for  mix it with general household waste. There is tronic products in accordance with legislation that requires proper treatment, re
you   Thank you for purchasing this PIONEER  important that you read and observe WARN-  If you want to dispose this product, do not a separate collection system for used elec-  purchase a similar new one).
Before  product  future reference.  recycling.     of disposal.  health.
Section  01                                                                 En  2
-
Section  02  English                                                        3  En
LANGUAGE (multi-language) This unit can display the text information from a compressed audio file even for information em- bedded in English or Russian. If the embedded language and the selected language setting are not the same, text infor- mation may not display properly. Some characters may not be displayed prop-  T
AF is on.
erly.
3
4
2
1
2
1
1
2
!
!
!
5  YES.  #  6
unit      Tuner: band and fre-  RDS: program service  name, PTY information and other literal informa-  CD player and USB stor-  age device: elapsed play-  back time and text  Appears when a lower tier of  folder or menu exists.
this   State  !  quency  !  tion  !  information  When you turn the ignition switch to ON after in- stallation, set up menu appears on the display. You can set up the menu options below. After installation of this unit, turn the  If you do not operate for 30 seconds, the set up If you prefer not to set up at this time, turn M
Operating  Indicator  Main infor-  mation sec-  tion  menu  up  ignition switch to ON.  SET UP appears.  Turn M.C. to switch to YES.  menu will not be displayed.  to switch to NO. Press to select.  Press M.C. to select.  confirm your selection.
9         a     Set     1     2  #  #  menu.  3  4  the menu.
7 8    a
5 6  3 4     The list function is being oper-  Sub information is displayed.  A TP station is tuned in.  The sound retriever function  Local seek tuning is on.  Track or folder repeat is on.
indication  2  9  State  ated.  TA function is on.  is on.  Random play is on.
Display  1    Indicator  (list)  1  Sub infor-  mation sec-  2  tion  TA (traffic  announce-  3  ments)  TP (traffic  program  4  identifica-  tion)  (sound re-  5  triever)  LOC  6  (repeat)  7  (ran-  8  dom)
e
7         d     (equalizer)  (back)/  to 6/  AUX input jack  (3.5 mm stereo  Detach button
unit               c   Part  BAND  DIMMER  (dimmer)  c/d  1/  jack)
this     6  5      b     8  9  a   b  c  d  e     Use an optional Pioneer USB cable (CD- U50E) to connect the USB storage device as any device connected directly to the unit will protrude out from the unit, which could be  Do not use unauthorized products.
Operating  unit  Head  3 4  2  1  a  9  8  Part  h (eject)  1  SRC/OFF  2  MULTI-CONTROL  3  (M.C.)  (list)  4  DISP  5  Disc loading slot  6  USB port  7  CAUTION  !  dangerous.  !
- 1
- 2
- 3
- 4
- 108
Страницы и текст этой инструкции
 (UBB) (UBG). Страница №1") Инструкция автомагнитолы Pioneer DEH-1500UB (UBA) (UBB) (UBG)
Инструкция автомагнитолы Pioneer DEH-1500UB (UBA) (UBB) (UBG)
 (UBB) (UBG). Страница №2") Информация отображена на картинке
Информация отображена на картинке
 (UBB) (UBG). Страница №3") Информация отображена на картинке
Информация отображена на картинке
 (UBB) (UBG). Страница №4") Информация отображена на картинке
Информация отображена на картинке
 (UBB) (UBG). Страница №5") Информация отображена на картинке
Информация отображена на картинке
Как использовать наш сайт инструкций OnlineManuals.ru
Наша цель состоит в том, чтобы предоставить вам быстрый доступ к содержанию инструкции для автомагнитолы Pioneer DEH-1500UB (UBA) (UBB) (UBG).
С помощью онлайн просмотра, Вы можете быстро просмотреть содержимое инструкции и найти решение проблемы с автомагнитолы Pioneer DEH-1500UB (UBA) (UBB) (UBG).
Для Вашего удобства
Если листать руководство пользователя автомагнитолы Pioneer DEH-1500UB (UBA) (UBB) (UBG) прямо на сайте, не очень удобно для Вас, есть два возможных решения:
• Просмотр в полноэкранном режиме — легко просмотреть руководство пользователя (без загрузки его на свой компьютер), Вы можете использовать режим полноэкранного просмотра.
Для просмотра инструкции пользователя автомагнитолы Pioneer DEH-1500UB (UBA) (UBB) (UBG) на полном экране, используйте кнопку «Открыть в Pdf-viewer».
• Загрузка на компьютер — Вы можете также скачать Инструкция автомагнитолы Pioneer DEH-1500UB (UBA) (UBB) (UBG) на свой компьютер и сохранить его в файлах.
Многие люди предпочитают читать документы не на экране, а в печатной версии.
Возможность печати руководства пользователя также была предусмотрена на нашем сайте,
и вы можете использовать ее, нажав на иконку «печать» в Pdf-viewer.
Нет необходимости печатать все руководство автомагнитолы Pioneer DEH-1500UB (UBA) (UBB) (UBG), можно выбрать только нужные страницы инструкции.
-
Страница 1
Owner ’ s Manual Mode d ’ emploi Manuale d ’ istruzioni Manual de instrucciones Bedienungsanleitung Handleiding Руководств о пользова те ля CD RDS RECEIVER A UT ORADIO CD RDS SINT OLETTORE CD RDS REPRODUCT OR DE CD CON RECEPT OR RDS CD RDS-EMPFÄNGER CD RDS-ONTV ANGER CD RDS ПРИЕМНИК DEH-1500UB DEH-1500UBG DEH-1[…]
-
Страница 2
Thank you for purchasing this PIONEER product T o ensure proper use, please read through this manual before using this product. It is especially important that you read and observe WARN- ING s and CAUTION s in this manual. Please keep the manual in a safe and accessible place for future reference. If you want to dispose this product, do not mix it […]
-
Страница 3
Head unit c d 5 9 1 2 3 4 6 7 b ae 8 Part Part 1 h (eject) 8 (equalizer) 2 SRC / OFF 9 BAND 3 MUL TI-CONTROL ( M.C. ) a (back)/ DIMMER (dimmer) 4 (list) b c / d 5 DISP c 1 / to 6 / 6 Disc loading slot d AUX input jack (3.5 mm stereo jack) 7 USB port e Detach button CAUTION ! Use an optional Pioneer USB cable (CD- U50E) to connect the USB storage de[…]
-
Страница 4
Notes ! Y ou can set up the menu options from the system menu. For details about the settings, refer to System menu on page 7. ! Y ou can cancel set up menu by pressing SRC / OFF . Basic operations Important ! Handle gently when removing or attaching the front panel. ! Avoid subjecting the front panel to excessive shock. ! Keep the front panel out […]
-
Страница 5
2 Press one of the preset tuning buttons (1/ to 6/ ) to select the desired station. Switching the display Selecting the desired text information 1 Press DISP to cycle between the following: ! FREQUENCY (program ser vice name or frequency) ! BRDCST INFO (program service name/PTY information) ! CLOCK (source name and clock) Notes ! If the program ser[…]
-
Страница 6
Playing songs on a USB storage device 1 Open the USB port cover . 2 Plug in the USB storage device using a USB cable. Playback is per formed automatically. Stopping playback of files on a USB storage de- vice 1 You may disconnect the USB storage device at any time. The unit stops playback. Selecting a folder 1 Press 1 / or 2 / . Selecting a track 1[…]
-
Страница 7
! SUB.W , SUB.W CTRL and HPF SETTING are not available when REAR/REAR is selected in SP-P/O MODE . For details, refer to SP-P/O MODE (rear output and preout set- ting) on the next page. ! SUB.W CTRL and HPF SETTING are not avail- able when SUB.W is selected in OFF . For de- tails, refer to SUB.W (subwoofer on/off setting) on this page. FADER (fader[…]
-
Страница 8
LANGUAGE (multi-language) This unit can display the text information from a compressed audio file even for information em- bedded in English or Russian. ! If the embedded language and the selected language setting are not the same, text infor- mation may not display properly. ! Some characters may not be displayed prop- erly. 1 Turn M.C. to select […]
-
Страница 9
For details, refer to System menu on page 7. Using an AUX source 1 Insert the stereo mini plug into the AUX input jack. 2 Press SRC/OFF to select AUX as the source. Note AUX cannot be selected unless the auxiliary set- ting is turned on. For more details, refer to AUX (auxiliar y input) on the previous page. Switching the display Selecting the desi[…]
-
Страница 10
Power cord 1 3 3 2 4 4 5 5 6 6 b 8 9 7 a e d c 1 T o power cord input 2 Depending on the kind of vehicle, the func- tion of 3 and 5 may be different. In this case, be sure to connect 4 to 5 and 6 to 3 . 3 Yellow Back-up (or accessor y) 4 Yellow Connect to the constant 12 V supply termi- nal. 5 Red Accessory (or back-up) 6 Red Connect to terminal co[…]
-
Страница 11
2 Mounting sleeve # Make sure that the unit is installed securely in place. An unstable installation may cause skipping or other malfunctions. DIN Rear -mount 1 Determine the appropriate position where the holes on the bracket and the side of the unit match. 2 Tighten two screws on each side. 1 2 3 1 Tapping screw (5 mm × 8 mm) 2 Mounting bracket […]
-
Страница 12
Message Cause Action FORMA T READ Sometimes there is a delay between the start of playback and when you start to hear any sound. W ait until the message disap- pears and you hear sound. NO AUDIO The inserted disc does not contain any playable files. Replace the disc. SKIPPED The inserted disc contains DRM protected files. Replace the disc. PROTECT […]
-
Страница 13
When using discs that can be printed on label sur- faces, check the instructions and the warnings of the discs. Depending on the discs, inserting and ejecting may not be possible. Using such discs may result in damage to this equipment. Do not attach commercially available labels or other materials to the discs. ! The discs may warp making the disc[…]
-
Страница 14
Example of a hierarchy Level 1 Level 2 Level 3 Level 4 01 02 03 04 05 : Folder : Compressed audio file 01 to 05: Folder number 1 to 6 : Playback sequence Disc Folder selection sequence or other operation may differ depending on the encoding or writing software. USB storage device Playback sequence is the same as recorded se-[…]
-
Страница 15
English 15 En[…]
-
Страница 16
Nous vous remer cions d ’ avoir acheté cet ap- pareil PIONEER. P our garantir une utilisation correcte, lisez bien ce mode d ’ emploi avant d ’ utiliser cet appareil. Il est particulièrement important que vous lisiez et respectiez les indications A TTENTION et PRÉ- CAUTION de ce mode d ’ emploi. Conser vez-le dans un endroit sûr et faci[…]
-
Страница 17
Appareil central c d 5 9 1 2 3 4 6 7 b ae 8 Partie Partie 1 h (éjection) 8 (égaliseur) 2 SRC / OFF 9 BAND 3 MUL TI-CONTROL ( M.C. ) a (retour)/ DIM- MER (atténuateur de luminosité) 4 (liste) b c / d 5 DISP c 1 / à 6 / 6 Fente de charge- ment des disques d Jack d ’ entrée AUX (jack stéréo 3,5 mm) 7 Port USB e T ouche de retrait de la face […]
-
Страница 18
5 Pour terminer la configuration, tournez M.C. pour sélectionner YES. # Si vous souhaitez modifier à nouveau le réglage, tournez M.C. pour passer à NO . Appuyez pour sélec- tionner . 6 Appuyez sur M.C. pour sélectionner . Remarques ! Vous pouvez configurer les options de menu à partir du menu système. Pour des détails sur les réglages, re[…]
-
Страница 19
Enregistrement et rappel des stations pour chaque gamme Utilisation des touches de présélection 1 Lorsque se présente une station que vous souhaitez mettre en mémoire, appuyez de manière prolongée sur l ’ une des touches de présélection (1/ à6 / ) jusqu ’ à ce que le numéro de la présélection cesse de clignoter . 2 Appuyez sur l ?[…]
-
Страница 20
SEEK (réglage de la touche droite/gauche) Vous pouvez assigner une fonction aux touches droite et gauche de l ’ appareil. Sélectionnez MAN (accord manuel) pour effectuer un accord de fréquence manuellement ou sélec- tionnez PCH (canaux présélectionnés) pour chan- ger de canal présélectionné. 1 Appuyez sur M.C. pour sélectionner MAN ou […]
-
Страница 21
Opérations à l ’ aide de touches spéciales Sélection d ’ une étendue de répétition de lecture 1 Appuyez sur 6 / pour parcourir les options disponibles : CD/CD-R/CD-RW ! ALL – Répétition de toutes les plages ! ONE – Répétition de la plage en cours de lecture ! FLD – Répétition du dossier en cours de lecture Périphérique de s[…]
-
Страница 22
Cet appareil est équipé d ’ une sortie haut-parleur d ’ extrêmes graves qui peut être mise en service ou hors ser vice. 1 Appuyez sur M.C. pour sélectionner le réglage souhaité. NOR (phase normale) — REV (phase inversée) — OFF (haut-parleur d ’ extrêmes graves désac- tivé) SUB.W CTRL (réglage du haut-parleur d ’ extrêmes gr[…]
-
Страница 23
Mise en service ou hors service de l ’ atténuateur de luminosité Vous pouvez régler la luminosité d ’ éclairage. 1 Appuyez sur M.C. pour afficher le menu principal. 2 T ourn ez M.C. pour afficher ILLUMI, puis appuyez pour sélectionner . 3 Appuyez sur M.C. pour sélectionner le ré- glage souhaité. OFF (hors ser vice) — ON (en service) […]
-
Страница 24
Connexions Important ! Lors de l ’ installation de cet appareil dans un véhicule sans position ACC (accessoire) sur le contact d ’ allumage, ne pas connecter le câble rouge à la borne qui détecte l ’ utilisa- tion de la clé de contact peut entraîner le dé- chargement de la batterie. O N S T A R T O F F Avec position ACC Sans position A[…]
-
Страница 25
e Connecteur ISO Dans certains véhicules, il est possible que le connecteur ISO soit divisé en deux. Dans ce cas, assurez-vous de connecter les deux connecteurs. Remarques ! Changez le menu initial de cet appareil. Re- portez-vous à la page 23, SP-P/O MODE (ré- glage de la sortie arrière et du préamp) . La sortie haut-parleur d ’ extrêmes […]
-
Страница 26
Retrait et remontage de la face avant Vous pouvez retirer la face avant pour protéger l ’ appareil contre le vol. Appuyez sur la touche de retrait, puis poussez la face avant vers le haut et tirez-la vers vous. P our les détails, reportez-vous à Retrait de la face avant pour pr otéger l ’ appar eil contre le vol et à la page 18, Remontage […]
-
Страница 27
Lecteur de CD Message Causes possi- bles Action correc- tive ERROR-07, 11, 12, 17, 30 Le disque est sale. Nettoyez le disque. Le disque est rayé. Utilisez un autre disque. ERROR-07, 10, 11, 12, 15, 17, 30, A0 Une erreur mé- canique ou électrique est survenue. Coupez et remet- tez le contact d ’ al- lumage ou choisissez une autre source, puis r[…]
-
Страница 28
Conseils sur la manipulation Disques et lecteur Utilisez uniquement des disques affichant l ’ un ou l ’ autre des logos suivants. Utilisez des disques 12 cm. N ’ utilisez pas de dis- ques 8 cm ni un adaptateur pour disques 8 cm. Utilisez seulement des disques conventionnels de forme circulaire. N ’ utilisez pas de disques ayant une forme pa[…]
-
Страница 29
Informations supplémentaires Seuls les 32 premiers caractères d ’ un nom de fi- chier (incluant l ’ extension de fichier) ou d ’ un nom de dossier peuvent être affichés. Les textes russes à afficher sur cet appareil doi- vent être codés avec un des jeux de caractères sui- vants : ! Unicode (UTF-8, UTF-16) ! Un jeu de caractères autre[…]
-
Страница 30
Ce produit intègre une technologie détenue par Microsoft Corporation, qui ne peut être utilisée et distribuée que sous licence de Microsoft Licensing, Inc. Caractéristiques techniques Généralités T ension d ’ alim entation ….. 14,4 V CC (10,8 V à 15,1 V ac- ceptable) Mise à la masse …………… Pôle négatif Consommation maxima […]
-
Страница 31
Français 31 Fr[…]
-
Страница 32
Grazie per aver acquistato questo prodotto PIONEER Leggere attentamente questo manuale prima di utilizzare il prodotto, per assicurarne il corretto utilizzo. È particolarmente importante leggere e osservare le precauzioni contrassegnate da AV- VERTENZA e A TTENZIONE contenute in questo manuale. Conser var e il manuale in un luogo sicuro e accessib[…]
-
Страница 33
Unità principale c d 5 9 1 2 3 4 6 7 b ae 8 Componente Componente 1 h (espulsione) 8 (equalizzato- re) 2 SRC / OFF 9 BAND 3 MUL TI-CONTROL ( M.C. ) a (indietro)/ DIMMER (varialu- ce) 4 (lista) b c / d 5 DISP c Da 1 / a 6 / 6 V ano d ’ inserimen- to dei dischi d Connettore di in- gresso ausiliario (AUX) (connettore stereo da 3,5 mm) 7 Porta USB e[…]
-
Страница 34
5 Per completare le impostazioni, ruotare M.C. per selezionare YES. # Se si desidera modificare nuovamente l ’ imposta- zione, ruotare M.C. per selezionare NO . Premere per selezionare. 6 Premere M.C. per selezionare. Note ! È possibile configurare le opzioni di menu dal menu di sistema. Per informazioni detta- gliate sulle impostazioni, vedere […]
-
Страница 35
Memorizzazione e richiamo delle stazioni per ciascuna banda Uso dei tasti di preselezione sintonia 1 Quando viene individuata una stazione che si desidera memorizzare, premere uno dei tasti di preselezione sintonia (da 1/ a6 / ), mantenendolo premuto fino a quando il numero di preselezione non cessa di lam- peggiare. 2 Premere e tenere premuto uno […]
-
Страница 36
CD/CD-R/CD-RW e dispositivi di memoria USB Funzionamento di base Riproduzione di CD/CD-R/CD-RW 1 Inserire un disco nel vano d ’ inserimento dei di- schi, con il lato dell ’ etichetta rivolto verso l ’ alto. Espulsione dei CD/CD -R/CD-RW 1 Premere h . Riproduzione dei brani registrati su un dispositivo di memoria USB 1 Sollevare la copertura d[…]
-
Страница 37
2 Ruotare M.C. per modificare l ’ opzione di menu; premere per selezionare FUNCTION. Dopo aver effettuato la selezione, è possibile re- golare la funzione descritta di seguito. S.RTRV (Sound Retriever) Questa funzione migliora automaticamente l ’ au- dio compresso e ripristina il suono completo. 1 Premere M.C. per selezionare l ’ impostazion[…]
-
Страница 38
Se si desidera che i suoni bassi provenienti dalla gamma di frequenza dell ’ uscita subwoofer non siano riprodotti dagli altoparlanti anteriori o poste- riori, attivare la funzione HPF (filtro passa alto). Solo le frequenze più alte di quelle comprese nel- l ’ intervallo selezionato vengono emesse dagli alto- parlanti anteriori o posteriori. 1[…]
-
Страница 39
4 Ruotare M.C. per selezionare la funzione del menu iniziale. Dopo aver effettuato la selezione, è possibile re- golare le funzioni del menu iniziale descritte di seguito. FM STEP (passo di sintonizzazione FM) Normalmente il passo per la sintonizzazione in FM impiegato dalla ricerca di sintonia è 50 kHz. Se sono attivate le funzioni AF o T A il p[…]
-
Страница 40
Collegamenti Importante ! Quando si installa questa unità in un veicolo che non dispone della posizione ACC (acces- soria) per l ’ interruttore della chiave di avvia- mento, se non si collega il cavo rosso a un terminale accoppiato al funzionamento del- l ’ interruttore della chiave di avviamento, la batteria potrebbe scaricarsi. O N S T A R T[…]
-
Страница 41
Note ! Modifica delle impostazioni di menu iniziali di questa unità. Vedere SP-P/O MODE (usci- ta posteriore e impostazione pr e-out) a pagina 39. L ’ uscita subwoofer di questa unità è mono. ! Se si usa un subwoofer da 70 W (2 W ), assicu- rarsi di collegarlo ai fili viola e viola/nero di questa unità. Non collegare niente ai fili verde e ve[…]
-
Страница 42
Rimozione e reinserimento del frontalino È possibile rimuovere il frontalino per protegge- re l ’ unità dai furti. Premere il tasto di rimozione e spingere il fronta- lino verso l ’ alto tirandolo verso l ’ esterno. Per ulteriori dettagli, vedere Rimozione del fronta- lino per pr oteggere l ’ unità dai furti e Reinserimen- to del frontal[…]
-
Страница 43
Lettore CD Messaggio Causa Azione ERROR-07, 11, 12, 17, 30 Il disco è spor- co. Pulire il disco. Il disco è graf- fiato. Sostituire il disco. ERROR-07, 10, 11, 12, 15, 17, 30, A0 Si è verificato un errore elettri- co o meccani- co. Spegnere e ac- cendere il motore oppure passare a una sorgente di- versa e poi di nuovo al lettore CD. ERROR-15 Il […]
-
Страница 44
Linee guida per l ’ uso corretto Dischi e lett ori Utilizzare esclusivamente dischi che riportino uno dei due seguenti loghi. Utilizzare dischi da 12 cm. Non utilizzare dischi da 8 cm o adattatori per dischi da 8 cm. Utilizzare esclusivamente dischi convenzionali, completamente circolari. Non utilizzare dischi dalla forma irregolare. Nel vano d ?[…]
-
Страница 45
Informazioni supplementari Per i nomi dei file (incluse le estensioni) o i nomi delle cartelle, è possibile visualizzare esclusiva- mente i primi 32 caratteri. Il testo cirillico da visualizzare su questa unità deve essere codificato con uno dei seguenti set di caratteri: ! Unicode (UTF-8, UTF-16) ! Un set di caratteri diverso da Unicode utilizza[…]
-
Страница 46
Dati tecnici Generali Alimentazione ……………… 14,4 V di c.c. (variazioni con- sentite da 10,8 V a 15,1 V) Messa a terra ………………. Negativa Consumo massimo ………. 10,0 A Dimensioni (L × A × P): DIN Unità principale ………………… 178 mm × 50 mm × 165 mm Pannello anter iore ………………… 188 mm × 58 mm × 1[…]
-
Страница 47
Italiano 47 It[…]
-
Страница 48
Gracias por haber adquirido este producto PIONEER Lea con detenimiento este manual antes de utili- zar el producto por primera vez para que pueda darle el mejor uso posible. Es muy importante que lea y cumpla con la información que apare- ce bajo los mensajes de ADVERTENCIA y PRECAUCIÓN de este manual. Una vez leído, guarde el manual en un lugar[…]
-
Страница 49
Unidad principal c d 5 9 1 2 3 4 6 7 b ae 8 Parte Parte 1 h (expulsar) 8 (ecualizador) 2 SRC / OFF 9 BAND 3 MUL TI-CONTROL ( M.C. ) a (parte poste- rior)/ DIMMER (re- ductor de luz) 4 (lista) b c / d 5 DISP c 1 / a 6 / 6 Ranura de carga de discos d Conector de en- trada AUX (co- nector estéreo de 3,5 mm) 7 Puerto USB e Botón de soltar PRECAUCIÓN[…]
-
Страница 50
5 Para cerrar la configuración, gire M.C. y seleccione YES. # Si prefiere volver a cambiar la configuración, gire M.C. para cambiar a NO y púlselo para realizar la se- lección. 6 Pulse M.C. para seleccionarlo. Notas ! Se pueden configurar las opciones del menú desde el menú del sistema. Si desea más in- formación sobre los ajustes, consulte[…]
-
Страница 51
Almacenamiento y recuperación de emisoras para cada banda Uso de los botones de ajuste de presintonías 1 Cuando encuentre la emisora que desee almacenar en la memoria, pulse uno de los botones de ajuste de presintonías (1/ a6 / ) y manténgalo pulsado hasta que el nú- mero de presintonía deje de parpadear . 2 Pulse uno de los botones de ajuste[…]
-
Страница 52
CD/CD-R/CD-RW y dispositivos de almacenamiento USB Funcionamiento básico Reproducción de un CD/CD -R/CD-RW 1 Inserte el disco en la ranura de carga de dis- cos con el lado de la etiqueta hacia arriba. Expulsión de un CD/CD-R/CD-RW 1 Pulse h . Reproducción de canciones de un dispositivo de almacenamiento USB 1 Abra la tapa del puerto USB. 2 Cone[…]
-
Страница 53
2 Gire M.C. para cambiar la opción de menú y pulse para seleccionar FUNCTION. Una vez seleccionado, se puede ajustar la fun- ción de abajo. S.RTRV (recuperador de sonido) Mejora automáticamente el audio comprimido y restaura el sonido óptimo. 1 Pulse M.C. para seleccionar el ajuste deseado. P ara obtener más información, consulte Mejo- ra de[…]
-
Страница 54
1 Pulse M.C. para acceder al menú princi- pal. 2 Gire M.C. para cambiar la opción de menú y pulse para seleccionar SYSTEM. 3 Gire M.C. para seleccionar la función del menú del sistema. Una vez seleccionado, se pueden ajustar las si- guientes funciones del menú de sistema. ! MUTE MODE y PW SAVE no están disponi- bles para DEH-1500UBA. LANGUAG[…]
-
Страница 55
4 Gire M.C. para seleccionar la función del menú del sistema. Una vez seleccionado, se pueden ajustar las si- guientes funciones del menú de sistema. P ara obtener más información, consulte Menú del sistema en la página 53. Uso de una fuente AUX 1 Inserte el miniconector estéreo en el co- nector de entrada AUX. 2 Pulse SRC/OFF para seleccio[…]
-
Страница 56
2 Salida trasera o salida de subgraves 3 Entrada de la antena 4 Fusible (10 A) 5 Entrada remota conectada (solo DEH- 1500UBG, DEH-1500UBB y DEH-1500UB) Es posible conectar un adaptador de mando a distancia físicamente conectado (se vende por separado). Cable de alimentac ión 1 3 3 2 4 4 5 5 6 6 b 8 9 7 a e d c 1 A la toma del cable de alimentaci?[…]
-
Страница 57
Montaje delantero DIN 1 Inserte el manguito de montaje en el sal- picadero. Si realiza la instalación en un espacio poco pro- fundo, utilice el manguito de montaje suminis- trado. Si hay suficiente espacio, utilice el manguito de montaje que venía con el vehículo. 2 Fije el manguito de montaje utilizando un destornillador para doblar las pestañ[…]
-
Страница 58
Solución de problemas Síntoma Causa Resolución La pantalla vuelve auto- máticamente a la visualiza- ción normal. No ha realizado ninguna opera- ción en aproxi- madamente 30 segundos. Realice la opera- ción de nuevo. El inter valo de repetición de reproducción cambia de manera ines- perada. Dependiendo del intervalo de repetición de re- pr[…]
-
Страница 59
Mensaje Causa Resolución CHECK USB El conector USB o el cable USB está corto- circuitado. Compruebe que el conector USB o el cable USB no esté enganchado en algo ni daña- do. El dispositivo de almacenamien- to USB consu- me más de la corriente máxi- ma admisible. Desconecte el dispositivo de al- macenamiento USB y no lo utili- ce. Coloque la […]
-
Страница 60
La carga y expulsión frecuente de un disco DualDisc puede producir ralladuras en el disco; las ralladuras graves pueden producir problemas de reproducción en esta unidad. En algunos casos, un DualDisc puede atascarse en la ranura de carga del disco y no se expulsará, para evitarlo, recomendamos que no utilice DualDisc en esta unidad. Consulte la[…]
-
Страница 61
P ara reproductores de audio portátiles USB, la secuencia es diferente y depende del reproduc- tor . T abla de caracteres rusos D: C D: C D: C D: C D: C : А : Б : В : Г : Д : Е , Ё : Ж : З : И , Й : К : Л : М : Н : О : П : Р : С : Т : У : Ф : Х : Ц : Ч : Ш , Щ : Ъ : Ы : Ь : Э : Ю : Я D : Visualización C : Carácte[…]
-
Страница 62
Vielen Dank , dass Sie sich für dieses PIONEER-Produkt entschieden haben. Bitte lesen Sie diese Anleitung vor der V er wen- dung dieses Produkts zur Gewährleistung seiner ordnungsgemäßen Verwendung durch. Lesen und befolgen Sie dabei insbesondere die Hin- weise WARNUNG und VORSICHT . Bewahren Sie die Anleitung zur zukünftigen Bezugnahme si- ch[…]
-
Страница 63
Hauptgerät c d 5 9 1 2 3 4 6 7 b ae 8 Bezeichnung Bezeichnung 1 h (Auswur f) 8 (Equalizer) 2 SRC / OFF 9 BAND 3 MUL TI-CONTROL ( M.C. ) a (Zurück)/ DIM- MER (Dimmer) 4 (Liste) b c / d 5 DISP c 1 / bis 6 / 6 Disc-Ladeschacht d AUX-Eingang (3,5-mm-Stereo- anschluss) 7 USB-Anschluss e T aste zum Entrie- geln der Front- platte VORSICHT ! Verwenden Si[…]
-
Страница 64
FM STEP (UKW-Kanalraster) Bei der Suchlaufabstimmung wird normaler weise das 50-kHz-UKW-Kanalraster verwendet. Wenn der Alternativfrequenzsuchlauf (AF) oder die Ver- kehrsmeldungen (TA) eingeschaltet sind, ändert sich das Kanalraster automatisch zu 100 kHz. Es kann jedoch vorteilhaft sein, das Kanalraster für den Alternativfrequenzsuchlauf auf 50[…]
-
Страница 65
T uner Grundlegende Bedie nvorgänge W ahl eines Bands (Wellenbereich) 1 Drücken Sie BAND , bis der gewünschte Wel- lenbereich angezeigt wird ( FM1 , FM2 , FM3 für UKW bzw . MW/LW ). W echseln der voreingestellten Sender 1 Drücken Sie c oder d . ! Wählen Sie PCH (voreingesteller Kanal) unter SEEK , um diese Funktion verwenden zu kön- nen. Fü[…]
-
Страница 66
LOCAL (Lokal-Suchlaufabstimmung) Mit der Lokal-Suchlaufabstimmung wird nur nach Stationen mit ausreichender Signalstärke für einen guten Empfang gesucht. 1 Drücken Sie auf M.C. , um die gewünschte Ein- stellung zu wählen. UKW : OFF — LV 1 — LV 2 — LV 3 — LV 4 MW/L W : OFF — LV 1 — LV 2 Bei Auswahl der höchsten Stufe werden nur die[…]
-
Страница 67
Bedienvorgänge mit speziellen T asten Wählen eines Wiederholbereichs 1 Drücken Sie 6 / , um zwischen den folgen- den Optionen umzuschalten: CD/CD-R/CD-RW-Discs ! ALL – Wiederholung aller Titel ! ONE – Wiederholung des momentanen Ti- tels ! FLD – Wiederholung des momentanen Ordners USB-Speichermedium ! ALL – Wiederholung aller Dateien ! O[…]
-
Страница 68
Dieses Gerät ist mit einem Subwoofer-Ausgang ausgestattet, der ein- und ausgeschaltet werden kann. 1 Drücken Sie auf M.C. , um die gewünschte Ein- stellung zu wählen. NOR (Normalphase) — REV (Gegenphase) — OFF (Subwoofer Aus) SUB.W CTRL (Subwoofer-Einstellungen) Vom Subwoofer werden nur solche Frequenzen ausgegeben, die unter dem gewählten[…]
-
Страница 69
PW SAVE (Energiesparmodus) Wenn Sie diese Funktion einschalten, reduzieren Sie den Verbrauch von Batterieleistung. ! Bei aktiviertem Energiesparmodus kann nur die Programmquelle eingeschaltet werden. 1 Drücken Sie M.C. , um den Energiesparmodus ein- oder auszuschalten. Umschalten der Dimmer — Einstellung Sie können die Helligkeit der Beleuchtung […]
-
Страница 70
Bei Anzeige einer unerwünschten Anzeige Schalten Sie die uner wünschte Anzeige anhand des unten beschriebenen Vorgangs aus. 1 Drücken Sie auf M.C., um das Hauptmenü anzuzeigen. 2 Drehen Sie M.C., um die Menüoption zu wechseln, und drücken Sie auf SYSTEM, um die angezeigte Option zu wählen. 3 Drehen Sie M.C., um die Option DEMO OFF zur Anzeig[…]
-
Страница 71
! Das schwarze Kabel gewährleistet die Er- dung. Dieses Kabel wie auch die Erdungska- bel anderer Produkte (insbesondere von Hochstromprodukten wie Leistungsverstär- ker) müssen separat verdrahtet werden. An- derenfalls kann es zu einem Brand oder einer Funktionsstörung kommen, wenn sich die Kabel versehentlich lösen. Dieses Gerät 3 45 2 1 1 […]
-
Страница 72
! Installieren Sie dieses Gerät keinesfalls an folgenden Orten: — Orte, an denen das Gerät die Steuerung des F ahrzeugs behindern könnte. — Orte, an denen das Gerät die Insassen des F ahrzeugs im Anschluss an eine Schnell- bremsung verletzen könnte. ! Der Halbleiterlaser kann durch Überhitzung beschädigt werden. Installieren Sie dieses G[…]
-
Страница 73
Fehlerbehebung Symptom Ursache Abhilfemaßnah- me Das Display schaltet auto- matisch in die normale An- zeige um. Sie haben kei- nen Bedienvor- gang innerhalb von 30 Sekun- den durchge- führt. Wiederholen Sie den Vorgang. Der Wieder- holbereich ändert sich unerwartet. Ja nach Wieder- holbereich kann sich der ausge- wählte Bereich ändern, sobald[…]
-
Страница 74
Meldung Ursache Abhilfemaßnah- me SKIPPED Das ange- schlossene USB-Speicher- medium enthält Dateien, die mit Windows Media ä DRM 9/10 ge- schützt sind. Spielen Sie eine Audio-Datei ab, die keinen Schutz mit Windows Media DRM 9/10 aufweist. PROTECT Alle Dateien auf dem USB-Spei- chermedium sind mit Windows Media DRM 9/10 ge- schützt. Übertrage[…]
-
Страница 75
Wischen Sie die Discs zum Reinigen mit einem weichen T uch von der Mitte zum Rand hin ab. Kondensation kann eine vorübergehende Störung der Player-Leistung zur Folge haben. Warten Sie in diesem Fall etwa eine Stunde ab, bis sich der Player an die höheren Temperaturen angepasst hat. Zudem sollten feuchte Discs mit einem wei- chen T uch trockenger[…]
-
Страница 76
Disc Abspielbare Ordnerstruktur: bis zu acht Ebenen (der Einfachheit halber sollte die Ordnerstruktur jedoch aus weniger als zwei Ebenen bestehen). Abspielbare Ordner: bis zu 99 Abspielbare Dateien: bis zu 999 Dateisystem: Konformität mit ISO 9660 Stufe 1 und 2, Romeo, Joliet Multi-Session-Wiedergabe: Kompatibel Datenübertragungen im Paketverfahr[…]
-
Страница 77
T echnische Daten Allgemein Stromversorgung …………. 14,4 V Gleichspan nung (T ole- ranz 10,8 V bis 15,1 V) Erdungssystem ……………. Negativ Maximale Leistungsaufnah me …………………………….. 10,0 A Abmessungen (B × H × T): DIN Einbaugröße …… 17 8 mm × 50 mm × 165 mm Frontfläche …….. 18 8 mm × 58 mm × 16 mm […]
-
Страница 78
Hartelijk dank voor uw keuze voor dit Pioneer-product. Lees deze handleiding voordat u het product in gebruik neemt zodat u het goed leert gebruiken. Lees vooral de gedeelten die met WAARSCHU- WING en LET OP gemarkeerd zijn aandachtig. Bewaar deze handleiding na het lezen op een vei- lige, voor de hand liggende plaats zodat u hem in- dien nodig alt[…]
-
Страница 79
Hoofdtoestel c d 5 9 1 2 3 4 6 7 b ae 8 Onderdeel Onderdeel 1 h (uitwerpen) 8 (equalizer) 2 SRC / OFF 9 BAND 3 MUL TI-CONTROL ( M.C. ) a (terug)/ DIM- MER (dimmer) 4 (lijst) b c / d 5 DISP c 1 / tot 6 / 6 Laadsleuf voor disc d AUX-ingang (3,5 mm-stereo- plug) 7 USB-poort e Verwijderen LET OP ! Sluit een USB -opslagapparaat via een Pioneer USB-kabel[…]
-
Страница 80
Opmerkingen ! U kunt de menu-opties instellen in het sys- teemmenu. Raadpleeg Systeemmenu op bladzijde 84 voor meer informatie over de in- stellingen. ! U kunt het instellingenmenu annuleren door op SRC / OFF te drukken. Basisbediening Belangrijk ! W ees voorzichtig bij het verwijderen en te- rugplaatsen van het voorpaneel. ! Stel het voorpaneel ni[…]
-
Страница 81
Zenders voor de verschillende frequentiebanden opslaan en oproepen De voorkeuzetoetsen gebruiken 1 Stem af op de zender die u in het geheu- gen wilt opslaan. Om hem op te slaan houdt u de gewenste voorkeuzetoets (1/ t/m 6/ ) ingedrukt tot het voorkeuzenummer stopt met knipperen. 2 Druk op de gewenste voorkeuzetoets (1/ t/m 6/ ) om de betreffende ze[…]
-
Страница 82
Cd/cd-r/cd-rw-discs en USB- opslagapparaten Basisbediening Een cd/cd-r/cd-rw afspelen 1 Plaats een disc met het etiket omhoog in de laadsleuf . Een cd/cd-r/cd-rw uitwerpen 1 Druk op h . Songs op een USB-opslagapparaat afspelen 1 Open het deksel van de USB -poort. 2 Sluit het USB -opslagapparaat aan via een USB-kabel. Het afspelen begint automatisch[…]
-
Страница 83
S.RTRV (sound retriever) Deze verbetert automatisch de weergave van ge- comprimeerde audio en zorgt voor een vol geluid. 1 Druk op M.C. en selecteer de gewenste instel- ling. Raadpleeg De geluidskwaliteit van gecompri- meerde audio verbeteren (sound retriever) op de vorige bladzijde voor meer informatie. Audio-instellingen 1 Druk op M.C. om het hoo[…]
-
Страница 84
Systeemmenu Belangrijk Als het toestel van de accu wordt losgekoppeld, wordt PW SAVE (energiezuinige modus) uitge- schakeld. Deze functie moet u weer inschakelen als het toestel terug met de accu wordt verbon- den. Als het voertuig niet van een contactscha- kelaar met accessoirestand (ACC) is voorzien, is het (afhankelijk van de aansluiting) mogeli[…]
-
Страница 85
Systeemmenu 1 Houd SRC/OFF ingedrukt tot het toestel uit gaat. 2 Houd SRC/OFF ingedrukt tot het hoofd- menu wordt weergegeven. 3 Draai aan M.C., selecteer de menuoptie SYSTEM en druk erop. 4 Draai aan M.C. en selecteer de systeem- menufunctie. U kunt de volgende functies in het systeemme- nu aanpassen. Raadpleeg Systeemmenu op de vorige bladzijde v[…]
-
Страница 86
5 Ingang voor draadafstandsbediening (alleen DEH-1500UBG, DEH-1500UBB en DEH- 1500UB) Een bedrade afstandsbedieningsadapter kan aangesloten worden (los verkrijgbaar). Stroomkabel 1 3 3 2 4 4 5 5 6 6 b 8 9 7 a e d c 1 Naar ingang stroomkabel 2 De functie van 3 en 5 kan verschillen af- hankelijk van het type voertuig. Verbind in dat geval 4 met 5 en […]
-
Страница 87
2 Zet de montagebehuizing vast door met een schroevendraaier de metalen lipjes op hun plaats te buigen (90°). 1 2 1 Dashboard 2 Montagebehuizing # Controleer of het toestel stevig op zijn plaats is gemonteerd. Het toestel functioneert wellicht niet naar behoren als het niet goed is bevestigd. DIN-achtermontage 1 Bepaal de juiste positie waar de ga[…]
-
Страница 88
Cd-speler Melding Oorzaak Actie ERROR-07, 11, 12, 17, 30 De disc is vuil. Reinig de disc. De disc is be- krast. Plaats een andere disc. ERROR-07, 10, 11, 12, 15, 17, 30, A0 Elektrisch of mechanisch probleem. Zet het contact uit en weer aan, of schakel over naar een andere signaalbron en dan terug naar de cd-speler . ERROR-15 De geplaatste disc beva[…]
-
Страница 89
Aanwijzingen voor het gebruik Discs en de playe r Gebruik uitsluitend discs die voorzien zijn van een van onderstaande twee logo ’ s. Gebruik discs van 12 cm. Gebruik geen discs van 8 cm en probeer deze ook niet met een adapter af te spelen. Gebruik uitsluitend normale, ronde discs. Gebruik geen discs met een andere vorm. Plaats geen ander object[…]
-
Страница 90
Bijkomende informatie Alleen de eerste 32 tekens van de bestandsnaam (inclusief de extensie) of mapnaam worden weer- gegeven. Russische tekst kan alleen op dit toestel worden weergegeven als die met een van de volgende te- kensets is gecodeerd: ! Unicode (UTF-8, UTF-16) ! Andere tekensets dan Unicode die in een Windows-omgeving worden gebruikt en o[…]
-
Страница 91
T echnische gegevens Algemeen Spanningsbron ……………. 14,4 V gelijkstroom (10,8 tot 15,1 V toelaatbaar) Aarding ……………………… Negatief Maximaal stroomverbruik …………………………….. 10,0 A Afmetingen (B × H × D): DIN Chassis ………….. 178 mm × 50 mm × 165 mm Voorkant ………… 188 mm × 58 mm × 16 mm D[…]
-
Страница 92
Благодарим Вас за покупку этого изделия компании PIONEER. Для обеспечения правильности эксплуата — ции внимательно прочитайте данное руко — водство перед началом использования изде лия . Особен?[…]
-
Страница 93
Основное устройство c d 5 9 1 2 3 4 6 7 b ae 8 Элемент Элемент 1 h ( извлечение ) 8 ( эквалай — зер ) 2 SRC / OFF 9 BAND 3 MUL TI-CONTROL ( M.C. ) a ( назад )/ DIM- MER ( регулятор освещенности ) 4 ( список ) b c / d 5 DISP c С 1 / по 6 / 6 Щель для за -[…]
-
Страница 94
5 Чтобы закончить настройку , поверни — те M.C. и выберите YES . # Если понадобится вновь изменить настройку , поверните M.C. и выберите NO . Нажмите для вы — бора . 6 Нажмите M.C. для выбора . Примечания ! На?[…]
-
Страница 95
Сохранение и вызов из памяти радиостанций для каждого диапазона Использование кнопок предварительной настройки 1 Чтобы сохранить в памяти ну жную ра — диостанцию , нажмите одну из кнопок пре?[…]
-
Страница 96
1 Нажмите M.C. , чтобы включить или выклю — чить функцию НОВОСТИ . SEEK ( настройка левой и правой кнопок ) Правой и левой кнопк ам на устройстве можно назначить опреде ленную функцию . Выберите MAN ( ру[…]
-
Страница 97
Функции с использованием специальных кнопок Выбор диапазона повторног о воспроизведе — ния 1 Нажимайте кнопку 6 / для выбора из сле — дующих функций : CD/CD-R/CD-RW ! ALL – Повторное воспроизведение вс?[…]
-
Страница 98
Это устройство имеет выход к анала сабвуфе — ра , который можно включать и выключать . 1 Нажмите M.C. для выбора нужной настрой — ки . NOR ( нормальная фаза ) — REV ( обратная фаза ) — OFF ( сабвуфер выключ?[…]
-
Страница 99
Звук / уровень звуково го сигнала данной систе — мы автоматически понижае тся при получении сигнала от оборудования с функцией приглу — шения звука . 1 Для отображения установо чного меню на — ж?[…]
-
Страница 100
1 Нажмите M.C. , чтобы открыть главное меню . 2 Поворачивай те M.C. для прокрутки пунктов меню ; нажмите , чтобы выбрать SYSTEM . 3 Поверните M.C. , чтобы отобразить DEMO OFF , затем нажмите . 4 Поверните M.C. для в?[…]
-
Страница 101
! Черный к абель являе тся заземляющим . Заземляющие кабели данного устройства и других устройств ( особенно устройств , предназна ченных для эксплуатации при больших токах , таких к ак усилит?[…]
-
Страница 102
! Не используйте детали , не разрешенные производите лем к использованию , по — скольку это может стать причиной неис — правностей . ! Уточните у дилера компании , требует ли установка сверления ?[…]
-
Страница 103
Устранение неисправностей Признак Причина Действие Дисплей ав — томатически возвращае т — ся в исход — ный режим . В те чение 30 секунд не было выполне — но никаких операций . Повторите опе — рацию[…]
-
Страница 104
Сообщение Причина Действие PROTECT Все файлы на запоминаю — щем устрой — стве USB закодированы Windows Media DRM 9/10. Перенесите ау — диофайлы , не закодированные Windows Media DRM 9/10, на за — поминающее ус — тройство U[…]
-
Страница 105
Запоминающее устройство USB С вопросами о работе запоминающего устрой — ства USB обращайтесь к производите лю ус — тройства . Подключение через USB- концентратор не под — держивается . Не подключай?[…]
-
Страница 106
Запоминающее устройство USB, содержащее разде лы : воспроизво дится только первый раз — дел . При начале воспроизведения ау диофайлов на запоминающем устройстве USB, с одержащем разве твленные и?[…]
-
Страница 107
Технические характеристики Общие Источник питания ……….. 14,4 В постоянного тока ( до — пустимый диапазон от 10,8 Вд о 15,1 В ) Система заземления ….. Заземление отрицате льно — го полюса Максимальны?[…]
-
Страница 108
PIONEER CORPORA TION 1-1, Shin-ogura, Saiwai-ku, Kawasaki-shi, Kanagawa 212-0031, JAP AN Корпорация Пайонир 1-1, Син — Огура , Сайвай — ку , г . Кавасаки , префектура Канагава , 212-0031, Япония Импортер ООО “ ПИОНЕР РУС ” 125040, Россия , г . Моск?[…]
-
Pioneer DEH-1500UBB — page 1
Owner ’ s Manual Mode d ’ emploi Manuale d ’ istruzioni Manual de instrucciones Bedienungsanleitung Handleiding Руководств о пользова те ля CD RDS RECEIVER A UT ORADIO CD RDS SINT OLETTORE CD RDS REPRODUCT OR DE CD CON RECEPT OR RDS CD RDS-EMPFÄNGER CD RDS-ONTV ANGER CD RDS ПРИЕМНИК DEH-1500UB DEH-1500UBG DEH-1 …
-
Pioneer DEH-1500UBB — page 2
Thank you for purchasing this PIONEER product T o ensure proper use, please read through this manual before using this product. It is especially important that you read and observe WARN- ING s and CAUTION s in this manual. Please keep the manual in a safe and accessible place for future reference. If you want to dispose this product, do not mix it …
-
Pioneer DEH-1500UBB — page 3
Head unit c d 5 9 1 2 3 4 6 7 b ae 8 Part Part 1 h (eject) 8 (equalizer) 2 SRC / OFF 9 BAND 3 MUL TI-CONTROL ( M.C. ) a (back)/ DIMMER (dimmer) 4 (list) b c / d 5 DISP c 1 / to 6 / 6 Disc loading slot d AUX input jack (3.5 mm stereo jack) 7 USB port e Detach button CAUTION ! Use an optional Pioneer USB cable (CD- U50E) to connect the USB storage de …
-
Pioneer DEH-1500UBB — page 4
Notes ! Y ou can set up the menu options from the system menu. For details about the settings, refer to System menu on page 7. ! Y ou can cancel set up menu by pressing SRC / OFF . Basic operations Important ! Handle gently when removing or attaching the front panel. ! Avoid subjecting the front panel to excessive shock. ! Keep the front panel out …
-
Pioneer DEH-1500UBB — page 5
2 Press one of the preset tuning buttons (1/ to 6/ ) to select the desired station. Switching the display Selecting the desired text information 1 Press DISP to cycle between the following: ! FREQUENCY (program ser vice name or frequency) ! BRDCST INFO (program service name/PTY information) ! CLOCK (source name and clock) Notes ! If the program ser …
-
Pioneer DEH-1500UBB — page 6
Playing songs on a USB storage device 1 Open the USB port cover . 2 Plug in the USB storage device using a USB cable. Playback is per formed automatically. Stopping playback of files on a USB storage de- vice 1 You may disconnect the USB storage device at any time. The unit stops playback. Selecting a folder 1 Press 1 / or 2 / . Selecting a track 1 …
-
Pioneer DEH-1500UBB — page 7
! SUB.W , SUB.W CTRL and HPF SETTING are not available when REAR/REAR is selected in SP-P/O MODE . For details, refer to SP-P/O MODE (rear output and preout set- ting) on the next page. ! SUB.W CTRL and HPF SETTING are not avail- able when SUB.W is selected in OFF . For de- tails, refer to SUB.W (subwoofer on/off setting) on this page. FADER (fader …
-
Pioneer DEH-1500UBB — page 8
LANGUAGE (multi-language) This unit can display the text information from a compressed audio file even for information em- bedded in English or Russian. ! If the embedded language and the selected language setting are not the same, text infor- mation may not display properly. ! Some characters may not be displayed prop- erly. 1 Turn M.C. to select …
-
Pioneer DEH-1500UBB — page 9
For details, refer to System menu on page 7. Using an AUX source 1 Insert the stereo mini plug into the AUX input jack. 2 Press SRC/OFF to select AUX as the source. Note AUX cannot be selected unless the auxiliary set- ting is turned on. For more details, refer to AUX (auxiliar y input) on the previous page. Switching the display Selecting the desi …
-
Pioneer DEH-1500UBB — page 10
Power cord 1 3 3 2 4 4 5 5 6 6 b 8 9 7 a e d c 1 T o power cord input 2 Depending on the kind of vehicle, the func- tion of 3 and 5 may be different. In this case, be sure to connect 4 to 5 and 6 to 3 . 3 Yellow Back-up (or accessor y) 4 Yellow Connect to the constant 12 V supply termi- nal. 5 Red Accessory (or back-up) 6 Red Connect to terminal co …
-
Pioneer DEH-1500UBB — page 11
2 Mounting sleeve # Make sure that the unit is installed securely in place. An unstable installation may cause skipping or other malfunctions. DIN Rear -mount 1 Determine the appropriate position where the holes on the bracket and the side of the unit match. 2 Tighten two screws on each side. 1 2 3 1 Tapping screw (5 mm × 8 mm) 2 Mounting bracket …
-
Pioneer DEH-1500UBB — page 12
Message Cause Action FORMA T READ Sometimes there is a delay between the start of playback and when you start to hear any sound. W ait until the message disap- pears and you hear sound. NO AUDIO The inserted disc does not contain any playable files. Replace the disc. SKIPPED The inserted disc contains DRM protected files. Replace the disc. PROTECT …
-
Pioneer DEH-1500UBB — page 13
When using discs that can be printed on label sur- faces, check the instructions and the warnings of the discs. Depending on the discs, inserting and ejecting may not be possible. Using such discs may result in damage to this equipment. Do not attach commercially available labels or other materials to the discs. ! The discs may warp making the disc …
-
Pioneer DEH-1500UBB — page 14
Example of a hierarchy Level 1 Level 2 Level 3 Level 4 01 02 03 04 05 : Folder : Compressed audio file 01 to 05: Folder number 1 to 6 : Playback sequence Disc Folder selection sequence or other operation may differ depending on the encoding or writing software. USB storage device Playback sequence is the same as recorded se- …
-
Pioneer DEH-1500UBB — page 15
English 15 En …
-
Pioneer DEH-1500UBB — page 16
Nous vous remer cions d ’ avoir acheté cet ap- pareil PIONEER. P our garantir une utilisation correcte, lisez bien ce mode d ’ emploi avant d ’ utiliser cet appareil. Il est particulièrement important que vous lisiez et respectiez les indications A TTENTION et PRÉ- CAUTION de ce mode d ’ emploi. Conser vez-le dans un endroit sûr et faci …
-
Pioneer DEH-1500UBB — page 17
Appareil central c d 5 9 1 2 3 4 6 7 b ae 8 Partie Partie 1 h (éjection) 8 (égaliseur) 2 SRC / OFF 9 BAND 3 MUL TI-CONTROL ( M.C. ) a (retour)/ DIM- MER (atténuateur de luminosité) 4 (liste) b c / d 5 DISP c 1 / à 6 / 6 Fente de charge- ment des disques d Jack d ’ entrée AUX (jack stéréo 3,5 mm) 7 Port USB e T ouche de retrait de la face …
-
Pioneer DEH-1500UBB — page 18
5 Pour terminer la configuration, tournez M.C. pour sélectionner YES. # Si vous souhaitez modifier à nouveau le réglage, tournez M.C. pour passer à NO . Appuyez pour sélec- tionner . 6 Appuyez sur M.C. pour sélectionner . Remarques ! Vous pouvez configurer les options de menu à partir du menu système. Pour des détails sur les réglages, re …
-
Pioneer DEH-1500UBB — page 19
Enregistrement et rappel des stations pour chaque gamme Utilisation des touches de présélection 1 Lorsque se présente une station que vous souhaitez mettre en mémoire, appuyez de manière prolongée sur l ’ une des touches de présélection (1/ à6 / ) jusqu ’ à ce que le numéro de la présélection cesse de clignoter . 2 Appuyez sur l ? …
-
Pioneer DEH-1500UBB — page 20
SEEK (réglage de la touche droite/gauche) Vous pouvez assigner une fonction aux touches droite et gauche de l ’ appareil. Sélectionnez MAN (accord manuel) pour effectuer un accord de fréquence manuellement ou sélec- tionnez PCH (canaux présélectionnés) pour chan- ger de canal présélectionné. 1 Appuyez sur M.C. pour sélectionner MAN ou …
-
Pioneer DEH-1500UBB — page 21
Opérations à l ’ aide de touches spéciales Sélection d ’ une étendue de répétition de lecture 1 Appuyez sur 6 / pour parcourir les options disponibles : CD/CD-R/CD-RW ! ALL – Répétition de toutes les plages ! ONE – Répétition de la plage en cours de lecture ! FLD – Répétition du dossier en cours de lecture Périphérique de s …
-
Pioneer DEH-1500UBB — page 22
Cet appareil est équipé d ’ une sortie haut-parleur d ’ extrêmes graves qui peut être mise en service ou hors ser vice. 1 Appuyez sur M.C. pour sélectionner le réglage souhaité. NOR (phase normale) — REV (phase inversée) — OFF (haut-parleur d ’ extrêmes graves désac- tivé) SUB.W CTRL (réglage du haut-parleur d ’ extrêmes gr …
-
Pioneer DEH-1500UBB — page 23
Mise en service ou hors service de l ’ atténuateur de luminosité Vous pouvez régler la luminosité d ’ éclairage. 1 Appuyez sur M.C. pour afficher le menu principal. 2 T ourn ez M.C. pour afficher ILLUMI, puis appuyez pour sélectionner . 3 Appuyez sur M.C. pour sélectionner le ré- glage souhaité. OFF (hors ser vice) — ON (en service) …
-
Pioneer DEH-1500UBB — page 24
Connexions Important ! Lors de l ’ installation de cet appareil dans un véhicule sans position ACC (accessoire) sur le contact d ’ allumage, ne pas connecter le câble rouge à la borne qui détecte l ’ utilisa- tion de la clé de contact peut entraîner le dé- chargement de la batterie. O N S T A R T O F F Avec position ACC Sans position A …
-
Pioneer DEH-1500UBB — page 25
e Connecteur ISO Dans certains véhicules, il est possible que le connecteur ISO soit divisé en deux. Dans ce cas, assurez-vous de connecter les deux connecteurs. Remarques ! Changez le menu initial de cet appareil. Re- portez-vous à la page 23, SP-P/O MODE (ré- glage de la sortie arrière et du préamp) . La sortie haut-parleur d ’ extrêmes …
-
Pioneer DEH-1500UBB — page 26
Retrait et remontage de la face avant Vous pouvez retirer la face avant pour protéger l ’ appareil contre le vol. Appuyez sur la touche de retrait, puis poussez la face avant vers le haut et tirez-la vers vous. P our les détails, reportez-vous à Retrait de la face avant pour pr otéger l ’ appar eil contre le vol et à la page 18, Remontage …
-
Pioneer DEH-1500UBB — page 27
Lecteur de CD Message Causes possi- bles Action correc- tive ERROR-07, 11, 12, 17, 30 Le disque est sale. Nettoyez le disque. Le disque est rayé. Utilisez un autre disque. ERROR-07, 10, 11, 12, 15, 17, 30, A0 Une erreur mé- canique ou électrique est survenue. Coupez et remet- tez le contact d ’ al- lumage ou choisissez une autre source, puis r …
-
Pioneer DEH-1500UBB — page 28
Conseils sur la manipulation Disques et lecteur Utilisez uniquement des disques affichant l ’ un ou l ’ autre des logos suivants. Utilisez des disques 12 cm. N ’ utilisez pas de dis- ques 8 cm ni un adaptateur pour disques 8 cm. Utilisez seulement des disques conventionnels de forme circulaire. N ’ utilisez pas de disques ayant une forme pa …
-
Pioneer DEH-1500UBB — page 29
Informations supplémentaires Seuls les 32 premiers caractères d ’ un nom de fi- chier (incluant l ’ extension de fichier) ou d ’ un nom de dossier peuvent être affichés. Les textes russes à afficher sur cet appareil doi- vent être codés avec un des jeux de caractères sui- vants : ! Unicode (UTF-8, UTF-16) ! Un jeu de caractères autre …
-
Pioneer DEH-1500UBB — page 30
Ce produit intègre une technologie détenue par Microsoft Corporation, qui ne peut être utilisée et distribuée que sous licence de Microsoft Licensing, Inc. Caractéristiques techniques Généralités T ension d ’ alim entation ….. 14,4 V CC (10,8 V à 15,1 V ac- ceptable) Mise à la masse …………… Pôle négatif Consommation maxima …
-
Pioneer DEH-1500UBB — page 31
Français 31 Fr …
-
Pioneer DEH-1500UBB — page 32
Grazie per aver acquistato questo prodotto PIONEER Leggere attentamente questo manuale prima di utilizzare il prodotto, per assicurarne il corretto utilizzo. È particolarmente importante leggere e osservare le precauzioni contrassegnate da AV- VERTENZA e A TTENZIONE contenute in questo manuale. Conser var e il manuale in un luogo sicuro e accessib …
-
Pioneer DEH-1500UBB — page 33
Unità principale c d 5 9 1 2 3 4 6 7 b ae 8 Componente Componente 1 h (espulsione) 8 (equalizzato- re) 2 SRC / OFF 9 BAND 3 MUL TI-CONTROL ( M.C. ) a (indietro)/ DIMMER (varialu- ce) 4 (lista) b c / d 5 DISP c Da 1 / a 6 / 6 V ano d ’ inserimen- to dei dischi d Connettore di in- gresso ausiliario (AUX) (connettore stereo da 3,5 mm) 7 Porta USB e …
-
Pioneer DEH-1500UBB — page 34
5 Per completare le impostazioni, ruotare M.C. per selezionare YES. # Se si desidera modificare nuovamente l ’ imposta- zione, ruotare M.C. per selezionare NO . Premere per selezionare. 6 Premere M.C. per selezionare. Note ! È possibile configurare le opzioni di menu dal menu di sistema. Per informazioni detta- gliate sulle impostazioni, vedere …
-
Pioneer DEH-1500UBB — page 35
Memorizzazione e richiamo delle stazioni per ciascuna banda Uso dei tasti di preselezione sintonia 1 Quando viene individuata una stazione che si desidera memorizzare, premere uno dei tasti di preselezione sintonia (da 1/ a6 / ), mantenendolo premuto fino a quando il numero di preselezione non cessa di lam- peggiare. 2 Premere e tenere premuto uno …
-
Pioneer DEH-1500UBB — page 36
CD/CD-R/CD-RW e dispositivi di memoria USB Funzionamento di base Riproduzione di CD/CD-R/CD-RW 1 Inserire un disco nel vano d ’ inserimento dei di- schi, con il lato dell ’ etichetta rivolto verso l ’ alto. Espulsione dei CD/CD -R/CD-RW 1 Premere h . Riproduzione dei brani registrati su un dispositivo di memoria USB 1 Sollevare la copertura d …
-
Pioneer DEH-1500UBB — page 37
2 Ruotare M.C. per modificare l ’ opzione di menu; premere per selezionare FUNCTION. Dopo aver effettuato la selezione, è possibile re- golare la funzione descritta di seguito. S.RTRV (Sound Retriever) Questa funzione migliora automaticamente l ’ au- dio compresso e ripristina il suono completo. 1 Premere M.C. per selezionare l ’ impostazion …
-
Pioneer DEH-1500UBB — page 38
Se si desidera che i suoni bassi provenienti dalla gamma di frequenza dell ’ uscita subwoofer non siano riprodotti dagli altoparlanti anteriori o poste- riori, attivare la funzione HPF (filtro passa alto). Solo le frequenze più alte di quelle comprese nel- l ’ intervallo selezionato vengono emesse dagli alto- parlanti anteriori o posteriori. 1 …
-
Pioneer DEH-1500UBB — page 39
4 Ruotare M.C. per selezionare la funzione del menu iniziale. Dopo aver effettuato la selezione, è possibile re- golare le funzioni del menu iniziale descritte di seguito. FM STEP (passo di sintonizzazione FM) Normalmente il passo per la sintonizzazione in FM impiegato dalla ricerca di sintonia è 50 kHz. Se sono attivate le funzioni AF o T A il p …
-
Pioneer DEH-1500UBB — page 40
Collegamenti Importante ! Quando si installa questa unità in un veicolo che non dispone della posizione ACC (acces- soria) per l ’ interruttore della chiave di avvia- mento, se non si collega il cavo rosso a un terminale accoppiato al funzionamento del- l ’ interruttore della chiave di avviamento, la batteria potrebbe scaricarsi. O N S T A R T …
-
Pioneer DEH-1500UBB — page 41
Note ! Modifica delle impostazioni di menu iniziali di questa unità. Vedere SP-P/O MODE (usci- ta posteriore e impostazione pr e-out) a pagina 39. L ’ uscita subwoofer di questa unità è mono. ! Se si usa un subwoofer da 70 W (2 W ), assicu- rarsi di collegarlo ai fili viola e viola/nero di questa unità. Non collegare niente ai fili verde e ve …
-
Pioneer DEH-1500UBB — page 42
Rimozione e reinserimento del frontalino È possibile rimuovere il frontalino per protegge- re l ’ unità dai furti. Premere il tasto di rimozione e spingere il fronta- lino verso l ’ alto tirandolo verso l ’ esterno. Per ulteriori dettagli, vedere Rimozione del fronta- lino per pr oteggere l ’ unità dai furti e Reinserimen- to del frontal …
-
Pioneer DEH-1500UBB — page 43
Lettore CD Messaggio Causa Azione ERROR-07, 11, 12, 17, 30 Il disco è spor- co. Pulire il disco. Il disco è graf- fiato. Sostituire il disco. ERROR-07, 10, 11, 12, 15, 17, 30, A0 Si è verificato un errore elettri- co o meccani- co. Spegnere e ac- cendere il motore oppure passare a una sorgente di- versa e poi di nuovo al lettore CD. ERROR-15 Il …
-
Pioneer DEH-1500UBB — page 44
Linee guida per l ’ uso corretto Dischi e lett ori Utilizzare esclusivamente dischi che riportino uno dei due seguenti loghi. Utilizzare dischi da 12 cm. Non utilizzare dischi da 8 cm o adattatori per dischi da 8 cm. Utilizzare esclusivamente dischi convenzionali, completamente circolari. Non utilizzare dischi dalla forma irregolare. Nel vano d ? …
-
Pioneer DEH-1500UBB — page 45
Informazioni supplementari Per i nomi dei file (incluse le estensioni) o i nomi delle cartelle, è possibile visualizzare esclusiva- mente i primi 32 caratteri. Il testo cirillico da visualizzare su questa unità deve essere codificato con uno dei seguenti set di caratteri: ! Unicode (UTF-8, UTF-16) ! Un set di caratteri diverso da Unicode utilizza …
-
Pioneer DEH-1500UBB — page 46
Dati tecnici Generali Alimentazione ……………… 14,4 V di c.c. (variazioni con- sentite da 10,8 V a 15,1 V) Messa a terra ………………. Negativa Consumo massimo ………. 10,0 A Dimensioni (L × A × P): DIN Unità principale ………………… 178 mm × 50 mm × 165 mm Pannello anter iore ………………… 188 mm × 58 mm × 1 …
-
Pioneer DEH-1500UBB — page 47
Italiano 47 It …
-
Pioneer DEH-1500UBB — page 48
Gracias por haber adquirido este producto PIONEER Lea con detenimiento este manual antes de utili- zar el producto por primera vez para que pueda darle el mejor uso posible. Es muy importante que lea y cumpla con la información que apare- ce bajo los mensajes de ADVERTENCIA y PRECAUCIÓN de este manual. Una vez leído, guarde el manual en un lugar …
-
Pioneer DEH-1500UBB — page 49
Unidad principal c d 5 9 1 2 3 4 6 7 b ae 8 Parte Parte 1 h (expulsar) 8 (ecualizador) 2 SRC / OFF 9 BAND 3 MUL TI-CONTROL ( M.C. ) a (parte poste- rior)/ DIMMER (re- ductor de luz) 4 (lista) b c / d 5 DISP c 1 / a 6 / 6 Ranura de carga de discos d Conector de en- trada AUX (co- nector estéreo de 3,5 mm) 7 Puerto USB e Botón de soltar PRECAUCIÓN …
-
Pioneer DEH-1500UBB — page 50
5 Para cerrar la configuración, gire M.C. y seleccione YES. # Si prefiere volver a cambiar la configuración, gire M.C. para cambiar a NO y púlselo para realizar la se- lección. 6 Pulse M.C. para seleccionarlo. Notas ! Se pueden configurar las opciones del menú desde el menú del sistema. Si desea más in- formación sobre los ajustes, consulte …
-
Pioneer DEH-1500UBB — page 51
Almacenamiento y recuperación de emisoras para cada banda Uso de los botones de ajuste de presintonías 1 Cuando encuentre la emisora que desee almacenar en la memoria, pulse uno de los botones de ajuste de presintonías (1/ a6 / ) y manténgalo pulsado hasta que el nú- mero de presintonía deje de parpadear . 2 Pulse uno de los botones de ajuste …
-
Pioneer DEH-1500UBB — page 52
CD/CD-R/CD-RW y dispositivos de almacenamiento USB Funcionamiento básico Reproducción de un CD/CD -R/CD-RW 1 Inserte el disco en la ranura de carga de dis- cos con el lado de la etiqueta hacia arriba. Expulsión de un CD/CD-R/CD-RW 1 Pulse h . Reproducción de canciones de un dispositivo de almacenamiento USB 1 Abra la tapa del puerto USB. 2 Cone …
-
Pioneer DEH-1500UBB — page 53
2 Gire M.C. para cambiar la opción de menú y pulse para seleccionar FUNCTION. Una vez seleccionado, se puede ajustar la fun- ción de abajo. S.RTRV (recuperador de sonido) Mejora automáticamente el audio comprimido y restaura el sonido óptimo. 1 Pulse M.C. para seleccionar el ajuste deseado. P ara obtener más información, consulte Mejo- ra de …
-
Pioneer DEH-1500UBB — page 54
1 Pulse M.C. para acceder al menú princi- pal. 2 Gire M.C. para cambiar la opción de menú y pulse para seleccionar SYSTEM. 3 Gire M.C. para seleccionar la función del menú del sistema. Una vez seleccionado, se pueden ajustar las si- guientes funciones del menú de sistema. ! MUTE MODE y PW SAVE no están disponi- bles para DEH-1500UBA. LANGUAG …
-
Pioneer DEH-1500UBB — page 55
4 Gire M.C. para seleccionar la función del menú del sistema. Una vez seleccionado, se pueden ajustar las si- guientes funciones del menú de sistema. P ara obtener más información, consulte Menú del sistema en la página 53. Uso de una fuente AUX 1 Inserte el miniconector estéreo en el co- nector de entrada AUX. 2 Pulse SRC/OFF para seleccio …
-
Pioneer DEH-1500UBB — page 56
2 Salida trasera o salida de subgraves 3 Entrada de la antena 4 Fusible (10 A) 5 Entrada remota conectada (solo DEH- 1500UBG, DEH-1500UBB y DEH-1500UB) Es posible conectar un adaptador de mando a distancia físicamente conectado (se vende por separado). Cable de alimentac ión 1 3 3 2 4 4 5 5 6 6 b 8 9 7 a e d c 1 A la toma del cable de alimentaci? …
-
Pioneer DEH-1500UBB — page 57
Montaje delantero DIN 1 Inserte el manguito de montaje en el sal- picadero. Si realiza la instalación en un espacio poco pro- fundo, utilice el manguito de montaje suminis- trado. Si hay suficiente espacio, utilice el manguito de montaje que venía con el vehículo. 2 Fije el manguito de montaje utilizando un destornillador para doblar las pestañ …
-
Pioneer DEH-1500UBB — page 58
Solución de problemas Síntoma Causa Resolución La pantalla vuelve auto- máticamente a la visualiza- ción normal. No ha realizado ninguna opera- ción en aproxi- madamente 30 segundos. Realice la opera- ción de nuevo. El inter valo de repetición de reproducción cambia de manera ines- perada. Dependiendo del intervalo de repetición de re- pr …
-
Pioneer DEH-1500UBB — page 59
Mensaje Causa Resolución CHECK USB El conector USB o el cable USB está corto- circuitado. Compruebe que el conector USB o el cable USB no esté enganchado en algo ni daña- do. El dispositivo de almacenamien- to USB consu- me más de la corriente máxi- ma admisible. Desconecte el dispositivo de al- macenamiento USB y no lo utili- ce. Coloque la …
-
Pioneer DEH-1500UBB — page 60
La carga y expulsión frecuente de un disco DualDisc puede producir ralladuras en el disco; las ralladuras graves pueden producir problemas de reproducción en esta unidad. En algunos casos, un DualDisc puede atascarse en la ranura de carga del disco y no se expulsará, para evitarlo, recomendamos que no utilice DualDisc en esta unidad. Consulte la …
-
Pioneer DEH-1500UBB — page 61
P ara reproductores de audio portátiles USB, la secuencia es diferente y depende del reproduc- tor . T abla de caracteres rusos D: C D: C D: C D: C D: C : А : Б : В : Г : Д : Е , Ё : Ж : З : И , Й : К : Л : М : Н : О : П : Р : С : Т : У : Ф : Х : Ц : Ч : Ш , Щ : Ъ : Ы : Ь : Э : Ю : Я D : Visualización C : Carácte …
-
Pioneer DEH-1500UBB — page 62
Vielen Dank , dass Sie sich für dieses PIONEER-Produkt entschieden haben. Bitte lesen Sie diese Anleitung vor der V er wen- dung dieses Produkts zur Gewährleistung seiner ordnungsgemäßen Verwendung durch. Lesen und befolgen Sie dabei insbesondere die Hin- weise WARNUNG und VORSICHT . Bewahren Sie die Anleitung zur zukünftigen Bezugnahme si- ch …
-
Pioneer DEH-1500UBB — page 63
Hauptgerät c d 5 9 1 2 3 4 6 7 b ae 8 Bezeichnung Bezeichnung 1 h (Auswur f) 8 (Equalizer) 2 SRC / OFF 9 BAND 3 MUL TI-CONTROL ( M.C. ) a (Zurück)/ DIM- MER (Dimmer) 4 (Liste) b c / d 5 DISP c 1 / bis 6 / 6 Disc-Ladeschacht d AUX-Eingang (3,5-mm-Stereo- anschluss) 7 USB-Anschluss e T aste zum Entrie- geln der Front- platte VORSICHT ! Verwenden Si …
-
Pioneer DEH-1500UBB — page 64
FM STEP (UKW-Kanalraster) Bei der Suchlaufabstimmung wird normaler weise das 50-kHz-UKW-Kanalraster verwendet. Wenn der Alternativfrequenzsuchlauf (AF) oder die Ver- kehrsmeldungen (TA) eingeschaltet sind, ändert sich das Kanalraster automatisch zu 100 kHz. Es kann jedoch vorteilhaft sein, das Kanalraster für den Alternativfrequenzsuchlauf auf 50 …
-
Pioneer DEH-1500UBB — page 65
T uner Grundlegende Bedie nvorgänge W ahl eines Bands (Wellenbereich) 1 Drücken Sie BAND , bis der gewünschte Wel- lenbereich angezeigt wird ( FM1 , FM2 , FM3 für UKW bzw . MW/LW ). W echseln der voreingestellten Sender 1 Drücken Sie c oder d . ! Wählen Sie PCH (voreingesteller Kanal) unter SEEK , um diese Funktion verwenden zu kön- nen. Fü …
-
Pioneer DEH-1500UBB — page 66
LOCAL (Lokal-Suchlaufabstimmung) Mit der Lokal-Suchlaufabstimmung wird nur nach Stationen mit ausreichender Signalstärke für einen guten Empfang gesucht. 1 Drücken Sie auf M.C. , um die gewünschte Ein- stellung zu wählen. UKW : OFF — LV 1 — LV 2 — LV 3 — LV 4 MW/L W : OFF — LV 1 — LV 2 Bei Auswahl der höchsten Stufe werden nur die …
-
Pioneer DEH-1500UBB — page 67
Bedienvorgänge mit speziellen T asten Wählen eines Wiederholbereichs 1 Drücken Sie 6 / , um zwischen den folgen- den Optionen umzuschalten: CD/CD-R/CD-RW-Discs ! ALL – Wiederholung aller Titel ! ONE – Wiederholung des momentanen Ti- tels ! FLD – Wiederholung des momentanen Ordners USB-Speichermedium ! ALL – Wiederholung aller Dateien ! O …
-
Pioneer DEH-1500UBB — page 68
Dieses Gerät ist mit einem Subwoofer-Ausgang ausgestattet, der ein- und ausgeschaltet werden kann. 1 Drücken Sie auf M.C. , um die gewünschte Ein- stellung zu wählen. NOR (Normalphase) — REV (Gegenphase) — OFF (Subwoofer Aus) SUB.W CTRL (Subwoofer-Einstellungen) Vom Subwoofer werden nur solche Frequenzen ausgegeben, die unter dem gewählten …
-
Pioneer DEH-1500UBB — page 69
PW SAVE (Energiesparmodus) Wenn Sie diese Funktion einschalten, reduzieren Sie den Verbrauch von Batterieleistung. ! Bei aktiviertem Energiesparmodus kann nur die Programmquelle eingeschaltet werden. 1 Drücken Sie M.C. , um den Energiesparmodus ein- oder auszuschalten. Umschalten der Dimmer — Einstellung Sie können die Helligkeit der Beleuchtung …
-
Pioneer DEH-1500UBB — page 70
Bei Anzeige einer unerwünschten Anzeige Schalten Sie die uner wünschte Anzeige anhand des unten beschriebenen Vorgangs aus. 1 Drücken Sie auf M.C., um das Hauptmenü anzuzeigen. 2 Drehen Sie M.C., um die Menüoption zu wechseln, und drücken Sie auf SYSTEM, um die angezeigte Option zu wählen. 3 Drehen Sie M.C., um die Option DEMO OFF zur Anzeig …
-
Pioneer DEH-1500UBB — page 71
! Das schwarze Kabel gewährleistet die Er- dung. Dieses Kabel wie auch die Erdungska- bel anderer Produkte (insbesondere von Hochstromprodukten wie Leistungsverstär- ker) müssen separat verdrahtet werden. An- derenfalls kann es zu einem Brand oder einer Funktionsstörung kommen, wenn sich die Kabel versehentlich lösen. Dieses Gerät 3 45 2 1 1 …
-
Pioneer DEH-1500UBB — page 72
! Installieren Sie dieses Gerät keinesfalls an folgenden Orten: — Orte, an denen das Gerät die Steuerung des F ahrzeugs behindern könnte. — Orte, an denen das Gerät die Insassen des F ahrzeugs im Anschluss an eine Schnell- bremsung verletzen könnte. ! Der Halbleiterlaser kann durch Überhitzung beschädigt werden. Installieren Sie dieses G …
-
Pioneer DEH-1500UBB — page 73
Fehlerbehebung Symptom Ursache Abhilfemaßnah- me Das Display schaltet auto- matisch in die normale An- zeige um. Sie haben kei- nen Bedienvor- gang innerhalb von 30 Sekun- den durchge- führt. Wiederholen Sie den Vorgang. Der Wieder- holbereich ändert sich unerwartet. Ja nach Wieder- holbereich kann sich der ausge- wählte Bereich ändern, sobald …
-
Pioneer DEH-1500UBB — page 74
Meldung Ursache Abhilfemaßnah- me SKIPPED Das ange- schlossene USB-Speicher- medium enthält Dateien, die mit Windows Media ä DRM 9/10 ge- schützt sind. Spielen Sie eine Audio-Datei ab, die keinen Schutz mit Windows Media DRM 9/10 aufweist. PROTECT Alle Dateien auf dem USB-Spei- chermedium sind mit Windows Media DRM 9/10 ge- schützt. Übertrage …
-
Pioneer DEH-1500UBB — page 75
Wischen Sie die Discs zum Reinigen mit einem weichen T uch von der Mitte zum Rand hin ab. Kondensation kann eine vorübergehende Störung der Player-Leistung zur Folge haben. Warten Sie in diesem Fall etwa eine Stunde ab, bis sich der Player an die höheren Temperaturen angepasst hat. Zudem sollten feuchte Discs mit einem wei- chen T uch trockenger …
-
Pioneer DEH-1500UBB — page 76
Disc Abspielbare Ordnerstruktur: bis zu acht Ebenen (der Einfachheit halber sollte die Ordnerstruktur jedoch aus weniger als zwei Ebenen bestehen). Abspielbare Ordner: bis zu 99 Abspielbare Dateien: bis zu 999 Dateisystem: Konformität mit ISO 9660 Stufe 1 und 2, Romeo, Joliet Multi-Session-Wiedergabe: Kompatibel Datenübertragungen im Paketverfahr …
-
Pioneer DEH-1500UBB — page 77
T echnische Daten Allgemein Stromversorgung …………. 14,4 V Gleichspan nung (T ole- ranz 10,8 V bis 15,1 V) Erdungssystem ……………. Negativ Maximale Leistungsaufnah me …………………………….. 10,0 A Abmessungen (B × H × T): DIN Einbaugröße …… 17 8 mm × 50 mm × 165 mm Frontfläche …….. 18 8 mm × 58 mm × 16 mm …
-
Pioneer DEH-1500UBB — page 78
Hartelijk dank voor uw keuze voor dit Pioneer-product. Lees deze handleiding voordat u het product in gebruik neemt zodat u het goed leert gebruiken. Lees vooral de gedeelten die met WAARSCHU- WING en LET OP gemarkeerd zijn aandachtig. Bewaar deze handleiding na het lezen op een vei- lige, voor de hand liggende plaats zodat u hem in- dien nodig alt …
-
Pioneer DEH-1500UBB — page 79
Hoofdtoestel c d 5 9 1 2 3 4 6 7 b ae 8 Onderdeel Onderdeel 1 h (uitwerpen) 8 (equalizer) 2 SRC / OFF 9 BAND 3 MUL TI-CONTROL ( M.C. ) a (terug)/ DIM- MER (dimmer) 4 (lijst) b c / d 5 DISP c 1 / tot 6 / 6 Laadsleuf voor disc d AUX-ingang (3,5 mm-stereo- plug) 7 USB-poort e Verwijderen LET OP ! Sluit een USB -opslagapparaat via een Pioneer USB-kabel …
-
Pioneer DEH-1500UBB — page 80
Opmerkingen ! U kunt de menu-opties instellen in het sys- teemmenu. Raadpleeg Systeemmenu op bladzijde 84 voor meer informatie over de in- stellingen. ! U kunt het instellingenmenu annuleren door op SRC / OFF te drukken. Basisbediening Belangrijk ! W ees voorzichtig bij het verwijderen en te- rugplaatsen van het voorpaneel. ! Stel het voorpaneel ni …
-
Pioneer DEH-1500UBB — page 81
Zenders voor de verschillende frequentiebanden opslaan en oproepen De voorkeuzetoetsen gebruiken 1 Stem af op de zender die u in het geheu- gen wilt opslaan. Om hem op te slaan houdt u de gewenste voorkeuzetoets (1/ t/m 6/ ) ingedrukt tot het voorkeuzenummer stopt met knipperen. 2 Druk op de gewenste voorkeuzetoets (1/ t/m 6/ ) om de betreffende ze …
-
Pioneer DEH-1500UBB — page 82
Cd/cd-r/cd-rw-discs en USB- opslagapparaten Basisbediening Een cd/cd-r/cd-rw afspelen 1 Plaats een disc met het etiket omhoog in de laadsleuf . Een cd/cd-r/cd-rw uitwerpen 1 Druk op h . Songs op een USB-opslagapparaat afspelen 1 Open het deksel van de USB -poort. 2 Sluit het USB -opslagapparaat aan via een USB-kabel. Het afspelen begint automatisch …
-
Pioneer DEH-1500UBB — page 83
S.RTRV (sound retriever) Deze verbetert automatisch de weergave van ge- comprimeerde audio en zorgt voor een vol geluid. 1 Druk op M.C. en selecteer de gewenste instel- ling. Raadpleeg De geluidskwaliteit van gecompri- meerde audio verbeteren (sound retriever) op de vorige bladzijde voor meer informatie. Audio-instellingen 1 Druk op M.C. om het hoo …
-
Pioneer DEH-1500UBB — page 84
Systeemmenu Belangrijk Als het toestel van de accu wordt losgekoppeld, wordt PW SAVE (energiezuinige modus) uitge- schakeld. Deze functie moet u weer inschakelen als het toestel terug met de accu wordt verbon- den. Als het voertuig niet van een contactscha- kelaar met accessoirestand (ACC) is voorzien, is het (afhankelijk van de aansluiting) mogeli …
-
Pioneer DEH-1500UBB — page 85
Systeemmenu 1 Houd SRC/OFF ingedrukt tot het toestel uit gaat. 2 Houd SRC/OFF ingedrukt tot het hoofd- menu wordt weergegeven. 3 Draai aan M.C., selecteer de menuoptie SYSTEM en druk erop. 4 Draai aan M.C. en selecteer de systeem- menufunctie. U kunt de volgende functies in het systeemme- nu aanpassen. Raadpleeg Systeemmenu op de vorige bladzijde v …
-
Pioneer DEH-1500UBB — page 86
5 Ingang voor draadafstandsbediening (alleen DEH-1500UBG, DEH-1500UBB en DEH- 1500UB) Een bedrade afstandsbedieningsadapter kan aangesloten worden (los verkrijgbaar). Stroomkabel 1 3 3 2 4 4 5 5 6 6 b 8 9 7 a e d c 1 Naar ingang stroomkabel 2 De functie van 3 en 5 kan verschillen af- hankelijk van het type voertuig. Verbind in dat geval 4 met 5 en …
-
Pioneer DEH-1500UBB — page 87
2 Zet de montagebehuizing vast door met een schroevendraaier de metalen lipjes op hun plaats te buigen (90°). 1 2 1 Dashboard 2 Montagebehuizing # Controleer of het toestel stevig op zijn plaats is gemonteerd. Het toestel functioneert wellicht niet naar behoren als het niet goed is bevestigd. DIN-achtermontage 1 Bepaal de juiste positie waar de ga …
-
Pioneer DEH-1500UBB — page 88
Cd-speler Melding Oorzaak Actie ERROR-07, 11, 12, 17, 30 De disc is vuil. Reinig de disc. De disc is be- krast. Plaats een andere disc. ERROR-07, 10, 11, 12, 15, 17, 30, A0 Elektrisch of mechanisch probleem. Zet het contact uit en weer aan, of schakel over naar een andere signaalbron en dan terug naar de cd-speler . ERROR-15 De geplaatste disc beva …
-
Pioneer DEH-1500UBB — page 89
Aanwijzingen voor het gebruik Discs en de playe r Gebruik uitsluitend discs die voorzien zijn van een van onderstaande twee logo ’ s. Gebruik discs van 12 cm. Gebruik geen discs van 8 cm en probeer deze ook niet met een adapter af te spelen. Gebruik uitsluitend normale, ronde discs. Gebruik geen discs met een andere vorm. Plaats geen ander object …
-
Pioneer DEH-1500UBB — page 90
Bijkomende informatie Alleen de eerste 32 tekens van de bestandsnaam (inclusief de extensie) of mapnaam worden weer- gegeven. Russische tekst kan alleen op dit toestel worden weergegeven als die met een van de volgende te- kensets is gecodeerd: ! Unicode (UTF-8, UTF-16) ! Andere tekensets dan Unicode die in een Windows-omgeving worden gebruikt en o …
-
Pioneer DEH-1500UBB — page 91
T echnische gegevens Algemeen Spanningsbron ……………. 14,4 V gelijkstroom (10,8 tot 15,1 V toelaatbaar) Aarding ……………………… Negatief Maximaal stroomverbruik …………………………….. 10,0 A Afmetingen (B × H × D): DIN Chassis ………….. 178 mm × 50 mm × 165 mm Voorkant ………… 188 mm × 58 mm × 16 mm D …
-
Pioneer DEH-1500UBB — page 92
Благодарим Вас за покупку этого изделия компании PIONEER. Для обеспечения правильности эксплуата — ции внимательно прочитайте данное руко — водство перед началом использования изде лия . Особен? …
-
Pioneer DEH-1500UBB — page 93
Основное устройство c d 5 9 1 2 3 4 6 7 b ae 8 Элемент Элемент 1 h ( извлечение ) 8 ( эквалай — зер ) 2 SRC / OFF 9 BAND 3 MUL TI-CONTROL ( M.C. ) a ( назад )/ DIM- MER ( регулятор освещенности ) 4 ( список ) b c / d 5 DISP c С 1 / по 6 / 6 Щель для за — …
-
Pioneer DEH-1500UBB — page 94
5 Чтобы закончить настройку , поверни — те M.C. и выберите YES . # Если понадобится вновь изменить настройку , поверните M.C. и выберите NO . Нажмите для вы — бора . 6 Нажмите M.C. для выбора . Примечания ! На? …
-
Pioneer DEH-1500UBB — page 95
Сохранение и вызов из памяти радиостанций для каждого диапазона Использование кнопок предварительной настройки 1 Чтобы сохранить в памяти ну жную ра — диостанцию , нажмите одну из кнопок пре? …
-
Pioneer DEH-1500UBB — page 96
1 Нажмите M.C. , чтобы включить или выклю — чить функцию НОВОСТИ . SEEK ( настройка левой и правой кнопок ) Правой и левой кнопк ам на устройстве можно назначить опреде ленную функцию . Выберите MAN ( ру …
-
Pioneer DEH-1500UBB — page 97
Функции с использованием специальных кнопок Выбор диапазона повторног о воспроизведе — ния 1 Нажимайте кнопку 6 / для выбора из сле — дующих функций : CD/CD-R/CD-RW ! ALL – Повторное воспроизведение вс? …
-
Pioneer DEH-1500UBB — page 98
Это устройство имеет выход к анала сабвуфе — ра , который можно включать и выключать . 1 Нажмите M.C. для выбора нужной настрой — ки . NOR ( нормальная фаза ) — REV ( обратная фаза ) — OFF ( сабвуфер выключ? …
-
Pioneer DEH-1500UBB — page 99
Звук / уровень звуково го сигнала данной систе — мы автоматически понижае тся при получении сигнала от оборудования с функцией приглу — шения звука . 1 Для отображения установо чного меню на — ж? …
-
Pioneer DEH-1500UBB — page 100
1 Нажмите M.C. , чтобы открыть главное меню . 2 Поворачивай те M.C. для прокрутки пунктов меню ; нажмите , чтобы выбрать SYSTEM . 3 Поверните M.C. , чтобы отобразить DEMO OFF , затем нажмите . 4 Поверните M.C. для в? …
-
Pioneer DEH-1500UBB — page 101
! Черный к абель являе тся заземляющим . Заземляющие кабели данного устройства и других устройств ( особенно устройств , предназна ченных для эксплуатации при больших токах , таких к ак усилит? …
-
Pioneer DEH-1500UBB — page 102
! Не используйте детали , не разрешенные производите лем к использованию , по — скольку это может стать причиной неис — правностей . ! Уточните у дилера компании , требует ли установка сверления ? …
-
Pioneer DEH-1500UBB — page 103
Устранение неисправностей Признак Причина Действие Дисплей ав — томатически возвращае т — ся в исход — ный режим . В те чение 30 секунд не было выполне — но никаких операций . Повторите опе — рацию …
-
Pioneer DEH-1500UBB — page 104
Сообщение Причина Действие PROTECT Все файлы на запоминаю — щем устрой — стве USB закодированы Windows Media DRM 9/10. Перенесите ау — диофайлы , не закодированные Windows Media DRM 9/10, на за — поминающее ус — тройство U …
-
Pioneer DEH-1500UBB — page 105
Запоминающее устройство USB С вопросами о работе запоминающего устрой — ства USB обращайтесь к производите лю ус — тройства . Подключение через USB- концентратор не под — держивается . Не подключай? …
-
Pioneer DEH-1500UBB — page 106
Запоминающее устройство USB, содержащее разде лы : воспроизво дится только первый раз — дел . При начале воспроизведения ау диофайлов на запоминающем устройстве USB, с одержащем разве твленные и? …
-
Pioneer DEH-1500UBB — page 107
Технические характеристики Общие Источник питания ……….. 14,4 В постоянного тока ( до — пустимый диапазон от 10,8 Вд о 15,1 В ) Система заземления ….. Заземление отрицате льно — го полюса Максимальны? …
-
Pioneer DEH-1500UBB — page 108
PIONEER CORPORA TION 1-1, Shin-ogura, Saiwai-ku, Kawasaki-shi, Kanagawa 212-0031, JAP AN Корпорация Пайонир 1-1, Син — Огура , Сайвай — ку , г . Кавасаки , префектура Канагава , 212-0031, Япония Импортер ООО “ ПИОНЕР РУС ” 125040, Россия , г . Моск? …
Раздел: Авто, мото оборудование и транспорт
Тип: Автомагнитола
Характеристики, спецификации
Проигрыватель:
CD, USB флеш
Встроенный усилитель:
есть
Эквалайзер:
есть, 5-полосн.
Поддерживаемые аудиоформаты:
MP3, WAV, WMA
Поддержка носителей:
CD, CD-R, CD-RW
Мощность:
4×50 Вт (пиковая)
Всего предустановок тюнера:
24
Поддержка технологии «RDS»:
есть
Поддерживаемые сервисы RDS:
PTY
Возможность подключения устройств:
кнопки управления на руле
Разъемы:
ISO-разъем, аудиовход, линейный выход
Безопасность:
съемная панель
Инструкция к Автомагнитоле Pioneer DEH-1500UBB

CD RDS RECEIVER
AUTORADIO CD RDS
SINTOLETTORE CD RDS
English NederlandsDeutschEspañolItalianoFrançais Русский
REPRODUCTOR DE CD CON RECEPTOR RDS
CD RDS-EMPFÄNGER
CD RDS-ONTVANGER
CD RDS ПРИЕМНИК
Owner’s Manual
Mode d’emploi
DEH-1500UB
Manuale d’istruzioni
Manual de instrucciones
DEH-1500UBG
Bedienungsanleitung
Handleiding
DEH-1500UBA
Руководство пользователя
DEH-1500UBB
Section
01
Before you start
Before you start
Thank you for purchasing this PIONEER
About this unit
In case of trouble
product
The tuner frequencies on this unit are allocated
Should this unit fail to operate properly, please
To ensure proper use, please read through this
for use in Western Europe, Asia, the Middle
contact your dealer or nearest authorized
manual before using this product. It is especially
East, Africa and Oceania. Use in other areas
PIONEER Service Station.
important that you read and observe WARN-
may result in poor reception. The RDS (radio
INGs and CAUTIONs in this manual. Please
data system) function only operates in areas
keep the manual in a safe and accessible place for
with broadcasting RDS signals for FM stations.
future reference.
CAUTION
This product is a class 1 laser product classi-
fied under the Safety of laser products, IEC
60825-1:2007.
If you want to dispose this product, do not
mix it with general household waste. There is
a separate collection system for used elec-
tronic products in accordance with legislation
that requires proper treatment, recovery and
CAUTION
recycling.
! Do not allow this unit to come into contact
with liquids. Electrical shock could result.
Private households in the member states of the
Also, damage to this unit, smoke, and over-
heating could result from contact with
EU, in Switzerland and Norway may return their
used electronic products free of charge to desig-
liquids.
nated collection facilities or to a retailer (if you
! The Pioneer CarStereo-Pass is for use only in
purchase a similar new one).
Germany.
For countries not mentioned above, please con-
! Always keep the volume low enough to hear
tact your local authorities for the correct method
outside sounds.
of disposal.
! Avoid exposure to moisture.
By doing so you will ensure that your disposed
! If the battery is disconnected or discharged,
product undergoes the necessary treatment, re-
any preset memory will be erased.
covery and recycling and thus prevent potential
Note
negative effects on the environment and human
Function setting operations are completed even
health.
if the menu is canceled before the operations
are confirmed.
About this manual
In the following instructions, USB memories
and USB audio players are collectively referred
to as “USB storage device”.
2
En
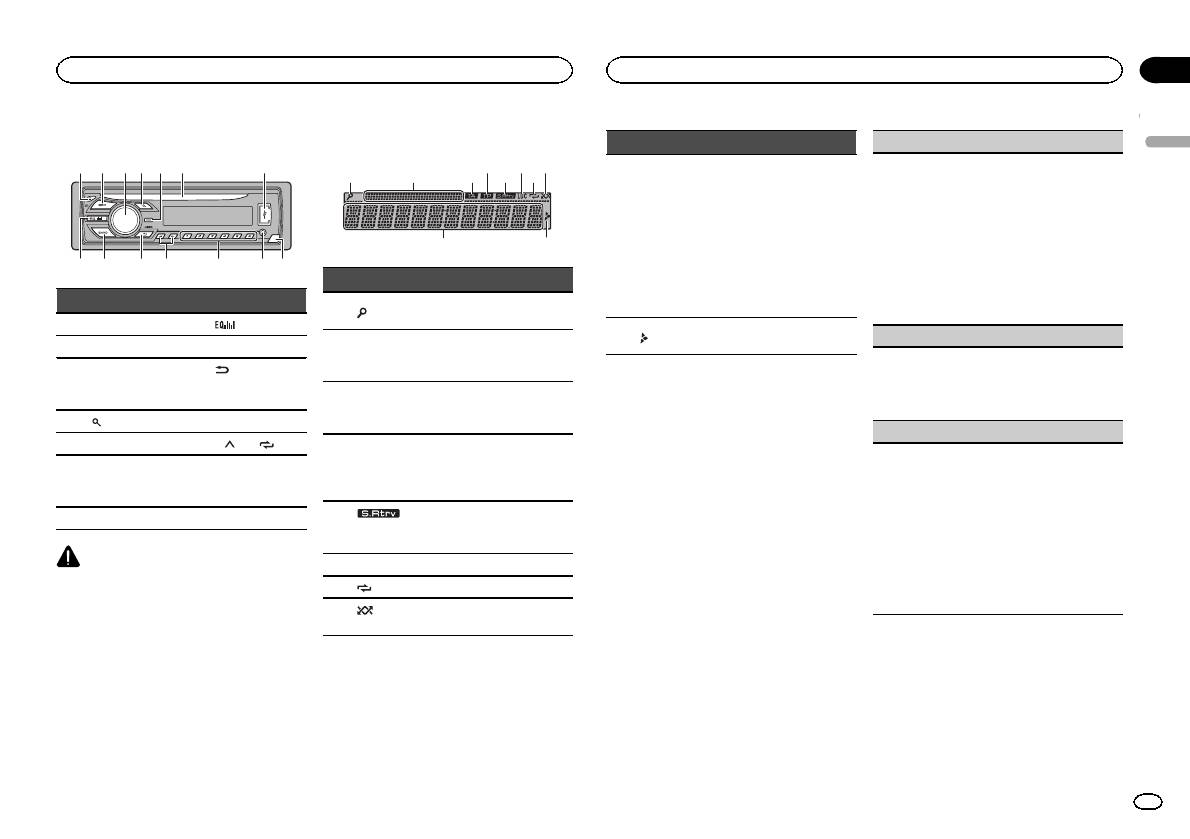
Head unit
c d
5
9
1 2 3 4 6 7
bae8
Section
Operating this unit
Operating this unit
02
Display indication
Indicator State
LANGUAGE (multi-language)
English
4 6 8
This unit can display the text information from a
! Tuner: band and fre-
21 3 75
compressed audio file even for information em-
quency
bedded in English or Russian.
! RDS: program service
! If the embedded language and the selected
name, PTY information
Main infor-
language setting are not the same, text infor-
and other literal informa-
9
mation sec-
mation may not display properly.
9
a
tion
tion
! Some characters may not be displayed prop-
! CD player and USB stor-
erly.
Indicator State
age device: elapsed play-
1 Turn M.C. to select the desired setting.
back time and text
Part Part
ENG (English)—РУС (Russian)
The list function is being oper-
information
1
(list)
2 Press M.C. to confirm the selection.
ated.
1 h (eject) 8
(equalizer)
Appears when a lower tier of
a
CLOCK SET (setting the clock)
Sub infor-
2 SRC/OFF 9 BAND
folder or menu exists.
2
mation sec-
Sub information is displayed.
1 Turn M.C. to adjust hour.
(back)/
tion
MULTI-CONTROL
2 Press M.C. to select minute.
3
a
DIMMER
(M.C.)
TA (traffic
Set up menu
3 Turn M.C. to adjust minute.
(dimmer)
3
announce-
TA function is on.
4 Press M.C. to confirm the selection.
When you turn the ignition switch to ON after in-
4
(list) b c/d
ments)
stallation, set up menu appears on the display.
FM STEP (FM tuning step)
5 DISP c 1/
to 6/
TP (traffic
You can set up the menu options below.
Normally, the FM tuning step employed by seek
program
AUX input jack
4
A TP station is tuned in.
tuning is 50 kHz. When AF or TA is on, the tuning
identifica-
1 After installation of this unit, turn the
6 Disc loading slot d
(3.5 mm stereo
step automatically changes to 100 kHz. It may be
tion)
ignition switch to ON.
jack)
preferable to set the tuning step to 50 kHz when
SET UP appears.
AF is on.
7 USB port e Detach button
The sound retriever function
5
(sound re-
! The tuning step remains at 50 kHz during man-
is on.
2 Turn M.C. to switch to YES.
triever)
ual tuning.
# If you do not operate for 30 seconds, the set up
CAUTION
1 Turn M.C. to select the FM tuning step.
6 LOC Local seek tuning is on.
menu will not be displayed.
! Use an optional Pioneer USB cable (CD-
50 (50 kHz)—100 (100 kHz)
# If you prefer not to set up at this time, turn M.C.
7
(repeat) Track or folder repeat is on.
U50E) to connect the USB storage device as
2 Press M.C. to confirm the selection.
to switch to NO. Press to select.
any device connected directly to the unit will
QUIT appears.
(ran-
If you select NO, you cannot set up in the set up
8
Random play is on.
protrude out from the unit, which could be
dom)
menu.
dangerous.
5 To finish your settings, turn M.C. to select
! Do not use unauthorized products.
3 Press M.C. to select.
YES.
# If you prefer to change your setting again, turn
4 Perform the following procedures to set
M.C. to switch to NO. Press to select.
the menu.
To proceed to the next menu option, you need to
6 Press M.C. to select.
confirm your selection.
En
3
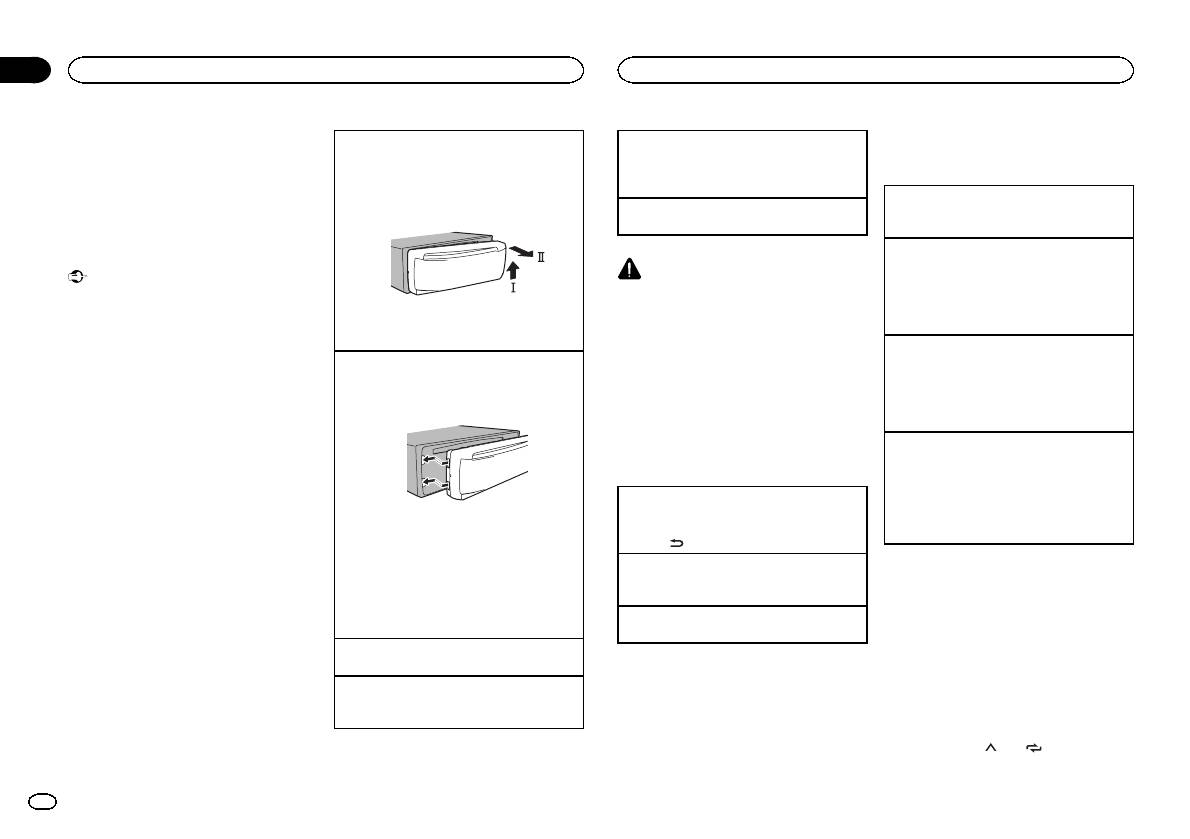
Section
02
Operating this unit
Operating this unit
Notes
Removing the front panel to protect your unit from
Selecting a source
Tuner
! You can set up the menu options from the
theft
1 Press SRC/OFF to cycle between:
system menu. For details about the settings,
Basic operations
1 Press the detach button to release the front
TUNER (tuner)—CD (CD player)—USB (USB)
refer to System menu on page 7.
panel.
—AUX (AUX)
! You can cancel set up menu by pressing
Selecting a band
2 Push the front panel upward (M) and then pull
SRC/OFF.
Adjusting the volume
1 Press BAND until the desired band (FM1,
it toward (N) you.
1 Turn M.C. to adjust the volume.
FM2, FM3 for FM or MW/LW) is displayed.
Basic operations
Switching preset stations
1 Press c or d.
Important
CAUTION
! Select PCH (preset channel) under SEEK to
! Handle gently when removing or attaching
For safety reasons, park your vehicle when re-
use this function. For details about the set-
the front panel.
moving the front panel.
tings, refer to SEEK (left/right key setting) on
! Avoid subjecting the front panel to excessive
3 Always keep the detached front panel in a pro-
Note
the next page.
shock.
tection device such as a protection case.
When this unit’s blue/white lead is connected to
Manual tuning (step by step)
! Keep the front panel out of direct sunlight
Re-attaching the front panel
the vehicle’s auto-antenna relay control termi-
1 Press c or d.
and high temperatures.
1 Slide the front panel to the left.
nal, the vehicle’s antenna extends when this
! Select MAN (manual tuning) under SEEK to
! To avoid damaging the device or vehicle inte-
Make sure to insert the tabs on the left side of
unit’s source is turned on. To retract the anten-
use this function. For details about the set-
rior, remove any cables and devices attached
the head unit into the slots on the front panel.
na, turn the source off.
tings, refer to SEEK (left/right key setting) on
to the front panel before detaching it.
the next page.
Frequently used menu
Seeking
1 Press and hold c or d, and then release.
operations
You can cancel seek tuning by briefly pressing
c or d.
Returning to the previous display
While pressing and holding c or d, you can
Returning to the previous list (the folder one level
skip stations. Seek tuning starts as soon as
2 Press the right side of the front panel until it is
higher)
you release c or d.
firmly seated.
1 Press
/DIMMER.
If you cannot attach the front panel to the
Note
head unit successfully, make sure that you are
Returning to the ordinary display
This unit’s AF (alternative frequencies search)
placing the front panel onto the head unit cor-
Canceling the main menu
function can be turned on and off. AF should be
rectly. Forcing the front panel into place may
1 Press BAND.
off for normal tuning operation (refer to AF (al-
result in damage to the front panel or head
Returning to the ordinary display from the list
ternative frequencies search) on the next page).
unit.
1 Press BAND.
Turning the unit on
Storing and recalling stations
1 Press SRC/OFF to turn the unit on.
for each band
Turning the unit off
Using preset tuning buttons
1 Press and hold SRC/OFF until the unit turns
off.
1 When you find a station that you want
to store in memory, press one of the preset
tuning buttons (1/
to 6/ ) and hold until
the preset number stops flashing.
4
En
Section
Operating this unit
Operating this unit
02
2 Press one of the preset tuning buttons
Searching for an RDS station by PTY information
OTHERS (others)
Local seek tuning lets you tune in to only those
(1/
to 6/ ) to select the desired station.
English
You can search for general types of broadcasting
radio stations with sufficiently strong signals for
EDUCATE (Education), DRAMA (Drama), CUL-
programs, such as those listed in the following
good reception.
Switching the display
TURE (Culture), SCIENCE (Science), VARIED (Var-
section. Refer to this page.
1 Press M.C. to select the desired setting.
ied), CHILDREN (Children’s), SOCIAL (Social
1 Press
(list).
FM: OFF—LV1—LV2—LV3—LV4
affairs), RELIGION (Religion), PHONE IN (Phone
Selecting the desired text information
2 Turn M.C. to select a program type.
MW/LW: OFF—LV1 —LV2
in), TOURING (Travel), LEISURE (Leisure), DOCU-
1 Press DISP to cycle between the following:
NEWS/INFO—POPULAR—CLASSICS—
The highest level setting allows reception of
MENT (Documentaries)
! FREQUENCY (program service name or
OTHERS
only the strongest stations, while lower levels
frequency)
3 Press M.C. to begin the search.
allow the reception of weaker stations.
! BRDCST INFO (program service name/PTY
The unit searches for a station broadcasting
Function settings
TA (traffic announcement standby)
information)
that type of program. When a station is found,
! CLOCK (source name and clock)
1 Press M.C. to display the main menu.
its program service name is displayed.
1 Press M.C. to turn traffic announcement
! To cancel the search, press M.C. again.
Notes
standby on or off.
2 Turn M.C. to change the menu option
! The program of some stations may differ
! If the program service name cannot be ac-
and press to select FUNCTION.
from that indicated by the transmitted PTY.
AF (alternative frequencies search)
quired in FREQUENCY, the broadcast fre-
! If no station is broadcasting the type of
quency is displayed instead. If the program
3 Turn M.C. to select the function.
program you searched for, NOT FOUND is
1 Press M.C. to turn AF on or off.
service name is detected, the program serv-
Once selected, the following functions can be
displayed for about two seconds and then
NEWS (news program interruption)
ice name will be displayed.
adjusted.
the tuner returns to the original station.
! BRDCST INFO text information will change
# If MW/LW band is selected, only BSM, LOCAL
1 Press M.C. to turn the NEWS function on or
automatically.
and SEEK are available.
off.
! Depending on the band, text information can
PTY list
be changed.
BSM (best stations memory)
SEEK (left/right key setting)
! Text information items that can be changed
NEWS/INFO (news and information)
BSM (best stations memory) automatically stores
You can assign a function to the left and right keys
depend on the area.
NEWS (News), AFFAIRS (Current affairs), INFO
the six strongest stations in the order of their sig-
of the unit.
(Information), SPORT (Sports), WEATHER (Weath-
nal strength.
Select MAN (manual tuning) to tune up or down
Using PTY functions
er), FINANCE (Finance)
1 Press M.C. to turn BSM on.
manually or select PCH (preset channel) to switch
You can tune in to a station using PTY (program
To cancel, press M.C. again.
between preset channels.
type) information.
POPULAR (popular)
1 Press M.C. to select MAN or PCH.
REGION (regional)
POP MUS (Popular music), ROCK MUS (Rock
music), EASY MUS (Easy listening), OTH MUS
When AF is used, the regional function limits the
(Other music), JAZZ (Jazz), COUNTRY (Country
selection of stations to those broadcasting region-
CD/CD-R/CD-RW and USB
music), NAT MUS (National music), OLDIES
al programs.
storage devices
(Oldies music), FOLK MUS (Folk music)
1 Press M.C. to turn the regional function on or
off.
Basic operations
CLASSICS (classics)
LOCAL (local seek tuning)
L. CLASS (Light classical), CLASSIC (Classical)
Playing a CD/CD-R/CD-RW
1 Insert the disc into the disc loading slot with
the label side up.
Ejecting a CD/CD-R/CD-RW
1 Press h.
En
5
Section
02
Operating this unit
Operating this unit
Switching the display
2 Use M.C. to select the desired file name
Playing songs on a USB storage device
Pausing playback
(or folder name).
1 Open the USB port cover.
1 Press 4/PAUSE to pause or resume.
2 Plug in the USB storage device using a USB
Selecting the desired text information
Selecting a file or folder
Enhancing compressed audio and restoring rich
cable.
1 Press DISP to cycle between the following:
CD-DA
1 Turn M.C.
sound (sound retriever)
Playback is performed automatically.
1 Press 3/S.Rtrv to cycle between:
! ELAPSED TIME (track number and play-
Playing
Stopping playback of files on a USB storage de-
1—2—OFF (off)
back time)
1 When a file or track is selected, press M.C.
vice
1 is effective for low compression rates, and 2
! CLOCK (source name and clock)
1 You may disconnect the USB storage device at
is effective for high compression rates.
! SPEANA (spectrum analyzer)
Viewing a list of the files (or folders) in the se-
any time.
CD-TEXT
lected folder
The unit stops playback.
! TRACK INFO (track title/track artist/disc
1 When a folder is selected, press M.C.
Function settings
Selecting a folder
title)
Playing a song in the selected folder
1 Press 1/
! ELAPSED TIME (track number and play-
1 Press M.C. to display the main menu.
or 2/ .
1 When a folder is selected, press and hold M.C.
back time)
Selecting a track
! CLOCK (source name and clock)
2 Turn M.C. to change the menu option
1 Press c or d.
! SPEANA (spectrum analyzer)
Operations using special buttons
and press to select FUNCTION.
Fast forwarding or reversing
MP3/WMA/WAV
Once selected, the function below can be ad-
1 Press and hold c or d.
! TRACK INFO (track title/artist name/album
Selecting a repeat play range
justed.
! When playing compressed audio, there is no
title)
1 Press 6/
to cycle between the following:
sound during fast forward or reverse.
! FILE INFO (file name/folder name)
CD/CD-R/CD-RW
S.RTRV (sound retriever)
! ELAPSED TIME (track number and play-
! ALL – Repeat all tracks
Returning to root folder
Automatically enhances compressed audio and
back time)
! ONE – Repeat the current track
1 Press and hold BAND.
restores rich sound.
! CLOCK (source name and clock)
! FLD – Repeat the current folder
1 Press M.C. to select the desired setting.
Switching between compressed audio and CD-DA
! SPEANA (spectrum analyzer)
USB storage device
For details, refer to Enhancing compressed
1 Press BAND.
! ALL – Repeat all files
Notes
audio and restoring rich sound (sound retriever)
! ONE – Repeat the current file
Switching between playback memory devices
on this page.
! TRACK INFO and FILE INFO text information
! FLD – Repeat the current folder
You can switch between playback memory devices
will change automatically.
on USB storage devices with more than one Mass
! Depending on the version of iTunes used to
Playing tracks in random order
Storage Device-compatible memory device.
write MP3 files to a disc or media file types,
1 Press 5/
to turn random play on or off.
Audio adjustments
1 Press BAND.
incompatible text stored within an audio file
Tracks in a selected repeat range are played in
! You can switch between up to 32 different
random order.
1 Press M.C. to display the main menu.
may be displayed incorrectly.
memory devices.
! To change songs during random play, press d
! Text information items that can be changed
2 Turn M.C. to change the menu option
depend on the media.
to switch to the next track. Pressing c restarts
Note
playback of the current track from the begin-
and press to select AUDIO.
Disconnect USB storage devices from the unit
ning of the song.
Selecting and playing files/
when not in use.
3 Turn M.C. to select the audio function.
tracks from the name list
Once selected, the following audio functions
can be adjusted.
1 Press to switch to the file/track name
! FADER is not available when SUB.W/SUB.W
list mode.
is selected in SP-P/O MODE. For details, refer
to SP-P/O MODE (rear output and preout set-
ting) on page 8.
6
En
Section
Operating this unit
Operating this unit
02
! SUB.W, SUB.W CTRL and HPF SETTING are
Only frequencies lower than those in the selected
SLA (source level adjustment)
not available when REAR/REAR is selected in
1 Press M.C. to display the setting mode.
English
range are outputted from the subwoofer.
SP-P/O MODE. For details, refer to
2 Turn M.C. to select the equalizer.
SLA (Source level adjustment) lets you adjust the
1 Press M.C. to display the setting mode.
SP-P/O MODE (rear output and preout set-
POWERFUL—NATURAL—VOCAL—CUS-
volume level of each source to prevent radical
2 Press M.C. to cycle between the following:
ting) on the next page.
TOM1—CUSTOM2—FLAT—SUPER BASS
changes in volume when switching between sour-
Cut-off frequency—Output level—Slope level
! SUB.W CTRL and HPF SETTING are not avail-
The equalizer band and equalizer level can be
ces.
Rates that can be adjusted will flash.
able when SUB.W is selected in OFF. For de-
customized when CUSTOM1 or CUSTOM2 is
! Settings are based on the FM volume level,
3 Turn M.C. to select the desired setting.
tails, refer to SUB.W (subwoofer on/off
selected.
which remains unchanged.
Cut-off frequency: 50HZ—63HZ—80HZ—
setting) on this page.
If selecting CUSTOM1 or CUSTOM2, complete
! The MW/LW volume level can also be adjusted
100HZ—125HZ—160HZ—200HZ
the procedures outlined below. If selecting
with this function.
Output level: –24 to +6
FADER (fader adjustment)
other options, press M.C. to return to the pre-
! When selecting FM as the source, you cannot
Slope level: –6 — –12
vious display.
switch to SLA.
1 Press M.C. to display the setting mode.
! CUSTOM1 can be set separately for each
BASS BOOST (bass boost)
1 Press M.C. to display the setting mode.
2 Turn M.C. to adjust the front/rear speaker bal-
source.
2 Turn M.C. to adjust the source volume.
ance.
! CUSTOM2 is a shared setting used in com-
1 Press M.C. to display the setting mode.
Adjustment range: +4 to –4
mon for all sources.
2 Turn M.C. to select a desired level.
BALANCE (balance adjustment)
3 Press M.C. to display the setting mode.
0 to +6 is displayed as the level is increased or
4 Press M.C. to cycle between the following:
decreased.
1 Press M.C. to display the setting mode.
System menu
Equalizer band—Equalizer level
2 Turn M.C. to adjust the left/right speaker bal-
HPF SETTING (high pass filter adjustment)
5 Turn M.C. to select the desired setting.
Important
ance.
Equalizer band: 80HZ—250HZ—800HZ—
When you do not want low sounds from the sub-
PW SAVE (power saving) is canceled if the ve-
EQ SETTING (equalizer recall)
2.5KHZ—8KHZ
woofer output frequency range to play from the
hicle battery is disconnected and will need to be
Equalizer level: +6 to –6
front or rear speakers, turn on the HPF (high pass
turned back on once the battery is reconnected.
! You can also switch the equalizer by pressing
filter). Only frequencies higher than those in the
When PW SAVE (power saving) is off, depend-
repeatedly.
selected range are output from the front or rear
ing on connection methods, the unit may con-
speakers.
tinue to draw power from the battery if your
LOUDNESS (loudness)
1 Press M.C. to display the setting mode.
vehicle’s ignition doesn’t have an ACC (acces-
Loudness compensates for deficiencies in the low-
2 Press M.C. to cycle between the following:
sory) position.
frequency and high-frequency ranges at low vol-
Cut-off frequency—Slope level
ume.
3 Turn M.C. to select the desired setting.
1 Press M.C. to display the main menu.
1 Press M.C. to select the desired setting.
Cut-off frequency: OFF—50HZ—63HZ—80HZ
OFF (off)—LOW (low)—MID (mid)—HI (high)
—100HZ—125HZ—160HZ—200HZ
2 Turn M.C. to change the menu option
Slope level: –6 — –12
and press to select SYSTEM.
SUB.W (subwoofer on/off setting)
This unit is equipped with a subwoofer output
3 Turn M.C. to select the system menu
which can be turned on or off.
function.
1 Press M.C. to select the desired setting.
Once selected, the following system menu func-
NOR (normal phase)—REV (reverse phase)—
tions can be adjusted.
OFF (subwoofer off)
! MUTE MODE and PW SAVE are not available
for DEH-1500UBA.
SUB.W CTRL (subwoofer adjustment)
En
7
Section
02
Operating this unit
Operating this unit
3 Turn M.C. to change the menu option
LANGUAGE (multi-language)
Sound from this system is automatically muted or
SP-P/O MODE (rear output and preout setting)
and press to select INITIAL.
attenuated when a signal from equipment with a
This unit can display the text information from a
The rear speaker leads output and the RCA output
mute function is received.
compressed audio file even for information em-
4 Turn M.C. to select the initial menu func-
of this unit can be used to connect a full-range
1 Press M.C. to display the setting mode.
bedded in English or Russian.
tion.
speaker or subwoofer. Select a suitable option for
2 Turn M.C. to select the desired setting.
! If the embedded language and the selected
Once selected, the following initial menu func-
your connection.
You can select any one of the options in the fol-
language setting are not the same, text infor-
tions can be adjusted.
1 Press M.C. to display the setting mode.
lowing list:
mation may not display properly.
2 Turn M.C. to select the desired setting.
! MUTE – Muting
! Some characters may not be displayed prop-
FM STEP (FM tuning step)
You can select any one of the options in the fol-
! 20dB ATT – Attenuation (20dB ATT has a
erly.
lowing list:
stronger effect than 10dB ATT)
Normally, the FM tuning step employed by seek
1 Turn M.C. to select the desired setting.
! REAR/SUB.W – Select when there is a full-
! 10dB ATT – Attenuation
tuning is 50 kHz. When AF or TA is on, the tuning
ENG (English)—РУС (Russian)
range speaker connected to the rear speak-
step automatically changes to 100 kHz. It may be
PW SAVE (power saving)
er leads output and there is a subwoofer
CLOCK SET (setting the clock)
preferable to set the tuning step to 50 kHz when
connected to the RCA output.
Switching this function on enables you to reduce
AF is on.
! SUB.W/SUB.W – Select when there is a
1 Press M.C. to display the setting mode.
the consumption of battery power.
! The tuning step remains at 50 kHz during man-
subwoofer connected directly to the rear
2 Press M.C. to select the segment of the clock
! Turning on the source is the only operation al-
ual tuning.
speaker leads output without any auxiliary
display you wish to set.
lowed when this function is on.
1 Press M.C. to select the FM tuning step.
amp and there is a subwoofer connected
Hour—Minute
1 Press M.C. to turn the power save on or off.
50 (50 kHz)—100 (100 kHz)
to the RCA output.
3 Turn M.C. to adjust the clock.
! REAR/REAR – Select when there is a full-
12H/24H (time notation)
range speaker connected to the rear speak-
Switching the dimmer setting
er leads output and the RCA output.
1 Press M.C. to select the desired setting.
If there is a full-range speaker connected to
You can adjust the brightness of illumination.
12H (12-hour clock)—24H (24-hour clock)
the rear speaker leads output and the RCA
output is not used, you may select either
AUTO PI (auto PI seek)
1 Press M.C. to display the main menu.
REAR/SUB.W or REAR/REAR.
The unit can automatically search for a different
2 Turn M.C. to display ILLUMI and press to
station with the same programming, even during
select.
preset recall.
System menu
1 Press M.C. to turn Auto PI seek on or off.
3 Press M.C. to select the desired setting.
1 Press and hold SRC/OFF until the unit
AUX (auxiliary input)
OFF (off)—ON (on)
turns off.
! You can also change the dimmer setting by
Activate this setting when using an auxiliary de-
pressing and holding
/DIMMER.
vice connected to this unit.
2 Press and hold SRC/OFF until the main
1 Press M.C. to turn AUX on or off.
menu appears in the display.
MUTE MODE (mute mode)
Initial menu
3 Turn M.C. to change the menu option
1 Press and hold SRC/OFF until the unit
and press to select SYSTEM.
turns off.
4 Turn M.C. to select the system menu
2 Press and hold SRC/OFF until the main
function.
menu appears in the display.
Once selected, the following system menu func-
tions can be adjusted.
8
En
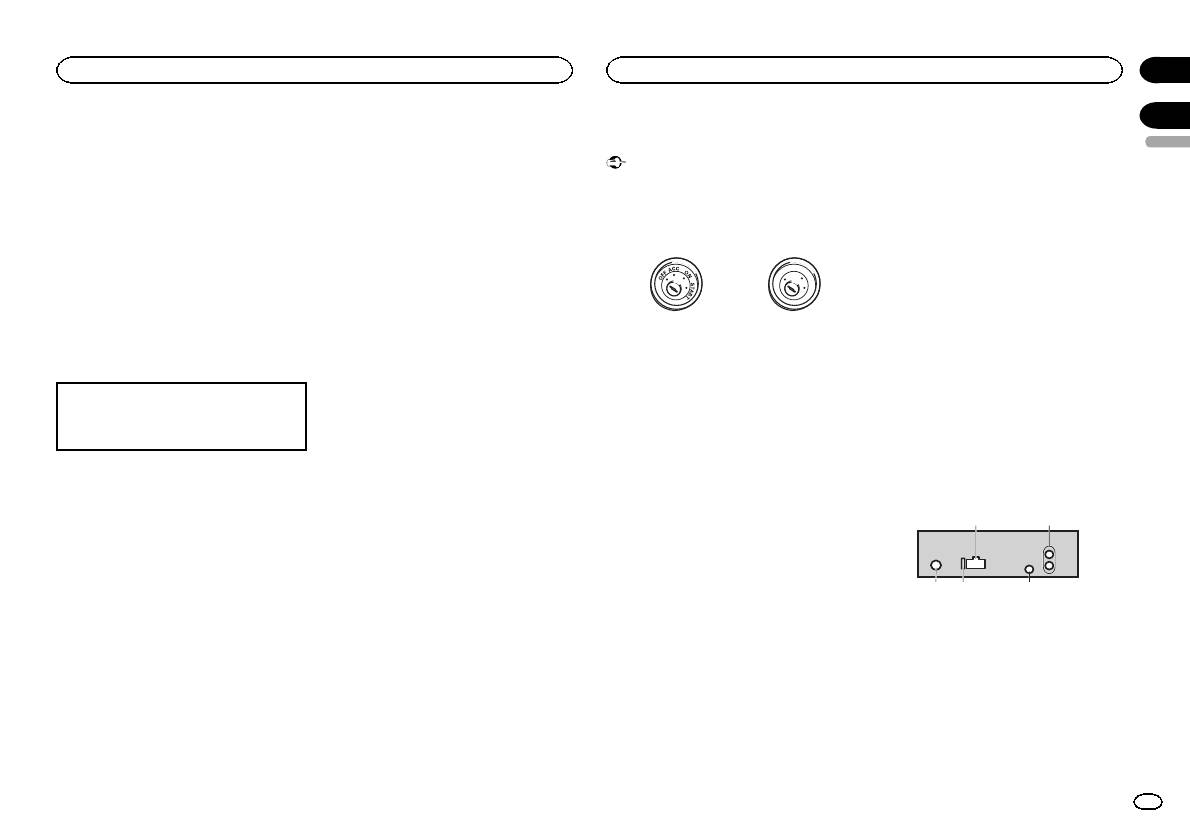
For details, refer to System menu on page 7.
— Never wire the negative speaker cable directly
Connections
to ground.
Important
— Never band together negative cables of multi-
Using an AUX source
! When installing this unit in a vehicle without
ple speakers.
an ACC (accessory) position on the ignition
! When this unit is on, control signals are sent
1 Insert the stereo mini plug into the AUX
switch, failure to connect the red cable to the
through the blue/white cable. Connect this
input jack.
terminal that detects operation of the ignition
cable to the system remote control of an ex-
key may result in battery drain.
ternal power amp or the vehicle’s auto-anten-
2 Press SRC/OFF to select AUX as the
na relay control terminal (max. 300 mA
source.
F
F
O
N
12 V DC). If the vehicle is equipped with a
O
T
S
Note
A
glass antenna, connect it to the antenna
T
R
AUX cannot be selected unless the auxiliary set-
booster power supply terminal.
ting is turned on. For more details, refer to AUX
! Never connect the blue/white cable to the
ACC position No ACC position
(auxiliary input) on the previous page.
power terminal of an external power amp.
! Use of this unit in conditions other than the
Also, never connect it to the power terminal
following could result in fire or malfunction.
of the auto antenna. Doing so may result in
Switching the display
— Vehicles with a 12-volt battery and negative
battery drain or a malfunction.
grounding.
! The black cable is ground. Ground cables for
Selecting the desired text information
— Speakers with 50 W (output value) and 4 W to
this unit and other equipment (especially,
1 Press DISP to cycle between the following:
8 W (impedance value).
high-current products such as power amps)
! Source name
! To prevent a short-circuit, overheating or mal-
must be wired separately. If they are not, an
! Source name and clock
function, be sure to follow the directions
accidental detachment may result in a fire or
below.
malfunction.
— Disconnect the negative terminal of the bat-
If an unwanted display appears
tery before installation.
This unit
— Secure the wiring with cable clamps or adhe-
Turn off the unwanted display using the proce-
sive tape. Wrap adhesive tape around wiring
dures listed below.
that comes into contact with metal parts to
protect the wiring.
1 Press M.C. to display the main menu.
— Place all cables away from moving parts,
such as the shift lever and seat rails.
2 Turn M.C. to change the menu option
— Place all cables away from hot places, such
and press to select SYSTEM.
as near the heater outlet.
— Do not connect the yellow cable to the battery
3 Turn M.C. to display DEMO OFF and press
by passing it through the hole to the engine
to select.
compartment.
— Cover any disconnected cable connectors
4 Turn M.C. to switch to YES.
with insulating tape.
— Do not shorten any cables.
5 Press M.C. to select.
— Never cut the insulation of the power cable of
this unit in order to share the power with
other devices. The current capacity of the
cable is limited.
— Use a fuse of the rating prescribed.
3 45
Section
Operating this unit
Installation
02
03
English
21
1 Power cord input
2 Rear output or subwoofer output
3 Antenna input
4 Fuse (10 A)
5 Wired remote input (DEH-1500UBG, DEH-
1500UBB and DEH-1500UB only)
Hard-wired remote control adapter can be
connected (sold separately).
En
9
Power cord
3
4
1
2
5
6
3
4
7
5
6
8
a
9
b
e
d
9 Blue/white
Power amp (sold separately)
! When installing, to ensure proper heat dis-
The pin position of the ISO connector will dif-
persal when using this unit, make sure you
Perform these connections when using the op-
fer depending on the type of vehicle. Connect
leave ample space behind the rear panel and
tional amplifier.
9 and b when Pin 5 is an antenna control
wrap any loose cables so they are not block-
type. In another type of vehicle, never con-
3
ing the vents.
1
nect 9 and b.
2
a Blue/white
4
Connect to system control terminal of the
55
power amp (max. 300 mA 12 V DC).
b Blue/white
1 System remote control
Connect to auto-antenna relay control termi-
Connect to Blue/white cable.
nal (max. 300 mA 12 V DC).
2 Power amp (sold separately)
c Yellow/black (DEH-1500UBG, DEH-1500UBB
3 Connect with RCA cables (sold separately)
and DEH-1500UB only)
4 To Rear output or subwoofer output
If you use an equipment with Mute function,
5 Rear speaker or subwoofer
wire this lead to the Audio Mute lead on that
equipment. If not, keep the Audio Mute lead
free of any connections.
c
Installation
d Speaker leads
Important
White: Front left +
White/black: Front left *
! Check all connections and systems before
1 To power cord input
Gray: Front right +
final installation.
2 Depending on the kind of vehicle, the func-
Gray/black: Front right *
! Do not use unauthorized parts as this may
tion of 3 and 5 may be different. In this
Green: Rear left + or subwoofer +
cause malfunctions.
case, be sure to connect 4 to 5 and 6 to
Green/black: Rear left * or subwoofer *
! Consult your dealer if installation requires
3.
Violet: Rear right + or subwoofer +
drilling of holes or other modifications to the
3 Yellow
Violet/black: Rear right * or subwoofer *
vehicle.
Back-up (or accessory)
e ISO connector
! Do not install this unit where:
4 Yellow
In some vehicles, the ISO connector may be
— it may interfere with operation of the vehicle.
Connect to the constant 12 V supply termi-
divided into two. In this case, be sure to con-
— it may cause injury to a passenger as a result
nal.
nect to both connectors.
of a sudden stop.
5 Red
! The semiconductor laser will be damaged if
Notes
Accessory (or back-up)
it overheats. Install this unit away from hot
! Change the initial menu of this unit. Refer to
6 Red
places such as near the heater outlet.
SP-P/O MODE (rear output and preout set-
Connect to terminal controlled by ignition
! Optimum performance is obtained when the
ting) on page 8.
switch (12 V DC).
unit is installed at an angle of less than 60°.
The subwoofer output of this unit is monau-
7 Connect leads of the same color to each
ral.
other.
60°
! When using a subwoofer of 70 W (2 W), be
8 Black (chassis ground)
sure to connect the subwoofer to the violet
and violet/black leads of this unit. Do not
connect anything to the green and green/
black leads.
5cmcm
Section
03
Installation
Installation
Leave ample
5 cm
space
5 cm
DIN front/rear mount
This unit can be properly installed using either
front-mount or rear-mount installation.
Use commercially available parts when instal-
ling.
DIN Front-mount
1 Insert the mounting sleeve into the dash-
board.
For installation in shallow spaces, use the sup-
plied mounting sleeve. If there is enough space,
use the mounting sleeve that came with the ve-
hicle.
2 Secure the mounting sleeve by using a
screwdriver to bend the metal tabs (90°) into
place.
1
2
1 Dashboard
10
En
Section
Installation
Additional information
03
2 Mounting sleeve
! When reattaching the trim ring, point the
Troubleshooting
Error messages
# Make sure that the unit is installed securely in
side with the notched tab down.
English
place. An unstable installation may cause skipping
When you contact your dealer or your nearest
or other malfunctions.
2 Insert the supplied extraction keys into
Symptom Cause Action
Pioneer Service Center, be sure to note the error
both sides of the unit until they click into
message.
The display
You did not per-
Perform operation
place.
DIN Rear-mount
automatically
form any opera-
again.
Common
returns to the
tion within
1 Determine the appropriate position
3 Pull the unit out of the dashboard.
ordinary dis-
about 30 sec-
where the holes on the bracket and the side
Message Cause Action
play.
onds.
of the unit match.
AMP ERROR Unit fails to op-
Check the speak-
The repeat
Depending on
Select the repeat
erate or speaker
er connection. If
play range
the repeat play
play range again.
connection is
the message fails
changes un-
range, the se-
incorrect; pro-
to disappear even
expectedly.
lected range
tective circuit is
after the engine is
may change
activated.
switched off/on,
when another
contact your deal-
2 Tighten two screws on each side.
Removing and re-attaching the front
folder or track is
er or an author-
panel
being selected
ized Pioneer
or during fast
You can remove the front panel to protect your
Service Station
3
1
forwarding/re-
unit from theft.
for assistance.
versing.
Press the detach button and push the front
panel upward and pull it toward you.
A subfolder is
Subfolders can-
Select another re-
2
For details, refer to Removing the front panel to
not played
not be played
peat play range.
CD player
protect your unit from theft and Re-attaching the
back.
when FLD (fold-
Message Cause Action
1 Tapping screw (5 mm × 8 mm)
front panel on page 4.
er repeat) is se-
2 Mounting bracket
lected.
ERROR-07,
The disc is dirty. Clean the disc.
3 Dashboard or console
NO XXXX ap-
There is no em-
Switch the display
11, 12, 17, 30
The disc is
Replace the disc.
pears when a
bedded text in-
or play another
scratched.
Removing the unit
display is
formation.
track/file.
ERROR-07,
There is an elec-
Turn the ignition
changed (NO
1 Remove the trim ring.
10, 11, 12,
trical or me-
switch OFF and
TITLE, for ex-
15, 17, 30,
chanical error.
back ON, or
ample).
A0
switch to a differ-
The unit is
You are using a
Move electrical
ent source, then
malfunction-
device, such as
devices that may
back to the CD
ing.
a cellular
be causing the in-
player.
There is inter-
phone, that
terference away
ERROR-15 The inserted
Replace the disc.
ference.
transmits elec-
from the unit.
disc is blank.
tric waves near
1 Trim ring
the unit.
ERROR-23 Unsupported
Replace the disc.
2 Notched tab
CD format.
! Releasing the front panel allows easier ac-
cess to the trim ring.
En
11
Appendix
Additional information
Additional information
Message Cause Action
Message Cause Action
Message Cause Action
Use only conventional, fully circular discs. Do not
use shaped discs.
FORMAT
Sometimes
Wait until the
SKIPPED The connected
Play an audio file
ERROR-19 Communication
Perform one of
READ
there is a delay
message disap-
USB storage de-
not embedded
failed.
the following op-
between the
pears and you
vice contains
with Windows
erations.
start of playback
hear sound.
files embedded
Media DRM 9/10.
–Turn the ignition
and when you
with Windows
switch OFF and
Do not insert anything other than a CD into the
start to hear any
Mediaä DRM 9/
back ON.
CD loading slot.
sound.
10.
–Disconnect the
USB storage de-
Do not use cracked, chipped, warped, or other-
NO AUDIO The inserted
Replace the disc.
PROTECT All the files in
Transfer audio
vice.
wise damaged discs as they may damage the play-
disc does not
the USB storage
files not em-
–Change to a dif-
er.
contain any
device are em-
bedded with
ferent source.
playable files.
bedded with
Windows Media
Unfinalized CD-R/RW discs cannot be played
Then, return to
Windows Media
DRM 9/10 to the
back.
SKIPPED The inserted
Replace the disc.
the USB source.
DRM 9/10.
USB storage de-
disc contains
Do not touch the recorded surface of the discs.
vice and connect.
ERROR-23 USB storage de-
USB storage de-
DRM protected
vice was not for-
vice should be for-
Store discs in their cases when not in use.
files.
N/A USB The USB device
! Connect a USB
matted with
matted with
connected to is
Mass Storage
PROTECT All the files on
Replace the disc.
Do not attach labels, write on or apply chemicals
FAT12, FAT16 or
FAT12, FAT16 or
not supported
Class compliant
the inserted
to the surface of the discs.
FAT32.
FAT32.
by this unit.
device.
disc are em-
To clean a CD, wipe the disc with a soft cloth out-
! Disconnect
STOP There are no
Select a list that
bedded with
ward from the center.
your device and
songs in the
contains songs.
DRM.
replace it with a
current list.
Condensation may temporarily impair the player’s
compatible USB
performance. Let it rest for about one hour to ad-
USB storage device
storage device.
just to a warmer temperature. Also, wipe any
CHECK USB The USB con-
Check that the
Handling guidelines
damp discs off with a soft cloth.
Message Cause Action
nector or USB
USB connector or
Discs and player
Playback of discs may not be possible because of
FORMAT
Sometimes
Wait until the
cable has short-
USB cable is not
disc characteristics, disc format, recorded applica-
READ
there is a delay
message disap-
circuited.
caught in some-
Use only discs that feature either of the following
tion, playback environment, storage conditions,
between the
pears and you
thing or dam-
two logos.
and so on.
start of playback
hear sound.
aged.
and when you
Road shocks may interrupt disc playback.
The connected
Disconnect the
start to hear any
USB storage de-
USB storage de-
Read the precautions for discs before using them.
sound.
vice consumes
vice and do not
NO AUDIO There are no
Transfer the audio
more than maxi-
use it. Turn the
songs.
files to the USB
mum allowable
ignition switch to
storage device
current.
OFF, then to ACC
and connect.
or ON and then
The connected
Follow the USB
connect only
Use 12-cm discs. Do not use 8-cm discs or an
adapter for 8-cm discs.
USB storage de-
storage device in-
compliant USB
vice has secur-
structions to dis-
storage devices.
ity enabled.
able the security.
12
En

Appendix
Additional information
Additional information
Frequent loading and ejecting of a DualDisc may
WAV
When using discs that can be printed on label sur-
Packet write data transfer: Not compatible
result in scratches on the disc. Serious scratches
English
faces, check the instructions and the warnings of
can lead to playback problems on this unit. In
File extension: .wav
Regardless of the length of blank sections be-
the discs. Depending on the discs, inserting and
some cases, a DualDisc may become stuck in the
tween the songs from the original recording, com-
ejecting may not be possible. Using such discs
Quantization bits: 8 and 16 (LPCM), 4 (MS
disc loading slot and will not eject. To prevent this,
pressed audio discs play with a short pause
may result in damage to this equipment.
ADPCM)
we recommend you refrain from using DualDisc
between songs.
Do not attach commercially available labels or
with this unit.
Sampling frequency: 16 kHz to 48 kHz (LPCM),
other materials to the discs.
Please refer to the information from the disc man-
22.05 kHz and 44.1 kHz (MS ADPCM)
! The discs may warp making the disc unplay-
USB storage device
ufacturer for more detailed information about
able.
DualDiscs.
! The labels may come off during playback and
Supplemental information
Playable folder hierarchy: up to eight tiers (A prac-
prevent ejection of the discs, which may result
tical hierarchy is less than two tiers.)
in damage to the equipment.
Only the first 32 characters can be displayed as a
Compressed audio
Playable folders: up to 500
file name (including the file extension) or a folder
compatibility (disc, USB)
name.
Playable files: up to 15 000
USB storage device
WMA
Russian text to be displayed on this unit should be
Playback of copyright-protected files: Not compati-
encoded in one of the following character sets:
ble
Address any questions you have about your USB
storage device to the manufacturer of the device.
File extension: .wma
! Unicode (UTF-8, UTF-16)
Partitioned USB storage device: Only the first par-
! A character set other than Unicode that is
tition can be played.
Connections via USB hub are not supported.
Bit rate: 48 kbps to 320 kbps (CBR), 48 kbps to
used in a Windows environment and is set to
384 kbps (VBR)
Russian in the multi-language setting
There may be a slight delay when starting play-
Do not connect anything other than a USB stor-
back of audio files on a USB storage device with
age device.
Sampling frequency: 32 kHz, 44.1 kHz, 48 kHz
This unit may not operate correctly depending on
numerous folder hierarchies.
Windows Media Audio Professional, Lossless,
the application used to encode WMA files.
Firmly secure the USB storage device when driv-
ing. Do not let the USB storage device fall onto the
Voice/DRM Stream/Stream with video: Not com-
There may be a slight delay at the start of playback
floor, where it may become jammed under the
patible
of audio files embedded with image data or audio
CAUTION
brake or accelerator pedal.
files stored on a USB storage device that has nu-
! Pioneer cannot guarantee compatibility with
merous folder hierarchies.
Depending on the USB storage device, the follow-
MP3
all USB mass storage devices and assumes
ing problems may occur.
no responsibility for any loss of data on
! Operations may vary.
File extension: .mp3
media players, smart phones, or other devi-
Disc
! The storage device may not be recognized.
ces while using this product.
Bit rate: 8 kbps to 320 kbps (CBR), VBR
! Files may not be played back properly.
! Do not leave discs or a USB storage device
Playable folder hierarchy: up to eight tiers (A prac-
! The device may generate noise in the radio.
Sampling frequency: 8 kHz to 48 kHz (32 kHz,
in any place that is subject to high tempera-
tical hierarchy is less than two tiers.)
44.1 kHz, 48 kHz for emphasis)
tures.
Playable folders: up to 99
DualDiscs
Compatible ID3 tag version: 1.0, 1.1, 2.2, 2.3, 2.4
(ID3 tag Version 2.x is given priority over Version
Playable files: up to 999
Sequence of audio files
DualDiscs are two-sided discs that have a record-
1.x.)
File system: ISO 9660 Level 1 and 2, Romeo, Joliet
The user cannot assign folder numbers and
able CD for audio on one side and a recordable
M3u playlist: Not compatible
specify playback sequences with this unit.
DVD for video on the other.
Multi-session playback: Compatible
Since the CD side of DualDiscs is not physically
MP3i (MP3 interactive), mp3 PRO: Not compatible
compatible with the general CD standard, it may
not be possible to play the CD side with this unit.
En
13
Appendix
Additional information
Additional information
Example of a hierarchy
Number of channels …….. 2 (stereo)
D: C D: C D: C D: C D: C
Specifications
MP3 decoding format …… MPEG-1 & 2 Audio Layer 3
01
WMA decoding format ….. Ver. 7, 7.1, 8, 9, 10, 11, 12 (2ch
02
: Р : С : Т : У : Ф
General
audio)
Power so urce ………………. 14.4 V DC (10.8 V to 15.1 V al-
(Windows Media Player)
: Ш,
lowable)
: Х : Ц : Ч
: Ъ
: Folder
Щ
WAV signal format ……….. Linear PCM & MS ADPCM
Grounding system ………… Negative type
03
: Compressed
(Non-compressed)
Maximum current consumption
: Ы : Ь : Э : Ю : Я
04
…………………………….. 10.0 A
audio file
01 to 05: Folder
Dimensions (W × H × D):
D: Display C: Character
USB
DIN
number
USB standard specification
Chassis ………….. 178mm × 50mm ×
05
1 to 6: Playback
…………………………….. USB 2.0 full speed
165 mm
Level 1 Level 2 Level 3 Level 4
sequence
Maximum current supply
Nose ……………… 188 mm × 58mm ×
Copyright and trademark
…………………………….. 1 A
16 mm
USB Class ………………….. MSC (Mass Storage Class)
D
Disc
iTunes
File system ………………….. FAT12, FAT16, FAT32
Chassis ………….. 178mm × 50mm ×
Folder selection sequence or other operation
Apple and iTunes are trademarks of Apple Inc.,
MP3 decoding format …… MPEG-1 & 2 Audio Layer 3
165 mm
may differ depending on the encoding or writing
registered in the U.S. and other countries.
WMA decoding format ….. Ver. 7, 7.1, 8, 9, 10, 11, 12 (2ch
Nose ……………… 170 mm × 46mm ×
audio)
software.
16 mm
(Windows Media Player)
MP3
Weight ……………………….. 1kg
WAV signal format ……….. Linear PCM & MS ADPCM
USB storage device
Supply of this product only conveys a license for
(Non-compressed)
Playback sequence is the same as recorded se-
private, non-commercial use and does not con-
Audio
quence in the USB storage device.
vey a license nor imply any right to use this prod-
Maximum power output ... 50 W × 4
FM tuner
To specify the playback sequence, the following
uct in any commercial (i.e. revenue-generating)
70 W × 1/2 W (for subwoofer)
Frequency range ………….. 87.5 MHz to 108.0 MHz
method is recommended.
real time broadcasting (terrestrial, satellite,
Continuous power output
Usable sensitivity …………. 9 dBf (0.8 µV/75 W, mono, S/N:
1 Create a file name that includes numbers
…………………………….. 22W × 4 (50 Hz to 15000Hz,
cable and/or any other media), broadcasting/
30 dB)
5 % THD, 4 W load, both chan-
that specify the playback sequence (e.g.,
streaming via internet, intranets and/or other
Signal-to-noise ratio ……… 72dB (IEC-A network)
nels driven)
001xxx.mp3 and 099yyy.mp3).
networks or in other electronic content distribu-
Load impedance ………….. 4W (4 W to 8 W allowable)
2 Put those files into a folder.
tion systems, such as pay-audio or audio-on-de-
Preout maximum output level
MW tuner
3 Save the folder containing files on the USB
mand applications. An independent license for
…………………………….. 2.0V
Frequency range ………….. 531 kHz to 1 602kHz
storage device.
such use is required. For details, please visit
Loudness contour ………… +10dB (100 Hz), +6.5 dB
Usable sensitivity …………. 25µV (S/N: 20 dB)
However, depending on the system environment,
http://www.mp3licensing.com.
(10 kHz) (volume: –30 dB)
Signal-to-noise ratio ……… 62dB (IEC-A network)
Equalizer (5-Band Graphic Equalizer):
you may not be able to specify the playback se-
Frequency …………….. 80Hz/250 Hz/800 Hz/
quence.
WMA
2.5 kHz/8 kHz
LW tuner
For USB portable audio players, the sequence is
Windows Media is either a registered trademark
Equalization range …. ±12 dB (2 dB step)
Frequency range ………….. 153 kHz to 281 kHz
different and depends on the player.
or trademark of Microsoft Corporation in the
Subwoofer (mono):
Usable sensitivity …………. 28µV (S/N: 20 dB)
United States and/or other countries.
Frequency …………….. 50Hz/63 Hz/80 Hz/100 Hz/
Signal-to-noise ratio ……… 62dB (IEC-A network)
125 Hz/160 Hz/200 Hz
This product includes technology owned by
Russian character chart
Slope …………………… –6 dB/oct, –12 dB/oct
Note
Microsoft Corporation and cannot be used or
Gain ……………………. +6dB to –24 dB
Specifications and the design are subject to
distributed without a license from Microsoft
Phase ………………….. Normal/Reverse
D: C D: C D: C D: C D: C
modifications without notice.
Licensing, Inc.
: А : Б : В : Г : Д
CD player
: Е, Ё : Ж : З : И, Й : К
System ………………………. Compact disc audio system
Usable discs ……………….. Compact disc
: Л : М : Н : О : П
Signal-to-noise ratio ……… 94dB (1kHz) (IEC-A network)
14
En

English
15En

Section
01
Avant de commencer
Avant de commencer
Nous vous remercions d’avoir acheté cet ap-
Quelques mots sur cet appareil
Quelques mots sur ce mode
pareil PIONEER.
Les fréquences du syntoniseur de cet appareil
d’emploi
Pour garantir une utilisation correcte, lisez bien
sont attribuées pour une utilisation en Europe
ce mode d’emploi avant d’utiliser cet appareil. Il
Dans les instructions suivantes, les mémoires
de l’Ouest, Asie, Moyen Orient, Afrique et Océ-
est particulièrement important que vous lisiez et
USB et les lecteurs audio USB sont collective-
anie. Son utilisation dans d’autres régions peut
respectiez les indications ATTENTION et PRÉ-
ment appelés “périphériques de stockage USB”.
se traduire par une réception de mauvaise qua-
CAUTION de ce mode d’emploi. Conservez-le
lité. La fonction RDS (radio data system) n’est
dans un endroit sûr et facilement accessible pour
opérationnelle que dans les régions où des si-
toute consultation ultérieure.
En cas d’anomalie
gnaux RDS sont diffusés pour les stations FM.
En cas d’anomalie, veuillez contacter votre re-
vendeur ou le centre d’entretien agréé par
PIONEER le plus proche.
PRÉCAUTION
Cet appareil est un produit laser de Classe 1,
classé selon l’article IEC 60825-1:2007 relatif à
la Sécurité des produits laser.
Si vous souhaitez vous débarrasser de cet ap-
pareil, ne le mettez pas à la poubelle avec vos
APPAREIL À LASER DE CLASSE 1
ordures ménagères. Il existe un système de
collecte séparé pour les appareils électroni-
ques usagés, qui doivent être récupérés, trai-
tés et recyclés conformément à la législation.
PRÉCAUTION
! Ne laissez pas cet appareil entrer en contact
avec des liquides. Cela pourrait provoquer
Dans les états membres de l’UE, en Suisse et en
Norvège, les foyers domestiques peuvent rap-
une électrocution. Tout contact avec des li-
porter leurs produits électroniques usagés gra-
quides pourrait également provoquer des
dommages, de la fumée et une surchauffe
tuitement à des points de collecte spécifiés ou à
un revendeur (sous réserve d’achat d’un produit
de l’appareil.
similaire).
! Le Pioneer CarStereo-Pass est utilisable seu-
lement en Allemagne.
Dans les pays qui ne sont pas mentionnés ci-
dessus, veuillez contacter les autorités locales
! Maintenez le niveau d’écoute à une valeur
pour vous informer de la méthode correcte de
telle que vous puissiez entendre les sons pro-
mise au rebut.
venant de l’extérieur.
En agissant ainsi vous assurerez que le produit
! Évitez tout contact avec l’humidité.
que vous mettez au rebut est soumis au proces-
! Si la batterie est débranchée ou déchargée,
sus de traitement, de récupération et de recy-
le contenu de la mémoire sera effacé.
clage nécessaire et éviterez ainsi les effets
Remarque
négatifs potentiels sur l’environnement et la
Les opérations de réglage des fonctions sont va-
santé publique.
lidées même si le menu est annulé avant la
confirmation des opérations.
16
Fr
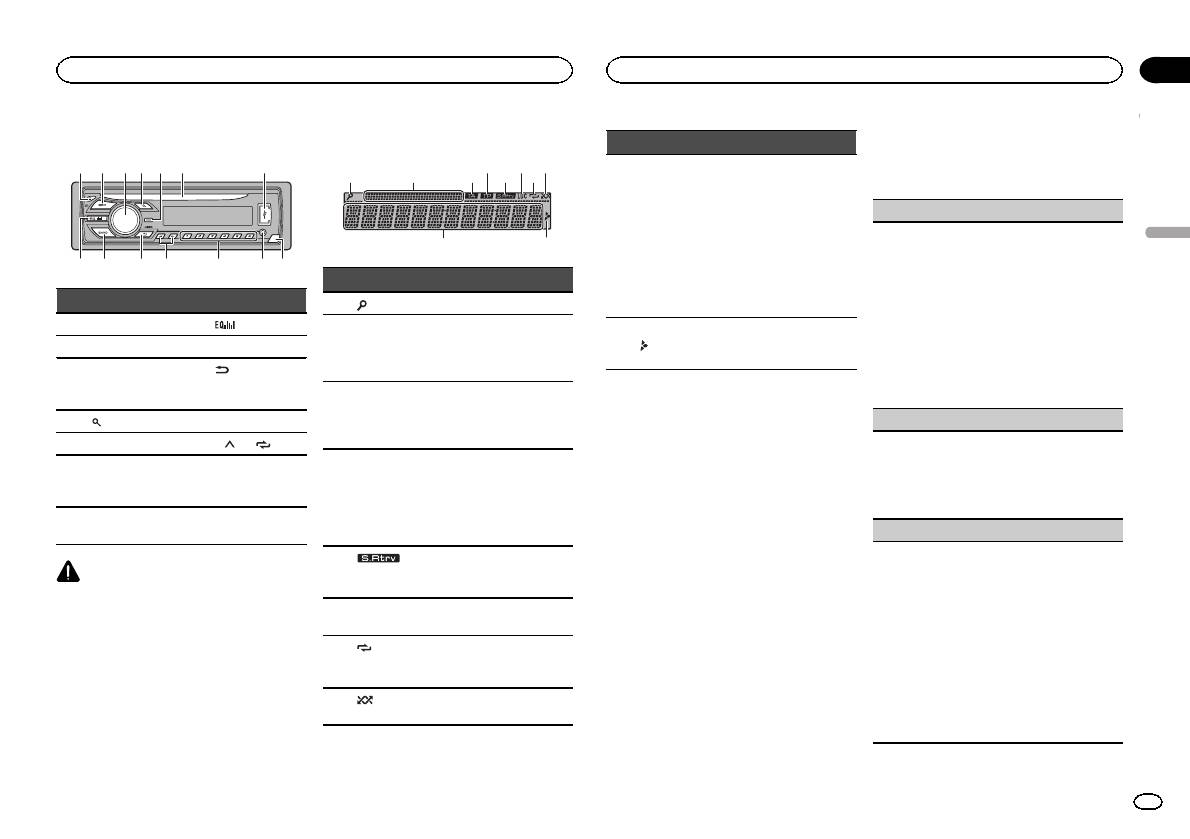
Appareil central
c d
5
9
1 2 3 4 6 7
bae8
Section
Utilisation de l’appareil
Utilisation de l’appareil
02
4 Effectuez les procédures suivantes pour
Indications affichées
Indicateur État
configurer le menu.
4 6 8
Pour passer à la prochaine option de menu,
! Syntoniseur : gamme et
21 3 75
vous devez confirmer votre sélection.
fréquence
! RDS : nom du ser vice de
Section
LANGUAGE (multilingue)
programme, informations
d’informa-
PTY et autres informations
9
Cet appareil peut afficher les informations textuel-
Français
9
a
tions princi-
textuelles
les d’un fichier audio compressé même si elles
pales
! Lecteur de CD et périphé-
sont incorporées en anglais ou en russe.
Indicateur État
rique de stockage USB :
! Si la langue incorporée et la langue sélection-
temps de lecture écoulé et
née sont différentes, les informations textuel-
Partie Partie
1
(liste) La fonction liste est utilisée.
informations textuelles
les peuvent ne pas s’afficher correctement.
1 h (éjection) 8
(égaliseur)
Section
! Certains caractères peuvent ne pas s’afficher
Apparaît lorsqu’un niveau in-
d’informa-
Les informations secondaires
correctement.
2 SRC/OFF 9 BAND
a
férieur de dossier ou de menu
2
tions secon-
sont affichées.
1 Tournez M.C. pour sélectionner le réglage sou-
existe.
(retour)/DIM-
daires
haité.
MULTI-CONTROL
3
a
MER (atténuateur
ENG (Anglais)—РУС (Russe)
(M.C.)
TA (bulle-
de luminosité)
2 Appuyez sur M.C. pour confirmer la sélection.
tins d’infor-
Menu de configuration
3
La fonction TA est en service.
4
(liste) b c/d
mations
CLOCK SET (réglage de l’horloge)
Lorsque vous mettez le contact d’allumage sur
routières)
5 DISP c 1/
à 6/
ON après l’installation, le menu de configura-
1 Tournez M.C. pour régler l’heure.
TP (identifi-
tion s’affiche sur l’écran.
Jack d’entrée
2 Appuyez sur M.C. pour sélectionner les minu-
Fente de charge-
cation des
Vous pouvez configurer les options de menu ci-
6
d
AUX (jack stéréo
tes.
ment des disques
program-
L’appareil est accordé sur une
dessous.
3,5 mm)
3 Tournez M.C. pour régler les minutes.
4
mes d’infor-
station TP.
4 Appuyez sur M.C. pour confirmer la sélection.
Touche de retrait
mations
1 Après avoir installé l’appareil, mettez le
7 Port USB e
de la face avant
FM STEP (incrément d’accord FM)
routières)
contact d’allumage sur ON.
SET UP s’affiche.
Normalement, l’incrément d’accord FM employé
La fonction Sound Retriever
par l’accord automatique est 50 kHz. Quand la
PRÉCAUTION
5
(sound re-
est activée.
2 Tournez M.C. pour passer à YES.
fonction AF ou TA est en service, l’incrément d’ac-
triever)
! Utilisez un câble USB Pioneer optionnel (CD-
# Si vous n’effectuez aucune opération dans les
cord passe automatiquement à 100 kHz. Il peut
U50E) pour connecter le périphérique de
L’accord automatique sur une
30 secondes environ, le menu de configuration ne
être préférable de régler l’incrément d’accord à
6 LOC
stockage USB, faute de quoi ce dernier,
station locale est en service.
s’affichera pas.
50 kHz quand la fonction AF est en service.
comme n’importe quel périphérique relié di-
# Si vous préférez ne pas effectuer la configuration
! Pendant l’accord manuel, l’incrément d’ac-
(répéti-
La fonction de répétition
rectement à l’appareil, dépasserait de l’appa-
pour l’instant, tournez M.C. pour passer à NO. Ap-
cord est maintenu à 50 kHz.
7
tion de la
d’une plage ou d’un dossier
reil et pourrait s’avérer dangereux.
puyez pour sélectionner.
1 Tournez M.C. pour choisir l’incrément d’accord
lecture)
est activée.
! N’utilisez pas de produits non autorisés.
Si vous sélectionnez NO, vous ne pouvez pas effec-
FM.
(lecture
La lecture aléatoire est acti-
tuer de réglage dans le menu de configuration.
50 (50 kHz)—100 (100 kHz)
8
aléatoire)
vée.
2 Appuyez sur M.C. pour confirmer la sélection.
3 Appuyez sur M.C. pour sélectionner.
QUIT s’affiche.
Fr
17
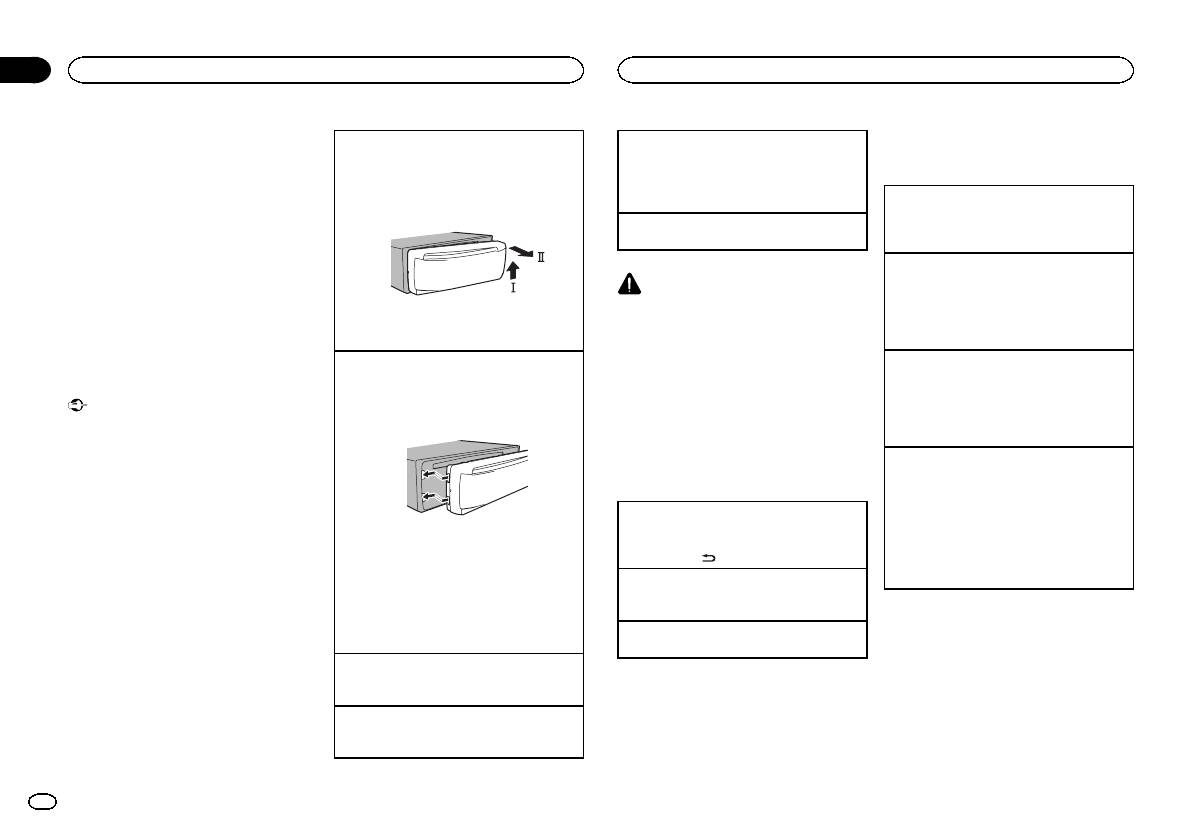
Section
02
Utilisation de l’appareil
Utilisation de l’appareil
5 Pour terminer la configuration, tournez
Retrait de la face avant pour protéger l’appareil
Choix d’une source
Syntoniseur
M.C. pour sélectionner YES.
contre le vol
1 Appuyez sur SRC/OFF pour parcourir les op-
# Si vous souhaitez modifier à nouveau le réglage,
Opérations de base
1 Appuyez sur la touche de retrait pour libérer la
tions disponibles :
tournez M.C. pour passer à NO. Appuyez pour sélec-
face avant.
TUNER (syntoniseur)—CD (lecteur de CD)—
tionner.
Sélection d’une gamme
2 Poussez la face avant vers le haut (M), puis
USB (USB)—AUX (AUX)
1 Appuyez sur BAND jusqu’à ce que la gamme
tirez-la vers vous (N).
6 Appuyez sur M.C. pour sélectionner.
Réglage du volume
souhaitée, FM1, FM2, FM3 en FM ou MW/LW
1 Tournez M.C. pour régler le volume.
(PO/GO), soit affichée.
Remarques
! Vous pouvez configurer les options de menu
Changement de fréquence en mémoire
à partir du menu système. Pour des détails
1 Appuyez sur c ou d.
PRÉCAUTION
sur les réglages, reportez-vous à la page 22,
! Sélectionnez PCH (canal présélectionné) sous
Pour des raisons de sécurité, garez votre véhi-
Menu système.
SEEK pour utiliser cette fonction. Pour des dé-
cule pour retirer la face avant.
! Vous pouvez annuler le menu de configura-
3 Conservez toujours la face avant dans un boî-
tails sur les réglages, reportez-vous à la page
tion en appuyant sur SRC/OFF.
tier de protection lorsqu’elle est détachée.
Remarque
20, SEEK (réglage de la touche droite/gauche).
Remontage de la face avant
Si le fil bleu/blanc de l’appareil est relié à la
Accord manuel (pas à pas)
1 Faites glisser la face avant vers la gauche.
prise de commande du relais de l’antenne moto-
1 Appuyez sur c ou d.
Opérations de base
Assurez-vous d’insérer les encoches sur le
risée du véhicule, celle-ci se déploie lorsque la
! Sélectionnez MAN (accord manuel) sous
Important
côté gauche de l’appareil central dans les fen-
source est mise en service. Pour rétracter l’an-
SEEK pour utiliser cette fonction. Pour des dé-
! Lorsque vous enlevez ou remontez la face
tes du panneau de commande.
tenne, mettez la source hors service.
tails sur les réglages, reportez-vous à la page
avant, manipulez-la doucement.
20, SEEK (réglage de la touche droite/gauche).
! Évitez de heurter la face avant.
Opérations de menu
Recherche
! Conservez la face avant à l’abri des tempéra-
1 Appuyez de manière prolongée sur c ou d,
tures élevées et de la lumière directe du so-
fréquemment utilisées
puis relâchez.
leil.
Vous pouvez annuler l’accord automatique en
! Pour éviter d’endommager le périphérique
Retour à l’affichage précédent
appuyant brièvement sur c ou d.
ou l’intérieur du véhicule, retirez tous les câ-
Retour à la liste précédente (le dossier de niveau
Lorsque vous appuyez de manière prolongée
bles et périphériques connectés à la face
2 Appuyez sur le côté droit de la face avant jus-
immédiatement supérieur)
sur c ou d, vous pouvez sauter des stations.
avant, avant d’enlever cette dernière.
qu’àcequ’elle soit bien en place.
1 Appuyez sur
/DIMMER.
L’accord automatique démarre dès que vous
Si vous ne pouvez pas monter la face avant
relâchez c ou d.
sur l’appareil central, vérifiez que la face avant
Retour à l’affichage ordinaire
est correctement placée sur l’appareil central.
Annulation du menu principal
Remarque
Forcer la face avant en position risque de l’en-
1 Appuyez sur BAND.
La fonction AF (recherche des autres fréquences
dommager ou d’endommager l’appareil cen-
Retour à l’affichage ordinaire à partir de la liste
possibles) de cet appareil peut être mise en ser-
tral.
1 Appuyez sur BAND.
vice ou hors service. La fonction AF doit être
Mise en service de l’appareil
hors service pendant une opération d’accord
1 Appuyez sur SRC/OFF pour mettre en service
normal (reportez-vous à la page suivante, AF (re-
l’appareil.
cherche des autres fréquences possibles)).
Mise hors service de l’appareil
1 Maintenez la pression sur SRC/OFF jusqu’àce
que l’appareil soit mis hors tension.
18
Fr

Section
Utilisation de l’appareil
Utilisation de l’appareil
02
Enregistrement et rappel des
Recherche d’une station RDS en utilisant le code
L. CLASS (Musique classique légère), CLASSIC
Quand la fonction AF est utilisée, la fonction de re-
stations pour chaque gamme
PTY
(Musique classique)
cherche des stations régionales limite la sélection
Vous pouvez rechercher une station qui diffuse un
aux stations qui diffusent des programmes régio-
Utilisation des touches de présélection
OTHERS (autres)
type général de programme mentionné dans la
naux.
1 Lorsque se présente une station que vous
liste de la section suivante. Reportez-vous à cette
EDUCATE (Éducation), DRAMA (Drame),
1 Appuyez sur M.C. pour mettre la fonction de
souhaitez mettre en mémoire, appuyez de
page.
CULTURE (Culture), SCIENCE (Science), VARIED
recherche des stations régionales en service
manière prolongée sur l’une des touches de
1 Appuyez sur
(liste).
(Programmes variés), CHILDREN (Émissions desti-
ou hors service.
Français
présélection (1/
à6/ ) jusqu’à ce que le
2 Tournez M.C. pour sélectionner le type de pro-
nées aux enfants), SOCIAL (Sujets de société), RE-
LOCAL (accord automatique sur une station lo-
numéro de la présélection cesse de clignoter.
gramme.
LIGION (Religion), PHONE IN (Programmes à
cale)
NEWS/INFO—POPULAR—CLASSICS—
ligne ouverte), TOURING (Voyages), LEISURE (Loi-
2 Appuyez sur l’une des touches de présé-
OTHERS
sirs), DOCUMENT (Documentaires)
L’accord automatique sur une station locale ne
lection (1/
à6/ ) pour sélectionner la sta-
3 Appuyez sur M.C. pour lancer la recherche.
s’intéresse qu’aux stations de radio dont le signal
tion souhaitée.
Cet appareil recherche une station qui diffuse
reçu est suffisamment puissant pour garantir une
Réglages des fonctions
ce type de programme. Quand une station est
réception de bonne qualité.
Changement de l’affichage
trouvée, son nom de service de programme
1 Appuyez sur M.C. pour sélectionner le réglage
1 Appuyez sur M.C. pour afficher le menu
est affiché.
souhaité.
principal.
! Appuyez à nouveau sur M.C. pour aban-
FM : OFF—LV1—LV2—LV3—LV4
Sélection des informations textuelles souhaitées
donner la recherche.
MW/LW (PO/GO) : OFF—LV1—LV2
1 Appuyez sur DISP pour parcourir les options
2 Tournez M.C. pour changer l’option de
! Le type de l’émission captée peut différer
La valeur la plus élevée permet la réception
disponibles :
menu et appuyez pour sélectionner
de celui indiqué par le code PTY transmis.
! FREQUENCY (nom du service de pro-
FUNCTION.
des seules stations très puissantes ; les autres
! Si aucune station ne diffuse d’émission du
valeurs autorisent la réception de stations
gramme ou fréquence)
type choisi, l’indication NOT FOUND s’affi-
moins puissantes.
! BRDCST INFO (nom du service de pro-
3 Tournez M.C. pour sélectionner la fonc-
che pendant environ deux secondes puis
gramme/informations PTY)
tion.
TA (attente de bulletins d’informations routières)
le syntoniseur s’accorde sur la fréquence
! CLOCK (nom de la source et horloge)
Une fois sélectionnées, les fonctions suivantes
d’origine.
peuvent être ajustées.
1 Appuyez sur M.C. pour mettre en service ou
Remarques
# Si la gamme MW/LW (PO/GO) est sélectionnée,
hors service l’attente d’ un bulletin d’informa-
! Si le nom du service de programme ne peut
seuls BSM, LOCAL et SEEK sont disponibles.
tions routières.
pas être acquis dans FREQUENCY, la fré-
Liste des codes PTY
AF (recherche des autres fréquences possibles)
quence d’émission s’affiche alors. Si le nom
BSM (mémoire des meilleures stations)
du service de programme est détecté, celui-
NEWS/INFO (actualités et informations)
La fonction BSM (mémoire des meilleures sta-
1 Appuyez sur M.C. pour mettre la fonction AF
ci s ’affiche.
NEWS (Bulletin d’informations), AFFAIRS (Actuali-
tions) mémorise automatiquement les six stations
en service ou hors service.
! Les informations textuelles BRDCST INFO
tés), INFO (Informations), SPORT (Sports), WEA-
les plus fortes dans l’ordre de la force du signal.
changent automatiquement.
THER (Météo), FINANCE (Finance)
NEWS (interruption pour réception d’un bulletin
1 Appuyez sur M.C. pour mettre la fonction BSM
! En fonction de la gamme sélectionnée, les
d’informations)
informations textuelles peuvent être différen-
POPULAR (populaire)
en service.
Pour annuler, appuyez à nouveau sur M.C.
tes.
1 Appuyez sur M.C. pour mettre la fonction
POP MUS (Musique populaire), ROCK MUS
! Les informations textuelles pouvant être mo-
REGION (stations régionales)
NEWS (bulletin d’informations) en service ou
(Rock), EASY MUS (Musique légère), OTH MUS
difiées dépendent de la région.
hors service.
(Autre musique), JAZZ (Jazz), COUNTRY (Coun-
try), NAT MUS (Musique nationale), OLDIES (Mu-
Utilisation des fonctions PTY
sique du bon vieux temps), FOLK MUS (Folk)
Vous pouvez rechercher une station à l’aide de
CLASSICS (classique)
son code PTY (type de programme).
Fr
19
Section
02
Utilisation de l’appareil
Utilisation de l’appareil
Changement de l’affichage
2 Utilisez M.C. pour sélectionner le nom de
SEEK (réglage de la touche droite/gauche)
Avance ou retour rapide
fichier (ou nom de dossier) souhaité.
1 Appuyez de manière prolongée sur c ou d.
Vous pouvez assigner une fonction aux touches
! Lors de la lecture d’un disque d’audio
Sélection des informations textuelles souhaitées
droite et gauche de l’appareil.
compressé, aucun son n’est émis pendant l’a-
1 Appuyez sur DISP pour parcourir les options
Sélection d’un fichier ou d’un dossier
Sélectionnez MAN (accord manuel) pour effectuer
vance ou le retour rapide.
disponibles :
1 Tournez M.C.
un accord de fréquence manuellement ou sélec-
CD-DA
Lecture
tionnez PCH (canaux présélectionnés) pour chan-
Retour au dossier racine
! ELAPSED TIME (numéro de plage et temps
1 Lorsqu’un fichier ou une plage est sélection-
ger de canal présélectionné.
1 Appuyez sur BAND de façon prolongée.
de lecture)
né(e), appuyez sur M.C.
1 Appuyez sur M.C. pour sélectionner MAN ou
Commutation entre les modes audio compressé
! CLOCK (nom de la source et horloge)
PCH.
et CD-DA
! SPEANA (analyseur de spectre)
Affichage d’une liste des fichiers (ou des dossiers)
1 Appuyez sur BAND.
CD-TEXT
dans le dossier sélectionné
! TRACK INFO (titre de la plage/interprète
1 Quand un dossier est sélectionné, appuyez sur
Changement de périphérique de mémoire de lec-
CD/CD-R/CD-RW et
de la plage/titre du disque)
M.C.
ture
! ELAPSED TIME (numéro de plage et temps
périphériques de stockage USB
Lecture d’une plage musicale dans le dossier sé-
Vous pouvez basculer entre les périphériques de
de lecture)
lectionné
mémoire sur les périphériques de stockage USB
Opérations de base
! CLOCK (nom de la source et horloge)
1 Quand un dossier est sélectionné, appuyez de
ayant plus d’un périphérique de mémoire compa-
! SPEANA (analyseur de spectre)
manière prolongée sur M.C.
tible avec la norme Mass Storage Class pour ef-
MP3/WMA/WAV
Lecture d’un CD/CD-R/CD-RW
fectuer la lecture.
! TRACK INFO (titre de la plage/nom de l’in-
1 Introduisez un disque, l’étiquette vers le haut,
1 Appuyez sur BAND.
terprète/nom de l’album)
dans le logement de chargement des disques.
! Vous pouvez basculer entre 32 différents péri-
! FILE INFO (nom du fichier/nom du dossier)
Éjection d’un CD/CD-R/CD-RW
phériques de mémoire maximum.
! ELAPSED TIME (numéro de plage et temps
1 Appuyez sur h.
de lecture)
Remarque
! CLOCK (nom de la source et horloge)
Lecture de plages musicales sur un périphérique
Débranchez les périphériques de stockage USB
! SPEANA (analyseur de spectre)
de stockage USB
de l’appareil lorsque vous ne l’utilisez pas.
1 Ouvrez le capot du port USB.
Remarques
2 Branchez le périphérique de stockage USB en
! Les informations textuelles TRACK INFO et
utilisant un câble USB.
FILE INFO changent automatiquement.
La lecture s’effectue automatiquement.
! Selon la version de iTunes utilisée pour enre-
Arrêt de la lecture de fichiers sur un périphérique
gistrer les fichiers MP3 sur un disque ou les
de stockage USB
types de fichiers média, des informations tex-
1 Vous pouvez débrancher le périphérique de
tuelles incompatibles enregistrées dans le fi-
stockage USB à tout moment.
chier audio peuvent ne pas s’afficher
L’appareil arrête la lecture.
correctement.
! Les informations textuelles pouvant être mo-
Sélection d’un dossier
difiées dépendent du média.
1 Appuyez sur 1/
ou 2/ .
Sélection d’une plage
Sélection et lecture des fichiers/
1 Appuyez sur c ou d.
plages à partir de la liste des noms
1 Appuyez sur pour passer en mode
liste des noms de fichiers/plages.
20
Fr