
Support for DEH-1600UBG | Pioneer
- Главная
- Продукция
- Автомобильные ресиверы
- Support for DEH-1600UBG
Support for DEH-1600UBG
CD-ресивер с RDS, подсвечиваемыми USB и дополнительным Aux-входом на фронтальной панели, а также воспроизведением файлов в формате WMA/MP3/WAV
- Программное обеспечение
- Назад к обзору
Программное обеспечение
Для данного продукта нет файлов, доступных для загрузки
Руководства
Перейти к контенту
![]()
Русские электронные инструкции по эксплуатации
Постоянно обновляемый большой каталог документации по эксплуатации и использованию современных устройств и оборудования на русском языке. Бесплатное скачивание файлов.
Поиск:
Главная
♥ В закладки
Просмотр инструкции в pdf


Инструкция по эксплуатации автомагнитолы Pioneer DEH-1600UBG.
Скачать инструкцию к автомагнитоле Pioneer DEH-1600UBG (3,37 МБ)

Автомагнитолы
« Инструкция к автомагнитоле Pioneer MVH-X460UI
» Инструкция к автомагнитоле Pioneer MVH-AV290BT
Вам также может быть интересно

Инструкция к автомагнитоле Pioneer DEH-2600UI

Инструкция к автомагнитоле Pioneer DEH-1500UB

Инструкция к автомагнитоле Pioneer MVH-150UI

Инструкция к автомагнитоле Pioneer DEH-1800UBG

Инструкция к автомагнитоле Pioneer DEH-S510BT

Инструкция к наушникам Pioneer SE-MJ751

Инструкция к автомагнитоле Pioneer DEH-S101UBG

Инструкция к автомагнитоле Pioneer DEH-X3800UI
Добавить комментарий
Имя *
Email *
Сайт
Комментарий


![]()


Сохранить моё имя, email и адрес сайта в этом браузере для последующих моих комментариев.
- Добавить инструкцию
- Заказать инструкцию
- Политика конфиденциальности
Перейти к контенту
Посмотреть инструкция для Pioneer DEH-1600UBG бесплатно. Руководство относится к категории автомагнитолы, 2 человек(а) дали ему среднюю оценку 6.9. Руководство доступно на следующих языках: русский, английский. У вас есть вопрос о Pioneer DEH-1600UBG или вам нужна помощь? Задайте свой вопрос здесь
Не можете найти ответ на свой вопрос в руководстве? Вы можете найти ответ на свой вопрос ниже, в разделе часто задаваемых вопросов о Pioneer DEH-1600UBG.
В чем разница между FM и AM?
Когда звук считается слишком громким?
Автомобильный радиоприемник не включается, что делать?
Как лучше всего выполнять чистку автомагнитола?
Инструкция Pioneer DEH-1600UBG доступно в русский?
Не нашли свой вопрос? Задайте свой вопрос здесь
Главная > Головные устройства > Магнитола Pioneer DEH-1600UBG
Pioneer DEH-1600 UBG руководство, отзывы и характеристики
| Модель: | Формат: | Размер: | Язык: | Скачать: |
| Магнитола Pioneer 1600UBG инструкция Руководство также подходит для:
|
3.37 MB | Английский Испанский Итальянский Немецкий Нидерландский Русский Французский |
 |
| Тип головного устройства | CD-MP3 |
| Формат акустики | 4.0 |
| Выходная мощность (Вт) | 4х50 |
| Носитель (источник) контента | CD, USB |
| Поддержка аудиоформатов | MP3, WMA, WAV |
| Поддержка видеоформатов | не поддерживает |
| FM/АМ | + / + |
| Поддиапазоны band (количество) | нет данных |
Магнитола Pioneer DEH-1600UBG отзывы
Преимущества:
- Pioneer 1600 UBG имеет качественный звук;
- отличный эквалайзер;
- удобная в эксплуатации;
- красивый современный дизайн;
- имеет много настроек звука;
- удобные кнопки;
- отлично читает диски;
- есть выход под пульт ДУ;
- соотношение цена-качество;
- громкий чистый звук;
- отличные басы.
Недостатки:
- DEH-1600 UBG имеет неудобное колесико регулировки звука.
Магнитола Пионер DEH-1600UBG отзывы составлены на базе 6 отзывов пользователей в Яндекс Маркет.
Пионер 1600 UBG руководство пользователя. Как скачать руководство по эксплуатации?
Руководство по эксплуатации к Пионер DEH-1600UBG легко скачивается, в начале страницы перед Вами будет таблица:

Нажимайте правой кнопкой на изображении PDF, после чего ищите в списке «Сохранить как», далее сохраняете на Вашем ПК автомагнитола Pioneer DEH-1600UBG инструкция на русском языке, например:
И последний шаг, выбираете папку, в которой желаете сохранить магнитола Пионер 1600UBG инструкция для пользователя, например на рабочем столе:
Надеемся, у Вас получилось найти инструкция по эксплуатации автомагнитолы Пионер, скачать и успешно ею воспользоваться. Желаем Вам приятного пользования Вашей автомагнитолой от компании Пионер.
![]()
Support for DEH-1600UBG | Pioneer
- Главная
- Продукция
- Автомобильные ресиверы
- Support for DEH-1600UBG
Support for DEH-1600UBG
CD-ресивер с RDS, подсвечиваемыми USB и дополнительным Aux-входом на фронтальной панели, а также воспроизведением файлов в формате WMA/MP3/WAV
- Программное обеспечение
- Назад к обзору
Программное обеспечение
Для данного продукта нет файлов, доступных для загрузки
Руководства
Немецкий, Английский, Испанский, Французский, Итальянский, Голландский, Русский
Датский, Финский, Шведский
Немецкий, Английский, Испанский, Французский, Итальянский, Голландский, Русский
Датский, Финский, Шведский
Перейти к контенту
![]()
Русские электронные инструкции по эксплуатации
Постоянно обновляемый большой каталог документации по эксплуатации и использованию современных устройств и оборудования на русском языке. Бесплатное скачивание файлов.
Главная
Просмотр инструкции в pdf
Инструкция по эксплуатации автомагнитолы Pioneer DEH-1600UBG.
Скачать инструкцию к автомагнитоле Pioneer DEH-1600UBG (3,37 МБ)
Автомагнитолы
« Инструкция к автомагнитоле Pioneer DVH-760AV
» Инструкция к автомагнитоле Pioneer AVH-X1500DVD
Вам также может быть интересно

Инструкция к наушникам Pioneer SE-MJ503-K

Инструкция к наушникам Pioneer HRM-5 Black
Инструкция к автомагнитоле Pioneer MVH-150UI

Инструкция к наушникам Pioneer SE-MJ503-G

Инструкция к автомагнитоле Pioneer DEH-1800UB

Инструкция к видеорегистратору Pioneer VREC-100CH

Инструкция к наушникам Pioneer HDJ-X5-S

Инструкция к автомагнитоле Pioneer MVH-G210BT
- Добавить инструкцию
- Заказать инструкцию
Инструкцию для Pioneer DEH-1600UBG на русском языке, в формате pdf можно скачать с нашего сайта. Наш каталог предоставляем Вам инструкцию производителя фирмы Pioneer, которая была взята из открытых источников. Ознакомившись с руководством по эксплуатации от Pioneer, Вы на все 100% и правильно сможете воспользоваться всеми функциями устройства.
Для сохранения инструкции «Автомобильная магнитола с DVD + монитор Pioneer DEH-1600UBG» на русском языке на вашем компьютере либо телефоне, нажмите кнопку «Скачать инструкцию». Если активна кнопка «Инструкция онлайн», то Вы можете просмотреть документ (manual), в своём браузере онлайн.
Если у Вас нет возможности скачать инструкцию по эксплуатации либо просмотреть её, Вы можете поделиться ссылкой на эту страницу в социальных сетях и при удобном моменте скачать инструкцию. Либо добавьте эту страницу в закладки Вашего браузера, нажав кнопку «Добавить страницу в закладки браузера».

Black plate (90,1)
Используйте эту функцию, если вы хотите,
чтобы воспроизводились только высокие ча-
стоты. На громкоговорители будут выводиться
только частоты выше, чем установленные
фильтром высоких частот (HPF).
1 Для отображения установочного меню на-
жмите M.C.
2 Нажимайте M.C. для выбора из следующих
функций:
Частота среза—Крутизна характеристики
3 Поворачивайте M.C. для выбора настрой-
ки.
Частота среза: OFF—50HZ—63HZ—80HZ—
100HZ
—125HZ—160HZ—200HZ
Крутизна характеристики: –12— –24
SLA (
регулировка уровня входного сигнала)
Эта функция предупреждает скачки громкости
при смене источника сигнала.
! Настройки основываются на уровне гром-
кости FM-тюнера, который остается неиз-
менным.
! Регулировку уровня громкости в диапазоне
MW/LW
также можно производить с по-
мощью данной функции.
1 Для отображения установочного меню на-
жмите M.C.
2 Поворачивая M.C., отрегулируйте уровень
громкости источника сигнала.
Диапазон настройки: от +4 до –4
Меню системы
Важно
PW SAVE (
режим энергосбережения) отклю-
чается при отсоединении аккумуляторной
батареи автомобиля; при подсоединении ба-
тареи его потребуется включить снова. При
выключенном режиме PW SAVE (режим
энергосбережения) возможно, что, в зависи-
мости от метода подключения, устройство
будет потреблять энергию аккумулятора,
если зажигание автомобиля не имеет поло-
жения АСС.
1 Нажмите M.C., чтобы открыть главное
меню.
2 Поворачивайте M.C. для прокрутки
пунктов меню; нажмите, чтобы выбрать
SYSTEM
.
3 Для выбора функции меню системы
поворачивайте M.C.
Следующие выбранные функции меню си-
стемы можно настраивать.
! MUTE MODE и PW SAVE недоступны для
DEH-1600UBA.
LANGUAGE (
выбор языка)
1 Нажмите M.C. для выбора нужной настрой-
ки.
ENG (
английский)—РУС (русский)—TUR (ту-
рецкий)
CLOCK SET (
установка часов)
1 Для отображения установочного меню на-
жмите M.C.
2 Нажимайте M.C., чтобы выбрать сегмент
дисплея часов, который нужно установить.
Часы—Минуты
3 Поворачивайте M.C., чтобы отрегулировать
время.
12H/24H (
формат отображения времени)
1 Нажмите M.C. для выбора нужной настрой-
ки.
12H (12-
часовой)—24H (24-часовой)
AUTO PI (
автоматический поиск по идентифи-
катору программы)
Устройство может автоматически искать дру-
гую станцию с такой же программой даже во
время вызова предварительной настройки.
1 Нажмите M.C., чтобы включить или выклю-
чить автоматический поиск по идентифика-
тору программы.
AUX (
вспомогательный вход)
Активируйте эту настройку при подключении к
данному устройству вспомогательного устрой-
ства.
1 Нажмите M.C., чтобы включить или выклю-
чить функцию AUX.
DIMMER (
регулятор освещенности)
1 Нажмите M.C., чтобы включить или выклю-
чить регулятор освещенности.
! Вы также можете выбрать другую настрой-
ку регулятора освещенности, удерживая
нажатой кнопку
/
DIMMER.
MUTE MODE (
режим приглушения звука)
Звук/уровень звукового сигнала данной систе-
мы автоматически понижается при получении
сигнала от оборудования с функцией приглу-
шения звука.
1 Для отображения установочного меню на-
жмите M.C.
2 Поворачивайте M.C. для выбора настрой-
ки.
! MUTE – приглушение звука
! 20dB ATT – ослабление уровня сигнала
(
20dB ATT
имеет более сильный эф-
фект, чем 10dB ATT)
! 10dB ATT – ослабление уровня сигнала
PW SAVE (
энергосбережение)
Включение этой функции позволяет снизить
потребляемую мощность аккумуляторной ба-
тареи.
! При включении этой функции единствен-
ной возможной операцией является вклю-
чение источника сигнала.
1 Нажмите M.C., чтобы включить или выклю-
чить функцию энергосбережения.
Стартовое меню
1 Нажмите и удерживайте кнопку SRC/
OFF
, пока устройство не выключится.
2 Нажмите кнопку SRC/OFF и удерживай-
те ее, пока не откроется стартовое меню.
Только для DEH-1600UBA
Нажмите M.C., чтобы открыть главное меню.
3 Поворачивайте M.C. для прокрутки
пунктов меню; нажмите, чтобы выбрать
INITIAL
.
4 Для выбора функции меню системы
поворачивайте M.C.
Следующие выбранные функции стартового
меню можно настраивать.
FM STEP (
шаг настройки в FM-диапазоне)
1 Нажмите M.C., чтобы выбрать шаг настрой-
ки в FM-диапазоне.
100 (100
кГц)—50 (50 кГц)
Использование данного устройства
90
Раздел
Использование данного устройства
Ru
02
<QRD3219-A>90

Black plate (1,1)
CD RDS RECEIVER
AUTORADIO CD RDS
SINTOLETTORE CD RDS
English NederlandsDeutschEspañolItalianoFrançais Русский
REPRODUCTOR DE CD CON RECEPTOR RDS
CD RDS-EMPFÄNGER
CD RDS-ONTVANGER
CD RDS ПРИЕМНИК
Owner’s Manual
Mode d’emploi
DEH-1600UB
Manuale d’istruzioni
Manual de instrucciones
DEH-1600UBG
Bedienungsanleitung
Handleiding
DEH-1600UBA
Руководство пользователя
DEH-1600UBB
<QRD3204-A>1
Black plate (2,1)
Section
01
Before you start
Before you start
Thank you for purchasing this PIONEER
About this unit
CAUTION
product
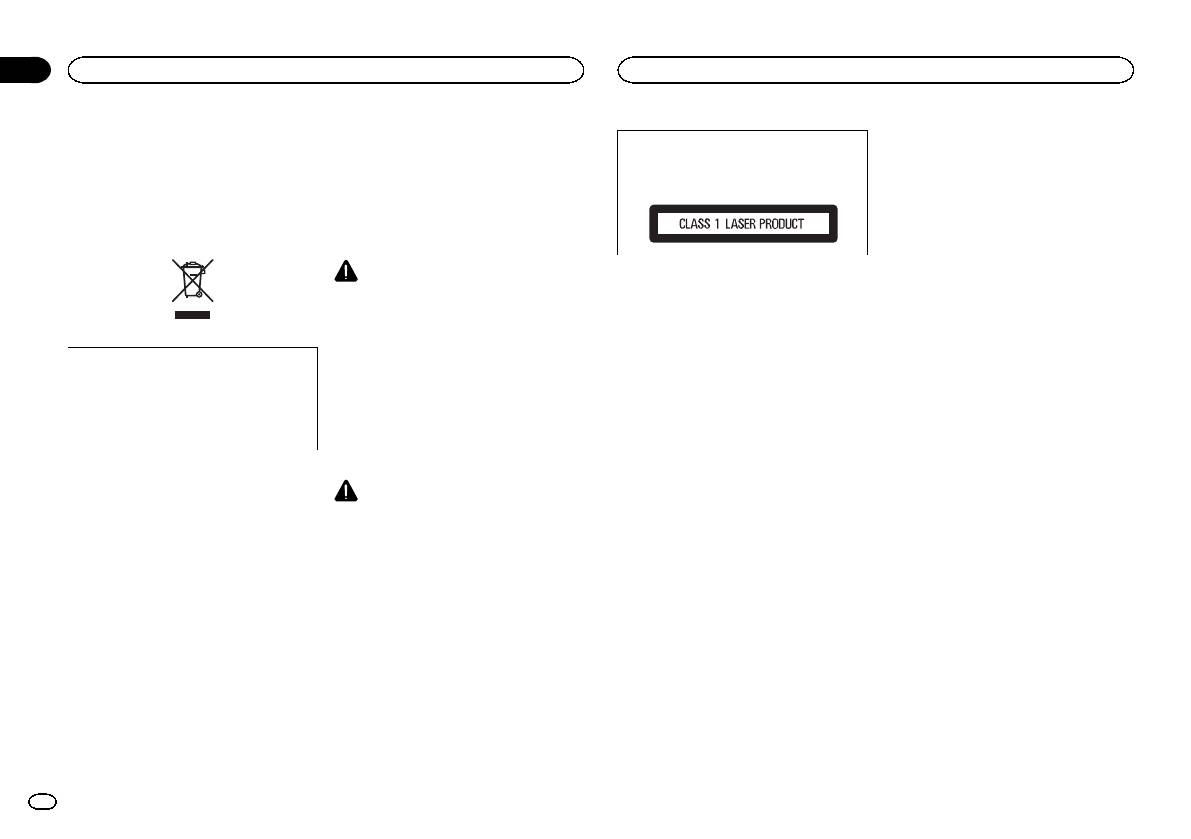
The tuner frequencies on this unit are allocated
This product is a class 1 laser product classi-
To ensure proper use, please read through this
for use in Western Europe, Asia, the Middle
fied under the Safety of laser products, IEC
manual before using this product. It is especially
East, Africa and Oceania. Use in other areas
60825-1:2007.
important that you read and observe WARN-
may result in poor reception. The RDS (radio
INGs and CAUTIONs in this manual. Please
data system) function only works in areas that
keep the manual in a safe and accessible place for
broadcast RDS signals for FM stations.
future reference.
WARNING
! Do not attempt to install or service this
If you experience problems
product by yourself. Installation or serv-
Should this unit fail to work properly, please con-
icing of this product by persons without
tact your dealer or nearest authorized PIONEER
training and experience in electronic
Service Station.
equipment and automotive accessories
If you want to dispose this product, do not
may be dangerous and could expose you
mix it with general household waste. There is
to the risk of electric shock, injury or
a separate collection system for used elec-
other hazards.
tronic products in accordance with legislation
! Do not attempt to operate the unit while driv-
that requires proper treatment, recovery and
ing. Make sure to pull off the road and park
recycling.
your vehicle in a safe location before at-
tempting to use the controls on the device.
Private households in the member states of the
EU, in Switzerland and Norway may return their
CAUTION
used electronic products free of charge to desig-
! Do not allow this unit to come into contact
nated collection facilities or to a retailer (if you
with liquids. Electrical shock could result.
purchase a similar new one).
Also, damage to this unit, smoke, and over-
For countries not mentioned above, please con-
heating could result from contact with
tact your local authorities for the correct method
liquids.
of disposal.
! The Pioneer CarStereo-Pass is for use only in
By doing so you will ensure that your disposed
Germany.
product undergoes the necessary treatment, re-
! Always keep the volume low enough to hear
covery and recycling and thus prevent potential
outside sounds.
negative effects on the environment and human
! Avoid exposure to moisture.
health.
2
En
<QRD3204-A>2
Black plate (3,1)
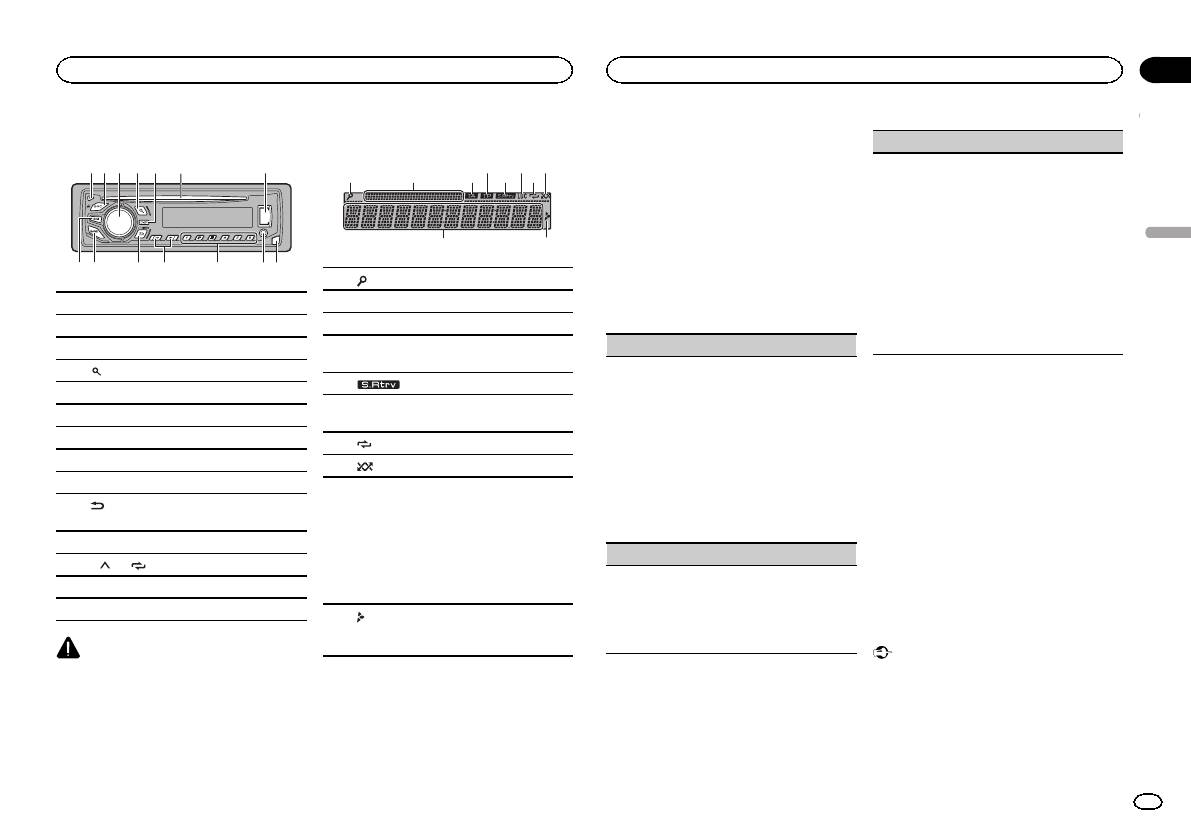
Head unit
2
3
71 4 6
9
a de
5
8
c
b
Display indication
21 3 75
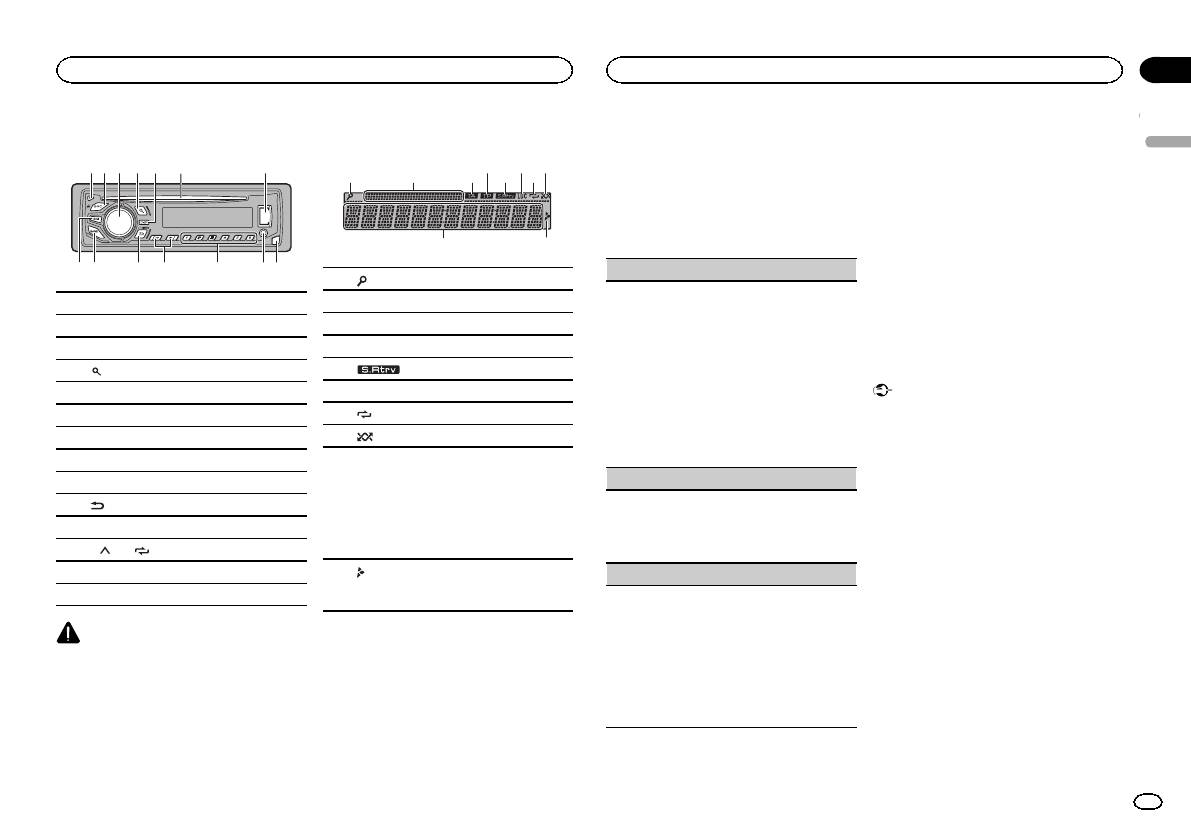
1 h (eject)
2 SRC/OFF
3 MULTI-CONTROL (M.C.)
4
(list)
5 DISP
6 Disc loading slot
7 USB port
8 EQ
9 BAND
a
(back)/DIMMER (dimmer)
b c/d
c 1/
to 6/
d AUX input jack (3.5 mm stereo jack)
e Detach button
CAUTION
Use an optional Pioneer USB cable (CD-U50E)
to connect the USB storage device as any device
connected directly to the unit will protrude out
from the unit, which could be dangerous.
9
Section
Using this unit
Using this unit
02
# If you prefer not to set up at this time, turn M.C.
5 To finish your settings, turn M.C. to select
to switch to NO.
YES.
English
4 6 8
# If you prefer to change your setting again, turn
3 Press M.C. to select.
M.C. to switch to NO.
4 Follow these steps to set the menu.
6 Press M.C. to select.
To proceed to the next menu option, you need to
Notes
confirm your selection.
a
! You can set up the menu options from the
system menu and initial menu. For details
LANGUAGE (multi-language)
1 (list)
about the settings, refer to System menu on
This unit can display the text information from a
page 7 and Initial menu on page 7.
2 Sub information section
compressed audio file even for information em-
! You can cancel set up menu by pressing
3 TA (traffic announcements)
bedded in English, Russian or Turkish.
SRC/OFF.
! If the embedded language and the selected
4 TP (traffic program identification)
language setting are not the same, text infor-
5
(sound retriever)
mation may not display properly.
Basic operations
! Some characters may not be displayed prop-
6 LOC (local seek tuning)
Important
erly.
! Handle the front panel with care when re-
7
(repeat)
1 Turn M.C. to select the desired setting.
moving or attaching it.
ENG (English)—РУС (Russian)—TUR (Turk-
8
(random)
! Avoid subjecting the front panel to excessive
ish)
shock.
Main information section
2 Press M.C. to confirm the selection.
! Keep the front panel out of direct sunlight
! Tuner: band and frequency
CLOCK SET (setting the clock)
and high temperatures.
! RDS: program service name, PTY infor-
! To avoid damaging the device or vehicle inte-
9
mation and other literal information
1 Turn M.C. to adjust hour.
rior, remove any cables and devices attached
! CD player and USB storage device:
2 Press M.C. to select minute.
to the front panel before detaching it.
elapsed playback time and text informa-
3 Turn M.C. to adjust minute.
tion
4 Press M.C. to confirm the selection.
FM STEP (FM tuning step)
a
Appears when a lower tier of folder or menu
exists.
Use FM STEP to set FM tuning step options (seek
step settings).
1 Turn M.C. to select the FM tuning step.
100 (100 kHz)—50 (50 kHz)
Set up menu
2 Press M.C. to confirm the selection.
1 After installation of this unit, turn the
QUIT appears.
ignition switch to ON.
! The manual tuning step is fixed at 50 kHz.
SET UP appears.
! When AF and TA are turned off, the seek step
is fixed at 50 kHz even if set to 100.
2 Turn M.C. to switch to YES.
# If you do not use the unit for 30 seconds, the set
up menu will not be displayed.
En
3
<QRD3204-A>3

Black plate (4,1)
Section
02
Using this unit
Using this unit
Note
Notes
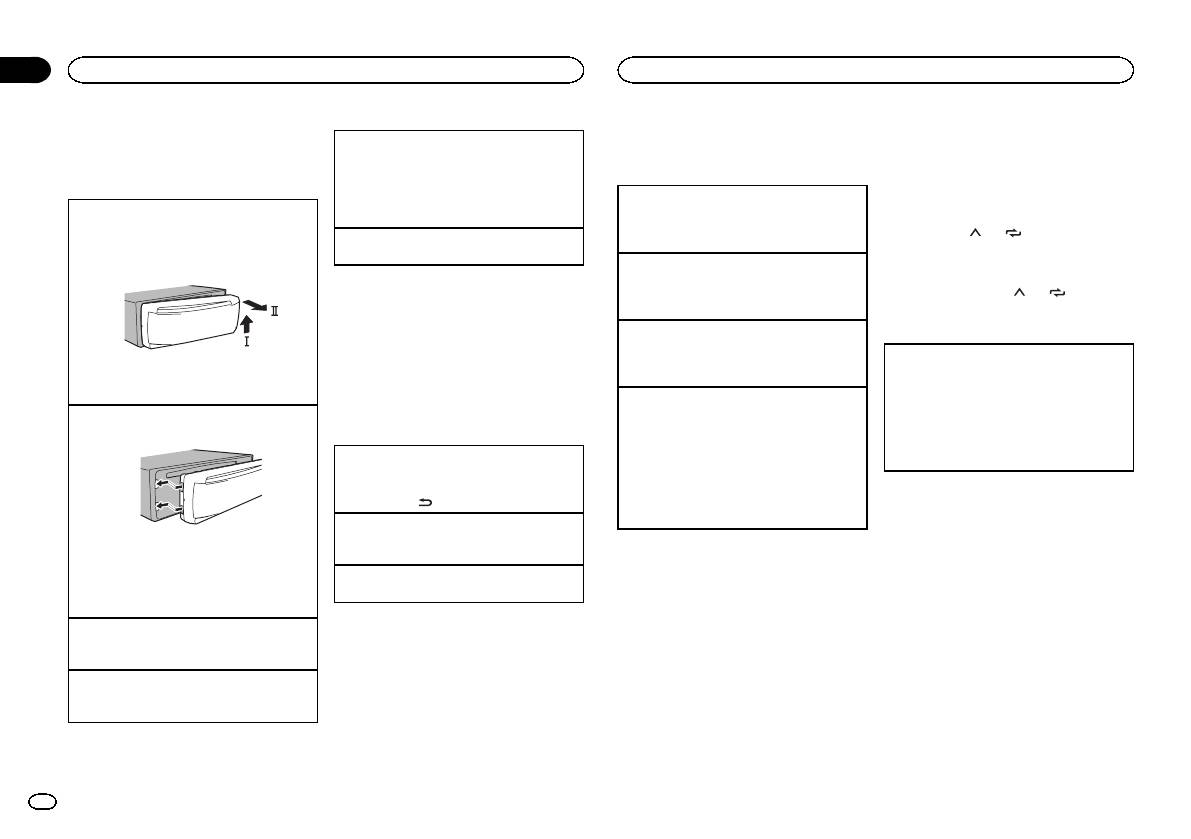
Removing the front panel
Manual tuning (step by step)
When this unit’s blue/white lead is connected to
! If the program service name cannot be ac-
1 Press the detach button to release the front
1 Press c or d.
the vehicle’s auto-antenna relay control termi-
quired in FREQUENCY, the broadcast fre-
panel.
! Select MAN (manual tuning) under SEEK to
nal, the vehicle’s antenna extends when this
quency is displayed instead. If the program
2 Push the front panel upward (M) and then pull
use this function.
unit’s source is turned on. To retract the anten-
service name is detected, the program serv-
it toward (N) you.
na, turn the source off.
Seeking
ice name will be displayed.
1 Press and hold c or d, and then release.
! Depending on the band, text information can
You can cancel seek tuning by briefly pressing
be changed.
Frequently used menu
c or d.
! Text information items that can be changed
operations
While pressing and holding c or d, you can
depend on the area.
skip stations. Seek tuning starts as soon as
you release c or d.
Returning to the previous display
3 Always store the detached front panel in a pro—
Using PTY functions
Returning to the previous list (the folder one level
tective case or bag.
Notes
You can tune in to a station using PTY (program
higher)
! For details about SEEK, refer to SEEK (left/
type) information.
Re-attaching the front panel
1 Press
/DIMMER.
right key setting) on page 5.
1 Slide the front panel to the left.
Returning to the ordinary display
! This unit’s AF (alternative frequencies
Searching for an RDS station by PTY information
Canceling the main menu
search) function can be turned on and off.
1 Press
(list).
1 Press BAND.
AF should be off for normal tuning operation
2 Turn M.C. to select a program type.
(refer to AF (alternative frequencies search)
NEWS/INFO—POPULAR—CLASSICS—
Returning to the ordinary display from the list
on page 5).
OTHERS
1 Press BAND.
3 Press M.C. to begin the search.
Storing and recalling stations
The unit searches for a station broadcasting
that type of program. When a station is found,
2 Press the right side of the front panel until it is
for each band
Radio
its program service name is displayed.
firmly seated.
! To cancel the search, press M.C. again.
Forcing the front panel into place may result in
Using preset tuning buttons
Basic operations
! The program of some stations may differ
damage to the front panel or head unit.
1 To store: Press and hold down one of the
from that indicated by the transmitted PTY.
Turning the unit on
preset tuning buttons (1/
to 6/ ) until
Selecting a band
! If no station is broadcasting the type of
1 Press SRC/OFF to turn the unit on.
the number stops flashing.
1 Press BAND until the desired band (FM1,
program you searched for, NOT FOUND is
FM2, FM3 for FM or MW/LW) is displayed.
displayed for about two seconds and then
Turning the unit off
2 To recall: Press one of the preset tuning
the tuner returns to the original station.
1 Press and hold SRC/OFF until the unit turns
Switching preset stations
buttons (1/
to 6/ ).
off.
1 Press c or d.
! Select PCH (preset channel) under SEEK to
Selecting a source
Switching the display
PTY list
use this function.
1 Press SRC/OFF to cycle between:
For more details about PTY list, visit the follow-
RADIO—CD—USB—AUX
Selecting the desired text information
ing site:
! USB MTP displays while the MTP connection
1 Press DISP to cycle between the following:
http://www.pioneer.eu/eur/products/25/121/tech/
is in use.
! FREQUENCY (program service name or
CarAudio/PTY.html
frequency)
Adjusting the volume
! BRDCST INFO (program service name/PTY
1 Turn M.C. to adjust the volume.
Function settings
information)
! CLOCK (source name and clock)
1 Press M.C. to display the main menu.
4
En
<QRD3204-A>4
Black plate (5,1)
Section
Using this unit
Using this unit
02
2 Turn M.C. to change the menu option
Note
Note
Local seek tuning allows you to tune in to only
and press to select FUNCTION.
English
This function is not compatible with WAV.
Disconnect USB storage devices from the unit
those radio stations with sufficiently strong sig-
when not in use.
nals for good reception.
3 Turn M.C. to select the function.
Basic operations
1 Press M.C. to select the desired setting.
Once selected, the following functions can be
Switching the display
FM: OFF—LV1—LV2—LV3—LV 4
adjusted.
MW/LW: OFF—LV1 —LV2
Playing a CD/CD-R/CD-RW
# If MW/LW band is selected, only BSM, LOCAL
The highest level setting allows reception of
1 Insert the disc into the disc loading slot with
Selecting the desired text information
and SEEK are available.
only the strongest stations, while lower levels
the label side up.
1 Press DISP to cycle between the following:
allow the reception of weaker stations.
CD-DA
FM SETTING (FM sound quality settings)
Ejecting a CD/CD-R/CD-RW
! ELAPSED TIME (track number and play-
TA (traffic announcement standby)
1 Press h.
The sound quality level can be set to match the
back time)
broadcast signal conditions of the FM band sig-
Playing songs on a USB storage device
! CLOCK (source name and clock)
1 Press M.C. to turn traffic announcement
nal.
1 Open the USB port cover.
! SPEANA (spectrum analyzer)
standby on or off.
1 Press M.C. to display the setting mode.
2 Plug in the USB storage device using a USB
CD-TEXT
2 Turn M.C. to select the desired setting.
AF (alternative frequencies search)
cable.
! TRACK INFO (track title/track artist/disc
! STANDARD – This is the standard setting.
title)
Stopping playback of files on a USB storage de-
1 Press M.C. to turn AF on or off.
! HI-FI – This is the setting to use to prioritize
! ELAPSED TIME (track number and play-
vice
the high quality of stereo sound.
back time)
NEWS (news program interruption)
1 You may disconnect the USB storage device at
! STABLE – This is the setting to use to priori-
! CLOCK (source name and clock)
any time.
tize the low noise of monaural sound.
! SPEANA (spectrum analyzer)
1 Press M.C. to turn the NEWS function on or
Selecting a folder
MP3/WMA/WAV
off.
BSM (best stations memory)
1 Press 1/
or 2/ .
! TRACK INFO (track title/artist name/album
SEEK (left/right key setting)
BSM (best stations memory) automatically stores
title)
Selecting a track
the six strongest stations in the order of their sig-
! FILE INFO (file name/folder name)
You can assign a function to the left and right keys
1 Press c or d.
nal strength.
! ELAPSED TIME (track number and play-
of the unit.
1 Press M.C. to turn BSM on.
Fast forwarding or reversing
back time)
Select MAN (manual tuning) to tune up or down
To cancel, press M.C. again.
1 Press and hold c or d.
! CLOCK (source name and clock)
manually or select PCH (preset channel) to switch
! When playing compressed audio, there is no
! SPEANA (spectrum analyzer)
between preset channels.
REGIONAL (regional)
sound during fast forward or reverse.
1 Press M.C. to select MAN or PCH.
When AF is used, the regional function limits the
Returning to root folder
Selecting and playing files/
selection of stations to those broadcasting region-
1 Press and hold BAND.
tracks from the name list
al programs.
CD/CD-R/CD-RW and USB
1 Press M.C. to turn the regional function on or
Switching between compressed audio and CD-DA
1 Press to switch to the file/track name
off.
storage devices
1 Press BAND.
list mode.
LOCAL (local seek tuning)
Switching between playback memory devices
MTP connection
You can switch between playback memory devices
2 Use M.C. to select the desired file name
MTP-compatible Android devices (running
on USB storage devices with more than one Mass
(or folder name).
Android OS 4.0 or higher) can be connected by
Storage Device-compatible memory device.
MTP connection using the USB source. To con-
1 Press BAND.
Selecting a file or folder
nect an Android device, use the cable that came
! You can switch between up to 32 different
1 Turn M.C.
with the device.
memory devices.
Playing
1 When a file or track is selected, press M.C.
En
5
<QRD3204-A>5
Black plate (6,1)
Section
02
Using this unit
Using this unit
2 Turn M.C. to change the menu option
Viewing a list of the files (or folders) in the se-
FADER (fader adjustment)
Loudness compensates for deficiencies in the low-
and press to select FUNCTION.
lected folder
frequency and high-frequency ranges at low vol-
Once selected, the function below can be ad-
1 When a folder is selected, press M.C.
1 Press M.C. to display the setting mode.
ume.
justed.
2 Turn M.C. to adjust the front/rear speaker bal-
1 Press M.C. to select the desired setting.
Playing a song in the selected folder
ance.
OFF (off)—LOW (low)—MID (mid)—HI (high)
1 When a folder is selected, press and hold M.C.
S.RTRV (sound retriever)
BALANCE (balance adjustment)
SUB.W (subwoofer on/off setting)
Automatically enhances compressed audio and
Operations using special buttons
restores rich sound.
This unit is equipped with a subwoofer output
1 Press M.C. to display the setting mode.
1 Press M.C. to select the desired setting.
which can be turned on or off.
2 Turn M.C. to adjust the left/right speaker bal-
Selecting a repeat play range
For details, refer to Enhancing compressed
1 Press M.C. to select the desired setting.
ance.
NOR (normal phase)—REV (reverse phase)—
1 Press 6/
to cycle between the following:
audio and restoring rich sound (sound retriever)
EQ SETTING (equalizer recall)
OFF (subwoofer off)
CD/CD-R/CD-RW
on page 6.
! ALL – Repeat all tracks
1 Press M.C. to display the setting mode.
SUB.W CTRL (subwoofer adjustment)
! ONE – Repeat the current track
2 Turn M.C. to select the equalizer.
Only frequencies lower than those in the selected
! FLD – Repeat the current folder
Audio adjustments
POWERFUL—NATURAL—VOCAL—CUS-
range are outputted from the subwoofer.
USB storage device
TOM1—CUSTOM2—FLAT—SUPER BASS
1 Press M.C. to display the main menu.
1 Press M.C. to display the setting mode.
! ALL – Repeat all files
The equalizer band and equalizer level can be
2 Press M.C. to cycle between the following:
! ONE – Repeat the current file
customized when CUSTOM1 or CUSTOM2 is
2 Turn M.C. to change the menu option
Cut-off frequency—Output level—Slope level
! FLD – Repeat the current folder
selected.
and press to select AUDIO.
Rates that can be adjusted will flash.
Playing tracks in random order
If selecting CUSTOM1 or CUSTOM2, complete
3 Turn M.C. to select the desired setting.
1 Press 5/
to turn random play on or off.
the procedures outlined below. If selecting
3 Turn M.C. to select the audio function.
Cut-off frequency: 50HZ—63HZ—80HZ—
Tracks in a selected repeat range are played in
other options, press M.C. to return to the pre-
Once selected, the following audio functions
100HZ—125HZ—160HZ—200HZ
random order.
vious display.
can be adjusted.
Output level: –24 to +6
! To change songs during random play, press d
! CUSTOM1 can be set separately for each
! FADER is not available when SUB.W/SUB.W
Slope level: –12— –24
to switch to the next track. Pressing c restarts
source.
is selected in SP-P/O MODE. For details, refer
BASS BOOST (bass boost)
playback of the current track from the begin-
! CUSTOM2 is a shared setting used in com-
to SP-P/O MODE (rear output and preout set-
ning of the song.
mon for all sources.
ting) on page 7.
1 Press M.C. to display the setting mode.
3 Press M.C. to display the setting mode.
! SUB.W and SUB.W CTRL are not available
Pausing playback
2 Turn M.C. to select a desired level.
4 Press M.C. to cycle between the following:
when REAR/REAR is selected in
1 Press 4/PAUSE to pause or resume.
0 to +6 is displayed as the level is increased or
Equalizer band—Equalizer level
SP-P/O MODE. For details, refer to
decreased.
Enhancing compressed audio and restoring rich
5 Turn M.C. to select the desired setting.
SP-P/O MODE (rear output and preout set-
sound (sound retriever)
Equalizer band: 80HZ—250HZ—800HZ—
ting) on page 7.
HPF SETTING (high pass filter adjustment)
1 Press 3/S.Rtrv to cycle between:
2.5KHZ—8KHZ
! SUB.W CTRL is not available when SUB.W is
1—2—OFF (off)
Equalizer level: +6 to –6
selected in OFF. For details, refer to SUB.W
1 is effective for low compression rates, and 2
! You can also switch the equalizer by pressing
(subwoofer on/off setting) on page 6.
is effective for high compression rates.
EQ repeatedly.
! SLA is not available when FM is selected as
the source.
LOUDNESS (loudness)
Function settings
1 Press M.C. to display the main menu.
6
En
<QRD3204-A>6
Black plate (7,1)
Section
Using this unit
Using this unit
02
3 Turn M.C. to select the system menu
Use this function when wanting to listen only to
Sound from this system is automatically muted or
SP-P/O MODE (rear output and preout setting)
function.
English
high-frequency sounds. Only frequencies higher
attenuated when a signal from equipment with a
Once selected, the following system menu func-
The rear speaker leads output and the RCA output
than the high-pass filter (HPF) cutoff are output
mute function is received.
tions can be adjusted.
of this unit can be used to connect a full-range
from the speakers.
1 Press M.C. to display the setting mode.
! MUTE MODE and PW SAVE are not available
speaker or subwoofer. Select a suitable option for
1 Press M.C. to display the setting mode.
2 Turn M.C. to select the desired setting.
for DEH-1600UBA.
your connection.
2 Press M.C. to cycle between the following:
! MUTE – Muting
1 Press M.C. to display the setting mode.
Cut-off frequency—Slope level
! 20dB ATT – Attenuation (20dB ATT has a
LANGUAGE (multi-language)
2 Turn M.C. to select the desired setting.
3 Turn M.C. to select the desired setting.
stronger effect than 10dB ATT)
! REAR/SUB.W – Select when there is a full-
Cut-off frequency: OFF—50HZ—63HZ—80HZ
! 10dB ATT – Attenuation
1 Press M.C. to select the desired setting.
range speaker connected to the rear speak-
—100HZ—125HZ—160HZ—200HZ
ENG (English)—РУС (Russian)—TUR (Turk-
PW SAVE (power saving)
er leads output and there is a subwoofer
Slope level: –12— –24
ish)
connected to the RCA output.
Switching this function on enables you to reduce
SLA (source level adjustment)
! SUB.W/SUB.W – Select when there is a
CLOCK SET (setting the clock)
the consumption of battery power.
subwoofer connected directly to the rear
This function prevents the volume from changing
! Turning on the source is the only operation al-
speaker leads output without any auxiliary
too dramatically when the source switches.
1 Press M.C. to display the setting mode.
lowed when this function is on.
amp and there is a subwoofer connected
! Settings are based on the FM volume level,
2 Press M.C. to select the segment of the clock
1 Press M.C. to turn the power save on or off.
to the RCA output.
which remains unchanged.
display you wish to set.
! REAR/REAR – Select when there is a full-
! The MW/LW volume level can also be adjusted
Hour—Minute
range speaker connected to the rear speak-
with this function.
3 Turn M.C. to adjust the clock.
Initial menu
er leads output and the RCA output.
1 Press M.C. to display the setting mode.
12H/24H (time notation)
If there is a full-range speaker connected to
2 Turn M.C. to adjust the source volume.
1 Press and hold SRC/OFF until the unit
the rear speaker leads output and the RCA
Adjustment range: +4 to –4
turns off.
1 Press M.C. to select the desired setting.
output is not used, you may select either
12H (12-hour clock)—24H (24-hour clock)
REAR/SUB.W or REAR/REAR.
2 Press and hold SRC/OFF until the main
AUTO PI (auto PI seek)
menu appears in the display.
System menu
Only for DEH-1600UBA
The unit can automatically search for a different
Important
Press M.C. to display the main menu.
System menu
station with the same programming, even during
PW SAVE (power saving) is canceled if the ve-
preset recall.
1 Press and hold SRC/OFF until the unit
hicle battery is disconnected and will need to be
3 Turn M.C. to change the menu option
1 Press M.C. to turn Auto PI seek on or off.
turns off.
turned back on once the battery is reconnected.
and press to select INITIAL.
When PW SAVE (power saving) is off, depend-
AUX (auxiliary input)
2 Press and hold SRC/OFF until the main
ing on connection methods, the unit may con-
4 Turn M.C. to select the initial menu func-
Activate this setting when using an auxiliar y de-
menu appears in the display.
tinue to draw power from the battery if your
tion.
vice connected to this unit.
Only for DEH-1600UBA
vehicle’s ignition doesn’t have an ACC (acces-
Once selected, the following initial menu func-
1 Press M.C. to turn AUX on or off.
Press M.C. to display the main menu.
sory) position.
tions can be adjusted.
DIMMER (dimmer)
3 Turn M.C. to change the menu option
1 Press M.C. to display the main menu.
FM STEP (FM tuning step)
and press to select SYSTEM.
1 Press M.C. to turn the dimmer on or off.
! You can also change the dimmer setting by
2 Turn M.C. to change the menu option
1 Press M.C. to select the FM tuning step.
4 Turn M.C. to select the system menu
pressing and holding
/DIMMER.
and press to select SYSTEM.
100 (100 kHz)—50 (50 kHz)
function.
MUTE MODE (mute mode)
For details, refer to System menu on page 7.
En
7
<QRD3204-A>7
Black plate (8,1)
— Never wire the negative speaker cable directly
Using an AUX source
Connections
to ground.
1 Insert the stereo mini plug into the AUX
Important
— Never band together negative cables of multi-
input jack.
! When installing this unit in a vehicle without
ple speakers.
an ACC (accessory) position on the ignition
! When this unit is on, control signals are sent
2 Press SRC/OFF to select AUX as the
switch, failure to connect the red cable to the
through the blue/white cable. Connect this
source.
terminal that detects operation of the ignition
cable to the system remote control of an ex-
key may result in battery drain.
ternal power amp or the vehicle’s auto-anten-
Note
na relay control terminal (max. 300 mA
AUX cannot be selected unless the auxiliary set-
F
F
O
N
12 V DC). If the vehicle is equipped with a
ting is turned on. For more details, refer to AUX
O
T
S
glass antenna, connect it to the antenna
T
R
A
(auxiliary input) on page 7.
booster power supply terminal.
! Never connect the blue/white cable to the
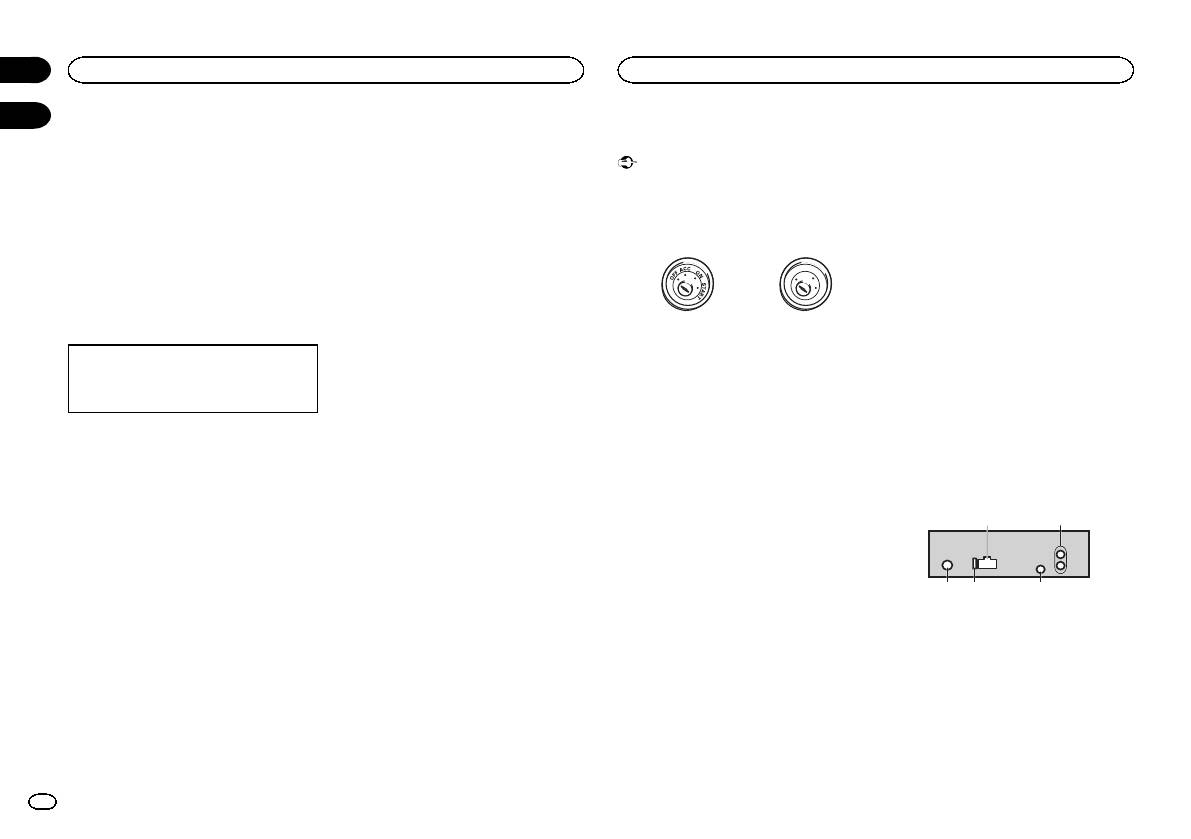
ACC position No ACC position
Switching the display
power terminal of an external power amp.
! Use of this unit in conditions other than the
Also, never connect it to the power terminal
Selecting the desired text information
following could result in fire or malfunction.
of the auto antenna. Doing so may result in
1 Press DISP to cycle between the following:
— Vehicles with a 12-volt battery and negative
battery drain or a malfunction.
! Source name
grounding.
! The black cable is ground. Ground cables for
! Source name and clock
— Speakers with 50 W (output value) and 4 W to
this unit and other equipment (especially,
8 W (impedance value).
high-current products such as power amps)
! To prevent a short-circuit, overheating or mal-
must be wired separately. If they are not, an
function, be sure to follow the directions
accidental detachment may result in a fire or
If an unwanted display appears
below.
malfunction.
Turn off the unwanted display using the proce-
— Disconnect the negative terminal of the bat-
dures listed below.
tery before installation.
This unit
— Secure the wiring with cable clamps or adhe-
1 Press M.C. to display the main menu.
sive tape. Wrap adhesive tape around wiring
that comes into contact with metal parts to
2 Turn M.C. to change the menu option
protect the wiring.
and press to select SYSTEM.
— Place all cables away from moving parts,
such as the shift lever and seat rails.
3 Turn M.C. to display DEMO OFF and press
— Place all cables away from hot places, such
to select.
as near the heater outlet.
— Do not connect the yellow cable to the battery
4 Turn M.C. to switch to YES.
by passing it through the hole to the engine
compartment.
5 Press M.C. to select.
— Cover any disconnected cable connectors
with insulating tape.
— Do not shorten any cables.
— Never cut the insulation of the power cable of
this unit in order to share the power with
other devices. The current capacity of the
cable is limited.
— Use a fuse of the rating prescribed.
3 45
Section
02
Using this unit
Installation
03
21
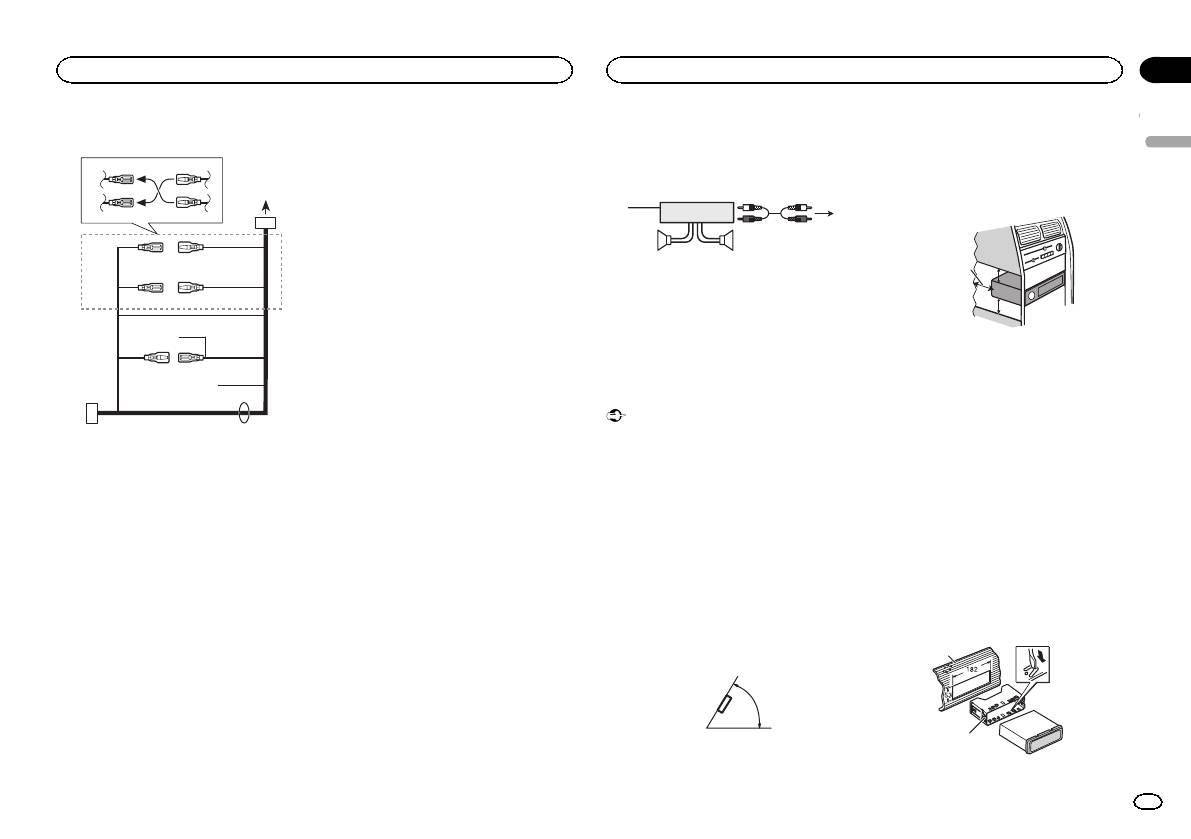
1 Power cord input
2 Rear output or subwoofer output
3 Antenna input
4 Fuse (10 A)
5 Wired remote input (DEH-1600UB, DEH-
1600UBG and DEH-1600UBB only)
Hard-wired remote control adapter can be
connected (sold separately).
8
En
<QRD3204-A>8
Black plate (9,1)
Power cord
3
4
1
2
5
6
3
4
7
5
6
8
a
9
b
e
d
9 Blue/white
Power amp (sold separately)
! When installing, to ensure proper heat dis-
The pin position of the ISO connector will dif-
persal when using this unit, make sure you
Perform these connections when using the op-
fer depending on the type of vehicle. Connect
leave ample space behind the rear panel and
tional amplifier.
9 and b when Pin 5 is an antenna control
wrap any loose cables so they are not block-
type. In another type of vehicle, never con-
3
ing the vents.
1
nect 9 and b.
2
a Blue/white
4
Connect to system control terminal of the
55
power amp (max. 300 mA 12 V DC).
b Blue/white
1 System remote control
Connect to auto-antenna relay control termi-
Connect to Blue/white cable.
nal (max. 300 mA 12 V DC).
2 Power amp (sold separately)
c Yellow/black (DEH-1600UB, DEH-1600UBG
3 Connect with RCA cables (sold separately)
and DEH-1600UBB only)
4 To Rear output or subwoofer output
If you use an equipment with Mute function,
5 Rear speaker or subwoofer
wire this lead to the Audio Mute lead on that
equipment. If not, keep the Audio Mute lead
free of any connections.
c
Installation
d Speaker leads
Important
White: Front left +
White/black: Front left *
! Check all connections and systems before
1 To power cord input
Gray: Front right +
final installation.
2 Depending on the kind of vehicle, the func-
Gray/black: Front right *
! Do not use unauthorized parts as this may
tion of 3 and 5 may be different. In this
Green: Rear left + or subwoofer +
cause malfunctions.
case, be sure to connect 4 to 5 and 6 to
Green/black: Rear left * or subwoofer *
! Consult your dealer if installation requires
3.
Violet: Rear right + or subwoofer +
drilling of holes or other modifications to the
3 Yellow
Violet/black: Rear right * or subwoofer *
vehicle.
Back-up (or accessory)
e ISO connector
! Do not install this unit where:
4 Yellow
In some vehicles, the ISO connector may be
— it may interfere with operation of the vehicle.
Connect to the constant 12 V supply termi-
divided into two. In this case, be sure to con-
— it may cause injury to a passenger as a result
nal.
nect to both connectors.
of a sudden stop.
5 Red
! The semiconductor laser will be damaged if
Notes
Accessory (or back-up)
it overheats. Install this unit away from hot
! Change the initial menu of this unit. Refer to
6 Red
places such as near the heater outlet.
SP-P/O MODE (rear output and preout set-
Connect to terminal controlled by ignition
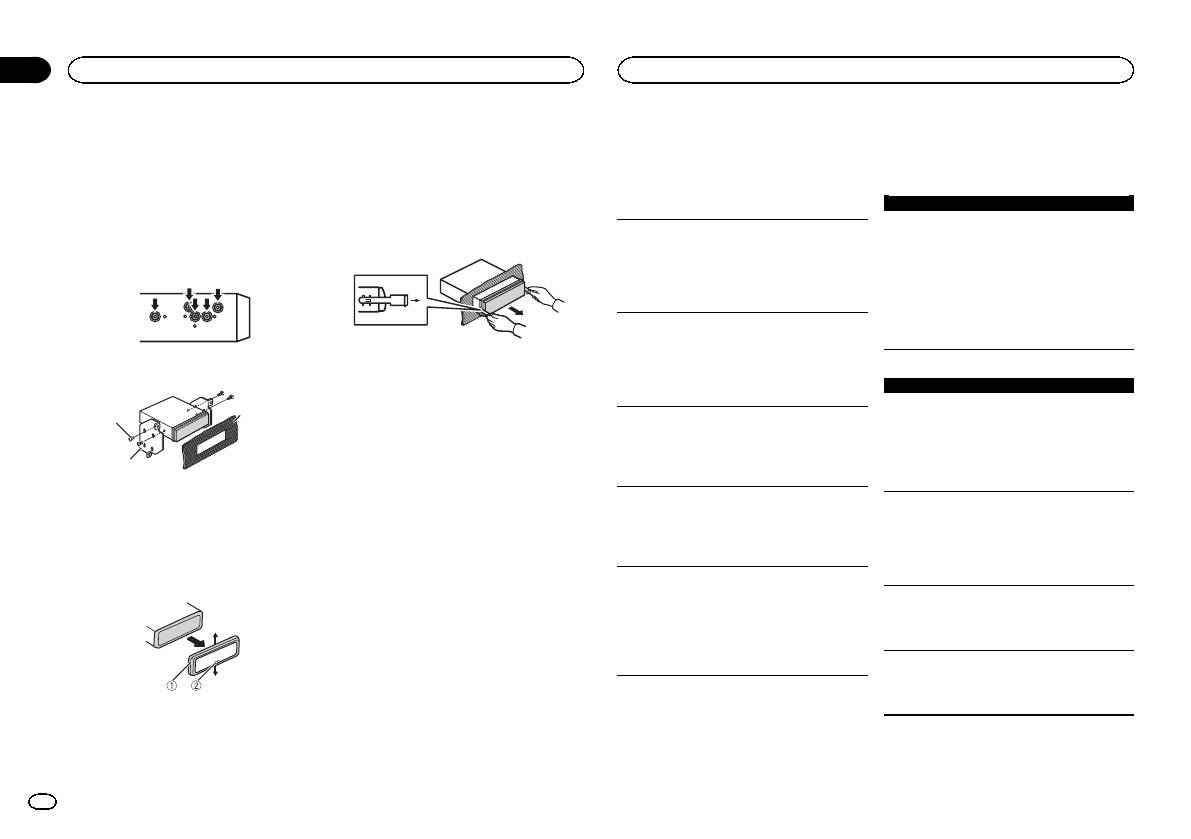
! Optimum performance is obtained when the
ting) on page 7.
switch (12 V DC).
unit is installed at an angle of less than 60°.
The subwoofer output of this unit is monau-
7 Connect leads of the same color to each
ral.
other.
60°
! When using a subwoofer of 70 W (2 W), be
8 Black (chassis ground)
sure to connect the subwoofer to the violet
and violet/black leads of this unit. Do not
connect anything to the green and green/
black leads.
5cmcm
Section
Installation
Installation
03
English
Leave ample
5 cm
space
5 cm
DIN front/rear mount
This unit can be properly installed using either
front-mount or rear-mount installation.
Use commercially available parts when instal-
ling.
DIN Front-mount
1 Insert the mounting sleeve into the dash-
board.
For installation in shallow spaces, use the sup-
plied mounting sleeve. If there is enough space,
use the mounting sleeve that came with the ve-
hicle.
2 Secure the mounting sleeve by using a
screwdriver to bend the metal tabs (90°) into
place.
1
2
1 Dashboard
En
9
<QRD3204-A>9
Black plate (10,1)
Section
03
Installation
Additional information
2 Mounting sleeve
! When reattaching the trim ring, point the
Symptoms are written in bold and causes in reg-
Troubleshooting
# Make sure that the unit is installed securely in
side with the notched tab down.
ular, non-indented text. Regular, indented text is
place. An unstable installation may cause skipping
Symptoms are written in bold and causes in reg-
used to indicate actions to be taken.
or other malfunctions.
2 Insert the supplied extraction keys into
ular, non-indented text. Regular, indented text is
both sides of the unit until they click into
used to indicate actions to be taken.
Common
place.
DIN Rear-mount
AMP ERROR
The display automatically returns to the ordinary
1 Determine the appropriate position
3 Pull the unit out of the dashboard.
display.
This unit fails to operate or the speaker connection is
where the holes on the bracket and the side
incorrect; the protective circuit is activated.
of the unit match.
You did not perform any operation within about 30
Check the speaker connection. If the message
seconds.
fails to disappear even after the engine is
Perform operation again.
switched off/on, contact your dealer or an
authorized Pioneer Service Station for
The repeat play range changes unexpectedly.
assistance.
Depending on the repeat play range, the selected
range may change when another folder or track is
2 Tighten two screws on each side.
Removing and re-attaching the front
being selected or during fast forwarding/reversing.
CD player
panel
Select the repeat play range again.
You can remove the front panel to protect your
ERROR-07, 11, 12, 17, 30
3
1
unit from theft.
A subfolder is not played back.
The disc is dirty.
For details, refer to Removing the front panel and
Subfolders cannot be played when FLD (folder re-
Clean the disc.
Re-attaching the front panel on page 4.
peat) is selected.
2
The disc is scratched.
Select another repeat play range.
Replace the disc.
1 Tapping screw (5 mm × 8 mm)
NO XXXX appears when a display is changed
2 Mounting bracket
ERROR-07, 10, 11, 12, 15, 17, 30, A0
(NO TITLE, for example).
3 Dashboard or console
There is an electrical or mechanical error.
There is no embedded text information.
Turn the ignition switch OFF and back ON, or
Switch the display or play another track/file.
switch to a different source, then back to the CD
Removing the unit
player.
1 Remove the trim ring.
The unit is malfunctioning.
There is interference.
ERROR-15
You are using a device, such as a cellular phone,
The inserted disc is blank.
that may cause audible interference.
Replace the disc.
Move electrical devices that may be causing the
interference away from the unit.
ERROR-23
Unsupported CD format.
Replace the disc.
1 Trim ring
Error messages
2 Notched tab
When you contact your dealer or your nearest
! Releasing the front panel allows easier ac-
Pioneer Service Center, be sure to note the error
cess to the trim ring.
message.
10
En
<QRD3204-A>10
Black plate (11,1)
Appendix
Additional information
Additional information
FORMAT READ
PROTECT
STOP
Condensation may temporarily impair the player’s
English
Sometimes there is a delay between the start of play-
All the files on the connected USB storage device
There are no songs in the current list.
performance. Let it rest for about one hour to ad-
back and when you start to hear any sound.
are embedded with DRM.
Select a list that contains songs.
just to a warmer temperature. Also, wipe any
Wait until the message disappears and you hear
Replace the USB storage device.
damp discs off with a soft cloth.
sound.
Playback of discs may not be possible because of
N/A USB
Handling guidelines
disc characteristics, disc format, recorded applica-
NO AUDIO
The connected USB device is not supported by this
tion, playback environment, storage conditions,
Discs and player
The inserted disc does not contain any playable files.
unit.
and so on.
Replace the disc.
! Connect a USB Mass Storage Class compliant
Use only discs that feature either of the following
device.
Road shocks may interrupt disc playback.
two logos.
SKIPPED
! Disconnect your device and replace it with a
When using discs that can be printed on label sur-
compatible USB storage device.
The inserted disc contains DRM protected files.
faces, check the instructions and the warnings of
The protected files are skipped.
the discs. Depending on the discs, inserting and
CHECK USB
ejecting may not be possible. Using such discs
PROTECT
The USB connector or USB cable has short-
may result in damage to this equipment.
circuited.
All the files on the inserted disc are embedded with
Do not attach commercially available labels or
Check that the USB connector or USB cable is
DRM.
other materials to the discs.
not caught in something or damaged.
Replace the disc.
! The discs may warp making the disc unplay-
The connected USB storage device consumes more
Use 12-cm discs.
able.
than maximum allowable current.
Use only conventional, fully circular discs.
! The labels may come off during playback and
Disconnect the USB storage device and do not
USB storage device
prevent ejection of the discs, which may result
use it. Turn the ignition switch to OFF, then to
The following types of discs cannot be used with
in damage to the equipment.
FORMAT READ
ACC or ON and then connect only compliant
this unit:
USB storage devices.
! DualDiscs
Sometimes there is a delay between the start of play-
! 8-cm discs: Attempts to use such discs with
USB storage device
back and when you start to hear any sound.
Wait until the message disappears and you hear
ERROR-19
an adaptor may cause the unit to malfunction.
! Oddly shaped discs
sound.
Connections via USB hub are not supported.
Communication failed.
Perform one of the following operations.
Do not connect anything other than a USB stor-
NO AUDIO
–Turn the ignition switch OFF and back ON.
age device.
–Disconnect the USB storage device.
There are no songs.
! Discs other than CDs
Firmly secure the USB storage device when driv-
–Change to a different source.
Transfer the audio files to the USB storage device
! Damaged discs, including discs that are
ing. Do not let the USB storage device fall onto the
Then, return to the USB source.
and connect.
cracked, chipped or warped
floor, where it may become jammed under the
! CD-R/RW discs that have not been finalized
The connected USB storage device has security en-
brake or accelerator pedal.
ERROR-23
abled.
Do not touch the recorded surface of the discs.
USB storage device was not formatted with FAT12,
Depending on the USB storage device, the follow-
Follow the USB storage device instructions to
Store discs in their cases when not in use.
ing problems may occur.
disable the security.
FAT16 or FAT32.
USB storage device should be formatted with
! Operations may vary.
Do not attach labels, write on or apply chemicals
FAT12, FAT16 or FAT32.
! The storage device may not be recognized.
SKIPPED
to the surface of the discs.
! Files may not be played back properly.
The connected USB storage device contains DRM
To clean a CD, wipe the disc with a soft cloth out-
! The device may cause audible interference
protected files.
ward from the center.
when you are listening to the radio.
The protected files are skipped.
En
11
<QRD3204-A>11
Black plate (12,1)
Appendix
Additional information
Additional information
Compressed audio
Supplemental information
USB storage device
Playable files: up to 15 000
Playback sequence is the same as recorded se-
compatibility (disc, USB)
Only the first 32 characters can be displayed as a
Playback of copyright-protected files: Not compati-
quence in the USB storage device.
file name (including the file extension) or a folder
ble
WMA
To specify the playback sequence, the following
name.
Partitioned USB storage device: Only the first par-
method is recommended.
File extension: .wma
1 Create a file name that includes numbers
Russian text to be displayed on this unit should be
tition can be played.
that specify the playback sequence (e.g.,
Bit rate: 48 kbps to 320 kbps (CBR), 48 kbps to
encoded in one of the following character sets:
There may be a slight delay when starting play-
001xxx.mp3 and 099yyy.mp3).
384 kbps (VBR)
! Unicode (UTF-8, UTF-16)
back of audio files on a USB storage device with
2 Put those files into a folder.
! A character set other than Unicode that is
numerous folder hierarchies.
Sampling frequency: 32 kHz, 44.1 kHz, 48 kHz
3 Save the folder containing files on the USB
used in a Windows environment and is set to
storage device.
Windows Mediaä Audio Professional, Lossless,
Russian in the multi-language setting
However, depending on the system environment,
Voice/DRM Stream/Stream with video: Not com-
This unit may not work properly depending on the
CAUTION
you may not be able to specify the playback se-
patible
application used to encode WMA files.
! Pioneer cannot guarantee compatibility with
quence.
all USB mass storage devices and assumes
For USB portable audio players, the sequence is
There may be a slight delay at the start of playback
no responsibility for any loss of data on
different and depends on the player.
MP3
of audio files embedded with image data or audio
media players, smart phones, or other devi-
files stored on a USB storage device that has nu-
ces while using this product.
File extension: .mp3
merous folder hierarchies.
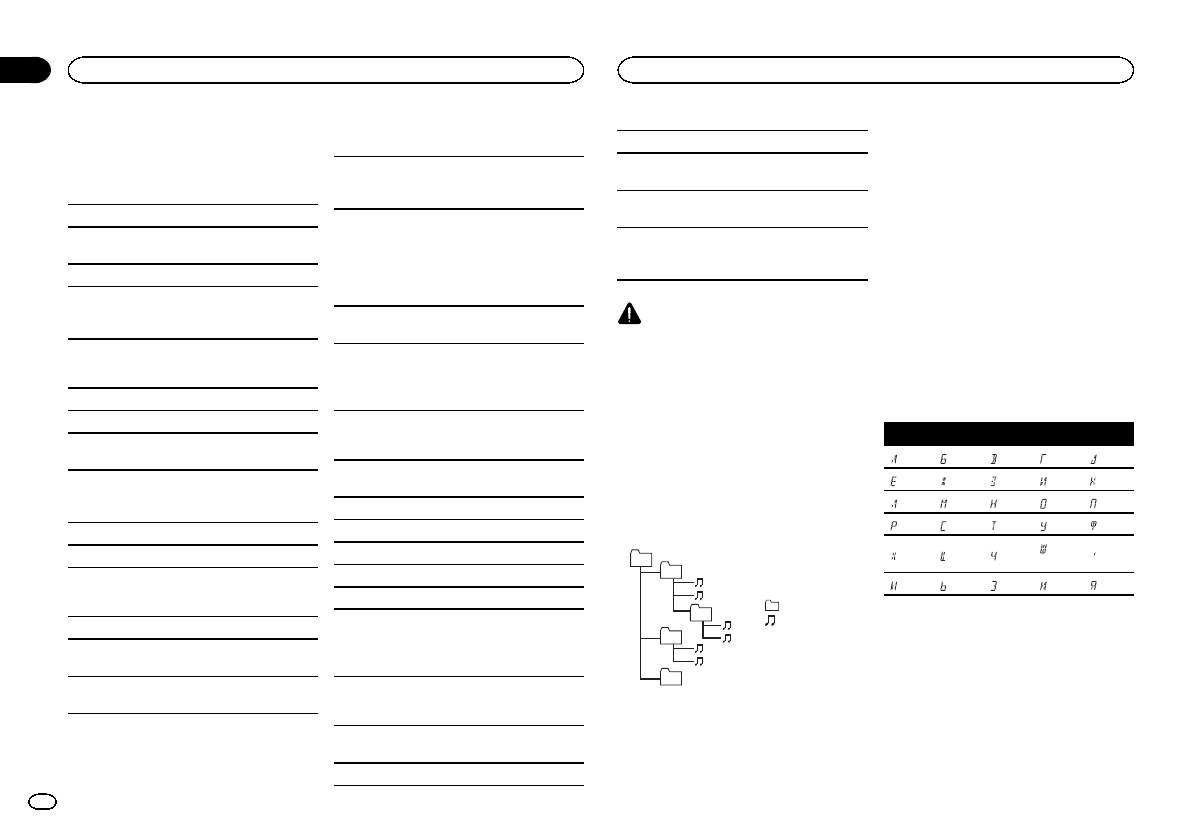
Russian character chart
! Do not leave discs or a USB storage device
Bit rate: 8 kbps to 320 kbps (CBR), VBR
in any place that is subject to high tempera-
D: C D: C D: C D: C D: C
Sampling frequency: 8 kHz to 48 kHz (32 kHz,
Disc
tures.
44.1 kHz, 48 kHz for emphasis)
: А : Б : В : Г : Д
Playable folder hierarchy: up to eight tiers (A prac-
Compatible ID3 tag version: 1.0, 1.1, 2.2, 2.3, 2.4
Sequence of audio files
: Е, Ё : Ж : З : И, Й : К
tical hierarchy is less than two tiers.)
(ID3 tag Version 2.x is given priority over Version
The user cannot assign folder numbers and
: Л : М : Н : О : П
1.x.)
Playable folders: up to 99
specify playback sequences with this unit.
: Р : С : Т : У : Ф
M3u playlist: Not compatible
Playable files: up to 999
Example of a hierarchy
: Ш,
MP3i (MP3 interactive), mp3 PRO: Not compatible
File system: ISO 9660 Level 1 and 2, Romeo, Joliet
: Х : Ц : Ч
: Ъ
01
Щ
Multi-session playback: Compatible
02
: Ы : Ь : Э : Ю : Я
WAV
Packet write data transfer: Not compatible
: Folder
03
D: Display C: Character
Regardless of the length of blank sections be-
: Compressed
File extension: .wav
tween the songs from the original recording, com-
04
audio file
Quantization bits: 8 and 16 (LPCM), 4 (MS
pressed audio discs play with a short pause
01 to 05: Folder
Copyright and trademark
ADPCM)
between songs.
number
05
1 to 6: Playback
Sampling frequency: 16 kHz to 48 kHz (LPCM),
MP3
Level 1 Level 2 Level 3 Level 4
sequence
22.05 kHz and 44.1 kHz (MS ADPCM)
Supply of this product only conveys a license for
USB storage device
private, non-commercial use and does not con-
Disc
vey a license nor imply any right to use this prod-
! You cannot use this function with USB MTP.
Playable folder hierarchy: up to eight tiers (A prac-
Folder selection sequence or other operation
uct in any commercial (i.e. revenue-generating)
tical hierarchy is less than two tiers.)
may differ depending on the encoding or writing
real time broadcasting (terrestrial, satellite,
Playable folders: up to 500
software.
cable and/or any other media), broadcasting/
12
En
<QRD3204-A>12
Black plate (13,1)
Appendix
Additional information
Additional information
streaming via internet, intranets and/or other
WMA decoding format ….. Ver. 7, 7.1, 8, 9, 10, 11, 12 (2ch
Specifications
networks or in other electronic content distribu-
audio)
English
(Windows Media Player)
tion systems, such as pay-audio or audio-on-de-
General
WAV signal format ……….. Linear PCM & MS ADPCM
mand applications. An independent license for
Power source ………………. 14.4 V DC (10.8 V to 15.1 V al-
(Non-compressed)
lowable)
such use is required. For details, please visit
Grounding system ………… Negative type
http://www.mp3licensing.com.
Maximum current consumption
USB
…………………………….. 10.0 A
USB standard specification
WMA
Dimensions (W × H × D):
…………………………….. USB 2.0 full speed
Windows Media is either a registered trademark
DIN
Maximum current supply
Chassis ………………………. 178mm × 50mm × 165mm
or trademark of Microsoft Corporation in the
…………………………….. 1 A
Nose ………………………….. 188 mm × 58mm × 16mm
United States and/or other countries.
USB Class ………………….. MSC (Mass Storage Class)
D
This product includes technology owned by
File system ………………….. FAT12, FAT16, FAT32
Chassis ………………………. 178mm × 50mm × 165mm
MP3 decoding format …… MPEG-1 & 2 Audio Layer 3
Microsoft Corporation and cannot be used or
Nose ………………………….. 170 mm × 46mm × 16mm
WMA decoding format ….. Ver. 7, 7.1, 8, 9, 10, 11, 12 (2ch
distributed without a license from Microsoft
Weight ……………………….. 1 kg
audio)
Licensing, Inc.
(Windows Media Player)
Audio
WAV signal format ……….. Linear PCM & MS ADPCM
Androidä
(Non-compressed)
Maximum power output ... 50 W × 4
Android is a trademark of Google Inc.
70 W × 1/2 W (for subwoofer)
Continuous power output
FM tuner
…………………………….. 22W × 4 (50Hz to 15000 Hz,
Frequency range ………….. 87.5 MHz to 108.0 MHz
5 % THD, 4 W load, both chan-
Usable sensitivity …………. 9dBf (0.8 µV/75 W, mono, S/N:
nels driven)
30 dB)
Load impedance ………….. 4 W (4 W to 8 W allowable)
Signal-to-noise ra tio ……… 72dB (IEC-A network)
Preout maximum output level
…………………………….. 2.0V
Loudness contour ………… +10dB (100 Hz), +6.5 dB
MW tuner
(10 kHz) (volume: –30 dB)
Frequency range ………….. 531 kHz to 1 602 kHz
Equalizer (5-Band Graphic Equalizer):
Usable sensitivity …………. 25µV (S/N: 20 dB)
Frequency …………………… 80Hz/250 Hz/800 Hz/2.5 kHz/
Signal-to-noise ra tio ……… 62dB (IEC-A network)
8 kHz
Equalization range ……….. ±12 dB (2 dB step)
Subwoofer (mono):
LW tuner
Frequency …………………… 50Hz/63 Hz/80 Hz/100 Hz/
Frequency range ………….. 153 kHz to 281kHz
125 Hz/160 Hz/200 Hz
Usable sensitivity …………. 28µV (S/N: 20 dB)
Slope …………………………. –12 dB/oct, –24 dB/oct
Signal-to-noise ra tio ……… 62dB (IEC-A network)
Gain ………………………….. +6dB to –24 dB
Phase ………………………… Normal/Reverse
Note
Specifications and the design are subject to
modifications without notice.
CD player
System ………………………. Compact disc audio system
Usable discs ……………….. Compact disc
Signal-to-noise ra tio ……… 94dB (1 kHz) (IEC-A network)
Number of channels …….. 2 (stereo)
MP3 decoding format …… MPEG-1 & 2 Audio Layer 3
En
13
<QRD3204-A>13
Black plate (14,1)
Section
01
Avant de commencer
Avant de commencer
Nous vous remercions d’avoir acheté cet ap-
Quelques mots sur cet appareil
PRÉCAUTION
pareil PIONEER
Les fréquences du syntoniseur de cet appareil
Cet appareil est un produit laser de Classe 1,
Pour garantir une utilisation correcte, lisez bien
sont attribuées pour une utilisation en Europe
classé selon l’article IEC 60825-1:2007 relatif à
ce mode d’emploi avant d’utiliser cet appareil. Il
de l’Ouest, Asie, Moyen-Orient, Afrique et Océ-
la Sécurité des produits laser.
est particulièrement important que vous lisiez et
anie. Son utilisation dans d’autres régions peut
respectiez les indications ATTENTION et PRÉ-
se traduire par une réception de mauvaise qua-
CAUTION de ce mode d’emploi. Conservez-le
APPAREIL À LASER DE CLASSE 1
lité. La fonction RDS (radio data system) n’est
dans un endroit sûr et facilement accessible pour
opérationnelle que dans les régions où des si-
toute consultation ultérieure.
gnaux RDS sont diffusés pour les stations FM.
Si vous rencontrez des
ATTENTION
problèmes
! N’essayez pas d’installer cet appareil ou
En cas d’anomalie, veuillez contacter votre re-
d’en faire l’entretien vous-même. L’instal-
vendeur ou le centre d’entretien agréé par
lation ou l’entretien de cet appareil par
PIONEER le plus proche.
des personnes sans formation et sans ex-
Si vous souhaitez vous débarrasser de cet ap-
périence en équipement électronique et
pareil, ne le mettez pas à la poubelle avec vos
en accessoires automobiles peut être
ordures ménagères. Il existe un système de
dangereux et vous exposer à des risques
collecte séparé pour les appareils électroni-
d’électrocution ou à d’autres dangers.
ques usagés, qui doivent être récupérés, trai-
! N’essayez pas de démonter ou de modifier
tés et recyclés conformément à la législation.
cet appareil. Veillez à quitter la route et garer
votre véhicule en lieu sûr avant d’essayer d’u-
tiliser les commandes de l’appareil.
Dans les états membres de l’UE, en Suisse et en
Norvège, les foyers domestiques peuvent rap-
porter leurs produits électroniques usagés gra-
PRÉCAUTION
tuitement à des points de collecte spécifiés ou à
! Ne laissez pas cet appareil entrer en contact
un revendeur (sous réserve d’achat d’un produit
avec des liquides. Cela pourrait provoquer
similaire).
une électrocution. Tout contact avec des li-
Dans les pays qui ne sont pas mentionnés ci-
quides pourrait également provoquer des
dessus, veuillez contacter les autorités locales
dommages, de la fumée et une surchauffe
pour vous informer de la méthode correcte de
de l’appareil.
mise au rebut.
! Le Pioneer CarStereo-Pass est utilisable seu-
En agissant ainsi vous assurerez que le produit
lement en Allemagne.
que vous mettez au rebut est soumis au proces-
! Maintenez le niveau d’écoute à une valeur
sus de traitement, de récupération et de recy-
telle que vous puissiez entendre les sons pro-
clage nécessaire et éviterez ainsi les effets
venant de l’extérieur.
négatifs potentiels sur l’environnement et la
! Évitez tout contact avec l’humidité.
santé publique.
14
Fr
<QRD3204-A>14
Black plate (15,1)
Appareil central
2
3
71 4 6
9
a de
5
8
c
b
Indications affichées
21 3 75
1 h (éjection)
2 SRC/OFF
3 MULTI-CONTROL (M.C.)
4
(liste)
5 DISP
6 Fente de chargement des disques
7 Port USB
8 EQ
9 BAND
(retour)/DIMMER (atténuateur de lumi-
a
nosité)
b c/d
c 1/
à 6/
d Jack d’entrée AUX (jack stéréo 3,5 mm)
e Touche de retrait de la face avant
PRÉCAUTION
Utilisez un câble USB Pioneer optionnel (CD-
U50E) pour connecter le périphérique de stoc-
kage USB, faute de quoi ce dernier, comme
n’importe quel périphérique relié directement à
l’appareil, dépasserait de l’appareil et pourrait
s’avérer dangereux.
9
Section
Utilisation de cet appareil
Utilisation de cet appareil
02
2 Tournez M.C. pour passer à YES.
FM STEP (incrément d’accord FM)
# Si vous n’utilisez pas l’appareil dans les 30 secon-
4 6 8
des environ, le menu de configuration ne s’affichera
Utilisez FM STEP pour régler les options d’incré-
pas.
ment d’accord FM (recherchez les réglages de l’in-
# Si vous préférez ne pas effectuer la configuration
crément).
pour l’instant, tournez M.C. pour passer à NO.
1 Tournez M.C. pour choisir l’incrément d’accord
FM.
3 Appuyez sur M.C. pour sélectionner.
100 (100 kHz) — 50 (50 kHz)
Français
a
2 Appuyez sur M.C. pour confirmer la sélection.
4 Procédez comme suit pour définir le
QUIT s’affiche.
1 (liste)
menu.
! L’incrément d’accord manuel est défini sur
2 Section d’informations secondaires
Pour passer à la prochaine option de menu,
50 kHz.
vous devez confirmer votre sélection.
! Quand les fonctions AF et TA sont toutes deux
3 TA (bulletins d’informations routières)
désactivées, l’incrément d’accord est défini
TP (identification des programmes d’infor-
LANGUAGE (multilingue)
sur 50 kHz même s’il est réglé sur 100.
4
mations routières)
Cet appareil peut afficher les informations textuel-
5
(sound retriever)
les d’un fichier audio compressé même si elles
5 Pour terminer la configuration, tournez
sont incorporées en anglais, en russe ou en turc.
M.C. pour sélectionner YES.
LOC (accord automatique sur une station lo-
6
! Si la langue incorporée et la langue sélection-
# Si vous souhaitez modifier à nouveau le réglage,
cale)
née sont différentes, les informations textuel-
tournez M.C. pour passer à NO.
7
(répétition de la lecture)
les peuvent ne pas s’afficher correctement.
! Certains caractères peuvent ne pas s’afficher
6 Appuyez sur M.C. pour sélectionner.
8
(lecture aléatoire)
correctement.
Remarques
Section d’informations principales
1 Tournez M.C. pour sélectionner le réglage sou-
! Vous pouvez configurer les options de menu
! Syntoniseur : gamme et fréquence
haité.
à partir du menu système et du menu initial.
! RDS : nom du service de programme, in-
ENG (Anglais)—РУС (Russe)—TUR (Turc)
Pour des détails sur les réglages, reportez-
formations PTY et autres informations
2 Appuyez sur M.C. pour confirmer la sélection.
9
vous à la page 19, Menu système et la page
textuelles
CLOCK SET (réglage de l’horloge)
20, Menu initial.
! Lecteur de CD et périphérique de stoc-
! Vous pouvez annuler le menu de configura-
kage USB : temps de lecture écoulé et in-
1 Tournez M.C. pour régler l’heure.
tion en appuyant sur SRC/OFF.
formations textuelles
2 Appuyez sur M.C. pour sélectionner les minu-
tes.
a
Apparaît lorsqu’un niveau inférieur de dos-
3 Tournez M.C. pour régler les minutes.
Opérations de base
sier ou de menu existe.
4 Appuyez sur M.C. pour confirmer la sélection.
Important
! Manipulez la face avant avec précaution
lorsque vous l’enlevez ou la remontez.
Menu de configuration
! Évitez de heurter la face avant.
! Conservez la face avant à l’abri des tempéra-
1 Après avoir installé l’appareil, mettez le
tures élevées et de la lumière directe du so-
contact d’allumage sur ON.
leil.
SET UP s’affiche.
Fr
15
<QRD3204-A>15
Black plate (16,1)
Section
02
Utilisation de cet appareil
Utilisation de cet appareil
! Pour éviter d’endommager le périphérique
Choix d’une source
Radio
Enregistrement et rappel des
ou l’intérieur du véhicule, retirez tous les câ-
1 Appuyez sur SRC/OFF pour parcourir les op-
stations pour chaque gamme
bles et périphériques connectés à la face
Opérations de base
tions disponibles :
avant, avant d’enlever cette dernière.
Utilisation des touches de présélection
RADIO—CD—USB—AUX
Sélection d’une gamme
! USB MTP apparaît lorsque la connexion MTP
1 Pour la mise en mémoire : Appuyez de
Retrait de la face avant
1 Appuyez sur BAND jusqu’à ce que la gamme
est en cours d’utilisation.
façon prolongée sur l’une des touches de
1 Appuyez sur la touche de retrait pour libérer la
souhaitée, FM1, FM2, FM3 en FM ou MW/LW
présélection (1/
à6/ ) jusqu’à ce que le
face avant.
Réglage du volume
(PO/GO), soit affichée.
numéro cesse de clignoter.
2 Poussez la face avant vers le haut (M), puis
1 Tournez M.C. pour régler le volume.
Changement de fréquence en mémoire
tirez-la vers vous (N).
1 Appuyez sur c ou d.
2 Pour le rappel : Appuyez sur une des tou-
Remarque
! Sélectionnez PCH (canal présélectionné) sous
ches de présélection (1/
à6/ ).
Si le fil bleu/blanc de l’appareil est relié à la
SEEK pour utiliser cette fonction.
prise de commande du relais de l’antenne moto-
Changement de l’affichage
risée du véhicule, celle-ci se déploie lorsque la
Accord manuel (pas à pas)
source est mise en service. Pour rétracter l’an-
1 Appuyez sur c ou d.
Sélection des informations textuelles souhaitées
tenne, mettez la source hors service.
! Sélectionnez MAN (accord manuel) sous
1 Appuyez sur DISP pour parcourir les options
3 Conservez toujours la face avant retirée dans
SEEK pour utiliser cette fonction.
disponibles :
un boîtier ou un sac de protection.
Recherche
! FREQUENCY (nom du service de pro-
Opérations de menu
Remontage de la face avant
1 Appuyez de manière prolongée sur c ou d,
gramme ou fréquence)
fréquemment utilisées
1 Faites glisser la face avant vers la gauche.
puis relâchez.
! BRDCST INFO (nom du service de pro-
Vous pouvez annuler l’accord automatique en
gramme/informations PTY)
Retour à l’affichage précédent
appuyant brièvement sur c ou d.
! CLOCK (nom de la source et horloge)
Retour à la liste précédente (le dossier de niveau
Lorsque vous appuyez de manière prolongée
immédiatement supérieur)
sur c ou d, vous pouvez sauter des stations.
Remarques
1 Appuyez sur
/DIMMER.
L’accord automatique démarre dès que vous
! Si le nom du service de programme ne peut
relâchez c ou d.
pas être acquis dans FREQUENCY, la fré-
Retour à l’affichage ordinaire
quence d’émission s’affiche alors. Si le nom
Annulation du menu principal
2 Appuyez sur le côté droit de la face avant jus-
Remarques
du service de programme est détecté, celui-
1 Appuyez sur BAND.
qu’àcequ’elle soit bien en place.
! Pour des détails sur SEEK, reportez-vous à la
ci s’affiche.
Forcer la face avant en position risque de l’en-
Retour à l’affichage ordinaire à partir de la liste
page 17, SEEK (réglage de la touche droite/
! En fonction de la gamme sélectionnée, les
dommager ou d’endommager l’appareil cen-
1 Appuyez sur BAND.
gauche).
informations textuelles peuvent être différen-
tral.
! La fonction AF (recherche des autres fré-
tes.
quences possibles) de cet appareil peut être
! Les informations textuelles pouvant être mo-
Mise en service de l’appareil
mise en service ou hors service. La fonction
difiées dépendent de la région.
1 Appuyez sur SRC/OFF pour mettre en service
AF doit être hors service pendant une opéra-
l’appareil.
tion d’accord normal (reportez-vous à la
Utilisation des fonctions PTY
Mise hors service de l’appareil
page 17, AF (recherche des autres fréquences
Vous pouvez rechercher une station à l’aide de
1 Maintenez la pression sur SRC/OFF jusqu’àce
possibles)).
son code PTY (type de programme).
que l’appareil soit mis hors tension.
16
Fr
<QRD3204-A>16
Black plate (17,1)
Section
Utilisation de cet appareil
Utilisation de cet appareil
02
# Si la gamme MW/LW (PO/GO) est sélectionnée,
Recherche d’une station RDS en utilisant le code
L’accord automatique sur une station locale ne
CD/CD-R/CD-RW et
seuls BSM, LOCAL et SEEK sont disponibles.
PTY
s’intéresse qu’aux stations de radio dont le signal
périphériques de stockage USB
1 Appuyez sur
(liste).
reçu est suffisamment puissant pour garantir une
FM SETTING (réglages de qualité sonore FM)
2 Tournez M.C. pour sélectionner le type de pro-
réception de bonne qualité.
Connexion MTP
gramme.
Le niveau de qualité sonore peut être réglé afin de
1 Appuyez sur M.C. pour sélectionner le réglage
Il est possible de connecter des périphériques
NEWS/INFO—POPULAR—CLASSICS—
correspondre aux conditions du signal d’émission
souhaité.
Android compatibles MTP (utilisant le système
OTHERS
de la gamme FM.
FM : OFF—LV1—LV2—LV3—LV 4
d’exploitation Android 4.0 ou version supérieure)
Français
3 Appuyez sur M.C. pour lancer la recherche.
1 Appuyez sur M.C. pour afficher le mode de ré-
MW/LW (PO/GO) : OFF—LV1 —LV2
via une connexion MTP à l’aide de la source
Cet appareil recherche une station qui diffuse
glage.
La valeur la plus élevée permet la réception
USB. Pour connecter un périphérique Android,
ce type de programme. Quand une station est
2 Tournez M.C. pour sélectionner le réglage sou-
des seules stations très puissantes ; les autres
utilisez le câble fourni avec l’appareil.
trouvée, son nom de service de programme
haité.
valeurs autorisent la réception de stations
Remarque
est affiché.
! STANDARD – Il s’agit du réglage standard.
moins puissantes.
! Appuyez à nouveau sur M.C. pour aban-
! HI-FI – Il s’agit du réglage à utiliser pour
Cette fonction n’est pas compatible avec WAV.
TA (attente de bulletins d’informations routières)
donner la recherche.
donner la priorité à la qualité supérieure du
! Le type de l’émission captée peut différer
son stéréo.
Opérations de base
1 Appuyez sur M.C. pour mettre en service ou
de celui indiqué par le code PTY transmis.
! STABLE – Il s’agit du réglage à utiliser pour
hors service l’attente d’un bulletin d’informa-
! Si aucune station ne diffuse d’émission du
donner la priorité au faible bruit du son
Lecture d’un CD/CD-R/CD-RW
tions routières.
type choisi, l’indication NOT FOUND s’affi-
monaural.
1 Introduisez un disque, l’étiquette vers le haut,
che pendant environ deux secondes puis
AF (recherche des autres fréquences possibles)
dans le logement de chargement des disques.
BSM (mémoire des meilleures stations)
le syntoniseur s’accorde sur la fréquence
d’origine.
1 Appuyez sur M.C. pour mettre la fonction AF
Éjection d’un CD/CD-R/CD-RW
La fonction BSM (mémoire des meilleures sta-
en service ou hors service.
1 Appuyez sur h.
tions) mémorise automatiquement les six stations
les plus fortes dans l’ordre de la force du signal.
NEWS (interruption pour réception d’un bulletin
Lecture de plages musicales sur un périphérique
Liste des codes PTY
1 Appuyez sur M.C. pour mettre la fonction BSM
d’informations)
de stockage USB
Pour plus de détails sur la liste PTY, visitez le site
en service.
1 Ouvrez le capot du port USB.
suivant :
Pour annuler, appuyez à nouveau sur M.C.
1 Appuyez sur M.C. pour mettre la fonction
2 Branchez le périphérique de stockage USB en
http://www.pioneer.eu/eur/products/25/121/tech/
NEWS (bulletin d’informations) en service ou
utilisant un câble USB.
REGIONAL (stations régionales)
CarAudio/PTY.html
hors service.
Arrêt de la lecture de fichiers sur un périphérique
Quand la fonction AF est utilisée, la fonction de re-
SEEK (réglage de la touche droite/gauche)
de stockage USB
Réglages des fonctions
cherche des stations régionales limite la sélection
1 Vous pouvez débrancher le périphérique de
aux stations qui diffusent des programmes régio-
Vous pouvez assigner une fonction aux touches
1 Appuyez sur M.C. pour afficher le menu
stockage USB à tout moment.
naux.
droite et gauche de l’appareil.
principal.
1 Appuyez sur M.C. pour mettre la fonction de
Sélectionnez MAN (accord manuel) pour effectuer
Sélection d’un dossier
recherche des stations régionales en service
un accord de fréquence manuellement ou sélec-
1 Appuyez sur 1/
ou 2/ .
2 Tournez M.C. pour changer l’option de
ou hors service.
tionnez PCH (canaux présélectionnés) pour chan-
menu et appuyez pour sélectionner
Sélection d’une plage
ger de canal présélectionné.
FUNCTION.
LOCAL (accord automatique sur une station lo-
1 Appuyez sur c ou d.
1 Appuyez sur M.C. pour sélectionner MAN ou
cale)
PCH.
Avance ou retour rapide
3 Tournez M.C. pour sélectionner la fonc-
1 Appuyez de manière prolongée sur c ou d.
tion.
! Lors de la lecture d’un disque d’audio
Une fois sélectionnées, les fonctions suivantes
compressé, aucun son n’est émis pendant l’a-
peuvent être ajustées.
vance ou le retour rapide.
Fr
17
<QRD3204-A>17
Black plate (18,1)
Section
02
Utilisation de cet appareil
Utilisation de cet appareil
Changement de l’affichage
Retour au dossier racine
Affichage d’une liste des fichiers (ou des dossiers)
Pause de la lecture
1 Appuyez sur BAND de façon prolongée.
dans le dossier sélectionné
1 Appuyez sur 4/PAUSE pour mettre en pause
Sélection des informations textuelles souhaitées
1 Quand un dossier est sélectionné, appuyez sur
ou reprendre la lecture.
Commutation entre les modes audio compressé
1 Appuyez sur DISP pour parcourir les options
M.C.
et CD-DA
Amélioration de l’audio compressé et restauration
disponibles :
1 Appuyez sur BAND.
Lecture d’une plage musicale dans le dossier sé-
d’un son riche (sound retriever (correcteur de son
CD-DA
lectionné
compressé))
Changement de périphérique de mémoire de lec-
! ELAPSED TIME (numéro de plage et temps
1 Quand un dossier est sélectionné, appuyez de
1 Appuyez sur 3/S.Rtrv pour parcourir les op-
ture
de lecture)
manière prolongée sur M.C.
tions disponibles :
Vous pouvez basculer entre les périphériques de
! CLOCK (nom de la source et horloge)
1—2—OFF (hors service)
mémoire sur les périphériques de stockage USB
! SPEANA (analyseur de spectre)
1 est efficace pour les faibles taux de compres-
ayant plus d’un périphérique de mémoire compa-
CD-TEXT
Opérations à l’aide de touches
sion et 2 est efficace pour les taux de compres-
tible avec la norme Mass Storage Class pour ef-
! TRACK INFO (titre de la plage/interprète
spéciales
sion élevés.
fectuer la lecture.
de la plage/titre du disque)
1 Appuyez sur BAND.
! ELAPSED TIME (numéro de plage et temps
Sélection d’une étendue de répétition de lecture
! Vous pouvez basculer entre 32 différents péri-
de lecture)
Réglages des fonctions
1 Appuyez sur 6/
pour parcourir les options
phériques de mémoire maximum.
! CLOCK (nom de la source et horloge)
disponibles :
! SPEANA (analyseur de spectre)
1 Appuyez sur M.C. pour afficher le menu
Remarque
CD/CD-R/CD-RW
MP3/WMA/WAV
principal.
! ALL – Répétition de toutes les plages
Débranchez les périphériques de stockage USB
! TRACK INFO (titre de la plage/nom de l’in-
! ONE – Répétition de la plage en cours de
de l’appareil lorsque vous ne l’utilisez pas.
terprète/nom de l’album)
2 Tournez M.C. pour changer l’option de
lecture
! FILE INFO (nom du fichier/nom du dossier)
menu et appuyez pour sélectionner
! FLD – Répétition du dossier en cours de
! ELAPSED TIME (numéro de plage et temps
FUNCTION.
lecture
de lecture)
Une fois sélectionnée, la fonction ci-dessous
Périphérique de stockage USB
! CLOCK (nom de la source et horloge)
peut être ajustée.
! ALL – Répétition de tous les fichiers
! SPEANA (analyseur de spectre)
! ONE – Répétition du fichier en cours de
S.RTRV (sound retriever)
lecture
Sélection et lecture des fichiers/
! FLD – Répétition du dossier en cours de
Améliore automatiquement l’audio compressé et
restaure un son riche.
plages à partir de la liste des noms
lecture
1 Appuyez sur M.C. pour sélectionner le réglage
1 Appuyez sur pour passer en mode
Lecture des plages dans un ordre aléatoire
souhaité.
liste des noms de fichiers/plages.
1 Appuyez sur 5/
pour activer ou désactiver
Pour les détails, reportez-vous à la page 18,
la lecture aléatoire.
Amélioration de l’audio compressé et restaura-
2 Utilisez M.C. pour sélectionner le nom de
Les plages d’une étendue de répétition sélec-
tion d’un son riche (sound retriever (correcteur
fichier (ou nom de dossier) souhaité.
tionnée sont lues dans un ordre aléatoire.
de son compressé)).
! Pour changer de plage musicale pendant une
lecture aléatoire, appuyez sur d pour passer à
Sélection d’un fichier ou d’un dossier
la plage suivante. Appuyez sur c pour redé-
1 Tournez M.C.
Réglages sonores
marrer la lecture de la plage en cours au
Lecture
début de la plage musicale.
1 Appuyez sur M.C. pour afficher le menu
1 Lorsqu’un fichier ou une plage est sélection-
principal.
né(e), appuyez sur M.C.
2 Tournez M.C. pour changer l’option de
menu et appuyez pour sélectionner AUDIO.
18
Fr
<QRD3204-A>18
Black plate (19,1)
Section
Utilisation de cet appareil
Utilisation de cet appareil
02
3 Tournez M.C. pour sélectionner la fonc-
Cet appareil est équipé d’une sortie haut-parleur
Utilisez cette fonction lorsque vous souhaitez uni-
tion audio.
1 Appuyez sur M.C. pour afficher le mode de ré-
d’extrêmes graves qui peut être mise en service
quement écouter des sons aigus. Seules les fré-
Une fois sélectionnées, les fonctions audio sui-
glage.
ou hors service.
quences supérieures à la coupure du filtre passe-
vantes peuvent être ajustées.
2 Tournez M.C. pour sélectionner l’égaliseur.
1 Appuyez sur M.C. pour sélectionner le réglage
haut (HPF) sont émises en sortie via les haut-par-
! FADER n’est pas disponible lorsque
POWERFUL—NATURAL—VOCAL—CUS-
souhaité.
leurs.
SUB.W/SUB.W est sélectionné dans
TOM1—CUSTOM2—FLAT—SUPER BASS
NOR (phase normale) — REV (phase inversée)
1 Appuyez sur M.C. pour afficher le mode de ré-
SP-P/O MODE. Pour les détails, reportez-vous
La bande et le niveau de l’égalisateur peuvent
— OFF (haut-parleur d’extrêmes graves désac-
glage.
à la page 20, SP-P/O MODE (réglage de la sor-
être personnalisés lorsque CUSTOM1 ou CUS-
Français
tivé)
2 Appuyez sur M.C. pour parcourir les options
tie arrière et du préamp).
TOM2 est sélectionné.
disponibles :
! SUB.W et SUB.W CTRL ne sont pas disponi-
Si CUSTOM1 ou CUSTOM2 est sélectionné,
SUB.W CTRL (réglage du haut-parleur d’extrêmes
Fréquence de coupure—Niveau de pente
bles lorsque REAR/REAR est sélectionné
suivez les procédures décrites ci-dessous. Si
graves)
3 Tournez M.C. pour sélectionner le réglage sou-
dans SP-P/O MODE. Pour les détails, repor-
d’autres options sont sélectionnées, appuyez
Seules les fréquences inférieures à celles de la
haité.
tez-vous à la page 20, SP-P/O MODE (réglage
sur M.C. pour revenir à l’affichage précédent.
plage sélectionnée sont produites par le haut-par-
Fréquence de coupure : OFF—50HZ—63HZ—
de la sortie arrière et du préamp).
! CUSTOM1 peut être réglé séparément
leur d’extrêmes graves.
80HZ—100HZ—125HZ—160HZ—200HZ
! SUB.W CTRL n’est pas disponible lorsque
pour chaque source.
1 Appuyez sur M.C. pour afficher le mode de ré-
Niveau de pente : –12— –24
SUB.W est sélectionné dans OFF. Pour les
! CUSTOM2 est un réglage partagé et
glage.
détails, reportez-vous à la page 19, SUB.W (ré-
commun à toutes les sources.
SLA (réglage du niveau de la source)
2 Appuyez sur M.C. pour parcourir les options
glage en service/hors service du haut-parleur
3 Appuyez sur M.C. pour afficher le mode de ré-
disponibles :
Cette fonction empêche une modification trop im-
d’extrêmes graves).
glage.
Fréquence de coupure—Niveau de sortie—Ni-
portante du volume lors du basculement de
! SLA n’est pas disponible lorsque FM est sé-
4 Appuyez sur M.C. pour parcourir les options
veau de pente
source.
lectionné comme source.
disponibles :
Les débits pouvant être réglés clignotent.
! Les réglages sont basés sur le niveau du vo-
Bande de l’égaliseur—Niveau de l’égaliseur
3 Tournez M.C. pour sélectionner le réglage sou-
lume FM qui lui, demeure inchangé.
FADER (réglage de l’équilibre avant-arrière)
5 Tournez M.C. pour sélectionner le réglage sou-
haité.
! Le niveau du volume MW/LW (PO/GO) peut
haité.
Fréquence de coupure : 50HZ—63HZ—80HZ
également être réglé avec cette fonction.
1 Appuyez sur M.C. pour afficher le mode de ré-
Bande de l’égaliseur : 80HZ—250HZ—800HZ
—100HZ—125HZ—160HZ—200HZ
1 Appuyez sur M.C. pour afficher le mode de ré-
glage.
—2.5KHZ—8KHZ
Niveau de sortie : –24 à +6
glage.
2 Tournez M.C. pour régler l’équilibre sonore
Niveau de l’égaliseur : +6 à –6
Niveau de pente : –12— –24
2 Tournez M.C. pour régler le volume de la
entre les haut-parleurs avant et arrière.
! Vous pouvez également changer l’égaliseur en
source.
appuyant de manière répétée sur EQ .
BASS BOOST (accentuation des graves)
BALANCE (réglage d’équilibre sonore)
Plage de réglage : +4 à –4
LOUDNESS (correction physiologique)
1 Appuyez sur M.C. pour afficher le mode de ré-
1 Appuyez sur M.C. pour afficher le mode de ré-
La correction physiologique a pour objet d’accen-
glage.
glage.
tuer les hautes et les basses fréquences à bas ni-
2 Tournez M.C. pour sélectionner le niveau dé-
Menu système
2 Tournez M.C. pour régler l’équilibre sonore
veaux d’écoute.
siré.
entre les haut-parleurs gauche/droite.
Important
1 Appuyez sur M.C. pour sélectionner le réglage
0 à +6 sont les valeurs affichées tandis que le
La fonction PW SAVE (économie d’énergie) est
EQ SETTING (rappel de l’égaliseur)
souhaité.
niveau augmente ou diminue.
annulée si la batterie du véhicule est déconnec-
OFF (hors service)—LOW (faible)—MID
HPF SETTING (réglage du filtre passe-haut)
tée et devra être réactivée une fois la batterie re-
(moyen)—HI (élevé)
connectée. Quand PW SAVE est hors service, il
SUB.W (réglage en service/hors service du haut-
est possible que selon la méthode de connexion
parleur d’extrêmes graves)
utilisée l’appareil continue à consommer du
courant de la batterie si le commutateur de
contact de votre véhicule ne possède pas de po-
sition ACC (accessoire).
Fr
19
<QRD3204-A>19
Black plate (20,1)
Section
02
Utilisation de cet appareil
Utilisation de cet appareil
1 Appuyez sur M.C. pour afficher le menu
2 Appuyez de façon prolongée sur SRC/
Activez ce réglage lorsque vous utilisez un appa-
SP-P/O MODE (réglage de la sortie arrière et du
principal.
OFF jusqu’à ce que le menu principal appa-
reil auxiliaire connecté à cet appareil.
préamp)
raisse sur l’afficheur.
1 Appuyez sur M.C. pour mettre AUX en service
2 Tournez M.C. pour changer l’option de
Seulement pour DEH-1600UBA
La sortie des bornes du haut-parleur arrière et la
ou hors service.
menu et appuyez pour sélectionner SYSTEM.
Appuyez sur M.C. pour afficher le menu princi-
sortie RCA de cet appareil peuvent être utilisées
DIMMER (atténuateur de luminosité)
pal.
pour connecter un haut-parleur pleine gamme ou
3 Tournez M.C. pour sélectionner la fonc-
un haut-parleur d’extrêmes graves. Sélectionnez
tion du menu système.
1 Appuyez sur M.C. pour mettre l’atténuateur de
3 Tournez M.C. pour changer l’option de
l’option appropriée à votre connexion.
Une fois sélectionnées, les fonctions du menu
luminosité en service ou hors service.
menu et appuyez pour sélectionner INITIAL.
1 Appuyez sur M.C. pour afficher le mode de ré-
système suivantes peuvent être ajustées.
! Vous pouvez également changer le réglage de
glage.
! MUTE MODE et PW SAVE ne sont pas dispo-
l’atténuateur de luminosité en appuyant de
4 Tournez M.C. pour sélectionner la fonc-
2 Tournez M.C. pour sélectionner le réglage sou-
nibles pour DEH-1600UBA.
façon prolongée sur
/DIMMER.
tion du menu initial.
haité.
Une fois sélectionnées, les fonctions du menu
! REAR/SUB.W – Sélectionnez cette option
MUTE MODE (mode sourdine)
LANGUAGE (multilingue)
initial suivantes peuvent être ajustées.
lorsqu’un haut-parleur pleine gamme est
Le son émis par l’appareil est automatiquement
connecté aux bornes du haut-parleur ar-
1 Appuyez sur M.C. pour sélectionner le réglage
coupé ou atténué quand un signal en provenance
FM STEP (incrément d’accord FM)
rière et qu’un haut-parleur d’extrêmes gra-
souhaité.
d’un équipement possédant la fonction silencieux
ves est connecté à la sortie RCA.
ENG (Anglais)—РУС (Russe)—TUR (Turc)
est reçu.
1 Appuyez sur M.C. pour choisir l’incrément
! SUB.W/SUB.W – Sélectionnez cette option
1 Appuyez sur M.C. pour afficher le mode de ré-
d’accord FM.
lorsqu’un haut-parleur d’extrêmes graves
CLOCK SET (réglage de l’horloge)
glage.
100 (100 kHz) — 50 (50 kHz)
est connecté directement aux bornes du
2 Tournez M.C. pour sélectionner le réglage sou-
haut-parleur arrière sans amplificateur au-
1 Appuyez sur M.C. pour afficher le mode de ré-
haité.
xiliaire et qu’un haut-parleur d’extrêmes
glage.
! MUTE – Silencieux
graves est connecté à la sortie RCA.
2 Appuyez sur M.C. pour sélectionner le seg-
! 20dB ATT – Atténuation (20dB ATT aun
! REAR/REAR – Sélectionnez cette option
ment de l’affichage de l’horloge que vous sou-
effet plus fort que 10dB ATT)
lorsqu’un haut-parleur pleine gamme est
haitez régler.
! 10dB ATT – Atténuation
connecté aux bornes du haut-parleur ar-
Heure—Minute
rière et à la sortie RCA.
3 Tournez M.C. pour régler l’horloge.
PW SAVE (économie d’énergie)
Si un haut-parleur pleine gamme est
12H/24H (notation temporelle)
Activer cette fonction vous permet de réduire la
connecté à la sortie des bornes du haut-
consommation de la batterie.
parleur arrière et que la sortie RCA n’est
1 Appuyez sur M.C. pour sélectionner le réglage
! La mise en service de la source est la seule
pas utilisée, vous pouvez sélectionner
souhaité.
opération permise quand cette fonction est en
REAR/SUB.W ou REAR/REAR.
12H (horloge 12 heures)—24H (horloge
service.
24 heures)
1 Appuyez sur M.C. pour mettre l’économie d’é-
nergie en service ou hors service.
AUTO PI (recherche automatique PI)
Menu système
L’appareil peut rechercher automatiquement une
1 Maintenez la pression sur SRC/OFF jus-
autre station avec le même type de programme, y
qu’à ce que l’appareil soit mis hors tension.
Menu initial
compris si l’accord a été obtenu par le rappel
d’une fréquence en mémoire.
1 Maintenez la pression sur SRC/OFF jus-
2 Appuyez de façon prolongée sur SRC/
1 Appuyez sur M.C. pour mettre en service ou
qu’à ce que l’appareil soit mis hors tension.
OFF jusqu’à ce que le menu principal appa-
hors service la recherche automatique PI.
raisse sur l’afficheur.
Seulement pour DEH-1600UBA
AUX (entrée auxiliaire)
20
Fr
<QRD3204-A>20
-
Pioneer DEH-1600UBG — page 1
Black plate (1,1) Owner ’ s Manual Mode d ’ emploi Manuale d ’ istruzioni Manual de instrucciones Bedienungsanleitung Handleiding Руководств о пользова т еля CD RDS RECEIVER A UT ORADIO CD RDS SINT OLETT ORE CD RDS REPRODUCT OR DE CD CON RECEPT OR RDS CD RDS-EMPFÄNGER CD RDS-ONTV ANGER CD RDS ПРИЕМНИК DEH-1600U …
-
Pioneer DEH-1600UBG — page 2
Black plate (2,1) Thank you for purchasing this PIONEER product T o ensure proper use, please read through this manual before using this product. It is especially important that you read and observe WARN- ING s and CAUTION s in this manual. Please keep the manual in a safe and accessible place for future reference. If you want to dispose this produ …
-
Pioneer DEH-1600UBG — page 3
Black plate (3,1) Head unit 7 1 4 6 3 2 9 a de 8 5 c b 1 h (eject) 2 SRC / OFF 3 MUL TI-CONTROL ( M.C. ) 4 (list) 5 DISP 6 Disc loading slot 7 USB port 8 EQ 9 BAND a (back)/ DIMMER (dimmer) b c / d c 1 / to 6 / d AUX input jack (3.5 mm stereo jack) e Detach button CAUTION Use an optional Pioneer USB cable (CD-U50E) to connect the USB storage device …
-
Pioneer DEH-1600UBG — page 4
Black plate (4,1) Removing the front panel 1 Press the detach button to release the front panel. 2 Push the front panel upward ( M ) and then pull it toward ( N ) you. 3 Always store the detached front panel in a pro — tective case or bag. Re-attaching the front panel 1 Slide the front panel to the left. 2 Press the right side of the front panel un …
-
Pioneer DEH-1600UBG — page 5
Black plate (5,1) 2 T ur n M.C. to change the menu option and press to select FUNCTION. 3 T ur n M.C. to select the function. Once selected, the following functions can be adjusted. # If MW/LW band is selected, only BSM , LOCAL and SEEK are available. FM SETTING (FM sound quality settings) The sound quality level can be set to match the broadcast s …
-
Pioneer DEH-1600UBG — page 6
Black plate (6,1) Viewing a list of the files (or folders) in the se- lected folder 1 When a folder is selected, press M.C. Playing a song in the selected folder 1 When a folder is selected, press and hold M.C. Operations using special buttons Selecting a repeat play range 1 Press 6 / to cycle between the following: CD/CD-R/CD-RW ! ALL – Repeat a …
-
Pioneer DEH-1600UBG — page 7
Black plate (7,1) Use this function when wanting to listen only to high-frequency sounds. Only frequencies higher than the high-pass filter (HPF) cutoff are output from the speakers. 1 Press M.C. to display the setting mode. 2 Press M.C. to cycle between the following: Cut-off frequency — Slope level 3 Turn M.C. to select the desired setting. Cut …
-
Pioneer DEH-1600UBG — page 8
Black plate (8,1) Using an AUX source 1 Insert the stereo mini plug into the AUX input jack. 2 Press SRC/OFF to select AUX as the source. Note AUX cannot be selected unless the auxiliar y set- ting is turned on. For more details, refer to AUX (auxiliar y input) on page 7. Switching the display Selecting the desired text information 1 Press DISP to …
-
Pioneer DEH-1600UBG — page 9
Black plate (9,1) Power cord 1 3 3 2 4 4 5 5 6 6 b 8 9 7 a e d c 1 T o power cord input 2 Depending on the kind of vehicle, the func- tion of 3 and 5 may be different. In this case, be sure to connect 4 to 5 and 6 to 3 . 3 Y ellow Back-up (or accessor y) 4 Y ellow Connect to the constant 12 V supply termi- nal. 5 Red Accessory (or back-up) 6 Red Co …
-
Pioneer DEH-1600UBG — page 10
Black plate (10,1) 2 Mounting sleeve # Make sure that the unit is installed securely in place. An unstable installation may cause skipping or other malfunctions. DIN Rear -mount 1 Determine the appropriate position where the holes on the bracket and the side of the unit match. 2 Tighten two screws on each side. 1 2 3 1 Tapping screw (5 mm × 8 mm) …
-
Pioneer DEH-1600UBG — page 11
Black plate (11,1) FORMA T READ Sometimes there is a delay between the start of play- back and when you start to hear any sound. W ait until the message disappears and you hear sound. NO AUDIO The inserted disc does not contain any playable files. Replace the disc. SKIPPED The inserted disc contains DRM protected files. The protected files are skip …
-
Pioneer DEH-1600UBG — page 12
Black plate (12,1) Compressed audio compatibility (disc, USB) WMA File extension: .wma Bit rate: 48 kbps to 320 kbps (CBR), 48 kbps to 384 kbps (VBR) Sampling frequency: 32 kHz, 44.1 kHz, 48 kHz Windows Media ä Audio Professional, Lossless, Voice/DRM Stream/Stream with video: Not com- patible MP3 File extension: .mp3 Bit rate: 8 kbps to 320 kbps ( …
-
Pioneer DEH-1600UBG — page 13
Black plate (13,1) streaming via internet, intranets and/or other networks or in other electronic content distribu- tion systems, such as pay-audio or audio-on-de- mand applications. An independent license for such use is required. For details, please visit http://www.mp3licensing.com. WMA Windows Media is either a registered trademark or trademark …
-
Pioneer DEH-1600UBG — page 14
Black plate (14,1) Nous vous remer cions d ’ avoir acheté cet ap- pareil PIONEER P our garantir une utilisation correcte, lisez bien ce mode d ’ emploi avant d ’ utiliser cet appareil. Il est particulièrement important que vous lisiez et respectiez les indications A TTENTION et PRÉ- CAUTION de ce mode d ’ emploi. Conser vez-le dans un en …
-
Pioneer DEH-1600UBG — page 15
Black plate (15,1) Appareil central 7 1 4 6 3 2 9 a de 8 5 c b 1 h (éjection) 2 SRC / OFF 3 MUL TI-CONTROL ( M.C. ) 4 (liste) 5 DISP 6 Fente de chargement des disques 7 Port USB 8 EQ 9 BAND a (retour)/ DIMMER (atténuateur de lumi- nosité) b c / d c 1 / à 6 / d Jack d ’ entrée AUX (jack stéréo 3,5 mm) e T ouche de retrait de la face avant P …
-
Pioneer DEH-1600UBG — page 16
Black plate (16,1) ! P our éviter d ’ endommager le périphérique ou l ’ intérieur du véhicule, retirez tous les câ- bles et périphériques connectés à la face avant, avant d ’ enlever cette dernière. Retrait de la face avant 1 Appuyez sur la touche de retrait pour libérer la face avant. 2 Poussez la face avant vers le haut ( M ), p …
-
Pioneer DEH-1600UBG — page 17
Black plate (17,1) Recherche d ’ une station RDS en utilisant le code PTY 1 Appuyez sur (liste). 2 T ournez M.C. pour sélectionner le type de pro- gramme. NEWS/INFO — POPULAR — CLASSICS — OTHERS 3 Appuyez sur M.C. pour lancer la recherche. Cet appareil recherche une station qui diffuse ce type de programme. Quand une station est trouvée, …
-
Pioneer DEH-1600UBG — page 18
Black plate (18,1) Retour au dossier racine 1 Appuyez sur BAND de façon prolongée. Commutation entre les modes audio compressé et CD-DA 1 Appuyez sur BAND . Changement de périphérique de mémoire de lec- ture Vous pouvez basculer entre les périphériques de mémoire sur les périphériques de stockage USB ayant plus d ’ un périphérique de …
-
Pioneer DEH-1600UBG — page 19
Black plate (19,1) 3 T ournez M.C. pour sélectionner la fonc- tion audio. Une fois sélectionnées, les fonctions audio sui- vantes peuvent être ajustées. ! FADER n ’ est pas disponible lorsque SUB.W/SUB.W est sélectionné dans SP-P/O MODE . Pour les détails, reportez-vous à la page 20, SP-P/O MODE (réglage de la sor- tie arrière et du pr …
-
Pioneer DEH-1600UBG — page 20
Black plate (20,1) 1 Appuyez sur M.C. pour afficher le menu principal. 2 T ournez M.C. pour changer l ’ option de menu et appuyez pour sélectionner SYSTEM. 3 T ournez M.C. pour sélectionner la fonc- tion du menu système. Une fois sélectionnées, les fonctions du menu système suivantes peuvent être ajustées. ! MUTE MODE et PW SAVE ne sont p …
-
Pioneer DEH-1600UBG — page 21
Black plate (21,1) Appuyez sur M.C. pour afficher le menu princi- pal. 3 T ournez M.C. pour changer l ’ option de menu et appuyez pour sélectionner SYSTEM. 4 T ournez M.C. pour sélectionner la fonc- tion du menu système. P our les détails, reportez-vous à la page 19, Menu système . Utilisation d ’ une source AUX 1 Insérez la mini prise s …
-
Pioneer DEH-1600UBG — page 22
Black plate (22,1) 1 Entrée cordon d ’ alimentation 2 Sortie arrière ou haut-parleur d ’ extrêmes gra- ves 3 Entrée antenne 4 F usible (10 A) 5 Entrée télécommande câblée (DEH-1600UB, DEH-1600UBG et DEH-1600UBB unique- ment) Un adaptateur de télécommande câblée (vendu séparément) peut être connecté. Cordon d ’ alimentation 1 …
-
Pioneer DEH-1600UBG — page 23
Black plate (23,1) Montage avant/arrière DIN Cet appareil peut être installé correctement soit en montage frontal ou en montage arrière. Utilisez des pièces disponibles dans le commerce lors de l ’ installation. Montage frontal DIN 1 Insérez le manchon de montage dans le tableau de bord. Lors de l ’ installation de cet appareil dans un es …
-
Pioneer DEH-1600UBG — page 24
Black plate (24,1) Dépannage Les symptômes apparaissent en gras et les cau- ses sous la forme de texte régulier non indenté. Le texte régulier indenté est utilisé pour indiquer les actions à mettre en œ uvre. L ’ écran revient automatiquement à l ’ affichage ordinaire. Vous n ’ avez exécuté aucune opération pendant 30 secondes. …
-
Pioneer DEH-1600UBG — page 25
Black plate (25,1) ERROR-19 P anne de communication. Effectuez une des opérations suivantes. – Coupez et remettez le contact d ’ allumage. – Déconnectez le périphérique de stockage USB. – Choisissez une autre source. Revenez ensuite à la source USB. ERROR-23 Le périphérique de stockage USB n ’ a pas été for- maté avec FA T12, FA …
-
Pioneer DEH-1600UBG — page 26
Black plate (26,1) Informations supplémentaires Seuls les 32 premiers caractères d ’ un nom de fi- chier (incluant l ’ extension de fichier) ou d ’ un nom de dossier peuvent être affichés. Les textes russes à afficher sur cet appareil doi- vent être codés avec un des jeux de caractères sui- vants : ! Unicode (UTF-8, UTF-16) ! Un jeu d …
-
Pioneer DEH-1600UBG — page 27
Black plate (27,1) Caractéristiques techniques Généralités T ension d ’ alimentatio n ….. 14,4 V CC (10,8 V à 15,1 V ac- ceptable) Mise à la masse …………… Pôle nég atif Consommation maxima le …………………………….. 10,0 A Dimensions (L × H × P) : DIN Châssis ………………………. 178 mm × 50 mm × 165 mm …
-
Pioneer DEH-1600UBG — page 28
Black plate (28,1) Grazie per aver acquistato questo prodotto PIONEER Leggere attentamente questo manuale prima di utilizzare il prodotto, per assicurarne il corretto utilizzo. È particolarmente importante leggere e osservare le precauzioni contrassegnate da AV- VERTENZA e A TTENZIONE contenute in questo manuale. Conser var e il manuale in un luog …
-
Pioneer DEH-1600UBG — page 29
Black plate (29,1) Unità principale 7 1 4 6 3 2 9 a de 8 5 c b 1 h (espulsione) 2 SRC / OFF 3 MUL TI-CONTROL ( M.C. ) 4 (lista) 5 DISP 6 V ano d ’ inserimento dei dischi 7 Porta USB 8 EQ 9 BAND a (indietro)/ DIMMER (varialuce) b c / d c Da 1 / a 6 / d Connettore di ingresso ausiliario (AUX) (con- nettore stereo da 3,5 mm) e T asto Rimozione A TT …
-
Pioneer DEH-1600UBG — page 30
Black plate (30,1) ! Per evitare danni ai dispositivi o agli interni del veicolo, accertarsi di scollegare gli even- tuali cavi e i dispositivi collegati al frontalino, prima di rimuoverlo. Rimozione del frontalino 1 Premere il tasto di rimozione per sganciare il frontalino. 2 Spingere il frontalino verso l ’ alto ( M ) e quindi ti- rarlo verso l …
-
Pioneer DEH-1600UBG — page 31
Black plate (31,1) Ricerca di una stazione RDS tramite le informazio- ni PTY 1 Premere (elenco). 2 Ruotare M.C. per selezionare un tipo di pro- gramma. NEWS/INFO — POPULAR — CLASSICS — OTHERS 3 Premere M.C. per avviare la ricerca. L ’ unità ricerca una stazione che trasmette il tipo di programma selezionato. Quando viene trovata una stazio …
-
Pioneer DEH-1600UBG — page 32
Black plate (32,1) Esegue l ’ avanzamento rapido/la modalità inversa rapida 1 Premere e tenere premuto c o d . ! Quando si riproducono file audio compressi, durante l ’ avanzamento rapido e la modalità in- versa non viene emesso audio. Ritorno alla cartella principale 1 Premere e tenere premuto BAND . P assaggio da audio compresso a CD-DA 1 P …
-
Pioneer DEH-1600UBG — page 33
Black plate (33,1) 3 Ruotare M.C. per selezionare la funzione audio. Dopo aver effettuato la selezione, è possibile re- golare le funzioni audio descritte di seguito. ! FADER non è disponibile se l ’ impostazione SUB.W/SUB.W è selezionata in SP-P/O MODE . Per ulteriori dettagli, vedere SP-P/O MODE (uscita posteriore e impostazio- ne pre-out) a …
-
Pioneer DEH-1600UBG — page 34
Black plate (34,1) 1 Premere M.C. per visualizzare il menu principale. 2 Ruotare M.C. per modificare l ’ opzione di menu; premere per selezionare SYSTEM. 3 Ruotare M.C. per selezionare la funzione del menu di sistema. Dopo aver effettuato la selezione, è possibile re- golare le funzioni del menu di sistema descritte di seguito. ! MUTE MODE e PW …
-
Pioneer DEH-1600UBG — page 35
Black plate (35,1) 3 Ruotare M.C. per modificare l ’ opzione di menu; premere per selezionare SYSTEM. 4 Ruotare M.C. per selezionare la funzione del menu di sistema. Per ulteriori dettagli, vedere Menu di sistema a pagina 33. Uso della sorgente AUX 1 Collegare il cavo mini plug stereo al con- nettore di ingresso ausiliario (AUX). 2 Premere SRC/OF …
-
Pioneer DEH-1600UBG — page 36
Black plate (36,1) 1 Ingresso cavo di alimentazione 2 Uscita posteriore o del subwoofer 3 Ingresso antenna 4 F usibile (10 A) 5 Ingresso telecomando cablato (solo per i mo- delli DEH-1600UB, DEH-1600UBG e DEH- 1600UBB) È possibile collegare un adattatore per tele- comando cablato (venduto a parte). Cavo di alimentaz ione 1 3 3 2 4 4 5 5 6 6 b 8 9 …
-
Pioneer DEH-1600UBG — page 37
Black plate (37,1) Montaggio DIN anteriore 1 Inserire la fascetta di montaggio nel cru- scotto. Se l ’ unità viene installata in uno spazio poco profondo, utilizzare la fascetta di montaggio for- nita. Se dietro l ’ unità vi è spazio sufficiente, uti- lizzare la fascetta di montaggio fornita con il veicolo. 2 Assicurare la fascetta di montag …
-
Pioneer DEH-1600UBG — page 38
Black plate (38,1) Risoluzione dei problemi In questo manuale i sintomi dei problemi sono riportati in testo grassetto, mentre le cause sono riportate in testo normale, non rientrato. Il testo normale, ma rientrato indica le azioni da intra- prendere. Il display torna automaticamente alla visualizzazione normale. Non è stata eseguita alcuna operaz …
-
Pioneer DEH-1600UBG — page 39
Black plate (39,1) ERROR-19 Errore di comunicazione. Eseguire una delle operazioni riportate di seguito. – Portare l ’ interruttore della chiave di avviamento in posizione OFF e quindi di nuovo su ON. – Scollegare il dispositivo di memoria USB. – P assare a una sorgente diversa. Quindi, tornare alla sorgente USB. ERROR-23 Il dispositivo di …
-
Pioneer DEH-1600UBG — page 40
Black plate (40,1) ! Non è possibile utilizzare questa funzione con l ’ opzione USB MTP . Informazioni supplementari Per i nomi dei file (incluse le estensioni) o i nomi delle cartelle, è possibile visualizzare esclusiva- mente i primi 32 caratteri. Il testo cirillico da visualizzare su questa unità deve essere codificato con uno dei seguenti …
-
Pioneer DEH-1600UBG — page 41
Black plate (41,1) Dati tecnici Generali Alimentazione ……………… 14,4 V di c.c. (varia zioni con- sentite da 10,8 V a 15,1 V) Messa a terra ………………. Negativa Consumo massimo ………. 10,0 A Dimensioni (L × A × P): DIN Unità principale …………… 17 8 mm × 50 mm × 165 mm Pannello anter iore ………… 18 8 mm × 58 …
-
Pioneer DEH-1600UBG — page 42
Black plate (42,1) Gracias por haber adquirido este producto PIONEER Lea con detenimiento este manual antes de utili- zar el producto por primera vez para que pueda darle el mejor uso posible. Es muy importante que lea y cumpla con la información que apare- ce bajo los mensajes de ADVERTENCIA y PRECAUCIÓN de este manual. Una vez leído, guarde el …
-
Pioneer DEH-1600UBG — page 43
Black plate (43,1) Unidad principal 7 1 4 6 3 2 9 a de 8 5 c b 1 h (expulsar) 2 SRC / OFF 3 MUL TI-CONTROL ( M.C. ) 4 (lista) 5 DISP 6 Ranura de carga de discos 7 Puerto USB 8 EQ 9 BAND a (parte posterior)/ DIMMER (reductor de luz) b c / d c 1 / a 6 / d Conector de entrada AUX (conector estéreo de 3,5 mm) e Botón de soltar PRECAUCIÓN Utilice un …
-
Pioneer DEH-1600UBG — page 44
Black plate (44,1) ! P ara evitar que el dispositivo o el interior del vehículo sufran daños, retire todos los cables o dispositivos conectados al panel delantero antes de extraerlo. Extracción del panel frontal 1 Pulse el botón de soltar para liberar el panel delantero. 2 Empuje el panel delantero hacia arriba ( M )y tire de él hacia usted ( …
-
Pioneer DEH-1600UBG — page 45
Black plate (45,1) Búsqueda de una emisora RDS por información PTY 1 Pulse (lista). 2 Gire M.C. para seleccionar el tipo de progra- ma. NEWS/INFO — POPULAR — CLASSICS — OT — HERS 3 Pulse M.C. para comenzar la búsqueda. La unidad busca una emisora que transmita ese tipo de programa, cuando la encuentra, se visualiza el nombre del ser vicio …
-
Pioneer DEH-1600UBG — page 46
Black plate (46,1) Cambio de la visualización Selección de la información de texto deseada 1 Pulse DISP para desplazarse entre las siguien- tes opciones: CD-DA ! ELAPSED TIME (número de pista y tiempo de reproducción) ! CLOCK (nombre de la fuente y reloj) ! SPEANA (analizador de espectro) CD- TEXT ! TRACK INFO (título de la pista/artista de l …
-
Pioneer DEH-1600UBG — page 47
Black plate (47,1) La sonoridad compensa las deficiencias en los in- tervalos de frecuencias bajas y altas cuando se es- cucha a un volumen bajo. 1 Pulse M.C. para seleccionar el ajuste deseado. OFF (desactivado) — LOW (bajo) — MID (medio) — HI (alto) SUB.W (ajuste de subgraves activado/desactiva- do) Esta unidad está equipada con una salida …
-
Pioneer DEH-1600UBG — page 48
Black plate (48,1) SP-P/O MODE (ajuste de la salida posterior y del preamplificador) La salida de cables de altavoces traseros y la sali- da RCA de esta unidad se puede usar para co- nectar altavoces de gama completa o de subgraves. Seleccione la opción adecuada para su conexión. 1 Pulse M.C. para mostrar el modo de ajuste. 2 Gire M.C. para selec …
-
Pioneer DEH-1600UBG — page 49
Black plate (49,1) 2 Salida trasera o salida de subgraves 3 Entrada de la antena 4 F usible (10 A) 5 Entrada remota conectada (solo DEH- 1600UB, DEH-1600UBG y DEH-1600UBB) Es posible conectar un adaptador de mando a distancia físicamente conectado (se vende por separado). Cable de alimentac ión 1 3 3 2 4 4 5 5 6 6 b 8 9 7 a e d c 1 A la toma del …
-
Pioneer DEH-1600UBG — page 50
Black plate (50,1) Montaje delantero DIN 1 Inserte el manguito de montaje en el sal- picadero. Si realiza la instalación en un espacio poco pro- fundo, utilice el manguito de montaje suminis- trado. Si hay suficiente espacio, utilice el manguito de montaje que venía con el vehículo. 2 Fije el manguito de montaje utilizando un destornillador para …
-
Pioneer DEH-1600UBG — page 51
Black plate (51,1) Solución de problemas Los síntomas se escriben en negrita y las cau- sas en escritura normal sin sangría. El texto nor- mal con sangría se utiliza para indicar las acciones que se han de tomar . La pantalla vuelve automáticamente a la visualización normal. No ha realizado ninguna operación en aproximada- mente 30 segundos. …
-
Pioneer DEH-1600UBG — page 52
Black plate (52,1) ERROR-19 Error de comunicación. Realice una de las siguientes operaciones: – Cambie la llave de encendido del automóvil a la posición de desactivación y luego pase de nuevo a activación. – Desconecte el dispositivo de almacenamiento USB. – Cambie a una fuente diferente. Después vuelva a la fuente USB. ERROR-23 El disp …
-
Pioneer DEH-1600UBG — page 53
Black plate (53,1) Información complementaria Solo se pueden visualizar los primeros 32 caracte- res como nombre de archivo (incluida la exten- sión) o nombre de carpeta. Los textos en ruso que se visualizarán en esta uni- dad se deben codificar con los siguientes conjun- tos de caracteres: ! Unicode (UTF-8, UTF-16) ! Los conjuntos de caracteres …
-
Pioneer DEH-1600UBG — page 54
Black plate (54,1) Este producto incluye tecnología propiedad de Microsoft Corporation, y no se puede usar ni dis- tribuir sin una licencia de Microsoft Licensing, Inc. Android ä Android es una marca comercial de Google Inc. Especificaciones Generales Fuente de alim entación …. 14,4 V cc (10,8 V a 15,1 V per- misible) Sistema de derivación a …
-
Pioneer DEH-1600UBG — page 55
Black plate (55,1) Español 55 Es <QRD3219-A>55 …
-
Pioneer DEH-1600UBG — page 56
Black plate (56,1) Vielen Dank , dass Sie sich für dieses PIONEER-Produkt entschieden haben Bitte lesen Sie diese Anleitung vor der Verwen- dung dieses Produkts zur Gewährleistung seiner ordnungsgemäßen Verwendung durch. Lesen und befolgen Sie dabei insbesondere die Hin- weise WARNUNG und VORSICHT . Bewahren Sie die Anleitung zur zukünftigen B …
-
Pioneer DEH-1600UBG — page 57
Black plate (57,1) Hauptgerät 7 1 4 6 3 2 9 a de 8 5 c b 1 h (Auswur f) 2 SRC / OFF 3 MUL TI-CONTROL ( M.C. ) 4 (Liste) 5 DISP 6 Disc-Ladeschacht 7 USB-Anschluss 8 EQ 9 BAND a (Zurück)/ DIMMER (Dimmer) b c / d c 1 / bis 6 / d AUX-Eingang (3,5-mm-Stereoanschluss) e T aste zum Entriegeln der Frontplatte VORSICHT Verwenden Sie für den Anschluss ein …
-
Pioneer DEH-1600UBG — page 58
Black plate (58,1) ! Entfernen Sie alle etwaigen angeschlosse- nen Kabel und Geräte, bevor Sie die Front- platte abnehmen, um eine Beschädigung des Geräts oder des Fahrzeuginneren zu ver- meiden. Abnehmen der Frontplatte 1 Drücken Sie die Taste zum Entriegeln der Frontplatte. 2 Drücken Sie die Frontplatte nach oben ( M ) und ziehen Sie sie in …
-
Pioneer DEH-1600UBG — page 59
Black plate (59,1) Suchen nach RDS-Stationen anhand eines Pro- grammtyps 1 Drücken Sie auf (Liste). 2 Drehen Sie M.C. , um einen Programmtyp zu wählen. NEWS/INFO — POPULAR — CLASSICS — OTHERS 3 Drücken Sie M.C. , um die Suche zu starten. Das Gerät sucht nach einer Station, die ein Programm des gewählten T yps ausstrahlt. W enn eine solch …
-
Pioneer DEH-1600UBG — page 60
Black plate (60,1) Rückkehr zum Stammordner 1 Halten Sie BAND gedrückt. Umschalten zwischen dem komprimierten Audio- format und CD-DA 1 Drücken Sie BAND . Umschalten zwischen Wiedergabespeichergerä- ten Sie können zwischen Wiedergabespeichereinhei- ten eines USB -Speichermediums wechseln, wel- ches über mehrere Massenspeicherklasse kompatible …
-
Pioneer DEH-1600UBG — page 61
Black plate (61,1) 3 Drehen Sie M.C., um die gewünschte Audio-Funktion zu wählen. Nach der Auswahl können die folgenden Audio- funktionen angepasst werden. ! FADER steht nicht zur Verfügung, wenn in SP-P/O MODE die Option SUB.W/SUB.W ge- wählt wurde. Für detaillierte Informationen hierzu siehe SP-P/O MODE (Heck ausgang- und P re out-Einstellu …
-
Pioneer DEH-1600UBG — page 62
Black plate (62,1) 1 Drücken Sie auf M.C., um das Hauptmenü anzuzeigen. 2 Drehen Sie M.C., um die Menüoption zu wechseln, und drücken Sie auf SYSTEM, um die angezeigte Option zu wählen. 3 Drehen Sie M.C., um die Systemmenü- Funktion zu wählen. Nach der Auswahl können die folgenden Sys- temmenüfunktionen angepasst werden. ! MUTE MODE und PW …
-
Pioneer DEH-1600UBG — page 63
Black plate (63,1) Drücken Sie auf M.C. , um das Hauptmenü an- zuzeigen. 3 Drehen Sie M.C., um die Menüoption zu wechseln, und drücken Sie auf SYSTEM, um die angezeigte Option zu wählen. 4 Drehen Sie M.C., um die Systemmenü- Funktion zu wählen. Für detaillierte Informationen hierzu siehe Sys- temmenü auf Seite 61. V erwendung der AUX- Prog …
-
Pioneer DEH-1600UBG — page 64
Black plate (64,1) ! Das schwarze Kabel gewährleistet die Er- dung. Dieses Kabel wie auch die Erdungska- bel anderer Produkte (insbesondere von Hochstromprodukten wie Leistungsverstär- ker) müssen separat verdrahtet werden. An- derenfalls kann es zu einem Brand oder einer Funktionsstörung kommen, wenn sich die Kabel versehentlich lösen. Dieses …
-
Pioneer DEH-1600UBG — page 65
Black plate (65,1) ! Installieren Sie dieses Gerät keinesfalls an folgenden Orten: — Orte, an denen das Gerät die Steuerung des F ahrzeugs behindern könnte. — Orte, an denen das Gerät die Insassen des F ahrzeugs im Anschluss an eine Schnell- bremsung verletzen könnte. ! Der Halbleiterlaser kann durch Überhitzung beschädigt werden. Instal …
-
Pioneer DEH-1600UBG — page 66
Black plate (66,1) Fehlerbehebung Symptome sind in Fett, Ursachen in normalem, nicht eingerückten T ext und Abhilfemaßnahmen in normalem, eingerückten T ext geschrieben. Das Display schaltet automatisch in die normale Anzeige um. Sie haben keinen Bedienvorgang innerhalb von 30 Sekunden durchgeführt. Wiederholen Sie den Vorgang. Der Wiederholber …
-
Pioneer DEH-1600UBG — page 67
Black plate (67,1) ERROR-19 Kommunikation gestört. Führen Sie einen der folgenden Bedienvorgänge durch: – Schalten Sie die Zündung aus (OFF) und wieder ein (ON). – T rennen Sie das USB-Speichermedium vom Gerät. – Schalten Sie auf eine andere Programmquelle um. Kehren Sie anschließend wieder zur Programmquelle USB zurück. ERROR-23 Das U …
-
Pioneer DEH-1600UBG — page 68
Black plate (68,1) ! Diese Funktion kann nicht mit USB MTP ver- wendet werden. Zusätzliche Informationen Von Dateinamen (einschließlich der Dateierweite- rung) bzw . von Ordnernamen können jeweils nur die ersten 32 Zeichen angezeigt werden. Damit kyrillische Buchstaben auf diesem Gerät angezeigt werden können, müssen diese mit einem der folge …
-
Pioneer DEH-1600UBG — page 69
Black plate (69,1) WMA Windows Media ist eine eingetragene Marke oder eine Marke der Microsoft Corporation in den USA und/oder anderen Ländern. Dieses Produkt enthält Technologie, die Eigen- tum der Microsoft Corporation ist und nicht ohne Lizenz von Microsoft Licensing, Inc. vertrie- ben werden dar f. Android ä Android ist eine Marke von Google …
-
Pioneer DEH-1600UBG — page 70
Black plate (70,1) Hartelijk dank voor uw keuze voor dit Pioneer-product Lees deze handleiding voordat u het product in gebruik neemt zodat u het goed leert gebruiken. Lees vooral de gedeelten die met WAARSCHU- WING en LET OP gemarkeerd zijn aandachtig. Bewaar deze handleiding na het lezen op een vei- lige, voor de hand liggende plaats zodat u hem …
-
Pioneer DEH-1600UBG — page 71
Black plate (71,1) Hoofdtoestel 7 1 4 6 3 2 9 a de 8 5 c b 1 h (uitwerpen) 2 SRC / OFF 3 MUL TI-CONTROL ( M.C. ) 4 (lijst) 5 DISP 6 Laadsleuf voor disc 7 USB-poort 8 EQ 9 BAND a (terug)/ DIMMER (dimmer) b c / d c 1 / tot 6 / d AUX-ingang (3,5 mm-stereoplug) e Verwijderen LET OP Sluit een USB -opslagapparaat via een Pioneer USB-kabel (CD-U50E, optio …
-
Pioneer DEH-1600UBG — page 72
Black plate (72,1) Het voorpaneel ver wijderen 1 Druk op de toets Verwijderen om het voorpa- neel los te maken. 2 Duw het voorpaneel naar boven ( M ) en trek het naar u toe ( N ). 3 Bewaar het losgemaakte voorpaneel altijd in een beschermende tas of een doosje. Het voorpaneel terugzetten 1 Schuif het voorpaneel naar links. 2 Druk de rechterzijde va …
-
Pioneer DEH-1600UBG — page 73
Black plate (73,1) RDS-zenders zoeken via PTY-informatie 1 Druk op (lijst). 2 Draai aan M.C. om een programmatype te kie- zen. NEWS/INFO — POPULAR — CLASSICS — OTHERS 3 Druk op M.C. om het zoeken te beginnen. Het toestel zoekt naar een zender die het gese- lecteerde programmatype uitzendt. Als er een zender is gevonden, wordt de programmaser …
-
Pioneer DEH-1600UBG — page 74
Black plate (74,1) Een ander display kiezen De gewenste informatie selecteren 1 Druk op DISP om over te schakelen tussen: CD-DA ! ELAPSED TIME (fragmentnummer en weergavetijd) ! CLOCK (naam signaalbron en klok) ! SPEANA (spectrumanalyzer) CD- TEXT ! TRACK INFO (fragmenttitel/naam artiest fragment/disctitel) ! ELAPSED TIME (fragmentnummer en weergav …
-
Pioneer DEH-1600UBG — page 75
Black plate (75,1) 1 Druk op M.C. om de instellingenmodus weer te geven. 2 Draai aan M.C. om de equalizer te selecteren. POWERFUL — NA TURAL — VOCAL — CUS- TOM1 — CUSTOM2 — FLA T — SUPER BASS De equalizerband en het equalizerniveau kun- nen worden aangepast van CUSTOM1 en CUSTOM2 . Volg de onderstaande procedure als u CUS- TOM1 of CUSTO …
-
Pioneer DEH-1600UBG — page 76
Black plate (76,1) Het geluid van dit toestel kan automatisch worden uitgeschakeld of gedempt wanneer een ander ap- paraat met uitschakelingsfunctie daarom vraagt met een speciaal signaal. 1 Druk op M.C. om de instellingenmodus weer te geven. 2 Draai aan M.C. en selecteer de gewenste in- stelling. ! MUTE – Tijdelijk uitschakelen ! 20dB A TT – D …
-
Pioneer DEH-1600UBG — page 77
Black plate (77,1) V erbindingen Belangrijk ! Als dit toestel wordt geïnstalleerd in een voer- tuig met een contactschakelaar zonder ACC — stand (accessoirestand), kan de accu leeglo- pen als de rode kabel niet wordt aangesloten op de aansluiting die de bediening van de contactschakelaar herkent. O N S T A R T O F F ACC -stand Geen ACC -stand ! Ge …
-
Pioneer DEH-1600UBG — page 78
Black plate (78,1) ! Als u een subwoofer van 70 W (2 W ) gebruikt, moet u de subwoofer aansluiten op de vio — lette en zwart-violette draden van dit toestel. Sluit niets aan op de groene en groen-zwarte draden. V ersterker (apart verkrijgbaar) Maak deze verbindingen als de optionele verster- ker wordt gebruikt. 1 3 2 4 5 5 1 Systeem …
-
Pioneer DEH-1600UBG — page 79
Black plate (79,1) Problemen verhelpen Symptomen worden vet gedrukt. Oorzaken wor- den in gewoon lettertype zonder inspringen ge- drukt. Gewone en ingesprongen tekst geeft aan wat u moet doen. Het display keert automatisch terug naar het gewone display . U hebt gedurende ongeveer 30 seconden geen han- deling uitgevoerd. Voer de handeling opnieuw ui …
-
Pioneer DEH-1600UBG — page 80
Black plate (80,1) ERROR-19 Communicatiefout. Probeer de volgende mogelijkheden. – Zet het contact uit en dan weer aan. – Ontkoppel het USB -opslagapparaat. – Schakel over naar een andere signaalbron. Schakel ver volgens terug naar de USB — signaalbron. ERROR-23 Het USB-op slagapparaat was niet geformatteerd met de indeling FA T12, FA T16 of …
-
Pioneer DEH-1600UBG — page 81
Black plate (81,1) Bijkomende informatie Alleen de eerste 32 tekens van de bestandsnaam (inclusief de extensie) of mapnaam worden weer- gegeven. Russische tekst kan alleen op dit toestel worden weergegeven als die met een van de volgende te- kensets is gecodeerd: ! Unicode (UTF-8, UTF-16) ! Andere tekensets dan Unicode die in een Windows-omgeving w …
-
Pioneer DEH-1600UBG — page 82
Black plate (82,1) T echnische gegevens Algemeen Spanningsbron ……………. 14,4 V gelijkstroom (10,8 tot 15,1 V toelaatbaar) Aarding ……………………… Negat ief Maximaal stroomverbruik …………………………….. 10,0 A Afmetingen (B × H × D): DIN Chassis ………………………. 178 mm × 50 mm × 165 mm Voorkant ….. …
-
Pioneer DEH-1600UBG — page 83
Black plate (83,1) Nederlands 83 Nl <QRD3219-A>83 …
-
Pioneer DEH-1600UBG — page 84
Black plate (84,1) Благодарим Вас за покупку этого изделия компании PIONEER Для обеспечения правильности эксплуата — ции внимательно прочитайт е данное руко — водство перед началом использования изде л? …
-
Pioneer DEH-1600UBG — page 85
Black plate (85,1) Основное устройство 7 1 4 6 3 2 9 a de 8 5 c b 1 h ( извлечение ) 2 SRC / OFF 3 MUL TI-CONTROL ( M.C. ) 4 ( список ) 5 DISP 6 Щель для загрузки диска 7 USB порт 8 EQ 9 BAND a ( назад )/ DIMMER ( регулятор освещен — ности ) b c / d c С 1 / по 6 …
-
Pioneer DEH-1600UBG — page 86
Black plate (86,1) ! Прежде чем снять переднюю панель , обя — зате льно отключите от нее все к абели и устройства , чтобы не повредить устрой — ство и внутреннюю от делку сал она . Снятие передней панели 1 ? …
-
Pioneer DEH-1600UBG — page 87
Black plate (87,1) Поиск станции RDS с помощью информации PTY 1 Нажмите ( список ). 2 Кнопкой M.C. выберите тип программы . NEWS/INFO — POPULAR — CLASSICS — OT — HERS 3 Нажмите M.C. , чтобы начать поиск . У стройство начинает пои? …
-
Pioneer DEH-1600UBG — page 88
Black plate (88,1) У скоренная перемотка вперед или назад 1 Нажмите и удерживайте кнопку c или d . ! При воспроизведении сж атых аудиофай — лов звук не воспроизводится , если включе — на ускоренная перемо? …
-
Pioneer DEH-1600UBG — page 89
Black plate (89,1) Настройка функций 1 Нажмите M.C. , чтобы открыть главное меню . 2 Поворачивай те M.C. для прокрутки пунктов меню ; нажмите , чтобы выбрать FUNCTION . Выбранные функции , которые можно на — страи? …
-
Pioneer DEH-1600UBG — page 90
Black plate (90,1) Используйте эту функцию , если вы хотите , чтобы воспроизводились только высокие ча — стоты . На громкоговорите ли будут выводиться только частоты выше , чем установленные филь тром ? …
-
Pioneer DEH-1600UBG — page 91
Black plate (91,1) SP-P/O MODE ( настройк а выхода заднего ка — нала и предварительног о усилителя ) Выход на провода заднего громкоговорителя и выход заднего канала RCA можно использо — вать для подключения ? …
-
Pioneer DEH-1600UBG — page 92
Black plate (92,1) Соединения Важно ! При установке данного устройства в авто — мобиле , в к отором отсут ствует положение ключа зажигания АСС , красный к абель должен быть подключен к клемме , кото — рая …
-
Pioneer DEH-1600UBG — page 93
Black plate (93,1) 9 Синий / белый Распо ложение штекера разъема ISO на различных автомобилях може т отлича ть — ся . Если штекер 5 предназна чен для управления антенной , подсоедините 9 к b . На других автом …
-
Pioneer DEH-1600UBG — page 94
Black plate (94,1) Заднее крепление стандарта DIN 1 Совместите отверстия на кронштейне и боковых панелях устройства . 2 Затяните по два винта с каждой сторо — ны . 1 2 3 1 Са монарезающий винт (5 мм ×8 мм ) 2 Мо ? …
-
Pioneer DEH-1600UBG — page 95
Black plate (95,1) ERROR-07, 10, 11, 12, 15, 17, 30, A0 Электрическая или механическая неисправ — ность . У становите ключ зажигания в положение OFF , а затем – в положение ON или переключитесь на другой источник сигнал? …
-
Pioneer DEH-1600UBG — page 96
Black plate (96,1) Конденсация может временно ухудшить рабо — ту проигрывателя . Оставьте его для адаптации к более высокой температуре примерно на час . Также у далите влагу с дисков с помощью мягкой …
-
Pioneer DEH-1600UBG — page 97
Black plate (97,1) Количество воспроизво димых файлов : не более 15 000 Воспроизведение защищенных от копирова — ния файлов : не поддерживае тся Запоминающее устройство USB, содержащее разде лы : воспроиз? …
-
Pioneer DEH-1600UBG — page 98
Black plate (98,1) Серийный номер На этом рисунке пок азана информация о месяце и годе изго товления устройства . L Го д Го д Символ 2001 2002 2003 2004 2005 2006 2007 2008 2009 2010 2011 2012 2013 2014 2015 2016 2017 2018 2019 2020 K LM N O P QR S T ABC DEFG …
-
Pioneer DEH-1600UBG — page 99
Black plate (99,1) MW- тюнер Диапазон частот …………. от 531 кГц до 1 602 кГц Полезная чувствительность …………………………….. 25 мкВ ( отношение сигнал / шум :2 0 дБ ) Отношение сигнал / шум …………………………….. 62 дБ ( …
-
Pioneer DEH-1600UBG — page 100
Black plate (100,1) PIONEER CORPORA TION 1-1, Shin-ogura, Saiwai-ku, Kawasaki-shi, Kanagawa 212-0031, JAP AN Корпорация Пайонир 1-1, Син — Огура , Сайвай — ку , г . Кавасаки , префектура Канагава , 212-0031, Япония Импортер ООО “ ПИОНЕР РУС ” 125040, Росс? …