
Время на прочтение
3 мин
Количество просмотров 16K
Введение
Всё началось с того, что меня несколько расстраивало отсутствие возможности загружаться с дисковода на старой плате Socket 3. CD-приводы в то время ещё не были распространены и разработчики BIOS даже не задумывались о предоставлении такой опции. Да и операционные системы распространялись на дискетах. Чуть позднее, когда ОС (в основном конечно Windows) стало удобнее устанавливать с диска, чем с пары десятков дискет, придумали так называемые загрузочные floppy, содержавшие драйвер дисковода и передававшие ему управление непосредственно. Но это на мой взгляд костыль и некрасиво. Я начал искать более изящное решение и даже в какой-то момент собирался купить SCSI-контроллер за много денег и привод к нему, но нашлась альтернатива.
Plop Boot Manager
Этой альтернативой был Plop. На самом деле я даже не задумывался об использовании загрузчиков, но когда мне сказали про Plop, я решил, что это весьма здравая идея. Он умеет загружаться из кучи источников и загружать практически любые устройства, кроме usb-дисководов. Кроме того, он имеет удобный интерфейс и множество настроек. Подробнее почитать о нём можно на официальном сайте.

Оставалось только решить с чего загружать Plop. Самым очевидным вариантом была дискета, но это снова костыль. А больше компьютер (не считая диска, естественно) ни с чего грузиться и не умеет. И вот тут на помощь пришла, как ни странно, сетевая карта.
BootROM и с чем его едят
Да, да, сетевая карта. Дело в том, что некоторые из них имеют функцию сетевой загрузки с некоторого сервера и для этого несут на себе свой собственный BIOS. В моём случае это карта Realtek rtl8139.
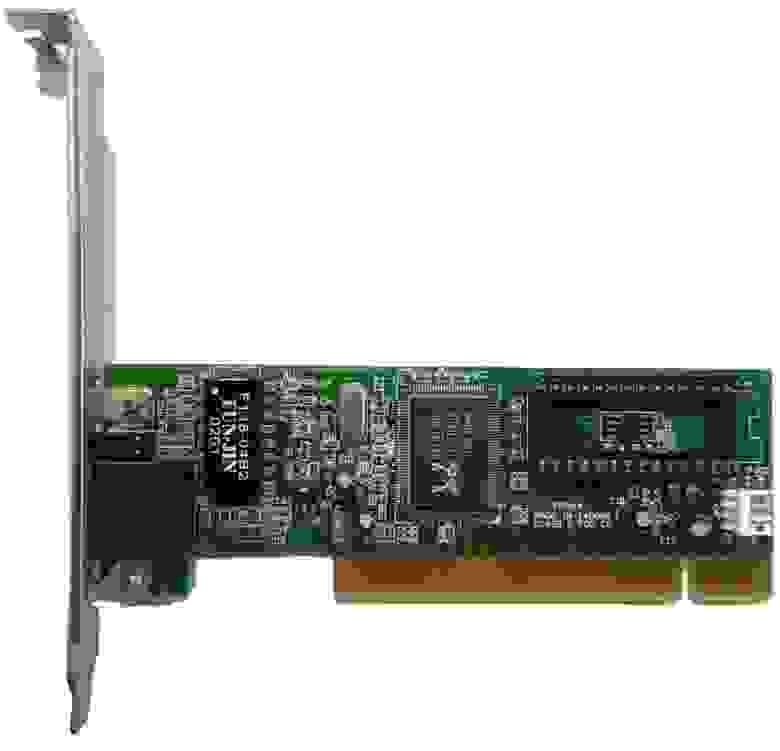
Панелька предназначена для микросхемы памяти объёмом до 64 килобайт. Никто не заставляет записывать именно BootROM, это может быть любой код. Содержимое ПЗУ просто исполняется после загрузки основного BIOS. Так вот, Plop умеет загружаться с сетевой карты, но для этого его нужно подготовить.
Непосредственная настройка и установка
Начнём с конфигурации загрузчика. В этом нам поможет готовая программа, которую можно взять здесь. Я использовал GUI-версию. В ней нужно выбрать бинарный файл, предназначенный для записи в OptionROM. В конфигурации я сразу переключил режим вывода на текстовый (потому что графический сильно тормозил), отключил анимации. Для удобства использования лучше поставить галочки INT19 и Startup Hotkey. Теперь Plop будет загружаться только при нажатии комбинации Ctrl+A, практически как Boot Menu в современных компьютерах. По вкусу можно установить таймер и устройство по умолчанию.

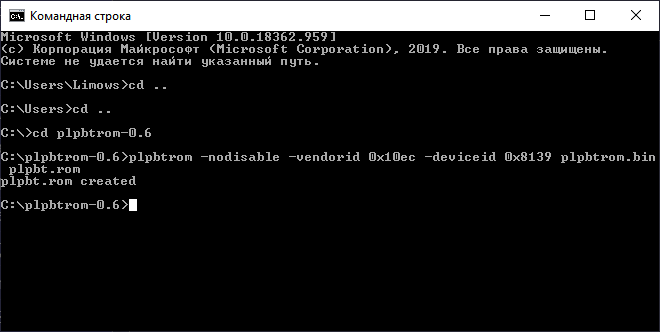
Далее требуется нажать кнопку «Configure plpbt.bin» и образ готов к подготовке к прошивке. Его нужно сконвертировать в ROM-файл. Для этого потребуется ещё один инструмент c сайта загрузчика. К сожалению он консольный. Параметрами программе нужно передать имя образа, сконфигурированного на предыдущем шаге и имя конечного файла. Так же требуется задать идентификаторы вендора и самого устройства. На сайте уже есть готовый пример для rtl8139. Для других карт идентификаторы можно считать из родного BootROM автоматически с помощью ключа -grabid. Необязательный ключ -nodisable. Без него Plop будет каждый раз при включении предлагать отключить ПЗУ сетевой карты, но нам это не нужно, поскольку меню и так будет загружаться только с сочетанием клавиш.
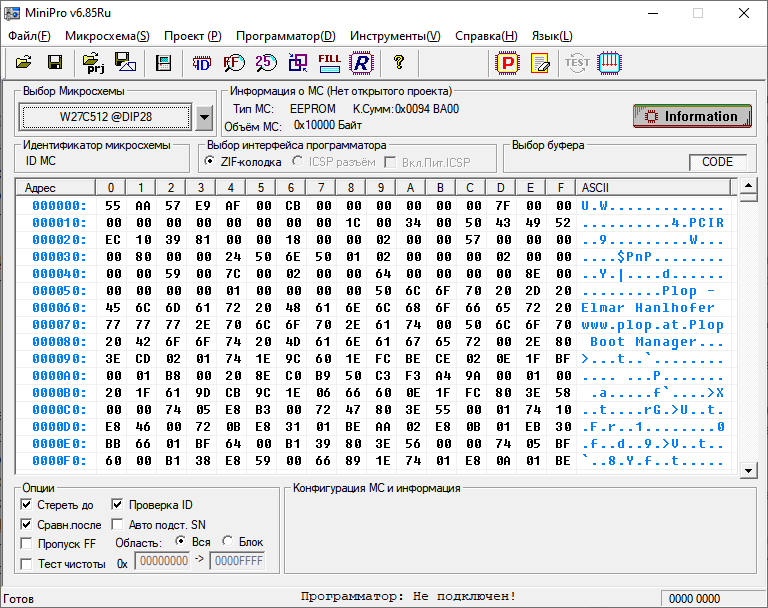
Теперь можно переходить к прошивке. Я использую программатор MiniPro, но подойдёт любой другой, который поддерживает EEPROM и Flash до 64 килобайт. ПЗУ можно взять 27, 28 или 29 серий нужного объёма. Процесс прошивки проходит как обычно. Выбрать микросхему, выбрать образ и нажать на кнопку записи.
После всех этих действий остаётся вставить микросхему памяти в панельку на карте, а карту вставить в слот на материнской плате. Единственное, возможно потребуется включить BootROM в конфигурации самой карты. Я сделал это с помощью программы для DOS, поставляющейся вместе с драйвером.

Если всё сделано правильно, после определения дисков и флоппи появится строка сообщающая, что BootROM успешно загружен и предложение нажать Ctrl+A для загрузки в меню.
PLoP Boot Manager — маленький загрузчик, для различных операционных систем. Поддерживает загрузку Windows (NT, 2K, XP, VISTA, Win7), Linux …, — позволяет осуществлять выбор запуска с устройств без входа в BIOS (что важно при отсутствии возможности там их выбора).
Пример: Иногда возникают ситуации, когда необходимо загрузить с флешки компьютер, у которого, не смотря на присутствие USB входа, — отсутствует в BIOS выбор загрузки с USB.
При постоянном использовании загрузчика PLoP Boot Manager его можно установить на жёсткий диск, — в таком случае при запуске (перезагрузке) компьютера будет появляться меню выбора устройства для последующей загрузки. В случае необходимости потом этот загрузчик можно удалить.
При временном использовании ёго можно загрузить с дискеты или компакт-диска с имеющейся на них программой PLoP Boot Manager.
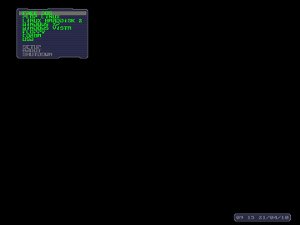
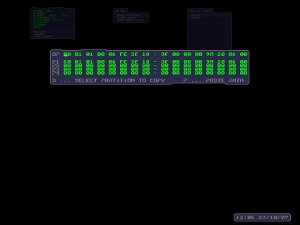
При запуске PLoP Boot Manager появляется меню:
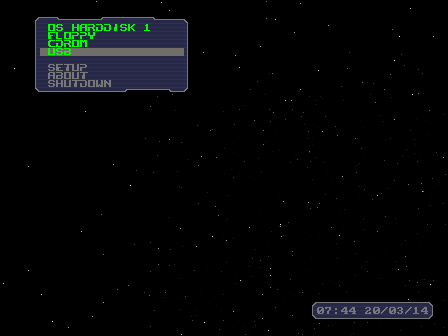
Рисунок 1
OS HARDDISK 1 – загрузка с первого жёсткого диска (может быть несколько пунктов по числу жёстких дисков, — при установке загрузчика на жёсткий диск настройки позволяют добавлять даже разделы с операционными системами).
FLOPPY – загрузка с дискеты
CDROM – загрузка с компакт-диска
USB – загрузка с USB диска (флешки).
SETUP – настройка загрузчика.
ABOUT – отображает информацию о версии программы.
SHUTDOWN — выключает компьютер.
Курсорными клавишами «↑» «↓» можно выбрать необходимую опцию и нажать клавишу Enter.
Более подробно о возможностях PLoP Boot Manager можете ознакомиться на сайте проекта © Эльмар Hanlhofer, — также и бесплатно скачать там свежие версии.
Архив PLOP_5.0.10_JCPACK.rar (размер 5.01 MB) вы также можете бесплатно скачать с Яндекс.Диск либо с depositfiles.
Ниже рассмотрим некоторые способы запуска PLoP Boot Manager.
1. Подготовка для запуска загрузчика PLoP Boot Manager:
- Дискеты.
- Компакт-диска.
2. Установка PLoP Boot Manager на жёсткий диск:
- С дискеты.
- С компакт-диска.
- Из операционной системы Windows XP.
В архиве PLOP_5.0.10_JCPACK.rar есть папки Boot и Install, в которых имеются необходимые образы для создания компакт-дисков и дискет установки PLoP Boot Manager на жёсткий диск и запуска его с внешнего носителя. Так же там имеется файл программы CDBurnerXP_4.3.2.2140_minimal.exe для записи «.iso» образа на компакт диск и файл утилиты rawwritewin.exe (путь — PLOP_5.0.10_JCPACK\Boot\Floppy) для записи «.img» образа на дискету.
Рассмотрим загрузку PLoP Boot Manager, используя флоппи-дискету.
Распаковываем архив PLOP_5.0.10_JCPACK.rar, — запускаем находящийся в папках PLOP_5.0.10_JCPACK\Boot\Floppy файл rawwritewin.exe
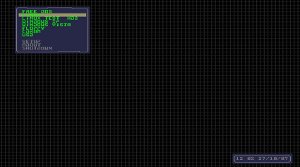
Открывается окно утилиты для записи «.img» образа на дискету RawWrite.
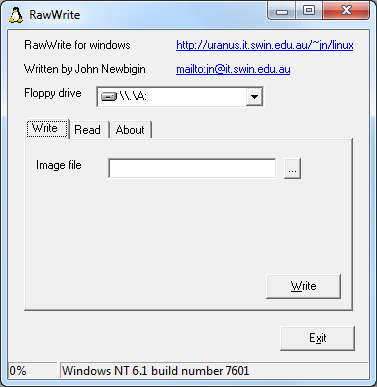
Рисунок 2
Правее поля Image file нажимаем квадратик справа.
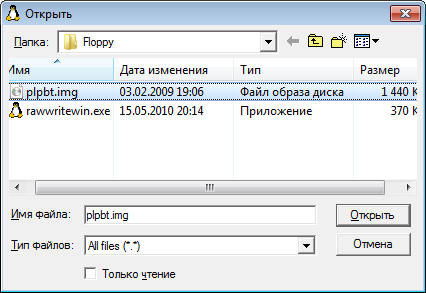
Рисунок 3
В открывшемся окне выбираем путь к образу plpbt.img, — и жмем «Открыть».
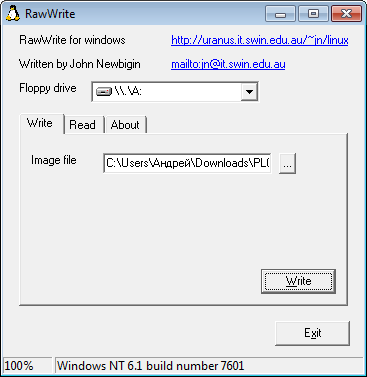
Рисунок 4
В поле Image file появляется путь к образу plpbt.img
Жмем кнопку Write, — начинается запись образа plpbt.img на дискету.
В левом нижнем углу видим проценты выполнения. При достижении 100%, — ждем, когда потухнет зеленый индикатор дисковода и жмем кнопку Exit.
Дискета готова!
Далее перезагружаем компьютер, — устанавливаем загрузку с Floppy (аналогично описанию на странице: Загрузка с флешки и компакт-диска) и загружаем PLoP Boot Manager. В появившемся меню (рисунок 1) выбираем курсорными клавишами нужное устройство (даже то, для которого отсутствует в BIOS выбор загрузки), — примеру, USB и нажимаем клавишу Enter.
Начинается загрузка компьютера с флешки.
Рассмотрим загрузку PLoP Boot Manager используя компакт-диск.
Находящийся в распакованном архиве (каталог PLOP_5.0.10_JCPACK\Boot\CDROM) ISO образ plpbt.iso записываем на компакт-диск. Это можно сделать с помощью, имеющейся в архиве бесплатной программы для записи компакт-дисков CDBurnerXP или воспользоваться любой другой удобной вам программой для записи компакт-дисков. Дальше устанавливаем загрузку компьютера с CD и загружаемся.
В появившемся меню (рисунок 1) выбираем курсорными клавишами нужное устройство, к примеру, USB и нажимаем клавишу Enter.
Начинается загрузка компьютера с флешки.
Установка PLoP Boot Manager на жесткий диск с дискеты.
Из распакованного архива (каталог PLOP_5.0.10_JCPACK\Boot\Floppy) запускаем утилиту записи образа на дискету rawwritewin.exe и записываем на дискету (аналогичным порядком, указанным на рисунках 2, 3 и 4) образ plpbtin.img,(находящийся в каталоге PLOP_5.0.10_JCPACK\Install\Floppy).
Далее устанавливаем загрузку компьютера с Floppy и загружаемся.
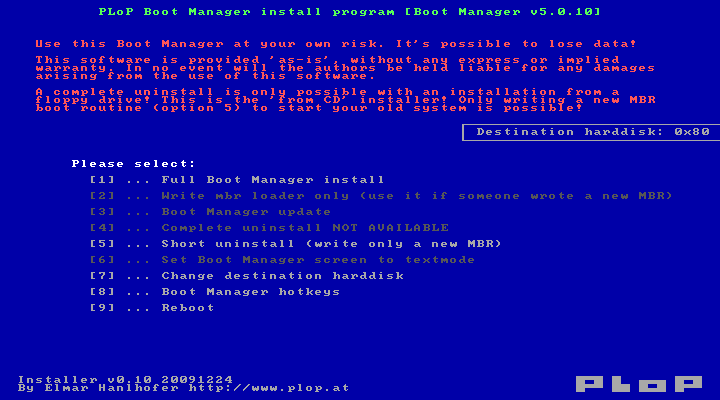
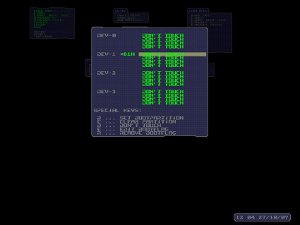
Рисунок 5
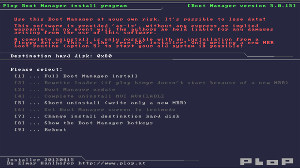
В открывшемся окне PLoP Boot Manager install program [Boot Manager v5.0.10] предлагаются следующие функции установки программы:
[ 1 ] … Full boot manager install (Полная установить менеджер загрузки).
С помощью этой опции можно установить менеджер загрузки на ваш жесткий диск. Если у вас установлена операционная система, то программа инсталляции создает профиль для загрузки операционной системы.
При установке с флоппи-дисковода, программа установки создаст резервную секторов, в которых загрузочный менеджер будет установлен. Программа установки пишет резервное копирование на дискеты. С этой резервной копии можно удалить диспетчер загрузки полностью с жесткого диска. Если вы используете компакт-диск установки, то это не возможно восстановление секторов. В этом случае процедуру удаления, создает новую MBR для загрузки текущей операционной системы. В таблице разделов, данные не будут изменены.
[ 2 ] … Write mbr loader only (Переписать загрузчик).
Небольшая программа (загрузчик) необходим в MBR, чтобы запустить менеджер загрузки. Операционных систем, как Windows XP пишут в процессе установки собственного малого программа в MBR. Если вы установите Windows XP после boot manager, Windows XP начнет вместо загрузочного менеджера потому, что загрузчик записывается программы от Windows XP. Настройка диспетчера загрузки начинается до Windows XP, вы должны использовать Переписать загрузчик.
[ 3 ] … Boot Manager update (Менеджер загрузки обновлений).
При этом, вы можете обновить » boot manager». Но только обновления с boot manager v5 работает.
[ 4 ] … Complete uninstall (Полное удаление).
Предупреждение этот параметр доступен только при установке с флоппи-дисковода.
Установка программы занимает резервной копии, сохраненной на дискете и записывает ее на жесткий диск. Предупреждение, если вы изменили что-либо с таблицей разделов, тогда не используйте этот вариант!
[ 5 ] … Short uninstall (Короткий удалить).
С этой опцией, программа записывает новую MBR, чтобы начать текущей операционной системы. Таблица разделов будет неизменной.
[ 6 ] … Set Boot Manager screen to textmode (Установка Boot Manager в текстовом режиме). Настраивает менеджер Загрузки, запуска в текстовом режиме.
[ 7 ] … Change destination harddisk (Изменение жесткого диска назначения).
Выбор жесткого диска для установки.
[ 8 ] … Boot Manager hotkeys (Загрузочный менеджер горячих клавиш).
См. Горячие клавиши.
[ 9 ] … Reboot (Перезагрузка)
Компьютер будет перезагружен.
Извините за то, что я здесь предоставил описание функций установки в переводе Яндекса, — оригинал прочитаете: 1.1 функции Программы.
Для полной установки менеджера загрузки на жёсткий диск нажимаем клавишу 1.
При наличии в компьютере нескольких жёстких дисков необходимо в опции [ 7 ] выбирать диск, к которому вы собираетесь применять выбранные действия.
Рисунок 6
Для подтверждения выбранного действия нажимаем клавишу Y.
Рисунок 7
На рисунке 7 видим полученный результат. Нажимаем любую клавишу для продолжения.
Рисунок 8
Далее в окне PLoP Boot Manager install program [Boot Manager v5.0.10] открывается Главное меню горячих клавиш.
Нажимая клавишу Esc (закрыть окно), — переходим к исходному меню (рисунок 5), где нажимая клавишу 9 перезагружаем компьютер. По перезагрузке увидим загрузочное меню (рисунок 1), где курсорными клавишами выбираем устройство, с которого хотим загрузиться.
В случае необходимости полного удаления с жёсткого диска, загруженного с дискеты загрузчика PLoP Boot Manager можно при загрузке с этой же дискеты в открывшемся окне PLoP Boot Manager install program [Boot Manager v5.0.10] (рисунок 5) выполнить пункт меню 4, — Complete uninstall (Полное удаление). Но использовать эту опцию, если вносились изменения в таблицу разделов нельзя! Иначе потеряете имеющуюся на разделах жёсткого диска информацию! В таких случаях следует пользоваться пунктом 5. При использовании для удаления загрузчика пункта 5, программа удаления записывает новый MBR текущей операционной системы. Таблица разделов останется неизменной. При последующих загрузках (перезагрузках) меню выбора дальнейшей загрузки (рисунок 1) больше не появляется.
Установка PLoP Boot Manager на жёсткий диск с компакт-диска:
Из распакованного архива (каталог PLOP_5.0.10_JCPACK\Install\CDROM) записываем «.iso» образ plpbtin.iso на компакт диск, воспользовавшись любой удобной вам программой для записи компакт-дисков. Далее, устанавливая загрузку с CD, — загружаемся с этого компакт-диска.
Далее проделываем все выше описанные действия в пункте «Установка PLoP Boot Manager на жесткий диск с дискеты».
Установка PLoP Boot Manager на жёсткий диск в операционной системе Windows XP.
Из распакованного архива PLOP_5.0.10_JCPACK\Install\ копируем папку HDD на диск C (раздел на котором установлена операционная система Windows XP). В папке HDD находятся три файла:
plpbt.bin
plpgenbtldr.exe
plpinstc.com
Запускаем в этой папке файл plpgenbtldr.exe
Рисунок 9
Нажимая Enter, — закрываем окно.
По выполнению сценария в этой же папке появится файл plpbtldr.bin, — это файл запуска менеджера загрузок, меню которого вы выдели выше на рисунке 1. Для его запуска необходимо прописать команду в файле boot.ini находящегося в корне диска C. Обратите внимание на сообщение об этом, — выделенное жёлтой рамочкой на рисунке 9.
Для Windows XP необходимо в файл boot.ini добавить строку следующего содержания: c:\HDD\plpbtldr.bin=»Start PLoP Boot Manager»
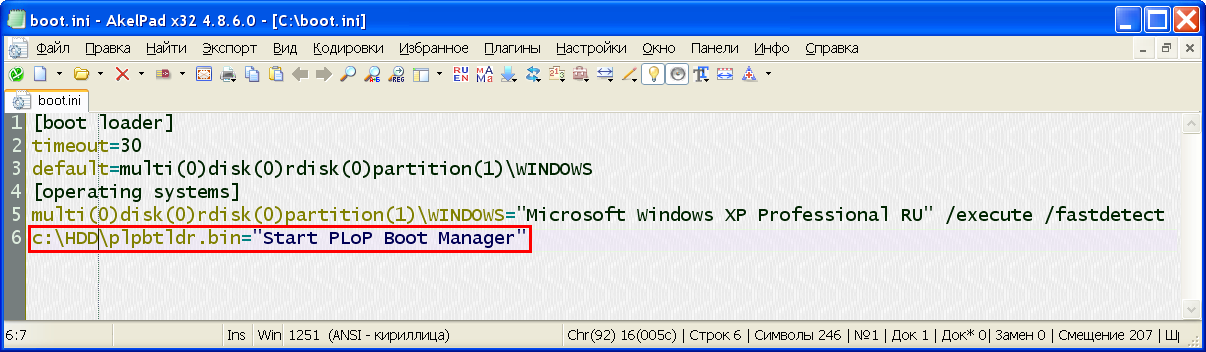
Рисунок 10
Открываем текстовым редактором на диске C файл boot.ini и дописываем эту строку, — закрываем с сохранением изменений. Перезагружаем компьютер.
Во время запуска видим следующее окно:

Рисунок 11
По умолчанию подсвечивается строка Microsoft Windows XP Professional RU, — через 30 секунд начнётся загрузка операционной системы. Выбираем курсорными клавишами строку Start PLoP Boot Manager и нажимаем клавишу Enter. Запускается PLoP Boot Manager и появляется меню (рисунок 1) в котором выбираем нужное для запуска устройство и для подтверждения выбора нажимаем клавишу Enter.
Предупреждение: На данной странице не преследуется цель описать все возможности и тонкости работы программы. Во избежание непредвиденных ситуаций установкой загрузчика PLoP Boot Manager на жесткий диск пользуйтесь только в том случае, если вы полностью уверены в том, что разобрались с выше упоминаемой документацией!
В качестве дополнительного материала можете ознакомиться на форуме Game Edition с темой PLoP Boot Manager — Грузит что угодно, и с чего угодно.
Удачи.
В начало страницы. | На главную страницу сайта.
 Plop boot manager — это универсальный загрузчик с невероятно разнообразными функциями. Программа позволяет выбрать устройство, с которого будет осуществляться загрузка, минуя вход в BIOS. Поддерживает загрузку с любой операционной системы, будь то Windows XP, Windows Vista, Windows 7, Windows 8 или Linux. Может запускаться с флеш-накопителя, жесткого диска, флоппи-дискеты, по сети, с CD или DVD. диска.
После установки Plop boot manager и запуска программы появляется меню, где можно выбрать загрузочный раздел. Благодаря тому, что раздел имеет собственные USB-драйвера, возможно произвести загрузку даже с тех устройств, на которых в силу ряда причин не получается или не предусмотрена загрузка через USB интерфейс. Например, распространённой проблемой является загрузка на старом компьютере с USB флеш-накопителя, компьютер просто на просто не видит флешку.
Основные возможности программы
- Загрузка с CD-DVD дисков без поддержки такой функции в BIOS.
- Загрузка с USB без поддержки такой функции в BIOS (UHCI, OHCI и EHCI).
- Загрузка с жесткого диска, флеш-накопителя, флоппи-дискеты, с CD-DVD диска.
- Загрузка различными загрузчиками: LILO, GRUB, Syslinux, Isolinux, Pxelinux (network).
- Загрузка с модуля ISA-PCI ROM.
- Возможность создания профилей загрузки для различных операционных систем.
- Позволяет произвести загрузку с поддержкой 16 разделов.
- При установке на жесткий диск не требуется создавать отдельный раздел.
- Позволяет скрывать пункты загрузки.
- Обратный отсчет при загрузке.
- Защита паролем компьютера и менеджера загрузки.
- Резервное копирование таблицы разделов.
- Текстовый режим интерфейса 80×50.
- Графические режимы интерфейса пользователя 640×480, 800×600, 1024×786, 1280×1024.
- Редактирование MBR таблицы разделов.
- Можно запустить в загрузочном меню Windows.
- Резервное копирование данных Partition Table.
Программа свободно распространяется и абсолютна бесплатна.
Загрузка программы
Plop boot manager можно скачать с официального сайта www.plop.at, выбираем нужную версию, скачиваем, распаковываем и устанавливаем.

Также на сайте можно найти подробные инструкции как пользоваться программой.
Как удалить Plop boot manager
Открываем командную строку с правами администратора, вводим команду bcdedit /v,
![]()
получаем список, ищем идентификатор Plop boot manager, копируем ID, запускаем команду bcdedit /delete {id}, вставляем скопированный ID в скобки, жмём кнопку ENTER.
Вот и всё! Программа Plop boot manager успешно удалена. Удачи!
Содержание
Plop или Plop Boot Manager — это универсальный загрузчик. Он может загружать операционные системы с жестких дисков, флопидисков, CD/DVD и USB. Особенно полезно для тех, кто не может грузиться с USB.
Установка
Из Windows
Из Linux
-
Распакуйте архив.
-
Под пользователем root скопируйте файл plpbt.bin в папку /boot
-
Добавьте новый пункт в меню GRUB:
-
Для GRUB legacy / grub4dos, добавьте в /boot/grub/menu.list следующий текст:
title Plop Boot Manager
root (hd0,0)
kernel /boot/plpbt.bin
-
Для GRUB (GRUB2), добавьте в /boot/grub/grub.cfg следующий текст:
menuentry "Plop Boot Manager" {
    set root=(hd0,1)
    linux16 /boot/plpbt.bin
}
Обратите внимание, значение (hd0,1) — это адрес вашего root раздела. Здесь подразумевается то, что он находится у вас в sda1. Присваивание значения sda1 значению (hd0,1) происходит следующим образом: sd=hd, а=0, 1=1.
-
-
Если вы выполняли пункт 4.2, пропустите этот пункт, иначе все выполненные настройки будут утеряны. Если вы выполняли пункт 4.1, необходимо обновить меню GRUB следующей командой в терминале:
sudo update-grub
В меню GRUB должен появиться пункт: «Plop Boot Manager». После загрузки, вы увидите окно такого вида:

Теперь просто выберите необходимое устройство загрузки и все.
Ссылки
Table of Contents
| 1. | Introduction |
| 2. | Overview of install/start modes |
| 3. | Features |
| 4. | Screenshots |
| 5. | Licence |
| 6. | Download |
| 7. | The Boot Manager |
| 8. | Install to the hard disk MBR (Master Boot Record) |
| 9. | plpbt.bin — LiveCD and other ways to start the Boot Manager |
| 10. | Uninstall the boot manager |
| 11. | Create your own ISO file with your modified plpbt.bin |
| 12. | plpcfgbt — configure plpbt.bin |
| 13. | plpbt.bin parameters |
| 14. | Create a PCI boot manager option ROM (save in bios) |
| 15. | plpbt4win |
| 16. | plpgenbtldr |
| 17. | PCMCIA CardBus driver — USB PC-Card |
| 18. | USB info |
| 19. | DOS and the USB driver |
| 20. | Detect the USB driver |
| 21. | Hidden partition / Cleared partition |
| 22. | Linux Boot Managers to the boot sector |
| 23. | Examples |
| 24. | NOD32 Virus report |
| 25. | FAQ — Frequently asked questions |
Introduction
The Plop Boot Manager is a small program to boot different operating systems.
The boot manager has a built-in ide cdrom and usb driver to access that
hardware without the help/need of a bios.
You can boot the operating systems from hard disk, floppy,
CD/DVD or from USB.
You can start the boot manager from floppy, CD, network and there are many more ways to start the boot manager.
You can install the boot manager on your hard disk. There is no extra partition required for the boot manager.
Programming language: Assembler
Software developer: Elmar Hanlhofer
The current version is plpbt-5.0.15.zip.
Overview of install/start modes
| Hard disk installation | The boot manager will be installed as primary boot manager to your hard disk. No extra partition and required. The boot manager will be in the first sectors of your hard disk before the first partition begins. The boot manager starts even when no operating system exists. |
| Start from external media Floppy CDROM/DVD USB drive |
It’s not required to install the boot manager to your hard disk. You can start it from those media and use the boot manager with some limitations. |
| Start from other boot managers LiLo Syslinux Grub Grub4Dos Grub2 Windows boot.ini Windows BCD |
You can still use your preferred boot manager and additionally use features from the Plop Boot Manager (like boot the usb drive,…). The boot manager can run in hidden mode, so you have for example an entry |
| Start from network | With help of pxelinux it’s possible to start the boot manager from the network. |
| Start from your bios as option rom | You can store the boot manager as option rom in your bios. There is no need for any hard disk or anything else to start the boot manager. It can be used as PNP part of your bios or the boot manager can hook the INT19 to take control as first boot device. |
Features
- USB boot without BIOS support (UHCI, OHCI and EHCI)
- CD/DVD boot without BIOS support (IDE)
- PCMCIA CardBus support to enable boot from USB PC-Cards
- Floppy boot
- Different profiles for operating systems
- Define up to 16 partitions
- No extra partition for the boot manager
- Hidden boot, maybe you have a rescue system installed and the user should not see that
there is another system installed - Boot countdown
- Hide partitions
- Password protection for the computer and the boot manager setup
- Backup of partition table data
- Text mode user interface 80×50
- Graphical user interface 640×480, 800×600, 1024×786, 1280×1024
- MBR partition table edit
- Start of the boot manager from hard disk, floppy, USB, CD, DVD
- Starting from Windows boot menu
- Starting from LILO, GRUB, Syslinux, Isolinux, Pxelinux (network)
- It can be used as PCI option ROM in your BIOS
- Access the whole USB hard disk (up to 2TB) even when the bios has a 128 GiB limit
- You can run the boot manager over the network
- Start the network card bootrom from the boot manager to boot from the network
Screenshots
|
Main menu |
Main menu (text mode) |
|
Profile partitions |
MBR partition edit |
|
MBR Install Program |
Licence
The Plop Boot Manager licence conditions:
This licence conditions are also used for the boot manager tools that are written
by Elmar Hanlhofer and not released under the GPL.
- The programs are free to use for personal and commercial use.
- The programs may not be sold¹.
- The origin of this software must not be misrepresented;
you must not claim that you wrote the original software. If
you use this software in a product, an acknowledgment in the
product documentation would be appreciated but is not required. -
This software is provided ‘as-is’, without any express or implied warranty.
In no event will the authors be held liable for any damages arising from
the use of this software.
¹ You can add the tools to non-profit products for free.
Example: You sell a CD and charge only the price for the blank CD without the
work to create the final CD (and so on).
Download
Tools
| plpbtrom-0.6.zip | 2011-08-14 | Create a PCI Option ROM |
| plpbt-createiso.zip | 2010-06-08 | Create custom boot manager cd’s |
| plpcfgbt-0.11.zip | 2012-02-03 | Tool to configure the boot manager file plpbt.bin (Windows/Linux) |
| plpdisd-0.2.zip | 2010-10-16 | Deactivate the USB driver under DOS |
| plpchk-0.1.zip | 2010-10-14 | Detect the USB driver under DOS |
| plpmkboot-0.1.zip | 2012-02-03 | plpbt.bin native FAT boot |
The Boot Manager
| 1. Hotkeys — Global keys |
| 2. Main menu |
| 2.1. Main menu hotkeys |
| 3. Setup |
| 3.1. Partitions |
| Edit label |
| Select Device |
| Partition ID |
| Edit MBR/Import data |
| Clear partition data |
| Reset changes |
| 3.2. Profiles |
| Edit label |
| Show in main menu |
| Linked partitions |
| Configure partition entries |
| Linked partitions — hotkeys |
| Clear profile data |
| Reset changes |
| 3.3. Boot manager |
| Startmode |
| Boot countdown |
| Edit boot countdown |
| Select at start |
| Default profile |
| Show floppy boot |
| Show cdrom boot |
| Show usb boot |
| Force USB 1.1 |
| Use Mass Stor Dev |
| Text mode after boot |
| Graphicmode |
| Zoom animation |
| Font |
| Starfield |
| Master password |
| Setup password |
1. Hotkeys — Global keys
Cursor up/down Move the bar Enter Choose selection ESC Close window CTRL — ESC Switch to text mode CTRL — PAGE UP Switch to higher screen resolution CTRL — PAGE DOWN Switch to lower screen resolution z Enable/Disable window zoom animation
2. Main menu
In the main menu you see all visible profiles to boot an operating system. You can start
an operating system from floppy, cd/dvd, usb or network. You can go to the setup of the boot manager,
partitions and profiles. If your bios supports APM, you can shut down your computer.
2.1. Main menu hotkeys
1-9 Boot profile q Quick boot, open a list of all possible hardcoded partitions to boot w Write MBR with the profile settings, but do not boot f Boot floppy c Boot CD/DVD u Boot USB n Network boot Special additional keys for USB boot:
Press SHIFT-u to force USB 1.1
Press CTRL-u to wait for a key press before starting the operating system.
When a drive was found, then you can press «s» to skip the device
or you can boot from the drive.Press ALT-u to wait for a key press before detecting the usb device type.
When a device was found, then you can press «s» to skip the device
or you can boot from the device when it’s as mass storage device.Difference CTRL-u and ALT-u:
When you use CTRL-u and the boot manager finds an usb device, then the
boot manager identifies it. Because of the stripped down usb implementation,
it’s possible that the boot manager sometimes hangs on some computers.
With ALT-u, the identification
of the usb drives happens when you press enter. When you press «s», then
the boot manager skips the device and it should not hang.
3. Setup
3.1. Partitions
You can manage your partitions here. The install program creates an entry for all
primary partitions it finds. The names are from HDA1 up to
HDD4. HD means hard disk.
HDA stands for hard disk A and
is the first hard disk. The numbers 1-4 are the numbers
of the primary partitions.Notice for linux users: HDA has nothing to do with the devices in linux like
/dev/hda.
Edit label
You can change the label for the partition. This label is used in the boot manager.
The maximum length is 16 chars.
Select Device
Here, you choose the hard disk of the partition.
HDA = Hard disk 1
HDB = Hard disk 2
HDC = Hard disk 3
HDD = Hard disk 4
Partition ID
There are 2 ways to set the ID of a partition.
1. Enter partition ID
You can enter the hexadecimal value for the partition.
2. Select ID from list
This list has the mostly used partition ID’s. If the requested ID is not in the list,
then use Enter partition ID.
Edit MBR/Import data
This is used to change the values of partitions in the MBR.
BP means boot manager partition. This values are stored
in the boot manager.P1-P4 this are the current values of the primary partitions
in the MBR.You can edit the hexadecimal values in the partition table. You can select a
row with s (select) and paste the values to the row
where the cursor is with p. With this
function, you can import partition values to the boot manager or change values in the MBR.
This can be very useful in emergency cases.
Clear partition data
Clearing the data means clearing of the partition data in the boot manager. The data on the
partition itself is unchanged.
Reset changes
Use it if you changed something and you want to restore the whole values of the partition
in the boot manager. This is possible until you close the partition edit window.
3.2. Profiles
Profiles are used to start different operating systems from different hard disks and partitions.
It’s also possible to detect changes in the MBR made by other software and import or forget the changes.If you have an operating system installed and you install the boot manager, the installer creates
a profile to boot the current operating system.
Edit label
You can edit the label of the profile. This label is shown in the main menu. It’s useful to use a
label to see what operating system is going to boot. The maximum length is 16 chars.
Show in main menu
With this option you select if the profile is shown in the main menu or not. Only visible profiles
can be booted. It also has effects on the default profile in the
boot manager setup.
Linked partitions
You select from which hard disk, partition and bios device number you want to boot with this profile.
You can also select what partitions or cleared partitions should be used for the MBR.
Configure partition entries
There are 3 states for a partition entry
1. a selected partition
Press enter to choose a partition from a list with all partition of this hard disk
available from Partitions.If another software changes
this entry in the MBR, the boot manager detects this change at the
next startup. You can choose if you want to import the new values or forget them.2. don’t touch
The partition entry in the MBR will not be changed from the boot manager. That is the default setting.
If a software changes this entry in the MBR the boot manager cannot detect this change.
3. cleared
The boot manager set’s this entry to 0 in the MBR. An operating system cannot detect that there is/was
a partition.WARNING: if the boot manager has not stored the values of the partition in «Partitions» then you lose the
partition values in the MBR and you cannot access the data on the partition. It’s possible to restore
those values, but it’s better, easier and safe to store the values in Partitions.Partition programs will say this is unallocated space! Do not partition this
space! You can lose data if you do it wrong.
Linked partitions — hotkeys
b set boot partition.
You select, what partition you want to boot with this profile. The boot manager set a bios drive
number automatically. It’s possible to change it with another key.c clear partition.
You set this entry to «cleared» and the boot manager clears this entry in the
MBR when you boot this profile.d don’t touch.
You set the entry to don’t touch and the boot manager
does not change this entry when you boot this profile.e edit boot flag.
The boot flag has the bios drive number used by the boot sector routine. In some cases it’s required to change
this value.r remove boot flag.
Here, you remove the boot flag from the profile.l set logical partition.
You can set to boot from a logical partition 1-4 of an extended partition. Change the logical number by pressing «l».
L1 = first logical, L2 = second, …
Clear profile data
You can clear the profile data in the boot manager. The data in
Partitions are not changed.
Reset changes
Use it if you changed something and want to restore the whole values of the profile in the boot manager.
This is possible until you close the profile edit window.
3.3. Boot manager
Startmode
The boot manager has two modes to start. With the user interface menu
and hidden.For the hidden mode, you have to set the boot countdown and you have
to select a default
profile. The default profile boots after the countdown.
The user cannot see that there is a boot manager in the background. If you want to
go into the boot manager, then press ESC.
Boot countdown
You can enable and disable the countdown.
If the boot countdown is enabled, the boot manager waits the given time and starts
after the countdown the last used profile or the default profile, depending on your settings.
Edit boot countdown
Choose between 1 and 99 seconds.
Select at start
At start, the boot manager set the bar to the selected option. This works for the
hidden start mode too.You have the following options
1. Last booted profile
2. Default profile
3. Floppy
4. CDROM
5. USB
Default profile
You can select the default profile from a list of all visible profiles.
Show floppy boot
Show the floppy boot option in the main menu.
Show cdrom boot
Show the cdrom boot option in the main menu.
Show usb boot
Show the USB boot option in the main menu.
Force USB 1.1
Use USB 1.1 controller even if there is a USB 2.0 controller.
Mode 1: Ignore the EHCI Controller
Mode 2: Setup EHCI Controller and set all ports to the companion host. Some controllers
need this option to force usb 1.1.
Use Mass Stor Dev
Use Mass Storage Device. Boot the X mass storage device that was found. Other devices are ignored.
Text mode after boot
You can select the text mode during the startup of an operating system.
Choose between «don’t change» and 80×50.
Graphicmode
Select the screen resolution in the boot manager. Choose between text mode 80×50 and
graphic mode 640×480, 800×600, 1024×768, 1280×1024.
Zoom animation
Enable and disable the window animation.
Font
Select the boot manager font or the bios font.
Starfield
Enable and disable the starfield animation.
Master password
Setup the master password. Disable the boot manager password protection with an empty password.
Setup password
Setup the setup password. Disable the boot manager setup password protection with an empty password.
Install to the hard disk MBR (Master Boot Record)
You can install the boot manager to the MBR of your hard disk. When you do that, then the
boot manager is the first program that is started when you boot from the
hard disk. That means
the boot manager is started before any operating system
has been started. This installation has many benefits. Some features are only
available when the boot manager is installed to the MBR.
As simple alternative to the MBR installation, it’s easy to add the boot manager
to an existing boot manager. See here.
Warning Linux users: Install LILO or GRUB to the boot sector of your Linux instead
of the Master Boot Record (MBR). The Plop Boot Manager is not a Linux loader and cannot start
Linux without LILO, GRUB, Syslinux and similar! See Linux Boot Managers.
| 1. The install program |
| 1.1 Program functions |
| 2. Uninstall |
| 3. Methods to start the install program |
| 3.1. Floppy |
| 3.2. CD |
| 3.3. DOS |
| 3.4. Windows boot menu (NT, 2K, XP, VISTA, Win7) |
| 3.5. Syslinux, Isolinux, Pxelinux (Network) |
| 3.6. LILO |
| 3.7. GRUB / grub4dos |
| 3.8. GRUB2 |
| 3.9. From Network |
| 3.10. Native from a FAT file system |
1. The install program
There are 2 versions of the install program. Basically both versions do the same.
The only difference is that plpinst.com creates a backup file
plpback.bin to restore hard disk sectors for a complete
boot manager uninstall.
The second version plpinstc.com skips the backup part. You have
to use the second version for installation from write protected media like CD’s or
when you install from network or any other boot manager.
1.1 Program functions
1. Full boot manager install
With this option you install the boot manager to your hard disk.
If you have an installed operating system, then the install program creates a
profile for you to boot this operating system.With the installation from floppy, the install program makes a backup of the sectors
where the boot manager will be installed. The install program writes the backup to
the floppy disk. With this backup it’s possible to remove the boot manager completely
from your hard disk. If you use the CD installation, then it’s not possible to
restore the sectors. In this case the uninstall routine creates a new MBR to boot
the current operating system. The partition table data won’t be changed.
2. Rewrite loader
A small program (the loader) is required in the MBR to start the boot manager.
Operating systems like Windows XP are writing during the installation their own
small program into the MBR. If you install Windows XP after the boot manager, then
Windows XP will start instead of the boot manager, because the loader is overwritten
with the program from Windows XP. To setup that the boot manager starts before Windows
XP you have to use Rewrite loader.
3. Boot Manager update
With this, you can update the boot manager. But only updates with boot manager v5 are working.
4. Complete uninstall
Warning, this option is only available with the installation from floppy.
The install program takes the backup that was saved on the floppy disk and writes it back
to the hard disk.Warning, if you changed anything with the partition table, then don’t use this option!
5. Short uninstall
With this option, the program writes a new MBR to start the current operating
system. The partition table will be unchanged.
6. Set Boot Manager screen to text mode
Configures the Boot Manager to start in text mode.
7. Change destination hard disk
Set destination hard disk to install the boot manager.
8. Boot Manager hotkeys
See Hotkeys.
9. Reboot
The computer will be restarted.
2. Uninstall
When you installed the boot manager to the MBR, then you can remove the
boot manager in the same way that you used to install the boot manager, but
you have to use the option 4 or 5 in the install program. The option 4 is only available when you install from floppy.
When you don’t want to use the install program to remove the boot manager,
then you can use any other program that writes a new program to the MBR.
Example FIXMBR, or «fdisk /mbr» and so on. Or you install another boot manager to the MBR.
3. Methods to start the install program
3.1. Floppy
You create the install floppy with a floppy disk image.
A floppy disk image is a file that contains every sector of the floppy disk. You cannot copy
the image file on a floppy disk like a common file. It’s required to use a special program that
writes sector per sector of the image file to the floppy disk sectors. There are many programs available to
do this.
Download the current boot manager plpbt-5.0.15.zip.
Extract it to get the floppy disk image. You find the disk image in the install directory.
The name of the file is plpbtin.img
How to create the floppy:
DOS: You can use diskimg.com
with diskimg -d a -w plpbtin.img
Windows: Write the disk image with the program rawwritewin to the
floppy disk
Linux: dd if=plpbtin.img of=/dev/fd0
3.2. CD
Download the current boot manager plpbt-5.0.15.zip.
Extract it to get the iso file. You find the iso file in the install directory.
The name of the file is plpbtin.iso
Notice: The CD installer makes no backup for a complete uninstall.
See The install program.
Windows:
You can use Nero, or the free program
CDBurnerXP, or any other program
that can burn ISO images.Use the option like burn ISO on CD or
burn ISO Image. Then choose the boot manager ISO and burn it.
Linux:
cdrecord
is the linux program to burn ISO images to a CD.Burn the ISO with cdrecord:
cdrecord -v dev=<devicename> <iso image>Example:
If you access your CD burner with /dev/hdd
cdrecord -v dev=/dev/hdd plpbtin.iso
3.3. DOS
Download the current boot manager plpbt-5.0.15.zip.
Extract it to get the install program. In the install directory there are 2 install programs
(plpinst.com and plpinstc.com)
for using under DOS.
plpinst.com creates a backup file plpback.bin
for a complete boot manager uninstall. plpinstc.bin makes no backup. Use
plpinstc.com for write protected media like CD’s.
3.4. Windows boot menu (NT, 2K, XP, VISTA, Win7)
Hint: When you don’t want to install the boot manager to the MBR then see plpbt.bin — LiveCD and ….
Download the current boot manager plpbt-5.0.15.zip.
Extract the zip file. Open the folder Windows. You will find the batch program
InstallToMBR. Run it as administrator in VISTA/WIN7 (right mouse click
on the file and choose «Run as administrator»). The batch creates an entry in your windows boot menu
called «Install the Plop Boot Manager to the MBR». When you reboot, then use
the entry to install the Plop Boot Manager to the mbr.
To remove the entry from the windows boot menu run the program
c:\plop\plpbt4win. Use «l» (small «L») to list all entries.
Remove the entry with «r ID». ID is the number you have
seen with «l». See here for more info’s to plpbt4win.
Note: plpgenbtldr and contig are no longer required.
3.5 Syslinux, Isolinux, Extlinux
Download the current boot manager plpbt-5.0.15.zip.
Extract it to get the boot manager install program. You find the
install program plpinstc
in the install directory.
Add plpinstc.com to the config file
- for Syslinux it’s syslinux.cfg
- for Isolinux it’s isolinux.cfg
- for Extlinux it’s extlinux.conf
Add the following lines to the config file
label plpinst
linux plpinstc.com
Copy plpinstc to the same directory where the config file is.
You start the install program when you select it from the menu
or you enter plpinst at the Syslinux command prompt.
3.6. LILO
Download the current boot manager plpbt-5.0.15.zip.
Extract it to get the boot manager install program. You find the
install program plpinstc.com
in the install directory.
Copy plpinstc.com to /boot.
Add to your /etc/lilo.conf the following
image=/boot/plpinstc.com
label=plop-install
Run lilo to update lilo.
3.7. GRUB / grub4dos
Download the current boot manager plpbt-5.0.15.zip.
Extract it to get the boot manager install program. You find the
install program plpinstc.com
in the install directory.
Copy plpinstc.com to /boot.
Add to your /boot/grub/menu.lst the following
title Install Plop Boot Manager
root (hd0,0)
kernel /boot/plpinstc.com
When you reboot, you should be able to choose the install program from your grub menu.
Info: You have to choose the correct root settings in your configuration or you get a «Error: file not found». See also this
Forum entry.
3.8. GRUB2
Download the current boot manager plpbt-5.0.15.zip.
Extract it to get the boot manager install program. You find the
install program plpinstc.com
in the install directory.
Copy plpinstc.com to /boot.
Example file /etc/grub.d/40_custom
#!/bin/sh
exec tail -n +3 $0

menuentry "Install Plop Boot Manager" {
    set root='(hd0,1)'
    linux16 /boot/plpinstc.com
}
Then run update-grub2 or update-grub.
When you reboot, you should be able to choose the install program from your grub menu.
Info: You have to choose the correct root settings in your configuration or you get a «Error: file not found». See also this
Forum entry.
3.9. From network
A better documentation comes when I have more time. Meanwhile
use the documentation of Plop Linux.
You need for booting over network a DHCP, TFTP server and the
program pxelinux.
For
Linux click here,
for
Windows click here
3.10. Native from a FAT file system
Download the current boot manager plpbt-5.0.15.zip.
Extract it to get the boot manager install program. You find the
install program plpinstc.com
in the install directory.
Copy plpinstc.com to the FAT formatted drive and
rename it to plpbt.bin.
Then use the program plpmkboot to make the drive
bootable to start plpbt.bin.
-
Linux example: plpmkboot /dev/sdb1
-
Windows example: plpmkboot F:
Hint: Do not use the other install program
plpinst.com except on FAT12 formatted drives.
plpbt.bin — LiveCD and other ways to start the Boot Manager
When you don’t want to install the boot manager to the MBR, then you have
to use plpbt.bin. You can start plpbt.bin
in many different ways.
You cannot save
boot manager settings when you use plpbt.bin. But
you can use plpcfgbt to configure plpbt.bin.
| 1. Floppy |
| 2. CD (LiveCD) |
| 3. Windows boot menu (NT, 2K, XP, VISTA and Win7) |
| 4. Syslinux, Isolinux, Extlinux |
| 5. LILO |
| 6. GRUB / grub4dos |
| 7. GRUB2 |
| 8. From network |
| 9. Native from a FAT file system |
1. Floppy
A floppy disk image is a file that contains every sector of the floppy disk. You cannot copy
the image file on a floppy disk like a common file. It’s required to use a special program that
writes sector per sector of the image file to the floppy disk sectors. There are many programs available to
do this.
Download the current boot manager plpbt-5.0.15.zip.
Extract it to get the floppy disk image plpbt.img.
How to create the floppy:
DOS: You can use diskimg.com
with diskimg -d a -w plpbt.img
Windows: Write the disk image with the program rawwritewin to the
floppy disk
Linux: dd if=plpbt.img of=/dev/fd0
You can configure the plpbt.bin on the floppy with plpcfgbt.
2. CD (LiveCD)
Download the current boot manager plpbt-5.0.15.zip.
Extract it to get the iso file plpbt.iso.
Customize ISO: See Create your own ISO …
Windows:
You can use Nero, or the free program
CDBurnerXP, or any other program
that can burn ISO images.Use the option like burn ISO on CD or
burn ISO Image. Then choose the boot manager ISO and burn it.
Linux:
cdrecord
is the linux program to burn ISO images to a CD.Burn the ISO with cdrecord:
cdrecord -v dev=<devicename> <iso image>Example:
If you access your CD burner with /dev/hdd
cdrecord -v dev=/dev/hdd plpbt.iso
3. Windows boot menu (NT, 2K, XP, VISTA and Win7)
Download the current boot manager plpbt-5.0.15.zip.
Extract the zip file. Open the folder Windows. You will find the batch program
InstallToBootMenu. Run it as administrator in VISTA/WIN7 (right mouse click
on the file and choose «Run as administrator»). The batch creates an entry in your windows boot menu
called «Plop Boot Manager». When you reboot, then use
the entry to start the Plop Boot Manager.
To remove the entry from the windows boot menu run the program
c:\plop\plpbt4win. Use «l» (small «L») to list all entries.
Remove the entry with «r ID». ID is the number you have
seen with «l». See here for more info’s to plpbt4win.
Note: plpgenbtldr and contig are no longer required.
4. Syslinux, Isolinux, Extlinux
Download the current boot manager plpbt-5.0.15.zip.
Extract it to get the boot manager binary program plpbt.bin.
Add plpbt to the config file
- for Syslinux it’s syslinux.cfg
- for Isolinux it’s isolinux.cfg
- for Extlinux it’s extlinux.conf
Add the following lines to your config file
label plp
linux plpbt.bin
Copy plpbt.bin to the same directory where the config file is.
You start the boot manager when you enter plp at the Syslinux command prompt.
You can configure the file plpbt.bin with plpcfgbt.
5. LILO
Download the current boot manager plpbt-5.0.15.zip.
Extract it to get the boot manager binary program plpbt.bin.
Copy the plpbt.bin file to /boot.
Add to your /etc/lilo.conf the following
image=/boot/plpbt.bin
label=Plop
Run lilo to update lilo.
You can configure the file plpbt.bin with plpcfgbt.
6. GRUB / grub4dos
Download the current boot manager plpbt-5.0.15.zip.
Extract it to get the boot manager binary program plpbt.bin.
Copy the plpbt.bin file to /boot.
Add to your menu.lst
title Plop Boot Manager
root (hd0,0)
kernel /boot/plpbt.bin
Info: You have to choose the correct root settings in your configuration or you get a «Error: file not found». See also this
Forum entry.
You can configure the file plpbt.bin with plpcfgbt.
7. GRUB2
Download the current boot manager plpbt-5.0.15.zip.
Extract it to get the boot manager binary program plpbt.bin.
Copy the plpbt.bin file to /boot.
Example file /etc/grub.d/40_custom
#!/bin/sh
exec tail -n +3 $0

menuentry "Plop Boot Manager" {
    set root=(hd0,1)
    linux16 /boot/plpbt.bin
}
Then run update-grub2 or update-grub.
When you reboot, you should be able to start the boot manager from your grub menu.
Info: You have to choose the correct root settings in your configuration or you get a «Error: file not found». See also this
Forum entry.
You can configure the file plpbt.bin with plpcfgbt.
8. From network
A better documentation comes when I have more time. Meanwhile
use the documentation of Plop Linux.
You need for booting over network a DHCP, TFTP server and the
program pxelinux.
For
Linux click here,
for
Windows click here
9. Native from a FAT file system
Download the current boot manager plpbt-5.0.15.zip.
Extract it to get the boot manager binary program plpbt.bin.
Copy plpbt.bin to the FAT formatted drive.
Then use the program plpmkboot to make the drive
bootable to start plpbt.bin.
-
Linux example: plpmkboot /dev/sdb1
-
Windows example: plpmkboot F:
Uninstall the boot manager
Uninstalling the Plop Boot Manager depends on where it is installed.
1. MBR
Restart the install program and choose the option 5 to write a fresh MBR program and remove the Plop Boot Manager start routine.
When you don’t want to use the install program to remove the boot manager, then you can use any other program that writes a new program to the MBR. Example FIXMBR, or «fdisk /mbr» and so on. Or you install another boot manager to the MBR.
2. Windows Boot Menu
To remove the entry from the windows boot menu run the program
c:\plop\plpbt4win. Use «l» (small «L») to list all entries.
Remove the entry with «r ID». ID is the number you have
seen with «l». See here for more info’s to plpbt4win.
3. LiLo, Grub and other boot managers
Just remove the boot manager entry and update the configuration when its required for the program.
Create your own ISO file with your modified plpbt.bin
plpbt-createiso.zip
is a simple script to create a custom plop boot manager iso by
Elmar Hanlhofer. There is one script for Windows and one script for Linux in the
zip file.
The scripts are using mkisofs from cdrtools.
How to use with Windows
The windows binaries of cdrtools are from
http://smithii.com/cdrtools
and included in the zip file.
plpbt.bin and create-iso.bat
must be in the same directory.
You have to run create-iso.bat to create the iso file.
You get a file called plpbtmycd.iso. That’s your new
boot manager iso file.
How to use with Linux
You must have installed mkisofs.
plpbt.bin and create-iso.sh
must be in the same directory.
You have to run sh create-iso.sh to create the iso file.
You get a file called plpbtmycd.iso. That’s your new
boot manager iso file.
plpcfgbt — configure plpbt.bin
plpcfgbt-0.11.zip is a tool to configure
plpbt.bin. This program is available as source code for Linux and Windows. You start the program from
a command shell. If you run the program without parameters then you will see the help information.
Usage: plpcfgbt [OPTIONS] file

Options:
========

 parameter    meaning
 -----------------------------------------------------------------------------
 vm           setup video mode
              values: text, 640x480, 800x600, 1024x768, 1280x1024

 stm          start mode of the boot manager
              values: menu or hidden, hidden requires cnt=on and dbt not off

 cnt          activate countdown, values: on or off

 cntval       countdown in seconds between 1 and 99

 dbt          default boot, values: off, profile, floppy, cdrom, usb

 dprf         use default profile value between 1 and 16

 stf          starfield, values: on or off

 zan          windows zoom animation, values: on or off

 fnt          set font, values: bt or bios

 usb1         force usb 1.1
              values:   off
                        1 = Mode 1 = skip ehci
                        2 = Mode 2 = force ehci to companion

 usbmdev      use usb massdev 1-99 (obsolete)

 int19h       do not boot the os and use int19h, values: on or off

 hotkey       startup hotkey, values: yes or no

 prf          set profile, value: 1-16

 prfname      set profilename 16 chars, 'prf' must be set

 btdrv        boot drive, 80h-89h, 'prf' must be set

 btprt        boot partition 1-4, 'prf' must be set

 btlog        boot log partition, 1-4, 'prf' must be set

 skippcmcia   skip pcmcia check, values: yes or no

 fastpcmcia   skip pcmcia check after usb card was found, values: yes or no

 ignoreusbdev ignore number of usb devices 0-99

 showextended show extended partitions in the main menu, values: yes or no


 hiddenusb    automatic usb boot without showing the boot manager
 hiddencdrom  automatic cdrom boot without showing the boot manager
Infos about int19h see here.
The hotkey option is useful with CD’s or ROM’s. You get the info to press CTRL-A
to start the boot manager. If you don’t press it, the booting continues
without the boot manager.
Examples
Print current settings:
plpcfgbt plpbt.bin
Configure hidden boot and boot the usb drive:
plpcfgbt stm=hidden cnt=on cntval=1 dbt=usb plpbt.bin
or
plpcfgbt hiddenusb plpbt.bin
plpbt.bin parameters
When you use a Linux boot manager, then you can pass some parameters
with «append»
to plpbt.bin.
List of supported parameters
| Parameter | Meaning |
| hiddenusb | is the short version of «stm=hidden cnt=on cntval=1 dbt=usb» |
| hiddencdrom | is the short version of «stm=hidden cnt=on cntval=1 dbt=cdrom» |
| usb1=1 | Force USB 1.1 Mode 1 (ignore the EHCI controller) |
| usb1=2 | Force USB 1.1 Mode 2 (force EHCI ports to usb 1.1) |
| vm=text | Switch to text mode |
| fnt=bios | Switch font to bios font |
| int19h=on | Use INT19h instead of booting usb |
| showextended=yes | Show extended partitions in the main menu |
Example syslinux.cfg:
# configure the boot manager to start in text mode

label plp
    linux plpbt.bin
    append vm=text

# configure the boot manager to start in hidden mode and
# boot usb with forcing usb 1.1 mode 1

label plp2
    linux plpbt.bin
    append "hiddenusb usb1=1"
Create a PCI boot manager option ROM (save in bios)
You can create a pci option rom file with
plpbtrom-0.6.zip.
You can store the option rom in your bios or to the rom of a network card and run
it from there.
Usage: plpbtrom [OPTIONS] input-file output-file

Options:
========
 -h               this help
 -vendorid        id hex value of the card vendor
 -deviceid        id hex value of device
 -grabid          grab vendor/device id from PCI ROM file
 -hidden          disable option rom text output
 -nodisable       do not allow option rom disable
 -forceINT        force hook interrupt
 -INT18           hook int 18h
 -compress        compress option rom
 -size  set rom to a size. examples: 64k, 128k, 1m, ...

 input-file   boot manager file (ex. plpbtrom.bin)
 output-file  ROM file name
Examples
- plpbtrom plpbtrom.bin plpbt.rom
- plpbtrom -vendorid 0x10ec -deviceid 0x8139 plpbtrom.bin plpbt.rom
- plpbtrom -grabid netcard.rom plpbtrom.bin plpbt.rom
- plpbtrom -grabid netcard.rom -size 64k plpbtrom.bin plpbt.rom
Special parameters
-
-forceINT: This forces the boot manager to hook the INT 19h/INT 18h. If you have a PNP bios, then the
boot manager does not use the PNP bios feature of the boot device sequence. The boot manager will be started before any
boot device is tried (when INT 19h mode is used) or the boot manager is the last program that is started when all boot devices
failed to boot (when INT 18h mode is used). -
-INT18: Hook INT18h instead of INT19h. INT19h is the default mode.
Files
plpbtrom — Linux executable
plpbtrom.exe — Windows executable
plpbtrom.bin — Boot Manager
Difference plpbtrom.bin and plpbt.bin
plpbtrom.bin gives the control of the boot
process back to the bios with a far return if you press esc. plpbt.bin
makes a reboot with int 19h.
Passing parameters to the boot manager with the linux kernel command line is not supported
by plpbtrom.bin
You can configure plpbtrom.bin like plpbt.bin with plpcfgbt.
You can enable/disable a hotkey to start the boot manager.
How to test a ROM
You can test your rom file with the free virtual machine qemu.
qemu -hda harddisk.img -option-rom plpbt.rom
If you have no hard disk image file then take one from the qemu download page
or use a floppy image.
qemu -fda floppy.img -option-rom plpbt.rom
How to flash an AMI bios
Do this at your own risk! This can damage your pc.
-
Download the Ami bios flash utility and save your current bios.
AMI HomepageIt’s a DOS program, run the following command from a DOS floppy to save your bios
afudos /obios.rom
-
Use the Windows tool MMTools
to replace the network rom with the plpbt.rom. -
Load the file bios.rom
-
Find the network option rom. It has the id 20, the name PCI Option ROM
and the RunLoc number VendorID:DeviceID of your network card. Maybe there are other option roms
in your bios. Take care that you choose the network option rom. -
Click on it that it’s marked.
-
Click at the Replace Tab
-
Load as Module file the plpbt.rom file.
-
Press the Replace button
-
Press the Save ROM as and give it the name mybios.rom
-
Now comes the dangerous part. Flashing the bios.
I suggest setting the bios to the default settings and save it. Then boot from a dos floppy and runafudos /imybios.rom
Do not turn off the pc during flash. After the flash has completed, go to the bios and do again a reset to the
default settings. -
If all is ok, you should be able to configure the bios and start the boot manager during the boot process.
How to flash an AWARD bios
Do this at your own risk! This can damage your pc.
-
Download the Award bios flash utility aflash. You should find it at
your Motherboard homepage in the bios section. -
Run it from a DOS floppy and save your current bios to a file. Give it the name bios.rom.
-
Search the file cbrom in the web. There are different versions, not all will work
with your bios file, so you have to test it with different versions. -
Run cbrom bios.rom /d
-
This should list all parts of the bios rom. I cannot give you the command to replace the rom. None of the
cbrom programs where able to display the content of my bios rom file.
You have to test it by yourself. -
When you updated the bios rom file, then flash it.
I suggest setting the bios to the default settings and save it. Then boot from a dos floppy and run
with awdflash. -
If all is ok, you should be able to configure the bios and start the boot manager during the boot process.
plpbt4win
plpbt4win makes it easy to add/remove the boot manager from the windows boot menu. The program can work with the boot.ini and with bcdedit. It automatically detects the required method.
You can use it as batch file or run it with an built-in command line. You find plpbt4win
in the Windows directory of plpbt-5.0.15.zip.
Feature list
-
Command line interface, ideal for batch programs and a gui frontend.
-
Built-in command line.
-
Works with boot.ini and bcdedit.
-
Can list, add and remove windows boot menu entries.
-
You can easy use different boot manager binary files. For example, one windows boot menu entry is the default boot manager file and another entry is configured to auto boot usb.
-
2 batch files are included. InstallToBootMenu.bat and InstallToMBR.bat.
The windows user must only start the batch file and everything is done by the batch file. The user must only reboot to see the new boot menu entries. Those batch files can also be used as example how to use plpbt4win.
Help for batch mode
plpbt4win [/?] [/B] [/C [FILE]] [/L] [/A [NAME]] [/R <ID>] [/BIN <FILE>] [/D]

 /?          Help
 /B          Batch mode
 /BIN <FILE> Set the program filename. Default is "c:\plop\plpbt.bin"
 /C [FILE]   Create the plop boot manager loader program. Set the output
             filename. The default filename is "c:\plop\plpbt4win.ldr"
 /L          List windows boot menu entries
 /A [NAME]   Add to the windows boot menu a new entry. The default name is
             "Plop Boot Manager"
 /R <ID>     Remove the menu entry from the windows boot menu. ID is the
             number of the menu entry
 /D          Debug mode
Batch mode examples
-
List boot menu entries: plpbt4win /B /L
-
Create loader: plpbt4win /B /C
-
Create custom named loader: plpbt4win /B /C c:\plop\plp.ldr
-
Add an entry: plpbt4win /B /A «The Plop Boot Manager is here»
-
Remove an entry, first use /L to get the ID and then: plpbt4win /B /R 3
-
Create loader and add entry at once: plpbt4win /B /C /A
Help for built in command line
Start plpbt4win without parameter.
Command (? for help):
 ?          Help
 bin <FILE> Set the program filename. Default is "c:\plop\plpbt.bin"
 c [FILE]   Create the plop boot manager loader program. Set the output
            filename. The default filename is "c:\plop\plpbt4win.ldr"
 l          List windows boot menu entries
 a [NAME]   Add to the windows boot menu a new entry. The default name is
            "Plop Boot Manager"
 r <ID>     Remove the menu entry from the windows boot menu. ID is the
            number of the menu entry
 d          Activate/disable debug mode
 v          Show current values
 q          Quit
Note for Windows XP error
Windows could not start because the following file is missing or corrupt:
\system32\hal.dll
Solution: Rename the file ‘plpbt4win.ldr’ to ‘plpwin.ldr’. Set the new file name in the ‘boot.ini’.
plpgenbtldr
plpgenbtldr is outdated and no longer supported.
Use plpbt4win.
To remove entries from the windows boot menu use either plpbt4win or
Open a command prompt as administrator.
Run «bcdedit /v» to list all entries.
Run «bcdedit /delete {id}» to remove the entry. {id} is the number with { } beside the listed entry.
PCMCIA CardBus driver — USB PC-Card
Many old laptops are having one or two CardBus slots. The boot manager can act as
USB PC-Card enabler and the boot manager makes it possible to boot from the USB
PC-Card. When your laptop has only USB 1.1, then you can speed up the boot process
with an USB 2.0 PC-Card. When your laptop has only one USB port, then you are able
to get more USB ports with an USB PC-Card.
You find the boot manager with the CardBus driver in the pcmcia directory of
plpbt-5.0.15.zip.
The boot manager initializes the CardBus during the boot manager startup.
This means, the PC-Card must be plugged in during the boot manager start!
I do this during the program start, because then you have an initialized and ready
to use PC-Card regardless if you boot from usb or not. When you have
a DOS USB driver (for OHCI and EHCI) then you are able to use it with the PC-Card and
you don’t need a extra CardBus driver.
During the boot manager startup you will see some infos about the CardBus init process.
When you want to read it, then press the CTRL key during the boot manager start.
Notes:
-
My CardBus driver works on many machines, but it does not work on all.
-
Because of the additional CardBus driver size, I had to remove the IDE Cdrom driver
(only) from
the pcmcia hard disk boot manager version.
plpbt.bin has all drivers included.
USB info
-
Only USB mass storage devices are supported. The USB support
allows booting from
USB hard disk, USB thumb drives and USB card readers. USB floppies and CD/DVD drives are not working. -
There is no USB HUB implementation. It’s required to connect your USB drive directly
to the USB port of your computer. - Current status see Boot Manager News.
DOS and the USB driver
| 1. The Boot Manager as USB hard disk driver for DOS |
| 2. Disable the USB driver |
| 3. Detect the USB driver under DOS |
1. The Boot Manager as USB hard disk driver for DOS
I know this is very special. Maybe it’s useful for some people. You have to configure
the plpbt.bin with plpcfgbt to use int19h
instead of booting the operating system.
plpcfgbt int19h=on plpbt.bin
Now you have to start plpbt.bin with a boot manager
like grub,
syslinux or whatever during boot time
(supported boot managers see here). Choose USB and the boot manager
will install the usb driver and go back to your boot manager. If you start DOS you will
have access to your usb drive as last hard disk. But remember, the usb drive is only as «read only» device available.
If it works for you then use plpcfgbt int19h=on stm=hidden cnt=on cntval=1 dbt=usb plpbt.bin
2. Disable the USB driver
If you run DOS and the Plop USB driver is loaded, then you can disable the USB driver
with
plpdisd-0.2.zip. When you
disable the driver, then you are able to load other DOS usb drivers.
You can run plpdisd from config.sys
DEVICE=c:\tools\plpdisd.exe
It’s also possible to run it from the autoexec.bat or command line.
3. Detect the USB driver under DOS
See here
Detect the USB driver
| 1. Detect the USB driver with Syslinux |
| 2. Detect the USB driver under DOS |
1. Detect the USB driver with Syslinux
Icecube wrote the module ifplop.c32 for syslinux to detect the plop usb driver
Example syslinux.cfg:
default plopcheck

# Check for the presence of plop (run by default)
#   When plop INT13 hook is found, run the first label
#   When plop INT13 hook isn't found, run the second label

label plopcheck
    com32 ifplop.c32
    append plop_detected -- plop_not_detected

# When plop INT13 hook was found, boot the menu system.
# plop can have added USB2.0 speed, so the entries we want to boot
# will be read from disk much faster (supposing that we have a BIOS
# that only supports USB1.1 speed).

label plop_detected
    com32 menu.c32
    append syslinux.cfg

# plop INT13 hook wasn't found, so we boot plop

label plop_not_detected
    linux plpbt.bin
ifplop.c32 is part of syslinux since version 4.01.
ifplop.c32 module page:
http://syslinux.zytor.com/wiki/index.php/Ifplop.c32
You find some driver detection info’s
here.
2. Detect the USB driver under DOS
With the program
plpchk-0.1.zip
you are able to detect the plop usb driver. You can use it in the config.sys,
in a batch program or from the command line. The program is able to create a file when the
driver is installed, or delete a file when the driver was not detected. According to
the existence of the file you can do some actions.
For batch files you can use the return value of the error level.
The program makes no screen output when you use the /h parameter.
plpchk [/?] [/h] [file]

  /?      help
  /h      hide text output
  file    create this file when the driver was detected or remove it when the
          driver was not detected

config.sys example: DEVICE=c:\tools\plpchk.exe c:\tmp\plpusb

For batch processing: ERRORLEVEL 0 = no driver detected
                                 1 = driver detected
You find some driver detection info’s
here.
Hidden partition / Cleared partition
Hidden partition / Cleared partition
There is a important difference between «hidden» and «cleared» partitions.
-
Hidden Partition: Operating systems, backup solutions and so on
can see them but they ignore them. I would say, this is a pseudo hidden partition. -
Cleared Partition: No program (except the boot manager) knows that
there is/was a partition defined in the MBR.
This is really hidden.
It looks
like unallocated space for every program. That means no other program can
access the data on that partition (with some work and searching the hard disk
there are still ways to
access the data). There is a risk, if you repartition
the hard disk, you will overwrite your invisible partition and all data
on it if you do it wrong.
Example: Hide a partition
This is an example: A partition should be visible in one profile and hidden (and not cleared) in another profile
Let’s say you want to have the second partition on HDA (HDA2) on one profile visible
and on another hidden (and not cleared).
-
Use an empty entry in partitions. Give it
the label «hidden hda2». -
Select the device HDA.
-
Go to «Edit MBR/Import data».
-
Move the cursor to P2 and press «s». Now move up to «BP» and press «p».
-
Press ESC and go to «Partition ID». Choose «Select from list». Choose the hidden version
of your partition. -
Press ESC and save your changes.
-
Go to «profiles».
Now you can assign the
«visible» version of your partition to one profile and the «hidden» to another profile.
Linux Boot Managers to the boot sector
LILO, GRUB / grub4dos, GRUB2: I had no time to write some short descriptions how to install them to the boot sector.
Examples
| 1. Video dual boot install Windows XP and Windows XP |
| 2. Windows XP and Windows Vista dual boot with hidden (cleared) partitions |
| 3. Dualboot Windows XP and Windows 7 |
1. Video dual boot install Windows XP and Windows XP
Download demoinstall.wmv
(demoinstall.zip). The quality is not the best but you see all required steps.
I hope it’s useful.
2. Windows XP and Windows Vista dual boot with hidden (cleared) partitions
The goal is to install Windows XP on the first partition
and Windows Vista on the second partition. I want that no windows has
access to the partition of the other Windows. There should be a third partition
that will be used as shared partition. Both Windows have access to this partition.
There are many ways to do this. I will describe one way.
It works only with the MBR installation!
What should be the result
- Windows XP on partition 1
- Windows Vista on partition 2
- A shared partition for both Windows as partition 3
- No Windows has access to the other Windows partition
- Realized with the Plop Boot Manager (hard disk installation)
Basic conditions
- The hard disk is not partitioned
- No boot manager is installed
The description
Install Windows XP
At first install Windows XP. Create with the Windows installer
a partition with the size you want. I use a 10GB partition. Install
Windows XP on this partition.
Setup Partitions
When you installed your Windows, go to the Disk Management
and create a second primary partition for Vista and
a third primary partition for the shared data.
Install the boot manager
Now comes the boot manager part. Boot from the boot manager install floppy or CD.
Install the boot manager to the hard disk and then reboot.
Configure the Windows XP profile
The boot manager created a profile called «os harddisk 1» to boot Windows XP.
It also imported the 3 primary partitions. The names are HDA1, HDA2 and HDA3.Now go to setup and profiles. Select os harddisk 1.
Give it the new label windows xp.Select linked partitions. Press enter at the first slot
of HDA and select HDA1.
At the second slot press c to set it to cleared.
You can leave the third slot as don’t touch or select
HDA3. See the difference at configure partition entries.
Configure the Windows Vista profile
Now leave the configuration of Windows XP and go to an empty profile in Profiles.
Give it the label windows vista. Set show
in main menu to yes.
Now select linked partitions. Press at the first slot
c to set it to cleared.
At the second slot press b to set the boot flag.
Press enter and select HDA2. On the third slot choose the same
as for windows xp (don’t touch or HDA3).
Install Window Vista
Go back to the main menu. Now you see windows xp and windows vista. Move to windows vista
and press Enter.
This writes the profile settings to the hard disk. The booting will fail, because Vista
is not installed. Now boot the Windows Vista install DVD. In the installer you should see
at the partitions screen at first an unallocated space (there is xp installed) and 2
primary partitions. Select the first primary partition to install Windows Vista. when the
Windows Vista installation has been finished, it’s possible, that Vista
is booting immediately and the Plop Boot Manager does not come. In this case use
Rewrite loader from the Plop Boot Manager install floppy or CD.
Now you should have two bootable Windows on your hard disk and they don’t know from each other.
You can share data between both with the shared partition.
Windows Vista on the second hard disk
It’s similar to the previous description, if you want to install Windows XP on the first hard disk and
Windows Vista on the second hard disk. The second hard disk is HDB in the boot manager.
So install Windows Vista to the first partition of the second hard disk. Set in
the vista profile/linked partitions the first slot of HDB to
HDB1 and press b.
The boot manager will set the boot flag to 81h. This should be
ok for your installation.
3. Dualboot Windows XP and Windows 7
Here are short instructions for a complete new installation of
your pc with dualbooting WinXP and Win7. It doesn’t matter if you use 32 or 64
bit versions.
Take care, all data on your pc will be deleted!
Boot the Win7 install DVD. Remove all partitions from the hard disk. Create a partition for Win7.
The install program will create 2 partitions. One with about 80MB for the Win7 boot files and a
second partition with the Win7 files. Create an additional partition for WinXP. Now you see
3 partitions. Install Win7 to the second partition. After the Win7 installation is complete, install the Plop
Boot Manager. After the Boot Manager installation go to the Boot Manager Setup, then Profiles, then
«OS HARDDISK 1». Change the name to «Win7». Go to linked partitions and press enter on the first position of HDA
and select HDA1, on the second select HDA2 and on the third press «c» for cleared. Now leave the profile settings
for Win7. Use now an empty profile to create the WinXP profile. Give it the name WinXP, visible in main menu «yes».
In linked partitions select for HDA on the first position HDA3, press «b» to set the boot flag on the first position.
On the second press «c» to set it cleared. On the third press «c» to set it to cleared too. Go to the main menu
and press enter on WinXP. You will be not able to boot this partition because XP is not installed currently.
If you get the message about invalid boot signature, then press «n» to abort. Now boot the WinXP
install CD. You should see now only one partition. Install WinXP there. After the installation
completed then start the Plop Boot Manager install CD and use «Rewrite loader». Reboot, the boot manager
will tell you about partition changes. Press «y» to import the new values. Now you should be able to boot
both systems.
NOD32 Virus report
NOD32 reports a MBR virus after the Boot Manager MBR installation. It’s a false report.
This problem was fixed but with the new NOD32 versions it’s back.
FAQ — Frequently asked questions
-
I booted DOS from USB and I cannot write on the drive
-
Are there plans to add write support in the future
-
The boot manager detect’s my usb cdrom, but booting hangs
-
My USB keyboard does not work when I booted from USB
-
Can I use my USB PC-Card (PCMCIA CardBus) to boot from USB
-
I want to install the boot manager from my USB device, but I cannot choose my internal hard disk
-
I use plpbt.bin and it forgets my settings
-
I cannot boot from my SATA CD/DVD drive
-
I was reading VIEW/EDIT/COPY data in the forum, where is this menu
-
Main menu network boot: !PXE structure was not found in UNDI
-
My USB DVD drive is detected, but I cannot boot
-
Windows could not start because the following file is missing or corrupt:
\system32\hal.dll
-
I booted DOS from USB and I cannot write on the drive
My drivers have no write routines implemented. You want to
know why? My intention was to have USB drivers for UHCI, OHCI
and EHCI controllers in my tiny boot manager. The space to install
the boot manager without the need of a partition is very limited.
So there was no space left for write routines. -
Are there plans to add write support in the future
It’s in my mind, but there are no fix plans.
-
The boot manager detect’s my usb cdrom, but booting hangs
USB CD/DVD drives are not supported.
-
My USB keyboard does not work when I booted from USB
USB keyboards are not supported by my drivers. When you boot Linux or Windows,
then your keyboard will work again when those operating systems are taking
control over the USB hardware. -
Can I use my USB PC-Card (PCMCIA CardBus) to boot from USB
Yes, with the pcmcai version of the boot manager
-
I want to install the boot manager from my USB device, but I cannot choose my internal hard disk
The problem with installing on the internal (in this case the second) hard disk
with the installer
is, that the installer imports the partitions from the usb device and
thinks this are the partitions of the first hard disk. When the boot
manager boot’s later from the real hard disk then the imported partitions are
not correct. You see the problem? Sure it would be possible to add an option to
handle this situation, but there are so many other ways to install the boot manager, that
there are no plans to add this feature to the installer (except, many people request this feature). -
I use plpbt.bin and it forgets my settings
You have to configure plpbt.bin with plpcfgbt. All changes you make within
the boot manager menu are only valid until you reboot. The changes are not saved. -
I cannot boot from my SATA CD/DVD drive
SATA CD/DVD drives are not supported. Only IDE CD/DVD drives are working.
-
I was reading VIEW/EDIT/COPY data in the forum, where is this menu
‘VIEW/EDIT/COPY’ data has been renamed to ‘Edit MBR/Import data’ (setup/partitions/partition edit).
-
Main menu network boot: !PXE structure was not found in UNDI
Your network rom is a ‘PXE Split ROM’. Currently only ‘Monolithic’ roms are supported
-
My USB DVD drive is detected, but I cannot boot
Booting from USB CD/DVD drives is not supported by the current usb driver
-
Windows could not start because the following file is missing or corrupt:
\system32\hal.dllRename the file ‘plpbt4win.ldr’ to ‘plpwin.ldr’. Set the new file name in the ‘boot.ini’.
© 2023 by
Elmar Hanlhofer
This page was last modified on 07/Feb/2012.

Мы неоднократно предлагали нашим читателям возможность переноса всей операционной системы с жесткого диска. CD-ROM на USB-накопитель. Предыдущий шаг для этого может обязательно потребовать небольшого преобразования того же компакт-диска (с операционной системой внутри) в образ ISO.
Если мы выполнили это требование, не составит труда найти какой-либо из множества инструментов, которые помогут нам передать все содержимое этого ISO-образ на USB-накопитель. Проблема может возникнуть, если на компьютере (настольном или портативном) с соответствующим USB-портом есть BIOS, где не могу установить порядок загрузки, что означает, что мы ни в коем случае не можем приказать, чтобы этот USB-накопитель использовался для начала установки с указанным аксессуаром. Благодаря небольшому инструменту под названием «Plop Boot Manager» невозможное становится практически возможным, о чем мы упомянем ниже, если вы столкнулись с этой печальной ситуацией на старом персональном компьютере.
Индекс
- 1 Как «Диспетчер загрузки Plop» работает на моем персональном компьютере?
- 2 Вариант 1 с диспетчером загрузки Plop
- 3 Вариант 2 с диспетчером загрузки Plop
Plop Boot Manager — это небольшой инструмент, который можно использовать двумя разными способами, а именно:
- Установка и настройка этого инструмента после запуска Windows.
- Работайте с этим инструментом, если у нас еще не установлена Windows.
Мы упомянули Windows как операционную систему для установки на ваш компьютер, хотя у пользователя могут быть другие типы совершенно других потребностей (например, установка Ubuntu на эти старые компьютеры). Если у нас есть USB-накопитель с операционной системой внутри, а на персональном компьютере есть BIOS, которая не позволяет нам выбирать его для запуска, то вы можете использовать любую из двух альтернатив, которые мы упомянем ниже, в зависимости от ваших потребностей. в определенный момент.
Вариант 1 с диспетчером загрузки Plop
Предположим, что на нашем персональном компьютере установлена Windows, и мы хотим добавить еще одну операционную систему, которая может быть версия Linux, которую мы интегрировали в USB-накопитель. Мы рекомендуем выполнить следующие шаги, чтобы вы могли достичь этой цели:
- Полностью запустите сеанс Windows.
- Скачать в «Менеджер загрузки Plop»С официального сайта и извлеките его содержимое.
- Перейдите в папку «plpbt -> Windows».
- Найдите файл «InstallToBootMenu.bat» и запустите его с правами администратора.
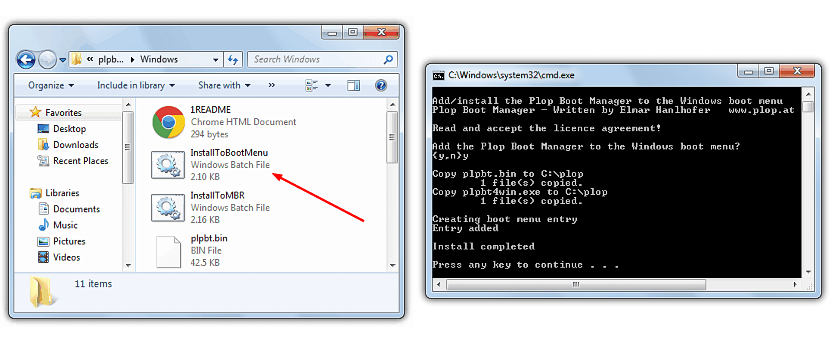
Сразу же появится окно «командного терминала», в котором пользователя спрашивают, уверены ли вы, что хотите выполнить эту задачу; если мы ответим утвердительно (с «и») в загрузочный файл будет внесено несколько изменений, что мы сможем проверить при следующей перезагрузке компьютера.
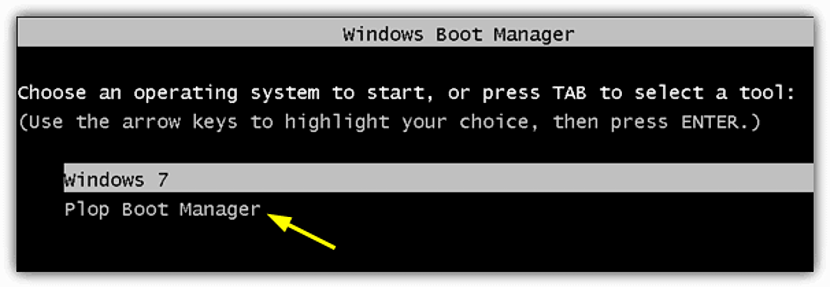
Окно, очень похожее на то, что мы разместили в верхней части, — это то, которое вы могли видеть, где в первую очередь будет присутствовать текущая операционная система системы, а на втором месте будет «Диспетчер загрузки Plop». , так же как и выбранный он запустит компьютер с USB-накопителем, который вы вставили.
Вариант 2 с диспетчером загрузки Plop
Метод, который мы предложили выше, является одним из самых простых для выполнения, хотя мы также должны учитывать совершенно другую ситуацию, которую мы также можем увидеть в любое время. Например, если на нашем персональном компьютере еще не установлена операционная система, а у нас USB-накопитель, готовый к использованию для запуска этой установки, то нам придется выбрать второй метод.
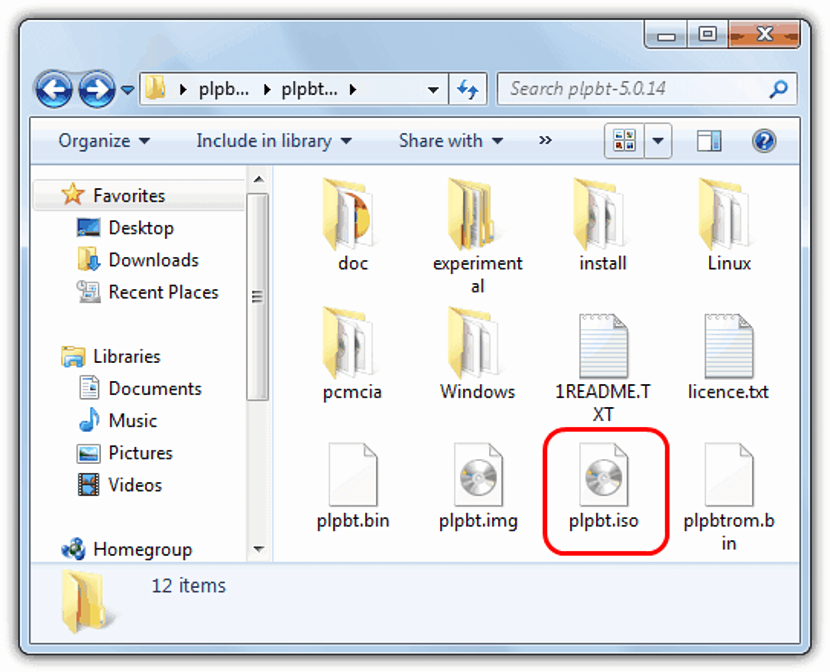
Для этого мы предлагаем вам перейти по тому же URL-адресу, который вы указали выше, и найти файл ISO, к которому вам нужно будет сохранить (записать) на диск CD-ROM; возможно, кому-то то, что мы порекомендовали, может показаться несколько нелогичным, потому что, если мы запустим наш CD-ROM с помощью «Plop Boot Manager», оттуда мы также могли бы начать установку операционной системы, если бы у нас был соответствующий диск. К сожалению, если у нас его нет, а вместо этого у нас есть USB-накопитель с операционной системой, готовой к установке, мы можем запустить компьютер с компакт-диска (и Plop Boot Manager, ранее записанный с его образом ISO) и дождитесь сообщения загрузчика.
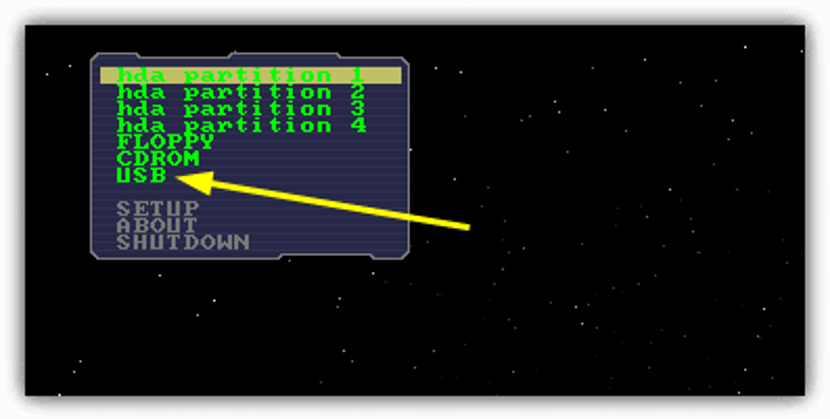
Экран, очень похожий на тот, который мы разместили в верхней части, — это тот, который вы могли видеть, где USB-накопитель, который мы должны были вставить ранее, появится в списке. в один из портов компа. Когда это произойдет, немедленно запустится система установки операционной системы, присутствующей на этом USB-накопителе.
Содержание статьи соответствует нашим принципам редакционная этика. Чтобы сообщить об ошибке, нажмите здесь.