

REV4.0.0 1910012685
User Guide
300Mbps Wireless N 4G LTE Router
TL-MR6400

Contents
About This Guide ……………………………………………………………………………………………1
Chapter 1. Get to Know Your 4G LTE Router . . . . . . . . . . . . . . . . . . . . . . . . . .2
1. 1. Product Overview. . . . . . . . . . . . . . . . . . . . . . . . . . . . . . . . . . . . . . . . . . . . . . . . . . . . . . . . . . . . 3
1. 2. Panel Layout. . . . . . . . . . . . . . . . . . . . . . . . . . . . . . . . . . . . . . . . . . . . . . . . . . . . . . . . . . . . . . . . . 3
1. 2. 1. Top View . . . . . . . . . . . . . . . . . . . . . . . . . . . . . . . . . . . . . . . . . . . . . . . . . . . . . . . . . . . . . . 3
1. 2. 2. The Back Panel. . . . . . . . . . . . . . . . . . . . . . . . . . . . . . . . . . . . . . . . . . . . . . . . . . . . . . . . 4
Chapter 2. Connect the Hardware . . . . . . . . . . . . . . . . . . . . . . . . . . . . . . . . . . . .6
2. 1. Position Your 4G LTE Router. . . . . . . . . . . . . . . . . . . . . . . . . . . . . . . . . . . . . . . . . . . . . . . . . . 7
2. 2. Connect Your 4G LTE Router . . . . . . . . . . . . . . . . . . . . . . . . . . . . . . . . . . . . . . . . . . . . . . . . . 7
Chapter 3. Log In to Your 4G LTE Router . . . . . . . . . . . . . . . . . . . . . . . . . . . . . .9
Chapter 4. Set Up Internet Connections . . . . . . . . . . . . . . . . . . . . . . . . . . . . 11
4. 1. Use Quick Setup Wizard . . . . . . . . . . . . . . . . . . . . . . . . . . . . . . . . . . . . . . . . . . . . . . . . . . . . 12
4. 2. Create a Connection Profile. . . . . . . . . . . . . . . . . . . . . . . . . . . . . . . . . . . . . . . . . . . . . . . . . 12
4. 3. Test Internet Connectivity . . . . . . . . . . . . . . . . . . . . . . . . . . . . . . . . . . . . . . . . . . . . . . . . . . 14
Chapter 5. QoS. . . . . . . . . . . . . . . . . . . . . . . . . . . . . . . . . . . . . . . . . . . . . . . . . . . . . 15
Chapter 6. Network Security . . . . . . . . . . . . . . . . . . . . . . . . . . . . . . . . . . . . . . . 18
6. 1. Protect the Network from Cyber Attacks . . . . . . . . . . . . . . . . . . . . . . . . . . . . . . . . . . . . 19
6. 2. Service Filtering . . . . . . . . . . . . . . . . . . . . . . . . . . . . . . . . . . . . . . . . . . . . . . . . . . . . . . . . . . . . 20
6. 3. Access Control . . . . . . . . . . . . . . . . . . . . . . . . . . . . . . . . . . . . . . . . . . . . . . . . . . . . . . . . . . . . . 21
6. 4. IP & MAC Binding . . . . . . . . . . . . . . . . . . . . . . . . . . . . . . . . . . . . . . . . . . . . . . . . . . . . . . . . . . . 22
Chapter 7. Parental Controls . . . . . . . . . . . . . . . . . . . . . . . . . . . . . . . . . . . . . . . 24
Chapter 8. SMS . . . . . . . . . . . . . . . . . . . . . . . . . . . . . . . . . . . . . . . . . . . . . . . . . . . . 28
8. 1. View Messages . . . . . . . . . . . . . . . . . . . . . . . . . . . . . . . . . . . . . . . . . . . . . . . . . . . . . . . . . . . . . 29
8. 2. Edit and Send a New Message . . . . . . . . . . . . . . . . . . . . . . . . . . . . . . . . . . . . . . . . . . . . . . 29
8. 3. View Sent Messages. . . . . . . . . . . . . . . . . . . . . . . . . . . . . . . . . . . . . . . . . . . . . . . . . . . . . . . . 30
8. 4. View Drafts . . . . . . . . . . . . . . . . . . . . . . . . . . . . . . . . . . . . . . . . . . . . . . . . . . . . . . . . . . . . . . . . . 30
8. 5. SMS Settings . . . . . . . . . . . . . . . . . . . . . . . . . . . . . . . . . . . . . . . . . . . . . . . . . . . . . . . . . . . . . . . 30

Chapter 9. Guest Network. . . . . . . . . . . . . . . . . . . . . . . . . . . . . . . . . . . . . . . . . . 32
9. 1. Create a Network for Guests . . . . . . . . . . . . . . . . . . . . . . . . . . . . . . . . . . . . . . . . . . . . . . . . 33
9. 2. Customize Guest Network Options. . . . . . . . . . . . . . . . . . . . . . . . . . . . . . . . . . . . . . . . . . 33
Chapter 10. NAT Forwarding. . . . . . . . . . . . . . . . . . . . . . . . . . . . . . . . . . . . . . . . . 35
10. 1. Translate Address and Port by ALG. . . . . . . . . . . . . . . . . . . . . . . . . . . . . . . . . . . . . . . . . . 36
10. 2. Share Local Resources in the Internet by Virtual Server. . . . . . . . . . . . . . . . . . . . . . 37
10. 3. Open Ports Dynamically by Port Triggering. . . . . . . . . . . . . . . . . . . . . . . . . . . . . . . . . . 38
10. 4. Make Applications Free from Port Restriction by DMZ . . . . . . . . . . . . . . . . . . . . . . . 39
10. 5. Make Xbox Online Games Run Smoothly by UPnP . . . . . . . . . . . . . . . . . . . . . . . . . . . 40
Chapter 11. Specify Your Network Settings. . . . . . . . . . . . . . . . . . . . . . . . . . 42
11. 1. USSD. . . . . . . . . . . . . . . . . . . . . . . . . . . . . . . . . . . . . . . . . . . . . . . . . . . . . . . . . . . . . . . . . . . . . . . 43
11. 2. PIN Management . . . . . . . . . . . . . . . . . . . . . . . . . . . . . . . . . . . . . . . . . . . . . . . . . . . . . . . . . . . 43
11. 3. Data Settings . . . . . . . . . . . . . . . . . . . . . . . . . . . . . . . . . . . . . . . . . . . . . . . . . . . . . . . . . . . . . . . 44
11. 4. LAN Settings . . . . . . . . . . . . . . . . . . . . . . . . . . . . . . . . . . . . . . . . . . . . . . . . . . . . . . . . . . . . . . . 45
11. 4. 1. Change the LAN IP Address . . . . . . . . . . . . . . . . . . . . . . . . . . . . . . . . . . . . . . . . . 45
11. 4. 2. Use the 4G LTE Router as a DHCP Server. . . . . . . . . . . . . . . . . . . . . . . . . . . . 46
11. 4. 3. Reserve LAN IP Addresses . . . . . . . . . . . . . . . . . . . . . . . . . . . . . . . . . . . . . . . . . . 47
11. 5. Wireless Settings . . . . . . . . . . . . . . . . . . . . . . . . . . . . . . . . . . . . . . . . . . . . . . . . . . . . . . . . . . . 48
11. 5. 1. Specify Basic Wireless Settings . . . . . . . . . . . . . . . . . . . . . . . . . . . . . . . . . . . . . 48
11. 5. 2. Use WPS for Wireless Connection. . . . . . . . . . . . . . . . . . . . . . . . . . . . . . . . . . . 49
11. 5. 3. Schedule Your Wireless Function. . . . . . . . . . . . . . . . . . . . . . . . . . . . . . . . . . . . 51
11. 5. 4. View Wireless Information. . . . . . . . . . . . . . . . . . . . . . . . . . . . . . . . . . . . . . . . . . . 52
11. 5. 5. Advanced Wireless Settings . . . . . . . . . . . . . . . . . . . . . . . . . . . . . . . . . . . . . . . . 53
11. 6. Set Up a Dynamic DNS Service Account . . . . . . . . . . . . . . . . . . . . . . . . . . . . . . . . . . . . 54
11. 7. Create Static Routes. . . . . . . . . . . . . . . . . . . . . . . . . . . . . . . . . . . . . . . . . . . . . . . . . . . . . . . . 55
11. 8. Set up a VPN Connection . . . . . . . . . . . . . . . . . . . . . . . . . . . . . . . . . . . . . . . . . . . . . . . . . . . 57
11. 8. 1. Use IPSec VPN to Access Your Home Network . . . . . . . . . . . . . . . . . . . . . . 57
11. 8. 2. Use OpenVPN to Access Your Home Network . . . . . . . . . . . . . . . . . . . . . . . 60
11. 8. 3. Use PPTP VPN to Access Your Home Network. . . . . . . . . . . . . . . . . . . . . . . 62
Chapter 12. Administrate Your Network . . . . . . . . . . . . . . . . . . . . . . . . . . . . . 66
12. 1. Set System Time . . . . . . . . . . . . . . . . . . . . . . . . . . . . . . . . . . . . . . . . . . . . . . . . . . . . . . . . . . . 67
12. 2. Update the Firmware. . . . . . . . . . . . . . . . . . . . . . . . . . . . . . . . . . . . . . . . . . . . . . . . . . . . . . . . 68
12. 2. 1. Online Upgrade . . . . . . . . . . . . . . . . . . . . . . . . . . . . . . . . . . . . . . . . . . . . . . . . . . . . . 68
12. 2. 2. Local Upgrade . . . . . . . . . . . . . . . . . . . . . . . . . . . . . . . . . . . . . . . . . . . . . . . . . . . . . . 69
12. 3. Back up and Restore Configuration Settings . . . . . . . . . . . . . . . . . . . . . . . . . . . . . . . . 69
12. 4. Change the Administrator Account. . . . . . . . . . . . . . . . . . . . . . . . . . . . . . . . . . . . . . . . . . 70

12. 5. Local Management . . . . . . . . . . . . . . . . . . . . . . . . . . . . . . . . . . . . . . . . . . . . . . . . . . . . . . . . . 71
12. 6. Remote Management . . . . . . . . . . . . . . . . . . . . . . . . . . . . . . . . . . . . . . . . . . . . . . . . . . . . . . . 72
12. 7. System Log. . . . . . . . . . . . . . . . . . . . . . . . . . . . . . . . . . . . . . . . . . . . . . . . . . . . . . . . . . . . . . . . . 73
12. 8. Monitor the Internet Traffic Statistics. . . . . . . . . . . . . . . . . . . . . . . . . . . . . . . . . . . . . . . . 74
12. 9. CWMP Settings. . . . . . . . . . . . . . . . . . . . . . . . . . . . . . . . . . . . . . . . . . . . . . . . . . . . . . . . . . . . . 75
12. 10. SNMP Settings . . . . . . . . . . . . . . . . . . . . . . . . . . . . . . . . . . . . . . . . . . . . . . . . . . . . . . . . . . . . . 77
FAQ ………………………………………………………………………………………………………………..79

1
About This Guide
This guide is a complement to Quick Installation Guide. The Quick Installation Guide
instructs you on quick internet setup, and this guide provides details of each function
and shows you the way to configure these functions appropriate to your needs.
Note: Features available in this router may vary by model and software version. Router
availability may also vary by region or ISP. All images, steps, and descriptions in this
guide are only examples and may not reflect your actual router experience.
Conventions
In this guide the following conventions are used:
Convention Description
Teal Underlined Hperlinks are in teal and underlined. You can click to redirect to a website or a specific
section.
Teal Contents to be emphasized and texts on the web page are in teal, including the menus,
items, buttons and so on.
>
The menu structures to show the path to load the corresponding page. For example,
Advanced > Wireless > MAC Filtering means the MAC Filtering function page is under the
Wireless menu that is located in the Advanced tab.
Note: Ignoring this type of note might result in a malfunction or damage to the device.
Tips: Indicates important information that helps you make better use of your device.
Speed/Coverage Disclaimer
*Maximum wireless signal rates are the physical rates derived from IEEE Standard
802.11 specifications. Actual wireless data throughput and wireless coverage are
not guaranteed and will vary as a result of network conditions, client limitations, and
environmental factors, including building materials, obstacles, volume and density of
traffic, and client location.
More Info
• The latest software, management app and utility are available from the Download
Center at https://www.tp-link.com/support/.
• The Quick Installation Guide can be found where you find this guide or inside the
package of the router.
• Specifications can be found on the product page at https://www.tp-link.com.
• TP-Link Community is provided for you to discuss our products and share knowledge
at https://community.tp-link.com.
• Our Technical Support contact information can be found at the Contact Technical
Support page at https://www.tp-link.com/support/.

Chapter 1
Get to Know Your 4G LTE
Router
This chapter introduces what the router can do and shows its appearance.
It contains the following sections:
• Product Overview
• Panel Layout

3
Chapter 1 Get to Know Your 4G LTE Router
1. 1. Product Overview
The 4G LTE Router shares the latest generation 4G LTE network with multiple Wi-Fi
devices, anywhere you want.
With Ethernet ports and antennas, the router provides wired and wireless access for
multiple computers and mobile devices.
With various features and functions, the router is the perfect hub of your home or
business network.
1. 2. Panel Layout
1. 2. 1. Top View
The router’s LEDs (view from left to right) are located on the front panel. You can check
the router’s working status by following the LED Explanation table.
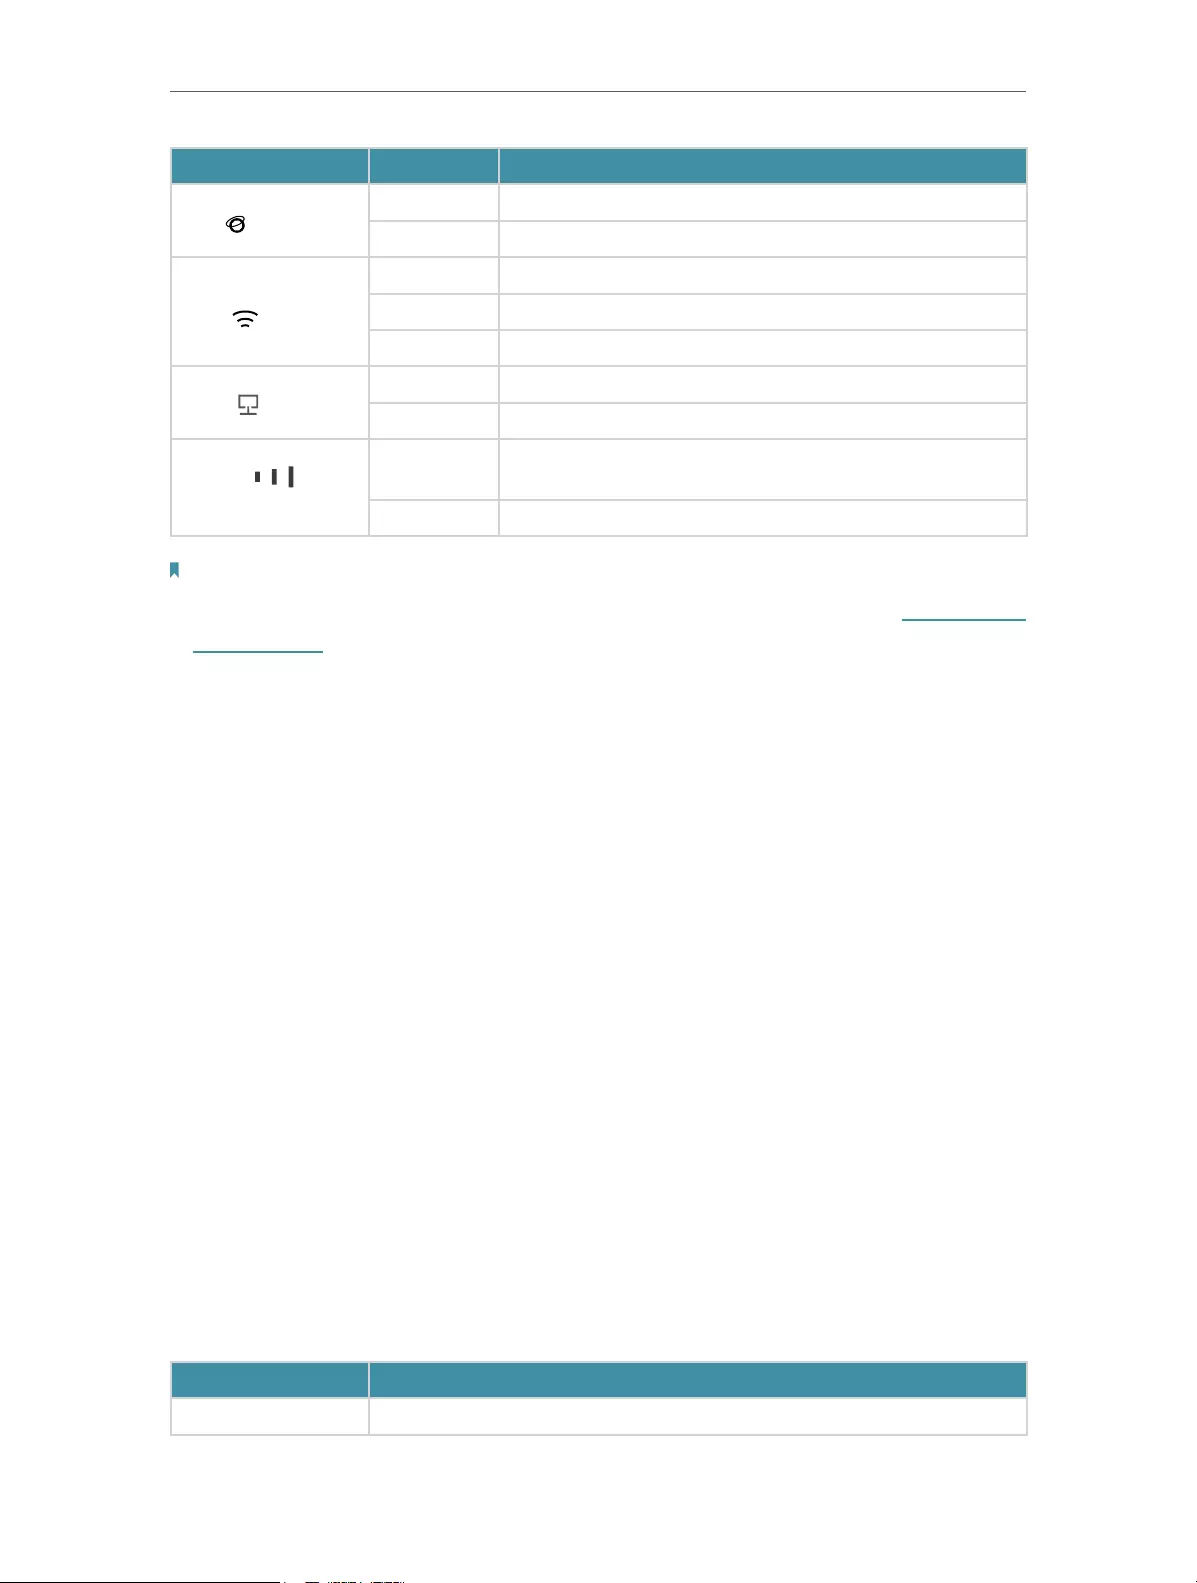
LED Explanation
Name Status Indication
(Power)
On The system has started up successfully.
Flashing The system is starting up or firmware is being upgraded. Do not
disconnect or power off the router.
Off Power is off.
4
Chapter 1 Get to Know Your 4G LTE Router
Name Status Indication
(Internet)
On The router is connected to the internet.
Off There is no internet connection.
(Wi-Fi)
On The wireless function is enabled.
Flashing WPS connection is in progress. This may take up to 2 minutes.
Off The wireless function is disabled.
(LAN)
On At least one LAN port is connected to a powered-on device.
Off No LAN port is connected to a powered-on device.
(Signal Strength)
On Indicates the signal strength the router received from the mobile
internet. More lit bars indicate a better signal strength.
Off There is no mobile internet signal.
Note:
1. If the Internet LED is off, please check your internet connection first. Refer to Connect Your
4G LTE Router for more information about how to make internet connection correctly. If you
have already made a right connection, please contact your ISP to make sure your internet
service is available now.
2. If the Signal Strength LED is off, please check your Internet LED first. If your Internet LED
is also off, please refer to Note 1. If your Internet LED is on, please relocate the router to a
location that receives a strong mobile internet signal, such as near a window.
1. 2. 2. The Back Panel
The following parts (view from left to right) are located on the rear panel.
Item Description
POWER Port For connecting the router to power socket via the provided power adapter.

5
Chapter 1 Get to Know Your 4G LTE Router
Item Description
POWER ON/OFF Button Press this button to power on or off the router.
LAN1, LAN2, LAN3,
LAN4/WAN
For connecting to your PCs or other Ethernet network devices.
In wireless router mode, the LAN4/WAN port is used for connecting to a Cable/FTTH/
VDSL/ADSL device.
WPS/RESET
Press and hold this button until the Power LED starts flashing to reset the router to its
factory default settings.
To enable the WPS function, press this button about 2 seconds. If you have a WPS-
supported device, you can press this button to quickly establish connection between the
router and the client device.
Wi-Fi ON/OFF For turning on/off the Wi-Fi function.
Micro SIM Card Slot For holding the micro SIM card.
Antennas Used for data sessions over LTE. Upright them for the best mobile internet signal.

Chapter 2
Connect the Hardware
This chapter contains the following sections:
• Position Your 4G LTE Router
• Connect Your 4G LTE Router
7
Chapter 2 Connect the Hardware
2. 1. Position Your 4G LTE Router
With the router, you can access your network from anywhere within the wireless network
coverage. However, the wireless signal strength and coverage varies depending on the
actual environment where your router is in. Many obstacles may limit the range of the
wireless signal, for example, concrete structures, thickness and number of walls.
For your security and best Wi-Fi performance, please:
• Do not locate the router in the place where it will be exposed to moisture or excessive
heat.
• Keep away from strong electromagnetic radiation source and electromagnetic—
sensitive devices.
• Place the router in a location where it can be connected to the various devices as well
as to a power source.
• Place the router in a location where it can receive a strong mobile internet signal.
• Make sure the cables and power cord are safely placed out of the way so they do not
create a tripping hazard.
Tips: The router can be placed on a shelf or desktop.
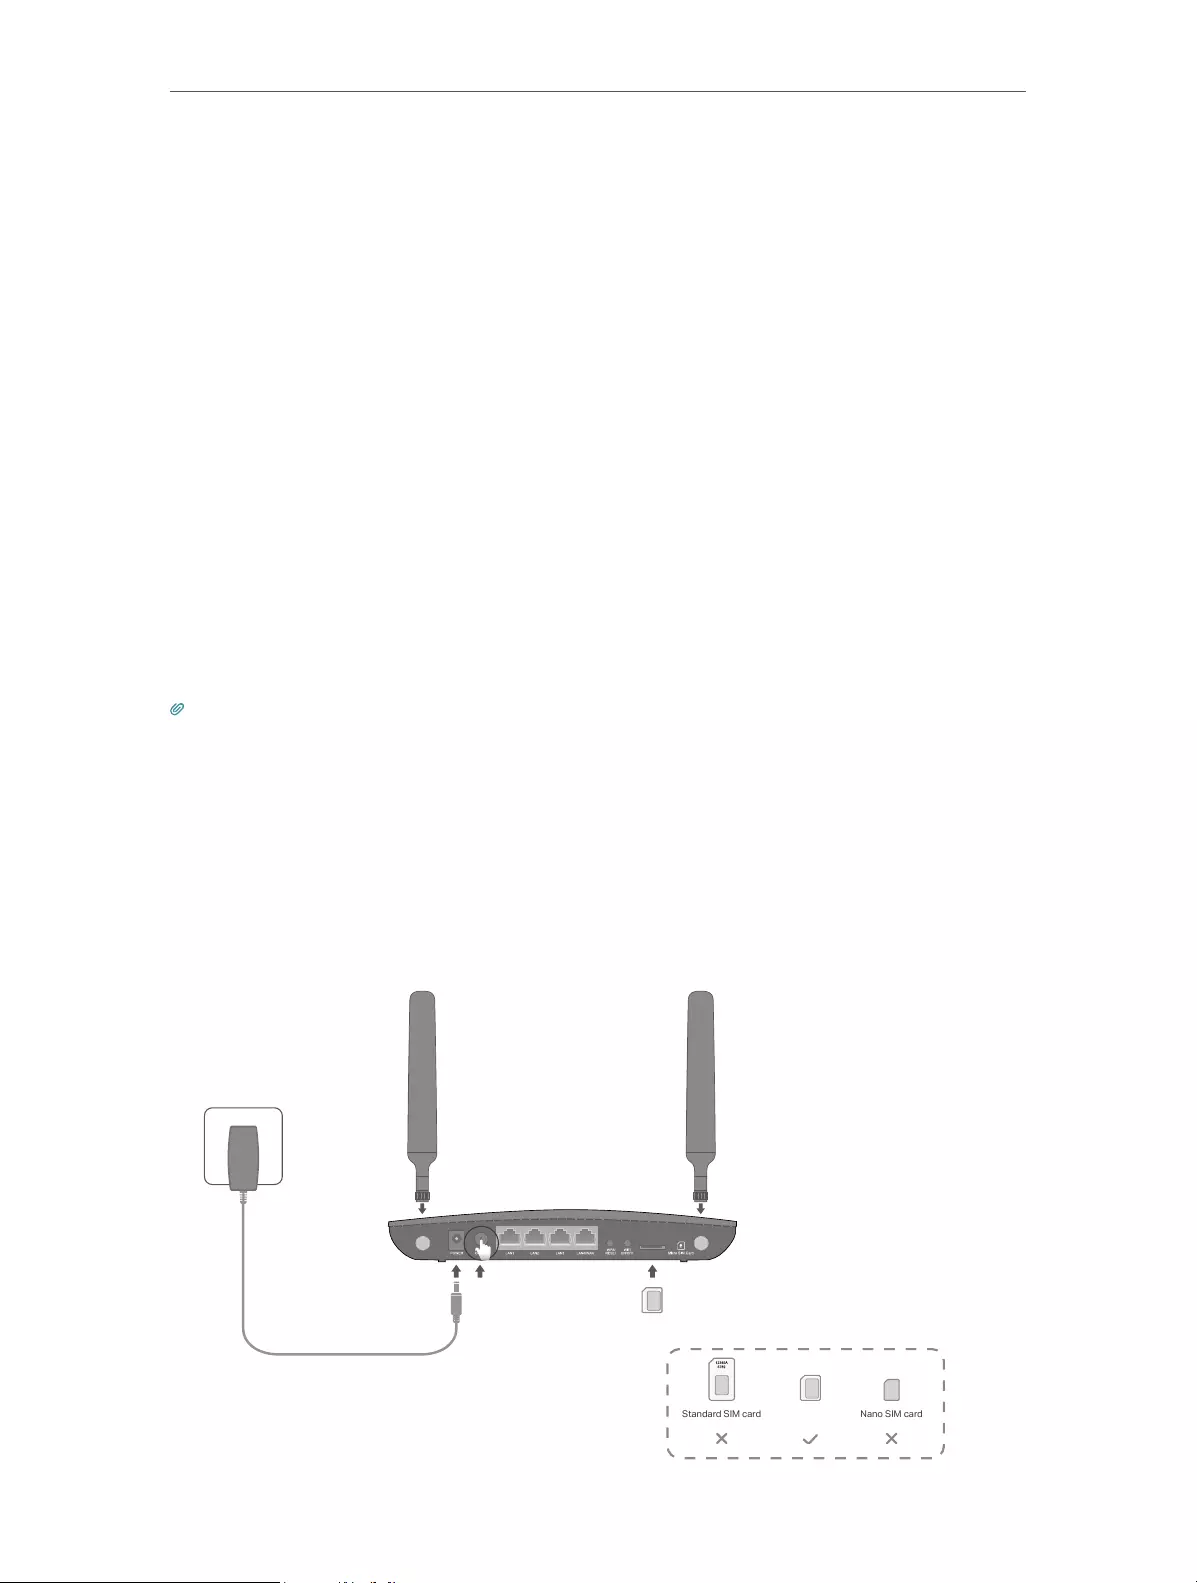
2. 2. Connect Your 4G LTE Router
Follow the steps below to connect your router.
1. Insert the Micro SIM card into the slot until you hear a click.
2. Connect the power adapter and push in the POWER ON/OFF button to turn on the
router. The power source shall be near the device and shall be easily accessible.
c. Connect the
power adapter
and turn on the
router.
b. Insert the Micro SIM card into
the slot until you hear a click.
Power adapter
Router
a. Install the antennas
and position them
upwards.
8
Chapter 2 Connect the Hardware
3. Connect your computer to the router.
Method 1: Wired
Connect your computer’s Ethernet port to one of the LAN ports on the router via an
Ethernet cable.
Method 2: Wirelessly
Use the default SSID (Wireless Network Name) and Wireless Password printed on the
product label of the router to connect wirelessly.
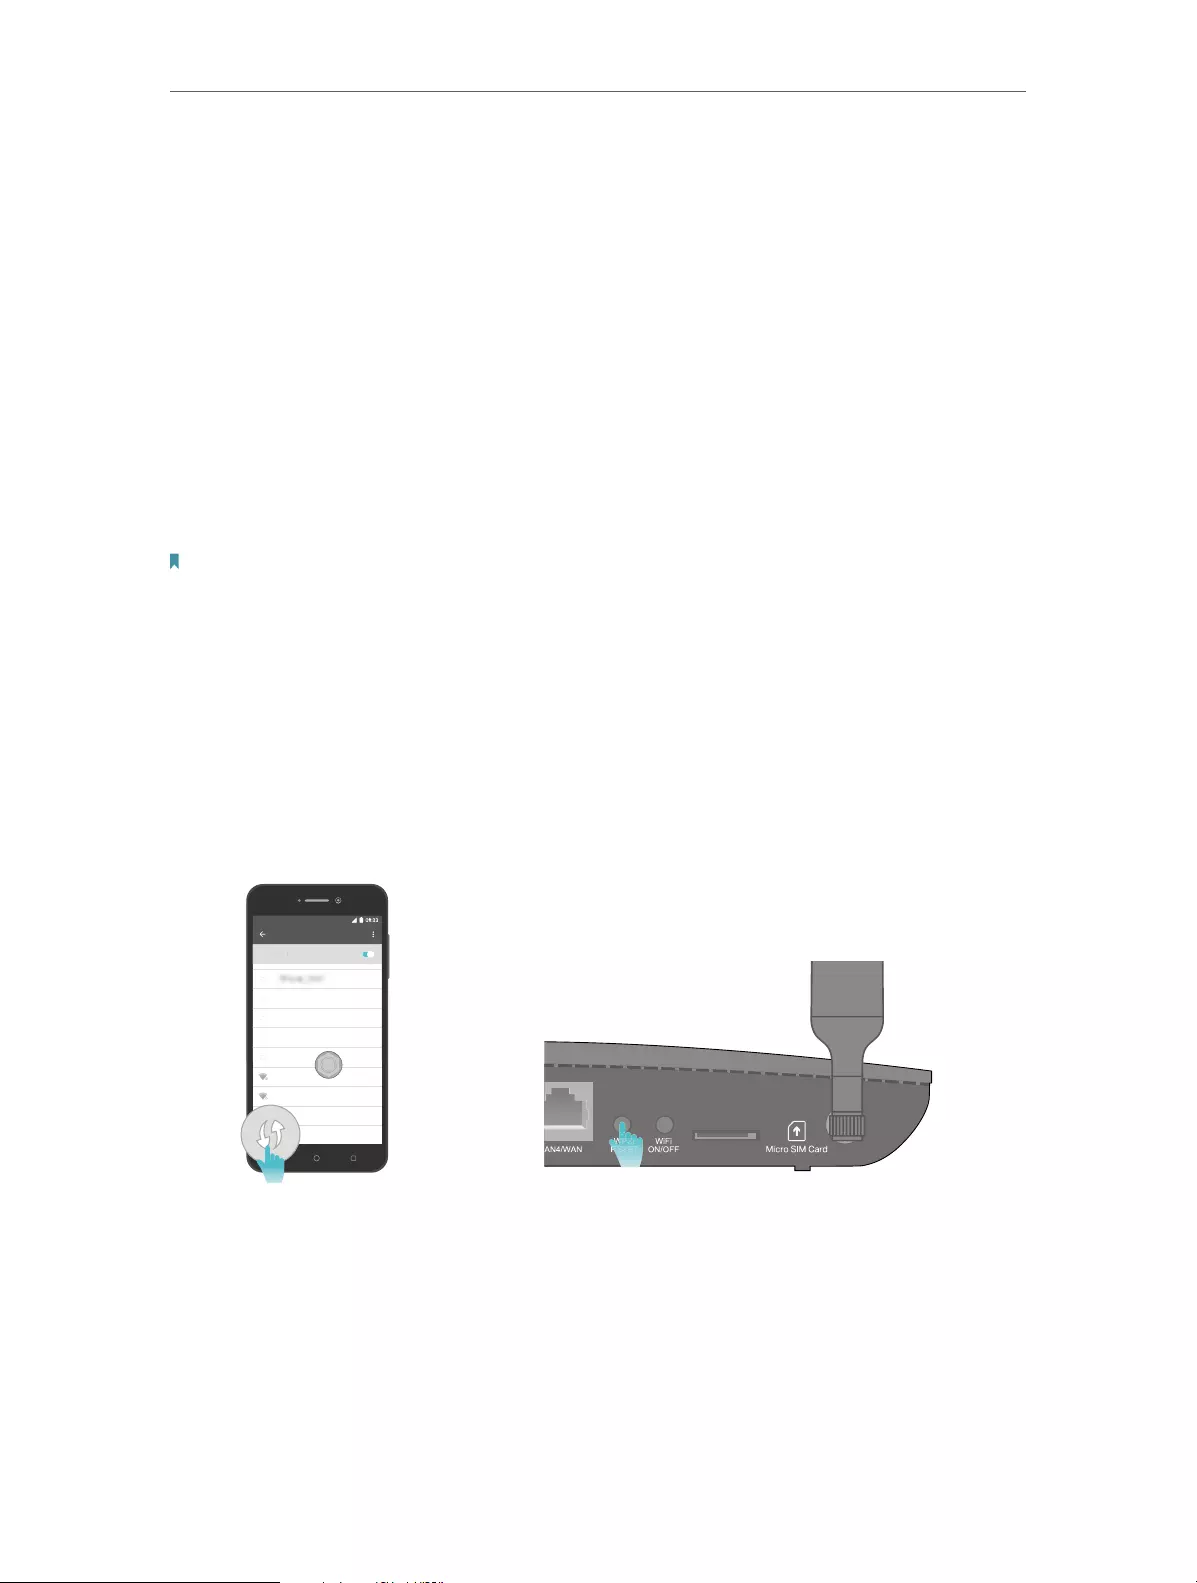
Method 3: Use the WPS button
Wireless devices that support WPS, including Android phones, tablets, most USB
network cards, can be connected to your router through this method. (WPS is not
supported by iOS devices.)
Note:
The WPS function cannot be configured if the wireless function of the router is disabled. Also, the WPS function will be
disabled if your wireless encryption is WEP. Please make sure the wireless function is enabled and is configured with the
appropriate encryption before configuring the WPS.
1 ) Tab the WPS icon on the device’s screen.
2 ) Immediately press the WPS button on your router.
3 ) The WPS LED flashes for about 2 minutes during the WPS process.
4 ) When the WPS LED is on, the client device has successfully connected to the
router.
WLAN
On
LAN
n
TP-Link_Home
My Home
My Network
Home Network
TP-Link_Network
TP-Link_Te st
4

Chapter 3
Log In to Your 4G LTE Router

10
Chapter 3 Log In to Your 4G LTE Router
With a web management page, it is easy to configure and manage the 4G LTE Router.
The web management page can be used on any Windows, Macintosh or UNIX OS with a
Web browser, such as Microsoft Internet Explorer, Mozilla Firefox or Apple Safari.
Follow the steps below to log in to your router.
1. If the TCP/IP Protocol on your computer is set to the static (fixed) IP address, you
need to change its settings to obtain an IP address automatically. Refer to FAQ to
configure your computer.
2. Launch a web browser and type in http://tplinkmodem.net or http://192.168.1.1.
Set a strong password using 1-32 characters and click Let’s Get Started.
Note: For subsequent logins, use your password that you have created.

Chapter 4
Set Up Internet
Connections
This chapter introduces how to connect your router to the internet. The router is
equipped with a web-based Quick Setup wizard. It has many ISP information built in,
automates many of the steps and verifies that those steps have been successfully
completed. Furthermore, you can set up IPv6 connection if your ISP provides IPv6
service.
This chapter includes the following sections:
• Use Quick Setup Wizard
• Create a Connection Profile
• Test Internet Connectivity

12
Chapter 4 Set Up Internet Connections
4. 1. Use Quick Setup Wizard
To set up your router with several easy steps quickly:
1. Visit http://tplinkmodem.net, and log in with the password you set for the router.
2. Click Quick Setup, after configuring your time zone, confirm the parameters with
the information provided by your ISP in the SIM part and click Next.
Note:
Quick Setup is not available if your SIM card is locked. Unlock your SIM card according to the prompt.
3. Follow the on-screen instructions to complete the setup.
Note:
1. During the quick setup process, you can change the preset wireless network name (SSID) and wireless password.
Once done, all your wireless devices must use the new SSID and password to connect to the router.
2. The router supports two operation modes, 3G/4G Router Mode and Wireless Router mode. If you already have a
modem or your internet comes via an Ethernet cable from the wall, you can set up the router as a regular wireless
router to share the internet. Refer to FAQ > Q6 for details.
4. 2. Create a Connection Profile
If your ISP settings are not detected by the router, you can create an internet connection
profile by following the steps below:
1. Visit http://tplinkmodem.net, and log in with the password you set for the router.
2. Go to Advanced > Network > Internet page.

13
Chapter 4 Set Up Internet Connections
3. Click Create Profile.
4. Specify the Profile Name, Username and Password. Select the PDP Type, APN Type
and Authentication Type according to your ISP.
5. Click OK to make the settings effective and the new profile will be used to set up a
new connection.
Tips:
1. You can view all internet connections or edit connections that are set up manually on this page.
2. You can change the Network Mode to 4G Only or 3G Only according to your needs.

14
Chapter 4 Set Up Internet Connections
4. 3. Test Internet Connectivity
After manually set up the internet connection, you need to know the internet connectivity.
The router provides a diagnostic tool to help you locate the malfunction.
1. Visit http://tplinkmodem.net, and log in with the password you set for the router.
2. Go to Advanced > System Tools > Diagnostics page.
3. Click Start to test the internet connectivity and you will see the test result in the
gray box.

Chapter 5
QoS
This chapter introduces how to create a QoS (Quality of Service) rule to specify
prioritization of traffic and minimize the impact caused when the connection is under
heavy load.
16
Chapter 5 QoS
I want to:
Specify priority levels for some devices or applications.
For example, I have several devices that are connected to my wireless network. I would
like to set an intermediate speed on the internet for my phone.
How can I do that?
1. Enable QoS and set bandwidth allocation.
1 ) Visit http://tplinkmodem.net, and log in with the password you set for the router.
2 ) Go to Advanced > QoS > Settings.
3 ) Select Enable QoS.
4 ) Input the maximum upload and download bandwidth provided by your Internet
service provider. 1Mbps equal s to 1000Kbps.
5 ) Click Advanced and drag the scroll bar to set the bandwidth priority percentage.
6 ) Click Save.
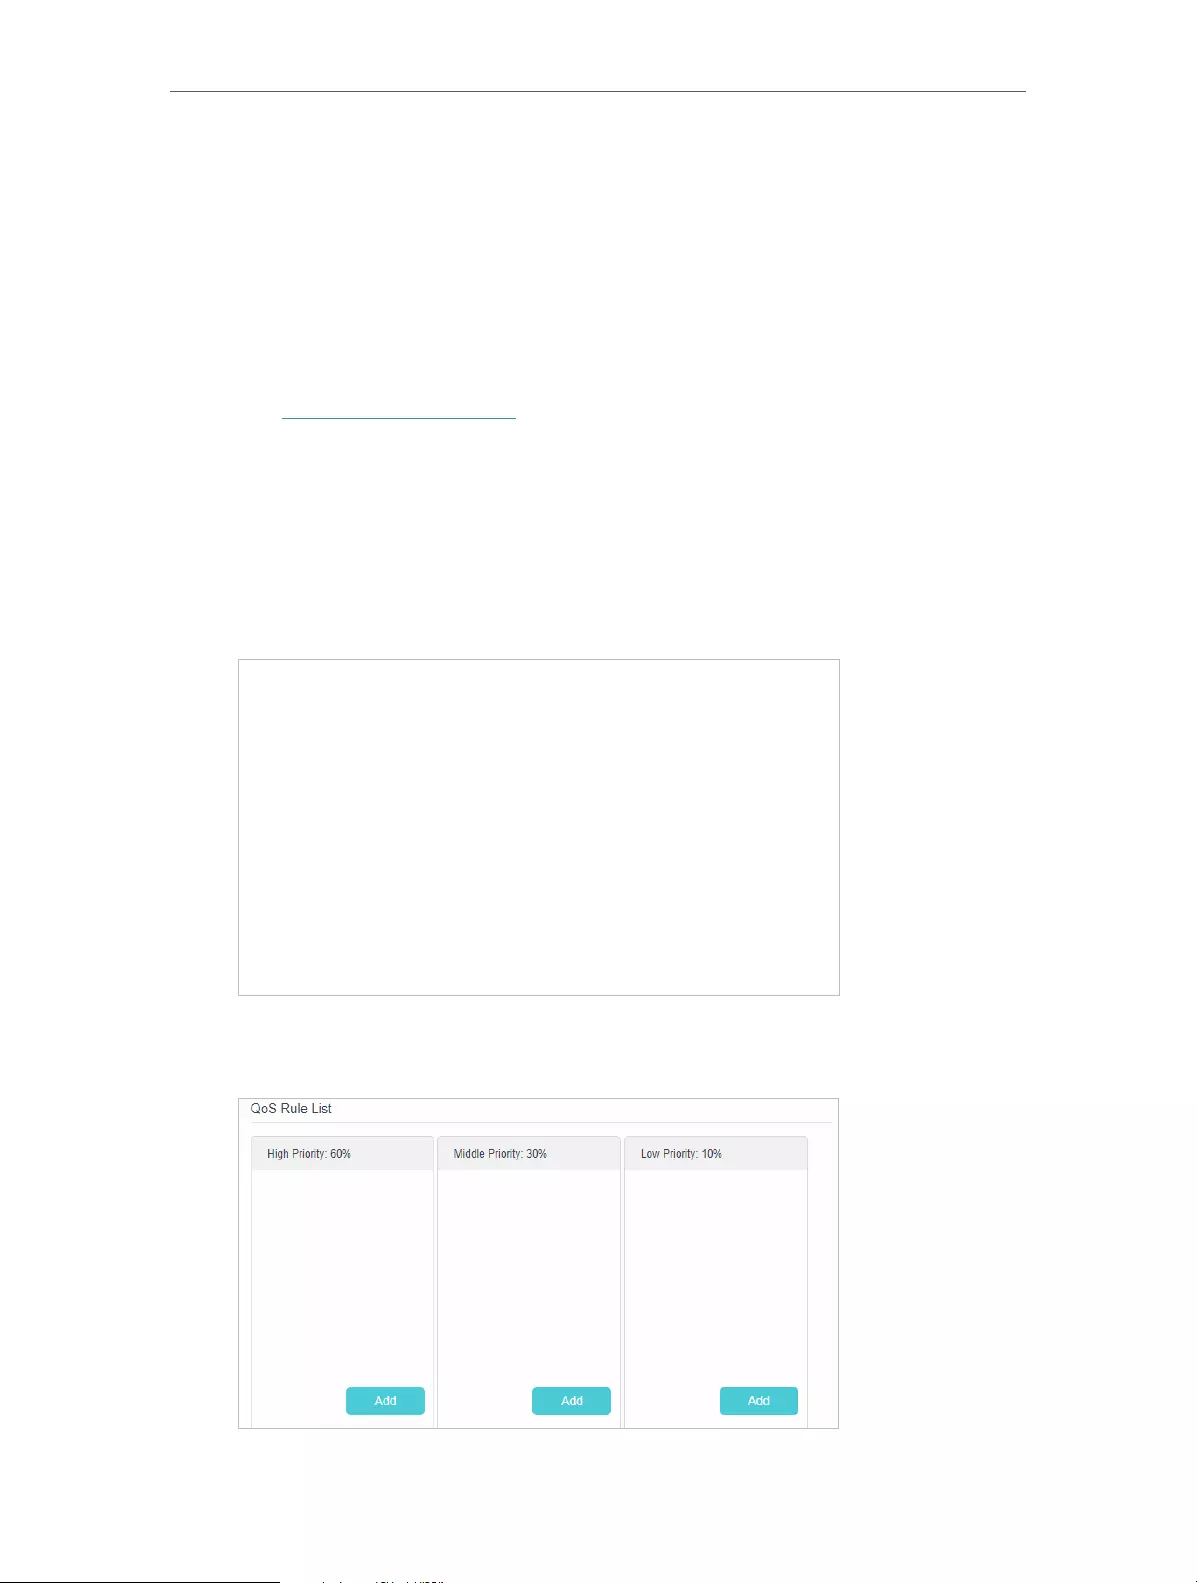
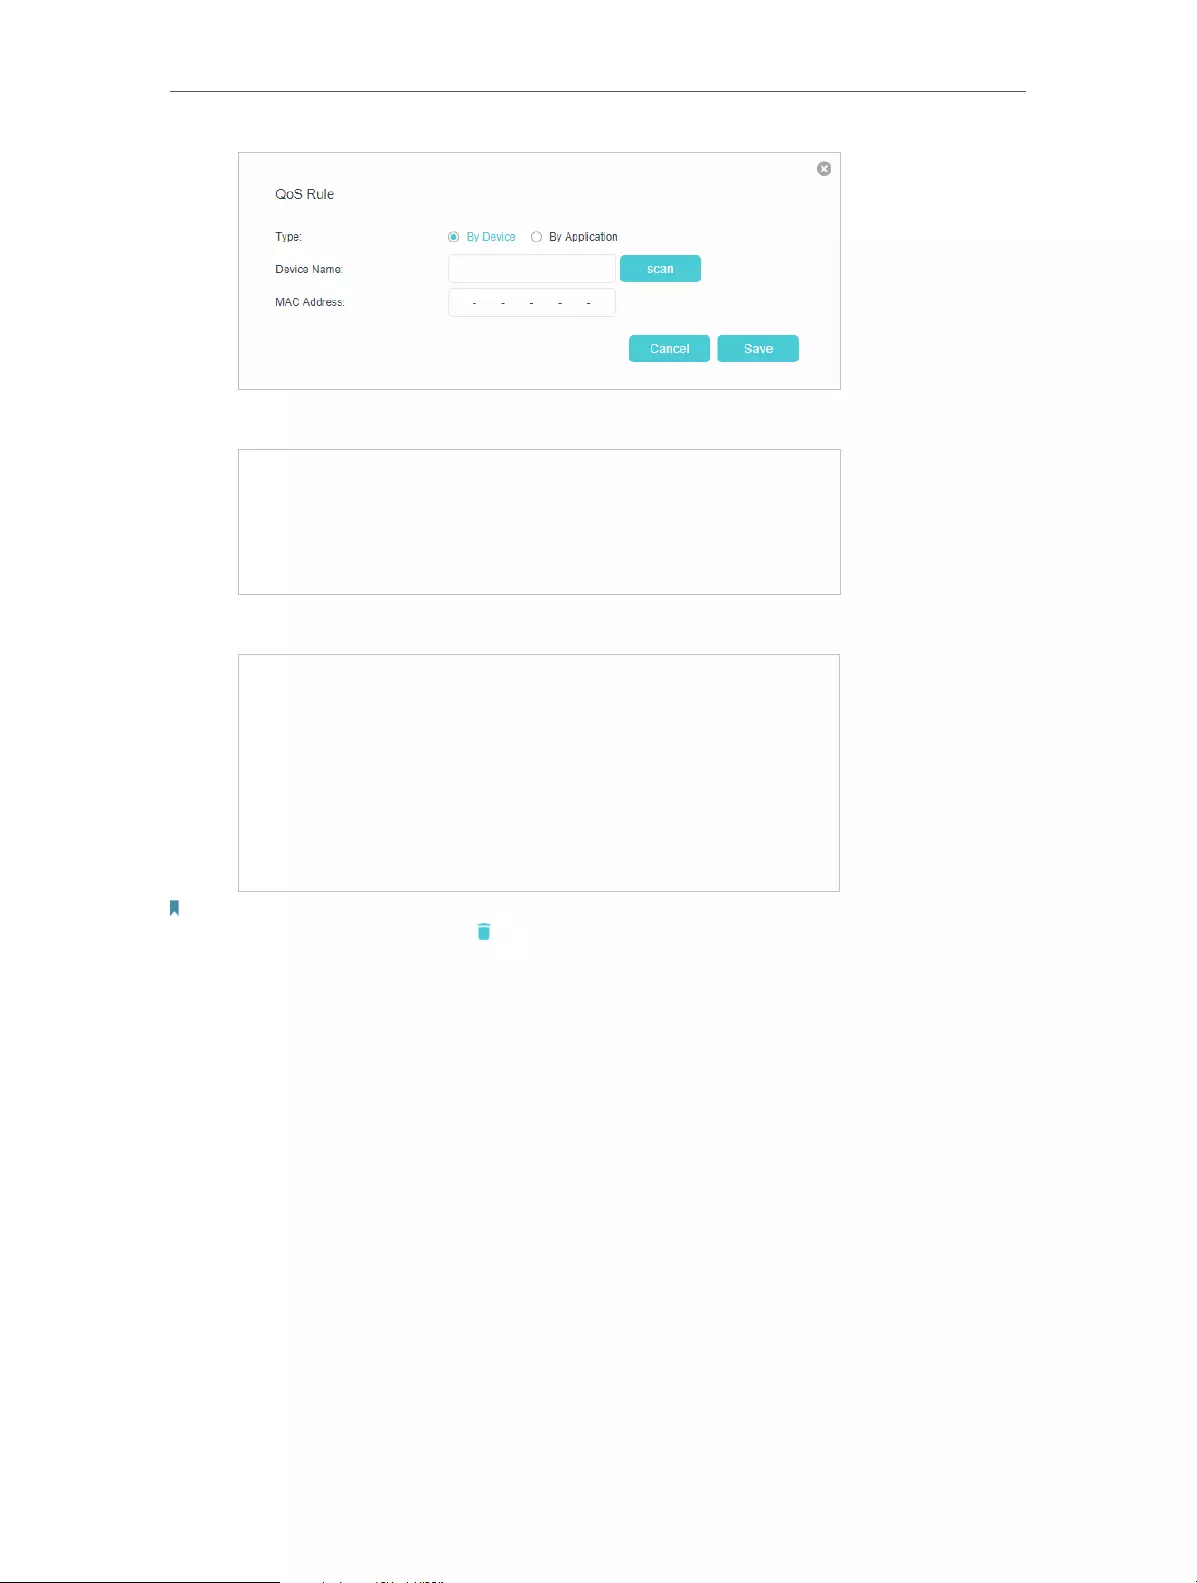
2. Add a middle priority QoS rule for the phone.
1 ) Click Add in the Middle Priority: 30% column.
2 ) Select By Device and then click Scan.
17
Chapter 5 QoS
3 ) Choose the respective device from the list.
4 ) Click Save.
Note:
If you want to delete a QoS rule, click to remove the responding rule from the list.
Done!
Now QoS is implemented to ssprioritize internet traffic.

Chapter 6
Network Security
This chapter guides you on how to protect your home network from cyber attacks
and unauthorized users by implementing these three network security functions. You
can protect your home network against DoS (Denial of Service) attacks from flooding
your network with server requests using DoS Protection, block or allow specific client
devices to access your network using Access Control, or you can prevent ARP spoofing
and ARP attacks using IP & MAC Binding.
• Protect the Network from Cyber Attacks
• Service Filtering
• Access Control
• IP & MAC Binding

19
Chapter 6 Network Security
6. 1. Protect the Network from Cyber Attacks
The SPI Firewall can prevent cyber attacks and validate the traffic that is passing
through the router based on the protocol. This function is enabled by default, and it’s
recommended to keep the default settings.
DoS Protection can protect your home network against DoS attacks from flooding your
network with server requests.
Follow the steps below to configure Firewall and DoS Protection.
1. Visit http:///tplinkmodem.net, and log in with the password you set for the router.
2. Go to Advanced > Security > Firewall & DoS Protection.
3. Enable IPv4 SPI Firewall.
4. Enable DoS Protection.
Note: DoS protection and Traffic Monitor must be enabled at the same time. To enable Traffic Monitor, go to System
Tools > Traffic Monitor and toggle on Traffic Monitor.
5. Set the level (Low, Middle or High) of protection for ICMP-FLOOD Attack Filtering,
UDP-FlOOD Attack Filtering and TCP-FLOOD Attack Filtering.
• ICMP-FLOOD Attack Filtering — Enable to prevent the ICMP (Internet Control
Message Protocol) flood attack.
• UDP-FlOOD Attack Filtering — Enable to prevent the UDP (User Datagram
Protocol) flood attack.
• TCP-FLOOD Attack Filtering — Enable to prevent the TCP-SYN (Transmission
Control Protocol-Synchronize) flood attack.
Tips:
The level of protection is based on the number of traffic packets. The protection will be triggered immediately
when the number of packets exceeds the preset threshold value (the value can be set on Dos Protection Level
Settings section of the same page), and the vicious host will be displayed in the Blocked DoS Host List.
6. Click Save.

20
Chapter 6 Network Security
6. 2. Service Filtering
With Service Filtering, you can prevent certain users from accessing the specified
service, even block Internet access completely.
1. Visit http://tplinkmodem.net, and log in with the password you set for the router.
2. Go to Advanced > Security > Service Filtering and enable Service Filtering.
3. Click Add.
4. Select a service type from the drop-down list and the following four fields will be
auto-populated. Select Custom when your desired service type is not listed, and
enter the information manually.
5. Specify the IP address(es) that this filtering rule will apply to.
6. Click Save.

21
Chapter 6 Network Security
6. 3. Access Control
Access Control is used to block or allow specific client devices to access your network
(via wired or wireless) based on a list of blocked devices (Blacklist) or a list of allowed
devices (Whitelist).
I want to:
Block or allow specific client devices to access my network (via wired or wireless).
How can I do that?
1. Visit http://tplinkmodem.net, and log in with the password you set for the router.
2. Go to Advanced > Security > Access Control and enable Access Control.
3. Select the access mode to either block (recommended) or allow the device(s) in the
list.
To block specific device(s)
1 ) Select Blacklist and click Save.
2 ) Select the device(s) to be blocked in the Online Devices table.
3 ) Click Block above the Online Devices table. The selected devices will be added
to Devices in Blacklist automatically.
To allow specific device(s)
1 ) Select Whitelist and click Save.
2 ) Click Add.

22
Chapter 6 Network Security
3 ) Enter the Device Name and MAC Address (You can copy and paste the information
from Online Devices table if the device is connected to your network).
4 ) Click Save.
Done!
Now you can block or allow specific client devices to access your network (via wired or
wireless) using the Blacklist or Whitelist.
6. 4. IP & MAC Binding
IP & MAC Binding, namely, ARP (Address Resolution Protocol) Binding, is used to bind
network device’s IP address to its MAC address. This will prevent ARP spoofing and
other ARP attacks by denying network access to a device with matching IP address in
the Binding list, but unrecognized MAC address.
I want to:
Prevent ARP spoofing and other ARP attacks.
How can I do that?
1. Visit http://tplinkmodem.net, and log in with the password you set for the router.
2. Go to Advanced > Security > IP & MAC Binding and enable IP & MAC Binding.

23
Chapter 6 Network Security
3. Bind your device(s) according to your needs.
To bind the connected device(s)
1 ) Select the device(s) to be bound in the ARP List.
2 ) Click Bind to add to the Binding List.
To bind the unconnected device
1 ) Click Add.
2 ) Enter the MAC address and IP address that you want to bind.
3 ) Select the checkbox to enable the entry and click Save.
Done!
Now you don’t need to worry about ARP spoofing and other ARP attacks.

Chapter 7
Parental Controls
This function allows you to block inappropriate, explicit and malicious websites, and
control access to specified websites at specified time.

25
Chapter 7 Parental Controls
I want to:
Control the time of day my children or other home network users are allowed to access
the internet and even types of websites they can visit.
For example, I want to allow my children’s devices (e.g. a computer or a tablet) to access
only www.tp-link.com and wikipedia.org, from 18:00 (6PM) to 22:00 (10PM) on weekdays
only.
How can I do that?
1. Visit http://tplinkmodem.net, and log in with the password you set for the router.
2. Go to Basic or Advanced > Parental Controls and enable Parental Controls.
3. Click Add.
26
Chapter 7 Parental Controls
4. Click Scan and select the device to be controlled. Or enter the Device Name and
MAC Address manually.
5. Click the icon to set the Effective Time. Drag the cursor over the appropriate
cell(s) and click OK.
6. Enter a Description for the entry.
7. Select the checkbox to enable this entry and click OK.
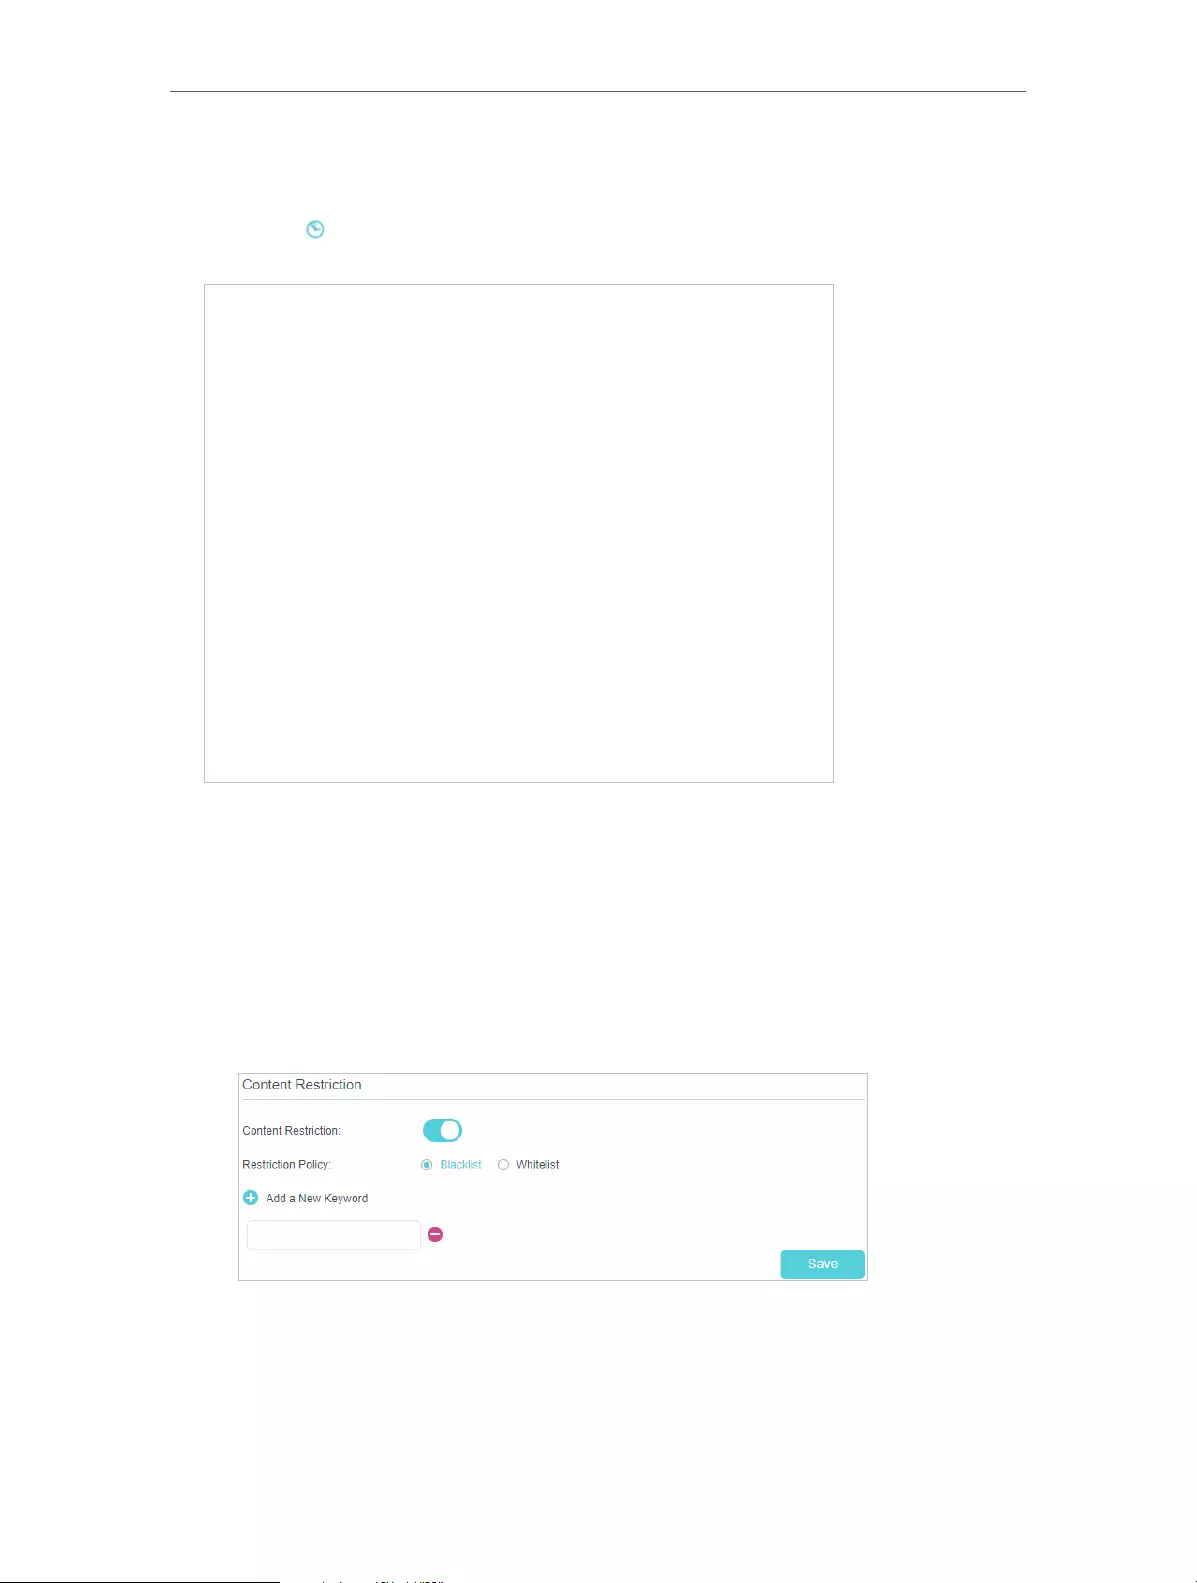
8. Select the restriction tpye.
1 ) With Blacklist selected, the controlled devices cannot access any websites
containing the specified keywords during the Effective Time period.
2 ) With Whitelist selected, the controlled devices can only access websites
containing the specified keywords during the Effective Time period.
9. Click Add a New Keyword. You can add up to 200 keywords for both Blacklist and
Whitelist. Below are some sample entries to allow access.
1 ) Enter a web address (e.g. www.tp-link.com) or a web address keyword (e.g.
wikipedia) to only allow or block access to the websites containing that keyword.

27
Chapter 7 Parental Controls
2 ) If you wish to block all internet browsing access, do not add any keyword to the
Whitelist.
10. Enter the keywords or websites you want to add and click Save.
Done!
Now you can control your children’s internet access according to your needs.

Chapter 8
SMS
This chapter introduces how to use the SMS functions to view and write messages,
keep drafts and specify the message center number. You can easily monitor your data
usage by sending a message to your carrier.
This chapter includes the following sections:
• View Messages
• Edit and Send a New Message
• View Sent Messages
• View Drafts
• SMS Settings

29
Chapter 8 SMS
8. 1. View Messages
1. Visit http://tplinkmodem.net, and log in with the password you set for the router.
2. Go to Advanced > SMS > Inbox page.
3. Click the or icon to unfold and read the content of the message.
Tips:
indicates the message is read, while indicates the message is unread.
8. 2. Edit and Send a New Message
1. Visit http://tplinkmodem.net, and log in with the password you set for the router.
2. Go to Advanced > SMS > New Message page.
3. Enter the receiver’s phone number in the Phone Number field.
4. Enter your message in the Message field.
Tips:
You can enter up to 160 letters or numbers, and any exceeding characters will be sent in the next message. You can send
up to 5 messages each time.

30
Chapter 8 SMS
5. Click Send to send the message or click Save to save the message to the Drafts.
8. 3. View Sent Messages
1. Visit http://tplinkmodem.net, and log in with the password you set for the router.
2. Go to Advanced > SMS > Outbox page. All the messages you sent are listed in the
Outbox table.
Tips:
You can click to edit and forward the message.
8. 4. View Drafts
1. Visit http://tplinkmodem.net, and log in with the password you set for the router.
2. Go to Advanced > SMS > Drafts page. All the unsent messages are listed in the
Drafts table.
Tips:
You can click to edit and forward the message.
8. 5. SMS Settings
SMS Settings allows you to configure the Message Center. When the Message Center
is enabled, you can change the Message Center Number via which messages will be
sent. It is not recommended to change it for a wrong message center number will affect
the SMS function of the router.

31
Chapter 8 SMS
1. Visit http://tplinkmodem.net, and log in with the password you set for the router.
2. Go to Advanced > SMS > SMS Settings page and enable Message Center.
3. The Message Center Number is auto-populated. Change it according to your needs.

Chapter 9
Guest Network
This function allows you to provide Wi-Fi access for guests without disclosing your
main network. When you have guests in your house, apartment, or workplace, you can
create a guest network for them. In addition, you can customize guest network options
to ensure network security, privacy, and fluency.
This chapter contains the following sections:
• Create a Network for Guests
• Customize Guest Network Options

33
Chapter 9 Guest Network
9. 1. Create a Network for Guests
1. Visit http://tplinkmodem.net, and log in with the password you set for the router.
2. Go to Advanced > Guest Network. Locate the Wireless section.
3. Create a 2.4GHz guest network.
1 ) Enable 2.4GHz wireless guest network.
2 ) Customize the SSID. Don‘t select Hide SSID unless you want your guests to
manually input the SSID for guest network access.
3 ) Set Security to WPA/WPA2 Personal, keep the default Version and Encryption
values, and customize your own password.
4. Click Save. Now your guests can access your guest network using the SSID and
password you set!
Tips:
To view guest network information, go to Advanced > Status and locate the Guest Network section.
9. 2. Customize Guest Network Options
1. Visit http://tplinkmodem.net, and log in with the password you set for the router.
2. Go to Advanced > Guest Network. Locate the Settings section.
3. Customize guest network options according to your needs.

34
Chapter 9 Guest Network
• Allow Guests to See Each Other
Select this checkbox if you want to allow the wireless clients on your guest network
to communicate with each other via methods such as network neighbors, Samba,
Ping, and FTP.
• Allow Guests to Access My Local Network
Select this checkbox if you want to allow the wireless clients on your guest network
to communicate with the devices connected to your router’s LAN ports or main
network via methods such as network neighbors, Samba, Ping, and FTP.
• Enable QoS for Guest Network
Select this checkbox if you want to assign the upstream and downstream
bandwidths for the guest network. This option is available only when Bandwidth
Control is enabled on the Advanced > QoS page.
4. Click Save. Now you can ensure network security, privacy, and fluency!
Tips:
To view guest network information, go to Advanced > Status and find the Guest Network section.

Chapter 10
NAT Forwarding
Router’s NAT (Network Address Translation) feature makes the devices in the LAN
use the same public IP address to communicate in the internet, which protects the
local network by hiding IP addresses of the devices. However, it also brings about the
problem that external host cannot initiatively communicate with the specified device in
the local network.
With forwarding feature the router can penetrate the isolation of NAT and allows the
external hosts on the internet to initiatively communicate with the devices in the local
network, thus to realize some special functions.
TP-Link router includes four forwarding rules. If two or more rules are set, the priority
of implementation from high to low is Virtual Servers, Port Triggering, UPnP and DMZ.
This chapter contains the following sections:
• Translate Address and Port by ALG
• Share Local Resources in the Internet by Virtual Server
• Open Ports Dynamically by Port Triggering
• Make Applications Free from Port Restriction by DMZ
• Make Xbox Online Games Run Smoothly by UPnP

36
Chapter 10 NAT Forwarding
10. 1. Translate Address and Port by ALG
ALG (Application Layer Gateway) allows customized NAT (Network Address Translation)
traversal filters to be plugged into the gateway to support address and port translation
for certain application layer “control/data” protocols: FTP, TFTP, H323 etc. Enabling ALG
is recommended.
1. Visit http://tplinkmodem.net, and log in with the password or your TP-Link ID.
2. Go to Advanced > NAT Forwarding > ALG.
Note: It is recommended to keep the default settings.
• PPTP Pass-through: If enabled, it allows Point-to-Point sessions to be tunneled
through an IP network and passed through the router.
• L2TP Pass-through: If enabled, it allows Layer 2 Point-to-Point sessions to be tunneled
through an IP network and passed through the router.
• IPSec Pass-through: If enabled, it allows IPSec (Internet Protocol Security) to
be tunneled through an IP network and passed through the router. IPSec uses
cryptographic security services to ensure private and secure communications over
IP networks.
• FTP ALG: If enabled, it allows FTP (File Transfer Protocol) clients and servers to transfer
data via NAT.
• TFTP ALG: If enabled, it allows TFTP (Trivial File Transfer Protocol) clients and servers
to transfer data via NAT.
• H323 ALG: If enabled, it allows Microsoft NetMeeting clients to communicate via NAT.
• SIP ALG: If enabled, it allows clients communicate with SIP (Session Initiation Protocol)
servers via NAT.

37
Chapter 10 NAT Forwarding
RTSP ALG: If enabled, it allows RTSP (Real—Time Stream Protocol) clients and servers to
transfer data via NAT.
10. 2. Share Local Resources in the Internet by Virtual
Server
When you build up a server in the local network and want to share it on the internet,
Virtual Server can realize the service and provide it to the internet users. At the same
time virtual server can keep the local network safe as other services are still invisible
from the internet.
Virtual server can be used for setting up public services in your local network, such as
HTTP, FTP, DNS, POP3/SMTP and Telnet. Different service uses different service port.
Port 80 is used in HTTP service, port 21 in FTP service, port 25 in SMTP service and port
110 in POP3 service. Please verify the service port number before the configuration.
I want to:
Share my personal website I’ve built in local network with my friends through the internet.
For example, the personal website has been built in my home PC (192.168.1.100). I hope
that my friends in the internet can visit my website in some way. The PC is connected to
the router with the WAN IP address 218.18.232.154.
4G LTE Router
WAN: 218.18.232.154
LAN
Home
Personal Website
How can I do that?
1. Assign a static IP address to your PC, for example 192.168.1.100.
2. Visit http://tplinkmodem.net, and log in with the password you set for the router.
3. Go to Advanced > NAT Forwarding > Virtual Servers, click Add.

38
Chapter 10 NAT Forwarding
4. Click View Existing Services, and choose HTTP. The external port, internal port and
protocol will be auto-populated. Enter the PC’s IP address 192.168.1.100 in the
Internal IP field.
5. Click Save to save the settings.
Note:
1. It is recommended to keep the default settings of Internal Port and Protocol if you are not clear about
which port and protocol to use.
2. If the service you want to use is not in the Service Type, you can enter the corresponding parameters
manually. You should verify the port number that the service needs.
3. You can add multiple virtual server rules if you want to provide several services in a router. Please note
that the External Port cannot be overlapped.
Done!
Users in the internet can enter http:// WAN IP (in this example, enter http://
218.18.232.154) to visit your personal website.
Note:
1. WAN IP should be a public IP address. For the WAN IP is assigned dynamically by ISP, it is recommended
to apply and register a domain name for the WAN by DDNS, go to Set Up a Dynamic DNS Service Account
for more information. Then you can use http://domain name to visit the website.
2. If you have changed the default External Port, you should use http://WAN IP: External Port or http://
domain name: External Port to visit the website.
10. 3. Open Ports Dynamically by Port Triggering
Port triggering can specify a triggering port and its corresponding external ports.
When a host in the local network initiates a connection to the triggering port, all the

39
Chapter 10 NAT Forwarding
external ports will be opened for subsequent connections. The router can record the
IP address of the host. When the data from the internet return to the external ports, the
router can forward them to the corresponding host. Port triggering is mainly applied
to online games, VoIPs and video players. Common applications include MSN Gaming
Zone, Dialpad and Quick Time 4 players, etc.
Follow the steps below to configure the port triggering rules:
1. Visit http://tplinkmodem.net, and log in with the password you set for the router.
2. Go to Advanced > NAT Forwarding > Port Triggering and click Add.
3. Click View Existing Applications, and select the desired application. The triggering
port and protocol, the external port and protocol will be auto-populated. Here we
take application MSN Gaming Zone as an example.
4. Click Save to make the settings take effect.
Tips:
1. You can add multiple port triggering rules according to your network need.
2. If the application you need is not listed in the Existing Applications list, please enter the parameters manually. You
should verify the external ports the application uses first and enter them into External Port field according to the
format the page displays.
10. 4. Make Applications Free from Port Restriction
by DMZ
When a PC is set to be a DMZ (Demilitarized Zone) host in the local network, it is totally
exposed to the internet, which can realize the unlimited bidirectional communication
40
Chapter 10 NAT Forwarding
between internal hosts and external hosts. The DMZ host becomes a virtual server with
all ports opened. When you are not clear about which ports to open in some special
applications, like IP camera and database software, you can set the PC to be a DMZ
host.
Note:
DMZ is more applicable in the situation that users are not clear about which ports to open. When it is enabled, the DMZ
host is totally exposed to the internet, which may bring some potential safety hazard. If DMZ is not in use, please disable
it in time.
I want to:
Make the home PC join the internet online game without port restriction.
For example, due to some port restriction, when playing the online games, you can log
in normally but cannot join a team with other players. To solve this problem, set your PC
as a DMZ with all ports opened.
How can I do that?
1. Assign a static IP address to your PC, for example 192.168.1.100.
2. Visit http://tplinkmodem.net, and log in with the password you set for the router.
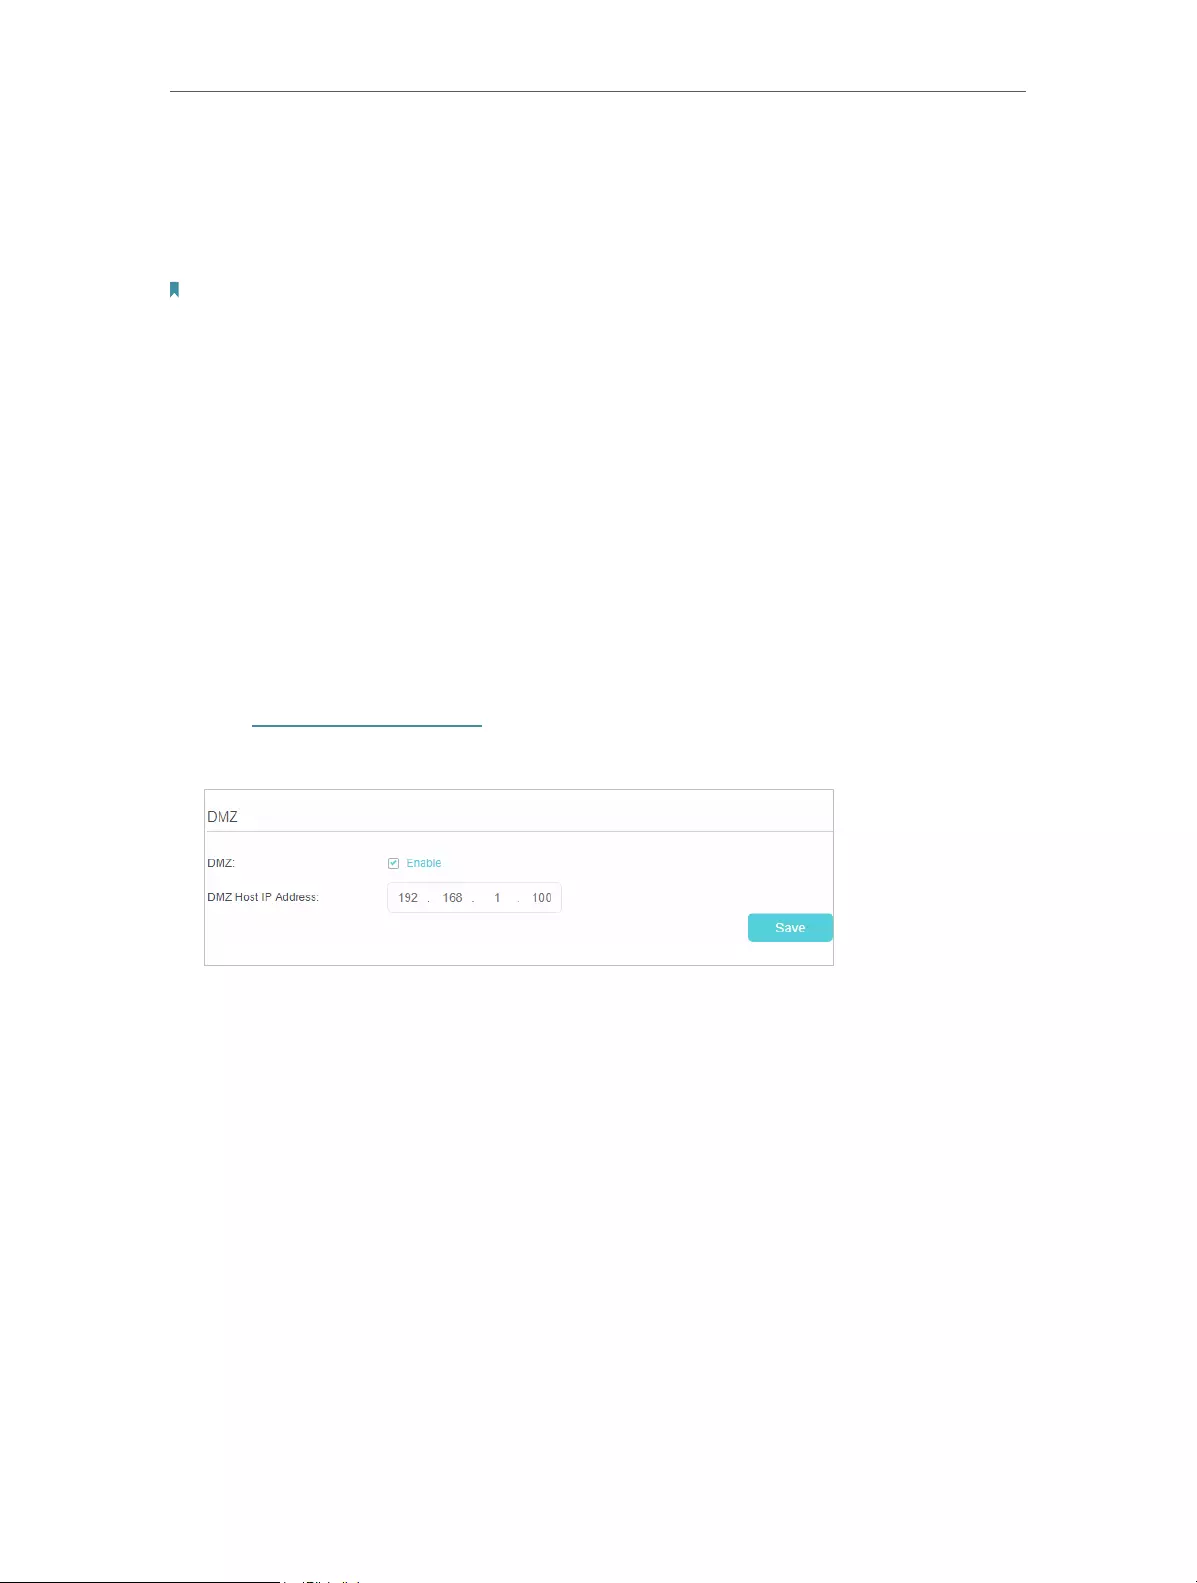
3. Go to Advanced > NAT Forwarding > DMZ and select the checkbox to enable DMZ.
4. Enter the IP address 192.168.1.100 in the DMZ Host IP Address filed.
5. Click Save to save the settings.
Done!
The configuration is completed. You’ve set your PC to a DMZ host and now you can
make a team to game with other players.
10. 5. Make Xbox Online Games Run Smoothly by
UPnP
UPnP (Universal Plug and Play) protocol allows the applications or host devices
to automatically find the front—end NAT device and send request to it to open the
corresponding ports. With UPnP enabled, the applications or host devices in the
both sides of NAT device can freely communicate with each other, realizing the
seamless connection of the network. You may need to enable the UPnP if you want
41
Chapter 10 NAT Forwarding
to use applications for multiplayer gaming, peer-to-peer connections, real-time
communication (such as VoIP or telephone conference) or remote assistance, etc.
Tips:
1. UPnP is enabled by default in this router.
2. Only the application supporting UPnP protocol can use this feature.
3. UPnP feature needs the support of operating system (e.g. Windows Vista/ Windows 7/ Windows 8, etc. Some of
operating system need to install the UPnP components).
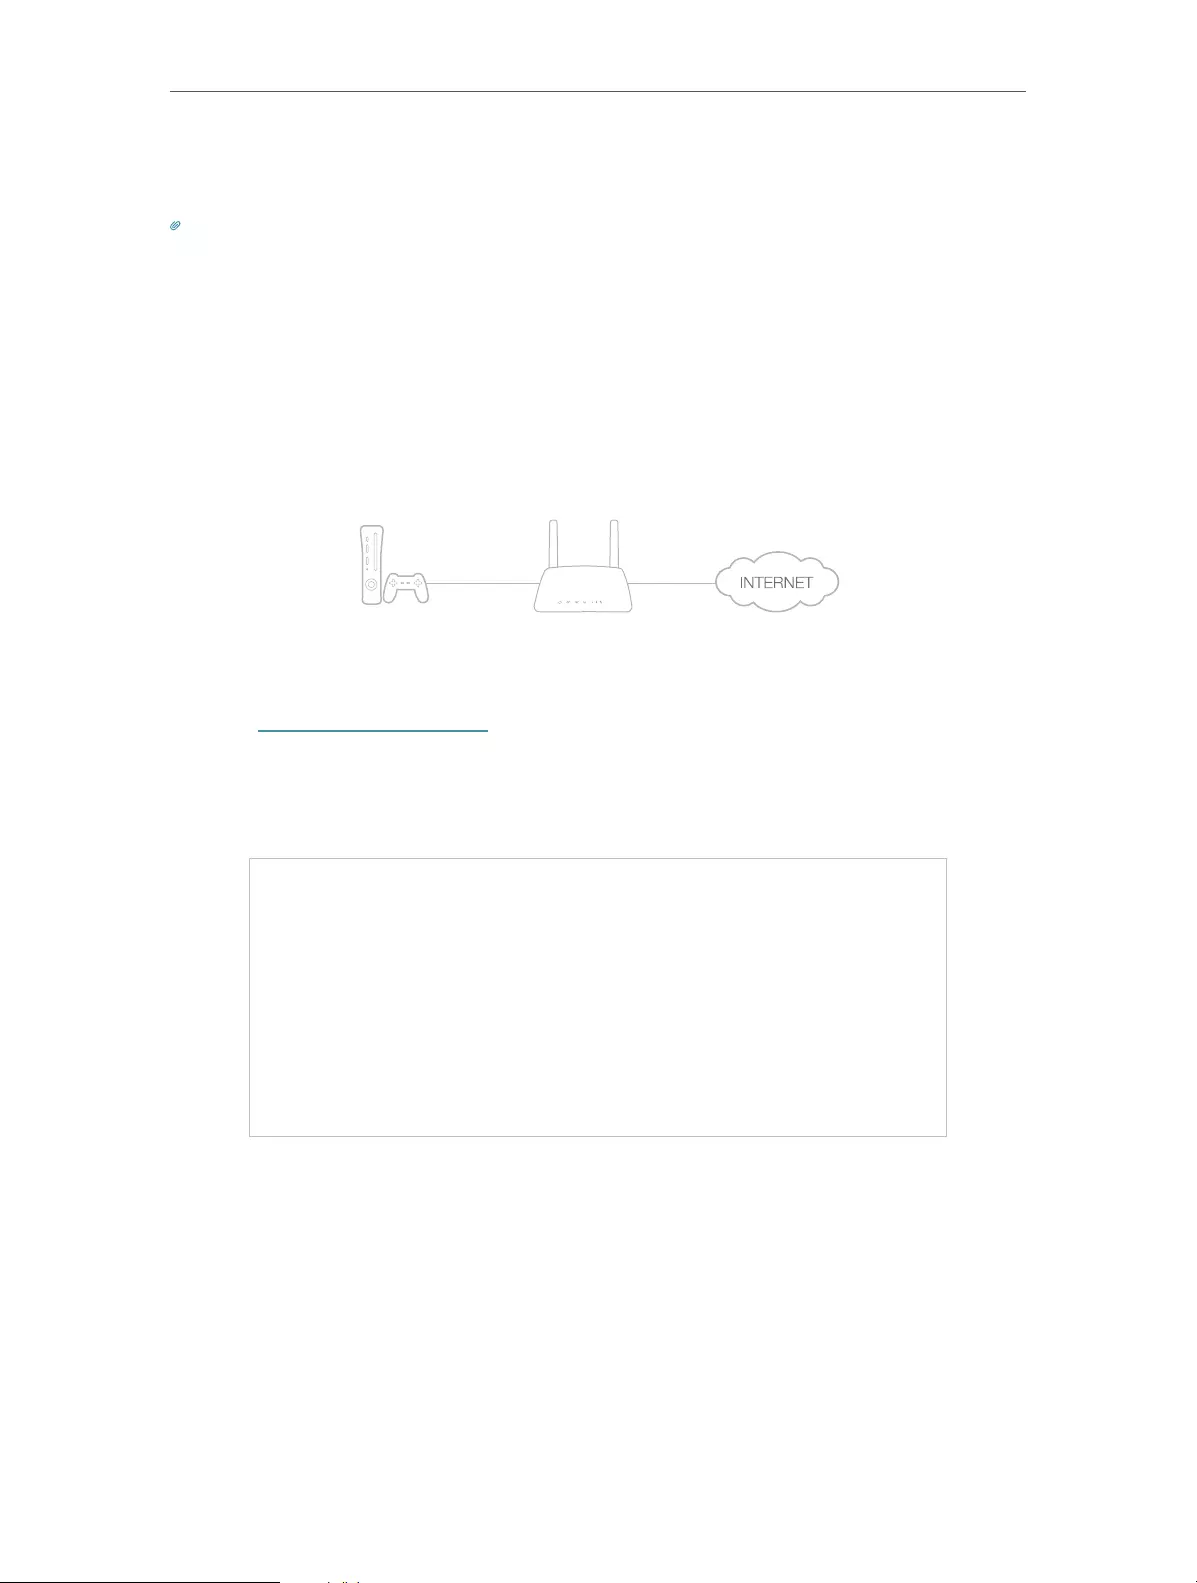
For example, when you connect your Xbox to the router which has connected to
the internet to play online games, UPnP will send requests to the router to open the
corresponding ports, allowing the following data penetrating the NAT to transmit.
Therefore, you can play Xbox online games without a hitch.
LAN WAN
If necessary, you can follow the steps to change the status of UPnP.
1. Visit http://tplinkmodem.net, and log in with the password you set for the router;
2. Go to Advanced > NAT Forwarding > UPnP and toggle on or off according to your
needs.

Chapter 11
Specify Your Network
Settings
This chapter introduces how to change the default settings or adjust the basic
configuration of the router using the web-based management page.
This chapter contains the following sections:
• USSD
• PIN Management
• Data Settings
• LAN Settings
• Wireless Settings
• Set Up a Dynamic DNS Service Account
• Create Static Routes
• Set up a VPN Connection

43
Chapter 11 Specify Your Network Settings
11. 1. USSD
USSD (Unstructured Supplementary Service Data) is used to communicate with the
service provider’s computer. You can query service data on this page.
Follow the steps below to get service data.
1. Visit http://tplinkmodem.net, and log in with the password you set for the router.
2. Go to Advanced > Network > USSD page.
3. Enter the USSD request and click Send. You will see the message returned from the
carrier in the USSD Result box.
11. 2. PIN Management
PIN (Personal Identification Number) is used to protect the SIM card from embezzlement.
PIN Management allows you to easily change the PIN settings of your SIM card as
needed.
Follow the steps below to change your PIN settings.
1. Visit http://tplinkmodem.net, and log in with the password you set for the router.
2. Go to Advanced > Network > PIN Management page.

44
Chapter 11 Specify Your Network Settings
• SIM Card Status — Displays the status of your SIM card.
• PIN Lock — Toggle on to enable PIN Lock. Once it is enabled, every time you start the
router with this SIM card inserted, you need to enter the PIN.
• Auto-unlock PIN — When the PIN is required upon router restarting or inserting a SIM
card, it will be validated automatically, saving you the trouble to enter the PIN each
time you start the router or insert a SIM card. If validation failed, you need to enter the
PIN on this page.
• PIN — Enter the PIN to unlock the SIM card. It consists of 4-8 digits.
• PUK — PIN Unlocked Key, also known as Personal Unlock Code (PUC), is used to reset
a PIN that has been lost or forgotten. The PUK is a SIM-specific code assigned by the
service provider. You need to enter the PUK after 3 incorrect login attempts of PIN.
Contact your service provider if you do not know the PUK. It consists of 8 digits.
• New PIN — Enter 4-8 digits to reset the PIN of your SIM card.
• Remaining Attempts — Shows how many attempts are left for you to try entering the
PIN or PUK. You have only 3 attempts for entering the PIN and 10 attempts for entering
the PUK. If you accidentally fail in 3 attempts, the SIM card will be locked and you will
be required to enter the PUK that is written on your SIM card.
3. Click Save to save the settings.
11. 3. Data Settings
Data Settings is used to monitor the data usage of your router in real-time. You can limit
your data usage according to your monthly allowance or total allowance and you will
receive a warning if your data usage reaches the specified level.
Follow the steps below to monitor your data usage.
1. Visit http://tplinkmodem.net, and log in with the password you set for the router.
2. Go to Advanced > Network > Data Settings page.
45
Chapter 11 Specify Your Network Settings
3. Enable Data Limit to set total/monthly data allowance and usage alert to prevent
data overuse.
4. Enter the allowed amount of total/monthly data in the Total/Monthly Allowance field.
When data usage exceeds the allowed level, the router will disconnect from the
internet and notify you on the Basic > Network Map Page.
5. Enter a percentage in the Usage Alert field to prevent data overuse. When data
usage reaches the alert level, a warning will be shown on the Basic > Network Map
Page. If you want to want receive the alert on your phone, enter your mobile phone
number in the SMS Alert for Usage field.
6. Enable Monthly Data Statistics to reset data statistics when the next billing cycle
starts.
7. Enter the start date of the billing cycle in the Start Date field.
8. Click Save to save the settings.
11. 4. LAN Settings
11. 4. 1. Change the LAN IP Address
The router is preset with a default LAN IP 192.168.1.1, which you can use to log in to
its web management page. The LAN IP address together with the Subnet Mask also
defines the subnet that the connected devices are on. If the IP address conflicts with
another device on your local network or your network requires a specific IP subnet, you
can change it.
Follow the steps below to change your IP address.
1. Visit http://tplinkmodem.net, and log in with the password you set for the router.
2. Go to Advanced > Network > LAN Settings page.
3. Type in a new IP Address as needed.
46
Chapter 11 Specify Your Network Settings
4. Select the Subnet Mask from the drop-down list. The subnet mask together with
the IP address identifies the local IP subnet.
5. You can configure the router’s Second IP and Subnet Mask for LAN interface
through which you can also access the web management page.
6. Leave the rest of the default settings as they are.
7. Click Save to make the settings effective.
11. 4. 2. Use the 4G LTE Router as a DHCP Server
You can configure the router to act as a DHCP server to assign IP addresses to its clients.
To use the DHCP server function of the router, you must configure all computers on the
LAN to obtain an IP Address automatically.
Follow the steps below to configure DHCP server.
1. Visit http://tplinkmodem.net, and log in with the password you set for the router.
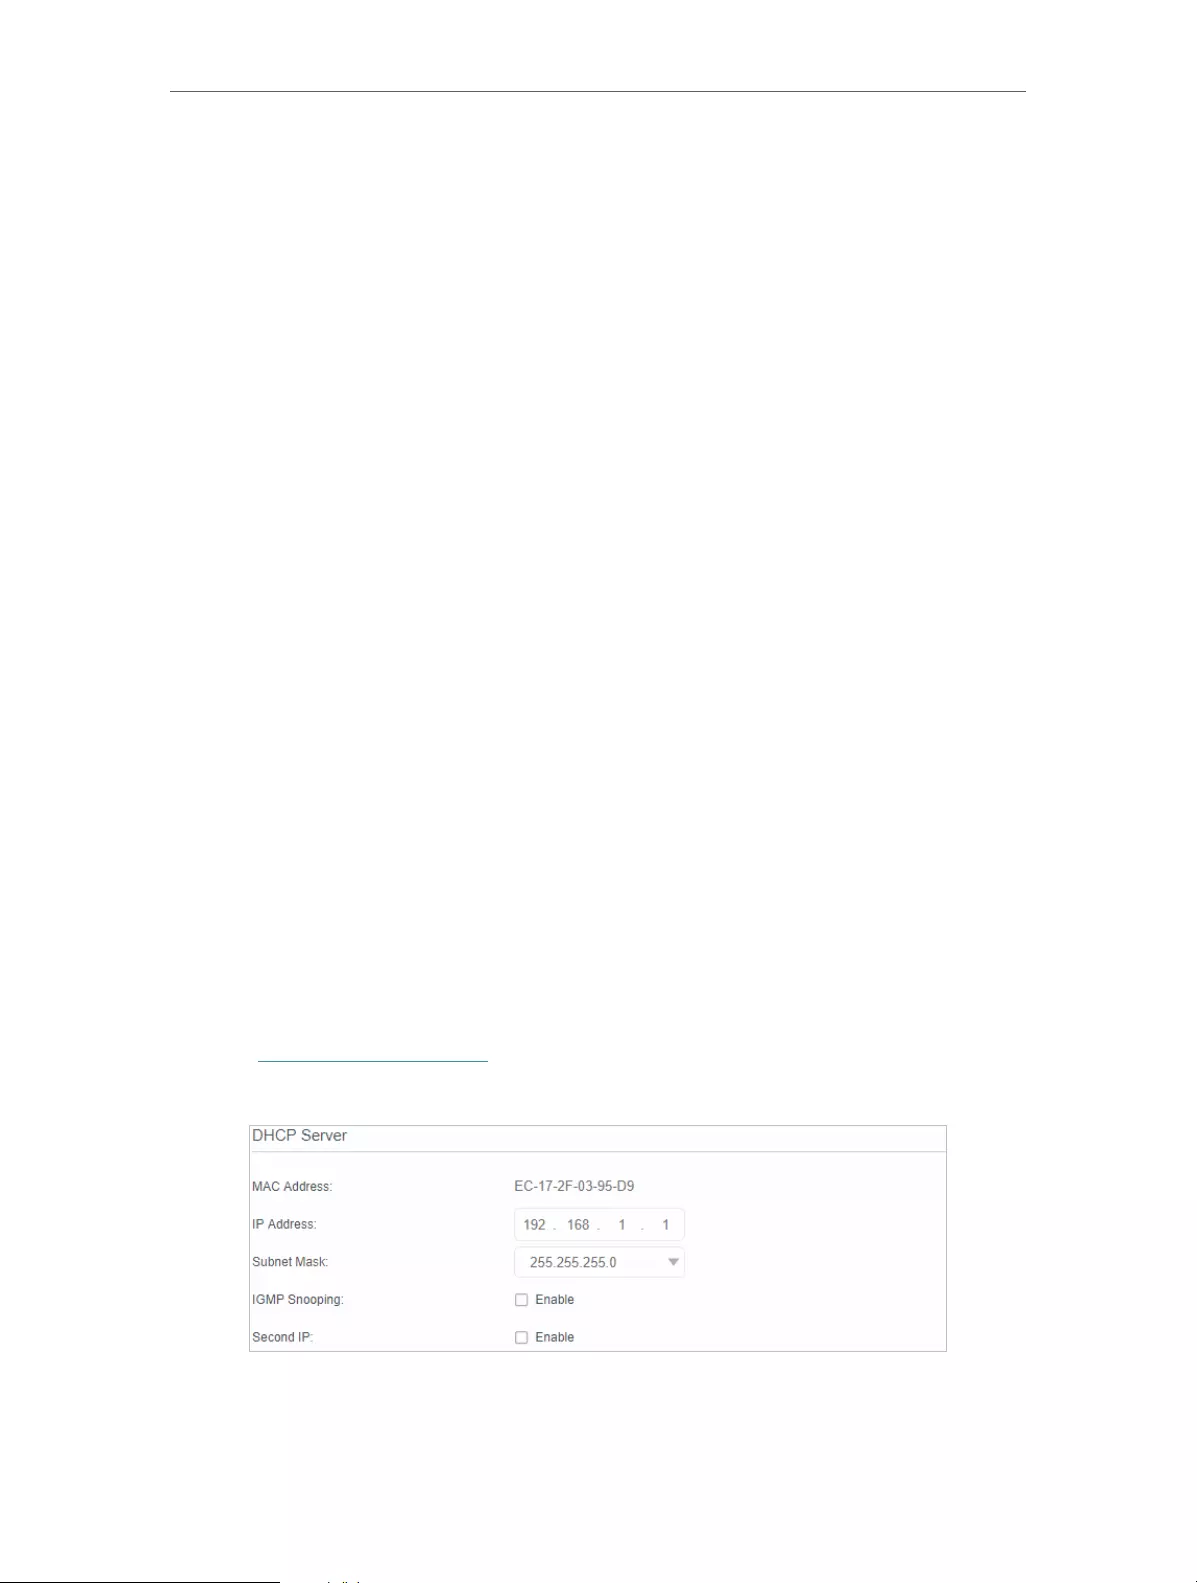
2. Go to Advanced > Network > LAN Settings page.
3. Select DHCP to enable the DHCP function and select DHCP Server.
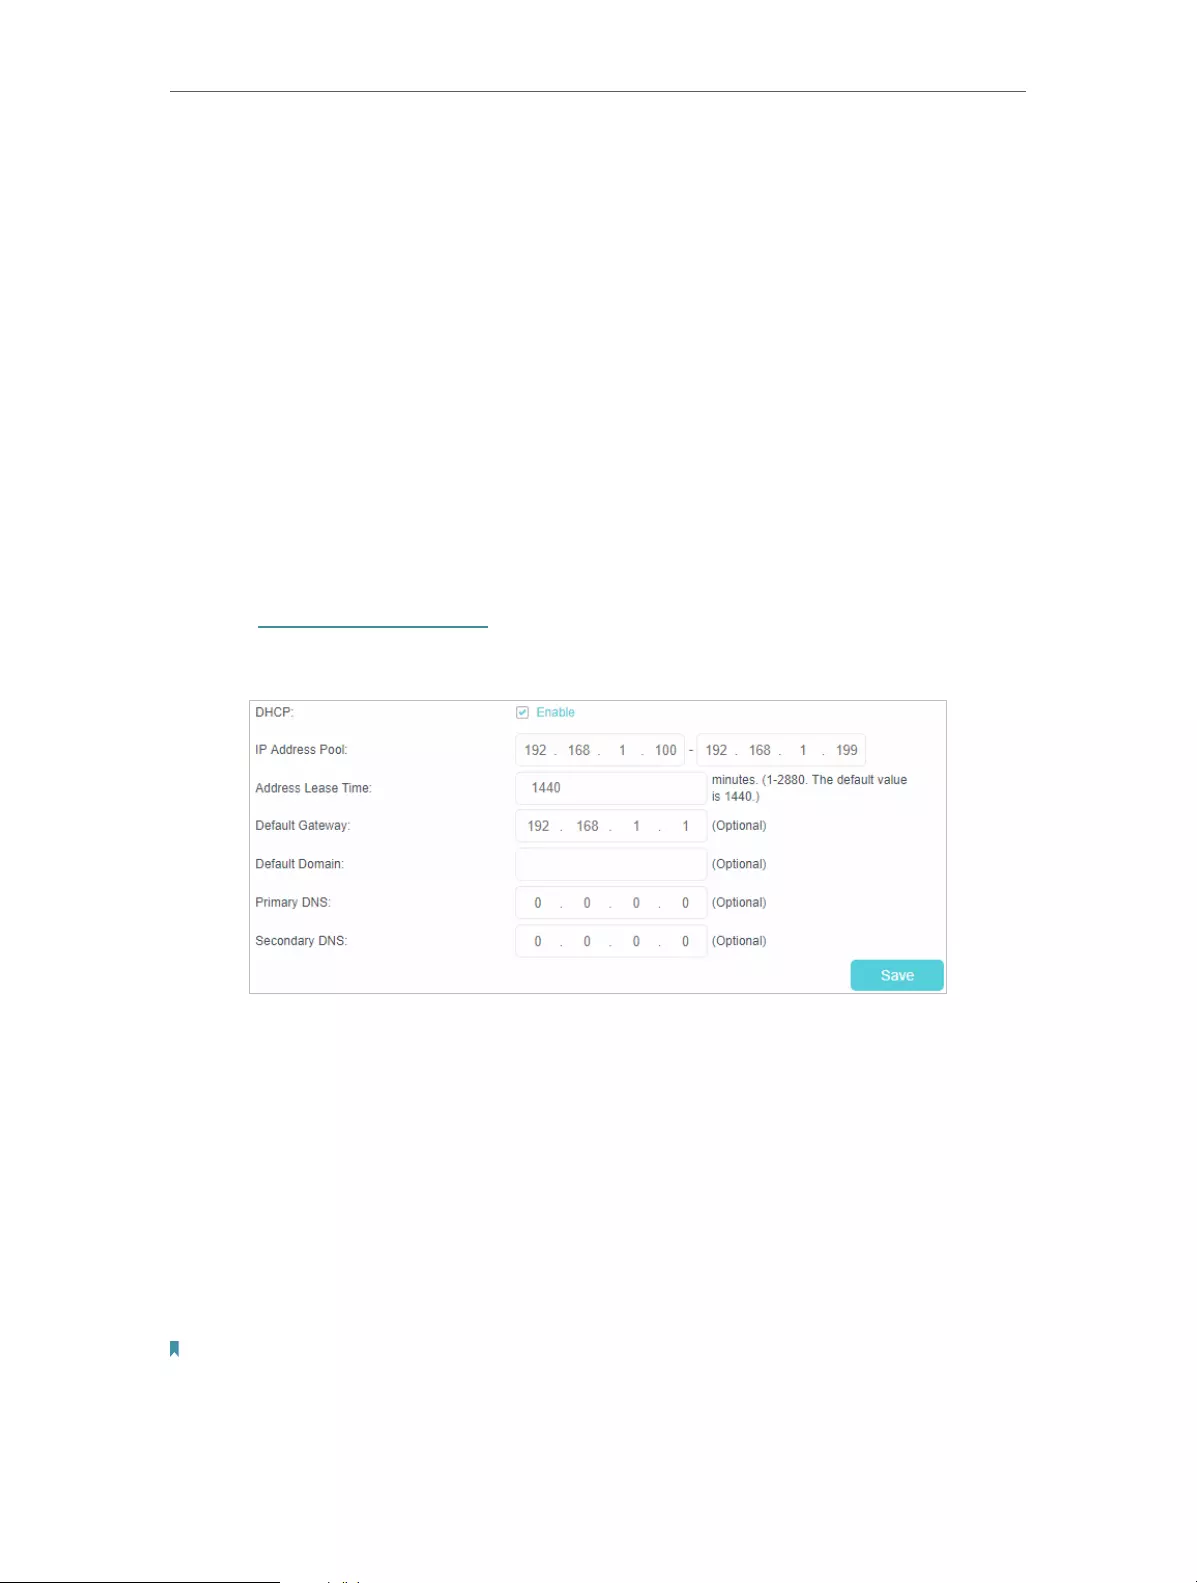
4. Specify the IP Address Pool, the start address and end address must be on the
same subnet with LAN IP. The router will assign addresses within this specified
range to its clients. It is from 192.168.1.100 to 192.168.1.199 by default.
5. Enter a value for the Address Lease Time. The Address Lease Time is the amount
of time in which a DHCP client can lease its current dynamic IP address assigned
by the router. After the dynamic IP address expires, the user will be automatically
assigned a new dynamic IP address. The default is 1440 minutes.
6. Keep the rest of the settings as default and click Save to make the settings effective.
Note:
1. The router can be configured to work as a DHCP Relay. A DHCP relay is a computer that forwards DHCP data
between computers that request IP addresses and the DHCP server that assigns the addresses. Each of the device’s
interfaces can be configured as a DHCP relay. If it is enabled, the DHCP requests from local PCs will be forwarded to
the DHCP server that runs on WAN side.

47
Chapter 11 Specify Your Network Settings
2. You can also appoint IP addresses within a specified range to devices of the same type by using Condition Pool
feature. For example, you can assign IP addresses within the range (192.168.1.50 to192.168.1.80) to Camera devices,
thus facilitating the network management. Enable DHCP feature and configure the parameters according to your
actual situation on Advanced > Network > LAN Settings page.
11. 4. 3. Reserve LAN IP Addresses
You can view and add a reserved address for a client. When you specify an IP address
for a device on the LAN, that device will always receive the same IP address each time
when it accesses the DHCP server. If there are some devices in the LAN that require
permanent IP addresses, please configure Address Reservation on the router for the
purpose.
Follow the steps below to reserve an IP address for your device.
1. Visit http://tplinkmodem.net, and log in with the password you set for the router.
2. Go to Advanced > Network > LAN Settings page.
3. Scroll down to locate the Address Reservation table and click Add to add an address
reservation entry for your device.
4. Enter the MAC address of the device for which you want to reserve IP address.
5. Specify the IP address which will be reserved by the router.
6. Check to Enable this entry and click Save to make the settings effective.

48
Chapter 11 Specify Your Network Settings
11. 5. Wireless Settings
11. 5. 1. Specify Basic Wireless Settings
The router’s wireless network name (SSID) and password, and security option are
preset in the factory. The preset SSID and password can be found on the product label.
You can customize the wireless settings according to your needs.
1. Visit http://tplinkmodem.net, and log in with the password you set for the router.
2. Go to Basic > Wireless page.
¾To enable or disable the wireless function:
Enable the Wireless Network 2.4GHz. If you don’t want to use the wireless function, just
uncheck the box. If you disable the wireless function, all the wireless settings won’t be
effective.
¾To change the wireless network name (SSID) and wireless password:
Enter a new SSID. The default SSID is TP-Link_XXXX and the value is case-sensitive.
Note:
If you use a wireless device to change the wireless settings, you will be disconnected when the settings are effective.
Please write down the new SSID and password for future use.
¾To hide SSID:
Select Hide SSID, and your SSID will not broadcast. Your SSID won’t display when you
scan for local wireless network list on your wireless device and you need to manually
join the network.
¾To change the mode or channel:
Go to Advanced > Wireless > Wireless Settings page.
• Mode — Select the desired mode.
• 802.11n only — Select only if all of your wireless clients are 802.11n devices.
• 802.11gn mixed — Select if you are using both 802.11g and 802.11n wireless
clients.
• 802.11bgn mixed — Select if you are using a mix of 802.11b, 11g, and 11n
wireless clients.

49
Chapter 11 Specify Your Network Settings
Note:
When 802.11n only mode is selected, only 802.11n wireless stations can connect to the router. It is strongly
recommended that you select 802.11bgn mixed, and all of 802.11b, 802.11g, and 802.11n wireless clients can
connect to the router.
• Channel — Select the channel you want to use from the drop-down list. This field
determines which operating frequency will be used. It is not necessary to change
the wireless channel unless you notice interference problems with another nearby
access point.
• Channel Width — Select the channel width from the drop-down list. The default setting
is Automatic, which can adjust the channel width for your clients automatically.
• Transmit Power — Select either High, Middle, or Low to specify the data transmit power.
The default and recommended setting is High.
¾To change the security option:
1. Go to Advanced > Wireless > Wireless Settings page.
2. Select an option from the Security drop—down list. The router provides four options,
None, WPA/WPA2 Personal (Recommended), WPA/WPA2 Enterprise, WEP. WPA2
uses the newest standard and the security level is the highest. We recommend you
don’t change the default settings unless necessary.
11. 5. 2. Use WPS for Wireless Connection
You can use WPS feature to add a new wireless device to your existing network quickly.
Method 1 Use the Wi-Fi Protected Setup Button
Use this method if your client device has a Wi-Fi Protected Setup button.
1. Press the WPS/RESET button on the back panel of the router for 1 second.
Note:
You can also use the Push button on the web management page. Go to Advanced > Wireless > WPS page and click the
Start WPS button on the screen.
50
Chapter 11 Specify Your Network Settings
2. Press the WPS button of the client device within two minutes.
3. The WPS LED flashes for about two minutes during the WPS process.
4. When the WPS LED is on, the client device has successfully connected to the router.
Method 2 Enter the client device’s PIN on the router
1. Visit http://tplinkmodem.net, and log in with the password you set for the router.
2. Go to Advanced > Wireless > WPS page.
3. Select Method Two—PIN and select Client’s PIN radio button.
4. Enter the client device’s PIN in the field, then click Connect.
5. Connect successfully will appear on the above screen, which means the client
device has successfully connected to the router.
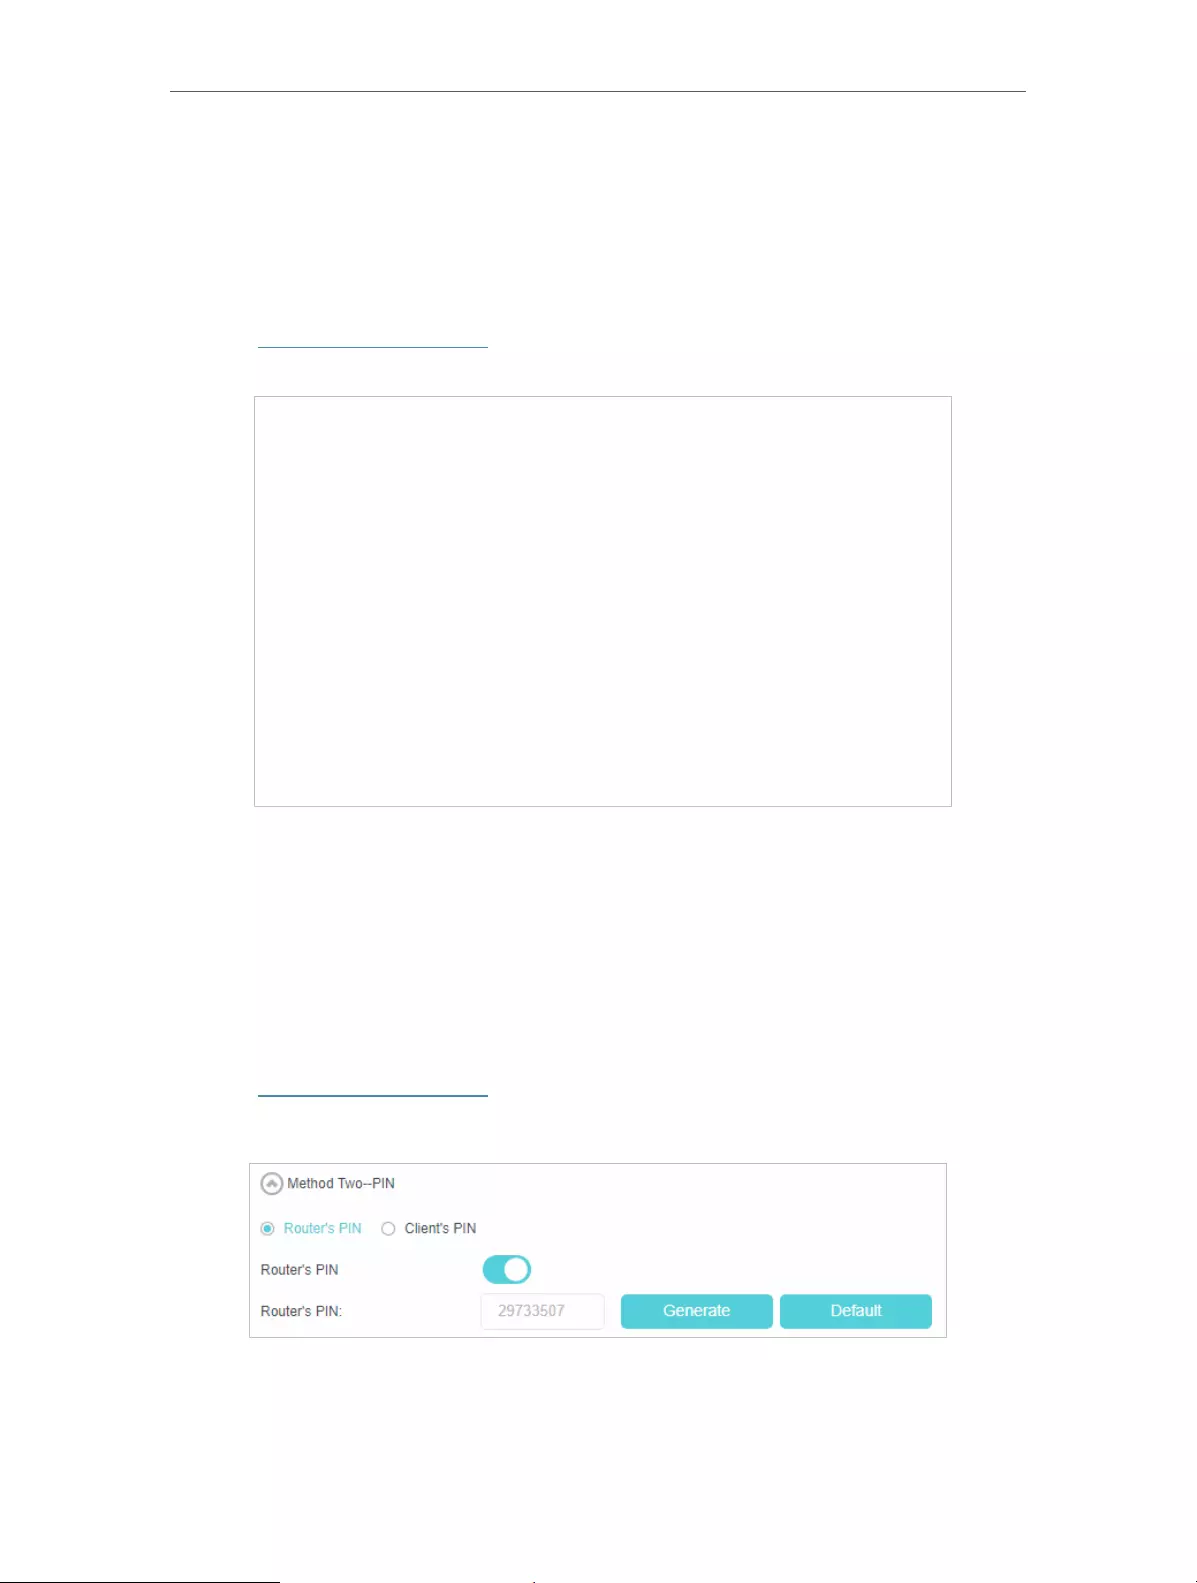
Method 3 Enter the router’s PIN on your client device
Use this method if your client device asks for the router’s PIN.
1. Visit http://tplinkmodem.net, and log in with the password you set for the router.
2. Go to Advanced > Wireless > WPS page.

51
Chapter 11 Specify Your Network Settings
3. Take a note of the Current PIN of the router. You can also click the Generate button
to get a new PIN.
4. On the client device, enter the router’s PIN. (The default PIN is also labeled on the
bottom of the router.)
5. The WPS LED flashes for about two minutes during the WPS process.
6. When the WPS LED is on, the client device has successfully connected to the router.
Note:
1. The WPS LED on the router will light on for no more than five minutes if the device has been successfully added to
the network.
2. The WPS function cannot be configured if the wireless function of the router is disabled. Please make sure the
wireless function is enabled before configuring the WPS.
11. 5. 3. Schedule Your Wireless Function
You can automatically turn off your wireless network at time when you do not need the
wireless connection.
1. Visit http://tplinkmodem.net, and log in with the password you set for the router.
2. Go to Advanced > Wireless > Wireless Schedule page.
3. Toggle on the button to enable the Wireless Schedule feature.
52
Chapter 11 Specify Your Network Settings
4. Set the wireless off time. Select From and To time and click Save to make the
settings effective. You can repeat the schedule every day or just certain days in a
week.
Note:
1. Please make sure that the time of the router is correct before using this function. For more details, refer to Set
System Time.
2. The wireless LED will turn off if both wireless networks are disabled.
3. The wireless network will be automatically turned on after the time period you set.
11. 5. 4. View Wireless Information
¾To view the detailed wireless network settings:
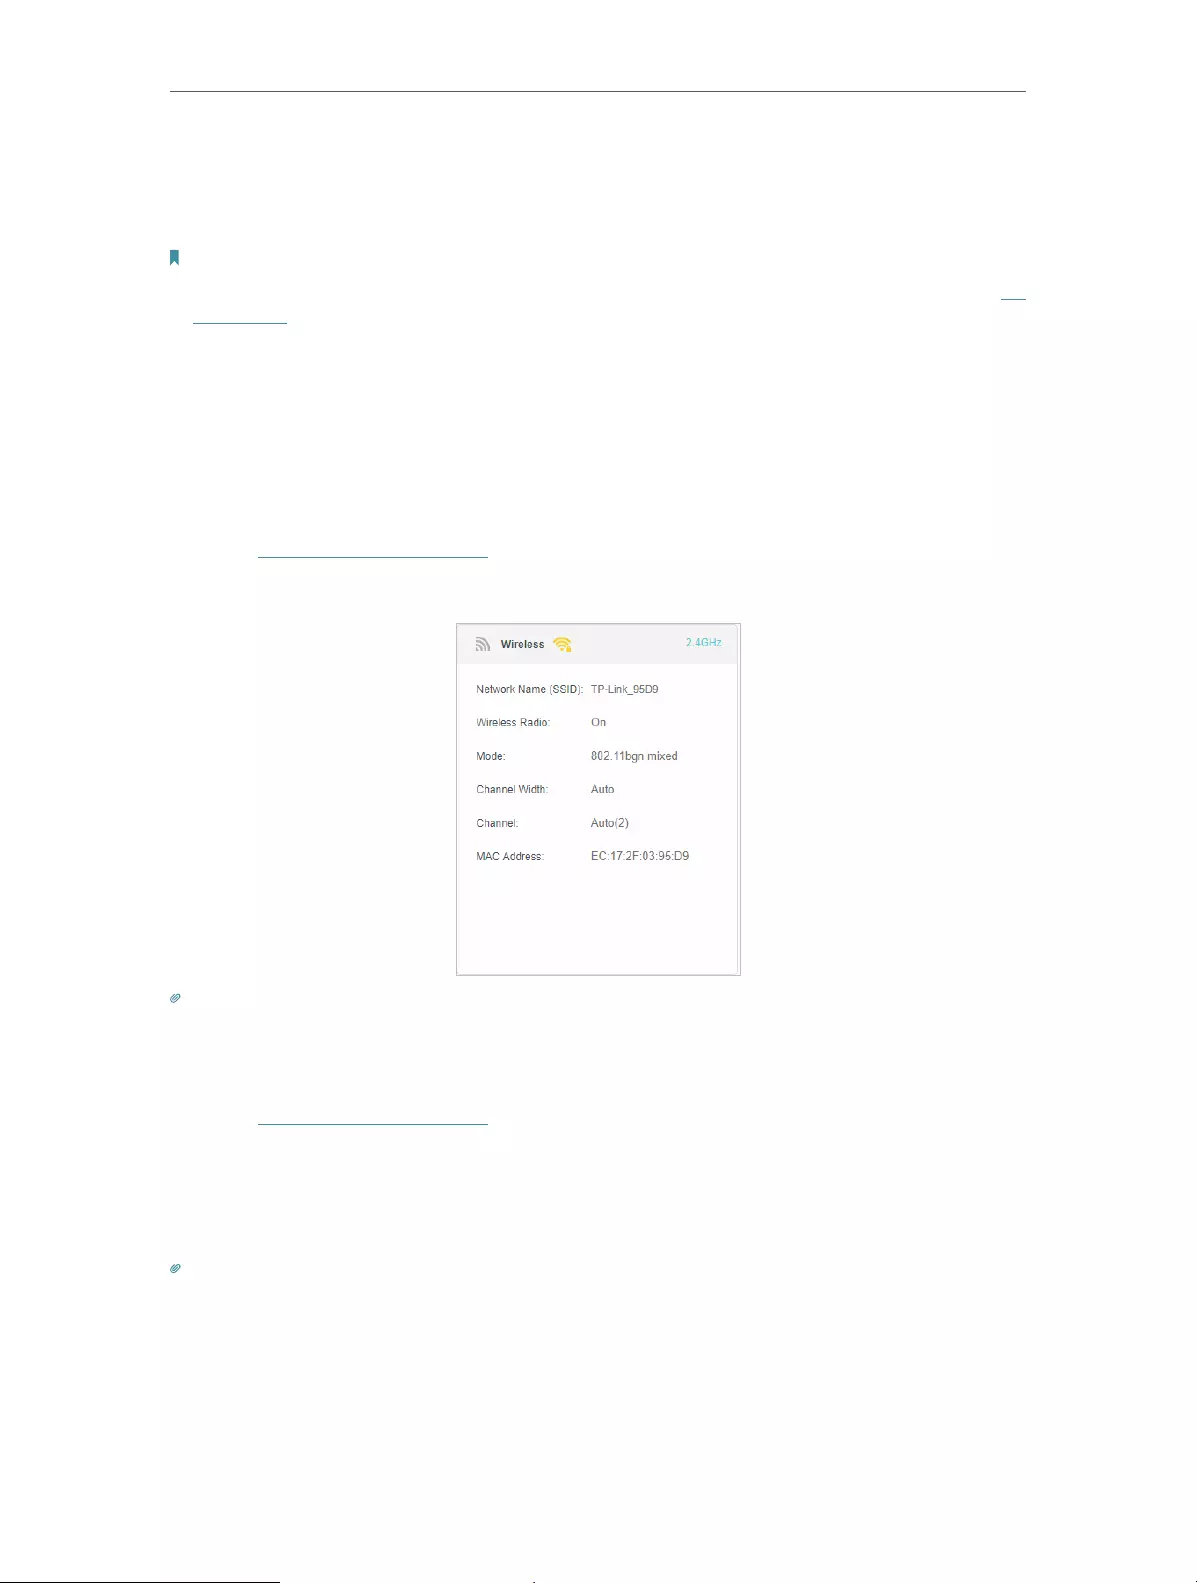
1. Visit http://tplinkmodem.net, and log in with the password you set for the router.
2. Go to Advanced > Status page. You can see the Wireless box.
Tips:
You can also see the wrieless details by clicking the router icon on Basic > Network Map.
¾To view the detailed information of the connected wireless clients:
1. Visit http://tplinkmodem.net, and log in with the password you set for the router.
2. Go to Advanced > Wireless > Statistics page.
3. You can view the detailed information of the wireless clients, including its connected
wireless band and security option as well as the packets transmitted.
Tips:
You can also see the wrieless details by clicking the wireless clients icon on Basic> Network Map.
53
Chapter 11 Specify Your Network Settings
11. 5. 5. Advanced Wireless Settings
Advanced wireless settings are for those have a network concept. If you are not familiar
with the settings on this page, it’s strongly recommended that you keep the provided
default values; otherwise it may result in lower wireless network performance.
1. Visit http://tplinkmodem.net, and log in with the password you set for the router.
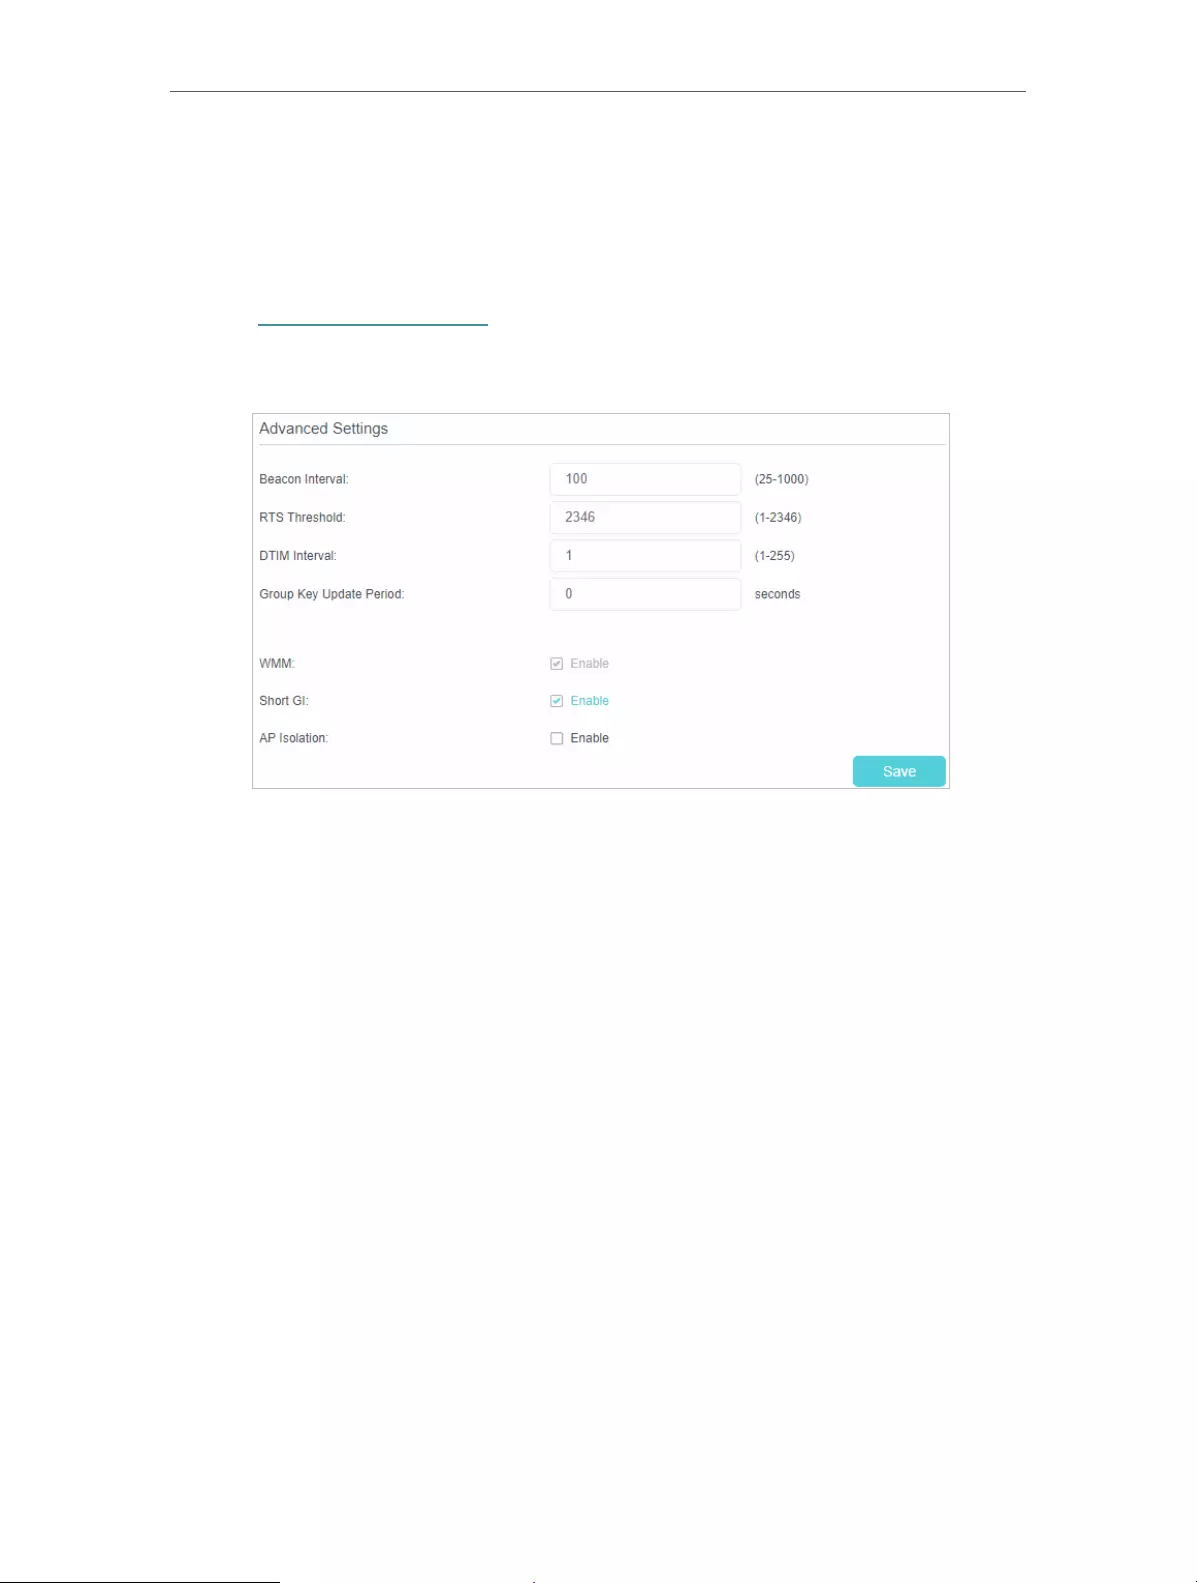
2. Go to Advanced > Wireless > Advanced Settings page.
• Beacon Interval — Enter a value between 25 and 1000 in milliseconds to determine the
duration between which beacon packets are broadcasted by the router to synchronize
the wireless network. The default is 100 milliseconds.
• RTS Threshold — Enter a value between 1 and 2346 to determine the packet size of
data transmission through the router. By default, the RTS (Request to Send) Threshold
size is 2346. If the packet size is greater than the preset threshold, the router sends
Request to Send frames to a particular receiving station and negotiates the sending
of a data frame, or else the packet will be sent immediately.
• DTIM Interval — Enter a value between 1 and 255 to determine the interval of the
Delivery Traffic Indication Message (DTIM). 1 indicates the DTIM Interval is the same
as Beacon Interval.
54
Chapter 11 Specify Your Network Settings
• Group Key Update Period — Enter the number of seconds (minimum 30) to control the
time interval for the encryption key automatic renewal. The default is 0, indicating no
key renewal.
• WMM — This feature guarantees the packets with high-priority messages being
transmitted preferentially. WMM is enabled compulsively under 802.11n or 802.11ac
mode. It is strongly recommended to enable WMM.
• Short GI — This feature is enabled by default and recommended to increase the data
capacity by reducing the Guard Interval (GI) time.
• AP Isolation — Select this checkbox to enable the AP Isolation feature that allows you
to confine and restrict all wireless devices on your network from interacting with each
other, but still able to access the internet. AP isolation is disabled by default.
11. 6. Set Up a Dynamic DNS Service Account
Most ISPs (internet service providers) assign a dynamic IP address to the router and
you can use this IP address to access your router remotely. However, the IP address
can change any time and you don’t know when it changes. In this case, you might need
the DDNS (Dynamic Domain Name Server) feature on the router to allow you and your
friends to access your router and local servers (FTP, HTTP, etc.) using domain name, in
no need of checking and remembering the IP address.
Note:
DDNS does not work if the ISP assigns a private WAN IP address (such as 192.168.1.x) to the router.
To set up DDNS, please follow the instructions below:
1. Visit http://tplinkmodem.net, and log in with the password you set for the router.
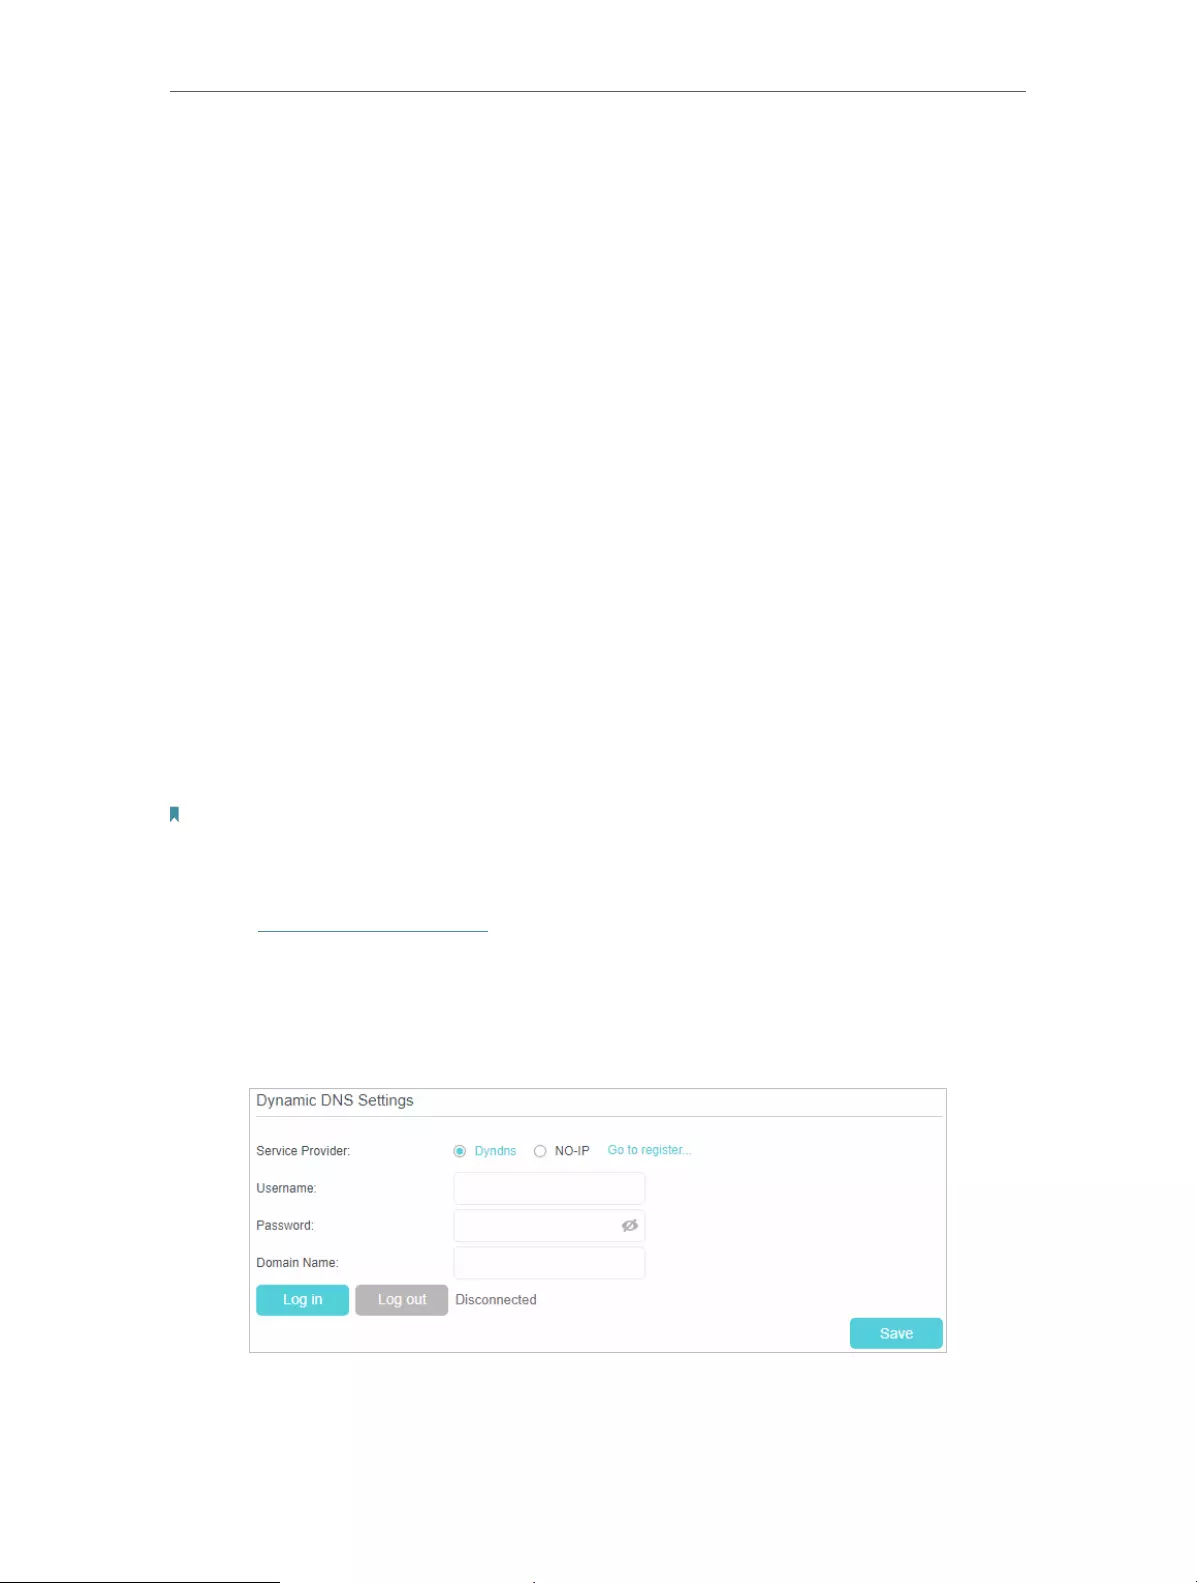
2. Go to Advanced > Network> Dynamic DNS.
3. Select the DDNS service provider (Dyndns or NO-IP). If you don’t have a DDNS
account, select a service provider and click Go to register.
4. Enter the username, password and domain name of the account (such as lisa.ddns.
net).
55
Chapter 11 Specify Your Network Settings
5. Click Log in and Save.
Tips:
If you want to use a new DDNS account, please log out first, then log in with the new account.
11. 7. Create Static Routes
A static route is a pre-determined path that network information must travel to reach
a specific host or network. Data from one point to another will always follow the same
path regardless of other considerations. Normal internet usage does not require this
setting to be configured.
I want to:
Visit multiple networks and multiple servers at the same time.
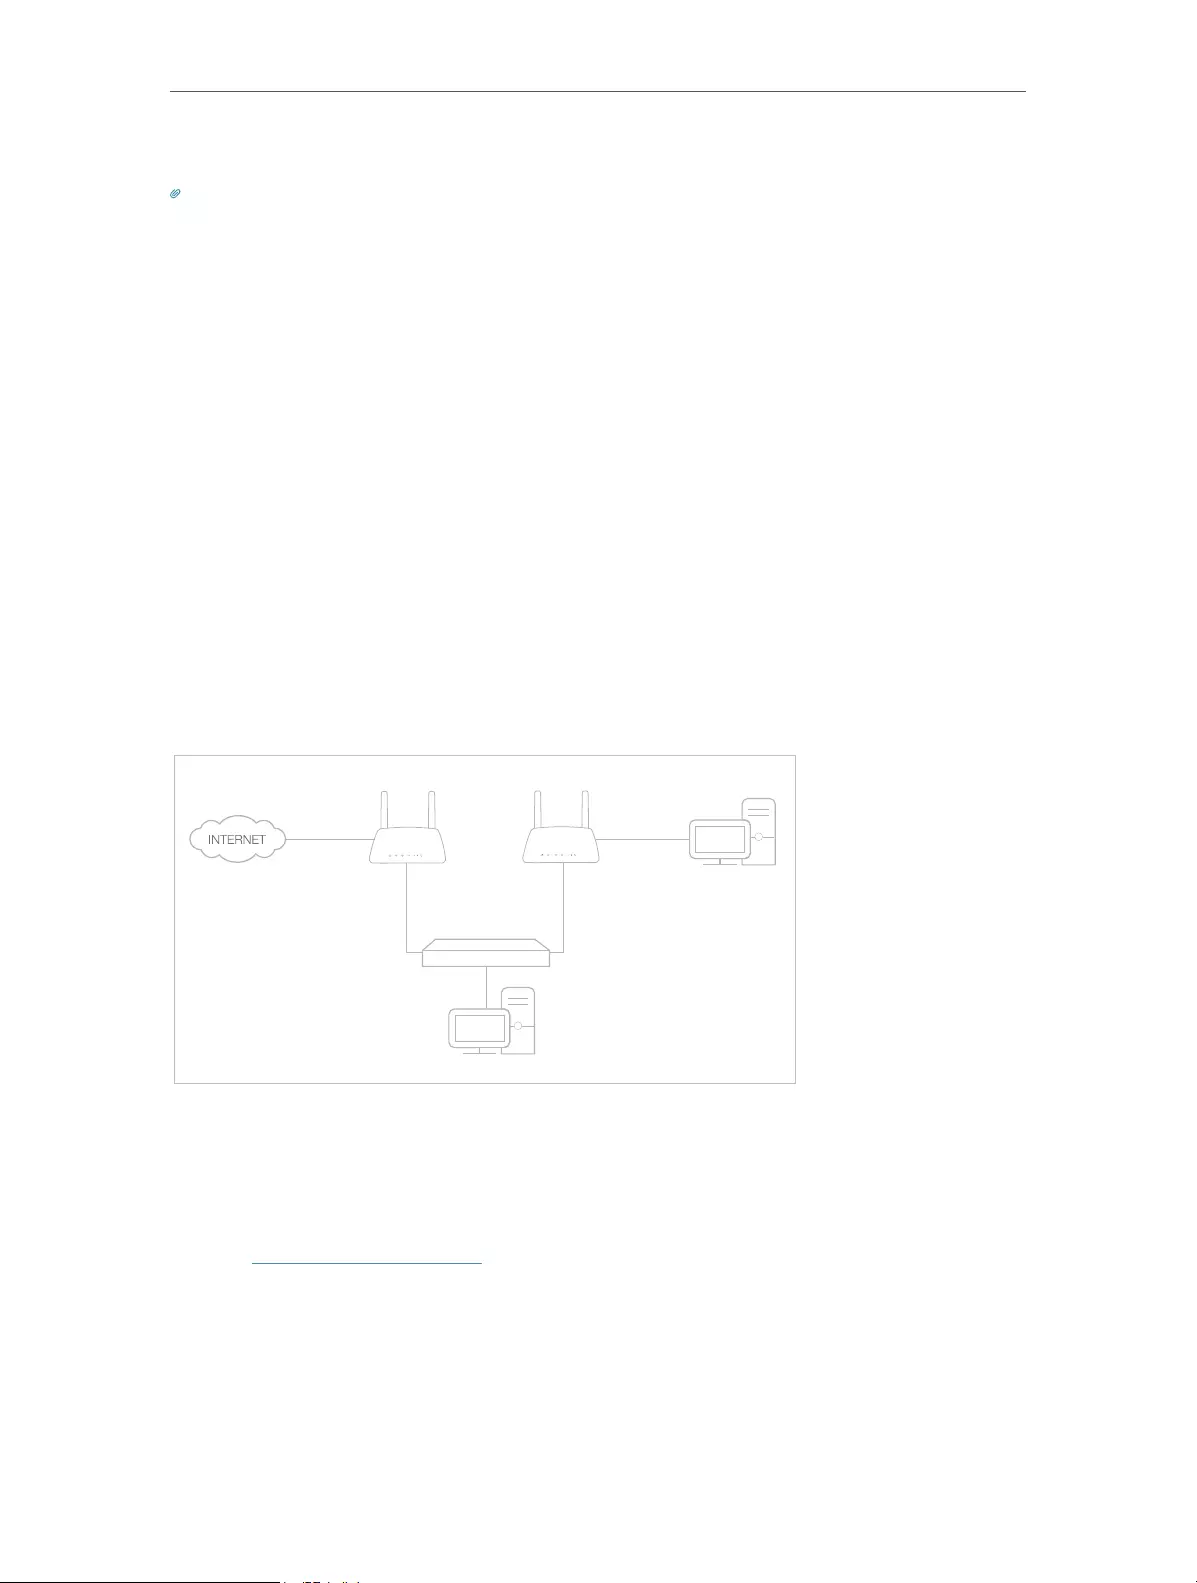
For example, in a small office, my PC can surf the internet, but I also want to visit my
company’s server. Now I have a switch and another router. I connect the devices as
shown in the following figure so that the physical connection between my PC and my
company’s server is achieved. To surf the internet and visit my company’s network at
the same time, I need to configure the static routing.
Company’s server
My PC
Router 2
4G LTE router
Switch
LAN: 192.168.1.1
192.168.1.100
LAN: 192.168.1.2
WAN: 172.30.30.100
172.30.30.1
How can I do that?
1. Make sure the routers use different LAN IP addresses on the same subnet. Disable
DHCP function of Router 2.
2. Visit http://tplinkmodem.net, and log in with the password you set for the router.
3. Go to Advanced > Network > Static Routing.

56
Chapter 11 Specify Your Network Settings
4. Click Add to add a new static routing entry. Finish the settings according to the
following explanations:
• Network Destination — The destination IP address that you want to assign to a
static route. This IP address cannot be on the same subnet with the WAN IP or
LAN IP of the router. In the example, the IP address of the company network is the
destination IP address, so here enters 172.30.30.1.
• Subnet Mask — Determines the destination network with the destination IP address.
If the destination is a single IP address, enter 255.255.255.255; otherwise, enter
the subnet mask of the corresponding network IP. In the example, the destination
network is a single IP, so here enters 255.255.255.255.
• Gateway — The IP address of the gateway device to which the data packets will
be sent. This IP address must be on the same subnet with the router’s IP which
sends out the data. In the example, the data packets will be sent to the LAN port of
Router 2 and then to the Server, so the gateway should be 192.168.1.2
• Interface — Determined by the port that sends out the data packets. In the example,
the data is sent to the gateway through the LAN port.
5. Select the checkbox to enable this entry.
6. Click Save to save the settings.

57
Chapter 11 Specify Your Network Settings
Done!
Open a web browser on your PC. Enter the company server’s IP address to visit the
company network.
11. 8. Set up a VPN Connection
VPN (Virtual Private Network) is a private network established across the public network,
generally via the internet. However, the private network is a logical network without any
physical network lines, so it is called Virtual Private Network.
With the wide application of the internet, more and more data need to be shared through
the internet. Connecting the local network to the internet directly, though can allow the
data exchange, will cause the private data to be exposed to all the users on the internet.
11. 8. 1. Use IPSec VPN to Access Your Home Network
The VPN (Virtual Private Network) technology is developed and used to establish the
private network through the public network, which can provide a secure communication
to a remote computer or remote network, and guarantee a secure data exchange. IPSec
is one of the major implementations of VPNs.
I want to:
Establish an IPSec VPN tunnel to connect two LANs via internet so that the hosts in
different remote LANs are able to communicate with each other as if they are in the
same LAN.
For example, I am the network administrator of a regional office, I need to let my office
staff to visit the headquarters’ servers and resources, and vice versa. I know that the
router in my office and the device in headquarters both support IPSec VPN feature, so
I decide to set up a VPN connection with the headquarter office.
The following diagram is a typical VPN topology. Here Site A refers to regional office’s
network (local network). And Site B refers to the headquarters’ network (remote network)
which I want to connect to.
Router 1
LAN: 192.168.1.1
WAN: 219.134.112.246
PC 1
Subnetmask: 255.255.255.0
WAN: 219.134.112.247
Router 2
PC 2
LAN: 192.168.2.1
Subnetmask: 255.255.255.0
Site A Site B

58
Chapter 11 Specify Your Network Settings
How can I do that?
1. Make sure of the topology you want to build and record site A (local network) and
site B (remote network)’s LAN IP and WAN IP.
2. Configuration on site A (local network).
1 ) Visit http://tplinkmodem.net, and log in with the password you set for the router.
2 ) Go to Advanced > VPN > IPSec VPN to open the configuration page. Click Add
to set up a VPN tunnel.
3 ) In the IPSec Connection Name column, specify a name.
4 ) In the Remote IPSec Gateway (URL) column, Enter Site B’s WAN IP address.
5 ) To configure Site A’s LAN:
In the Tunnel access from local IP addresses column, here we take Subnet Address
as an example. Then input the LAN IP range of Site A in the IP Address for VPN
column, and input Subnet Mask of Site A.
6 ) To configure Site B’s LAN:
In the Tunnel access from local IP addresses column, here we take Subnet Address
as an example. Then input the LAN IP range of Site B in the IP Address for VPN
column, and input Subnet Mask of Site B.

59
Chapter 11 Specify Your Network Settings
7 ) Select the Key Exchange Method for the policy. We select Auto(IKE) here.
8 ) Enter the Pre-Shared Key for IKE authentication. Then keep Perfect Forward
Secrecy enabled.
Note:
Make sure Site A and Site B use the same key.
9 ) Leave the Advanced Settings as default value. Then click OK to save.
3. Configuration on Site B (remote network). Refer to step 2 configuration on Site A
and make sure that Site A and Site B use the same pre-shared keys and Perfect
Forward Secrecy settings.
4. The Status column will change to Up if the VPN connection has been set up
successfully.
5. Check the VPN connection. You can ping site B’ LAN IP from your computer to verify
that the IPSec VPN connection is set up correctly.
To check the VPN connection, you can do the following.
a . On the host in Site A, press [Windows Logo] + [R] to open Run dialog. Input “cmd”
and hit OK.
b . In the CLI window, type in “ping 192.168.2.x” (“192.168.2.x” can be IP address of
any host in Site B). Then press [Enter].

60
Chapter 11 Specify Your Network Settings
c . If Ping proceeds successfully (gets replies from host in Site B), the IPSec
connection is working properly now.
Done!
Now IPSec VPN is implemented to establish a connection.
Note:
1. The product supports a maximum of ten simultaneous connections.
2. If one of the site has been off line for a while, for example, if Site A has been disconnected, on Site B you need to click
Disable and then click Enable after Site A back on line in order to re-establish the IPSec tunnel.
11. 8. 2. Use OpenVPN to Access Your Home Network
In the OpenVPN connection, the home network can act as a server, and the remote
device can access the server through the router which acts as an OpenVPN Server
gateway. To use the VPN feature, you should enable OpenVPN Server on your router,
and install and run VPN client software on the remote device. Please follow the steps
below to set up an OpenVPN connection.
Step1. Set up OpenVPN Server on Your Router
1. Visit http://tplinkmodem.net, and log in with the password you set for the router.
2. Go to Advanced > VPN Server > OpenVPN, and select Enable VPN Server.

61
Chapter 11 Specify Your Network Settings
Note:
• Before you enable VPN Server, we recommend you configure Dynamic DNS Service (recommended) or assign a
static IP address for router’s WAN port and synchronize your System Time with internet.
• The first time you configure the OpenVPN Server, you may need to Generate a certificate before you enable the VPN
Server.
3. Select the Servive Type (communication protocol) for OpenVPN Server: UDP, TCP.
4. Enter a VPN Service Port to which a VPN device connects, and the port number should be
between 1024 and 65535.
5. In the VPN Subnet/Netmask fields, enter the range of IP addresses that can be leased to the
device by the OpenVPN server.
6. Select your Client Access type. Select Home Network Only if you only want the remote device
to access your home network; select Internet and Home Network if you also want the remote
device to access internet through the VPN Server.
7. Click Save.
8. Click Generate to get a new certificate.
Note:
If you have already generated one, please skip this step, or click Generate to update the certificate.
9. Click Export to save the OpenVPN configuration file which will be used by the remote device
to access your router.
Step 2. Configure OpenVPN Connection on Your Remote Device
62
Chapter 11 Specify Your Network Settings
1. Visit http://openvpn.net/index.php/download/community-downloads.html to download the
OpenVPN software, and install it on your device where you want to run the OpenVPN client
utility.
Note:
You need to install the OpenVPN client utility on each device that you plan to apply the VPN function to access your
router. Mobile devices should download a third-party app from Google Play or Apple App Store.
2. After the installation, copy the file exported from your router to the OpenVPN client utility’s
“config” folder (for example, C:\Program Files\OpenVPN\config on Windows). The path
depends on where the OpenVPN client utility is installed.
3. Run the OpenVPN client utility and connect it to OpenVPN Server.
11. 8. 3. Use PPTP VPN to Access Your Home Network
PPTP VPN Server is used to create a VPN connection for remote device. To use the VPN
feature, you should enable PPTP VPN Server on your router, and configure the PPTP
connection on the remote device. Please follow the steps below to set up a PPTP VPN
connection.
Step 1. Set up PPTP VPN Server on Your Router
1. Visit http://tplinkmodem.net, and log in with the password you set for the router.
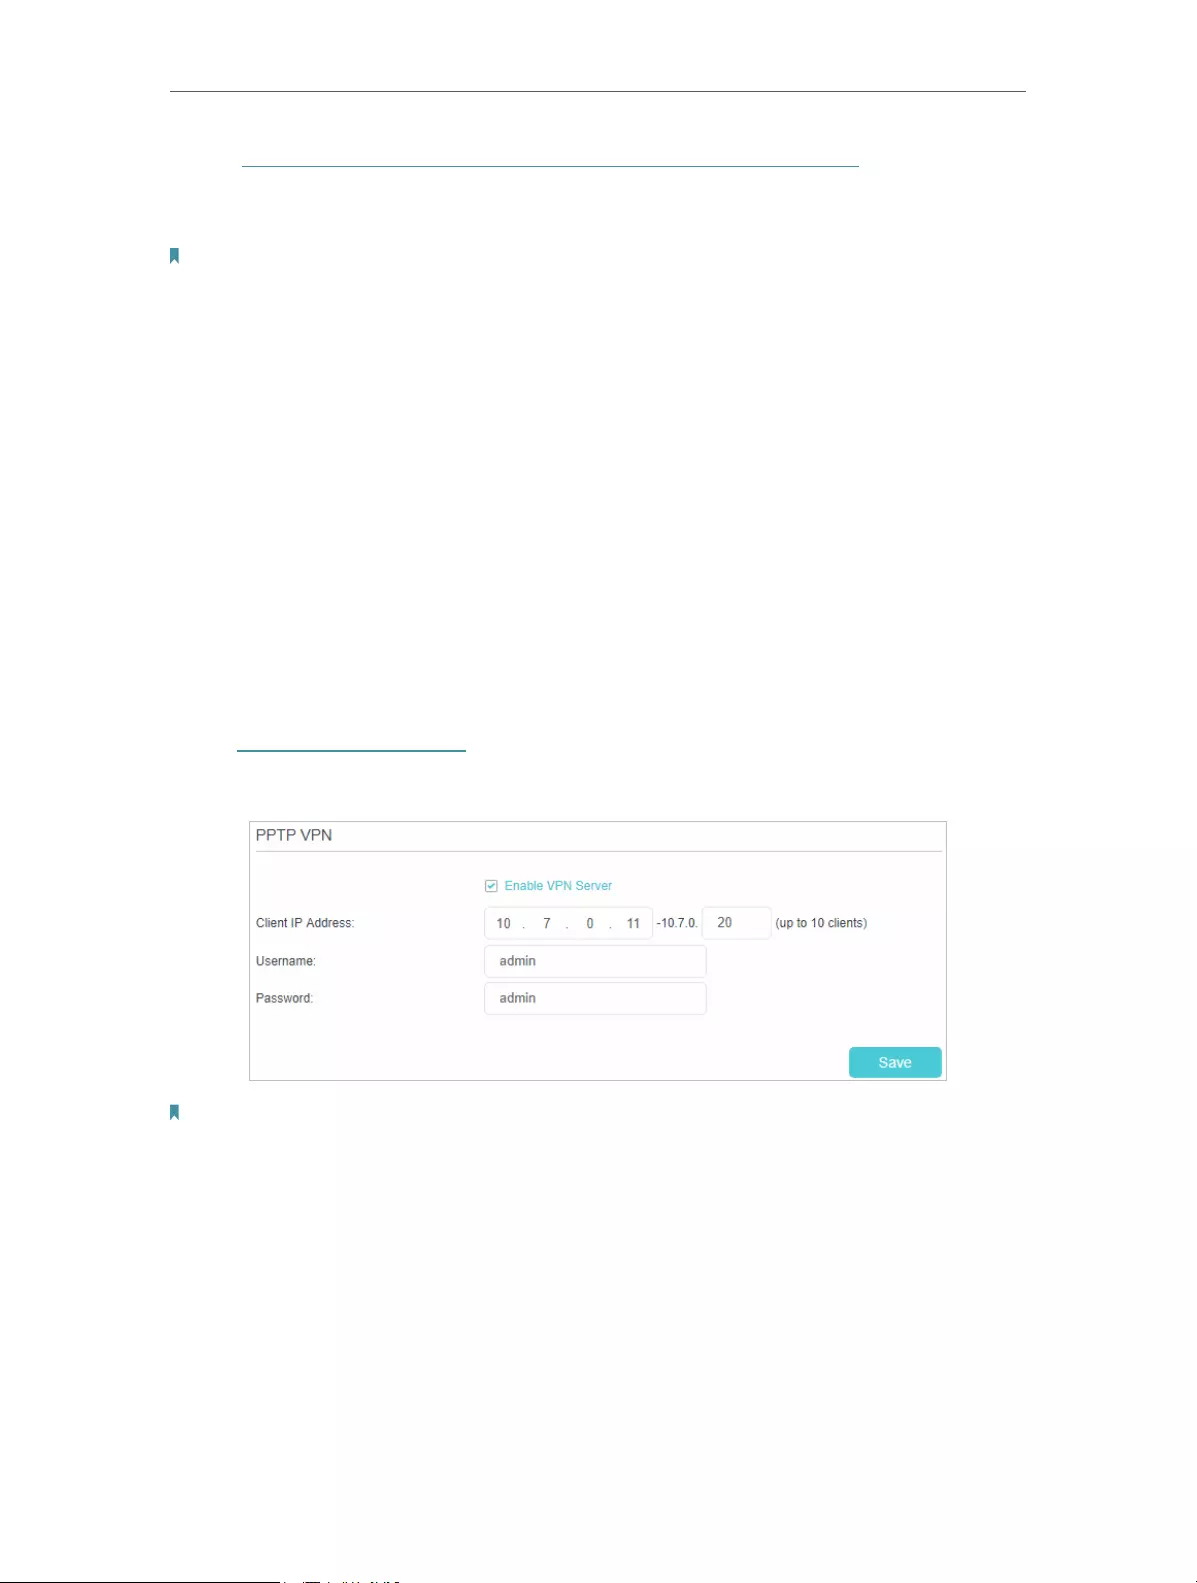
2. Go to Advanced > VPN Server > PPTP VPN, and select Enable VPN Server.
Note:
Before you enable VPN Server, we recommend you configure Dynamic DNS Service (recommended) or assign a static
IP address for router’s WAN port and synchronize your System Time with internet.
3. In the Client IP Address filed, enter the range of IP addresses (up to 10) that can be leased to
the devices by the PPTP VPN server.
4. In the Username/Password filed, enter the username and password to authenticate clients to
the PPTP VPN server.
5. Click Save.
Step 2. Configure PPTP VPN Connection on Your Remote Device

63
Chapter 11 Specify Your Network Settings
The remote device can use the Windows built-in PPTP software or a third-party PPTP
software to connect to PPTP Server. Here we use the Windows built-in PPTP software
as an example.
1. Go to Start > Control Panel > Network and Internet > Network and Sharing Center.
2. Select Set up a new connection or network.
3. Select Connect to a workplace and click Next.

64
Chapter 11 Specify Your Network Settings
4. Select Use my Internet connection (VPN).
5. Enter the internet IP address of the router (for example: 218.18.1.73) in the Internet address
field. Click Next.

65
Chapter 11 Specify Your Network Settings
6. Enter the User name and Password you have set for the PPTP VPN server on your router, and
click Connect.
7. The PPTP VPN connection is created and ready to use.

Chapter 12
Administrate Your Network
This chapter introduces how to change the system settings and administrate your
router’s network.
This chapter contains the following sections:
• Set System Time
• Update the Firmware
• Back up and Restore Configuration Settings
• Change the Administrator Account
• Local Management
• Remote Management
• System Log
• Monitor the Internet Traffic Statistics
• CWMP Settings
• SNMP Settings

67
Chapter 12 Administrate Your Network
12. 1. Set System Time
System time is the time displayed while the router is running. The system time you
configure here will be used for other time-based functions like Parental Controls and
Wireless Schedule. You can manually set how to get the system time.
Follow the steps below to set your system time.
1. Visit http://tplinkmodem.net, and log in with the password you set for the router.
2. Go to Advanced > System Tools > Time Settings page.
3. Configure the system time using the following methods :
Manually — Select your time zone and enter your local time.
Get from PC — Click this button if you want to use the current managing PC’s time.
Get from the Internet — Click this button if you want to get time from the internet.
Make sure your router can access the internet before you select this way to get
system time.
4. Click Save to make your settings effective.
5. After setting the system time, you can set Daylight Saving time according to your
needs. Tick the checkbox to enable Daylight Saving, set the start and end time and
then click Save to make the settings effective.

68
Chapter 12 Administrate Your Network
12. 2. Update the Firmware
TP-Link is dedicated to improving and richening the product features, giving you a
better network experience.
We will inform you through the web management page if there’s any update firmware
available for your router. Also, the latest firmware will be released at TP-Link official
website, you can download it from the Support page of our website www.tp-link.com
for free.
Note:
1. Make sure that you have a stable connection between the router and your computer. It is NOT recommended to
upgrade the firmware wirelessly.
2. Make sure you remove any USB storage device connected to the router before the firmware upgrade to prevent data
loss.
3. Back up your router configuration before upgrading the firmware.
4. Do NOT turn off the router during the firmware upgrade.
12. 2. 1. Online Upgrade
1. Visit http://tplinkmodem.net, and log in with the password you set for the router.
2. If there’s any firmware update available for your router, the update icon will display on the
top-right corner of the page. Click the icon to go to the Firmware Upgrade page.
Alternatively, you can go to Advanced > System Tools > Firmware Upgrade, and click Check
for Upgrades to see if there’s any new firmware.
Tips:
If there’s any new important firmware update for your router, you will see the notification (similar as shown below)
on your computer when open a new web page. Click Upgrade Now, and log in to the web management page. You
will see the Firmware Upgrade page.
3. Focus on the Online Upgrade section, and click Upgrade.
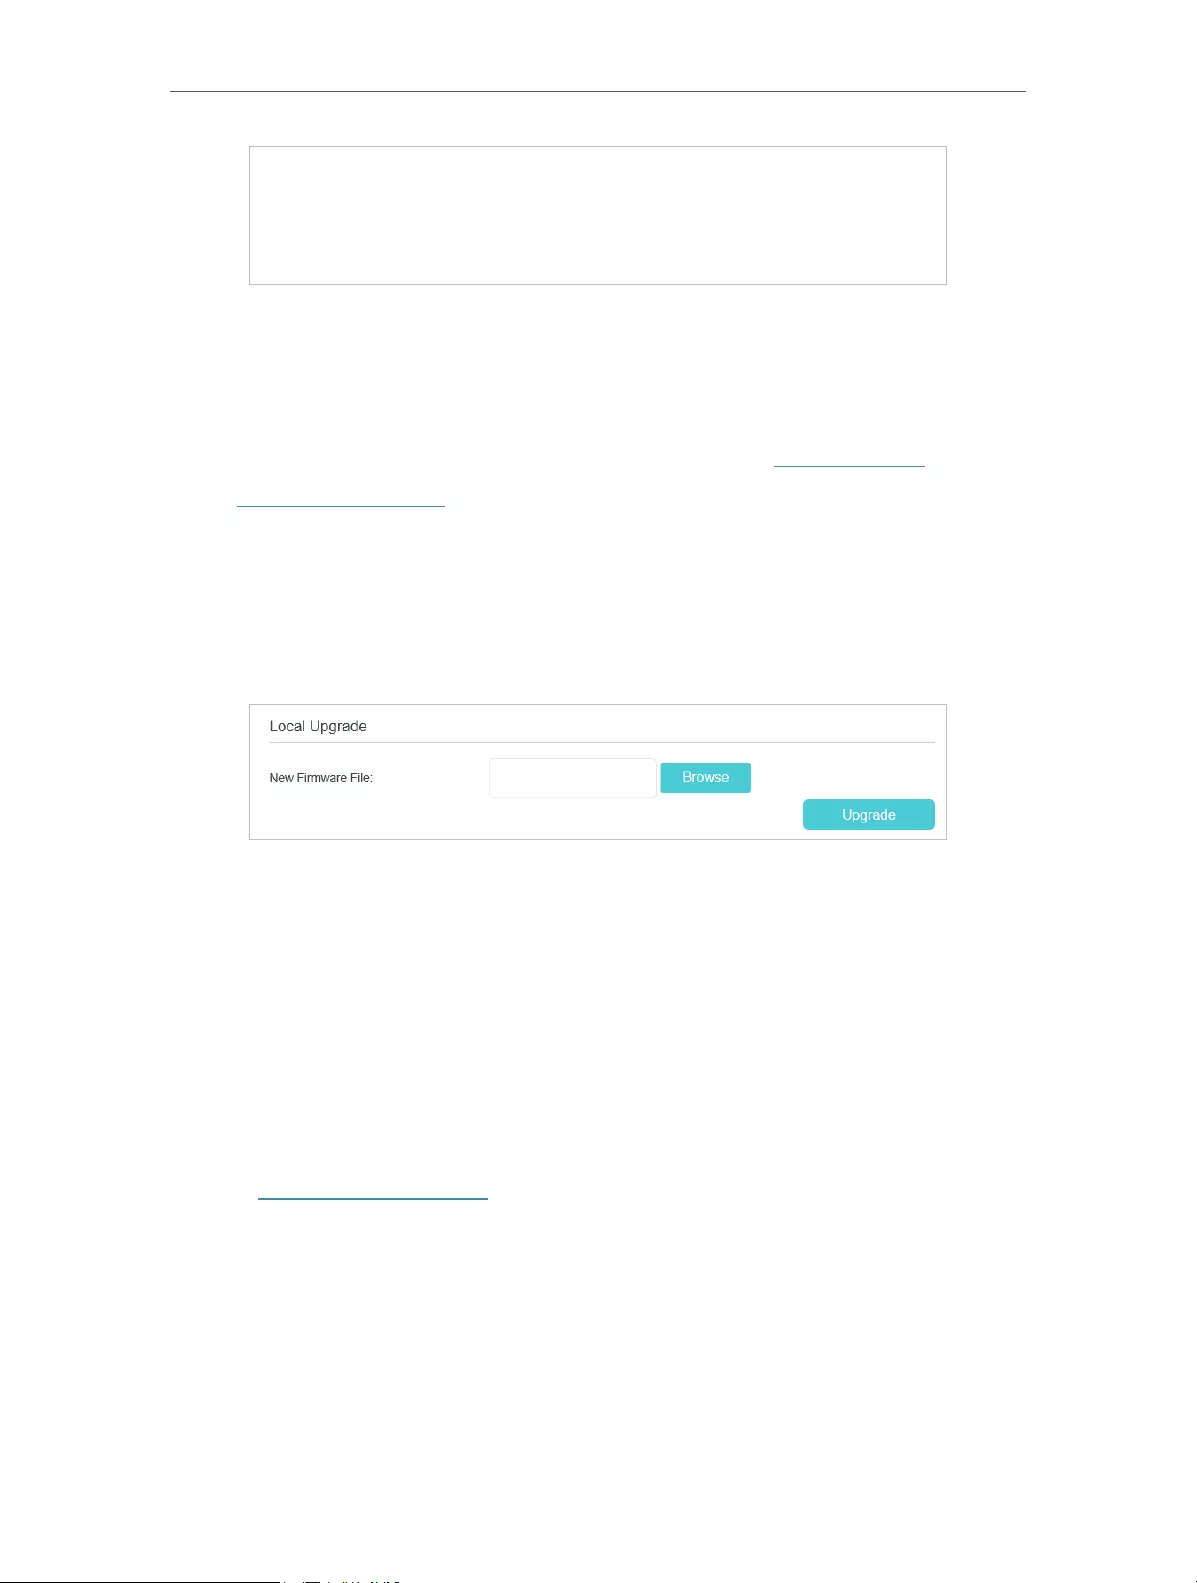
69
Chapter 12 Administrate Your Network
4. Wait a few moments for the upgrading and rebooting.
12. 2. 2. Local Upgrade
1. Download the latest firmware file for the router from our website www.tp-link.com.
2. Visit http://tplinkmodem.net, and log in with the password you set for the router.
3. Go to Advanced > System Tools > Firmware Upgrade.
4. Focus on the Device Information section. Make sure the downloaded firmware file matches
with the Hardware Version.
5. Focus on the Local Upgrade section. Click Browse to locate the downloaded new firmware
file, and click Upgrade.
6. Wait a few moments for the upgrading and rebooting.
12. 3. Back up and Restore Configuration Settings
The configuration settings are stored as a configuration file in the router. You can back
up the configuration file to your computer for future use and restore the router to a
previous settings from the backup file when needed. Moreover, if needed you can erase
the current settings and reset the router to the default factory settings.
¾To back up configuration settings:
1. Visit http://tplinkmodem.net, and log in with the password you set for the router.
2. Click Advanced > System Tools > Backup & Restore page.
3. Click Backup to save a copy of the current settings to your local computer. A conf.
bin file will be stored to your computer.
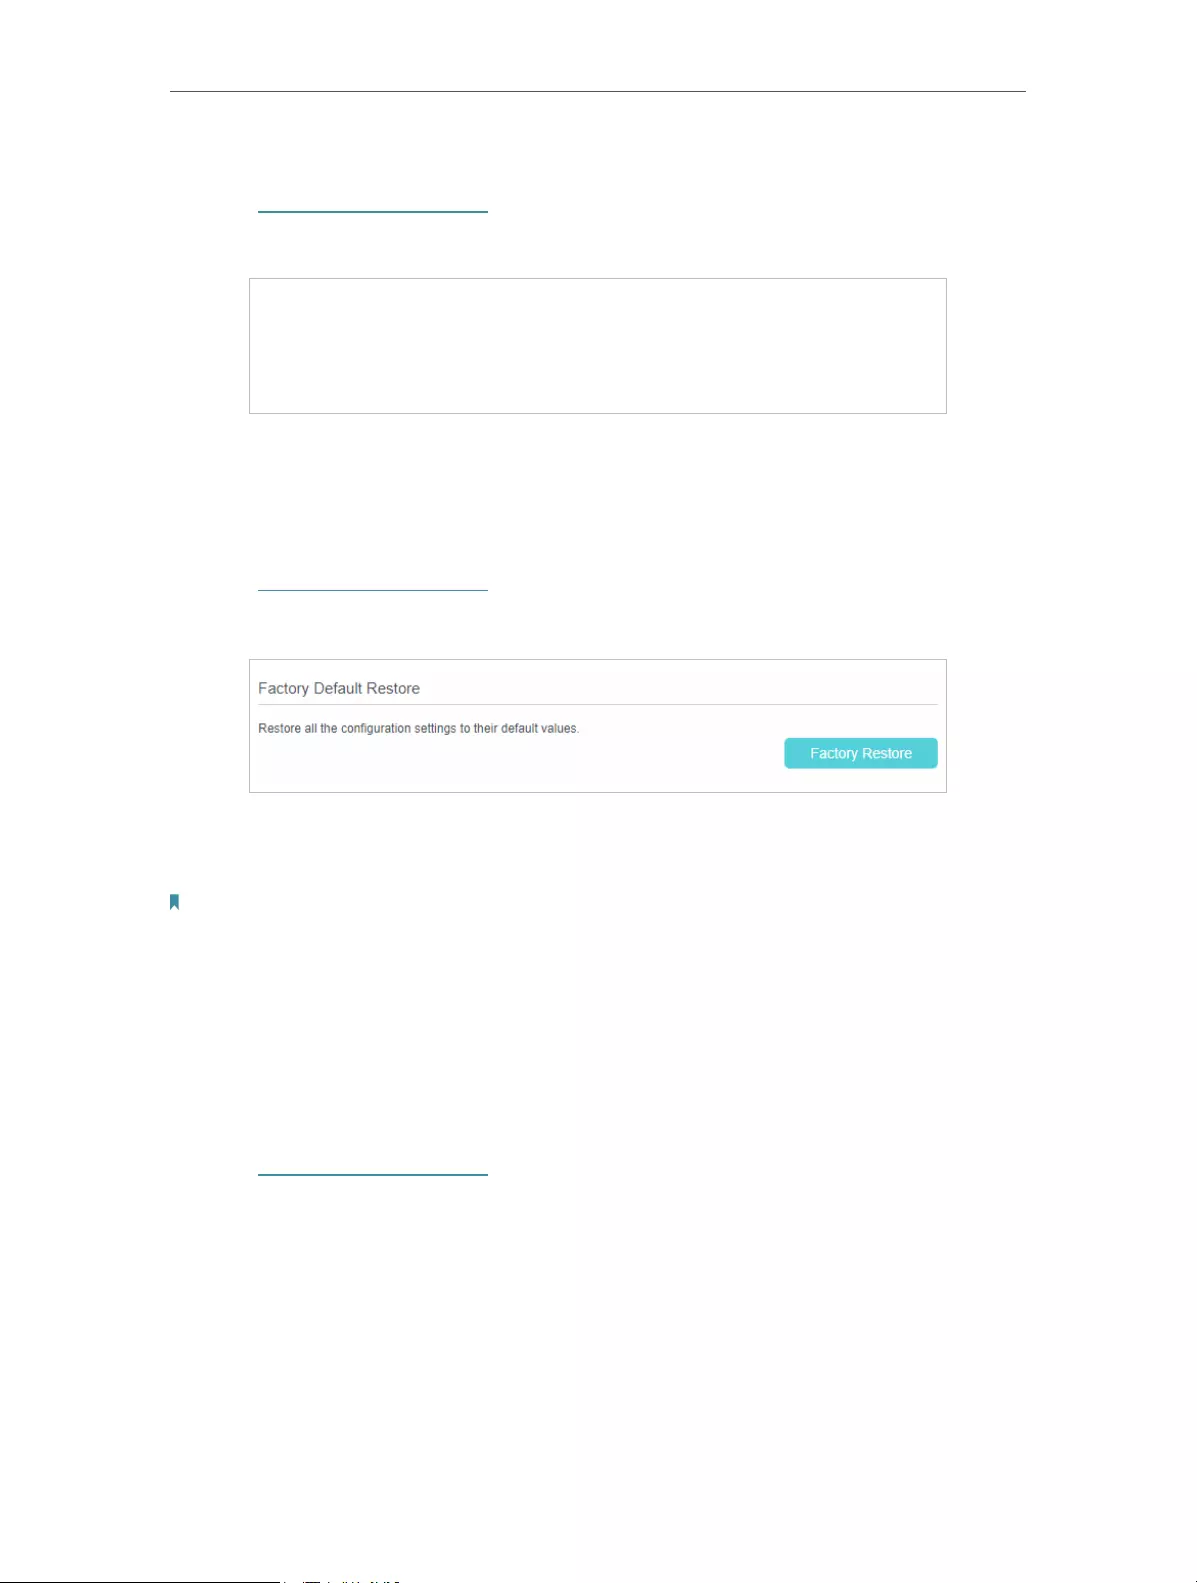
70
Chapter 12 Administrate Your Network
¾To restore configuration settings:
1. Visit http://tplinkmodem.net, and log in with the password you set for the router.
2. Click Advanced > System Tools > Backup & Restore page.
3. Click Browse to locate the previous backup configuration file, and click Restore.
4. Wait for the restoring and then the router will automatically reboot.
¾To reset the router to factory default settings:
1. Visit http://tplinkmodem.net, and log in with the password you set for the router.
2. Click Advanced > System Tools > Backup & Restore page.
3. Click Factory Restore to reset the router.
4. Wait for the resetting and then the router will automatically reboot.
Note:
1. Do not interrupt or turn off the router during the resetting process.
2. We strongly recommend you to back up the current configuration settings before resetting the router.
12. 4. Change the Administrator Account
Admin account is used to log in to the router’s web-based management page. You are
required to set the admin account at the first login. You can change it on the web page.
1. Visit http://tplinkmodem.net, and log in with the password you set for the router.
2. Go to Advanced > System Tools> Administration page. Locate the Account
Management section.
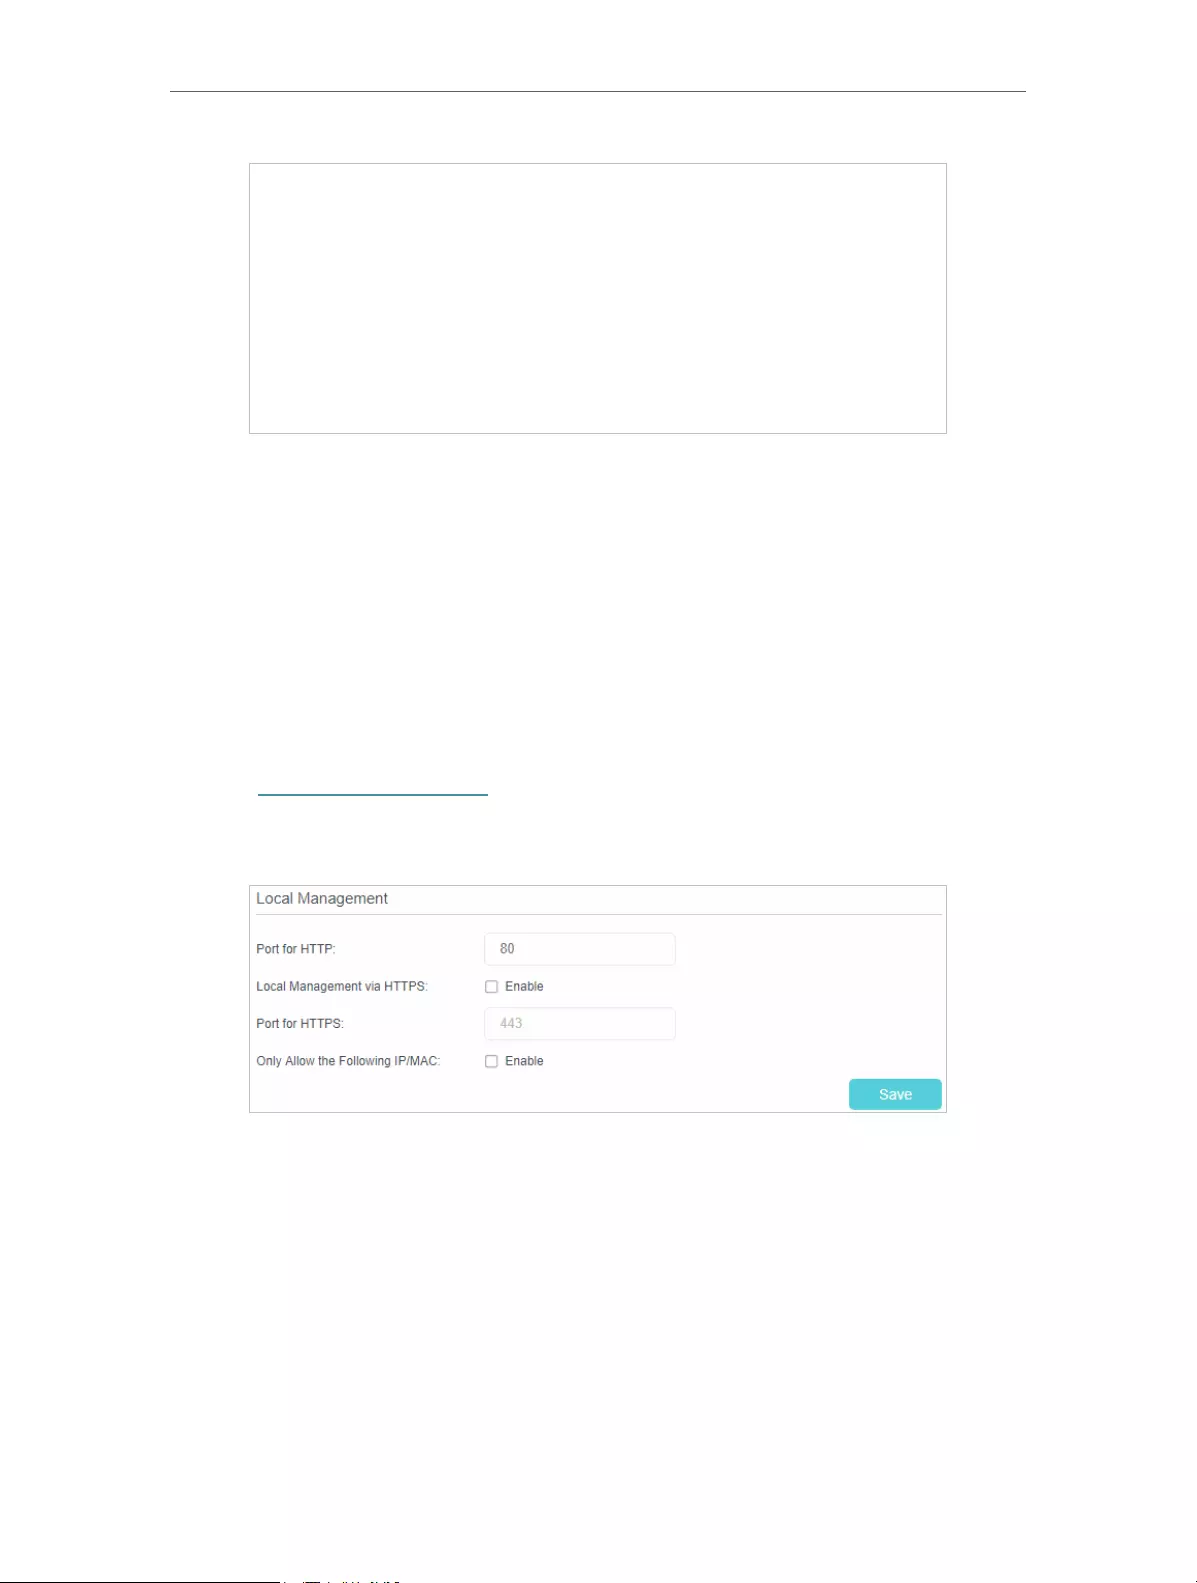
71
Chapter 12 Administrate Your Network
3. Enter the old password. Enter the new password and enter again to confirm.
4. Click Save to make the settings effective.
12. 5. Local Management
You can control the local devices’ authority to manage the router via the Local
Management feature. By default all local connected devices are allowed to manage the
router. You can also allow only one device to manage the router.
Follow the steps below to specify the local management.
1. Visit http://tplinkmodem.net, and log in with the password you set for the router.
2. Go to Advanced > System Tools> Administration page. Locate the Local
Management section.
3. Enable Local Management via HTTPS if you want to access the router via both
HTTPS and HTTP, or keep it disabled if you only want to access the router via HTTP.
4. Keep the Port for HTTP and Port for HTTPS as the default settings.
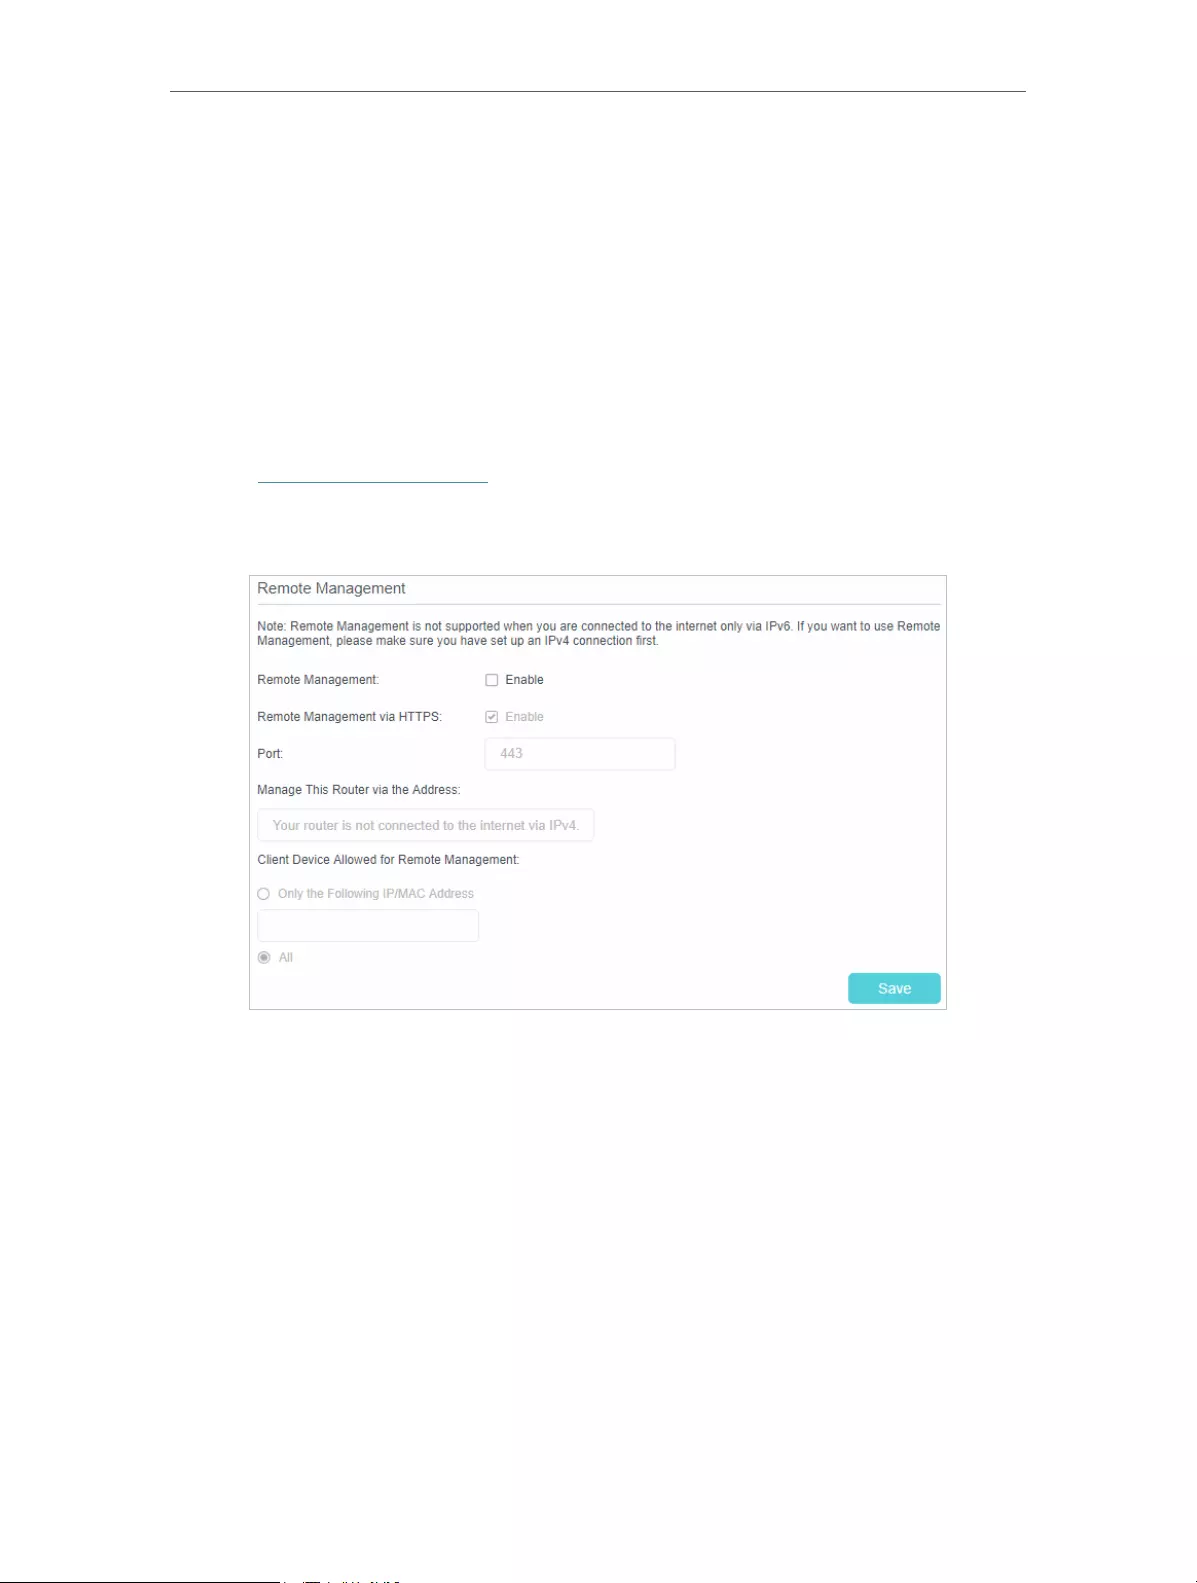
72
Chapter 12 Administrate Your Network
5. If you only want to allow one specific device to manage the router, enable Only
Allow the Following IP/MAC and then enter the IP Address or MAC Address of the
device in the IP/MAC Address field.
6. Click Save to make the settings effective.
12. 6. Remote Management
By default, the remote devices are not allowed to manage the router from the internet.
Follow the steps below to allow remote devices to manage the router.
1. Visit http://tplinkmodem.net, and log in with the password you set for the router.
2. Go to Advanced > System Tools> Administration page. Locate the Remote
Management section.

73
Chapter 12 Administrate Your Network
3. Enable Remote Management if you want to allow Remote Management via HTTPS,
or enable Remote Management and then disable Remote Management via HTTPS
if you only want to allow Remote Management via HTTP.
4. Keep the Port as the default setting.
5. If you only want to allow one specific device to manage the router, select Only the
Following IP/MAC Address and then enter the IP Address or MAC Address. If you
want to allow all remote devices can access the router, select All.
6. Click Save to make the settings effective.
Tips:
1. You can find the WAN IP address of the router on Basic > Network Map > Internet.
2. The router’s WAN IP is usually a dynamic IP. Please refer to Set Up a Dynamic DNS Service Account if you want to log
in to the router through a domain name.
12. 7. System Log
System Log can help you know what happens to your router, facilitating you to locate
the malfunctions. For example when your router does not work properly, you will need
to save the system log and send it to the technical support for troubleshooting.
1. Visit http://tplinkmodem.net, and log in with the password you set for the router.
2. Click Advanced > System Tools > System Log page.
¾To view the system logs:

74
Chapter 12 Administrate Your Network
1. Select the log Type. Select ALL to view all kinds of logs, or select DHCPD or IGMP
to view the specific logs.
2. Select the log Level and you will see the logs with the specific or higher levels.
3. Click Refresh to refresh the log list.
¾To save the system logs:
You can choose to save the system logs to your local computer or a remote server.
1. Click Save Log to save the logs in a txt file to your computer.
2. Click Log Settings to set the save path of the logs.
• Save Locally — Select this option to cache the system log to the router’s local memory,
select the minimum level of system log to be saved from the drop-down list. The logs
will be shown in the table in descending order on the System Log page.
• Save Remotely — Select this option to send the system log to a remote server, select
the minimum level of system log to be saved from the drop—down list and enter the
information of the remote server. If the remote server has a log viewer client or a sniffer
tool implemented, you can view and analyze the system log remotely in real-time.
12. 8. Monitor the Internet Traffic Statistics
The Traffic Monitor page displays the network traffic of the LAN, WAN and WLAN sent
and received packets, allowing you to monitor the volume of internet traffic statistics.
1. Visit http://tplinkmodem.net, and log in with the password you set for the router.

75
Chapter 12 Administrate Your Network
2. Go to Advanced > System Tools > Traffic Monitor.
3. Toggle on Traffic Monitor, and then you view the traffic usage of a device in the past
10 minutes or that of all devices in the past 10 minutes/24 hours/7 days.
12. 9. CWMP Settings
The router offers CWMP feature. The function supports TR-069 protocol which collects
information, diagnoses the devices and configures the devices automatically via ACS
(Auto-Configuration Server).
1. Visit http://tplinkmodem.net, and log in with the password you set for the router.

76
Chapter 12 Administrate Your Network
2. Go to Advanced > System Tools > CWMP Settings page.
• Enable CWMP — Toggle On to enable the CWMP (CPE WAN Management Protocol)
feature.
• Inform — Enable this feature to send an Inform message to the ACS (Auto Configuration
Server) periodically.
• Inform Interval — Enter the time in seconds when the Inform message will be sent to
the ACS.
• ACS URL — Enter the web address of the ACS which is provided by your ISP.
• ACS Username/Password — Enter the username/password to log in to the ACS server.
• Interface used by TR-069 client — Select which interface to be used by the TR-069
client.
• Display SOAP messages on serial console — Toggle to enable or disable this feature.
• Connection Request Authentication — Select this checkbox to enable authentication
for the connection request.
• Username/Password — Enter the username/password for the ACS server to log in to
the router.
• Path — Enter the path for the ACS server to log in to the router.
• Port — Enter the port that connects to the ACS server.

77
Chapter 12 Administrate Your Network
• URL — Enter the URL that connects to the ACS server.
• Get RPC Methods — Click to get the methods to support CWMP.
3. Click Save to make the settings effective.
12. 10. SNMP Settings
SNMP (Simple Network Management Protocol) has been widely applied in the computer
networks currently, which is used for ensuring the transmission of the management
information between two nodes. In this way, network administrators can easily search
and modify the information on any node on the network. Meanwhile, they can locate
faults promptly and implement the fault diagnosis, capacity planning and report
generating.
An SNMP Agent is an application running on the router that performs the operational
role of receiving and processing SNMP messages, sending responses to the SNMP
manager, and sending traps when an event occurs. So a router contains SNMP “agent”
software can be monitored and/or controlled by SNMP Manager using SNMP messages.
1. Visit http://tplinkmodem.net, and log in with the password you set for the router.
2. Go to Advanced > System Tools > SNMP Settings page.
• Enable SNMP Agent/SNMP Agent for WAN — Toggle On to enable the built-in SNMP
agent that allows the router to operate as the operational role in receiving and
processing of SNMP messages, sending responses to the SNMP manager, and
triggering SNMP traps when an event occurs.
• Read-only Community — Displays the default public community string that protects
the router from unauthorized access.

78
Chapter 12 Administrate Your Network
• Write Community — Displays the default read and write community string that protects
the router from unauthorized changes.
• System Name — Displays the administratively-assigned name for this managed device.
• System Description — Displays the textual description of the managed device. This
value should include the full name and version identification of the system’s hardware
type, software operating-system, and networking software.
• System Location — Displays the physical location of this device (e.g. telephone closet,
3rd floor).
• System Contact — Displays the textual identification of the contact person for this
managed device, together with information on how to contact this person.
• Trap Manager IP — Displays the IP address of the host to receive the traps.
3. It is recommended to keep the default settings. Click Save to make the settings
effective.

79
FAQ
Q1. How do I restore my router to its factory default settings?
With the router powered on, press and hold the WPS/RESET button on the rear panel
until the Power LED starts flashing.
Note:
Once the router is reset, the current configuration settings will be lost and you will need to re-configure the router.
Q2. What should I do if I forget my password?
• Web Management page password:
Restore the router to its factory default settings and then create a new password using
1-32 characters.
• Wireless Network password:
1. The default Wireless Password/PIN is printed on the product label of the router.
2. If the default wireless password has been changed, log in to the router’s web
management page and go to Basic > Wireless to retrieve or reset your password.
Q3. What should I do if I cannot access the web management page?
This can happen for a variety of reasons. Please try the methods below to log in again.
• Make sure your computer has connected to the router correctly and the corresponding
LED light up.
• Make sure the IP address of your computer is configured as Obtain an IP address
automatically and Obtain DNS server address automatically.
• Make sure you enter the correct IP address to log in: http://tplinkmodem.net.
• Check your computer’s settings:
1 ) Go to Start > Control Panel > Network and Internet, and click View network
status and tasks.
2 ) Click Internet Options on the bottom left.

80
3 ) Click Connections and select Never dial a connection.
4 ) Click LAN settings, deselect the following three options and click OK;

81
5 ) Go to Advanced > Restore advanced settings, click OK to save the settings.
• Use another web browser or computer to log in again.
• Reset the router to factory default settings and try again. If the login still fails, please
contact the technical support.
Note: You’ll need to reconfigure the router to surf the internet once the router is reset.
Q4. What can I do if I cannot access the internet?
1. Verify that your SIM card is an LTE or WCDMA card.
2. Verify that your SIM card is in your ISP’s service area.
3. Verify that your SIM card has sufficient credit.
4. Check the LAN connection:
Open a web browser and enter http://tplinkmodem.net or http://192.168.1.1 in the
address bar. If the login page does not appear, refer to Q3 and then try again.
5. Check your ISP parameters:
1 ) Open a web browser and log in to the web management page.

82
2 ) Go to Advanced > Network > Internet to verify the parameters (including the
APN, Username and Password) provided by your ISP are correctly entered. If the
parameters are incorrect, click Create Profile and enter the correct parameters,
then select the new profile from the Profile Name list.
6. Check the PIN settings:
1 ) Open a web browser and log in to the web management page.
2 ) Go to Advanced > Network > PIN Management to verify if PIN is required. If it is,
enter the correct PIN provided by your ISP or disable PIN Lock, and click Save.
7. Check the Data Limit:
1 ) Open a web browser and log in to the web management page.
2 ) Go to Advanced > Network > Data Settings to verify if the Total Used exceeds
the Total Allowance or if the Monthly Used exceeds the Monthly Allowance. If it
does, click Correct and set Total/Monthly Used to 0 (zero), or disable Data Limit.
8. Check the Mobile Data:
1 ) Open a web browser and log in to the web management page.
2 ) Go to Advanced > Network > Internet to verify that Mobile Data is enabled. If
not, toggle it On to access the internet.
9. Check the Data Roaming:
1 ) Confirm with your ISP if you are in a roaming service area. If you are, open a web
browser and log in to the web management page.
2 ) Go to Advanced > Network > Internet to verify that Data Roaming is enabled. If
not, toggle it On to access the internet.
Q5. What should I do if my internet speed is slow?
1. Make sure you are inside a network coverage area.
2. Relocate your router and your computer to have a better signal reception – you may
be in or near a structure that is blocking the signal. Obstacles (for example, walls,
ceilings, and furniture) between the router and other wireless devices decreases
the signal strength.
Q6. How to use the router as a regular wireless router to share my
internet ?
The router support two operation modes, 3G/4G Router Mode and Wireless Router
mode. If you already have a modem or your internet comes via an Ethernet cable from
the wall, you can set up the router as a regular wireless router to share the internet.
1. Connect your router’s LAN4/WAN port to the modem or the network port.

83
2. Visit http://tplinkmodem.net, and log in with password you set for the router.
3. Go to Advanced > Operation Mode page.
4. Select the Wireless Router Mode option and click Save to make the settings
effective.
Note:
1. In wireless router mode, you can use 3G/4G network as a backup solution for internet access. When 3G/4G Backup is
enabled, your router will be directly connected to the 3G/4G network when the original network service fails. To enable
or disable 3G/4G Backup, go to Advanced > Network > Internet.
2. In wireless router mode, you can set up your router for an IPTV connection. To enable and configre IPTV, go to
Advanced > IPTV.
Q7. What can I do if I cannot find my wireless network or I cannot connect
the wireless network?
¾If you fail to find any wireless network, please follow the steps below:
1. Make sure the wireless function is enabled if you’re using a laptop with built-in
wireless adapter. You can refer to the relevant document or contact the laptop
manufacturer.

84
2. Make sure the wireless adapter driver is installed successfully and the wireless
adapter is enabled.
On Windows 7
1 ) If you see the message No connections are available, it is usually because the
wireless function is disabled or blocked somehow;
2 ) Clicking on Troubleshoot and windows might be able to fix the problem by itself.
On Windows XP
1 ) If you see the message Windows cannot configure this wireless connection,
this is usually because windows configuration utility is disabled or you are
running another wireless configuration tool to connect the wireless.
2 ) Exit the wireless configuration tool (the TP-Link Utility, for example);
3 ) Select and right click on My Computer on desktop, select Manage to open
Computer Management window;

85
4 ) Expand Services and Applications > Services, find and locate Wireless Zero
Configuration in the Services list on the right side;
5 ) Select Wireless Zero Configuration, right click it, and then select Properties;
6 ) Change Startup type to Automatic, click on Start button and make sure the
Service status is Started. And then click OK.

86
7 ) Connect to wireless network.
¾If you can find other wireless network except your own, please follow the steps
below:
1. Check the WLAN LED indicator on your router;
2. Make sure your computer/device is still in the range of your router/modem, move
closer if it is currently too far away;
3. Go to Advanced > Wireless > Advanced Settings page, and check the wireless
router settings. Double check your Wireless Network Name, and make sure the
SSID is not hided;
4. Connect to wireless network.
¾If you can find your wireless network but fail to connect, please follow the steps
below:
1. Authenticating problem, password mismatch.
1 ) Sometimes it will ask you to type in a PIN number when you connect to the
wireless network for the first time. This PIN number is different from the Wireless
Password/Network Security Key, usually you can only find it on the back of your
wireless router/modem;

87
2 ) If you cannot find the PIN or PIN failed, you may choose Connecting using a
security key instead, and then type in the Network Security Key/Wireless
Password;
3 ) If it continues saying network security key mismatch, it is suggested to confirm
the wireless password on your wireless router/modem;
Note: Wireless password/Network Security Key is case-sensitive.
4 ) Connect to wireless network.

88
2. Windows was unable to connect to XXXX /Cannot join this network/Taking longer
than usual to connect to this network.
1 ) Check the wireless signal strength of your network, if it is weak (1~3 bars),
please move the router closer and try again;
2 ) Change the wireless Channel of the router to 1,6,or 11 to reduce interference
from other networks;
3 ) Re-install or update the driver for your wireless adapter of the computer;
4 ) Connect to wireless network.

89
COPYRIGHT & TRADEMARKS
Specifications are subject to change without notice. is a registered trademark
of TP-Link Technologies Co., Ltd. Other brands and product names are trademarks or
registered trademarks of their respective holders.
No part of the specifications may be reproduced in any form or by any means or used
to make any derivative such as translation, transformation, or adaptation without
permission from TP-Link Technologies Co., Ltd. Copyright © 2019 TP-Link Technologies
Co., Ltd. All rights reserved.
https://www.tp-link.com

90
CE Mark Warning
This is a class B product. In a domestic environment, this product may cause radio
interference, in which case the user may be required to take adequate measures.
OPERATING FREQUENCY(the maximum transmitted power)
2400 MHz -2483.5 MHz(20dBm)
EU declaration of conformity
TP-Link hereby declares that the device is in compliance with the essential requirements
and other relevant provisions of directives 2014/53/EU, 2009/125/EC, 2011/65/EU and
(EU)2015/863.
The original EU declaration of conformity may be found at https://www.tp-link.com/en/ce
RF Exposure Information
This device meets the EU requirements (2014/53/EU Article 3.1a) on the limitation of
exposure of the general public to electromagnetic fields by way of health protection.
The device complies with RF specifications when the device used at 20 cm from your
body.
Korea Warning Statements
당해 무선설비는 운용중 전파혼신 가능성이 있음.
NCC Notice
注意!
依據 低功率電波輻射性電機管理辦法
第十二條 經型式認證合格之低功率射頻電機,非經許可,公司、商號或使用者均不得擅
自變更頻率、加大功率或變更原設計之特性或功能。
第十四條 低功率射頻電機之使用不得影響飛航安全及干擾合法通行;經發現有干擾現象
時,應立即停用,並改善至無干擾時方得繼續使用。前項合法通信,指依電信規定作業
之無線電信。低功率射頻電機需忍受合法通信或工業、科學以及醫療用電波輻射性電機
設備之干擾。
減少電磁波影響,請妥適使用。
BSMI Notice
安全諮詢及注意事項
• 請使用原裝電源供應器或只能按照本產品注明的電源類型使用本產品。
• 清潔本產品之前請先拔掉電源線。請勿使用液體、噴霧清潔劑或濕布進行清潔。
• 注意防潮,請勿將水或其他液體潑灑到本產品上。

91
• 插槽與開口供通風使用,以確保本產品的操作可靠並防止過熱,請勿堵塞或覆蓋開
口。
• 請勿將本產品置放於靠近熱源的地方。除非有正常的通風,否則不可放在密閉位置
中。
• 請不要私自打開機殼,不要嘗試自行維修本產品,請由授權的專業人士進行此項工
作。
限用物質含有情況標示聲明書
產品元件名稱
限用物質及其化學符號
鉛
Pb
鎘
Cd
汞
Hg
六價鉻
CrVI
多溴聯苯
PBB
多溴二苯醚
PBDE
PCB ○ ○ ○ ○ ○ ○
外殼 ○ ○ ○ ○ ○ ○
電源供應器 − ○ ○ ○ ○ ○
備考1. 超出0.1 wt %” 及 “超出0.01 wt %” 系指限用物質之百分比含量超出百分
比含量基準值。
備考2.“○”系指該項限用物質之百分比含量未超出百分比含量基準值。
備考3.“ − “ 系指該項限用物質為排除項目。
Продукт сертифіковано згідно с правилами системи УкрСЕПРО на відповідність
вимогам нормативних документів та вимогам, що передбачені чинними
законодавчими актами України.
Safety Information
• Keep the device away from water, fire, humidity or hot environments.
• Do not attempt to disassemble, repair, or modify the device.
• Do not use damaged charger or USB cable to charge the device.
• Do not use any other chargers than those recommended.
• Do not use the device where wireless devices are not allowed.
• Adapter shall be installed near the equipment and shall be easily accessible.
• Use only power supplies which are provided by manufacturer and in the original
packing of this product. If you have any questions, please don’t hesitate to contact us.
Please read and follow the above safety information when operating the device. We
cannot guarantee that no accidents or damage will occur due to improper use of the
device. Please use this product with care and operate at your own risk.

92
Explanation of the symbols on the product label
Symbol Explanation
DC voltage
Indoor use only
RECYCLING
This product bears the selective sorting symbol for Waste electrical and
electronic equipment (WEEE). This means that this product must be handled
pursuant to European directive 2012/19/EU in order to be recycled or
dismantled to minimize its impact on the environment.
User has the choice to give his product to a competent recycling organization
or to the retailer when he buys a new electrical or electronic equipment.
TP-Link TL-MR150 – это максимально простое и доступное решение, когда необходимо организовать подключение к интернету через сеть мобильного оператора. Когда нет возможности провести кабельный интернет, и единственный вариант это 3G/4G сеть, которая на сегодня уже доступна как в небольших городах так и селах. Этот роутер имеет встроенный 3G/4G модем. Поэтому, все что нам необходимо, это просто вставить любую SIM-карту в роутер, подключить свои устройства к роутеру по Wi-Fi или по кабелю и можно пользоваться подключением к интернету.
Это намного проще, дешевле и удобнее по сравнению со схемой роутер + USB 3G/4G модем. Там еще нужно подбирать эти модемы под роутер, настраивать их, модемы все время отваливаются. С TP-Link TL-MR150 это все было бы намного проще. Нужна только SIM-карта и покрытие 3G/4G сети выбранного вами оператора. Так же TL-MR150 может работать как обычный Wi-Fi роутер. То есть, в нем есть WAN-порт, в который можно подключить интернет по кабелю. Даже если вам проведут кабельный интернет, не придется менять роутер. Так же второе подключение может использоваться как резервное.
Что нужно знать о TP-Link TL-MR150?
- Возможность подключения к сети мобильного оператора на скорости до 150 Мбит/с. Поддержка 3G/4G LTE. Слот для Micro SIM-карты.
- Wi-Fi антенны встроенный в корпус. Две съемные LTE антенны, которые усиливают прием мобильной сети.
- Одновременное подключение до 32 клиентов.
- Раздает Wi-Fi сеть в диапазоне 2.4 ГГц (802.11n) на скорости до 300 Мбит/с.
- 3 порта LAN и 1 порт LAN/WAN. Порты работают на скорости до 100 Мбит/с.
- Благодаря наличию WAN-порта может работать как обычный маршрутизатор (когда интернет подключен по кабелю).
- Простая установка SIM-карты и автоматическая настройка. Подключение к сети мобильного оператора будет настроено автоматически. Вставили SIM-карту – интернет работает.
- Настройка и управление через веб-интерфейс, или приложение Tether.
- Есть родительский контроль, функция ограничения скорости для разных устройств, гостевая Wi-Fi сеть.
- Присутствует отдельная кнопка для отключения Wi-Fi сети. Это очень удобно.
- Отдельный индикатор на корпусе TP-Link TL-MR150, который показывает уровень сигнала сети мобильного оператора (в три деления).
Комплектация и внешний вид
Упаковка обычная. Такая же, как и у других роутеров от TP-Link. На ней нанесена информация о роутере. Правда в моем случае роутер для европейского региона и вся информация на английском языке.

Комплектация TP-Link TL-MR150: маршрутизатор, адаптер питания, две 4G LTE антенны, сетевой кабель, инструкции и переходник из Nano SIM на Micro SIM.

Основная часть корпуса TP-Link TL-MR150 сделана из черного матового пластика. А верхняя крышка, на которой нанесен логотип компании и светодиодные индикаторы сделана из глянцевого пластика. В сочетании с серебристым логотипом и индикаторами, которые горят синим цветом она выглядит очень классно.

Но верхняя часть, которая глянцевая, очень быстро пачкается и царапается.

Все кнопки и разъемы размещены на задней панели. Два разъема для подключения съемных антенн, разъем POWER, кнопка включения/отключения питания, 3 LAN и один LAN/WAN порт, кнопка WPS/Reset и кнопка Wi-Fi On/Off.

Ну и разъем для Micro SIM-карты.
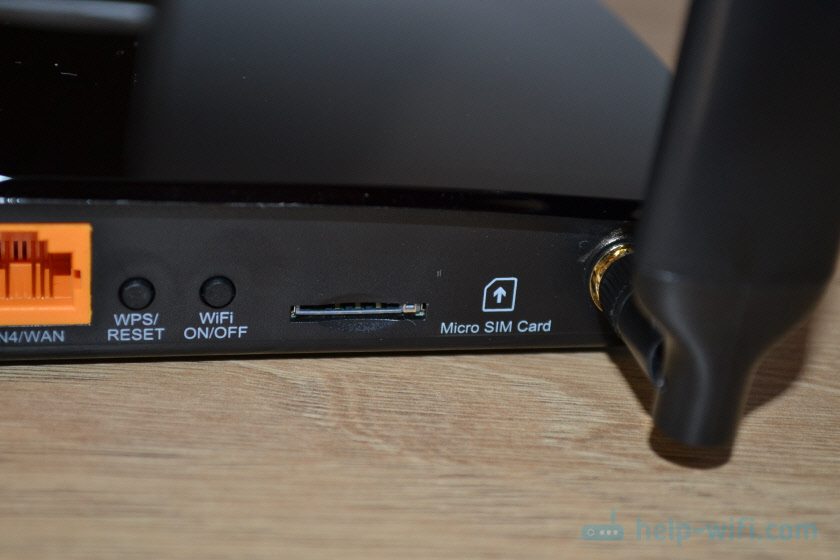
Если у вас Nano SIM, то подключить ее можно через переходник, который есть в комплекте.

Снизу есть наклейка с необходимой заводской информацией и отверстия для крепления TP-Link TL-MR150 на стену.

Веб-интерфейс TP-Link TL-MR150 доступен по адресу tplinkmodem.net. На этой модели установлен новый и современный веб-интерфейс. Выглядит он вот так:

В настройках есть возможность просматривать и отправлять SMS. Так же можно отправлять USSD команды.
Настраивать роутер практически не нужно. Он начинает раздавать интернет сразу после установки SIM-карты. Только при условии, что есть покрытие сети и нет ограничений со стороны оператора. При первом входе в настройки роутер просит сменить пароль администратора. Так же при желании можете сменить имя Wi-Fi сети и пароль. А можно оставить заводские, которые указаны на корпусе TP-Link TL-MR150.
Я могу смело рекомендовать данный роутер всем, у кого нет возможности провести проводной интернет, но есть покрытие сети 3G/4G LTE хотя бы одного оператора. Для выхода в интернет вам понадобится только TP-Link TL-MR150 и SIM-карта. Вообще не вижу смысла покупать USB-модемы. Разве что вам нужно подключить к интернету только один компьютер и не нужен Wi-Fi.
TP-Link TL-MR150 — это мощный и универсальный роутер, который обеспечивает быстрый и стабильный доступ в Интернет. Он идеально подходит для использования дома или в офисе, а также для путешествий и работы в дороге. Однако, чтобы полностью насладиться всеми его возможностями, необходимо правильно настроить устройство. В этой статье мы предлагаем пошаговую инструкцию по настройке роутера Tl mr150 tp link.
Первым шагом является подключение роутера к вашему компьютеру или ноутбуку. Для этого воспользуйтесь сетевым кабелем, который поставляется в комплекте с устройством. Подключите один конец к порту «LAN» на задней панели роутера, а другой конец — к порту «LAN» на вашем компьютере.
Затем, откройте ваш любимый веб-браузер и введите в адресной строке IP-адрес роутера. Обычно это «192.168.1.1», но вы можете проверить точный IP-адрес в инструкции пользователя или на задней панели устройства. Нажмите клавишу «Enter» и вы будете перенаправлены на страницу настройки роутера.
Теперь введите имя пользователя и пароль для доступа к панели управления роутером. Обычно они задаются по умолчанию и указаны в инструкции пользователя. Рекомендуется изменить пароль по умолчанию для повышения безопасности вашей сети. После ввода данных, нажмите «Войти» и вы будете перенаправлены на главную страницу панели управления роутером.
Содержание
- Шаг 1. Подключение к питанию
- Шаг 2. Подключение к компьютеру
- Шаг 3. Вход в административную панель
- Шаг 4. Настройка соединения с интернетом
- Шаг 5. Настройка беспроводной сети
- Шаг 6. Настройка безопасности
- Шаг 7. Проверка подключения и использование
- Вопрос-ответ
- Как подключить и настроить Tl mr150 tp link?
- Как установить пароль для Wi-Fi на Tl mr150 tp link?
- Как изменить имя Wi-Fi на Tl mr150 tp link?
- Как настроить Tl mr150 tp link на использование 4G-соединения?
- Могу ли я подключить другие устройства к Tl mr150 tp link?
Шаг 1. Подключение к питанию
Перед тем как начать настройку роутера Tl mr150, необходимо подключить его к питанию. Для этого выполните следующие действия:
- Убедитесь, что роутер находится вблизи розетки.
- Возьмите кабель питания, поставляемый в комплекте, и введите его в разъем питания на задней панели роутера.
- Подключите другой конец кабеля питания в розетку.
- Убедитесь, что роутер включен и питание подано (обычно светится индикатор питания).
После выполнения данных шагов ваш роутер будет подключен к электричеству и готов к дальнейшей настройке.
Шаг 2. Подключение к компьютеру
После того, как вы распаковали устройство Tl mr150 tp link и подготовили его к установке, необходимо подключить его к компьютеру для дальнейшей настройки. Для этого выполните следующие действия:
- Возьмите сетевой кабель, поставляемый в комплекте, и подключите одin из его концов к порту WAN на задней панели устройства.
- Вставьте другой конец кабеля в сетевой порт вашего компьютера.
- Убедитесь, что ваш компьютер включен.
После проведения всех вышеуказанных действий можно переходить к следующему шагу установки устройства Tl mr150 tp link.
Шаг 3. Вход в административную панель
Для настройки Tl mr150 tp link вам потребуется войти в административную панель роутера. В этом разделе мы расскажем, как это сделать.
1. Подключите свой компьютер или ноутбук к роутеру Tl mr150 tp link с помощью Ethernet-кабеля.
2. Откройте веб-браузер (например, Google Chrome, Mozilla Firefox, Safari) на вашем устройстве и введите IP-адрес роутера в адресной строке. Обычно IP-адрес для Tl mr150 tp link — 192.168.1.1
3. Нажмите клавишу «Enter» на клавиатуре или кликните на кнопку «Перейти».
4. В открывшемся окне введите логин и пароль администратора роутера. По умолчанию логин и пароль — admin. Если вы или кто-то другой изменил эти настройки, введите соответствующие данные.
5. После ввода логина и пароля нажмите на кнопку «Войти» или «ОК».
6. Вы будете перенаправлены на главную страницу административной панели Tl mr150 tp link, где вы сможете настроить различные параметры роутера.
Обратите внимание, что процедура входа в панель администрирования может незначительно отличаться в зависимости от модели роутера Tl mr150 tp link и версии программного обеспечения. Если вы столкнулись с какими-либо трудностями, обратитесь к руководству пользователя или на сайт производителя для получения более подробной информации.
Шаг 4. Настройка соединения с интернетом
После успешного подключения роутера TP-Link TL-MR150 к компьютеру и включения питания, необходимо настроить соединение с интернетом. Для этого выполните следующие шаги:
- Откройте веб-браузер на компьютере и введите адрес 192.168.0.1 в адресной строке.
- Нажмите клавишу Enter для перехода к странице настройки роутера.
- Введите логин и пароль администратора. Если вы не меняли эти данные, используйте значения по умолчанию: логин — admin, пароль — admin. Нажмите кнопку «Войти».
- На странице настройки выберите раздел «Сеть» или «Настройки соединения».
- Нажмите на кнопку «Настройка соединения с интернетом» или аналогичную.
- Выберите тип соединения с интернетом, который предоставляет ваш провайдер. Это может быть PPPoE, DHCP или статический IP-адрес.
- В зависимости от типа соединения, введите необходимые данные, такие как имя пользователя и пароль для PPPoE, IP-адрес и маску подсети для статического IP-адреса.
- Нажмите кнопку «Сохранить», чтобы применить настройки.
После завершения настройки соединения с интернетом, роутер TP-Link TL-MR150 будет готов к использованию. Вы сможете подключить к нему другие устройства с помощью Wi-Fi или LAN-портов и наслаждаться высокоскоростным интернетом.
Шаг 5. Настройка беспроводной сети
После успешной настройки основных параметров, можно приступить к настройке беспроводной сети на вашем Tl mr150 tp link.
Для этого выполните следующие действия:
- Войдите в веб-интерфейс маршрутизатора, введя IP-адрес маршрутизатора в адресную строку браузера. Обычно данный адрес равен 192.168.0.1.
- После входа в настройки найдите раздел «Беспроводная сеть» или «Wireless».
- В этом разделе вы сможете настроить следующие параметры:
- Имя (SSID) сети — задайте имя вашей беспроводной сети. Вы можете выбрать любое название, которое будет отображаться при поиске доступных сетей.
- Режим работы — выберите подходящий режим работы беспроводной сети. Например, вы можете выбрать режим 802.11b/g/n, чтобы обеспечить совместимость со всеми устройствами.
- Канал — выберите подходящий канал для вашей сети. Рекомендуется выбрать канал, который не перекрывается с другими беспроводными сетями в вашем окружении.
- Шифрование — установите пароль для вашей беспроводной сети. Рекомендуется использовать WPA2-PSK для обеспечения безопасности.
- Скорость передачи данных — выберите желаемую скорость передачи данных в вашей сети.
- После настройки всех параметров, сохраните изменения и перезапустите маршрутизатор.
Теперь ваш Tl mr150 tp link настроен для беспроводного подключения. Вы можете подключаться к вашей сети с помощью устройств, поддерживающих Wi-Fi.
Шаг 6. Настройка безопасности
После подключения и настройки беспроводного роутера TP-Link TL-MR150, необходимо обеспечить безопасность вашей сети Wi-Fi. В этом разделе мы расскажем, как настроить параметры безопасности вашей сети.
- Смените пароль администратора: Первым шагом в обеспечении безопасности вашего роутера является смена пароля администратора. Это позволит предотвратить несанкционированный доступ к настройкам роутера. Чтобы сменить пароль администратора, войдите в настройки роутера через веб-интерфейс, найдите раздел «Смена пароля» или «Настройки безопасности» и следуйте инструкциям.
- Установите защиту Wi-Fi: Для обеспечения безопасности вашей беспроводной сети важно установить защиту Wi-Fi. На роутере TP-Link TL-MR150 можно использовать различные виды защиты, такие как WEP, WPA или WPA2. Рекомендуется выбрать наиболее безопасный протокол WPA2-PSK (AES) и установить уникальный пароль.
- Отключите функцию WPS: Функция WPS (Wi-Fi Protected Setup) предназначена для упрощения процесса подключения устройств к Wi-Fi. Однако она может быть уязвимой для взлома. Рекомендуется отключить функцию WPS в настройках роутера.
- Ограничьте доступ к настройкам роутера: Чтобы предотвратить несанкционированный доступ к настройкам вашего роутера, рекомендуется ограничить доступ к ним посредством установки пароля. Настройте доступ к настройкам только для авторизованных пользователей.
- Включите брандмауэр: Брандмауэр предоставляет дополнительный уровень защиты для вашей сети. Включите брандмауэр на роутере TP-Link TL-MR150 и настройте его параметры, чтобы обеспечить безопасность вашей сети.
- Регулярно обновляйте прошивку: Регулярное обновление прошивки вашего роутера важно для устранения уязвимостей и обеспечения безопасности вашей сети. Проверяйте наличие новых версий прошивки на официальном сайте производителя и следуйте инструкциям по обновлению.
Следуя этим шагам по настройке безопасности, вы обеспечите безопасное использование вашей сети Wi-Fi на роутере TP-Link TL-MR150.
Шаг 7. Проверка подключения и использование
После завершения настройки Tl mr150 tp link, необходимо выполнить проверку подключения и убедиться в его работоспособности перед использованием. Ниже приведены несколько шагов, которые помогут вам выполнить данную проверку:
- Убедитесь, что все подключения между вашим интернет-провайдером, модемом и Tl mr150 tp link осуществлены правильно и надежно зафиксированы.
- Включите Tl mr150 tp link и дождитесь, пока индикаторы света станут постоянно гореть, что указывает на стабильное подключение к Интернету.
- На вашем устройстве (например, компьютере, смартфоне или планшете) найдите доступные Wi-Fi сети и выберите ту, которая соответствует имени сети (SSID), указанному во время настройки Tl mr150 tp link. Введите пароль, если он был установлен.
- После успешного подключения к Tl mr150 tp link проверьте Интернет-соединение на вашем устройстве, открыв веб-браузер и выполните поиск или откройте любой веб-сайт, чтобы убедиться, что подключение работает исправно.
Если вы испытываете проблемы с подключением или Интернет-соединением, вы можете обратиться к документации, предоставляемой с Tl mr150 tp link, или обратиться в техническую поддержку производителя для получения дополнительной помощи и решения проблем.
Вопрос-ответ
Как подключить и настроить Tl mr150 tp link?
Для начала подключите Tl mr150 tp link к источнику питания и установите сим-карту. Затем подключите компьютер или устройство к Tl mr150 tp link посредством Wi-Fi или с помощью кабеля Ethernet. Откройте веб-браузер и введите адрес 192.168.0.1, а затем введите имя пользователя и пароль для входа в панель управления Tl mr150 tp link. В панели управления вы сможете настроить различные параметры, такие как тип соединения, протокол безопасности и пароль для Wi-Fi. После настройки сохраните изменения и Tl mr150 tp link будет готов к использованию.
Как установить пароль для Wi-Fi на Tl mr150 tp link?
Чтобы установить пароль для Wi-Fi на Tl mr150 tp link, откройте панель управления, введя адрес 192.168.0.1 в веб-браузере, а затем введите имя пользователя и пароль для входа. В меню выберите раздел настройки Wi-Fi и найдите опцию «защита паролем» или «шифрование». Введите желаемый пароль и сохраните изменения. Теперь ваш Wi-Fi будет защищен паролем, и только пользователи с правильными авторизационными данными смогут подключиться к сети.
Как изменить имя Wi-Fi на Tl mr150 tp link?
Для изменения имени Wi-Fi на Tl mr150 tp link откройте панель управления, введя адрес 192.168.0.1 в веб-браузере, а затем введите имя пользователя и пароль для входа. В разделе настройки Wi-Fi найдите опцию «SSID» или «Имя сети». Введите новое имя для Wi-Fi и сохраните изменения. Теперь ваш Wi-Fi будет отображаться с новым именем при поиске доступных сетей.
Как настроить Tl mr150 tp link на использование 4G-соединения?
Для настройки Tl mr150 tp link для использования 4G-соединения откройте панель управления, введя адрес 192.168.0.1 в веб-браузере, а затем введите имя пользователя и пароль для входа. В меню выберите раздел настройки соединения и найдите опцию «тип соединения». Выберите 4G в качестве типа соединения и введите необходимые данные для доступа к вашей сети 4G. Сохраните изменения и Tl mr150 tp link будет подключен к сети 4G.
Могу ли я подключить другие устройства к Tl mr150 tp link?
Да, вы можете подключить другие устройства к Tl mr150 tp link. Устройство имеет Wi-Fi и порты Ethernet, поэтому вы можете подключить компьютер, ноутбук, планшет или другие устройства как посредством беспроводного, так и проводного соединения. Просто убедитесь, что устройство поддерживает Wi-Fi или имеет порт Ethernet, чтобы быть совместимым с Tl mr150 tp link.
Роутер TP-Link TL-MR150 — это компактное и удобное устройство, предназначенное для обеспечения доступа в Интернет посредством сотовых сетей. Он позволяет использовать мобильный интернет на всех ваших устройствах, подключенных к роутеру. Но перед тем, как начать пользоваться этим устройством, необходимо правильно его настроить.
В этой статье мы расскажем вам о том, как настроить роутер TP-Link TL-MR150, чтобы обеспечить стабильное и безопасное подключение к Интернету.
Первым шагом является установка роутера. Для этого необходимо подключить его к источнику питания и установить SIM-карту вашего оператора сотовой связи. После этого роутер будет готов к настройке.
Для начала настройки роутера необходимо подключиться к его Wi-Fi сети. Найдите Wi-Fi сеть, название и пароль которой указаны на дне роутера. Подключитесь к этой сети с помощью вашего смартфона или компьютера.
После успешного подключения откройте веб-браузер и введите в адресной строке IP-адрес роутера. Обычно этот адрес указан на дне роутера или в документации. В появившемся окне авторизации введите логин и пароль по умолчанию, которые также указаны на дне роутера или в документации.
После успешной авторизации вы попадете в конфигурационное меню роутера. Здесь вы сможете настроить все необходимые параметры, такие как тип подключения, имя и пароль Wi-Fi сети, настройки безопасности и многое другое. После внесения настроек не забудьте сохранить их.
Содержание
- Подключение роутера TP-Link TL-MR150 к интернету
- Первоначальная настройка роутера
- Настройка беспроводной сети
- Как изменить пароль для доступа к роутеру
- Особенности настройки роутера TP-Link TL-MR150 для использования с мобильным интернетом
- Основные проблемы и их решения при настройке роутера TP-Link TL-MR150
Подключение роутера TP-Link TL-MR150 к интернету
Шаг 1: Подключите красный WAN-порт роутера TP-Link TL-MR150 к порту модема или роутера, предоставленного вашим интернет-провайдером, с помощью Ethernet-кабеля.
Шаг 2: Подключите синий порт LAN роутера TP-Link TL-MR150 к вашему компьютеру с помощью Ethernet-кабеля.
Шаг 3: Подключите источник питания к роутеру TP-Link TL-MR150 и включите питание.
Шаг 4: Подождите несколько минут, пока роутер TP-Link TL-MR150 загружается и устанавливает подключение к интернету.
Шаг 5: Откройте веб-браузер и введите в адресной строке IP-адрес роутера TP-Link TL-MR150. Обычно это 192.168.0.1 или 192.168.1.1. Нажмите Enter.
Шаг 6: Введите имя пользователя и пароль администратора роутера TP-Link TL-MR150. Если вы не изменили их ранее, используйте стандартные учетные данные: admin / admin. Нажмите Войти.
Шаг 7: В разделе «Настройки сети» выберите тип подключения к интернету, предоставленный вашим провайдером. Можно выбрать DHCP, PPPoE или статический IP-адрес. Заполните все необходимые поля.
Шаг 8: Нажмите кнопку «Сохранить» или «Применить», чтобы сохранить настройки и установить подключение к интернету.
Шаг 9: После сохранения настроек роутер TP-Link TL-MR150 будет подключен к интернету. Вы можете проверить подключение, открыв веб-браузер и перейдя на любую веб-страницу.
Обратите внимание: Если у вас возникли проблемы с подключением к интернету или если вы не уверены в настройках, рекомендуется обратиться к своему интернет-провайдеру или посмотреть руководство пользователя для получения подробной информации о настройке TP-Link TL-MR150.
Первоначальная настройка роутера
Перед началом настройки роутера TP-Link TL-MR150, убедитесь, что у вас есть следующая информация:
- Имя сети (SSID) и пароль для доступа к беспроводной сети
- Имя пользователя и пароль для доступа к веб-интерфейсу роутера
- Настройки для подключения к интернету (например, имя пользователя и пароль от поставщика интернет-услуг)
После этого, выполните следующие шаги:
- Подключите роутер к источнику питания и подождите, пока индикаторы не перестанут мигать и станут стабильными.
- Соедините роутер с вашим компьютером с помощью Ethernet-кабеля, подключив к одному из LAN-портов на задней панели роутера.
- Откройте веб-браузер и введите IP-адрес роутера (обычно это 192.168.0.1 или 192.168.1.1) в адресную строку.
- Введите имя пользователя и пароль для доступа к веб-интерфейсу роутера. Если вы не знаете эти данные, проверьте документацию или обратитесь к производителю.
- После успешной авторизации, откроется главная страница веб-интерфейса роутера. Здесь вы сможете настроить различные параметры роутера.
- Для настройки беспроводной сети, найдите раздел «Wireless Settings» или «Настройки беспроводной сети». Введите желаемое имя сети (SSID) и пароль для доступа к сети.
- Настройте параметры подключения к интернету, указав имя пользователя и пароль, предоставленные вашим интернет-провайдером. Обычно эти настройки можно найти в разделе «WAN Settings» или «Настройки WAN».
- После завершения всех необходимых настроек, сохраните изменения и перезагрузите роутер.
После этого ваш роутер TP-Link TL-MR150 будет настроен и готов к использованию.
Настройка беспроводной сети
Для настройки беспроводной сети на роутере TP-Link TL-MR150 следуйте следующим инструкциям:
1. Подключите компьютер к роутеру с помощью LAN-кабеля или подключитесь к роутеру через Wi-Fi сеть.
2. Откройте веб-браузер и введите в адресной строке IP-адрес роутера (по умолчанию 192.168.0.1), нажмите Enter.
3. Введите логин и пароль для доступа к панели администратора роутера. По умолчанию логин – admin, пароль – admin. Если вы его изменили, введите свои учетные данные.
4. В панели администратора выберите вкладку «Беспроводные настройки» или «Wireless Settings».
5. Включите беспроводную сеть, выбрав опцию «Включено» или «Enable».
6. Задайте имя беспроводной сети (SSID). Рекомендуется использовать уникальное, но не слишком информативное имя сети.
7. Установите тип шифрования для защиты беспроводной сети. Рекомендуется использовать WPA2-PSK для наилучшей безопасности. Задайте пароль.
8. Нажмите кнопку «Сохранить» или «OK», чтобы применить настройки беспроводной сети.
9. Подключитесь к вновь созданной беспроводной сети, используя имя сети (SSID) и пароль, который вы задали. Теперь вы можете использовать беспроводной интернет-соединение.
Примечание: После настройки беспроводной сети роутер может автоматически перезагрузиться для применения изменений. Дождитесь, пока роутер перезагрузится, и повторно подключитесь к сети.
Как изменить пароль для доступа к роутеру
Для обеспечения безопасности вашей сети рекомендуется периодически изменять пароль для доступа к роутеру. Вот простая инструкция о том, как изменить пароль для доступа к роутеру TP-Link TL-MR150:
- Откройте веб-браузер на вашем устройстве и введите IP-адрес вашего роутера в адресную строку. По умолчанию IP-адрес для TL-MR150 — 192.168.0.1.
- Введите имя пользователя и пароль, чтобы войти в административный интерфейс роутера. По умолчанию имя пользователя и пароль — admin.
- Перейдите на вкладку «Настройки безопасности» или «Security» в административном интерфейсе роутера.
- Найдите раздел «Изменить пароль» или «Change Password».
- Введите новый пароль для доступа к роутеру. Новый пароль должен быть надежным и содержать как минимум 8 символов, включая буквы верхнего и нижнего регистров, цифры и специальные символы.
- Подтвердите новый пароль, введя его в поле «Подтверждение пароля» или «Confirm Password».
- Нажмите кнопку «Сохранить» или «Save», чтобы применить изменения.
- Подождите несколько секунд, пока роутер применит новые настройки.
Теперь вы успешно изменили пароль для доступа к роутеру TP-Link TL-MR150. Убедитесь, что вы храните новый пароль в надежном месте и не передаете его третьим лицам для обеспечения безопасности вашей сети.
Особенности настройки роутера TP-Link TL-MR150 для использования с мобильным интернетом
Роутер TP-Link TL-MR150 обладает рядом особенностей, которые делают его идеальным выбором для использования с мобильным интернетом. В этом разделе мы рассмотрим, как правильно настроить данный роутер для использования с мобильным интернетом.
1. Подключите роутер к источнику питания и вставьте SIM-карту оператора мобильной связи. Убедитесь, что SIM-карта имеет доступ к интернету и поддерживает технологию 4G LTE.
2. Соедините роутер с вашим компьютером или ноутбуком с помощью Ethernet-кабеля.
3. Запустите веб-браузер и введите адрес 192.168.0.1 в адресной строке. Нажмите Enter.
4. В появившемся окне введите логин и пароль для доступа к настройкам роутера. По умолчанию логин и пароль равны «admin».
5. После входа в настройки роутера откройте вкладку «Quick Setup» или «Быстрая настройка».
6. Выберите вариант подключения «Mobile Wireless» или «Мобильный беспроводной».
7. Установите режим соединения «4G LTE» и выберите ваш регион.
8. Введите PIN-код SIM-карты, если он требуется, и нажмите «Next» или «Далее».
9. Настройте параметры беспроводной сети, включая имя сети (SSID) и пароль.
10. Проверьте и отредактируйте другие настройки, такие как протокол шифрования и список подключенных устройств.
11. После завершения настройки, нажмите кнопку «Save» или «Сохранить», чтобы сохранить изменения.
12. Подключите другие устройства к беспроводной сети, используя указанные настройки и пароль.
Теперь ваш роутер TP-Link TL-MR150 настроен для использования с мобильным интернетом. Вы можете наслаждаться быстрым и стабильным подключением в любом месте, где доступен оператор сети мобильной связи.
Основные проблемы и их решения при настройке роутера TP-Link TL-MR150
При настройке роутера TP-Link TL-MR150 могут возникнуть некоторые проблемы, которые мешают его полноценной работе. В этом разделе мы рассмотрим основные проблемы и предложим способы их решения.
1. Проблема: Отсутствие подключения к Интернету
- Проверьте, правильно ли установлены все кабели. Убедитесь, что провод от провайдера подключен к WAN-порту роутера.
- Проверьте настройки подключения к Интернету. Откройте веб-интерфейс роутера, перейдите на вкладку «Настройки соединения» и убедитесь, что параметры соединения указаны правильно.
- Перезагрузите роутер и модем провайдера. Иногда проблема может быть вызвана неправильной инициализацией оборудования.
2. Проблема: Низкая скорость Wi-Fi
- Разместите роутер в центре вашего дома или квартиры, чтобы сигнал достигал всех устройств.
- Избегайте помех от других электронных устройств. Разместите роутер подальше от микроволновой печи, телефонов и других устройств, которые могут влиять на качество Wi-Fi сигнала.
- Измените настройки Wi-Fi канала в веб-интерфейсе роутера. Попробуйте использовать другой канал с меньшим количеством устройств для получения более стабильного сигнала.
3. Проблема: Ограниченное количество подключений
- Убедитесь, что роутер не находится в режиме экономии энергии. Проверьте настройки питания в веб-интерфейсе и установите максимальное значение.
- Увеличьте количество IP-адресов, выделяемых роутером, во вкладке «DHCP-сервер» в веб-интерфейсе. Это позволит подключать больше устройств к сети.
- Если проблема остается, попробуйте обновить прошивку роутера до последней версии. Некоторые обновления могут исправлять ошибки и улучшать производительность.
4. Проблема: Забытый пароль к Wi-Fi сети
- Сбросьте настройки роутера до заводских значений с помощью кнопки Reset на задней панели. После этого вы сможете настроить роутер заново.
- Используйте программу-сканер Wi-Fi сетей на своем устройстве для поиска и подключения к Wi-Fi сети роутера. После подключения вы сможете настроить новый пароль.
Если у вас возникли другие проблемы при настройке роутера TP-Link TL-MR150, рекомендуется обратиться в службу поддержки TP-Link или проконсультироваться с опытным специалистом.